

Page 1
use
&
care
Introduction. . . . . . . . . . . . . . . . . . 2
Precautions Microwave Energy . . . . . . . 3
Important Safety Instructions. . . . . . .
C
ountertop Installation . . . . . . .
Names Of Oven Parts And Accessories . .
Operation
Frigidaire.com USA 1-800-374-4432 Frigidaire.ca Canada 1-800-265-8352
. . . . . . . . . . . . . . . . .
4
.
8
.
9
Maintenance
Cleaning And Care
Service Call Check . . . . . . . . . . . . .
Warranty . . . . . . . . . . . . . . . .
. . . . . . . . . . . . .
. . . . . . . . . . .
A06823539 (March 2024)
. .
Page 2
2
INTRODUCTION
INTRODUCTION
Welcome to our
Thank you for bringing Frigidaire into your home!
We see your purchase as the beginning of a long
relationship together.
This manual is your resource for the use and care
of your product. Please read it before using your
appliance. Keep it handy for quick reference. If
something doesn’t seem right, the troubleshooting
section will help you with common issues.
FAQs, helpful tips and videos, cleaning products, and
kitchen and home accessories are available at www.
frigidaire.com.
We are here for you! Visit our website, chat with an
agent, or call us if you need help. We may be able
to help you avoid a service visit. If you do need
service, we can get that started for you.
uct.
Keep your product info here so it’s easy to find.
family
Model Number:
Serial Number:
Purchase Date:
Serial Number Location
Page 3
Do not attempt to operate this oven
with the door open since open door operation can
result in harmful exposure to microwave energy. It
is important not to defeat or tamper with the safety
interlocks.
Do not place any object between the oven front
face and the door or
accumulate on sealing surfaces.
To reduce the risk of burns, electric shock, fire,
injury to persons or exposure to excessive
microwave energy:
soil or cleaner residue to
(Only for USA)
• Operation of the microwave oven may cause
interference to your radio, TV or similar
equipment.
• When there is interference, it may be reduced
or eliminated by taking the following measures:
Do not operate the oven if it is damaged. It is
particularly important that the oven door close
properly and that there is no damage to the:
DOOR (bent)
HINGES AND LATCHES (broken or loosened)
DOOR SEALS AND SEALING SURFACES.
The oven should not be adjusted or repaired by
anyone except properly qualified service
personnel.
• Personal Injury Hazard
- Clean door and sealing surface of the oven.
- Reorient the receiving antenna of radio or
television.
- Relocate the microwave oven with respect to
the receiver.
- Move the microwave oven away from the
receiver.
- Plug the microwave oven into a dierent outlet
so that microwave oven and receiver are on
dierent branch circuits.
•
Tightly-closed utensils could explode. Closed
containers should be opened and plastic pouches
should be pierced before cooking.
• See the instructions on "Materials you can use in
microwave oven or to be avoided in microwave
oven."
There may be certain non-metallic utensils that are
not safe to use for microwaving. If in doubt, you
can test the utensil in question following the
procedure below.
- Fill a microwave-safe container with 1 cup of
cold water (250ml) along with the utensil in
question.
- Cook on maximum power for 1 minute.
- Carefully feel the utensil. If the empty utensil is
warm, do not use it for microwave cooking.
- Do not exceed 1 minute cooking time.
Page 4
Read all instructions before using this appliance.
This manual contains important safety symbols and instructions. Please pay at-tention to these symbols
and follow all instructions given.
Do not attempt to install or operate your appliance until you have read the safety precautions in this
manual. Safety items throughout this manual are labeled with a WARNING or CAUTION statement based
on the risk type.
Warnings and important instructions ap-pearing in this guide are not meant to cover all possible
conditions and situations that may occur. Common sense, caution, and care must be exercised with
installing, maintaining, or operating your appliance.
This is the safety alert symbol. It is used to alert of potential personal injury hazards. Obey all safety
messages that follow this symbol to avoid possible injury or death.
.
Indicates installation, operation or main-tenance
information which is important but not hazardrelated.
Page 5
When using electrical appliances basic safety
precautions should be followed, including the
following:
To reduce the risk of burns, electric shock, fire,
injury to persons or exposure to excessive
microwave energy:
Read all instructions before using the appliance.
Read and follow the specific:
"PRECAUTIONS TO AVOID POSSIBLE
EXPOSURE TO EXCESSIVE MICROWAVE
ENERGY" found on page
This appliance must be grounded. Connect only
to properly grounded outlet. See
"GROUNDING INSTRUCTIONS" found on page 6.
Install or locate this appliance only
in accordance with the provided installation
instructions.
Some products such as whole eggs and sealed
containers - for example, closed glass jars - are
able to explode and should not be heated in this
oven.
Use this appliance only for its intended use as
described in the manual. Do not use corrosive
chemicals or vapors in this appliance. This type
of oven is specifically designed to heat, cook or
dry food. It is not designed for industrial or
laboratory use.
3.
• To reduce the risk of fire in the oven cavity:
- Do not overcook food. Carefully
paper, plastic, or other combustible
materials are placed inside the oven to facilitate
cooking.
- Remove wire twist-ties from paper or plastic bag
before
- If material inside of the oven ignite, keep oven
door closed, turn oven o, and disconnect the
power cord, or shut o power at the fuse or circuit
breaker panel.
- Do not use the cavity for storage purposes. Do not
leave paper products, cooking utensils, or food in
the cavity when not in use.
• Liquids, such as water, coee, or tea are able to be
overheated beyond the boiling point without
appearing to
be boiling. Visible bubbling or boiling when the
container is removed from the microwave oven is
not always present. THIS COULD RESULT IN VERY
HOT LIQUID SUDDENLY BOILING OVER WHEN THE
CONTAINER IS DISTURBED OR A UTENSIL IS
INSERTED INTO THE
•
•
•
•
placing bag in oven.
Do not operate this appliance if it has a damaged
cord or plug, if it is not working properly, or if it
has been damaged or dropped.
This appliance should be serviced only by
qualified service personnel. Contact nearest
authorized service facility for examination, repair,
or adjustment.
Do not store this appliance outdoors. Do
•
•
•
•
•
•
•
•
Page 6
This appliance must be grounded. In the event of an electrical short circuit, grounding reduces the risk of
electric shock by providing an escape wire for the electric current. This appliance is equipped with a cord
having a grounding wire with a grounding plug. The plug must be plugged into an outlet that is properly
installed and grounded.
Improper use of the grounding can result in a risk
of electric shock.
Consult a qualified electrician or serviceman if the
grounding instructions are not completely
understood, or if doubt exists as to whether the
appliance is properly grounded. If it is necessary to
use an extension cord, use only a
3-wire extension cord that has a 3-blade grounded
plug, and 3-slot receptacle that will accept the
plug on the appliance.The marked rating of the
extension cord shall be equal to or greater than the
electrical rating of the appliance.
Touching some of the internal components can
cause serious personal injury or death. Do not
disassemble this appliance.
Electric Shock Hazard
Improper use of the grounding can result in
electric shock. Do not plug into an outlet until
appliance is properly installed and grounded.
• A short power supply cord is provided to reduce
the risks resulting from becoming entangled in or
tripping over a longer cord.
• Longer cord sets or extension cords are available
and may be used if care is exercised in their use.
• If a long cord or extension cord is used:
- The marked electrical rating of the cord set or
extension cord should be at least as great as the
electrical rating of the appliance.
- The extension cord must be a grounding-type 3-
wire cord.
- The longer cord should be arranged so that it
will not drape over the counter top or tabletop
where it can be pulled on by children or tripped
over unintentionally.
Page 7
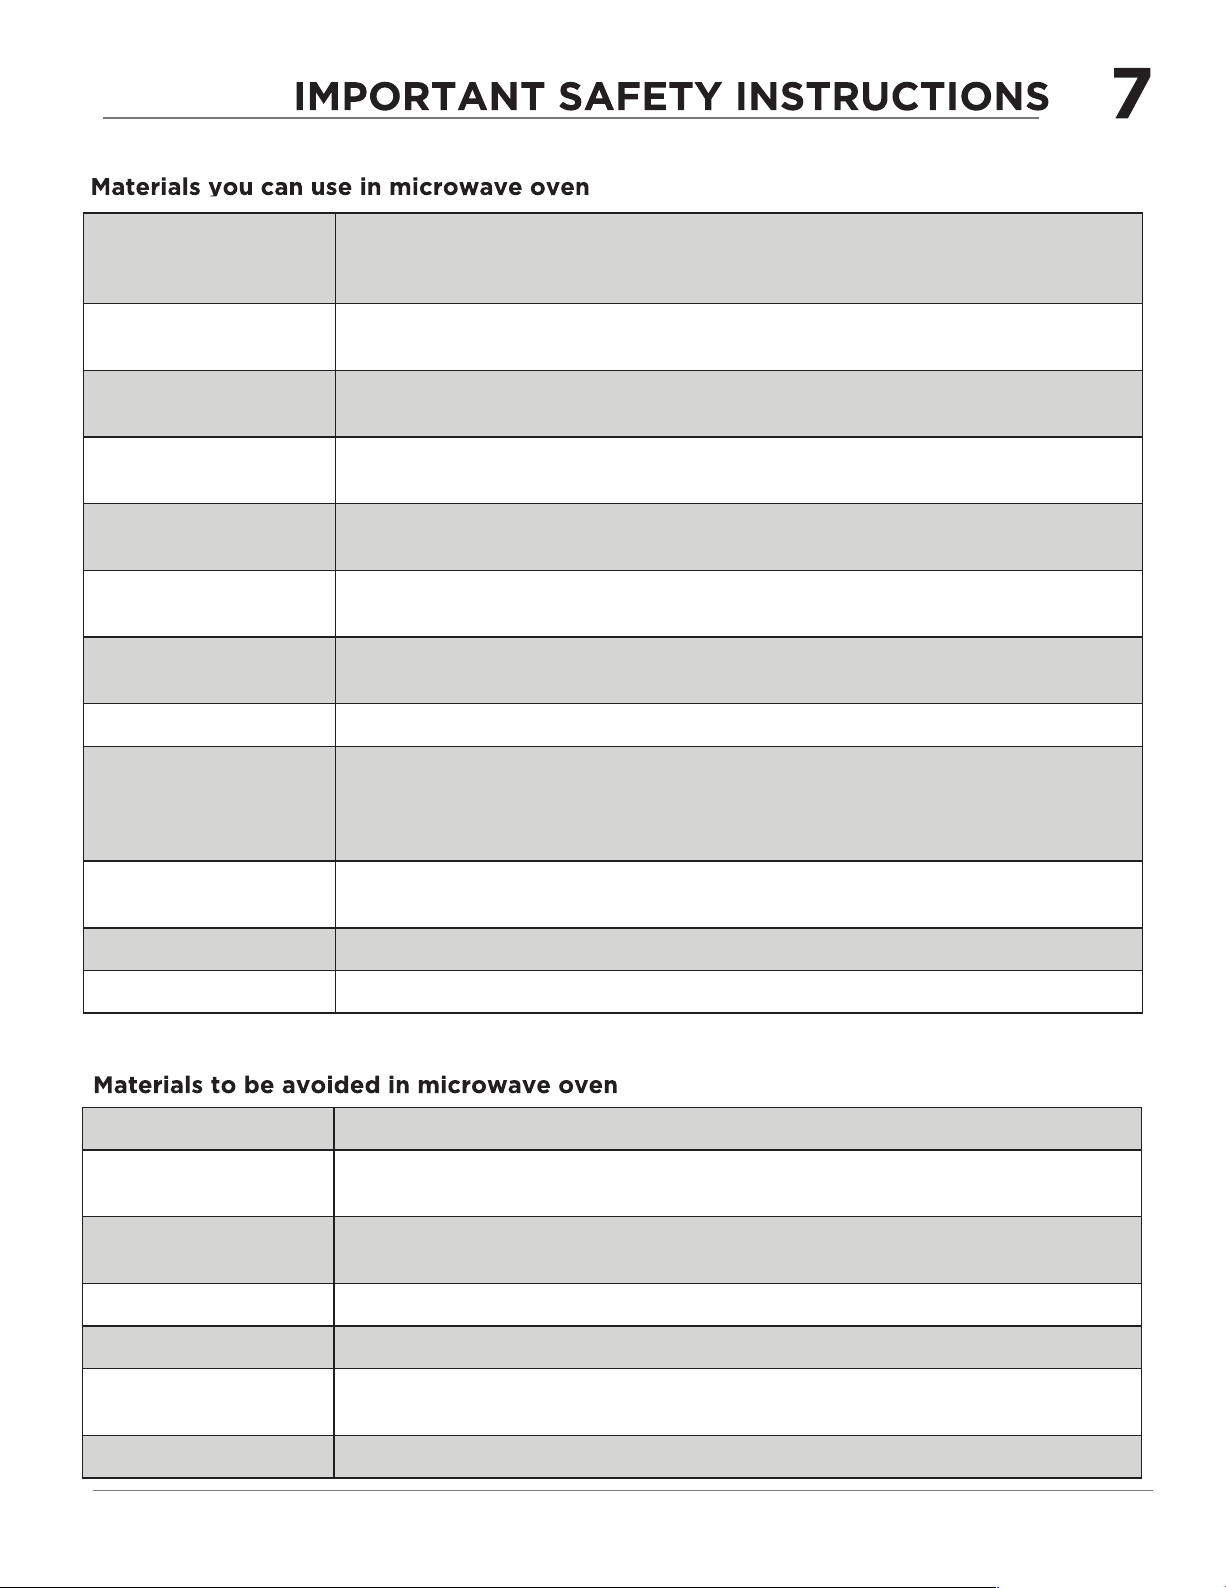
Browning dish
Follow manufacturer instructions. The bottom of browning dish must be at
least 3/16 inch (5mm) above the turntable. Incorrect usage may cause the
turntable to break.
Dinnerware
Glass jars
Glassware
Oven cooking bags
Paper plates and cups
Paper towels
Parchment paper Use as a cover to prevent splattering or a wrap for steaming.
Plastic
Plastic wrap
Microwave-safe only. Follow manufacturer's instructions. Do not use cracked
or chipped dishes.
Always remove lid. Use only to heat food until just warm. Most glass jars are
not heat resistant and may break.
Heat-resistant oven glassware only. Make sure there is no metallic trim. Do not
use cracked or chipped dishes.
Follow manufacturer instructions. Do not close with metal tie. Make slits to
allow steam to escape.
Use for short term cooking/warming only. Do not leave oven unattended
while cooking.
Use to cover food for reheating and absorbing fat. Use with supervision for a
short-term cooking only.
Microwave-safe only. Follow the manufacturer instructions. Should be labeled
"Microwave Safe". Some plastic containers soften, as the food inside gets hot.
"Boiling bags" and tightly closed plastic bags should be slit, pierced or vented
as directed by package.
Microwave-safe only. Use to cover food during cooking to retain moisture. Do
not allow plastic wrap to touch food.
Thermometers Microwave-safe only (meat and candy thermometers).
Wax paper Use as a cover to prevent splattering and retain moisture.
Aluminum tray May cause arcing. Transfer food into microwave-safe dish.
Food carton with
metal handle
Metal or metaltrimmed utensils
Metal twist ties May cause arcing and could cause a fire in the oven.
Paper bags May cause a fire in the oven.
Plastic foam
Wood Wood will dry out when used in the microwave oven and may split or crack.
May cause arcing. Transfer food into microwave-safe dish.
Metal shields the food from microwave energy. Metal trim may cause arcing.
Plastic foam may melt or contaminate the liquid inside when exposed to high
temperature.
Page 8
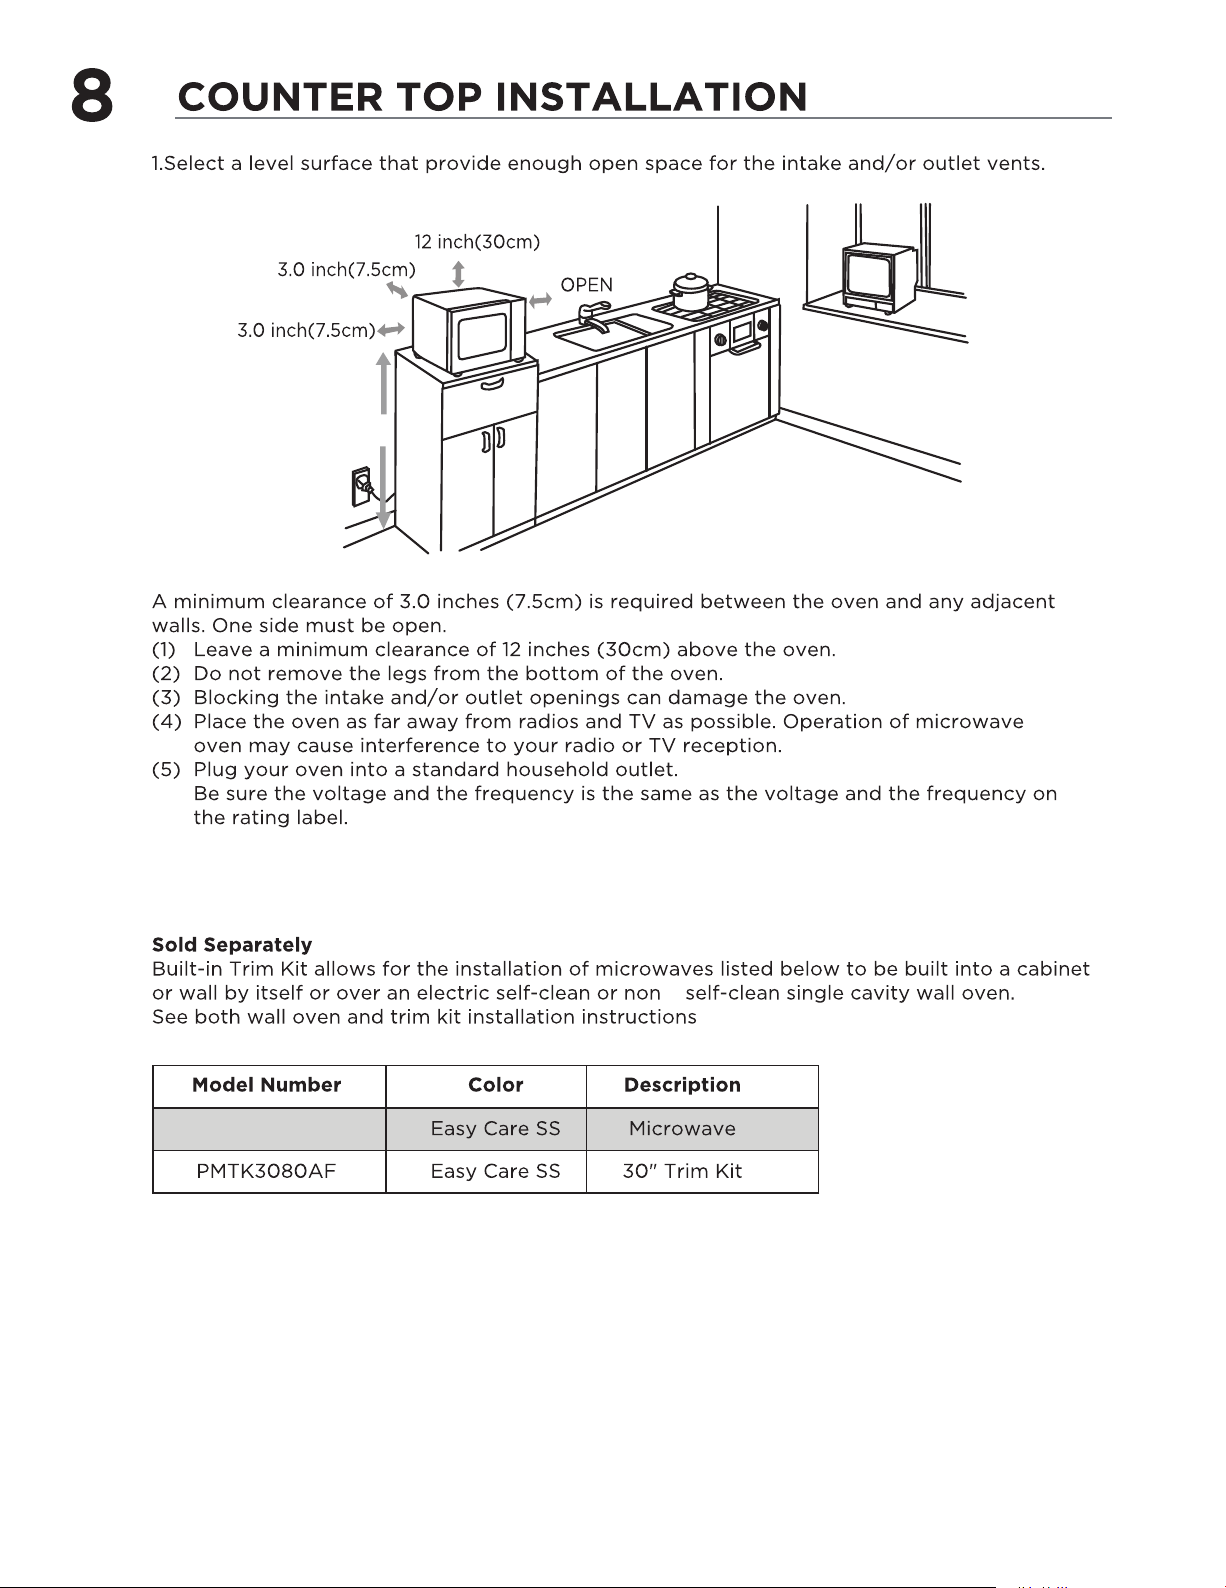
>36 inch(91.4cm)
(6) The minimum installation height is 36 inches(91.4cm).
PMBS3080BF
Page 9
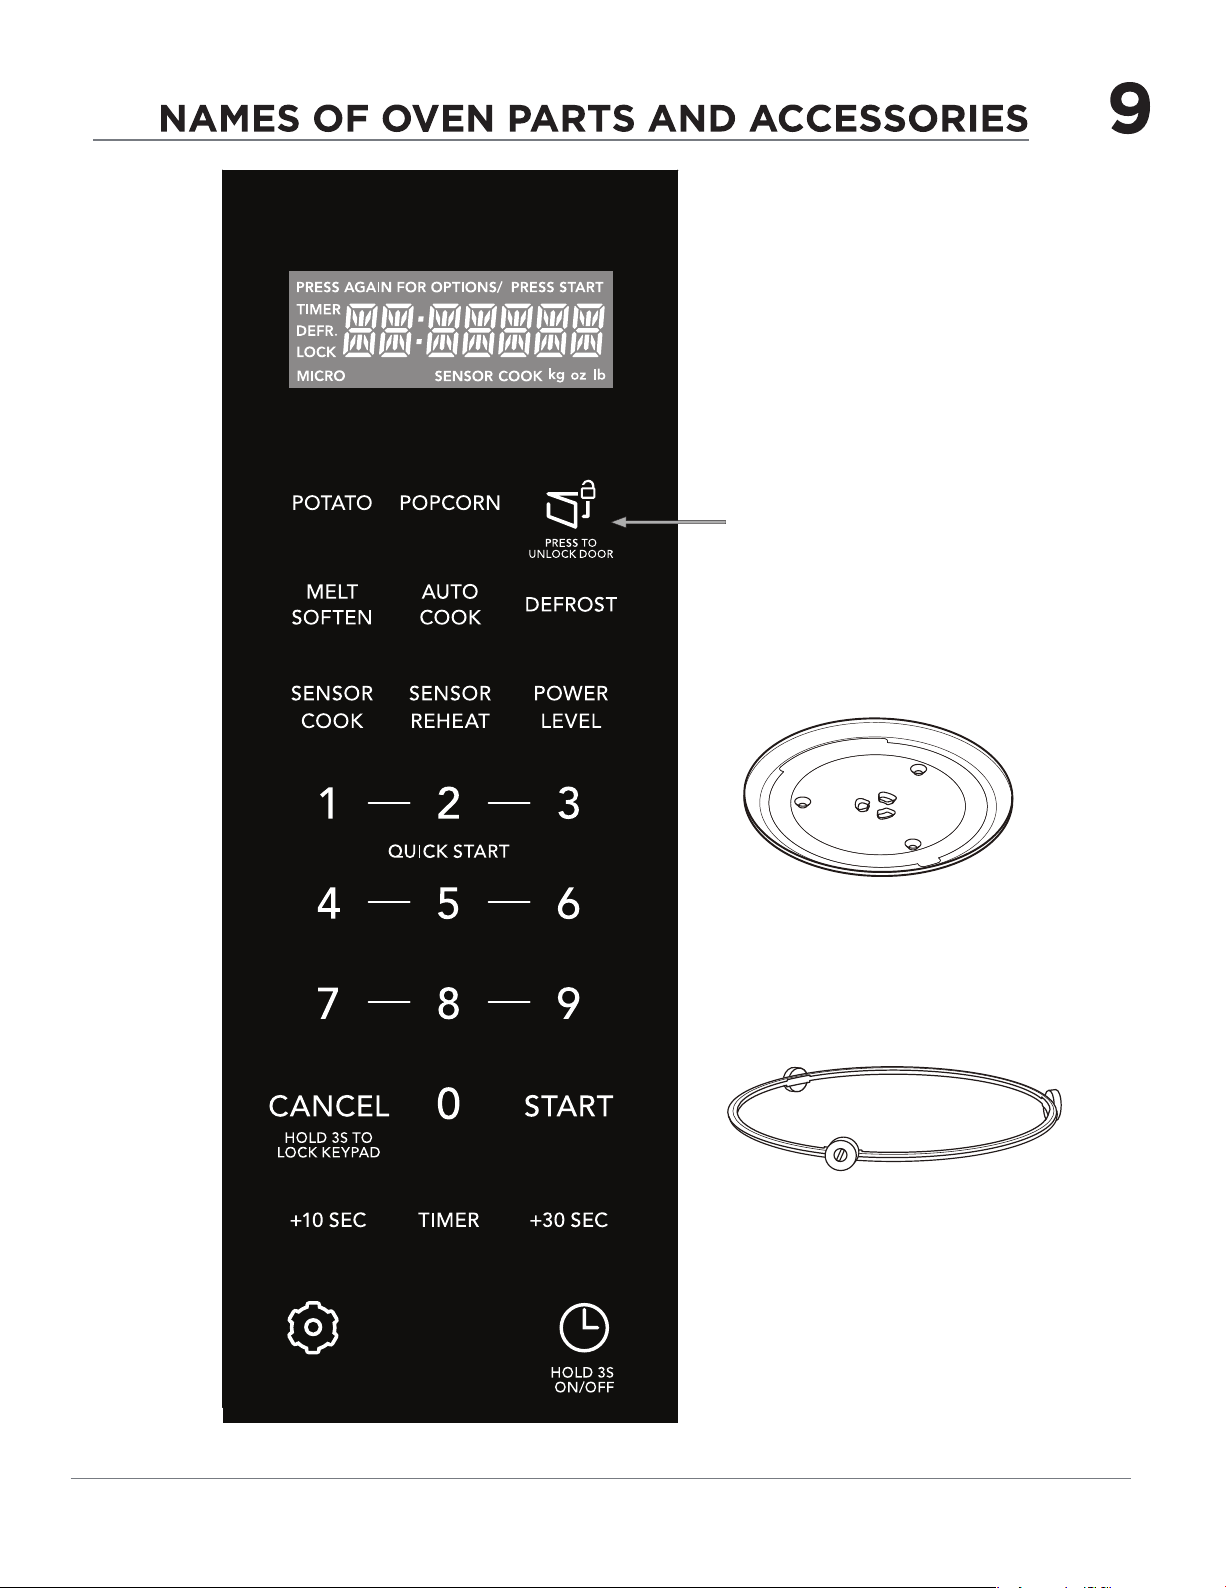
See page 10 for door operation
Glass turntable
Turntable Ring Assembly
Page 10
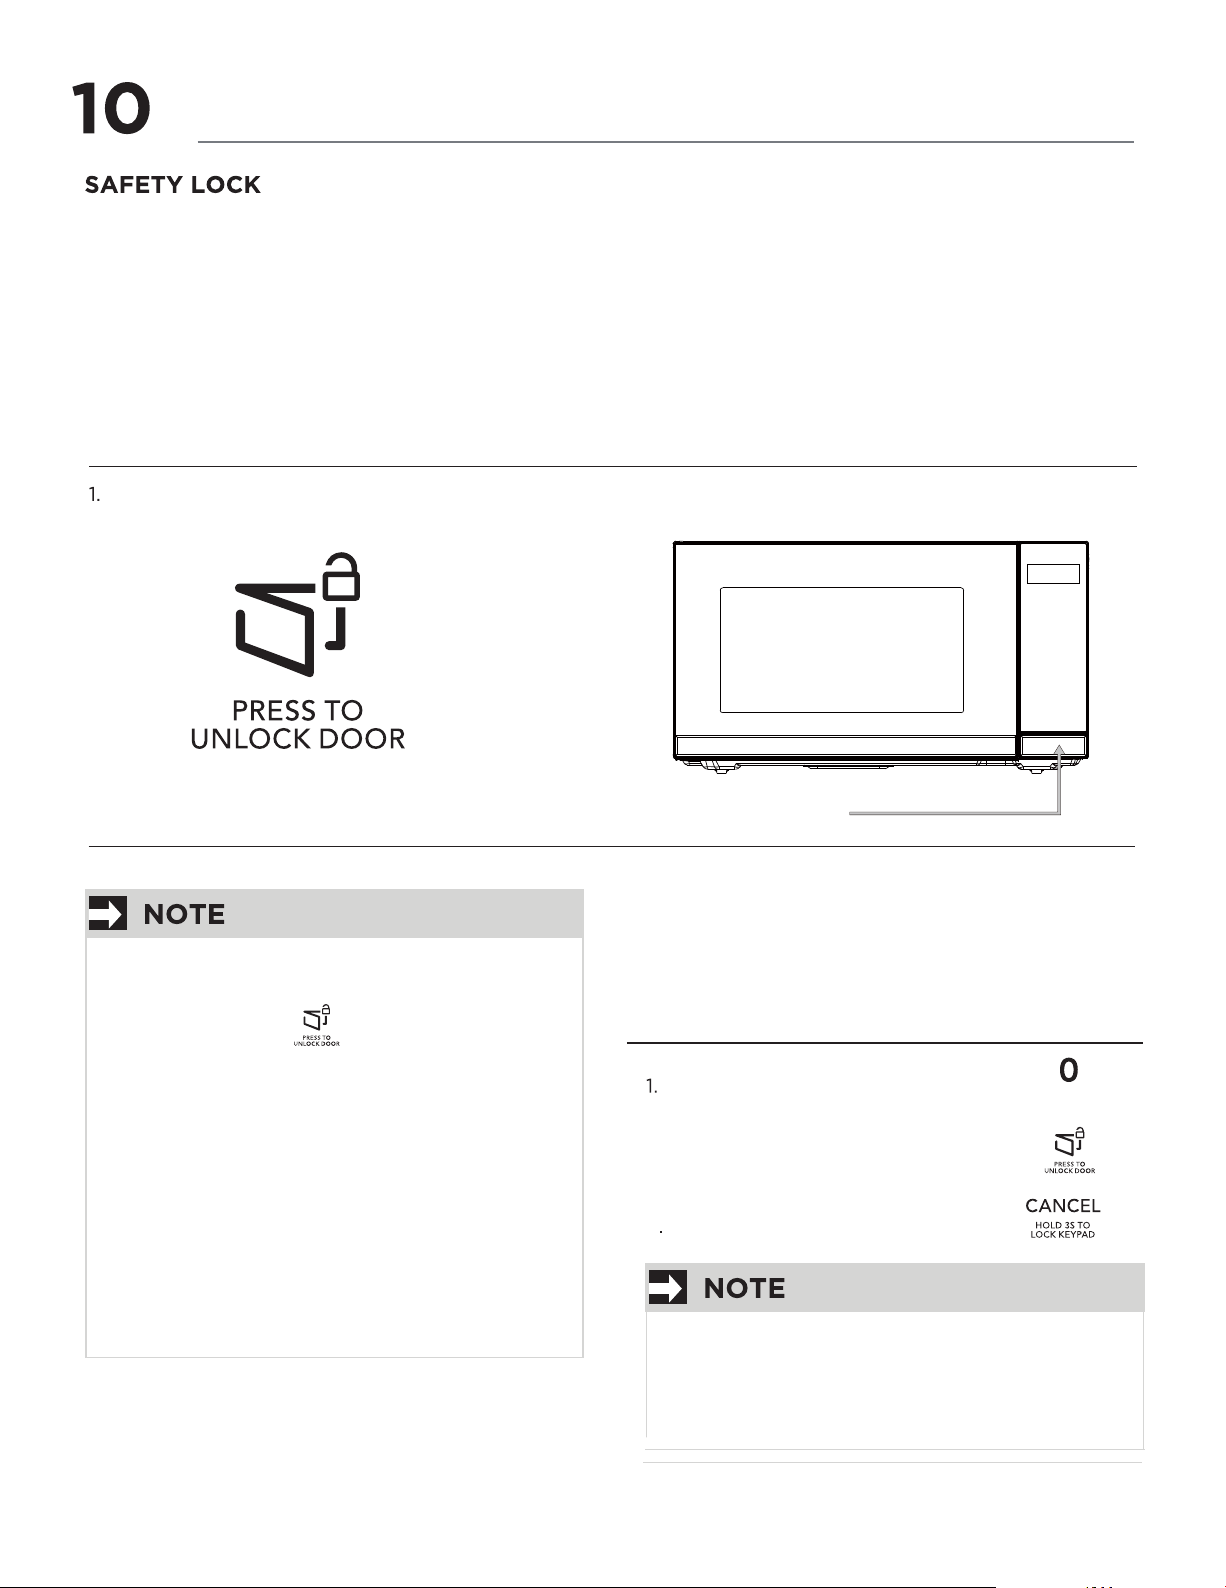
OPERATION
The two step function is provided to allow the consumer an option to limit access to contents from
children during and after cooking.
The microwave will be in standby mode requiring only a single step to open the door when no cooking
is in process.
TO OPEN THE DOOR:
During the cooking or within 30 minutes after the end of cooking the microwave will require two
steps to open the door.
Push door button
Touch
2.
1 After 30 minutes of the end of cooking, the
oven door will be unlocked.
After touching
2. ” once to unlock the
door, you must open the oven door within 10
seconds. Otherwise, the oven door will be
locked again.
3. When you open the oven door in the cooking
process, the oven door will be unlocked until
the oven starts cooking again.
4. When you open the oven door within 30
minutes after the end of cooking, the oven
door will be unlocked and the oven will return
to standby mode.
“
PUSH BUTTON
TO DEACTIVATE/REACTIVATE
THE SAFETY LOCK:
If there are no children in the house, you can
choose to permanently deactivate the safety lock
function.
Touch
Touch
2.
Hold 3 seconds
3
All three must be touch within 30 seconds, then
the screen will display “UNLOC”.
To reactivate the safety lock, repeat steps.
Page 11

OPERATION
11
1. Before operating your new oven make sure you
read and understand this Use and Care Guide
completely.
2. Before the Built-in Convention Microwave Oven
can be used, follow these procedures:
• Plug in the oven. Close the door. The oven
display will flash 12:00.
• If no operation after 1 minute, the oven will show
12:01.
3. Set clock. See below.
Touch pad once .
2. Enter time using number
pads.
Touch START pad.
3
Timer count down does not stop even if the door is
opened. To stop/cancel the timer, press the TIMER
key once . When the timer has reached the end of
set time, you will hear beep alerts indicating the
timer has run out.
You may lock the control panel to prevent the
microwave from being accidentally started or used
by children.
The control lock feature is very useful when cleaning
the control panel. The lock will prevent accidental
programming when wiping the control panel clean.
Touch and hold the CANCEL pad for
more than 3 seconds. The Lock icon
will appear in the display window
along with 1 beep.
Touch and hold pad .
2. Time will display, after 3s, OFF
will display.
When the clock display o:
Press the button to enter the clock query
state and return to the standby mode after 1
second. The clock is not displayed.
Hold down the key for 1-3 seconds to display
the current clock. After 1 second, display the
current clock and enter the clock setting mode.
Touch TIMER pad once.
OFF
Touch and hold the CANCEL pad for
more than 3 seconds. The Lock icon
will disappear in the display window.
Touch the +10 SEC/+30 SEC pad to:
1. Start programmed cooking.
2. Start cooking for 10 seconds/30 seconds at 100%
power level.
3. Extend cooking time in multiples of 10
seconds/30 seconds each time this pad is
touched during microwave cooking.
Press +30SEC pad twice.
/
2. Enter desired time using
number pads.
3. Touch TIMER pad.
Page 12
12
"Food" will be displayed if a quick start cooking
cycle or +10 Sec /+30 Sec key is pressed more
than 5 minutes after the door of microwave oven
is closed. You must open then door again to clear
''Food'' from the display.
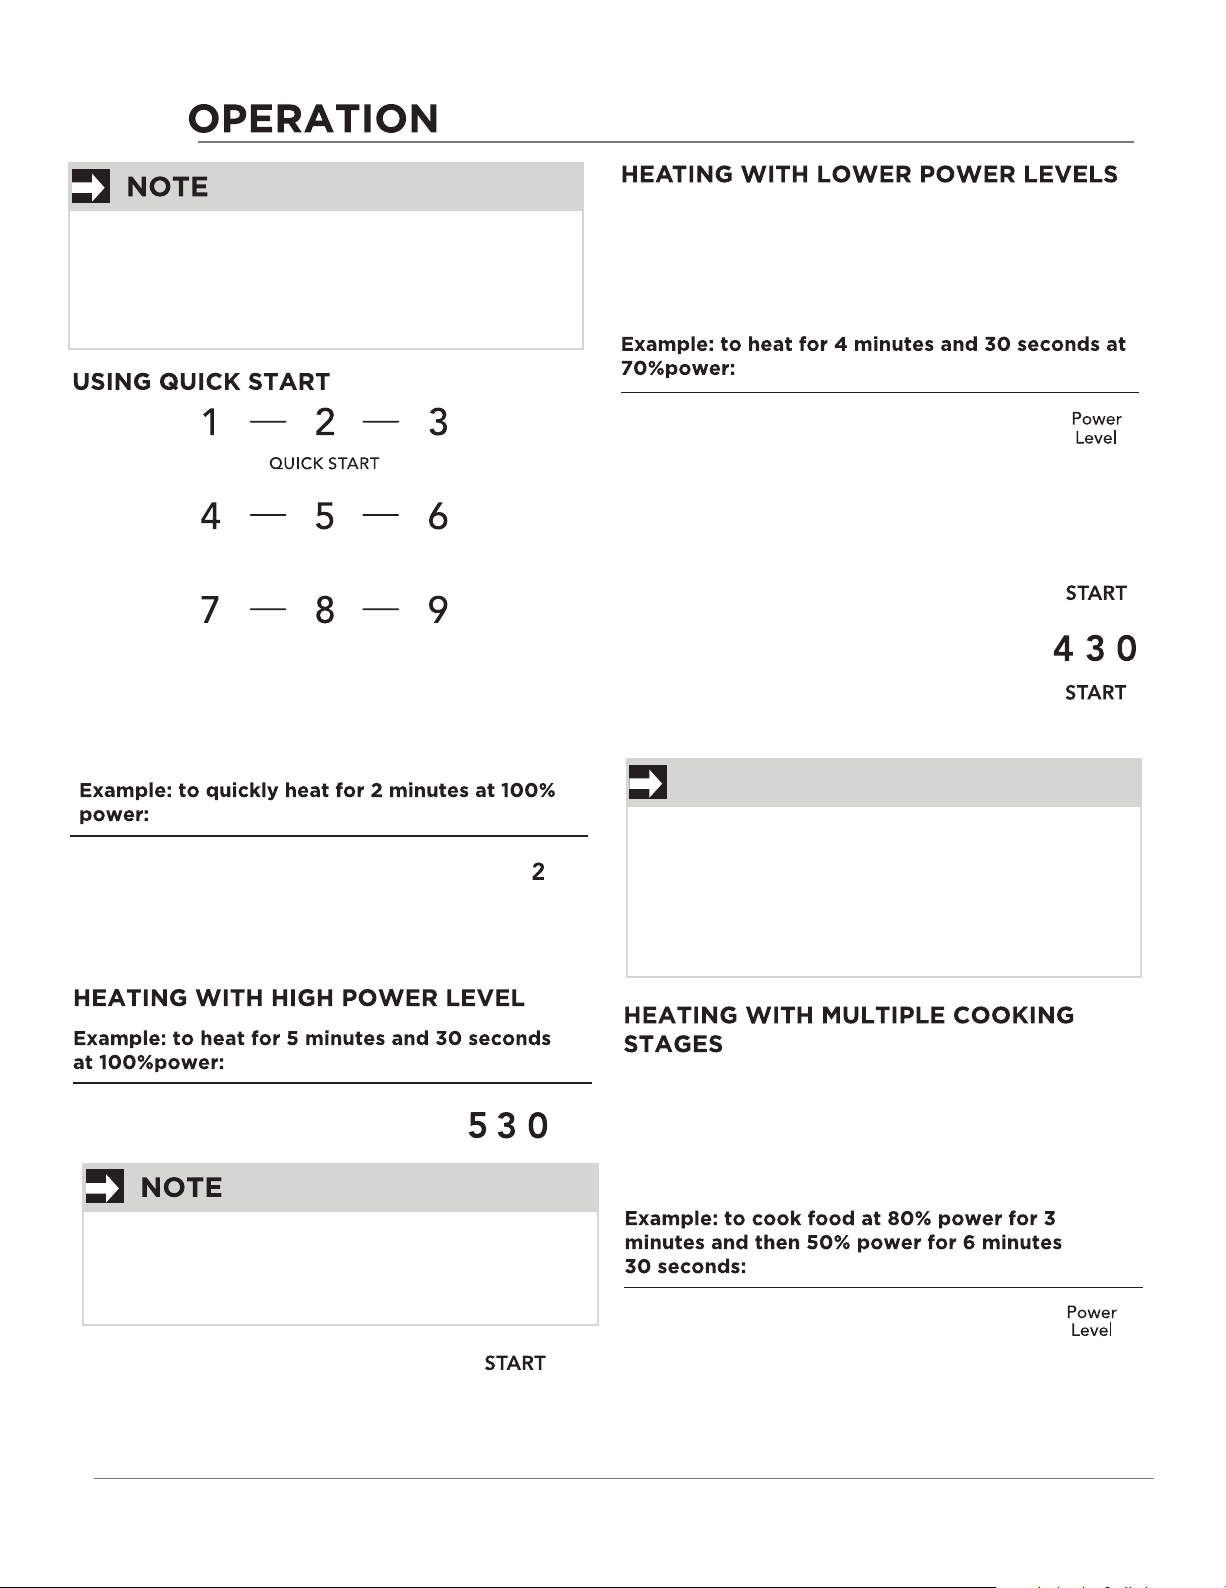
Microwave heating or cooking may be quickly set
at 100% power level for 1-9 minutes. Use the
number keys 1-9 to choose the desired minutes
of cook time (this option will only work using the
1-9 numeric pads).
Using the highest power level to heat foods does
not always give the best results when some types
of food need slower cooking, such as roasts, baked
goods or custards. Your oven has nine other power
levels you may choose.
1 . Press Power Level pad.
2. Press Power Level four
times or press the number
keys 7 to change to 70%
power level. PL-70 appears
in the display.
3. Press
4. Use the number pads to
enter heating time.
5. Press
When finished, you will hear a series of beeps.
START pad.
START pad.
NOTE
Press number pad for desired minute(s).
The microwave will start at once.
1. Use the number pads to enter
desired heating time.
For time sets that start with numbers 1 - 9, the
remaining numbers must be entered within 2
second from the first key press, otherwise the
Quick Start time will be used.
2. Press START pad.
When finished, you will hear a series of beeps.
1.
2.
For best results, some microwave recipes call for
dierent power levels or dierent lengths of time
for cooking. Your microwave may be set to change
from one stage to another automatically (2 stages
maximum).
For time settings that start with numbers 1 - 9,
the remaining numbers must be entered within
2 second from the first key press, otherwise the
Quick Start time will be used.
For power level settings, you can easily select
a level using the number keys 1-9.
1 . Press Power Level pad.
Press Power Level three
2.
times or press the number
keys 8 to change to 80%
power level. PL-80 appears
in the display.
Page 13
OPERATION
13
3. Press
4.
Use the number pads to
enter heating time for the
1st stage.
5. Press Power Level (within 1
second) for the 2nd stage.
Press Power Level six
.
6
times or press the number
keys 5 to change to 50%
power level. PL-50 appears
in the display.
7. Press START pad.
When finished, you will hear a series of beeps.
The “Convenience operation” can’t be set as one
of multiple cooking.
Do not leave microwave unattended during
any of auto cook selections.
START pad.
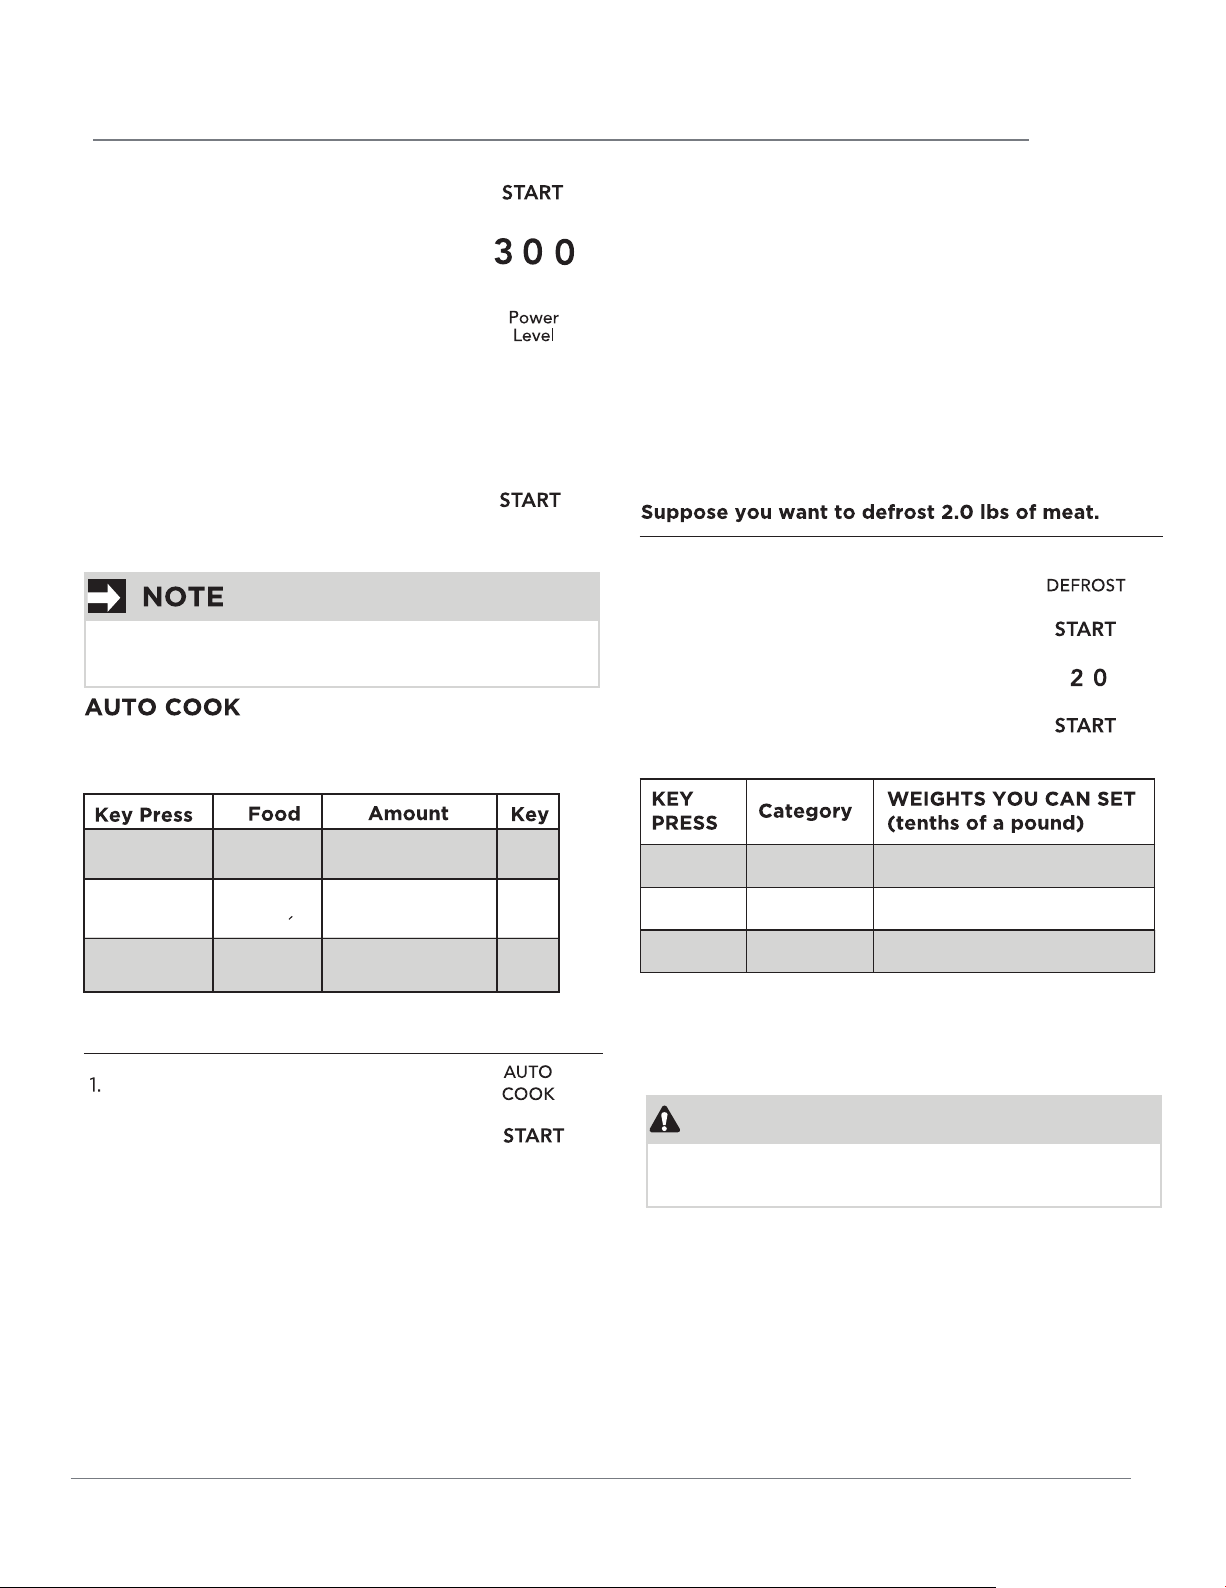
For added convenience, the Auto Defrost includes
a built-in beep mechanism that reminds you to
check, turn over, separate, or rearrange the food in
order to get the best defrost results. Three
dierent defrosting levels are provided:
1. MEAT
2. POULTRY
3. FISH
Available weight is 0.1 to 6.0 lbs.
1. Press DEFROST pad.
2. Press START pad.
3. Enter cook weight
4. Press START pad.
(Refer the table on next page)
Auto
x1
Cook
Auto
x2
Cook
Auto
x3
Cook
Example: to cook Rice.
Press AUTO COOK pad 3 times.
2. Press START pad.
The microwave will beep when finished.
Bacon
Frozen
Entree
Rice
1 - 3 slices
10 oz
20 oz
1 cup
2 cups
1 - 3
-
-
USING AUTO DEFROST
Three defrost sequences are preset in the oven.
The auto defrost feature provides you with the
best defrosting method for frozen foods.
The cooking guide will show you which defrost
sequence is recommended for the food you are
defrosting.
Defrost Meat 0.1 to 6.0
Defrost Poultry 0.1 to 6.0
Defrost Fish 0.1 to 6.0
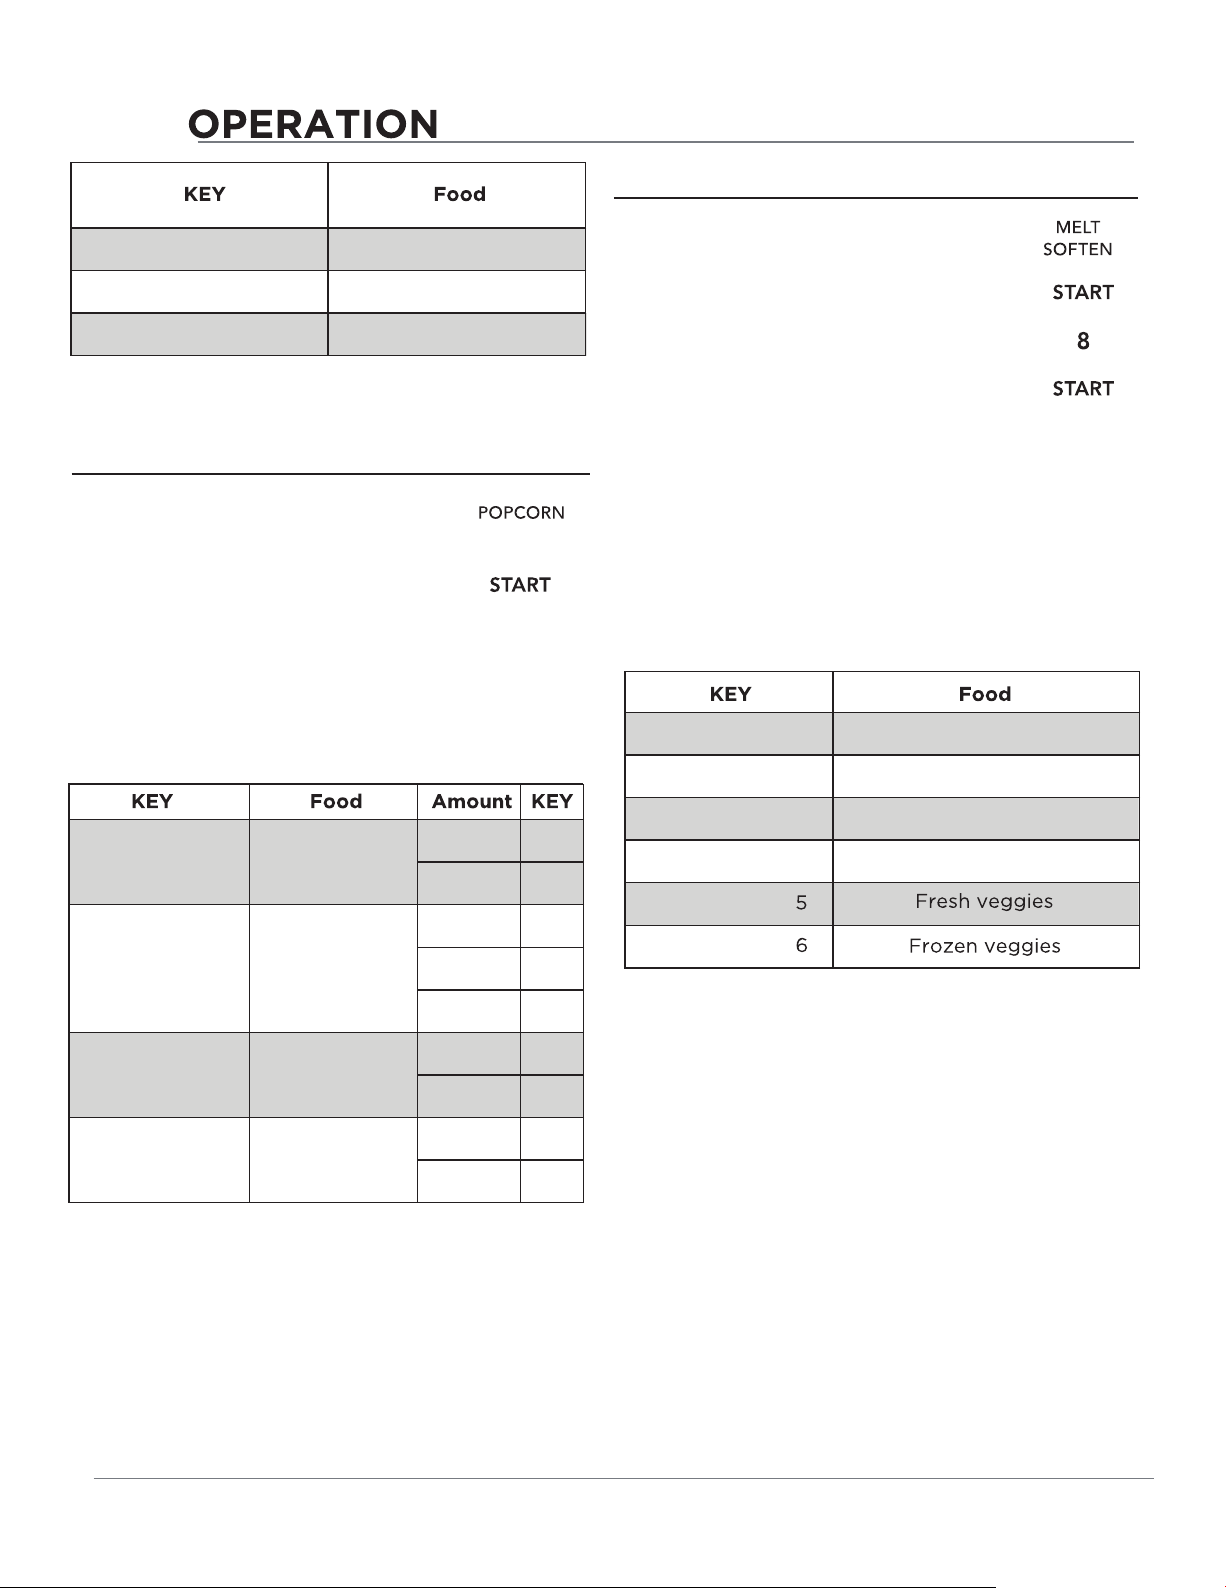
POPCORN
CAUTION
DO NOT leave microwave oven unattended while
popping popcorn|.
The popcorn feature lets you pop 3 dierent
commercially packaged microwave popcorn sized
bags. Use the table below to determine the setting
to use:
Page 14
14
Popcorn x1
3.3 oz. (default)
Suppose you want to melt 8 oz. of Chocolate.
1. Press MELT SOFTEN pad 2 times
(refer to table above).
Popcorn x2
Popcorn x3
Example: to pop a 1.75 oz. bag of popcorn
automatically:
1. Press POPCORN pad 3 times (refer
to table above).
2. Press START pad.
When finished, you will hear a series of beeps.
3.0 oz.
1.75 oz.
SETTING MELT/SOFTEN
The oven uses low power to melt and soften items.
See the following table.
1 stick 1
Melt / Soften x1
Melt / Soften x2
Melt Butter
Melt Chocolate
2 sticks 2
2 oz. 2
4 oz. 4
2. Press START pad.
3. Enter cook weight.
4. Press START pad.
SENSOR COOK OPERATING TIPS
The Sensor Cook categories are designed to
detect the increasing humidity released by the
food during the cooking process. The microwave
oven sensor will automatically adjust the cooking
time to the type and amount of food. The food
categories that are controlled with the humidity
sensor are:
Sensor Cook x1
Sensor Cook x2
Sensor Cook x3
Sensor Cook x4
Sensor Cook x
Sensor Cook x
Frozen Breakfast (8-12oz)
Ground Meat
Fish Seafood
Chicken Breast
Melt / Soften x3
Melt / Soften x4
Soften Ice
Cream
Soften Cream
Cheese
8 oz. 8
1 Pint 1
1.5 Quart 2
3 oz. 3
8 oz. 8
Page 15
For best results, do not use one of the Sensor
Cook categories twice in succession on the same
food portion. This may result in severely overcooked or burnt food. If the food appears to be
undercooked, use one of the Easy Set pads or
cook time pads to add more time.
OPERATION
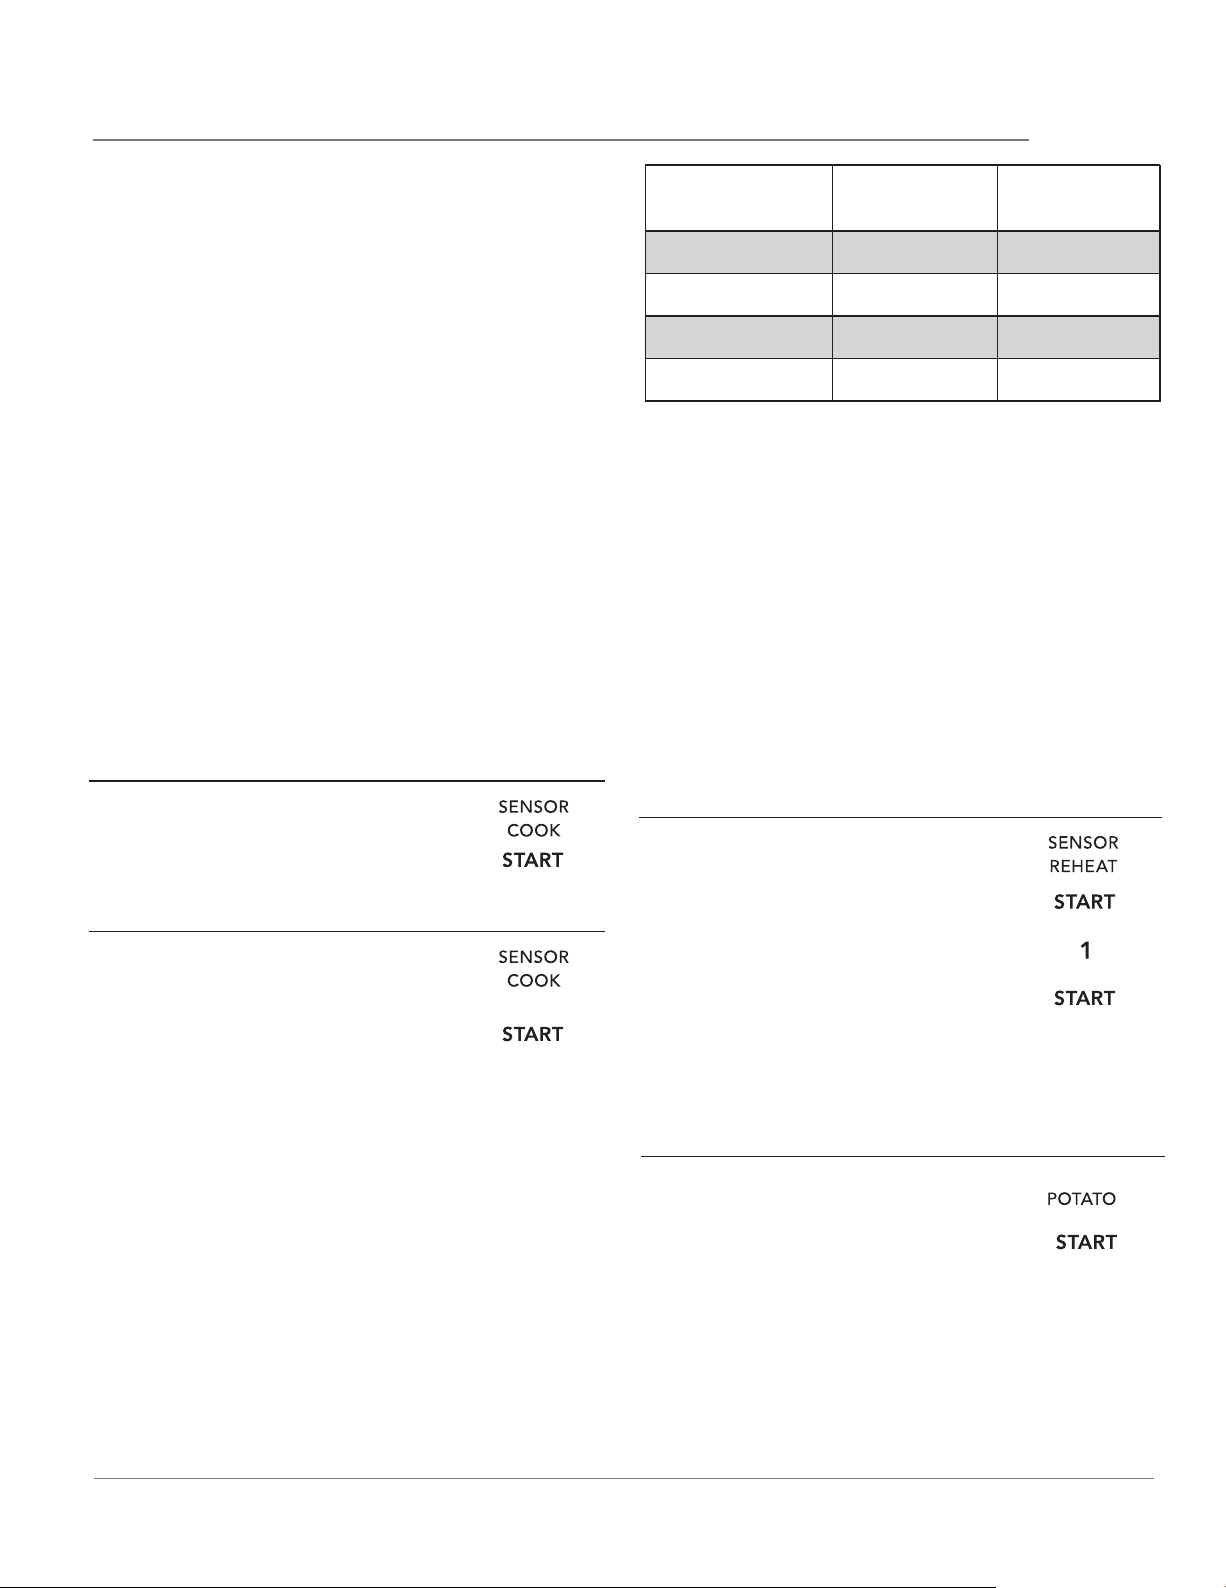
KEY Selection Amount
Sensor Reheat x1 Beverage 1 - 3 cups
Sensor Reheat x2 Dinner Plate 1 - 2 plates
15
Additional sensor cook suggestions are:
• Never start with less than 4 oz. of food.
• Use proper containers and covers for best
sensor cooking results.
• Always use microwave-safe containers.
• Never usetight sealing plastic containers.
• They will prevent steam from escaping and this
will mislead the sensor, usually causing the
food to overcook.
Be sure the outside of the cooking containers and
the cavity of the microwave oven are dry before
placing food in the oven. Excessive moisture
turning into steam that does not result from the
food cooking can mislead the sensor.
Suppose you want to cook Frozen Breakfast.
1. Press the SENSOR COOK pad.
2. Press START pad.
Suppose you want to cook Fish Seafood.
Sensor Reheat x3
Sensor Reheat x4
Notes concerning sensor reheat:
• For casseroles, add 2 - 3 tablespoons of liquid,
cover with lid or vented plastic wrap. Stir when
instructed from display.
• For canned foods, empty contents of can into a
casserole dish or serving bowl. Cover dish with lid
or vented plastic wrap. Let stand a few
minutes before serving.
• For plates of food, arrange food on plate and add
any butter or gravies, etc. Cover with loose-fitting
lid or vented plastic wrap. After reheating, let
stand a few minutes be. ;
Example: suppose you want to reheat 1 cup
beverage.
1. Press SENSOR REHEAT pad.
2. Press START pad.
Soup - Sauce 1 - 2 cups
Casserole 1 - 4 servings
1. Press the SENSOR COOK pad three
times.
2. Press START pad.
SENSOR REHEAT
The reheat feature is designed to detect the
increasing humidity released by the food during
the cooking process. The microwave oven sensor
will automatically adjust the cooking time to the
type and amount of food.
3. Enter 1.
4. Press START pad.
BAKED POTATO
The potato feature cooks 1 - 4 baked potato
automatically (starting from room temperature).
1. Press the POTATO pad.
2. Press START pad.
Page 16
16
USER REFERENCE
This section gives instructions for operating each
function. Please read this section carefully.
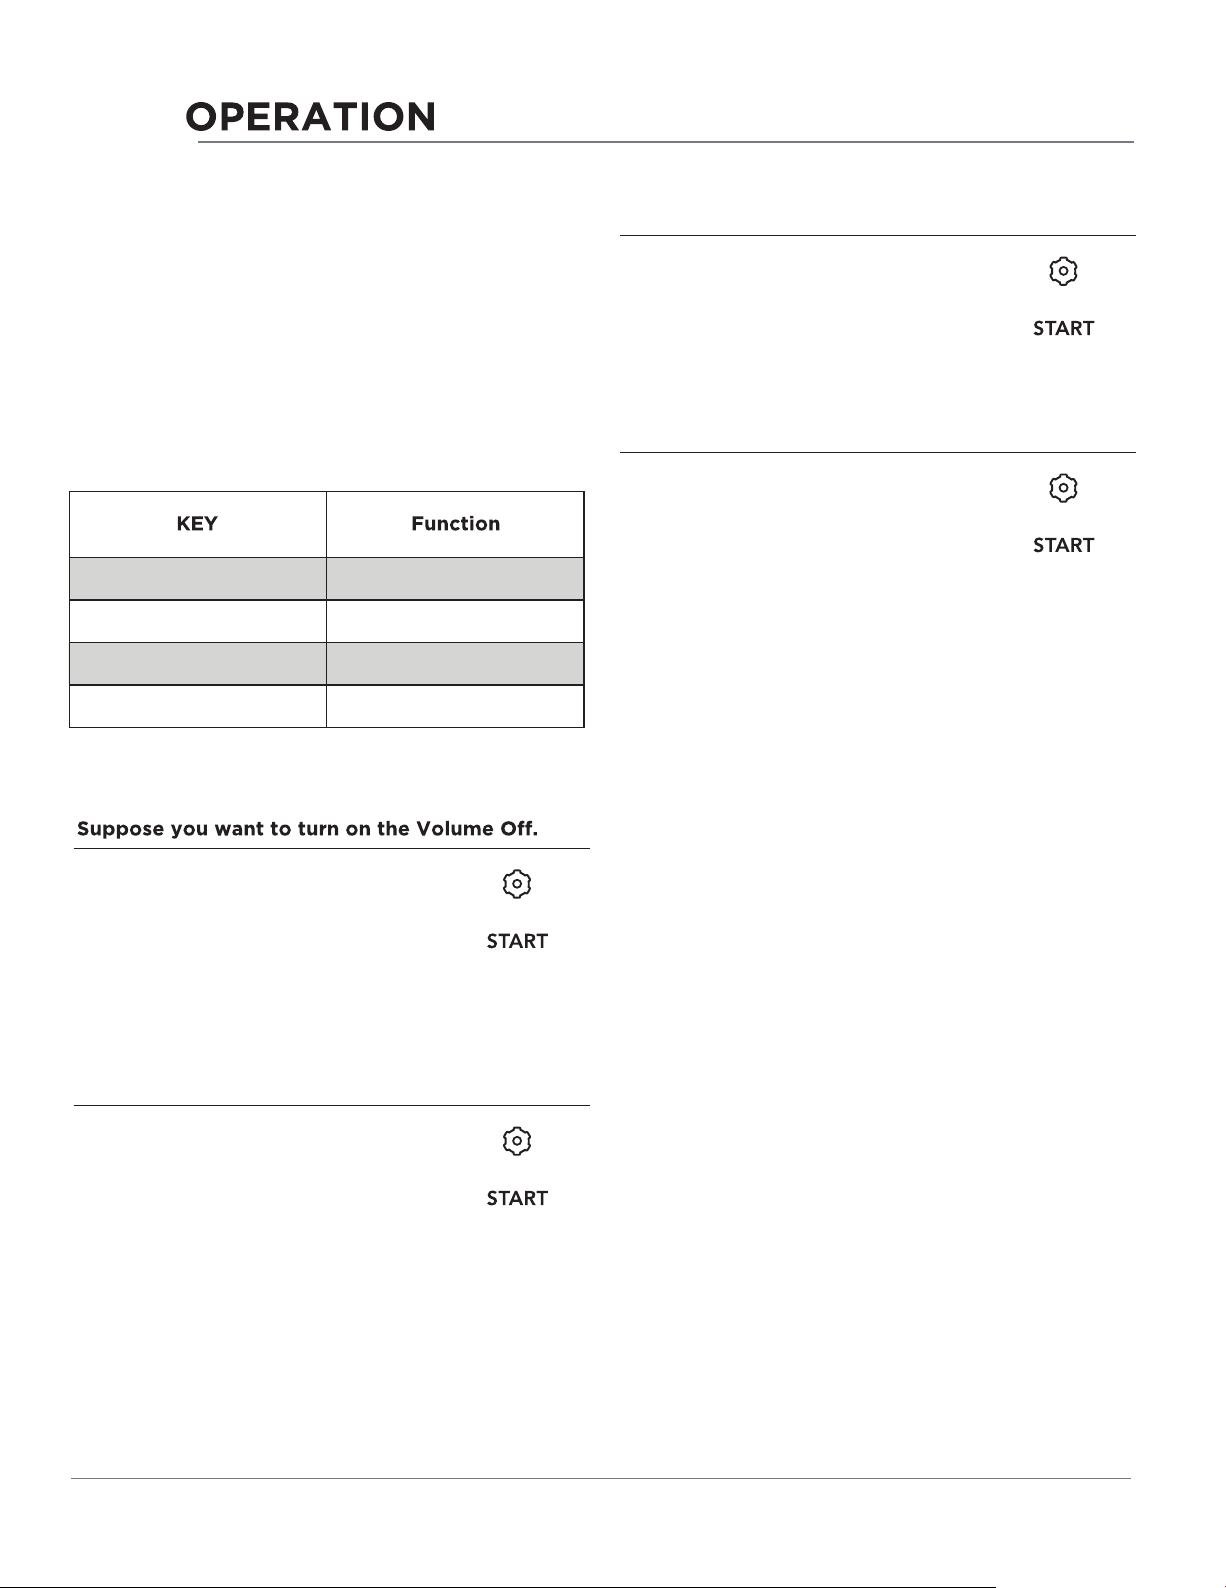
PREFERENCES
The microwave oven has settings that allow you
to customize the operation for your
convenience. Below is the table showing the
various settings. Touch the User Pref key
multiple times to scroll to the desired
setting function.
User Pref x 1
User Pref x 2
User Pref x 3
User Pref x 4
Volume
Weight
Language
Demo Mode
SETTING LANGUAGE MODE
Suppose you want to enter Language Mode.
1. Press the User Pref pad three times.
2. Press START pad.
SETTING DEMO MODE
Suppose you want to enter Demo Mode.
1. Press the User Pref pad four times.
2. Press START pad.
SETTING AUDIO LOW/MED/HIGH/OFF
1. Press the User Pref pad once.
2. Press START pad when display
indicates volume level is o.
SETTING WEIGHT LBS/KG
Suppose you want to toggle weight between
pounds & kilograms.
1. Press the User Pref pad twice.
2. Press START pad.
Page 17
MAINTENANCE
Troubleshooting
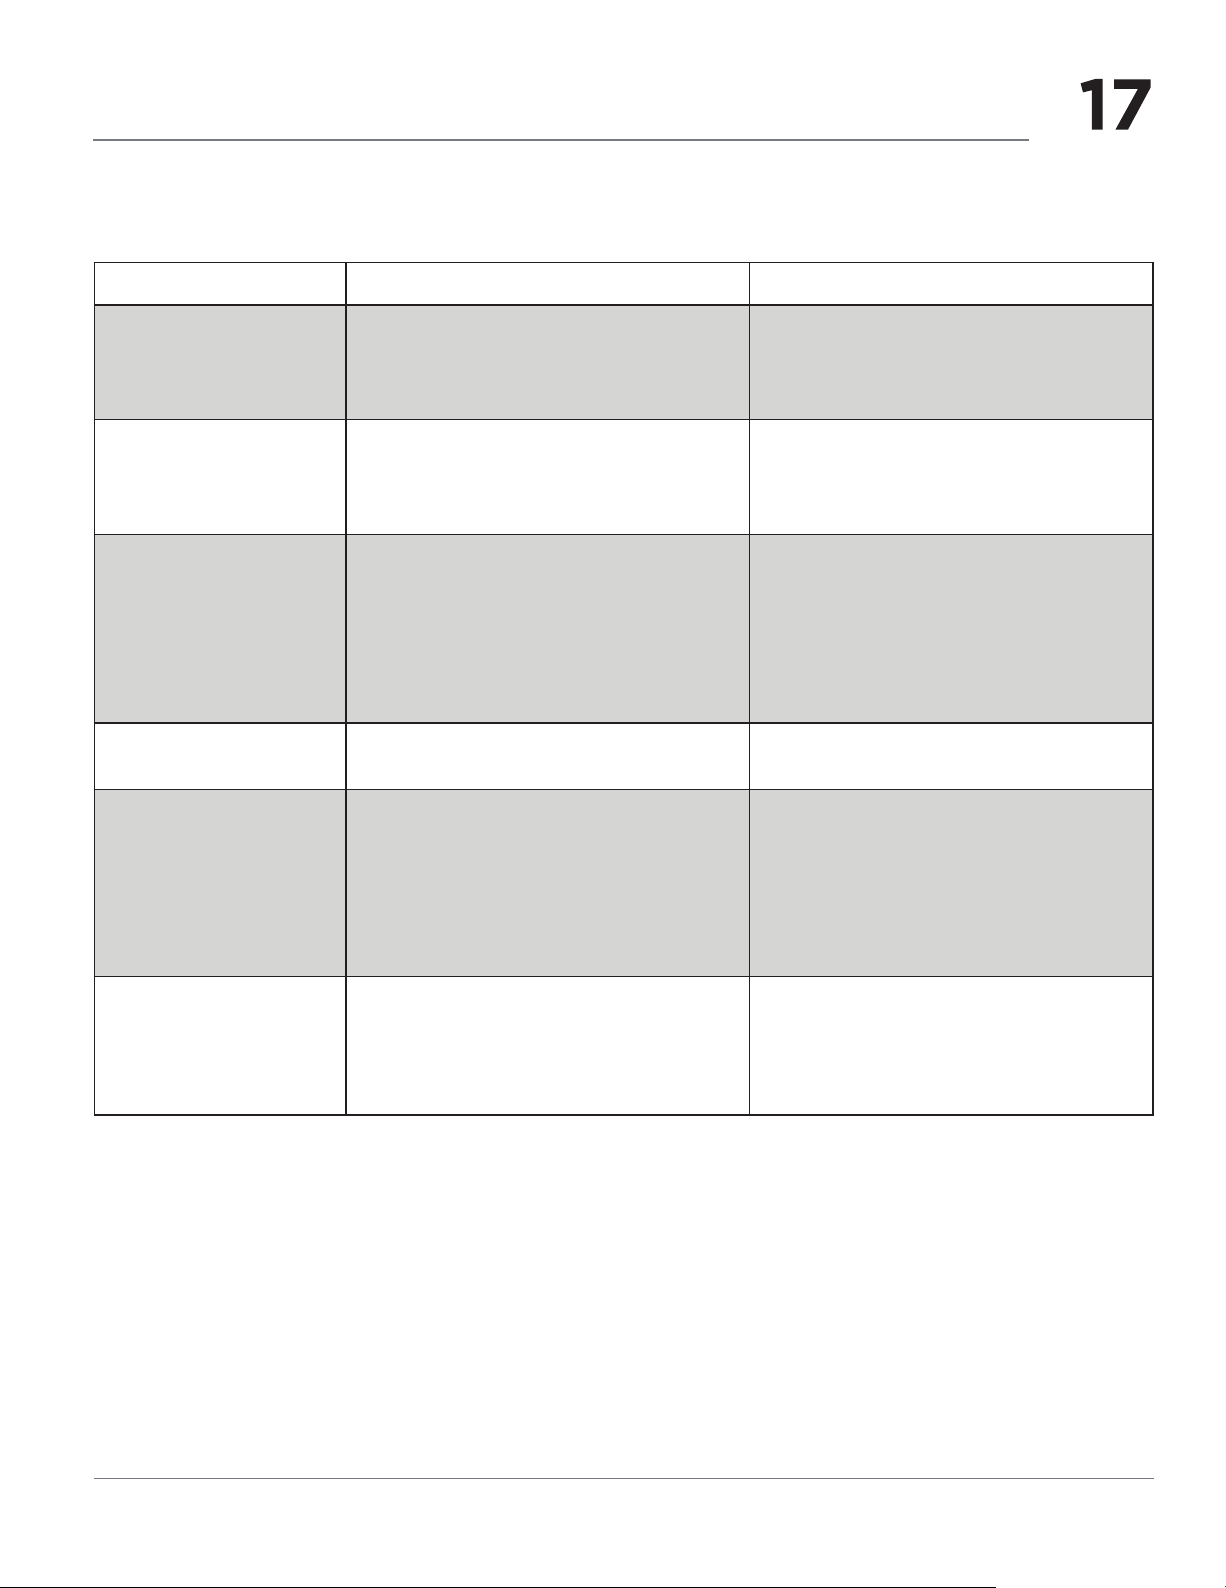
Check your problem by using the chart below and try the solutions for each problem. If the
microwave oven still does not work properly, contact the nearest authorized service center.
TROUBLE POSSIBLE CAUSE POSSIBLE REMEDY
Oven will not start
Arcing or sparking
Unevenly cooked
foods
Overcooked foods
Undercooked foods
• Electrical cord for oven is not
plugged in.
• Door is open.
• Wrong operation is set.
• Materials to be avoided in
microwave oven were used.
• The oven is operated when empty.
• Spilled food remains in the cavity.
• Materials to be avoided in
microwave oven were used.
• Food is not defrosted completely.
• Cooking time, power level is not
suitable.
• Food is not turned or stirred.
• Cooking time, power level is not
suitable.
• Materials to be avoided in
microwave oven were used.
• Food is not defrosted completely.
• Oven ventilation ports are
restricted.
• Cooking time, power l
suitable.
evel is not
• Plug into the outlet.
• Close the door and try again.
• Check instructions.
• Use microwave-safe cookware only.
• Do not operate with oven empty.
• Clean cavity with wet towel.
• Use microwave-safe cookware only.
• Completely defrost food.
• Use correct cooking time, power
level.
• Turn or stir food.
• Use correct cooking time, power
level.
• Use microwave-safe cookware only.
• Completely defrost food.
• Check to see that oven venti-
lation ports are not restricted.
• Use correct cooking time, power
level.
Improper defrosting
• Materials to be avoided in
microwave oven were used.
• Cooking time, power level is not
suitable.
• Food is not turned or stirred.
• Use microwave-safe cookware only.
• Use correct cooking time, power
level.
• Turn or stir food.
Page 18
MAINTENANCE
TROUBLESHOOTING GUIDE
If you have a problem you cannot solve, please
do not hesi-tate to call our service line:
elapsed -
Questions or for Service Call:
1-800-374-4432
Before you call a repair person for your
microwave, check the list below for possible
easy solutions to some common problems.
Neither the microwave’s display or oven
operates -
Properly insert the plug into a
grounded power outlet.
Remove the plug from the outlet, wait 10
seconds, then plug the microwave in again.
Check the household circuit breaker.
Plug the microwave into a dierent power
outlet.
The oven display works, but the oven will not
operate -
Make sure the oven door is closed securely and
completely.
If there has been a power interruption, remove
the plug from the outlet; wait 10 seconds, then
plug the microwave in again. If there was a
power outage, the time indicator in the display
will show 00:00.
Reset the clock and any cooking instructions.
Check the household circuit breaker.
Press the STOP pad twice and attempt to
re-enter cooking instructions.
Plug the microwave into a dierent power
outlet.
Food is cooking too slowly -
Make sure the oven is on a separate 20 amp
circuit line. Operating another appliance on the
same circuit can cause a voltage drop.
You see sparks or arcing -
Remove any metallic utensils, cookware or metal
ties from the oven cavity.
Check to see if packing material or other
materials are stuck to the door seal.
Check for damage to the oven door. Contact
service if dented.
Press the STOP pad twice and attempt to
re-enter cooking instructions.
Plug the microwave into a dierent power
outlet.
I cannot open the oven door -
Confirm the keypad lock is not active on
the CANCEL button.
The turntable makes noises or sticks -
Clean the turntable, roller ring and oven cavity
bottom.
Make sure the turntable and roller ring are
positioned correctly.
Using your microwave causes TV or radio
interference -
This is similar to the interference caused by
other small appliances, such as hair dryers. Move
your microwave further away from other
appliances.
Please note: If the oven is set to cook for more
than 30 minutes at 100% power level, it will
automatically adjust itself to a 80% power level
after 30 minutes to avoid overcooking.
Page 19

CLEANING SUGGESTIONS
CLEANING AND CARE
For best performance and for safety reasons,
keep the oven clean inside and outside. Take
special care to keep the inner door panel and
oven frame free of food and grease buildup.
Never use rough scouring powder or pads on
the microwave. Wipe the microwave oven inside
and out with a soft cloth and warm (not hot)
mild detergent solution. Then rinse and wipe
completely dry.
Wipe splatters immediately with a wet paper
towel, especially after cooking greasy foods like
chicken or bacon.
Follow these instructions to clean and care for
your microwave oven:
Keep the inside (cavity) of the oven clean. Food
particles and spilled liquids can stick to the oven
walls, causing the oven to work less eciently.
Wipe up spills immediately. Use a damp, clean
cloth and mild detergent. DO NOT use harsh
detergents or abrasive cleaners.
Wash the oven door window with very mild
soap and water. Be sure to use a soft clean cloth
to avoid scratching.
If steam accumulates inside or outside the oven
door, wipe with a soft cloth. Steam can
accumulate when operating the oven in high
humidity and in no way indicates microwave
leakage.
Never operate the oven without food in the
oven cavity; this can damage the magnetron
tube or glass tray.
To help loosen baked-on food particles or
liquids, heat 2 cups of water (add the juice of 1
lemon if you desire to keep the oven smelling
fresh) in a 4 cup measuring glass at High power
for 5 minutes or until boiling. Let stand in oven
cavity for 1 to 2 minutes.
Remove the glass turntable tray from the oven
when cleaning the oven cavity or tray. To
prevent the glass turntable from breaking,
handle with care and do not put it in water
immediately after cooking. Wash the turntable
tray with mild detergent.
Clean the outside surface of the microwave with
mild detergent and a clean damp cloth. Dry
with a clean soft cloth. To prevent damage to
the operating parts of the oven, do not let water
seep into any vents or openings.
Page 20
SERVICE CALL CHECK
Please check the following before calling for service:
Place one cup of water in a glass measuring cup in the microwave oven and close the
door securely. Operate the microwave oven for one minute at HIGH 100%.
A
Does the microwave oven light come on?
B
Does the cooling fan work? (Put your hand at top above Display.)
C Does the turntable rotate? (It is normal for the turntable to turn in either
direction.)
Is the water in the microwave oven warm?
D
If “NO” is the answer to any of the above questions,
please check electrical outlet, fuse and/or circuit
breaker. If they are functioning properly, CONTACT
YOUR NEAREST ELECTROLUX AUTHORIZED
SER-VICER.
A microwave oven should never be serviced by a
“do-it-yourself” repair person.
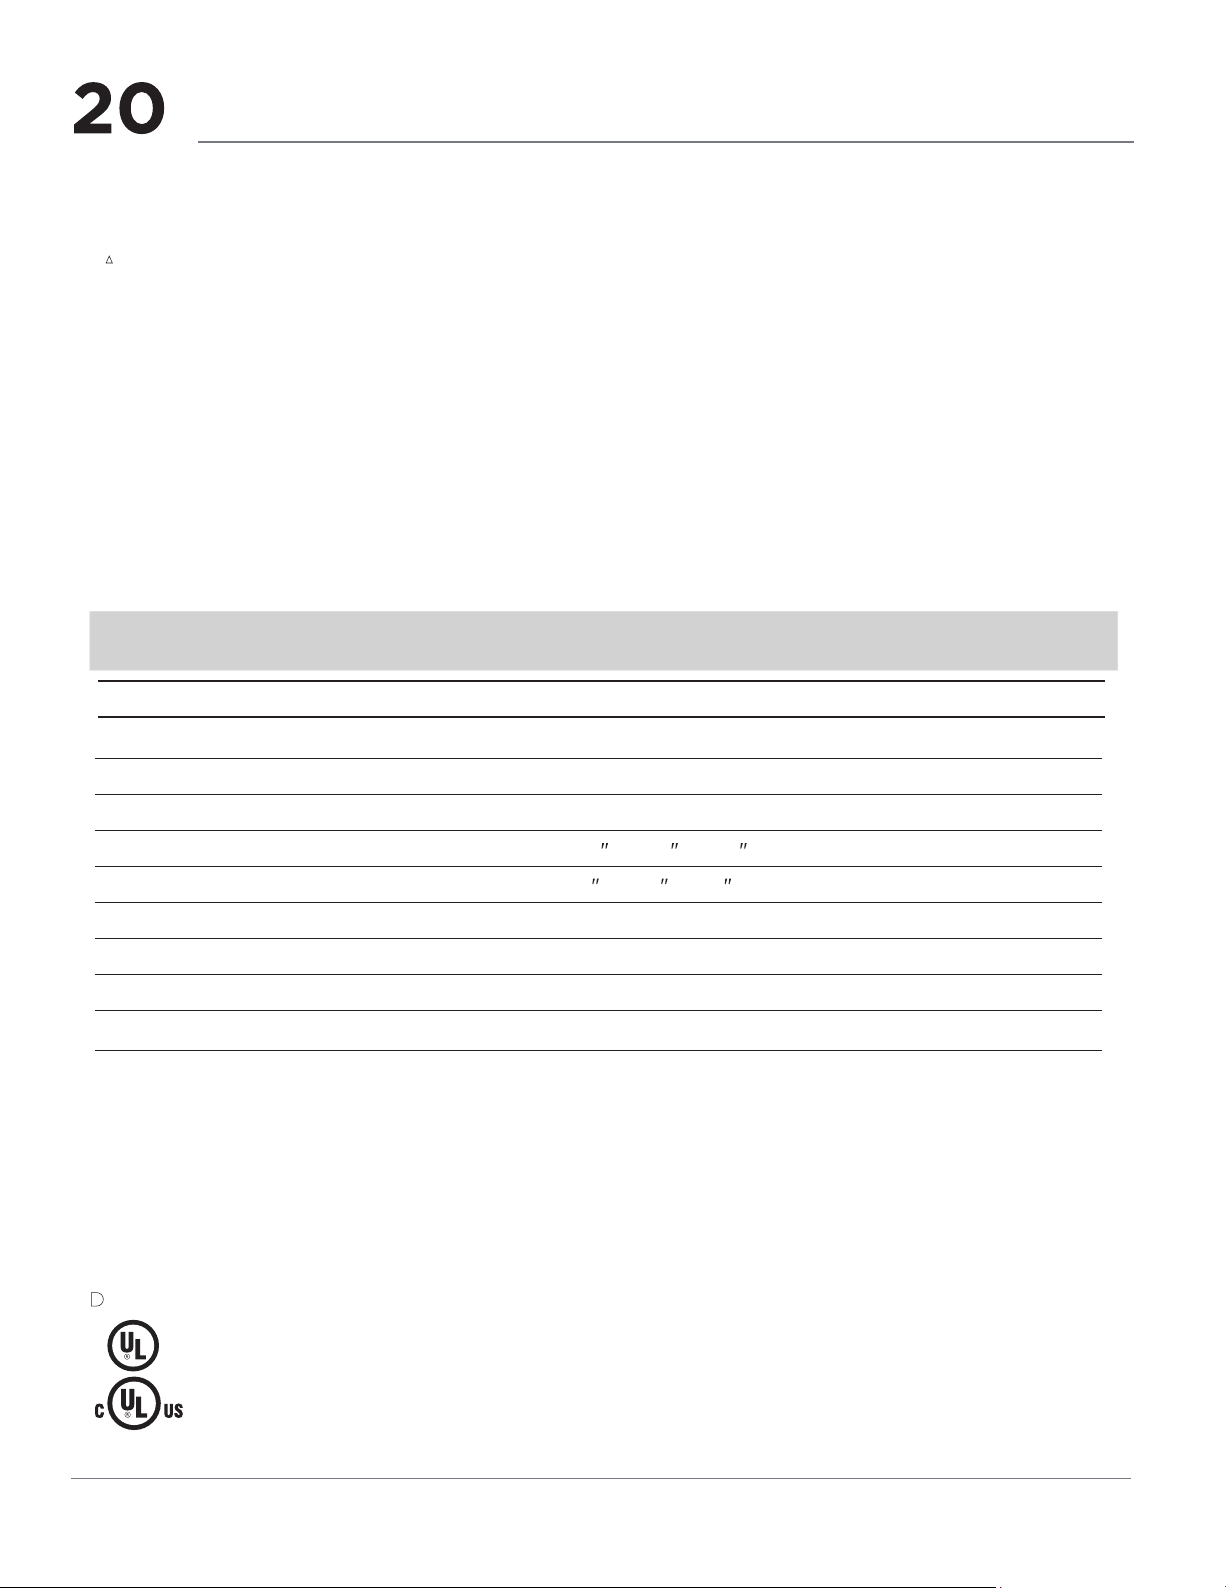
SPECIFICATIONS
AC Line Voltage: Single phase 120VAC, 60Hz, AC only
YES ____ NO ____
YES ____ NO ____
YES ____ NO ____
YES ____ NO ____
Rated Input
Output Power*: 1100 W
Frequency: 2450 MHz
Outside Dimensions (including handle):
Cavity Dimensions:
Microwave oven Capacity***:
Cooking Uniformity: Turntable
Weight:
Oven Light:
* The International Electiotechnical Commission's standardized method for measuring output wattage.
method is widely recognized. test method
This is the classification of ISM (Industrial, Scientific and Medical) equipment described in the International
**
Standard CISPR11.
***
Internal capacity is calculated by measuring maximum width, depth and height. Actual capacity for
holding food is less.
C
F C - Federal Communications Commission Authorized.
DHHS -
omplies with Department of Health and Human Services (DHHS) rule, CFR, Title 21, Chapter I,
C
Subchapter J.
- This symbol on the nameplate means the product is listed by Underwriters Laboratories, Inc.
In compliance with standards set by:
1500W
24.4
x 19.8 x 13.5
x 17.8 x 11.2
19.1
2.2 Cu.Ft.
Approx.(net) 42.73 Lbs,(gross)48.12 Lbs
1*1.5W LED,
- This symbol on the nameplate means the product is listed by Underwriters Laboratories,
Inc. for use in USA or Canada.
Page 21
WARRANTY
Your appliance is covered by a one year limited warranty. For one year from your original
date of purchase, Electrolux will pay all costs for repairing or replacing any parts of this
appliance that prove to be defective in materials or workmanship when such appliance is
installed, used and maintained in accordance with the provided instructions.
This warranty does not cover the following:
1. Products with original serial numbers that have been removed, altered or cannot be readily determined.
2. Product that has been transferred from its original owner to another party or removed outside the USA or
Canada.
3. Rust on the interior or exterior of the unit.
4. Products purchased “as-is” are not covered by this warranty.
5. Food loss due to any refrigerator or freezer failures.
6. Products used in a commercial setting.
7. Service calls which do not involve malfunction or defects in materials or workmanship, or for appliances not
in ordinary household use or used other than in accordance with the provided instructions.
8. Service calls to correct the installation of your appliance or to instruct you how to use your appliance.
9. Expenses for making the appliance accessible for servicing, such as removal of trim, cupboards,
shelves, etc., which are not a part of the appliance when it is shipped from the factory.
10. Service calls to repair or replace appliance light bulbs, air fi lters, water fi lters, other consumables, or knobs,
handles, or other cosmetic parts.
11. Surcharges including, but not limited to, any after hour, weekend, or holiday service calls, tolls, ferry trip
charges, or mileage expense for service calls to remote areas, including the state of Alaska.
12. Damages to the fi nish of appliance or home incurred during installation, including but not limited to
fl oors, cabinets, walls, etc.
13. Damages caused by: services performed by unauthorized service companies; use of parts other than genuine
Electrolux parts or parts obtained from persons other than authorized service companies; or external causes
such as abuse, misuse, inadequate power supply, accidents, fi res, or acts of God.
CUSTOMER’S SOLE AND EXCLUSIVE REMEDY UNDER THIS LIMITED WARRANTY SHALL BE PRODUCT REPAIR
OR REPLACEMENT AS PROVIDED HEREIN. CLAIMS BASED ON IMPLIED WARRANTIES, INCLUDING
WARRANTIES OF MERCHANTABILITY OR FITNESS FOR A PARTICULAR PURPOSE, ARE LIMITED TO ONE
YEAR OR THE SHORTEST PERIOD ALLOWED BY LAW, BUT NOT LESS THAN ONE YEAR. ELECTROLUX SHALL
NOT BE LIABLE FOR CONSEQUENTIAL OR INCIDENTAL DAMAGES SUCH AS PROPERTY DAMAGE AND
INCIDENTAL EXPENSES RESULTING FROM ANY BREACH OF THIS WRITTEN LIMITED WARRANTY OR ANY
IMPLIED WARRANTY. SOME STATES AND PROVINCES DO NOT ALLOW THE EXCLUSION OR LIMITATION OF
INCIDENTAL OR CONSEQUENTIAL DAMAGES, OR LIMITATIONS ON THE DURATION OF IMPLIED
WARRANTIES, SO THESE LIMITATIONS OR EXCLUSIONS MAY NOT APPLY TO YOU. THIS WRITTEN
WARRANTY GIVES YOU SPECIFIC LEGAL RIGHTS. YOU MAY ALSO HAVE OTHER RIGHTS THAT VARY FROM
STATE TO STATE.
If You Need Service
Keep your receipt, delivery slip, or some other appropriate payment record to establish the warranty period
should service be required. If service is performed, it is in your best interest to obtain and keep all receipts.
Service under this warranty must be obtained by contacting Electrolux at the addresses or phone
numbers below.
This warranty only applies in the USA and Canada. In the USA, your appliance is warranted by Electrolux Major
Appliances North America, a division of Electrolux Home Products, Inc. In Canada, your appliance is warranted by
Electrolux Canada Corp. Electrolux authorizes no person to change or add to any obligations under this warranty.
Obligations for service and parts under this warranty must be performed by Electrolux or an authorized service
company. Product features or specifi cations as described or illustrated are subject to change without notice.
U
SA
1-800-374-4432
Electrolux Home Products,
Inc., 10200 David Taylor
Drive Charlotte, NC 28262
1.800.265.8352
Electrolux Canada Corp.
5855 Terry Fox Way
Mississauga, Ontario, Canada
L5V 3E4
Printed in China
Canada
Page 22
welcome
home
Our home is your home. Visit us if you
need help with any of these things:
owner support
accessories
service
registration
(See your registration card
for more information.)
Frigidaire.com
1-800-374-4432
Frigidaire.ca
1-800-265-8352
 Loading...