

Page 1
All about the
Use & Care
of your
www.frigidaire.com USA 1-800-944-9044 www.frigidaire.ca Canada 1-800-265-8352
Gas Range
Product Record and Registration . . . . . . . . . . . . . . 2
Important Safety Instructions . . . . . . . . . . . . . . . . . 3
Before Setting Surface Controls . . . . . . . . . . . . . . . 8
Setting Surface Burners . . . . . . . . . . . . . . . . . . . . . 9
Before Setting Oven Controls . . . . . . . . . . . . . . . . 12
Oven Controls . . . . . . . . . . . . . . . . . . . . . . . . . . . . 14
TABLE OF CONTENTS
Care and Cleaning . . . . . . . . . . . . . . . . . . . . . . . . 29
Before You Call . . . . . . . . . . . . . . . . . . . . . . . . . . . 33
Warranty . . . . . . . . . . . . . . . . . . . . . . . . . . . . . . . . 36
A02992501 Rev C (May 2015)
Page 2

PRODUCT RECORD AND REGISTRATION
Need Help?
Product Record and Registration . . . . . . . . . . . . . . . . . 2
Important Safety Instructions . . . . . . . . . . . . . . . . . . . . 3
Before Setting Surface Controls. . . . . . . . . . . . . . . . . . 8
Setting Surface Burners . . . . . . . . . . . . . . . . . . . . . . . . 9
Before Setting Oven Controls . . . . . . . . . . . . . . . . . . . 12
Oven Controls. . . . . . . . . . . . . . . . . . . . . . . . . . . . . . . . 14
Care and Cleaning . . . . . . . . . . . . . . . . . . . . . . . . . . . . 29
Before You Call . . . . . . . . . . . . . . . . . . . . . . . . . . . . . . 33
Warranty . . . . . . . . . . . . . . . . . . . . . . . . . . . . . . . . . . . . 36
Visit the Frigidaire web site at www.frigidaire.com
Before you call for service, there are a few things you can
do to help us serve you better.
Read this Use & Care Manual
This manual contains instructions to help you use and
maintain your range properly.
If You Received a Damaged Range...
Immediately contact the dealer (or builder) that sold you the
range.
Save Time and Money
Thank you for choosing Frigidaire.
This Use and Care Guide is part of our commitment to
customer satisfaction and product quality throughout the
service life of your new appliance. We view your purchase
as the beginning of a relationship. To ensure our ability to
continue serving you, please use this page to record
important product information.
Questions?
For toll-free telephone support in the U.S. and Canada call
1-800-944-9044
For online support and Internet production information visit
www.frigidaire.com.
Check the section title “Before You Call”. This section helps
step you through some common problems that might occur.
If you do need service, help is only a phone call away. Call
Frigidaire Customer Services at 1-800-944-9044.
Product Registration
Registering your product with Frigidaire enhances our
ability to serve you. Register online at www.frigidaire.com
or by dropping your Product Registration Card in the mail.
Record model & serial numbers here
Purchase Date
Frigidaire model number
Frigidaire serial number
2
2015 Electrolux Home Products, Inc. All rights reserved. Printed in the USA
Page 3
WARNING
CAUTION
IMPORTANT
NOTE
WARNING
WARNING
IMPORTANT SAFETY INSTRUCTIONS
CAUTIONS AND WARNINGS
Read all instructions before using this appliance.
This manual contains important safety symbols and
instructions. Please pay attention to these symbols
and follow all instructions given.
Do not attempt to install or operate your appliance
until you have read the safety precautions in this
manual. Safety items throughout this manual are
labeled with a WARNING or CAUTION statement
based on the risk type.
DEFINITIONS
This is the safety alert symbol. It is used to alert you
to potential personal injury hazards. Obey all safety
messages that follow this symbol to avoid possible
injury or death.
Indicates a potentially hazardous situation which, if
not avoided, may result in death or serious injury.
If the information in this manual is not followed
exactly, a fire or explosion may result causing
property damage, personal injury or death.
FOR YOUR SAFETY: Do not store or use gasoline
or other flammable vapors and liquids in the vicinity
of this or any other appliance.
WHAT TO DO IF YOU SMELL GAS:
• Do not try to light any appliance.
• Do not touch any electrical switch.
• Do not use any phone in your building.
• Immediately call your gas supplier from a
neighbor's phone. Follow the gas supplier's
instructions.
• If you cannot reach your gas supplier, call the
fire department.
• Installation and service must be performed by
a qualified installer, servicer or the gas
supplier.
Indicates a potentially hazardous situation which, if
not avoided, may result in minor or moderate injury.
Indicates installation, operation, maintenance, or
valuable information that is not hazard related.
Indicates a short, informal reference. Usually
something written down to assist the memory or for
future reference.
Storage In or On Appliance—Flammable materials
should not be stored in an oven or near surface
units. This includes paper, plastic, and cloth items,
such as cookbooks, plastic ware, and towels, as well
as flammable liquids. Do not store explosives, such
as aerosol cans, on or near the oven.
3
Page 4
IMPORTANT SAFETY INSTRUCTIONS
IMPORTANT
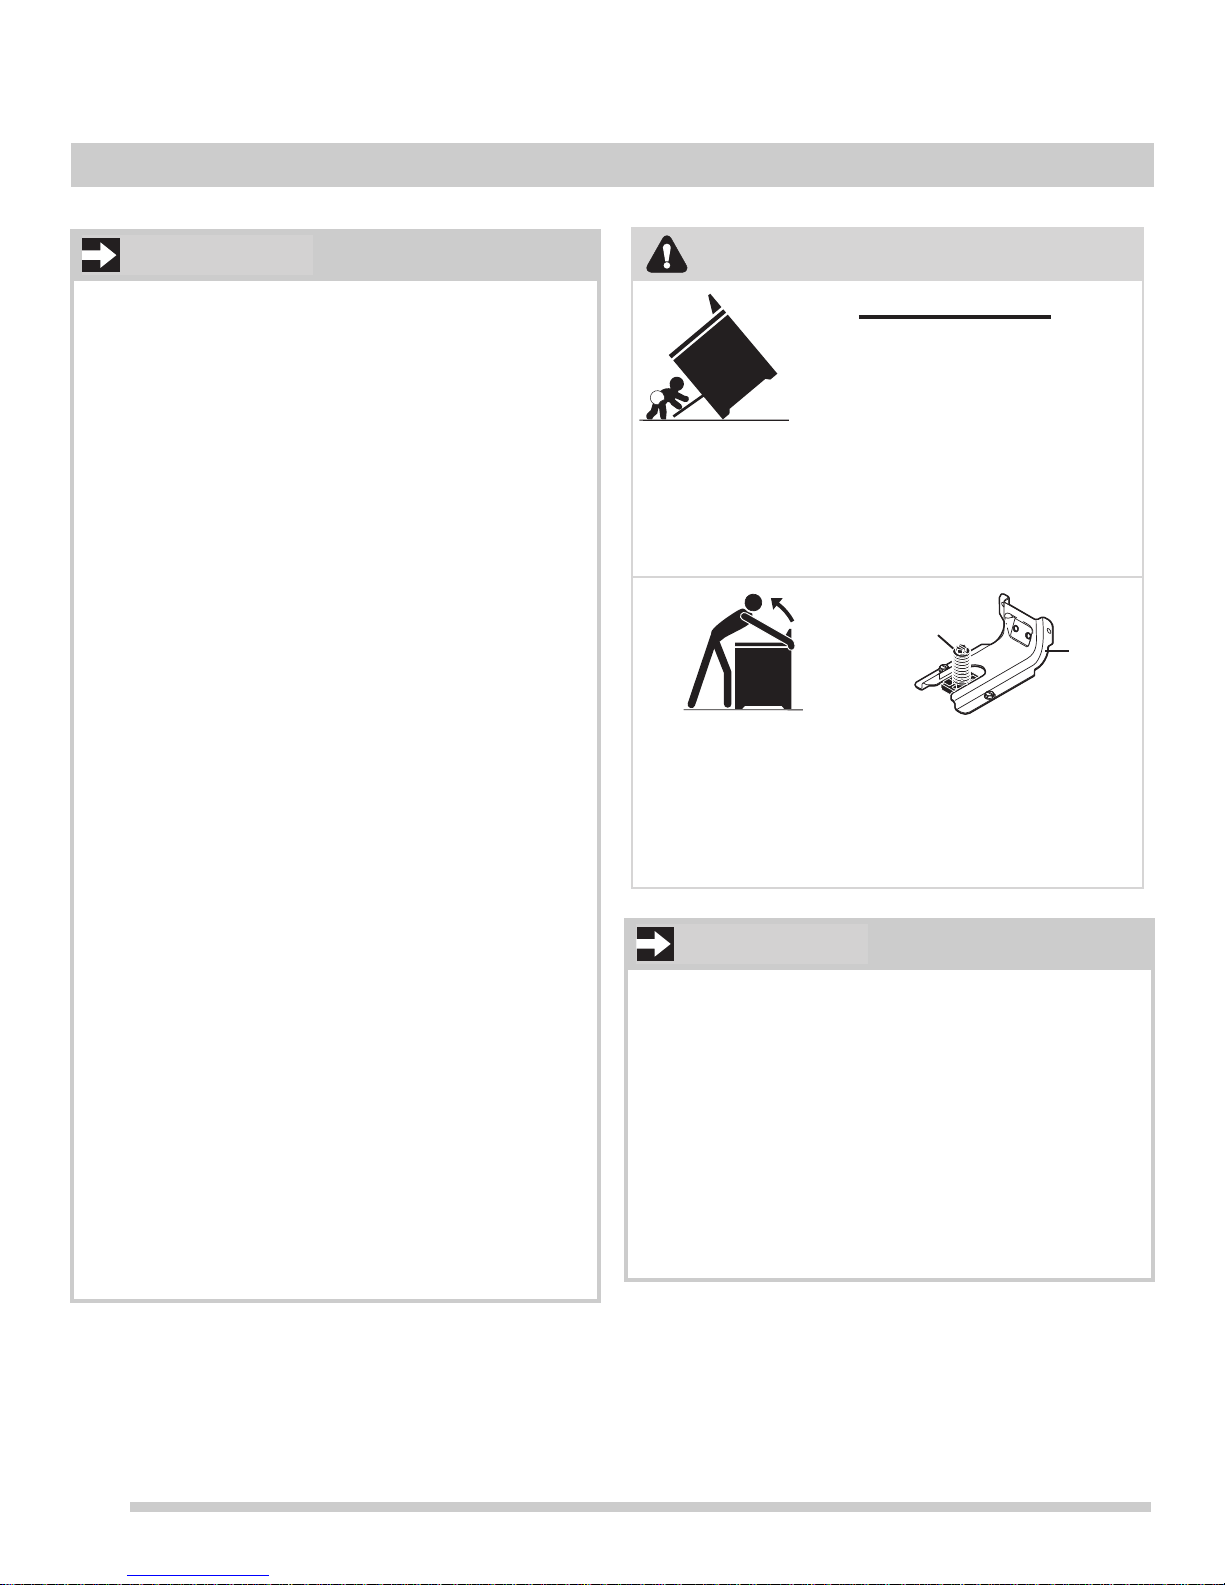
Tip Over Hazard
Range
leveling leg
Anti-tip
bracket
• A child or adult can tip the
range and be killed.
• Verify the anti-tip device has
been installed to floor or wall.
• Ensure the anti-tip device is re-engaged to floor
or wall when the range is moved.
• Do not operate the range without the anti-tip
device in place and engaged.
• Failure to follow these instructions can result in
death or serious burns to children and adults.
To check if the anti-tip bracket is installed properly, use
both arms to grasp the rear edge of the range back.
Carefully attept to tilt range forward. When properly
installed, the range should not tilt forward.
Refer to the anti-tip bracket installation instructions
supplied with your range for proper installation.
IMPORTANT
Read and follow the below instructions and precautions for unpacking, installing, and servicing your
appliance:
• Remove all tape and packaging before using the
oven. Destroy the carton and plastic bags after
unpacking the oven. Never allow children to play
with packaging material.
• Proper installation is essential. Be sure your
appliance is properly installed and grounded by a
qualified technician in accordance with the
National Electrical Code ANSI/NFPA No. 70
latest edition and local electrical code requirements. In Canada, install in accordance with
CSA Standard C22.1, Canadian Electrical code,
Part 1, and local electrical code requirements.
Install only per installation instructions provided
in the literature package for this oven.
WARNING
• User Servicing - Do not repair or replace any p art
of the appliance unless specifically recommended in the manuals. All other servicing
should be done only by a qualified technician.
This reduces the risk of personal injury and
damage to the oven.
• Ask your dealer to recommend a qualified technician and an authorized repair service. Know how
to disconnect the power to the oven at the circuit
breaker or fuse box in case of an emergency.
• Never modify or alter the construction of an oven
by removing the leveling legs, panels, wire
covers, anti-tip brackets/screws, or any other
part of the oven.
• Remove the oven door from any unused oven if
it is to be stored or discarded.
• Be sure to have an appropriate foam-type fire
extinguisher available, visible, and easily accessible located near the appliance.
Cold temperatures can damage the electronic
control. When using this appliance for the first time,
or when the appliance has not been used for an
extended period of time, be sure the appliance has
been in temperatures above 32ºF (0ºC) for at least 3
hours before turning on the power to the appliance.
Do not attempt to operate the oven during a power
failure. If the power fails, always turn off the oven. If
the oven is not turned off and the power resumes,
the oven will not operate. Once the power resumes,
reset the clock and oven function.
4
Page 5

IMPORTANT SAFETY INSTRUCTIONS
WARNING
CAUTION
• Do Not Leave Children Alone - Children should
not be left alone or unattended in the ar ea where
appliance is in use. They should never be
allowed to sit or stand on any part of the appliance, including the storage drawer, lower broiler
drawer, warmer drawer, or lower double oven.
• Do not store items of interest to children near or
in cabinets above appliance. Children climbing
on the range to reach items could be seriously
injured.
• Stepping, leaning, or sitting on the door or
drawers of a oven can result in serious injuries
and also cause damage to the appliance. Do not
allow children to climb or play around the oven.
The weight of a child on an open oven door may
cause the oven to tip, resulting in serious burns
or other injury.
• Never cover any slots, holes, or passages in the
oven bottom or cover an entire oven rack with
materials, such as aluminum foil or any other
oven liners or materials. Aluminum foil linings or
other oven linings may trap heat, causing a fire
hazard.
Important Safety Notice - The California Safe Drinking
Water and Toxic Enforcement Act requires the
governor of California to publish a list of substances
known to cause cancer, birth defects, or other reproductive harms, and requires businesses to warn
customers of potential exposures to such substances.
• When heating fat or grease, watch it closely.
Grease may catch fire if it becomes too hot.
• Do not use water or flour on grease fires.
Smother fire or flame or use a dry chemical or
foam-type extinguisher . Cover the fire with a p an
lid or use baking soda.
• Use dry potholders. Moist or damp potholders on
hot surfaces may result in burns from steam. Do
not let potholders touch hot cooking areas. Do
not use towels or other bulky cloths.
• Do not heat unopened food containers. Build-up
of pressure may cause container to burst and
result in injury.
• Wear proper apparel. Loose-fitting or hanging
garments should never be worn while using the
appliance.
• Do not touch heating elements or interior
surfaces of oven. Heating elements may be hot
even though they are dark in color. Interior
surfaces of an oven become hot enough to
cause burns.
• During and after use, do not touch, or let clothing
or other flammable materials contact heating
elements or interior surfaces of oven until they
have had sufficient time to cool. Other surfaces
of the appliance may become hot enough to
cause burns - among these surfaces are oven
vent openings and surfaces near these
openings, oven doors, and windows of oven
doors.
5
Page 6

IMPORTANT SAFETY INSTRUCTIONS
WARNING
IMPORTANT INSTRUCTIONS FOR USING YOUR
COOKTOP
Use Proper Flame Size — Adjust flame size so it
does not extend beyond the edge of the utensil. The
use of undersized utensils will expose a portion of
the burner flame to direct contact and may result in
ignition of clothing. Proper relationship of utensil to
flame will also improve efficiency.
• Know which knob controls each surface burner.
Place a pan of food on the burner before turning it
on, and turn the burner off before removing the
pan.
• Always turn knob to the full LITE position when
igniting top burners. Visually check that burner has
lit. Then adjust the flame so it does not extend
beyond the edge of the utensil.
• To reduce the risk of burns, ignition of flammable
materials, and spillage due to unintentional contact
with the utensil, the handle of the utensil should be
positioned so that it is turned inward, and does not
extend over adjacent surface burners.
• Never leave surface burners unattended at high
heat settings — Boil overs cause smoking and
greasy spill overs that may ignite, or a pan that has
boiled dry may melt.
• Glazed cooking utensils — Only certain types of
glass, glass/ceramic, ceramic, earthenware, or
other glazed utensils are suitable for cook top
service without breaking due to the sudden change
in temperature. Check the manufacturer’s recommendations for cook top use.
• When you are flaming foods under a ventilating
hood, turn the fan on.
IMPORTANT INSTRUCTIONS FOR USING YOUR
OVEN
• Never use your appliance for warming or heating
the room.
• Use care when opening oven door, lower oven
door, or warmer drawer (some models). Stand to
the side of the oven when opening the door of a
hot oven. Let hot air or steam escape before you
remove or replace food in the oven.
• Keep oven vent ducts unobstructed. Touching
surfaces in this area when the oven is on may
cause severe burns. Do not place plastic or heatsensitive items on or near the oven vent. These
items can melt or ignite.
• Placement of Oven Racks - Always place oven
racks in desired location while oven is cool. If rack
must be moved while oven is hot, do not let
potholders contact hot heating element in oven.
Use potholders and grasp the rack with both hands
to reposition.Remove all cookware and utensils
before moving the rack.
• Do not use a broiler pan without its insert. Broiler
pans and inserts allow dripping fat to drain away
from the high heat of the broiler. Do not cover the
broiler insert with aluminum foil or any other
material; exposed fat and grease could ignite.
• Protective Liners - Do not use aluminum foil or any
other materials or liners to line surface or oven
bottoms, except as suggested in the manual.
Improper installation of these liners may result in a
risk of electric shock, or fire.
• Do not cook food on the oven bottom. Always cook
in proper cookware and always use the oven
racks.
• Air curtain or other overhead range hoods, which
operate by blowing a downward air flow on to a
range, shall not be used in conjunction with gas
ranges other than when the hood and range have
been designed, tested and listed by an independent test laboratory for use in combination with
each other.
6
Page 7
IMPORTANT SAFETY INSTRUCTIONS
CAUTION
WARNING
Do not cut, remove, or
bypass the grounding
plug under any
circumstances.
Grounding type
wall receptacle
Power supply cord
with 3-prong
grounding plug
WARNING
IMPORTANT INSTRUCTIONS FOR CLEANING
YOUR OVEN
Before manually cleaning any part of the oven, be
sure all controls are turned off and the oven is cool.
• Clean the oven regularly to keep all parts free of
grease that could catch fire.
• Always follow the manufacturer’s recommended
directions for use of kitchen cleaners and aerosols.
Be aware that excess residue from cleaners and
aerosols may ignite causing damage and injury.
• Clean ventilating hoods frequently. Grease should
not be allowed to accumulate on the hood or filter.
Follow the manufacturer’s instructions for cleaning
hoods.
SELF CLEANING OVENS
• Clean only the parts listed in this manual. Before
using clean, remove the broiler pan, any food,
utensils, and cookware from the oven. Remove
oven racks unless otherwise instructed.
• Do not use oven cleaners. No commercial oven
cleaner or oven liner protective coating of any kind
should be used in or around any part of the oven.
• Do not clean the oven door gasket. The door
gasket is essential for a good seal. Care should be
taken not to rub, damage, or move the gasket.
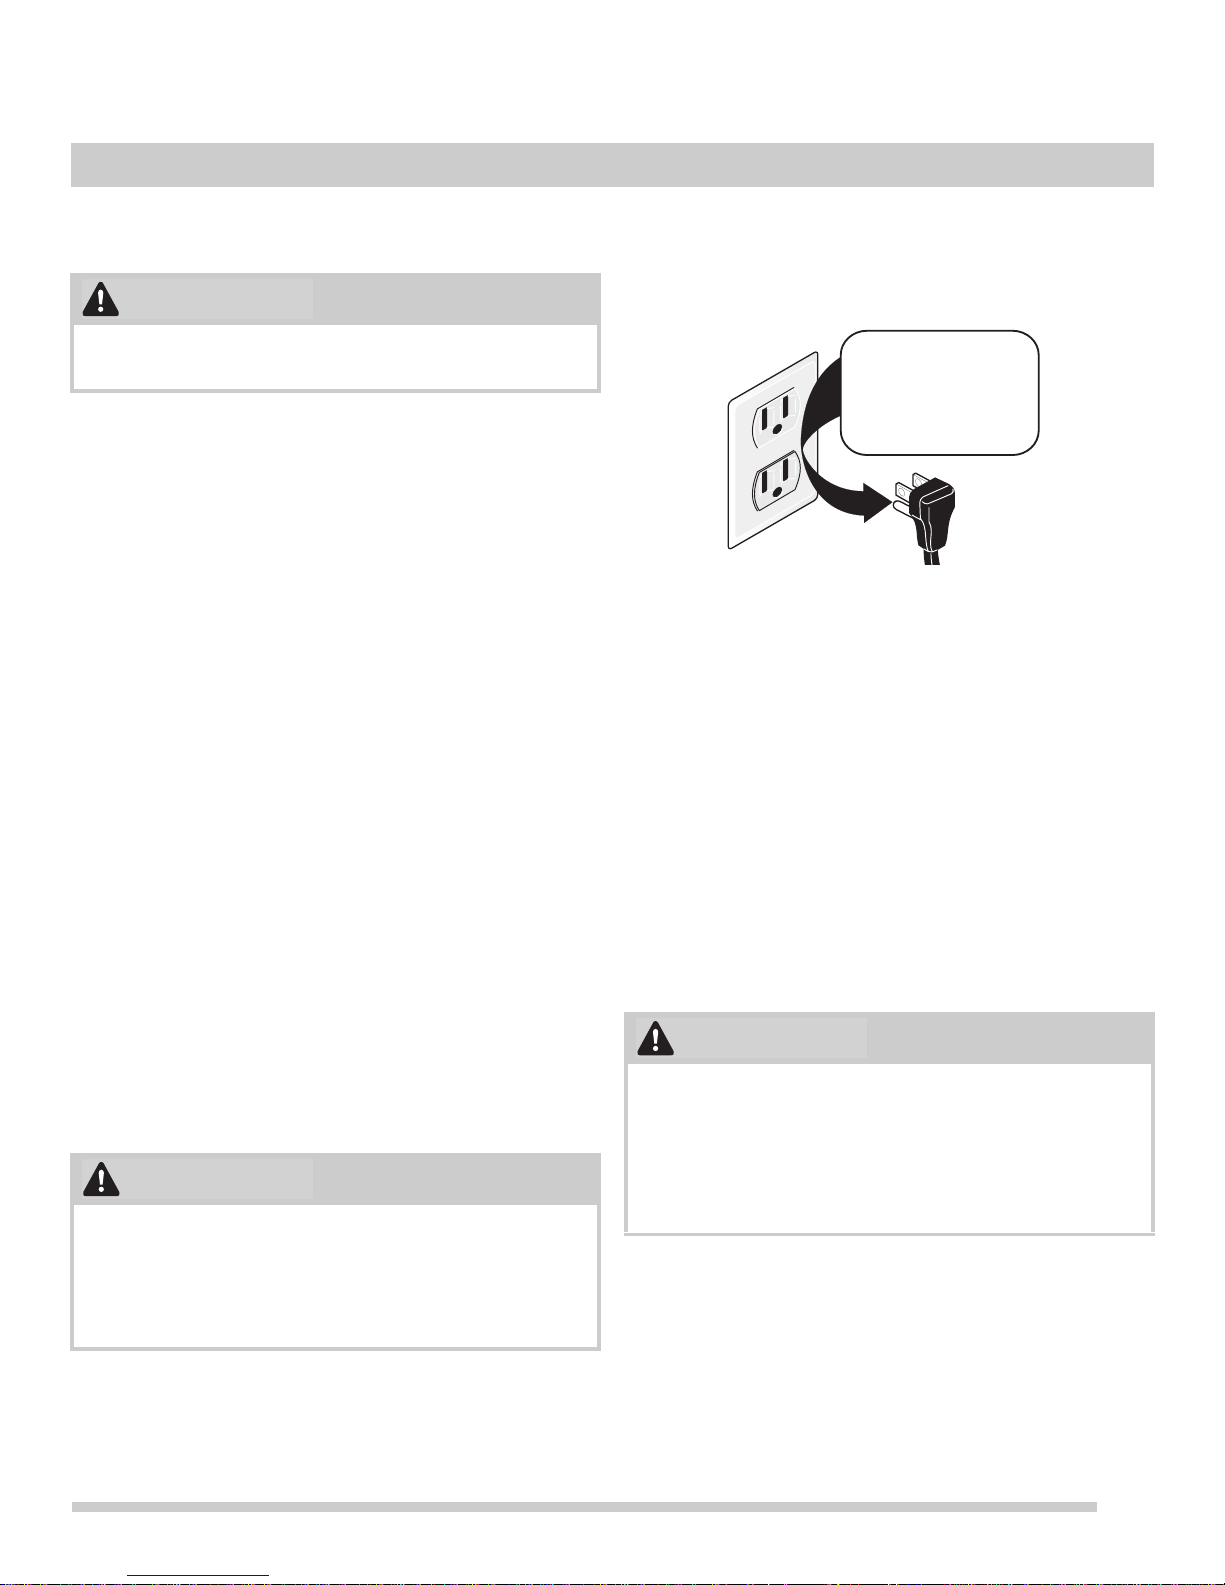
This appliance is equipped with a 3-prong grounding
plug for your protection against shock hazard and
should be plugged directly into a properly grounded
receptacle. Do not cut or remove the grounding prong
from this plug.
For personal safety, the range must be properly
grounded. For maximum safety, the power cord must
be plugged into an electrical outlet that is correctly
polarized and properly grounded.
If a 2-prong wall receptacle is the only available outlet,
it is the personal responsibility of the consumer to
have it replaced with a properly grounded 3-prong wall
receptacle, installed by a qualified technician.
See the installation instructions packaged with this
appliance for complete installation and grounding
instructions.
Conversion to L.P. Gas
This appliance allows for conversion to Liquefied
Petroleum (L.P.) Gas. If L.P. conversion is needed,
contact your local L.P. Gas provider for assistance.
• Some birds are extremely sensitive to the fumes
given off during the clean cycle of any oven. Move
birds to another well-ventilated room.
GROUNDING INSTRUCTIONS.
Avoid fire hazard or electrical shock. Do not use an
adapter plug, an extension cord, or remove the
grounding prong from the electrical power cord.
Failure to follow this warning may cause serious
injury, fire, or death.
Personal injury or death from electrical shock may
occur if the conversion to L.P. gas is not made by a
qualified installer or electrician. Any additions,
changes or conversions required in order for this
appliance to satisfactorily meet the application
needs must be made by a qualified technician.
7
Page 8
IMPORTANT
Burner cap lip
Burner cap
Burner head
IMPORTANT
Correct burner cap
placement
Incorrect burner cap
placement
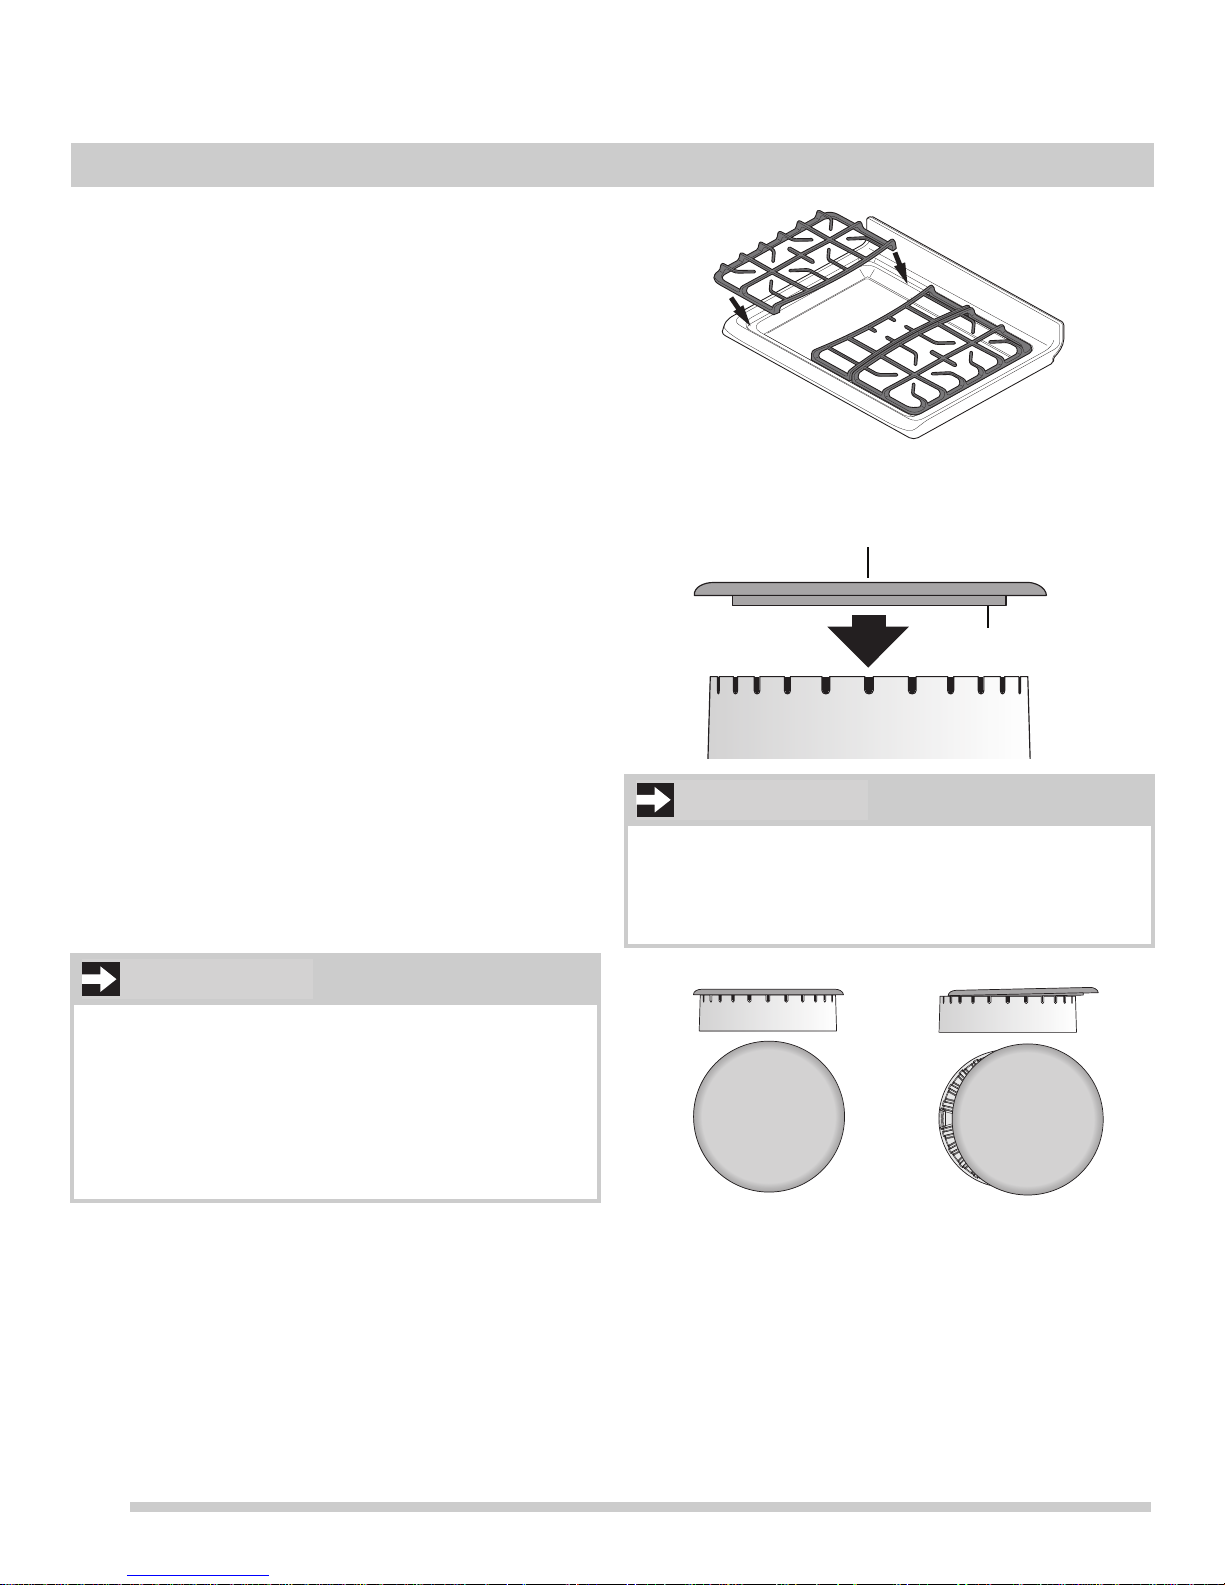
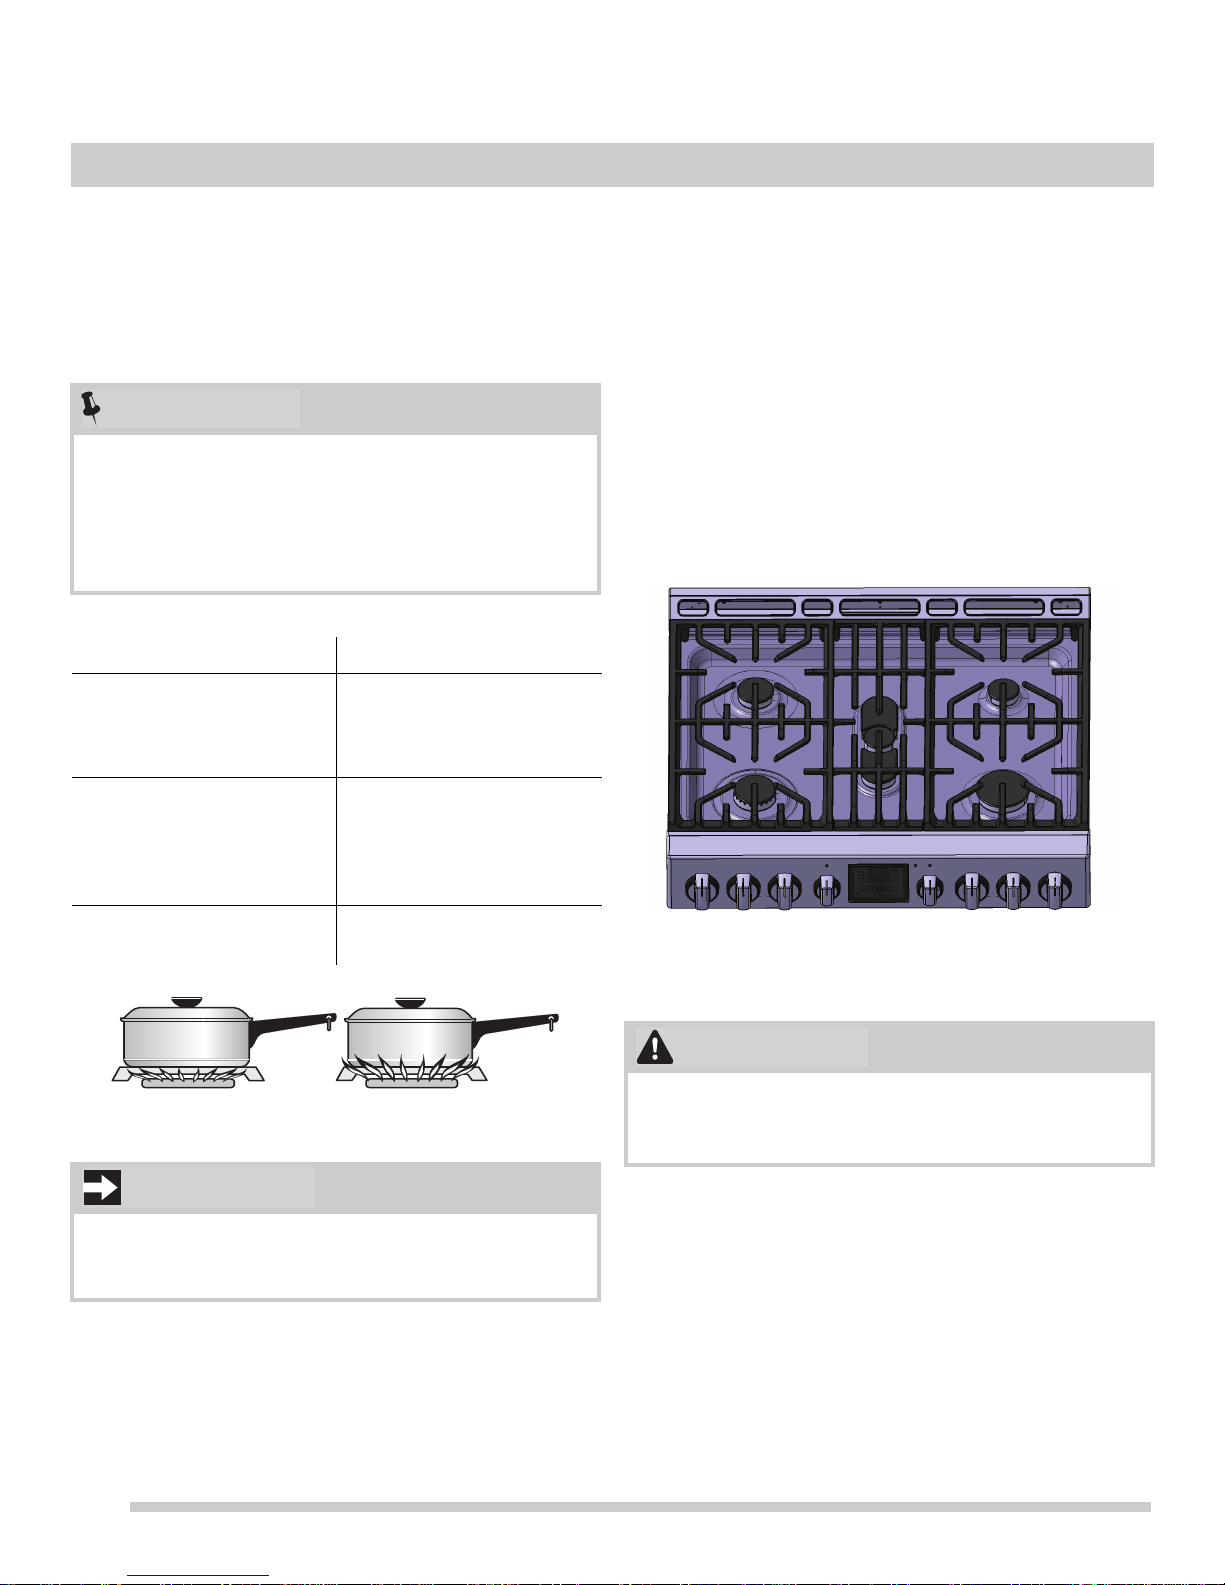
BEFORE SETTING SURFACE CONTROLS
Control locations of the gas surface burners
Your range is equipped with gas surface burners with
different BTU ratings. The ability to heat food quicker and in
larger volumes increases as the burner size increases.
The small simmer burner is best used for simmering
delicate sauces, etc. This burner is located at the right rear
burner position on the cooktop. The standard burner can be
used for most surface cooking needs. The standard b urners
are located at the left front and left rear positions on the
cooktop.
The power burners are best used for bringing large quantities of liquid rapidly up to temperature or when prep aring
larger quantities of food. The power burner is located at the
right front position on the cooktop. Regardless of size,
always select cookware that is suitable for the amount and
type of food being prepared. Sele ct a burn er and fla me size
appropriate to the pan. Never allow flames to extend
beyond the outer edge of the pan.
Assembly of the surface burner caps and burner
grates
It is very important to make sure that all of the surface
burner caps and surface burner grates are installed
correctly and at the correct locations.
Figure 1: Proper grate installation
1. Remove all packing material from cooktop area.
2. Discard all packing material (if applicable).
3. Unpack burner grates and position on the cooktop.
• The grates are designed to rest inside the recess on
the cooktop.
• To install burner grates, place grates flat-side down
and align into the cooktop recess.
• Grates should rest flush against each other and
against the sides of the recess.
Do not allow spills, food, cleaning agents or any other
material to enter the gas orifice holder opening.
Always keep the burner caps and burner heads in place
whenever the surface burners are in use.
8
Page 9
• Do not cook with the surface control knob left in the
IMPORTANT
CAUTION
LITE position. The electronic ignitor will continue to
spark if the control knob setting remains in the LITE
position.
• When setting any surface control knob to the LITE
position, all electronic surface ignitors will spark at the
same time. However, only the surface burner you are
setting will ignite.
• Never place or straddle a cooking utensil over two
different surface cooking areas at the same time. This
can cause uneven heating results.
• In the event of an electrical power outage, the surface
burners can be lit manually . Use caution when lighting
surface burners manually. To light a surface burner,
hold a lit match to the burner head, then slowly turn
the surface control knob to LITE. After burner lights
push in and turn knob to desired setting.
• When operating the oven, it is possible for residual
heat from the oven to build-up and over time to eventually transfer to the surface control knobs located
directly above the oven door.
• Do not place flammable items such as plastic salt and
pepper shakers, spoon holders or plastic wrap p ing s
on the cooktop when it is in use. These items could
melt or ignite. Potholders, towels, or wooden spoons
could catch fire if placed too close to the range
cooktop.
• Do not place aluminum foil or any material that can
melt on the range cooktop. If these items melt they
may permanently damage the cooktop surface.
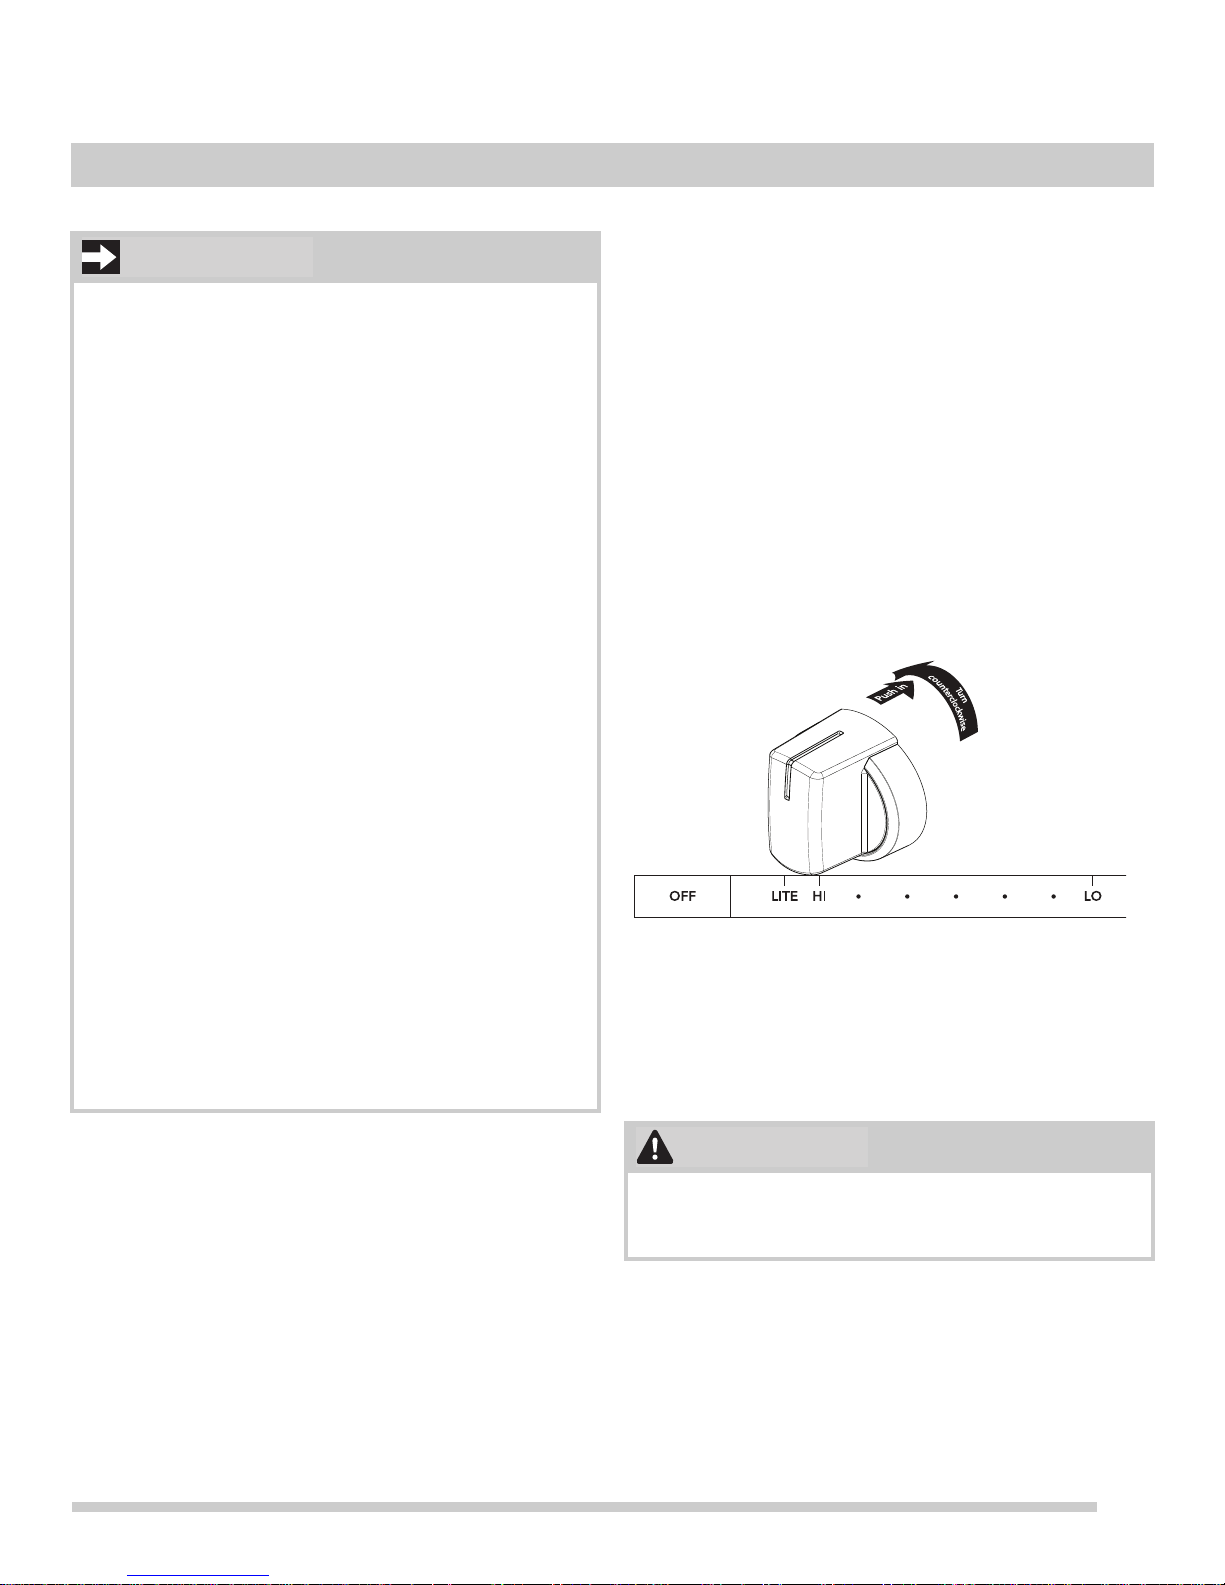
SETTING SURFACE BURNERS
Operating the gas surface controls
1. Place cooking utensil on surface burner.
2. Push the surface control knob in and turn counterclock-
wise out of the OFF position.
3. Release the knob and rotate to the LITE position (see
figure 2). Note: All four electronic surface ignitors will
spark at the same time. However, only the burner you
are turning on will ignite.
4. Visually check that the burner has a flame.
5. Turn the control knob counterclockwise to the desired
flame size. The control knobs do not have to be set at a
particular setting. Use the knob indicator settings to
adjust the flame as needed. Do not cook with the
surface control knob in the LITE position. (The electronic ignitor will continue to spark if the knob is left in
the LITE position.)
OFF
LITE
HI
.
.
Figure 2: Operating the gas knob
In the event of an electrical power outage, the surface
burners can be lit manually . To light a surface burner , hold a
lit match to the burner head, then slowly turn the surface
control knob to LITE. After burner lights turn the knob to
desired setting.
Do not operate the burner for an extended pe rio d of tim e
without cookware on the grate. The finish on the grate
may chip without cookware to absorb the heat.
9
Page 10
SETTING SURFACE BURNERS
NOTE
IncorrectCorrect
IMPORTANT
CAUTION
Setting proper surface burner flame size
For most cooking: Start on the highest control setting and
then turn to a lower one to complete the process. Use the
recommendations below as a guide for determining proper
flame size for various types of cooking. The size and type of
utensil used and the amount of food being cooked will
influence the setting needed.
Settings based on using medium weight metal or
aluminum pans. Settings may vary using other types of
pans. The color of the flame is key to proper burner
adjustment. A good flame is clear , blue, and hardly visible
in a well lit room. Each cone of the flame should be
steady and sharp. Clean burner if flame is yellow-orange.
Flame Size Type of Cooking
High Flame
• Start most foods
• Bring water to a boil
• Pan broiling
Gas Cooktop Burners
The front control gas cooktop comes with a variety of
burners to accommodate different sizes of cookware. The
most powerful burner (18k BTU) for cooking in larger pots
for canning or large amounts of soup or for boiling water is
located at the right front of the cooktop.
The cooktop also has12k, 7.5k, and 5k BTU burners to fit
most cookware and cooking need.
The Simmer Oval burner is in the center of the cooktop and
consists of a center burner and an oval burner. The center
burner of the simmer oval can be set separately from the
oval burner.
Medium Flame
Low Flame
Figure 3: Gas flame adjustme n t
Never extend the flame beyond the outer edge of the
utensil. A higher flame simply wastes heat and energy,
and increases the risk of being burned by the gas flame.
• Maintain slow boil
• Thicken sauces and
gravies
• Steaming foods
• Keep foods cooking,
poaching and stewing
Figure 4: Gas cooktop with simmer-oval burner
shown in center of cooktop.
Never place or straddle a cooking utensil over two
different surface cooking areas at the same time unless
the cooktop is designed for such a purpose.
10
Page 11
SETTING SURFACE BURNERS
Setting the Simmer Oval Burner
The simmer oval burner is specifically designed for use with
a griddle, and can be used for simmering sauces or foods in
most pots or pans. There are two knobs which control the
separate functions of the simmer oval.
To turn on the full simmer oval use the control knob located
to the left of the oven mode knob. There is an oval icon
marking above the knob.
Figure 5: Control knob for full oval burner
To access the center burner only, turn the control knob
located to the right of the oven temperature control knob.
Home Canning
Be sure to read and observe all the following points when
home canning with your appliance. Check with the United
States Department of Agriculture (USDA) website and be
sure to read all the information they have available as well
as follow recommendations for home canning procedures.
• Use only quality flat bottom canners when home
canning.
• Use a straight-edge to check canner bottom.
• Make sure the diameter of the canner does not exceed
1 inch beyond the surface element markings or burner.
• Start with hot tap water to bring water to boil more
quickly.
• Use the highest heat setting when first bringing the
water to a boil. Once boiling is achieved, reduce heat to
lowest possible setting to maintain that boil.
• Never place or straddle a cooking utensil over two
different surface cooking areas at the same time unless
the cooktop is designed for such a purpose.
Figure 6: Center burner control knob
Important: Both the simmer oval control and the center
control may be turned on at the same time.
11
Page 12

oven vent
CAUTION
IMPORTANT
BEFORE SETTING OVEN CONTROLS
Oven vent location
The oven vent is located under the backguard in the rear of
the cooktop. When the oven is on, warm air passe s through
this vent. This venting is necessary for proper air circulation
in the oven and good baking results. While the oven is in
operation, it is normal for steam or moisture to appear near
the vent. Do not block oven vent.
Figure 7: Oven vent location
Always use pot holders or oven mitts when using the
oven. When cooking, the oven interior and exterior, oven
racks and cooktop will become very hot which can cause
burns.
Type of oven racks
at handle
oven rack
oset
oven rack
glide
rack
Oven Rack Descriptions
• Flat oven racks (or the flat handle oven rack) may be
used for most cooking needs and may be placed in
most oven rack positions.
• The offset oven rack (some models) provides additional step down positions from the standard flat rack
design. The offset design positions the base of the rack
about ½ of a rack position lower than the flat rack and
may be used in most oven rack positions.
• The fully extendable ov en glide rack allows you to
effortlessly extend your food away from the oven.
Remove all oven racks and clean according to instructions provided in the Care & Cleaning section of this
manual. Never pick up hot oven racks or parts.
All oven racks should be removed before a clean operation. Racks left in the oven during the high heat of the
clean function can easily discolor. The ability of the racks
to easily slide in and out along the rack positions may
also be affected.
12
Removing, replacing, and arranging flat or offset
oven racks
T o arrange - Always arrange the oven racks when the oven
is cool (prior to operating the oven).
To remove - Pull the oven rack straight forward until it
reaches the stop position. Lift up front of oven rack slightly
and slide out.
To replace - Place the oven rack on the rack guides on
both sides of oven walls. Tilt the front of oven rack upward
slightly and slide the oven rack back into place. Be sure
oven racks are level before using.
Page 13

Do not line the oven walls, racks, bottom or any other
IMPORTANT
IMPORTANT
parts of the range with aluminum foil or any other
materials or oven liners. Doing so will alter heat distribution and may cause permanent damage to the oven
interior . During clean the oven temperatures will be hot
enough to melt foil.
Protective Liners — Only use aluminum foil as recommended in this manual. Improper installation of these
liners may result in risk of electric shock or fire.
Removing and Replacing the Glide Racks
The fully extendable Glide rack makes food preparation
easier. This oven rack has glide tracks that allow the rack to
be pulled away from the oven without rubbing the sides of
the oven wall.
To remove - Using one hand, reach through handle
opening and lift up on the release lever located across the
lower front of the rack as shown in Figure 8.
BEFORE SETTING OVEN CONTROLS
Using both hands, grasp the upper and lower portions of the
glide rack. Lift up the front of the rack slightly and continue
to pull the rack away from the oven (Figure 10). Be sure to
grasp both upper and lower rack portions together when
removing or handling the glide rack. The rack portions
move independently and are difficult to handle unless held
together.
Figure 10: Remove and replace using both hands
Figure 8: Grasp handle and lift up on bar
While holding up the release lever, pull the glide rack out of
the oven until the stop position is reached (Figure 9)
Figure 9: Pull rack to stop position
To replace - grasp both upper and lower portions of glide
rack, lift and hold the rack level between the oven cavity
walls. Tilt the front of the rack upward slightly and slide the
rack completely into position.
To prevent possible damage to the oven, do not attempt
to close the oven door until all the oven racks are fully
positioned back inside the oven cavity.
13
Page 14

OVEN CONTROLS
1
2
3
OVEN CONTROLS
OVEN MODE SETTINGS
POWERPLUS™ PREHEAT - Use powerplus preheat for
single rack items only and place food in center of oven.
BAKE - Use to select bake function before setting tempera-
ture.
CLEAN - Use to select clean feature cycle before setting
clean with oven temperature selector.
CONVECT BAKE - Use to select convection baking before
setting oven temperature.
CONVECT ROAST - Use to select convection roast for
beef, lamb, pork, and poultry before setting oven temperature.
BROIL - Use to set broil feature before setting broil with
oven temperature selector.
KEEP WARM - Keep warm provides a low heat for keep ing
cooked foods at serving temperature.
OVEN DISPLAY FEATURES
1. OVEN LIGHT - Use to turn internal oven light on and
off.
2. CLOCK - Use clock icon when setting the time of day.
3. TIMER - Oven timers for tracking cooking times. Timers
do not stop or start the cooking process.
OVEN TEMPERATURE SETTINGS
Use to set oven temperatures between 170°F (KEEP
WARM) and 550°F. The CLEAN setting should only be used
after reading all cautions and warnings in the “Self
Cleaning” sections of this manual starting on page 26.
Oven Minimum and Maximum Control Settings
Feature Min. Temp/Time Max. Temp/Time
BAKE
POWERPLUS
PREHEAT
CONVECT BAKE
CONVECT ROAST
MEAT PROBE
BROIL
TIMER
CLOCK (12hr)
CLEAN (Times)
170°F (77°C)
(KEEP WARM)
170°F (77°C)
(KEEP WARM)
170°F (77°C)
(KEEP WARM)
170°F (77°C)
(KEEP WARM)
550°F (288°C)
550°F (288°C)
550°F (288°C)
550°F (288°C)
140°F (60°C) 210°F (99°C)
550°F (288°C)
0:01 Hr 11:59
1:00 Hr 12:59 Hr
2, 3 OR 4 HOURS
User Preference Settings
The default (factory) settings for sounds, energy saving,
temperature offset, and convection convert are pre-set in
the oven control. These may be changed by accessing the
user preference display while the oven is idle. Once the
user preference menu is activated, the user can make
changes and scroll through a menu of options, choosing
from AUd (audible control setting), ES (energy saving),
UPO (User Programmable Offset for changing the oven
temperature), Aut (automatic convection convert), dEF
(default setting) and rSt (which will reset all preferences to
default settings).
14
Page 15

OVEN CONTROLS
NOTE
NOTE
Setting the Clock
The clock icon is used to access the time of day setting.
When the oven is first plugged in or if there has been an
interruption in power to the range, 12:00 will flash in the
display.
To set the correct time of day:
1. Press the clock icon.
2. The display will show a time along with a
key in the display below.
3. Press either
day and release the key.
4. The control will accept the new set time with a chime,
and the control will show the time of day along with the
two timers that are available.
The clock cannot be changed when the oven is set for
cooking or clean is active. Only a 12 hour clock is
available on the Frigidaire Professional model.
– or + key to scroll to the correct time of
– key and a +
Oven Lights
The oven lights will turn on automatically when the oven
door is opened. The oven lights may be turned on when th e
door is closed by using the oven light key located on the
control panel.
Note: Keep oven lights off while baking. The oven lights
will turn off during a clean cycle and not operate.
To toggle the oven lights on and off:
Setting the Timer
The minute timers in the oven display serve as extra timers
to help keep track of cooking functions. The timer cannot be
used during a clean cycle or if the meat probe function
associated with the timer display is in use. The minimum
timer setting is 1 minute and the maximum setting is 11:59
(HR:MIN).
To set the timer:
1. Press either TIMER key.
2. The timer display will show
3.
0:00 and a – key and + key on either side of the time
display. NOTE: If the
invalid key chime will sound.
4. Press the
If the
Once the desired setting is reached, release the key
and the timer will start counting down automatically after
a short time-out.
5. The timer display will show the H:M icon if the timer is
set for more than 1 minute. If the value is under 1
minute, the timer will display the time in seconds and
the H:M icon will not appear.
6. When the timer ends, a reminder chime will sound and
repeat once every 60 seconds for a period of five
minutes. Before the user can program an expired timer
again, the timer key must be pressed.
7. To cancel the timer before the set time expires, press
the TIMER key.
+ key to begin to scrol l t o t he de si r ed s et ti n g.
+ key is held, the timer value will increase rapidly.
– key is pressed at this time an
1. Press oven light symbol .
The interior oven light is covered with a glass shield. The
glass shield must be in place whenever the oven is in use.
To change the interior oven lights, see ““Replacing the oven
light” in the Care & Cleaning section.
The minute timers will not start or stop the cooking
process. The minute timers can be used alone or while
using most of the other oven features.
15
Page 16

OVEN CONTROLS
IMPORTANT
Setting Continuous Bake or 6 Hour Energy Saving
The oven is preset to cook up to 6 hours and to shut off
automatically. For longer periods of cooking, this feature
can be changed to continuous cooking by setting the user
preference and turning the energy saving feature off.
To set the oven for continuous cooking:
1. Press and hold both the light icon and th e clock icon at
the same time for a few seconds until the display
sounds an acceptance chime and the display will show
one of the user preferences.
2. Press the
appears and ON is showing.
+ key in the upper part of the display until ES
Setting Control for Silent Operation
The oven is set to operate with certain chimes and tones
(default settings) that alert the user to certain oven
functions. The silent operation feature allows the oven
control to be operated without sounds when necessary. By
accessing user preferences, this option can be later
returned to operate with normal programming sounds.
To set the oven control for silent operation:
1. Press and hold both the light icon and the clock icon at
the same time for a few seconds until the display
sounds an acceptance chime. AUd should appear in
the display.
2. If Aud is not showing, press the
of the display until AUd appears and HI is showing in
the lower part of the display. This is the normal (default)
setting.
+ key in the upper part
Figure 11: Energy saving with ON and OFF options
3. To turn the energy saving feature off, press the
key in the lower part of the display and OFF will appear
in the display.
4. The control will accept the change in a few seconds and
sound the acceptance chime. The oven is now set for
continuous cooking.
5. To return to the time of day display, press and hold the
light and clock icons at the same time for a few
seconds until the display chimes and fades back to
showing the time of day in the display.
Changing to continuous bake does not change how the
cooktop controls operate.
+ or –
Figure 12: Default setting for oven control sounds
3. To turn the energy saving feature to a lower sound or
completely OFF, press the
of the display until LO or OFF appears in the display.
Figure 13:
4. When the desired setting appears in the display , release
the key and wait for an acceptance chime.
5. To return to the time of day display, press and hold both
the light and clock icons at the same time for a few
seconds until the display chimes and fades back to
showing the time of day.
+ or – key in the lower part
16
Page 17

OVEN CONTROLS
1
2
3
4
5
6
Setting PowerPlus™ Preheat
The PowerPlus™ Preheat feature uses the convection fan
to quickly bring the oven up to the set temperature. Use
powerplus preheat for single rack items only and place food
in center of oven.
Important: When baking delicate items like cakes and
cookies use the regular bake or convection bake mode.
To set powerplus preheat:
1. Turn the oven mode selector to POWERPLUS
PREHEAT. The oven mode light will turn on.
2. Turn the oven temperature selector to the desired
temperature. The convection fan will turn on after 6
minutes and remain on as a convection bake. The
control will chime once the oven is preheated.
3. When finished baking turn both oven selectors to the
OFF position.
Setting Bake
Baking tips
For best bake results:
• Fully preheat the oven before baking items like cookies,
cakes, biscuits, and breads. When using any single
rack, position the rack so that the food is in the center of
the oven.
• The convection fan will be on during preheat and then
turn off and on occasionally as needed.
• For best results when baking cakes using two oven
racks, place racks in positions 6 (offset rack) and 1
(Glide rack) Figure 14.
• When baking using two oven racks, position cookware
as shown in Figure 15. Allow at least 2 inches (5 cm) of
space between cookware for proper air circulation.
• Dark or dull bakeware absorbs more heat than shiny
bakeware. It may be necessary to reduce oven temperature and cook time to prevent overbrowning of some
foods. Dark bakeware is recommended for pies. Shin y
bakeware is recommended for cakes, cookies, and
muffins.
Important: For batter and dough-based baked goods such
as cakes, pastries, and breads, use the regular bake
function for best results. For cookies use the convection
bake function.
.
Figure 14: Rack positions Figure 15: Pan spacing
Use the bake function whenever a recipe calls for normal
baking. When the set bake temperature is reached the
control will sound a chime to alert that the oven is fully
preheated.
Bake may be set for any temperature between (170°F
77°C) and 550°F (288°C).
To set BAKE for oven temperature of 350°F:
1. Be sure to arrange racks to the desired po sitions for the
item(s) to be baked.
2. Turn the oven mode selector to the BAKE position.
3. Turn the oven temperature selector to 350°F.
4. The PREHEAT and the oven temperature light will turn
on and sound an acceptance tone. The oven will begin
heating.
5. When the set temperature is reached a reminder chime
will sound alerting you to place food in oven. Set either
timer to keep track of actual cooking time if necessary.
6. When finished baking, be sure to return both the
temperature selector knob and the oven mode knob to
the OFF positions.
Note: Do not open oven door too often. Doing so reduces
oven temperature and may extend cooking time.The
convection fan will start after the oven has been heating for
6 minutes. It will stop each time the oven door is opened.
17
Page 18

OVEN CONTROLS
1
2
3
4
5
6
Convection Cooking
This mode of cooking enables you to obtain the best results
when baking with multiple pans and racks. The oven ca n be
programmed for convection baking at any temperature
between 170°F to 550°F with a default temperature of
350°F. The convection fan will turn on after 6 minutes and
remain on during the convection baking process.
The convection function uses a fan to circulate the oven
heat uniformly and continuously around the oven
(Figure 16). This improved heat distribution allows for fast,
even cooking and browning results. It also gives better
baking results when using two oven racks at the same time.
Benefits of convection cooking:
• Multiple rack baking.
• Some foods may cook faster.
Convection baking tips:
• Fully preheat the oven before baking items like cookies,
cakes, biscuits, and breads. For best resu lts baking
cookies use convection bake function.
• If your recipe cooking temperature has not been
converted for convection baking, see “Setting Convec-
tion Convert” on page 19 for further instructions on
temperature conversion.
Setting Convection Bake
This mode of cooking enables you to obtain the best results
when baking with multiple pans and racks. The oven can be
programmed for convection baking at any temperature
between 170°F to 550°F.
To set the oven for convection bake and temperature to
350°F:
1. Arrange interior oven racks.
2. Turn the oven mode selector to CONVECT BAKE.
3. Turn the oven temperature selector to 350°F.
4. The convection fan will turn on 6 minutes after the oven
begins heating. Once the oven reaches the set temperature the oven will sound a chime indicating the food
items can be placed in the oven.
5. When finished baking, be sure to return both the
temperature selector knob and the oven mode knob to
the OFF positions.
• When using any single rack, position the rack so that
the food is in the center of the oven.
• For best results when baking cakes using two oven
racks, place racks in positions 6 with offset rack and 1
using Glide rack (See Figure 16).
• When baking using two oven racks, position cookware
as shown in Figure 17. Allow at least 2 inches (5 cm) of
space between cookware for proper air circulation.
• Dark or dull bakeware absorbs more heat than shiny
bakeware. It may be necessary to reduce oven temperature and cook time to prevent overbrowning of some
foods. Dark bakeware is recommended for pies. Shin y
bakeware is recommended for cakes, cookies, and
muffins.
• Do not open oven door too often. Doing so reduces
oven temperature and may extend cooking time.
• Most baked goods (except cakes) should be baked on
pans with no sides or low sides to allow air to circulate.
18
Figure 16: Convection air flow
Figure 17: Pan spacing recommendations
Page 19

OVEN CONTROLS
Setting Convection Convert
This feature must be set before selecting the oven mode
and oven temperature by using the user preference setting
in the oven display.
Convection convert automatically converts a standard
baking recipe for convection baking. Convection convert
may only be used with a convection bake cooking mode.
Because convection baking generally cooks food faster
than normal baking, food items should be checked for
doneness before the suggested normal recipe cook times.
To set convection convert:
1. The oven temperature selector must be in the OFF
position. Turn the oven mode selector to CONVECT
BAKE.
2. Press and hold both the oven light icon and the clock
icon for about 3 seconds until Aut° (Automatic convection convert) appears in the display.
3. Press either the
– or + key until ON appears.
Setting Convection Roast
Convection roast is best for cooking tender cuts of beef,
lamb, pork, and poultry. Use this mode when cooking speed
is desired. Convection roasting gently browns the exterior
and seals in the juices. Convection roasting uses the bake
element, convection element, and fan to circulate the heat
evenly and continuously within the oven.
Convection roasting tips:
• Use a broiler pan and grid, as well as a roasting rack
(available by mail order). The broiler pan will catch
grease drippings, and the grid will help prevent spatters.
The roasting rack will hold the meat. Make sure the
roasting rack is securely seated on the grid in the broiler
pan. Do not use the broiler p an without the grid or cover
the grid with aluminum foil or any other material.
• Pull the rack out to the stop position before removing
food. Position food (fat side up) on the roasting rack.
• Do not open the oven door often. Doing so will reduce
the temperature in the oven and may increase the
cooking time necessary for best results.
• It is not recommended to roast chicken on a roasting
rack. Use a deep pan and place on rack position 1
(offset rack).
Figure 18: Convection convert off (L) and on (R)
4. Turn the oven mode selector to the OFF position. The
oven will accept the convection convert setting with an
acceptance chime and the control will return to display
the time of day . The convection bake function will now
automatically convert normal baking temperatures for
convection baking.
5. To change back to regular convection baking, repeat
the same steps in this process and press the
until OFF appears. Once the control accepts the
change with a chime, turn the oven mode selector to
OFF.
+ or - key
To set oven for convection roasting
1. Place meat on roasting rack and place in oven.
2. Turn oven mode selector to CONVECT ROAST.
3. Turn oven temperature selector to desired roasting
temperature.
Note: Preheating the oven for convection roasting is not
necessary. At this time you may want to set TIMER as a
reminder for checking food.
:
19
Page 20

OVEN CONTROLS
CAUTION
1
2
3
4
5
6
Table 1: Convection roasting temperature and time rec ommendations
Meat Weight Oven Temp Internal Temp Minutes per lb.
Beef Standing rib roast* 4 to 6 lb. 350°F (177ºC) *160ºF (71ºC) 25-30
Rib eye roast* 4 to 6 lb. 350°F (177ºC) *160ºF (71ºC) 25-30
Tenderloin roast 2 to 3 lb. 400°F (204ºC) *160ºF (71ºC) 15-25
Poultry Turkey whole** 12 to 16 lb. 325°F (163ºC) 180°F (82ºC) 8-10
Turkey whole** 16 to 20 lb 325°F (163ºC) 180°F (82ºC) 10-15
Turkey whole** 20 to 24 lb. 325°F (163ºC) 180°F (82ºC) 12-16
Chicken 3 to 4 lb. 350°F-375°F (177ºC191ºC)* 180°F (82ºC) 12-16
Pork Ham roast, fresh 4 to 6 lb. 325°F (163ºC) 160°F (71ºC) 30-40
Shoulder roast 4 to 6 lb. 325°F (163ºC) 160°F (71ºC) 20-30
Loin 3 to 4 lb. 325°F (163ºC) 160°F (71ºC) 20-25
Pre-cooked ham 5 to 7 lb. 325°F (163ºC) 160°F (71ºC) 30-40
* The U.S. Department of Agriculture states, “Rare fresh beef is popular, but you should know that cooking it to only 140°F (60°C) means some
food poisoning organisms may survive.” (Source: Safe Food Book, Your Kitchen Guide, USDA Rev. June 1985.) The lowest temperature recommended by the USDA is 145°F (63°C) for medium rare fresh beef. For well done 170°F (77ºC)
** Stuffed turkey requires additional roasting time. Shield legs and breast with foil to prevent over browning and drying of the skin.
Roasting rack
Figure 19: Roast with broil pan and insert
Do not use the broiler pan without the insert. A roasting
rack Figure 20 (some models) can be used when convection roasting. Do not cover the broil pan or insert with
aluminum foil or any other material; the exposed grease
could ignite.
Insert
Broil pan
Figure 20: Optional roasting rack shown with broil pan
and insert.
Figure 21: When roasting chicken do not use roasting
rack; use a deep pan and place on rack position 1.
20
Page 21

Using the Broil Feature
WARNING
CAUTION
1
2
3
4
5
6
Use the broil feature to cook meats requiring direct exposure to radiant heat for optimum browning results.
Should an oven fire occur, do not open oven door, turn off
the oven. If the fire continues, throw baking soda on the
fire or use a fire extinguisher. Do not put wa ter or flou r on
the fire. Flour may be explosive, and water can cause a
grease fire to spread and cause personal injury.
Always use pot holders or oven mitts when working with a
hot oven. When broiling, the oven interior, oven racks and
cooktop will become hot enough to cause burns. Do not
use the broiler pan without the insert. Do not cover the
broil pan or insert with aluminum foil or any other
material; the exposed grease could ignite.
OVEN CONTROLS
To set broil:
1. Arrange oven racks while oven is cool.
2. Turn the mode selector knob to broil. The corre-
sponding indicator light will flash.
3. Turn the temperature selector knob to broil. The
indicator light will turn on and remain lit. For optimum
browning results, preheat oven for 5 minutes before
adding food.
4. Place the broiler pan on the rack. Be sure to center the
broiler pan directly under the broiler flame.
5. Broil with door closed.
6. Pull the oven rack out to the stop position before turning
or removing food.
7. Turn the temperature and the selector knobs to OFF
when cooking is completed or to cancel broil
Recommended Broiling Times
Depending on the type, the thickness, and the desired
doneness of meat, it might be necessary to increase or
decrease recommended broiling times or adjust the broiling
pan to different rack positions. If a broiler pan and insert are
not supplied with this appliance, they may be purchased
from frigidaire.com.
.
Figure 22: Rack positions (L); and broil pan and insert (R)
Table 2: Broiling Suggestions
Food Rack Position Temperature Cook time (minutes)
Steak 1” thick 5th or 6th* 550F (288ºC) 6 4 145ºF (63ºC) Medium*
Steak 1” thick 5th or 6th* 550F (288ºC) 8 7 170°F (77ºC) Well
Pork Chops 3/4” thick 5th 550F (288ºC) 8 6 170°F (77ºC) Well
Chicken bone-in 4th 550F (288ºC) 20 10 170°F (77ºC) Well
Chicken boneless 4th 550F (288ºC) 8 6 170°F (77ºC) Well
Fish 5h 550F (288ºC) 13 n/a 170°F (77ºC) Well
Shrimp 5h 550F (288ºC) 5 n/a 170°F (77ºC) Well
Hamburger 1” thick 6th (flat rack) 550F (288ºC) 4 4 135°F (57°C) Rare**
Hamburger 1” thick 6th* 550F (288ºC) 9 7 145ºF (63ºC) Medium
Hamburger 1” thick 6th* 550F (288ºC) 10 8 170°F (77ºC) Well
* Use offset rack in top position unless indicated oth erwise. ** The U.S. Department of Agriculture states, “Rare fresh beef is popular, but you should know th at co ok-
ing it to only 140°F (60°C) means some food poisoning organisms may survive.” (Source: Safe Food Book, Your Kitchen Guide, USDA Rev. June 1985.) The lowest
temperature recommended by the USDA is 145°F (63°C) for medium rare fresh beef. For well done 170°F (77ºC). Suggest ed broiling times do not include the 2 minutes for preheating.
1st side 2nd side
Internal
T emperature
Doneness
21
Page 22

OVEN CONTROLS
IMPORTANT
handle
probe
cable
probe
sensor
handle
receptacle
probe
connector
Meat Probe
Use the probe feature for best results when cooking foods
such as roasts, hams or poultry, using a probe to check
internal temperature is the safest method to ensure properly
cooked food. Before using the meat probe read the
important information listed here:
• The probe feature must be set before setting the
cooking mode and oven temperature.
• If a timer is running when the meat probe is plugged
in, the control will sound a triple beep once and the
timer will keep running. The timer must be canceled
before the probe temperature can be set.
• If the meat probe is unplugged during a cooking
function, or plugged in during BROIL, the oven will
stop cooking and turn off.
• If the meat probe is plugged in while the oven is in a
function that allows for the meat probe, the control will
sound a triple beep indicating that the meat probe is
not allowed. After the alert, the oven will continue to
cook to the set oven temperature.
• If no cooking mode is selected within 30 seconds of
setting the target temperature, the oven mode
indicator light will stop blinking. The display will
continue to show the meat probe settings until an
allowable cooking mode is selected.
• When the meat probe is set correctly, the control will
signal an alert when the internal food temperature
reaches the desired set target temperature. When
active, the internal food temperature is visible in the
display during the cooking process. This eliminates
any guesswork or the need to open the oven door to
check a thermometer.
Note: If the meat probe is plugged while the oven is in a
function which allows probe cooking, it may be set the
following way:
Proper placement of probe in food.
• Insert the probe so that the probe tip rests inside the
center of the thickest part of meat or food (Figure 23).
For best results, do not allow the probe to cont act bone,
fat, gristle, or the cookware.
• For bone-in ham or lamb, insert the probe into the
center of lowest large muscle or joint.
• For meatloaf or casseroles, insert the probe into center
of food.
• When cooking fish, insert meat probe just above the gill.
• For whole poultry or turkey, fu lly insert the probe into the
thickest part of the breast.
Figure 23: Placing probe in poultry
To set probe:
1. Insert the probe into the food. Place prepared food on
the desired oven rack position and slide into the oven.
2. Plug the connector end of the probe into the probe
receptacle while the oven is still cool.
1. Cancel the active cooking function. The display will
show the meat probe icon and temperature 000°.
2. The meat probe temperature can now be set and the
control will sound an acceptance chime. The oven
mode indicator light will blink until an allowable
cooking function is selected.
22
Page 23

OVEN CONTROLS
WARNING
Meat Probe (cont’d)
3. When the probe is inserted, an acceptance tone will
sound,
Figure 24). Close the oven door.
Figure 24: Probe inserted and ready to set temperature
4. Press the + key to set the desired probe temperature
between 140°F and 210°F. If no selection is made
within10 seconds, the control will automatically set the
default temperature of 170°F and the display will sound
an acceptance chime.
Note: The probe must be fully set before setting the oven
mode and temperature mode.
5. Set the oven mode to POWERPLUS PREHEAT,
BAKE, CONVECT BAKE, or CONVECT ROAST.
6. Set the oven temp control to the desired cooking
temperature.The oven will begin heating.
7. During the cooking process, an up arrow and the
current meat probe temperature will appear in the
display until the meat probe target temperature is
reached.
8. When 75% of the target temperature is reached, the
control will chime and a CHECK FOOD reminder will
appear in the display. CHECK FOOD will remain in the
display and continue to chime every 60 seconds for five
minutes or until the oven door is open.
9. Once the target temperature of the food is reached, the
control will chime to signal the end of cooking. At this
time the will turn off and the display will show the
FOOD READY and OVEN WARM messages.
the probe icon appears in the display (See
Trailing Keep Warm with Meat Probe
When the meat probe reaches the target temperature, the
oven will automatically switch to keep warm (170°F) and
remain on for up to 3 hours before turning off automatically.
The display will continue to show the meat probe temperature until either keep warm is canceled or by disconnecting
the meat probe from the receptacle. Once turned off, the
probe icon and temperature will fade from the display.
Important: If the meat probe temperature should exceed
the maximum allowable temperature, the oven control will
beep and HOT will appear in the display for 40 seconds to
notify that the probe temperature is too high.
Setting Keep Warm
Keep Warm maintains a temperature of 170°F (77°C) for
keeping oven baked foods at serving temperature until
canceled. The feature may be used with BAKE, CONVECT
BAKE, CONVECT ROAST, and POWERPLUS PREHEAT.
Keep warm tips:
• Always start with hot food. Do not use the keep warm
feature to heat cold food.
• Food in heat-safe glass and glass ceramic containers
may need higher temperature settings compared to
food in regular containers. Avoid repeated openings of
the oven, it will allow hot air to escape and the food to
cool.
• Aluminum foil may be used to cover food to increase
moisture content.
To set keep warm:
1. Arrange interior oven racks and place food in oven.
2. Turn the oven mode selector to BAKE, CONVECT
BAKE, CONVECT ROAST, or POWERPLUS
PREHEAT.
3. Set the oven temperature selector to KEEP WARM.
4. The indicator light will blink and then an acceptance
chime will sound.
Food Poisoning Hazard. Do not let food sit for more than one
hour before or after cooking. Doing so can result in food
poisoning or sickness.
5. The preheat indicator light will turn on and stay on until
the oven reaches the keep warm temperature of 170°
F.
23
Page 24

OVEN CONTROLS
WARNING
Setting the Sabbath Feature
This appliance provides special settings
for use when observing the Jewish
Sabbath/Holidays. Sabbath mode
disables all audible tones or visual display
changes on the oven control.
For further assistance, guidelines for
proper usage, and a complete list of models with the
Sabbath feature, please visit the web at www.star-k.org.
The Sabbath feature may only be used with the bake
function. Once the oven is properly set using bake with the
Sabbath feature active, the oven will remain on until
canceled. The Sabbath feature overrides the factory preset
6 hour energy saving feature.
Important: The oven light will turn off during the Sabbath
mode and remain off until the Sabbath mode is canceled.
Note: The meat probe feature is not available in Sabbath
mode.
Food Poisoning Hazard. Do not let food sit for more than one
hour before or after cooking. Doing so can result in food
poisoning or sickness. Foods that can easily spoil such as milk,
eggs, fish, meat, or poultry should be chilled in the refrigerator
first. Even when chilled, they should not stand in the oven for
more than 1 hour before cooking begins and should be removed
promptly when finished cooking.
To set the oven for baking and activate the Sabbath
feature:
1. Be sure the clock is set to the correct time of day. Place
food in the oven.
2. Turn the oven mode selector to BAKE.
3. Turn the oven temperature selector to the desired bake
temperature.
4. An acceptance chime will sound, the oven will start
heating and the LED lights will stop blinking and remain
on.
5. To enter Sabbath mode press and hold the oven light
key and the clock key at the same time for about 3
seconds. The control will sound an acceptance chime
and SAB will appear in the display below the time of
day.
Figure 25: Oven display showing Sabbath mode
Note: During the Sabbath mode all normal sounds of the
oven control will be turned off. However the control will
allow any sounds associated with alarms.
During Sabbath operation the oven temperature may be
changed by adjusting the oven temperatu r e sele ct or . Th e
oven will remain in Sabbath until canceled by the user.
To turn off the Sabbath feature:
1. Turning the oven mode selector and the oven tempera-
ture selector to the OFF position will cancel BAKE only.
2. To turn off the Sabbath feature press and hold both the
oven light key and the clock key for about 3 second s.
3. The acceptance chime will sound and SAB will
disappear from the display. Be sure both oven selectors
are returned to the OFF positions
Power failure while using Sabbath feature:
Should you experience a power failure or interruption, the
oven will shut off. When power is returned, SF (Sabbath
Failure) will be displayed, and the oven will not turn back on
automatically. If your food was nearly fully cooked, you may
allow the trapped heat in the oven to finish the cooking
process. Otherwise, you should remove the food when the
power failure occurs because you may only start the oven
once during the Sabbath/Jewish holidays.
After the Sabbath observance turn off the Sabbath
feature.
Press and hold both the oven light and clock keys for at
least 3 seconds. SAb will disappear from the display, and
the oven may be used with all normal functions.
24
Page 25

OVEN CONTROLS
NOTE
NOTE
Adjusting the Oven Temperature
The temperature in the oven is pre-set at the factory. When
first using the oven, be sure to follow recipe times and
temperatures.
Do not use oven thermometers such as those found in
grocery stores to check the temperature settings inside
your oven. These oven thermometers may vary as much
as 20 to 40 degrees from actual temperatures.
If you think the oven is cooking too hot or too cool for the
temperature you select, you can adjust the actual oven
temperature to be more or less than what is displayed by
accessing the UPO (User Programmable Offset).
Before adjusting, test a recipe by using a temperature
setting higher or lower than the recommended temperatur e.
The baking results should help you to decide how mu ch of
an adjustment is needed.
To adjust the oven temperature:
Important: Make sure both the oven mode selector and the
oven temperature selector are in the OFF position.
1. Press and hold both the light icon and the clock icon at
the same time for a few seconds until the display
sounds an acceptance chime. AUd should appear in
the display.
2. Press the
UPO appears and the default setting of
set temperature offset) is showing.
+ key in the upper part of the display until
0° (or the last
3. Using the
until the desired temperature change (offset) is
reached. The display will change
press to a maximum of
Figure 27: UPO shown 10° higher than default
If a lower temperature offset is desired, press the – key in
the bottom of the display until the desired lower temperature appears.
Figure 28: UPO shown 10° lower than default
Once the new offset appears in the display, release the key
and the control will accept the change.
4. To return the display to normal, press and hold both the
oven light icon and the clock icon at the same time
until an acceptance chime sounds. The display will
return to show the time of day.
+ or - key in the bottom of the display, press
± 5° with each key
+ 35° or a minimum of – 35°F.
Figure 26: UPO shown at default setting
Changing the UPO will not affect the broil or clean
temperatures.
25
Page 26

OVEN CONTROLS
IMPORTANT
CAUTION
CAUTION
Self Cleaning
A self cleaning oven cleans itself with temperatures well
above normal cooking temperatures which eliminate soils
completely or reduces them to a fine powdered ash you can
wipe away with a damp cloth.
While the oven is in operation, the oven heats to temperature much higher than those used in normal cooking.
Sounds of metal expansion and contraction are normal.
Odor is also normal because the food soil is being removed.
Smoke may appear through the oven vent.
Adhere to the following self clean precautions:
• Do not spray oven cleaners or oven protective
coatings in or around any part of the oven interior.
• Do not clean the oven door gasket (Figure 29). The
woven material of the oven door gasket is essential
for a good seal. Care should be taken not to rub,
damage, or remove the gasket.
• Do not use any cleaning materials on the oven door
gasket. Doing so could cause damage.
The health of some birds is extremely sensitive to the
fumes given off during the clea n cycle of any range . Move
birds to another well-ventilated room.
Do not force the oven door open. This can damage the
automatic door locking system. Use caution when
opening the door after the clean cycle is complete. The
oven may still be very hot.
• Remove the broiler pan and insert, all utensils, and
any aluminum foil from the cooktop and oven. These
items cannot withstand high cleaning temperatures
and may melt.
• Completely remove all oven racks and any accessories. If the oven racks are not removed, they will lose
their special coating properties and no longer slide in
and out of the oven cavity easily.
• Remove any excessive soil or debris from the oven
bottom.To clean, use hot, soapy water and a cloth.
Large spills can cause heavy smoke or fire when
subjected to high temperatures.
• Do not allow food spills with a high sugar or acid
content (such as milk, tomatoes, sauerkraut, fruit
juices, or pie filling) to remain on the surface as they
may leave a dull spot even after cleaning.
• Clean any soil from the oven frame, the door liner
outside the oven door gasket, and the small area at
the front center of the oven bottom. These areas heat
sufficiently to burn soil on. Clean with soap and water.
These areas are shown in white (Figure 29).
Figure 29: Clean around the oven door gasket
To avoid possible burns, use care when opening the oven
door after the clean cycle. Stand to the side of the oven
when opening the door to allow hot air or steam to
escape.
Do not leave small children unattended near the
appliance during a clean cycle; the range may become
very hot to the touch and may cause burns.
Do not line the oven walls, racks, bottom, or any other
part of the range with aluminum foil or with any oven
liners or materials. Doing so will destroy heat distribution,
produce poor baking results, and cause permanent
damage to the oven interior (aluminum foil will melt to the
interior surface of the oven).
26
Page 27

Setting Clean
If you are planning to use the oven directly after a clean
cycle, remember to allow time for the oven to cool down
and the oven door to unlock. This normally takes about one
hour. A 3 hour clean cycle will actually take about 4 hours to
complete.
It is recommended to use a 2 hour clean cycle for light soils,
a 3 hour cycle for average soils, and a 4 hour cycle for
heavy soils.
To set the controls for a 3 hour clean cycle and shut off
automatically:
1. Turn both the oven mode and oven temper ature
selectors to CLEAN. The display will show a 3 hour
time (normal clean) and the
– and + keys.
OVEN CONTROLS
Figure 32: Setting 4 hour clean
Once the control accepts the clean time the display will
flash a reminder for the user to REMOVE RACKS. The
Figure 33: Display prompting user to remove racks
Figure 30: Oven set for 3 hour clean
2. If a 3 hour clean is desired, the control will accept the
time within 3 seconds. However, the user may select a
2 or 4 hour clean by using the – or + keys to change to
the desired clean time and then allow the control to
accept the change.
Figure 31: Setting 2 hour clean
REMOVE RACKS notification will flash for a few seconds
prompting the user to remove all oven racks. If the oven
door is opened as this time the display will show CLO to
indicate that the door must be closed before the clean cycle
can begin. If the door remains open for more than 3
minutes, the clean function will be canceled.
Figure 34: Message of open door that must be closed
before oven can begin the clean cycle
When the oven is set to run the clean cycle, the motor door
lock will begin locking the oven door. Do not open the oven
door while the lock motor is running or when any locking
indicators or displays are showing. The oven door is
completely locked in about 15 seconds.
27
Page 28

OVEN CONTROLS
CAUTION
3. Once the door is closed the time of day will be visible
along with the selected clean time and the door lock
icon will be visible in the display.
Figure 35: Clean cycle in progress
4. During the clean cycle the time of day remains in the
display and the time remaining in the clean cycle will
also be active.(Figure 35)
Figure 36: Hot oven after clean with door still locked
5. When the clean cycle ends the oven will be too hot for
the door to unlock until the oven cools to a safe temperature. This may take up to an hour. During this time the
display will show Hot along with the door lock icon.
6. At this point CLn will appear in the display and the lock
icon will blink and the control will signal the end of the
clean cycle with a chime. The internal oven temperature
will still be hot enough to cause burns.
To avoid possible burns, use care when opening the oven
door after the clean cycle. Stand to the side of the oven
when opening the door to allow hot air or steam to
escape.
Do not force the oven door open while clean is active.
This can damage the automatic door locking system. Use
caution when opening the door after the clean cycle is
complete. The oven may still be very hot.
28
Figure 37: Clean lock icon blinks as door unlocks
Note: Once the clean cycle ends the oven will not be
available for another clean for 4 hours.
To cancel a clean before it ends:
Turn both the oven selector knob and th e oven tempe rature
knob to the OFF position.
Page 29

CARE AND CLEANING
Cleaning Various Parts of Your Oven
Before cleaning any part of the oven, be sure all co ntrols are turned off and the oven is cool.
Remove spills and any heavy soiling as soon as possible. Regular cleaning will reduce the number of major cleaning
later.
Surface Type Recommendation
Aluminum and Vinyl • Use hot, soapy water and a cloth. Dry with a clean cloth.
Painted body parts
Painted decorative trims
Painted and plastic control
knobs and control panel
Surface burners
Burner grates
Smudge Proof™ Stainless
Steel (some models)
Stainless Steel
Porcelain enamel broiler pan
and insert (available by mail
order)
Oven interior (Porcelain)
Door liner and body parts
• Using a soft cloth, clean with mild dish detergent and water or a 50/50 solution of
vinegar and water. Follow by rinsing the area with clean water; dry and polish
with a soft cloth. Glass cleaners may be used if sprayed on a soft cloth first. Do
not spray liquids directly on the oven control and display area. Do not use large
amounts of water on the control panel. Excess water on the control area may
cause damage to the appliance. Do not use other liquid cleaners, abrasive
cleaners, scouring pads, or paper towels - they will damage the finish.
• To remove control knobs, turn to the OFF position; grasp firmly and pull straight
off the shaft. To replace knobs after cleaning, line up the flat sides of both the
knob and the shaft; then push the knob into place.
• For details on cleaning surface burners and grates see “Cleaning the cooktop
and surface burners” om page 30.
• Your oven finish may be made with stainless steel (some models). Clean the
stainless with warm soapy water using a clean sponge or cloth. Rinse with clean
water and dry with a soft clean cloth .
• Do not use any store bought cleaners like stainless steel cleaners or any other
types of cleaners containing any abrasive, chlorides, chlorine, or ammonia. It is
recommended to use mild dish soap and water or a 50/50 solution of water and
vinegar.
• Gentle scouring with a soapy scouring pad will remove most spots. Rinse with a
1:1 solution of clear water and ammonia. If necessary, cover difficult spots with
an ammonia-soaked paper towel for 30 to 40 minutes. Rinse with clean water
and a damp cloth, and then scrub with a soap-filled scouring pad. Rinse and wipe
dry with a clean cloth. Remove all cleaners or the porcelain may become
damaged during future heating.
Oven racks • Oven racks must be removed from oven cavity. Clean by using a mild, abrasive
Oven door
Oven door gasket
• Use soap and water to thoroughly clean the top, sides, and front of the oven
• Do not clean the oven door gasket. On self-clean models, the oven door gasket
cleaner following manufacturer’s instructions. Rinse with clean water and dry.
door. Rin se well. You may use a glass cleaner on the outside glass of the door.
Do not immerse the door in water. Do not spray or allow water or the glass
cleaner to enter the door vents. Do not use oven cleaners, cleaning powders, or
any harsh abrasive cleaning materials on the outside of the oven door.
is made of a woven material which is essential for a good seal. Care should be
taken not to rub, damage, or remove this gasket.
29
Page 30

CARE AND CLEANING
slots
ignition port
orice port
CAUTION
Cleaning the cooktop and surface burners
To avoid possible burns turn off all of the surface burners
and allow them to cool.
Any additions, changes or conversions required in o rder for
this appliance to satisfactorily meet the application needs
must be made by an authorized qualified agency.
Routinely clean the cooktop. Wipe with a clean, damp cloth
and wipe dry to avoid scratches. Keeping the surface
burner head ports and slots clean will prevent improper
ignition and an uneven flame.
To clean recessed and contoured areas of cooktop
If a spill occurs on or in the recessed or contoured areas,
blot up spill with an absorbent cloth. Rinse with a clean,
damp cloth and wipe dry.
To clean burner grates
• Clean when the grates are cool. Use nonabrasive
plastic scrubbing pad and mild abrasive cleanser.
• Food soils containing acids may affect the finish. Clean
immediately after the grates are cool. Thoroughly dry
grates immediately following cleaning.
To clean burner caps
• Remove caps from burner heads after they have
cooled. Clean heavy soils with a plastic scrubbing pad
and absorbent cloth. Thoroughly dry burner caps immediately following cleaning including the bottom and
inside of cap.
• Do not use abrasive cleaners. Do not clean burner caps
in the dishwasher. Do not operate surface burners
without burner caps properly in place.
To clean the surface burner heads
For proper gas flow it may be necessary to clean the burner
head and slots. First use a clean damp cloth to soak up any
spills. Remove any food from between the burner slots
using a small nonabrasive brush like a toothbrush and wipe
up using a damp cloth. For stubborn soils located in the
slots, use a small-gauge wire or needle to clean. The
electrode must be carefully cleaned. Take care not to hit the
electrode with any thing hard or it could be damaged.
To clean the burner head ignition ports
Each burner head has a small ignition port (Figure 38).
Should you experience ignition problems it may be that this
port hole is partially blocked with soil. With the burner head
in place, use a small wire gauge needle or the end of a
paper clip to clear the ignition port.
Figure 38: Gas burner head parts
Replacing the oven light
Be sure the oven is unplugged and all parts are cool
before replacing oven light.
The interior oven lights are located at the rear of the oven
cavity and are covered with glass shields. The glass shield
must be in place whenever the oven is in use (Figure 39).
1. Turn electrical power off at the main source or unplug
the appliance.
2. Remove interior oven light shield by turning the shield
gently counter-clockwise and pull the shield straight out.
Do not twist or turn.
3. Replace bulb with a new appliance bulb. Replace glass
oven light shield.
4. Turn power back on again at the main source (or plug
the appliance back in). Be sure to reset the time of day
on the clock.
Figure 39: Oven light protected by glass shield
30
Page 31

CARE AND CLEANING
WARNING
IMPORTANT
CAUTION
Oven door
hinge
locations
Removing and Replacing the Oven Door
Do not remove oven door until it is completely cooled.
To remove oven door:
1. Open oven door completely horizontal with floor (See
Figure 40).
2. Pull the door hinge locks on both left and right door
hinges up from the oven frame completely towards the
oven door (See Figure 41). A tool such as a small flatblade screwdriver may be required to unlock the hinge
(Figure 42).
3. Grasp both sides of oven door along the door sides. Do
not use the oven door handle (See Figure 43).
4. Keep pulling the bottom of the door toward you while
rotating the top of the door toward the appliance to
completely disengage the hinge levers(Figure 43).
To replace oven door:
1. Firmly grasp both sides of oven door along the door
sides. Do not use the oven door handle (See
Figure 43).
2. Holding the oven door at the same angle as the removal
position, seat the hook of the hinge arm over the roller
pins located on each side of the oven door frame (See
Figure 43). The hook of the hinge arms must be fully
seated onto the roller pins.
3. Fully open the oven door, horizontal with floor See
Figure 40).
The door is heavy. For safe, temporary storage, lay the
door flat with the inside of the door facing down.
Figure 40: Door hinge location
Figure 41: Door hinge locks
4. Push the door hinge locks up towards a nd into the oven
frame on both left and right oven door hinges to the
locked position (See Figure 41 ).
5. Close the oven door.
Special door care instructions - Most oven doors
contain glass that can break. Do not close the oven door
until all the oven racks are fully in place. Do not hit the
glass with pots, pans, or any other object. Scratching,
hitting, jarring, or stressing the glass may weaken its
structure and increase risk of breakage at a later time.
Figure 42: Hinge in unlocked position
Figure 43: Holding door for removal
31
Page 32

CARE AND CLEANING
Caring for your glide racks
Handle oven racks only when they are cool.
After cooking or after the clean cycle, racks will be very hot and
can cause burns.
Important Notes:
• It is recommended to remove all racks from the oven
during clean cycles. After a clean cycle, or anytime the
gliding is rough, the glide racks should be treated with
graphite lubrication.
• Do not use cooking oil, cooking spray, or other oil-based
lubrication products on the glide rack extension tracks.
Use only the graphite lubrication in this area.
• It is important that the parts of the rack that contact the
oven sides always have a light coating of vegetable oil.
Apply a thin layer of vegetable oil to the sides of the
rack after every clean cycle and when the rack
becomes difficult to reposition in the oven.
To lubricate the glide rack:
1. Remove the rack from the oven and place the rack on a large
flat surface covered with newspaper or scrap cloth. Fully
extend the rack.
2. Wipe away debris and crumbs from the glide track using a
cloth or sponge.
4. Extend and return the glide rack several times along the
tracks to distribute the lubrication.
5. Turn glide rack over. Shake graphite lubrication very well
before applying. Place four drops of graphite lubrication along
the tracks. Repeat on both sides of the glide rack.
6. Extend and return the glide rack several times along the
tracks to distribute the lubrication.
3. Shake graphite lubrication very well before applying. Place
four drops of graphite lubrication along the tracks (see area
circled on figure below). Repeat on both sides of the glide
rack.
32
7. Apply a thin layer of cooking oil to the outer frame of the glide
rack as shown below. Keeping the frame sides lightly lubricated allows the entire rack to slide easily when changing rack
positions.
Replace rack in oven right side up.
Page 33

BEFORE YOU CALL
Solutions to Common Baking Problems
For best cooking results, heat the oven be fore baking cookies, bread s, cakes, pies or p astr ies, etc. There is no n eed
to preheat the oven for roasting meat or baking casseroles. The cooking times and temperatures needed to bake a
product may vary slightly from your previously owned appliance.
Baking Problems and Solutions Chart
Baking Problems Causes Corrections
Cookies and biscuits
burn on the bottom.
Cakes too dark on top
or bottom.
Cakes not done in
center.
Cakes not level.
• Cookies and biscuits put into
oven before the preheating
time is completed.
• Oven rack is overcrowded.
• Dark pans absorbs heat too
fast.
• Cakes put in oven before
preheating time is completed.
• Rack position too high or too
low.
• Oven too hot.
• Oven too hot.
• Incorrect pan size.
• Pan not centered in oven.
• Range not level.
• Pan too close to oven wall or
rack overcrowded.
• Pan warped.
• Oven light left on during baking.
• Allow oven to preheat to desired temperature before
placing food in oven.
• C hoose pan sizes that will permit 2” to 4” of air space
(5.1 cm to 10.2 cm) on all sides when placed in the
oven.
• Use a medium weight baking sheet.
• Allow oven to preheat to the selected temperature
before placing food in the oven.
• Use proper rack position for baking needs.
• Set oven temperature 25°F/13°C lower than recom-
mended.
• Set oven temperature 25°F/13°C lower than recommended.
• Use pan size suggested in recipe.
• Use proper rack position and place pan to allow for 2” to
4” (5.1 cm to 10.2 cm) of space on all sides of pan.
• Place a marked glass measuring cup filled with water
on the center of the oven rack. If the water level is
uneven, refer to the installation instructions for leveling
the range.
• Be sure to allow 2” to 4” (5.1 cm to 10.2 cm) of
clearance on all sides of each pan in the oven.
• Do not use pans that are dented or warped.
• Keep oven light off while baking.
Foods not done when
cooking time is over.
• Oven too cool.
•
• Oven overcr ow d e d.
• Oven door opened too
frequently.
• Set oven temperature 25°F/13°C higher than suggested
and bake for the recommended time.
• Be sure to remove all pans from the oven except the
ones to be used for baking.
• Ope n oven door only after shortest recommended
baking time.
33
Page 34

BEFORE YOU CALL
Solutions to Common Problems
Before you call for service, review the following list. It may sa ve yo u tim e and ex pe n se. Possible solutions are provided
with the problem listed:
Problem Solution
Poor baking results Many factors effect baking results. Use proper oven rack position. Center food in the
oven and space pans to allow air to circulate. Preheat oven to the set temperature
before placing food in the oven. Try adjusting the recipe's recommended temperature
or baking time. See “Adjusting the Oven Temperature” on page 25 if you feel the oven
is too hot or cold.
Appliance is not level Be sure floor is level, strong and stable enough to adequately support range. If floor is
sagging or sloping, contact a carpenter to correct the situation.
Poor installation. Place oven rack in center of oven an d p lace a leve l on the oven rack.
Adjust leveling legs at base of appliance until the rack is level.
Kitchen cabinet alignment may make range appear not level. Be sure cabinets are
square and have sufficient room for appliance clearance.
Cannot move appliance easily.
Appliance must be accessible for
service.
Entire appliance does not work. For models with a power cord, make sure power cord is plugged properly into outlet. If
Oven portion does not operate. The time of day is not set. The oven clock must first be set in order to operate the oven.
Oven light does not work. Be sure the oven light is secure in the socket. See “Replacing the oven light” on
Flames inside oven or smoking
from oven vent.
Oven racks discolored or do not
slide easily.
Oven smokes excessively when
broiling.
Cabinets not square or are built in too tight to allow clearance for appliance. Contact
builder or installer to make appliance accessible.
Carpet interferes with appliance. Provide sufficient space so appliance can be lifted
over carpet.
electricity to home is working, check fuse box or breaker. Call your local electric
company for service outage information..
See “Setting the Clock” on page 15.
Be sure oven controls are set properly. See “Oven Control Functions” on page 14 and
review instructions for the desired cooking function in this manual or see “Entire
appliance does not operate” in this checklist.
page 30.
Excessive spills in oven. Grease or food spilled onto oven bottom or oven cavity. Wipe
up excessive spills before starting oven. If flames or excessive smoke are present
when using Broil, see “Using the Broil Feature” on page 21.
Oven racks left in oven cavity during Clean. Always remove oven racks from oven
cavity before starting a clean cycle. Clean by using a mild abrasive cleaner following
manufacturer's instructions. Rinse with clean water, dry, and replace in oven.
Incorrect setting. Follow broiling instructions in Setting Oven Controls section.
Meat too close to the broil flame. Reposition broil rack to provide proper clearance
between the meat and flame. Remove excess fat from mea t. Cut remaining fa tty edges
to prevent curling, but do not cut into lean.
Grease build up on oven surfaces. Regular cleaning is necessary when broiling
frequently. Grease or food splatters will cause excessive smoking.
34
Page 35

BEFORE YOU CALL
Oven control panel sounds an
audible alarm and displays an
Error code.
Soil not completely removed after
Clean
Convection fan does not rotate. Oven door is open. Convection fan will turn off if oven door is opened when Convection
Clean does not work. Oven control not set properly. Review instructions in Clean section.
Surface burners do not ignite. Surface control knob was not completely turned to Lite. Push in and turn the surface
Oven control has detected a fault or error condition. T urn either oven mode or temper ature selector to the OFF position to clear the error code. Try Bake or Broil function. If
the Error code error repeats, turn OFF power to appliance, wait 5 minutes and then
repower appliance. Set clock with correct time of day. Try Bake or Broil function again.
If fault recurs, turn oven mode and temperature selectors OFF and call 1-800-4-MYHOME® for assistance.
Clean was interrupted. Review instructions in Clean section.
Excessive spills on oven bottom. Clean before starting Clean.
Failure to clean soil from the oven frame, the door liner outside the oven door gasket
and the small area at the front center of the oven bottom. These areas are not in the
self-cleaning area, but get hot enough to burn on residue. Clean these areas before
starting the clean cycle. Burned-on residue can be cleaned with a stiff nylon brush and
water or a nylon scrubber. Be careful not to damage the oven gasket.
is active. Close oven door.
The convection fan will turn on after the oven has been heating for 6 minutes, and
remain on during the cooking process.
control knob to Lite until burner ignites and th en tu rn control kno b to desired flame size.
Burner ports are clogged. With the burne r OFF, use a small-gauge wire or needle to
burner head slots and ignition ports.
Range power cord is disconnected from outlet (electric ignition models only). Be sure
power cord is securely plugged into the power outlet. Electrical power outage. Burners
may be lit manually. See “Operating the gas surface controls” on page page 9.
Surface burner flame uneven or
only part way around the burner
cap.
Surface burner flame is too high. Surface control knob is set too high. Adjust to lower flame setting.
Burner slots or ports are clogged. With the su rface burner OFF, clean ports with a small
gauge wire or needle.
Moisture is present after cleaning. Lightly fan the flame and allow burner to op erate
until flame is full.
Burner caps are not seated properly. Check that all burner caps are level and seated
correctly on burner heads.
Burner caps are not seated properly. Check that all surface burner caps are level and
seated correctly on surface burner heads.
Incorrect L.P. conversion. Refer to L.P. conversion kit inst ructions to correct.
35
Page 36

Your appliance is covered by a one year limited warranty. For one year from your original date of
purchase, Electrolux will pay all costs for repairing or replacing any parts of this appliance that prove
to be defective in materials or workmanship when such appliance is installed, used and maintained in
accordance with the provided instructions.
Exclusions
This warranty does not cover the following:
1. Products with original serial numbers that have been removed, altered or cannot be readily determined.
2. Product that has been transferred from its original owner to another party or removed outside the USA or
Canada.
3. Rust on the interior or exterior of the unit.
4. Products purchased “as-is” are not covered by this warranty.
5. Food loss due to any refrigerator or freezer failures.
6. Products used in a commercial setting.
7. Service calls which do not involve malfunction or defects in materials or workmanship, or for appliances
not in ordinary household use or used other than in accordance with the provided instructions.
8. Service calls to correct the installation of your appliance or to instruct you how to use your appliance.
9. Expenses for making the appliance accessible for servicing, such as removal of trim, cupboards, shelves,
etc., which are not a part of the appliance when it is shipped from the factory.
10. Service calls to repair or replace appliance light bulbs, air filters, water filters, other consumables, or knobs,
handles, or other cosmetic parts.
11. Surcharges including, but not limited to, any after hour, weekend, or holiday service calls, tolls, ferry trip
charges, or mileage expense for service calls to remote areas, including the state of Alaska.
12. Damages to the finish of appliance or home incurred during installation, including but not limited to floors,
cabinets, walls, etc.
13. Damages caused by: services performed by unauthorized service companies; use of parts other than
genuine Electrolux parts or parts obtained from persons other than authorized service companies; or
external causes such as abuse, misuse, inadequate power supply, accidents, fires, or acts of God.
CUSTOMER’S SOLE AND EXCLUSIVE REMEDY UNDER THIS LIMITED WARRANTY SHALL BE PRODUCT
REPAIR OR REPLACEMENT AS PROVIDED HEREIN. CLAIMS BASED ON IMPLIED WARRANTIES, INCLUDING
WARRANTIES OF MERCHANTABILITY OR FITNESS FOR A PARTICULAR PURPOSE, ARE LIMITED TO ONE YEAR
OR THE SHORTEST PERIOD ALLOWED BY LAW, BUT NOT LESS THAN ONE YEAR. ELECTROLUX SHALL NOT
BE LIABLE FOR CONSEQUENTIAL OR INCIDENTAL DAMAGES SUCH AS PROPERTY DAMAGE AND INCIDENTAL
EXPENSES RESULTING FROM ANY BREACH OF THIS WRITTEN LIMITED WARRANTY OR ANY IMPLIED
WARRANTY. SOME STATES AND PROVINCES DO NOT ALLOW THE EXCLUSION OR LIMITATION OF INCIDENTAL
OR CONSEQUENTIAL DAMAGES, OR LIMITATIONS ON THE DURATION OF IMPLIED WARRANTIES, SO THESE
LIMITATIONS OR EXCLUSIONS MAY NOT APPLY TO YOU. THIS WRITTEN WARRANTY GIVES YOU SPECIFIC
LEGAL RIGHTS. YOU MAY ALSO HAVE OTHER RIGHTS THAT VARY FROM STATE TO STATE.
Keep your receipt, delivery slip, or some other appropriate payment record to establish the warranty period
should service be required. If service is performed, it is in your best interest to obtain and keep all receipts.
Service under this warranty must be obtained by contacting Electrolux at the addresses or phone
numbers below.
DISCLAIMER OF IMPLIED WARRANTIES; LIMITATION OF REMEDIES
This warranty only applies in the USA and Canada. In the USA, your appliance is warranted by Electrolux Major Appliances
North America, a division of Electrolux Home Products, Inc. In Canada, your appliance is warranted by Electrolux Canada Corp.
Electrolux authorizes no person to change or add to any obligations under this warranty. Obligations for service and parts under
this warranty must be performed by Electrolux or an authorized service company. Product features or specifications as described
or illustrated are subject to change without notice.
If You Need
Service
Canada
1.800.265.8352
Electrolux Canada Corp.
5855 Terry Fox Way
Mississauga, Ontario, Canada
L5V 3E4
USA
1.800.944.9044
Electrolux Home Products, Inc.
10200 David Taylor Drive
Charlotte, NC 28262
WARRANTY
36
 Loading...