


Versión en españolVersión en español
Versión en español
Versión en españolVersión en español
Si desea obtener una copia en español de estas
Instrucciones de Funcionamiento, sírvase escribir a la
dirección que se incluye a continuación.
Solicite la P/N 131799900.
Spanish Owner's Guides
Frigidaire Home Products
P. O. Box 212378
Augusta, GA 30917
BeforBefor
Befor
BeforBefor
Read your dryer Owner's Guide. Read your dryer Owner's Guide.
Read your dryer Owner's Guide. It has important
Read your dryer Owner's Guide. Read your dryer Owner's Guide.
safety and warranty information. It also has many
suggestions for best drying results.
shock, or injury to persons, read the IMPORTANT
SAFETY INSTRUCTIONS in your dryer owner's guide
before operating this appliance.
Operating StepsOperating Steps
Operating Steps
Operating StepsOperating Steps
ReRe
Re
ReRe
It explains these operating steps in detail.
1. Pr 1. Pr
1. Pr
1. Pr 1. Pr
e Operating Ye Operating Y
e Operating Y
e Operating Ye Operating Y
To reduce the risk of fire, electric
ad Drying Procedures in your Owner's Guide.ad Drying Procedures in your Owner's Guide.
ad Drying Procedures in your Owner's Guide.
ad Drying Procedures in your Owner's Guide.ad Drying Procedures in your Owner's Guide.
epare items for drying.epare items for drying.
epare items for drying.
epare items for drying.epare items for drying.
our Drour Dr
our Dr
our Drour Dr
yeryer
yer
yeryer
OPERAOPERA
OPERA
OPERAOPERA
2.2.
Check that lint screen is clean and in place.Check that lint screen is clean and in place.
2.
Check that lint screen is clean and in place.
2.2.
Check that lint screen is clean and in place.Check that lint screen is clean and in place.
3.3.
Load the dryer. Load the dryer.
3.
Load the dryer. If desired, add a dryer fabric
3.3.
Load the dryer. Load the dryer.
softener sheet.
4.4.
Close the dryer door.Close the dryer door.
4.
Close the dryer door.
4.4.
Close the dryer door.Close the dryer door.
5.5.
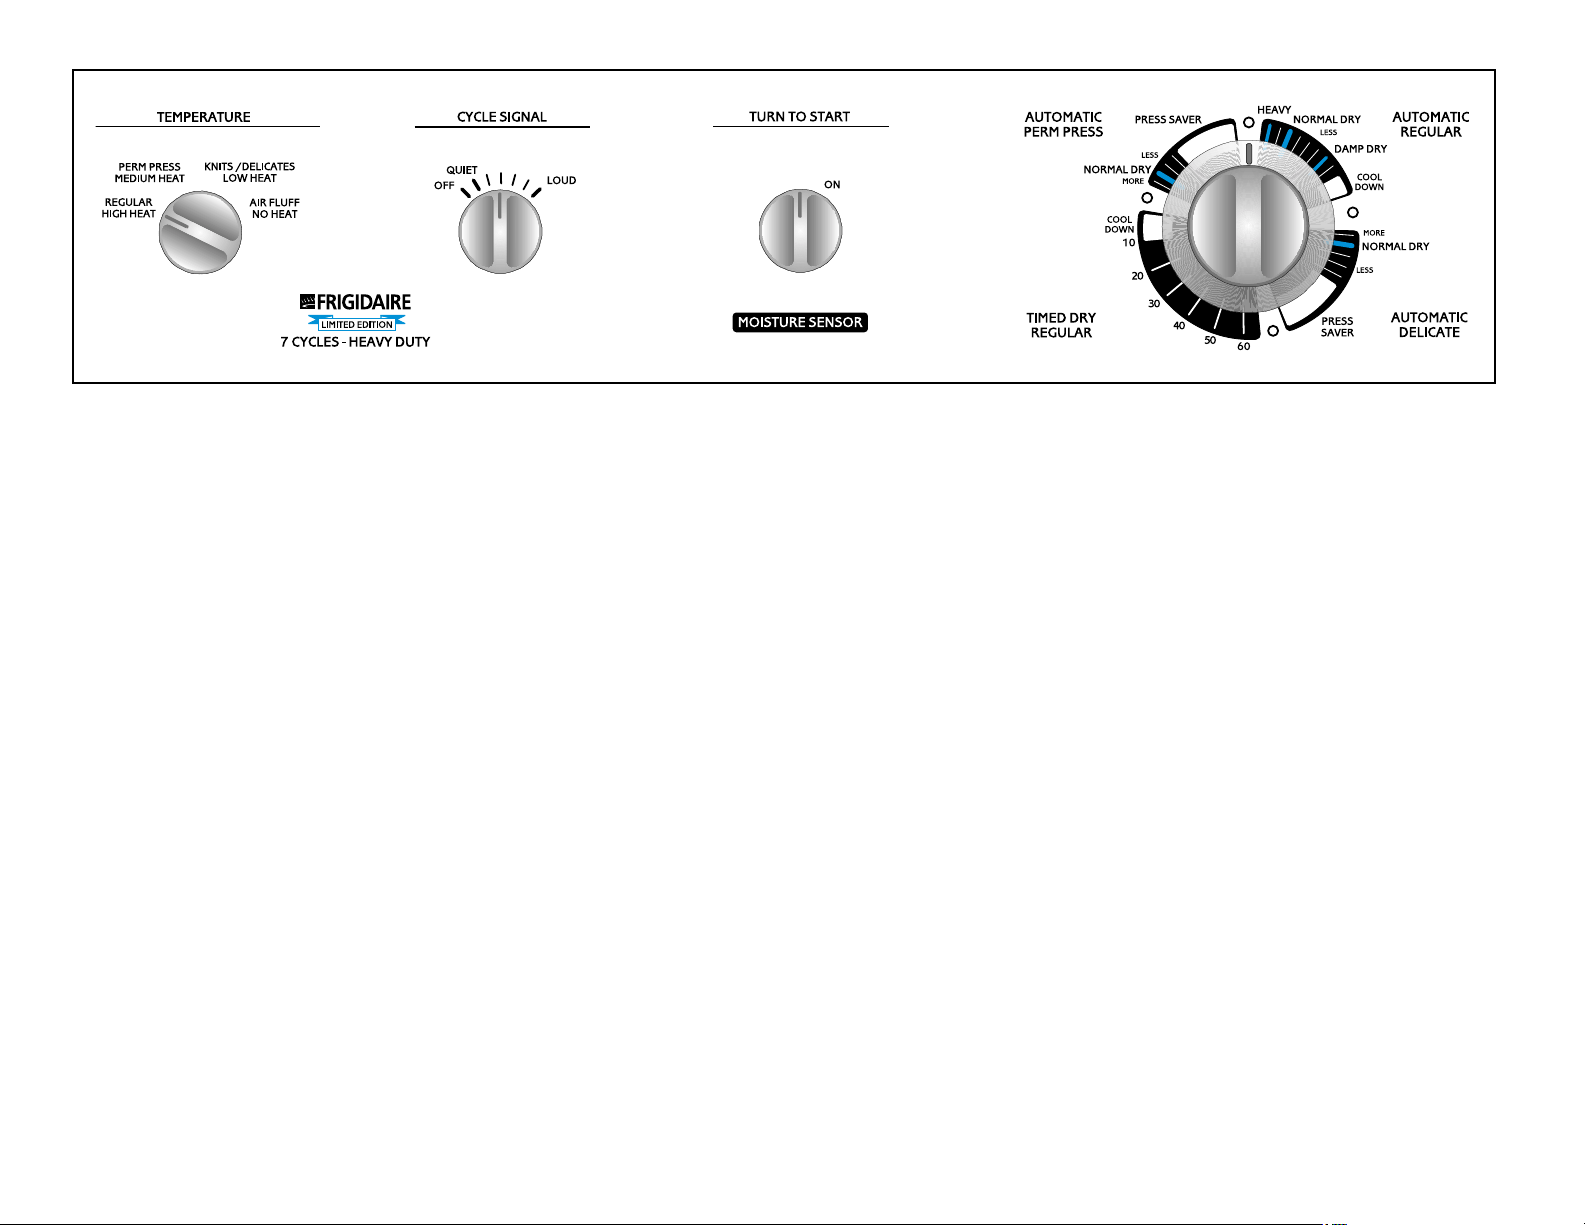
Set Temperature and Cycle Signal controls.Set Temperature and Cycle Signal controls.
5.
Set Temperature and Cycle Signal controls.
5.5.
Set Temperature and Cycle Signal controls.Set Temperature and Cycle Signal controls.
6.6.
Turn cycle selector clockwise to desiredTurn cycle selector clockwise to desired
6.
Turn cycle selector clockwise to desired
6.6.
Turn cycle selector clockwise to desiredTurn cycle selector clockwise to desired
setting.setting.
setting.
setting.setting.
7.7.
Start dryer. Start dryer.
7.
Start dryer. Turn the Turn to Start control clockwise
7.7.
Start dryer. Start dryer.
to ON.
8.8.
When the Cycle Signal control has been turnedWhen the Cycle Signal control has been turned
8.
When the Cycle Signal control has been turned
8.8.
When the Cycle Signal control has been turnedWhen the Cycle Signal control has been turned
on, a signal will sound when the cycle ends.on, a signal will sound when the cycle ends.
on, a signal will sound when the cycle ends.
on, a signal will sound when the cycle ends.on, a signal will sound when the cycle ends.
9.9.
Remove items immediately and hang or fold.Remove items immediately and hang or fold.
9.
Remove items immediately and hang or fold.
9.9.
Remove items immediately and hang or fold.Remove items immediately and hang or fold.
10.10.
Clean lint screen after every load.Clean lint screen after every load.
10.
Clean lint screen after every load.
10.10.
Clean lint screen after every load.Clean lint screen after every load.
TT
emperaturemperatur
T
emperatur
TT
emperaturemperatur
Always follow directions on fabric careAlways follow directions on fabric care
Always follow directions on fabric care
Always follow directions on fabric careAlways follow directions on fabric care
labels.labels.
labels.
labels.labels.
to dry items containing feathers or down, foam rubber,
plastics, or similarly textured, rubber-like materials.
Use Air Fluff-No Heat setting only.
TING INSTRUCTIONSTING INSTRUCTIONS
TING INSTRUCTIONS
TING INSTRUCTIONSTING INSTRUCTIONS
INTERIOR DRUM LIGHT
Hold for 1-2 seconds and release.Hold for 1-2 seconds and release.
Hold for 1-2 seconds and release.
Hold for 1-2 seconds and release.Hold for 1-2 seconds and release.
e Selectione Selection
e Selection
e Selectione Selection
To avoid fire hazard, do not use heat
FDE/FDG647RFFDE/FDG647RF
FDE/FDG647RF
FDE/FDG647RFFDE/FDG647RF
REGULAR-HIGH HEAT, PERM PRESS-MEDIUM REGULAR-HIGH HEAT, PERM PRESS-MEDIUM
The
REGULAR-HIGH HEAT, PERM PRESS-MEDIUM
REGULAR-HIGH HEAT, PERM PRESS-MEDIUM REGULAR-HIGH HEAT, PERM PRESS-MEDIUM
HEATHEAT
HEAT, and
HEATHEAT
erature settings may be used with any cycle setting. The
AIR FLUFF-NO HEATAIR FLUFF-NO HEAT
AIR FLUFF-NO HEAT setting can be used only in the
AIR FLUFF-NO HEATAIR FLUFF-NO HEAT
Timed Dry cycle.
AIR FLUFF-NO HEAT AIR FLUFF-NO HEAT
AIR FLUFF-NO HEAT setting tumbles the load without
AIR FLUFF-NO HEAT AIR FLUFF-NO HEAT
heat. Use Air Fluff to freshen clothing, pillows or
blankets, or to dust draperies.
Cycle SelectionCycle Selection
Cycle Selection
Cycle SelectionCycle Selection
Turn cycle selector clockwise to desired cycle and
setting.
Each cycle ends with a cool down period. The heat
automatically turns off and the load continues to tumble
during the cool down period. This reduces wrinkling and
makes items easier to handle during unloading.
Drying time varies depending on size and dampness of
load, weight and fabric type. Room temperature and
humidity, type of installation and electrical voltage or
gas pressure can also affect drying time.
(continued, reverse side)
KNITS/DELICATES-LOW HEAT KNITS/DELICATES-LOW HEAT
KNITS/DELICATES-LOW HEAT temp-
KNITS/DELICATES-LOW HEAT KNITS/DELICATES-LOW HEAT
Printed in U.S.A.
P/N 131799800 (9811)
INTERIOR DRUM LIGHT
Cycle Selection Cycle Selection
Cycle Selection
Cycle Selection Cycle Selection
AuAu
tomatic tomatic
Au
tomatic
AuAu
tomatic tomatic
This cycle is best for cotton items that can be tumble
dried. Drying time is determined automatically at the
temperature selection of your choice.
• Initially set cycle selector on
• For items requiring more drying time, set cycle
selector on
• For items requiring less drying time, set cycle selector
LESSLESS
on
LESS.
LESSLESS
• Select
items to be line dried, dried flat, or ironed.
AuAu
tomatic Delicate Cycletomatic Delicate Cycle
Au
tomatic Delicate Cycle
AuAu
tomatic Delicate Cycletomatic Delicate Cycle
This cycle is best for knit and delicate items. Drying time
is determined automatically at the temperature selection
of your choice.
• Low heat is suggested for knit and delicate items.
• Initially set cycle selector on
• For items requiring more drying time, set cycle
selector on
• If the dried load cannot be removed promptly, the
cycle selector will advance to the
• Unheated tumbling continues during the
for 22 minutes to help reduce wrinkling.
Regular Cycle Regular Cycle
Regular Cycle
Regular Cycle Regular Cycle
HEAVYHEAVY
HEAVY.
HEAVYHEAVY
DAMP DRYDAMP DRY
DAMP DRY to remove some moisture from
DAMP DRYDAMP DRY
MORE. MORE.
MORE.
MORE. MORE.
(continued)(continued)
(continued)
(continued)(continued)
NORMAL DRYNORMAL DRY
NORMAL DRY.
NORMAL DRYNORMAL DRY
NORMAL DRY.NORMAL DRY.
NORMAL DRY.
NORMAL DRY.NORMAL DRY.
Press SaverPress Saver
Press Saver setting.
Press SaverPress Saver
Press SaverPress Saver
Press Saver
Press SaverPress Saver
• When the Cycle Signal is on, it will sound briefly
every 5 minutes as a reminder to remove the load.
Timed DTimed D
Timed D
Timed DTimed D
This cycle provides up to 65 minutes of drying time at
the temperature selection of your choice.
Automatic Perm Press CycleAutomatic Perm Press Cycle
Automatic Perm Press Cycle
Automatic Perm Press CycleAutomatic Perm Press Cycle
This cycle is best for permanent press items. Drying
time is determined automatically at the temperature
selection of your choice.
• Medium heat is suggested for permanent press
items.
• Initially set cycle selector on
• For items requiring more drying time, set cycle
selector on
• For items requiring less drying time, set cycle selector
on
• If the dried load cannot be removed promptly, the
cycle selector will advance to the
setting.
• Unheated tumbling continues during the
for 22 minutes to help reduce wrinkling.
• When the Cycle Signal is on, it will sound briefly
every 5 minutes as a reminder to remove the load.
LESS.LESS.
LESS.
LESS.LESS.
ry Regulary Regula
ry Regula
ry Regulary Regula
MORE.MORE.
MORE.
MORE.MORE.
r Cycler Cycle
r Cycle
r Cycler Cycle
NORMAL DRY. NORMAL DRY.
NORMAL DRY.
NORMAL DRY. NORMAL DRY.
Press SaverPress Saver
Press Saver
Press SaverPress Saver
Press SaverPress Saver
Press Saver
Press SaverPress Saver
Energy Saving TipsEnergy Saving Tips
Energy Saving Tips
Energy Saving TipsEnergy Saving Tips
• Keep the lint screen clean and exhaust the dryer
correctly.
• Sort laundry properly and select proper temperature
and cycle settings. Choose an automatic dry cycle
whenever possible for accurate drying time.
• Dry only full loads. Single items and small loads
usually take longer to dry.
• Avoid overloading, adding wet items to a partially
dry load, and overdrying.
• Dry one load after another to take advantage of a
warm dryer.
• Opening the door needlessly causes warm air to
escape, which prolongs drying time.
• If possible, use the dryer on low humidity days.
• Install the dryer in an area where the room
temperature is at least 45°F (7°C).
P/N 131799800 (9811)
 Loading...