

Page 1
SERVICE DATA SHEET
Resistance Temperature Detector
P4 L2 OUT
P5 L2 IN
P1 L1
P2 BROIL
P3 BAKE
K2
BAKEK1BROIL
K3
DLB
J2
1
TEMP PROBE
NEUTRAL
TEMP PROBE
Electric Ranges with ES 100 Electronic Oven Controls
ELECTRONIC OVEN CONTROL (EOC)
NOTICE - This service data sheet is intended for use by persons having
electrical and mechanical training and a level of knowledge of these
subjects generally considered acceptable in the appliance repair trade. The
manufacturer cannot be responsible, nor assume any liability for injury or
damage of any kind arising from the use of this data sheet.
SAFE SERVICING PRACTICES
To avoid the possibility of personal injury and/or property damage, it is important
that safe servicing practices be observed. The following are examples, but
without limitation, of such practices.
1. Before servicing or moving an appliance remove power cord from electrical
outlet, trip circuit breaker to OFF, or remove fuse.
2. Never interfere with the proper installation of any safety device.
3. GROUNDING: The standard color coding for safety ground wires is
GREEN or GREEN WITH YELLOW STRIPES. Ground leads are not to
be used as current carrying conductors. It is extremely important that the
service technician reestablish all safety grounds prior to completion of
service. Failure to do so will create a potential safety hazard.
4. Prior to returning the product to service, ensure that:
• All electric connections are correct and secure.
• All electrical leads are properly dressed and secured away from sharp
edges, high-temperature components, and moving parts.
• All uninsulated electrical terminals, connectors, heaters, etc. are
adequately spaced away from all metal parts and panels.
• All safety grounds (both internal and external) are correctly and securely
reassembled.
Oven Calibration
Set the electronic oven control for normal baking at 350°F. Obtain an average
oven temperature after a minimum of 5 cycles. Press OFF to end bake mode.
RTD SCALE
Temperature °F (°C)
32 ± 1.9 (0 ± 1.0)
75 ± 2.5 (24 ± 1.3)
250 ± 4.4 (121 ± 2.4)
350 ± 5.4 (177 ± 3.0)
450 ± 6.9 (232 ± 3.8)
550 ± 8.2 (288 ± 4.5)
650 ± 9.6 (343 ± 5.3)
900 ± 13.6 (482 ±7.5)
Probe circuit to case ground
Resistance (ohms)
1000 ± 4.0
1091 ± 5.3
1453 ± 8.9
1654 ± 10.8
1852 ± 13.5
2047 ± 15.8
2237 ± 18.5
2697 ± 24.4
Open circuit/infinite resistance
Temperature Adjustment
(some models - do not use Bake or Broil while adjusting the oven
temperature):
1. Press & hold the BAKE key pad and release after the display begins
ashing the factory temperature setting of 00.
Note: If the oven temperature has been previously adjusted from the factory
setting, the current temperature adjusted value will ash in the display instead.
2. You may increase the oven temperature in 5°F increments with each press
of the UP ARROW key pad to a maximum oven adjustment of +35°F. You
may also adjust the oven temperature downward in 5°F increments with
each press of the DOWN ARROW key pad (total adjustment range of
-35 to +35 F. Note: Your oven control was factory set in the (Fahrenheit)
°F Temperature Display Mode. To change for (Celsius) °C, see the
Temperature Display in the Oven Control Functions section of the Use &
Care Manual.
3. If no other key pad is pressed after 5 seconds the display will begin to
ash.
4. If you do not want to keep the display adjustment, press the OFF key pad
before the oven control beeps. This will cancel the temperature adjustment
procedure. To start this procedure over again begin with step 1 above OR;
5. If you want to keep the adjustment, wait until the display quits ashing and
the oven control beeps once.
6. The oven temperature adjustment has be accepted by the oven control
and the display will return to the time of day.
Notes: The oven temperature adjustment may be made if your oven control has
been set to operate in the (Celsius) °C Temperature Display Mode. In this
case each press of the UP ARROW or DOWN ARROW key pad will adjust in
1°C increments upward (maximum +18°C) or downward (maximum -18°C),
depending on which arrow key pad is pressed.
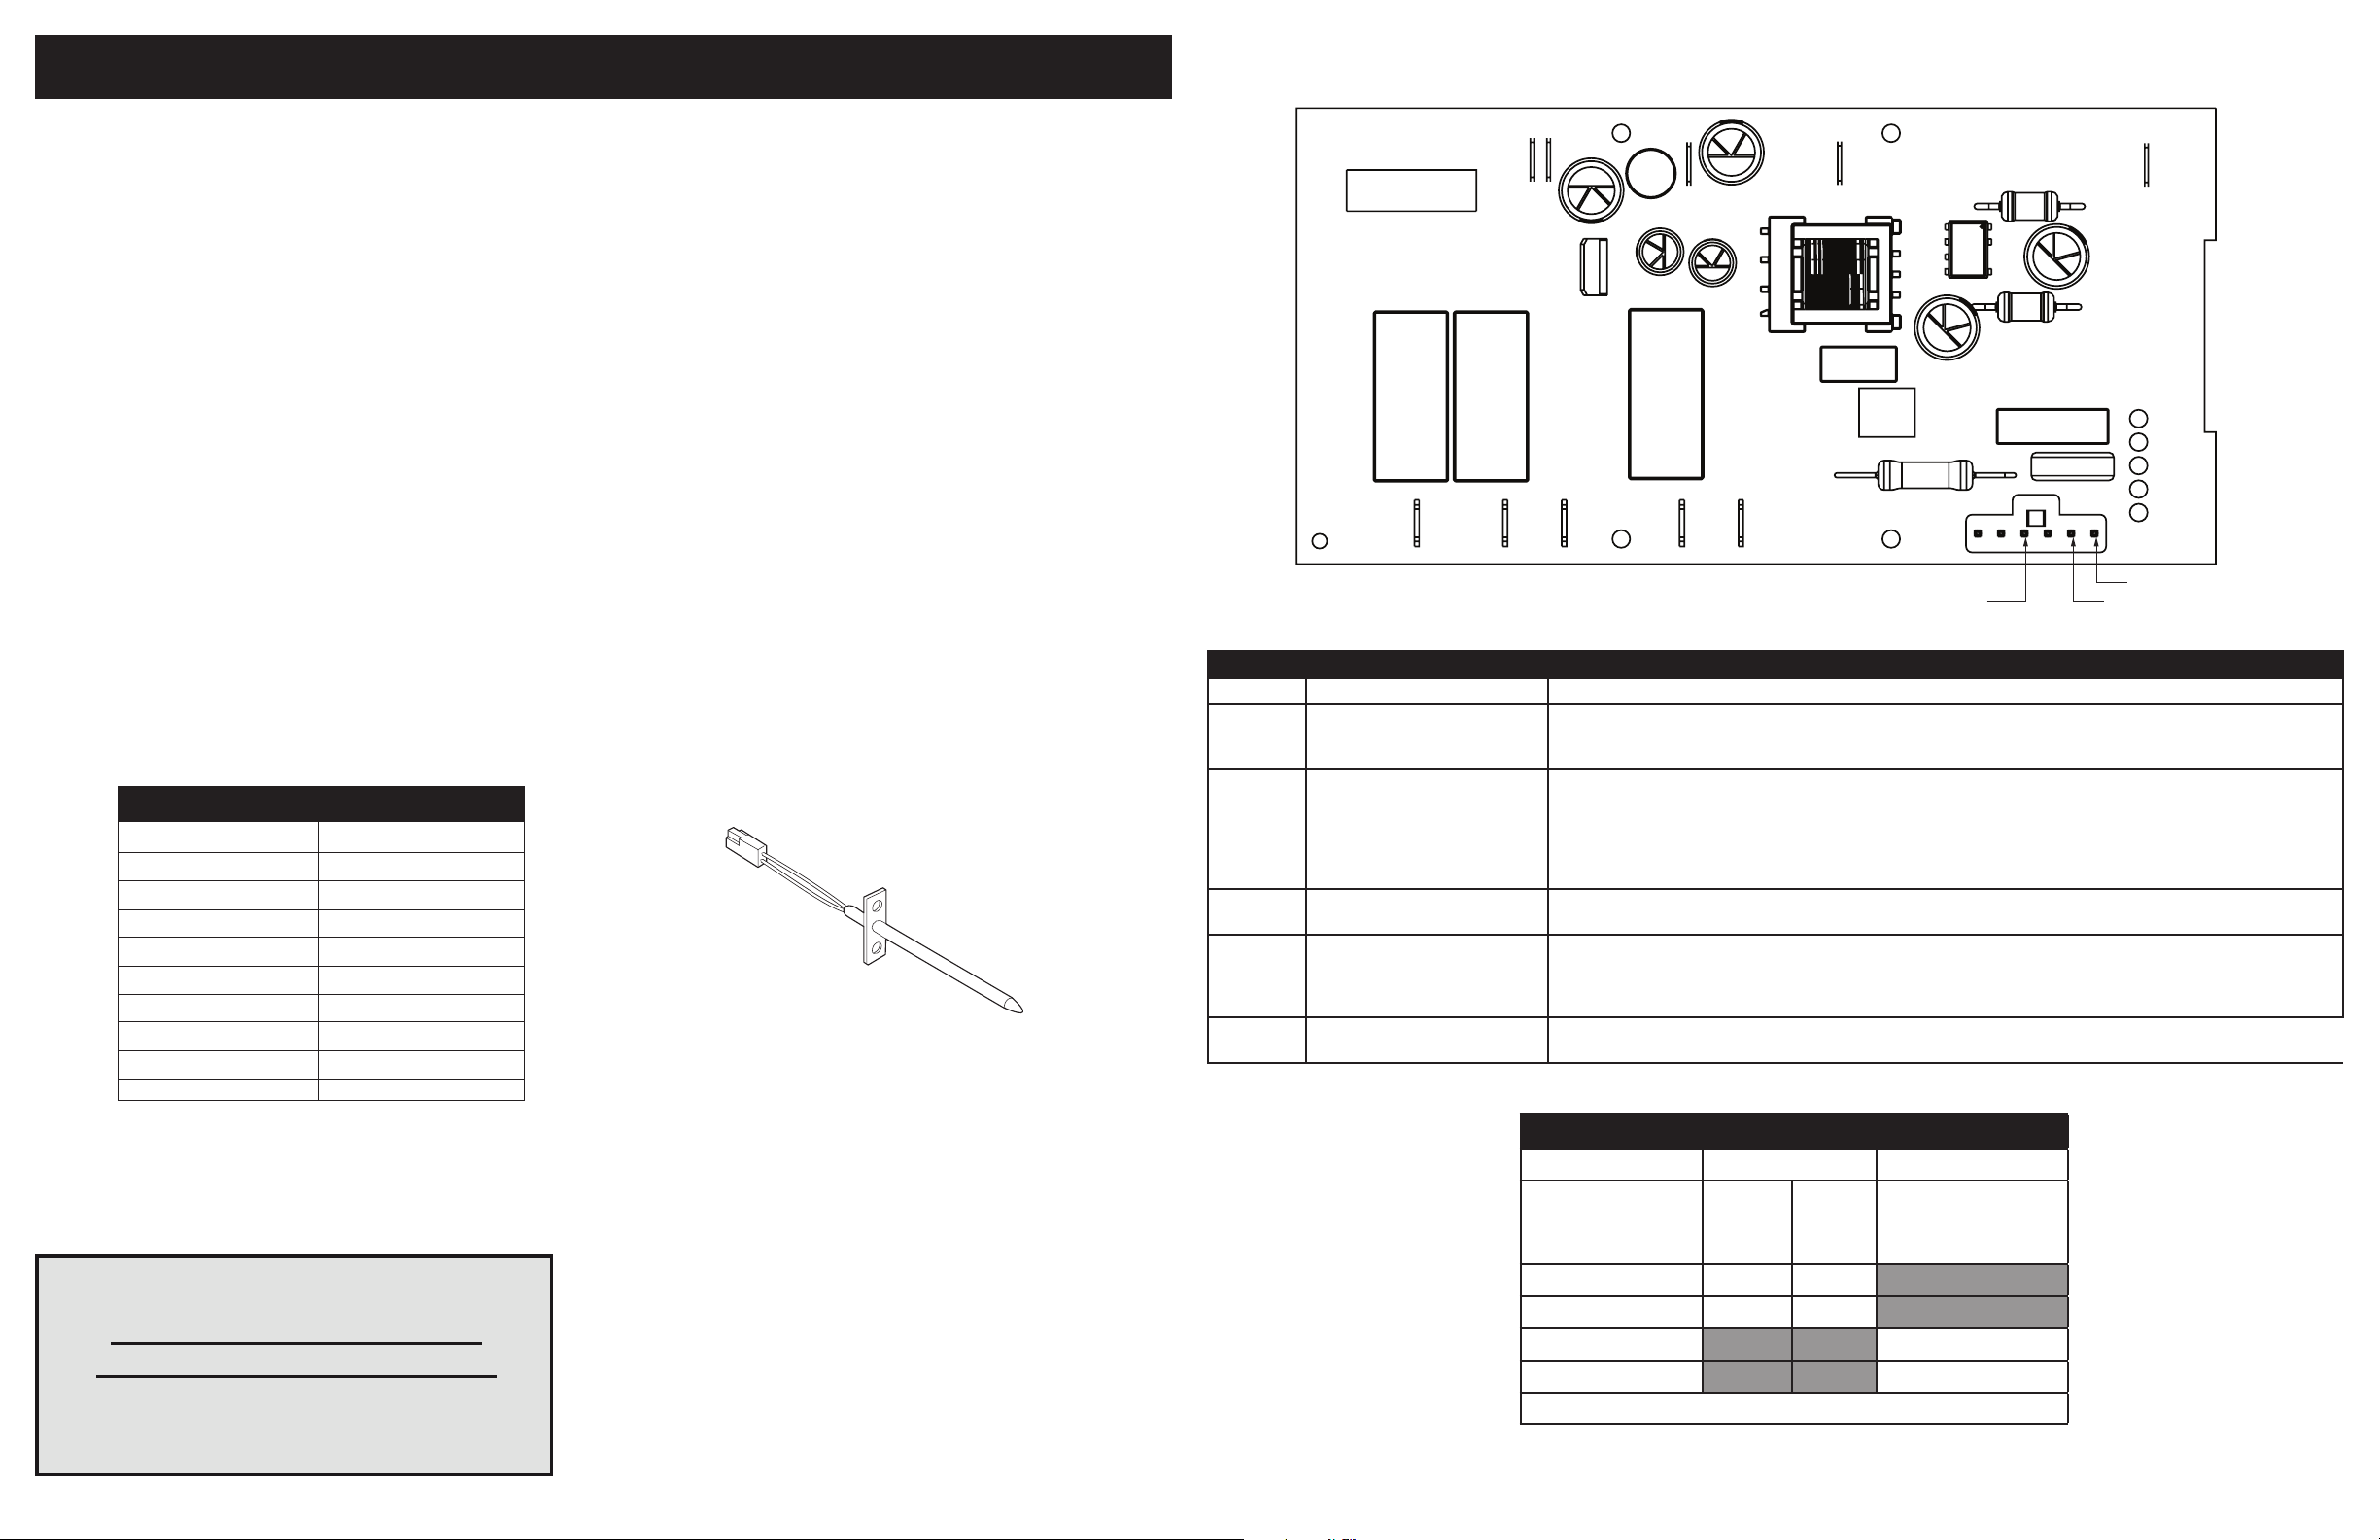
Electric Oven Control Fault Description
Fault Code Likely Failure Conditon/Cause Suggested Corrective Action
F10 Runaway temperature
F11 Short key 1. If a key was pressed inadvertently for a long time this error code will be displayed. Make sure there is noth-
F13 Incorrect Conguration Check-
F30
F31
F50 Unable to properly read cavity
Oven heats when no cook cycle
is programmed.
sum
Open Temperature Probe 1. Check probe circuit wiring for possible open or short condition.
Short Temperature Probe
probe A2D
1. If oven is overheating, disconnect power. Check oven temperature probe (RTD) and replace if necessary.
2. If the oven temperature probe is good and if oven continues to overheat when power is reapplied, replace
the oven relay board.
ing (water, utensils) in contact with the keyboard. The fault code should go away once the key is released
and the Stop key is pressed. If the F011 error comes back when a key is pressed it means the error condition is still there. If the F011 error does not come back it means the error condition is gone and the oven can
be used.
2. If the fault code cannot be cleared, replace the EOC.
1. Disconnect power, wait 30 seconds and reapply power.
2. If fault returns upon power-up, replace EOC.
2. Verify RTD resistance at room temperature (compare to probe resistance chart). If resistance does not
match the chart, replace the RTD probe.
3. If the problem persists replace the oven relay board.
1. Disconnect power, wait 30 seconds and reapply power.
2. If fault returns upon power-up, replace EOC.
IMPORTANT
DO NOT REMOVE THIS BAG
OR DESTROY THE CONTENTS
WIRING DIAGRAMS AND SERVICE
INFORMATION ENCLOSED
REPLACE CONTENTS IN BAG
808532419 Rev B EN (1906)
Circuit Analysis Matrix
EOC RELAYS
L1 to
Bake
Bake X X*
Broil X
Door Open X
Door Closed
Note: X=Check listed circuits. *=Alternates with Bake element
L1 to
Broil
Door Switch
COM-NO
(some models)
Page 2
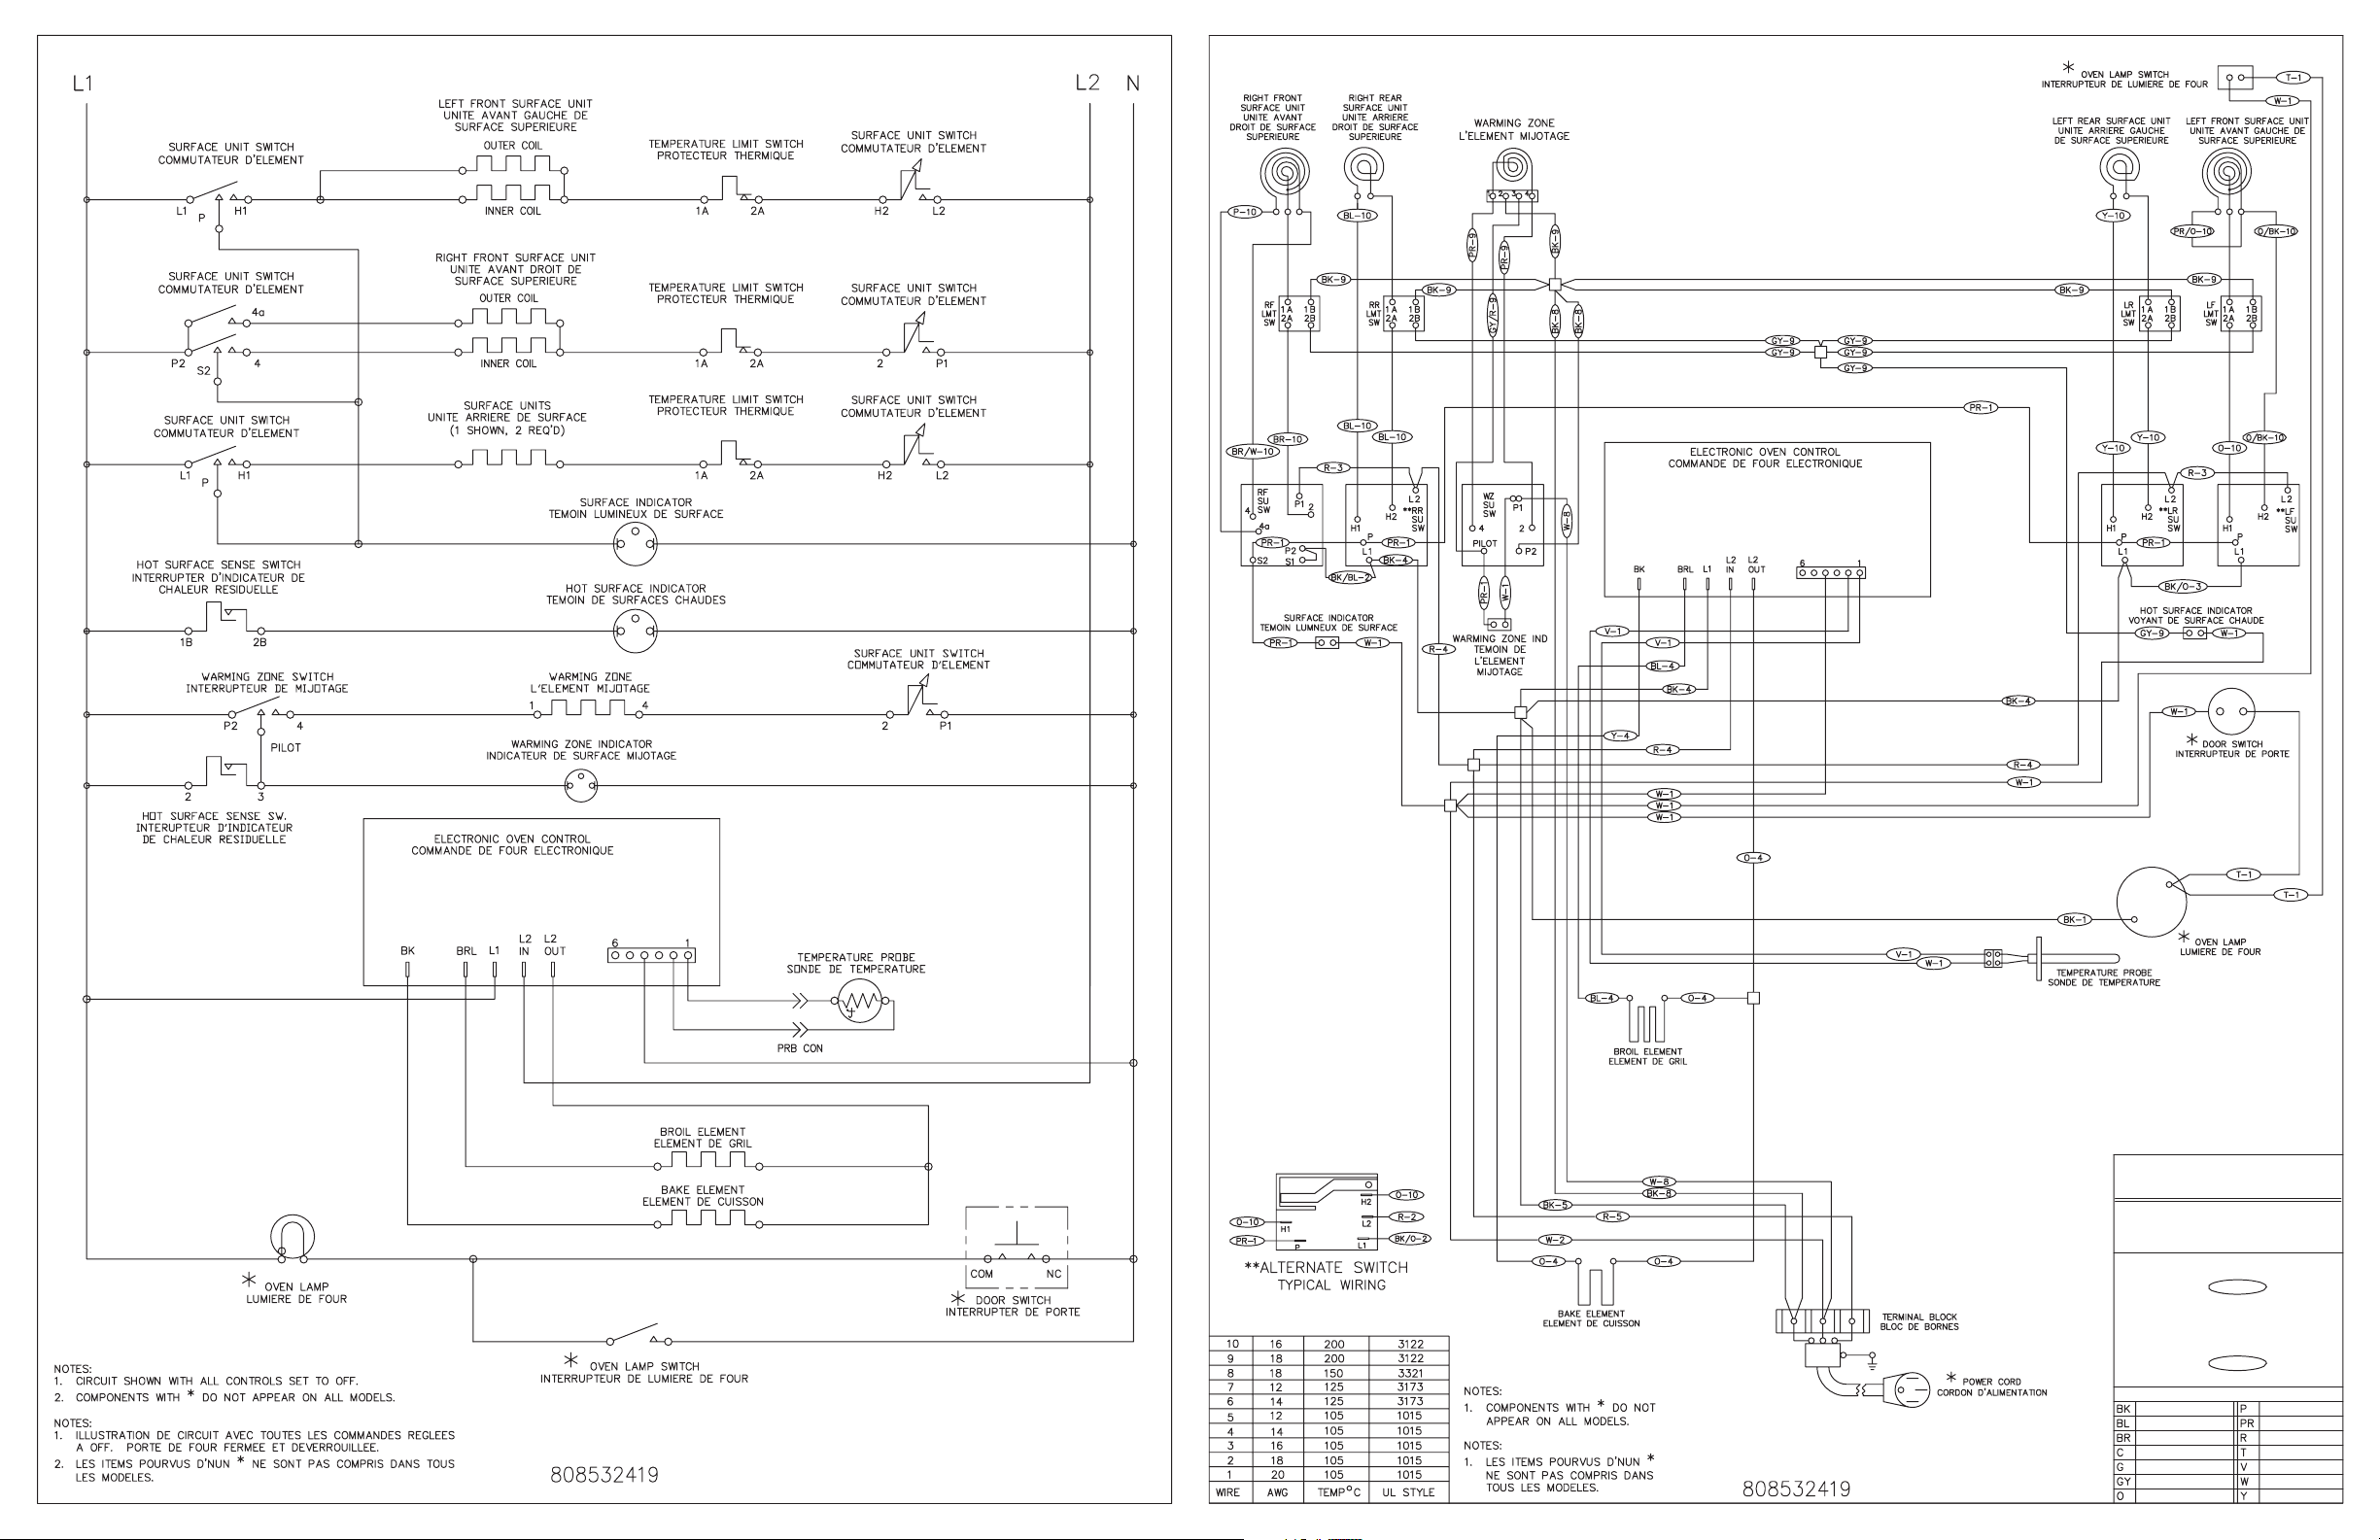
WARNING
AVERTISSEMENT
DISCONNECT POWER BEFORE SERVICING
DEBRANCHEZ L' APPAREL DE
L' ALIMENTATION ELECTRIQUE AVANT
DE FAIRE TOUT SERVICE D' ENTRETIEN
TRACER WIRE: WIRE COLOR NOTED
FIRST, STRIPE NEXT.
EXAMPLE:
GREEN WIRE WITH YELLOW STRIPE.
LEGENDE DE FILAGE: LA COULEUR
DU FIL EN PREMIER. SUIVIE DE
CELLE DE TOUTE BANDE.
EXEMPLE:
FIL VERT AVEC BANDE JAUNE.
COLOR CODE / CODE DES COULEURS
BLACK / NOIR
BLUE / BLEU
BROWN / BRUN
COPPER / CUIVRE
GREEN / VERT
GRAY / GRIS
ORANGE
G / Y-8
G / Y-8
PINK / ROSE
PURPLE / POURPRC
RED / ROUGE
TAN / BRUN CLAIR
VIOLET
WHITE / BLANC
YELLOW / JAUNE
Page 3

SERVICE DATA SHEET
P4 L2 OUT
P5 L2 IN
P1 L1
P2 GRIL
P3 CUIRE
K2
CUIREK1GRIL
K3
DLB
J2
1
NEUTRE
SONDE DE TEMPERATURE
SONDE DE TEMPERATURE
Electric Ranges with ES 100 Electronic Oven Controls
CONTRÔLE ÉLECTRONIQUE DU FOUR (EOC)
AVIS - Cette che de service est destinée aux personnes ayant une formation
en électricité et en mécanique et possédant un niveau de connaissance de
ces sujets généralement considéré comme acceptable dans le secteur de la
réparation d'appareils. Le fabricant ne peut être tenu responsable, ni assumer
aucune responsabilité pour des blessures ou dommages de quelque nature que
ce soit résultant de l'utilisation de cette che technique.
PRATIQUES D'ENTRETIEN SÉCURITAIRES
Pour éviter tout risque de blessure et / ou de dégât matériel, il est important
de respecter les règles de sécurité en matière d’entretien. Ce qui suit sont des
exemples, mais sans limitation, de telles pratiques.
1. Avant d'entretenir ou de déplacer un appareil, débranchez le cordon
d'alimentation de la prise électrique, mettez le disjoncteur sur OFF, ou
retirez le fusible.
2. Ne jamais interférer avec l'installation correcte d'un dispositif de sécurité.
3. MISE À LA TERRE: Le code de couleur standard pour les ls de terre de
sécurité est VERT ou VERT À RAYURES JAUNES. Les ls de terre ne
doivent pas être utilisés comme conducteurs porteurs de courant. Il est
extrêmement important que le technicien de maintenance rétablisse toutes
les bases de la sécurité avant la n du service. Sinon, cela créera un
danger potentiel pour la sécurité.
4. Avant de remettre le produit en service, assurez-vous que:
• Toutes les connexions électriques sont correctes et sécurisées.
• Tous les ls électriques sont correctement habillés et xés à l'écart des
bords tranchants, des composants à haute température et des pièces
mobiles.
• Toutes les bornes électriques, connecteurs, appareils de chauffage, etc.
non isolés sont sufsamment éloignés de toutes les pièces et de tous les
panneaux métalliques.
• Toutes les zones de sécurité (internes et externes) sont correctement et
solidement réassemblées.
Calibrage du four
Réglez la commande électronique du four pour une cuisson normale à 350 °
F. Obtenir une température de four moyenne après un minimum de 5 cycles.
Appuyez sur OFF pour mettre n au mode de cuisson.
ÉCHELLE DU DÉTECTEUR DE TEMPÉRATURE
Température °F (°C)
32 ± 1,9 (0 ± 1,0)
75 ± 2,5 (24 ± 1,3)
250 ± 4,4 (121 ± 2,4)
350 ± 5,4 (177 ± 3,0)
450 ± 6,9 (232 ± 3,8)
550 ± 8,2 (288 ± 4,5)
650 ± 9,6 (343 ± 5,3)
900 ± 13,6 (482 ±7,5)
Circuit de la sonde mise à la
terre à la caisse
À RÉSISTANCE
Résistance (ohms)
Circuit ouvert/résistance infinie
1 000 ± 4,0
1 091 ± 5,3
1 453 ± 8,9
1 654 ± 10,8
1 852 ± 13,5
2 047 ± 15,8
2 237 ± 18,5
2 697 ± 24,4
IMPORTANT
N’ENLEVEZ P
DÉTR
UISEZ P
CONTIENT LES SCHÉMAS DE CÂBLAGE ET
LES INFORMATIONS DE RÉPARATION
REMETTRE LE CONTENU
808532419 REV B FR (1906)
AS CE SAC OU NE
AS SON CONTENU
DANS LE SAC
Réglage de la température
(certains modèles - n'utilisez pas Bake ou Broil lors du réglage du four
Température):
1. Appuyez sur la touche BAKE et maintenez-la enfoncée, puis relâchez-la
lorsque l'afchage commence à faire clignoter le réglage de température
d'usine 00.
Remarque: Si la température du four a déjà été réglée en usine
réglage, la valeur actuelle de la température ajustée clignotera à l’écran.
2. Vous pouvez augmenter la température du four par incréments de 5 ° F à
chaque fois que vous appuyez sur la touche de direction vers le haut pour
un réglage du four maximum de + 35 ° F. Vous pouvez également régler
la température du four par incréments de 5 ° F à chaque fois que vous
appuyez sur la touche de direction BAS (plage de réglage totale de -35
à +35 ° F). Remarque: La commande de votre four a été réglée en usine
à la température (° Fahrenheit) ° F. Mode d'afchage: Pour changer pour
(Celsius) ° C, voir Afchage de la température dans la section Fonctions
de commande du four du manuel d'utilisation et d'entretien.
3. Si aucun autre clavier n'est appuyé après 5 secondes, l'afchage
commencera à clignoter.
4. Si vous ne souhaitez pas conserver le réglage de l'afchage, appuyez
sur la touche OFF avant que la commande du four n'émette un bip. Cela
annulera la procédure de réglage de la température. Pour recommencer
cette procédure, recommencez à l’étape 1 ci-dessus OU;
5. Si vous souhaitez conserver le réglage, attendez que l'afcheur cesse de
clignoter et que la commande du four émette un bip sonore.
6. Le réglage de la température du four a été accepté par la commande du
four et l'afchage revient à l'heure du jour.
Remarques: Le réglage de la température du four peut être effectué si votre
commande a été conguré pour fonctionner en mode d'afchage de la
température (° Celsius) ° C. Dans ce Chaque fois que vous appuyez sur les
touches du haut ou du bas, les incréments de 1 ° C s’ajusteront par incréments
de 1 ° C vers le haut (maximum + 18 ° C) ou vers le bas (-18 ° C maximum), en
fonction du pavé directionnel indiqué.
DÉTECTEUR DE TEMPÉRATURE À RÉSISTANCE
DESCRIPTIONS DES CODES D’ANOMALIE DU RÉGULATEUR DE FOUR ÉLECTRONIQUE
Code d’anomalie Cause probable du problème Action corrective suggérée
F10 Température fugue
F11 Touche courte 1. Si une touche a été appuyée par inadvertance pendant une longue période, ce code d'erreur sera afché.
F13 Somme de contrôle de cong-
F30
F31
F150 Impossible de lire correcte-
Le four chauffe lorsqu'aucun
cycle de cuisson n'est programmé.
uration incorrecte
Sonde de température
ouverte
Sonde de température courte
ment la sonde de cavité A2D
1. Si le four surchauffe, débranchez le cordon d'alimentation. Vériez la sonde de température du four
(RTD) et remplacez-la si nécessaire.
2. Si la sonde de température du four est bonne et si le four continue de surchauffer lorsque le courant est
rétabli, remplacez la carte de relais du four.
Assurez-vous qu'il n'y a rien (eau, ustensiles) en contact avec le clavier. Le code de défaut devrait disparaître une fois la touche relâchée et la touche Stop appuyée. Si l'erreur F011 se reproduit lorsqu'une
touche est enfoncée, cela signie que la condition d'erreur est toujours présente. Si l'erreur F011 ne se
reproduit pas, cela signie que la condition d'erreur a disparu et que le four peut être utilisé.
2. Si le code d'erreur ne peut pas être effacé, remplacez le code EOC.
1. Déconnectez l'alimentation, attendez 30 secondes et remettez-la sous tension.
2. Si le problème réapparaît à la mise sous tension, remplacez l'EOC.
1. Vériez le câblage du circuit de la sonde pour voir s'il est ouvert ou court-circuité.
2. Vérier la résistance de la sonde à température ambiante (comparer au tableau de résistance de la
sonde). Si la résistance ne correspond pas au tableau, remplacez la sonde RTD.
3. Si le problème persiste, remplacez la carte de relais du four.
1. Déconnectez l'alimentation, attendez 30 secondes et remettez-la sous tension.
2. Si le problème réapparaît à la mise sous tension, remplacez l'EOC.
Matrice d'analyse de circuit
RELAIS DES
EOC
L1 à
Cuire
Cuire X X*
Cuire X
Porte ouverte X
Porte fermée
Remarque: X = Vérier les circuits répertoriés. * = Alternates avec élément Bake
L1 à
Gril
Interrupteur de porte COM-NO
(certains modèles)
Page 4

WARNING
AVERTISSEMENT
DISCONNECT POWER BEFORE SERVICING
DEBRANCHEZ L' APPAREL DE
L' ALIMENTATION ELECTRIQUE AVANT
DE FAIRE TOUT SERVICE D' ENTRETIEN
TRACER WIRE: WIRE COLOR NOTED
FIRST, STRIPE NEXT.
EXAMPLE:
GREEN WIRE WITH YELLOW STRIPE.
LEGENDE DE FILAGE: LA COULEUR
DU FIL EN PREMIER. SUIVIE DE
CELLE DE TOUTE BANDE.
EXEMPLE:
FIL VERT AVEC BANDE JAUNE.
COLOR CODE / CODE DES COULEURS
BLACK / NOIR
BLUE / BLEU
BROWN / BRUN
COPPER / CUIVRE
GREEN / VERT
GRAY / GRIS
ORANGE
G / Y-8
G / Y-8
PINK / ROSE
PURPLE / POURPRC
RED / ROUGE
TAN / BRUN CLAIR
VIOLET
WHITE / BLANC
YELLOW / JAUNE
 Loading...