

Frigidaire Electric Range, CMEF212EB1, CMEF212EB2, CMEF212EB3, CMEF212ES1 Use & Care Manual
...Page 1

Electric
Range
CONTENTS Page
Product Registration.......................................................2
Important Safety Instructions ..................................... 3-4
Installation Instructions ..............................................5-6
Oven Light ...................................................................... 6
Surface Light ..................................................................6
Circuit Protection ............................................................7
Indicator Light ................................................................ 7
Models with Touch Pad Control......................................7
Selecting Surface Cooking Utensils ................................ 7
Setting Surface Controls (models without ESEC) ........... 7
Specialty Pans & Trivets..................................................8
Canning Tips & Information ...........................................8
Oven Baking .................................................................... 9
Air Circulation.................................................................. 9
Convection Cooking ...................................................... 10
Convection Roasting .................................................... 10
Speed Bake Cooking System (some models)................11
Broiling..........................................................................12
Oven Settings ................................................................12
Ceramic Glass Cooktop - heating units (without ESEC) 13
Ceramic Glass Cooktop - ESEC controls ................. 14-17
Ceramic Glass Cooktop - use and care.................... 18-19
Setting Warm Zone Control ..........................................2 0
Cleaning the appliance............................................ 21-24
To Remove/Replace the Oven Door ..............................2 4
Removable Outer Door Glass Panel ..............................25
To Remove/Replace Storage Drawer.............................25
Warmer Drawer (some models)............................... 26-27
Avoid Service Checklist ........................................... 28-31
Warranty........................................................................32
318200427 (0211) Rev . A
1
Page 2
Product Registration
Register Your Product
The self-addressed PRODUCT
REGISTRATION CARD should be filled in
completely, signed and returned to
Electrolux Home Products North America.
Thank you for choosing this appliance. The information contained within this
Owner's Guide will instruct you on how to properly operate and care for your
range. Please read through the information contained in your literature pack to
learn more about your new appliance.
Record Your Model and Serial Numbers
Record in the space provided below the model and serial numbers. The numbers
are found on the serial plate located at the right of the range frame and are visible
when the drawer is open.
Model Number: __________________________________________________
Serial Number: __________________________________________________
Date of Purchase: ________________________________________________
This Owner's Guide contains general operating instructions for your range and
feature information for several models. Your range may not have all the
described features. The graphics shown are representational. The graphics on
your range may not look exactly like those shown.
Note: The instructions appearing in this Owner's Guide are not meant to cover
every possible condition and situation that may occur. Common sense and
caution must be practiced when installing, operating and maintaining any
appliance.
Important: Keep a copy of your bill of sale.
The date on the bill establishes the warranty period service be required. Place it
where it can be easily retrieved. If service is performed while the appliance is
under warranty, you may have to show your bill of sale.
© 2001 Electrolux Canada Corp.
All rights reserved
2
Page 3

IMPORTANT SAFETY INSTRUCTIONS
Read all instructions before using this appliance.
Save these instructions for future reference.
This guide contains important safety symbols and instructions. Please pay special attention to these symbols and follow all
instructions given. Here is a brief explanation of these symbols.
This symbol will help you to situations that may cause serious bodily harm, death or property damage.
This symbol will help you to situations that may cause bodily injury or property damage.
• Remove all tape and packaging wrap before using the range.
Destroy the carton and plastic bags after unpacking the
range. Never allow children to play with packaging material.
• Proper Installation—Be sure your appliance is properly installed and grounded by a qualified technician in accordance
with CSA C22.1 PART 1 — latest edition and local code
requirements. Install only per installation instructions provided
in the literature package for this range.
Ask your dealer to recommend a qualified technician and an
authorized repair service. Know how to disconnect the electrical
power to the range at the circuit breaker or fuse box in case of an
emergency.
• User Servicing — Do not repair or replace any part of the
appliance unless specifically recommended in the manuals.
All other servicing should be done only by a qualified technician
to reduce the risk of personal injury and damage to the range.
• Never modify or alter the construction of a range by removing panels, wire covers or any other part of the product.
Stepping, leaning or sitting on the door or
drawer of this range can result in serious injuries and may also
cause damage to the range. Do not allow children to climb or play
around the range. The weight of a child on an open door may cause
the range to tip, resulting in serious burns or other injury.
Do not use the oven for storage.
• Storage in or on Appliance — Flammable materials should
not be stored in an oven, near surface units or in the storage
drawer. This includes paper, plastic and cloth items, such as
cookbooks, plasticware and towels, as well as flammable liquids.
Do not store explosives, such as aerosol cans, on or near the
range. Flammable materials may explode and result in fire or
property damage.
Do not store items of interest to children in the
cabinets above a range or on the backguard of a range.
Children climbing on the range to reach items could be seriously
injured.
• Do not leave children alone. Children should not be left alone
or unattended in the area where an appliance is in use. They
should never be allowed to sit or stand on any part of the
appliance.
• DO NOT TOUCH SURFACE UNITS, AREAS NEAR THESE
UNITS, OVEN HEATING ELEMENTS OR INTERIOR SURFACES
OF THE OVEN. Both surface units and oven heating elements
may be hot even though they are dark in color. Areas near surface
units may become hot enough to cause burns. During and after
use, do not touch, or let clothing or other flammable materials
touch these areas until they have had sufficient time to cool.
Among these areas are the cooktop, surfaces facing the cooktop,
the oven vent openings and surfaces near these openings, oven
door and window.
• Wear Proper Apparel — Loose-fitting or hanging garments
should never be worn while using the appliance. Do not let
clothing or other flammable materials contact hot surfaces.
Never use your appliance for warming or
heating the room.
• Do Not Use Water or Flour on Grease Fires—Smother the
fire with a pan lid, or use baking soda, a dry chemical or
foam-type extinguisher.
• When heating fat or grease, watch it closely. Fat or grease may
catch fire if allowed to become too hot.
• Use Only Dry Potholders — Moist or damp potholders on hot
surfaces may result in burns from steam. Do not let the
potholders touch hot heating surface units or interior oven
elements. Do not use a towel or other bulky cloth instead of a
potholder.
• Do Not Heat Unopened Food Containers—Build-up of pressure may cause the container to burst and result in injury.
• Remove the oven door from any unused range if it is to be
stored or discarded.
• IMPORTANT—Do not attempt to operate the oven during a
power failure. If the power fails, always turn the oven off. If
the oven is not turned off and the power resumes, the oven will
begin to operate again. Food left unattended could catch fire or
spoil.
Electronic controllers can be damaged by cold
temperatures. When you use your range for the first time, or if
it has not been used for a long period of time, make sure that it
has been exposed to a temperature above 0°C/32°F for at
least 3 hours before connecting it to the power supply.
3
Page 4

IMPORTANT SAFETY INSTRUCTIONS (continued)
IMPORTANT INSTRUCTIONS FOR USING
YOUR COOKTOP
• Know which knob controls each surface heating unit.
• Use Proper Pan Size — This appliance is equipped with one or
more surface units of different sizes. Select utensils having flat
bottoms large enough to cover the surface unit. The use of
undersized utensils will expose a portion of the surface heating
unit to direct contact and may result in ignition of clothing. Proper
relationship of utensil to the surface unit will also improve
efficiency.
• Keep Oven Vent Ducts Unobstructed. The oven is vented
between the cooktop and the backguard. Touching the surfaces
in this area when the oven is operating may cause severe burns.
Also, do not place plastic or heat-sensitive items on or near the
oven vent. These items could melt or ignite.
• Placement of Oven Racks. Always place oven racks in desired
location while oven is cool. Remove all utensils from the rack
before removing rack. If rack must be moved while oven is hot, use
extreme caution. Use potholders and grasp the rack with both
hands to reposition. Do not let potholders contact the hot oven
element or interior of the oven.
• Utensil Handles Should Be Turned Inward and Should Not
Extend Over Adjacent Surface Units — To reduce the risk of
burns, ignition of flammable materials, and spillage due to
unintentional contact with the utensil.
• Never Leave Surface Units Unattended — Boilovers cause
smoking and greasy spillovers that may ignite, or a pan that has
boiled dry may melt.
• Protective Liners — Do not use aluminum foil to line oven
bottom or any other part of the range. Only use aluminum foil as
recommended for baking if used as a cover placed on the food.
Any other use of protective liners or aluminum foil may result in a
risk of electric shock or fire or a short circuit.
• Glazed Cooking Utensils — Only certain types of glass, glass/
ceramic, ceramic, earthenware, or other glazed utensils are suitable for rangetop service without breaking due to the sudden
change in temperature. Check the manufacturer’s recommendations for rangetop use.
FOR GLASS COOKTOPS ONLY
• Do Not Cook on Broken Cooktop — If cooktop should break,
cleaning solutions and spillovers may penetrate the broken
cooktop and create a risk of electric shock. Contact a qualified
technician immediately.
• Clean Cooktop with Caution — If a wet sponge or cloth is used
to wipe spills on a hot cooking area, be careful to avoid a steam
burn. Some cleaners can produce harmful fumes if applied to a
hot surface.
• Do not use the broiler pan without its insert. The broiler pan
and grid allow dripping fat to drain and be kept away from the
high heat of the broiler.
• Do not cover the broiler grid with aluminum foil. Exposed fat
and grease could ignite.
• Do not touch a hot light bulb with a damp cloth. Doing so
could cause the bulb to break. Disconnect the range or turn off
the power to the range before removing and replacing light bulb.
IMPORTANT INSTRUCTIONS FOR
CLEANING YOUR RANGE
• Clean the range regularly to keep all parts free of grease
that could catch fire. Exhaust fan ventilation hoods and grease
filters should be kept clean. Do not allow grease to accumulate.
Greasy deposits in the fan could catch fire. Refer to the hood
manufacturer’s instructions for cleaning.
• Cleaners/Aerosols — Always follow the manufacturer’s recommended directions for use. Be aware that excess residue from
cleaners and aerosols may ignite causing damage and/or injury.
SELF-CLEANING OVENS:
• Clean in the self-cleaning cycle only the parts of the oven
listed in this owner’s guide. Before self-cleaning the oven,
remove the broiler pan and any utensils stored in the oven.
• Do not clean the oven door gasket. Care should be taken not to
rub, damage or move the gasket.
IMPORTANT INSTRUCTIONS FOR USING YOUR
OVEN
• Use Care When Opening Door — Stand to the side of the range
when opening the door of a hot oven. Let hot air or steam escape
before you remove or replace food in the oven.
SA VE THESE INSTRUCTIONS
• Do not use oven cleaners. No oven cleaner or oven liner
protective coating of any kind should be used in or around any
part of the oven.
• Remove oven racks. Oven racks colour will change if left in the
oven during a self-cleaning cycle.
The health of some birds is extremely sensitive
to the fumes given off during the self-clean cycle of any range.
Move birds to another well ventilated room.
4
Page 5
Installation Instructions
Installation and service must be performed by a qualified technician.
IMPORTANT: Save for the local electrical inspector’s use.
Read and save these instructions for future reference.
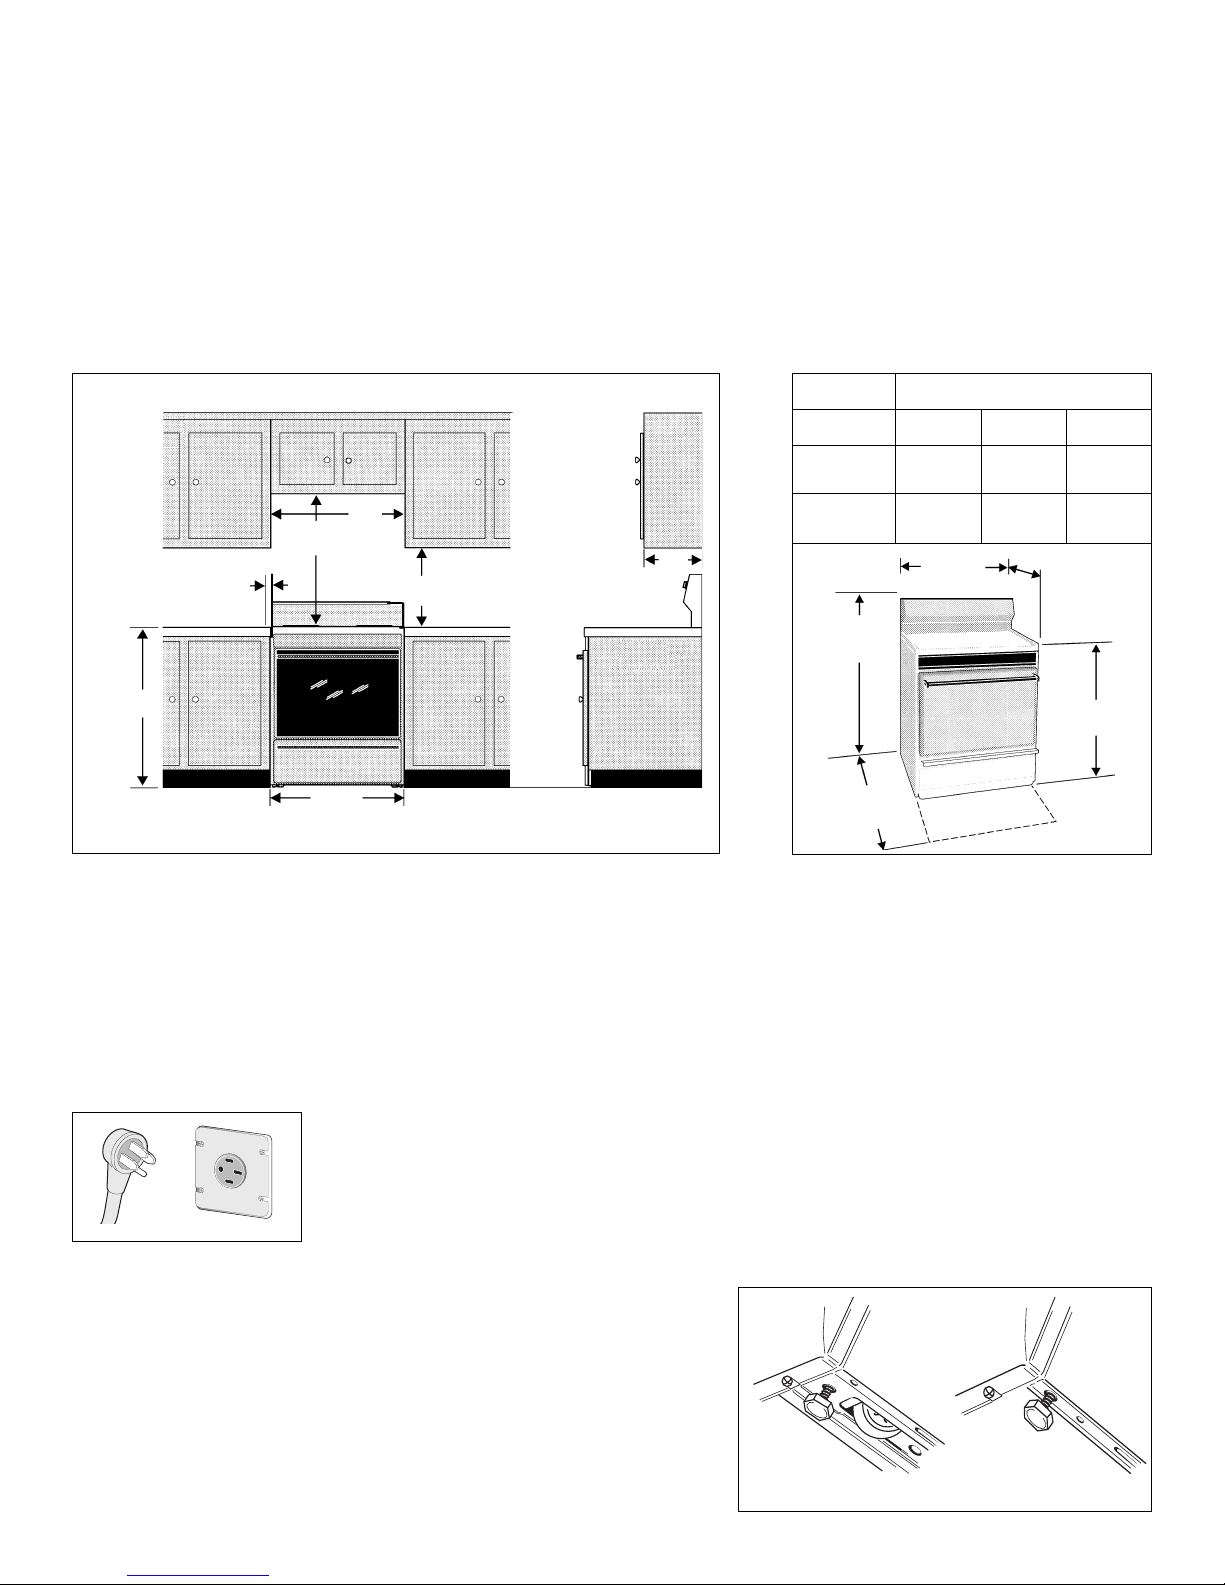
Clearances and Dimensions
a. Provide adequate clearances between the range and adjacent combustible surface (1.3cm (1/2”) to the cabinet side walls and
the rear wall).
b. Location—Check location where the range will be installed. Check for proper electrical supply and the stability of floor.
c. Dimensions that are shown must be used. Given dimensions provide minimum clearance. Contact surface must be solid and
level.
FRONT
VIEW
91.4 cm
(36”)
Minimum to
wall on either
side of range.
1.3 cm
(1/2”)
76.2 cm (30”)
Minimum
B
RANGE
SIDE
VIEW
24”
C
*
Minimum to
45.7 cm
(18”)
cabinets on
either side of
range.
Maximum depth for
cabinets above
range top.
33 cm
(13”)
30”
122 cm (48”)
Maximum
114.3 cm (45”)
Door Open
A
61 cm
24”
76.2 cm
30”
DIMENSIONS
B
63.5 cm
25”
78.7 cm
31”
A
66 cm (26”)
C
61 cm
24”
76.2 cm
30”
91.4 ± 0.3 cm
(36 ± 1/8”)
* 76.2 cm (30”) Minimum clearance between the top of the cooking surface and the bottom of an unprotected wood or metal
cabinet; or 61 cm (24”) Minimum when bottom of wood or metal cabinet is protected by not less than 0.64 cm (1/4”) flame
retardant millboard covered with not less than 0.038 cm (0.015”) stainless steel, 0.061 cm (0.024”) aluminum or 0.051 cm
(0.020”) copper . 1.3 cm (1/2”) clearance is the minimum for the r ear and sides of the range. Follow all dimension requir ements
provided above to prevent property damage, Potential fire hazard, and incorrect countertop and cabinet cuts.
To eliminate the risk of burns or fire by reaching over heated surface units, cabinet storage space located above the
surface units should be avoided. If cabinet storage is to be provided, the risk can be reduced by installing a range hood
that projects horizontally a minimum of 12.7 cm (5”) beyond the bottom of the cabinets.
Electrical Hook-Up
This appliance must be connected to a grounded 120/240 volt or 120/208 volt Range outlet. If no
outlet is available, have one installed by a qualified electrician.
Location
Set your new range 1.3 cm (1/2”) away from the rear wall and line it up with
the kitchen counters. Make sure there is at least 1.3 cm (1/2”) of clearance
between each side of the range and the kitchen counters. Allow 7.6 cm (3”)
min. clearance between your range and the refrigerator, if they are side by
side.
Leveling
For good baking results, your range should be level. Screw type leveling legs
are provided at each corner of the range at the base. Remove the storage
drawer to adjust the leveling legs. (Refer to Storage Drawer section).
24” Models30” Models
5
Page 6

Installation Instructions (continued)
To level the range:
1. Use a 1-1/4” open end key or an adjustable wrench to equally unscrew the four leveling legs
two to three turns each.
2. Install an oven rack in the center of the oven.
3. Move the range to its final position, then put a spirit level on the rack to check for levelness.
Take two readings, one with the level placed diagonally first in one direction, and then the
other.
4. Use the 1-1/4” key or wrench to adjust the leveling legs. T urn each one until the range stands
firm without wobbling.
5. Some models are supported by smooth glide rollers to facilitate moving.
UNLOCK
LOCK
LOCKING THE FRONT ROLLERS
(some of the 30” models only)
If floor is flat and level, open the drawer and lower the front roller locking levers (some
models) to prevent the range from moving.
If floor is not flat or level or if this model has rollers without locking levers, use the 4 leveling
legs to level, support and prevent the range from moving.
Oven Light
Do not turn the oven light on during the self-cleaning cycle. High
temperature will reduce lamp life.
On some models an interior oven light will turn on automatically when the oven door is opened.
The oven light may be turned on when the door is closed by using the oven light switch located on
or underneath the control panel.
On a self clean oven the lamp is covered with a glass shield held in place by a wire holder.
THIS GLASS SHIELD MUST BE IN PLACE WHENEVER THE OVEN IS IN USE.
To replace the light bulb:
BE SURE OVEN IS COOL.
1. T urn the power off at the main source.
2. Wear a leather -faced glove for protection against possible broken glass.
3. Replace bulb with a 40 watt appliance bulb only .
4. For self-cleaning oven, press wire holder to one side to release glass shield, change bulb and be sure to replace glass shield.
Surface Light
(some models)
elements are cool.
Be sure all surface element control knobs are turned off “ ” and
Use switch located on or underneath the control panel to turn the surface light ON/OFF .
Replace the surface light, if after repeated attempts to turn it on you are not successful.
30” RANGE SURFACE LIGHT REPLACEMENT (some models)
To remove and r eplace the fluorescent light:
1. Place your fingers under the tube at approximately 20.3 cm (8”) from each end.
2. To remove, turn the tube 90° then pull it down and out of its sockets.
3. To replace the tube, engage the new tube into the sockets, then rotate and snap the tube in
30” Models
place. Turn on the surface light to make sure it will lit.
24” RANGE SURFACE LIGHT REPLACEMENT (Some models)
To remove and r eplace the fluorescent light:
1. Lift up the control panel cover .
2. Place your fingers on the tube at approximately 20.3 cm (8”) from each end.
3. To remove, turn the tube 90° then pull it out of its sockets.
4. T o replace the tube, engage the new tube into the sockets, then r otate and snap the tube in
place light to make it sure it will lit.
White-Westinghouse
24” Models
6
Page 7
Circuit Protection
As a protection against surcharge, a 15 amp, 120 volt fuse is provided for each of the electric outlet(s) (2 max.) located on top of
the control panel. To access the fuse(s) raise the control panel cover. Models with no electric outlet have no fuse.
Indicator Light
Some models have an indicator light for each heating unit, other models have an indicator light for each pair of heating units. Some
models have indicator lights only with the warmer zone and warmer drawer .
The indicator light glows as soon as a heating unit is turned on. Check if the indicator light glows when the control knob of the
individual heating unit is turned on. If the knob is set to a very low temperature setting, the indicator may glow and yet, the heating
unit may not be heating at all. If this happens, turn the knob to a higher setting until the heating unit comes on.
When cooking is finished, a glance at the indicator lights is an easy check to be sure all the control knobs have been turned to OFF.
Models with Touch Pad Control (only)
NOTE: When the oven is in a baking, convection baking, broiling or self-cleaning operation, a cooling fan may automatically
turn on and off to cool internal parts. It is normal and the fan may continue to run even after oven is turned off.
Selecting Surface Cooking Utensils
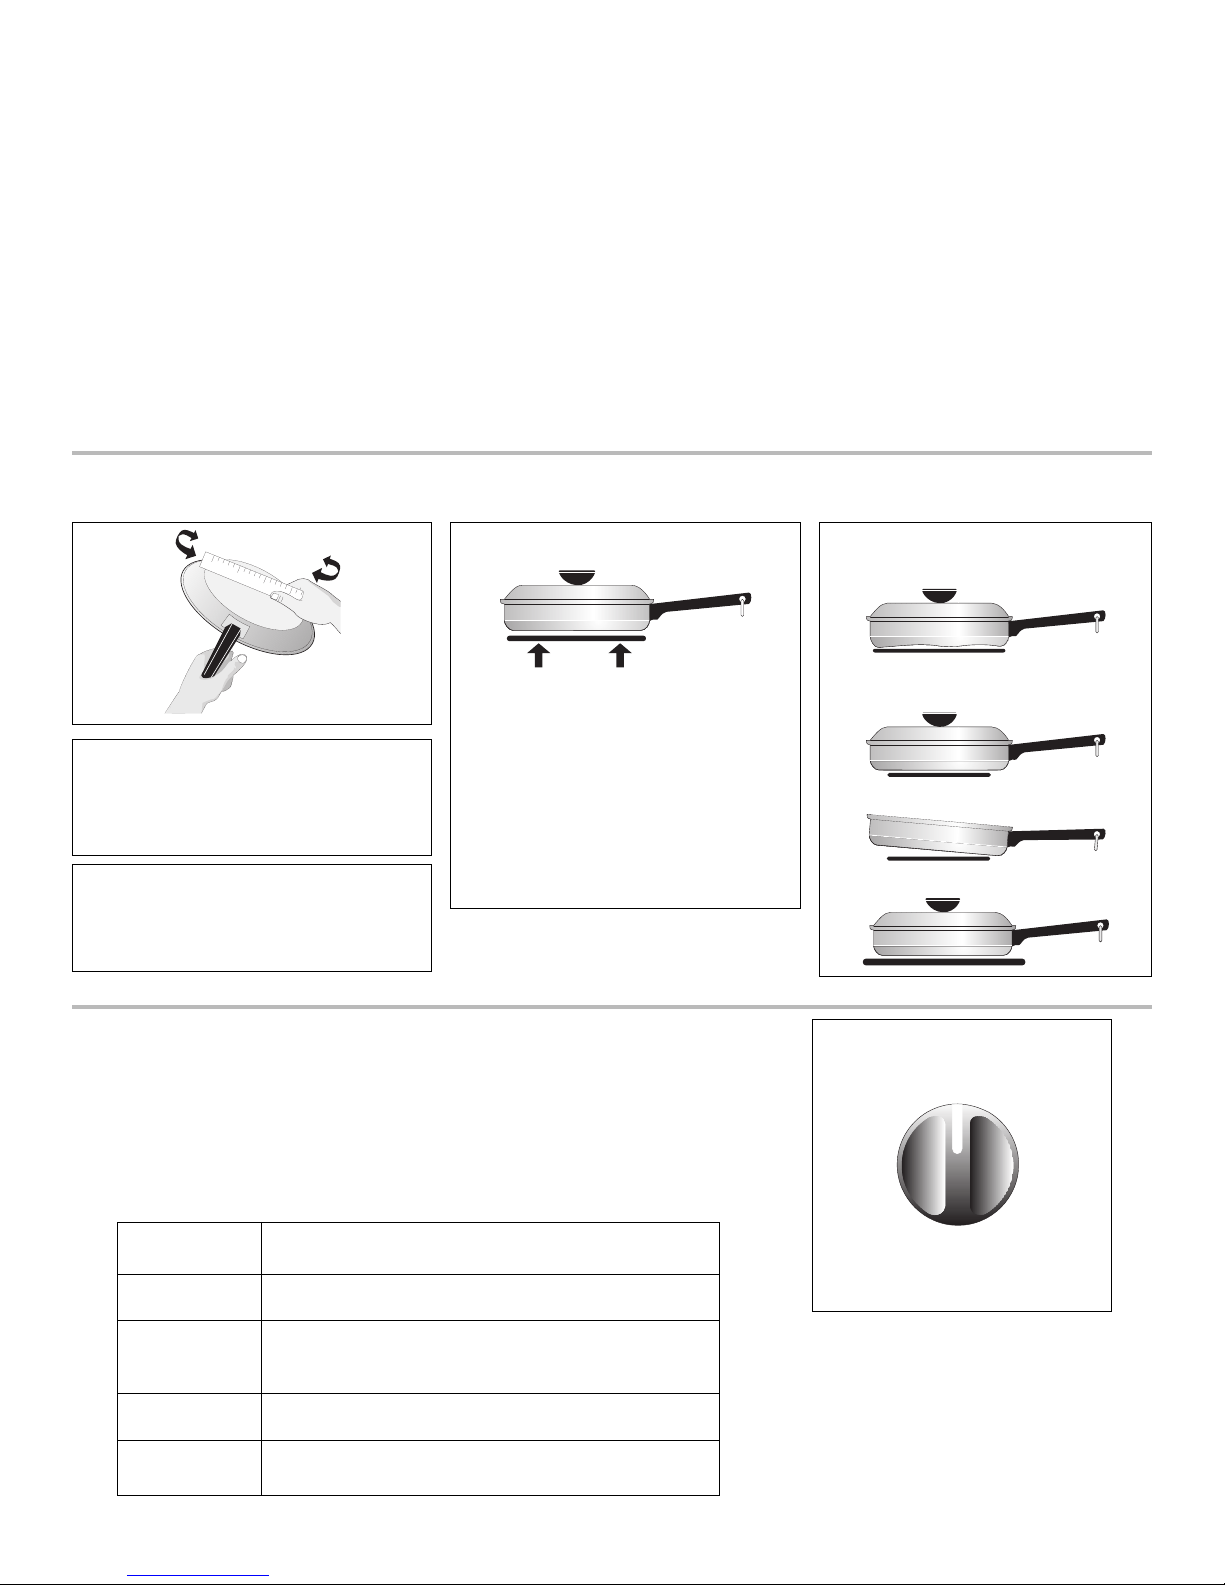
For best results and energy conservation, choose cooking utensils that have these characteristics:
*GOOD
• Flat bottom and straight sides.
• Tight fitting lids.
• Weight of handle does not tilt pan. Pan
Pans should have flat bottoms that make
good contact with the entire surface element. Check for flatness by rotating a ruler
across the bottom. There should be no
gaps between the pan and ruler.
Note: Always use a utensil for its intended
purpose. Follow manufacturer’s instructions. Some utensils were not made to be
used in the oven or on the cooktop.
is well balanced.
• Pan sizes match the amount of food to
be prepared and the size of the surface
element.
• Made of material that conducts heat
well.
• Easy to clean.
* Specialty pans such as lobster pots, griddles
and pressure cookers may be used but must
conform to the above recommended cookware requirements.
Setting Surface Controls (some models)
1. Place the pan on the surface element.
2. Push in and turn the surface element control knob to desired setting.
3. The surface signal light will glow when one or more elements are turned on.
Always turn the element off before removing the pan.
The suggested settings found in the chart below are based on cooking inmediumweight aluminum pans with lids. Settings may vary when using other types of pans.
POOR
• Curved and warped pan bottoms.
• Pan overhangs unit by more than 2.5
cm (1”).
• Heavy handle tilts pan.
• Pan is smaller than element.
OFF
LO
HI
19
28
Setting
MAX
MEDIUM
MEDIUM LOW
MIN
T ype of Cooking
Start most foods, bring water to a boil, pan broiling.
Maintain a slow boil, thicken sauces and gravies,
steam vegetables.
Keep foods cooking, poach, stew.
Keep warm, melt, simmer.
37
46
5
Note: The size and type of utensil
used, and the amount and type of
food being cooked will influence the
setting needed for best cooking re-
7
Page 8

Specialty Pans & Trivets
Woks with flat bottoms suitable for
use on your cooktop are available in
most cookshop or hardware stores.
Round-bottomed woks (with a support ring that does not extend beyond the heating element) may also
be used. The metal ring was designed to support the wok safely
when it is filled with large amounts
of liquids (soup making) or fat (frying).
DO NOT use two
elements (if the cooktop is not
equipped with bridge element) to
heat one large pan such as a roaster
or griddle, or allow cooking utensils
to boil dry . The bottom surface of
the pan in either of these situations
could cause discoloring or crazing of
the porcelain enamel range surface,
and damage to the surface elements
and/or damage to the drip pans (if
equipped).
DO NOT use a wok if it is equipped with
a metal ring that extends beyond the
surface element. Because this ring traps
heat, the surface element and cooktop
surface could be damaged.
For glass smoothtop models, only flat
bottomed woks (without support rings)
may be used.
Canning Tips & Information
Canning can generate
large amounts of steam. Use extreme
caution to prevent burns. Always raise
the lid to vent steam away from you.
Wire trivets: Do not use wire trivets. Cookware bottoms must be in
direct contact with the surface elements.
1. Use tested recipes and follow instructions carefully. Check with your local
Cooperative Agricultural Extension Service or a manufacturer of glass jars for the
latest canning information.
2. Use flat-bottomed canners only. Heat is spread more evenly when the bottom
surface is flat.
3. Center canner on the surface element.
4. Start with hot water and a high heat setting to reduce the time it takes to bring
the water to a boil; then reduce the heat setting as low as possible to maintain a
constant boil.
5. It is best to can small amounts and light loads.
Prevent damage to cooktop:
1. Do not use water bath or pressure canners that extend more than one inch
beyond the edge of the surface element.
2. Do not leave water bath or pressure canners on high heat for an extended
amount of time.
3. Alternate surface elements between each batch to allow the units and
surrounding surfaces to cool down. T ry to avoid canning on the same element all
day.
Safe canning requires that harmful micro-organisms are destroyed
and the jars are sealed completely. When canning in a water bath canner, a gentle
but steady boil must be maintained continuously for the required time.
8
Page 9
Oven Baking
For best cooking results, heat the oven before baking cookies, breads, cakes, pies or pastries, etc... There is no need to preheat the
oven for roasting meat or baking casseroles.
The cooking times and temperatures needed to bake a product may vary slightly from your previously owned appliance.
Baking Problems and Solutions Chart
Baking
Problems
Cookies and biscuits
burn on the bottom.
Cakes too dark on
top or bottom.
Cakes not done in the
center.
Cakes not level.
Causes
• Cookies and biscuits put into the
oven before the preheating time is
completed.
• Oven rack overcrowded.
• Dark pan absorbs heat too fast.
• Cakes put into the oven before preheating time is completed.
• Rack position too high or low.
• Oven too hot.
• Oven too hot.
• Incorrect pan size.
• Pan not centered in oven.
• Range not level.
• Pan too close to oven wall or rack
overcrowded.
• Pan warped.
Corrections
• Allow oven to preheat to the selected temperature before
placing food in oven.
• Choose pan sizes that will permit 5.1 cm to 10.2 cm (2” to 4”)
of air space on all sides when placed in the oven.
• Use a medium-weight aluminum baking sheet.
• Allow oven to preheat to the selected temperature before
placing food in the oven.
• Use proper rack position for baking needs.
• Set oven temperature 25°F/12°C lower than recommended.
• Set oven temperature 25°F/12°C lower than recommended.
• Use pan size suggested in recipe.
• Use proper rack position and place pan so there is 5.1 cm to
10.2 cm (2” to 4”) of space on all sides of pan.
• Place a marked glass measuring cup filled with water on the
center of the oven rack. If the water level is uneven, refer to
the installation instructions for leveling the range.
• Be sure to allow 5.1 cm to 10.2 cm (2” to 4”) of clearance on
all sides of each pan in the oven.
• Do not use pans that are dented or warped.
Foods not done when
cooking time is up.
• Oven too cool.
• Oven overcrowded.
• Oven door opened too frequently.
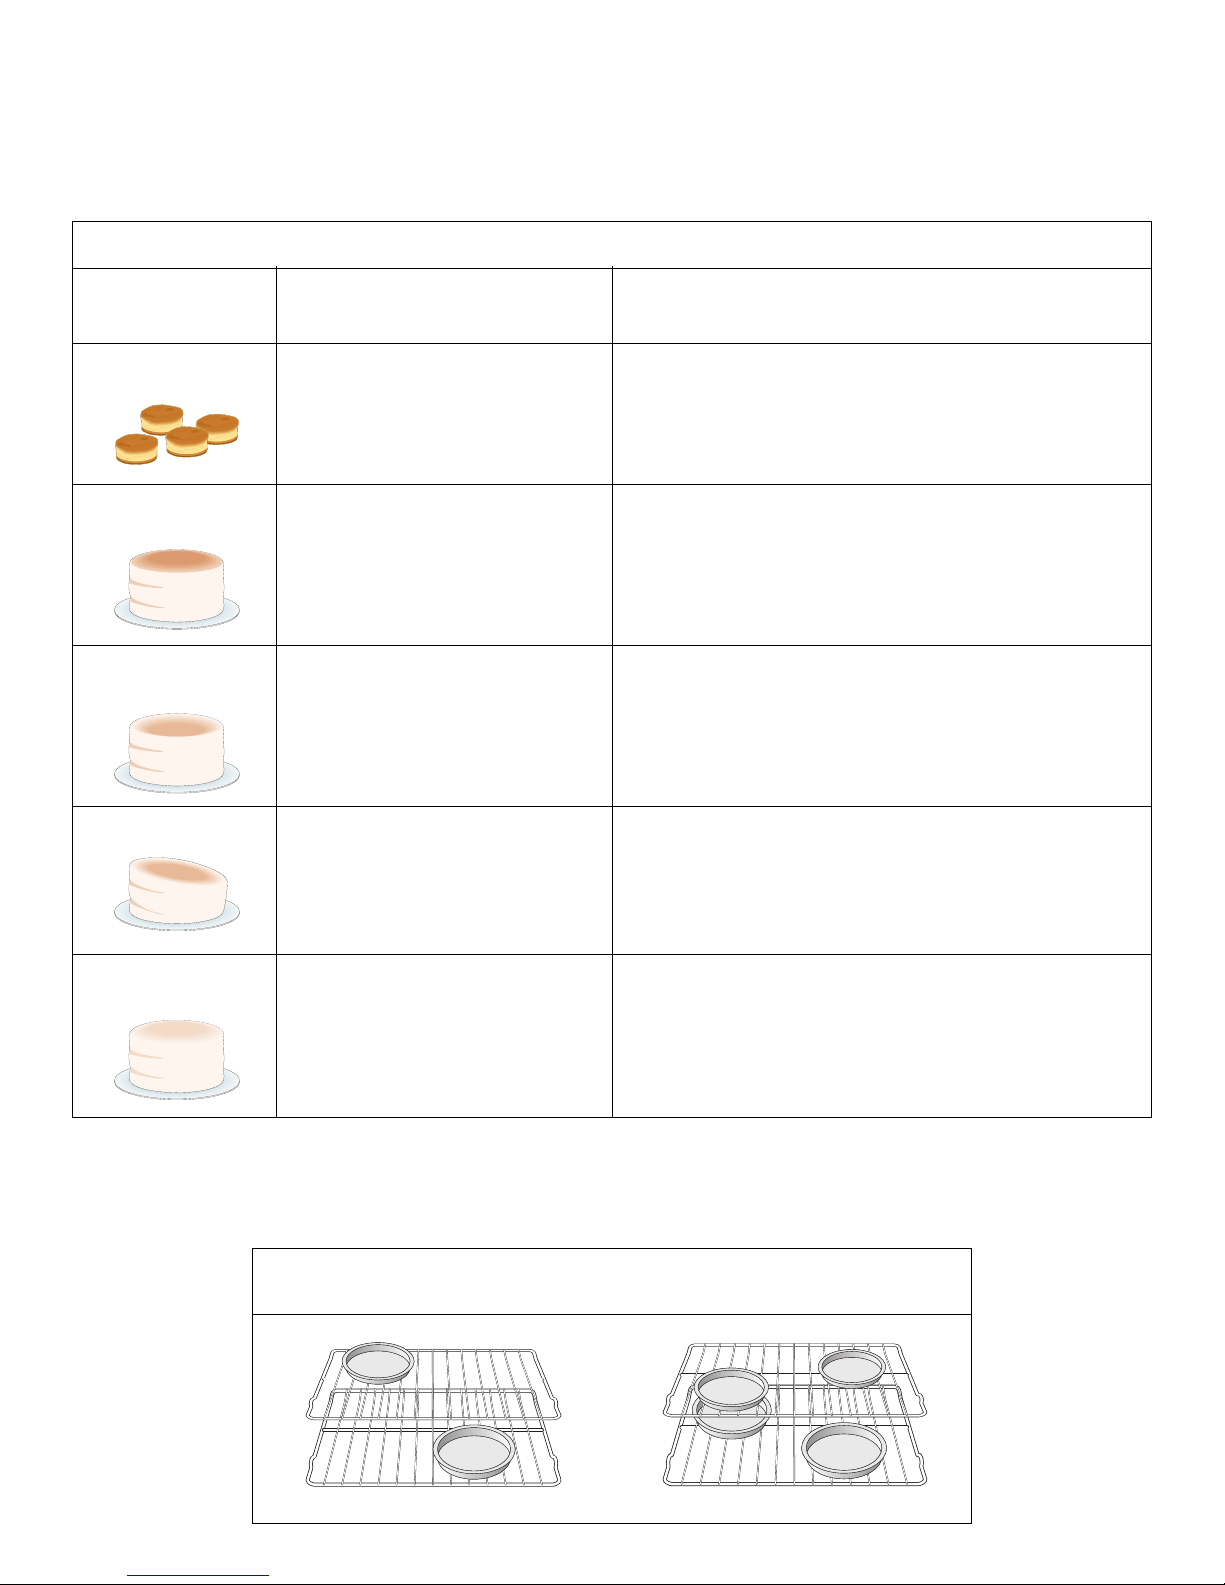
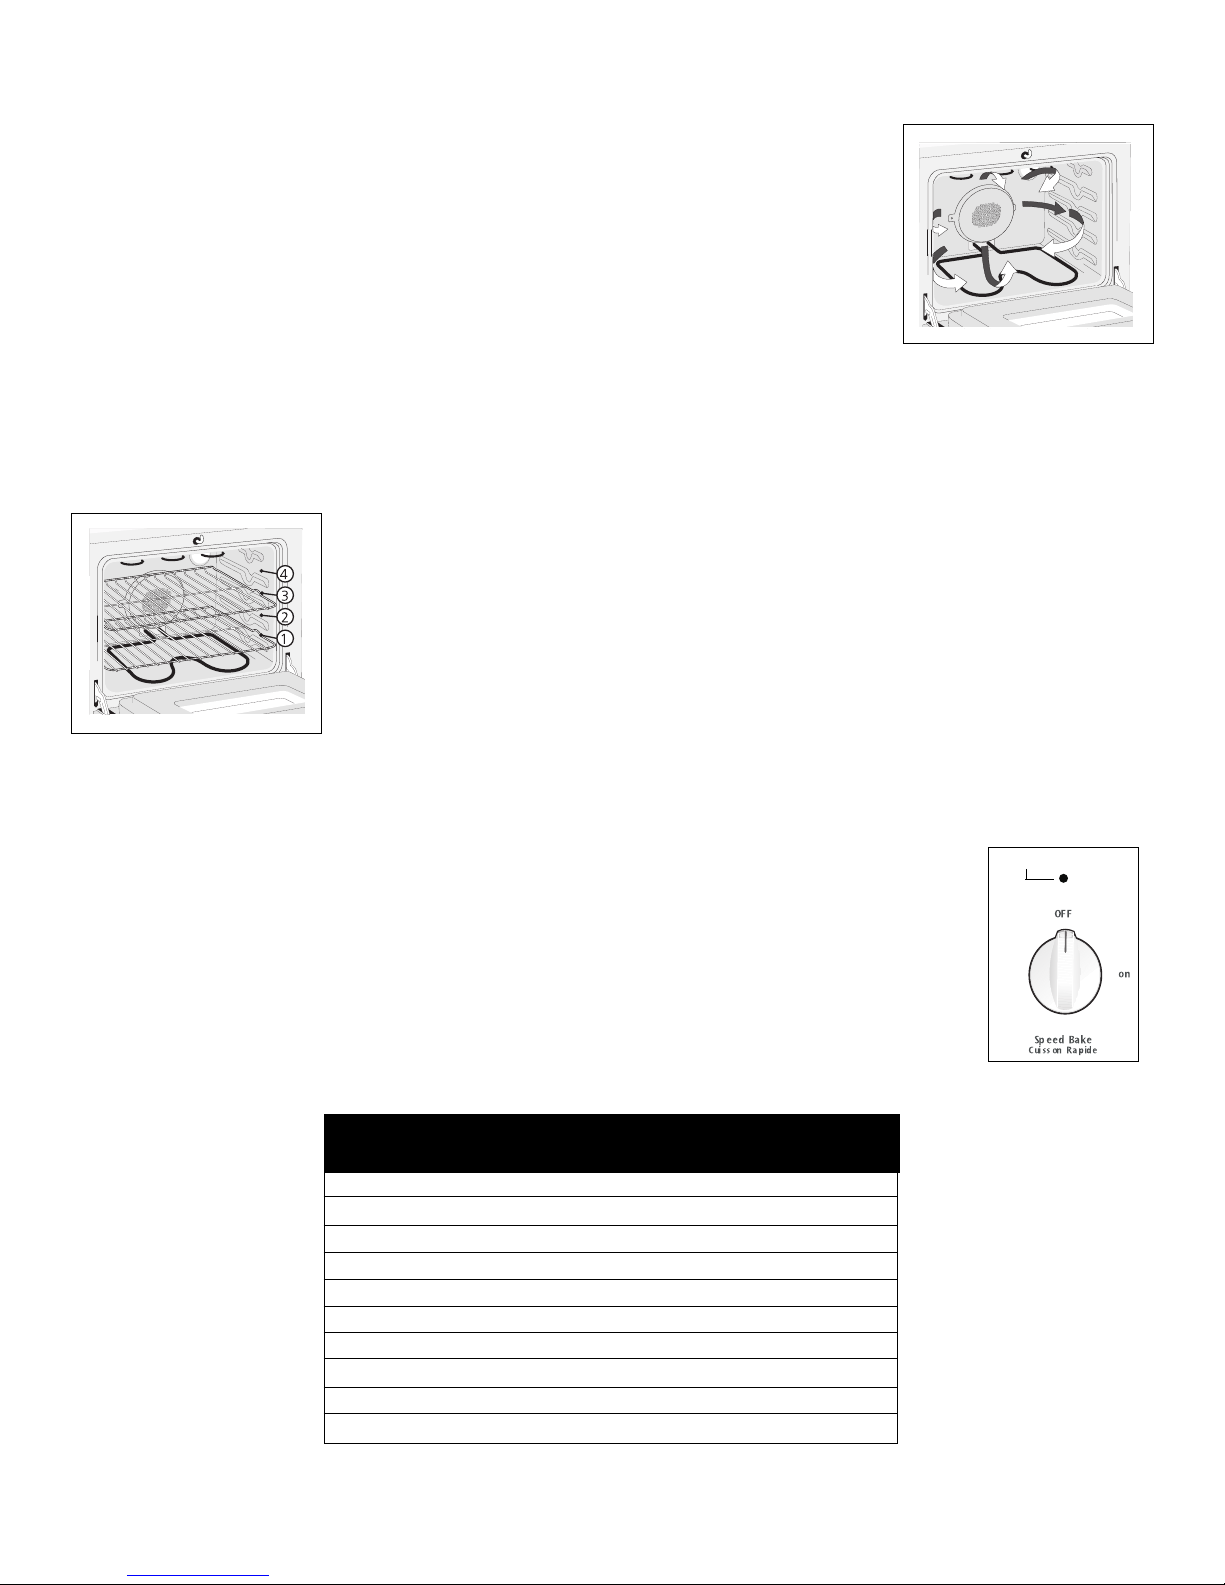
Air Circulation in the Oven
For good air circulation in the oven and best baking results, center pans as much as possible. Allow 5.1 to 10.2 cm (2” to 4”) around
the utensil(s) for proper air circulation and be sur e pans do not touch each other, the door , sides or back of oven. The hot air must
circulate around the pans for even heat to reach all parts of the oven.
• Set oven temperature 25°F/12°C higher than suggested and
bake for the recommended time.
• Be sure to remove all pans from the oven except the ones to
be used for baking.
• Open oven door only after shortest recommended baking
time.
If using multiple pans, stagger as shown.
If using one pan, place in center of oven.
9
Page 10

Convection Cooking (some models)
NOTE: The convection fan automatically turns off when the oven door is opened while oven is in a convection
mode and resumes when the door is closed again.
The convection oven uses a fan located in the rear wall of the oven to circulate heated air around the food to be cooked. The
controlled air flow pattern quickly seals the food surface retaining the natural juices and flavour. This method of cooking enables
you to obtain the best culinary results when baking, thawing, dehydrating and roasting foods.
Convection notes:
1. Most recipes can be made with temperatures set at 13°C (25°F) lower than temperatures required for normal radiant cooking
methods. Refer to the electronic oven control operating instructions included in section “Electronic Oven Control Guide” of this
Use & Care Guide. This can result in considerable reduction of food shrinkage and more tender meats.
2. Batch cooking is more convenient with better results.
3. Defrosting is quicker in convection mode when compared to regular radiant cooking.
4. Remember to use tested recipes with times adjusted for convection baking/roasting when using the convection mode. Times
may be reduced by as much as 30% when using the convection feature.
Convection Roasting (some models)
When convection roasting, use the broiler pan and grid, and the roasting rack. The
broiler pan will catch grease spills and the grid will help prevent grease spatters.
The roasting rack will hold the meat.
1. Place oven rack on bottom or next-bottom rack position.
2. Place the grid in the broiler pan. The roasting rack fits on the grid allowing the
heated air to circulate under the food for even cooking and helps to increase
browning on the underside. Make sure the roasting rack is securely seated on
the grid in the broiler pan. DO NOT use the broiler pan without the grid or
cover the grid with aluminum foil.
Roasting
Rack
Grid
Broiler Pan
10
Page 11
Speed BakeTM Cooking System (some models)
Speed BakeTM Cooking System uses a fan to circulate the oven’s heat uniformly and
continuously around the oven. This improved heat distribution allows for fast, even cooking and
browning results. It also gives better baking results when using two racks at the same time.
Heated air flows around the food from all sides, sealing in juices and flavors. Meats cooked with
Speed BakeTM Cooking System are juicer . Poultry is crisp on the outside while staying tender and
moist on the inside. Breads and pastry brown more evenly. Most foods baked in a standard oven
can be cooked faster and more evenly with Speed BakeTM Cooking System.
Benefits of Speed BakeTM Cooking System:
- Foods cook up to 30% faster, saving time and energy.
- Two racks can be used with mor e even cooking and br owning.
- No special pans or bakeware needed.
General Cooking Instructions:
1. To convert baking times from normal recipes to Speed Bake times, start with a 30%
reduction in time and increase the time until desired doneness is obtained. Time reductions
will vary depending on the amount and type of food.
2. Preheating is not necessary when cooking with Speed Bake, except with items such as
cakes, cookies, biscuits, breads, etc.
3. When using two racks at the same time, place them in positions 1 and 3 for the best results.
4. When baking cakes with Speed Bake, set temperature 25°F (13°C) degrees lower than the
recommended setting for best results.
To Set Speed BakeTM Cooking System:
1. Program the oven as you normally would for baking. Speed Bake may be used with Bake, Time Bake and Delayed Time Bake
modes.
2. T urn the Speed Bake switch to ON position. The indicator light will glow and the fan will come on. The
fan stays on when oven door is closed and shuts off while the oven door is opened. The fan will continue
to operate until baking is complete.
3. When using Speed Bake feature along with the Delayed Timed Bake mode, the fan will begin to operate
when the control is set. The oven elements will not begin to operate until the Delayed Start Time is
reached. This operation is normal.
4. To cancel Speed Bake function, push CANCEL on the oven control as you would to cancel any baking
function.
Note: Speed Bake mode will not work during a clean cycle.
Recommended Foods for
Speed BakeTM Cooking System
Food Item
Casseroles
Meats
Poultry
Frozen Foods
Refrigerator Cookies or Biscuits
Rolls/Breads/Pizza
Vegetables
Baked potatoes
Pies/Pastries
Decrease Cook Time by:
25%
15% (or 5 mins/pound)
30% (or 10 mins/pound)
20%
25% (or 2 to 5 min.)
25% (or 5 min.)
25%
25%
30%
Indicator Light
11
Page 12

Broiling
Broiling is a method of cooking tender cuts of meat by direct heat under the broil element of the oven.
Preheating
Preheating is suggested when searing rare steaks. (Remove the broiler pan before preheating.
Foods will stick if placed on hot metal.) T o pr eheat, set the oven contr ol(s) to BROIL as instructed
in the Owner’s Guide. Wait for the element to become red-hot, usually about 2 minutes.
Preheating is not necessary when broiling meats well-done.
To Broil
to the “Broil Stop”
Open door
position when broiling.
Broil on one side until the food is browned; turn and cook on the second side. Season and serve.
Always pull rack out to the “stop” position before turning or removing food.
Always pull oven rack out
to the “stop” position before turning or removing
food.
Determining Broiling Times
Broiling times vary, so watch the food closely. Time not only depends on the distance from the
element, but on the thickness and aging of meat, fat content and doneness preferred. The first
side usually requires a few minutes longer than the second. Frozen meats also require additional
time.
Broiling Tips
Grid
The broiler pan and its grid allow dripping grease to drain and be kept away from the high heat
of the broiler.
DO NOT use the pan without its grid. DO NOT cover the grid with foil.
The exposed grease could ignite.
Should an oven fire occur, close the oven door and turn off the oven. If the fire
continues, throw baking soda on the fire or use a fire extinguisher. DO NOT put water or flour on
Broiler Pan
the fire. Flour may be explosive.
Broiler Clean-Up Tips:
• To make cleaning easier, line the bottom of the broiler pan with aluminum foil. DO NOT cover the br oiler grid with foil.
• To prevent grease from baking on, remove the broiler pan from the oven as soon as cooking is completed. Use hot pads
because the broiler pan is extremely hot. Pour off grease. Soak the pan in HOT, soapy water.
• Clean the broiler pan as soon as possible after each use. If necessary, use soap-filled steel wool pads. Heavy scouring may
scratch the grid.
Oven Settings
For oven settings, refer to the timer section or the electronic oven control.
12
Page 13
Ceramic Glass Cooktop (some models)
The ceramic-glass cooktop has electric heating coils located below the ceramic glass surface. The design of the glass cooktop
outlines the area of the surface heating unit below . Most importantly, make sure the diameter of the pan matches the diameter of
the surface unit. Heat is transferred up through the surface of the cooktop. Only flat-bottomed pans should be used. The type and
size of the cookware, number of surface units in use and the settings of the surface units are factors that will affect the amount of
heat that will spread to areas surrounding the units. The areas surrounding the units may become hot enough to cause burns.
The cooktop should not be used as a cutting board or work surface. Dropping heavy or hard objects on the cooktop may crack it.
Pans with rough bottoms may scratch the cooktop surface. Placing foods directly on the smoothtop surface (without cooking
utensils) is not recommended as difficult cleaning will result and foods may smoke and cause a potential fire hazard. Never use the
griddle or similar cooking sheet on the ceramic glass cooktop.
Types of heating units used (some models)
Depending on model, three types of heating units may be found under the ceramic glass cooktop:
– Regular (single coil) radiant elements of various diameters or shapes.
– Expandable type (double circuits) radiants elements of various diameters or shapes.
– Bridge Expandable type (triple circuits) radiants elements of various diameters or shapes.
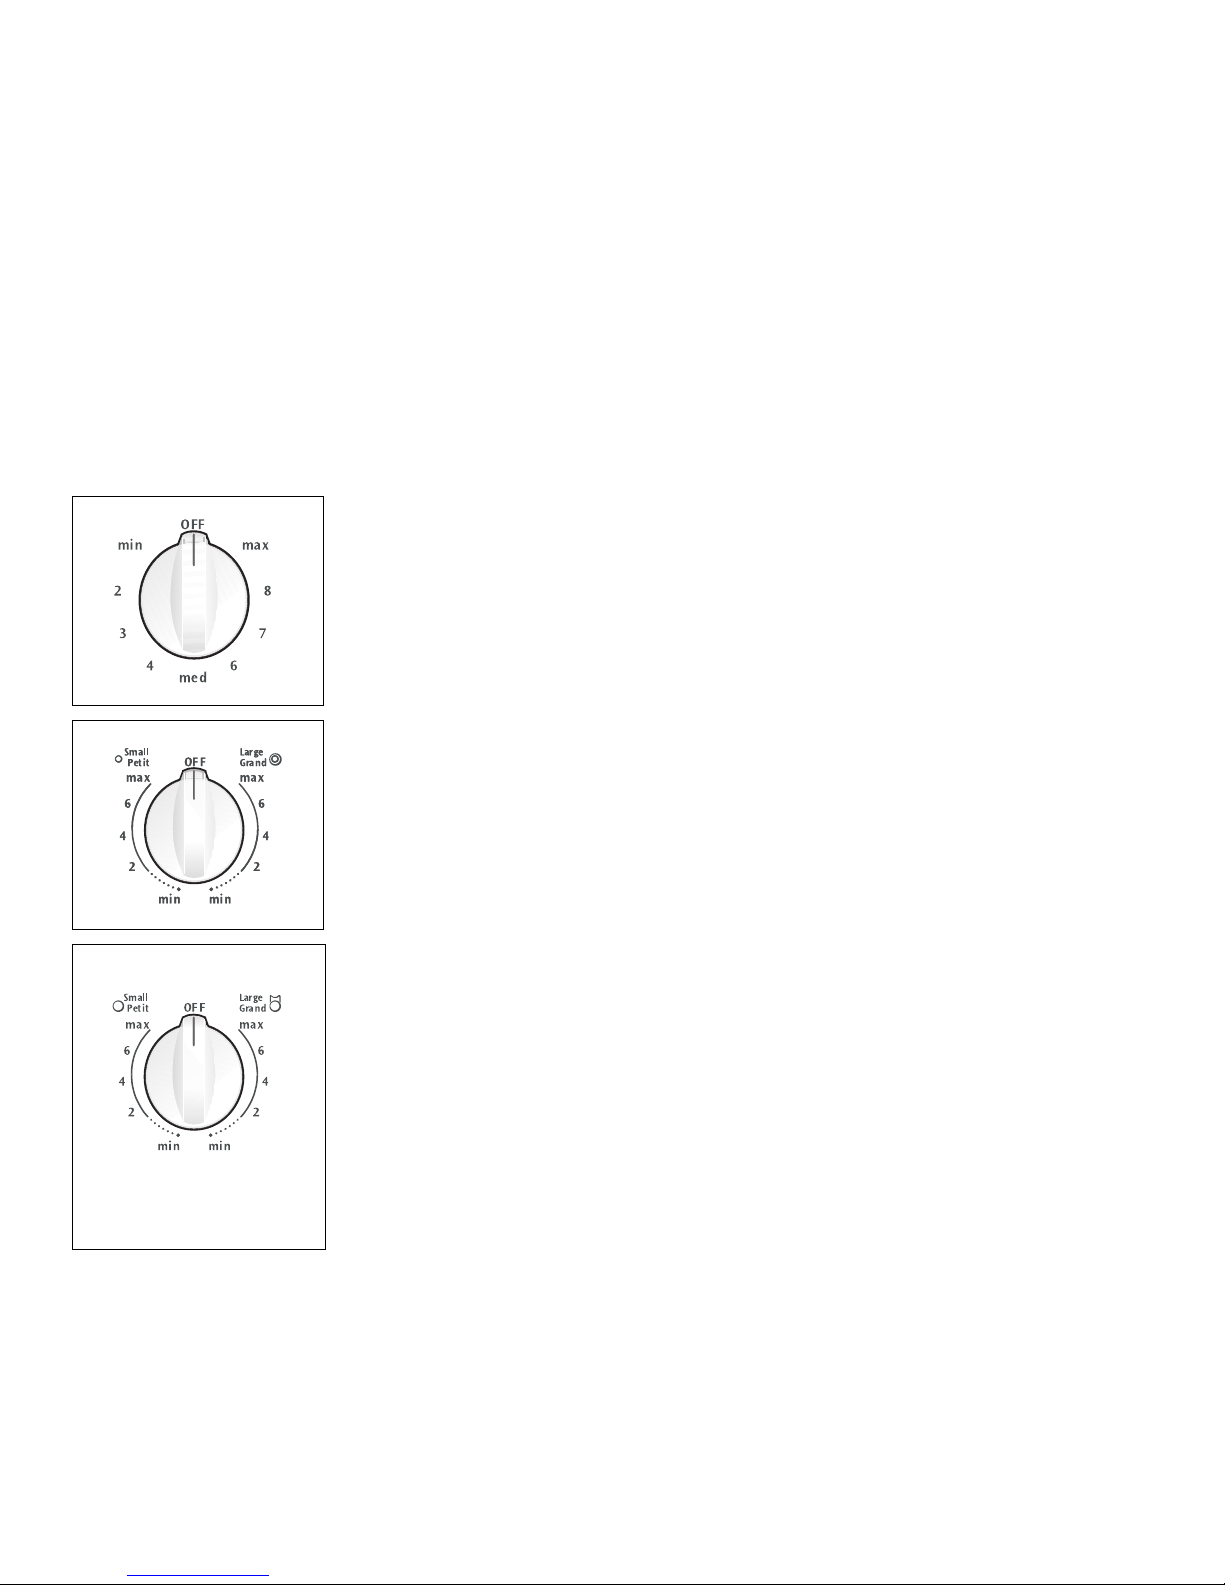
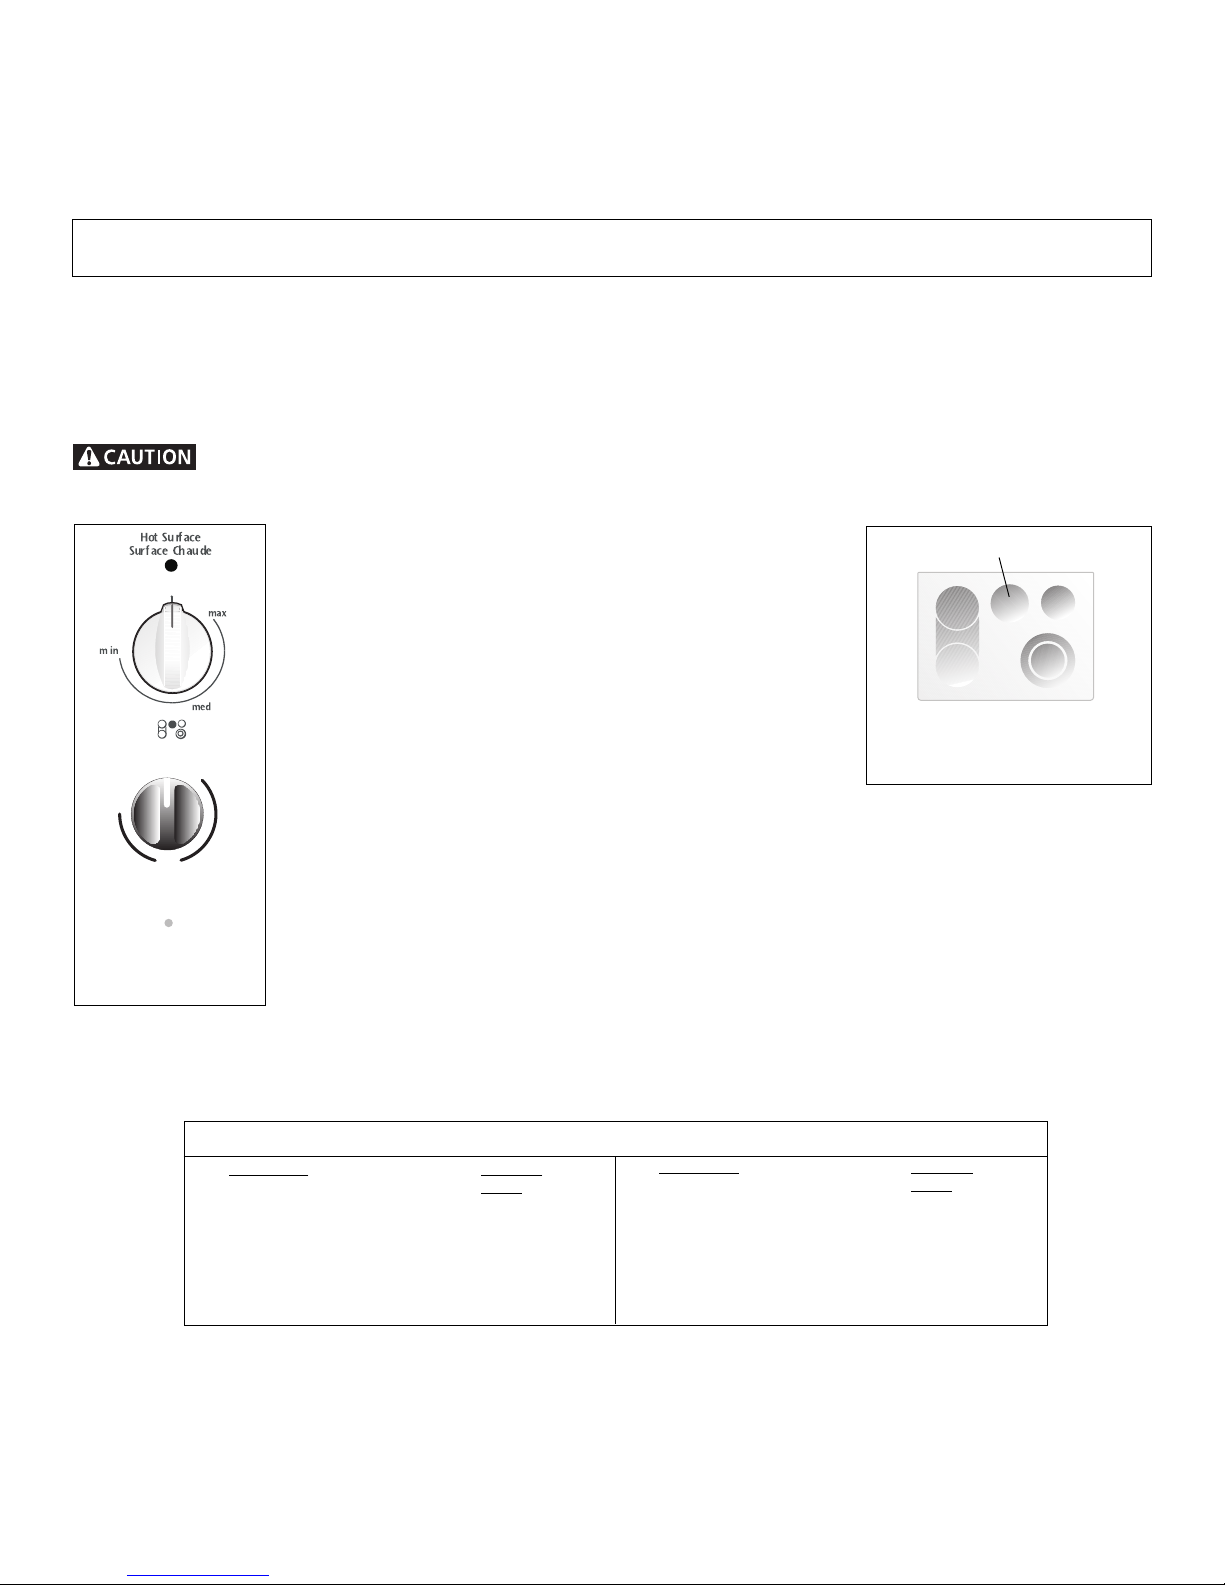
Regular radiant elements (some models)
The ceramic glass design shows the location of the heating surfaces.
Control knobs are used to set the heat power levels; knobs need first to be pressed in when at
OFF position, then turned to the desired heat settings.
A glowing red surface unit extending beyond the bottom edge of the cooking utensil indicates
the utensil is too small for the unit. The control knob does not have to be set exactly on a
particular mark. Use the marks as a guide and adjust the control knob as needed. The hot
surface and surface indicator lights will glow.
Front
Element
graduations
Expandable radiant elements (some models)
This heating unit combines the characteristics of a small and a large regular radiant heating unit.
Its principal advantage is to allow small and large utensils to be used on the same heating unit,
therefore increasing the cooktop flexibility.
Heat power levels are adjusted by a special control knob that has a dual set of graduations; for
small utensils use the small graduations; the inner surface only will be heating. For larger utensils
use the larger graduations; the whole surface will be heating.
The hot surface and surface indicator lights will glow when the heating unit is turned ON.
Bridge Radiant elements (some models)
Its principal advantage is to allow you to create larger cooking zone for larger pan such as
roaster , griddle or some other specialty pans.
To use the bridge element, turn the control knob on left side, to the bridge element settings.
For full bridge element operation turn on the rear element.
T o use only the fr ont element, turn the control knob on right side, to the front element settings.
Bridge
Element
graduations
13
Page 14
Ceramic Glass Cooktop (some models) (continued)
ESEC Models Controls (some models)
Appearance and graphics of cooktops may be differents
Cooktop Appearance Cooktop radiant areas that heat
Figure 1
About the Ceramic Glass Cooktop
The ceramic cooktop has radiant surface elements located below the surface of the glass.
The design of the ceramic cooktop outlines
the area of the surface element underneath.
Make sure the diameter of the pan matches
the diameter of the element outline on the
cooktop (see figure 1).
Heat is transferred up through the surface of
the cooktop to the cookware. Only flat-bottom cookware should be used. The type and
size of cookware, the number of surface elements in use and their settings, are all factors
that will affect the amount of heat that will
spread to areas beyond the surface elements.
The areas surrounding the elements may become hot enough to cause burns.
About the Radiant Surface Elements
The element temperature rises gradually and
evenly. As the temperature rises, the element
will glow red. To maintain the selected setting, the element will cycle on and off. The
heating element retains enough heat to provide a uniform and consistant heat during the
off cycle. For efficient cooking, turn off the element several minutes before cooking is
complete. This will allow residual heat to
complete the cooking process.
Figure 2
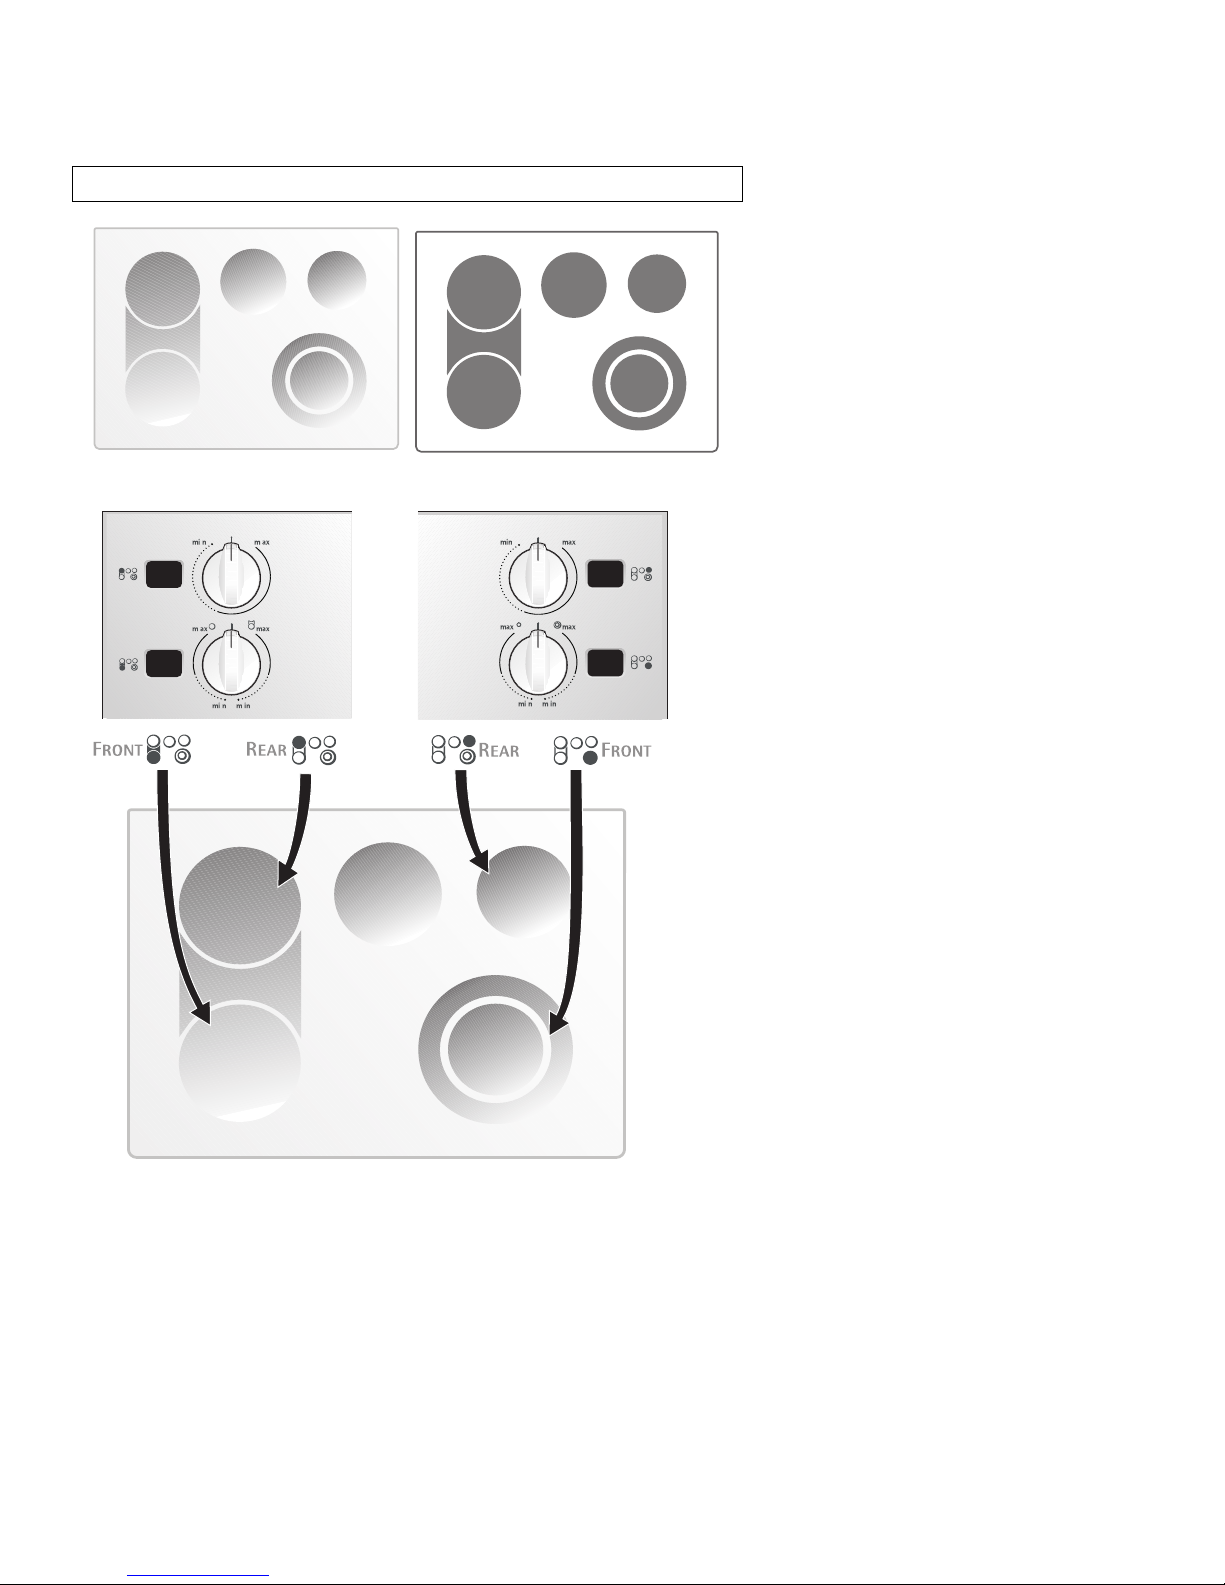
Locations of the Radiant Surface
Elements and Controls
Y our appliance is equipped with radiant sur face elements with differents wattage ratings.
The ability to heat food quicker and in larger
volumes increases as the element wattage increases.
The example shown (figure 2) describes a
model with all kind of elements you could
possibly have. We will take this example
all along this section, but the appearance
and graphics of your cooktop may be different. Figure 2 have a smaller 6 inch radi-
ant element located at the right rear position;
a dual 6 or 9 inch radiant element located
at the right front position; a Warmer Zone
radiant element at the center rear position;
and two 8 inch radiant elements located at
both the left front and rear positions. Located
between left front and rear elements is a
Bridge radiant element.
The Bridge radiant element is controlled using
the same knob that controls the left front radiant element position.
14
Page 15
Ceramic Glass Cooktop (some models) (continued)
The Electronic Surface Element Control (ESEC)
The Electronic Surface Element Control (“ESEC”) feature includes 4
digital display windows. The ESEC feature provides a numeric digital
setting for 4 of the radiant surface element positions on the cooktop, including shared settings at the left front knob control position for both
the left front radiant element and the “Bridge” radiant element. Also
the right front control knob position shares settings for the dual radiant
element. These settings work the same way as normal knob setting indicators work except the settings are displayed in digital windows (figures 1 thru 4).
Figure 1
Figure 2
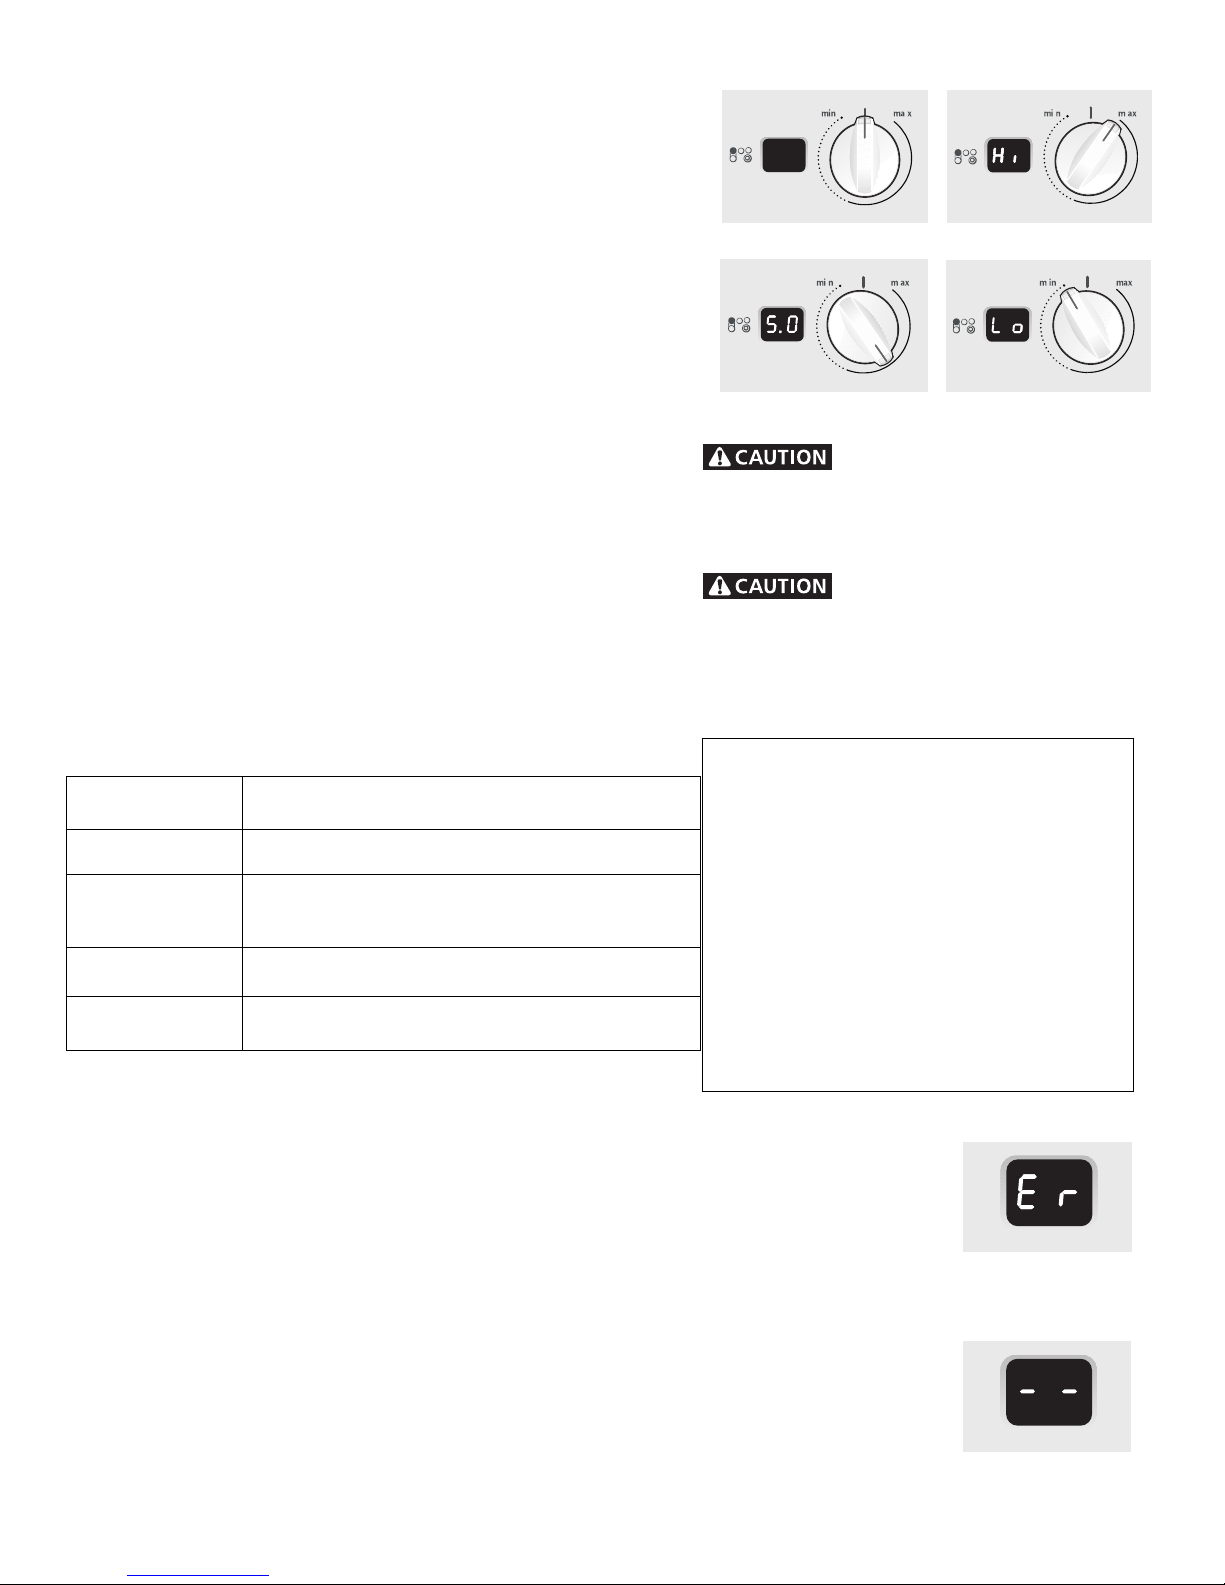
The available ESEC Display Settings
The ESEC control provides various heat levels from Hi (Fig. 2) to Lo
(Fig. 4) and OFF (Fig. 1). The settings from Hi to 3.0 decrease in increments of .5. The settings from 3.0 to Lo (Simmer settings) decrease in
increments of .2 for more precise settings of lower heat levels.
Use the chart (Fig. 5) to determine the correct setting for the kind of
food you are preparing. The Simmer settings are used to simmer and
keep larger quantities of foods warm such as stews and soups. The
lower Simmer settings are ideal for delicate foods and melting chocolate or butter .
Note: The size and type of cookware used will influence the setting
needed for best cooking results.
Surface Cooking Settings
Setting
MAX
MEDIUM
MEDIUM LOW
MIN
T ype of Cooking
Start most foods, bring water to a boil, pan broiling.
Maintain a slow boil, thicken sauces and gravies,
steam vegetables.
Keep foods cooking, poach, stew.
Keep warm, melt, simmer.
Figure 3 Figure 4
Radiant surface elements may appear to have cooled after they have been turned
off. The glass surface may still be hot and burns
may occur if the glass surface is touched before it
has cooled sufficiently .
Do not place plastic items such
as saltand pepper shakers, spoon holders or
plastic wrappings on top of the range when it
is in use. These items could melt or ignite.
Potholders, towels or wooden spoons could catch
fire if placed too close to the surface elements.
NOTE:
Please read detailed instructions for ce-
ramic glass cooktop cleaning in the Ceramic
Glass cooktop section and Avoid Service
Checklist section of this Use and Care Guide.
NOTE:
lows the element to cycle on and off, even at
the HI setting. This helps to prevent damage to
the ceramic smooth top. Cycling at the Hi setting is normal and can occur if the cookware is
too small for the radiant element or if the cookware bottom is not flat (Refer to Surface Cooking Utensils section on page 11 for using correct
cookware instructions with the cooktop).
Radiant elements have a limiter that al-
Figure 5
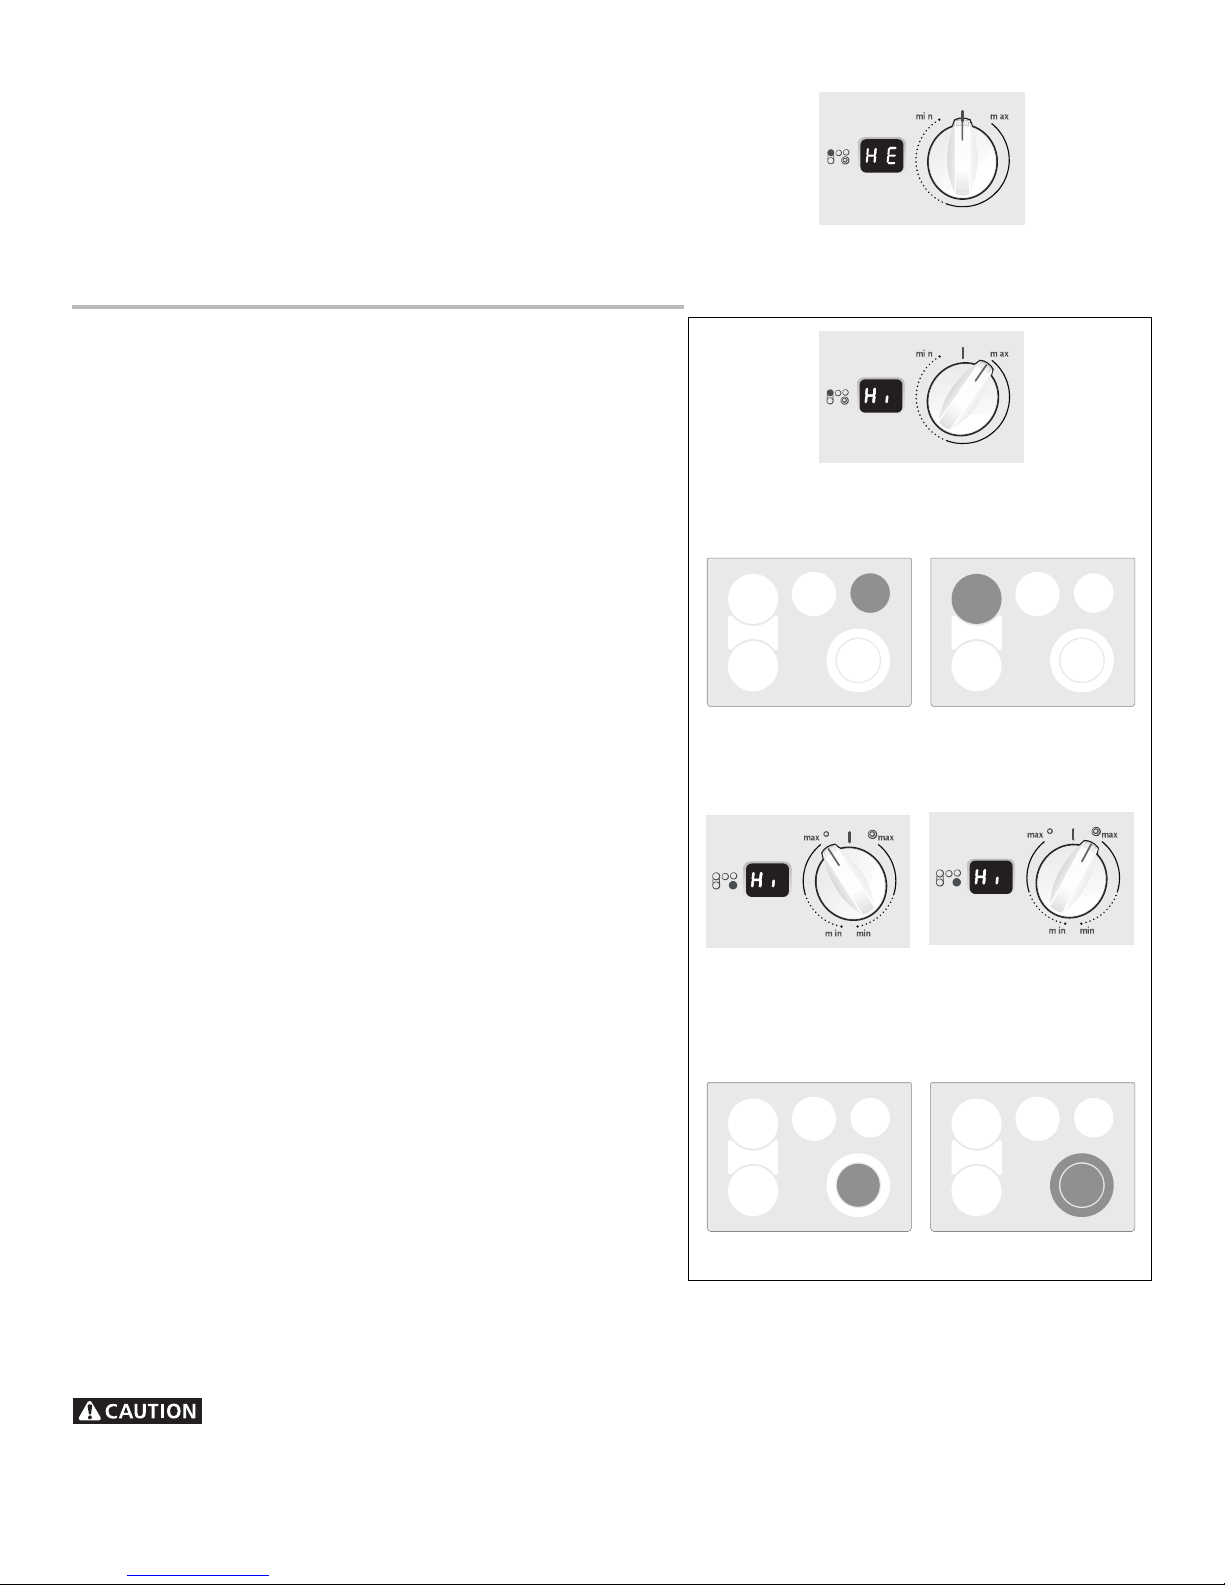
ESEC Error Indicator Message (Er)
An error message will be displayed (flashing “Er”) at power (or after a power failure) if ANY of
the surface control knobs were left in the ON positions. If a power failure should occur, be sure to
set all of the 4 surface control knobs to the OFF position (see figure 6). This will reset the surface
controls.
Be sure to reset the clock. Once the surface controls have been set to the OFF positions and the
clock has been set with the correct time of day, the surface controls should return to normal operation. If the surface controls do not function and the “Er” message remains in any display after
following these produces, contact an authorized Electrolux servicer.
ESEC Lockout Feature (- -)
The self-clean feature will not operate whenever a radiant surface element is ON. The ESEC feature will not operate during a self-clean cycle or when the Oven Lockout feature is active. Whenever the ESEC lockout feature is active, “- -” may appear in any display window (see figure 7). If
any of the surface elements are still hot during active Lockout, “HE” will appear in the window instead of the “- -” message.
Figure 6
Figure 7
15
Page 16
Ceramic Glass Cooktop (some models) (continued)
ESEC Hot Element Indicator Message (HE)
After using any of the single, dual or bridge radiant element positions
the cooktop will become very hot. Even after turning the control knob
to OFF, the cooktop will remain hot for some time. The ESEC control
monitors the temperature of the cooktop and displays the message
“HE” (hot element) warning when the cooktop is still too hot to touch
(Fig. 1). If the HE message appears in the window, the contr ol can be
turned on again for use.
Operating ESEC Surface Elements
Operating ESEC Single Radiant Surface Elements
The cooktop has single radiant surface elements at 2 locations; the
right rear (Fig. 3) and left rear (Fig. 4) element positions. The BRIDGE
element position can also be used as a single element.
To Operate the Single Surface Elements:
1. Place correctly sized cookware on the radiant surface element.
2. Push in and turn the surface control knob in either direction to the
desired setting using the ESEC digital display window for the desired
setting (Fig. 2). T urn the knob to adjust the setting if desired. Start
most cooking operations on a higher setting and then turn to a
lower setting to finish cooking. Each surface element provides a
constant amount of heat at each setting. A glowing red surface
heating area extending beyond the bottom edge of the cookware
indicates the cookware is too small for the surface heating area.
3. When cooking has completed, turn the surface control knob to OFF
before removing the cookware. Note: The HE message will appear
after turning the control knob to OFF if the cooktop is still hot and
will remain on until heating surface area has cooled suf ficiently.
Figure 1
Figure 2
Appearance and graphics of cooktops
may be differents
Figure 3
Right Rear Element
Left Rear Element
Figure 4
Operating the ESEC Dual Surface Radiant Elements
(some models)
The cooktop is equipped with a dual radiant surface element located at
the right front (Fig. 8) position. The size of graduations on control
panel indicate which coil of the dual radiant element will heat. The
small graduations indicates that only the inner coil will heat (Fig. 5 &
7). The large graduations indicates that both inner and outer coils will
heat (Fig. 6 & 8). You may switch from either coil setting at any time
during cooking.
To Operate the Dual Surface Elements:
1. Place correctly sized cookware on the radiant surface element.
2. Push in and turn the control knob counterclockwise (Fig. 5) for
smaller cookware and clockwise (Fig. 6) for larger cookware.
3. Use the ESEC digital display window for the desired setting. Turn
the knob to adjust the setting if needed. Start most cooking operations on ahigher setting and then turn to a lower setting to finish
cooking. Each surface element provides a constant amount of heat
at each setting. A glowing red surface heating area extending beyond the bottom edge of the cookware indicates the cookware is
too small for the surface heating area.
4. When cooking has completed, turn the surface control knob to OFF
before removing the cookware. Note: The HE message will appear
after turning the control knob to OFF if the cooktop is still hot and
will remain on until the radiant surface area has cooled sufficiently.
Figure 5
Appearence and graphics of cooktops
may be differents
Figure 7 Figure 8
Figure 6
Radiant surface elements may appear to have cooled
after they have been turned off. The glass surface may still be hot
and burns may occur if the glass surface is touched before it has cooled
sufficiently.
16
Page 17
Ceramic Glass Cooktop (some models) (continued)
Operating ESEC Surface Elements (continued)
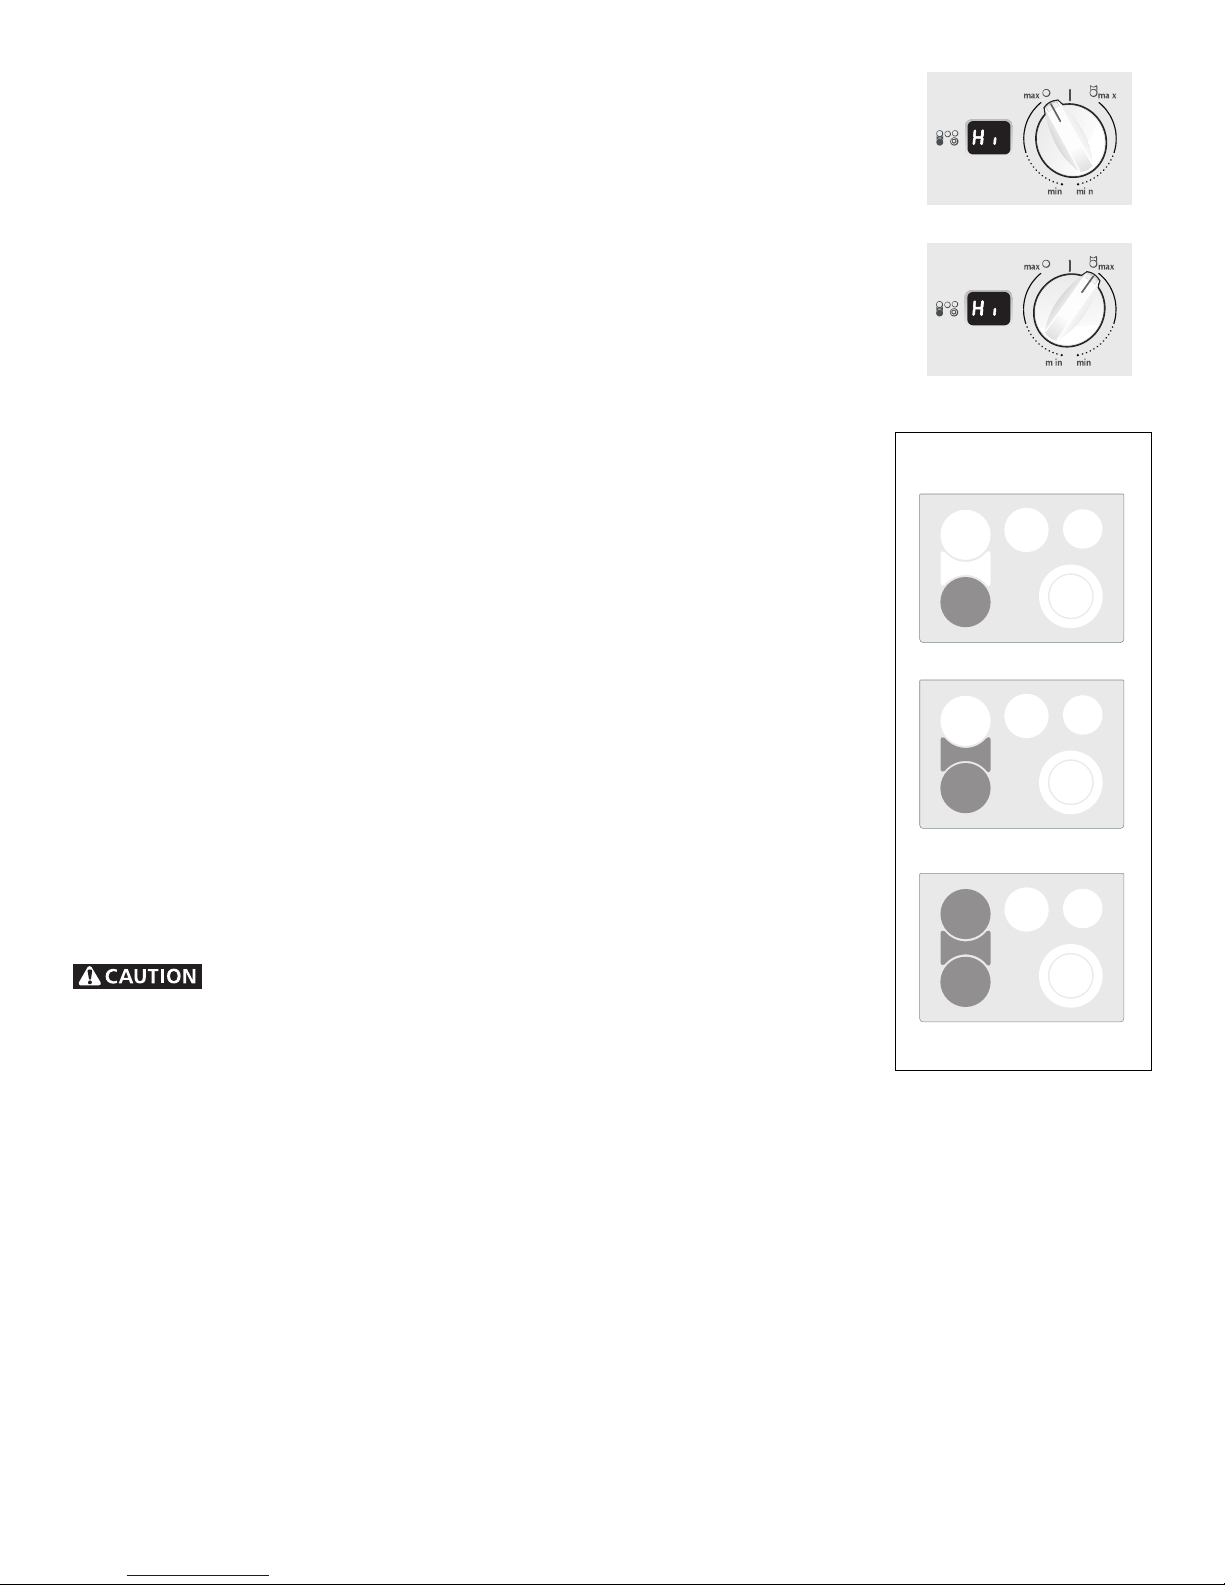
Operating the ESEC Bridge Surface Radiant Element (some models)
The cooktop is equipped with a “Bridge” surface element located at the left front and
middle positions. The Bridge can be used when cooking with rectangular (like a griddle) or
oval shaped cookware. The element will maintain an even temperature setting across both
portions of the Bridge. If needed for normal cookware, the Bridge element can work like a
single element without the Bridge.
Bridge element operation symbols are located on the control panel on each side of the
Bridge element control knob. These symbols indicate the direction to turn the control knob
when operating the Bridge element. The symbol in figure 1 indicates that only the single
portion of the Bridge element will heat (see figure 3). The symbol in figure 2 indicates
that both the single and Bridge portions of the element will heat together (see figure 4).
Y ou may switch fr om either of these settings at any time during cooking with the Bridge element.
To Operate the Bridge Surface Elements:
1. Place correctly sized cookware on the radiant surface element.
2. Push in and turn the surface control knob counterclockwise to heat the portion of the
Bridge element for normal shaped cookware or clockwise for larger or rectangular
shaped cookware.
3. Use the ESEC digital display window for the desired setting. Turn the knob to adjust the
setting if needed. Start most cooking operations on a higher setting and then turn to a
lower setting to finish cooking. Each surface element provides a constant amount of
heat at each setting. A glowing red surface heating area extending beyond the bottom
edge of the cookware indicates the cookware is too small. Please note that not all cookware will fit the Bridge element correctly.
3. When cooking has completed, turn the surface control knob to OFF before removing the
cookware. Note: The HE message will appear after turning the control knob to OFF if
the cooktop is still hot and will remain on until heating surface area has cooled sufficiently.
The BRIDGE element may also be used in combination with the left rear single element
(see figure 5). Because these element have 2 different controls, one element can be used
to cook while the other element may be used to keep food warm.
Figure 1
Figure 2
Appearance and graphics of
cooktops may be differents
Figure 3
Figure 4
Radiant surface elements may appear to have cooled after they have been
turned off. The glass surface may still be hot and burns may occur if the glass surface is
touched before it has cooled sufficiently.
Figure 5
17
Page 18
Ceramic Glass Cooktop (some models) (continued)
Special Caution for Aluminum Foil and Aluminum Cooking Utensils
1) Aluminum foil
Use of aluminum foil will damage the cooktop. Do not use under any circumstances.
2) Aluminum utensils
The melting point of aluminum being much lower than that of other metals, care must be taken when aluminum pots or pans
are used. If allowed to boil dry , not only will the utensil be ruined, but also permanent damage in the form of br eakage, fusing
or marking may affect the ceramic glass surface.
Sliding aluminum or copper clad bottom pans on the cooktop can cause metal markings
on the cooktop surface. These marks should be removed immediately after the
cooktop has cooled using the cooktop cleaning cream. Metal marks can become
permanent if not removed prior to future use.
Cookware (cast iron, metal, ceramic or glass) with rough bottoms can mark or scratch
the cooktop surface. Do not slide anything metal or glass across the cooktop. Do
not use your cooktop as a cutting board or work surface in the kitchen. Do not cook
foods directly on the cooktop surface without a pan.
Do not drop heavy or hard objects on the glass cooktop, they may cause it to crack.
Appearance and graphics of
cooktops may be differents
Things to Remember
1. AVOID using bleach and don’ t use ammonia to clean the ceramic surface.
2. Do not put plastic items on warm cooking areas.
3. Never slide oven racks across cooktop surface. They may scratch or metalmark the cooktop.
4. If cooktop should break, do not use cooktop or attempt to clean it. Call your authorized
service technician immediately .
5. Never use a trivet or metal stand between the cooking utensil and the ceramic cooktop. The
ceramic surface may be scratched, metal marked or etched by such items.
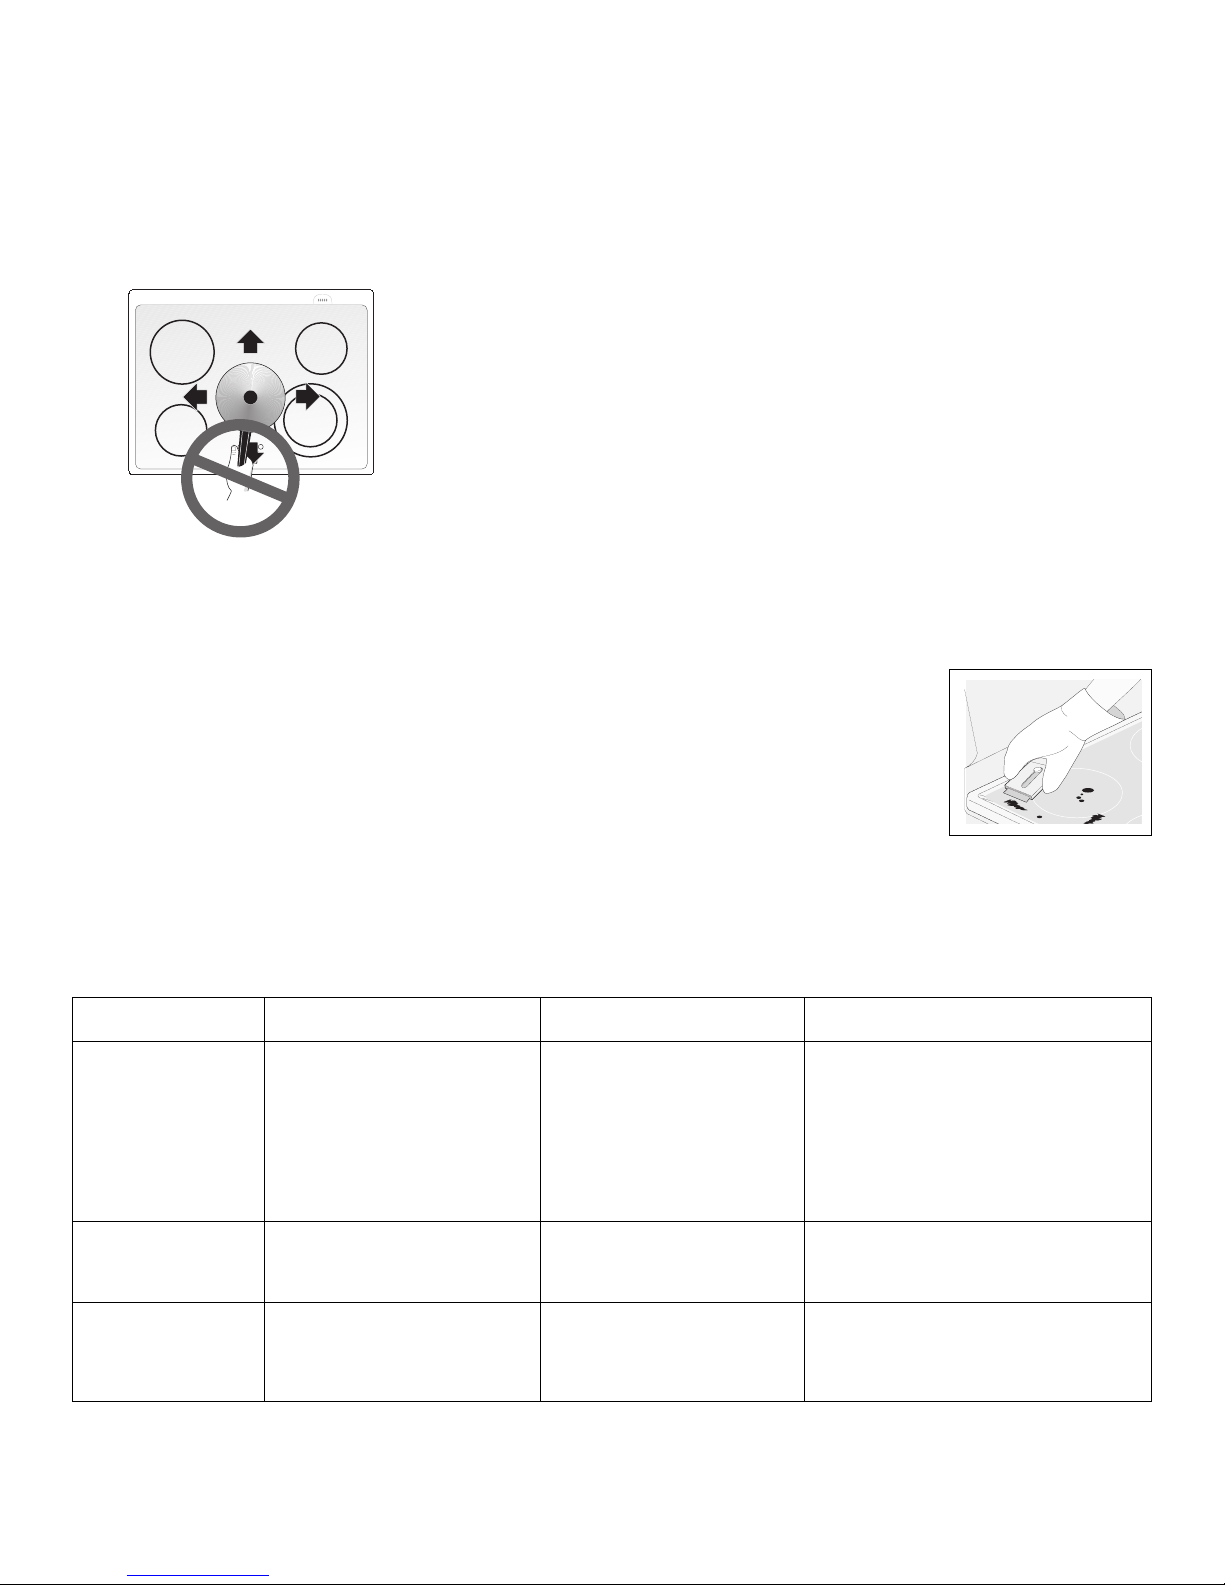
6. Sugary spills can cause pitting of your cooktop surface. Therefore, you must begin cleaning the spills
while the cooktop is still hot. Use caution when following the steps below.
a) Turn off all surface units and remove all pans immediately.
b) Wearing an oven mitt, use a razor blade scraper to scrape the hot spill out of the cooking zone to a cooler area on the
cooktop.
c) Allow the cooktop to cool.
Use and Care of Glass Surface
Problem Cause To Prevent To Remove
Fine ”brown Coarse particles (salt, Clean cooktop after Tiny scratches are not removable.
lines“ (tiny sand, sugar or grit) every use. They can be minimized by
scratches or between bottom of continual use of cleaner cream.
abrasions which cookware and cooktop Such scratches do not affect
have collected that are not removed cooking.
soil) before cooking.
Metal marking Sliding or scraping Do not slide cookware Apply cleaner cream
(mark or black metal utensils or oven across cooktop. with dampened paper
marks). shelves across cooktop. towel to a cooled surface.
Brown streaks Cleaning with a Use cleaner cream Use a small amount of cleaner
and specks. sponge or dishcloth with clean, damp paper cream with clean, damp paper
NOTE: Due to the high intensity of heat generated by the surface elements, the glass surface will turn green when the element
will be turned off. This phenomenon is normal and the glass will come back to its original white color after it has
completely cooled down. (White glass cooktops only).
Using incorrect cleaning Daily use of cleaner
materials. cream.
that has been used towel. towel.
for other kitchen tasks.
18
Page 19
Ceramic Glass Cooktop (some models) (continued)
Use and Care of Glass Surface (continued)
Cleaning Materials for Ceramic Glass Cooktop
Some cleaning materials may contain an ingredient which can damage the cooktop. Use recommended
materials only (see below). Cleaner cream should be used regularly. Prior to using your cooktop for the
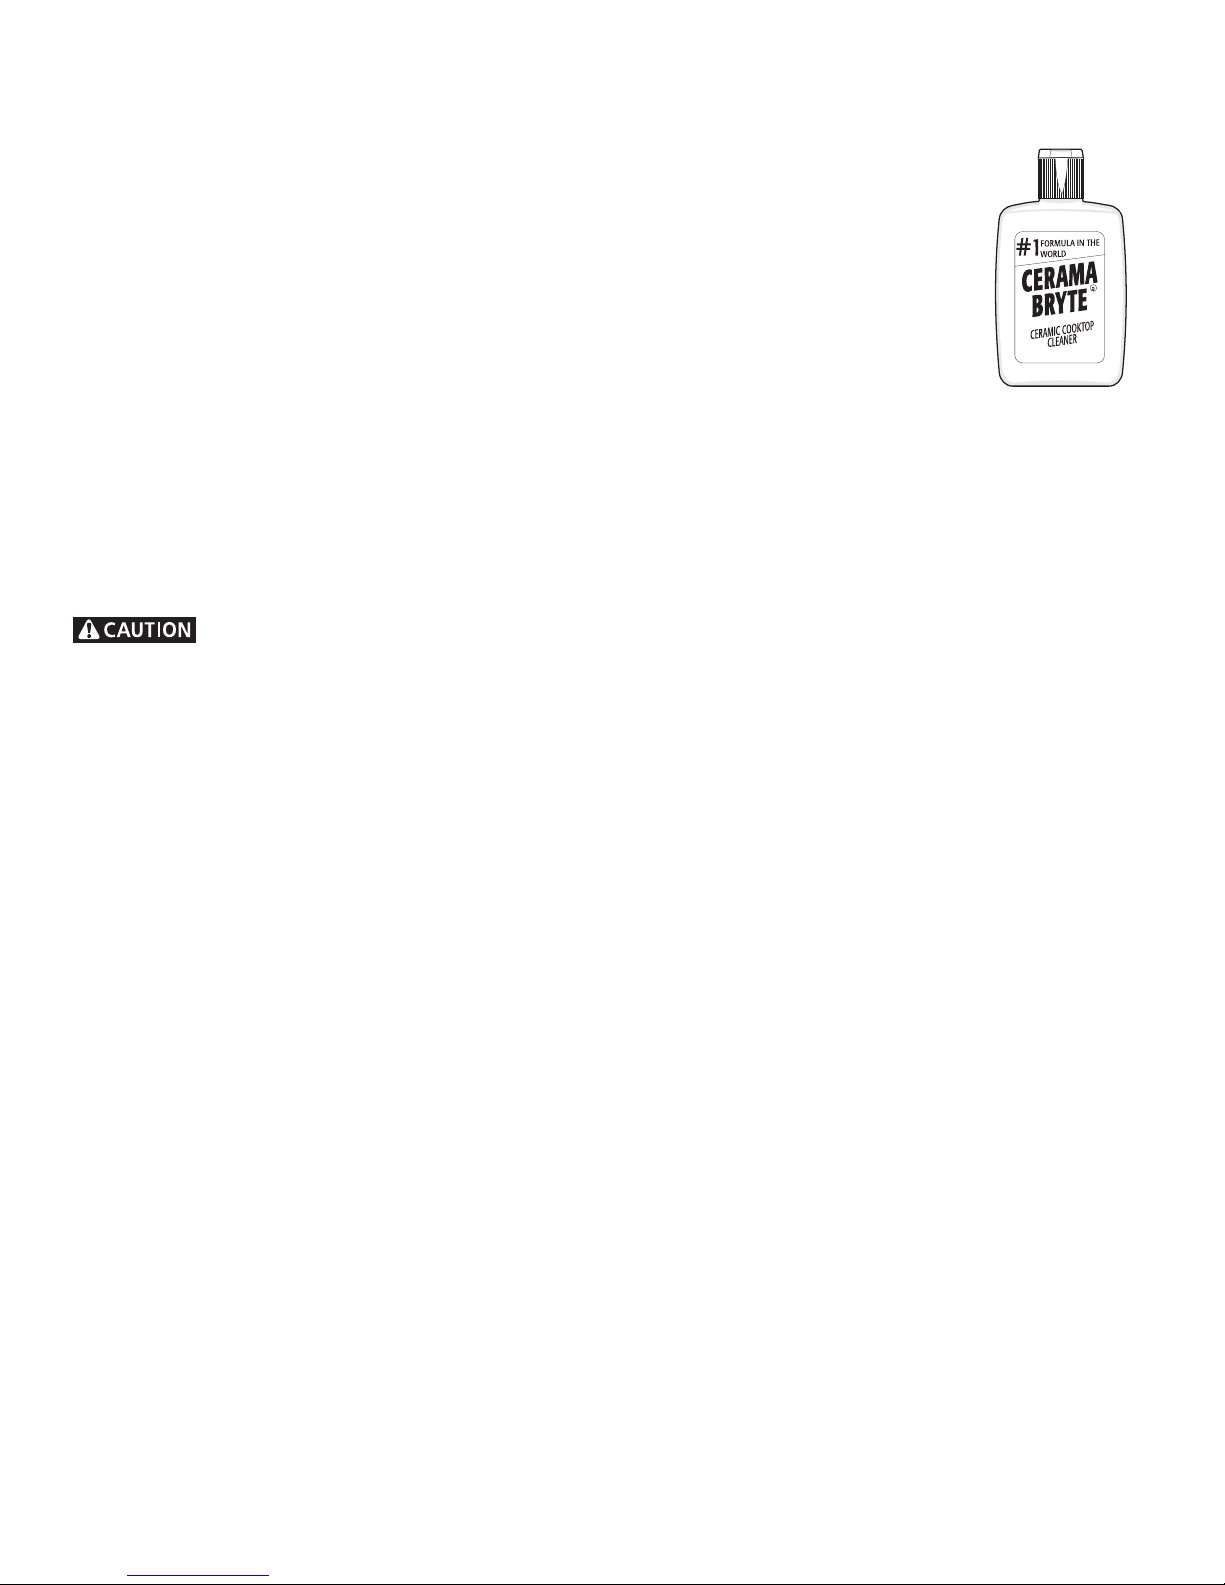
first time, apply a cleaner cream to the ceramic surface. A sample of CERAMA BRYTE
supplied with your range. More are available in stores if needed.
Use only recommended cleaning products and follow these basic cleaning suggestions.
1. BEFORE THE COOKTOP IS USED. Thoroughly clean and saturate the cooktop with cleaner cream.
a) Dampen clean paper towel and clean unit.
b) Wipe off with another clean, damp paper towel; then wipe dry .
2. For normal daily cleaning, apply a dab of cleaner cream in the center of each unit-area to be
cleaned. Start with approximately 1/8 teaspoon. (Apply more if needed). Then, proceed as stated
above in (a and b).
3. Make sure bottom of cookware and cooking area are clean and dry.
4. Select heat settings and cookware large enough for food and liquid. This stops boilovers and spatterings.
5. Wipe up food spills and spatters before they burn into surface.
IMPORTANT Regularly use cleaner cream. If you run out of cleaner cream, use one of the cleansers listed.
Be sure to get a new supply of cleaner cream.
Never mix cleaning products! Mixtures may interact, with damaging or hazardous results.
® cleaner cream is
CERAMA BRYTE®
(Cleaner cream for
ceramic cooktops)
Do Use on Ceramic Glass Cooktop
1. Baking soda.
2. Non-impregnated plastic and nylon pads.
3. For burned on material, scrape with single-edged razor blade, held at a 30° angle.
4. Ceramic glass cleaning cream.
5. CERAMA BRYTE® cleaner cream.
Do not Use on Ceramic Glass Cooktop
1. Avoid pads, that can leave marks and scratches.
2. Avoid heavy-duty cleansing powders, these can scratch, depending on their abrasiveness and cleaning pressure applied.
3. Avoid chemical oven cleaners. These can etch the cooktop surface and are caustic.
4. Avoid rust stain removers containing hydrofluoric acid.
5. Avoid using bleach and don’t use ammonia.
Special Cleaning Instructions for Mineral Deposits and Discolorations
Problem: A gray brown stain that is not removed when using cleaner cream.
Cause: Condensation, when cooking, often collects and drips from cookware. The minerals found in water supply and foods may
cause a gray or brown film to develop on cooktop. This film is so thin it cannot be felt and appears to be under cooktop.
To Prevent: Daily and proper use of cleaner cream.
T o Remove:
– Wet surface with water and sprinkle on cleaner cream.
– Scrub with clean, damp paper towel until stain disappears.
– Clean remaining paste away with damp paper towel.
– Apply dab of cleaner cream and polish with a clean paper towel.
WARNING
– Do not use cleansers on a heated surface. Fumes could be hazardous. Wait for area to cool before cleaning.
– Do not use cleaner cream to clean porcelain, paint or aluminium.
19
Page 20
Setting Warm Zone Controls (some models)
To Operate the warm zone
Y our appliance is equipped with a warm zone. The purpose of the warm zone is to keep hot cooked foods at serving temperature.
Always start with hot food. It is not recommended to heat cold food on the warm zone.
Use the warm zone to keep cooked foods hot such as: vegetables, gravies, casseroles, soups, stews, breads, pastries and
oven-safe dinner
All food placed on the warm zone should be covered with a lid or aluminum foil to maintain quality . For best r esults, when warming
pastries or breads, the cover should have an opening to allow moisture to escape. Do not use plastic warp to cover food.
Plastic may melt onto the surface and be very difficult to clean.
Use only dishware, utensils and cookware recommended for oven and cooktop use on the warm zone.
Unlike the surface elements, the warm zone will not glow red when it is hot. Always use potholders or oven mitts
when removing food from the warm zone as cookware and plates will not be hot.
Indicator Lights
Warm Zone
The Hot Surface indicator light is located above or below the
warm zone control. It turns on when the control is set and will
continue to glow until the glass cooktop has cooled down to
moderate level.
To Set the Warm Zone Control
1. To set the contr ol, push in and turn the knob. The temperatures
OFF
HI
LO
are approximate, and are designated by MAX, MED and MIN.
However , the contr ol can be set at any position between HI and
MIN for different levels of heating.
Appearence and graphics
may be differents
2. When done, turn the control to OFF position. The warm zone will
MED
WARM & SERVE
ZONE
Appearence and
graphics may be
differents
remain warm until the hot surface indicator light goes off.
Temperature Selection
Refer to the chart for recommended heating levels. If a particular food is not listed, start with the medium level, and adjust as
needed. Most food can be kept at serving temperatures by using the medium level.
Warm Zone Recommended Food Settings Chart
Food Item Heating
Breads/Pastries MIN
Casseroles MIN
Dinner Plate with Food MIN
Eggs MIN
Gravies MIN
Meats MED
Level
Food Item Heating
Level
Sauces MED
Soups (cream) MED
Stews MED
Vegetables MED
Fried Foods MA X
Hot Beverages MAX
Soups (liquid) MAX
20
Page 21

Cleaning the Appliance
Exterior Cleaning
Before cleaning any part of the range, make sure all heating
elements are turned to OFF and are cool.
Clean range after each use to prevent sticky
grease built-up and spills from cooking on. Wash with hot, soapy water and a clean cloth. Wipe with a soft cloth or paper towel.
Do not use abrasives, steel wool, cleaners containing ammonia, acids or commercial oven cleaners on any exterior parts of the
range, except the porcelain enamel cooktop. If a metal cleaner or polish is used on metal trim, be sure the label specifies that it is
safe for use on chrome and aluminium.
Steel/Aluminum Control Panel
Control knobs (some models)
If the control panel needs cleaning turn the control knobs to OFF, then pull knobs straight off the
shafts.
Most cleaning of your steel/aluminum control panel can be done using a clean cloth with warm
soapy water or other mild household cleaners.
Sometimes, applying few drops of a recommended cooktop cleaning/polishing cream (with
silicone) will remove any remaining soil and will leave a protective coating which will keep your
range looking like new.
Cooktop cleaning/polishing cream can be purchased through authorized service centers or major
department stores.
Glass Control Panel:
Use a clean cloth or a sponge with warm, soapy water or paper towel and spray glass cleaner to clean the glass panel. Be careful
not to let water/cleaner go behind the glass or near the knob activated controls.
Replace knobs; engage the flat surface inside the knob cavity with the flat on the shaft. Push knobs onto the shafts.
Prior to cleaning the coil elements make
sure they are cold and that control knobs
are turned to OFF “
coil elements as they could be permanently
damaged if the coil is turned on by accident.
”.
Never leave covers on the
Coil Elements and Drip Bowls
Coil elements clean themselves when they are turned on.
Coil elements and drip bowls are removable and
allow to clean the drip bowls.
To remove a coil element, push against the front
edge and lift element up and out.
T o clean by hand, wash the drip bowls in hot sudsy
water. For hard to remove spots, use a nylon
scrubber with soap. Rinse and dry while still warm.
Never immerse coil elements in water.
SURFACES CLEANING AGENTS INSTRUCTIONS
Porcelain Enamel Mild Cleaners or soap-filled steel Use a damp sponge or dampened soap pad,
(Cooktop, wool pads rinse and dry
Surface under cooktop)
Insert – Control panel Hot, soapy water or cleaner Use a clean, soapy, dampened cloth or paper towel,
cream remove soil and dry. Do not use abrasive products.
Coil Surface Elements (some models)
21
Page 22

Cleaning the Appliance (continued)
Porcelain Enamel Cooktop Cleaning Instructions.
DO NOT use a cooktop
cleaner on a hot cooktop. The fumes can
be hazardous to your health, and can
chemically damage the cooking surface.
Porcelain Enamel Cooktop Cleaning
Correct and consistent cleaning is essential to maintaining your porcelain enamel
cooktop. If food spills and grease spatters are not removed, they may burn onto the
surface of the cooktop and cause permanent discoloration.
Before Cleaning the
surface cooktop, be sure the controls are
turned to OFF and the cooktop is cool.
DO NOT use commer-
cial oven cleaners on the exterior
surfaces including rangetop and door
frame.
Daily Cleaning
For normal soil:
1. Allow cooktop surface to cool.
2. Wipe off spills and spatters using a clean paper towel or a clean cloth with warm,
soapy water .
3. If needed, use a soapy steel wool pad or other mild household cleaners.
4. Be sure to rinse off the cleaners or the porcelain may become damaged during
future heating.
For heavy , burned-on soil:
1. Allow cooktop surface to cool.
2. Use a soap filled scouring pad with warm water or cover heavily soiled spots with
a solution of clear water and ammonia. Scour gently . Rinse and wipe dry with a
clean cloth.
3. If any soil remains, apply a few drops of a recommended cooktop cleaning
cream on the spots and rub gently using a clean damp cloth or scouring pad. Buff
with a dry cloth until all soil and cream are removed. Frequent cleaning with the
cooktop cleaning cream leaves a protective coating which helps in preventing
scratches and abrasions.
For sugary spillovers:
Sugary spills can chemically damage your cooktop surface. Therefore, you must
begin cleaning the spills while the cooktop is still hot. Use caution when following
the steps below.
1. Turn off all surface units and remove all pans immediately.
2. Wearing an oven mitt, wipe up carefully or move hot spills away from the
element area with a clean damp cloth.
3. Allow the cooktop to cool. Follow the instructions above for heavy, burned-on
soil.
COOKTOP CLEANING/POLISHING CREAM can be purchased through authorized
service centers or major department stores.
22
Page 23

Cleaning the Appliance (continued)
Cleaning the Regular Oven (Non self-clean oven)
Make sure the oven is cool and that all control knobs are at OFF position. Cleaning the oven is
a lot easier when the door is removed.
1. Remove the oven door; see “ T o Remove and Replace Oven Door” section in this manual.
2. Empty the oven including the racks.
3. You can wash the broiler pan, grid and racks in the kitchen sink.
4. Clean oven lining thoroughly with soap and a wet cloth and wipe with a dry cloth.
T o r emove burned-on fat on oven walls, moisten soiled parts with household ammonia, using a
wet cloth. Follow suggested manufacturer’s cleaning method. (Do not remove the oven door
when using ammonia.)
Complete cleaning with a damp cloth and use a fine steel wool or scouring agent if necessary .
The lower element can be moved up for cleaning purposes.
5. Replace racks in the oven. Reinstall oven door.
Cleaning the Self-Clean Oven (some models)
Adhere to the following cleaning precautions:
• Allow the oven to cool before cleaning.
• Wear rubber gloves when cleaning any exterior parts of the oven manually.
During the self-cleaning cycle, the outside of the wall oven can become very hot to the touch. DO NOT leave small
children unattended near the appliance.
The health of some birds is extremely sensitive to the fumes given off during the self-cleaning cycle of any range.
Move birds to another well ventilated room.
Before cleaning any part of the oven, be sure the electronic oven control is turned off or else push CANCEL pad.
Wait until the oven is cool.
DO NOT use commercial oven cleaners or oven protective coatings in or around any part of the self-cleaning oven. DO NOT clean
the oven door gasket. The gasket on the oven door is essential for a good seal. Care should be taken not to rub, damage or move
the gasket. DO NOT use any cleaning materials on the gasket. Doing so could damage it. DO NOT use aluminum foil to line the
oven bottom. This may affect cooking or foil could melt and damage the oven surface.
A self-cleaning oven cleans itself with high temperatures (well above cooking temperatures) which eliminate soil completely or
reduce it to a fine powdered ash you can whisk away with a damp cloth.
Preparing the Oven for Self-Cleaning
1. Remove any excess spillovers in the oven cavity before starting the self-cleaning
Do Hand
Clean
Frame
cycle. To clean, use hot soapy water and a cloth. Large spillovers can cause heavy
smoke or fire when subjected to high temperatures. DO NOT allow food spills with
a high sugar or acid content (such as tomatoes, sauerkraut, fruit juices or pie filling)
to remain on the surface as they may cause a dull spot even after cleaning.
2. Clean any soil from the oven frame and the door liner (see illustration). These areas
heat sufficiently during a self-clean cycle to burn soil on. Clean with soap and
water.
3. Remove the broiler pan and insert, all utensils and any foil. These items do not
withstand high cleaning temperatures.
4. Oven racks may be left in the oven or may be removed. If they go through the clean
Do Hand
Clean Door
Do Not Hand
Clean Seal
cycle, their colour will turn slightly dull. After the cycle is completed and the oven
has cooled, rub the sides of the racks with wax paper or a cloth containing a small
amount of baby oil or salad oil. This will make the racks glide easier.
23
Page 24

Cleaning the Appliance (Continued)
AUTOMA TIC LOCK OFF OF THE SURF ACE ELEMENTS (30“ models with a self-cleaning oven only)
During the self-clean cycle, the surface elements, when used, are subjected to high heat. To ensure maximum element life, a safeguard
locks off the use of the surface elements during the self-clean cycle. Once the oven cleaning cycle is complete and the oven door can be
opened, the surface elements can be utilized.
What to Expect During Cleaning
While the oven is in operation, the oven heats to temperatures much higher than those used in normal cooking. Sounds of metal
expansion and contraction are normal. Odor is also normal as the food soil is being removed. Smoke may appear through the oven
vent, located on the top of the control panel.
If heavy spillovers are not wiped up before cleaning, they may flame and cause more smoke and odor than usual. This is normal
and safe and should not cause alarm. If available, use an exhaust fan during the self-cleaning cycle.
NOTE: A smoke eliminator in the oven vent converts most of the soil into a colourless vapor .
Setting the Controls for a Clean Cycle
For the setting of the clean cycle, refer to the section on the timer or Electronic oven control.
Upswept lift cooktop (some models)
On some models, the cooktop, when equipped with coil elements, can be raised to facilitate
cleaning of the panel.
To raise the cooktop, grab the sides and lift from the front. Use the two sliding wire supports
located on each side of the cooktop and pull them toward you, to the lock position, in order to
maintain the cooktop in the raised position while cleaning the panel.
Lower the cooktop slowly; be careful not to pinch fingers. Do not let the
cooktop fall freely, as this may damage the porcelain finish.
To Remove and Replace the Oven Door
1. Open the door fully .
2. Pull up the lock located on both hinge supports and engage them in the hook of the hinge levers. Y ou may have to apply a
little downward pressure on the door to pull the locks fully over the hooks.
3. Grab the door by the sides, pull the bottom of the door up and toward you to disengage the hinge supports.
Keep pulling the bottom of the door toward you while rotating the top of the door toward the range to completely disengage
the hinge levers.
4. Proceed in reverse to reinstall the door.
Make sure the hinge supports are fully engaged before unlocking the hinge levers.
Lock in normal
position
Lock engaged
for door removal
24
HINGE SLOT
Door removed from
the range
Page 25

Removable Outer Door Glass Panel (some models)
Applicable only to models with an external glass panel not held with a frame. This design allows you to clean the inside face of the
exterior door panel as well as the hidden face of the door inner glass. There are two different kinds of glass panel; one with a lower
metal trim fixed on the underside of the glass panel and the other one with a lower metal support rail.
To remove the external door glass panel:
1. Pull the door off the range as per instructions under “To Remove and Replace Oven Door” in “Cleaning the Appliance”
section and lay the door flat.
2. Using a screwdriver, remove the screws fastening the glass lower metal trim or the glass assembly.
3. Grab both sides of the glass panel and slowly pull it out of the door upper moulding. Lay the glass flat.
Handle the glass panel with care. When dropped on a corner the glass panel may shatter in multiple fragments and
you could get hurt.
DO NOT remove the lower metal trim, which is fixed on the underside of the glass panel.
To replace the external door panel:
1. Grab the sides of the glass panel and carefully insert the glass into the door top moulding.
2. Replace the glass lower trim or the glass assembly using the locking screws.
3. Replace the door onto the range as per “T o Remove and Replace Oven Door” in “Cleaning the Appliance” section.
To Remove/Replace Storage Drawer
To remove the Drawer:
Push down the left latch
and pull up the right latches.
Pull drawer out
of range.
T o Remove/Replace the Storage Drawer with Extendable Glides (some models)
Use the storage drawer for storing cooking utensils. The drawer can be removed to facilitate
cleaning under the range. Use care when handling the drawer.
To Remove the Drawer:
1. Pull out the empty drawer until it stops.
2. Push down the left glide latch and pull up the right glide latch.
3. Pull drawer out of the range.
ROLLER
RAILS
To Replace the Drawer:
1. Slide the drawer rails over the glides.
2. Push the drawer back into the range.
To Remove/Replace the Storage Drawer with Rollers (some models)
To Remove the Drawer:
1. Pull the empty drawer out to the roller guide stop.
2. Tilt the drawer up and pull it out over the rollers.
To Replace the Drawer:
1. Insert the rear end of the drawer into the opening.
2. Fit the drawer end rollers onto the guide rails.
3. Push the drawer in until it stops, then lift to allow the rollers to clear the roller guide stop,
and push in.
25
Page 26

Warmer Drawer (some models)
Setting Warmer Drawer Contr ols
To Operate the Warmer Drawer
Your range is equipped with a warmer drawer. The purpose of the warmer drawer is to keep hot cooked foods at serving
temperature. Always start with hot food. It is not recommended to heat cold food in the warmer drawer.
All food placed in the warmer drawer should be covered with a lid or aluminum foil to maintain quality . Do not cover crisp foods.
Do not use plastic wrap to cover food. Plastic may melt onto the drawer and be very difficult to clean.
Use only dishware, utensils and cookware recommended for oven use in the warmer drawer.
Always use potholders or oven mitts when removing food from the warmer drawer as cookware and plates are hot.
Note: Use the warmer drawer to keep hot foods hot such as: vegetables, gravies, meats, casseroles, biscuits and rolls, pastries and
heated dinner plates.
Note: The warmer drawer is equipped with a catch which may require extra for ce when opening and closing the drawer.
Indicator Light
The indicator light is located below the thermostat control. It turns on when the control is set, and stays on
until the control is turned off. The warmer drawer is inoperable during the self-clean cycle. The indicator
light will not come on during the self-clean cycle.
T o Set the Thermostat Contr ol
The thermostat control is used to select the temperature of the warmer drawer. It is located on the control
panel. To set the thermostat, push in and turn the knob to the desired setting. The temperatures are
approximate, and are designated by MAX, MED and MIN. The control can be set to the three settings, or
OFF
HI
anywhere between.
LO
1. Select the temperature setting.
2. For best results, preheat the drawer before adding food. An empty drawer will reach the HI
setting in about 18 minutes, the Med setting in about 15 minutes and the MIN setting in about
MED
WARM & SERVE
DRAWER
12 minutes.
3. When done, turn the thermostat control to OFF position.
Appearence and graphics may be differents
Temperature Selection
Refer to the chart in the side column for recommended settings. If a particular food
is not listed, start with the medium setting. If more crispness is desired, remove the
lid or aluminum foil.
Most foods can be kept at serving temperatures by using the medium setting.
When a combination of foods are to be kept warm (for instance, a meat with 2
vegetables and rolls), use the high setting.
Refrain from opening the warmer drawer while in use to eliminate loss of heat from
the drawer .
To Warm Serving Bowls and Plates
Heat bowls and plates on the MIN setting. Place empty dishes on the rack to raise
them off drawer bottom. To further heat dishes or to heat fine china, check with the
manufacturer for maximum heat tolerance.
IMPORTANT: The warmer drawer will be turned off automatically when the oven is
in a self-cleaning mode. The warmer drawer can be used immediately after the
clean cycle is ended.
Warmer Drawer Recommended
Food Settings Chart
Food Item Setting
Bacon MAX
Biscuits MED
Casseroles MED
Eggs MED
Empty Dinner Plates MIN
Fish, Seafood MED
Fried Foods MAX
Gravies MED
Ham MED
Hamburger Patties MAX
Pancakes, Waffles MAX
Pastries MED
Pies MED
Pizza MAX
Pork Chops MAX
Potatoes (baked) MAX
Potatoes (mashed) ME D
Poultry MAX
Roasts (Beef, Pork, Lamb) MED
Rolls, soft MIN
Rolls, hard MED
Vegetables MED
26
Page 27

Warmer Drawer (some models)
Arranging Warmer Drawer Rack Positions
Set the warmer drawer rack in the vertical position as shown below.
The rack can be used in 2 ways:
• In the upright position to allow low profile food items to be placed both under and on top of the rack (for example, rolls or
biscuits on top of the rack and a casserole dish under).
• In the downward position to allow you to place light weight food items and empty dishware (for example, rolls or pastries and
dinner plates).
Downward PositionUpright Position
Warmer Drawer General Cleaning
T o Remove and Replace W armer Drawer
T o Remove W armer Drawer:
1. T urn power off befor e removing the warmer drawer.
2. Open the drawer to the fully opened position.
3. Locate the latches on both sides of the warmer drawer. The left latch is visible. However, the right side is not and is located
inside the drawer glides.
4. Pull up on the left glide latch while inserting a screwdriver over the right latch and pushing down.
5. Pull the drawer away from the range.
6. T o clean warmer drawer, gently scoure with a soapy scouring pad, this will remove most spots. Rinse with a 1:1 solution of clear
water and ammonia.
If necessary, cover difficult spots with an ammonia-soaked paper towel for 30 to 40 minutes. Rinse with clean water and a damp
cloth, and then scrub with a soap-filled scouring pad. Rinse and wipe dry with a clean cloth. Remove all cleaners or the porcelain
may become damaged during future heating. DO NOT use spray oven cleaners on the cooktop.
T o Replace W armer Drawer:
1. Align the glide latches on both sides of the drawer with the slots on the drawer .
2. Push the drawer back into the range.
Electrical Shock Hazard can occur and result in
serious injury or death. Disconnect appliance from electric power
before cleaning and servicing the warmer drawer.
Pull up on left glide latch while
inserting a screwdriver over
the right latch and
pushing down.
27
Page 28

Avoid Service Checklist
Before you call for service - read this
Y ou may save the cost and inconvenience of an unnecessary service call by first reviewing this easy to use A void-Service Check List
of the most frequently encountered situations that are not the result of defective workmanship of materials.
You will be charged for a service call while the appliance is in warranty if the problem is not caused by defective product
workmanship or materials.
Y our new appliance is a carefully engineer ed product. Many times, what appears to be a r eason to call for service requires nothing
more than a simple adjustment you can easily make in your own home or is normal operating characteristic of appliance under
certain conditions.
This list is applicable to a variety of models; some of the items will not necessarily apply to your appliance.
PROBLEM
INSTALLATION
Range is not level.
RANGE DOES NOT OPERA TE
Entire range does not operate.
Oven does not operate.
POSSIBLE CAUSE/SOLUTION
Poor installation. See the suggested levelling instruction in the “General Information”
section of this manual. When oven is level, cooktop may not appear to be level with
countertop if the latter is not level.
Be sure floor is level and can adequately support range. Contact carpenter to correct
sagging or sloping floor .
Kitchen cabinets misalignment may make range appear to be unlevel. Be sure cabinets are
square and have sufficient room for range clearance (1.3 cm (1/2”) each side).
House fuse has blown or circuit breaker has tripped. Check and/or replace fuse or reset
circuit breaker.
Cord/plug not plugged into wall outlet. Make sure cord plug is plugged tightly into outlet
(Canada only).
Power outage. Check house lights to be sure.
No power to range. See steps “Entire range does not operate” above.
Oven selector control knob (some models) set between two positions. T urn selector control
knob to BAKE or BROIL, etc. and make sure surface signal lights turn on.
Make sure the oven temperature control knob is set to the desired temperature.
Oven control beeps and displays -F1-, -F3- or -F9-. Electronic control has detected a fault
condition. Push the CANCEL pad to clear the display and stop the beeping. Reprogram the
oven. If fault recurs, record the fault number push the CANCEL pad and contact an
authorized servicer .
Oven timer set on “time bake” function. Cancel the time bake function.
28
Page 29

Avoid Service Checklist (continued)
PROBLEM
RANGE DOES NOT OPERA TE
Surface elements do not heat.
Oven light does not work.
POSSIBLE CAUSE/SOLUTION
No power to range. Check steps “Entire range does not operate” above.
Control knobs set too low. At very low heat settings of the contr ol knobs, the surface signal
light may come on; however, surface unit does not operate. Turn the control knob to a
slightly higher setting until the elements start heating.
Coil elements not seated properly in terminals. Turn temperature control knobs to OFF . Pull
out and lift up coil elements. Straighten terminals on end of coil element if necessary.
Replace elements properly into the element block.
Incorrect surface control knob turned on. Make sure the correct surface control is on for the
surface unit to be used.
The automatic lock off of the surface element is on (models with self-cleaning oven only).
During the self-clean cycle, the surface elements, when used, are subjected to high heat. To
ensure maximum element life, a safeguard locks off the use of the surface element during
the self clean cycle. Once the oven cleaning cycle is complete and the oven door can be
opened, the surface elements can be utilized. Cancel the self clean cycle.
Burned-out light bulb. See “Oven Lamp” in the “General Information” section.
Control panel light does not oper ate (some models).
SURFACE UNITS
Surface elements too hot or too
cold.
Liquids boil at LOW setting of surface units.
CERAMIC GLASS COOKTOP
(some models)
Scratches or abrasions on cooktop
surface.
NOTE: Clean sugary food spills on the heating surfaces as soon as possible, as these can cause cratering of these surfaces when
hot.
Lamp loose in sockets or burned-out. See Fluorescent Lamp in General Information section.
Raise or lower setting until proper amount of heat is obtained.
Use only flat bottom, evenly balanced, medium or heavy-weight cookware. Pans having a
flat bottom heat better than warped pans. Cookware material affects heating. Heavy and
medium weight pans heat evenly. Because light-weight pans heat unevenly, foods may
burn easily .
Incorrect setting of the control knob. Turn control knob to a lower setting.
Cooking on right rear element. When the oven is operating, heated air escapes through the
oven vent located directly under the right rear end coil element or little behind it. This will
increase the heat input.
See “Ceramic Glass Cooktop” section in “General Information” section.
29
Page 30

Avoid Service Checklist (continued)
PROBLEM
POOR BAKING RESULTS
Baked foods too done or not
done enough.
Baked foods not evenly browned
and/or raised.
Baking time too long.
POSSIBLE CAUSE/SOLUTION
Actual oven temperature and cooking times may vary from recipe or box instruction. If this
is a new range, temperatures may differ from your old range. Older ovens may drift in
temperature. You may have to adjust your favorite recipe times and temperatures.
Use the pan size recommended in the recipe. Except when baking pies or breads, set the
oven temperature control 13°C (25°F) lower when using glass pans.
A covered pan should not be used for baking, unless specified in the recipe. Foods baked in
covered pans do not brown well.
Use clean, shiny pans. Blackened pans may cause burning of bottom. Use flat bottom pans.
Warped pans may cause uneven baking.
If bottom of foods burns, raise the rack. If top of foods is too brown, lower the rack.
Frequently opening the oven door to check doneness. Oven temperature drops 10°C (18°F)
or more each time door is opened. Set for shortest baking time and check baking process
only at end of set time. Check baking progress through the window if available.
Placing a very large pan or several smaller pans very close together on one rack does not
allow proper circulation of the oven air around the pans. A cookie sheet or sheet pan should
not cover the entire oven rack. Allow at least 5.1 cm (2 in.) of space for air circulation on all
sides of baking pan(s) and between pans and sides of the oven. When two racks are used,
stagger pans so one is not directly above the other.
Oven steaming.
BROILING
Oven smokes excessively during
broiling.
It will take approximately 10 minutes for the oven to reach the temperature setting. Better
results will be obtained by pre-heating the oven before placing foods to be baked.
Moist foods may cause oven steaming. Cover the dish if appropriate for the food being
cooked.
Open the door to the broil stop position.
Add 3 to 4 cups of water in the broiler pan to completely cover the bottom of the pan. Position
food on grid and broil. The water catches the grease from the broiling food, cools the grease
and reduces smoking.
Meat too close to the element. Lower the rack.
Remove excess fat from the meat. Slash remaining fat edges to prevent curling; do not cut
into lean.
Always place the grid on the broiler pan with the slots down to allow grease to drip into the
pan.
Grease has built up on oven surfaces. Regular cleaning is mandatory when broiling
frequently. Old grease or food spatters cause excessive smoking.
30
Page 31

Avoid Service Checklist (continued)
PROBLEM
SELF-CLEANING OVEN
(SOME MODELS)
Self-clean cycle does not work.
Soil not completely removed after
self-cleaning cycle.
POSSIBLE CAUSE/SOLUTION
Follow steps specified in this manual for appropriate settings of controls.
Door was not closed properly. Close door and start appropriate clean cycle again.
Failure to clean the bottom or front top of oven or door area, these surfaces get hot enough
to burn on residue. Self cleaning of area underneath a closed door is not efficient. Clean
these areas before the self-cleaning cycle is started. Burned on residue may be cleaned with
a stiff nylon brush and water or nylon scrubber. Be careful not to damage the oven seal.
Clean cycle too short. Put oven through an additional cycle.
Check for temporary loss of power. Reset the controls and put the oven through another
self-clean cycle.
Avoid Transportation Damage to your Range
If you have to move your range into/out of your residence or when moving to a new home, it is suggested that you take the
following precautions:
1. Screw in the levelling legs under the range.
2. Remove the racks and other utensils from the oven, and from the lower drawer.
3. Use adhesive tape to firmly secure the door and the drawer to the side panels. Also attach the electric power cord in the same
manner.
4. Use a two-wheeled dolly with strap and fasten the range to it. Cover the appliance with a heavy blanket to prevent scratches
and dents.
5. Avoid pulling or pushing the control panel when moving the appliance.
31
Page 32

Warranty Information
RANGE WARRANTY
Your range is protected by this warranty
In the U.S.A., your appliance is warranted by Electrolux Home Products North America, a division of White Consolidated Industries, Inc. We authorize
no person to change or add to any of our obligations under this warranty. Our obligations for service and parts under this warr anty must be
performed by us or an authorized Electrolux Home Products North America servicer. In Canada, your appliance is warranted by Electrolux Canada
Corp.
*NORMAL
RESPONSIBILITIES
OF THE CONSUMER
EXCLUSIONS
IF YOU NEED
SERVICE
This warranty applies only to products in ordinary household use, and the consumer is responsible for the
items listed below:
1. Proper use of the appliance in accordance with instructions provided with the product.
2. Proper installation by an authorized servicer in accordance with instructions provided with the appliance and in
accordance with all local plumbing, electrical and/or gas codes.
3. Proper connection to a grounded power supply of sufficient voltage, replacement of blown fuses, repair of loose
connections or defects in house wiring.
4. Expenses for making the appliance accessible for servicing, such as removal of trim, cupboards, shelves,etc.,
which are not a part of the appliance when it was shipped from the factory.
5. Damages to finish after installation.
6. Replacement of light bulbs and/or fluorescent tubes (on models with these features).
This warranty does not cover the following:
1. CONSEQUENTIAL OR INCIDENTAL DAMAGES SUCH AS PROPERTY DAMAGE AND INCIDENTAL EXPENSES
RESULTING FROM ANY BREACH OF THIS WRITTEN OR ANY IMPLIED WARRANTY.
NOTE: Some states do not allow the exclusion or limitation of incidental or consequential damages, so this
limitation or exclusion may not apply to you.
2. Service calls which do not involve malfunction or defects in workmanship or material, or for appliances not in
ordinary household use. The consumer shall pay for such service calls.
3. Damages caused by services performed by servicers other than Electrolux Home Products North America or its
authorized servicers; use of parts other than genuine Electrolux Home Products parts; obtained from persons
other than such servicers; or external causes such as abuse, misuse, inadequate power supply or acts of God.
4. Products with original serial numbers that have been removed or altered and cannot be readily determined.
Keep your bill of sale, delivery slip, or some other appropriate payment record. The date on the bill establishes the
warranty period should service be required. If service is performed, it is in your best interest to obtain and keep all
receipts. This written warranty gives you specific legal rights. You may also have other rights that vary from state to
state. Service under this warranty must be obtained by contacting Electrolux Home Products:
USA
1•800•944•9044
Electrolux Home Products
North America
P.O. Box 212378
Augusta, GA 30917
Canada
1•866•294•9911
Electrolux Home Products
North America
802, boul. L’Ange-Gardien
L’Assomption, Québec
J5W 1T6
This warranty only applies in the 50 states of the U.S.A., Puerto Rico, and
Canada. Product features or specifications as described or illustrated
are subject to change without notice. All warranties are made by
Electrolux Home Products North America, a division of White Consolidated
Industries, Inc. In Canada, your appliance is warranted by Electrolux
Canada Corp.
Page 33

Cuisinières
électriques
CONTENU Page
Enregistrement du produit ..............................................2
Mesures de sécurité importantes .................................3 -4
Instructions d’installation ............................................5-6
Lampe du four.................................................................6
Lampe de surface............................................................ 6
Coupe-circuit de protection ............................................. 7
Réglage des commandes des foyers de surface .............7
Modèles avec minuterie à touches capacitives ............... 7
Choix des ustensiles de cuisine
pour la cuisson sur les foyers ......................................... 7
Casseroles et sous-plats particuliers...............................8
Conseils et renseignements sur la mise en conserve ......8
Cuisson au four............................................................... 9
Circulation d’air dans le four ...........................................9
Voyants lumineux ..........................................................10
Cuisson par convection .................................................1 0
Rôtissage par convection ..............................................10
Système de cuisson rapide (certains modèles) .............11
Cuisson au gril ..............................................................12
Réglage du four.............................................................1 2
Surface de cuisson vitrocéramique-foyers sans ESEC ..13
Surface de cuisson vitrocéramique-contrôles ESEC 14-17
Surface de cuisson vitrocéramique-entretien.......... 18-19
Réglage de la commande de la zone réchaud...............20
Nettoyage de l’appareil............................................ 21-24
Enlever et reinstaller la porte .........................................24
Porte avec vitre extérieure démontable .........................25
Retirer/replacer le tiroir de rangement ........................... 25
Tiroir-Réchaud (certains modèles) .......................... 26-27
Liste des vérifications préventives .......................... 28-31
Garantie.........................................................................32
318200427 (0211) Rev . A
Page 34

Enregistrement du
produit
Merci d’avoir choisi cet appareil. Les renseignements contenus dans ce Guide de
l’utilisateur expliquent comment utiliser et entretenir l’appareil. Lisez les documents
qui accompagnent l’appareil pour en savoir davantage sur cet appareil.
Enregistrez votre appareil
La CARTE D’ENREGISTREMENT doit être
remplie avec soin, puis signée et retournée
à la compagnie Produits Electrolux NordAméricains.
Enregistrez les numéros de modèle et de série de votre appareil
Écrivez ci-dessous ces numéros que vous trouverez sur la plaque signalétique qui se
trouve sur le cadre avant de la cuisinière et qui est visible lorsque le tiroir est ouvert.
Numéro de modèle: ________________________________________________
Numéro de série: __________________________________________________
Date d’achat: ______________________________________________________
Ce guide donne des instructions générales pour votre appareil et des renseignements
s’appliquant à plusieurs modèles. Votre appareil peut ne pas avoir toutes les
caractéristiques décrites. Les figures montrées dans ce manuel sont représentatives
et peuvent ne pas illustrer identiquement les caractéristiques de votre appareil.
Note: Les instructions données dans ce guide ne couvrent pas toutes les conditions
et situations possibles. Faites preuve de bon sens et de prudence lors de l’installation,
de l’emploi et de l’entretien de tout appareil ménager.
Important: Garder votre facture.
La période de la garantie débute à la date indiquée. Placez-la dans un endroit où vous
la retrouverez facilement. Si vous devez faire réparer votre appareil alors qu’il est sous
garantie, on pourrait exiger de voir votre facture.
© 2001 Electrolux Canada Corp.
Tous droits réservés
2
Page 35

MESURES DE SÉCURITÉ IMPORTANTES
Lisez ces instructions avant d’utiliser l’appareil.
Conservez ces instructions pour références futures.
Ce guide contient des instructions et symboles de sécurité importants. Veuillez fair e particulièrement attention à ces symboles
et suivre les instructions données. V oici une brève explication de ces symboles.
Ce symbole vous prévient des situations qui risquent d’entraîner de graves blessures, la mort ou des
dommages matériels.
Ce symbole vous prévient des situations pouvant entraîner des blessures ou dommages matériels.
• Enlevez tout le ruban et le matériau d’emballage avant
d’utiliser la cuisinière. Détruisez le cartonnage et les sacs en
plastique après le déballage de l’appareil. Ne laissez jamais les
enfants jouer avec les matériaux d’emballage.
• Installation – Assurez-vous que l’appareil est correctement
installé et mis à la terre par un technicien qualifié,
conformément à la dernière édition de la norme C22.1 de
l’ACNOR, code canadien de l’électricité, partie 1, ainsi qu’aux
codes de la région. N’installez l’appareil que selon les instructions
d’installation fournies dans la documentation.
Demandez à votre marchand de vous recommander un technicien
qualifié ainsi qu’un centre de réparation autorisé. Sachez comment
couper le courant électrique de la cuisinière à la boîte de fusibles
ou au coupe-circuit en cas d’urgence.
• Entretien par l’usager – Ne réparez pas ou ne remplacez pas
des pièces de l’appareil à moins d’une recommandation
précise dans les guides. Toutes les réparations doivent être faites
par un technicien qualifié, afin de réduire les risques de blessure et
de dommage à l’appareil.
• Ne modifiez jamais l’appareil, que ce soit en enlevant des
panneaux, protège-fils, ou toute autre pièce.
Il peut être dangereux pour les
personnes ou dommageable pour l’appareil de monter,
s’appuyer , ou s’asseoir sur la porte ou le tiroir de la cuisinièr e. Ne
permettez pas aux enfants de grimper ou de jouer autour de la
cuisinière. Le poids d’un enfant sur une porte ouverte peut faire
basculer l’appareil et causer des brûlures ou d’autres blessures.
N’utilisez pas la cuisinière pour
entreposer des articles.
• Rangement dans ou sur l’appareil – Ne rangez pas dans le four,
ou près des éléments, ou dans le tiroir de l’appareil, des
matériaux inflammables. Ceci inclus des papiers, plastiques,
tissus, livres de cuisine, objets en plastique et torchons, ainsi que
des liquides inflammables. N’y posez pas ou ne rangez pas des
produits explosifs comme une bombe aérosol. Les produits
inflammables pourraient exploser et allumer un feu ou causer des
dommages matériels.
Ne rangez pas des articles pouvant intéresser
les enfants dans les armoires au-dessus de la cuisinière ou sur le
dosseret. Ne laissez pas les enfants grimper sur l’appareil pour saisir
des articles, ceci pourrait leur causer des blessures graves.
• Ne laissez pas les enfants seuls ou sans surveillance dans un
lieu où un appareil fonctionne. Ne les laissez jamais s’asseoir ou
se tenir debout sur une pièce quelconque de l’appareil.
• NE TOUCHEZ PAS AUX ÉLÉMENTS DE SURFACE, AUX ZONES
À PROXIMITÉ DE CEUX-CI, AUX ÉLÉMENTS DU FOUR, OU AUX
SURFACES INTÉRIEURES DU FOUR. Les éléments de surface et
ceux du four peuvent être très chauds, même s’ils sont de couleur
foncée. Les zones près des éléments de surface peuvent devenir
suffisamment chaudes pour causer des brûlures. Pendant et après
toute utilisation, ne touchez pas et ne laissez pas vos vêtements ou
d’autres produits inflammables venir en contact avec ces zones, à
moins qu’elles aient eu le temps de se refroidir. Ces zones
comprennent la surface de cuisson, les surfaces orientées vers elle,
la sortie d’air chaud du four et les zones à proximité, la porte du
four et la fenêtre.
• Portez des vêtements appropriés–Ne portez jamais de
vêtements amples ou flottants en utilisant cet appareil. Ne
laissez pas les matériaux inflammables et les vêtements venir en
contact avec des surfaces chaudes.
N’utilisez jamais votre appareil pour
réchauffer ou chauffer une pièce.
• N’éteignez pas les feux de friture avec de l’eau ou de la
farine—Étouffez les feux avec un couvercle ou du bicarbonate
de soude, ou avec un extincteur à poudre sèche ou à mousse.
• En chauffant de l’huile ou de la graisse, restez près de
l’appareil. La graisse ou l’huile peuvent prendre feu si elles
devenaient trop chaudes.
• N’utilisez que des gants isolants secs–Des gants mouillés ou
humides en contact avec des surfaces chaudes peuvent causer
des brûlures par la vapeur. Ne laissez pas les gants isolants
toucher les éléments. Ne vous servez pas de torchon ni de chiffon à
la place d’un gant.
• Ne réchauffez pas des contenants non ouverts–l’accumulation
de pression peut faire exploser le contenant et blesser.
• Enlevez la porte de toute cuisinière inutilisée qui doit être
entreposée ou mise aux rebuts.
• IMPORTANT–N’essayez pas de faire fonctionner la cuisinière
pendant une panne de courant. Lorsqu’il se produit une panne
de courant, éteignez toujours le four. Si ce dernier n’est pas
éteint, il recommencera à chauffer lorsque le courant reviendra. Les
aliments laissés sans surveillance pourraient prendre feu ou se
détériorer.
Les températures froides peuvent endom-
mager le contrôleur électronique. Si c’est la première fois que
vous faites fonctionner la cuisinière, ou qu’elle n’a pas été
utilisée depuis longtemps, assurez-vous que celle-ci a été exposée à une température au dessus de 0°C/32°F pendant au
moins 3 heures avant de mettre l’appareil sous tension électrique.
3
Page 36

MESURES DE SÉCURITÉ IMPORTANTES (suite)
INSTRUCTIONS DE SÉCURITÉ IMPORT ANTES
POUR L ’UTILISA TION DE VOTRE SURFACE DE CUISSON
• Vous devez savoir quel bouton commande chacun des
éléments de la surface de cuisson.
• Utilisez la grosseur de casserole appropriée – Cet appareil
est équipé d’un ou de plusieurs éléments de différentes
grosseurs. Choisissez les ustensiles ayant un dessous plat assez
large pour recouvrir l’élément chauffant. Si vous utilisez des
ustensiles trop petits, une partie de l’élément sera à découvert,
et les vêtements entrant directement en contact avec l’élément
sont susceptibles de prendre feu. L’utilisation d’ustensiles d’une
taille proportionnelle à l’élément améliore aussi le rendement.
• Les poignées d’ustensiles doivent être tournées vers
l’intérieur, sans surplomber les éléments adjacents, afin de
réduire les risques de brûlure, de combustion et de
renversements causés par le contact involontaire avec un
ustensile.
• Ne laissez jamais les éléments sans surveillance. Les
débordements causent de la fumée, les éclaboussures de
graisse sont susceptibles de prendre feu et les ustensiles dont le
contenu s’est évaporé peuvent fondre.
• Protecteurs – N’utilisez pas de papier d’aluminium pour
recouvrir le fond du four ou toute autre partie de la cuisinière.
Utilisez seulement le papier d’aluminium pour recouvrir la
nourriture durant la cuisson au four. Toute autre utilisation de
protecteurs ou de papier aluminium est susceptible de causer
un choc électrique, un feu ou un court-circuit.
• Ustensiles vitrifiés – En raison des brusques changements de
température, on ne peut utiliser avec la surface de cuisson que
certains ustensiles en verre, en vitrocéramique, en céramique ou
en terre cuite, ou autres ustensiles vitrifiés, sans risquer qu’ils se
fendent. Vérifiez les recommandations du fabricant quant à leur
utilisation sur une surface de cuisson.
POUR SURFACE DE CUISSON
VITROCÉRAMIQUE SEULEMENT
• Ne cuisinez pas sur une plaque de cuisson brisée. Si la plaque
se brise, les solutions nettoyantes et les éclaboussures peuvent
pénétrer dans la plaque de cuisson brisée, et créer un risque de
choc électrique. Communiquez avec un technicien qualifié
immédiatement.
• Nettoyez soigneusement la plaque de cuisson. Si une
éponge ou un chiffon humide est utilisé pour essuyer des
renversements sur une surface chaude, faites attention afin
d’éviter de vous brûler par la vapeur. Certains nettoyeurs
peuvent produire de la fumée nocive s’ils sont appliqués sur une
surface chaude.
INSTRUCTIONS IMPORT ANTES
POUR L’UTILISATION DE VOTRE FOUR
• Soyez prudent en ouvrant la porte du four – Tenez-vous sur
le côté de l’appareil pour ouvrir la porte d’un four chaud. Laissez
d’abord l’air chaud ou la vapeur s’échapper avant de retirer ou
de placer des aliments dans le four.
• Ne bloquez pas les orifices d’aération. La ventilation du four se
produit à travers la surface de cuisson. Toucher les surfaces de cette
zone pendant le fonctionnement du four peut causer de graves
brûlures. Ne placez aucun objet en plastique ou conducteur de
chaleur à proximité de l’évent. Ils risquent de fondre ou de prendre
feu.
• Installation des grilles du four. Disposez toujours les grilles à
l’emplacement désiré lorsque le four est froid. Enlevez tous les
ustensiles qui se trouvent sur la grille avant de la retirer. Pour
déplacer une grille lorsque le four est chaud, soyez extrêmement
prudent. Utilisez des poignées et tenez la grille fermement avec les
deux mains pour la remettre en place. Ne touchez pas l’élément
chaud ou l’intérieur du four avec des poignées.
• Ne vous servez pas de la lèchefrite sans utiliser le couvercle qui
l’accompagne. Le couvercle permet à la graisse de s’égoutter au
fond de la lèchefrite, à l’abri de la chaleur intense du gril.
• Ne recouvrez pas le couvercle de la lèchefrite de papier
d’aluminium. L’huile et la graisse qui s’y accumulent peuvent
prendre feu.
• Ne touchez pas l’ampoule du four avec un linge mouillé pendant
qu’elle est chaude. Si vous le faites, elle risque de se briser.
Débranchez l’appareil ou coupez le courant avant d’enlever
l’ampoule et de la remplacer.
INSTRUCTIONS IMPORT ANTES
POUR LE NETTOY AGE DE VOTRE CUISINIÈRE
• Nettoyez régulièrement votre cuisinière pour enlever la
graisse sur toutes ses parties, car cette graisse risque de prendre feu. Le ventilateur d’évacuation des hottes et les filtres de graisse
doivent demeurer propres en tout temps. Ne laissez pas la graisse s’y
accumuler. Les accumulations de graisse dans le ventilateur
pourraient prendre feu. Reportez-vous aux instructions du fabricant
sur le nettoyage de la hotte.
• Nettoyants/Aérosols – Suivez toujours les recommandations du
fabricant, quant à leur utilisation. Sachez que les résidus excessifs de
nettoyeurs et d’aérosols risquent de prendre feu et de causer des
dommages et/ou des blessures.
FOURS AUTONETTOYANTS:
• Ne nettoyez dans le cycle autonettoyant que les parties du four
énumérées dans le présent Guide de l’utilisateur . Avant d’utiliser
le cycle autonettoyant, enlevez la lèchefrite et tout ustensile se
trouvant dans le four.
• Ne nettoyez pas le joint d’étanchéité de la porte. Faites attention
pour ne pas le frotter, l’endommager ou le déplacer.
• N’utilisez pas de nettoyeur commercial pour four. V ous ne devez
utiliser aucun nettoyeur commercial pour four, ni aucun enduit
protecteur à l’intérieur ou sur toute partie du four.
• Retirez les grilles du four. Les grilles changer ont de couleur si elles
sont laissées dans le four durant un cycle d’autonettoyage.
Certains oiseaux sont très vulnérables aux gaz
dégagés lors du nettoyage des fours auto-nettoyants; ils doivent
être placés dans une autre pièce, bien aérée.
CONSERVEZ CES INSTRUCTIONS
4
Page 37

Instructions d’installation
L ’installation et le service doivent être exécutés par un technicien qualifié.
Important: conservez ce document pour le présenter à l’inspecteur local d’électricité s’il le
demande. Lisez et conservez ce document pour référence.
Espaces prévus et dimensions
a. Laissez suffisamment d’espace entre la cuisinière et les surfaces combustibles adjacentes (1.3cm (1/2”) sur les côtés et à
l’arrière).
b. Endroit – Vérifiez l’endroit où la cuisinière sera installée. Assurez-vous qu’il y a une source d’alimentation électrique
adéquate et que le plancher est solide.
c. Les dimensions qui sont données doivent être respectées. Ces dimensions allouent un minimum de jeu. Les surfaces en
contact doivent être solides et de niveau.
VUE DE
L’AVANT
Distance minimum
du mur de chaque
côté de la cuisinière.
91.4 cm
(36”)
1.3 cm
(1/2”)
76.2 cm (30”)
Minimum
VUE DE
MODÈLES
CÔTÉ
24”
C
*
Distance minimum
à l’armoire du haut
45.7 cm
(18”)
du côté gauche ou
droit.
Profondeur maximum
des armoires sises au
dessus de la cuisinière.
33 cm
(13”)
B
30”
122 cm (48”)
Maximum
114.3 cm (45”)
Porte ouverte
76.2 cm
A
61cm
24”
30”
A
DIMENSIONS
B
63.5 cm
25”
78.7 cm
31”
66 cm (26”)
91.4 ± 0.3 cm
(36 ± 1/8”)
C
61 cm
24”
76.2 cm
30”
* Espace minimum de 76,2 cm (30”) entre le dessus de la surface de cuisson et le dessous d’une armoire en bois ou en métal non
protégée, ou espace minimum de 61 cm (24”) si le fond de l’armoire en bois ou en métal est protégé par un panneau résistant au
feu d’au moins 0.64 cm (1/4”) recouvert d’une feuille d’acier doux dont l’épaisseur est au moins de 0.038 cm (0.015”) si en aci er
inoxidable, de 0.061 cm (0.024”) si en aluminimum ou de 0.051cm (0.020”) si en cuivre. Un espace de 1.3 cm (1/2”) minimum
pour l’arrière et les côtés de la cuisinière est requis. Respectez toutes les dimensions indiquées ci dessus afin d’éviter des dommages
à la propriété, de créer un danger potentiel d’incendie et de faire des découpages incorrects du comptoir et de l’armoire.
Évitez d’ajouter des espaces de rangement au-dessus de l’appareil pour éliminer tout risque de brûlures ou de feu en vous
penchant au-dessus de surfaces chaudes pour prendre des objets. Si des espaces de rangement doivent être ajoutés, les
risques peuvent être réduits en installant une hotte qui excède le devant de l’armoire d’au moins 12.7 cm (5”).
Branchement
Cet appareil nécessite une alimentation électrique de 120/240 ou 120/208 volts correctement mise
à la terre. Branchez le câble d’alimentation de la cuisinière à une prise murale. S’il n’y en a pas,
faites-en installer une par un maître électricien.
Emplacement
Installez votre nouvelle cuisinière à 1.3 cm (1/2”) du mur arrière et alignez-la
avec les comptoirs de la cuisine. Assurez-vous qu’un espace libre de 1.3 cm
(1/2”) est conservé entre les côtés de la cuisinière et les comptoirs. Espacez
votre cuisinière d’au moins 7.6 cm (3”) minimum de votre réfrigérateur s’ils
sont côte à côte.
Nivellement
Pour obtenir de bons résultats de cuisson, votre cuisinière doit être de niveau.
Des vis de nivellement sont installées aux quatre coins inférieurs de la
cuisinière. Pour les ajuster , r etirez le tir oir de rangement. (V oir section Tiroir de
rangement).
Modèles 30”
Modèles 24”
5
Page 38

Instructions d’installation (suite)
Pour mettre la cuisinière de niveau:
1. Utilisez une clé ouverte de 1-1/4” ou une clé à molette pour dévisser chacune des quatre vis
de nivellement de deux à trois tours.
2. Installez une des grilles dans le centre du four.
3. Installez la cuisinière à son emplacement final et déposez le niveau à bulle sur la grille pour
vérifier si le niveau est acceptable. Prenez deux lectures, une avec le niveau placé en
diagonale dans le four et l’autre lecture dans l’autre diagonale.
4. Utilisez la clé 1-1/4” pour ajuster les vis de nivellement. Tournez chacune d’elles jusqu’à ce
que l’appareil soit assis fermement sur le plancher sans se balancer.
5. Certains appareils sont supportés par des roulettes à roulement doux qui servent à en faciliter
DÉBARRER
BARRER
ANCRAGE DES ROULETTES AVANT
(certains des modèles 30” seulement)
le déplacement.
Si le plancher est d’aplomb et de niveau, ouvrez le tiroir et abaissez les leviers d’ancrage des
roulettes avants pour empêcher la cuisinière de se déplacer (certains modèles).
Si le plancher n’est pas plat ou de niveau, servez-vous des vis de nivellement pour mettre
l’appareil de niveau et le supporter.
Lampe du four
Ne laissez pas la lampe du four allumée pendant le cycle
d’autonettoyage. Les hautes températures réduiront sa longévité.
Pour certains modèles, la lampe à l’intérieur du four s’allume automatiquement en ouvrant la porte.
La lampe peut être allumée, alors que la porte est fermée, grâce à l’interrupteur situé sur ou sous le
panneau de commandes.
Si le four est autonettoyant, la lampe est protégée par un protège-lampe en verre retenu par une
broche.
CE PROTÈGE-LAMPE DOIT ÊTRE EN PLACE LORS DE L ’UTILISA TION DU FOUR.
Pour remplacer la lampe:
ASSUREZ-VOUS QUE LE FOUR EST SUFFISAMMENT REFROIDI.
1. Coupez la source d’alimentation électrique de l’appareil.
2. Utilisez des gants avec face intérieure en cuir comme mesure de sécurité au cas où l’ampoule se briserait en la dévissant.
3. Remplacez l’ampoule par une autre de 40 watts conçue pour appareils électroménagers.
4. Si le four est autonettoyant, poussez la broche de côté pour libérer le protège-lampe, changez la lampe tel qu’expliqué ci-haut
et assurez-vous que le protège-lampe est remis en place.
Lampe de surface
(certain modèles)
surface de cuisson sont à la position ARRÊT “ ” et froids.
Assurez-vous que tous les boutons de commande des foyers de la
Actionnez l’interrupteur situé sur ou sous le panneau de commandes, du coté droit, pour allumer
ou éteindre la lampe de surface. Remplacez la lampe fluorescente si elle refuse de s’allumer après
plusieurs essais.
Lampe de surface installée sous le panneau de commande (certains modèles)
Pour la remplacer:
1. Placez vos doigts sous la lampe à environ 20.3 cm (8”) des deux extrémités.
2. Faites tourner le tube de 90° et le tirer vers le bas hors des réceptacles.
3. Installez le nouveau tube en l’insérant dans les guides des réceptacles et tournez-le pour
Modèles 30”
l’engager en position de fonctionnement; vérifiez si la lampe fonctionne correctement.
Lampe de surface installée sur le panneau de commande (certains modèles)
Pour la remplacer:
1. Soulevez le panneau de commande.
2. Placez vos doigts sous la lampe à environ 20.3 cm (8”) des deux extrémités.
3. Faites tourner le tube de 90° et le tirer vers le bas hors des réceptacles.
4. Installez le nouveau tube en l’insérant dans les guides des réceptacles et tournez-le pour
l’engager en position de fonctionnement; vérifiez si la lampe fonctionne correctement.
White-Westinghouse
Modèles 24”
6
Page 39

Coupe-circuit de protection
Comme protection en cas de surcharge, chacune des prises de courant (2 max.) qui se trouvent au dessus du panneau de
commandes est protégée par un fusible de 15 ampères, 120 volts. Pour les apercevoir, soulevez le couvercle qui se trouve au
dessus du panneau de commandes. Aucun fusible ne sera fourni si l’appareil ne comprend pas de prise de courant.
Réglage des commandes des foyers de surface (certains modèles)
1. Placez le plat sur le foyer.
2. Enfoncez et tournez le bouton de commande du foyer au réglage désiré.
3. La/les lampes témoins des foyers s’allument lorsqu’un ou plusieurs foyers sont utilisés. Éteignez
toujours le foyer avant d’en retirer le plat.
Les réglages suggérés dans le tableau ci-dessous ont été obtenus en utilisant des plats en aluminium
d’épaisseur moyenne ou élevée pour la cuisson, avec leur couvercle en place. Ces réglages peuvent
être différents lorsque d’autres types de plats sont utilisés.
Remarque: La grosseur et le type d’ustensile utilisé, en plus de la quantité et du type d’aliment à
cuire influenceront le réglage nécessaire pour obtenir de bons résultats culinaires.
Ne déposez pas d’objets en plastique tels que salières et poivrières, supports à cuillères ou
emballages en plastique sur la surface de cuisson lorsqu’elle est utilisée. Ces items peuvent prendre en feu ou fondre.
Les poignées, serviettes ou cuillères en bois peuvent prendre en feu s’ils sont trop près des foyers.
Réglage
Haut (MAX)
Type de cuisson
Pour débuter la cuisson, pour faire bouillir
de l’eau, pour faire griller de la viande.
Moyen (MED)
Pour garder l’eau en ébullition, épaissir les
sauces, cuire les légumes à la vapeur.
Moyen à faible
Pour compléter la cuisson, faire cuire des
oeufs pochés ou du ragoût.
Faible (MIN)
Pour garder chaud, fondre ou faire mijoter.
Modèles avec minuterie à touches capacitives (seulement)
NOTE: Lorsque que le four est en fonction soit: pour la cuisson au four, la cuisson par convection, le grillage ou pour le cycle
autonettoyant, un ventilateur démarre et arrête automatiquement afin de refroidir des pièces internes de l’appareil. C’est
normal et il est possible que ce ventilateur continue de fonctionner même si le four est à la position arrêt.
Choix des ustensiles de cuisine pour la cuisson sur les foyers
Pour obtenir de bons résultats et conserver l’énergie, choisissez des ustensiles de cuisine possédant les caractéristiques suivantes:
*BON
MAUVAIS
• Fonds incurvés et déformés.
Le fond des casseroles doit être plat. Vérifiez
que le fond est plat en faisant tourner une
règle sur le fond de la casserole. Il ne devrait
pas y avoir d’espace entre la casserole et la
règle.
Utilisez toujours les ustensiles pour l’usage
auquel ils ont été conçus. Suivez les instructions du fabricant. Certains ustensiles de
cuisine ne peuvent être utilisés au four ou
sur les foyers.
• Fond plat et côtés droits.
• Couvercles qui ferment
hermétiquement.
• Le poids du manche ne fait pas
basculer la casserole. La casserole est
bien équilibrée.
• Les tailles des casseroles correspondent à la quantité d’aliments à faire
cuire.
• Matériau qui conduit bien la chaleur.
• Facile à nettoyer.
* Il est possible d’utiliser des ustensiles de
cuisine spéciaux comme les casseroles à
homard, les plaques chauffantes et les
autocuiseurs en s’assurant toutefois, qu’ils
sont conformes aux exigences ci-dessus.
7
• La casserole déborde du brûleur de plus
de 2.5 cm (1”).
• Manche trop lourd qui fait basculer la
casserole.
• Le foyer déborde des bords de la casserole.
Page 40

Casseroles et sous-plats
particuliers
La plupart des boutiques d’articles de
cuisine et des quincailleries offrent des
woks à fond plat qui conviennent à
cette surface de cuisson. Les woks à
fond rond (pourvus d’un anneau de
support qui ne dépasse pas le contour
de l’élément chauffant) peuvent
également être utilisés. L’anneau
métallique est conçu pour soutenir le
wok de façon sécuritaire lorsqu’il
contient une grande quantité de liquide
(soupe) ou de graisse (friture).
NE PAS utiliser deux
éléments (sauf si la table de cuisson est
munie d'un élément allongé) à la fois
pour chauffer une grande casserole
comme une rôtissoire ou une plaque
chauffante, ni laisser chauffer
l’ustensile jusqu’à ce que tout le liquide
s’évapore. Dans ces deux cas, le fond
de la casserole risquerait de décolorer
ou de craqueler la surface émaillée de
l'appareil et d’endommager les
éléments de surface ou la cuvette de
l’élément (s’il y a lieu).
NE PAS utiliser un wok pourvu d’un
anneau métallique de support qui
dépasse le contour de l’élément de surface. Étant donné que cet anneau
retient la chaleur, il pourrait endommager l’élément de surface ou la surface de cuisson.
Dans le cas des surfaces lisses en verre,
seuls les woks à fond plat (sans anneau
de support) peuvent être utilisés.
Conseils et
renseignements sur la
mise en conserve
La mise en conserve
peut générer une grande quantité de
vapeur . User d’une grande prudence pour
prévenir les blessures. Toujours soulever
le couvercle de façon à diriger la vapeur à
l’opposé des personnes.
Sous-plats métalliques : Ne pas
utiliser de sous-plats métalliques. Le
fond de la casserole doit être en contact direct avec les éléments de surface.
1. Utiliser des recettes éprouvées et suivre les directives attentivement. Consulter
un service de vulgarisation agricole ou un fabricant de bocaux en verre pour les
données les plus récentes sur la mise en conserve.
2. Utiliser uniquement des casseroles de mise en conserve à fond plat. La chaleur se répartit
plus uniformément lorsque le fond de la casserole est plat.
3. Centrer la casserole de mise en conserve sur l’élément de surface.
4. Verser de l’eau chaude dans la casserole et régler l’élément à une température
élevée pour accélérer l’ébullition; réduire la température le plus possible tout en
maintenant une ébullition constante.
5. Il est préférable de mettre de petites quantités d’aliments en conserve à la fois.
Pour ne pas endommager la surface de cuisson :
1. Ne pas utiliser les grandes casseroles ou les autocuiseurs de mise en conserve qui
dépassent de plus de 2,5 cm (1") le contour de l’élément de surface.
2. Ne pas laisser les grandes casseroles ou les autocuiseurs de mise en conserve à
une température élevée trop longtemps.
3. Utiliser un élément différent pour chaque nouvelle charge de mise en conserve
pour permettre à l’élément et à la surface avoisinante de refroidir. Éviter
d’utiliser le même élément pendant toute une journée pour la mise en conserve.
Pour que la mise en conserve soit sécuritaire, les micro-organismes
dangereux doivent être détruits et les pots bien scellés. Lorsqu’une grande casserole
de mise en conserve est utilisée, il faut maintenir une ébullition légère mais
constante pendant toute la durée requise.
8
Page 41

Cuisson au four
Afin d’obtenir de meilleurs résultats de cuisson, réchauffez le four avant d’y faire cuire des biscuits, pains, gâteaux, tartes ou
pâtisseries, etc. Il n’est pas nécessaire de préchauffer le four pour cuire un rôti ou pour cuire dans une casserole.
Les durées et températures de cuisson nécessaires pour faire cuire une denrée au four peuvent varier légèrement par rapport
aux temps requis avec votre ancienne cuisinière.
Tableau des Problèmes de cuisson au four et de leurs Solutions
Problème de
cuisson au four
Le fond des petits
gâteaux et biscuits
est brûlé.
Gâteaux trop dorés
sur le dessus ou le
dessous.
Gâteaux pas assez
cuits au centre.
Les gâteaux ne sont
pas d’épaisseur
égale.
Causes
• Petits gâteaux et biscuits mis au four
avant la fin du préchauffage.
• Grille du four surchargée.
• Un moule foncé absorbe la chaleur
trop rapidement.
• Gâteaux mis au four avant la fin du
préchauffage.
• Grille placée trop haute ou trop
basse dans le four.
• Four trop chaud.
• Four trop chaud.
• Taille de moule incorrecte.
• Moule non centré dans le four.
• La cuisinière n’est pas de niveau.
• Moule trop près de la paroi du four
ou grille surchargée.
• Moule déformé.
Solutions
• Laissez le four se réchauffer à la température voulue avant d’y
placer les aliments.
• Choisir des tailles de moule qui laisseront dans le four 5.1 à 10.2
cm (2” à 4”) d’espace libre tout autour du moule.
• Utilisez une tôle à biscuit en aluminium d’épaisseur moyenne.
• Laissez le four préchauffer à la température voulue avant d’y
placer les aliments.
• Utilisez la position de grille appropriée pour la cuisson.
• Réglez la température du four à 25°F (12°C) de moins que
suggéré.
• Réglez la température du four à 25°F (12°C) de moins que prévu.
• Utilisez la taille de moule suggérée dans la recette.
• Utilisez la position de grille appropriée et placez le moule pour
qu’il y ait 5.1 à 10.2 cm (2” à 4”) d’espace tout autour.
• Placez une tasse à mesurer en verre, remplie d’eau, au centre de la grille du
four. Si le niveau d’eau est inégal, veuillez consulter les instructions
d’installation pour mettre la cuisinière de niveau.
• Veillez à conserver dans le four 5.1 à 10.2 cm (2” à 4”)
d’espace libre tout autour du moule.
• N’utilisez pas de moules bosselés ou déformés.
Les aliments ne sont
pas assez cuits à la
fin de la durée de
cuisson prévue.
• Four pas assez chaud.
• Four surchargé.
• La porte du four a été ouverte trop
fréquemment
• Réglez la température du four à 25°F (12°C) de plus que prévu
et faites cuire pendant la durée recommandée.
• Veillez à retirer du four tous les plats ou moules sauf ceux qui
sont nécessaires à la cuisson.
• N’ouvrez pas la porte du four avant la fin de la durée minimum
de cuisson recommandée.
Circulation d’air dans le four
Pour une bonne circulation d’air et une cuisson satisfaisante, centrez les moules le mieux possible. Allouez 5.1 à 10.2 cm (2” à 4”) autour
des ustensiles pour permettre à l’air de circuler et veillez à ce que les moules ne se touchent pas mutuellement, et qu’ils ne touchent pas la
porte, les côtés ou l’arrière du four. L’air chaud doit pouvoir circuler autour des moules pour que la chaleur soit uniforme dans toutes les
parties du four.
Si vous utilisez plusieurs moules, espacez-les tel que montré ci-dessous.
Avec un seul moule, placez-le au centre du four.
9
Page 42

Voyants lumineux
Certains modèles possèdent un voyant pour chacun des foyers, d’autres en possède un pour chaque paire de foyers. D’autres
n’en ont que pour la zone de réchaud et le tiroir réchaud.
Le voyant devient lumineux aussitôt qu’un foyer est allumé. Vérifiez si le voyant devient lumineux aussitôt que vous tournez
chacun des boutons des commandes de foyer. Si le bouton est réglé à un très faible réglage de chaleur, le voyant peut
s’allumer même si aucune chaleur n’est produite par le foyer. Si cela se produit, tournez le bouton à un réglage plus élevé,
jusqu’à ce que le foyer commence à chauffer.
Quand la cuisson est terminée, jetez un coup d’oeil rapide aux voyants; c’est un moyen facile de vous assurer que tous les
boutons de commande ont été tournés au repère ARRÊT “ ”.
Cuisson par convection (option disponible avec certains modèles)
NOTE: Le moteur de la turbine convection cesse automatiquement de tourner si la porte est ouverte alors que le
four fonctionne en mode convection. Elle recommence à tourner lorsque la porte est refermée.
En mode convection, un ventilateur au fond du four sert à faire circuler l’air chaud autour des aliments. Ce mouvement contrôlé
d’air scelle rapidement la surface des aliments, retenant ainsi tous les jus naturels et leur saveur. Cette méthode de cuisson vous
permet d’obtenir les meilleurs résultats culinaires, c’est à dire pour la cuisson, décongeler, déshydrater et rôtir des aliments.
Conseils sur la convection:
1. Pour la cuisson par convection, on peut réussir presque toutes les recettes en abaissant la température du four requise pour la
cuisson en mode normal par radiation de 13°C (25°F). Vérifiez le mode de fonctionnement de la commande électronique qui se
trouve dans le feuillet “Programmateur électronique du four” de ce guide de l’utilisateur. Ceci peut avoir comme résultat de
réduire considérablement la perte de volume des aliments, en plus de cuire les viandes plus tendres.
2. Il est plus facile de cuire des lots d’aliments et d’obtenir de meilleurs résultats.
3. Décongeler les aliments par convection est plus rapide que par la méthode normale de cuisson par radiation.
4. Souvenez-vous d’utiliser des recettes déjà connues et essayées, dont la durée de cuisson aura été ajustée pour le mode
convection. La durée de la cuisson peut-être réduite jusqu’à 30% lorsque l’option convection est utilisée.
Rôtissage par convection (certains modèles)
Pour le rôtissage par convection, servez-vous toujours de la lèchefrite et de son
couvercle ainsi que de la grille de rôtissage convection. La graisse s’écoule dans la
lèchefrite et son couvercle prévient les éclaboussures de graisse. La grille de
rôtissage supporte la viande.
1. Placez la grille du four sur le premier support ou le deuxième support du bas.
2. Placez le couvercle sur la lèchefrite. La grille de rôtissage convection s’imbrique
dans la lèchefrite. L ’air chaud cir cule sous l’aliment afin de procur er une cuisson
uniforme. Ne vous servez pas de la lèchefrite sans son couvercle ou ne la
recouvrez pas de papier d’aluminium.
Grille de
rôtissage
Couvercle
Lèchefrite
10
Page 43

Système de cuisson rapide (certains modèles)
En mode de cuisson rapide, un ventilateur à l’arrière du four fait circuler l’air chaud autour des
aliments. Cette circulation d’air scelle rapidement la surface des aliments, retenant ainsi les jus et
leur saveur. Cette méthode permet d’obtenir de meilleurs performances, aussi bien pour cuire,
décongeler , déshydrater que pour rôtir les aliments.
Les viandes cuites à l’aide du système de cuisson rapide sont plus savoureuses. Le poulet est
croustillant à l’extérieur tout en étant tendre et juteux à l’intérieur. Les pains et patisseries cuisent
plus uniformément. La plupart des aliments peuvent être préparée plus rapidement et plus
efficacement en mode de cuisson rapide.
Les avantages du système de cuisson rapide:
- Économise du temps et de l’énergie puisque les aliments cuisent de 15 à 30% plus rapidement.
- Cuit et grille plus uniformément les aliments lorsque deux tablettes sont utilisées.
- Ne requiert pas de casseroles ou d’ustensiles de cuisson spéciaux.
Instructions de cuisson générales:
1. Lorsque le mode de cuisson rapide est utilisé, le temps de cuisson est réduit
considérablement. Commencez par réduire le temps de 30% et augmentez graduellement
jusqu’à ce que les aliments atteignent la cuisson désirée. La réduction du temps de cuisson
variera selon la quantité et le type d’aliment à cuire.
2. À l’exception de la cuisson de pains, de gâteaux, de biscuits, etc., le préchauffage du four
n’est pas nécessaire lorsqu’il est utilisé en cuisson rapide.
3. La cuisson d’aliments en lots est améliorée en mode de cuisson rapide, lorsque l’utilisation
de 2 tablettes est requise en même temps pour la cuisson, placez-les en position 1 et 3 pour
obtenir de meilleurs résultats.
4. Lors de la cuisson de gâteaux en mode de cuisson rapide, réglez la température 25°F (13°C) degrés plus basse que la
température recommandée pour les meilleurs résultats.
Voyant
lumineux
Réglage du système de cuisson rapide
1. Réglez le four comme pour une cuisson normale au four . Le système de cuisson rapide peut êtr e utilisé
avec les fonctions suivantes: cuisson au four , cuisson au four chr onométrée et mise en marche dif férée.
2. Activez l’interrupteur à bascule du mode de cuisson rapide situé sur le panneau de commande. Le
voyant lumineux s’allume et le ventilateur démarre. Ce ventilateur est en fonction lorsque la porte du
four est fermée et s’éteint quand on ouvre la porte. Le ventilateur continue à fonctionner jusqu’à ce que
la cuisson soit terminée.
3. Lorsque l’option cuisson rapide est utilisée avec le mode cuisson chronométrée, le ventilateur du
four se met à fonctionner dès que le programmateur est réglé. Par contre, l’élément du four ne
commencera pas à chauffer avant que l’heure de départ programmée ne soit atteinte.
4. Pour annuler la cuisson rapide, procédez de la même façon que pour annuler toutes autres modes de cuisson.
Note: Le mode de cuisson rapide ne fonctionne pas
durant un cycle autonettoyant.
Guide pour système de
Nourriture
Plats en casserole
Viandes
Volailles
Aliments congelés
Biscuits réfrigérés
Rouleaux/Pains/Pizza
Légumes
Pommes de terre au four
Tartes/Pâtisseries
11
cuisson rapide
Réduction du temps de cuisson:
25%
15% (ou 5 minutes/lb)
30% (ou 10 minutes/lb)
20%
25% (ou 2 to 5 minutes)
25% (ou 5 minutes)
25%
25%
30%
Page 44

Cuisson au gril
La cuisson au gril est un procédé de cuisson des coupes tendres de viande grâce à la chaleur radiante émise par l’élément
supérieure du four .
Préchauffage
Le préchauffage est recommandé pour saisir les biftecks saignants. (Retirez la lèchefrite avant
le préchauffage. Les aliments placés sur le métal chaud collent). Pour le préchauffage, réglez
la commande du four à BROIL (GRIL) en suivant les instructions du Guide de l’utilisateur .
Attendez que l’élément devienne rouge vif, cela prend environ 2 minutes. Le préchauffage
n’est pas nécessaire pour les viandes bien cuites.
Ouvrez la porte à la position
grillage lors de la
cuisson au gril.
Pour la cuisson au gril
Grillez la viande sur un côté jusqu’à ce qu’elle soit dorée; retournez et faites cuire le deuxième
côté. Assaisonnez et servez. Tirez toujours la grille hors du four jusqu’à la position d’arrêt avant
de retourner ou de retirer les aliments.
Tirez toujours la grille du
four jusqu’à sa position
d’arrêt pour retourner ou
retirer les aliments.
Calcul des durées de cuisson au gril
Les durées de cuisson au gril peuvent varier: surveillez attentivement la cuisson. Non
seulement la durée de cuisson dépend-elle de la distance par rapport à l’élément, mais
également de l’épaisseur et du vieillissement de la viande, de sa teneur en matières grasses et
du degré de cuisson préféré. Le premier côté nécessite généralement quelques minutes de plus
que le deuxième. Les viandes surgelées prennent aussi plus de temps à cuire.
Conseils pour la cuisson au gril
La lèchefrite et son couvercle permettent à la graisse de s’égoutter au fond de la lèchefrite, à
l’abri de la chaleur intense du gril.
NE P AS utiliser la lèchefrite sans son couvercle qui l’accompagne. NE PAS recouvrir le
couvercle de papier aluminium. Le gras en surface pourrait s’enflammer.
Si un feu se produit à l’intérieur du four, fermez la porte du four et
éteignez le four. Si le feu ne s’éteint pas, lancez dessus du bicarbonate de soude ou utilisez un
extincteur. NE PAS mettre d’eau ou de farine sur le feu. La farine risque d’exploser.
Couvercle
Lèchefrite
Conseils pour le nettoyage de la lèchefrite:
• Pour faciliter le nettoyage, couvrez le fond de la lèchefrite d’un papier d’aluminium. NE recouvrez PAS le couvercle de la
lèchefrite de papier d’aluminium.
• Pour empêcher la graisse de s’incruster, retirez la lèchefrite du four dès que la cuisson est terminée. Utilisez des mitaines car
la lèchefrite est extrêmement chaude. Vidangez la graisse. Faites tremper la lèchefrite dans l’eau CHAUDE et savonneuse.
• Nettoyez la lèchefrite dès que possible après utilisation. S’il y a lieu, utilisez des tampons de laine d’acier saponifiés. Un
récurage trop énergique pourrait l’endommager .
Réglage du four
Pour le réglage du four , r eportez-vous à la section minuterie ou programmateur électr onique.
12
Page 45

Surface de cuisson vitrocéramique (certains modèles)
Des éléments électriques chauffants sont situés sous la surface de cuisson vitrocéramique. L’emplacement des éléments sur la
plaque de cuisson est clairement délimité par le design. Vous devez surtout vous assurer que le diamètre de la casserole est de
dimension similaire au diamètre des éléments. La chaleur est propagée vers le haut, à travers la surface de la plaque de cuisson.
N’utilisez que des ustensiles à fond plat. Le type et la grosseur des ustensiles de cuisine, le nombre d’éléments utilisés et le réglage
des éléments, sont des facteurs qui influencent la quantité de chaleur qui s’étend aux zones autour des éléments. Celles-ci peuvent
devenir suffisamment chaudes pour causer des brûlures.
La surface de cuisson vitrocéramique ne doit pas être utilisée comme planche à découper ou table de travail. Si vous laissez tomber
des objets durs ou lourds sur la plaque de cuisson, vous risquez de la faire éclater. Les casseroles avec des fonds rugueux peuvent
égratigner la plaque de cuisson. Il est recommandé de ne pas déposer d’aliments directement sur la plaque de cuisson (sans les
mettre dans des ustensiles de cuisine), car le nettoyage sera plus difficile et les aliments pourraient générer de la fumée et entraîner
un risque potentiel d’incendie. N’utilisez jamais de plaque chauffante ou d’ustensiles similaires sur la surface en vitrocéramique.
Types de foyers utilisés (certains modèles)
T r ois types de foyers chauffants peuvent êtr e utilisés tout dépendant du modèle; ce sont ceux qui ont:
– des éléments radiants réguliers (à une seule zone) de divers diamètres ou configurations.
– des éléments radiants à surface variable (à deux zones) de divers diamètres ou configurations.
– des éléments radiants allongés (à trois zones) de divers diamètres ou configurations.
Éléments radiants réguliers (certains modèles)
Un motif épousant la forme du foyer radiant apparaît sur la surface vitrocéramique et vous
permet de le situer.
Le niveau de chaleur est ajusté à l’aide d’un bouton de commande que vous devez enfoncer à
fond en premier, s’il est à la position ARRÊT. Tournez ensuite le bouton au niveau de chaleur
désiré.
Si la surface chauffante de l’élément dépasse le contour de la casserole, l’ustensile est trop
petit pour l’élément. Il n’est pas nécessaire d’aligner le bouton de commande sur une marque
particulière. Servez-vous des marques comme points de repère, et ajustez le bouton de
commande en conséquence. Les voyants lumineux de fonctionnement et de surface chaude
s’allumeront.
Graduations
de l’élément
avant.
Graduations
de l’élément
allongé.
Éléments radiants à surface variable (certains modèles)
Ce foyer combine les caractéristiques d’un petit et d’un grand foyer radiant. Le principal
avantage de ce foyer c’est qu’il peut être utilisé pour la cuisson avec de petits ou de grands
ustensiles, ce qui augmente l’utilité de la surface de cuisson.
Les niveaux de chaleur sont ajustés à l’aide d’un bouton de commande à deux séries de
graduations. Avec de petits ustensiles, utilisez les petits caractères; seule la petite surface
intérieure chauffera. Pour chauffer de grands ustensiles servez-vous des graduations à gros
caractères; toute la surface du foyer chauffera alors.
Les voyants lumineux de fonctionnement et de surface chaude s’allumeront lorsque l’élément
chauffera.
Éléments radiants allongés (certains modèles)
Le principal avantage de ce type de foyer est qu’il permet de créer une zone de cuisson plus
grande pour les casseroles de forme allongée comme les rotissoires ou les plaques chauffantes.
Pour utiliser l’élément allongé, tournez le bouton de commande vers la gauche, en direction des
graduations de l’élément allongé.
Pour un élément allongé complet, activez aussi l’élément arrière.
Et pour utiliser seulement l’élément avant, tournez le bouton de commande vers la droite, en
direction des graduations de l’élément avant.
13
Page 46

Surface de cuisson vitrocéramique (certains modèles) (suite)
Modèles avec contrôles ESEC (certains modèles)
L’apparence et les graphiques peuvent être différents
Apparence de la table de cuisson
Figure 1
AVANT ARRIÈRE
Emplacement des éléments
chauffants
AVANT
Surface de cuisson vitrocéramique
Des éléments électriques chauffants sont
situés sous la surface de cuisson
vitrocéramique. L’emplacement des éléments
sur la plaque de cuisson est clairement
délimité par le design. Assurez-vous que le
diamètre de la casserole est de dimension
similaire au diamètre des éléments (Figure 1).
La chaleur est propagée vers le haut, à
travers la surface de la plaque de cuisson.
N’utilisez que des ustensiles à fond plat. Le
type et la grosseur des ustensiles de cuisine,
le nombre d’éléments utilisés et le réglage
des éléments, sont des facteurs qui
influencent la quantité de chaleur qui s’étend
aux zones autour des éléments. Celles-ci
peuvent devenir suffisamment chaudes
pour causer des brûlures.
Éléments de surface radiants
La température des éléments augmente
graduellement et uniformément. Lorsque
l’élément chauffe, ce dernier devient rouge.
Afin de maintenir la température désirée,
l’élément s’allumera et s’éteindra
automatiquement. L’élément retient assez de
chaleur pour continuer de fournir une
température constante même lorsque ce
dernier est éteint. Pour une cuisson efficace,
éteignez l’élément quelques minutes avant
que la cuisson soit complétée. Ceci permet à
la chaleur résiduelle de compléter le processus de cuisson.
Figure 2
Emplacement des éléments et des
contrôles
Votr e appar eil possède des éléments radiants
de 6 différentes puissances. Plus la puissance
de l’élément est élévée plus les grandes
quantités aliments chauffent rapidement.
L’exemple utilisé en Figure 2 montre un
modèles avec tous les sortes d’éléments que
vous pourriez avoir . Nous utiliserons cet
exemple dans cette section, mais
l’apparence et les graphiques peuvent
être différents. Figure 2 possède un
élément régulier de 6 pouces, situé à
l’arrière à droite; on retrouve un élément radiant à surface variable de 6 ou 9 pouces à
l’avant à droite; un élément radiant Zone
réchaud se situe à l’arrière au centre; et
deux éléments radiants de 8 pouces sont
situés à l’avant et à l’arrière du côté gauche.
On retrouve entre l’élément avant et arrière à
gauche un élément radiant PONT.
L’élément PONT est contrôlé par le même
bouton de contrôle que l’élément radiant
avant gauche.
14
Page 47

Surface de cuisson vitrocéramique
(certains modèles) (suite)
Commandes électroniques des éléments
de surface (ESEC)
Chaque commande électronique ESEC des éléments de surface
possède un écran digital. La caractéristique ESEC est munie de 4
écrans digitals numériques soit un écran par élément de surface.
Une seule commande contrôle l’élément avant gauche et l’élément
pont. L ’élément radiant double avant dr oit est aussi contrôlé par un
seul bouton de commande. Ce type de commande fonctionne de la
même façon qu’une commande normale mais il est possède un écran
digital permettant de visionner le réglage (voir figures 1 à 4)
Figure 1 Figure 2
Réglages disponibles de la commande électronique
ESEC
La commande électronique ESEC permet différents niveaux de
température situés entre maximum Hi (Fig. 2), minimum Lo (Fig. 4) et
arrêt OFF (Fig. 1). Les réglages situés entre Hi et 3.0 diminuent par
intervalle de .5. Les réglages situés entre 3.0 et Lo (Mijotant, position
indiqué par les pointillés sur le dosseret) diminuent par intervalle de .2
afin d’obtenir plus de précision aux niveaux les plus bas.
Utilisez le tableau (Fig. 5) pour déterminer le réglage le plus approprié
dépendamment des aliments à préparer. La fonction “Mijotant” est
utilisée afin de conserver chaude une grande quantité d’aliments tel
que les soupes ou les ragoûts. La plus basse température de la fonction
mijotant est idéale pour les aliments délicats ou pour faire fondre le
chocolat ou le beurre.
Note: La grosseur ou le type d’ustensile utilisés influenceront le réglage
nécessaire pour obtenir de bons résultats culinaires.
Réglages des éléments de surface recommandés
Réglage
Haut (MAX)
Moyen (MED)
Moyen à faible
Faible (MIN)
Type de cuisson
Pour débuter la cuisson, pour faire bouillir
de l’eau, pour faire griller de la viande.
Pour garder l’eau en ébullition, épaissir les
sauces, cuire les légumes à la vapeur.
Pour compléter la cuisson, faire cuire des
oeufs pochés ou du ragoût.
Pour garder chaud, fondre ou faire mijoter.
Figure 5
sembler avoir refroidi après leur utilisation. La sur face de vitrocéramique peut être encore chaude
et causer des brûlures si elle est touchée lorsqu’elle
n’a pas assez refroidi. Soyez prudent.
que salières et poivrières, supports à cuillères ou
emballage en plastique sur la surface de cuisson
lorsqu’elle est utilisée. Ces items peuvent prendre feu ou fondre. Les poignées, serviettes ou
cuillères en bois peuvent prendre feu s’ils sont trop
près des éléments.
NOTE:
surface vitrocéramique à la section nettoyage
général et la section avant d’appeler le service dans
ce manuel.
NOTE:
permettant à l’élément de passer d’allumé à éteint
automatiquement, afin de fournir le degré de la
chaleur demandée. Ceci permet aussi de protéger la
vitre contre les dommages. Ce phénomène peut se
produire au réglage maximum (HI), ce qui peut signifier que le diamètre de l’ustensile est trop petit par
rapport au diamètre de l’élément ou bien que le fond
de l’ustensile n’est pas plat. (Référez-vous à la section
Ustensiles pour la cuisson sur les élément en page 11).
Figure 3 Figure 4
Les éléments radiants peuvent
Ne déposez pas d’objets tels
Veuillez lire les instructions de nettoyage de la
Les éléments radiants possèdent un dispositif
Message d’erreur de la commande ESEC (Er)
Le message d’erreur s’affichera et clignotera (“ Er”, voir Figure 6) lors du branchement (ou après
un interruption de courant) si UNE commande est à la position Marche (ON). Si une interruption
de courant survient, assurez-vous que les 4 commandes sont à la position Arrêt. Ceci redémarrera
les commandes des éléments de surface.
Assurez-vous de redémarrer l’horloge. Après avoir placé les commandes à la position Arrêt (OFF)
et avoir régler l’horloge, les afficheurs devraient revenir à la normale. Si les commandes ne
fonctionnent toujours pas et que “Er” demeure affiché dans un des afficheurs, contactez
réparateur autorisé Sears.
Figure 6
V errouillage de la commande électronique ESEC (- -)
La fonction autonettoyante du four ne fonctionnera pas si une des commandes des éléments de
surface n’est pas à la position arrêt (OFF). Les éléments de surface ne seront pas opérant durant
un cycle autonettoyant ou lorsque la fonction verrouillage de la commande du four est en
fonction. Lorsque la fonction verrouillage est activée, “- -” apparaîtra à l’écran. Si un des éléments
de surface est encore chaud au moment où la commande de verrouillage est mise en fonction, le
message “HE” apparaîtra à l’écran plutôt que “- -”.
Figure 7
15
Page 48

Surface de cuisson vitrocéramique
(certains modèles) (suite)
Message indiquant que la surface est chaude (HE)
Lors de l’utilisation d’un ou l’autre des éléments simples, doubles ou
pont la surface de cuisson devient très chaude. Même après avoir
éteint les éléments, la surface de cuisson demeure chaude pour une
certaine période. La commande ESEC détecte la chaleur de la surface
de cuisson et affiche le message “HE” (hot element) pour aviser que
la surface est encore trop chaude pour être touché. Même si le message HE est affiché, l’élément peut être utilisé à nouveau à ce moment.
Réglage d’un élément radiant régulier
La table de cuisson possède des éléments simples à 2 endroits; à
l’arrière à droite (Fig. 3) et à l’arrière à gauche (Fig. 4). L’élément
PONT peut aussi être utilisé comme un élément simple.
Pour régler les éléments radiants simples:
1. Placez un plat de dimension approprié sur l’élément radiant.
2. Enfoncez et tournez le bouton de commande d’un côté ou de
l’autre en vous référant à l’écran ESEC (Fig. 2) pour obtenir le
réglage désiré. Tournez le bouton de commande pour ajuster le
réglage si désiré. Débutez la plupart des cuissons à la position la
plus élevé et ensuite continuez la cuisson en réglant le bouton à un
réglage plus faible. Chacun des éléments de cuisson produit une
chaleur constante. Si un halo rouge déborde de l’ustensile de
cuisson ceci indique que le diamètre de ce dernier est trop petit
pour l’élément utilisé.
3. Lorsque la cuisson est complétée tournez le bouton de commande
à la position Arrêt avant de retirer l’ustensile de l’élément. Note:
Le message HE apparaîtra à ce moment et demeurera à l’écran
jusqu’à ce que la surface ait suffisamment refroidi.
Figure 1
Figure 2
L’appar ence et les graphiques peuvent
être différents
Figure 3
Élément droit arrière
Élément gauche arrière
Figure 4
Réglage des éléments radiants doubles
La table de cuisson possède un élément radiant double situé à l’avant
à droite (Fig. 8). La dimension des graduations sur le panneau de
commande indique quelle zone de l’élément double fonctionne. Les
graduations à petits caractères indiquent que seul la zone interne de
l’élément fonctionne (Fig. 5 & 7). Les graduations à gros caractères
indiquent que les deux zones de l’élément double fonctionnent (Fig. 6
& 8). Vous pouvez passer d’une zone à l’autr e à tout moment durant
la cuisson.
Pour régler les éléments doubles:
1. Placez un plat de dimension approprié sur l’élément radiant.
2. Poussez et tournez le bouton de commande vers les graduations à
petits caractères pour faire fonctionner la zone interne de l’élément
double (Fig. 5) et en direction des graduations à gros caractères
pour faire fonctionner l’élément double au complet (Fig. 6).
3. Référez-vous à l’écran ESEC pour obtenir le réglage désiré. Tournez
le bouton de commande pour ajuster le réglage si désiré. Débutez
la plupart des cuissons à la position la plus évelé et ensuite
continuez la cuisson en repositionnant le bouton à un réglage plus
faible. Chacun des éléments de cuisson produit une chaleur
constante. Si un halo rouge déborde de l’ustensile de cuisson ceci
indique que le diamètre de ce dernier est trop petit pour l’élément
utilisé.
4. Lorsque la cuisson est complétée tournez le bouton de commande
à la position Arrêt avant de retirer l’ustensile de l’élément. Note:
Le message HE apparaîtra à ce moment et demeurera à l’écran
jusqu’à ce que la surface ait suffisamment refroidi.
Figure 5
L’appar ence et les graphiques peuvent
être différents
Figure 7 Figure 8
Les éléments radiants peuvent
sembler avoir refroidi après leur utilisation. La sur face de vitrocéramique peut être encore chaude
et causer des brûlures si elle est touchée
lorsqu’elle n’est pas assez refroidi. Soyez pru-
dent.
Figure 6
16
Page 49

Surface de cuisson vitrocéramique
(certains modèles) (suite)
Réglage de l’élément radiant PONT
La table de cuisson est munie d’un élément “PONT” situé à avant et au centre à gauche.
L’élément pont peut être utilisé pour cuire à l’aide d’ustensile rectangulaire (comme une
rôtisserie) ou une casserole de forme ovale. L’élément maitiendra la température constante sur
tout l’élément. Si nécessaire afin d’utiliser un ustensile standard, l’élément Pont peut
fonctionner comme un élément radiant simple sans utiliser la zone pont de l’élément.
Les symboles de l’élément pont sont situés sur le panneau de commande de chaque côté du
bouton de commande de l’élément. Ces symboles indiquent de quel côté tourner le bouton
pour faire fonctionner l’élément. Un symbole indique que seule la zone avant de l’élément pont
est en fonction. Un symbole indique les deux zones de l’élément pont sont en fonction en
même temps. Vous pouvez changer d’un à l’autr e à n’importe quel temps lors de la cuisson.
Pour régler l’élément radiant pont:
1. Placez un plat de dimension approprié sur l’élément radiant.
2. Poussez et tournez le bouton de commande dans le sens inverse des aiguilles d’une montre
pour faire fonctionner la zone inférieure de l’élément double (Fig. 5) et dans le sens des
aiguilles d’une montre pour faire fonctionner les 2 zones de l’élément pont (Fig. 6).
3. Référez-vous à l’écran ESEC pour obtenir le réglage désiré. Tournez le bouton de commande
pour ajuster le réglage si désiré. Débutez la plupart des cuissons à la position la plus élevé et
ensuite continuez la cuisson en repositionnant le bouton à un réglage plus faible. Chacun
des éléments de cuisson produit une chaleur constante. Si un halo rouge déborde de
l’ustensile de cuisson ceci indique que le diamètre de ce dernier est trop petit pour l’élément
utilisé. V euillez noter que pas tous les ustensiles de cuisson ne peuvent être utilisés sur
l’élément pont.
4. Lorsque la cuisson est complétée tournez le bouton de commande à la position Arrêt avant
de retirer l’ustensile de l’élément. Note: Le message HE apparaîtra à ce moment et
demeurera à l’écran jusqu’à ce que la surface ait suffisamment refroidi.
L’élément PONT peut aussi être utilisé en combinaison avec l’élément radiant simple situé à
l’arrière à gauche. Puisque cet élément possède 2 commandes différentes, un élément peut
être utilisé pou la cuisson tandis que l’autre peut être utilisé pour garder les aliments chauds.
Les éléments radiants peuvent sembler avoir refroidi après leur utilisation. La
surface de vitrocéramique peut être encore chaude et causer des brûlures si elle est touchée
lorsqu’elle n’a pas assez refroidi. Soyez prudent.
Figure 1
Figure 2
L’appar ence et les graphiques
peuvent être différents
Figure 3
Figure 4
Figure 5
17
Page 50

Surface de cuisson vitrocéramique (certains modèles) (suite)
Précautions à prendre avec l’emploi de papier d’aluminium et de récipients en aluminium
1) Papier d’aluminium
L’emploi de papier d’aluminium peut endommager la surface de cuisson; évitez de l’employer.
2) Récipients en aluminium
L ’aluminium fond à une température plus basse que celle des autr es métaux. V ous devez êtr e vigilant lorsque vous employez de
tels récipients. Si toute l’eau du récipient s’évapore, des dommages permanents à la surface de cuisson peuvent en résulter;
égratignure, fusion et même bris de la surface.
Glisser des récipients avec des fonds en aluminium ou cuivre peut laisser des
marques. Ces marques doivent être nettoyées avec une crème immédiatement après
que la surface aie refroidie . Ces marques peuvent devenir permanentes si elles ne
sont pas nettoyées.
Les ustensils (acier, métal, céramique ou verre) avec des fonds rugueux peuvent
endommager la surface de cuisson. Ne glissez aucun ustensils de métal ou verre
sur la surface. N'utilisez pas la surface comme comptoir de cuisine. Ne cuisinez
pas sur la surface directe sans récipients. N'échappez pas d'objets lourds ou tres
L’appar ence et les graphiques
peuvent être différents
Points à se rappeler
1. Ne glissez pas d’ustensiles sur la surface de cuisson vitrocéramique, ceci pourrait
égratigner ou laisser des marques métalliques permanentes sur la surface de cuisson.
2. ÉVITEZ d’utiliser des agents de blanchissage et ne vous servez pas d’ammoniaque pour nettoyer la
surface vitrocéramique.
3. Ne placez pas d’articles en matière plastique sur la surface de cuisson si elle est chaude.
4. Ne placez pas les grilles du four sur la surface de cuisson vitrifiée, car elles peuvent l’endommager .
5. Si la vitre venait à se briser , ne vous servez pas de la surface de cuisson et n’essayez pas de
la nettoyer . Appelez immédiatement un technicien du service autorisé.
6. Ne placez pas de supports métalliques entre les casseroles et la surface de cuisson vitrifiée. Ces supports risquent de tacher,
d’égratigner ou même de marquer la surface de cuisson vitrifiée.
7. Les renversements sucrés peuvent attaquer la surface de votre plaque de cuisson. V ous devez donc pr océder au nettoyage de
ces renversements pendant que l’appareil est encore chaud. Suivez prudemment les étapes qui suivent.
a) Éteignez tous les foyers et retirez immédiatement toutes les casseroles.
b) Protégez votre main avec une moufle et grattez le débordement encore chaud de la surface du foyer à l’aide d’un grattoir
à lame de rasoir, en repoussant les résidus vers la partie plus froide de la surface de cuisson.
c) Laissez refroidir l’appareil.
Entretien de la surface de cuisson
durs sur la surface, ceci pourrait la faire craquer.
Problème Causes Pour prévenir Pour enlever
Lignes brunes très Présence de grains de sel, Essuyez la surface de Enlever les égratignures s’avère
fines (légères sucre, résidus de cuisson après chaque impossible. Celles-ci peuvent
égratignures, cuisson, ou même sable usage. être réduites au minimum en
dans lesquelles entre les récipients et vous servant régulièrement d’une
se sont logées la surface de cuisson. crème nettoyante.
des impuretés). Ces égratignures n’affectent pas
Utilisation d’agents de Utilisez quotidiennement pour autant la cuisson.
nettoyage non recommandés. la crème nettoyante.
Marques Frottement de récipients de Évitez de déplacer les Appliquer sur la surface froide
métalliques, métal ou tablettes du four récipients en les glissant une crème nettoyante à l’aide
grises ou noires. sur la surface de cuisson. sur la surface de cuisson. d’une serviette de papier humide.
Rayures Nettoyage avec une Utilisez la crème Appliquez une crème nettoyante
brunâtres éponge ou un linge à nettoyante à l’aide à l’aide d’une serviette de papier
et petites vaisselle destiné à d’autres d’une serviette de papier humide.
taches. tâches dans la cuisine. propre et humide.
NOTE : La vitre de la surface de cuisson deviendra verte lorsque les éléments de surface seront éteints après avoir été utilisés à
haute intensité. Ce phénomène est normal et la vitre redeviendra à sa couleur blanche originale lorsqu’elle sera
complètement refroidie. (Vitres blanches seulement).
18
Page 51

Surface de cuisson vitrocéramique (certains modèles) (suite)
Entretien de la surface de cuisson (suite)
Comment nettoyer la surface de cuisson vitrocéramique
Certains nettoyeurs à vitres contiennent des ingrédients qui endommageront votre surface de cuisson.
Nous vous suggérons de vous servir de nettoyeurs approuvés, énumérés plus loin dans le texte. Pour
nettoyer et protéger la surface de cuisson, une crème nettoyante devra être utilisée régulièrement. Avant
d’utiliser votre appareil pour la première fois, appliquez de la crème nettoyante sur la surface de cuisson
céramique. Un échantillon de crème nettoyante CERAMA BRYTE
produit est disponible en magasins.
Employez un des nettoyeurs recommandés et terminez avec la crème nettoyante. Suivez les
recommandations suivantes:
1. AVANT DE VOUS SERVIR DE L’APPAREIL, nettoyez à fond et saturez la surface de cuisson avec
une crème nettoyante.
a) Humectez une serviette de papier et nettoyez la surface souillée.
b) Essuyez avec une autre serviette de papier imbibée d’eau; après quoi polissez avec une serviette
de papier sèche.
2. Pour le nettoyage quotidien, appliquez un peu de crème nettoyante au centre de chaque foyer. Appliquez environ 1/8 de
cuillerée à thé (appliquez-en plus si nécessaire), puis procédez de la façon spécifiée plus haut pour le nettoyage (a et b).
3. Assurez-vous que le dessous du récipient et la surface de cuisson sont propres et secs.
4. Réglez le bouton de commande et choisissez des récipients suffisamment grands pour éviter des renversements et
éclaboussures.
5. Essuyez les aliments qui se sont renversés ainsi que les éclaboussures avant qu’ils ne brûlent sur la surface.
IMPORTANT Utilisez la crème nettoyante à intervalles réguliers. Assurez-vous de toujours avoir de la crème nettoyante à la portée
de la main. Si vous ne disposez pas de crème nettoyante, utilisez un des nettoyeurs approuvés.
® est fourni avec votre appareil. Ce
CERAMA BRYTE®
(Crème nettoyante pour
les surfaces de cuisson
en céramique)
Ne mélangez jamais les agents nettoyeurs. Les mélanges peuvent être nocifs, dommageables, et possiblement
dangereux.
Nettoyeurs approuvés pour la surface de cuisson vitrocéramique
1. BICARBONATE DE SOUDE (Soda à pâte).
2. T ampons de plastique et de nylon non-imprégnés.
3. Dans le cas d’aliments brûlés sur la surface, grattez légèrement à un angle de 30° avec une lame de rasoir à tranchant unique.
4. Crème pour nettoyer les vitres céramique.
5. Crème nettoyante CERAMA BRYTE® .
À ne pas utiliser sur la surface de cuisson vitrocéramique
1. Des tampons qui peuvent égratigner et marquer la surface de cuisson.
2. Des poudres nettoyantes. Elles peuvent égratigner, selon leur rugosité et la pression de frottage qui est appliquée.
3. Des nettoyeurs chimiques pour le four . Ils peuvent mar quer la surface de cuisson et sont caustiques.
4. Tous les produits capables d’enlever les taches de rouille qui contiennent de l’acide hydrofluorique.
5. Les agents de blanchissage. Ne vous servez pas d’ammoniaque.
Instructions spéciales pour le nettoyage des dépôts minéraux et décoloration
Problème: Une tache d’un gris brunâtre qui ne s’enlève pas avec la crème nettoyante.
Cause: La condensation, provenant de la cuisson, s’accumule et dégoutte du couvercle du récipient. Les minéraux qui se trouvent
dans l’eau et dans les aliments peuvent causer la formation d’un dépôt grisâtre ou brunâtre sur la surface de cuisson. Ce dépôt
est si mince qu’il ne peut être décelé au toucher et semble être situé sous la surface de cuisson.
Pour prévenir: Servez-vous chaque jour de la crème nettoyante.
Pour l’enlever:
– Humectez la tache avec de l’eau et appliquez une petite quantité de crème nettoyante.
– Frottez avec une serviette de papier propre et humide, jusqu’à ce que la tache disparaisse.
– Enlevez le résidu avec une autre serviette de papier humide.
– Appliquez une petite quantité de crème nettoyante et polissez avec une serviette de papier propre.
AVERTISSEMENT
– N’appliquez jamais de détergent sur une surface de cuisson vitrocéramique avant qu’elle ne soit complètement refroidie, à
cause des vapeurs nocives qui seraient générées.
– N’utilisez pas de crème nettoyante pour le nettoyage et le polissage des surfaces en porcelaine, chromées ou en aluminium.
19
Page 52

Réglage de la commande de la zone réchaud (certains modèles)
Pour faire fonctionner la zone réchaud
La surface de cuisson de votre cuisinière est munie d'une zone réchaud. Cette zone a pour fonction de conserver les aliments
chauds à la température de service. Commencez toujours par les mets chauds. Il n'est pas recommandé de chauffer des aliments
froids sur la zone réchaud.
Utilisez la zone réchaud pour conserver chaud certains aliments qui sont cuits tels que: les légumes, les sauces, les mets dans
une casserole, les soupes, les ragoûts, les pains, les pâtisseries et les assiettes de service utilisables au four.
Tous les aliments placés sur la zone réchaud doivent être recouverts d'un couvercle ou d'une feuille de papier aluminium pour
conserver leur qualité. Pour les meilleurs résultats, laissez le couvercle entrouvert lorsque vous désirez garder chaud des pâtisseries
ou des pains. N'utilisez pas de plastique pour recouvrir les aliments. Le plastique peut fondre; il sera très difficile de
l'enlever de la surface par la suite.
Utilisez seulement la vaisselle et les ustensiles de cuisine recommandés pour le four et la zone réchaud.
La zone réchaud ne devient pas rouge lorsqu'elle est chaude contrairement aux éléments de surface. Utilisez
toujours des poignées ou des mitaines pour fours pour retirer les aliments de la zone réchaud, car les ustensiles et plats qui s'y
trouvent sont chauds.
Témoin lumineux
Warm Zone
La lampe témoin de surface chaude de la zone réchaud est
située sous ou dessus la commande thermostat de la zone réchaud.
Elle s'allume lorsque le bouton de la commande est réglé et et
continuera de briller tant que la vitre ne se sera pas refroidie à un
niveau acceptable.
Réglage de la zone réchaud
1. Pour régler le thermostat, enfoncez le bouton et tournez-le au
OFF
HI
LO
réglage désiré. Les températures sont approximatives et
désignées par HAUT (MAX), MOYEN (MED) et BAS (MIN).
T outefois, le bouton peut êtr e positionné à tout endroit entr e les
L’appar ence et les graphiques
peuvent être différents
repères HAUT (MAX) et BAS (MIN) pour des niveaux de chaleur différents.
MED
WARM & SERVE
ZONE
L’apparence et les
graphiques peuvent
être différents
2. Lorsque vous aurez terminé, tournez la commande de thermostat à OFF (ARRÊT). La lampe témoin
surface chaude s'éteint lorsque la zone réchaud s'est refroidie à un niveau sécuritaire.
Sélection de température
Référez-vous au tableau pour les réglages recommandés. Si un aliment n'est pas énuméré, commencez par le réglage moyen. La
plupart des aliments peuvent être conservés aux températures de service en utilisant le réglage moyen.
Tableau des réglages recommandés pour la zone réchaud
Aliments Réglage
Pains / pâtisseries Bas (MIN)
Mets en casserole Bas (MIN)
Assiettes de service avec aliments Bas (MIN)
Oeufs Bas (MIN)
Jus de viande Bas (MIN)
Viandes Moyen (MED)
Aliments Réglage
Sauces Moyen (MED)
Soupes (crème) Moyen (MED)
Ragoûts Moyen (MED)
Légumes Moyen (MED)
Aliments frits Haut (MAX)
Breuvages chauds Haut (MAX)
Soupes (liquides) Haut (MAX)
20
Page 53

Nettoyage de l’appareil
Nettoyage extérieur
Nettoyez la cuisinière après chaque usage
Avant de débuter le nettoyage de la cuisinière, assurez-vous que
toutes les commandes des éléments de chauffage sont bien à la position ARRÊT “ ” et que les éléments sont froids.
afin d’éviter toute accumulation de saletés et
prévenir ainsi qu’elles carbonisent et lavez avec de l’eau chaude et savonneuse. Essuyez avec un linge doux ou avec du papier
essuie-tout.
N’utilisez pas de produits abrasifs, de laine d’acier, de nettoyeurs à base d’ammoniaque ou d’acide, ou des nettoyeurs pour fours,
sur les surfaces extérieures de la cuisinière excepté pour les surfaces émaillées. Avant d’utiliser un nettoyeur ou un poli pour métal
sur les garnitures métalliques, assurez-vous que l’étiquette indique qu’il peut être employé sur le chrome ou l’aluminium.
T ableau des commandes
Boutons de commande
Si le tableau de commandes a besoin d’être nettoyé, tournez les boutons de commandes à ARRÊT
“
” et retirez-les de l’axe des commandes.
L’utilisation d’un chiffon imbibé d’eau chaude savonneuse ou d’un nettoyeur ménager doux suffira
pour la plupart des travaux de nettoyage du tableau de commande en acier ou en aluminium.
Parfois, l’application de quelques gouttes d’une crème nettoyante ou crème de polissage (à base
de silicone) recommandée viendra à bout des souillures persistantes, et laissera une couche
protectrice aidant à conserver l’apparence original de votre cuisinière.
Vous pouvez vous pr ocurez la crème nettoyante/polissante recommandée dans tous les centr es de
services après-vente autorisés et dans tous les grands magasins.
Modèles avec panneau de verre:
Nettoyez le panneau de verre à l’aide d’un chiffon/éponge imbibé d’eau chaude savonneuse ou à l’aide d’un essuie-tout et d’un
nettoyeur de vitre en aérosol. Prenez des précautions pour que l’eau ou le nettoyeur n’aille pas se loger derrière le panneau de
verre ou à proximité de commandes activées par des boutons.
Replacez les boutons en prenant soin d’aligner le plat de l’axe avec le plat dans la cavité du bouton. Enfoncez les boutons sur les
axes des commandes.
Avant de débuter le nettoyage des foyers
spiralés, assurez-vous qu’ils sont froids et
que les commandes sont à la position
ARRÊT “
couvercles sur les foyers spiralés, ceux-ci
pourraient être endommagés en permanence si les foyers étaient allumés
accidentellement.
SURFACES
Acier émaillé (T able de
cuisson; surface sous
la table de cuisson)
”.
Ne laissez jamais de
AGENTS DE NETTOY AGE
Nettoyeurs doux
ou tampons en acier
saponifiés.
Surface de cuisson à foyers spiralés (certains modèles)
Les foyers spiralés et cuvettes de propreté
Les foyers spiralés se nettoient d’eux-mêmes lorsqu’ils fonctionnent.
Les foyers spiralés et les cuvettes de propreté sont
amovibles et permettent ainsi de nettoyer les
cuvettes de propreté.
Pour enlever un foyer spiralé, poussez sur sa
partie avant et relevez-la, puis tirez-le hors de sa
fiche.
Pour un lavage à la main, lavez les cuvettes de
propreté dans de l’eau chaude savonneuse. Pour
faire disparaître les taches résistantes, utilisez un tampon à récurer en nylon et du
savon; rincez et séchez pendant que ces pièces sont encore chaudes.
Ne faites jamais tremper les éléments spiralés dans de
l’eau.
INSTRUCTIONS
Utilisez une éponge moullée ou un tampon saponifié et
trempé, lavez et asséchez.
Garniture - Panneau
de commandes
Eau chaude et savonneuse
ou crème nettoyante.
Utilisez un linge propre ou un papier essuie-tout
savonneux et mouillé, lavez et asséchez. N’utilisez pas de
produits abrasifs.
21
Page 54

Nettoyage de l’appareil (suite)
Instructions pour le nettoyage de la surface de cuisson en émail vitrifié
NE P AS utiliser de
nettoyeur à plaque de cuisson sur une
surface de cuisson chaude. Les émanations
peuvent mettre votre santé en danger, et
risquer d’endommager chimiquement la
surface émaillée.
Avant de nettoyer la surface
émaillée, assurez-vous que tous les boutons des
commandes sont tournés à OFF (ARRÊT) et que
la table de cuisson est froide.
Nettoyage de la surface de cuisson en émail vitrifié
Un nettoyage correct et consistant est essentiel au maintien de votre surface de
cuisson en émail vitrifié. Si les renversements d’aliments et les éclaboussures de
graisses ne sont pas enlevés, ils brûleront sur la surface de cuisson et causeront
une décoloration permanente.
Nettoyage quotidien
Pour la saleté normale:
1. Laissez refroidir la surface de cuisson.
2. Nettoyez les renversements et les éclaboussures à l’aide d’un chiffon et de
l’eau chaude savonneuse.
3. Au besoin, l’utilisation délicate d’un tampon à récurer ou d’un nettoyeur
ménager doux permettront d’enlever les taches rebelles.
4. Retirez toute trace du savon ou du nettoyeur sans quoi l’émail pourrait être
endommagé par la chaleur.
NE PAS utiliser de nettoyeurs
commerciaux pour les fours sur les surfaces
extérieures, y compris le cadre de la porte et la
surface de cuisson.
Pour la saleté tenace et les taches calcinées:
1. Laissez refroidir la surface de cuisson.
2. Utilisez un tampon de laine d’acier savonneux avec de l’eau chaude ou
humectez les taches d’un mélange d’eau et d’ammoniaque. Frottez
délicatement. Rincez et séchez à l’aide d’un chiffon propre.
3. Si la saleté persiste (grosses souillures), appliquez quelques gouttes d’une
crème nettoyante RECOMMANDÉE pour surface de cuisson (émail/
vitrocéramique) et à l’aide d’un chiffon humide ou d’un tampon à récurer,
frottez. Épongez et essuyez jusqu’à ce que toute la saleté et la crème soient
enlevées. Un nettoyage et polissage régulier avec la crème nettoyante laisse
une couche protectrice qui aide à prévenir les égratignures et les abrasions.
Pour les renversements sucrés:
Les renversements sucrés peuvent attaquer le fini de votre surface de cuisson.
Vous devez donc procéder au nettoyage de ces renversements pendant que
l’appareil est encore chaud.
1. Éteignez tous les éléments de la surface de cuisson.
2. Protégez votre main avec une moufle et prudemment essuyez le
débordement encore chaud avec un chiffon sans toucher aux éléments de
cuisson.
3. Laissez refroidir la surface de cuisson et suivez les instructions précitées pour
enlever les souillures restantes.
Vous pouvez vous procurer la CRÈME NETTOYANTE RECOMMANDÉE pour
surface en émail vitrifié ou vitrocéramique chez tous les centres de services
autorisés ou grands magasins.
22
Page 55

Nettoyage de l’appareil (suite)
Nettoyage du four régulier (four non autonettoyant)
Assurez-vous d’abord que le four est froid et que toutes les commandes sont à la position ARRÊT
”. Il est plus facile de nettoyer le four lorsque la porte est retirée.
“
1. Enlevez la porte, voir la section “ Enlevez et réinstallez la porte du four” .
2. Videz le four de son contenu incluant les grilles.
3. La lèchefrite, le couvercle et les grilles peuvent être lavés dans l’évier.
4. Nettoyez l’intérieur du four à fond avec un linge humide et savonneux, puis essuyez à sec.
Pour faciliter le nettoyage des saletés incrustées difficiles à enlever, utilisez un produit pour
usage domestique à base d’ammoniaque. Suivez le mode d’emploi suggéré par le fabricant.
(Ne retirez pas la porte si vous utilisez de l’ammoniaque.)
Complétez le nettoyage avec un linge mouillé, aidé d’une laine d’acier fine ou d’un agent de
récurage si nécessaire.
Vous pouvez fair e pivoter l’élément inférieur vers le haut pour faciliter le nettoyage du four.
5. Replacez les grilles dans le four. Réinstallez la porte.
Nettoyage du four autonettoyant (certains modèles)
Prenez les précautions de nettoyage qui suivent:
• Laissez le four refroidir avant le nettoyage.
• Portez des gants en caoutchouc lorsque vous nettoyez toute partie extérieure du four à la main.
Pendant le cycle d’autonettoyage, l’extérieur du four peut devenir très chaud au toucher. NE laissez pas les
enfants sans surveillance près de l’appareil.
Certains oiseaux sont très vulnérables aux gaz dégagés lors du nettoyage des fours auto-nettoyants; ils doivent
être placés dans une autre pièce, bien aérée.
Avant de débuter le nettoyage, assurez-vous que la commande du four est tournée à arrêt ou appuyez sur la
touche ARRÊT (OFF) ou ANNULATION. Attendez que le four se soit refroidi.
N’utilisez pas de nettoyeurs commerciaux ou d’enduits protecteurs sur ou autour d’aucune partie du four. NE nettoyez pas le
joint d’étanchéité. Le joint d’étanchéité qui est installé sur la porte du four est essentiel à une fermeture efficace du four. Faire
attention de ne pas le frotter ou le déplacer, car ceci pourrait l’endommager. N’utilisez pas de papier d’aluminium pour protéger
le fond du four car ceci pourrait nuire à la cuisson ou fondre et affecter le fini du four.
Un four autonettoyant se nettoie de lui-même à des températures élevées (bien au-dessus des températures de cuisson), qui
éliminent complètement ou réduisent les saletés en fines cendres, que vous pouvez faire disparaître très facilement avec un linge
humide.
Préparation du four avant l’autonettoyage
1. Retirez tout excès de renversements dans la cavité du four avant de débuter le cycle
NETTOYEZ
LE CADRE
AVANT À LA
MAIN
d’autonettoyage. Utilisez un linge trempé dans de l’eau chaude et savonneuse pour
le nettoyage. Les gros renversements peuvent être la cause de fumées épaisses ou
d’un incendie s’ils sont exposés à des températures élevées. Ne pas permettre à des
renversements qui contiennent beaucoup de sucre ou qui ont un niveau d’acidité
élevé (tels que tomates, choucroute, jus de fruits, ou garnitures de tarte) de
demeurer en surface, car ils peuvent causer la formation de taches qui resteront sans
éclat même après le nettoyage.
2. Nettoyez toute saleté présente sur le cadre avant du four, ainsi que l’intérieur de la
porte (surfaces ombragées de l’illustration). Ces surfaces deviennent suffisamment
chaudes pendant le cycle d’autonettoyage pour cuire les éclaboussures sur les
NETTOYEZ
LA PORTE
À LA MAIN
NE NETTOYEZ PAS
LE JOINT D’ÉTANCHÉITÉ À
LA MAIN
surfaces. Nettoyez avec de l’eau et du savon.
3. Retirez la lèchefrite et son couvercle ainsi que tous les ustensiles et tout papier
d’aluminium. Ces produits ne supportent pas les températures élevées de
l’autonettoyage.
4. Les grilles peuvent être laissées dans le four ou être enlevées. Si elles subissent un cycle d’autonettoyage, leur couleur
deviendra terne. Quand le cycle de nettoyage sera terminé et que le four sera refroidi, frottez les broches sur les côtés des grilles
avec du papier ciré ou avec un peu d’huile pour bébé ou d’huile à salade. Ceci aidera les grilles à mieux glisser.
23
Page 56

Nettoyage de l’appareil (suite)
BLOCAGE AUTOMATIQUE DES ÉLÉMENTS DE SURFACE (Modèles avec four autonettoyant seulement)
Les éléments de surface sont exposés à des températures élevées s’ils sont utilisés alors que le four fonctionne en mode
autonettoyant. Pour maximiser la durée de vie des éléments de surface, un système de protection les rend hors d’usage
pendant le cycle d’autonettoyage du four . Les éléments de surface redeviennent fonctionnels lorsque le cycle de nettoyage est
complété et que la porte du four peut être ouverte.
Ce qui peut survenir durant l’autonettoyage
Lorsque le four fonctionne, sa température devient beaucoup plus élevée que celle utilisée pour la cuisson. Il est normal d’entendre
des bruits de dilatation et de contraction du métal. Il y aura aussi des odeurs causées par l’élimination des souillures. Il est même
possible que de la fumée s’échappe par la sortie d’aération qui débouche sur la table de cuisson.
Si les gros débordements ne sont pas essuyés avant l’autonettoyage, ils pourraient s’enflammer et causer encore plus de fumée et
d’odeurs que la normale. Cette situation est normale et sans danger et ne devrait pas vous alarmer . Si vous possédez une hotte,
utilisez-la durant le cycle d’autonettoyage pour évacuer les odeurs et les fumées.
REMARQUE: Un éliminateur de fumée est installé dans le conduit d’aération; il transforme la presque totalité des saletés en un gaz
invisible.
Réglage des commandes du four
Pour le réglage d’un cycle de nettoyage, référez-vous à la section minuterie ou programmateur électronique.
Table de cuisson levable (certains modèles)
Avec certains modèles, la table de cuisson à foyers spiralés peut être soulevée pour faciliter le
nettoyage.
Pour soulever la table de cuisson, prenez-la par les côtés vers l’avant et soulevez-la. Utilisez les
deux broches supports et faites glisser le cran d’arrêt vers vous, pour que la table de cuisson
demeure en position élevée pendant le nettoyage.
Abaissez la table de cuisson lentement en prenant soin de ne pas vous faire
pincer les doigts. Ne la laisser pas se refermer avec force, car ceci pourrait endommager le fini
émaillé.
Enlever et réinstaller la porte
1. Ouvrez la porte complètement.
2. Faites pivoter vers le haut les deux loquets mobiles se trouvant sur les supports des charnières et engagez-les dans les crochets
des bras des charnières. Il se peut qu’il soit nécessaire d’exercer une légère pression sur la porte pour que les loquets s’engagent
complètement.
3. Avec une main de chaque côté de la porte, soulevez légèrement la porte et tirez-la vers vous pour dégager les supports des
charnières.
Continuez à tirer la porte vers vous tout en faisant pivoter le haut de la porte vers la cuisinière de façon à dégager les bras des
charnières.
4. Pour remettre la porte en place, procédez à l’inverse.
Assurez-vous que les supports de la charnière sont bien engagés avant de libérer les bras de charnières.
Loquet en position
normale
Loquet en position engagée
dans le bras de la charnière
24
FENTE DES CHARNIÈRES
Porte complètement
dégagée de la cuisinière
Page 57

Porte avec vitre extérieure démontable (certains modèles)
Ces modèles n’ont pas la vitre extérieure de la porte retenue par un cadre enveloppant. Ce design vous permet de nettoyer la face
interne de la vitre extérieure, ainsi que la partie cachée de la vitre du hublot intérieur de la porte. Il existe deux types de porte avec
vitre extérieure démontable, soit: un modèle avec moulure inférieure collée sur la vitre et un autre modèle avec moulure inférieure
indépendante de la vitre.
Pour retirer la vitre extérieure de la porte:
1. Retirez la porte de la cuisinière en se référant à “ Enlevez et réinstallez la porte” à la section “ Nettoyage de l’appareil” et
déposez-la à plat.
2. À l’aide d’un tournevis, retirez les vis retenant l’assemblage vitre et moulure inférieure pour les modèles avec moulure
inférieure collée sur la vitre; ou les vis retenant la moulure inférieure pour les modèles avec moulure inférieure indépendante de
la vitre et retirez ensuite la moulure inférieure.
3. Tenez la vitre par les côtés et faites-la doucement glisser hors de la moulure supérieure avant de la porte. Déposez la vitre à
plat.
Manipulez cette vitre avec précaution. Si la vitre est cognée sur un coin, elle peut éclater en petits morceaux et
vous blesser .
Pour les modèles avec la moulure inférieure collée sur la vitre: NE décollez PAS la moulure de la vitre.
Pour réinstaller la vitre extérieure de la porte:
1. Soulevez la vitre par les côtés et insérez-la délicatement sous la moulure supérieure de la porte.
2. Replacez l’assemblage vitre et moulure inférieure ou la moulure inférieure et les vis qui le retiennent en place.
3. Replacez la porte sur la cuisinière en référant à “ Enlevez et réinstallez la porte” à la section “ Nettoyage de l’appareil” .
Retirer/replacer le tiroir de rangement
Pour retirer/replacer le tiroir avec glissières extensibles (certains modèles)
Utilisez le tiroir de rangement pour entreposer des ustensiles de cuisine. Le tiroir peut être enlevé pour faciliter le nettoyage sous
l’appareil. Faites attention en manipulant le tiroir.
Pour retirer le tiroir:
Abaissez le levier de gauche,
soulevez celui de droite et
sortez le tiroir.
Roulette
Pour retirer le tiroir:
1. Tirez sur le tiroir vide jusqu’à ce qu’il bloque.
2. Soulevez le levier de la barrure de la glissière droite et abaissez celle de gauche.
3. Retirez le tiroir de la cuisinière.
Pour replacer le tiroir:
1. Faites glisser les guides du tiroir sur les glissières.
2. Poussez le tiroir à fond dans la cuisinière.
Pour retirer/replacer le tiroir de rangement avec roulettes (certais modèles)
Pour retirer le tiroir:
1. Tirez le tiroir vide jusqu’au butoir des roulettes.
2. Soulevez l’avant du tiroir vers le haut et faites-le passer par dessus les roulettes.
Pour replacer le tiroir:
1. Insérez l’arrière du tiroir dans l’ouverture.
2. Déposez les roulettes arrières du tiroir sur les guides des roulettes.
3. Poussez le tiroir jusqu’à ce qu’il bloque, puis soulevez-le par dessus le butoir et glissez-le au
fond.
Guide
25
Page 58

Tiroir-Réchaud (certains modèles)
Réglage des commandes du tiroir -réchaud
Pour faire fonctionner le tiroir -réchaud
Votre cuisinière est munie d'un tiroir-réchaud. Ce tiroir a pour fonction de conserver les aliments chauds à la température de
service. Commencez toujours par les mets chauds. Il n'est pas recommandé de chauffer des aliments froids dans le tiroir-réchaud.
T ous les aliments placés dans le tir oir -réchaud doivent êtr e recouverts d'un couver cle ou d'un papier en aluminum pour conserver
leur qualité. Ne couvrez pas les aliments croustillants. N'utilisez pas de plastique pour recouvrir les aliments. Le
plastique risque de fondre dans le tiroir et d'être très dif ficile à nettoyer.
Utilisez seulement la vaisselle et les ustensiles de cuisine recommandés pour le four dans le tiroir-réchaud.
Utilisez toujours des poignées ou des mitaines pour four pour retirer les aliments du tiroir-réchaud, car les
ustensiles et plats s'y trouvant sont chauds.
Note: Utilisez le tiroir-réchaud pour garder les aliments chauds comme : les légumes, les sauces, les viandes, les casseroles, les
biscuits et les petits pains, les pâtisseries et les assiettes à dîner servies.
Note: Le tiroir -réchaud est equipé d'un loquet qui peut exiger assez d'effort pour ouvrir et fermer le tir oir.
Témoin lumineux
Le témoin lumineux est situé sous le bouton de la commande thermostat. Il s'illumine lorsque la
commande est réglée et reste allumé jusqu'à ce qu'on l'éteigne. Le tiroir-réchaud ne peut fonctionner
pendant le cycle auto-nettoyant. Le témoin lumineux ne s'allumera pas pendant le cycle auto-nettoyant.
Réglage du bouton de la commande du thermostat
La commande thermostat est utilisée pour sélectionner la température du tiroir-réchaud. Elle est située
derrière la porte du tiroir-réchaud. Pour régler le thermostat, appuyez sur le bouton et tournez-le au
réglage désiré. Les températures sont approximatives et désignées par HAUT (HI), MOYEN (MED) et BAS
(LO). Le bouton peut aussi être réglé à ces trois niveaux de chaleur ou à n'importe quel autre niveau de
OFF
HI
LO
MED
WARM & SERVE
DRAWER
Sélection de température
Référez-vous au tableau dans la colonne ci-contre pour les réglages recommandés.
Si un aliment n'est pas énuméré, commencez par le réglage moyen. Si vous
préférez que l'aliment soit plus croustillant, enlever le couvercle ou le papier
aluminium qui le recouvre.
La plupart des aliments peuvent être conservés aux températures de service en
utilisant le réglage MOYEN(MED).
Lorsqu'une combinaison d'aliments doit être gardée au chaud, utilisez le réglage
élevé(HI) (par exemple, une viande avec 2 légumes et petits pains).
Evitez d'ouvrir le tiroir-réchaud pendant qu'il est utilisé afin d'éviter toute perte de
chaleur.
Pour réchauffer les bols et assiettes de service
Réglez le chauffage à BAS (LO) pour réchauffer les bols et assiettes. Placez les plats
vides sur la grille pour qu'ils ne touchent pas le fond du tiroir. Vérifiez auprès du
fabricant pour déterminer le degré de chaleur que peuvent tolérer les articles en
porcelaine.
IMPORTANT: Le tiroir-réchaud sera automatiquement mis hors de service pendant
que le four fonctionne en mode autonettoyant. Il pourra être utilisé à nouveau
lorsque le cycle d'autonettoyage sera terminé.
chaleur compris entre ces réglages.
1. Sélectionnez le réglage de température.
2. Pour de meilleurs résultats, préchauffez le tiroir avant d'ajouter les aliments. Un tiroir vide prend
environ 18 minutes à réchauffer au réglage MAX(Haut), 15 minutes au réglage MED (MOYEN) et 12
minutes au réglage MIN (BAS).
3. Lorsque vous aurez terminé, tournez la commande
thermostat à OFF (Arrêt).
L’apparence et les graphiques peuvent être différents
T ableau des réglages r ecommandés
pour le tiroir -réchaud
Aliments Réglage
Bacon Haut (MAX)
Biscuits Moyen (MED)
Plats en Casserole Moyen (MED)
Oeufs Moyen (MED)
Assiettes vides Bas (MIN)
Poisson, fruits de mer Moyen (MED)
Aliments frits Haut (MAX)
Sauces Moyen (MED)
Jambon Moyen (MED)
Pâtés de viande Haut (MAX)
Crêpes, gaufres Haut (MAX)
Pâtisserie Moyen (MED)
Tartes Moyen (MED)
Pizza Haut (MAX)
Côtes de porc Haut (MAX)
Pommes de terre (au four) Haut (MAX)
Pommes de terre (en purée) Moyen (MED)
Poulet Haut (MAX)
Rôtis (Boeuf, Porc, Agneau) Moyen (MED)
Petits pains (moux) Bas (MIN)
Petits pains (durs) Moyen (MED)
Légumes Moyen (MED)
26
Page 59

Tiroir-Réchaud (certains modèles) (suite)
Disposition de la grille du tiroir -réchaud
Disposez la grille du tiroir -réchaud comme illustré ci-dessous.
La grille peut être utilisée de 2 façons:
• Grille en U vers le bas pour permettre de disposer des aliments de moindre dimension sur et sous la grille (par exemple,
petits pains ou biscuits sur la grille et casserole en dessous).
• Grille à plat sur le fond pour permettre de disposer des aliments de moindre poids et la vaisselle vide (par exemple, petits
pains ou pâtisseries et vaiselle pour le dîner).
U vers le haut À plat
Nettoyage général
Pour retirer et replacer le tir oir -réchaud
Pour enlever le tiroir -réchaud:
1. Interrompez le courant avant d'enlever le tiroir-réchaud.
2. Ouvrez complètement le tiroir .
3. Localisez les loquets des deux côtés du tiroir-réchaud. Le loquet gauche est visible, mais celui du côté droit ne l'est pas et est
situé à l'intérieur des glissières du tir oir.
4. Tirez vers le haut sur le loquet de la glissière gauche en insérant un tournevis dans le loquet droit et poussez vers le bas.
5. Enlevez le tiroir de la cuisinière.
6. Pour nettoyer le tiroir-réchaud, utilisez délicatement un tampon à récurer savonneux; ceci permet d'enlever la plupart des
taches. Rincez à l'aide d'une solution contenant des parts égales d'eau claire et d'ammoniaque. Au besoin, couvrez les taches
tenaces d'un essuie-tout imbibé d'ammoniaque pendant 30 à 40 minutes. Rincez avec de l'eau claire et un chiffon, puis frottez
délicatement avec un tampon à récurer savonneux. Rincez et séchez à l'aide d'un chiffon propre. Retirez toute trace de
nettoyeur sans quoi l'émail pourrait être endommagé par la chaleur. NE PAS utiliser de nettoyeur en aérosol pour four sur la
surface de cuisson.
Pour replacer le tiroir -réchaud :
1. Alignez les loquets des glissières des deux côtes du tiroir avec les guides du tiroir.
2. Poussez le tiroir dans la cuisinière.
Risque de choc électrique pouvant
occasionner de blessures graves ou la mort. Débranchez
l'appareil du courant électrique avant le service d'entretien ou
avant d'enlever ou de replacer le tiroir-réchaud.
Tirez vers le haut sur le loquet de la
glissière gauche en insérant un
tournevis sur le loquet
droit et en
poussant
vers le bas.
MISE EN GARDE!
27
Page 60

Liste des vérifications préventives
Avant d’appeler un technicien de service lisez ce qui suit:
Dans bien des cas, vous pouvez épargner le coût et les inconvénients causés par la visite d’un technicien de service en consultant la liste des vérifications préventives qui suit. Elle décrit les situations les plus courantes n’ayant aucun rapport avec une pièce
défectueuse ou un vice de construction.
Vous devr ez défrayer les frais pour toute visite d’un technicien de service durant la période où l’appareil est couvert par la
garantie si le problème n’est pas causé par un vice de construction ou une pièce défectueuse.
Votr e nouvel appar eil ménager a été construit avec soin. Il est fréquent que ce qui semblait êtr e une raison valable pour justifier
la visite d’un technicien de service ne nécessite en fait qu’un simple réglage de votre part ou n’est qu’une conséquence
normale du fonctionnement de l’appareil en certaines circonstances.
Cette liste couvre différents modèles de cuisinières et certains items ne s’appliqueront pas nécessairement à votre appareil.
PROBLÈME
INSTALLATION
La cuisinière n’est pas de niveau.
LA CUISINIÈRE NE FONCTIONNE
PAS
Aucune partie de l’appareil ne
fonctionne.
CAUSE POSSIBLE / SOLUTION
Référez-vous à la méthode de nivellement suggérée dans la section “ Informations
générales” . Après avoir mis la cuisinière de niveau, la surface de cuisson pourrait sembler
croche par rapport au comptoir, si ce dernier n’est pas de niveau.
Assurez-vous que le plancher est de niveau et assez solide pour supporter le poids de la
cuisinière sans fléchir. Adressez-vous à un menuisier pour corriger la pente ou
l’affaissement du plancher si nécessaire.
Assurez-vous que les armoires sont bien alignées, de niveau et qu’un dégagement
suffisant a été prévu pour la cuisinière (1.3 cm (1/2” ) de chaque côté).
Vérifiez les fusibles de la maison et remplacez-les s’il y a lieu ou enclenchez le
disjoncteur automatique.
Assurez-vous que la fiche du cordon d’alimentation de l’appareil est bien branchée à la
prise murale (Canada seulement).
Panne de courant. Vérifiez le fonctionnement des ampoules de la maison.
Le four ne fonctionne pas.
Pas de courant électrique à la cuisinière. Voir “ Aucune partie de l’appareil ne fonctionne”
ci-dessus.
Le bouton sélecteur (certains modèles) est entre 2 repères. Réglez le bouton sélecteur sur
le repère CUISSON ou CUIRE ou GRIL ou GRILLAGE, etc... jusqu’à ce que la lampe
témoin du four s’allume.
Assurez-vous que le bouton de la commande de température soit réglé à la température
désirée.
Le programmateur électronique émet des signaux sonores et affiche le code -F1-, -F3- ou
-F9-. Un vice de fonctionnement à été détecté. Poussez la touche ANNULER pour effacer
le message affiché et faire cesser les signaux sonores. Reprogrammez le four. Si le même
code défaut réapparaît à l’affichage, note-le, poussez la touche ANNULER, et
communiquez avec un service d’entretien autorisé.
La fonction TEMPS DE CUISSON (cuisson chronométrée) est en marche. ANNULEZ la
fonction.
28
Page 61

Liste des vérifications préventives (suite)
PROBLÈME
LA CUISINIÈRE NE FONCTIONNE
PAS (suite)
Les éléments de la surface de
cuisson ne chauffent pas.
CAUSE POSSIBLE / SOLUTION
L’appareil n’est pas sous tension électrique. Voir “ Aucune partie de l’appareil ne
fonctionne” ci-dessus.
Lorsque le réglage de chaleur d’un foyer de surface est très bas, son voyant lumineux peut
s’allumer même si l’élément ne chauffe pas. Tournez alors le bouton de commande à un
repère plus élevé jusqu’à ce que l’élément commence à chauffer.
Les éléments spiralés ne sont pas insérés correctement dans les réceptacles. Tournez les
boutons de commande de température à ARRÊT. Retirez les éléments, redressez les
terminaux si nécessaire. Réinsérez-les à nouveau dans leur réceptacle respectif.
Vous avez tourné le mauvais bouton de commande de températur e. Assurez-vous d’utiliser
le bouton de commande qui correspond au foyer que vous désirez utiliser.
Le blocage automatique des éléments est en fonction (modèles avec four autonettoyant
seulement). Les éléments de surface sont exposés à des températures élevées s’ils sont
utilisés alors que le four fonctionne en mode autonettoyant. Pour maximiser la durée de vie
des éléments de surface, un système de protection les rend hors d’usage pendant le cycle
d’autonettoyage du four. Les éléments de surface redeviennent fonctionnels lorsque le
cycle de nettoyage est complété et que la porte du four peut être ouverte. Annulez le cycle
d’autonettoyage.
La lampe du four ne s’allume pas.
L’éclairage du tableau des
commandes ne fonctionne pas
(certains modèles).
SURFACE DE CUISSON
Foyers trop chauds ou trop froids.
Les liquides bouillent sur les foyers
alors que le réglage de chaleur
est bas.
L’ampoule est brûlée; remplacez-la. Voir “ Lampe du four” dans la section “ Informations
générales” .
Le tube fluorescent n’est pas bien fixé dans les réceptacles ou est brûlé. Reportez-vous à
“ Lampe de surface” dans la section “ Informations générales”
Augmentez ou diminuez le réglage jusqu’à ce que vous obteniez le degré de chaleur
désiré.
Utilisez seulement des casseroles à fond plat, non bosselées, bien équilibrées et d’épaisseur
moyenne ou élevée. Les casseroles dont le fond est plat chauffent plus rapidement que
celles dont le fond est bombé. La rapidité du chauffage dépend des matériaux utilisés et du
poids des casseroles. Les casseroles à paroi d’épaisseur moyenne ou élevée chauffent de
façon uniforme. Les aliments risquent de brûler plus facilement dans une casserole à paroi
mince.
Le réglage du bouton de commande du foyer est incorrect. Tournez le bouton de réglage de
la chaleur à un niveau plus faible.
Lorsque le four fonctionne, de l’air chaud s’échappe par le conduit d’aération situé au
centre du foyer spiralé arrière droit ce qui augmente l’apport de chaleur.
29
Page 62

Liste des vérifications préventives (suite)
PROBLÈME
SURFACE DE CUISSON
VITROCÉRAMIQUE (certains
modèles)
Égratignures ou abrasion de la
surface de cuisson.
NOTE: Essuyez le plus rapidement possible les débordements d’aliments sucrés sur les surfaces chauffantes vitrocéramique, car
ceux-ci peuvent piquer ces surfaces s’ils sont chauds.
CUISSON AU FOUR
Les aliments sont trop ou pas
assez cuits.
CAUSE POSSIBLE / SOLUTION
Reportez-vous à “ Surface de cuisson vitrocéramique” qui se trouve dans la section
“ Informations générales” .
Les températures de cuisson au four et la durée de cuisson peuvent varier par rapport à la
recette ou les instructions apparaissant sur l’emballage du produit. Pour un réglage donné,
la température du four de votre nouvelle cuisinière peut être différente de celle de votre
ancienne cuisinière. Avec votre ancienne cuisinière, le réglage de température était moins
précis. Il est donc fort probable que vous ayez à modifier les durées de cuisson et les
températures de vos recettes préférées.
Utilisez la grandeur de casserole recommandée dans la recette. Si vous utilisez des plats en
verre, abaissez la température du four de 13°C (25°F). Ceci ne s’applique pas si vous les
utilisez pour cuire des tartes ou du pain.
Les plats mis au four ne sont pas
uniformément dorés ou gonflés.
Durée de cuisson trop longue.
Le four dégage de la vapeur
d’eau.
Il ne faut pas cuire des aliments dans un plat recouvert, à moins que ce ne soit indiqué dans
la recette. Les aliments cuits dans un plat recouvert ne dorent pas facilement.
Utilisez des plats propres et brillants. Les plats noircis risquent de faire coller les aliments au
fond. Utilisez des ustensiles à fond plat. Les ustensiles dont le fond est bombé peuvent
causer une cuisson irrégulière.
Si les aliments brûlent au fond du plat, c’est que la grille du four est trop basse; déplacez-la
à un niveau plus élevé. Si c’est le dessus qui est trop grillé, abaissez-la.
Quand vous ouvrez la porte du four pour vérifier le degré de cuisson, la température du four
chute de 10°C (18°F) ou plus à chaque fois. Réglez pour une durée de cuisson la plus courte
possible, et vérifiez le degré de cuisson seulement lorsque le temps de cuisson sera écoulé.
Vérifiez la progression de la cuisson par le hublot de la porte s’il y en a un.
Il ne faut pas qu’une plaque à biscuits ou de cuisson recouvre toute la surface de la grille.
Laissez un espace d’au moins 5.1 cm (2 po.) entre les ustensiles, les plats et les côtés du
four, pour une bonne circulation d’air. Lorsque vous utilisez les deux grilles, disposez les
plats de sorte que l’un ne soit pas directement au-dessus d’un autre.
Il faut environ 10 minutes pour que le four atteigne la température de réglage. La cuisson
sera mieux réussie si le four est préchauffé avant d’y déposer des aliments.
Durant la cuisson, de la vapeur d’eau se dégage des aliments qui contiennent beaucoup
d’eau. Couvrez le plat avec son couvercle si cela convient aux aliments que vous désirez
faire cuire.
Bruit de ventilateur lorsque le four
fonctionne.
Un ventilateur démarrera et arrêtera automatiquement afin de refroidir des pièces internes
de l’appareil. Ceci est normal et il est possible que ce ventilateur continue de fonctionner
même si le four est à la position arrêt.
30
Page 63

Liste des vérifications préventives (suite)
PROBLÈME
CUISSON AU GRIL
Beaucoup de fumée se dégage
du four durant la cuisson au gril.
AUTONETTOYAGE DU FOUR
(certains modèles)
CAUSE POSSIBLE / SOLUTION
Entrouvrez la porte à la position grillage.
Versez 3 à 4 tasses d’eau dans la lèchefrite, afin d’en recouvrir entièrement le fond.
Déposez la viande sur le couvercle de la lèchefrite et mettez le tout au four. La graisse
qui s’écoule de la viande tombe sur l’eau dans la lèchefrite où elle se refroidit; ceci réduit
la formation de fumée.
Abaissez la grille du four pour éloigner la viande de l’élément de grillage.
Enlevez l’excédent de gras; faites des entailles dans le suif entourant la viande pour
qu’elle ne se recroqueville pas. Ne coupez pas dans le maigre.
Assurez-vous que le couvercle est toujours placé sur la lèchefrite, avec les encoches vers
le bas, pour que la graisse puisse s’écouler dans la lèchefrite.
Il y a accumulation de graisse sur les parois du four. Il faut nettoyer le four régulièrement
si la cuisson au gril est souvent utilisée. La vieille graisse ou les éclaboussures peuvent
dégager beaucoup de fumée.
Le cycle d’autonettoyage ne
fonctionne pas.
Il y a encore de la saleté après le
cycle d’autonettoyage.
Suivez les instructions données dans ce guide pour bien programmer le cycle de
nettoyage.
La porte n’a pas été bien fermée. Fermez la porte et réglez le cycle de nettoyage à
nouveau.
Vous n’avez pas enlevé les saletés au fond du four, sur le bâti du four ou sur les surfaces
de la porte à l’extérieur du joint d’étanchéité. La partie du four immédiatement sous la
porte devrait être lavée. Le cycle d’autonettoyage n’agit pas sur ces surfaces, mais elles
deviennent assez chaudes pour cuire les éclaboussures. Nettoyez ces surfaces à la main
avant de débuter le cycle de nettoyage. Les résidus carbonisés peuvent être nettoyés
avec une brosse en nylon rigide et de l’eau ou avec un tampon à récurer en nylon. Faites
attention de ne pas endommager le joint du four .
Un temps de nettoyage trop court. Réglez un cycle de nettoyage supplémentaire.
Le courant fut interrompu durant le cycle d’autonettoyage. Vérifiez quelle fut la cause de
cette panne. Réglez un cycle additionnel d’autonettoyage.
Évitez d’endommager l’appareil durant son transport
Pour éviter d’endommager votre cuisinière durant son transport à l’intérieur où à l’extérieur de votre demeure ou lors d’un
déménagement, prenez les précautions suivantes :
1. Revissez à fond les vis de nivellement de l’appareil.
2. Retirez les grilles du four ainsi que les ustensiles remisés dans le tiroir de rangement.
3. Utilisez du ruban adhésif pour attacher fermement la porte et le tiroir au châssis. Attachez le câble d’alimentation à la
cuisinière de la même façon.
4. Utilisez un diable et attachez-y la cuisinière solidement à l’aide de courroies. Couvrez l’appareil avec une couverture épaisse
afin d’éviter tout risque d’égratignures ou de bosses à l’appareil.
5. Évitez de tirer ou de pousser sur le panneau de contrôle lorsque vous bougez l’appareil.
31
Page 64

Informations sur la garantie
GARANTIE DE LA CUISINIÈRE
Votre cuisinière est protégée par cette garantie
Aux États-Unis, votre appareil est garanti par Produits Electrolux Nord-Américains, une filiale de White Consolidated Industries, Inc. Nous n’autorisons
aucune personne à modifier ou à ajouter quelle qu’obligation que ce soit à cette garantie. Nos obligations concernant les réparations ou les pièces
couvertes par cette garantie doivent être effectuées par Produits Electrolux Nord-Américains ou par un dépositaire de service autorisé de Produits
Electrolux Nord-Américains. Au Canada, votre appareil est garanti par Electrolux Canada Corp.
*RESPONSABILITÉS
NORMALES
DU CLIENT
EXCLUSIONS
SI VOUS
AVEZ BESOIN
DE SERVICE
Cette garantie s’applique uniquement aux produits utilisés à des fins domestiques et le client est responsable
pour les items inclus dans la liste ci-dessous :
1. Une utilisation appropriée de l’appareil conformément aux instructions fournies avec le produit.
2. Une installation appropriée par un dépositaire de service autorisé conformément aux instructions fournies avec
l’appareil et à tous les codes locaux de plomberie, d’électricité et/ou de gaz.
3. Un branchement appropri é à une prise de courant avec mise à la terre et à une tension suffisante, ainsi que le
remplacement des fusibles grillés, la réparation des branchements défaits ou défectueux.
4. Les coûts pour rendre l’appareil accessible pour les réparations, comme l’enlèvement de garnitures, d’armoires,
d’étagères, etc., qui ne faisaient pas partie de l’appareil à sa sortie de l’usine.
5. Les dommages au fini après l’installation.
6. Le remplacement des ampoules électriques et/ou des tubes fluorescents (sur les modèles qui présentent ces
caractéristiques).
Cette garantie ne couvre pas :
1. LES DOMMAGES INDIRECTS OU CONSÉCUTIFS, COMME LES DOMMAGES À LA PROPRIÉTÉ OU LES FRAIS
CONSÉCUTIFS RÉSULTANT D’UN MANQUEMENT DE QUELLE QUE NATURE QUE CE SOIT DE CETTE GARANTIE ÉCRITE
OU DE TOUTE AUTRE GARANTIE IMPLICITE.
REMARQUE : Certains états ou provinces ne permettent pas l’exclusion ou la limitation des dommages indirects ou
consécutifs, il est donc possible que cette limitation ne s’applique pas à votre cas.
2. Les appels de service non reliés à un mauvais fonctionnement ou à une défaillance de matériaux ou de fabrication ou
pour les appareils qui ne servent pas à des fins domestiques. Le client devra assumer les frais de ces appels de service.
3. Les dommages causés par un entretien effectué par un dépositaire non autorisé par Produits Electrolux NordAméricains; l’utilisation de pièces autres que les pièces authentiques de Produits Electrolux Nord-Américains ou
obtenues par une personne autre qu’un dépositaire autorisé ou encore des causes extérieures comme une utilisation
abusive, un mauvais usage, une alimentation électrique inadéquate ou une catastrophe naturelle.
4. Les produits dont les numéros de série d’origine ont été enlevés ou effacés et qui ne peuvent être lus.
Garder votre facture, le bordereau de livraison ou toute autre preuve de versement effectué. La date de la facture
indique le début de la période de garantie dans l’éventualité où une réparation serait requise. Il est dans votre intérêt de
demander et de conserver tous les reçus. Cette garantie écrite vous donne des droits légaux spécifiques. Il est possible que
vous ayez également d’autres droits qui varient selon les régions. Les services couverts par cette garantie doivent être
obtenus en contactant Produits Electrolux Nord-Américains:
USA
1•800•944•9044
Produits Electrolux
Nord-Americains
P.O. Box 212378
Augusta, GA 30917
Canada
1•866•294•9911
Produits Electrolux
Nord-Americains
802, boul. L’Ange-Gardien
L’Assomption, Québec
J5W 1T6
Cette garantie ne s’applique qu’aux 50 états des États-Unis, Puerto
Rico, et Canada. Les caractéristiques du produit décrites ou illustrées
sont sujettes à des modifications sans préavis. Toutes les garanties sont
émises par Produits Electrolux Nord-Américains, une filiale de White
Consolidated Industries, Inc. Au Canada, votre appareil est garanti
par Electrolux Canada Corp.
 Loading...