

Frigidaire CFEB30S5GC4, CFEB30S5GC3, CFEB30S5DS8, CFEB30S5DS7, CFEB30S5DB8 Owner’s Manual
...Page 1

ELECTRONIC OVEN CONTROL
Self-cleaning Models
NOTE: The basic timer is externally arranged in different configuration in various appliance models. This does not ct]ange the
way it operates.
NOTE: Some models have a touch pad control. To activate it, you just have to touch the pad with afinger. Take care to have
a good contact between the finger and the touch pad. Long nails can make the activation difficult. It isa good idea to clean
the control panel after eachuse or as soon aspossible after aspill, boil over or spatter because some ionic or salty ingredients
as ketchup, tomatoes sauce, etc.., can operate the control. Before cleaning the control panel it isrecommended to turn on
the control lockout feature.
• o
;.8 2q_ O cur
I_ pur_e_etruui 6e
.... S: :::\
Th_e_
@
Fi_ ure 1 Figure 2
ELECTRONIC OVEN CONTROL
Control Pad Functions
Read the instructions carefully before using the oven. For satisfactory use of your oven, become familiar with the various
functions of the oven as described below.
Note: The oven function will not work if the time of day clock is not set.
Clock Pad- Used to
Up and Down arrow pads- Usedalong with the function set the time of day.
pads to select oven temperature, cooking time, start time
Clean Pad- Used to
select the clean cycle.
Feature indicator
lights- These light
show which
feature is in use.
Bake Pad
Used to enter
the normal
baking mode
temperature.
/
Broil Pad- Used
to select the
variable broil
function.
-\
\
Keep Warm Start Time Pad- Used to set the
Pad- Used to desiredstarttimeforbaking. Can
set the Keep be used with BAKE TIME to
Warmfeature. program a delayed bake cycle.
BakeTime Pad-Used (whenprogramminganautomaticstarttime),timeofday_ / Ovenlnterior Ught
to enter the bngth of clean time and minute timer. Pad- Used to turn
the baking time.
oven interior light ON
and OFF.
Clear/Off Pad- Used
previously entered
except the time of day
and minute timer,
H0ri0gr_
Push Clear/Off pad
/to stop cooking or
enable the oven
Ovell
Preheat
_ Pr_(hauffage
borer /o_ke_
\\\ _ Por_e V¢iiotqll@
tif_(_i ¸ i
o,_0
\
lockout feature,
Timer On/Off Pad-
Used to set or cancel
the minute timer. The
minutetimer doesnot
start or stop cooking.
Ove_n,Preheat & Lock lights- The "oven" light indicates that the
oven isfunctionning. The "Preheat" light will glow when the oven
isfirst set to operate, or if the desired temperature is reset higher
than the actual oven temperature. The "Door Locked" light will
flash untilthe door locks when the self<lea n _ycleisinuse. It glows
constantly after the door locks.
Versi6n ell espa_o[
Sidesea obtener una copia en espar_ol de este Manual del
Usuario, sirvase escribir a la direcciOn que se induye a
continuaci0n. S@icitela P/N318200188E.
Spanish Owner's Guides
Frigidaire Company
P.O. Boxg061
Dublin, Ohio 4S017-0961
318200188 (040% Rev.A
Page 2

ELECTRONIC OVEN CONTROL
Control Pad Functions
Read the instructions carefully before using the oven, For satisfactory use of your oven, become familiar with the various
functions of the oven as described below. Note: The graphics on your timer may not look exactly like the one shown. This
doesn't change the way it operates.
Note: The oven function will not work if the time of day clock is not set.
Oven interior Cook Time Up and Down arrow pads- Used along ADD 1 MINUTE PAD Used to add 1minute
Light Pad- Pad-Used to with the function pads to select oven [otheTimerCountdown Th[sfeatureworks
Used to turn Clock Pad- enter thelength temperature, cooking time, start time withtheKkchenTimeronlyanddoesnot
oven interior Used to set the of the baking (when programming an automatic start alfectanycooktimeorstarttimefunctions.
hght ON and timeofday. \\ time. , time),timeofday, c[ean time and minute // BakePadUsedtoenter
OFF. _f _ _ timer. \ / / thenormal baking mode
Feature indicator "_ @ \\ / @/ o Broil Pad- Usedto
lights- These light I _ \\ Aii'd select the variable
show which , _ (_ (_ ; _olcTime _ _ M._o..........
_ _ \\ / / ,emperature.
_,p_de \\ "" u- e_re _lli_ broil function.
feature is in us_ _q. ...... c_._o., _ \\,,o, _ ..j
Clean Pad ...... .... .,,_ Usedto setthe Keep
Used to _et_a M_._t_,_ D_.,'P_
self-selectthe °_..... 7[# ® _'o<eW,rouiH_eO°°re'ech'_eL°ck_d_ ??F_.LM°'°_L0ok ......................................Stop Pad- Used to
cleaning /
cycle.
Timer Pad- Used to
set or cancel the
minute timer. The
minute timer does not
start or stop cooking.
SeJect Clean Time< •
/
Delay Start Pad- Used
to set the desired start
time for baking. Can be
used with BAKE TIME
to program a delayed
bake cycle.
Oa art ; Fo_ Ga_a.d Warm feature.
/
Preheat /
Oven, Preheat & Lock lights- The "oven" light indicates
that the oven isfunctionning. The "Preheat" lightwill glow
when the oven is first set to operate, or if the desired
temperatu re isreset higher than theactual oventernperature.
The "Door Locked" light will flash until the door locks when
the serf-clean cycle isin use. It glows constantly after the door
locks (some models).
. Warm _ Ho'd Pad-Select @ @
clear any function
previously entered
except the time of day
and minute timer.
Push Clear pad to
stop cooking or
enable the oven
lockout feature.
The oven can be programmed to:
Bake normally, Keep warm, Time Bake,Delayed Timed Bake (delayed start), Broil and Clean.
Note: Push buttons or pads may be shaped differently.
For a silent control panel:
When choosing a function, a beep will be heard each time a pad ispushed, ff desired, the controls can be programmed for silent
operation.
Tote[[ if your oven isset for normal or silent operation push and hold STARTTIME or DELAY START pad for 7 seconds. "- -" or
"SP" appears in the display. Within Bseconds, pressthe UP or DOWN ARROW pad to switch between normal sound operation
and silent operation mode. The display wi[[ show either "- -" or "SP". Wait 5 seconds to return to normal operating mode.
Note: if "SP" appears, the control wi[[ operate with normal sounds and beeps. If "- -" appears, the control isinthe silent operation
mode.
Temperature Conversion (Fahrenheit / Celsius)
The electronic oven control isset to operate in °F (Fahrenheit) when shipped from the factory. The oven can be programmed for
any temperature from I70% to 550% (77°C to 288°C).
To change the temperature to °C (Celsius) or from °C to °F (control should not be in a Bake or Clean mode):
I. Pressand hold BROIL pad for 7 seconds until °F or °C appears in the display.
2. Pressthe UP or DOWN ARROW pad to change °F to °C or °C to °F.
3. Wait 5 seconds to accept the changes or press CLEAR/OFF or STOP pad to accept the changes.
Page 3

Setting the Clock and Minute Timer
1 M_j_l_
0 0 _ 0
® ® •
Note: The time of day must first be set in order to operate the oven•
To set the Clock
When the range isfirst plugged in, or when the power supply to the app%nce hasbeen interrupted, the displaywillfiash "12:00".
1. Pressthe CLOCK or (_ pad once (do not hold pad down).
2. Within 5 seconds, push and hold the UP or DOWN ARROW pad until the correct time of day appears in the display•
3. Pressthe CLOCK or pad to accept the new time of day. If the CLOCK or pad isnot pressed, the timer will return
automatically to the new time of day after 7 seconds•
Note: The clock cannot be changed during any bake, timed bake, delayed time bake, clean cycle or delayed clean cycle.
Changing between 12 or 24 Hour Time of Day Display
1. PressandholdtheCLOCKor Q pad for 7 seconds. After7seconds,"12Hr"or"24Hr"willappearinthedisplayandthe
control will beep once•
2. Pressthe UPor DOWN ARROW pad to switch between the 12 and 24 hour time of day display. The displaywill show either
"12Hr" or"24Hr".
3. Wait 5 seconds or press the CLEAR/OFF or STOP pad to return to the time of day display•
4. Resetthe correct time as described in To set the Clock above. Pleasenote that if the 24 hour time of day mode was chosen,
the clock will now display time from 0:00 through 23:59 hours.
To Set the Minute Timer
1. Pressthe TIMER ON/OFF pad.
2. Pressthe UPARROW pad to increase or DOWN ARROW pad to decreasethe time inone minute increments• The timer can
be set for any amount of time from I minute to 11 hours and 59 minutes•
3. Thedisplayshowsthetimercountdown in minutesif morethan I hourremains. When lessthan 1 hourremains, thedisplay
will count down in seconds•
4. When the set time has run out, the timer wNIbeep 3 times. It will continue to beep 3times every 8 seconds until theTIMER
ON/OFF pad is pressed•
Note: The indicator light located above the TIMER ON/OFF pad will glow while the minute timer isactive•
Note: The minute timer does not start or stop cooking• It servesasan extra timer in the kitchen that will beep when the set time
has run out. The minute timer can be used alone or during any of the other oven functions• When the minute timer isin use with
any other mode, the minute timer will be shown in the display. To view other functions, pressthe function pad for that mode.
To Cancel the Minute Timer before the set time has run out: Pressthe TIMER ON/OFF pad.
To Set Add 1 Minute Feature
The _,_o_ADD 1 MINUTE pad is used to set the Add 1 Minute feature• When the _,.°,_pad ispressed, I minute isadded to the
Minute Timer feature if this feature is already active• If the Minute Timer feature is not active and the _,°.- pad is pressed, the
Minute Timer feature will become active and will begin counting down from 1 minute• Forfurther information on howto set the
Minute Timer feature see To Set the Minute Timer instructions above•
3
Page 4

Setting Oven Controls
Note: The time of day must first be set in order to operate the oven.
To Set or Change the Temperature for Baking
The oven can be programrned to bake at any ternperature from 170% to 550% (77°C to 288°0.
To Set the Controls for Baking:
I. Pressthe BAKE pad.' .... appears in the display.
2. Within 5 seconds, Pressthe UPor DOWN ARROW pad. Thedisplayw[H show "350°F (177°C)." By holding the UP or DOWN
ARROW pad, the temperature can then be adjusted in 5°F(1°C if control is set to display Celsius) increments.
3. 8 seconds after the UP or DOWN ARROW pad is released, the oven will begin heating to the selected temperature. When
the displayed temperature reachesthe desired baking temperature, the preheat indicator lightwill turn OFF.
4. To cancel the baking function, pressthe CLEAR/OFF or STOP pad.
To Change the Oven Temperature after Baking has Started:
Pressthe UP or DOWN ARROW pad to increase or decrease the set temperature.
To Set Control for Continuous Bake or 12 Hour Energy Saving:
The oven control has a buik-in 12 Hour Energy Saving feature that w[]] shut off the oven iftile control is [efton for more than 11
hours and 59 minutes. The oven can be programmed to override this feature for continuous baking.
To set control for continuous baking:
1. Pressand hold the TIMER ON/OFF or STOP pad for 7 seconds until a tone is heard.
2. Within 5seconds, pressthe UPor DOWN ARROW pad to switch between Continuous Bakeand 12 Hour Energy%ving mode.
The display wi[[ show either "---- hr" or "12hr".
if "--hr" appears, the oven wi][ be setto continuous baking. If "12hr" appears, the oven issetto 12 hour energy saving mode.
3. Wait 5 seconds or press the CLEAR/OFF or STOP pad to accept the changes.
To Set Control for Oven Lockout (some models):
The control can be programmed to lockthe oven door (some models) and/or lock the oven control pads (a[[ models).The Oven
Lockout feature prevents the oven from being accidentally turned on. it does not disable the dock, minute timer or the interior
oven light.
To Set Control for Oven Lockout feature:
1. Pressthe CLEAR/OFF or STOP pad and hold for 3seconds. The "Door Locked" indicator lightwill flash and the motor driven
door lock wi[I begin to close automatically. DO NOT open the oven door while the indicator light isflashing. Allow about
15 seconds for the oven door to lock.Once the oven door is locked, "Loc " wi]] appear in display.
2. To cancel the Oven lockoutfeature, press the CLEAR/OFF or STOP pad and hold for 3 seconds. The control wi[I unlock the
oven door and resume normal operation.
Page 5
Setting Oven Controls (continued)
• t _df _
• 0
!_!i_ii ii!)i_@:¸¸ _ _rf 0 _r
, /(_ ":%,
0 0 • t
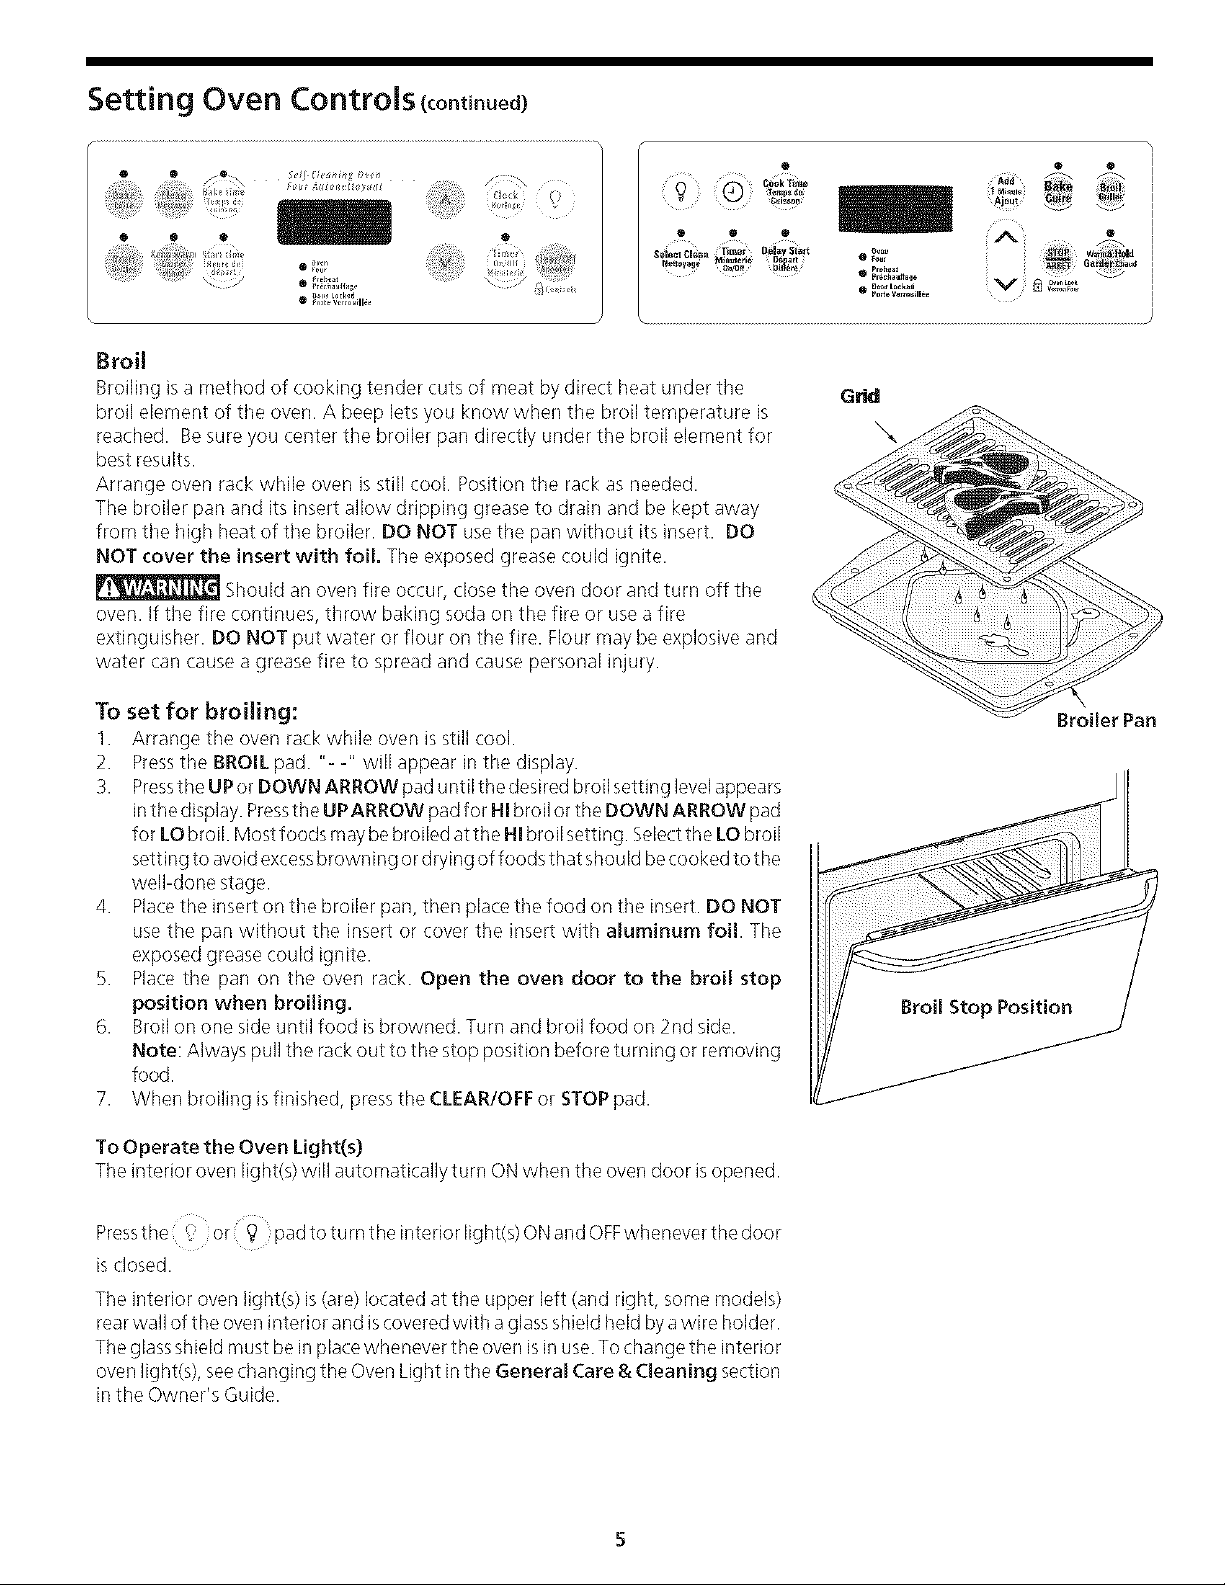
Broil
Broiling isa method of cooking tender cuts of meat by direct heat under the
broil element of the oven. A beep lets you know when the broil temperature is
reached. Besure you center the broiler pan directly under the broil element for
best results.
Arrange oven rack while oven is still cook Position the rack as needed.
The broiler pan and its insert allow dripping grease to drain and be kept away
from the high heat of the broiler. DO NOT use the pan without its insert. DO
NOT cover the insert with foil, The exposed grease could ignite.
Should an oven fire occur, close the oven door and turn off the
oven. If the fire continues, tt]row baking soda on the fire or use a fire
extinguisher. DO NOT put water or flour on the fire. Flour may be explosive and
water can cause a grease fire to spread and cause personal injury.
To set for broiling:
I. Arrange the oven rack while oven is still cool.
2. Pressthe BROIL pad. "- -" will appear in the display.
3. Pressthe UPor DOWN ARROW pad until the desired broil setting level appears
inthe display. Pressthe LiPARROW padfor HI broil or the DOWN ARROW pad
for LObroil. Mostfoods maybe broiled at the HI broil setting. Selectthe LObroil
setting to avoid excessbrowning or drying of foods that shouIdbe cooked to the
well-done stage.
4. Placethe insert on the broiler pan, then place the food on the insert. DO NOT
use the pan without the insert or cover the insert with aluminum foil. The
exposed grease could ignite.
B. Placethe pan on the over] rack. Open the oven door to the broil stop
position when broiling,
6. Broil on one side until food is browned. Turn and broil food on 2nd side.
Note: Always pull the rack out to the stop position before turning or removing
food.
7. When broiling is finished, pressthe CLEAR/OFF or STOPpad.
Q • @
X
Broiler Pan
To Operate the Oven Light(s)
The interior oven light(s) will automatically turn ON when the oven door isopened.
Pressthe ,_ or g : pad to turn the interior light(s) ONand OFFwhenever the door
¢
isclosed.
The interior oven light(s) is(are) located at the upper left (and right, some models)
rear wall of the oven interior and iscovered with a glass shield held by a wire holder.
The glassshield must be in place whenever the over]isin use.To change the interior
oven light(s), seechanging the Oven Light in the General Care & Cleaning section
in the Owner's Guide.
5
Page 6

Setting Oven Controls (continued)
To Set the Timed Sake and Delayed Timed Sake Features
The BAKE TIM Eor COOK TiME and STARTTiME or DELAY START pads operate the features that will turn the oven ON and
OFFat the times you select in advance. The oven can be programmed to start immediately and shut off automatically (Timed
Bake) or to begin baking at a later time with a delayed start time (Delay Start).
Note: During Timed Bakethe preheat indicator light will function during the preheat operation.
To Program the Oven to Begin Baking immediately and To Shut Off Automatically (Timed Bake):
I. Be sure that the clock shows the correct time of day.
2. Placethe food in the oven.
3. Pressthe BAKE pad. '.... appears in the display.
4. Within 5 seconds, pressthe UPor DOWN ARROW pad.The displaywill show "350°F (177°C)". Byholding the UPor DOWN
ARROW pad, the temperature can then be adjusted in 5°F increments (1° if the control is set to display Celsius).
5. Wait 8 seconds to accept the temperature.
6. PressthegAKETIMEorCOOKTIMEpad. "0:00"willflashinthedisplay(MIN:SEC)or(HR:MIN)ifprogrammedformore
than 60 minutes.
7. Pressthe UP or DOWN ARROW pad until the desired baking time appears inthe display.
8. The oven will turn ON and begin heating.
Note: When the control isset for this function the oven temperature will be displayed. Tosee the cook time remaining pressthe
BAKE TiME or COOK TiME pad and to seethe time of day press the CLOCK or pad.
To Program Oven for aDelayed Start Time and to Shut-Off Automatically (Delayed Start Bake):
I. Be sure that the clock shows the correct time of day.
2. Placethe food in the oven.
3. Pressthe BAKE pad. '.... appears in the display.
4. Within 5 seconds, pressthe UPor DOWN ARROW pad. Thedisplaywill show "350°F (I77°C)." Byholding the UPor DOWN
ARROW pad, the temperature can then be adjusted in 5% increments (1° if the control is set to display Celsius).
5. Wait 8 seconds to accept the temperature.
6. Pressthe BAKE TIME or COOK TIME pad. "0:00" will flash in the display (MIN:SEC) or (HR:MIN) if programmed for more
than 60 minutes.
7. Pressthe UP or DOWN ARROW pad until the desired baking time appears.
8. Wait 5 seconds for the control to accept the time.
9. Pressthe START TiME or DELAY START pad. The earliest possible start time will appear in the display.
10. Pressthe UP or DOWN ARROW pad until the desired start time appears inthe display and wait 7 seconds to accept.
11. Once the controls are set, the control calculates the time when baking will start and stop.
12. The oven will turn ON at the delayed start time and begin heating.
Note: When the control is set for a delayed time bake the time of day isdisplayed until the delayed time bake is reached.
When the oven will turn on, the oven temperature will be displayed. To seethe cook time remaining pressthe BAKE
TIME or COOK TIME pad and to seethe time of day press the CLOCK or pad.
When the Set Bake Time Runs Out:
1. "END" will appear in the display window and the oven will shut off automatically.
2. The control will beep 3 times every 25 seconds until the CLEAR/OFF or STOP pad is pressed.
To Change the Oven Temperature or Bake Time after Baking has Started:
I. Pressthe function pad you want to change.
2. Pressthe UP or DOWN ARROW pad to adjust the setting.
Use caution with the Timed Bake and Delayed Timed Bake features. Foods that can easilyspoil such asmilk,
eggs, fish, meat or poultry, should bechilled inthe refrigerator first. Evenwhen chilled, they should not stand in the ovenfor more
than 1 hour before cooking begins, and should be removed promptly when cooking iscompleted.
Page 7

Setting Oven Controls (continued)
• t _df _
• O
!_!i_ii ii!)i_@:¸¸ _ _rf O _r
, /(_ ":%,
0 0 • t
Q • @
X
Setting the Keep Warm or Warm & Hold Feature
The KEEPWARM or WARM & HOLD pad turns ON the Keep Warm feature and will maintain an oven temperature of 170° F
(T7°C). The Keep Warm feature will keep oven baked foods warm for serving up to 3 hours after cooking has finished. After
3 hours the Keep Warm feature will shut the oven OFFautomatically. The KeepWarm feature may be used without any other
cooking operations or can be used after cooking hasfinished using aTIMED BAKE or a DELAYED TIMED BAKE,
To set Keep Warm:
1. Arrange the interior oven racks and place baked food in the oven.
2. Pressthe KEEPWARM or WARM & HOLD pad. "- -" will appear in the display and the Keep Warm indicator light above
the pad will turn ON.
Note: If no further pads are touched within 6 seconds the request to turn ON Keep Warm will be cleared.
3. Pressthe UP or DOWN ARROW pad to start. "Hid" will be displayed.
4. Toturn Keep Warm OFFat any time pressthe CLEAR/OFF or STOP paf or KEEPWARM orWARM & HOLD pad. The Keep
Warm indicator light above the pad will turn OFF.
To set Keep Warm to turn ON automatically:
I. Arrange the interior oven racksand place food inthe oven. Setthe oven properly for Timed Bake or Delayed Timed Bake.
2. Pressthe KEEP WARM or WARM & HOLD pad. "- -" will appear in the display and the Keep Warm indicator light above
the pad will turn ON.
B. PresstheUP or DOWN ARROW pad to start. KeepWarm issetto turn ONautomaticallyafterTimed Bake or Delayed Timed
Bake has finished.
4. Toturn Keep Warm OFFat any time press the CLEAR/OFF or STOPpad. The Keep Warm indicator light above the pad will
turn OFF.
7
Page 8

Setting Oven Controls (continued)
To Set the Sabbath Feature (for use on the Jewish Sabbath & Holidays)
The BAKE TIME or COOK TIME and START TIME or DELAY START pads are used to set the Sabbath feature. The Sabbath
feature may only be used with the BAKE pad. The oven temperature may be set higher or lower after setting the Sabbath
feature (the oven temperature adjustment feature should be used only during Jewish Holidays), however the display will not
visibly show or provide any audible tones indicating whether the change occurred correctly. Once the oven is properly set
using Bake with the Sabbath feature active, the oven will remain continuously ON until cancelled. This will override the
factory preset 12-Hour Energy Savingfeature.
if the oven light will be needed during the Sabbath, press the or I_ pad before activating the Sabbath feature. Once
the oven light isturned ON and the Sabbath feature is active, the oven light will remain ON until the Sabbath feature is
turned OFF.If the oven light needs to be OFF,be sure to turn the oven light OFFbefore activating the Sabbath feature.
IMPORTANT NOTES: It is not advised to attempt to activate any other program feature other than BAKE while the Sabbath
feature is active. ONlY the following key pads will function after setting the Sabbath feature; UP or DOWN ARROW, BAKE
& CLEAR/OFF or STOP.ALL OTHER KEYPADS will not function once the Sabbath feature isproperly activated.
To Program the Oven to Begin Baking Immediately & activate the Sabbath feature:
1. Besure that the clock is set with the correct time of day.
2. Placethe food in the oven.
3. Pressthe BAKE pad. '.... appears in the display.
4. Within Bseconds, press the UP or DOWN ARROW pad. The display will show "350% (177°C)." By holding the UP or
DOWN ARROW pad, the temperature can then be adjusted in 5% increments (1°C if the control is set to display
Celsius).
5. If you desire to set the oven control for a Timed Bake or a Delayed Timed Bake do so at this time. If not, skip this step
and continue to step 6. Refer to the Bake Time (complete steps 6-7) / Delayed Timed Bake (complete steps 6-I0)
section for complete instructions. Remember the oven will shut down after using Bake Time or Delayed bake Time and
therefore may only be used once during the Sabbath/Jewish Holidays. The maximum Delayed Bake Time is 11 hours &
59 minutes.
6. The oven will turn ON and begin heating.
7. Pressand hold both the Bake Time or Cook Time and Start Time or Delay Start pads for at least 3 seconds. SAb will
appear in the display. Once SAb appears in the display the oven control will no longer beep or display any further
changes and the oven isproperly set for the Sabbath feature.
Note: You may change the oven temperature once baking has started by pressing the UP or DOWN ARROW (for Jewish
Holidays only). The oven temperature will be adjusted in 5°F increments with each press of these pads (I°C if the control
is set to display Celsius). Remember that the oven control will no longer beep or display any further changes
once the oven isset for tile Sabbath feature.
8. The oven may be turned OFFat any time by first pressing the Clear/Off or STOP pad (this will turn the oven OFFonly).
To turn OFFthe Sabbath feature press and hold both the Bake Time or Cook Time and Start Time or Delay Start pads
for at least 3 seconds. SAb will disappear from the display.
Should you experience a power failure or interruption, the oven will shut off. When power isreturned the oven will not turn
back on automatically. The oven will remember that it isset for the Sabbath and the food may be safely removed from the
oven while still in the Sabbath feature, however the oven cannot be turned back on until after the Sabbath. After the
Sabbath observance turn OFFthe Sabbath feature. Pressand hold both the Bake Time or Cook Time and Start Time or
Delay Start pads for at least 3 seconds. SAb will disappear from the display and the oven may be used with all normal
functions. Forfurther assistance, guidelines for proper usage, and a complete list of models with the Sabbath feature, please
visit the web at http:V, www.star-k.org.
Page 9

Oven Cleaning
Self-Clean Cycle
NOTE: Tile kitchen area should be well ventilated using an open window, ventilation fan or exhaust hood during the Self-
Clean or Speed Clean cycle. This will help eliminate the normal odors associated with tile Self-Cleanning cycles.
To Set the Controls for a Self-Clean or a Delayed Start Self-Clean:
(Note: If you do not want to start a Delayed Self-Clean Cycle, skip steps 2 & 3.)
1. Besure the clock shows the correct time of day.
2. Pressthe START TIME pad.
3. Pressand hold the UP ARROW pad to scroll to the time to start the delayed Self-Clean
cycle. Releasethe pad when the desired time isdisplayed.
4. Pressthe CLEAN pad (for a 3 hour cycle). "- -" appears in the display.
5. Pressthe UP OR DOWN ARROW pad once.
As soon asthe controls are set, the motor driven lock will begin to close automatically
and the "Door Locked" indicator light will flash. DO NOT open the oven door while the
light isflashing (it takes about 15 seconds for the oven door to lock).
6. "CLn" will appear in the display during the Self-Clean cycle and the "Door Locked" light
will glow until the Self-Cleaning cycle iscomplete or cancelled and the oven temperature
has cooled.
Self-Clean Cycle time length (for models with the SELECTCLEAN pad)
For satisfactory results, use a 2 hour Self-Clean cycle for light soils and a 3 hour cycle for
average or a 4 hour cycle for heavy soils. NOTE: The kitchen area should
be well ventilated using an open window, ventilation fan or exhaust hood during the Self-
Clean cycle. This will help eliminate the normal odors associated with the Self-Clean cycle.
NOTE: A smoke eliminator in
the oven vent converts most of
the soil into a colorless vapor.
_ To avoid
possible burns use carewhen
opening the oven door after
the Self-Cleaning cycle. Stand
to the side of the oven when
opening the door to allow hot
air or steam to escape.
_DO NOT fo
the oven door open. This can
damage the automatic door
locking system. Use caution
and avoid possible burnswhen
opening the door after the
Self-Cleaning cycle has
completed. The oven maystill
be VERY HOT.
roe
To Set the Controls for a Self-Clean Cycle or a Delayed Start Self-Clean Cycle:
(Note: If you do not want to start a Delayed Self-Clean Cycle, skip steps 2 & 3.)
1. Besure the clock shows the correct time of day.
2. PressSTART TIME pad.
3. Pressand hold the UP ARROW pad to scroll to the time to start the delayed Self-Clean cycle. Releasethe pad when the
desired time is displayed.
4. PressSELECTCLEAN pad. "- -" appears in the display.
5. Pressthe UP OR DOWN ARROW once. "3:00" appears in the display for a 3 hour cycle. To change to a 2 hour cycle
press DOWN ARROW. "2:00" appears in the display or to select a 4 hour cycle press UP ARROW. "4:00" appears in
the display. As soon asthe controls are set, the motor driven lock will begin to close automatically and the "Door
Locked" indicator light will flash. DO NOT open the oven door while the light isflashing (it takes about 15 seconds for
the oven door to lock).
6. "CLn" will appear in the display during the Self-Clean cycle and the "Door Locked" light will glow until the Self-
Cleaning cycle is complete or cancelled and the oven temperature has cooled.
When the Self-Clean Cycle is Completed:
1. Thetime of day or "End" will appear in the displayand the "Clean" and "Door Locked" light will continue to glow.
2. Once the oven hascooled down for about 1 HOURand the "Door Locked" light hasgone out, the oven door can be opened.
3. If "End" is in tile display and the Select Clean indicator light remains ON, pressthe CLEAR/OFF or STOP pad. The time
of day will appear in the display.
NOTE: When the oven is cool, wipe away any residue or powdered ash with a damp cloth or paper towel.
Stopping or Interrupting a Self-Cleaning Cycle
If it becomes necessary to stop or interrupt a Self-Cleaning cycle:
1. Pressthe CLEAR/OFF or STOP pad.
2. Once the oven hascooled down for about 1 HOURand the "Door Locked" light hasgone out, the oven door can be opened.
:3. Restart the Self-Clean cycle once all conditions have been corrected.
9
Page 10

Adjusting the Oven Temperature
Your oventhermostat has been preciselysetat the factory. Thissetting maydifferfrom your previous oven, however, soyour recipe
times may not give you the results you expect. Ifyou think that the oven iscooking too hot or cool for your recipe times, you can
adjust the thermostat so that the oven cooks hotter or cooler than the temperature displayed.
To Adjust Oven Temperature:
1. Pressand hold the BAKE pad for 8 seconds. The display now indicates the amount of degrees offset between the original
factory temperature setting and the current temperature setting. Ifthe oven control has the original factory calibration, the
display will read "0".
2. Thetemperaturecan now be adjusted up or down 35°For 19°C, in I°F or 1°Csteps by pushing and holding the UPor DOWN
ARROW pad. Adjust until the desired amount of degrees offset appears inthe display. When lowering the oven temperature,
a minus sign (-)will appear before the number to indicate that the oven will be cooler by the displayed amount of degrees.
3. When you have made the desired adjustment, wait 5 seconds and the display will go back to the time of day.
Note: Oven temperature adjustment made will not change the Self-Cleaning or Broil feature temperature.
10
Page 11

PROGRAMMATEUR ELECTRONIQUE DU FOUR
Modeles Autonettoyants
NOTE: L'apparence ext@ieurement de la minuterie peut avoir une cenfiguratk)n diff@ente pour divers modeles d'appareils.
Ceci ne change pas son fonctionnement.
NOTE: Certains mod_les ont un panneau de contr61e a touche, Pour I'activer, vous n'avez qu'a appuyer sur une touche avec
un doigt. Assurez-vous d'avoir un bon contact entre le doigt et la touche• Les longs ongles peuvent rendre I'activation difficile.
C'est une bonne idle de nettoyer le panneau de commande apr6s chaque utiNsation ou aussit6t que possible apres des
eclaboussures. Avant de nettoyer le panneau de commande il est recommande d'activer le dispositif de verrouillage de
commande.
0 • / /X!l s_
.... S; !?:X
• o
i:7!i!iT !i!!iii iiiic,
@
Th_e_
Figure 2
Fi_ure 1
t
s._ 2_i_ O cur
pur_e _etruui 6e
PROGRAMMATEUR ELECTRONIQUE DU FOUR
Fonctions des touches de commande
Lisez attentivement ces instructions avant d'utiliser le four. Pour obtenir des r_sultats satisfaisants de votre four, il est
important de bien connaitre les fonctions du programmateur electronique decrites ci-dessous. Note: Le graphisme sur votre
programmateur peut ne pas _tre identique a celuiilhstre dans ce guide. Ceci ne change aucunement son mode de fonctionnement.
Note: Aucune commande ne fonctionne si ['hodoge Nest pas reglee _ I'heure.
Nettoyer- S@lectionne Temps de
le cycle de four cuisson-
autonettoyant. Programme le
temps de
_ cuisson au
four•
Voyants
Fl_che ascendante et descendante- Horloge-
%lectionne la temperature du four, le temps Utilisee pour
de cuisson, I'heure d'arr_t (lots de la r_gler I'heure.
programmation d'un arr_t automatique),
I'heure, la duree du nettoyage et la
minuterie.
q
lumineuxde
fonction- Indique __
que[ mode est en
fonction.
..... __
Cuire Selectionnee_
[a temperature/
du mode de
j; Oven
Preheat
cuisson normale. @ Pr_dla_ffage
t P0rle V_r¢ouill_e \
o
ifl_e
Lalumi_re interieure de
four- Employee pour
al[umer la lumiere
int@ieure de four•
Annuler- Annule
toutes les fonctions
pre-s_lectionn_es
saul I'heure et la
minuterie. Appuyez
sur cette touche
pour mettre fin a la
cuisson.
V]inuterie- Regleet
annule toutes les
fonctions de la
minuterie. Ne
commence ni n'arr_te
/ Heure de D_part- UtiNs6 Voyants lumineux Four, Pr_chauffage et Porte Verrouill4_e- Levoyant
Griller- Garder pour regler le temps lumineux "four" s'allume chaque fois que le four est en fonction. Levoyant
Selectionne la Chaud-Utilise desir_ de debut de lumineux "Pr_chauffage" s'allumeaussit6t que le four est programm_ ou
cuisson au pour r_gler la cuisson. Peut _tre utilise Iorsque la temperature est reprogramm@ a la hausse et s'eteint Iorsque la
gril. fonction avec TEMPS DE CUISSON temperature programee est atteinte. Le voyant lumineux "Porte VerrouiN_e"
Garder Chaud. pour programmer une clignote jusqu'a ce que la porte du four se verrouiNe Iors d'un cycle
cuisson differ_e, autonettoyant et reste continueliement allume une fois que ]a porte du four
est verrouiNee.
Versi6n en espaffo[
Si desea obtener una copia en espaffol de este Manual
del Usuario, sfrvase escribir a la direcci6n que se
incluye a continuaci6n. Solicite ta P/N 318200188E.
Spanish Owner's Guides
Frigidaire Company
P.O. Boxg061
Dublin, Ohio 43017-0961
318200188 (040% Rev.A
Page 12

PROGRAMMATEUR I LECTRONIQUE DU FOUR
Fonctions des touches de commande
Lisez attentivement ces instructions avant d'utiliser le four. Pour obtenir des r_sultats satisfaisants de votre four, il est
important de bien connaitre lesfonctions du programmateur ¢lectronique decrites ci-dessous. Note: Le graphisme sur votre
programmateur peut nepas_tre identique aceluiillustre dans ce guide. Ceci nechange aucunement son mode de fonctionnement.
Note: Aucune commande ne fonctionne si I'horloge n'est pas reglee a I'heure.
La lu mi _re Horloge- Temps de Fl_che ascendante et descendante- Aj out- Uti[is# pour ajouter I minute au
int_rieure de Utiiisee pour cuisson- S61ectionne la temp6rature du four, le compte & rebours de la Minuterie. Cette
four- Employ6e r6gler I'heure. Programme le temps de cuisson, I'heure d'arr_t (Iors de caract6ristique fonctionne avec la Minuterie
pour alhmer la \ temps de la programmation d'un arr6t de Cuisine et n'affecte pas [e temps de
lumiere int6rieure \\ cuisson au four. automatique), ['heure, la duree du cuisson ou les fonctions de temps de d#part.
de four. -_
Voyants
lumineu×de
fonction- Indique
quel mode est en
fonction.
Nettoyage- ® •
S61ectionne ....
four _°_ .... _
le cycle de D_
autonettoyant _
Minuterie- Regle et
annule toutes les
fonctions de la
minuterie. Ne
commence ni n'arr6te d6sir6 de debut de
la cuisson, cuisson. Peut 6tre utilise
D_part Diff_re!Utilis6
pour regler le temps
avec TEMPS DE CUISSON
pour programmer une
cuisson differ6e.
\ nettoyage et la minuterie.
\,
?
_, <_U _sta I__
i ......Griller-
ore. Garder Chaud-
_,_,o_t Utilis_pour regler
Pi_r_hat_ffage
0eorLocked la fonction Garder
P_rteV_r fouillee C ha U d.
Voyants lumineux Four, Pr_chauffage et Porte Verrouill_e- toutes les fonctions
Levoyanthmineux "Four" s'allumechaquefois que le four est pr_-selectionn_es
en fonction. Levoyant lumineux "Pr6chauffage" s'allume saul I'heureet la
aussit6t que lefour est programmeou Iorsquela temperature minuterie. Appuyez
est reprogramm_e_ la hausseet s'_teint Iorsquela temperature sur cettetouche
programeeest atteinte. Levoyant lumineux "Porte Verrouill_e" pour mettrefin _la
dignote jusqu'_ ce que la porte du four severrouilleIorsd'un cuisson.
cycleautonettoyant et restecontinuellement allum_ une lois que
la porte du four estverrouill_e.
Cuire Selectionne la
"temp6rature du
mode de cuisson
normale.
Selectionnela
cuissonau gril.
) Arr_t- Annule
Le four peut _tre programme pour :
Cuire normalement, Garder Chaud, Temps de Cuisson, %part Differe, Griller et Nettoyer.
Note: Lestouches ou lesboutons peuvent _tre differents.
Pour un tableau de comrnande silencieux:
Un signal sonore sefera entendre chaque fois que vous appuyez sur une touche. Vous pouvez, sivous ledesirez, programmer les
commandes pour qu'elles fonctionnent sans_mettre de signal sonore.
Pour dire sivotre four est regle pour un tableau de commande silencieux ou normal appuyez et gardez enfonce la touche HEURE
DE DEPARTou DISPARTDIFFI_R[_pendant 7 secondes. "- -" ou "SP" apparait aI'ecran. Dans les5secondes quisu ivent, appuyez
sur la touche FLECHEASCENDANTE ou DESCENDANTE pour basculer entre le mode sonore normale ou silencieux. L'ecran
affichera "- -" ou "SP". Attendez 5secondes pour retoumer _ I'affichage normal.
Note: Si "SP" apparait, letableau de commande fonctionnera avec lessons normaux. Si "- -" apparait, letableau de commande
fonctionnera en mode silencieux.
Conversion des temperatures (Fahrenheit / Celsius)
Le programmateur electronique a ete reglee a la rnanufacture pour fonctionner en degres _'F(Fahrenheit). Le four peut _tre
programme pour n'importe qu'elle temperature entre 170°F et 550°F (77°C et 2%°C).
Pour _hanger la temperature en degr_s °C (Celsius) ou de °C(Celsius} a°F (Fahrenheit) (le programmateur ne dolt pas
_tre en fonction cuisson ou nettoyage):
1. Appuyez et gardez enfonce la touche GRILLER pendant 7 secondes jusqu'_ ce que °Fou °C apparaisse.
2. Appuyez sur [atouche FLECHEASCENDANTE ou DESCENDANTE pour changer °F pour °C ou °C pour °F.
13. Attendez 5 secondes pour accepter les changements ou appuyez sur la touche ANNULER ou ARRI_T pour accepter les
changements.
Page 13

Reglage de Phorloge et de la minuterie
/ 77 \
• t O _ O
, Q o_n
INote: Aucune commande ne fonctionne si I'hodoge n'est regimea I'heure.
_ur
o0_ L0cked
pas
o o •
o
T_mp_ _e
Q
Reglage de I'horloge
Lorsque I'appareil est branche pour la premiere fois, ou chaque fois que son alimentation a ete interrompue, "12:00"
dignote _ I'ecran.
1. Appuyez sur la touche HORLOGE ou (_i une fois (ne pasgarder la touche enfonc@).
2. Dans les 5 secondes suivantes, Appuyez et gardez enfonce latouche FLECHEASCENDANTE ou DESCENDANTE jusquk_
ce que la bonne heure apparaisse a I'ecran.
3. Appuyez sur la touche HORLOGE ou pour accepter la nouvelle heure du jour. Si la touche HORLOGE ou (_)n'est
pas appuy_, le programmateur retournera automatiquement a la nouv@e heure du jour apres 7 seconde.
Note: L'heure ne peut pas 6tre changee durant le cycle de cuisson,cuisson minut@, cuisson minut@ differee, un cycle
d'auto nettoyage ou d'auto nettoyage differe.
Pour changer entre un affichage de 12 ou 24 heure
)
I. Appuyez sur latouche HORLOGE ou (_)pendant 7 secondes. Apres 7 secondes, "12Hr" ou "24Hr" apparaitra
I'ecran et vous entendrez un signal sonore.
2. Appuyez sur la touche FLECNEASCENDANTE ou DESCENDANTE pour basculer entre le mode 12 et 24. L'affichage
montrera "12Hr" ou "24Hr".
3. Attendez 5 secondes ou appuyez sur latouche ANNULER ou ARRET pour revenir a I'affichage de I'heure du jour.
4. Remettez I'heure correcte comme decrit dans la section R_glage de I'horloge et de la minuterie ci-haut. Veuillez
rioter que si le mode 24h a ete choisi, I'horloge affichera dorenavant I'heure de 0:00 a 23:59 heures.
R6glage de la minuterie
1. Appuyez sur latouche MINUTERIE.
2. Appuyez sur la touche FLC-CHEASCENDANTE pour augmenter letemps par intervalle de I minute. Appuyez sur la
touche FLECHEASCENDANTE et retenez-la pour faire avancer le temps par intervalle de 10 minutes. La minuterie peut
_tre regl@ pour n'importe quel laps de temps, de 1 minute _ 11 heures et 59 minutes.
3. L'ecran affiche le decompte a rebours de la minuterie en minute jusqu'a ce qu'il reste une minute; par la suite, le
decompte _ rebours s'affiche en secondes.
4. Lorsque le temps est ecoule, la minuterie emet 3 signaux sonores et continue _ les emettre _ toutes les8 secondes
jusqu'a ce que vous ayez appuye sur la touche MINUTERIE.
Note: Levoyant lumineux situe au-dessus de la touche MINUTERIE s'dlumera quand la minuterie est active.
Note: La minuterie ne commence ni n'arr#te la cuisson. Ellesert a mesurer letemps et emet un signal sonore Iorsque le
temps est ecoule. La minuterie peut #tre utilisee seule ou durant le fonctionnement de toute autre fonction. Lorsque la
minuterie est utilisee en re#me temps qu'une autre fonction, elle s'affiche a I'ecran. Pour afficher lesautres fonctions,
appuyez sur la touche de fonction correspondante.
Pour arr6ter la minuterie avant que le temps r6g16 soit 6coul6:
Appuyez sur latouche MINUTERIE.
Pour r6gler la fonction Ajout
Latouche _...... AJOUT est utilis@ pour ajouter 1minute. Quand latouche _i_o_est appuyee, 1 minute est ajoutee a laminuterie
si cette fonction est d_ja active. Sila fonction n'est pas encore active et que la touche _,_,_ est appuy@ la minuterie s'activera
et un compte _rebours de 1 minute debutera. Pour de plus amples informations surla fac_onde regler lafonction minuterie, voyez
Reglage de la minuterie ci-dessus.
3
Page 14

R glage Des Commandes De Four
Note: Aucune commande ne fonctionne si I'horloge n'est pas r0_gleea I'heure.
Pour regler ou changer la temperature pour la cuisson au four
Le four peut _tre programme pour cuire a n'importe quelle temperature entre 170% et 550% (77°C et 288°C).
Pour regler les commandes pour la cuisson au four:
1. Appuyez sur la touche CUIRE.'.... s'affiche.
2. DanslesSsecondessuivantes, appuyezsurlatoucheFLECHEASCENDANTEouDESCENDANTE L'afficheurindiquera"350%
(1770C). La temperature peut _tre ajustee par intervalle de 5% (1°C) en appuyant sur la touche FLECHEASCENDANTE ou
DESCENDANTE.
3. 8 secondes apr_s avoir relache la touche FLI_CHEASCENDANTE ou DESCENDANTE, le four comrnence a chauffer pout
atteindre latemperature prog_amm_e. Lorsque latemperature prog_amm_e est atteinte, levoyant [umineux duprechauffage
s'_teint.
4. Pour annuler la fonction CUIRE, appuyez sur la touche ANNULER OU ARRC-T.
Pour modifier la temperature du four apr_s le debut de la cuisson:
Appuyez sur la touche FLECHEASCENDANTE ou DESCENDANTE pour augmenter ou diminuer latemperature reglee.
Pour r_gler le programmateur _lectronique pour une cuisson continue ou pour une _conomie
d'_nergie de 12 heures:
Le programmateur electronique de four a une fonction integree d'_conomie d'_nergie de 12 heures qui eteindra lefour s'il est
allum0_pour plus de 11 heures et 59 minutes. Lefour peut _tre programme pour annuler cedispositif pour une cuisson continue.
Pour rCgler le programmateur _lectronique pour une cuisson continue:
I. Appuyez et gardez enfonc¢ le touche MINUTERIE pendant 7 secondesjusqu'a ce que vous entendiez un signal sonore.
2. Dartsles5secondes qui suivent, appuyez surla touche FLECHEASCENDANTE ou DESCENDANTE pour basculer entre le mode
de cuisson continue et le mode d'economie d'energie de 12h. L'afficheur indiquera "- - hr" ou "12hr".
SI "- - hr" s'affiche, lefour est programm0_pour une cuisson continue. Si "12hr " s'affiche, lefour est programme en mode
d'economie d'energie de 12h.
3. Attendez 5secondes ou appuyez sur la touche ANNULER ou ARRET pour accepter les changements.
Pour r_gler le programrnateur electronique pour un verrouillage securitaire du four (certains
mod@les):
Lecontr61e peut _tre programm_ pour verrouiller laporte du four (certains modeles)etJou verrouiller lepanneau de contr61e (tous
les mod_les).Le dispositif de verrouillage de four emp_che le four d'etre accidentellement allume. IIne desactive pas I'hodoge,
la minuterie ou lalumiere interieure du four.
Pour r_gler le programmateur _lectronique pour un vCrrouillage securitaire du four:
I. Appuyez et gardez enfonce le touche ANNULER ou ARRET pendant :3secondes. Levoyant lumineux "Porte Verrouillee"
dignotera et laserrure de porte cont61ee par moteur corr_menceraa sefermer automatiquement. N'OUVREZ PAS la porte
pendant que le voyant lumineux clignote. Accordez environ 15 secondes pour le verrouillage de la porte. Une fois que
la porte sera verrouillee, I'afficheur indiquera "Loc ".
2. Pourannulerle%rrouillagesecuritairedu four, appuyezetgardezenfoncelatoucheANNULERouARRETpendant3 secondes.
Leprogrammateur electronique deverrouillera automatiquement la porte du four et retournera aufonctionnement normal de
I'appareik
Page 15

R glage Des Commandes De Four (suite)
• t df _
• O
!_'!i__ii ;i!)i_@:¸¸ _ _;_rf O _r
, /(_ --:%,
0 0 • t
Griller
La cuisson au gril est un procedO de cuisson des coupes tendres de viande grace
h chaJeur radiante emise par I'eJ0ment supOrieur du four. Un signal sonore se
fait entendre quand la tempOrature de cuisson sur le gril est atteinte. Assurez-
vous de centrer la casserole directement sous I'ele_mentde cuisson pour de
meilleurs rOsultats. Arranger les etag0res du four pendant que le four est encore
froid. Phcez les griJlestel que desire.
La Lechefritte permet de drainer h graisse qui s'egoutte et ainsi la garde
eloign@ de la haute chaJeur du grik NE PAS utiJiser Jalechefrite sans son
couvercle qui Faccompagne. NE PAS recouvrir le couverde de papier
aluminium. Legras en surface pourrait s'enfiammer.
Si un feu se produit _.I'int@ieur du four, fermez la porte
du four et @teignez le four. Si le feu ne s'eteint pas, lancez sur te feu du
bicarbonate de soude ou utilisez un extincteur. NE PAS mettre d'eau ou de
farine sur le feu. La farine risque d'exploser et I'eau peut permettre _.un feu
de graisse de s'@tendre et de causer des blessures personnelles.
Q • @
X
L_chefrite
Pour griiler:
1. Positionnez lesgrilles aFemphcement desir_ Iorsque le four est froid.
2. Appuyez sur la touche GRILLER.L'afficheur indiquera "- -".
3. Appuyez la touche FL_:CHEASCENDANTE ou DESCENDANTEjusqu'a ce que
le niveau de grillage desire apparaisse sur I'afficheur. Appuyez sur la touche
FLECHE ASCENDANTE pour un grillage _ la puissanceHI ou sur la touche
FLJ_CHEDESCENDANTE pour un grillage a la puissance LO. La plupart des
aliments peuvent _tre grilles _ la puissancemaximale HI.Choisissez la puissance
minimale LO pour @viterde br01erou d'assecher les aliments qui doivent @e
bien cult.
4. Placezle couve_clesui laI_chefrite, ensuite placezla nourriture surle couvercle.
N'utilJsez PAS la lechefrite sanssoncouverde. NErecouvrez PAS lecouverde
de papier d'ahminium. Legras en surface pourrait s'enfiammer.
5. Phcez la lechefrite surh grille du four. Ouvrez la porte du four a la position
d'arr#t pour le grillage.
6. Grillez hviande surun cOtejusqu'a cequ'eJle soit dot@; retournez et faites cuire
le deuxieme c6te. Note: Tirez toujours la grille jusqu'a saposition d'arr@tpour
retourner ou retirer lesaliments.
7. Lorsque legrillage est termine, appuyez sur la touche ANNULER ou ARRe-T.
Pour actionner Idles lumi_re(s) du four:
La/les hmiere(s) interieure(s) de four s'allumera/ont automatiquement quand la
porte de four est ouverte.
Appuyezsur latouche !, ou O pourallumer et eteindre la lumi_re du four quand
la porte est fermee.
La/les lumiere(s)interieure{s) de four est/sont Iocalise(es)du cOtesuperieur gauche
(et droit, certains mo@les) dons le fond du four et est/sont couvert(es) d'un
protecteur deverre retenu par une broche. Leprotecteur de verre doit @'e en place
chaque fois que lefour est en service. Pour changer la hmi_re interieure de four {les
lumi_res), voir Changer laLumiere deFourdans la section SoinG@eral & Entretiens
du Guide du Proprietaire.
5
Page 16

Reglage Des Comrnandes De Four (suite)
Pour programmer une cuisson rninutee et une cuisson rninutee diff_ree:
LestouchesTEMPS DECUISSON et HEUREDEDEPARTou DISPARTDIFFERI_actionnent lesdispositifs qui allument ou eteignent
]e foul a un moment que vous choisissez a I'avance. Le four peut _tre proglamm@ pour s'allumer tout de suite et s'eteindre
automatiquement (Temps de Cuisson) ou commencer la cuisson a un moment ulterieur avec un temps de d(_part retarde (Heure
de Depart ou Depart Differ@).
Note: Pendant une cuisson minut@ele voyant lumineux de pr_chauffage s'allumera pendant I'operation de prechauffage.
Programmer ]e four pour commencer a cuire immCdiatement et a s'_teindre automatiquement (Temps de Cuisson):
1. Assurez-vousclue I'horloge indique I'heure juste.
2. Placez la nourriture dans le four.
13. Appuyez sur latouche CUIRE. '.... s'affiche a I'ecran.
4. Dans les5secondesqui suivent, appuyez sur latouche FLJ_CHEASCENDANTE ouDESCENDANTE "350°F(I77°C)" s'affiche
I'{_cran.Enappuyant surlatouche FLJ_CI-IEASCENDANTEou DESCENDANTE, latemperature peut _treajust@epartranche
de 5% (1° si le contrOleur affiche les degres en celcius).
5. Attendez 5 secondes pour accepter la temperature.
6. Appuyez sur la touche TEMPS DE CUISSON. "0:00" s'affiche a I'ecran (MIN:SEC) ou (HR:MIN)si programme pour plus de
60 minutes.
7. Appuyezsurlatouche FLI_CHEASCENDANTEou DESCENDANTEjusqu'a ceque letempsdecuissondesires'affiche_ I'_cran.
8. Le four s'allumera et commencera a chauffer.
Note: Quand lacommande estprogramee pour cette fonction latemperatu re de four seraaffichee. Pourvoir letemps de cuisson
restant appuyez sur la touche TEMPS DE CUISSON et pour voir I'heure du jour appuyez sur la touche HORLOGE ou
Programmer le four pour un depart differ€ et pour qu'il s'¢teigne automatiquement (Heure de Depart ou D_part
differ€):
1. Assurez-vousque I'horloge indique I'heure juste.
2. Placez la nourriture dans le four.
3. Appuyez sur la touche CUIRE. '.... s'affiche a I'ecran.
4. Dans les5secondesqui suivent, appuyez sur ]atouche FLJ_CHEASCENDANTE ouDESCENDANTE "350°F(I77°C)" s'affiche
a I'e_cran.Enappuyant surlatouche FLI_CHEASCENDANTE ou DESCENDANTE, latemperature peut @treajustee partranche
de 5% (1° si le contrOleur affiche les degr6s en celcius).
5. Attendez 5 secondes pour accepter la temp@rature.
6. Appuyez sur la touche TEMPS DE CUISSON. "0:00" s'affiche a I'_cran (MIN:SEC) ou (HR:MIN)si programm6 pour plus de
60 minutes.
7. Appuyezsurlatouche FLECHEASCENDANTEou DESCENDANTEjusqu'a ceque letempsdecuissondesires'affiche_ I'_cran.
8. Attendez 5secondes pour accepter la temperature.
9. Appuyez sur latouche HEURE DE DlePART ou DEPART DIFFI_RI_.L'heure de depart laplus tot possible appara_tra a I'ecran.
10. Appuyez sur la touche FLECNEASCENDANTE ou DESCENDANTE jusqu'_ ce que I'heure de depart desiree s'affiche et
attendez 7 secondes pour accepter.
11. Une fois le contr61e regl& il calcule le moment ou la cuisson commencera et arr_tera.
12. Le four s'allumera _ I'heure de d_,part et commencera a chauffer.
Note: Quand le contr01e est regle pour un depart differe, I'heure du jour reste affichee jusqu'a I'heure de depart.
Quand lefour s'allumera, latemperatu redu fou_seraaffichee. Pourvoir letemps decuissonrestant appuyez surlatouche TEMPS
e
DE CUlSSON et pour voir I'heure du jour appuyez sur la touche HORLOGE ou (_).
Lorsque le Temps de Cuisson s_lectionn_ est _coule:
1. "END" (fin) appara_t a I'ecran et le four s'eteint automatiquement.
2. Le contr61e 6met 3 signaux sonores a toutes les25 secondes jusqu'a ce que latouche ANNULER ou ARRI_Tsoit appuy(_e.
Pour changer la temperature du four ou le temps de cuisson apr_s le debut de ]a cuisson:
1. Appuyez sur la touche de la fonction que vous desirez changer.
2. Appuyez sur la touche FLECHEASCENDANTE ou DESCENDANTE pour ajuster le reglage.
Soyez prudent Iorsque vous reglez une cuisson differee. Cette fonction est utilis#_epour faire cuire de la
viande salaisonnee ou congelee et laplupart des fruits et I@gumes.Lesaliments facilement perissablescomme le lait, lesoeufs,
le poisson, laviande ou la volaille doivent d'abord @trer@frigeres.M6me Iorsqu'ils sont refroidis, ils ne doivent pas rester dans
le four plus d'une heure avant le debut de la cuisson et doivent #_trerapidement enlev¢s Iorsque lacuisson estterminee.
Page 17

R glage Des Comrnandes De Four (suite)
• t _df _
• O
!_!i_ii ii!)i_@:¸¸ _ _rf O _r
, /(_ ":%,
0 0 • t
Q • @
X
Reglage du dispositif Garder Chaud
La touche GARDER CHAUD active lafonction GARDER CHAUD et maintiendra une temperature de four deI70 ° F177°C1.La
fonction GARDER CHAUD conservera chaude la noumture cuite au four jusqu'a 13heures apres Jacuisson. Apres 13heures la
fonction GARDER CHAUD eteindra Jefour automatk uement. La fonction GARDER CHAUD peut @treempJoyee sans une
operation de cuisson ou peut _tre employee apres une cu_ssonavech fonction TEMPS DECUISSON ou un TEMP DECUISSON
DJFFERE.
Programmer la fonction GARDER CHAUD:
1. Arrangez JesgrilJesinterieures du four et placez la nourriture cuite darts le four.
2. Appuyez sur la touche GARDER CHAUD. "- -" s'affiche et le voyant Jumineux de Jatouche GARDER CHAUD s'allume.
Note: Siaucune autre touche n'est appuyee dans les 6 secondes suivantes, la fonction s'annulera.
3. Appuyez sur la touche FLECHE ASCENDANTE ou DESCENDANTE pour Factiver. "Hid" sera affiche.
4. Pour eteindre lafonction GARDER CHAUD a n'importe quel moment, appuyez latouche ANNULER ou ARRI:T ou appuyez
sur la touche GARDER CHAUD. Le voyant lumineux de latouche GARDER CHAUD s'eteindra.
Programmer la fonction GARDER CHAUD pour qu'eHe s'_teigne automatiquement:
1. Arrangez Jesgrilles interieuresdu fouret pJacezlanoumturedans lefour. Programmez lefourcorrectement pour unecuisson
minut_e ou une cuisson avec un d_part differS.
2.
Appuyez sur latouche GARDER CHAUD. "- -" s'affiche et levoyant lumineux de la touche GARDER CHAUD s'allume.
3.
Appuyez sur la touche FLI_CHE ASCENDANTE ou DESCENDANTE pour I'activer. Le dispositif GARDER CHAUD
s'allumera automatiquement apr_s la cuisson minut_e ou la cu_ssonavec un dOpart diffOrO.
4.
Pour eteindre le dispositif GARDER CHAUD a n'importe quel moment, appuyez latouche ANNULER ou ARRI_Tou appuyez
sur la touche GARDER CHAUD. Le voyant lumineux de latouche GARDER CHAUD s'eteindra.
7
Page 18

A@glage Des Commandes De Four (suite)
Fonction Sabbat (_ utiliser le jour du sabbat juif & pendant les autres f_tes)
Lestouches TEMPS DECUISSON et NEURE DE DEPART ou DEPART DIFFEREcontrOlent la fonction Sabbat. Lafonction
Sabbat peut _tre utilisBe seulement avec la touche CUIRE. IJest possible d'augmenter ou de diminuer Jatemperature du four
apres avoir active la fonction Sabbat (l'ajustement de la temperature du four peut _tre fait seulement Iors des f_tes juives),
toutefois I'_cran demeure inactif et silencieux lots de I'ajustement de la temperature. Lorsque le four est regle pour une
cuisson avec lafonction Sabbat en operation, lefour vafonctionner continuellement jusqu'a ce qu'iJ soit annule. La fonction
Sabbat passera outre le mode Arr_t automatique apr_s 12-heures preprogramme a I'usine.
Si la lumiere du four dolt _tre dlumee durant lejour du sabbat, appuyez sur la touche _ ou _ avant d'activer la
fonction Sabbat. Si la lumiere du four est allum_e et que la fonction Sabbat est active, cette derniere restera allumee
jusqu'a ce que lafonction Sabbat soit annulce. Si la lumiere du four doit rester eteinte, assurez-vous de I'eteindre avant
d'activer la fonction Sabbat.
NOTES IMPORTANTES: IIn'est pas conseille d'essayer d'activer d'autres fonctions que CUIRE Iorsque la fonction Sabbat est
active. Les SEULEStouches pouvant _tre activee Iorsque la fonction Sabbat est active sont les suivantes: ELECHE
ASCENDANTE et DESCENDANTE, CUIRE etANNULER ou ARR_T. TOUTES LESAUTRES TOUCHES resteront inactives si la
fonction Sabbat est adcquatement utilis_e.
Pour r_gler le four pour qu'il commence la cuisson imm_diatement & activer la fonction Sabbat:
I. Assurez-vous que I'horloge est a I'heure juste.
2. Placez les plats a cuisinier dans le four.
3. Appuyez sur la touche BAKE. '.... apparaft a I'ecran.
4. Dans les 5 secondes qui suivent, appuyez sur la touche EL_:CHEASCENDANTE ou DESCENDANTE. L'ccran affiche
"350% (177°C)". Enappuyant sur lestouches ELI_CNEASCENDANTE ou DESCENDANTE,la temperature peut alors #tre
ajustee par des increments de 5% (I°C si lecontrOleur est programm# en Celsius).
5. SIvous d@sirez r@glerteprogrammateur pour une OuJsson Minut_e ou un D_part Dlff_r_ faites le maintenant.
Sinon, continuez a I'_tape 7. R@f#rez-vous _.la section Culsson Mlnut_e (compl@tez les @tapes6 a 8) / D_part
Diff_r_ (compl_tez les etapes 6 _.10) pour les instructions compl@tes. Rappelez-vous que le four s'eteindra Iorsque
la Ouisson Mlnut_e ou le D_part Diff_r_ sera termin@. Le four ne pourra doric pas Otreutilis@a nouveau durant le
jour du Sabbat/F@tes juives. Le d#part differ@le plus Bloign# pouvant @treprogramm@ est de 11 heures & B9
minutes.
6. Le four s'allume et commence a chauffer.
7. Appuyez et maintenez simultan@ment les touches TEMPS DE CUISSON et HEUREDE DISPARTou DEPART DIEE_:RI_
pendant au moins 3 secondes. SAb apparait _,I'_cran. Une fois que SAb apparatt a I'_cran, le programmateur arr@te
d'@mettre des signaux sonores Iorsque les touches sont appuy@es et d'afficher tes changements futurs. Le four est
alors correctement r@gl#en mode Sabbat.
Note: Vous pouvez modifier la temperature Iorsque le four est en marche en appuyant sur les touches FLEOHE
ASCENDANTE ou DESCENDANTE (durant les F@tesjuives seulement). La temperature peut alors @treajust@edans
des increments de 5°F (1°C si le contr61eur est programm@ en Celsius). Rappelez-vous que le programmateur
n'_met pas de signaux sonores Iorsqu'une touche est appuy_e et que I'_cran demeure inactif une fois que la
fonction Sabbat est active.
8. Le four peut &tre arr&t_ _ tout moment en appuyant d'abord sur ANNULER ou ARRET (ceci arr_tera lefour
seulement). Pour arr&ter le dispositif de Sabbath appuyez et maintenez simultanement les touches TEMPS DE
CUISSON et HEURE DE DEPART ou DEPART DIFFleR¢: pendant 3 secondes. SAb disparaitra de !'affichage.
Lorsqu'une panne ou une interruption de courant survient, le four s'eteint. Lorsque le courant revient le four ne se rallume
pas automatiquement. Le programmateur est toujours en fonction Sabbat. La nourriture peut alors Otre retiree du four de
fa_on s_curitaire mOme si la fonction Sabbat est encore active. Toutefois le four ne peut pas _tre rallum_ avant la fin du
jour du Sabbat. Une fois le jour du Sabbat termine, d_sactivez la fonction Sabbat en appuyant et maintenant
simultan_ment lestouches TEMPS DE CUISSON et HEURE DE DEPART ou DEPART DIFFI_A_ pendant 3 secondes. SAb
disparaftra de I'affichage et le four peut alors _tre utilis_ de fagon habituelle. Pour plus d'assistance, d'aide pour un usage
adequat de la fonction Sabbat ainsi que pour consulter la liste complete des modules poss_dant la fonction Sabbat, s'il
vous pla_tvisitez te site internet http:\\www.star-k.org.
Page 19

Nettoyage du four
D_marrage du cycle autonettoyant
NOTE: La cuisine devrait _tre bien a_ree en utilisant une fen#tre ouverte, un ventilateur ou une hotte )endant lecycle
d'auto nettoyage. Ced aidera _ eliminer les odeurs normales li_es aux cycles d'auto nettoyage.
Programmer le cycle d'auto nettoyage ou d'auto nettoyage differe: NOTE UN eliminateur de
(Note: Si vous ne voulez pas commencer un Cycle d'Auto nettoyage DiffCr_ sauter les_tapes fumee dans le conduit du four
2 & 3.) convertit la plupart des r_sidus
I. Assurez-vous que I'horloge indique I'heurejuste. en une vapeur sanscouleur.
2. Appuyez sur latouche HEURE DE DISPARTou DI!PART DIFI_RI_.
3. Appuyez et maintenir la touche FLJ_CNEASCENDANTE pourobtenirl'heure de depart du _ Soyez
cycle d'auto nettoyage desire, prudent en ouvrant laporte du
4. Appuyez sur la touche NETTOYER (pour un cycle de 3 heure). "- -" sera affiche, fourapres un cycled'auto net-
5. Appuyez une fois latouche FLJ_CNEASCENDANTE. toyage. Tenez-vous sur le c0te
Aussit0t que les contr01es sont regles, le voyant lumineux "Porte Wrrouillee" dignotera et de I'appareilpourouvrirla porte
la serrure de porte contr61ee par moteur commencera a se fermer automatiquement, afin de laisserI'air chaud ou la
N'OUVREZ PAS la porte pendant que le voyant lurnineux dignote. Accordez environ chaleur s'e_chapper.
I 5 secondes pour le verrouillage de la porte. Une fois que la porte sera verrouillce,
I'afficheur indiquera "Loc " _ Ne for-
6. "CLn" sera affiche pendant le cycle d'auto nettoyage. Le voyant lumineux "PORTE cez pas la porte du four
VERROUILLI_E" sera allume_jusqu'a lafin du cycle ou I'annulation du cycle et que le four pour I'ouvrir. Ceci risque
sesoit refroidi, d'endommager le systeme de
verrouillage automatique.
D_marrage du cycle autonettoyant (pour les modules avec la touche SELECT Soyez prudent en ouvrant la
CLEAN) porte du foura lafin d'un cycle
Pour des resukats satisfaisants, employez un cycle autonettoyant de 2 heures pour salet_ autonettoyant;lefour risque
I_gere et un cycle de 3 heures pour la salet_ normale ou un cycle de 4 heures pour la d'etre encore tr_s chaud.
salet_ tenace. NOTE: La cuisine devrait _tre bien aerie en utilisant une fen_tre ouverte, un
ventilateur ou une hotte pendant le cycle d'auto nettoyage. Ceci aidera a eliminer les odeurs
normales liees aux cyclesd'auto nettoyage.
Programmer le cycle d'auto nettoyage ou d'auto nettoyage differS:
(Note: Sivous ne voulez pas commencer un Cycle d'Auto nettoyage Diff_r_ sauter les etapes 2 & 13.)
I. Assurez-vous que I'horloge indique I'heurejuste.
2. Appuyez sur la touche HEURE DE DISPARTou DEPART DIFI_RE.
13. Appuyez et maintenir la touche FLI_CHEASCENDANTE pour obtenir I'heure de depart du cycle d'auto nettoyage desir(<
4. Appuyez sur la touche SELECTCLEAN. "- -" seraaffich(_.
5. Appuyez une fois la touche FLJECHEASCENDANTE ou DESCENDANTE. "13:00" apparaTtdans I'affichage pour un cycle
de 3 heures. Pour changer en un cycle de 2 heures appuyez la touche FL_CHE DESCENDANTE. "2:00" apparait dans
I'affichage ou pour changer en un cycle de 4 heures appuyez la touche FL_':CHEASCENDANTE "4:00" apparait dans
I'affichage.Aussit6t que le contr61e est regle, le voyant lumineux "Porte Verrouillee" clignotera et la serrure de porte
contr01ee par moteur commencera a sefermer automatiquement. N'OUVREZ PAS la porte pendant que le voyant
lurnineux clignote. Accordez environ I 5 secondes pour le verroui%ge de la porte. Une fois que la porte sera
verrouill@e,I'afficheur indiquera "Lot".
6. "CLn" sera affiche pendant le cycle d'auto nettoyage. Le voyant lumineux "PORTE VERROUILLEE" sera allum_ jusqu'a
la fin du cycle ou I'annulation du cycle et que le four se soit refroidi.
A la fin du cycle d'auto nettoyage:
1. L'heure du jour ou "End" apparaTt_ I'ecran et lesvoyants lumineux "NETTOYER ou NETTOYAGE" et "PORTE
VERROUlLLItE" demeurent allum_.
2. Lorsque le four s'est refroidi pendant environ 1heure et que le voyant lumineux "PORTEVERROUILLEE"s'est eteint, on
peut ouvrir la porte du foui.
3. Si "End" reste a I'ecran et que le voyant lumineux "NETTOYERou NETTOYAGE" est encore allume, appuyez sur la
touche ANNULER ou ARRET. L'heure apparaTtra a I'ecran.
NOTE: Une fois le four refrodi, essuyeztout residu ou cendre avec un tissu humide ou une serviette de papier.
Arr_t ou interruption d'un cycle autonettoyant:
Si vous devez arr_ter ou irrterrompre le cycle autonettoyant pour causede fumee excessiveou de feu:
1. Appuyez la touche ANNULER ou ARRI_.T.
2. Lorsque le four s'est refroidi pendant environ 1heure et que le voyant lumineux "PORTEVERROUILLEE"s'est @teint,on
peut ouvrir la porte du four.
3. Une fois lasituation corrigee, vous pouvez reprogrammer le cycle autonettoyant.
9
Page 20

R glage de la temperature du four
Votre thermostat de four a ete regle avec precision a I'usine. Cet ajustement peut diff_rer de celui de votre four precedent,
cependant, vos temps de cuisson peuvent ne pas vous donner ]es rcsultats que vous pr@voyez.Si vous pensez que le four cult
trop chaud ou froid pour vos temps de cuisson, vous pouvez ajuster le thermostat de sorte que votre four puisse cuire a une
temperature plus basse ou plus elev(_eque celle affichee.
Pour ajuster la temperature du four:
1. Appuyez sur la touche CUIRE pendant 8 secondes. L'affichage indique maintenant I'ecart de temperature en degres entre
I'arrangement original de la temperature en usine et I'arrangement courant de la temperature. Si le four a la calibration
original d'usine, "0" sera affiche.
2. La temperature peut maintenant @treajustee a la hausse o_J_ la baisse de 35% ou 19°C, par I°F ou 1°C en appuyant sur
la touche FLECHE ASCENDANTE ou DESCENDANTE. Ajustez jusqu'a ce que I'ecart de temperature desire de degr(_s
apparaisse darts I'affichage. Enabaissant latemperature defour, un signe moins(-)apparaTtra devant le nombre pour indiquer
que le four sera plus froid par la quantite affichee de degres.
/3. Une fois I'ajustement fait, attendez 5 secondes pour retourner a I'affichage de I'heure.
Note: L'ajustement de la temperature de four ne changera pas la temp@rature du dispositif d'auto nettoyage ni de cuisson au
gril.
10
 Loading...