

Page 1
Installation & Operation Manual
Portable Air Conditioner
Model P-12
Rev 6-07
Page 2
Foreword
Table of Contents
Thank you for purchasing the new Friedrich ZoneAire® Portable
Air Conditioner. We are confi dent that you will fi nd this unit a
quiet and effi cient example of Friedrich reliability.
This Installation and Operation Manual has been designed to
insure maximum satisfaction in t he performance of your unit.
For years of trouble-free service, please follow these installation
instructions closely.
Notice:
(1) This appliance is not intended for use by young children
without supervision.
(2) The plug should be accessible after installation of the ap-
pliance.
(3) The unit shall be installed in accordance with local and
national codes.
(4) If the supply cord is damaged, it must be replaced by the
manufacturer or its service agent or a similarly qualifi ed
person in order to avoid a hazard.
(5) Please wait three minutes before restarting when the
power is broken.
(6) Due to momentary high current demand when your air
conditioner is started, use a "TIME DELAY" fuse or a
HACR type circuit breaker.
Introduction ................................................................................2
Unit Identifi cation .......................................................................3
Operation of Remote Control.....................................................5
Control Panel Unit Operation.....................................................6
Water Drainage Methods ........................................................... 7
Maintenance/service ..................................................................8
Safety cautions ..........................................................................8
T roubleshooting .........................................................................8
Installation ................................................................................10
Hose and window kit ................................................................10
Accessories ............................................................................. 11
Introduction
Portable Air Conditioner
This Portable Air Conditioner is designed to provide a quick and
easy cooling solution for areas that either do not have air con ditioning or areas that the current system cannot maintain at a
comfortable level.
This unit is also great as a back-up system in case the primary
cooling system should fail.
!
!
WARNING
CAUTION
This symbol refers to a hazard or unsafe practice which can result in severe personal injury or
death.
This symbol refers to a hazard or unsafe practice which can result in p ersonal injur y or prod uct or property damage.
Other means of conditioning should be employed when the indoor temperature is either below 17°C (63°F) or above 35°C
(95°F) .
Attention
Before you use your PORTABLE AIR CONDITIONER , please
read this instruction manual c arefully so that you get the best
performance from the unit.
This instruction manual is used for gui dance and does not form
part of a contract. We reserve the right to make technical changes without prior notice.
2
Page 3
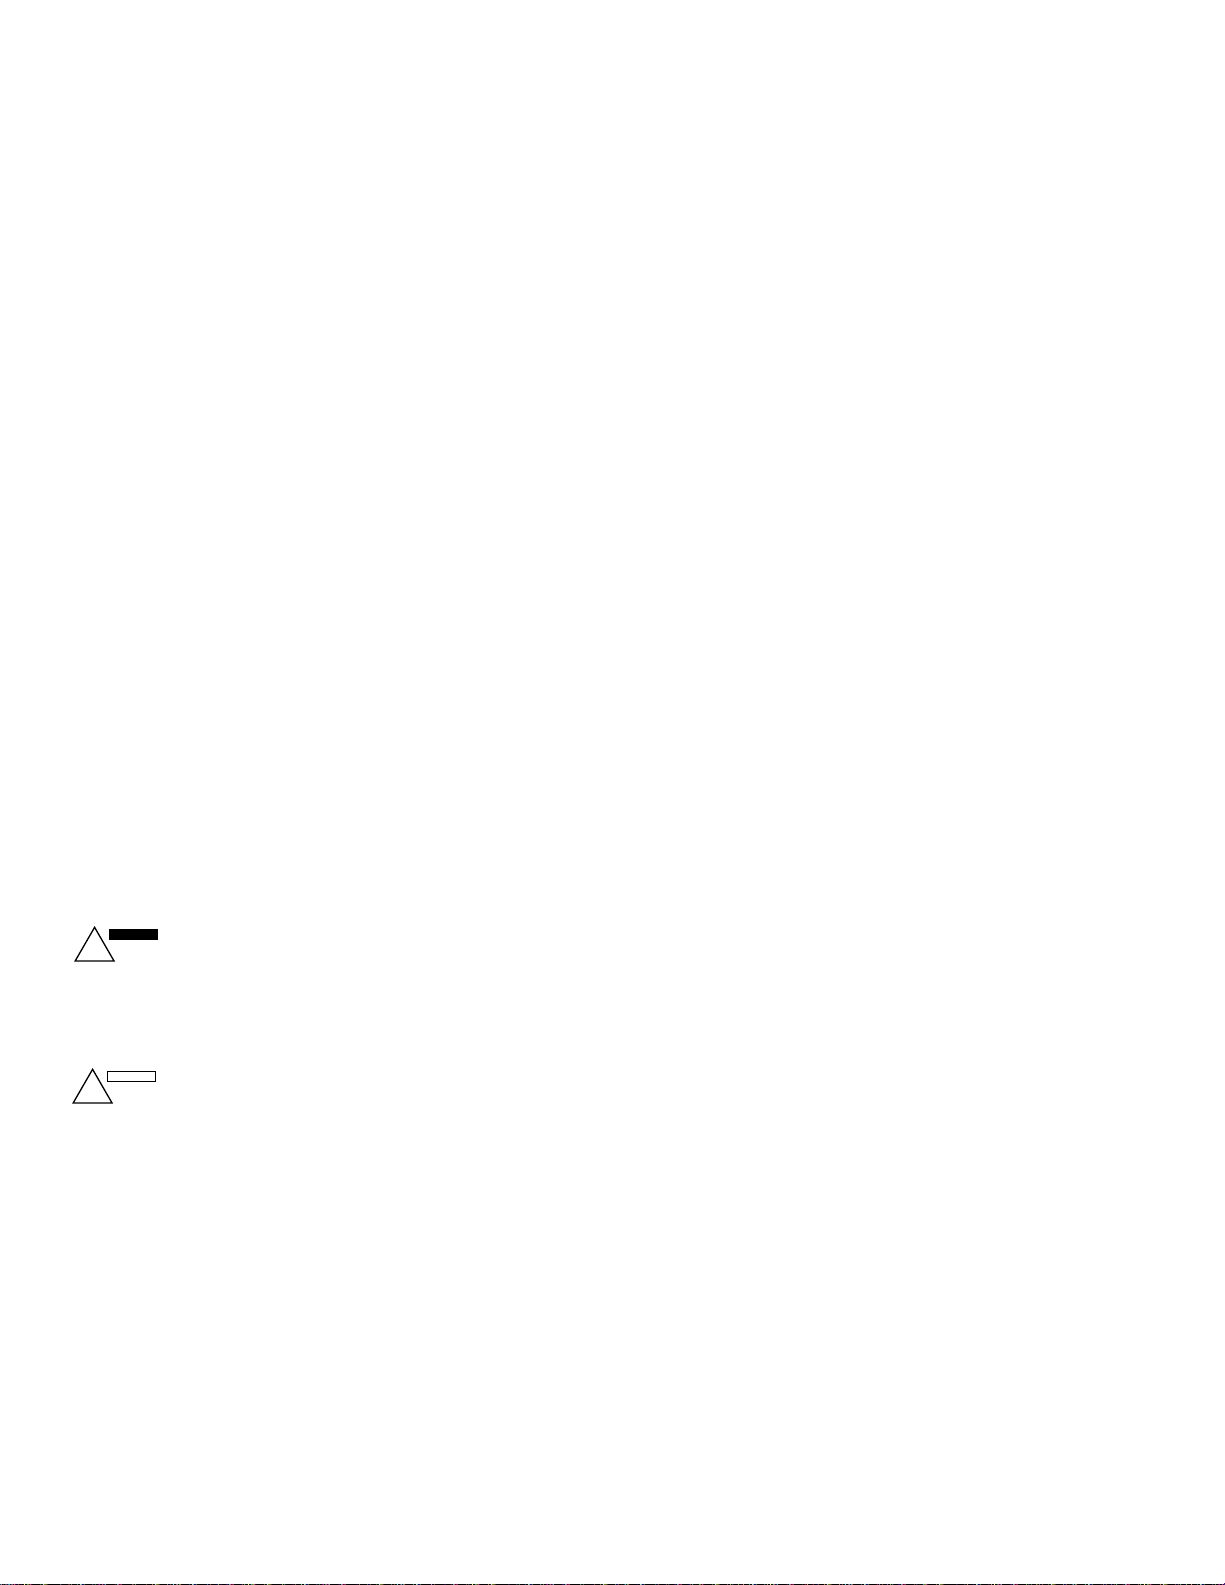
Unit Identification and Function
Front
Back
Upper air intake grille
Condensate pump
hose connection
Hot air outlet
Lower air intake grille
Lower air intake grille
Base stopper
3
Page 4
Unit Identification and Function
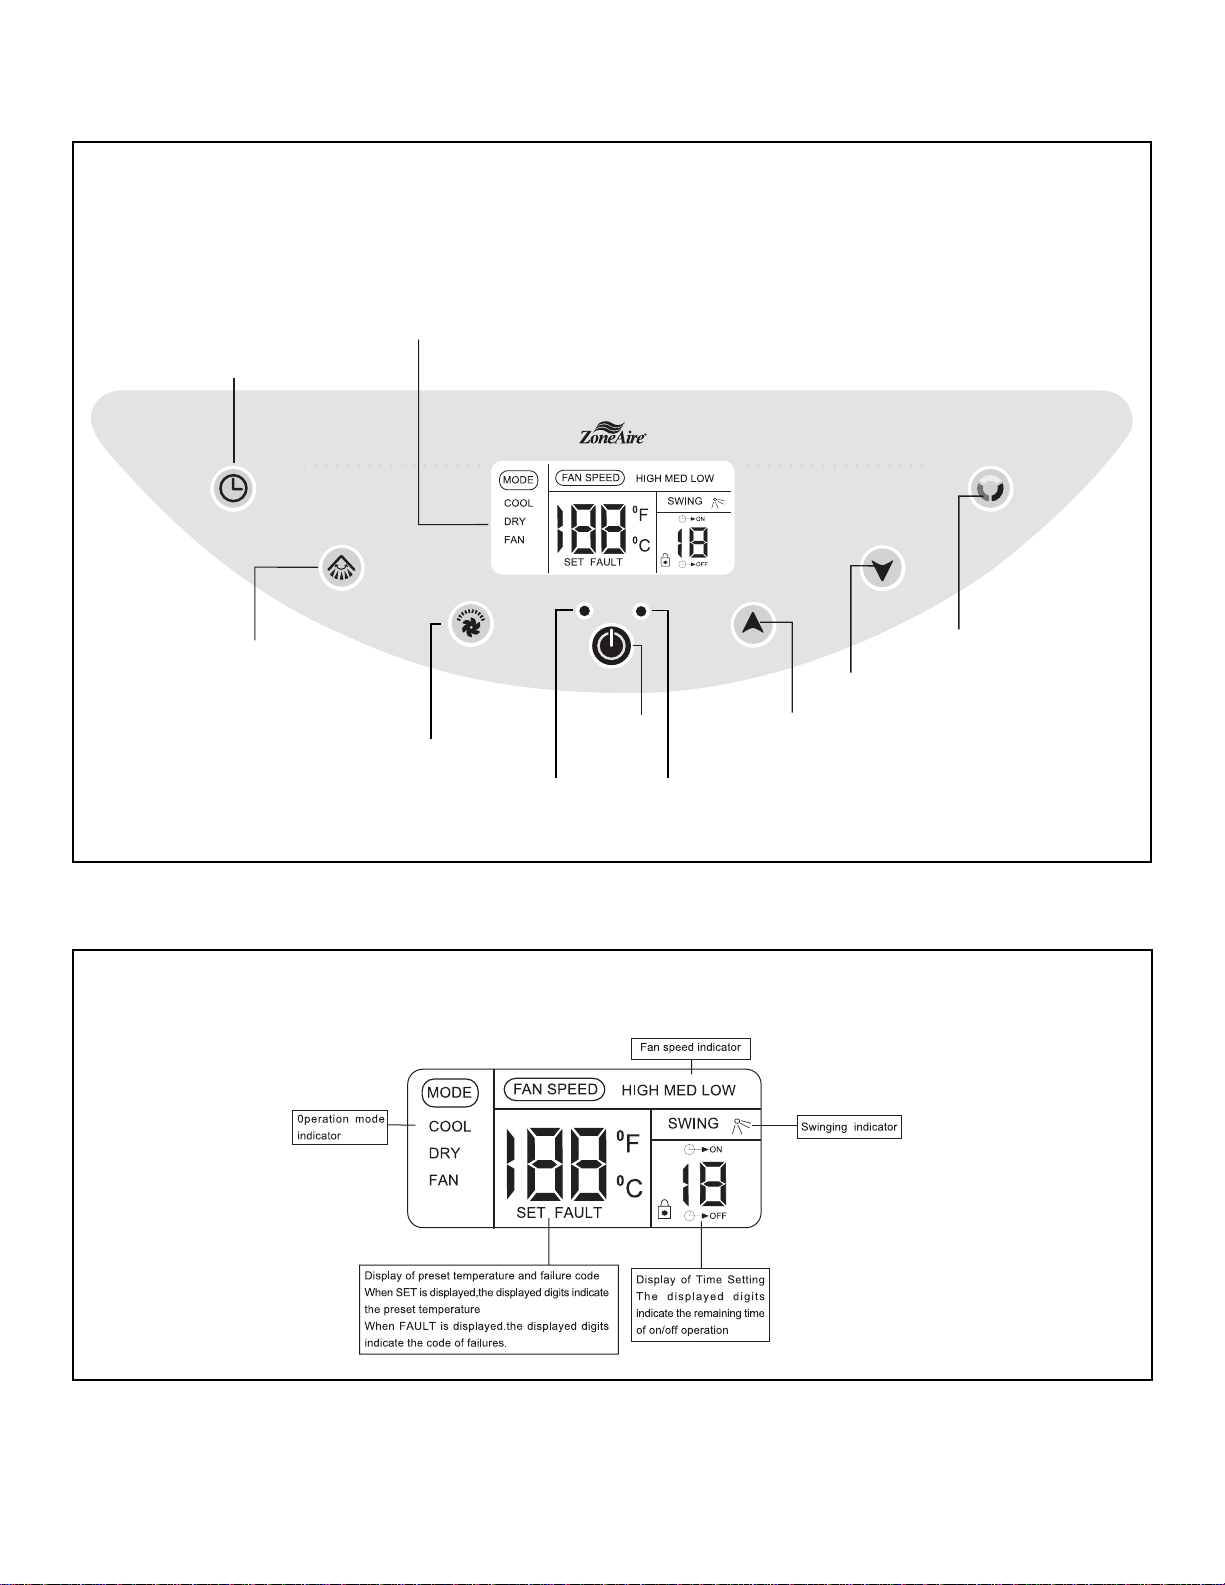
Control Panel
TIMER Button
Set the time for
switch-on, switch-off
or to clear the timer
Timer
SWING Button
Choose either
auto-swing or
fixed direction
mode
Swing
Display
Fan Speed
FAN SPEED Button
Choose high,
medium or low fan
speed
Power
ON/OFF
ON/OFF Button
POWER
indication
lamp
Water Full
WATER FULL
indication lamp
Temp
TEMP
UP
Button
Tem p
TEMP
DOWN
Button
Mode
MODE Button
Press this button
to select among
cooling, dry and
fan modes
Display Screen
4
Page 5

Remote Control Identification and Function
Press this button to
choose high, medium or
low-speed of air delivery
Press this button to select
auto-swing or fixed air
delivery.
This button is used to set the
room temperature. Each
pressing of the "+" or "-"
button increases or decreases
the temperature by 1°.
Pressing this button will
select among cool, dry or
fan modes.
When batteries are inserted, the time is automatically set to 12:00 AM (EX: Set to 10:30 AM)
Press the CLK button.
Unload the back cover. Push the clock button with
the tip of a ball-point pen, etc. The time indicator is
blinking and can set the present time.
5
Page 6

Control Panel Operation
Dehumidifying and cooling operation
The operating range for cooling op eration is 63°F - 8 8°F (or
17°C - 31°C) and the operating range for dehumidifying is
68°F - 88°F (or 20°C - 31°C).
Power source
• The AC socket must be fi rm and reliable.
• D on’t connect the portable air c onditioner to a multiple socket
outlet which is also being used for other electrical appliances.
• Insert the AC power plug securely into the AC socket before
using the unit, when it beeps after t wo seconds, press ON/
OFF button, the unit begins to run.
LCDI power cord information
All Friedrich portable air conditioners are shipped from the
factory with a Leakage Current Detection Interrupter (LCDI)
equipped power cord. The LCDI device meets the UL and NEC
requirements for cord connected air conditioners effective August 2004.
T o test your power supply cord:
1. Plug power supply cord into a grounded 3 prong outlet.
2. Press RESET (See drawing below).
3. Press TEST (listen for click; Reset button trips and pops
out).
4. Press and release RESET (listen for click; Reset button
latches and remains on). The power supply cord is ready for
operation.
Cooling operation
1. Press MODE button to choose the cooling mode, LCD
window will sho w “cool”.
During the cooling op eration, always place the air exhaust
hose through an open window.
2. Repeatedly press TEMP+ or TEMP- but ton to set a proper
room TEMP. between 63°F - 88°F.
3. Press FAN SPEED button to choose a proper fan speed:
high, middle, low speed.
4. Press SWING button to adjust the air delivery direction, The
LCD window will show “
NOTE:
In order to improve the cooling effi ciency:
a) If your room is directly exposed to the sun, draw the cur-
tains.
b) Do not place near other heat source.
”.
Dehumidifying Operation
1. Keep the w indows and the do ors c lo sed to aid in effectively
dehumidifying the room.
2. Press MODE button to choose the dehumidifying mode, LCD
window will show “DRY”, the fan speed cannot be adjusted.
When used as dehumidifi er only it is not necessary to install the
exhaust hose.
NOTE: LCDI device is not intended to be used as a switch.
Once plugged in the unit will operate normally without the need
to reset the LCDI device.
If the device fails to trip when tested or if the power supply cord
is damaged it must be replaced with a new supply cord from the
manufacturer. We recommend you contact our Technical Assistance Line at (800) 541-6645. To expedite service, please have
your model and serial number available.
TEST
RESET
Test Button
Reset Button
WARNING: NEVER CUT OR REMOVE THE GROUNDING
PRONG FROM PLUG. NEVER USE E X TE NSI ON CO RDS TO
OPERATE AN AIR CONDITIONER.
Time Set Function
To set the time to star t t he machine, with the unit of f (but pow er supplied), press TIMER button, the LCD window will show
“
”, continually press the TIMER button, set the preferred
start time. The setting range is 1-12 hours.
To set the time to stop the ma ch in e, with the unit running, press
TIMER button, the LCD window will show “ ”, continually
press the TIMER button ,set the prefer red tim e to stop the machine. The setting range is 1-12 hours
NOTE: During timer mode, if the TIMER button is pressed again,
it will cancel the timer operation.
6
Page 7

Condensation Handling
Yo u r Z o n e A i r e® Portable Air Conditioner is designed to evapo-
rate the condensation removed from the interior space through
the exhaust hose. Under certain c onditions it is possible that
the unit will not evaporate 100% of the removed moisture.
The unit is designed with a built-in reservoir and pump to accu-
mulate excess condensate and help dispose of it.
Draining Water
The water can be drained from t he unit either by removing the
base stopper and letting the water drain by gravity. Or the condensate pump hose may be used to direct the condensate to a
drain location like a sink.
1. When the WATER FULL lamp is on unplug the unit and move
the unit to a suitable location for draining the condensation.
Internal Water Level
1. Under any mode if the water level is in the “low” area the unit
will function normally.
2. If the water level is in the “normal” area the unit will continue
to function normally with the internal recirculation pump running to evaporate the water. You may hear the pump r un at
times.
3. If the water level is in the “high” area the unit will function normally and the water pump will work for 10 minutes. After that,
if the water level returns to the “low” or “normal” level the unit
will function normally. If after running 10 minutes, the water
level is still in the “high” area the machine will turn off and the
WATER FULL lamp on the control panel will illuminate. The
LCD window indicates failure code E5.
water tank
2. If using the gravity drain method ensure that the base stopper is located above a suitable area for draining the condensate and remove the stopper. Re-install the stopper once all
water has drained.
If using the condensate removal pump ensure that the conden-
sate pump hose is located in a proper area for drainage. Restore power to the unit and press both the TIMER and SWING
buttons simultaneously and the pump will begin to run.
3. Return the unit to the original location and restore power and
duct connections.
4. The WATER FULL indicator should be off and the unit will
return to normal operating mode.
water
Maintenance/Service
WARNING
!
Cleaning the air filter
If the air fi lter is blocked with a lot of dust, the air fl ow volume will
be reduced. Clean the fi lter once every two weeks.
Open and clean the air fi lter:
1. D irec tly grasp t he hook on t he bot tom of t he fi lter to remove
the air-return grids.
2. Take out the air fi lter from the fi lter cover.
3. Wash the air fi lter by immersing it gently into warm (about 40°C or
104°F) water with a neutral detergent or vacuum the fi lter clean.
4. Rinse the fi lter and dry it thoroughly in a shaded place.
5. Install the air fi lter back to its original place.
• Disconnect the power before cleaning.
• Make sure there is no power to the unit before
beginning to maintain or repair the unit in order to
prevent accidents caused by electrical shock.
7
Page 8

Maintenance/Service
Cleaning the air conditioner
Clean the surfac e of the unit wit h a damp cloth, t hen dr y using
a duster or similar.
CAUTION
!
Do not use chemical solvent (like benzene or alcohol) to clean the surfac e of the unit. If you do so,
the surfac e may be scratched, damaged or even
cause the case to become deformed.
Prior to operating seasons
1. Check to ensure that the air inlets and outlets of the unit are
not blocked.
2. M ake sure that air fi lter is properly in place before operat-
ing the machine. If the machine is operated with air fi lter
removed, dust and foreign objects will result in faulty performance of the air conditioner.
CAUTION
Safety Precautions
• Make sure the unit is installed in an accessible location.
• Do not lo c ate the unit in direc t sunlight s o as to avoid discoloration of the plastic.
• Do not use the unit in water or near water to avoid electr ical
shock.
• Do not use near gas appliances, fi res or in the vicinity of
fl ammable liquids.
• Only operate the unit in the appropriate upright position.
!
Preparation for storage
1. Turn off the air conditioner, disconnect the power.
2. Perform proper maintenance to the air fi lter and other parts.
3. Open the base stopper to drain out all of the water f ro m the
base. Operating the unit in fan only mode for 12 hours will
help ensure there is no moisture within the unit.
4. Cover the unit to prevent dust or fi lth from entering the unit.
WARNING
Power Sources
• Do not use a damaged or improper AC socket.
• When unplugging the unit, ho ld the power plug securely
and pull it out carefully.
• Never use an extension cord with this air conditioner.
!
Other Warnings
• Keep the unit one meter away from TV sets or r adi o s to
avoid the risk of electromagnetic interference.
• Ensure that the discharge air outlet is free f rom obstruc tions and not impeded by walls or other structures.
Troubleshooting
Before seeking repair or service, please check the following fi rst:
Trouble Check Action
Is there power?
Air conditioner does
not operate
Cooling effi ciency
is not good
T oo much noise and
vibration
The machine starts
and stops frequently
WARNING
In case of major malfunction, disconnect power immediately and call for service.
!
Is it plugged in? Push the plug into the wall socket
Is the fuse or circuit breaker switch off? Change the fuse or reset breaker
Is timer on? Pres TIMER button
Is air inlet or outlet blocked? Clear the air path
Is there any other heat source in the room? Move the unit away from heat source
Are air fi lters dirty? Clean the air fi lter
Is SET TEMP suitable? Set to a suitable temperature
Is indoor fan speed set at low? Set to a suitable fan speed
Is the sound part of the refrigeration cycle? The sound may be normal
Is unit leveled? Move unit to a level location
Is the voltage of the power source correct and continuous? Repair the power source
Is the air exhaust bent? Try to keep the air exhaust horizontal
8
Page 9

Troubleshooting
Self diagnosis function
The following error codes are pre-programmed into each unit to
help identify possible unit conditions.
Installation
Failure code Diagnosis of Malfunction
E2 Room Temperature sensor failure
E3 Coils sensor failure
E4 Unit malfunction
E5 Water level exceeded capacity
Selection of installation location
Put the port able air conditioner in a fl at location where the air
outlets cannot be covered up, place the unit no les s than 20 in.
(50cm) away from a wall or other obstacle.
Mounting the exhaust hose
1) Fix the square end of the exhaust hose to the exhaust
terminal of the unit as shown.
2) Put the other end (discharge) to the nearest window.
Instructions to install hose
If the hose becomes disconnected from the hose fi tting it m us t b e
reinserted. Fit the hose to the hose fi tting then rotate it 2 - 3 revo-
lutions to tighten the hose into the fi tting. See fi gure below:
Note: The length of the air exhaust hose is between 24" - 72".
T ry to keep the hose as straight and horizontal as possible.
Correct mounting shown below
(If mounting in the wall, the height of the hole should be 16" - 51")
Only One
9
Page 10

Instructions to install hose cont'd
If the air exhaust requires bending, see below:
Window kit installation
Your window kit has been de signed to fi t most standard “verti-
cal” and “hor izontal” window applications. However, it may be
necessar y for you to improvise/modif y some aspe cts of the in stallation procedures for certain types of windows. Please refer
drawings below for minimum and maximum window openings.
Incorrect hose mounting ( Air exhaust bend is too great and will
restrict airfl ow). See below:
Instruction: Install two screws into installation board II
10
Page 11

Water drainage hose installation
Fit the drainage hose to the drainage hole in the back of the unit.
Installation accessories
Flexible exhaust hose with adapters........... 1/set
Stretches from 19-1/2” (50cm) up to 78-3/4(200cm) overall
Window exhaust adapter (fl at mouth )........ 1pc
Adjustable window slider kit...................... 2/set
From 26-5/8” (67.5 cm) up to 48-3/8” (123cm )
11
Page 12

Friedrich Air Conditioning Company
P.O. Box 1540
San Antonio, TX 78295
210.357.4400
www.friedrich.com
PORTABLE AIR CONDITIONERS
LIMITED WARRANTY
FIRST YEAR
ANY PART: If any part supplied by FRIEDRICH fails because of a defect in workmanship or material within twelve months from
date of original purchase, FRIEDRICH will repair the product at no charge, provided the product is transported to a Friedrich
Authorized Service Center for repair. ALL transportation charges are the sole responsibility of the owner. This remedy is expressly
agreed to be the exclusive remedy within twelve months from the date of the original purchase.
SECOND THROUGH FIFTH YEAR
SEALED REFRIGERANT SYSTEM: If the Sealed Refrigeration System (defined for this purpose as the compressor, condenser
coil, evaporator coil, reversing valve, check valve, capillary, filter drier, and all interconnecting tubing) supplied by FRIEDRICH in
your Room Air Conditioner fails because of a defect in workmanship or material within sixty months from date of purchase,
FRIEDRICH will pay a labor allowance and parts necessary to repair the Sealed Refrigeration System; PROVIDED FRIEDRICH will
not pay the cost of diagnosis of the problem, removal, freight charges, and transportation of the air conditioner to and from the
Service Agency, and the reinstallation charges associated with repair of the Sealed Refrigeration System. All such cost will be the
sole responsibility of the owner. This remedy is expressly agreed to be the exclusive remedy within sixty months from the date of the
original purchase.
APPLICABILITY AND LIMITATIONS: This warranty is applicable only to units retained within the Fifty States of the U.S.A., District
of Columbia, and Canada. This warranty is not applicable to:
1. Air filters or fuses.
2. Products on which the model and serial numbers have been removed.
3. Products which have defects or damage which results from improper installation, wiring, electrical current
OBTAINING WARRANTY PERFORMANCE: Service will be provided by the FRIEDRICH Authorized Dealer or Service
Organization in your area. They are listed in the Yellow Pages. If assistance is required in obtaining warranty performance, write
to: Room Air Conditioner Service Manager, Friedrich Air Conditioning Co., P.O. Box 1540, San Antonio, TX 78295-1540.
LIMITATIONS: THIS WARRANTY IS GIVEN IN LIEU OF ALL OTHER WARRANTIES. Anything in the warranty
notwithstanding, ANY IMPLIED WARRANTIES OF FITNESS FOR PARTICULAR PURPOSE AND/OR MERCHANTABILITY
SHALL BE LIMITED TO THE DURATION OF THIS EXPRESS WARRANTY. MANUFACTURER EXPRESSLY DISCLAIMS AND
EXCLUDES ANY LIABILITY FOR CONSEQUENTIAL OR INCIDENTAL DAMAGE FOR BREACH OF ANY EXPRESSED OR
IMPLIED WARRANTY.
NOTE: Some states do not allow limitations on how long an implied warranty lasts, or do not allow the limitation or exclusion of
consequential or incidental damages, so the foregoing exclusions and limitations may not apply to you.
OTHER: This warranty gives you specific legal rights, and you may also have other rights which vary from state to state.
PROOF OF PURCHASE: Owner must provide proof of purchase in order to receive any warranty related services.
All service calls for explaining the operation of this product will be the sole responsibility of the consumer.
All warranty service must be provided by an Authorized FRIEDRICH Service Agency, unless authorized by FRIEDRICH prior to
repairs being made.
characteristics, or maintenance; or caused by accident, misuse or abuse, fire, flood, alterations and/or misapplication
of the product and/or units installed in a corrosive atmosphere, default or delay in performance caused by war,
government restrictions or restraints, strikes, material shortages beyond the control of FRIEDRICH, or acts of God.
Rev 6-07
 Loading...