

Page 1
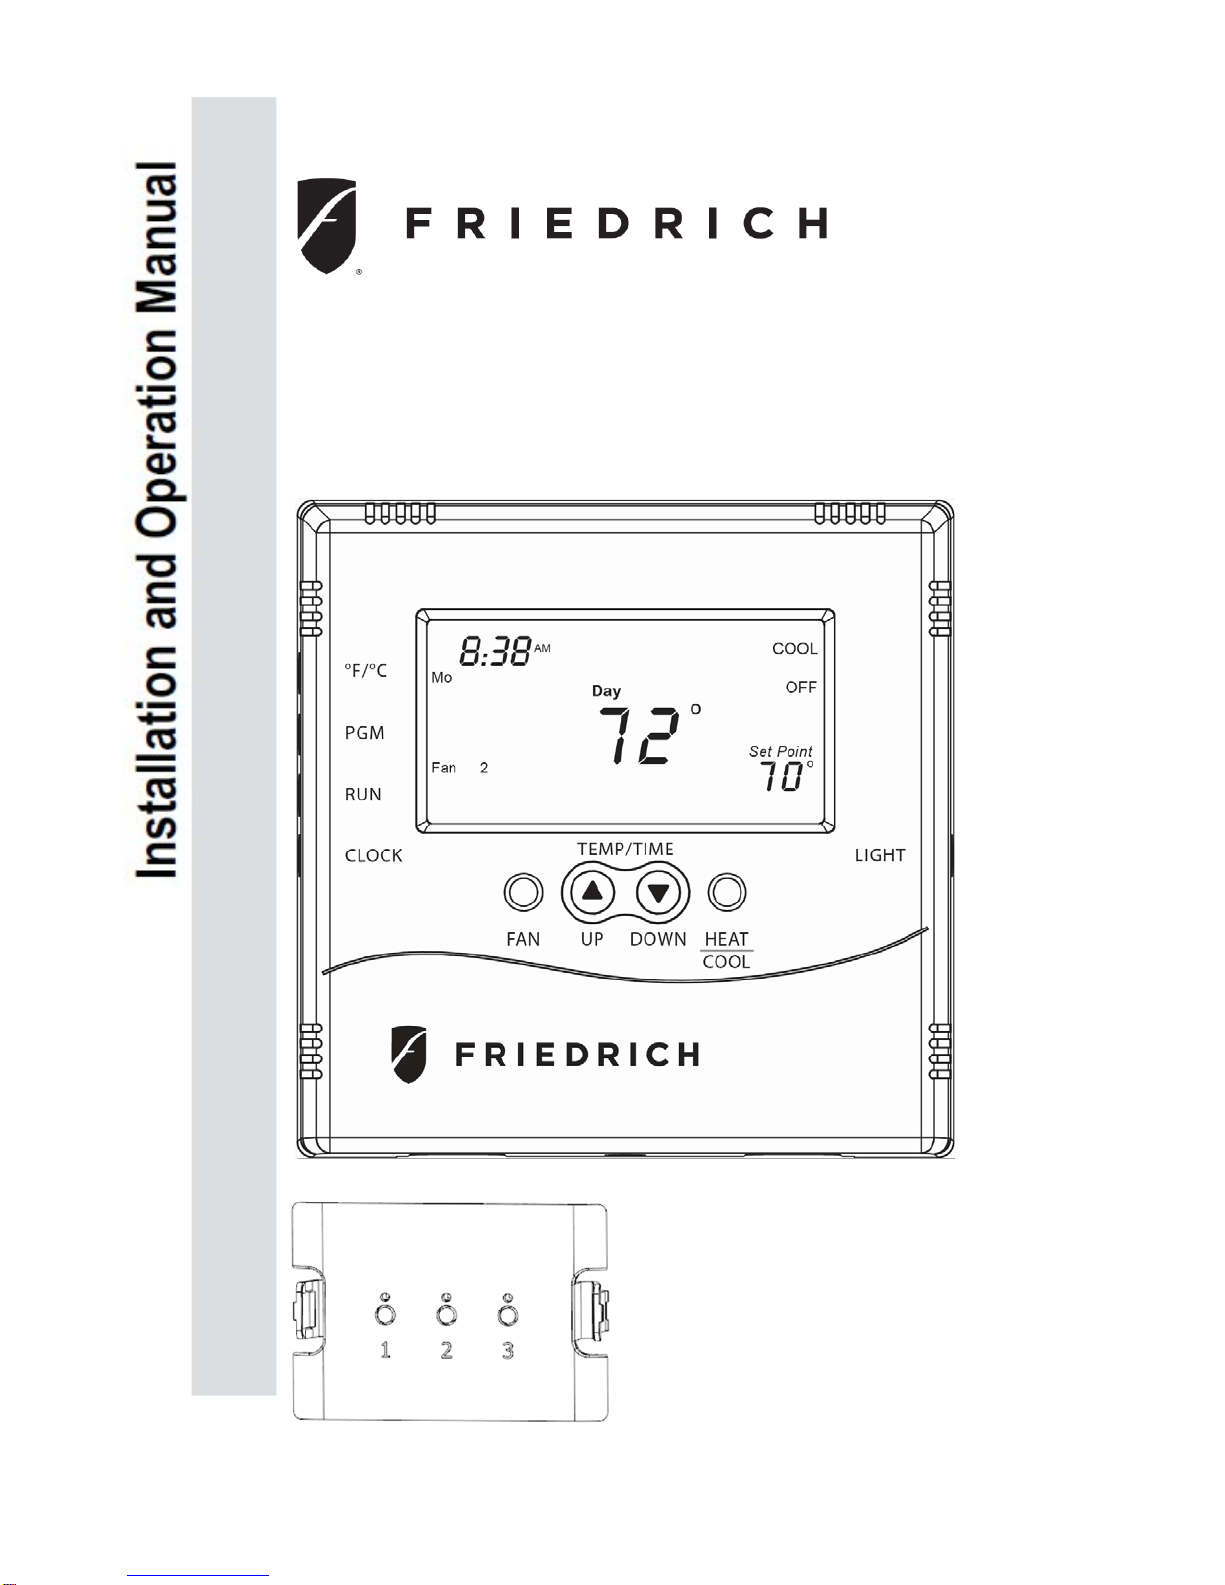
This Manual covers the following models:
KWW– Kühl Wireless Wall Thermostat
KCM– Kühl Communication Module
KWW
KCM
930-01-005 (4/8)
Page 2

KWW Overview
KWW
Time and day
Toggles display -
Fahrenheit/Celsius
Puts thermostat into
the program setup
mode
Starts and stops the
program – Holds Set
Point when program
is not running
Puts thermostat into
the program setup
Fan operating status
Fan control
(Thermostat)
Indicates program
period – Morning,
Day, Evening,
Night
Communication
connection with
KCM
Operating mode
indication - HEAT,
COOL, OFF
Indicates holding
of Set Point
temperature –
See Run button
Current Set Point
temperature
Momentary
backlight button
Changes
operating mode
HEAT, COOL,
OFF
Push button for
pairing with KWW
2
Changes Set
Point temp - Also
used in clock and
program setup
KCM
930-01-005 (4/8)
Page 3

Step 1: Setting provisions to allow for the KWW to operate the air conditioner through
the KCM module.
Instructions on how to configure the unit’s electronic control for KCM operation
Accessing the switch es section:
1. Ensure display is fully bright. If display is dimmed, press any button on the user interface to wake it up.
2. Simultaneously press and hold the 4 corner buttons on the Kühl display (Fig 1)(System + Fan Speed + Up Arrow
+ Timer / Schedule) for about 5 seconds. Release the buttons when the display shows any two digit number (00 –
99). (Fig 2)
3. Open the filter access panel door on Kühl unit to access the timer buttons below the Kühl control panel.(TIMER
SET, HOUR, and MIN). (Fig 3 & 4)
4. Use the up or down arrow to scroll until switch number 01 is displayed
5. If switch number 01 is ON, switch to OFF, press the HOUR button once and let go. (Fig 2)
6. When the wall thermostat is used with your Kühl unit you have the option to have the unit display continue to light
up as it does without the KWW thermostat or, you may configure the unit so the display is inactive and only the
communication symbol will illuminate . If you want the screen to illuminate scroll the up arrow key until switch
number 3 is displayed and switch it to ON. If you would like only the communication symbol to appear turn switch
to OFF (If you skip this step after approximately (3) minutes the screen will go blank.)
7. Use the up or down arrow to scroll until switch number 13 is displayed.
8. If switch number 13 is ON, switch to OFF, press the HOUR button once and let go. (Fig 2)
9. Repeat above steps for switch number 50, 57 and 61 and turn them OFF. *DO NOT CHANGE ANY OTHER
SWITCH SETTINGS*
10. When done, press TIMER SET to save and exit.
11. If you wish to return the unit control and discontinue use of the KWW wall thermostat you must turn switches 1,
13, 50, 57 back on.
Fig 2
Fig 3
Fig 1
Fig 4
3
930-01-005 (4/8)
Page 4
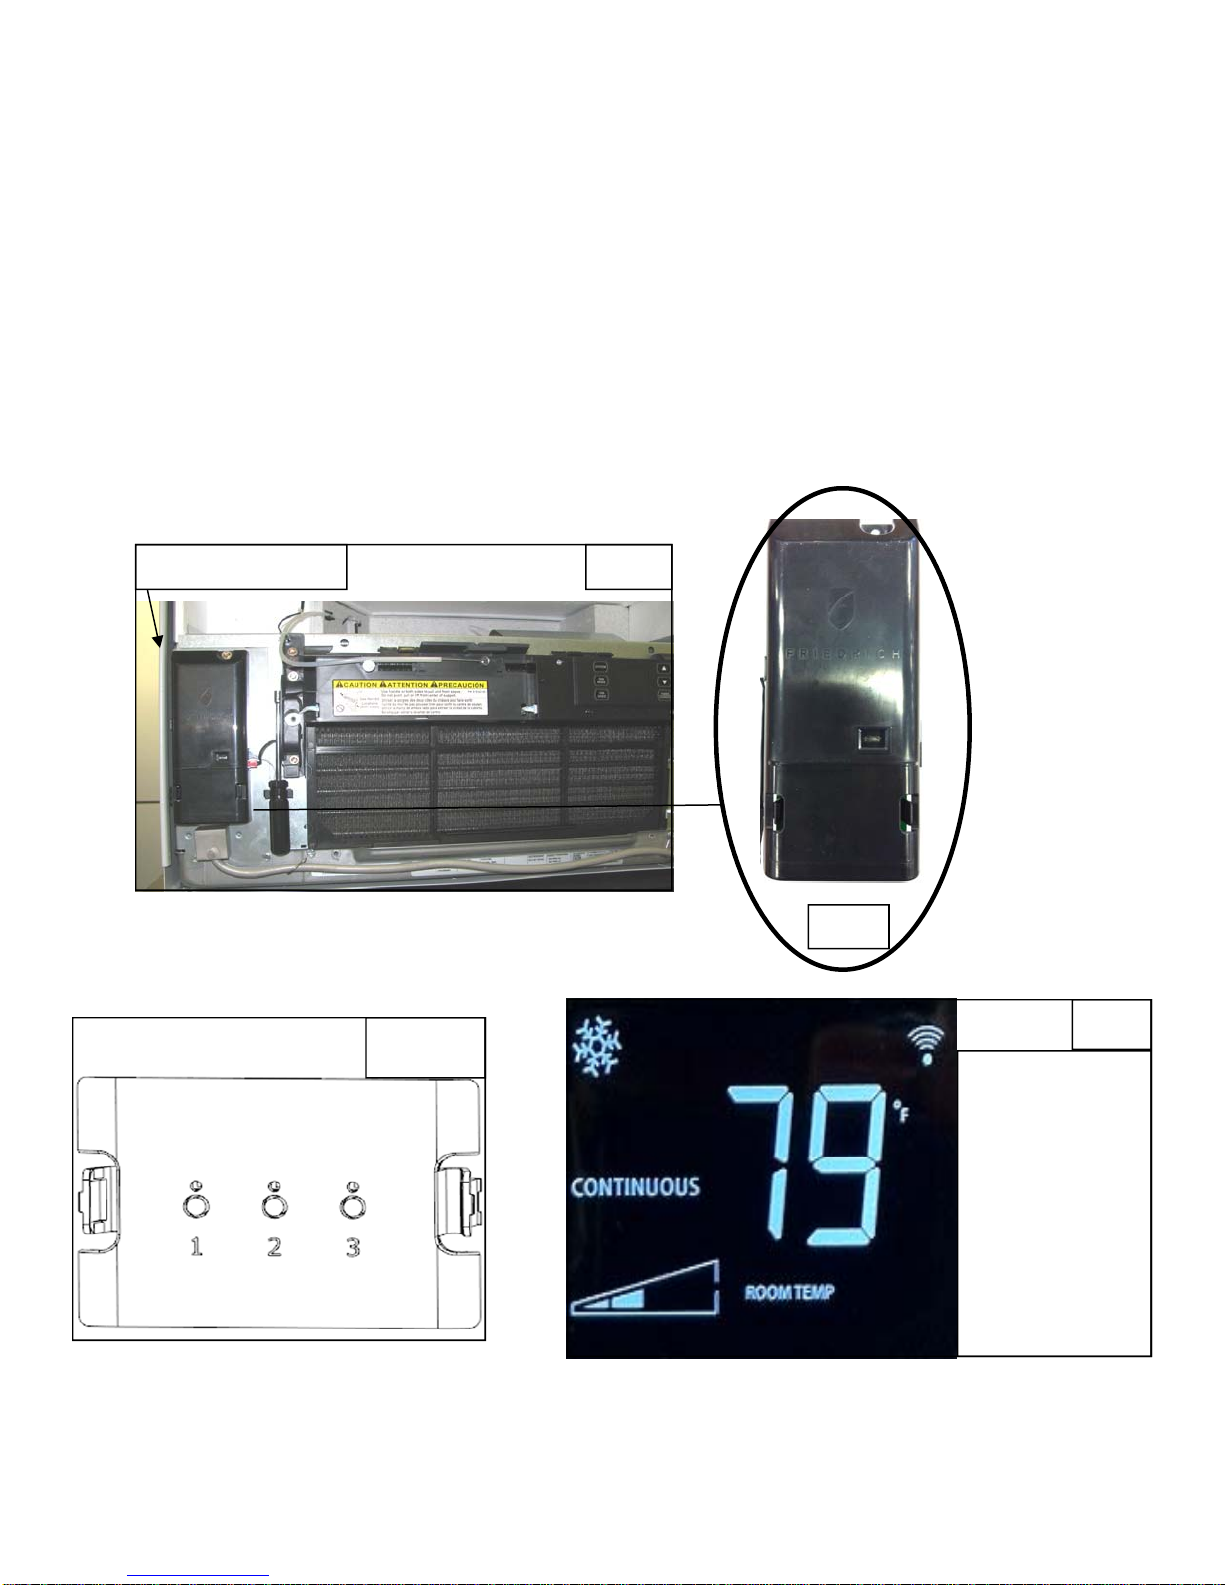
Step 2: Install KCW into your Kühl air conditioner
Turn off power to unit at power button
Open the filter panel on front of Kühl unit (Fig 3)
Locate control board at the left side of unit (Fig 5)
Remove blank plate on lower side of the electronic control board, by squeezing the left and right tabs and pulling
cover away from unit (Fig 6)
Plug KCM into location that cover was removed from (Fig 7)
Power up Window unit
Communication symbol will appear on the display of your Window u nit (Fig 8)
Control Board
KCM
Fig 7
Fig 5
Fig 6
Fig 8
Communication
symbol will appear on
the display of window
air conditioner.
4
930-01-005 (4/8)
Page 5

To open KWW’s housing press in tabs at bottom and pull apart the housing (Fig 9)
Install (4) AA batteries into KWW (Fig 10)
Backplate removed
Fig 9
Tabs
KWW
Fig 10
Thermostat will operate on either
battery Set A, Set B or both.
When changing, replace with all
new battieries. Never use a mix of
old and new.
Battery orientation is critical.
5
930-01-005 (4/8)
Page 6

Step 3: Pair Thermostat with Module
Linking thermostat (KWW) to KCM- *Note– KCM comes pre programmed to the KWW use the instructions
below in the event that the KCM should arrive unprogrammed, or you have purchased additional KCM
modules*
Open KWW and locate SW4,SW9 and PB 1. (Fig 11)
Press SW4-INSTALL button once and let go inside the thermostat back. (Fig 11) A steady 00 will show on
the KWW’s display and the Install icon will blink.
Next press the HEAT/COOL button once and let go. The default number 00 will flash on the KWW’s
display. (*Note: For multiple KCM’s set 01,02 etc, as more KCM’s are added)
Next press SW9-Link button once and let go. (Fig 11) “Please wait” message appears on the display.
Within 5 seconds, press push button #1 once and let go on the KCM. (Fig 12)
A response of “good” should be displayed on the thermostat.
If “good” displays press SW4-INSTALL once and let go to close the installation session and return to
normal thermostat operation.
Note: In the unlikely event of a “Bad” response message displaying during the linking process, repeat the
following steps.
Press the thermostat SW4-Install button.(Fig 12) The install icon will blink.
Press and hold for (3) seconds the PB1-NETWORK button inside the thermostat back. (Fig 11)
Repeat steps 1-5 again.
Thermostat (KWW) Backview
Fig 11
KCM
Push button
Fig 12
6
930-01-005 (4/8)
Page 7

Step 4: Mounting the Thermostat
Note: Mount the thermostat about five feet above the floor. Do not mount the thermostat on an
outside wall, in direct sunlight, behind a door, or in an area affected by a vent or duct.
The KWW has six (6) mounting holes. Back plate will match up with existing electrical box or
drywall mounting ring.
1- Remove back plate from thermostat housing and use it to mark the mounting holes. Ensure
thermostat is level for aesthetic reasons as orientation will not affect operation.
2- Drill 3/8” holes and insert drywall fasteners (#6 Screws recommended) and fasten the back plate
to the wall.
OptionalLocated on the back of the housing is a built-in hinged stand support. This feature permits the
thermostat to stand on a flat surface such as a table or shelf, in the event that permanent mounting to a
wall is not desired.
Button Definitions:
A four button arrangement is located on the front of the KWW.
These buttons are used in adjusting fan operation, changing
the set point temperature up or down and changing the
operating mode of the thermostat. *Note that the Up, Down,
and heat/Cool buttons are also used for setting the clock
and programming the thermostat.
Four buttons located on the left side of the thermostat (Figure 13) control
display of temperature in either Fahrenheit or Celsius, programming, clock
setup and control of whether the thermostat is under manual or program
control.
A single button on the right side of the thermostat activates the display
backlight. When pressed, the backlight will illuminate the display briefly
and turn off. If other buttons are pressed immediately after the backlight
button, the display will stay illuminated until a few seconds after all button
activity has ended. Backlighting takes significant energy from the batteries
and should be used sparingly. Frequent use of the backlight function will
noticeably reduce battery life.
F / C - Toggles Fahrenheit Celsius display
Program set up button
Run – Sets program or manual mode of operation
Fig 13
Clock set up button
7
930-01-005 (4/8)
Page 8

RUN BUTTON- Program / Manual Operation:
The RUN button toggles the thermostat between manual operating mode
and program operating mode. When in the program mode your thermostat
responds to the times and temperatures programmed.
(Figure 14) shows a thermostat running in program mode. One of the four
periods, in this case “Day”, is displayed, letting you know which period of the
day the program is in. When in manual mode as shown in (Figure 15), the
period of the day is not displayed. Instead, the word “HOLD” will be
displayed above the set point temperature, indicating the thermostat is
holding that temperature.
Note: When “OFF” appears on the display of the KWW the system has
turned off based on the set point.
In manual mode you can adjust to the desired temperature using the UP
and DOWN buttons, and the thermostat will maintain that temperature until
you change it again.
Fig 15
DAY
8
Fig 14
930-01-005 (4/8)
Page 9

Programmable Thermostat options
Setting the Clock:
In all set up modes the thermostat will blink the display item you are about to
change. The UP and DOWN buttons change the settings, the HEAT/COOK
button is used to move to the next item.
To set the clock, you will use the buttons marked CLOCK, UP, DOWN, HEAT/
COOL.
Step 1
Press the CLOCK button. The hour digits will blink. Press the UP or DOWN
button to change the hour. Note: AM/PM will change as you roll the hour past
12. Be sure to set the hour properly for AM/PM. Press HEAT/COOL button to
keep the hour you’ve just sent and to move minutes.
Step 2
The Minute digits will now be blinking. Press UP or DOWN button to change to
the desired minute. When the correct minute is flashing press HEAT/COOL.
Step 3
One of the seven day icons (Mo, Tu, We, Th, Fr, Sa, Su) will now blink, press
UP or DOWN until the correct day icon is displayed and press HEAT/COOL.
Step 4
Press the CLOCK button to keep all clock changes you’ve made and resume
normal operation.
Thermostat Programming:
The Friedrich Kuhl thermostat provides four program periods: Morning, Day, Evening, and Night. The time and
temperature can be set for each period. *Separate heating and cooling programs can be entered.
Upon initial power up the thermostat loads time and temperature program
default parameters for weekday and weekend days.
You can quickly step through to a specific item you want to change by pressing the HEAT/
COOL button until what you want to change is flashing. When the item you want to change is
flashing, use the UP or DOWN button to adjust.
9
930-01-005 (4/8)
Page 10

Cont’ Thermostat Programming:
The mode the thermostat is in when the PROGRAM or RUN button is pressed is the mode that will be controlled by
that program. If in the COOL mode as shown, the program entered will be stored as the program for cooling.
The mode displayed on the screen is the mode that will run.
To program the thermostat, you will use the PROGRAM, HEAT/COOL, UP, and DOWN buttons.
Step 1
Press the PROGRAM button to put the thermostat into the programming mode. The display will blink all of the day of
the week icons. Pressing the UP or DOWN buttons will toggle between (weekday) icons and the (weekend) icons.
Ensure the display is blinking the days you want to program. Press HEAT/COOL.
Step 2
Next the morning period will blink. Use the UP or DOWN button to toggle through Morning, Day, Evening, or Night,
stopping at the period you want to program. Press HEAT/COOL.
Step 3
Next, the hour of the day will blink. This is the starting hour of the period you have selected. Use the UP or DOWN
button to change the selected hour start time. Press HEAT/COOL.
Step 4
The minute of the day will blink next. This is the starting minute in the hour. Use the UP or DOWN button to change the
minute digits to the desired setting. (Note that the minutes change in five-minute increments.) Press HEAT/COOL.
Step 5
The desired set point will now be blinking. This is the temperature you want the thermostat to go to at the time of the
day you selected. Press the UP or DOWN button to change the set point temperature.
Step 6
If you started with the morning time period, the next period, Day, will now be blinking. Follow steps two, three, four and
five above for each period you wish to program
.
Exiting program mode:
Pressing the PROGRAM button at any time will exit out of the programming
mode, save your changes to memory and return you to normal thermostat
operation.
10
930-01-005 (4/8)
Page 11

Changing temperature while running a program:
You can always change the temperature up or down while a program is
running. However, when the program moves to the next period, the
programmed set point temperature for that period will take effect. For
instance, assume the current program period is Evening, with a
programmed temperature of 70°, and the next period, Night, is programmed
for 65°, scheduled to start at 11:00 PM. If during the evening time period
you desired the space to be warmer, you could press the UP button to raise
the temperature set point. The thermostat will hold that temperature until the
next program period, at which point the temperature will adjust to the
programmed temperature set point for that period. In this case the Night
period is set for 11:00 PM and 65°. (Fig16)
Fig 16
The default program
parameters conform to Energy
Star guidelines and are a good
point from which to start.
Default settings are provided in
(Fig 16)
Contact Us
Friedrich Air Conditioning
10001 Reunion Place, Ste. 500
San Antonio, TX 78216
Toll Free: 1-800-541-6645
www.friedrich.com
11
:
930-01-005 (4/8)
 Loading...