

Page 1
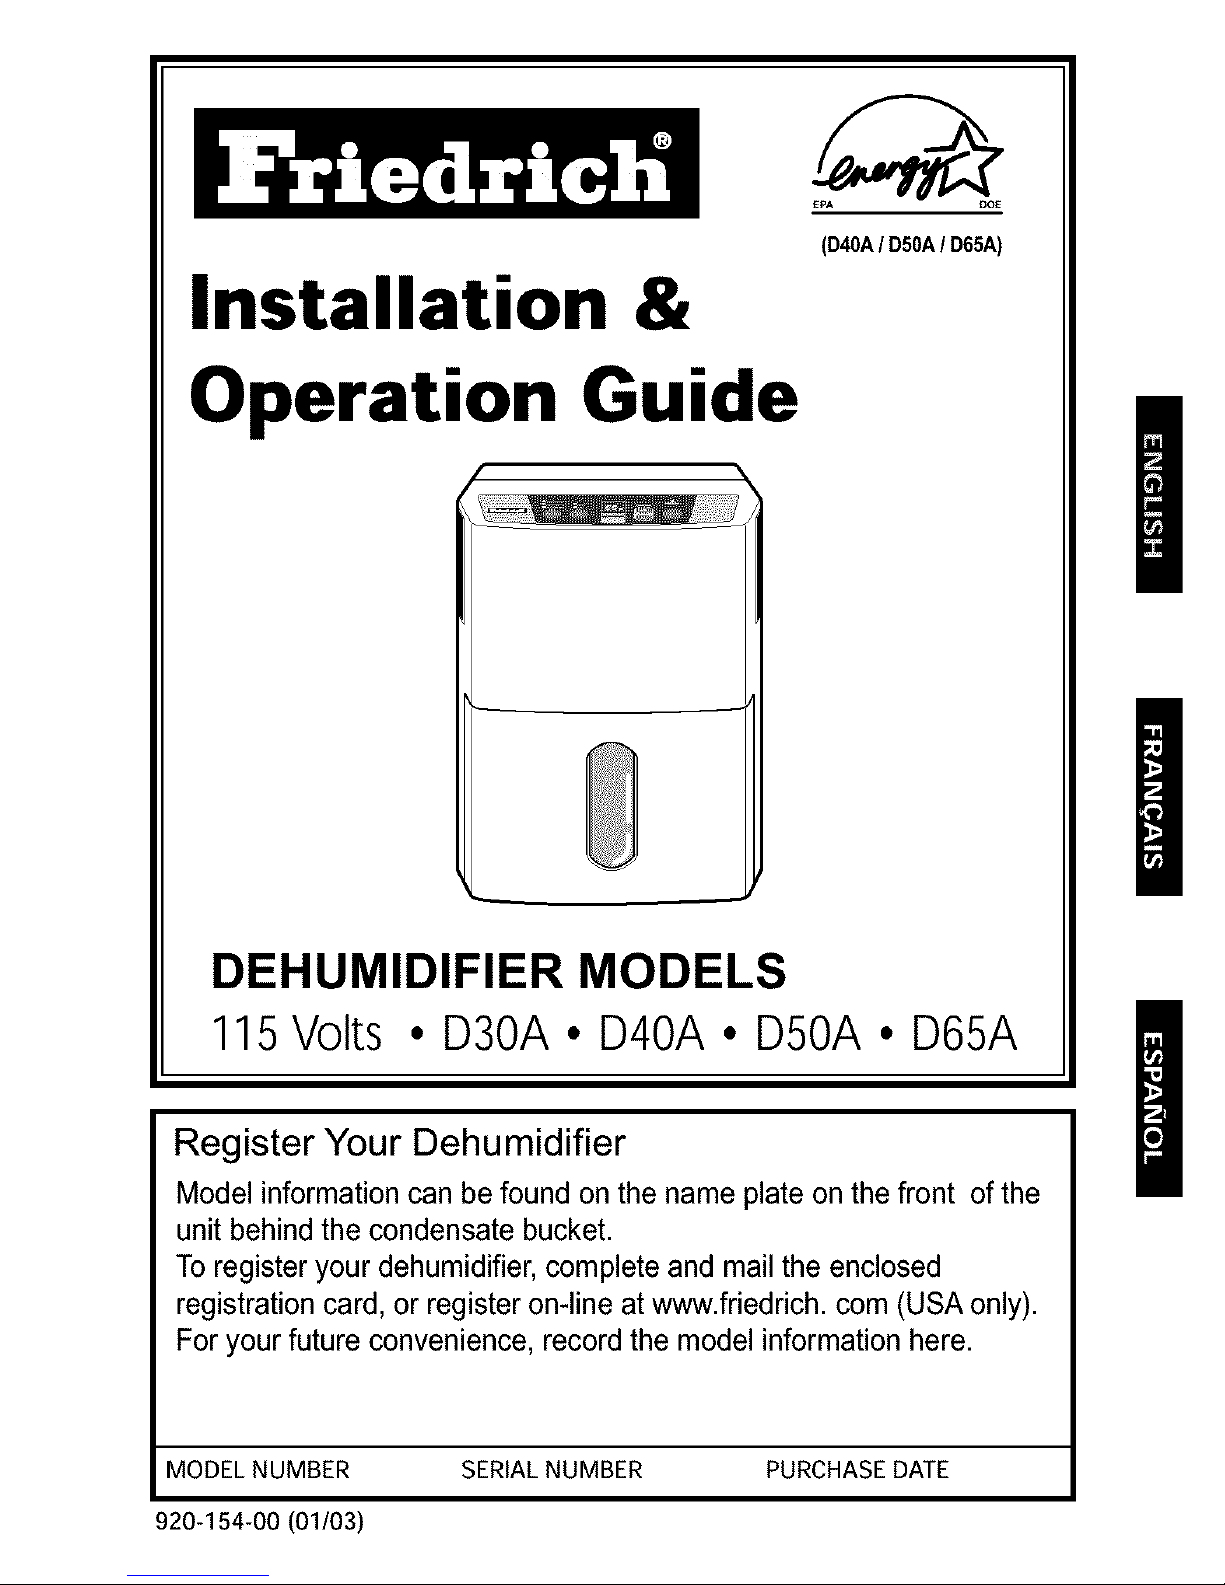
Installation &
Operation Guide
£PA DOE
(D40A/ D50A/ D65A)
DEHUMIDIFIER MODELS
115Volts • D30A. D40A • D50A • D65A
Register Your Dehumidifier
Model information can be found on the name plate on the front of the
unit behind the condensate bucket.
To register your dehumidifier, complete and mail the enclosed
registration card, or register on-line at www.friedrich, com (USA only).
For your future convenience, record the model information here.
MODEL NUMBER SERIAL NUMBER PURCHASE DATE
920-154-00 (01/03)
Page 2
FOR YOUR RECORDS ................................ 2
READ THIS MANUAL ................................... 2
PRECAUTION ............................................... 2
Safety Precautions...................................... 3
ELECTRICAL REQUIREMENTS .................. 5
OPERATION ................................................. 6
Features ................................................... 6
Control Panel ........................................... 7
INSTALLING YOUR DEHUMIDIFIER .............. 8
Defrost Control ......................................... 8
CHOOSING THE PROPER LOCATION .......8
AUTOMATIC SHUT OFF .............................. 9
REMOVING AND EMPTYING
THE WATER BUCKET .................................. 9
MAINTENANCE .......................................... 10
Grille and case ....................................... 10
Air filter ................................................... 10
Cleaning inside the unit .......................... 10
General cleaning .................................... 10
Water bucket cleaning ............................ 10
TROUBLESHOOTING ................................ 11
FRANQAIS .................................................. 13
ESPA_IOL ................................................... 25
Write the model and serial numbershere:
You can find them on a label on the back of the dehumidifier behindthe bucket.
Model #
Serial #
Dealer's Name
Date Purchased
Staple your receipt here.
Inside you will find many helpful hints on how to use and maintain your dehumidifier properly. Just
a little preventive care on your part can save you a great deal of time and money over the life of
your dehumidifier.
You'll find many answers to common problems in the chart of Troubleshooting Tips. If you review
our chart of Troubleshooting Tips first, you may not need to call for service at all
•Contact an Authorized Service Center for repair or maintenance of this unit.
•The dehumidifier is not intended for use by young children or invalids without supervision.
•Young children should be supervised to ensure that they do not play with the dehumidifier.
-2-
Page 3

READ ALL INSTRUCTION BEFORE USING.
• To prevent injuryto the useror other people andproperty damage, the following instructions must be
followed.
• Incorrectoperation dueto ignoring instructionswill cause harmor damage; the seriousness is classified by
the following indications.
//_k WARNING This symbol indicatesthe possibilityof death or serious injury.
,_ CAUTION This symbol indicatesthe possibility of injury or damage to properties only.
• Meaningsof symbols used in thismanual are as shown below.
Never do this
Always do this
• Otherwise, it could cause
electrical shock or fire.
.aZ_ WARN;|N_: a
• It could cause electrical shock
or fire.
• It could cause fire or product
damage hazard.
/
• It could cause electrical shock
and personal injury hazard.
®
• It is notsanitary and could
cause illness orpersonal injury
hazard.
-3-
• It may cause electrical shock.
Page 4
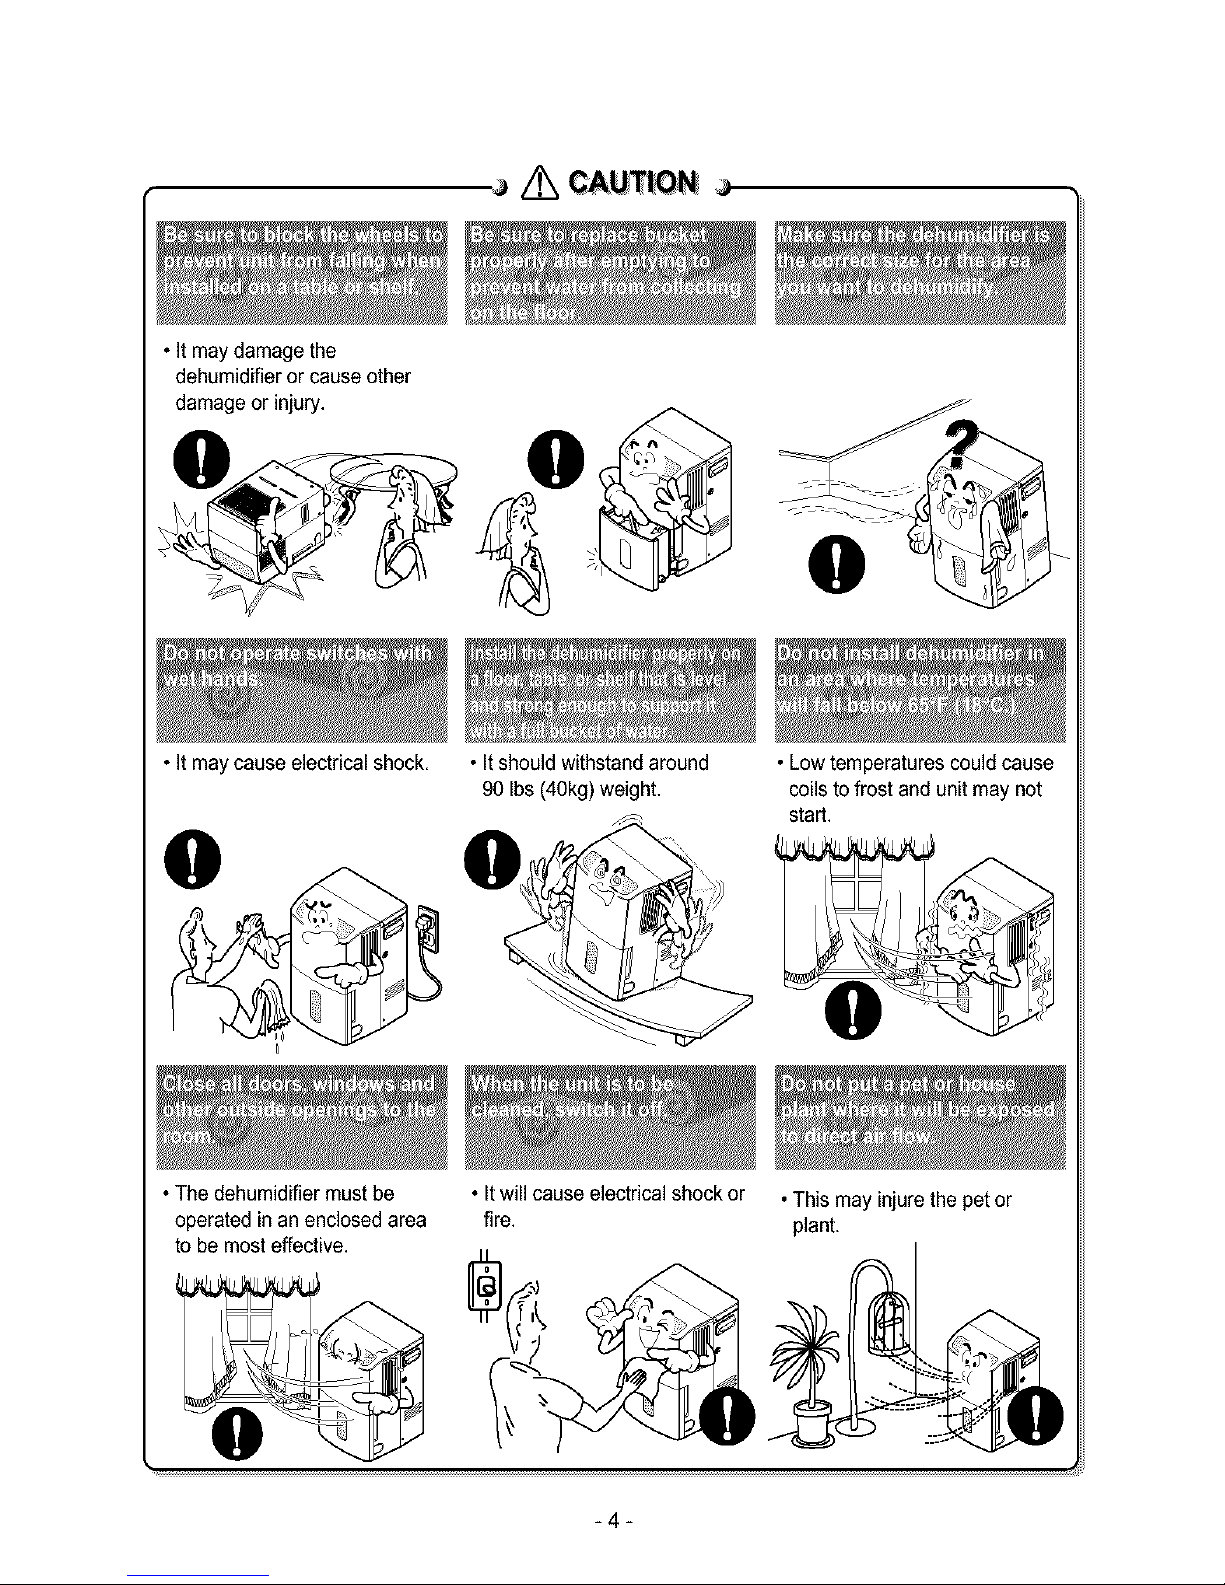
•Itmaydamagethe
dehumidifierorcauseother
damageorinjury.
•Itmaycauseelectricalshock.
•Itshouldwithstandaround
90Ibs(40kg)weight.
•Lowtemperaturescouldcause
coilstofrostandunitmaynot
start.
•Thedehumidifiermustbe
operatedinan enclosed area
to bemost effective.
• It will cause electrical shock or • This may injurethe pet or
fire. plant.
-4-
Page 5
OBSERVE ALL LOCAL CODES AND
ORDINANCES.
DO NOT, UNDER ANY CIRCUMSTANCES,
REMOVETHEPOWERSUPPLYCORD
GROUND PRONG.
ELECTRICAL GROUND IS REQUIRED ON
THIS APPLIANCE.
A 115-volt 60 Hz, AC only, 15A fused and
properly grounded electrical supply is required.
A time delay fuse or time delay circuit breaker
is recommended. Use a dedicated circuit,
serving only this appliance.
DO NOT USE AN EXTENSION CORD.
RECOMMENDED GROUNDING METHOD
For your personal safety, this appliance must
be grounded. This appliance has a power
supply cord with a 3-prong grounding plug. To
minimize possible shock hazard, the cord must
be plugged into a mating grounding type wall
receptacle and grounded in accordance with
the National Electrical Code (ANSI/NFPA 70)
latest edition and all local codes and
ordinances. If a mating wall receptacle is not
available, it isthe personal responsibility and
obligation of the customer to have a properly
grounded 3-prong wall receptacle installed by a
qualified electrician.
Electrical Shock Hazard
Plug into a grounded 3 prong outlet.
Do not remove ground prong.
Do not use an adapter.
Do not use an extension cord.
Failure to follow these instructions can
result in death, fire, or electrical shock.
_3-prong
^ I _- I grounding
,_-prong. _,_-_ I( [__ I type wall
pluggrOunamg_ _receptacle
Ground
Power _ prong
supply
cord
-5-
Page 6
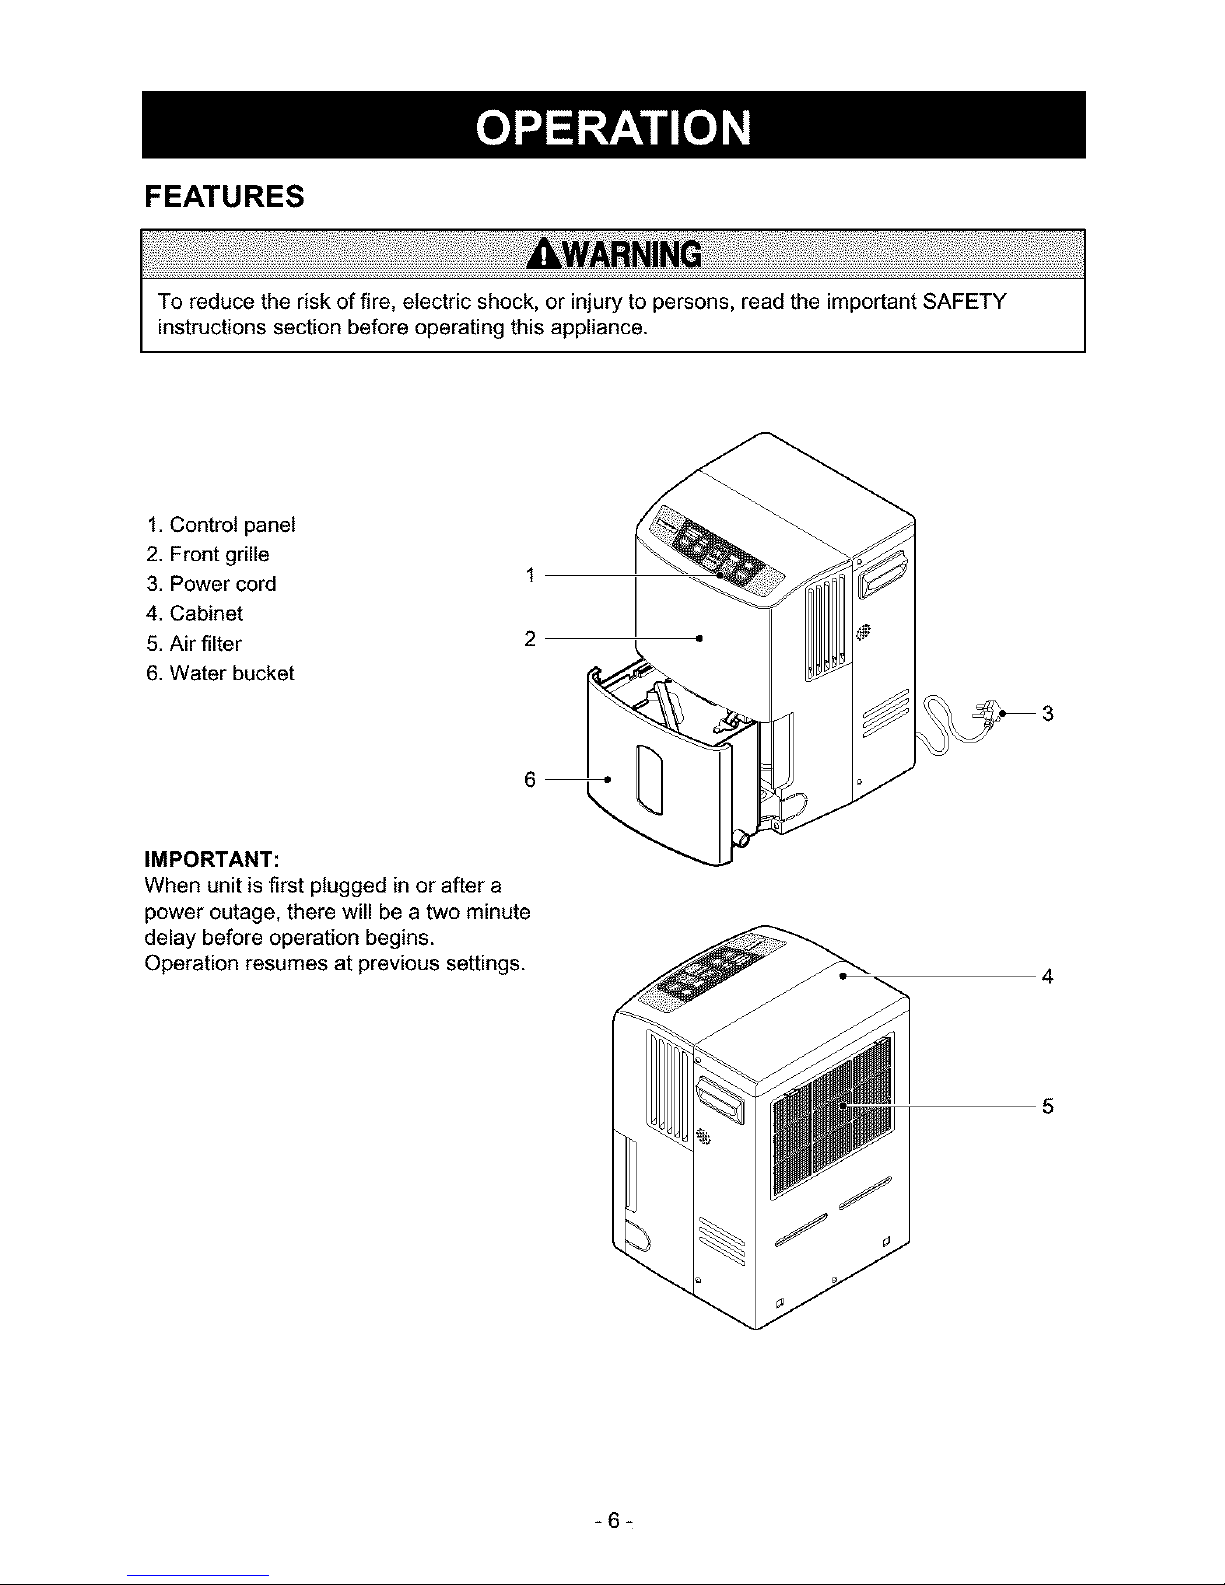
FEATURES
To reduce the risk of fire, electric shock, or injury to persons, read the important SAFETY
instructions section before operating this appliance.
1. Control panel
2. Front grille
3. Power cord
4. Cabinet
5. Air filter
6. Water bucket
IMPORTANT:
When unit is first plugged in or after a
power outage, there will be a two minute
delay before operation begins.
Operation resumes at previous settings.
1
2
4
5
-6-
Page 7
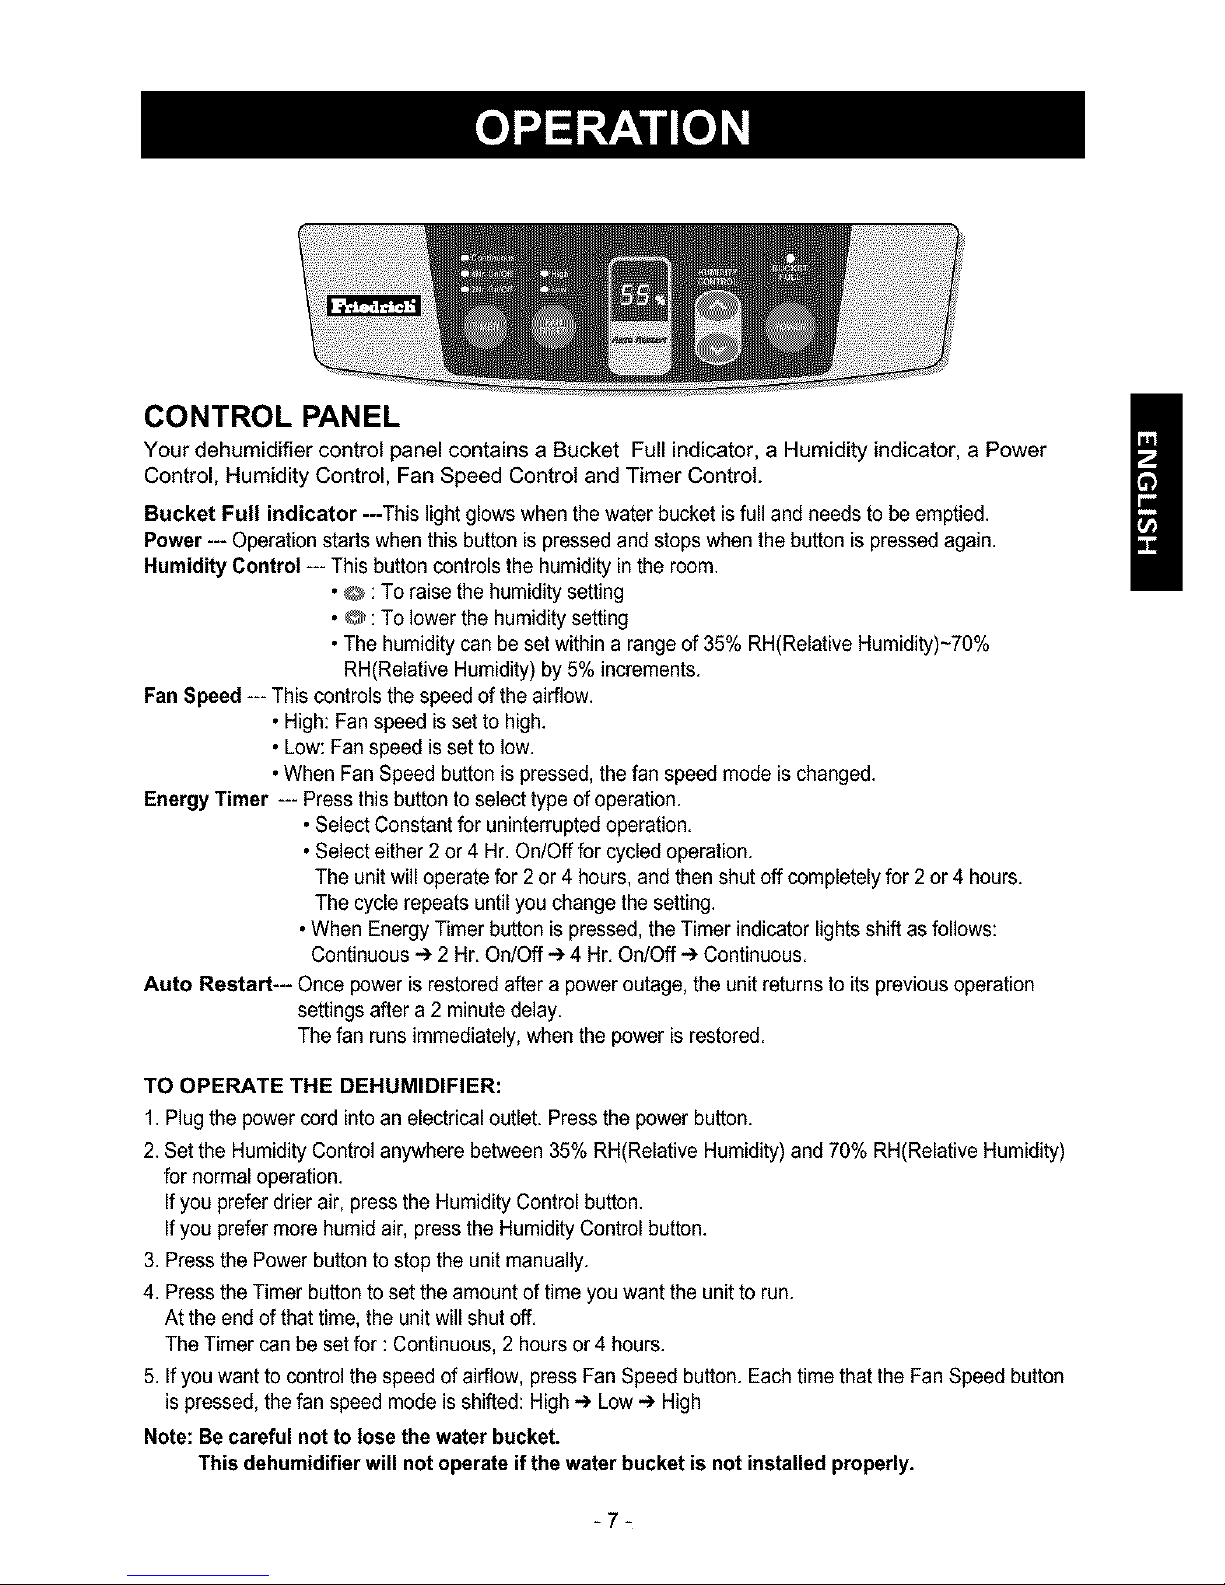
CONTROL PANEL
Your dehumidifier control panel contains a Bucket Full indicator, a Humidity indicator, a Power
Control, Humidity Control, Fan Speed Control and Timer Control.
Bucket Full indicator ---This light glows when the water bucket is full and needsto be emptied.
Power --- Operation starts when this button is pressed and stops when the button is pressed again.
Humidity Control --- This button controls the humidity in the room.
•@ : To raise the humidity setting
• Q : To lower the humidity setting
•The humiditycan be set within a range of 35% RH(Relative Humidity)~70%
RH(Relative Humidity) by 5% increments.
Fan Speed --- This controls the speed of the airflow.
•High: Fan speed isset to high.
•Low: Fan speed isset to low.
•When Fan Speed button is pressed, the fan speed mode is changed.
Energy Timer --- Pressthis buttonto select type of operation.
•Select Constant for uninterruptedoperation.
•Select either 2 or 4 Hr.On/Off for cycled operation.
The unit will operate for 2or 4 hours,and then shut off completely for 2or 4 hours.
The cycle repeats until you change the setting.
•When EnergyTimer button is pressed,the Timer indicator lights shift as follows:
Continuous-) 2 Hr.On/Off e. 4 Hr. On/Off -) Continuous.
Auto Restart--- Once power is restored after a power outage, the unit returns to its previousoperation
settings after a 2 minutedelay.
The fan runsimmediately, when the power is restored.
TO OPERATE THE DEHUMIDIFIER:
1.Plug the power cord into an electrical outlet. Press the power button.
2. Setthe Humidity Control anywhere between 35%RH(Relative Humidity) and 70% RH(Relative Humidity)
for normaloperation.
If you prefer drier air, press the Humidity Control button.
If you prefer more humid air, press the Humidity Control button.
3. Press the Power button to stop the unit manually.
4. Pressthe Timer button to set the amount of time you want the unitto run.
At the end of that time, the unit will shut off.
The Timer can be setfor :Continuous, 2 hoursor 4 hours.
5. If you want to control the speed of airflow, press Fan Speed button. Eachtime that the FanSpeed button
is pressed,thefan speed mode is shifted: High-) Low -) High
Note: Be careful not to lose the water bucket.
This dehumidifier will not operate if the water bucket is not installed properly.
/
-7-
Page 8
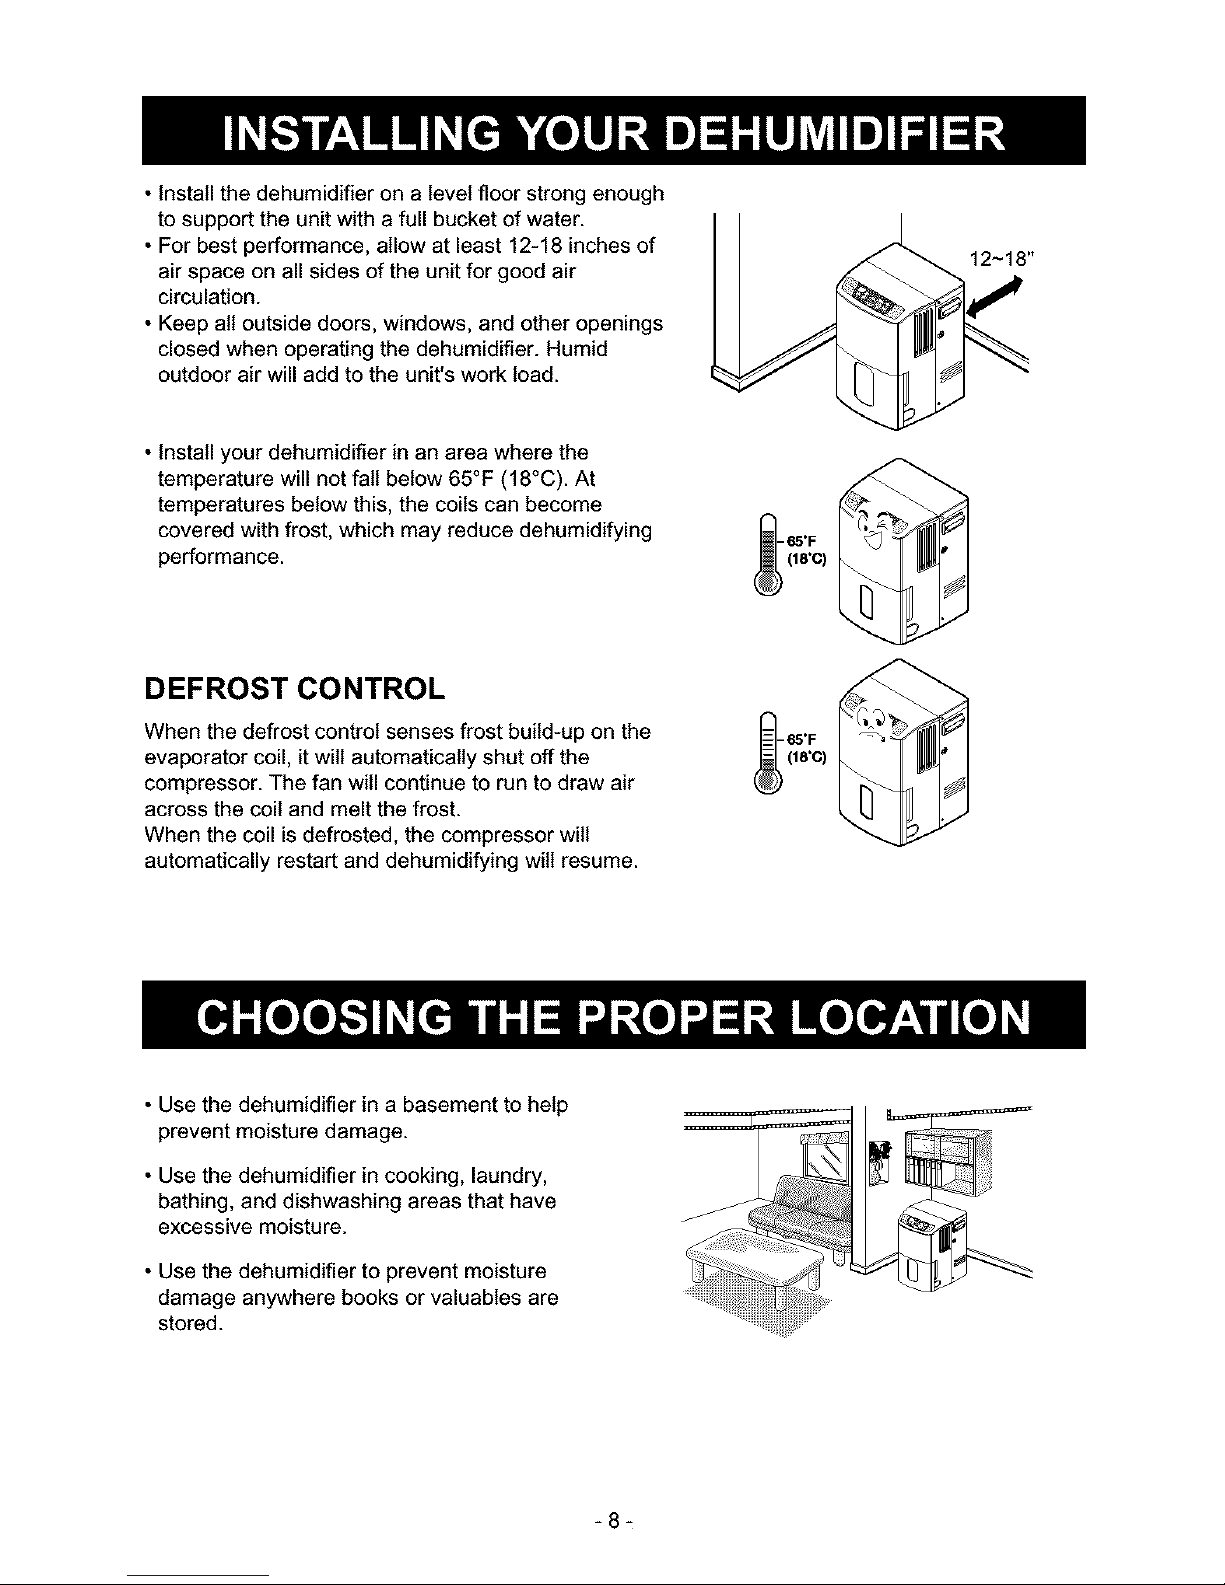
• Install the dehumidifier on a level floor strong enough
to support the unit with a full bucket of water.
• For best performance, allow at least 12-18 inches of
air space on all sides of the unit for good air
circulation.
• Keep alt outside doors, windows, and other openings
closed when operating the dehumidifier. Humid
outdoor air will add to the unit's work load.
12~18"
• Install your dehumidifier in an area where the
temperature will not fall below 65°F (18°C). At
temperatures below this, the coils can become
covered with frost, which may reduce dehumidifying
performance.
DEFROST CONTROL
When the defrost control senses frost build-up on the
evaporator coil, it wilt automatically shut off the
compressor. The fan will continue to run to draw air
across the coil and melt the frost.
When the coil is defrosted, the compressor wilt
automatically restart and dehumidifying will resume.
• Use the dehumidifier in a basement to help
prevent moisture damage.
• Use the dehumidifier in cooking, laundry,
bathing, and dishwashing areas that have
excessive moisture.
• Use the dehumidifier to prevent moisture
damage anywhere books or valuables are
stored.
-8-
Page 9

When the bucket is full, or when the bucket is not in the proper position>the Bucket Full light turns on
and the unit automatically shuts off.
Also>when bucket is out of position>the unit will beep 3 times.
The bucket must be replaced in the proper position for the dehumidifier to work. The light will
be on and the dehumidifier will not run if the bucket is not in the proper position.
The water bucket can be emptied in one of three ways:
1. Empty the bucket
manually.
When the bucket is full,
remove and empty it into a
large sink or tub. When
finished, replace it properly.
NOTE: To replace the bucket
properly, make sure the
slots on the back of bucket
are positioned correctly.
NOTE: Be careful while
taking out the bucket as it
can be heavy. It is advisable
to carry the bucket by
supporting it from bottom.
2. Place the dehumidifier
directly over drain.
The bucket has a threaded
hose connection which can be
left open. Drill a 1/4" (6.4mm)
to 1/2"(13mm) hole in the
center of the hose connection.
Once opened, the hose
connection will continually
drain water from the bucket.
NOTE: When inserting the
bucket into the unit. Lifting
up the bottom tip of the
bucket lightly makes
insertion easily.
3. Attach a garden hose to
the threaded bucket drain
hose connection to carry
water to the drain, (HAND
TIGHTEN ONLY)
Be sure the hose doesn't kink
or bend. It should lie fiat from
the dehumidifier to the drain.
NOTE: Do not tighten the
hose excessively when
connecting it to the bucket.
Use a rubber washer and
tighten by hand firmly
without stripping the plastic
threads.
/
-9-
Page 10
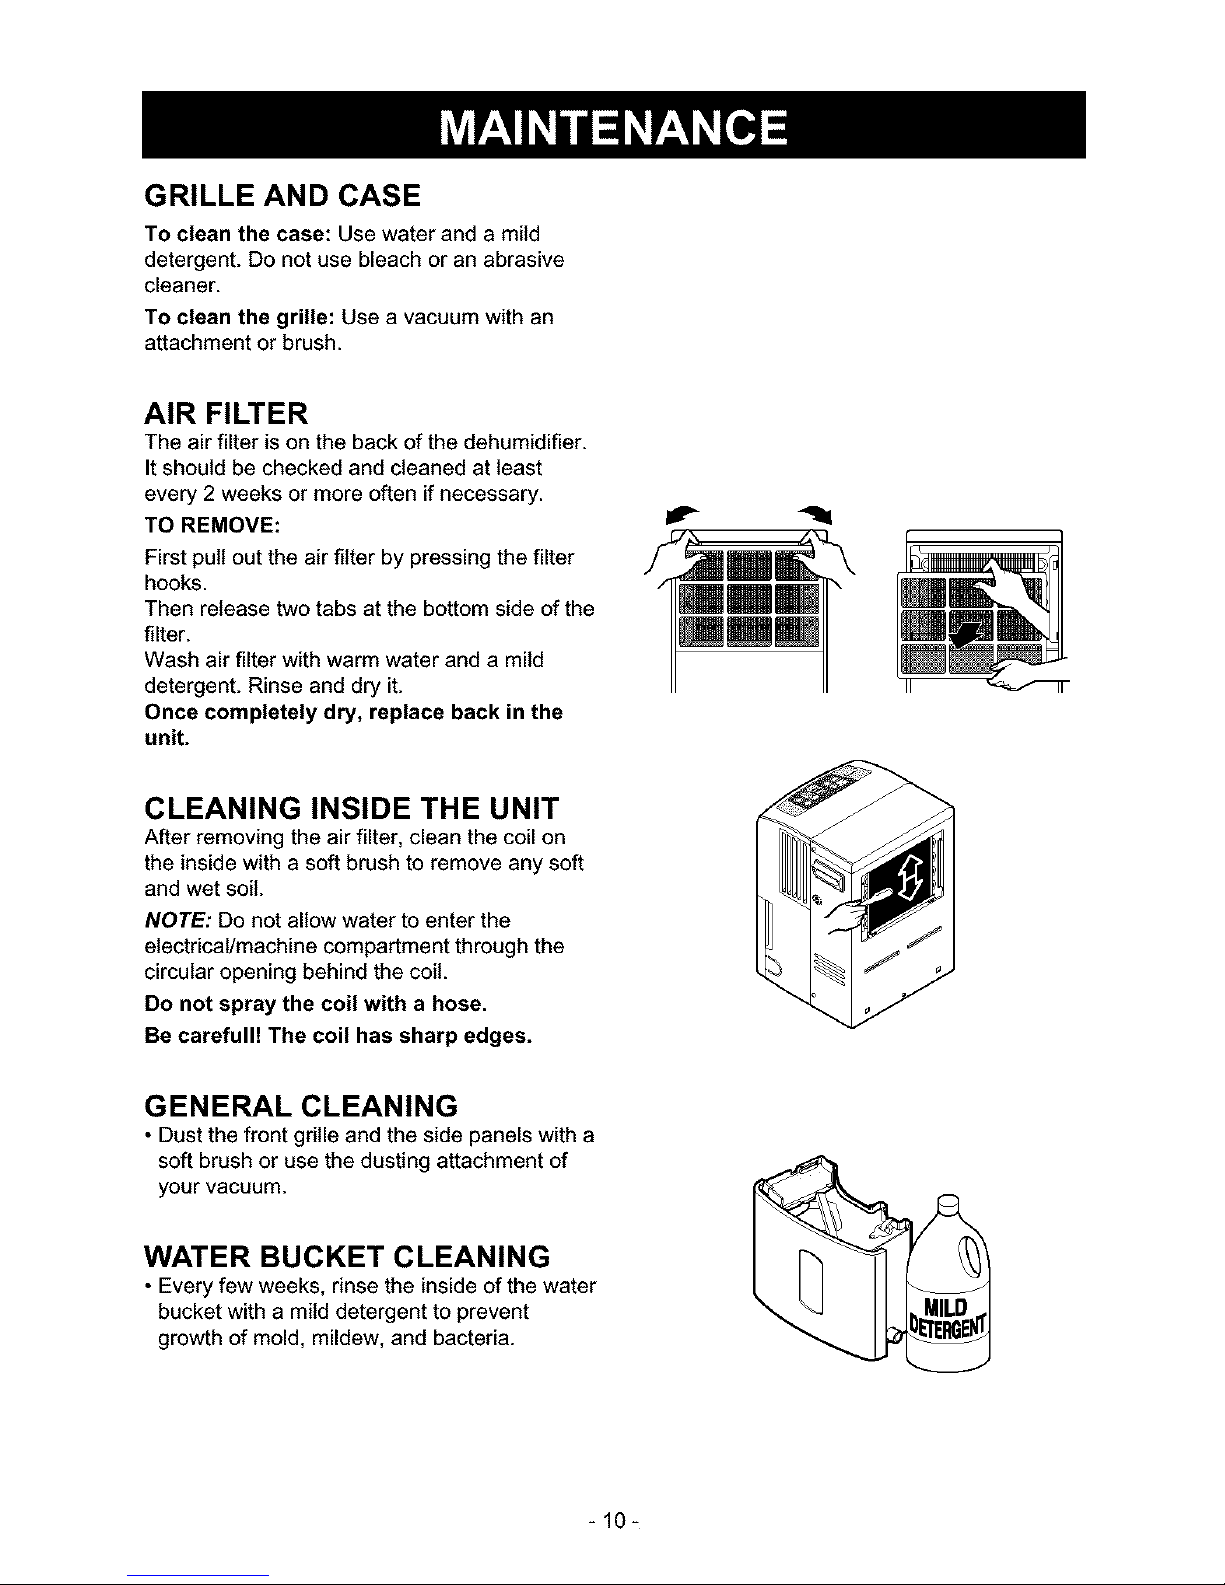
GRILLE AND CASE
To clean the case: Use water and a mild
detergent. Do not use bleach or an abrasive
cleaner.
To clean the grille: Use a vacuum with an
attachment or brush.
AIR FILTER
The air filter is on the back of the dehumidifier.
Itshould be checked and cleaned at least
every 2 weeks or more often if necessary.
TO REMOVE:
First pull out the air filter by pressing the filter
hooks.
Then release two tabs at the bottom side of the
filter.
Wash air filter with warm water and a mild
detergent. Rinse and dry it.
Once completely dry, replace back in the
unit.
CLEANING INSIDE THE UNIT
After removing the air filter, clean the coilon
the inside with a soft brush to remove any soft
and wet soil.
NOTE: Do not allow water to enter the
electrical/machine compartment through the
circular opening behind the coil.
Do not spray the coil with a hose.
Be carefulH The coil has sharp edges.
GENERAL CLEANING
• Dust the front grille and the side panels with a
soft brush or use the dusting attachment of
your vacuum.
WATER BUCKET CLEANING
• Every few weeks, rinse the inside of the water
bucket with a mild detergent to prevent
growth of mold, mildew, and bacteria.
-10-
Page 11
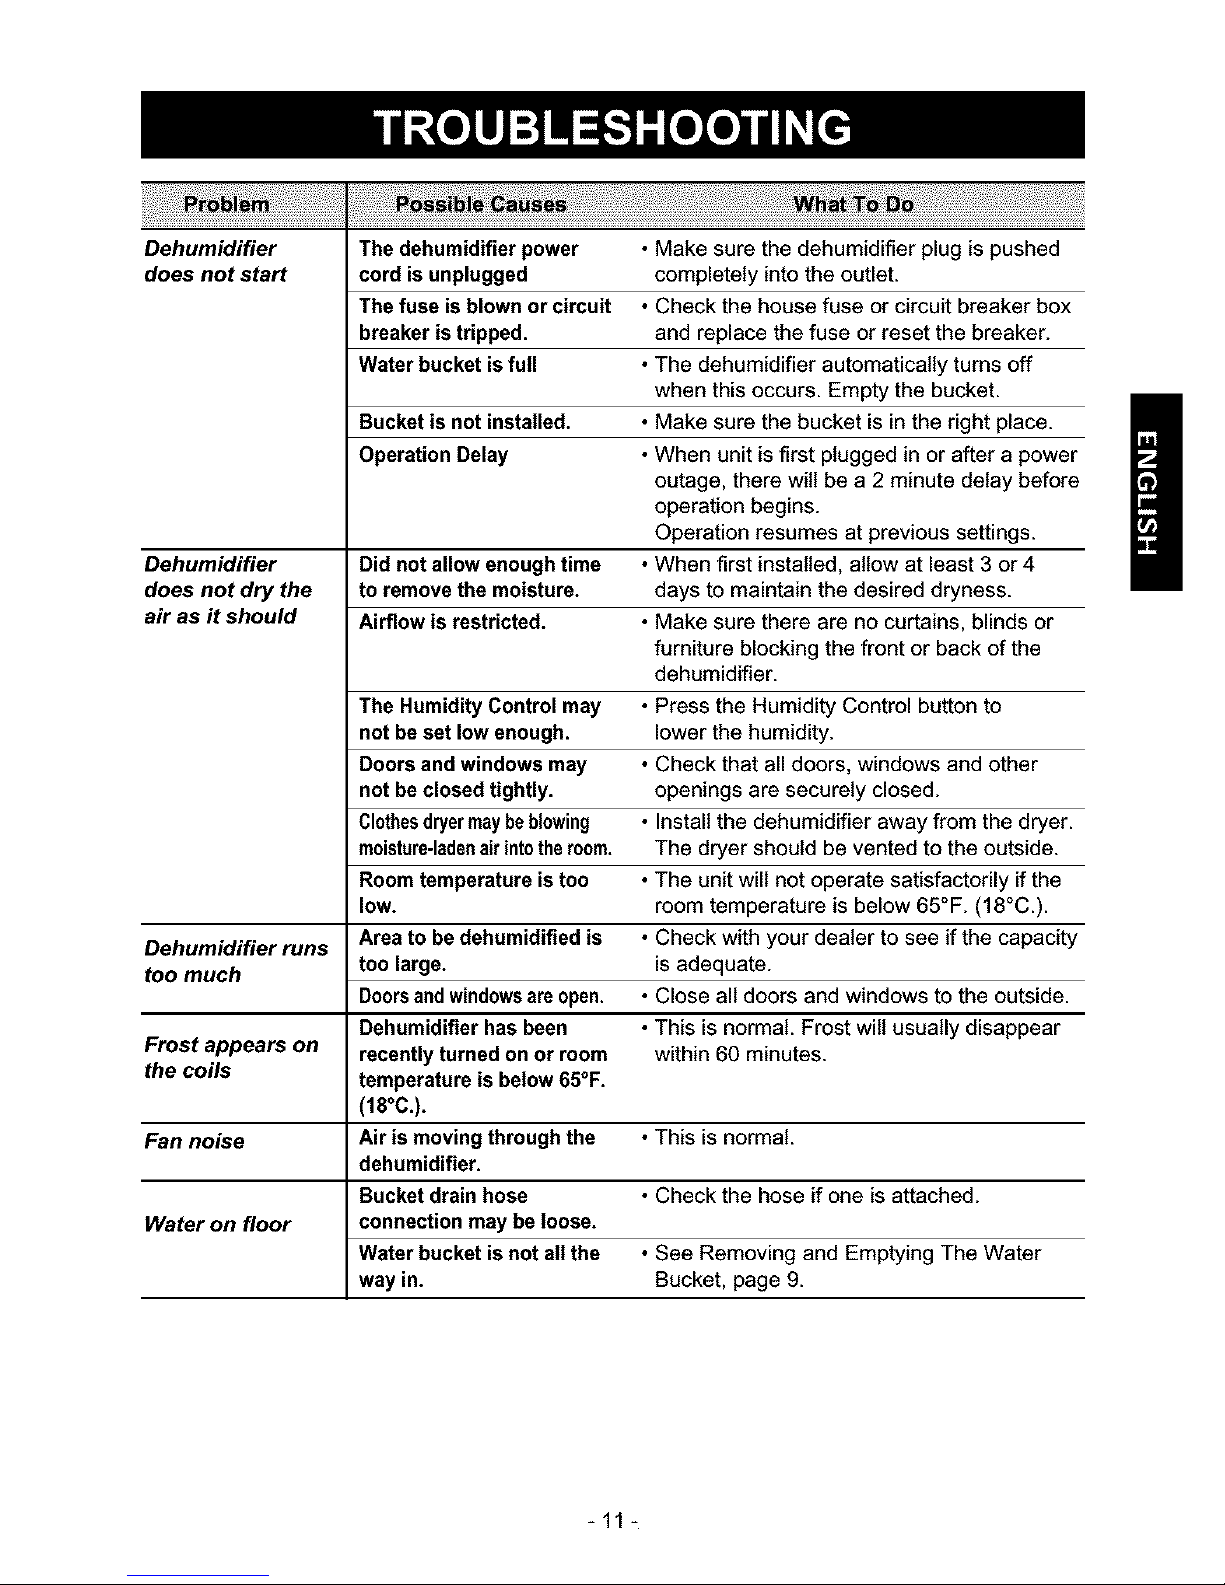
Dehumidifier The dehumidifier power • Make sure the dehumidifier plug is pushed
does not start cord is unplugged completely into the outlet.
The fuse is blown or circuit • Check the house fuse or circuit breaker box
breaker is tripped, and replace the fuse or reset the breaker.
Water bucket is full ° The dehumidifier automatically turns off
when this occurs. Empty the bucket.
Bucket is net installed. • Make sure the bucket is in the right place.
Operation Delay • When unit is first plugged in or after a power
outage, there will be a 2 minute delay before
operation begins.
Operation resumes at previous settings.
Dehumidifier Did net allow enough time • When first installed, allow at least 3 or 4
does not dry the to remove the moisture, days to maintain the desired dryness.
air as it should Airflow is restricted. • Make sure there are no curtains, blinds or
furniture blocking the front or back of the
dehumidifier.
The Humidity Control may • Press the Humidity Control button to
net be set low enough, lower the humidity.
Doors and windows may • Check that all doors, windows and other
net be closed tightly, openings are securely closed.
Clothesdryermaybeblowing • Install the dehumidifier away from the dryer.
moisture-ladenairintotheroom. The dryer should be vented to the outside.
Room temperature is tee • The unit will not operate satisfactorily if the
low. room temperature is below 65°F. (18°C.).
Dehumidifier runs Area to be dehumidified is • Check with your dealer to see if the capacity
too much tee large, is adequate.
Doorsandwindowsareopen. • Close all doors and windows to the outside.
Dehumidifier has been • This is normal. Frost wilt usually disappear
Frost appears on recently turned on or room within 60 minutes.
the coils temperature is below 65°F.
(18oc.).
Fan noise Air is moving through the ° This is normal.
dehumidifier.
Bucket drain hose ° Check the hose if one is attached.
Water on floor connection may be loose.
Water bucket is not all the • See Removing and Emptying The Water
way in. Bucket, page 9.
-11-
Page 12
FRIEDRICHAIRCONDITIONINGCO.
Post Office Box 1540 • San Antonio, l÷xas 78295-1540
(210) 357-4400 • FAX (210) 357-4480
DEHUMIDIFIER
LIMITED WARRANTY
FIRST YEAR
ANY PART'. If any part supplied by FRIEDRICH fails because of a defect in workmanship or mateda_ within twelve months from date of
odginat purchase, FRIEDRICH will repair the product at no charge, provided room air conditioner is reasonably accessibIe for service.
Any additional labor cost for removing inaccessible units and/or charges for mitaage related to travel by a Service Agency that exceeds
25 miles one way will be the responsibility of the owner. This remedy is expressly agreed to be the exclusive remedy within twelve
months from the date of the odginal purchase.
SECOND THROUGH FIFTH YEAR
SEALED REFRIGERANT SYSTEM: If the sealed refrigeration system (defined for this purpose as the compressor, condenser coil,
evaporator coil, reversing vaIve, check valve, capillary, filter drier, and aII interconnecting tubing) supplied by FRIEDRICH in your Room
Air Conditioner fails because of a defect in workmanship or material within sixty months from date of purchase, FRIEDRICH will pay a
labor a_iowance and parts necessary to repair the Sealed Refrigeration System; PROVIDED FRIEDRICH will not pay the cost of diagnosis
of the problem, removal, freight charges and transportation of the air conditioner to and from the Service Agency, and the reinstallation
charges associated w_threpair of the Sealed Retdgerafion System. Atl such cost will be the sole responsibility of the owner. This remedy
is expressly agreed 1o be the exclusive remedy within sixty months from the date of the original purchase.
APPLICABILITY AND LIMITATIONS: This warranty is applicable only to units retained within the Fifty States of the U.S.A., District of
Columbia, and Canada. This warranty is not applicable 1o:
1. Air fiifers or fuses.
2. Products on which the model and seda! numbers have been removed.
3. Products which have defects or damage which results from improper installation, wiring, etactdcat current characteristics, or
maintenance; or caused by accident, misuse or abuse, fire, flood, alterations and/or misapplication of the product and/or units
installed in a corrosive atmosphere, default or delay in performance caused by war, government rest0ctions or restraints, strikes,
material shortages beyond the control of FRIEDRICH, or acts of God.
OBTAINING WARRANTY PERFORMANCE: Service will be provided by the FRIEDRICH Authorized Dealer or Service Organization
in your area. They are tisted in the Yellow Pages.if assistance is required inobtaining warranty performance, write to: Room Air Conditioner
Service Manager, Friedricb Air Conditioning Co., P.O. Box 1540, San Antonio, TX 78295-1540.
LIMITATIONS: THIS WARRANTY tS GIVEN IN LIEU OF ALL OTHER WARRANTIES. Anything in the warranty notwithstanding,
ANY IMPLIED WARRANTIES OF FITNESS FOR PARTICULAR PURPOSE AND/OR MERCHANTABILITY SHALL BE LIMITED TO
THE DURATION OF THIS EXPRESS WARRANTY. MANUFACTURER EXPRESSLY DISCLAIMS AND EXCLUDES ANY LIABILITY
FOR CONSEQUENTIAL OR INCIDENTAL DAMAGE FOR BREACH OF ANY EXPRESSED OR IMPLIED WARRANTY.
NOTE: Some states do not allow limitslJons on bow long an implied warranty lasts,or do not allow the limitation or exclusion of consequenfial
or incidental damages,so the foregoing exclusions and limifations may not apply 1oyou.
OTHER: This warranty gives you specific legal rights, and you may also have other rights which vary from state to state.
PROOF OF PURCHASE: Owner must provide proof of purchase in order to receive any warranty related services.
All service calls for explaining the operattan of this product will be the sole responsibility of the consumer.
All warranty service must be provided by an Authorized FRIEDRICH Service Agency, unless authodzed by FRIEDRICH prior to
repairs being made.
In case of questions regarding the provisions of this warranty, the English version will govern.
Revised 01/03
-12-
Page 13

£PA DOE
(D40A/ D50A/ D65A)
Guide a I'installation et
au fonctionnement
DESHUMIDIFICATEUR MODELES
115Volts • D30A. D40A • D50A • D65A
Enregistrez votre d shumidificateur
Vouspouveztrouverlesinformationssurlemodlesurlaplaque-marquesurledevantde
Iappareilderrirelerservoirdecondensation.
Pourenregistrervotredshumidificateur,compltezetexpdiezlacartedenregistrement
ci-jointe,ouenregistrez-vousenlignesurlesitewww.friedrich.com(uniquementEtats-
Unis).Pourvotrecommodit,enregistrezicilesinformationssurlemodle.
NUMI_RO DU MOD#LE NUMC:RO DE SC:RIE DATE D'ACHAT
920-154-00 (01/03)
Page 14

VOS DOSSIERS .............................................14
LIRE CE MANUEL...........................................14
PRECAUTIONS...............................................14
Mesuresde s_curit6...................................15
SPECIFICATIONS ELECTRIQUES ................17
FONCTIONNEMENT.......................................18
Caracteristiques.........................................18
Tableau decommande ..............................19
INSTALLATIONDUDC:SHUMIDIFICATEUR......20
Contr61ede d_givrage................................20
CHOIXDE L'EMPLACEMENTAPPROPRI¢:......20
ARRC:TAUTOMATIQUE.................................21
RETRAITET VIDANGE
DU RECIPIENT D'EAU....................................21
ENTRETIEN....................................................22
Grille et boftier............................................22
Filtre a air ...................................................22
Nettoyage intr_rieur de I'appareil...............22
Nettoyage g_n_ral......................................22
Nettoyage du r_cipientd'eau .....................22
DC:PANNAGE............................................23
Inscrivez ici le numero du module et le numero de serie :
Vous les trouverez sur 1'6tiquette apposee a I'arriere du d6shumidificateur pr6s du reservoir.
Numdro du modele
Numdro de s6rie
Nom du revendeur
Date d'achat
Agrafez votre r6c6piss6 ici
Vous y trouverez de nombreuses indications sur la fa£on d'utiliser et d'entretenir correctement ce
deshumidificateur. Quelques soins preventifs suffiront a vous faire economiser beaucoup de
temps et d'argent tout au long de la vie de votre deshumidificateur.
Vous trouverez les reponses a de nombreux problemes courants dans le tableau des Conseils de
depannage. En examinant le tableau des Conseils de depannage, il se peut que vous n'ayez pas
besoin de faire appet a nos services.
• Prenez contact avec un Centre de service agree pour tout ce qui releve de la reparation ou de la
maintenance de cet appareil.
• Le d6shumidificateur ne dolt pas 6tre utilis_ par de jeunes enfants ou par des personnes
invalides sans surveillance.
• Les jeunes enfants ne doivent pas _tre laiss_s sans surveillance et ne doivent pas pouvoir jouer
avec le d_shumidificateur.
-14-
Page 15

LISEZ TOUTES LES INSTRUCTIONS AVANT UTILISATION.
• Lesinstructions suivantes doivent¢tre respectees afin de ne pas risquer de blesser I'utilisateur, ou d'autres
personnes, ou d'endommager des biens.
• Unmauvais fonctionnement de ala non-observation de ces instructions est susceptible de provoquer des
prejudices et des dommages dont la gravite est_valu_e par les indications suivantes.
,//_ AVERTISSEMENTCesymbole signale des possibilit_s de d6c_sou de blessures gravesATTI=I_iTI_I_i Cesymbole signale des possibilit6s de blessures ou dedommages materiels
• Les significations des symboles utilis_sdans ce manuelsont indiqu6es ci-dessous.
Q Ne faites jamais cela
0¢@ Faites toujours cela
•Risque de choc _lectrique ou
d'incendie.
• Risque de choc _lectrique et
de dommages corporels.
• Risque de choc_lectrique ou
d'incendie
• Risque d'incendie ou de
d_g_ts provoqu6s parces
produits.
®
• Cetteeauestimpropre_ la
consommationetelleestsusceptible
deprovoqaerdesmaladiesetdes
dommagescorporels.
• Risque de choc_lectrique.
-15-
Page 16

,a ATTENTION
•Le deshumidificateur risque
d'etre endommage ou de
provoquer des blessures ou
des dommages corporels.
•Risque de choc _lectrique. • IIs doivent pouvoir resister _ 40
kg(90 Ibs)environ.
• Risque de choc _lectrique ou
d'incendie.
• Les basses temp6ratures sont
susceptibles de provoquer le
givrage des bobines et
d'empecher le d_marrage de
rappareiL
• Pour etre efficace, le
deshumidificateurdoit
fonctionner dans uneenceinte
close. ___.
q
• IIsrisqueraient de subir des
dommages.
-16-
Page 17

OBSERVER TOUS LES CODES ET
REGLEMENTS LOCAUX.
EN AUCUNE CIRCONSTANCE, NE PAS
ENLEVER LA BROCHE DE MISE .,_LA
TERRE DE LA FICHE DU CORDON
D'ALIMENTATION ELECTRIQUE.
UNE MISE A LA TERRE F:LECTRIQUE EST
REQUISE POUR CET APPAREIL.
Une alimentation etectrique de 115 V, 60 Hz,
CA seulement, avec fusible de 15 A et une
mise appropriee a la terre sont requises. On
recommande l'emploi d'un fusible temporise ou
d'un disjoncteur temporise. Ufiliser un circuit
s6par6 pour brancher seulement le
d6shumidificateur.
NE PAS UTILISER UNE RALLONGE.
Risque de choc_lectrique.
Brancher dans une prisede courant mise a la
terre _ 3 trous.
Ne pas enlever la broche de mise_ laterre.
Ne pas utiliser un adaptateur.
Ne pas utiliser un cordon de rallonge.
Le non-respect de cesinstructions peutcauser
un d_c_s, un incendie ou unchoc _lectrique.
M_:THODE RECOMMAND_:E DE MISE .A.LA
TERRE
Pour la securit6 personneile des utilisateurs, ce
d6shumidificateur dolt _tre mis a la terre. Cet
appareit est muni d'un cordon d'alimentation
etectrique dot6 d'une fiche a 3 broches, mise
la terre. Pour minimiser le risque de choc
etectrique, le cordon doit 6tre branche sur une
prise de courant murale correspondante a 3
trous et mise a la terre, conform_ment aux
codes de la National Electrical Code
(ANSI/NFPA 70), derni6re edition, et tousles
codes et reglements locaux. Si une prise de
courant compatible avec la fiche de
branchement n'est pas disponible, c'est au
proprietaire de l'appareit qu'incombe la
responsabitite et robligafion personnelles de
faire installer par un 61ectricien qualifi6, une
prise de courant murale a 3 trous,
correctement mise a la terre.
Prise de courant murale
mise a laterre de
genre a 3 trous
Fiche misea la I 11
terre _ 3 broches I I
d'alimentati°n _'2_ Broche de raise
electrique_r-_-- a la terre
/
-17-
Page 18

FONCTIONS
Pour reduire les dsques d'incendie, de choc etectrique ou de blessures aux personnes, lire la
section des instructions importantes de S¢:CURIT¢: avant de faire fonctionner cet appareil.
1. PANNEAU DE CONTROLE
2. GRILLE AVANT
3. CABLE D'ALIMENTATION
4. CHASSIS
5. FILTRE A AIR
6. RI_SERVOIR D'EAU
1
2
IMPORTANT:
Lorsque I'appareil est branche la
premiere fois ou apres une panne de
courant, il y aura un delai de 2
minutes avant la remise en marche.
Le fonctionnement reprend les
reglages pr6c6dents.
-18-
Page 19

PANNEAU DE CONTR( LE
Le panneaude contrSledud6shumidificateurcontientunindicateurde r6servoirplein,un indicateurd'humidit6,un
contr61ed'alimentation,uncontrSled'humidit_,uncontrSledevitessedu ventilateuretun contr61ede minuterie.
Indicateurde r_servoirplein - Levoyants'allumequandlereservoird'eauestpleinet dolt_trevid6.
Alimentation- L'appareilse meten marchequandvousappuyezsurceboutonets'arr_tequandvousappuyezde
nouveausurcebouton.
Contr61ehuraidit6- IIcontrSleI'humiditedanslapiece.
• _ : pouraugmenterle reglagede I'humidit_
•® :pourdiminuerle r6glagede rhumidit_.
•L'humidit_peut6trer6gl_edansunegammede35%HR- 70%HRavecdesaugmentationsde5%.
Vitesseduventilateur-IIcontr61elavitessedu d6bitd'air.
, Elev6e:LavitesseduventilateurestregleesurElev6e
, Basse:Lavitesseduventilateurestr6gl6esurBasse
, Quandvousappuyezsurle boutonVitesseVentilateur,le modevitesseduventilateurchange.
Minuterie_nerg_tique-Pressercettetouchepourselectionnerle typedefonctionnement.
•Selectionner_<Constant_>pourunfonctionnementcontinuel
•Selectionner2ou 4h pourunfonctionnementa cyclemarche-arrCt
L'appareilfonctionnependant2 ou4 heures,puiss'arrCtependant2ou4 heures.
Lecycleestr6p_t6jusqu'acequeler6glagesoitmodifie.
•Lorsquelatoucheminuterie_nerg_tiqueestpressee,le voyantminuteries'allumecommesuit :
Continuouse,marche-arr_t2 h_ marche-arr_t4 h,e,Continuous.
Remiseautomatique-Unefoisralimentationretablieapr_sunepannedecourant,I'appareilreprendlesr_glagesde
fonctionnementpr6c_dentsapr_sund61aide2 minutes.
Leventilateursemetimm_diatementenmarchequandlecourantestrestaur6.
POURFAIREFONCTIONNERLEDESHUMIDIFICATEUR
I. Branchezlec_bled'alimentationsurunepriseelectrique,.AppuyezsurlatoucheAlimentation.
2.Reglezlecontr61ehumiditeentre35%HRet70%HRpourunfonctionnementnormal.
Sivouspr6f_rezdeI'aird6shydrat6,appuyezsur latoucheContr61eHumidite
Sivouspr6f_rezplusd'airhumide,appuyezsurla toucheContrSleHumidit6.
3.AppuyersurlatoucheAlimentationpourarr_termanuellementI'appareil.
4.Appuyersurle Boutonminuteriepourreglerladur_edefonctionnement.
A la findecetemps,I'unitese methorscircuit.
Laminuteriepeut_trer_gl_epour:Continuous.e,2h e. 4 h e. Continuous.
5.SivousvoulezcontrSlerlavitessedud_bitderair,appuyezsurlatoucheVitesseventilateur.Chaquefoisquevous
appuyezsurlatouche,lemodevitesseventilateurchange:€:lev_ee,Bassee,Elevee.
Remarque:Faitesattentionde nepasperdrele rdservoird'eau.
Ceddshumidificateurnefonctionoerapassiler_servoird'eaun'estpasbieoinstallS.
-19-
Page 20

•Installerle deshumidificateur sur un plancher
d'aplomb assez fort pour supporter le
deshumidificateur avec un r6cipient rempli
d'eau.
• Pour obtenir le meilleur rendement, laisser au
moins de 12 a 18 pouces d'espace de tousles
c6tes de I'appareil pour une bonne circulation de
I'air.
•Garder toutes les portes, fen6tres et autres
ouvertures vers I'exterieur fermees Iorsque le
deshumidificateur fonctionne. L'air humide de
I'exterieur augmentera la t_che du
d6shumidificateur.
• Installerle d6shumidificateur dans un endroit o0
la temp6rature ne baisse pas au-dessous de
65°F (18°C). Les temp6ratures plus basses
causeront la formation de givre sur les
serpentins.
REMARQUE: Si le givre survient, I'appareil
s'arr6tera et se remettra en marche. Ceci est
normal. D6brancher I'appareil (ou r6gler
I'appareil au point d'arr6t) jusqu'a ce que le givre
fonde et la temp6rature ambiante devienne plus
6lev6e.
COMMANDE DU DEGIVRAGE
Lorsque la commande du d6givrage d6tecte
I'accumulation de givre sur le serpentin
evaporateur, la commande arr6te
automatiquement le compresseur. Le ventilateur
continuera de fonctionner pour attirer Fair
travers le serpentin et faire fondre le givre.
Lorsque le serpentin est d6givr6, le compresseur
recommencera automatiquement a fonctionner, et
la d6shumidification sera remise en marche.
- 65°F I
(18°0)
12 a 18 po
• Utiiiser le d6shumidificateur darts un sous-sol
pour aider a 6viter les dommages par
l'humidit6.
• Utiiiser le deshumidificateur darts un espace
de cuisson, buandede, bain et lave-vaisselle
o0 il existe une humidite excessive.
• Utiliser le deshumidificateur pour emp6cher
les dommages de l'humidite partout o0 des
livres ou objets precieux sont entreposes.
- 20 -
Page 21

Led6shumidificateursemetautomatiquementhorscircuitIorsqueler6cipientestpleinous'ilest
enleveoumalplac&
Le rdcipient dolt _tre placd dans la position appropri_e afin que I'appareil fonctionne. Le
voyant s'allume et le d_shumidificateur ne fonctionnera pas si le r_cipient est mal plac&
Le r6cipient d'eau peut _tre vidange seion l'une des trois fa_ons:
1. Vider le rdcipient
manuellement.
Lorsque le r_cipient est plein,
I'enleveret le vidanger dans un
grand _vier ou cuvette. Ensuite,
le replacer au bonendroit.
REMARQUE : Pour replacer le
r6cipient au bon endroit,
s'aseurer que les fentes
rarri6re du r6cipient sont
correctement en position.
REMARQUE : Faites attention
quand vous retirez le r6eervoir
car il peut 6tre Iourd.
2. Placez le d_shumidificateur
directement sur undrain
Le r_servoir poss_deune
connexion fllet_e pourtuyau
flexible qui peut etre ouverte.
Percer un trou de 1/4"(6,4 mm)
1/2" (13 mm) au centre de la
connexion. Quand elle est
ouverte, laconnexion drainera
I'eaudu r_servoir.
REMARQUE : L'insertion du
flexible au bac b condens_ts
serafacilit_e si le bac
condens_ts est I_g_rement
sur_lev&
3. Fixer un tuyau flexible de
jardin au joint du tuyau
d'dcoulement filetd du
r_cipient d'eau pour
transporter I'eau & I'dgout
d'_coulement. (SERRER A
LA MAIN SEULEMENT)
Lorsquele raccorddu tuyau
d'_coulement du r_cipientd'eau
est tell& s'assurerque le tuyau
n'est pas pli_ ou pinc&
IIdevrait reposer _ plat entre le
d_shumidiflcateur et I'_gout
d'_coulement.
REMARQUE : Ne pastendre
excessivement le flexible
Iorsqu'il est connect_ au bac
condens_ts.
-21 -
Page 22

GRILLE ET BO|TIER
Pour nettoyerla caisse: Utiliserde I'eauet un
d_tergent cloux. Ne pas utiliser de I'eaude javelle
ou un nettoyant abrasif.
Pour nettoyer la grille: Utiliser un aspirateuravec
un accessoire ou unpinceau.
FILTRE .A,AIR
Lefiltre a airest _tI'arri_redu d_shumidiflcateur.
IIdolt _tre v_rifi_ et nettoy_ au moins _ tousles 2
semaines ou plussouvent, si n_cessaire.
POUR L'ENLEVER:
Plier le filtre aucoin droit inf_rieur et glisser lecSt_
droit sup6rieur vers la gauche. D6gagertoutes les
attaches et enlever le filtre. Laver dans I'eau
chaude savonneuse.
D_squ'il est compl_tement sec, remettez en
place I'arri_re de I'appareil.
NETTOYAGE DE L'INTERIEUR DE
L'APPAREIL
Apr_s avoir enlev_ lefiltre _tair, nettoyer le serpentin
I'int_rieur avec un pinceau doux pourenlever toute
salet_ I_g_re et humide.
REMARQUE: Ne paslaisser I'eaup_n_trerclansle
compartiment _lectrique/m_canique parI'ouverture
circulaire en arri_re du serpontin.
Ne pas arroser le serpentin avec un tuyau
d'arresage.
Faites attention ! La bobine a des bords pointus.
i p-
NETTOYAGE GIf::NERAL
• Epousseter la grillea I'avant et les panneaux
lat_raux avecun pinceaucloux,ou utiliserun
accessoirecl'_poussetagede votreaspirateur.
•Si la pointure cluboffiers'_caille,faire une retouche
avec de la pointure_maill_e de honnequalit6pour
emp_cherla rouille.
NETTOYAGE DU RECIPIENT D'EAU
•,_intervalles de quelques semaines, rincer
I'int_rieurdu r6cipient cl'eauavec un d_tergent
doux pour emp_cher lacroissance de moisissure,
mildiou et bact_ries.
- 22 -
Page 23

Led_shumidificateur Le cordond'alimentation • S'assurer que la fche du
nese metpasen _lectrique de rhumidificateur d_shumidificateur est pouss_e
marche n'est pas branch,, compl_tement dans la prise de courant.
Le fusible est grill_,ou le • Verifier la bo?tedu fusible et du disjoncteur
disjoncteur est ouvert, de la maison, et remplacer le fusible, ou
r_gler de nouveau le disjoncteur.
Le r_cipient d'eau est plein. • Le deshumidificateur s'arr_te
automatiquement dans ce cas.
Vidanger le recipient.
Le r_cipient d'eau n'est pas • S'assurer que ]e r_cipient est bien place.
installS,
Fonctionnementdiff_r_ • Quandrappareilestbraech_pourlapremiereloisou
apr_sunecoupuredecourant,ily auraunretardde2
minutesavantquelefoectioenernentnereprenne.
Lefonctionnementreprendaveclereglageprecedent.
Le d_shumidificateur Avez-vous accord_ assezde • Lors de ]'installationinitiale, laisserau moins
nes_chepas I'air tel temps pour enlever rhumidit_? 3 ou 4 jours pourmaintenir I'air sec desire.
quepr_vu Le d_bit d'air estrestraint. • S'assurer qu'il n'y a pas de rideaux, stores
ou meubles qui bloquent le devant ou
I'arriere du d_shumidifcateur.
Le contr61eHumidit_ peut ne pas • Appuyez sur la touche Contr6ie humidite
_tre r_gl_ suffisamment has. pour avoir humidit_ basse( _ ).
Les porteset les fen_tres ne sont • Verifier si toutes les portes, fen_tres et
peut-_tre pas bien ferm_es, autres ouvertures sont bien ferm_es.
La s_cheuse _ liege peut • Installer le deshumidificateur loin de la
transmettre de rair humide dans secheuse. La s_cheuse devrait evacuer
la piece. I'air vers rext_rieur.
La temperature ambiante est trop • L'appareil ne fonctionnera pas d'une fa_on
basse, satisfaisante si la temperatureambiante est
au-dessous de 65°F (18°C).
Led_shumidificateur L'espacepourlad_shumidification • Verifier aupres du marchand pour voir si la
fonctionne esttropgrand, capacite est adequate.
excessivement Lesportesetlesfen_tressont • Fermer toutes les portes et les fen_tres.
ouvertes.
Legivreappara#sur Le d_shumidificateura • Ceci est normal. Le givre dispara?tra
lesserpentins r_cemment _t_ mis en marche, ou habituellement darts un d_lai de 60
la temperature ambiante est minutes.
au-dessous de65°F(18°C).
Le ventilateurfait L'air passe_ travers le • Ceci est normal.
beaucoupde bruit d_shumidificateur.
L'eaucoulesurle Le tuyau devidange du r_cipient • Verifier le tuyau s'il est installS.
plancher d'eau n'est pas bien branch,.
Le r_cipient d'eau n'est pas plac_ • Voir Retrait et vidange du r_cipient d'eau,
compl_tement_ rint_rieur, page 9.
- 23 -
Page 24

FRIEDRICHAIRCONDITIONINGCO.
Post Office Box 1540 • San Antonio, i÷xas 78295-1540
(210) 357-4400 • FAX (210) 357-4480
Garantie limit e- Deshumidificateur
GARANTIE LIMITI_E -PREMI#RE ANNI_E
TOUTES LES PIECES - Si, darts les 12 mois suivant la date d'acbat initial, une piece foumie par FRIEDRICH est d_fectueuse _ cause
d'un d_faut de main d'oeuvre ou de materiel, FRIEDRICH r_parera le produit gratuifament, pourvu qu'il soit raisonnablement facile
d'obfanir acc_s au climatiseur pour Is r_parer.Toufa main d 'oeuvre n_cessaire pour d_poser des appareils d 'acc_s dif8cile et/ou les frais
de d_placement (kilom_trage) par le centre de r_paration, au del_ de 25 miles (40kin) darts une seule direction, sont ta responsabilit_ do
propd_taire. Ce remsde est express_ment accept_ comme le seul remc_dedans les 12 mois sctvant la date d'acbat initial.
GARANTIE LIMITEE -DEUXI#ME A ClNQUI_ME ANNI_E
SYSTEME DE R_:FRIGERATION CTANCHE * Si fa syst_me de r_fdg_ration _tanche (darts te cadre de cette garantie, d_fini comme le
compresseur, le serpentin de condenseur, fa serpentin d'_vaporafaur, la vanne d'inverstan, le clapet de non-rsfaur, le tube capillaire, le
filtre-d6shydrateur et tous Ieurs tubes de raccordement) faisant pattie du climatiseur FRtEDRICH est d_fectueux & cause d'un d_faut de
main d'oeuvre ou de mat_riau dans les 60 mois& compfar de la date d'achat initial, FRIEDRICH paiera une allocation pour les frais de
main d'oeuvre et les pi_ces n6cessaires pour r_parer le sysfame de r_frig_ration _tanche. FRIEDRICH ne paiera pas pour les frais de
diagnostic du probl_me,de d_pose, de transport du climatiseur jusqu'au centre de r_partaion et de retour ni les frais de repose associ_s
la r_paration du syst_me de r_frig6ration _tanche. TOUSces frais sont _ la charge du propri_taire. Ce remede est express6ment accept6
comme le seul remade dans Ies 60 mois suivant ta date d'achat initial.
CONDITIONS D 'APPLICATION El"LIMITATIONS - Cette garantie s'applique _ tousles appareils vendus au d_tail aux Etats-Unis, darts
Is District de Colombia et au Canada. Cetta garantie ne s'applique pas :
1. aux filtres _ air ni aux fusibles ;
2. aux produits dent le num_ro de mod¢ie et le num_ro de s_rie ont _t_ enlev_s ;
3. a_x produits dont tes d_fauta ou d_g_ta ont _t_ causes par une mauvaise installation, un mauvais c_blage, ratimentation avec une
mauvaise tension ou par un mauvais entretien ; ni causes par un accident, une mauvaise utilisation ou des abus, un tacendie, des
inondations, des modiScations et/ou une mauvaise application du prodctt e_ou des appareils install_s dans _ne atmosphere
corrosive, probI_mes ou d_lais de r_paration causes par actas de guerre, des restrictions ou limitations par Is gouvernement, des
gr_ves, des manquements de matariet en dehors du contr61e de FRIEDRICH ou par des cas de force majeure.
OBTENTION DE REPARATION SOUS GARANTIE. Le service sera fourni par un distribL_eur agr¢_ par FRIEDRICH ou un centre de
r_paration darts ta r_gfan, lls sont indiqu_s darts les Pages Jaunes. S'il faut de I'assistance pour obtenir des r_parations sous garantie,
_crire _ Room Air Conditioner Service Manager, Frtaddch Air Conditioning Co., P.O. Box 1540, San Antonio, Texas 78295-1540.
LIMITATIONS * CETTE GARANTtE A ET_=DONN_=E EN REMPLACEMENT DE TOUTE AUTRE GARANTIE. Inddpendamment de
cette garantta, TOUTE GARANTIE SOUS*ENTENDUE D'APPLICATION POUR UN BUT PARTtCULIER ET/OU DE VENDABILITE
EST LIMITEE A LA DUREE DE LA GARANTIE EXPRESSE. LE FABRICANT SPECIFtQUEMENT DECMNE ET REFUSE TOUTE
RESPONSABILtTE POUR LES DOMMAGES INDIRECTS OU SECONDAIRES POUR INEXECUTtON DE TOUTE GARANTIE EX*
PRESSE OU SOUS*ENTENDUE.
REMARQUE - Certaines provinces ne permettent pas les limitations sur la Iongueur de la garantie sous-entendue ou ne permettent pas
la limitation ni I'exclusion des dommages indirecta ou secondaires, il est doric possible que ces exctustans et limitations ne s'appliquent
pas _ un cas sp_cifique.
AUTRE - Cette garantie donne des droits sp¢cifiques et il est possible que le propri_taire ait d'autres droits qui varient d'une province
I'autre.
PREUVE D'ACHAT - Le propri_taire dolt fournir la preuve d'achat pour pouvtar recevoir des services sous garantie.
Tousles appe_s pour expIiquer le fonctionnement de ce produit sont _ la charge du consommateur.
Toute r_paration sous garantie dolt _tre faite par un agent de r_paration agr_ par FRIEDRICH, sant en cas d'autodsation pr_alable par
FRIEDRICH.
En cas de question concernant les clauses de cette garantie,la version en anglais a prioritY.
Revised 01/03
- 24 -
Page 25

£PA DOE
(D40A/ D50A/ D65A)
Manual de instalacion
& operacion
MODELOS DE DESHUMIDIFICADOR
115Voltios • D30A • D40A • D50A • D65A
Registre su deshumidificador
Lainformacinsobreelmodeloseencuentraenlaetiquetaidentificativaenla
partefrontaldelaunidad,detrsdelrecipientede recogidadecondensado.
Pararegistrarsu deshumidificador,s rvaserellenaryenviarporcorreolatarjeta
deregistroadjunta,oregstreseenIneaenwww.friedrich.com(sIoEE.UU.).
Parasu usofuturo,anotelainformacin sobreelmodeloaqu.
NOMERO DE MODELO NOMERO DE SERIE FECHA DE COMPRA
920-154-00 (01/03)
Page 26

PARA GUARDAR ......................................... 26
LEER ESTE MANUAL .................................. 26
PRECAUCION .............................................. 26
Precaucionesde Seguridad ..................... 27
REQUERIMIENTOS ELECTRICOS ............ 29
FUNCIONAMIENTO .................................... 30
Caracteristicas ....................................... 30
Panel de control ...................................... 31
INSTALACION DEL DESHUMIDIFICADOR ... 32
Control de descongelamiento ................. 32
SELECCI6N DEL LUGAR ADECUADO ...32
APAGADO AUTOMATICO .......................... 33
REMOCION Y VACIADO DEL
RECIPIENTE DE AGUA ............................... 33
MANTENIMIENTO ...................................... 34
La rejilla y el gabinete .............................. 34
Filtro de aire .......................................... 34
Limpieza interna de la unidad ................ 34
Limpieza de la unidad ............................. 34
Limpieza del recipiente de agua ............. 34
SOLUCION DE PROBLEMAS .................... 35
Escriba los nt_merosde modelo y serial aca :
Puede encontrados en laetiqueta en la parte posterior del deshumedecedor detras de la cubeta
# del Modelo
# Serial
Nombre del Distribuidor
Feeha de Adquisicibn
Adjunte sufactura aqui
Aqui adentro encontrara muchos consejos que ayudar_ en et uso y mantenimiento apropiado de
su deshumedecedor. Tan solo un pequeSo cuidado preventivo de su parte puede ahorrar mucho
de su tiempo y dinero durante la vida de su deshumedecedor.
Encontrar_ muchas respuestas a los problemas comunes en el cuadro de Consejos para la
Resoluci6n de Problemas. Si revisa primero nuestro cuadro de Consejos para la Resoluci6n de
Problemas, puede que no sea necesario ltamar por un servicio.
• P6ngase en contacto con un Centro de Servicios Autorizado para reparar o realizar el
mantenimiento de esta unidad.
• El deshumedecedor no est_ para ser usado por niSos menores o minusvalidos sin supervisi6n
• Los niSos menores deben estar bajo supervisi6n para asegurar que ellos no esten jugando con
et deehumedecedor.
- 26 -
Page 27

Lea todas las instrucciones antes del uso
• Paraprevenir lesiones al usuario u otras personasy dafios a la propiedad, deben deseguir las siguientes
instrucciones.
• Laoperaci6n incorrectadebido alas instrucciones ignoradascausaraperjuicioo daSo la seriedad esta
clasificada por medio de las siguientes indicaciones.
I Z_ ADVERTENCIA Este simbolo indica la posibilidad de muerte olesiones serias
_ PRECAUCION Estesimbolo indica la posibilidadde lesioneso dafios a las
P °p edades n!camente...............................................................................................................................................................................................................................................
• Lossignificados delos simbolos usados en estemanual son mostrados abajo.
• De Iocontrario, puede causar
corto el_ctrico o incendio.
• Puede causar cortoel_ctrico y
riesgo de lesiones personales.
• Puede causar co[to el_ctrico o
incendio.
• Puede causar incendio o
riesgo de dafio al producto.
• Este no es higi@nicoy puede
causar enfermedades o riesgo
de lesiones personales.
• Puede causar cortoel_ctrico.
/
- 27 -
Page 28

PRECAUCI
• Puede daSarse el
deshumedecedor o causar otro
daSoo lesi6n.
• Puede causar cortoel_ctrico.
• Deberia resistir un peso acerca
de 90 libras. (40Kilos)
• Las temperaturas bajas podria
causar que se congele las
bobinas y la unidad puede no
arrancar.
• El deshumedecedor debe ser
operado en una area
encerradapara ser mas
• Esta causara corto el_ctrico o
incendio.
- 28 -
• Puede causar lesiones en la
mascota o en la plant&
Page 29

RESPETE TODOS LOS C6DIGOS Y
REGLAMENTOS.
BAJO NINGUNA CIRCUNSTANCIA CORTE,
QUITE O EVITE EL USO DE LA CONEXI(_N
A TIERRA DE ESTA CLAVIJA.
ESTE APARATO NECESITA SER
CONECTADO A TIERRA.
Se requiere una alimentaci6n electrica CA,
adecuadamente conectada a tierra con un
fusible de 15 A, de 60 Hz y de 115 V. Se
recomienda un fusible de retardo o un
disyuntor de circuito que alimente solamente a
este aparato.
NO USE CABLE ELECTRICO DE
EXTENSION.
METODO RECOMENDADO DE CONEXI(_N A
TIERRA
Por su propia seguddad este aparato debe
conectarse a tierra, Este aparato viene
equipado con un cable de alimentaci6n y una
ctavija de tres terminates. Para reducir al
m&ximo el petigro de choque et6ctrico, el cable
debe estar conectado a una conexi6n de pared
con conexi6n a tierra, y esta conexi6n debe
hacerse de acuerdo con la t_ltima edici6n del
C6digo Electrico Nacionat (ANSI/NFPA 70), asi
como con los c6digos y regtamentos locales. Si
no existe una conexi6n de pared adecuada, et
ctiente tiene la responsabitidad y la obligaci6n
de mandar instalar, con un electricista
catificado, una conexi6n de pared adecuada de
tres terminates con conexi6n a tierra.
Peligrode choqueel6ctrico
Conecteen unaconexi6ndeparedde 3 terminales
Noquite laterminalde conexi6na tierra
Nouse adaptadores
Nouse cableel6ctricode extensi6n
Si no sesiguenestas instrucciones,puede
ocasionarselamuerte,un incendioo un choque
el6ctrico.
Cable de
alimentaci6n con
ctavija dotada de
conexi6n a tierra
de 3 terminales.
Toma de corriente
de pared con
conexi6n a tierra.
__Terminal de
conexi6n a tierra.
F
Bajo ninguna
circunstancia corte, quite o
evite el uso de la conexi6n
a tierra de esta clavija.
- 29 -
Page 30

CARACTERiSTICAS
Para reducir et riesgo de incendio, choque et6ctrico o daSos corporales, lea la secci6n de
importantes instrucciones de SEGURIDAD antes de porter a funcionar este aparato.
1. Placa decorativa
2. Rejillafrente
3. Cable alimentaci6n
4. Armario
5. Filtro de aire
6. Tanque de agua
1
2
6
4
5
- 30-
Page 31

PANELDECONTROL
ElpaneldecontroldeldeshumidificadorcontieneunindicadordetanqueIleno,un indicadordehumedad,uncontrolde
encendido,controlde humedad,controldevelocidaddelventiladory controldeltemperizador.
IndicadordetanqueIleno - EsteindicadorseiluminacuandoeltanquedeaguaestaIlenoydebevaciarse.
Encendido- Eldeshumidificadorseponeenfuncionamientecuandosepulsaestebot6nyseparacuandosepulsadenuevo.
Controlde humedad- Controlala humedaddela habitaci6n
• @ : Paraincrementarelvalordehumedad
• @ : Parareducirelvalordehumedad
•Lahumedadsepuedesituarenunosvaloresentreel35%HR(HumedadRelativa)-70%
HR(HumedadRelativa)en incrementosdel5%.
Velocidaddelventilador - Contralavelecidaddecirculaci6ndelaire.
. Alta:lavelocidaddelventiladoresalta
. Baja:lavelocidaddelventiladeresbaja
. Cuandose pulsaelcontroldevelocidaddelventilador,secambiael mododevelocidaddel
ventilador.
Temporizaderde Energia - Presieneestebot6nparaseleccionareltipodeoperaci6n
. SeleccieneConstantparalaoperaci6nsininterrupci6n.
. Seleccienetanto2 o4 horasOn/Offparalaoperaci6nenciclo:
Launidadeperar_per2o 4 horas,y luegoseapagar_completamentepor2 o4 horas.
ElciclosetrepitehastaqueustedcambiaIo ajustado.
•Cuandoes presionadoelbet6ndelTemporizadordeEnergla,lalamparadelindicadordel
Temporizadorcambiacomosigue:
Constinuouse,2 HorasOn/Offe.4 HorasOn/Offe Constinueus.
Reinicieautem_tico- Unavezquelaenergiaesrealmacenadadespu_sdeunainterrupci6nelectrica,launidadvuelve
a losajustesde laoperaci6npreviadespu6sde2 minutosdedemora.
Elventiladorseponeinmediatamenteenfuncionamientoalvolverlaelectricidad.
FUNCIONAMIENTODELDESHUMIDIFICADOR
I. Conecteelenchufeenunatomadepared.Pulseelbot6nde encendido.
2.Configureelcontroldehumedadentreel35%HR(HumedadRelativa)y70%HR(HumedadRelativa)paraobtenerun
funcionamientonormal.
Siprefiereunmayorgradodesequedadenel aire,oprimael bot6ndecontrolde humedad(HumidityControl)
Siprefiereunmayorgradodehumedadenel aire,oprimael bot6ndecontrolde humedad(HumidityControl)
3.Pulseelbot6ndeencendidoparadetenerlaunidadmanualmente.
4.Aprieteel borondelRelojal conjuntola cantidaddetiempoustedquierequela unidadacorra.
A finesde esetiempe,la unidadapagara.
ElRelejsepuedeponerpara:laConstinuous,2 heraso4 horas.
5.Sideseacontrolarla velecidaddelacerrientedeaire,pulseelbot6ndevelocidaddelventilador.Cadavezquepulse
estebot6n,secambiarael medodevelocidaddelventilador:Altoe,bajo._ Alto.
Nora:esimportanteno perderel tanquedelagua.
Estedeehumidificadorno funcienar_si no tieneel tanquedeaguadebidamenteinstalade.
-31 -
Page 32

• Instale el deshumidificador en un piso nivelado
lo suficientemente s61ido como para soportar
la unidad con el recipiente lteno de agua.
• Para lograr un m_ximo rendimiento, deje un
espacio tibre de 12 a 18 pulgada en todo el
espacio que circunde al aparato con objeto de
mantener una buena circulaci6n de aire.
• Mantenga todas las puertas, ventanas y otras
entradas de aire cerradas al operar et
deshumidificador. El aire hQmedo del exterior
hara que el aparato trabaje en exceso.
• Instale su deshumidificador en una zona en
que la temperatura no baje a menos de 65°F
(18°C). A menor temperatura, el serpentin del
aparato podria cubrirse de escarcha.
Por 1otanto el desempe_o de dehumidifying se
puede reducir.
CONTROLDEDESCONGELAMIENTO
Cuando el control de descongelamiento detecta
la formaci6n de escarcha en el serpentin del
evaporador, automaticamente desconecta el
compresor. El ventilador seguir_ funcionando
para hacer que el aire pase por el serpentin y
derrita la escarcha. Cuando se derrite la
escarcha, el compresor arranca de nuevo
autom_ticamente y comienza a haber
deshuimidificaci6n.
- 65OF
(18°C)
• Use el deshumidificador en un s6tano para
ayudar a evitar los dafios que causa la
humedad.
• Use el deshumidificador al cocinar, al lavar la
ropa, al bafiarse yen lugares en que lava la
vajilla en que hay demasiada humedad.
• Use el deshumidificador para evitar los dafios
que causa la humedad en libros y objetos
valiosos almacenados.
- 32-
Page 33

Cuandoetcuboestarepleto,ocuandoelcubenoestaenlaposicionapropiada,etCuboRepleto
ligeroprendeylaunidadapagaautomaticamente.
Tambien,cuandocuboesfueradeposicion,launidadhacepippip3times.
Laeubetadebeserre-ubicadoenlaposiei6napropiada para que el deshumedeeedor
funcione. La luz ser_ encendida y el deshumedecedor no funcionar_ si la cubeta no est_
en la posicibn apropiada.
El recipiente de agua puede ser vaciado en una de las tres siguientes maneras:
1. Vaciado manual del
recipiente
Cuando el recipiente este Ileno,
quitelo y vacielo en un lavabo
grande o en una tina. Una vez
que Io haya hecho, vuelva a
colocarlo correctamente.
NOTA: Para reemplazar
correctamente el recipiente,
cercibrese de que las ranuras
de la parte posterior del
recipiente est6n bien
colocadas.
NOTA: Tenga cuidado al
extraer el recipiente, porque
puede ser bastante pesado.
2. Ponga el deshumidificador
directamente sobre el
desagLie
El tanque tiene una conexi6n de
manguera que se puede dejar
abierta. Perfore un agujero de
entre 4/1" (6,4 mm) y 1/2" (13
mm) en el centro de la conexi6n
de manguera. Una vez abierto,
la conexiSn de manguera
drenara continuamente el agua
del tanque.
NOTA: Cunande se vuelva a
celocar la cubeta en la unidad
si se levanta un poco por
detr_s es m_s facil la
inserccibn.
3. Instale una manguera de
jardin en la conexibn
roscada de la manguera de
drenaje del recipiente para
Ilevar el agua al drenaje,
(MANO APRETAR
UNICAMENTE)
AI estar colocada en la conexi6n
de la manguera de drenaje del
recipiente, cerci6rese de que la
manguera no se tuerza o se
doble.
Debe quedar sin pliegues entre
al deshumidificador y el drenaje.
NOTA: No apretar
excesivamente la manguera
de drenaje cuando se conecte
al depbsite.
Usar un cinta plzistica y
apretar a mane firmemente
sin arrancar los hilos.
- 33-
Page 34

LA REJILLA Y EL GABINETE
Para limpiar el gabinete: Use agua y un
detergente suave. No use blanqueador ni
limpiadores abrasivos.
Para limpiar la rejilla: Use una aspiradora con
un cono o cepitlo.
FILTRO DE AIRE
El fiitro de aire se encuentra en la parte
posterior del deshumidificador. Debe revisarse
y limpiarse cuando menos cada 2 semanas o
mas frecuentemente si es necesado.
PAPA RETIPARLO:
Flexione el filtro en la esquina inferior derecha
y deslice la esquina superior derecha hacia la
izquierda. L_velo con agua jabonosa tibia.
Enju_gueto y d6jelo secar antes de volverlo a
cotocar.
Una vez est_ completamente seco,
colbquelo de nuevo en la unidad,
LIMPIEZA INTERNA DE LA UNIDAD
Despu6s de quitar et filtre de aire, limpie et
serpentin interno con un cepilio suave para
quitar las particulas no adheridas o hQmedas.
NOTA: No deje que et agua entre en el
compartimiento electrico/mecancio en la
abertura circular situada detr_s del serpentfn.
No rocie el serpentin con manguera.
iTenga cuidado! Los bordes de la espiral
son afilados.
LIMPIEZA GENERAL
• Quite el poivo de la rejilla y de los panetes
laterales con un cepillo suave o use et cepilto
de su aspiradora.
• Si et gabinete se despostilla, puede retocar la
pintura con un esmalte de buena calidad para
evitar que se oxide.
LIMPIEZA DEL RECIPIENTE DE
AGUA
• Cada dos o tres semanas, enjuague et
interior del recipiente con detergente suave
para evitar la fermaci6n de moho, humedad o
baeterias.
-qu
- 34 -
Page 35

Eldeshumidificadorno
arranca.
Eldeshumidificadorno
secael airecomo
debiera
Elcable de alimentacibndel
deshumidificadorestb desenchufado,
Elfusible estbquemadoo el
disyuntordel circuitoestb abierto,
Elrecipientede aguaestb Ileno,
Elrecipientede aguano estb
instalado,
Noha dejadosuficientetiempo para
queseque elaire,
Hayescasacirculacibnde aire,
Puedequeelcontroldehumedadnoest_
fijadoenunvalorIosuficientementebajo.
Laspuertasy ventanasnoestbnbien
cerradas,
Elsecador de ropapodria estar
generandoaire hdmedoen el recinto.
Latemperaturadel recintoestb
demasiadobaja,
Eldeshumidificador Elvolumende airepot deshumidificar
trabajadenmasiado es excesivo,
Laspuertasy ventanasestbn
abiertas,
Seforma eacarchaen Eldeshumidificadorhasido
elserpentin, encendidohace pocoo la
temperaturadelrecintoes inferiora
65°F(18°C).
• Cerci6rese de que la clavija del cable de
alimentaci6n del deshumidificador est6 bien
puesta en la conexi6n de pared.
• Revise la caja del disyuntor del circuito del
fusible y cambie el fusible o vuelva a cerrar
el disyuntor.
• El deshumidificador se apaga
autom_ticamente cuando estro sucede.
Vacie el recipiente de agua.
• Cerci6rese de que el recipiente est6 en el
lugar correcto.
• Cuando se instala por primera vez, deje que
pasen 3 o 4 dias para que se mantenga la
sequedad deseada.
• Cerci6rese de que no haya cortinas,
persianas o muebles que bloqueen la parte
anterior o posterior del deshumidificador.
• Pulse el _bot6n de control de humedad a
humedad baja.
• Revise que todas las puertas, ventanas y
otras aberturas est_n bien cerradas.
• Instale el deshumidificador lejos de la
secadora de ropa. Esta debe arrojar el aire
caliente fuera del recinto.
• La unidad no funcionar_ satisfactoriamente
si la temperatura del recinto es inferior a
65°F (18°C).
• Verifique con su vendedor si la capacidad
es la adecuada
• Cierre todas las puertas y ventanas que den
al exterior.
• Es normal. La escarcha normalmente
desaparecer_ en 60 minutos
El ventiladorhace Hay circulacibndeaire alrededordel • Es normal.
ruido, deshumidificador.
Hayagua en el piso, La conexibnde la manguerade • Revise si la manguera est_ instalada.
drenaje que vaal recipiente de agua
est_ floja.
El recipiente de agua no est_ bien • Verifique la posici6n correcta del Recipiente
colocado, de Agua, P_gina 9.
/
- 35-
Page 36

FRIEDRICH AIR CONDITIONING CO,
Post Office Box 1540 • San Antonio, Texas 78295-I540
(210) 357-4400 • FAX (210) 357-4480
TI RMINOS DE LA GARANTIA LIMITADA -
DESHUMIDIFICADOR
GARANTIA LIMITADA -PRIMER AISle
TODAS LAS PARTES: Si cuatquiera de las partes suministradas per FRIEDRICH no funciona debido a un defecto de manufactura o del
material dentro de los 12 meses siguientes a ta fecha original de compra, FRIEDRICH reparar_ el producto sin costo alguno, siempre y
cuando que [a unidad est_ razonablemente accesible para el servicio. Todo costo adicionat ocasionado per remover unidades inaccesibIes
y/o costos per millaje reiacionados con el viaje de service, los cuales excedan und distancia de 25 mittas (una via), correr_n per cuenta del
propietario. Esta soluci6n es [a solucii6n 0nica convenida dentro de los 12 mesas seguientes de ta vecha original de compra.
GARANTIA MMITADA -DEL SEGUNDO AL QUINTO AISle
SISTEMA REFRIGERANTE SELLADO: Si et sistema refrigerante seIlado (definido para este propbsite come eI compresor, cendensador,
serpenttn, serpent[n de evaperaci6n,vblvula de reversa, v_ivuta de control, capilar, secador de filtro y tubeda de interconexi6n) suministrade
per FRIEDRICH con su unidad de aire acondicienado falta, debido a un defecto de manufactura o deI material, dentre de los 60 meses
siguientes a la fecha original de compra, FRIEDRICH pagarb una asignaci6n para mane de obra y las partes necessarias para arreglar el
sistema refdgerante settade, el sistema refrigerante sellado. Sin embargo, FRIEDRtCH no pagarb el costo de[ diagn6stico del problema, el
retire y transperte de la unidad hacia/de ta agencia de servicio, ni los gastos de reinstataci6n asociados con la reparaci6n dei sistema
refdgerante seilado. Todos esos costos correr_n per cuenta de[ propietado. Esta soluci6n es la soluci6n _nica convenida dentro de los 60
mesas siguientes a la fecha original de cempra.
APLICABIMDAD Y LIMtTACtONES: Esta garantla es aplicable 6nicamente a unidades que permanezcan dentro del territorio de ios 50
Estados Unidos de America, eI Distrito de Columbia y Canada. Esta garantia no es apticable a:
Fiitrosde aire ofusibles.
Productos en los cuales se hayat_ retirade [as especificaciones de los modelos y los n_meros de serie.
Productos que sultan def_ctos o daSos resultantes de instalaci6n e tendido eI_ctdco incorrectos,caractedsticas de Ia corriente
elL'ctdca e mat mantenimiento. Daffos causados per accidentes, real use o abuse, incendio,inundaci6n, alteraciones y mala apti-
cacidn dei producto y/e unidades que se hayan instatadoen una atm6sfera corrosiva, probiemas causados per guerra, restricciones
gubernamentales, paros, carencia de materiales que vaya m_s atI_ del control de FRIEDRICH, o actos de la naturaleza.
PAPA OBTENER CUMPMMIENTO DE LA GARANTIA: El servicio set& prestado per el concesionario/representante autorizado de
FRiEDRICH o Ia organizaci6n de servicio afiliada en su _rea. Estos est_n listados en las P_ginas Amarillas. Si requiere ayuda para
obtener el cumplimiento de la garantia, per favor escdba a: Room Air Conditioner Service Manager, Fdeddcb Air Conditioning C_,Box
1540, San Antonio, TX 78295-1540.
LIMITACIONES: ESTA GARANTIA SE CONCEDE EN LUGAR DE OTRAS GARANTIAS. Adem_s de Io que se detalla en la garantia,
CUALQUIER GARANTIA DE IDONEIDAD EXPRESA PARA CUALQUIER PROPOSITO PARTICULAR Y/0 PAPA MERCADEO SE
LIMITARA A LA DURACION CONCEDIDA POR ESTA GAPANTIA EXPRESA. EL FABRICANTE RENUNCIA EXPRESAMENTE Y
EXCLUYE CUALQUIER RESPONSABILIDAD PeR DAI_IOS INClDENTALES 0 CONSECUENCIALES DETERMINADOS POR EL
ROMPIMIENTO DE CUALQUIER GAPANTIA EXPRESA 0 IMPLICITA.
NOTA: Atgunos estados no permiten limitaciones sobre el tiempo de duraci6n de una garantla implicita, o no permiten la limitaci6n o
exclusi6n de daffos incidentales o consecuenciales, asi que peede ser que esas exclusiones no apliquen en su case.
OTRA: Esta garantla le da derechos legales especificos. ES posible que usted tenga otros derecbos que son variables en cada estado.
PRUEBA DE COMPRA: El propietado debe tenet la prueba/recibo de compra correctos para recibir servicios relacionados con la ga-
rantla.
Todas las Ilamadas telef6nicas relacionadas con Ia operaci6n/reparaci6n de este producto correr_n per cuenta del consumido_
Todo servicio de garantta debe ser prestado per una agencia de servicio autodzada per FR_EDRICH, a menos que FRiEDRICH autorice
exp_samente otto arreg!o antes de que se baga la reparaci6n.
En case de preguntas relacionadas con los t_rminos de esta garantia, la versi6n en ing!_s es la que tiene pdoddad.
Revised 01/03
- 36-
Page 37

- 37-
Page 38

-38-
Page 39

- 39-
Page 40

FRIEDRICH AIR CONDITIONING CO
Visit our web site at www friedrich corn
Post Office Box 1540 • 4200 N Pan Am Expressway • San Antonio, Texas 78295-1540
• (210) 357-4400 • FAX (210) 357-4480
P/NO: 3828A20315C
 Loading...