

Friedrich Chill CP18, Chill CP24, Chill CP15, Chill+ EP18, Chill+ EP24 Installation And Operation Manual
Page 1
230
CP15
CP18
CP24
115
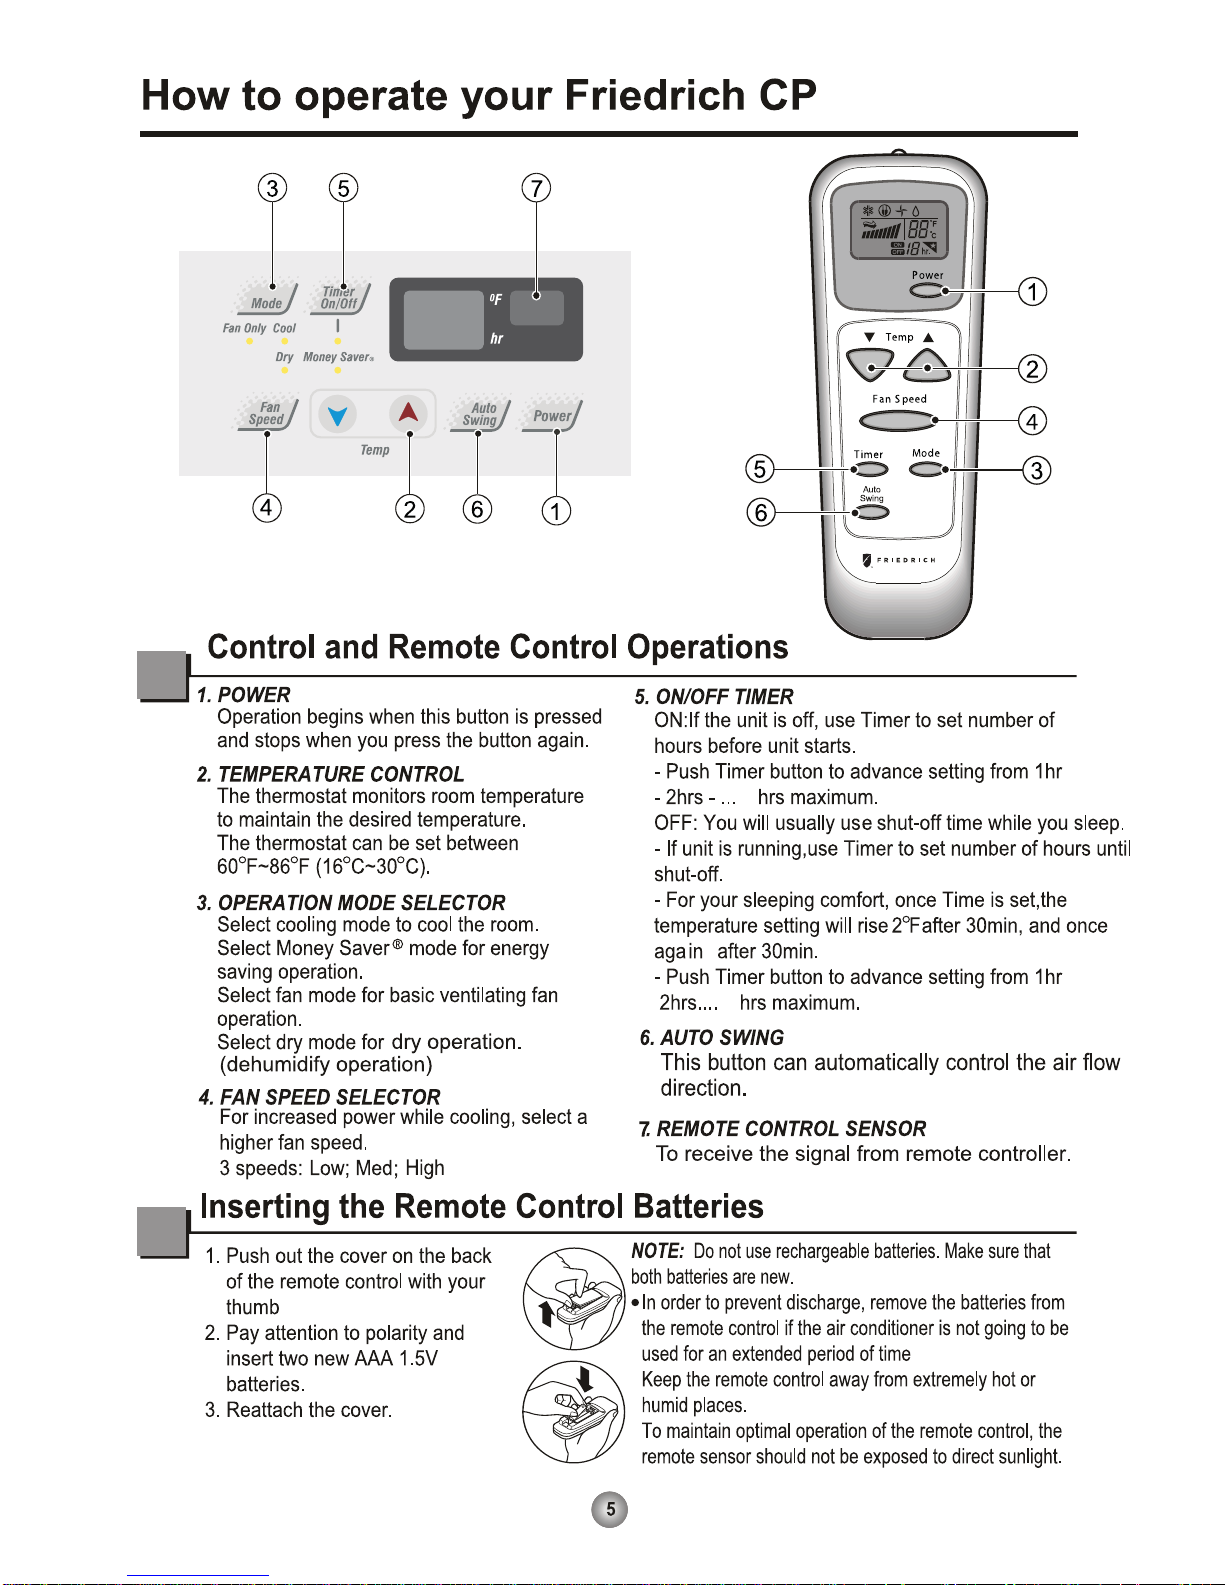
F
Power
Mode
Timer
0n0ff
Fan
Speed
Temp
CoolMoney
Saver
®
Fan
Only
Dry
hr
Auto
Swing
F
Power
Mode
Timer
0n0ff
Fan
Speed
Temp
CoolMoney
Saver
®
Fan
Only
Dry
hr
Auto
Swing
Page 2

16
Page 3

Page 4
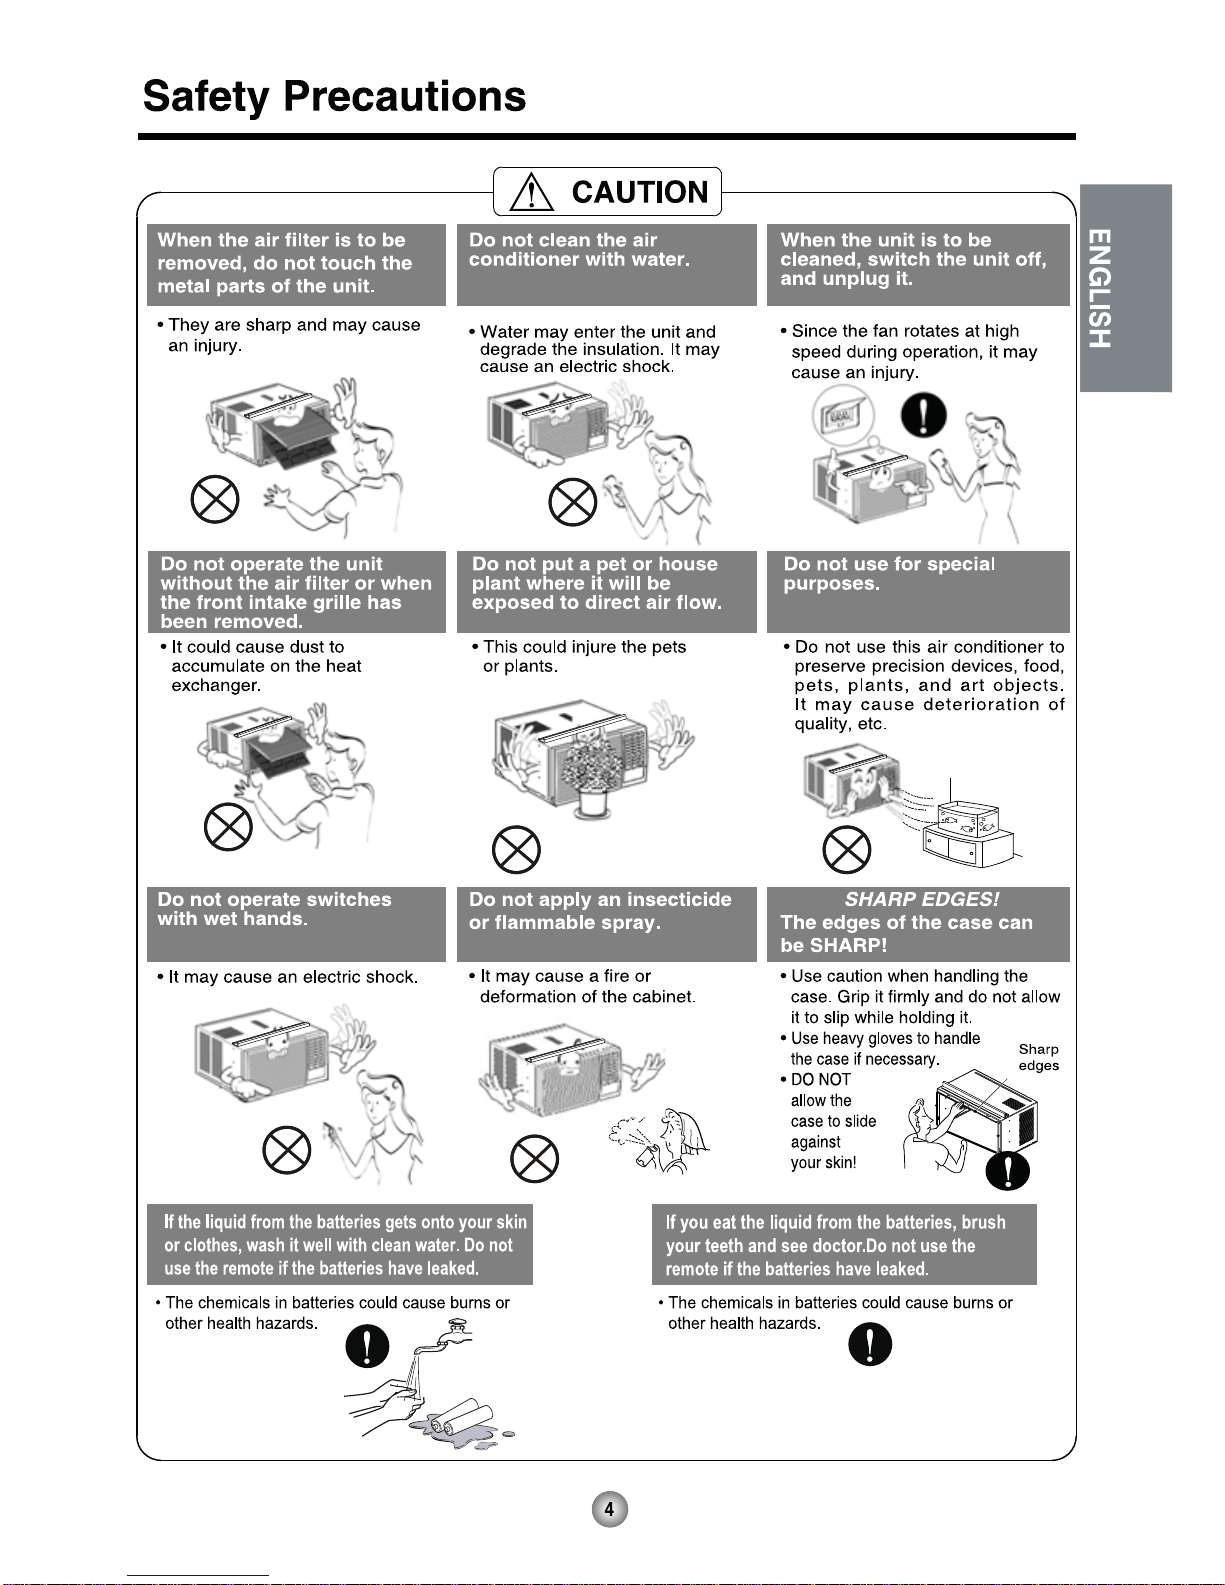
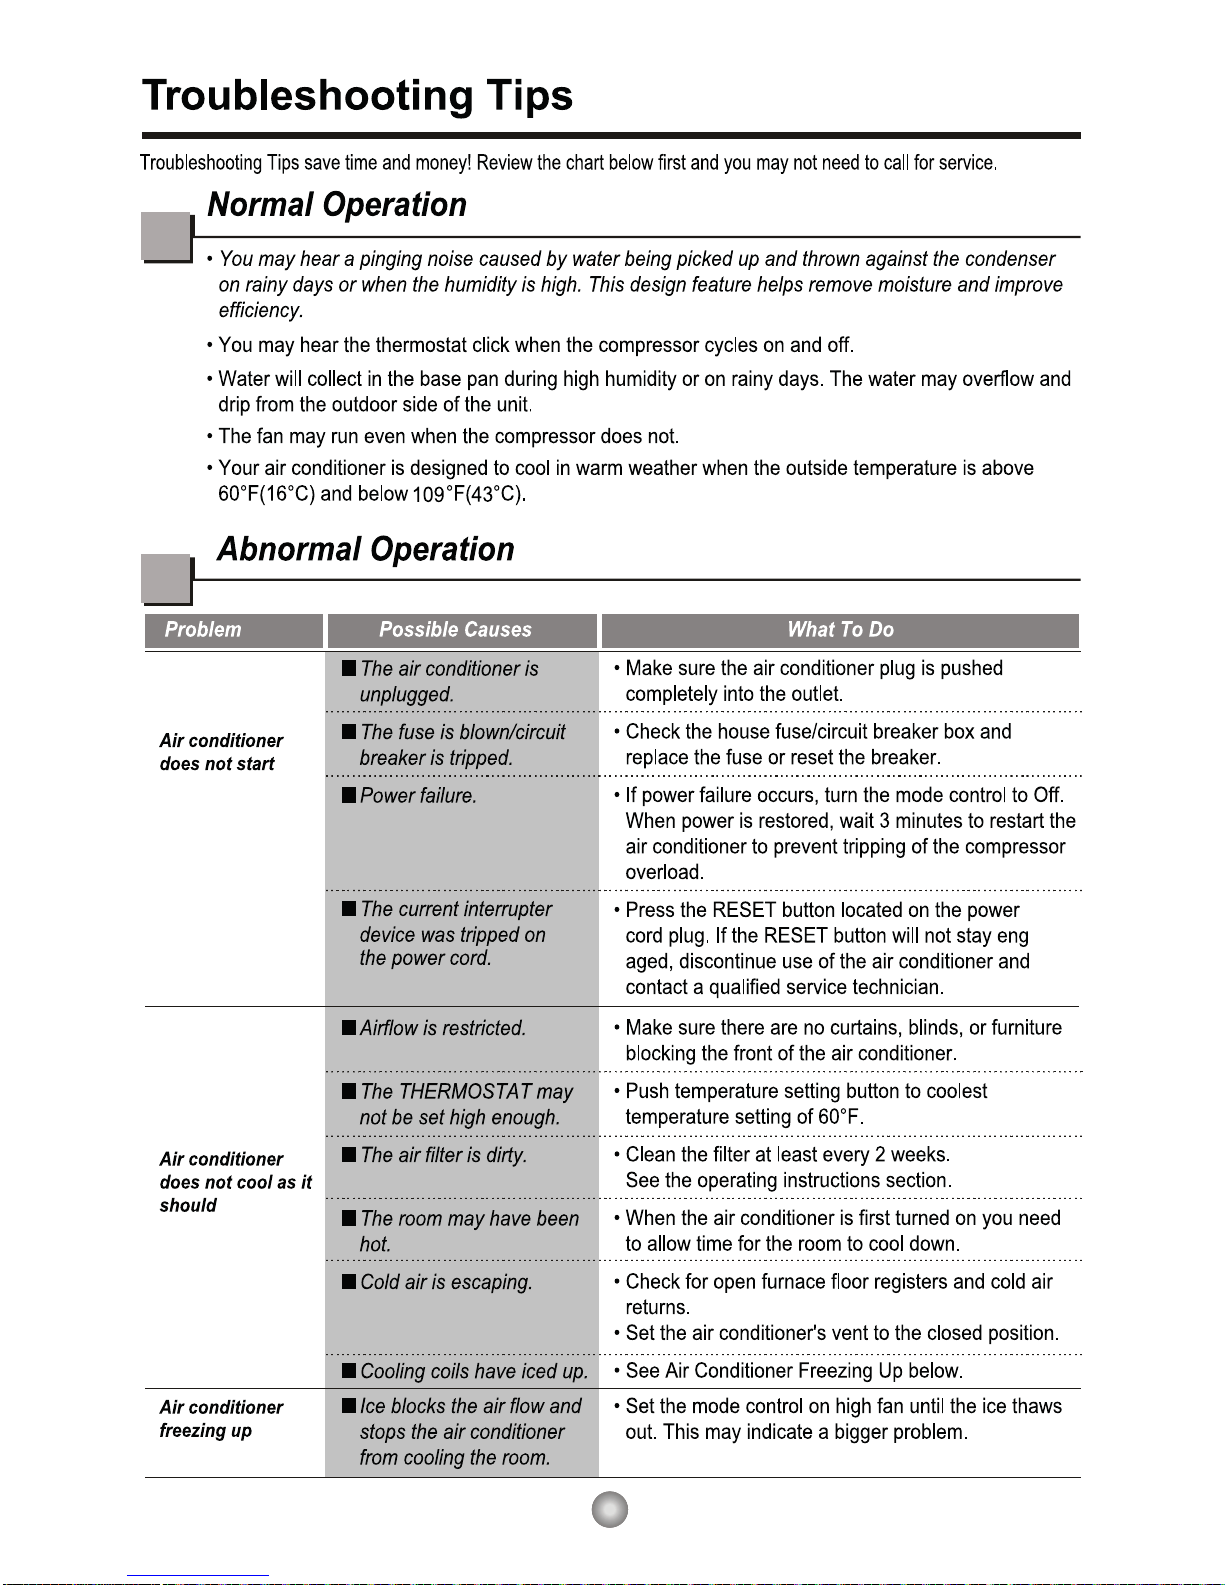
For inner cleaning, contact an Authorized Service Center or a dealer.
Do not use harsh detergent that causes corrosion or damage on the unit.
Harsh detergent may also cause failure of product, fire, or electronic shock.
Page 5
Page 6
24
24
Page 7
Page 8

Page 9

e
Page 10
Page 11
41
8
26
41
18
Page 12

Foam-PE
(Adhesive-Backed)
Type C (5) Type D (2)
Type A (11)
Carriage Bolt (2) Lock Nut (4)
Type B (7)
Foam strip
(Plain-Back)
Right frame
curtain
Window locking
bracket
Left frame
curtain
Frame guide(2)
Sill
bracket
(2)
Support bracket(2)
Drain joint pipe
Page 13

4
4
4
10
3
3.
3
44
Page 14
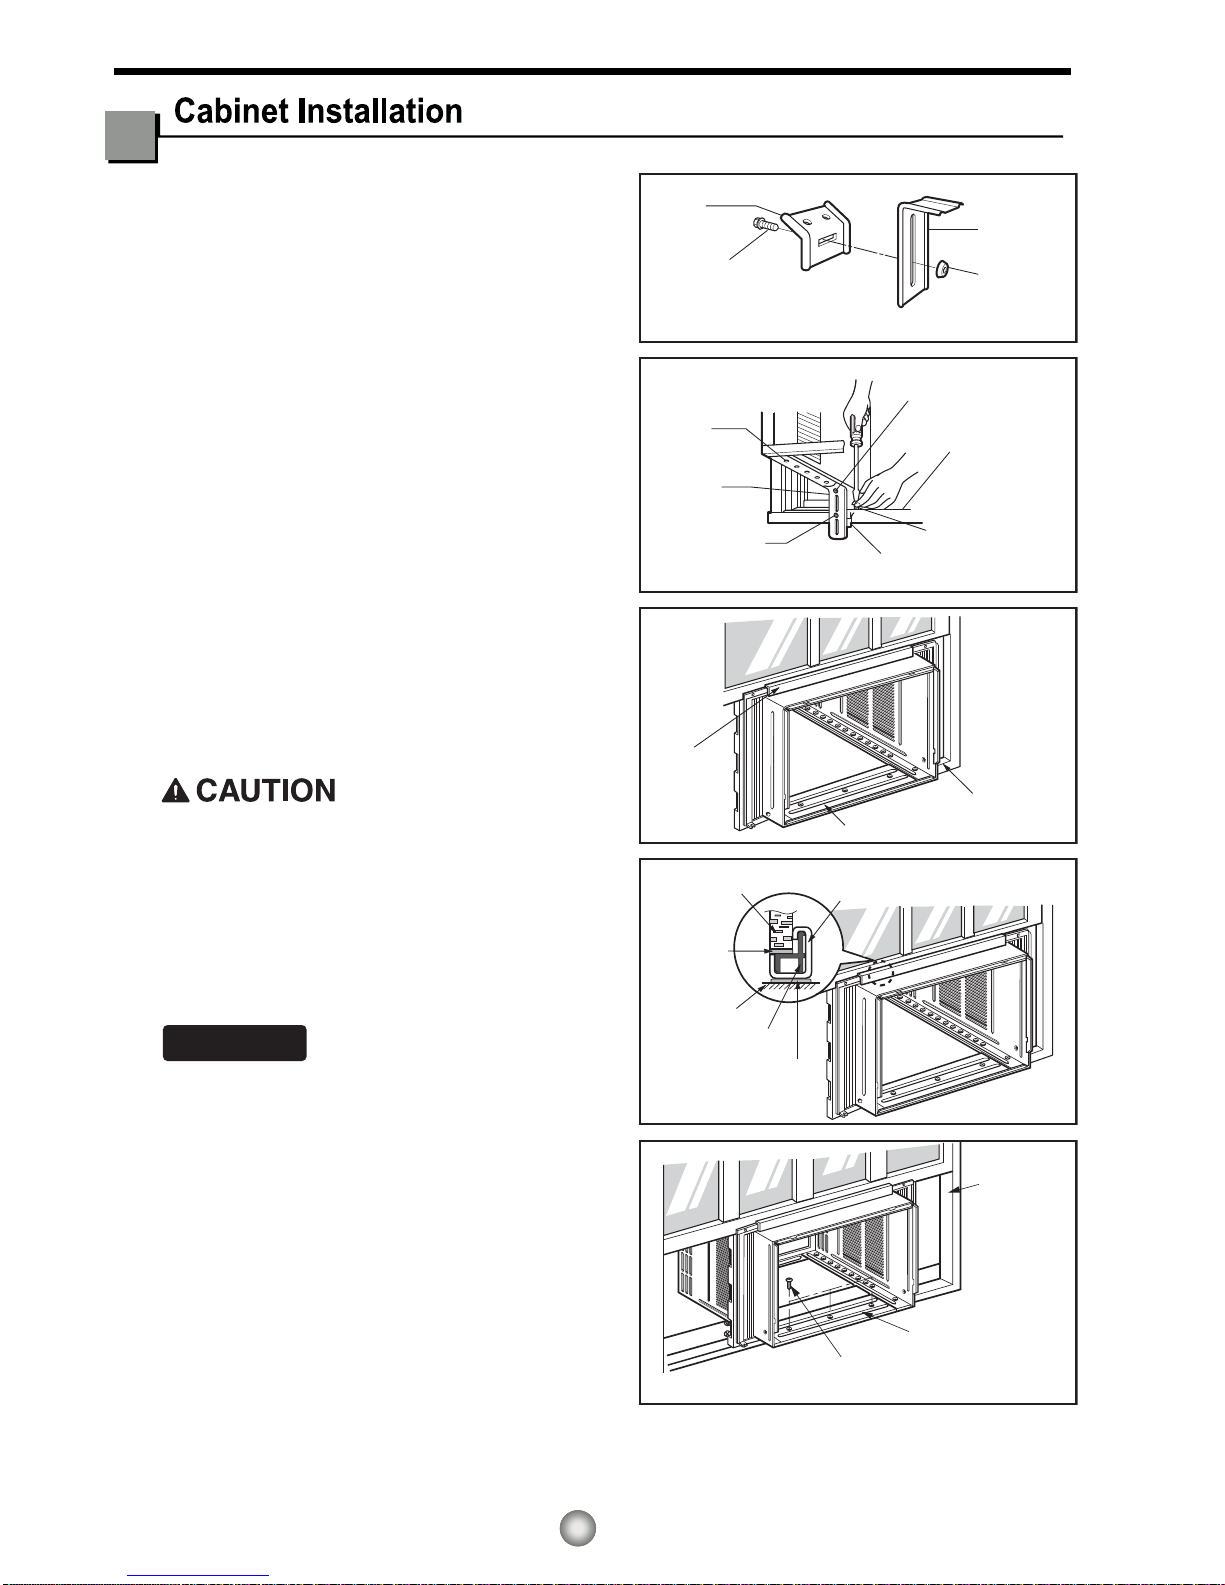
1. Open the window. Mark a line on the center of
the window stool between the side window stop
moldings.
Loosely attach the sill bracket to the support
bracket using the carriage bolt and the lock nut.
2. Attach the sill bracket to the window sill using
the screws (Type B).
Carefully place the cabinet on the window stool
and align the center mark on the bottom front
with the center line marked window stool.
3. Using the M-screw and the lock nut, attach the
support bracket to the cabinet track hole.Use
the first track hole after the sill bracket on the
outer edge of the window sill.Tighten the
carriage bolt and the lock nut. Be sure the
cabinet slants outward.
Do not drill a hole in the bottom pan.The unit is
designed to operate with approximately 1/2" of
water in bottom pan.
4. Pull the bottom window sash down behind the
Top retainer bar until they meet.
1. Do not pull the window sash down so tightly
that the movement of Frame curtain is
restricted. Attach the cabinet to the window
stool by driving the screws (Type B) through
the cabinet into window stool.
2.The cabinet should be installed with a very
slight tilt downward toward the outside.
NOTICE
Support
Bracket
Lock nut
Sill
Bracket
Carriage
Bolt
(M-Screw)
Front angle
Window stool
Window sash
Top retainer bar
Cabinet
Foam-PE
Frame curtain
Screw(Type B)
Front Angle
Sash track
Foam-PE
Cabinet
Track hole
Support
Bracket
Carriage bolt
and lock nut
Machine screw(Type D)
and lock nut
Outer edge
of window
sill
Screw(Type B)
Sill bracket
Top
retainer
bar
Fig. 5
Fig. 6
Fig. 7
Fig. 8
Fig. 9
13
Page 15
ENGLISH
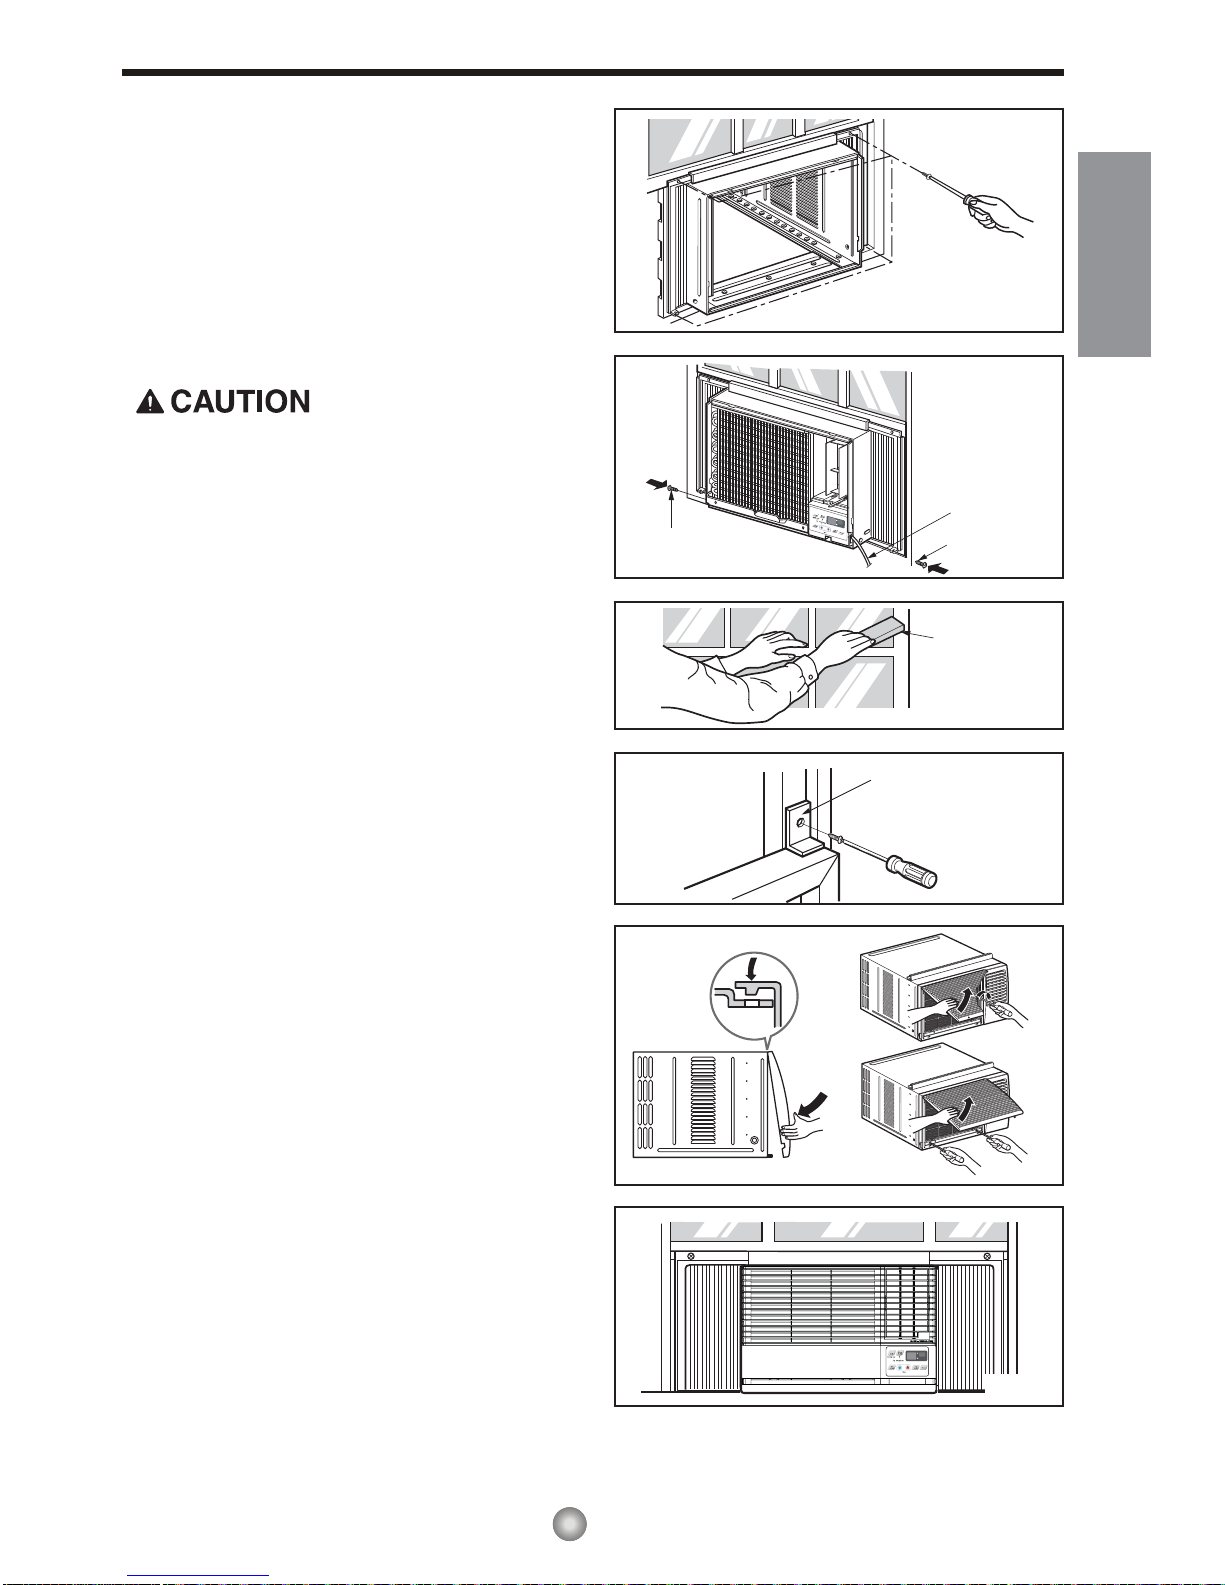
5.
Pull each Frame curtain fully to each window sash
track, and pull the bottom window sash down behind
the Top retainer bar until it meets.
6.
Attach each Frame curtain the window sash by
using screws (Type C.) (See Fig. 10)
7.
Slide the unit into the cabinet.(See Fig. 11)
For security purpose, reinstall screws(Type A) at
cabinet's sides.
8.
Cut the Foam-strip to the proper length and insert
between the upper window sash and the lower
window sash.(See Fig. 12)
9.
Attach the Window locking bracket with a screw
(Type C.) (See Fig.13)
10.
Attach the front grille to the cabinet by inserting the
tabs on the grille into the tabs on the front of the
cabinet. Push the grille in until it snaps into
place.(See Fig.14)
Lift the inlet grille and secure it with a screw (Type
A) through the front grille.(See Fig. 14)
Window installation of room air conditioner is now
completed. See ELECTRICAL DATA for attaching
pow
er cord to electrical outlet.
Power Cord
Screw (Type A)
Screw
Window locking
bracket
Foam-Strip
Screw(Type C)
Fig. 10
Fig. 11
Fig. 12
Fig. 13
Fig. 14
Fig. 15
3.
4.
14
Page 16
15
Page 17
16
Page 18

10001 Reunion Place, Suite 500
San Antonio, TX 78216
800.541.6645
www.friedrich.com
date of original purchase, FRIEDRICH will repair the product at no charge, provided room air conditioner is reasonably accessib le
for service. Any additional labor cost for removing inaccessible units and/or charges for mileage related to travel by a Service
Agency that exceeds 25 miles one way will be the responsibility of the owner. This remedy is expressly agreed to be the exclusi ve
remedy within twelve months from the date of the original purchase.
coil, evaporator coil, reversing valve, check valve, capillary, filter drier, and all interconnecting tubing) supplied by FRIEDRICH in
your Room Air Conditioner fails because of a defect in workmanship or material within sixty months from date of purchase,
FRIEDRICH will pay a labor allowance and parts necessary to repair the Sealed Refrigeration System;
not pay the cost of diagnosis of the problem, removal, freight charges, and transportation of the air conditioner to and from the
Service Agency, and the reinstallation charges associated with repair of the Sealed Refrigeration System. All such cost will b e the
sole responsibility of the owner. This remedy is expressly agreed to be the exclusive remedy within sixty months from the date of the
original purchase.
of Columbia, and Canada. This warranty is not applicable to:
1. Air filters, fuses, batteries and the front grille removal tool.
2. Products on which the model and serial numbers have been removed.
3. Products which have defects or damage which results from improper installation, wiring, electrical current
to: Friedrich Air Conditioning Co.,ATTN:Warranty Registration,10001 Reunion Place,Ste.500,San Antonio,TX 78216.
If any part supplied by FRIEDRICH fails because of a defect in workmanship or material within twelve months from
If the Sealed Refrigeration System (defined for this purpose as the compressor, condenser
FRIEDRICH will
This warranty is applicable only to units retained within the Fifty States of the U.S.A., District
characteristics, or maintenance; or caused by accident, misuse or abuse, fire, flood, alterations and/or misapplication
of the product and/or units installed in a corrosive atmosphere, default or delay in performance caused by war,
government restrictions or restraints, strikes, material shortages beyond the control of FRIEDRICH, or acts of God.
Service will be provided by the
in your area. They are listed in the Yellow Pages. If assistance is required in obtaining warranty performance, write
1. Repair of the unit
2. A refund to the customer for the prorated value of the unit based upon the remaining warranty period of the unit.
3. Providing a replacement unit of equal value
Some states do not allow limitations on how long an implied warranty lasts, or do not allow the limitation or exclusion of
consequential or incidental damages, so the foregoing exclusions and limitations may not apply to you.
This warranty gives you specific legal rights, and you may also have other rights which vary from state to state.
Owner must provide proof of purchase in order to receive any warranty related services.
All service calls for explaining the operation of this product will be the sole responsibility of the consumer.
All warranty service must be provided by an
repairs being made.
17
, unless authorized by FRIEDRICH prior to
(11-10)
Page 19

230
CP15
CP18
CP24
115
F
Power
Mode
Timer
0n0ff
Fan
Speed
Temp
CoolMoney
Saver
®
Fan
Only
Dry
hr
Auto
Swing
F
Power
Mode
Timer
0n0ff
Fan
Speed
Temp
CoolMoney
Saver
®
Fan
Only
Dry
hr
Auto
Swing
Page 20

16
17
Page 21

Page 22

Pour le nettoyage de l’intérieur, veuillez contacter un Centre de Service Agrée ou un concessionnaire.
N’utilisez pas de détergent puissants qui provoquent la corrosion ou endommagent l’unité.
Les détergents puissants peuvent aussi provoquer des pannes, des incendies ou des chocs électriques.
Page 23

Page 24

24
24
Page 25

Page 26

Page 27

Page 28

Page 29

41
8
6
Page 30

Mousse-PE
(Enduit d’adhésif)
Type C (5) Type D (2)
Type A (11)
Boulon de Ecrou
Type B (7)
Bande de mousse
(sous-couche simple)
Rideau du
cadre droit
Crochet de
fermeture de la fenêtre
Rideau du
cadre gauche
Guide du cadre (2)
Crochet de
Crochet de soutien (2)
Tuyau d’évacuation joint
G
Sommaire Kit d’Installation
l’appui (2)
carrosserie (2)
autobloquant (4)
:
Ayez les outils suivants à votre disposition au moment de l’installation
G
Tournevis (pour écrou à fentes et Phillips)G
CouteauG
CrayonG
Règle
MarteauG
Niveau à bulle d’airG
Page 31

6
4
4
4
3
3
Page 32

1. Ouvrez la fenêtre,Faites un trait au centre du
rebord de la fenêtre entre les moulures d’arrêt
de la fenêtre latérale.
Fixez moyennement le crochet de l’appui au
crochet de soutien en utilisant le boulon de
2. Fixez le crochet de l’appui à la fenêtre au
moyen des vis (Type B).
Placez doucement le boîtier sur le rebord de
la fenêtre et alignez le trait central de la face
inférieur sur la ligne centrale marquée du
3. Au moyen d’une M-vis et de l’écrou autobloquant,
fixez le crochet au trou du boitier.Utilisez le
premier trou après le crochet d’appui sur
le coté extérieur du rebord de la fenêtre.Resserrez
le boulon de carrosserie et l’écrou autobloquant.
Assurez-vous que le boîtier est incliné vers l’extérieur.
Ne percez pas de trou sur le fond de la cuvette.
L’unité est conçue pour fonctionner avec
approximativement ½ d’eau dans le fond de
4. Tirez le châssis de la fenêtre de fond vers
1. Ne tirez pas le châssis de la fenêtre si bas que
le mouvement du Rideau du cadre en soit
restreint.Fixez le boitier au rebord de la fenêtre en
passant les vis (Type B) à travers le boitier dans
le rebord de la fenêtre.
2.Le boitier doit être installé avec une très
légère inclinaison extérieure et vers le bas.
rebord de la fenêtre.
la cuvette.
Crochet
de Soutien
Ecrou
Crochet
de l’appui
Boulon de
Carrosserie
(M-vis)
Angle avant
Rebord de la fenêtre
Châssis de la fenêtre
Bague d’arrêt Supérieure
Boitier
Mousse-PE
Rideau du cadre
Vis (Type B)
Angle Avant
Piste du châssis
Mousse-PE
Trou du
Boitier
Crochet
de Soutien
Boulon de Carrosserie
et Ecrou autobloquant
Vis à Métaux (Type D)
et Ecrou autobloquant
Bord extérieur
du rebord de
la fenêtre
Ecrou(Type B)
Crochet d’appui
Bague
d’arrêt
supérieure
Fig. 5
Fig. 6
Fig. 7
Fig. 8
Fig. 9
carrosserie et l’écrou autobloquant.
ATTENTION
le bas derrière la bague d’arrêt Supérieure jusqu’à
ce qu’ils se rencontrent.
autobloquant
ATTENTION
Page 33

(1*/,6+
5.
Tirez entièrement chaque Rideau du cadre à
châssis inférieure de la fenêtre vers le bas
derrière le bague d’arrêt Supérieure
6.
Fixez chaque Rideau du cadre au châssis de
la fenêtre au moyen d’une vis (Type C).
(Voir Fig. 10)
7.
Faites glisser l’unité dans le boitier. (Voir Fig. 11)
Pour des raisons de sécurité, réinstallez les vis
(Type A) sur les côtés du boitier.
8.
Coupez une bande de mousse de longueur
convenable et insérez-là entre le châssis
supérieur et le châssis inférieur de la fenêtre
9.
Serrez le crochet de fermeture de la fenêtre
avec une vis (Type C.) (Voir Fig. 13)
10.
Serrez la grille avant au boitier en insérant les
anneaux sur la grille dans les anneaux à l’avant
du boitier.Poussez la grille jusqu’à ce qu’elle se
mette bien en place. (Voir Fig. 14)
Soulevez la grille d’entrée d’air et sécurisez là
avec une vis (Type A) passée à travers la
L’installation du climatiseur de chambre sur la
fenêtre est à présent terminée.
Voir DONNEES ELECTRIQUES pour fixer le
grille avant. (See Fig. 14)
cordon d’alimentation à la prise de courant.
Cordon d’alimentation
Vis (Type A)
Vis
Fig. 10
Fig. 11
Fig. 12
Fig. 13
Fig. 14
Crochet de fermeture
de la fenêtre
Bande de Mousse
Vis (Type C)
Fig. 15
3.
4.
jusqu’à ce qu’il se rencontre.
ATTENTION
(Voir Fig. 12)
14
Page 34

15
Page 35

16
Page 36

Friedrich Air Conditioning Company
10001 Reunion Place, Suite 500
San Antonio, Tx 78216
www.friedrich.com
GARANTIE LI MITÉE
CLIM ATISEURS INDIVIDUELS
PREMIÈRE ANNÉE
TOUTES LES PIÈCES - Si, dans les 12 mois suivant la date d’achat initial, une pièce fournie par FRIEDRICH devenait défectueuse en raison d’un
déf
aut de fabrication ou de matériau, FRIEDRICH réparera le prod uit gratuitemen t, dans la mesure où le climatiseur est raisonnable ment acces -
si
ble pour la réparation. Tous les frais de main d’oeuvre additionne ls pour la dépose d’un appareil difficilement accessible et/o u les frais de
déplacem
C
ent (kilométrage) encourus par le réparateur, au delà de 40 km (25 miles) dans une seule direction, sont la responsabilité du propriétaire.
ette compensation est reconnue comme étant la seule compensation of f erte dans les 12 mois qui suivent la date d’achat initi al .
DEUXIÈME À CINQUIÈME ANNÉE
SYSTÈME FRIGORIFIQUE HERMÉTIQUE - Si le système frigorifique hermétique (comprenant, aux termes de cette garantie, le compresseur, le serpentin de
condenseur, le serpentin d’évaporateur, le robinet d’inversion, le clapet anti-retour, le tube capillaire, le déshydrateur-filtre et toute la tuyauterie interconnectée)
intégré par FRIEDRICH à votre climatiseur devenait défectueux en raison d’un défaut de fabrication ou de matériau dans les 60 mois à compter de la date
d’achat initial, FRIEDRICH allouera un dédommagement pour les frais de main d’oeuvre et les pièces nécessaires à la réparation du système frigorifique
hermétique. FRIEDRICH ne prendra pas en charge les frais de diagnostic, de dépose et de transport du climatiseur jusqu’au centre de réparation et retour, ni
les frais de réinstallation consécutifs à la réparation. Tous ces frais sont à la charge du propriétaire. Ce dédommagement est reconnu comme étant la seule
compensation offerte dans les 60 mois qui suivent la date d'achat initial.
CONDITIONS D’APPLICATION ET RESTRICTIONS - Cette garantie s’applique exclusivement aux appareils vendus au détail aux États-Unis, dans le District
de Columbia et au Canada. Cette garantie ne s’applique pas :
1. Aux filtres à air ni aux fusibles ;
2. Aux produits dont le numéro de modèle et le numéro de série ont été enlevés ;
3. Aux produits dont la défaillance ou les dommages résultent d’une mauvaise installation, d’un mauvais câblage, d’une tension d’alimentation inadaptée ou d’un mauvais entretien; ni lorsqu’ils sont causés par un accident, une utilisation erronée ou abusive, un incendie, une inondation, une
modification et/ou une erreur d’application du produit. La garantie ne s’applique pas non plus aux appareils installés dans une atmosphère corrosive,
ni aux problèmes ou délais d’utilisation résultant d’actes de guerre, de restrictions ou de contraintes gouvernementales, de grèves, de pénuries de
matériau indépendantes du contrôle de FRIEDRICH, ou de catastrophes naturelles.
EXÉCUTION DE LA GARANTIE - Les réparations seront effectuées par un revendeur ou un centre de réparation agréés par FRIEDRICH et situés dans votre
région. Leurs coordonnées se trouvent dans les Pages Jaunes. Si vous avez besoin d’assistance pour obtenir une réparation sous garantie.
EXCLUSIONS - CETTE GARANTIE EST OFFERTE À L'EXCLUSION DE TOUTE AUTRE GARANTIE. Nonobstant les clauses cette garantie, TOUTE
GARANTIE IMPLICITE DE CONFORMITÉ POUR UN USAGE PARTICULIER ET/OU DE QUALITÉ MARCHANDE SERA LIMITÉE À LA DURÉE DE LA
PRÉSENTE GARANTIE EXPRESSE. LE FABRICANT DÉCLINE ET EXCLUT FORMELLEMENT TOUTE RESPONSABILITÉ POUR LES DOMMAGES ET
PRÉJUDICES INDIRECTS RELATIFS À L’INEXÉCUTION DE TOUTE GARANTIE EXPRESSE OU IMPLICITE.
La performance de l'obligation de Garantie de Friedrich est limitée à une des méthodes suivantes :
1. Réparation de l'unité
2. Un remboursement au client pour la valeur distribuée au prorata de l'unité basée sur la période restante de garantie de l'unité.
3. L'établissement d'une unité de remplacement de valeur égale
La méthode pour fulfuillment de l'obligation de garantie est à la discrétion unique de Friedrich.
REMARQUE - Certaines provinces n’autorisent pas de restriction sur la durée d’une garantie implicite ou n’autorisent pas de restriction ni d’exclusion des
dommages ou préjudices indirects. Il est donc possible que ces exclusions et restrictions ne s’appliquent pas à vous.
AUTRE - Cette garantie vous accorde des recours légaux spécifiques mais il est possible que vous bénéficiez d’autres droits selon votre province.
PREUVE D’ACHAT – Pour bénéficier des services offerts par la présente garantie, l’acquéreur devra fournir une preuve d’achat.
Tous les appels de service relatifs au fonctionnement de ce produit sont à la charge du consommateur.
Toute réparation sous garantie doit être effectuée par un centre de service agréé par FRIEDRICH, sauf autorisation expresse de FRIEDRICH au préalable.
17
Page 37

230
CP15
CP18
CP24
115
F
Power
Mode
Timer
0n0ff
Fan
Speed
Temp
CoolMoney
Saver
®
Fan
Only
Dry
hr
Auto
Swing
F
Power
Mode
Timer
0n0ff
Fan
Speed
Temp
CoolMoney
Saver
®
Fan
Only
Dry
hr
Auto
Swing
Page 38

17
18
Page 39

Page 40

Para una limpieza interior, póngase en contacto con un Centro de Servicios Autorizado o un revendedor.
No utilice detergentes abrasivos que causan corrosión o dañan la unidad.
Los detergentes abrasivos pueden igualmente provocar un fallo del producto, un incendio o una
descarga electrónica.
Page 41

Page 42

24
24
24
Page 43

Page 44

Page 45

Page 46

Page 47

41
18
26
41
18
Page 48

Page 49

Page 50

1. Abra la ventana. Marque una línea en el centro
de la repisa de la ventana entre las molduras de
tope de la ventana lateral.
Coloque sin apretar la ménsula del alféizar en la
ménsula de soporte utilizando el pemo y la
tuerca de segutidad.
2. Coloque la ménsula del alféizar en el alflL]DUGH
la ventana utilizando los tornillos (Tipo B). Apriete
el perno y la tuerca de seguridad.
Repisa de la ventana y alinee la marca central en
el frente del fondo con la línea central marcada
en la repisa de la ventana.
3. Utilizando el tornillo M y la tuerca de seguridad,
coloque la ménsula de soporte en el orificio de la
guía del gabinete. Use el primer orificio de la guoD
después de la ménsula del alfézar en el borde
exterior del alféizar de la ventana.
Apriete el perno y la tuerca de seguridad.
Asegúrese de que el gabinete esté inclinado
hacia afuera.
No perfore la charola del fondo. La unidad estj
diseñada para operar con aproximadamente 1/2"
de agua en la charola del fondo.
1. No hale el marco de la ventana hacia abajo tan
apretado que se restrinja el movimiento de los
deslizadores. Sujete el gabinete a la repisa de
la ventana insstalando los tornillos (tipo A o B)
a través del gabinete en la repisa de la ventana.
2. El gabinete deberá ser instalado ligeramente
inclinado hacia abajo hacia el exterior.
CONSEJO
MENSULA
DE SOPORTE
TUERCA DE
SEGURIDA
MENSULA DEL
ALFEIZAR
BULÓN
PARTE FRONTAL INTERIOR
REPISA DE VENTANA
MARCO DE LA
VENTANA
BARRA DE
RETENCION SUPERIOR
GABINETE
PANEL
GUIA
CINTA DE
ESPUMA
CINTA DE
ESPUMA
TORNILLO(TIPO B)
Parte Frontal Interior
ORIFICIO DE
CARRIL DE GABINETE
MENSULA
DE SOPORTE
TORNILLO PARA
METALES
(TIPO D)
Y
TUERCA DE SEGURIDA
BORDE EXTERIOR
DEL ANTEPECHO
DE LA VENTANA
TORNILLO(TIPO B)
MENSULA
DEL ALFEIZAR
BARRA
DE
RETENCION
SUPERIOR
Fig. 5
Fig. 6
Fig. 7
Fig. 8
Fig. 9
Page 51

ESPAÑOL
5.
Hale cada panel guía completamente a cada
lado de la ventana y repita del paso 2.
6.
Adjunte cada panel guía a cada lado de la
ventana usando tornillos (Tipo C).
(Ver Fig.10)
7.
Deslice el chasís dentro del gabinete.
(Ver Fig.11)
Por razones de seguridad, re instale los tor nillos
(Tipo A) en los lados del gabinete.
8.
Corte la tira de goma a la medida apropiada e
introdúzcala entre la parte superior e inferior de
la ventana. (Ver Fig. 12)
9.
Se debe instalar el asa antes de fijar el frente
decorativo. (Ver Fig.13)
10.
Instale la rejilla frontal en el cabinete
insertando la lengüeta en la rejilla a la
lengüeta en el frente del cabinete. Empuje la
rejilla hasta que se cierre con sonido de golpe.
(Ver Fig. 14)
Levante la rejilla de entrada y asegúrela con
un tornillo (tipo A) a través de la rejilla frontal.
(Ver Fig.14)
Ahora la instalación del aire acondicionado en
la ventana es completada.Vea los DATOS
ELECTRICOS para instalar el cable de
alimentación en la toma de corriente.
CORDÓN DE
ALIMENTACIÓN
ELÉTRICA
TORNILLO
(TIPO A)
TORNILLO
SOPORTE DE
CERRADURA
TIRA DE GOMA
TORNILLO
(TIPO C)
Fig. 10
Fig. 11
Fig. 12
Fig. 13
Fig. 14
Fig. 15
3.
4.
14
Page 52

15
Page 53

16
Page 54

17
Page 55

Friedrich Air Conditioning Company
10001 Reunion Place, Suite 500
San Antonio, Tx 78216
800.541.6645
www.friedrich.com
AIRE ACONDICIONADO DE HABITACIÓN
GARANTÍA LIMITADA
EL PRIMER AÑO
CUALQUIER PIEZA: Si cualquier pieza suministrada por FRIEDRICH falla debido a un defecto de fabricación o de material dentro de los doce meses a partir
de la fecha original de compra, FRIEDRICH reparara el producto sin costo adicional, siempre cuando el aire acondicionado de la habitación esté accesible
para servicio. El propietario será responsable de cualquier costo adicional de mano de obra para desinstalar unidades inaccesibles y/o cargos relacionados
con los viajes de una agencia de servicio que excede de 25 millas. Esta garantía sólo será válida 12 meses después de la fecha de compra original.
SEGUNDO A QUINTO AÑO
SISTEMA DE ENFRIAMIENTO: Si el sistema de enfriamiento (para este propósito se define como el compresor, serpentín de evaporador y del condensador,
válvula de retorno, válvula de retención, capilar, filtro, secador, todas las tuberías de interconexión) suministrados por FRIEDRICH fallan debido a un defecto
de fabricación o de material dentro de los sesenta meses a partir de la fecha original de compra, FRIEDRICH pagará un subsidio de mano de obra y las partes
necesarias para reparar el sistema de enfriamiento, asumiendo que FRIEDRICH no pagará el costo del diagnóstico del problema, desinstalación, los gastos
de flete y transporte del aire acondicionado a la Agencia de Servicio, y los cargos asociados con la reparación y la reinstalación del sistema de refrigerante
sellado. Todos los gastos se harán de la exclusiva responsabilidad del propietario. Esta garantía sólo será válida 60 meses después de la fecha de compra
original.
APLICABILIDAD Y LIMITACIONES: Esta garantía sólo es aplicable a las unidades dentro de los cincuenta estados de los EE.UU., Distrito de Columbia
y Canadá.
Esta garantía no se aplic a a:
1.
Filtros de aire o fusibles.
2. Productos en los que los números de modelo y de serie han quitado.
3.
Los productos que tienen defectos o daños que son debidos a una mala instalación, cableado, corriente eléctrica, o mantenimiento; accidente,
abuso, negligencia, mal uso, incendios, inundaciones, alteraciones, unidades instaladas en una atmósfera corrosiva, retraso en funcionamiento
debidos a la guerra, restricciones del gobierno, huelgas, provocados por la escasez de materiales fuera del control de FRIEDRICH, o actos de Dios
OBTENIENDO RESULTADOS DE LA GARANTIA: El servicio será sumin istrado por el dist ribuidor autorizado de servicio o la Organización de S e r vici o
de FRIEDRICH en su área. Se podrán encon trar en las Páginas Amarillas. Si se requiere asistencia con la garantía.
LIMITACIONES: ESTA GARANTÍA SE DA EN LUGAR DE CUALQUIER OTRA GARANTÍA Cualquier objeto incluido en esta garantía, CUALQUIER
GARANTÍA IMPLÍCITA PARA UN PROPÓSITO EN PARTICULAR Y/O MERCANTIL SERA LIMITADA POR LA DURACION DE ESTA GARANTIA. EL
FABRICANTE DECLARA EXPLICITAMENTE Y SE DESLINDA DE CUALQUIER RESPONSABILIDAD POR DAÑOS CONSECUENTES O INCIDEN TALES POR INCUMPLIMIENTOS EN ACUERDOS DE CUALQUIER GARANTIA EXPLICITA O IMPLICITA.
La ejecución de la obligación de la garantía de Friedrich está limitada a cualquiera de los siguientes métodos:
1. Reparación de la unidad.
2. Reembolso al cliente por el valor prorrateado de la unidad basado en el período remanente de la garantía de la unidad.
3. Proveyendo el reemplazo de una unidad de igual valor.
El método de cumplimiento de la obligación de la garantía de Friedrich es a la sola discreción de Friedrich Air Conditioning.
AVISO: Algunos estados no pe rmiten limitaciones en l a d u r ación de una ga rantía, o no pe rmiten la limitación o exclusión de consecuen c i a
daños indirectos o incidentales; p or lo que las exclusiones y las limitaciones a nt e r iores no se ap lic ar an a uste d.
OTROS:
COMPROBANTE DE COMPRA: El propietario debe en t regar el com p robante de co m pra par a pode r recib ir ser vicios d e g a rantí a .
Todas las llamadas de servicio pa r a expli ca r el funcionamiento de este producto, s e rá r esponsabilidad del consumidor.
La agencia de servicio autorizado de FRIEDRICH debe de dar servicio de garantía, o FRIEDRICH debe dar autor ización antes que se haga la
reparación.
Esta garantía le da derechos legales específicos para que reciba servicios relacionados con la garantía.
s o
18
Page 56

 Loading...