


EN
MANUAL DE
FRESH INTELLIVENT®
FR
NL

Thank you for choosing this product from Fresh. Before you install and use the fan you should
read through this guide/manual. Please retain it for future reference
Warning!
This appliance is not intended for use by persons (including children) with reduced physical, sensory or mental capabilities, or lack of experience and knowledge, unless they have been given supervision or instruction concerning use of the appliance by a person responsible for their safety.
Children should be supervised to ensure that they do not play with the appliance.
If the supply cord is damaged, it must be replaced by the manufacturer, its service agent or similarly qualified persons in order to avoid a hazard.
2

CONTENTS
4 |
Introduction |
EN |
|
||
5 |
Installation guide |
|
|
• Contents |
|
|
• Installation |
|
|
•Wiring |
|
• Brief functional description
• Quick setup
12Description
•Comprehensive features, etc.
•Humidity control
•Timer
•Speed control
•Control panel
•LED indicators
22 |
Maintenance |
24 |
Guarantee |
24Recycling
25Accessories
26Technical data
27Troubleshooting guide
30Index
3

INTRODUCTION »
Fresh Intellivent is a completely new type of bathroom fan that sets a completely new standard for this type of product. The starting point has been to provide a significantly higher level of userfriendliness, at the same time as new technology is introduced. In other words – a new generation of fan.
Over a period of many years we have gathered information from our customers on their needs. This has provided the inspiration for a large number of innovative functions that make it easier for you, the user, to let the fan do its job, just the way you want.
Important aspects for customers have been, among others: design, user-friendliness, life span, noise level, cleanability and power consumption.
4

EN
INSTALLATION GUIDE »
5
INSTALLATION GUIDE »
1. Contents
The packaging should contain the following:
•Fan
•2 adapters, 1 x Ø98 mm and 1 x Ø118 mm
•Guide
•Accessory bag with 4 screws and plugs, a pull cord with toggle, and an insulating sleeve for the standard cable type (FK)
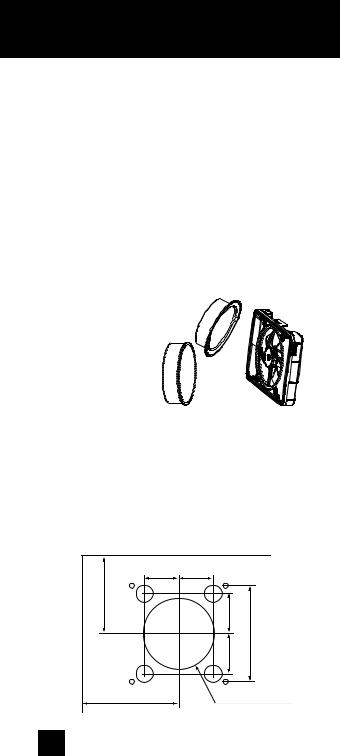
2. Installation
The fan must not be installed in an environment where the temperature
can exceed 50 °C. |
1 |
If required, attach a |
|
suitable adapter to the |
|
fan’s chassis, Ø98 (1) |
|
for a Ø100 duct or |
2 |
Ø118 (2) |
|
for a Ø125 duct. |
|
The fan can also be installed and used without an adapter, full surface-mounted installation, e.g. with ducts less than Ø98.
When installing the fan, check that there is a seal between the pipe/duct and wall/ceiling to prevent humid air from penetrating the wall or ceiling. Use the accompanying screw and plug, if necessary.
Mounting dimensions
45 |
45 |
|
80 Min |
55 |
|
|
55 |
#124 |
Min 120 |
Ø100 alt. Ø120 |
|
6
EN
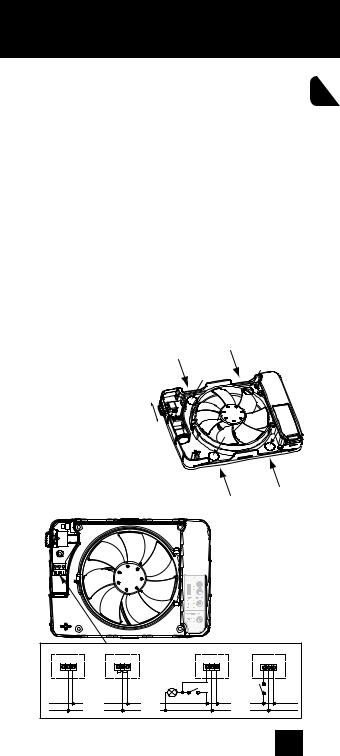
3. Wiring
Installation work should be performed by a qualified electrician.
•The fan is double insulated and must not be earthed
•Push the safety switch up to position 0, the Off position.
•The cable can be installed either along the surface using inlets A in the chassis or concealed using inlets B in the chassis. Both options are shown below. Use the supplied insulating sleeve for
the cable (FK).
•If you use any of the B inlets, remove the concealed round plastic cover by tapping inside the break-off notch from the inside out to the back with a screwdriver, for example.
|
abelingångar |
A |
A |
|
|
B |
|||
Cable inputs |
=utanpåliggande |
|
||
|
B |
|||
=dold |
|
|||
A = surface-mounted |
on |
|
|
|
B = concealed |
|
|
|
|
|
|
o |
|
B |
|
|
|
B |
|
|
|
|
|
|
|
|
|
|
A |
A
Wiring diagrams
|
1 |
2 |
3 |
4 |
|
SL N L |
SL N L |
SL N L |
SL N L |
L |
L |
L |
|
L |
N |
N |
N |
|
N |
7

INSTALLATION GUIDE »
4. Brief functional description
The fan can be installed in four ways depending on the function as detailed below:
Humidity control only, wiring diagram 1
1The fan is connected using constant phase (L) and neutral (N) for automatic humidity control.
The timer can be activated manually by fitting a pull cord and pulling on this.
Constant low speed + humidity control, wiring diagram 2
The fan is connected using constant phase (L) and neutral (N) for automatic humidity control.
Phase (L) is linked to switched live (SL) for constant low speed.When humid air is present the fan runs in the selected mode of silent or maximum. Once the humid air has been expelled, the fan returns to running at low speed. You can adjust the low speed setting using the speed buttons (plus or minus) on the control panel.
Humidity control + timer with light switch, wiring diagram 3
The fan is connected using constant phase (L) and neutral (N) for automatic humidity control.
Switched live (SL) is connected to activate the fan’s timer, i.e. when the bathroom light is switched on, current is present at switched live. This option offers a delayed start of 90 seconds before the fan starts. When the light is switched off, there is a delay of 5, 15 or 30 minutes before the fan stops (post-running time), depending on your preferred control panel setting.
8

EN
Humidity control + timer with momentary switch, wiring diagram 4
The fan is connected using constant phase (L) and neutral (N) for automatic humidity control.
Switched live (SL) is connected to activate the fan’s timer, with a momentary switch.With this setup, the fan starts immediately. The delay before the fan stops is 5, 15 or 30 minutes (post-running time), depending on your preferred control panel setting.
For wiring diagrams for 1-4, see page 7.
NOTE!
Use an ordinary round file to create a suitably placed smooth cutout in the front cover. Do NOT use pliers or similar tools, as these may cause the cover to crack.
9

INSTALLATION GUIDE »
Connecting the pull cord switch
If desired, a pull cord can be installed for activating the timer manually.
Remove the mounting plate using a screwdriver, for example, and thread the accompanying pull cord through the hole as illustrated below.
• Once installation is complete, push the safety switch down to position I – the fan is active.
When the fan is connected to the power supply, it also performs a self-test where control functions, the
LEDs, and the motor function are all tested.
10
EN
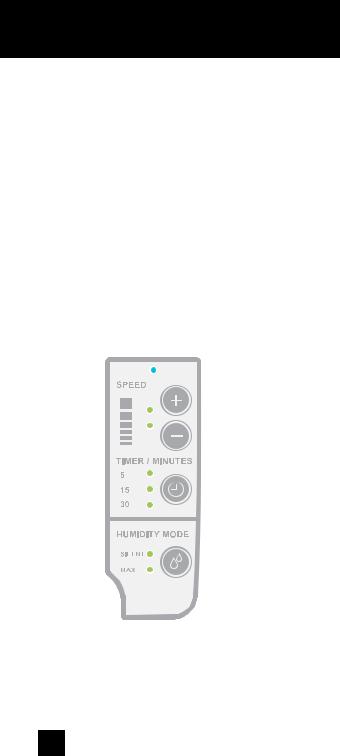
5. Quick setup of the control panel
You can use the control panel to adjust preferred functions quickly and easily.
1 Set the preferred speed for the timer function using the plus and minus buttons. To quickly reset to the factory speed setting, push both the plus and minus buttons simultaneously.
2 Set the preferred post-running time of 5, 15 or 30 minutes for the timer function using the Timer button.
(If you choose to use a timer.)
3 Select the preferred humidity mode, silent or maximum capacity.

 1
1
2
3
The fan is now ready for use. For a more detailed description of functions, etc., see the Description section on page 12.
11

DESCRIPTION »
DESCRIPTION » |
|
• Comprehensive features, etc. |
14 |
• Humidity control |
16 |
•Timer |
17 |
• Speed control |
18 |
• Control panel |
20 |
• LED indicators |
21 |
12
EN
Life span
As there is an integrated power adapter in the fan we have been able to use a low voltage motor that has a life span of approximately 60,000 hours. This is about 3-5 times longer than a standard fan. The motor uses extremely quiet bearings. You can now also let the fan run continuously without risk of failure after one year.
Two fans in one – different dimensions, both 100 & 125
For the first time we can also introduce a bathroom fan for which you are free to choose the dimension.
The fact that you can choose whether you want 100 or 125 is a major advantage, as these are the two sizes usually used for exhaust air ducts. If you choose to use size 125, the noise level is even lower and the capacity even higher. Thus, with two sizes of adapter available, you get two fans in one pack!
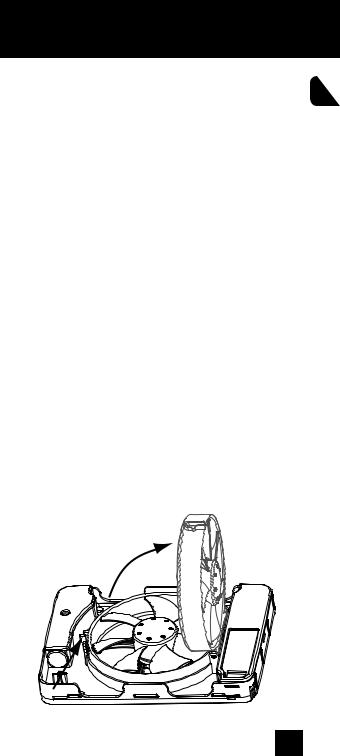
Cleanability – naturally
A very popular function being introduced for this product is the ability to simply open the centre of the fan and gain access to the duct. Using the
”swing-out” function you can easily clean and clear clogged grilles on the outside of the façade, for example. Press the snap-in catch and swing out the motor – that’s it! 
13

DESCRIPTION »
Extremely quiet
The design of the low voltage motor used in the
fan ensures silent operation. Those of you who previously had a fan with a conventional AC motor will hardly notice that your Intellivent is running when
it is installed and operational. Tests show that today Fresh Intellivent is the quietest fan on the market.
Integrated safety switch
In principle, no fan on the market today has an integrated safety switch. European electrical safety standards require any permanent electrical apparatus installed to be preceded by an omnipolar switch. This means that you must install a separate switch on the wall before the cable reaches the fan. Fresh Intellivent has an integral omnipolar switch which means you do not need to install a separate switch. As standard. Very cost efficient for you, the consumer, and it also guarantees a quicker installation time – very smart.
Airing function
Fresh Intellivent has an integrated function which means that when the fan has been inactive for 16 hours, it runs an airing program for 60 minutes to air and exchange the air in the bathroom. No more worries about stuffy, musty odours in the bathroom when you have been away for a while.
Power consumption
By using a low voltage motor we can significantly reduce power consumption. The fan only consumes 5 watts, about a third of what a conventional bathroom fan uses.
14

EN
Full surface-mounted installation
Fresh Intellivent is designed so that it can be fully surface-mounted if you choose not to install a 100 or 125 adapter.This is ideal if you have a duct that measures less than 100 mm or a duct that bends directly after the hole. No other conventional bathroom fan is able to offer full surface mounting. Don’t worry, we have considered other options as well. Provided the fan does not protrude by more than 30 mm, there is still plenty of room for connecting cables (both FK and EKK) for quick and easy installation!
Design
With Fresh Intellivent, we are introducing a brand new front cover design. By making the cover of colourless ABS plastic and then painting the inside with high-quality water-based metallic paint, we have managed to obtain a surface depth that is aesthetically pleasing and in harmony with other modern bathroom fixtures. The covers can be produced in different colours to satisfy different material and colour options. The visible blades give the fan a retro feel and ensure a very low noise level.
One world – one version
Thanks to the integrated power adapter, both frequency and voltage are adapted to suit the fan motor, meaning you can install the fan anywhere in the world, 50 or 60 Hz or 115 or 230 volts – it makes no difference. However, you must take national electrical safety regulations into consideration. Fresh Intellivent is currently only approved for the whole of
Europe. Approval in other areas to follow.
15

HUMIDITY CONTROL »
Automatic moisture detection system
Fresh Intellivent is equipped with a brand new generation of humidity control system and is designed to further simplify operation for you as a user.
For the first time we can now introduce fully automatic humidity control, which means the fan learns to run only when it can make a difference.
This means that the fan no longer needs to be adjusted manually to start when there is excessive moisture in the air. All of today’s humidity-controlled fans require this kind of manual adjustment, and adjustments are affected by season.
The integrated “sniff” function means the fan is continually asking itself whether it is making a difference. If the fan can lower the humidity of the air, it starts automatically. This “intelligence” is controlled via an integrated microprocessor, which uses software newly developed after years of testing in different environments.When the fan is unable to lower the humidity any further, it stops.
The fan also has two capacity modes for humidity control, silent or max.
If you have set the fan to silent mode, the fan runs as per its basic specification. This equates to normal capacity, but the noise level is extremely low. If you have set the fan to maximum mode, the fan runs at maximum speed and its capacity is about 30 % higher than an equivalent standard fan.
If you have a small bathroom, silent mode is the obvious choice. If you have a large bathroom, you can also choose maximum mode and the higher capacity, especially if you have selected dimension 125.
If you want to relax in the bath and temporarily turn off the fan even if the humidity function is active, pull the pull cord (if installed) and the fan will switch off (pause) for one hour. The humidity function is re-activated when the fan resumes operation.
You can also cancel the forced stop function at any time by pulling the cord again. The fan then resumes operation with the humidity function running.
16

TIMER »
EN
Timer
Fresh Intellivent has an integrated timer that you can activate in several different ways, either via the light switch, pull cord or a separate switch, standard or momentary. You can also link switched live with phase in the fan, which means the fan can run nonstop. The control panel can easily be used to set the required post-running time of 5, 15 or 30 minutes, depending on the size of your bathroom. If the fan is activated by the light switch, there is a turn-on delay of 90 seconds. If you are only in the bathroom briefly, the fan will probably not need to start. The green
LED flashes faster and faster until the fan starts; the LED then remains lit.
The fan’s timer can be connected in four different ways as follows:
1. Activation with pull cord
Attach the supplied pull cord and activate the fan’s timer by pulling on the cord.
With this setup, the fan starts immediately.
The delay before the fan stops is 5, 15 or 30 minutes
(post-running time), depending on your preferred control panel setting.
You can cancel the timer function by pulling on the cord a second time.
2. Constant timer function (low speed)
If phase (L) is linked to switched live (SL), the fan runs constantly at the selected speed.
Typically, a lower speed is selected for constant operation to ensure silent operation at minimum capacity.
When humid air is present the fan runs in the selected mode of silent or maximum.
Once the humid air has been expelled, the fan returns to running at low speed.
You can adjust the low speed setting using the speed buttons (plus or minus) on the control panel.
17

TIMER/SPEED CONTROL »
3. Connection to light switch
Switched live (SL) is connected to activate the fan’s timer, i.e. when the bathroom light is switched on, current is present at switched live.
This option offers a delay of 90 seconds before the fan starts.
When the light is switched off, there is a delay of 5, 15 or 30 minutes before the fan stops (post-running time), depending on your preferred control panel setting.
4. Connection to momentary switch
Switched live (SL) is connected to activate the fan’s timer using a momentary switch.With this setup, the fan starts immediately. The delay before the fan stops is 5, 15 or 30 minutes (post-running time), depending on your preferred control panel setting.
Integrated speed control
Fresh Intellivent also features an integrated speed control that controls the fan’s capacity when the timer is enabled. If you have linked switched live (SL) with phase for continuous operation, you may decide, for example, to let the fan run at low speed for silent operation.When the fan next detects humid air it switches to the function and speed you have chosen, silent or max mode. It is, however, the maximum speed that controls the fan, i.e. if you have set a higher speed for the timer than the speed selected for silent mode with humidity control, the fan will always run at the higher speed. Using a lower speed for the humidity function when you have continuous operation would be illogical. Typically, a lower speed is selected for constant operation, ensuring silent minimum capacity.
When humid air is present the fan runs in the selected mode of silent or maximum.
Once the humid air has been expelled, the fan returns to running at low speed.
18

You can adjust the low speed setting using the speed EN buttons (plus or minus) on the control panel.
You can use the control panel’s speed buttons to select your preferred speed when the fan’s timer is active.When the fan is installed for the first time it is set to normal capacity and speed.The LEDs for both the plus and minus buttons are lit.
To increase the speed, press the plus button until you reach the desired speed. There are four separate intervals up. You cannot hold the button down to increase the speed, you must press and release the button each time. The speed increases by 7 per cent each time you press the button. If you have increased the speed from that used for normal mode, only the LED for the plus button lights up.
If you want to reduce the speed, press the minus button until you reach the desired speed. There are six separate intervals down. You cannot hold the button down to reduce the speed, you must press and release the button each time. The speed is reduced by 6 per cent each time you press the button. If you have reduced the speed from that used for normal mode, only the LED for the minus button lights up.
To return to normal speed, press both buttons simultaneously and both speed LEDs light up again.
19
CONTROL PANEL »
Control panel
Until now there has been no easy way to demonstrate the functions of a bathroom fan, or to easily set and control the fan to suit personal preferences. Our aim has been for you as a user to be able to control and understand basic fan functions without having to read the guide. And we think we have succeeded. If the control panel is not used for 30 seconds, it enters standby mode and all the LEDs go out (except possibly the one indicating current fan function). To re-activate the control panel, press any button once. Settings are not changed until you press another button. The buttons on the control panel are good for at least one million operations, which we believe is enough.
20
LED - INDICATORS »
EN
LED indicators –What is the fan doing?
Functional description
Fresh Intellivent is equipped with a three-colour LED indicator.
These three colours tell the user what the fan is doing and which function is currently controlling the motor.
•No LED lit: the fan is turned off. However, the fan’s open design means it still provides natural draught ventilation when turned off.
•Blue LED lit: the motor has been activated – the humidity sensor has detected increased humidity in the room.
•Blue flashing LED: the motor has been activated – the fan has detected that it can reduce the level of humidity in the room.
•Yellow LED lit: the fan’s timer has been activated by switched live (switch) or the pull cord on the fan.
•Yellow flashing LED: the fan’s timer has been activated by the light switch.The LED flashes during the 90-second turn-on delay.The speed at which the LED flashes increases as activation of the motor draws closer.
•Purple LED lit: the motor has been activated –
the airing function is enabled.
As a user it is hugely beneficial to be able to see what the fan is doing and which mode is currently active.
The fan uses a three-colour LED indicator to communicate exactly what it is doing. A blue light indicates that the fan is working to expel hazardous moisture.
A yellow light indicates that the timer has been activated in some way. A purple light indicates that the fully automatic airing function is enabled.
21

MAINTENANCE »
Maintenance
Fresh Intellivent is designed to work efficiently for many years.
However, the fan needs to be cleaned at regular intervals if it is to function properly. These intervals are determined by duration of fan operation and air quality. However, the fan must be cleaned at least twice a year.
Disconnect the power supply to the fan by pushing the safety switch up to position 0.
The fan’s “swing out” function is useful, as it provides easy access to the duct. Press the motor mount ring’s snap-in catch and swing out the motor/blades.
OFF

Clean the duct/pipe if there is any dirt present inside. There is otherwise a risk of impaired capacity.
When cleaning the fan, pay particular attention to the blades if these are dirty. There is otherwise a risk of imbalance and hence increased noise and a reduced life span for the motor bearings.
22

EN
Clean the fan’s blades with a brush or paintbrush. Clean the fan cover with a polishing cloth moistened with water and possibly a mild detergent.
NOTE! Never use solvents or similar products on any part of the fan, as there is a risk of them damaging the fan’s plastic components!
Never completely submerge the fan in water, as there is a risk that this could damage the fan’s motor.
After cleaning, swing the motor mount ring back into position and lock it by securing the snap-in catch. Switch the safety switch back on by moving it down to position I.
Klick!
If maintenance of the fan is not performed as specified above, the product guarantee will be void.
23

GUARANTEE & ENVIRONMENT »
Guarantee
Your Fresh Intellivent fan is of the highest possible quality. Therefore, we provide a 5-year guarantee
against manufacturing defects.
Greater peace of mind for you as a user.
For the guarantee to be valid, proof of purchase is required and the fan:
•must be assembled and installed according to the installation guide in this manual
•must have been maintained according to the maintenance instructions in this manual
•must be installed in a normal residential environment
•must be connected to a voltage of 100-250V AC
•must not have been exposed to lightning or abnormal power surges
•must not be subject to tampering
•must have been installed in a zone rated as IP44.
•must not have been installed in an environment where the temperature can exceed 50 °C.
Complaints concerning the product are to be made to the point of purchase.
Recycling
End-of-life products may be taken to local recycling centres and are sorted as electronic scrap.
24

ACCESSORIES »
EN
Accessories
There are a number of accessories available for Fresh Intellivent to help you, as a user, install the product as smoothly as possible. Below are some examples of accessories.
Pipe for sizes
100 and 125
Adapter for sizes
100 and 125 for plastic grilles
Plastic grille for sizes
100 and 125
Metal grille for sizes
100 and 125
Cold surge protection 100
For optimum ventilation, you must ensure that sufficient air can enter the bathroom. This is solved either by creating an opening at the bottom of the door or by installing an air vent in the door or wall.
It is also important to draw fresh air into the house that is then expelled through the bathroom or laundry room, for instance.
In this case, it’s a good idea to install fresh air vents in bedrooms and the living room.
25
TECHNICAL DATA »
|
Maximum capacity |
|
|
132 m³/h |
|||||
|
Sound pressure level 3 m (Silent mode) |
|
22 dB(A) |
||||||
|
|
|
|
|
|
|
|
||
|
Power consumption |
|
|
|
5 W |
||||
|
Mounting dimensions in wall |
|
|
0-30 mm |
|||||
|
|
|
|
|
|
|
|
|
|
|
Holes |
|
|
|
0-130 mm |
||||
|
Material |
|
|
|
ABS plastic |
||||
|
|
|
|
|
|
|
|
||
|
Protection rating |
|
|
|
IP44 |
||||
|
Insulation class |
|
|
|
|
|
|
|
|
|
Voltage |
|
|
|
90-240 V |
||||
|
|
|
|
|
|
|
|||
|
Frequency |
|
|
|
50-60 Hz |
||||
|
Certificates |
|
|
|
|
|
|
|
|
|
|
|
|
|
|
|
|
|
|
|
|
|
|
|
|
|
|
|
|
|
Duct |
|
Max / |
Capacity |
|
Sound pres- |
|||
|
|
|
sure level |
||||||
|
dimension |
|
Silent |
(free blowing) |
|
||||
|
|
|
3 m |
||||||
|
|
|
|
|
|
|
|||
|
Ø 100 |
|
Max |
105 m³/h |
|
33 dB(A) |
|||
|
|
|
|
|
|
|
|
|
|
|
Ø 100 |
|
Silent |
73 m³/h |
|
23.5 dB(A) |
|||
|
Ø 125 |
|
Max |
132 m³/h |
|
32 dB(A) |
|||
|
|
|
|
|
|
|
|
|
|
|
Ø 125 |
|
Silent |
85 m³/h |
|
22 dB(A) |
|||
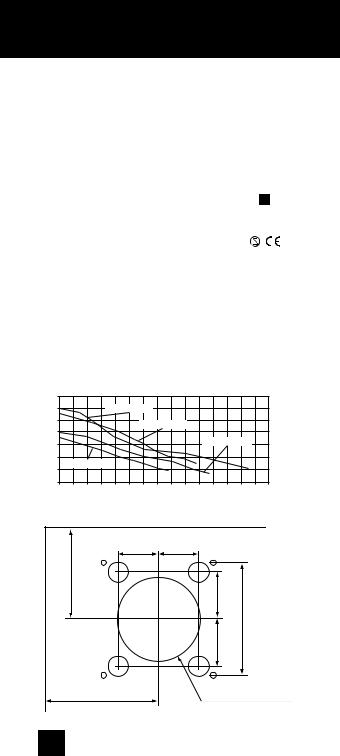
Pa 35 |
|
|
|
30 |
Ø120 max speed |
|
|
25 |
Ø100 max speed |
|
|
20 |
|
|
|
|
|
|
|
15 |
|
Ø120 silent speed |
|
|
|
|
|
10 |
Ø100 silent speed |
|
|
5 |
|
|
|
|
|
|
|
0 |
50 |
100 |
m³/h 150 |
0 |
|||
|
Pipe outlet for |
|
45 |
45 concealed installation |
|
80 Min |
55 |
|
|
55 |
#124 |
Min 120 |
Ø100 alt. Ø120 |
|
26 |
|
|

TROUBLESHOOTING GUIDE »
EN
The fan does not start
The fan is newly installed and has never been started
•Checkthatthefanimpellerrunsfreelybyspinningit.
•Check the position of the safety switch. It should be in position I, which corresponds to On.
•Remove the cover and disconnect the power supply to the fan by moving the safety switch to 0. Then return the switch to I.
•Check that there is voltage at terminal block L.
(To be done by electricians only.)
• Check that neutral is properly connected by measuring the voltage across L-N.
(To be done by electricians only.)
If the fan still fails to initiate the startup sequence, which involves the LEDs lighting up in sequence and the motor starting after a short time, you can return the fan as long as it is within the guarantee period and you have a receipt. See Guarantee on page 24.
The fan has been in use for some time
Check that the fan impeller runs freely by spinning it.
Remove the cover and restart the fan by turning the safety switch off and then on again. Leave the fan switched off for about 3 seconds before switching it back on.
If the LEDs light up in sequence but the motor does not start, you can return the fan as long as it is within the guarantee period and you have a receipt. See Guarantee on page 24.
The fan has been cleaned
Check that the fan impeller runs freely by spinning it.
Check the position of the safety switch. It should be in position I, which corresponds to On.
27

TROUBLESHOOTING GUIDE »
The fan runs nonstop
Red LED is constantly lit
(If the fan has been running nonstop for at least 24 hours)
Check operation by opening the bathroom door and leaving it open for at least half an hour to equalise humidity levels.
Remove the cover and disconnect the power supply to the fan by moving the safety switch to 0. Then return the switch to I.
Green LED is constantly lit
Check that the fan has not been set up for continuous operation.
(To be done by electricians only.)
If the fan is connected to an external switch for timer control, switch this off and wait at least 30 minutes.
Remove the cover and disconnect the power supply to the fan by moving the safety switch to 0. Then return the switch to I.
No LEDs lit
Remove the cover and disconnect the power supply to the fan by moving the safety switch to 0. Then return the switch to I.
If the fan still runs nonstop, you can return the fan as long as it is within the guarantee period and you have a receipt. See Guarantee on page 24.
28

TROUBLESHOOTING GUIDE »
EN
Other faults
The fan stops when the light is switched off
The fan has been installed incorrectly.Terminal L on the terminal block should always have direct phase.
Contact your electrician.
The fan does not work as described
Remove the cover and disconnect the power supply to the fan by moving the safety switch to 0. Then return the switch to I (On).
If the fan still does not work as described in this guide, contact the retailer or Fresh by e-mail to: intellivent@fresh.se.
29

INDEX »
A |
|
Accessories |
p. 25 |
Airing function |
p. 14 |
B |
|
Bathroom light - connection |
p. 7 |
Brief functional description |
p. 8 |
C |
|
Cable inlets |
p. 7 |
Cleaning, Cleanability |
p. 13, 22 |
Connections - connection |
p. 7 |
Constant low speed |
p. 8, 17 |
Contents - packaging |
p. 6 |
Control panel |
p. 11, 20 |
Cutout - mounting cover |
p. 9 |
D |
|
Dimensions |
p. 26 |
F |
|
Functional description - description |
p. 8, 12 |
G |
|
Guarantee |
p. 24 |
H |
|
Humidity control - description |
p. 16 |
I |
|
Interval, pause function |
p. 16 |
Installation |
p. 6 |
Installation |
p. 7 |
Installation dimensions |
p. 26 |
Introduction |
p. 4 |
L |
|
LED, control panel |
p. 11, 21 |
Low speed |
p. 8, 17 |
30
 Loading...