

Page 1

TECHNICAL
MANUAL
OPTIMA PT-VS-ST
TECHNICAL MANUAL
From Serial N° 18180100 till ...
Page 2

Revision table
TM Optima PT-VS-ST_en : ref NT1741
Date Revision Chapter Description
03/04/03 0 All index "a" création
20/08/07 1 Index "b" New EMC standard, spare parts up date
Page 3

1 Presentation...................................................................................................... 7
1.1 General presentation ............................................................................. 7
1.2 Operation diagram ................................................................................. 8
1.3 Precautions for use................................................................................ 9
1.4 Operation safety..................................................................................... 9
1.5 Technical characteristics ...................................................................... 9
1.5.1 Electrical details .........................................................................................................9
1.5.2 Electronic details ........................................................................................................ 9
1.5.3 Mechanical details...................................................................................................... 9
1.5.4 Conformity and norms .............................................................................................. 10
2 Description and operation ............................................................................. 11
2.1 Physical description ............................................................................ 11
2.1.1 Display board and front panel .................................................................................. 12
2.1.2 The CPU board ........................................................................................................ 14
2.1.3 The power supply board and battery........................................................................ 17
2.2 Operational description ....................................................................... 19
2.2.1 Tube check and maintenance sub-assembly ........................................................... 19
2.2.2 Pumping sub-assembly ............................................................................................ 19
2.2.3 External connection sub-assembly .......................................................................... 19
3 Description of the menus .............................................................................. 21
3.1 Parameter configuration menu ........................................................... 21
3.1.1 Access to the menu.................................................................................................. 23
3.1.2
3.1.3
3.1.4
SAV1, preventive maintenance configuration ....................................................... 24
SAV2, tube selection configuration ....................................................................... 24
SAV3, "Beep" ........................................................................................................ 25
3.2 Calibration menu.................................................................................. 27
3.3 After-Sales Service test menu............................................................. 29
4 Preventive maintenance ................................................................................ 31
4.1 Recommendations ............................................................................... 31
4.2 Maintenance schedule......................................................................... 31
4.2.1 Preventive maintenance........................................................................................... 31
4.2.2 Quality control .......................................................................................................... 31
4.3 Checks................................................................................................... 33
4.3.1 Accessing the tests .................................................................................................. 33
4.3.2 Visual check ............................................................................................................. 33
4.3.3 Operating period and maintenance date.................................................................. 34
4.3.4 Indicator lights test ................................................................................................... 34
4.3.5 Keyboard check ....................................................................................................... 35
4.3.6 Battery voltage check ............................................................................................... 35
4.3.7 Checking the last 10 alarms..................................................................................... 35
Optima_PT-VS-ST_enTDM.fm 3
Page 4

4.3.8 Checking the total operating period ......................................................................... 37
4.3.9 Checking the analogue sensor input........................................................................ 37
4.3.10 Checking the software version ................................................................................. 38
4.3.11 Checking the motor clamp (only Optima VS) .......................................................... 38
4.3.12 Checking the calibration values ............................................................................... 39
4.3.13 Checking the infusion motor..................................................................................... 39
4.3.14 Checking the last 10 events before a locking alarm or error .................................... 40
4.3.15 Checking the pressure alarm limit............................................................................ 40
4.3.16 Flow rate check ........................................................................................................ 41
4.3.17 Air detector check .................................................................................................... 41
4.3.18 Battery autonomy check........................................................................................... 41
4.3.19 Continuity test .......................................................................................................... 42
4.3.20 Contrast check ......................................................................................................... 42
4.3.21 Timestamp check ..................................................................................................... 42
4.3.22 Quality Control Certificate ........................................................................................ 43
4.4 Cleaning and disinfecting ................................................................... 45
4.5 Storage.................................................................................................. 46
5 Troubleshooting..............................................................................................47
5.1 Breakdown guide ................................................................................. 47
5.2 Error messages ................................................................................... 51
6 Intervention procedures................................................................................. 55
N∞1, Procedure: CPU board ....................................................................... 57
N∞2, Procedure: Display board .................................................................. 61
N∞3, Procedure: Pumping system ............................................................. 65
N∞4, Procedure: LCD display .................................................................... 69
N∞5, Procedure: Air detector board........................................................... 73
N∞6, Procedure: Pressure sensor.............................................................. 77
N∞7, Procedure: OCS clamp motor (if OCS is present) ........................... 81
N∞8, Procedure: Power supply board ....................................................... 85
N∞9, Procedure: Battery ............................................................................. 87
N∞10, Procedure: Front cover, base and angle bracket .......................... 89
7 Calibration .......................................................................................................93
7.1 Calibration procedure.......................................................................... 93
7.1.1 Access to the calibrations ........................................................................................ 93
7.1.2
7.1.3
7.1.4
EtAL.1 Door calibration....................................................................................... 94
EtAL.2 Calibration of the flow rate corrective coefficient .................................... 95
EtAL.9 Calibrating the upstream and downstream pressure sensors ................ 96
44 Optima_PT-VS-ST_enTDM.fm
Page 5

8 Spare parts catalogue.................................................................................... 99
8.1 Upper cover .......................................................................................... 99
8.2 Base..................................................................................................... 101
8.3 Optima pump angle bracket.............................................................. 103
Optima_PT-VS-ST_enTDM.fm 5
Page 6

66 Optima_PT-VS-ST_enTDM.fm
Page 7

1 Presentation
1.1 General presentation
The Optima pump is a new pump based on the same pumping mechanism as the MVP
pump. It is used for infusion of intravenous agents.
There are three types of the Optima pump:
PT: for standard PVC tubes with a drop detector.
VS: for standard PVC tubes. The drop detector is optional. The pump is equipped with an
automatic occlusion checking system (OCS).
ST: for silicon tubes equipped with a drop detector.
The Optima pump has its own control keyboard and distinct displays. It has an internal
battery which ensures a minimum autonomy of 4 hours for a flow rate of 125 ml/h.
A choice of easily accessible configurations enables optimal use of the functions according to
the needs of each department.
optima01_002b_en.fm 7
Presentation
Page 8

1.2 Operation diagram
Presentation
8 optima01_002b_en.fm
Page 9

1.3 Precautions for use
The symbol which appears on the device’s condensed user instructions recommends a
complete reading of the user instructions, in accordance with norm EN 60 601-1.
Fresenius Vial cannot, in any circumstances, be held responsible for any medical or other
problem due to incorrect use of the device.
Kindly consult the user manual for more details.
!
1.4 Operation safety
As soon as it is in operation, the device ensures permanent surveillance of its functions. Any
internal fault or any procedural anomaly is immediately detected. Nevertheless, abnormal
functioning of the device, without a defined cause, must always be brought to the attention of
the qualified staff in your establishment or our After-sales Service.
The Optima pump contains an internal battery which ensures normal functioning during a
mains power cut. In addition, two fuses protect the affected mains area.
1.5 Technical characteristics
1.5.1 Electrical details
! External power supply: 100 - 240 Vac.
! Max. consumption: 50 VA.
! Battery: 6 V - 2.7/ 3 Ah - NIMH.
! Fuse: 2 x 630 mA T IEC 127.
1.5.2 Electronic details
The Optima volumetric pump has 4 electronic boards:
! CPU board
! Display board
! Power supply board
! Air detector board
1.5.3 Mechanical details
! Dimensions: H x L x W: 135 x 175 x 145 mm.
! Weight: approx. 2.9 kg
optima01_002b_en.fm 9
Presentation
Page 10

1.5.4 Conformity and norms
0459
Safety of Electro
Medical
Equipements
EMC
(ElectroMagnetic
Compatibility)
Direct Courant Equipotentiality Fonctionnal earth.
Conform to the 93/42/EEC Medical Directive. IP31 Protection against
splashing liquid.
Conform to EN/IEC 60601-1 and EN/IEC 60601-2-24. Protection against
leakage current: CF
type.
Conform to EN/IEC 60601-1-2 (second index)
and EN/IEC 60601-2-24.
Detailed information concerning electromagnetic compatibility is available in the chapter
"Guidance and manufactureris declaration on EMC" of the User Manual.
Protection against
electric shocks: class I.
Presentation
10 optima01_002b_en.fm
Page 11
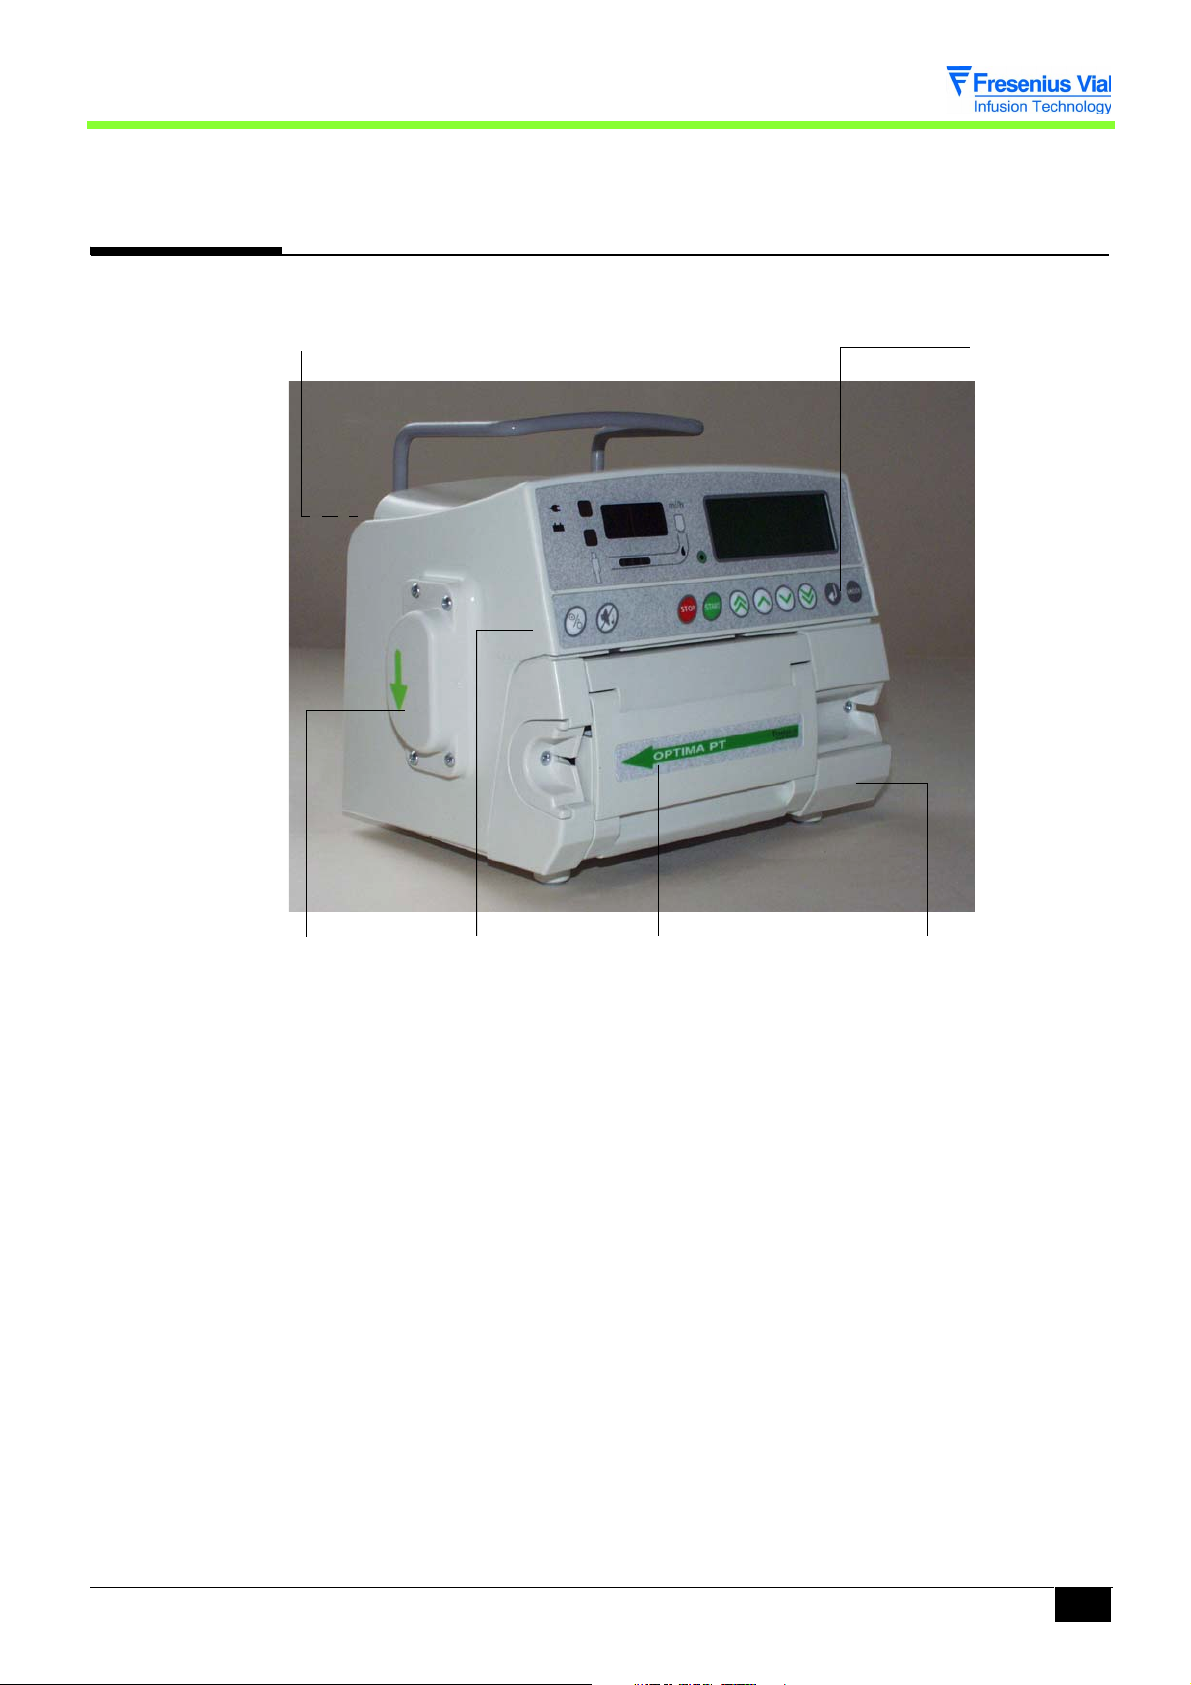
2 Description and operation
2.1 Physical description
Angle bracket
Control panel
Air bubble
Front cover
Door
Base
detector
The Optima pump is made out of a front cover, a base and an angle bracket.
! The front cover contains:
" a display board linked to the control panel,
" a CPU board,
" an air detector board,
" the OCS system if OCS is present.
! The base supports the door and contains:
" the pump body unit.
! The angle bracket contains:
" a power supply board,
" the battery.
optima02_002b_en.fm 11
Description and operation
Page 12
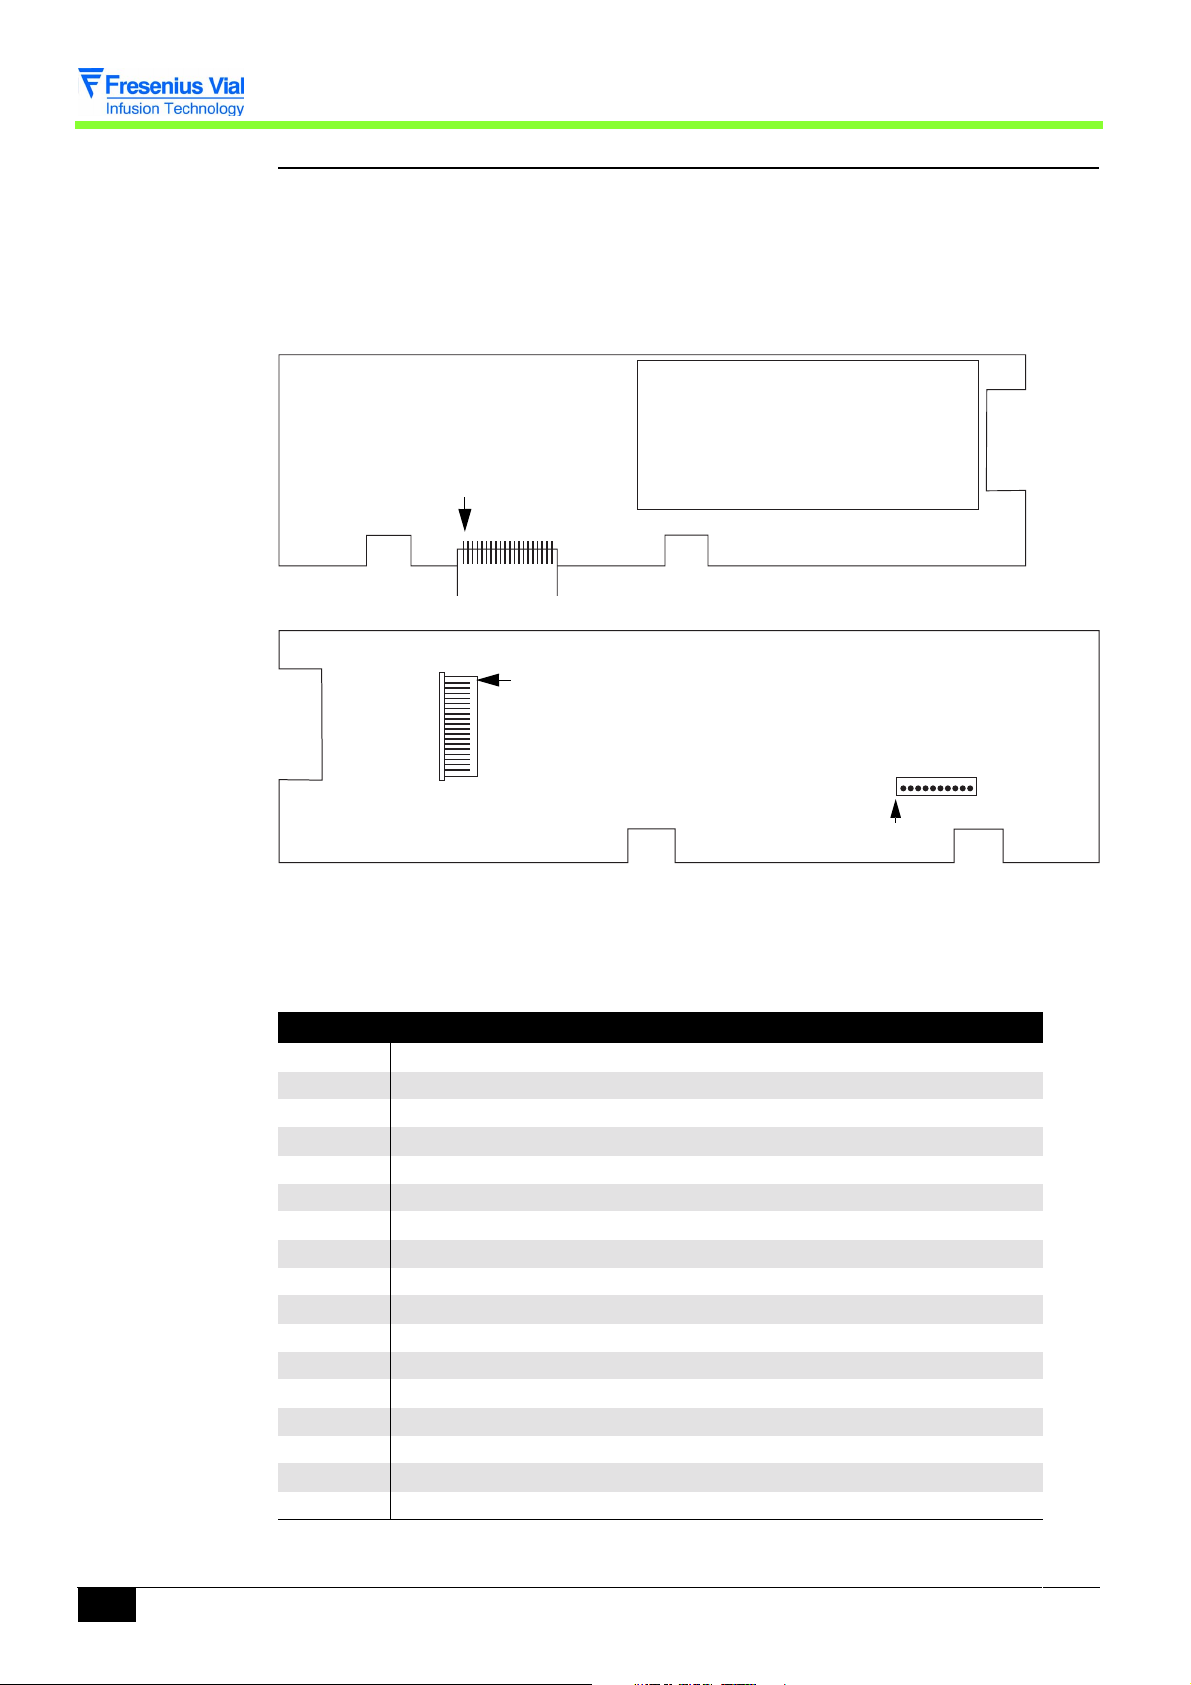
2.1.1 Display board and front panel
The display board is situated under the control panel and contains all the essential parts for
the man-machine interaction:
! keyboard,
! synoptic and control indicators,
! 7-segment displays,
! LCD screen.
Pin n°1
J1
Display board LCD screen side.
Pin n°1
J2
J3
Pin n°1
Display board component side
This board is connected to the various equipment by means of connectors:
J1 connector to CPU board
Pin Signal Description
1 5V Power supply
2 VBAT Battery voltage
3GND
4 MOSI-AFF Serial output
5GND
6 MISO-AFF Serial input
7GND
8 CLK-AFF Serial clock
9GND
10 CSLCD LCD selection
11 GND
12 CSAFCL Display selected
13 GND
14 A0AFF LCD address
15 GND
16 RESET/
17 GND
Description and operation
12 optima02_002b_en.fm
Page 13

J1 connector to CPU board
Pin Signal Description
18 TON/OFF ON/OFF Signal
19 VBAT Battery voltage
20 5V Power supply
J2 connector to LCD
Pin Signal Description
1 + led VBAT + back light
2 - led - back light
3+5V
4 /RESET /RESET
5VSS Gnd
6 LD7 Data’s writing
7 R/W Gnd - Writing selection
8 LD6 Data’s writing
9 A0AFF LCD address
10 LD5 Data’s writing
11 LD4 Data’s writing
12 LD3 Data’s writing
13 LD2 Data’s writing
14 LD1 Data’s writing
15 LD0 Data’s writing
16 Enable
17 LCDCS2 Chip select
18 /LCDCS1 Chip select
J3 connector to keyboard
Pin Signal Description
1 COL2 Keyboard interface column
2 COL1 Keyboard interface column
3 COL0 Keyboard interface column
4 Line 3 Keyboard interface
5 Line 2 Keyboard interface
6 Line1 Keyboard interface
7 Line 0 Keyboard interface
8 TON/OFF On/Off
9 CONTRÔLE
10 GND
optima02_002b_en.fm 13
Description and operation
Page 14
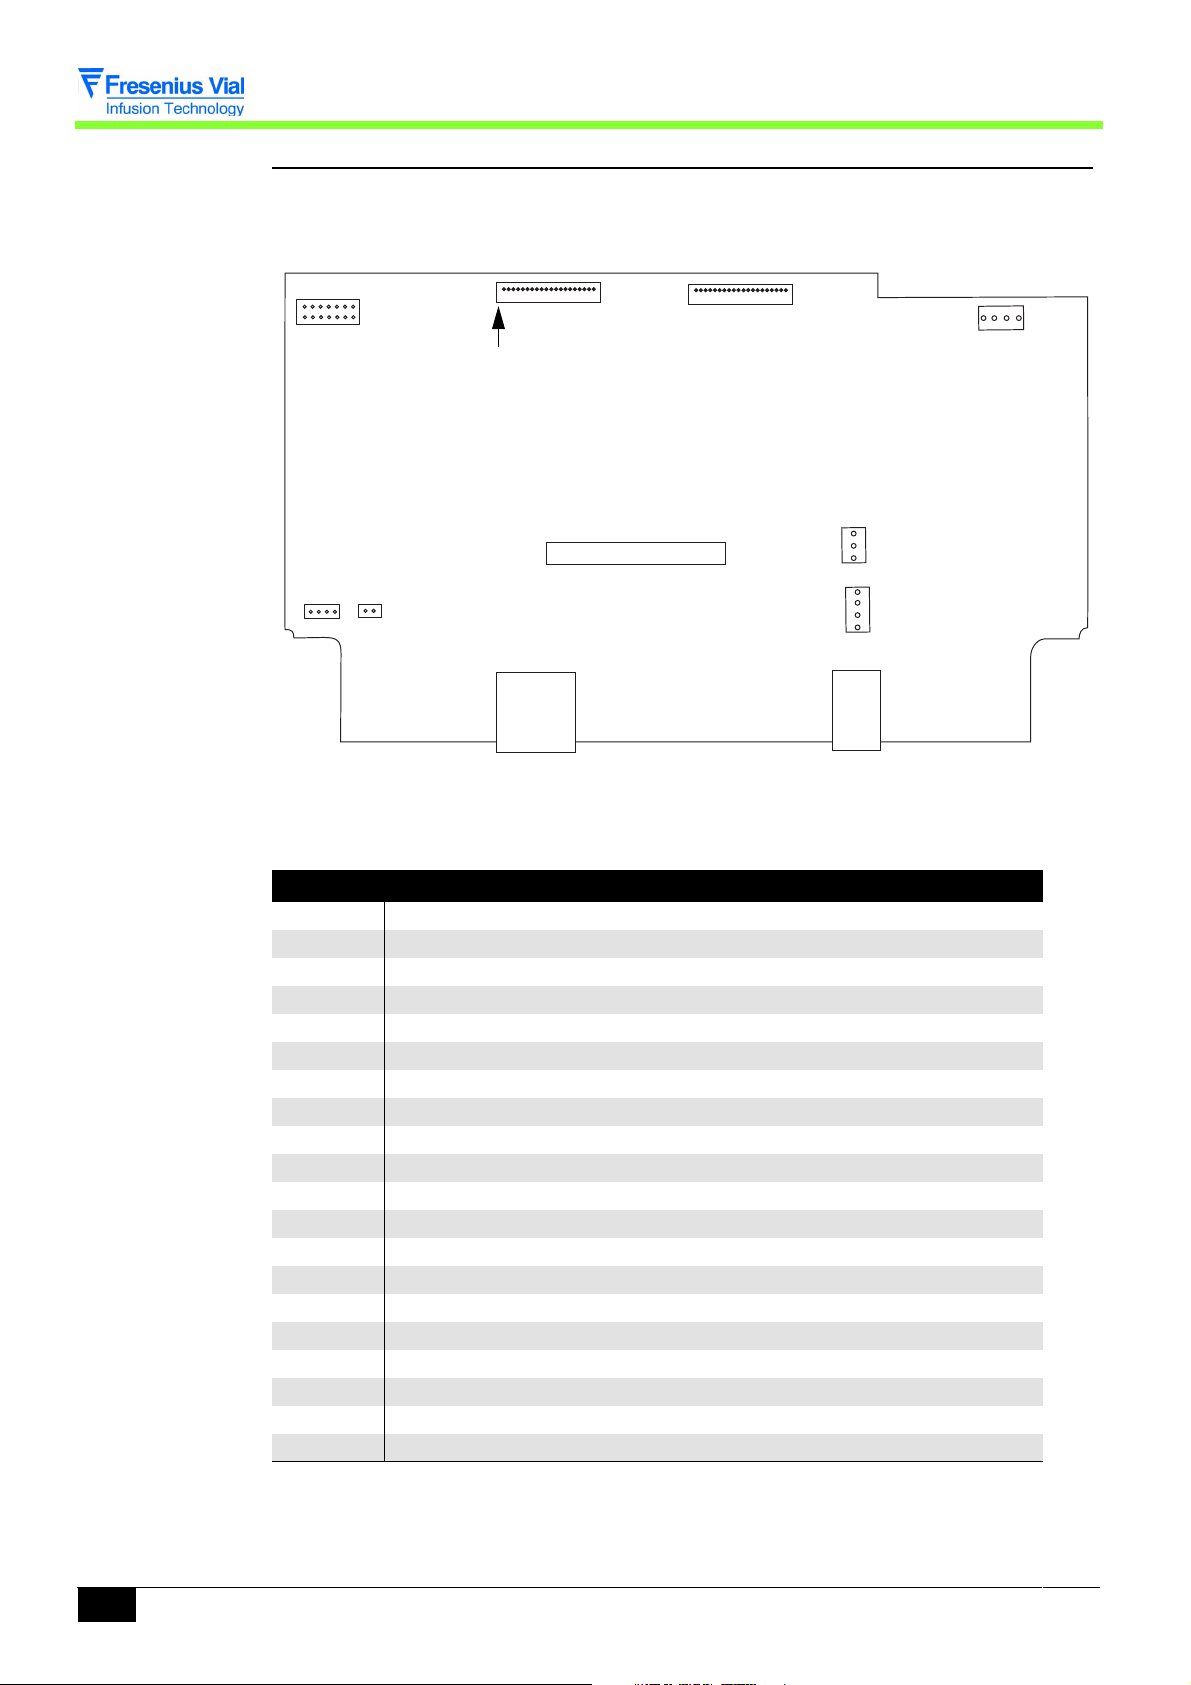
2.1.2 The CPU board
The CPU board contains a 80C32 micro-processor. It is connected to the display board by
means of the J1 connector.
J1 J2
J4
J3
Pin n°1
J7
J6
J10J9
J8
J11
J12
CPU board
Info: Pin 1 of connector J1 is opposite to that indicated by the CPU board screen printing.
J1 display board connector
Pin Signal Description
1 5V Power supply
2 VBAT Battery voltage
3GND
4 MOSI-AFFl Serial output
5GND
6 MISO-AFF Serial input
7GND
8 CLK-AFF Serial clock
9GND
10 CSLCD LCD selection
11 GND
12 CSAFCL Display selected
13 GND
14 A0AFF Address LCD
15 GND
16 RESET/
17 GND
18 GNDTON/OFF Signal ON/OFF
19 VBAT Battery voltage
20 5V Power supply
Description and operation
14 optima02_002b_en.fm
Page 15

J12 drip detector connector
Pin Signal Description
1 Pulse-drip Low signal yield
2 GND
3GND
4 CDLED-drip Control LED 5V/ 40 mA
J4 motor
Pin Description
1 +Reel A
2 - Reel A
3 +Reel B
4 - Reel B
J6 power supply
Pin Signal Description
1 ALIM SECT Power supply
2 GND
3 ALIM EXT Not used
J8 battery
Pin Signal Description
1 VBATNC + Battery
2 ANA-CTN Temperature sensor Output
3GND
4 VBATNP + Battery before thermal fuse
connector
connector
connector
J11 RS232 connector / Nurse call
Pin Signal Description
1 TxD-PC Data reception from PC
2 RTS-PC Request to send from PC
3 DTR-PC PC terminal ready
4 RXD-PC Transmission of data to PC
5GND
6 Nurse Call Normally open contact
7 Nurse Call Common contact
8 Nurse Call Normally closed contact
J10 D.C. motor
Pin Description
1 + DC motor
2 - DC motor
connector
Description and operation
optima02_002b_en.fm 15
Page 16

J2 sensors connector
Pin Signal Description
1GND
2 /PRES_CLAMP CLAMP presence
3 CD_CLAMP/ CLAMP detector power supply
4 +AMPLI_AM Input + ampli sensor upstream pressure
5 - ALIM_AM Upstream pressure sensor power supply return
6 - AMPLI_AM Input - ampli upstream pressure sensor
7 + ALIM_AM Upstream pressure sensor power supply
8 GND
9 - Hall effect sensor power supply
10 GND
11 ANA_HALL Hall effect sensor output
12 + AMPLI_AV Input + ampli downstream pressure sensor
13 - ALIM_AV Downstream pressure sensor power supply
return
14 - AMPLI_AV Input - ampli downstream pressure sensor
15 + ALIM_AV Downstream pressure sensor power supply
16 GND
17 ET OPTO State of sensor
18 GND
19 +5 V 5 V power supply
20 - Power supply sensor return
J9 air detector
Pin Description Description
1 /TST Sensor test
2 5V
3GND
4 /DETECT Air bubble detection
connector
Description and operation
16 optima02_002b_en.fm
Page 17
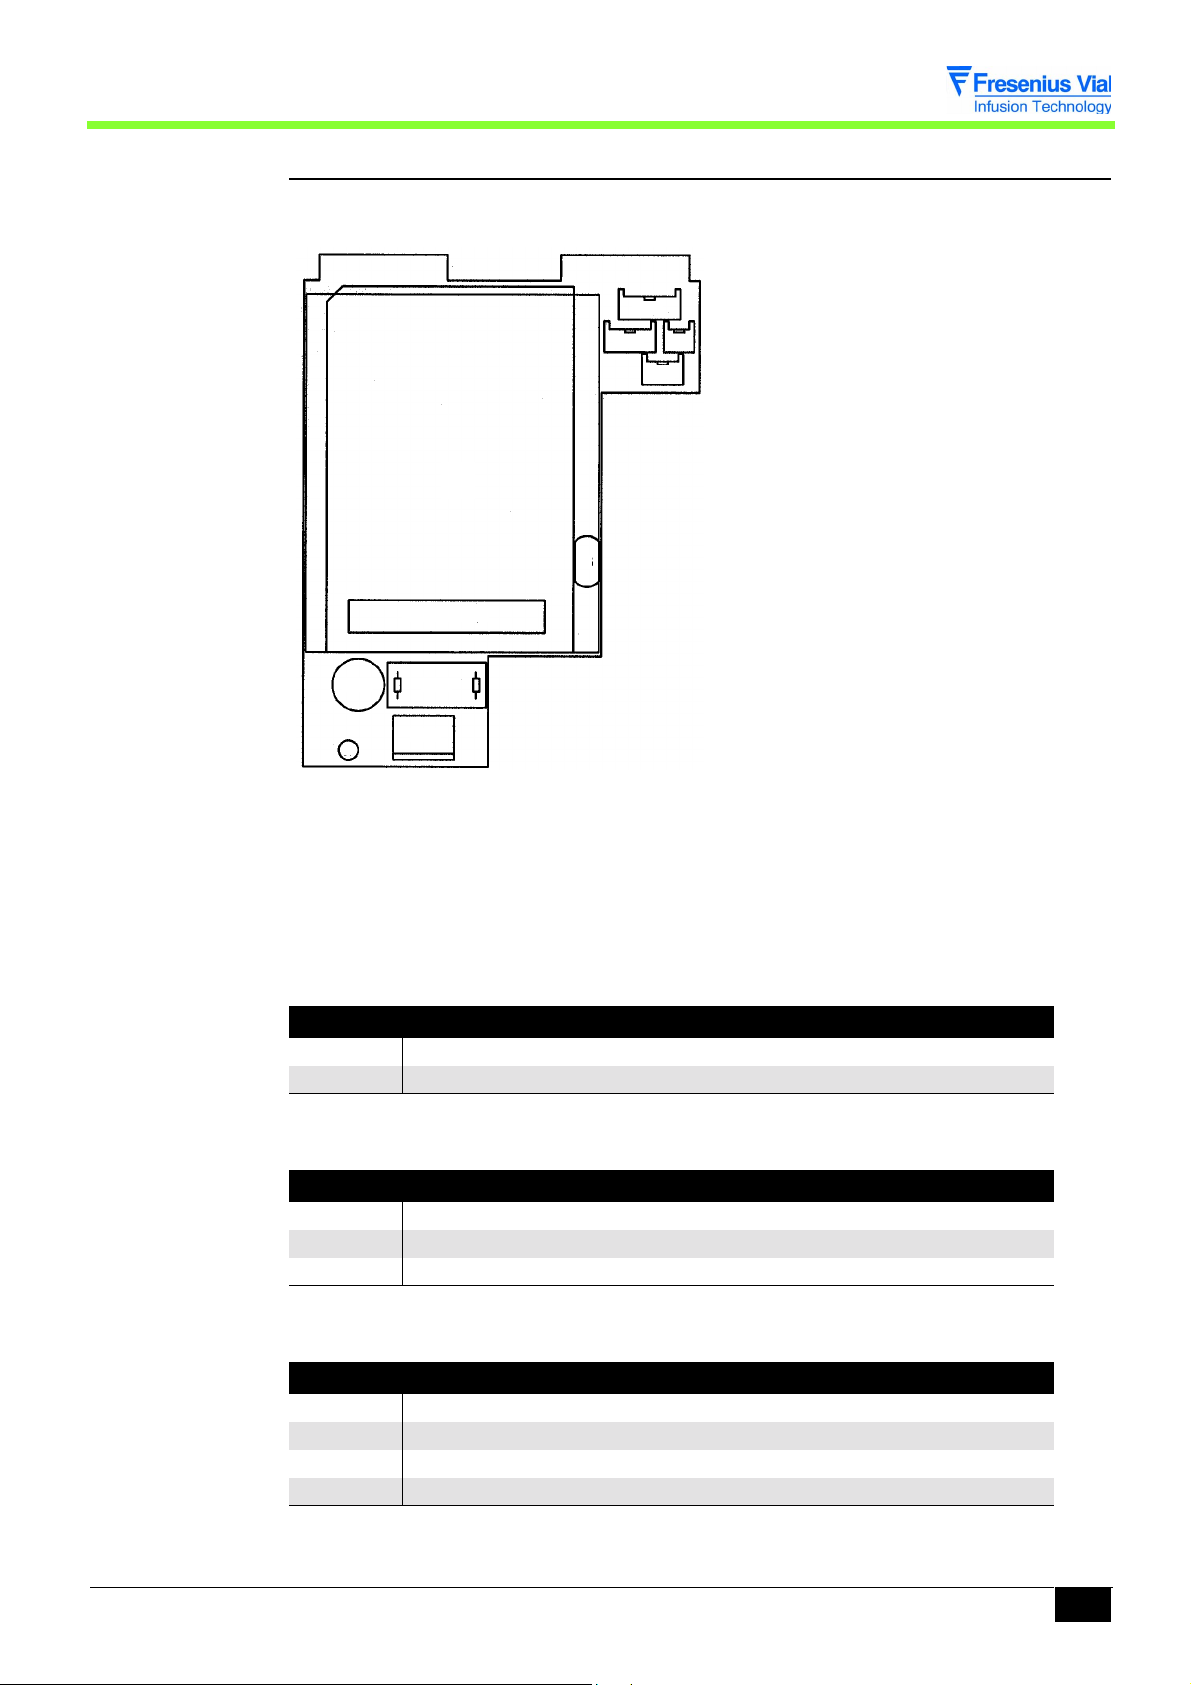
2.1.3 The power supply board and battery
The power supply board is positioned on the angle bracket. It supplies power to the electronic
unit from the 230 VAC network. It also ensures a battery charge of 2.7/3 Ah.
J6
J5
J4
J3
U1
U2
C3
Bars code
F2
J1
L1
J2
Power supply board
This board is connected to the various parts by means of connectors. F2 is time-delayed
fuses of 630 mAT.
J1 functional Earth connector
J2 Mains connector
Pin Description
1 PH Phase (100 - 240 Vac)
2 N Neutral (100 - 240 Vac)
J3 power supply output connector
Pin Description
1 9V Sect 9V output convertor AC/DC
2 GND
3 9V Ext 9V external power supply not used
J4 battery output connector to the CPU board
Pin Description
1+Vbat
2 +Thermal sensor
3GND
4 VBAT NP
optima02_002b_en.fm 17
Description and operation
Page 18

J6 battery input connector
Pin Description
1+ VBAT
2 VBAT NP
3 + Thermal sensor
4 - Thermal sensor
5GND
Description and operation
18 optima02_002b_en.fm
Page 19

2.2 Operational description
From an operational point of view, the Optima pump is made up of 3 sub-assemblies:
! a sub-assembly to maintain to check the correct positioning of the tube,
! a motorisation sub-assembly,
! an external connection sub-assembly.
2.2.1 Tube check and maintenance sub-assembly
The tube is positioned along the front part and held in place by the door.
The front part is equipped with four detection systems:
! a detector to check the closed /open position of the door,
! an ultra-sound detector to detect the presence of air bubbles in the tube.
! The pressure detection is ensured by two piezo-resistant sensors.
2.2.2 Pumping sub-assembly
The pumping sub-assembly contains the peristaltic pumping mechanism.
The mechanism is made up of a camshaft that creates a wave-like movement in a bank of 14
’fingers’. The displacement of these ’fingers’ is controlled by the CPU board, while turning it
displaces the liquid at the programmed flow rate.
The cam shaft is driven by a stepper-motor and a reduction gearbox assembly via a toothed
belt.
An optical disc attached to the end of the cam shaft controls its rotation.
2.2.3 External connection sub-assembly
The Optima contains two connectors located at the rear of the lower case:
! an RS 232 connector/Nurse call,
! a connector dedicated to the drip detector.
optima02_002b_en.fm 19
Description and operation
Page 20

Description and operation
20 optima02_002b_en.fm
Page 21

3 Description of the menus
3.1 Parameter configuration menu
The configuration menu adapts the Optima to the particular needs of each department. It
accesses the menus that customise the infusion parameters.
Fresenius Vial recommends the presence of its qualified staff, or a member of your Technical
Department, who will assist you in implementing the configuration procedures you wish to
select.
The configuration mode is activated by holding down the "MODE"
key when the device is switched on.
The following menus are displayed:
! User setting,
! Wards setting,
! Maintenance.
Each menu consists of sub-menus. The sub-menus can be accessed
by using the "START" key.
To access some of the sub-menus, you need to type in an access code. This code can be
defined and/or de-activated in the Service configuration mode. As long as the device is kept
switched on, the code does not need to be keyed in again.
Main Menu Key in code Sub-menu Sub-menu
User setting Code XXXX
User setting menu
Wards setting Code 0200
Wards setting menu
Maintenance This code will be communicated at the end of the maintenance
technician training.
Te st
Maintenance tests menu
After-sales configuration
Maintenance configuration
menu
Calibration
Calibration menu
optima03.1_001b_en.fm 21
Description of the menus
Page 22
Te st
TEst.1
operating period and maintenance date
Maintenance
Configuration
Calibration
TEst.2
TEst.3
TEst.4
TEst.5
TEst.6
TEst.9
TEst.A
TEst.C
TEst.E
TEst.F
TEst.J
SAV.1
SAV.2
SAV.3
EtaL.1
LED, LCD screen, 7-segment display and buzzer test
keyboard test
display’s the battery voltage
display’s the last 10 alarms codes
display’s the total running time
display’s the analogue sensor values
display’s the software version
clamping motor test
display’s the calibration values
infusion motor test
display’s the code last 10 alarm codes before error
preventive maintenance
tube selection
Beep
door calibration
EtaL.2
EtaL.9
The maintenance menu is reserved for qualified staff only.
corrective infusion coefficient
upstream and downstream pressure sensors
calibration
Description of the menus
22 optima03.1_001b_en.fm
Page 23
3.1.1 Access to the menu
Key Function
ON switches on the device.
OFF switches off the device and exits the configuration mode when
pressed for more than three seconds.
SILENCE ALARM
MODE accesses the configuration mode.
The selection keys scroll through the numbers and letters, the tenths,
units and tens values.
Activate or de-activate choices.
ENTER moves the cursor.
START validates a selection.
STOP cancels the current configuration.
Activate the After-Sales Service test menu.
! Keep the "MODE" button pressed, during the device
switch on.
" The various menus are displayed.
! Select the "Maintenance" menu and confirm.
! Type in the access code and confirm.
! Select "Sav" and confirm.
! Use the selection keys to scroll through the various tests on
the LCD display.
optima03.1_001b_en.fm 23
Description of the menus
Page 24
3.1.2 SAV1, preventive maintenance configuration
! SAV1, press "START".
" The running time since the last maintenance in hours and
the date are displayed on the LCD screen.
" To move the cursor use the enter key.
" Use the selection keys to modify a field.
" By validating once again, the new running time and date
are memorised and you may return to the After-sales
Service menu.
By pressing "STOP" you can cancel the modification and return to the Aftersales Service configuration menu.
You can exit the configuration mode at any time by pressing the "OFF" key.
3.1.3 SAV2, tube selection configuration
! SAV2, press "START".
" The list of available tubes is displayed on the LCD screen.
The tubes which have already been calibrated for pressure are marked with a "v".
" Select the tube using the keys.
" Press "START" to save the tube selection.
" When the device is switched on, the selected tube will
appear on the display unit.
By pressing "STOP", the modification is cancelled and you can return to the
After-sales Service configuration menu.
You can exit the configuration mode at any time by pressing the "OFF" key.
Description of the menus
24 optima03.1_001b_en.fm
Page 25
3.1.4 SAV3, "Beep"
This option is available on Optima pump equipped with software version 1.8e minimum.
!
SAV3, press "START".
! + 10 s. (not activated)
! + 0 s. (activated)
" Select your choice using the key.
# 10 s: the audible alarm "Beep" is triggered every 10
seconds.
# 0 s: the audible alarm "Beep" is triggered every 0
second.
" Press "START" to record your selection.
By pressing "STOP", the modification is cancelled and you can return to the
After-sales Service configuration menu.
You can exit the configuration mode at any time by pressing the "OFF" key.
optima03.1_001b_en.fm 25
Description of the menus
Page 26

Description of the menus
26 optima03.1_001b_en.fm
Page 27

Description of the menus
3.2 Calibration menu
The calibration menu is reserved for qualified staff only. Its access is protected by a
secret code. To find out about the operating mode for the various calibrations, refer
to the "Calibrations" chapter.
This menu enables manual calibration of:
!
ETAL.1: the door,
!
ETAL.2: the corrective coefficient for the infusion flow rate by tube type,
!
ETAL.9: the upstream and downstream pressure sensors.
optima03.3_001b_en.fm 27
Description of the menus
Page 28

Description of the menus
28 optima03.3_001b_en.fm
Page 29

Description of the menus
3.3 After-Sales Service test menu
The After-Sales Service test menu is reserved for qualified personnel. It enables a series of
checks that can be carried out on the Optima pump to confirm it is operating correctly. (See
chapter "Checks"). These must be carried out each time parts are replaced.
The After-Sales Service tests can also be carried out more quickly and simply from a PC
using our maintenance software. (Contact our After-Sales Service department.)
The Service test menu contains a series of 17 tests or checks:
!
tESt.1: operation period and maintenance date display
!
tESt.2: indicator lights test
!
tESt.3: keyboard test
!
tESt.4: battery voltage test
!
tESt.5: display’s the last 10 alarms codes
!
tESt.6: display’s the total operating period
!
tESt.9: display’s the analogue sensor values
!
tESt.A: display’s the software version
!
tESt.C: clamping motor test (only Optima VS)
!
tESt.E: display’s the calibration values
!
tESt.f: infusion motor test
!
tESt.J: display’s the last 10 alarm codes before error
A log of more than 760 time-stamped events can be consulted using our maintenance
software "VP Control". (Contact our After-Sales Service department.)
optima03.4_002b_en.fm 29
Description of the menus
Page 30

Description of the menus
30 optima03.4_002b_en.fm
Page 31

4 Preventive maintenance
4.1 Recommendations
The Optima pump can only be checked, serviced or repaired by Fresenius Vial or by a
certified and approved maintenance service. Any abnormal functioning of the pump must be
brought to the attention of your in-house qualified technical personnel or our After-Sales
Service.
Should you need to return the pump to our After-Sales Service, it should be cleaned,
disinfected and very carefully packaged, preferably in its original packaging, before being
sent.
For all information concerning the repair and use of the pump, kindly contact our After-Sales
Service or our Sales department.
Fresenius Vial is not liable for loss or damage to the pump during its transport to our AfterSales Service.
4.2 Maintenance schedule
4.2.1 Preventive maintenance
In order to maintain the pump’s performance, a Preventive Maintenance inspection
must be carried out every 3 years. This procedure, which includes changing the
battery, should be carried out by a qualified technician.
Any abnormal functioning or failure must be reported to the qualified technical staff in your
organisation or to our After-Sales Service. In these instances, the pump should not be used.
Important: If these maintenance procedures are not observed, the pump’s correct
operation will be impaired.
4.2.2 Quality control
At the request of the health organisation, a quality check will be carried out every 12
months.
A quality check (not included in the guarantee) consists of different inspection procedures as
defined in the pump’s Technical Manual. Only a qualified technician may perform the quality
check which must be performed using Fresenius-Vial software.
For more information, kindly contact our After-Sales Service.
At the end of the device life, return it to an organization competent in the
treatment of the electrical an electronic equipment waste. Remove the
battery from the device and return it to competent recycling organization.
optima04.1&2_001b_en.fm 31
Preventive maintenance
Page 32

Preventive maintenance
32 optima04.1&2_001b_en.fm
Page 33

Preventive maintenance
4.3 Checks
In order to ensure the preventive maintenance follow-up, a regular servicing inspection is
recommended every 12 months (see "Quality Control Certificate").
Recharge the battery during 16h before starting the checking procedure !
4.3.1 Accessing the tests
Keyboard description.
Key Function
ON switches on the device.
OFF switches off the device when pressed for over three seconds.
SILENCE ALARM
STOP, cancels the current test.
START validates a selection.
MODE accesses the test mode.
The selection keys scroll through the numbers and letters on the tenths,
units and tens values, and activate or de-activate the infusion menus.
ENTER validates your test selection or moves the cursor.
Activate the After-Sales Service test menu.
! Keep the "MODE" button pressed, during the device
switch on.
" The various menus are displayed.
! Select the "Maintenance" menu and confirm.
! Type in the access code and confirm.
! Select "Test" and confirm.
! Use the selection keys to scroll through the various tests on
the LCD display.
4.3.2 Visual check
Check the general aspect of the case and labels and check for shock impact damage.
optima04.3_002b_en.fm 33
Preventive maintenance
Page 34

4.3.3 Operating period and maintenance date
This test displays
the Optima’s
running time since
its last servicing
inspection. It also
displays and
modifies the "last"
servicing
inspection date.
When the servicing
inspection date is
modified, the
operating time is
resetted.
!
tESt.1, press "START".
" The operating time and the last service inspection date
are displayed on the LCD screen.
" If "Preventive test" flashes, service inspection is required.
" Press on the "Enter" key to select the date.
When reading this information, it is possible to modify
the day, month and year of the service inspection date using
the units and tens keys. This date will be stored in EEPROM
and the operating time is reseted to zero.
" When validating again, a new test can be selected.
This test checks
the correct
functioning of the
indicator lights, the
LCD screen
display, front panel
and buzzer.
You can interrupt the test at any time by pressing "STOP" and returning to
the test selection.
4.3.4 Indicator lights test
!
tEeSt.2, press "START".
" All the leds, 7-segment displays and the LCD lighten up.
" When validating again
# the leds and displays scroll across one by one from
left to right (leds display, 7 segment display by
segment and then by section of 8).
# An image scrolls across the LCD screen.
The test is OK if all the indicator lights have lit up and the buzzer has gone off.
You may interrupt the test at any time by pressing "STOP" and returning
to the test selection.
If the display is faulty, replace the display board (see "Display Board procedure).
Preventive maintenance
34 optima04.3_002b_en.fm
Page 35

4.3.5 Keyboard check
This test checks
that the keyboard
keys are
functioning
correctly.
This test displays
the mains or
battery voltage in
volts or in tenths of
volts.
!
tESt.3, press "START".
" The following screen appears:
" Press each key one by one,
# The keys that have been pressed appear as a
reverse video image on the LCD screen.
If two keys or more are held down simultaneously, "beep! beep! beep!" will be heard,
indicating an error.
You may exit the test at any time by pressing
"START" for more than 3 seconds, returning to the test selection.
4.3.6 Battery voltage check
!
tESt.4, press "START".
" The voltage is displayed in volts.
# If the Optima pump is running on battery, the LCD
screen displays, for example:
This test displays
in code form the
last ten alarms
which have been
triggered on the
Optima pump.
# If the Optima pump is running on the mains, the LCD
displays, for example:
" By confirming once again, a new test may be selected.
4.3.7 Checking the last 10 alarms
!
tESt.5, press "START".
" The code for the most recent alarm is displayed at the top
of the LCD screen.
" Press the selection keys to display the following codes
1xxx to 10xxx.
from
" By validating once again, a new test may be selected.
Preventive maintenance
optima04.3_002b_en.fm 35
Page 36

Alarm or error codes description:
Alarm Description
A10 Battery alarm
A12 End of infusion alarm
A16 Downstream occlusion alarm
A17 Air detection alarm
A18 Air volume alarm
A19 Upstream occlusion alarm
A20 Tube absence alarm
A21 Mobile clamp absence alarm.
A22 Door alarm
A23 Drip detector absence alarm
A24 Drip detector alarm: under flow
A25 Drip detector alarm: over flow
A26 Free flow
A27 Occlusion problem during auto-set
OFF Normal stop
FAIL Abnormal stop
Error Description
Er10 Internal RAM
Er20 External RAM
Er30 Check-sum Flash
Er40
Er50 Access Adc
Er60 Tube parameters
Er70 Motor frequency
Er80 Keyboard matrix (key press non functioning)
Er90 Check-sum Flash or software version µC secondary
Er01 Rotation (absence top turn)
Er11 Rotation (white or black too great)
Er21 Rotation (incorrect number of turns)
Er31 Automatic clamping motor
Er41 Rotation (presence top turn)
Er14 Period calculation parameters verification
Er24 Rotation direction verification
Er44 Incoherence quartz µC principal and µC secondary
Er54 Absence display board
Er74 Battery disconnection (3)
Er84 Battery charge (3) fault
Er94 Battery temperature fault
Er55 µC secondary access
Preventive maintenance
Er65 Absence LCD display back light
Access (E2prom) Eeprom
36 optima04.3_002b_en.fm
Page 37

Error Description
Er85 Restart µC secondary
Er16 Date and time in µC secondary verification
Er56 Association condition output/step number
Er17 Keyboard matrix (key press and columns inactive)
Er27 Keyboard check default (path not fine tuned)
Er37 ON/OFF key locked
Er47 Switching off impossible
Er28 Language file incompatible
4.3.8 Checking the total operating period
This test displays
the total period of
operation for the
Optima pump. The
value cannot be
modified manually.
!
tESt.6, press "START".
" The running time is displayed on the LCD screen.
" By confirming once again, a new test may be selected.
4.3.9 Checking the analogue sensor input
! tESt.9, press "START".
" The LCD screen displays:
# Upstream pressure, e.g.:
# Downstream pressure, e.g.:
# Door sensor, e.g.:
" By confirming once again, a new test may be selected.
If the value is out of limits, recalibrate the force sensor. (See "EtAL9 upstream and
downstream pressure sensors calibration").
optima04.3_002b_en.fm 37
Preventive maintenance
Page 38

4.3.10 Checking the software version
This test displays
the software
version and
revision numbers.
!
tESt.A, press "START".
" The LCD screen displays:
# the name of the Optima pump.
# the software version.
# the date.
" Press the tenths keys to continue the test.
" The LCD screen displays:
# the language versions.
" By confirming once again, a new test may be selected.
4.3.11 Checking the motor clamp (only Optima VS)
! tESt.C, press "START".
" The LCD screen displays:
# clamping
# unclamping
" Moving from clamping to unclamping occurs automatically
after confirming one of the two functions using the
selection keys.
" Press "START" to carry out the clamping or unclamping.
You may interrupt the test at any moment by pressing "STOP" and
returning to the test selection.
Preventive maintenance
38 optima04.3_002b_en.fm
Page 39

4.3.12 Checking the calibration values
This test displays
the calibration
values recorded in
the EEPROM.
!
tEStE, press "START".
" Move to another value using the keys.
Display Description
Por1
Por2
Por3
PaM1
PaM2
PaV1
PaV2
PaV3
! By confirming once again, a new test may be selected.
The value between brackets after the title is the number of calibrations carried out. The
display of the upstream and downstream pressure values is carried out according to the
number of active tubes.
Hall effect sensor, door closed without tube.
Hall effect sensor, door open.
Hall effect sensor, door closed with filled tube.
Upstream pressure, door open.
Upstream pressure, 0 mmHg, with filled tube.
Downstream pressure, door open.
Downstream pressure, 0 mmHG, with filled tube.
Downstream pressure, 750 mmHg, with filled tube.
This test starts the
motor without
activating any
infusion alarms.
4.3.13 Checking the infusion motor
!
tESt.F, press "START".
" Select an infusion flow rate (0.1 ml/h to 1000 ml/h) using
the keys.
" Press "START" to confirm the flow rate and start up the
motor.
If a motor rotation problem is detected, the LCD screen disappears and
Er01, Er11 or Er21 appears on the 7-segment display. By pressing
"STOP" you may exit the error and return to the test.
The test may be interrupted at any time by pressing the "STOP" key and
a new test may be selected.
optima04.3_002b_en.fm 39
Preventive maintenance
Page 40

4.3.14 Checking the last 10 events before a locking alarm or error
This test enables
the visualisation of
the codes for the
last 10 events that
have occurred
during operation of
the device before
the last locking
error.
!
teSt.J, press "START".
" The number of times the machine has been switched on
since the last locking error is displayed on the LCD
screen.
# "A" for an alarm. (See table
# "E" for an error. (See table
" By validating once again, a new test may be seleted.
teSt.5)
teSt.5)
4.3.15 Checking the pressure alarm limit
To carry out this operation, exit the test mode and press "OFF".
! Carry out the following assembly
1 m
Manom eter
Tap 3 ways
PUMP
Pocket
50cm
Container
! Press "ON".
" Position a tube in the device and lock the door inserting
the clamp.
" Position the manometer at the outlet of the tube.
" Select a flow rate of 125 ml/h.
" Adjust the pressure threshold to 750 mmHg.
# Let the tap run in a container.
# Start up the infusion and leave it running for 30
seconds.
# Position the tap to the manometer.
# Check that the alarm is triggered for a value of 1 bar ±
0.15 bar.
" Stop the infusion by pressing "STOP".
If the measured pressure value, depending to the limit selected is out of range, recalibrate
the pressure sensors. (See"
ETAL9 Calibration of the upstream and downstream
pressure sensors".)
Preventive maintenance
40 optima04.3_002b_en.fm
Page 41

4.3.16 Flow rate check
! Connect the Optima pump to the mains.
Before any flow rate test, run out an infusion of 20 ml to stabilise the flow rate.
To carry out this test, we recommend to use the IS Flow rate software available with
Fresenius Vial.
! Carry out a flow rate test according to the norm EN 60601-2-24.
! Check that the flow rate error lies between - 5% et + 5%.
If the discrepancy is too significant, refer to chapter 7 "Calibration / Calibration procedure
/
EtAL2 Calibrating the flow rate corrector coefficient".
4.3.17 Air detector check
To carry out this test, exit the test mode.
! Position a tube filled with water in the device.
! Press "ON".
" Select a flow rate of 100 ml/h.
" Press "START" to start up the infusion.
" Turn the drop chamber upside down to create an air
bubble of around 5 cm.
" Check that the alarm is triggered when the air bubble
crosses the detector.
The audio alarm can be stopped by pressing "SILENCE ALARM".
(Default running time is 2 minutes.).
4.3.18 Battery autonomy check
! Recharge the battery for at least 16 hours (100% capacity).
! Press "ON".
" Position a filled tube at a flow rate of 125 ml/h, then
confirm.
" Check the battery autonomy is at least 4 hours.
optima04.3_002b_en.fm 41
Preventive maintenance
Page 42

4.3.19 Continuity test
Use a multimeter.
To carry out this procedure, exit the test mode. Press "OFF.
! Using a calibrated multimeter in ohms, check the presence of an electrical resistance
greater than 10 MΩ between:
" between the phase and equipotential pin.
" between the neutral and equipotential pin.
4.3.20 Contrast check
To carry out this procedure, go to the "User configuration" menu.
" Key in the access code (if asked).
" Select "LCD contrast" and confirm.
" Check that the central portion of the screen is slightly
darker and adjust the contrast if necessary using the
selection keys.
" By pressing the confirm key, you can exit the test.
4.3.21 Timestamp check
To carry out this procedure, go to the "User configuration" menu.
" Key in the access code (if asked).
" Select "Time setting" and confirm.
" Check if the date and time are correct.
If necessary, adjust the date and time using the
selection keys and the ENTER key to move
from one figure to another.
" By pressing the confirm key you can exit the test.
Preventive maintenance
42 optima04.3_002b_en.fm
Page 43

Preventive maintenance
4.3.22 Quality Control Certificate
Use this table to summarise the results obtained from the various tests.
These tests can be done with a software dedicated to Optima.
Device type: Code: Device serial n°:
N° Procedure Obtained value
1 ! Check the general appearance of the case, labels, serial number and product
code.
2 ! Check the contrast.
If a fault is observed, refer to chapter ’Contrast Check’.
3 ! Check the clock. If an adjustment is needed, refer to chapter on datestamp
checking.
4
5
6
7
8
9
10 ! Check the drop detector (if the detector is present).
11 ! Check the air detector.
12 ! Check the downstream pressure.
! Display the operating period,
! Check the indicator lights, tESt.2.
! Check the keyboard,
! Display the total running time,
! Occlusion check, tESt.F
" Connect the water manometer to the tube outlet.
" Start up test F.
" Check that there is no motor error and that the maximum pressure is above
2 bar (1500 mmHg) for the version PT and ST,
above 1.6 bar for the version ST.
! Check clamping and unclamping,
" Confirm the two functions.
" Check for any absence of motor alarm.
" Start up an infusion.
" Check the (green) drop indicator lights up each time a drop appears in the drop
chamber.
" Disconnect the detector.
" Check if the drop alarm is activated.
" Create an air bubble in the tube of at least 5 cm long.
" Check the presence of the air bubble alarm (sound and visual) while the air
bubble is in the air bubble detector.
" Install a calibrated water manometer at the tube outlet.
" Adjust the pressure threshold to 750 mmHg.
" Start an infusion at 100 ml/h.
" Check that the downstream occlusion alarm is activated at 750 mmHh +/-125
(1 bar +/-0.15).
If there is a too great discrepancy, refer to chapter 7 "Calibration / Calibration
procedure /
sensors".
EtAL.9 calibrating the upstream and downstream pressure
tESt.3.
tESt.1and the maintenance date.
tESt.6.
tESt.C. (if OCS is present)
Conformity
Yes No
.
optfiche_002b_en.fm 43
Preventive maintenance
Page 44

N° Procedure Obtained value
13 ! Check the upstream pressure. (Only Optima VS)
" Start an infusion at 100 ml/h without drop detector.
" Clamp the tube between the drop chamber and the pump.
" Check that the upstream occlusion alarm is activated within 10 seconds.
" Unclamp.
" Check that the confirmation indicator lights up.
14 ! Check the clamp.
" Place a water pipe in the device.
" Close and open the door.
" Check that the clamp lock the tube.
# There should be no dripping at the tube outlet.
15 ! Check the battery operation.
" Disconnect the mains lead.
" Check the presence of the battery indicator.
" Reconnect the mains lead.
" Check if the battery indicator is switched off and that the mains indicator lights
up.
16 ! Check the flow rate.
Before any flow rate test, run an infusion of 20 ml to stabilise the flow rate.
Conformity
Yes No
" Carry out a flow rate check in accordance with the norm EN 60601-2-24.
" Check that the flow rate error is between - 5% and + 5%.
If there is too much discrepancy, refer to chapter 7 "Calibration / Calibration
procedure /
17 ! Check the battery autonomy.
" Start an infusion at 125 ml/h for 4 hours.
18 ! Carry out an electrical safety test according to norm EN 60601-1-2
EtAL.2 calibrating the flow rate corrector coefficient".
Name: Date: Visa:
Observations:
Preventive maintenance
44 optfiche_002b_en.fm
Page 45

Preventive maintenance
4.4 Cleaning and disinfecting
The pump form part of the patient's immediate environment. It is advisable to clean and
disinfect the device’s external surfaces of the device on a daily basis in order to protect
patient and staff.
! Disconnect the Base from its mains supply before cleaning.
! Do not place in an AUTOCLAVE nor IMMERSE the device, Do not let liquids enter the
device’s casing.
! If the device is placed in a high contamination risk unit, it is advisable to leave it in the room
during disinfecting, after having disinfected it with amoist cloth.
! Use a cloth soaked in DETERGENT-DISINFECTANT, previosly diluted with water if
required, to destroy micro organisms.
" Avoid abrasive scrubbing which could scratch the casing.
" Do not rinse or wipe the surfaces.
Do not use :
" ¨TRICHLOROETHYLENE-DICHLOROETHYLENE
" AMMONIA.
" AMMONIUM CHLORIDE
" CHLORINE AND AROMATIC HYDROCARBON.
" ETHYLENE DICHLORIDE-METHYLENE
" CHLORIDE-CETONE
These aggressive agents could damage the plastic parts and cause device malfunction.
Take car also with ALCOHOL based SPRAYS (20% -40% alcohol) .They lead to
tarnishing and small cracks in the plastic, and do not provide the neceeeary
cleaning prior to disinfection.
Disinfecting SPRAYS may be used, in accordance wih the manufacturer recommendation,
from a distance of 30 cm of the device, avoid the accumulation of the product in liquid form.
Avoid iodine-based solutions that may result in coloring some plastic parts permanently.
Please contact the appropriate service, responsible for cleaning and disinfecting products, in
your establishment for further details.
optima04.5&6_001b_en.fm 45
Preventive maintenance
Page 46

4.5 Storage
The device should be stored in a dry, cool place. In case of prolonged storage, the battery
should be disconnected via the battery access flap situated underneath the device.This
should be done by a qualified technician
! Storage conditions and carrying:
" Temperature: -10°C to 60°C / 14°F to 140°F.
" Atmospheric pressure: 500 hPa to 1060 hPa.
" Humidity: 10% to 90%, no condensation.
! Use conditions:
" Temperature: 5°C to 40°C / 41°F to 104°F.
" Atmospheric pressure: 700 hPa to 1060 hPa.
" Humidity: 20% to 90%, no condensation.
Fully recharge the battery before using the equipment to avoid any risks caused by micro
power cuts in the mains supply and to ensure maximum autonomy.
Preventive maintenance
46 optima04.5&6_001b_en.fm
Page 47

5 Troubleshooting
5.1 Breakdown guide
Message on
LCD display
Meaning Causes Action
Door open
alarm
Clamp
position
alarm
Set
insertion
alarm
OCS test
Alarm
! Hall affect sensor
detects that the door
is open
! The Optima does
not detect the
presence of the set
securing clamp
! Wrong position of
the set
! Occlusivity test
not successful. The
pumping mechanism
does not succeed to
increase the
pressure in the IV
set during the OCS
test
! Check set installation
! Check the presence of the
door magnet
! Calibration of the door sensor
! Replace the door sensor
! Check set installation
! Check the securing clamp
micro switch
! Replace it if necessary
! Check set installation
! Check the presence of the
door magnet
! Calibration of the door sensor
! Replace the door sensor
! Check set installation
! Check the door and carry on
a calibration if necessary
! Verify the good condition of
the membrane. Replace it if
necessary; refer to the
maintenance protocol : PM 0094
Air bubble
alarm
! Air volume
detected is higher
Than the limit
programmed
! Set is not
properly inserted in
the air detector
! Prime the line to remove the
air
! Check set installation on the
air detector Verify the air
adjustment of the air size
programmed
! Replace the air detector or
air bubble board
Troubleshooting
optima05.1_001a_en.fm 47
Page 48

Message on
LCD display
Meaning Causes Action
Drop alarm
(If drop
detector is
present)
! The container is
empty
! The rolling clamp
is closed
! Over-flow , under
flow, free flow
! The position of
the drip sensor
! Drop chamber is
full
! Drop detector is
disconnected while
the pump is
configured to be
used with
! The drip sensor
is connected and
disconnected
! Verify the volume remaining
on the container
! Verify if the roller clamp is
open
! Verify if the air inlet cap if
open when the pump is used
with a bottle
! Verify the positioning of the
drop detector
! Verify the volume of the liquid
in the drop chamber
! Verify the IV set position
! Verify the drip sensor is well
connected
! Verify the connector if it's
damaged
! Replace the drip sensor
Free flow
alarm
(in case of
use with
drip
sensor)
Upstream
occlusion
alarm
Downstrea
m pressure
alarm
! Over-flow
! Set not properly
positioned
! Upstream
pressure in line is
too low
! Empty container
! Check the roller
clamp
! Air inlet cap is
closed ( bottle
used)
! The pressure in
line exceeds the
limit programmed
! Check set installation
! Check drip sensor
positioning
! Check container
! Check roller clamp
! Check if the set is not
squeezed
! Check the container height
! Check the air inlet cap ( if
bottle used)
! Check the calibration values (
Test 9)
! Proceed to the calibration of
pressure
! Replace the force sensor
! Check the infusion line
! Check the correspondence
between the limit programmed
and detected
! Check the pressure sensor (
Test 9)
! Proceed to the calibration of
the force sensor
! Replace the force sensor
Troubleshooting
48 optima05.1_001a_en.fm
Page 49

Message on
LCD display
Meaning Causes Action
Air alarm
! The IV set is
present on the air
bubble detector but
not on the pumping
! Remove the IV set and reinstall it
! Carry on a calibration of the
door
mechanism
! The pump runs
over 24 hours, no air
bubble have
detected by the
sensor
Preventive maintenance
24/10/2003 passed
Battery
alarm
Preventive
maintenan
ce
! Low battery
voltage
! Preventive
maintenance date or
time is passed
requested
Problems Causes Action
Flow rate drift
! The installed set
doesn't correspond with
the set selected
! A mechanical part
which has a link with the
pumping mechanism or
the CPU board has been
changed without
calibrating the flow rate
correcting coefficient
! Check the set selection
! Measure the flow rate using a
reference set and calibrate the flow rate
correcting coefficient
! Connect the pump to the
mains power
! Check the charging voltage,
pump connected to the mains.
! Replace the battery
! Proceed to the complete
check up of the pump and
update the maintenance date or
time ( test 1)
Display defect:
LED's, 8 segments
display units
! Control transistors,
LED's and/or display
board connection are
defective
! Check the LED's and display (test 2)
! Check the good condition of the
display board
! Replace the LED's
! Check the connector which link CPU
and display boards
! Replace the display board
The device turns off
when it is
disconnected from
mains power
! The battery is
unplugged or the battery
cable is cut
! Battery is totally
! Check the battery connection
! Check the charging voltage
! Replace the battery
discharged
Mains LED's does
not switch ON
! Mains fuses out of
order
! Power supply out of
order
! Replace Check the mains fuses
! Replace the power supply board
! If the problem remains, replace the
CPU board
optima05.1_001a_en.fm 49
Troubleshooting
Page 50

Problems Causes Action
Battery alarm while
it has been
completely charged
Battery alarm
whereas the
Optima is
connected to the
mains
! Battery is totally
discharged
! Power supply or CPU
boards are faulty
! Check the charging voltage
! Replace the battery
! Check the charging voltage
! Check the power supply mains fuses
! Replace the power supply if
necessary.
! If the problem remains, replace the
CPU board and carry on a complete
configuration
The module MVP
turns ON or turns
OFF alone
Some keys from
keyboard out of
order
After a fall
Pump noisy
! Keyboard is defective
! CPU board is
defective
! Keyboard is defective ! Check the keyboard (test 3)
! Mechanical elements
damaged
! Power supply and
CPU wires are closed to
the motor (earth wire
also)
! Check the keyboard ( test 3)
! Replace the keyboard if necessary
! Check that there was no liquid
infiltration on the CPU board
! Replace the CPU board and carry
on a complete configuration of the
device
! Replace the keyboard if necessary
! Check that the mechanical
assembly and the cases are intact
! Fix the wires as it shown on the
technical manual
Troubleshooting
50 optima05.1_001a_en.fm
Page 51

Troubleshooting
5.2 Error messages
Error codes Meaning Action
Electronic and software command anomalies *
Er10
Internal RAM Anomaly
! Carry on a complete configuration of
the device via VP Control software
! Replace the CPU board and carry
on a complete configuration
Er20
Er30
Er40
Er50
Er60
Er70
Er80
External RAM Anomaly
EPROM Anomaly
EEPROM Anomaly
ADC Anomaly
Sets parameters anomaly
Motor frequency anomaly
Keyboard anomaly
! Check the ADC
! Replace the CPU board and carry
on a complete configuration
! Reconfigure the module MVP with
VP Control software
! Replace the CPU board and carry
on a complete configuration
! Check and replace the keyboard if
necessary
! Check that there is no liquid
presence inside the device which could
damage keyboard and the electronics
boards
! Replace the CPU board and carry
on a complete configuration
Er90
Er01
Er11
Er21
Er31
Er41
Software version
Stepper motor rotation error
Stepper motor rotation error
Stepper motor rotation error
OCS DC motor failure
Stepper motor rotation error
! Configuration of the device is
needed through with VP Control
! Replace the CPU board and carry
on a complete configuration
! Replace the motor
! Check the motor coupling
See PM 0094
! Replace the mechanical block
See PM 0094
! Check the motor clamp for OCS and
rubber O ring
! Put some grease on the clamp finger
threaded screw. Replace the rubber
O ring if necessary (p/n: 174256)
! Replace the OCS motor clamp
! Replace the motor
Troubleshooting
optima05.2_002a_en.fm 51
Page 52

Error codes Meaning Action
Er14
Motor period calculation
anomaly
! Reconfigure the device with VP
Control software
! Replace the CPU board and carry
on a complete configuration of the
device
Er24
Er44
Er54
Er74
Er84
Er94
Er55
Motor rotation direction
anomaly
Quartz frequency anomaly
Display board anomaly
Battery disconnected
Battery charging failure
Temperature fault
Access default to the
secondary µ processor
! Check the motor rotation sensor
! Replace the CPU board and carry
on a complete configuration of the
device
! Replace the quartz
! Replace the CPU board and carry
on a complete configuration of the
device
! Check the display board connection
and replace it if necessary
! Check the battery connection
! Check the charging voltage
! Ensure that the charging time is not
over 15 hours
! Replace the battery
! Replace the battery
! Replace the CPU board
! Carry on a complete configuration of
the device with VP Control software
! Replace the CPU board and Carry
on a complete configuration of the
device via VP Control software
Er65
Er85
Er16
Er56
Troubleshooting
52 optima05.2_002a_en.fm
Back light anomaly of LCD
display
Impossible to start the
secondary µ processor
! Date / time failure ! Check the date and the time clock
! Out put conditions / Step
number association default
! Replace the LCD
! Carry on a complete configuration of
the device with VP Control software
! Replace the CPU board and Carry
on a complete configuration of the
device via VP Control software
! Replace the CPU board and Carry
on a complete configuration of the
device via VP Control software
! Carry on a complete configuration of
the device with VP Control
Page 53

Error codes Meaning Action
Er17
Er27
Er37
Er47
Er28
! Keyboard matrices default ! Replace the keyboard
! Check that there is no liquid
presence inside the device which could
damage keyboard and electronics
boards
! Keyboard matrices default
! ON/OFF key locked
! OFF key out of order
(no way to switch OFF the
device)
! Language file
incompatible
! Replace the CPU board and carry
on a complete configuration of the
device via VP Control software
! Carry on a complete configuration of
the device via VP Control software
optima05.2_002a_en.fm 53
Troubleshooting
Page 54

Troubleshooting
54 optima05.2_002a_en.fm
Page 55

6 Intervention procedures
This chapter lists all the dismantling and re-assembling procedures.
optima06.0_001a_en.fm 55
Intervention procedures
Page 56

Intervention procedures
56 optima06.0_001a_en.fm
Page 57

Intervention procedures
N°1, Procedure: CPU board
Safety:
For safety reasons, the technician should not intervene while the device is in operation.
Material needed:
! 1 Posidriv Z1 screwdriver
! 1 anti-static bracelet
Maintenance level:
Level 2, specialist technician. (See biomedical technical training documentation.)
Procedure:
Access
! Pivot the Optima pump on the top of the front cover.
! Unscrew the 2 cruciform screws (marker 1), connecting the Optima angle bracket to the
base.
! Remove the angle bracket being careful not to pull out the connectors.
! Disconnect the J4 and J3 connectors, as well as the functional Earth.
! Return the Optima pump to its original position.
1
1
2
2
Allen key
! Using an Allen key, gently slide out the two screws located under the door.
! Remove the door.
! Unscrew the 4 cruciform screws (marker 2 on Fig. 1 and 2) connecting the front cover to
the base.
! Remove the front cover, being careful not to pull out the CPU board flat cable.
optima06.0_0010b_en.fm 57
Fig. 1
Intervention procedures
Page 58

! Disconnect the CPU board flat cable: J2 connector and J4 connector.
2
2
Fig. 2
Do not touch the electronic boards with your hands.
Dismantling
When working with electronic components, we recommend wearing an anti-static bracelet
connected to the earth and working on a foam anti-static mat.
! Disconnect the J6, J8, J9 and J10 connectors.
! Disconnect the J1 flat cable.
! Unscrew the 3 cruciform screws (marker 3) connecting the CPU board to the front cover.
3
J1
3
J9
J10
J6
J8
3
! Remove the board from its housing, being careful with the display board J3 flat cable.
! Remove the CPU board.
Intervention procedures
58 optima06.0_0010b_en.fm
Page 59

Re-assembling
Carry out the dismantling procedure in reverse order to re-assemble the unit.
When closing the pump, ensure that the 2 cables connecting the power supply board
and the CPU board are positioned above the motor. In addition, check that the earth
wire is next to the metal support.
Incorrect positioning of one of these cables could result in a noise being heard when
the pump is in operation.
! Positioning of the earth wire.
Correct
Incorrect
! Positioning of the wires connecting the power supply board and the CPU board.
Right
Wrong
Wrap an adhesive silicon cord around the CPU board J12 and J11 connectors.
optima06.0_0010b_en.fm 59
Intervention procedures
Page 60

! Perform a complete configuration for a new board using VP Control Maintenance
Software.
Each Optima pump has its own type of "display and CPU board"; it is important that you
do not mix up the different Optima pump references and that you order the one that
corresponds to your device.
! Carry out regular servicing checks. (See Quality Control Certificate.)
Intervention procedures
60 optima06.0_0010b_en.fm
Page 61

Intervention procedures
N°2, Procedure: Display board
Safety:
For safety reasons, the technician should not intervene while the device is in operation.
Material needed:
! 1 Posidriv Z1 screwdriver
! 1 anti-static bracelet
Maintenance level:
Level 2, specialist technician (see biomedical technical training documentation).
Procedure:
Access
! Pivot the Optima pump on the top of the front cover.
! Unscrew the 2 cruciform screws (marker 1) connecting the Optima pump angle bracket to
the base.
! Remove the angle bracket, being careful not to pull out the connectors.
! Disconnect the J4 and J3 connectors, as well as the functional Earth.
! Return the Optima pump back to its original position.
1
1
2
2
Allen key
! Using an Allen key, gently slide out the two screws located under the door.
! Remove the door.
! Unscrew the 4 cruciform screws (marker 2 on Fig. 1 and 2) connecting the front cover to
the base.
! Remove the front cover, being careful not to pull out the CPU board flat cable.
optima06.0_0020b_en.fm 61
Fig. 1
Intervention procedures
Page 62

! Disconnect the CPU board flat cable: J2 connector and J4 connector.
2
2
Fig. 2
Do not touch the electronic boards with your hands.
Dismantling
When working with electronic components, we recommend wearing an anti-static bracelet
connected to the earth and working on a foam anti-static mat.
! Disconnect the J1 connector connecting the display board to the CPU board.
! Disconnect the display board J3 connector.
! Unscrew the cruciform screw (marker 3) situated on the display board, connecting it to the
front cover.
! Remove the display board.
J3
J1
J2
3
Intervention procedures
62 optima06.0_0020b_en.fm
Page 63

Re-assembling
Each Optima pump has its own type of "display and CPU board"; it is important that you
do not mix up the different Optima pump references and that you order the one that
corresponds to your device.
Carry out the dismantling procedure in reverse order to re-assemble the new unit.
When fixing the display board, ensure that the plastic inserts are not tightened too much
or they will be damaged.
When positioning the front case, ensure that the sealing is perfectly positioned in its
housing after re-assembling.
When closing the pump, ensure that the 2 cables connecting the power supply board
and the CPU board are positioned above the motor. Also check that the earth wire is
next to the metal support.
Incorrect positioning of one of these cables could result in a noise being heard when
the pump is in operation. (See photo on procedure sheet n°1.)
! Carry out regular servicing checks. (See Quality Control Certificate.)
optima06.0_0020b_en.fm 63
Intervention procedures
Page 64

Intervention procedures
64 optima06.0_0020b_en.fm
Page 65

Intervention procedures
N°3, Procedure: Pumping system
Safety:
For safety reasons, the technician should not intervene while the device is in operation.
Material needed:
! 1 Posidriv Z1 screwdriver
! 1 anti-static bracelet
Maintenance level:
Level 2, specialist technician. (See biomedical technical training documentation.)
Procedure:
Access
! Pivot the Optima pump on the top of the front cover.
! Unscrew the 2 cruciform screws (marker 1), connecting the Optima pump angle bracket to
the base.
! Remove the angle bracket being careful not to pull out the connectors.
! Disconnect the J4 and J3 connectors, as well as the functional Earth.
! Return the Optima pump back to its original position.
1
1
2
2
Allen key
! Using an Allen key gently slide out the two screws located under the door from their
groove.
! Remove the door.
! Unscrew the 4 cruciform screws (marker 2 on Fig. 1 and 2) connecting the front cover to
the base.
! Remove the front cover, being careful not to pull out the CPU board flat cable.
optima06.0_0030b_en.fm 65
Fig.1
Intervention procedures
Page 66

! Disconnect the CPU board flat cable: J2 connector and J4 connector.
2
2
Fig.2
Do not touch the electronic boards with your hands.
Dismantling
When working with electronic components, we recommend wearing an anti-static bracelet
connected to the earth and working on a foam anti-static mat.
! Using a cutter, remove the label.
! Unscrew the 2 middle cruciform screws (marker 3) located under the label.
3
3
3
3
3
4
Intervention procedures
66 optima06.0_0030b_en.fm
! Unscrew the 2 cruciform screws (marker 4).
4
Page 67

! Unscrew the cruciform screw (marker 5), paying attention to the washer.
! Remove the pumping system.
5
Re-assembling
When replacing the mechanical bloc, it’s recommended to read the following instruction.
! If a good metal washer and a metal pulley are already mounted, let them in place.
old aluminium pulley with washer New aluminium pulley without washer
6
L
Check that there is no axial free play on the mechanical block cam shaft.
Carry out the dismantling procedure in reverse order to re-assemble the new unit.
When closing the pump ensure that the 2 cables connecting the power supply board
and the CPU board are positioned above the motor. In addition, check that the earth
wire is next to the metal support.
Incorrect positioning of one of these cables could result in a noise being heard when
the pump is in operation. (See photo in Procedure n°1.)
! Carry out regular servicing checks. (See Quality Control Certificate.)
optima06.0_0030b_en.fm 67
Intervention procedures
Page 68

Intervention procedures
68 optima06.0_0030b_en.fm
Page 69

Intervention procedures
N°4, Procedure: LCD display
Safety:
For safety reasons, the technician should not intervene while the device is in operation.
Material needed:
! 1 Posidriv Z1 screwdriver
! 1 anti-static bracelet
Maintenance level:
Level 2, specialist technician. (See biomedical technical training documentation.)
Procedure:
Access
! Pivot the Optima pump on the top of the front cover.
! Unscrew the 2 cruciform screws (marker 1), connecting the Optima pump angle bracket to
the base.
! Remove the angle bracket being careful not to pull out the connectors.
! Disconnect the J4 and J3 connectors, as well as the functional Earth.
! Return the Optima pump to its original position.
1
1
22
Allen key
! Using an Allen key, gently slide out the two screws situated under the door.
! Remove the door.
! Unscrew the 4 cruciform screws (marker 2 on Fig. 1 and 2) connecting the front cover to
the base.
! Remove the front cover, being careful not to pull out the CPU board flat cable.
optima06.0_0040b_en.fm 69
Fig. 1
Intervention procedures
Page 70

! Disconnect the CPU board flat cable: J2 connector and J4 connector.
2
2
Fig. 2
Do not touch the electronic boards with your hands.
Dismantling
When working with electronic components, we recommend wearing an anti-static bracelet
connected to the earth and working on a foam anti-static mat.
! Remove the display board. (See corresponding Procedure n°2.)
! Disconnect the J2 keyboard connector.
! Detach the LCD display.
! Remove the LCD display.
J2
Intervention procedures
70 optima06.0_0040b_en.fm
Page 71

Re-assembling
! Recover the self-adhesive block from the old LCD.
! Position the self-adhesive block on the LCD display, above the LCD display label.
! Position the LCD display on the display board.
! Press down the display on the display board so that the block adheres to the display
board.
Carry out the dismantling procedure in reverse order to re-assemble the new unit.
When closing the pump, ensure that the 2 cables connecting the power supply board
and the CPU board are positioned above the motor. In addition, check that the earth
wire is next to the metal support.
Incorrect positioning of one of these cables could result in a noise being heard when
the pump is in operation. (See photo on Procedure n°1)
.
! Carry out regular servicing checks. (See Quality Control Certificate.)
optima06.0_0040b_en.fm 71
Intervention procedures
Page 72

Intervention procedures
72 optima06.0_0040b_en.fm
Page 73

Intervention procedures
N°5, Procedure: Air detector board
Safety:
For safety reasons, the technician should not intervene while the device is in operation.
Material needed:
! 1 Posidriv Z1 screwdriver
! 1 anti-static bracelet
Maintenance level:
Level 2, specialist technician. (See biomedical technical training documentation.)
Procedure:
Access
! Pivot the Optima pump on the top of the front cover.
! Unscrew the 2 cruciform screws (marker 1), connecting the Optima pump angle bracket to
the base.
! Remove the angle bracket being careful not to pull out the connectors.
! Disconnect the J4 and J3 connectors, as well as the functional Earth.
! Return the Optima pump to its original position.
1
1
2
2
Allen key Fig. 1
! Using an Allen key, gently slide out the two screws located under the door.
! Remove the door.
! Unscrew the 4 cruciform screws (marker 2 on Fig. 1 and 2) connecting the front cover to
the base.
! Remove the front cover, being careful not to pull out the CPU board flat cable.
optima06.0_0050b_en.fm 73
Intervention procedures
Page 74

! Disconnect the CPU board flat cable: J2 connector and J4 connector.
2
2
Fig. 2
Do not touch the electronic boards with your hands.
Dismantling
When working with electronic components, we recommend wearing an anti-static bracelet
connected to the earth and working on a foam anti-static mat.
! Unclip the non-oxidizing aluminium plate (marker 3) holding the air detector board in
place.
! Unclip the board.
3
Intervention procedures
74 optima06.0_0050b_en.fm
Page 75

! Disconnect the J9 connector (marker 4) connecting the CPU board to the air detection
board.
! Disconnect the connector (marker 5) connecting the board to the air detector.
5
4
Re-assembling
Carry out the dismantling procedure in reverse order to re-assemble the new unit.
When closing the pump, ensure that the 2 cables connecting the power supply board
and the CPU board are positioned above the motor. In addition, check that the earth
wire is next to the metal support. Incorrect positioning of one of these cables could
result in a noise being heard when the pump is in operation. (See photo in Procedure
n°1.) Carry out regular servicing checks.
! Carry out regular servicing checks. (See Quality Control Certificate.)
optima06.0_0050b_en.fm 75
Intervention procedures
Page 76

Intervention procedures
76 optima06.0_0050b_en.fm
Page 77

Intervention procedures
N°6, Procedure: Pressure sensor
Safety:
For safety reasons, the technician should not intervene while the device is in operation.
Material needed:
! 1 Posidriv Z1 screwdriver
! 1 anti-static bracelet
Maintenance level:
Level 2, specialist technician. (See biomedical technical training documentation.)
Procedure:
Access
! Pivot the Optima pump on the top of the front cover.
! Unscrew the 2 cruciform screws (marker 1), connecting the Optima pump angle bracket to
the base.
! Remove the angle bracket being careful not to pull out the connectors.
! Disconnect the J4 and J3 connectors, as well as the functional Earth.
! Return the Optima pump to its original position.
1
2
1
2
Allen key
! Using an Allen key, gently slide out the two screws located under the door.
! Remove the door.
! Unscrew the 4 cruciform screws (marker 2 on Fig. 1 and 2) connecting the front cover to
the base.
! Remove the front cover, being careful not to pull out the CPU board flat cable.
optima06.0_0070b_en.fm 77
Fig. 1
Intervention procedures
Page 78

! Disconnect the CPU board flat cable: J2 connector and J4 connector.
2
2
Fig. 2
Do not touch the electronic boards with your hands.
Intervention procedures
78 optima06.0_0070b_en.fm
Page 79

Dismantling
When working with electronic components, we recommend wearing an anti-static
bracelet connected to the earth and working on a foam anti-static mat.
! Remove the pumping system. (See corresponding Procedure n° 3.)
! Using a cutter, unstick the "circular sticker" (marker 3).
! Unscrew the 3 cruciform screws (marker 4) situated under the "circular sticker" connecting
the tube catches to the base.
3
4
! Remove the tube catchings.
! Unscrew the cruciform screw which maintain the right infusion set guide to the metallic
plate and the base.
! Remove the plate.
! Unscrew the 2 screws of each pressure sensor support (marker 5) connecting the
supports to the base.
2
2
44
5
5
5
5
optima06.0_0070b_en.fm 79
Intervention procedures
Page 80

! Separate the pressure sensors from their support (see arrows)
! Unsolder the pressure sensor wires (marker 6).
! Remove the pressure sensors.
6
6
Re-assembling
Carry out the dismantling procedure in reverse order to re-assemble the unit.
After re-assembling the pressure sensors, calibrate them. (See
the upstream and downstream pressure sensors.)
When closing the pump, ensure that the 2 cables connecting the power supply board
and the CPU board are positioned above the motor. In addition, check that the earth
wire is next to the metal support.
Incorrect positioning of one of these cables could result in a noise being heard when
the pump is in operation. (See photo in Procedure n°1.)
! Carry out regular servicing checks. (See Quality Control Certificate.)
ETAL9, Calibrating
Intervention procedures
80 optima06.0_0070b_en.fm
Page 81

Intervention procedures
N°7, Procedure: OCS clamp motor (if OCS is present)
Safety:
For safety reasons, the technician should not intervene while the device is in operation.
Material needed:
! 1 Posidriv Z1 screwdriver
! 1 anti-static bracelet
Maintenance level:
Level 2, specialist technician. (See biomedical technical training documentation.)
Procedure
Access
! Pivot the Optima pump over the top of the front cover.
! Unscrew the 2 cruciform screws (marker 1), connecting the Optima angle bracket to the
base.
! Remove the angle bracket being careful not to pull out the connectors.
! Disconnect the J4 and J3 connectors, as well as the functional Earth.
! Return the Optima pump to its original position.
1
2
1
2
Allen key
! Using an Allen key, gently slide out the two screws located under the door.
! Remove the door.
! Unscrew the 4 cruciform screws (marker 2 on Fig. 1 and 2) connecting the front cover to
the base.
! Remove the front cover, being careful not to pull out the CPU board flat cable.
optima06.0_0081b_en.fm 81
Fig. 1
Intervention procedures
Page 82

! Disconnect the CPU board flat cable: J2 connector and J4 connector.
2
2
Fig. 2
Do not touch the electronic boards with your hands.
Intervention procedures
82 optima06.0_0081b_en.fm
Page 83

Dismantling
When working with electronic components, we recommend wearing an anti-static bracelet
connected to the earth and working on a foam anti-static mat.
! Using a cutter, unstick the 4 "circular stickers" (marker 3).
! Unscrew the 4 cruciform screws (marker 4) situated under the "circular stickers", holding
the air bubble detector case to the front cover.
3
! Separate the air detector from the case.
! Disconnect the J10 connector (CPU board).
! Unscrew the clamp (marker 6), while holding the motor reducer.
! Unscrew the 3 cruciform screws (marker 5) holding the
motor reducer to the front cover.
! Remove the motor reducer.
4
4
4
4
6
5
5
5
optima06.0_0081b_en.fm 83
Intervention procedures
Page 84

Re-assembling
Carry out the dismantling procedure in reverse order to reassemble the unit.
When re-assembling the motor clamp, apply a drop of silicon grease around the screw
path (marker 6).
When closing the pump, ensure that the 2 cables connecting the power supply board
and the CPU board are positioned above the motor. In addition, check that the earth
wire is next to the metal support.
Incorrect positioning of one of these cables could result in a noise being heard when
the pump is in operation. (See photo in Procedure n°1.)
.
! Carry out regular servicing checks. (See Quality Control Certificate).
Intervention procedures
84 optima06.0_0081b_en.fm
Page 85

Intervention procedures
N°8, Procedure: Power supply board
Safety:
For safety reasons, the technician should not intervene while the device is in operation.
Material needed:
! 1 Posidriv Z1 screwdriver
! 1 anti-static bracelet
Maintenance level:
Level 2, specialist technician. (See biomedical technical training documentation.)
Procedure
Access
! Pivot the Optima pump on the top of the front cover.
! Unscrew the 2 cruciform screws (marker 1), connecting the Optima pump angle bracket to
the base.
! Remove the angle bracket being careful not to pull out the connectors.
! Disconnect the J4 and J3 connectors, as well as the functional Earth.
1
1
optima06.0_0090b_en.fm 85
Intervention procedures
Page 86

! Unscrew the 2 cruciform screws (marker 4) holding the power supply shelf in place.
! Disconnect the earth wire (marker 5) and the mains connector (marker 6).
! Remove the power supply board.
6
5
4
4
Re-assembling
Carry out the dismantling procedure in reverse order to re-assemble the unit.
When closing the pump, ensure that the 2 cables connecting the power supply board
and the CPU board are positioned above the motor. In addition, check that the earth
wire is next to the metal support.
Incorrect positioning of one of these cables could result in a noise being heard when
the pump is in operation. (See photo in Procedure n°1.)
! Carry out regular servicing checks. (See Quality Control Certificate.)
.
Intervention procedures
86 optima06.0_0090b_en.fm
Page 87

Intervention procedures
N°9, Procedure: Battery
Safety:
For safety reasons, the technician should not intervene while the device is in operation.
Material needed:
! 1 Posidriv Z1 screwdriver
Maintenance level:
Level 2, specialist technician. (See biomedical technical training documentation.)
Procedure:
Access
! Pivot the Optima pump on the top of the front cover.
! Unscrew the 2 cruciform screws (marker 1) connecting the Optima pump angle bracket to
the base.
! Remove the angle bracket, being careful not to pull out the connectors.
1
1
optima06.0_0100b_en.fm 87
Intervention procedures
Page 88

Dismantling
! Unscrew the 2 cruciform screws (marker 2) holding the battery in place.
! Disconnect the battery.
! Remove the battery.
2
2
Re-assembling
Carry out the dismantling procedure in reverse order to re-assemble the unit.
We recommend carrying out a complete charging and discharging cycle to guarantee that
the battery will function correctly.
When closing the pump, ensure that the 2 cables connecting the power supply board
and the CPU board are positioned above the motor. In addition, check that the earth
wire is next to the metal support.
Incorrect positioning of one of these cables could result in a noise being heard when
the pump is in operation. (See photo in Procedure n°1.)
! Carry out regular servicing checks. (See Quality Control Certificate.)
Intervention procedures
88 optima06.0_0100b_en.fm
Page 89

Intervention procedures
N°10, Procedure: Front cover, base and angle bracket
Safety:
For safety reasons, the technician should not intervene while the device is in operation.
Material needed
! 1 Posidriv Z1 screwdriver
! 1 anti-static bracelet
! 1 soldering iron
! Soldering wire "RADIEL Sn60Pb RI 1" (no cleaning necessary) or equivalent
Maintenance level:
Level 2, specialist technician. (See biomedical technical training documentation.).
Procedure:
Access
! Pivot the Optima pump on the top of the front cover.
! Unscrew the 2 cruciform screws (marker 1), connecting the Optima angle bracket to the
base.
! Remove the angle bracket being careful not to pull out the connectors.
! Disconnect the J4 and J3 connectors, as well as the functional Earth.
! Return the Optima pump to its original position.
1
1
2
2
Fig.1Allen key
! Using an Allen key, gently slide out the two screws located under the door.
! Remove the door.
! Unscrew the 4 cruciform screws (marker 2 on Fig. 1 and 2) connecting the front cover to
the base.
optima06.0_0110b_en.fm 89
Intervention procedures
Page 90

! Disconnect the CPU board flat cable: J2 connector and J4 connector.
2
2
Fig.2
Do not touch the electronic boards with your hands.
Dismantling the upper cover
! Dismantle the CPU board. (See corresponding Procedure.)
! Dismantle the display board. (See corresponding Procedure.)
! Dismantle the OCS motor clamp. (See corresponding Procedure.)
! Dismantle the air detector board. (See corresponding Procedure.)
Re-assembling the upper cover
! Re-assemble the display board. (See corresponding Procedure.).
! Re-assemble the CPU board. (See corresponding Procedure.)
! Re-assemble the OCS motor clamp. (See corresponding Procedure.)
! Re-assemble the air detector board. (See corresponding Procedure.)
Dismantling the base
! Dismantle the pumping system. (See corresponding Procedure.)
! Dismantle the tube clamp switch. (See corresponding Procedure.)
! Dismantle the pressure sensors. (See corresponding Procedure.)
Re-assembling the base
Carry out the dismantling procedure in reverse order to re-assemble the base.
Intervention procedures
90 optima06.0_0110b_en.fm
Page 91

Dismantling the angle bracket
! Dismantle the battery. (See corresponding Procedure.)
! Dismantle the power supply board. (See corresponding Procedure.)
Re-assembling the angle bracket
Carry out the dismantling procedure in reverse order to re-assemble the angle bracket.
When closing the pump, ensure that the 2 cables connecting the power supply board
and the CPU board are positioned above the motor. In addition, check that the earth
wire is next to the metal support.
Incorrect positioning of one of these cables could result in a noise being heard when
the pump is in operation. (See photo in Procedure n°1.)
! Carry out regular servicing checks. (See Quality Control Certificate.)
optima06.0_0110b_en.fm 91
Intervention procedures
Page 92

Intervention procedures
92 optima06.0_0110b_en.fm
Page 93

7 Calibration
7.1Calibration procedure
The calibration menu is reserved for qualified staff only. Its access is protected with
a secret code.
7.1.1 Access to the calibrations
Keyboard description.
Key Function
ON switches on the device.
OFF switches off the device when pressed for more than three
seconds.
SILENCE ALARM
START validates a choice.
MODE accesses the calibrating mode.
The selection keys scroll through the numbers and letters on the LCD
screen using the tenths, units and tens values.
Activate or de-activate the infusion menu.
ENTER confirms the selected calibration, or moves the cursor.
STOP cancels the current calibration.
How to activate the calibration mode
! Keep the "MODE" button pressed, during the device switch on.
" The various menus are displayed.
! Using the selection keys, select "Maintenance" on the
display.
! Press "START".
! Key in the access code.
! Press "START".
! Select "Calibration".Press "START".
! Using selection keys select:
" EtAL.1: calibration of the door.
" EtAL.2: calibration of the infusion flow rate corrective coefficient.
" EtAL.9: calibration of the upstream and downstream pressure sensors.
optima07.1_001b_en.fm 93
Calibration
Page 94

7.1.2 EtAL.1 Door calibration
This menu records
the 3 door
positions in the
EEPROM.
!
EtAL.1, press "START".
" Por.1: close the door without tube.
# Press "START".
The value is read and recorded. The value should be between
1196 < X < 3750 mV.
" Por.2: open the door without tube.
# Press "START".
The value is read and recorded. The value should be between
2197 < X < 2695 mV.
" Por.3: position a tube filled with water and close the door.
# Press "START".
The value is read and recorded. The value should be between
1699 < X <3398 mV.
" By validating once again, another calibration can be
selected.
Press "STOP" key to exits the menu without memorising the calibration
values.
Calibration
94 optima07.1_001b_en.fm
Page 95

7.1.3 EtAL.2 Calibration of the flow rate corrective coefficient
Before any flow rate test, carry out an infusion of 20 ml to stabilise the flow rate. The
adjustment range allows a correction up to -10% to +10%.
This menu adjusts
the device flow rate
according to the
used tube.
! Place a tube filled with water on the device, taking into
account the positioning of the clamp, and close the door.
! Select a flow rate of 100 ml/h.
! Start the infusion.
! Perform a flow rate measurement according to the norm
601-1-2-24.
! Note the programmed flow rate and the obtained flow rate.
!
EtAL.2, press "START".
" Using the selection keys, enter the programmed flow rate.
" Press the "ENTER" key to move from one field to another.
" Enter the measured flow rate.
" Press "START" to start the calculation of the new
corrective coefficient.
# if the coefficient lies between 0.9 and 1.1, you may
return to the configuration menu.
# if the coefficient does not lies between 0.9 and 1.1
the "Error" message appears.
Pressing "STOP" exits the menu without calculating the new coefficient.
optima07.1_001b_en.fm 95
Calibration
Page 96

7.1.4 EtAL.9 Calibrating the upstream and downstream pressure sensors
This menu records
the pressure value
in the EEPROM
according to the
selected tube.
The Optima can operate with various tube types. The choice of tube is made through:
! the "MODE" key, set selection when the pump is on normal mode.
! maintenance menu and SAV 2
The pressure calibration must be done for each type of tube active on the pump.
If a pressure sensor, the door sensor or CPU board has been changed, the calibration
values must be reset to zero for each tube. Where the CPU board has been changed, the
calibration must be carried out using maintenance software during the configuration
procedure.
Installation:
! According to the diagram below:
Pocket
50 cm
Manom eter
Tap 3 ways
1 m
Pump
Container
The manometer must be placed at the same level as the Optima pump.
Calibration
96 optima07.1_001b_en.fm
Page 97

! EtAL.9, press "START".
Resetting the pressure calibrations
" Choose "YES" or "NO" using the selection keys and
confirm.
" If "YES", the calibration values for the pressure sensors
are reset to zero, for all tubes.
" If "NO", the calibration values are reset to zero only for the
tube selected.
If the calibration of the pressure sensors should be performed only for the tube selected,
it’s recommennded to choose "NO".
When choosing "YES" a calibration for all the tubes programmed should be carried out
using VP control maintenance sofware.
When changing the force sensors, the calibration should be done for all the tube available
on the pump.
The calibration described below is concerns only the active tube chosen through mode
key / set selection or maintenance / SAV 2.
" Press "CONFIRM" key to start the calibration.
Calibrating the downstream and upstream pressure sensor with the door open.
" PaV.1,PaM.1: open the door of the Optima
pump, no tube installed.
" Press "ENTER".
# The values for "downstream pressure sensor door
open" and "upstream pressure sensor door open" are
read and recorded.
# The threshold for "downstream pressure door open"
must be between 1997 < X < 4453 mV.
# The threshold for "upstream pressure door open"
must be between 1197 < X < 4297 mV.
optima07.1_001b_en.fm 97
Calibration
Page 98

Calibrating the downstream pressure sensor at 0 mm Hg with the door closed, filled
tube installed.
" Position the tube according to the preceding diagram and
open the 3-channel tap in the direction of the PumpManometer.
" Press "START", to warm up the tube.
" Wait until the pressure reaches around 750 mm Hg
(1 bar +/- 0.05 bar), and open the 3-channel tap in the
pump-container direction to lower the pressure
(0 mm Hg).
" Press "STOP" to stop infusion.
" Press "ENTER" to record the pressure.
# The threshold for the "downstream pressure
at 0 mm Hg door closed" should be between
1499 < X < 3696 mV.
Calibrating the downstream pressure sensor at 750 mm Hg with the door closed filled
tube installed.
" Position the 3 channel tap in the direction pump-manometer.
" Press "START" to start up the pump.
" Wait until the pressure reaches 750 mm Hg ±30 mm Hg
(1 bar +/- 0.05 bar).
" Press "STOP" to stop infusion.
" Press "ENTER" to record the pressure value.
# The threshold for "downstream pressure at
750 mm Hg door closed" should be between
898 < X < 2998 mV.
Calibrating the upstream pressure sensor at 0 mm Hg with the door closed filled
tube installed.
" Keep the door closed.
" Open the 3-channel tap in the direction pump-container.
" Press "ENTER" to record the pressure, when the pressure level
is back to 0 mm Hg.
# The threshold for "upstream pressure
at 0 mm Hg door closed" should be between
1499 < X < 3696 mV.
Press "STOP" key to exit the menu without memorising the calibration
values.
Calibration
98 optima07.1_001b_en.fm
Page 99

8 Spare parts catalogue
8.1 Upper cover
109
110
107
100
104
102
106
105
111
112
108
Marker Qty Reference Name
100 1 159611 Upper cover
101 1 159620 Keyboard
102 1 159602 Display board
103 1 159605 CPU board
104 1 159616 Window
105 1 168402 Air detection board PT/VS
105 1 168403 Air detection board ST
106 1 168938 Air detector
107 1 159899 Drip detector
108 1
1
109 1 159646 OCS motor reducer (only on Optima VS)
110 1
1
1
1
111 1 174256 OCS O ring (only on Optima VS)
112 1 168448 Clamp cap (Optima PT-ST)
168765
174253
168349
168487
168348
199623
Air detector cover
Sealing
Clamp (only on Optima VS)
Motor reducer washer
Clamp screw
Tru a r c r ing
103
101
Spare parts catalogue
optima08.1_002b_en.fm 99
Page 100

Spare parts catalogue
100 optima08.1_002b_en.fm
 Loading...