


manual ATTENTION |
|||
R |
|
|
|
ead |
|
|
|
all |
|
|
|
|
parts |
in |
|
before |
this |
||
your |
|
|
|
|
scooteroperating |
||
FR510DXs2b
FR168-3X/ FR-168-3Xs |
FR510DXX/ FR510DXXs/FR510DXXsb |
USERS INSTRUCTION
MANUAL

FOREWORD
Please read and follow all instructions in this Users Instruction Manual before attempting to operate your Freerider Scooter for the first time. If there is anything in this manual that you do not understand, or if you require additional assistance for setting it up , contact your Authorized Freerider Agent.
Using your Freerider product safely depends upon your diligence in following the warnings, cautions and instructions in this manual. Using your Freerider Scooter safely also depends upon your good judgment and / or common sense, as well as that of your Provider, Carer or Health Professional. Always think safety!
CONTENTS
Introduction . . . . . . . . . . . . . . . . . . . . . . . . . . . . . . . . . 2 Product description. . . . . . . . . . . . . . . . . . . . . . . . . . . . 3 Purpose of your Freerider Scooter . . . . . . . . . . . . . . . . . . 5 Rules for safe use. . . . . . . . . . . . . . . . . . . . . . . . . . . . . . 5 Getting to know your Freerider Scooter. . . . . . . . . . . . . . .6 Operating your Freerider Scooter. . . . . . . . . . . . . . . . . . . 7 Freewheeling your Freerider Scooter . . . . . . . . . . . . . . . 12 Safety instructions and warnings . . . . . . . . . . . . . . . . . . 13 Safety instruction labels . . . . . . . . . . . . . . . . . . . . . . . . 17 Learning to get about . . . . . . . . . . . . . . . . . . . . . . . . . 17 Transporting your Scooter for journeys away. . . . . . . . . . 20 Dismantling your Scooter . . . . . . . . . . . . . . . . . . . . . . 21
Re-Assembling your Scooter . . . . . . . . . . . . . . . . . . . . 23 Battery and battery charging . . . . . . . . . . . . . . . . . . . . 24 Care and maintenance. . . . . . . . . . . . . . . . . . . . . . . . . 27 Basic fault finding . . . . . . . . . . . . . . . . . . . . . . . . . . . . 31 Technical specification. . . . . . . . . . . . . . . . . . . . . . . . . 34 Circuit diagrams. . . . . . . . . . . . . . . . . . . . . . . . . . . . . 36 Advisory safety notice . . . . . . . . . . . . . . . . . . . . . . . . . 39 Code of practice for Class 3 vehicle users . . . . . . . . . . . 40 Scooter spare parts . . . . . . . . . . . . . . . . . . . . . . . . . . . 42 Optional accessories . . . . . . . . . . . . . . . . . . . . . . . . . . 43 Guarantee terms . . . . . . . . . . . . . . . . . . . . . . . . . . . . 44 Service history . . . . . . . . . . . . . . . . . . . . . . . . . . . . . . 45
INTRODUCTION
Congratulations on purchase of your Freerider Scooter.
Please read this User Instruction Manual carefully before your attempt to operate Freerider Scooter. Your User Instruction Manual will assist you to get the most from your machine.
This manual contains important information regarding
the safe operation and maintenance of your Freerider Scooter. Before beginning to use your Scooter, make sure you completely read and understand all instructions thoroughly. If you have any queries concerning operation or maintenance, consult your authorized Freerider dealer.
Please keep in mind that the operator of the Scooter is responsible for hazards occurring to other people or their property.
Your Freerider Scooter has numberous features not found on other power Scooters. With proper care and
maintenance, you will enjoy many years of dependable service. Your Freerider Scooter needs to receive maintenance at regular intervals and should be inspected frequently for proper mechanical operation. Troubles shooting guidelines, methods of detecting improper operation
and making minor adjustments are included in manual.
Follow all recommendations to obtain trouble free, safe and enjoyable operation of your Freerider Scooter.
Please remember that when it comes to service and repairs, your authorized Freerider dealer knows your Freerider Scooter best.
2

PRODUCT DESCRIPTION
The Scooter supplied has fitted as standard the following features:
Rear-wheel drive via sealed drive axle
50 A/H sealed non-maintenance lead-acid batteries.
Captain-style seat with folding backrest,adjustable width arm-rests and safety belt
Seat rotates and is fully adjustable forwards and backwards and for height
 Multi-positional handle bars for greater comfort, driving mirror, front basket for storing personal items.
Simple controls siturated on the steering handlebars regulate speed and braking
Three independent braking systems
Steering is controlled by handlebar attached to a linkage system containing front wheels
'State-of -the-art' micro-controller electronics ensures a smooth,comfortable and safe drive on all surfaces and gradients
 High / Low speed switch,for safe driving on footpath or roads
 Automatically controlled charging system
Front and rear Suspension
 Front and rear lights.Direction indicator warning lights
  Two part tubular steel chassis
Your Scooter can be removed;with the handlebars lowered and with the aid of ramps your Scooter can be transported in a suitable estate car. However your Scooter is not designed to transport the user in a moving vehicle.
Your Freerider Scooter should be serviced as recommended in this manual by an approved Freerider
Distributor in order to ensure safe, reliable operation.For service details and list of consumable parts, options and accessories refer to the appropriate section of this manual.
FR510DXs2b FEATURE GUIDE
1 |
Steering handlebars |
2 |
|
|
|
13 |
|
2 |
|
|
|
Driving mirror |
3 |
|
|
|
|
|
|
3 |
Console |
|
|
4 |
Charging socket |
|
1 |
5 |
Basket |
5 |
|
|
|
6 Front light
4
7Direction indicator lights
8Front and Rear bumper
9 |
Amber side reflectors |
12 |
|
6 |
|||
|
|
10 Floor mat
8
11 |
Pneumatic wheels with grey tyres |
9 |
12 |
Rear lights and indicators |
7 |
|
||
13 |
Adjustable angle seat with backres |
|
8
10
11
3

|
FR168-3X/FR168-3XsFEATURE GUIDE |
||
1 |
Steering handlebars |
|
12 |
|
|
|
|
2 |
Driving mirror |
3 |
2 |
|
|||
3 |
Console |
|
|
4 |
Charging socket |
|
1 |
5 |
|
||
|
|
|
|
5 |
Basket |
|
|
4
6Front light
7Direction indicator lights
8 |
Front and rear bumper |
11 |
|
|
6 |
9 |
Floor mat |
8 |
|
|
|
10 |
Pneumatic wheels with grey tyres |
|
11 |
Rear lights and indicators |
7 |
8 |
||
12 |
Adjustable angle seat with backres |
|
9
10
FR510DXX/FR510DXXs/FR510DXXsb FEATURE GUIDE
1 |
Steering handlebars |
|
2 |
|
11 |
Driving mirror |
2 |
|
|
|
|
3 |
Console |
3 |
4 |
Charging socket |
|
5 |
Basket |
1 |
|
||
6 |
Front light |
5 |
|
||
7 |
Rear bumper |
4 |
|
||
8 |
Floor mat |
|
9 |
Pneumatic wheels with grey tyres |
10 |
10 |
Rear lights and indicators |
6 |
11 |
|
7 |
Adjustable angle seat with backres |
|
8
9
4

PURPOSE OF YOUR FREERIDER SCOOTER
Your Freerider Scooter is suitable for persons who require independent mobility combined with comfort, safety,
reliability and a product that needs a minimal amount of maintenance.
The intended user should possess some degree of ability with the use of both arms and hands, reasonable balance and eyesight, and a degree of spatial awareness. The user should have received training in the use of the product, preferably in their normal environment. The maximum user weight for the Scooter can be found in the rear of this manual, under'Technical Specification'.
Your Scooter is suitable for use indoors at low speeds
in shopping malls or outdoors on dry, reasonably smooth level road surfaces.It climbs slopes safely up to 10 and kerbs up to 9cm(3.5").Your Scooter should not be used in torrential rain or deep snow, on loose slippery surfaces and slopes or on wet grass etc.,which could become a danger to the rider, or other road users.
Passengers must not be carried.Excess baggage outside of the seating area can affect stability.
Your Scooter is a 'Class 2' (B) * vehicle and designed for pavement use at up to 4m.p.h. And for roads at up to
8m.p.h. To drive a Scooter you must be aged 14 years or over, be suffering from some physical disability and capable of reading a car's registration number at 12.3metres(40ft).Do not drive your Scooter if
you are under the influence of alcohol, drugs or medication that may affect your ability. If you are in doubt consult your doctor. You should also familiarise yourself with the current edition of the Highway Code and read the Code of Practice for Class 3 vehicles (page 39 of this manual).
* DEFINITION
Electrically powered Scooter are classified in the following categories :Class 3 as defined in "The use of invalid carriages on the Highways Regulations 1988". A Scooter designed for use on roads/highways with a maximum speed limitof 8mph and a facility to travel at 4mph on footways. Class 'B' as defined in the European Standard En12184: 1999.A Scooter sufficiently compact and manoeuvrable for some indoor environments and capable of travelling over longer distances and negotiating outdoor obstacles.
RULES FOR SAFE USE
These symbols below are used in this Users Instruction manual to identify and warnings and cautions. It is very important for you to read and understand them.
Warning: Failure to note the warnings in this users manual may result in personal injury.
Cautions: Failure to observe the cautions in this users manual in damage to your Scooter.
Your Scooter is a powerful machine, Please read
all of the instructions in this manual before operating your Scooter. Follow notes carefully to ensure safety at all times.
Always make certain your machine is fully charged and in full working order before staring your journey.
1.Do not ride your Scooter without reading this instruction manual. Also read all of the safety instructions and warnings starting on page 13 of this manual.
2.Only drive your Scooter if your health condition will allow you to be safe.
3.Do not exceed the maximum safe gradient outlined for your vehicle(see Technical Specification,page36)
4.Do not carry passengers or exceed the maximum carrying weight.(see Technical Specifications page 34)
5.Do not mount or dismount you Scooter unless it is switched off with the freewheel device fully engaged.
6.Do not switch your Scooter 'on' with the forward/reverse lever depressed.
7.Do not mount or dismount your Scooter unless the speed adjustment dial is set to minimum.
8.Do not reverse your Scooter onto uneven
inclines or surfaces. Be cautious when traversing slopes.
9.Do not drive your Scooter in a confined space unless the speed adjustment dial is set low.
10.Do not turn suddenly at full speed, especially on uneven or sloping ground.
11.Do not drive your Scooter where you cannot safely or legally walk. Obey the Highway Code.
12.Do not drive your Scooter unless the seat is locked into the driving position.
13.Do not drive your Scooter with the handlebar adjustment lock, in the unlocked position.
14.Do not drive your Scooter over deep, soft terrain (eg. soft earth, deep grass, loose gravel, snow).
5
15.Do not drive when under the influence of alcohol or certain drugs which may impair your safety.
16.Do not climb or descend kerbs that exceed the maximum dimension detailed under technical specification (see page34) of this manual. Do not turn when negotiating kerbs.
17.Always approach obstacles at low speed.
18.Always approach obstacles straight.
19.Always stop fully before changing direction(forward or reverse).
20.Always keep your feet on the vehicle when driving.
21.Always keep both hands on the handlebars.
22.Always proceed carefully while riding, especially as you approach the downgrade of a ramp.
23.Always reduce speed when descending inclines.
24.Always avoid uneven surfaces.
25.Always consult you physician or a therapist if in doubt about your ability to operate a Scooter.
26.Transport-Do not sit on your Scooter while it it in a moving vehicle. Always strap down your Scooter then transfer to the vehicle seat.
27.The batteries fitted to your Scooter are
maintenance free and do not require topping up with distilled water. Do not attempt to remove the safety valves situated in the top of the battery. Failuer to observe this warning will invalidate your battery guarantee.
28.Do not drive you Scooter through deep water or clean with a high pressure hose.
29.Do not drive your Scooter through sea sand or sea water, this is very corrosive. Always wash salt
splashing from the metal parts of your Scooter with hot soapy water as soon as possible.
30.Do not drive on motorways, unrestricted dual carriageways(i.e. Those with a speed limit of over 50mph),cycle lanes or in bus lanes.
31.Use of an 'amber' warning beacon is advised if you find it necessary to drive on unrestricted carriageways
32.Always switch your lights on at night or in poor visibility. Wear reflective clothing.
33.Do not drive your Scooter with a canopy in gale force wind conditions i.e. above 61km/h (38mph).
34.Do not use solid inserts in your tyres, they will increase the weight of your Scooter and reduce the effectiveness of your Scooter's suspension.
35.Do not hang bags etc. over you handlebars, this could impede driving and put you in a dangerous situation, use the front basket provided.
Please remember you are a motorised pedestrian and must observe all rules and regulations of other pedestrians wherever possible. Your Scooter has
been designed for use on most roads; drive with due care and attention. Read the 'Code of Practice for Class 3
GETTING YOU KNOW YOUR SCOOTER
Your Freerider scooter is delivered in a strong tri-wall carton. When unpacking the carton, first remove all of the sharp metal staples which are located in the top. Carefully dispose
of the staples to avoid injury. Remove all packing materials, avoid using sharp instruments as this may damage the Scooter. Carefully remove the scooter from the carton; to minimize damage to the scooter and the operator, two people should be used for this operation.
Safely dispose of all packaging materials, your local waste disposal authority can advise you on this procedure.
Your Freerider Scooter is delivered fully assembled, fitting the two batteries ,driving mirror and the seat assembly together with minor adjustments are detailed on
the following pager under 'Operating your Freerider Scooter'. A full technical specification for your Freerider Scooter can be found at the rear of this manual.
A great deal of thought and consultation has gone into the design of your state-of-the-art, life-changing Scooter. Your Freerider Scooter will help to increase your mobility
and therefore give you more time and energy to enjoy life. Your Scooter is a medium size four wheeled vehicle
which will allow you to negotiate obstacles encountered on pavements and most roads.
6
The following are just some of the features that will enhance your driving.
COMFORT- The contoured seat together with the shock adsorbing suspension helps cushion you from the vibrations of a journey, giving you day-long comfort. A fully proportional speed-controller with a speed restriction facility allows you a smooth ,safe jerk-free ride.
VERSATILITY- The multi positional seat which swivels for easy access, together with infinitely variable handlebar positioning, will allow you to set the Scooter to your own individual driving position.
SERVICE- Your Freerider Scooter has been designed
to be service friendly. Sealed batteries which are virtually maintenance-free will give your Freerider the power it requires. Should you need to take you batteries on an aircraft, then you can peace of mind because the batteries are totally spill-free. (Please consult your carrier for details).
SAFETY- The advanced speed controller has been designed
with extensive self-checking circuits to give you the maximum 'state-of-the-art' safety technology. Two Fully automatic electronic braking systems together with independent manually operated front wheel brakes gives the driver confidence in any environment. The on/off key can be removed for added security and safety, this disables the electronic drive circuitry, and your Scooter cannot therefore be driven away by any unauthorised person.
CAUTION- Do not switch 'off' the on/off power key when you are moving; this will automatically apply the motor parking brake suddenly and could place you in a dangerous situation. Your Scooter is fitted with anti-tipping
wheels. they are an important part of the scooter's design to prevent against backwards tipping on excessively sharp inclines. Do not remove these anti-tipping wheels.
CHARGING- Your Scooter is fitted with a battery
level indicator. Charging is straight forward. Your charge is fully automatic and will reduce to a top-up charge mode when the re-charge cycle is complete. (See Batteries and Battery Charging section of this manual).
OPERATING YOUR FREERIDER SCOOTER
Before setting out on your Freerider Scooter you need to make sure that your seat is in the correct driving position.
Your Freerider distributor will set the seat to the correct height for your individual needs (note: see warnings on page 7&8).
The seat has four basic adjustments to assist your comfort.
1.Seat Lock Lever :(Fig 1). This allows the seat to swivel through 360 and lock in a convenient position. The locking lever is located under the left side of the seat. NB: It can be re-located on the right side for your convenience. Pull up fully to release the seat allowing rotation. Release level to lock the seat into the desired position.
Warning: When driving, the seat should be locked in the straight ahead position.
Caution: The seat locking level must lock be lifted up fully when rotating the seat, failure to observe this may result in unnecessary wear of the seat post.
Removing seat from Scooter: The seat mounting post is designed with a special 'one position' lifting point,
this will prevent the seat from inadvertently dismounting itself in the case of an accidental upset of
the Scooter. The seat can only be demounted by turning the seat 90  to right or left from the forward driving position.
2.Armrest Width Adjustment: On each side at the rear of the seat you will find a large black knob (Fig 2). By simply loosening this knob you are able to slide the armrests in or out to whatever width you desire. Re-tighten the knobs fully. You may need a friend to assist you with this initial setting up operation. This may extend the width of your Scooter.
Caution: The backrest of your seat will not fully fold
FIG 1
FIG 2
forwards if armrests are positioned too closely towards one another. Warning: Do not drive your Scooter with the arms removed or in the raised position.
3.Armrest Angle Adjustment :(Fig 3). The armrest angle can be adjusted individually to suit your needs. To make adjustments to the armrest angle you will need two 13mm spanners (not provided). Lift the arm upwards, you will note the adjusting bolt. First loosen the locking nut, rotate the bolt in or out until the required angle is found, lower the arm and check the angle for comfort; re-adjust as necessary. Finally tighten the locking nut.
Warning: When lowering the arm make certain clothing or fingers are not positioned under it.
7

4.Seat Slide Adjustment: (Fig 4).Located on the right front side of the seat. This lever allows you to adjust your seat forwards and backwards when sitting on the seat. Simply pull up the lever and move in the desired position backwards by pushing or forward by hitching. As soon as the lever is released, the seat will lock into the new position.
Caution: Test that the seat has fully locked by hitching backwards and forwards.
Warning: Do not carry out this operation when your Scooter is moving ,first stop apply the brakes and then carry out the seat positioning.
SEAT:
The seat as fitted to your Freerider Scooter, has a fold down backrest(see Fig 5).The seat has two height positions. Your Freerider distributor will position the seat to allow you the most comfortable driving position.
5.Seat Height Adjustment: You may need to alter the seat height setting at a later date, please follow these instructions.
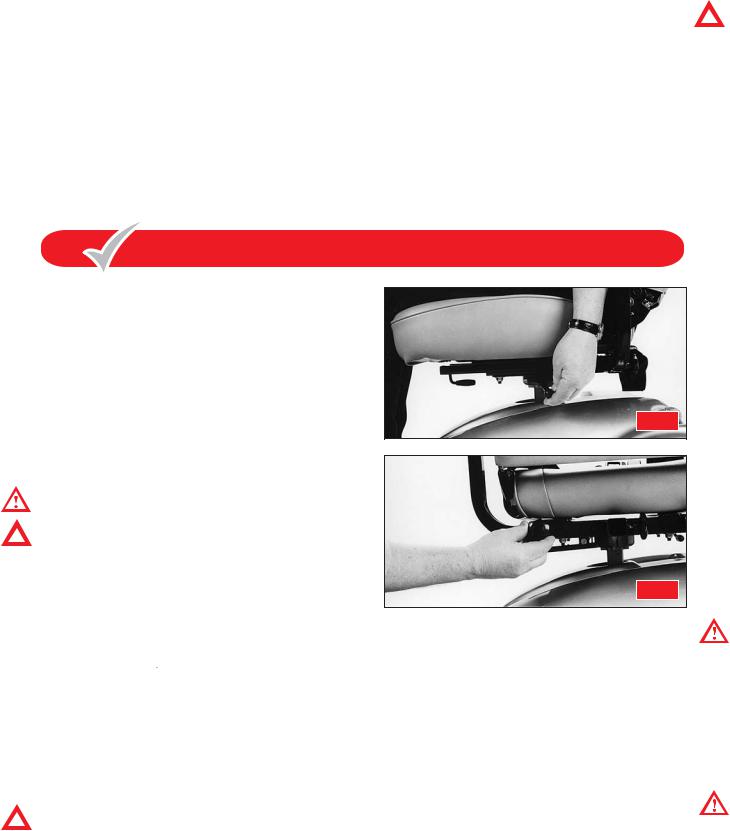
1.Remove your seat from the Scooter by lifting the seat locking lever and lifting the seat clear of the vehicle (see Fig 1). Note :your seat can only for safety reasons be removed when it is Turned 90 to the right or left from the straight ahead driving position. Please take care when lifting heavy weights. Place your seat on a soft clean work area.
2.With the aid of a 17mm spanner (not supplied) loosen the 10mm seat clamp fixing bolt (see Fig 6).
3.Remove the 10mm fixing bolt and reposition the bolt into one of the four preferred location holes of the seat mounting tube (see Fig 6).
4.Re-tighten the 10mm fixing bolt. Refit the seat onto your Freerider Scooter. Warning: Do not have the seat set too high, you must be able to place both feet firmly on the Scooter's floor area. Stability will be reduced the higher your seat is set on the mounting tube. Always take great care when cornering, lean into the corner to achieve the best stability from your Scooter.
6.Backrest Angle Adjustment : For a comfortable driving position the backrest of your seat can be adjusted to one of the four fixed positions by moving the stop bolt located in each side hinge bracket(see fig 7).The left hinge bracket is marked 90 ,100
,100 ,105
,105 and 120
 with corresponding hole positions. With the aid of a 4mm hexagon key and a9mm spanner(not provided)remove and reposition the stop bolt from each of the two hinge brackets, into the appropriate angled position. Retighten each bolt and locknut making certain the two bolts are located in exactly the same position on either side. Warning: Both stop bolts must be positioned in the same position for the backrest to be fully supported, failure to observe this warning may distort the backrest frame. Warning: The rearward stability of your scooter will be reduced the greater the backrest is set past 90
 .Always
FIG 3
FIG 4
FIG 5
FIG 6
FIG 7
8

take great care when going up steep slopes or kerbs, always lean forward to achieve the best stability for your Scooter. Do not drive up a slope greater than 5 if your backrest is positioned at the 120
 position. Failure to observe this warning may put you in a dangerous situation.
7.Backrest Height Adjustment: The upper cushion of your backrest (See Fig 8) can be adjustment for height, giving you more back support if you are tall, by operating the small latch at the base of the left hand round support bar. Lift the cushion up or push down for the most comfortable position. The headrest will also lift out for convenience.
8.Lap Saftery Belt: Your Scooter seat is fitted with a safety belt to prevent you from slipping forwards under braking conditions or when going sown a slope or over obstacles, always us it-even for short journeys.
The lap belt can be adjusted on one side to fit comfortably around your waist. To fit simply connect the two buckles together( see fig 9 )until a distinct 'click' is heard. To remove simply 'press' the red buckle and the two belts will separate. Caution: Care should be taken when the belt is not in use, it should be connected together and placed in the centre of the seat cushion. Failure to observe this notice could lead to the two buckles falling onto and damaging the bodywork, catching a person or foreign body.
HANDLEBAR ADJUSTMENT
The handlebar of your Scooter is designed to allow you to position it in a comfortable driving position. It can be locked into numerous positions or unlocked to move freely for transportation.
The handlebar lock is operated by a black lever positioned on the right hand side of the handlebar (see Fig 10). To release the handlebar from a locked position pull the black lever upwards, the handlebar will now move freely, but under mild tension.
To lock the handlebar into a comfortable driving position, simply push the black lever downwards until the handlebar is locked firmly into position.
With the combination of the height adjustment together with the handlebar movement, you should find a suitably comfortable driving position.
Warning: Always make certain the handlebar locking lever is fully down and the handlebar is securely clamped onto the chrome support plates before driving your Scooter. For service adjustment of this part, refer to the Care and Maintenance section of this manual.
CONTROL FEATURES
Your controls are located on the handlebar console (see Fig11) they are:
1.Speed Adjustment Dial: This allows you to pre-select you desired top speed. The dial is proportional to speed
and can be set anywhere between 'min' and 'max' increments. Turn the dial knob anti-clockwise to minimum for a very
FIG 8
FIG 9
FIG 10
3 |
Front/Rear |
6 |
Diection |
5 |
Battery |
6 |
Diection |
7 |
Lo-Speed |
Light Switch |
Warning |
Meter |
Warning |
Warning |
|||||
|
|
|
Lights |
|
Status |
|
Lights |
|
Light |
|
|
|
|
|
Indicator |
|
|
|
|
|
|
|
|
|
|
|
|
|
|
|
|
|
|
|
|
|
|
8 |
On-Off |
|
|
|
|
|
|
|
|
Power |
Switch
|
|
|
|
|
|
FIG 11 |
|
|
|
|
|
|
|
Hi/Lo |
|
Speed |
|
Hazzard |
9 Horn |
Direction |
2 Speed |
1 |
10 |
4 Indicator |
|||
Switch |
|
Adjustment |
|
WIIarning |
|
Light Switch |
|
Dial |
|
|
|
||
|
|
|
|
|
||
|
|
|
|
|
|
9

gentle operation, and clockwise towards maximum to increase your speed. NOTE: When attempting to climb obstacles, you will need to set the dial to a high setting. Remember the higher position you set your speed dial to, the faster your Scooter will travel. Caution: The speed adjustment dial(1)works in conjunction with the Hi/Low speed switch (2),if both are set to their lowest settings there may not be sufficient power delivered to the motor to drive your Scooter, in this case turn the speed dial up to a higher setting.
2.Hi/Lo speed Switch: Located on the left side of your console this switch controls the maximum high (Hi) and low (Lo) speed range for your Freerider Scooter.
When riding on the pavement or in shopping areas the low 4mphspeed range must be engaged, this is a lega requirement and must be adhered to at all times.When the low speed range is chosen a 'red' warning light (see
fig 11 No.7) will illuminate. The Hi/Lo speed range switch can be operated while the Scooter is in motion.
Please note the Hi/Lo speed swith works in conjunction with the speed adjustment dial (see fig 11 No.1) and the forward/reverse speed lever; the speed dial must be set to it's highest setting for maximum speed in both Hi and Lo speed settings.
3.Front/Rear Light Switch: This rocker type switch controls the function of the front and rear lights. Simply push down on the left side for 'on' and the right side for 'off'.
4.Direction Indicator Light Swithc: Located at the bottom right of your console, the direction indicator lights for right and left manoeuvers are controlled by this switch. When making a turning manoeuvre on the road the appropriate switch direction should be made. Simply, when turning right 'flick' the switch to the right, you will note a warning 'bleeper' is audible and the appropriate direction warning light (see fig 11 No.6) Will flash. To cancel the direction indicator return the switch to the centre position. The left direction indicators are activated by 'flicking' the switch to the left. Caution: Please note the direction indicators are not self-cancelling.Warning: Please be aware to test the function of your direction lights before each journey. Failure to observe this warning could put you and other road users into a dangerous situation. If in the event a direction indicator bulb fails, you will note the direction warning light (see fig 11 No.6) on your console flashing quicker than normal, in this situation the appropriate bulb should be substituted.
5.Batter Gauge/Status Indicator Light: Located at the top of your console. This is a 10 bar segmented colour illuminated display which indicates when your Scooter is
switched on, it also displays the status of the batteries, the speed controller and the Scooter's electrical system.
'Battery Gauge':When your Scooter is switched on, after half a second, the coloured bars will illuminate to show the level of charge in your batteries. If the batter gauge displays red, yellow and green your batteries are fully
charged and you are ready to drive. As the power is used up in your batteries the bar indication will move towards the red sector indicating the state of charge at thaat precise time.
If the batter gauge displays red and yellow, then your batteries have lost charge and they should be recharged as soon as you can, but you will still have power to spare. When the battery gauge falls into the red sector, either steady or flashing slowly, then you should charge your batteries without delay.
It is not recommended to drive your Scooter regularly with the batter charge indication in the yellow to red sector, as this will shorten batter life. It is wise to re-charge your batteries after each journey especially as it enters the yellow to red sectors of your battery gauge(see Batteries and Battery Charging section of this manual ) Note:When driving up steep slopes or similar obstacles your
Scooter's motor will be working hard, the battery gauge may move towards the red sector, it will recover
towards the green sector once the load on your motor is reduced, this does not indicate low batteries.
'Status Warning Indicator':When you turn your
Freerider Scooter on, after half a second the battery
bar gauge will illuminate at a constant rate indicating the state of charge level in your batteries. The battery bar gauge is connected to a very sophisticated diagnostic system which can identify faults should they occur on the main speed control system or some other part of your Scooter's electronic drive system .If in the unlikely event a fault should occur with your Freerider Scooter you can find out what has happened by counting the number of bars that are flashing on the battery gauge. For instance if your batteries run low on power, the status indication will flash slowly one bar, indicating that the batteries need recharging or that there is a poor connection to the batteries. The Battery Status Bar Gauge detects 8 similar fault diagnostic signals, reference to these diagnostic codes is found under 'Basic fault finding' on page31.
6.Direction Warning Light: This green light will illuminate when the direction indicator switch is activated to the right for a right turn and to the left for a left turn. The light will also flash at a higher rate than normal to indicate a bulb failure in one of the front or rear direction lights.
7.4m.p.h. Lo Speed Warning Light : This red light will illuminate when the Hi/Lo speed switch is engaged in the slow speed position, see also point No.2 above -Hi/Lo speed switch.
8.On-Off Power Switch: Located on the right side of your control console. Insert the key and turn clockwise .This controls the power to your speed control system. You will note that after half a second the battery condition gauge will illuminate with a solid light. Your Scooter is now ready to drive. To switch off your Scooter turn the key anti-clockwise. Remove the key when your vehicle is left unattended. Caution: Do Not switch to 'off' when your Scooter
10
is moving. Failure to observe this warning will result in the motor brake being applied suddenly and placing you in a dangerous situation.
You should only switch 'off' when in motion in the case of an emergency. Continual use in this mode may cause undue stress to the drive system and damage the main electronic speed control unit.
Be extremely cautious on slopes. Sit upright in your seat or your machine could become less stable.
Sleep Time: When you rest your Freerider Scooter
with the electronics switched 'on' you are using valuable battery power. Your Freerider Scooter will automatically go into a sleep mode to preserve battery energy after approximately 15 minutes. To start your Scooter again simply switch the key to 'off' and back to 'on' again, your Scooter is now ready to go.
9.Horn Button:(Yellow) Positioned in the bottom centre of your console, press to sound a warning to other road users.
10.Hazard Warning: Positioned to the bottom left of your console, when pressed this red triangular button activates all of the amber fashing direction lights to warn other road users that you are stationary or in distress. This function should only be used in emergencies. You will not that both green direction lights at the top of your console are flashing to warn you the hazard system is in operation. To cancel the hazard warning simply press and release the red triangular button.
FORWARD-REVERSE SPEED AND BRAKING LEVER
Located under the handlebar grips (fig 12).Your speed and braking in forward and reverse motion is controlled here. The right lever moves your Freerider Scooter in a forwards direction and also controls the rate of speed by the
FIG 12
proportional amount of pressure applied. The left lever moves the Scooter in a reverse direction and controls the rate of speed by the pressure applied. The lever when released will automatically return itself to the neutral braking position, and you will slow down and gently stop. The rate at which you brake is also proportional to the movement of the control lever, the quicker you return it to the centre position the harder you will brake. Your Freerider distributor can modify your Scooter if you require so that the left hand lever will give you forward speed direction and the right hand lever will give
you reverse speed direction.
Warning: Do not attempt to operate the right and left lever simultaneously, failure to observe this warning may distort the lever system and could put you at risk. It should also be noted that reverse speed is set at half of full speed, this is a safety precaution, always make certain the Hi/Lo speed switch and the 'min and max' speed selection dial are set high enough to give you adequate power for your reverse manoeuvre.
Warning: If you are not an accomplished outdoors powered vehicle driver, we strongly recommend that you seek advice from your local 'road safety officer' who may be able to advise you of any training schemes that are available in your locality, your local Freerider Distributor may also help you in finding training in road craft skills.
We strongly recommend that you first practice in an open, safe area, free from traffic, preferably with a companion who can assist you .Please remember as a road user you are required by law to drive your Scooter with due care and regard to other road users and pedestrians. Although you do not by law require a driving licence, road tax, M.O.T. Test or insurance, we strongly recommend that you insure yourself and your Scooter against any risk that could occur, your Freerider Dealer will advise you of insurance companies who specialise in this field or you could seed advice from your own insurance company who provide other cover for you such as house insurance.
We also bring your attention to the 'Code of Practice for Class 3 Vehicle Users' this can be found on page 37 of this manual. Warning: Do not attempt to drive your Freerider Scooter until you have read and understood all of the details in this users instruction manual, failure to observe this manual may place you in a dangerous situation.
MANUAL EMERGENCY BRAKE
Located on the left side of the steering handlebars(see fig 13).The lever when pulled towards you operates two front drum brakes. This manual braking system works independently of the main electronic braking system and must only be used in an emergency situation, for instance if the drive transmission becomes disconnected for reasons of convenience to push you Scooter.
To operate the manual brake simply squeeze the lever towards the handlebars, the harder you squeeze the more pressure will
FIG 132
be applied to the brakes. Warning: Remember the manual brake is connected to the front wheels only, when applied at high speed brace the handlebars to prevent steering wander.
11

The brake lever for convenience can be locked in the 'brake applied' position. To permanently lock the lever on, simply apply the brake and flick down the 'locking latch' (see fig 14) which is situated at the pivot end of the manual brake lever. To release the lever simply squeeze the 'manual brake lever' and the locking latch will automatically release.
Warning: Do not drive your Freerider Scooter with the manual brake applied. Failure to observe this warning will overload your Scooter's drive motor and drain your batteries of power, this action could result in permanent damage to the motor, batteries and brake components. See also 'Manual Brake Adjustment' on page 30 of this manual.
FIG 14
FREEWHEELING YOUR SCOOTER
If for the reasons of convenience, you require to push your Freerider Scooter for a short distance, the drive system can be put into 'freewheel mode'. This will allow your Scooter to roll freely.
SCOOTER FREEWHEEL PROCEDURE
The freewheel device is a red lever located at the rear right hand side of your Scooter (fig 15).To freewheel your Scooter first switch off the power switch located on the Scooter's control console (fig 11). Pull up the red
lever (fig 15) until a distinct click is felt. You can now push your Scooter with ease. Please note, in this mode with the power switch in the off position, the braking safety
system is automatically activated when the Scooter is pushed quicker than walking speed, this is an automatic 'run away' safety checking system, it also reduces the risk of casual theft.
By switching on the console power switch at this stage you will introduce some heavy motor braking, you will note that nine bars on the console battery gauge are flashing. This indicates that your Scooter is in a freewheel mode and
you cannot drive your Scooter. Note, the quicker you push your Scooter the heavier the brake will be applied.
To re-engage the drive system, simply push down the brake until a distinct click is felt, Switch the power switch on your console off and then on, the battery gauge light will be fully illuminated and you will be able to drive your Scooter
once again.
Warning: Do not sit on your Freerider Scooter with the freewheel device in the disengage position. Your Freerider Scooter will not drive in this mode , the bar status light on your console will flash nine bars.
Warning: If your Freerider Scooter is in the freewheel mode when you turn on your power key switch and depress your speed forward-reverse lever, you will not be able to move under motor power ,Dismount and re-engage the drive system by pushing the red freewheel lever down.
ENGAGE
BRAKE
DISENGAGE |
FIG 15 |
|
Remount your Scooter, switch the power switch off and on again until the battery gauge fully illuminates, your Scooter will now drive under motor power again.
Warning: Always check that the freewheel device is in the drive position before attempting to drive your Scooter after it has been left unattended for a period of time. Failure to observe this warning may result in an accident.
General note: If you are able to push your Freerider Scooter the drive system is disconnected. Do not
attempt to drive your Scooter. Please check once again the afore mentioned procedure for re-engaging the drive.
Warning: If your batteries are disconnected from your Scooter there will be no brake function in the freewheel mode. Do not leave your Scooter unattended in this situation as it could roll away causing damage to other parties or property. Always re-engage the drive system when left unattended.
Warning: |
WARNING |
|
EMERGENCY FREEWHEELING DEVICE |
||
Yellow warning |
||
NEVER SIT ON YOUR SCOOTER WITH THE |
||
notice situate on |
FREEWHEEL DEVICE IN THE DISENGAGED |
|
the cover at the rear |
POSITION. ALWAYS RE-ENGAGE THE |
|
EMERGENCY FREEWHEELING DEVICE AFTER |
||
of you Scooter. |
USE. FAILURE TO COMPLY WITH THIS |
|
|
WARNING MAY RESULT IN INJURY. |
Please take extreme care
12

SAFET Y INSTRUCTIONS & WARNINGS
GENERAL
Warning: Do not attempt to operate your new Freerider Scooter for the first time without completely reading and understanding all of the facts in this Users Instruction Manual.
Your Freerider Scooter is a state-of-the-art device designed to enhance and increase your mobility. Freerider provides a range of Scooters to best suit the individual needs and circumstance of the Scooter user.
Please be aware that the final selection and purchasing decision regarding the model of Scooter to be used is the responsibility of the Scooter user who is capable of making such a decision with assistance from his/her healthcare professional (i.e. medical doctor, physical therapist etc.)
The contents of this Users Instruction Manual are based on the expectation that the mobility device expert has properly fitted the Scooter to the user and has assisted the prescribing healthcare professional and/or the authorized Freerider Distributor in the instruction process for the safe use of the scooter.
There are certain situations, including some medical conditions, where the Scooter user will need to practice operating the Scooter in the presence of a trained attendant. A trained attendant can be defined as a family member or care professional specially trained in assisting a Scooter user in various daily living activities also seek advice from your local Road Safety Officer and disability groups.
When you begin to use your Freerider Scooter, you will probably encounter situations in which you will need some practice. Simply take your time and you will soon become confident and in control as you manoeuvre through doorways, on and off elevators, up and down ramps and over moderate terrain. Below are some tips, precautions and other safety measures that will help you to become accustomed to the safe operation of your Freerider Scooter.
SAFETY CHECK
Get to know the feel of your Freerider Scooter and it's capabilities. Freerider recommends that you perform a safety check before each use to make certain your Scooter operates smoothly and safely. For details on how to perform these necessary inspections, see the Care and Maintenance section of this manual. Perform the following inspection prior to using your Freerider Scooter.
 Check tyre inflation, Rear tyres maintained at 35 p.s.i.(2.5 bar) Front tyres maintained at 30 p.s.i.(2.1bar).
 Check all battery connections, making certain they are tight and not corroded.
 Check batteries have been fully charged
  Check operation of brakes
Check operation of all lights
Warning: It is critical that the pressure in the pneumatic tyres is maintained at all times. Failure to observe this warning may result in a serious failure of the tyre or wheel, causing serious personal injury and/or damage to your Scooter.
SOLID TYRE INSERTS(PUNCTURE PROOFING)
Your Freerider Scooter is fitted with pneumatic tyres(air)
as standard equipment, the pneumatic quality and feel of these tyres greatly enhances the ride quality of your Scooter. We do not recommend the fitting of solid inserts to replace the air pressure in your wheels, these products add unnecessary weight and place more stress on the suspension components of your Scooter. If puncture resisting security is desired then use an appropriate liquid sealer, your Freerider Dealer can advise you on these systems.
Warning: Do not carry passengers on your Scooter. Your Scooter is designed for a single occupant which complies with legal requirements for pavement vehicles. Carrying passengers on your Scooter may result in personal injury and/or property damage.
WEIGHT LIMIT
Your Freerider Scooter is designed for a maximum user weight limit of 160kg (350lbs)FR510DXs2b/ 277kg(500lbs)FR168-3X/FR168-3Xs/ FR510DXX/FR510DXXs /FR510DXXsb.
Warning: Exceeding the weight limit will void your warranty and may result in personal injury and damage to your scooter. Freerider will not be held responsible for injuries and/or
property damage resulting from failure to observe these weight limitations. Please also remember when carrying heavy objects that this will increase your weight and may make your Scooter unstable.
CORNERING
Excessively high cornering speeds can create the possibility of tipping. Factors which affect the possibility of tipping include, but are not limited to, cornering speed, steering angle (how sharply you are turning), uneven surfaces, inclined surfaces (such as heavily cambered pavements), riding from an area of low traction to an area of high traction (such as passing from grass areas to a paved area - especially at high speed while turning), and abrupt directional changes. Do not corner at high speed! If you feel that you may tip over in a corner, reduce your speed and steering angle to prevent your Scooter from tipping.
Warning: When cornering sharply, reduce your speed. When using your Scooter at higher speeds, anticipate changes
in the road surface. This will greatly reduce the possibility of a tip or fall. To avoid personal injury or property damage, always exercise common sense when cornering.
It is always advisable when cornering to lean towards the corner, just as you would on a bicycle, this will enhance the sideways stability of your Scooter.
13

BRAKING
Your Freerider Scooter is equipped with one powerful electronic brake systems, and an emergency manual system:
1.Regenerative: Uses the electricity generated in your Scooter drive motor to rapidly slow your Scooter
when the speed direction lever is returned to the centre (neutral drive )stop position; and
2.Disc Park Brake: Located on the end of your drive motor it activates mechanically after the regenerative brake slows your Scooter to a near stop, or when power is removed from the drive system for any reason, as in the case of switching your machine off!
3.Mechanical (Emergency) Brake: Two drum brakes positioned on the front wheels can be activated by the lever positioned to the left hand side of the handlebars (Four wheels only).The brakes are operated by squeezing the lever for emergency braking, as in the unlikely event of transmission failure.
GENERAL Brake engagement is far more abrupt at higher speeds. It is important that you anticipate when the brakes will engage and that your are braced for the resulting deceleration. Practice braking on level ground to understand your braking distance time.
Warning: Your Scooter can decelerate very quickly. Do not decelerate or turn abruptly when travelling at high speed unless absolutely necessary. If it is necessary to decelerate or turn abruptly when driving at high speed, brace yourself by gripping the steering handlebar tightly and positioning your feet firmly on the floorboard. Users who cannot grip the handlebar tightly and/or place their feet firmly against the footboard should avoid deceleration from or turning abruptly at high speed, and therefore should avoid travelling at high speed. Failure to observe this warning could result in serious personal injury and property damage. Always brace yourself firmly when decelerating your Freerider Scooter.
Never drive down slopes at full speed, always adjust your speed to the driving condition and allow for gradual descents on inclines. Note: when descending a slope it is good practice to switch your Scooter into the 'Lo(4mph) speed range, this can be activated while you are driving.
OUTDOOR DRIVING SURFACES
Your Freerider Scooter is designed to provide optimum stability under normal driving conditions i.e. dry, level surfaces composed of concrete or asphalt. However Freerider recognizes that there will be times when you will encounter other surfaces such as packed soil, grass and gravel. These surfaces may not be sound and fail to give good traction, caution should be considered before driving on this tyre of surface to prevent stability problems resulting in injury or damage to your Scooter.
 Reduce your Scooters speed to the 'Lo' switch position when driving on uneven terrain or soft surfaces.
 Avoid long and unsafe grass that can become tangles in the running gear or may hide debris and holes.
 Avoid loosely packed sand and gravel.
 If you feel unsure about a driving surface, please anticipate and avoid that surface.
 Always avoid kerbs if possible use 'cut-outs' in pavements.
STREET AND ROADWAY DRIVING
Warning: Your Freerider Scooter has not been designed for operation on public streets and roads. It is designed for operation on pedestrian pavements and traffic free shopping areas.
Your Freerider Scooter must be driven with due care and compliance with the Road Traffic Acts and conditions of the Highway Code. Always obey all local pedestrian traffic rules. Wait until your path is clear of traffic, and then proceed with extreme caution. Note: Always wear light or illuminating clothing when driving your Scooter. Be aware that it may be difficult for traffic to see you when you are seated on your Scooter. Only drive your Scooter on the pavement at the 'Lo' 4mph(6km) speed range, it is illegal to drive your
Scooter over 4mph in areas where pedestrians walk, i.e. Shopping areas, crossings, under passes, parks etc.
WARNING BEACON
A warning beacon must be fitted and illuminated if you drive on an unrestricted dual carriageway i.e.a carriageway that allows speeds of over 50mph. We do not recommend that you drive on these roads and advise you to choose an alternative route, avoid fast moving traffic at all times.
INSURANCE
Although at this moment in time it is not a legal requirement for accident insurance cover (third party), it is a sensible precaution. Your Freerider Authorized Agent will be able to give you details of specialist insurance companies or you own insurance company will be able to advise you.
WEATHER PRECAUTIONS
Warning: Freerider recommends that you do not operate  your Freerider Scooter in icy or slippery conditions or on salted surfaces i.e. Roads and Pavements etc. Such use may result
in accident, personal injury or adversely affect the performance and safety of your Scooter.
Warning: Freerider recommends that you do not expose your Scooter to any tyre of heavy moisture at any time i.e. rain, snow or power washer. Such exposure can damage your Scooter. Never drive through deep water or expose your Scooter to sea water. Note: salt is very corrosive to metal and electronic components. Following use in winter or exposure to sea sand and water, your Scooter should be washed with a
14

Mild soap and water to remove all ingress of salts. Do not use a power hose. Do not operate your Scooter if it has been exposed to moisture until has been thoroughly dried out.
Warning: If your Scooter is fitted with a canopy (cab) avoid gale force winds i.e. Winds above 61km/h (38mph), avoid exposed areas near to water.
FREEWHEEL YOUR SCOOTER
Your Scooter is equipped with a manual freewheel device for convenience when you need to push it. See the Freewheeling your Freerider Scooter section on page 12 of this manual.
Warning: Do not use your Scooter in the freewheel mode without an attendant present. Personal injury may result.
Warning: Do not attempt to personally place your Scooter
in freewheel mode while seated on it. Personal injury may result. Ask an attendant for assistance if necessary.
Warning: Do not place your Scooter in freewheel mode while on an incline. The Scooter could roll uncontrollably on its own, causing personal injury.
TYRE INFLATION
If your Scooter is equipped with pneumatic tyres, you should check their condition on a daily basis. Have the tyre pressure checked and if necessary inflated to the recommended pressure at least once a week .This can be found on page34 under 'Technical Specification'. Properly inflated tyres will help ensure a smooth, stable ride with minimum rolling resistance for your motor, it will also prolong the tyre's life and resistance to punctures.
Warning: Always inflate your tyres from a regulated air source. Over inflation from an unregulated air source could over inflate your tyres resulting in "blow out" or personal injury. Do not over inflate your tyres to the maximum inflation pressure indicated on the tyre cover, failure to observe this warning could damage your Scooter wheels. Your tyres are designed for low speed use on pavements and roads. They are not for high speeds, such as in vehicles designed to travel at speeds in excess of 15 mph.
MOTOR VEHICLE TRANSPORTATION
Currently there are no standards approved for "tie down" systems in a moving vehicle of any tyre to transport a person while seated in a Scooter.
Although your Scooter may be equipped with a positioning belt *, this is not designed to provide proper restraint during motor vehicle movements.
Anyone travelling in a motor vehicle should be properly secured in the motor vehicle seat with a safety belt fastened securely.
Warning: Do not sit on your Scooter while it is in a moving
vehicle. Personal injury may result.
Warning: Always make certain that your Scooter is properly secured when being transported. Failure to comply may result in personal injury and/or damage to your Scooter.
POSITIONING SAFETY BELT
Your Freerider Scooter is fitted as standard with a positioning safety 'lap' belt. It is a legal requirement for Class 3 vehicle riders to wear this belt.
Warning: Wear your seat belt at all times, make certain it is adjusted and fastened securely. Serious personal injury may result if you fall from your Scooter (see page9)
ACCESSING YOUR SCOOTER
Getting on and off your Scooter requires a good sense of balance. Please observe the following tips when getting on or off your Scooter:
 Make certain your Freerider Scooter is switched off at the power switch, and the power key is removed.
 Ensure your Scooter is not in the freewheel mode (see page 12 Freewheeling your Scooter)
 Make certain the seat and handlebars are locked firmly into position.
 The seat armrests can be lifted up to make access easier. Make certain you do not attempt to drive with the armrests raised.
Warning: Position yourself as far back into the Scooter seat as possible to prevent tipping and causing injury.
Warning: Avoid using the armrests for weight bearing purposes, such use may cause the Scooter to tip and cause personal injury and/or damage to the Scooter.
Warning: Avoid putting weight onto the steering handlebars, such use may cause the Scooter to tip and cause personal injury and/or damage to the Scooter.
Warning: Avoid putting all of your weight onto the footboard, such use may cause the Scooter to tip and cause personal injury.
Warning: Do not hang bags over your steering handlebars, such use may cause your scooter to drive out of control and may cause personal injury and/or damage to the Scooter.
MODIFICATIONS
Freerider has designed your Scooter to provide maximum mobility. A range of accessories are available from Authorised Freerider Agents, to further customise your Scooter needs. However, under no circumstances should you
modify, add, remove or disable any feature, part or function of your machine.
Warning: Failure to observe this warning may result in personal injury and/or damage to your Scooter.
15
 Loading...