

Page 1
U
SER’S
M
ANUAL
CAUTION
Read all precautions and instructions in this manual before
using this equipment. Keep this
manual for future reference.
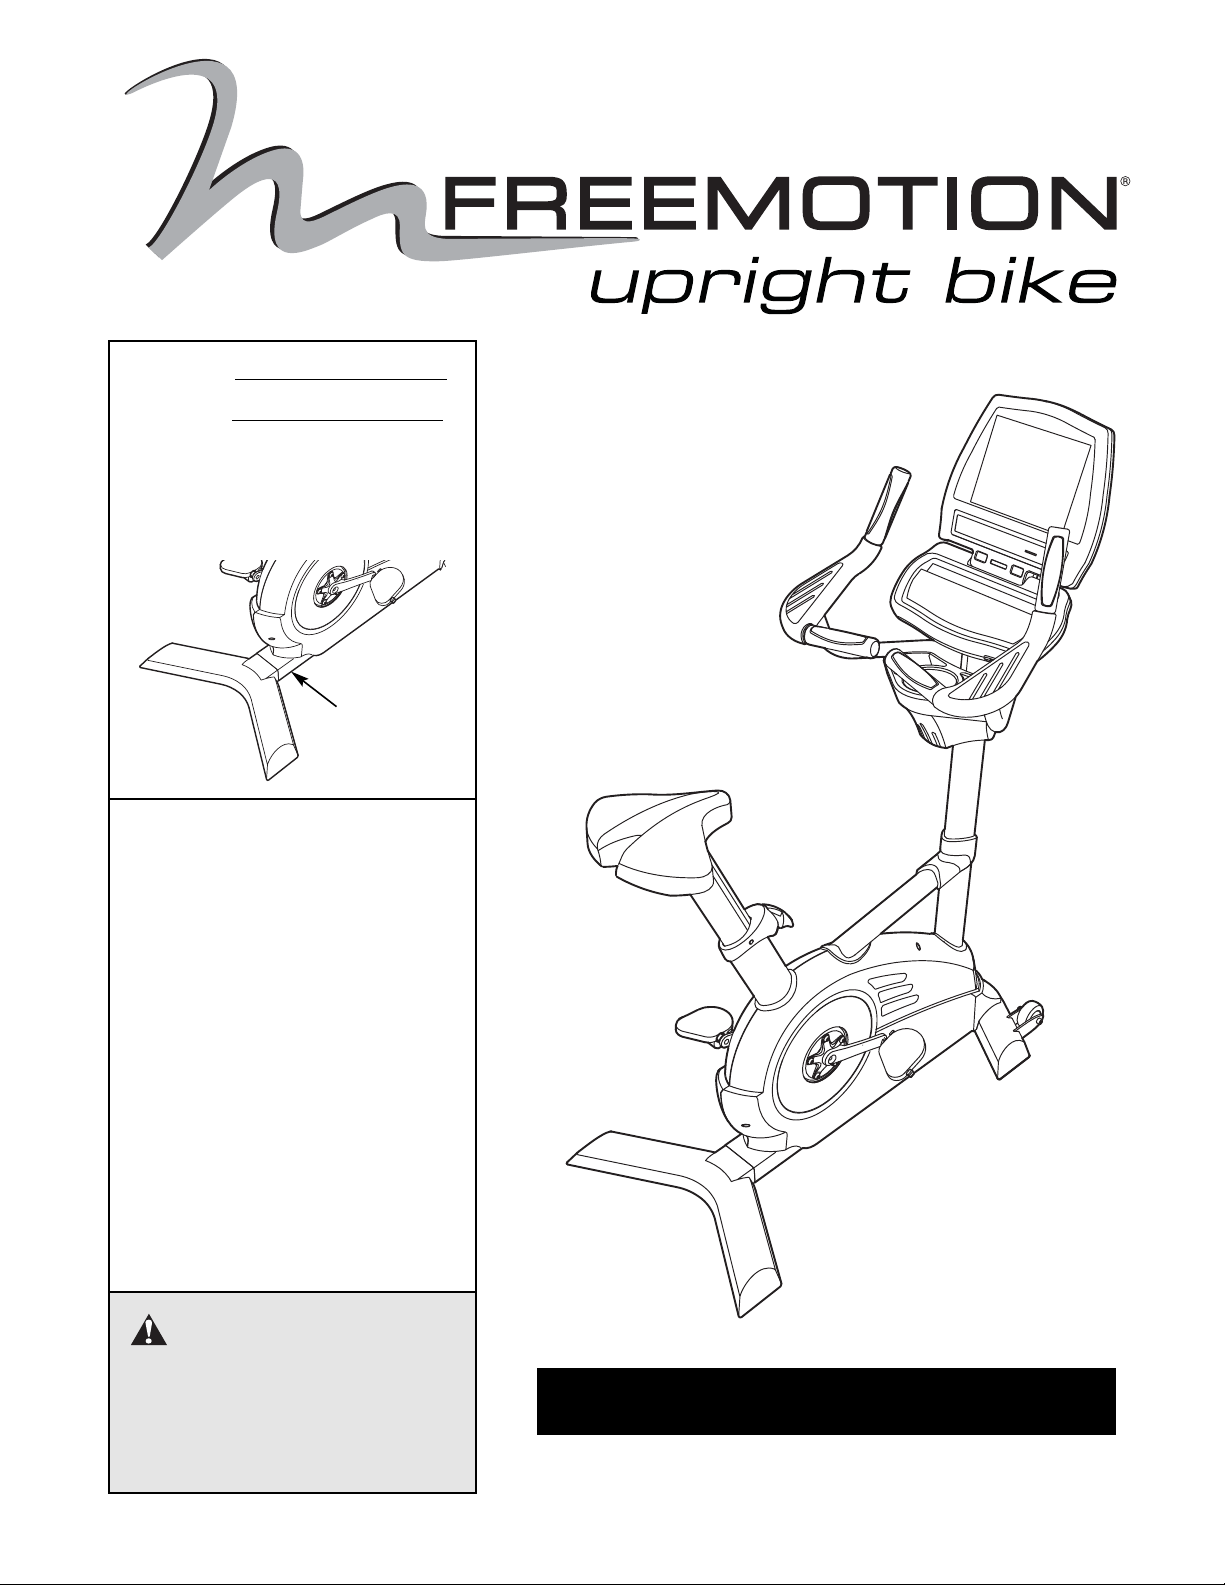
Model No.
Serial No.
The model number and serial number are found in the location shown
below. Write the model number and
serial number in the space above.
QUESTIONS?
At FreeMotion Fitness, we’re
committed to providing complete
customer satisfaction. If you
have questions, see HOW TO
CONTACT CUSTOMER CARE on
page 2 of this manual.
Serial
Number
Decal
Page 2

Page 3

How to Contact Customer Care . . . . . . . . . . . . . . . . . . . . . . . . . . . . . . . . . . . . . . . . . . . . . . . . . . . . .2
SECTION 1
Important Precautions . . . . . . . . . . . . . . . . . . . . . . . . . . . . . . . . . . . . . . . . . . . . . . . . . . . . . . . . . . . . .3
Before You Begin . . . . . . . . . . . . . . . . . . . . . . . . . . . . . . . . . . . . . . . . . . . . . . . . . . . . . . . . . . . . . . . .4
How to Assemble the Upright Bike . . . . . . . . . . . . . . . . . . . . . . . . . . . . . . . . . . . . . . . . . . . . . . . . . . .5
How to Set Up the Upright Bike . . . . . . . . . . . . . . . . . . . . . . . . . . . . . . . . . . . . . . . . . . . . . . . . . . . . .7
How to Upgrade the Console . . . . . . . . . . . . . . . . . . . . . . . . . . . . . . . . . . . . . . . . . . . . . . . . . . . . . . .8
SECTION 2
How to Use the Basic Console . . . . . . . . . . . . . . . . . . . . . . . . . . . . . . . . . . . . . . . . . . . . . . . . . . . . . .9
SECTION 3
Maintenance and Troubleshooting . . . . . . . . . . . . . . . . . . . . . . . . . . . . . . . . . . . . . . . . . . . . . . . . . .21
SECTION 4
Exercise Guidelines . . . . . . . . . . . . . . . . . . . . . . . . . . . . . . . . . . . . . . . . . . . . . . . . . . . . . . . . . . . . .23
SECTION 5
Part List . . . . . . . . . . . . . . . . . . . . . . . . . . . . . . . . . . . . . . . . . . . . . . . . . . . . . . . . . . . . . . . . . . . . . . .27
Exploded Drawing . . . . . . . . . . . . . . . . . . . . . . . . . . . . . . . . . . . . . . . . . . . . . . . . . . . . . . . . . . . . . . .28
TABLE OF CONTENTS
1
FREEMOTION is a registered trademark of ICON IP, Inc.
Page 4

2
If you have questions after reading this manual, or if you require assistance, please contact Customer Care at the
address and phone number listed below. Please be prepared to give the following information:
• the MODEL NUMBER OF THE PRODUCT (see the front cover of this manual for the location)
• the NAME OF THE PRODUCT (FREEMOTION
®
upright bike)
• the SERIAL NUMBER OF THE PRODUCT (see the front cover of this manual for the location)
When ordering replacement parts, please also give the KEY NUMBER and DESCRIPTION OF THE PART(S)
(see the PART LIST and the EXPLODED DRAWING on pages 27 to 29).
HOW TO CONTACT CUSTOMER CARE
Customer Care: 1-800-201-2109, Monday–Friday, 8 a.m.–5 p.m. Mountain Time
FreeMotion Fitness, Inc. • 1096 Elkton Drive, Suite 600 • Colorado Springs, CO 80907
Page 5

3
1. It is the responsibility of the owner to ensure
that all users of the upright bike are adequately informed of all warnings and precautions.
2. Operate the upright bike only as described in
this manual.
3. Do not operate the upright bike until it is
properly assembled (see HOW TO ASSEMBLE
THE UPRIGHT BIKE on page 5).
4. Keep the upright bike indoors, away from
moisture and dust. Do not place the upright
bike in a garage or covered patio or near
water.
5. Place the upright bike on a level surface. To
protect the floor or carpet from damage, place
a mat beneath the upright bike.
6. Regularly inspect and tighten all parts of the
upright bike.
7. Keep children under the age of 12 and pets
away from the upright bike at all times.
8. The upright bike should not be used by persons weighing more than 160 kg (350 lbs.).
9. Always wear appropriate exercise clothes and
athletic shoes when operating the upright
bike. Do not wear loose clothes that could become caught on the upright bike.
10. Do not modify the power cord or use an
adapter to connect the power cord to an improper receptical. Keep the power cord away
from heated surfaces. Do not use an extension
cord.
11. Keep your back straight while using the upright bike; do not arch your back.
12. If you feel pain or dizziness while exercising,
stop immediately and cool down.
13. The pulse sensor is not a medical device.
Various factors, including the user’s movement, may affect the accuracy of heart rate
readings. The pulse sensor is intended only
as an exercise aid in determining heart rate
trends in general.
WARNING: To reduce the risk of serious injury, read the following important precautions
and information before operating the upright bike.
IMPORTANT PRECAUTIONS
WARNING: Before beginning this or any exercise program, consult your physician. This
is especially important for persons over the age of 35 or persons with pre-existing health problems.
Read all instructions before using. FreeMotion Fitness assumes no responsibility for personal injury
or property damage sustained by or through the use of this product.
SAVE THESE INSTRUCTIONS
Page 6
4
Congratulations for selecting the revolutionary
FREEMOTION®upright bike. The upright bike offers
an impressive array of features to make your workouts
more effective and enjoyable.
For your benefit, read this manual carefully before
using the FREEMOTION upright bike. If you have
questions after reading this manual, please see HOW
TO CONTACT CUSTOMER CARE on page 2. To help
us assist you, note your product model number and
serial number before contacting us. The model number
and serial number can be found on a decal attached to
the upright bike (see the front cover of this manual for
the location of the decal).
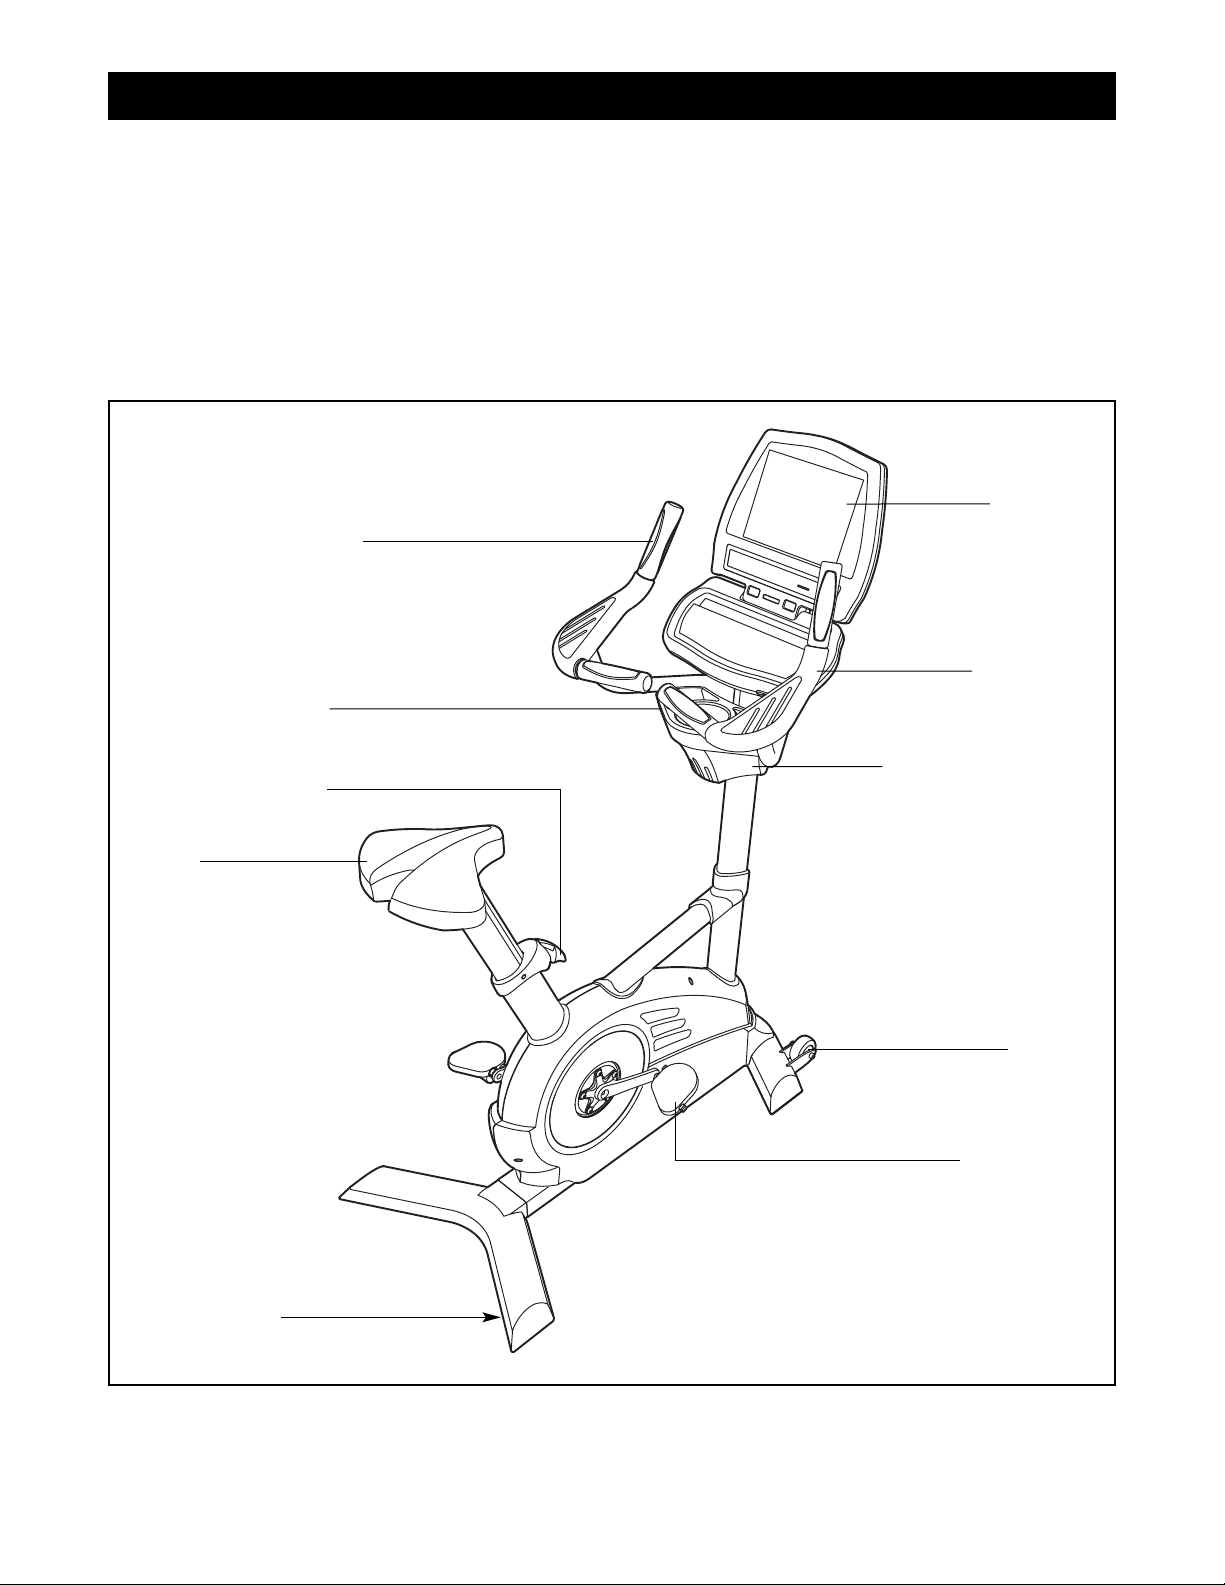
Before reading further, please familiarize yourself with
the parts that are labeled in the drawing below.
Handlebar
CD/Accessory Tray
Console
Leveling Foot
Adjustment Handle
BEFORE YOU BEGIN
Handgrip Pulse Sensor
Water Bottle Holder*
*No water bottle is included
FRONT
REAR
Seat
Wheel
Pedal/Strap
RIGHT SIDE
Page 7
5
Assembly requires two persons. Set the upright bike in a cleared area and remove all packing materials. Do not
dispose of the packing materials until assembly is completed. Assembly can be completed using the included
tools.
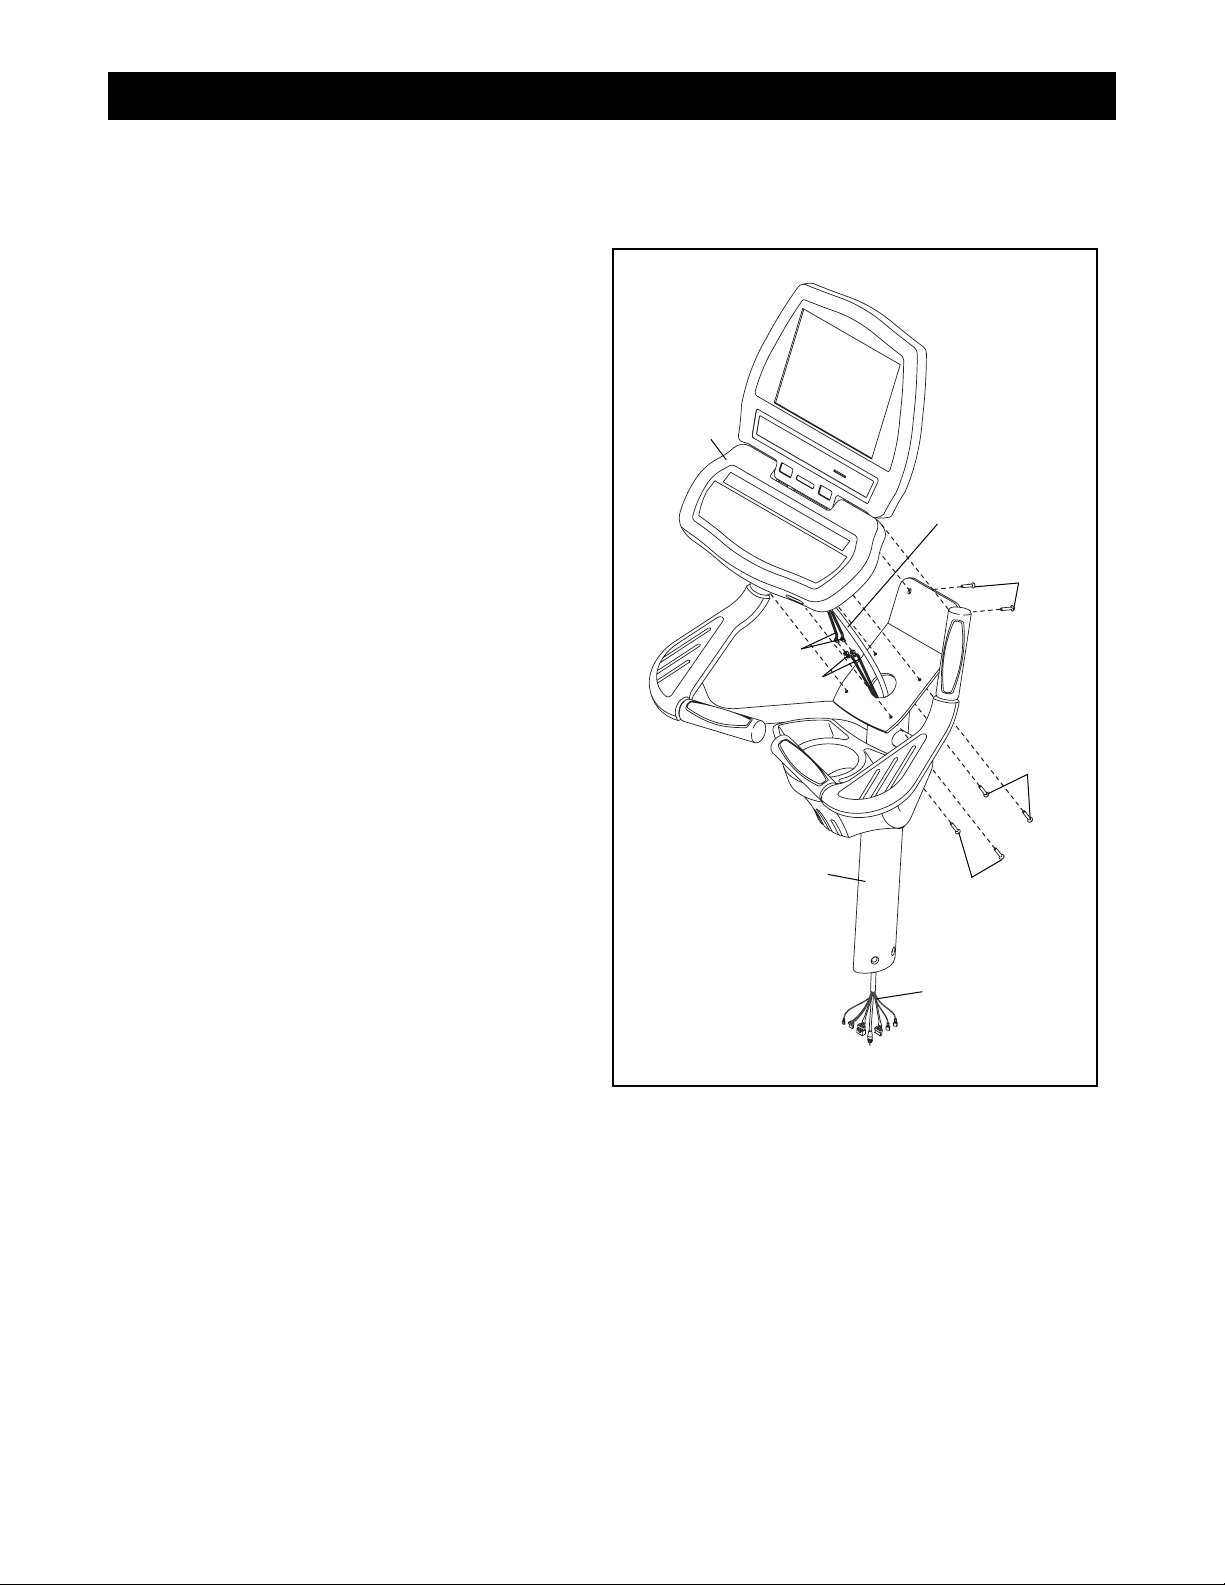
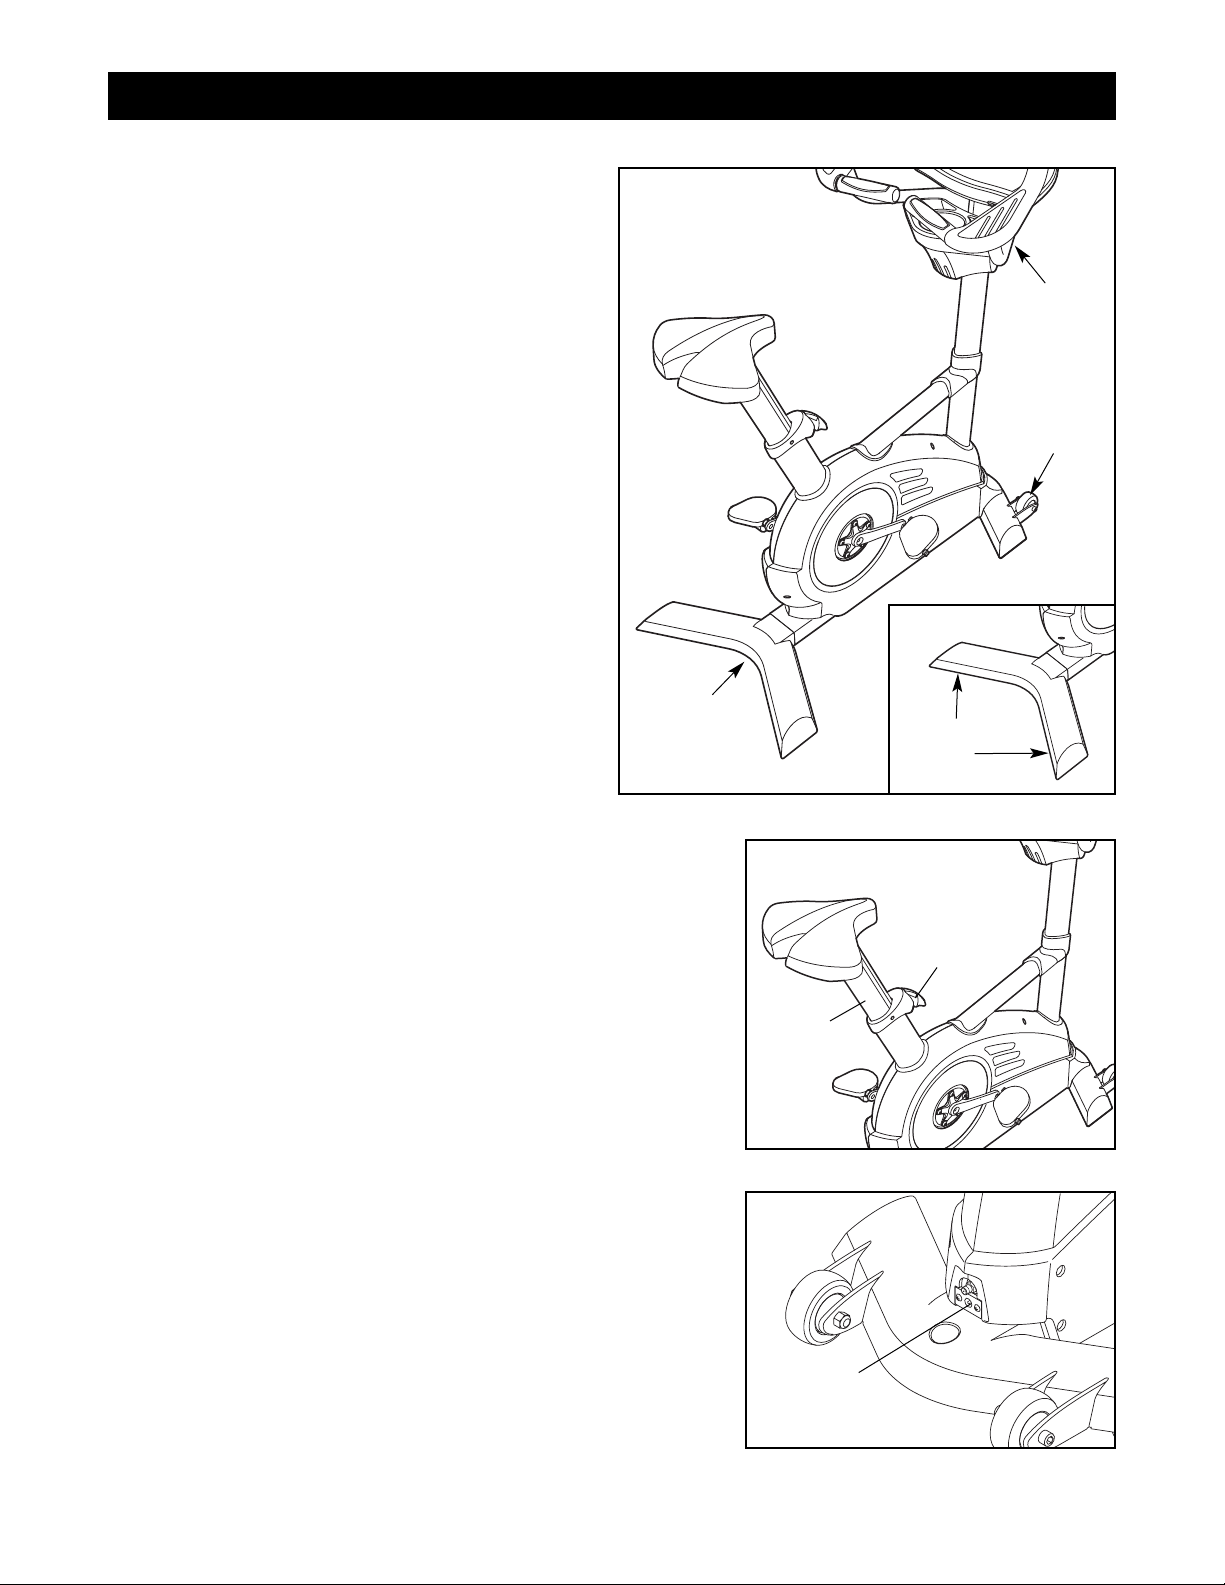
HOW TO ASSEMBLE THE UPRIGHT BIKE
1. While a second person holds the Console (4)
near the Upright (3) as shown, insert the console
wires downward through the Upright. Then, connect the pulse wires on the console to the connectors on the Hand Pulse Sensor Wire (41).
Attach the Console (4) to the Upright (3) with six
Console Screws (88). Be careful to avoid
pinching the wires during this step.
Console
Wires
Console
Wires
Pulse
Wires
Avoid pinching
the wires during
this step
88
41
88
88
1
4
3
Page 8
6
9
5
73
73
3
2
85
85
47
3
1
Console
Wires
Frame
Wires
2. Slide the Upright Screw Cover (47) onto the Upright
(3). Make sure that the Upright Screw Cover is
oriented as shown. Then, slide the Upright Screw
Cover upward to the top of the Upright.
While a second person holds the Upright (3) near
the Frame (1), connect the console wires to the
matching connectors on the frame wires.
Slide the Upright (3) onto the Frame (1). Attach the
Upright with four Upright Screws (85). Be careful
to avoid pinching the wires during this step.
Then, slide the Upright Screw Cover (47) downward to the bottom of the Upright (3).
3. Attach the Seat (9) to the Seat Post (5) with three
Seat Screws (73).
Avoid pinching
the wires during
this step
Page 9
7
HOW TO MOVE AND LEVEL THE UPRIGHT BIKE
Before moving the upright bike, make sure that
the power cord is unplugged. Note: If a CATV
cable is connected to the upright bike, it may be necessary to disconnect the cable if the upright bike will
be moved far.
Due to the size and weight of the upright bike,
moving it requires two persons. While one person
lifts the indicated end, firmly hold the upright and tip
the upright bike forward until it rolls on the front
wheels. Carefully move the upright bike to the desired location and then lower it back to the level position. CAUTION: To reduce the risk of injury, use
extreme caution while moving the upright bike.
Do not attempt to move the upright bike over uneven surfaces.
If the upright bike rocks slightly during use, turn the
leveling feet under the rear or the front stabilizer until
the rocking motion is eliminated.
HOW TO ADJUST THE SEAT
For effective exercise, the seat should be at the proper height. As
you pedal, there should be a slight bend in your knees when the
pedals are in the lowest position. To adjust the height of the seat, lift
the adjustment handle, slide the seat upward or downward to the
desired position, and then release the adjustment handle.
HOW TO CONNECT THE POWER CORD
If the upright bike has a Basic console, it can be used with or without the included power cord. If the upright bike has a Workout TV
console, the power cord must be used for the TV to operate.
To use the power cord, first plug one end of the power cord into the
jack on the front of the upright bike. Note: If there is a plastic cover
over the jack, remove the cover. Plug the other end of the power
cord into an appropriate outlet that is properly installed in accordance with all local codes and ordinances.
Adjustment
Handle
Seat
Post
HOW TO SET UP THE UPRIGHT BIKE
Lift
Here
Wheel
Upright
Power
Cord
Jack
Leveling
Feet
Page 10
8
Your bike has been pre-configured to operate with a Basic console and a Workout TV console (see the drawings
below). To learn about the features of the Basic console, see page 9. To learn about the features of the Workout
TV console, see the user’s manual included with the Workout TV console.
To upgrade your console and expand the capabilities of your bike whenever you choose, see HOW TO
CONTACT CUSTOMER CARE on page 2 of this manual.
HOW TO UPGRADE THE CONSOLE
Basic
Console
Workout TV
Console
HOW TO CONNECT A CATV CABLE
If your bike has a Workout TV console, a CATV cable must be connected to the bike for cable TV stations to be viewed. Locate the
cable jack on the front of the bike. Connect the CATV cable to the
cable jack.
A satellite receiver, VCR, or DVD player can also be connected to
the bike. Connect a CATV cable from the coaxial output on your
equipment (usually labeled TV OUT or RF OUT) to the cable jack.
Note: Audio/video equipment without coaxial outputs (some satellite
receivers and DVD players) will require an RF modulator to operate
with the bike. RF modulators and external CATV cables are not available from FreeMotion Fitness, but are available
at electronics stores. See the owner's manual included with the equipment you wish to connect to see whether an
RF modulator is needed.
Cable
Jack
F S A
Page 11

9
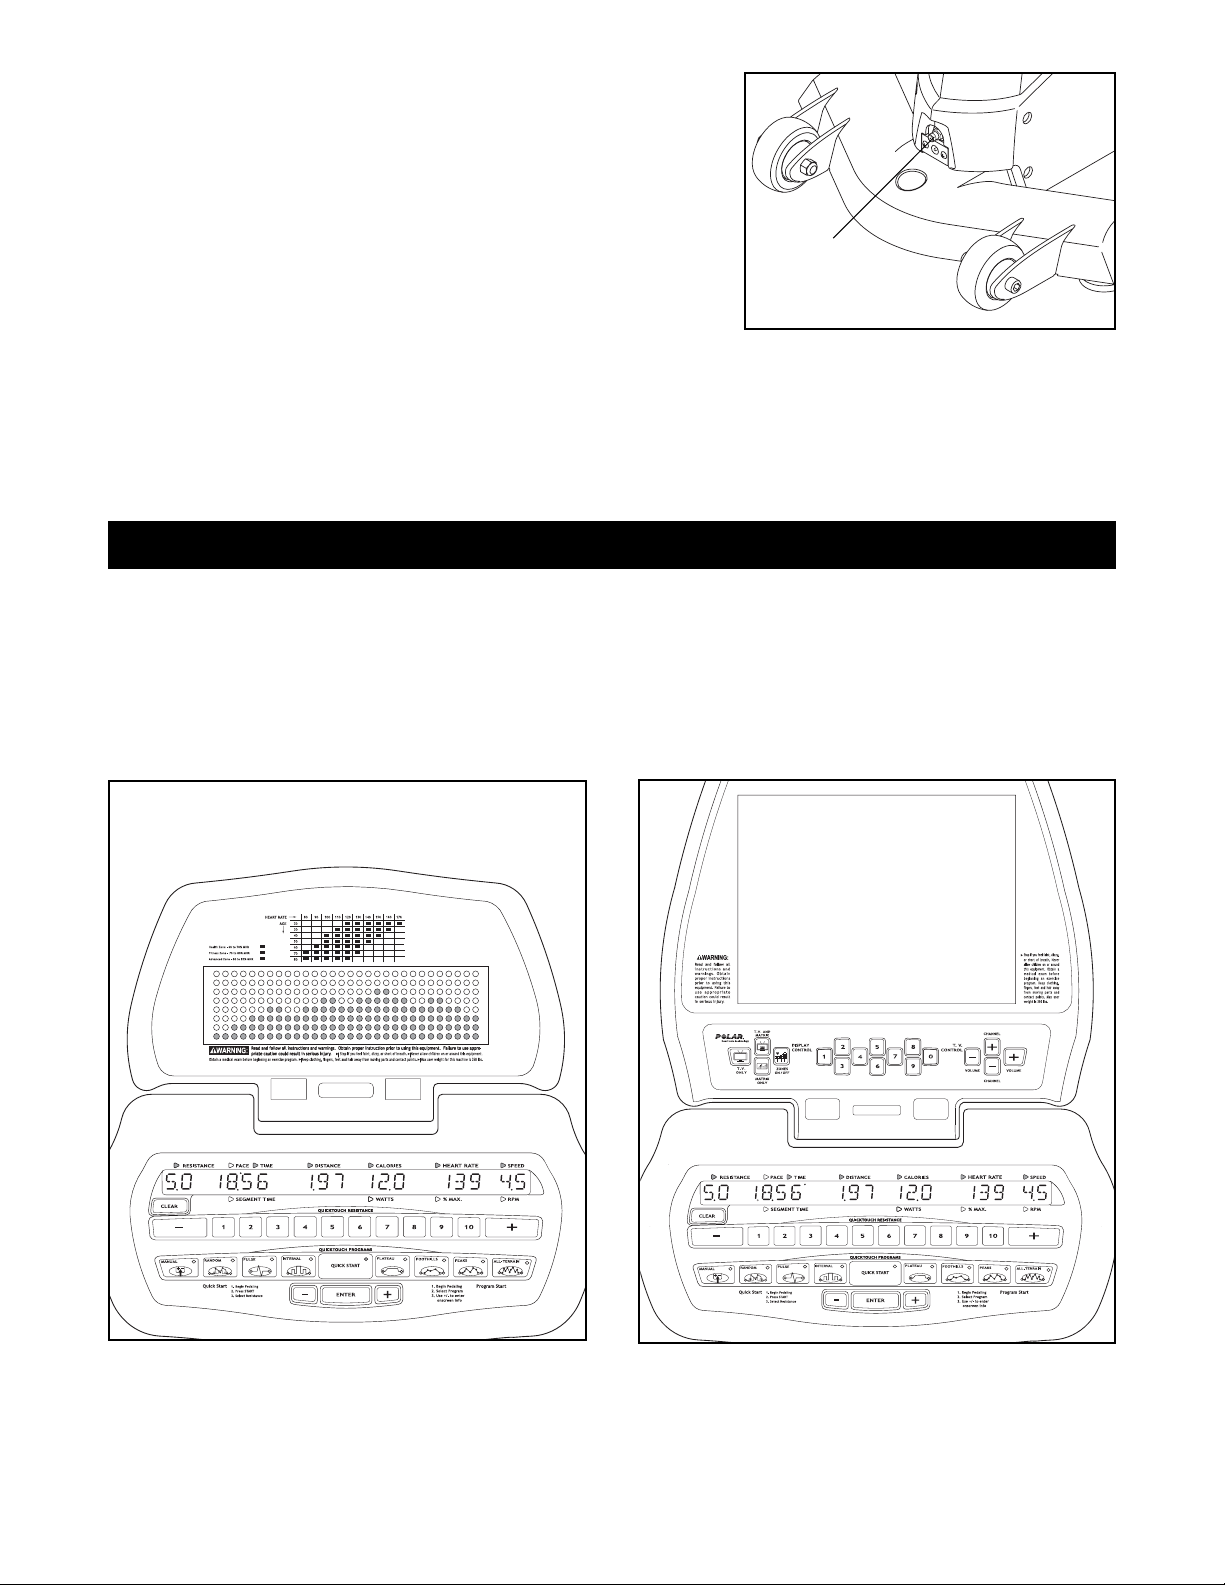
FEATURES OF THE CONSOLE
The Basic console offers an impressive array of
features designed to help you get the greatest benefits
from your exercise on the bike. When the QUICK
START mode is selected, the resistance of the pedals
can be changed with the touch of a button. As you exercise, the console will provide continuous exercise
feedback. You can even measure your heart rate using
the built-in pulse sensor.
In addition, the console offers a wide selection of workout programs. Each program automatically controls the
resistance of the pedals as it guides you through an effective workout. The console also offers two PULSE
programs that automatically adjust the resistance of
the pedals to keep your heart rate near a target level
during your workouts. Note: The PULSE programs require the use of a Polar®-compatible chest pulse sensor
(not included).
Before using the bike, please read OVERVIEW OF
THE CONSOLE on pages 10 to 12. To use the
QUICK START mode of the console, follow the steps
beginning on page 13. To use the MANUAL
program, see page 13. To use the RANDOM program, see page 15. To use a PULSE program, see
page 16. To use the INTERVAL program, see page
17. To use the PLATEAU program, see page 18. To
use the FOOTHILLS, PEAKS, or ALL-TERRAIN program, see page 19. To use the maintenance mode,
see page 20.
Main Display
Matrix
HOW TO USE THE BASIC CONSOLE
Page 12

10
OVERVIEW OF THE CONSOLE
For your benefit, please read all of the instructions
on pages 10 to 12 before you use the bike.
HOW TO ACTIVATE THE CONSOLE
If the bike has a Basic console, it can be used with
or without a power cord. To purchase and use a power
cord, see HOW TO CONNECT THE POWER CORD
on page 7. To use the bike without a power cord, simply begin pedaling at a cadence of about 25 revolutions per minute (RPM) or faster. The main display will
light, the indicators on the QUICKTOUCH PROGRAMS buttons will begin to flash, a tone will sound,
and the words “PLEASE SELECT A PROGRAM TO
BEGIN” will scroll across the main display. While you
pedal, power will be supplied by a generator; remember to continue pedaling while using the bike.
If the bike has a Workout TV console, the power
cord must be used for the TV to operate. See HOW
TO CONNECT THE POWER CORD on page 7. When
the power cord is plugged in, the main display will light,
the indicators on the QUICKTOUCH PROGRAMS buttons will begin to flash, a tone will sound, and the
words “PLEASE SELECT A PROGRAM TO BEGIN”
will scroll across the main display.
HOW TO TURN OFF THE CONSOLE
If the power cord is not being used, and if the ped-
als are not moved for a short period of time, the console will automatically turn off.
If the power cord is being used, and if the pedals are
not moved for a short period of time, the words
“PLEASE SELECT A PROGRAM TO BEGIN” will
scroll across the main display. Unplug the power cord
when the bike is not in use.
THE BUTTONS
The CLEAR button—This
button is used to reset the
console. When this button is
pressed, the main display will
be reset and the words
“PLEASE SELECT A PROGRAM TO BEGIN” will scroll across the main display.
Note: If one program is started and then a different
program is selected, the main display will not be reset
unless the CLEAR button is pressed before the second
program is selected.
The QUICKTOUCH RESISTANCE buttons—These
buttons control the resistance of the pedals. There are
twenty resistance settings, from 0.5 to 10. Each time
the + or – button is pressed, the resistance setting will
change by 0.5. When one of the buttons numbered 1
to 10 is pressed, the corresponding resistance setting
will be selected. Note: It may take a moment for the
pedals to reach the selected resistance setting.
The QUICKTOUCH PROGRAMS buttons—These
buttons are used to select the QUICK START mode
and the programs.
The ENTER button and +
and – buttons—These but-
tons are used to enter information into the console.
Page 13

11
THE MAIN DISPLAY
The main display will display a variety of text messages
to guide you through your workouts. In addition, the
main display will display the following information while
you exercise:
Resistance—The left end of
the main display will show
the resistance setting of the
pedals.
Pace/Time/Segment
Time—When the QUICK
START mode is selected,
this section of the main display will show your pedaling
pace, in minutes per mile or
minutes per kilometer, and the elapsed time. The display will change from one number to the other every
few seconds. When a program is selected, the main
display will show your pedaling pace, the time remaining in the program, and the time remaining in the current segment of the program.
Distance—This section of
the main display will show
the distance that you have
pedaled, in miles or kilometers.
Calories/Watts—This section of the main display will
show the approximate number of calories you have
burned and your power output in watts. The display will
change from one number to the other every few seconds.
Heart Rate/% Max—When
you use the handgrip pulse
sensor or a Polar
®
-compatible chest pulse sensor (not
included), this section of the
main display will show your
heart rate. When a PULSE program is selected, the
display will show your heart rate and the corresponding
percentage
of your
estimated maximum heart rate
(see step 6 on page 16 for an explanation of your estimated maximum heart rate). The display will change
from one number to the other every few seconds.
Speed/RPM—The right end
of the main display will show
your pedaling speed, in miles
per hour or kilometers per
hour, and your pedaling cadence, in revolutions per
minute (RPM). The display will change from one number to the other every few seconds.
Note: The main display can display text messages in
any of six languages (see step 6 on page 20). In addition, the main display can display data using either the
English system or the metric system (see step 7 on
page 20).
THE MATRIX
When the RANDOM, INTERVAL, PLATEAU, FOOTHILLS, PEAKS, or ALL-TERRAIN program is selected,
the matrix will display a profile of resistance settings.
Each program is divided into 30-second segments,
and each column of the matrix represents one 30-second segment. The flashing column represents the current segment. Note: If a program has more than 30
segments, the matrix will show up to 30 segments at a
time.
The lit indicators in each column represent the resistance setting for that segment of the program. One lit
indicator represents a resistance setting of 0.5 or 1, two
lit indicators represent a resistance setting of 1.5 or 2,
three lit indicators represent a resistance setting of 2.5
or 3, and so forth. Note: Because there are eight indicators in each column, the matrix will normally show resistance settings up to 8. If resistance settings of 8.5, 9,
9.5, or 10 are programmed for one or more segments,
the lit indicators in all columns will occasionally shift
downward
so that the higher settings are displayed in
the matrix.
Flashing Column
Page 14

12
When the QUICK START mode or the MANUAL program is selected, the matrix will show the resistance
settings that you select.
When a PULSE program is selected, the matrix will display a heartbeat graphic. Each time a heartbeat is detected, an additional peak will appear in the display.
THE PULSE SENSOR
If there are thin sheets
of plastic on the metal
contacts on the pulse
sensor, peel off the
plastic. To measure
your heart rate, hold the
contacts; your palms
must be resting on the
upper contacts, and
your fingers must be touching the lower contacts.
Avoid moving your hands. When your pulse is detected, the HEART RATE indicator above the main display will begin to flash, and then your heart rate will be
shown. For the most accurate heart rate reading, hold
the contacts for at least 15 seconds without moving
your hands.
If your heart rate is not shown, make sure that your
hands are positioned as described. Be careful not to
move your hands excessively or to squeeze the contacts too tightly. For optimal performance, clean the
contacts using a soft cloth; never use alcohol, abrasives, or chemicals.
Flashing Column
Contacts
Page 15

13
HOW TO USE THE QUICK START MODE
If you do not plan to use a program, the QUICK
START mode will allow you to simply start exercising
and adjust the resistance of the pedals manually.
Plug in the power cord or begin pedaling to
activate the console.
See HOW TO ACTIVATE THE CONSOLE on
page 10.
Select the QUICK START mode.
To select the QUICK START mode, press the
QUICK START button. The indicator on the button will light.
Begin exercising and change the resistance of
the pedals as desired.
As you pedal, change the resistance of the pedals
by pressing the RESISTANCE + and – buttons or
the QUICKTOUCH RESISTANCE buttons.
When the QUICK START mode is selected, the
matrix will show your progress and the resistance
settings that you select. When you begin exercising, the left column of the matrix will begin to flash.
After 30 seconds, a tone will sound and the column to the right will begin to flash.
Each time you change the resistance of the pedals, additional indicators will light or darken in the
flashing column, and in all columns to the right of
the flashing column. Note: If you select a resistance setting higher than 8,
the indicators in all
columns will shift downward,
until you select a
lower resistance setting.
After every 30 seconds that you exercise, a tone
will sound and the next column to the right will
begin to flash. When you have exercised for 8
minutes, the same column will continue to flash,
and
all columns of indicators will shift one position
to the left.
The columns of indicators will continue
to shift to the left after every 30 seconds, until you
are finished exercising.
Follow your progress with the main display.
See THE MAIN DISPLAY on page 11.
Measure your heart rate if desired.
See THE PULSE SENSOR on page 12.
When you are finished using the bike, the console will automatically enter an idle mode or
turn off.
See HOW TO TURN OFF THE CONSOLE on
page 10.
HOW TO USE THE MANUAL PROGRAM
The MANUAL program will count down the time
remaining in your workout as you control the
resistance of the pedals.
Plug in the power cord or begin pedaling to
activate the console.
See HOW TO ACTIVATE THE CONSOLE on
page 10.
Select the MANUAL program.
To select the MANUAL program, press the MANUAL button. The indicator on the button will light,
and the word “MANUAL” will appear in the main
display for a moment.
2
1
6
5
4
3
2
1
Flashing Column
Page 16

14
Enter your age.
A moment after the program is selected, the
words “ENTER AGE” and an age setting of 35 will
appear in the main display. To enter your age,
press the + and – buttons beside the ENTER button; hold down the buttons to enter your age in increments of 5 years. When your age is shown,
press the ENTER button.
Enter your weight.
Next, the words “ENTER WEIGHT” and a weight
setting of 180 pounds will appear in the main display. To enter your weight, press the + and – buttons beside the ENTER button; hold down the
buttons to enter your weight in increments of 5
pounds. When your weight is shown, press the
ENTER button.
Enter a program time.
Next, the words “ENTER TIME” and a time setting
of 10 minutes will appear in the main display. To
change the length of time that the program will
last, press the + and – buttons beside the ENTER
button. Then, press the ENTER button.
Begin exercising and change the resistance of
the pedals as desired.
As you pedal, change the resistance of the pedals
by pressing the RESISTANCE + and – buttons or
the QUICKTOUCH RESISTANCE buttons.
During the MANUAL program, the
matrix will show
your progress and
the resistance settings that you select. During the
first 30-second
segment of the program, the left column of the matrix will flash. During the last four seconds of the
first segment, the column to the right will also
flash. When the first segment ends, a tone will
sound and the column to the right will continue to
flash.
Each time you change the resistance of the pedals, additional indicators will light or darken in the
flashing column, and in all columns to the right of
the flashing column. Note: If you select a resistance setting higher than 8,
the indicators in all
columns will shift downward,
until you select a
lower resistance setting.
At the end of each segment, a tone will sound and
the next column to the right will begin to flash.
When you have completed the first 8 minutes of
the program, the same column will continue to
flash, and
all columns of indicators will shift one
position to the left.
The columns of indicators will
continue to shift to the left at the end of each segment, until the last segment of the program is
shown in the far right column of the matrix.
The
next column to the right will then begin to flash at
the end of each segment,
until the program is
completed.
Follow your progress with the main display.
See THE MAIN DISPLAY on page 11.
Measure your heart rate if desired.
See THE PULSE SENSOR on page 12.
When you are finished using the bike, the console will automatically enter an idle mode or
turn off.
See HOW TO TURN OFF THE CONSOLE on
page 10.
9
8
7
6
5
4
3
Flashing Column
Page 17

15
HOW TO USE THE RANDOM PROGRAM
The RANDOM program will automatically change the
resistance of the pedals during your workout. Each
time the program is selected, the resistance settings of
the program will be different.
Plug in the power cord or begin pedaling to
activate the console.
See HOW TO ACTIVATE THE CONSOLE on
page 10.
Select the RANDOM program.
To select the RANDOM program, press the RANDOM button. The indicator on the button will light,
and the word “RANDOM” will appear in the main
display for a moment. Note: To select a different
RANDOM program, simply press the RANDOM
button again.
Enter your age.
See step 3 on page 14.
Enter your weight.
See step 4 on page 14.
Enter a program time.
See step 5 on page 14.
Enter a maximum resistance setting.
Next, the words “MAX RESIST” and the maximum
resistance setting of the program will appear in
the main display. If you wish to change the maximum resistance setting, press the + and – buttons
beside the ENTER button. (Note: If the maximum
resistance setting is increased, the intensity level
of the program will be increased.) When the desired maximum resistance setting is shown, press
the ENTER button.
Begin exercising.
The program is divided into 30-second segments.
One resistance setting is programmed for each
segment. Note: The same resistance setting may
be programmed for two or more consecutive segments.
During the program, the matrix
will show your
progress and the
resistance settings
of the program.
During the first 30second segment of
the program, the
left column of the matrix will flash. During the last
four seconds of the first segment, the column to
the right will also flash. If the resistance of the pedals is about to change, a series of tones will sound
and the resistance setting will flash in the main display. When the first segment ends, the column to
the right will continue to flash, and the resistance
of the pedals will automatically change if a different resistance setting is programmed for the next
segment. Note: If all of the indicators in the flashing column are lit,
the indicators in all columns
may shift downward
temporarily.
At the end of each segment, a tone will sound, the
next column to the right will begin to flash, and the
resistance of the pedals will automatically change
if a different resistance setting is programmed for
the next segment. When you have completed the
first 8 minutes of the program, the same column
will continue to flash, and
all columns of indicators
will shift one position to the left.
The columns of indicators will continue to shift to the left at the end
of each segment, until the last segment of the program is shown in the far right column of the matrix.
The next column to the right will then begin to flash
at the end of each segment,
until the program is
completed.
During the program, you can change the resistance of the pedals, if desired, by pressing the
RESISTANCE + and – buttons or the QUICKTOUCH RESISTANCE buttons. However, when
the current segment ends, the resistance will automatically change if a different resistance setting
is programmed for the next segment. Note: The
program ends with a two-minute cool-down period.
During this period, the resistance level cannot be
changed.
7
6
5
4
3
2
1
Flashing Column
Page 18

16
Follow your progress with the main display.
See THE MAIN DISPLAY on page 11.
Measure your heart rate if desired.
See THE PULSE SENSOR on page 12.
When you are finished using the bike, the
console will automatically enter an idle mode
or turn off.
See HOW TO TURN OFF THE CONSOLE on
page 10. HOW TO USE THE PULSE PRO-
GRAMS
HOW TO USE THE PULSE PROGRAMS
The CONSTANT PULSE program will automatically
control the resistance of the pedals to keep your heart
rate near a target level during your workout.
The VARIABLE PULSE program will automatically
control the resistance of the pedals to keep your heart
rate within a target range during your workout.
Put on a Polar
®
-compatible chest pulse sensor
(not included).
You must wear a chest pulse sensor to use a
PULSE program. See the instructions included
with the chest pulse sensor.
Plug in the power cord or begin pedaling to
activate the console.
See HOW TO ACTIVATE THE CONSOLE on
page 10.
Select one of the PULSE programs.
To select a PULSE program, first press the
PULSE button. The indicator on the button will
light, and the word “PULSE” will appear in the main
display for a moment.
Next, the words “CONSTANT MODE” will appear
in the main display. If you plan to use the CONSTANT PULSE program, press the ENTER button. If you plan to use the VARIABLE PULSE program, press the + or – button beside the ENTER
button so that the words “VARIABLE MODE” appear in the main display; then press the ENTER
button.
Enter your age.
See step 3 on page 14.
Enter your weight.
See step 4 on page 14.
Enter a maximum heart rate setting.
Next, the words “PCT MAX RATE” and the maximum heart rate setting of the program will appear
in the main display. The maximum heart rate setting represents a
percentage
of your
estimated
maximum heart rate.
Note: Your maximum heart
rate is estimated by subtracting your age from
220. For example, if you are 30 years old, your
estimated maximum heart rate is 190 beats per
minute (220 – 30 = 190). Therefore, if you are 30
years old, a target heart rate setting of 50% is
equal to 95 beats per minute (50% of 190 is 95).
If you wish to change the maximum heart rate setting, press the + and – buttons beside the ENTER
button. When the desired maximum heart rate
setting is shown, press the ENTER button.
Enter a program time.
See step 5 on page 14.
Begin exercising.
During PULSE
programs, the matrix will display a
heartbeat graphic.
Each time a heartbeat is detected,
an additional peak
will appear in the
matrix.
8
7
6
5
4
3
2
1
10
9
8
Page 19

The program is divided into 30-second segments.
One target heart rate setting is programmed for
each segment. Note: If the CONSTANT PULSE
program is selected, the same target heart rate
setting is programmed for all segments.
At the end of each segment, a tone will sound and
the resistance of the pedals will automatically
change, if necessary, to bring your heart rate
closer to the target heart rate setting for the next
segment. The program will continue in this way
until the last segment ends.
During the program, you can change the resistance of the pedals, if desired, by pressing the
RESISTANCE + and – buttons or the QUICKTOUCH RESISTANCE buttons. However, when
the current segment ends, the resistance will automatically change, if necessary, to bring your heart
rate closer to the target heart rate setting for the
next segment. Note: Each PULSE program ends
with a two-minute cool-down period. During this
period, the resistance level cannot be changed.
If your pulse is not detected during the program,
the letters “PLS” will flash in the main display, and
the resistance of the pedals may automatically decrease. If this occurs, see the instructions included
with the chest pulse sensor.
Follow your progress with the main display.
See THE MAIN DISPLAY on page 11.
When you are finished using the bike, the
console will automatically enter an idle mode
or turn off.
See HOW TO TURN OFF THE CONSOLE on
page 10.
HOW TO USE THE INTERVAL PROGRAM
The INTERVAL program will automatically change the
resistance of the pedals to simulate a series of hills as
it guides you through an effective interval training
workout.
Plug in the power cord or begin pedaling to
activate the console.
See HOW TO ACTIVATE THE CONSOLE on
page 10.
Select the INTERVAL program.
To select the INTERVAL program, press the INTERVAL button. The indicator on the button will
light, and the word “INTERVAL” will appear in the
main display for a moment.
Enter your age.
See step 3 on page 14.
Enter your weight.
See step 4 on page 14.
Enter a program time.
See step 5 on page 14.
Enter a maximum resistance setting.
See step 6 on page 15.
Enter the desired number of hills for the
program.
Next, the words “NUMBER HILLS” and the number of hills that the program will simulate will appear in the main display. If you wish to change the
number of hills, press the + and – buttons beside
the ENTER button. When the desired number of
hills is shown, press the ENTER button.
7
6
5
4
3
2
1
10
9
17
Page 20

18
Begin exercising.
See step 7 on page 15.
Follow your progress with the main display.
See THE MAIN DISPLAY on page 11.
Measure your heart rate if desired.
See THE PULSE SENSOR on page 12.
When you are finished using the bike, the
console will automatically enter an idle mode
or turn off.
See HOW TO TURN OFF THE CONSOLE on
page 10.
HOW TO USE THE PULSE PROGRAMS
HOW TO USE THE PLATEAU PROGRAM
During the PLATEAU program, the resistance of the
pedals will gradually increase, remain constant for several segments, and then gradually decrease.
Plug in the power cord or begin pedaling to
activate the console.
See HOW TO ACTIVATE THE CONSOLE on
page 10.
Select the PLATEAU program.
To select the PLATEAU program, press the
PLATEAU button. The indicator on the button will
light, and the word “PLATEAU” will appear in the
main display for a moment.
Enter your age.
See step 3 on page 14.
Enter your weight.
See step 4 on page 14.
Enter a maximum resistance setting.
See step 6 on page 15.
Enter a program time.
See step 5 on page 14.
Begin exercising.
See step 7 on page 15.
Follow your progress with the main display.
See THE MAIN DISPLAY on page 11.
Measure your heart rate if desired.
See THE PULSE SENSOR on page 12.
When you are finished using the bike, the
console will automatically enter an idle mode
or turn off.
See HOW TO TURN OFF THE CONSOLE on
page 10.
10
9
8
7
6
5
4
3
2
1
11
10
9
8
Page 21

19
HOW TO USE THE FOOTHILLS, PEAKS, AND
ALL-TERRAIN PROGRAMS
During the FOOTHILLS program, the resistance of the
pedals will gradually increase and then gradually decrease. The number of times that the resistance will increase and decrease will depend on the maximum resistance setting and the intensity level that you select.
During the PEAKS program, the resistance of the pedals will increase and then decrease. The number of
times that the resistance will increase and decrease
will depend on the maximum resistance setting and the
intensity level that you select.
During the ALL-TERRAIN program, the resistance of
the pedals will sharply increase and then sharply decrease repeatedly. The number of times that the resistance will increase and decrease will depend on the
maximum resistance setting and the intensity level that
you select.
Plug in the power cord or begin pedaling to
activate the console.
See HOW TO ACTIVATE THE CONSOLE on
page 10.
Select the desired program.
Press the FOOTHILLS, PEAKS, or ALL-TERRAIN
button. The indicator on the button will light, and
the word “FOOTHILLS,” “PEAKS,” or “ALL-TERRAIN” will appear in the main display for a
moment.
Enter your age.
See step 3 on page 14.
Enter your weight.
See step 4 on page 14.
Enter a program time.
See step 5 on page 14.
Enter a maximum resistance setting.
See step 6 on page 15.
Enter an intensity level.
Next, the word “INTENSITY” and the intensity
level of the program will appear in the main display. Press the + and – buttons beside the
ENTER button to select level 1 (for a low-intensity
workout), level 2 (for a moderate-intensity workout), or level 3 (for a high-intensity workout).
Then, press the ENTER button.
Begin exercising.
See step 7 on page 15.
Follow your progress with the main display.
See THE MAIN DISPLAY on page 11.
Measure your heart rate if desired.
See THE PULSE SENSOR on page 12.
When you are finished using the bike, the
console will automatically enter an idle mode
or turn off.
See HOW TO TURN OFF THE CONSOLE on
page 10.
11
10
9
8
7
6
5
4
3
2
1
Page 22

20
HOW TO USE THE MAINTENANCE MODE
The console features a maintenance mode that allows
you to access information and to view and change default settings. Follow the steps below to use the maintenance mode.
Plug in the power cord or begin pedaling to
activate the console.
See HOW TO ACTIVATE THE CONSOLE on
page 10.
Hold down the CLEAR button and the ENTER
button simultaneously for a few seconds to
select the maintenance mode.
When the maintenance mode is selected, the
words “MAINTENANCE MODE” will appear in the
main display for a moment.
View the total number of hours that the bike
has been used.
When the words “MAINTENANCE MODE” disappear, the main display will show the total number
of hours that the bike has been used.
Press the ENTER button and view the total
distance pedaled on the bike.
When the button is pressed, the main display will
show the total distance pedaled on the bike.
Press the ENTER button again and set a
maximum program time for the programs.
The maximum program time for the programs can
be from 10 minutes to 90 minutes. To change the
maximum program time, press the + and – buttons beside the ENTER button.
Press the ENTER button again and select a
language for the main display.
The main display can display text messages in
English, International English, German, Spanish,
Italian, or French. To change the language, press
the + and – buttons beside the ENTER button.
Press the ENTER button again and select the
desired system of measurement.
The console can display data using the English
system (miles and pounds) or the metric system
(kilometers and kilograms). To change the system
of measurement, press the + and – buttons beside the ENTER button.
Press the ENTER button again and set the
length of time that will elapse before the console will turn off or enter the idle mode.
If the bike is used without a power cord, and if the
pedals are stationary for a period of time, the console will turn off. If the bike is used with a power
cord, and if the pedals are stationary for a period
of time, the console will enter an idle mode and
the words “PLEASE SELECT A PROGRAM TO
BEGIN” will begin to scroll across the main display.
To set the length of time that will elapse before the
console will turn off or enter the idle mode, press
the + and – buttons beside the ENTER button.
The length of time can be from 15 seconds to 2
minutes.
Hold down the ENTER button and the CLEAR
button simultaneously for a few seconds to
exit the maintenance mode.
To exit the maintenance mode at any time, hold
down the ENTER button and the CLEAR button
simultaneously for a few seconds.
9
8
7
6
5
4
3
2
1
Page 23

If you have questions about maintenance or troubleshooting, see HOW TO CONTACT CUSTOMER CARE
on page 2.
Regularly inspect and properly tighten all external parts of the upright bike. To clean the upright bike, apply a
small amount of mild multi-purpose cleaner to a 100% cotton cloth and wipe the console, screens, and external
surfaces. Do not spray cleaner directly onto the upright bike or use ammonia or acid-based cleaners.
LEVELING THE UPRIGHT BIKE
If the upright bike rocks slightly during use, see HOW TO MOVE AND LEVEL THE UPRIGHT BIKE on page 7.
SEAT ADJUSTMENT
To adjust the position of the seat, see HOW TO ADJUST THE SEAT on page 7.
SELECTING A SYSTEM OF MEASUREMENT
The console can display data using the standard system (miles and pounds) or the metric system (kilometers and
kilograms). To change the system of measurement, see step 4 on page 20.
PULSE SENSOR TROUBLESHOOTING
If the handgrip pulse sensor does not function properly, see THE PULSE SENSOR on page 12.
TV TROUBLESHOOTING
If the TV in the Workout TV console does not function properly, make sure that the included power cord is fully inserted (see HOW TO CONNECT THE POWER CORD on page 7). The power cord must be used for the TV to
operate.
If the TV picture is fuzzy, make sure that the correct connection setting is selected (see the user’s manual included with the Workout TV console). In addition, make sure that the CATV cable is properly connected (see
HOW TO CONNECT A CATV CABLE on page 8).
MAINTENANCE AND TROUBLESHOOTING
21
Page 24

22
NOTES
Page 25

23
EXERCISE STEPS
The following nine steps for designing your exercise
program were developed by exercise physiologists at
FreeMotion Fitness. The actual exercise you perform
is only part of a safe and effective training program.
There are many other aspects to developing a life-long
commitment to physical fitness.
Consult your physician before beginning
any exercise program.
A medical examination or consultation with your
physician is essential.
Establish personal fitness goals.
Set attainable, realistic goals. Reward yourself
when you meet your goals. Remember, your
goals should act as a guide for your workout
program.
Determine your target heart rate.
Your
target heart rate
(THR), is the rate at which
you would like your heart to work during aerobic
exercise. It is expressed as a percentage of your
maximum heart rate
(MHR). MHR is the maximum
number of times that your heart can pump during
one minute. To determine your approximate MHR,
subtract your age (in years) from 220. This is only
an estimation of your MHR—only clinical stress
testing can provide an actual MHR reading.
Once you have determined your MHR, you can
establish your target heart rate zone. Beginning
exercisers may wish to start at 60 to 70 percent of
their MHR. This level is called the
Health
level.
Exercise at 70 to 85 percent of your MHR for the
optimal training, aerobic, or cardiovascular level—
the
Fitness
level.
Advanced
exercisers, or those
wishing to do sports, athletic conditioning, or interval training workouts should exercise at 80 to 85
percent of the MHR for short periods of time. The
chart below shows Target Heart Rate Zones for
Health, Fitness, and Advanced exercisers.
Be sure to check your heart rate at least twice
during an aerobic conditioning session. First,
check your heart rate five minutes into your workout to be sure that you are at the proper intensity.
Then, check it again near the end of your workout
to verify that you have maintained your target
heart rate for the recommended period of time.
3
2
1
FACTORS IN A SENSIBLE DIET
• Choose high-fiber, low-fat, and low-sugar
foods: fruits, vegetables, and whole grains.
• Eat at least five servings of fruits and
vegetables daily.
• Reduce red meat consumption; eat lean meat,
white meat, and fish.
• Choose healthful snacks; bring healthful foods
with you to work or in the car.
• Eat regular meals or mini-meals. Control your
portion size—don’t binge or overeat. Eat
slowly.
• Reduce fast food and pre-packaged meals.
• Pay attention to fat content and calories.
• Limit alcoholic beverages and caffeine.
• Drink at least eight to ten glasses of water
daily.
TARGET HEART RATE ZONES
Beginner,
low-intensity +
long duration =
fat burning
Optimal training, aerobic or
cardiovascular
Sports, athletic
conditioning,
interval training
EXERCISE GUIDELINES
200
180
160
140
Pulse
120
100
80
25 30 35 40 45 50 55 60 65 70
Age
Health Fitness Advanced
Page 26

24
Warm up before you begin.
A warm-up routine prepares your body and mind
for vigorous exercise. It also helps provide insurance against injury and soreness. Warm up with
two to five minutes of slow exercise, at minimal intensity.
Stretch after your warm-up.
A pliable, well-stretched muscle is less susceptible to injury. Perform the recommended stretches
on a smooth, flat surface.
The correct form for several stretches is described
below (see the drawings at the right). Be sure to
move slowly as you stretch—never bounce.
1. Toe Touch Stretch—Sit with your knees bent
slightly and slowly bend forward from your hips.
Allow your back and shoulders to relax as you
reach toward your toes as far as possible. Hold for
15 to 30 seconds, then relax. Repeat 3 times.
Stretches: Hamstrings, back of knees, and back.
2. Calf/Achilles Stretch—With one leg in front of
the other, reach forward and place your hands
against a wall. Keep your back leg straight and
your back foot flat on the floor. Bend your front
leg, lean forward, and move your hips toward the
wall. Hold for 15 to 30 seconds, then relax.
Repeat 3 times for each leg. To cause further
stretching of the achilles tendons, bend your back
leg as well. Stretches: Calves, achilles tendons,
and ankles.
3. Hamstring Stretch—Sit with one leg extended.
Bring the sole of the opposite foot toward you and
rest it against the inner thigh of your extended leg.
Reach toward your toes as far as possible. Hold
for 15 to 30 seconds, then relax. Repeat 3 times
for both legs. Stretches: Hamstrings, lower back,
and groin.
4. Inner Thigh Stretch—Sit with the soles of your
feet together and your knees outward. Pull your
feet toward your groin area as far as possible.
Hold for 15 to 30 seconds, then relax. Repeat 3
times. Stretches: Quadriceps and hip muscles.
5. Quadriceps Stretch—With one hand against a
wall for balance, reach back and grasp one foot
with your other hand. Bring your heel as close to
your buttocks as possible. Hold for 15 to 30
seconds, then relax. Repeat 3 times for each leg.
Stretches: Quadriceps and hip muscles.
5
4
WEIGHT LOSS TIPS
At least four, 30-minute workouts per week,
along with a reduced-calorie diet, are
recommended if you are trying to lose weight.
However, be sure to stay within your target heart
rate zone and exercise a maximum of 5 days per
week for 60 minutes per workout.
Good posture is the key to safe, comfortable
workouts. Keep your chin up and your head
facing forward. Align your head and shoulders
with your hips. Avoid leaning forward. Keep your
back straight.
1
2
4
5
3
Page 27

25
Get FIT with FreeMotion Fitness
Effective aerobic exercise has three major parts:
frequency, intensity
, and
time
. The acronym "FIT"
may help you to remember these three parts:
“F” stands for the frequency of your work-
outs. Three to five workouts per week are
recommended. Exercise at least four times a
week for weight loss.
“I” refers to the intensity of your workout.
Check your heart rate at least twice during
your aerobic exercise session: once during the
session and once again at the end. Maintain a
workout intensity level within your Target Heart
Rate Zone. You can measure your heart rate
using the handgrip pulse sensor or the method
described below:
1. Lower your wrist below your heart level. This
will make your heart rate stronger and easier to
feel.
2. Using the
index and
middle fingertips of your
right hand,
touch your left
wrist, onefourth inch from
your wrist joint,
at the base of your thumb.
3. Apply minimal pressure with both fingers—let
the beat come to your fingers. If you can’t find
your pulse, use the opposite wrist and hand.
“T” is for the time or duration of your work-
out. Beginning exercisers may wish to start
with 5 to 10 minutes of aerobic activity. Those in
average physical condition should exercise for 20
to 30 minutes. Highly fit people, or people who
want to lose weight, should exercise for 30 to 60
minutes. The key is to maintain your target heart
rate for the duration of the workout period.
Remember to take it slowly. Fitness is a lifelong
commitment. If you can’t go the full 20 minutes
from the start, which is common, try to exercise
for five minutes at a time, a couple of times a day.
Recent research indicates that several short
workouts in one day can also provide fitness
benefits. Gradually, your stamina will increase
and it will become easier to exercise for longer
periods of time.
Cool down after aerobic exercise.
Keep moving! It is important that you cool down
properly to allow your heart rate to decrease
slowly after it has been elevated. This helps the
blood flow from your extremities back to your
heart. Keep your legs moving on the upright bike
at a slower pace for at least five minutes following
the aerobic phase.
Stretch again at the end of your exercise
session.
Stretching after exercise reduces muscle soreness. See step 5 on page 24.
Participate in strength training.
"Balanced fitness, including both strength training
and aerobic exercise, can do more to ensure a
happy life than just about anything else known to
medical science today."
—Kenneth Cooper, M.D., M.P.H., founder of The
Cooper Institute For Aerobic Research, Dallas,
Texas.
A strength-training program increases your lean
muscle mass. Lean muscle mass aids in burning
body fat. With additional muscle mass and
strength, you will receive the full benefits of an exercise program. You will also be less prone to injuries during the aerobic phase of your workout.
9
8
7
6
F
T
I
BENEFITS OF AEROBIC EXERCISE
• Effective weight loss and management
• Added protection from heart disease
• Increased strength and health of bones
• Higher levels of energy for greater productivity
during the day
• Healthy stress relief from a pressure-packed
day
• Greater intellectual capacity and productivity
Page 28

26
WORKOUT PROGRAMS
The
Health
level typically lasts four to six weeks. At
this level you should be concerned with slowly improving your fitness level and endurance.
Take it slowly. Set mini-goals for yourself. You may
want to begin your fitness routine with three or four
short, 5- or 10-minute workouts in a day.
Move on to the Fitness Level only when you feel ready
and your heart rate has moved below your target heart
rate zone.
The
Fitness
level usually lasts 12 to 20 weeks. (It may
last longer, depending on your fitness goals.) At this
level you should strive to achieve your fitness goals.
Set realistic short- and long-term goals for yourself.
Frequently re-evaluate your fitness goals and reward
yourself as you are successful.
Move on to the
Advanced
Level when you have
reached your fitness goals and your heart rate has
moved below your target heart rate zone.
Work out at the
Advanced
level once you have
reached your desired fitness goals. It is intended to be
a maintenance program and should continue on a regular, long-term basis.
You may wish to add
Interval Training
to your maintenance program as well. Interval training will add variety
to your workout routine and further condition your
cardiovascular system. Interval training has been
shown to promote higher levels of aerobic conditioning. It consists of spurts of high-intensity activity followed by active rest periods of exercise at a lower intensity. For example, a one-minute spurt of high-resistance, fast exercise is followed by a two- to threeminute active rest period of low-resistance, slow exercise. The duration of these periods should be based
more on how you feel rather than time. A sequence
such as this should be repeated 5 to 20 times during
your workout session.
WORKOUT TIPS
Full-body conditioning helps take care of many of
life’s aches and pains. However, it takes time for
your body to adapt to any new routine. Below are
some tips that will help ease you into your new
FreeMotion Fitness routine.
• Begin and end each exercise session with the
stretches on page 24. Stretch in a smooth,
controlled manner. Hold each stretch for 15 to
30 seconds. You may experience some initial
muscle soreness and discomfort as a result of
exercising inactive or poorly stretched
muscles. For maximum benefit, a stretching
routine must be performed every day.
• Be aware of your body’s signals and react to
them accordingly. At your correct exercise intensity, you should be able to whistle or maintain a normal conversation. If during
exercise you feel tired, light-headed, dizzy, or
nauseated, stop exercising immediately and
consult your physician. Your heart rate may
also be affected by such things as stress,
caffeine, nicotine, or prescription drugs.
HEALTH
FITNESS
ADVANCED
Heart Rate Intensity
Age
Page 29

To locate the parts listed below, see the EXPLODED DRAWING on pages 28 and 29.
PART LIST R0107A
27
1 1 Frame
2 1 Front Stabilizer
3 1 Upright
4 1 Console
5 1 Seat Post
6 1 Bottle Tray
7 1 Left Side Shield
8 1 Right Side Shield
9 1 Seat
10 1 Adjustment Handle
11 4 Hand Pulse Grip
12 1 Tray Cover
13 1 Generator Assembly
14 1 Rear Stabilizer
15 1 Drive Belt
16 1 Control Board
17 1 Stabilizer Plate
18 4 Foot
19 1 Adjustment Block
20 1 TV Cable
21 1 Power Receptical
22 1 Left Pedal
23 1 Right Pedal
24 1 Left Pedal Strap
25 1 Right Pedal Strap
26 1 Left Handlebar
27 1 Left Crank Arm
28 1 Right Crank Arm
29 1 Bottom Bracket
30 1 Pulley
31 1 Right Handlebar
32 2 Crank Screw
33 2 Wheel
34 1 Left Handlebar Cover
35 1 Right Handlebar Cover
36 1 Adjustment Pin
37 8 Contact
38 8 Grip Insert
39 1 Pulse Jumper Wire
40 1 Pulse Board Return Wire
41 1 Hand Pulse Sensor Wire
42 1 Electromagnet Wire
43 1 Chest Pulse Sensor Wire
44 1 Controller Wire
45 1 Power Wire
46 1 Generator Coil Wire
47 1 Upright Screw Cover
48 1 Power Supply
49 1 Bottle Tray Insert
50 1 Bottle Tray Bracket
51 4 Control Board Standoff
52 1 Resistance Cylinder
53 1 Cylinder Cap
54 1 Cylinder Bracket
55 1 Adjustment Cover
56 1 Seat Post Collar
57 1 Upright Collar
58 1 Crossbar Collar
59 1 Seat Post Sleeve
60 1 Adjustment Spring
61 1 Side Shield Cover
62 1 Adjustment Bar
63 2 Latch Pin
64 4 Snap Ring
65 4 Tape
66 5 Pulley Screw
67 1 Cylinder Screw
68 4 Set Screw
69 4 Generator Screw
70 4 Control Board Screw
71 4 Adjustment Bar Screw
72 1 Cylinder Cap Screw
73 3 Seat Screw
74 2 Adjustment Block Bolt
75 2 Adjustment Block Nut
76 2 Adjustment Cover Screw
77 2 Wheel Bolt
78 2 Wheel Nut
79 2 Stabilizer Bolt
80 6 Stabilizer Screw
81 8 Stabilizer Washer
82 2 Stabilizer Nut
83 8 Pulse Grip Screw
84 2 Bottle Tray Screw
85 4 Upright Screw
86 4 Handlebar Screw
87 6 Handlebar Cover Screw
88 6 Console Screw
89 4 Console Bracket Screw
90 2 Console Bracket Washer
91 7 Side Shield Screw
# 1 User’s Manual
# 1 Hex Key/Allen Wrench
Key No. Qty. Description Key No. Qty. Description
Note: “#” indicates a non-illustrated part. Specifications are subject to change without notice. If replacement parts
are needed, or if parts are missing or damaged, see HOW TO CONTACT CUSTOMER CARE on page 2.
Page 30

28
1
2
5
8
7
9
10
13
14
15
16
17
18
18
18
18
19
20
21
22
24
23
25
27
28
29
30
32
32
33
33
36
51
51
52
53
54
55
56
57
58
59
60
61
62
63
64
64
65
65
65
66
66
67
68
68
69
70
71
71
72
73
73
74
75
76
76
77
77
78
79
79
80
80
81
81
81
81
82
82
91
91
EXPLODED DRAWING A R0107A
Page 31

29
EXPLODED DRAWING B R0107A
83
34
37
38
83
49
87
50
26
37
38
11
38
83
11
37
38
83
37
86
37
38
89
11
90
88
37
4
89
3
83
38
11
38
89
37
35
83
38
83
37
31
87
87
83
6
39
40
41
43
44
45
46
42
12
84
85
47
85
86
88
48
Page 32

Part No. CC7198 R0107A Printed in USA © 2007 ICON IP, Inc.
FreeMotion Fitness, Inc. • 1096 Elkton, Suite 600 • Colorado Springs, CO 80907
 Loading...