

Freedom PT-9 User Manual

1
.
USER MANUAL
PT-9
P
reface
Thank you for purchasing the PT-9. This manual shows how to operate the device smoothly and correctly. Make sure to read this
manual carefully before using this product. Please note that specification and information are subject to changes without prior notice in
this manual. Any change will be integrated in the latest release. The manufacturer assumes no responsibility for any errors or omissions
in this document.

2
Content
1 How does PT-9 work?................................................................................................3
2 Notes and cautions………………………………………………………………….3
3 Specifications……………………………………………………………………….3
4 Get started……………………………………………………………………....4
4.1 accessories
4.2 battery charging
4.3 SIM card insert
5 Set up………………………………………………………………………………..5
5.1 phone book
5.2 Timer setting
5.3 parameters setting
5.3.1 Time zone
5.3.2 GPS data timer
5.3.3 SMS timer
5.3.4 T emperature Alarm
5.3.5 Geofence Alarm
5.3.6 Speeding Alarm
6 Operate………………………………………………………………………………8
6.1 Device ON/OFF
6.2 Geofence ON/OFF
6.3 SOS
7 Two Location Inquiry Modes .………………………………………………………8
7.1 Change the Inquiry mode
7.2 In NORMAL mode
7.3 In GOOGLEMAP mode
8 Inquire about and Set up working status……… ………………………………….. ..9
8.1 Establish & Change the SET
8.2 Inquire about the working status
8.3 Set up the working status
8.4 Restore the default value
9 Check the IMEI Code ………………………………………………………………12
10 View Real Location………….………………………………………………………12
11 Troubleshooting……………………………………………………………………...13
12 GPRS setup…………………………………………………………………………..13
12.1 IP setting
12.1.1 Router
12.1.2 Modem
12.2 Settings on the mobile phone
12.2.1 GPRS activation
12.2.2 APN setting
12.2.3 APN checking
12.3 Software installation and setting
12.3.1 Software installation
12.3.2 Software setting
13 Troubleshooting……………………………………………………………………….19
14 Worldwide APN (Access Point Name) List…………………………………………...20
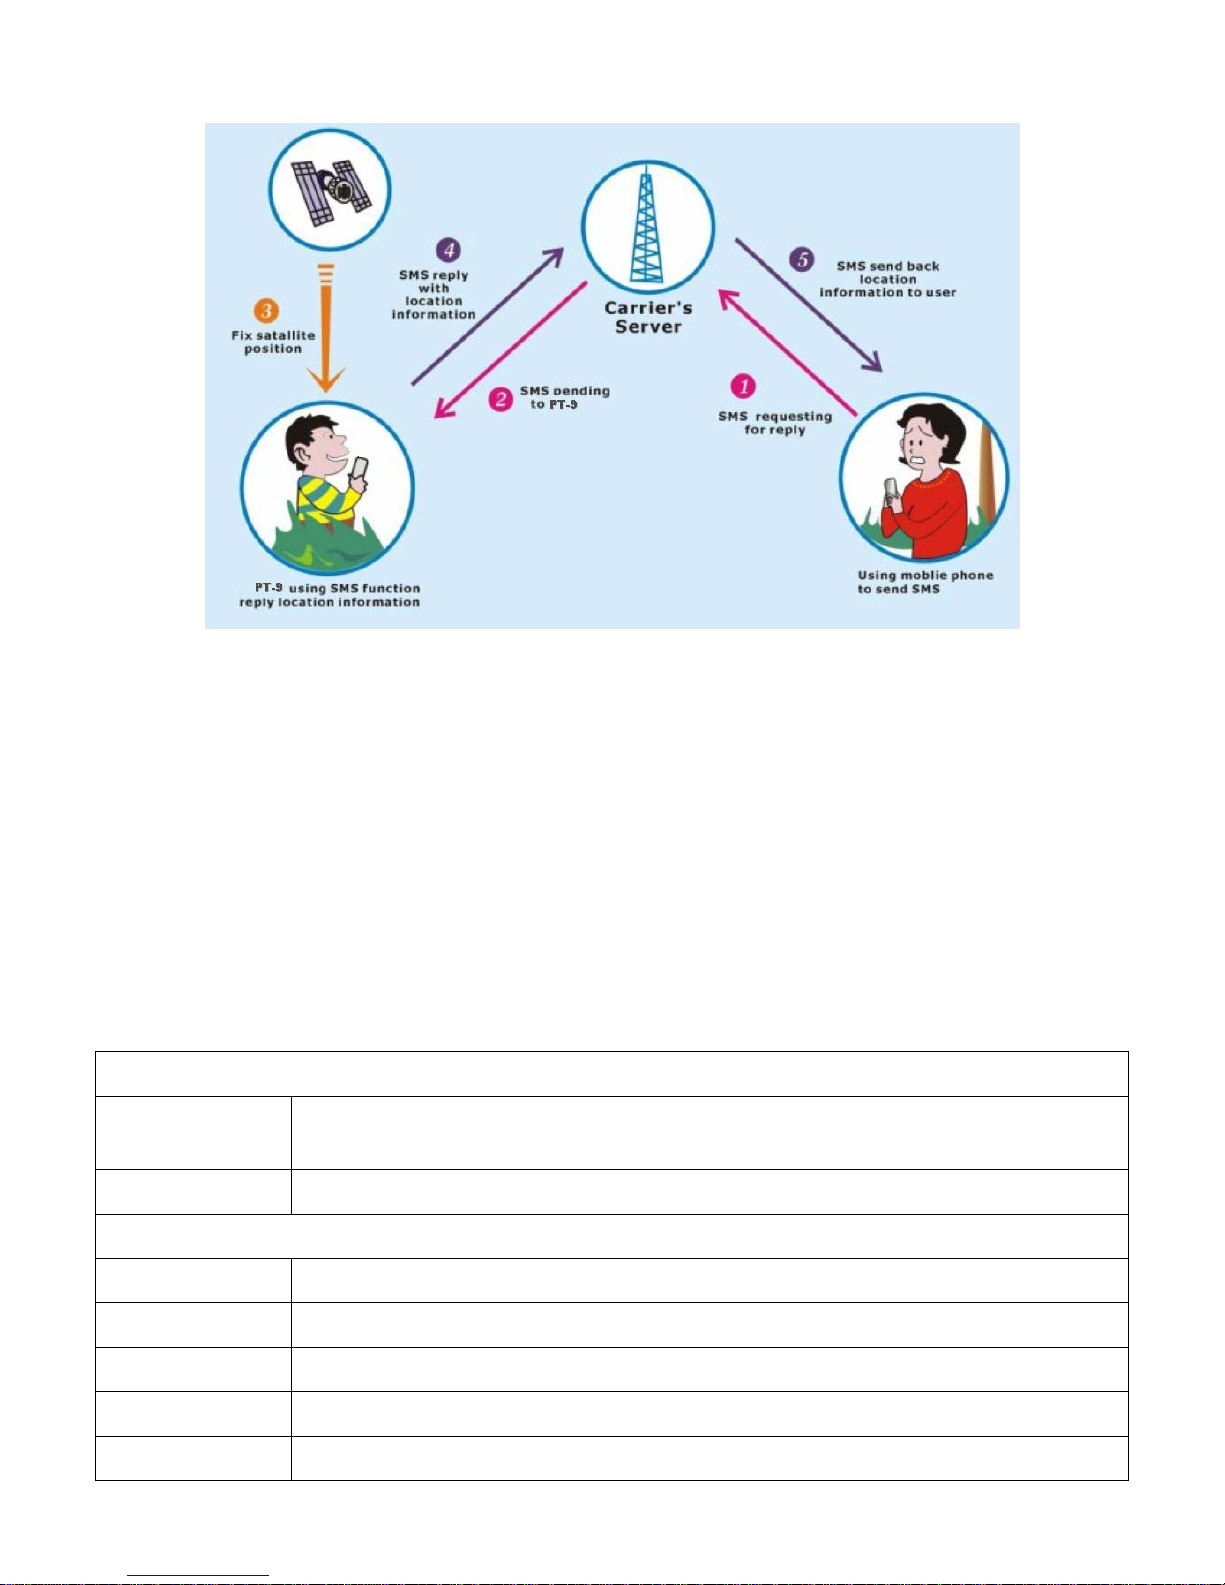
1 How does PT-9 work?
2 Notes and Cautions
2.1 GSM/GPRS network connection will determine the performance of the device.
2.2 The satellite signal will be blanketed by cement and metallic material, and it’s recommended to use it in an open field.
2.3 To keep the best connection, please make sure the GPS antenna looks skywards.
2.4 Do make sure there is no any text message in the SIM card.
2.5 Do make sure the PIN code is deactivated.
2.6 Don’t let the device run at or above 50 degrees by, such as, exposing the device under the sunshine for a long time, for
safety consideration.
2.7 Put it in a covert place if using it for anti-theft.
2.8 Risk of explosion may exist, if the battery is replaced by an incorrect type.
2.9 Disposal of used battery should comply with the legal instructions.
3 Specification
GSM/GPRS
GSM/GPRS
module
Sincom300 Tri-Band GSM module (GSM900/1800/1900MHz)
GSM Antenna Build-in
GPS
GPS module SRIF III 20 channels
Protocol NMEA-0183 compliant protocol
GPS Antenna Build-in active high sensitivity antenna
Accuracy 1-5m
Update rate 1 HZ
3
Start time Cold start: 42s
Warm start: 35s
Hot start : 1s
Electrical
Operating
Voltage
3.3V
Charge voltage 4.5~5V
Standby 15mA
Operating 80mA
Battery Li-ion 1100mAh
other
Size 68mm*47mm*27mm
Weight 55g(including battery)
4 Get Started
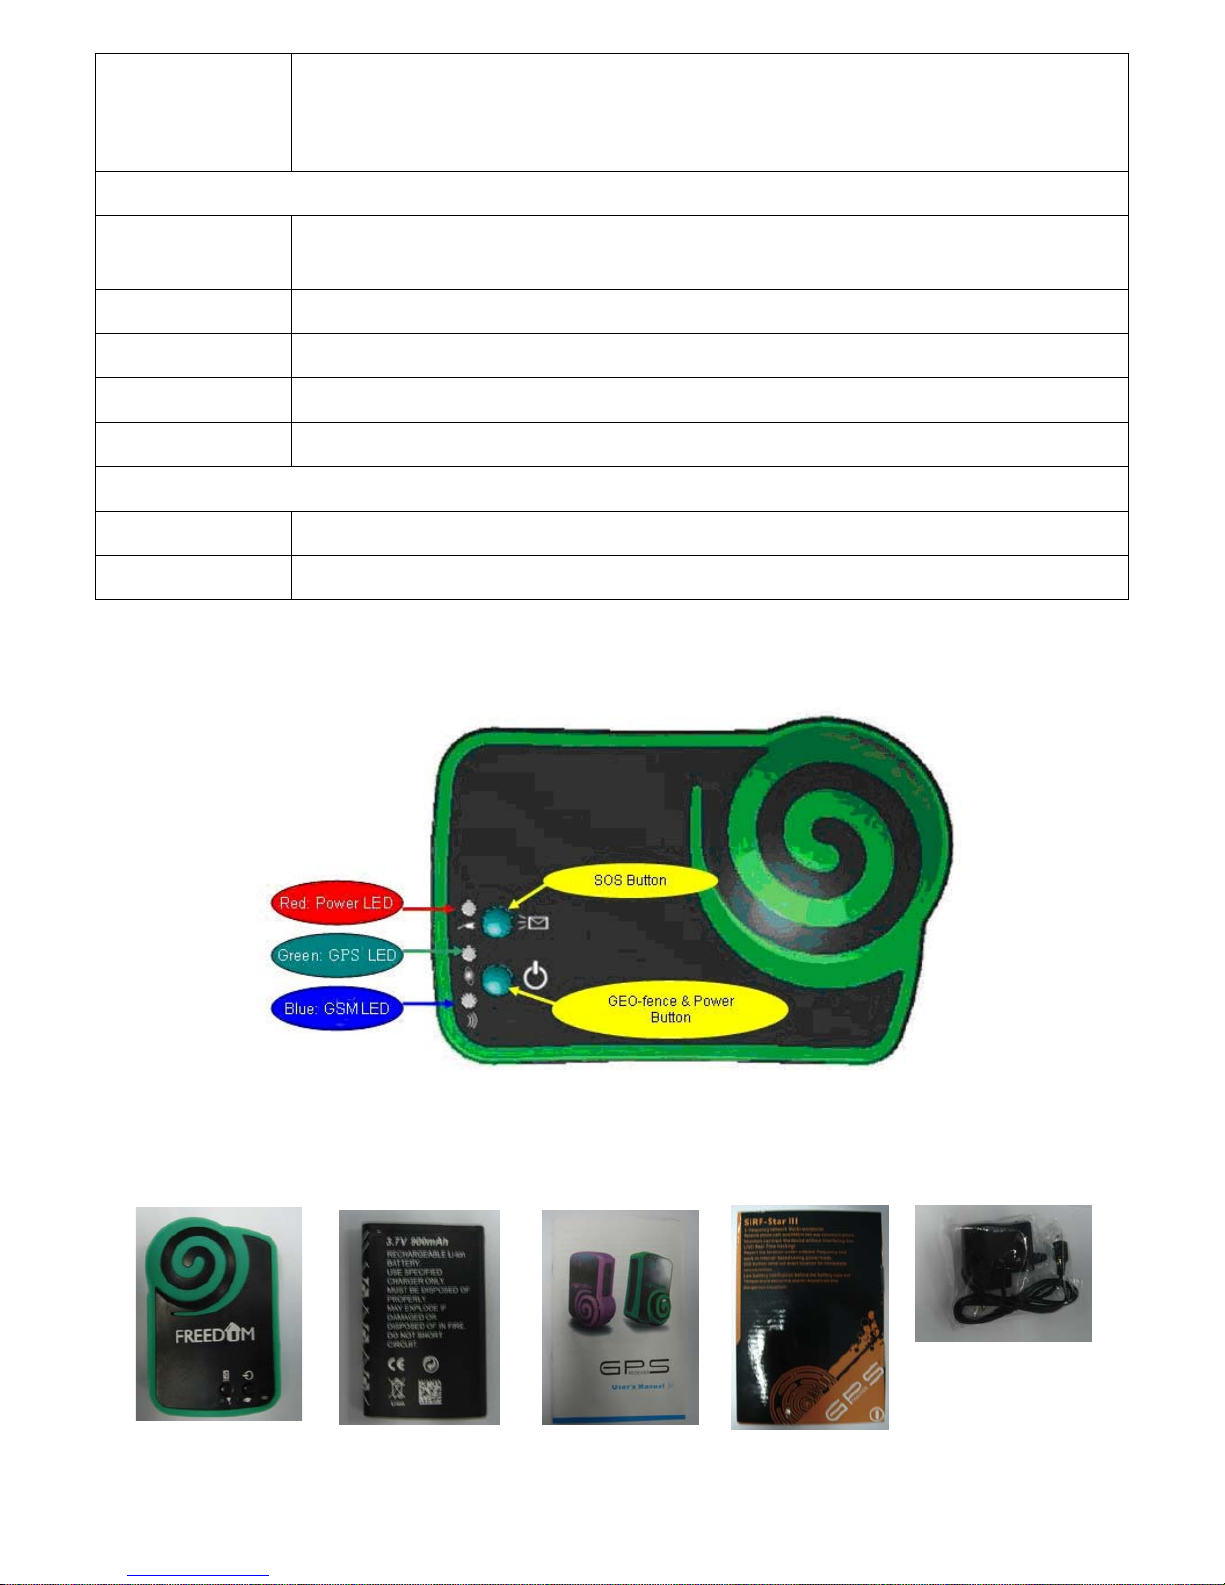
4.1 Accessories
User manual
PT-9 900mAhLi-ionBattery
Package
Charger
4
4.2 Battery Charging
1. It takes at least 4 hours to charge the battery fully. Please power off the device to charge.
2. Connect the charger to a power supply
3. The yellow LED will turn off when the battery is fully charged, then disconnect the power supply.
From here, you can charge the
battery.
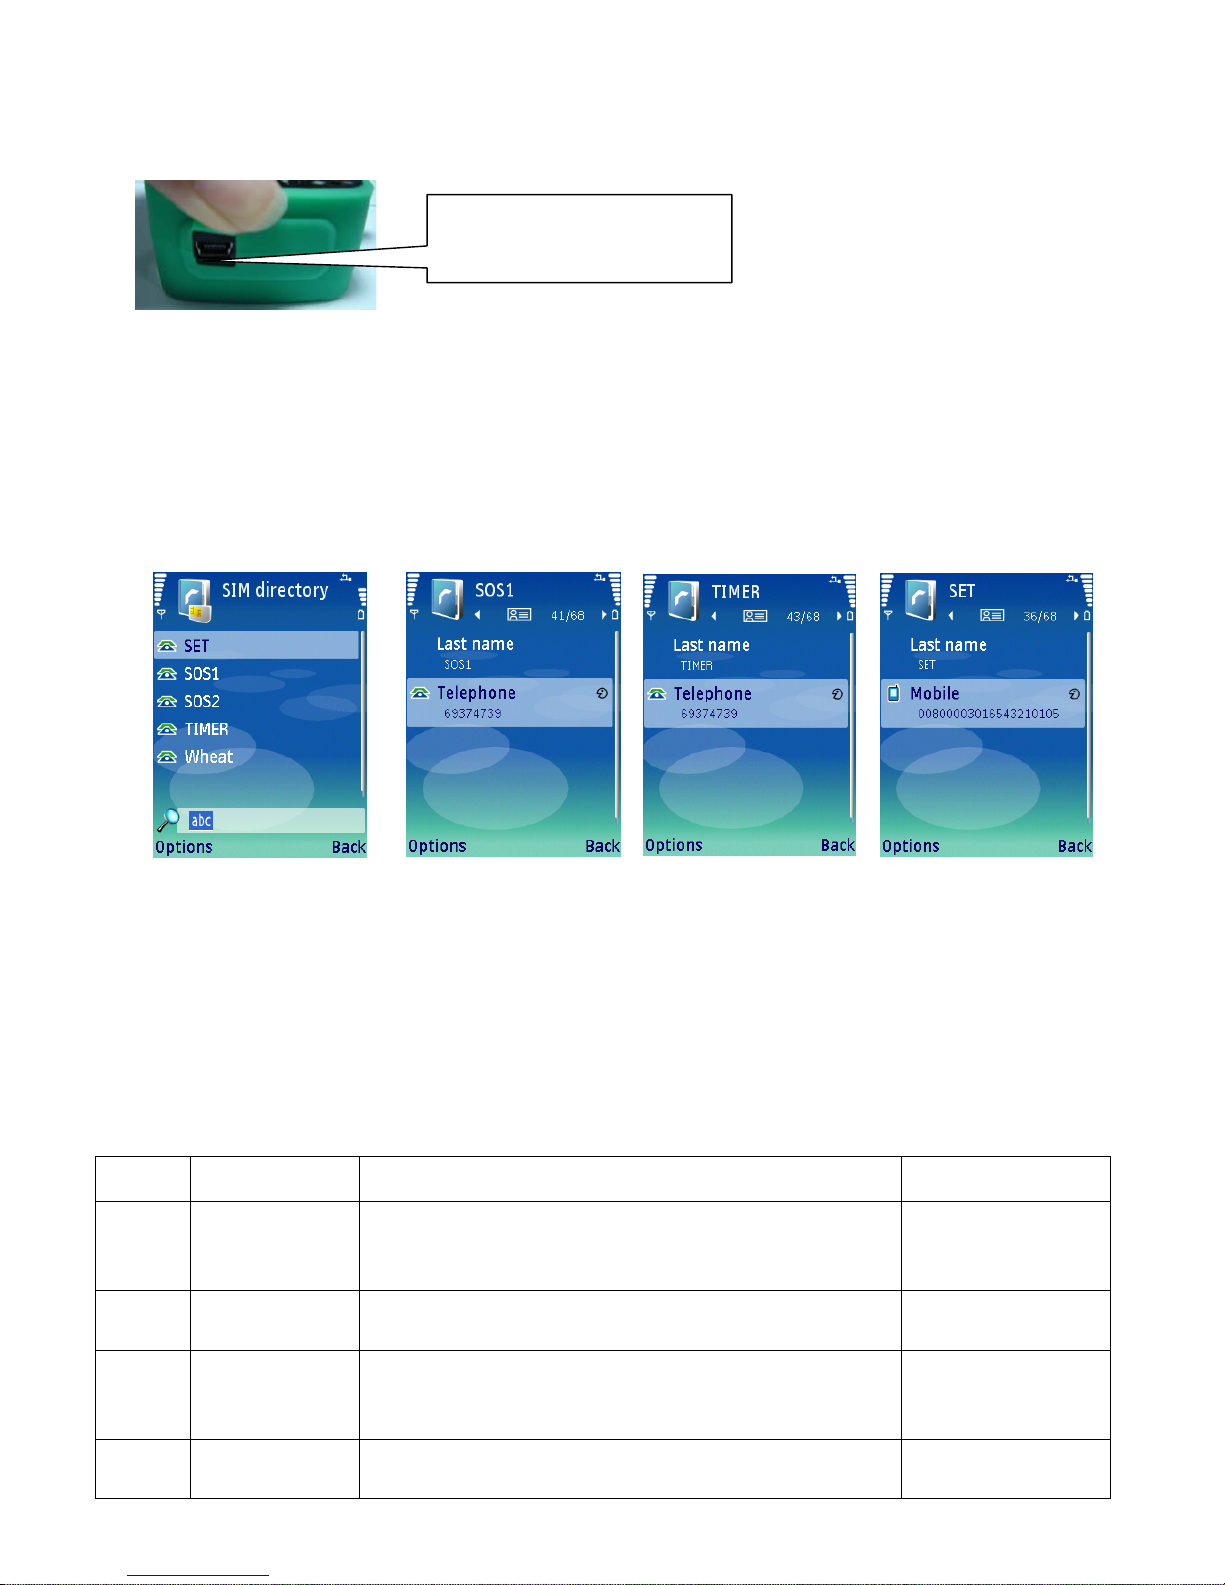
4.3 Insert the SIM card
1. Press the battery cover, and then pull it downward to open it.
2. Remove the battery
3. Insert the SIM card into the holder according to the direction shown and close the holder when done.
4. Put the battery back and close the battery cover
5 Set up
Before using the tracker, please set up the SIM card on your mobile phone first. The settings as below:
5
Phonebook Setting SOS Setting Timer Setting SET Setting
Note: 1.The user at most can set up to 5 SOS numbers, which should be separately named SOS1,SOS2……SOS5 in the SIM
card.
2. The “TIMER” does not receive SMS when the SOS button is pressed. Only SOS numbers are able to receive this
SMS.
3. The “SET” is for Parameters setting. (please refer to the article 5.3)
4. All the settings are in CAPITAL letters.
5.3 Parameters setting
The SIM card of the tracker needs to be setup in the mobile phone first. The device parameter consists of 20 digits. Please store
it as a whole number and in the name of “SET” :
Digit Definition Value& Meaning Default
1-5
Time Zone
GMT+12:00(01200) to
GMT -13:00(11300)
GMT+00:00(00000)
6-7
GPS data timer
00: device always receives GPS data.
01-99: device receives GPS data in every 1 minute to 99 minutes.
00: device always
receives GPS data.
8-9
SMS timer
00: device doesn’t send SMS automatically.
01-99: device automatically sends SMS to mobile phone in every
1 minute to 99 minutes
00: device doesn’t send
SMS automatically.
10
Temperature
0: device doesn’t check the temperature.
1-9: device will check the temperature in every 1-9 minutes and
0: device doesn’t check
the temperature.
Alarm
alarm in SMS when the temperature reaches 50 degree.
11-16
Device Password
Set a 6 digits password as from 000000-999999.
000000
17-18
Geofence
“00”-“99”, each number means distance 50 meters, e.g. 2 is 100
meters, it is calculated in progression, say **×50m.
“00”, Geofence doesn’t
work.
19-20
Speeding alarm
“00” to “99”, To take an example: each number means 10km/h;
e.g. 2 is 20km/h, it is calculated in progression, say **×10km/h.
“00”, Speeding alarm
does not work.
For example:
1) 00800: Time zone:GMT+8:00.
2) 00: The tracker keeps receiving GPS signal.
3) 30: The tracker keeps sending a SMS to the TIMER in time interval 30 minutes.
4) 1: The tracker keep checking the temperature every 1minute.
5) 654321: The password is 654321. if the caller’s number is not stored in phonebook, the
password should be typed in to track the device.
6) 01: Geofence is set at 50 m radius range(1×50m).
7) 05: Speeding alarm will work when the speed is over 50km/h (5×10km/h).
5.3.1 Time zone
The device receives the time in Greenwich Mean Time (GMT). For different countries and areas, users should adjust it to local
time by setting as below:
Digit 1 indicates ‘+’ (0) or ‘-’ (1)
Digit 2 and 3 indicates hour difference to GMT.
Digit 4 and 5 indicates minute difference to GMT
Values of time zones are shown as below:
Time Zone Value Time Zone Value Time Zone Value
GMT-12:00 11200 GMT-2:00 10200
GMT+5:45 00545
GMT-11:00 11100
GMT-1:00 10100 GMT+6:00 00600
GMT-10:00 11000
GMT 00000 GMT+6:30 00630
GMT-9:00 10900
GMT+1:00 00100 GMT+7:00 00700
GMT-8:00 10800
GMT+2:00 00200 GMT+8:00 00800
GMT-7:00 10700
GMT+3:00 00300 GMT+9:00 00900
GMT-6:00 10600
GMT+3:30 00330 GMT+9:30 00930
GMT-5:00 10500
GMT+4:00 00400 GMT+10:00 01000
GMT-4:00 10400
GMT+4:30 00430
GMT+11:00 01100
GMT-3:00 10300
GMT+5:00 00500 GMT+12:00 01200
GMT-3:30 10330 GMT+5:30 00530
GMT+13:00 01300
Note: Other input is regarded as the default value (00000).
5.3.2 GPS data timer
For saving battery power, the device can be set to turn on at a predefined interval. It is set as below:
6
“00”: the device turns on and receives GPS data continuously;
“01”-“99”: the device will turn on automatically in every 1-99 minutes.
Note: Other input is regarded as the default value (00).
5.3.3 SMS timer
These two digits determine the interval at which the device sends the SMS automatically.
“00”: the device doesn’t send out SMS automatically;
“01”-“99”: the SMS will be sent in every 1-99 minutes.
Note: Other input is regarded as the default value (00).
5.3.4 Temperature Alarm
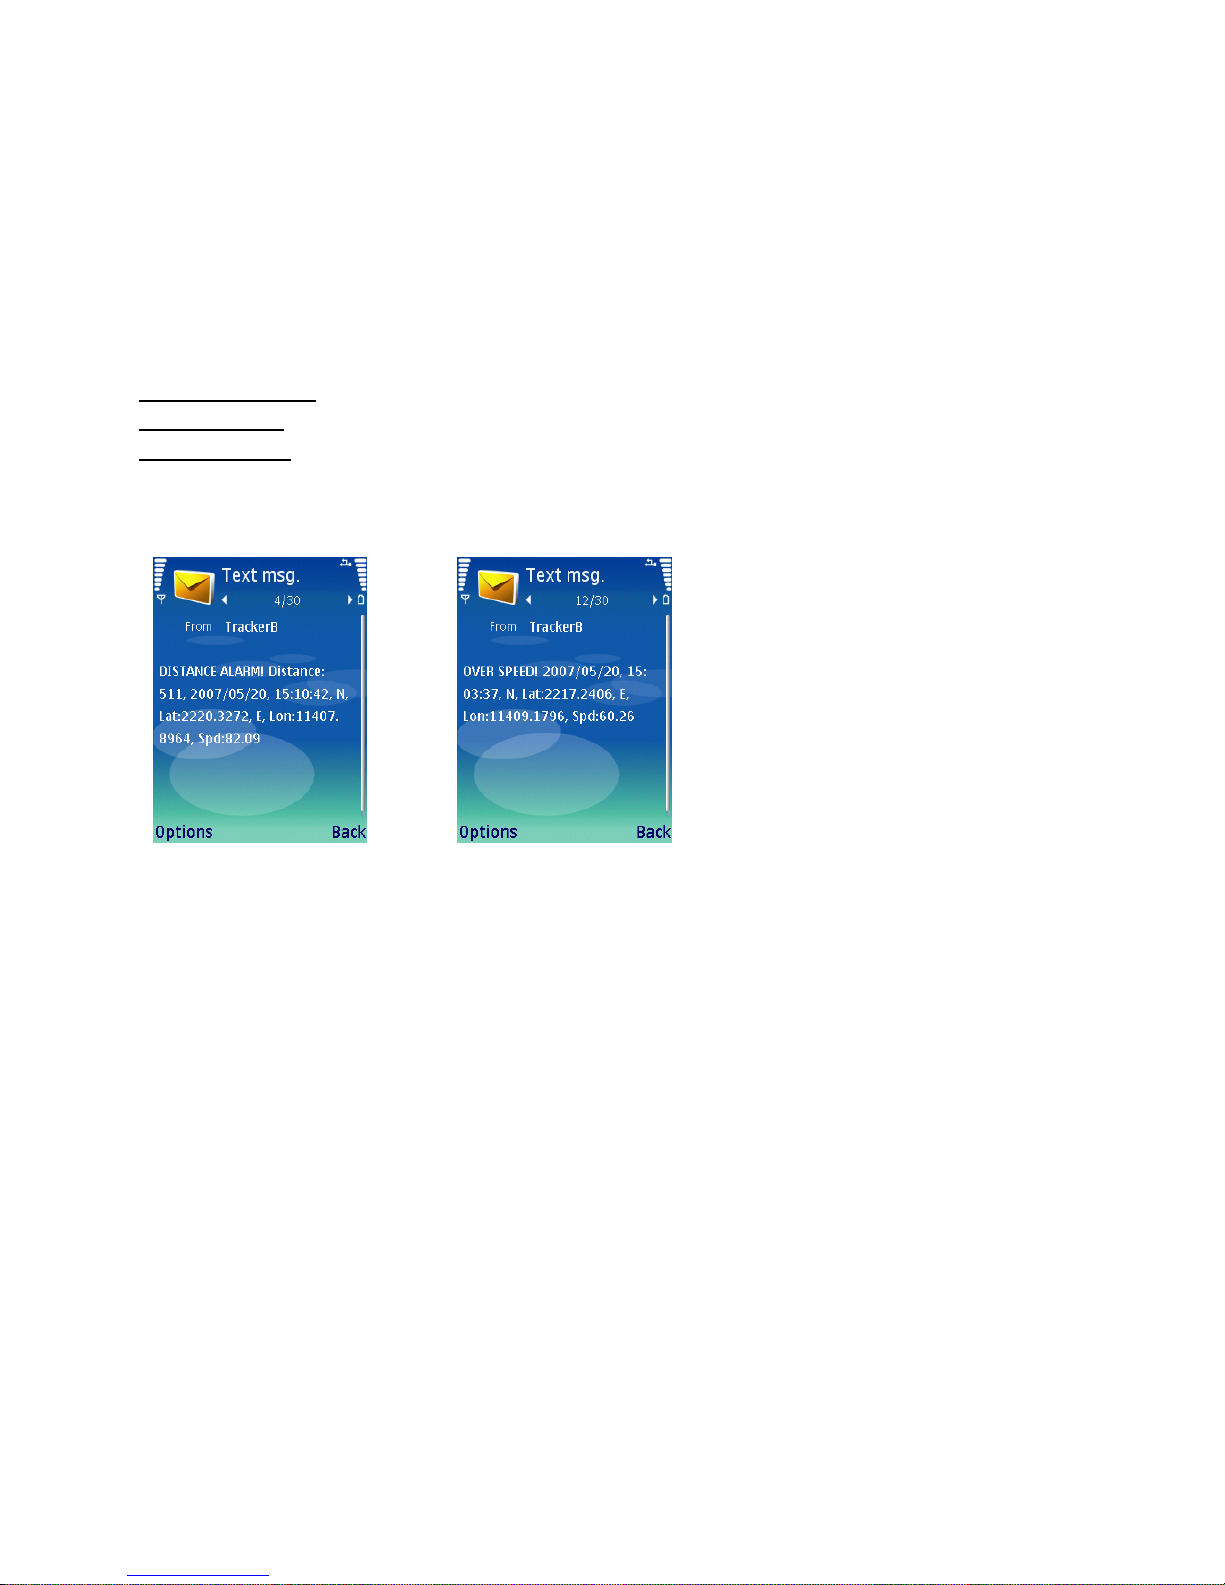
When the device temperature reaches 50 degree, it will send a SMS to SOS numbers as the following format:
Temperature > 60C !
N,Lat:2242.9753,
E,Lon:11349.0237
Note: Set the 10th number for “1-9” : the device will check the temperature in every 1-9 minutes.
5.3.5 Geofence & Speeding Alarm
Notes:
7
1) ONLY when you set GPS data timer at “00”,
the speeding alarm works.
2) Speed alarm & Distance alarm will be sent to
the TIMER.
3) It is recommended that Speeding Alarm is set at
not less than 50km/h for a precise alarm, for below
that rate, it may cause drift or excursion of GPS
signal influenced by clouds etc.
6 Operate
Once the tracker moves
out of the predefined
range, it will warn you up
by two SMS.
Once the tracker moves
exceeding the speed limit,
the device will warn you
up by two SMS.
6.1 Device ON/OFF
Tu r n o n : Press the power button, and then the Red and the Blue LEDs flash quickly and Green LED is on, after the startup
process is completed it will enter the standby mode with the Red and Blue LED flashing slowly and Green LED flashes
slowly.(During the startup, the tracker can not be turned off.)
Turn off: Press the power button for four seconds, and the Red and the Blue LEDs will flash quickly. When both of the LEDs
turn off, the device turns off for sure.
6.2 Geofence ON/OFF
ON
After the PT-9 works normally, double press the power button in 2seconds, then the Red LED will flash quickly. When the Red
LED changes to normally flash, it means that PT-9 has saved your current position. Now Geofence mode is ready, when the
user move out of the range that has preset in the parameters setting the tracker will warn user up by two SMS.
OFF
Double press the power button in 2seconds, and when the Red LED normally flashes, it means Geofence will be closed.
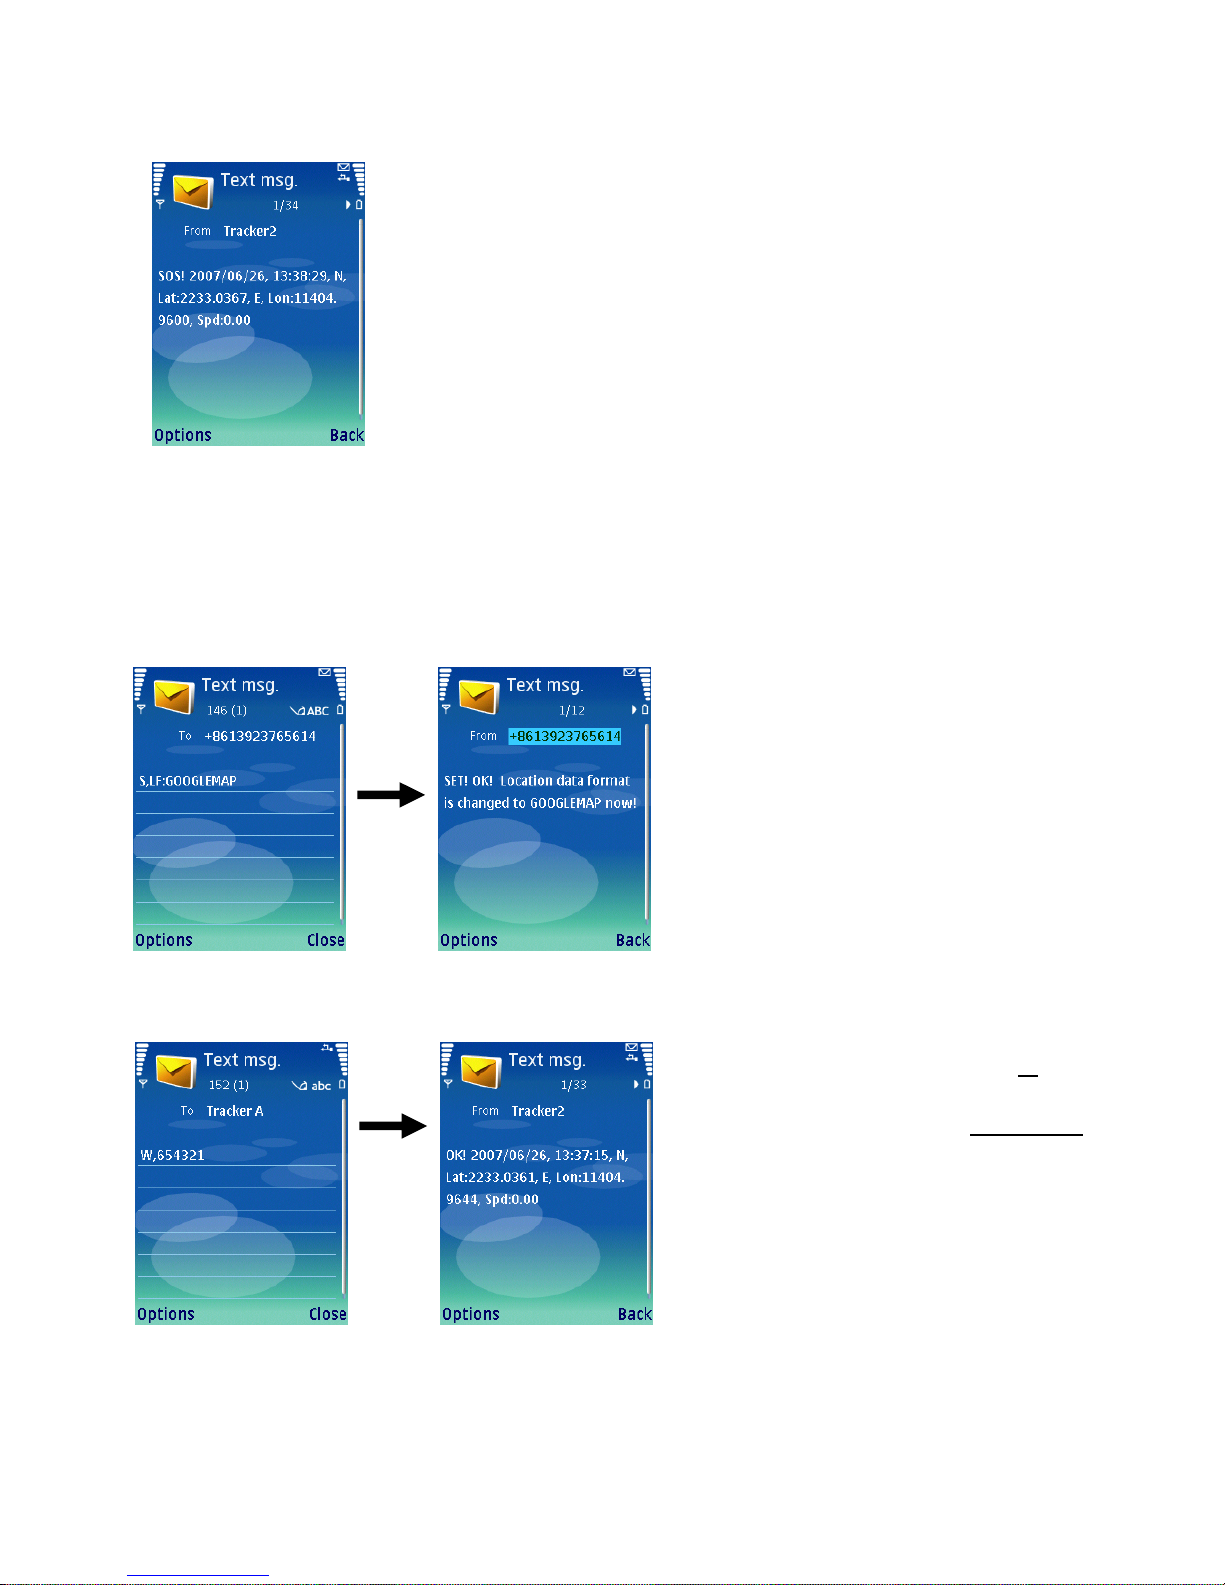
6.3 SOS
8
Press the SOS button for 2 seconds, and PT-9 will send out its location to the SOS
numbers by SMS as shown on the left.
The red LED will flash quickly during and then go out.
7 Two Location Inquiry Modes
There are two inquiry modes:
NORMAL: The user can check the location by coordinates.
GOOGLEMAP: The user can check the real location with a mobile phone, which must be able to browse the internet.
7.1 Change the Inquiry Mode
The user can send a SMS command to change the inquiry mode. The SMS command is as below:
Confirm
7.2 In NORMAL mode
By SMS
The numbers in the phonebook can send “
W” to check
the location, while other numbers not listed in the
phonebook of PT-9 must input “
W+Password” to
check the location.
Reply
 Loading...