

Page 1

8VHU·V*XLGH8VHU·V*XLGH8VHU·V*XLGH8VHU·V*XLGH8VHU·V*XLGH
70
4XDQWXP6XSHU/RDGHU
4XDQWXP6XSHU/RDGHU70
6XSHU/RDGHU
70
2$
Page 2

Quantum SuperLoader 3 User’s Guide, 81-81317-02 A01, September 2005.
Quantum Corporation provides this publication “as is” without warranty of any kind, either express or
implied, including but not limited to the implied warranties of merchantability or fitness for a particular
purpose. Quantum Corporation may revise this publication from time to time without notice.
COPYRIGHT STATEMENT
Copyright 2005 by Quantum Corporation. All rights reserved.
Your right to copy this manual is limited by copyright law. Making copies or adaptations without prior
written authorization of Quantum Corporation is prohibited by law and constitutes a punishable violation of
the law.
TRADEMARK STATEMENT
Quantum, the Quantum logo, and SuperLoader 3 are trademarks of Quantum Corporation, registered in the
U.S.A. and other countries. DLTtape and Super DLTtape are registered trademarks of Quantum Corporation.
Products mentioned herein are for identification purposes only and may be trademarks or registered
trademarks of their respective companies. All other trademarks are the property of their respective owners.
Page 3

Contents
Preface xv
Chapter 1 Introduction 1
Overview............................................................................................................. 1
SuperLoader 3 LTO-2................................................................................. 2
SuperLoader 3 LTO-3................................................................................. 2
SuperLoader 3 VS160 ................................................................................. 3
SuperLoader 3 SDLT600 ............................................................................ 3
Chapter 2 Installation and Configuration 5
Installing the Autoloader.................................................................................. 5
Accessories..........................................................................................................8
Choosing a Location .......................................................................................... 9
Installation Overview.................................................................................6
Installation Preparation .............................................................................7
SCSI Bus Requirements.............................................................................. 7
SuperLoader 3 Autoloader User’s Guide iii
Page 4

Contents
UL Requirements..............................................................................................10
Elevated Operating Ambient Temperature...........................................10
Reduced Air Flow .....................................................................................10
Mechanical Loading..................................................................................10
Overloading the Circuit ...........................................................................10
Reliable Earthing (Grounding)................................................................10
Understanding Autoloader Features.............................................................11
General Features........................................................................................11
Bar Code Reader...............................................................................................11
Product Overview.....................................................................................12
Unpacking the Autoloader .............................................................................14
Identifying Product Components ..................................................................15
Accessories .................................................................................................15
Mounting the Rail Kit ......................................................................................16
Connecting the SCSI and Power Cables........................................................16
Attaching SCSI and Power Cables..........................................................17
Preparing the Host and Verifying the Connection......................................18
Installing the Device Drivers ..........................................................................19
Tape Drive Device Driver ........................................................................19
Autoloader Device Driver........................................................................20
Chapter 3 Operating the Autoloader 23
Operator's Panel Functionality.......................................................................24
Enter Passwords........................................................................................25
Logout.........................................................................................................25
Using Cartridges...............................................................................................26
Insert a Single Cartridge...........................................................................27
Moving a Single Cartridge.......................................................................28
Ejecting a Single Cartridge.......................................................................28
Using Magazines and Magazine Blanks .......................................................30
Ejecting a Magazine ..................................................................................31
Magazine Load/Unload Command.......................................................32
Installing a Magazine................................................................................32
Manually Operating the Magazine.........................................................33
Viewing Status Information............................................................................34
Viewing SuperLoader 3 Autoloader Status...........................................34
Viewing Firmware Version......................................................................35
Viewing Element Status ...........................................................................36
Viewing Tape Drive Status......................................................................37
Viewing Tape Drive Version ...................................................................37
Viewing Ethernet Information ................................................................38
iv SuperLoader 3 Autoloader User’s Guide
Page 5

Contents
Running an Inventory ..................................................................................... 38
Data Compression............................................................................................ 39
Chapter 4 On-board Remote Management 41
On-board Remote Management Overview.................................................. 41
Opening On-board Remote Management............................................. 42
Viewing Status Information .................................................................... 43
Default Username and Password........................................................... 43
Time Display ............................................................................................. 43
Feedback on Pages.................................................................................... 44
Configuration Page.......................................................................................... 44
System Operations Options..................................................................... 44
Updates Page.................................................................................................... 53
Diagnostics Page .............................................................................................. 54
Running Diagnostic Tests........................................................................ 54
Viewing Error or History Logs............................................................... 54
Diagnostics................................................................................................. 55
Identification.............................................................................................. 55
Performing a System Reset...................................................................... 55
Commands Page .............................................................................................. 56
Inventory.................................................................................................... 56
Set to Home ............................................................................................... 56
Sequential Operations.............................................................................. 57
Chapter 5 Administration 59
Administration of the Autoloader................................................................. 59
Configuring the Autoloader........................................................................... 60
Setting the Time................................................................................................ 66
Setting the SCSI ID.................................................................................... 62
Setting Ethernet.........................................................................................62
Setting the IP Address.............................................................................. 63
Setting the Subnet Mask .......................................................................... 64
Setting an IP Gateway .............................................................................. 64
Setting the SNMP Server ......................................................................... 65
Setting the Time Server............................................................................ 66
SuperLoader 3 Autoloader User’s Guide v
Page 6

Contents
Setting the Change Mode ................................................................................68
Sequential Mode Operations ...................................................................69
Setting Security..........................................................................................70
Setting Magazines .....................................................................................70
Setting Passwords .....................................................................................71
Getting Lost Passwords............................................................................72
Chapter 6 Diagnostics 73
POST...................................................................................................................74
Perform a POST.........................................................................................75
Interpret the POST Results ......................................................................75
Diagnostic Tests from the Front Panel ..........................................................75
Setting the Security ...................................................................................76
Stopping a Diagnostic Test ......................................................................76
Front Panel Diagnostic Tests ...................................................................77
On-board Remote Management Diagnostic Tests.......................................78
Diagnostics Using On-board Remote Management ............................79
Chapter 7 Customer Replaceable Units (CRUs) 81
Replacing a Magazine or Magazine Blank ...................................................82
Removing a Magazine..............................................................................82
Removing a Magazine Blank...................................................................83
Reinstalling a Magazine ...........................................................................83
Installing a magazine blank.....................................................................83
Changing the Orientation ........................................................................84
Rack Mounting the Autoloader......................................................................86
General Preparation for Rack Mount Installation................................88
Stationary Rack Mount Installation........................................................88
Installing and Removing the Optional V-Rail Kit .......................................95
Requirements.............................................................................................95
Accessory Pieces........................................................................................97
Installation in a .375 Square Hole Rack..................................................98
Installation in a .280 Diameter Thru Hole Rack....................................99
Installation in a 10-32 Threaded Hole Rack.........................................100
Chassis-Mounted Rails...........................................................................101
vi SuperLoader 3 Autoloader User’s Guide
Page 7

Contents
Chapter 8 Troubleshooting 107
Before Contacting Customer Support......................................................... 107
Returning the Autoloader for Service......................................................... 112
Preparing the Autoloader for Shipment.............................................. 112
Removing the Autoloader from a Rack............................................... 113
Packing the Autoloader ......................................................................... 114
Checking for Errors........................................................................................ 114
Hard Error Log Display.........................................................................123
Error Code Field Description................................................................ 125
Chapter 9 Basic Logs 137
Basic Information Logs.................................................................................. 137
Log Descriptions ............................................................................................138
Autoloader Logs ..................................................................................... 138
Error Codes..................................................................................................... 139
Soft Logs................................................................................................... 143
Update Logs............................................................................................. 143
Shadow Logs ...........................................................................................143
Boot Logs.................................................................................................. 144
OEM Logs ................................................................................................144
ID Logs ..................................................................................................... 144
Tape Drive Logs ............................................................................................. 145
Log Fields................................................................................................. 145
POST Failure Logs .........................................................................................146
Appendix A Specifications 147
Physical Specifications .................................................................................. 148
Autoloader Performance Specifications .....................................................149
Environmental Specifications.......................................................................151
Autoloader Power Specifications ................................................................ 152
Autoloader Vibration Specifications........................................................... 152
Autoloader Shock Specifications .................................................................153
SuperLoader 3 Autoloader User’s Guide vii
Page 8

Contents
Tape Drive Specifications..............................................................................153
LTO-2 Drive Specifications....................................................................153
Media Capacity........................................................................................154
Media Specifications ...............................................................................154
LTO-3 Drive Specifications....................................................................155
Media Capacity........................................................................................155
Media Specifications ...............................................................................155
VS160 Drive Specifications ....................................................................156
Media Capacity........................................................................................157
Media Specifications ...............................................................................157
SDLT600 Drive Specifications ...............................................................158
Media Capacity........................................................................................158
Media Specifications ...............................................................................159
Appendix B Drive Error Logs 161
Tape Drive Error Logs ...................................................................................161
Error Log Display....................................................................................161
SCSI Check Condition Error Logs ........................................................162
Bugcheck Error Logs (SDLT600 only) .........................................................166
Event Error Logs (SDLT600 only) ................................................................168
A500: Hard Read Error...........................................................................169
A501: SDLT Hard Write Error...............................................................171
A502: SDLT Loader Communication Error.........................................173
A503: SDLT Drive Servo Error..............................................................173
A507/A508: Directory Read Failure/Directory Write Failure .........179
Appendix C Regulatory Statements 187
Taiwan Statement...........................................................................................188
Japan Notice ....................................................................................................189
Canadian Notice (Avis Canadien) ...............................................................189
European Union Notice.................................................................................189
Product Safety Electrostatic Discharge .......................................................190
Grounding Methods ......................................................................................191
Disposal of Electrical and Electronic Equipment.......................................192
Glossary 193
viii SuperLoader 3 Autoloader User’s Guide
Page 9

Contents
Index 205
SuperLoader 3 Autoloader User’s Guide ix
Page 10

Contents
x SuperLoader 3 Autoloader User’s Guide
Page 11

Figures
Figure 1 Front Panel Controls .................................................................. 12
Figure 2 Back Panel Overview ................................................................. 13
Figure 3 Accessories .................................................................................. 15
Figure 4 Attaching SCSI and Power Cables........................................... 17
Figure 5 Front Panel .................................................................................. 24
Figure 6 Left and Right Sides of a Magazine ......................................... 30
Figure 7 System Menu Tree...................................................................... 61
Figure 8 Magazine and Blank................................................................... 84
Figure 9 Removing the Screws from the Handle .................................. 85
Figure 10 Clearance Requirements for Rack Mounting .........................87
Figure 11 Required Parts for Installation ................................................. 89
Figure 12 Installing Two Clip Nuts...........................................................90
Figure 13 Attaching Autoloader Brackets................................................ 91
Figure 14 Attaching Support Brackets......................................................92
Figure 15 Sliding Autoloader into Rack ................................................... 93
Figure 16 Front Alignment ......................................................................... 94
Figure 17 Connecting Support Brackets ................................................... 94
SuperLoader 3 Autoloader User’s Guide xi
Page 12

Figures
Figure 18 Left Rail Assembly......................................................................96
Figure 19 Right Rail Assembly...................................................................96
Figure 20 Front Mount Features.................................................................97
Figure 21 Rear Mount Features..................................................................97
Figure 22 Front Cover Plate and 10-32 Nut Plates ..................................98
Figure 23 .375 Square Hole Rack Installation...........................................99
Figure 24 .280 Diameter Thru Hole Rack Installation...........................100
Figure 25 10-32 Threaded Hole Rack Installation..................................101
Figure 26 Chassis Rail Parts......................................................................102
Figure 27 Rail Installed on Chassis..........................................................102
Figure 28 Close up of Chassis Rail...........................................................103
Figure 29 Chassis Mounted in Rack ........................................................104
Figure 30 Back View of Mounted Chassis ..............................................104
Figure 31 Close Up of Back View Chassis ..............................................105
Figure 32 Back View of the Rail After Installation ................................105
Figure 33 Error Log Diagram ...................................................................116
Figure 34 Error Code Bit Descriptions ....................................................126
Figure 35 Error Code Field Descriptions ................................................126
Figure 36 Error Code Listing and Suggested Actions...........................128
Figure 37 Shadow Log Sample.................................................................144
Figure 38 Log Field Descriptions .............................................................145
Figure 39 POST Failures Event Log Sample...........................................146
Figure 40 Hard Read Error/Hard Write Error Block Descriptor........169
Figure 41 Hard Read Error/Hard Write Error Block Descriptor........171
Figure 42 Loader Communication Error Block Description ................173
Figure 43 Drive Servo Error Block Descriptor .......................................174
Figure 44 Directory Read Failure/Write Failure Block Descriptor.....179
xii SuperLoader 3 Autoloader User’s Guide
Page 13

Tables
Table 1 Location Criteria........................................................................... 9
Table 2 Autoloader Status....................................................................... 35
Table 3 Firmware Version Fields ........................................................... 35
Table 4 Drive Status Fields ..................................................................... 37
Table 5 Drive Version Fields .................................................................. 37
Table 6 Ethernet Information Fields...................................................... 38
Table 7 POST Descriptions ..................................................................... 74
Table 8 Probable Cause and Possible Solutions................................. 108
Table 9 Error Codes ............................................................................... 117
Table 10 Hard Error Log Field Descriptions........................................ 125
Table 11 Log Retrieval Methods ............................................................ 138
Table 12 Log Fields ..................................................................................139
Table 13 Error Code Fields ..................................................................... 140
Table 14 POST Failure Specific Fields ................................................... 146
Table 15 Error Log Display Field Descriptions.................................... 162
Table 16 SCSI Check Condition Error Log Field Descriptions.......... 163
Table 17 Sense Key Field Definitions .................................................... 163
SuperLoader 3 Autoloader User’s Guide xiii
Page 14

Tables
Table 18 ASC/ASCQ Field Descriptions ..............................................165
Table 19 Bugcheck Log Field Descriptions...........................................166
Table 20 Error Event Logs Field Descriptions......................................168
Table 21 Hard Read /Hard Write Error Field Descriptions...............169
Table 22 Hard Read Error/Hard Write Error Field Descriptions .....171
Table 23 Loader Communication Error Field Description.................173
Table 24 Drive Servo Error Field Descriptions.....................................174
Table 25 Directory Read/Write Failure Field Descriptions ...............180
xiv SuperLoader 3 Autoloader User’s Guide
Page 15

Preface
Related
Documentation
Documents related to the Quantum SuperLoader 3 are shown below:
Related Quantum Documentation
Document No. Document Title Document Description
81-81313
81-81314
Quantum
SuperLoader 3 Quick
Start Guide
Quantum
SuperLoader 3
Magazine and
Magazine Blank
Removal/
Replacement
This guide contains a
sequence of steps
recommended for unpacking,
installing, and setting up
your autoloader.
This guide contains a
sequence of steps
recommended for removal,
unpacking and installing a
magazine.
0
SuperLoader 3 Autoloader User’s Guide xv
Page 16

Preface
Document No. Document Title Document Description
Notational
Conventions
81-81316
81-81237
Quantum
SuperLoader 3 Rail
Installation Quick
Start Guide
How to Ship the
Quantum
SuperLoader
This guide contains a
sequence of steps
recommended for unpacking
and installing a rail kit.
This guide provides
information on the proper
packing for returning the
autoloader for repair.
This manual uses the following conventions to designate specific
elements:
Note: Notes emphasize important information related to the main
topic.
Caution: Cautions indicate potential hazards to equipment and are
included to prevent damage to equipment.
Warning: Warnings indicate potential hazards to personal safety
and are included to prevent injury.
xvi SuperLoader 3 Autoloader User’s Guide
Page 17

Contact Information
Quantum Corporate Headquarters 0
To order documentation for the Quantum SuperLoader 3 or other
products contact:
Quantum Corporation
141 Innovation
Irvine, CA 92617-3040
(949) 856-7800
(800) 284-5101
Technical Publications 0
Preface
To comment on existing documentation, send e-mail to:
doc-comments@quantum.com
Visit the Quantum home page at: 0
http://www.quantum.com
Quantum Frequently Asked Questions (FAQs) 0
Visit the Quantum Knowledge Base at:
http://www.quantum.com/am/service_support/faqs
SuperLoader 3 Autoloader User’s Guide xvii
Page 18

Preface
Customer Support 0
The Quantum Customer Support Department provides a 24-hour help
desk that can be reached at:
North/South America (949) 725-2100 or
(800) 284-5101
Asia/Pacific Rim (International Code)
+61 7 3839 0988
Europe/Middle East/Africa: (International Code)
+44 (0) 1256 848748
Send faxes for the Customer Support Department to:
North/South America (949) 725-2176
Asia/Pacific Rim (International Code)
+61 7 3839 0955
Europe/Middle East/Africa: (International Code)
+44 (0) 1256 848777
Send e-mail for the Customer Support Department to:
North/South America helpdesk@quantum.com
Asia/Pacific Rim apachelp@quantum.com
Europe/Middle East/Africa: eurohelp@quantum.com
xviii SuperLoader 3 Autoloader User’s Guide
Page 19

Chapter 1
1Introduction
Overview 1
Data backup is essential to protect irreplaceable information. Backing up
data to magnetic tape is an easy, cost-efficient method used by many
small and medium businesses. However, most enterprises have so much
data that a single backup tape is not enough; the information has to be
spread across numerous tapes. To avoid constantly changing tapes
manually, many tape backup systems include a Quantum SuperLoader 3
autoloader.
Each autoloader is a robot that includes a tape drive and one or two
magazines for tape cartridges. The user's application can automatically
load and unload tape cartridges as required for data backup or data
retrieval. Quantum SuperLoader 3 autoloaders provide a compact, high
capacity, but low cost method for simple, unattended data backup.
SuperLoader 3 Autoloader User’s Guide 1
Page 20

Chapter 1 Introduction
Overview
The Quantum SuperLoader 3 contains a Quantum LTO-2 half-height tape
drive, a Quantum LTO-3 tape drive, a Quantum VS160 tape drive, or a
Quantum SDLT600 tape drive, and one or two magazines containing up
to eight cartridges each. A single cartridge can be inserted directly via a
password-protected mailslot. From the mailslot, the cartridge can be
inserted into the tape drive provided there is no cartridge already in the
drive, or you can load the cartridge into a magazine slot provided there is
no cartridge already in the slot.
The front panel on the autoloader includes a liquid crystal display (LCD)
screen and four function keys. A scrolling menu on the LCD screen
allows you to obtain information from the autoloader and enter
commands. The front panel also includes two light emitting diodes
(LEDs) indicating the autoloader's ready status and error status.
The Quantum SuperLoader 3 connects to your host server via a SCSI
connection allowing the host to send data and commands automatically.
You can also connect to the autoloader using an Ethernet connection to
perform administrative functions and download system updates.
SuperLoader 3
LTO-2 1
SuperLoader 3
LTO-3 1
The autoloader is SCSI-3 compatible and operates as a single SCSI ID/
two LUN data storage device. The Quantum SuperLoader 3 LTO-2
autoloader is equipped with a Quantum LTO-2 half-height tape drive
and contains up to sixteen Ultrium 2 data cartridges when utilizing two
magazines, providing a compressed capacity of 6.4 Terabytes and a
sustained data transfer rate of 93.6 GB per hour (native) or as high as
187.2 GB per hour compressed (assuming 2:1 compression).
The autoloader is compatible with the most popular operating systems
and environments supporting a Ultra 160 SCSI-3 LVD interface but
requires direct support from the operating system or a compatible
backup application to take full advantage of its many features.
The autoloader is SCSI-3 compatible and operates as a single SCSI ID/
two LUN data storage device. The Quantum SuperLoader 3 LTO-2
autoloader is equipped with a Quantum LTO-3 tape drive and contains
up to sixteen Ultrium 3 data cartridges when utilizing two magazines,
providing a compressed capacity of 6.4 Terabytes and a sustained data
transfer rate of 245 GB per hour (native) or as high as 490 GB per hour
compressed (assuming 2:1 compression).
2 SuperLoader 3 Autoloader User’s Guide
Page 21

Chapter 1 Introduction
Overview
The autoloader is compatible with the most popular operating systems
and environments supporting a Ultra 160 SCSI-3 LVD interface but
requires direct support from the operating system or a compatible
backup application to take full advantage of its many features.
SuperLoader 3
VS160 1
SuperLoader 3
SDLT600 1
The autoloader is SCSI-3 compatible and operates as a single SCSI ID/
two LUN data storage device. The Quantum SuperLoader 3 VS160
autoloader is equipped with a Quantum VS160 tape drive and contains
up to sixteen Quantum VS1 data cartridges when utilizing two
magazines, providing a compressed capacity of 2560 GB and a sustained
data transfer rate of 28.8 GB per hour (native) or as high as 57.6 GB per
hour compressed (assuming 2:1 compression).
The autoloader is compatible with the most popular operating systems
and environments supporting a SCSI LVD interface but requires direct
support from the operating system or a compatible backup application to
take full advantage of its many features.
The autoloader is SCSI-3 compatible and operates as a single SCSI ID/
two LUN data storage device. The Quantum SuperLoader 3 SDLT600
autoloader is equipped with a Quantum SDLT600 tape drive and
contains up to sixteen SDLT II data cartridges when utilizing two
magazines, providing a compressed capacity of 9.4 Terabytes and a
sustained data transfer rate of 129.6 GB per hour (native) or as high as
259.2 GB per hour compressed (assuming 2:1 compression).
The autoloader is compatible with the most popular operating systems
and environments supporting a 16-bit Ultra 160 SCSI-3 LVD interface but
requires direct support from the operating system or a compatible
backup application to take full advantage of its many features.
SuperLoader 3 Autoloader User’s Guide 3
Page 22

Chapter 1 Introduction
Overview
4 SuperLoader 3 Autoloader User’s Guide
Page 23

Chapter 2
2Installation and Configuration
Installing the Autoloader 2
• Installation Overview
• Installation Preparation
• SCSI Bus Requirements
• Accessories
• Choosing a Location on page 9
• UL Requirements
• Understanding Autoloader Features
• Bar Code Reader
• Product Overview
• Identifying Product Components
SuperLoader 3 Autoloader User’s Guide 5
on page 10
on page 11
on page 12
on page 15
on page 11
Page 24

Chapter 2 Installation and Configuration
Installing the Autoloader
• Connecting the SCSI and Power Cables on page 16
Installation
Overview 2
• Preparing the Host and Verifying the Connection
• Installing the Device Drivers
on page 19
on page 18
Installing the autoloader consists of the following steps, which are
explained in more detail later in this section:
1 Prepare to install your new Quantum SuperLoader 3 autoloader (see
Installation Preparation
).
2 Identifying the proper SCSI bus types (see SCSI Bus Requirements
3 Identify the accessories that come with the autoloader (see
Accessories
on page 15).
4 Install the autoloader in a computer rack or select a table or desktop
near the host server. If installing a rack mount unit, refer to your rack
Installation Guide.
5 Shut down or turn off the server and all devices attached to the server
(see Connecting the SCSI and Power Cables
on page 16).
6 Attach the SCSI cable to the autoloader and server's SCSI host
adapter (see Connecting the SCSI and Power Cables
on page 16).
).
7 Attach the power cable to the autoloader and plug in the power cable
to the nearest power outlet (see Connecting the SCSI and Power
Cables on page 16). Power the autoloader on to ensure it passes the
Power-on Self Test (POST).
8 Set the SCSI ID for the autoloader (see Setting
page 62).
9 Set up the host and verify the connection (see Preparing the Host and
Verifying the Connection on page 18).
Warning: Whenever you power cycle the autoloader, allow 10
seconds before turning the power back on. The power
supply requires at least two to three seconds for the
capacitors to discharge. This ensures a complete system
reset on power down and may avoid system errors.
6 SuperLoader 3 Autoloader User’s Guide
the SCSI ID on
Page 25

Chapter 2 Installation and Configuration
Installing the Autoloader
Installation
Preparation 2
SCSI Bus
Requirements 2
Before you install your new Quantum SuperLoader 3 autoloader, unpack
it carefully and inspect it for any damage that might have occurred
during shipping. The
Quantum SuperLoader 3 Quick Start Guide included in
the packaging describes all the necessary information to unpack and
inspect your autoloader correctly.
Ensure that the work area is free from conditions that could cause
electrostatic discharge (ESD). Discharge static electricity from your body
by touching a known grounded surface, such as your computer's metal
chassis.
There are minor differences between the Quantum SuperLoader 3 LTO-2
and the Quantum SuperLoader 3 VS160/SDLT600 autoloaders.
SuperLoader 3 LTO-2 2
You must connect the Quantum SuperLoader 3 LTO-2 to one of the
following SCSI bus types:
• Ultra2 SCSI Low-voltage Differential (LVD), Single-ended (SE) SCSI
bus
Note: The autoloader is not compatible with a High-voltage
Differential (HVD) SCSI bus.
SuperLoader 3 LTO-3/VS160/SDLT600 2
You must connect the Quantum SuperLoader 3 LTO-3, VS160 or
SDLT600 autoloader to one of the following SCSI bus types:
• Ultra 320 SCSI-3, LVD SE SCSI bus
• Ultra 160 SCSI-3, LVD SE SCSI bus
SuperLoader 3 Autoloader User’s Guide 7
Page 26

Chapter 2 Installation and Configuration
Accessories
General Information 2
Your SCSI host adaptor card must also support the SCSI bus type used to
connect the autoloader. If you use a LVD SCSI bus, use a host adapter
card with a connection for a VHDCI cable.
Note: If you use a single-ended (SE) SCSI bus, the tape drive’s
performance is limited to the maximum data transfer speed of
the bus.
Note: The maximum number of autoloaders supported per SCSI bus
is four.
Note: The autoloader may not work with multiple SCSI LUNS when
attached to a RAID controller. The autoloader is not
recommended for use with a RAID controller. If this problem
occurs, it is recommended that the autoloader be attached to a
separate SCSI bus controller on the host or server.
Accessories 2
The following accessories are shipped with the Quantum SuperLoader 3
autoloader:
• Quantum SuperLoader 3 Quick Start Guide
• SCSI host cable
•SCSI terminator
• Hardware to rack mount the autoloader
• T8 and T10 TORX
• One magazine blank
•Power cable
8 SuperLoader 3 Autoloader User’s Guide
®
L-Key drivers
Page 27

Chapter 2 Installation and Configuration
Choosing a Location
• Documentation CD containing all of the documentation in Adobe®
Portable Document Format (PDF)
•Bar code labels
Choosing a Location 2
Choose a location that meets the following criteria (see table 1
autoloader uses standard rack mounting hardware.
Table 1 Location
Criteria
Criteria Description
Rack requirements Standard 19-inch rack with 2U of clearance.
Room temperature 10–35° C (50–95° F)
Power source AC power voltage: 100–127 VAC; 200–240 VAC
Line frequency: 50–60 Hz
Note: Locate the AC outlet near the autoloader. The AC
power cable is the product’s main disconnect
device and must be easily accessible at all times.
Weight 14.1 kg (31 lb.) unloaded
17.2 kg (38 lb.) loaded with 2 magazines, 16 cartridges
). The
Air Quality Minimize sources of particulate contamination. Avoid
areas near frequently used doors and walkways, cooling or
exhaust vents, stacks of supplies that collect dust, printers,
and smoke-filled rooms.
Caution: Excessive dust and debris can damage tapes
and tape drives.
SuperLoader 3 Autoloader User’s Guide 9
Page 28

Chapter 2 Installation and Configuration
UL Requirements
Criteria Description
Humidity 20–80% RH (non-condensing)
Clearance Back: Minimum of 43.2 cm (17 in.)
Front: Minimum of 68.6 cm (27 in.)
Sides: Minimum of 5.08 cm (2 in.)
UL Requirements 2
Elevated
Operating Ambient
Tempe rat u re 2
Reduced Air Flow 2 Installation of the equipment in a rack should be such that the amount of
Mechanical
Loading 2
Overloading the
Circuit 2
When installed in a closed multi-unit rack assembly, the operating
ambient temperature of the rack environment may be greater than the
room ambient. Therefore, consideration should be given to installing the
equipment in an environment compatible with the manufacturer’s
maximum recommended ambient temperature.
air flow required for safe operation of the equipment is not compromised.
Mounting of the equipment in a rack should be such that a hazardous
condition is not achieved due to uneven mechanical loading.
Consideration should be given to the connection of the equipment to the
supply circuit and the effect that overloading of circuits might have on
overcurrent protection and supply wiring. Appropriate consideration of
equipment nameplate ratings should be used when addressing the
concern.
Reliable Earthing
(Grounding) 2
10 SuperLoader 3 Autoloader User’s Guide
Reliable earthing of rack-mounted equipment should be maintained.
Particular attention should be given to supply connections other than
direct connections to the branch circuit, such as use of power strips.
Page 29

Chapter 2 Installation and Configuration
Understanding Autoloader Features
Understanding Autoloader Features 2
General Features 2 The autoloader is compatible with most operating systems and
environments that support the SCSI interface, but requires either direct
support from the operating system or a compatible backup application to
take full advantage of its many features.
Bar Code Reader 2
The bar code reader is enclosed within the body of the autoloader. The
bar code reader automatically scans each cartridge in the magazine upon
power up, after a reset, after an import or export, or when a re-inventory
command is issued (see Running an Inventory
there is no user interface with the bar code reader via the front panel
operator controls or LCD screen. The information from each label is
stored in memory and available through SCSI and On-board Remote
Management to the computer's operating system or backup application
upon request.
on page 38). Beyond that,
If utilizing the bar code reader, you must apply or slide the bar code
labels into the appropriate slot on the front of each cartridge. The labels
must conform to ANSI/AIM BC1 -1995 Uniform Symbology Specification
Code 39. A set of bar code labels is initially included with the autoloader.
Refer to
code labels.
www.quantum.com for information on obtaining additional bar
SuperLoader 3 Autoloader User’s Guide 11
Page 30
Chapter 2 Installation and Configuration
Bar Code Reader
Product Overview 2
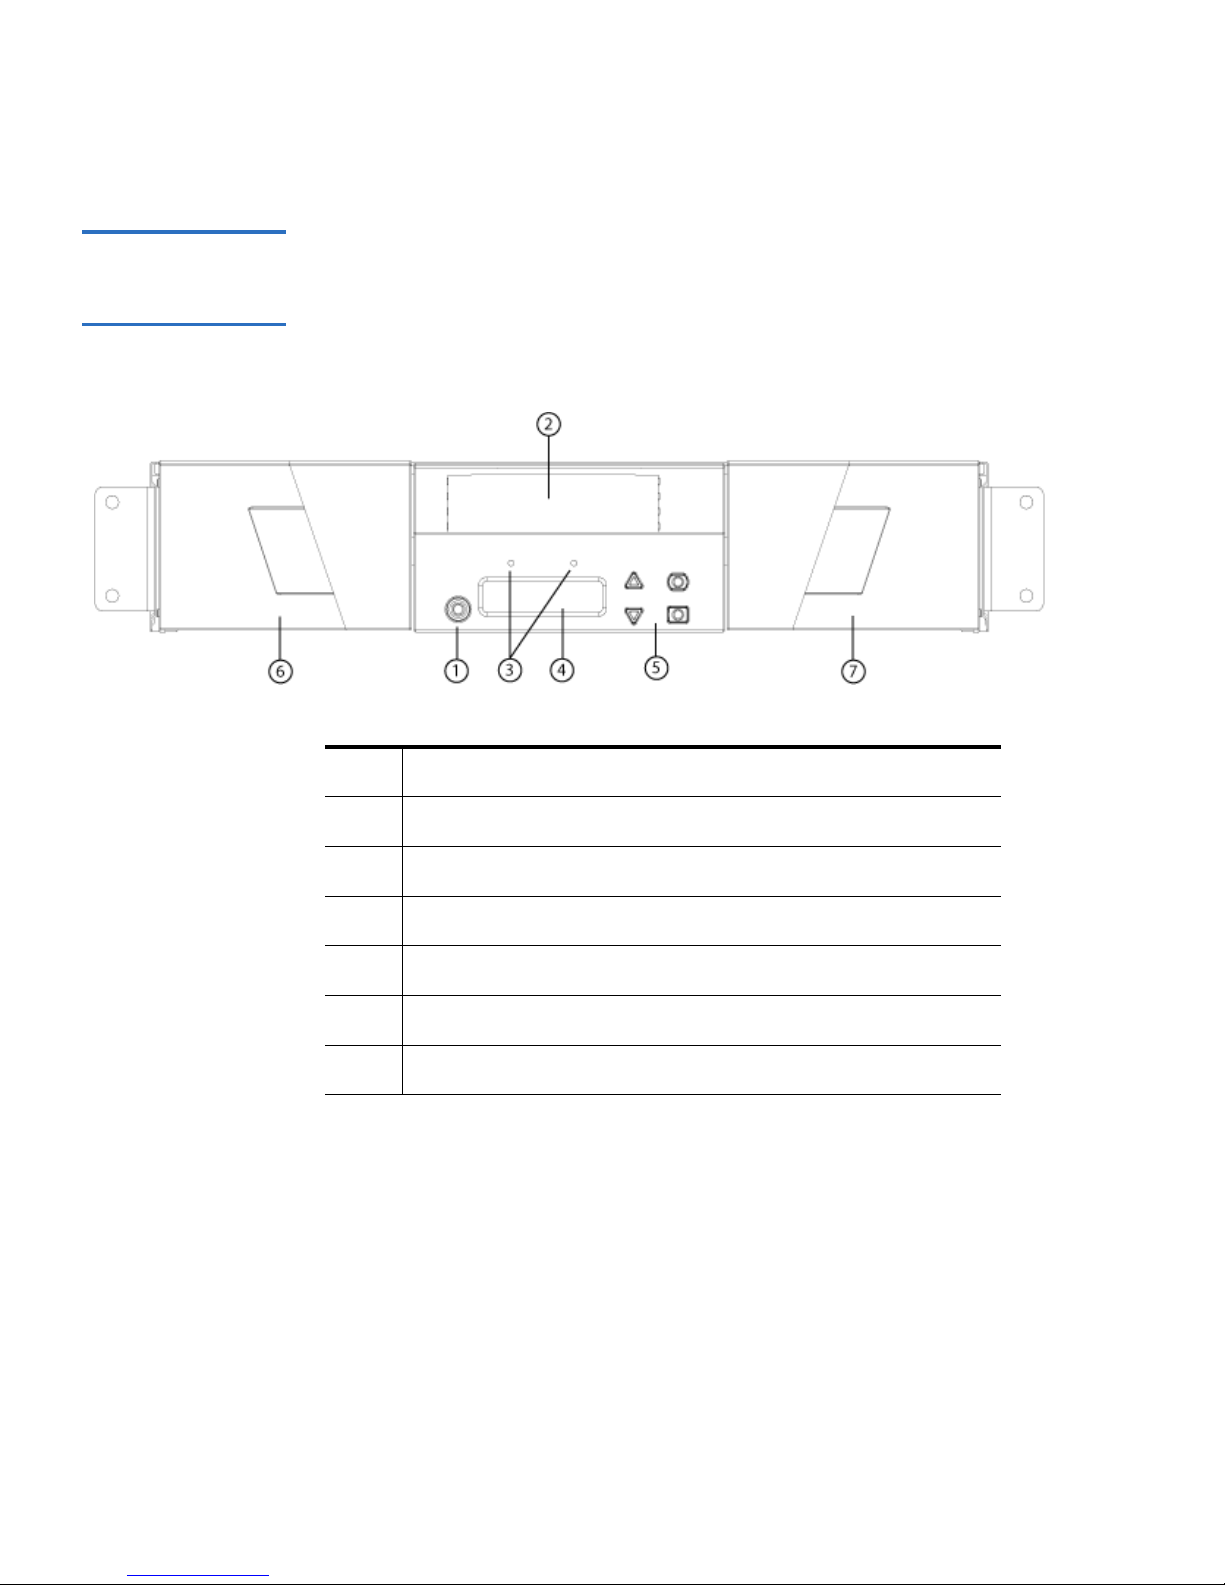
Figure 1 Front Panel
Controls
1Power switch
2 Mailslot
3 Front panel LEDs
4 Front panel LCD screen
5 Function keys
6Left magazine (or blank)
7 Right magazine (or blank)
12 SuperLoader 3 Autoloader User’s Guide
Page 31

Figure 2 Back Panel
Overview
Chapter 2 Installation and Configuration
Bar Code Reader
1 VHDCI SCSI connectors
2Fan vent
3 Power connector
4 Ethernet connector
5Power switch
Note: If the cover must be taken off, there are 26 screws that need to
be removed.
SuperLoader 3 Autoloader User’s Guide 13
Page 32

Chapter 2 Installation and Configuration
Unpacking the Autoloader
Unpacking the Autoloader 2
Before you begin, clear a desk or table so that you can unpack the
autoloader. You also need to select an open 2U computer rack location
near the server that will host the autoloader.
Caution: If the room in which you are working differs from the
temperature in which the autoloader was shipped or
stored by 15° C (30° F) or more, let the autoloader
acclimate to the surrounding environment for at least 12
hours before opening the shipping carton.
Unpack and inspect the autoloader for shipping damage by doing the
following:
1 Clear a table or desk so that you have room to unpack the autoloader.
2 Inspect the shipping box for damage. If you notice any damage,
report it to the shipping company immediately.
3 Open the shipping box and remove the accessories package. Set the
accessories package aside for now.
4 Lift the autoloader and padding out of the box and place it on the
work surface, top facing up. Do not set the autoloader on either end or
sides.
5 Carefully remove the shipping padding from the left and right sides
of the autoloader. Then remove the bag from the autoloader. Save the
packing materials in case you need to move or ship the autoloader in the
future.
14 SuperLoader 3 Autoloader User’s Guide
Page 33

Chapter 2 Installation and Configuration
Identifying Product Components
Identifying Product Components 2
Accessories 2
Figure 3 Accessories
1 SCSI cable
2SCSI terminator
3Power cable
4 Quick Start Guide
5 CD (drivers and documentation)
6 Magazine blank
7Bar code labels
8 TORX T8 and T10 L-key drivers
SuperLoader 3 Autoloader User’s Guide 15
Page 34

Chapter 2 Installation and Configuration
Mounting the Rail Kit
Mounting the Rail Kit 2
For instruction on mounting the autoloader in a standard 19-inch rack,
see I
nstalling and Removing the Optional V-Rail Kit on page 95.
Connecting the SCSI and Power Cables 2
To connect the SCSI and power cables to the autoloader, follow these
steps:
1 Shut down and turn off the selected server. Turn off all attached
accessory devices, such as printers and other SCSI devices.
2 Attach one end of the SCSI cable (included in the accessory kit) to one
of the connectors on the back panel of the autoloader.
3 Attach the other end of the SCSI cable to the connector on the SCSI
host adapter or to the connector on the previous device on the SCSI
bus.
16 SuperLoader 3 Autoloader User’s Guide
Page 35

Attaching SCSI and
Power Cables 2
Figure 4 Attaching
SCSI and Power
Cables
Chapter 2 Installation and Configuration
Connecting the SCSI and Power Cables
3
1
2
1Ethernet cable
2 SCSI cable
3SCSI terminator
If the supplied SCSI cable does not fit the connector on your SCSI host
adapter, you either have an incompatible SCSI host adapter or you need
to purchase a cable adapter. Contact your service representative or your
SCSI host adapter manufacturer for information.
1 Attach the terminator to the remaining SCSI connector on the back
panel of the autoloader (if the autoloader is the last or only device on
the SCSI bus). Otherwise, attach the cable to the next device on the
SCSI bus. Make sure that the last device on the SCSI bus is properly
terminated.
2 Attach the female connector of the power cable to the power
connector on the back panel of the autoloader.
3 Plug in the power cable to the nearest properly grounded power
outlet.
4 Plug in the host server or workstation and all attached devices.
SuperLoader 3 Autoloader User’s Guide 17
Page 36

Chapter 2 Installation and Configuration
Preparing the Host and Verifying the Connection
5 Turn on the autoloader by setting the power switch on the front panel
to the
ON position. Turn on any other devices you turned off earlier.
Check the LCD screen to make sure the autoloader is receiving
power. If it is not, check the power connections and your power
source.
During the Power-on Self Test (POST), both LEDs are illuminated
briefly, followed by only the Ready/Activity LED flashing. When the
initialization sequence is complete, the LCD screen displays the
Home
screen.
6 Turn on the server.
Preparing the Host and Verifying the Connection 2
If necessary, install a SCSI host adapter, software, and compatible drivers.
Refer to the manuals for the host computer and SCSI host adapter for
detailed instructions. In addition, follow these general guidelines:
• When the host server is powered on, install software, and/or drivers
that are compatible with the autoloader (see Installing the Device
Drivers). Software compatibility information is available at
www.quantum.com. Most backup software packages require an
additional module to communicate with the autoloader robotics.
• If the host server is connected to a network, check with the system
administrator before turning off power.
• Use proper procedures to prevent electrostatic discharge (ESD). Use
wrist-grounding straps and anti-static mats when handling internal
components.
• Make sure that the host server has an open expansion slot.
• Make sure that your backup application supports the SCSI host
adapter.
• Depending on the server configuration, you may need to change the
SCSI ID of the autoloader (see Setting
the SCSI ID on page 62).
• Ensure the autoloader is properly terminated. If the autoloader is the
only SCSI device other than the SCSI host adapter on the selected
SCSI bus, it must be terminated. Likewise, if the autoloader is
physically the last SCSI device on the SCSI bus, it must be terminated.
18 SuperLoader 3 Autoloader User’s Guide
Page 37

Chapter 2 Installation and Configuration
Installing the Device Drivers
Only the devices physically at the beginning and end of the SCSI bus
should be terminated. If the host is located at the beginning of the
SCSI bus, the host should already have a terminator installed.
• Verify the connection between the autoloader and host by going to
Settings>Control Panel>System>Hardware>Device Manager>Tape
Drive
and/or Media Changer in Microsoft® Windows® 2000, Microsoft
Windows XP and Windows Server
®
2003. For more information on
verifying the connection of SCSI devices, consult the operating
system documentation.
Installing the Device Drivers 2
There are two device drivers associated with the SuperLoader 3
autoloader. One for the autoloader itself, and a second for the tape drive
within the autoloader.
Tape Drive Device
Driver 2
Note: Device drivers are required if you intend to use the Microsoft
Windows 2000 native backup application. Commercial backup
applications provide all necessary device driver support. Refer
to
www.quantum.com for a list of compatible backup
applications. Please note that Microsoft Windows NT
®
does
not include native support for autoloaders. A backup
application must be used if using the SuperLoader 3
autoloader under Microsoft Windows NT.
Microsoft Windows 2000:
1 Make sure that you are logged on to the host server with
administrator privileges.
2 Download the latest drivers from
service_support/downloads/default.htm. Save the drivers to your host
http://www.quantum.com/am/
computer.
SuperLoader 3 Autoloader User’s Guide 19
Page 38

Chapter 2 Installation and Configuration
Installing the Device Drivers
3 Open the device manager (please refer to your specific OS
documentation for instructions). For example, right-click the
Computer
Device Manager.
My
icon on the Windows desktop, click Manage, and then click
• The drive should be listed under the
QUANTUM [drive] SCSI Sequential Device.
4 Right-click the appropriate listing, click
? Other Devices item as
Uninstall, and then click OK
to confirm that you want to remove the device.
5 Click
Action in the upper-left corner of the Computer Management
dialog box.
6 Click
7 Right-click the appropriate listing and click
8 Select the
9 Click
Scan for Hardware Changes. Windows 2000 now scans for the
SuperLoader 3 drive. The drive appears under
Driver tab.
Update Driver.
? Other Devices again.
Properties.
10 When the Upgrade Device Driver Wizard appears, click
11 Click
12 Scroll down and click
Display a list... and then click Next.
Tape Drive, and then click Next.
13 Select the appropriate directory for your drive.
14 Click the
Quantum SuperLoader 3 [drive] entry, and then click Next.
Next.
Autoloader Device
Driver 2
15 Click
16 Click
17 Click the
Microsoft Windows 2000:
1 Make sure that you are logged on to the host server with
Next to install the driver.
Finish.
Device Properties dialog box.
The drive now appears in
Quantum SuperLoader 3 [drive] and is ready to use.
Device Manager under Tape Drives as a
administrator privileges.
2 Download the latest drivers from
service_support/downloads/default.htm. Save the drivers to your host
http://www.quantum.com/am/
computer.
20 SuperLoader 3 Autoloader User’s Guide
Page 39

Chapter 2 Installation and Configuration
Installing the Device Drivers
3 Right-click the My Computer icon on the Windows desktop, click
Manage, and then click Device Manager.
The autoloader should be listed under
Medium Changer Device
4 Right-click the
Uninstall, and then click OK to confirm that you want to remove the
Unknown Medium Changer Device listing, click
.
Medium Changers as Unknown
device.
5 Click
Action in the upper-left corner of the Computer Management
dialog box.
6 Click
Scan for Hardware Changes.
Windows 2000 now scans for the Quantum SuperLoader 3
Autoloader. The autoloader appears under
7 Right-click the
Properties.
8 Select the
Unknown Medium Changer Device listing and click
Driver tab.
9 When the Upgrade Device Driver Wizard appears, click
10 Click
Display a list... and then click Next.
Medium Changers again.
Next.
11 Browse to the location where the drivers were saved on the host
computer, and then click
OK.
12 Click the
13 Click
14 Click
15 Close the
Quantum SuperLoader 3 Autoloader entry and click Next.
Next again to install the driver.
Finish.
Device Properties dialog box.
The autoloader now appears in
Changers
as a Quantum SuperLoader 3 Autoloader, and is ready to
use.
SuperLoader 3 Autoloader User’s Guide 21
Device Manager under Medium
Page 40

Chapter 2 Installation and Configuration
Installing the Device Drivers
22 SuperLoader 3 Autoloader User’s Guide
Page 41

3Operating the Autoloader
• Operator's Panel Functionality
• Using Cartridges on page 26
Chapter 3
• Using Magazines and Magazine Blanks
• V
iewing Status Information on page 34
• Running an Inventory
• D
ata Compression on page 39
on page 38
on page 30
SuperLoader 3 Autoloader User’s Guide 23
Page 42

Chapter 3 Operating the Autoloader
Operator's Panel Functionality
Operator's Panel Functionality 3
Note: If security is enabled and you try to execute a command
without entering a password, the autoloader displays the
Enter Password screen until you enter a password. Once you
enter a password, the autoloader takes you back to the
command screen that you were at prior to entering the
password.
The Operator's Panel consists of two LEDs, four buttons, and a 2-line by
16-character LCD screen. The Operator's Panel provides everything you
need to monitor autoloader status and to control all of its functions.
Figure 5 Front Panel
1Power switch
2 Front panel LCD screen
3 Front panel LEDs
4 Scroll up button
24 SuperLoader 3 Autoloader User’s Guide
Page 43

Chapter 3 Operating the Autoloader
Operator's Panel Functionality
5 Scroll down button
6 Escape
7Enter
All the functionality accessed from the scrolling menu is passwordprotected. Two levels of security are built into the menu. The lower-level
security is the operator level and the higher-level security is the
administrator level. There is one password for each level.
The administrator password allows access to all the functionality
available. The operator password allows access to all the functionality in
the
Command and Status submenus.
Enter Passwords 3 Many functions on the autoloader may be password-protected to ensure
data integrity. To access the menu items necessary to execute these
functions, you must first enter your password (see Enter Passwords
on
page 25). All passwords are six numeric digits long.
When you enter a password, all password-protected functionality is
available until you close your browser session. If you do not use the front
panel for a period of time, the main screen reappears on the LCD. When
the main screen reappears, the autoloader has automatically logged you
out. You will have to re-enter your password again to access the menu
functionality.
Logout 3 To logout of the autoloader, use the following procedure.
1 From the main menu, scroll to
2 From the
Enter. Session Complete appears on the LCD.
Commands submenu, scroll to Log Out, and then press
Note: You can also press
Escape as required until the main screen appears.
Commands, and then press Enter.
Escape to log out. Continue pressing
SuperLoader 3 Autoloader User’s Guide 25
Page 44

Chapter 3 Operating the Autoloader
Using Cartridges
Using Cartridges 3
Typically, when you first install the autoloader, you load your cartridges
into the magazines and then load the magazines into the autoloader.
However, you can insert and eject cartridges individually using the
mailslot, or you can eject a magazine, manually load and unload
cartridges, then load the magazine back into the autoloader. The
autoloader automatically detects the presence of a cartridge in the
magazine slot.
Note: On the front panel menu, whenever you see
means the tape enters and leaves the autoloader through the
mailslot. Whenever you see
is loaded into or unloaded from the tape drive.
If you try to perform an illegal operation, the autoloader refuses to
perform the operation. For example, if you try to load a cartridge through
the mailslot to the drive but the drive already contains a cartridge, the
mailslot does not unlock. If you try to unload a cartridge from the drive
while the autoloader is writing to the tape, the command will not be
initiated until the write command is completed.
Caution: If a tape cartridge is holding the mailslot door open on
power up, the robot will not move. The system detects that
the mailslot door is open but cannot detect the presence of
the tape. If the mailslot door is open, the bar code scanner
laser light may shine out the door and potentially cause
physical injury.
With the mailslot door open, do not insert your hand
through the mailslot door. This is to prevent bodily injury
from the robot. Precautions are in place to prevent the
robotic mechanism functioning in this circumstance.
Load or Unload, it means the tape
Enter or Eject, it
26 SuperLoader 3 Autoloader User’s Guide
If the tape cartridge is holding the mailslot door open
during operation, the system keeps track of the tape
movement and continues robotic motion. This can occur if
the robot ejects the cartridge out through the mailslot
door.
Page 45

Chapter 3 Operating the Autoloader
Using Cartridges
Insert a Single
Cartridge 3
When you want to load a single cartridge into the autoloader, you can use
the mailslot. However, if the
Security option is turned on, you have to
enter a valid password to unlock the mailslot before you can load a
cartridge. When you insert a cartridge through the mailslot, you can load
it into the tape drive or store it in a magazine.
To insert a cartridge in the tape drive:
1 From the main menu, scroll to
2 From the
3 From the
Note: After
Commands submenu, scroll to Enter, and then press Enter.
Enter submenu, scroll to To D r ive, and then press Enter.
Load cartridge appears on the LCD, you have 20
Commands, and then press Enter.
seconds to load a cartridge through the mailslot before it
relocks.
Note: For the Quantum SuperLoader 3 autoloader, push in the
cartridge until you meet resistance. The cartridge will be
about 2 inches (5.0 cm) inside the mailslot, and only the
end of the cartridge will be visible through the mailslot.
4 Once you have inserted the cartridge, the prompt
appears. You have 20 seconds to press
Enter in response.
Enter to Continue
Note: If the insert cartridge function fails, the cartridge ejects and
you will have to perform steps 3
and 4 again.
To insert a cartridge in a magazine slot:
1 From the main menu, scroll to
2 From the
3 From the
Commands submenu, scroll to Enter, and then press Enter.
Enter submenu, scroll to To L o c ati o n , and then press Enter.
Commands, and then press Enter.
Scroll through the magazine slots and view their status until you find
the appropriate slot. Slots that are occupied by a data cartridge are
indicated by an asterisk (
*).
4 Scroll to the slot where you want to store the cartridge, and then
press
Enter.
SuperLoader 3 Autoloader User’s Guide 27
Page 46

Chapter 3 Operating the Autoloader
Using Cartridges
After Load cartridge appears on the LCD, you have 20 seconds to load
a cartridge through the mailslot before it relocks. The autoloader
automatically loads the cartridge into the selected slot.
Note: If the load cartridge function fails, the cartridge ejects and
you will have to perform steps 3
and 4 again.
Moving a Single
Cartridge 3
5 Once you have inserted the cartridge, the prompt
appears. You have 20 seconds to press
Enter in response.
Enter to Continue
You can easily move a single cartridge from one location to another
inside the autoloader.
1 From the main menu, scroll to
2 From the
The
Commands submenu, scroll to Move, and then press Enter.
Move screen appears under From:. Scroll to the current location of
Commands, and then press Enter.
the cartridge you want to move. Slots that are occupied by a data
cartridge are indicated by an asterisk (
*).
3 From To:, scroll to the location to which you want to move the
cartridge. Slots that are occupied by a data cartridge are indicated by
an asterisk (
4 Press
Enter.
If you select an empty location,
*). Press Enter.
No Source Element appears on the
LCD. Choose a different location.
If you select a location that is already occupied,
Destination Full
appears on the LCD. Choose a different location.
Ejecting a Single
Cartridge 3
When you want to remove a single cartridge from the autoloader, you
can specify the cartridge you want by bar code or location, or choose the
cartridge currently in the tape drive.
To eject a cartridge by bar code (if you have a bar code reader):
1 From the main menu, scroll to
2 From the
3 From the
press
28 SuperLoader 3 Autoloader User’s Guide
Commands, and then press Enter.
Commands submenu, scroll to Eject, and then press Enter.
Eject submenu, scroll to Tap e , scroll to Mailslot, and then
Enter.
Page 47

Chapter 3 Operating the Autoloader
Using Cartridges
4 Scroll to By Barcode.
A bar code label appears.
5 Scroll to the label that corresponds to the cartridge you want to eject.
Press
Enter.
To eject a cartridge by location:
1 From the main menu, scroll to
2 From the
3 From the
press
4 Scroll to
Commands submenu, scroll to Eject, and then press Enter.
Eject submenu, scroll to Tap e , scroll to Mailslot, and then
Enter.
By Location.
Commands, and then press Enter.
Slots that are occupied by a data cartridge are indicated by an asterisk
(
*). The slot that is occupied by a cleaning tape is indicated with an @
sign, if
Auto Clean is enabled. Scroll to the slot containing the
cartridge you want to eject.
5 Press
Enter.
The cartridge you want is ejected from the mailslot.
To eject a cartridge from the tape drive:
1 From the main menu, scroll to
2 From the
3 From the
4 Scroll to
Commands submenu, scroll to Eject, and then press Enter.
Eject submenu, scroll to Cartridge, and then press Enter.
From Drive, and then press Enter.
Commands, and then press Enter.
The cartridge you want is ejected from the mailslot.
SuperLoader 3 Autoloader User’s Guide 29
Page 48

Chapter 3 Operating the Autoloader
Using Magazines and Magazine Blanks
Using Magazines and Magazine Blanks 3
Figure 6 Left and
Right Sides of a
Magazine
30 SuperLoader 3 Autoloader User’s Guide
Page 49

Chapter 3 Operating the Autoloader
Using Magazines and Magazine Blanks
The autoloader will not run unless both magazine openings are properly
closed. One way that you can close the openings is to use two magazines.
If you use only one magazine, then you must fill the other magazine
opening with a magazine blank for the unit to become operational.
Note: Magazines, magazine blanks, and magazine handles are not
interchangeable between drives types. Please order the
appropriate part numbers when replacing these items.
Ejecting a
Magazine 3
When you want to remove several cartridges at once, eject the
magazine(s) first.
To eject a magazine:
1 From the main menu, scroll to
2 From the
3 On the
then press
Commands submenu, scroll to Eject, and then press Enter.
Eject submenu, scroll to Right Magazine or Left Magazine, and
Enter.
Commands, and then press Enter.
You will hear a distinctive popping sound as the appropriate
magazine is ejected from the autoloader.
ejected
or Right magazine has been ejected appears on the LCD.
Left magazine has been
Note: To prevent damage to the autoloader or the magazine, use
both hands when removing the magazine from the
autoloader supporting the entire length of the magazine.
4 Grasp the magazine by the handle with one hand and slide it out,
supporting it underneath with the other hand.
Note: Once you eject a magazine, you must fully remove it or
fully reinstall it before powering off the autoloader. Before
returning a magazine to the autoloader, manually turn the
wheels on the side of the magazine. If they move freely,
the cartridges are properly seated. If the wheels do not
turn freely, check the cartridges and remove and replace as
needed.
SuperLoader 3 Autoloader User’s Guide 31
Page 50

Chapter 3 Operating the Autoloader
Using Magazines and Magazine Blanks
Magazine Load/
Unload Command 3
Installing a
Magazine 3
When issuing a Load/Unload command to the autoloader, the system
automatically ejects the right-hand magazine. To remove the left-hand
magazine using the Load/Unload command, you must:
1 Remove the right magazine.
2 Replace the right magazine with a magazine blank.
3 Issue the Load/Unload command again. The system will then eject
the left magazine.
4 If you want to have the magazine in the right-hand bay, replace the
magazine blank in the right-hand bay with a cartridge magazine.
To install a magazine into the autoloader, use the following procedure.
1 Grasp the magazine by the handle with one hand and support it
underneath with the other hand.
2 Slide the magazine into the magazine bay until it clicks.
Make sure that you position the magazine correctly. It should slide
into the magazine bay smoothly. If you meet resistance, verify the
orientation of the magazine.
The magazine is correctly installed when you feel it click into place
and the front is flush with the front panel.
Mag Inserted
appears on the LCD. The autoloader automatically
Left Mag Inserted or Right
proceeds to run an inventory.
Note: Be careful not to turn the knob on the side of the magazine
while the magazine is partially inserted into the
autoloader. Doing so may cause damage to the magazine
or the autoloader.
32 SuperLoader 3 Autoloader User’s Guide
Page 51

Chapter 3 Operating the Autoloader
Using Magazines and Magazine Blanks
Manually
Operating the
Magazine 3
The following section describes how to operate a magazine.
There are two knobs located on each end of the magazine. You can move
the slots within the magazine by turning these two knobs and aligning a
slot with one of the two openings. You can use the openings in the
magazine to load and unload cartridges from the eight slots within each
magazine.
Note: It is recommended that you fully remove the magazine to load
and unload cartridges. If the magazine is not fully removed,
do not rotate the magazine.
To load cartridges into a fully ejected magazine:
1 To load cartridges into the magazine, center a slot within one of the
openings located on the side of the magazine.
2 Properly orient the cartridge.
Note: There is a keying feature in each slot that only allows you
to fully insert the cartridge one way.
3 Fully insert the cartridge into the slot.
When pushing the cartridge into the slot, you will feel a small
resistance (detente) until the cartridge is properly latched into the
slot. All forward progress stops when the cartridge is fully inserted.
You can remove a cartridge in the same manner as you insert it. Use the
knobs to center the desired slot(s) in the openings on the side of the
magazine. Using your thumb and index finger, pull out the cartridge.
You will feel a small resistance, but continue to pull the cartridge until it
comes free.
To unload cartridges from a fully ejected magazine:
1 Pull the ejected magazine until the large upper slot is accessible.
2 Rotate the desired slot into position (centered in the opening). Either
load or unload a cartridge to that location. Do not expose more than
the large upper opening when manually operating the magazine.
SuperLoader 3 Autoloader User’s Guide 33
Page 52

Chapter 3 Operating the Autoloader
Viewing Status Information
To identify a slot: 3
Each slot has an identification number that is exposed when the slots are
in the upper section of the magazine. With the magazine removed from
the autoloader, you can see the identification mark on the top side of the
magazine through one of two windows on the upper surface of the
magazine.
Each magazine has a unique identification number indicating whether it
is the right or left magazine. The left magazine will indicate the number 1
and the right magazine will indicate the number 9.
Viewing Status Information 3
From the scrolling menu on the LCD, you can view the autoloader status,
firmware version, element status, tape drive status, tape drive version,
and Ethernet information.
Viewing
SuperLoader 3
Autoloader Status 3
The autoloader status provides information about: whether a magazine is
installed or not, SCSI connection status, Ethernet connection status, and
whether a bar code reader is installed or not.
To view the autoloader status:
1 From the main menu, scroll to
2 From the
3 From the
Status submenu, scroll to Autoloader, and then press Enter.
Autoloader submenu, scroll to Status, and then press Enter.
Status, and then press Enter.
A list of messages similar to the following appears:
34 SuperLoader 3 Autoloader User’s Guide
Page 53

Chapter 3 Operating the Autoloader
Table 2 Autoloader
Status
Status Message Description
Magazines L=* The left magazine is present.
R=* The right magazine is present.
Viewing Status Information
SCSI ID A digit 0 through 7
The assigned SCSI ID for the autoloader.
(default 5)
Mode Random The change mode is set to Random.
SEQUENTIAL The change mode is set to Sequential.
BC Reader Yes or No A bar code reader is present.
Viewing Firmware
Version 3
To view the current firmware version, use the following procedure:
1 From the main menu, scroll to
2 From the
3 From the
Status submenu, scroll to Autoloader, and then press Enter.
Autoloader submenu, scroll to Version, and then press Enter.
Status, and then press Enter.
A list of messages appears on the LCD. The firmware version is listed
as
Firmware: VX.XX where X.XX is the current installed version of the
firmware.
Table 3 Firmware
Version Fields
Field Description
Firmware The number indicates the firmware version.
EDC The number indicates the Error Correction Code that
was generated when the firmware was installed. The
autoloader uses this number to verify that the
firmware and the memory holding the firmware are
good.
SuperLoader 3 Autoloader User’s Guide 35
Page 54

Chapter 3 Operating the Autoloader
Viewing Status Information
Field Description
HW Rev The number indicates the hardware version.
ME Rev The number indicates the mechanical version.
Viewing Element
Status 3
The element status reports the status of the magazine slots. The status
indicates whether a slot contains a cartridge or not, and which slot is
allocated as the cleaning cartridge's slot. To view an element's status:
1 From the main menu, scroll to
2 From the
3 From the
press
4 Press
Status submenu, scroll to Autoloader, and then press Enter.
Autoloader submenu, scroll to Element Status, and then
Enter.
Enter.
Status, and then press Enter.
You can scroll through each of the slots. Slots that are occupied by a
data cartridge are indicated by an asterisk (
*). The empty slot that is
assigned to a cleaning cartridge is indicated with an exclamation
point (
with an ampersand (
!). The slot that is occupied by a cleaning cartridge is indicated
@).
5 Scroll to the slot containing the cartridge for which you want to see
the label, or the cartridge you want to move, and then press
The
Element Status screen appears, displaying the bar code label for
Enter.
that cartridge. A move command also appears on the screen.
Note: The
If you want to move the cartridge, scroll until the location you want
to move to appears under
want to move the cartridge, press
36 SuperLoader 3 Autoloader User’s Guide
Move command appears only if the security is
disabled or if you are logged in as Administrator or
Operator.
To:, and then press Enter. If you do not
Escape.
Page 55

Chapter 3 Operating the Autoloader
Viewing Status Information
Viewing Tape Drive
Status 3
Table 4 Drive Status
Fields
To view the tape drive status, use the following procedure.
1 From the main menu, scroll to
2 From the
3 From the
Status submenu, scroll to Drive, and then press Enter.
Drive submenu, scroll to Status, and then press Enter.
Status, and then press Enter.
A list of messages appears. These messages may include:
Field Description
SCSI ID Indicates the drive’s SCSI ID number.
Loader LUN Indicates the Logical Unit Number (LUN) of the
media changer device.
Compression Indicates whether the tape drive compression is
enabled or disabled.
Drive Tape Indicates whether the tape drive is present or not.
Viewing Tape Drive
Version 3
Table 5 Drive Version
Fields
To view the tape drive version, use the following procedure.
1 From the main menu, scroll to
2 From the
3 From the
Status submenu, scroll to Drive, and then press Enter.
Drive submenu, scroll to Version, and then press Enter.
Status, and then press Enter.
A list of messages appears. These messages may include:
Field Description
Product Type Indicates the type of drive installed.
Version Indicates the version number of the drive.
SuperLoader 3 Autoloader User’s Guide 37
Page 56

Chapter 3 Operating the Autoloader
Running an Inventory
Viewing Ethernet
Information 3
Table 6 Ethernet
Information Fields
To view the Ethernet information, use the following procedure.
1 From the main menu, scroll to
2 From the
Status submenu, scroll to Ethernet, and then press Enter.
Status, and then press Enter.
A list of messages appears. These messages may include:
Field Description
MAC Address Indicates the unique network identifier associated
with the autoloader.
IP Address indicates the static IP address or currently assigned
dynamic IP address. The text
DHCP displays in this
case.
Network Indicates whether the autoloader is connected to the
network or not and at what speed.
Running an Inventory 3
The autoloader automatically runs an inventory whenever you power it
back on or insert a magazine. An inventory checks each magazine slot,
the drive, the picker, and the mailslot to determine if a cartridge is
present. If so, it also reads the bar code label, if available. If you need to
run an inventory in addition to this, you can do so manually.
Note: No bar code labels can be read if there is a tape in the picker.
To perform an inventory manually:
1 From the main menu, scroll to
2 From the
Enter. The autoloader scans the bar codes of all the cartridges present.
38 SuperLoader 3 Autoloader User’s Guide
Commands submenu, scroll to Inventory, and then press
Commands, and then press Enter.
Page 57

Chapter 3 Operating the Autoloader
Data Compression
Data Compression 3
Compressing the data means that the autoloader can write more data to
the same amount of tape. Compression also increases the performance of
the data transfers from or to the SCSI bus. The data compression is drive
dependent and cannot be set from the front panel or On-board Remote
Management. Your backup application package may also have
information on compression. The front panel display will indicate
whether data compression is
Enabled or Disabled.
SuperLoader 3 Autoloader User’s Guide 39
Page 58

Chapter 3 Operating the Autoloader
Data Compression
40 SuperLoader 3 Autoloader User’s Guide
Page 59

4On-board Remote
Management
• On-board Remote Management Overview
• Configuration Page
• Updates Page on page 53
• D
iagnostics Page on page 54
Chapter 4
• Commands P
age on page 56
On-board Remote Management Overview 4
Your Quantum SuperLoader 3 autoloader firmware includes an Ethernet
interface to allow remote administration of the autoloader. The interface,
called the On-board Remote Management, includes a Web server that
provides a Hypertext Markup Language (HTML)-based graphic user
interface (GUI) for ease of use.
Many of the operations that you perform from the front panel, you can
also perform remotely using On-board Remote Management. These
functions include moving tapes, sequential operations, system operations
SuperLoader 3 Autoloader User’s Guide 41
Page 60

Chapter 4 On-board Remote Management
On-board Remote Management Overview
options, networking options, security options, running diagnostic tests,
and performing system updates.
Opening On-board
Remote
Management 4
Note: Only use the
Diagnostic command when the autoloader is
known to be idle and unavailable to host backup/restore
applications. Use of the
Diagnostic commands from On-board
Remote Management should not be issued while the
autoloader is being used by host applications. The autoloader
will recognize when the drive or autoloader is executing host
commands and will respond appropriately to prevent
application failures. A
Diagnostic command being issued
between host application commands may not be recognized
resulting in a failed application, such as a failed backup/
restore job.
Note: To log out of the system, you must close your browser to end
the session.
On-board Remote Management has an HTML interface, which means
you use a browser to open it. The following Web browsers are supported:
• For Microsoft Windows—Microsoft Internet Explorer 5.5 or later
• For Microsoft Windows 2003—Microsoft Internet Explorer 6.0 or later
(with latest security patches)
•For Redhat
®
2.1—Mozilla™ 1.4.2
• Firefox™ 1.0
You need an operator password to access the
need an administrator password to access the
and
Updates pages.
To open On-board Remote Management:
1 From your computer, open your Web browser.
2 In the browser's address field, enter the IP address for your
autoloader (see Viewing Ethernet Information
42 SuperLoader 3 Autoloader User’s Guide
Commands page, and you
Configuration, Diagnostics,
on page 38).
Page 61

Chapter 4 On-board Remote Management
On-board Remote Management Overview
The Home page appears in your browser window.
Note: When using the On-board Remote Management page with
Microsoft Internet Explorer, be sure to enable the
META REFRESH
option.
Allow
On Internet Explorer version 6.0, this feature is controlled
through the
the
Security tab.
Tools>Internet Options menu selection under
Viewing Status
Information 4
Default Username
and Password 4
Status information appears on the right-hand side of the Home page and
every page of On-board Remote Management except for the
Updates
page. The status information is updated automatically every 60 seconds.
Changes to the status appear in the status window update, but may take
approximately 60 seconds to refresh. You can also click
Refresh Status to
get an immediate update of the system.
The menu headings also appear at the top of every page. To access the
functionality under the menu heading, click the specific menu heading.
The first time that you connect, On-board Remote Management prompts
you for your username and password, then displays the opening page for
that menu.
The default username for On-board Remote Management is guest. The
default password is
guest.
The username and password are case sensitive and should be entered in
all lower case letters. The default username and password are valid if no
usernames have been configured.
Time Display 4 The time displayed is either regular time or power-on time. Regular time
is Month/Date/Year time, such as
Power On Cycles (POC)/Power On Hours (POH), such as
POH:00002:07:45
• POC (5-digit number) is the number of times the system has booted
• POH is the number of hours, minutes, and seconds that the system
Nov/21/2004 19:28. Power-on time is
POC:00121,
.
since it was manufactured.
has been on since the current boot occurred.
SuperLoader 3 Autoloader User’s Guide 43
Page 62

Chapter 4 On-board Remote Management
Configuration Page
Feedback on
Pages 4
If there is feedback from the system when you submit a request, the
feedback appears beneath the
submit button. In some cases, you may
have to scroll to see the feedback information.
Configuration Page 4
The
Configuration page includes a submenu on the left-hand side of the
System
Operations
Options 4
page. You can set the
options from this page.
The options listed under System Operations include SCSI ID, Mode,
Compression, Cleaning Tape, Magazines, and System Time.
SCSI ID 4
System Operations, Networking, and Security
You can change the drive's SCSI ID from On-board Remote Management.
To change the SCSI ID:
1 From any page, click the
Configuration heading. The Configuration
screen displays.
2 Under
System Operations, select SCSI ID.
3 Click the drop-down box to select a number to assign for the new
SCSI ID.
4 Click
submit.
Note: You must perform a system reset before the new SCSI ID
takes effect, or you can use the front panel to power cycle
your machine.
Mode 4
You can set the autoloader to either
change mode is
Random.
Random or Sequential. The default
44 SuperLoader 3 Autoloader User’s Guide
Page 63

Chapter 4 On-board Remote Management
Configuration Page
In Random mode, you (or the backup software) can specify which
cartridge you want to use and where you want it to go. You will probably
use this mode the most.
The
Sequential mode supports certain backup applications that do not
manage media. During backup, when one cartridge is read or written to
the end of the tape, the autoloader automatically returns that cartridge to
its slot and loads the cartridge from the next higher numbered slot to the
tape drive to be read or written to. This continues until the backup
software stops accessing the drive or until all the cartridges have been
sequentially accessed. The autoloader does not move the media until the
host requests the tape drive to unload the tape via a SCSI unload
command.
Note: In
Sequential mode, the medium changer does not appear in
the
Device Manager. The medium changer will reappear in
Device Manager if you return the system to Random mode. This
is to allow for operating systems that do not support multiple
LUNS.
In
Sequential Cycle mode, which is an option of the Sequential mode, the
autoloader automatically starts over with magazine slot 1 when the last
cartridge is used (slot 16 or highest filled slot). If this change mode is not
set, the autoloader stops when the last cartridge available has been used.
In
Sequential Cycle mode, the autoloader continues to cycle until a user
stops it.
To set the
1 From any page, click the
Mode:
Configuration heading. The Configuration
screen displays.
2 In the
change the mode, select a different option. The
box is ignored if
3 Click
Mode section of the page, the current mode is marked. To
Sequential Cycle check
Sequential mode is not selected.
submit.
Note: You must perform a system reset before the new mode
takes effect, or you can use the front panel to power cycle
your machine.
SuperLoader 3 Autoloader User’s Guide 45
Page 64

Chapter 4 On-board Remote Management
Configuration Page
Compression 4
For the Quantum SuperLoader 3 autoloader, data compression is drivedependent. The front panel and On-board Remote Management will
display whether or not compression is enabled.
Compressing the data means that the drive can write more data to the
same amount of tape. Compression also increases the performance of the
data transfers from or to the SCSI bus.
Note: Compression cannot be changed from the front panel or On-
board Remote Management of the autoloader.
To view the compression setting:
From any page, click the
displays. Under the
setting is displayed as
Configuration heading. The Configuration screen
Compression heading, the current compression
Compression Enabled or Compression Disabled.
Cleaning Tape 4
To enable or disable the
Auto Clean function, you must also designate a
full slot for the cleaning tape cartridge. If a slot has not been designated,
the box displays None. To designate the cleaning tape slot:
1 Load a cleaning tape into an empty slot using the
2 Enable or disable
Note: If
Auto Clean is disabled, the cleaning tape will
Auto Clean by selecting the check box.
Commands page.
automatically be ejected via the mailslot. Cleaning is
managed by the backup package you have installed
instead.
To set
Auto Clean:
1 From any page, click the
Configuration heading. The Configuration
screen displays.
46 SuperLoader 3 Autoloader User’s Guide
Page 65

2 Scroll to Cleaning Tape.
Chapter 4 On-board Remote Management
Configuration Page
If a check mark appears in the box next to
enabled. To disable
Auto Clean, click the box to remove the check
mark. If no check mark appears in the box next to
option is disabled. To enable
Auto Clean, click the box to enter a check
Auto Clean, the option is
Auto Clean, the
mark.
3 In the
where you installed the cleaning tape. If
Cleaning Tape Location field, select the appropriate slot location
Auto Clean is disabled,
cleaning is managed by the backup package you have installed
instead.
4 Click
submit.
Setting the Magazines 4
This setting is used to report the number of storage elements and the
element address to the SCSI host. This setting must match the physical
configuration in order for correct information to be reported. This setting
only affects the information reported to the SCSI host. This setting does
not affect the access to magazine slots from the front panel or On-board
Remote Management. Those interfaces are based on the physical
configuration.
When configured for
Both magazines, the autoloader always reports 16
storage elements to the SCSI host. This allows the removal and
reinstallation of magazines without affecting what is reported to the host.
When configured for
Left or Right, the autoloader will always report eight
storage elements to the SCSI host.
The element addresses vary depending on which magazine is configured.
If
Left or Right is selected, and both magazines are physically installed,
the front panel and On-board Remote Management allow the user access
to the other magazine, but the SCSI host will not have access.
To set the
1 From any page, click the
Magazines option:
Configuration heading. The Configuration
screen displays.
2 Scroll to
Magazines. The Magazines options display.
A check mark appears after the currently enabled mode.
3 Do one of the following:
• To leave the
SuperLoader 3 Autoloader User’s Guide 47
Magazines mode unchanged, press Esc.
Page 66

Chapter 4 On-board Remote Management
Configuration Page
•To change the Magazines configuration, scroll to the setting you
want for the autoloader, selecting the appropriate check box, and
then click
submit. These settings include Both, Right, and Left.
The message
change. Enter To Continue
• To continue with the change, press
power cycle the tape autoloader and reconfigure the ISV app.
This will require a power cycle and ISV configuration
is displayed.
submit. The message Please
displays.
Setting the System Time 4
The system time is displayed by On-board Remote Management and it is
used internally for logging events and errors (see Setting the Time
on
page 66).
The autoloader must be reset after each power up. The time can be reset
automatically if a time server is configured (see Setting Ethernet
on
page 62). Otherwise, the time must be set manually from the front panel
or through On-board Remote Management. The time zone setting is not
lost when powered off.
Note: Whether the autoloader is connected to a time server or not, if
you want to include time changes for daylight savings time,
you must change the time zone manually.
To set the system time:
1 Using the first drop-down list next to
hours difference between your local time and Greenwich Mean Time
(GMT).
Note: For example, if you live in Colorado, the time difference is
–6 hours in the summer and –7 hours in the winter.
2 Below the
3 In the
4 In the
5 In the
48 SuperLoader 3 Autoloader User’s Guide
Time Zone field, select the current Month drop-down list.
Day field, type the current day of the month.
Year field, type the current year.
Hour text box, type the current hour in 24-hour format.
Time Zone, select the number of
Page 67

Chapter 4 On-board Remote Management
6 In the Minute text box, type the current minute.
Configuration Page
7 Click
submit to save the information.
Setting Network Options 4
When you originally installed the autoloader, you set the Ethernet
configurations through the front LCD panel. However, you can modify
them through On-board Remote Management. The options include
Current Network Parameters, Set IP, and Set Network Configuration. To
change the Ethernet configurations:
To view the
1 From any page, click the
Current Network Parameters:
Configuration heading. The Configuration
screen displays.
2 From the
The
Configuration menu, click Networking.
Current Network Parameters area displays the current IP address,
MAC address, and the speed setting for the Ethernet connection.
In the
Set IP section, if a check mark appears in the box next to DHCP, the
dynamic IP address option is enabled. This means that with every reset of
the system, the IP address may change depending on the network
administrator's settings.
To
Set IP address:
1 Clear the check box to remove the check mark from the
DHCP field, if
applicable.
2 In the IP address fields, type the static IP address using the
<Tab> key
to move from box to box.
3 If no check mark appears in the box next to
DHCP, the static IP
address option is enabled. To change a static IP address, type in the
new address in the IP address fields using the
<Tab> key to move
from box to box.
4 To change the IP address from a static address to a dynamic address,
click the box next to
To
Set Network Configuration:
DHCP.
1 To change the values of the subnet mask, gateway, Simple Network
Management Protocol (SNMP) server, or the time server, type in the
new address, using the
SuperLoader 3 Autoloader User’s Guide 49
<Tab> key to move from box to box.
Page 68

Chapter 4 On-board Remote Management
Configuration Page
2 Click submit.
Setting Security Options 4
When you enable the security option, users must enter a password to
access the autoloader's front panel functionality. A password allows
either administrator-level access or operator-level access (see Setting
Security on page 70). To set security:
1 From any page, click the
Configuration heading. The Configuration
screen displays.
2 On the left-hand side of the screen, click
Security
section of the screen displays.
3 To enable front panel security, select the check box next to
Security Enabled
.
Security. The System
Front Panel
4 If the check box is blank, the security option for the front LCD panel
is not enabled.
5 Click
submit.
To reset the front panel password:
1 From any page, click the
Configuration heading. The Configuration
screen displays.
2 On the left-hand side of the screen, click
3 Select the check box next to
Reset Front Panel Password. A check
Security.
mark appears.
4 Click
To set
submit.
User Administration:
1 From any page, click the
screen displays.
2 On the left-hand side of the screen, click
3 From the drop-down list next to
Operator 2, Administrator 1 or Administrator 2.
4 In the
5 In the
6 In the
50 SuperLoader 3 Autoloader User’s Guide
Configuration heading. The Configuration
Security.
Select User Type, select Operator 1,
Username field, enter a user name.
Password field, enter the new password.
Verify Password field, re-enter the same new password.
Page 69

7 Click submit.
Chapter 4 On-board Remote Management
Configuration Page
Note: To view the list of currently defined users, click
with
Select User Type.
To set the
1 From any page, click the
Client Authorization Control:
Configuration heading. The Configuration
submit
screen displays.
2 On the left-hand side of the screen, click
Scroll to
Client Authorization Control. In this section is a list of the IP
Security.
addresses that are authorized to perform functions using On-board
Remote Management for this specific unit. There are two sets of IP
address boxes. You can individually enable/disable and configure
each set.
• If enabled, each set can be used to specify either a range of IP
addresses or a pair of specific IP addresses that are allowed to
administer this unit. A set can also be used to specify a single IP
address if the desired IP address is entered into both the "a" and
"b" portions of the set. When a set is used to specify a range of IP
addresses, the "b" portion of each address set must be greater
than or equal to the "a" portion of that address set.
• If neither set is enabled, any IP client can administer the unit. If a
single set is enabled, only clients that pass the test specified by
that set are allowed administrator access. If both sets are enabled,
any client that passes either of the two filter tests can administer
the unit.
The Web server always allows any client to view the status
information of the unit, regardless of the authorized client list or the
overlap control policy.
3 Use the drop-down box to select
Enable or Disabled.
4 Type the IP addresses in the appropriate boxes.
5 Click
Client Overlap Control is a management policy on controlling how the
submit to save.
Web server handles overlapping control requests from multiple clients on
the authorized client list. The options include
and
Time-Based Locking.
SuperLoader 3 Autoloader User’s Guide 51
No Locking, Full Locking,
Page 70

Chapter 4 On-board Remote Management
Configuration Page
• No Locking allows multiple clients to have unrestricted access to
control the system as long as they are on the authorized client list.
•
Full Locking permits only one authorized client to issue control
requests at a time. This client must release the lock by clicking the
Home option in the upper frame of the page to permit other
authorized clients to have control access.
•
Time-Based Locking is similar to Full Locking in that only one
authorized client can have control access at once, but the lock is
automatically released after the specified number of seconds of
inactivity have elapsed.
After selecting the appropriate policy by clicking the check box, click
submit to save the changes.
1 From any page, click the
Configurations heading. The Configurations
screen displays.
2 On the left-hand side of the screen, click
3 Select a security option from the
•
No locking allows multiple users to access the system and issue
Client Overlap Control options:
Security.
requests.
•
Full Locking allows only one user to access the system and issue
requests.
•
Time-based Locking allows only one user to access the system and
issue requests with the lock expiring after a designated amount
of inactivity (in seconds).
•
Home is used to release a full or time-based lock and permit
another user to access the system.
Note: Locking is only available to users on the authorized client
list.
4 Click
submit.
Note: To log out of the system, you must close your browser to end
52 SuperLoader 3 Autoloader User’s Guide
the session.
Page 71

Chapter 4 On-board Remote Management
Updates Page
Note: By entering an improper range of IP addresses, a user could
possibly lock out all IP clients from administering the
autoloader. If this occurs, you can restore the default values by
running
Menu
Restore Default from the front panel Configuration
.
Updates Page 4
You can browse to find system updates and then upload the updates. To
get system updates:
1 From any page, click the
Updates heading. The Firmware Update
screen displays.
2 Click
3 Click
4 Click
Browse to navigate to the host system for the update file. The
file should end in an
Upload.
OK in response to the confirmation box. The autoloader
.img extension.
automatically uploads the new code and processes it to the system.
Note: A Microsoft issue can keep a user from updating drive or
loader firmware over the On-board Remote Management
interface. This can occur under Windows Server 2003 with
Service Pack 1 (SP1), or if a user has installed Microsoft
Security Update MS05-019. This problem will appear with a 6F
Communication Error message on the front panel with the
warning light on. On-board Remote Management will
continue to report the autoloader status as
Initialization.
Microsoft has described a workaround for this problem in
their product with Technical Support Article 898060 (
support.microsoft.com/default.aspx?scid=898060). If this problem
http://
occurs, the autoloader should be restarted to avoid further
communication errors.
SuperLoader 3 Autoloader User’s Guide 53
Page 72

Chapter 4 On-board Remote Management
Diagnostics Page
Diagnostics Page 4
Running
Diagnostic Tests 4
Viewing Error or
History Logs 4
From the
Diagnostics page, you can run various tests on the autoloader.
You can also view error and history logs, test progress, identify the
physical unit in a rack, or reset the system.
The diagnostic tests available on the autoloader include:
•Halt Test
•Loader—Self Test
•Loader—Health Check
•Loader—Picker Test
• Loader—Magazine Test
• Loader—Inventory Test
To view error or history logs:
1 From any page, click the
Diagnostics heading. The Diagnostics screen
displays.
2 Under
default is
3 Under
the logs to a file by clicking
View Error and History Logs, select Autoloader or Drive. The
Autoloader.
View Error and History Logs, click View Logs. You can also save
Save Logs. If you save the logs to a file,
you must select a destination folder within 60 seconds.
Note: These logs are valuable for assessing problems. Service
personnel may want to use these logs.
54 SuperLoader 3 Autoloader User’s Guide
Page 73

Chapter 4 On-board Remote Management
Diagnostics 4 To view the various diagnostic options:
Diagnostics Page
1 From any page, click the
Diagnostics heading. The Diagnostics screen
displays.
2 In the
run from the
Diagnostics section, select the diagnostic test that you want to
Test drop-down menu.
3 Specify a loop count, if desired.
4 Click
submit.
5 While the test is running, you can view the status of the test. From
View Diagnostic Test Progress, click View Status.
A separate screen indicates which test is running and the current
status of the diagnostic test.
6 To refresh the status information, click
and then click
View Status again.
View Diagnostic Test Progress,
Identification 4 You can use the Identification feature of the autoloader by requesting the
LCD backlight to flash for a specified number of seconds.This can be
helpful in identifying the location of the autoloader in an equipment
room.
Performing a
System Reset 4
1 From any page, click the
Diagnostics heading. The Diagnostics screen
displays.
2 Under
Identification, enter the number of seconds in the Time (secs)
field.
3 Click
Identify. The LCD backlight flashes on the autoloader for the
specified number of seconds.
You will use System Reset when making SCSI ID changes, mode changes,
magazine changes, and IP address changes. A system reset will take at
least three minutes if there is a tape in the drive, or approximately 30
seconds otherwise. To perform a system reset:
1 From any page, click the
Diagnostics heading. The Diagnostics screen
displays.
2 Under the
SuperLoader 3 Autoloader User’s Guide 55
System Reset section, click System Reset.
Page 74

Chapter 4 On-board Remote Management
Commands Page
Commands Page 4
You can move tapes, run a system inventory, reset the picker to its home
position, or perform sequential operations from the
When you click
Commands, the page displays.
From a remote location, you can request that a tape be moved from one
position to another. To move a tape:
Commands page.
1 From any page, click the
Commands heading. The Commands screen
displays.
2 From the
menu under
Moving Tapes section of the page, click the drop-down
From: and select the current location of the tape that you
want to move.
Note: You can also click the slot on the graphic of the autoloader
magazine to select and move a cartridge.
3 From the drop-down menu under
you want to move the tape, and then click
To:, select the location to which
submit.
Inventory 4 The autoloader automatically runs an inventory whenever you power it
on or insert a magazine. If you need to run an inventory in addition to
this, you can use On-board Remote Management to do it remotely. To
run an inventory:
1 From any page, click the
Commands heading. The Commands screen
displays.
2 From the
inventory immediately.
Set to Home 4 If the autoloader is not able to successfully execute a Moving Tapes or an
Inventory command, try executing a Set to Home command, and then
retry the move or inventory command again.
The
Set to Home command resets the autoloader as a means to help the
autoloader recover from an unexpected internal condition. To set to
Home:
56 SuperLoader 3 Autoloader User’s Guide
Commands page, click Inventory. The autoloader starts an
Page 75

Chapter 4 On-board Remote Management
Commands Page
1 From any page, click the Commands heading. The Commands screen
displays.
Sequential
Operations 4
2 From the
Commands page, click Set to Home. This executes a reset
command to the autoloader.
The Sequential Operations mode supports certain backup applications
that do not manage media. During backup, when one cartridge is read or
written to the end of the tape, the autoloader automatically returns that
cartridge to its designated slot and loads the cartridge from the next
higher numbered slot to the tape drive to be read or written to. This
continues until the backup software stops accessing the drive or until all
the cartridges have been sequentially accessed. The autoloader does not
move the media until the host requests the tape drive to unload.
1 From any page, click the
Commands heading. The Commands screen
displays.
2 From the
3 To start
Commands page, scroll to Sequential Operations.
Sequential Operations, click Start. This moves the first
available cartridge from the storage slot to the drive.
•To stop
Sequential Operations, click Stop. This removes the cartridge
from the drive and places it back into the cartridge's previous storage
slot.
•To resume
Sequential Operations, click Resume. This moves the next
cartridge to the tape drive.
Note: You must perform a
cartridge into the tape drive before starting a host backup.
SuperLoader 3 Autoloader User’s Guide 57
Start or Resume command to load a
Page 76

Chapter 4 On-board Remote Management
Commands Page
58 SuperLoader 3 Autoloader User’s Guide
Page 77

Chapter 5
5Administration
Administration of the Autoloader 5
• Configuring the Autoloader
• Setting the SCSI ID on page 62
• Setting Ethernet
• Setting the Time
• Setting the Change Mode
• Setting Security
• Setting Magazines
• Setting Passwords
SuperLoader 3 Autoloader User’s Guide 59
on page 62
on page 66
on page 70
on page 70
on page 71
on page 68
Page 78

Chapter 5 Administration
Configuring the Autoloader
When you first power on the Quantum SuperLoader 3 autoloader, it
automatically runs a Power-On Self-Test (POST). During the POST, the
left (green) LED flashes. After the POST, the left (green) and right (amber)
LED flash alternately back and forth. Do one of the following:
• If the autoloader powers on successfully, continue configuring the
autoloader (see Configuring the Autoloader
).
Note: The front panel requires a six-digit password to change the
configuration (see Setting Passwords
on page 71). The
LCD front panel default password for the Administrator is
000000. The default password for the Operator is 111111.
• If the autoloader does not power on successfully, check the following:
• Power switch is on.
• Power cable is inserted correctly.
• SCSI bus is terminated.
• SCSI cable is connected to the autoloader and host computer.
• No error code appears on the autoloader LCD.
• If you cannot resolve the problem yourself, contact your service
representative or go to
www.quantum.com.
When you first power on the autoloader, the setting for the Internet
Protocol (IP) address is static with the address
192.168.20.128. If you want
to use Dynamic Host Configuration Protocol (DHCP) to change the IP
address, see Setting the IP Address
on page 63. To determine the IP
address when using DHCP, view the Ethernet status information (see
Setting
the SCSI ID on page 62).
Configuring the Autoloader 5
To configure the autoloader, start with the main menu on the front panel.
If the main menu is not already visible on the LCD, press
Enter.
60 SuperLoader 3 Autoloader User’s Guide
Page 79

Figure 7 System
Menu Tree
Chapter 5 Administration
Configuring the Autoloader
When you first power on the autoloader, the default is set with no
password protection. However, after you set the security option, all the
configuration functionality is password-protected. You need an
administrator-level password to configure the autoloader.
The front panel menu has the following options:
SuperLoader 3 Autoloader User’s Guide 61
Page 80

Chapter 5 Administration
Configuring the Autoloader
To configure the Quantum SuperLoader 3 autoloader, you must verify
the setup of the following:
• SCSI ID(s). For the autoloader, there is a single SCSI ID.
• Magazine(s).
• Ethernet IP address (if you are not using DHCP).
• SNMP server IP address only if SNMP is being used.
• Time server IP address (or the time zone, date, and time, if
configuring manually)—only if a time server is being used.
• Control mode.
• Security option.
Setting the SCSI ID
5 Each SCSI device attached to a server or workstation must have a unique
SCSI ID. For the SuperLoader 3 autoloader, you need one SCSI ID.
To set the SCSI ID:
1 If the main menu is not already visible, press
2 On the main menu, scroll to
3 On the
Configuration submenu, scroll to SCSI ID and press Enter.
Configuration and press Enter.
Enter.
4 Scroll to the number you want to set as the autoloader's SCSI ID, then
press
Enter. Cycle Power new SCSI ID appears on the LCD.
5 Press and hold the power button on the front panel until
Shutdown wait 60 sec
appears on the LCD. Power Off appears on the
System
LCD, then the autoloader shuts off.
6 Press the power button again to power on the autoloader. The new
SCSI ID is now in effect.
Setting Ethernet 5 Ethernet is the method used by the autoloader to access a network. With
an Ethernet connection, you can remotely access the autoloader over the
network. To use the Ethernet connection, you must define the following:
• A dynamic or static IP address for the autoloader (required)
• A subnet mask (required)
• An IP gateway (optional)
62 SuperLoader 3 Autoloader User’s Guide
Page 81

Chapter 5 Administration
Configuring the Autoloader
• A Simple Network Management Protocol (SNMP) server (optional)
• A time server, or set the time and time zone manually (optional)
Setting the IP
Address 5
An IP address is the address of any device attached to a network. Each
device must have a unique IP address. IP addresses are written as four
sets of numbers separated by periods ranging from
including
255.255.255.255.
0.0.0.0 up to and
IP addresses are either permanent or dynamically assigned. A
permanent, or static, address remains the same each time the device
connects to the network. A dynamic address may change each time the
device connects to the network server using Dynamic Host Configuration
Protocol (DHCP).
To set a dynamic IP address:
1 From the main menu, scroll to
2 From the
3 From the
4 Scroll to
Configuration menu, scroll to Ethernet, and then press Enter.
Ethernet submenu, scroll to Set IP, and then press Enter.
DHCP, and then press Enter. Please reboot to use DHCP
Configuration, and then press Enter.
appears on the LCD screen.
5 Press and hold the power button on the front panel until
Shutdown wait 60 sec
appears on the LCD. Power Off appears on the
System
LCD, then the autoloader shuts off.
6 Press the power button again to power on the autoloader. The IP
address is changed.
To set a static IP address:
1 From the main menu, scroll to
2 From the
3 From the
4 Scroll to
Configuration menu, scroll to Ethernet, and then press Enter.
Ethernet submenu, scroll to Set IP, and then press Enter.
Static IP, and then press Enter. The cursor automatically
Configuration, and then press Enter.
appears at the first digit.
5 At each position of the IP address, use the up and down arrows to
change the value of each digit. Press
Enter to advance the cursor to
the next digit.
SuperLoader 3 Autoloader User’s Guide 63
Page 82

Chapter 5 Administration
Configuring the Autoloader
When you have advanced through all of the digits of the IP address,
the autoloader displays
Enter to save.
Note: If you make a mistake, press Escape to backspace to the
digit you want to change.
Setting the Subnet
Mask 5
6 Press
Enter. The Configuration submenu appears and the static IP is
now in effect. You do not need to reboot the autoloader.
7 Press
Escape or Enter to return to the Ethernet submenu.
Creating a subnet mask is a method of splitting IP networks into a series
of subgroups, or subnets, to improve performance or security.
To set a subnet mask:
1 From the main menu, scroll to
2 From the
3 From the
Enter.
Configuration menu, scroll to Ethernet, and then press Enter.
Ethernet submenu, scroll to Set Subnet Mask, and then press
Configuration, and then press Enter.
4 At each position of the Subnet Mask address, use the up and down
arrows to change the value of each digit. Press
Enter to advance the
cursor to the next digit.
When you have advanced through all of the digits of the subnet mask
address, the autoloader displays
Enter to save.
Note: If you make a mistake, press
5 Press Enter. New Subnet Mask xxx.xxx.xxx appears on the LCD. You do
not need to reboot the autoloader.
6 Press
Setting an IP
Gateway 5
To set an IP gateway:
1 From the main menu, scroll to
2 From the
64 SuperLoader 3 Autoloader User’s Guide
Escape to backspace to the
digit you want to change.
Escape or Enter to return to the Ethernet submenu.
Configuration, and then press Enter.
Configuration menu, scroll to Ethernet, and then press Enter.
Page 83

Chapter 5 Administration
Configuring the Autoloader
3 From the Ethernet submenu, scroll to Set Gateway, and then press
Enter. The cursor automatically appears at the first digit.
4 At each position of the gateway address, use the up and down arrows
to change the value of each digit. Press
Enter to advance the cursor to
the next digit.
When you have advanced through all of the digits of the gateway
address, the autoloader displays
Enter to save.
Setting the SNMP
Server 5
Note: If you make a mistake, press
Escape to backspace to the
digit you want to change.
5 Press Enter. New Gateway is xxx.xxx.xxx appears on the LCD. You do
not need to reboot the autoloader.
6 Press
Escape or Enter to return to the Ethernet submenu.
An SNMP server monitors a network by processing reporting activity in
each network device (hub, router, bridge, and so on). The server uses this
information to define what is obtainable from each device and what can
be controlled (turned off, on, and so on).
To set an SNMP server:
1 From the main menu, scroll to
2 From the
3 From the
Enter. The cursor automatically appears at the first digit.
Configuration menu, scroll to Ethernet, and then press Enter.
Ethernet submenu, scroll to Set SNMP Server, and then press
Configuration, and then press Enter.
4 At each position of the SNMP server address, use the up and down
arrows to change the value of each digit. Press
Enter to advance the
cursor to the next digit.
When you have advanced through all of the digits of the SNMP
server address, the autoloader displays
Note: If you make a mistake, press
Enter to save.
Escape to backspace to the
digit you want to change.
5 Press Enter. New SNMP Server xxx.xxx.xxx appears on the LCD. You do
not need to reboot the autoloader.
SuperLoader 3 Autoloader User’s Guide 65
Page 84

Chapter 5 Administration
Setting the Time
6 Press Escape or Enter to return to the Ethernet submenu.
Setting the Time 5
The system time is displayed by On-board Remote Management and it is
used internally when logging events and errors. The system time is either
regular time or power-on time. Regular time is Month/Date/Year Time,
such as Nov/21/2004 19:28. Power-on time is Power On Cycles/Power
On Hours. For example,
number of times the system has booted since it was manufactured, and
POH is the number of hours, minutes, and seconds since the last system
boot. If regular time is known, it will be used, otherwise power-on time is
used.
The SuperLoader 3 autoloader must be reset after each power up. The
time can be reset automatically if a time server is configured (see Setting
the Time Server).
POC: 00121, POH: 00002:07:45 where POC is the
Setting the Time
Server 5
If you locate a time server that is compatible with Simple Network Time
Protocol (SNTP), you can connect the autoloader to a server that will
supply the correct date and time. The autoloader uses this information to
time stamp information in its memory.
To set a time server:
1 From the main menu, scroll to
2 From the
3 From the
Enter. The cursor automatically appears at the first digit.
Configuration menu, scroll to Ethernet, and then press Enter.
Ethernet submenu, scroll to Set Time Server, and then press
Configuration, and then press Enter.
4 At each position of the time server address, use the up and down
arrows to change the value of each digit. Press
Enter to advance the
cursor to the next digit.
66 SuperLoader 3 Autoloader User’s Guide
Page 85

Chapter 5 Administration
Setting the Time
When you have advanced through all of the digits of the time server
address, the autoloader displays
Enter to save.
Note: If you make a mistake, press
Escape to backspace to the
digit you want to change.
5 Press Enter. New Time Server xxx.xxx.xxx appears on the LCD. You do
not need to reboot the autoloader.
6 Press
Escape or Enter to return to the Ethernet submenu.
To set the time zone:
1 From the main menu, scroll to
2 From the
3 From the
The
Configuration menu, scroll to Time, and then press Enter.
Time submenu, scroll to Set Timezone, and then press Enter.
Time Zone screen appears, allowing you to set the hours. The
Configuration, and then press Enter.
cursor automatically appears at the first digit.
4 Scroll to set the number of hours difference between your local time
and Greenwich Mean Time (GMT).
5 Scroll to set the number of minutes difference between your local
time and GMT, then press
6 Press
Escape or Enter as necessary to return to the main menu.
Enter. The new time zone is set.
To set the date and time:
1 From the main menu, scroll to
2 From the
3 From the
The
Configuration menu, scroll to Time, and then press Enter.
Time submenu, scroll to Set Date/Time, and then press Enter.
Date/Time screen appears, allowing you to set the date and time.
Configuration, and then press Enter.
The cursor automatically appears at the first digit.
4 The first four digits represent the current year. At each position of the
year, use the up and down arrows to change the value of each digit.
Press
Enter to advance the cursor to the next digit.
5 The next two digits represent the current month. At each position of
the month, use the up and down arrows to change the value of each
digit. Press
Enter to advance the cursor to the next digit.
6 The next two digits represent the current day. At each position of the
day, use the up and down arrows to change the value of each digit.
Press
Enter to advance the cursor to the next digit.
SuperLoader 3 Autoloader User’s Guide 67
Page 86

Chapter 5 Administration
Setting the Change Mode
7 The next two digits represent the current hour. At each position of the
hour, use the up and down arrows to change the value of each digit.
Press
Enter.
8 The last two digits represent the current minute. At each position of
the minute, use the up and down arrows to change the value of each
digit. Press
Enter to advance the cursor to the next digit.
9 Press
10 Press
Enter to save.
Escape as necessary to return to the main menu.
Setting the Change Mode 5
You can set the autoloader to either
change mode is
In
Random mode, you, or the backup software, can specify which
Random.
cartridge you want to use and where you want it to go. You will probably
use this mode the most.
The
Sequential mode supports certain backup applications that do not
manage media. During backup, when one cartridge is read or written to
the end of the tape, the autoloader automatically returns that cartridge to
its slot and loads the cartridge from the next higher numbered slot to the
tape drive to be read or written to. This continues until the backup
sequentially accessed. The autoloader does not move the media until the
host requests the tape drive to unload the tape via a SCSI unload
command.
Random or Sequential. The default
Note: In
In
Seq Cycle mode, which is an option of the Sequential mode, the
autoloader automatically starts over with magazine slot 1 when the last
cartridge is used (slot 16 or highest filled slot). If this change mode is not
set, the autoloader stops when the last cartridge available has been used.
In
Seq Cycle mode the autoloader continues to cycle until a user stops it.
68 SuperLoader 3 Autoloader User’s Guide
Sequential mode, the medium changer does not appear in
the
Device Manager. The medium changer will reappear in
Device Manager if you return the system to Random mode. This
is to allow for operating systems that do not support multiple
LUNS.
Page 87

To set the Change Mode:
Chapter 5 Administration
Setting the Change Mode
Sequential Mode
Operations 5
1 From the main menu, scroll to
2 From the
Enter. the mode options appear. A check mark appears next to the
Configuration menu, scroll to Change Mode, and then press
Configuration, and then press Enter.
currently enabled mode.
3 Do one of the following:
• To leave the mode the same, press
Escape.
• To modify the change mode, scroll to the mode to which you
want to set the autoloader and press
mode
appears on the LCD.
4 Press and hold the power button on the front panel until
Shutdown wait 60 sec
appears on the LCD. Power Off appears on the
Enter. Reboot to enable new
System
LCD and the autoloader shuts off.
5 Press the power button again to power up the autoloader. The new
change mode is now in effect.
If you enable Sequential mode, you must use the Sequential Ops submenu
under the
Commands menu to operate the autoloader after you reboot.
•The
•The
Start command allows you to load the first cartridge.
Resume command allows you to continue from the next unused
slot, if a user stopped the cycle.
•The
To start
1 From the main menu, scroll to
2 From the
3 From the
To stop
1 From the main menu, scroll to
2 From the
Stop command allows you to stop the cycle.
Sequential mode operation:
Commands, and then press Enter.
Commands menu, scroll to Sequential Ops, and then press
Enter.
Sequential Ops menu, scroll to Start, and then press Enter.
Moving first tape to drive appears on the LCD.
Sequential mode operation:
Commands, and then press Enter.
Commands menu, scroll to Sequential Ops, and then press
Enter.
SuperLoader 3 Autoloader User’s Guide 69
Page 88

Chapter 5 Administration
Setting the Change Mode
3 From the Sequential Ops menu, scroll to Stop, and then press Enter.
Ejecting tape from drive appears on the LCD.
To resume
1 From the main menu, scroll to
2 From the
Enter.
3 From the
Enter. Moving next tape to drive appears on the LCD.
Sequential mode operation:
Commands, and then press Enter.
Commands menu, scroll to Sequential Ops, and then press
Sequential Ops menu, scroll to Resume, and then press
Setting Security 5 You can add security to the front panel by password-protecting the
autoloader's functionality. The security setting only protects the front
panel functionality. The default setting is
Off, meaning that no password
is required. However, you can enable the security option so that users
must enter a password to access functionality.
Security Option 5
When you first power on the autoloader, the security option is set to
Use the following procedure to enable the security option. You must have
an administrator-level password to set passwords.
Off.
To set the security option:
1 From the main menu, scroll to
2 From the
Configuration menu, scroll to Security. If a check mark
appears after the word, the security option is
appears, the security option is
3 To change the option, press
was set to
On, it is now set to Off, and no check mark appears.
Configuration, and then press Enter.
On. If no check mark
Off.
Enter. For example, if the security option
Setting Magazines5 In some cases, autoloader owners were being charged Independent
Software Vendor (ISV) licensing fees for two-magazine SuperLoader 3s
although only one magazine was configured. This occurred because the
ISV software was registering the autoloader as a two-magazine device,
regardless of the number of magazines configured. You have the ability
to set the number of magazines in the autoloader.
70 SuperLoader 3 Autoloader User’s Guide
Page 89

To set the number of magazines:
Chapter 5 Administration
Setting the Change Mode
1 From the main menu, scroll to
2 From the
Enter.
3 From the
Configuration menu, scroll to Magazines, and then press
Magazines menu, select either Right, Left, or Both to indicate
Configuration, and then press Enter.
the magazines installed in the autoloader.
Setting Passwords5 Many operations on the autoloader are password-protected to ensure
data integrity. You can set passwords to administrator level and to
operator level. Operator-level users have access to the
Status menus. Administrator-level users have access to all functionality.
Commands and
To set a password:
1 From the main menu, scroll to
2 From the
Enter.
Configuration menu, scroll to Set Password, and then press
3 To set a password to the operator level, scroll to
password to the administrator level, scroll to
press
Enter. The Set Password screen appears.
Configuration, and then press Enter.
Operator. To set a
Administrator, then
4 Press
Enter. If you are not logged in as Administrator, press Enter
again to log in. A text box appears above the first asterisk.
In the text box, scroll to the first character of the password. The cursor
automatically appears at the first number of the password.
5 At each position of the password, use the up and down arrows to
change the value of each number. Press
Enter to advance the cursor to
the next number.
Note: If you make a mistake, press
Escape to backspace to the
digit you want to change.
6 Press
Enter. The text box above the asterisk disappears and another
text box appears above the next asterisk.
7 Repeat steps 5
When you have entered six numbers, the autoloader displays
Password
and 6 to enter the remaining digits of the password.
Submit
below the asterisks.
SuperLoader 3 Autoloader User’s Guide 71
Page 90

Chapter 5 Administration
Setting the Change Mode
8 Press Enter to submit the password. Password Successfully changed
appears on the LCD.
Getting Lost
Passwords 5
9 Press
Enter. The Operator and Administrator options reappear. You
can either enter another password, or press
Escape or Enter as
necessary to return to the main menu.
If you forget the administrator-level password, you cannot access the
autoloader's functionality to enter a new password. In this case, you must
call customer support. When you call, have the autoloader connected to
the Ethernet and open On-board Remote Management.
Note: You can reset front panel passwords to the factory defaults
from On-board Remote Management. However, if the Onboard Remote Management passwords are lost, you must
contact customer support. If you must contact customer
support, be at the host computer with On-board Remote
Management on line. From the main screen, click
Configuration. The enter Network Password or User name
screen displays. The customer support representative will
need the number surrounded by asterisks to locate and
reset your password. This is your “realm number.”
72 SuperLoader 3 Autoloader User’s Guide
Page 91

6Diagnostics
• POST
• Diagnostic Tests from the Front Panel on page 75
Chapter 6
• On-board Remote Management D
iagnostic Tests on page 78
The Power On Self Test (POST) and diagnostic tests are helpful tools for
testing the autoloader’s functionality and for troubleshooting errors.
With the results from the POST and diagnostic tests, you can determine
how well the autoloader is working and locate any problems.
The Diagnostics section describes the POST and its various tests. This
section also explains how to perform diagnostic tests from the front panel
and On-board Remote Management.
Note: Only use the
Diagnostics Commands when the autoloader is
known to be idle and unavailable to host backup/restore
applications. Use of the
Diagnostic Commands from On-board
Remote Management should not be issued while the
autoloader is being used by host applications. The autoloader
will recognize when the drive or autoloader are executing host
commands and will respond appropriately to prevent
application failures. A
Diagnostic command being issued
between host application commands may not be recognized
appropriately resulting in a failed application, such as a failed
backup/restore job.
SuperLoader 3 Autoloader User’s Guide 73
Page 92

Chapter 6 Diagnostics
POST
POST 6
Every time you turn on the autoloader, the POST checks all of the
autoloader’s basic components. If you experience problems with the
autoloader, the POST is a good method to determine if any major parts
are malfunctioning.
Table 7 POST
Descriptions
POST Test Description
MICROP Tests the microprocessor’s general-purpose registers
IRAM Tests the microprocessor’s internal RAM
Addr Lines Bit walks the SRAM address lines
SRAM Tests the 512k SRAM
Code Chksum Verifies the Flash image checksum
EERom Checks the EERom area and verifies the checksums
PLL Clock Tests that the microprocessor’s PLL is synchronized correctly
LCD Verifies that the LCD is present and working correctly
Ethernet Configures and verifies communication with the Ethernet chip
Barcode Verifies that the bar code reader is present and performs a
hardware handshake
Temperature Sense Pass/Fails the MDM and configures the AHIM temperature
sensors
MDM Verifies that the MDM is present and checks the sensors
Fan Verifies that the fan is operating correctly
74 SuperLoader 3 Autoloader User’s Guide
Page 93

Chapter 6 Diagnostics
Diagnostic Tests from the Front Panel
Perform a POST 6 If you experience errors while operating your autoloader, you may need
to reboot the autoloader to perform a POST.
To reboot the SuperLoader 3 Autoloader:
Interpret the POST
Results 6
1 Hold down the power button until
appears.
2 Release the power button. The autoloader turns off.
3 Press the power button again to turn the autoloader on. POST runs
automatically.
While the POST is running, a progress indicator showing the name of the
test displays on the front panel. If the autoloader is working properly, the
message
POST completes successfully.
If the autoloader is not working properly, error messages display on the
front panel (see Checking for Errors
System Ready and the current configuration display after the
System Shutdown Please Wait...
on page 114).
Diagnostic Tests from the Front Panel 6
Diagnostic tests allow you to calibrate parts of the autoloader, check the
condition of parts, or test the autoloader’s functionality. From the front
panel, you can perform all of the diagnostic tests. Because certain tests
require you to manually insert a cartridge, you can perform only some of
the diagnostic tests using On-board Remote Management (see On-board
Remote Management Diagnostic Tests on page 78).
Note: On-board Remote Management allows you to request all
diagnostic tests, but any tests that require a cartridge to be
inserted will time-out unless someone manually inserts the
cartridge at the appropriate time.
SuperLoader 3 Autoloader User’s Guide 75
Page 94

Chapter 6 Diagnostics
Diagnostic Tests from the Front Panel
Setting the
Security 6
When you enable the security function, the diagnostic tests are password
protected to ensure data integrity. To access any of the diagnostic tests,
you must first enter an Administrator password. If you do not enter the
password, you will be prompted to enter the password when you
attempt to perform a diagnostic test.
To enter an Administrator Password:
1 From any menu, click the
Commands heading, The Commands screen
displays.
2 On the
Enter.
3 On the
press
The
Command submenu, scroll to Enter Password, and then press
Enter Password submenu, scroll to Administrator, and then
Enter.
Login screen appears with a row of asterisks. A text box appears
above the first asterisk.
4 In the textbox, scroll to the first number of the password, and then
press
Enter. The text box above the asterisk disappears and another
text box appears above the next asterisk.
5 Repeat step 4
to enter the remaining numbers of your password.
Stopping a
Diagnostic Test 6
Note: Press
Escape to backspace to a previous text box, if
necessary.
When you have finished entering your password,
Submit Password
appears on the LCD below the asterisks.
6 Press
Enter to submit your password. The display returns to the Enter
Password
submenu.
At times you may need to stop a diagnostic test while it is in progress.
Certain diagnostic tests even require you to stop them or they run
continuously. To stop a diagnostic test while it is running, use the
Test
function. When you select Halt Test, any picker or magazine
Halt
functions complete, and then the diagnostic test is stopped.
To perform a
1 While the diagnostic test you wish to stop is running, press
The
Halt Test from the front panel:
Escape.
Diagnostics submenu appears.
76 SuperLoader 3 Autoloader User’s Guide
Page 95

Chapter 6 Diagnostics
Diagnostic Tests from the Front Panel
2 On the submenu, scroll to Halt Test, and then press Enter. User Abort
appears.
Front Panel
Diagnostic Tests 6
3 Press
Enter to return to the Diagnostics submenu. Refer to On-board
Remote Management for any test results.
To perform a
1 Select
submit.
Halt Test from On-board Remote Management:
Halt Test from the Diagnostics drop-down menu, and click
2 Select View Status to see the results of the command. Test Stopped
appears along with any text results.
You can perform the following diagnostic tests using the front panel:
•Halt Test
•Loader—Self Test
•Loader—Health Check
•Loader—Picker Test
• Loader—Magazine Test
• Loader—Inventory Test
To perform any of the front panel diagnostic tests:
1 From the main menu, scroll to
2 Scroll to the test that you want to run and press
Diagnostics and press Enter.
Enter.
If you are already logged in as Administrator, the test begins
executing immediately. The message
Running Test appears while the
test is running.
The
Loader—Health Check test displays on ongoing progress
indicator while executing. When the test completes, either the
message
error code appears. Proceed to step 4
SuperLoader 3 Autoloader User’s Guide 77
Test Successful appears or the message Tes t F ai l ed and an
.
Page 96

Chapter 6 Diagnostics
On-board Remote Management Diagnostic Tests
3 If you are not logged in, you will be asked to enter the Administrator
password. Do the following:
a From the front panel, enter the administrator password by using
the
Up and Down scroll arrows to select each digit, and then press
Enter to move to the next digit. To move to the previous digit,
press
Escape. When you have entered the entire six digit
password, you will be asked to press
submit the password. If the password is incorrect, you will be
asked to re-enter it using the same procedure. Otherwise, you
will be returned to the
desired test.
Running Test appears while the test is in progress. To stop the test
prematurely, see Stopping a Diagnostic Test
Enter one more time to
Diagnostics menu. Press Enter to run the
.
b The
Loader—Health Check test displays an ongoing progress
indicator while executing. When the test completes, either the
message
Test Successful appears or the message Tes t F ai l ed and an
error code appear.
4 If the test is successful, press
Enter to return to the Diagnostics test
menu. For detailed results of a test, use On-board Remote
Management to retrieve the diagnostic test status (see Diagnostics
Using On-board Remote Management).
On-board Remote Management Diagnostic Tests 6
You can perform the following diagnostic tests from On-board Remote
Management:
•Halt Test
•Loader—Self Test
•Loader—Health Check
•Loader—Picker Test
78 SuperLoader 3 Autoloader User’s Guide
Page 97

Chapter 6 Diagnostics
On-board Remote Management Diagnostic Tests
• Loader—Magazine Test
• Loader—Inventory Test
Note: On-board Remote Management allows you to request all
diagnostic tests, but any tests that require a cartridge to be
inserted will time-out unless someone manually inserts the
cartridge at the appropriate time.
Diagnostics Using
On-board Remote
Management 6
Many tests can be run using On-board Remote Management. To perform
On-board Remote Management diagnostic tests:
1 Open a web browser and connect to the autoloader. The On-board
Remote Management main menu appears.
2 Click the
Diagnostics heading. A login window appears.
3 Type an Administrator user name and a password, and then click
Enter. The Diagnostics submenu appears.
4 Select the test you wish to perform from the Diagnostics drop-down
menu, and then click
submit.
The selected diagnostic test runs. While the test is running, you can
view the status of the test. To view the status, from the
Diagnostic Test
Progress, click View Status.
View
SuperLoader 3 Autoloader User’s Guide 79
Page 98

Chapter 6 Diagnostics
On-board Remote Management Diagnostic Tests
80 SuperLoader 3 Autoloader User’s Guide
Page 99

Chapter 7
7Customer Replaceable Units
(CRUs)
The SuperLoader 3 is not intended for customer servicing. If you do
service the unit yourself, the power cable must be removed from the unit
and the electrical outlet before removing the cover. Failure to do so may
cause severe bodily injury or damage to the equipment.
Some parts of the autoloader are customer-replaceable. Magazines are
not interchangeable between the VS/SDLT drive types and LTO drive
types of the SuperLoader 3. These parts can be ordered from Quantum
and installed at the site of the unit. Be sure to order the appropriate
magazine for your unit.
Customer Replaceable Units (CRUs) include:
• Replacing a Magazine or Magazine Blank
• Rack Mounting the Autoloader on page 86
• I
nstalling and Removing the Optional V-Rail Kit on page 95
SuperLoader 3 Autoloader User’s Guide 81
Page 100

Chapter 7 Customer Replaceable Units (CRUs)
Replacing a Magazine or Magazine Blank
Replacing a Magazine or Magazine Blank 7
To replace a cartridge magazine or magazine blank, you need to remove
the current magazine or blank, and then install the new magazine or
blank. If you currently have a magazine blank and wish to change it to a
cartridge magazine, you must remove the blank first, and then insert a
cartridge magazine. This allows for up a maximum of 16 cartridges in the
autoloader, plus one cartridge in the drive.
Note: Handles are either right or left. They are not interchangeable
between the left and right sides of the autoloader.
Removing a
Magazine 7
In most cases, you will remove a magazine by using the Eject command
on the front panel menu. If you need to remove the magazine when the
autoloader is powered off, you must remove it manually. Please contact
Customer Support for more information.
Removing a magazine using the front panel 7
1 On the menu, scroll to
2 Press
Enter.
3 On the Commands submenu, scroll to
4 On the Eject submenu, scroll to
Commands.
Eject, and then press Enter.
Right Magazine or Left Magazine,
depending on which magazine you want to eject, and then press
Enter.
The magazine pops forward so that the front of the magazine is no
longer flush with the front panel.
5 With one hand, grasp the magazine by the handle and slide it
forward to remove. Place your other hand under the magazine to
support it and prevent it from falling.
82 SuperLoader 3 Autoloader User’s Guide
 Loading...