

Freecom Network hard drive, CLASSIC SL NETWORK HARD DRIVE Owner's Manual
Rev.503
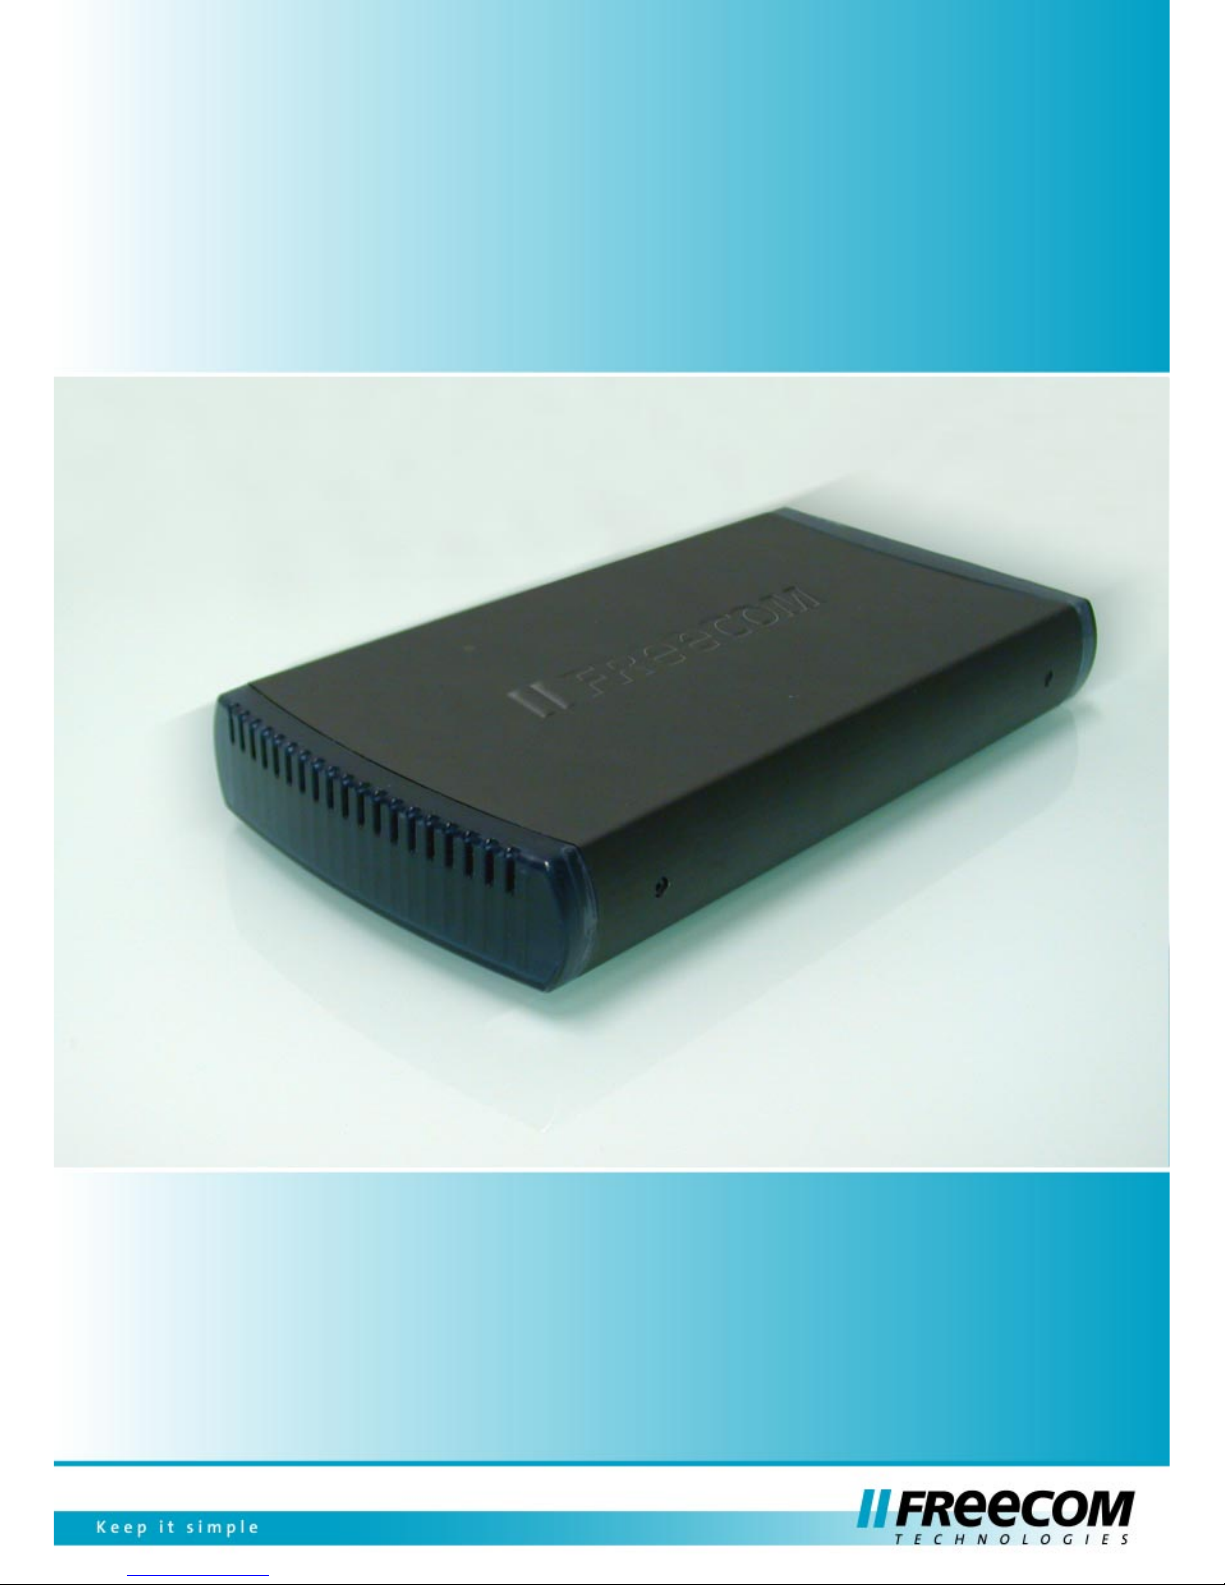
Freecom Classic SL Network Drive
EXTERNAL HARD DRIVE

Freecom Classic SL Network Drive
GB
2
Warning !
All rights reserved. The products named in this manual are only used for identification purposes and may be trademarks or registered trademarks of the respective
companies. This device was designed for home or office use.
Warning! This device is equipment complying with EN55022 class A. This equipment can cause radio disturbances in a residential area. If this is the case, the user
has to take appropriate measures and assume all responsibility and costs for. It may
not be used near or with any life-sustaing systems.
Freecom cannot be made liable for any damages, loss of data or damage following
thereof -whatsoever (including, without limitation, damages for loss of business
profits, business interruption, loss of business information, or other pecuniary loss)
arising out of the use of or inability to use this Freecom product, even if Freecom
has been advised of the possibility of such damages.
We reserve the right to upgrade our products in keeping with technological
advances.
Dear customer.
Thank you for purchasing the Freecom Classic SL Network Drive -
Network storage via Ethernet made possible through NDAS technology!
This User Manual is intended to help you install the Classic SL Network Drive
quickly and easily onto your Personal Computer or Ethernet Network. Please
read the instructions carefully.
Freecom Technologies • Germany
www.Freecom.com

GB
3
Table of Contents
Table of Contents
Chapter 1: Introduction ............................... page 6
1.1 Package Contents ......................................................................... page 6
1.2 System Requirements ................................................................... page 6
1.3 Classic SL Network Drive Setup Overview ................................... page 7
Chapter 2: Cable Installation....................... page 8
2.1 NDAS Mode .................................................................................. page 8
2.2 USB Mode ..................................................................................... page 8
Chapter 3: Software Installation ................ page 9
3.1 For Windows XP and Windows 2000 .......................................... page 9
3.2 For Windows 98 SE and Windows ME ......................................... page 10
3.3 Classic SL Network Drive Administrator ...................................... page 12
Chapter 4: Drive Registration ..................... page13
4.1 Add / Register a New Classic SL Network Drive .......................... page 13
4.2 Using Classic SL Network Drive .................................................... page 15
4.3 Sharing Classic SL Network Drive ................................................. page 15
Chapter 5: Status and Mode Indicator ....... page17
5.1 Changing from Read / Write Mode to Read Only Mode ........... page 18
5.2 Changing from Read Only mode to Read / Write Mode ............ page 18

Freecom Classic SL Network Drive
GB
4
Chapter 6: Introduction to Administrator
Tool Menu ..................................................... page19
Chapter 7: Drive Functions .......................... page20
Chapter 8: Advanced Drive Functions ........ page21
8.1 Introduction to Aggregation ....................................................... page 21
8.2 Introduction to Mirroring ............................................................ page 21
8.3 Requirements for Aggregating / Mirroring ................................ page 21
8.4 Instructions for Aggregating / Mirroring
Two Classic SL Network Drives ..................................................... page 21
8.4.1 Disable Classic SL Network Drive .............................................. page 22
8.4.2 Aggregate / Mirror Classic SL Network Drive ........................... page 22
8.4.3 Enable Classic SL Network Drive ............................................... page 24
8.4.4 Format Classic SL Network Drive .............................................. page 25
8.4.5 Enable Classic SL Network Drive for Other Users .................... page 25
8.4.6 Unbind Classic SL Network Drive .............................................. page 26
Chapter 9: Formatting ................................. page 28
9.1 Initialize Classic SL Network Drive ............................................... page 28
9.2 Partition Classic SL Network Drive ............................................... page 29
Chapter 10: Uninstall ................................... page33
Chapter 11: FAQ ............................................ page35

GB
5
Chapter 12: Troubleshooting ...................... page44
Regulatory Statements ................................ page50
© 2005 Freecom Technologies

Freecom Classic SL Network Drive
GB
1
6
Chapter 1: Introduction
1.1 Package Contents
The following items are included in the Classic SL Network Drive package:
• Classic SL Network Drive
• Power adapter
• Manual and Software Installation CD
• Ethernet Cable
• USB Cable
• Warranty card
1.2 Minimum System Requirements
Windows® 98SE / Me / 2000 / XP
• 233 MHz Pentium® II or higher
• 64 MB RAM (128 MB recommended)
• USB 1.1 Port (USB 2.0 recommended)
• CD-ROM drive for installation
• 100Base-T full duplex switch for NDAS mode
Mac® OS X
• Mac OS X 10.3 or higher
• 128 MB RAM (256 MB recommended)
• USB 1.1 Port (USB 2.0 recommended)
• CD-ROM drive for installation
• 100Base-T full duplex switch for NDAS mode
• MAC OS X requires the drive formatted in FAT-32
GB
1
7
Introduction
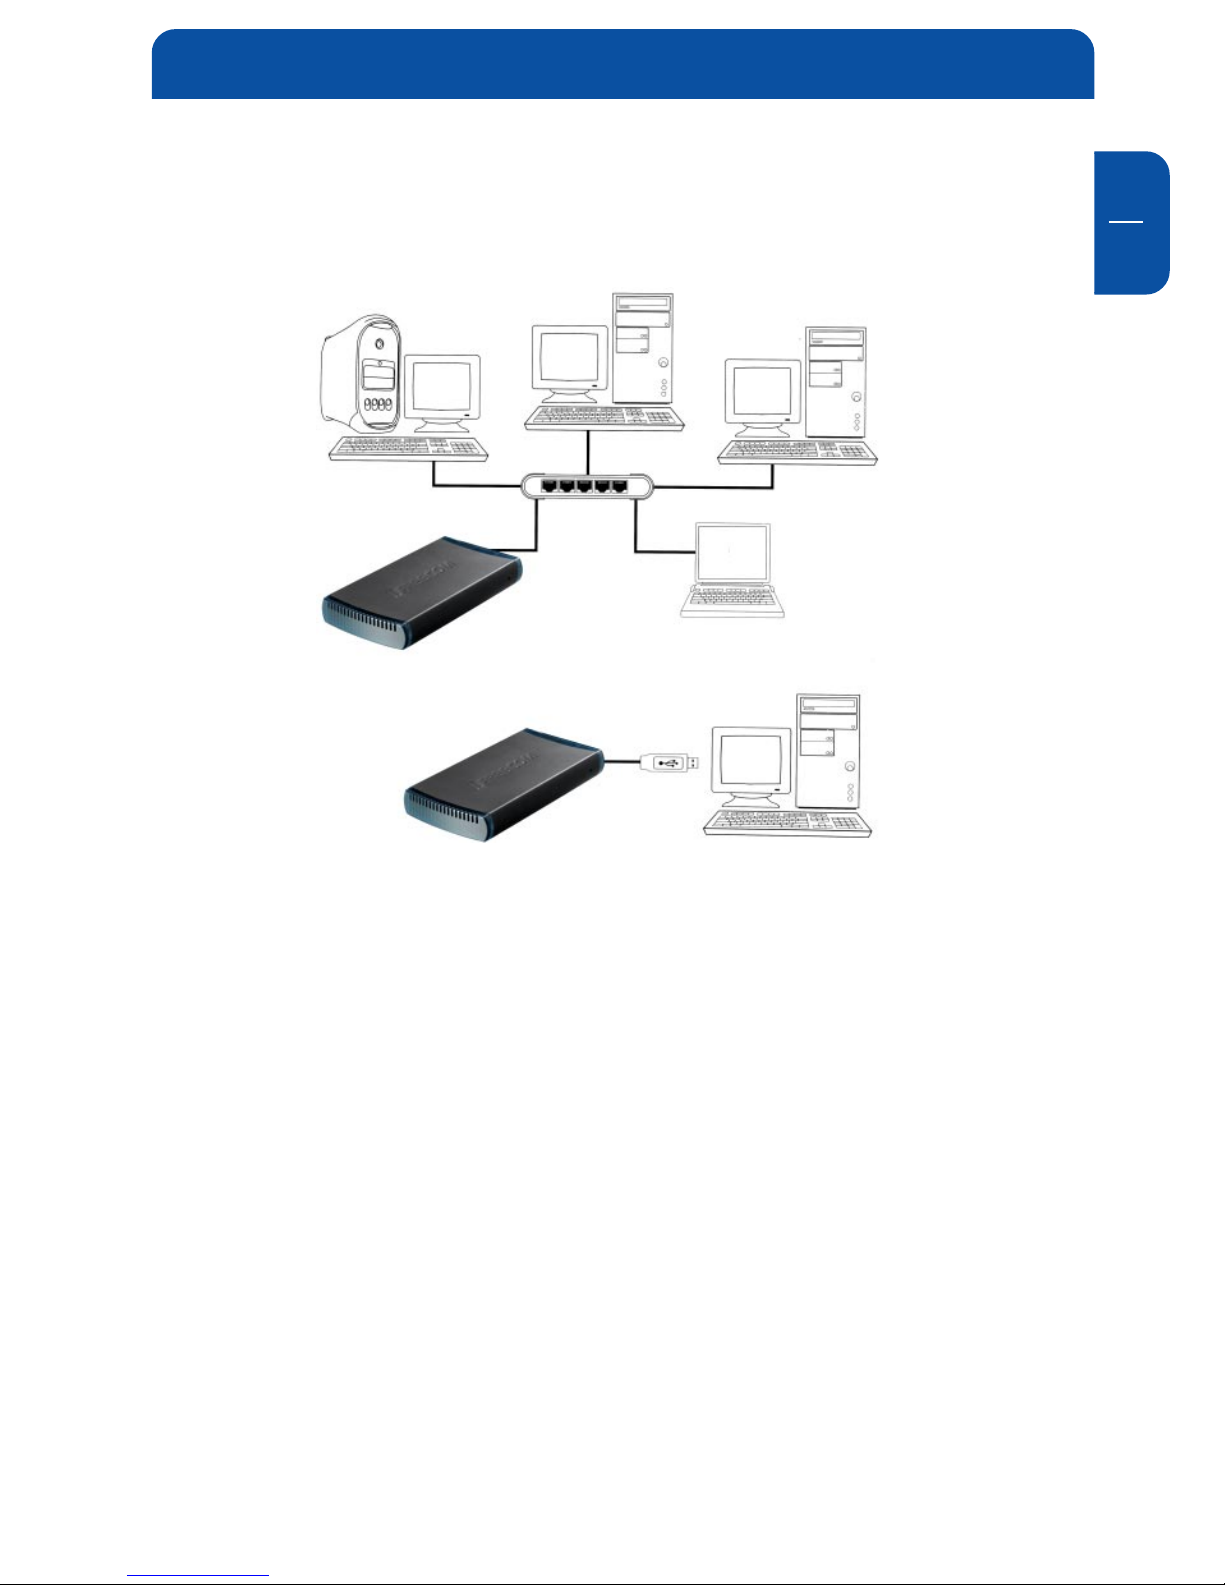
1.3 Classic SL Network Drive Setup Overview
Classic SL Network Drive
NDAS (Ethernet) mode
USB-mode

Freecom Classic SL Network Drive
GB
2
8
Chapter 2: Cable Installation
Warning: Do not connect USB cable and Ethernet cable at the
same time.
2.1 NDAS (Ethernet) Mode
Classic SL Network Drive
1. Connect the included Ethernet cable from the Ethernet port on the Classic SL
Network Drive to a switch (100 Base-T full duplex).
Wireless users: Connect Classic SL Network Drive to your wireless router or
access point with the included Ethernet cable.
2. Make sure the power connector is firmly attached to the Classic SL Network
Drive and connect the power adapter to a power source.
3. Slide the On/Off Switch to ON position.
2.2 USB Mode
Classic SL Network Drive
1. Connect the included USB cable from the USB port on the Classic SL Network
Drive to your PC’s USB port.
2. Make sure the power connector is connected firmly to the Classic SL Network
Drive and connect the power adaptor to a power source.
3. Slide the On/Off Switch to ON position.

GB
3
9
Chapter 3: Software Installation
3.1 For Windows XP and Windows 2000
Installation of the Classic SL Network Drive software is simple and easy. Insert the
included "Classic SL Network Drive Manual & Software Installation CD" into your
CD-ROM Drive and select the Drive Sharing and Classic SL Network Drive Mode.
You will be guided through the installation.
Network Drive Mode:
NDAS mode: Select NDAS mode to share the Classic SL Network Drive with users
on the network.
Drive Sharing:
Select a Drive Sharing Mode that is best for your environment:
• Multi OS:
- Classic SL Network Drive can be shared within a mixed network of Windows98/Me/2000/XP and Apple Macintosh computers
- Multiple PC’s can have Read Only access simultaneously
- Write access is assigned to one user at a time and is passed from one user
to another.
- Fastest performance
• Multi-Write:
- Windows2000/XP environment
- Multiple PC’s can have Read and Write access simultaneously
USB 2.0 Mode: Select USB mode to use the Classic SL Network Drive as a portable
external hard drive for your PC.
Software Installation
Freecom Classic SL Network Drive
GB
3
10
3.2 For Windows 98 SE and Windows ME
For the latest software and drivers, visit www.freecom.com
NDAS Mode
Insert the included "Classic SL Network Drive Installation CD" into your CDROM Drive. You will be guided through the installation.
USB 2.0 Mode
Follow the instructions below:
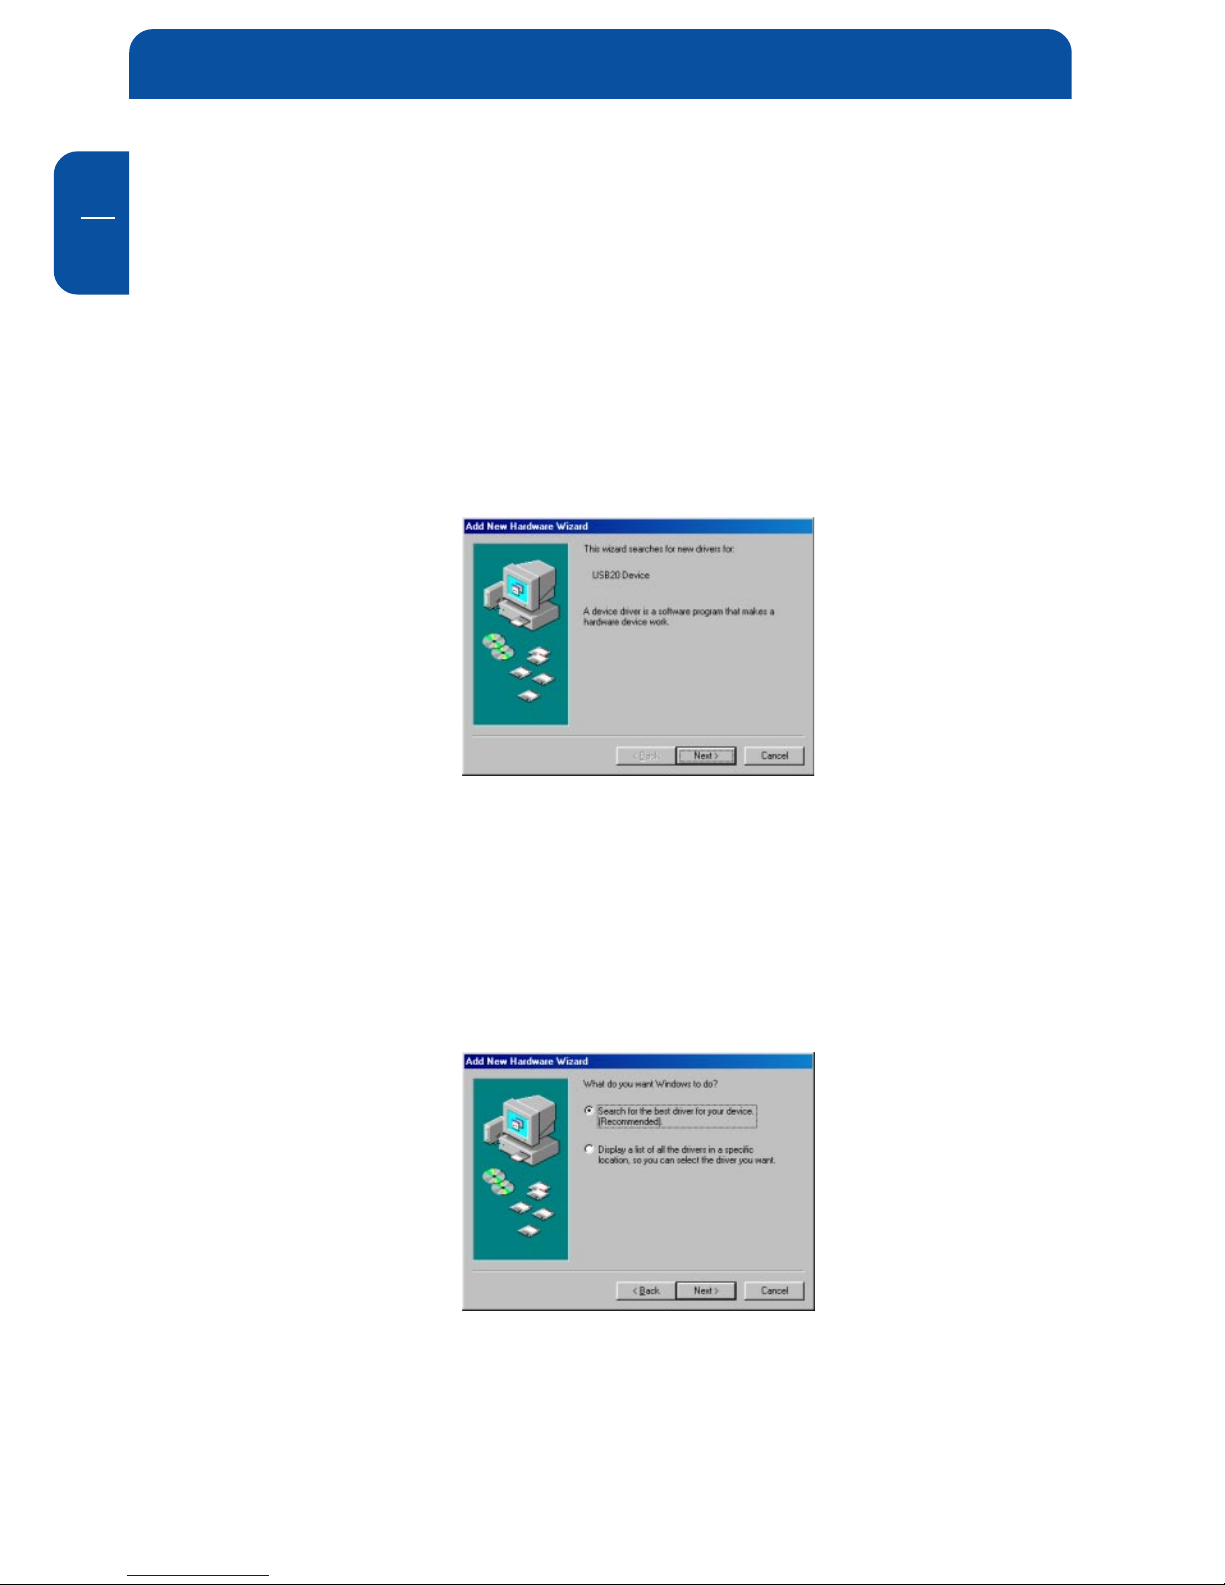
Step 1
If this is your first time installing the Classic SL Network Drive, the "Add New
Hardware Wizard" will appear. Click "Next" and follow the instructions on
your screen.
If you have already previously installed the Classic SL Network Drive, the
Classic SL Network Drive will be listed as a local drive in "My Computer". Drive
letter and name may vary between Personal Computers.
Step 2
Select "Search for the best driver for your device".
Click "Next".
GB
3
11
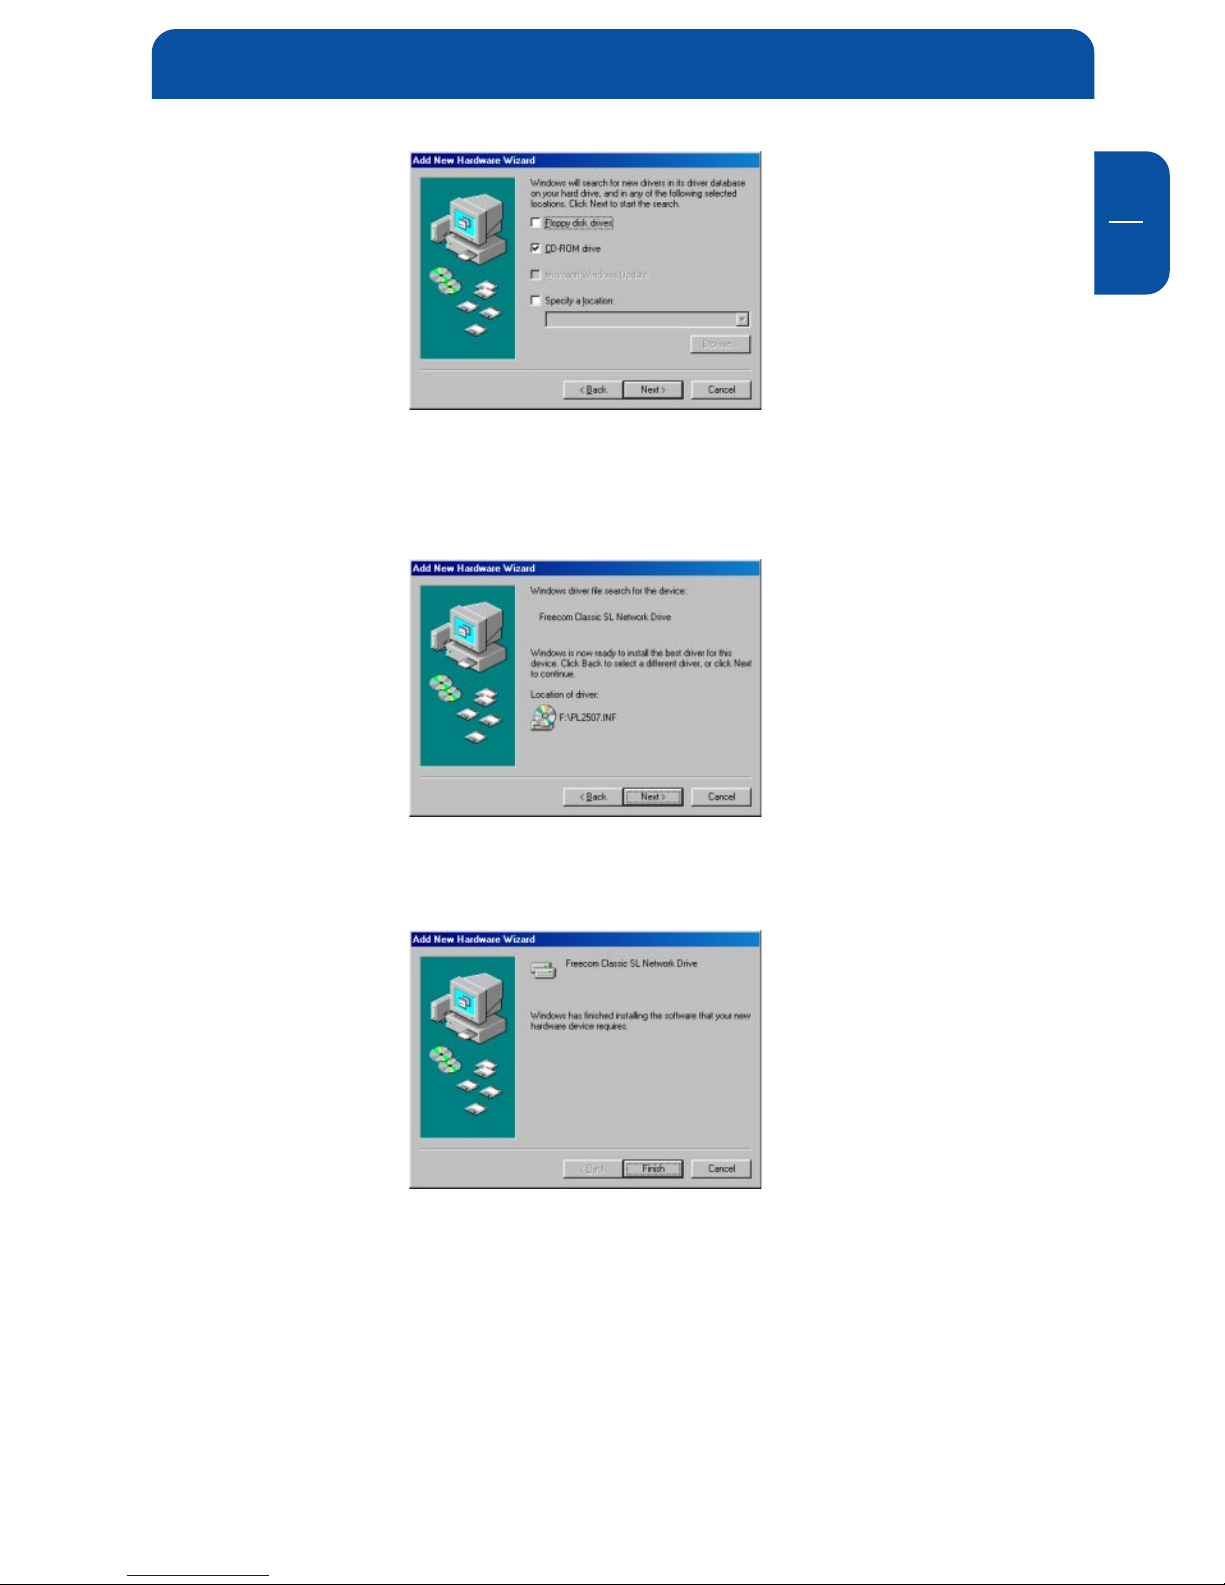
Step 3
Make sure that the checkbox "CD-ROM drive" is activated. Continue by
clicking on "Next".
Step 4
Click "Next".
Step 5
Driver has been successfully installed, click "Finish".
Software Installation

Freecom Classic SL Network Drive
GB
3
12
3.3 Classic SL Network Drive Administrator
When the software installation is completed, you will find a Classic SL Network
Drive Launcher Icon on your desktop screen and a Classic SL Network Drive
Administrator Tool icon on the system tray.
• Classic SL Network Drive Launcher (desktop icon) activates and loads the
Classic SL Network Drive Administrator Tool onto the system tray.
• Classic SL Network Drive Administrator Tool (system tray icon) performs the
following functions:
- Refresh Classic SL Network Drive Status
- Add a Classic SL Network Drive
- Display Software Version
- Enable Read / Write Access
- Enable Read Only Access
- Disable Classic SL Network Drive
- Edit Classic SL Network Drive Name
- Display Classic SL Network Drive Properties
NOTE: Classic SL Network Drive Launcher is used only on Windows
XP and Windows 2000.
GB
4
13
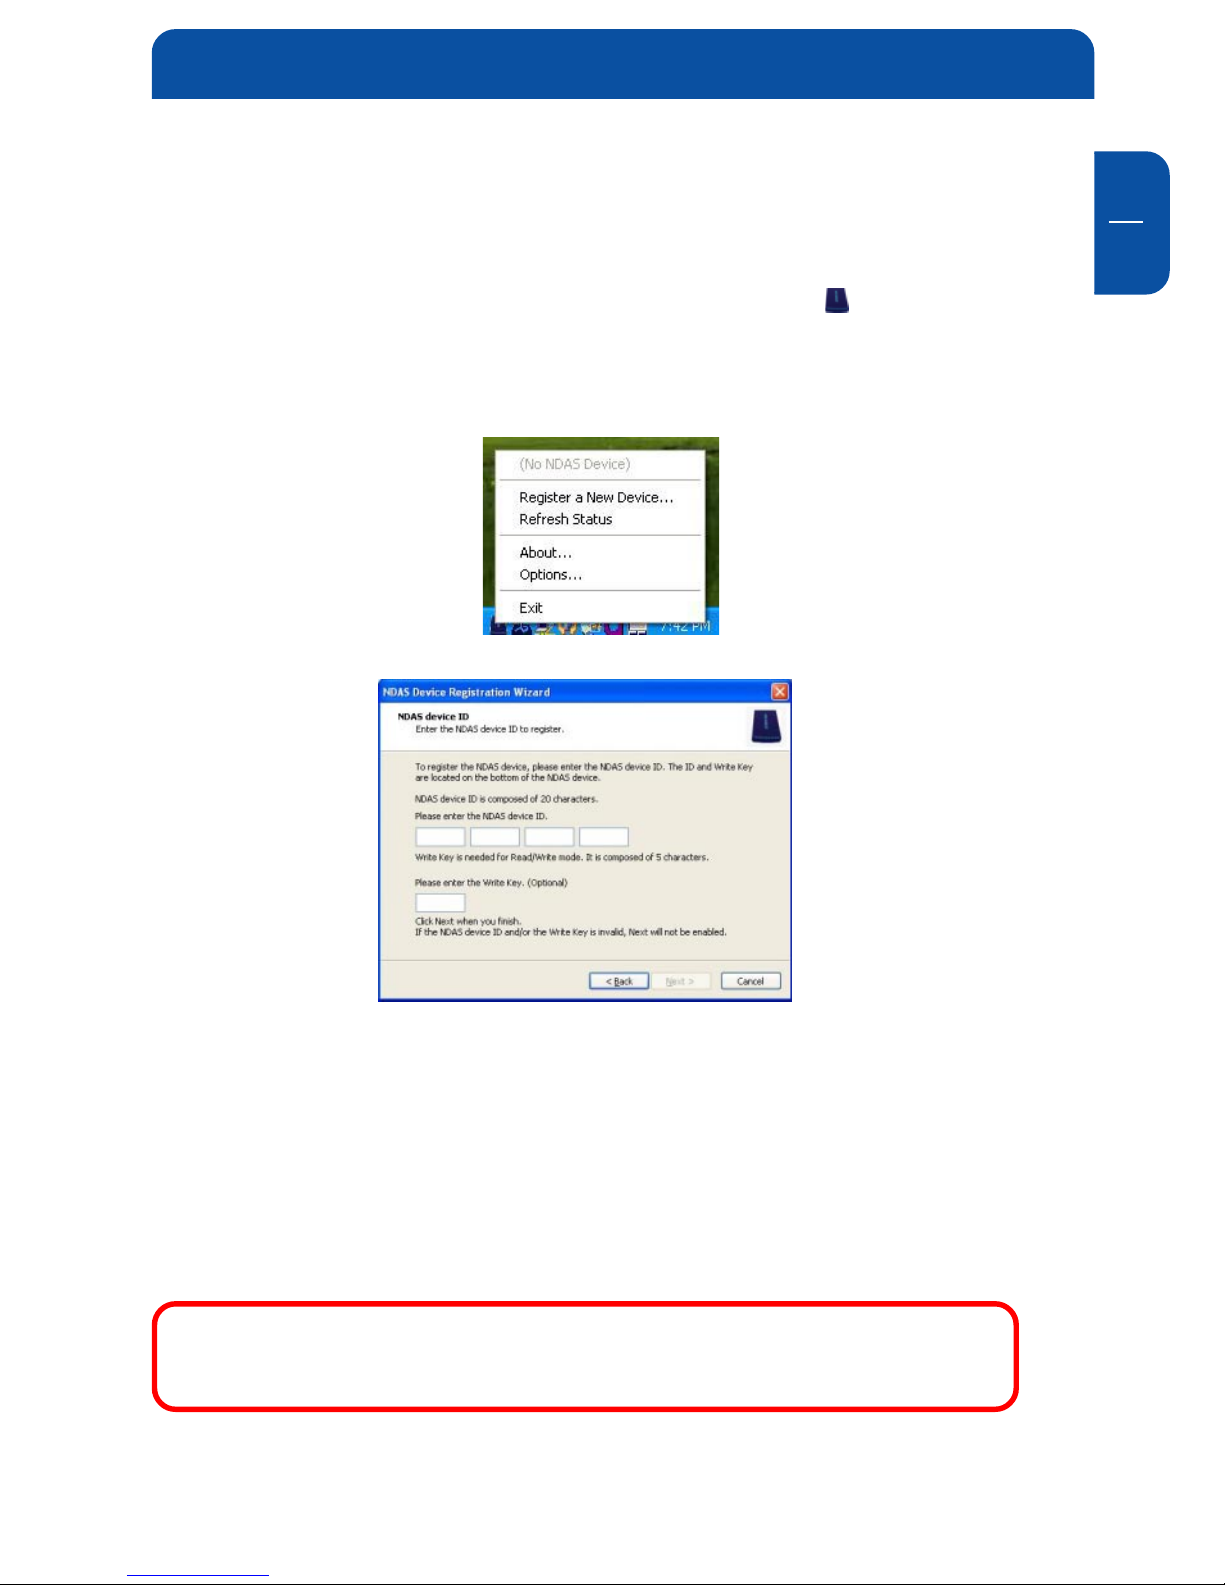
Chapter 4: Drive Registration
4.1 Add / register a New Classic SL Network Drive
1. Click "Classic SL Network Drive Administrator Tool" Icon located on the
system tray.
2. Select "New Classic SL Network Drive".
3. Register a Classic SL Network Drive.
- Classic SL Network Drive Name: (optional) Select a name for your Classic
SL Network Drive
- Classic SL Network Drive ID: Enter the 20-digit Classic SL Network Drive
ID located on the bottom of your Classic SL Network Drive.
- Write Key: (optional) Enter the 5-digit Write Key located on the bottom of
your Classic SL Network Drive.
Write Key must be registered to write to Classic SL Network Drive.
NOTE: Classic SL Network Drive ID and Write Key do not contain
the letter O. Please use the number 0 (zero), for all 0’s.
Drive Registration

Freecom Classic SL Network Drive
GB
4
14
4. Click "Add".
5. Click "OK" to confirm the Classic SL Network Drive registration.
- If the "Write Key" was entered in the previous step, the Classic SL Network
Drive is registered as "Read / Write Mode".
- If the "Write Key" was not entered in the previous step, the Classic SL
Network Drive is registered as "Read Only Mode".
6. "Found New Hardware Wizard"
- This window may or may not appear.
- If the "Found New Hardware" window appears, follow the instructions and
install the new Classic SL Network Drive.
NOTE: For Windows 2000, the "Upgrade Device Driver Wizard" will
appear instead.
7. "Windows Digital Signature" window.
Windows 2000 Windows XP
Click "Yes" Click "Continue Anyway"
8. Registration is completed.
Click "Classic SL Network Drive Administrator Tool" to see the registered
Classic SL Network Drive.
Read/Write Mode Read Only Mode
Freecom Network DriveFreecom Network Drive
Freecom Network DriveFreecom Network Drive
Freecom Network Drive

GB
4
15
4.2 Using Classic SL Network Drive
Now that you have successfully installed the Freecom Classic SL Network Drive,
please familiarize yourself with using the Classic SL Network Drive. The Classic SL
Network Drive is located in "My Computer" as a local drive. Drive letter and
Classic SL Network Drive name may vary between different Personal Computers.
You can use Classic SL Network Drive like a local drive on your PC.
- Drag and drop files to Classic SL Network Drive.
- Copy and paste data to Classic SL Network Drive.
- Make and delete folders.
- Share files and folders.
- Backup your data.
4.3 Sharing Classic SL Network Drive
When the Classic SL Network Drive is connected to your network, it can be
accessed from any computer on this network. To share the Classic SL Network
Drive, the following must be done:
Windows 2000/XP Environment:
- All computers and Classic SL Network Drive must be on the same LAN.
- Classic SL Network Drive must be connected via Ethernet or Wireless Access
Point.
- To share Read and Write access, all computers on the network using the
Network Disk must have the Classic SL Network Drive driver version 3.x.x
installed.
- Classic SL Network Drive must be registered onto each computer.
Mixed Environment with Windows and Mac:
- All computers and Classic SL Network Drive must be on the same LAN.
- Classic SL Network Drive must be connected via Ethernet or Wireless Access Point.
- To share Classic SL Network Drive each computer on the network must install
the corresponding Classic SL Network Drive Driver.
- On Windows XP/2000, install Classic SL Network Drive driver v2.4 (do not use
3.x.x).
- On Windows 98 SE/ME, install Classic SL Network Driver 1.x
- On Mac OSX, install Classic SL Network Drive driver 1.x
- Classic SL Network Drive must be registered onto each computer.
- Write access is assigned to one user at a time and is passed from one
user to another.
Drive Registration

Freecom Classic SL Network Drive
GB
4
16
NOTE: Classic SL Network Drive is preformatted in NTFS. In order
to use Classic SL Network Drive in mixed environments, Classic SL
Network Drive must be formatted in FAT32. If you use the "Disk
Management" utility in Windows XP or 2000 to format your
Classic SL Network Drive, then your Classic SL Network Drive will
be re-formatted in NTFS. NTFS is not a compatible file system
format with Mac and Windows 98SE / Me, thus your computers on
these OS will not recognize Classic SL Network Drive. You can use
a third party format utility to choose the file format your Classic SL
Network Drive is formatted in.
Warning:
• Do not perform disk operations (format, partition and chkdsk)
when multiple PCs are connected.
• Classic SL Network Drive can be formatted, partitioned, chkdsk,
aggregated or mirrored only when one PC is connected.
• When sharing Classic SL Network Drive between Windows
2000 and Windows XP, perform chkdsk.
 Loading...