

Freecom Multimedia Player User Manual
Rev. 530
MANUAL
Freecom MediaPlayer
2.5" Drive-In Kit

2
Freecom MediaPlayer Drive-In
GB
Dear customer,
Thank you for buying the Freecom MediaPlayer-25 Drive-In Kit, a brand-new
digital multimedia player that supports data access mode via 2.5" HDD inside
(not supplied). With this player you can easily enjoy Digital Movies, Digital
Music, Digital Photos from a 2.5" HDD (when assembled in the device) directly
on your TV or HiFi set.
Freecom Technologies • Germany
www.freecom.com
Warning !
All rights reserved. The products named in this manual are only used for
identification purposes and may be trademarks or registered trademarks of the
respective companies. This device was designed for home or office use.
Warning! This device is equipment complying with EN55022 class B.
Freecom Technologies is not liable for any damages that may occur from the use
of a Freecom system. All rights reserved. We reserve the right to upgrade our
products in keeping with technological advances.

3
GB
Table of Contents
Users manual
General Information .......................................................................... page 4
Warnings and Safety Instructions .....................................................page 6
Chapter 1:
Explanation of the exterior Appearance ......................................... page 9
Chapter 2:
Assembling a Hard Drive into the MediaPlayer .............................. page 10
Chapter 3:
Connecting the player to a PC .......................................................... page 11
Chapter 4:
Connecting the player to external AV Devices ................................ page 14
Chapter 5:
Basic Setup of the player ...................................................................page 19
Chapter 6:
Play Video, Audio and Photo files .................................................... page 23
Chapter 7:
Format the Built-in HDD via USB ...................................................... page 32
Appendix ............................................................................................. page 45
© 2005 Freecom Technologies

4
Freecom MediaPlayer Drive-In
GB
* USB 2.0 is downwards compatible to USB 1.1. To achieve optimal performance from the
Freecom MediaPlayer-25 Drive-In Kit your PC should be equipped with an USB 2.0 port.
USB 2.0 PCI Host Controllers are separately available at www.freecom.com.
Introduction
The Freecom MediaPlayer-25 Drive-In Kit is 2.5" HDD interface type of MPEG4
player based on USB 2.0 High Speed. It can be connected to TV in home or a
monitor. It is not only an external USB HDD but also the best portable AV device
that displays Music, Movie and photo.
Package Content
Please check the contents of the box. The following should be supplied:
• Freecom MediaPlayer-25 Drive-In Kit
• DC Adaptor
• AV 1 Cable (Yellow / Red / White)
• AV 2 Cable (Yellow/S-Video)
• AV3 Cable (Yellow / Red / Green)
• USB Cable
• Remote Control
• AAA Battery
• Quick Install Guide
• CD with manual and USB 2.0 Driver for WIN98SE
Minimum System Requirements
The following hard- and software requirements must be fulfilled to ensure
trouble-free operation.
Hardware Requirements
• Pentium III 500MHz or faster
• At least 128 MB RAM
• USB interface (USB 1.1 or USB 2.0*)
• A CD-ROM drive or internet connection for driver installation (for WIN98SE)
• For playback on TV, a TV with PAL or NTSC system is required.
• Support HDD: Compatible with standard 2.5" IDE Hard Drive

5
GB
General Information
Software Requirements
• Windows XP, Windows 2000, Windows Me, Windows 98 Second Edition
• Mac OS X or higher
• Linux 2.4 or higher
• For use under Mac OS and Linux, the drive needs to be FAT-32 formatted.
Supported Media Formats
Video
• MPEG 1, 2, 4 (MPG, MPEG, AVI, M2V, DAT, VOB, etc)
• DivX, XviD (Except GMC & Qpel option applied formats)
Audio
• MP3
• OGG Vorbis
• WMA
• WAV
Main Specifications & Functions
• An External USB HDD using 2.5" HDD.
• Supports 480 Mbps High-Speed USB 2.0 data transmission interface.
• Works on Windows 98SE/ME/2000/XP, Mac OS X higher, Linux 2.4 higher.
• Supports FAT32 and NTFS file system.
• Multi-Codec Digital Data Player that plays various Audio, Video formats and
photos through TV or a monitor.
• Supports various multimedia formats (MPEG 1, 2, 4, DivX, XviD, MP3, OGG,
JPG, etc).
• Supports multi-language.
• Supports high-resolution data & 5.1 Ch digital sound through Coaxial
output.
• Supports 480p. 720p, 1080i progressive scan.
• No additional power required to connect to a PC.
• Firmware upgradeable for the latest functions and performance.

6
Freecom MediaPlayer Drive-In
GB
Warnings and Safety Instructions
Please read and follow the below mentioned instructions. They should be
observed in order to prevent injury to the user, damage to the device and
damage to property, as well as to ensure safe use of the product. Not following
these instructions may cause the unit to malfunction.
To ensure that your Freecom MediaPlayer-25 Drive-In Kit functions properly,
please take note of the following precautions. If these are not followed, you
may void your warranty and damage the Freecom MediaPlayer-25 Drive-In Kit.
• Safely remove the Freecom MediaPlayer-25 Drive-In Kit via your operating
system (the "unplug or eject hardware" option in the Windows taskbar)
before disconnecting the USB cable or power cable and before switching
off the device. Failing to do so may result in data loss.
• Do not disconnect the Freecom MediaPlayer-25 Drive-In Kit from the PC
during file transfer. This may result in data loss and an error on the player.
If this occurs, please run the ScanDisk utility.
• Do not turn off the power when a file is playing.
• We strongly recommend you to regularly back up the data from the hard
drive that you have built in, to another safe media. Freecom can never be
held responsible for data damage or data loss of the built-in HDD.
• Unplug the power adaptor when you don't use the device for a longer
period of time.
• If the length of USB cable is too long, it may not be connected smoothly
(Recommend: up to 3 meters)
• We recommend you to use the all supplied cables or accessories that are
customized for the best performance of the Freecom MediaPlayer-25 DriveIn Kit. Using other cables or accessories may not support the best performance.
• If you have USB 1.1 Host Adapter, the device will be working at USB1.1
speed.
• When using a hard drive with less than 6GB storage capacity, you may
experience data damage or data loss. We recommend you to use a harddrive
of more than 6GB.
Note: Make sure to format the Hard Drive before using the
device. When you use an unformatted HDD, a PC will not detect
the Freecom MediaPlayer-25 Drive-In Kit.

7
GB
Warnings and Safety Instructions
• In a car, we recommend you to use the supplied cigarette lighter jack
(option) and we are not responsible for the damage or loss of data in a HDD
by using another cigarette lighter jack.
• Grip the side of the Freecom MediaPlayer-25 Drive-In Kit. The top & bottom
cover may have heat due to aluminum case.
• This Freecom MediaPlayer-25 Drive-In Kit does not supports the DivX, XviD
codec of video files that has GMC, Qpel option.
• This Freecom MediaPlayer-25 Drive-In Kit supports only "Pass-Through for
DTS Audio codec.
Be away from water, heavy moisture. If the Freecom MediaPlayer25 Drive-In Kit has a liquid, unplug the Freecom MediaPlayer-25
Drive-In Kit from a PC right away. If you use the Freecom
MediaPlayer-25 Drive-In Kit under this condition, the HDD may
be fired or you may have electric shock.
• Don’t touch the Freecom MediaPlayer-25 Drive-In Kit by wet hands. It may
cause electric shock.
• Be away from heat, a direct ray of light.
• Be away from devices that transmit strong magnetic signal. It may cause
data damage or loss on HDD.
• Don’t disassemble as the user’s own accord. It may cause the Freecom
MediaPlayer-25 Drive-In Kit damaged or loose the data.
• Do not drop the Freecom MediaPlayer-25 Drive-In Kit or expose it to other
kinds of sudden mechanical shocks as this may result in data loss and
damage to the hard drive.
• Do not use the Freecom MediaPlayer-25 Drive-In Kit when the ambient
temperature is below 10°C or above 45°C.
• If the Freecom MediaPlayer-25 Drive-In Kit is moved from a cool environment to a warmer environment, please allow the drive to acclimatize to the
ambient temperature before operating the device. Failing to do so may
lead to condensation within the drive enclosure, which in turn may cause
the drive to malfunction.
• Do not use the Freecom MediaPlayer-25 Drive-In Kit in a dusty environment.
Dust inside the enclosure may damage the internal electronics and result in
drive malfunction.
• Do not use the Freecom MediaPlayer-25 Drive-In Kit near magnetic fields.
• The MediaPlayer-25 Drive-In Kit may generate heat when used for a longer
period of time.

8
Freecom MediaPlayer Drive-In
GB
Furthermore, warranty does not apply to:
• Damages or problems resulting from misuse, abuse, accident, alteration or
incorrect electrical current or voltage.
• Any product tampered-with or damaged serial number label.
• Any product without a serial number label.
• Consumable items delivered with or in the equipment.

9
GB
1
Chapter 1: Explanation of the exterior Appearance
FRONT VIEW
REAR VIEW
Power LED: Lights up when drive is powered
HDD LED: Lights up when data is transmitted
IR LED: Blinks when a signal is received from the remote control
IR Receiver: Reception area of the remote control.
USB Port: Connect USB Cable to a PC in order to copy and paste data
DC Input: Connect DC Power Adaptor.
SV/5.1: Output for S-Video, Coaxial, Component (Y, Pr) signal.
A/V: Output for Composite, Stereo L-R, Component (Pb) signal.
Power LED
HDD LED
IR LED
IR Receiver
USB Port
DC Input
S-Video / Coaxial /
Component (Y, Pr)
Composite / Stereo L-R /
Component (Pb)
Explanation of the exterior Appearance
10
Freecom MediaPlayer Drive-In
GB
2
Chapter 2: Assembling a Hard Drive into the
MediaPlayer
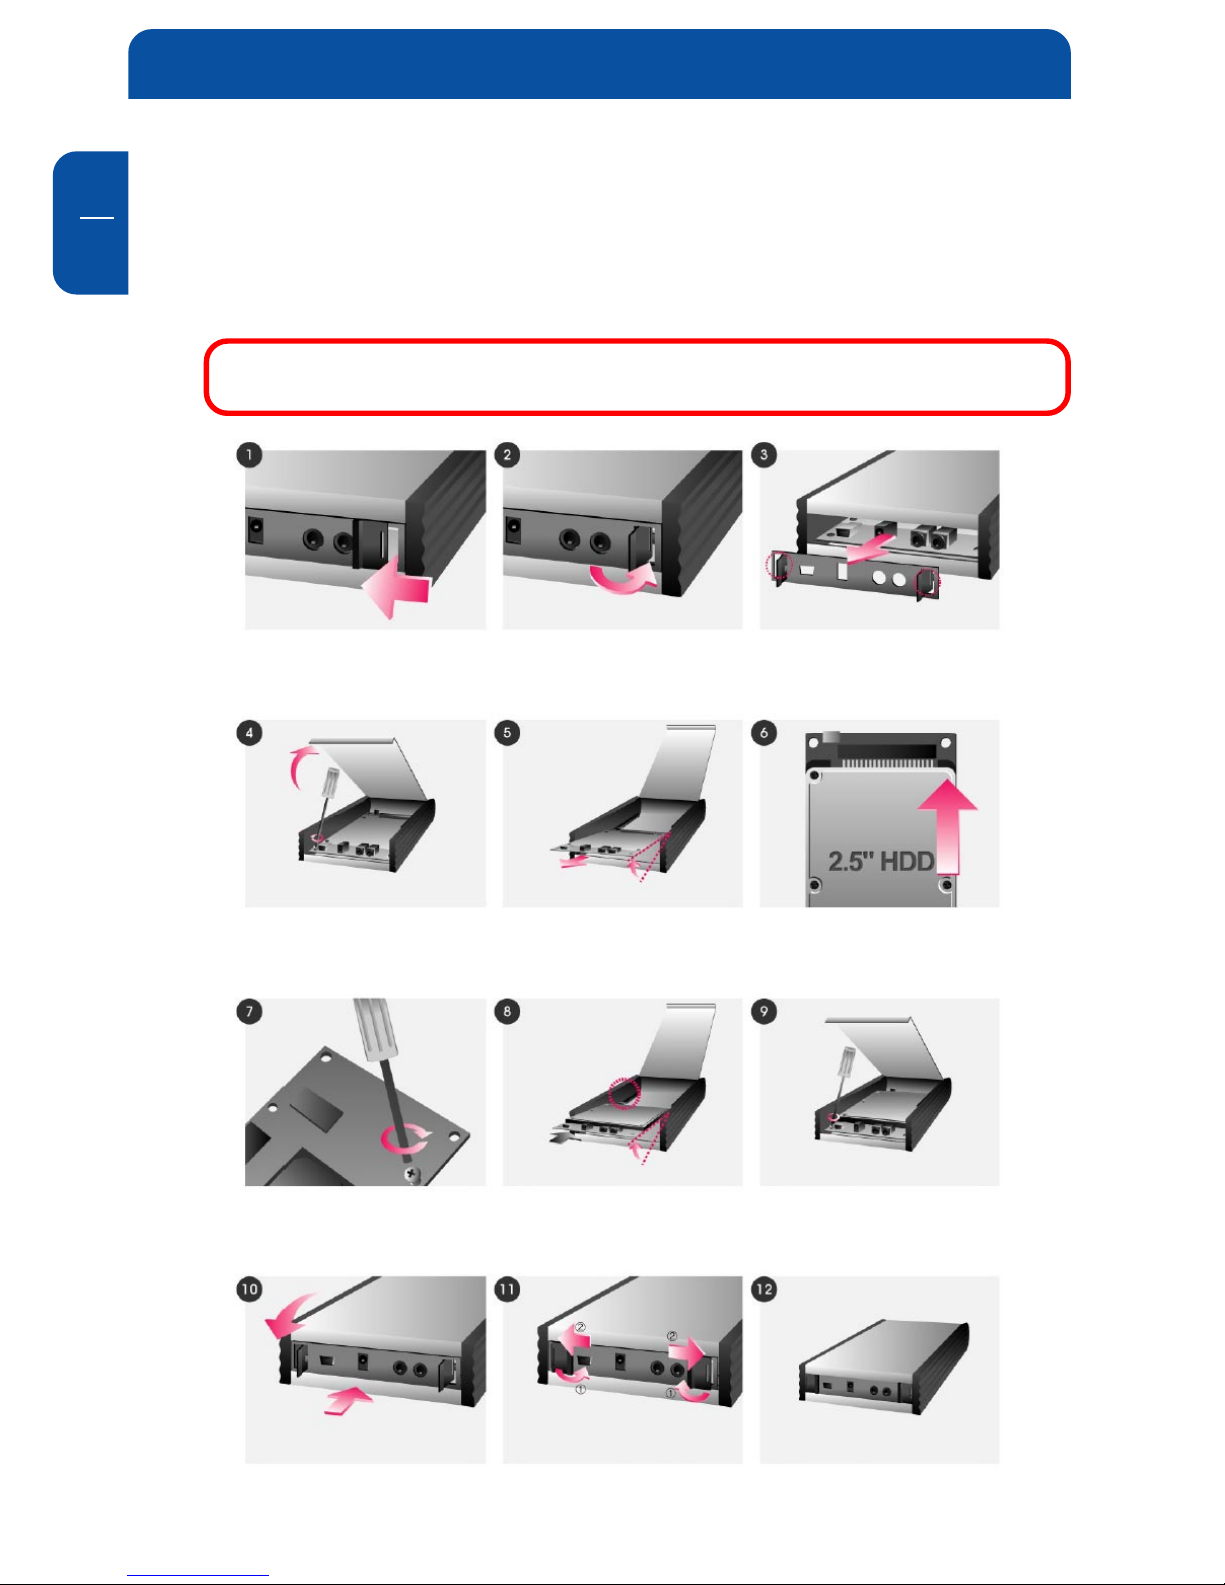
This chapter describes how to assemble or disassemble a hard drive to/from the
player.
Note: The HDD should be jumpered as "Master".
Pull a hasp to the arrow direction. Pull another hasp to the arrow
direction.
Grip the hasp and pull it out to the
arrow direction.
Open the top-cover and unscrew the
PCB.
Pull the PCB out. Grip HDD and insert it into the pins
of PCB (be sure to match the 44 pins).
Screwing HDD on PCB solidly by
using the supplied screws.
Insert the screwed HDD & PCB into a
case of Freecom MediaPlayer-25
Drive-In Kit.
Screw HDD & PCB on the Freecom
MediaPlayer-25 Drive-In Kit by using
a screw driver.
Put the back panel in. Push each hasp to the arrow
direction.
Now the assambly is compleated.
11
GB
3
Chapter 3: Connecting the player to a PC
Connect the player to the PC using the supplied USB Cable.
Note: Windows 98SE users have to install the Installation Driver
first. Refer to the below instructions.
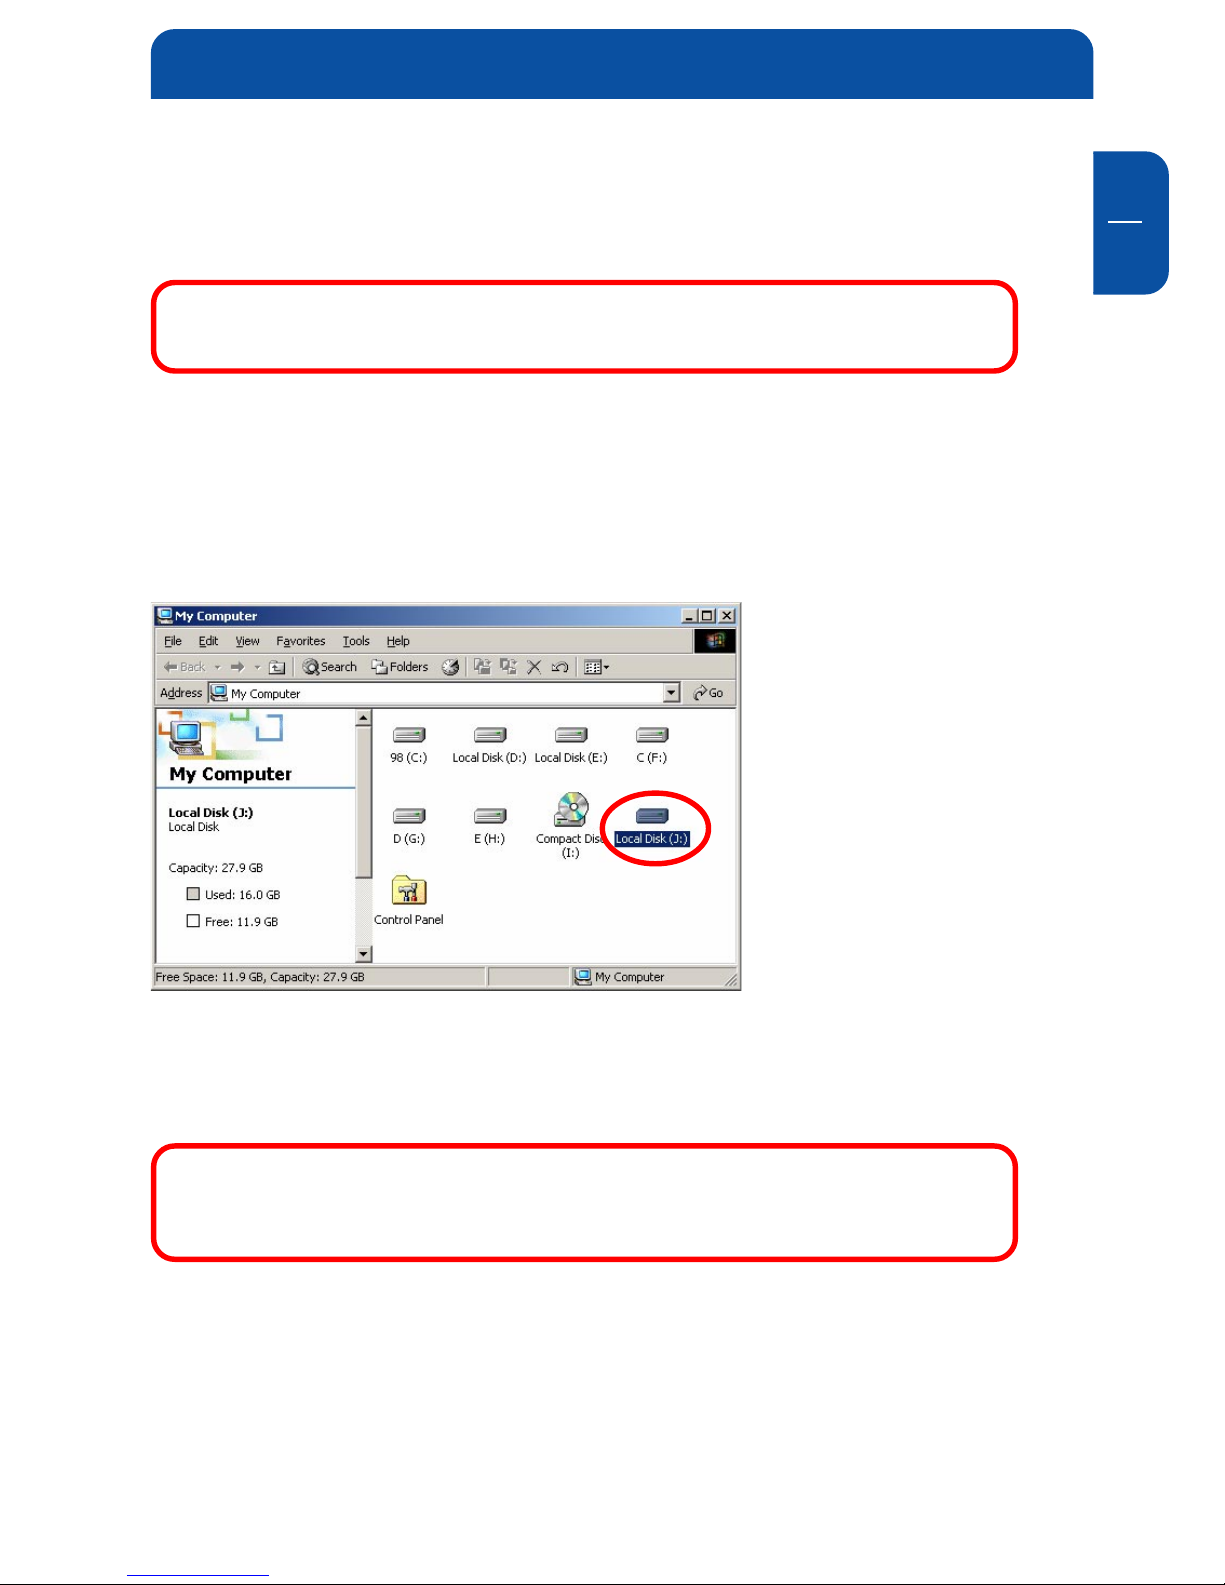
3.1. Instructions for Windows Users
When the player is connected to the PC, a new volume will appear on [My
Computer]. You can save any data on this volume. See the instructions below
the various Windows versions.
After detecting the Player, a new volume will appear.
3.1.1 Windows 98SE Users
Note: For the use under Windows98SE you must install the
USB2.0 driver which is on the manual CD, otherwise your PC does
not recognize the player as a new disk drive.
Connecting the player to a PC

12
Freecom MediaPlayer Drive-In
GB
3
When you install [Win98_Freecom MediaPlayer-25.exe], the installation wizard will appear. Press [Next] button and complete the installation.
Check the Driver Installation
You can check whether the driver is installed correctly or not at [Appendix.
Check the Driver Installation for the Freecom MediaPlayer-25 Drive-In Kit at
Windows].
Check whether the hard drive is formatted or not
If the assembled hard drive is not formatted, a PC will not detect the HDD. Refer
to Chapter 7:"Format the Built-in HDD via USB", for more details.
How to remove the Freecom MediaPlayer-25 Drive-In Kit safely from
a PC
Remove the player using the "safely remove" icon from the Windows taskbar.
Not following this procedure may cause damage to the drive and/or data loss.
13
GB
3
3.1.2 Windows ME/2000/XP Users
There is no need to install any Installation Driver.
Connect the player to the PC using the supplied USB Cable. The PC will
automatically detect the player as USB Mass Storage Device in [My Computer].
Check the Driver Installation
You can check whether the driver is installed correctly or not at Appendix:
"Check the Driver Installation for the Freecom MediaPlayer-25 at Windows".
Check whether the hard drive is formatted or not
If the assembled hard drive is not formatted, a PC will not detect the HDD. Refer
to Chapter 7:"Format the Built-in HDD via USB", for more details.
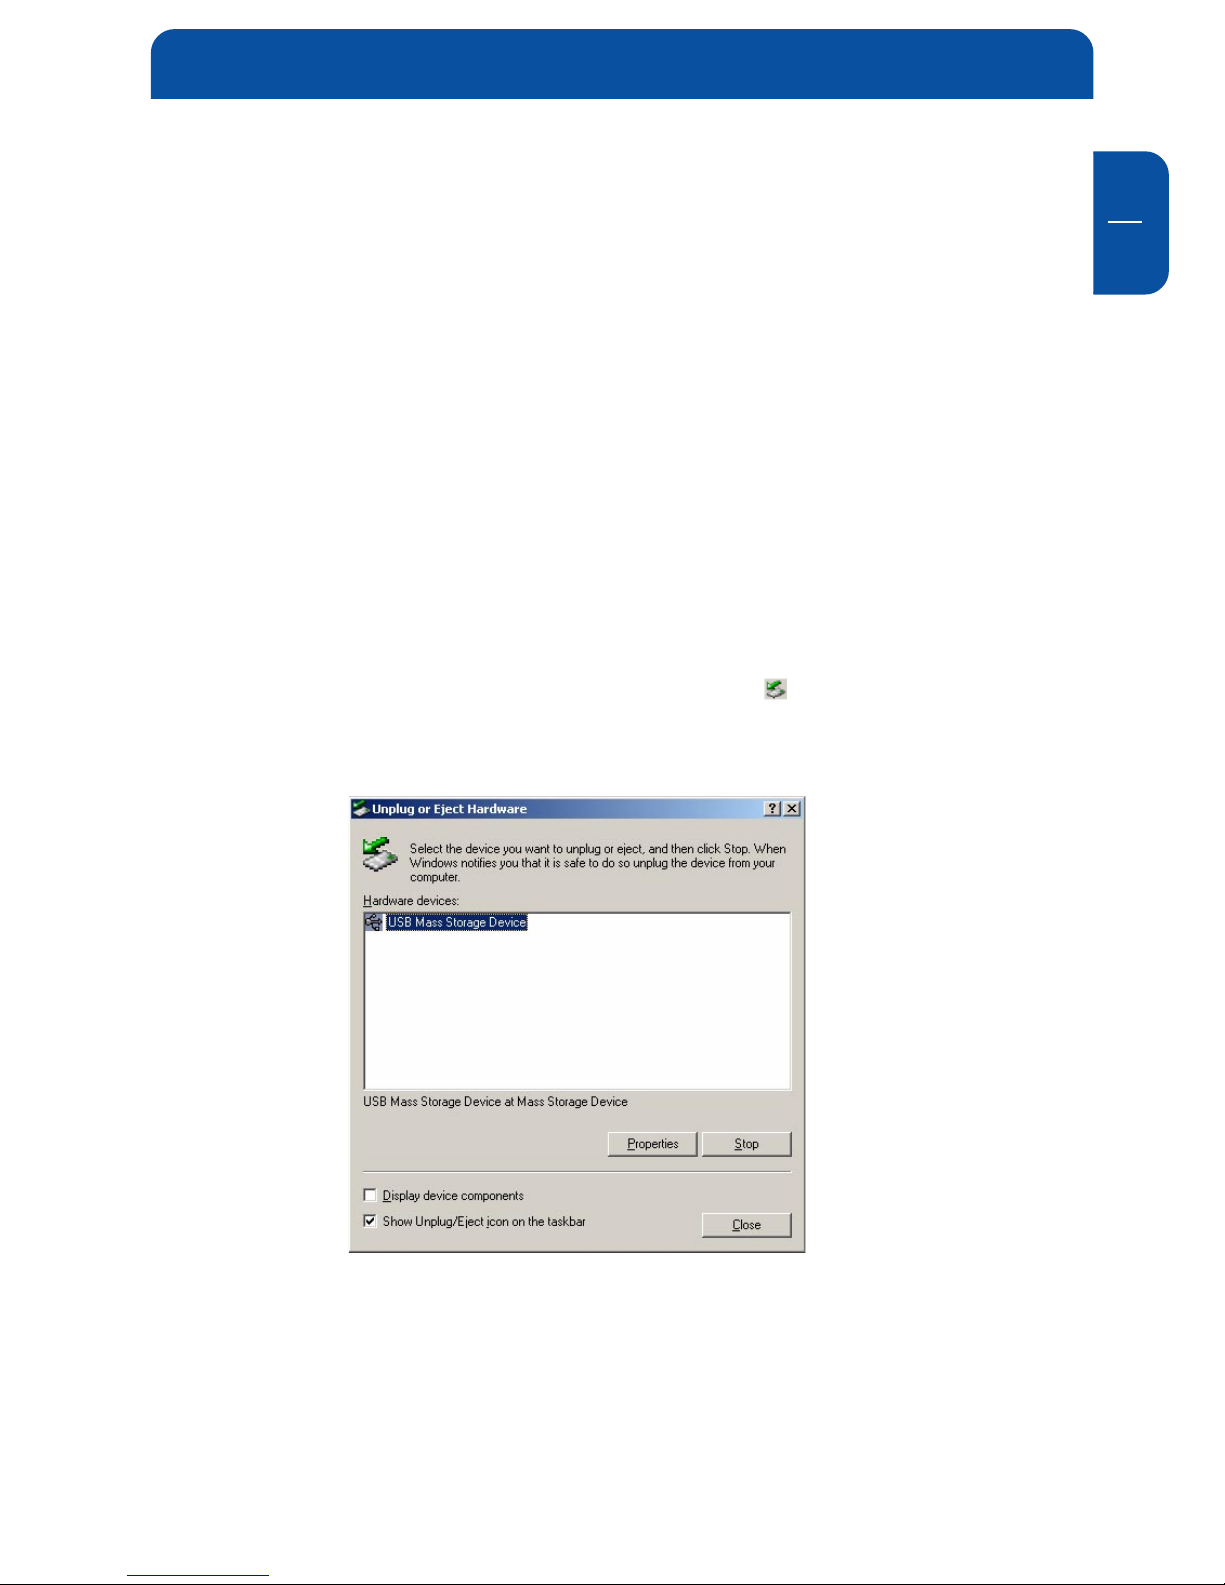
How to remove the Freecom MediaPlayer-25 Drive-In Kit safely from
a PC
Remove the player using the "safely remove" icon
from the Windows
taskbar. Not following this procedure may cause damage to the drive and/or
data loss.
3.2 Mac Users
There is no need to install an installation driver for Mac OS 10.x version; the
player will be detected automatically. If the Freecom MediaPlayer-25 Drive-In
Kit is detected correctly, an icon will appeared on your desktop.
To remove the player safely, drag the icon to the trash can and unplug the
player.
Connecting the player to a PC
14
Freecom MediaPlayer Drive-In
GB
4
Chapter 4: Connecting the player to external AV
Devices
The player supports Composite, S-Video, and Component for Video and Stereo
& 5.1Ch sound by Digital Output (Coaxial). Please refer to the below examples.
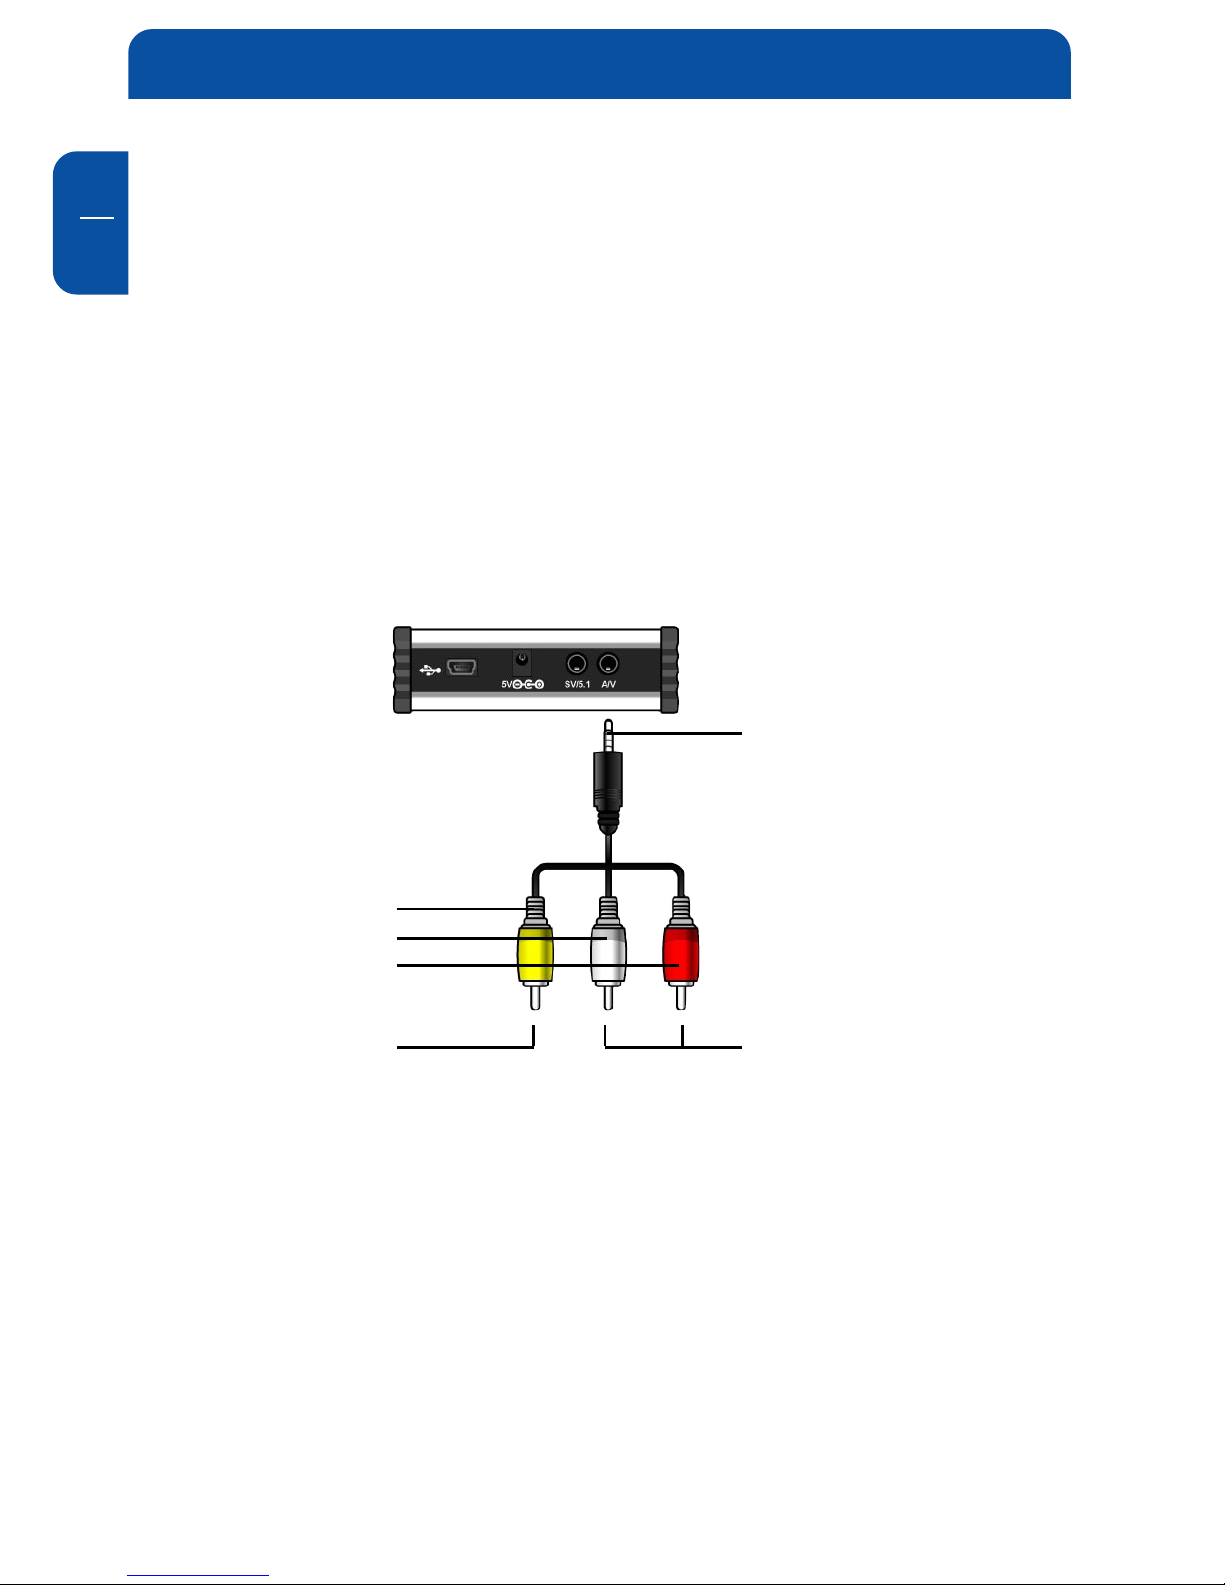
4.1 Connect by Composite for Video & Stereo for Audio
This is the most commonly used method to connect the player to a TV.
Connection for Video through Composite and for Audio through
Stereo
Connect AV 1 Cable (Yellow, White, Red)
to AV Jack.
Connect to Audio Jacks of TV or HiFi
White = L (Left) Audio Input
Red = R (Right) Audio Input
Yellow
White
Red
Connect to Composite
(CVBS) Jack on TV
15
GB
4
4.2 Connect by Composite for Video & 5.1Ch for Audio
Connection for Video through Composite and for Audio through
5.1Ch (Coaxial)
After cable connection, set the Audio as 5.1Ch at Setup page of the player.
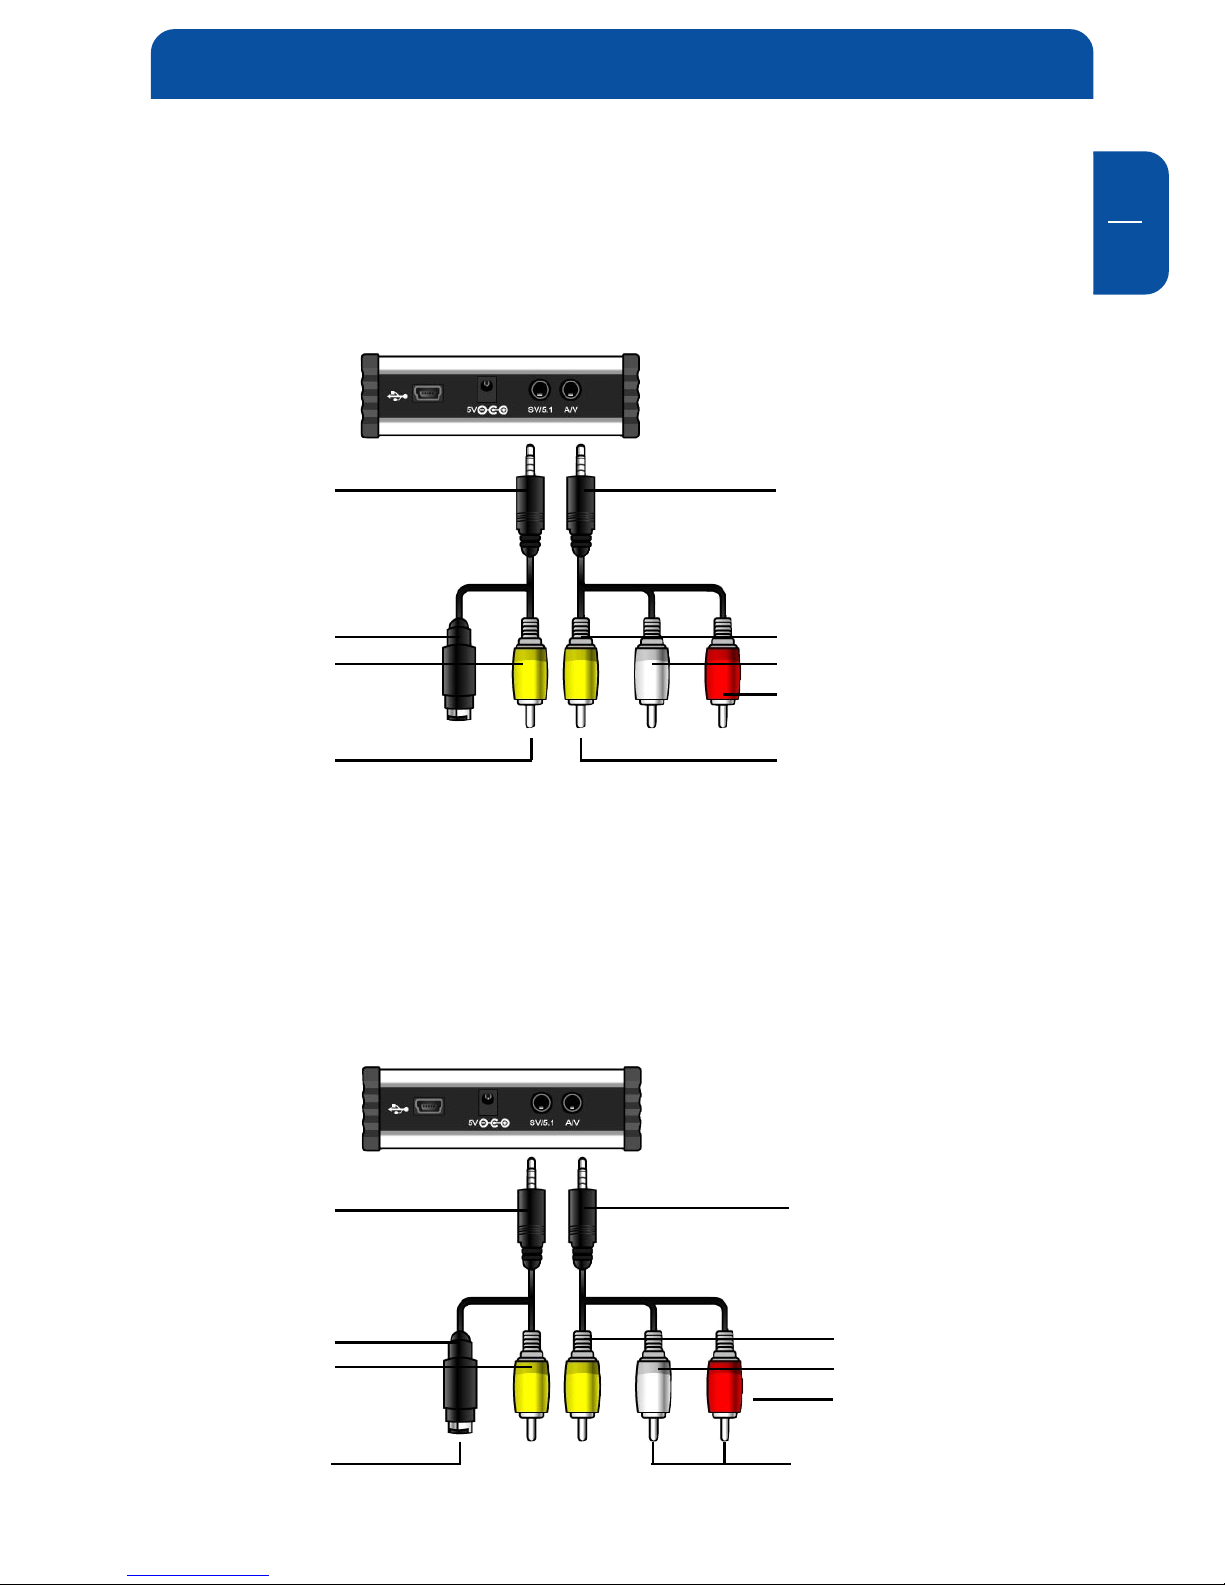
4.3 Connect by S-Video for Video & Stereo for Audio
Connection for Video through S-Video and for Audio through Stereo
Yellow
White
Red
Connect AV 1 Cable (Yellow,
White, Red) to AV Jack.
Black
Yellow
Connect to Composite (CVBS) Jack
of TV.
Connect to Coaxial jack of
an Amplifier (Receiver)
Connect AV 2 Cable (Yellow,
SVideo) to SV/5.1 Jack.
Yellow
White
Red
Black
Yellow
Connect AV 1 Cable (Yellow,
White, Red) to AV Jack.
Connect AV 2 Cable (Yellow,
SVideo) to SV/5.1 Jack.
Connect to Audio Jacks of TV or
HiFi White = L (Left) Audio Input /
Red = R (Right) Audio Input.
Connect S-Video (black
color) to S-Video Jack of TV.
Connecting the player to external AV Devices
 Loading...