

Freecom Media Player 45 User Manual
NETWORK MEDIAPLAYER 45
EXTERNAL MULTIMEDIA HARD DRIVE / 3.5" / USB 2.0 / LAN / AV
WIN & MAC
Rev. 750
USER MANUAL

Freecom MediaPlayer
EN
Dear customer,
Thank you for buying the Freecom Network MediaPlayer-45 (Drive-In Kit), a brand-new
digital multimedia player that supports dual data access mode via 3.5" HDD inside (not
supplied with "Drive In Kit"-model) and 10/100Mbps Network. With this player you can
easily enjoy Digital Movies, Digital Music, Digital Photos from a 3.5" HDD (when assembled
in the device) and from all PC's in your network, directly on your TV or HiFi set.
Freecom Technologies • Germany
www.freecom.com
Warning !
All rights reserved. The products named in this manual are only used for identification
purposes and may be trademarks or registered trademarks of the respective companies.
This device was designed for home or office use.
Warning! This device is equipment complying with EN55022 class A. This equipment can
cause radio disturbances in a residential area. If this is the case, the user has to take appropriate measures and assume all responsibility and costs for. It may not be used near
or with any life-sustaining systems.
Freecom Technologies is not liable for any damages that may occur from the use of a
Freecom system. All rights reserved. We reserve the right to upgrade our products in
keeping with technological advances.
© 2007 Freecom Technologies
2

EN
Table of Contents
User manual
General Information ...........................................................................................................page 4
Warnings and Safety Instructions ..................................................................................pa
Product Overview ................................................................................................................pa
ge 7
ge 8
Chapter 1:
Use as External USB HDD ..................................................................................................page 10
Insert Hard Disk ............................................................................................................. page 10
Connect the Freecom MediaPlayer to the PC .................................................... page 11
Format Built-in HDD via USB ....................................................................................page 11
Chapter 2:
Access PC via Network .......................................................................................................page 22
Connect LAN Cable......................................................................................................pa
Set Network Configurations ..................................................................................... page 23
ge 22
Chapter 3:
Use as Network Storage (NDAS) ..................................................................................... page 40
Chapter 4:
Freecom Network MediaPlayer for Mac ......................................................................page 45
USB 2.0 Mode ................................................................................................................page 45
NDAS Mode ................................................................................................................... page 45
NDAS Device Registration ........................................................................................ page 49
NDAS Utility ..................................................................................................................page 50
Using Freecom MediaPlayer ....................................................................................page 51
Using Freecom MediaPlayer in a Mixed Environment .................................. page 53
Uninstall .........................................................................................................................page 54
Partitioning your Freecom MediaPlayer under Mac OS X ............................page 55
FAQ Mac .........................................................................................................................page 55
3

Freecom MediaPlayer
EN
Chapter 5:
Use as Multimedia Player ..................................................................................................page 58
Connect to External AV Device ...............................................................................page 58
Basic Setup ......................................................................................................................page 60
Basic Screen Menu .......................................................................................................page 70
Play Video Files ..............................................................................................................page 73
Play DVD Files ................................................................................................................page 76
Play Music Files .............................................................................................................. page 78
Play Photo Files .............................................................................................................page 81
Make a Play-List .............................................................................................................page 83
Remote Control .............................................................................................................page 85
Others ...............................................................................................................................page 87
Chapter 6:
Technical Specifications ....................................................................................................page 88
4

EN
General Information
General Information
Introduction
• Dual Data Access Mode via 10/100Mbps LAN and 3.5" HDD (when assembled in the
device)
• Digital Multimedia Player via Home TV or Car TV
• USB 2.0 External Storage via PC (NTFS, FAT32)
• Audio - Stereo, Digital Coaxial & Optical 5.1ch. Sound
• Video - Composite, S-Video, HD Component 480p, 720p, 1080i
• DVD Manager - Playback of DVD File same as Original DVD Title
• NDAS (Network Direct Attached Storage) supporting file copy/delete with wired
LAN
irmware upgradeable.
• F
Package Content
Please check the contents of the box. The following should be supplied:
• Freecom MediaPlayer
• F
ootstand
• Remote Control, Batteries
• Composite + Stereo L-R Cable
• USB Cable
• LAN Cable
• Power Adapter
• CD with manual, application software and safety manual
• Quick Install Guide
5

Freecom MediaPlayer
EN
Minimum System Requirements
PC:
• Intel Pentium III / AMD Duron 900 MHz or higher
• 256 MB RAM (Vista: 512 MB RAM) or higher
• Available USB 2.0, 1.1 Port (USB 2.0 recommended)*
• Available 10/100 Ethernet LAN Port, RJ-45 (100Mbps recommended)
• LAN Cable (cross-wired or standard - see "2.1 Connect LAN Cable")
• 100Base-T full duplex switch for NDAS mode
• CD-ROM drive for installation
• For playback on TV, a TV with PAL or NTSC system is required.
• Support HDD: Compatible with a standard 3.5" SATA Hard Drive
• Internet connection for online warranty registration, software updates and downloads
• O
perating system: Windows 2000, Windows XP, Windows Vista
Mac:
owerPC G3/G4/G5, Power Book G3/G4 or Intel Mac
• P
• 256 MB RAM or higher
• Available USB 2.0, 1.1 Port (USB 2.0 recommended)*
• Available 10/100 Ethernet LAN Port, RJ-45 (100Mbps recommended)
• LAN Cable (cross-wired or standard - see "2.1 Connect LAN Cable")
• 100Base-T full duplex switch for NDAS mode
• CD-ROM drive for installation
• For playback on TV, a TV with PAL or NTSC system is required.
• Support HDD: Compatible with a standard 3.5" SATA Hard Drive
• Internet connection for online warranty registration, software updates and downloads
• O
perating system: Mac OS X v10.3 or higher
* USB 2.0 is downwards compatible to USB 1.1. To achieve optimal performance from the Freecom
MediaPlayer your PC should be equipped with an USB 2.0 port.
6

EN
General Information
Precautions
• We strongly recommend you to regularly back up the data from the hard drive that
you have built in, to another safe media. Freecom can never be held responsible for
data damage or data loss of the built-in HDD.
• Unplug the power adaptor when you don't use the device for a longer period time.
• The device does not support DivX, XviD codec of video files that has GMC, Qpel option.
o not turn off the power when a file is playing.
• D
• We recommend (when connected to PC) that you use a USB cable not longer than 3
meters.
f you have USB 1.1 Host Adapter, the device will be working at USB1.1 speed.
• I
• When using a hard drive with less than 6GB storage capacity, you may experience data
damage or data loss. We recommend you to use a harddrive of more than 6GB.
Note: Be sure to format the Hard Drive before using the device (USB).
7

Freecom MediaPlayer
EN
Warnings and Safety Instructions
Please read and follow the below mentioned instructions. They should be observed in
order to prevent injury to the user, damage to the device and damage to property, as
well as to ensure safe use of the product. Not following these instructions may cause
the unit to malfunction.
To ensure that your Freecom Network MediaPlayer functions properly, please take note
of the following precautions. If these are not followed, you may void your warranty and
damage the Freecom Network MediaPlayer.
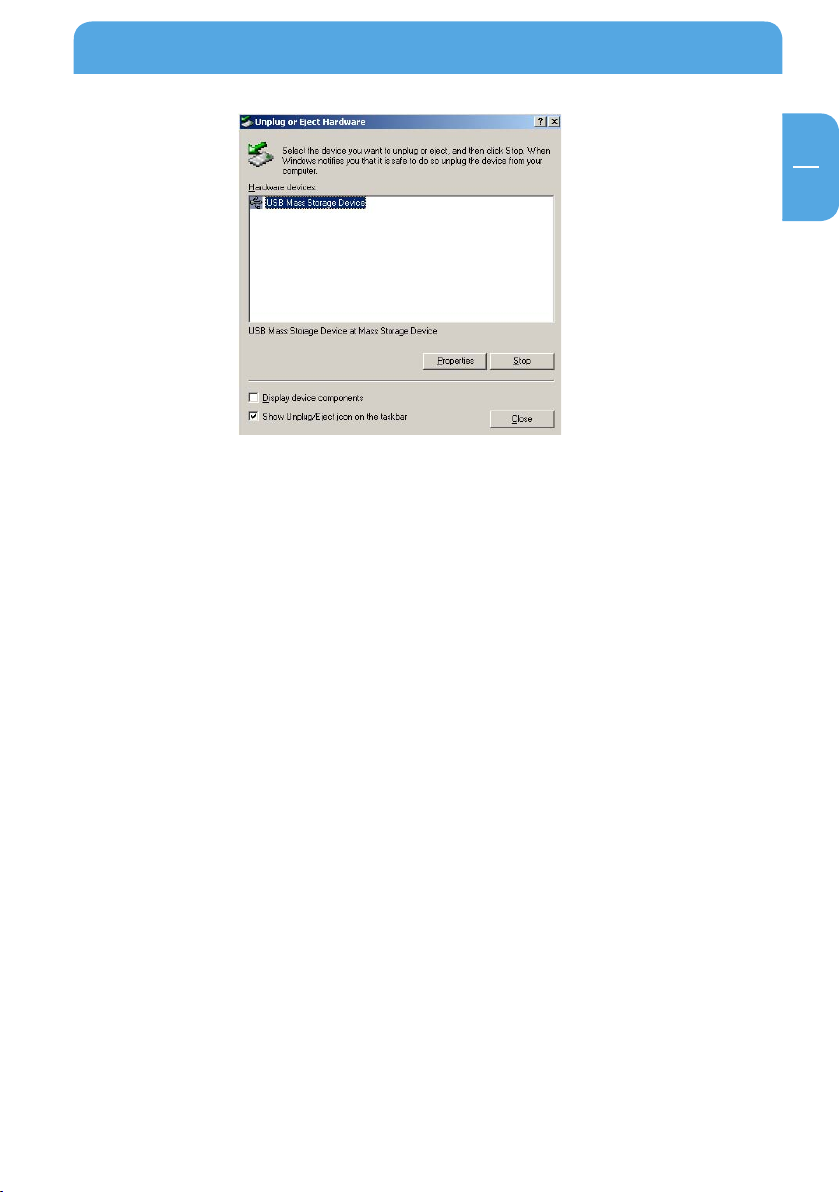
afely remove the Freecom Network MediaPlayer via your operating system (the
• S
"unplug or eject hardware" option in the Windows taskbar) before disconnecting
the USB cable or power cable and before switching off the device. Failing to do so
may result in data loss.
o not disconnect the Freecom Network MediaPlayer from the PC during file transfer.
• D
This may result in data loss and an error on the player. If this occurs, please run the
ScanDisk utility.
o not drop the Freecom Network MediaPlayer or expose it to other kinds of sudden
• D
mechanical shocks as this may result in data loss and damage to the hard drive.
o not use the Freecom Network MediaPlayer when the ambient temperature is
• D
below 10°C or above 35°C.
f the Freecom Network MediaPlayer is moved from a cool environment to a warmer
• I
environment, please allow the drive to acclimatize to the ambient temperature before operating the device. Failing to do so may lead to condensation within the drive
enclosure, which in turn may cause the drive to malfunction.
o not place liquids or drinks on the Freecom Network MediaPlayer. When liquids
• D
are spilled and get in contact with the electronics within the drive enclosure, it will
damage the drive and will cause the drive to malfunction.
o not use the Freecom Network MediaPlayer in a dusty environment. Dust inside
• D
the enclosure may damage the internal electronics and result in drive malfunction.
o not use the Freecom Network MediaPlayer near magnetic fields.
• D
• The Network MediaPlayer may generate heat when used for a longer period of
time.
Furthermore, warranty does not apply to:
amages or problems resulting from misuse, abuse, accident, alteration or incorrect
• D
electrical current or voltage.
• A
ny product tampered-with or damaged warranty seal or serial number label.
• Any product without a warranty or serial number label.
• Batteries and any consumable items delivered with or in the equipment.
8
EN
Product Overview
Product Overview
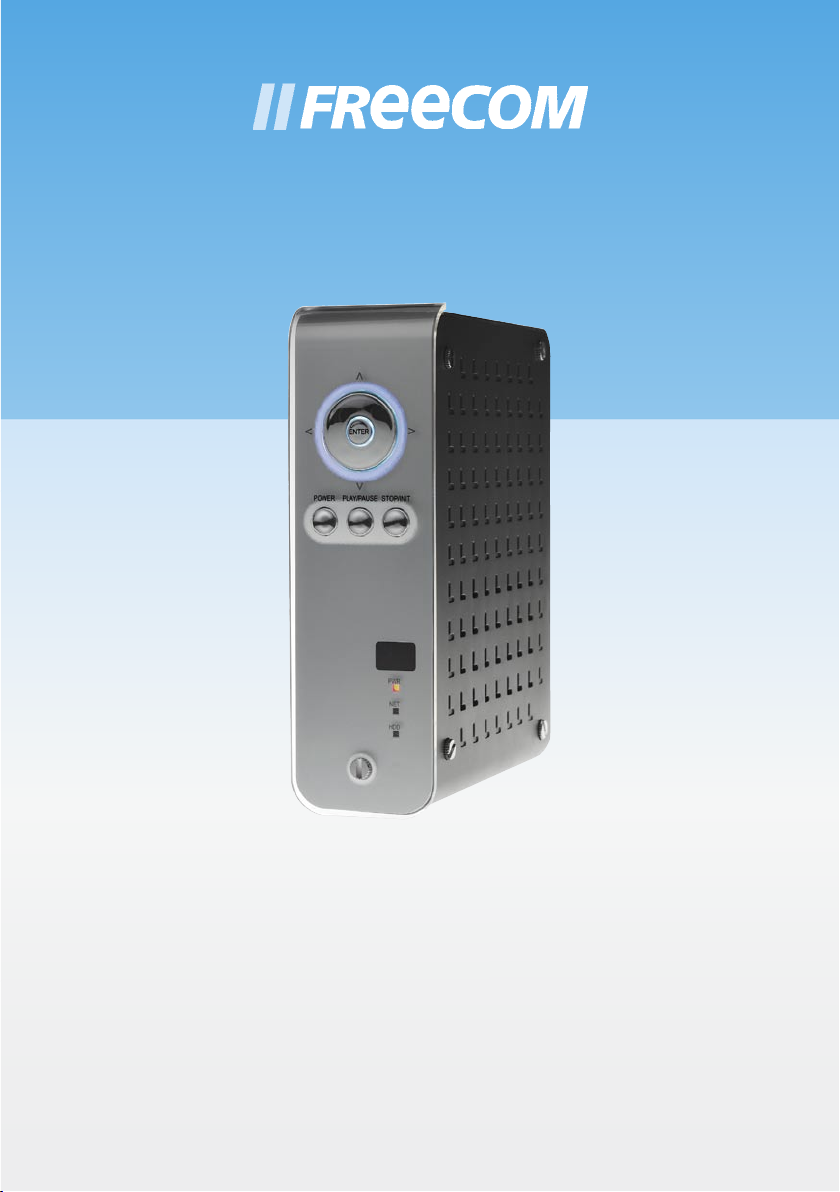
1. Front view
All basic operation functions can be done with the buttons on the device without use
of the remote control.
1. Enter
2.
3. Power
4. Play / Pause
1. ENTER Select or play a file
2.
Navigation Key, Up, Down, Left, Right
3. POWER Power On, Off
4. PLAY / PAUSE Play all files from selected file / Pause
5. STOP / INIT Stop / Return to Mode Selection Screen
6. IR IR receiving area for remote signals
7. PWR Power LED
8. NET Network LED
9. HDD HDD LED
5. Stop / Init
6. IR
7. PWR
8. NET
9. HDD
9

Freecom MediaPlayer
EN
2. Back view
8. CVBS
1. USB
2. Optical
3. S-Video
9. Stereo L - R
4. Coaxial
5. Y. PB. PR
6. LAN
7. PWR
1. USB Connect USB cable
2. OPTICAL Connect Optical cable for 5.1 ch. digital audio output
3. S-VIDEO Connect s-video for video output
4. COAXIAL Connect coaxial cable for 5.1 ch. digital audio output
5. Y, PB, PR Connect component Y, Pb, Pr cable for video output
6. LAN Connect lan cable for networking
7. PWR Connect power cable
8. CVBS Connect composite cable for video output
9. STEREO L-R Connect stereo cable for audio output
10
EN
1
Chapter 1: Use as External USB HDD
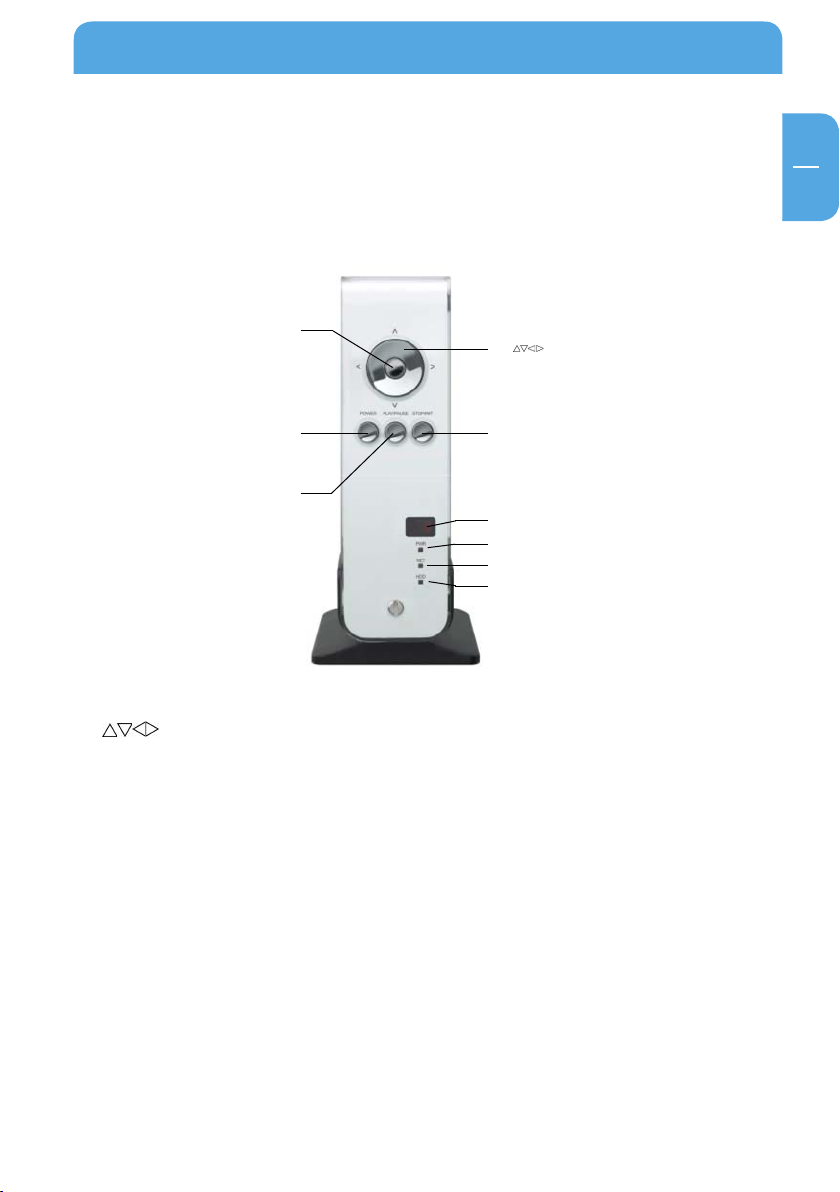
1.1 Insert Hard Disk
• Only use a 3.5" SATA Hard Disk for Desktop.
1. Unscrew the 4 screws and open the cover by sliding it in the direction of the arrow
Connect Power and SATA connector to Hard
2.
Disk.
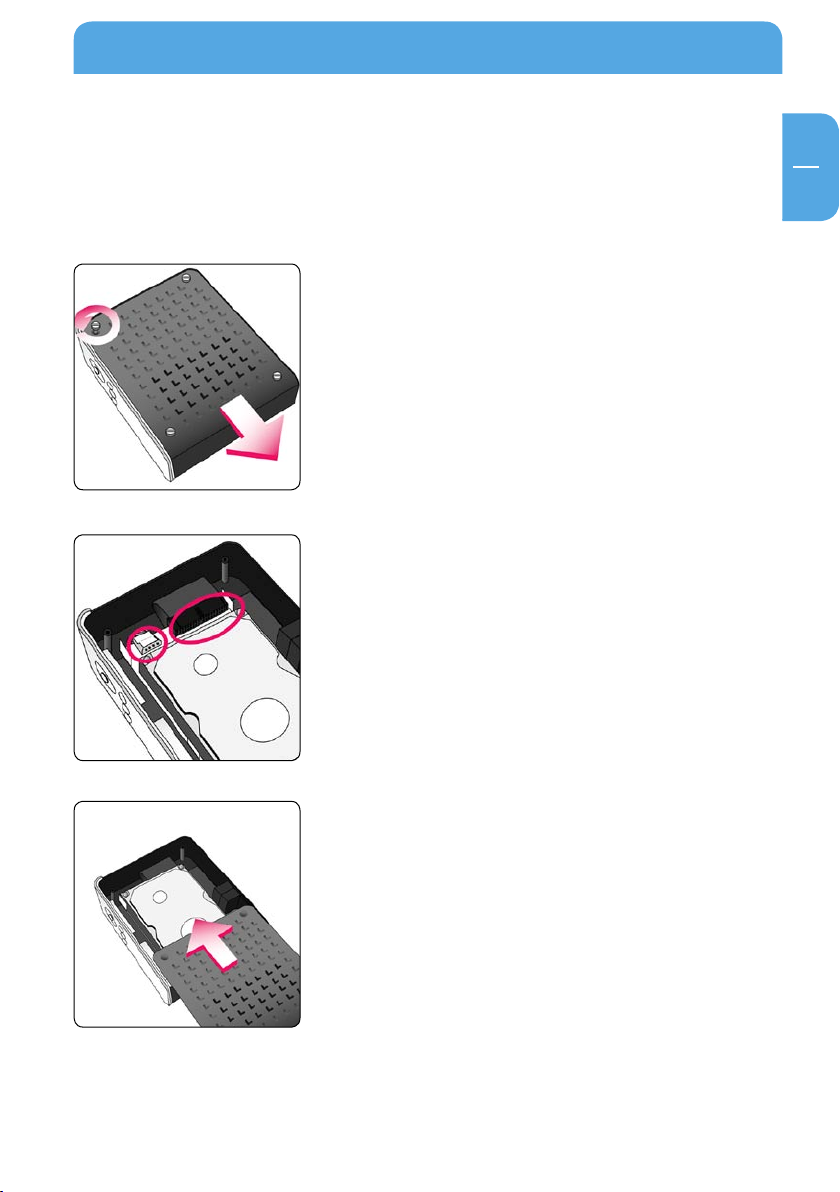
Use as External USB HDD
3.
Close the cover by sliding it in the direction of the
arrow.
11
Freecom MediaPlayer
EN
1
4. Put the 4 screws back
1.2 Connect the Freecom MediaPlayer to the PC
1. Connect the USB cable to the Freecom MediaPlayer and connect the power adapter
to the DC jack on the Freecom MediaPlayer.
2. Connect the adapter into an AC outlet.
3. Connect the Freecom MediaPlayer to the PC's USB port.
4. Windows 2000, Windows XP and Windows Vista will recognize the Freecom MediaPlayer as a USB drive; you can use the Freecom MediaPlayer without installing a
driver. If the Freecom MediaPlayer is not recognized or detected, please check that
the USB connector is properly connected to the device and the PC.
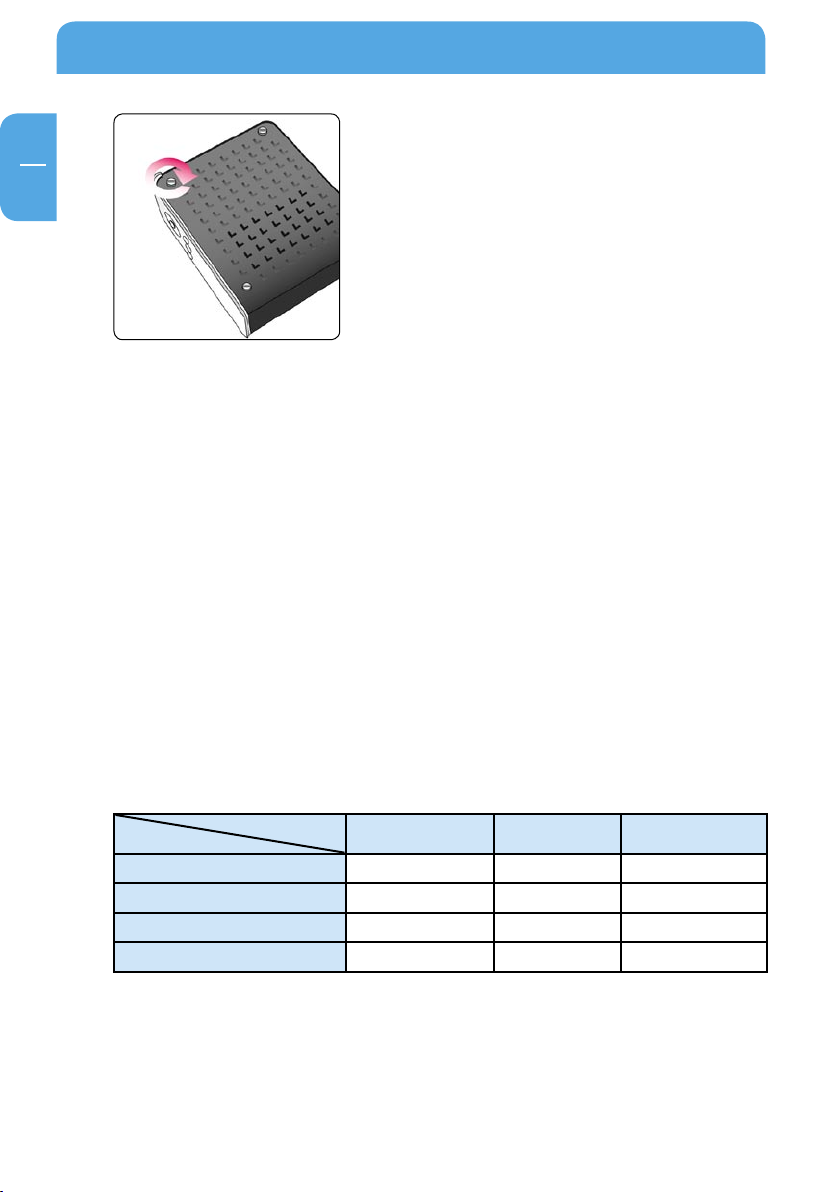
1.3 Format Built-in HDD via USB
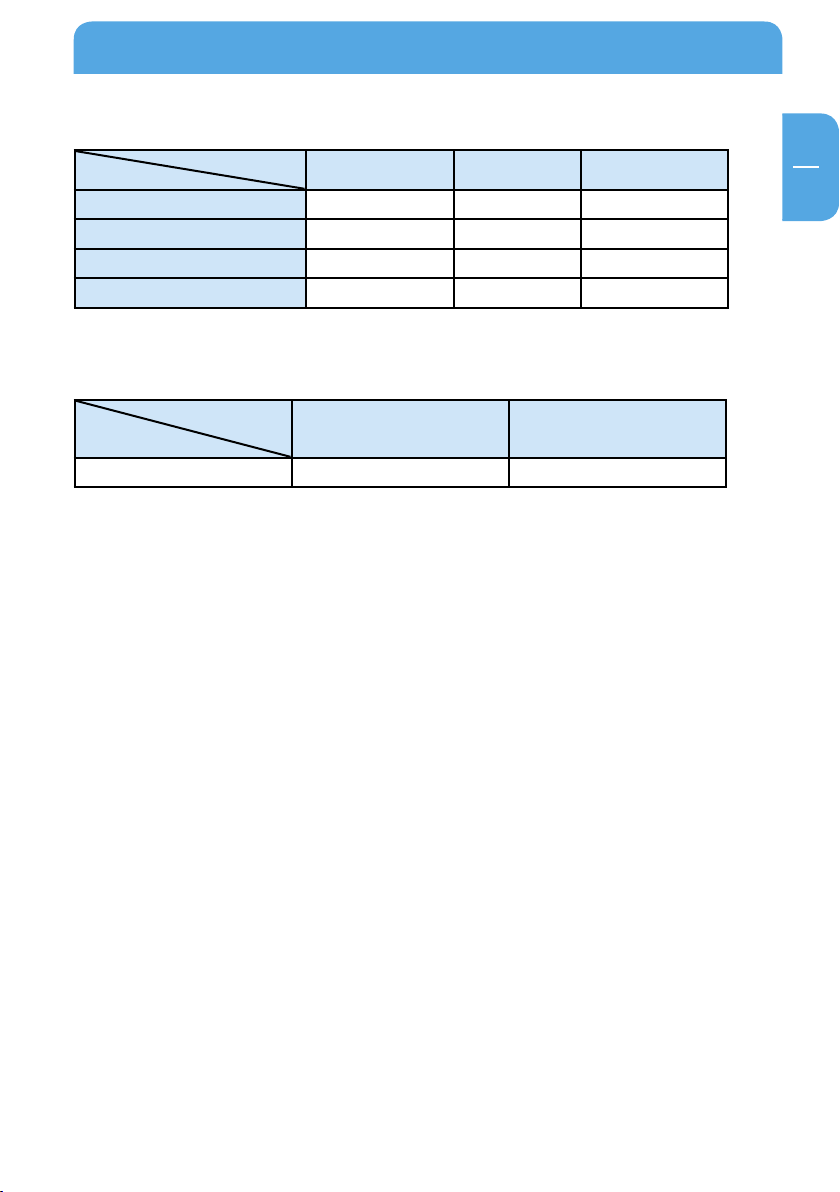
File System features
Please refer to the tables below for an overview:
File systems supported by different operating systems
Operat ing system
Windows 98SE yes yes not supported
Windows ME yes yes not supported
Windows 2000 yes yes yes
Windows XP / Vista yes yes yes
File sys tem
FAT FAT32 NTFS
12
EN
1
Maximum size of a partition
Use as External USB HDD
Operat ing system
File sys tem
Windows 98SE 2 GB 60 GB
Windows ME 2 GB 2 TB
Windows 2000 4 GB
Windows XP / Vista 4 GB
FAT FAT32 NTFS
*1, 2
*2
*3
*3
32 GB 16 TB
32 GB 16 TB
n.a.
n.a.
Example for different partitions with different file systems on one Freecom
MediaPlayer
File sys tem
Operat ing system
NTFS FAT32
120 GB 90 GB 30 GB
The example above is a good solution for Windows 2000/XP/Vista users who sometimes
exchange data with Windows 98SE/ME PCs.
For storing the data under Windows 2000/XP/Vista both partitions can be used. As the
NTFS file system is not recognized by Windows 98SE/ME data to be used on these operating systems must be stored on the FAT32 partition.
Please follow the steps below to adapt the Freecom MediaPlayer for your needs.
If the built-in HDD is not formatted, the PC can not detect the hard disk drive. If so, format the hard disk first referring to the following guide. If the hard disk drive is already
formatted, see "Copy Data via USB".
*1
: A patch for Windows 98SE is required for hard disk larger than 60 GB. Further information and an update to
fix this problem can be found in article 263044 of the "Microsof t Knowledge Base"on the Microsoft Website
under http://support.microsoft.com.
*2
: Hard disk capacit y will not be displayed correctly by fdisk!
*3
: FAT partitions larger than 2 GB can only be administrated by Windows 2000/XP/Vista.
13
Freecom MediaPlayer
EN
1
1.3.1 Windows 2000
1. Connect Freecom MediaPlayer to PC via USB cable, and plug power cable of Freecom
MediaPlayer.
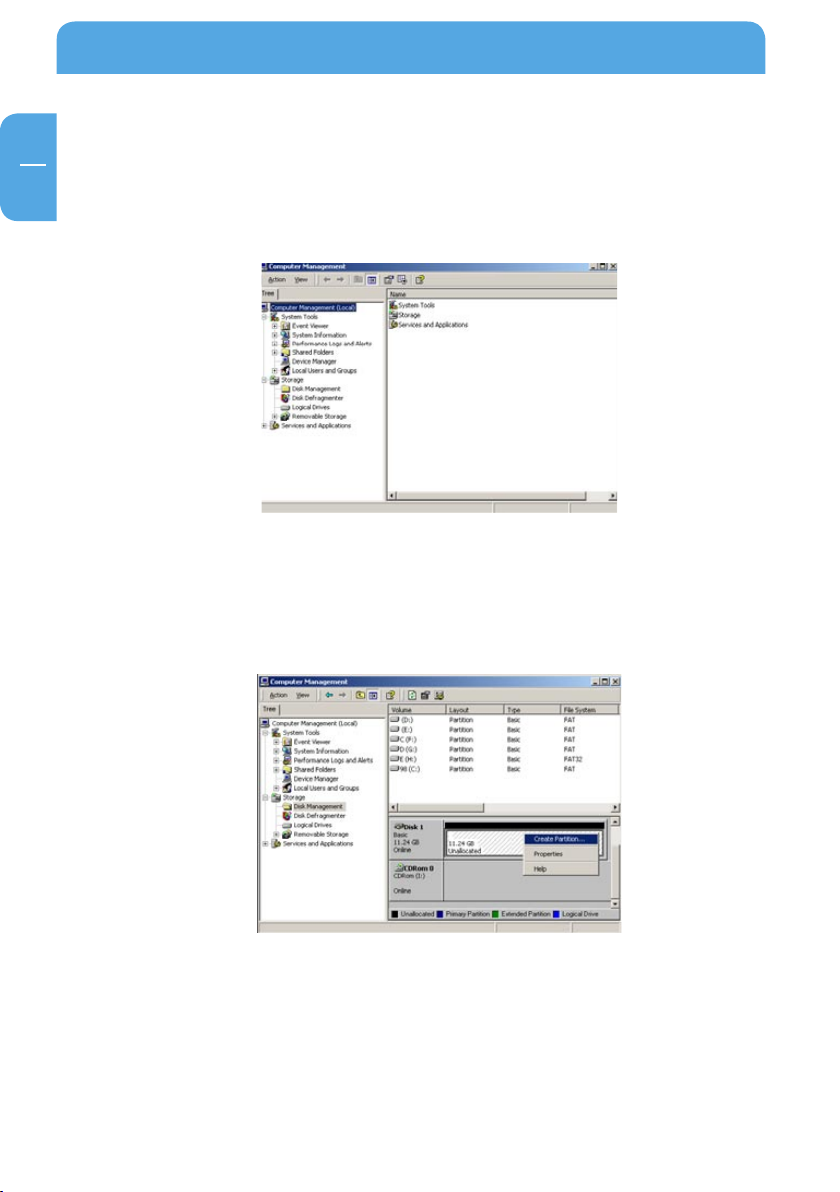
2.
Select "Start > Settings > Control Panel > Administrative Tools > Computer Manage-
ment > Disk Management" in Windows.
If the "Disk Signature and Upgrade Disk Wizard" is started, click Next to progress for
3.
finishing the wizard. If this wizard does not start, right click the left area of unallocated
drive and start the wizard.
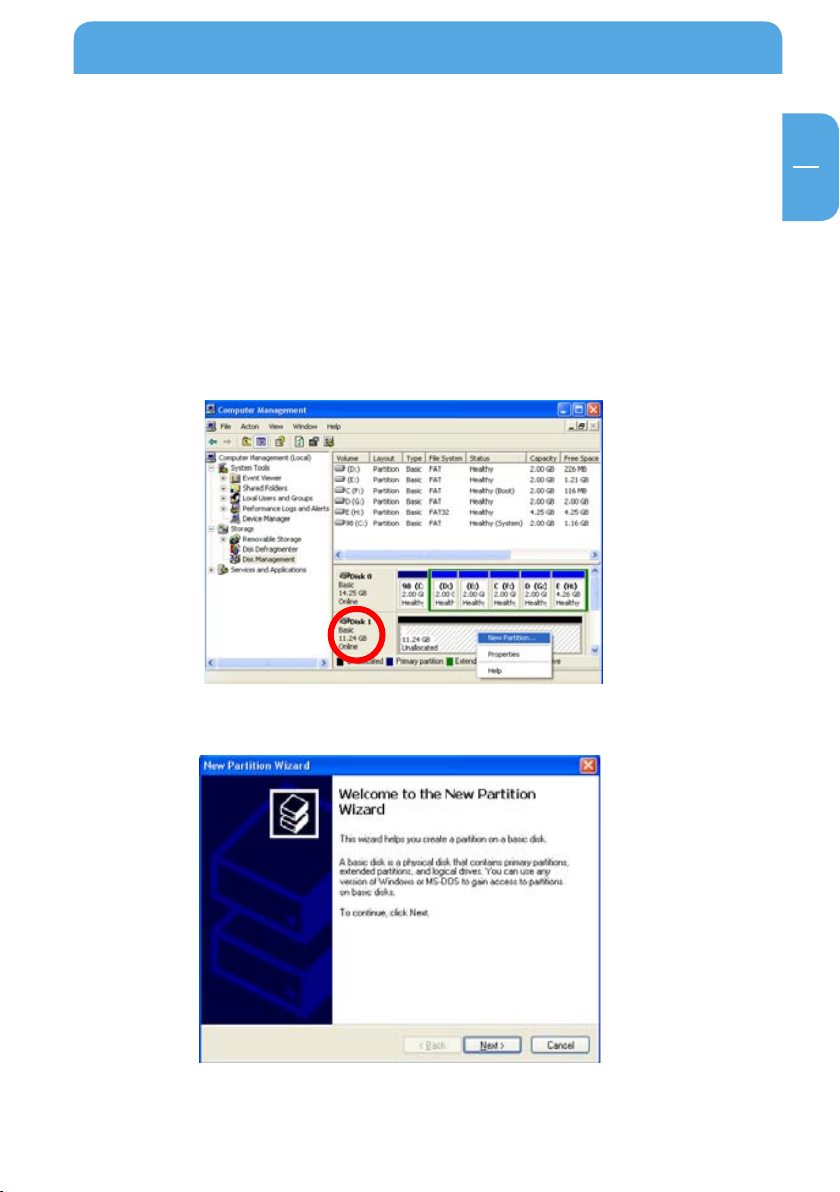
4.
After finishing the "Disk Signature and Upgrade Disk Wizard", right-click the Unal-
located Drive and then, click "Create Partition".
14
EN
1
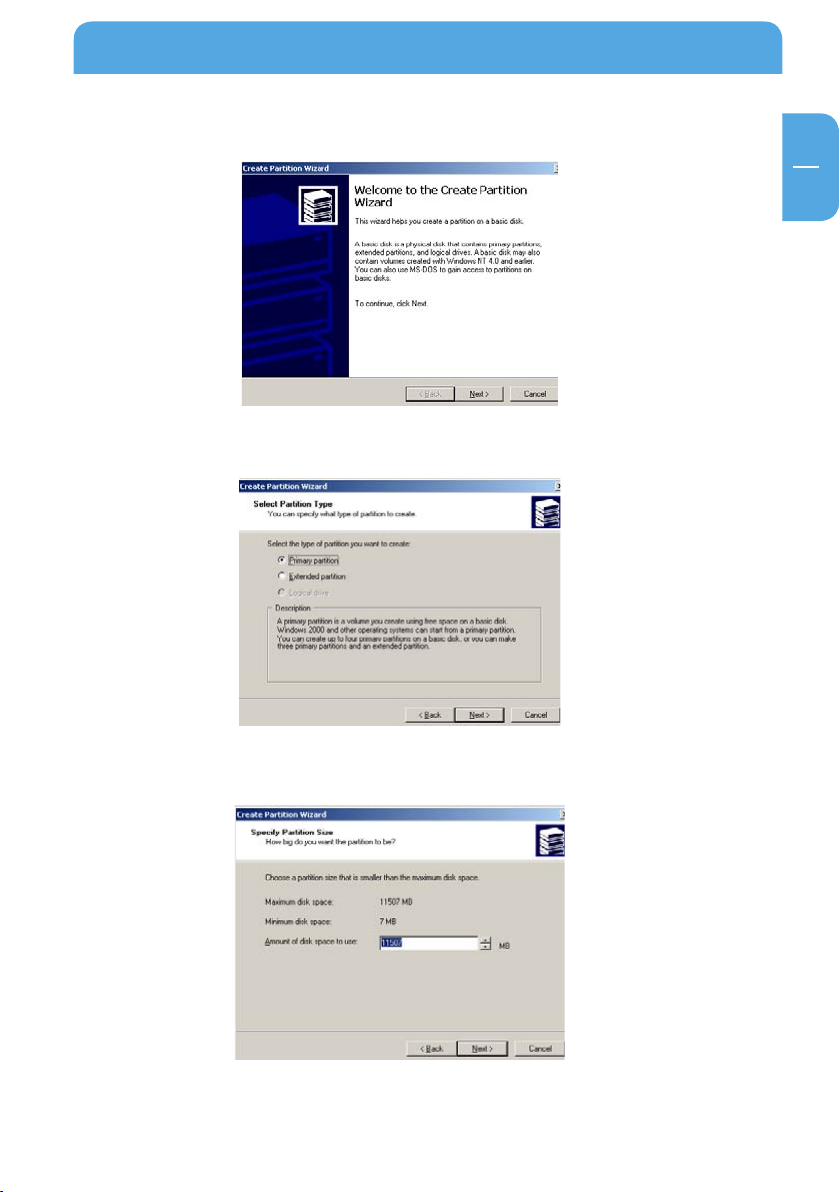
5. Click "Next" at the Windows Create Partition Wizard.
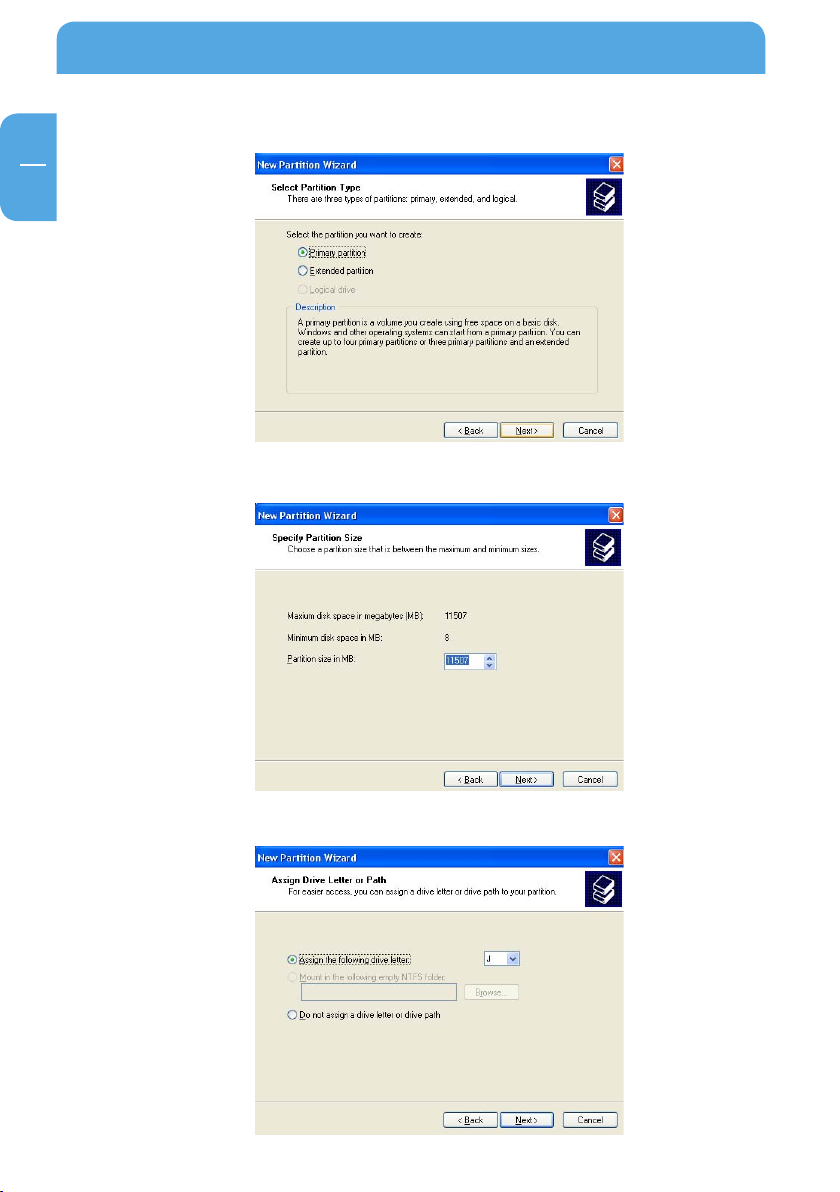
6. Check "Primary Partition" and click "Next".
Use as External USB HDD
7. Type the size that you want to use and click "Next".
15
Freecom MediaPlayer
EN
1
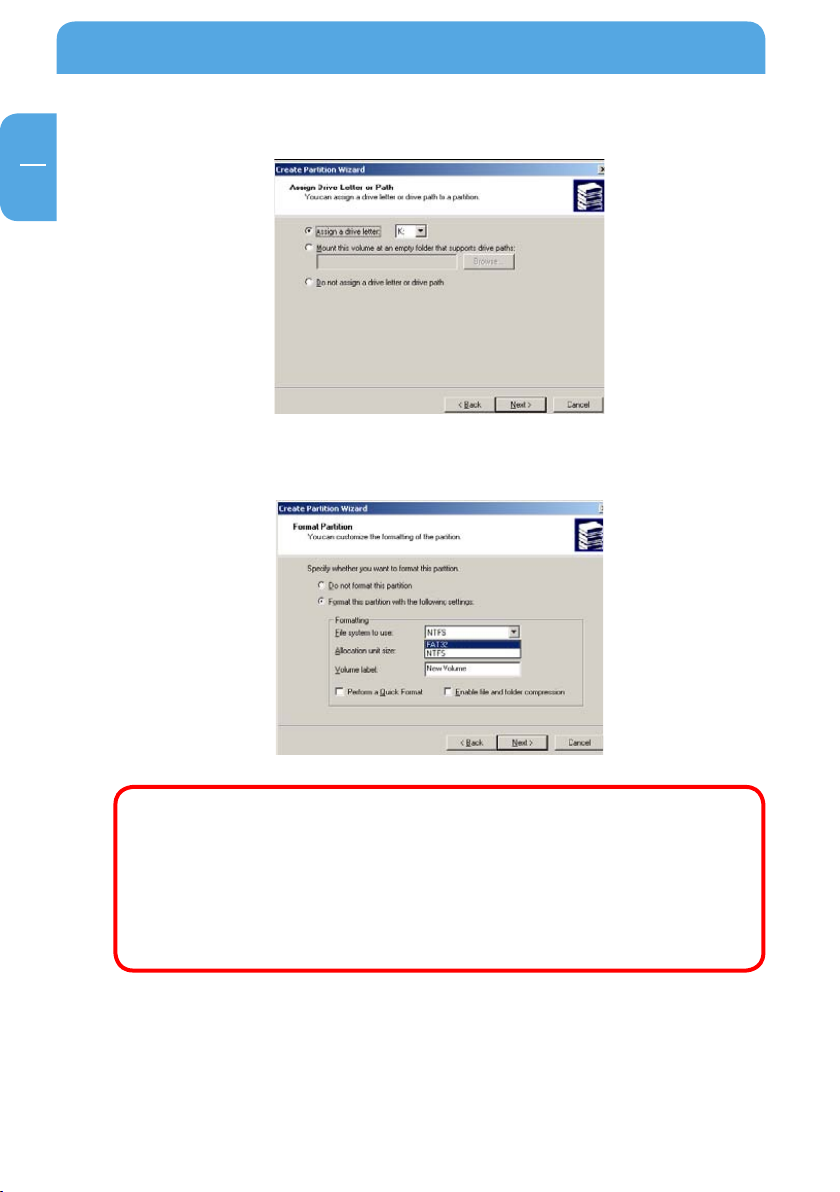
8. Assign a drive letter and click "Next".
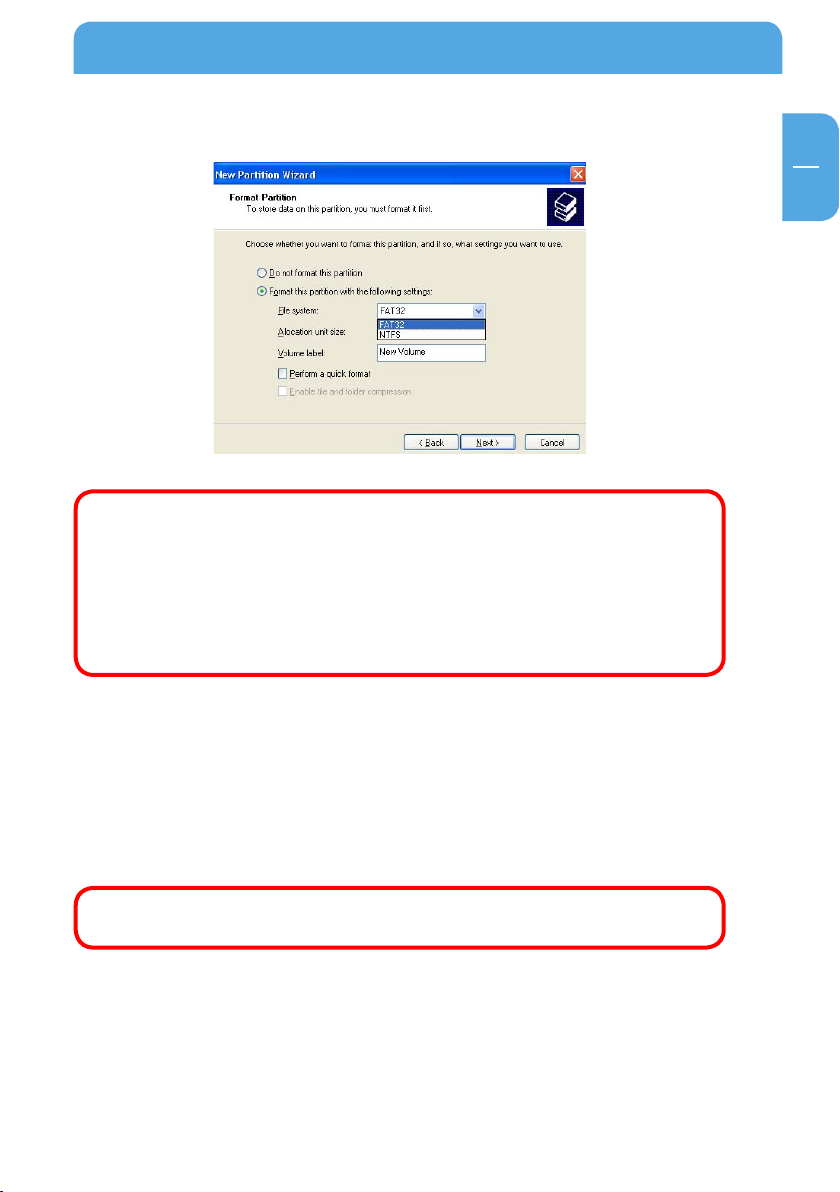
9. Choose FAT32 or NTFS at File system to use and click "Next".
16
FAT 32 system is available on Windows 98/ME and Windows 2000/XP/Vista,
but NTFS system is available on Windows 2000/XP/Vista only.
If you choose FAT32 system on Windows 2000/XP/Vista, one drive letter's
maximum size will be limited to 32GB. If you want to use one drive letter of
32GB more, you have to format on Windows 98SE/ME.
If you want to create two or more partitions with one disk drive, it will be
recommended "Primary Partition".
fter finishing Wizard setup, formatting will be progressed automatically.
10. A
EN
1
Use as External USB HDD
1.3.2 Windows XP / Vista
1. Connect Freecom MediaPlayer to PC via USB cable, and plug power cable of Freecom
MediaPlayer.
2.
Click "Settings > Control Panel > Administrative Tools > Computer Management>
Disk Management" in Windows. If you can not find Administrative Tools at Control
Panel, click "switch to classic view" in the upper left corner on the screen.
If the "Disk Signature and Upgrade Disk Wizard" starts, click "Next" to progress for
3.
finishing the wizard. If this wizard does not start, right click the marked left area of
unallocated drive and start the wizard.
After finishing the "Disk Signature and Upgrade Disk Wizard", Right-click the 'Unal-
4.
located' Drive. And then, click "New Partition".
Click "Next" at the New Partition Wizard.
5.
17
Freecom MediaPlayer
EN
1
6. Check "Primary partition" and click "Next".
7. Type number size you want to use and click "Next".
8. Assign a drive letter and click "Next".
18
EN
1
Use as External USB HDD
9. Choose FAT32 or NTFS at File system to use and click "Next".
FAT 32 system is available on Windows 98/ME and Windows 2000/XP/Vista,
but NTFS system is available on Windows 2000/XP/Vista only.
If you choose FAT32 system on Windows 2000/XP/Vista, one drive letter's
maximum size will be limited to 32GB. If you want to use one drive letter of
32GB more, you have to format on Windows 98SE/ME.
If you want to create two or more partitions with one disk drive, it will be
recommended "Primary Partition".
10. After finishing Wizard setup, formatting will be progressed automatically.
1.4 Copy Data via USB
It is possible to use the Freecom MediaPlayer as an external USB hard disk drive. You can
copy data from your PC to built-in HDD of Freecom MediaPlayer via USB. It is possible to
play media files at the hard disk on TV set.
When connecting to a PC, you have to connect power cable of Freecom
MediaPlayer.
19
Freecom MediaPlayer
EN
1
1.4.1 Windows 2000/XP/Vista
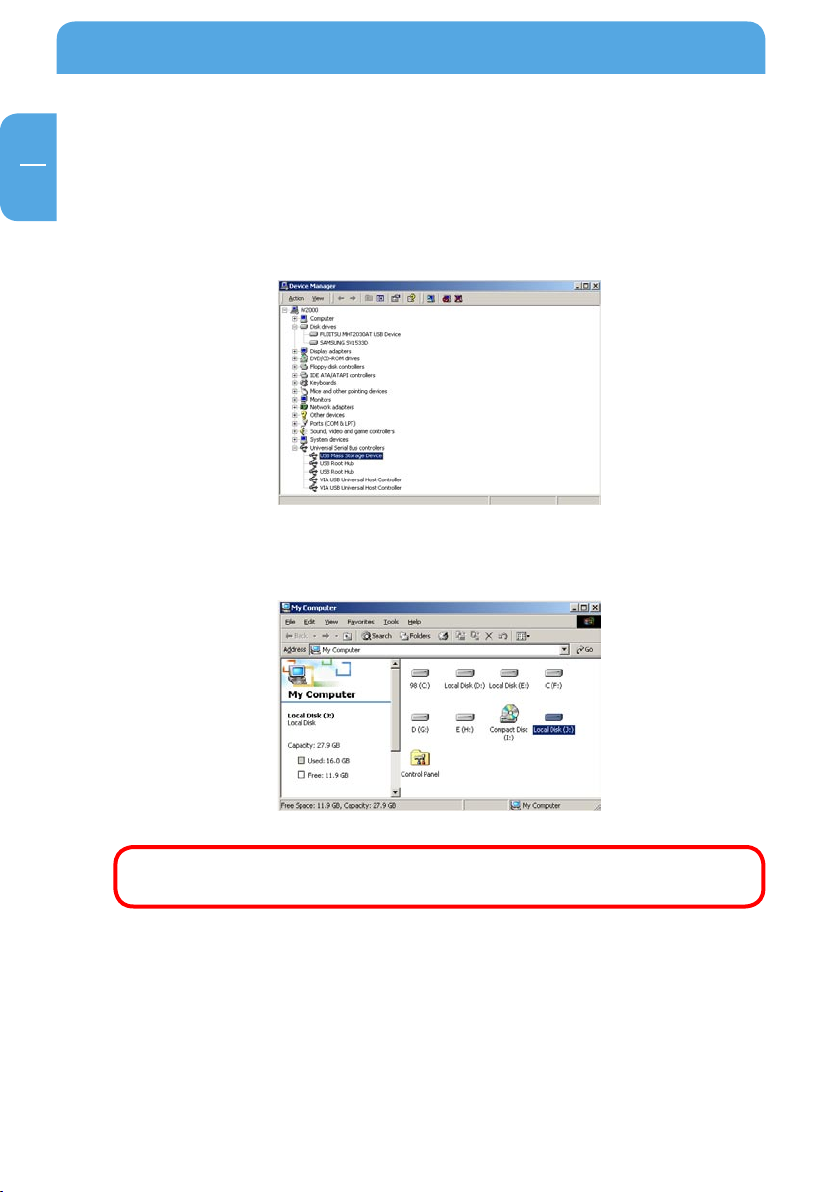
1. After connecting Freecom MediaPlayer and plug power cable, Windows itself will
install driver automatically. And then, check the driver installation at Windows "Start
> Settings > Control panel > (switch to classic View on Windows XP/Vista) > System
> Hardware > Device manager > Universal Serial Bus controllers > USB Mass Storage
Device".
2.
Check 'My Computer' or 'Explorer', there should be a new volume. You can copy any
data to this volume.
20
If new volume does not appear, check if HDD is formatted. Windows 2000/
XP/Vista can detect both FAT32 and NTFS file system.
fter copying data, remove the Freecom MediaPlayer by using the "safely remove
3. A
h
ardware" option in the Windows task bar. If you don't follow this procedure, data
and Freecom MediaPlayer may get damaged.
EN
1
Use as External USB HDD
When you see 'Non High-Speed USB Hub Message'
The message will be displayed on Windows 2000/XP/Vista when you plug Freecom
MediaPlayer into USB 1.1 spec. Host adapter.
1.4.2 Mac
It can be available on Mac OS X v10.3 or higher.
There is no need to install the installation driver at Mac OS X 10.3 version. The Freecom
MediaPlayer will be detected automatically. If the Freecom MediaPlayer is detected correctly, an icon appeers on the desktop.
To remove the Freecom MediaPlayer safely, drag the icon to the trash and unplug the
Freecom MediaPlayer.
21
Freecom MediaPlayer
EN
2
Chapter 2: Access PC via Network
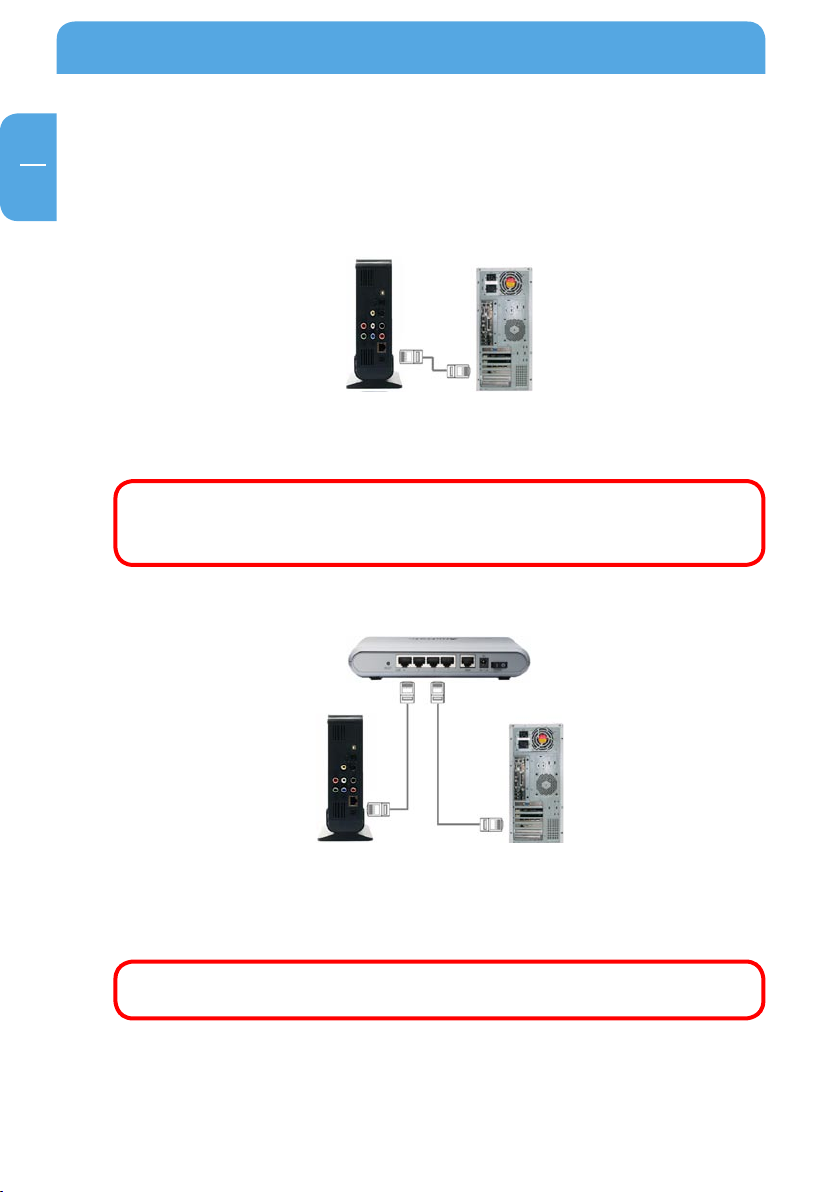
2.1 Connect LAN Cable
When connecting Computer to the Network MediaPlayer directly
Connect LAN cable to LAN port between player and PC. In this case, you have to use a
Cross-wired LAN cable.
If your computer's LAN card is already used for connection to Internet line,
you can install an additional LAN card to your PC and connect that additional
LAN card to the Freecom MediaPlayer.
When connecting with IP Router or Hub
Connect LAN cable to LAN port between IP Router or Hub. In this case, you have to use
a standard LAN Cable.
If you want to use as Network Storage, refer to "3. Use as Network Storage
(NDAS)".
22

EN
2
Access PC via Network
2.2 Set Network Configurations
After connecting the LAN cable, you have to set network configurations of Computer and
Player. You need to share a folder on Windows computer and use same 'IP Address range'
and same 'Subnet Mask ' between Windows computer and Player. For example:
Computer MediaPlayer
IP Address 192.168.1.2 192.168.1.3
Subnet Mask 255.255.255.0 255.255.255.0
It is possible to assign IP address and Subnet Mask of the player as Dynamic
or Static.
2.2.1 Windows 2000
Select a folder which you want to share. Right-click the folder and click 'Sharing' in
1.
pop menu.
23

Freecom MediaPlayer
EN
2
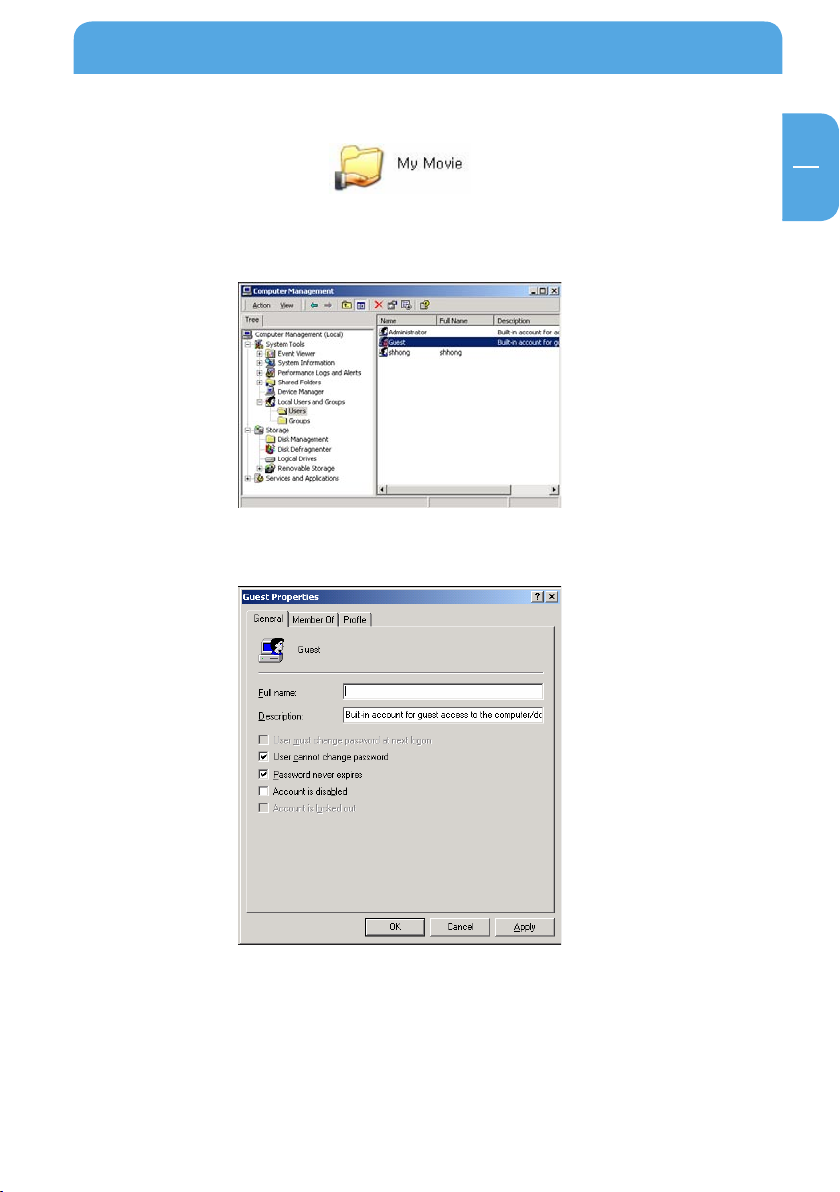
2. Check 'Share this folder' and write 'share name'. For example, "My Movie":
"Share Name": maximum length is 12 characters.
3. Click 'Permissions' and check whether "Everyone" account is present or not. If not,
dd "Everyone" account.
a
We Recommend only to use 'Read>Allow' at Permissions.
24
EN
2
Access PC via Network
4. After that, the shared folder will be displayed as following picture.
Move to "Settings>Control Panel>Administrative Tools>Computer management>Local
5.
Users and Groups>Users", and double click 'Guest'.
Check 'User cannot change password' and 'Password never expires'.
6.
25
Freecom MediaPlayer
EN
2
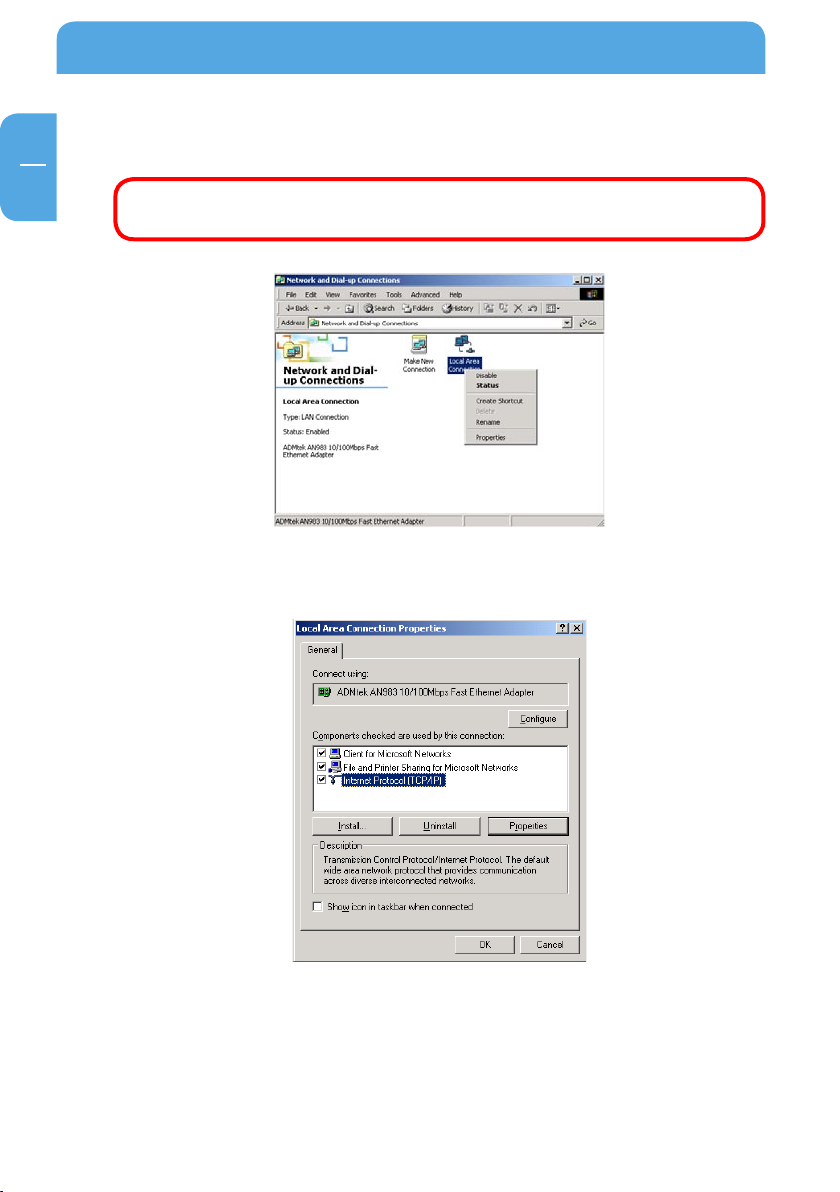
7. Move to "Control Panel>Network and Dial-up Connections", and select Properties
'Local Area Connections' by right click of mouse.
If you see two or more 'Local area connections', select one that you will use
for connecting to the player.
8. Double click 'Internet Protocol (TCP/IP)' that you want to use on your computer.
26
EN
2
Access PC via Network
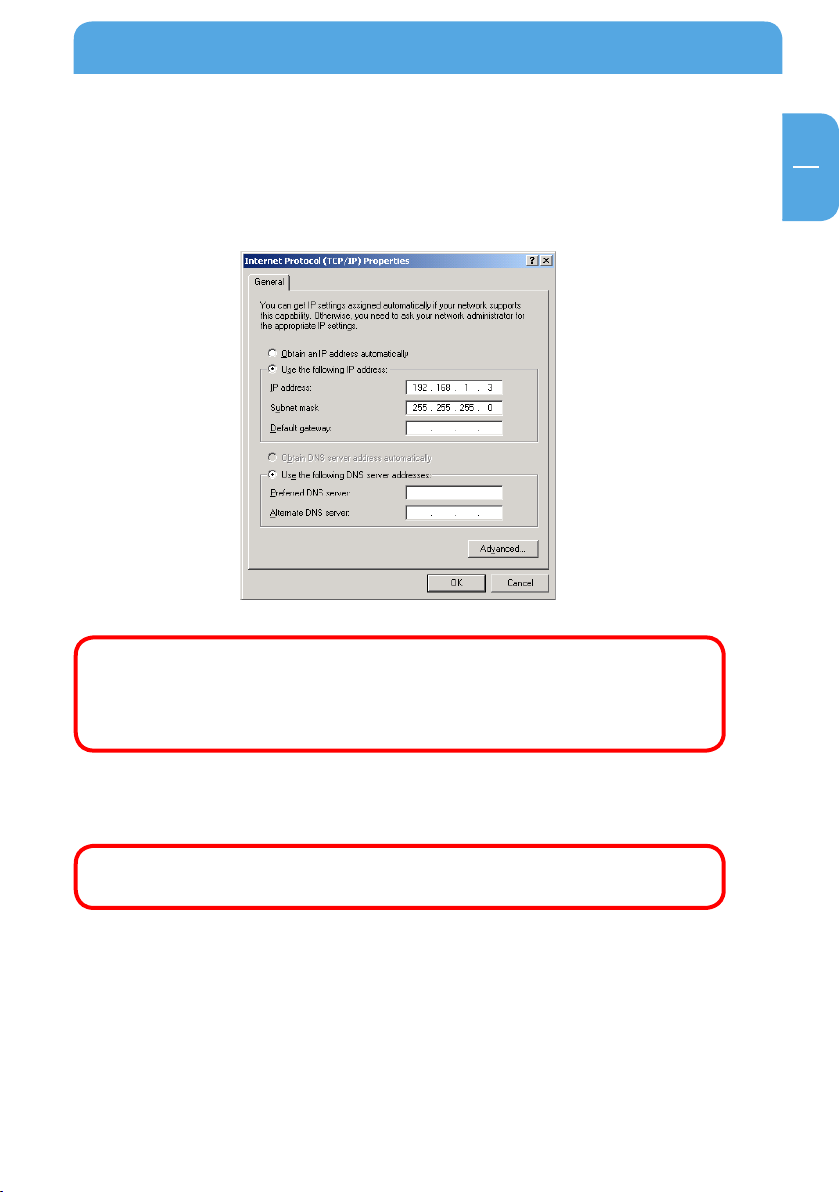
9. Check 'Use the following IP address', and write 'IP address' & 'Subnet mask' that you
want to use. For example:
IP address: 192.168.1.3
Subnet mask: 255.255.255.0
If you have already been provided a dynamic IP address from DHCP Server
or IP Router on your local area network, you don't need to enter a static IP
address. Use 'Obtain an IP address automatically' or enter the IP address
& Subnet mask that DHCP Server or IP Router provides.
10. Set the network configurations of the player.
Y
ou have to connect the player to a TV set for this setup. See "5.1.1 Connect
Video Cable".
ress "SETUP" on remote control for moving to setup screen. Select 'DHCP off' and
P
w
rite IP address & Subnet mask. For example:
IP Address: 192.168.1.2
Subnet mask: 255.255.255.0
27
 Loading...