

Page 1

Rev. 350
Users Manual
Page 2

GB
USA
Dear user!
Thank you for choosing the Freecom Beatman Flash 128 FM MP3/WMA
Digital Audio Player, the ultra small, skip-free solution for enjoying music
everywhere you go, whatever you do. Please read the operating instructions
carefully before starting to use your Freecom Beatman Flash 128 FM.
Freecom Technologies Germany
www.freecom.com
WARNING!
All rights reserved. The products named in this manual are only used for
identification purposes and may be trademarks or registered trademarks of the
respective companies. This device was designed for home or office use.
We reserve the right to upgrade our products in keeping with technological
advances.
When using headphones
Avoid damaging your hearing: do not play your headset at a high volume.
Hearing experts advise against continuous extended play. If you experience a
ringing in your ears, reduce the volume or discontinue use.
Do not use while operating a motorized vehicle. It may create a traffic hazard
and it is illegal in many areas. You should be extremely cautious or temporarily
discontinue use in potentially hazardous situations. Even if your headphones
are of an "open air" type, do not turn up the volume so high that you cannot
hear what is going on around you.
2
Page 3

Contents
USER MANUAL
Contents of the box .................................................................. page 4
Minimum system requirements ................................................ page 5
Precautionary measures ............................................................ page 5
Device description ..................................................................... page 6
Display panel ............................................................................. page 7
CHAPTER 1:
Start up - Hardware Installation ............................................... page 8
CHAPTER 2:
Installation of the Digital Audio Manager software .............. page 10
CHAPTER 3:
Driver Installation ...................................................................... page 12
GB
USA
CHAPTER 4:
Every day use ............................................................................. page 19
CHAPTER 5:
Troubleshooting ........................................................................ page 35
© 2003 Freecom Technologies
3
Page 4
GB
USA
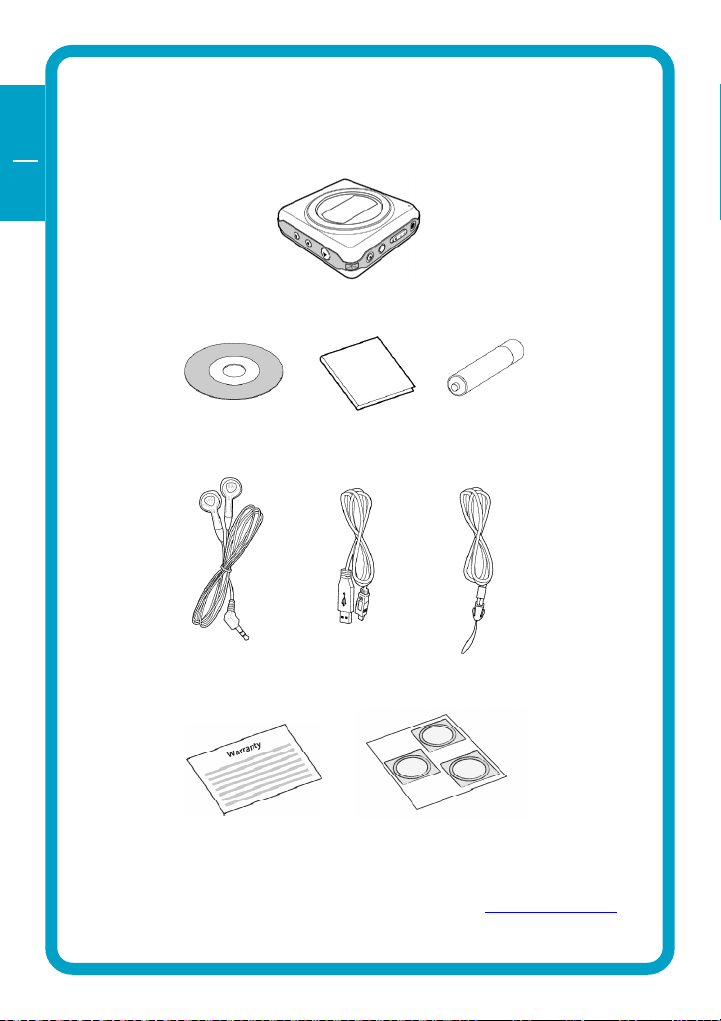
Contents of the box
Before starting to use your Freecom Beatman Flash 128 FM, please check the
box for the following contents.
Freecom Beatman Flash 128 FM MP3/WMA player
Software CD Quick Install Guide Duracell Ultra M3
Sennheiser headphones USB cable for Neck-strap
connection to PC
Warranty card cover labels
Contact your local Freecom dealer/retailer or the Freecom Support Center for
your country if any of the above items are missing from your box. Do not forget
to register your Freecom Beatman Flash 128 FM by visiting www.freecom.com or
by filling out the warranty card.
AAA size battery
4
Page 5

Precautionary measures
Minimum System Requirements for Digital Audio Manager Software
Intel Pentium 133 MHz
32 MB RAM
40 MB free hard drive space
CD-ROM drive
Windows 98 SE, ME, 2000 or XP
Available USB port
Precautionary measures
To ensure that your Freecom Beatman Flash 128 FM functions properly,
please take note of the following precautions. If these are not followed, you
may void your warranty and damage the Beatman Flash 128 FM.
Do not drop the Freecom Beatman Flash 128 FM or expose it to other
kinds of excessively heavy shocks, as this may result in the unit malfunc-
tioning.
Do not use the Freecom Beatman Flash 128 FM when the ambient
temperature is below 10°C or above 45°C and in direct sun-light.
If the Freecom Beatman Flash 128 FM is moved from a cool environment
to a warmer environment, please allow it to acclimatize to the ambient
temperature before operating the device. Failing to do so may lead to
condensation within the enclosure, which in turn may cause it to
malfunction.
Do not place liquids or drinks on the Beatman Flash 128 FM. When liquids
are spilled and get in contact with the electronics within the device
enclosure, it will damage the Beatman Flash 128 FM and will cause it to
malfunction.
Do not use the Beatman Flash 128 FM in a dusty environment. Dust inside
the enclosure may damage the internal electronics and result in a
malfunction.
Opening the Beatman Flash 128 FM will void the warranty.
GB
USA
5
Page 6
GB
USA
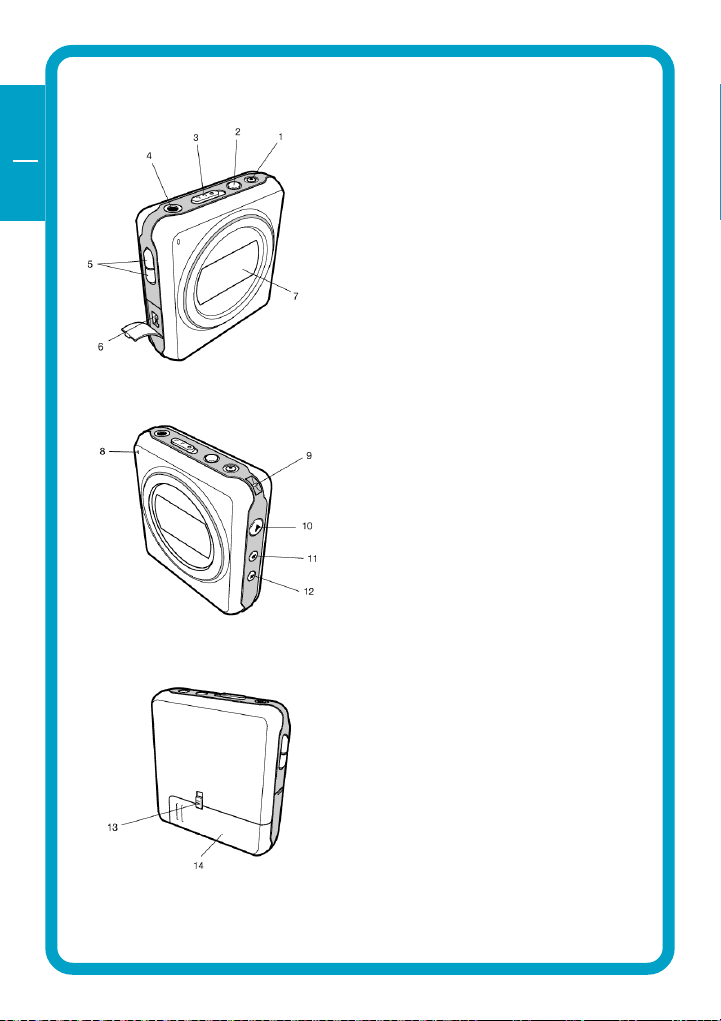
Device description
1 Rec (voice recording) /
Repeat A-B button
2 Mode / Equalizer /
Navigation button
3 Hold switch
4 Headphone connector
5 Volume control (up/down)
6 USB connector
7 LCD Display
8 Microphone
9 Neck strap holder
10 Power On / Play / Pause / Power
Off button
11 Previous / Fast backward
12 Next / Fast forward
13 Battery lock switch
14 Battery cover
6
Page 7
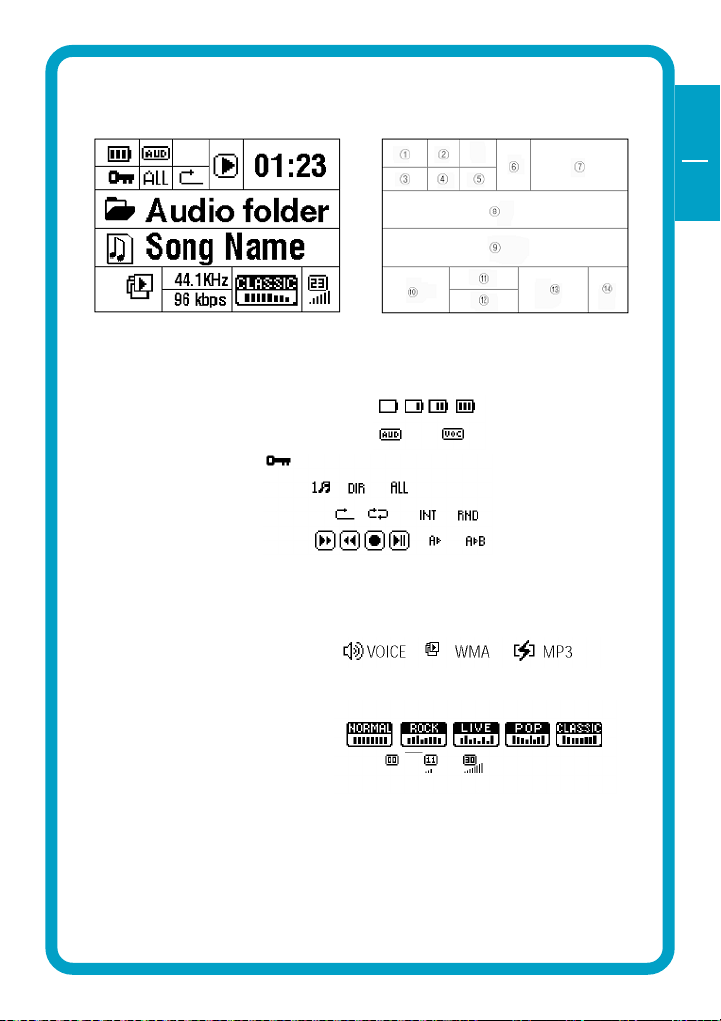
Display panel
1 BATTERY indicator
2 PLAY TYPE (audio/voice) indicator
3 HOLD indicator
4 REPEAT MODE indicator
5 REPEAT SETTING indicator
6 PLAY STATUS indicator
7 PLAYING TIME indicator
8 CURRENT FOLDER indicator
9 CURRENT SONG indicator
10 CURRENT FILE TYPE indicator
11 CURRENT SAMPLING FREQUENCY indicator
12 BIT RATE indicator
13 EQUALIZER SETTING indicator
14 VOLUME indicator
Display panel
GB
USA
7
Page 8
GB
USA
1
CHAPTER 1: Start up - Hardware Installation
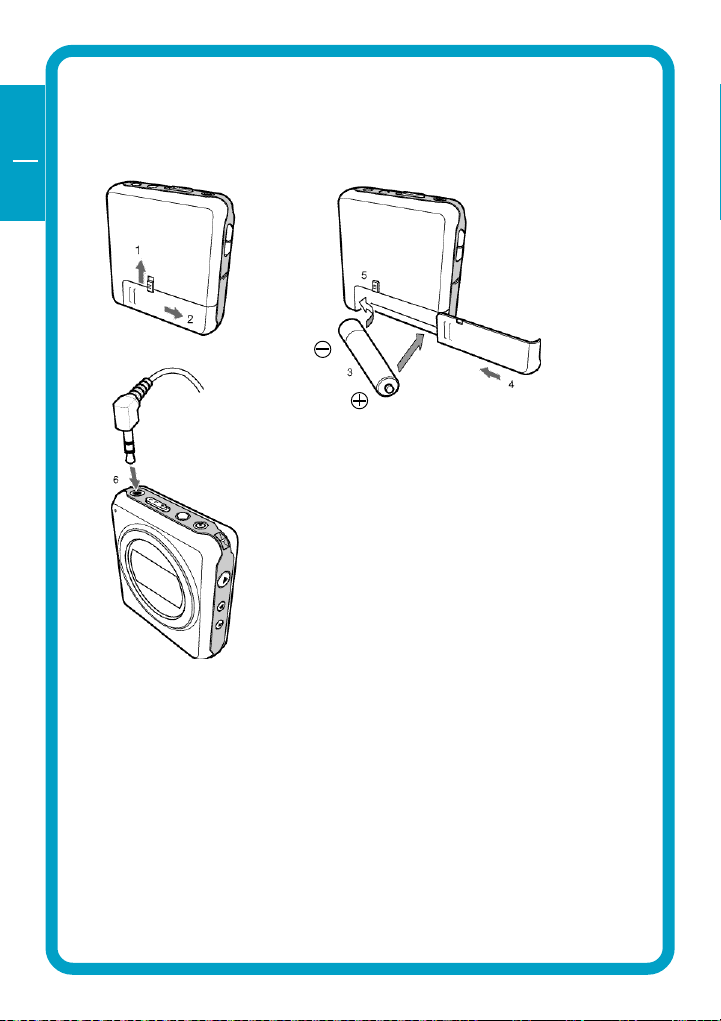
1.1 Inserting battery & connecting headphone
1. Unlock battery cover by sliding the battery hold switch in the direction
shown.
2. Slide the battery cover in the direction shown to open the battery cover.
3. Insert one AAA-size battery as shown, with the side touching the spring
inside the battery cover.
Note: Batteries contain chemical substances. When empty, they
should be properly disposed of.
4. Slide the battery cover back.
5. Lock the battery cover by sliding the lock-switch back.
6. Insert the headphone jack into the headphone connector, as shown.
8
Page 9
Connect the Beatman Flash 128 FM to your PC
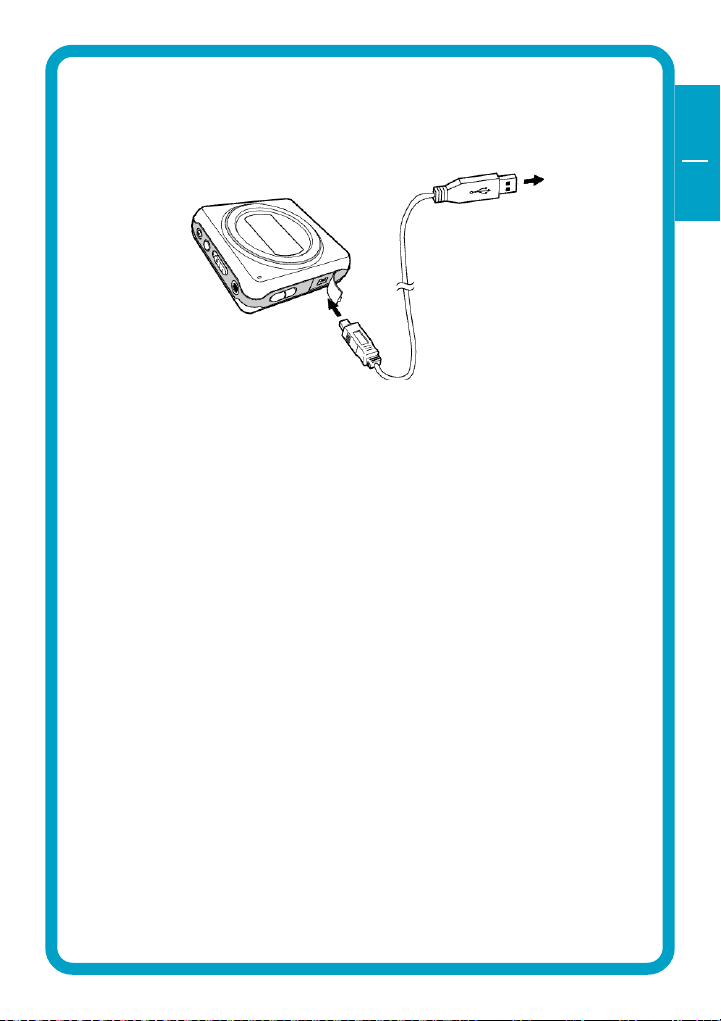
1.2 Connecting the Beatman Flash 128 FM to your PC
1. Insert the large USB connector into a USB port (USB 1.1 or 2.0) of your PC
2. Insert the small USB connector into the USB connector of the Beatman
Flash 128 FM.
Note: If you connect the USB cable when the Beatman Flash 128 FM
is still playing, it may cause the unit to malfunction. To avoid this,
please only connect the USB cable when the Beatman Flash 128 FM
is in Power Off or Pause mode.
GB
USA
1
9
Page 10
GB
USA
2
CHAPTER 2: Installing the Digital Audio Manager
software
Note: check www.freecom.com for the latest software-versions and up-
dates.
IMPORTANT: If you have installed the Digital Audio Manager soft-
ware from the Beatman Flash 64 MB model (Freecom article number
19034), please uninstall this software first before installing the
Digital Audio Manager software for the Beatman Flash 128 FM-model.
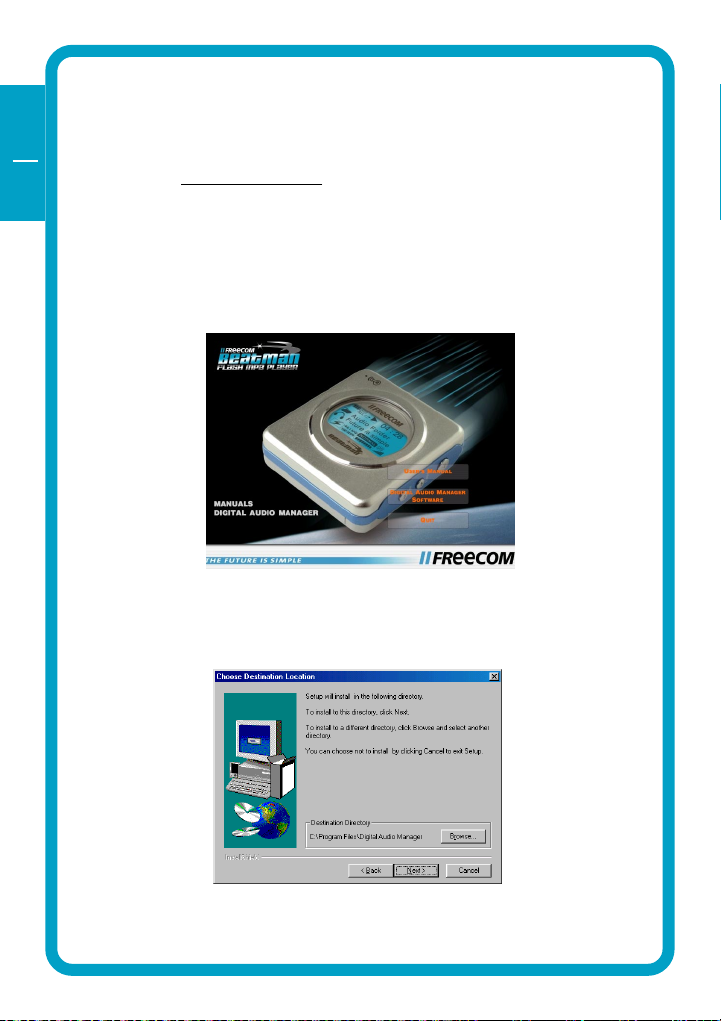
1. Insert the Freecom software CD into your CD-ROM drive.
Click "Digital Audio Manager Software" to continue.
2. Select destination directory (we advise you to accept the default selec-
tion) and click "Next" to continue
10
Page 11
Installation of the Digital Audio Manager software
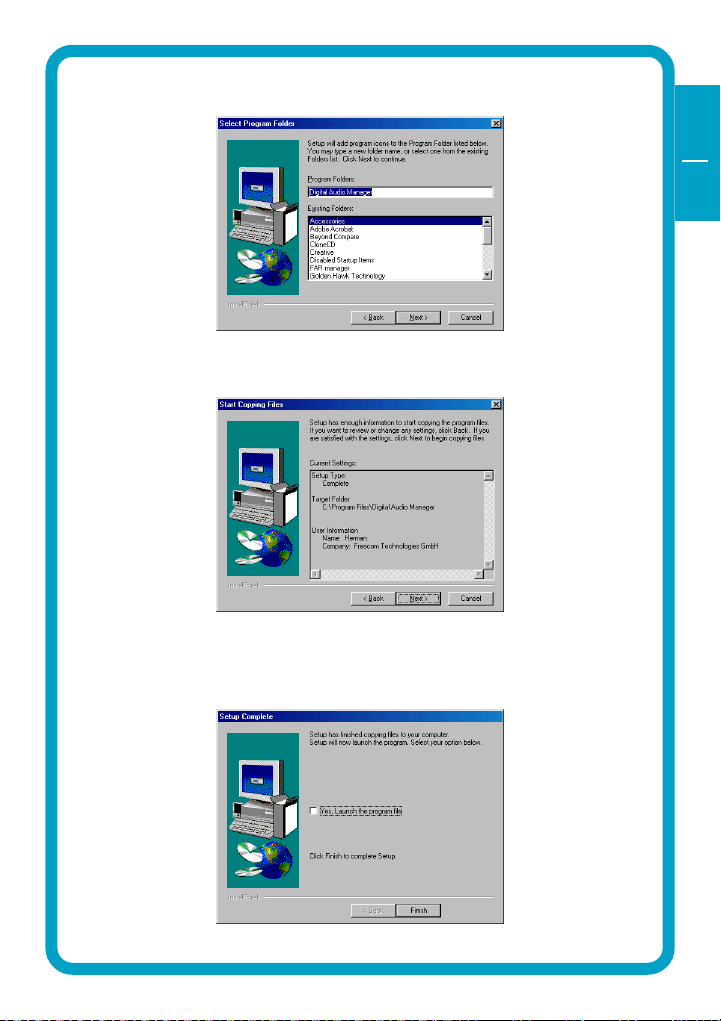
3. Cick "Next" to continue
4. Cick "Next" to continue
GB
USA
2
5. Click "Finish" to finish installation. You can access Digital Audio Man-
ager from the Programs menu in the Windows Start menu.
11
Page 12
GB
USA
CHAPTER 3: Driver Installation
3.1 Installing Windows 98 SE USB driver
3
1. Make sure the Freecom Beatman Flash 128 FM is connected to the PC by
using the supplied USB connection cable.
2. Switch the Freecom Beatman Flash 128 FM on.
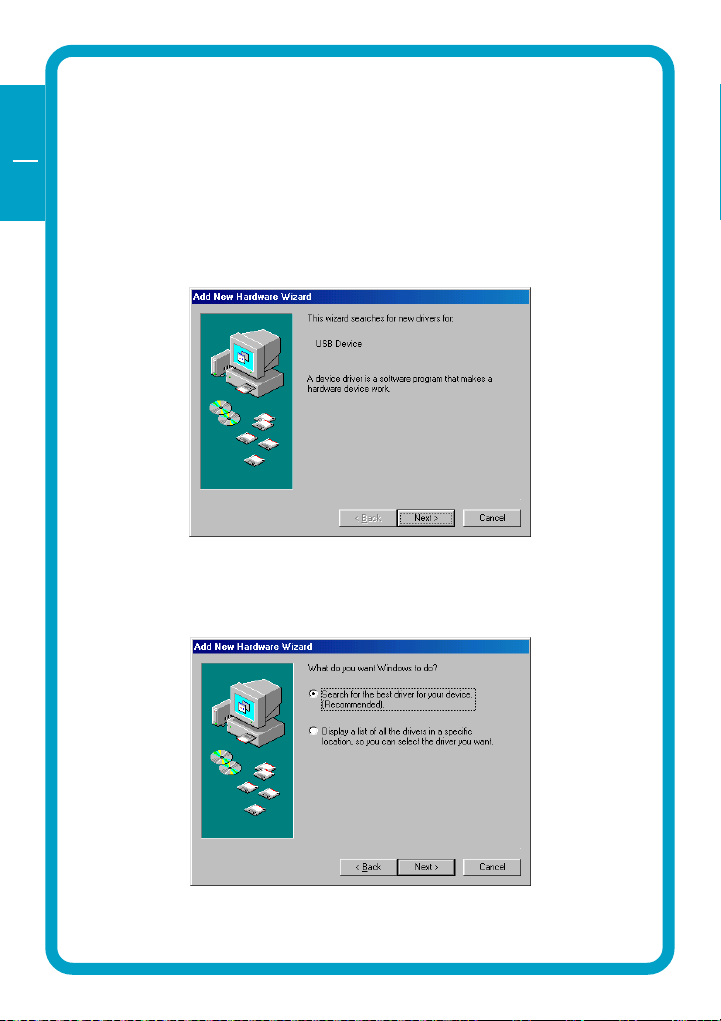
3. The "Add New Hardware Wizard" opens and a "USB Device" is found.
Click on "Next".
4. In the next window select "Search for the best driver for your device.
(Recommended)".
Click on "Next".
12
Page 13

Installing driver Windows 98 SE
5. Click "Browse". Select the CD-ROM drive with the Digital Audio Player
software.
Continue by clicking on "Next".
6. Follow the instructions on screen.The necessary files will be installed.
Click on "Finish" to complete the installation.
GB
USA
3
13
Page 14

GB
USA
3
3.2 Installing Windows Me USB driver
1. Make sure the Freecom Beatman Flash 128 FM is connected to the PC by
using the supplied USB connection cable.
2. Switch the Freecom Beatman Flash 128 FM on.
3. The "Add New Hardware Wizard" opens and a "USB Device" is found.
Click on "Next".
4. The necessary files will be installed. Click on "Finish" to complete the
installation.
14
Page 15

Installing driver Windows 2000
3.3 Installing Windows 2000 USB driver
1. Make sure the Freecom Beatman Flash 128 FM is connected to the PC by
using the supplied USB connection cable.
2. Switch the Freecom Beatman Flash 128 FM on.
3. The "Add New Hardware Wizard" opens and a "USB Device" is found.
Click on "Next".
4. In the next window select "Search for a suitable driver for my device
(recommended).
GB
USA
3
Click on "Next".
15
Page 16

GB
USA
3
5. Make sure that the checkbox "CD ROM drive" is activated in the next
window.
Continue by clicking on "Next".
6. In the next window a massage is shown, that a driver for an USB device
is found.
Click on "Next".
16
Page 17

Installing USB driver under Windows XP
7. The necessary files will be installed. Click on "Finish" to complete the
installation.
3.4 Installing Windows XP USB driver
1. Make sure the Freecom Beatman Flash 128 FM is connected to the PC by
using the supplied USB connection cable.
2. Switch the Freecom Beatman Flash 128 FM on.
3. The "Add New Hardware Wizard" opens and a "USB Device" is found.
GB
USA
3
Click on "Next".
17
Page 18

GB
USA
3
4. Click "Continue Anyway".
5. The necessary files will be installed. Click on "Finish" to complete the
installation.
18
Page 19

CHAPTER 4: Every day use
4.1 Starting the program
Every day use
GB
USA
Please select the "Freecom Digital Audio Manager":
1. Click "Start" - "Programs" - "Freecom Digital Audio Manager" - "Freecom
Digital Audio Manager".
2. Select the music files you want to transfer and "drag and drop" them to
the screen on the right.
4
3. To transfer / change / remove files or to format the memory, please select
the operation menu
19
Page 20

GB
USA
4.2 Description of the menus
MENU SUBMENU DESCRIPTION
4
OPERATION DOWNLOAD SELECTED FILES Download selected data or
FROM PC TO PLAYER files from PC into memory
(Drag & Drop)
UPLOAD SELECTED FILES FROM Upload selected data or files
PLAYER TO PC *) from memory of Player to PC
(drag & drop)
REMOVE SELECTED FILES FROM Delete selected data or files
from PLAYER memory of Player
REMOVE ALL FILES Delete all data or files from
memory of Player
FORMAT Format all memory of Player
FORMAT ALL MEMORIES Format all selected data or files
in memory of Player
CANCEL OPERATIONS IN QUEUE Cancel operation of selected
DOWNLOAD/UPLOAD/DELETE
in queue
CANCEL ALL OPERATIONS Cancel all operations of
DOWNLOAD/UPLOAD/DELETE
in queue
VIEW MEMORY Option for viewing selected
memory in internal/external
memory. You can select and
view one of [NAME,STORAGE,
SIZE, DATA]
PC Option for viewing data in
PC. You can select and view
one of [BIG ICON, SMALL,
ICON, LIST, REPORT]
ABOUT ABOUT Information on Digital Audio
Manager software
*) Note: When "UPLOAD SELECTED FILES FROM PLAYER TO PC" is selected:
1. MP3 and WMA files can not be uploaded from Player to PC.
2. Voice files will be converted into .wav and stored on the PC.
20
Page 21

Every day use
4.3 Operating instructions
Power on
1. Press the "4" button to turn the power on.
2. After Power On, music will start immediately (when autoplay is acti-
vated).
Pause / Power off
GB
USA
4
1. Press "4" button during playback to pause the player.
2. To turn the power off, press "4" button for more than 2 seconds when
the player is in pause mode.
21
Page 22

GB
USA
4
Hold On/Off
Hold-On
Hold-Off
The Hold function locks all buttons.
1. Slide the hold switch in the direction of the arrow to activate Hold
function.
2. Slide the hold switch back to de-activate Hold function.
Volume Control
Press Vol. +/- on the left side of the player to adjust the volume. Volume
range is 0 (minimum) to 30 (maximum).
22
Page 23

Every day use
Fast Backward & Fast Forward
Press and hold "7" button during playback to search fast backward within
the song.
Press and hold "8" button during playback to search fast forward within the
song.
Previous / Next Track
GB
USA
4
1. Press "8" button to move the next song.
2. Press "7" button to move the previous song.
23
Page 24

GB
USA
4
Loop repeat
1. Press "Rec/A.B" button shortly during playback to mark the beginning
of the loop. "A 4" will flicker in the display
2. Press "Rec/A.B" button shortly again to mark the end of the loop. "A
B" will appear in the display and the loop is played repeatedly.
3. Press "Rec/A.B" button shortly again to exit the loop.
Deleting Files
Press "Rec/A.B" button for a few seconds during playback to delete the song
currently playing.
24
Page 25

Every day use
Intro
1. Press "4" button for a few seconds to activate the intro mode: the first
10 seconds of each song will be played in sequence.
2. Press "4" again to exit the intro mode.
MODE Setting
1. Press "4" button to pause music while playing.
2. Press MODE button for a few seconds to enter the MODE menu.
3. Scroll through the menu by pressing VOL +/- buttons.
4. Change the setting by pressing "7" or "8" buttons .
5. Press MODE button for a few seconds to exit mode menu.
GB
USA
4
See table on page 26 for a detailed description of the mode settings.
25
Page 26

GB
USA
MODE Setting
MODE ITEMS SETTINGS REMARKS
4
Repeat [1Song] repeat 1 song
[All] repeat all
Play Mode [Normal] Play only once
[Auto-R Infinite repeat
[Intro] Play the first 10 seconds
of each song
[Random] Play randomly
Resume [Off] Plays the first song in the
memory
[Song] Plays from
the start of last-played song
before power-off
[Real] Plays from the exact
position in last-played song
before power-off
Set EQ [Normal] Normal
[Live] Live
[Pop] Pop
[Rock] Rock
[Classic] Classic
AUTO PLAY [On] Auto Play On
[Off] Auto Play Off
ID3 tag [On] ID3 TAG on
[Off] ID3 Tag off
Language [Kor] Korean
[Eng] English
[Jpn] Japan/[Chn] Chinese
26
Page 27

Every day use
FM Sensibility [High] High The higher the level,
the more fequencies
can be received when
autoscanning.
[Mid] Mid
[Low] Low
Rec set [8KBps] Low quality of voice- Low quality = small file
recording szie
[16KBps] Mid quality of voice-
recording
[32KBps] High quality of voice- High quality = large file
recording size
Contrast 0~10
El Mode (Backlighting) [3Sec] El mode on for 3sec.
[5Sec] EL mode on for 5sec.
[10Sec] EL mode on for 10sec.
[Always] EL mode always on
[Off] EL mode always off
* To select a mode press the Vol. +, - buttons.
* To select a function within a mode, press the "7" or "8" buttons
GB
USA
4
27
Page 28

GB
USA
4
Equalizer setting and navigation during playback
Equalizer Setting
1. Press MODE button shortly during playback
2. EQ indicator on display will flicker; change EQ setting by pressing "7"
or "8" button.
3. Press MODE button shortly to exit EQ setting menu
Navigation during playback
1. Press MODE button for a few seconds during playback
2. Search for music file by pressing "7" or "8" button
3. Press "4" to play the selected song
Voice recording
1. Press "4" button during playback to enter pause mode
2. Press "Rec/A.B" button for more than 2 seconds to start voice recording.
"Recording now..." will appear in the display.
3. Press "Rec/A.B" button shortly to stop voice recording.
Note
- Voice file is created automatically during voice recording
- Voice quality can be changed in "MODE" settings, see page 26
MIC
28
Page 29

Every day use
Playback & Deleting voice files
1. Playback of recorded voice files is the same as playback of music files.
Select a file using "7" or "8" and press "4" to start playback.
2. Press "Rec/A.B" button for more than 2 seconds to delete the voice file
that is currently playing.
Returning to Audio mode
GB
USA
4
1. Press "4" button shortly to pause mode during playback.
2. Press MODE button for a few seconds to enter mode setting menu.
3. Press VOL +/- buttons until you reach TYPE mode
4. Press "7" or "8" button to change from Voice to Audio mode
5. Press "MODE" for more than 2 seconds to exit Mode setting menu.
29
Page 30

GB
USA
4
Listening to the radio/Setting the frequency
1. To listen to the FM-radio: when player is in Audio Folder, press mode
button twice for a short period, when player is in Voice Folder press
mode button once for a short period.
2. Press <mode> button for a few seconds, then <Preset Scan mode> and
<Manual Scan mode> will be set alternatively. If a preset channel is
found, the Preset icon appears and disappears on the display
alternatively. If no preset frequency is found, the message Preset
Channel Not Found is displayed for 3 seconds and the mode is automati-
cally set to Manual Scan mode .
30
Preset Scan Mode Manual Scan Mode
Page 31

Every day use
FM Mode Icon
1. Battery
2. Preset Display Preset scan mode or Manual scan mode
3. Display Stereo or Mono icon
4. Volume During listening the radio you can adjust the volume.
5. Antenna status
6. Preset channel (1~20 is available to save) Display preset channel.
7. Frequency
8. Frequency scroll bar
GB
USA
4
31
Page 32

GB
USA
4
Manual Scan Mode
1. Press the <mode> button to set to Manual Scan Mode.
2. Press the button "7" or "8" shortly to increase or decrease the frequency.
For fast scanning press the button"7" or "8" button for a longer period.
Preset
1. Press the button "7" or "8" in the Manual Scan Mode until you have
reached the channel you want to listen to.
2. Press the Rec button for a short period to store this channel to one of the
presets.
3. The preset number is blinking. The preset number is changed by pressing
the "7" or "8" button. If there is no key pressed for over 10 seconds,
the player will go back to Manual Scan Mode. When the selected preset
channel is already previouosly used to store a channel, the "USED
Channel xx.xx MHz" will be displayed. When the selected preset channel
is empty, the message Empty Channel will be displayed.
32
Page 33

Every day use
4. After selecting the preset channel you want, press the REC button for a
short period to store the frequency to the preset channel.
Deleting Preset
1. In the Preset Scan mode, press the "7" or "8"button to select the preset
channel.
2. After selecting the channel, press the REC button to delete the channel
from the presets. If you want to restore the preset you have just deleted,
press the REC button one more time.
3. Press the buttons "7", "8"or Mode key to exit.
Preset Scan Mode
GB
USA
4
1. Press the Mode button for a few seconds to select the Preset Scan mode.
The Preset icon is displayed.
33
Page 34

GB
USA
4
2. You can browse through the preset channels by using the "7" or "8"
buttons.
3. Press the button "7" or "8" for a few seconds to select Intro Preset.
Intro Preset: You can listen for 10 seconds to each preset channel
automatically. To cancel the Intro Preset function, press the button "7"
or "8" for a short time.
Auto Preset Scan
1. Press the REC button for a few seconds when in FM-Radio mode to enter
Auto Preset Scan mode. This function automatically searches for the
channels with the best reception and automatically stores these chan-
nels in the presets. During Auto Preset Scan the icon is blinking.
2. During automatic scanning, if a channel is found then you can listen to
it for 5 seconds and its preset and display automatically. After these 5
seconds scanning starts again. When you press the REC button during
scanning, the scanning function stops.
You can set the scan level (High,Mid or Low) in the Setup menu.
Stereo/Mono Mode Change
1. Press the button "4" for a short time.
2. If you press the button you can switch from Stereo to Mono Mode.
34
Page 35

Troubleshooting
CHAPTER 5: Troubleshooting
PROBLEM CAUSE AND ACTION
The power will not turn on Check if the battery is inserted correctly
Check if the battery is empty; if so replace
battery
Check if ambient temperature is too low;
operating temperature is between 10° and 45° C.
Buttons do not work Check if the Hold function is activated:
if so de-activate hold function.
Poor sound quality or no sound Check if headphones are connected correctly
MP3/WMA files cannot be Check if power is turned on.
downloaded Check if USB cable is connected correctly to player
and PC.
Check in Windows Device Manager if the USB
driver is installed correctly.
GB
USA
5
35
Page 36

GB
USA
5
Technical Specifications
Model No.: Beatman Flash 128 FM
Specifications
Supported MP3 file format MPEG 1/2/2.5 LAYER 3 Playback
MP3 Bit Rate 32Kbps ~ 320Kbps & VBR(Variable Bit Rate)
MP3 Sampling Frequency 16/22.05/24/32/44.1/48KHz
WMA supported WMA playback (64Kbps ~ 128Kbps)
Internal (built-in) memory Built-in 128 MB, not expandable
Voice Recording supported User Selectable (8/16/32Kbps)
- maximum 34 hours at 8Kbps(128MB)
Multi-Line Graphic LCD 128 * 64 dot & 4 Lines display
with EL
ID3 TAG Supported
EQ Classic/Pop/Rock/Live/Normal
Supported Language English/Japanese/Korean/Chinese
PC Interface USB
USB download speed up to 3.5Mbps
Battery type AAA size * 1EA
Running time Up to 9 hours
Size (mm) 52.6 * 56.7 * 17.5mm
Weight (g) 44 (battery not included)
Frequency Response 20Hz ~ 20KHz
S/N > 85dB
THD < 0.1%
Headphone Out 7mW + 7mW
Number of FM Preset 20 figures
Supported FM Freq. 3 Type
[Type1] Band (87.5~108.0MHz) step
(100KHz)(Default)
[Type2] Band (87.5 ~ 108.0MHz) step (50KHz)
[Type3] Band (76.0 ~ 82.0MHz) step
(100KHz)(Japan)
36
Page 37

WARRANTY
WARRANTY (valid in Europe/Turkey only):
Warranty: two years manufacturers warranty. Opening the Freecom
Beatman Flash 128 FM voids warranty.
For service contact your local Freecom dealer or the Freecom Service
Center in your country.
Freecom and Beatman are trademarks of Freecom Technologies BV, Delft, The
Netherlands (freecom.com). All other brands/marks are trademarks of their
respective companies.
Errors and omissions excepted.
GB
USA
FEDERAL COMMUNICATIONS COMMISSION - DECLARATION OF CONFORMITY
This equipment has been tested and found to comply with the limits for a Class B digital
device, pursuant to part 15 of the FCC Rules, and RS 210 Regulations (Canada). These
limits are designed to provide reasonable protection against harmful interference in a
residential area. This equipment generates, uses, and can radiate radio frequency
energy and if, not installed and used in accordance with the instructions, may cause
harmful interference to radio communications. However, there is no guarantee that
interference will not occur in a particular installation. If this equipment does cause
harmful interference to radio or television reception, which can be determined by
running the equipment off and on, the user is encouraged to try to correct the
interference by one or more of the following measures:
Reorient or relocate the receiving antenna.
Increase separation between the equipment and receiver.
Connect the equipment to an outlet on a circuit different from that
to which the receiver is connected.
Consult the dealer or an experienced radio technician for help.
37
Page 38

WARRANTY (Valid in Europe/Turkey only):
We thank you for purchasing this Freecom product and hope you will enjoy using it.
In order to avoid unnecessary inconvenience on your part, we suggest reading the quick install guide,
instruction manual and any additional electronic and or printed manuals. When problems occur we
have a database with Frequently Asked Questions (FAQ) on our Freecom website (www.freecom.com),
please check this site before you contact the helpdesk.
Your Guarantee
All Freecom products come with unlimited technical phone and web support. By this Guarantee, Freecom
warrants their products to be free from defects in material and workmanship for a period listed below
from the date of its original purchase. If during this period of guarantee the product proves defective
due to improper materials or workmanship, Freecom will, without charge for labour or parts, at its
sole discretion, repair or replace the product or its defective parts upon the terms and conditions set
out below.
Conditions
This guarantee will be granted only when the original invoice or sales receipt (indicating the date of
purchase, product and serial number) is presented together with the defective product and a Freecom
RMA number received from the Freecom Website or given by a Freecom Service Center. Freecom
reserves the right to refuse the free-of-charge guarantee services when the date of purchase of the
product cannot be proven. This guarantee will not apply if the RMA number is missing, the serial
number on the product has been altered, removed or made illegible.
This guarantee covers only the hardware components packaged with the product. This guarantee
covers none of the following: (a) any consumable supplied with the product, such as media or batter-
ies; (b) damage to or loss of any software programs, data or removable storage media; (c) any damage
resulting from adaptations, changes or adjustments, which may have been made to the product,
without the prior written consent of Freecom; (d) attempted repair by any party other than autho-
rized by Freecom and (e) accidents, lightning, water, fire or any other such cause beyond the reason-
able control of Freecom.
With respect to all services provided, Freecom is not responsible for any damage to or loss of any
programs, data or other information stored on any media or any part of any product serviced. Freecom
is not liable for the consequence of business loss in case of system failure. Be sure to exclude all parts
not covered by this guarantee prior to returning the product to Freecom. Freecom is not liable for any
loss or damage to these items. If during the repair of the product the contents of the hard drive are
altered, deleted or in any way modified, Freecom is not liable whatsoever.
Repair parts and replacement products will be provided on an exchange basis and will be either new,
equivalent to new or reconditioned. All replaced parts and products become the property of Freecom
The period of guarantee for any product or part repaired or replaced in warranty shall be the balance
of the original guarantee. Repairs or replacements on product or parts out of warranty carry 6 (six)
months guarantee.
All Freecom products come with unlimited free technical phone and web support.
Freecom Product Warranty period
Traveller & Portable 1 year (Two years in Europe)
Classic & Internal CD-RW 1 year (Two years in Europe)
FX-SERIES & FS-1 1 year (Two years in Europe)
FHD-1/FHD-2 & FireWire Harddrive 1 year (Two years in Europe)
USBCard 1 year (Two years in Europe)
DAT & LTO Drives (retail) 3 years
DAT-S Kits 2 years
ThinServer* 1 year (Two years in Europe)
Beatman 1 year (Two years in Europe)
Cables 1 year (Two years in Europe)
* Controller inside 3 years after online registration only. (GB)
 Loading...