

Page 1

B
EXPANDABLE ELECTRONIC BOOK
OO
K
USER’S GUIDE
SDK-763 • SDK-765
MAN
Page 2

License Agreement
READ THIS LICENSE AGREEMENT BEFORE USING ANY BOOKMAN ELECTRONIC BOOK.
YOUR USE OF THE BOOKMAN ELECTRONIC BOOK DEEMS THAT YOU ACCEPT THE TERMS OF THIS LICENSE. IF YOU DO NOT AGREE WITH THESE
TERMS, YOU MAY RETURN THIS PACKAGE WITH PURCHASE RECEIPT TO
THE DEALER FROM WHICH YOU PURCHASED THE BOOKMAN ELECTRONIC BOOK AND YOUR PURCHASE PRICE WILL BE REFUNDED. BOOKMAN ELECTRONIC BOOK means the software product, hardware, and
documentation found in this package and FRANKLIN means Franklin Electronic
Publishers, Inc.
LIMITED USE LICENSE
All rights in the BOOKMAN ELECTRONIC BOOK remain the property of FRANKLIN. Through your purchase, FRANKLIN grants you a personal and nonexclusive
license to use the BOOKMAN ELECTRONIC BOOK on a single FRANKLIN BOOKMAN at a time. You may not make any copies of the BOOKMAN ELECTRONIC
BOOK or of the preprogrammed data stored therein, whether in electronic or print
format. Such copying would be in violation of applicable copyright laws. Further , you
may not modify, adapt, disassemble, decompile, translate, create derivative works
of, or in any way reverse engineer the BOOKMAN ELECTRONIC BOOK. Y ou may
not export or reexport, directly or indirectly , the BOOKMAN ELECTRONIC BOOK
without compliance with appropriate governmental regulations. The BOOKMAN
ELECTRONIC BOOK contains Franklin’ s confidential and propriety information which
you agree to take adequate steps to protect from unauthorized disclosure or use.
This license is effective until terminated. This license terminates immediately without notice from FRANKLIN if you fail to comply with any provision of this license.
1
Page 3

Contents
Key Guide .......................... 4
Special BOOKMAN Features 6
Getting Started
Installing Batteries ................... 8
Installing Book Cards............... 8
Selecting a Book...................... 9
Using the Color Keys............... 9
Viewing the Demonstration.... 10
Changing the Settings ........... 10
Selecting a T opic ................... 11
Typing Characters.................. 12
Using a Password.................. 13
Gauging the Memory ............. 14
Using the Clocks
Setting the Home Clock......... 16
Setting the World Clock......... 17
Using the Daily Alarm ............ 17
Changing the
Time/Date Format.................. 18
Swapping the Clocks ............. 19
Using the Calendar
Creating Calendar Entries...... 21
Duplicating a Calendar Entry . 22
Using the Daily View ............. 23
Using the Weekly View.......... 24
Using the Monthly View......... 25
Editing Calendar Entries ........ 26
Searching for
Calendar Entries .................... 26
Trimming the Schedule .......... 27
Using Cardfiles
Creating a Cardfile ................ 29
Adding Cards......................... 30
Duplicating a Card................. 31
Viewing Cardfiles and Cards.. 31
Editing Cards......................... 32
Searching for Cards............... 33
Using Notes
Creating a Note Folder .......... 36
Adding Notes......................... 37
2
Page 4

Contents
Duplicating a Note................. 38
Viewing Note Folders
and Notes.............................. 38
Editing Notes......................... 39
Searching for Notes............... 40
Using Expenses
Creating Expense Entries....... 43
Viewing Expense Entries........ 44
Editing Expense Entries ......... 44
Computing Expense Sums ..... 45
Using the Calculator
Making Calculations .............. 47
Saving and Retrieving
Calculations .......................... 48
Using the Connectivity
Software
The Equipment Y ou Need....... 50
Connecting the Serial Cable .. 50
Installing the
Connectivity Software............ 51
Starting the
Connectivity Software............ 52
T esting Your Connection........ 53
Linking Files .......................... 54
Merging All Linked Files ........ 57
Advanced Transfers
and Merging .......................... 60
Recovering Files .................... 62
Backing up and
Restoring Files....................... 63
Solutions to Common
Problems ............................... 64
Doing a Factory Reset ...... 67
Resetting Your BOOKMAN 67
Specifications .................. 68
Copyrights and Patents...... 68
Limited Warranty ............... 69
Index ................................ 70
Note: This User’ s Guide is intended for
use with BOOKMAN Sidekick models
SDK-763 and SDK-765. For information
about your specific BOOKMAN Sidekick, read “Specifications.”
3
Page 5
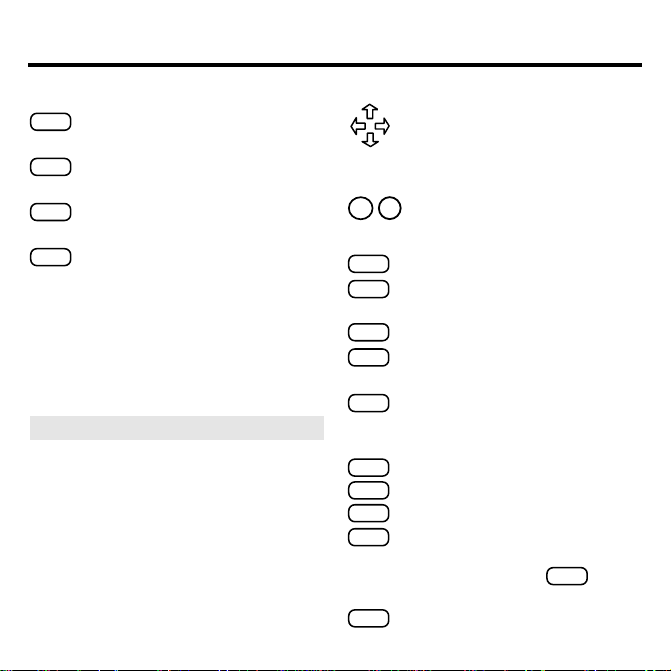
Key Guide
Color Keys
FILES
(red) Cycles through the
cardfiles.
CALEND
(green) Cycles through the
calendar views.
NOTES
(yellow) Cycles through the
note folders.
EDIT
(blue) Displays entry , search,
edit, delete and other options.
➤ Understanding the Color Keys
The color keys (red, green, yellow,
and blue) perform the functions
listed above only for the book described in this User’ s Guide.
Other BOOKMAN books have their
own color key functions, which are
labeled on their keyboards or book
cards. To lear n more, read “Using
the Color Keys.”
Direction Keys
Moves through text or menus,
or moves the cursor . In the
Calculator, types basic math
symbols (i.e., +, x, -, ÷).
DN
UPPages down or up.
BACK
Erases a letter , or backs up.
CAP
Shifts a key to type capital
letters or punctuation marks.
CARD
Exits the book you are reading.
CLEAR
Clears to the main screen of
the current topic.
ENTER
Selects a menu item, or enters
search words. In the Calculator,
performs a selected math function.
HELP
Displays help messages.
MENU
Displays the main menus.
ON/OFF
T urns your BOOKMAN on or off.
✽
?
T ypes a question mark. At
menus, displays the full title of
a menu item. With
an asterisk.
SPACE
T ypes a space or pages down.
4
Other Keys
CAP
, types
Page 6
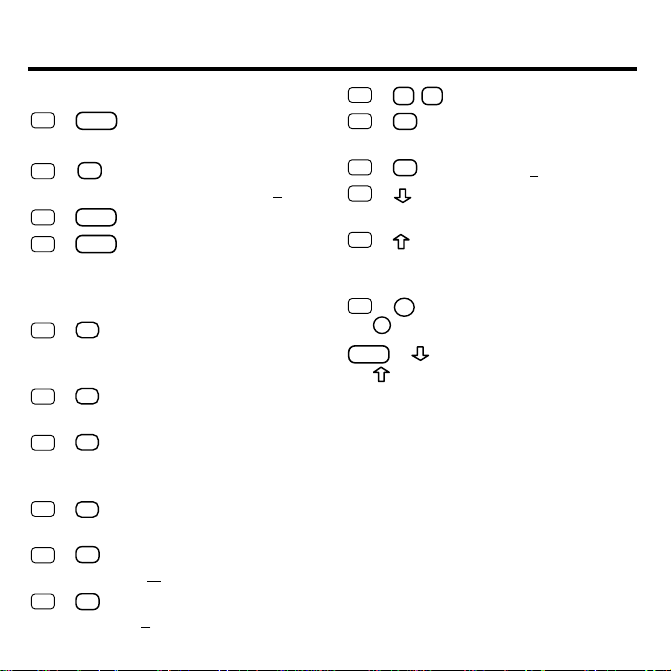
Key Guide
C
Key Combinations*
BACK
✩
+
Exits a new or edited
entry without saving.
+
✩
Toggles between the
Home and World
EDIT
+
✩
+
✩
Opens an entry to edit.
ENTER
Saves an entry. In the
Calendar Daily view,
checks or unchecks T o
Do items and Calls.
H
+
✩
In the Calculator, converts a number to a
percentage.
J
+
✩
In the Calculator,
squares a number.
K
+
✩
In the Calculator, calculates the square root of
a number.
+
✩
In the Calculator, calcu-
L
lates a reciprocal.
M
+
✩
+ N Locks and unlocks the
✩
Selects the Calculator
math).
(
numbered keys.
clock.
✩
+ Q-PTypes numbers.
S
✩
+
Displays the special
characters you can type.
X
✩
+
✩
+ At a field or entry
Selects Expenses.
screen, types a hyphen.
✩
+ At a field or entry
screen, accents a typed
letter .
DN
✩
+
or
UP
CAP
+ Goes to the bottom or
or
Goes to the next or previous entry or match.
top of a list, menu, or
entry .
* Hold the first key while pressing the other
key.
5
Page 7
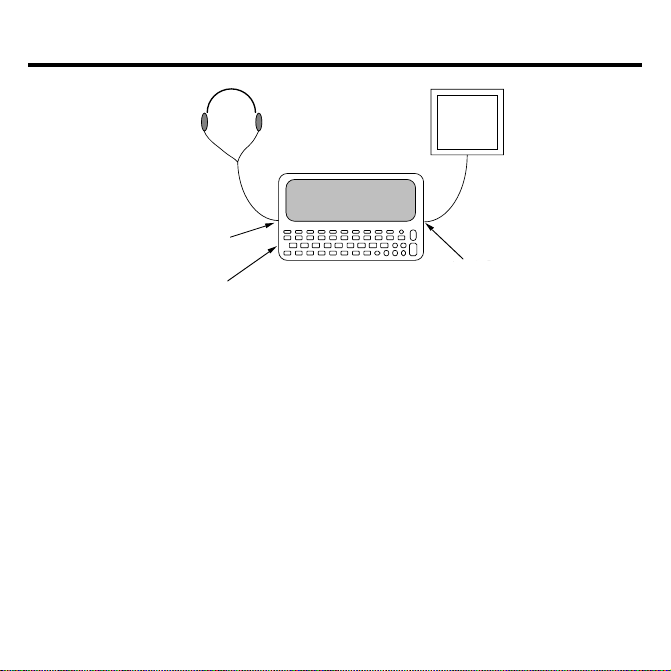
t
Special BOOKMAN Features
Headphone Jack
Volume Control
PC
Serial Por
Serial Port
Your BOOKMAN 770 is equipped with
several special features that many , but
not all, BOOKMAN books use. T o
learn if you can use the special features with a particular BOOKMAN
book, read its User’s Guide.
Headphone Jack: The headphone
jack is designed for 3.5 mm, 35 ohm
impedance stereo headphones. Cau-
tion: Monophonic headphones will not
work with this BOOKMAN model.
Volume Control: The dial located
under the headphone jack controls the
volume of the speaker or headphones.
Serial Port: The serial port allows certain BOOKMAN books, when Franklin’ s
BOOKMAN PC-Connect serial cable is
connected to your BOOKMAN, to transfer data to a personal computer (PC).
Warning: Using a serial cable other
than the one obtained from Franklin may
damage your BOOKMAN and/or PC.
Franklin’ s serial cable is specifically designed for the transfer of data between
BOOKMAN and a PC.
Speaker: The speaker is located on
the back of your BOOKMAN near the
serial port. For best results, do not
cover the speaker with your hand.
6
Page 8

Getting Started
If you are using your BOOKMAN Sidekick
for the first time, read this section.
It explains how to start using your
BOOKMAN Sidekick, as well as how
to perform basic and important operations.
Installing Batteries ......................................................... 8
Installing Book Cards ..................................................... 8
Selecting a Book ............................................................ 9
Using the Color Keys...................................................... 9
Viewing the Demonstration .......................................... 10
Changing the Settings .................................................. 10
Selecting a Topic .......................................................... 11
Typing Characters ........................................................ 12
Using a Password......................................................... 13
Gauging the Memory .................................................... 14
7
Page 9
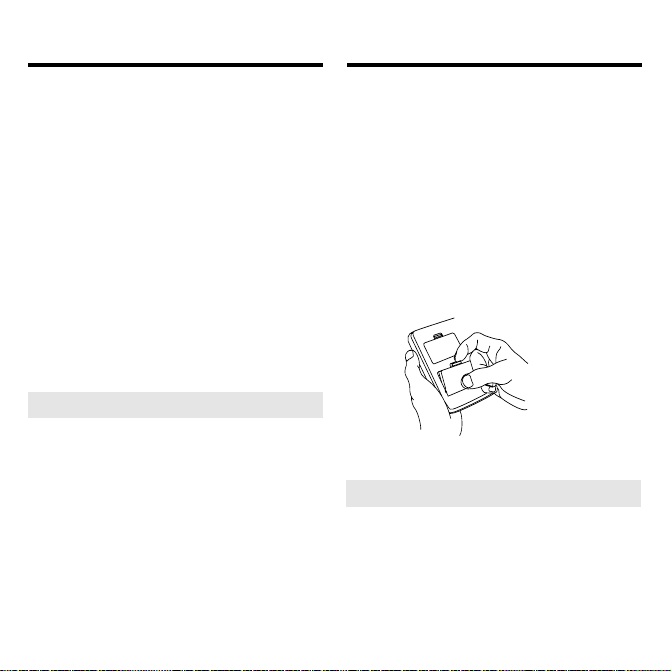
Installing Batteries
Installing Book Cards
Your BOOKMAN model is powered by
two AAA, 1.5-volt batteries. Here is
how to install or replace them.
1. T urn your BOOKMAN over.
2. Remove the battery cover on
the back of your BOOKMAN
by compressing its tab with
your finger and then lifting
the cover.
3. Install the batteries as shown
on the diagram in the battery
compartment.
4. Replace the battery cover .
➤ When the Batteries Are Low
An on-screen warning message will
appear when the batteries in your
BOOKMAN Sidekick are low on
power. This message does not
mean that any of the information entered in your BOOKMAN Sidekick
is in danger of being lost or erased.
However , you may not be able to
create new entries until fresh
batteries are installed.
Warning: Never install or remove a
book card when your BOOKMAN is
turned on. If you do, information that
you entered in any installed book cards
may be erased. However, information
saved in your BOOKMAN Sidekick will
not be erased.
1. Turn your BOOKMAN off.
2. T urn your BOOKMAN over.
3. Align the book card tabs with
the notches in a card slot.
4. Press the book card until it
snaps into place.
➤ Removing Book Cards
Warning: When you remove most
book cards, information that you entered is not saved in the book cards. If
you change the batteries or reset your
BOOKMAN, that information will be
erased.
8
Page 10
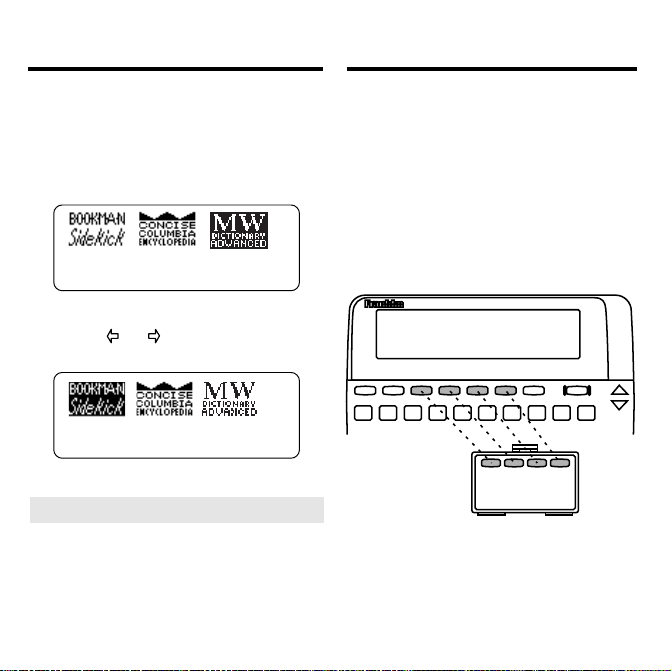
Selecting a Book Using the Color Keys
Once you have installed a book card in
your BOOKMAN, you can select
which book to use.
1. Turn your BOOKMAN on.
2. Press CARD.
These are sample books.
3. Press or to highlight
the book you want to use.
4. Press ENTER to select it.
➤ About the Screen Illustrations
Some screen illustrations in this
User’s Guide may differ slightly
from what you see on screen. This
does not mean that your BOOKMAN is malfunctioning.
The red, green, yellow, and blue keys
on your BOOKMAN change their functions according to which book you are
using.
When you are using the built-in book,
the color keys function as labelled on
the BOOKMAN keyboard. When you
are using a book card, the color keys
function as labelled on that book card.
Remember, the color keys for book
cards function as labelled on their cards,
not as labelled on the BOOKMAN
keyboard.
9
Page 11
Viewing the Demonstration
Changing the Settings
Before you start using your BOOKMAN
Sidekick, you may want to see a brief
demonstration of what it can do.
When a book card is not installed in your
BOOKMAN, the demonstration automatically appears after you turn on your
BOOKMAN. To stop the demonstration,
press CLEAR. To disable it, press MENU
and then select
Setup menu. T o re-enable it, select
Disable Demo
from the
Enable Demo.
When a book card is installed in your
BOOKMAN, select
Setup menu to see the demonstration.
➤ Help is Always at Hand
At virtually any screen, you can view
a help message by pressing HELP.
Use or DN to read it. To exit
help, press BACK.
T o read a tutorial about this book, se-
Tutorial
lect
You change the language of the
help messages, tutorial, and demonstration. To lear n how, read “Changing the Settings.”
View Demo
from the Setup menu.
from the
Y ou can adjust the screen contrast,
automatic shutoff time, the help message language, and the time/date format of the clocks and calendars of
your BOOKMAN Sidekick.
The automatic shutoff time is how long
your BOOKMAN stays on if you forget
to turn it off. The help message language is the language of the help messages, tutorial, and demonstration.
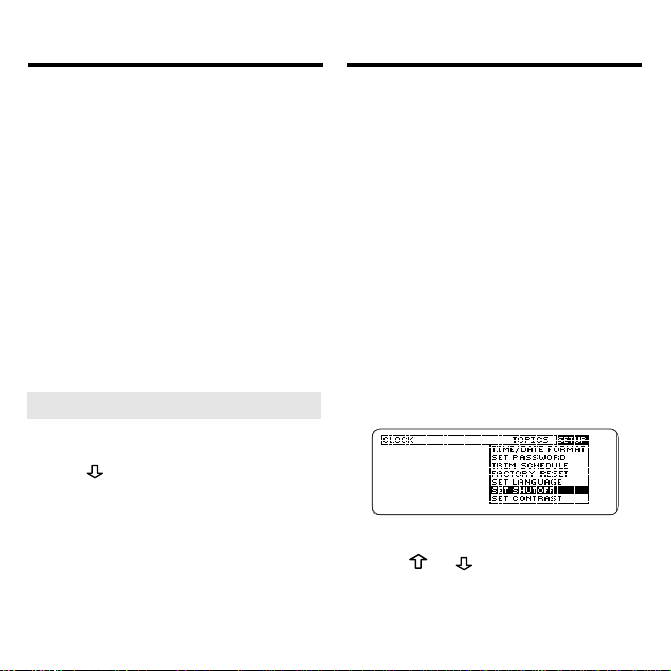
1. Press MENU until the main
menus appear.
2. Use the arrow keys to highlight Time/Date Format, Set
Language, Set Shutoff, Set
Contrast on the Setup menu.
3. Press ENTER.
4. Use or to change the
setting.
Or press BACK to leave it unchanged.
5. Press ENTER to select it.
10
Page 12
Selecting a Topic
Selecting a Topic
Your BOOKMAN Sidekick has seven
main functions, or topics: Cardfiles,
(Home) Clock, World Clock, Expenses, Calculator , Calendar, and
Notes. Here is how to change the
selected topic.
1. Press MENU until the main
menus appear.
2. Use the arrow keys to highlight the Topics menu.
3. Highlight a topic.
4. Press ENTER to select it.
➤
A Quick Way to Select Topics
You can also select topics using
these keys:
To go to... Press...
Cardfiles FILES (red)
Home or
+ C
✩
World Clock
Expenses
Calculator
✩
✩
+ X
+ M
Calendar CALEND (green)
Notes NOTES (yellow)
➤
If Y ou Forget to Save Y our Changes
If you try to select a topic while creating a new entry or editing an existing entry , or if you press CLEAR
while creating an entry , a message
appears asking if you want to save
your changes.
T o save your changes, press S. To
exit the entry without saving, press
X. T o go back to the entry, press
any other key except CLEAR,
✩
ON/OFF, CAP, or
➤
Follow the Arrows
.
The flashing arrows at the right of
the screen show which arrow keys
you can use to view more text, and
highlight menus and menu items.
Note: At some menus, you can also
highlight menu items by typing the
first few letters of their titles.
11
Page 13
Typing Characters
Typing Characters
Many of the topics in your BOOKMAN
Sidekick let you type and save entries
that consist of fields, or items of information. For example, below are fields
in a single-day appointment.
To Type Letters and Accents
At fields that normally require letters,
such as names and descriptions, the
cursor appears as a flashing triangle.
At such fields, simply press the letter
keys to type letters.
The first letter in letter fields automatically types as a capital. T o type a lowercase letter as the first letter in a
letter field, hold CAP and press a letter
key . To type subsequent capitals, hold
CAP and press the letter keys.
T o accent a letter, type it and then hold
and press until the desired
✩
accent appears.
To Type Numbers
At fields that require numbers, such as
dates and times, simply press the numbered keys.
At other fields that often use numbers,
such as ZIP codes, the number lock is
turned on by default. At such fields, you
can type letters from the top row (Q, W , E,
R, T, Y, etc.) by holding ✩ and pressing
the appropriate key . To unlock or relock the
numbered keys, hold ✩ and press N.
Fields that require or normally use numbers
are indicated by a flashing box cursor .
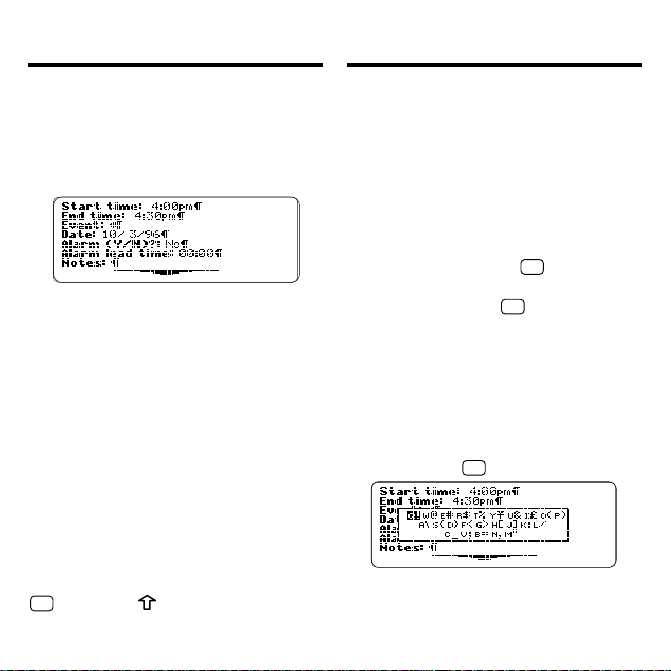
To Type Special Characters
At many fields, you can type a variety
of special characters, such as monetary symbols and punctuation marks,
by first holding
Then type the letter to the left of the
symbol. Or use the arrow keys to highlight a symbol and then press ENTER.
and pressing S.
✩
12
Page 14
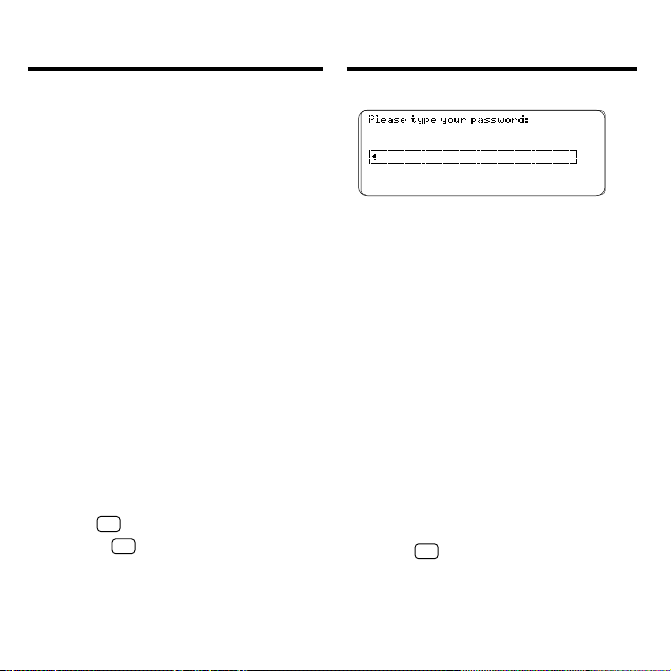
Using a Password
Using a Password
To limit access to your BOOKMAN Sidekick, you can assign a password that will
be required whenever you or anyone
else turns on your BOOKMAN Sidekick.
Caution: If you lose or forget your
password, you will need to send your
BOOKMAN Sidekick to Franklin Electronic Publishers to regain access.
To Set Your Passwor d
1. Press MENU until the main
menus appear.
2. On the Setup menu, highlight
Set Password and then press
ENTER.
3. T ype all the requested information, including a password.
4. Record your password in a
separate location, not on your
BOOKMAN.
5. Hold ✩ and press ENTER.
Or hold ✩ and press BACK to exit
without setting the password.
6. Press C to set the password.
7. Turn of f your BOOKMAN.
8. Turn on your BOOKMAN.
9. Type your password and then
press ENTER.
The password you type must exactly
match the password you set.
To Change or Delete Your
Password
1. On the Setup menu, highlight
Set Password and then press
ENTER.
2. T o change the passwor d, scroll
down to it and retype it.
3. T o delete the passwor d, move
the cursor to the end of the
password, and then use BACK
to erase it.
4. Hold
save your changes.
If you delete the password, it will
not be requested when your
BOOKMAN Sidekick is turned on.
and press ENTER to
✩
13
Page 15

Using a Password
Gauging the Memory
➤ If Y ou Lose or Forget Y our Password
If you misplace your password, you
can regain access to your BOOKMAN Sidekick by contacting Franklin Electronic Publishers, Inc.
In the U.S., first call 1-800-BOOKMAN to obtain a return authorization code. Then mail your
BOOKMAN Sidekick, with your return authorization code, to Franklin
Electronic Publishers, Inc., One
Franklin Plaza, Burlington, NJ
08016.
In the U.K., send your carefully
packaged BOOKMAN Sidekick to
Franklin Electronic Publishers Ltd.,
Unit 5, West Surrey Estate,
Spelthorne Lane, Ashford,
Middlesex, TW18 1UH. Remember
to enclose a note explaining your
need to regain access through having lost or forgotten your password
and make sure your full name and
address is included.
The amount of memory in your BOOKMAN Sidekick varies according to the
model. As you enter and transfer information into your BOOKMAN Sidekick, you
will occasionally need to check how much
memory is available for more entries.
1. Press MENU.
2. On the Setup menu, highlight
Memory Gauge.
3. Press ENTER.
4. Press MENU to return to the
main menus.
➤ Resuming Where Y ou Left Off
You can turn of f your BOOKMAN
Sidekick at any screen. When you
turn your BOOKMAN Sidekick on
again, the screen that you most recently viewed appears.
14
Page 16

Using the Clocks
Y our BOOKMAN Sidekick has two clocks
that keep time simultaneously:
a Home Clock and a World Clock.
Y ou can set either clock
to any time zone around the world
and then swap the clocks as you travel.
Y ou can also set a daily alarm
that works even when
your BOOKMAN Sidekick is turned off.
Setting the Home Clock................................................ 16
Setting the World Clock ............................................... 17
Using the Daily Alarm .................................................. 17
Changing the Time/Date Format .................................. 18
Swapping the Clocks ................................................... 19
15
Page 17
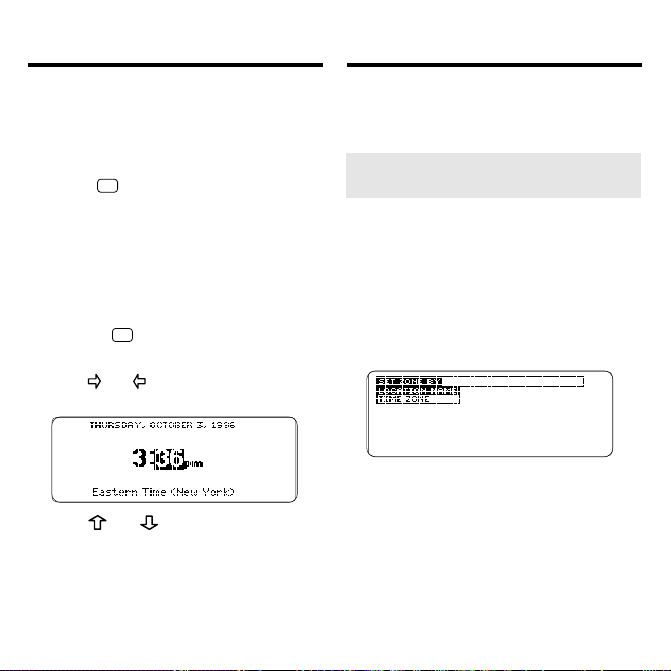
Setting the Home Clock
Setting the Home Clock
The first time that you use your
BOOKMAN Sidekick, you should set
the Home Clock to the date and time
in your time zone.
✩
1. Hold
and press C until the
Home Clock appears.
HOME
or a home icon indicates the
Home Clock.
2. Press EDIT (blue).
3. Press ENTER to select Set
Date and Time.
Or hold
✩
and press EDIT when
the Home Clock is on screen.
4. Use or to highlight a part
of the date or time.
5. Use or to change it.
6. Use the arrow keys to highlight and change other parts
of the date and time.
7. Press ENTER when finished.
Or press BACK to exit without
changing the date or time.
➤
Setting the Home Clock
by Location or Time Zone
You can also set the Home Clock to
the time and date of any of dozens
of locations around the world or to
any of 24 world time zones.
When the Home Clock is on
screen, press EDIT (blue) and then
Set Home Time Zone
select
the Clock Edit menu.
Next, select
Zone
Location Name
. If you select
Location Name
start typing a city , country or other
location name until it is highlighted
and then press ENTER to set the
Home Clock to its time. If you se-
Time Zone
lect
, highlight a time
zone and press ENTER.
16
from
or
Time
,
Page 18
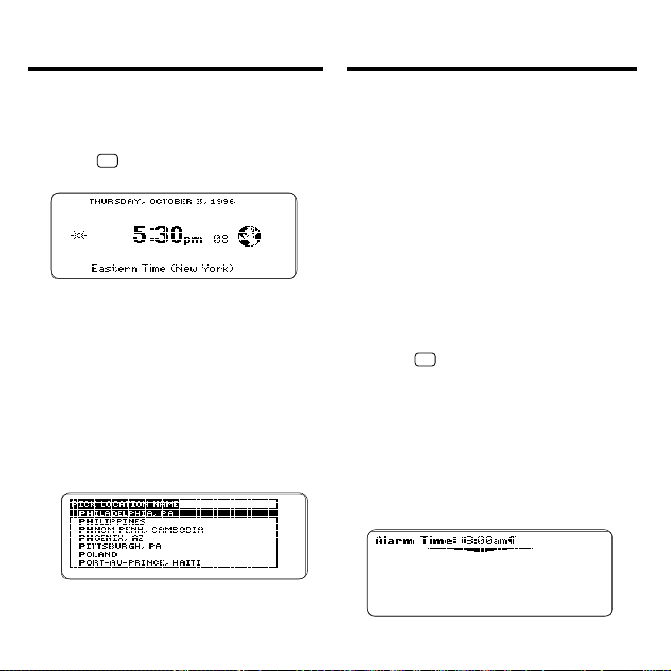
Using the Daily AlarmSetting the World Clock
After you have set the Home Clock, you can
set the World Clock by selecting a time zone
or one of dozens locations around the world.
1. Hold ✩ and press C until the
World Clock appears.
A world icon indicates the World Clock.
2. Press EDIT (blue).
3. Highlight Set World Time
Zone and then press ENTER
to select it.
4. Select Location Name
or Time Zone.
5. Start typing a location name
until it is highlighted or
highlight a time zone.
6. Press ENTER to set the World
Clock to that time.
The Home Clock has an alarm that you
can set for waking up and other oncea-day uses. This single, daily alarm
makes a series of quick beeps that
stops after about 10 seconds.
The daily alarm works even when your
BOOKMAN Sidekick is turned off. When
the daily alarm sounds, your BOOKMAN
Sidekick is automatically turned on and
the daily alarm time is displayed.
To Set or Change the Daily
Alarm
1. Hold ✩ and press C until the
Home Clock appears.
2. Press EDIT (blue).
3. Highlight Set Alarm Time and
then press ENTER to select it.
4. Select Set Alarm Time again.
5. Type an hour, minutes, and
an a or p (for a.m. or p.m.).
17
Page 19
Using the Daily Alarm
Changing the
Time/Date Format
6. Press ENTER when finished.
A bell icon on the Home Clock indicates
the daily alarm is enabled and set.
7. When the daily alarm sounds,
press any key except
CAP to turn it off and clear
the daily alarm time display.
✩
or
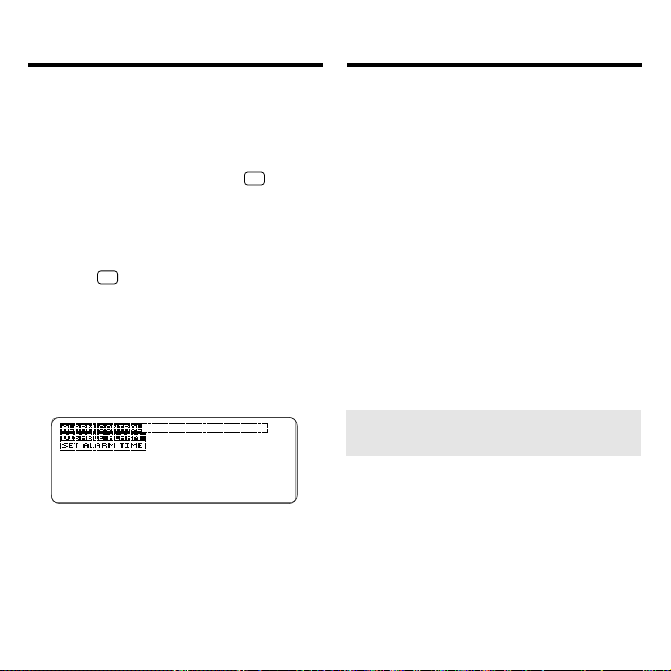
To Disable the Daily Alarm
1. Hold ✩ and press C until the
Home Clock appears.
2. Press EDIT (blue).
3. Highlight Set Alarm Time and
then press ENTER.
4. Highlight Disable Alarm and
then press ENTER.
The bell icon disappears from the
Home Clock.
5. To re-enable the daily alarm
without changing its time,
select Enable Alarm from the
Alarm Control menu.
You may want to change the format of
the time and date on the clocks and in
the Calendar. The formats you can use
are 12- or 24-hour and month/day/year
(U.S.) or day/month/year (European).
1. Press MENU to see the main menus.
2. On the Setup menu, highlight
Time/Date Format.
3. Press ENTER.
A check marks the current format.
4. Highlight another format and
then press ENTER.
Or press BACK to exit without
changing the format.
➤
Selecting Daylight Savings
or Standard Time
By default, standard or daylight savings time is automatically set for
U.S. time zones. To manually set either option for the Home or World
Clock, first press EDIT (blue) when a
clock is on screen. Then select
light Savings
ings
and either
or
Time
or
World Daylight Sav-
Standard (Winter)
Daylight (Summer) Time.
Day-
18
Page 20

Swapping the Clocks
Swapping the Clocks
Once you have set both the Home and
World Clocks, you can swap their
times and dates. Swapping the clocks
is a useful feature if you frequently
travel between time zones.
✩
1. Hold
Home Clock appears.
2. Press EDIT (blue).
3. On the Clock Edit menu, highlight Swap Home & World Time.
4. Press ENTER.
➤
Understanding Clock Swapping
When you swap your Home and
World Clocks, your daily alarm setting, appointment times and their
alarms, and any other time-sensitive
calendar entries do not change.
For example, if your daily alarm was
originally set for 6:30 a.m. New
York time, after swapping the clocks
and press C until the
it will sound at 6:30 a.m. in your
new Home Clock time zone. And if
you had an appointment scheduled
at 9:00 a.m. New York time, after
swapping it will be scheduled at
9:00 a.m. in the new time zone.
➤
Resetting the Clock
When you remove the batteries
from your BOOKMAN Sidekick, or
if they lose all power, you may need
to reset the Home and World
Clocks.
After replacing the batteries, a message may appear asking you to
check the Home Clock time. If its
time is correct, simply press
ENTER.
If the time is incorrect, use the arrow keys to change it. To learn how,
read “Setting the Home Clock.” To
learn how to reset the World Clock,
read “Setting the World Clock.”
19
Page 21

Using the Calendar
The Calendar is a powerful tool
to help you organize your activities.
Y ou can use the Calendar to schedule
appointments, multiple-day events,
to do lists, phone calls, and
special days such as birthdays and anniversaries.
Y ou can see your Calendar
in Daily , W eekly, and Monthly views.
And you can even search your Calendar
for entries containing any word(s).
Creating Calendar Entries ............................................ 21
Duplicating a Calendar Entry ....................................... 22
Using the Daily View .................................................... 23
Using the Weekly View................................................. 24
Using the Monthly View ............................................... 25
Editing Calendar Entries............................................... 26
Searching for Calendar Entries .................................... 26
Trimming the Schedule................................................. 27
20
Page 22

Creating Calendar Entries
Creating Calendar Entries
Y our calendar entries can be appointments
(single-day and recurring), To Do items,
calls, multi-day events, or special days. Y ou
can create new calendar entries from the
Daily, W eekly, or Monthly calendar view .
1. Press CALEND (green).
2. Press EDIT (blue).
3. Press ENTER to select New
Calendar Entry.
4. Highlight an entry type and
then press ENTER to select it. For
example, select Appointment.
5. If you selected an appointment, select an appointment
type (for example, Single Day
Appointment).
6. Type information.
T o erase, use BACK. To learn
more, read “T yping Characters.”
7. Press ENTER to go to the next
field. Or use the arrow keys
to move the cursor .
✩
8. Hold
and press ENTER to
save your entry.
✩
Or hold
and press BACK to exit.
➤ Understanding Calendar Entries
Appointments can be for a single
day, can recur once a week, or can r ecur once a month. You can create up
to three appointments overlapping any
single, 15-minute time span. But you
cannot create a single-day appointment that spans two days (for example 11:00 p.m. to 2:00 a.m.).
Instead, create a multi-day event.
Every appointment must have a starting time, an ending time, and an event
or title description.
You can also set appointment alarms
to sound either at an appointment’ s
starting time or with a lead time of up
to 23 hours and 59 minutes. Appointment alarms work even when your
BOOKMAN Sidekick is turned off.
When an appointment alarm sounds,
21
Page 23
Creating Calendar Entries
Duplicating a Calendar Entry
press any key except ✩ or CAP to
turn it off and clear the display .
T o Do items must have a title and
can have a due date. T o Do items appear on the Calendar Daily view on
the day they are entered. They carry
over to subsequent days until you
check them off as completed. On their
due dates, T o Do items appear bolded
on the Daily view. To learn how to
check off completed T o Do items,
read “Using the Daily View .”
Calls must have a title. They carry
over to subsequent days until you
check them off as completed. T o learn
how to check off completed calls,
read “Using the Daily View .”
Multi-day Events must have event
descriptions and number of days.
Special Days can be annually recurring, such as birthdays, or a singleday occurrence. If you type
in the Annual field, that special day entry will not recur .
N
, for no,
A quick way to create a new calendar
entry is to duplicate an existing entry .
When you duplicate an entry , a new
entry is opened with the same information as an existing entry . To save the
new entry , you must change at least
one field of information.
1. Press CALEND (green) until the
Daily view appears.
This is a sample Daily view.
2. Highlight the calendar entry
that you want to duplicate.
3. Press EDIT (blue).
4. Highlight Duplicate Calendar
Entry and then press ENTER.
5. Edit at least one field. Use the
arrow keys to move around.
6. Hold ✩ and press ENTER to
save your entry. Or hold
and press BACK to exit
without saving.
22
✩
Page 24
Using the Daily View
Using the Daily View
Once you have created calendar entries,
you can view or edit them directly from
the Daily view of the Calendar.
From top to bottom, the Daily view lists
special days, multi-day events, appointments (by time), T o Do items, and calls.
You probably will want to use the Daily
view as your basic scheduling tool.
1. Press CALEND (green) until
the Daily view appears.
This is a sample Daily view.
2. Highlight an entry.
To... Press...
scroll down or up
or
page down or up DN or UP
go to the bottom CAP +
or
or top entry
go to the next or
✩
+ DN or UP
previous day
go to the top of CLEAR
the current Daily
view
3. Perform one of these functions:
To... Press...
view a full title
✻
?
check/uncheck ✩ + ENTER
a completed T o
Do item or call
view an entry ENTER
✩
edit an entry
+ EDIT (blue)
Note: When you check off a completed To Do item or call, its title is
italicized and checkmarked on the
Daily view.
4. If you pressed ENTER to view
an entry, you can scroll
down, press BACK to exit, or
✩
hold
and press EDIT to edit
the entry.
✩
5. If you pressed
+ EDIT
(blue), you can type your
changes and then hold
and press ENTER to save
them.
23
✩
Page 25

Using the Daily View
Using the Weekly View
✩
Or hold
without saving your changes.
6. Press CLEAR to return to the
Daily view for the current day.
➤ Understanding Daily View Icons
On the Daily view, calendar entries
are identified by these icons:
This Icon Means
and press BACK to exit
special day
multi-day event
appointment alarm
To Do item
call
completed To Do
item or call
The Weekly view of the Calendar displays
your appointments as bar charts showing
their time ranges.
1. Press CALEND (green) until a
Weekly view appears. Or
press CALEND (green), MENU,
and then select Weekly.
This is a sample Weekly view. The
bars indicate the time ranges of
your appointments, with up to three
overlapping.
2. Use the Direction keys.
To... Press...
see earlier or later
times
scroll down or up
page down or up DN or UP
go to the end CAP +
or start of a week
or
or
24
or
Page 26

Using the Weekly View
Using the Monthly View
To... Press...
✩
go to the next or
+ DN or UP
previous week
go to the current CLEAR
day on the Weekly
view
3. To create a new entry or
search for existing calendar
entries, press EDIT (blue).
4. To go to the Daily view for a
given day, highlight it and
then press ENTER. Or to go to
the Monthly view, press
CALEND (green).
The Monthly view lets you quickly scan the
Calendar for dates and calendar entries.
1. Press CALEND (green) until the
Monthly view appears. Or
press CALEND (green), MENU,
and then select Monthly.
This is a sample Monthly view.
The dots indicate dates with
appointments.
2. Use the Direction keys.
To... Press...
highlight a date
, , ,
go to the next or DN or UP
previous month
go to the next or
✩
+ DN or UP
previous year
3. To create a new calendar
entry, or search for calendar
entries, press EDIT (blue).
4. To go to the Daily view for a
date, highlight it and then
press ENTER.
25
Page 27

Editing Calendar Entries
Searching for
Calendar Entries
Once you have created calendar entries, it’s easy to change or edit them.
1. Press CALEND (green) until
the Daily view appears.
2. Highlight the calendar entry
that you want to edit.
3. Hold ✩ and press EDIT (blue).
Or press EDIT (blue) and then
select Edit.
4. Type your changes.
5.
Hold ✩ and press ENTER to save
your entry. Or hold
BACK to exit without saving.
➤ Deleting and Undeleting Entries
To delete a calendar entry, first highlight the entry you want to delete on
the Daily view. Then press EDIT (blue)
and select
delete the entry .
If you delete a recurring appointment
or recurring special day, all past and
future occurrences of that calendar
entry will be deleted, too.
To undelete the most recently deleted
entry, select
Calendar Edit menu.
Delete
Undelete
✩
and press
. Then press D to
from the Daily
Y ou can search the Calendar for current
or future appointments, multi-day events,
T o Do items, calls and special days.
Note: Y ou can not search for calendar
entries that are scheduled before the current date on your Home Clock.
1. At any Calendar view, press
EDIT (blue).
2. Highlight Search and then
press ENTER.
T ype one or mor e words that
3.
occur in the titles, descriptions,
or notes of calendar entries.
These are sample search words.
In your search words you can type
numbers (but not to find times),
special characters, and accents to
find exact matches. You do not need
to type capital letters.
4. Press ENTER to search.
26
Page 28

Searching for
Calendar Entries
The Daily view of the first date that
has a match for your word(s) appears.
Note: Multiple-word searches find
only entries containing all your
search words.
✩
5. Hold
go to the next or previous
day, if any, with matches.
6. When finished, press CLEAR
to clear your search.
➤ Searching for Parts of Words
In the Calendar , you can search for the
first few letters in a word to find inflections, suffixes, and other similar words.
For example, searching for
entries with
and press DN or UP to
par
will find
park, party, apartment
T rimming the Schedule
In order not to fill up the memory of
your BOOKMAN Sidekick, it is wise to
periodically trim your schedule. Trimming the schedule deletes only those
calendar entries that were completed
prior to a date you specify.
Note: Special days are trimmed only if
they are nonannual. Multi-day events and
recurring appointments are fully trimmed
only if all their dates fall before the date
you specify. If they span that date, only
their earlier dates are trimmed.
1. Press MENU.
2. From the Setup menu, select
Trim Schedule.
3. Type the date before which
you want to delete the
completed calendar entries.
4. Press ENTER.
5. Press D to trim the schedule.
, etc.
Or press any other key to exit
without trimming.
27
Page 29

Using Cardfiles
Think of your cardfiles as a personalized filing system.
Y ou can create cardfiles to organize
your business and personal addresses, wine
and music collections, favorite restaurants
or hotels, and almost anything else.
Each card in a cardfile is like an index card,
holding information such as phone numbers,
e-mail addresses, company names,
birthdays, and more.
And you can search a cardfile to quickly find
the cards and information that you need.
Creating a Cardfile ....................................................... 29
Adding Cards ............................................................... 30
Duplicating a Card ....................................................... 31
Viewing Cardfiles and Cards........................................ 31
Editing Cards................................................................ 32
Searching for Cards ..................................................... 33
28
Page 30
Creating a Cardfile
Creating a Cardfile
A cardfile is a collection, or database, of
cards. You can create six types of cardfiles by choosing one of the following
templates, or cardfile types:
Address Book
;
Personal Address
Business
Book; Email Address Book; Wine List
Hotels, Restaurants
Collection
Note: You can create more than one
cardfile from a particular template.
1.
2. Press MENU to go to the
3. Press EDIT (blue).
4. Press ENTER to select New
5. Use the arrow keys to high-
6. Press ENTER.
.
Press FILES (red). Or select
Cardfiles from the Topics menu.
Cardfiles menu.
Cardfile.
light a cardfile template.
; and
Music/CD
7. Type the name of your new
cardfile.
;
This is a sample cardfile name. T o
erase a typed character, use BACK.
8. Press ENTER to create it.
➤
Deleting a Cardfile
Warning: When you delete a cardfile, all the cards contained in it are
permanently deleted.
At the Cardfiles menu, highlight the
cardfile you want to delete. Then press
EDIT (blue), highlight
and press ENTER. Finally, pr ess D to
delete the cardfile and Y to confirm.
Press any other key to cancel.
Delete Cardfile
29
,
Page 31

Creating a Cardfile
Adding Cards
➤
Renaming a Cardfile
You can easily change the name of
a cardfile.
At the Cardfiles menu, highlight the
cardfile that you want to rename.
Press EDIT (blue), highlight
Cardfile
, and then press ENTER.
Rename
Use BACK to erase the typed letters and then type your new cardfile
name. Press ENTER to rename the
cardfile, or press CLEAR to exit
without renaming it.
➤
Creating Your Own Templates
You can cr eate your own cardfile
templates on your PC Sidekick and
then transfer them to your BOOKMAN Sidekick.
T o learn how to create custom templates, read your PC Sidekick
User’s Guide. Then read “Using the
BOOKMAN Sidekick Connectivity
Software” in this User’s Guide to
learn how to transfer or merge them
to your BOOKMAN Sidekick.
Once you have created a cardfile, you can
create cards and add them to it. Cards consist of fields in which you enter information.
1. If needed, use FILES (red) to
cycle to the cardfile into
which you want to add a card.
2. Press EDIT (blue).
This is a sample Cardfile Edit menu.
3. Press ENTER to select New
Card Entry.
4. Enter your card information.
Press ENTER to go to the next field. T o
move the cursor, use the arrow keys.
5. To add the card, hold
✩
press ENTER, or press ENTER
at the last field.
Or hold
✩
and press BACK to exit
without saving.
30
and
Page 32

Duplicating a Card
Viewing Cardfiles and Cards
A quick way to create a new card is to
duplicate an existing card. When you
duplicate a card, a new card is opened
with the same information as the card
you selected. T o save the new card,
you must change at least one field in it.
For example, you can use
Duplicate
to
quickly create cards in which fields
such as company , business address,
etc. are the same, but other fields
such as name, home phone, pager,
etc. are different.
1. Press FILES (red).
2. Highlight the card you want
to duplicate.
3. Press EDIT (blue).
4. Highlight Duplicate and then
press ENTER.
5. Edit at least one field of
information.
✩
6. Hold
and press ENTER to
save your new card.
✩
Or hold
and press BACK to exit
without saving.
There are several ways to view and access your cardfiles and cards.
1. Press FILES (red) repeatedly to
cycle through your cardfiles.
To display the full title of a card,
press
✽
?
.
2. To see a list of your cardfiles,
press MENU to see the
Cardfiles menu.
To display the full title of a cardfile,
press
✽
?
.
31
Page 33

Viewing Cardfiles and Cards
Editing Cards
3. Highlight a cardfile and then
press ENTER to see its cards.
You can highlight a cardfile by
scrolling to it or by typing its title at
the menu.
4. Highlight a card and then
press ENTER to view it.
5. To go to the bottom or top of
a card, hold CAP and press
and .
Note: When you view a card, only
the fields in which you typed information are displayed.
6. To go to the next or previous
card in the cardfile, if any ,
✩
hold
and press DN or UP.
7. To edit a card that you are
viewing, hold
✩
and press
EDIT (blue).
After you have created a card, you can
edit or change it.
1. Press FILES (red).
2. To highlight a card, scroll to it
or type the first few letters
of its title.
3. Hold ✩ and press EDIT (blue).
Or press EDIT (blue) and then se-
Edit This Card
lect
.
4. Enter your card information.
Use BACK to erase typed characters.
5. Hold ✩ and press ENTER to
save your changes.
Or hold
✩
and press BACK to exit
without saving.
32
Page 34

Editing Cards
Searching for Cards
➤
Deleting and Undeleting a Card
You can delete existing car ds. You
can also restore a deleted card by
undeleting it.
T o delete a card, first use FILES
(red) to find the desired cardfile and
then highlight the card you want to
delete. If you want to view the card
before you delete it, press ENTER.
Then press EDIT (blue) and highlight
Delete This Card
Then press D to delete the card.
Press any other key to cancel.
T o undelete the card most recently
deleted card from a selected cardfile, first press EDIT (blue) and then
highlight
ENTER to undelete that card.
Undelete Card
. Press ENTER.
. Press
You can search a cardfile by entering one
or more words that occur in the fields of
its cards. Note: You can search only one
cardfile at a time.
1. If needed, use FILES (r ed) to find
the cardfile you want to search.
2. Press EDIT (blue) and highlight Search This Cardfile.
3. Press ENTER.
4. T ype one or more wor ds.
In your search words you can type numbers, special characters, and accents to
find exact matches. Y ou do not need to
type capital letters, but if you want to,
hold CAP and type a letter .
5. Press ENTER to search.
Matching cards are displayed.
33
Page 35

Searching for Cards
6. Highlight a match and press
ENTER.
✩
7. Hold
and press DN or UP
to go to the next or previous
match.
8. To go back to the list of
matching cards, press BACK.
9. Press CLEAR to clear your
search.
➤
Searching for Parts of Words
You can search for words in cards by
typing the endings, beginnings, and
other parts of the word. For example,
par
searching for
park, party, apartment
will find entries with
, etc.
34
Page 36

Using Notes
Y ou can use notes and note folders
to create, edit and organize textual information
about anything from travel directions
to grocery lists to business ideas.
Y ou can even search through a note folder
to quickly find the notes that you need.
Creating a Note Folder ................................................. 36
Adding Notes ............................................................... 37
Duplicating a Note........................................................ 38
Viewing Note Folders and Notes.................................. 38
Editing Notes ................................................................ 39
Searching for Notes ..................................................... 40
35
Page 37

Creating a Note Folder
Creating a Note Folder
Before you can create notes, you must
first create note folders in which to
hold them.
Note: BOOKMAN Sidekick can hold
only one notefile, containing note folders and notes, at a time.
1. Press NOTES (yellow). Or select
Notes from the Topics menu.
2. Press MENU to go to the
Notes menu.
3. Press EDIT (blue).
4. Press ENTER to select New
Folder.
5. Name the folder.
Use BACK to erase a typed character.
6. Press ENTER to create it.
➤
Deleting a Note Folder
Warning: When you delete a note
folder , all the notes contained in it
are permanently deleted.
At the Notes menu, highlight the
note folder that you want to delete.
Then press EDIT (blue), highlight
Delete Folder
Finally , press D to delete the note
folder and Y to confirm. Press any
other key to cancel.
➤
Renaming a Note Folder
You can easily change the name of
an existing note folder.
At the Notes menu, highlight the
note folder that you want to rename. Press EDIT (blue), highlight
Rename Folder
ENTER. Use BACK to erase the
typed characters and then type your
new folder name. Press ENTER to
rename the note folder , or press
CLEAR to exit without renaming it.
, and press ENTER.
, and then press
36
Page 38

Adding Notes
Adding Notes
Once you have created a note folder ,
you can create notes and add them to
a folder. Each note consists of a subject field and a note field. In their note
folders, notes are listed alphabetically
by their subjects.
1. If needed, use NOTES
(yellow) to find the note
folder into which you want
to add a note.
2. Press EDIT (blue).
This is a sample Note Folder Edit
menu.
3. Press ENTER to select New
Note Entry.
4. Enter your note information.
Press ENTER to go to the next
field. To move the cursor, use the
arrow keys.
To quickly go to the top or bottom of a
note, hold CAP and press
5. Hold
✩
add a note.
Or hold ✩ and press BACK to exit
without saving.
and press ENTER to
37
or .
Page 39

Duplicating a Note
Viewing Note Folders
and Notes
A quick way to create a new note is to
duplicate an existing note. When you
duplicate a note, a new note is opened
with the same information as the note
you selected. T o save the new note,
you must change at least one field in it.
1. Press NOTES (yellow).
2. Highlight the note you want to
duplicate.
3. Pr ess EDIT (blue).
4. Highlight Duplicate and then
press ENTER.
5. Edit at least one field of
information.
✩
6. Hold
and press ENTER to
save your new note.
✩
Or hold
and press BACK to exit
without saving.
There are several ways to view and access your notes and note folders.
1. Press NOTES (yellow) repeatedly to cycle through your
note folders.
To display the full title of a note,
press
✽
?
.
2. To see a list of your note
folders, press MENU to go to
the Notes menu.
To display the full title of a note
folder , press
✽
?
.
3. Highlight a note folder and then
press ENTER to see its notes.
You can highlight a note folder by
scrolling to it or by typing its title at
the menu.
38
Page 40
Viewing Note Folders
and Notes
Editing Notes
4. Highlight a note and then
press ENTER to view it.
5. To go to the bottom or top of
a note, hold CAP and press
and .
Note: When you view a note, only
the fields in which you typed information are displayed.
6. To go to the next or previous
note in a note folder, if any,
✩
hold
and press EDIT (blue).
7. To edit a note that you are
viewing, hold
✩
and press
EDIT (blue).
After you have created a note, you can
edit, or change, it.
1. Press NOTES (yellow).
2. To highlight a note, scroll to
it or type the first few letters
of its title.
3. Hold ✩ and press EDIT (blue).
Or press EDIT (blue) and then
select
Edit This Note
.
4. Enter your note information.
Use BACK to erase typed characters.
✩
5. Hold
and press ENTER to
save your changes.
✩
Or hold
and press BACK to exit
without saving.
39
Page 41

Editing a Note
Searching for Notes
➤
Deleting and Undeleting a Note
You can delete existing notes. You
can also restore a deleted note by
undeleting it.
To delete a note, first use NOTES
(yellow) to find the desired note
folder and then highlight the note
you want to delete. If you want to
view the note before you delete it,
press ENTER. Then press EDIT
(blue) and highlight
. Press ENTER and then press
Note
D to delete the note. Press any
other key to cancel.
To undelete the most recently deleted note from a selected note
folder, first press EDIT (blue) and
then highlight
ENTER to undelete that note.
Delete This
Undelete Note.
Press
You can search a note folder by entering
one or more words that occur in the fields
of its notes. Note: You can search only
one note folder at a time.
1. If needed, use NOTES (yellow) to find the note folder
you want to search.
2. Press EDIT (blue) and highlight Search This Notefile.
3. Press ENTER.
4. T ype one or more wor ds.
In your search words you can type
numbers, special characters, and
accents to find exact matches. You
do not need to type capital letters, b
if you want to, hold CAP and type a
letter .
5. Press ENTER to search.
40
ut
Page 42

Searching for Notes
Matching notes appear .
6. Highlight a match and press
ENTER.
7. Hold
✩
and press DN or UP
to go to the next or previous
match.
8. To go back to the list of
matches, press BACK.
9. Press CLEAR to clear your
search.
➤
Searching for Parts of Words
You can search for words in notes
by typing the endings, beginnings,
and other parts of a word. For ex-
par
ample, searching for
tries with
park, party, apartment
will find en-
,
etc.
41
Page 43

Using Expenses
The Expenses topic tracks
your business and personal expenses.
Y ou can save expense information
such as account and payment type, restaurant, airline,
vendor , curr ency, remarks, and more.
Then you can quickly calculate your total expenses
according to their account and payment type.
Creating Expense Entries ............................................. 43
Viewing Expense Entries .............................................. 44
Editing Expense Entries ................................................ 44
Computing Expense Sums ............................................ 45
42
Page 44
Creating Expense Entries
Creating Expense Entries
You must enter an account and an
amount in every expense entry. You
can enter other information such as
the date and payment type (e.g., cash,
check, etc.). Expense entries are listed
alphabetically by their Accounts.
✩
1. Hold
and press X. Or select
Expenses from the Topics
menu.
The Expenses menu is empty the
first time you use it.
2. Press EDIT (blue).
3. Press ENTER to select New
Expense Entry.
The current date appears in the
Date field. To type another date,
simply type over it.
4. Type your expense infor mation.
Note: You do not need to type a
dollar sign or other currency symbol
in the Amount field. To erase characters, use BACK.
5. Press ENTER to go to the next
line. Or use the arrow keys to
move the cursor.
6. To save the entry, hold
and press ENTER, or press
ENTER at the last field.
✩
Or hold
and press BACK to exit
without saving.
➤
Merging and T ransferring
Expense Entries to Y our PC
Only if you are using Sidekick 95 or
later can you merge or transfer expense entries from your BOOKMAN Sidekick to your computer
using the BOOKMAN Sidekick
Connectivity software. The expenses topic is an addition to Sidekick 95 and is not included in earlier
versions of PC Sidekick.
43
✩
Page 45

Viewing Expense Entries
Editing Expense Entries
You can easily view an expense entr y
to see the information entered in its
fields.
1. Hold ✩ and press X to go to
the Expenses menu.
2.
Highlight an expense entry and
then press ENTER to view it.
To highlight an expense entry, use
the arrow keys to scroll to it or start
typing its title (Account).
Note: When you view an expense
entry, only the fields in which you
typed information are displayed.
3. To go to the bottom or top of
an expense entry, hold CAP
and press
and .
4. To go to the next or previous
expense entry, if any, hold
✩
and press DN or UP.
To learn about editing expense entries, read “Editing Expense Entries.”
Once you have created expense entries, you can edit them. Your changes
will be reflected when you compute
your expenses sums.
✩
1. Hold
and press X. Or select
Expenses from the Topics
menu.
2. T o highlight an expense entry ,
scroll to it or type the first few
letters of its title.
3. Hold
✩
and press EDIT (blue).
Or press ENTER to view an expense entry and then hold ✩ and
press EDIT (blue).
Or press EDIT (blue) and then select
Edit This Expense
.
4. Enter your expense information.
5. To save the entry, hold
and press ENTER, or press
ENTER at the last field.
✩
Or hold
and press BACK to exit
without saving.
44
✩
Page 46

Editing Expense Entries
Computing Expense Sums
➤
Deleting and Undeleting an
Expense Entry
You can delete any expense entr y.
You can also restore the most recently deleted expense entry by
undeleting it.
T o delete an expense entry, highlight it and press EDIT (blue) when
the Expenses menu is on screen.
Then highlight
and press ENTER.
Press D to delete it.
T o undelete the most recently de-
leted expense entry , select
Undelete Expense
Expenses menu.
Delete This Expense
from the
After you have entered expense entries,
you can calculate your total expenses by
account and payment type.
✩
1. Hold
Expenses from the Topics
menu.
2. Press EDIT (blue) and highlight
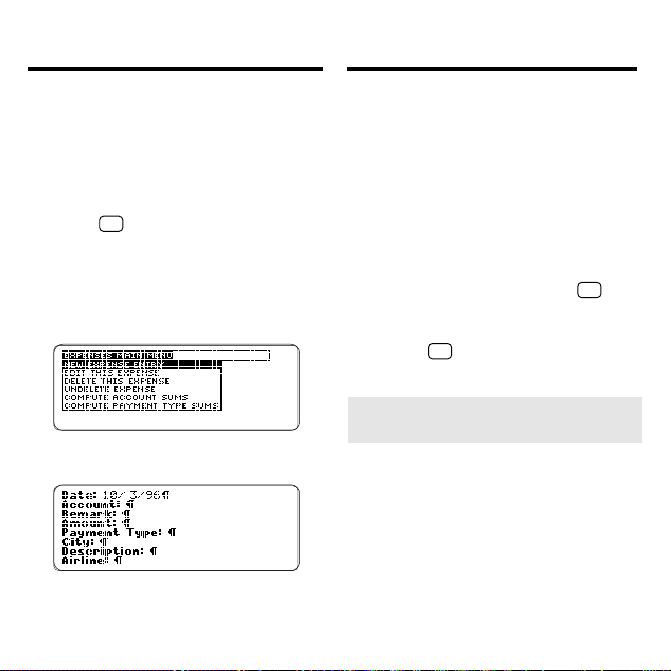
Compute Account Sums or
Compute Payment Type Sums.
3. Press ENTER.
To scr oll down, use or DN.
4. Press BACK to go back to the
Expenses menu.
and press X. Or select
45
Page 47

Using the Calculator
Y ou can use the Calculator
to add, subtract, multiply , divide,
and perform other math functions
such as percentages and square roots.
Y ou can also save and retrieve
the results of your calculations
for use in subsequent calculations.
Making Calculations ..................................................... 47
Saving and Retrieving Calculations.............................. 48
46
Page 48
Making Calculations
1. Hold ✩ and press M. Or
select Calculator from the
Topics menu.
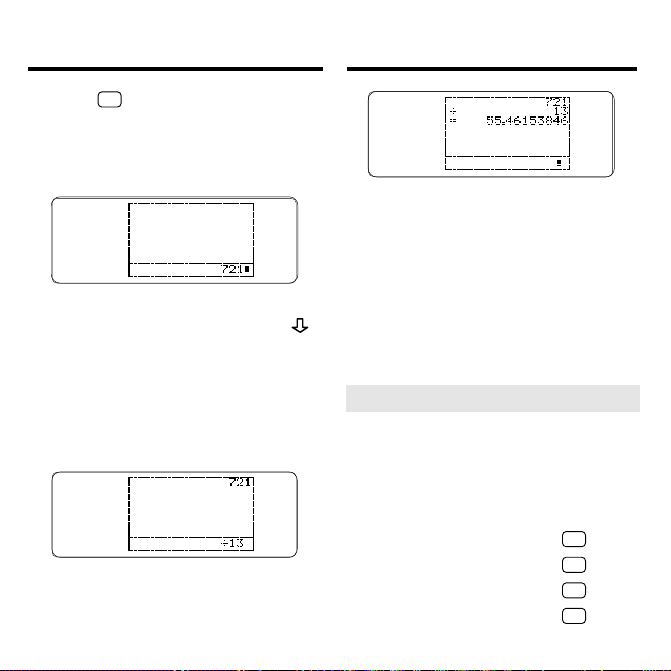
2. Type a number (e.g., 721) by
pressing the numbered keys.
To erase numbers, use BACK.
To type a negative number, press
before typing a number.
To type a decimal, press the period
key .
3. Press one of the arrow keys to
type a math symbol (e.g., ÷).
4. T ype another number (e.g., 13).
5. Press ENTER to calculate.
Making Calculations
6. To repeat the calculation,
press ENTER again.
7. Press the UP or DN key to
view your calculation(s).
You can do mor e calculations now,
if you like.
8. Press CLEAR to erase the
current calculation(s).
➤
Using Other Math Functions
You can per form the following math
functions by typing a number in the
Calculator and then using these key
combinations:
To... Use...
convert to a percentage
square a number
calculate a square root
calculate a reciprocal
✩
✩
✩
✩
+ H
+ J
+ K
+ L
47
Page 49

Saving and Retrieving
Calculations
Saving and Retrieving
Calculations
You can save the r esults of your calculations and the retrieve them for use in
other calculations.
1. Make a calculation.
T o learn how, read “Making
Calculations.”
2. Press EDIT (blue).
3. Press ENTER to select Save
This Result.
4. Type a name for the result
(e.g., calc1).
The name can contain numbers but
should not begin with a number.
5. Pr ess ENTER to save the r esult.
6. To retrieve the result, first
press EDIT (blue).
7. Then select Use Previous
Result.
8. Select a result.
9. Press an arrow key to use the
result in the next calculation.
➤ A Quick Way to Retrieve a Result
You can quickly retrieve a result by
typing its name at the Calculator
main screen and pressing ENTER.
For example, you could retrieve the
result in the previous example by
entering this at the Calculator:
To type the top row of letters in the
Calculator, hold
numbered keys.
Note: If you type a number first at
the Calculator main screen, you can
not type letters after it.
➤
Deleting a Previous Result
To delete a previously saved result,
press EDIT (blue) at the Calculator
main screen and select
Previous Result
sult to delete and press ENTER.
and press the
✩
Delete
. Then highlight a re-
48
Page 50

Using the Connectivity Software
The BOOKMAN® Sidekick® Connectivity software is a powerful tool
for sending information between your BOOKMAN Sidekick
and your personal computer . Before you can send information,
you must first link the files that you want to either transfer or merge.
The simplest and quickest way to combine
all your linked BOOKMAN Sidekick and PC Sidekick files
is to use the Merge All option. T o perform more complicated transfers or
merges of individual pairs of linked files, use the Advanced T ransfer option.
If you make a mistake when transferring or merging files, you can
easily recover your most recently transferred or merged PC Sidekick files.
In addition, for storage and safety , you can back up and restore
all the files from your BOOKMAN Sidekick to your computer ,
even if you do not have PC Sidekick.
The Equipment You Need ............................................. 50
Connecting the Serial Cable......................................... 50
Installing the Connectivity Software ............................ 51
Starting the Connectivity Software .............................. 52
Testing Your Connection .............................................. 53
Linking Files ................................................................. 54
Merging All Linked Files .............................................. 57
Advanced Transfers and Merging ................................ 60
Recovering Files ........................................................... 62
Backing up and Restoring Files.................................... 63
Solutions to Common Problems ................................... 64
49
Page 51

The Equipment Y ou Need
Connecting the Serial Cable
To use the BOOKMAN Sidekick Connectivity software, you need:
• The BOOKMAN PC-connect serial
cable and the BOOKMAN Sidekick
Connectivity software disk, packaged
with certain BOOKMAN Sidekick models and available only from Franklin
Electronic Publishers, Inc.
• An IBM PC Compatible, 386 processor
or higher .
• Microsoft Windows version 3.1 or later,
or Windows 95.
• Minimum of 2 MB RAM (4 MB is rec-
ommended).
• Minimum of 2 MB hard disk space .
• One available communications (COM)
port on your computer.
• One 3.5” high density floppy disk drive.
If you have questions about Sidekick
PC software, see your owner’s manual
or call Starfish Software. For installation or initial configuration questions,
call 1 (970) 522-4610. For all other
questions, call 1 (800) 953-9995. Or
visit the Starfish Software web site at
http://www.starfishsoftware.com
.
Before you can start using the BOOKMAN
Sidekick Connectivity software, you must
first connect the Franklin BOOKMAN PCconnect serial cable between your BOOKMAN Sidekick and your computer.
Warning: Using a different serial
cable may damage your BOOKMAN
Sidekick files, as well as your BOOKMAN Sidekick itself or your computer.
1. T urn off your computer.
2. Locate a fr ee communications
port on the back of your
computer .
To lear n how to find a communications port, read the user manual for
your personal computer .
3. Insert the 9-pin plug into the
communications port.
Note which communications port you
used (for example, COM1). You will
need this information when you start
using the connectivity software.
4. Turn on your computer.
5. Turn off your BOOKMAN
Sidekick.
50
Page 52

Connecting the Serial Cable
Installing the
Connectivity Software
6. Firmly insert the 3.5 mm plug
completely into the serial
port on the right side of your
BOOKMAN Sidekick and turn
on your BOOKMAN.
Read “Special BOOKMAN Features”
for a diagram of the serial port’ s location.
Caution: Make sure the serial cable
plug is pushed all the way into the serial
port on your BOOKMAN Sidekick. If a
secure connection is not made, you will
not be able to send files between your
BOOKMAN and computer .
To disconnect your BOOKMAN
Sidekick, it is recommended that
you remove the 3.5 mm plug from
your BOOKMAN Sidekick and
leave the 9-pin plug inserted in the
communications port.
➤
Connectivity Help is Always
at Hand
Y ou can view a help message at virtually
any window in the connectivity software
Help
by clicking
the scroll bars to read the help message. T o exit help, click
on your computer . Use
Close
.
Here is how to install the connectivity
software for Windows version 3.1 or
later , or Windows 95. This section assumes a basic understanding of the
Windows environment.
Note: If you upgrade your PC Sidekick
software at a later date, you must reinstall the connectivity software and select
the appropriate Sidekick version.
Caution: After you have installed the
connectivity software, you will be
prompted to reboot Windows.
1. Insert the BOOKMAN Sidekick
Connectivity disk into a 3.5”
floppy disk drive.
2. If you are using Windows 3.1
or later, select Run from the
File menu in the Program
Manager. If you are using
Windows 95, select Run from
the Start menu.
3. Type a:\setup and then click OK
(with a:\ being the letter of your
3.5” floppy drive).
51
Page 53

Installing the
Connectivity Software
Starting the
Connectivity Software
4. At the BOOKMAN Sidekick
Connectivity Software
Installation screen, click OK.
5. Select the version of PC Sidekick that is installed on your
computer and then click OK.
If you do not have a version of PC
Sidekick installed on your computer ,
Sidekick not installed on PC
select
This will allow you to only backup and
restore your files.
6. Type the destination drive and
directory and then click OK.
Or , click
The default directory is
C:/BOOKSDK
7. Click OK.
8. Click Yes to reboot Windows.
When you reboot Windows, a new
program group called BOOKMAN
appears, containing the BOOKMAN
Sidekick Connectivity icon. If you
do not reboot, this window and icon
will not be created.
Cancel
to stop the installation.
.
Once you have connected the serial
cable and installed the BOOKMAN
Sidekick Connectivity software on
your computer, you can start using the
connectivity software.
1. On your computer, star t the
BOOKMAN Sidekick Connectivity Software.
.
If you are using Windows, doubleclick the BOOKMAN Sidekick Connectivity icon.
If you are using Windows 95, select
Programs/BOOKMAN/BOOKMAN Sidekick Connectivity
the Start menu or double-click the
BOOKMAN Sidekick Connectivity
icon in the BOOKMAN window.
Note: If you close the BOOKMAN
window, the icon cannot be accessed again.
2. When the BOOKMAN Sidekick
Connectivity main window
appears, click the COM port
pull down menu to match the
communications port to which
you connected the serial cable.
52
from
Page 54

Starting the Connectivity Software
Testing Your Connection
Once you have selected a communications port, you do not need to select it again, unless you change the
port you are using.
3. On your BOOKMAN Sidekick,
press MENU, highlight PC
Connect on the Setup menu,
and then press ENTER.
The BOOKMAN Sidekick remains
in this state until you start linking,
transferring, or merging.
4.
Y ou now can test the connection.
To learn how, read “Testing Y our
Connection.”
➤
Shutoff During Connection
If your BOOKMAN Sidekick automatically shuts off while connected to your
computer, do not worry. Simply turn
your BOOKMAN Sidekick back on
and then select
Setup menu to reconnect.
PC Connect
from the
You should test the connection when
you connect your BOOKMAN Sidekick
and your computer for the first time,
whenever you have disconnected the
serial cable, or if you forget which communications port you are using.
Note: You do not need to select a COM
port on the BOOKMAN Sidekick Connectivity main window before you click
1. At the main window of the
BOOKMAN Sidekick Connectivity software, click Test.
The BOOKMAN Sidekick Port
Finder window appears.
2. Click Start.
If the Status box says that your BOOKMAN Sidekick is not detected on any
communications port, make sure that
the serial cable is fully inserted in the
serial port and that you have selected
PC Connect
your BOOKMAN Sidekick.
3. Click OK when finished.
4.
Make sure the selected COM
port matches the communications port found by the test.
from the Setup menu of
53
Test
.
Page 55

Linking Files
Linking Files
Before you can merge or transfer files,
you must first link them in pairs. When
you link a pair of files, you create a connection between a BOOKMAN Sidekick
file and a PC Sidekick file. Linking itself
does not merge or transfer information
from one file to another . Note: Y ou only
need to link the files that you want to
merge or transfer.
There are three linking options:
• Linking Two Existing Files: This option
links an existing BOOKMAN Sidekick
file to an existing PC Sidekick file.
• Linking a New BOOKMAN Cardfile:
This option links an existing PC Sidekick cardfile to a new BOOKMAN
Sidekick cardfile.
• Linking a New PC Sidekick File: This
option links an existing BOOKMAN
Sidekick file to a new PC Sidekick file.
Note: You can only link expenses in
the Sidekick 95 version or later , not in
the Sidekick 2.0 version.
Caution: If your BOOKMAN Sidekick and your computer are not prop-
erly connected, you will not be able to
link files. Read “Testing Your Connection” for more information.
To Link Two Existing Files
1. On the BOOKMAN Sidekick
Connectivity main window,
click Link.
The Link Databases dialog box appears. Y ou can exit this window by
Cancel
clicking
links currently selected in this window.
2. Click the Database T ype pull
down menu to select the
type of file you want to link.
Note: This screen display and any others in “Using the Connectivity Software” were taken from Windows 3.1.
If you are using Windows 95, or any
. This will remove all
54
Page 56

Linking Files
Linking Files
later version, your screen may vary.
3. Click the BOOKMAN Sidekick
file to highlight it.
4. Click Link To PC File.
You can also select a BOOKMAN
Sidekick file to link to a PC Sidekick
file by simply double-clicking the
BOOKMAN Sidekick file at the Link
Databases dialog box.
5. Select a directory and then highlight a PC Sidekick file.
6. Click OK.
The pair of linked files now appear
side by side.
7. Link more files, if desired.
If needed, change the database
type.
8. Click OK again to return to
the main window.
T o Link a New BOOKMAN Cardfile
Note: A new BOOKMAN Sidekick file is
not actually created until you transfer or
merge the file from your computer to
your BOOKMAN Sidekick.
1. On the BOOKMAN Sidekick
Connectivity main window,
click Link.
2. Select Cards as the Database Type.
3. Click New BOOKMAN File.
4. Type the name of the new
BOOKMAN Sidekick cardfile
to be created.
5. Click Link.
6. Highlight a PC Sidekick file.
Or you can click
Create BOOKMAN File
7. Click OK.
The new BOOKMAN Sidekick
Cardfile will be double bracketed
<<sample>>
(
8. Click OK again to return to
the main window.
Cancel
).
to return to the
dialog box.
T o Link a New PC Sidekick File
Note: The PC Sidekick file is not actually created until you transfer or merge
the file from your BOOKMAN Sidekick
to your personal computer.
1. On the main window, click Link.
55
Page 57

Linking Files Linking Files
2. Select a Database T ype.
3. Highlight a BOOKMAN
Sidekick file.
4. Click Link To PC File.
5. Type the name of the new PC
Sidekick file to be created.
You do not need to type a file extension because the connectivity
software automatically adds one.
6. Click OK twice to return to
the main window.
The new PC Sidekick file is double
bracketed (
➤
Updating Your Links
If you add, delete or rename the cardfiles on your BOOKMAN Sidekick
while using the connectivity software,
and these changes do not appear on
the Link Databases dialog box, you
should update your links.
From the main window, select
Links
your BOOKMAN Sidekick for changes
made to your cardfiles and then automatically updates your links.
<<SAMPLE>>
).
Update
from the File menu. This checks
➤
Maintaining and Removing
Links
You do not need to r elink your files
every time you use the connectivity
software. Even if you turn off your
computer , your linked files r emain
linked until you unlink them, or delete or rename a file.
T o unlink a pair of linked files, first
Link
click
bases dialog box. Then click a pair
of linked files and click
➤
Linking Multiple BOOKMAN
Cardfiles
You can link a single PC Sidekick
cardfile to multiple BOOKMAN
Sidekick cardfiles.
However , if you link a PC Sidekick
cardfile to more than one BOOKMAN Sidekick cardfile and then
click
MAN Sidekick cardfiles merge in
the order that they appear in the
Link Databases dialog box.
to go to the Link Data-
Merge All
, the linked BOOK-
56
Unlink
.
Page 58

Merging All Linked Files
Merging All Linked Files
Once you have linked files, the simplest way
to combine your BOOKMAN Sidekick and
PC Sidekick files is to merge all your linked
files. Please note,
mended way to combine your linked files.
Merging all your linked files saves all their
nonidentical entries on both your BOOKMAN Sidekick and your PC Sidekick.
Identical entries in your linked files remain
unchanged. The result is linked files that
are identical on both your BOOKMAN
Sidekick and PC Sidekick.
Caution: When you merge files, the
previously existing linked files on your
BOOKMAN Sidekick and computer
are overwritten.
➤
More Information About Merging Entries
If: T wo entries are found in which all
the field information matches,
If: T wo entries are found with
matching index field information,
but with different non-index fields,
If: T wo entries are found in which one
or more index fields do not match,
Merge All
is the recom-
1. On the BOOKMAN Sidekick
Connectivity main window,
click Merge All.
Before you merge all your files, you
must first link them. To learn how,
read “Linking Files.”
If you are currently running PC
Sidekick, it will automatically quit
when you transfer or merge.
2. If you are overwriting data
to your BOOKMAN Sidekick,
click OK.
3. If duplicate records are
found, select one of the three
options and then click OK.
Then: One entry will appear in both
➔
Then: You must decide which entr y to
➔
Then: Both entries will appear in both
➔
57
files.
save in both files. T o learn how,
read “Understanding Duplicate
Records.”
files.
Page 59

Merging All Linked Files
Merging All Linked Files
T o learn more, read “Understanding
Duplicate Records.”
4. If the Merge Options dialog
box appears, click one of the
four buttons.
The Merge Options dialog box appears only if you are merging two
cardfiles that have one or more nonidentical field names. Here is what the
buttons do:
Use PC Only
•
names from the PC Sidekick file.
•
Use BOOKMAN Only
the field names from the BOOKMAN Sidekick file.
•
Use All Fields
unique field names from both the
PC Sidekick file and the BOOKMAN Sidekick file.
copies all the field
copies all
copies all of the
Cancel
•
5. If you are merging Calendars,
the Date Range dialog box
will appear. If needed,
change the start and end
dates and then click OK.
Or click
entries from both Calendars.
Warning: If you select a date
range, all the entries on your
BOOKMAN Sidekick outside the
selected range will be permanently
erased. T o learn more about merging Calendars, read “Transfer ring
Calendars.”
When the main window
6.
appears, your files are merged.
➤
Merging Y our Notes
If you merge a pair of linked
notefiles, all note folders with identical names will be saved in both
notefiles. All nonidentical notes in either note folder will be saved to both
files, and all identical notes in both
note folders will remain unchanged.
stops these two files from
merging.
Ignore
to merge all of the
58
Page 60

Merging All Linked Files
Merging All Linked Files
➤
Merging New Files
It is also possible to merge an existing file, either a PC Sidekick or
BOOKMAN Sidekick file, to a newly
created file. For example, if you
linked an existing PC Sidekick cardfile to a new BOOKMAN cardfile,
you can still click
adds all of the entries from the
All
existing file to the new file.
➤
Understanding Duplicate
Records
Each BOOKMAN Sidekick entry , or
record, has up to three index fields.
Index fields contain the information
that is displayed in menu items on
your BOOKMAN Sidekick. Index
fields are also used for sorting entries and files on your PC Sidekick.
The Duplicate Record Assignment
dialog box appears whenever you
try to merge two entries that have
identical information in their index
fields, but have different information
Merge All. Merge
in their other fields. When the Duplicate Record dialog box appears you
must choose one of these options:
Use...from Sidekick
•
try from the PC Sidekick file and
discards the entry from the
BOOKMAN Sidekick file.
Use...from BOOKMAN
•
entry from the BOOKMAN Sidekick file and discards the entry
from the PC Sidekick file.
Both
saves the entries from both
•
the BOOKMAN Sidekick file and
the PC Sidekick file.
Preference
The
how carefully you want to look at future duplicate records.
saves the en-
box lets you choose
Continue Querying on Each Occurrence
allows you to examine each
pair of duplicate records.
Use Same Selection for Future Occurrences
current selection to all future duplicate records in this current file.
automatically applies the
59
saves the
Page 61

Advanced T ransfers
and Merging
Advanced T ransfers and Merging
Once you have linked files, you can
transfer or merge individual linked files
between the computer and your
BOOKMAN Sidekick using the Advanced T ransfer button.
T ransferring, like merging, sends entries between your BOOKMAN Sidekick and the computer. But unlike
merging, transferring copies all the entries from one file and overwrites them
in the other, ther eby deleting all the
previous entries in the file copied to.
For example, if you transfer a cardfile
from your computer to your BOOKMAN Sidekick, all the cards in the
BOOKMAN cardfile will be replaced by
the cards in the cardfile from PC Sidekick.
Caution: Before you transfer files
from your computer to your BOOKMAN Sidekick, you may want to check
the memory gauge on your BOOKMAN Sidekick to make sure that it has
enough memory available to hold the
new files. Read “Gauging the
Memory” for more information.
Note: T o recover the PC Sidekick files
that you most recently transferred,
read “Recovering Files.”
1. On the BOOKMAN Sidekick
Connectivity main window,
click Advanced Transfer.
This is the T ransfer Databases dialog box.
A right pointing arrow (⇒) indicates
that entries can be transferred or
merged only from a BOOKMAN
Sidekick file to a (new) PC Sidekick
file.
A left pointing arrow (⇐) indicates
that entries can be transferred or
merged only from a PC Sidekick file
to a (new) BOOKMAN Sidekick file.
A double pointing arrow (⇔) indicates entries can be transferred or
60
Page 62

Advanced T ransfers and Merging
Advanced Transfers and Merging
merged to or from both files.
2. Select a Database T ype.
3. Click the linked pair that you
want to transfer or merge.
An
X
in the check box to the left of
files indicates they are selected for
transferring or merging. To deselect
files, click them again.
4. Do one of the following:
To... Click...
Transfer the file(s)
from PC to your
BOOKMAN
Transfer the file(s)
from your BOOKMAN to the PC
Merge your PC
and BOOKMAN
files
5. Click OK to transfer or merge.
Cancel
Or click
6. Click OK again to return to
the main window.
To BOOKMAN
To PC
Merge
to stop.
➤ Transferring Calendar Entries
Using
Advanced Transfer
transfer or merge one or more calendar entry types: appointments, To
Do items, calls, multi-day events,
and special days.
To select a calendar entry type, first
change the Database Type to
dars
. Then highlight one or more calendar entry types to select it. To
deselect an entry type, highlight it
again. You can now transfer or
merge the calendar entries.
When you merge calendar entries
between your BOOKMAN Sidekick
and your PC Sidekick, the Date
Range dialog box appears. By setting the date range, you trim your
BOOKMAN Sidekick to display only
the calendar entries within that
range. To mer ge all your calendar
entries, click
Note: If you use
not be able to transfer a specific calendar entry type.
Ignore
, you can
.
Merge All
, you will
61
Calen-
Page 63

Advanced T ransfers and Merging
Recovering Files
➤
Merging and T ransferring
Notes from Sidekick 95
In Sidekick 95, notes are referred to
as Write files, which contain text
that can be formatted as you would
a word processing file (e.g., bolding,
italicizing, font size, paragraph alignment, etc.).
If you transfer or merge a Write file
to your BOOKMAN Sidekick and
transfer
then
your computer , its text formatting
will be lost.
the same file back to
Every time you transfer a file from your
BOOKMAN Sidekick to your computer , as
well as every time that you merge a pair of
linked files, a recovery file is created on
your computer. Recovery files contain all
the information from the PC Sidekick file
that was overwritten when you merged
that file or transferred to that file.
Caution: Recovery files contain information from only the most recent time that a
PC Sidekick file was transferred or
merged. Each time a file is transferred or
merged to a PC Sidekick file, its recovery
file is overwritten.
Recovery files are saved in a
subdirectory, called
in the same directory as the BOOKMAN Sidekick Connectivity software.
All recovery files retain their original
names and extensions. Y ou can retrieve recovery files in PC Sidekick, by
opening the
and selecting a recovery file.
Caution: If you attempt to transfer or
merge a recovery file, you risk losing
the information which was saved in the
recovery file.
Recovery
Recovery
, located
subdirectory,
62
Page 64

Backing up
and Restoring Files
Backing up and Restoring Files
Even if you do not have PC Sidekick,
you can back up all the information on
your BOOKMAN Sidekick into one file
on your computer. This file can be r estored later for use on your BOOKMAN Sidekick.
Warning: If you open the backup file
as a text file on your computer , you
may damage or alter the file. The damaged backup file cannot be restored to
your BOOKMAN Sidekick.
This file will be stored in the same directory as the BOOKMAN Sidekick Connectivity software. The backup file is an
image file, called
backup file is overwritten each time that
you back up your BOOKMAN Sidekick.
Note: The time it takes to back up or
restore your BOOKMAN Sidekick files
can vary from five minutes to forty-five
minutes or longer, depending on the
amount of information.
Bookman.img
. The
T o Back up Your Files
1. From the BOOKMAN Sidekick
Connectivity main window,
select Backup from the File
menu to back up all your
BOOKMAN Sidekick files.
2. When your backup is completed, click OK.
T o Restore Your Files
Warning: When you restore your
BOOKMAN Sidekick files from the
backup file all your current BOOKMAN
Sidekick files will be overwritten.
1. From the BOOKMAN Sidekick
Connectivity main window,
select Restore from the File
menu.
If you do not have
the same directory as the BOOKMAN Sidekick Connectivity software, this option will not be
available.
2. Click OK to restore your files,
or Cancel to not restore them.
Bookman.img
63
in
Page 65

Solutions to Common
Problems
Solutions to Common Problems
I do not have the BOOKMAN PCconnect serial cable or the
BOOKMAN Sidekick Connectivity software disk.
To order one or both, contact Franklin Electronic Publishers, Inc.
While installing the BOOKMAN
Sidekick Connectivity software,
I realize that I do not want to
reboot Windows.
Cancel
Click
the Windows main window.
I have installed the connectivity
software, but I cannot find its
program icon.
The BOOKMAN Sidekick Connectivity icon should appear in the
newly created BOOKMAN program
group. If one or both do not appear,
Install the connectivity software
again. T o learn how, read “Installing
the Connectivity Software.”
. This will return you to
I clicked Test to discover which
communications port is being
used, and the screen says that
BOOKMAN Sidekick is not
found on my system.
Do the following:
• Make sure that you are using the
Franklin BOOKMAN PC-connect
serial cable. No other cable will
work with your BOOKMAN Sidekick.
• Make sure the cable is inserted as
far as it will go into the serial port,
and not the headphone jack, on
your BOOKMAN Sidekick. Read
“Special BOOKMAN Features”
for more information.
• Make sure that the cable is prop-
erly connected to a communications port on your computer.
• Make sure that your BOOKMAN
Sidekick is turned on and
nect
is selected from the Setup
menu on your BOOKMAN Sidekick.
64
PC Con-
Page 66

Solutions to Common Problems
Solutions to Common Problems
A Data Error dialog box appears, saying Unable to receive
data from the BOOKMAN.
The Data Error dialog box appears
when you are linking files, merging
all your files, or using the Advanced
Transfer option. Do one of the
following:
OK
• Click
COM Port to matches the communications port in which the serial cable was inserted.
• Click
test your connection.
The Retrieving File Descriptors
box has remained on for over
one minute without any
progress.
If you have a large amount of information in your BOOKMAN Sidekick, there may be a short delay
before progress is shown.
and make sure the
OK
and then click
Test
to
When transferring or merging
files, I realized that I did not
intend to overwrite a PC
Sidekick file.
Every time that a BOOKMAN Sidekick file is transferred to your computer and every time a pair of
Sidekick files are merged, a PC
Sidekick recovery file is created. T o
learn how to recover the file, read
“Recovering Files.”
Note: Only the information that existed
before the most recent transfer or
merge is contained in a recovery file.
I realized that I did not intend
to overwrite a BOOKMAN
Sidekick file.
There is no way to recover a BOOKMAN Sidekick file if it is overwritten
due to a transfer or merge.
In the future, you may want to create a backup file to insure that your
files will not be permanently lost. T o
learn how, read “Backing up and
Restoring Files.”
65
Page 67

Solutions to Common Problems
BOOKMAN Sidekick Connectivity
Software Copyrights
In Windows 95, I opened a
Write file and all its text formatting is gone.
Any new notes or note folders that
were added to the Write file because of a merge will have no text
formatting. But any previously existing notes or note folders in the
Write file retain their original formatting.
All text formatting in Write files is
automatically deleted when you
transfer a notefile from your BOOKMAN Sidekick to your computer .
You may be able to r ecover your
formatting by recovering the notefile. Read “Recovering Files” for
more information.
Copy and use restrictions for BOOKMAN Sidekick
Connectivity software
Although you are encouraged to make a backup copy of the Software for your own use, you are not allowed to make unlimited copies. The Software is protected by the copyright laws that pertain to
computer software. It is illegal to make copies of the Software except for backups. It is illegal to give copies to another person, or to
duplicate the Software by any other means, including electronic
transmission. The Software contains trade secrets, and in order to
protect them you may not decompile, reverse engineer, disassemble, or otherwise reduce the Software to human-perceivable
form. You may not modify, adapt, translate, rent, lease, loan, resell
for profit, distribute, network or create derivative works based upon
the Software or any part thereof.
Limitations of liability
IN NO EVENT SHALL STARFISH OR FRANKLIN BE LIABLE FOR
ANY INCIDENTAL, SPECIAL, OR CONSEQUENTIAL DAMAGES
FOR YOUR USE, MISUSE OR INABILITY TO USE THE SOFTWARE
OR RELATED DOCUMENT ATION. SOME JURISDICTIONS DO
NOT ALLOW THE EXCLUSION OR LIMITATION OF LIABILITY FOR
INCIDENTAL OR CONSEQUENTIAL DAMAGES SO THE ABOVE
EXCLUSION MAY NOT APPLY TO YOU. UNDER ALL CIRCUMSTANCES THE TOTAL LIABILITY OF FRANKLIN AND OR STARFISH TO YOU FOR ANY AND ALL DAMAGES AND LOSSES FOR
ANY CLAIM OR CAUSE OF ACTION IS LIMITED TO THE
AMOUNT PAID BY YOU FOR THE SOFTWARE.
Disclaimer of software warranty
BOOKMAN SIDEKICK CONNECTIVITY SOFTWARE IS PROVIDED “AS-IS” AND STARFISH AND FRANKLIN EXPRESSLY
DISCLAIMS ALL WARRANTIES ON THE SOFTWARE AND RELATED DOCUMENT ATION, EXPRESS OR IMPLIED, INCLUDING
BUT NOT LIMITED TO THE IMPLIED WARRANTIES OF MERCHANTABILITY AND FITNESS FOR A PARTICULAR PURPOSE.
FRANKLIN EXPRESSLY DISCLAIMS ANY W ARRANTY THAT THE
OPERATION OF THE SOFTW ARE WILL BE ERROR FREE OR UNINTERRUPTED; AND STARFISH AND FRANKLIN DISCLAIMS
ANY WARRANTY CONCERNING THE CORRECTNESS, ACCURACY , OR RELIABILITY OF THE SOFTW ARE, OR RELATED
DOCUMENTA TION, OR ANY SER VICE PROVIDED TO YOU
THROUGH USE OF THE SOFTWARE. SOME JURISDICTIONS
DO NOT ALLOW THE EXCLUSION OF IMPLIED WARRANTIES,
SO THE ABOVE EXCLUSION MAY NOT APPL Y TO YOU.
66
Page 68

Doing a Factory Reset
Resetting Your BOOKMAN
Warning: Doing a factory reset permanently erases all the records saved
in your BOOKMAN Sidekick. Unless
you want to erase all your information,
do not perform a factory reset.
In addition, when you do a factory reset, any settings that you have
changed, such as the screen contrast
or help message language, are reset
to their default settings. Also, all
sample cardfiles or note folders (e.g.,
Folder 1
not contain any notes or cards.
1. Press MENU.
2. On the Setup menu, highlight
3. Press ENTER.
4. Press F to start the factory
) will be restored but they will
Factory Reset.
reset. Or press any other key
to exit without doing a
factory reset.
If the BOOKMAN keyboard fails to respond, or if its screen performs erratically , first press CLEAR and then press
ON/OFF twice. If nothing happens, follow the steps below to reset it.
Warning: Pressing the reset button
with more than very light pressure may
permanently disable your BOOKMAN
Sidekick. In addition, resetting your
BOOKMAN Sidekick restores certain
settings to their defaults, and may
erase user-entered information in any
installed book cards.
1. Hold CLEAR and press ON/OFF.
If nothing happens, try Step 2.
2. Use a paperclip to gently
press BOOKMAN’s reset
button.
The reset button is recessed in a
pin-sized hole on the back of your
BOOKMAN.
This unit may change operating modes due
to Electro-static Discharge. Normal operation of this unit can be re-established by
pressing the reset key, ON/OFF, or by removing/replacing batteries.
67
Page 69

Specifications
Copyrights and Patents
Model: SDK-763
• size: 12 x 8.3 x 1.4 cm
• weight: 7 oz
• memory: 512 kb
• records:
20-characters: approx. 19,500
30-characters: approx. 12,999
• ISBN 1-56712-313-9
Model: SDK-765
• size: 12 x 8.3 x 1.4 cm
• weight: 7 oz
• memory: 1 mb
• records:
20-characters: approx. 45,500
30-characters: approx. 30,331
• ISBN 1-56712-314-7
© 1996 Franklin Electronic Publishers,
Inc., Burlington, NJ 08016-4907 U.S.
All rights reserved.
© 1995 Starfish Software. All rights
reserved.
Sidekick is a registered trademark of
Starfish Software.
FCC Notice: Complies with the limits for a Class B computing device pursuant to Subpart B of part 15 of FCC
Rules. Operation is subject to the following two conditions: (1) This device
may not cause harmful interference;
and (2) This device must accept any interference received, including interference that may cause undesired
operation.
U.S. Patents 4,490,811; 4,830,618;
4,891,775; 4,982,181; 5,113,340;
5,203,705; 5,218,536; 5,229,936;
5,295, 070; 5,333,313; 5,007,019;
5,153,831; 5,249,965; 5,321,609;
5,396,606; European Patent 0 136 379;
Deutsch Pats. M 9409743.7 and
M 9409744.5.
Pat. Pend.
68
Page 70

Limited Warranty
FRANKLIN warrants to you that the BOOKMAN PRODUCT will be free from defects in materials and
workmanship for one year from purchase. In the case of such a defect in your BOOKMAN PRODUCT,
FRANKLIN will repair or replace it without charge on return, with purchase receipt, to the dealer from which
you made your purchase or Franklin Electronic Publishers, Inc., One Franklin Plaza, Burlington, NJ 080164907, within one year of purchase. Alternatively, FRANKLIN may, at its option, refund your purchase price.
Data contained in the BOOKMAN PRODUCT may be provided under license to FRANKLIN. FRANKLIN
makes no warranty with respect to the accuracy of data in the BOOKMAN PRODUCT. No warranty is made
that the BOOKMAN PRODUCT will run uninterrupted or error free. Y ou assume all risk of any damage or loss
from your use of the BOOKMAN PRODUCT .
This warranty does not apply if, in the sole discretion of FRANKLIN, the BOOKMAN PRODUCT has been
tampered with, damaged by accident, abused, misused, or misapplication, or as a result of service or
modification by any party, including any dealer , other than FRANKLIN. This warranty applies only to products
manufactured by or for FRANKLIN. Batteries, corrosion, or battery contacts and any damage caused by
batteries are not covered by this warranty. NO FRANKLIN DEALER, AGENT , OR EMPLOYEE IS AUTHORIZED
TO MAKE ANY ADDITIONAL WARRANTY IN THIS REGARD OR TO MAKE ANY MODIFICATION OR
EXTENSION OF THIS EXPRESS WARRANTY.
THE FOREGOING WARRANTY IS EXCLUSIVE AND IS IN LIEU OF ALL OTHER EXPRESS OR IMPLIED
WARRANTIES, WRITTEN OR ORAL, INCLUDING, BUT NOT LIMITED TO, WARRANTIES OF
MERCHANTABILITY OR FITNESS FOR A PARTICULAR PURPOSE. YOUR SOLE AND EXCLUSIVE
REMEDY SHALL BE FRANKLIN’S OBLIGATION TO REPLACE OR REFUND AS SET FORTH ABOVE IN
THIS WARRANTY. Some States do not allow the exclusion of implied warranties, or limitations on how long
a warranty lasts. This warranty gives you specific rights; you may also have additional rights which vary from
State to State. This warranty shall not be applicable to the extent that enforcement of any provision may be
prohibited by applicable law.
FRANKLIN SHALL IN NO EVENT BE LIABLE TO YOU OR TO ANY OTHER PERSON FOR ANY SPECIAL,
INCIDENTAL, OR CONSEQUENTIAL DAMAGES, OR ANY OTHER INDIRECT LOSS OR DAMAGE,
ARISING OUT OF YOUR PURCHASE, THE MANUFACTURE OR SALE OF THE BOOKMAN PRODUCT,
THIS LICENSE, OR ANY OBLIGA TION RESUL TING THEREFROM OR THE USE OR PERFORMANCE OF
THE BOOKMAN PRODUCT UNDER ANY LEGAL THEOR Y, WHETHER BREACH OF CONTRACT, TOR T,
STRICT LIABILITY OR ANY OTHER CAUSE OF ACTION OR PROCEEDING, WHICH DAMAGES SHALL
INCLUDE, BUT NOT BE LIMITED TO, LOST PROFITS, DAMAGES T O PROPERTY , OR PERSONAL INJURY
(BUT ONLY TO THE EXTENT PERMITTED BY LAW). FRANKLIN’S ENTIRE LIABILITY FOR ANY CLAIM
OR LOSS, DAMAGE, OR EXPENSE FROM ANY SUCH CAUSE SHALL IN NO EVENT EXCEED THE
PRICE PAID FOR THE BOOKMAN PRODUCT. THIS CLAUSE SHALL SURVIVE FAILURE OF AN
EXCLUSIVE REMEDY . This license and warranty is governed by the laws of the United States and the State
of New Jersey.
(U.S. only)
69
Page 71

Index
?* key 31, 38
Accenting letters 12, 26
Adding
cards to cardfiles 30
notes to note folders 37
Advanced Transfer 60, 61
Alarms
appointments 21
daily 17, 18
Appointments 21, 23-25, 27
Arrows
flashing 11
keys 4
Auto-resume feature 14
Automatic shutoff time
described 10
with BOOKMAN Sidekick
Connectivity software 52
Backing up files 63
Batteries
installing 8
low warning 8
Book cards
installing 8
removing 8
BOOKMAN PC-connect serial cable
50, 64
BOOKMAN Sidekick port finder 53
BOOKMAN Sidekick Connectivity
software
backing up and restoring riles 63
BOOKMAN window 52
equipment needed 50
copyrights 66
help text 51
icon 52
installing 64
if PC Sidekick is installed 51
if PC Sidekick is not installed 52
linking files 54
merging all linked files 57
merging individual files 60
recovering files 62
starting, using icon or menus 52
testing the connection 53
transferring files 60
troubleshooting 64
Calculator
basic math functions 47
deleting previous results 48
making calculations 47
naming results 48
other math functions 47
repeating calculations 47
saving calculations 48
using previous results 48
70
Page 72

Index
Calendar
Daily view 23
merging files 58
Monthly view 25
transferring files 61
Weekly view 24
Calendar entries
creating 21, 22
deleting 26
duplicating 22
icons of 24
partial word searches 27
searching 26
understanding 21
Calls 21-23, 26
Capital letters in searches 33, 40
CARD (green) key 4
Cardfiles
creating 29, 30
deleting 29
described 28, 29
naming 29
renaming 30
templates 29, 30
viewing 31, 32
Cardfiles Edit menu 30
Cardfiles menu 30, 31
Cards
adding to cardfiles 30
deleting 33
described 30
duplicating 31
editing 32
searching for 33, 34
searching for parts of words 34
undeleting 33
viewing 31, 32
Changing
automatic shutoff time 10
help message language 10
password 13
time/date format 10, 18
topics 11
Clock Edit menu 16, 19
Clock swapping 19
Clocks
changing the time/date format 18
daily alarm 17, 18
resetting after power loss 19
setting the Home Clock 16
setting the World Clock 17
swapping 19
understanding swapping 19
Color keys
understanding 4
using 9
71
Page 73

Index
Communications (COM) port
finding 50, 53
selecting 52
troubleshooting 64, 65
Computing expense sums 45
Connectivity software. See BOOK-
MAN Sidekick
Connectivity software
Creating
cardfile templates 30
cardfiles 29, 30
cards 30
expense entries 43
files using the connectivity software
55
note folders 36
notes 37
program icon for connectivity
software 64
Daily (Calendar) view 22-27
Daily alarm
changing, setting 17
disabling 18
Data Error 65
Database Type 54, 55, 61
Day/month/year format 18
Daylight Savings time 18
Decimals 47
Deleting
Calculator results 48
cardfiles 29
cards 33
expense entries 45
note folders 36
notes 40
password 13
Demonstration
disabling/enabling 10
viewing 10
Direction keys 4
Directory, selecting to install 52
Duplicate Record Assignment 59
Duplicate records 57, 59
Duplicate records, understanding 59
Duplicating
calendar entries 22
cards 31
notes 38
EDIT (blue) key 4, 33,
36-40, 43, 44, 45
Editing
cards 32
expense entries 44
notes 39
Expense entries
account type 43, 45
72
Page 74

Index
amount 43
computing sums 45
creating 43
deleting 45
merging and transferring to a PC 43
payment type 43, 45
undeleting 45
Expenses menu 43, 45
Factory Reset 67
Files
advanced transfer and merging 60
backing up and restoring 63
linking 54-56
merging 59-61
merging all linked files 57-59
recovering (PC Sidekick) only 62
restoring backup files 63
transferring 60, 61
unlinking 56
FILES (red) key 4, 29-33
Finding your communications port 53
Full titles of menu items 31, 38
Gauging the memory 60
Headphone jack 6
Help messages
in BOOKMAN Sidekick 10
in connectivity software 51
language 10
tutorial 10
Home clock
setting
by changing time 16
by location or time zone 16
swapping with World clock 19
Home icon 16
Hyphens, typing 5
Icons
bell 18
calendar entries 24
Daily (Calendar) view 24
Home Clock 16
World Clock 17
Image file 63
Index fields 59
Installing
batteries 8
book cards 8
Key combinations 5
Language of help messages. See
Help messages
Link Databases dialog box 54-56
Linking files
linking a new BOOKMAN cardfile 54, 55
linking a new PC Sidekick file 54, 55
linking pairs of files 54
linking two existing files 54
73
Page 75

Index
maintaining and removing links 56
multiple BOOKMAN cardfiles 56
options 54
updating links 56
Locations
setting Home clock by 16
setting World clock by 17
Low battery warning 8
Maintaining links 56
Math functions 47
Memory Gauge 14, 60
Merge All button 57, 59
Merge Options dialog box 57, 58
Merging files
merging all linked files 57
merging calendar files 58
merging individual files 60, 61
merging new files 59
merging notefiles 58
merging Sidekick 95 notes 62
Monetary symbols 12
Month/day/year format 18
Monthly (Calendar) view 25
Multi-day events 21-23, 26, 27
Negative numbers, typing in Calcu-
lator 47
Note Folder Edit menu 37
Note folders
creating 36
deleting 36
described 35
renaming 36
searching 41
viewing 38, 39
Notes
adding to a note folder 37
deleting 40
described 35
duplicating 38
editing 39
merging 58
merging and transferring 62
searching for 40, 41
undeleting 40
viewing 38, 39
NOTES (yellow) key 4, 37-40
Notes menu 36, 38
Numbers, typing 5
Parts of words, searching for 27, 34, 41
Password
changing or deleting 13
if you forget it 14
setting 13
PC Connect 53, 64
Percentages 47
74
Page 76

Index
Port Finder window 53
Problems with the connectivity
software 64
Punctuation marks 12
Rebooting Windows 51, 52, 64
Reciprocals 47
Recover subdirectory 62
Recovering files (PC Sidekick only)
62
Recovery files described 62
Recurring appointments
deleting 26
trimming the Schedule 27
Recurring special days 26
Renaming
cardfiles 30
note folders 36
Resetting BOOKMAN 67
Restoring backup files using the
connectivity software 63
Retrieving file descriptors 65
Saving changes 11
Schedule trimming 27
Screen contrast 10
Searching
cardfiles 33
for cards 33, 34
for notes 40, 41
for parts of words 27, 34, 41
note folders 40, 41
Selecting
books 9
communications (COM) port 52
database type for transferring or
merging 54
daylight or standard time 18
destination drive 52
PC Connect 52
topics 11
Serial cable 6, 52, 64, 65
Serial cable, connecting 50
Serial port
location of 6
using with BOOKMAN PC-Connect
serial cable 51, 64
Sidekick PC, questions about 50
Size and weight 68
Special characters
in searches 26, 33, 40
typing 12
Special days 21-23, 27
Special features 6
Specifications 68
Square roots 47
Squares of numbers 47
Standard time 18
Swapping Home and World Clocks 19
75
Page 77

Index
Templates (cardfiles) 30
Testing BOOKMAN/PC connection
53, 65
Time zones
setting Home clock by 16
setting World clock by 17
Time/date format 10, 18
To Do items 22, 23, 26
Transfer Databases dialog box 60
Transferring files 60, 61
calendar entries 61
Sidekick 95 notes 62
Trimming the schedule 27
Troubleshooting (connectivity soft-
ware) 64
Tutorial 10
Typing
accents 12, 26
decimals in Calculator 47
hyphens 5
letters 12
letters in Calculator 48
math symbols 47
monetary symbols 12
negative numbers in Calculator 47
numbers 12, 47
punctuation marks 12
special characters 12
Undeleting
cards 33
expense entries 45
notes 40
Unlinking files 56
Updating links 56
Upgrading to Sidekick 95 51
Viewing
cardfiles, cards 31, 32
connectivity help messages 51
demonstration 10
full titles of menu items 31, 38
help messages 10
note folders, notes 38, 39
Volume contr ol 6
Weekly (Calendar) View 24, 25
World clock
setting 17
swapping with Home clock 19
Write files (Windows 95) 62, 66
76
Page 78

FPR-28004-00
P/N 7201305 Rev . A
 Loading...