

Page 1

User’ s Guide
REX™ PRO/Docking Station
Starfish, 1700 Green Hills Road, Scot ts Valley, CA 95066 www.starfish.com
Franklin Electronic Publishers, One Franklin Plaza, Burlington, NJ 08016-4907 www.franklin.com
Page 2

Starfish Software, Inc. Software License, Disclaimer of Warranties, and Limitation of
Liability
License for Individual Use
Tr ueSync Desktop for REX PRO ("the Desktop Software") and all software on the REX PRO device ("the Device Software") were
designed, developed, and produced by Starfish Software, Inc. ("Starfish"). All software is licensed to you f or y our own individual use
only. You may make a single copy of only the Desktop Software, for archive purposes only. All software is protected by U.S. and
international copyright law and treaties, and cannot be copied or otherwise made available to more than one person at the same
time without violating the law. Starfish reserves all rights not specifically granted in this document.
Other Limits on Your U se
Except as specifically described in this license, you may not transfer, rent, lease, lend, copy, modify, translate, sublicense, time-
share, or electronically transmit or receive the Desktop Software or the Device Software. You ackno wledge that the Desktop
Software and the Device Software in source code form remain a confidential trade secret of Starfish and therefore you agree not to
modify or attempt to reverse engineer, decompile, or disassemble the software, except and only to the extent that such activity is
expressly permitted by applicable law notwithstanding this limitation.
Disclaimer of Warranties
TO THE MAXIMUM EXTENT PERMITTED BY APPLICABLE LAW, STARFISH AND ITS SUPP LIER S EXPR ESSLY DISCLAIM
ALL WARRANTIES AND CONDITIONS, EITHER EXPRESS OR IMPLIED, INCLUDING, BUT NOT LIMITED TO, IMPLIED
WARRANTIES OF MERCHANTABILITY, FITNESS FOR A PARTICULAR PURPOSE, TITLE, AND NON-INFRINGEMENT, WITH
REGARD TO ALL SOFTWARE AND THE PROVISION OF OR FAILURE TO PROVIDE SUPPORT SERVICES.
Limitation of Liability
To the maximum extent permitted by applicable law, Starfish and its suppliers expressly disclaim any liability for damages arising
from the use of this product or any other damages, including (though not limited to) lost profits or data, special, incidental,
consequential, indirect, or other damages or claims, even if Starfish or its suppliers has been specifically advised of the possibility
of such damages or claims. Regardless of the form of the damage or claim, the only liability Starfish or its suppliers will have to you
or any other person will be limited to the amount actually paid for your product of which the software is a part. Because some states
and jurisdictions do not allow the exclusion or limitation of liability, the above limitation may not apply to you.
Miscellaneous
This license, disclaimer of warranties, and limitation of liability can only be modified in writing signed by you and an authorized
officer of Starfish. If any part or provision is found to be unenforceable or void, the remainder shall be valid and enforceable. If a ny
remedy provided is determined to have failed of its essential purpos e, all limitations of liability and exclusions of damages shall
remain in effect. Use, duplication, or disclosure of the software and documentation by the U.S. Government is subject to the
restricted rights applicable to commercial computer software (under FAR 52.227-19 and DFARS 252.227-7013). Sale of the
software is subject to the U.S. Commerce Department export restrictions. The software is intended for use in the country in which it
is first sold (or the EEC if first sold in the EEC). This license, disclaimer of warranties, and limitation of liability shall be construed
under the laws of California, U.S.A. You have specific legal rights under this document, and may have other rights that vary from
state to state and country to country. Copyright (c) Starfish Software, Inc. All rights reserved. Starfish, TrueSync, Sidekick,
EarthTime, and the Starfish logo are trademarks of Starfish Software, Inc. U.S. Patent Nos. 5,519,606 and D388,776. Other
patents pending. The furnishing of the software, the accompanying product, or any related documentation or materials does not
give you any license to these patents. REX is a trademark of Franklin Electronic Publishers. Other trademarks are the property of
their respective owners.
FCC Notice
Complies with the limits for a Class B digital device pursuant to Subpart B of part 15 of FCC Rules. Operation is subject to the
following two conditions: (1) This device may not cause harmful interference; and (2) This device must accept any interference
received, including interference that may cause undesired operation. These limits are designed to provide reasonable protection
against harmful interference. This equipment generates, uses, and can radiate radio frequency energy and, if not installed and
used in accordance with the instructions, may cause harmful interference to radio communications.
However, there is no guarantee that interference will not occur in a particular installation. If this equipment does cause harmful
interference to radio or television reception, which can be determined by turning th e equipme nt off and on, the user is encouraged
to try to correct the interference by one or more of the following measures:
- Increase the separation between the equipment and receiver.
- Connect the equipment into an outlet on a circuit different from that to which the receiver is connected.
- Consult the dealer or an experienced radio/TV technician for help.
NOTE: This unit was tested with shielded cables on the peripheral devices. Shielded cables must be used with the unit to insure
compliance.
NOTE: The manufacturer is not responsible for any radio or TV interference caused by unauthorized modifications to this
equipment. Such modifications could void the user's authority to operate the equipment.
Printed in the U.S.A.
REP-28051-00 Rev A
P/N 7201875
Page 3

Contents
Introduction 5
REX PRO: the intellig ent device . . . . . . . . 5
REX PRO on the go. . . . . . . . . . . . . 5
REX PRO accessories. . . . . . . . . . . . 6
For more information . . . . . . . . . . . . 6
Getting Started 7
Using the REX PRO card . . . . . . . . . . . . 7
Using the keys. . . . . . . . . . . . . . . . 7
Understanding the status bar . . . . . . . . 9
Take a walk with the Setup Wizard. . . . . 9
Home. . . . . . . . . . . . . . . . . . . . .13
Overview of the REX PRO modules . . . . . 13
Calendar . . . . . . . . . . . . . . . . . . .14
Contacts . . . . . . . . . . . . . . . . . . .14
Memos. . . . . . . . . . . . . . . . . . . .14
To Do . . . . . . . . . . . . . . . . . . . .15
Time Zones . . . . . . . . . . . . . . . . .15
Preferences. . . . . . . . . . . . . . . . . .15
Getting in Sync 17
The first steps. . . . . . . . . . . . . . . . . . 17
Selecting what to synchronize. . . . . . . . . 17
Getting connected . . . . . . . . . . . . . . . 18
Synchronizing . . . . . . . . . . . . . . . . . 20
Using the modules . . . . . . . . . . . . . . . 21
Key to the keys. . . . . . . . . . . . . 21
Home. . . . . . . . . . . . . . . . . . . . .21
Editing with REX PRO . . . . . . . . . . .22
Using the Cal endar. . . . . . . . . . . . . . . 23
Changing views (Daily, Weekly, Monthly).23
Using reminder alarms . . . . . . . . . . .23
Vie wing events . . . . . . . . . . . . . 24
Editing your Calendar. . . . . . . . . . . .26
Using Contacts . . . . . . . . . . . . . . . . . 30
Changing views . . . . . . . . . . . . . . .30
Sorting cards. . . . . . . . . . . . . . . . .31
Changing the telephone number display . .31
Editing your Contacts . . . . . . . . . . . .32
Using To Do Lists . . . . . . . . . . . . . . . 34
3
Page 4

Checking off comple ted items . . . . . . .35
Creating To Do items . . . . . . . . . . . .36
Using Memos. . . . . . . . . . . . . . . . . . 38
Creating QuickNotes . . . . . . . . . . . .38
Using Tim e Zones . . . . . . . . . . . . . . . 40
Changing cities and time zones. . . . . . .40
Setting the clock. . . . . . . . . . . . . . .40
Using alarms. . . . . . . . . . . . . . . . .41
Understanding time zones and travel. . . .41
Using Preferences . . . . . . . . . . . . . . . 41
Caring for your REX PRO 45
Installing ne w batte rie s. . . . . . . . . . . . . 45
Tips for removing the batteries . . . . . . .46
Resetting your REX PRO card . . . . . . .46
Product care . . . . . . . . . . . . . . . . . . 47
Tips and Tricks 49
Getting the most from your REX PRO card . 49
Choosing a Contact ’s main phone number . . 49
One-click access to information . . . . . . . . 49
Memorable memos. . . . . . . . . . . . . . . 50
Speeding up your REX PRO card. . . . . . . 50
Using the REX PRO featur es . . . . . . . . . 51
Using the Docking Station 53
Installing the batte rie s . . . . . . . . . . . . . 53
Connecting the Doc king Sta tion. . . . . . . . 54
Setting up your REX PRO card . . . . . . . . 54
Removing your REX PRO card. . . . . . . . 55
Index 61
4
Page 5

Chapter 0
Introduction
REX PRO: the
intelligen t de vice
REX PRO on the
go
Congratulations on your purcha se of REX PRO! The REX PRO card
represents the next-gene ration in ultra-portable technology. REX
PRO stores thousands of names, numbers, appointments, notes and
to-do items in a credit card-size device. You can synchronize this
information wit h your personal organizer software by using eithe r the
PC Card slot on your computer or the optional Docking Station. For
details on synchronizing, see “Getting connected” on page 18.
Your purchase of REX PRO includes Tr ueSync Desktop for REX
PRO, which is personal organizer software that allows you to create,
modify , synchronize, and view Calendar, Contacts, To Do, and
Memos files. To learn more about TrueSyn c De sktop, see the
True Sync Desktop for REX PRO User’s Guide.
REX PRO includes the revolutionary SuperKey® data entry system
so you can instantly enter or update information when you're away
from your PC. The SuperKey system is intelligent: it learns from you
and anticipates y our a ctions. The m ore you use it, the f aste r and e asie r
it becomes to enter and update information.
Combining the SuperKey system with ultra-portable technology
creates a dev ic e that tr av els in your pocket or purse, contains your
entire address book and schedule, and can be updated in seconds.
Your REX PRO card can even alert you with an alarm when a
meeting or conference call is imminent. Concerned about security?
REX PRO’s passwor d lock feature is designed to protect your data.
In addition, REX PRO includes state-of-the-art, power management
technology. Just two lithium watch batteries (included) provide
months of operation.
Reminder: REX PRO is designed to be light and compact to make it
easy to carry with you. However , REX PRO is an electronic
instrument and must be treated carefully, as you would treat any
electronic instrume nt or pers onal item such as eyeglasses. Bending
the case or striking the device agains t other objects can cause damage
to REX PRO.
In order to avoid damage to your REX PRO, please:
Introduction 5
Page 6

Do not carry REX PRO in your pocket: the device will break if you
sit on it, bend it, or crush it.
Do not place REX PRO in your briefcase or handbag if the device
can slide around and strike other objects.
Do not bend, flex, or drop the REX PRO case or allow other
objects to press on the display scree n.
Keep the device away from water or harsh chemicals (see the care
instructions).
Please note that Franklin’ s limit ed warranty expressly excludes
damage to REX PRO caused by accident or misuse.
REX PRO
accessories
For more
information
If your computer does not have a PC card slot, or if you are running
Windows NT 4.0, you will need to use a Docking Station for
synchronization. F or mo re inf ormation about t he Doc king Station a nd
related products , visit the Franklin Web site at www.franklin.com/rex.
This User’s Guide explains everything you need to know about using
the REX PRO card and the Docking Station. The TrueSync Desktop
for REX PRO User’s Guide and online help system explain how to
use the desktop software that accompanies your REX PRO card.
In addition to the printed and online documentation, you can use the
following resources for additional help.
Online Technical Support
For free, 24-hour technical support, visit the REX Web site at
www .f ranklin.com/CustomerSupport.html.
Starfish Web Site
Vi sit the Starfish Web site at www.starfish.com for information about
the latest Starfish products.
T elephone Technical Support
If you need additional technical support, call 609-386-8997 between
8 a.m. and 8 p.m. Eastern time, Monday through Friday.
6 Introduction
Page 7
Chapter 1
Getting Started
1
Using the REX
PRO card
Using the keys
This chapter guides you through a tour of your REX PRO card’s
special features. You will also want to read these chapters: “Caring
for your REX PRO Card,” to learn how to make sure that your REX
PRO stays in good condition, and “Tips and Tricks,” which suggests
ways for getting the most from your REX PRO.
For details on using your Docking Station, se e Chapter 5.
T urn on the REX PRO card
T o turn on the REX PRO card, press any of the six control keys.
T o turn off the REX PRO card, hold down the Home key (see below)
for a few seconds at the Home screen.
Hold down the
Home key to
turn off the REX
PRO ca rd.
Your REX PRO card has six keys that let you select and view
information. The basic uses for each key are described in the table
Getting Started 7
Page 8
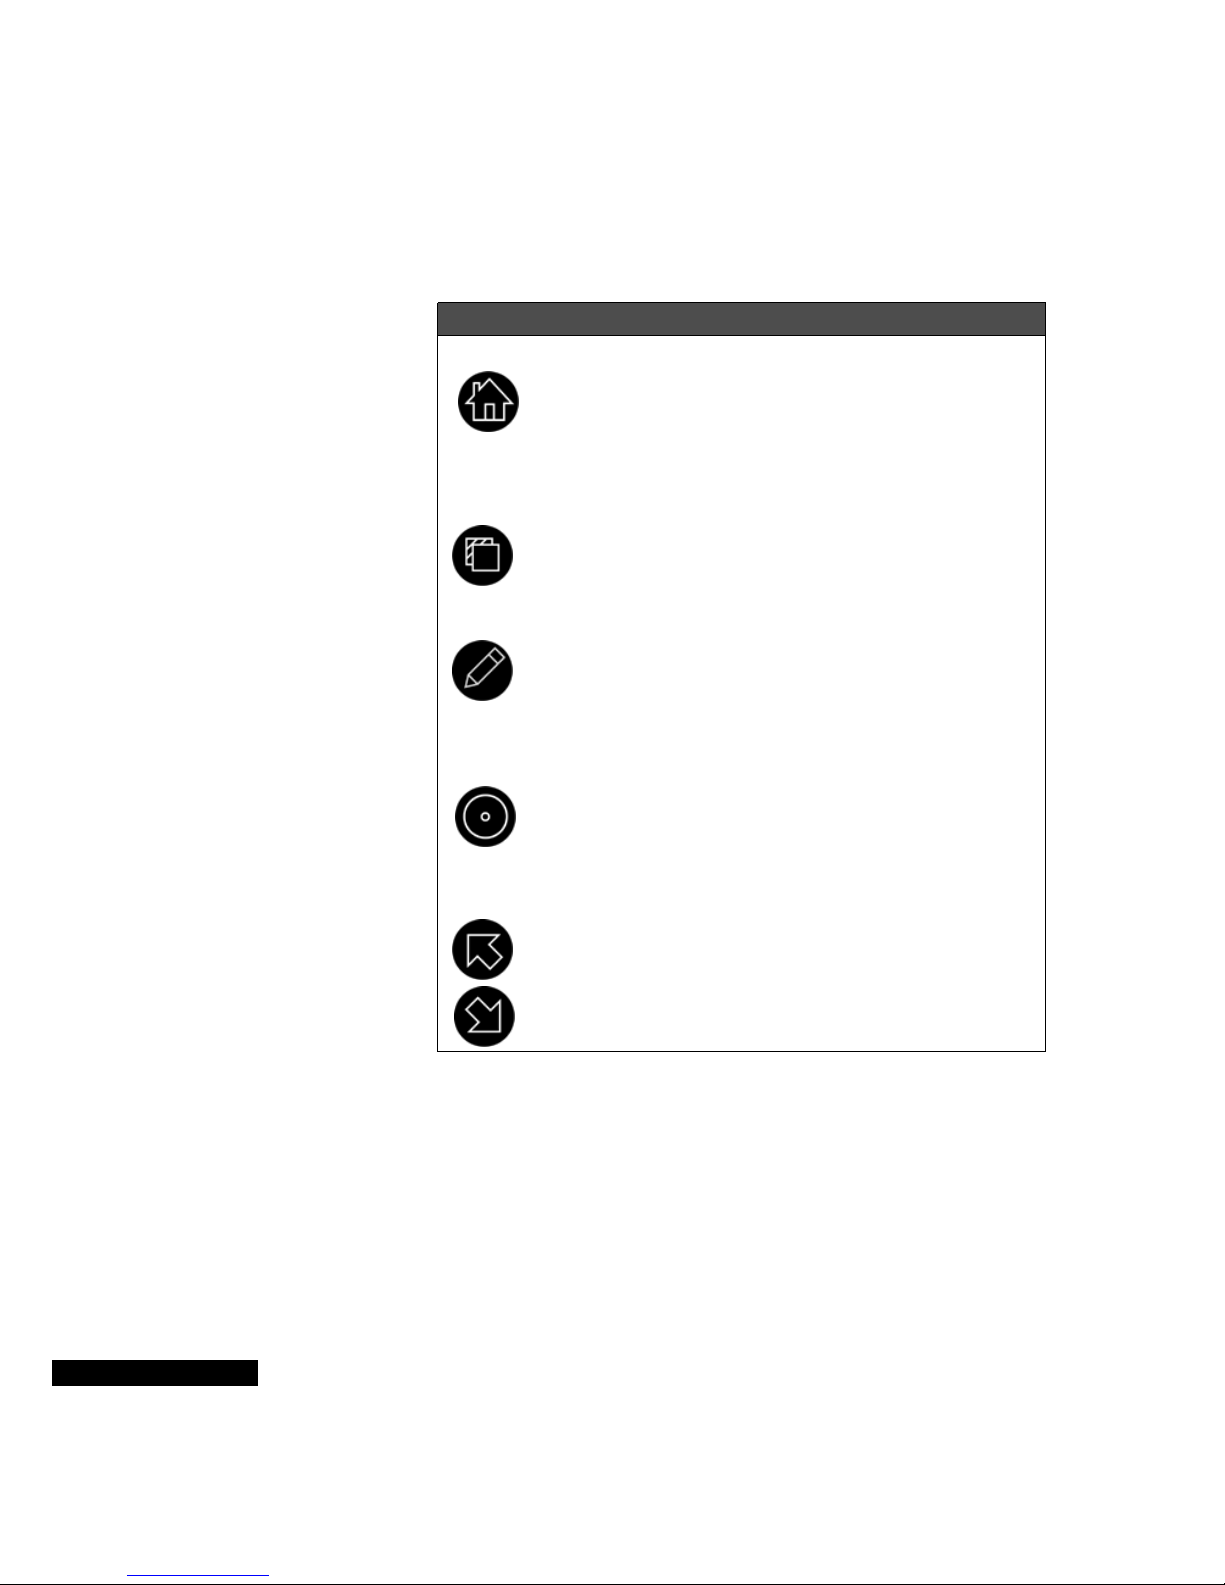
below. In addition, when you are entering data, each key may have
additional functions.
Icon Name Description
Press the Home key to return to the Home
Home
View
screen from any other screen. When you are in
Edit mode, use t he Home k ey to undo y our last
action. Press the Home key for a few seconds
at the Home screen to turn off the REX PRO
card.
Press the View key to see a menu of cu rrent
options. In the Calendar, for example, you can
choose from Daily, Weekly, and Monthly
views.
Edit
Select
Up/Left
Down/Right
Press the Edit key to move into and out of Edit
mode.
Press the Select ke y to choose an option, just
like the Enter key on your computer. For
example, in the Mont hly Calendar view, it
selects a date.
Press the Up and Down keys to scroll or move
the highlight through a list or screen. On the
Home screen, they move through the m odules
to highlight a selection. In Edit mode, you can
use these keys to move from one letter or
number to another.
8 Chapter 1
Page 9
Understanding the
status bar
The status bar at the bottom of your REX PRO card displays labeled
icons that tell you which functions you can perform from that view.
Here, the Status bar
icons tell you to use the
Up or Down key on the
REX PRO card to return
to the previous screen,
or to move forward; use
the Edit key i f you w ant to
change your profile.
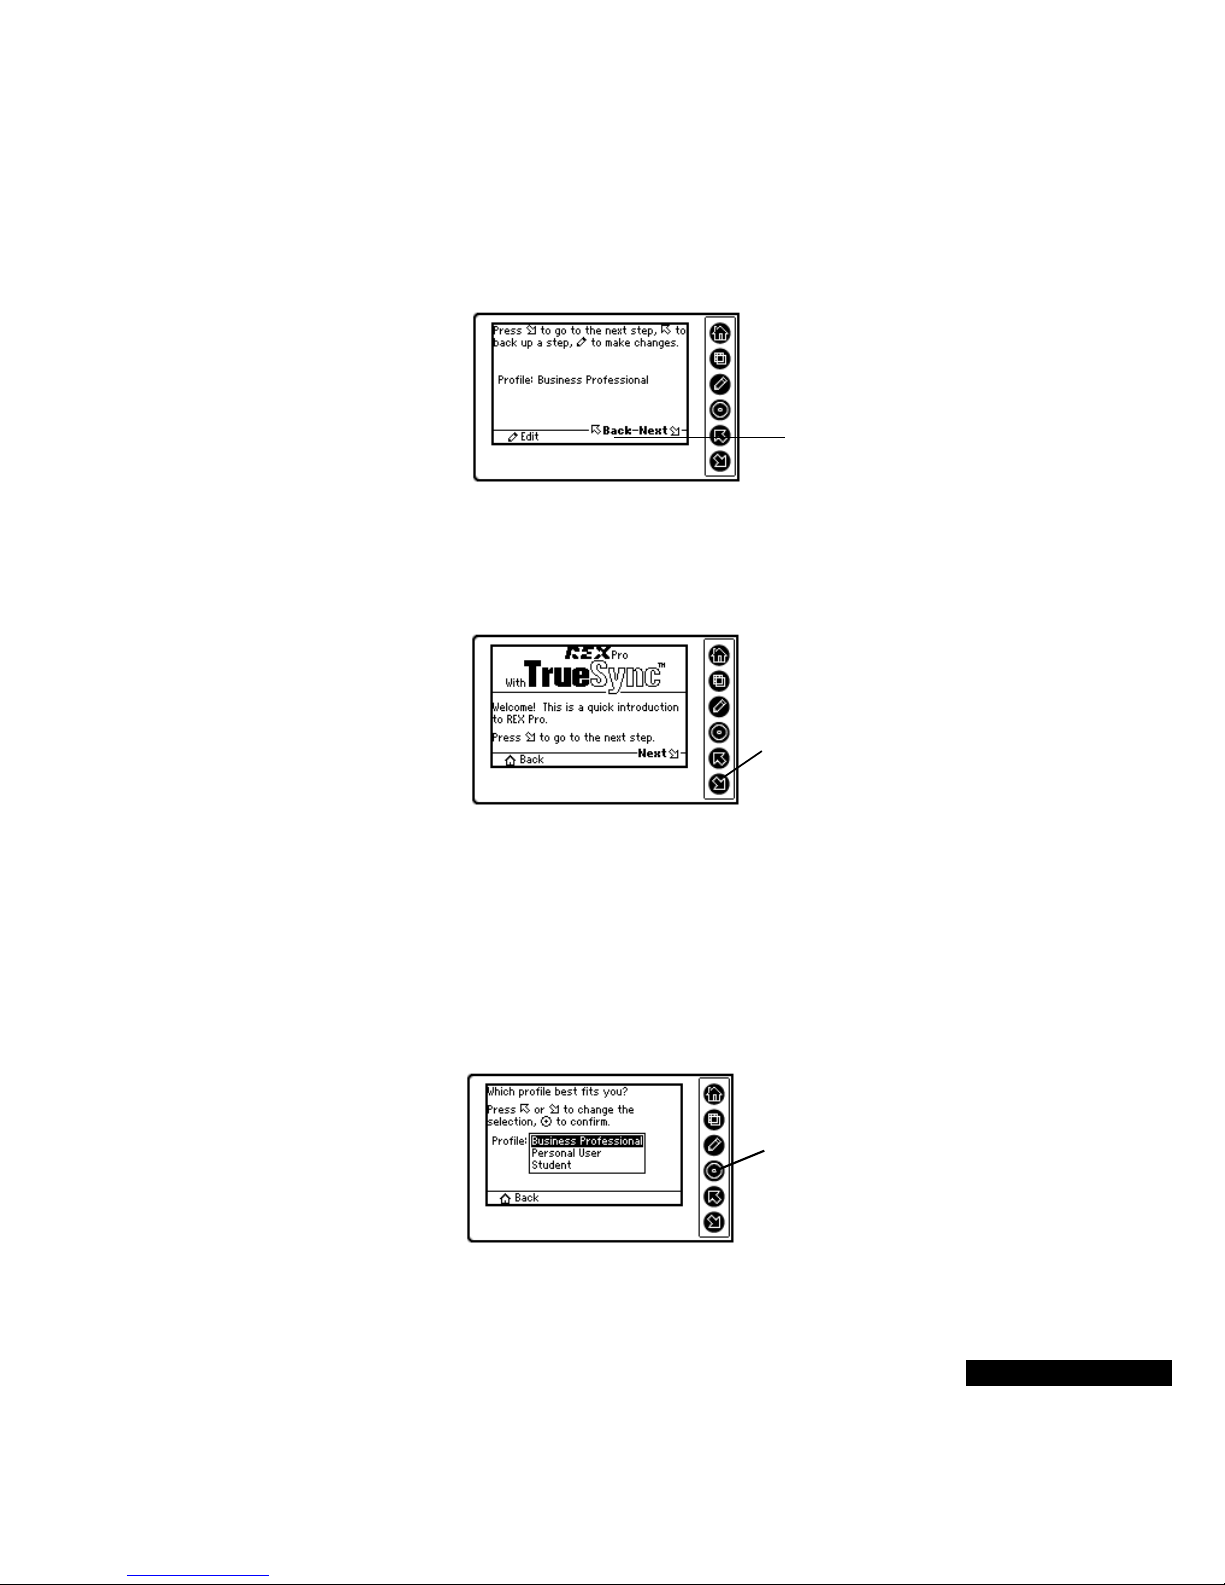
Take a walk with
the Setup Wizard
When you first turn on your REX PRO card, the RE X PRO Setup
Wizard will help you get up and running.
Press the Down key
on the REX PRO
card to continue.
The second Wiz ard screen lets you select your profile. Your selection
determines your options when creating Calendar events and T o Do
items. For example, if you select the Business Professional profile,
your Calendar list will include an Off-Site option.
You can change your profile later in the TrueSync Desktop software,
and you can also customize these lists. For details, refer to the
True Sync Desktop for REX PRO’s User Guide.
Press the Select key to
enter your choice. If y ou
want to return to the
previous screen, press
the Home key.
Getting Started 9
Page 10
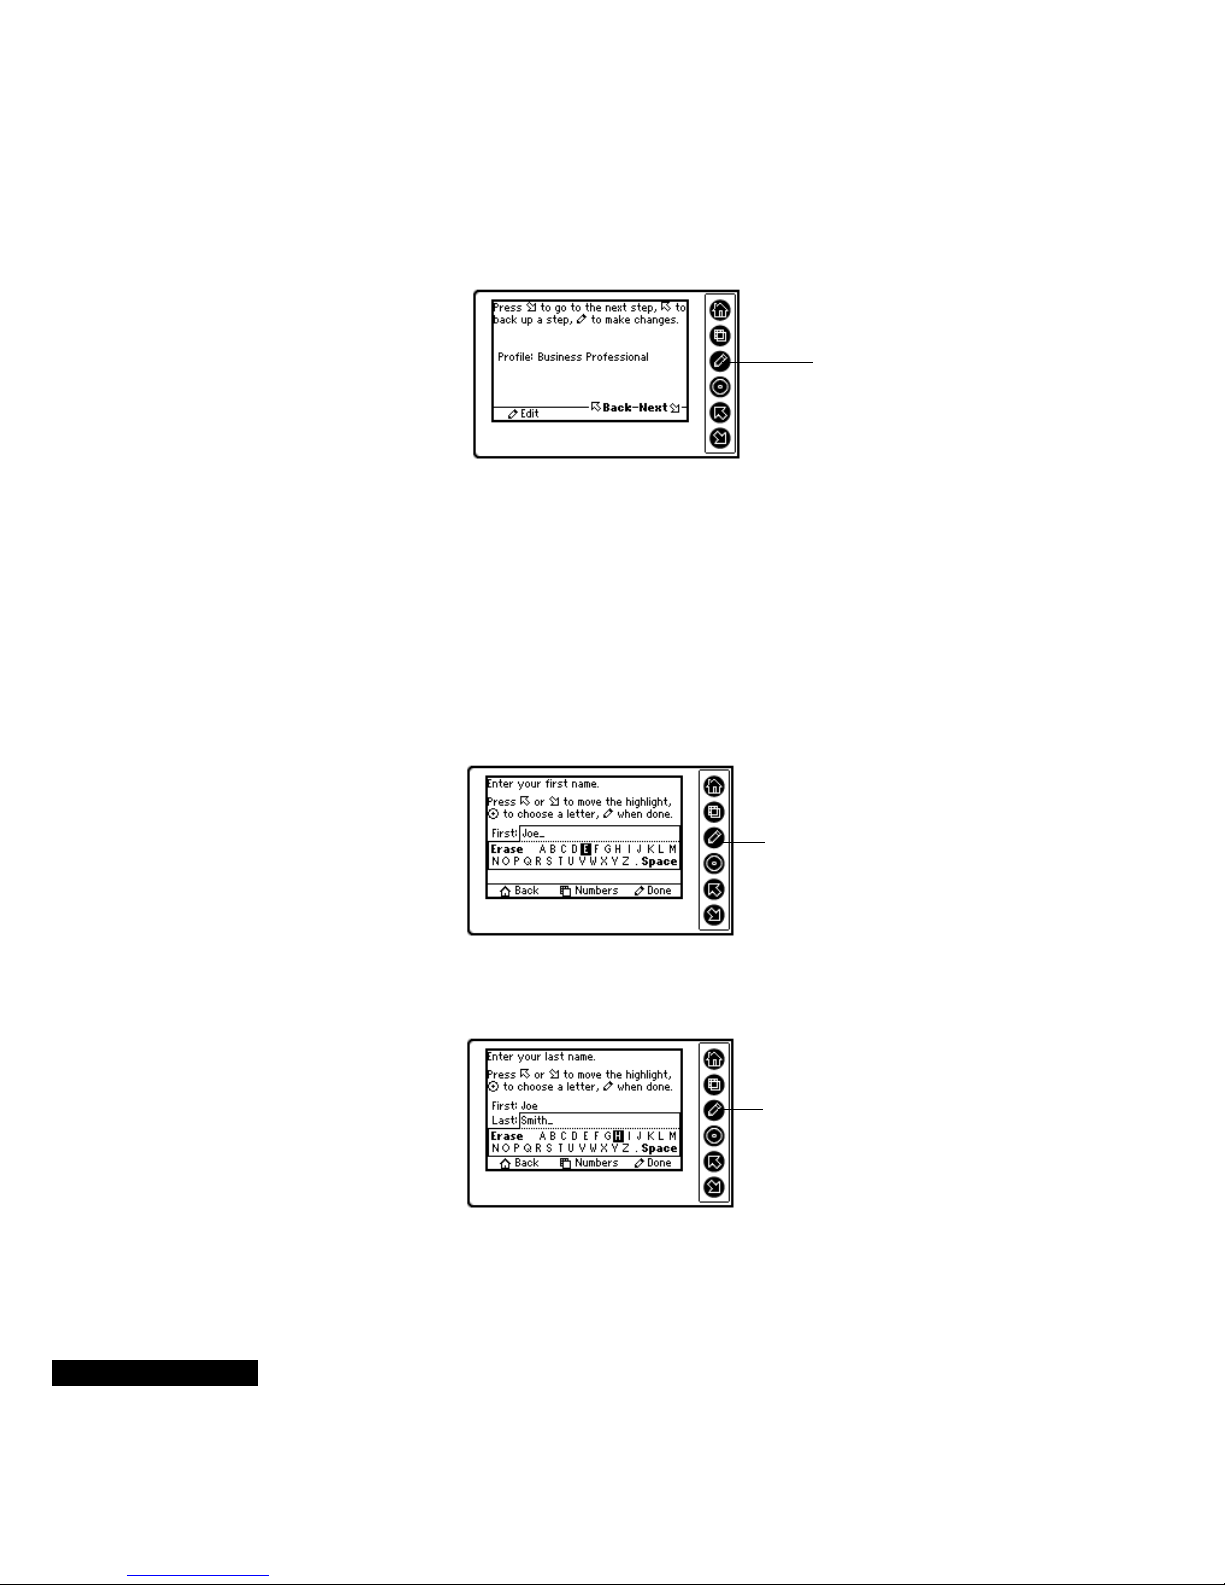
The third Wizard screen shows your profile selection.
Use the Edit key if
you want to
change your
profile.
Now you need to enter your first name. Use the Up or Down key on
the REX PRO card to select the letters of your name. To scroll
quickly, hold down the Up or Down key.
After you have highlighted a choice, pr ess the Select key. If you want
to enter any numbers, press the View key. To return to letters, press
the Vie w key agai n. I f you make an error, move the highlight to the
Erase section. Press the Home key if you want to return to the
previous screen.
10 Chapter 1
When your first
name is spelled
correctly, press the
Edit key.
Next, enter your last name. Use the same keys as described above.
When your last
name is spelled
correctly, press the
Edit key.
Page 11
Now you can view the results of your entries. If everything appears
correct, press the Down key. To change something, press the Up key
to move back to the previous screen, or press the Edit key.
When everything’ s just the
way you want it, press the
Down key.
The next task is to customize the time zone setting. Use the Up or
Down key to select a city in your time zone. You can return to the
previous screen by pressing the Home key. Press the Select key to
enter your choice.
Press the Select key
to continue with the
Wizard.
REX PRO also needs to know the date. Use the Up or Down key to
select the month, and then press the Select key. The highlight will
then move to the date. Use the Up or Down key to select the date, and
then press the Select key. Follow this same process to enter the year.
Press the Select key
after you have
completed the date
entry.
Getting Started 11
Page 12
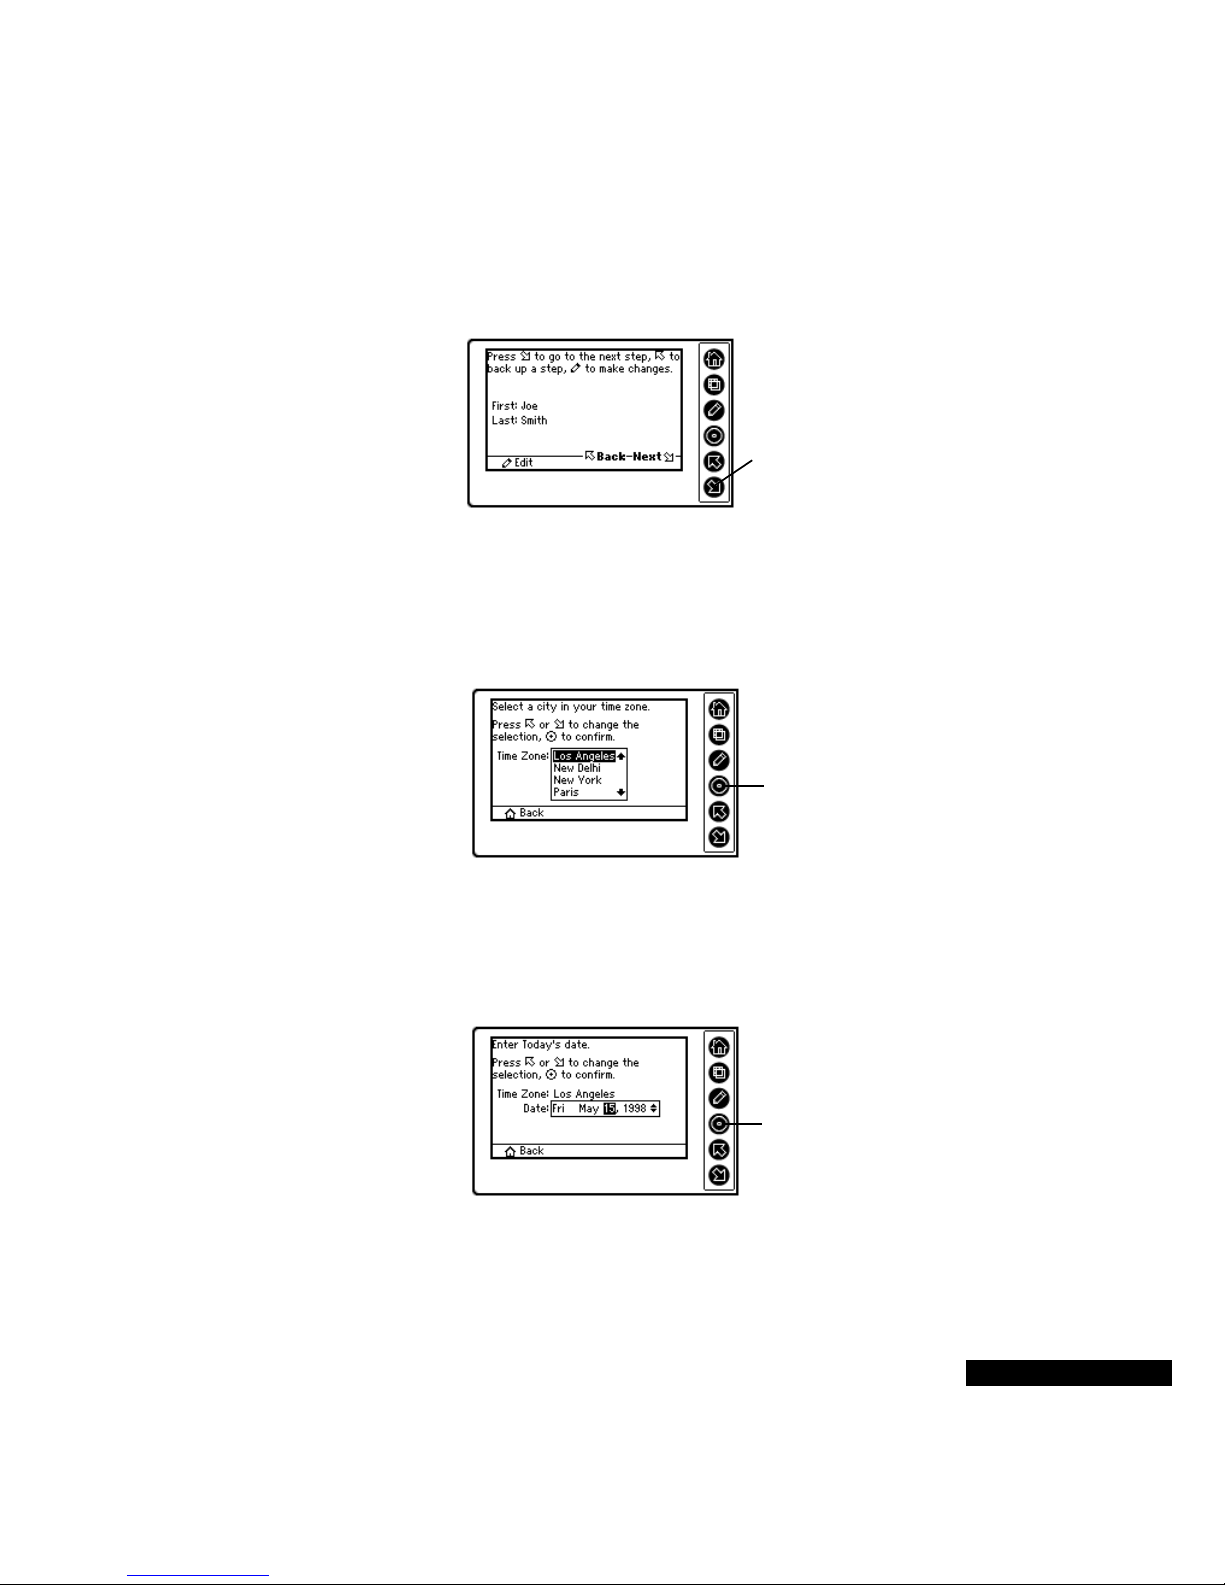
After you have entered the year, select the time.
After you have
entered the time,
press the Select key.
The next screen shows your settings. To accept them and continue,
press the Down key. To make changes, press the Edit or Up key.
If you need to make
changes, press the Edit or
Up key.
Congratulations! You have given your REX PRO card all the
information that it needs to be in sync with you. Press the Select key,
and you can start using your REX PRO.
12 Chapter 1
When you have
finished, press the
Select key. If you want
to make changes,
press the Up key.
Page 13
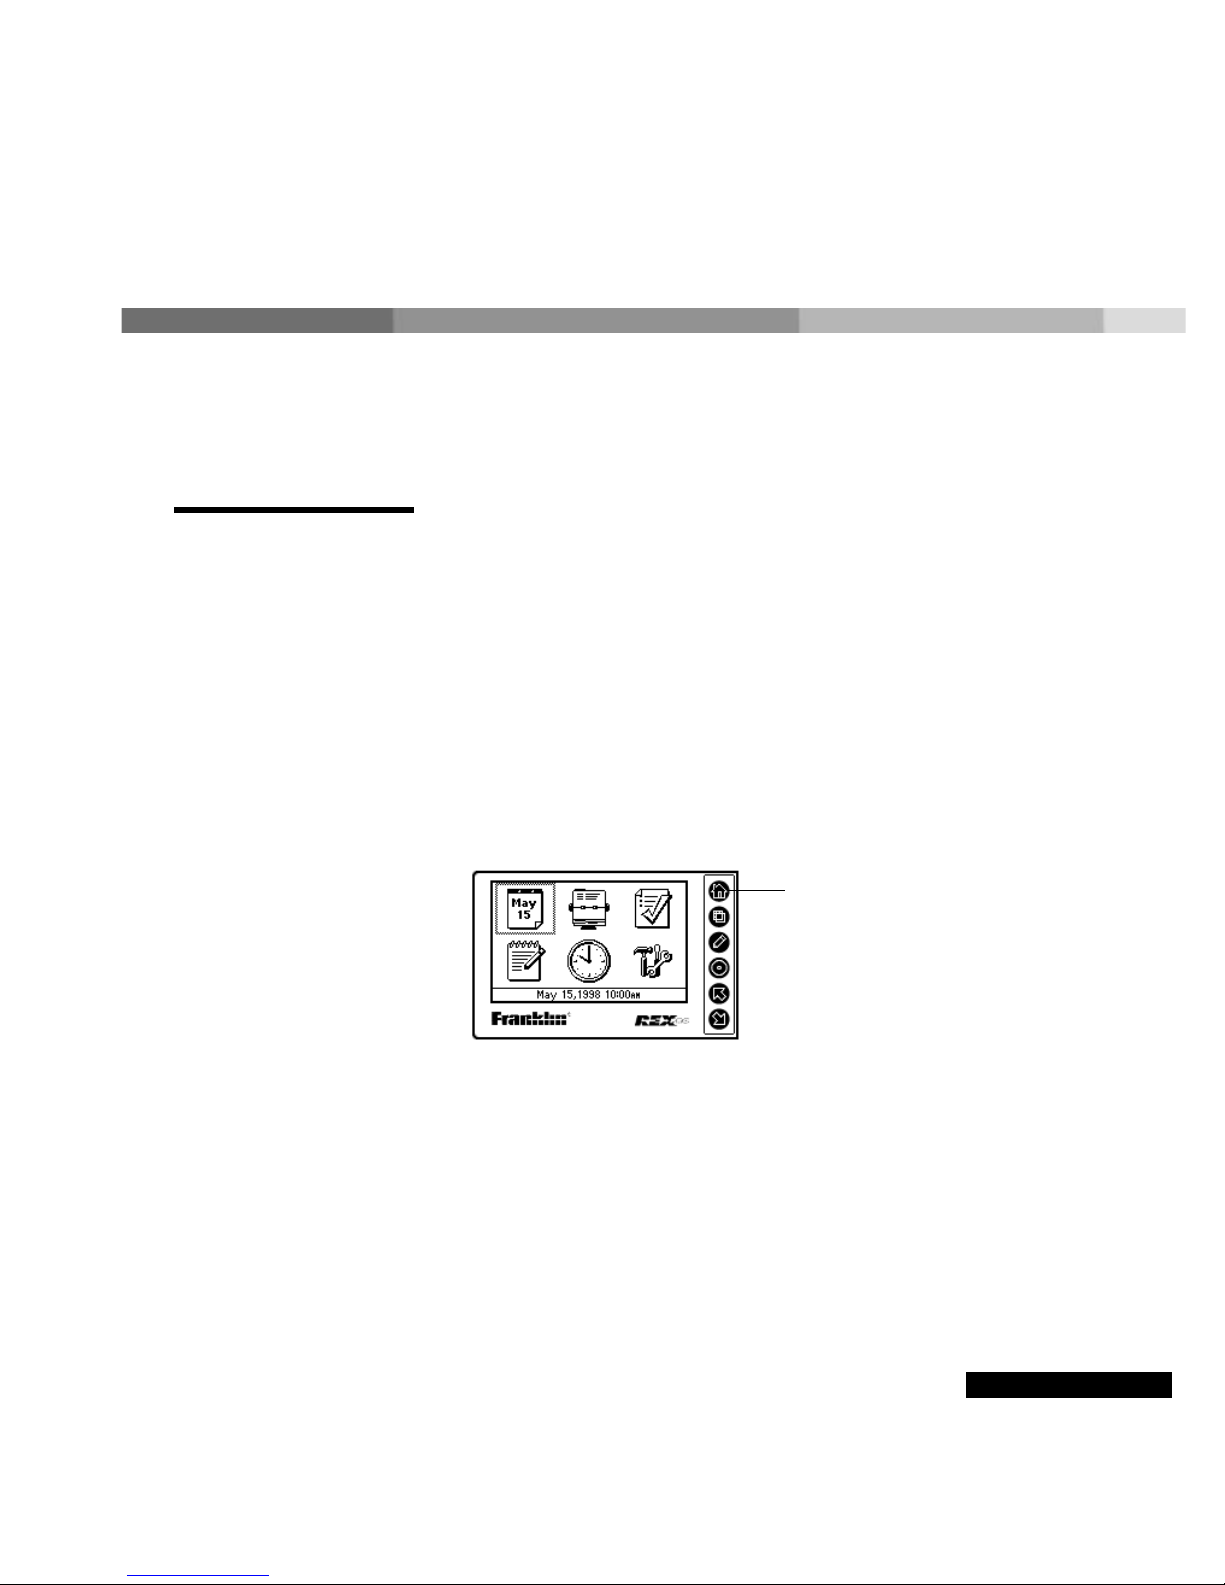
Home
The Home screen shows the different modules in your REX PRO:
Calendar, Contacts, To Do List, Memos, Time Zones, and
Preferences. The time in the Status Bar reflects the active t im e. See
the Time Zones section below for details.
Use the Home screen
to select the different
modules, or to change
or view your
preferences or time.
Use the Up and Down keys to highlight the module that you want,
and then press the Select key.
Press the V iew key at the Home screen to check the Owner
Information. The Owner Informati on will reflect the choices you
made in the Setup Wizard. You can change your identification
information in TrueSync Desktop for REX PRO. For details, see the
True Sync Desktop for REX PRO User’s Guide. Press Home to return
to the Home screen.
Overview of the
REX PRO
modules
You can add your
address and phone
number in your REX
PRO card by entering
it in TrueSync
Desktop for REX
PRO, and then
synchronizing.
The REX PRO modules include Calendar, Contacts, To Do List,
Memos, Time Zones, and Preferences. These modules are described
below. For more details on each module, and information on how to
synchronize your REX PRO card with your desktop application, see
“Getting in Sync.”
Getting Started 13
Page 14
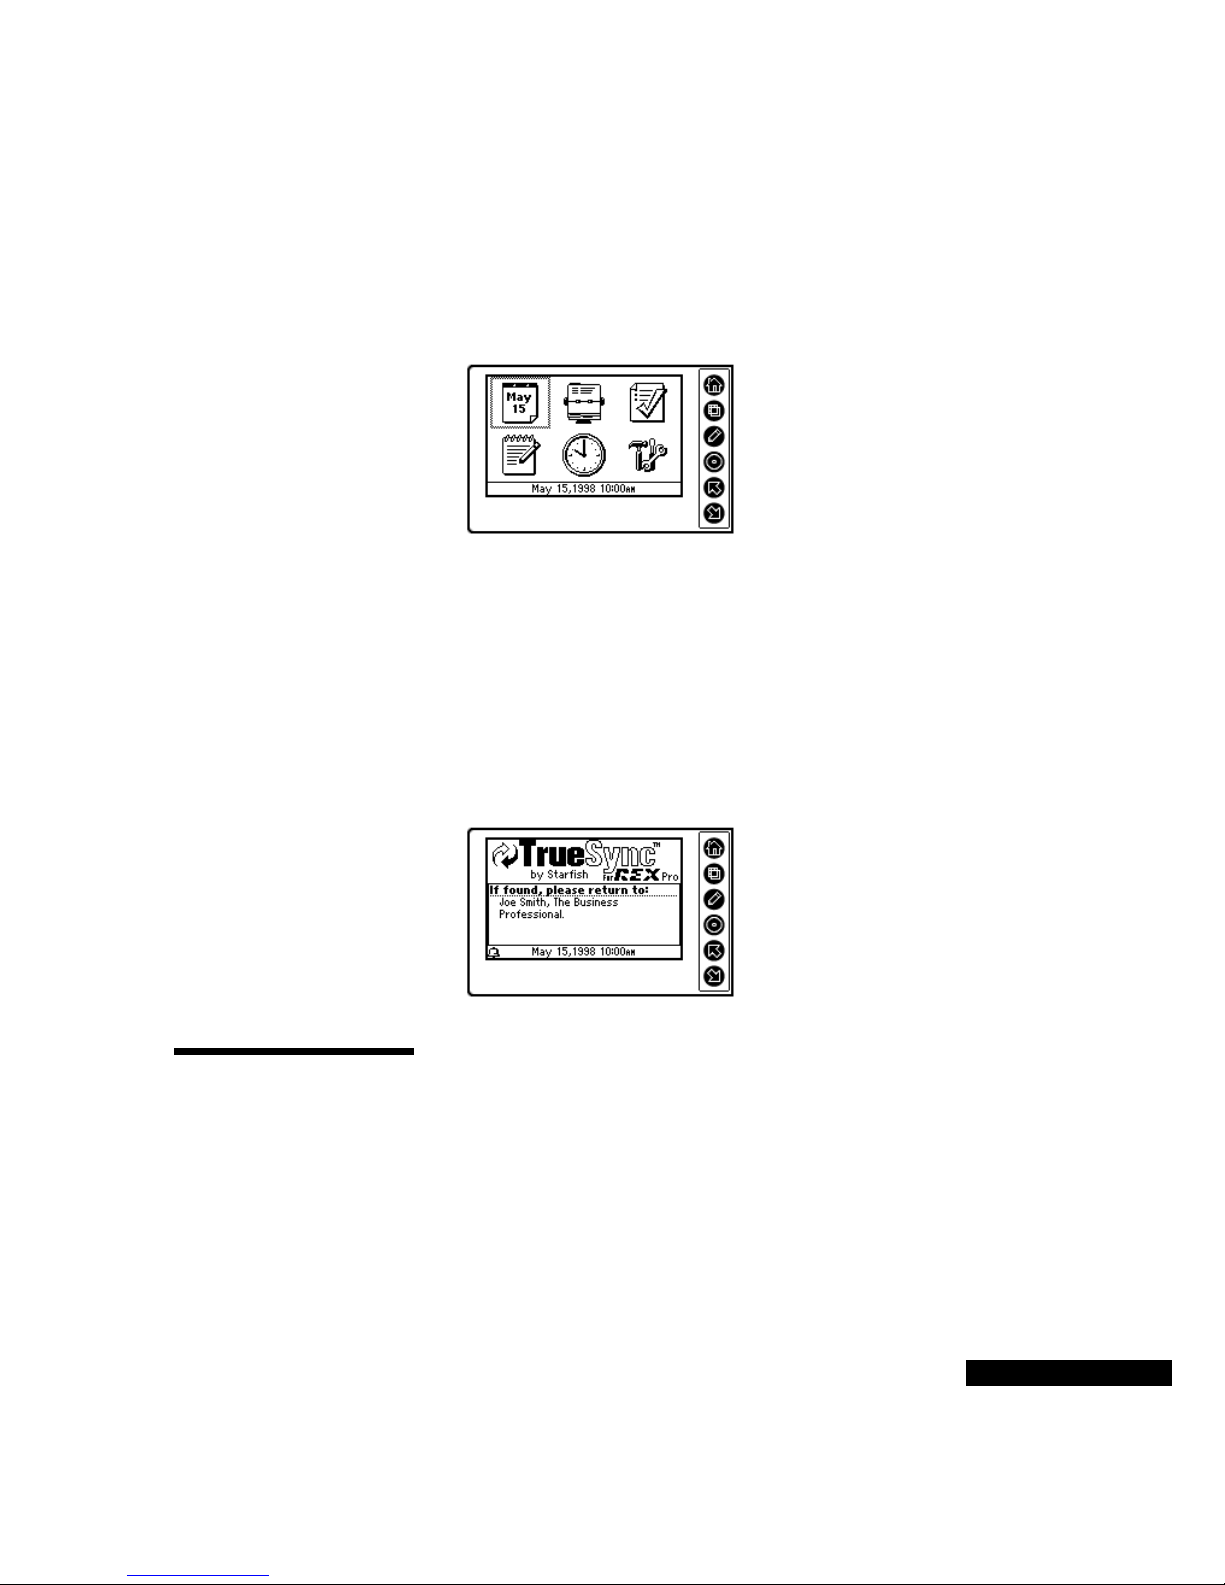
Calendar
Use the Calendar to view, modify, or add to your schedule.
The Daily View lists all
of that day’ s scheduled
events.
Contacts
Memos
Use the Contacts module to check, modify, or add to your Contacts.
The Contact Index View
shows the first line of data
for multiple contact
entries.
Use the Memos module to read your notes. You can also create
QuickNotes, and even append to them.
The Memo Index View
shows the title of multiple
memos.
14 Chapter 1
Page 15
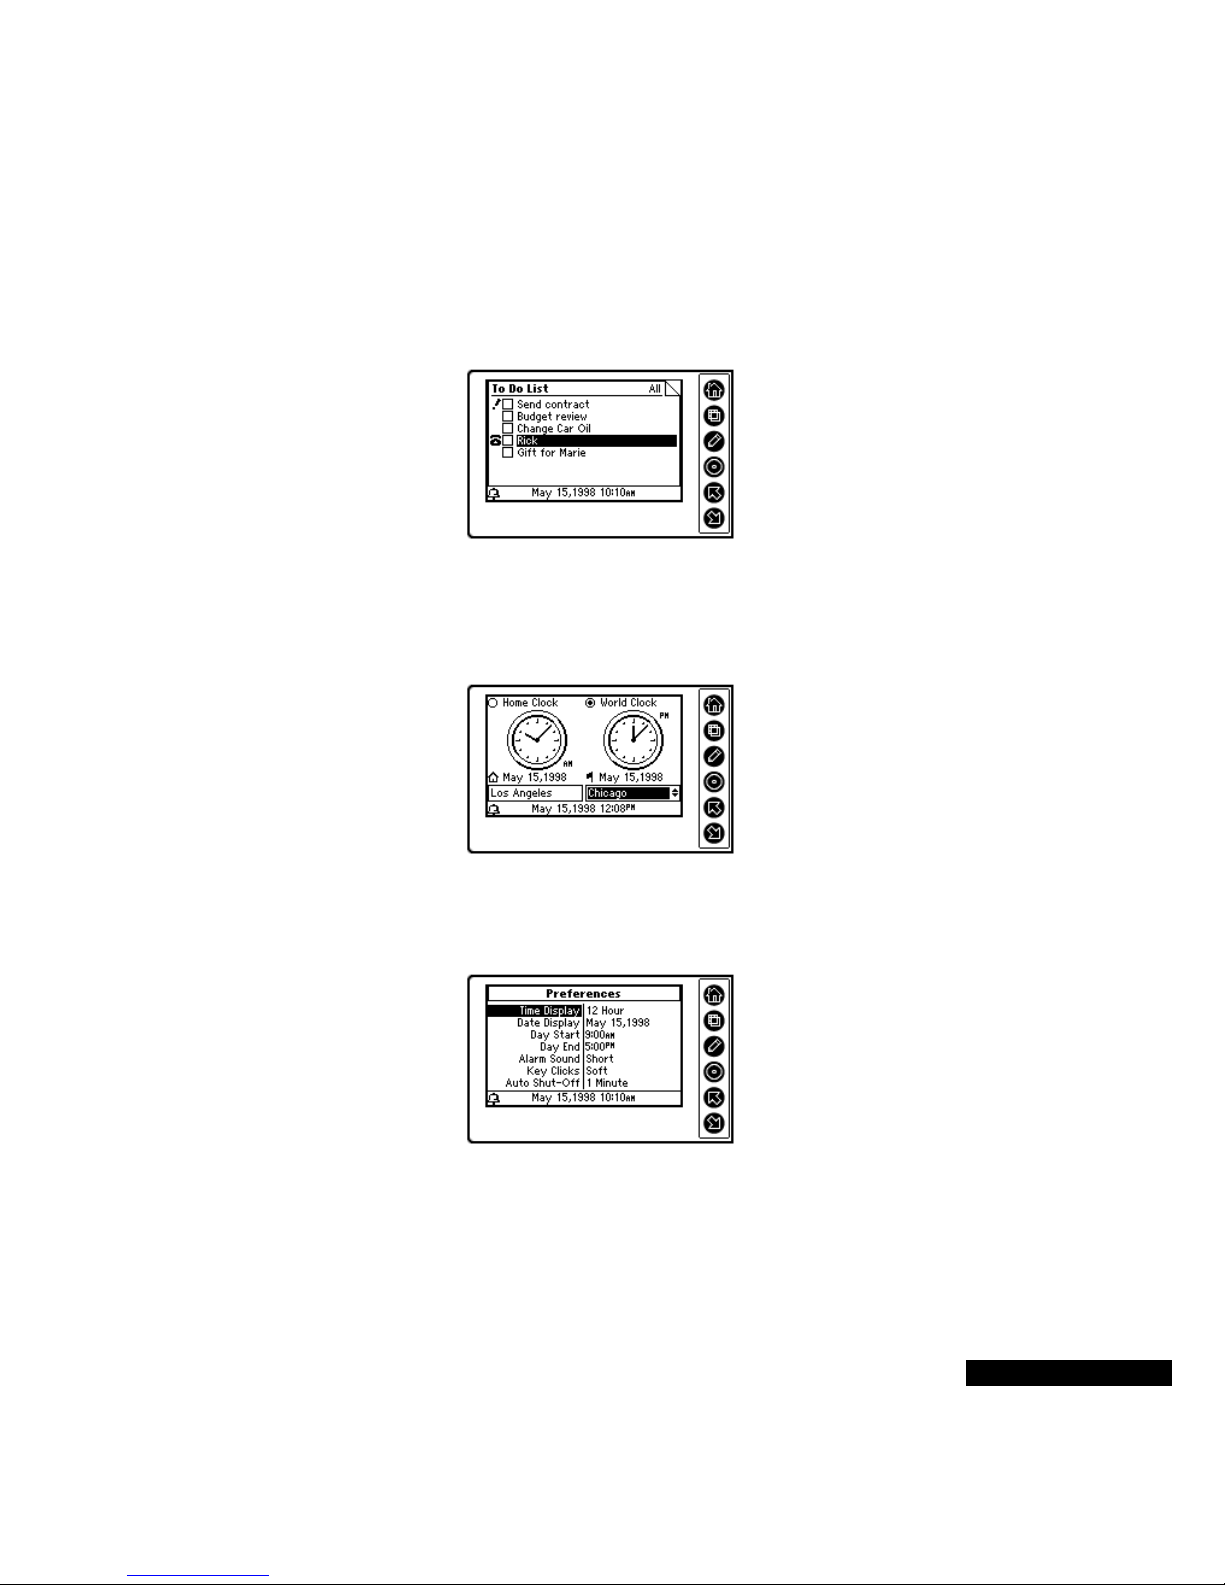
To Do
Use the T o Do module to recall, modify, add to, or check off your To
Do List items. The two-way synchronizati on feature in TrueSync
Desktop lets you synchronize fro m your REX PRO card to your
desktop application, automatically updating your To Do lists.
The To Do Index View
shows the status of
multiple To Do items.
Time Zones
Preferences
Use the Time Zones module for staying on time when you are
traveling, keepi ng t rack of e vents in ot her parts of the wo rld, and even
setting a daily alarm.
The Time Zones
Dual-Clock View
means you can stay
on schedule, whether
you’re traveling or at
home.
Use the Prefer en ce s module to change options such as the key clicks,
date display format, and alarm sounds.
The Preferences View
allows changes to the time
display format and other
customizable options.
Getting Started 15
Page 16

16 Chapter 1
Page 17

Chapter 2
Getting in Sy nc
2
The first st eps
Selecting what to
synchronize
The steps for “getting in sync” are simple: get set up, get connected,
and get synchronized!
In this chapte r, you will learn how to (1) use your desktop application
to set up the files that you wa nt to synch ronize, (2) connect your REX
PRO card with your computer, and (3) synchronize. You will also
discover more about the features in each module.
T o select the data that you want to synchronize, you will need to
install the TrueSync Desktop for REX PRO and complete the
TrueSync Insta ll and Setup Wizards.
If you already have Sidekick 98, T rueSync Information Manager,
and/or TrueSync Plus for REX on your system, please refer to the
separate procedure described in the section, “Using Sidekick 98,
TrueSync Inf ormation Manager, or TrueSync Plus for REX.”
For full details on install ati on, configuring, and synchronizing, r efe r
to the T rueSync Desktop for REX PRO User’s Guide. The steps below
will get you started:
1
Install the TrueSync Desktop.
2
Click Start | TrueSync Desktop. The Setup Wizard will guide you
through the steps ne eded for the init ial setup. Clic k the Help butto n
in any of the screens for which you need more details.
3
Now you need to specify which files you want to synchronize.
Click the TrueSync icon on the Deskpad, and follow the directions
on the TrueSync Setup Wizard screens to select the data to be
synchronized, and to choos e the file mappings. Refer to the chapter
on synchronization in the TrueSync Desktop for REX PRO User’s
Guide for details on this process.
Getting in Sync 17
Page 18

Using Sidekick 98, TrueSync Information Manager, or TrueSync
Plus for REX
If you are a Sidekick 98 or TrueSync Plus for REX user, TrueSync
Desktop for REX PRO automatically updates your synchronization
files. If you are a TrueSync Informat ion Manager user , the installation
process upgrades TrueSync Information Manager to TrueSync
Desktop for REX PRO.
Follow these steps to complete the insta llation and setup process:
1
Install the TrueSync Desktop.
2
Start Sidekick 98 or TrueSync Plus for REX. If you were using
TrueSync Information Manager, the install process upgraded
TrueSync Information Manager to True Sync Deskt op. Start
TrueSync Desktop, and configure it as described below.
3
Depending on your desktop application:
Sidekick 98 users: click Tools | Synchronize | TrueSync on the
Sidekick 98 menu. Click the REX PRO icon, and click
Configure. Follow the direct ions on the Tru eSync Setup Wizard
screens to select the data to be synchronized and choose the file
mappings. Click the Help button in any screen for which you
need more information.
18
Getting
connected
TrueSync Plus for REX users: after the installation process is
complete, click Client | Add Device on the TrueSync Plus for
REX menu bar to add the REX PRO device.
TrueSync Desktop (upgraded from TrueSync Information
Manager) users: Click the TrueSync icon on the Deskpad, and
follow the directions on the TrueSync Setup Wizard screens to
select the d ata to be synchronize d and choose the file mappings.
You can synchronize with eithe r a PC Card slot or the Docking
Station.
To connect using a PC Card slot:
1
Slide the REX PRO card into a PC Card slot on your computer.
Page 19

2
You should hear a connection tone, or see a PC Card icon on the
Windows taskbar.
Slide in the
card carefully.
NOTE
You can enable or disable the tone and icon using the
PC card icon in the Window s C ontrol Panel.
3
To remove the card, press the Eject button on the PC card slot.
Depending on your system, you may also be able to remove the
REX PRO card by right-clicking the PC card icon on the Taskbar,
choosing the REX PRO card from the list, and clicking Eject .
To connec t usin g the Do cki n g St ation:
If your computer does not have a Type II PC card slot , yo u will ne ed
to connect the Docking Station to a serial communications (COM)
port on your computer. The procedure is outlined below. For more
details, refer to Chapter 5.
1
Connect your Docking Station to a serial communications (COM)
port on your computer.
2
With its screen facing you, align the REX PRO card with the card
slot in the Docking Station and carefully slide the REX PRO card
into the slot until you hear the connection tone. Do not force the
19
Page 20

REX PRO card into the slot. When the REX PRO card is inserted
correctly, Ready will appear on the REX PRO screen.
Slide in the card,
and listen for the
connection tone.
To remove the card, press the Eject butt on beneath the card slot .
Synchron izing
Now that you have set up your files and connected your REX PRO
card, you are ready to synchronize. Make sure that your REX PRO
card is in your PC Card slot or Docking Station.
To synchronize without starting TrueSync Desktop:
Right-click the TrueSy nc icon in the Windows taskbar, and choose
Synchronize from the shortcut menu.
To synchron ize from the TrueSync Desk to p:
Click the TrueSync icon on the Deskpad.
If you have a password enabled on your REX PRO card, you will
need to click the five-key password combination, and click OK to
start the synchronization process. For details on setting your
password, see “Using Preferences” on page 41.
Do not remove your REX PRO card from your PC Card slot or
Docking Station until synchronization is complete.
Please note the following guidelines:
After you finish synchronizing, remove the REX PRO card from
the Docking Station. Leaving the REX PRO card in the Docking
Station decreases batte ry life.
20
If you have an alarm set to go off at a certain time, do not place the
REX PRO card in the Docking Station or PC card slot during that
Page 21

time period. Alarms do not sound when the REX PRO card is in
the Docking Station or PC card slot.
Using the
module s
Ready to start viewing and entering Calendar events? Anxious to
learn how to update your Contacts? Curious about how to create a
Memo? The next sections will answer those questions, and more.
Key to the keys
You will be using the keys that were described in the Getting Started
chapter. If you need a refresher as you read the sections below, use
this table.
Icon Name Description
Home
View
Edit
Press the Home key to return to the Home
screen from any other screen.
Press the View key to see a menu of cu rrent
options.
Press the Edit key to move into and out of Edit
mode.
Home
Select
Up/Left
Down/Right
Press the Select ke y to choose an option, just
like the Enter key on your computer.
Press the Up and Down keys to scroll or move
the highlight through a list or screen.
Select the module that you want (for exa mple, Contacts) in the Home
screen. You can also check the Local date a nd time and see the Owne r
Information in the Home screen.
21
Page 22

To use the Hom e screen:
Press or hold the Home key until the Home screen appears.
The Calendar icon shows the date for the Local Time Zone. The
Local Time Zone is the time that you have selected on your REX
PRO card. (For details, see the section below on World and Home
Clocks.) The Clock icon shows the Local Time.
You can use the Up or Down
key to highlight an icon.
From the Home screen, use the:
Up and Down keys to highlight the icons.
Select key to enter a module.
Home key to return to the Home screen.
Edit key to create an Event, a Contact, a To Do item, or a
QuickNote.
Editing wi th REX
PRO
22
View key to check the owner information for your REX PRO
card.
Keeping your
identification
information up-todate can save the
day if you lose
your REX PRO
card!
Pressing the Edit key ope ns the door to the REX PRO SuperKey data
entry system. When you are in Edit mode, you can create, delete, or
modify events, Contacts, To Do items, and QuickNotes.
The SuperKey system learns from and anticipates your actions. As
you use the REX PRO, SuperKey adapts to your personal styles and
needs with every session. The SuperKey system thus refines your
Page 23

choices, so that the process of entering and updating data becomes
increasingly faster and easi er.
You can select Edit mode in almost any module. Your list of options
is based on your entry point into the system. If you press the Edit key
when you are looking at the Calendar, for example, you will see the
list below.
You can create a new
event, or follow up,
reschedule or cancel
an event, when you
are in Edit mode in
the Calendar module.
Other in-context options are presente d in each module. These options
are discussed in the following sections.
Using the
Calendar
Changing views
(Daily, Weekly,
Monthly)
Using r e minder
alarms
Using the Calendar, you can view, modify, delete, and create
appointments, birthdays, holidays, and other events that were entered
in TrueSync Desktop f or REX PRO, and then synchronized to your
REX PRO card.
To select the C ale nda r :
From the Home screen, use the Up or Down key to highlight the
Calendar icon, and then press the Select key to go to the Calendar
Daily view.
T o move from the Daily to the Weekly to the Monthly areas of your
Calendar, press the View key. You will see a menu of your options .
Highlight the desired view, and press the Select key.
In Weekly or Monthly view, the current date of the selected REX
PRO clock is indicated with parenthese s ( ). In Daily view, the date
that displays is the date of the currently selected Local Time.
You can set an alarm for that important event in TrueSync Desktop
for REX PRO or Sidekick 98. Then synchronize your Calendar to
your REX PRO card — and, no matter where you are, the REX PRO
alarm will remind you of that event.
You can also set a reminder alarm when you create an event, or a
follow-up to an event, in your REX PRO card.
23
Page 24

When an alarm sounds, go to the Home screen to read the reminder
details. Press any key to turn off the alarm. Press the Home or Select
key to clear the reminder notice.
If you turn off alarm sounds in Preferences, only a reminder notice
appears. For details on Pre ferences, see “Settin g Your Preferences” in
this chapter.
V iewi ng events
In Daily view , us e the:
Up or Down key to move to the next or previous day.
Select key to highlight a Calen dar eve nt. Press the Selec t key agai n
to see the details of a highlighted event. Use the Up or Down key
to scroll through the detail s. The n press Home again to r eturn to
the Daily view.
Press the Home
key to return to
the Daily view.
24
Home key to deselect the highlight on an event.
Vi ew key to bring up your menu of options, and change to anothe r
view.
Icon
In Weekly view, use the:
Up or Down key to move to the next or previous week.
Select, and then the Up or Down key, to scroll to a time earlier or
later than the time range on the screen.
Home key to stop scrolling.
Page 25

Select key twice to view the daily Calendar for the first day of the
week.
Your events appear as
bars, with each bar
representing the time
span of an event.
In the W eekly view, your Calendar events appear as bars. Each bar
indicates the duration of the event that it represents.
Press the View key , and choose from the menu of options to go to the
Monthly view.
In Monthly view, use the:
Up or Down key to move to the next or previous month, and the
Select key to highlight a date with a Calendar event. Press the
Home key to remove the highlight.
Select key to highlight the firs t date in a month with Cale ndar
events. Press the Select key again to view the daily C alenda r for
that date.
Select key to highlight the firs t date with a n event, and the Up or
Down key to move to other dates with events. This feature lets you
move quickly and easily from one date with an event to another
date with an event.
The current date
appears in
parentheses.
The current date is indicated with parentheses; dates with events are
shown in bold. A dot indicates an all-day, multi-day, or annual event.
25
Page 26

Editing your
Calendar
You can create, modify, and delete Calendar events by changing to
Edit mode and using the REX PRO Wizards.
T o create a new event:
1
Press the Edit key in Calendar module, or in the Home screen.
2
If it is not already highli ghted, highl ight the New Eve nt option , and
press the Select key.
Highlight the New
Event option, and
press the Select key.
3
Choose the New Event type by highlighting it using the Up or
Down key, and then pressing the Select key.
Select the Event
Type from the list.
26
4
The next Wizard screen will vary, based on your user pr ofile. You
will see a pre-set QuickList of events.
QuickLists allow you to quickly enter events or tasks into your
REX PRO without typing. These “pick lists” are based on your
user profile. You can customize these pre-def ined lis ts in T r ueSync
Desktop for REX PRO, and then synchronize them to the REX
PRO. You can also change your profile at any time in TrueSync
Desktop for REX PRO. See the TrueSy nc Desktop for REX PRO
User’s Guide for details.
For example, if you have a Business profile, and you choose to
create an Event, your QuickList will include: Meeting,
Appointment, Presentation, Conference Call, Flight, Co nference,
Page 27

Seminar, Interview, or Other Event. If you choose Other Event,
you will need to enter the event subject manually.
As shown below, the Status Bar helps to guide you through this
process. Use the Up or Down key to choose a letter or number , and
then press the Select key to enter it. Use the View key to switch
between Numbers and Letters. Press the Edit key when you are
finished. After you have entered this subject manually, it will
automatically a ppear i n your list of s ubject options, so that you wi ll
not need to enter it manually again.
After this user adds a “t”
and presses the Edit
key, the event subject
Haircut will
automatically appear in
the list of options, and
will not need to be
manually entered.
5
The next Wizard screen will ask you to confirm the event’s type
and subject. If you want to change the subject or Event type , pr es s
the Edit key. To confirm the event, press the Down key.
6
Depending on your selections, you may now be asked to select a
participant from your cardf ile s.
7
To select a participant, use the Up or Down key to scroll through
the alphabetical tabs of a cardfile. You can use the Select key, and
then the Up or Down key, to go to a specific lettere d tab. Press the
Select key, and then use the Up or Down key, to go to the card for
the participant who you want to add. Press the Select key to enter
your choice. (For more details on viewing and selecting individual
Contacts, see “Changing views” on page 30.)
8
Next, select the event date with the Up or Down key. Use the
Select key to tab from the month to the day to the year. Press the
Home key to change one of your selections. Press the Select ke y
again when the date is correct.
9
If you are creating an event with a time, you will need to select the
start time and end time. Use the Up or Down key to change the
time as desired, and the Select key to enter the time.
10
To confirm the date, press the Down key. To change it, press the
Edit key. Then use the Up or Down key to move to the field that
27
Page 28

you want to change. Use the Select key to change the field as
desired. Press the Select key again when the date is cor rect.
Remember: the Down key always moves you to the next screen!
11
Depending on the event, you may have the opportun ity to set a
reminder alarm. (See the section above on Remind er Alarms.) Use
the Up or Down key to scroll through the list, and press the Select
key to make your choice.
Press the Up or Down
key to scroll through
the list, and then press
the Select key to enter
your choice.
12
If you are creating a recurr ing eve nt, like an Off-Site meeting, you
can choose the recurrence pattern, so that you only need to enter
the original occur rence of t he meet ing. The fol low-up mee tings are
automat ical l y entered, based on the select ed recurrence patter n.
28
Select a recurrence
pattern from the
list. (This screen
appears only if you
are creating a
recurring event.)
13
Use the Up or Down key to scroll through the list and highlight a
recurrence pattern. Press the Select key to enter your choice.
14
If you select a recurrence pattern, you will also need to select the
duration, such as “ Indefi nitely” o r “2 Weeks .” Use the Up or Down
key to highlight a duration. Press the Sele ct key to enter your
choice.
15
Now you are ready to confirm the recurrence pattern. Press the
Edit key to make a change, and the Down key to move to the next
screen.
Page 29

16
Congratulations ! You can view the summary of the Event tha t you
have created. Press the Select key to accept it, or the Home key if
you want to make a change.
17
You will now see the daily Calendar view for the event that you
created.
To follow up, reschedule, or cancel an event:
1
Go to the event in your Calendar, and highlight it by pressing the
Select key .
2
Press the Edit key, and then highlight the desired option. Note that
choosing “Follow up” creates a new meeting; “Reschedule” moves
the original meeting’s date. After you have highlighted an option,
press the Select key.
Highlight the desired
option, and then press
the Select key.
3
If you are:
following up or rescheduling an event, use the Up or Down key
to choose the new date and/or time, and the Select key to enter
your selection. Press the Select key again when you are done.
When you follow up an event, or reschedule an event, the
existing meeting’s char acte ristics are used, such as alarm
settings. This means that you can update an event ve ry quickly.
canceling an event, you will see a confirmation screen asking if
you are certain that you want to delete the event. Highlight Yes,
and press the Select key to remove the event from your REX
PRO card. Highlight No to keep the event.
To go to a linked Contact within in an event:
1
Go to the event in your Calendar, and highlight it by pressing the
Select key .
2
Press the Edit key.
29
Page 30

3
Select Find in Contacts.
4
The card for the Contact included in that event appears.
Using Contacts
Changing views
Using Contacts, you can view and create cardfiles containing
information such as names, phone numbers, street addresses, and email addresses.
You can also change how your Contacts are sorted on the REX PR O
card, and decide which telephone numbers to display.
To select the C onta ct s modu l e:
From the Home screen, use the Up or Down key to highlight the
Contacts icon, and then press the Select key.
You will see a cardfile name or “all” at the top right of the sc reen.
“All” means that you are viewing all the cardfiles that were
synchronized. (If you have only one cardfile cat egory or the Contacts
modules does not contain any cardfiles, “All” will not appear.)
“All” appears if you are
viewing all the
synchronized cardfiles.
30
Now you can:
Choose a cardfile by pressing the View key, and selecting the
desired cardfile from the menu.
Scroll through the alphabet ical tabs of a cardfile with the Up or
Down key.
Go to a specific lettered tab by pressing the Select key, and then
using the Up or Down key. If the ta b has too many cards to display
on a single screen, press the Select key again to se e the sub- tabs.
View a specific card by pressing the S elect key, and then using the
Up or Down key. Now a single card should be highlighted. Pre ss
the Select key aga in to vie w the de tails , and t he View key to swit ch
between the address, telephone number, and note views of the
Page 31

card. The views are indicated at the top right of the cards by
telephone, house, envelope , a nd notebook icons.
The telephone icon
indicates that you
are viewing
telephone
information.
If the conten ts of a card fi le fie ld are t oo long to d isplay on the REX
PRO card, ellipsis (...) will appea r at the end of the text. To view the
entire field if it is a number , highlight the number , and press the Select
key. If it is a text field, use the Up or Down key to scroll.
Sorting cards
Changing the
telephone number
display
Y ou can s ort c ards i n cardfil es al phabeticall y by l ast na me, fi rst name,
or company . When you syn chronize your REX PRO card, the order is
reset to the last name.
To sort card s:
1
In the Contacts module, press the View key. The menu appears.
Highlight Sort Order, and press the Selec t key.
Press the Select
key to choose the
order in which your
cards are sorted.
2
Use the Up or Down key to move the highlight to the field by
which you want to sort. Press the Select key to choose the Sort
order.
You can determine which telephon e numbers, e-mail addresses, and
W eb site addresses appear on the alphabetically tabbed card files view.
31
Page 32

To change the information displayed in the Contacts index view:
1
Press the Select key, and then use the Up or Down key to highlight
a specific ca rd. Pre ss Sel ec t again to vie w its detai ls.
2
Use the Up or Down key to highlight the field that you want. You
may need to press the View key to move to the correct field. (You
are in the telephone field if you see a telephone ico n at the upper
right corner of the card). Then press the Edit key, and select
“Display This Number.”
Select Display This
Number from the
menu.
3
Press the Select key to choose the field.
The selected number or address now appears after the name in the
tabbed cardfiles view.
32
Editing your
Contacts
You can create, edit, and dele te Contacts by selecting Edit mode and
using the REX PRO Wizards . In addi tion, you c an set up a meeting or
a telephone call from within a contact in Edit mode.
T o create a new Contact:
1
Press the Edit key in Contacts module, or in the Home screen.
2
Use the Up or Down key to highlight the option to create a New
Contact, and press the Select key.
Press the Se lec t key
after highlighting New
Contact.
Page 33

3
Use the Up or Down key to select the type of Contact that you
want. The Contact types are Business Contact, Personal Contact,
and Company Contact; the fields will vary, dep endi ng on the type
of contact that you choose.
Choose the Contact
type, and press the
Select key.
4
Now enter the contact’s first name. If the Contact is a Company
Contact, enter the name of the company. Use the Up and Down
keys to move from one letter to the other, and use the Sele ct key to
enter each letter. To change to num bers, press the View key. Press
the View key again to mo ve back to l etters . When you ar e fi nished,
press the Edit key.
5
Enter the Contact’s last name. (If it is a Company Contac t, this
screen will not appear.)
6
Confirm the contact name by pressing the Down key. If you want
to make a change, press the Edit key.
7
Now enter the category for your new Contact. If ther e are no
categories, or only one category, this Wizard screen will not be
displayed.
8
Next comes the contact’s information. Use the Up or Down key to
scroll and select the desired contact method, such as Work Fax. If
you enter a telephone number without hyphens or parentheses,
such as “18001003000,” REX PRO will auto-format it for you,
adding hyphens (-) and parentheses as needed.
9
Confirm the contact information by pressing the Down key. To
change it, press the Up key, or the Edit key.
10
At the Contact Summary page, press the Select key to ente r the
new contact on your REX PRO card.
To remove a Contact:
1
Highlight the Contact, and then press the Edit key.
33
Page 34

2
Use the Down key to move the highlight to Remove, and press the
Select key. You will be asked to confirm the deletion of this
contact. Highlight Yes and press the Sele ct key to complete the
removal; highlight No and press the Selec t key to keep the Contact.
T o set up a meeting or telephone call with a Contact:
1
Highlight the Contact, and then press the Edit key.
2
Choose Meet or Call from the menu, and press the Select key.
Highlight the desired
option, and press the
Select key.
3
Select the meeting date by pressing the Up or Down key. Each
time that you press the Select key, you will move to the nex t field.
For example, if you have used the Up or Down key to move the
month to Jan., and then press the Select key, the highlight will
move to the date field. Press the Home key to undo your selection
in a field.
34
Using To Do
Lists
4
After you enter the date, enter the star t time. Then enter the End
time.
Select the end time from
the list.
5
You also will have the option of choosing a reminder. The
Summary screen will then conclude this ta sk. I f you view the
Summary screen and want to make a change, press the Home key.
Using the To Do lists, you can view tasks, calls, and overdue items.
You can also create, reschedule, delete, and check off To Do items.
Page 35

To view To Do items
1
From the Home screen, highlight the To Do icon, and press the
Select key .
2
You will see a list of your To Do items. Highlight a To Do item,
and press the Select key, to see the details of that ite m .
Highlight an item, and
press the Select key to
see the details.
3
After viewing the details, press the Home key to return to the To
Do list.
4
To see a list of all your options in the To Do module, press the
View key. Use the Up or Down key to highlight the To Do items
that you want to view, and press the Select key.
Highlight a menu option,
and press the Select key.
Checking off
comple te d items
You can check off a To Do item as completed. Then, when you
synchronize to your desktop applic ation, your To Do item will be
checked off there as well.
T o check off completed To Do items
1
Highlight the item by pressing the Up or Down ke y, and then press
the Select key to move to the Details of that item.
35
Page 36

2
Press the Edit key.
Highlight Check Off, and
press the Select key.
3
Check Off is highligh ted in t he menu. Pre ss the Se lect key to che ck
off the item. (If the item that you check off was overdue , it will be
removed from the Overdue Tasks List.)
Creating To Do
items
You can create To Do items, including tasks, calls, and deliverables.
T o create a To Do item
1
Press the Edit key, highlight New To Do, and press the Select key.
2
Highlight the type of To Do from the menu, and press the Select
key.
Highlight the desired
type of To Do item, and
press the Select key.
3
Select the To Do item subject. The list of subjects will vary, based
on the To Do type and your profile. Press the Up or Down key to
scroll through the list of subje ct s and highlight your choice. Press
the Select key to enter your choice.
36
Highlight the subject, and
press the Select key.
Page 37

4
The Confirmation screen appears. Press the Down key to accept
your selection, or press the Edit key to chang e it.
5
Select a due date, if desired. (Note: “Due by” dates for calls
entered on the REX PRO are neither displayed nor accessible on
TrueSync Desktop.) If you select “Spec ific date” from the menu,
you can enter a month, day, and year in the next Wizard screen.
Use the Up or Down key to
select the month, date, and
year. Press the Select key
to enter each choice, and
move to the next field.
6
If you chose Specific Date, use the next Wizard scr een to choo se
the month, date, and year. Use the Up or Down key to scroll
through each field; move from field to field by pressing the Select
key.
7
Confirm the due date by pressing the Down key. To change your
selections, press the Edit key or the Up key.
8
At the Summary screen, press the Select key to enter your new To
Do item. Press the Up key if you want to return to a previous
Wizard screen.
To reschedule or remove a To Do item:
1
Highlight the To Do item with the Up or Down key.
2
Press the Edit key, and then highlight the Resc hedule or Remove
option. Press the Select key.
Highlight the desired
option, and then press
the Select key.
3
If you are rescheduling the To Do item, use the Up or Down key to
choose the new date, and the Select key to enter your selection.
37
Page 38

4
If you selected Specific Date from the menu, use the Up or Down
key to change to a different month, day, and/or year. Press the
Select key to move from field to field.
To go to a Contact included in a Call:
1
Go to the detailed view of the Call.
2
Press the Edit key.
3
Select Find in Contacts.
4
The card for the Contact included in that Call appears.
Using Mem os
You can read Memos or create QuickNotes. QuickNot es are single
lines of text that, when synchronized, become the title of a Memo in
your desktop application. You can create a QuickNote to remind you
of a key phrase , ev ent, or To Do item. For example, if you ar e inspi red
with a terrific idea for the topi c of a speech at work, you could e nter i t
as a QuickNote in your REX PRO.
You can add to a QuickNote at any time. For example, you might
want to create a QuickNote that contains your daily blood pressure
readings. However , other than the abi lity t o append to your notes, you
cannot edit a completed QuickNote by changing text or deleting text
at a later date. If you want to edit it, synchronize the QuickNote to
TrueSync Desktop or another computer application. Edit it in your
application, and then re-synchronize.
To view or remove Memos and QuickNotes:
From the Home screen, highlight the Memos icon, and press the
Select key.
1
A list of your Memos will appear. This list includes your
QuickNotes. Highlight a Memo, and then press the Select key to
read it. Use the Up or Down key to scroll through the text. Press
the Home key to return to the Memos list.
2
To see a list of all your options in the Memos module, press the
View key. Highlight Remove to delete a memo or QuickNote.
Creating
QuickNote s
38
A QuickNote is a single word, key phrase, or sentence. After you
have created a QuickNote, you can add to it at any time.
Page 39

T o create a QuickNote
1
Press the Edit key, highlight New QuickNote, and press the Select
key.
2
Enter the text of the QuickNote.
Press the Select
key to enter each
letter or number.
3
Use the Up and Down keys to move from letter to letter. Press the
Select key after each letter that you want to enter. Press the View
key to change to Numbers, and to return to Letters. You can also
move the highlight to Erase a letter or number, and to add a Space
or a period (.). Press the Edit key when you are done.
4
Select the Filing Category from the list, using the Up and Down
keys to move from category to categor y. Pre ss the Select key when
the desired category is highl ighted.
5
The Confirmation screen appears. Press the Select key to accept
your selection, or press the Edit key to revise it.
6
If you have entered too many letters to view, the truncated
QuickNote will appear in the list of Memos followed by an ellipsis
(...).
To add to a QuickNote:
1
Highlight the QuickNote with the Up or Down key.
39
Page 40

2
Press the Edit key, and then hi ghlight the Append option. Press the
Select key .
Highlight Append if you
want to add text to a
QuickNote, and then
press the Select key.
Using Time
Zones
Changing cities
and time zones
NOTE
existing text by selecting Append.
Your REX PRO card has two clocks: the Home clock, which shows
the time and date in your home city, and the World clock, which can
show the times and dates in other cities around the world.
When you select a clock , by hig hlight ing it, tha t cl ock’s time becomes
your Local Time. The stat us bar time will change accordingly.
You can change both the Home and World clocks to show different
cities and/or time zones.
1
Move from the Home Clock to t he World Clo ck by using the Up or
Down key.
2
Press the Select key to change to a different city or time zone.
3
Use the Up or Down key to highlight your new choice, and press
the Select key.
Appending to a QuickNote adds new text; you cannot edit
Use the Up or Down key
to select the new time
zone, and then press the
Select key .
Setting the clock
40
To change the clock settings:
1
In the Time Zones module, press the View key.
2
Select Set Cloc k from the menu by using the Up or Down key, and
then press the Select key.
Page 41

Using alarms
To activate or change an alarm:
Use the Up or Down key to move from Alarm to Alarm Time.
When you have highli ghted t he field t hat you wan t to c hange, pr ess
the Select key.
To activate or change the alarm, use the Up or Down key to move
through the list to the alarm frequenc y tha t you desire. Then press
the Select key. If you select Daily, an a larm wil l so und eve ry day a t
the specified time. If you select Once, an alarm will sound only at
the next occurrence of the specified time.
If you are changing the alarm time, use the Up or Down key to
change the hours, minutes, and/or PM or AM entries. Press the
Select key to move from field to field.
If you are changing the clock time, use the Up or Down key to
change the month, date, year, and/or time. Press the Select key
to move from field to field.
Use the Up or Down
key to select the new
alarm time.
Understanding
time zones and
travel
Using
Preferences
When you change the time zone of the currently selected cloc k on the
REX PRO card, the calendar events automatically change to reflect
the new time zone. For exampl e, an appo intment sch eduled for 2 p. m.
in New York changes to 11 a.m. when Los Angeles is sele cted.
For details on time zones, refer to the T rueSync Desktop for REX PRO
manual.
Your REX PRO card’s preferences include the Time Display, Date
Display, Alarm Sound, Key Clicks, Day Star t and Day End, and Auto
Shut-Off. You can also set your password and clock, or view device
information, such as the amount of free memory, in the Preferences
module.
41
Page 42

To change y our preferences:
1
From the Home screen, Highlight the Preferenc es icon, and press
the Select key.
2
In the Preferences screen, use the Up or Down key to move from
one field to the next.
Use the Up or Down
key to scroll through
the options; use the
Sele ct key t o enter
your choices.
3
When the field that you want to change is highlighted, press the
Select key. You can then use the Up or Down key to scroll through
the list. When the choice that you desire is highlighted, press the
Select key .
To change your password:
1
Press the View key in the Preferences module. Use the Down key
to highlight the Set P assword option, and then press the Select key.
42
2
T o set a password, press five keys. You can choose any order or
combination of keys that you desire. When you have pressed five
keys, you will return to the Set Password Screen.
3
If you want to have your REX PRO card p assword-protected,
choose an option other than Disabled in the Password Lock field.
Use the Up or Down key
to scroll through the
Password Lock list, and
then press the Select key
to enter your choice.
To view the device information:
1
Press the View key in the Preferences module, and high light
Device Information in the menu. Press the Select key.
Page 43

2
You can now view details about your REX PRO device. Press the
View key, and use the menu to return to the Preferences screen, or
to set your clock or password.
43
Page 44

44
Page 45

Chapter 3
Caring for your REX PRO
This chapter is designe d to hel p ensure you and your REX PRO have
a long and happy life together.
3
Installing new
batteries
The REX PRO card is powered by two CR2025, 3-volt batteries,
which can last for up to six months of average use.
NOTE
replace the batterie s promptly; if they lose all power, all the
information in your REX card may be lost.
To remove the old batteries and install new batteries:
1
Turn over the REX PRO card.
2
Insert the tip of a paper clip into the small hole on one of the
battery compartment doors.
3
Gently press the battery compartment door towards its hinge and
then push outward to open the door.
4
You may need to tilt the REX PRO card so that the battery slides
out.
5
Insert a new battery, with the positi ve (+) side facing the front of
the REX PRO card.
If you see a message, “Battery is low,” it is important to
Caring for your REX PRO 45
Page 46

6
Carefully close the battery compartment door until it snaps shut.
Push the door outward slowly
and carefully.
Tips for re moving
the batteries
Resetting your
REX PRO card
You can insert the tip of an opened paper clip into the small hole in
one of the battery compartment doors. Then gent ly press the door
toward the hinge, and push the compartment door out to a 45-degr ee
angle. Rest a finger on the door to prevent it from opening beyond
that angle.
After replacing the batteries, be sure to c lose the bat tery compartm ent
door very gently. Do not press it down into the REX card.
WARNING
PRO card at the same time. If you remove both batteries
simultaneously, the information in th e R EX PRO card wi ll be
lost. You will then need to resynchronize with your computer.
However, you will lo s e any information that you entered
directly into your REX PRO card and did not synchronize to
your computer.
If your REX PRO card fails to operate properly after battery
installation, you can perform a reset.
You should reset your REX PRO card only if it does not operate
correctly. For example, if you press the View key, and nothing
happens, you can try performing a reset.
Avoid remo v ing both batteri es fr om t he REX
46 Chapter 3
To reset your REX PRO card:
1
Turn over the REX PRO card.
Page 47

2
Use the straightened end of a small paper clip to press the recessed
Reset button, as shown below. Press very gently: if you use too
much force, it can damage the REX PRO card.
Never use a pencil or
other brittle object
to press the
reset bu tton.
3
Wait for the reset tone, and make sure the Home screen is visible,
before you tr y using the RE X PRO card ag ain .
Product care
If the screen of your REX PRO card becomes smudged or dusty,
apply eyeglass cleanin g fluid or isoprop yl alc ohol to a cle an cloth a nd
gently wipe the screen clean. NEVER apply cleaner s directly to the
REX PRO screen or card.
To protect you r REX PRO ca rd
Do not drop, or put excessive pressure on the REX PRO card. For
example, do not put the REX PRO card in your back pocket or
wallet. You could damage it when you sit down.
Do not bend the REX PRO card. Bending the card can lead to data
loss, or damage to the LCD screen.
Do not expose the REX PRO card to moisture, extreme
temperatures, or other adverse conditions. The REX PRO card is
not waterproof. Do not store it in damp, humid, or wet places.
Do not store the REX PRO card in its Docking Station, if you have
one. When the REX PRO card is stored in its docking station, its
batteries may lose power more quickly. In addition, alarms cannot
sound if the REX PRO card is in the Docking Station.
Protect the REX PRO card from being scratched or marred.
Caring for your REX PRO 47Caring for your REX PRO 47
Page 48

48 Chapter 3
Page 49

Chapter 4
T ips and Tricks
4
Getting the most
from your REX
PRO card
Choosing a
Contact’s main
phone number
This chapter of fers t echniqu es and tips f or using your REX PRO card.
Be sure to check the REX Web site at www.franklin.com/rex for the
latest on REX news, and the Starfish Web Site at www.starfish.com
for the latest TrueSync details.
Tip: Take your REX
PRO card on y our next
business trip. It’s as
easy to carry and as
essential as a credit
card! (But don’t put
REX PRO in your back
pocket!)
In these high-tech days of cell phones and pagers, you probably have
at least one Contact who has several different telephone numbers.
REX PRO lets you choose which telephone number you want to
appear when you select that Contact.
To choose a main phone number for a Contact
1
Go to that Contact’s detailed screen.
2
Highlight the desired number, and then press the Edit key.
One-cl ick access
to information
3
Highlight “Display This Number.”
4
Choose the desired number, and then press the Sele ct key.
How often have you scrawled directions to an event, a n interview, or
a friend’s new home on a post-it note — and then discovered that
Tips and Tricks 49
Page 50

you’d lost the note when you were on your way and really needed
help?
Now you can use your desktop a pplic ation to enter the directions in a
Memos file. Synchronize that file to the Memos module in the REX
PRO, and take your REX PRO card with you. Then, if you still can’t
find the location, just look up the tele phone number in your REX
PRO Contacts, and call from the nearest phone.
Memo rable
memos
Speeding up
your REX PRO
card
Anticipating a long plane ride? Instead of grabbing a handful of the
latest industry magazine s, you c an copy and paste any of the
following items into a Memos file in your desktop application. Then
synchronize that file to your REX PRO card’s Memos module.
Examples include:
e-mail messages that you want to review
text from some interesting Web pages, or Internet News groups
inspirational text, poems, or even a short story
notes for a speech or meeting agenda that you want to review
If you have an extremely large Calendar (for example, four recurring
events almost eve ry day, many special days, et c.), yo u may notice tha t
your Calendar is slow to display on your REX PRO card.
Follow these guidelines to make your Calendar display more quickly
and clearly:
Reduce the calendar size in your REX PRO card by putting
realistic lim its on the start an d end da te s of recurring events and
multi-day events.
Remove special days that have no personal importance.
50 Chapter 4
Check your Calendar to see if you have events that might be
moved to your To Do List.
When you set up TrueSync for synchronization, ch oose a minimal
range for Start and End dates. Synchroniz ing “all” is typically not
necessary, since you’ll be re-sync hronizing a nd thus updat ing your
REX PRO device as you use it.
Be sure to save and back up all your changes in your desktop
application and your device bef ore sync hronizing.
Page 51

Using the REX
PRO features
The following guidelines will help you to benefit from the SuperKey
system included with your REX PRO card:
The REX PRO card shows a maximum of 10 QuickList items. If
you have added more than 10 items to your QuickLis t selecti ons in
the TrueSync Desktop, the REX PRO card will show the 10 items
that were most recently added.
The maximum event alarm lead time is five hours, and the
maximum event length is six hours.
For Contacts:
1
You can store up t o 14 tel ephone numbers per Contact recor d on
the REX PRO card, with a recommended maximum number of
4,000 Cont act records.
2
You can sort by first name, last name, or company in your
Contact records.
A To Do item or Call can be a maximum of 255 characters.
The REX PRO card can display up to eight time zones, plus GMT.
These can be selected from more than 300 clocks available from
the TrueSync Desktop, TrueSync Plus for REX, or Sidekick 98.
Tips and Tricks 51
Page 52

52 Chapter 4
Page 53

Chapt er 5
Using the Docking Station
You will need to use the Docking Station if your computer does not
have a PC card slot, or if you are running Windows NT 4.0.
5
Instal ling the
batteries
To install new batteries:
1
Remove the battery cover on the back of the Docking Station. To
do so, first compress the tab. Then lift the cover.
Lift the
cover of
the
Docking
Station.
2
Install four AAA 1.5-volt batterie s in the battery compartment, as
shown on the diagram.
3
Replace the battery cover.
4
Insert the flat end of the stand into the slot on the back of the
Docking Station.
Using the Docking Station 53
Page 54

5
Place the Docking Station in an upright position.
The
Docking
Station
should be
upright.
Connecting the
Docking St at io n
Setting up you r
REX PRO card
To connec t the Do ck in g Stati o n:
1
Locate an available serial communications (COM) port on your
computer. (If you need more information about COM ports, pleas e
refer to your computer’s user manual.)
2
Insert the 9-pin plug of the se ri al cable into the COM port. Tighten
the screws. Be sure to note which COM port you used (for
example, COM1). You will need this information to configure
your TrueSync Desktop before you can synchronize. Please note
that you will need an adaptor if the only available serial port on
your computer has a 25-pin jack.
To place your REX PRO card in the Docking Station:
1
Begin sliding the REX PRO card into the slot in the Docking
Station. Its screen should face you.
2
Continue sliding the REX PRO card until you hear the connection
tone. “Ready” will appear on its screen.
3
If the REX PRO card is not correctly inserted in the Docking
Station, its screen will stay blank. If tha t occurs, press the Eject
button on the Docking Station, and remove the REX PRO card.
54 Using the Docking Station
Page 55

4
Wait a few seconds, and then return the REX PRO card to the
Docking Station slot.
The REX
PRO ca rd
is placed
facing
outward.
Removing your
REX PRO card
CAUTION
If the Dock ing Station batteries are low on power,
the mess age “Cradle batt ery low!” appears on t he REX
screen when it is inserted in the Docking Station. If you see
this message, change t he batteries as so on as possible.
To remove your REX PRO card from the Docking Station:
1
Press the Eject button below the slot on the Dockin g Station.
2
Gently remove the REX PRO card from the slot.
Press the
Eject
button to
remove the
REX PRO
card.
Follow these guidelines:
After you finish synchronizing, remove the REX PRO card from
the Docking Station. Leaving the REX PRO card in the Docking
Station decreases batte ry life.
If you have an alarm set to go off at a certain time, do not place the
REX PRO card in the Docking Station during that time period.
Alarms do not sound when the REX PRO card is in the Docking
Station.
Using the Docking Station 55
Page 56

Remove the REX PRO card from the Docking Station before
attempting to use its keypad.
For details on synchronizing, refer to the TrueSync Desktop User’s
Guide.
56 Chapter 5
Page 57

ONE YEAR LIMITED HARDWARE WARRANTY (U.S. only)
IMPORTANT: This is your hardware warrant y for all components of the
product known as the REX PRO, except software, and includes the REX
PRO card and docking station, the removable media (CD or disks) upon
which software is recor ded, and all other hard goods furnished as part of the
REX PRO. This product is call ed "the Hardware Product" in this warranty.
Read this warranty carefully.
Franklin Electronic Publishers, Inc. ("Franklin") warrants to the end user
that the Hardware Product will be free from defects in material and workmanship for a period of ONE YEAR from the date of original retail purchase, as evidenced by the sales receipt for the end user's purchase. On
discovery of a defect, the end us er must return the Hardware Product (transportation char ges prepaid) either to the dealer from whom it was purchased
or directly to Franklin at the following address:
FRANKLIN ELECTRONIC PUBLISHERS, INC.
ATTENTION: SERVICE DEPARTMENT
ONE FRANKLIN PLAZA
BURLINGTON, NEW JERSEY 08016-4907
Each Hardware Product returne d must include the user's name, address, and
telephone number, as well as a brief descript ion of the nature of the defect
and a copy of the sales receipt as proof of the date of the original retail purchase. Enclose a $3.00 check or money order for shippi ng and handli ng payable to "Franklin Electronic Publishers, Inc."
Franklin will, at its option, repair or replac e any Hardware Product with the
same or an equivalent product that is free from defects in m aterial and workmanship at no furth er char ge to t he end us er on de te rmination by Fr anklin , in
its sole discretion, that the Hardware Product was defective and that the
defect arose within the dur at ion of this l im ited warranty. This warranty does
not apply if, in the sole discretion of Franklin, the Hardware Product has
been tampered with, dam age d by accident, acts of nature, ab us e, improper
installation, misuse or misapplication, negligence, power surge (by lightning) or as a result of service or modification by any party, including any
dealer, other than Franklin. FRANKLIN SHALL NOT BE RESPONSIBLE
IN ANY WAY FOR ANY SERVICE OR MODIFICATION TO ANY
HARDWARE PRODUCT BY ANY PARTY, INCLUDING ANY
DEALER, OTHER THAN FRANKLIN.
Franklin makes no other express warranty, written or oral, with
respect to the Hardware Products. This warranty applies only to Hardware
Products sold by Fr anklin.
Using the Docking Station 57
Page 58

ALL IMPLIED WARRANT IES, INCLUDING ANY IMPLIED WAR RANTIES OF MERCHANTABILITY OR FITNESS FOR A PARTICULAR
PURPOSE, SHALL BE STRICTLY LIMITED IN DURATION TO THAT
OF THE EXPRESS WARRANTY SET FORTH ABOVE, THAT IS, ONE
YEAR FROM THE DATE OF ORIGINAL RETAIL PURCHASE.
THE WAR RANT Y AND REMEDY SET FORTH ABOVE ARE THE
EXCLUSIVE REMEDY OF THE RETAIL BUYER AND END USER IN
CONNECTION WITH THE MANUFACTURE, SALE, OR USE OF THE
HARDWARE PRODUCTS AND ARE IN LIEU OF ANY AND ALL
OTHER WARRANTIES OR REMEDIES, WRITTEN OR ORAL,
EXPRESS OR IMPLIED. NO FRANKLIN DEALER, AGENT, OR
EMPLOYEE IS AUTHORIZED TO MAKE ANY ADDITIONAL WARRANTY IN THIS REGARD OR TO MAKE ANY MODIFICATION OR
EXTENSION OF THIS EXPRESS WARRANTY. FRANKLIN SHALL
NOT BE RESPONSIBLE FOR ANY DIRECT, INDIRECT, SPECIAL,
INCIDENTAL , OR CONSEQUENTIAL DAMAGES (INCLUDING BUT
NOT LIMITED TO LOST PROFITS, LOST DATA, DAMAGES TO
PROPERTY OR DAMAGES FOR PERSONAL INJURY (BUT ONLY TO
THE EXTENT PERMITTED BY LAW)), RESUL TING FROM THE
MANUFACTURE, SALE OR USE OF THE HARDWARE PRODUCTS
UNDER ANY LEGAL THEORY, INCLUDING THE BREACH OF ANY
EXPRESS OR IMPLIED WARRANTY OR CONTRACT OR TORT.
UNLESS OTHERWISE CONTRARY TO APPLICABLE LAW, FRANKLIN'S LIABILITY SHALL IN NO CASE EXCEED THE PRICE PAID
FOR THE HARDWARE PRODUCT CLAIMED TO BE DEFECTIVE.
This warranty shall not be applicable to the extent that the enforcement of
any provision may be pr ohibited by applicable law. Th is warranty gives you
specific rights , and you may also have other rights which vary from state to
state. Some states do not allow the exclusion or limitation of incidental or
consequential damages or limitation on how long an impl ied warranty may
last, so the above limitation or exclusion may not apply to you.
58 Chapter 5
NINETY DA Y (90 DAY) SOFTWARE PRODUCTS LIMITED
WARRANTY (U.S. only)
IMPORTANT: This is your software warranty for all software furnished by
Franklin with the product known as the REX PRO, and include s the TrueSync Desktop for REX PRO software and software in the REX PRO card.
These products are called "the Software Products" in thi s warranty. Read
this warranty carefully.
Franklin Electronic Publishers, Inc. ("Franklin") warrants to the end user
that the Software Products will perform the operations described in the
Page 59

enclosed manuals and in the "readme.txt" files contained in the software for
a period of NINETY (90) DAYS from the date of original retail purch ase, as
evidenced by the sales receipt for the end user's purchase. On discovery of
the failure of the Sof twar e Product s to pe rform thes e opera tions , the end us er
must return the removable media (CD or dis ks ) furnished by Franklin and
upon which software was recorded, and, if possible, the Software Product
(transportation charges prepaid) either to the dealer from whom it was purchased or directly to Franklin at the following address:
FRANKLIN ELECTRONIC PUBLISHERS, INC.
ATTENTION: SERVICE DEPARTMENT
ONE FRANKLIN PLAZA
BURLINGTON, NEW JERSEY 08016-4907
Each removable medi a an d/or Software Product returned m u st include the
user's name, a ddress, and telephone num ber, as well as a brief description of
the nature of t he defect and a copy of the s ales receipt as proof of the date of
the original retail purchase. Enclose a $3.00 check or money order for shipping and handling payable to "Franklin Electronic Publishers, Inc."
Franklin will, at its option, repair or replac e any Soft ware Product with the
same or an equivalent product that will perform the operations described in
the within manual and in the readme.txt fi les contained in the software at no
further charge to the end user on determination by Fra nklin, in its sole discretion, that, within the duration of this limited warranty, the Software Product was failed to perform the operations described in the enclosed manuals
and in th e "r ea dme.txt " fi le s co n tained in th e S o f tw a r e P r od u cts. This wa rranty does not apply if, in the sole discretion of Frank lin, the Software Product has been tampered with, damaged by accident, acts of nat ure, abuse,
improper instal lati on, misuse or m isappli ca tion, neglige nce, power surg e (by
lightning) or as a result of service or modification by any party, including
any dealer, other than Franklin. FRANKLIN SHALL NOT BE RESPONSIBLE IN ANY WAY FOR ANY SERVICE OR MODIFICATION TO ANY
SOFTWARE PRODUCT BY ANY PARTY, INCLUDING ANY DEALER,
OTHER THAN FRANKLIN. Franklin makes no other express warranty,
written or oral, with respect to the Software Products .
This warranty applies only to Software Products sold by Franklin.
Franklin does not warrant that the Software Product will meet your requirements, that operation of the Software Product will be uninterrupted or error
free, or that all Software Product errors will be corrected.
ALL IMPLIED WARRANT IES, INCLUDING ANY IMPLIED WAR RANTIES OF MERCHANTABILITY OR FITNESS FOR A PARTICULAR
PURPOSE, SHALL BE STRICTLY LIMITED IN DURATION TO THAT
OF THE EXPRESS WARRANTY SET FORTH ABOVE, THAT IS,
Using the Docking Station 59
Page 60

NINETY DAYS FROM THE DATE OF ORIGINAL RETAIL PURCHASE.
THE WAR RANT Y AND REMEDY SET FORTH ABOVE ARE THE
EXCLUSIVE REMEDY OF THE RETAIL BUYER AND END USER IN
CONNECTION WITH THE MANUFACTURE, SALE, OR USE OF THE
SOFTWARE PRODUCTS AND ARE IN LIEU OF ANY AND ALL
OTHER WARRANTIES OR REMEDIES, WRITTEN OR ORAL,
EXPRESS OR IMPLIED. NO FRANKLIN DEALER, AGENT, OR
EMPLOYEE IS AUTHORIZED TO MAKE ANY ADDITIONAL WARRANTY IN THIS REGARD OR TO MAKE ANY MODIFICATION OR
EXTENSION OF THIS EXPRESS WARRANTY. FRANKLIN SHALL
NOT BE RESPONSIBLE FOR ANY DIRECT, INDIRECT, SPECIAL,
INCIDENTAL , OR CONSEQUENTIAL DAMAGES (INCLUDING BUT
NOT LIMITED TO LOST PROFITS, LOST DATA, DAMAGES TO
PROPERTY OR DAMAGES FOR PERSONAL INJURY (BUT ONLY TO
THE EXTENT PERMITTED BY LAW)), RESUL TING FROM THE
MANUFACTURE, SALE OR USE OF THE SOFT WARE PRODUCTS
UNDER ANY LEGAL THEORY, INCLUDING THE BREACH OF ANY
EXPRESS OR IMPLIED WARRANTY OR CONTRACT OR TORT.
UNLESS OTHERWISE CONTRARY TO APPLICABLE LAW, FRANKLIN'S LIABILITY SHALL IN NO CASE EXCEED THE PRICE PAID
FOR THE SOFTWARE PRODUCT CLAIMED TO BE DEFECTIVE.
This warranty shall not be applicable to the extent that the enforcement of
any provision may be pr ohibited by applicable law. Th is warranty gives you
specific rights , and you may also have other rights which vary from state to
state. Some states do not allow the exclusion or limitation of incidental or
consequential damages or limitation on how long an impl ied warranty may
last, so the above limitation or exclusion may not apply to you.
367466
60 Chapter 5
Page 61

Index
A
alarms 23
All
Contacts 30
alphabetical tabs
Contacts 30
B
batteries
removing and installing 45
battery icon 45
C
Calendar views 23
calls
setting up 34
canceling event s 29
cardfile
select 30
cautions
protecting your card 47
changing citie s 40
changing time zones 40
checking off To Do items 35
cities 40
cleaning REX PRO 47
clock
setting 40
connecting the Docking
Station 54
connecting with a PC Card
slot 18
Contacts
removing 33
sorting 31
sorting cards 31
tabs 30
Contacts icons 31
Contacts view 30
creating Contacts 32
creating event s 2 6
creating QuickNotes 39
creating To Do items 36
customer s erv i ce 6
D
Daily view 23
data, selectin g 17
deleting Contacts 33
deleting To Do items 37
device information 42
displaying telephone
numbers 31
Docking Station 19
connecting 54
installing batteries 53
Down key 8
, 53–
21
,
E
Edit key 21
Edit mode 8
editing 10
Eject button 19
ellipses 31
e-mail addres s es 31
entering text 10
envelope ic on 31
events
canceling 29
creating 26
reschedul ing 29
viewing 24
22
,
F
Franklin 6
G
guidelines 51
H
help, getting 6
highlight 21
Home clock 40
56
Home key 8
Home screen 13
house icon 31
21
,
I
icons
Contacts 31
ID information 13
information, selecting 17
Install Wizard 17
installing batteries 45
K
keys 7–8
L
lettere d tabs 30
limitations 51
Local Time 40
long cardfile fields 31
M
main phone numbers 49
meetings
scheduling 34
Memos
removing 38
viewing 38
menu 8
Monthly view 23
N
new batteries 45
new Contacts
creating 32
new events
creating 26
notebook icon 31
O
Owner Information 13
Index 61
Page 62

P
password 20
changing 42
PC card slot
connecting 18
Personal Information 13
preferences 41
product care 47
product cautions 47
profile 9
protecting REX PRO 47
protecting your card 47
Q
QuickNotes
creating 39
removing 38
viewing 38
R
remind er alarms 23
removing batteries 45
removing Contacts 33
removing To Do items 37
rescheduling Do items 37
rescheduling eve nts 29
resetting REX PRO 46
resources 6
REX PRO
resetting 46
REX PRO card
removing 19
turning it off 7
turning it on 7
REX PRO card tone 19
REX PRO Docking
Station 19
REX PRO keys 7
REX PRO product care 47
REX PRO profiles 9
REX PRO Wiz ard 9
, 53–
56
8
–
S
scroll 21
Select key 8
selecting data 17
setting alarms 23
21
,
setting the clock 40
setting up calls 34
setting up for
synchronization 18
setting up meetings 34
setting up the Do cking
Station 53
sorting cards 31
sorting cards (Cardfile) 31
support services 6
synchronizing 17
T
technical support 6
telephone ic on 31
telephone number display 31
text entry 10
text limitations 51
time zone 41
time zones 40
time zones and trav el 41
To Do items 35
checking off 35
creating 36
removing 37
reschedul ing 37
travel and time zones 41
TrueSync
configuring 17
Tr ueSync Desktop 17
Tr ueSync icon 20
turning of f alar m s 23
turning the REX PRO off and
on 7
U
Up key 8, 21
V
Vi ew k ey 8, 21
viewing Contacts 30
viewing event s 24
viewi n g To Do items 35
W
Web site addresses 31
Web sites 6
Weekly view 23
Wizar d 9
World clock 40
62
 Loading...