

Page 1

Franklin Planner
for Microsoft® Outlook™ 98 and 2000
™
User’s Guide
23030UG
Page 2

License Agreement and Copyright Information
Important! You must exit Microsoft® Outlook™ before installing
Franklin Planner™ software.
Franklin Planner™ for Microsoft® Outlook™ License Agreement
By breaking the seal on the Software diskettes or CD-ROM, or installing, copying, or otherwise using this software
product, you agree to be bound by the terms of this software license agreement. If you do not agree to the terms of
this license agreement, you are not authorized to use the software product and must promptly return the package to
the place where you obtained it.
Purchaser's License
Franklin Planner software is protected by copyright law and international copyright treaty. The Franklin Planner for
Microsoft Outlook computer program (“Software”) is licensed, not sold, to you. You own the diskettes or CD-ROM,
but (“Franklin Covey”) retains ownership of all copies of the software. You may copy this software onto a computer
for personal use and you may make an archive copy for the sole purpose of protecting your investment from loss. As
an express condition of this license, you must reproduce on each copy the copyright notice as it appears on the original
software supplied by Franklin Covey. Franklin Planner software may not be made available for use by more than one
person. Making this software available for use by more than one person is illegal and will terminate this license. Each
person using the software must purchase a separate software package, just as they would purchase their own copy of
the Franklin Planner.
Transferring the Software License
You may legally transfer all of your rights to use this software to another person provided you also transfer all copies
of the software, diskettes, and documentation (including this license agreement). Remember, by transferring your
right to another person, you no longer have any right to use it. The person to whom this software is transferred may
legally use it in accordance with copyright law, international tre aty, and this license agreement. Upgrades and the original version of the software constitute a single product.
The original version and upgraded software may not be available for use by two different people at the same time and
may not be transferred separately. You may not decompose, reverse engineer, disassemble, or otherwise reduce the
software to a human perceivable form. Except as provided in this license, you may not transfer, rent, lease, lend, copy,
modify, translate, sublicense, time-share, or electronically transmit or receive this software, media, or documentation.
You agree that neither the software nor any direct product thereof will be transferred or re-exported, directly or indirectly, into any country prohibited by the U.S. Export Administration Act and its regulations, nor will it be used for
any purpose prohibited by the Act.
Limited Warranty
This software and accom panying physical media are warran ted to be free of defects in materials a nd workmanship for
30 days from the purchase date. If Franklin Covey receives written notification within the warranty period of defects
in materials or workmanship, Franklin Covey will replace the defective media or documentation. If Franklin Covey
does not receive notice within 30 days of purchase, it will be assumed that the program is operating in a satisfactory
manner and that you wish to keep the program and be bound by the terms and conditions of this license. Specifically,
Franklin Covey makes no representation or warranty that the software or documentation are error-free or meet any
user-particular standards, requirements, or needs. Other than the above mentioned guarantee and support, this program and accompanying media and documentation are provided as is, without warranty of any kind, either expressed
or implied, including but not limited to the implied warranties of performance, merchantability, and fitness for a particular purpose. The entire risk as to the quality and performance of the program is assumed by you.
Should the program prove defective after the trial period, you (and not Franklin Covey) assume the entire cost of all
necessary servicing, repair, or correction. In no event will Franklin Covey be liable for any damages, including lost
profits, lost savings, or other incidental or consequential damages arising out of the use or inability to use this program.
Termination of This License
This license will terminate immediately, without notice from Frankli n Covey, if you fail to comply with any of its pr ovisions. Upon termination of this license, you must destroy all copies of the software. You may terminate this license
by doing so at any time.
Franklin Covey reserves all rights not specifically granted to the user in this statement.
ii
Page 3

Disclaimer and Limitation of Liability
Franklin Covey assumes no responsibility for any damage or loss resulting from the use of this product. Franklin Covey also assumes no responsibility for any damage or loss caused by the use of the Palm OS, Windows CE OS, or any
third party software or hardware. Franklin Covey assumes no responsibility for the deletion of data as a result of malfunction, repairs, or hardware battery replacement. Be sure to make backup copies of all important data on other media to protect against data loss.
Entire Agreement
This Agreement sets forth the entire understanding and agreement between the parties and may be amended only in
writing signed by both parties. No vendor, distributor, dealer, retailer, salesperson, or other person is authorized by
Franklin Covey to modify this Agreement or to make any warranty, representation, or promise that is different than,
or in addition to, the warranties, representations, or promises of this Agreement.
Restricted Rights
The Software is provided with restricted rights. Use, duplication, or disclosure by the government is subject to restrictions as set forth in DFARS 252.227-701© (1) for the Department of Defense of FAR 52.227-19© (2) for other U.S.
Government entities. Contractor/manufacturer is Franklin Covey, 2200 West Parkway Boulevard, Salt Lake City, UT,
84119-2099.
Copyright
© 2000 Franklin Covey Co. Printed in the U.S.A. All rights reserved. Reproduction, adaptation, or translation of this
document is prohibited without prior written permission of Franklin Covey.
Franklin Planner software is a registered trademark of Franklin Covey. Palm Computing, Graffiti and HotSync are
registered Trademarks, and Palm VII, Palm V, Palm III, PalmPilot, Palm OS, Palm, the Palm Computing platform
logo, the Palm VII logo, the Palm V logo, the Palm III logo, and the PalmPilot logo are trademarks of Palm Computing
Inc. or its subsidiaries. Microsoft Windows 95 and Windows 98 are registered trademarks and Outlook and Windows
CE are trademarks of Microsoft Corporation. All other brand and product names mentioned in this manual are
trademarks of their respective companies.
Page 4

iv
Page 5

&RQWHQWV
License Agreement and Copyright Information .....................................ii
Franklin Planner™ for Microsoft® Outlook™ 98 and 2000.................7
Discover What Matters Most........................................................................ 7
System Requirements.................................................................................... 7
What You Install with Franklin Planner...................................................... 8
Special Instructions for Current Users of Palm Organizers.....................9
Before Installing Franklin Planner........................................................10
Preparing to Install Franklin Planner.........................................................10
To Install Expression Service from the Outlook CD .......................... 10
Back Up Your Palm Organizer Data .......................................................... 11
Special Information for Palm Organizer Users .....................................13
First Method .........................................................................................13
Second Method.....................................................................................13
Install Franklin Planner for Microsoft Outlook.....................................15
Install Franklin Planner ..............................................................................15
Installation Options ............................................................................. 16
A Note on Franklin Planner Software/
ASCEND 97 Data Conversion .............................................................17
Continue the Installation .....................................................................17
Register Franklin Planner ........................................................................... 18
Starting Outlook After Franklin Planner Installation ............................... 20
Uninstall Franklin Planner .........................................................................20
Installing Special Components ............................................................22
Converting Franklin Planner Software/ASCEND 97 Data ................22
Install Palm Components ...........................................................................23
Install PPC (Pocket PC) Components ....................................................... 23
Franklin Planner Software Data Conversion............................................. 24
Install Multimedia Files ..............................................................................25
v
Page 6

Start Using the Franklin Planner ..........................................................26
The Franklin Planner Menu ....................................................................... 26
The Franklin Planner Toolbar....................................................................26
What Matters Most Today versus Outlook Today.................................... 27
Adding the Franklin Planner Icon to your Windows Taskbar .................28
Getting Help ........................................................................................29
The What Matters Most Compass Map..................................................... 29
The Multimedia Companion Volume ....................................................... 31
Online Help ................................................................................................. 31
Outlook Help........................................................................................ 31
Franklin Covey Help ............................................................................31
Technical Support .......................................................................................32
Using the Wizards to Discover What Matters Most.............................33
Identify your Governing Values ................................................................. 33
Identify your Roles ......................................................................................35
Develop your Mission Statement ...............................................................36
Set Long-Range Goals ................................................................................. 38
Create a Weekly Compass........................................................................... 39
Using Franklin Planner to Manage your Time......................................40
Remember to Plan....................................................................................... 40
Plan Your Week....................................................................................40
Plan Your Day.......................................................................................41
Create a Prioritized Daily Task List............................................................42
Schedule Appointments .............................................................................. 43
Create a Master Task List............................................................................ 44
Use Your Weekly Compass......................................................................... 45
Use Outlook’s Journal as a Daily Record of Events................................... 46
Print to Franklin Covey Custom Forms .................................................... 47
Additional Information ........................................................................49
Running the Conversion Utility as a Standalone Application .................. 49
Index ...................................................................................................51
vi
Page 7

Franklin Planner
™
for Microsoft® Outlook™ 98 and 2000
You know Microsoft Outlook as an innovative and integrated
productivity tool that combines electronic mail, calendaring, group
scheduling, and contact and task management into a single, easy-touse system. Franklin Planner for Microsoft Outlook extends these
capabilities to include the tools and concepts taught in the What
Matters Most
to time and life management.
Important: Franklin Planner for Microsoft Outlook is designed to be
Franklin Planner for Microsoft Outlook gives you new capabilities
that complement the already powerful features of Microsoft Outlook.
Discover What Matters Most
Franklin Planner for Microsoft Outlook integrates the Franklin Covey
approach to time and life management, helping you identify your
Governing Values, your key Roles, your Personal Mission, and LongRange Goals. Franklin Planner for Microsoft Outlook also helps you
use your Governing Values, Roles, Personal Mission, and Goals to
organize your daily tasks and appointment schedules and to create a
Weekly Compass. This helps you align your daily activities with what
matters most ... to you.
™
seminar, Franklin Covey’s principle-based approach
used with Microsoft Outlook 98, 2000 or later. It does not
work with earlier versions of Microsoft Outlook.
System Requirements
Because Franklin Planner for Microsoft Outlook runs in conjunction
with Outlook, it supports the same basic system requirements.
To use Franklin Planner for Microsoft Outlook, you need the
following:
ΠA 486/66 or higher (Pentium 90 or higher to view multime-
dia movies)
ΠMinimum hard drive space for a Pentium processor
ΠWindows 95/98 or Windows NT 4.0 (Windows NT users
must install Service Pack 3 for Windows NT 4.0 before installing Outlook)
ΠMicrosoft Outlook 98, 2000 or newer (Microsoft Outlook 98
must have Expression Service installed)
Page 7
Page 8

Π8 MB Ram for Windows 95/98; 16 MB Ram for Windows NT
4.0
ΠA printer supported by Windows (required for printing Fran-
klin Covey forms)
What You Install with Franklin Planner
When you install Franklin Planner for Microsoft Outlook, you’ll add
the following components to your Outlook 98, 2000 or later
environment:
1. Five Wizards that help you identify your Governing Values
(page 33), Roles (page 35), Personal Mission (page 36), Longrange Goals (page 38), and create a Weekly Compass
(page 39).
2. A Prioritized Daily Task List (page 42).
3. A Master Task List (page 44).
4. A multimedia presentation introducing the What Matters
Most process (page 29).
5. Additional printing capabilities, enabling you to print your
What Matters Most information to a variety of forms or plain
paper (page 47).
6. A way to turn Outlook Today into What Matters Most Today
(page 27).
Page 8
Page 9

Special Instructions for Current Users of Palm Organizers
The installation program for Franklin Planner for Microsoft Outlook
includes an option to convert data from Franklin Planner Software for
Windows or ASCEND 97 into a format useable by Franklin Planner
for Microsoft Outlook.
Œ If you are currently using a Palm™ organizer with Franklin
Planner Software for Windows or ASCEND 97, refer to
“Special Information for Palm Organizer Users” on page 13
before converting any data. This will prevent potentially
severe duplication of task, appointment, and contact information. Read the section carefully before you install Franklin
Planner for Microsoft Outlook.
ΠIf you wish to install Franklin Planner for Microsoft Out-
look, but wish to wait until a future time to convert Franklin Planner Software/ASCEND 97 data, you can do this by
choosing No at the point in the installation process where
you are prompted to convert Franklin Planner Software/
ASCEND 97 data.
ΠYou can run the Data Conversion Utility as a standalone
application, separate from the Franklin Planner for Microsoft
Outlook installation process. See “Running the Conversion
Utility as a Standalone Application” on page 49 for instructions.
ΠIf you are not currently using a Palm connected organizer
with Franklin Planner Software for Windows or ASCEND
97, simply ensure that your Palm data is backed up onto your
desktop computer program before installing Franklin Planner for Microsoft Outlook. If you choose to install Franklin
Planner for Palm, your Palm information will be synchronized with Franklin Planner for Microsoft Outlook on the
second HotSync operation after installation (the first one
installs the Franklin Planner for Palm applications, while the
second one actually synchronizes the data).
Page 9
Page 10
Before Installing Franklin Planner
Note: You must exit Microsoft Outlook before installing Franklin
Planner for Microsoft Outlook.
Preparing to Install Franklin Planner
Before you can install Franklin Planner for Microsoft Outlook, you
must complete a full installation of Outlook 98, 2000 or later. A full
installation includes Outlook, Internet Explorer, Outlook Help,
NetMeeting, Office Assistants, PIM converters, system tools, and
additional Outlook enhancements.
If you are using Microsoft Outlook 98, one such enhancement –
Expression Service – is required for the Franklin Planner extension.
If you don’t have Expression Service installed (if you didn’t complete
a full install of Outlook 98, for example), you can install the service
manually. You can also use the following steps to make sure the
service is installed:
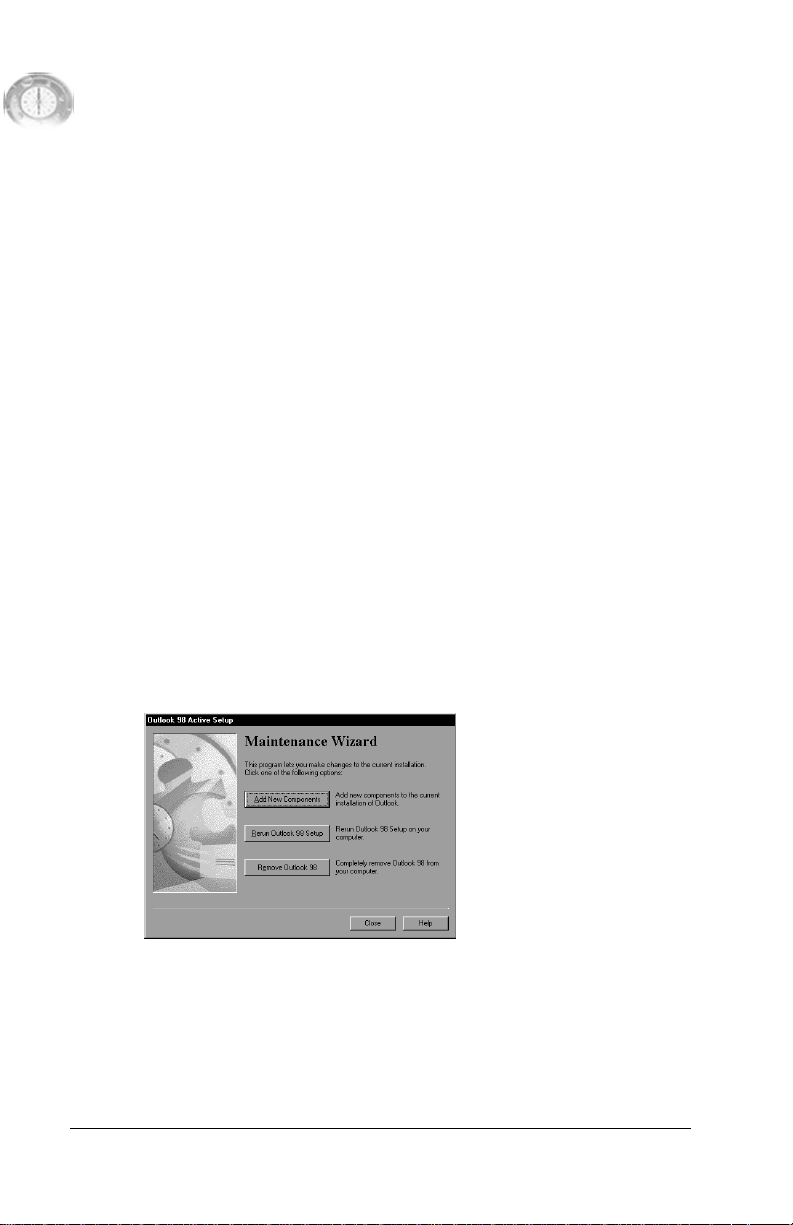
To Install Expression Service from the Outlook CD
Note: The following instructions are only for users of Microsoft
Outlook 98.
1. Make sure Outlook 98 is already installed on your hard drive.
Then, insert your Outlook 98 CD into your CD-ROM drive.
The Maintenance Wizard dialog appears:
2. Click Add New Components. This opens the Add New
Components window.
Page 10
Page 11
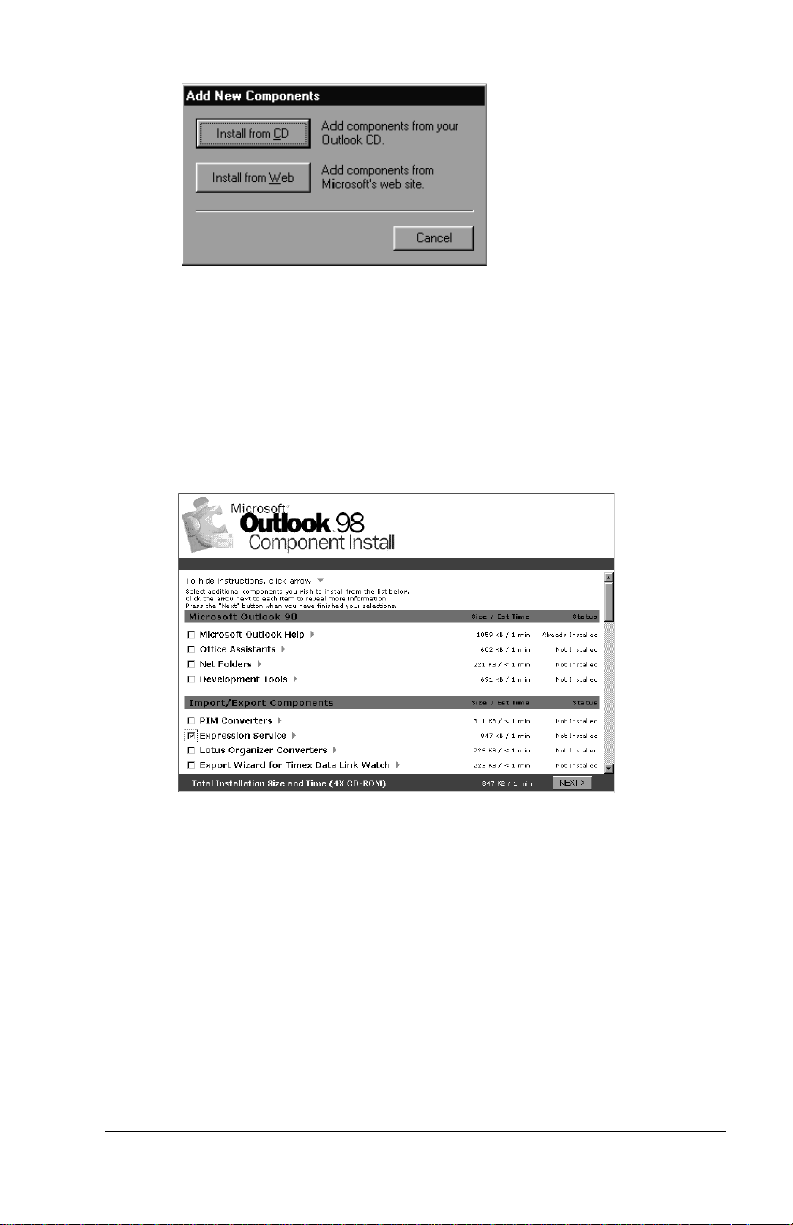
3. You can install new components from the Outlook 98 CD or
from Microsoft’s web site. For this example, select Install
from CD. The Microsoft Outlook Component Install
window opens. If Expression Service is already installed on
your machine, the box next to Expression Service is checked
and Already Installed appears in the right column under
Status. If this is the case, you can simply exit the Component
Install program.
4. If Expression Service has not been installed, check the
Expression Service option and click Next. This installs
Expression Service to your hard drive.
Back Up Your Palm Organizer Data
If you have previously installed Palm Desktop software or Franklin
Planner Software for Windows and are using HotSync technology to
synchronize with your Palm organizer, we recommend you back up
your data by conducting a HotSync operation before installing
Franklin Planner for Microsoft Outlook.
If you are currently using Palm Desktop or Franklin Planner Software
for Windows, during installation of Franklin Planner for Microsoft
Page 11
Page 12

Outlook you will be asked if you want to reinstall Palm interface files.
This is necessary if you want to synchronize your Palm organizer with
Franklin Planner for Microsoft Outlook. Backing up your data by
conducting a HotSync operation with your Palm organizer prior to
reinstallation of Palm interface files will prevent possible data loss
when performing this reinstall.
Page 12
Page 13

Special Information for Palm Organizer Users
If you are currently using a Palm handheld organizer, you have two
choices of how to convert your Franklin Planner Software for
Windows or ASCEND 97 data to Microsoft Outlook format. Read
these methods carefully before you install Franklin Planner for
Microsoft Outlook.
First Method
The simplest method is to install Franklin Planner for Microsoft
Outlook (page 15). If the installation program detects that you have
Franklin Planner Software for Windows installed on your computer,
you will be prompted to choose whether to export your Franklin
Planner Software for Windows/ASCEND 97 data to Franklin Planner
for Microsoft Outlook (page 24).
You can then perform a hard reset on your Palm organizer, and finally
synchronize your organizer with Franklin Planner for Microsoft
Outlook. This eliminates the possibility for duplicate records;
however, you will lose all add-on applications that you have on your
Palm organizer as a result of the hard reset. Do not use this option
unless you are not using add-on Palm organizer applications, or
unless you don't mind reinstalling your add-on applications.
Second Method
The second method is more complex, but prevents duplication of
records while preserving your other Palm organizer add-on
applications:
1. Conduct a final HotSync operation to synchronize data
between your Palm organizer and Franklin Planner
Software/ASCEND 97. Now, all your information is safely
resident in Franklin Planner Software/ASCEND 97.
2. Remove the Task List, FCLinkDB and other Franklin Covey
applications (if any) from your Palm organizer. See your Palm
organizer user's guide for information on how to remove addon applications.
3. Install Franklin Planner for Microsoft Outlook from the
installation CD (page 15), insuring that you check the
Franklin Planner for Palm option (page 16).
4. During installation of Franklin Planner for Outlook, you will
Page 13
Page 14

be prompted to choose whether to convert your Franklin
Planner Software or ASCEND 97 data to a form useable by
Microsoft Outlook. Choose Yes and follow the instructions
(page 24). This will export your Franklin Planner Software/
ASCEND 97 data to Franklin Planner for Outlook.
5. After installing Franklin Planner for Outlook (including
installing Palm applications and conducting Franklin Planner
Software data conversion), conduct a HotSync operation
between Franklin Planner for Microsoft Outlook and your
Palm organizer. This installs the Franklin Covey applications
to your Palm organizer.
6. Conduct another HotSync operation to synchronize your
information with the newly installed Franklin Covey
applications.
Page 14
Page 15
Install Franklin Planner for Microsoft Outlook
After completing the preparations in the previous sections, you are
now ready to install Franklin Planner for Microsoft Outlook.
Install Franklin Planner
1. Exit Microsoft Outlook and any other running applications.
Important! You must exit Microsoft Outlook before installing
Franklin Planner for Microsoft Outlook.
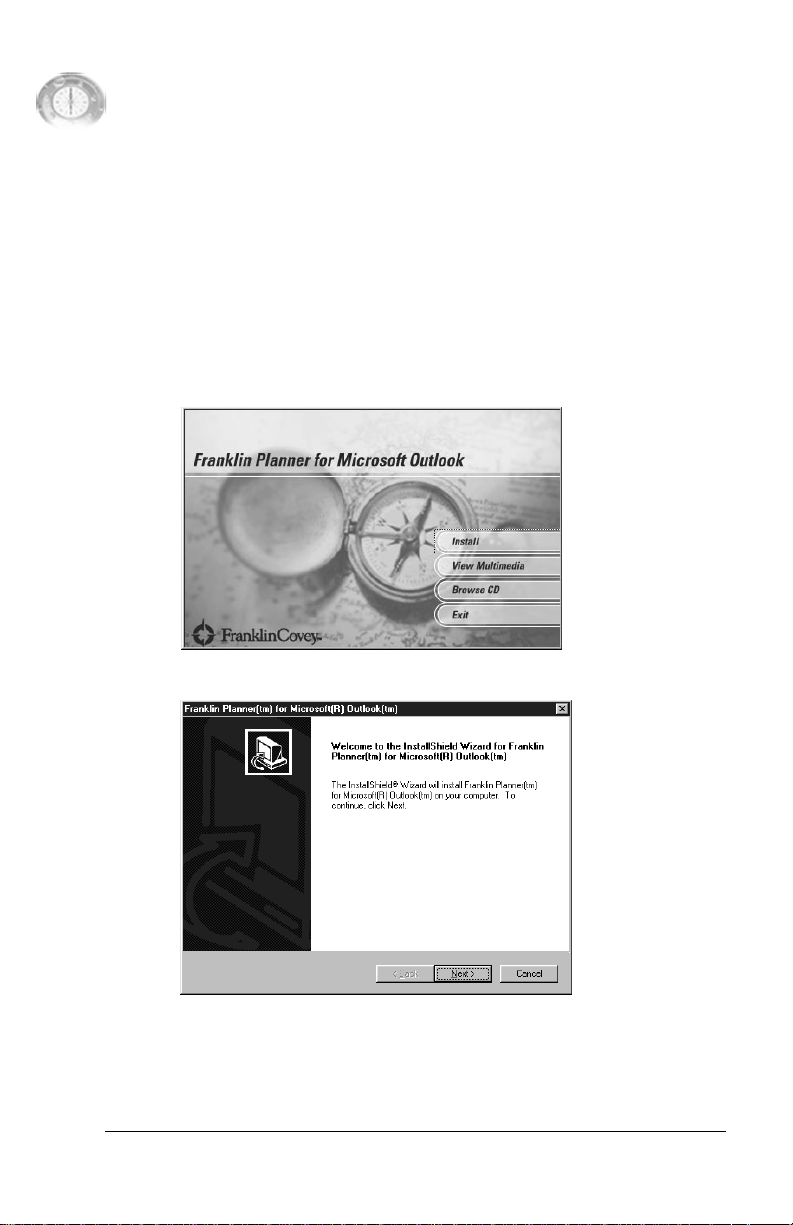
2. Insert the Franklin Planner CD into your CD-ROM drive. The
installation screen appears.
3. Choose Install. The Install Shield welcome screen appears.
4. Click Next. The copyright and license agreement screen
appears. Click Yes to accept the agreement.
Note: You will not be able to install Franklin Planner for Microsoft
Outlook unless you accept the license agreement.
Page 15
Page 16
5. If you are prompted to select an Outlook profile, select the
desired profile and choose Next.
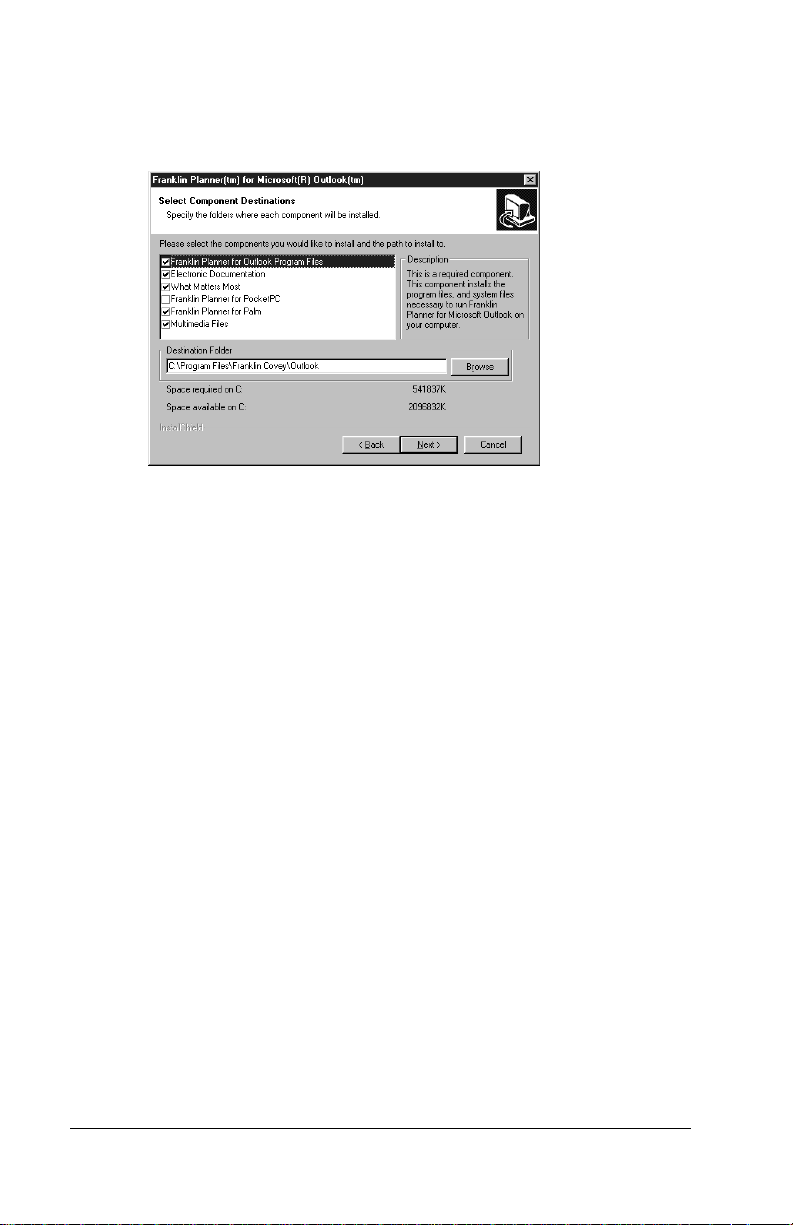
6. The Select Component Destinations screen now appears.
7. Click the check box to install Franklin Planner for Microsoft
Outlook. You may also elect to install Franklin Planner for
Palm, Franklin Planner for PPC (Palm PC), and multimedia
files.
8. If you wish to accept the default installation folders, simply
click Next. To change a folder, highlight the component, click
Browse, and navigate to the desired folder. When you are
ready to continue, click Next.
Installation Options
Following is a brief description of the installation options in addition
to Franklin Planner for Microsoft Outlook. Complete instructions on
installing these applications is included in a separate section entitled
“Installing Special Components” on page 22.
ΠFranklin Planner for Palm. If you will be synchronizing Out-
look and Franklin Planner for Outlook with a Palm handheld
organizer, select this option. The files required to conduct
HotSync operations will be installed on your computer, as
well as Palm versions of Franklin Covey applications. See the
What Matters Most for the Palm Computing Platform Companion
Vol um e for information about how to use Franklin Covey
applications for your Palm handheld organizer.
See “Install Palm Components” on page 23 for information on how
installing Franklin Planner for Palm changes the installation
procedure.
Page 16
Page 17

ΠFranklin Planner for PPC (Pocket PC). If you will be using a
Pocket PC running the Windows CE operating system, select
this option. Pocket PC versions of Franklin Covey applications will be installed. For information about using the Franklin Covey applications for the Pocket PC, see the What
Matters Most for Windows CE Companion Volume.
See “Install PPC (Pocket PC) Components” on page 23 for information
on how installing Franklin Planner for PPC changes the installation
procedure.
ΠInstalling Multimedia Files. Installing the multimedia files
means that the files will be copied to your hard drive for
faster access. You can still run the multimedia files even if
you don’t install them to your hard drive—you will simply
need to insert the Franklin Planner CD into your hard drive
when accessing the multimedia files from within Franklin
Planner for Microsoft Outlook.
See “Install Multimedia Files” on page 25 for instructions on how to
install multimedia files during the installation process.
A Note on Franklin Planner Software/ASCEND 97 Data Conversion
If you have been using Franklin Planner Software for Windows, or
ASCEND 97, you will be prompted during the installation process to
choose whether to convert the information in your database to a form
that can be used by Franklin Planner for Outlook. This will happen
automatically.
See “Franklin Planner Software Data Conversion” on page 24 for
instructions on how to conduct the conversion during the installation
process.
You can also run the data conversion utility as a standalone
application after you have installed Franklin Planner for Microsoft
Outlook. See “Running the Conversion Utility as a Standalone
Application” on page 49.
Continue the Installation
9. After selecting your installation options and choosing your
destination paths, click Next.
Note: The installation process will be a little different depending on
whether you have chosen to install Franklin Planner for Palm,
Franklin Planner for PPC, or the multimedia files (or some
Page 17
Page 18

combination). Refer to “Installing Special Components” on
page 22 for information on how each of these options changes
the installation process.
10. The Select Program Folder screen appears.
11. To accept the default folder, click Next. If you wish, you can
type a different folder name, then click Next.
12. The Start Copying Files screen appears. Click Next to
continue.
13. During installation, a Question screen appears, asking if you
want to add a Franklin Planner icon to your Windows
taskbar. This icon gives you quick access to the Task List, the
Weekly Compass, and the Compass Map.
14. Click Yes to add the icon to your taskbar, or No to skip this
step.
Register Franklin Planner
15. After Franklin Planner for Microsoft Outlook is installed, you
will be prompted to register your new software. We
recommend you register immediately—once you register
Page 18
Page 19

you’ll be notified of product updates, new products, and
become eligible for technical support.
You have several options for registration:
ΠInternet using my Web browser. This option takes you to the
Franklin Covey web site and register online.
Note: Do not use this option unless you have already set up your
computer to connect with the Internet through a local area
network (LAN) or through a modem line..
ΠSend information by e-mail. You will fill in a form with reg-
istration information, then be given the option to send the
form to Franklin Covey via your e-mail system.
Note: Do not use this option unless your e-mail system is already set
up.
ΠSend information by modem. You will fill in a form with
registration information, then be given the option to send the
form to Franklin Covey via your modem.
ΠPrint a form for faxing. You will fill in a form with registra-
tion information, then be given the option to print a form that
can be faxed to Franklin Covey.
ΠPrint a form for mailing. You will fill in a form with registra-
tion information, then be given the option to print a form that
can be mailed to Franklin Covey.
16. From the Registration screen, click Next and follow
directions. Depending on the registration option you selected,
you will be presented with different options. When you are
Page 19
Page 20

finished with registration, you will be taken to the Completed
Registration screen. Click Done.
17. From the Installation Complete screen, click Finish.
The Franklin Covey product installation screen will remain displayed
until you click Exit.
Starting Outlook After Franklin Planner Installation
1. The first time you start Outlook after installing Franklin
Planner for Microsoft Outlook, the Welcome to Franklin
Planner for Microsoft Outlook screen appears.
Click topics for
other screens
Click Close
when finished
2. The first screen (in a series of three) tells you what features
were added to your Outlook installation. To learn a little more
about What Matters Most or Franklin Planner, click the topics
in the left column. Click Close when finished.
Important:The Welcome to Franklin Planner for Microsoft Outlook
screen appears only the first time you start Franklin
Planner for Microsoft Outlook. If you want to view it
again, you must look for it on your installation CD and
run it from there. You will find the file, called
START.EXE, in the root directory of the installation CD.
Uninstall Franklin Planner
If you need to uninstall Franklin Planner for Outlook, follow these
simple steps:
1. Close Outlook completely.
2. From your Windows taskbar, choose Start, Settings, Control
Panel to get to the Control Panel. Double-click Add / Remove
Programs.
Page 20
Page 21

3. Select Franklin Planner for Microsoft Outlook and click the
Add / Remove button.
4. In the Setup Type screen, you can choose to reinstall Franklin
Planner for Outlook, or uninstall the program. Click
Uninstall ..., then click Next.
5. The Setup Status screen shows the progress of the
uninstallation process. You may be prompted to remove
certain unused shared files, which you can choose to delete.
6. After uninstallation, the Maintenance Complete screen
appears. Click Finish.
You'll need to restart your system before you can reinstall Franklin
Planner for Microsoft Outlook.
Page 21
Page 22

Installing Special Components
When you install Franklin Planner for Microsoft Outlook, you have
the option of installing some “specialized” components of the
software. You can choose to install the following specialized
components:
ΠFranklin Planner for Palm. Franklin Covey has created sev-
eral applications for the Palm family of handheld organizers
that support the What Matters Most system for time management and life leadership. When you choose to install these
applications on your Palm, the installation program will prepare the applications to be installed on your Palm organizer
the first time you conduct a HotSync operation, and will
install the software necessary to conduct a HotSync (synchronization) operation.
ΠFranklin Planner for PPC (Pocket PC). When you choose to
install Franklin Planner for the Pocket PC, three applications
(the Prioritized Daily Task List, the Master Task List, and the
Daily Record of Events) will be installed on your Pocket PC.
These applications will synchronize with the corresponding
applications in Microsoft Outlook (the Daily Record of
Events synchronizes with the Notes feature of Outlook’s
Journal).
ΠMultimedia Files. Franklin Covey has created a series of
multimedia presentations to help you better understand the
What Matters Most system for time management and life
leadership. If you choose to install multimedia files, the files
will be installed to your hard drive.
You can still run the multimedia files even if you don’t install
them to your hard drive (see “Install Multimedia Files” on
page 25).
Depending on which specialized components you choose to install,
the installation procedure will differ a little from the standard. Refer
to the paragraphs below for specifics as to the installation procedure
for each of the listed components.
Converting Franklin Planner Software/ASCEND 97 Data
If you are a current user of Franklin Planner Software for Windows or
its predecessor, ASCEND 97, the Franklin Planner for Outlook
installation program will detect the existence of Franklin Planner
Page 22
Page 23

Software/ASCEND 97 on your computer. You will then be prompted
to choose whether to convert your Franklin Planner Software/
ASCEND 97 information into a format useable by Franklin Planner for
Microsoft Outlook. See “Franklin Planner Software Data Conversion”
on page 24 for instructions on how to do this.
Install Palm Components
If you want to install the files to synchronize Franklin Planner for
Microsoft Outlook with your Palm handheld organizer, you will mark
the Franklin Planner for Palm option on the Select Components
screen (see page 16).
1. During installation, the User Information screen appears.
Type the user name for your Palm organizer (up to 20
characters) and click Next.
2. You will be prompted to select the serial port to which your
Palm cradle is attached. The installation program
automatically detects your Palm organizer cradle if it is
attached to your computer, so you can normally accept the
default selection by clicking Next. You can change the port
later if it becomes necessary (refer to your Palm
documentation for this simple procedure).
3. You may be prompted to install the latest Franklin Planner
Palm applications. Choose Yes to install.
4. The installation process will then continue.
Install PPC (Pocket PC) Components
If you want to install the files necessary to synchronize Franklin
Planner for Microsoft Outlook with your Pocket PC, you will mark the
Franklin Planner for PPC option on the Select Components screen
(see page 16).
1. A warning may appear advising you that Windows CE
services must be installed on your desktop before you can
install Franklin Planner for PPC. Click Next to continue.
2. The Choose Destination Location screen appears. To accept
the default location to install the PPC files, click Next. To
change the location, click Browse, navigate to the desired
folder, click OK, then click Next.
3. From the Start Installation screen, click Next.
4. You will now be prompted to install files to the PPC device.
Click OK and follow instructions.
Page 23
Page 24

5. The installation process will then continue.
Franklin Planner Software Data Conversion
If you have been using Franklin Planner Software for Windows or
ASCEND 97, the Franklin Planner for Outlook installation program
will automatically detect this software on your computer and prompt
you to choose whether you want to convert Franklin Planner
Software/ASCEND 97 information into a format useable by Franklin
Planner for Microsoft Outlook.
1. During the installation process, a Question screen appears,
asking if you want to install the data conversion utility. Click
Yes to continue.
2. The installation process will continue, until the ASCEND >
Outlook Export screen appears.
3. From here, choose which Franklin Planner Software/
ASCEND 97 data types you want to export by clicking in the
appropriate check boxes.
ΠContacts. Exports Address and Phone to Outlook's Contacts
list.
Page 24
Page 25

ΠCalendar. Exports Appointment Schedule to Outlook's Cal-
endar.
ΠTasks. Exports the Prioritized Daily Task List to the Priori-
tized Daily Task List in Franklin Planner for Microsoft Outlook.
ΠMaster Tasks. Exports the Master Task List to the Master
Task List in Franklin Planner for Microsoft Outlook.
ΠDaily Record of Events. Exports Daily Record of Events
entries to the Journal in Microsoft Outlook as Notes on the
date of the entry.
4. With your export options selected, click Export Files. The
Export Progress box appears. Depending on the number of
items being exported, the export process may take some time.
5. When the export is complete, the Export Progress box
displays the prompt “Transfer Complete.” Click OK. Back at
the Export dialog box, click Exit to close the conversion utility.
6. The installation process will then continue.
Install Multimedia Files
At the Select Components screen (page 16), you are given the option
to install multimedia files. If you select the option to install
multimedia files, the multimedia files will be copied to your hard disk
during the installation process.
Note: You can still run the multimedia files even if you don’t elect to
install them to your hard disk. When you activate an option in
Franklin Planner for Outlook that requires the multimedia
files, you will simply be prompted to insert the Franklin
Planner for Outlook installation CD in the CD-ROM drive
before continuing.
Page 25
Page 26

Start Using the Franklin Planner
Once you’ve installed Franklin Planner for Microsoft Outlook, you’re
ready to start scheduling your daily activities based on your highest
priorities. Following are a few tips that will help you get started.
The Franklin Planner Menu
One of the first things you’ll notice after installing Franklin Planner for
Microsoft Outlook is the addition of the Planner menu in the main
menu bar.
Use the Planner menu to:
ΠCreate new Franklin Planner tasks and appointments.
ΠOpen the What Matters Most Wizards.
ΠOpen the Prioritized Daily Task List, Master Task List,
Weekly Compass, and Compass Map.
ΠPrint to Franklin Planner custom forms.
ΠAccess online Help.
The Franklin Planner Toolbar
After you install, you’ll also notice that five additional icons appear on
the main Outlook toolbar. These icons correspond to the following
Franklin Planner features:
Opens your Prioritized Daily Task List
Opens your Master Task List
Page 26
Page 27

Opens the Franklin Planner Print dialog box
Opens the Compass Map
Opens Franklin Planner online Help
What Matters Most Today versus Outlook Today
Microsoft Outlook’s Outlook Today page lets you see everything
you’ve got going today. It shows you all your appointments and tasks
for the current day, as well as new e-mail messages and contact
information.
Franklin Planner for Microsoft Outlook builds on this daily preview
by incorporating what matters most to you into your daily Outlook
page, called What Matters Most Today. This page works much like
Outlook Today—you get a quick glimpse of your daily tasks and
appointments, e-mails and contacts, but you also remind yourself
what matters most to you.
When you install Franklin Planner for Microsoft Outlook, What
Matters Most Today is automatically made your default view when
you select Outlook Today. If you change the view to the normal
Outlook Today, you can change back to What Matters Most Today in
the following manner:
To select What Matters Most Today as your default page
1. Click the Tools menu from the main menu bar and select
Options.
Page 27
Page 28

2. Click the Franklin Planner tab.
3. From the Today Page field, select What Matters Most Today.
Click OK to close the Options screen.
4. Open your What Matters Most Today page by clicking the
Outlook Today icon in the Folder List or on the Outlook Bar.
Click on the
Options button
to customize your
view
Type in a name
to quickly locate
a listing in your
Contacts folder
5. Review your What Matters Most information by clicking on
the tabs or buttons for Discover, Plan, and Act.
Adding the Franklin Planner Icon to your Windows Taskbar
During installation, you have the option to show the Franklin Planner
icon on the Windows taskbar (see page 18). If you didn’t select this
option during installation, you can manually add the icon to your
Page 28
Page 29

Windows taskbar at any time. Adding the Franklin Planner icon to
your Windows taskbar lets you open your Prioritized Daily Task List,
Master Task List, Weekly Compass, and the Compass Map without
opening Outlook.
To add the Franklin Planner icon to the System Tray:
1. Click the Windows Start button and select Programs.
2. Select Franklin Covey.
3. Click Task. The Franklin Planner compass icon appears on
the Windows taskbar.
4. Right-click on the icon to display a pop-up menu:
5. From this pop-up menu, you can display your Prioritized
Daily Task List, your Master Task List, your Weekly
Compass, or the Compass Map. You can also choose Close to
remove the icon from the Windows taskbar if you desire.
Getting Help
As you work with Franklin Planner, you may discover that you need
two different kinds of help: (1) help with the What Matters Most
process, Franklin Covey’s method for time and life management; and
(2) help with the software itself. Help with the What Matters Most
process is available by consulting the Compass Map, the Multimedia
Companion Volume, and the online Help system; help with Franklin
Planner and Outlook software is available from online Help.
The What Matters Most Compass Map
To help you learn about the Franklin Covey approach to time and life
management, we’ve prepared a multimedia presentation –accessed
through a “Compass Map” – that gives a quick, thorough overview of
the Franklin Covey system. You can install the multimedia
presentation on your hard drive, or you can simply access it from your
CD (see “Install Multimedia Files” on page 25).
Page 29
Page 30

As you view the various parts of the presentation, you’ll learn:
Œ Franklin Covey’s method for aligning your life with what
truly matters most to you.
Œ How to build your life’s “compass” based on a simple, yet
powerful exercise in introspection.
Œ How to use this “compass” to establish long-range goals.
ΠHow to turn your long-range goals into reality by creating
some simple, effective plans.
ΠHow to fit your highest dreams and aspirations into your
already overcrowded daily schedule.
The multimedia presentation includes several individual segments:
ΠAn eight-minute overview of the What Matters Most process
ΠSix shorter segments, each of which focuses on a specific step
in the What Matters Most process.
The Compass Map lets you access each segment and track your
progress as you view individual segments.
To access the Compass Map:
1. Select Compass Map from the Planner menu, click the
Multimedia icon on the Franklin Planner toolbar, or click
Compass Map from the What Matters Most Today home
screen.
2. The Compass Map opens, displaying a compass.
Individual
segments
Overview
Page 30
Page 31

3. Click Overview to view the eight-minute movie.
4. Click one of the buttons on the compass to view individual
segments. You will notice that, as you move your mouse over
the various buttons, the “lens” moves around the compass,
the needle moves, and a box pops up giving you options to
view the multimedia segment or go directly to the Wizards to
begin using the particular feature.
Each time you access the Compass Map, the needle on the compass
will point to your next step in the discovery process.
The Multimedia Companion Volume
Also included with Franklin Planner for Microsoft Outlook is a
booklet entitled Discovering What Matters Most, a companion volume
to the multimedia presentation that gives a more in-depth explanation
of the concepts outlined in the multimedia presentation.
Online Help
Franklin Planner for Microsoft Outlook builds on the capabilities of
Microsoft Outlook. As a result, if you encounter problems while
working with Franklin Planner and Microsoft Outlook, some of your
help needs will be better answered by Microsoft Corporation, while
other needs can be addressed by Franklin Covey sources.
Outlook Help
If you’re having problems in the regular Outlook environment, your
problem is probably with Microsoft Outlook itself, and you should
consult Microsoft information sources. In this case, there are several
places to turn for help:
Œ Your Outlook User ’s Manual
ΠMicrosoft Web Help. Visit the Microsoft technical support
Web site at http://www.microsoft.com/support/.
ΠOnline Help. Online Help is available within Outlook by
pressing the F1 key, or choosing Help from the menu bar.
Franklin Covey Help
If you are encountering a problem while working in a Franklin
Planner screen, form, or dialog, then your problem probably concerns
the Franklin Planner product, and you need help from Franklin Covey
sources. In this case, there are several places you can go to find the
information you need.
Page 31
Page 32

Œ This User’s Guide.
ΠOnline Help. You can access Franklin Covey online Help
from several places. The easiest is to click the Help icon on
the Franklin Planner toolbar, or to select Franklin Covey
Help from the Planner menu. Context-sensitive help is also
available by pressing F1.
Œ Franklin Covey technical support (see “Technical Support”
below).
Technical Support
If your problem is with Franklin Planner for Microsoft Outlook and
you can’t find the answer to your question in this User’s Guide or the
online Help system, registered users can contact Franklin Covey
Technical Support for help. Technical Support is available via:
Telephone
975-9999 between 7 AM and 6 PM Mountain Time, Monday through
Friday (except holidays). Make sure you have the software open on
your computer so you can walk through the problem with the support
technician.
Fax
– For support by fax, call (801) 978-1133.
E-mail
support@franklincovey.com.
Web
at http:\\www.franklincovey.com. Click the Online Communities tab
and select Technology Forum.
– To reach Franklin Covey Technical Support, call (801)
– For e-mail support, send your message to
– You can get help from Franklin Covey via the World Wide Web
Page 32
Page 33

Using the Wizards to Discover What Matters Most
Franklin Planner for Microsoft Outlook includes five Wizards that
walk you step by step through the process of discovering what
matters most to you. Each Wizard begins with an introduction or
explanation screen-which you can turn on or off:
Subsequent Wizard pages show you how to complete individual steps
in the What Matters Most process.
To open any of the Wizards, select What Matters Most Wizards from
the Planner menu and then select the Wizard you want to open. The
Wizards will help you identify your governing values, roles, mission
statement, and long-range goals and create your Weekly Compass.
Identify your Governing Values
Your governing values represent your highest priorities. They help
you determine what is worthwhile and important to you. For
example, you may value things like family, humor, individuality,
honesty, friendship, health, and so on. The Governing Values Wizard
will step you through the process of identifying, prioritizing, and
clarifying your governing values.
Page 33
Page 34

For example, in the second screen of the Governing Values Wizard,
you create a list of your governing values. To get you started, the
Wizard provides some sample values you can copy to your list. You
can also enter your own unique values directly into your list.
Subsequent screens in the Wizard help you prioritize and clarify your
values.
For more information on Governing Values and using the
V
Governing Values Wizard, see the following online Help topics:
ΠDiscover your Governing Values
ΠThe Governing Values Wizard
ΠAdding Governing Values
ΠPrioritizing Governing Values
ΠClarifying Governing Values
Page 34
Page 35

Identify your Roles
Roles represent your key relationships and responsibilities. They help
you separate the different areas of your life that require attention. The
Roles Wizard will help you identify your key relationships and define
your responsibilities within each relationship.
For example, in the last screen of the Roles Wizard you select one of
your roles and then identify a key person or persons for that role. Once
you’ve identified a key person, you write a tribute statement that
you’d like that person to say about you.
For more information on Roles and how to use the Roles Wizard,
V
see the following online Help topics:
ΠDiscover your key roles and relationships
ΠThe Roles Wizard
ΠAssociating key people with each role
ΠAdding tribute statements for each key person
Page 35
Page 36

Develop your Mission Statement
Your personal Mission Statement represents your unique purpose in
life as you see it, and should be a natural outgrowth of your governing
values and roles. You can create a personal Mission Statement, or a
Mission Statement for a business, family, or other group.
When you create a mission statement with the Mission Statement
Wizard, you are given the option to view an existing mission
statement, or click New to create a new one.
We’ll assume you want to create a new one, so you click New. You are
then given the option to enter the mission statement directly, or to use
the Mission Statement Wizard to help you better understand personal
mission statements.
If you choose to enter a mission statement directly, you’ll be taken to
another page in the Wizard, where you can record your mission
statement.
Page 36
Page 37

If you choose to create a mission statement with the Wizard, you’ll be
guided through a series of questions about yourself and then use your
answers to draft your mission statement. For example, here’s one of
the questions from the Wizard:
There is a very detailed explanation of mission statements and
V
how to use the Wizard to develop a personal mission statement
in the online Help system. As a start, see the following Help
topics:
ΠDiscover Your Personal Mission
ΠFormulating Your Personal Mission Statement
Œ Try “Fast Writing” a Mission Statement
ΠThe Mission Statement Wizard
ΠWriting a Personal Mission Statement with the Wizard
ΠWriting a Mission Statement Without the Wizard
Page 37
Page 38

Set Long-Range Goals
You begin to bring your daily activities in line with what matters most
by setting long-range goals, subdividing your goals into manageable
steps, then scheduling those steps as tasks and appointments. The
Long-Range Goals Wizard helps you identify long-range goals, link
those goals to what matters most to you, and create and schedule
intermediate steps for achieving your goals.
For example, the second screen of the Long-Range Goals Wizard
ensures that the goals you set for yourself reflect the things that you
value most. In this screen, you set a goal and then link the goal to your
values, roles, or mission.
For more information on Long-Range Goals and using the Long-
V
Range Goals Wizard, see the following online Help topics:
ΠSetting Long-Range Goals
ΠThe Long-Range Goals Wizard
ΠIdentifying Long-Range Goals
Page 38
Page 39

ΠLinking Goals to What Matters Most
ΠListing Intermediate Steps Toward Goals
ΠScheduling Long-Range Goals
Create a Weekly Compass
As you plan your week, you’ll want to plan and schedule the things
that matter most, first. Usually, the things that matter most relate to
your key roles and relationships. The Weekly Compass Wizard helps
you identify goals you want to achieve in your key roles during the
coming week, and then either schedule events that relate to those
goals or simply keep those goals in the front of your mind.
In the second screen of the Wizard, you review all your roles and then
select several roles to focus on developing during the coming week.
In the final screen of the Wizard, you schedule the steps that will help
you accomplish your Weekly Compass goals.
Page 39
Page 40

For more information on the Weekly Compass and using the
V
Weekly Compass Wizard, see the following online Help topics:
ΠWhy Plan Weekly?
ΠThe Weekly Compass Wizard
ΠSelecting Weekly Compass Roles
ΠScheduling Compass Events
For more information on the importance of key roles and
relationships, see the Discovering What Matters Most multimedia
presentation and Companion Volume. Also, see “Use Your Weekly
Compass” on page 45.
Using Franklin Planner to Manage your Time
Once you’ve identified what matters most to you, you can start using
Franklin Planner for Microsoft Outlook to perform common time and
life management tasks.
Remember to Plan
Franklin Planner for Microsoft Outlook will help you schedule and
plan your weeks and days. However, as you begin to plan, you must
take some time to think about what you really want to accomplish.
Following are a few guidelines to consider as you plan.
Plan Your Week
Weekly planning is the primary way that you take what matters most
to you and fit it into your schedule first.
Page 40
Page 41

Use the following five-step process to plan your week. Before you
begin, find an area that is as free from distractions as possible, where
you can concentrate on the task at hand. Ideally, this will be the same
place (and the same time) each week. Then, follow these five steps:
1. Review What Matters Most. Spend a few minutes reviewing
what matters most to you—your Governing Values, Roles,
and Personal Mission. This refreshes your mind so that the
tasks and appointments you schedule for the week will reflect
your highest priorities.
2. Evaluate Last Week. With what matters most fresh in your
mind, review last week’s task lists and appointment
schedules for any items that were uncompleted, deleted,
forwarded, or that need follow-up.
3. Check Your Master Task List. Check your Master Task List
for any items that you want to schedule for the coming week.
You’re not scheduling these tasks just yet ... you’re just getting
an idea of what items from your Master Task List need to be
moved into your daily schedule. Some Master Tasks may be
scheduled in Step 5, Schedule What Matters Most, while
others may be “fill-in” tasks after you’ve scheduled the most
important items.
4. Complete Your Weekly Compass. “Create a Weekly
Compass” on page 39 shows you how to identify and set
goals for particular roles and relationships that you want to
focus on for the coming week.
5. Schedule What Matters Most. Create and schedule tasks and
appointments that support your Weekly Compass goals and
other goals that support what matters most to you.
Plan Your Day
Daily planning is where you set the stage to act on your values, roles,
and mission statement. That is, you schedule tasks and appointments
on your daily calendar that help you achieve what matters most to
you. Follow these four steps to plan your day’s events.
1. Review Yesterday. Before you can schedule tasks and events
for today, you need to “close out” any uncompleted items
from the previous day. Review your task and appointment
list from yesterday for any uncompleted items and reschedule them as needed.
2. List Today’s Events Realistically. However good your
intentions, you can only accomplish so much in one day.
Page 41
Page 42

Create a realistic task list and appointment schedule, and don’t
overload yourself.
3. Assign a Value to Each Task. Assign values to the tasks on
your list by determining which tasks are most important. “A”
priority tasks are Vital – they must be completed today. “B”
priority tasks are Important but not vital – they should be
completed today if possible, but can wait if necessary. “C”
priority tasks are Optional – you normally turn your attention
to them only when A and B priority tasks are completed.
4. Order Each Task. Once you’ve assigned values to your tasks,
order your tasks with a ranking (A1/A2/A3, B1/B2/B3, C1/
C2/C3 and so on) so that the very most important things to
you are the things that you get done first.
Create a Prioritized Daily Task List
The Franklin Planner Prioritized Daily Task List (PDTL) works just
like Outlook’s TaskPad. You can add, copy, and delete tasks; assign
tasks to others; create recurring tasks; set task start and due dates;
track task status, set task reminders, and categorize tasks. The PDTL
is where you’ll add and prioritize most of your daily tasks.
Unlike Outlook’s TaskPad, however, the PDTL gives you several
additional options. With the PDTL, you can:
ΠAssign Franklin Covey action codes to tasks.
ΠPrioritize and rank your tasks.
ΠAssign tasks to a Time Matrix quadrant.
ΠView the date for any given task list.
ΠDisplay a link to a long-range goal.
ΠEasily filter tasks based on categories you specify.
ΠLaunch the PDTL from the Windows taskbar so you can view
and edit your tasks even when Outlook isn’t running.
Page 42
Page 43

Because the PDTL maintains the functionality of Outlook’s TaskPad,
it may be helpful to review Outlook’s online Help topic “Creating and
Maintaining a Task List” for information on using task lists.
For more information on the Prioritized Daily Task List, see the
V
following online Help topics:
ΠOrganize Your Day
Œ The PDTL versus Outlook’s TaskPad
ΠOpening the PDTL
ΠAdding a Task in the PDTL
ΠPrioritizing Your Tasks
ΠAssigning an Action Code to a Task
ΠAssigning a Task to a Quadrant
ΠThe Time Matrix
Schedule Appointments
Franklin Planner for Microsoft Outlook uses Outlook’s Calendar
feature for appointments and events. As a result, you schedule an
appointment with Franklin Planner just as you would with Outlook.
The only difference is that Franklin Planner adds a tab to the
Appointment dialog box that lets you assign the appointment to a
Time Matrix quadrant and view any long-range goals the
appointment may be linked to. To access the Franklin Planner tab, you
must create the appointment from the Planner menu by choosing
Planner |New |Appointment.
Page 43
Page 44

For more information on scheduling appointments, see the
V
following online Help topics:
ΠAdding an Appointment
ΠThe Time Matrix
Œ Microsoft Outlook’s online Help. As a starting point, open
Outlook’s online Help, click the Index tab, and type
“appointment.”
Create a Master Task List
The Master Task List (MTL) is a “holding bin” for important tasks that
you don’t want to forget but that you haven’t yet placed on your PDTL
or appointment schedule. The MTL looks and operates just like the
PDTL, with one exception: You cannot assign a rank to Master Tasks
(1, 2, 3 and so on); you can assign only A, B, or C values. Your Master
Task List looks something like this:
Page 44
Page 45

For more information on the Master Task List, see the following
V
online Help topics:
ΠOpening the Master Task List
ΠCreating a Master Task
ΠScheduling a Master Task
ΠAssigning a Value to a Master Task
ΠAssigning a Master Task to a Quadrant
ΠUsing Categories with Master Tasks
ΠViewing a Goal Linked to a Master Task
Use Your Weekly Compass
Once you’ve created your Weekly Compass with the Weekly
Compass Wizard, you can view and modify it at any time. To open
your compass, select Weekly Compass from the Planner menu, or
right-click the Franklin Planner icon in the System Tray. Your Weekly
Compass opens and looks something like this:
Click the Refresh button
to update your Weekly
Compass with any changes
you make in your Calendar
or PDTL
It’s a good idea to review your compass regularly, as a reminder of
those things that are most important to you.
For more information on the Weekly Compass, see the following
V
online Help topics:
ΠOpening Your Compass from the Taskbar
ΠEditing your Weekly Compass from Outlook
ΠEditing your Weekly Compass from the Taskbar
Page 45
Page 46

ΠViewing Your Compass from What Matters Most Today
ΠViewing Your Compass from Outlook
Use Outlook’s Journal as a Daily Record of Events
The Journal in Microsoft Outlook functions much like Franklin
Covey’s Daily Record of Events (DRE). It can track your activities –
mail messages, tasks, appointments, phone calls, and so forth – as well
as your work within any Microsoft Office document.
You view the Journal by clicking on the Journal folder in Outlook, or
by clicking the Act tab in What Matters Most Today. The Journal
displays a timeline showing each document you worked on and each
call, appointment, task, or other activity for which you created a
Journal entry. To easily view tasks, appointments, and notes for the
week, from the menu bar choose View | Current View | By
Category.
For more information on using the Journal as a Daily Record of
V
Events, see the following online Help topics:
Œ Using Outlook’s Journal
ΠSetting Journal Preferences
ΠAdding a New Journal Entry Manually
ΠAdding Existing Items to the Journal
ΠViewing Your Journal
Œ Microsoft Outlook’s online Help. As a starting point, open
Outlook’s online Help, click the Index tab, and enter “journal.”
Page 46
Page 47

Print to Franklin Covey Custom Forms
With Franklin Planner for Microsoft Outlook, you get powerful
printing options. You can print your Appointment Schedule and
Prioritized Daily Task List to plain paper or Franklin Planner paper
forms. You can also print items like your Master Task List and your
Governing Values, Roles, Mission Statement, and Long-Range Goals.
To open the Franklin Planner Print dialog box, you have three options:
click the Print icon on the Franklin Planner toolbar; right-click on the
item you want to print and select Print from the pop-up menu; or
select Print Franklin Covey Forms from the Planner menu. The
Franklin Planner Print dialog box opens.
Whether you’re printing your tasks and appointments, your journal,
or any other item, there are several print options that are common to
any print job. These options include:
ΠBinder size
ΠPaper type
ΠWhat to Print
ΠDate range
ΠPage range
ΠWhich pages within the range to print
Π# of copies
These options are selected on either the What to Print or the Paper
tabs of the Print screen.
Page 47
Page 48

For more information on printing to Franklin Covey custom
V
forms, see “Print Franklin Covey pages” in the online Help file.
Page 48
Page 49

Additional Information
This section gives you more detailed information about particular
features of Franklin Planner for Microsoft Outlook.
Running the Conversion Utility as a Standalone Application
If you do not choose to convert Franklin Planner Software/ASCEND
97 data during installation of Franklin Planner for Outlook, you can
still come back and convert data at anytime in the future.
1. From the Windows taskbar, choose Start, Run to open the
Run dialog box. Click Browse and navigate to the folder
containing the file FPSConvert.exe file (normally
C:\Program Files\Franklin Covey\Outlook).
2. Highlight the FPSConvert.exe file, then choose Open, then
OK. If you are prompted to do so, choose the desired user
from the User Selection dialog box and click OK. This brings
up the ASCEND-Outlook Export dialog box.
3. Follow the directions in “Franklin Planner Software Data
Conversion” on page 24 to perform the conversion.
When the export is complete, open Microsoft Outlook to verify that
your items were exported correctly.
Page 49
Page 50

Page 50
Page 51

Index
C
CE - see Windows CE
compass
as the multimedia map 30
associated Help topics for
Weekly Compass 40
build a "life compass"
how to create a Weekly Compass
39
use the Weekly Compass Wizard
39
use your Weekly Compass
Weekly Compass
Compass icon
access Weekly Compass from
Windows taskbar
conversion
Copyright information
custom
17, 22, 24, 49
print to Franklin Covey custom
26, 47
forms
D
daily planning - see planning
Daily Record of Events (DRE)
online Help topics 46
using Outlook’s Journal as a DRE
46
daily task list - see Prioritized Daily
Task List
data conversion
DRE - see Daily Record of Events
17, 22, 24, 49
E
Expression Service
installing Expression Service
needed for Franklin Planner
installation 8
F
forms
30
45
7, 8, 26
29
ii
10
how to print to Franklin Covey
custom forms
online Help topics
use the Planner menu to print to
Franklin Covey custom forms
26
FPS Data Conversion Utility
24, 49
Franklin - see Franklin Covey
Franklin Covey
approach to time and life
management 7
Franklin Planner
What Matters Most
Franklin Planner
add Franklin Planner icon to
Windows taskbar
before you install
converting Outlook Today to
What Matters Most Today
copyright information
daily planning
Daily Record of Events
Expression Service needed before
installati on 10
Franklin Planner toolbar
getting help
installing
installing Palm components
installing Windows CE
components 23
launch applications from
Windows taskbar 29
license agreement
manage your time
Master Task List
multimedia companion volume
31
multimedia presentation
online Help available
Planner menu
printing to custom forms
Prioritized Daily Task List
scheduling appointments
software registration
supports What Matters Most
methodology
41
29
8, 10
26
47
48
17, 22,
7
7
28
10
27
ii
46
26
20
ii
40
44
29
31
47
42
43
18
7
Page 51
Page 52

technical support 32
32
e-mail
fax
32
telephone
Web
uninstall instructions
Weekly Compass
weekly planning
What Matters Most Wizards
works with Microsoft Outlook
Franklin Planner for Palm
Franklin Planner for Pocket PC
22, 23
32
32
20
45
40
22
G
goals
online Help topics
part of What Matters Most
methodology
setting long-range goals
weekly goals for the Weekly
Compass
goals - see long-range goals
Governing Values
defined
how to identify your Governing
online Help topics
part of discovering What Matters
use Wizards to discover What
33
Values 33
Most 7
Matters Most 33
38
7, 30
38
39
34
H
Help
getting Help with Outlook or the
Franklin Planner 29
icon that opens Franklin Planner
online Help
online Help
Franklin Covey Help 31
Outlook Help
technical support
the multimedia companion
volume
use Planner menu to access
27
31
32
31
33
17,
online Help
What Matters Most multimedia
presentation 29
26
I
installation
back up Palm organizer data
before installing the Franklin
7
Planner 10
installation instructions
installing Microsoft Outlook
Expression Service 10
installing Palm components
installing Windows CE
components 23
multimedia
multimedia files
software registration
special components
system requirements
uninstall instructions
what you install with the
Franklin Planner 8
25
17
J
Journal - see Daily Record of Events
K
key roles - see Roles
L
License Agreement ii
life management
create a weekly compass
daily planning
develop your mission statement
36
discover What Matters Most
identify governing values
identify your roles
set long-range goals
use your weekly compass
watch multimedia presentation
29
weekly planning
41
40
11
15
20
18
22
7
20
39
7
33
35
38
45
Page 52
Page 53

M
map
click icon to open multimedia
map 27
how to access the multimedia
map 30
open multimedia map from
Planner menu
open multimedia map from
Windows taskbar 29
use multimedia map for
overview of What Matters
Most methodology
master task - see Master Task List
Master Task List
access from Windows taskbar
check Master Task List, part of
weekly planning 41
how to create
installed with Franklin Planner
online Help topics
print to Franklin Covey custom
47
forms
use icon to access
use Planner menu to access
Microsoft Outlook
components added with Franklin
Planner install
converting Outlook Today to
What Matters Most Today 27
defined
full installation required prior to
how to install Expression Service
mission
create a mission statement for a
create a Mission Statement with
create a Mission Statement
develop your Personal Mission
online Help topics
part of discovering What Matters
7
Franklin Planner install 10
10
business, family, or group
the Wizard 37
without the Wizard 36
Statement
7
Most
26
29
44
45
26
26
8
36
37
Wizard installed to help you
discover your Personal
Mission
mission statement - see Mission
multimedia
access multimedia map from
Windows taskbar 29
companion volume
install to hard drive
installed with Franklin Planner
run from CD
run from hard drive
use icon to access multimedia
map
use Planner menu to access
29
multimedia map 26
8
17, 22, 25
17
27
O
Outlook - see Microsoft Outlook
Outlook Today
8
change appearance of Outlook
27
Today
P
Palm 22
Palm connected organizer
backing up data
installing Palm components
Palm Desktop software
Palm Desktop - see Palm connected
organizer
PDTL - see Prioritized Daily Task
List
personal mission - see Mission
Pilot - see Palm connected organizer
plan - see planning
36
planning
Pocket PC
40–46
create a Master Task List
create a Prioritized Daily Task
List 42
daily planning
daily planning process
schedule appointments
use your Weekly Compass
weekly planning
17, 22, 23
11
41
40
31
17
8
17
20
11
44
41
43
45
Page 53
Page 54

PPC - see Pocket PC
Prioritized Daily Task List (PDTL)
defined
launch from Windows taskbar
online Help topics
ordering tasks
prioritizing tasks
42
43
42
42
R
registration
how to register your software
(online or registration card)
18
Roles
defined 35
online Help topics
part of discovering What Matters
Most 7
use Roles Wizard to identify roles
35
35
S
support - see technical support
system requirements
minimum
requirements of Outlook
installation
7
7
10
T
table of contents v
task list - see Prioritized Daily Task
List
Task(s)
be realistic in creating
component parts of Long-Range
Goals 38
displayed in Outlook Today or
What Matters Most Today
how to create a Prioritized Daily
Task List 42
online Help topics for Prioritized
Daily Task List 43
part of Daily Planning process
part of Weekly Planning process
41
Prioritized Daily Task List and
41
27
Master Task List available
42
42
from Windows taskbar
use icon to open Prioritized Daily
Task List or Master Task List
26
use Planner menu to open
Prioritized Daily Task List 26
technical support
Franklin Planner
e-mail support 32
fax support
telephone support
Web support
online Help for Franklin Planner
31
online Help for Outlook
registration necessary for
support 19
time management
daily planning
Franklin Planner tool for time
and life management 7
use Franklin Planner to manage
your time 40
view What Matters Most
multimedia presentation
weekly planning
What Matters Most a basis for
effective time management
Time Matrix
online Help topics 42, 43
U
uninstall
instructions
utility
conversion
20
17, 22, 24, 49
V
values - see Governing Values
W
41
Weekly Compass
access from Windows taskbar
associated Help topics
defined
39
29
32
32
32
32
31
41
29
40
7
29
40
Page 54
Page 55

how to create a Weekly Compass
39
launch from Windows taskbar
online Help topics
part of weekly planning
part of What Matters Most
methodology 7
scheduling tasks and
appointments to support
Weekly Compass goals
use Planner menu to access
use your Weekly Compass
using Weekly Compass Wizard
39
Wizard installed with Franklin
Planner 8
weekly planning
create a Weekly Compass 39
defined
online Help topics
process
What Matters Most
basis for effective time
40
41
management
40
41
40
40
39
26
45
converting Outlook Today to
What Matters Most Today 27
29
Franklin Planner tools to help
you discover 7
learn process from multimedia
companion volume 31
learn process from multimedia
presentation
use Wizards to discover and use
What Matters Most 33
What Matters Most Today
make default Outlook Today
screen
Windows CE
installing Windows CE
components
Wizards
list of What Matters Most
Wizards
use Planner menu to access What
Matters Most Wizards 26
use Wizards to discover What
Matters Most
Weekly Compass Wizard
29
27
23
8
33
39
Page 55
Page 56

Page 56
 Loading...