

Franke Foodservice VIVA XXL-T Installation Manual
Operating Instructions
bremer VIVA XXL-T
Automatic coffee brewing
and dispensing machine
with grounds container

Dear customers, ladies,
and gentlemen,
Please read the operating manual thoroughly before using the VIVA XXL-T
automatic coffee dispensing machine bremer VIVA XXL-T for the first time.
The operating manual contains important instructions for proper operation
and provides you with the requisite safety while handling the automatic
coffee dispensing machine.
Always keep the operating manual within reach!
bremer VIVA XXL-T
- Commercial coffee maker for filter cof fee, with automatic ejection of
used coffee powder after the brewing process
- four differently sized, selectable brewing quantities (see page 3)
- four differently dosed coffee output quantities (see page 3)
- Hot water outlet for cup (for small pot additional equipment)
Function
After selection of a brewing stage, the automatic coffee machine doses hot
water and coffee powder into its brewing container. After expiry of the
soaking time, it filters the freshly brewed coffee in its storage bowl. You can
take out the desired quantity by pressing the item key-button.
Explanation of symbols:
Steps/Activities to be carried out
Instructions, Sequence of functions
Reference to further instructions

Table of Contents Page
1. Instructions for operational safety 2. . . . . . . . . . . . . . . . . . . . . . . . . . . .
2. Get familiar with the coffee dispensing machine 3. . . . . . . . . . . . . . .
2.1 Set the language for the menue 4. . . . . . . . . . . . . . . . . . . . . . . . . . . . . . . . . . . . .
3. Start-up 5. . . . . . . . . . . . . . . . . . . . . . . . . . . . . . . . . . . . . . . . . . . . . . . . . . . . .
3.1 Refill cof fee powder 6. . . . . . . . . . . . . . . . . . . . . . . . . . . . . . . . . . . . . . . . . . . . . . .
3.2 Insert container or grounds drawer (optional) 6. . . . . . . . . . . . . . . . . . . . . . . . . .
3.3 Start brewing process 7. . . . . . . . . . . . . . . . . . . . . . . . . . . . . . . . . . . . . . . . . . . . .
3.4 Selection of brewing stage, disable and enable 8. . . . . . . . . . . . . . . . . . . . . . . .
3.5 Take out coffee 9. . . . . . . . . . . . . . . . . . . . . . . . . . . . . . . . . . . . . . . . . . . . . . . . . . .
3.6 Dispensing hot water 10. . . . . . . . . . . . . . . . . . . . . . . . . . . . . . . . . . . . . . . . . . . . . .
4. Stopping / End of operation 11. . . . . . . . . . . . . . . . . . . . . . . . . . . . . . . . . .
5. Cleaning and care 11. . . . . . . . . . . . . . . . . . . . . . . . . . . . . . . . . . . . . . . . . . .
5.1 The cleaning programme 12. . . . . . . . . . . . . . . . . . . . . . . . . . . . . . . . . . . . . . . . . . .
5.2 Empty grounds container and confirm 13. . . . . . . . . . . . . . . . . . . . . . . . . . . . . . . .
5.3 Clean housing 14. . . . . . . . . . . . . . . . . . . . . . . . . . . . . . . . . . . . . . . . . . . . . . . . . . . .
5.4 Clean coffee powder container 14. . . . . . . . . . . . . . . . . . . . . . . . . . . . . . . . . . . . . .
5.5 Emptying and cleaning the grounds drawer (optional) 14. . . . . . . . . . . . . . . . . . .
6. Setting/Adjusting the coffee dispensing machine 15. . . . . . . . . . . . . .
6.1 Overview of possible settings 15. . . . . . . . . . . . . . . . . . . . . . . . . . . . . . . . . . . . . . .
6.2 Display or delete/reset counter 16. . . . . . . . . . . . . . . . . . . . . . . . . . . . . . . . . . . . . .
6.3 Setting the brewing parameters 17. . . . . . . . . . . . . . . . . . . . . . . . . . . . . . . . . . . . .
6.4 Setting of the beverage volumes for items 18. . . . . . . . . . . . . . . . . . . . . . . . . . . .
6.5 Beverage selection 19. . . . . . . . . . . . . . . . . . . . . . . . . . . . . . . . . . . . . . . . . . . . . . .
6.6 Select beverage prices 20. . . . . . . . . . . . . . . . . . . . . . . . . . . . . . . . . . . . . . . . . . . .
6.7 Set dispensing control (external accounting) 21. . . . . . . . . . . . . . . . . . . . . . . . . .
6.8 Setting of cleaning parameters 22. . . . . . . . . . . . . . . . . . . . . . . . . . . . . . . . . . . . . .
6.9 Entering a PIN code to change settings 23. . . . . . . . . . . . . . . . . . . . . . . . . . . . . .
7. Faults and remedies 24. . . . . . . . . . . . . . . . . . . . . . . . . . . . . . . . . . . . . . . . .
8. Technical data 26. . . . . . . . . . . . . . . . . . . . . . . . . . . . . . . . . . . . . . . . . . . . . . .
9. Set up and connection 27. . . . . . . . . . . . . . . . . . . . . . . . . . . . . . . . . . . . . . .
9.1 Set up 27. . . . . . . . . . . . . . . . . . . . . . . . . . . . . . . . . . . . . . . . . . . . . . . . . . . . . . . . . .
9.2 Water connection 27. . . . . . . . . . . . . . . . . . . . . . . . . . . . . . . . . . . . . . . . . . . . . . . . .
9.3 Waste connection 28. . . . . . . . . . . . . . . . . . . . . . . . . . . . . . . . . . . . . . . . . . . . . . . . .
9.4 Electrical connections 28. . . . . . . . . . . . . . . . . . . . . . . . . . . . . . . . . . . . . . . . . . . . .
10. Servicing / customer service / data plate 29. . . . . . . . . . . . . . . . . . . . . .
1
1. Instructions for operational safety
Operation
D The bremer VIVA XXL-T may be operated only
- by assigned personnel,
- with inserted container or grounds drawer
- when the automatic coffee dispensing machine is supervised,
- for the purpose envisaged in the operating manual.
D CAUTION! Danger of scalding! During operation and cleaning, do not reach
under the coffee or hot water outlet.
D Do not remove the grounds container during a brewing process. If you have the
optional please ensure that the mobile grounds container is fixed.
D CAUTION! Do not reach into the coffee powder container during operation.
D Do not cover the ventilation vents.
D Do not allow any liquids to flow into the ventilation slits and filling openings!
D CAUTION! Do not spray the automatic coffee dispensing machine with a water
hose-pipe or high-pressure cleaner.
D The bremer VIVA XXL-T
- should be protected against dampness and the direct rays of the sun,
- may be operated in the open only with ceiling cover and sufficient
wind-protection!
D The ambient temperature at the installation site must not sink below freezing
point. The water could freeze and damage the components or the machine.
D bremer recommends to avoid water-damage: Get an electronic water-stop
installed between the water tap and the automatic coffee dispensing machine.
Your authorised bremer customer service would be glad to advise you.
D bremer VIVA XXL-T COOL: The machine must not be switched on and used if
the glass housing has broken. A new housing must be fitted by a bremer
customer service technician.
D In case of faults, pay attention to the instructions in chapter 7. ”Faults and
remedies”.
Pressure Chamber and Steam Boiler maintenance
D bremer recommends: According to the Pressure Chamber and Steam Boiler
maintenance, the operator must take care for the thorough servicing and testing
of the safety facilities.
D Therefore, at least once a year, get your automatic coffee dispensing machine
inspected and serviced by the authorized bremer customer service.
Servicing work includes, e.g. tests of the pressure chamber and its safety
facilities, functional, tightness tests.
Disposal, disassembly
D The housing parts are made of reusable plastic and are marked accordingly.
2
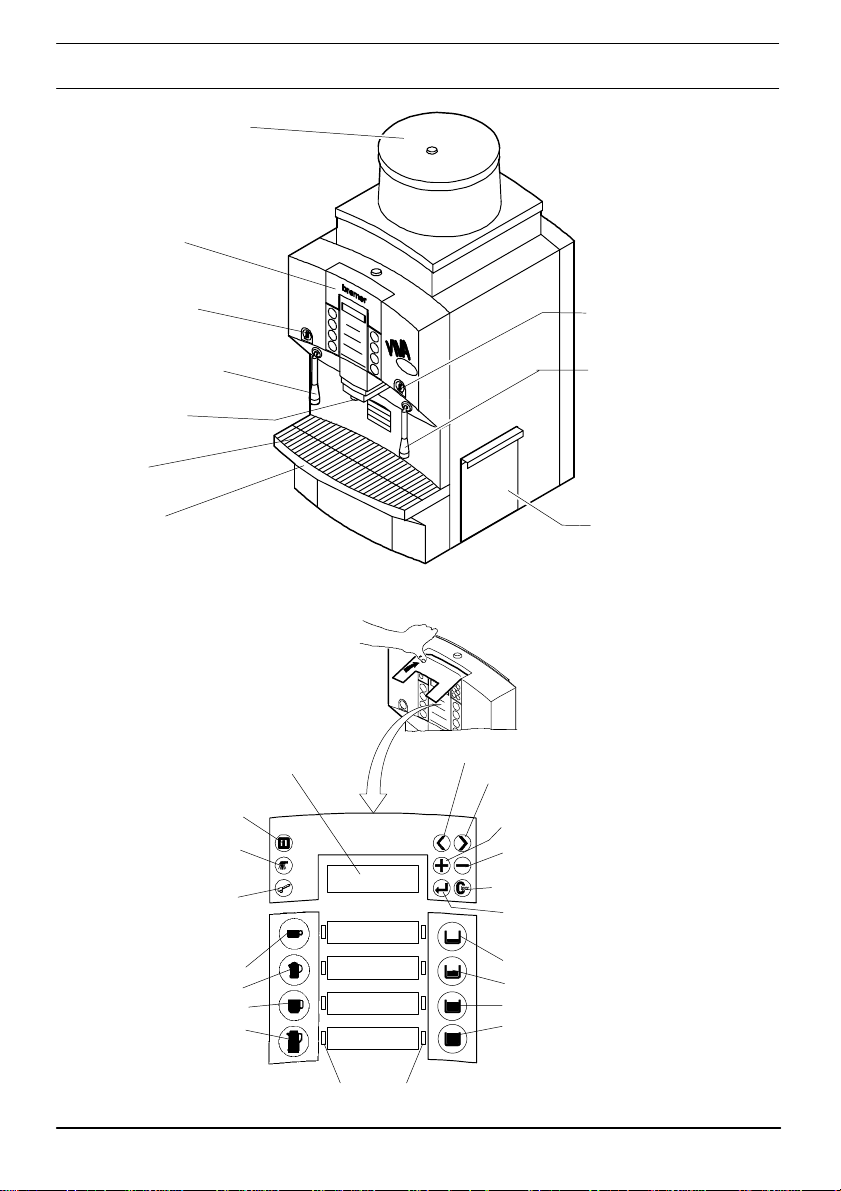
2. Get familiar with the coffee dispensing machine
Cover of the coffee
powder container
(lockable)
Key-board
cover (lockable)
Key-button for
cup of hot water
Hot water output
Cup
Coffee output
Drip tray
Drip pan
Key-board and display
Standard model
Machine switch
On / Off (S TANDBY)
Start cleaning pro-
gramme
Confirm insertion of the
cleaning tablets
Coffee-Item key-buttons:
Cup
Mug
Pot
Flask
display
screen
CUP OF COFFEE
MUG OF COFFEE
POT OF COFFEE
FLASK OF COFFEE
Key-button for Mug /
Pot hot water (option)
Hot water output,
Mug / Pot (option)
Optional grounds
drawer
Move backwards through the menu
Move forwards the menu
Carry out adjustments / undosed
taking of coffee
Carry out adjustments / Disable
brewing stages
Deletion/Resetting of quantity counters
Open and close menus
Brewing stages of filter coffee:
Stage 1.0 litre
Stage 2.0 litres
Stage 2.0 litres
Stage 2.5 litres, for continuous
brewing
Control lamps
3
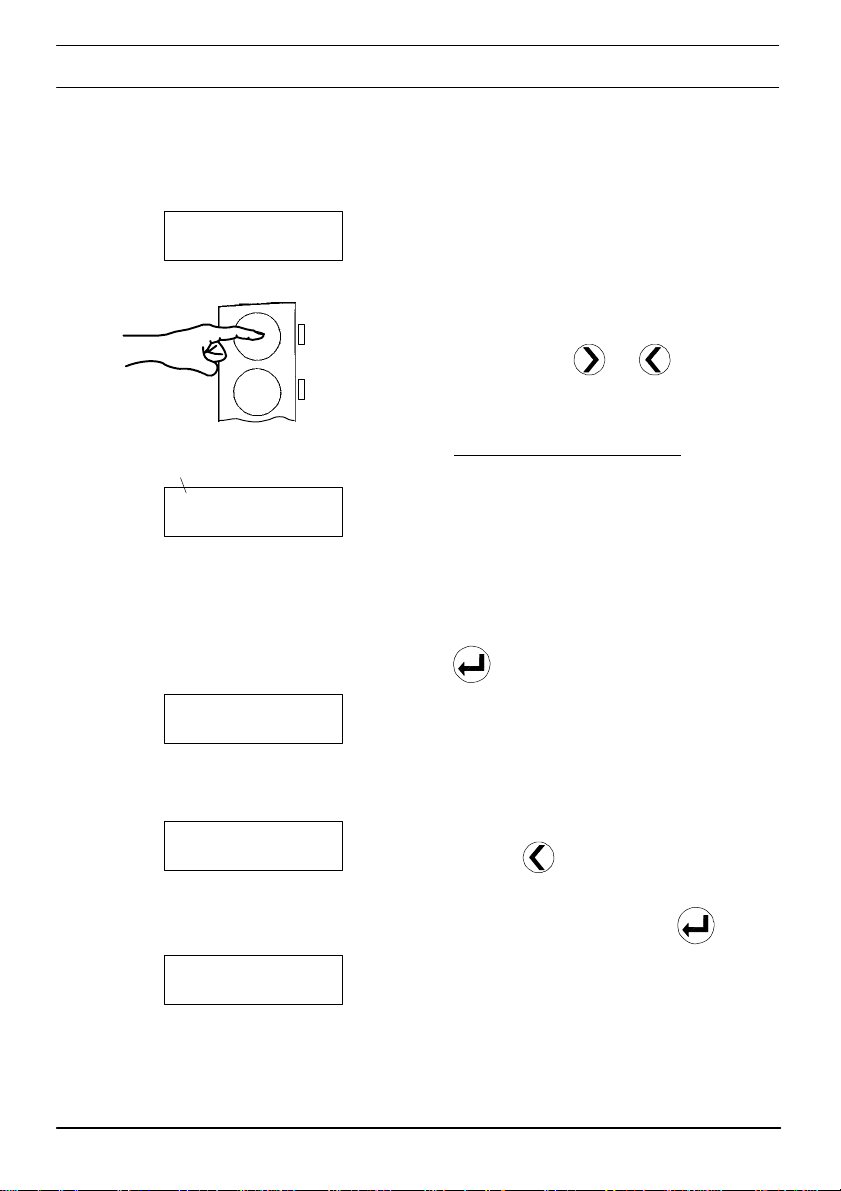
2.1 Set the language for the menue
Example: set the language to
German
STANDBY
. Press the upper article key on the left
START
START
Ländercode
049 STANDBY
. Confirm the setted contry code with key
D You can set the language of the texts or
country code at the machine
- before switching on
- in STANDBY Mode.
hand side continuously, press at the
same time key
or till the
requested country code apears in the
display
Country code Language
031 Netherlands
033 French
044 English
049 German
081 Japanese
(since 2002-11)
095 Russian
Summenzähler
Menü
verlassen
D Subsequently the setted language is
shown (Summing counter) in the display.
. Go to “Menü verlassen” (Exit menu)
with key
. Confirm the setting with key
STANDBY
D The machine goes into the STANBY
Mode and stores the new setting.
D With deviating proceeding the setting
may be lost after wetting running.
4
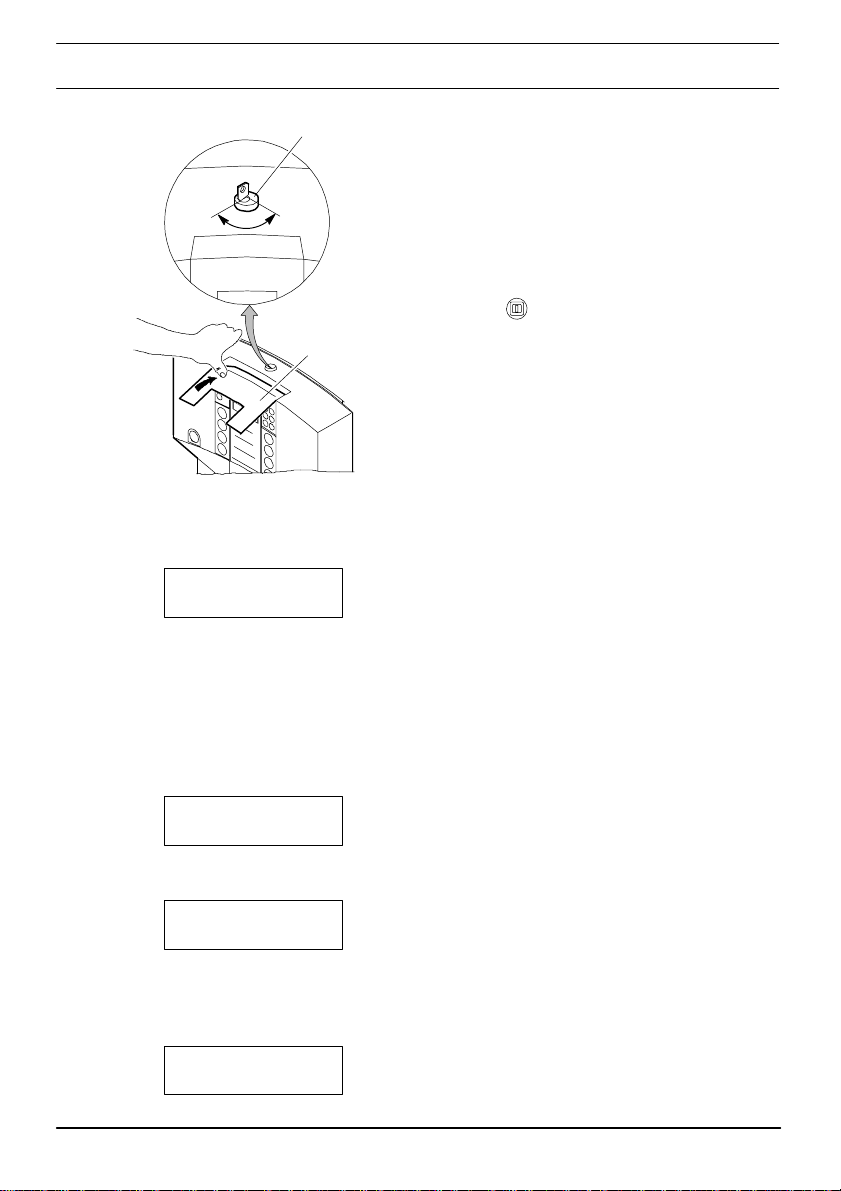
3. Start-up
Open
Start filling
heating up
Closed
Lock
Keyboard
cover
. Open water tap.
. Switch on electrical switch at the front of
the bremer VIVA XXL-T.
. Ensure that grounds drawer or grounds
container is in the correct position.
. Unlock keyboard cover with key and
open.
. Press
to switch on the coffee
machine.
. Close keyboard cover and withdraw key.
D Display ”Start filling, heating
up” appears when power supply to the
automatic coffee dispensing machine
has been cut off. The automatic coffee
dispensing machine carries out the
switch-on programme and checks right
up to the readiness of all functions.
Thereby, a rinsing process runs and the
boiler is heated up (duration approx. 5 to
8 minutes).
Machine heating
please wait
Machine test
please wait
Select
D ”Machine heating, please wait”
appears, if you switch on the machine
from the display ”STANDBY” (Machine
was not cut off from the power supply).
D ”Machine test, please wait” is
carried out by the bremer VIVA XXL-T
with adjustment switch-off after cleaning,
in order to clean its brewing system of
cleaning agent remains (duration approx.
8 to 10 minutes).
D “Select” appears, if the machine is
ready for selecting a brewing stage to
start a brewing process.
5
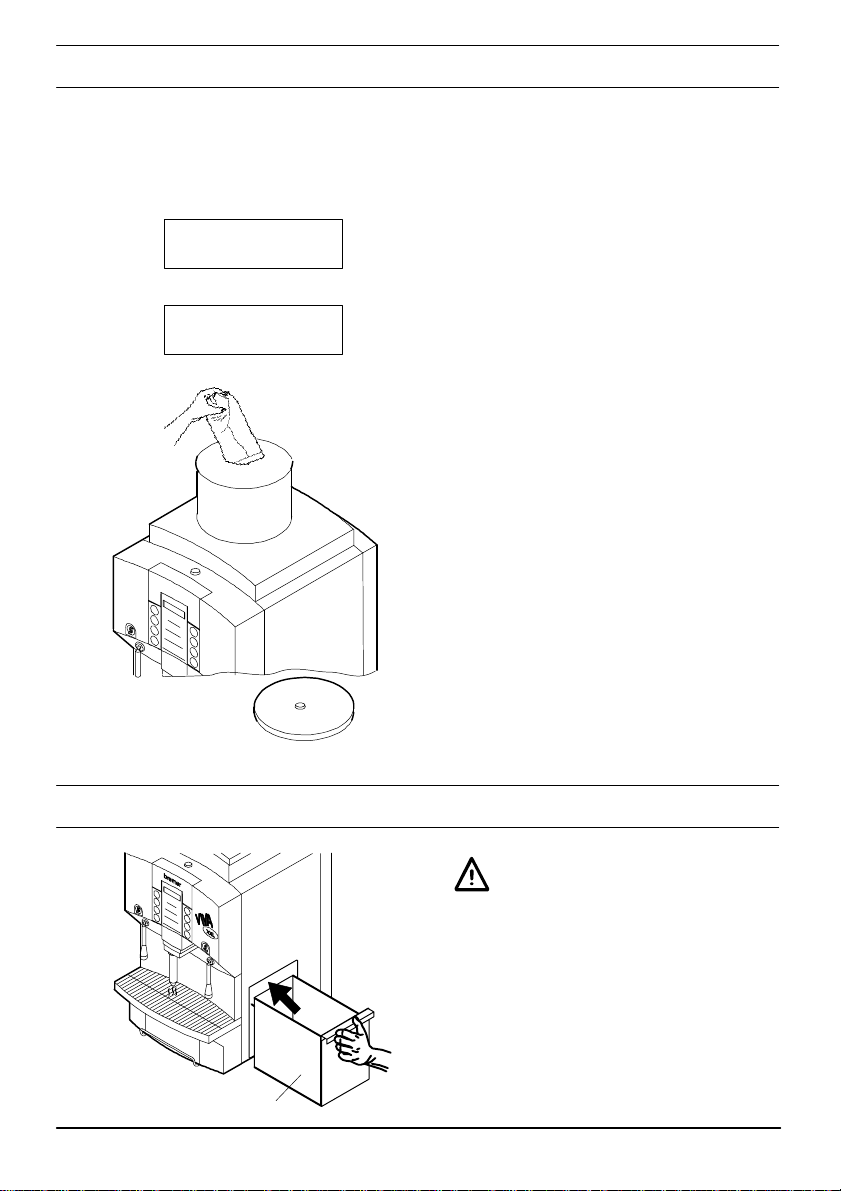
3.1 Refill coffee powder
D Do not use instant coffee or coffee powder with additional substances. The
coffee filter may block up and a machine fault may occur !
D Refill when the coffeepowder loses aroma or on long periods of storage.
D Make sure that no foreign bodies get into the coffee powder container.
2 brewings
Res.operation
Cof.powder empt
D If the coffee powder container becomes
empty during operation, the following is
displayed ”2 brewings,
Res.operation”.
D After the second brewing, the display
appears ”Cof.powder empt” and the
automatic coffee dispensing machine
disables all brewing stages.
. Unlock cover of the coffee powder
container with key and remove.
. Fill the empty coffee powder container
- up to 3 kg with the desired coffee
powder type, e.g. grinding for
fresh brew automatic dispensing
machine
- Close after filling, so that the
aroma is retained longer.
3.2 Insert container or grounds drawer (optional)
. Insert container underneath the
machine or the grounds drawer before
starting a brewing process.
D The machine is only brewing with a
removed grounds drawer.
Grounds drawer
6
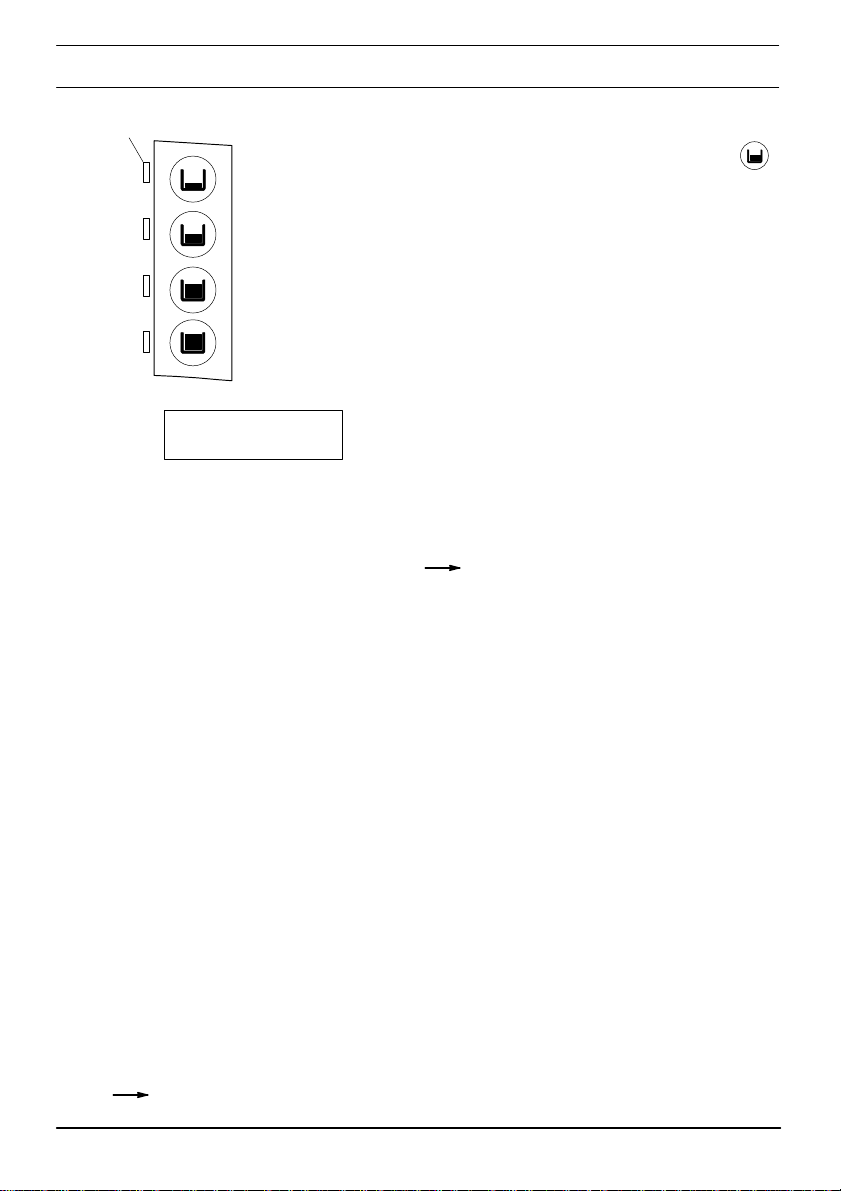
3.3 Start brewing process
Control lamp
Brewing stages:
. Start brewing process, by pressing the
key-button for the desired item, e.g.
1.0 litre
for 1 litre of filter coffee.
D The control lamp of the brewing stage
2.0 litres
2.0 litres
2.5 litres, only for
increased demand
Brew.stage 1
blinks for about 5 seconds.
D In the meantime, you may choose
another brewing stage.
D After that the brewing stage is switched
on and the automatic coffee dispensing
machine starts a brewing process with
the display ”Brew.stage 1”.
D The control lamp lights up when the
brewing stage is activated.
Soaking time see page 17. The contact
time for water with coffee (1 litre) takes
about 3 minutes.
D During a brewing process the grounds container (add. feature) is locked.
D After the brewing,
- the machine throws out the used coffee into the mobile 76 litre container
- the automatic coffee dispensing machine enables the item key-buttons,
provided their output quantity is available (control lamp of the item key-button
lights up).
D Switch on the desired brewing stage by pressing - then to switch off press again.
A brewing process that has already started cannot be interrupted.
D Additional automatic brewing for filter coffee
- by reaching the min. content of filter coffee in the storage vessel,
- if a brewing stage is elected.
D You may always select another brewing stage. The new selected brewing stage
deletes the brewing stage you have selected previously.
D Brewing stages 1 to 3 litres: the bremer VIVA XXL-T re-brews fresh filter coffee if
the value falls below the minimum storage. Brewing stage 4 litres: continuous
brewing of filter coffee. Switch on this brewing stage only in case of increased
demand.
D The amount of ready available brewing coffee is shown on the display screen.
For modification of the brewing stage settings see page 17.
7
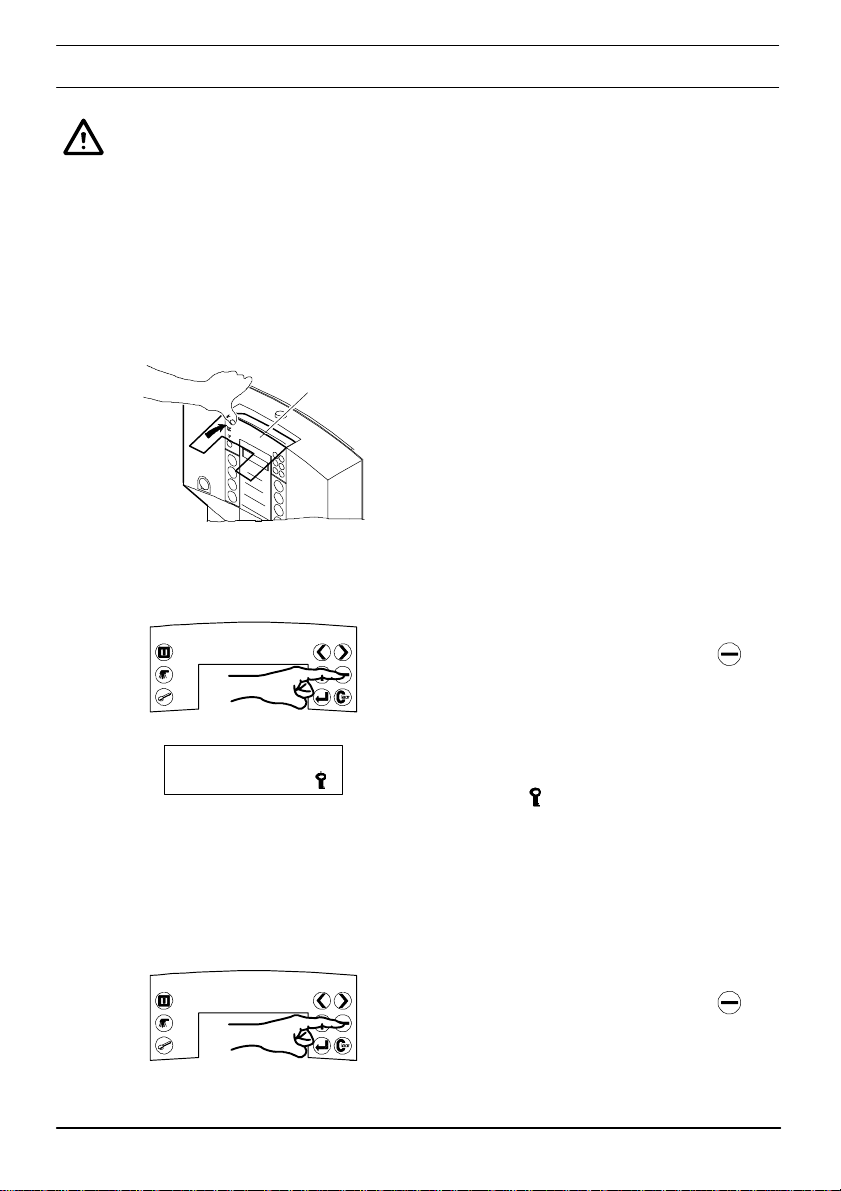
3.4 Selection of brewing stage, disable and enable
You can disable or enable selection of the brewing stage
- during a brewing process
- with a selected brewing stage
- so that a third person for example cannot switch on any other brewing stage.
In case of a deselected and disabled brewing stage, the automatic coffee
dispensing machine does not re-brew any longer and you can remove or use up the
coffee stock. A brewing stage switched on earlier cannot be switched off.
Brew 0.0L
stage 1
Keyboard
cover
. Unlock keyboard cover with key and and
open.
Disabling of the selection of the
brewing stage
. Disable the selection of the brewing
stage by pressing the key-button
D The brewing stages are disabled for
selection. As confirmation the key symbol
appears
display screen.
below on the right of the
.
Enabling the selection of the
brewing stage
. Enable the selection of the brewing stage
by pressing the key-button again
D The selection of the brewing stage is
enabled.
D The key symbol on the display screen
has disappeared.
.
8
 Loading...