

Page 1
GB
IT
FR
DE
TR
Instructions for use and installation
Cooker Hood
Istruzioni per l’uso e l’installazione
Cappa
Mode d’emploi et installation
Hotte de Cuisine
Bedienungsanleitung und Einrichtung
Dunstabzugshaube
Kullanım ve montaj talimatları
Davlumbaz
FNES 907 BTH
Page 2

EN
Instructions Manual
INDEX
RECOMMENDATIONS AND SUGGESTIONS......................................................................................................................7
CHARACTERISTICS..............................................................................................................................................................8
INSTALLATION ......................................................................................................................................................................9
USE.......................................................................................................................................................................................12
MAINTENANCE....................................................................................................................................................................13
2
2
Page 3
EN
RECOMMENDATIONS AND SUGGESTIONS
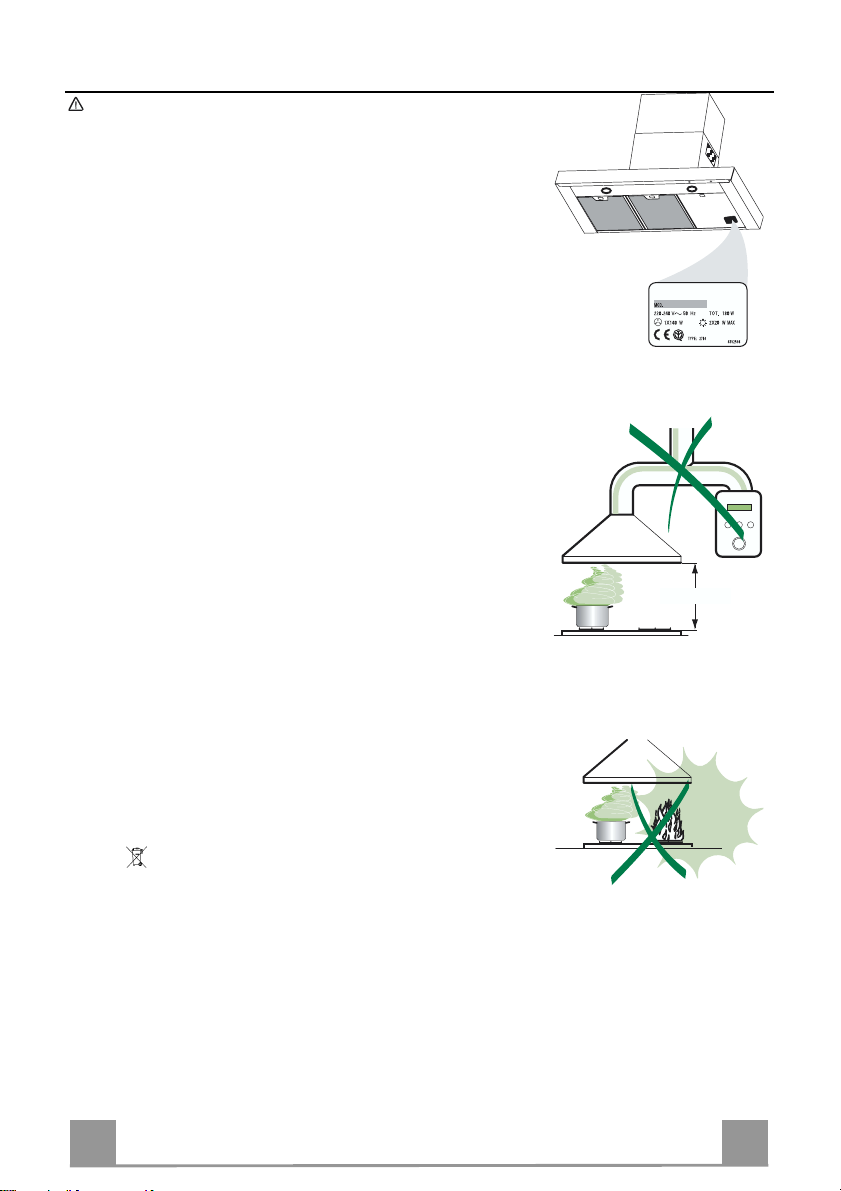
650 mm min.
The Instructions for Use apply to several versions of this appliance. Accordingly,
you may find descriptions of individual features that do not apply to your specific
appliance.
INSTALLATION
• The manufacturer will not b e h eld lia ble for any damages res ultin g from in correc t or
improper install at ion.
• The minimum safety distance between the cooker top and the extractor hood is 650
mm.
• Check that the mains voltage corresponds to that indicated on the rating plate fixed
to the inside of the hood.
• For Class I appliances, check that the domestic power supply guarantees adequate
earthing.
Connect the extractor to the exhaust flue through a pipe of minimum diameter 120
mm. The route of the flue must be as short as possible.
• Do not connect the extractor hood to exhaust ducts carrying combustion fumes
(boilers, fireplaces, etc.).
• If the extractor is used in conjunction with non-electrical appliances (e.g. gas burning appliances), a sufficient degree of aeration must be guaranteed in the room in
order to prevent the backflow of exhaust gas. The kitchen must have an opening
communicating directly with the open air in order to guarantee the entry of cl ean air.
USE
• The extractor hood has been designed exclusively for domestic use to eliminate
kitchen smells.
• Never use the hood for purposes other than for which it has ben designed.
• Never leave high naked flames under the hood when it is in operation.
• Adjust the flame intensity to direct it onto the bottom of the pan only, making sure
that it does not engul f the sides.
• Deep fat fryers must be continuously monitored during use: overheat ed oil can burst
into flames.
• Do not flambè under the range hood; risk of fire
• This appliance is not intended for use by persons (including children) with reduced
physical, sensory or mental capabilities, or lack of experience and knowledge,
unless they have been given supervision or instruction concerning use of the appliance by a person responsible for thei r safety.
• Children should be su per vised to ensure th at they do not play w ith the appliance.
MAINTENANCE
• Switch off or unplug the appliance from the mains supply before carrying out any
maintenance work.
• Clean and/or replace t he Filters after the specified ti me period.
• Clean the hood using a damp cloth and a neutral liquid deter gent.
The symbol on the product or on its packaging indicates that this product may not be treated as
household waste. Instead it shall be handed over to the applicable collection point for the recycling
of electrical and electronic equipment. By ensuring this product is disposed of correctly, you will help
prevent potential negative consequences for the environment and human health, which could otherwise be caused by inappropriate waste handling of this product. For more detailed information about
recycling of this product, please contact your local city office, your household waste disposal service
or the shop where you purchased t he product.
7
7
Page 4
EN
CHARACTERISTICS
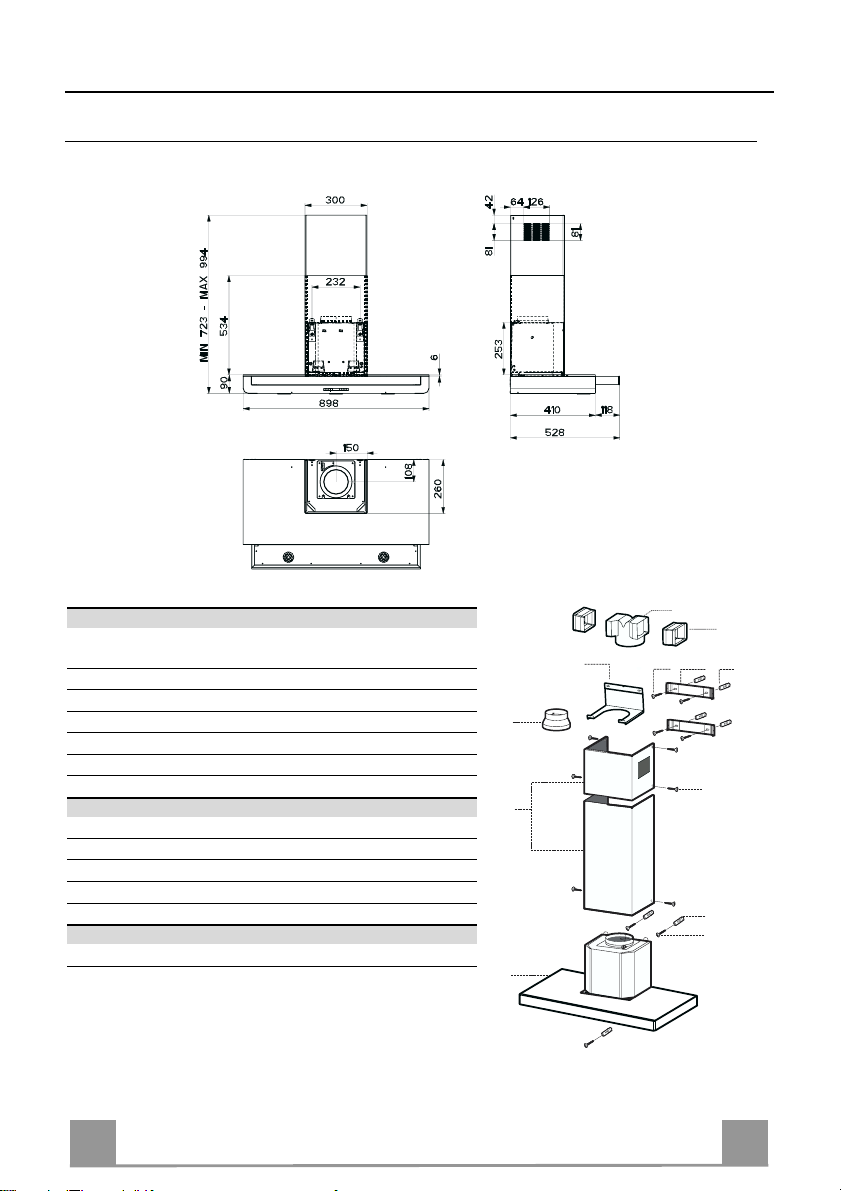
Dimensions
Components
Ref. Q.ty Product Components
1 1 Hood Body, complete with: Controls, Light, Blower,
2 1 Telescopic Chimney comprising:
2.1 1 Upper Section
2.2 1 Lower Section
9 1 Reducer Flange ø 150-120 mm
14.1 2 Air Outlet Connection Extension
15 1 Air Outlet Connection
Ref. Q.ty Installation Components
7.2.1 2 Upper Chimney Section Fixing Brackets
7.3 1 Air Outlet Connection Support
11 7 Wall Plugs
12a 7 Screws 4,2 x 44, 4
12c 6 Screws 2,9 x 9, 5
Q.ty Documentation
1 Instruction Manual
Filters
15
14.1
7.3
9
2.1
2
2.2
1
12a
7.2.1 11
12c
11
12a
8
8
Page 5
EN
INSTALLATION
Wall drilling and bracket fixing
7.2.1
1÷2
X
116
116
350
11
12a
64
650 min.
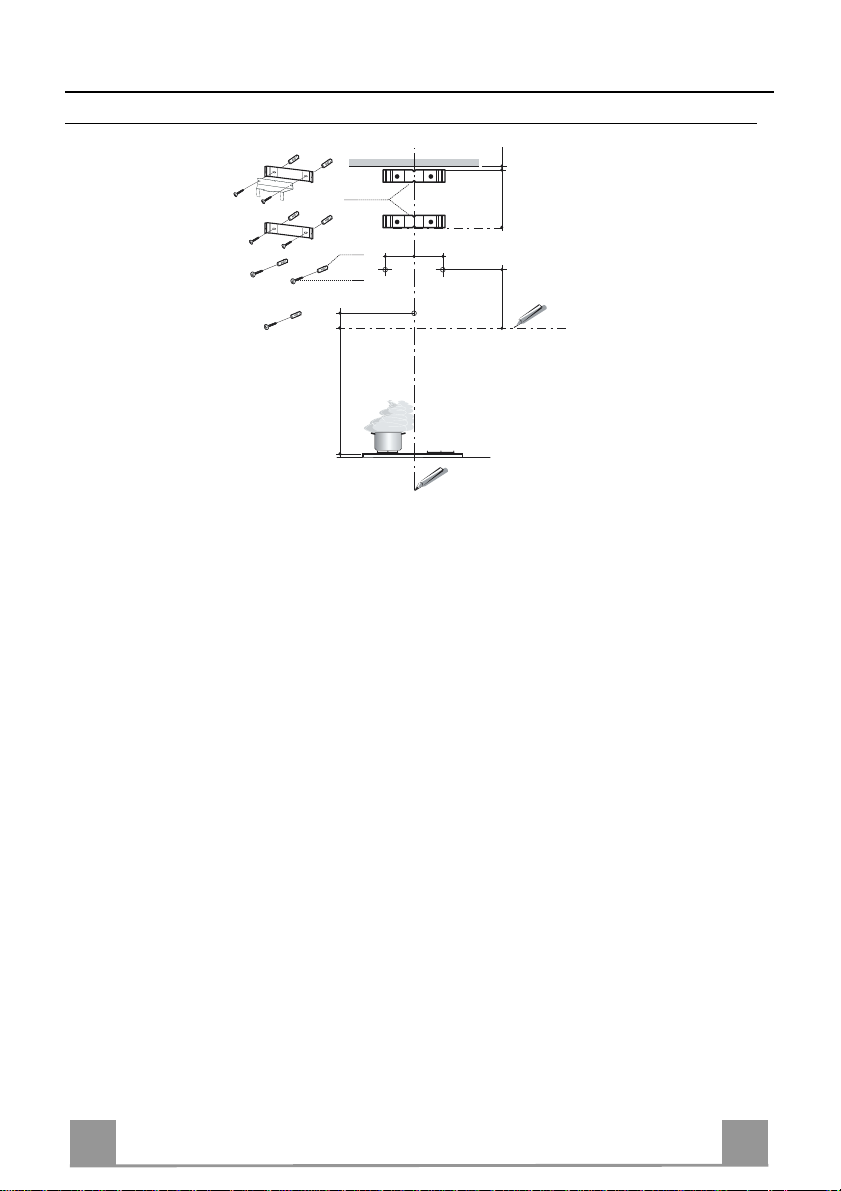
Wall marking:
• Draw a vertical line on the supporting wall up to the ceiling, or as high as practical, at the
centre of the area in which the hood will be installed.
• Draw a horizontal line at 650 mm above the hob.
• P l ace bracket 7.2.1 on the wall as shown about 1-2 mm from the ceiling or upper limit aligning the centre (notch) with the vertical reference line.
• Mark the wall at the centres of the holes in th e br acket.
• P l ace br acket 7.2.1 on the wall as shown at X mm below the first bracket (X = height of the
upper chimney section supplied), aligning the centre (notch) with the vertical line.
• Mark the wall at the centres of the holes in th e br acket.
• Mark a reference point as in dicated at 116 mm from the vertical reference li ne and 350 mm
above the horizontal reference l ine.
• Repeat this operation on the other side.
• Mark a reference point as indicated at 64 mm from the vertical reference line.
• Drill ø 8 mm holes at all the centre points marked.
• Insert the wall plugs 11 in the holes.
• Fix the lower bracket 7.2.1 using the 12a screws (4,2 x 44,4) supplied.
• Fix the upper bracket 7.2.1 and the air outlet connection supp ort 7.3 to gether using the 2
screws 12a (4,2 x 44,4) supplied.
• Insert th e 3 screws 12a (4,2 x 44,4) supplied in the hood body fixing holes, leaving a gap of
5-6 mm between the wall and the head of the screw.
9
9
Page 6
EN 110
Hood body installation
12a
Vr
9
ø 120ø 150
ø 150
15
14.1
7.3
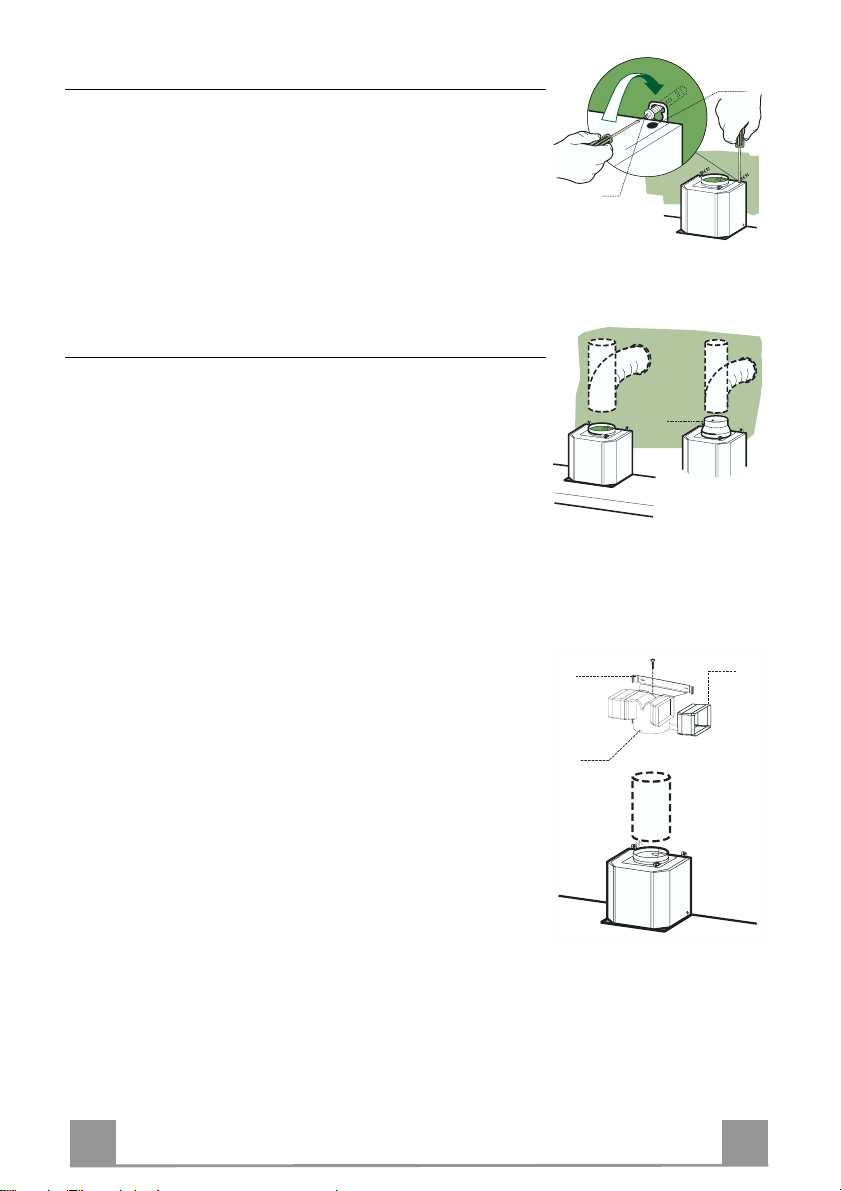
• Before hooking the hood body it is necessary to tighten 2 Vr screws
placed in the fixing points of the body.
• Hook the hood body on the 12a screws.
• Tighten completely 12a support screws.
• The correct hood body position can be levelled with Vr screws.
• Fix th e hood definitively by tightening the 12a security screw.
Connections
DUCTED VERSION AIR EXHAUST SYSTEM
When installing the ducted version, connect the hood to the
chimney using either a flexible or rigid pipe ø 150 or 120 mm,
the choice of which is left to the installer.
• To install a ø 120 mm air exhaust connection, insert the reducer flange 9 on the hood body outlet.
• Fix the pipe in position using sufficient pipe clamps (not supplied).
• Remove any activated charcoal filters.
RECIRCULATION VERSION AIR OUTLET
• Insert t he con nection ext ension pieces laterall y 14.1 in connection 15.
• Insert the Connecto r 15 into the Supp ort bracket 7.3 and fix it
with a screw.
• Make sure that the outlet of th e extension pieces 14.1 is horizontally and vertically aligned with the chimney outlets.
• Connect the air outlet connecti on 15 to the hood body outlet
using either a flexible or rigid pipe ø 150 mm, the choice of
which is left to the installer.
• Ensure that the activated charcoal filters have been inserted.
Page 7
EN 111
ELECTRICAL CONNECTION
12c
2.1
2.2
2
7.2.1
12c
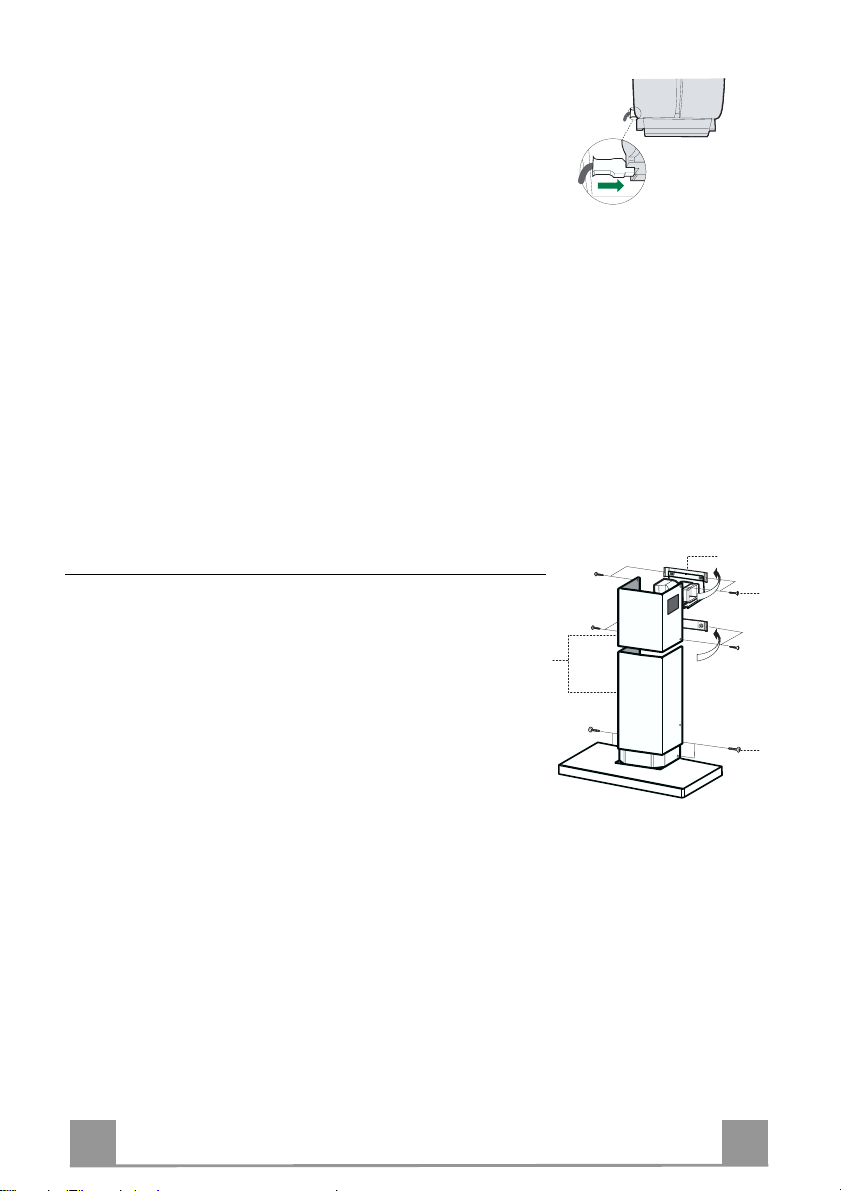
• Connect the hood to the mains through a two-pole switch having a contact gap of at least 3 mm.
• Re move the grease filters (see paragraph Maintenance) being
sure that the conn ector of the feeding cable is correctly inserted
in the socket placed on th e side of the fan.
Flue assembly
Upper exhaust flue
• Slightly widen the two sides of the upper flue and hook them
behind the brackets 7.2.1, making sure that they are well
seated.
• Secure the sides to the brackets using the 4 screws 12c (2,9 x
9,5) supplied.
• Make sure that the outlet of the extension s pieces is aligned
with the chimney outlets.
Lower ex haust flue
• Slightly widen the two sides of the flue and hook them between the upper flue and t he wall, making sure that they are
well seated.
• Fix the lower part laterally to the hood body using the 2 screws
12c (2,9 x 9,5) supplied.
Page 8
EN 112
USE
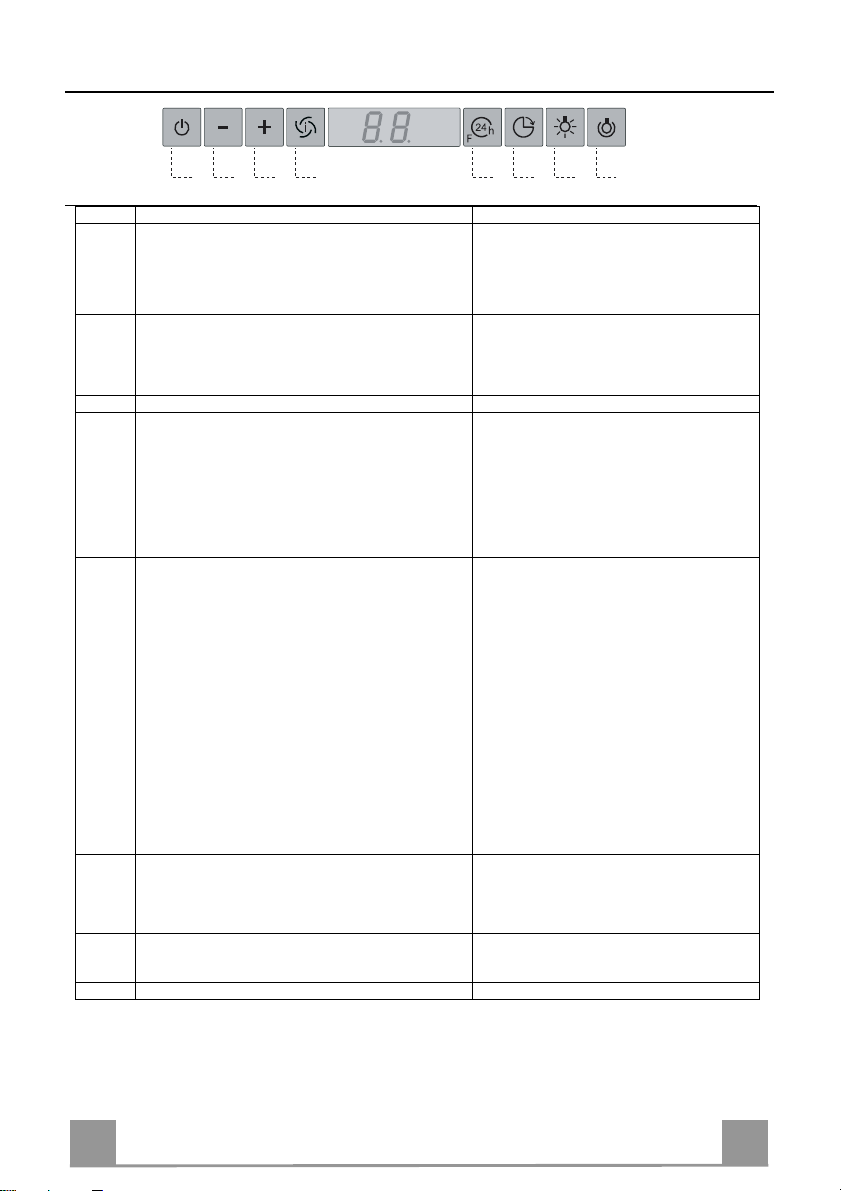
Button Function Display
A
B Press briefly to decrease the working speed.
C Increase the working speed.
D Intensive function:
E 24H function:
F Delay function:
G Turns the lighting system on and off.
H Turns t he reduced intensity lighting system on and off.
Warning: Never rest anything on the sliding carriage when it is open!
A B C D E F G H
Control panel
Carriage Closed: Press for approx. 1.5 Seconds to open
the carriage, turn the lights on, turn the Fans on and start
the Motor at the last speed set.
Carriage Open: Press b riefly to turn the Motor off or to
start it at the last speed set. Press for 1.5 seconds to turn
the Motor and the Fans off and to close the carriage.
Press for 2 Seconds to turn the Fans off.
Once the Fans are turned off t hey will tur n on automat ically every time the Carriage is extracted, or when the
Working speed is increased.
Can only be activated with the Carriage open at any
speed and with the Motor turned off. It has a timer set to
10 minutes, after which the system will return to the
speed set be fore. Su itable to deal w ith max imum le vels
of cooking fumes.
When the function is enabled/disabled, the Fans are enabled/disabled.
Cannot be enabled when Delay or 24H are on.
Carriage Closed: The function is enabled and the carriage
remains closed.
Carriage Open: When the function is enabled the Motor
and the Fans turn off and the carriage returns; After this
the 24H function starts.
Starts the Motor at a speed that allows suction of 100
m3/h for 10 minutes per hour for 24h, after which the
Motor will stop.
When the filter alar m is active, press the button for approximately 4 seconds with the Motor and Lights off to
reset the alarm. Reset is indicated by the fact that the
Display turns off.
These signals are only visible when the Motor is off.
Enables automatic shutdown of the Motor, the Fans and
the Lighting with a 30’ delay.
Cannot be enabled when Intensive or 24H are on.
Press for 2 Seconds to allow an optional additional appliance to be turned on and off.
Displays the set speed.
With the Fans on, the Display on the left shows
an animation.
-
-
Displays HI and the time remaining, alternately.
It is disabled by pressing the Button or turning
the Motor off.
Displays 24, and the dot on the Right flashes
once a second when the Motor is on, while
when the Motor is off only 24 appears.
It is disabled by pressing the Button or turning
the Motor off.
When the procedure terminates, the indication
shown previousl y turns off:
FF indicates the need to wash the metal grease
filters. The alarm is tr iggered a fter t he Hoo d has
been in operation for 100 working hours.
EF indicates the need to change the activated
charcoal filters, and to wash the metal grease
filters. The alarm is tr iggered a fter t he Hoo d has
been in operation for 200 working hours.
Displays the speed of the Motor and the time
remaining, alternately.
It is disabled by pressing the Button or turning
the Motor off.
Page 9
EN 113
MAINTENANCE
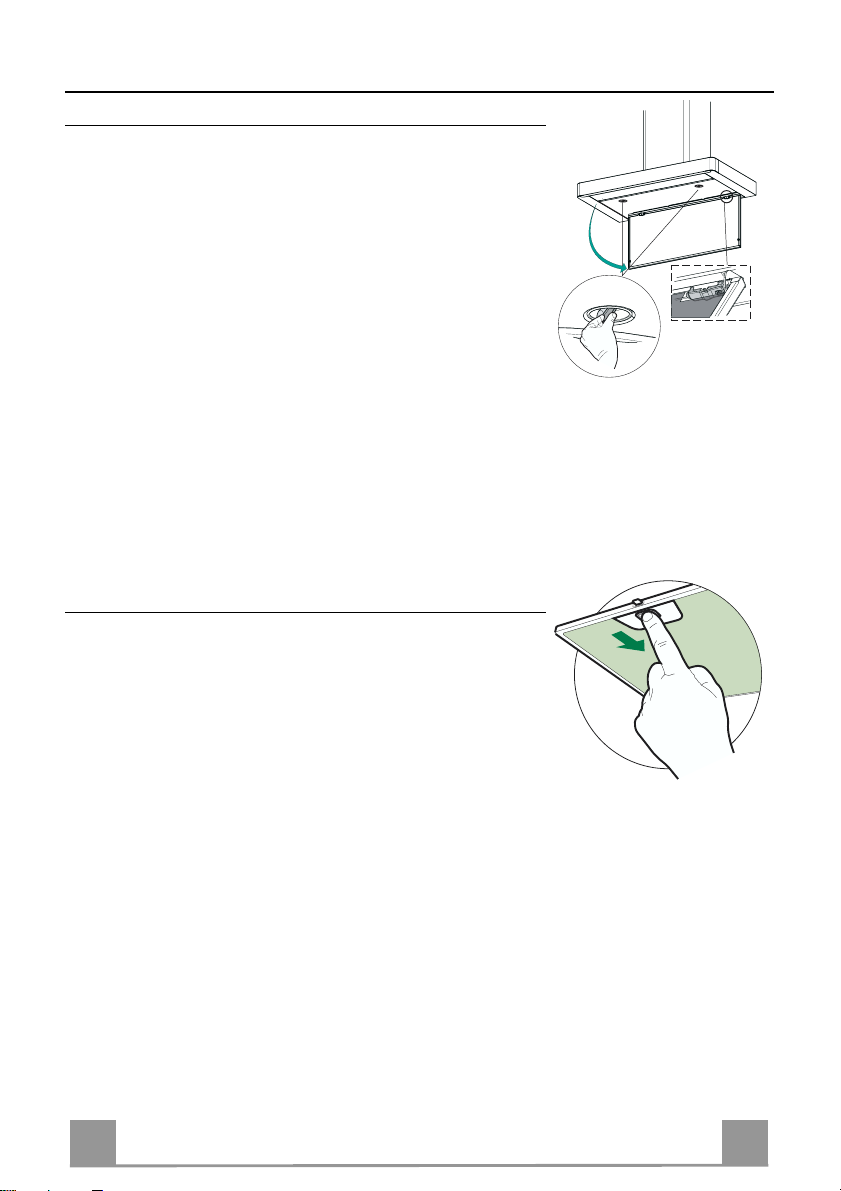
Cleaning the Comfort Panel
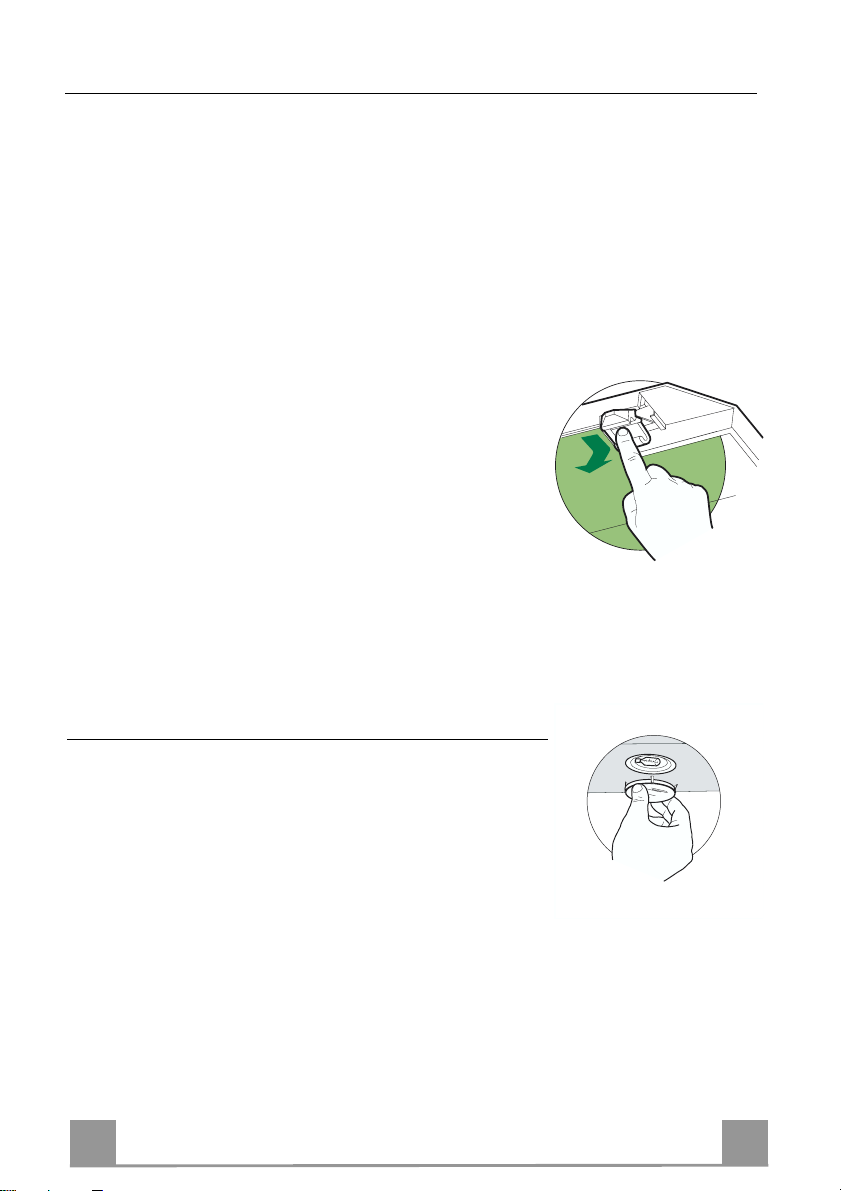
• Open the Comfort Panel by turning the knobs.
• Unfasten the panel from the hood canopy by sliding the fixing
pin lever provided.
• The comfort panel must never be washed in the dishwasher.
• Clean the outside with a damp cloth and neutral detergent.
• Clean the inside using a damp cloth and neutral detergent; do
not use wet cloths or sponges, or jets of water; do not use abrasive substances.
• On completing the operation, hook the panel up to the hood
canopy again and close it by turning the knobs in the opposite
direction.
Metal grease filters
These can b e wa sh ed in th e d i sh was her, a n d need t o b e c lea n ed wh en ever
the FF sign appears on the display or at least once every 2 months use, or
more frequently if use is particularly intensive.
Resetting the alarm signal
• Turn the Lights and the Suction motor off, then disable the 24h function, if enabled.
• Press button E until the displ a y turns off.
Cleaning the Filters
• Open the Comfort Panel by turning the knobs.
• Remove the Filters one at a time, pushing them towards the back of the
unit and at the same time pulling downward.
• Wash the Filters without bending them, and leave them to dry completely before replacing. (If the surface of the filter changes colour as
time goes by, this will have absolutely no effect on the efficiency of
the filter itself.)
• Replace, taking care to ensure that the handle faces forwards.
• Close the Comfort Panel by turning the knobs.
Page 10
EN 114
Charcoal filter (recycling version)
• This filter cannot be washed or regenerated. It must be replaced when the EF appears on the
display or at least once every 4 months.
Activation of the alarm signal
• In the recycling version hoods the filter saturation alarm must be activated during the installation or later.
• Switch off the hood and the lights.
• Disconnect the hood from the mains supply.
• When restoring the connection press and hold B-key.
• When releasing the key two rotating rectangles appear on the display.
• Within 3 seconds press the B-key until a flashing confirmation appears on the dispaly:
• 2 flashes with EF - charcoal filter saturation alarm ACTIVATED
• 1 flash with EF - charcoal filter saturation alarm DEACTIVATED.
CHANGING THE ACTIVATED CHARCOAL FILTER
Resetting the alarm signal
• Turn the Lights and the Suction motor off, then disable the 24h function, if enabled.
• Press button E until the displ a y turns off.
Changing the Filter
• Open the Comfort Panel by turning the knobs.
• Remove t he Metal grease filters.
• Remove the saturated Activated charcoal filter, using the hooks provided.
• Fit the new Filter, hooking it into place.
• Replace the Metal grease filters.
• Close the Comfort Panel by turning the knobs.
Lighting
LIGHT REPLACEMENT
20 W halogen light.
• Remove the snap-on lamp cover by levering it from under the
metal ring, supporting it with one hand.
• Remove the halogen lamp from the lamp holder by pulling
gently.
• Replace the lamp with a new one of the same type, making
sure that you insert the two pins properly into the housings on
the lamp holder.
• Replace the snap-on lamp cover.
Page 11

Franke S.p.a.
Via Pignolini,2
37019 Peschiera d el Garda (VR)
www.franke.it
436004063_ver2
 Loading...