

Page 1
Read the operating instructions and the chapter "For your safety"
before operating the machine.
Keep the operating instructions near the machine.
Coffee machine: FCS4039/FCS4039UL — Refrigeration unit: FCS4048
A200
ORIGINAL OPERATING INSTRUCTIONS
Page 2

Page 3

Page 1
With the A200/A200 FoamMaster, you have chosen a powerful
and space-saving coffee machine.
Thank you for your confidence in us.
The A200/A200 FoamMaster adapts to your needs perfectly.
Your customers will be impressed. You will be able to offer highquality coffee specialties rapidly and individually.
We hope you enjoy your coffee machine and that it will bring
you consistently happy customers.
Sincerely, Franke Kaffeemaschinen AG
DEAR CUSTOMER
Page 4

Dispensing hot water
. . . . . . . . . . . . . . . . . . . . . . . . . . . . . . . 30
steam Dispenser
. . . . . . . . . . . . . . . . . . . . . . . . . . . . . . . . . . . 31
Care of the a200
. . . . . . . . . . . . . . . . . . . . . . . . . . . . . . . . . . . . 32
Cleaning
. . . . . . . . . . . . . . . . . . . . . . . . . . . . . . . . . . . . . . . . 32
Cleaning the milk system (foammaster)
. . . . . . . . . . . . . . . . . . 34
rinsing the a200 manually
. . . . . . . . . . . . . . . . . . . . . . . . . . . 35
DesCaling the a200
. . . . . . . . . . . . . . . . . . . . . . . . . . . . . . . . 36
Cleaning the water tank (for operation with a water tank)
. . . . . 37
replaCing the water filter
. . . . . . . . . . . . . . . . . . . . . . . . . . . . 38
emptying the system
. . . . . . . . . . . . . . . . . . . . . . . . . . . . . . . . 39
maintenanCe plan
. . . . . . . . . . . . . . . . . . . . . . . . . . . . . . . . . . 40
Configuring
. . . . . . . . . . . . . . . . . . . . . . . . . . . . . . . . . . . . . . . . 41
introDuCtion to programming
. . . . . . . . . . . . . . . . . . . . . . . . . 41
input
. . . . . . . . . . . . . . . . . . . . . . . . . . . . . . . . . . . . . . . . . . . 42
menu tree "Config"
. . . . . . . . . . . . . . . . . . . . . . . . . . . . . . . . . 43
Config/aDministration–Configuration
. . . . . . . . . . . . . . . . . 44
Config/aDministration–rights management; Data transfer
. . . 45
Config/proDuCts 46
Config/inDiviDualization
. . . . . . . . . . . . . . . . . . . . . . . . . . . . 48
Config/information
. . . . . . . . . . . . . . . . . . . . . . . . . . . . . . . . 51
roles anD rights
. . . . . . . . . . . . . . . . . . . . . . . . . . . . . . . . . . 52
DeCommissioning anD Disposal
. . . . . . . . . . . . . . . . . . . . . . . . . . . 53
DeCommissioning
. . . . . . . . . . . . . . . . . . . . . . . . . . . . . . . . . . 53
Disposal
. . . . . . . . . . . . . . . . . . . . . . . . . . . . . . . . . . . . . . . . 54
troubleshooting
. . . . . . . . . . . . . . . . . . . . . . . . . . . . . . . . . . . . . 55
help with maChine errors
. . . . . . . . . . . . . . . . . . . . . . . . . . . . 55
help with problems ConCerning proDuCt quality
. . . . . . . . . . . . 56
inDex
. . . . . . . . . . . . . . . . . . . . . . . . . . . . . . . . . . . . . . . . . . . . . 57
for your safety
. . . . . . . . . . . . . . . . . . . . . . . . . . . . . . . . . . . . . . 3
proper use
. . . . . . . . . . . . . . . . . . . . . . . . . . . . . . . . . . . . . . . 3
general safety ConCerns when using the a200
. . . . . . . . . . . . . . 4
explanation of symbols
. . . . . . . . . . . . . . . . . . . . . . . . . . . . . . . . . 6
symbols from the operating instruCtions
. . . . . . . . . . . . . . . . . . 6
symbols useD in the software
. . . . . . . . . . . . . . . . . . . . . . . . . . 7
navigation
. . . . . . . . . . . . . . . . . . . . . . . . . . . . . . . . . . . . . . . . 8
DepiCtion of error messages
. . . . . . . . . . . . . . . . . . . . . . . . . . . 8
sCope of Delivery anD iDentifiCation
. . . . . . . . . . . . . . . . . . . . . . . . 9
DesCription
. . . . . . . . . . . . . . . . . . . . . . . . . . . . . . . . . . . . . . . . . 11
Coffee maChine a200/a200 foammaster
. . . . . . . . . . . . . . . . 11
Components of the a200
. . . . . . . . . . . . . . . . . . . . . . . . . . . . 13
Components foammaster
. . . . . . . . . . . . . . . . . . . . . . . . . . . . 14
the operating interfaCe
. . . . . . . . . . . . . . . . . . . . . . . . . . . . . . 15
installation anD teChniCal Data
. . . . . . . . . . . . . . . . . . . . . . . . . . 17
installation
. . . . . . . . . . . . . . . . . . . . . . . . . . . . . . . . . . . . . . 17
Commissioning
. . . . . . . . . . . . . . . . . . . . . . . . . . . . . . . . . . . . . . 21
initial Commissioning of the a200
. . . . . . . . . . . . . . . . . . . . . . 21
Daily Commissioning of the a200
. . . . . . . . . . . . . . . . . . . . . . 21
filling anD emptying
. . . . . . . . . . . . . . . . . . . . . . . . . . . . . . . . . . 22
filling the Coffee maChine
. . . . . . . . . . . . . . . . . . . . . . . . . . . . 22
emptying the Coffee maChine
. . . . . . . . . . . . . . . . . . . . . . . . . . 24
preparing Drinks
. . . . . . . . . . . . . . . . . . . . . . . . . . . . . . . . . . . . . 26
preparing a stanDarD Drink
. . . . . . . . . . . . . . . . . . . . . . . . . . . 26
preparing two Drinks at onCe
. . . . . . . . . . . . . . . . . . . . . . . . . 27
Drink preparation with grounD Coffee
. . . . . . . . . . . . . . . . . . . 28
Drink preparation with Capsule (optional)
. . . . . . . . . . . . . . . . . 29
TABLE OF CONTENTS
Page 5

i
For your safety
Page 3
Cup warmer (optional)
The cup warmer is an optional add-on unit for your coffee machine.
It is intended only for warming coffee cups and glasses used when
preparing drinks.
The cup warmer is not designed to dry dish towels or other cloths.
It is not necessary to cover the cups to warm them.
Refrigeration unit
A refrigeration unit is an optional add-on unit for your A200 that is
used exclusively for keeping milk cool for beverage preparation on
an A200 coffee machine.
Only use pre-cooled milk (2 - 5 °C or 36 - 41°F).
Only use FRANKE clean solution for cleaning the milk system. Other
cleaning agents may leave residue in the milk system.
FoamMaster
The FoamMaster is an add-on unit for your A200 FM, that is used
exclusively for keeping milk cool and for the foaming of milk on an
A200 FM coffee machine.
Only use pre-cooled milk (2 - 5 °C or 36 - 41°F).
Only use FRANKE clean solution for cleaning the FoamMaster.
Other cleaning agents may leave residue in the milk system.
Do you have any questions or
problems that are not addressed
in these instructions? Please do
not hesitate to contact Customer
Service or your Service technician.
A200
The A200 is a coffee machine for use in food service, offices and
similar environments. It is designed to process whole coffee beans,
ground coffee, capsules (optional) and fresh milk.
Your coffee machine is designed exclusively for preparing coffee
drinks, capsule drinks (optional) and hot water in accordance with
these instructions and the technical data.
FOR YOUR SAFETY
Both you and the coffee machine are important to us. Therefore, we would like to provide you with detailed safety information. For our products, a high degree of safety goes without saying. Protect yourself against residual risks arising from the functions of the machine.
Proper use
Page 6

!
For your safety
Page 4
Risk of death by electrocution!
•Never operate a machine that has been damaged or has a damaged power supply cable.
•If you suspect damage to the machine (for instance, a hot or
burning odor), unplug the machine from the outlet and contact
your Service technician.
•Ensure that the power supply cable is not pinched and does not
rub against sharp edges. The machine contains electrically conductive parts. Opening the machine can pose risk of death.
•Ensure that the machine and power supply cable are not near any
hot surfaces such as gas or electric stoves or ovens.
•If the power supply cable to this machine is damaged, it must be
replaced by a suitable power supply cable.
•If the power supply cable is permanently mounted to the machine: please contact your service partner.
•If the power supply cable is not permanently mounted to the
machine: order a new power supply cable (see p. 61 for the
item number).
•Never open or attempt to repair the machine yourself.
•Do not make any modifications to the machine that are not de-
scribed in the operating instructions.
•Repairs should only be made by Franke trained service technician
using original replacement and accessory parts.
Important
•Do not operate the coffee machine or add-on units until you
have completely read and understood these instructions.
•Keep these instructions near your coffee machine.
•Your coffee machine is intended for use by trained personnel.
Each operator of the coffee machine must have read and understood these instructions. This does not apply for self-service
customers. Self-service machines must always be monitored to
protect the users.
•The device is not suitable for children under the age of 8 years.
Children above the age of 8 or persons who are challenged
with respect to physical, sensory or mental abilities must never
approach the machine alone and must always be supervised.
Children are not allowed to play with the appliance. Children are
not permitted to perform any cleaning on the machine.
•The coffee machine is intended exclusively for operation in
interior rooms.
•Have the machine serviced at regular intervals. Regular maintenance will ensure the safe operation and high performance of
your coffee machine.
•If the machines are sold or transferred to a third party, give the
operating instructions to the next user.
•You will find statements regarding the conformity of your coffee
machine in the accompanying Declaration of conformity.
DANGER
General safety concerns when using the A200
Page 7

!
!
!
!
!
!
!
For your safety
Page 5
Risk of contamination
When the machine is not in use for extended periods, residue may accumulate.
•Rinse the coffee machine before initial use and when not in use for extended
periods (more than 2 days).
Risk of injury
Reaching into the machine may result in abrasions or crushing injuries from interior
components.
•Remove only the components of the machine intended for this purpose insofar
as required by daily work (grounds and capsule container, drip tray, water tank,
coffee bean hopper).
•Exercise care and caution when working in an open machine.
•Only Service technicians should open the machine for maintenance or repair.
Danger of tripping
Suspended cables or ones lying on the floor could cause people to trip.
•Do not let the power supply cable hang loose.
Damage to the coffee machine caused by adverse weather conditions
Adverse weather conditions could damage the machine and impair its functions.
•Do not expose the machine to the elements, such as rain, frost or direct sunlight.
CAUTION
CAUTION
Risk of scalding
During cleaning, hot water and steam are released repeatedly.
•Keep hands away from the outlets and nozzles during cleaning.
When drinks are dispensed, the products pose a risk of scalding.
•Always be careful with hot drinks.
Danger of burns
The combined outlet, the hot water outlet and the steam wand become hot.
•Do not touch the outlets or nozzles.
The surfaces of the cup warmer become hot.
•Do not touch these surfaces.
WARNING
WARNING
WARNING
Risk of injury, eye injury and damage to the machine
If objects find their way into the bean hopper, the capsule system, the powder feed or
the grinder, splinters may be ejected, leading to injuries or damage to the machine.
•Never put any objects into the coffee bean hopper, the capsule system, the powder feed or the grinder.
Damage from liquids
The coffee machine is not protected against spray water and can be damaged by the
effects of liquids.
•Avoid using water jets for cleaning and do not use high-pressure cleaners.
•Do not fill up any part of the machine with water except the water tank intended
for that purpose.
•Do not fill up any part of the machine with milk except the milk container intended for that purpose.
•Disconnect the machine from the power supply without delay if milk or water has
been filled in incorrectly and call your Service office.
NOTE
WARNING
Danger from spoiled food residue
If the machine is not cleaned regularly, milk and coffee residue may accumulate in
the machine or clog the outlets. Products could become contaminated as a result.
•Clean the coffee machine and add-on units at least once a day. See chapter "Care
of the A200", p. 32.
CAUTION
NOTE
Page 8
!
!
!
01
4
4
01
i
Clean components with the 5-step
method (p. 32).
WARNING indicates risk of injury.
CAUTION directs your attention to a
danger of minor injuries.
DANGER indicates potentially lifethreatening danger or grave injury.
NOTICE makes you aware of the risk
of damaging the machine.
Describes and illustrates a step
that you must perform.
Steps highlighted in color are
optional and must be performed
only on the corresponding
machine versions.
EXPLANATION OF SYMBOLS
So that you can get the most out of your A200, we would like to familiarize you with the symbols used in the operating
instructions and the software. For us, thorough information and open communication go without saying.
Symbols from the Operating instructions
This symbol indicates tips, shortcuts and additional information.
Thorough rinsing of removable
parts.
DANGER
NOTE
WARNING
CAUTION
Page 9
Explanation of symbols
Page 7
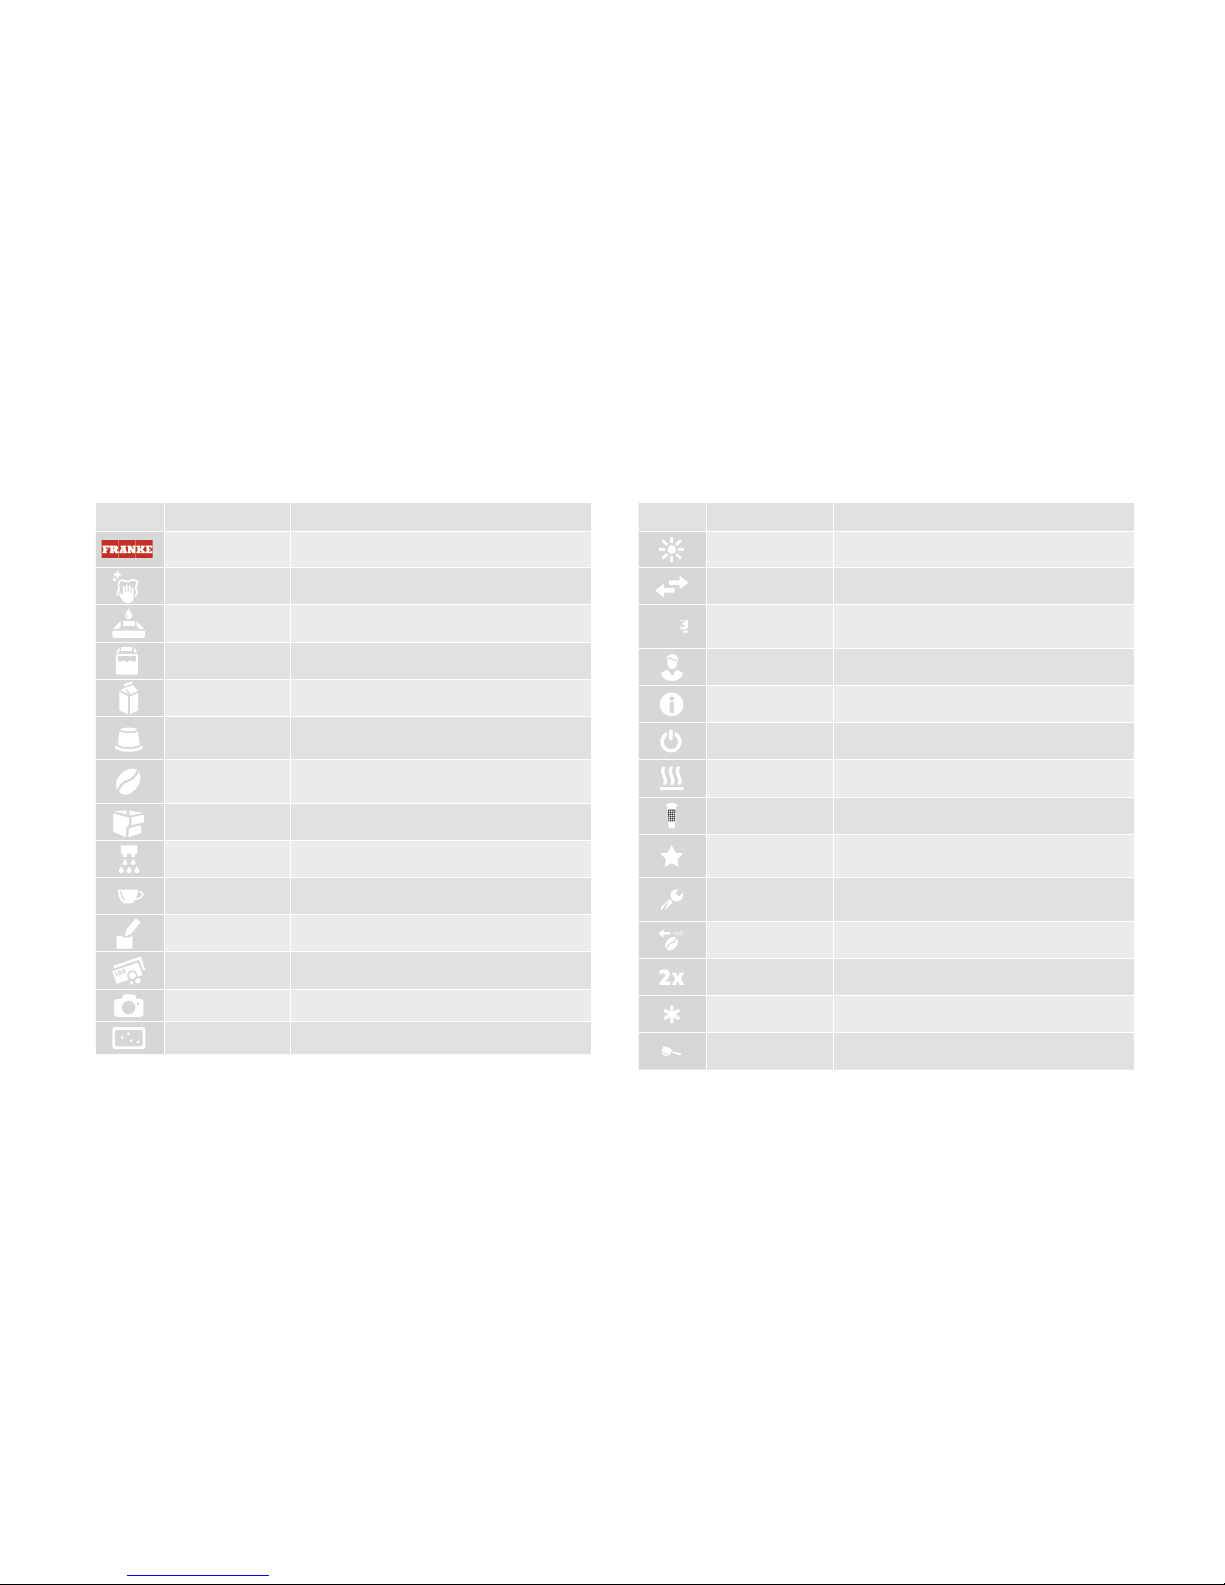
Symbols used in the software
Symbol Designation Description
Brightness Set brightness
Data transfer Data being transferred
Individual products
counter
Individualization
Info
Standby Machine switches to standby
Cup heater
Filter
Favorites
Favorites key, can be assigned to an often-used
function
Service/Confi gura-
tion/Administration
Bean left/right
Double product
Cold milk
Powder feed
00
Symbols in the dashboard, in the menu and for selection buttons
Symbol Designation Description
Franke Call up Maintenance level
Servicing/cleaning Machine must be cleaned and/or serviced
Drip tray Drip tray is full or not installed correctly
Water tank Water tank empty/missing
Milk Milk container is empty or not installed correctly
Capsule system
Capsule container missing or full
Capsule insert is open
Coff ee bean
Bean hopper is empty or not installed correctly
Powder feed is open or missing
Grounds container Grounds container must be emptied or is missing
Rinse Carry out rinsing
Product Set products
Descale Descaling required
Payment
Advertising images
Screen saver
Page 10
Explanation of symbols
Page 8
Symbol Designation Description
Progress display Displays the progress of the drink preparation
Progress display;
Cancel button
Cancel preparation
Start button Start preparation
Page backwards/
forwards
Scroll through menus with multiple pages
Number of monitor screen pages/active page
(white)
Return button Up one level/save confi guration
Home button Go to start screen
Exit menu Go to product overview
Temporary interruption
System not functioning.
System still fully
functional for the time
being.
System has limited
functionality.
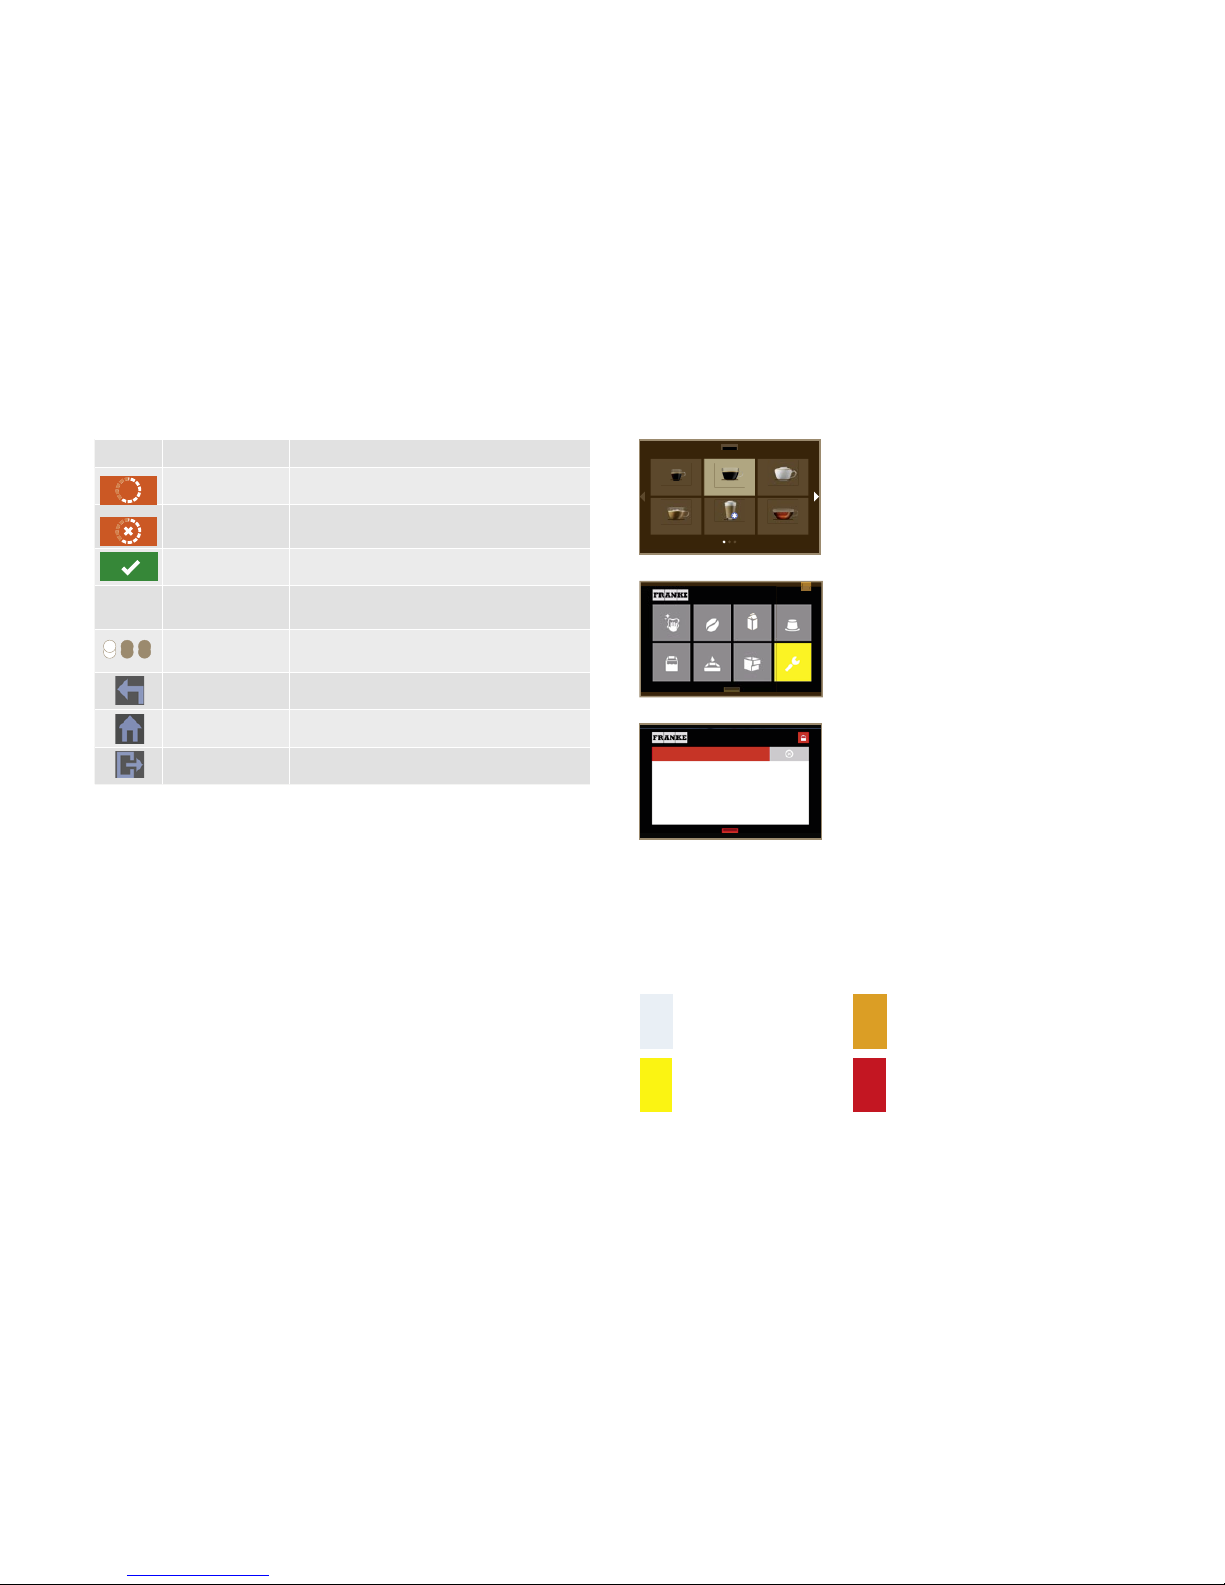
Depiction of error messages
Color code for error messages
A colored symbol in the dashboard indicates
an error. Pressing the symbol will display further information and troubleshooting instructions.
Certain processes can be activated directly
from the error message (e.g. Cleaning).
Highlighted products cannot be prepared.
The dashboard can be called up with the
"roller shutter".
If the entire system is aff ected by an error,
then the error message will appear automatically.
Navigation
Symbol Designation Description
Progress display Displays the progress of the drink preparation
Progress display;
Cancel button
Cancel preparation
Start button Start preparation
Page backwards/
forwards
Scroll through menus with multiple pages
Number of monitor screen pages/active page
(white)
Return button Up one level/save confi guration
Home button Go to start screen
Exit menu Go to product overview
Page 11
i
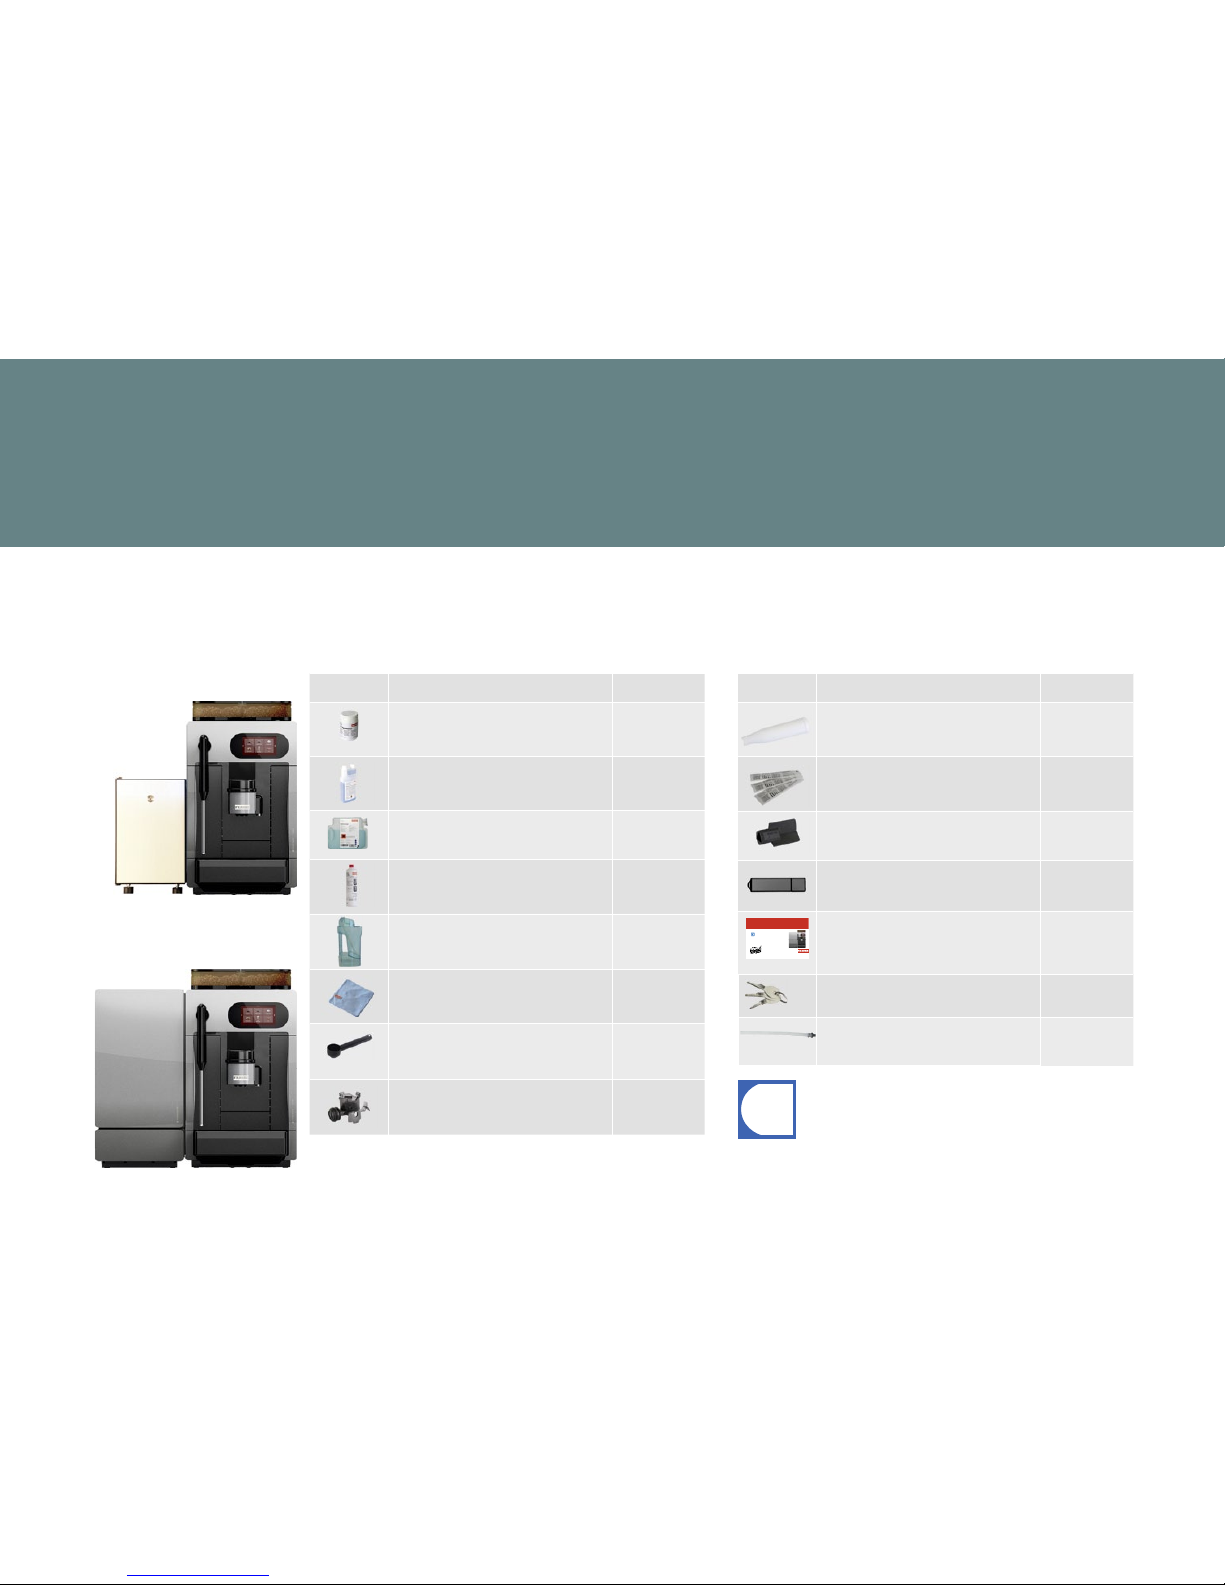
Scope of delivery and identifi cation
Page 9
Item Designation Item no.
Filter cartridge
(Not for water connection option)
1P315694
Measuring strips
(to determine the water hardness)
1N330577
Grinder adjustment wrench 1N330253
USB stick
(optional) 1H329064
Kaffeemaschine: FCS4039 - Kühleinheit: FCS4048
A200
ORIGINALBETRIEBSANLEITUNG
Lesen Sie die Betriebsanleitung und das Kapitel «Zu Ihrer
Sicherheit», bevor Sie an der Maschine arbeiten.
Bewahren Sie die Betriebsanleitung beim Gerät auf.
Original Operating Instructions
Declaration of conformity
1A335001
1A335287
Keys (A200 FoamMaster) 1N330314
Milk suction hose with coupling
Milk suction hose
(FoamMaster)
1A335233
1B340144
Item Designation Item no.
Cleaning tablets (100 pcs.) BK328400
Clean solution MS1 1L301219
Clean solution for FoamMaster 1Z365033
Descaling agent 1P315430
Cleaning container
(A200 FoamMaster)
1B340220
Microfi ber cloth 1H325974
Dosing spoon 1N330799
Filter holder
1N330385
The scope of delivery may vary, depending on the device
confi guration. Please refer to your purchase agreement.
Additional accessories may be obtained directly from your
retailer or from FRANKE Kaff eemaschinen AG in Aarburg,
Switzerland.
A200 with MS1
A200FoamMaster
Scope of delivery
SCOPE OF DELIVERY AND IDENTIFICATION
The A200 is a powerful coff ee machine. Its modern operating concept will help you keep your cool in any situation.
Listed below are ways to identify your machine and what is included in the standard scope of delivery.
Page 12
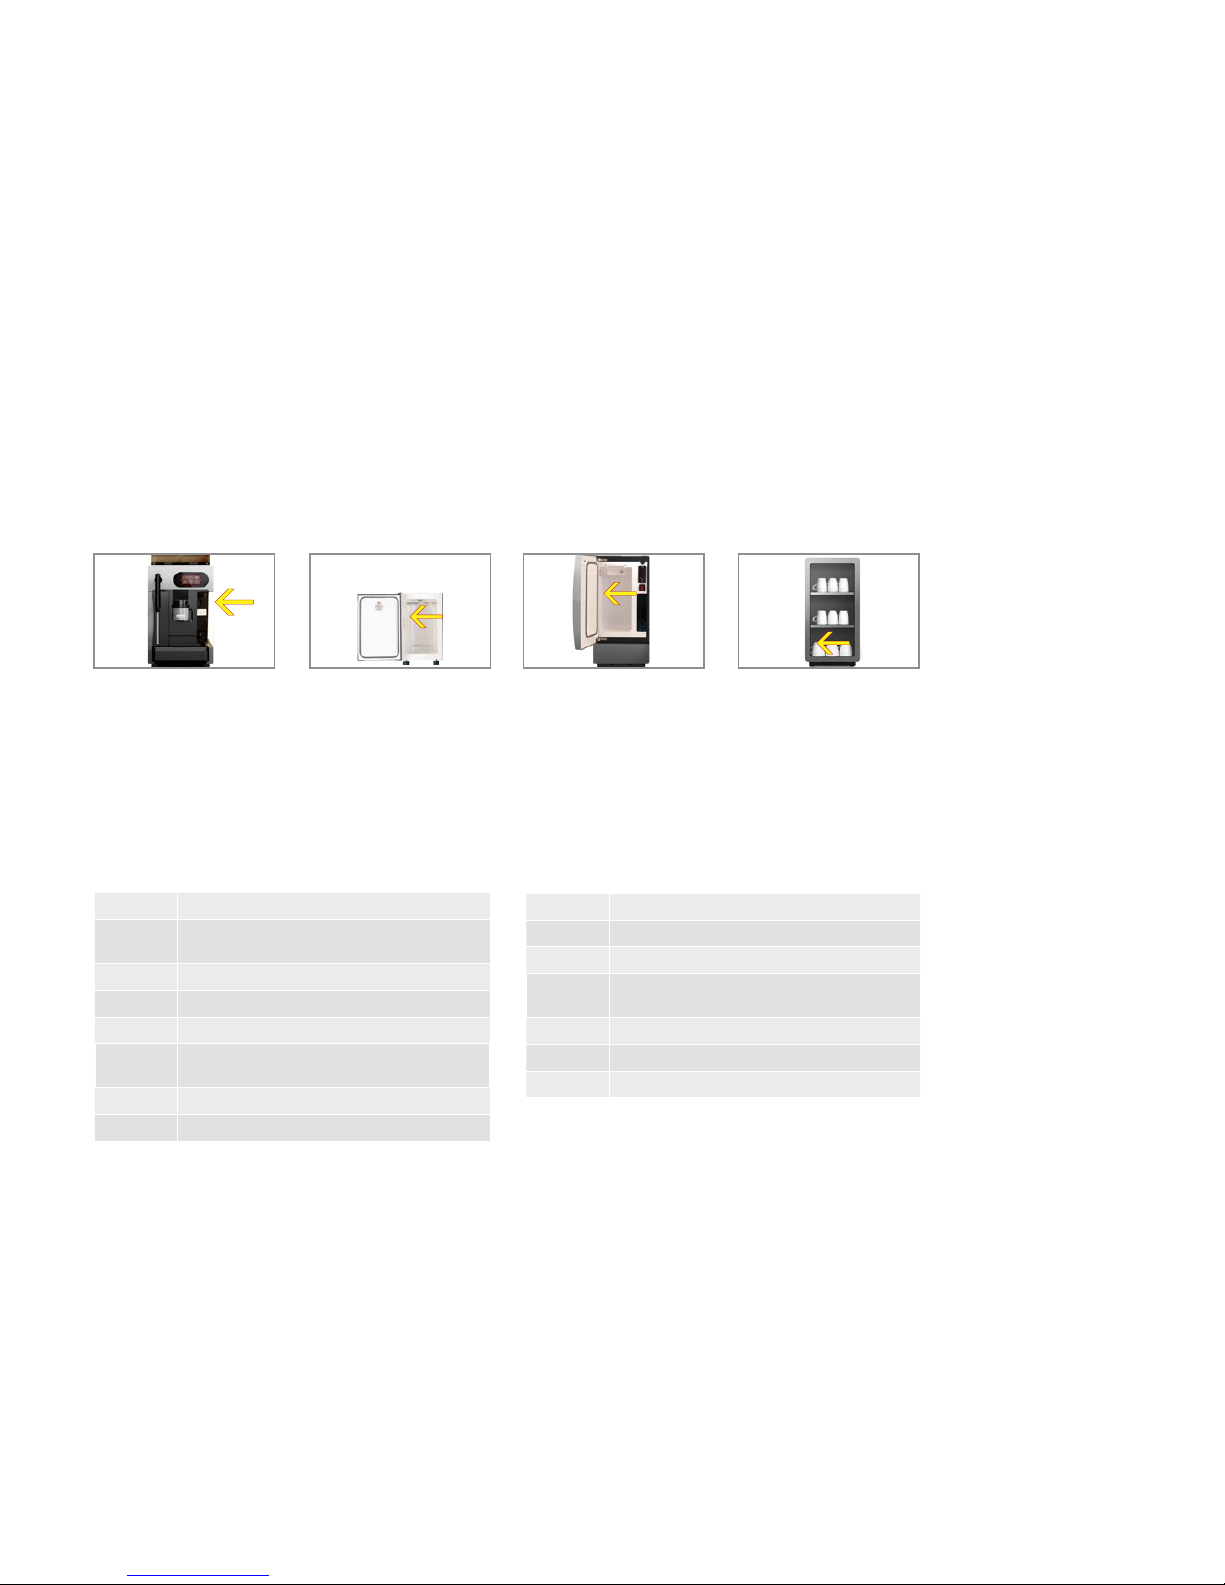
Scope of delivery and identifi cation
Page 10
CW
The type plate for the cup
warmer is located on the inner
side of the device at the lower
left.
Add-on unitsCoff ee machine A200 (FCS4039)
SU05 Refrigeration unit (< 10 l)
MS1 Milk system without pump in SU05
MS2 Milk system with pump in SU05
FM1 FoamMaster (cold and hot milk, cold and hot milk
foam)
1 C 1M 1 coff ee machine, 1 milk type
CW Cup warmer
AC Payment device
SU05A200 KE200
Type key
Position of type plates
Identifi cation
A200 Coff ee machine (fully automatic device)
MS1 Milk system in accordance with the Venturi principle
(hot milk, hot milk foam)
2G Number of grinders
H1 Hot water
S1 Steam wand
FM1 FoamMaster (cold and hot milk, cold and hot milk
foam)
1 C Capsule system
W1 Fixed water connection
The type plate for the KE200 is
located in the cooling room.
The type plate for the SU05 is
located in the cooling room.
The type plate is located behind
the water tank.
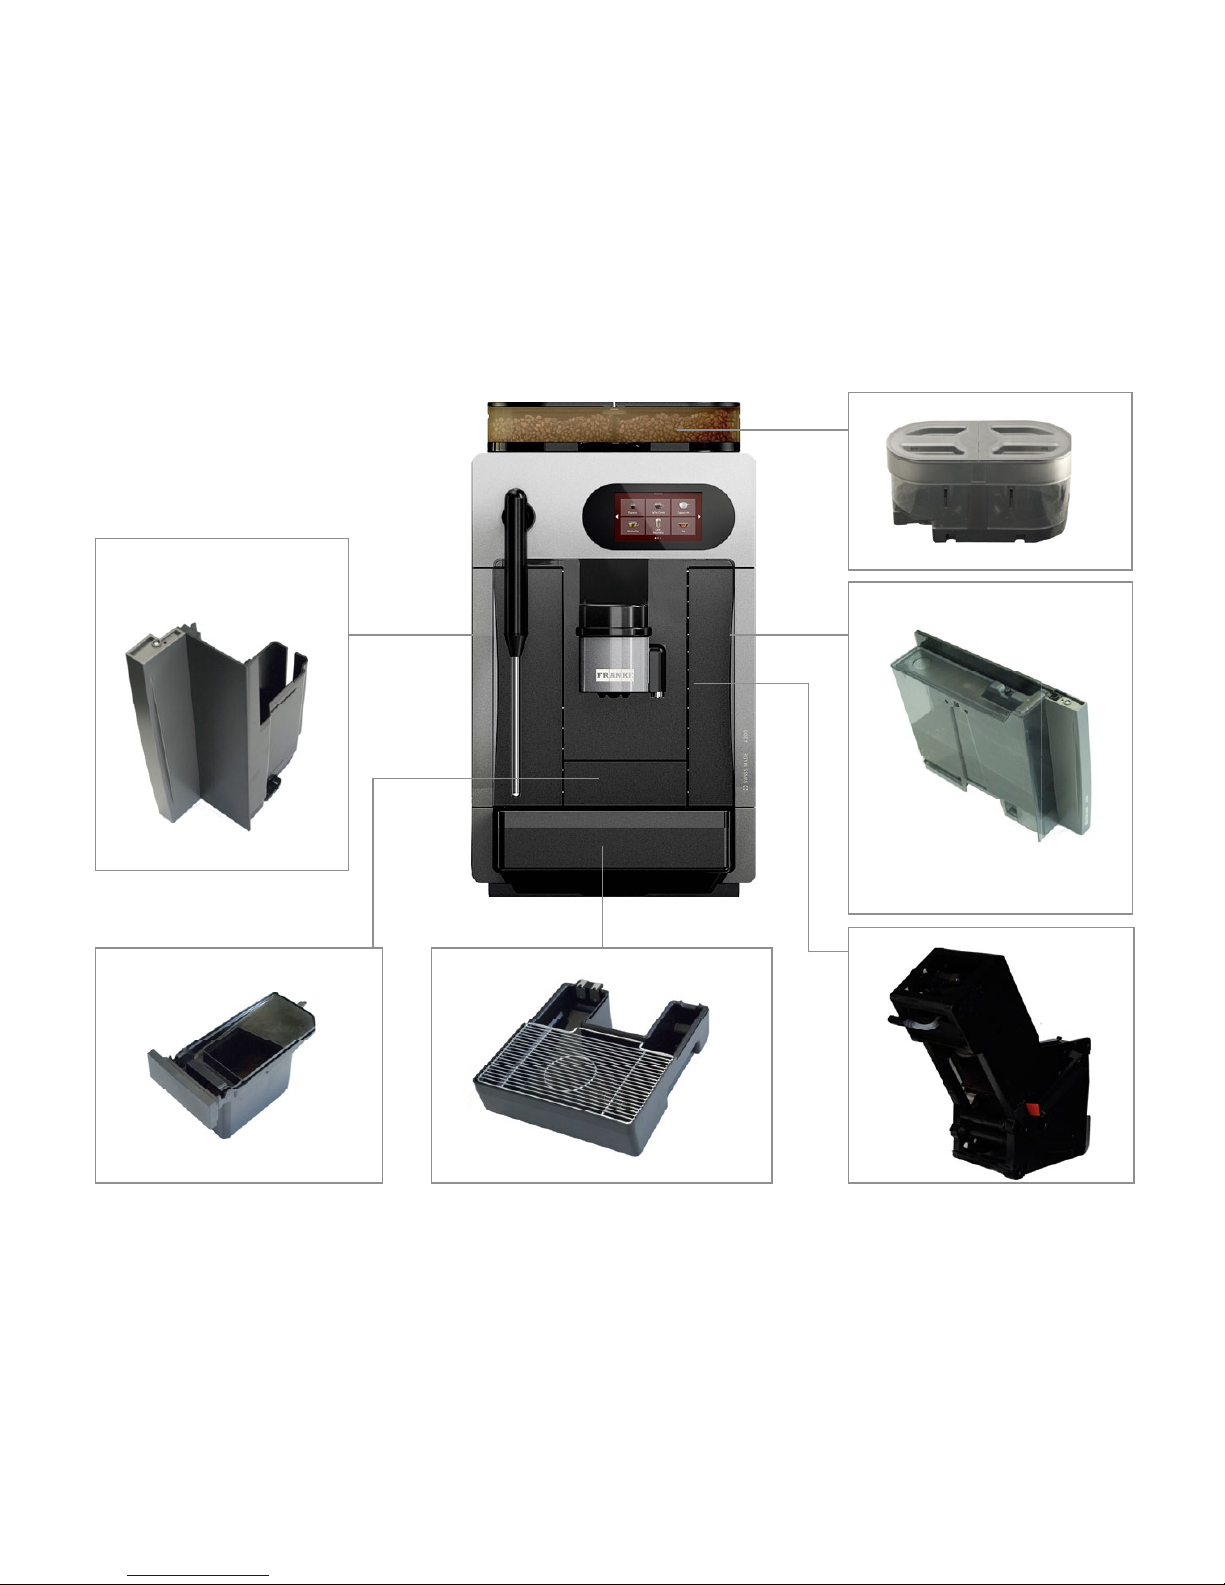
Page 13
Description
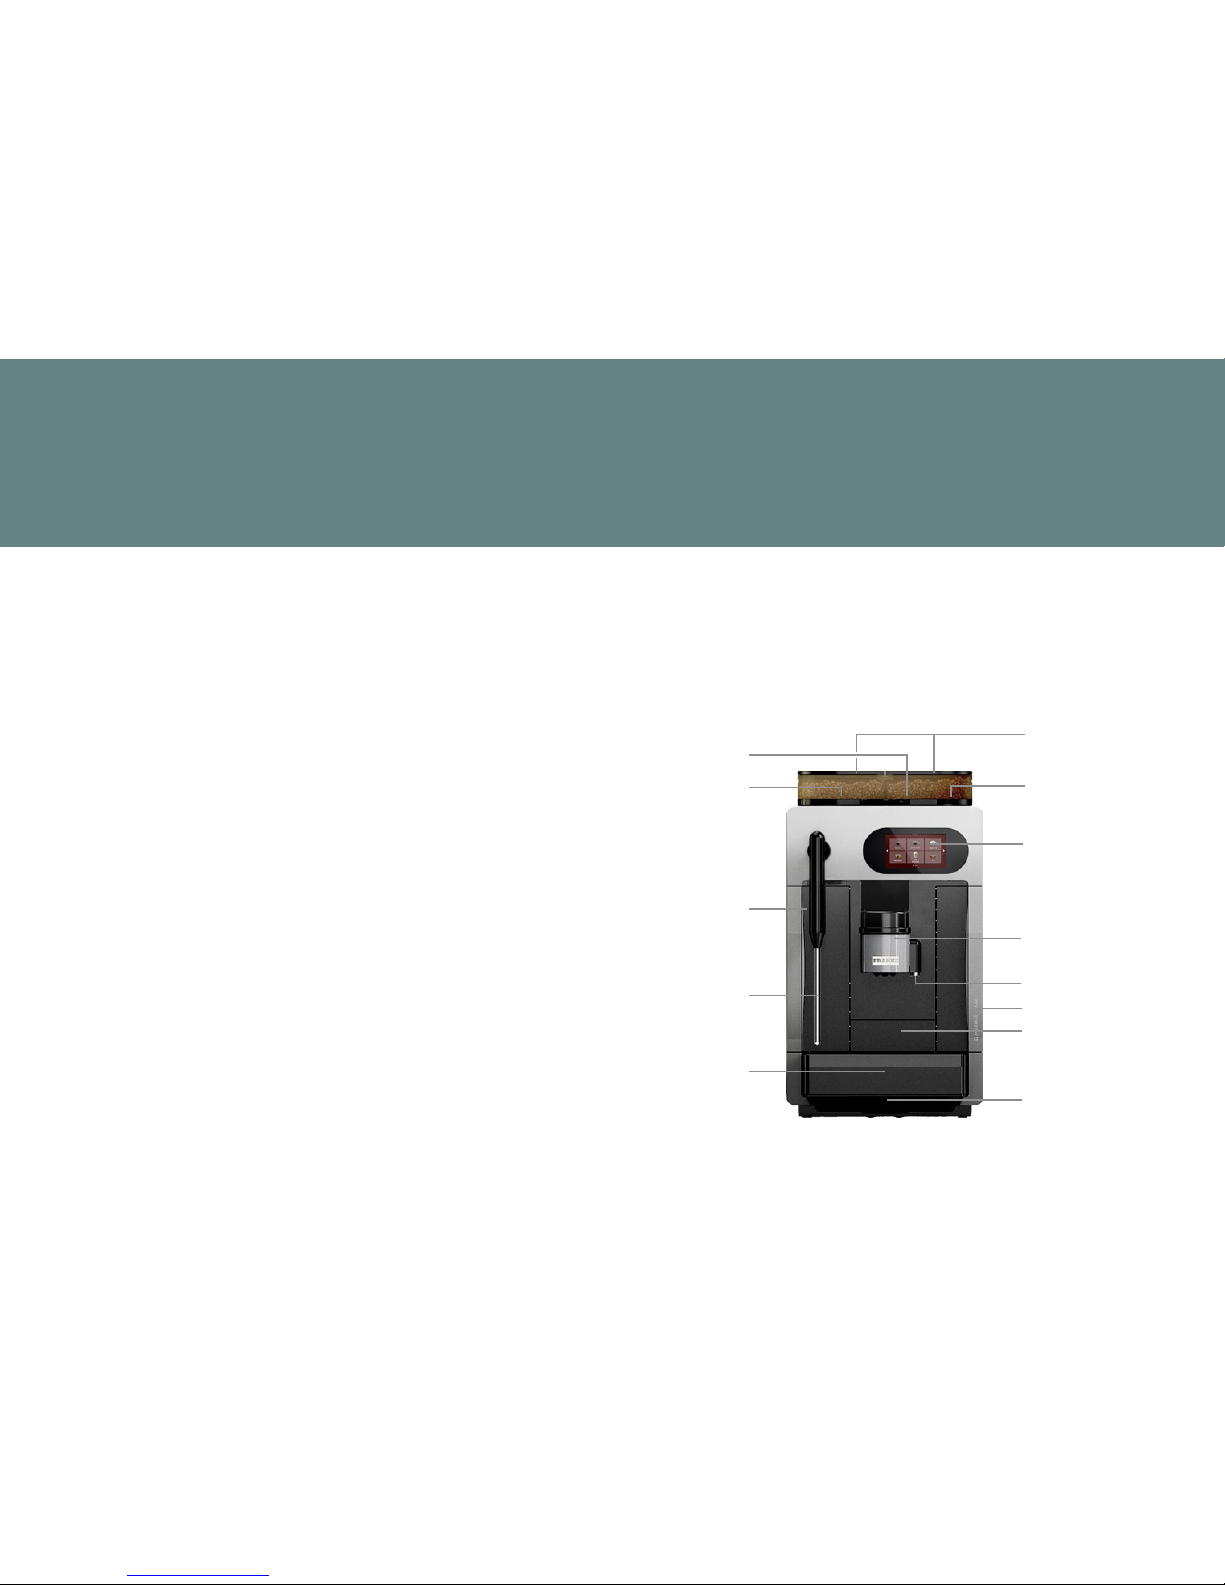
Page 11
A200
Capsule container
Operator panel
(Touch Display)
Combined outlet
(coffee, milk, capsule products)
Hot water
Bean hopper
Steam wand
Powder feed
Capsule insert
(option)
Cup rack
On/Off switch
(on the rear)
Drip tray with drip grid
Water tank
Grounds container
Introduction
The coffee machine can be operated with water tank or with fixed water connection. A capsule system is available as an option. Depending
on your requirements, you can select further options and add-on units.
In order for you to obtain an overview of your machine, we are presenting here the standard version.
The configuration of your coffee machine may differ from that shown
in the instructions.
Coffee machine A200/A200 FoamMaster
You have chosen enjoyment of every single coffee with the A200. In this section you will learn more
about the functions and options of your coffee machine and where the controls are located.
DESCRIPTION
Page 14
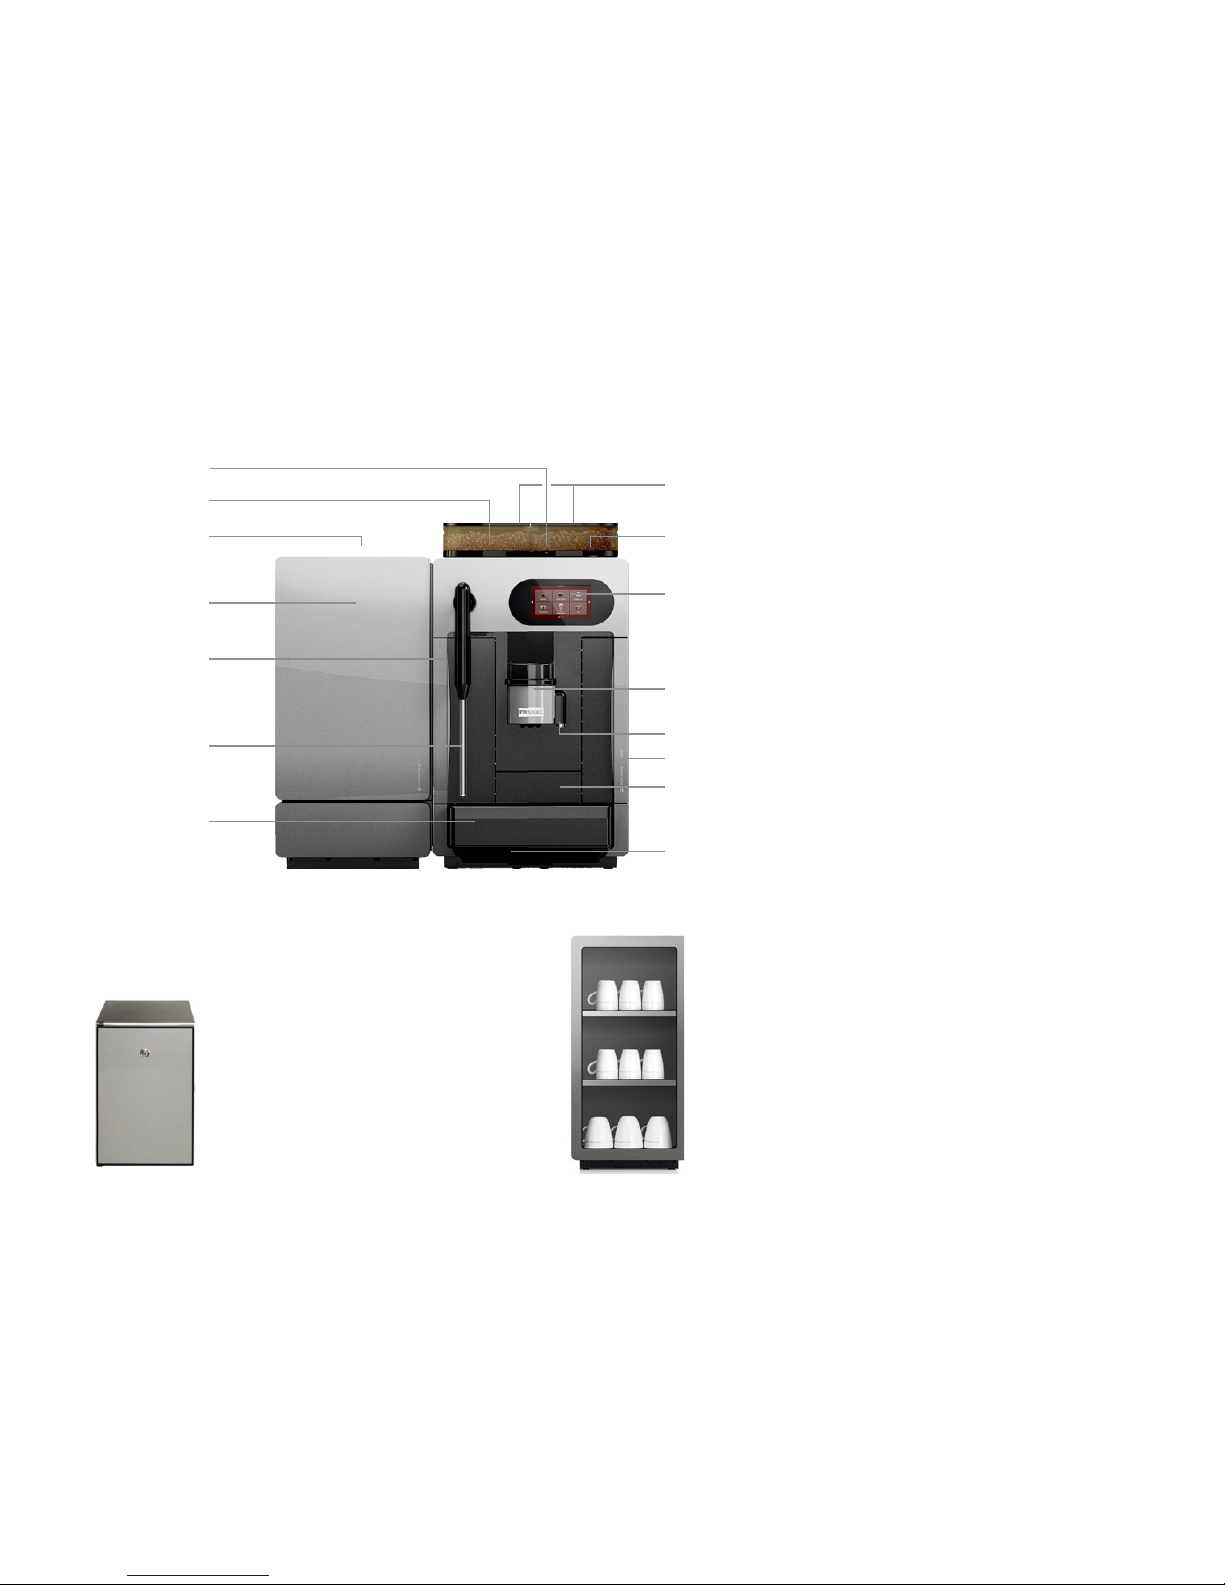
Description
Page 12
Cup warmer
FoamMaster
A200 FoamMaster
Add-on units
Refrigeration unit
In many regions, milk is part of
a good cup of coff ee. You can
connect the refrigeration unit
directly to the A200 to make
sure the milk stays fresh (MS1).
Cup warmer
To enjoy coff ee at its best, you
need pre-heated cups. The cup
warmer fi ts perfectly on your A200.
Operator panel (Touch Display)
Combined outlet
(coff ee, milk, capsule products)
Hot water outlet
Bean hopper
Cup rack
On/Off switch (on the rear)
Water tank
Grounds container
Capsule container
Steam wand
Powder feed
Capsule insert
Drip tray with drip grid
Page 15
Description
Page 13
Water tank
Grounds container
Capsule container
Brewing unit
Drip tray
Components of the A200
Bean hopper
Page 16
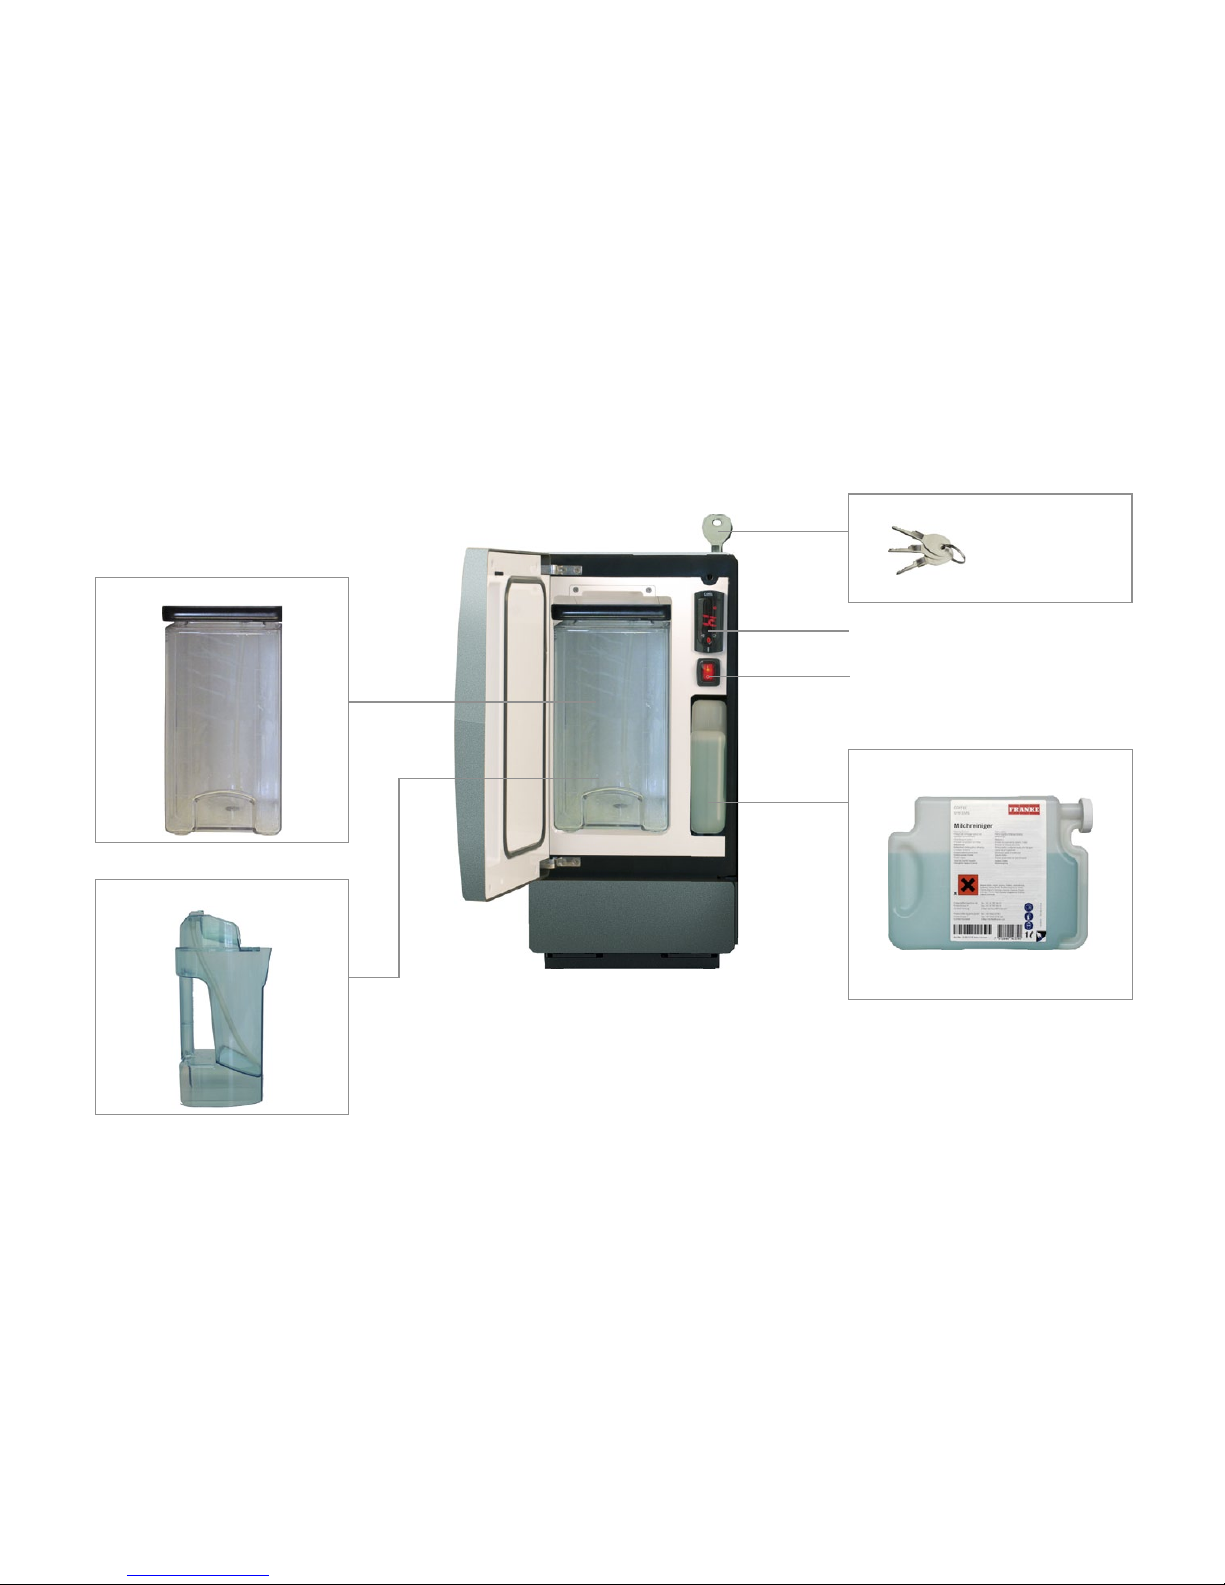
Description
Page 14
Main switch
Temperature display
Clean solution
Cleaning container
Milk container
Components FoamMaster
Keys
Page 17
4
01 02 03
04
4 4
i
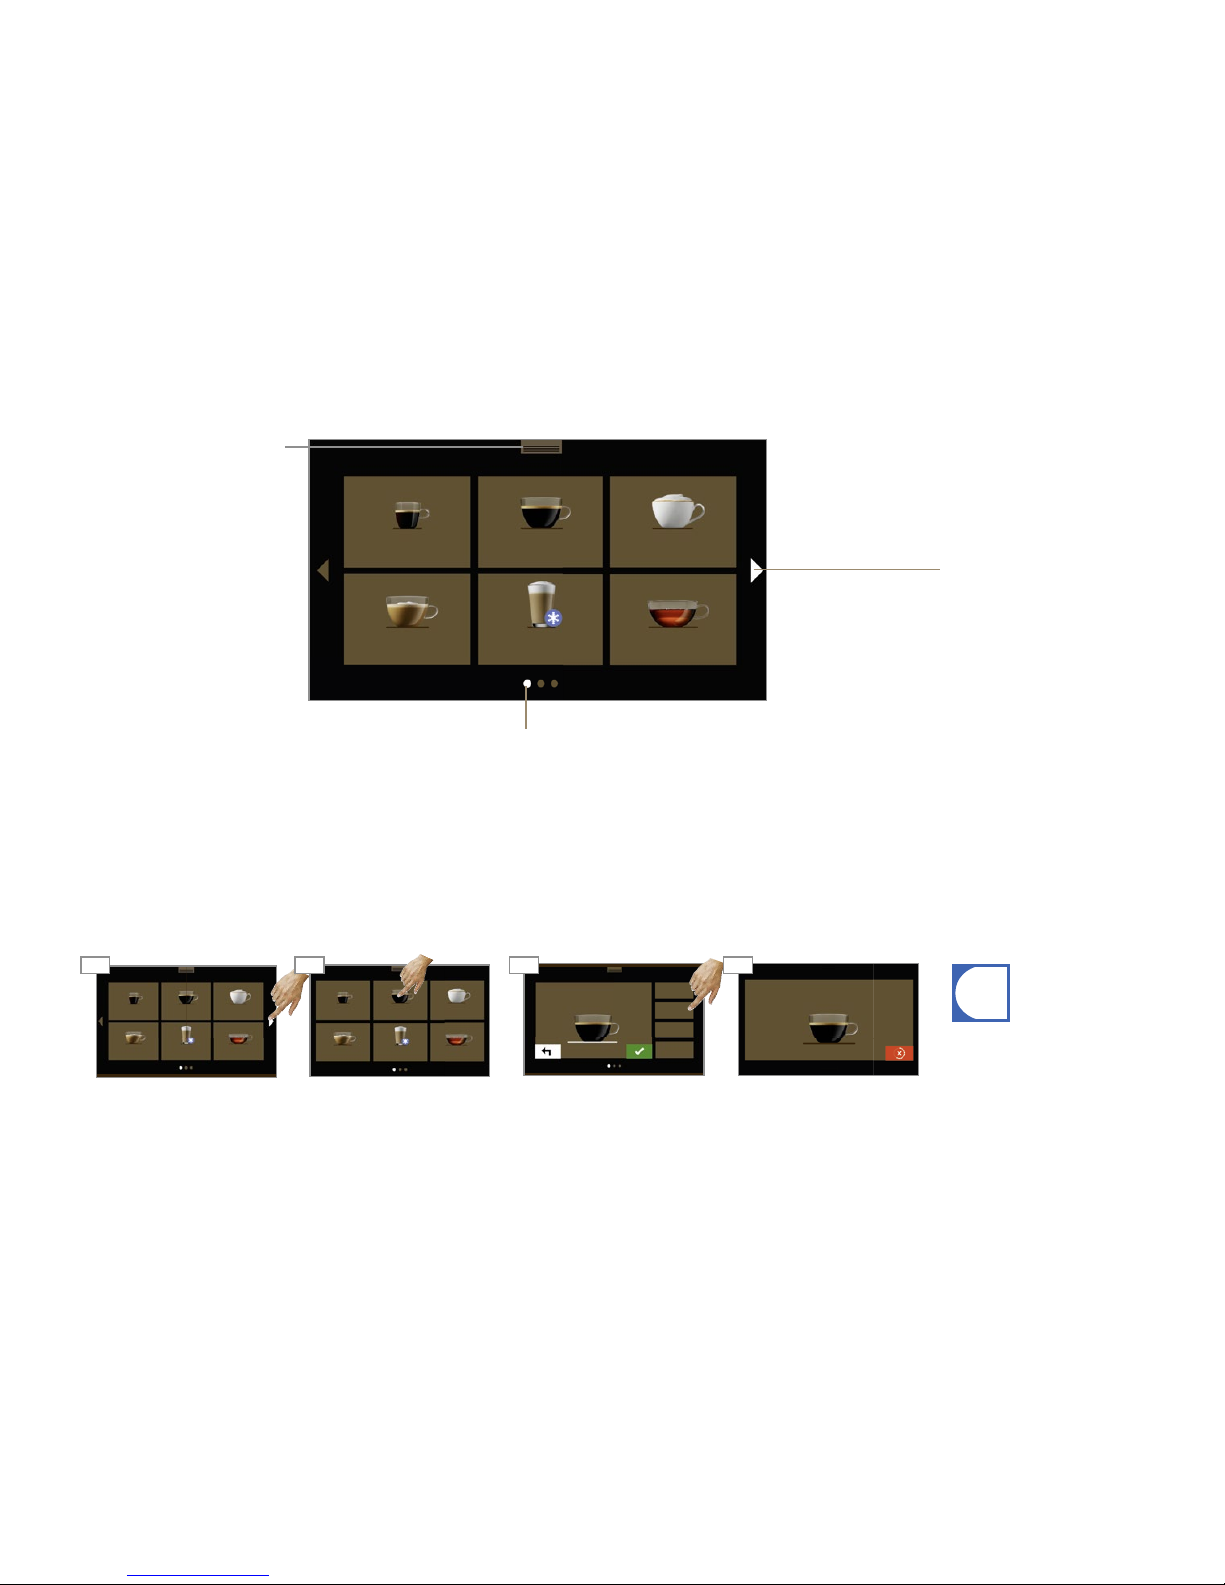
Description
Page 15
Cappuccino
TeaMilk coff ee Iced Latte Macc.
Café Crème
Espresso
Cappuccino
TeaMilk coff ee Iced Latte Macc.
Café Crème
Espresso
Additional information on the
preparation of drinks can be
found in the chapter "Preparing
drinks". See p. 26.
Tap the respective button to
select a drink.
Preparing drinks
In order to individualize the
beverage further, tap on selection button(s) (visible only if the
selection buttons are confi gured).
The drink is being prepared
The dashboard can be called up
with the "roller shutter".
See p. 16.
Scrolling forwards or backwards; the white arrow shows
that additional pages are present. If no more arrows appear,
then the active page is the last
one in this direction.
The operating interface
Press on the arrow to scroll.
The circles show the available
pages. The fi lled circle marks
the current position.
Cappuccino
TeaMilk coff ee
Iced Latte
macchiato
Café CrèmeEspresso
No return change Credit: 60.80
Café Crème
3.50
Page 18
i
01 02 03
04
i
i
44 4
4
4
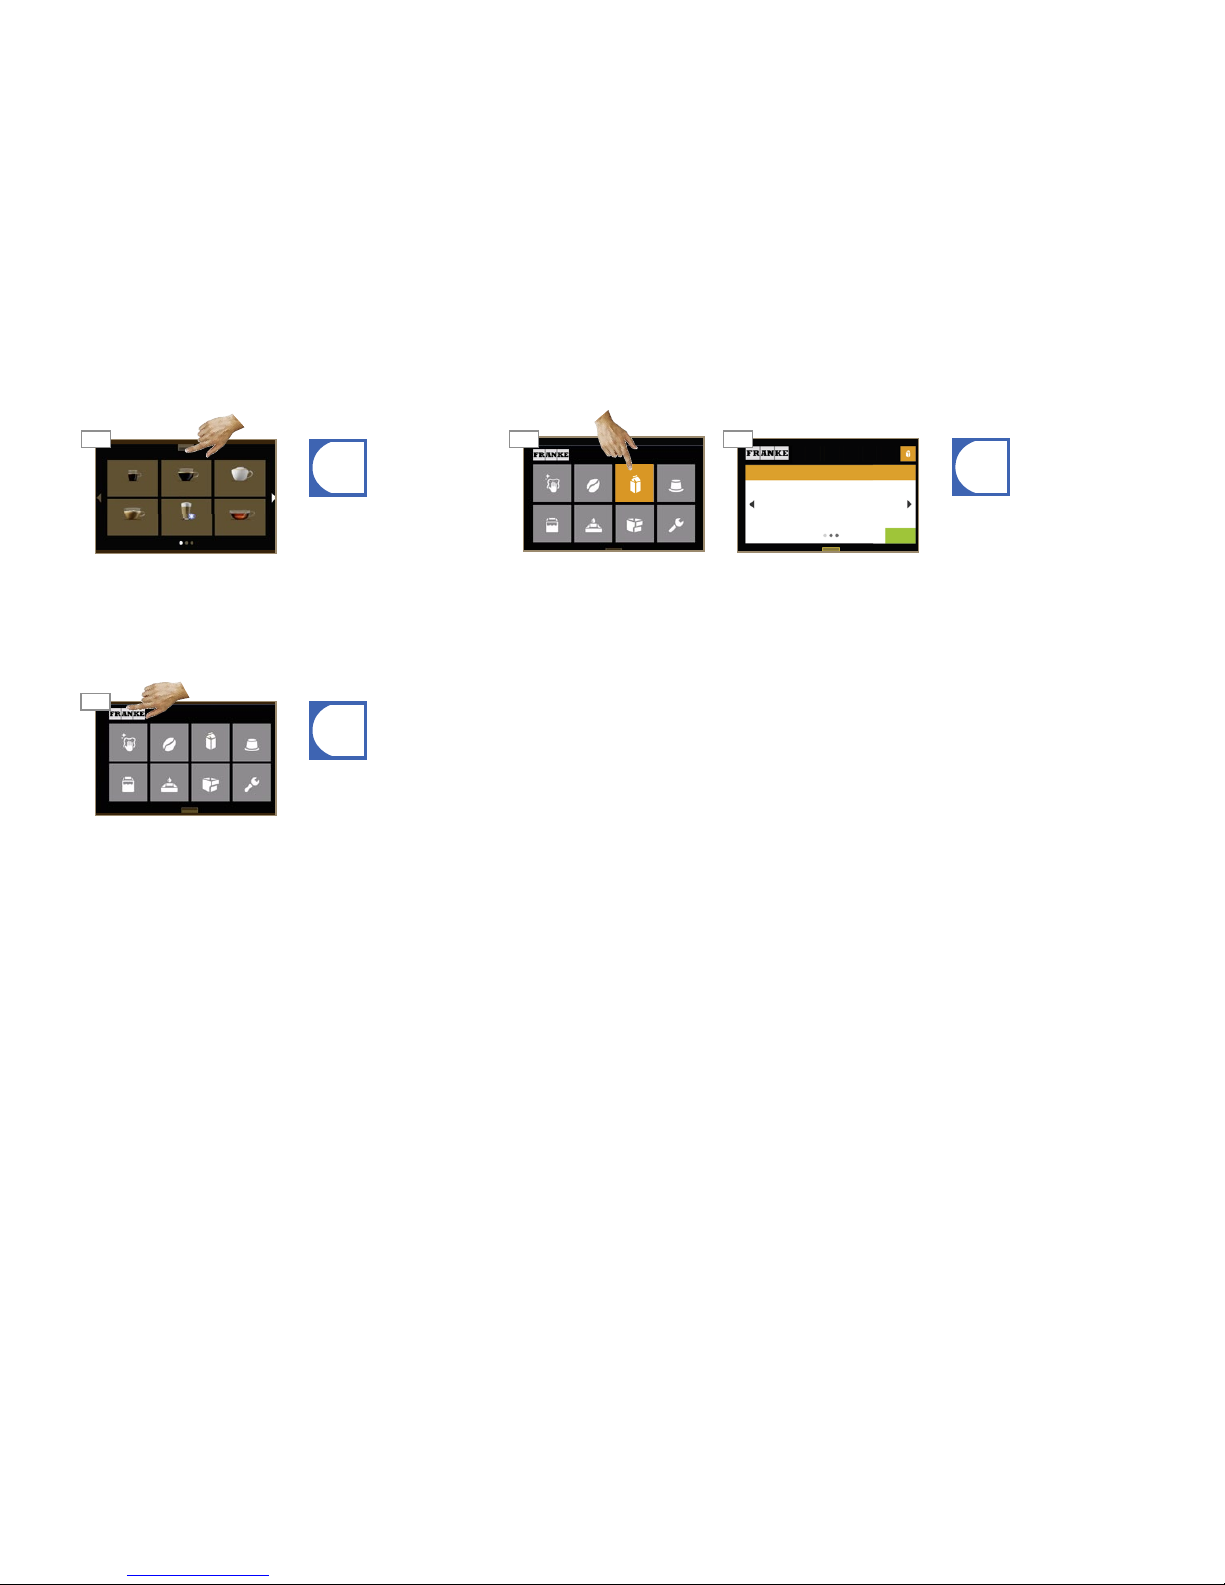
Description
Page 16
Cappuccino
TeaMilk coff ee Iced Latte Macc.
Café Crème
Espresso
09:26
Fr 2015-03-27
Additional information on administration, product settings,
individualization, care and machine information can be found
in the "Confi guration" chapter.
See p. 41.
Click on the Franke logo to
switch to programming mode.
The numerical pad appears for
entering the PIN.
Press the arrow to go to the
next error message.
To call up the more detailed
error message, press the corresponding symbol.
The error message is displayed.
Press the "roller shutter" to call
up the dashboard.
The dashboard appears.
The dashboard
OK
The milk in the FoamMaster is empty. No further
products can be produced with milk.
Please top up with fresh, pre-cooled milk.
E123 Milk empty
The symbols for the error
messages are displayed in the
dashboard.
Error messages contain the
error code, a key word, an
error description and handling
instructions for rectifying the
error.
Page 19

Installation and technical data
Page 17
Bean hopper 0.6 kg per hopper (optional: lockable)
Water tank 4.0 liters
Grounds container 40 cakes
Capsule container 10 empty capsules
Drip tray
(monitored) 2.5 liters
Electrical connection 220-240 V1LNPE2.4-2.75 kW50/60 HzFuse: 16A, without power management
220-240 V1LNPE1.2-1.50 kW50/60 HzFuse: 10A, with power management
100V2LPE1.30 kW50/60 HzFuse: 15A
120V2LPE1.45 kW60 HzFuse: 15A
Electric cable l = 1800 mm
Waste-water hose
(optional) Not permanently attached to the drain (vented), d = 14.5 mm, l = 2,000 mm
Noise emission < 70 dB (A)
Weight Approx. 20-25 kg
Width 340 mm
Depth 560 mm
Height 604 mm
Fixed water connection
(optional) Metal hose with union nut G 3/8", l = 1,500 mm (59")
Water supply line If possible on installation side: untreated water of drinking water quality (not from house-
hold decalcification system)
Water pressure 80-800 kPa (0.8-8.0 bar)
Water temperature < 25°C
Water shut-off With checkable check valve and filter
Water hardness max. 70 mg CaO/1 l water (7 dH, 13 °fH)
Chlorine content max. 0.1 mg/l(WHO recommendation: max. 0.5 mg/l)
Ideal pH value 7
Drain pipe dmin = 1"
Ambient conditions Humidity: max. 80 %
Ambient temperature: 10-32°C
Technical data of the A200/A200 FoamMasterRequirements
•The power connection for the coffee machine must be protected
by a ground fault circuit interrupter (GFCI).
•Each terminal of the power supply must be able to be interrupted
by a switch.
•For operation with a fixed water connection, this must have a
water shut-off with a check valve that can be inspected and a
filter. The fixed water connection must meet the requirements of
the technical data and of local regulations.
•The coffee machine must be connected to the water supply with
the hose set supplied. Do not use any other water hoses that happen to be present.
•The water for coffee preparation should always be fresh, oxygenated and rich in minerals.
Once the requirements are met, one of our service technicians will
install your coffee machine and put it into operation for the first time.
The technician will walk you through the basic functions.
Your coffee machine must be properly installed so that you can operate it correctly – your Service technician
will do that for you. You'll have to take care of a few things first. You'll find the preparations for problem-free
enjoyment of your coffee machine here.
INSTALLATION AND TECHNICAL DATA
Installation
Page 20
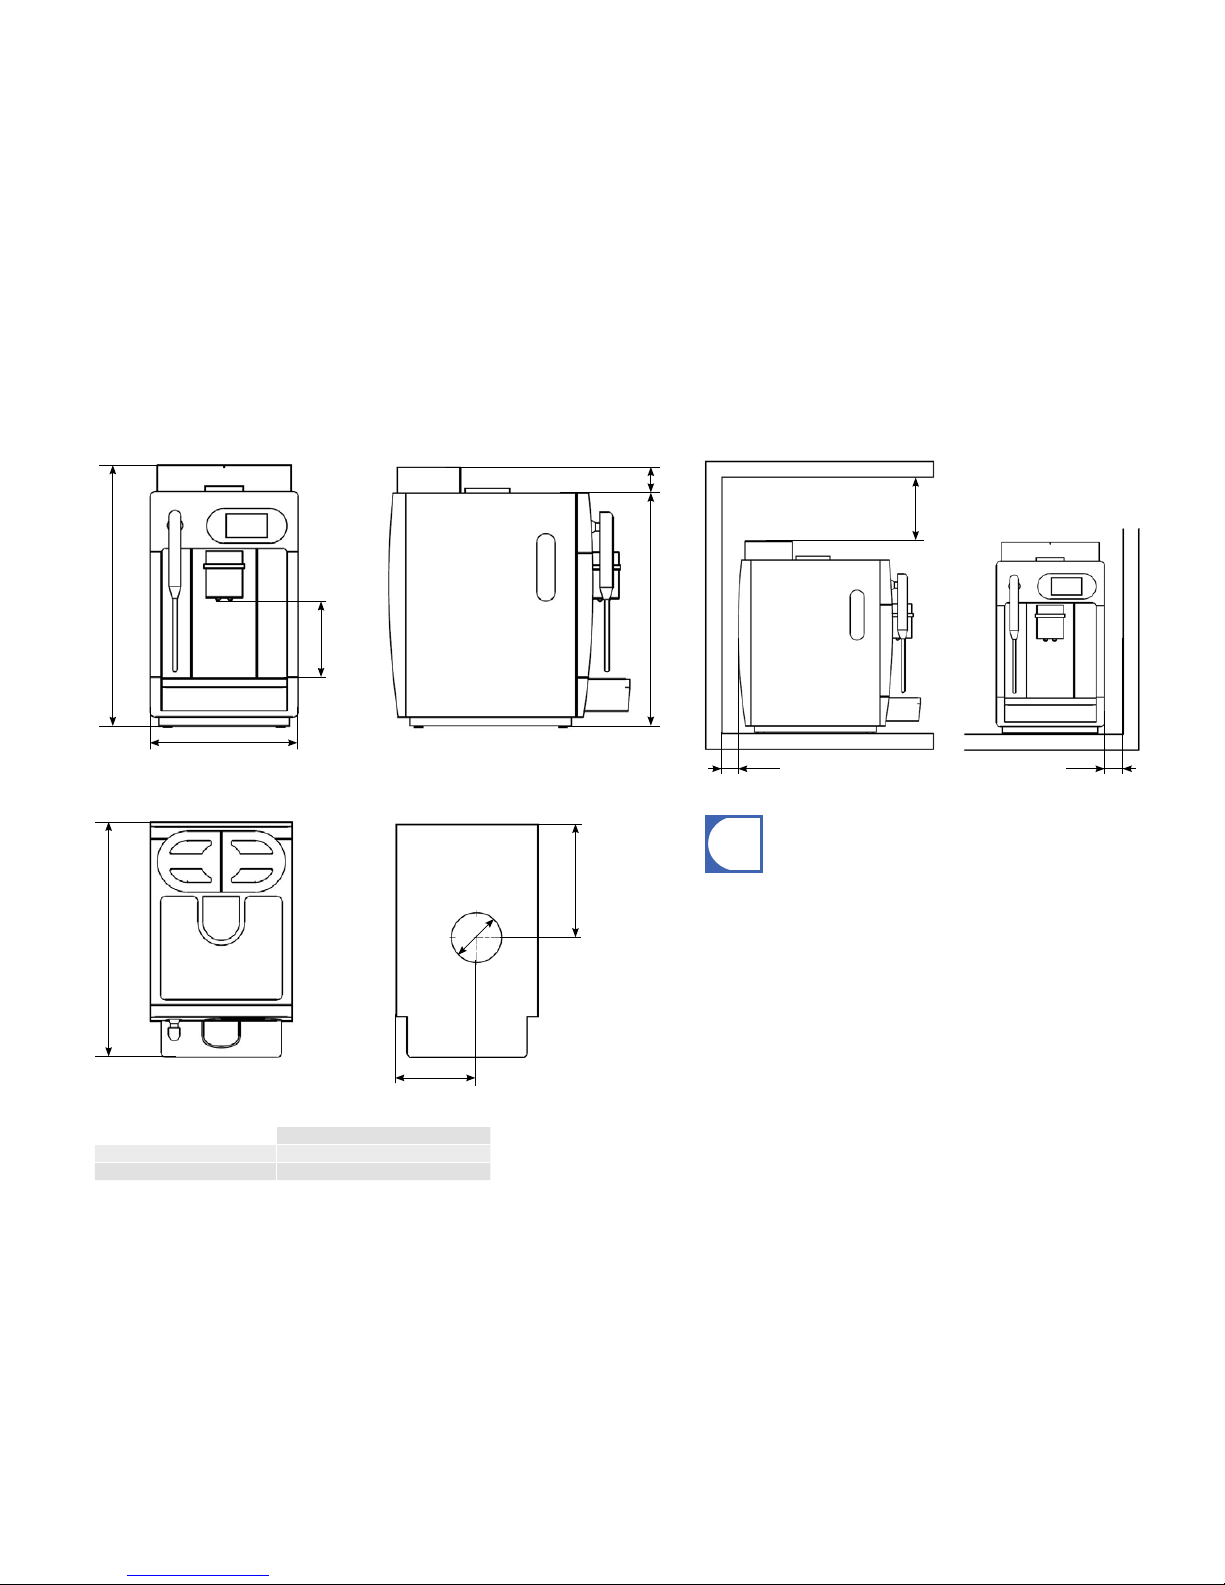
604
340
193
∅120
560
272
540 60
70-180
i
Installation and technical data
Page 18
Prepare a stable, ergonomic surface (min. load capacity: 100 kg or 220 lb).
The operator panel should be no higher than at eye level.
Minimum clearances:
▪ To the rear wall: 50 mm
▪ Upwards: 200 mm (fi lling and removal of coff ee bean hopper)
▪ To the right: 60mm (for removal of the brewing unit)
▪ To the left: 60mm (for opening the refrigeration unit)
Adjustable feet (optional) can be used to compensate for unevenness or
height diff erences.
If optional add-on units are installed, up to an additional 330mm of width
may be required.
Buff et feed-through for grounds ejection
Installation dimensions of the A200 Dimensions of the A200
Total height
40 mm 600mm+40mm=640mm
100 mm 600mm + 100mm=700mm
Adjustable feet
≥ 50 ≥ 60
≥200
Page 21

560
≥200
≥ 60≥ 50
613
≥ 60
i
Installation and technical data
Page 19
Prepare a stable, ergonomic surface (min. load capacity: 100 kg or 220 lb).
The operator panel should be no higher than at eye level.
Minimum clearances:
▪ To the rear wall: 50 mm
▪ Upwards: 200 mm (filling and removal of coffee bean hopper)
▪ To the right: 60mm (for removal of the brewing unit)
▪ To the left: 60mm (for opening the refrigeration unit)
Adjustable feet (optional) can be used to compensate for unevenness or
height differences.
If optional add-on units are installed, up to an additional 330mm of width
may be required.
Total height
40 mm 600mm+40mm=640mm
100 mm 600mm + 100mm=700mm
Adjustable feet
Installation dimensions of the A200 FoamMasterDimensions of the A200 FoamMaster
60540
70-180
604
613
270 340
Page 22

Installation and technical data
Page 20
Device type FCS4048
Milk container 5 l
Electrical connection 220-240 V1LNPE1.95-2.3k W
50/60 Hz Fuse: 10 A
Electric cable 1800 mm
Ambient conditions Humidity: max. 80 %
Ambient temperature: 10 – 32 °C
Coolant R134a /40 g
Climate class N (temperate climate)
Noise emission < 70 dB (A)
Cooling temperature 2.0 - 5.0 °C
Weight Approx. 23kg
Width 270 mm
Depth 474 mm
Height 540 mm
Technical data FoamMaster (optional)
Device type KE200
Milk container 4 l
Electrical connection 220–240 V1LNPE82 W50/60 Hz
Fuse: 10 A
Electric cable 1800 mm
Ambient conditions Humidity: max. 80 %
Ambient temperature: 10 – 32 °C
Coolant R134a / 40 g
Climate class N (temperate climate)
Noise emission < 70 dB (A)
Cooling temperature 2.0 - 5.0 °C
Weight Approx. 13kg
Width 225 mm
Depth 468 mm
Height 337 mm
Technical data for the cup warmer (optional)Technical data KE200 (optional)
Device type FCS4054
Capacity Up to 120 cups (depending on cup size)
Electrical connection 220 – 240 V1L N PE120 W50/60 Hz
Fuse: 10 A
Electric cable 1800 mm
Weight Approx. 16 kg
Width 270 mm
Depth 453 mm
Height 544 mm (21¼")
Page 23

!
4
4
03
4
02
01
i
i
Commissioning
Page 21
Add coff ee beans and milk, if
necessary.
In addition to this, fi ll up with
water for operating with water
tank.
Your service technician will put your coff ee machine in operation for the
fi rst time and instruct you in its operation.
Later recommissioning will also be undertaken by your service technician.
Initial commissioning of the A200
The coff ee machine automatically vents and rinses after
heating.
In this chapter you will learn how to start up your coff ee machine for the fi rst time. In addition to the start-up
procedure, you will also learn about processes that take place automatically during daily commissioning.
The coff ee machine is ready for
operation.
WARNING
Risk of scalding
The machine releases hot water
and hot steam after being
switched on.
•Do not touch the machine
below the outlets or the
outlets themselves.
If necessary, switch machine
on at the power switch.
Tip on the operating interface.
The machine starts.
COMMISSIONING
Daily commissioning of the A200
Page 24

!
02
4 4 4
01
03
03
01 02
4 4 4
i
NOTE
Information regarding the insertion and
replacement of the water fi lter
can be found in the chapter
"Care of the A200", p. 32.
Machine damage
Incorrect fi lling of the machine
causes damage to the machine.
•Fill the water tank with water
only.
•Disconnect the machine
from the power supply if
there is milk in the FluidSystem
•Call Service
Adding coff ee beans
Replace water tank and slide
it into the machine until it hits
the stop.
Fill the water tank.
Use the lid to close the water tank.
Pull out the water tank.
Remove the lid.
Filling the water tank (optional)
Risk of injury, eye injury and damage to the machine
If objects fi nd their way into the bean hopperor grinder, splinters may
be ejected, leading to injuries or damage to the machine.
•Never put any objects in the coff ee bean hopper or grinder.
Ensure that all ingredients are always available. That way you will able to off er your customers
the wide assortment of your product range at all times. Get primed for a successful day.
FILLING AND EMPTYING
WARNING
Attach the bean hopper cover
and lock it (optional).
Add coff ee beans.Open the bean hopper.
Filling the coff ee machine
Page 25

08
04
4
02 03
4
4
01 02
01
03
4
4
4 4
4 4
4 4
4 4
05 06 07
Filling and emptying
Page 23
The quality of the milk may be impaired.
•Only clean containers should be fi lled with milk.
•Only use pre-cooled milk (2 - 5 °C or 36 - 41°F).
•Only touch the intake hose, the inside of the milk container and
the milk lid after sanitizing your hands, or wear disposable gloves.
•Place the container lid with the suction hose only on a surface
that is clean.
NOTE
Close the door.
Slide the milk container all the
way in.
Fit the container lid.
Fill the milk container with a
maximum of 5l of cooled milk.
Clean the milk container and
intake hose.
Remove milk container.The current cooling chamber
temperature is displayed.
Open the door and switch on
the FoamMaster.
Adding milk with FoamMaster (optional)
Slide in the milk container.
Insert the intake hose through
the opening in the cover.
Close the door.
Remove the lid.
Fill the milk container with milk
and seal it with the cover.
Open the door.
Pull intake hose out of the
machine.
Remove the milk container
towards the front.
Adding milk with MS1 (optional)
The quality of the milk may be impaired
•Only clean containers should be fi lled with milk.
•Only use pre-cooled milk (2 - 5 °C or 36 - 41°F).
•Only touch the intake hose after sanitizing your hands or wear
disposable gloves.
•Place the container lid with the suction hose only on a clean
surface.
NOTE
Page 26

!
01 02
4 4
4
07
4
4
44
4
0503
03
06
4 4
01 02
4
04
04
Filling and emptying
Page 24
Empty drip tray.
Emptying the drip tray, grounds container and capsule container
WARNING
Risk of scalding
The drip tray may contain hot water.
•Allow the water in the drip tray to cool down.
•Transport the drip tray carefully.
•Empty the drip tray slowly and carefully.
Formation of mildew
Coff ee residue can lead to
mildew formation.
•Empty and clean the
grounds container and the
drip tray at least once daily.
NOTE
Pull out the drip tray.
Emptying the coff ee machine
Pull out and empty the grounds
container.
Insert the capsule container
and grounds container.
Clean and dry the drip grid, drip
tray, grounds container and
capsule container.
Pull out the capsule container
and empty it.
Replace the drip tray.
Use the lid to close the water tank.Empty and clean the water tank.
Emptying the water tank
Replace water tank and slide it into
the machine until it hits the stop.
Pull out the water tank all the way.
Remove the lid.
Page 27

01 02 03
4
4
4 4
01 02
03
4
4
4
4
4
4
07 08
4
06
05
i
04
Filling and emptying
Page 25
If needed, the grind coarseness
can be set in stages for each
coff ee grinder.
NOTE
Emptying the bean hopper, changing the grind coarseness
Remove bean hopper by pulling
it out straight up.
Turn locking knob counterclockwise.
Open the two bean hopper covers (optional) and remove them.
Empty, clean and dry the bean
hopper.
Spoiled milk
Insuffi cient cooling or hygiene can cause milk to spoil.
•Do not use the refrigeration unit to store milk outside of
periods of operation.
•Store the milk in a refrigerator.
•Clean the coff ee machine and refrigeration unit once a day
(see p. 32).
Clean the milk container and
the refrigeration unit.
Store the milk in a refrigerator
or dispose of it, if necessary.
Open the door.
Remove the suction hose on
MNS1.
Remove the milk container
towards the front.
Emptying milk
Attach the bean hopper cover
and lock it (optional).
Turn locking knob clockwise.
Set the grind coarseness with the
grinder adjustment wrench.
•Finer grind: turn counterclockwise.
•Coarser grind: turn clockwise.
Insert the bean hopper.
Loss of coff ee quality
Moisture and cleaning agent
residue have a negative infl uence on coff ee quality.
•Dry the bean hopper well
after cleaning it. It must
not contain any moisture or
cleaning agent residue.
NOTE
Page 28

4
!
4
01 02
4
4
4
04 05 06
07
03
4
4
Café Crème Cappuccino
Tea
Milk coff ee
Iced Latte
macchiato
Espresso
Café Crème Cappuccino
Tea
Milk coff ee
Iced Latte
macchiato
Espresso
Tap the respective button to
select a drink.
The drink is being prepared.Press the arrow to scroll.
In order to individualize the
drink further, tap on selection
button(s) (visible only if the selection buttons are confi gured).
Preparation of the drink can
be canceled by pressing the
Cancel button.
Place an appropriate cup or
glass under the outlet.
Set the outlet height.
PREPARING DRINKS
Preparing a standard drink
You chose the A200 because you love coff ee and want to off er your customers something special. In this section
you will fi nd information about preparing drinks and the variations possible for your specialty drinks.
WARNING
Risk of scalding or burning
The dispensers and drinks are hot.
•Do not touch the area under the outlets.
•In case of scalding or burns, immediately cool the aff ected area
and, depending on the severity of the injury, consult a doctor.
Iced Latte
Macchiato
Page 29

!
i
4
4
4
01
4
4
4
4
04 05 06
07
03
02
Preparing drinks
Page 27
Café Crème Cappuccino
Tea
Milk coff ee
Iced Latte
macchiato
Espresso
Tap the respective button to
select a drink.
Preparing two drinks at once
Risk of scalding or burning
The dispensers and drinks are hot.
•Do not touch the area under the outlets.
•In case of scalding or burns, immediately cool the aff ected area
and, depending on the severity of the injury, consult a doctor.
Place two appropriate cups or
glasses under the outlet.
Set the outlet height.
WARNING
The drink is being prepared.
In order to individualize the
drink further, tap on selection
button(s) (visible only if the selection buttons are confi gured).
Preparation of the drink can
be canceled by pressing the
Cancel button.
Press the arrow to scroll.
Café Crème Cappuccino
Tea
Milk coff ee
Iced Latte
macchiato
Espresso
Page 30

!
03
04
4 4
44
i
4
4
06
05
07
08
4
01
02
i
4
4
Preparing drinks
Page 28
Café Crème
Fill powder and close powder lid.
Drink preparation with ground coff ee
Place an appropriate cup or
glass under the outlet.
Set the outlet height.
The drink is being prepared
Risk of scalding or burning
The dispensers and drinks are hot.
•Do not touch the area under the outlets.
•In case of scalding or burns, immediately cool the aff ected area
and, depending on the severity of the injury, consult a doctor.
For one cup, use approximately
7-9 g of ground coff ee.
Damage from foreign objects
Putting foreign objects through the powder lid can lead to damage to
the machine.
•Never insert any foreign objects.
•Never poke around in the powder lid with any object and never
insert anything except cleaning tablets or ground coff ee in the
powder lid.
NOTE
Fill in ground coff ee and close
powder lid.
Open powder lid.
WARNING
Preparation of the drink can
be canceled by pressing the
Cancel button.
Cappuccino
Tea
Milk coff ee
Iced Latte
macchiato
Café Crème
Espresso
The prompt appears on the
display to add powder.
Tap the respective button to
select a drink.
Page 31

i
!
07
08
03
4
4
4
4
05
4
4
4
01
02
06
4
04
Preparing drinks
Page 29
Insert capsule and close the capsule cover.
Iced Latte Macchiato
Drink preparation with capsule (optional)
Place an appropriate cup or
glass under the outlet.
Set the outlet height.
Risk of scalding or burning
The dispensers and drinks are hot.
•Do not touch the area under the outlets.
•In case of scalding or burns, immediately cool the aff ected area
and, depending on the severity of the injury, consult a doctor.
WARNING
The drink is being prepared
Preparation of the drink can
be canceled by pressing the
Cancel button.
The prompt appears on the
display to insert the capsule.
Insert the capsule.
Close the capsule fl ap.
Open the capsule fl ap.
Select the desired product.
Damage from foreign objects
Putting foreign objects into the capsule system can cause damage to
the machine.
•Only use the designated capsules.
•Never insert any foreign objects in the capsule system.
NOTE
Café Crème Cappuccino
Tea
Milk coff ee
Iced Latte
macchiato
Espresso
Page 32

!
4
01
03
4
4
i
4
04
05
4
02
Preparing drinks
Page 30
Set the outlet height.
▪ If the Simultaneous drink preparation function is not activated, all
other products are blocked during hot water dispensing.
▪ Hot water can be stored either as a permanent product or as an
individual product. In the case of permanent product, hot water
will continue to be dispensed for as long as the button is pressed.
In the case of an individual product, the quantity is defi ned.
These settings can be made only by a Service technician.
Risk of scalding or burning
The dispensers and drinks are hot.
•Do not touch the area under the outlets.
•In case of scalding or burns, immediately cool the aff ected area
and, depending on the severity of the injury, consult a doctor.
Place an appropriate cup or
glass under the hot-water
outlet.
Press the Tea product key.
WARNING
Hot water dispenser
The dispensing of hot water
begins.
Preparation of the drink can
be canceled by pressing the
Cancel button.
Café Crème Cappuccino
Tea
Milk coff ee
Iced Latte
macchiato
Espresso
Page 33

4
01 02
4
02a
i
i
!
04
4
4
Preparing drinks
Page 31
Cancel preparation by pressing
the Cancel button.
03
Hot water
Steam
Steam
Permanent
2 Latte Mac-
chiato
Hot water
Permanent
Latte Macchiato
Steam is suitable for the
manual heating and foaming
of milk and for the heating of
other drinks.
Wipe the steam outlet with a
damp cloth after each use.
Select Steam continuous.
Preparation begins.
The steam dispensing takes
place until the Cancel button
is actuated or for the programmed time period, respectively.
Risk of scalding or burning!
The dispensers and drinks are hot.
•Do not touch the area under the outlets.
•In case of scalding or burns, immediately cool the aff ected area
and, depending on the severity of the injury, consult a doctor.
WARNING
Steam dispenser
Hold a suitable container under
the steam outlet.
Select Steam.
Preparation starts and will end
after the programmed output
time.
Hot water
Steam
Steam
Permanent
2 Latte Mac-
chiato
Hot water
Permanent
Latte Macchiato
Steam
Page 34

IV
4 4
III
4
4
4
II
V
i
I
CARE OF THE A200
Even a coff ee machine like the A200 must be cared for. To ensure high-quality fl avor,
the A200 must be cleaned at least once a day and serviced at regular intervals.
Cleaning
Rinse the parts thoroughly.Remove coarse dirt with a
brush or paint brush.
Wash the parts.Soak the par ts in water with a
mild detergent.
Dry the parts.
5-step method for removable parts
Your responsibility for the perfect coff ee experience
The perfect coff ee experience depends on a per fectly cleaned coff ee machine. Increase the quality
of your products!
Clean your coff ee machine at least once a day and more frequently if necessary.
Follow the 5-step method for all removable parts.
Accessories required:
•Cleaning tablets
•Microfi ber cloth
•Cleaning container
•Clean solution
Page 35

4
4
!
4
4
02
03
i
01
05
04
i
i
Care of the A200
Page 33
Menu
Fill the water tank
Cleaning (2/10)
Cleaning (1/10)
The automatic cleaning cycle
starts.
Café Crème Cappuccino
Tea
Milk coff ee
Iced Latte
macchiato
Espresso
If you require a detailed guide
for a certain step, you can fi nd
this under the i symbol in
the bottom-right corner of the
screen.
Confi guration Standby
Select Clean and confi rm.
Click on the Franke logo to
switch to the Service Menu.
Click on the "roller shutter" to
call up the dashboard.
The dashboard appears.
Risk of scalding
During cleaning, hot water and
steam are released repeatedly.
• Do not touch the machine
below the outlets or the
outlets themselves.
Follow the instructions on
the display and confi rm with
Continue.
The machine guides you to the
next step.
This is how you start the automatic cleaningMy S ings
WARNING
Clean
For cleaning a coff ee machine
with MS1, you need an empty
container with a capacity of
1 l (0.264 liq.gal.) («Cleaning
container», not included in the
scope of delivery).
Follow the instructions during
automatic cleaning.
For coff ee machines with
FoamMaster, you can start
cleaning also directly on the
FoamMaster, see. p. 34).
Page 36

i
02
03
01
4
i
04
4 4
4
!
Espresso
Iced Latte
Macchiato
Milchkaff ee
Tee
Cappuccino
Café Crème
09
05
06
08
07
Care of the A200
Page 34
NoYes
Slide the milk container all the
way into the cooling chamber.
Close door.
Clean the milk container and
intake hose.
Clean and dry the interior
chamber, inner side of the door
and door seal.
Remove the cleaning container
from the cooling chamber when
prompted to do so.
Empty liquid residues into the
wastewater.
WARNING
Risk of scalding by hot
liquids
Hot liquid is discharged during
cleaning.
•Do not touch the area under
the outlet.
•Treat any injuries that occur
immediately.
Café Crème
Cappuccino
Tea
Milk coff ee
Iced Latte
macchiato
Espresso
The machine is ready for
service.
If you require a detailed guide
for a certain step, you can fi nd
this under the
i
symbol in
the bottom-right corner of the
screen.
Follow the instructions on the
display.
Click Continue when a corresponding button appears.
The machine guides you to the
next step.
Confi rm cleaning by pressing
Yes .
Slide the empty cleaning
container all the way into the
cooling chamber.
A query window will appear on
the display.
Remove the milk container and
keep the milk cool.
The milk system must be
cleaned when prompted to do
so.
You can perform cleaning at
any time by pressing the cleaning button on the machine.
This is how you start the FoamMaster cleaning
Do you really want to start cleaning?
Start cleaning
Cleaning (1/10)
Page 37

4
!
i
4
4
4
4
01
02
07
03
06
04
05
4
04
4
Care of the A200
Page 35
Menu
Confi guration StandbyClean
Café Crème Cappuccino
Tea
Milk coff ee
Iced Latte
macchiato
Espresso
Café Crème Cappuccino
Tea
Milk coff ee
Iced Latte
macchiato
Espresso
The machine is ready for
service.
Confi guration
Descale
Emptying the system
In the menu Confi g.>Care,
select the menu item Rinsing.
Rinse
Info
Confi guration
Rinsing (1/3)
The rinsing starts.
Information
Products Individualization
Care
In the menu Confi guration,
select the menu item Care.
Administration
Tap on the Franke logo to
switch to the Service Menu.
Click on the "roller shutter" to
call up the dashboard.
The dashboard appears.
Rinsing the A200 manually
Risk of scalding
Hot water is released during
rinsing.
•Do not touch the machine below the outlets or the outlets
themselves.
•Do not place anything on the
drip grid.
WARNING
▪ Rinsing does not replace daily cleaning. Rinsing is necessary to
remove residue build-up in the coff ee and milk systems.
▪ The A200 automatically rinses after certain time intervals, as well
as when it is switched on or off . You can call up rinsing manually,
however.
Press Confi guration.
Page 38

4
!
i
!
4
4
4
4
4
01
02
4
03
08
04
05
4
07
Care of the A200
Page 36
Café Crème Cappuccino
Tea
Milk coff ee
Iced Latte
macchiato
Espresso
Descale (1/8)
Confi g > Care
Descale
Emptying the system
In the menu Confi g.>Care,
select the menu item Descaling
and confi rm.
Rinse
Confi guration
Information
Products Individualization
Care
In the menu Confi guration,
select the menu item Care.
Descaling the A200
Descale (1/8)
Skin and eye irritation
The descaler can cause irritations upon contact with skin or
eyes.
•Observe the safety instructions on the packaging of
the descaler
•Wear protective gloves and
eye protection.
WARNING
Remove water fi lter from
the tank.
Fill water tank with 700 ml
of descaler.
Empty grounds container.
Empty drip tray.
Risk of scalding
During descaling, hot water and
steam are released repeatedly.
• Do not touch the machine
below the outlets or the
outlets themselves.
Follow the instructions on the
display.
Click Continue when a corresponding button appears.
The machine guides you to the
next step.
WARNING
If you require a detailed guide
for a certain step, you can fi nd
this under the i symbol in
the bottom-right corner of the
screen.
Descaling starts.
Tap on the Franke logo to
switch to the Service Menu.
Click on the "roller shutter" to
call up the dashboard.
The dashboard appears.
Press Confi guration.
Café Crème Cappuccino
Tea
Milk coff ee
Iced Latte
macchiato
Espresso
The machine is ready for service.
Menu
Confi guration StandbyClean
0606
0707
Page 39

05
444
04
02
4
01 03
4
4
Care of the A200
Page 37
Turn the (optional) fi lter cartridge counterclockwise and
remove it.
Pull out the water tank.
Remove the lid.
Cleaning the water tank (optional for operation with a water tank)
Clean the water tank using the
5-step method.
Replace water tank and slide
it into the machine until it hits
the stop.
Insert the (optional) fi lter
cartridge in the fi lter holder and
turn clockwise until it hits the
stop.
Use the lid to close the water
tank.
Page 40

!
4
4
4
06
4
01
02
03 04
05
4
4
i
i
Care of the A200
Page 38
Menu
Confi guration Standby
Café Crème Cappuccino
Tea
Milk coff ee
Iced Latte
macchiato
Espresso
The machine is ready for service.
Filter replacement (1/7)
Remove and empty the
water tank.
Follow the instructions on the
display.
Click Continue when a corresponding button appears.
The machine guides you to the
next step.
If you require a detailed guide
for a certain step, you can fi nd
this under the
i
symbol in
the bottom-right corner of the
screen.
Press Filter replacement.
Filter replacement
Confi g > Care
Descale
Emptying the system
Rinse
Confi guration
Information
Products
Individualization
Care
In the menu Confi guration,
select the menu item Care.
Administration
Tap on the Franke logo to
switch to the Service Menu.
Press Confi guration.
Health hazard
Contaminations could present a health hazard if the (optional) water
fi lter is used for too long.
•Replace the fi lter when prompted by the machine to do so.
•Do not use dried-out or used fi lter cartridges.
•Take care to ensure that the fi lter cartridge is mounted correctly.
CAUTION
The water fi lter ensures optimal
water quality. The (optional)
water fi lter must be replaced
on schedule in order to ensure
a long lifespan for the coff ee
machine.
Replacing the optional water fi lter
Page 41

4
4
4
4
4
4
i! i
01
04
05
02
03
0605
Care of the A200
Page 39
Remove and empty the
water tank.
Follow the instructions on the
display.
Click Continue when a corresponding button appears.
The machine guides you to the
next step.
If you require a detailed guide
for a certain step, you can fi nd
this under the
i
symbol in
the bottom-right corner of the
screen.
Café Crème Cappuccino
Tea
Milk coff ee
Iced Latte
macchiato
Espresso
Confi guration
Descale
Emptying the system
In the menu Confi g.>Care,
select the menu item Empty
system and confi rm.
Rinse
Confi guration
Information
Products Individualization
In the menu Confi guration,
select the menu item Care.
Administration
Care
Emptying the system
Tap on the Franke logo to
switch to the Service Menu.
Click on the "roller shutter" to
call up the dashboard.
The dashboard appears.
Press Confi guration.
Emptying (1/3)
The system emptying process
begins.
After the emptying cycle, the
machine switches back into
energy saver mode.
Risk of scalding
While the system is emptying, hot water and steam are
released repeatedly.
• Do not touch the machine
below the outlets or the
outlets themselves.
WARNING
Emptying (1/3)
Menu
Confi guration StandbyClean
Page 42

Care of the A200
Page 40
Frequency Task Information
Daily Clean Coffee Machine p. 32
Weekly Clean water tank p. 37
When prompted by the machine Clean the brewing unit
Monthly Clean the coffee bean hopper p. 25
Every two months/as necessary Change water filter p. 38
As necessary Descale machine p. 36
Annually, after every 20,000 products, or as necessary Maintenance by Service technician Contact a Ser vice technician
Maintenance plan
Page 43

i
i
0201
03
4 4 4 4
04
Confi guring
Page 41
Café Crème Cappuccino
Tea
Milk coff ee
Iced Latte
macchiato
Espresso
Confi guration
Information
Products IndividualizationAdministration
Care
Café Crème Cappuccino
Tea
Milk coff ee
Iced Latte
macchiato
Espresso
You can review and change the PIN codes with the
owner role in the menu Confi g/Administration/Rights
management, see p. 45.
Certain rights have been assigned to each PIN. The respective menu is displayed after the
authentication.
Authenticate with PIN.
The menu appears.
Click on the "roller shutter" to
call up the dashboard.
The dashboard appears.
Click on the Franke logo to
switch to programming mode.
The numerical pad appears for
entering the PIN.
Introduction to programming
CONFIGURING
Your A200 is individually programmable – so that the A200 is just as fl exible as you are. We have kept the
programming simple to make your job easier. Try it for yourself.
All programming menu items
are shown on the following
pages. Some of these menu
items may not feature on your
coff ee machine, depending on
the confi guration.
Page 44

02
01
i
44
Confi guring
Page 42
8 Cappuccino
Products>Milk settings
Milk temperature
Yes
Administration>Confi guration
Use water fi lter for tank (Claris)?
Change date
Individualization>Date/Time>Date
Date
Français
English
Individualization > Language
Deutsch
Select language
▪ Enter the desired value.
▪ Confi rm with OK.
▪ For confi guring relative
values.
▪ Steplessly confi gurable.
▪ Binary selection
▪ Click on desired Confi g
(Yes /No; On/O ff ).
▪ Press the return button (
)
to save the Confi g.
▪ Press the desired Confi g.
▪ Press the return button (
)
to save the Confi g.
Input
Select the input parameter that
is to be set by touching the
respective button.
Press confi gured date.
Window with numerical keypad
appears.
▪ On this page you will fi nd an overview of the various input options
for confi guring the machine.
▪ Information on the symbols and controls can be found in the
chapter "Explanation of symbols"», p. 7.
Confi g > Individualization
Depiction
Date and Time
Language
Page 45

i
Configuring
Page 43
▪ Start the maintenance processes in the Care menu. The mainte-
nance has to be performed in major time intervals.
▪ The Service technician can empty the system to be able to do
maintenance work.
Observe the information and data regarding filter replacement, descaling, and rinsing in the chapter "Care of the A200".
Assign Favorites
Acoustic signals
p. 52
p. 39
p. 36
p. 35
p. 38
p. 46
p. 49
p. 50
p. 48
p. 48
p. 45
p. 45
p. 45
p. 44
Payment
[Select product]
Configuration
Care
Filter replacement
Rinse
Descaling
Emptying the system
Products
Coffee
Milk
Capsule
Hot water
Steam
Prices
Information
Counter Individual
products
Product groups counter
Counters, other
Machine information
Individualization
Language
Panel setup
Load products
Clear products
Switch products
Depiction
Selection buttons
Advertising images
Screen saver
Backlight Brightness
Date and Time
Date
Time
Timer funct.
Timer
Administration
Configuration
Water supply
Milk foam
Rights management
Owner
Operator
Specialist
Data transfer
Backing up data
Load data backup
Cup heater
Menu tree "Config"
Page 46

Configuring
Page 44
Parameter Value range Remarks
Cup heater Yes/No Only with FoamMaster option
Cup heater
Parameter Value range Remarks
Set PIN 0-9 The PIN has a maximum length of 10 characters.
Owner
Rights management
Continued on next page
Parameter Value range Remarks
Signal tone before
rinsing
Yes/No -
Signal tone with
prompts
Yes/No -
Button tone Yes/No -
Acoustic signals
Parameter Value range Remarks
Solid foam Level 1-7 • Level 1: very liquid foam
• Level 7: very solid foam
Liquid foam Level 1-7 • Level 1: very liquid foam
• Level 7: very solid foam
Milk temperature
Milk foam
Parameter Value range Remarks
Water hardness Level 1-5 The levels correspond to those of the measuring strips.
Water filter Yes/No Claris water filter in the tank
Water tank Yes/No
Water supply
Configuration
Administration
Configuration
Config/Administration–Configuration
Page 47

Configuring
Page 45
Parameter Value range Remarks
Activate payment Yes/No • Ye s activates the payment. The price is displayed on
the monitor at the upper right during drink preparation. In the "Adapt drinks" monitor, the price is
displayed to the right of the product.
• No deactivates the payment. All product screens are
displayed without prices.
Payment
Parameter Value range Remarks
Load data backup - • A query appears as to whether the existing configu-
ration should be overwritten.
• If no USB stick is connected, the prompt will appear
"Insert USB stick".
• The successful data transfer is confirmed by a
message.
Parameter Value range Remarks
Backing up data - • The prompt appears "Inser t USB stick".
• The successful data transfer is confirmed by a
message.
Load data backup
Backing up data
Data transfer
Parameter Value range Remarks
Set PIN 0-9 The PIN has a maximum length of 10 characters.
Parameter Value range Remarks
Set PIN 0-9 The PIN has a maximum length of 10 characters.
Specialist
Operator
Config/Administration–Rights management; Data transfer
Page 48

Configuring
Page 46
Continued on next page
[Select product]
Milk
Coffee
Parameter Value range Remarks
Milk quantity 0-120s --
Milk temperature
(setting)
Relative value • To the right: higher milk temperature
• To the left: lower milk temperature
Foam quantity 0-120s -
Wait time after product 0-25s
Foam quality • Solid 100%
• Solid 50%, liquid 50%
• Liquid 100%
• Liquid 50%, solid 50%
Only with FoamMaster
Add steam with milk Yes/No Higher milk temperatures are made possible by adding
steam.
Parameter Value range Remarks
Water quantity 20-500ml -
Grind quantity Level 1-15 • To the right: larger grind quantity
• To the left: smaller grind quantity
Select grinder • Left
• Right
• Both
Select brew tempera-
ture
• Low
• Medium
• High
-
Pre-inject • No
• Short
• Medium
• Long
Pre-injection increases the brewing time and affects
product quality.
Configuration
Products
Config/Products
Page 49

Configuring
Page 47
Parameter Value range Remarks
PLU 1-999 The Service technician can select between two set-
tings:
• Permanently assigned PLU
• Variable PLU (click on the text box and use the
numerical keypad to enter the PLU)
Price list 0 (cash price) 0.10-999.99 Price input
Price list (Cashless 1) 0.10-999.99 Price input
Price list 2 (Cashless 2) 0.10-999.99 Price input
Free product Yes/No Product is free (Yes/No)
Token Yes/No Product can be paid for with token (Yes/No)
Price
Parameter Value range Remarks
Steam time 0-300s -
Steam
Parameter Value range Remarks
Water quantity 0-500ml -
Temperature • Low
• Medium
• High
-
Hot water
Parameter Value range Remarks
Water quantity 0-500ml -
Temperature • Low
• Medium
• High
-
Capsule
Config/Products (continued)
Page 50

Configuring
Page 48
Continued on next page
Assign Favorites
Parameter Value range Remarks
Assign a function to
favorite buttons 1-3
• No function
• Rinsing
• Descaling
• Advertising images
• Display brightn
• Product settings
• Water supply
• Individual products
counter
• Assign functions to the Favorites keys that you use
frequently.
Assign Favorites key:
• Click on the desired function in the selection menu.
• Exit the menu item, and confirm the configuration
change if necessary.
Parameter Value range Remarks
Select language 8 languages • The language is switched immediately
• For Asian languages, the English name of the langua-
ge appears in brackets
Parameter Value range Remarks
Assign product key - • 36 keys can be assigned on 6 pages
• When a button is touched, a selection list appears
with the available products (32)
Switch products
Panel setup
Clear products
Load products
Configuration
Individualization
Language
Config/Individualization
Parameter Value range Remarks
Clear product from key - -
Parameter Value range Remarks
Switch product keys - -
Page 51

Configuring
Page 49
Parameter Value range Remarks
Activate advertising
pictures
Yes/No • Load images from a USB stick to the machine if
necessary.
• Existing images can be activated/deactivated.
• If advertising images are activated, no simultaneous
drink preparation is possible.
Configure selection but-
tons
Parameter Value range Remarks
Double products Yes/No -
Switch grinders Yes/No Ye s: Two kinds of beans can be offered.
Instant coffee Yes/No Ye s: An additional coffee type can be offered in ground
form (e.g. decaffeinated coffee).
Activate selection but-
tons
Continued on next page
Parameter Value range Remarks
Select screen saver • No screen saver
• Franke screen saver
• Individual screen saver
For an individual screen saver, images must first be loa-
ded if there are not yet any available on the machine.
Set timeout 1-60min Wait time until the screen saver is switched on
Backlight Brightness
Screen saver
Advertising images
Config/Individualization(continued)
Parameter Value range Remarks
Set brightness Relative value Slider to the right: brighter display
Slider to the left: darker display
Depiction
Selection buttons
Parameter Value range Remarks
Activate selection
buttons
Yes/No -
Activate advertising
pictures
Page 52

Configuring
Page 50
Parameter Value range Remarks
Display mode 12h/24h -
Set time • Hours: 0-23/0-12
• Minutes: 0-59
• (a.m./p.m.)
Input via numerical keypad
Time
Date and Time
Parameter Value range Remarks
Set date • Days: 1-31
• Months: 1-12
• Years: 2013-9999
Input via numerical keypad
Date
Parameter Value range Remarks
Set time
(a.m./p.m.)
1-300min • Input via numerical keypad
• Switch on: press Activate button
A green checkmark appears next to the set time. The
timer is activated.
• Switch off: press Deactivate button
A red checkmark appears next to the set time. The
Timer is deactivated.
Parameter Value range Remarks
Activate days Mo, Tu, We, Th, Fr, Sa, Su Activate or deactivate days by clicking
Set switch-on time • Hours: 0-23/0-12
• Minutes: 0-59
• (a.m./p.m.)
• Input via numerical keypad
• Switch on: press Activate button
A green checkmark appears next to the set time. The
switch-on time is activated.
• Switch off: press Deactivate button
A red checkmark appears next to the set time. The
switch-on time is deactivated.
Set switch-off time • Hours: 0-23/0-12
• Minutes: 0-59
• (a.m./p.m.)
• Input via numerical keypad
• Switch On/Off as above
Timer
Timer funct.
Config/Individualization(continued)
Page 53

Configuring
Page 51
Parameter Value range Remarks
Software version
Serial number
Device type
1.0.0 ...
Parameter Remarks
Number of products since commissioning
Number of products until next maintenance
Cleanings performed
Remaining number of dispenses
Descalings performed
Remaining water quantity until next descaling
Remaining water qty for water filter in tank
Replace water filter in tank on: [dd.mm.yyyy]
Maintenance cycles performed
Product groups counter
Counters, other
Machine information
Parameter Value range Remarks
Coffee products - The product groups counters cannot be cleared.
Milk products -
Hot water products -
Capsule products -
Parameter Value range Remarks
[Product] - Clear Counters: all product counters are cleared.
Configuration
Information
Counter Individual
products
Config/Information
Page 54

Configuring
Page 52
Roles and rights
Menu items Owner Specialist
Operator
Administration
Configuration x x
-
Rights management x -
Data transfer x x -
Payment x x -
Products
[Select product] x x -
Individualizations
Language x x -
Panel setup x x -
Depiction x x -
Date and Time x x -
Care
Rinse filter x x x
Rinse x x x
Descaling x x x
Empty system x x -
Information
Counter Individual products x x -
Product groups counter x x -
Counters, other x x x (only reading rights)
Machine information x x -
Page 55

4
4
4
05
03
4
01 02 04
4
i
Decommissioning and disposal
Page 53
Please contact Service for recommissioning.
The coff ee machine must be serviced and cleaned before it is used
again. This is the only way to ensure that the coff ee machine functions properly and the products are of top quality.
Note the date of the decommissioning on the coff ee machine.
Care
Empty the machine. To do this,
open the menu Care and click
on Empty system, see p. 39.
Remove all food residue from
the machine after the system
has been emptied.
Empty and clean all containers.
Switch off the coff ee machine
and any add-on units.
Interrupt the electricity and
water supply.
Clean the coff ee machine and
its components, see p. 32.
Risk of damage to the machine
The coff ee machine will become damaged if it is not stored properly.
•Contact your FRANKE service team in the event of prolonged
decommissioning.
•Observe the storage conditions: Temperature: 5 °C to +50 °C,
humidity: max. 80%.
•Empty the coff ee machine.
NOTE
DECOMMISSIONING AND DISPOSAL
Do you want to shut down your coff ee machine for longer periods? Call your local Service. The used capsules,
all operating resources and the coff ee machine can be disposed of in an environmentally friendly manner.
Decommissioning
Decommissioning for longer periods, storage
Emptying the
system
Rinse
Descale
Clean
Confi guration
Information
Products Individualization
Care
Administration
Page 56

i
i
Decommissioning and disposal
Page 54
Dispose of plastic parts in accordance with their marking.
Disposal of the coffee machine and the FoamMaster
Disposal of the capsules and the operating resources
Dispose of electronic parts
separately.
The A200|A200FM coffee machine is in compliance with the European Directive 2002/96/EU regarding waste electrical and electronic equipment (WEEE) and may not be disposed of with domestic
refuse.
The tetrafluorethane (R134a) coolant used for the FoamMaster
requires no special means of disposal.
▪ The information enclosed with the detergent applies for the dis-
posal of unused detergent.
▪ Dispose of used capsules with domestic refuse or in recycling
containers.
▪ Dispose of the fluids from the cleaning container or the drip tray
in the wastewater system.
Disposal
Page 57

i
Ok
Troubleshooting
Page 55
E123 Milk empty
The error message contains
the error code, a key word, an
error description and handling
instructions for rectifying the
error.
Follow the instructions in the
error message.
The dashboard appears when
there is an error.
A more detailed error message
can be called up by clicking on
a symbol.
Help is available from your A200 in the event of problems. Details regarding the error and information on troubleshooting
appear on the monitor screen. Should you be unable to resolve a problem, please contact your Service offi ce.
Help with machine errors
TROUBLESHOOTING
•If the entire system is aff ected by an error, then error messages
will appear automatically.
•The machine must be restarted in the event of severe errors.
Check the power supply if the machine fails to start.
•Contact your Service technician if the machine cannot be started
or if you are unable to rectify the error.
Temporary interruption
System not functioning.
System still fully
functional for the time
being.
System has limited
functionality.
Color code for error messages
The milk in the FoamMaster is empty. No further
products can be produced with milk.
Please top up with fresh, pre-cooled milk.
Page 58

Troubleshooting
Page 56
Help with problems concerning product quality
Possible causes Solution
Coffee tastes dull
Grind too coarse Select a finer grind
Too little powder Increase amount of coffee
Temperature too low Increase temperature
Coffee is too old Store coffee properly
Coffee tastes strange
Poor grind Contact customer service
Minimal coffee usage Load smaller coffee quantity
Coffee beans are bad Replace coffee beans
Residue from cleaning agents Rinse the machine
Cup dirty Check dishwasher
Water (chlorine, hardness, etc.) Have water quality checked
Coffee tastes bitter
Temperature too high Lower coffee temperature
Grind too fine Select a coarser grind
Too little powder Increase amount of coffee
Roast too dark Change coffee
Coffee tastes sour
Temperature too low Increase coffee temperature
Roast too light Change coffee
Grind too coarse Select a finer grind
Page 59

Page 57
Index
rinsing
. . . . . . . . . . . . . . . . . . . . . . 31
Cleaning
. . . . . . . . . . . . . . . . . . . . . . . 29
5-step methoD
. . . . . . . . . . . . . . . . . 29
start
. . . . . . . . . . . . . . . . . . . . . . . . 30
water tank
. . . . . . . . . . . . . . . . . . . . 33
Coffee beans, aDDing
. . . . . . . . . . . . . . . 20
Components of the a200
. . . . . . . . . . . 13
Configuration
. . . . . . . . . . . . . . . . . . . . 41
aDministration
. . . . . . . . . . . . . . . . . 42
inDiviDualization
. . . . . . . . . . . . . . . . 46
information
. . . . . . . . . . . . . . . . . . . 49
menu tree
. . . . . . . . . . . . . . . . . . . . 41
proDuCts
. . . . . . . . . . . . . . . . . . . . . 44
Configuring
. . . . . . . . . . . . . . . . . . . . . 39
Consumable materials
. . . . . . . . . . . . . . 57
Counters
. . . . . . . . . . . . . . . . . . . . . . . 49
inDiviDual proDuCts
. . . . . . . . . . . . . 49
proDuCt groups
. . . . . . . . . . . . . . . . 49
Cup warmer
. . . . . . . . . . . . . . . . . . . . . 12
D
Daily Commissioning
. . . . . . . . . . . . . . . 19
DashboarD
. . . . . . . . . . . . . . . . . . . . . . 15
Data transfer
. . . . . . . . . . . . . . . . . . . . 43
Date anD time
. . . . . . . . . . . . . . . . . . . . 48
DeCommissioning
. . . . . . . . . . . . . . . . . . 51
5-step methoD
. . . . . . . . . . . . . . . . . . . 29
a
a200 . . . . . . . . . . . . . . . . . . . . . . . . . . 11
a200 foammaster
. . . . . . . . . . . . . . . . 12
aDapter
. . . . . . . . . . . . . . . . . . . . . . . . . 9
aDD-on units
. . . . . . . . . . . . . . . . . . . . . 12
aDDing milk
. . . . . . . . . . . . . . . . . . . . . 21
aDministration
. . . . . . . . . . . . . . . . . . . 42
Configuration
. . . . . . . . . . . . . . . . . 42
Data transfer
. . . . . . . . . . . . . . . . . 43
payment
. . . . . . . . . . . . . . . . . . . . . . 43
rights management
. . . . . . . . . . . . . . 42
aDvertising images
. . . . . . . . . . . . . . . . 47
b
baCklight brightness
. . . . . . . . . . . . . . 47
bean hopper
. . . . . . . . . . . . . . . . . . . . . 13
brewing unit
. . . . . . . . . . . . . . . . . . . . . 13
C
CanCel button
. . . . . . . . . . . . . . . . . . . 24
CapaCities
. . . . . . . . . . . . . . . . . . . . . . . 11
Capsule
. . . . . . . . . . . . . . . . . . . . . . . . 27
Capsule Container
. . . . . . . . . . . . . . . . . 13
Care
. . . . . . . . . . . . . . . . . . . . . . . . . . 29
Cleaning
. . . . . . . . . . . . . . . . . . . . . 29
DepiCtion
. . . . . . . . . . . . . . . . . . . . . . . 47
DesCription
. . . . . . . . . . . . . . . . . . . . . . 11
a200. . . . . . . . . . . . . . . . . . . . . . . . 11
a200 foammaster
. . . . . . . . . . . . . . 12
Cup warmer
. . . . . . . . . . . . . . . . . . . 12
refrigeration unit
. . . . . . . . . . . . . . . 12
Dimensions
. . . . . . . . . . . . . . . . . . . 17, 18
Dispensing hot water
. . . . . . . . . . . . . . . 28
Disposal
. . . . . . . . . . . . . . . . . . . . . . . . 51
Drip griD
. . . . . . . . . . . . . . . . . . . . 11, 12
Drip tray
. . . . . . . . . . . . . . . . . 11, 12, 13
e
empty grounDs Container
. . . . . . . . . . . . 21
emptying
. . . . . . . . . . . . . . . . . . . . . . . . 20
bean hopper
. . . . . . . . . . . . . . . . . . . 22
Drip tray
. . . . . . . . . . . . . . . . . . . . . 21
grounDs Container
. . . . . . . . . . . . . . 21
milk
. . . . . . . . . . . . . . . . . . . . . 21, 23
water tank
. . . . . . . . . . . . . . . . . . . . 22
emptying milk
. . . . . . . . . . . . . . . . . . . . 23
emptying the bean hopper
. . . . . . . . . . . . 22
error messages
. . . . . . . . . . . . . . . . . . , 5
Color CoDe
. . . . . . . . . . . . . . . . . . . , 5
DepiCtion
. . . . . . . . . . . . . . . . . . . . . . 5
explanation of symbols
. . . . . . . . . . . . . . 3
DashboarD
. . . . . . . . . . . . . . . . . . . . . 4
INDEX
Page 60

Page 58
Index
timer
. . . . . . . . . . . . . . . . . . . . . . . . . . 48
timer funCt.
. . . . . . . . . . . . . . . . . . . . . 48
troubleshooting
. . . . . . . . . . . . . . . . . . 53
maChine malfunCtion
. . . . . . . . . . . . 53
proDuCt quality
. . . . . . . . . . . . . . . . 54
type key
. . . . . . . . . . . . . . . . . . . . . . . . 10
type plate
. . . . . . . . . . . . . . . . . . . . . . . 10
w
water filter
. . . . . . . . . . . . . . . . . . . . . 34
removing
. . . . . . . . . . . . . . . . . . . . . 34
water tank
. . . . . . . . . . . . . . . . . . . . . . 13
o
operating interfaCe
. . . . . . . . . . . . . . . . 14
p
panel setup
. . . . . . . . . . . . . . . . . . . . . . 46
pin . . . . . . . . . . . . . . . . . . . . . . . . 30, 39
Default pin
. . . . . . . . . . . . . . . . . . . 39
my pin
. . . . . . . . . . . . . . . . . . . . . . 39
power switCh
. . . . . . . . . . . . . . . . . . . . 19
preparing a stanDarD Drink
. . . . . . . . . . 24
preparing Drinks
. . . . . . . . . . . . . . . 14, 24
preparing two Drinks at onCe
. . . . . . . . . 25
proDuCt quality
. . . . . . . . . . . . . . . . . . 54
programming
. . . . . . . . . . . . . . . . . . . . 39
r
refrigeration unit
. . . . . . . . . . . . . . . . . 12
rights management
. . . . . . . . . . . . . . . . 43
rinsing
. . . . . . . . . . . . . . . . . . . . . . . . . 31
roles anD rights
. . . . . . . . . . . . . . . . . . 50
s
safety
. . . . . . . . . . . . . . . . . . . . . . . . . . 6
proper use
. . . . . . . . . . . . . . . . . . . . . 6
risks
. . . . . . . . . . . . . . . . . . . . . . . . . 7
symbols
. . . . . . . . . . . . . . . . . . . . . . . 3
sCope of Delivery
. . . . . . . . . . . . . . . . . . 9
sCreen saver
. . . . . . . . . . . . . . . . . . . . 47
serviCe menu
. . . . . . . . . . . . . . . . . . . . 31
set the outlet height
. . . . . . . . . . . . . . . 24
storage
. . . . . . . . . . . . . . . . . . . . . . . . 51
symbols
t
teChniCal Data
. . . . . . . . . . . . . . . . . . . 16
test proDuCt
. . . . . . . . . . . . . . . . . . . . . 40
operating instruCtions
. . . . . . . . . . . . 3
software
. . . . . . . . . . . . . . . . . . . . . . 4
f
filling
. . . . . . . . . . . . . . . . . . . . . . . . . 20
Coffee beans
. . . . . . . . . . . . . . . . . . 20
milk
. . . . . . . . . . . . . . . . . . . . . . . . 21
water tank
. . . . . . . . . . . . . . . . . . . . 20
fill water tank
. . . . . . . . . . . . . . . . . . . 20
formation of milDew
. . . . . . . . . . . . . . . 21
g
grounD Coffee
. . . . . . . . . . . . . . . . . . . 26
grounDs Container
. . . . . . . . . . . . . . . . 13
h
hourly output
. . . . . . . . . . . . . . . . . . . 11
i
iDentifiCation
. . . . . . . . . . . . . . . . . . . . . 9
inDiviDualization
. . . . . . . . . . . . . . . . . . 46
Date anD time
. . . . . . . . . . . . . . . . . . 48
DepiCtion
. . . . . . . . . . . . . . . . . . . . . 47
language
. . . . . . . . . . . . . . . . . . . . . 46
panel setup
. . . . . . . . . . . . . . . . . . . 46
information
. . . . . . . . . . . . . . . . . . . . . 49
input
. . . . . . . . . . . . . . . . . . . . . . . . . . 40
installation
. . . . . . . . . . . . . . . . . . . . . 16
requirements
. . . . . . . . . . . . . . . . . . 16
installation Dimensions
. . . . . . . . . . 17, 18
l
language
. . . . . . . . . . . . . . . . . . . . . . . 46
m
maChine information
. . . . . . . . . . . . . . . 49
maChine malfunCtion
. . . . . . . . . . . . . . 53
maintenanCe plan
. . . . . . . . . . . . . . . . . 38
manufaCturer
. . . . . . . . . . . . . . . . . . . . 10
menu tree «Config»
. . . . . . . . . . . . . . . . 41
Page 61

Page 59
Page 62

Page 60
Page 63

Page 61
Item Order number
Cleaning tablets (100 pcs.) BK328400
Clean solution MS1 1L301219
Clean solution FoamMaster 1Z365033
Descaling agent 1P315430
Filter cartridge 1P315694
Item Order number
Power supply cable USA 15 A 115 V 1A335515
Power supply cable EU 16 A Schuko 1N330002
Power supply cable CH 16 A 1N330000
Power supply cable GB 13 A 1N330001
Power supply cable CN 16 A 1N330718
Power supply cable JA 6/15 AJ 1N330920
Consumable materials
Power supply cable
Page 64

Franke Kaffeemaschinen AG
Franke-Strasse 9
4663 Aarburg
Switzerland
Tel. +41 62 787 31 31
www.franke.com
Your distribution partner:
Issued 12.15/order number: 1A335001/revision C
 Loading...