


OV5

FRAMTID
OV5
FR
DE
IT


ENGLISH 4
DEUTSCH 20
FRANÇAIS 39
ITALIANO 63

ENGLISH 4
Your safety and that of others are very
important.
This manual and the appliance itself provide
important safety warnings, to be read and
observed at all times.
This is the danger symbol, pertaining to
safety, which alerts users to potential
risks to themselves and others.
All safety warnings are preceded by the
danger symbol and the following terms:
DANGER! Indicates a hazardous
situation which, if not avoided, will
cause serious injury.
WARNING! Indicates a hazardous
situation which, if not avoided, could
cause serious injury.
All safety warnings give specic details of
the potential risk present and indicate how
to reduce risk of injury, damage and electric
shock resulting from improper use of the
appliance. Carefully observe the following
instructions:
- The appliance must be disconnected
from the power supply before carrying
out any installation work.
- Electrical installation and maintenance
must be carried out by a qualied
technician, in compliance with the
manufacturer’s instructions and local
safety regulations. Do not repair or
replace any part of the appliance unless
specically stated in the user manual.
- Regulations require that the appliance is
earthed.
- The power cable must be long enough
for connecting the appliance, once
tted in its housing, to the power supply
socket.
- For installation to comply with current
safety regulations, an all-pole
disconnect switch with minimum contact
gap of 3 mm must be utilized.
- Do not use multiple plug adapters or
extension leads.
- Do not pull the power supply cable in
order to unplug the appliance.
- The electrical components must not be
accessible to the user after installation.
- Do not touch the appliance with any wet
part of the body and do not operate it
when barefoot.
- This appliance is designed solely
for use as a domestic appliance for
cooking food. No other type of use is
permitted (e.g.: heating rooms). The
Manufacturer declines all responsibility
for inappropriate use or incorrect setting
of the controls.
- The appliance is not intended for use
by persons (including children) with any
physical, sensory or mental impairment,
or without experience and knowledge
of the appliance, unless supervised or
previously instructed in its use by those
responsible for their safety.
- The accessible parts of the appliance
may become very hot during use. Young
children should be kept away from the
appliance and supervised to ensure that
they do not play with it.
Safety information 4
Product description 6
Control panel 7
Daily use 7
Cooking tables 9
Cleaning and maintenance 11
What to do if ... 13
Technical data 14
Installation 15
Electrical connection 17
Environmental concerns 17
IKEA GUARANTEE 18
Safety Information
Table of contents

ENGLISH 5
- During and after use, do not touch the
heating elements or interior surfaces
of the appliance - risk of burns. Do not
allow the appliance to come into contact
with cloths or other ammable materials
until all the components have cooled
sufciently.
- At the end of cooking, exercise
caution when opening the appliance
door, letting the hot air or steam exit
gradually before accessing the oven.
When the appliance door is shut, hot air
is vented from the aperture above the
control panel. Do not obstruct the vent
apertures.
- Use oven gloves to remove pans and
accessories, taking care not to touch the
heating elements.
- Do not place ammable materials in or
near the appliance: a re may break out
if the appliance is inadvertently switched
on.
- Do not heat or cook sealed jars or
containers in the appliance. The pressure
that builds up inside might cause the jar
to explode, damaging the appliance.
- Do not use containers made of synthetic
materials.
- Overheated oils and fats catch re
easily. Always remain vigilant when
cooking foods rich in fat and oil.
- Never leave the appliance unattended
during food drying.
- If alcoholic beverages are used when
cooking foods (e.g. rum, cognac, wine),
remember that alcohol evaporates at
high temperatures. As a result, there is a
risk that vapours released by the alcohol
may catch re upon coming into contact
with the electrical heating element.
Scrapping of household appliances
- This appliance is manufactured with
recyclable or reusable materials.
Dispose of it in accordance with local
waste disposal regulations. Before
scrapping, cut off the power supply
cable.
- For further information on the treatment,
recovery and recycling of household
electrical appliances, contact your
competent local authority, the collection
service for household waste or the store
where you purchased the appliance.

ENGLISH 6
Product description
1
Control panel
2
Cooling fan (not visible)
3
Upper heating element
4
Grill element
5
Rear oven lamp
6
Fan
7
Lower heating element (hidden)
8
Oven cool door
Accessories
Baking tray
1x
Wire Shelf
1x
Drip tray
1x
1
2
3
4
5
6
8
7

ENGLISH 7
Control panel
Switching on the oven
Turn the selector knob to the required
function. The oven light switches on.
Turn the thermostat knob clockwise to the
required temperature. The red thermostat
led lights up, switching off again when the
oven reaches the selected temperature. At
the end of cooking, turn the knobs to “0”.
Cooking time selector
This selector can be used to set a cooking
time of between 1 and 120 minutes.
To set cooking time, after selecting the
required cooking function, turn the knob
right round in a clockwise direction and then
turn it back in the opposite direction to the
desired cooking duration.
At the end of the set cooking time the
oven switches off and the selector remains
positioned at “0”.
To use the oven in manual mode, i.e. without
setting a cooking time, make sure that the
programme selector is turned to the symbol
.
Important: When the selector is positioned
at “0” the oven will not switch on.
To switch the oven on, set the selector to the
symbol
or set a cooking time.
Daily use
A
Function selector knob
B
Cooking time selector
C
Thermostat knob
D
Thermostat indicator light (red)
A B C D

ENGLISH 8
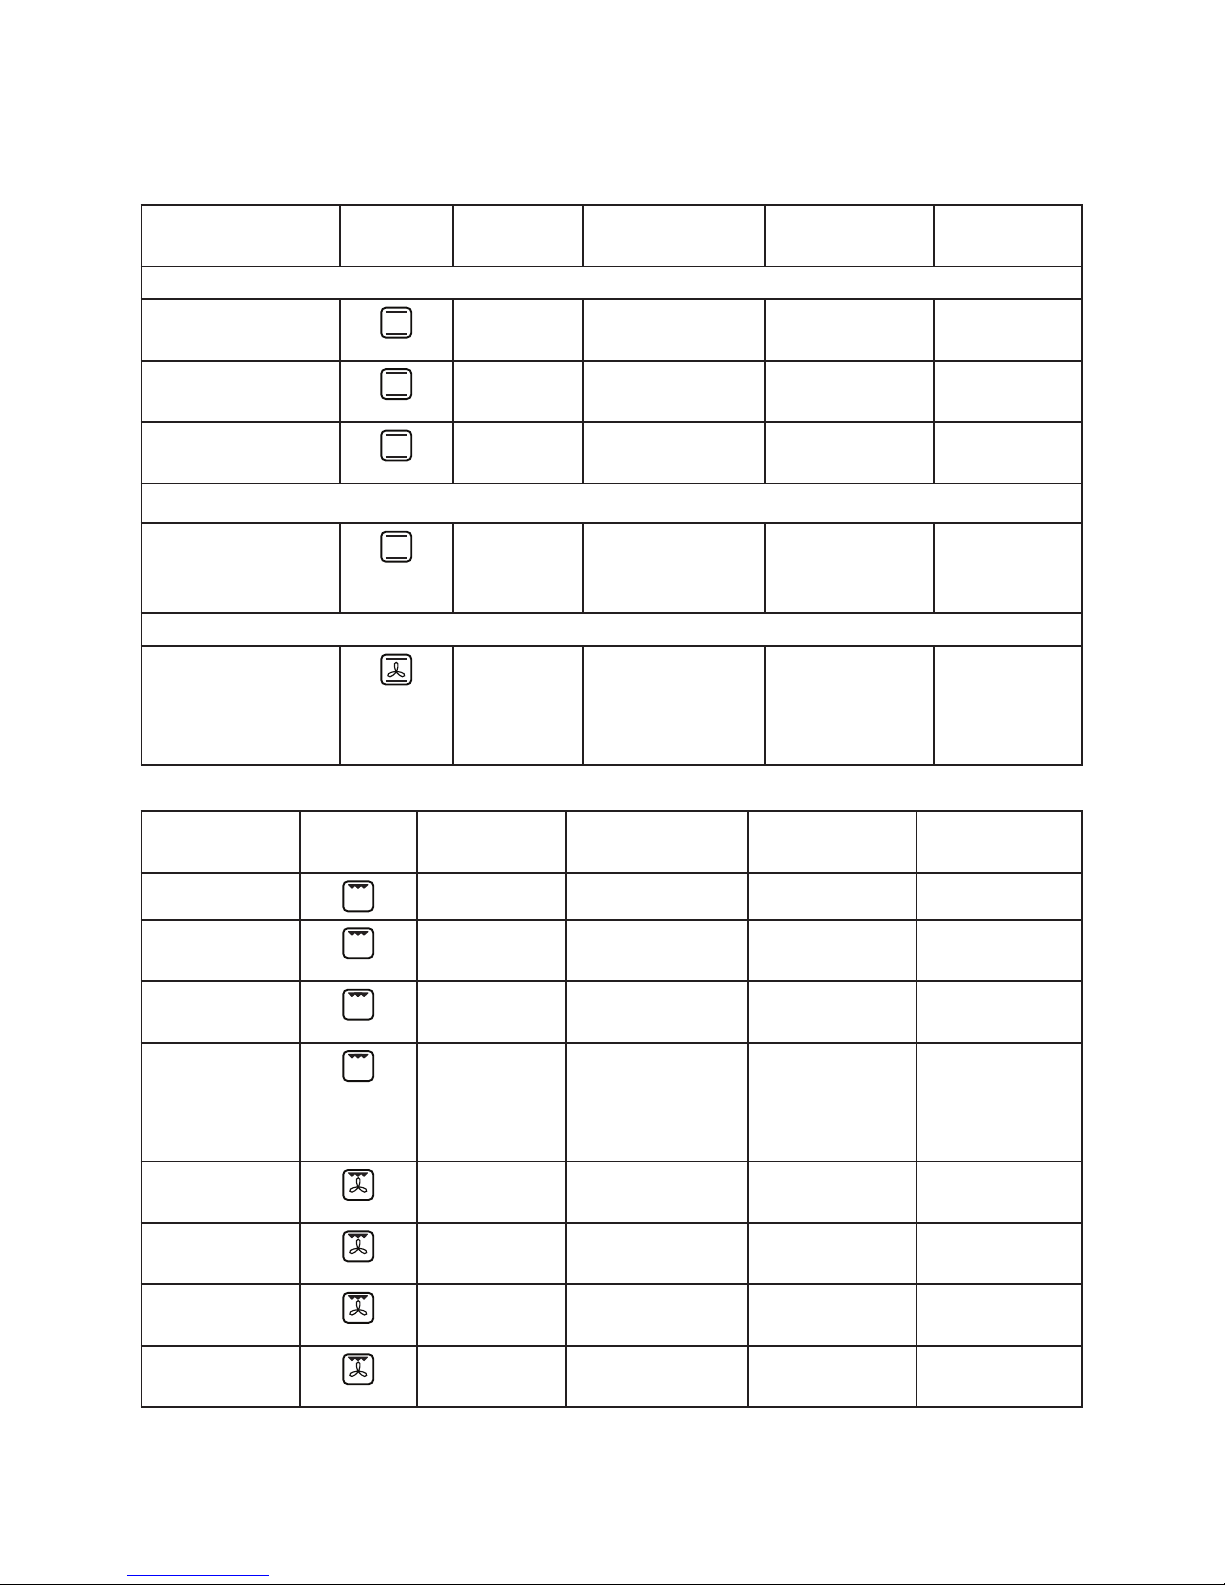
Oven functions table
Function Description of function
0
OVEN OFF -
LIGHT To switch on the oven light.
CONVENTIONAL Function suitable for cooking any type of dish on one shelf.
Preheat the oven to the required temperature and place the
food in it when the set temperature is reached. It is advisable to
use the second shelf for cooking.
PASTRY For baking cakes with liquid lling (sweet or savoury), on one
shelf. If necessary, switch the positions of the dishes to cook food
more evenly.
GRILL To grill steak, kebabs and sausages, to cook vegetables au
gratin and to toast bread. Preheat the oven for 3 - 5 min. It is
advisable to use the 4th shelf for cooking. During cooking the
oven door must remain closed. When cooking meat, pour a
little water into the drip tray (on the 3rd shelf) to reduce smoke
and fat spatters. The oven door must be kept closed during the
cooking cycle.
TURBOGRILL To grill large joints of meat (roast beef and other roast meats).
The oven door must be kept closed during the cooking cycle.
When cooking meat, it is advisable to pour water in the drip
tray placed on the rst/second shelf. This will reduce smoke and
spattering of fat. Turn the meat during grilling. Ideally ther meat
should be turned during cooking.
DEFROST This function can be used to speed up the thawing of food at
room temperature. The food should be placed in the oven in its
wrapping to prevent it from drying out. It is advisable to use the
central shelf for cooking.

ENGLISH 9
Type of food Function Preheating Shelf (from the
bottom)
Temperature
(°C)
Cooking time
(min)
SWEETS, PASTRY, ETC
Leavened cakes
X 2 160-180 35-55
Biscuits/tartlets
X 3 170-180 15-40
X 1 - 3 170-180 20-40
Choux buns
X 3 180 30-40
Vols-au-vent /Puff
pastry crackers
X 3 180-200 20-30
Filled pies
(cheesecake,
strudel, fruit pie)
X 1 180-200 50-60
Meringues
X 3 90 120-130
Savoury pies
(vegetable pie,
quiche)
X 1 180-200 35-55
Lasagne, baked
pasta, cannelloni,
ans
X 2 190-200 45-55
Bread/focaccia
X 2 190-230 15-50
Pizza
X 2 230-250 7-20
Pizza/focaccia
X 1 - 3 230-250 12-30
Cooking tables
ENGLISH 10
Type of food Function Preheating Shelf (from the
bottom)
Temperature
(°C)
Cooking time
(min)
MEAT
Lamb/Veal/Beef/
Pork 1Kg
X 2 190-200 90-110
Chicken/Rabbit/
Duck 1Kg
X 2 190-200 65-85
Turkey/Goose
3Kg
X 1/2 190-200 140-180
FISH
Baked sh/en
papillote (llet,
whole)
X 2 180-200 40-60
VEGETABLES
Stuffed vegetables
(tomatoes,
courgettes,
aubergines)
X 2 175-200 40-60
Cooking table with GRILL function
Type of food Function Preheating Shelf (from the
bottom)
Temperature
(°C)
Cooking time
(min)
Toast
X 4 200 2-5
Vegetable
gratin
X 3 200 10-20
Fish llets /
steaks
X 3 200-225 25-35
Sausages/
kebabs/
spare ribs/
hamburgers
X 4 200 30-50
Leg of lamb/
knuckle
– 3 200 55-70
Roast
potatoes
– 3 200 45-55
Roast chicken
1 - 1.3 Kg
– 2 200 55-70
Roast beef
rare 1Kg
– 3 200 30-40
Note: cooking temperatures and times are for guidance only.

ENGLISH 11
Cleaning and maintenance
CLEANING
WARNING!
- Never use steam cleaning equipment.
- Only clean the oven when it is cool to
the touch.
- Disconnect the appliance from the
power supply.
Oven exterior
i
IMPORTANT: do not use corrosive or
abrasive detergents. If any of these
products accidentally comes into contact
with the appliance, clean immediately with
a damp cloth.
• Clean the surfaces with a damp cloth.
If it is very dirty, add a few drops of
washing up detergent to the water.
Finish off with a dry cloth.
Oven interior
i
IMPORTANT: do not use abrasive
sponges or metallic scrapers or scourers.
Over time, these can ruin enamelled surfaces
and the oven door glass.
• After every use, allow the oven to cool
then clean it preferably while it is still
warm in order to remove built-up dirt
and stains caused by food residues (e.g.
food with a high sugar content).
• Use proper oven detergents and follow the
manufacturer’s instructions to the letter.
• Clean the door glass with a suitable
liquid detergent. The oven door can
be removed to facilitate cleaning (see
MAINTENANCE).
• The top heating element of the grill (see
MAINTENANCE) can be lowered (some
models only) to clean the roof of the oven.
NOTE: during prolonged cooking of foods
with a high water content (e.g. pizza,
vegetables, etc.) condensation may form on
the inside of the door and around the seal.
When the oven is cold, dry the inside of the
door with a cloth or sponge.
Accessories
• Soak the accessories in water with
washing up detergent immediately after
use, handling them with oven gloves if
still hot.
• Food residues can be easily removed
using a brush or sponge.
Cleaning the rear wall and catalytic side
panels of the oven (if present):
i
IMPORTANT: do not use corrosive or
abrasive detergents, coarse brushes,
pot scourers or oven sprays which could
damage the catalytic surface and ruin its
self-cleaning properties.
• Operate the oven empty with the fan assisted
function at 200°C for about one hour.
• Next, leave the appliance to cool down
before removing any food residue with
a sponge.
MAINTENANCE
WARNING!
- Use safety gloves.
- Ensure the oven is cold before carrying
out the following operations.
- Disconnect the oven from the power supply.
To remove the door
1. Open the door fully.
2. Lift the catches and push them forwards
as far as they will go (Fig. 1).
Fig. 1

ENGLISH 12
3. Close the door as far as it will go (A), lift
it up (B) and turn it (C) until it is released
(D) (Fig. 2, 3, 4).
A
Fig. 2
B
B
C
Fig. 3
D
Fig. 4
To ret the door
1. Insert the hinges in their seats.
2. Open the door fully.
3. Lower the two catches.
4. Close the door
To replace the rear lamp
1. Disconnect the oven from the power supply.
Fig. 5
2. Unscrew the lamp cover (Fig. 5), replace
the lamp (see note for lamp type) and
screw the lamp cover back on.
3. Reconnect the oven to the power supply.
NOTE:
Only use 25-40W/230V type E-14, T300°C
incandescent lamps.
Lamps are available from IKEA After Sales
Service.
ENGLISH 13
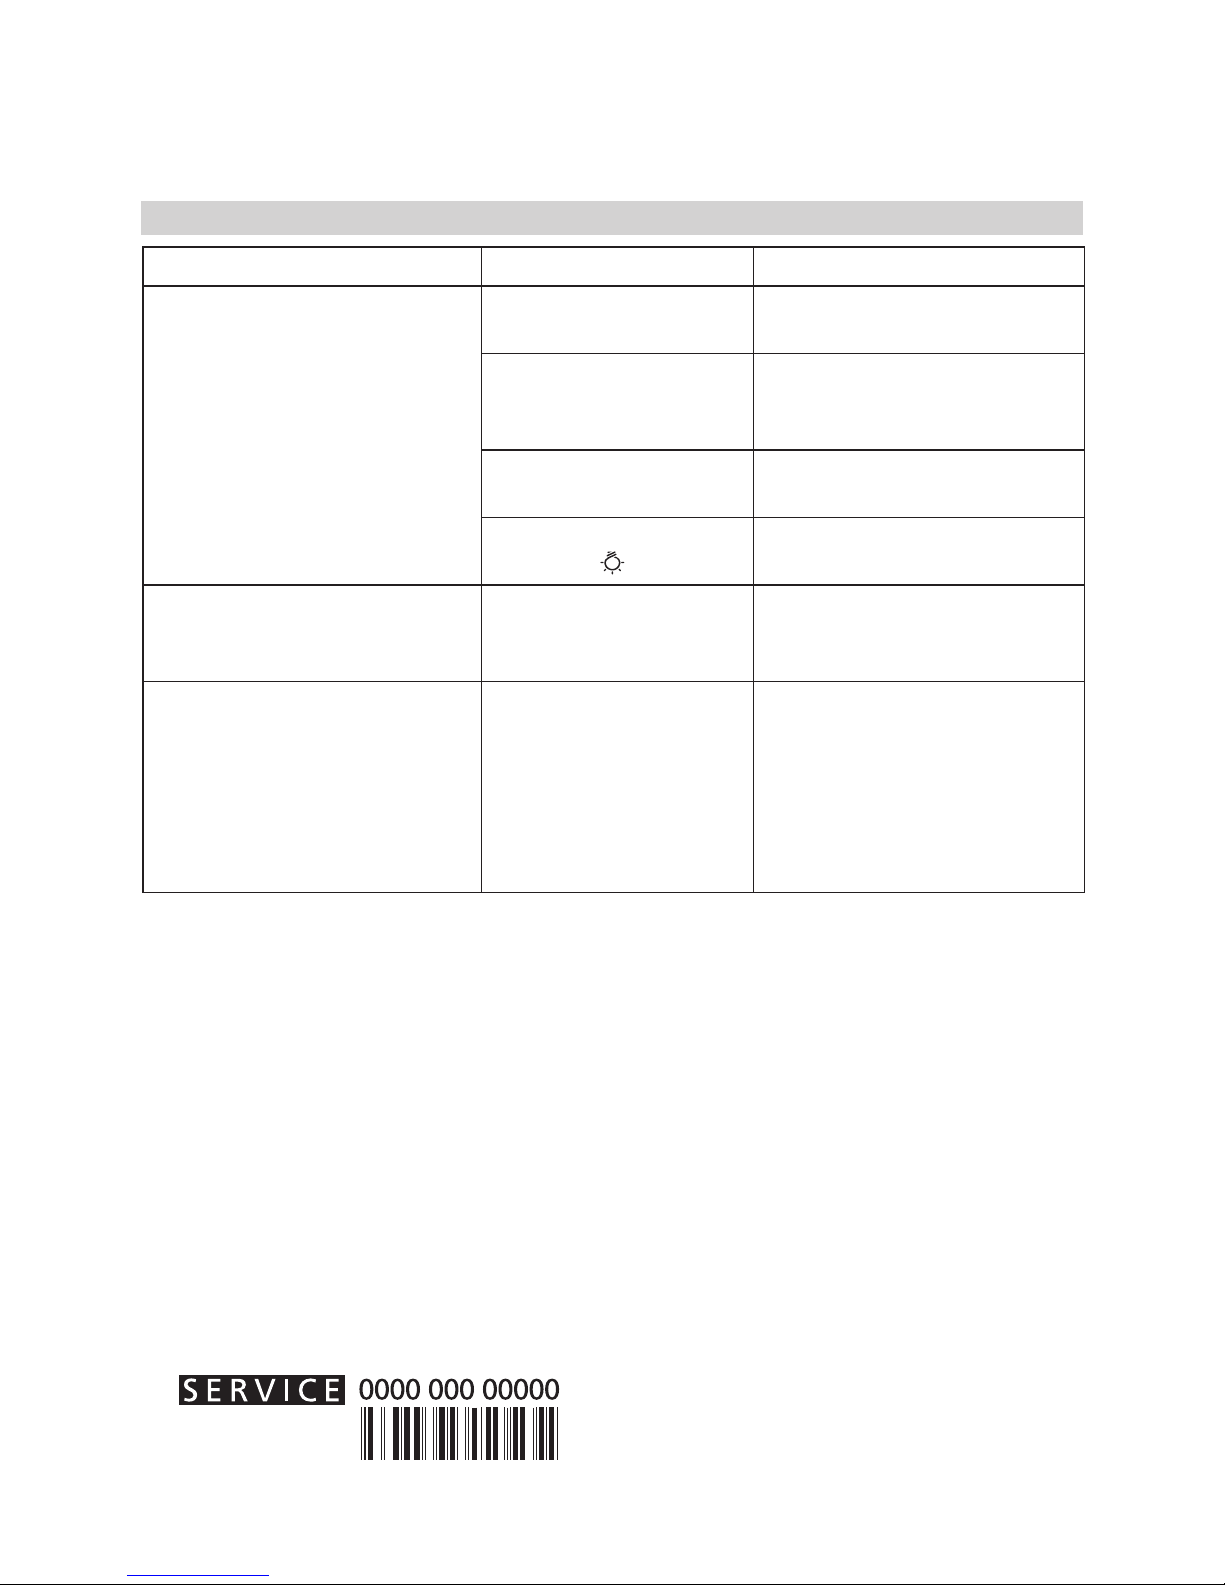
Problem Possible cause Solution
The oven does not work. No presence of mains
electrical power.
Verify the presence of mains
electrical power.
The oven is not
connected to the
electrical supply.
Connect the oven to the
power supply.
‘The oven selector is
turned to “0”.
Turn the oven selector and
select a cooking function.
The oven selector is
turned to “
”.
Turn the oven selector and
select a cooking function.
The door is locked and will not
release.
Electronic malfunction
due to voltage
variations.
Turn off the oven and restart it
to see if the fault persists.
The electronic programmer
does not work.
Electronic malfunction
due to voltage
variations.
If the electronic programmer
(depending on the model)
presents the message “F HH”,
contact the nearest After Sales
Service. Specify in this case
the number that follows the
letter “F”.
What to do if ...
Before calling the After-Sales Service:
1. See if you can solve the problem
yourself with the help of the suggestions
given in the “What to do if ...” table.
2. Switch the appliance off and back on
again it to see if the fault persists.
If after the above checks the fault still occurs,
contact IKEA After Sales Service.
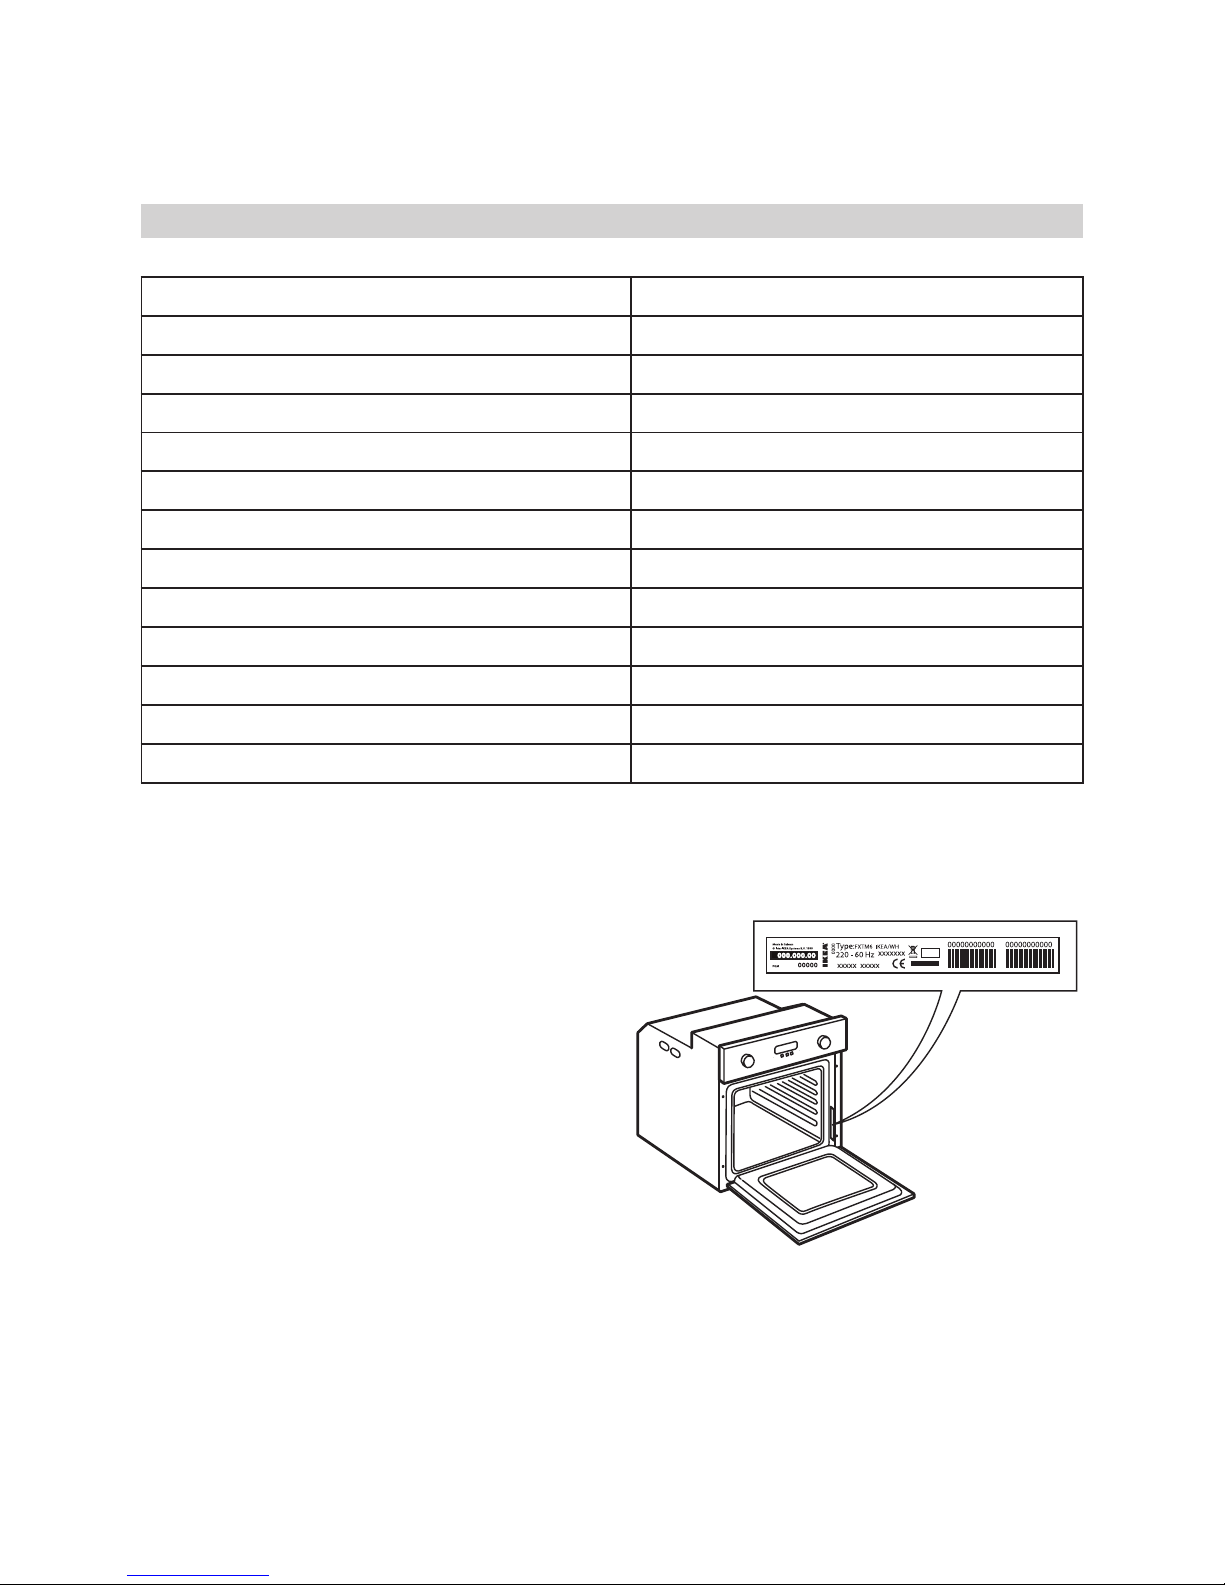
Always specify:
• a brief description of the fault;
• the type and exact model of the oven;
• the service number (number after the
word Service on the rating plate),
located on the right hand edge of the
oven cavity (visible when the oven door
is open);
• your full address;
• your telephone number.
If any repairs are required, please contact
IKEA After Sales Service (to guarantee that
original spare parts will be used and repairs
carried out correctly).
ENGLISH 14
Technical data
Dimensions
Width 595
Height 595
Depth 564
Usable volume l 53
Area of largest baking sheet (net surface) cm
2
1200
Bottom heating element W 1150
Grill W 1400
Cooling fan W 21
Oven lamp W 25
Total rating W 2500
Number of functions 5
Energy consumption kWh 0.79
The technical informations are situated in the rating plate inside the appliance.

ENGLISH 15
After unpacking the oven, make sure that
it has not been damaged during transport
and that the oven door closes properly. In
the event of problems, contact the dealer or
your nearest After-sales Service. To prevent
any damage, only remove the oven from
its polystyrene foam base at the time of
installation.
Preparing the housing unit
• Kitchen units in contact with the oven
must be heat resistant (min 90°C).
• Carry out all cabinet cutting work before
tting the oven in the housing and
remove all wood chips and sawdust.
• After installation, the bottom of the oven
must no longer be accessible.
• For correct appliance operation, do
not obstruct the minimum gap between
the worktop and the upper edge of the
oven.
General recommendations
Before use
- Remove cardboard protection pieces,
protective lm and adhesive labels from
accessories.
- Remove the accessories from the oven
and heat it at 200° for about an hour
to eliminate the smell and fumes from
the insulating materials and protective
grease.
During use
- Do not place heavy objects on the door
as they could damage it.
- Do not cling to the door or hang
anything from the handle.
- Do not cover the inside of the oven with
aluminium foil.
- Never pour water into the inside of a
hot oven; this could damage the enamel
coating.
- Never drag pots or pans across the
bottom of the oven as this could damage
the enamel coating.
- Make sure that the electrical cables of
other appliances do not touch hot parts
of the oven or become trapped in the
door.
- Do not expose the oven to atmospheric
agents.
Installation

ENGLISH 16
Door lock device
To open the door with the door lock device
see Fig 1.
Fig. 1
The door lock device can be removed by
following the sequence of images (see
Fig. 2).
Fig. 2

ENGLISH 17
Disposal of packing material
- The packing material is 100% recyclable
and is marked with the recycle
symbol ( ). The various parts of the
packing must therefore be disposed of
responsibly and in full compliance with
local authority regulations governing
waste disposal.
Scrapping the product
- This appliance is marked in compliance
with European Directive 2002/96/
EC, Waste Electrical and Electronic
Equipment (WEEE).
- By ensuring this product is disposed
of correctly, you will help prevent
potential negative consequences for
the environment and human health,
which could otherwise be caused by
inappropriate waste handling of this
product.
- The symbol
on the product or
on the accompanying documentation
indicates that it should not be treated
as domestic waste but must be taken
to an appropriate collection centre for
the recycling of electrical and electronic
equipment.
Energy saving
- Only pre-heat the oven if specied in
the cooking table or your recipe.
- Use dark lacquered or enamelled
baking moulds as they absorb heat far
better.
- Switch the oven off 10/15 minutes before
the set cooking time. Food requiring
prolonged cooking will continue to cook
even once the oven is switched off.
Declaration of conformity
- This oven, which is intended to come
into contact with foodstuffs, complies
with European Regulation ( )
n. 1935/2004 and has been designed,
manufactured and sold in conformity
with the safety requirements of the
“Low Voltage” directive 2006/95/
CE (which replaces 73/23/CEE and
subsequent amendments), the protection
requirements of “EMC” 2004/108/CE.
Environmental concerns
Make sure the power voltage specied on
the appliance rating plate is the same as
the mains voltage. The rating plate is on
the front edge of the oven (visible when the
door is open).
Power cable replacement (type H05 RR-F 3
x 1,5 mm2) must be carried out by a qualied
electrician. Contact IKEA After Sales Service.
Electrical connection

ENGLISH 18
IKEA GUARANTEE
How long is the IKEA guarantee valid?
This guarantee is valid for ve (5) years from
the original date of purchase of your appliance
at IKEA, unless the appliance is named LAGAN
in which case two (2) years of guarantee
apply. The original sales receipt, is required
as proof of purchase. If service work is carried
out under guarantee, this will not extend the
guarantee period for the appliance.
Which appliances are not covered by the
IKEA ve (5) years guarantee?
The range of appliances named LAGAN and
all appliances purchased in IKEA before 1st of
August 2007.
Who will execute the service?
IKEA service provider will provide the
service through its own service operations or
authorized service partner network.
What does this guarantee cover?
The guarantee covers faults of the appliance,
which have been caused by faulty construction
or material faults from the date of purchase
from IKEA. This guarantee applies to domestic
use only. The exceptions are specied under
the headline “What is not covered under this
guarantee?” Within the guarantee period,
the costs to remedy the fault e.g. repairs,
parts, labour and travel will be covered,
provided that the appliance is accessible for
repair without special expenditure. On these
conditions the EU guidelines (Nr. 99/44/
EG) and the respective local regulations
are applicable. Replaced parts become the
property of IKEA.
What will IKEA do to correct the problem?
IKEA appointed Service Provider will examine
the product and decide, at its sole discretion,
if it is covered under this guarantee. If
considered covered, IKEA Service Provider
or its authorized service partner through its
own service operations, will then, at its sole
discretion, either repair the defective product
or replace it with the same or a comparable
product.
What is not covered under this guarantee?
• Normal wear and tear.
• Deliberate or negligent damage, damage
caused by failure to observe operating
instructions, incorrect installation or by
connection to the wrong voltage, damage
caused by chemical or electrochemical
reaction, rust, corrosion or water damage
including but not limited to damage
caused by excessive lime in the water
supply, damage caused by abnormal
environmental conditions.
• Consumable parts including batteries and
lamps.
• Non-functional and decorative parts which
do not affect normal use of the appliance,
including any scratches and possible color
differences.
• Accidental damage caused by foreign
objects or substances and cleaning or
unblocking of lters, drainage systems or
soap drawers.
• Damage to the following parts: ceramic
glass, accessories, crockery and cutlery
baskets, feed and drainage pipes, seals,
lamps and lamp covers, screens, knobs,
casings and parts of casings. Unless such
damages can be proved to have been
caused by production faults.
• Cases where no fault could be found
during a technician’s visit.
• Repairs not carried out by our appointed
service providers and/or an authorized
service contractual partner or where nonoriginal parts have been used.
• Repairs caused by installation which is
faulty or not according to specication.
• The use of the appliance in a non-domestic
environment i.e. professional use.
• Transportation damages. If a customer
transports the product to his home or

ENGLISH 19
another address, IKEA is not liable for any
damage that may occur during transport.
However, if IKEA delivers the product
to the customer’s delivery address, then
damage to the product that occurs during
this delivery will be covered by IKEA.
• Cost for carrying out the initial installation
of the IKEA appliance.
However, if an IKEA appointed Service
Provider or its authorized service partner
repairs or replaces the appliance under
the terms of this guarantee, the appointed
Service Provider or its authorized
service partner will reinstall the repaired
appliance or install the replacement, if
necessary.
These restrictions do not apply to fault-free
work carried out by a qualied specialist
using our original parts in order to adapt the
appliance to the technical safety specications
of another EU country.
How country law applies
The IKEA guarantee gives you specic legal
rights, which cover or exceed all the local legal
demands. However these conditions do not
limit in any way consumer rights described in
the local legislation.
Area of validity
For appliances which are purchased in one EU
country and taken to another EU country, the
services will be provided in the framework of
the guarantee conditions normal in the new
country.
An obligation to carry out services in the
framework of the guarantee exists only if
the appliance complies and is installed in
accordance with:
- the technical specications of the country in
which the guarantee claim is made;
- the Assembly Instructions and User Manual
Safety Information.
The dedicated AFTER SALES for IKEA
appliances
Please don’t hesitate to contact IKEA
appointed After Sales Service Provider to:
• make a service request under this
guarantee;
• ask for clarications on installation of the
IKEA appliance in the dedicated IKEA
kitchen furniture;
• ask for clarication on functions of IKEA
appliances.
To ensure that we provide you with the best
assistance, please read carefully the Assembly
Instructions and/or the User Manual before
contacting us.
How to reach us if you need our service
Please refer to the last
page of this manual for the
full list of IKEA appointed
After Sales Service Provider
and relative national phone
numbers.
In order to provide you a quicker
service, we recommend to use the
specic phone numbers listed on this
manual. Always refer to the numbers
listed in the booklet of the specic
appliance you need an assistance for.
Please also always refer to the IKEA
article number (8 digit code) and 12
digit service number placed on the
rating plate of your appliance.
SAVE THE SALES RECEIPT!
It is your proof of purchase and required
for the guarantee to apply. The sales
receipt also reports the IKEA name and
article number (8 digit code) for each of
the appliances you have purchased.
Do you need extra help?
For any additional questions not related
to After Sales of your appliances please
contact your nearest IKEA store call centre.
We recommend you read the appliance
documentation carefully before contacting us.
DEUTSCH 20
Ihre eigene Sicherheit und die anderer
Personen ist von höchster Wichtigkeit!
Diese Anweisungen sowie das Gerät selbst
enthalten wichtige Sicherheitshinweise, die
Sie durchlesen und stets beachten sollten.
Dieses Symbol warnt vor möglichen
Gefahren für die Sicherheit des
Benutzers und anderer Personen.
Alle Sicherheitshinweise werden von dem
Gefahrensymbol und folgenden Begriffen
begleitet:
GEFAHR! Weist auf eine
Gefahrensituation hin, die zu schweren
Verletzungen führt, wenn sie nicht
vermieden wird.
ACHTUNG! Weist auf eine
Gefahrensituation hin, die bei
mangelnder Vorsicht zu schweren
Verletzungen führt.
Alle Gefahrenhinweise bezeichnen das
potenzielle Risiko, auf das sie sich beziehen
und geben an, wie Verletzungsgefahren,
Schäden und Stromschläge durch
unsachgemäßen Gebrauch des Gerätes
vermieden werden können. Halten Sie sich
genau an folgende Anweisungen:
- Halten Sie das Gerät von der
Stromversorgung getrennt, bis der
Einbau durchgeführt wurde.
- Die elektrische Installation und
Wartungsarbeiten müssen von einer
qualizierten Fachkraft gemäß den
Herstellerangaben und den gültigen
örtlichen Sicherheitsbestimmungen
durchgeführt werden. Reparieren Sie
das Gerät nicht selbst und tauschen
Sie keine Teile aus, wenn dies vom
Bedienungshandbuch nicht ausdrücklich
vorgesehen ist.
- Die Erdung des Gerätes ist gesetzlich
vorgeschrieben.
- Das Netzkabel muss lang genug sein,
um das in die Küchenzeile eingebaute
Gerät an das Stromnetz anzuschließen.
- Um die einschlägigen
Sicherheitsvorschriften zu erfüllen,
muss installationsseitig ein allpoliger
Trennschalter mit einer Kontaktöffnung
von mindestens 3 mm vorgesehen
werden.
- Verwenden Sie keine Mehrfachstecker
oder Verlängerungskabel.
- Ziehen Sie nicht am Netzkabel des
Gerätes, um den Stecker aus der
Steckdose zu ziehen.
- Nach der Installation dürfen Strom
führende Teile für den Benutzer nicht
mehr zugänglich sein.
- Berühren Sie das Gerät nicht mit
feuchten Händen und benutzen Sie es
nicht, wenn Sie barfuß sind.
Sicherheitshinweise 20
Produktbeschreibung 22
Bedienfeld (Display) 23
Täglicher Gebrauch 23
Gartabellen 25
Reinigung und Pege 27
Störung - was tun? 30
Technische Daten 32
Aufstellung 33
Elektrischer Anschluss 35
Umweltschutz 35
IKEA GARANTIE 36
Sicherheitshinweise
Inhaltsverzeichnis

DEUTSCH 21
- Das Gerät ist ausschließlich zur
Zubereitung von Nahrungsmitteln für
private Haushalte konzipiert. Jeder
hiervon abweichende Gebrauch ist nicht
gestattet (z.B. das Heizen von Räumen).
Der Hersteller übernimmt keine
Verantwortung für Schäden aufgrund
von unsachgemäßer oder falscher
Verwendung.
- Der Backofen darf ohne Aufsicht weder
von Kindern noch von Personen mit
herabgesetzten körperlichen, sensuellen
oder mentalen Fähigkeiten oder ohne
die erforderliche Erfahrung und Kenntnis
benutzt werden, es sei denn, sie wurden
durch für ihre Sicherheit verantwortliche
Personen entsprechend eingewiesen.
- Die erreichbaren Teile des Backofens
können während des Betriebs sehr heiß
werden. Halten Sie Kinder vom Gerät
fern und achten Sie darauf, dass sie das
Gerät nicht als Spielzeug benutzen.
- Berühren Sie die Heizelemente sowie
die Geräteinnenächen während und
unmittelbar nach dem Betrieb nicht, es
besteht Verbrennungsgefahr. Vermeiden
Sie den Kontakt mit Tüchern oder
anderen entammbaren Materialien, bis
das Gerät wieder vollständig abgekühlt
ist.
- Öffnen Sie die Gerätetür am Ende
der Garzeit vorsichtig. Lassen Sie
heiße Luft und Dampf austreten,
bevor Sie ins Geräteinnere fassen. Bei
geschlossener Gerätetür wird die heiße
Luft durch eine Öffnung oberhalb der
Bedienblende nach außen geblasen.
Die Belüftungsöffnungen dürfen nicht
blockiert werden.
- Verwenden Sie Backofenhandschuhe,
um Gargeschirr und Roste zu
entnehmen. Achten Sie darauf, die
Heizelemente nicht zu berühren.
- Auf, in oder neben dem Gerät darf sich
kein entammbares Material benden;
bei einem versehentlichen Einschalten
könnte es zu einem Brand im Gerät
kommen.
- Erhitzen Sie keine geschlossenen Gefäße
oder Behälter im Backofen. Der Druck,
der in solchen Gefäßen entsteht, kann
zu ihrer Explosion und dadurch zu
Beschädigungen am Gerät führen.
- Verwenden Sie keine Behälter aus
synthetischen Materialien.
- Heißes Fett und Öl sind leicht
entzündlich. Beaufsichtigen Sie stets den
Garvorgang, wenn Sie Speisen mit viel
Fett oder Öl zubereiten.
- Lassen Sie das Gerät während des
Dörrens von Lebensmitteln niemals
unbeaufsichtigt.
- Bei Verwendung von alkoholischen
Getränken (z. B. Rum, Cognac,
Wein, usw.) zum Braten oder Backen
ist zu beachten, dass Alkohol bei
hohen Temperaturen verdampft. Die
entstandenen Dämpfe können sich
entzünden, wenn sie in Kontakt mit dem
elektrischen Heizelement kommen.
Entsorgung von Altgeräten
- Dieses Gerät wurde aus recycelbaren
oder wiederverwendbaren Werkstoffen
hergestellt. Entsorgen Sie das Gerät im
Einklang mit den lokalen Vorschriften zur
Abfallbeseitigung. Schneiden Sie das
Netzkabel durch, bevor Sie das Gerät
verschrotten.
- Genauere Informationen zu Behandlung,
Entsorgung und Recycling von
elektrischen Haushaltsgeräten erhalten
Sie bei Ihrer örtlichen Verwaltungsstelle,
der Müllabfuhr oder dem Händler, bei
dem Sie das Gerät gekauft haben.

DEUTSCH 22
Produktbeschreibung
1
Bedienfeld
2
Kühlgebläse (nicht sichtbar)
3
Oberes Heizelement/Grill
4
Grillelement
5
Hintere Backofenbeleuchtung
6
Gebläse
7
Unteres Heizelement (verdeckt)
8
Kühle Backofentür
Zubehör
Kuchenblech
1x
Rost
1x
Abtropfschale
1x
1
2
3
4
5
6
8
7

DEUTSCH 23
Bedienfeld (Display)
Backofen einschalten
Drehen Sie den Bedienknopf zur
Funktionswahl auf das Symbol der
gewünschten Funktion. Die Ofenbeleuchtung
schaltet sich ein.
Drehen Sie den Thermostatknopf nach
rechts auf die gewünschte Temperatur. Die
rote Thermostat-Anzeigeleuchte leuchtet auf
und erlischt wieder, wenn der Backofen die
ausgewählte Temperatur erreicht hat. Drehen Sie nach dem Ende des Garvorgangs
die Bedienknöpfe wieder auf „0“.
Garzeitprogrammierung
Diese Programmierung erlaubt eine
Zeiteinstellung von 1 bis 120 Minuten
Um die Garzeit einzustellen, nachdem die
gewünschte Garfunktion ausgewählt ist, den
Knopf im Uhrzeigersinn herum drehen, und
dann wieder in die Gegenrichtung auf die
gewünschte Gardauer drehen.
Am Ende der eingestellten Garzeit schaltet
sich der Backofen aus und der Bedienknopf
steht wieder auf „0“.
Um den Ofen im manuellen Modus
zu benutzen, d.h. ohne eine Garzeit
einzustellen, muss der Bedienknopf auf das
Symbol
eingestellt sein.
Wichtig: Wenn der Programmierknopf
sich in Stellung „0“ bendet, lässt sich der
Ofen nicht einschalten.
Um den Ofen einzuschalten, schalten Sie
den Bedienknopf auf das Symbol
oder
stellen Sie eine Garzeit ein.
Täglicher Gebrauch
A
Bedienknopf zur Funktionswahl
B
Garzeitprogrammierung
C
Thermostatknopf
D
Thermostat-Anzeigeleuchte (rot)
A B C D

DEUTSCH 24
Übersicht Betriebsarten des Geräts
Betriebsart Funktionsbeschreibung
0
BACKOFEN AUS -
BELEUCHTUNG Einschalten der Backofen-Innenbeleuchtung.
OBER- UND
UNTERHITZE
Diese Betriebsart eignet sich zur Zubereitung aller Arten von
Gerichten auf einer Einschubebene. Heizen Sie den Ofen auf die
gewünschte Gartemperatur vor und schieben Sie die Speisen
in den Ofen, wenn die eingestellte Temperatur erreicht ist.
Verwenden Sie zum Garen möglichst die zweite Einschubebene.
GEBÄCK Zum Backen von salzigen oder süßen Kuchen mit üssiger
Füllung auf einer Ebene. Falls notwendig, können die
Einschubebenen vertauscht werden, um eine gleichmäßigere
Garung zu erreichen.
GRILL Zum Grillen von Steaks, Fleischspießen und Würsten, zum
Überbacken von Gemüse und Rösten von Brot. Heizen Sie den
Ofen 3 - 5 Min. lang vor. Es wird empfohlen, das Gargut auf die
4. Ebene zu geben. Während des Garvorgangs muss die Tür
geschlossen bleiben. Beim Grillen/Garen von Fleisch empfehlen
wir zur Reduzierung von Fettspritzern und Rauchbildung, etwas
Wasser in die Fettpfanne (auf der 3. Einschubebene) zu geben.
Während des Garvorgangs muss die Tür geschlossen bleiben.
GRILL +
HEISSLUFT
Diese Funktion eignet sich besonders zum Garen großer
Fleischstücke (Roastbeef und andere Rostbraten). Während des
Garvorgangs muss die Tür geschlossen bleiben. Beim Garen von
Fleisch empfehlen wir, etwas Wasser in die Fettpfanne auf der
ersten/zweiten Einschubebene zu geben, um Fettspritzer und
Rauchbildung zu vermeiden Wenden Sie das Fleisch während
des Grillens. Das Fleisch sollte beim Garen gedreht werden.
AUFTAUEN Diese Funktion dient der Beschleunigung des Auftauens von
Speisen bei Raumtemperatur Lassen Sie das Auftaugut verpackt,
um es vor Austrocknung zu schützen. Verwenden Sie zum Garen
möglichst die mittlere Einschubebene.

DEUTSCH 25
Art der Speise Betriebs-
art
Vorheizen Einschubebene
(von unten)
Temperatur
(°C)
Garzeit
(Min.)
BACKWAREN, TEILCHEN USW.
Hefekuchen
X 2 160-180 35-55
Plätzchen (Kekse),
Törtchen
X 3 170-180 15-40
X 1 - 3 170-180 20-40
Beignets
X 3 180 30-40
Blätterteigtörtchen, Salziges
Blätterteiggebäck
X 3 180-200 20-30
Gefüllte Kuchen
(Käsekuchen,
Strudel,
Obstkuchen)
X 1 180-200 50-60
Baiser
(Meringuen)
X 3 90 120-130
Quiche
(Gemüsetorte,
Quiche)
X 1 180-200 35-55
Lasagne,
überbackene
Pasta, Cannelloni,
Auäufe
X 2 190-200 45-55
Brot, Fladenbrot
X 2 190-230 15-50
Pizza
X 2 230-250 7-20
Pizza/Fladenbrot
X 1 - 3 230-250 12-30
Gartabellen
 Loading...