

Page 1
ARC Mini R2 COMPUTERCASE
rev 1.0
Page 2

About Fractal Design – our concept
Without a doubt, computers are more than just technology - they have become an integral
part of our lives. Computers do more than make living easier, they often dene the functionality and design of our homes, our ofces and ourselves.
The products we choose represent how we want to describe the world around us and how
we want others to perceive us. Many of us are drawn to designs from Scandinavia, which
are organized, clean and functional while remaining stylish, sleek and elegant. We like these
designs because they harmonize with our surroundings and become nearly transparent.
Brands like Georg Jensen, Bang Olufsen, Skagen Watches and Ikea are just a few that
represent this Scandinavian style and efciency.
In the world of computer components, there is only one name you should know,
Fractal Design.
For more information and product specications, visit www.fractal-design.com
Support
Europe and Rest of World: support@fractal-design.com
North America: support.america@fractal-design.com
DACH: support.dach@fractal-design.com
China: support.china@fractal-design.com
1
Page 3

Table of Contents:
Instructions for Arc Mini R2 computer case
ENGLISH ................................................................................................ 3
FRENCH ................................................................................................. 6
GERMAN ................................................................................................ 9
ITALIAN.................................................................................................12
CHINESE .............................................................................................. 15
JAPANESE ...........................................................................................18
KOREAN ............................................................................................... 21
POLISH ................................................................................................. 24
RUSSIAN .............................................................................................. 27
SPANISH ..............................................................................................30
SWEDISH ............................................................................................. 33
EXPLODED VIEW ................................................................................ 36
2
Page 4
Introduction
Congratulations and thank you for purchasing a Fractal Design computer case.
Please thoroughly read the following information and instructions before using your new case.
Arc Mini R2
The Arc Mini R2 micro ATX case combines excellent cooling potential and build congurability in a compact, minimalistic and elegant chassis design.
The Arc series of cases is dedicated to delivering optimized cooling solutions and the Arc
Mini R2 is no exception. The adaptable hard drive cage design brings forth options for multiple cooling setups. For a case of this size, it offers unmatched possibilities for water cooling
components with a choice to even t a 360mm thick radiator in the roof. The three Silent
Series R2 fans included in the case contribute to excellent cooling straight out of the box.
The Arc Mini R2 is compact but the size does not compromise exibility for component conguration and drive capacity. With room for up to six 3.5” drives plus an additional two 2.5”
drives hidden behind the motherboard plate, you can build a well-cooled PC with ample storage space.
As in all our products, the Arc Mini R2 highlights ease of use alongside quality workmanship
and materials, which is something Fractal Design takes pride in. The case is built to last and
is lled with smart features such dust lters, integrated fan controller and plenty of space for
tidy cable routing. To top it all off, the Arc Mini R2 comes with a beautiful, slightly tinted window side panel which allows you to show off your build from the outside.
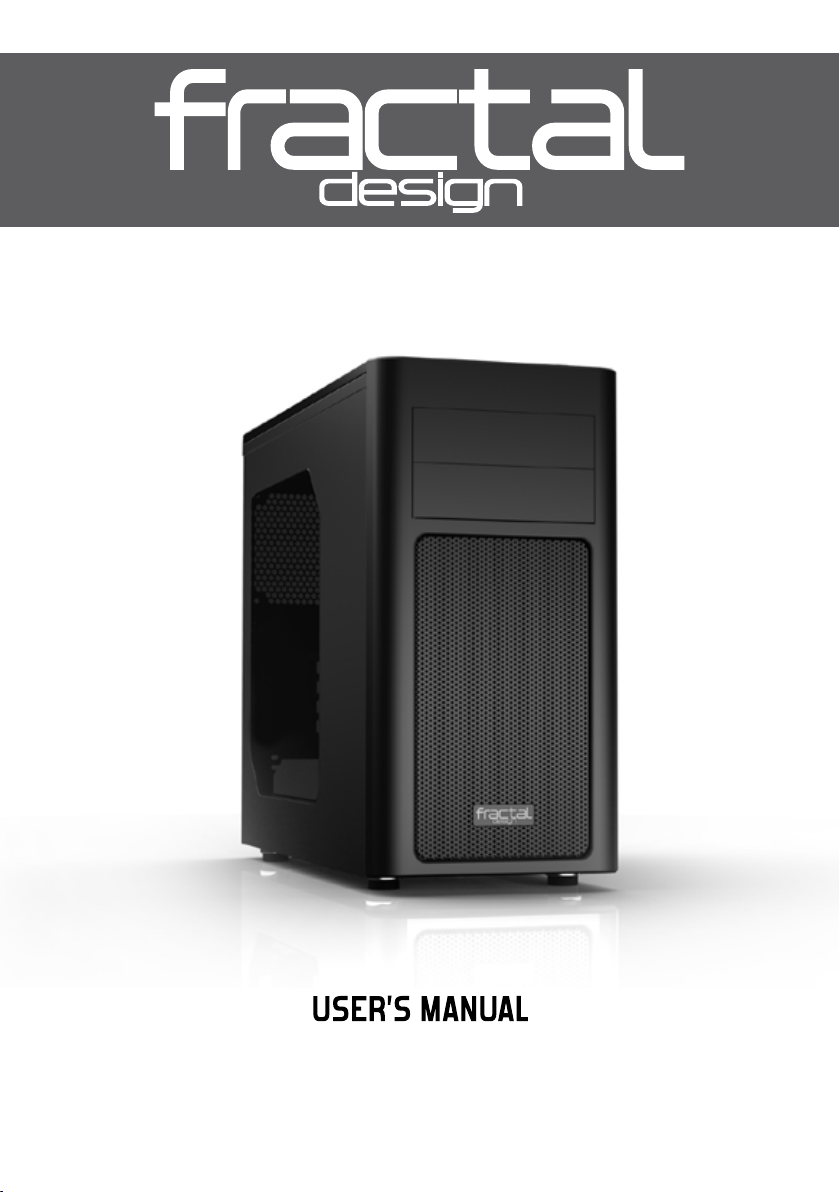
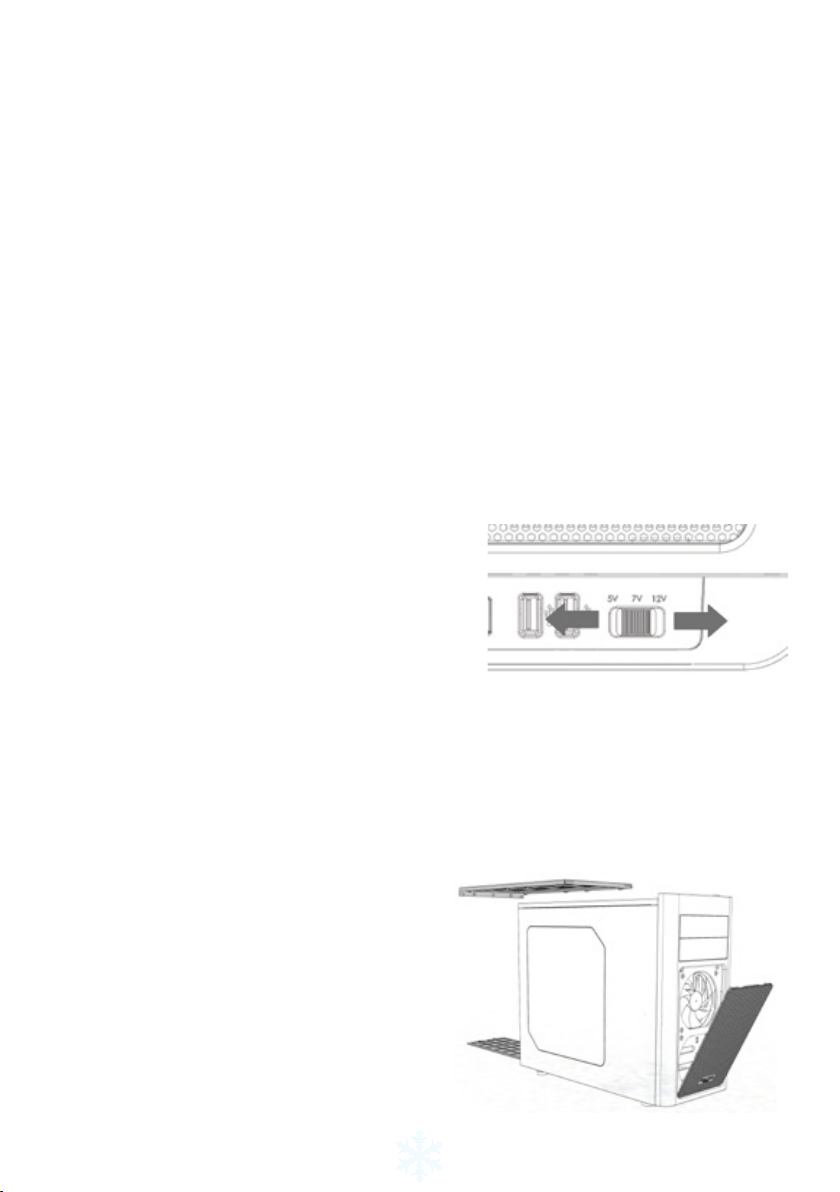
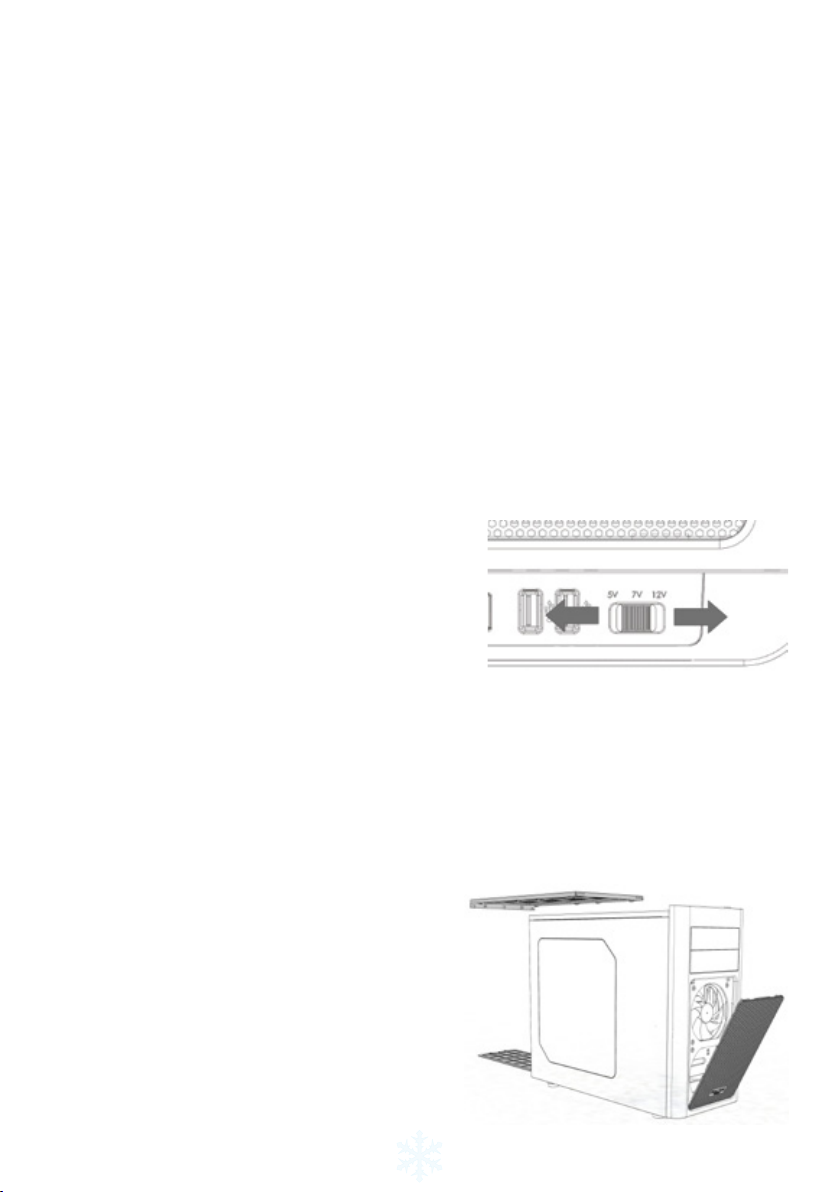
Fan controller
To install the built-in fan controller you have four connectors, three of which you connect to your case fans
and one Molex connector which you plug into your
power supply unit. The speed of the fans can be regulated in three steps, low speed (5V), medium speed
(7V) and high speed (12V).
Note: Some fans might not start in the low-speed position
and require a higher setting. Check the Starting Voltage of
non-Fractal Design fans for which setting should be used.
Cleaning the dust lters
The Arc Mini R2 comes with 3 separate dust lters:
• Front panel: Remove the front dust lter by pushing the upper part of the mesh; the
lter can be cleaned under running water or
by using a vacuum cleaner.
• Bottom lter: The lter located under the
power supply is removable by pulling it
straight out at the back of the case; it can be
cleaned under running water.
• Top panel: This lter is easiest to clean by
just using a vacuum cleaner, but can also be
taken off by removing the two thumbscrews at
the rear of the case.
3
Page 5
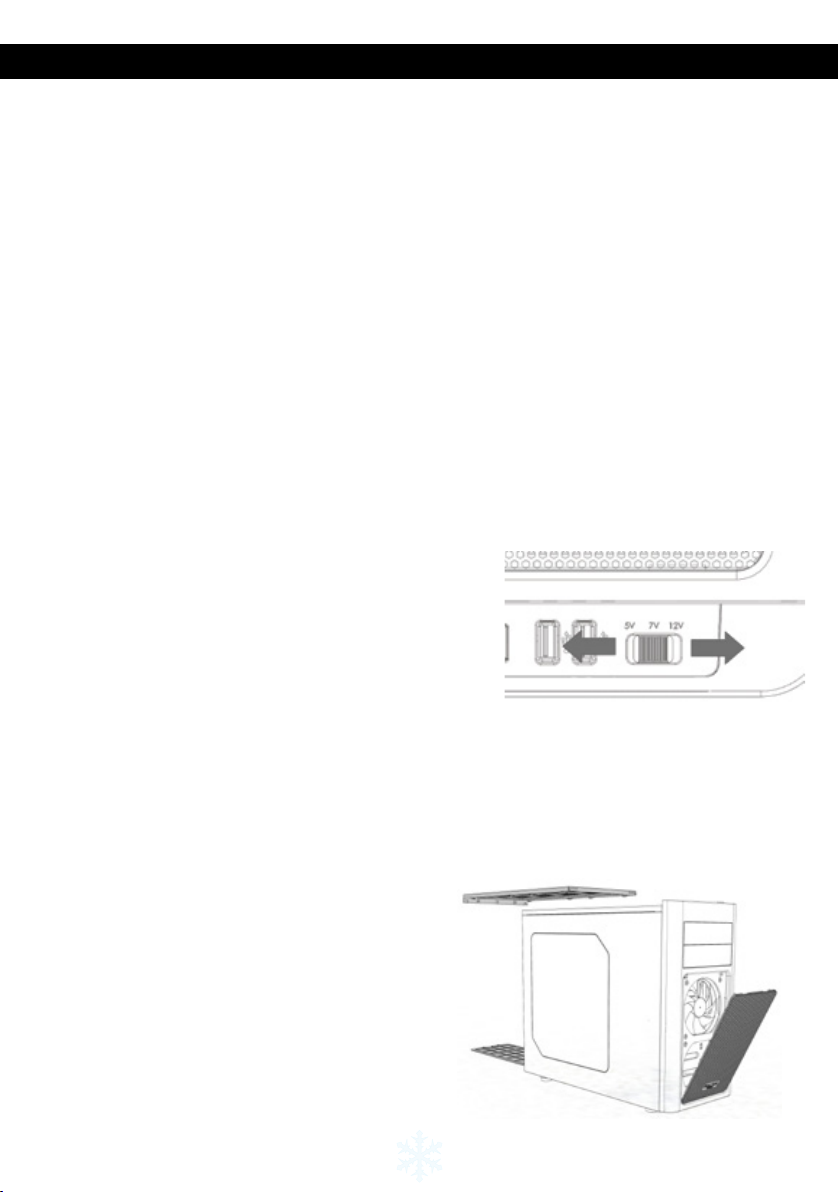
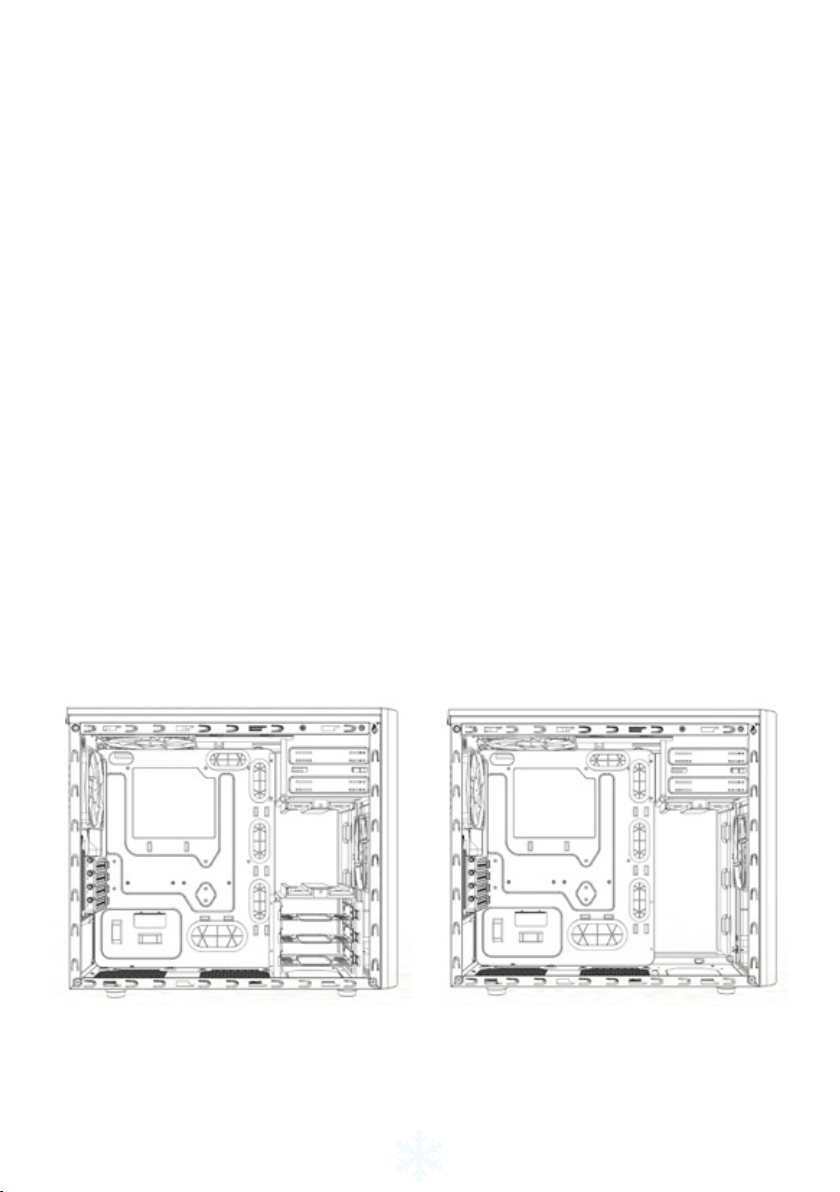
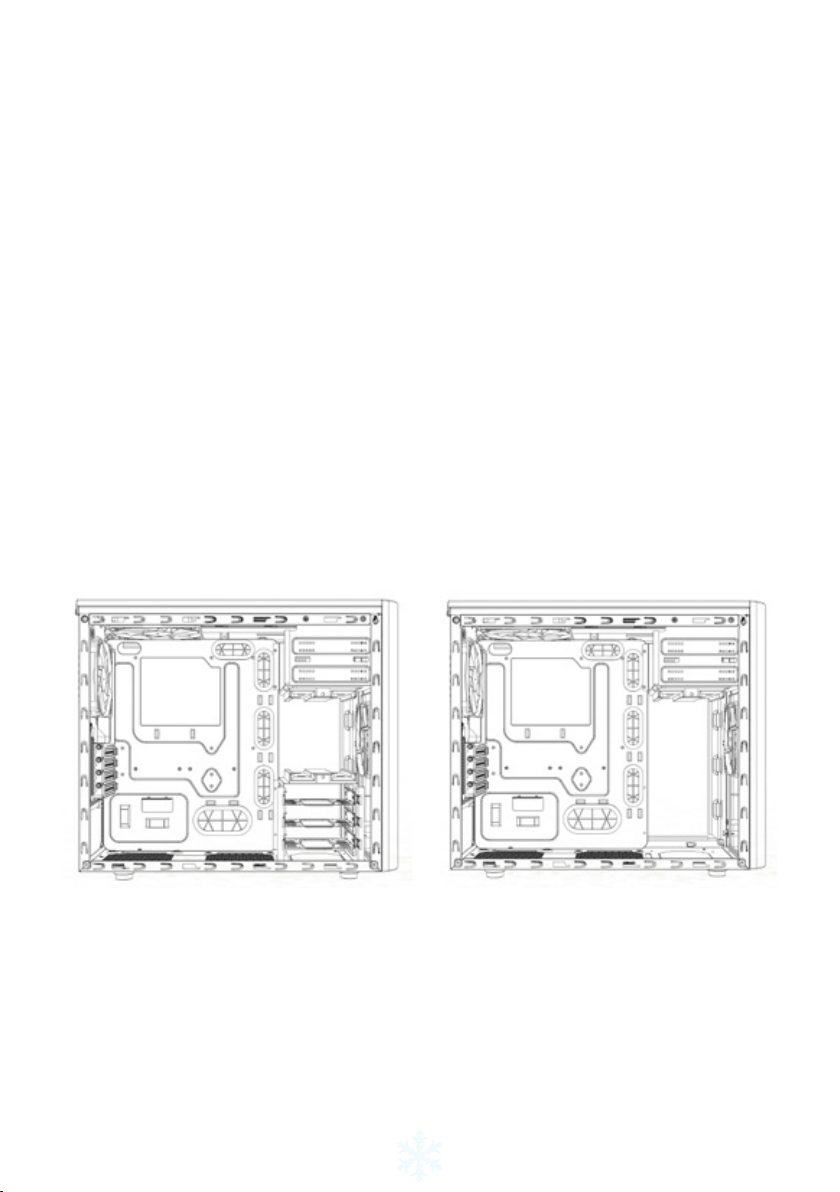
Adaptable hard drive cages
All drive cages in the Arc Mini R2 can be removed in order to t bigger components or simply
to optimize airow throughout the case.
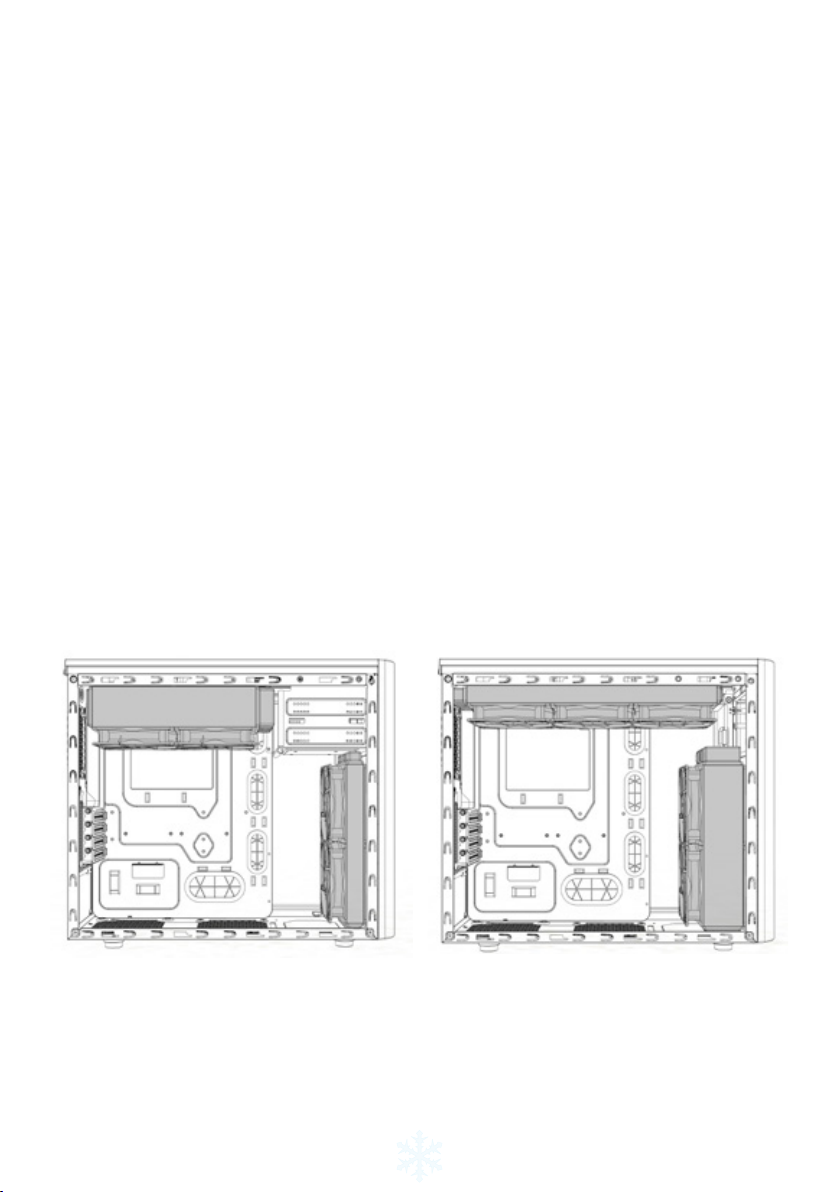
Removing or rotating the upper hard drive cage
In its original position, the upper HDD cage has been strategically placed to optimize a clean
build with excellent HDD cooling and cable management. In order to t graphics card(s) longer than 260mm you may need to remove the upper HDD cage. When the upper HDD cage
is rotated, it acts as a guide for the front fan and directs airow to the graphics card(s). To
remove or rotate the upper HDD cage, the two thumbscrews securing it must be removed.
Following rotation of the HDD cage, re-insert it in the desired position and secure the thumbscrews in the new position or remove it completely.
Removing the lower hard drive cage
In order to t water cooling radiators to the front panel you will need to remove the lower
HDD cage to make space for it. The cage is removed by unscrewing 4 screws at the bottom
of the case.
Removing the optical drive bay
In order to install a 360mm radiator in the top panel you need to remove the optical drive bay
from the front of the case. This is secured by 8 screws, two on each side connecting to the
top panel and four in the front connected to the front metal panel. Simply unscrew the eight
screws and remove the optical drive bay from the case.
4
Page 6
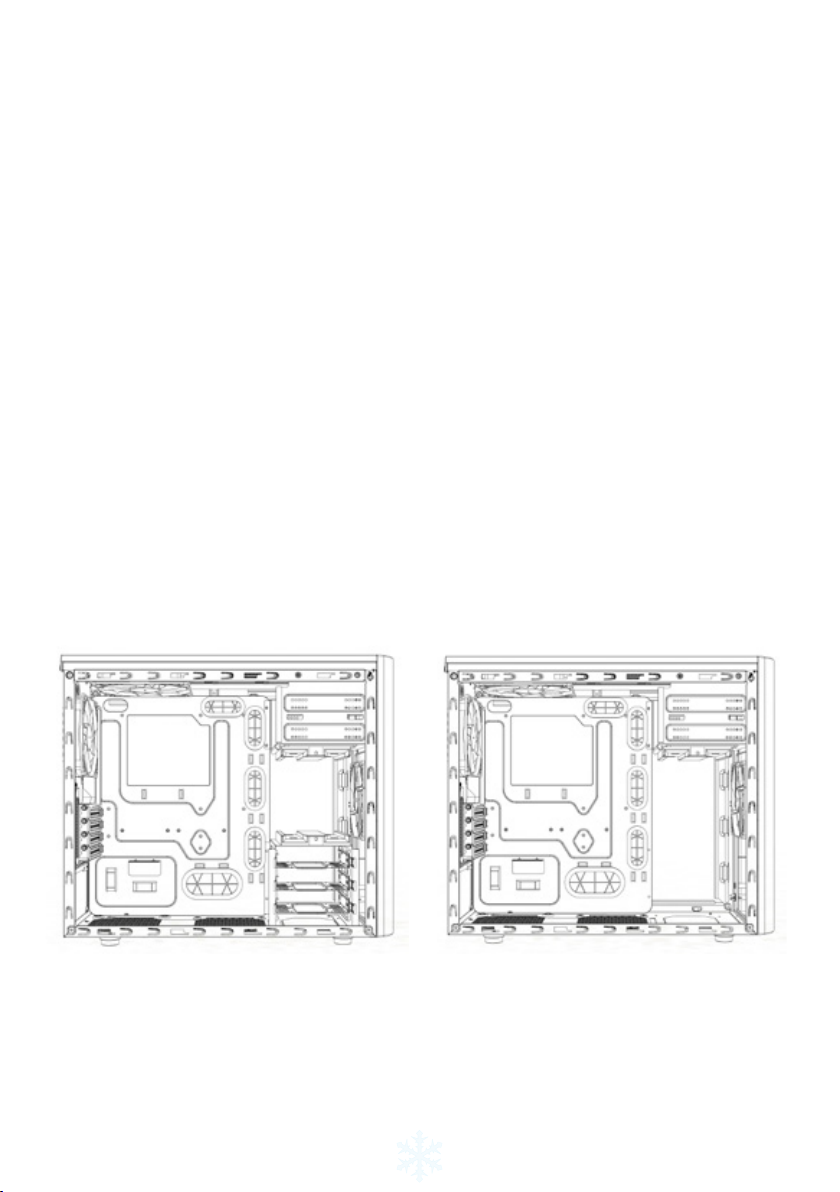
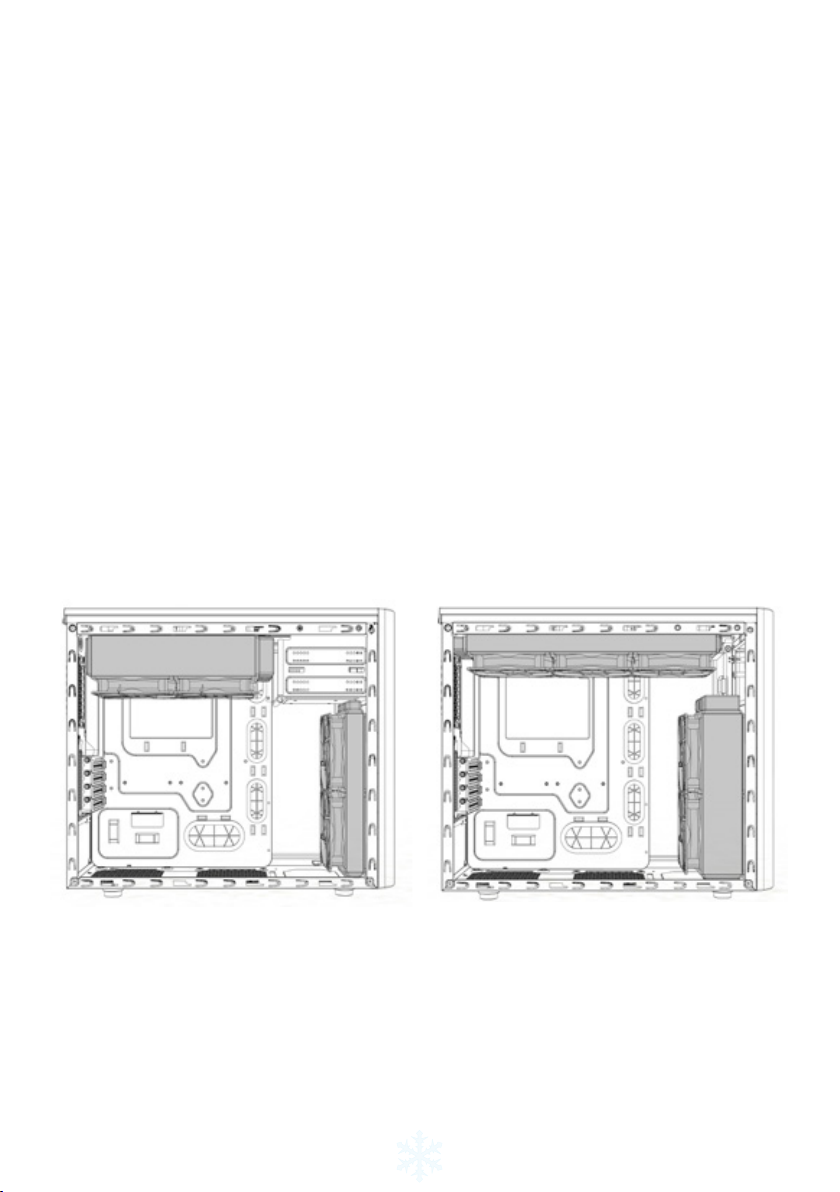
Water cooling options
The Arc Mini R2 offers multiple options when it comes to installing water cooling components:
• Top panel: The fan positions in the top panel are positioned in such a way that install-
ing thick water cooling radiators will not interfere with components on your motherboard
such as memory or heatsinks. A 240mm radiator will t in the top but you can also t a
360mm radiator if you remove the optical drive bay from the front of the case. Instructions on how to remove the optical drive bay are outlined in the section Removing the
optical drive bay.
• Front panel: A 240mm radiator ts in this position as long as the total length is no
more than 272 mm and the bottom HDD cage is removed. If the radiator is longer than
272mm, if may still be installed however the optical bay will have to be removed. Instructions on how to remove the optical drive bay are outlined in the section Removing
the optical drive bay.
• Rear panel: In this fan position you can t a 120mm radiator.
• Bottom panel: In this fan position you can t a 120mm radiator.
5
Page 7
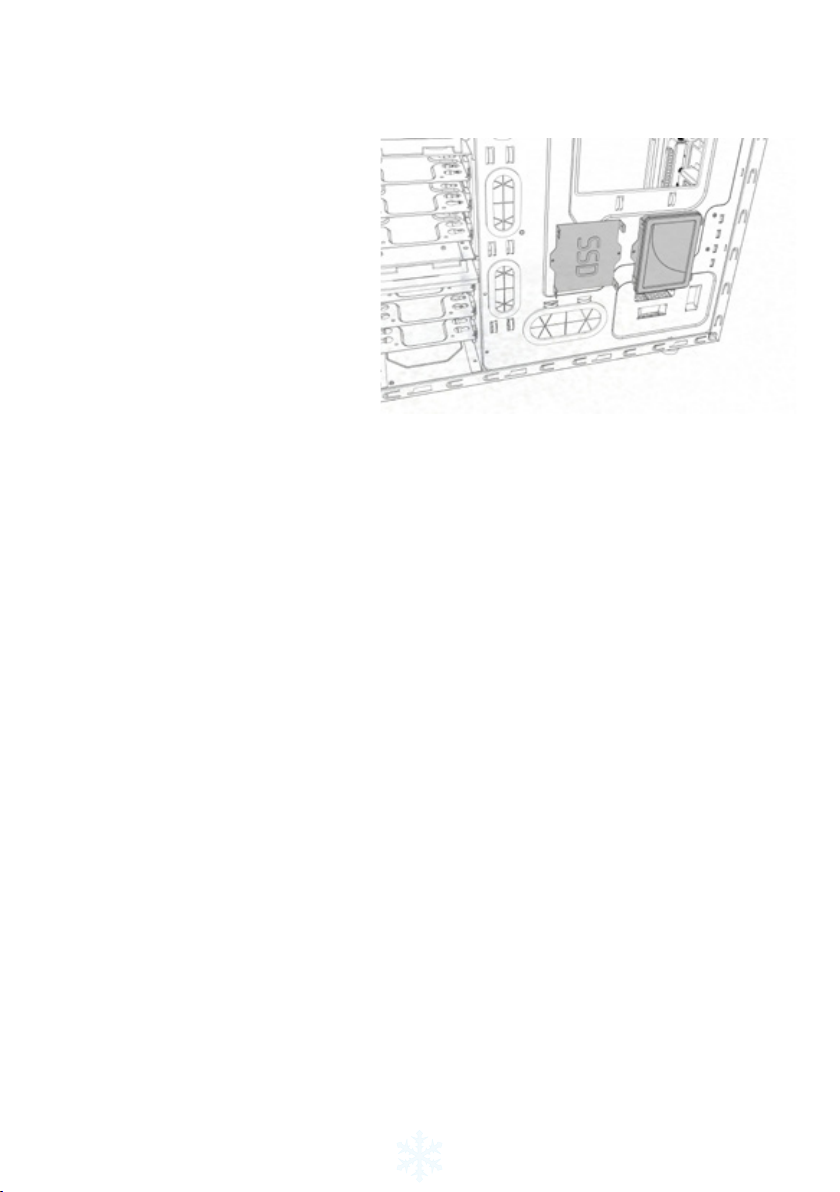
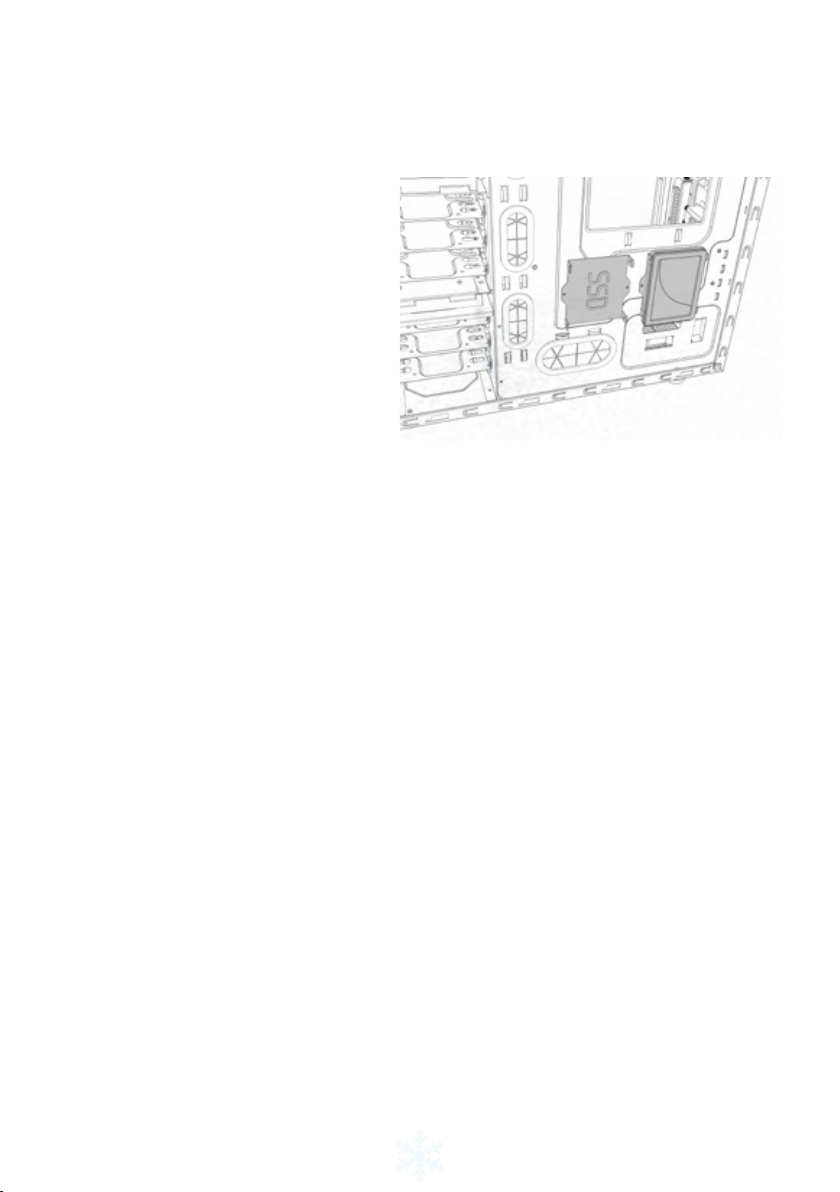
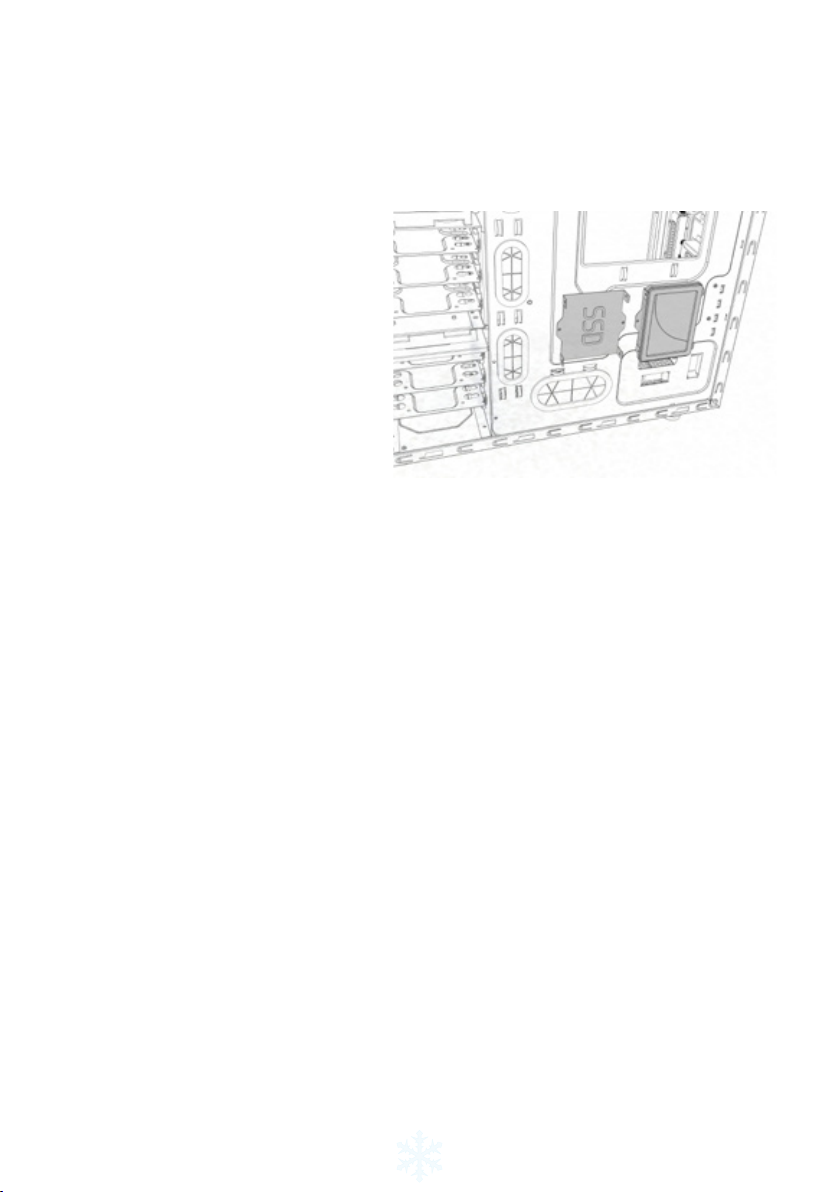
Motherboard plate SSD mounting options
For maximum use of the space behind the motherboard plate and the side panel, the Arc
Mini R2 computer case features an additional option for two solid state drives to be mounted
on the back of the motherboard
plate. Please note that you can also
mount SSD units in all of the regular
hard drive trays.
To fasten your drive, simply unscrew
the SSD bracket from the back of the
motherboard, attach your SSD drive
to the bracket with screws found in
the accessory box, then reattach the
bracket to the motherboard plate. It is
recommended to use straight cables
with straight SATA connectors; 90
degree cables are not supported.
Limited warranty and limitations of liability
Fractal Design Arc Mini R2 computer cases are guaranteed for twenty four (24) months from
the date of delivery to end-user, against defects in materials and/or workmanship. Within
this limited warranty period, products will either be repaired or replaced at Fractal Design’s
discretion. Warranty claims must be returned to the agent who sold the product, shipping
prepaid.
The warranty does not cover:
• Products which have been used for rental purposes, misused, handled carelessly or ap-
plied in such a way that is not in accordance with its stated intended use.
• Products damaged from an Act of Nature including, but not limited to, lightning, re,
ood and earthquake.
• Products whose serial number and/or the warranty sticker have been tampered with or
removed.
Product support
If you need to contact support please use following adresess:
In US and Canada: support.america@fractal-design.com
In DACH (Germany, Switzerland, Austria): support.dach@fractal-design.com
In China: support.china@fractal-design.com
Rest of the world : support@fractal-design.com
6
Page 8
Arc Mini R2
Le boîtier ATX Arc Mini R2 micro combine un excellent potentiel de refroidissement et une
exibilité de montage dans un châssis compact, minimaliste et élégant.
La série de boîtiers Arc est conçue pour proposer des solutions de refroidissement optimisées et l’Arc Mini R2 ne fait pas exception. La cage adaptable pour disques durs offre des
options pour différentes congurations. Pour un boîtier de sa taille, il propose des possibilités uniques avec des composants de refroidissement par eau et peut même s’accommoder
d’un radiateur épais de 360 mm sur le dessus. Les trois ventilateurs Silent Series R2 compris dans le boîtier contribuent à un excellent refroidissement dès le départ.
L’Arc Mini R2 est compact mais la taille ne compromet pas la exibilité pour la conguration
de composants et la capacité des disques. Avec de la place pour jusqu’à six disques de 3,5
“ plus deux emplacements de 2,5 “ cachés derrière la carte mère, vous pouvez construire un
PC bien refroidi avec beaucoup d’espace de stockage.
Comme pour tous nos produits, l’Arc Mini R2 met en avant la convivialité et la qualité des
matériaux et des nitions, ce dont Fractal Design est er. Le boîtier est conçu pour durer et
est rempli d’éléments utiles tels que des ltres contre la poussière, un contrôleur de ventilateur intégré et beaucoup de place pour un câblage propre. Pour couronner le tout, l’Arc Mini
R2 est proposé avec une panneau latéral vitré élégant, légèrement teinté qui vous permet
d’avoir un aperçu rapide de l’ensemble.
Contrôleur de ventilateur
Pour installer le contrôleur de ventilateur intégré, il y
a quatre connecteurs, trois d'entre eux allant sur les
ventilateurs de votre boîtier et un connecteur Molex
que vous devez brancher sur le bloc d'alimentation.
La vitesse des ventilateurs peut être réglée en trois
étapes, vitesse faible (5 V), vitesse moyenne (7 V) et
haute vitesse (12 V).
Remarque : Il se peut que certains ventilateurs ne démarrent pas
en position à vitesse faible et aient besoin d'être réglés à une vites-
se supérieure. Vériez la Tension au démarrage des ventilateurs autres que Fractal Design pour savoir quel réglage
utiliser.
Nettoyage des ltres à poussière
L'Arc Mini R2 est fourni avec 3 ltres à poussière séparés :
• Panneau frontal: Retirez le ltre à poussière
frontal en poussant la partie supérieure de la
maille, le ltre peut être nettoyé sous de l’eau
courante ou en utilisant un aspirateur.
• Filtre inférieur: Le ltre situé sous l‘alimen-
tation peut être retiré en tirant dessus et en le
faisant sortir de l‘arrière du boîtier. Il peut être
nettoyé sous de l‘eau courante.
• Panneau supérieur: Ce ltre est le plus
facile à nettoyer, en utilisant uniquement un
aspirateur. Mais il peut aussi être retiré en
enlevant les deux vis à l’arrière du boîtier.
Page 9
Cages pour disque dur disponibles
Toutes les cages de disque de l’Arc Mini R2 peuvent être retirées an de s’accommoder de
plus gros composants ou simplement pour optimiser le ux d’air à travers le boîtier.
Retirer ou faire tourner la cage de disque dur supérieure
Dans sa position originale, la cage supérieure de disque dur a été placée stratégiquement
pour optimiser une version d’origine avec un très bon refroidissement de disque dur et une
gestion de câbles intelligente. An de pouvoir placer des cartes graphiques plus longues que
260 mm, vous devrez peut-être retirer la cage de disque dur supérieure. Quand la cage supérieure de disque dur est pivotée, elle agit comme guide pour le ventilateur frontal et dirige
le débit d’air sur la ou les cartes graphiques. Pour retirer ou faire pivoter la cage supérieure
de disque dur, les deux vis doivent être retirées. Après avoir fait pivoter la cage de disque
dur, insérez-la à nouveau dans la position souhaitée et serrez les vis dans la nouvelle posi-
tion, ou bien retirez-la complètement.
Retirer la cage de disque dur inférieure
An de placer des radiateurs de refroidissement sur le panneau frontal, vous devrez retirer
la cage de disque dur inférieure pour faire de la place. La cage se retire en dévissant les 4
vis en bas du boîtier.
Retirer la baie de disque optique
Pour installer un radiateur de 360 mm sur le panneau supérieur, vous devrez retirer la baie
de disque optique de l’avant du boîtier. Il est xé par 8 vis, deux sur chaque côté pour relier
le panneau supérieur et quatre sur l’avant reliés au panneau métallique à l’avant. Dévissez
simplement les huit vis et retirez la baie du lecteur optique du boîtier.
8
Page 10
Options de refroidissement à l’eau
L’Arc Mini R2 offre divers options quand il s’agit d’installer les composants de refroidisse-
ment par eau :
• Panneau supérieur: Les ventilateurs sur le panneau supérieur sont disposés d’une
façon qui permet aux radiateurs de refroidissement par eau épais de ne pas gêner les
composants de votre carte mère, par exemple mémoire ou dissipateurs de chaleur. Un
radiateur de 240 mm peut se placer sur le dessus, mais vous pouvez aussi placer un
radiateur de 360 mm si vous retirez la baie de lecteur optique de l’avant du boîtier. Des
instructions sur le retrait de la voie du lecteur optique sont décrites dans la section Retirer la baie du lecteur optique.
• Panneau frontal: Un radiateur de 240 mm peut se placer dans cette position tant que
la longueur totale ne dépasse pas 272 mm et que la cage de disque dur inférieure est
retirée. Si le radiateur fait plus de de 272 mm, il peut tout de même être installé, mais
vous devrez retirer la baie optique. Des instructions sur le retrait de la voie du lecteur
optique sont décrites dans la section Retirer la baie du lecteur optique.
• Panneau arrière: Vous pouvez placer un radiateur de 120 mm dans cette position.
• Panneau inférieur: Vous pouvez placer un radiateur de 120 mm dans cette position.
9
Page 11
Cages de disques durs modulables
Pour une utilisation maximale de l’espace derrière la plaque de la carte mère et le panneau
latéral, le boîtier d’ordinateur Arc Mini R2 possède l’option supplémentaire de monter deux
disques durs au dos de la plaque où la carte mère est vissée. Veuillez noter que vous pouvez également monter des unités SSD dans toutes les baies de disques durs régulières.
Pour xer votre lecteur, dévissez simplement les xations SSD de l’arrière de
la carte mère, xez votre lecteur SSD
sur le support avec les vis se trouvant
dans la boîte à accessoires, puis xez à
nouveau l’ensemble à la carte mère. Il
est conseillé d’utiliser des câbles droits
avec des connecteurs SATA droits, les
câbles à 90 degrés ne sont pas pris en
charge.
Garantie limitée et limites de responsabilité
Les boîtiers d’ordinateur Fractal Design Arc Mini R2 sont garantis pendant vingt quatre (24)
mois, à compter de la date de livraison à l’utilisateur nal, contre les défauts de matériaux
et/ou de fabrication. Dans cette période de garantie limitée, les produits seront soit réparés
ou remplacés, au choix de Fractal Design. Les réclamations de garantie doivent être faites
auprès de l’agent qui a vendu le produit, frais prépayés.
La garantie ne couvre pas ce qui suit :
• Les produits qui ont été loués, utilisés incorrectement, utilisés avec négligence ou uti-
lisés d’une manière qui n’est pas en conformité avec l’usage prévu indiqué.
• Les produits qui ont été endommagés par des causes naturelles, y compris mais sans
s’y limiter, la foudre, les incendies, les inondations et les tremblements de terre.
• Les produits dont le numéro de série et/ou l’étiquette de garantie a été enlevé ou modi-
é.
Support du produit
Pour le support du produit, veuillez utiliser les informations de contact suivantes :
Amérique du Nord : support.america@fractal-design.com
DACH (Allemagne-Suisse-Autriche) : support.dach@fractal-design.com
Chine: support.china@fractal-design.com
Europe et/ou reste du monde : support@fractal-design.com
10
Page 12
Arc Mini R2
Das Micro-ATX-Gehäuse Arc Mini R2 kombiniert ausgezeichnetes Kühlpotenzial und Kongurierbarkeit in einem kompakten, minimalistischen und eleganten Gehäusedesign.
Die Gehäuse der Arc-Serie zielen auf die Bereitstellung optimierter Kühllösungen ab; und
das Arc Mini R2 stellt keine Ausnahme dar. Das anpassungsfähige Design des Festplatten-
kägs fördert Optionen für mehrere Kühleinrichtungen. Für ein Gehäuse dieser Größe bietet
es beispiellose Möglichkeiten für Wasserkühlkomponenten mit der Option, sogar einen 360
mm dicken Kühlkörper am Dach anzubringen. Die drei im Gehäuse enthaltenen Silent Series R2-Lüfter leisten direkt einen ausgezeichneten Beitrag zur Kühlung.
Das Arc Mini R2 ist kompakt, während die Größe keine Einbußen in puncto Flexibilität bei
der Komponentenkonguration und Festplattenkapazität fordert. Mit Platz für bis zu sechs
3,5-Zoll-Festplatten und zusätzlichen zwei 2,5-Zoll-Festplatten hinter der Motherboard-Platte
können Sie einen gut gekühlten PC mit reichlich Speicherkapazität erschaffen.
Wie all unsere Produkte weist auch das Arc Mini R2 eine einfache Handhabung in Verbindung mit qualitativer Verarbeitung und hochwertigen Materialien auf, worauf Fractal Design
zurecht stolz ist. Das Gehäuse wurde auf Beständigkeit ausgerichtet und verfügt über zahl-
reiche intelligente Merkmale, wie Staublter, integrierte Lüftersteuerung und Unmengen
Platz zur sauberen Kabelführung. Und nicht zuletzt weist das Arc Mini R2 eine wunderschöne Seitenblende mit leicht getöntem Fenster auf, das Einblicke in Ihr System gewährt.
Lüftersteuerung
Zur Installation der integrierten Lüftersteuerung
haben Sie vier Anschlüsse; drei dieser Anschlüsse
verbinden Sie mit Ihren Gehäuselüftern, einen Molex-Anschluss verbinden Sie mit Ihrem Netzteil Die
Geschwindigkeit der Lüfter kann in drei Schritten
reguliert werden: Geringe Geschwindigkeit (5 V),
mittlere Geschwindigkeit (7 V) und hohe Geschwindigkeit (12 V).
Hinweis: Einige Lüfter starten möglicherweise bei Einstellung
auf die niedrige Geschwindigkeit nicht und erfordern eine höhere
Einstellung. Prüfen Sie daher zur Verwendung einer geeigneten Einstellung die Startspannung bei Lüftern, die nicht
von Fractal Design hergestellt wurden.
Staublter reinigen
Das Arc Mini R2 verfügt über 3 separate Staublter:
• Vordere Blende: Entfernen Sie den vorderen Staublter, indem Sie auf das obere Teil
des Gitters drücken; der Filter kann unter ießendem Wasser oder mit einem Staubsau-
ger gereinigt werden.
• Unterer Filter: Der Filter unter dem Netzteil
kann von hinten gerade aus dem Gehäuse
herausgezogen werden; reinigen Sie ihn bei
Bedarf unter ießendem Wasser.
• Obere Blende: Dieser Filter kann mit einem
Staubsauger besonders einfach gereinigt
werden; Sie können ihn jedoch auch durch
Entfernen der Rändelschrauben an der Gehäuserückseite entfernen.
11
Page 13

Anpassbare Festplattenkäge
Alle Festplattenkäge im Arc Mini R2 können zur Installation größerer Komponenten bzw.
zur Optimierung der Luftzirkulation im Gehäuse entfernt werden.
Oberen Festplattenkäg entfernen oder drehen
In seiner Ausgangsposition wurde der obere Festplattenkäg strategisch zur Optimierung
eines sauberen Aufbaus mit ausgezeichneter Festplattenkühlung und Kabelführung platziert.
Zur Installation einer/mehrerer Grakkarte(n) mit einer Länge von mehr als 260 mm müssen
Sie möglicherweise den oberen Festplattenkäg entfernen. Wenn der obere Festplattenkäg
gedreht wird, agiert er als Führung für den vorderen Lüfter und leitet den Luftstrom in Rich-
tung Grakkarte(n). Zum Entfernen oder Drehen des oberen Festplattenkägs müssen die
beiden zugehörigen Rändelschrauben entfernt werden. Nehmen Sie den Festplattenkäg
anschließend vollständig heraus bzw. drehen Sie ihn in die gewünschte Position und befesti-
gen Sie ihn dort wieder mit den Rändelschrauben.
Unteren Festplattenkäg entfernen
Zur Anbringung von Wasserkühlkörpern an der Frontblende müssen Sie den unteren Fest-
plattenkäg entfernen, um Platz zu schaffen. Entfernen Sie den Käg, indem Sie die 4
Schrauben an der Unterseite des Kägs lösen.
Optischen Laufwerkseinschub entfernen
Zur Installation eines 360-mm-Kühlkörpers an der oberen Blende müssen Sie den optischen Laufwerkseinschub im vorderen Bereich des Gehäuses entfernen. Dieser wird durch
8 Schrauben gehalten, zwei Schrauben pro Seite halten ihn an der oberen Blende, vier
Schrauben an der Vorderseite verbinden ihn mit der vorderen Metallblende. Lösen Sie einfach die acht Schrauben, entfernen Sie den optischen Laufwerkseinschub aus dem Gehäuse.
12
Page 14
Wasserkühloptionen
Das Arc Mini R2 bietet mehrere Optionen hinsichtlich der Installation von Wasserkühlkomponenten:
• Obere Blende: Die Lüfterpositionen an der oberen Blende sind so ausgerichtet, dass
dicke Wasserkühlkörper Komponenten auf Ihrem Motherboard wie Speicher oder Kühl-
körpern nicht in die Quere kommen. Ein 240-mm-Kühlkörper passt problemlos; Sie
können jedoch auch einen 360-mm-Kühlkörper installieren, wenn Sie den optischen
Laufwerkseinschub im vorderen Bereich des Gehäuses entfernen. Anweisungen zum
Entfernen des optischen Laufwerkseinschubs nden Sie im Abschnitt Optischen Laufwerkseinschub entfernen.
• Vordere Blende: Ein 240-mm-Kühlkörper passt problemlos, sofern die Gesamtlänge
nicht mehr als 272 mm beträgt und der unteren Festplattenkäg entfernt ist. Falls der
Kühlkörper eine Länge von mehr als 272 mm misst, kann er dennoch installiert werden, sofern Sie das optische Laufwerk entfernen. Anweisungen zum Entfernen des
optischen Laufwerkseinschubs nden Sie im Abschnitt Optischen Laufwerkseinschub
entfernen.
• Hintere Blende: In dieser Lüfterposition können Sie einen 120-mm-Kühlkörper installie-
ren.
• Untere Blende: In dieser Lüfterposition können Sie einen 120-mm-Kühlkörper installie-
ren.
13
Page 15

Motherboard-Platte mit SSD-Montageoptionen
Zur maximalen Nutzung des Freiraums hinter der Motherboard-Platte und seitlichen Blende
verfügt das Arc Mini R2-Computergehäuse über eine zusätzliche Option, bei der zwei Solid
State Drives an der Rückseite der Motherboard-Platte montiert werden können. Bitte beachten Sie, dass Sie SSDs auch in allen regulären Festplatteneinschüben montieren können.
Lösen Sie zum Befestigen Ihrer
Festplatte einfach die SSD-Halterung an der Rückseite des Mother-
boards; bringen Sie Ihre SSD mit
den mitgelieferten Schrauben an
der Halterung an, befestigen Sie die
Halterung wieder an der Motherboard-Platte. Sie sollten gerade Kabel mit geraden SATA-Anschlüssen
verwenden; angewinkelte Kabel (90
Grad) werden nicht unterstützt.
Eingeschränkte Garantie und Garantieeinschränkungen
Bei Fractal Design Arc mini R2-Computergehäusen gewähren wir dem Endanwender eine
Garantie von zwei Jahren ab Lieferdatum, die sich auf Material- und Verarbeitungsfehler erstreckt. Innerhalb der eingeschränkten Garantiezeit werden Produkte nach Fractal Designs
Ermessen repariert oder ausgetauscht. Garantieansprüche müssen beim jeweiligen Händler
geltend gemacht werden; Versandkosten übernimmt der Käufer.
Nicht von der Garantie abgedeckt werden:
• Produkte, die falsch oder fahrlässig behandelt, entgegen ihres bestimmungsgemäßen
Einsatzzweckes oder zum Verleih eingesetzt wurden.
• Produkte, die durch höhere Gewalt beschädigt wurden; dazu zählen unter anderem
Blitzschläge, Brände, Überschwemmungen und Erdbeben.
• Produkte, deren Seriennummer und/oder Garantieaufkleber manipuliert oder entfernt
worden.
Produktunterstützung
Zur Produktunterstützung nutzen Sie bitte die folgenden Kontaktmöglichkeiten:
In Nordamerika: support.america@fractal-design.com
In DACH (Deutschland, Schweiz, Österreich): support.dach@fractal-design.com
In China: support.china@fractal-design.com
In Europa sowie in sämtlichen sonstigen Ländern: support@fractal-design.com
14
Page 16

Arc Mini R2
Arc Mini R2 micro ATX机箱采用紧凑、简约、优雅的机箱设计,兼具优异的散热性能和装机配置
性 能。
Arc系列机箱致力于提供最佳散热解决方案,Arc Mini R2也不例外。可调硬盘驱动器笼设计提供
多种散热装置选项。在此机箱尺寸情况下,它令人难以想象地提供水冷组件,甚至可以选择在顶
板上安装360mm厚散热器。机箱中配备三个静音系列R2风扇,具有优异的直接散热性能。
Arc Mini R2是一款紧凑型机箱,但其尺寸并不影响组件配置的灵活性和驱动器容量。它的内部
空间最多可容纳6个3.5”驱动器,母板背面还有2个隐藏式2.5”驱动器空间,让您轻松配置存储空
间充足且散热良好的PC。
在我们的全部产品中,Arc Mini R2的亮点是其易用性及其高质量的工艺和材料,这也是Fractal
Design引以为傲的因素。此款机箱持久耐用,并采用多种精巧设计,如防尘网、集成式风扇控制
器、留有充足的空间整理走线。更妙的是,Arc Mini R2配有精美的、稍带颜色的窗口侧面板,您
可 以 从 外 部展 示 您 的 配置。
风扇调速器
要安装内置风扇调速器,需要用到四个连接器,其中
三个连接到机箱风扇,剩下的一个Molex连接器插到
电源供应器上。风扇速度可调节,共有三档:
低速(5 V)、中速(7 V)和高速(12 V)。
注:低速时一些风扇可能无法启动,须将速度设置在较高档。
对于非Fractal Design 出产的
清洁防尘网
Arc Mini R2配有3个独立的防尘网:
• 前面板:推动网眼的上部,拆下前部防尘网;可在流水下清洗防尘网,也可使用吸尘器
进行清洁。
• 底部防尘网:可将位于电源底部的防尘网直接从机箱后侧拉出,拆下该防尘网;可在流
水下进行清洗。
• 顶部面板:该防尘网最容易清洁,只需使用吸尘器即可,但也可以拆下机箱后侧的两个
翼形螺丝,取下防尘网进行清洁。
15
Page 17

可调驱动器笼
Arc Mini R2中的所有驱动器笼均可卸下,以安装更大的组件或者优化机箱内的空气流通。
卸下或转动上部硬盘驱动器笼
在其原始位置,上部硬盘驱动器笼已巧妙地放置在可保持整洁外观的位置,并具有极佳的硬
盘驱动器散热效果和走线位置。为了安装长度超过260mm的图形卡,可能需要卸下上部硬
盘驱动器笼。若转动上部硬盘驱动器笼,它会对前部风扇产生引导作用,并会引导气流流向
图形卡。为卸下或转动上部硬盘驱动器笼,必须卸下固定它的两个翼形螺丝。转动硬盘驱动
器笼之后,重新将其插入所需位置,并将翼形螺丝固定在新位置,或将其完全卸下。
卸下下部硬盘驱动器笼
为了在前面板上安装水冷散热器,需要卸下下部硬盘驱动器笼以腾出空间。拧下机箱底部的
4 个螺 丝 后,即 可卸 下此 笼。
卸下光驱位
为了在顶部面板上安装360mm散热器,需要从机箱前部卸下光驱位。它有8个固定螺丝,每
个侧面分别有2个连接到顶部面板,前面有4个连接到前部金属面板。拧下8个螺丝后,即可从
机箱上卸下光驱位。
水冷选项
Arc Mini R2提供多种水冷组件安装选项:
• 顶部面板: 顶部面板上风扇的位置既能安装厚的水冷散热器,又不妨碍母板上的组件(
如内存或散热装置)。 顶部安装240mm散热器。如果从机箱前部卸下光驱位,还可以安
装360mm散热器。关于如何卸下光驱位的说明,在卸下光驱位中介绍。
• 前面板: 只要总长度不超过272 mm且卸下底部硬盘驱动器笼,此位置可以安装
240mm风扇。当散热器长度超过272mm时,仍可安装,但必须卸下光驱位。 关于如何
卸下光驱位的说明,在卸下光驱位中介绍。
• 后面板: 此风扇位置可以安装120mm散热器。
• 底部面板:此风扇位置可以安装120mm散热器。
16
Page 18

母板SSD安装选项
为了最大程度地利用母板和侧面板后的空间,Arc Mini R2电脑机箱为要安装在母板后侧的
两个固态驱动器提供了额外选项。请注意,您也可以在所有常规硬盘驱动器托盘中安装SSD
单元。
要固定您的驱动器,只需将SSD托架从母板后侧拧下,用配件箱中的螺丝将SSD驱动器连接
至托架,然后重新将托架连接到母板上。建议使用配有SATA接头的直连线缆;不支持90度
线 缆。
有限质保及责任范围
Fractal Design Arc Mini R2 电脑主机保修期为终端用户交付之日起的二十四 (24)个月,针对
的是材料和/或工艺上的缺陷。在此保修期内,由Fractal Design决定是否对产品进行维修或
更 换。保 修 申 请 必须 提 交到销售产品的 代 理 商 处,运费预付。保修范 围 不包括:
• 产品已用于出租用途,使用不当,处理不当或未按照其既定的预
• 产品因自然灾害损坏,包括但不限于 电、火灾、洪水和地震。
• 产品的序列号和/或保修贴纸已被篡改或去除
北美区: support.america@fractal-design.com
德国/瑞士/奥地利: support.dach@fractal-design.com
欧洲及其他: support@fractal-design.com
中國: support.china@fractal-design.com
17
Page 19

Arc Mini R2
Arc Mini R2 micro ATX ケースは、コンパクト、かつ簡素でエレガントなシャーシのデザインで、優
れた冷却ポテンシャルとビルド構成の可能性を兼ね備えています。
Arc series のケースは、最適化された冷却ソリューションの提供に特化しており、Arc Mini R2 も例
外ではありません。ハードドライブケージのデザインが適応可能であることから、多くの冷却設定
向けオプションが作られました。このデザインはこのサイズのケースに、水冷コンポーネントに厚さ
360mm のラジエータさえも上盤に適合させることができる無比の可能性を提供します。このケー
スに搭載された 3 つの Silent Series R2 ファンにより、購入した日からすぐに使える優れた冷却が
実現します。
Arc Mini R2 はコンパクトですが、このサイズでもコンポーネント構成とドライブ容量の柔軟性に
妥協をしていません。最大 6 つの 3.5 インチのドライブと、2 つの 2.5 インチの追加のドライブをマ
ザーボードプレートの裏側に入れる余裕を持つゆったりとした収納スペースで十分冷却された PC
を構築できます。
すべての当社製品と同様、Arc Mini R2 は、フラクタルデザイン社が得意とする高品質の仕上がり
および材料と同時にその使い易さを強調しています。ケースは、長持ちするように構築され、そし
て、ダストフィルタ、統合型ファンコントローラ、および整然としたケーブル配線用の十分なスペース
などのスマートな機能で満たされています。その上、Arc Mini R2 は、ケースの中味を外から見るこ
とができるよう、わずかに着色されたウィンドウサイドパネルが付属しています。
ファンコントロー ラ
4 つのコネクタのある内蔵ファンコントローラを取り付け
る場合は、コネクタの 3 つをケースのファンに接続し、残
りのモレックスコネクタを電源 装置に差し込みます。 ファ
ンの速度は、低速(5V)、中速(7V)、高速(12V)の3 つの
ステップで調節できます。
注: 一部に低速位置では稼働せず、より高い設定が必要なファンもあり
ます。 どの設定を使用すべきかについては、フラクタルデザイン社 製以外
のファンの起動電圧を確認してください。
防塵フィルタの清掃
Arc Mini R2 には、3 つの防塵フィルタが別個付属しています:
• フロントパネル: メッシュの 上部を押して、フロン
ト防 塵フィルタを 取り外します。フィルタは流水
または電気掃除機を使って掃除することができ
ます。
• 底面フィルタ: 電源装置の下にあるフィルタを、ケ
ースの背面からまっすぐ引っ張って取り外します。
流水で洗浄することができます。
• 上面パネル: このフィルタは、電気掃除機を使え
ば簡単に掃除できますが、ケース背面にある 2 本
のつまみねじを外して取り出すこともできます。
18
Page 20

適応できるドライブケージ
Arc Mini R2 では、大きいコンポーネントを適合させる、またはケース全体のエアフローを単に最
適化した い場 合、 すべてのドライブケージを取り外 すことができます。
上部 ハードドライブケージを取り外す、または回転させる
元の位置では、上部 HDD ケージは、優れた HDD 冷却およびケーブル管理を備えたクリーンビル
ドを最適化するために戦略的に配置されています。260 mm より長いグラフィックカードを適合さ
せるには、上部 HDD ケージを取り外す必要があります。上部 HDD ケージを回転させると、それは
フロントファンのガイドとして機能し、エアフローをグラフィックスカードに導きます。上部 HDD ケ
ージの取り外し/回転を行うには、それを固定している 2 本のつまみねじを取り外す必要がありま
す。HDD ケージの回転に続いて、望ましい位置に再挿入しつまみねじで新しい位置に固定するか、
あるいは 完全に 取り外します。
下部 ハードドライブケージを取り外す
水冷ラジエータをフロントパネルに適合させるには、下部 HDD ケージを取り外してスペースを作
る必 要があります。ケージの 底面 にある 4 つの ねじを抜 いてケージを取り外します。
光学ドライブベイを取り外す
上面パネルに 360 mm のラジエータを一台設置するには、ケースのフロントから光学ドライブベ
イを取り外す必要があります。上面パネルにつながる各側面に 2 つ、フロントの金属パネルにつな
がるフロント部に 4 つ、合計 8 つのねじで固定します。8 つのねじを外し、ケースから光学ドライブ
ベイを取り外 すだけです。
19
Page 21

水 冷 オプ ション
水冷コンポーネントの設置に関しては、Arc Mini R2 は複数のオプションを提供します。
•
上部パネル: 上部パネルにあるファンは、がっしりした水冷却ラジエータの設置が、メモリや
ヒートシンクなどのマザーボード上のコンポーネントを邪魔しないように配置されています。
240 mm の一台のラジエータは上部に適合しますが、ケースのフロントから光学ドライブベイ
を取り外すと、360 mm のラジエータを一台適合させることもできます。光学ドライブベイを取
り外す方法については、「光学ドライブベイの取り外し」のセクションに概説されています。
• フロントパネル: 240 mm のラジエータ一台は、長さが合計 272 mm 未満であり、底面の
HDD ケージが取り外されていれば、この位置に適合します。ラジエータの長さが 272 mm を
超える場合、設置はできるものの、光学ベイは取り外す必要があります。 光学ドライブベイを
取り外す方法に ついては、「光学ドライブベイの取り外し」のセクションに 概説されています。
• 背面パネル: 120 mm のラジエータを一台このファンの位置で適合できます。
• 底面パネル: 120 mm のラジエータを一台このファンの位置で適合できます。
20
Page 22
マザーボード板の SSD 取付オプション
マザーボードプレートとサイドパネルの背面のスペースを最大限に活用するため、Arc Mini R2 コ
ンピュータケースは、マザーボードプレートの背面に取り付けた半導体ドライブ (2 台) 向けに追加
オプションを用意しています。また、通常のすべてのハードドライブトレイに SSD ユニットを取り付
けることもできます。
ドライブを固定するには、マザーボードの背面から SSD ブラケットを緩め、アクセサリボックスにあ
るねじでブラケットにお 使いの SSD ドライ
ブを接続し、次にマザーボードプレートに
ブラケットを再接続します。SATA コネクタ
付きストレートケーブルを使用することを
お勧めします。90 度ケーブルは、サポート
されません。
限定保証と責任制限
Fractal Design Arc Mini R2コンピュータケースは、素材および/または製造における欠陥に対し
て、最終消費者の元に届いた日付から24ヶ月間保証されています。この限定保証期間内に、製品
はFractal Designの裁量で修理されるか、交換されます。保証請求は製品を販売した代理店に元
払いで返却する必要があります。
以下の場合は保証は適用されません。
• 製品が賃貸の目的のために使われた、誤用された、不注意に扱われた、または明記された用
途以外で利用された場合
• 製品が稲妻、火災、洪水、および地震を含むがこれらに限定されない天災により損傷した場合
• 製品のシリアル番号および/または保証ステッカーが改変されたか、取り除かれた場合
製品サポート
製品サポートに関しては、以下の連絡先にお問い合わせください。
北米: support.america@fractal-design.com
DACH (ドイツ、スイス、オーストリア): support.dach@fractal-design.com
中国: support.china@fractal-design.com
欧州および/またはその他の国: support@fractal-design.com
21
Page 23

Arc Mini R2
Arc Mini R2 micro ATX 케이스는 탁월한 냉각 성능과 내부 구성 편의성을 하나의 컴팩트하
고 미니멀리스트 스타일의 우아한 섀시 디자인에 결합했습니다.
Arc 시리즈의 케이스들은 최적화된 냉각 솔루션을 제공하는 데 주력한 제품들로서 Arc Mini
R2도 예외는 아닙니다. 상황에 맞게 변화를 줄 수 있는 하드 드라이브 케이지 디자인으로 여
러 가지 쿨링 셋업이 가능합니다. 이 크기의 케이스의 경우 타제품에서는 상상도 못할 일로
서 수냉식 냉각 구성부품들을 상부에 있는 360mm 두께의 라디에이터에 별 어려움 없이 설
치할 수 있습니다. 케이스에 세 개의 Silent 시리즈 R2 팬을 탑재하여 공기를 곧장 방출시킴
으로써 냉각 성능이 탁월합니다.
Arc Mini R2는 컴팩트하나 그 크기로 인해 구성부품 구성과 드라이브 수용량에 대한 유연성
이 떨어지지 않습니다. 최대 6개의 3.5” 드라이브와 추가적으로 2개의 2.5” 드라이브를 마
더보드 플레이트 뒤에 숨겨 수용할 만한 공간이 있어 스토리지 공간이 충분하고 냉각이 잘
되는 PC를 만들 수 있습니다.
당사의 모든 제품에서와 같이 Arc Mini R2도 고품질의 제작 기술 및 소재 외에 용이한 사용
법이 특징을 이루는데, 이러한 특징은 Fractal Design이 자랑하는 요소들입니다. 이 케이스
는 내구성이 우수하고, 먼지 필터, 통합형 팬 컨트롤러, 케이블 정리를 위한 충분한 공간 등
스마트한 특징들을 다양하게 제공합니다. 이 밖에 Arc Mini R2는 색조를 약간 넣은 멋진 창
측 패널을 채택하여 외관이 화려합니다.
팬 컨트롤러
내장형 팬 컨트롤러를 설치하도록 커넥터 네 개가 제
공되며, 그 가운데 세 개는 케이스 팬에 연결되고 나
머지 한 개는 전원공급장치에 연결하는 Molex 커
넥터입니다. 팬 속도는 저속(5V), 중속(7V) 및 고속
(12V)의 세 단계로 조절할 수 있습니다.
참고: 일부 팬은 저속 위치에서 시동하지 못할 수 있기 때문에 더 높
은 설정을 요구합니다. 사용해야 하는 설정에 대해서는 비-Fractal
Design 팬의 시동 전압을 확인하십시오.
먼지 필터 청소하기
Arc Mini R2에는 별도의 먼지 필터 3개가 제공됩니다:
• 전면 패널: 메쉬의 상부를 밀어 전면 먼
지 필터를 제거합니다. 필터를 수돗물
로 또는 진공 청소기로 청소할 수 있습
니다.
• 하부 필터: 전원공급장치 아래에 있는
필터는 케이스 후면에서 직선으로 잡아
당겨 빼서 제거할 수 있으며 수돗물로
청소할 수 있습니다.
• 상부 패널: 이 필터는 청소하기가 가장
간편해서 진공청소기로 청소하면 되지
만 케이스 후면의 엄지나사 두 개를 제
거하여 분리할 수 있습니다.
22
Page 24
적응형 드라이브 케이지
크기가 더 큰 구성부품을 설치하거나 단순히 케이스 내의 공기 흐름을 최적화하기 위해 Arc
Mini R2 내의 모든 드라이브 케이지를 제거할 수 있습니다.
상부 하드 드라이브 케이지를 제거 또는 회전하기
원래의 위치에서 상부 HDD 케이지는 깔끔하게 장착되고 우수한 HDD 냉각 및 깔끔한 케이
블 정리를 제공하도록 장착되어 있습니다. 길이가 260mm보다 큰 그래픽 카드를 설치하려
면 상부 HDD 케이지를 제거해야 합니다. 상부 HDD 케이지는 회전하면 전면 팬의 가이드
역할을 하여 공기 흐름을 그래픽 카드 쪽으로 돌립니다. 상부 HDD 케이지를 제거하거나 회
전시키려면 케이지를 고정하는 두 개의 엄지나사를 제거해야 합니다. HDD 케이지의 회전
후 원하는 위치에 다시 삽입하여 엄지나사를 새 위치에 고정하거나 완전히 제거하십시오.
하부 하드 드라이브 케이지를 제거하기
수냉식 라디에이터를 전면 패널에 설치하려면 공간 확보를 위해 하단 HDD 케이지를 제거해
야 합니다. 케이지 하부에 있는 4개의 나사를 풀면 케이지를 제거할 수 있습니다.
광드라이브 베이를 제거하기
360mm 라디에이터를 상부 패널에 설치하려면 케이스의 전면에서 광드라이브 베이를 제거
해야 합니다. 이 라디에이터는 8개의 나사를 사용하여 고정하는데, 이 경우 상단 패널에 연
결되는 측면에 각각 2개씩 그리고 전면 금속 패널에 연결된 전면에 4개의 나사를 사용합니
다. 간단히 8개의 나사를 풀면 케이스에서 광드라이브 베이를 제거할 수 있습니다.
23
Page 25

수냉 옵션
Arc Mini R2는 수냉식 냉각 구성부품을 설치할 때 다음과 같은 여러 가지 옵션을 제공합니
다.
• 상부 패널: 상부 패널의 팬 위치는 두꺼운 수냉식 라디에이터를 설치할 때 메모리나 방
열판과 같은 마더보드 상의 구성부품에 방해가 되지 않도록 배치됩니다. 240mm 라디
에이터는 상부에 그냥 설치할 수 있으나, 360mm 라디에이터도 케이스 전면에서 광드
라이브 베이를 제거한다면 설치할 수 있습니다. 광드라이브 베이를 제거하는 방법은 광
드라이브 베이 제거하기 절에 요약되어 있습니다.
• 전면 패널: 240mm 라디에이터의 경우 전체 길이가 272 mm를 넘지 않고 하부 HDD 케
이지를 제거하면 설치할 수 있습니다. 한편 라디에이터 길이가 272mm가 넘는 경우에
도 광드라이브 베이를 제거하면 설치가 가능합니다. 광드라이브 베이를 제거하는 방법
은 광드라이브 베이 제거하기 절에 요약되어 있습니다.
• 후면 패널: 이 팬 위치에는 120mm 라디에이터를 설치할 수 있습니다.
• 하부 패널:이 팬 위치에는 120mm 라디에이터를 설치할 수 있습니다.
Page 26

마더보드 플레이트 SSD 장착 옵션
마더보드 플레이트와 사이드 패널 뒤의 공간 사용을 극대화하기 위해서 Arc Mini R2 컴퓨
터 케이스는 마더보드 플레이트 뒤에 장
착되는 SSD 두 개를 위한 추가 옵션을
제공합니다. SSD 유닛은 모든 일반 하
드 드라이브 트레이에도 장착할 수 있
습니다.
드라이브를 고정하려면 마더보드의 후
면에서 SSD 브래킷의 나사를 풀고 부속
품 상자에 제공된 나사를 사용하여 SSD
드라이브를 브래킷에 부착한 후 브래킷
을 도로 마더보드 플레이트에 부착합니
다. 직선 SATA 커넥터가 달린 직선 케
이블을 사용할 것을 권장합니다. 90도
케이블은 지원되지 않습니다.
제한된 보증 및 신뢰성
Fractal Design Arc Mini R2 컴퓨터 케이스는 제품에 하자가 있거나 고장이 난 경우 구입일
로부터 24개월 간 보증합니다. 제한된 보증 기간 내에 제품은 Fractal Design의 지침대로 교
체 또는 수리됩니다. 보증 청구는 제품을 구입한 곳을 통해서 신청해야 합니다.
보증에 포함되지 않는 내용:
• 제품의 임대, 오용, 부주의한 취급, 원래 목적대로 사용하지 않은 경우.
• 번개, 화재, 홍수 및 지진을 포함한 천재지변으로 인해 파손된 경우.
• 제품 번호 및/또는 보증 스티커가 제거되거나 변경된 경우.
제품 지원.
제품 지원을 받으려면 다음 연락 정보를 참조하십시오.
북미: support.america@fractal-design.com
DACH (독일-스위스-오스트리아): support.dach@fractal-design.com
중국: support.china@fractal-design.com
유럽 및/또는 나머지 국가: support@fractal-design.com
25
Page 27

Arc Mini R2
Obudowa micro ATX Arc Mini R2 łączy doskonałe, potencjalne możliwości chłodzenia i kongurowalność w niewielkich rozmiarów, minimalistycznej i eleganckiej konstrukcji.
Seria Arc zapewnia zoptymalizowane rozwiązania chłodzenia, a obudowa Arc Mini R2 nie
jest tu wyjątkiem. Adaptowalna konstrukcja wnęki dysku twardego udostępnia opcje dla
wielu rozwiązań chłodzenia. Obudowa o tej wielkości oferuje niezrównane możliwości dla
komponentów chłodzenia wodą, nawet z opcją dopasowania grubego, 360mm radiatora na
ściance górnej. Trzy wentylatory Silent Series R2, zapewniają doskonałe chłodzenie w obrębie całej obudowy.
Obudowa Arc Mini R2 ma niewielkie gabaryty, ale nie oznacza to pogorszenia elastyczności
konguracji komponentów i zmniejszenia miejsca na napędy. Możliwość instalacji do sześciu
napędów 3,5” i dwóch dodatkowych napędów 2,5”, ukrytych za płytą główną, zapewnia uzyskanie dobrze chłodzonego komputera PC z dużą ilością miejsca.
Jak we wszystkich naszych produktach, obudowa Arc Mini R2 zapewnia łatwość używania i
wysoką jakość produkcji i materiałów, co stanowi przedmiot dumy Fractal Design. Obudowa
jest trwała i zawiera ciekawe rozwiązania, takie jak ltry antykurzowe, zintegrowany kontroler wentylatora i wiele miejsca na uporządkowane prowadzenie okablowania. Przede wszystkim, obudowa Arc Mini R2 jest dostarczana z ładnym panelem bocznym, wyposażonym w
lekko zabarwione okno, przez które widać z zewnątrz elementy konstrukcji.
Kontroler wentylatora
Do instalacji wbudowanego kontrolera wentyla-
tora dostępne są cztery złącza, trzy z nich należy
podłączyć do wentylatorów obudowy, a jedno złącze
Molex jest podłączane do modułu zasilacza. Obroty
wentylatorów można regulować w trzech poziomach,
niskie obroty (5V), średnie obroty (7V) i wysokie ob-
roty (12V).
Uwaga: Niektóre wentylatory mogą nie uruchamiać się w pozycji
niskich obrotów i wymagają ustawienia w wyższej pozycji. Sprawdź
Napięcie uruchamiania wentylatorów innych producentów niż Fractal
Design dla których ustawienie powinno być używane.
Czyszczenie ltrów antykurzowych
Obudowa Arc Mini R2 jest dostarczana z 3 oddzielnymi ltrami antykurzowymi:
• Panel przedni: Wyjmij ltr antykurzowy z przodu, naciskając górną część siatki; ltr
można czyścić pod bieżącą wodą lub od-
kurzaczem.
• Filtr dolny: Filtr znajdujący się pod zasilac-
zem można wyjąć, wyciągając go prosto z
tyłu obudowy; można go czyścić pod bieżącą
wodą.
• Panel górny: Ten ltr najłatwiej czyścić od-
kurzaczem, ale można go także wyjąć, poprzez odkręcenie dwóch śrub radełkowanych z
tyłu obudowy.
26
Page 28

Adaptowalne wnęki dysku twardego
Wszystkie wnęki obudowy Arc Mini R2 można odłączyć w celu dopasowania większych
komponentów lub zoptymalizowania przepływu powietrza w obudowie.
Wyjmowanie lub obracanie górnej wnęki dysku twardego
W pozycji oryginalnej, górna wnęka na dysk twardy została strategicznie rozmieszczona,
aby zoptymalizować możliwości czyszczenia z doskonałym chłodzeniem dysku twardego
i prowadzeniem kabli. Aby dopasować kartę(y) graczną(e) o długości powyżej 260mm
należy zdjąć górną wnękę dysku twardego. Po obróceniu górnej wnęki dysku twardego,
działa ona jak prowadnica dla wentylatora przedniego i bezpośrednio kieruje przepływ powietrza na kartę(y) graczną(e). Aby zdjąć lub obrócić górną wnękę dysku twardego należy
odkręcić dwie nakrętki radełkowane. Po obróceniu lub zdjęciu wnęki dysku twardego należy
ponownie włożyć i zamocować w nowej pozycji śruby radełkowane, albo je całkowicie
usunąć.
Wyjmowanie niższej wnęki dysku twardego
Aby dopasować radiatory chłodzenia wodą do panelu przedniego w celu przygotowania
miejsca należy wyjąć niższą wnękę dysku twardego. Wnękę można wyjąć odkręcając 4
śruby na spodzie obudowy.
Wyjmowanie kieszeni napędu optycznego
Aby zainstalować radiator 360mm na panelu górnym należy wyjąć kieszeń napędu optycznego z przodu obudowy. Wnęka jest zamocowana 8 śrubami, po dwie z każdej strony, do
panela górnego i czterema z przodu, łączącymi z przednim metalowym panelem. Wystarczy
odkręcić osiem śrub i wyjąć kieszeń napędu optycznego z obudowy.
27
Page 29

Opcje chłodzenia wodą
Obudowa Arc Mini R2 oferuje wiele opcji do instalacji komponentów chłodzenia wodą:
• Panel górny: Pozycje wentylatora na panelu górnym są tak rozmieszczone, aby insta-
lacja grubych radiatorów chłodzenia wodą nie powodowała kolizji z komponentami na
płycie głównej, takimi jak moduły pamięci lub elementy odprowadzania ciepła. Radiator
o grubości 240mm będzie pasował na górze, ale po wyjęciu kieszeni napędu optycznego z przodu obudowy, dopasować można także radiator 360mm. Instrukcje wyjmowania
kieszeni napędu optycznego, znajdują się w części Wyjmowanie kieszeni napędu opty-
cznego.
• Panel przedni: W tej pozycji można zamontować radiator 240mm, jeśli jego całkowita
długość nie przekracza 272 mm i zostanie wymontowana dolna wnęka dysku twardego.
Jeśli radiator jest dłuższy niż 272mm, nadal można go zainstalować należy jednak
wyjąć kieszeń napędu optycznego. Instrukcje wyjmowania kieszeni napędu optycznego, znajdują się w części Wyjmowanie kieszeni napędu optycznego.
• Panel górny: W tej pozycji wentylatora można dopasować radiator 120mm.
• Panel dolny: W tej pozycji wentylatora można dopasować radiator 120mm.
28
Page 30

Opcje montażu SSD na płycie głównej
Dla maksymalnego wykorzystania miejsca za płytą główną i panelem bocznym, obudowa
komputera Arc Mini R2 ma dodatkową opcję montażu dwóch napędów SSD, z tyłu płyty
głównej. Należy pamiętać, że SSD można także montować we wszystkich zwykłych tacach
dysku twardego.
Aby zamocować napęd, wystarczy odkręcić wspornik SSD z tyłu płyty głównej, przymocować napęd SSD śrubami
do wspornika z pudełka akcesoriów, a
następnie ponownie podłączyć wspornik
do płyty głównej. Zaleca się używanie
prostych kabli z prostymi złączami
SATA; nie są obsługiwane kable 90
stopniowe.
Graniczona gwarancja i ograniczenia odpowiedzialności
Obudowy Fractal Design Arc Mini R2 są objęte gwarancją przez dwadzieścia cztery (24)
miesiące od daty dostarczenia do użytkownika, na defekty materiałowe i/lub wady wytwarzania. W okresie obowiązywania tej ograniczonej gwarancji, produkty zostaną naprawione lub
wymienione według decyzji rmy Fractal Design. Roszczenia gwarancyjne należy przekazać
przedstawicielowi, który sprzedał produkt, z opłatą kosztów dostarczenie.
Gwarancja nie obejmuje:
• Produktów, które były wynajmowane, nieprawidłowo używane, nieuważnie obsługiwane
lub stosowane w sposób niezgodny z przeznaczeniem.
• Produktów uszkodzonych w wyniku działania sił natury, włącznie, ale nie tylko, z wyła-
dowaniami atmosferycznymi, pożarem, powodzią i trzęsieniem ziemi.
• Produktów z uszkodzonym lub usuniętym numerem seryjnym i/lub naklejką gwarancy-
jną.
Pomoc techniczna dla produktu
W celu uzyskania pomocy technicznej należy wykorzystać następujące informacje kontaktowe:
W Ameryce Północnej: support.america@fractal-design.com
W DACH (Niemcy-Szwajcaria-Austria): support.dach@fractal-design.com
W Chiny: support.china@fractal-design.com
W Europie i/lub reszcie świata: support@fractal-design.com
29
Page 31

Arc Mini R2
Корпус Arc Mini R2 с форм-фактором микро-АТХ сочетает в себе превосходный
потенциал охлаждения и конфигурируемости с компактным, минималистическим
дизайном.
Корпуса серии Arc призваны обеспечить оптимальное охлаждение, и корпус
Arc Mini R2 не является исключением. Адаптируемый отсек для жесткого диска
обеспечивает возможность использования различных конфигураций охлаждения.
Для такого размера этот корпус обеспечивает не имеющие себе равных возможности
для установки элементов системы водяного охлаждения даже с использованием
радиатора толщиной 360 мм на его верхней части. Три бесшумных вентилятора Silent Series R2, входящие в комплект поставки корпуса, обеспечивают его отличное
охлаждение.
Корпус Arc Mini R2 компактный, но его размер ничуть не уменьшает гибкость
конфигурации компонентов и емкость жесткого диска. Благодаря возможности
установки до шести дисков 3.5” и двух дополнительных дисков 2.5”, скрытых за
панелью материнской платы, можно создать хорошо охлаждаемый ПК с большим
объемом памяти.
Как и все наши изделия, корпус Arc Mini R2 отличается простотой использования и
высоким качеством изготовления и материалов, что свойственно корпусам Fractal Design. Корпус изготовлен на совесть и обладает рядом дополнительных возможностей,
такими как пылевые фильтры, встроенный контроллер вентиляторов и обилие
пространства для аккуратной прокладки кабелей. И наконец, корпус Arc Mini R2
поставляется с привлекательной, слегка окрашенной боковой панелью с окном, через
которое вы можете полюбоваться на свое творение снаружи.
Контроллер вентилятора
Для установки контроллера встроенного
вентилятора имеются четыре разъема, три из
которых можно подсоединить к вентиляторам
в корпусе, а еще один, разъем Molex, можно
подключить к блоку питания. Имеются три
ступени регулировки скорости вращения
вентиляторов: низкая (5 В), средняя (7 В) и
высокая (12 В).
Примечание. Некоторые вентиляторы могут не
запускаться в низкоскоростном режиме и требуют
установки более высокой скорости вращения (повышенного напряжения для запуска). Проверьте, на какое
напряжение запуска рассчитаны вентиляторы, выпускаемые не компанией Fractal Design.
30
Page 32

Очистка пылеулавливающих фильтров
Arc Mini R2 выпускается с тремя отдельными пылеулавливающими фильтрами.
• Передняя панель: снимите передний пылеулавливающий фильтр, нажав на
верхнюю часть сетки, после чего фильтр можно очистить в проточной воде или с
помощью пылесоса.
• Нижний фильтр: расположенный под
блоком питания фильтр вытаскивается с
задней части корпуса, после чего его можно
очистить в проточной воде.
• Верхняя панель: этот фильтр проще всего
очистить с помощью пылесоса, но его
также можно извлечь, отвернув два винта
с накатанной головкой на задней панели
корпуса.
Адаптируемые отсеки для жестких дисков
Все отсеки для жестких дисков корпуса Arc Mini R2 можно снять, если необходимо
установить более крупные компоненты или же просто оптимизировать воздушный
поток, проходящий через корпус.
Снятие или поворот верхнего отсека для жестких дисков
Изначально верхний отсек для жестких дисков установлен, чтобы оптимизировать
используемое пространство и обеспечить наилучшее охлаждение жестких дисков и
прокладку кабелей. Чтобы установить графическую карту (карты) длиной более 260
мм, может потребоваться снять верхний отсек для жестких дисков. Если верхний отсек
для жестких дисков развернуть, он выполняет функцию направляющей для переднего
вентилятора и направляет поток воздуха на графическую карту (карты). Чтобы
извлечь или развернуть верхний отсек для жестких дисков, следует отвернуть два
винта крепления с накатанной головкой. После извлечения отсека для жестких дисков
установите его в нужное положение и закрепите винтами с накатанной головкой или
полностью извлеките из корпуса.
Снятие нижнего отсека для жестких дисков
Для установки радиаторов водяного охлаждения на переднюю панель необходимо
снять нижний отсек для жестких дисков, чтобы обеспечить необходимое для них
место. Чтобы снять отсек, открутите 4 винта в нижней части корпуса.
Снятие отсека для оптического привода
Чтобы установить 360-миллиметровый радиатор на верхнюю панель, необходимо
снять отсек для оптического привода на передней части корпуса. Этот отсек крепится
8 винтами, по два винта с каждой стороны, крепящие его к верхней панели, и четыре
винта спереди, крепящие отсек к передней металлической панели. Просто выкрутите
восемь винтов и извлеките отсек для оптического привода из корпуса.
31
Page 33

Водяное охлаждение
Корпус Arc Mini R2 обеспечивает множество возможностей по установке компонентов
системы водяного охлаждения:
• Верхняя панель: установочные места под вентиляторы на верхней панели
расположены таким образом, что установка толстых радиаторов водяного
охлаждения не помешает другим компонентам материнской платы, таким как
модули памяти и радиаторы. 240-миллиметровый радиатор можно установить
в верхней части, но если снять отсек для оптического привода с передней части
корпуса, то можно установить и 360-миллиметровый радиатор. Инструкции по
демонтажу отсека для оптического привода см. в разделе „Снятие отсека для
оптического привода“.
• Передняя панель: на нее можно установить 240-миллиметровый радиатор, если
только его длина не превышает 272 мм и снят нижний отсек для жесткого диска.
Можно установить и радиатор длиной более 272 мм, однако для этого придется
снять отсек для оптического привода. Инструкции по демонтажу отсека для
оптического привода см. в разделе „Снятие отсека для оптического привода“.
• Задняя панель: на нее можно установить 120-миллиметровый радиатор.
• Нижняя панель: на нее можно установить 120-миллиметровый радиатор.
32 33
Page 34

Возможность установки твердотельных жестких дисков за
системной платой
В целях максимального использования пространства за системной платой и задней
панелью в корпусе ПК Arc Mini R2 есть дополнительная возможность установки сзади
системной платы двух твердотельных жестких дисков. Твердотельные жесткие диски
можно также устанавливать во всех
лотках для стандартных жестких дисков.
Для установки диска просто отверните
кронштейн крепления твердотельного
диска на задней части системной платы,
установите на кронштейн твердотельный
диск с помощью винтов из комплекта
дополнительных принадлежностей
и установите кронштейн на место
на системной плате. Рекомендуется
использовать кабели с прямыми
разъемами SATA; кабели с Г-образным
разъемами не поддерживаются.
Ограниченная гарантия и ограничения ответственности
На компьютерные корпуса Fractal Design Arc Mini R2 предоставляется гарантия
отсутствия дефектов материалов и производственного брака сроком двадцать
четыре (24) месяца со дня доставки конечному пользователю. В течение этого
срока ограниченной гарантии компания Fractal Design по собственному усмотрению
осуществляет ремонт или замену неисправных изделий. Изделия по гарантийным
рекламациям необходимо вернуть первоначальному продавцу с предоплатой
доставки.
Изделия, на которые не распространяется действие гарантии:
• изделия, сдававшиеся в аренду, использовавшиеся с несоблюдением правил
эксплуатации, небрежно или не по прямому назначению;
• изделия, поврежденные вследствие действия непреодолимой силы, в том числе,
не исключая прочего, молнии, пожара, наводнения или землетрясения;
• изделия, серийный номер и (или) гарантийная наклейка которых были
несанкционированно изменены или удалены.
Поддержка изделий
По вопросам поддержки изделий обращайтесь по перечисленным ниже адресам.
Северная Америка: support.america@fractal-design.com
Германия, Швейцария, Австрия (DACH): support.dach@fractal-design.com
Китай: support.china@fractal-design.com
Европа и остальные страны мира: support@fractal-design.com
33
Page 35

Arc Mini R2
La carcasa Arc Mini R2 micro ATX combina una excelente capacidad de refrigeración y una
congurabilidad de los componentes con un diseño de chasis compacto, minimalista y el-
egante.
La serie de carcasas Arc ha sido diseñada para ofrecer soluciones de refrigeración optimizadas y la carcasa Arc Mini R2 no es una excepción. El diseño de armazones adaptables
para unidades de disco duro ofrece varias opciones para las conguraciones de refrigeración. Para una carcasa de este tamaño, ofrece posibilidades inigualables para los componentes de refrigeración por agua con la posibilidad, incluso, de colocar un radiador de 360
mm de grosor en el techo. Los tres ventiladores R2 de la serie Silent incluidos en la carcasa
proporcionan una refrigeración excelente desde el primer momento.
La carcasa Arc Mini R2 es compacta pero el tamaño no compromete la exibilidad de la
conguración de los componentes ni la capacidad para las unidades de disco. Con espacio
para un máximo de seis unidades de disco de 3,5” más dos unidades de disco adicionales
de 2,5” ocultas detrás de la placa de la placa base, podrá montar un PC con una buena
refrigeración y un amplio espacio de almacenamiento.
Como en todos los productos, la carcasa Arc Mini R2 pone de maniesto la facilidad de
uso junto a mano de obra y materiales de calidad, algo de lo que Fractal Design está orgulloso. La carcasa está creada para durar y está repleta de funciones inteligentes, como por
ejemplo ltros de polvo, controlador de ventiladores integrado y gran cantidad de espacio
para colocar los cables de forma ordenada. Como punto culminante, la carcasa Arc Mini
R2 incluye un bonito panel lateral de tipo ventana ligeramente tintado que le permite ver su
composición desde fuera.
Controlador de ventiladores
Dispone de cuatro conectores para instalar el controlador de
ventiladores integrado, tres de ellos para conectar a los ventiladores de la carcasa y uno de tipo Molex para enchufar a
la fuente de alimentación. La velocidad de los ventiladores
se puede regular en tres pasos: velocidad baja (5 V), velocidad media (7 V) y velocidad alta (12 V).
Nota: Algunos ventiladores podrían no iniciarse en la posición de baja velocidad y necesitarán un valor más alto. Compruebe el parámetro Voltaje de
inicio de los ventiladores que no son de Fractal Design para saber qué valor
se debe utilizar.
Limpieza de los ltros de polvo
La carcasa Arc Mini R2 cuenta con 3 ltros de polvo independientes:
• Panel frontal: quite el ltro de polvo frontal empujando la parte superior de la malla; el
ltro se puede limpiar debajo del agua corri-
ente o con una aspiradora.
• Filtro inferior: el ltro ubicado debajo de la
fuente de alimentación se puede extraer tirando de él en línea recta hacia afuera en la
parte posterior de la carcasa; se puede limpiar
debajo del agua corriente.
• Panel superior: este ltro es el más fácil
de limpiar utilizando simplemente una aspiradora, pero también se puede extraer quitando los dos tornillos de apriete manual situados
en la parte posterior de la carcasa.
34
Page 36

Armazones adaptables para unidades de disco
Todos los armazones para unidades de disco de la carcasa Arc Mini R2 se pueden quitar
con el n de colocar componentes más grandes o simplemente para optimizar el ujo de
aire a través de la carcasa.
Quitar o girar el armazón superior para unidades de disco duro
En su posición original, el armazón superior para unidades de disco duro se ha colocado
estratégicamente para optimizar un montaje limpio con una refrigeración de las unidades de
disco duro y un manejo de los cables excelentes. Para colocar tarjetas grácas superiores
a 260 mm, necesitará quitar el armazón superior para unidades de disco duro. Cuando el
armazón superior para unidades de disco duro se gira, actúa como guía para el ventilador
frontal y dirige el ujo de aire hacia las tarjetas grácas. Para quitar o girar el armazón su-
perior para unidades de disco duro, deberá quitar los dos tornillos de apriete manual que lo
sujetan. Después de girar el armazón para unidades de disco duro, vuelva a introducirlo en
la posición que desee y je los tornillos de apriete manual en una nueva posición o quítelo
completamente.
Quitar el armazón inferior para unidades de disco duro
Para colocar radiadores de refrigeración por agua en el panel frontal, necesitará quitar el
armazón inferior para unidades de disco duro con el n de disponer de espacio suciente
para ello. El armazón se quita desatornillando los cuatro tornillos de la parte inferior de la
carcasa.
Quitar el conector de unidad óptica
Para colocar un radiador de 360 mm en el panel frontal, necesitará quitar el conector de
unidad óptica de la parte frontal de la carcasa. Éste se sujeta mediante ocho tornillos, dos a
cada lado que lo conectan con el panel superior y cuatro en la parte frontal que lo conectan
al panel metálico frontal. Simplemente, desatornille los ocho tornillos y quite el conector de
unidad óptica de la carcasa.
35
Page 37

Opciones de refrigeración por agua
La carcasa Arc Mini R2 ofrece varias opciones en cuanto a la instalación de componentes
de refrigeración por agua:
• Panel superior: Las posiciones de los ventiladores en el panel superior están colo-
cadas de forma que si instala radiadores gruesos de refrigeración por agua, éstos
no puedan interferir con los componentes de su placa base, como la memoria o los
disipadores. Podrá colocar un radiador de 240 mm en la parte superior pero también
podrá colocar un radiador de 360 mm si quita el conector de unidad óptica de la parte
frontal de la carcasa. Las instrucciones sobre cómo quitar el conector de unidad óptica
se describen en la sección Quitar el conector de unidad óptica.
• Panel frontal: Podrá colocar un radiador de 240 mm en esta posición siempre que la
longitud total no sea superior a 272 mm y quite el armazón inferior para unidades de
disco duro. Si el radiador tiene una longitud superior a 272 mm también podrá instalarlo, sin embargo, deberá quitar el conector de unidad óptica. Las instrucciones sobre
cómo quitar el conector de unidad óptica se describen en la sección Quitar el conector
de unidad óptica.
• Panel trasero: En esta posición de los ventiladores podrá colocar un radiador de 120
mm.
• Panel inferior: En esta posición de los ventiladores podrá colocar un radiador de 120
mm.
36
Page 38

Opciones de montaje de unidades de estado sólido en la placa
de la placa base
Para maximizar el uso del espacio detrás de la placa de la placa base y del panel lateral,
la carcasa para PC Arc Mini R2 incluye una opción adicional para montar dos unidades de
estado sólido en la parte posterior de la placa
de la placa base. Tenga en cuenta que tam-
bién puede montar unidades de estado sólido
en cualquiera de las bandejas para unidades
de disco duro convencionales.
Para jar la unidad, simplemente desatornille
el soporte de la unidad de estado sólido de
la parte posterior de la placa base, acople la
unidad de disco de estado sólido en el soporte con los tornillos que se encuentran en la
caja de accesorios y, a continuación, vuelva
a acoplar el soporte a la placa de la placa
base. Es recomendable utilizar cables rectos
con conectores SATA rectos; no se admiten
cables de 90 grados.
Garantía limitada y limitación de responsabilidad
Las carcasas para PC Fractal Design Arc Mini R2 están garantizadas durante veinticuatro
(24) meses a partir de la fecha de entrega al usuario nal contra defectos materiales y/o de
mano de obra. Dentro de este período de garantía limitada, los productos se repararán o
reemplazarán, lo que Fractal Design estime más oportuno. Las reclamaciones de garantía
se deben devolver al agente que vendió el producto, con portes pagados.
La garantía no cubre:
• Productos que hayan sido utilizados para alquiler, que se hayan utilizado indebidamen-
te, que se hayan manipulado sin cuidado o que se hayan aplicado de una forma que no
esté contemplada en el uso indicado.
• Productos dañados por la fuerza de la naturaleza como por ejemplo, sin limitación,
tormentas, incendios, inundaciones y terremotos.
• Productos cuyo número de serie y/o pegatina de garantía se hayan manipulado o quita-
do.
Asistencia técnica del producto
Para obtener asistencia técnica del producto, utilice la siguiente información de contacto:
En Norteamérica: support.america@fractal-design.com
En DACH (Alemania-Suiza-Austria): support.dach@fractal-design.com
En China: support.china@fractal-design.com
En Europa y/o el resto del mundo: support@fractal-design.com
37
Page 39

Arc Mini R2
Arc Mini R2 är ett datorchassi som kombinerar utmärkt kylförmåga med exibilitet för olika
typer av datorbyggen i en kompakt, minimalistisk och elegant design.
Hela Arc-serien med datorchassin är designade för att möjliggöra optimala kylningslösningar
och Arc Mini R2 är inget undantag. De anpassninsbara hårddiskburarna öppnar för möjligheter till olika typer av kylning och för ett chassi i denna storlek så erbjuder den oöverträffad
kompabilitet med komponenter för vattenkylning. Det nns till exempel plats för en 360mm
stor radiator i chassits tak. De tre medföljande Silent Series R2-äktarna ger dessutom ut-
märkt kylning direkt ur kartongen.
Arc Mini R2 är ett kompakt chassi utan att för den sakens skull kompromissa exibilitet vid
komponentval och hårddiskkapacitet. Med plats för upp till sex 3.5” diskar samt ytterliggare
två 2.5” diskar bakom moderkortsplåten kan man bygga en välkyld PC med mycket lagrings-
utrymme.
Som med alla våra produkter så är Arc Mini R2 väldigt lätt att använda samt är tillverkad
med hög byggkvalitet och kvalitativa material, något Fractal Design är stolta över. Chassit är
mycket hållbart och är fyllt med smarta funktioner såsom dammlter som är lätta att rengöra,
integrerad äktkontroll, extraplatser för SSD enheter samt gott om plats för prydlig kabel-
dragning. Avslutningsvis är Arc Mini R2 utrustat med ett snyggt, lätt tonat, sidopanelsfönster
som låter dig visa upp ditt system från utsidan.
Fläktkontrollern
För att installera den medföljande äktkontrollern nns det
fyra kontakter, tre för att koppla in till äktar samt en mo-
lexkontakt för att koppla in till ditt nätaggregat. Hastigheten
på äktarna kan regleras i tre olika lägen, låg hastighet
(5V), medlehastighet (7V) samt full hastighet (12V).
OBS! Vissa äktar startar inte på låghastighetsläget, utan behöver en
högre inställning. Kontrollera startspänningen på äktar som inte tillverkats
av Fractal Design för att avgöra vilken spänning som ska användas.
Rengöring av dammlter
Arc Mini R2 är utrustad med 3 olika partikellter:
• Frontpanelen: Ta ut dammltret genom att klicka på den övre delen av äktgallret,
ltret kan därefter rengöras under rinnande
vatten eller med dammsugare.
• Bottenlter: Dra ut bottenltret rakt ut bakif-
rån. Filtret kan därefter rengöras under rinnande vatten.
• Toppanelen: Detta lter rengörs enklas
direkt med en dammsugare, men går även
att ta loss ltret genom att först lossa två
tumskruvar på chassits baksida.
38
Page 40

Flexibla hårddiskburar
Alla burar för hårddiskar och optiska enheter kan monteras bort för att få plats med större
komponenter eller för att öka chassits luftöde.
Ta bort eller rotera den over hårddiskburen
Den övre hårddiskburen har i sitt orginalutförande placerats för att möjliggöra ett snyggt
bygge med utmärkt hårddiskkylning och kabeldragning. För att få plats med grakkort som
är längre än 260mm behöver du ta bort den övre hårddiskburen. När den övre buren roteras
agerar den som en luftkanal för frontäkten som då obehindrat kan förse grakkortet med
frisk luft. För att rotera eller ta bort buren behöver man skruva loss de två tumskruvarna som
sitter i övre respektive undre delen av hårddiskburen. Efter att buren har placerats i önskad
position eller tagits bort kan skruvarna skruvas fast igen.
Borttagning av den under hårddiskburen
För att få plats med frontmonterad vattenkylning kan man ta bort den undre hårddiskburen,
detta görs genom att skruva loss 4 skruvar i botten av buren samt 2 baktill i moderkortsplåten.
Borttagning av bur för optiska enheter
För att kunna montera en 360mm stor radiator i chassits toppanel så behöver man montera
bort buren för optiska enheter i chassits främre del. Denna är fastskruvad med 10 skruvar,
två på vardera sida där den sitter ihop med toppanelen, två i moderkortsplåten samt fyra i
chassits frontpanel. Skruva bort samtliga 10 skruvar helt och lyft därefter ut buren.
39
Page 41

Alternativ för vattenkylning
Arc Mini R2 är designat för att kunna användas för vattenkylda datorsystem i stor utsträckning och har stöd för följande:
• Toppanel: Fläktpositioneringen i toppanelen gör att radiatorer i storleken 240mm kan
monteras utan risk att komma i konikt med moderkort och minnen. En 240mm stor
radiator får plats i toppen men man kan också få plats med en 360mm stor radiator om
man monterar bort buren för optiska enheter i fronten av chassit. Instruktioner hur man
monterar bort denna bur står skrivna i sektionen ”Borttagning av bur för optiska enheter”.
• Frontpanel: En 240mm stor radiator radiator går att montera i fronten på chassit så
länge dess totala längd överstiger 272mm, gör den det går det fortfarande att montera
den i fronten men man måste först montera bort buren för optiska enheter. Instruktioner
hur du monterar bort denna bur står skrivna i sektionen ”Borttagning av bur för optiska
enheter”.
• Bottenpanel: 120mm radiatorer kan användas på denna äktposition.
• Bakpanel: 120mm radiatorer kan användas på denna äktposition.
Page 42

Montering av SSD enheter bak på moderkortsplåten
För maximal användning av utrymmet mellan moderkortsplåten och sidopanelen har Arc
Mini R2 en extra monteringsmöjlighet av två 2,5 tums SSD-enheter på baksidan av moderkortsplåten. Notera att det även går att montera SSD enheter i samtliga hårddiskvaggor.
Montera din enhet genom att först skruva
loss SSD-fästet från baksidan av moderkortsplåten , montera sedan din enhet på
fästet med 4 skruvar som du hittar i tillbehörsboxen. Skruva sedan tillbaka fästet på
baksidan av moderkortsplåten. Det är rekommenderat att använda raka ström- och SATA
kontakter, 90 graders kontakter stöds ej.
Begränsad garanti och ansvarsbegränsningar
Fractal Design Arc Mini R2-datorchassi från Fractal Design täcks av en tjugofyra (24) månaders garanti från leveransen till första slutanvändaren, mot defekter i material och/eller
tillverkning. Under denna period med begränsad garanti kommer produkterna att antingen
repareras eller bytas enligt Fractal Designs gottnnande. Garantianspråk måste returneras
till ombudet som sålde produkten, med försändelsen förskottsbetald.
Garantin täcker inte:
• Produkter som har använts för uthyrning, felanvänts, hanterats vårdslöst eller använts
på ett sådant sätt att det inte är i överensstämmelse med den angivna avsedda användningen.
• Produkter som skadats genom naturfenomen inklusive, men inte begränsat till, åskvä-
der, brand, översvämning och jordbävning.
• Produkter vars serienummer och/eller garantietikett har manipulerats eller tagits bort.
Produktsupport
För produktsupport ska följande kontaktinformation användas:
Nordamerika: support.america@fractal-design.com
DACH-länderna (Tyskland-Österrike-Schweiz): support.dach@fractal-design.com
Kina: support.china@fractal-design.com
Europa och/eller övriga världen: support@fractal-design.com
41
Page 43

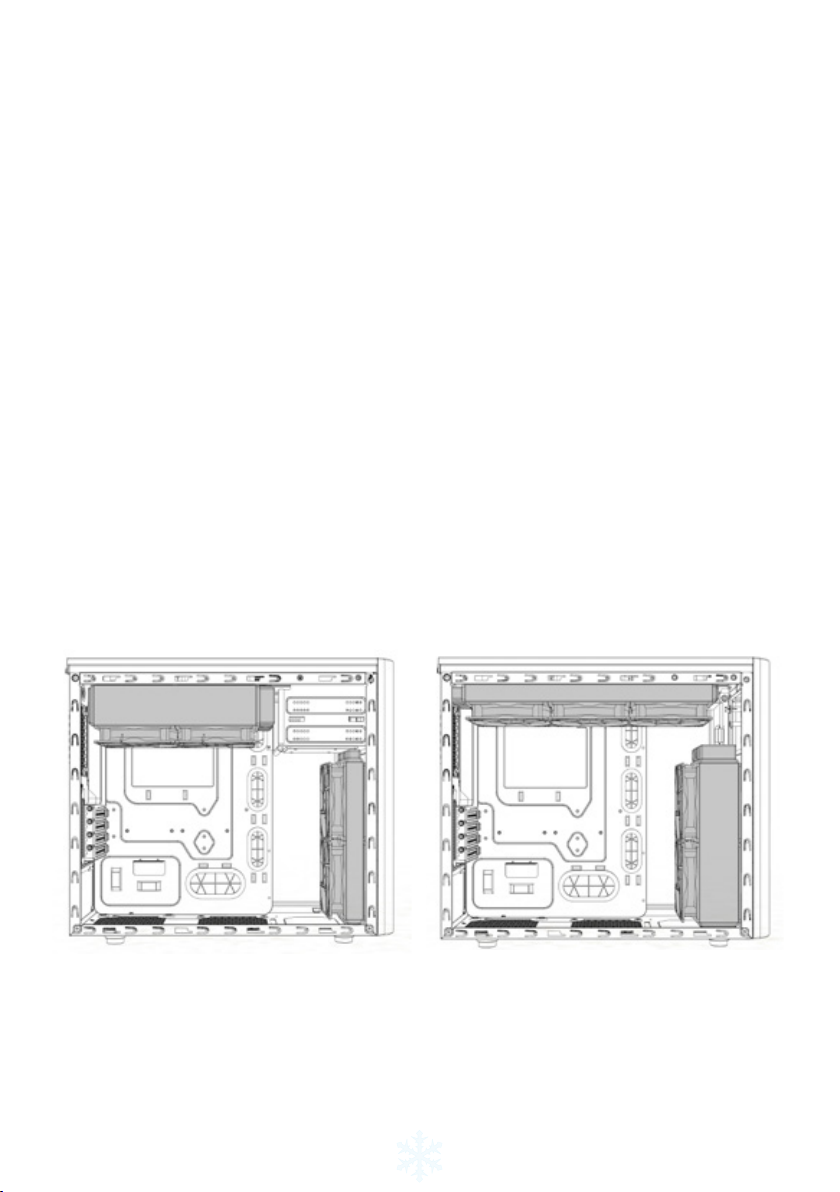
Exploded View Arc Mini R2
1. Front fan lter
2. Fan controller switch
3. 2 x USB 3.0
4. Removable/rotatable upper HDD cage
5. Removable lower HDD cage
6. HDD tray with silicone anti-vibration grommets
7. Removable top panel with dust lter
8. Top panel radiator mounting
9. SSD mounts behind M/B plate
10. Window side panel
6
10
42
Page 44

7
9
8
2
3
5
4
1
43
Page 45

www.fractal-design.com
 Loading...