

Page 1
Node 304 COMPUTERCASE
rev 2.0
R 1.0
Page 2

Fractal Design
About Fractal Design – our concept
Without a doubt, computers are more than just technology - they have become an integral
part of our lives. Computers do more than make living easier, they often dene the functionality and design of our homes, our ofces and ourselves.
The products we choose represent how we want to describe the world around us and how
we want others to perceive us. Many of us are drawn to designs from Scandinavia, which
are organized, clean and functional while remaining stylish, sleek and elegant. We like these
designs because they harmonize with our surroundings and become nearly transparent.
Brands like Georg Jensen, Bang Olufsen, Skagen Watches and Ikea are just a few that
represent this Scandinavian style and efciency.
In the world of computer components, there is only one name you should know,
Fractal Design.
For more information and product specications, visit www.fractal-design.com
Support
Europe and Rest of World: support@fractal-design.com
North America: support.america@fractal-design.com
DACH: support.dach@fractal-design.com
China: support.china@fractal-design.com
Page 3

Node 304
Table of Contents:
EXPLODED VIEW .................................................................................. 1
ENGLISH ................................................................................................ 3
GERMAN ................................................................................................ 5
SPANISH ................................................................................................8
ITALIAN................................................................................................. 11
CHINESE .............................................................................................. 14
JAPANESE ...........................................................................................16
KOREAN ............................................................................................... 18
POLISH ................................................................................................. 20
RUSSIAN .............................................................................................. 22
FRENCH ............................................................................................... 25
SWEDISH ............................................................................................. 28
Page 4
Fractal Design
NODE 304
NODE 304
www.fractal-design.com
4
6
9
1
5
3
1
2
7
Page 5
Node 304
13
11
12
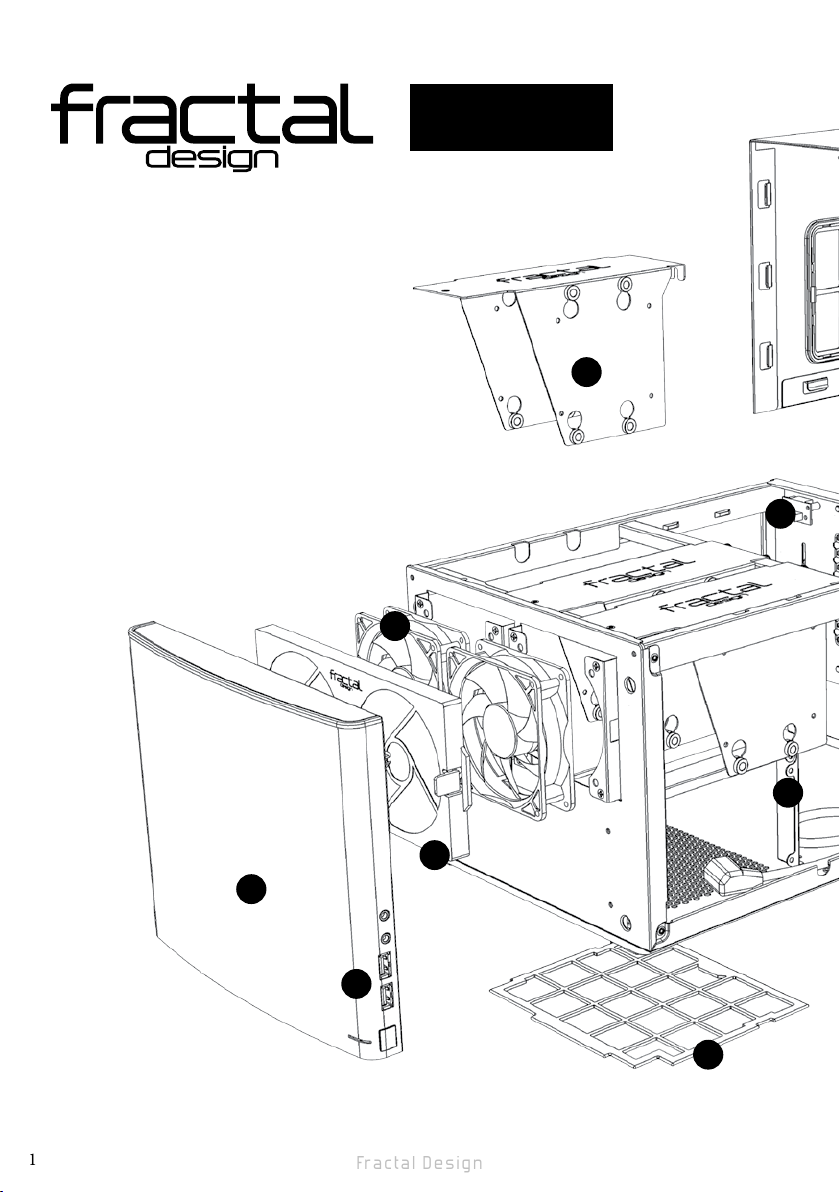
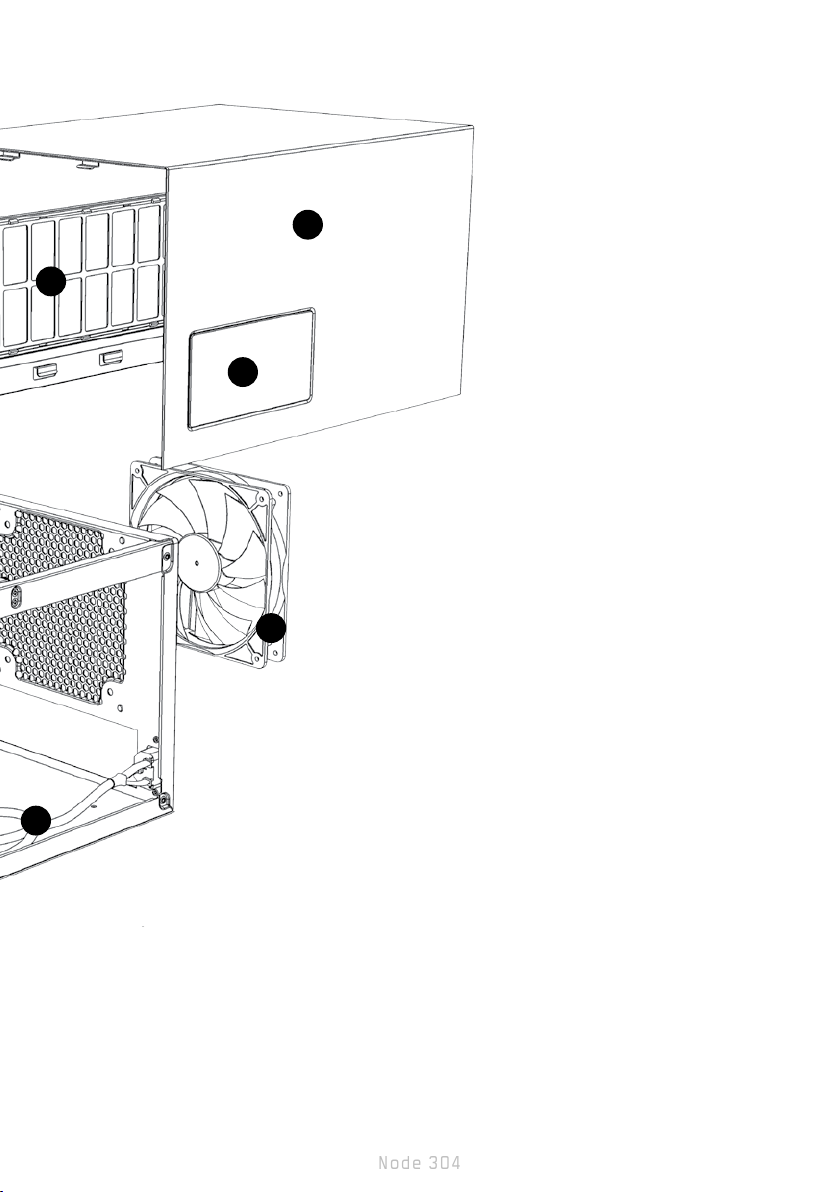
Exploded View Node 304
8
10
1. Aluminum front panel
2. Front I/O with USB 3.0 and Audio in/out
3. Front fan lter
4. 2 x 92mm Silent Series R2 fans
5. ATX power supply mounting bracket
6. Hard drive mounting bracket
7. PSU lter
8. PSU extension cord
9. 3 step fan controller
10. 140mm Silent Series R2 fan
11. Top cover
12. PSU air outlet
13. GPU air intake with air lter
2
Page 6
Fractal Design
Node 304 computer case
The Node 304 is a compact computer case with a unique and versatile modular interior that
allows you to adapt it according to your needs and components. Whether you want a cool
le server, a quiet home theater PC or a powerful gaming system, the choice is yours.
The Node 304 comes complete with three hydraulic bearing fans, with the option of using
tower CPU coolers or a water cooling system. All air intakes are equipped with easy-to-
clean air lters, which reduce dust from getting into your system. The strategic placement of
the hard drives directly facing two front-mounted Silent Series R2 fans ensures that all your
components remain at optimal cool temperatures. Unused hard drive disk brackets can be
easily removed to make room for long graphic cards, increased airow, or additional space
for organizing cables.
The Node 304 carries on the Fractal Design legacy of minimalistic and sleek Scandinavian
design combined with maximum functionality.
Installation / instructions
To take full advantage of the improved features and benets of the Node 304 computer
case, the following information and instructions are provided.
System installation
The following steps are recommended for mounting components in a Node 304:
1. Remove the three hard drive mounting brackets.
2. Mount the motherboard using the provided motherboard standoffs and screws.
3. Install the ATX power supply using the screws provided (see detailed description below).
4. If desired, mount a graphics card (see detailed description below).
5. Mount the hard drive(s) to the white bracket(s) using the provided screws.
6. Mount the hard drive brackets(s) back into the case.
7. Connect the power supply and motherboard cables to the components.
8. Connect the power supply extension cable to the power supply.
Installing hard drives
Installing hard drives in the Node 304 is similar to standard computer cases:
1. Dismount the hard drive brackets from the case by removing the screw located in the
front with a Phillips screwdriver and the two thumb screws in the back.
2. Mount the hard drives with their connectors facing to the rear of the case, using the
screws provided in the accessory box.
3. Put the bracket back into the case and secure it before plugging in the connectors;
unused hard drive brackets can be left out for increased airow.
Installing the power supply
The power supply is easiest to install after the motherboard has been installed:
1. Slide the PSU into the case, with the power supply fan facing downwards.
2. Secure the power supply by fastening it with the three screws provided in the accessory box.
3. Plug in the pre-mounted extension cable in your power supply.
4. Lastly, plug in the cable that came with the power supply at the back of the case and
turn on your power supply.
3
Page 7

Node 304
The Node 304 is compatible with ATX power supply units (PSU) up to 160mm in length.
PSUs with modular connectors on the back typically need to be shorter than 160 mm when
used in combination with a long graphics card.
Installing graphics cards
The Node 304 was designed with the most powerful components in mind. In order to install
a graphics card, one of the hard drive brackets, located on the same side as the mother-
board’s PCI slot, must rst be removed. Once removed, the graphics card can be inserted
onto the motherboard.
The Node 304 is compatible with graphics cards up to 310mm in length, when 1 HDD
bracket is removed. Please note that graphics cards longer than 170 mm will conict with
PSUs longer than 160mm.
Cleaning the air lters
Filters are installed at air intakes to help prevent dust from entering the case. To ensure
optimal cooling, lters should be cleaned at regular intervals:
• To clean the PSU lter, simply slide the lter toward the rear of the case and remove it;
clean any dust gathered on it.
• To clean the front lter, rst remove the front panel by pulling it straight out and using
the bottom as a handle. Be careful not to damage any cables while doing this. Once
the front panel is off, remove the lter by pushing the two clips on the sides of the ler.
Clean the lters, then reinstall the lter and front panel in reverse order.
• By design, the side lter is not removable; the side lter can be cleaned when the top
part of the case is removed.
Fan controller
The fan controller is located at the rear of the case over the PCI slots. The controller has
three settings: low speed (5v), medium speed (7v) and full speed (12v).
Limited warranty and limitations of liability
Fractal Design Node 304 computer cases are guaranteed for twenty four (24) months from
the date of delivery to end-user, against defects in materials and/or workmanship. Within
this limited warranty period, products will either be repaired or replaced at Fractal Design’s
discretion. Warranty claims must be returned to the agent who sold the product, shipping
prepaid.
The warranty does not cover:
• Products which have been used for rental purposes, misused, handled carelessly or
applied in such a way that is not in accordance with its stated intended use.
• Products damaged from an Act of Nature including, but not limited to, lightning, re,
ood and earthquake.
• Products whose serial number and/or the warranty sticker have been tampered with or
removed.
Product support
For product support, please use the following contact information:
In North America: support.america@fractal-design.com
In DACH (Germany-Switzerland-Austria): support.dach@fractal-design.com
In China: support.china@fractal-design.com
In Europe and/or Rest of World: support@fractal-design.com
4
Page 8

Fractal Design
Node 304-Computergehäuse
Das Node 304 ist ein Computergehäuse mit einer einzigartigen und vielseitigen, modularer Innenausstattung, das sich an Ihren Bedarf und Ihre Komponenten anpasst. Ob Sie
einen kühlen Dateiserver, einen leisen Heimkino-PC oder ein kraftvolles Gaming-System
aufbauen – Sie haben die Wahl.
Das Node 304 wird mit drei hydraulisch gelagerten Lüftern geliefert; auf Wunsch können Sie auch Tower-CPU-Kühler oder ein Wasserkühlungssystem einsetzen. Sämtliche
Lufteinlässe sind mit leicht zu reinigenden Luftltern ausgestattet, die ein Eindringen von
Staub in Ihr System vermindern. Die durchdachte Platzierung der Festplatten direkt vor
den beiden Silent Series R2-Lüftern an der Front gewährleistet, dass all Ihre Komponenten
bei optimalen Temperaturen arbeiten können. Nicht genutzte Festplattenhalterung lassen
sich leicht entfernen, um Platz für lange Grakkarten, verbesserten Luftdurchsatz oder zum
Verlegen von Kabeln zu schaffen.
Das Node 304 setzt die Fractal Design-Tradition minimalistischen und schlanken skandina-
vischen Designs bei maximaler Funktionalität fort.
Installation/Anleitungen
Damit Sie sämtliche Vorzüge der verbesserten Merkmale und Vorteile des Node 304-Computergehäuses vollständig nutzen können, stellen wir Ihnen die folgenden Informationen
und Anleitungen zur Verfügung.
Systeminstallation
Zur Installation von Komponenten im Node 304 empfehlen wir die folgenden Schritte:
1. Nehmen Sie die drei Festplattenhalterungen heraus.
2. Installieren Sie das Motherboard mit Hilfe der mitgelieferten Motherboard-Abstandhaltern und Schrauben.
3. Installieren Sie das ATX-Netzteil mit den mitgelieferten Schrauben (schauen Sie sich
dazu die nachstehende, detaillierte Beschreibung an).
4. Installieren Sie bei Bedarf eine Grakkarte (siehe nachstehende Beschreibung).
5. Bringen Sie die Festplatte(n) mit den mitgelieferten Schrauben an den/der weißen
Halterung(en) an.
6. Installieren Sie die Festplattenhalterung(en) wieder im Gehäuse.
7. Schließen Sie Netzteil- und Motherboard-Kabel an die Komponenten an.
8. Verbinden Sie das Netzteil-Verlängerungskabel mit dem Netzteil.
Festplatten installieren
Festplatten werden ähnlich wie bei herkömmlichen Computergehäusen im Node 304 installiert:
1. Lösen Sie die Festplattenhalterungen vom Gehäuse, indem Sie die Schraube an der
Vorderseite mit einem Kreuzschlitzschraubendreher und die beiden Rändelschrauben
an der Rückseite mit der Hand lösen.
2. Montieren Sie die Festplatten mit den im Zubehörkarton mitgelieferten Schrauben so,
dass deren Anschlüsse zur Rückseite des Gehäuses zeigen.
3. Setzen Sie die Halterung wieder in das Gehäuse ein, xieren Sie die Halterung, bevor
Sie die Stecker anschließen. Nicht benötigte Festplattenhalterungen können Sie zur
Verbesserung des Luftdurchsatzes auslassen.
5
Page 9

Node 304
Netzteil installieren
Das Netzteil lässt sich am leichtesten nach der Installation des Motherboards einbauen:
1. Schieben Sie das Netzteil an seine Position an der Rückwand des Gehäuses; achten
Sie darauf, dass der Netzteillüfter nach unten weist.
2. Fixieren Sie das Netzteil mit den drei im Zubehörkarton mitgelieferten Schrauben.
3. Verbinden Sie das zuvor angeschlossene Verlängerungskabel mit dem Netzteil.
4. Schließen Sie zuletzt das mit dem Netzteil gelieferte Kabel an der Rückseite des
Gehäuses an, schalten Sie das Netzteil ein.
Das Node 304 ist mit ATX-Netzteilen bis 160 mm Länge kompatibel. Netzteile mit modularen Verbindern an der Rückseite müssen üblicherweise kürzer als 160 mm sein, wenn
diese in Kombination mit einer langen Grakkarte eingesetzt werden.
Grakkarten installieren
Das Node 304 wurde zum Einsatz extrem leistungsstarker Komponenten konzipiert. Zur
Installation einer Grakkarte müssen Sie zunächst eine der Festplattenhalterungen auf der
Seite, auf der sich auch der entsprechende PCI-Steckplatz des Motherboards bendet, ausbauen. Anschließend lässt sich die Grakkarte leicht in das Motherboard einsetzen.
Das Node 304 ist mit Grakkarten bis 310 mm Länge kompatibel, wenn eine Festplattenhalterung ausgebaut wurde. Bitte beachten Sie, dass Grakkarten mit einer Länge von mehr
als 170 mm mit Netzteilen kollidieren, die länger als 160 mm sind.
Luftlter reinigen
An den Lufteinlässen benden sich Luftlter, die das Eindringen von Staub in das Gehäuse
verhindern. Damit stets eine optimale Kühlleistung gewährleistet bleibt, sollten die Filter
regelmäßig gereinigt werden:
• Zum Reinigen des Netzteillters schieben Sie den Filter einfach zur Rückseite des
Gehäuses hin und nehmen ihn ab; entfernen Sie eventuell vorhandene Staubansammlungen.
• Zur Reinigung des vorderen Filters ziehen Sie zunächst die Frontplatte gerade nach
vorne ab, dabei nutzen Sie den unteren Teil als Griff. Achten Sie gut darauf, dabei
keine Kabel zu beschädigen. Nachdem die Frontplatte abgenommen wurde, drücken
Sie auf die beiden Clips an den Seiten des Filters und nehmen den Filter ab. Reinigen
Sie die Filter, bauen Sie dann Filter und Frontplatte in umgekehrter Reihenfolge wieder
ein.
• Der seitliche Filter kann aus konstruktionstechnischen Gründen nicht entnommen
werden, lässt sich aber reinigen, wenn Sie den oberen Teil des Gehäuses abnehmen.
Lüftersteuerung
Die Lüftersteuerung bendet sich über den PCI-Steckplätzen an der Rückseite des
Gehäuses. Die Steuerung kann dreifach eingestellt werden: Geringe Drehzahl (5 V), mittlere Drehzahl (7 V) und volle Drehzahl (12 V).
6
Page 10

Fractal Design
Eingeschränkte Garantie und Garantieeinschränkungen
Bei Fractal Design Node 304-Computergehäusen gewähren wir dem Endanwender eine
Garantie von zwei Jahren ab Lieferdatum, die sich auf Material- und Verarbeitungsfehler erstreckt. Innerhalb der eingeschränkten Garantiezeit werden Produkte nach Fractal Designs
Ermessen repariert oder ausgetauscht. Garantieansprüche müssen beim jeweiligen Händler
geltend gemacht werden; Versandkosten übernimmt der Käufer.
Nicht von der Garantie abgedeckt werden:
• Produkte, die falsch oder fahrlässig behandelt, entgegen ihres bestimmungsgemäßen
Einsatzzweckes oder zum Verleih eingesetzt wurden.
• Produkte, die durch höhere Gewalt beschädigt wurden; dazu zählen unter anderem
Blitzschläge, Brände, Überschwemmungen und Erdbeben.
• Produkte, deren Seriennummer und/oder Garantieaufkleber manipuliert oder entfernt
worden.
Produktunterstützung
Zur Produktunterstützung nutzen Sie bitte die folgenden Kontaktmöglichkeiten:
In Nordamerika: support.america@fractal-design.com
In DACH (Deutschland, Schweiz, Österreich): support.dach@fractal-design.com
In China: support.china@fractal-design.com
In Europa sowie in sämtlichen sonstigen Ländern: support@fractal-design.com
7
Page 11

Node 304
Carcasa Node 304 para equipos
La Node 304, es una carcasa compacta para equipos con un interior modular único y
versátil que permite al usuario adaptarla conforme sus necesidades y componentes. Tanto
si desea un servidor de archivos refrigerado, un equipo para cine en casa silencioso o un
sistema de juegos potente, la elección es suya.
La carcasa Node 304 incluye tres ventiladores con rodamientos hidráulicos que ofrece la
posibilidad de utilizar refrigeradores de CPU tipo torre o un sistema de refrigeración por
agua. Todas las entradas de aire cuentan con ltros de aire fáciles de limpiar que reducen
la entrada de polvo en el sistema. La ubicación estratégica de las unidades de disco duro
orientadas directamente hacia dos ventiladores Silent Series R2 montados en la parte frontal, garantiza que la temperatura de todos los componentes permanece en valores óptimos.
Los soportes para unidades de disco duro no utilizados se pueden quitar fácilmente para
dejar espacio para tarjetas grácas largas, aumentar el ujo de aire o disponer de espacio
adicional para organizar los cables.
La carcasa Node 304 continúa el legado de Fractal Design de diseño escandinavo mini-
malista y elegante combinado con máxima funcionalidad.
Instalación e instrucciones
Para aprovechar al máximo las funciones y ventajas mejoradas de la carcasa Node 304
para equipos, se proporciona la siguiente información e instrucciones.
Instalación del sistema
Es recomendable llevar a cabo los pasos siguientes para montar componentes en una
carcasa Node 304:
1. Quite los tres soportes de montaje para unidades de disco duro.
2. Monte la placa base utilizando los tornillos separadores y tornillos convencionales para
placa base proporcionados.
3. Instale la fuente de alimentación ATX utilizando los tornillos proporcionados (consulte a
continuación la descripción detallada).
4. Si lo desea, monte una tarjeta gráca (consulte a continuación la descripción detallada).
5. Monte las unidades de disco duro en los soportes de color blanco mediante los tornillos proporcionados.
6. Vuelva a colocar los soportes para unidades de disco duro en la carcasa.
7. Conecte el cable de alimentación y los cables de la placa base a los componentes.
8. Conecte el alargador de la fuente de alimentación a esta.
Instalar unidades de disco duro
El procedimiento de instalación de unidades de disco duro en la carcasa Node 304 es similar al de las carcasas estándar para equipos:
1. Desmonte los soportes para unidades de disco duro de la carcasa quitando el tornillo
ubicado en la parte delantera sirviéndose de un destornillador Phillips y los dos tornillos de apriete manual situados en la parte posterior.
2. Monte las unidades de disco duro con sus conectores orientados hacia la parte posterior de la carcasa mediante los tornillos proporcionados en la caja de accesorios.
3. Vuelva colocar el soporte en la carcasa y fíjelo antes de enchufar los conectores; los
soportes para unidades de disco duro no utilizados se pueden dejar fuera para aumen-
tar el ujo de aire.
8
Page 12

Fractal Design
Instalar la fuente de alimentación
La fuente de alimentación es más fácil de instalar una vez instalada la placa base:
1. Desplace la fuente de alimentación hacia la parte posterior de la carcasa de forma que
el ventilador de la fuente de alimentación quede orientado hacia abajo.
2. Asegure la fuente de alimentación jándola con los tres tornillos proporcionados en la
caja de accesorios.
3. Enchufe el alargador preinstalado a la fuente de alimentación.
4. Por último, enchufe el cable incluido con la fuente de alimentación en la parte posterior
de la carcasa y encienda dicha fuente alimentación.
La carcasa Node 304 es compatible con fuentes de alimentación (PSU) ATX de hasta 160
mm de longitud. Las fuentes de alimentación con conectores modulares en la parte posterior normalmente necesitan tener una longitud inferior a 160 mm cuando se utilizan junto
con tarjetas grácas largas.
Instalar tarjetas grácas
La carcasa Node 304 se ha diseñado teniendo en cuenta los componentes más potentes.
Para instalar una tarjeta gráca, debe quitar primero uno de los soportes para unidades de
disco duro de los ubicados en el mismo lado que la ranura PCI de la placa base. Una vez
quitado, podrá insertar la tarjeta gráca en la placa base.
La carcasa Node 304 es compatible con tarjetas grácas de hasta 310 mm de longitud
cuando se quita un soporte para unidad de disco duro. Tenga en cuenta que las tarjetas
grácas cuya longitud es superior a 170 mm tendrán problemas con fuentes de alimentación cuya longitud sea superior a 160 mm.
Limpiar los ltros de aire
Los ltros están instalados en las entradas de aire para ayudar a evitar que entre polvo en
la carcasa. Para garantizar una refrigeración óptima, los ltros se deben limpiar con cierta
frecuencia:
• Para limpiar el ltro de la fuente de alimentación, simplemente deslícelo hacia la parte
posterior de la carcasa, extráigalo y limpie la acumulación de polvo que tenga.
• Para limpiar el ltro delantero, quite primero el panel frontal tirando de él en línea recta
hacia fuera utilizando la parte inferior como asa. Tenga cuidado para no dañar ningún
cable mientras realiza esta operación. Cuando el panel frontal se haya quitado, retire
el ltro empujando los dos broches situados en los laterales de dicho ltro. Limpie los
ltros y, a continuación, vuelva a instalar estos y el panel frontal en orden inverso.
• Por cuestiones de diseño, el ltro lateral no se puede extraer. Este ltro se puede lim-
piar con la parte superior de la carcasa quitada.
Controlador de ventiladores
El controlador de los ventiladores se encuentra ubicado en la parte posterior de la carcasa
encima de la ranuras PCI. El controlador tiene tres posibles conguraciones: baja velocidad
(5 V), velocidad media (7 V) y velocidad máxima (12 V).
9
Page 13

Node 304
Garantía limitada y limitación de responsabilidad
Las carcasas para PC Fractal Design Node 304 están garantizadas durante veinticuatro
(24) meses a partir de la fecha de entrega al usuario nal contra defectos materiales y/o de
mano de obra. Dentro de este período de garantía limitada, los productos se repararán o
reemplazarán, lo que Fractal Design estime más oportuno. Las reclamaciones de garantía
se deben devolver al agente que vendió el producto, con portes pagados.
La garantía no cubre:
• Productos que hayan sido utilizados para alquiler, que se hayan utilizado indebidamente, que se hayan manipulado sin cuidado o que se hayan aplicado de una forma que
no esté contemplada en el uso indicado.
• Productos dañados por la fuerza de la naturaleza como por ejemplo, sin limitación,
tormentas, incendios, inundaciones y terremotos.
• Productos cuyo número de serie y/o pegatina de garantía se hayan manipulado o
quitado.
Asistencia técnica del producto
Para obtener asistencia técnica del producto, utilice la siguiente información de contacto:
En Norteamérica: support.america@fractal-design.com
En DACH (Alemania-Suiza-Austria): support.dach@fractal-design.com
En China: support.china@fractal-design.com
En Europa y/o el resto del mundo: support@fractal-design.com
10
Page 14

Fractal Design
Case per computer Node 304
Il Node 304 è un case compatto per computer con un interno modulare unico e versatile
che permette di adattarlo in base alle esigenze e ai componenti. Che si desideri un bel le
server, un silenzioso PC Home Theater o un potente sistema di gioco, la scelta è nelle mani
dell’utente.
Il Node 304 è dotato di tre ventole con cuscinetti idraulici, con la possibilità di utilizzare
dissipatori per CPU tower o un sistema di raffreddamento ad acqua. Tutte le prese d’aria
sono dotate di ltri d’aria facili da pulire, che riducono la penetrazione di polvere all’interno
del sistema. La disposizione strategica dei dischi rigidi direttamente di fronte a due ventole Silent Series R2 montate nela parte anteriore assicura che tutti i componenti vengano
raffreddati a temperature ottimali. Le staffe dei dischi rigidi non utilizzati possono essere
facilmente rimosse per fare spazio a lunghe schede video, ad un maggiore usso di aria o
ad uno spazio supplementare per la sistemazione dei cavi.
Il Node 304 porta avanti l’eredità della serie Fractal Design con un design scandinavo mini-
malista e sensazionale combinato con massima funzionalità.
Installazione/istruzioni
Per sfruttare appieno le funzionalità migliorate e i vantaggi del case per computer Node
304, sono fornite le seguenti informazioni e istruzioni.
Installazione del sistema
Si consigliano le seguenti procedure per il montaggio di componenti in un Node 304:
1. Rimuovere le tre staffe di montaggio del disco rigido.
2. Montare la scheda madre con i distanziatori della scheda madre e le viti in dotazione.
3. Installare l’alimentatore ATX con le viti in dotazione (vedere la descrizione dettagliata di
seguito).
4. Se lo si desidera, montare una scheda video (vedere la descrizione dettagliata di
seguito).
5. Montare i dischi rigidi sulle staffe bianche con le viti in dotazione.
6. Montare di nuovo le staffe del disco rigido nel case.
7. Collegare i cavi dell’alimentatore e della scheda madre ai componenti.
8. Collegare i cavi di prolunga dell’alimentatore all’alimentatore.
Installazione dei dischi rigidi
L’installazione dei dischi rigidi nel Node 304 è simile a quella dei case per computer standard:
1. Smontare le staffe del disco rigido dal case per rimuovere la vite situata nella parte
anteriore con un cacciavite a croce e le due viti ad alette nella parte posteriore.
2. Montare i dischi rigidi con i connettori rivolti verso la parte posteriore del case, con le
viti in dotazione nel kit accessori.
3. Montare di nuovo la staffa nel case e ssarla prima di collegare i connettori; non mon-
tare le staffe dei dischi rigidi non utilizzati per ottenere maggiore usso di aria.
11
Page 15

Node 304
Installazione dell’alimentatore
è più semplice installare l’alimentatore dopo aver installato la scheda madre:
1. Far scorrere il PSU nella parte posteriore del case con la ventola dell’alimentatore
rivolta verso il basso.
2. Fissare l’alimentatore serrando le tre viti in dotazione nel kit accessori.
3. Collegare il cavo di prolunga montato in precedenza all’alimentatore.
4. Inne, collegare il cavo in dotazione con l’alimentatore nella parte posteriore del case e
accendere l’alimentatore.
Il Node 304 è compatibile con alimentatori ATX (PSU) no a 160 mm di lunghezza. In
genere, i PSU con connettori modulari nella parte posteriore devono avere una lunghezza
inferiore a 160 mm se usati insieme a schede video lunghe.
Installazione di schede video
Il Node 304 è stato progettato utilizzando i componenti più potenti. Per installare una
scheda video, è necessario rimuovere prima una delle staffe del disco rigido situata nello
stesso lato dello slot PCI della scheda madre. Una volta rimossa, è possibile inserire la
scheda video nella scheda madre.
Il Node 304 è compatibile con schede video no a 310 mm di lunghezza quando si rimuove
1 staffa HDD. Le schede video di lunghezza superiore a 170 mm entrano in conitto che
PSU di lunghezza superiore a 160 mm.
Pulizia dei ltri d’aria
I ltri sono installati nelle prese d’aria per evitare che la polvere penetri nel case. Per garantire un raffreddamento ottimale, pulire i ltri a intervalli periodici:
• Per pulire i ltri PSU, basta far scorrere il ltro verso la parte posteriore del case e
rimuoverlo; eliminare la polvere accumulata.
• Prima di pulire il ltro anteriore, rimuovere il pannello anteriore estraendolko e utilizzando la parte inferiore come maniglia. Fare attenzionea non danneggiare i cavi durante
questa operazione. Una volta estratto il pannello anteriore, rimuovere il ltro spingendo
i due clip sui lati del ltro. Pulire i ltri, quindi inserire di nuovo il ltro e il pannello ante-
riore in ordine inverso.
• Per design, il ltro laterale non è rimovibile; esso può essere pulito quando si rimuove
la parte superiore del case.
Controller ventola
Il controller della ventola si trova nella parte posteriore del case sugli slot PCI. Il controller
dispone di tre impostazioni: bassa velocità (5 V), media velocità (7 V) e massima velocità
(12 V).
12
Page 16

Fractal Design
Garanzia limitata e limitazione delle responsabilità
I case per computer Fractal Design Node 304 sono garantiti per ventiquattro (24) mesi dalla
data di consegna all’utente nale in caso di difetti nei materiali e/o nella fabbricazione. Entro
questo periodo della garanzia limitata, i prodotti verranno riparati o sostituiti a discrezione di
Fractal Design. I reclami in garanzia devono essere consegnati all’agente che ha venduto il
prodotto, con le spese di spedizione prepagate.
La garanzia non copre:
• I prodotti noleggiati, utilizzati in modo improprio, maneggiati senza cura o utilizzati in
modo non conforme con le istruzioni per l’uso fornite in dotazione.
• I prodotti danneggiati da fenomeni naturali, inclusi, ma non solo, fulmini, incendi, alluvioni e terremoti.
• I prodotti con il numero di serie e/o l’adesivo della garanzia manomessi o cancellati.
Assistenza per il prodotto
Per l’assistenza per il prodotto, utilizzare le seguenti informazioni di contatto:
In Nord America: support.america@fractal-design.com
In DACH (Germania-Svizzera-Austria): support.dach@fractal-design.com
In Cina: support.china@fractal-design.com
In Europa e/o resto del mondo: support@fractal-design.com
13
Page 17

Node 304
Node 304 机箱Nätaggregatet monteras enklast efter det att moderkortet installerats:
Node 304 是一款采用独特的通用模块化内部设计的紧凑型机箱,您可以根据您的需求以及所
使用的组件对机箱进行调整。您可以选择是用来作低温文件服务器、安静的家庭影院
PC 或功能强大的游戏系统。
Node 304 配有三个液压轴承风扇,可选择使用塔型 CPU 散 热 器或 水 冷系统。所有 进
气口都配有易于清洗的防尘网,可防止灰尘进入您的系统。巧妙地将硬盘安装在直接面
向两个前侧安装的 Silent 系列 R2 风扇可确保您所有的组件都保持在最佳冷却温度,
以便为长显卡腾空间、提高散热能力或为走线提供附加空间。
Node 304 继 承了 Fractal Design 简约、光滑的斯堪的纳维亚设计,并最大程度地结合
了 功 能性。
安装/说明
为了全面利用这些改进的特点的优势以及 Node 304 机箱的益处,我们为您提供了以下
信息和 说 明。
系统安装
在 Node 304 中安装组件时,建议采用以下操作步骤:
1. 拆下三个硬盘盒。
2. 使用提供的主板铜柱和螺丝安装主板。
3. 使用提供的螺丝安装 ATX 电 源(见下文中 的 详细 描 述)。
4. 如果需要,可安装显卡(见下文中的详细描述)。
5. 使用提供的螺丝将硬盘安装到白色硬盘盒上。
6. 将硬盘盒安装回机箱中。
7. 将电源和主板线缆连接至组件。
8. 将电源延长线连接至电源。
安装硬盘
将硬盘安装 Node 304 与将其安装标准机箱的操作步骤类似:
1. 用十字头螺丝刀拧下安装在前侧的螺丝以及后侧的两个蝶形螺丝,从机箱中拆下
硬盘盒。
2. 使用配件箱中提供的螺丝安装硬盘,使其连接器面向机箱后侧。
3. 将托架放回机箱中并将其固定,然后再插入连接器;未使用的硬盘连接器可不
用,以便提供更好的散热效果。
安装电源
安装完主板后,可以轻松安装电源。
1. 将电源滑入机箱中,使电源风扇朝下。
2. 用配件箱中提供的三个螺丝固定电源。
3. 将预先安装的延长线插入电源中。
4. 最后,插入随机箱后侧电源提供的线缆,并启动电源。
14
Page 18

Node 304
Node 304 与长度最大为16公分的 ATX 电源装置 (电源)。如果与长显卡结合使用,后
侧安有模块化连接器的电源通常需要短于 16公分。
清洗防尘网
防尘网安装在进气口处,有助于防止灰尘进入机箱。为了确保达到最佳散热效果,
应定期清洗防尘网:
• 要清洗电源防尘网,只需朝机箱后侧滑动防尘网并将其拆下;清洗防尘网上积聚的
灰尘。
• 要清洗前侧防尘网,请先直接将前面板拉出并将底部作为手柄拆下前面板。执
行此操作时,请多加小心,不要损坏任何线缆。
拆下前面板之后,推动防尘网侧面上的两个卡扣,拆下防尘网。清洗防尘网,然后按照相
反的顺序重新安装防尘网和前面板。
• 侧面防尘网设计为不可拆卸;可在拆下机箱顶部时清洗侧面防尘网。
风扇调速器
风扇调速器位于机箱后侧 PCI 槽之上。控制器有三种设置:低速 (5v),中速 (7v) 和全速
( 1 2v )。
有限保修和责任限制
Fractal Design Node 304 机箱自交付最终用户使用之日起,对材料和/或工艺缺陷保修二十
四 (24) 个月。在该有限保修期内,Fractal Design 将酌情决定对产品进行维修或更
换。保修申请必须退回销售产品的代理处,并需要预付运费。
保修内容不包括:
• 用于租借目的、使用不当、疏忽处理或使用方法不符合其声明的预期用途的产品。
• 因不可抗拒力(包括但不限于闪电、火灾、洪水和地震)造成损坏的产品。
• 列号和/或保修标签被涂改或撕掉的产品。
要获得产品支持,请使用以下联系信息:
北美:support.america@fractal-design.com
DACH(德国-瑞士-奥地利):support.dach@fractal-design.com
欧洲和/或世界其他地区:support@fractal-design.com
中国:support.china@fractal-design.com
Page 19

Node 304
Node 304コンピュータケース
Node 304は、あなたのニーズとコンポーネントに合わせて調整できるモジュール式の内部を持
つ、ユニークかつ多目的で使用できるコンパクトなコンピュータケースです。 クールなファイル
サーバー、静かなホームシアターPC、強力なゲームシステムなど、あなたが選んだ目的のため
に使用できます。
Node 304には、タワーCPUクーラーか水冷却システムの利用が選べる、3つの油圧式ベアリング
ファンが付属します。 すべての空気取り入れ口には掃除しやすいエアフィルタが付属し、システ
ムに入り込むほこりを減らします。 正面に取り付けられた2台のSilent Series R2ファンにハード
ディスクを直接向けるという戦略的配置により、すべてのコンポーネントが最適な冷温で保たれ
ます。 未使用のハードディスクディスクブラケットは簡単に取り外して、長いグラフィックカード、
気流の増加、ケーブルの整理に対応するためのスペースを空けることができます。
Node 304 は、最小主義で優美なスカンジナビアデザインに最大限の機能性を結合するという
Fractal Designの遺産を継承しています。
取り付け/ 指 示
Node 304コンピュータケースの改善された機能と長所を最大限に生かすために、次の情報と
指示が提供されます。
システム 取り付 け
Node 304にコンポーネントを取り付ける際に次のステップが推奨されます。
1. 3つのハードディスク取り付けブラケットを 取り外します。
2. 付属のマザーボードスタンドオフとねじを使って、マザーボードを取り付けます。
3. 付属のねじを使ってATX電源を取り付けます(詳細は下の説明を参照してください)。
4. 必要に応じて、グラフィックカードを取り付けます(詳細は下の説明を参照してください)。
5. 付属の ねじを使って、白いブラケットにハ ードドライブを取り付けます。
6. ハードディスクブラケットをケースに 再び取り付けます。
7. 電源装置とマザーボードケーブルをコンポーネントに接続します。
8. 電源延長ケーブルを電源に接続します。
ハードディスク取り付 け
Node 304へのハードディスクの取り付けは標準的なコンピュータケースの場合と同じです。
1. プラスドライバーで正面のねじと背面の2つのつまみねじを外し、ケースからハードディス
クブラケットを 取り外します。
2. アクセサリー ボックスに入っているねじを 使って、ケース の後ろに 面しているコネクタで ハ
ードディスクを取り付けます。
3. ケースにブラケットを戻し、固定してからコネクタに差し込みます。未使用のハードディスク
ブラケットは気流の増加に備えて外しておくことができます。
電源装置の取り付け
電源装置はマザーボードの取り付け後が最も取り付けやすくなります。
1. 電 源ファンを下に向けた状態で、PSUをケースの後ろにスライドさせます。
2. アクセサリーボックスに入っている3つのねじで電源装置を固定します。
3. あらかじめ取り付けられた延長ケーブルを電源装置に差し込みます。
4. 最後に、電源装置のケーブルをケースの後ろに差し込み、電源を入れます。
Node 304は、長さが最大で160mmのATX電源ユニット(PSU)と互換性があります。 背面にモジ
ュラーコネクタがあるPSUの場合は通常、長いグラフィックカードとの組み合わせで使用すると
きに、160mmより短くする必要があります。
Page 20

Fractal Design
グラフィックカードの 取り付け
Node 304は最も強力なコンポーネントを念頭に設計されました。 グラフィックカードを取り付
けるには、マザーボードのPCIスロットと同じ側にあるハードディスクブラケットの1つを最初に
取り外します。 取り外したら、グラフィックカードをマ ザー ボードに 挿入できま す。
Node 30
換性があります。 170mmより長いグラフィックカードと160mmより長いPSUは食い違うことに注
意してください。
4は、HDDブラケットを取り外したとき、長さが最大で310mmのグラフィックカードと互
エアフィルタの掃除
フィルタは、ほこりがケースに入ることを防止する目的で空気取り入れ口に取り付けられていま
す。 最適な冷却を維持するためには、フィルタを定期的に掃除する必要があります。
• PSUフィルタを掃除するには、ケースの後ろにフィルタをスライドさせ、フィルタを外します。
フィルタに積もったほこりを掃除します。
正面のフィルタを掃除するには、最初にフロントパネルを取り外します。このとき、フロント
•
パネルをまっすぐに引き、底をハンドルとして使います。 ケーブルを破損させないように注
意してください。 フロントパネルが外れたら、フィルタ側の2つのクリップを押してフィルタ
を取り外します。 フィルタを掃除し、フィルタとフロントパネルを逆の手順で元に戻します。
• 横のフィルタは意図的に取り外せないようになっています。横のフィルタはケースの上部を
取り外したときに 掃除できます。
ファンコントロー ラ
ファンコントローラはケースの後ろにあります。PCIスロットの上です。 コントローラには低速
(5V)、中間のスピード(7V)、フルスピード(12V)の3つの設定があります。
限定保証と責任制限
Fractal Design Node 304コンピュータケースは、素材および/または製造における欠陥に対し
て、最終消費者の元に届いた日付から24ヶ月間保証されています。この限定保証期間内に、製品
はFractal Designの裁量で修理されるか、交換されます。保証請求は製品を販売した代理店に元
払いで返却する必要があります。
以下の場合は保証は適用されません。
• 製品が賃貸の目的のために使われた、誤用された、不注意に扱われた、または明記された
用途以外で利用された場合
• 製品が稲妻、火災、洪水、および地震を含むがこれらに限定されない天災により損傷した場
合
• 製品のシリアル番号および/または保証ステッカーが改変されたか、取り除かれた場合
製 品サ ポ ート
製品サポートに関しては、以下の連絡先にお問い合わせください。
北米: support.america@fractal-design.com
DACH (ドイツ、スイス、オーストリア): support.dach@fractal-design.com
中国: support.china@fractal-design.com
欧州および/またはその他の国: support@fractal-design.com
17
Page 21

Node 304
Node 304 컴퓨터 케이스
Node 304는 소형 컴퓨터 케이스이며 내부가 독특하면서도 범용성 모듈형으로 되어 있어
사용자의 필요와 구성 부품에 맞게 구성할 수 있습니다. 우수한 파일 서버를 원하건, 조용
한 홈씨어터 PC를 원하건 또는 강력한 게임 시스템을 원하건 선택은 사용자의 것입니다.
Node 304에는 유압 베어링 팬 3개가 장착되며, 타워 CPU 쿨러 또는 수냉식 시스템 가운
데 하나를 선택하여 장착할 수 있습니다. 모든 흡기구에는 청소가 용이하고 시스템에 유입
되는 먼지를 줄여 주는 공기 필터가 달려 있습니다. 하드 드라이브를 두 개의 전면 장착형
Silent Series R2 팬과 직접 마주보게 장착하여 모든 구성 부품이 최적의 동작 온도를 유지
합니다. 사용하지 않dms 하드 드라이브 디스크 브래킷을 간편하게 제거하여 긴 그래픽 카
드를 장착하거나 공기량을 증대시키기 위한 공간 또는 케이블 정리용 추가 공간을 만들 수
있습니다.
Node 304는 미니멀리즘을 추구하는 세련된 스칸디나비아 디자인을 채택한 프랙털 디자인
요소를 구현하여 기능성을 극대화했습니다.
장착 / 지침f
Node 304 컴퓨터 케이스의 향상된 특장점을 최대한 활용할 수 있도록 다음 정보와 지침이
제공됩니다.
시스템 설치
다음 절차는 구성 부품을 Node 304에 장착하기 위해서 권장됩니다:
1. 세 개의 하드 드라이브 장착 브래킷을 탈거합니다.
2. 제공된 마더보드 스탠드오프와 나사를 사용하여 마더보드를 장착합니다.
3. 제공된 나사를 사용하여 ATX 전원공급장치를 설치합니다(아래의 자세한 설명 참조).
4. 원할 경우 그래픽 카드를 장착합니다(아래의 자세한 설명 참조).
5. 하드 드라이브를 제공된 나사를 사용하여 흰색 브래킷에 장착합니다.
6. 하드 드라이브 브래킷을 케이스에 다시 장착합니다.
7. 전원공급장치 케이블과 마더보드 케이블을 구성 부품에 연결합니다.
8. 전원공급장치 확장 케이블을 전원공급장치에 연결합니다.
하드 드라이브 설치하기
하드 드라이브를 Node 304에 설치하는 것은 표준 컴퓨터 케이스와 비슷합니다:
1. 필립스 스크루드라이버로 앞쪽의 나사와 뒤쪽의 나비나사 두 개를 제거하여 하드 드라
이브 브래킷을 케이스에서 분리합니다.
2. 부속품 상자에 제공된 나사를 사용하여 하드 드라이브를 커넥터를 케이스 뒤쪽을 향하
게 하여 장착합니다.
3. 커넥터를 연결하기 전에 브래킷을 케이스에 다시 장착하여 고정합니다. 사용되지 않는
하드 드라이브 브래킷은 공기량을 증대시키기 위해서 제거할 수 있습니다.
전원공급장치 설치하기
마더보드를 설치한 후 가장 쉽게 설치할 수 있는 것이 바로 전원공급장치입니다:
1. 전원공급장치(PSU)를 전원공급장치 팬을 아래를 향하게 하여 케이스 뒤쪽에서 밀어
넣습니다.
2. 전원공급장치를 부속품 상자에 제공된 세 개의 나사로 고정합니다.
3. 미리 장착된 연장 케이블을 전원공급장치에 연결합니다.
4. 마지막으로 전원공급장치와 함께 제공된 케이블을 케이스 뒤쪽에 연결하고 전원공급
장치를 켭니다.
18
Page 22

Fractal Design
Node 304는 최대 길이 160mm의 ATX 전원공급장치(PSU)와 호환됩니다. 뒤쪽에 모듈형
커넥터가 있는 PSU는 긴 그래픽 카드와 함께 사용할 때 160mm보다 더 짧아야 합니다.
그래픽 카드 설치하기
Node 304는 가장 강력한 구성 부품을 염두에 두고 고안되었습니다. 그래픽 카드를 설치하
려면, 마더보드의 PCI 슬롯과 같은 쪽에 있는 하드 드라이브 브래킷 가운데 하나를 먼저 제
거해야 합니다. 일단 제거하면, 그래픽 카드를 마더보드에 끼울 수 있습니다.
Node 304는 HDD 브래킷 1개를 제거할 때 최대 310mm 길이의 그래픽 카드와 호환됩니
다. 170mm보다 더 긴 그래픽 카드는 160mm보다 더 긴 PSU와 충돌합니다.
에어 필터 청소하기
먼지가 케이스에 들어가는 것을 차단하기 위해서 필터가 흡기구에 설치되어 있습니다. 최
적의 냉각을 유지하기 위하여 필터를 정기적으로 청소해야 합니다:
• PSU 필터를 청소하려면, 필터를 케이스 뒤쪽으로 밀어서 제거한 후 필터에 있는 먼지
를 모두 닦아냅니다.
• 앞쪽 필터를 청소하려면 우선 전면 패널을 똑바로 잡아당겨 아래쪽을 잡고 제거합니
다. 이렇게 하는 동안 어떤 케이블도 손상되지 않도록 주의하십시오. 전면 패널을 분리
한 후 필터 측면에 있는 두 개의 클립을 눌러 필터를 제거합니다. 필터를 청소한 후 필
터와 전면 패널을 역순으로 재장착합니다.
• 구조상 측면 필터는 제거할 수 없습니다. 측면 필터는 케이스 상부가 제거되어 있을 때
청소할 수 있습니다.
팬 컨트롤러
팬 컨트롤러는 케이스 뒤쪽의 PCI 슬롯 위에 있습니다. 컨트롤러에서는 저속(5V), 중속
(7V), 고속(12V)의 세 가지 설정을 사용합니다.
제한된 보증 및 신뢰성
Fractal Design Node 304 컴퓨터 케이스는 제품에 하자가 있거나 고장이 난 경우 구입일로
부터 24개월 간 보증합니다. 제한된 보증 기간 내에 제품은 Fractal Design의 지침대로 교체
또는 수리됩니다. 보증 청구는 제품을 구입한 곳을 통해서 신청해야 합니다.
보증에 포함되지 않는 내용:
• 제품의 임대, 오용, 부주의한 취급, 원래 목적대로 사용하지 않은 경우.
• 번개, 화재, 홍수 및 지진을 포함한 천재지변으로 인해 파손된 경우.
• 제품 번호 및/또는 보증 스티커가 제거되거나 변경된 경우.
제품 지원.
제품 지원을 받으려면 다음 연락 정보를 참조하십시오.
북미: support.america@fractal-design.com
DACH (독일-스위스-오스트리아): support.dach@fractal-design.com
중국: support.china@fractal-design.com
유럽 및/또는 나머지 국가: support@fractal-design.com
19
Page 23

Node 304
Obudowa komputera Node 304
Node 304 to niewielkich rozmiarów obudowa komputera z unikatowym i uniwersalnym mod-
ularnym wnętrzem, które pozwala na jej adaptację do potrzeb i komponentów. Do wyboru
jest serwer plików, cichy komputer PC kina domowego lub potężny system gier.
Node 304 jest dostarczany w komplecie z trzema wentylatorami z łożyskami hydraulicznymi, z opcją radiatorów CPU lub systemu chłodzenia wodą. Wszystkie wloty powietrza są
wyposażone w łatwe do czyszczenia ltry powietrza, które zmniejszają możliwość dostawania się do systemu pyłu. Strategiczne rozmieszczenie dysków twardych bezpośrednio
skierowanych w stronę dwóch cichych, zamontowanych z przodu wentylatorów serii R2,
zapewnia utrzymanie optymalnej temperatury wszystkich komponentów. Nieużywane
wsporniki dysków twardych można łatwo usunąć, aby uzyskać miejsce na długie karty
graczne, zwiększony przepływ powietrza lub dodatkowe miejsce na kable.
Node 304 bazuje na Fractal Design, minimalistycznym i błyszczącym skandynawskim wzornictwie w połączeniu z maksymalną funkcjonalnością.
Instalacja/instrukcje
Aby w pełni wykorzystać poprawione funkcje i korzyści posiadania obudowy komputera
Node 304, dostarczone zostały następujące informacje i instrukcje.
Instalacja systemu
W celu montażu komponentów Node 304 zaleca się wykonanie następujących czynności:
1. Wyjmij trzy wsporniki montażowe twardych dysków.
2. Zamontuj płytę główną z użyciem dostarczonych kołków i śrub.
3. Zainstaluj zasilacz ATX dostarczonymi śrubami (sprawdź szczegółowy opis poniżej).
4. Jeśli to wymagane, zamontuj kartę gaczną (sprawdź opis poniżej).
5. Zamontuj dysk(i) twardy w białym wsporniku(ch), dostarczonymi śrubami.
6. Zamontuj w obudowie wspornik(i) twardego dysku.
7. Podłącz dokomponentów kable zasilacza i płyty głównej.
8. Podłacz do zasilacza przedłużacz.
Instalacja dysków twardych
Instalacja dysków twardych w Node 304 jest podobna do instalacji w standardowych obudowach komputerów:
1. Odkręć śrubokrętem krzyżakowym wsporniki dysków twardych od obudowy odkręcając
znajdującą się z przodu śrubę i odkręć dwie śruby radełkowane z tyłu.
2. Zamontuj dyski twarde w złączach przodem w tylną stronę obudowy, śrubami dostarczonymi w pudełku z akcesoriami.
3. Włóż wspornik z powrotem do obudowy i zamocuj, przed podłączeniem złączy;
nieużywane wsporniki dysku twardego można wyjąć, aby zwiększyć przepływ powi-
etrza.
Instalacja zasilacza
Zasilacz najłatwiej zainstalować po zainstalowaniu płyty głównej:
1. Wsuń zasilacz do tyłu obudowy, kierując go w dół.
2. Zamocuj zasilacz trzema śrubami dostarczonymi w pudełku akcesoriów.
3. Podłącz do zasilacza wstępnie zamontowny przedłużacz.
4. Na koniec, podłącz z tyłu obudowy kabel dostarczony z zasilaczem i włącz zasilacz.
20
Page 24

Fractal Design
Obudowa Node 304 jest zgodna z zasilaczami ATX (PSU) o długości do 160mm. Zasilacze
z modularnymi złączami z tyłu, powinny być krótsze niż 160 mm, przy używaniu z długą
kartą graczną.
Instalacja kart gracznych
Obudowa Node 304 została zaprojektowana przy założeniu, że będą w niej montowane
najbardziej potężne komponenty. Aby zainstalować kartę graczną należy najpierw usunąć
jeden ze wsporników karty gracznej, znajdujący się z tej samej strony co gniazda PCI na
płycie głównej. Po wyjęciu, kartę graczną można włożyć do płyty głównej.
Po wyjęciu wspornika dysku twardego, obudowa Node 304 jest zgodna z kartami
gracznymi o długości do 310mm. Należy pamiętać, że karty graczne o długości
przekraczającej 170 mm, będą kolidować z zasilaczami o długości powyżej 160mm.
Czyszczenie ltrów powietrza
Filtry są instalowane na wlotach powietrza, aby zapobiec dostawaniu się do środka kurzu.
Aby zapewnić optymalne chłodzenie, ltry należy czyścić w regularnych odstępach czasu:
• Aby oczyścić ltr zasilacza, wystarczy go przesunąć w kierunku tyłu obudowy i wyjąć;
należy usunąć nagromadzony w nim kurz.
• Aby oczyścić ltr przedni należy najpierw wyjąć panel przedni, pociągając go prosto
i używając jako uchwytu dolnej części. Należy uważać, aby w trakcie wyjmowania
nie uszkodzić kabli. Po zdjęciu panela przedniego, wyjmij ltr naciskając dwa zaczepy z boków ltra. Oczyść ltry, a następnie zainstaluj ltr przedni i panel przedni w
kolejności odwrotnej.
• Konstrukcja uniemożliwia wyjęcie ltra bocznego; ltr boczny można oczyścić po
zdjęciu górnej części obudowy.
Kontroler wentylatora
Kontroler wentylatora znajduje się z tyłu obudowy, nad gniazdami PCI. Kontroler ma trzy
ustawienia: niskie obroty (5v), średnie obroty (7v) i wysokie obroty (12v).
Ograniczona gwarancja i ograniczenia odpowiedzialności
Obudowy Fractal Design Node 304 są objęte gwarancją przez dwadzieścia cztery (24)
miesiące od daty dostarczenia do użytkownika, na defekty materiałowe i/lub wady wytwarzania. W okresie obowiązywania tej ograniczonej gwarancji, produkty zostaną naprawione lub
wymienione według decyzji rmy Fractal Design. Roszczenia gwarancyjne należy przekazać
przedstawicielowi, który sprzedał produkt, z opłatą kosztów dostarczenie.
Gwarancja nie obejmuje:
• Produktów, które były wynajmowane, nieprawidłowo używane, nieuważnie obsługiwane
lub stosowane w sposób niezgodny z przeznaczeniem.
• Produktów uszkodzonych w wyniku działania sił natury, włącznie, ale nie tylko, z
wyładowaniami atmosferycznymi, pożarem, powodzią i trzęsieniem ziemi.
• Produktów z uszkodzonym lub usuniętym numerem seryjnym i/lub naklejką
gwarancyjną.
Pomoc techniczna dla produktu
W celu uzyskania pomocy technicznej należy wykorzystać następujące informacje kontaktowe:
W Ameryce Północnej: support.america@fractal-design.com
W DACH (Niemcy-Szwajcaria-Austria): support.dach@fractal-design.com
W Chiny: support.china@fractal-design.com
W Europie i/lub reszcie świata: support@fractal-design.com
21
Page 25

Node 304
Компьютерный корпус Node 304
Компактный компьютерный корпус Node 304 отличается уникальной и универсальной
модульной внутренней конструкцией, позволяющий адаптировать корпус к
потребностям пользователя и используемым компонентам. Требуется ли вам
отличный файл-сервер, тихий ПК для домашнего кинотеатра или мощная игровая
система, выбор остается за вами.
Корпус Node 304 оснащен тремя вентиляторами с гидростатическими подшипниками
и допускает установку процессорного кулера для корпусов типа tower или системы
водяного охлаждения. Все воздухозаборные отверстия оснащены фильтрами,
которые легко чистить и которые сокращают количество пыли, попадающей в
систему. Благодаря продуманному расположению жестких дисков непосредственно
перед двумя передними вентиляторами бесшумной серии R2 поддерживается
оптимальное охлаждение всех компонентов системы. Неиспользуемые кронштейны
для жестких дисков легко снимаются, благодаря чему освобождается дополнительное
пространство для длинных видеокарт и прокладки кабелей, а также улучшается
циркуляция воздуха.
Корпус Node 304 отличается минималистским и элегантным скандинавским
дизайном, характерным для корпусов Fractal Design, в сочетании с максимальной
функциональностью.
Установка и инструкции
Чтобы использовать все преимущества и передовые возможности компьютерного
корпуса Node 304, ознакомьтесь с приведенными ниже сведениями и инструкциями.
Сборка системы
Ниже приведена рекомендованная процедура установки компонентов в корпус Node
304:
1. Снимите три крепежных кронштейна для жестких дисков.
2. Установите материнскую плату, при помощи входящих в комплект стоек и винтов
для материнской платы.
3. Установите блок питания ATX и закрепите его при помощи входящих в комплект
винтов (подробные инструкции см. ниже).
4. При необходимости установите видеокарту (подробные инструкции см. ниже).
5. Закрепите один или несколько жестких дисков на белых кронштейнах при помощи
входящих в комплект винтов.
6. Установите кронштейны с жесткими дисками обратно в корпус.
7. Подключите кабели от блока питания и материнской платы к остальным
компонентам.
8. Подключите удлинительный кабель блока питания к блоку питания.
Установка жестких дисков
Установка жестких дисков в корпус Node 304 выполняется аналогично установке
дисков в другие компьютерные корпуса:
1. Отсоедините от корпуса кронштейны для жестких дисков, удалив расположенный
спереди винт при помощи крестовой отвертки и два расположенных сзади винта с
накатанной головкой.
2. Установите жесткие диски разъемами к задней части корпуса и закрепите их
винтами, находящимися в коробке с принадлежностями.
22
Page 26

Fractal Design
3. Установите кронштейн с жестким диском в корпус и закрепите его перед
подключением разъемов. Неиспользованные кронштейны для жестких дисков
можно не устанавливать в корпус для улучшения циркуляции воздуха.
Установка блока питания
Блок питания (БП) легче всего установить после установки материнской платы:
1. Задвиньте БП в заднюю часть корпуса так, чтобы вентилятор БП был направлен
назад.
2. Закрепите БП тремя винтами, находящимися в коробке с принадлежностями.
3. Подключите предварительно подсоединенный удлинительный кабель БП.
4. Наконец, подключите сетевой кабель питания, прилагающийся к БП, к гнезду на
задней панели корпуса и включите БП.
Корпус Node 304 совместим с БП ATX длиной до 160 мм. БП с модульными
разъемами на задней панели обычно должны быть короче 160 мм в случае
использования с длинной видеокартой.
Установка видеокарт
Корпус Node 304 рассчитан на установку самых мощных компонентов. Для установки
видеокарты необходимо удалить один из кронштейнов для жестких дисков,
расположенный со стороны слота PCI на материнской плате. После удаления
кронштейна можно установить видеокарту на материнскую плату.
Корпус Node 304 совместим с видеокартами длиной до 310 мм, если удален 1
кронштейн для жесткого диска. Следует учитывать, что видеокарту длиннее 170 мм
нельзя установить вместе с блоком питания длиннее 160 мм.
Очистка воздушных фильтров
Фильтры установлены на впускных вентиляционных отверстиях для предотвращения
попадания пыли в корпус. Чтобы обеспечить оптимальное охлаждение системы,
фильтры следует регулярно чистить:
• Чтобы очистить фильтр БП, просто сдвиньте фильтр к задней панели корпуса и
снимите его, а затем удалите с него скопившуюся пыль.
• Чтобы очистить передний фильтр, сначала снимите переднюю панель, взявшись
за ее нижнюю часть и потянув ее вертикально вверх. Соблюдайте осторожность,
чтобы не повредить при этом какие-либо кабели. Сняв переднюю панель, снимите
фильтр, нажав на два фиксатора по бокам фильтра. Очистите фильтр, а затем
установите фильтр и переднюю панель в порядке, обратном снятию.
• Конструкция бокового фильтра не допускает его снятия. Его можно очистить, сняв
верхнюю панель корпуса.
Переключатель скорости вращения вентиляторов
Переключатель скорости вращения вентиляторов расположен в задней части корпуса
над слотами PCI. Этот переключатель позволяет выбрать три скорости: низкую (5 В),
среднюю (7 В) и полную (12 В).
23
Page 27

Node 304
Ограниченная гарантия и ограничения ответственности
На компьютерные корпуса Fractal Design Node 304 предоставляется гарантия
отсутствия дефектов материалов и производственного брака сроком двадцать
четыре (24) месяца со дня доставки конечному пользователю. В течение этого
срока ограниченной гарантии компания Fractal Design по собственному усмотрению
осуществляет ремонт или замену неисправных изделий. Изделия по гарантийным
рекламациям необходимо вернуть первоначальному продавцу с предоплатой
доставки.
Изделия, на которые не распространяется действие гарантии:
• изделия, сдававшиеся в аренду, использовавшиеся с несоблюдением правил
эксплуатации, небрежно или не по прямому назначению;
• изделия, поврежденные вследствие действия непреодолимой силы, в том числе,
не исключая прочего, молнии, пожара, наводнения или землетрясения;
• изделия, серийный номер и (или) гарантийная наклейка которых были
несанкционированно изменены или удалены.
Поддержка изделий
По вопросам поддержки изделий обращайтесь по перечисленным ниже адресам.
Северная Америка: support.america@fractal-design.com
Германия, Швейцария, Австрия (DACH): support.dach@fractal-design.com
Китай: support.china@fractal-design.com
Европа и остальные страны мира: support@fractal-design.com
24
Page 28

Fractal Design
Boîtier d’ordinateur Node 304
Le Node 304 est un boîtier d’ordinateur compact avec un intérieur unique et modulaire qui
vous permet de l’adapter en fonction de vos besoins et des composants. Si vous voulez un
serveur de chiers qui reste froid, un PC silencieux à la maison ou un système de jeu puissant, le choix est vôtre.
Le Node 304 est livré complet avec trois ventilateurs hydrauliques, et la possibilité d’utiliser
des refroidisseurs de CPU tour ou un système de refroidissement à l’eau. Toutes les prises
d’air sont équipées de ltres à air faciles à nettoyer, ce qui réduit la poussière qui peut
pénétrer dans votre système. Le placement stratégique des disques durs directement face
aux deux ventilateurs frontaux silencieux de série R2 assure que tous vos composants
restent à une température optimale. Les supports de montage de disque dur non utilisés peuvent être facilement enlevés pour avoir plus d’espace pour les grandes cartes
graphiques, un meilleur débit d’air, ou de l’espace supplémentaire pour l’arrangement des
câbles.
Le Node 304 continue l’héritage de la série Fractal Design, avec un design Scandinave
minimaliste et impressionnant combiné avec de nombreuses fonctionnalités et une réduction maximale du bruit.
Installation / instructions
Les informations et les instructions suivantes sont fournies pour vous aider à proter au
maximum des fonctions améliorées du boîtier d’ordinateur Node 304.
Installation du système
Les étapes suivantes sont recommandées pour le montage des composants dans un Node
304 :
1. Retirez les trois supports de montage de disque dur.
2. Installez la carte mère en utilisant les espaceurs et les vis de carte mère fournies.
3. Installez le bloc d’alimentation ATX à l’aide des vis fournies (voir la description détaillée
ci-dessous).
4. Si vous le désirez, vous pouvez aussi installer une carte graphique (voir la description
détaillée ci-dessous).
5. Installez le(s) disque dur sur le(s) support blanc à l’aide des vis fournies.
6. Installez le(s) support de disque dur dans le boîtier.
7. Branchez le cordon d’alimentation et les câbles de la carte mère sur les composants.
8. Branchez le cordon d’extension de d’alimentation sur la source d’alimentation.
Installer les disques durs
L’installation des disques durs dans le nœud 304 est similaire à celle dans les boîtiers
d’ordinateur standard :
1. Démontez les supports de disque dur du boîtier en retirant la vis située à l’avant avec
un tournevis Phillips et les deux vis de serrage à l’arrière.
2. Installez les disques durs avec leurs connecteurs faisant face à l’arrière du boîtier, en
utilisant les vis fournies dans la boîte d’accessoires.
3. Remettez le support dans le boîtier et attachez-le avant de brancher les connecteurs
; les supports de disque dur qui ne sont pas utilisés peuvent être enlevés pour augmenter le débit d’air.
25
Page 29

Node 304
Installation de la source d’alimentation
La source d’alimentation est plus facile à installer après avoir installé la carte mère :
1. Insérez le bloc d’alimentation à l’arrière du boîtier, avec le ventilateur de l’alimentation
vers le bas.
2. Fixez la source d’alimentation en l’attachant avec les trois vis fournies dans la boîte
d’accessoires.
3. Branchez le câble d’extension pré-monté sur votre source d’alimentation.
4. Puis branchez le câble fourni avec la source d’alimentation à l’arrière du boîtier et allumez la source d’alimentation.
Le Node 304 est compatible avec les unités d’alimentation ATX (PSU) jusqu’à 160mm de
longueur. Les PSU avec des connecteurs modulaires à l’arrière ont généralement besoin
d’être plus court que 160 mm lorsqu’ils sont utilisés en combinaison avec une longue carte
graphique.
Installation des cartes graphiques
Le Node 304 a été conçu avec les composants les plus puissants à l’esprit. Pour installer
une carte graphique, l’un des supports de disque dur, situé sur le même côté que la fente
PCI de la carte mère, doit d’abord être enlevé. Une fois enlevé, la carte graphique peut être
insérée sur la carte mère.
Le Node 304 est compatible avec les cartes graphiques jusqu’à 310mm de longueur, quand
1 support de disque dur est retiré. Veuillez noter que les cartes graphiques de plus de 170
mm de long seront en conit avec les PSU de plus de 160mm.
Nettoyage des ltres à air
Des ltres sont installés sur les prises d’entrée d’air pour éviter que de la poussière n’entre
dans le boîtier. Pour un refroidissement optimal, les ltres doivent être nettoyés à intervalles
réguliers :
• Pour nettoyer le ltre du PSU, glissez simplement le ltre vers l’arrière du boîtier et
enlevez-le ; nettoyez la poussière qui s’est accumulée dessus.
• Pour nettoyer le ltre avant, retirez d’abord le panneau frontal en tirant dessus et en
utilisant le fond comme une poignée. Faites attention à ne pas endommager les câbles
lorsque vous faites cela. Une fois que le panneau frontal a été enlevé, retirez le ltre
en poussant les deux clips sur les côtés du ltre. Nettoyez les ltres, puis réinstallez le
ltre et le panneau frontal dans l’ordre inverse.
• De par sa conception, le ltre latéral n’est pas amovible, le ltre latéral peut être net-
toyé lorsque la partie supérieure du boîtier est enlevée.
Contrôleur de ventilateur
Le contrôleur de ventilateur est situé à l’arrière du boîtier sur les fentes PCI. Le contrôleur a
trois positions : vitesse faible (5v), vitesse moyenne (7v) et haute vitesse (12v).
26
Page 30

Fractal Design
Garantie limitée et limites de responsabilité
Les boîtiers d’ordinateur Fractal Design Node 304 sont garantis pendant vingt quatre (24)
mois, à compter de la date de livraison à l’utilisateur nal, contre les défauts de matériaux
et/ou de fabrication. Dans cette période de garantie limitée, les produits seront soit réparés
ou remplacés, au choix de Fractal Design. Les réclamations de garantie doivent être faites
auprès de l’agent qui a vendu le produit, frais prépayés.
La garantie ne couvre pas ce qui suit :
• Les produits qui ont été loués, utilisés incorrectement, utilisés avec négligence ou utilisés d’une manière qui n’est pas en conformité avec l’usage prévu indiqué.
• Les produits qui ont été endommagés par des causes naturelles, y compris mais sans
s’y limiter, la foudre, les incendies, les inondations et les tremblements de terre.
• Les produits dont le numéro de série et/ou l’étiquette de garantie a été enlevé ou modi-
é.
Support du produit
Pour le support du produit, veuillez utiliser les informations de contact suivantes :
Amérique du Nord : support.america@fractal-design.com
DACH (Allemagne-Suisse-Autriche) : support.dach@fractal-design.com
Chine: support.china@fractal-design.com
Europe et/ou reste du monde : support@fractal-design.com
27
Page 31

Node 304
Node 304 datorchassi
Node 304 är ett kompakt datorchassi med en unik och modulär inre uppbyggnad som låter
dig anpassa den efter dina komponenter och önskemål. Vare sig du vill ha en sval lserver,
en tyst HTPC eller ett kraftfullt spelsystem, så är valet ditt.
Node 304 kommer komplett med tre äktar med hydrauliska glidlager, det nns även
möjlighet att använda CPU kylare med kylartorn eller enklare vattenkylning. Alla luftintag
är utrustade med äktlter som är enkla att rengöra, dessa minskar mängden damm som
kommer in i ditt system. Den strategiska placeringen av hårddiskarna direkt bakom två
Silent Series R2-äktar håller samtliga komponenter i ditt system vid en optimal arbetstemperatur. Oanvända hårddiskhållare kan enkelt tas bort för att få plats med långa grakkort,
förbättrat luftöde eller för att få mer plats för kabeldragning.
Node 304 för dessutom vidare arvet från Fractal Design med en minimalistisk skandinavisk
design kombinerad med maximal funktionalitet.
Installation / Instruktioner
För att dra full nytta av funktioner och fördelar i din Node 304, var god läs följande information och instruktioner.
Installation av system
Följande steg är rekommenderade vid installation av komponenter i Node 304:
1. Skruva loss och avlägsna de tre hårddiskhållarna.
2. Montera moderkortet genom att använda de medföljande moderkortsdistanser och
skruvar.
3. Installera nätaggregatet, använd medföljande skruvar. (Se mer detaljerad beskrivning
nedan).
4. Montera grakkortet, om ett sådant används. (Se mer detaljerad beskrivning nedan).
5. Fäst hårdiskarna i de vita hårddiskhållarna med medföljande skruvar.
6. Montera tillbaks hårddiskhållarna i chassit.
7. Koppla ihop nödvändiga kablar från nätaggregat och moderkort till dina komponenter.
8. Slutligen, sätt i chassits förlängningssladd i nätaggregatet.
Installation av hårddiskar
Installation av hårdiskar i en Node 304 görs på liknande sätt som i en konventionellt datorchassi:
1. Montera loss hårdiskhållarna från chassit genom att skruva ut skruven i framkant med
en stjärnmejsel och genom att lossa de två tumskruvarna baktill.
2. Montera hårddisken med kontakterna riktade bakåt, använd de skruvar som följde med
i tillbehörsboxen.
3. Sätt tillbaka hårdiskhållaren och skruva fast den innan kablar ansluts till nätaggregat
och moderkort. Oanvända hårdiskållare kan behållas utanför chassit för ökat luftöde.
28
Page 32

Fractal Design
Installation av nätaggregat
Nätaggregatet monteras enklast efter det att moderkortet installerats:
1. Skjut in nätaggregatet i chassit med äkten vänd nedåt.
2. Skruva fast nätaggregatet med de tre skruvar som följde med i tillbehörsboxen.
3. Sätt i den förinstallerade förlängningsladden i ditt nätaggregat.
4. Slutligen, sätt i sladden som kom med nätaggregatet på chassits baksida och slå på
nätaggregatet.
Node 304 är kompatibelt med ATX nätaggregat som är upp till 160 mm långa. Nätaggregat
med modulära anslutningar baktill behöver vanligtvis vara kortare än 160 mm för att få plats
i kombination med ett långt grakkort.
Installation av grakkort
Node 304 är designad med de mest kraftfulla komponenter i åtanke. För att kunna installera
ett långt grakkort måste först en av hårdiskhållarna, på samma sida som moderkortets PCI
anslutning, monteras bort. När denna tagits bort kan grakkortet monteras på moderkortet.
Node 304 är kompatibel med grakkort upp till 310mm långa när en hårddiskhållare är borttagen. Var god notera att grakkort längre än 170mm kommer få problem att monteras ihop
med nätaggregat som är längre än 160mm.
Rengöring av äktlter
Filter nns monterade vid alla luftintag för att minimera mängden damm som tar sig in i
chassit. För att säkerställa en bra temperatur i chassit var god rengör lterna med jämna
mellanrum:
• För att rengöra ltret i botten, för ltret bakåt tills det lossnar; ta bort damm som fastnat
i ltret.
• För att rengöra ltret i fronten måste först frontpanelen tas bort genom att dra den rakt
ut, man kan använda nederdelen på fronten som handtag. Var försiktig så att inga
kablar skadas när du gör detta. När frontpanelen är bortagen kan du ta loss frontltret
genom att trycka på de två låsmekanismerna. Rengör sedan ltret och sätt tillbaks lter
och front i omvänd ordning.
• Per konstruktion så går inte ltret i sidan på chassit tas bort, detta rengörs enklast när
topdelen på chassit är avmonterad.
Fläktkontrollern
Fläktkontrollern är placerad på chassits baksida, över PCI-infästningarna. Kontrollern har
tre lägen: låg hastighet (5V), medelhög hastighet (7V) och full hastighet (12V).
29
Page 33

Node 304
Begränsad garanti och ansvarsbegränsningar
Node 304 datorchaasin från Fractal Design täcks av en tjugofyra (24) månaders garanti från
leveransen till första slutanvändaren, mot defekter i material och/eller tillverkning. Under
denna period med begränsad garanti kommer produkterna att antingen repareras eller bytas
enligt Fractal Designs gottnnande. Garantianspråk måste returneras till ombudet som sålde
produkten, med försändelsen förskottsbetald.
Garantin täcker inte:
• Produkter som har använts för uthyrning, felanvänts, hanterats vårdslöst eller använts
på ett sådant sätt att det inte är i överensstämmelse med den angivna avsedda användningen.
• Produkter som skadats genom naturfenomen inklusive, men inte begränsat till,
åskväder, brand, översvämning och jordbävning.
• Produkter vars serienummer och/eller garantietikett har manipulerats eller tagits bort.
Produktsupport
För produktsupport ska följande kontaktinformation användas:
Nordamerika: support.america@fractal-design.com
DACH-länderna (Tyskland-Österrike-Schweiz): support.dach@fractal-design.com
Kina: support.china@fractal-design.com
Europa och/eller övriga världen: support@fractal-design.com
30
Page 34

Fractal Design
31
www.fractal-design.com
 Loading...