

Page 1
AR Games
You can start AR Games from the HOME Menu. These games use AR Cards that are included
with your Nintendo 3DS system. Using the outer cameras, the system can read the AR
Cards and make magic happen! AR Cards display game stages or characters that can be
recognized by the cameras.
Playing AR Card games
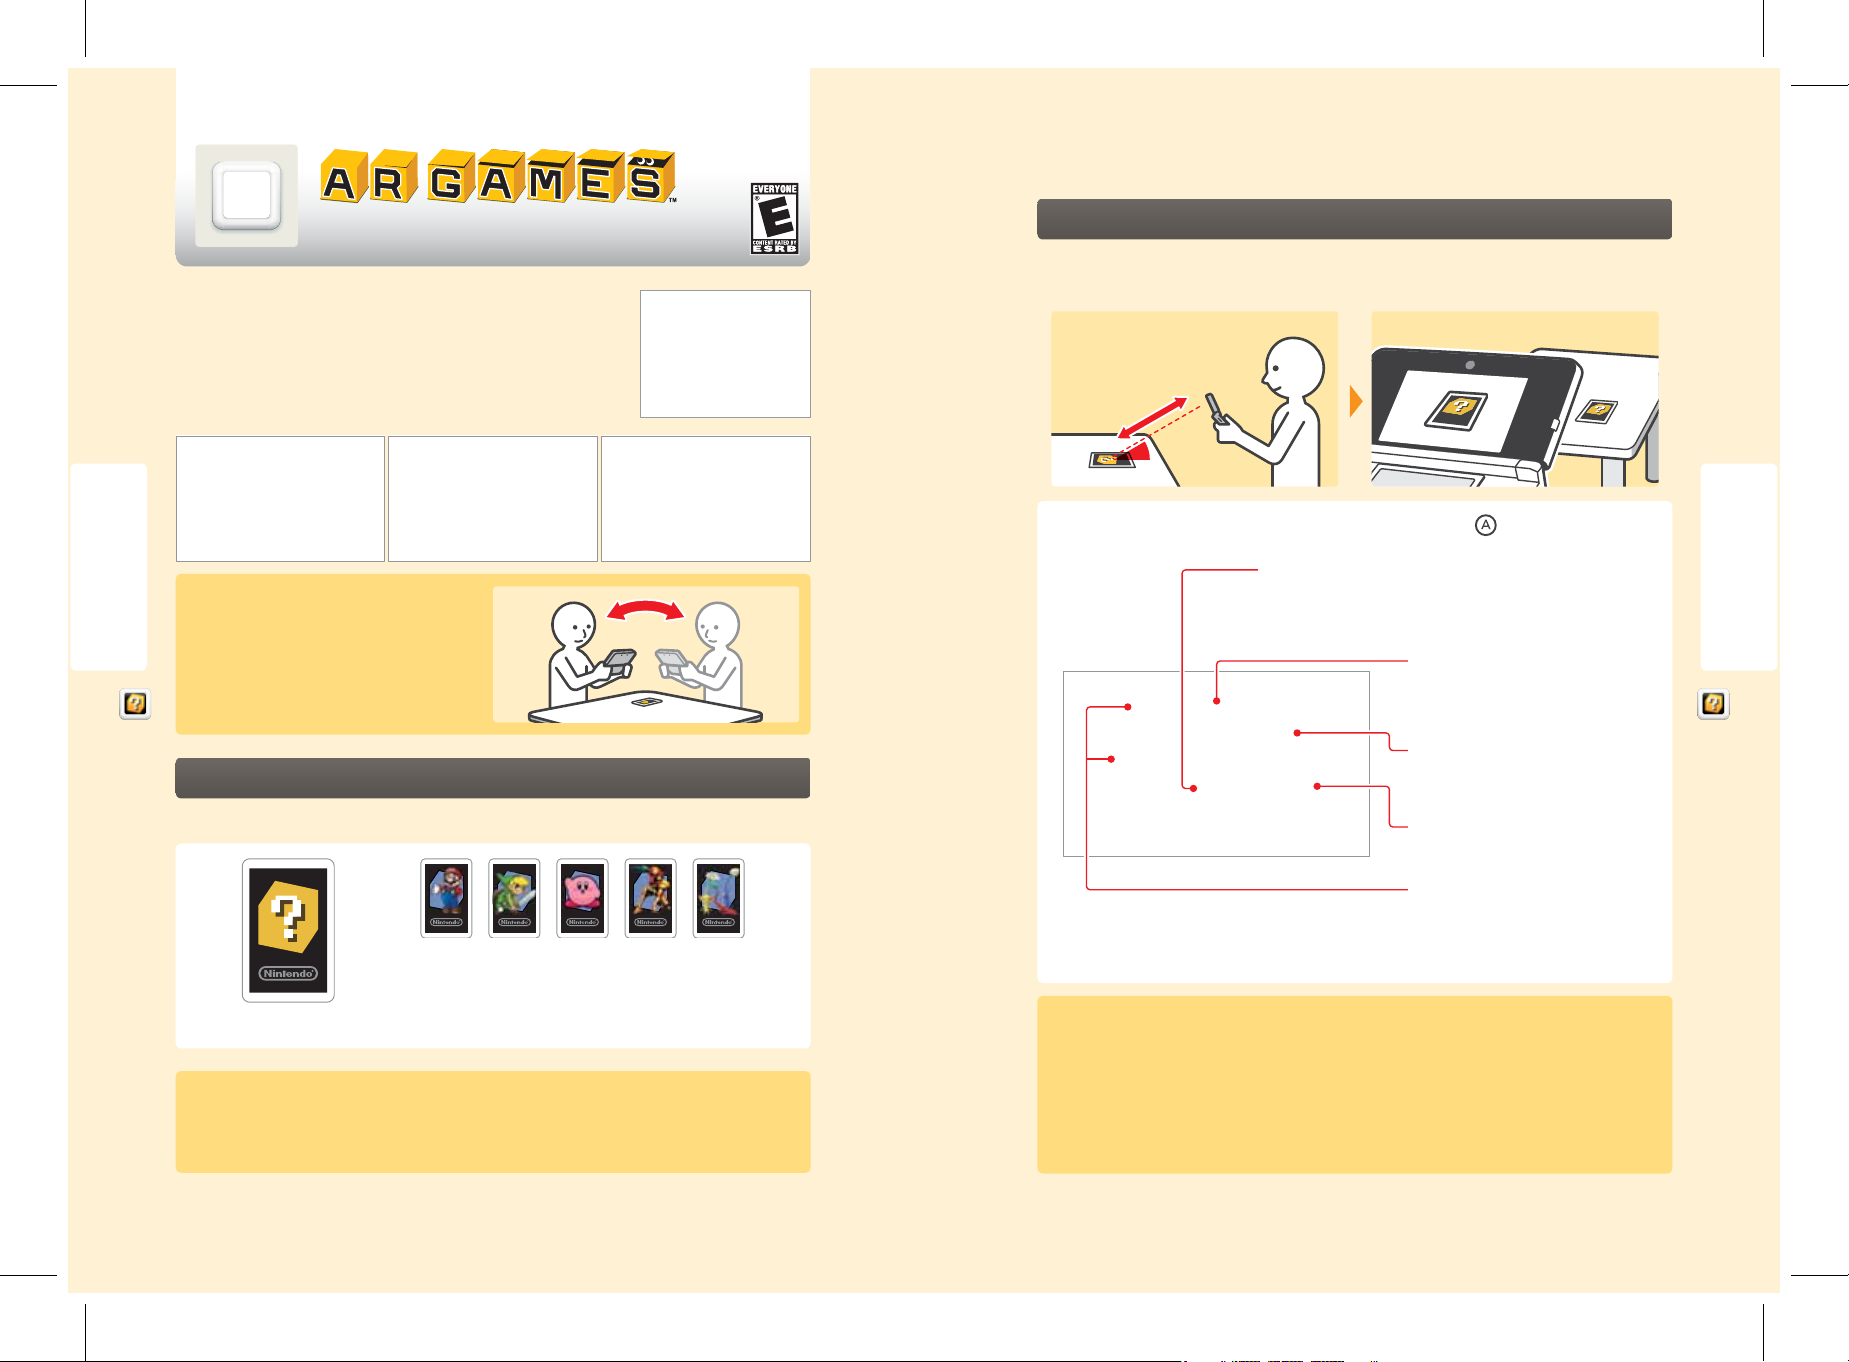
Place the “?” AR Card on a at, well-lit surface and keep it within the view of your system’s outer cameras at the correct distance
and angle, as described below. Follow the directions, and an on-screen menu should appear above the image of the AR Card.
Keep the same distance and angle during
game play.
14” (35cm)
30˚
Aim the cameras at the AR Card.
Using Software
Check your surroundings...
When playing AR Card games, you may have to move
around the area while holding the Nintendo 3DS system.
Make sure you have enough room, and hold the system
rmly with both hands while playing.
AR Cards
Your Nintendo 3DS system includes six AR Cards. You use the “?” AR card to start game play.
AR Games
“?” AR Card
IMPORTANT: If an AR Card becomes damaged or dirty, the cameras may not be able to read it.
If you lose an AR Card, or if it becomes unreadable, you can download AR Card images from support.nintendo.com/ARcards
and then print the images in color and use them as replacement cards.
Character AR Cards
Use these cards when playing Star Pics (see next page).
NOTE: If you are not playing Star Pics, do not use these cards and the “?” AR
Card together.
Aim the crosshair at the game you would like to play and then press
to make your selection.
Archery
Shoot the targets that appear on the screen.
Complete this to unlock Mii Pics and AR Shot. When you complete AR shot,
Menu screen
something more will be unlocked!
Star Pics
If you place a character AR Card in front of the
cameras, the character will appear and you can
take a photo.
Mii Pics
Arrange your Mii in dierent poses and take
photos of your Mii in dierent settings!
AR Shot
Hit the ball and try to move it into the goal.
???
These games are unlocked when you have
cleared AR Shot.
NOTE: Press START to exit the game and return to the menu screen.
If an AR Card isn’t recognized by the cameras, check the following conditions:
• Check the distance and the angle. The cameras can’t recognize the card if the distance is too close.
• Make sure the card is centered on the screen.
• Make sure your game play area is well-lit.
• Make sure a bright light source is not reecting o the surface of the card.
• Make sure the camera lenses are clean.
• Make sure the card is not damaged or dirty.
Using Software
AR Games
54
55
Page 2
FACE RAIDERS
Face Raiders
Playing Face Raiders
You can start Face Raiders from the HOME Menu. Face Raiders puts your face and your
friends’ faces in the game! You will need to take at least one face photo to play (see page 42
for more information on taking photos).
Using Software
Face Raiders
Check your surroundings...
In Face Raiders, you will move around with the Nintendo
3DS system and aim at the targets. Make sure you have
enough room to move around freely, and hold the system
rmly with both hands while playing.
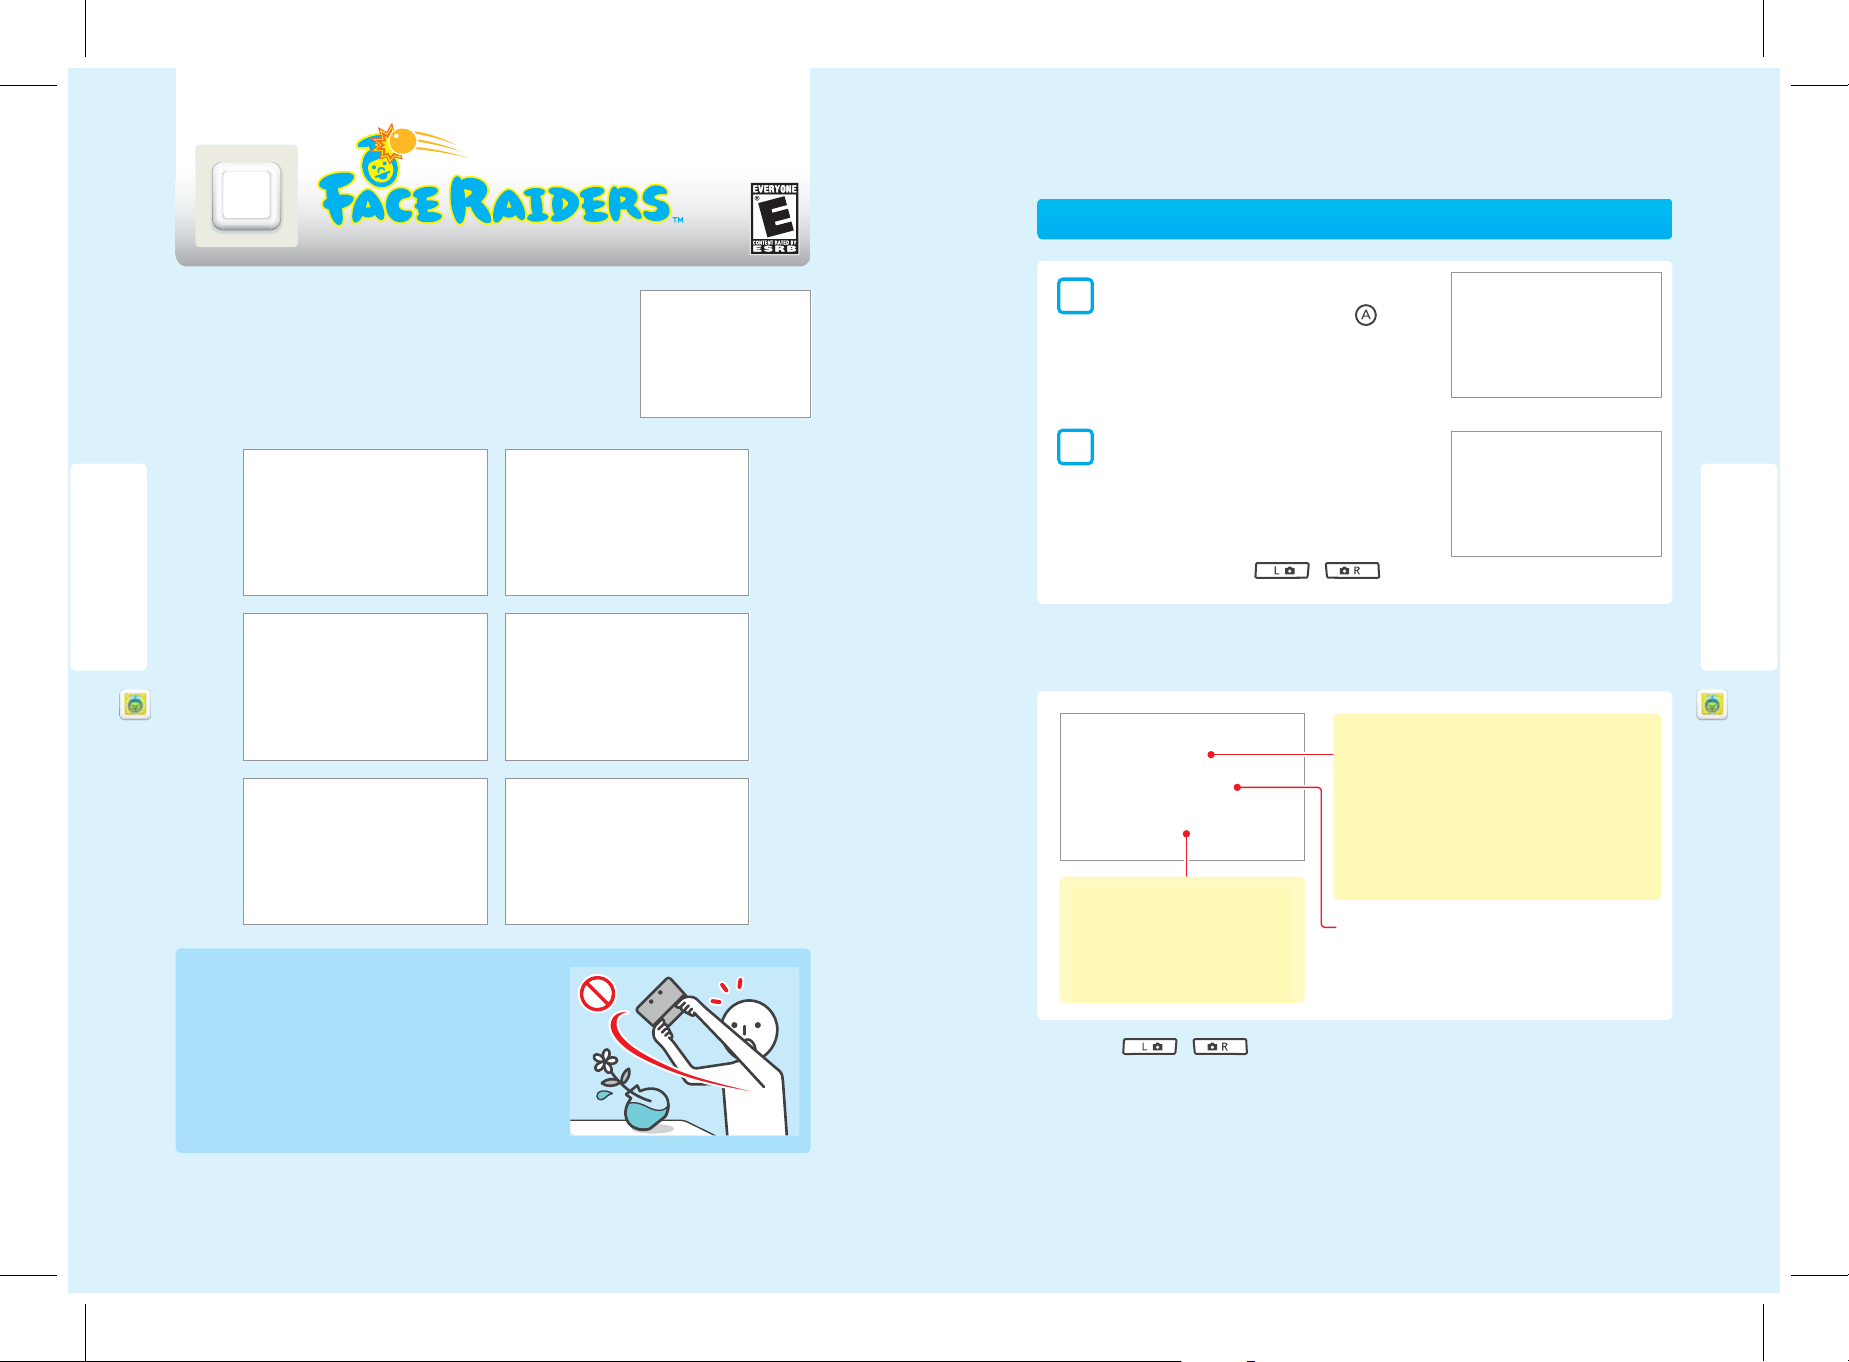
Select Play.
1
Choose an item using the Circle Pad and then press .
Take a photo of a face and begin the game.
2
• When taking a face photo, a guide will be displayed. Line up
the face with the guide on the upper screen. When the face is
recognized, the game will begin. (For tips on facial recognition,
see page 96.)
• If the face is not automatically recognized, you can manually
take the photo by pressing
or
.
Clearing a game and saving photos
When you complete a game, you can save the face photo. The more face photos you save, the more levels you can open up.
Play
Select a previously saved face and begin a game. You can also
take a new face photo and then begin the game.
Face photos taken with Nintendo 3DS Camera may also
randomly appear in the game.
NOTE: If you have a photo that you do not want used in Face
Face Collection
You can view, edit, and delete previously
saved faces.
NOTE: To edit, select a face and then select
Face Settings.
• You can press
can view later in the Nintendo 3DS Camera application.
• To end a stage and return to the stage selection screen, rst press START to suspend your game, then select Quit.
• When you reach the maximum number of face photos, you can delete some photos to make room for new face photos.
or
as you progress through the game to save an image of the upper screen, which you
Raiders, you can delete the photo.
Show a Friend!
Choose among serveral short stages designed to quickly
introduce your friends to the game. Take photos of each
other’s faces and begin the game.
Using Software
Face Raiders
56
57
Page 3
Activity Log
Software Library
The Activity Log can be started from the Nintendo 3DS HOME Menu.
This software allows you to keep track of the number of steps you have
taken when you take the Nintendo 3DS with you. It also records your
play time on software titles.
NOTE: Steps are counted when the system is on and closed.
Using Software
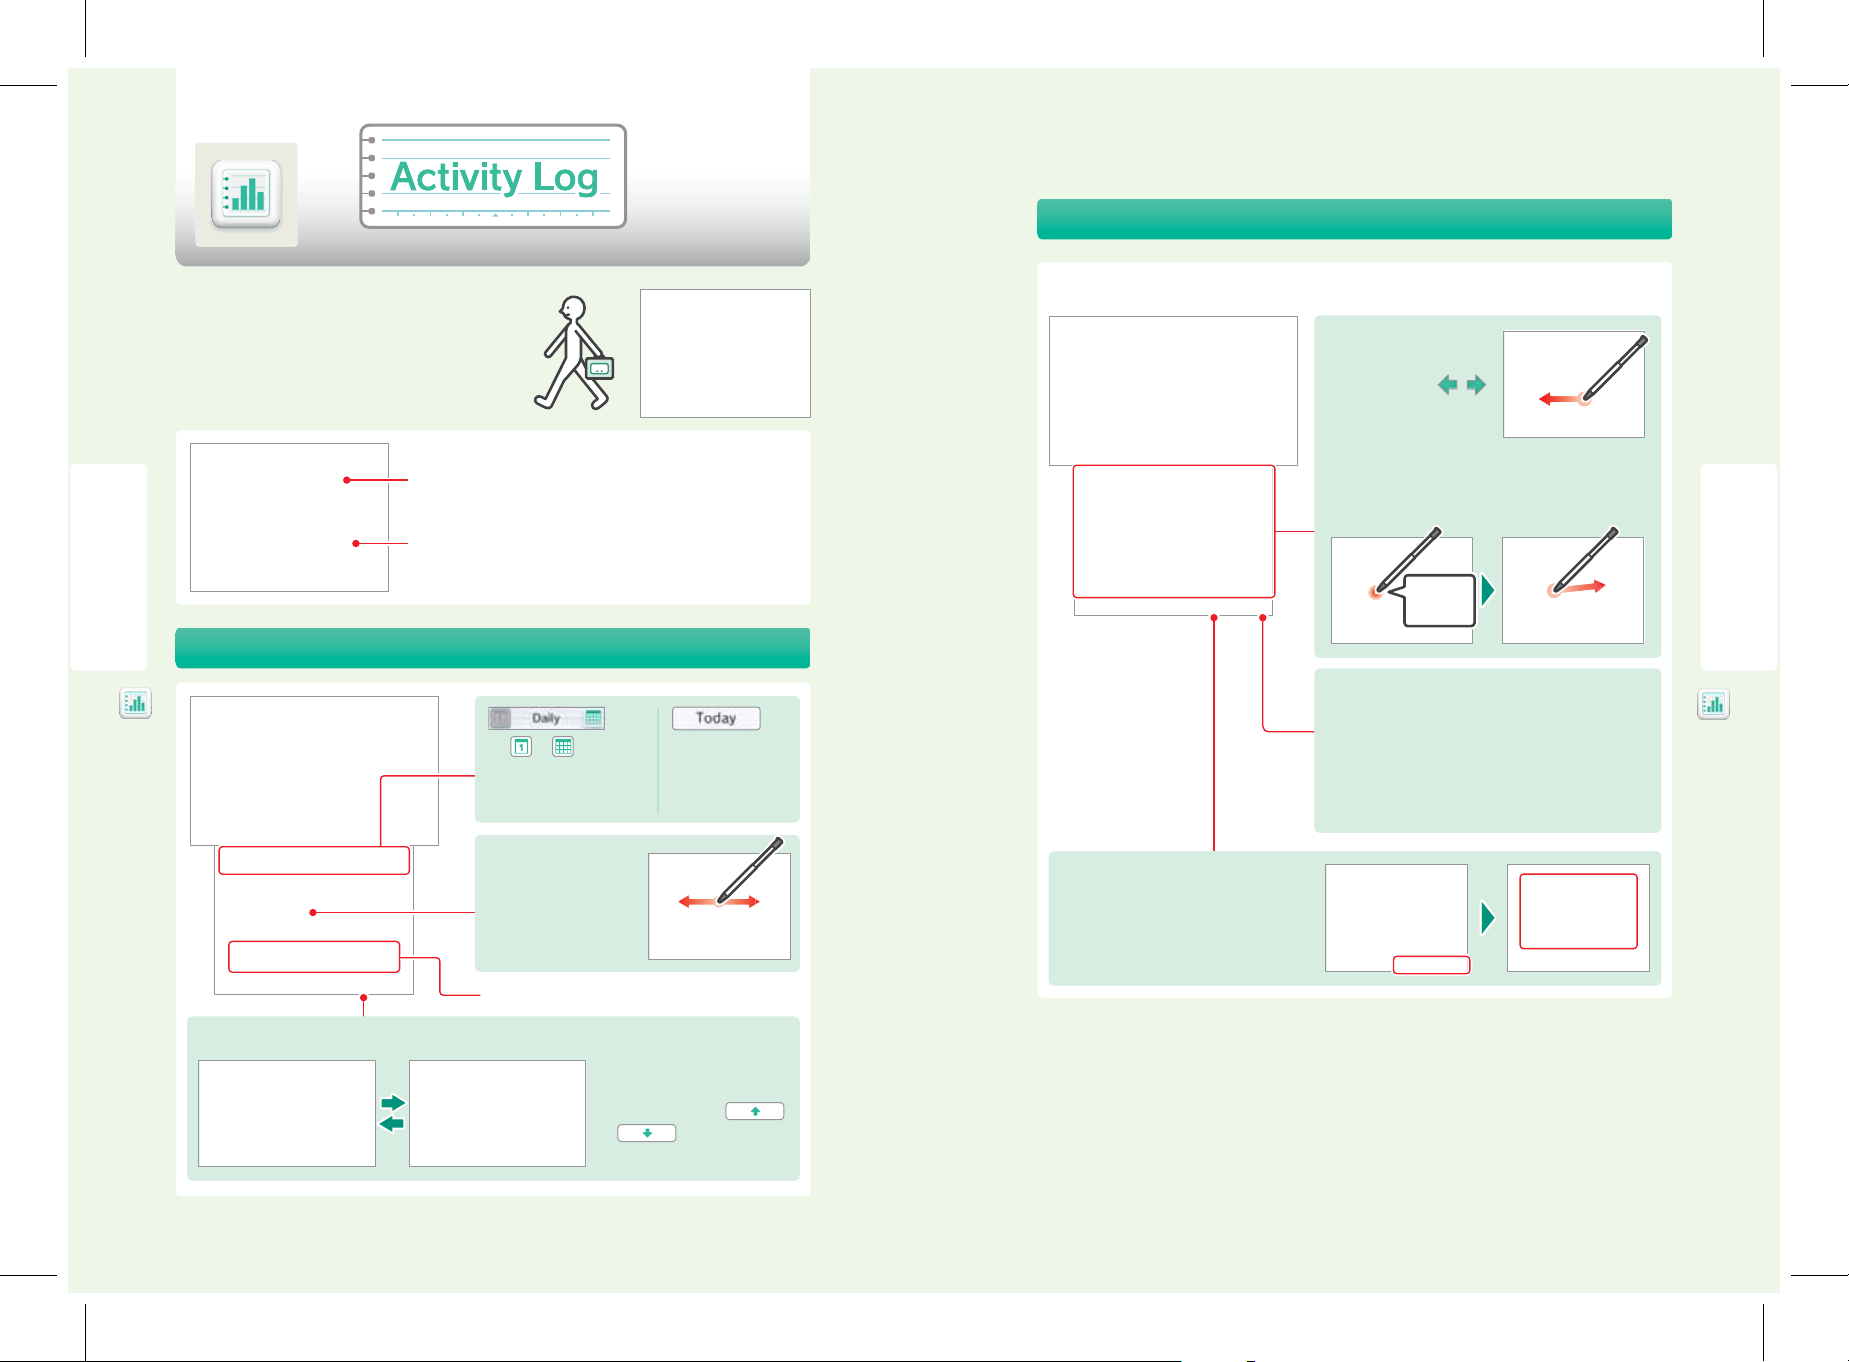
Daily Records
Activity Log
Select to view the number of steps you have taken when carrying the
system with you and the number of hours you have played software.
Select to view a list of the software titles you have played, the number of
times you have played them, and your play times for each title.
Tap
or
to change
the time scale that is displayed
between days, weeks, months,
and years.
Tap this option to
display the records for
the day, week, month
or year.
Control dial
Slide the dial left or right to
change the displayed day,
week, month, or year.
Tap a software icon to display information about that software on the upper screen.
Turning pages
To turn pages, slide the stylus to
the left or right, or tap / .
Moving icons
Tap and hold the stylus on an icon, and then you can slide it to a
new position.
Tap, hold,
then slide
Deleting icons
Tap here to delete the selected icon.
• Icons displayed in the Daily Log will not be deleted.
• If you play the same software again after deleting its icon, your
playing times and other information from before deleting its icon
will be retained and added to its displayed gures.
Displaying rankings
Tap here to see various rankings of all the software you have played to date. To change the
ranking being displayed, tap Change Order.
Using Software
Activity Log
Switch between graph display or activity lists.
58
Switch between step count and play time.
Activity lists will display playing times
for each software title.
Scroll the list by tapping
or
on the lower screen.
• The number of steps counted will depend on the conditions under which you use your system and may vary from the actual
number of steps taken. For a more accurate step count, you can carry the system in something connected to your waist, such
as a hip pouch.
• You can record up to 256 dierent software titles. If this number is exceeded, records will be deleted, beginning with the oldest.
• If you play a Nintendo DS or Nintendo DSi software title continuously without exiting it, you can store up to seven days’ worth
of step counts and playing times.
• When the log is full, step counts and playing times are deleted beginning from the oldest rst. For step counts, you can store
up to about 10 years’ worth of data, depending on how you are using software applications.
59
Page 4
Download Play
Nintendo eShop
With only a single copy of a Download Play-compatible software title, you can play
multiplayer games with other Nintendo 3DS systems, and send and receive demos of some
software titles through local wireless game play. (This feature is not supported through
Internet online play.)
Download Play is compatible with Nintendo DSi XL™, Nintendo DSi™, Nintendo DS™ Lite,
and Nintendo DS™ systems.
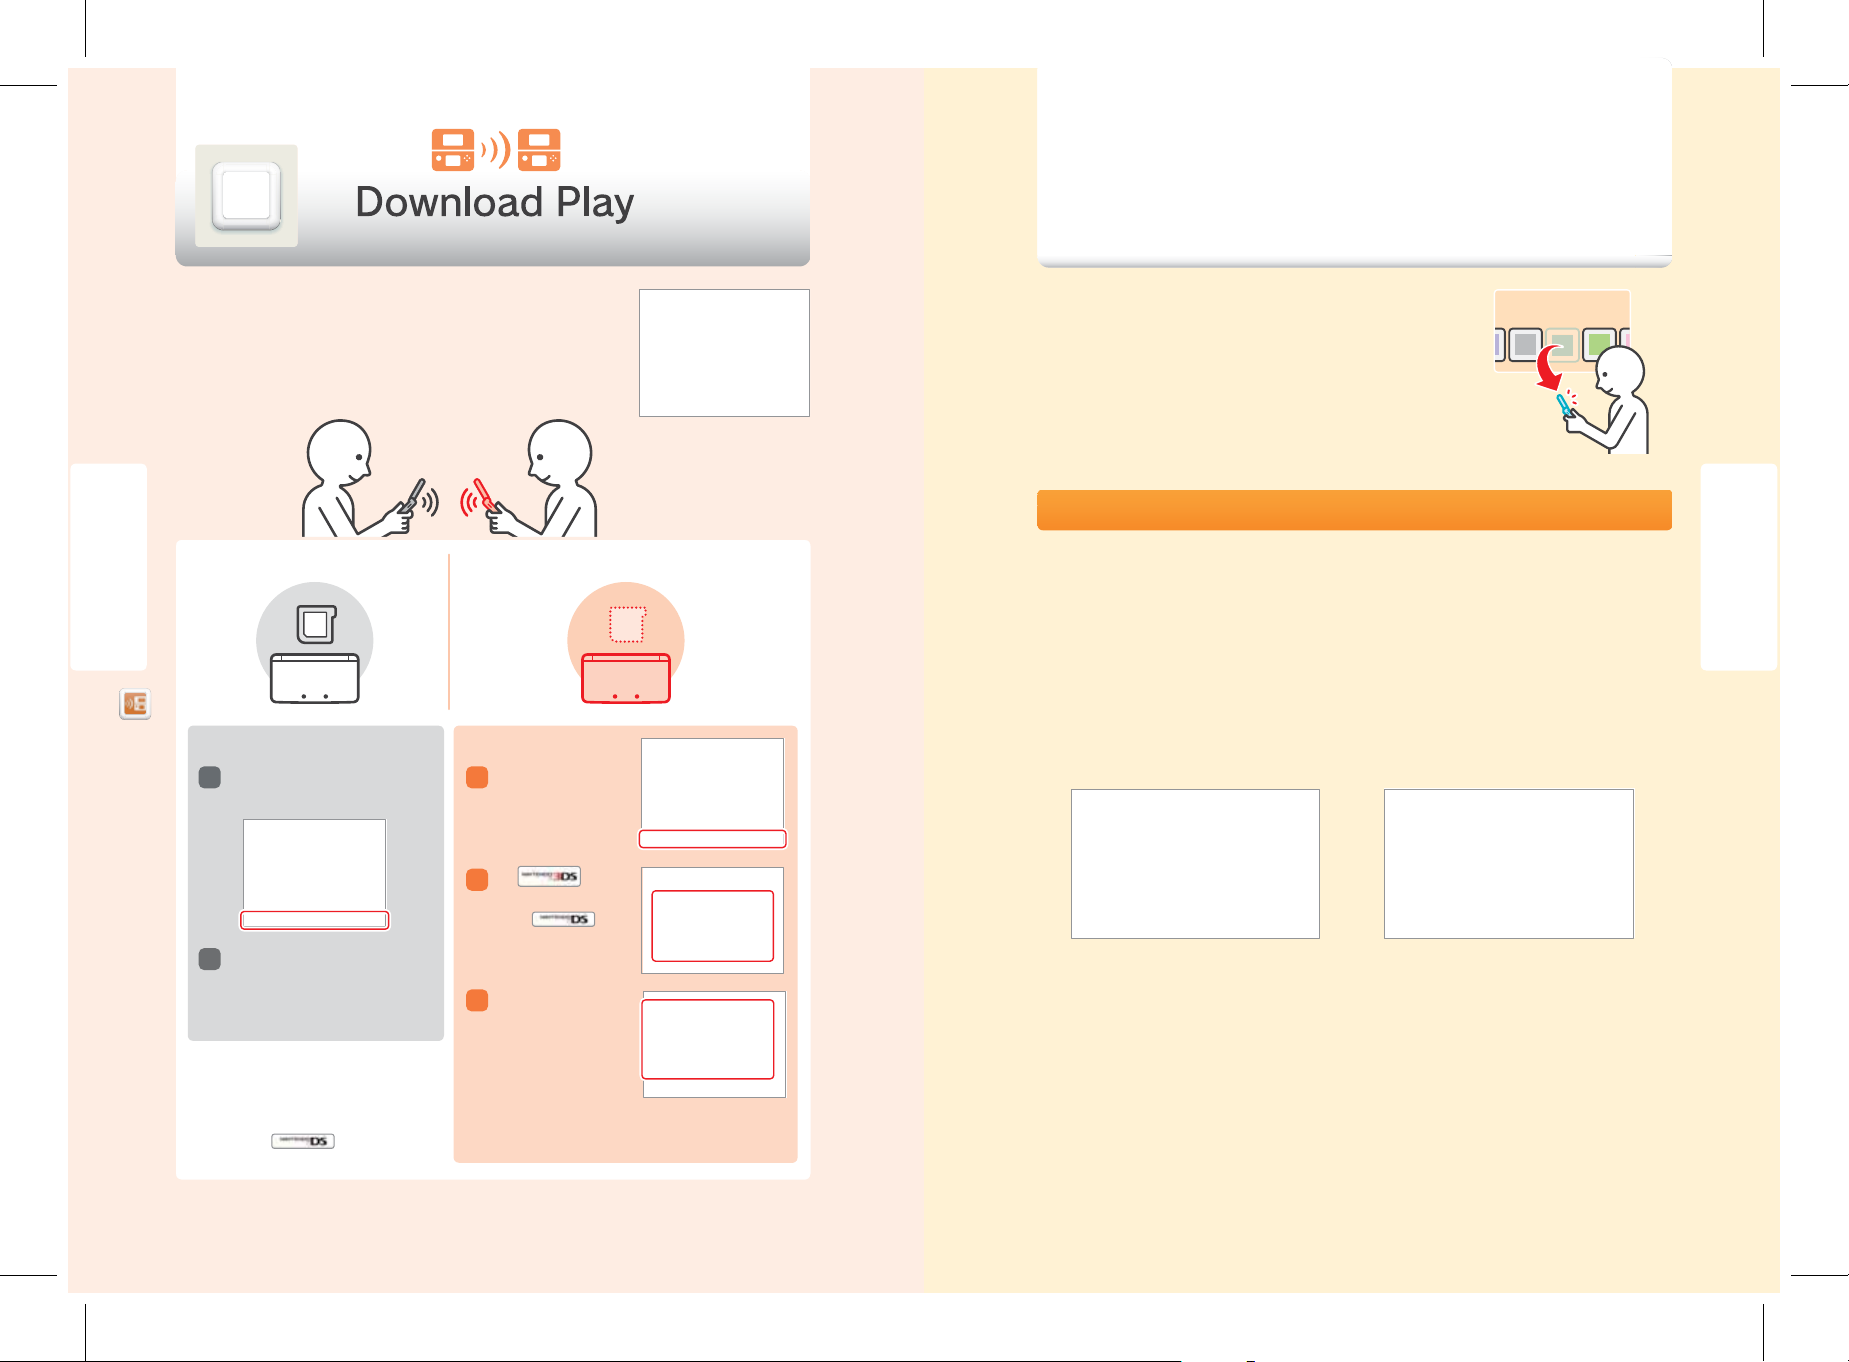
Operations on sending system (Host)
Using Software
Steps for host system
Start a Download Play-compatible title
1
from the HOME Menu.
Operations on receiving system (Client)
Steps for client system
Start Download Play from
1
the HOME Menu.
You can connect to Nintendo eShop through the Internet and download Nintendo 3DS
Download Software and Nintendo DSiWare™, as well as classic Virtual Console™ software.
NOTE: A broadband wireless network connection is required to connect to the Internet.
See page 63 for more information on setting up a connection.
A System Update is required to add the Nintendo eShop feature to your system.
(See page 80 for more information on performing a System Update. ) After the update,
a Nintendo eShop icon will be added to your HOME Menu. Tap the icon and then select
Manual from the HOME Menu to read the built-in manal for more information.
Nintendo eShop
Downloadable software
Nintendo 3DS Download Software
Some Nintendo 3DS software is available exclusively through Nintendo eShop.
You can save a maximum of 300 Nintendo 3DS Download Software titles and Virtual Console titles on an SD Card. If there is insufcient space on the SD Card, you may need to create some blocks of free space by deleting data in Data Management (see page 78)
or moving data to a high capacity SDHC Card (see page 24).
Virtual Console
With the Virtual Console service you can download games that were originally released on platforms prior to Nintendo DS, such as
Game Boy™ and Game Boy™ Color.
Using Software
Nintendo eShop
Download Play
Review the instruction booklet for the
2
game title you are playing. Steps may
vary depending on the type of software
you are using.
NOTE: Nintendo DS/Nintendo DSi titles are
stretched to t the Nintendo 3DS screen. To display
the game at the original screen size ratio, hold
down START or SELECT while tapping Start on the
Host system and
60
on the Client system.
Tap
2
Nintendo 3DS software,
or tap
to receive Nintendo DS or
Nintendo DSi software.
3
A list of available titles to
download will appear in
the lower screen. Tap the
title you want to receive.
Review the instruction
booklet for the game title
you are playing. Steps may vary depending on the type of
software you are using.
to receive
Nintendo DSiWare
You can also download Nintendo DSiWare from Nintendo eShop. Nintendo DSiWare was originally released for the Nintendo DSi
system. There are many types of software titles available from Nintendo eShop, from games to useful tools and other applications.
You can save a maximum of 40 Nintendo DSiWare titles. If there is insucient space in System Memory, you may need to create
some blocks of free space by deleting data or moving data to an SD Card in Data Management (see page 78).
NOTE: To play Nintendo DSiWare saved on an SD Card, you must rst transfer it into the Nintendo 3DS System Memory.
61
Page 5
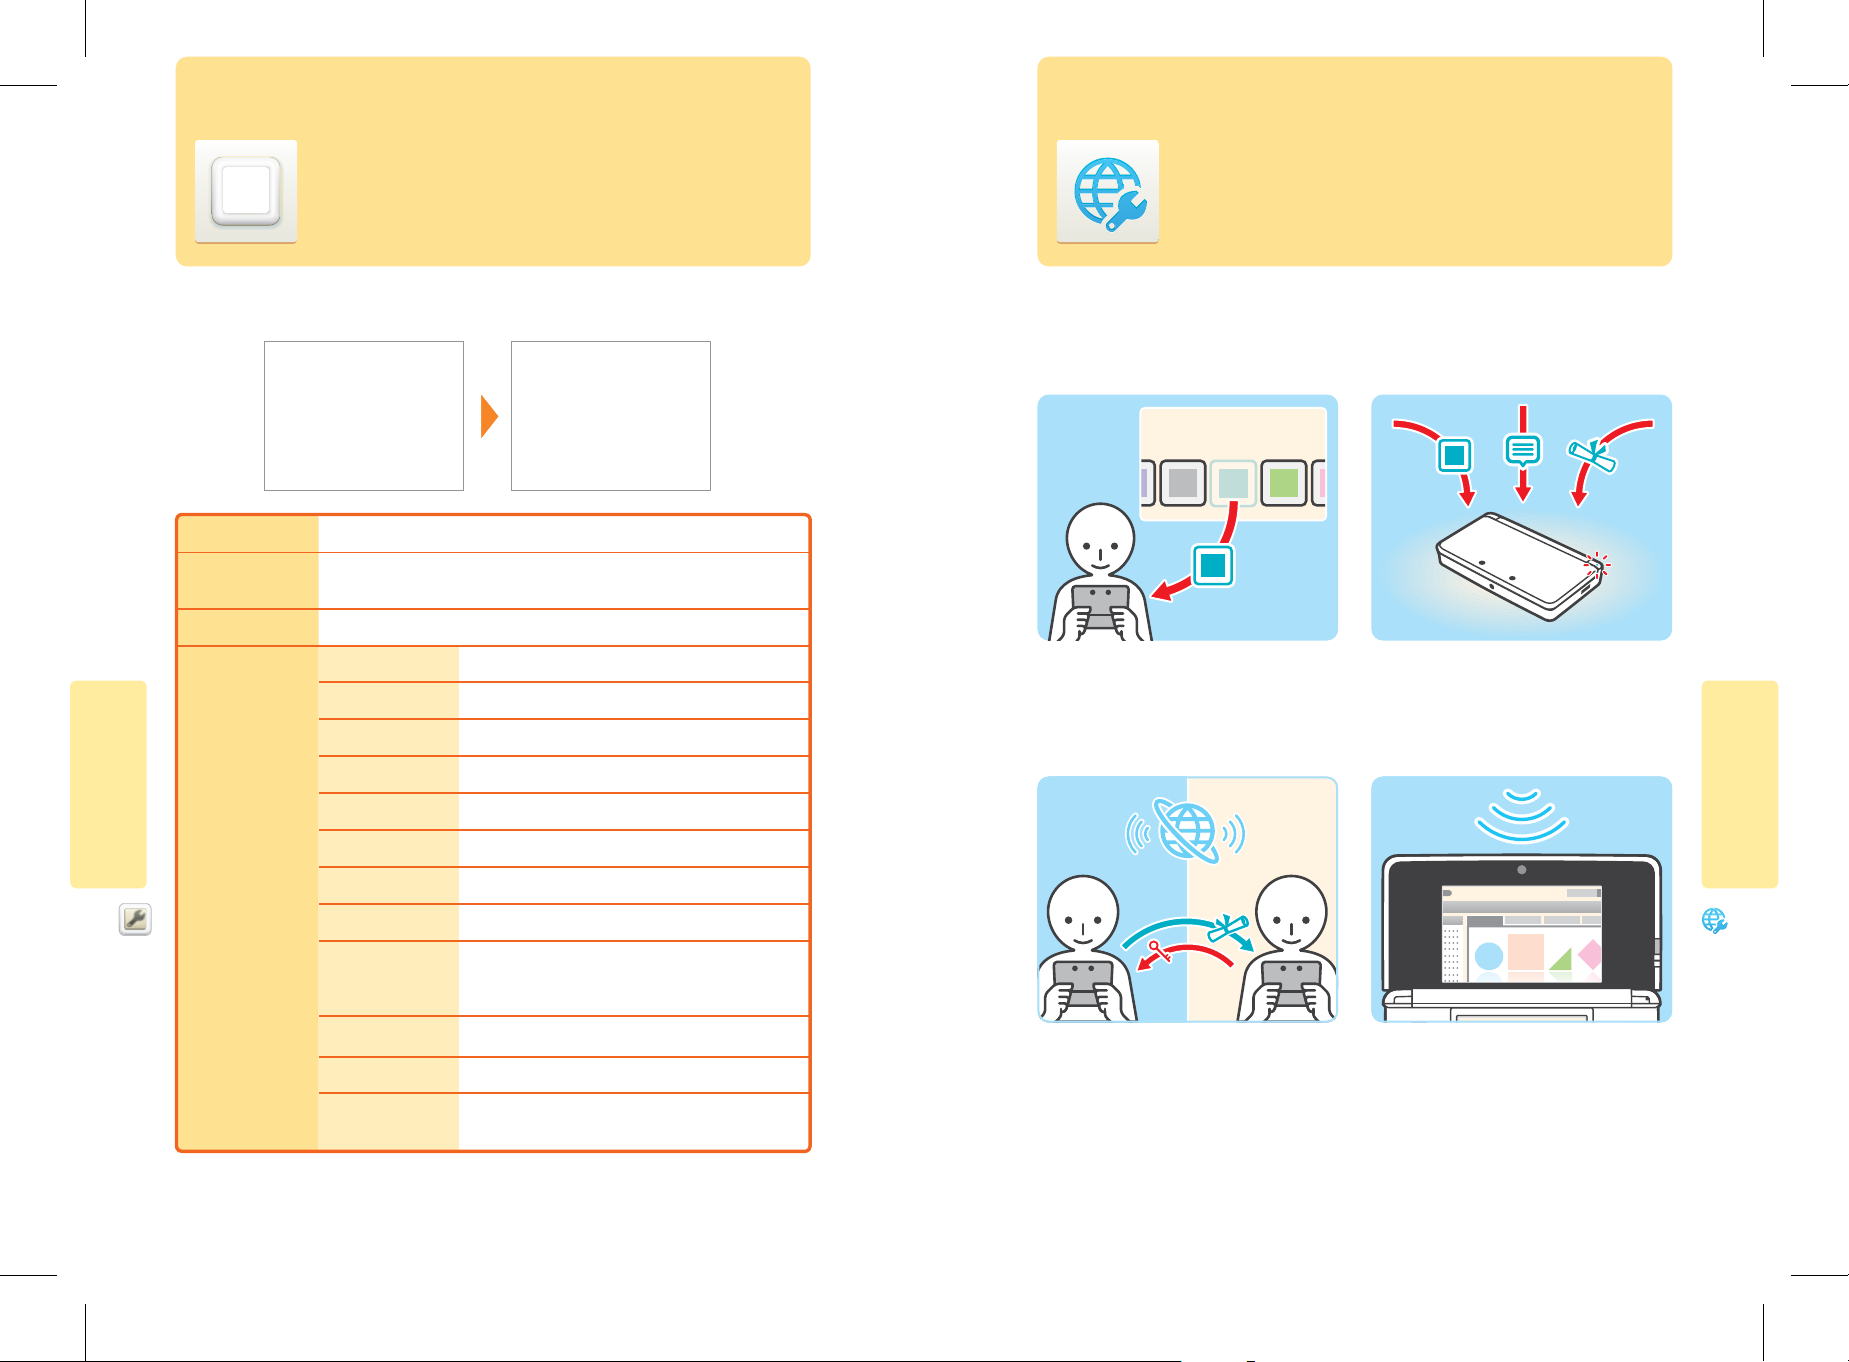
Internet SettingsSystem Settings
From System Settings, you can congure various settings for the Nintendo 3DS system, such as Internet Settings and Parental
Controls. You can access System Settings from the HOME Menu.
Internet Settings Congure Internet connection settings (page 65).
Parental Controls Restrict a user’s ability to download games and use certain features, such as the display of
3D images (page 74).
Data Management Manage downloaded software, StreetPass data, and blocked-user settings (page 78).
Other Settings Prole Set your user name and birthday (page 81).
Date & Time Set the date and time (page 82).
Touch Screen Calibrate the Touch Screen (page 82).
3D Screen Check Check the 3D Screen viewing guidelines (page 83).
Sound Change the sound settings (page 83).
System Conguration
Mic Test Conrm that the microphone works properly (page 83).
Outer Cameras Calibrate the outer cameras (page 84).
From Internet Settings, you can congure your Nintendo 3DS system to connect to the Internet. Once you have connected to the
Internet and accepted the Nintendo 3DS Service User Agreement, you can use features such as Nintendo eShop, SpotPass, Internet
Browser, and wireless game play over the Internet.
Nintendo eShop
SpotPass
Nintendo eShop
You can download software such as Nintendo 3DS
Download Software and Nintendo DSiWare.
NOTE: Your Nintendo 3DS system may require a system
update to use this software.
Wireless Internet game play
You can receive information or system updates even during game play or while the system is in Sleep Mode.
Internet Browser
System Conguration
Internet Settings
Circle Pad Calibrate the Circle Pad (page 86).
System Transfer Transfer software and Internet settings to another Nintendo 3DS
system (page 86). A system update may be required to use
this feature.
Language Set the system language that text messages appear in (see page 87).
System Update Update the system and built-in software (page 87).
Format System Memory Erase all software, save data, and pictures saved on the system
(page 88).
System Settings
62
You can wirelessly connect to the Internet to play
specially designed games against people from all over
the world.
NOTE: The ability to play games over the Internet depends on the software title. See the instruction manual
for the software you are using for more information.
You can easily view web pages on the Internet.
NOTE: Your Nintendo 3DS system may require a
system update to use this software.
63
Page 6
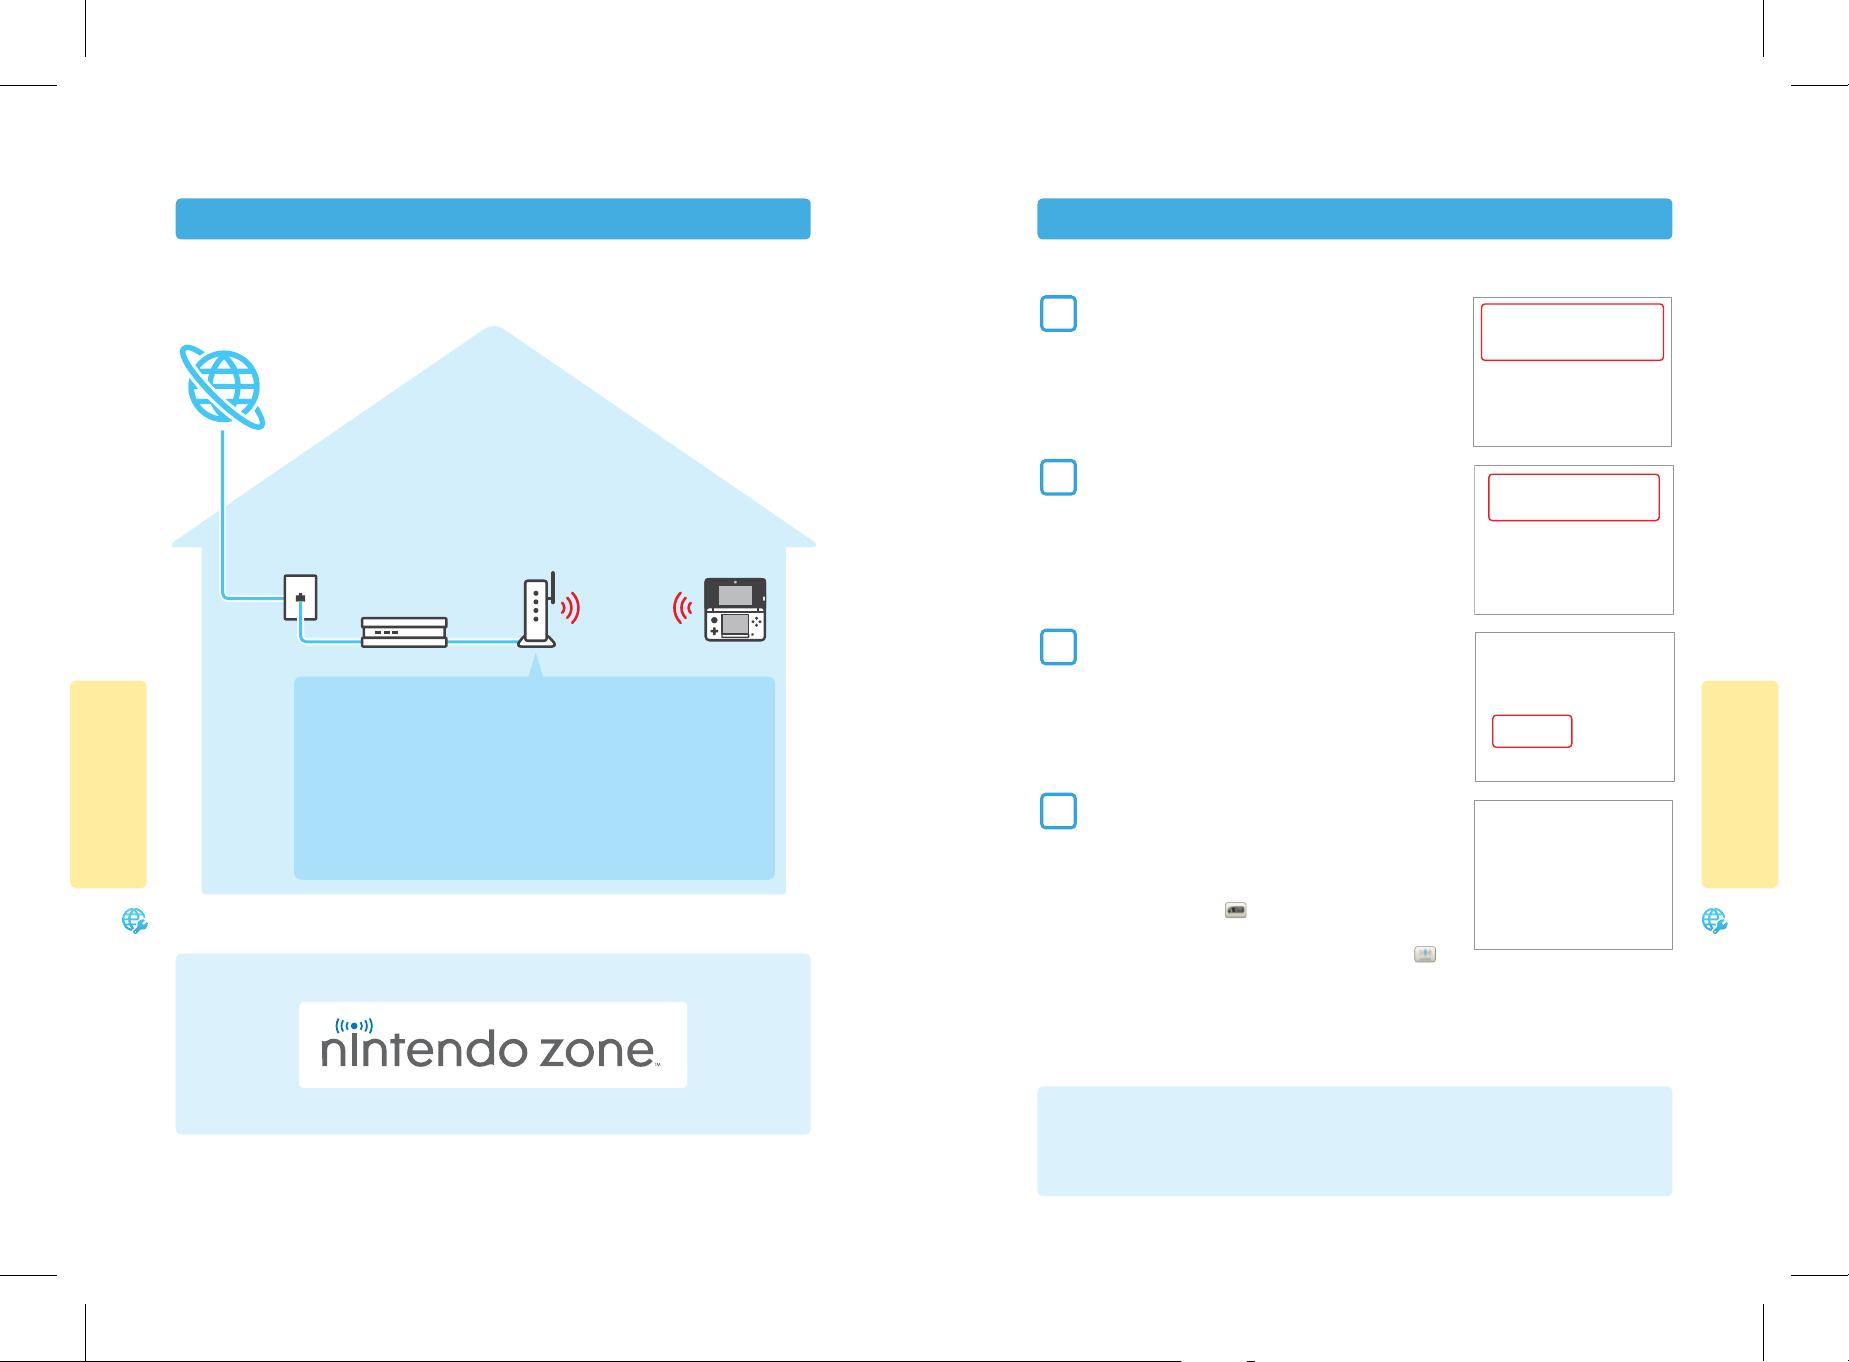
Internet connection requirements
Congure your Internet settings
To connect your Nintendo 3DS system to the Internet, you will need an Internet connection that supports wireless communication.
(If you haven’t already set up a wireless network, you may also need a computer to congure a wireless access point such as a
wireless router (sold separately).
Internet
Home Internet
environment
(May include a PC)
Broadband
Internet line
Cable modem,
DSL modem or
Wireless
communication
other device
Wireless access point such as a wireless router (sold separately)
• The Nintendo 3DS is compatible with 802.11g and 802.11b. You should use wireless
router that is compatible with these wireless standards.
• For information on nding a router, or on accessing and locating security settings on the
router you have, visit support.nintendo.com/nintendo3DSrouter.
System Conguration
• Setup is easy if your router supports WPS (Wi-Fi Protected Setup™) or AOSS. Check the
documentation that came with your router to see if it includes one of these features.
If you have no Internet connection...
Within a Nintendo Zone location, you can connect to the Internet without any special settings or equipment.
After conguring the devices necessary for connecting to the Internet, tap Internet Settings in the System Settings menu.
Tap Connection Settings.
1
Tap New Connection.
2
NOTE: If you have already created connection settings that were unable to
connect to the Internet, delete these rst before conguring a new one.
Tap Manual Setup.
3
NOTE: See the information at the bottom of this page for information on the
Tutorial option.
Tap the setup method that matches your environment:
4
• Quickest setup method: If you know your access point name, tap Search
for Access Point, see page 66.
• If you know that your access point supports the Wi-Fi Protected Setup (WPS)
method for conguration, tap
• If you know that your access point is compatible with the proprietary AOSS
standard (found on most routers sold under the Bualo™ brand), tap
(AOSS), see page 69.
• Congure with Nintendo Wi-Fi USB Connector
NOTE: This product is no longer available. If you already own this product and would like more information about using
it for your wireless connection, visit support.nintendo.com.
• Congure with Manual Setup, see page 71.
(WPS), see page 68.
System Conguration
Internet Settings
For more information on where to nd Nintendo Zone locations, visit www.nintendo.com.
Internet Settings
64
Choose Tutorial for a guided setup.
In step 3 above, tap Tutorial for help determining the best setup method. Follow the on-screen directions to select the
best Internet connection method. NOTE: If you need additional guidance during setup, tap the helper icon at the bottom
of the screen.
65
Page 7
Setup using Search for Access Point
If you know the name of your wireless network (also known as an access point), and aren’t using WPS or AOSS to congure your
system, follow these steps:
If you are using the guided setup Tutorial and selected No/I don’t know, proceed to step 2.
Tap Search for Access Point.
1
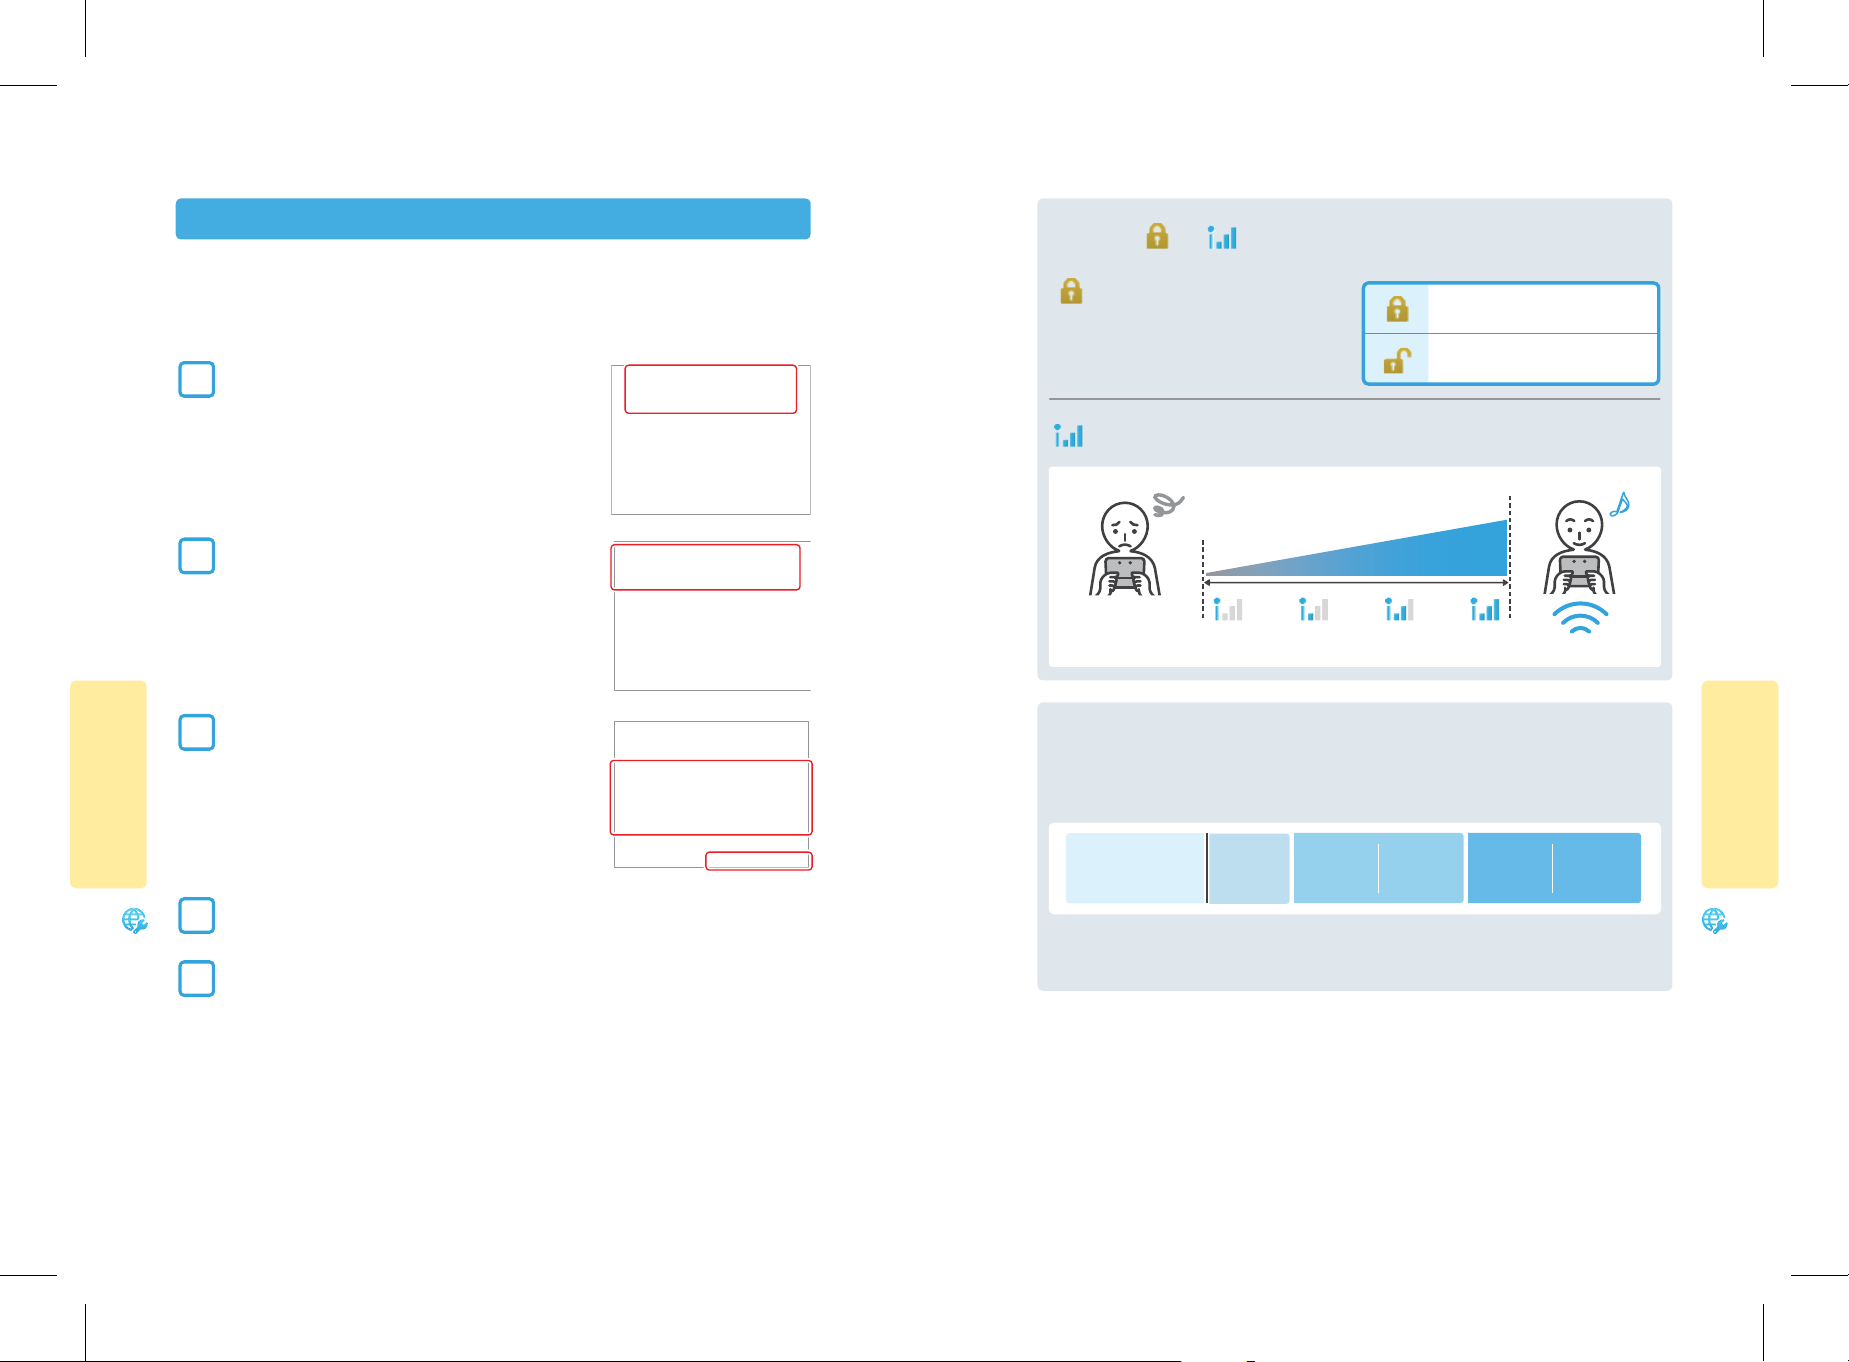
About the
This icon shows whether or not you will need to enter
a key to use that access point.
This icon shows the signal strength of the wireless connection. It is displayed in four stages, and the stronger the
signal, the better reception you will have.
and
icons
The access point requires a key.
The access point does not require a key.
System Conguration
Tap the name of your wireless network to select it.
2
Enter a password, code, or key if required.
3
This screen will be displayed if your access point has security settings congured. You must enter the security password for the access point for your
Nintendo 3DS system to be able to connect to it. This may also be called an
encryption key or network password on your wireless network setup.
For information on accessing and locating the security settings on
your router, visit support.nintendo.com/nintendo3DSrouter.
Tap OK to save the settings.
4
Tap OK to run a connection test.
5
If the connection test succeeds, setup is complete.
NOTE: If the connection test fails and an error code is displayed, follow the instructions displayed in the error
message, or visit support.nintendo.com and use the Error Code Lookup tool for information on resolving the error.
Strong
Weak
Signal reception
Reception signal strength icons
About security settings
The Nintendo 3DS system supports the types of security shown below. The type of security your router uses is usually set
when you install the access point in your network environment. Review the manual for your router for more information
on security settings for your access point.
Security encryption
methods
NOTE: Nintendo DS software only supports WEP security. To connect to the Internet and play Nintendo DS software, please
congure your Nintendo DS Settings and then make sure your access point is set up to use WEP security.
WEP
WPA™-
PSK(TKIP)
WPA2™-
PSK(TKIP)
WPA-
PSK(AES)
WPA2-
PSK(AES)
♪
System Conguration
Internet Settings
Internet Settings
66 67
Page 8
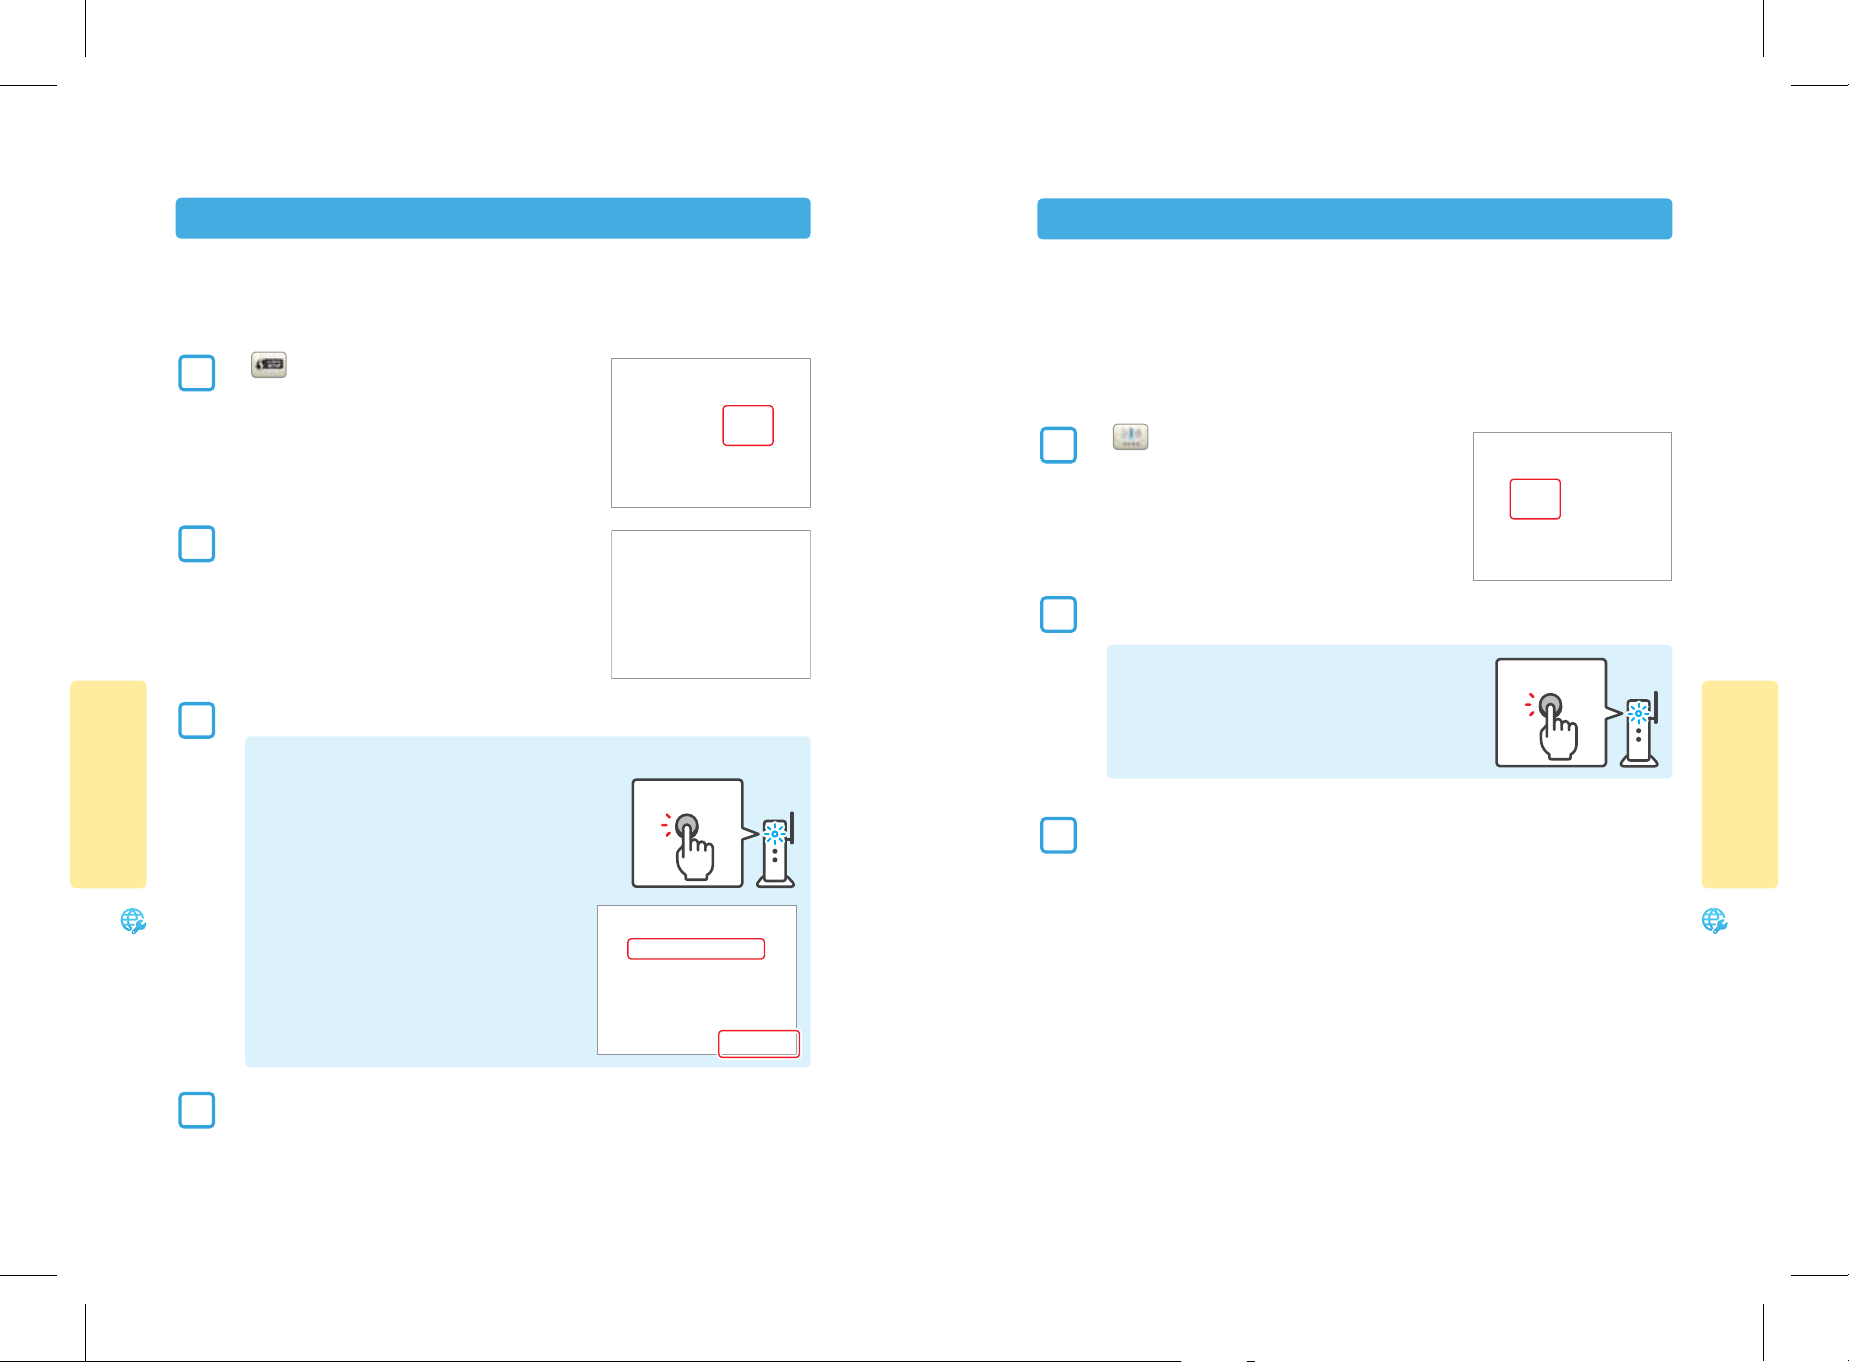
Setup using Wi-Fi Protected Setup (WPS)
Setup using AOSS™
Setup is easy if you use a wireless router that includes the WPS feature. Read the instruction manual for your router for additional information on using the WPS feature.
If you are using the guided setup Tutorial, proceed to step 2.
to begin WPS conguration.
NOTE: It may take up to two minutes to complete the connection.
Push-Button Connection
Hold down the WPS Button on the access point until the corresponding
light ashes.
WPS Button
System Conguration
Tap
1
Tap the connection method that matches your router.
2
On your WPS-compatible router, you will have either one of the following options:
3
OR
PIN Connection
Use the number displayed on the Nintendo 3DS screen to congure your router, then tap Next.
Setup is easy if you use a wireless router that includes the AOSS feature. This is found on many routers sold under the Bualo™
brand name. Read the instruction manual for your router for additional information about using AOSS.
NOTE: If you use AOSS, your access point settings may sometimes change. Computers and other devices connected without
using AOSS sometimes lose the ability to connect to the Internet and may need to be recongured. (If you congure
your settings by using Search for an Access Point, your access point settings will not change.)
If you are using the guided setup Tutorial, proceed to step 2.
Tap to begin AOSS conguration.
1
On your AOSS-compatible router, press the AOSS button.
2
Hold down the AOSS button until the corresponding LED blinks twice.
If the connection fails repeatedly, wait about ve minutes and try again.
When a Settings Complete screen appears on your Nintendo 3DS system, tap OK to run a connection test. If the
3
connection test succeeds, setup is complete.
NOTE: The connection test may fail if you try to connect immediately after nishing setup. Wait one or two minutes before trying
the connection test.
AOSS Button
System Conguration
Internet Settings
When a Settings Complete screen appears on your Nintendo 3DS system, tap OK to run a connection test. If the
4
connection test succeeds, setup is complete.
NOTE: The connection test may fail if you try to connect immediately after nishing setup. Wait one or two minutes before trying
Internet Settings
the connection test.
68 69
Page 9
Changing, deleting, or testing Internet settings
Setup using Manual Setup
You can save up to three wireless conguration settings. Once you have saved a setting, you can change or delete it, or run a
connection test.
IMPORTANT: If you enter incorrect information for the Internet connection settings, you will not be able to connect
to the Internet. You should be familiar with conguring network settings before attempting to manually edit
these settings.
Tap Connection Settings.
1
Tap the desired connection setting.
2
Tap the choice for the action you want to take.
3
• If you tap Delete Settings or Connection Test, follow the on-screen
instructions.
System Conguration
• If you tap Change Settings, proceed to the next step.
Tap the connection setting you want to change, as shown on the next page for Manual
4
Setup.
NOTE: If you used the AOSS or WPS procedures for the setting you are changing, you cannot change the SSID or
security settings.
To enter individual settings yourself,
tap Connection Settings, New
Connection, Manual Setup, and then
Manual Setup again. Tap a panel to edit
a particular setting.
NOTE: If you congure the IP address
manually, you must also congure
the DNS.
SSID
Security IP Address
DNS Proxy Settings MTU Value
The name assigned to the access point. Also called ESS-ID or network name.
SSID:
IP Address: The number used on a network to identify a source/destination for transmitted data.
Subnet Mask: The value in an IP address that shows which network it belongs to.
Gateway: The entrance/exit for a network. In connection point settings, it points to this server’s IP address.
Primary DNS/Secondary DNS: This is a server that can tell you the IP address that corresponds to a computer’s name. In
connection point settings, it points to this server’s IP address.
Proxy: A server used to relay various requests to the Internet.
MTU: This value shows the maximum amount of data that can be sent over the network at once.
System Conguration
Internet Settings
When you have completed your settings, tap Save and run a connection test.
If the connection test succeeds, setup is complete.
NOTE: If the connection test fails and an error code is displayed, follow the instructions displayed in the error message, or visit
Internet Settings
70 71
support.nintendo.com/errorcode and use the Error Code Lookup tool for information on resolving the error.
Page 10

Nintendo DS Connections
Other Information
If you are using Nintendo DS software that supports game play over the Internet, use these settings.
NOTE: If your access point has security settings congured, they must be set to WEP for the Nintendo DS system to connect to
the Internet.
Tap Nintendo DS Connections.
1
For operations specic to the Nintendo DS system, please refer to the Nintendo Wi-Fi
2
Connection Instruction Booklet included with your Nintendo DS software that
supports game play over the Internet.
System Conguration
Tap this option to agree to or review the Nintendo 3DS Service User Agreement, or to conrm the MAC address for the Nintendo
3DS system. (The MAC address is a unique number assigned to all devices that connect to the Internet.)
If an Error Code is displayed during setup
If the connection test fails and an error code is displayed, follow the instructions displayed in the error message, or visit
support.nintendo.com/errorcode and use the Error Code Lookup tool for information on resolving the error.
If an error message is displayed while you are conguring Nintendo DS settings or while you are playing software for a Nintendo
DS system, please try the following:
If you are conguring Nintendo DS settings or playing Nintendo DS software
It is possible that the Nintendo DS settings are not congured correctly. Please read the
Nintendo Wi-Fi Connection Instruction Booklet included with the Nintendo DS software
you are playing and refer to the displayed error code.
System Conguration
If you are playing Nintendo DSi software
It is possible that the Nintendo 3DS Internet settings are not congured correctly. Please perform a connection test as described on page 70 and follow any
instructions displayed in an error message.
Internet Settings
72 73
Internet Settings
Page 11

Parental Controls
Parental Controls can limit the download and use of certain content on the Nintendo 3DS system. Parental Controls can also limit
the use of certain features of the Nintendo 3DS system such as the display of 3D images.
NOTE: When Parental Controls are enabled, some System Settings, such as Internet Settings, the Outer Cameras adjustment, and
system update cannot be accessed. You will need to enter the PIN to access these features.
IMPORTANT: If a child will be the primary user, a parent or guardian should congure the settings.
Limiting the use of content or features
See the information below for a list of the content or features that can be limited.
Software Rating You can restrict the use of Nintendo 3DS software and Nintendo DSi software based on ratings
set by the Entertainment Software Ratings Board (ESRB). See page 89 for more information
on software rating information.
You cannot restrict the use of Nintendo DS software or software downloaded with DS Download Play.
Internet Browser You can restrict the use of the Internet browser.
Nintendo 3DS When your system has been updated with Nintendo eShop, you can restrict the use of credit
Shopping Services cards, prepaid cards, and online purchasing of content and services through Nintendo 3DS
Shopping Services.
Display of 3D Images You can restrict the display of 3D images. This will make all images display in 2D. The restriction
of the display of 3D images is recommended for users 6 years or younger.
Conguring Parental Controls
From System Settings, tap Parental Controls to begin the setup procedure and then follow the on-screen instructions.
1
Information and directions for the Parental Controls feature will be displayed on the screens. Carefully read and follow
the instructions.
Enter a four-digit PIN.
2
Enter the PIN a second time to conrm your choice.
NOTE: You will need to enter this PIN each time you would like to
suspend or change Parental Controls settings.
Select a secret question and then tap OK.
3
If you forget your PIN, you can answer the secret question to retrieve the
number.
Enter an answer and then tap OK.
4
Use the keyboard to enter an answer and follow the on-screen instructions. (See page 20 for information on using the keyboard.)
System Conguration
Sharing Images / You can restrict the wireless transmission of photos, images, sounds, animations,
Audio / Video and data and other user created content.
System Conguration
NOTE: This restriction does not work with Nintendo DS software.
Online Interaction You can restrict the exchange of data between users who are not your friends and the ability to
participate in software that can be played via the Internet.
NOTE: This restriction does not work with Nintendo DS software.
StreetPass You can restrict communications with other users via StreetPass.
NOTE: This restriction does not work with Nintendo DS or Nintendo DSi software.
Friend Registration You can restrict the registration of friends.
DS Download Play You can restrict the use of DS Download Play.
NOTE: A single Nintendo 3DS system can only have one Parental Controls conguration. It is recommended that if you want to
restrict the use of content for multiple users, congure the system with settings to match the restrictions for the youngest user
and share the PIN only with those allowed to view restricted content. Please visit www.nintendo.com for more details.
Parental Controls
74 75
Tap Set Restrictions.
5
You can also choose to change your PIN or clear the Parental Controls
settings.
Select a category to set restrictions.
6
Follow the on-screen instructions. You can slide the stylus on the right side
of the screen to see more options.
When you are nished with your selections, tap Done.
Parental Controls
Page 12

Suspending, changing, or removing restrictions
If you forget your PIN or secret question answer
Suspending restrictions
You can temporarily remove or change restrictions by selecting the feature and then
entering your PIN.
Changing or removing restrictions
Tap Parental Controls under System Settings.
1
Enter the PIN a second time to conrm your choice.
NOTE: You will need to enter this PIN each time you would like to
suspend or change Parental Controls settings.
Tap Change.
2
System Conguration
Input your PIN and then tap OK.
3
If you forget your PIN, you can answer the secret question to retrieve the
number.
You can either tap Forgot PIN after selecting Parental Controls from
1
System Settings, or tap I Forgot on the PIN entry screen.
Enter the answer to your secret question and then tap OK to return to
2
the Parental Controls options.
If you have also forgotten the answer to your secret question,
continue to the next step. You will need to know the date that
is set on your system (see the Prole option in Other Settings,
page 80).
Tap I Forgot on the keyboard entry screen.
3
A reference number will be displayed.
4
Call Nintendo Customer Service at 1-800-255-3700 and
provide this reference number and the date that is set on your
system. You will be given a master key to allow you to access
Parental Controls again.
Tap OK.
5
System Conguration
Parental Controls
Tap the feature you want to change.
4
You can also choose to change your PIN or clear the Parental Control
settings.
Parental Controls
76
Enter the master key number and then tap OK.
6
You will return to Parental Controls.
77
Page 13

Data Management
Tap Erase or Move.
3
Tap Move to move the DSiWare from System Memory to an SD Card or from an SD Card to System Memory.
You can check, erase, or move downloaded software or StreetPass software, or manage
blocked-user settings. To do so, tap Data Management in System Settings and then
tap the item you want to manage.
Nintendo 3DS Data
Management
DSiWare Data
Management
StreetPass Management
Reset Blocked-User Settings
IMPORTANT: You cannot start DSiWare software from an SD Card. To play a DSiWare application, please move it to System
Memory rst. If the same application already exists in the move location, it will be overwritten. Take care not to
overwrite important save data.
System Conguration
Software
management
Extra data
management
You can check DSiWare software saved on System Memory or an SD Card. You
can also erase DSiWare software or move it between System Memory and an
SD Card. NOTE: A system update may be required to use this feature.
You can check the list of software that includes the StreetPass feature. You can
also turn o StreetPass for each application.
Clear the blocked-user settings. (All data that you have restricted yourself from
receiving will no longer be restricted.)
Check or erase Nintendo 3DS Download Software and
Virtual Console software.
Check or erase extra data for Nintendo 3DS software.
Managing Nintendo 3DS or Nintendo DSiWare software data
• The maximum number of Nintendo DSiWare applications that can be saved to System Memory is 40.
• The maximum number of Nintendo 3DS applications or extra data les that can be saved to an SD Card is 300.
• Nintendo DSiWare software that is moved to an SD Card on another Nintendo 3DS system will no longer be displayed on the
Erase/Move menu screen.
Nintendo DSiWare software cannot be moved in the following circumstances:
• There aren’t enough open blocks in the destination.
• Moving the data would exceed the memory capacity of the destination system or SD Card.
• The SD Card write-protection lock switch has been set to the lock position, disabling write permissions for the SD Card.
StreetPass Management
StreetPass data associated with each application will be displayed in a list.
Select a software icon and then tap Deactivate StreetPass to discontinue the use of StreetPass for that application.
• If you congure StreetPass in software that supports this feature, StreetPass settings will be saved by the Nintendo 3DS system.
You can have up to 12 applications using StreetPass simultaneously. If you already have 12 applications using StreetPass and
want to enable StreetPass for another application, you will rst need to deactivate StreetPass in one of the active applications.
• Each software title can have only one StreetPass setting conguration.
System Conguration
Data Management
Tap the item you would like to manage data for.
1
If you have selected Nintendo 3DS, you will have an additional choice of Software or Extra Data. A list of software
data will be displayed. The number of open blocks in System Memory and the SD Card will be displayed on the
upper screen.
Tap the item you would like to erase or move.
2
You can tap or
NOTE: You can only select from System Memory or SD Card if you
are managing Nintendo DSiWare data.
Data Management
if you have more than one page of items.
Select from System Memory or SD Card
78
Reset Blocked-User Settings
On the Data Management screen, tap Reset Blocked-User Settings to clear
these settings.
79
Page 14

Other Settings
Tap Other Settings in System Settings to change your user information, calibrate various Nintendo 3DS components, or perform
other system functions.
You can tap
or to switch between pages of options.
Prole
Tap a Prole item to congure it.
NOTE: Nintendo DS Prole will be used if you are playing certain Nintendo DSi or
Nintendo DS software titles. Not all titles use these settings.
User Name Use the keyboard to enter your name.
Remember that other Nintendo 3DS users will
see your user name when interacting with them,
so do not use your real name or otherwise share
any personal information in your user name.
Prole Enter prole information, including your name and birthday.
Date & Time Enter a date and time.
Touch Screen Calibrate the Touch Screen.
System Conguration
3D Screen Check Check the 3D Screen viewing guidelines.
Sound Change the sound settings.
Mic Test Conrm that the microphone is working properly.
Outer Cameras Calibrate the outer cameras.
Circle Pad Calibrate the Circle Pad.
System Transfer Transfer software and Internet settings to another Nintendo 3DS system.
NOTE: A system update may be required to use this feature.
Language Select a language that the system will display text in.
System Update Connect to the Internet and check for updates to the system or built-in software.
Format System Memory Erase all added software, save data, pictures, and system settings.
Other Settings
Birthday Enter a date, tapping
settings.
Region Settings Select your country and state or province.
Nintendo DS Prole Message
Enter a short message of up to 26 characters.
Remember that other Nintendo 3DS users will
see your message when interacting with them,
so do not use your real name or otherwise share
any personal information in your user name.
Color
Select a color and then tap OK.
or to adjust the
System Conguration
Other Settings
80
81
Page 15

Date & Time
3D Screen Check
Tap the setting you would like to adjust.
1
Tap or
2
time, then tap OK.
Some applications use the date and time, so it is
important to set this correctly.
to adjust the date or
Touch Screen
Use the following procedure if the Touch Screen doesn’t seem to respond properly to the stylus.
Tap with the tip of the stylus.
1
It is important to tap each accurately, in all three locations, to correctly
calibrate the Touch Screen. If you have done so, calibration will be completed and Calibrated will be displayed.
Tap in four places to check calibration.
2
System Conguration
The icon will turn green if you can accurately tap it.
If you cannot accurately tap the icon, tap Repeat to try
the calibration process again.
Green when tapped
If you are having diculty seeing 3D images, slide the 3D depth slider all the way to the top and then follow the on-screen
instructions.
Sound
Tap the setting you would like to use for the system sound, then tap OK.
System Conguration
Mic Test
Speak into the microphone to test its operation. The volume bar in the microphone will change color if it’s working correctly.
Tap Finish when the test is complete.
Other Settings
If you are having diculty selecting with the stylus...
While holding,
press
Turn the power on while holding down the L Button, R Button, and X Button. This will automatically start the Touch Screen
Other Settings
calibration procedure.
82 83
Microphone
Volume Bar
The bars will change color if the
microphone picks up sound.
Page 16

Outer Cameras
If your 3DS system receives an impact or is left in a place where it is exposed to high temperatures, 3D images viewed or taken
by the outer cameras may become misaligned. If you feel like the 3D images are out of alignment, use the following procedure
to calibrate the cameras.
IMPORTANT: If you calibrate to the wrong values, the misalignment could get worse. Please calibrate the outer
cameras only when you think the 3D images they take are out of alignment.
Move the 3D depth slider to its highest
1
position and tap Next.
Tap Automatic Setup.
2
(Tap Return to Default Settings to return the settings to their factory
defaults.)
Tap Next and center the cameras on a subject suitable for
3
automatic calibration.
Center the cameras on a brightly lit outdoors subject that is 65 feet (20 meters) or farther away. Avoid having any nearby
objects in the view. Hold the system as steady as possible, and when all three circles ( ) light up on the upper
screen, the cameras will auto-calibrate.
Manual calibration
You can manually calibrate the vertical alignment of the outer cameras. Please do this if you are not able to use auto-calibration.
Move the 3D depth slider to its highest
1
position and tap Next.
Tap Manual Setup.
2
Tap Next and center the cameras on a subject for manual calibration, then press
3
to take a photo.
• Set the system down on a at surface to avoid blur from shaky hands. Center the subject of the photo in the
screen and photograph it from directly in front.
• Manual calibration is easier if you photograph something with a simple, at shape and a clear outline, like that
shown below.
10” (25cm)
or
System Conguration
System Conguration
65’ (20m)
Adjust the image so that the photo subjects displayed in the
If you center on subjects like those below, the cameras cannot calibrate, and the three circles (
up. If this happens, try centering on a dierent object. Depending on the subject, the cameras may not be able to
calibrate. In those cases, calibrate manually, as described on the next page.
Other Settings
84 85
Low-contrast object Close-up object
) will not all light
4
center of the upper screen line up exactly.
• Adjust the vertical alignment. You can also adjust the image to the left
and right, but these horizontal adjustments are not saved.
• If there are other objects in the photo besides the calibration subject,
those objects don’t need to be aligned.
• If you photographed the calibration subject from above or from a slant,
you may not be able to make it align exactly.
Tap Test 3D and follow the on-screen instructions.
5
Other Settings
Page 17

Circle Pad
Language
If the Circle Pad seems to be operating incorrectly, follow these steps to calibrate it.
Make two or three full rotations, then tap Next.
1
If Calibration Failed is displayed, try step 1
again.
Tap Return to Default to return the settings
back to factory default.
Move the Circle Pad in all four directions.
2
Conrm that the color of the triangles changes to
green, then tap OK.
If the color does not change, tap Repeat to try the
calibration procedure again.
If you are having diculty with the input from the Circle Pad...
If you repeatedly use excessive force when moving the Circle Pad, it may begin to incorrectly register input. If it registers
input even when you aren’t using it, and the other control buttons or the Touch Screen don’t seem to operate correctly, try
the following procedure:
System Conguration
While holding,
press
Select the language you would like the system to display text in, then tap OK.
System Update
IMPORTANT: The Nintendo 3DS System specications and the Nintendo 3DS Service are constantly evolving and we may
update or change the Nintendo 3DS System or the Nintendo 3DS Service in whole or in part, without notice to you. Such
updates may be required for you to play new Nintendo 3DS games, enjoy new features, or continue to access the Nintendo 3DS
Service. After the Nintendo 3DS menu is updated, any existing or future unauthorized technical modication of the hardware
or software of your Nintendo 3DS System, or the use of an unauthorized device in connection with your system, will render the
system permanently unplayable. Content deriving from the unauthorized modication of the hardware or software of your
Nintendo 3DS system will be removed. Failure to accept the update may render games and new features unplayable.
The Nintendo 3DS system automatically updates a list to help limit the use of inappropriate words and a list of access points
that can be used for network services oered by Nintendo. No prior notice for these or other minor automatic updates will be
displayed on the screen. For other system updates, a notice will be displayed on the screen, and you will need to select “Accept”
to receive such updates.
NOTE: A broadband wireless network connection is required to connect to the Internet and perform a system update.
See page 63 for more information on setting up a connection.
Tap OK on the System Update screen.
1
IMPORTANT: Be sure the battery is suciently charged before performing a system update to make sure the update is completed correctly.
System Conguration
Other Settings
Turn the power on while holding down the L Button, R Button, and Y Button. This will automatically start the Circle Pad
calibration procedure.
Read the on-screen messages, then tap I Accept.
2
System Transfer
Transfer software and Internet settings to another Nintendo 3DS system.
NOTE: A system update may be required to use this feature.
Other Settings
86 87
Page 18

Format System Memory
IMPORTANT: You should format your Nintendo eShop account rst, then your System Memory, prior to selling or
otherwise transferring your system to any third party. For more information about privacy and the protection of
your personal information, see the Nintendo 3DS System Privacy Policy on page 100.
Format System Memory will erase any data saved in System Memory and return the system to its factory-default state. The system
will keep any updates you have made with the System Update feature.
Tap Format
1
Read the on-screen messages and make sure you want to format your System Memory. IMPORTANT: The following
data cannot be restored if it is erased:
• All save data in System Memory including your friend list, Notications, and step count information
• System Settings data
• Built-in software save data
• All photos in System Memory
• Any other extra data
Tap Format again to erase the data.
2
After formatting the System Memory, when you turn the system on for the
rst time, the initial setup process will begin, as described on page 18.
Video and Computer Game Software Rating
Information
The Entertainment Software Rating Board (ESRB) ratings are designed to provide information about video and computer game
content, so you can make informed purchasing decisions. ESRB ratings have two parts: rating symbols suggest age appropriateness for the game, and content descriptors indicate elements in a game that may have triggered a particular rating and/or may be
of interest or concern.
To take full advantage of the ESRB rating system, it’s important to check both the rating symbol (found on the front of the game
box) and the content descriptor (found on the back of the game box).
Go to www.esrb.org for a complete list of these content descriptors.
The ESRB rating system is designed to provide information about a computer or video game. The ratings are not meant to recommend which games consumers should buy or rent or to serve as the only basis for choosing a product. Rather, individuals should
use the ESRB ratings together with personal tastes and standards when deciding what is best to purchase.
For more information on the ESRB and video game ratings, go to the ESRB web site at www.esrb.org.
Video and Computer Game Software Rating Information
System Conguration
Other Settings
Titles rated RP (Rating
Pending) have been
submitted to the ESRB and
are awaiting nal rating.
(This symbol appears only in
advertising prior to a game’s
release.
Titles rated E10+ (Everyone
10 and older) have content
that may be suitable for
ages 10 and older. Titles in
this category may contain
more cartoon, fantasy or
mild violence, mild language
and/or minimal suggestive
themes.
Titles rated EC (Early Child-
hood) have content that may
be suitable for ages 3 and
older. Contains no material
that parents would nd inap-
propriate.
Titles rated T (Teen) have
content that may be suitable for
ages 13 and older. Titles in this
category may contain violence,
suggestive themes, crude humor,
minimal blood, simulated
gambling, and/or infrequent use
of strong language.
Titles rated E (Everyone) have
content that may be suitable for
ages 6 and older. Titles in this
category may contain minimal
cartoon, fantasy or mild violence
and/or infrequent use of mild
language.
Titles rated M (Mature) have
content that may be suitable for
ages 17 and older. Titles in this
category may contain intense
violence, blood and gore, sexual
content and/or strong language.
88 89
Consumer Information
Page 19

Replacing the Battery Pack
Battery packs become worn with repeated charge/discharge cycles, and the amount of time they can be used when fully charged
will decrease gradually over time. If you feel the usage time has dropped o noticeably, replace the battery pack.
• Do not use any battery other than the Nintendo 3DS rechargeable battery pack, Model No. CTR-003. A replace-
ment battery may be ordered through Nintendo’s website at store.nintendo.com (USA/Canada only) or by
calling Customer Service at 1-800-255-3700.
• A parent or guardian should replace the battery pack if a child is using the system.
• Turn the power o and make sure the AC adapter is unplugged from the Nintendo 3DS system.
Loosen the four Phillips-head (+) screws on the battery cover with a screwdriver, and remove the battery cover.
1
IMPORTANT: To avoid damage to the screw or threads, use a screwdriver that is appropriate for the screw (#0).
Remove the battery pack as shown.
2
Replace the battery cover and tighten the four screws,
4
being careful not to overtighten.
IMPORTANT: Always be sure to replace the battery cover
and tighten the screws before resuming use.
PLEASE RECYCLE YOUR USED BATTERIES
When disposing of a rechargeable battery, take care to follow
appropriate local guidelines and regulations.
• Do not disassemble, attempt to repair, or deform the battery
pack.
• Do not dispose of rechargeable batteries in a re.
To nd a collection site near you, contact your local solid waste
authority or, in the United States, visit:
http://www.epa.gov/osw/conserve/materials/battery.htm
For more information or for assistance from Nintendo, visit: http://www.nintendo.com/consumer/recycle.jsp
Place tape over the battery contacts
before recycling.
Replacing the Battery Pack
Replacing the B attery Pack
Wait at least 10 seconds after removing the old battery
3
pack before inserting the new battery pack to make sure the
Power LED resets correctly.
Check to make sure it is oriented correctly, as shown in the
illustration.
Consumer Information
90
Consumer Information
91
Page 20

Troubleshooting
Before seeking assistance, please review the following problems and solutions.You can also visit
support.nintendo.com for assistance and additional troubleshooting and repair options, or call 1-800-255-3700.
NOTE: Please also review any instruction manuals for the games or accessories you may be using.
The system won’t charge or the recharge LED doesn’t light up or stay lit.
The system won’t turn on or there is no picture or sound.
• Make sure the battery pack is charged (see page 16).
• Check to see if the power LED lights up when you press the Power Button, as shown below.
• Make sure you are using the correct AC adapter, Model No. WAP-002(USA).
• Check your connections, as shown below. Remove the Nintendo 3DS system from the charging cradle and unplug the AC
adapter from both the cradle and the wall outlet. Wait approximately 30 seconds and then reconnect the components, making
sure the system clicks into place in the charging cradle. (Review the battery-charging procedure on page 17.)
• Make sure you are charging the battery pack within an ambient temperature range of 41˚F – 95˚F (5˚C – 35˚C). The battery
pack may not charge properly outside of this range.
• If the recharge LED is blinking or won’t stay lit, visit support.nintendo.com for assistance and additional troubleshooting
and repair options, or call 1-800-255-3700.
Troubleshooting
Recharge
LED
It takes a long time to charge the battery pack or a battery charge doesn’t last
very long.
Consumer Information
• Make sure you aren’t exposing the system to or charging the system in temperatures below the ambient temperature range of
41˚F – 95˚F (5˚C – 35˚C). Cold temperatures can increase the recharge time and decrease the usage time of a charged battery.
• Over time and after repeated charging, the performance of the battery will decrease. If you have had the system for a long
time, or if the battery pack appears slightly swollen, try replacing the battery pack.
Power
LED
• If you are using a Game Card, make sure it is completely inserted into the Game Card slot until it clicks into place.
• The battery pack may be installed incorrectly. Check the installation of the battery pack (see page 90).
The system seems too warm.
• Make sure you are neither exposing the system to or charging the system in temperatures above the ambient temperature
range of 41˚F – 95˚F (5˚C – 35˚C). Do not expose the system to direct sunlight in an enclosed space.
The message “There is nothing inserted into Game Card slot” is displayed on the
HOME Menu, even though a Game Card is inserted in the Game Card slot.
• Make sure the Game Card is completely inserted into the Game Card slot until it clicks into place.
• Check the Game Card connectors and Game Card slot for dirt, dust, or other foreign material.
A Game Card won’t play.
• Make sure the game content is not restricted by Parental Controls. If this is the case, you can either enter a PIN to temporarily
turn o Parental Controls, or you can recongure Parental Controls. See Parental Controls in System Settings for more information (page 62).
An error message appeared when playing Nintendo DS or Nintendo DSi software:
“An error has occurred. Press and hold the POWER Button to turn the system o. Please refer to the
Operations Manual for details”
• Turn o your system, then on again. Try repeating the same action that caused the error message to occur. If the same error
occurs again, please visit support.nintendo.com for assistance and additional troubleshooting and repair options, or call
1-800-255-3700.
Troubleshooting
Consumer Information
92
93
Page 21

The system registers control input when you aren’t operating the controls, or the
controls don’t seem to operate correctly.
• The Circle Pad may need to be calibrated. Use the calibration procedure in System Settings to recalibrate the Circle Pad (see
page 86).
NOTE: You can also go directly to the Circle Pad calibration procedure by following this procedure. First turn the power o.
Then hold down the L Button, R Button, and Y Button and turn the system on as shown below.
While holding,
press
The Touch Screen doesn’t seem to operate or respond correctly to stylus input.
• If you have attached a screen protector (sold separately) incorrectly to the Touch Screen, try removing it and using the Touch
Screen again. If it operates correctly, either try reattaching the screen protector, carefully following the instructions included
with it, or avoid using one. (Please use screen protectors ocially licensed by Nintendo.)
There is no sound from the speakers.
• Check to make sure there are no headphones plugged into the system, as the speakers do not operate when headphones are
plugged into the audio jack.
• Try adjusting the volume control to make sure the volume is not turned o, as shown below.
Volume
+ –
There is no sound from the headphones.
• Try adjusting the volume control to make sure the volume is not turned o, as shown above.
• Make sure the headphones are fully inserted all the way in to the audio jack, as shown below.
Troubleshooting
Not aligned correctly Dirt or air bubbles present
The microphone doesn’t seem to work or recognize sounds (including headset
microphones).
• The Touch Screen may need to be recalibrated. Use the calibration procedure in System Settings to recalibrate the Touch Screen
(see page 82).
NOTE: You can also go directly to the Touch Screen calibration procedure by following this procedure. First turn the power
o. Then hold down the L Button, R Button, and X Button and turn the system on as shown below.
Troubleshooting
Consumer Information
While holding,
press
94 95
• Make sure the software you are using includes microphone features.
• Conrm that the microphone is operating correctly by performing a microphone test in System Settings (see page 80).
• Some voices may be dicult for the system to recognize. Try having a dierent person speak the same word or phrase to verify
if this is the problem.
The microphone seems to respond on its own, or there is feedback from the speakers
(including headset microphones).
• The microphone may be responding either to ambient noise in the environment or to noise coming from the speakers. Try to
remove the source of the noise or move to another location. You can also try lowering the speaker volume, as shown below, or
use headphones.
NOTE: If the speakers are emitting odd
or high-pitched noises, this may be
caused by feedback from the microphone. Lowering the volume should
solve this problem.
Volume
+ –
Consumer Information
Page 22

3D images can’t be seen or are dicult to see.
• Make sure you are not using Nintendo DS or Nintendo DSi software, which do not support 3D image display.
• Check the 3D LED. Not all software includes 3D images, and the 3D LED will light up if 3D images can be viewed.
• Make sure that this feature is not restricted by Parental Controls. If this is the case, you can either enter a PIN to temporarily
turn o Parental Controls, or you can recongure Parental Controls. See Parental Controls in System Settings for more information (page 62).
• Be aware that 3D images can only be displayed on the upper screen.
• Make sure the 3D depth slider is not set all the way to the bottom of its range (in the o position).
• Make sure you are holding the Nintendo 3DS in the proper position to best view 3D images (see page 22).
• If your left and right eyes have dierent visual abilities, this can make 3D images dicult to see. If you use corrective eyewear,
they may help you to see 3D images.
• Avoid conditions where direct sunlight or other strong light is reec ting o the screen.
NOTE: The ability to view 3D images varies from individual to individual. In rare cases, some individuals may be unable
to see 3D images or may only be able to see double images. If this is the case, the 3D screen should be set to display 2D
images only by sliding the 3D depth slider all the way to the bottom of its range.
WARNING: The 3D feature is only for children 7 and older.
The cameras don’t recognize my face.
In certain software titles, the cameras are used to recognize facial features. Observe the following guidelines to improve the
recognition process.
I can’t see the 3D eect in images taken with the outer cameras.
• Make sure the image was taken with the outer cameras, not the inner camera.
• Make sure the lenses for the outer cameras are clean and free of dirt or dust. Clean with a soft, dry cloth if necessary.
• Make sure there isn’t a strong light such as direct sunlight shinning on the camera lenses.
IMPORTANT: If your Nintendo 3DS system has been subjected to a physical shock or high temperatures, this could change the
alignment of the outer cameras and aect the 3D image quality. If you think your system may be aected by this, see page 84 for
more information on realigning the cameras.
When I take pictures with the Nintendo 3DS, the colors don’t seem correct.
• Check the camera mode settings for the cameras (see page 45).
• If you adjusted the settings for the cameras, try taking additional photos to see if the problem was corrected.
The SD Card functions don’t seem to work.
• Check to make sure the SD Card is installed correctly (see page 24).
• Try checking the operation of the SD Card on a PC that has an SD Card reader.
I can’t view photos saved to an SD Card.
• The Nintendo 3DS system can only view photos taken by the Nintendo 3DS Camera software. Photos taken by digital cameras
or cell phones cannot be viewed.
Music les saved on an SD Card won’t play in Nintendo 3DS Sound.
• Check to make sure the les are in a format compatible with Nintendo 3DS Sound. The les must be in the following format:
AAC les with .m4a, .mp4, and .3gp extensions, or MP3 les with .mp3 extensions.
Bit rate of 16kbps - 320kbps and sampling frequency of 32kHz - 48kHz.
NOTE: The Nintendo 3DS cannot play copy-protected music les.
Troubleshooting
Take photos in a well-lit area
Troubleshooting
Consumer Information
• The surrounding environment, the color of your hair and beard, or facial and hair decorations can interfere with facial
recognition.
• In rare cases, dierences in facial features may make the facial recognition process fail.
Move your bangs so the cameras
can recognize your eyebrows
96 97
Face the screen directly
Remove your glasses if you
use them
• Make sure the SD Card is correctly inserted into the SD Card slot (see page 24).
• Make sure the les are in a format compatible with Nintendo 3DS Sound (see the troubleshooting step above for compatible
le formats).
• The SD Card must not have more than 3000 music les on it.
• The SD Card must not have more than 1000 le folders on it.
• An individual folder must not have more than 100 music les in it. NOTE: If you have more than one folder with the same
name, the music les in each folder will be combined and displayed as one folder.
• An individual folder must not have more than seven subfolders (eight levels including the main folder).
Music les saved on an SD Card won’t display in Nintendo 3DS Sound.
Consumer Information
Page 23

The screen brightness or image colors change, or bright colors appear pale.
• If power-saving mode is on, these may be adjusted automatically to save batter y power. For normal appearance, turn the
power-saving mode o (see page 29).
Some pixels on either the upper or lower screen are always dark or lit.
• Due to the characteristics of liquid crystal displays, a small number of pixels may not illuminate, or may always stay lit. This is
normal and not considered a defect unless the number of pixels that don’t function normally increase over time.
The brightness or color between the upper and lower screens seems dierent.
• The specications of the upper and lower screens are dierent so the appearance of images may be dierent. This is normal
and is not considered a defect.
The Download Play feature doesn’t work.
• Make sure this feature is not restricted by Parental Controls, either with Software Ratings restrictions or with Download Play
restrictions. If this is the case, you can either enter a PIN to temporarily turn o Parental Controls, or you can recongure
Parental Controls. S ee Parental Controls in System Settings for more information (page 62).
The system is not counting step numbers accurately.
• If your system is open, it cannot count steps. Steps are only counted when both the power is on and the system is closed.
• If you carry your Nintendo 3DS system in a bag that is not closely connected to your body, or you dangle it by a strap or case as
you walk, it cannot accurately count your steps. The step numbers will be counted more accurately if you carry your system in a
bag connected to your waist (such as a hip pouch).
• If you play a Nintendo DS or Nintendo DSi software title for long periods of time without exiting, the system can only save up to
seven days of information. Intermittently save your progress and exit the software to accurately count steps when using this
type of software. See page 58 for more information on the step counting feature.
The system suddenly enters Sleep Mode.
Check for and remove the following possible external causes:
• A strong external magnetic force, such as from an audio speaker, can cause the system to go into Sleep Mode.
Troubleshooting
• The Nintendo 3DS system may go into Sleep Mode if it is stacked up with other systems in the Nintendo DS
product line.
Wireless communication doesn’t work or works inconsistently.
• Check the signal strength icon. If it appears as or
less access point.
• External causes, such as cell phones, computers, microwaves, or even physical barriers, can interfere with wireless communica-
Consumer Information
tions. Check for these conditions and either remove them or move to a dierent location.
, move closer to your communications partner or to your wire-
I forgot my PIN and answer to the secret question for Parental Controls
• Please review the section on Parental Controls for more information on retrieving this information (see page 77).
98
Page 24

Warranty and Service Information
Troubleshooting
ンデザインデー タあり
•このページは別でイ
You may need only simple instructions to correct a problem with your product. Try our website at support.nintendo.com or call our
Consumer Assistance Hotline at 1-800-255-3700, rather than going to your retailer. Hours of operation are 6 a.m. to 7 p.m., Pacic Time,
Monday - Sunday (times subject to change). If the problem cannot be solved with the troubleshooting information available online or over the
telephone, you will be oered express factory service through Nintendo. Please do not send any products to Nintendo without contacting us rst.
HARDWARE WARRANTY
Nintendo of America Inc. (“Nintendo”) warrants to the original purchaser that the hardware product shall be free from defects in material and
workmanship for twelve (12) months from the date of purchase. If a defect covered by this warranty occurs during this warranty period, Nintendo
will repair or replace the defective hardware product or component, free of charge.* The original purchaser is entitled to this warranty only if the
date of purchase is registered at point of sale or the consumer can demonstrate, to Nintendo’s satisfaction, that the product was purchased within
the last 12 months.
GAME & ACCESSORY WARRANTY
Nintendo warrants to the original purchaser that the product (games and accessories) shall be free from defec ts in material and workmanship for
a period of three (3) months from the date of purchase. If a defect covered by this warranty occurs during this three (3) month warranty period,
Nintendo will repair or replace the defective product, free of charge.*
SERVICE AFTER EXPIRATION OF WARRANTY
Please try our website at support.nintendo.com or call the Consumer Assistance Hotline at 1-800-255-3700 for troubleshooting information and
repair or replacement options and pricing.*
In some instances, it may be necessary for you to ship the complete product, FREIGHT PREPAID AND INSURED FOR LOSS OR DAMAGE, to Nintendo.
*
Please do not send any products to Nintendo without contacting us rst.
WARRANTY LIMITATIONS
THIS WARRANTY SHALL NOT APPLY IF THIS PRODUCT: (a) IS USED WITH PRODUCTS NOT SOLD OR LICENSED BY NINTENDO (INCLUDING, BUT NOT LIMITED TO, NON-LICENSED GAME ENHANCEMENT AND COPIER DEVICES, ADAPTERS, SOFTWARE, AND POWER SUPPLIES); (b) IS USED FOR COMMERCIAL
PURPOSES (INCLUDING RENTAL); (c) IS MODIFIED OR TAMPERED WITH; (d) IS DAMAGED BY NEGLIGENCE, ACCIDENT, UNREASONABLE USE, OR BY OTHER
CAUSES UNRELATED TO DEFECTIVE MATERIALS OR WORKMANSHIP; OR (e) HAS HAD THE SERIAL NUMBER ALTERED, DEFACED OR REMOVED.
ANY APPLICABLE IMPLIED WARRANTIES, INCLUDING WARRANTIES OF MERCHANTABILITY AND FITNESS FOR A PARTICULAR PURPOSE, ARE HEREBY
LIMITED IN DURATION TO THE WARRANTY PERIODS DESCRIBED ABOVE (12 MONTHS OR 3 MONTHS, AS APPLICABLE). IN NO EVENT SHALL NINTENDO BE
LIABLE FOR CONSEQUENTIAL OR INCIDENTAL DAMAGES RESULTING FROM THE BREACH OF ANY IMPLIED OR EXPRESS WARRANTIES. SOME STATES DO
NOT ALLOW LIMITATIONS ON HOW LONG AN IMPLIED WARR ANTY LASTS OR EXCLUSION OF CONSEQUENTIAL OR INCIDENTAL DAMAGES, SO THE ABOVE
LIMITATIONS MAY NOT APPLY TO YOU.
This warranty gives you specic legal rights. You may also have other rights which vary from state to state or province to province.
Nintendo’s address is: Nintendo of America Inc., P.O. Box 957, Redmond, WA 98073-0957 U.S.A.
This warranty is only valid in the United States and Canada.
Warranty and Service Information
Consumer Information
Consumer Information
Revision R
98 99
Page 25

Nintendo 3DS System Privacy Policy
Last Updated: November 21, 2010
Nintendo is dedicated to protecting your privacy and handling any personal information we obtain from you with care and respect. By accepting
the Nintendo 3DS Service User Agreement, you consent to and accept this Nintendo 3DS System Privacy Policy (“Privacy Policy”). This Privacy
Policy describes, among other things, the types of information collected about you by Nintendo when you use the Nintendo 3DS System; how your
information may be used; when it may be disclosed; how you can control the use and disclosure of your information; and how your information
is protected. This Privacy Policy applies only to information collected from your Nintendo 3DS System by Nintendo of America Inc. or its parent
company, Nintendo Co. Ltd. (individually and collectively, “Nintendo”). Information that you may submit to Nintendo through any of its Web sites or
any other Nintendo product or service is subject to the applicable privacy policy posted at support.nintendo.com. This Privacy Policy should be read
in conjunction with the Nintendo 3DS Service User Agreement and Code of Conduct. All capitalized terms not dened in this Privacy Policy will have
the meaning set forth in the Nintendo 3DS Service User Agreement.
CHANGES TO THIS PRIVACY POLICY
We may revise and update this Privacy Policy from time to time. Please review the most recent version of this policy frequently by going to
support.nintendo.com or contacting us at 1-888-977-7627. When we update this Privacy Policy, we will revise the “Last Updated” date above.
INFORMATION COLLECTED
Personally Identiable Information. “Personally Identiable Information” or “PII” is information that identies you as an individual, such as your
full name, address, telephone number, or email address. We only collect PII that you provide to us. If you choose not to provide us with certain PII,
you will be able to continue using your Nintendo 3DS System, except that your use of features or applications that require the disclosure of cer tain PII
may be limited or unavailable.
We may add to or update the PII you provide on your Nintendo 3DS System with data collected from other sources, including oine sources (e.g.,
consumer service transactions such as repairs, part orders or purchases). If we combine information collected oine with information collected
through the Nintendo 3DS System, the combined PII will be treated in accordance with this Privacy Policy.
Non-Personally Identiable Information. In addition to the PII you provide to us, we may collect Non-Personally Identiable Information from
you. “Non-Personally Identiable Information” or “Non-PII” is information that does not identify you as an individual. This includes information such
as your Mii prole information, age, gender, geographic area, game-play data, online status, Nintendo 3DS System serial number and device ID,
device certicate information, cookies, Friend Codes, wireless access point information, Internet Protocol (“IP”) address, and Media Access Control
(“MAC”) address. We may link your PII with Non-PII or Aggregate Information that we collect from you. Some of the ways in which we collect NonPII are described in more detail below.
• Web Beacons: Certain Nintendo 3DS System online applications may use a common Internet technology called “Web Beacons” which are
small graphic images placed on a Web page, on a Web-based document, or in an email message, designed to collect certain information
and monitor user activity online. We may use Web Beacons to collect information such as IP address, MAC address, the URL of the page the
Nintendo 3DS System Privacy Policy
Consumer Information
Web user comes from, and the time the Web Beacon is activated (such as when you view the Web page, advertisement, or email containing
the Web Beacon). We may use the information collected through Web Beacons, for example, to determine how to improve the Nintendo
3DS System applications by seeing which areas, features, and products are most popular; to personalize the Nintendo 3DS System services
and make recommendations based on downloaded products; and to complete transactions you have requested.
• Cookies: Certain Nintendo 3DS System online applications may use cookies, which are small text les that a Web site places on your
Nintendo 3DS System. These les identify your Nintendo 3DS System and record data about your visit so that when you return to a Web
site, the site recognizes your Nintendo 3DS System and can personalize your visit. Cookies may be linked to your transaction history, online
game play or other information. We may use information collected by cookies, as well as other tools such as log les and Web Beacons,
for example, to determine how to improve the Nintendo 3DS System applications by seeing which areas, features, and products are most
popular; to personalize the Nintendo 3DS System services; make recommendations based on downloaded products; and to complete
transactions you have requested.
• Nintendo Wireless Communications: Your Nintendo 3DS System is automatically assigned an IP address by your Internet Provider when
you connect to Nintendo via wireless communications. Nintendo receives a log le of your activities that may include, for example, your
IP address, MAC address, cookie information, transaction data, settings and download activity. We may use these log les, for example, to
monitor trac on our Web sites, to facilitate your use of Nintendo 3DS System features and applications, and to troubleshoot technical problems. If you do not want Nintendo to collect this information, you should turn o wireless communications on your Nintendo 3DS System.
Aggregate Information. We also may collect and aggregate certain information about our users’ game play, age, gender, search terms,
clickstreams, and purchases for the purposes of advertising and improving the Nintendo 3DS System features, applications, games, and content.
“Aggregate Information” is Non-PII that is combined with the Non-PII of other users.
HOW INFORMATION IS USED
We may collect PII, Non-PII, and Aggregate Information from you on your Nintendo 3DS System in order to: (i) fulll your requests for products,
services, and information, including to send you commercial and non-commercial messages and to process orders you have placed through your
Nintendo 3DS System; (ii) contact you in connection with games, contests, sweepstakes, sur veys, promotional materials, and product changes; (iii)
facilitate your use of Nintendo 3DS System applications and features, such as StreetPass Communications and communications with other users;
(iv) customize the content, features, and adver tising available through the Nintendo 3DS System, such as your Nintendo 3DS Shop catalog and
other catalogs; (v) set up repair orders and respond to other consumer service inquiries; (vi) provide you back-end services, such as system updates,
system messages, and free games, applications, trials, and content; (vii) analyze the use of the Nintendo 3DS Service, games, and applications
and information about our users for demographic studies, quality assurance and to understand and improve our service oerings; (viii) facilitate
demographic studies and quality assurance; (ix) prevent potentially illegal or oensive activities or to enforce our rights or the rights of our users;
and (x) for any other purposes disclosed to you at the time we collect your information or pursuant to your consent.
DISCLOSURE OF INFORMATION
We may facilitate the disclosure of PII, Non-PII and Aggregate Information when you use the Nintendo 3DS System. For example, information such
as your Mii name, Mii prole information, online status, Mii greeting, and other User Content or game-play information may be displayed to other
users when you use the online features of the Nintendo 3DS System.
• Third Parties. We may share PII, Non-PII, and Aggregate Information with our vendors to help us perform various functions necessary
to operate our business or fulll your requests (for example, completing downloads or purchases, developing and executing marketing
campaigns, etc.). We also may share such information and any User Content you create with third parties. We may share your PII, Non-PII,
and Aggregate Information with third parties to complete your transactions and provide you with advertising and other promotional
materials on your Nintendo 3DS System.
• StreetPass Communications. Certain Nintendo 3DS System features and games allow other Nintendo 3DS System users to automatically
contact and interact with you. The StreetPass Communications feature allows Non-PII and User Content that you have provided or that is
stored on your Nintendo 3DS System to be shared automatically with other Nintendo 3DS users via a wireless connection, the Nintendo
Zone or a StreetPass Communication Point. You understand that you have no expectation of privacy in User Content shared via StreetPass
Communications. When StreetPass Communications are enabled on your Nintendo 3DS system, you may not only receive User Content
from other users but advertising or other promotional materials from Nintendo and third parties. You may disable this feature at any time
through the Nintendo 3DS System settings.
• Friends. In addition, you may add Friends to your Nintendo 3DS Friend list by exchanging friend codes or friend cards. Through the
Nintendo 3DS Friend list and Friend messaging features, certain information that you have provided or that is stored on your Nintendo 3DS
System, such as your Mii name, Mii prole information, Mii greeting, online status, rankings, and other User Content or game-play information, may be shared with your Nintendo 3DS Friends.
• Legal and Business Purposes. We may disclose PII in order to comply with legal process, to respond to claims or inquiries, or to protect
the rights, property or personal safety of Nintendo, our users, or the public. Information about our users, including PII, may be disclosed as
part of any sale or transfer of company assets, if permitted by and done in accordance with applicable laws. We also may disclose your PII
for any other purposes pursuant to your consent.
Please do not to share PII about yourself or otherwise store such information on the Nintendo 3DS System except where necessary
to complete a transaction. You are responsible for any User Content that you share through the Nintendo 3DS System and for ensuring that such information does not contain any PII. Please be aware that other Nintendo 3DS System users may be able to store or
share with third parties information that you provide them through your Nintendo 3DS System.
MARKETING AND ADVERTISING
We may collect and use your PII, Non-PII, or Aggregate Information for marketing purposes, including the delivery of advertising and other
promotional materials to you through the Nintendo 3DS System. For example, we might deliver messages to your Nintendo 3DS System that oer
discounts on Nintendo games or products. You may be able to opt-out of receiving these messages through the Nintendo 3DS System settings or as
otherwise described to you in the marketing message.
Nintendo 3DS System Privacy Policy
Consumer Information
100
101
Page 26

NINTENDO ZONE
We may collect and use your PII and Non-PII to notify you when you are close to a Nintendo Zone. If you choose to access a Nintendo Zone, we may
use your PII and Non-PII, for example, to facilitate your access to applications and content. In addition, third parties may collect PII that you provide
to them and Non-PII through the Nintendo Zone.
LINKING ACCOUNTS
You may link your Nintendo 3DS Shop Account to your Club Nintendo account to receive personalized content and to participate in a variety of activities, promotions and programs. By linking your Club Nintendo account to your Nintendo 3DS Shop Account, you consent to having any PII you enter
on your Club Nintendo account linked to your Nintendo 3DS Shop Account. You may unlink these accounts in the Settings section of the Nintendo
3DS Shop.
THIRD-PARTY WEB BEACONS AND COOKIES
In the event you visit a third party’s Web site through the Internet browser on the Nintendo 3DS System, or you choose to view an ad delivered by a
third party, such as those made available through the Nintendo Zone, those Web sites or ads may also contain tools such as cookies and Web Beacons
which may be accessible to such third party to collect information about your online browsing. These third parties also may use ad networks, ad servers, ad exchanges, or other third parties that may collect information when you view or interact with advertisements or Web sites across the Internet
in an eort to understand your interests and deliver you advertisements tailored to your interests. Nintendo does not have access to the information
these third parties may collect about your interests to deliver relevant advertising to you, and the information practices of these third parties are not
covered by this Privacy Policy. We strongly recommend that you refer to the privacy policies of these third parties to learn more about how they may
collect, use, and disclose your information.
GAMES, APPLICATIONS, ADVERTISING, AND CONTENT PROVIDED BY THIRD PARTIES
You may disclose PII and Non-PII to third parties when you use the Nintendo 3DS System to play third-party games, use third-party applications,
view third-party advertisements, or visit third-party Web sites. We are not responsible for the privacy practices of these third parties, and we recommend that you review their privacy policies before submitting any information.
ATTENTION PARENTS OR LEGAL GUARDIANS: PROTECTING CHILDREN’S PRIVACY
The Nintendo 3DS System is directed to a general audience. We do not knowingly collect or store PII from children under the age of 13. Before
allowing your children to use the Nintendo 3DS System, we strongly recommend that you educate them on the importance of not sharing PII about
themselves with strangers. Children must not include any PII in their Nintendo 3DS System user name, Mii name, Mii prole information, in-game
nicknames or other User Content. Children also must not disclose PII when communicating with other Nintendo 3DS System users or
Nintendo through the Nintendo 3DS System wireless communication features.
We strongly recommend that you supervise your children’s use of the Nintendo 3DS System at all times. You can restrict your children’s use of certain
features of the Nintendo 3DS System by setting up the Nintendo 3DS Parental Controls. For a detailed description of the Nintendo 3DS System
wireless communication features and Parental Controls, please see the Nintendo 3DS System Operations Manual included with your Nintendo 3DS
System. This Operations Manual is also available at support.nintendo.com.
SECURITY
Nintendo 3DS System Privacy Policy
We have established reasonable safeguards to help ensure the security, integrity and privacy of the PII submitted or collected from your Nintendo
3DS System. We also have implemented reasonable security measures to help protect information under our control against loss, misuse or alteration. Nintendo will notify users of a data breach involving unencrypted PII by email or by posting a notice on our Web site. While we strive to safeguard your PII, no data storage system or transmission of data over the Internet or any other public network can be guaranteed to be 100% secure.
Please note that information collected by a Third Par ty Content Provider may not have the same security protections as information you submit to us,
and we are not responsible for protecting the security of such information.
If you install unauthorized applications or content on your Nintendo 3DS System or make unauthorized modications to the Nintendo 3DS System,
your PII may be compromised. Nintendo is not responsible for any data collection, use or disclosure from any Nintendo 3DS System with unauthorized applications or applications installed.
Consumer Information
OPTING-OUT OF INFORMATION COLLECTION
You may use the Nintendo 3DS System without disclosing PII; however, some features and applications may not be available to you. If you have
provided PII to us, you can opt-out of the collection of such data by turning o wireless communications on your Nintendo 3DS System. You also may
be able to opt-out of some types of information collection through the Nintendo 3DS System settings and Parental Controls.
DISABLING AND REMOVING INFORMATION STORED ON YOUR NINTENDO 3DS SYSTEM
Certain PII about you that you disclose when communicating with third parties or using your Nintendo 3DS System may be stored on your Nintendo
3DS System. For your protection, before selling or otherwise transferring your Nintendo 3DS System, please be sure to remove all stored information
on your Nintendo 3DS System. For instructions on how to remove this information, please see the Internet Setup section of your Nintendo 3DS
System Operations Manual or contact a Nintendo consumer service representative.
If you transfer data to a Nintendo 3DS System using the System Transfer or Nintendo 3DS Transfer Tool features, any PII or Non-PII included in such
data will be transferred as part of this process.
INTERNATIONAL USERS
Any information you provide or that is collected through the Nintendo 3DS System may be stored and processed in the United States or any other
country in which we or our aliated companies, vendors or agents maintain facilities. As such, PII may be accessed by foreign governmental authorities and otherwise in accordance with applicable laws. By using the Nintendo 3DS System, you consent to such storage and processing. We abide by
the safe harbor framework as set forth by the U.S. Department of Commerce regarding the collection, use, and retention of data from the European
Union. However, this Privacy Policy is intended to meet the laws and requirements of the United States and those of Canada and Latin America,
which may not be the same as the laws and regulations of your home country. If you are not located in the United States, Canada or Latin America
please go back to the country selection screen and select an appropriate country so that you will be aware of the policies that apply to you.
CONTACT US WITH YOUR PRIVACY QUESTIONS, COMMENTS OR CONCERNS
If you have any questions, complaints or comments regarding this Privacy Policy, the data collected from you or our practices, please contact the Nintendo 3DS Privacy Policy Administrator via email at privacypolicy@noa.nintendo.com, by phone at 1-888-977-7627, or by regular mail at Nintendo
of America Inc., Attn: Online Privacy Policy Administrator, 4600 150th Avenue NE, Redmond, WA 98052, U.S.A.
Nintendo is a licensee of the Entertainment Software Rating Board’s Privacy Online Program. If you believe that we have not responded to your
inquiry or your inquiry has not been satisfactorily addressed, please contact ESRB at http://www.esrb.org/privacy/contact.jsp, ESRB Attn: Privacy
Online Program, 317 Madison Avenue, 22nd Floor New York, NY 10017, U.S.A. or privacyinfo@esrb.org.
Nintendo 3DS System Privacy Policy
Consumer Information
102
103
Page 27

Nintendo 3DS Code of Conduct
Regulations for Equipment Use in U.S.A. and Canada
This Nintendo 3DS Code of Conduct outlines the rules that you must follow to participate in the Nintendo 3DS Service. These rules are designed to
keep the Nintendo 3DS Service a friendly and safe environment.
The Nintendo 3DS Code of Conduct may be found at http://support.nintendo.com and may be revised by us at anytime. If you do not have Internet
access, please contact Nintendo Consumer Service by (i) sending a letter to Nintendo of America Inc., Attn: Nintendo 3DS Code of Conduct, 4600
150th Ave NE, Redmond, WA 98052 USA; or (ii) calling, toll free, 1-888-977-7627, and they will mail you a current version of the Nintendo 3DS Code
of Conduct, free of charge. All capitalized terms not dened in this Nintendo 3DS Code of Conduct will have the meaning set forth in the Nintendo
3DS Service User Agreement.
1. Your use of the Nintendo 3DS is subject to this Nintendo 3DS Code of Conduct, which prohibits all harmful, illegal or otherwise oensive conduct,
including, but not limited to the following:
• Misrepresenting, impersonating, abusing, stalking, threatening or harassing any person or company, including, but not limited to other
users, Nintendo, and/or its employees, moderators, or sta.
• Doing anything illegal, discriminatory, defamatory, hateful, harassing, abusive, obscene, threatening, physically dangerous or other wise
objectionable in connection with the Nintendo 3DS System or Nintendo 3DS Service.
• Making, disseminating, sharing or playing unauthorized copies of games, music or images on the Nintendo 3DS System. This activity is
illegal!
• Making new versions of existing Content or Products.
• Trying to modify or gain access to another person’s Nintendo 3DS System or Nintendo 3DS Service without permission or trying to modify or
gain access to any of Nintendo’s computers, hardware or networks used to provide the Nintendo 3DS Service or any feature of the Nintendo
3DS System.
• Cheating in a game, unless such cheats have been deliberately enabled.
• Hosting, intercepting, emulating, reverse engineering or redirecting the communication protocols used by Nintendo as part of the Nintendo
3DS System or Nintendo 3DS Service, regardless of the method used to do so.
• Engaging in any commercial activity using the Nintendo 3DS System or any other activity that disrupts, diminishes the quality of, interferes
with the performance of, or impairs the functionality of a Nintendo 3DS System, including the Nintendo 3DS Service or networks connected
to the Nintendo 3DS Service.
• Accessing or attempting to access another person’s Nintendo 3DS System, including, but not limited to a person’s Nintendo 3DS Shop Account without permission or trying to modify, destroy or lose information from, copy or access any third party’s, including, but not limited
to Nintendo’s computers, hardware or networks.
Nintendo 3DS Code of Conduct
Consumer Information
• Uploading, posting, emailing, transmitting or otherwise making available: (a) any content that you do not have a legal right to make
available; (b) any content that infringes any patent, trademark, trade secret, copyright or other intellectual property or proprietary rights of
any party; (c) any unsolicited or unauthorized advertising or promotional materials (e.g. “spam”); (d) information which personally identies you or any third party; (e) content to which you have disguised the origin; or (f) content that is obscene, unlawful or prohibited from
publication in your jurisdiction, including but not limited to publishing news, stories or pictures associated with a third party.
2. Nintendo is not responsible for, and to the fullest extent permitted by law, will not accept liability for, anything you say or anything that happens
on the Nintendo 3DS System and Nintendo 3DS Service or as a result of your use of the Nintendo 3DS System and Nintendo 3DS Service; you
alone are responsible.
3. Virtual Property. Some games or other content may have certain features that may be traded with other Nintendo 3DSusers. For example, a
game might give you the ability to create a character that gathers objects (like a car or gold coins) and has certain characteristics (like a special
ability or appearance). These features are sometimes called “virtual property.” Nintendo (or its licensors) own this virtual propert y, and you may
not sell, trade, assign, license, or otherwise convey virtual property for real money.
4. Nintendo reserves the right to immediately terminate, block or suspend, in whole or in part, your use of the Nintendo 3DS Service or any feature
of the Nintendo 3DS System for, in Nintendo’s sole discretion, any violation of this Nintendo 3DS Code of Conduct. Nintendo reserves the right
to contact and cooperate with any law enforcement agencies, government ocials or Internet Service Providers, as Nintendo believes in its sole
discretion, is necessary or appropriate to investigate or resolve possible problems or inquiries, or as otherwise required by law.
FCC and Industry Canada Information
In order to comply with FCC radio-frequency radiation exposure guidelines for an uncontrolled exposure, this device and its
antenna must not be co-located or operating in conjunction with any other antenna or transmitter.
This device complies with Part 15 of the FCC Rules and RSS-210 of Industry Canada. Operation is subject to the following two
conditions: (1) This device may not cause harmful interference, and (2) this device must accept interference received, including
interference that may cause undesired operation.
Changes or modications not expressly approved by the manufacturer could void the user’s authority to operate this device.
This equipment has been tested and found to comply with the limits of a Class B digital device, pursuant to part 15 of the FCC
Rules. These limits are designed to provide reasonable protection against harmful interference in a residential installation.
This equipment generates, uses and can radiate radio frequency energy and, if not installed and used in accordance with the
instructions, may cause harmful interference to radio communications. However, there is no guarantee that interference will not
occur in a particular installation. If this equipment does cause harmful interference to radio or television reception, which can be
determined by turning the equipment o and on, the user is encouraged to try to correct the interference by one or more of the
following measures:
• Reorient or relocate the receiving antenna.
• Increase the separation between the equipment and receiver.
• Connect the equipment into an outlet on a circuit dierent from that to which the receiver is connected.
• Consult the dealer or an experienced radio/TV technician or call Nintendo Consumer Service at 1-800-255-3700
for assistance.
The user may nd the following booklet prepared by the Federal Communications Commission helpful: How to Identify and
Resolve Radio-TV Interference Problems. This booklet is available from the U.S. Government Printing Oce, Washington, D.C.,
20402, Stock No. 004-000-00345-4.
Regulatons for Equipment Use in U.S.A. and Canada
Consumer Information
104
105
Page 28

Specications
Nintendo 3DS battery pack
Model name: CTR-003
Nintendo 3DS system
Model name: CTR-001 (USA)
LCD screens Upper Screen: Widescreen LCD display, enabling 3D view without the need for
(Screen size/pixel count) special glasses. Capable of displaying approximately 16.77 million colors. 3.53-inch
display (76.80 mm horizontal x 46.08 mm vertical) with 800x240 pixel resolution
(400 pixels are allocated for each eye to enable 3D viewing).
Lower Screen: LCD Touch Screen. Capable of displaying approximately 16.77 million
colors. 3.02-inch display (61.44 mm horizontal x 46.08 mm vertical) with 320x240
pixel resolution.
Power source AC adapter (WAP-002 (USA), Battery pack (CTR-003)
Wireless frequency: 2.4GHz band
Wireless standards: IEEE802.11b/g
Recommended wireless distance: Within 98’ (30 m). Depending on surrounding conditions, this
distance may be less.
Camera functions: Lens: Single focus. Capture element: CMOS. Active pixel count: Approx. 300,000
pixels.
Clock features: Maximum daily variance: ± 4 seconds
Speakers: Stereo (with pseudo-surround support)
Input/output: Game Card slot, SD Card slot, AC adapter connector, charging cradle terminal, and
stereo headphone output jack
Battery type: Lithium-Ion
Power Capacity: 5Wh
Nintendo 3DS charging cradle
Model name: CTR-007
Input/output: DC 4.6V 900mA
Dimensions: Height: 86.5 mm / width: 138.2 mm / thickness: 31.8 mm
Weight: Approximately 87.4 g
Specications
Nintendo 3DS AC adapter
Model name: WAP-002 (USA)
Input: 120V 60Hz 7W
Output: DC 4.6V 900mA
Dimensions: Height: 67.5 mm / width: 47.7 mm / thickness:23.0 mm
Weight: Approximately 80 g
Cord length: Approximately 1.9 m
Compatible products: Nintendo 3DS, Nintendo DSi XL, Nintendo DSi
Sensors: Motion sensor, gyro sensor
Specications
Maximum power consumption: Approximately 4.1W (while charging)
Operating environment: Temperature, 41˚F – 95˚F (5˚C – 35˚C) / humidity, 20-80 percent
Dimensions: Height: 74 mm / width: 134 mm / thickness: 21 mm (when closed)
Weight: Approximately 235 g (including battery pack (CTR-003), stylus (CTR-004), and SD
Card)
Consumer Information
Charge time Approx. 3 hours and 30 minutes
Battery endurance Please see page 21.
106 107
Consumer Information
Page 29

Legal Notices
This product includes RSA BSAFE Cryptographic software from RSA Security Inc. RSA is a registered trademark of RSA Security Inc. BSAFE is a registered trademark of RSA Security Inc. in the United States and/or
other countries. ©2005 RSA Security Inc. All Rights Reserved.
SDHC Logo is a trademark of SD-3C, LLC.
This product uses certain fonts provided by Fontworks Inc.
This product includes speech rate conversion software developed by Toshiba corporation. Copyright ©2008 TOSHIBA CORPORATION
“QR code reader” includes software deliverables of Information System Products Co., Ltd. and Institute of Super Compression Technologies, Inc. QR Code is a registered trademark of DENSO WAVE INCORPORATED
in JAPAN and other countries.
“
“ and AOSS™ are the trademarks of BUFFALO INC.
THIS PRODUCT IS LICENSED UNDER THE MPEG-4 SYSTEMS PATENT PORTFOLIO LICENSE FOR ENCODING IN COMPLIANCE WITH THE MPEG-4 SYSTEMS STANDARD. EXCEPT THAT AN ADDITIONAL LICENSE AND
PAYMENT OF ROYALTIES ARE NECESSARY FOR ENCODING IN CONNECTION WITH (i) DATA STORED OR REPLICATED IN PHYSICAL MEDIA WHICH IS PAID FOR ON A TITLE BY TITLE BASIS AND/OR (ii) DATA WHICH IS PAID
FOR ON A TITLE BY TITLE BASIS AND IS TRANSMITTED TO AN END USER FOR PERMANENT STORAGE AND/OR USE. SUCH ADDITIONAL LICENSE MAY BE OBTAINED FROM MPEG LA, LLC. SEE <HTTP://WWW.MPEGLA.
COM> FOR ADDITIONAL DETAILS.
Ubiquitous TCP/IP+SSL Copyright ©2001-2010 Ubiquitous Corp.
Powered by Devicescape Software. Portions of this products are © 2003-2010 Devicescape Software, Inc. All rights reserved.
Copyright ©2003-2010, Jouni Malinen <j@w1.> and contributors All Rights Reserved.
WPA Supplicant licensed pursuant to BSD License.
Redistribution and use in source and binary forms, with or without modication, are permitted provided that the following conditions are met:
1. Redistributions of source code must retain the above copyright notice, this list of conditions and the following disclaimer.
2. Redistributions in binary form must reproduce the above copyright notice, this list of conditions and the following disclaimer in the documentation and/or other materials provided with the distribution.
3. Neither the name(s) of the above-listed copyright holder(s) nor the names of its contributors may be used to endorse or promote products derived from this software without specic prior written permission.
THIS SOFTWARE IS PROVIDED BY THE COPYRIGHT HOLDERS AND CONTRIBUTORS ”AS IS” AND ANY EXPRESS OR IMPLIED WARRANTIES, INCLUDING, BUT NOT LIMITED TO, THE IMPLIED WARRANTIES OF MERCHANTABILITY AND FITNESS FOR A PARTICULAR PURPOSE ARE DISCLAIMED. IN NO EVENT SHALL THE COPYRIGHT OWNER OR CONTRIBUTORS BE LIABLE FOR ANY DIRECT, INDIRECT, INCIDENTAL, SPECIAL, EXEMPLARY,
OR CONSEQUENTIAL DAMAGES (INCLUDING, BUT NOT LIMITED TO, PROCUREMENT OF SUBSTITUTE GOODS OR SERVICES; LOSS OF USE, DATA, OR PROFITS; OR BUSINESS INTERRUPTION) HOWEVER CAUSED AND
ON ANY THEORY OF LIABILITY, WHETHER IN CONTRACT, STRICT LIABILITY, OR TORT (INCLUDING NEGLIGENCE OR OTHERWISE) ARISING IN ANY WAY OUT OF THE USE OF THIS SOFTWARE, EVEN IF ADVISED OF THE
POSSIBILITY OF SUCH DAMAGE.
This product includes software developed by the OpenSSL Project for use in the OpenSSL Toolkit. (http://www.openssl.org/). Copyright ©1998-2007 The OpenSSL Project. All rights reserved.
Redistribution and use in source and binary forms, with or without modication, are permitted provided that the following conditions are met:
1. Redistributions of source code must retain the above copyright notice, this list of conditions and the following disclaimer.
2. Redistributions in binary form must reproduce the above copyright notice, this list of conditions and the following disclaimer in the documentation and/or other materials provided with the distribution.
3. All advertising materials mentioning features or use of this software must display the following acknowledgment: ”This product includes software developed by the OpenSSL Project for use in the OpenSSL
Toolkit. (http://www.openssl.org/)”
4. The names ”OpenSSL Toolkit” and ”OpenSSL Project” must not be used to endorse or promote products derived from this software without prior written permission. For written permission, please contact
openssl-core@openssl.org.
5. Products derived from this software may not be called ”OpenSSL” nor may ”OpenSSL” appear in their names without prior written permission of the OpenSSL Project.
6. Redistributions of any form whatsoever must retain the following acknowledgment: This product includes software developed by the OpenSSL Project for use in the OpenSSL Toolkit (http://www.openssl.org/)
THIS SOFTWARE IS PROVIDED BY THE OpenSSL PROJECT “AS IS” AND ANY EXPRESS OR IMPLIED WARRANTIES, INCLUDING, BUT NOT LIMITED TO, THE IMPLIED WARRANTIES OF MERCHANTABILITY AND FITNESS FOR A
PARTICULAR PURPOSE ARE DISCLAIMED. IN NO EVENT SHALL THE OpenSSL PROJECT OR ITS CONTRIBUTORS BE LIABLE FOR ANY DIRECT, INDIRECT, INCIDENTAL, SPECIAL, EXEMPLARY, OR CONSEQUENTIAL DAMAGES
(INCLUDING, BUT NOT LIMITED TO, PROCUREMENT OF SUBSTITUTE GOODS OR SERVICES; LOSS OF USE, DATA, OR PROFITS; OR BUSINESS INTERRUPTION) HOWEVER CAUSED AND ON ANY THEORY OF LIABILITY,
WHETHER IN CONTRACT, STRICT LIABILITY, OR TORT (INCLUDING NEGLIGENCE OR OTHERWISE) ARISING IN ANY WAY OUT OF THE USE OF THIS SOFTWARE, EVEN IF ADVISED OF THE POSSIBILITY OF SUCH DAMAGE.
This product includes cryptographic software written by Eric Young. Copyright ©1995-1998 Eric Young (eay@cryptsoft.com). All rights reserved.
This package is an SSL implementation written by Eric Young (eay@cryptsoft.com). The implementation was written so as to conform with Netscapes SSL.
This library is free for commercial and non-commercial use as long as the following conditions are adhered to. The following conditions apply to all code found in this distribution, be it the RC4, RSA, lhash, DES,
etc., code; not just the SSL code. The SSL documentation included with this distribution is covered by the same copyright terms except that the holder is Tim Hudson (tjh@cryptsoft.com).
Copyright remains Eric Young’s, and as such any Copyright notices in the code are not to be removed. If this package is used in a product, Eric Young should be given attribution as the author of the parts of the
library used. This can be in the form of a textual message at program startup or in documentation (online or textual) provided with the package.
Redistribution and use in source and binary forms, with or without modication, are permitted provided that the following conditions are met:
Legal Notices
1. Redistributions of source code must retain the copyright notice, this list of conditions and the following disclaimer.
2. Redistributions in binary form must reproduce the above copyright notice, this list of conditions and the following disclaimer in the documentation and/or other materials provided with the distribution.
3. All advertising materials mentioning features or use of this software must display the following acknowledgement: ”This product includes cryptographic software written by Eric Young (eay@cryptsoft.
com)” The word ‘cryptographic’ can be left out if the rouines from the library being used are not cryptographic related :-).
4. If you include any Windows specic code (or a derivative thereof) from the apps directory (application code) you must include an acknowledgement: This product includes software written by Tim Hudson
(tjh@cryptsoft.com).
THIS SOFTWARE IS PROVIDED BY ERIC YOUNG ”AS IS” AND ANY EXPRESS OR IMPLIED WARRANTIES, INCLUDING, BUT NOT LIMITED TO, THE IMPLIED WARRANTIES OF MERCHANTABILITY AND FITNESS FOR A
PARTICULAR PURPOSE ARE DISCLAIMED. IN NO EVENT SHALL THE AUTHOR OR CONTRIBUTORS BE LIABLE FOR ANY DIRECT, INDIRECT, INCIDENTAL, SPECIAL, EXEMPLARY, OR CONSEQUENTIAL DAMAGES (INCLUDING, BUT NOT LIMITED TO, PROCUREMENT OF SUBSTITUTE GOODS OR SERVICES; LOSS OF USE, DATA, OR PROFITS; OR BUSINESS INTERRUPTION) HOWEVER CAUSED AND ON ANY THEORY OF LIABILITY, WHETHER IN
CONTRACT, STRICT LIABILITY, OR TORT (INCLUDING NEGLIGENCE OR OTHERWISE) ARISING IN ANY WAY OUT OF THE USE OF THIS SOFTWARE, EVEN IF ADVISED OF THE POSSIBILITY OF SUCH DAMAGE.
The licence and distribution terms for any publicly available version or derivative of this code cannot be changed. i.e. this code cannot simply be copied and put under another distribution licence [including
the GNU Public Licence.]
Consumer Information
This product uses the LC Font by Sharp Corporation. LCFONT, LC Font and the LC logo mark are trademarks of Sharp Corporation.
The Wi-Fi CERTIFIED logo, Wi-Fi Protected Access® (WPA and WPA2), and the Wi-Fi Protected Setup icon are registered trademarks of the Wi-Fi Alliance.
MODE D’EMPLOI
108 109
 Loading...