

Page 1

RAID User Guide
Edition
V1.0
Trademarks
All brand or product names mentioned are trademarks or registered trade-
marks of their respective holders.
Page 2

Contents
1. Introduction.............................................................................1
2. Installing Hard Disks...............................................................2
3. BIOS Configuration.................................................................3
4. RAID Configuration Utility........................................................3
1) Intel Matrix Storage Manager Option ROM Utility...........................3
2) Silicon Image BIOS RAID Configuration Utility.............................14
3) VASSTEK BIOS RAID Configuration (optional)............................22
5. Installing Operating System with RAID..................................23
6. Installing RAID Driver............................................................24
7. Creating a RAID driver disk................................................... 24
Page 3

RAID User’s Guide
RAID Configurations
1. Introduction
RAID (Redundant Array of Independent Disks) is a method of combining two hard
disk drives into one logical unit. The advantage of an Array is to provide better
performance or data fault tolerance. The motherboard comes with the Intel ICH7R,
the Silicon Image Sil3132 and the VASSTEK VSC6110 RAIDm1 RAID controllers
that allow you to configure Serial ATA and IDE hard disk drives as RAID sets. The
following RAID configurations are provided for users.
RAID 0 (Striping)
RAID 0 reads and writes sectors of data interleaved between multiple drives. If any
disk member fails, it affects the entire array. The disk array data capacity is equal
to the number of drive members times the capacity of the smallest member. The
striping block size can be set from 4KB to 128KB. RAID 0 does not support fault
tolerance.
RAID 1 (Mirroring)
RAID 1 writes duplicate data onto a pair of drives and reads both sets of data in
parallel. If one of the mirrored drives suffers a mechanical failure or does not
respond, the remaining drive will continue to function. Due to redundancy, the drive
capacity of the array is the capacity of the smallest drive. Under a RAID 1 setup, an
extra drive called the “spare drive” can be attached. Such a drive will be activated to
replace a failed drive that is part of a mirrored array. Due to the fault tolerance, if any
RAID 1 drive fails, data access will not be affected as long as there are other
working drives in the array.
RAID 5
RAID 5 Provides data striping at the byte level and also stripe error correction
information. This results in excellent performance and good fault tolerance. Level
5 is one of the most popular implementations of RAID.
RAID 10 (0+1)
RAID 10 is a combination of striping and mirroring. This configuration provides
optimal speed and reliability, but you need four SATA hard disks.
JBOD (Spanning)
JBOD (Just a Bunch of Disks) combines drives into larger logical volumes. Itprovides
no fault tolerance, nor does it provide any improvements in performancecompared
to the independent use of its constituent drives.
1
Page 4
RAID User’s Guide
Intel Matrix Storage
The Intel Matrix Storage technology creates two partitions on each hard disk drive
to create a virtual RAID 0 and RAID 1 sets. This technology also allows you to
change the hard disk drive partition size without losing any data. You only need two
SATA hard disks to utilize this function.
RAIDm1
RAIDm1 (Reliable Access In a Disk by Mirror 1) is a new creative concept engi-
neered by VASSTEK. It provides RAID 1 robust and mature technology in one hard
disk to provide real-time data protection advantage.
2. Installing Hard Disks
Installing Parallel ATA hard disks
STEP 1: Refer to the hard disk documentation to set the jumpers of each hard disk
as master or slave.
STEP 2:Install the hard disks into the drive bays.
STEP 3: Connect the hard disk signal cables.
STEP 4: Connect a 4-pin power cable to the power connector on each drive.
Installing Serial ATA hard disks
STEP 1:Install SATA hard disks into the drive bays.
STEP 2:Connect one end of the SATA data cable to the motherboard’s one of
SATA connectors.
STEP 3: Connect the other end of the SATA data cable to one SATA hard disk.
Notes:
1. SATA_1/SATA_2/SATA_3/SATA_4 supports a RAID 0, 1, 5, 10 con-
figuration with the Intel ICH7R RAID controller.
2. SATA_5 can combine with an external Serial ATA port multiplier to
configure RAID 0, 1, 5, 10 and JBOD set through the onboard Silicon
Image 3132 SATA RAID controller.
3. VASRAID provides two modes for RIDE, RAIDm1 mode and ATA mode,
these 2 modes are set for Master device. For slave device, it is always
at ATA mode.
2
Page 5
RAID User’s Guide
3. BIOS Configuration
A.Enter the BIOS setup program by pressing the <Del> key during the POST
(Power-On Self Test ).
B.Setting ICH7R RAID item in BIOS
1) Select the OnChip IDE Device item form Integrated Peripherals menu.
2) Switch the SATA Mode option to [RAID].
C. Setting Sil3132 RAID item in BIOS
1) Select the Onboard Device item form Integrated Peripherals menu.
2) Switch the Sil3132 SATA Controller option to [RAID Mode].
D. Setting RAIDm1 item in BIOS
1) Select the Onboard Device item form Integrated Peripherals menu.
2) Switch the PATA RAID VSC6110 option to [Enabled].
E.Save the BIOS setting and exit the BIOS setup program.
4. RAID Configuration Utility
1) Intel Matrix Storage Manager Option ROM Utility
A.Setting RAID 0
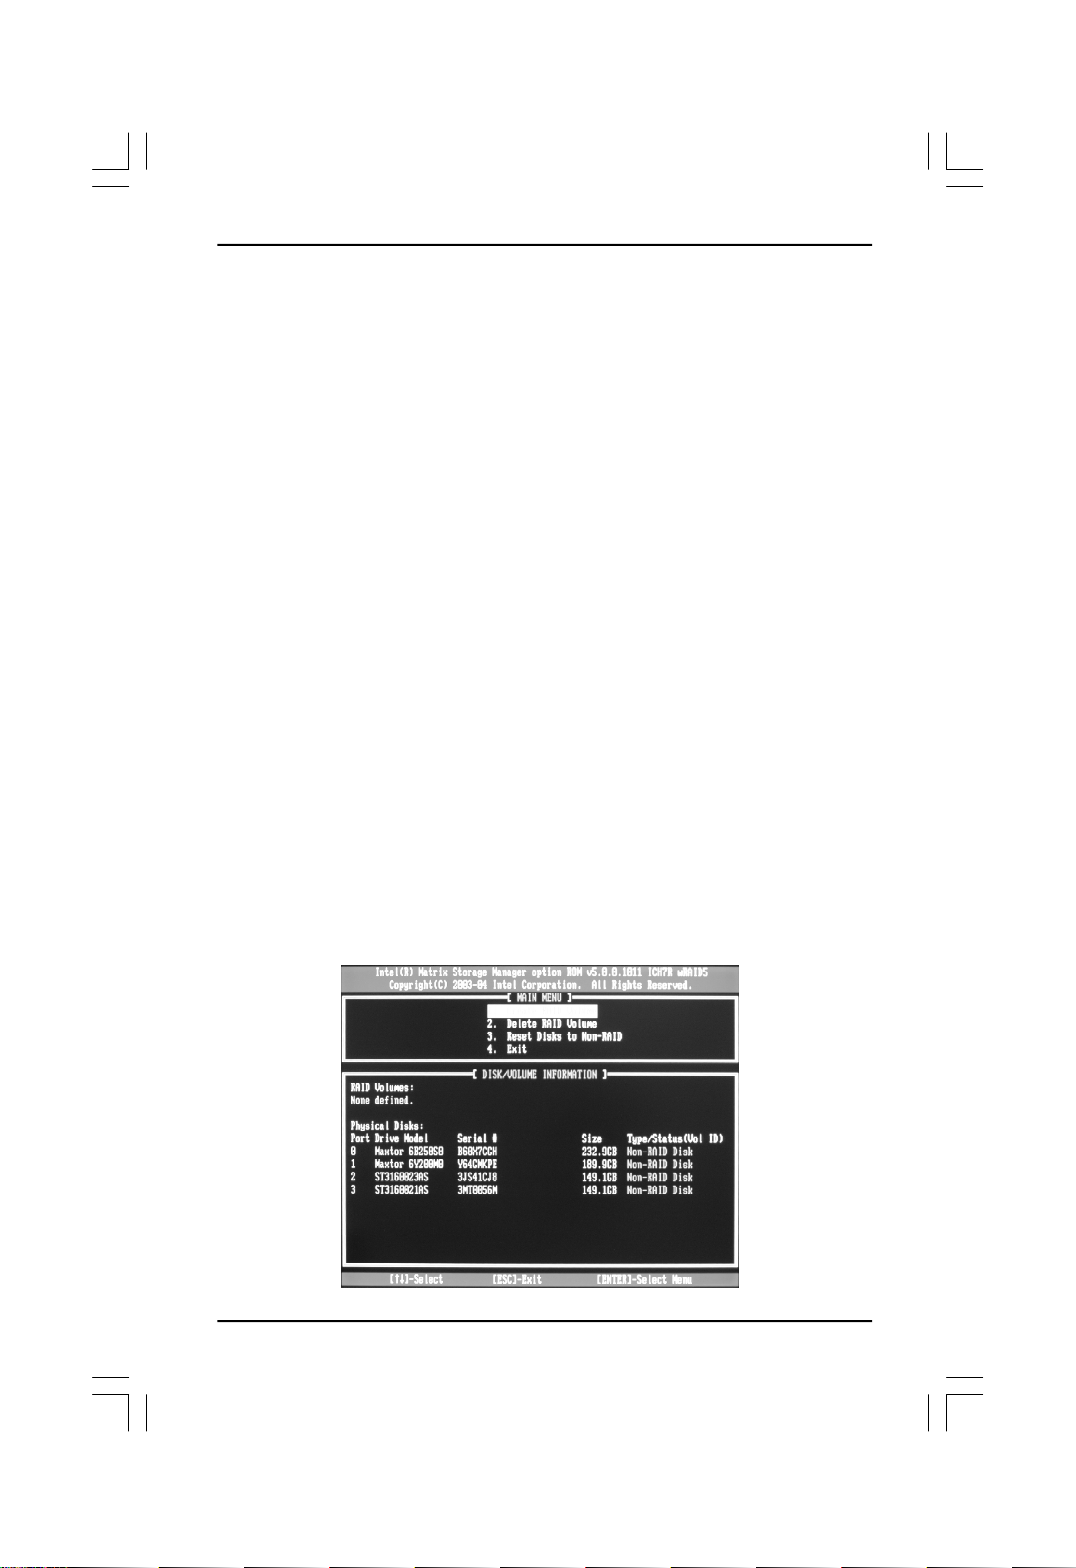
a.When the system powers on, the following information will appear on screen:
Press the <Ctrl-I> to enter Configuration Utility.
At this moment, press <Ctrl>+<I> to enter Main Menu:
3
Page 6
RAID User’s Guide
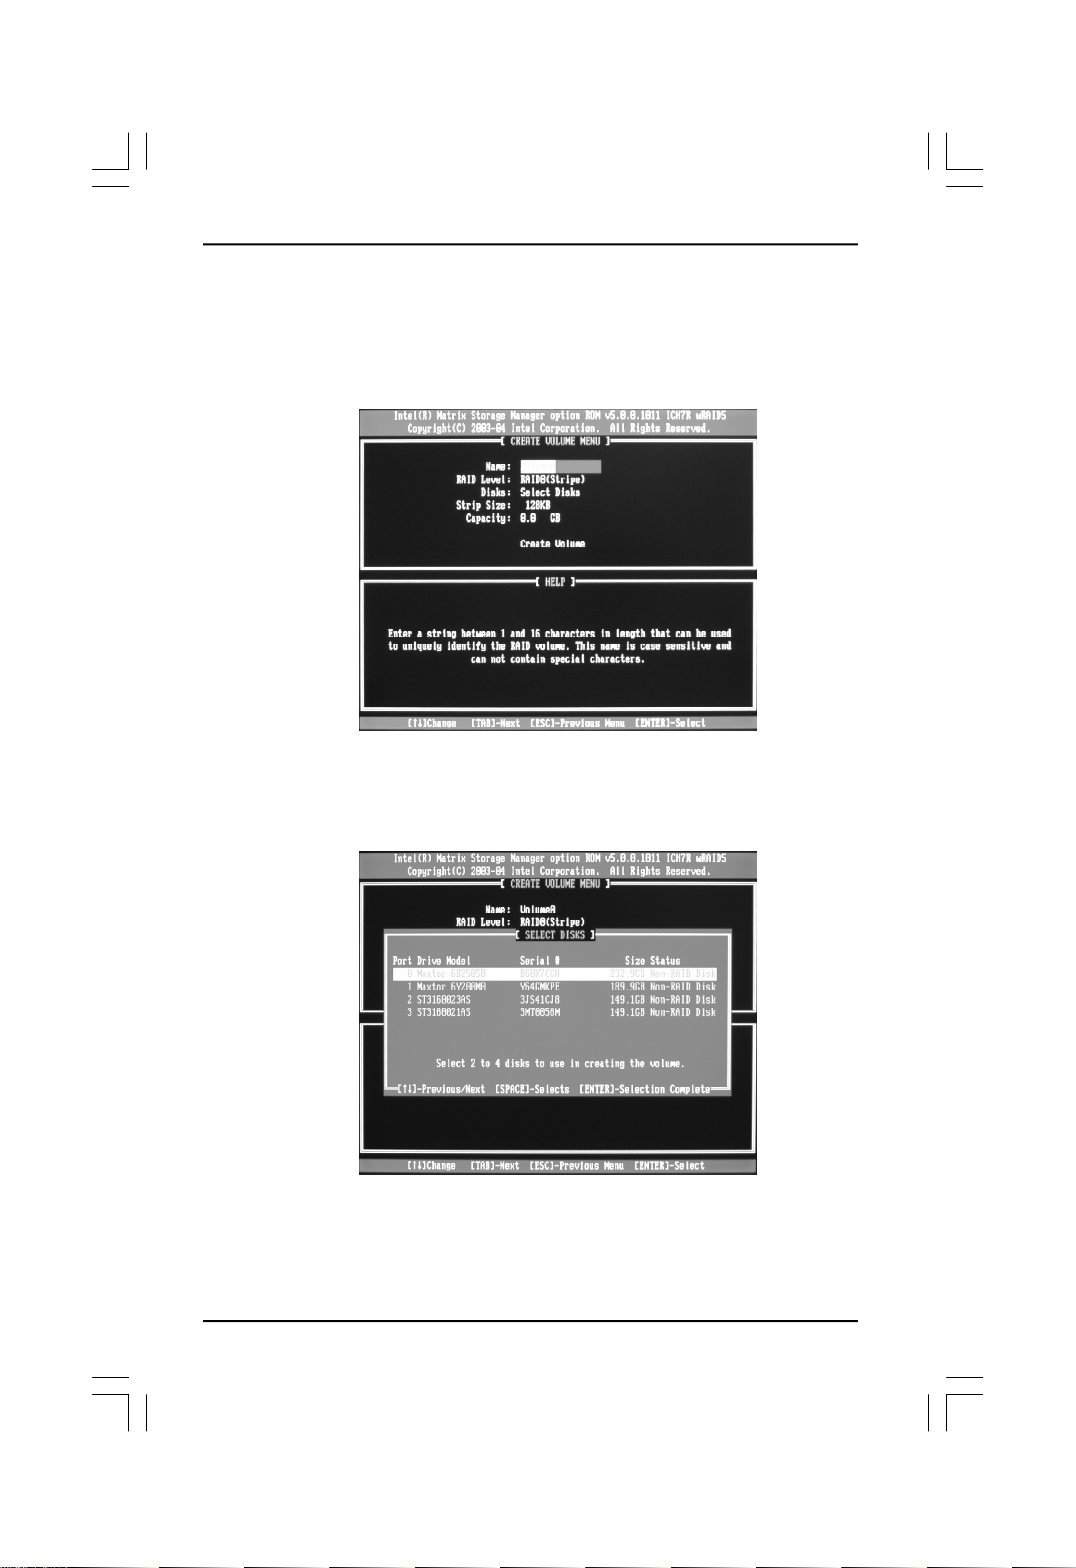
b.Choose Create RAID Volume and press <Enter> to enter. Press <Tab> to
switch to RAID Level item, and then use Up and Down arrow keys to select
RAID0 (Stripe), pressing <Enter> confirms.
c.Using up or down arrow key to select the hard disks you want to set RAID 0 from
Disks item, <Space> key to confirm and <Enter> key to finish the selection.
4
Page 7
RAID User’s Guide
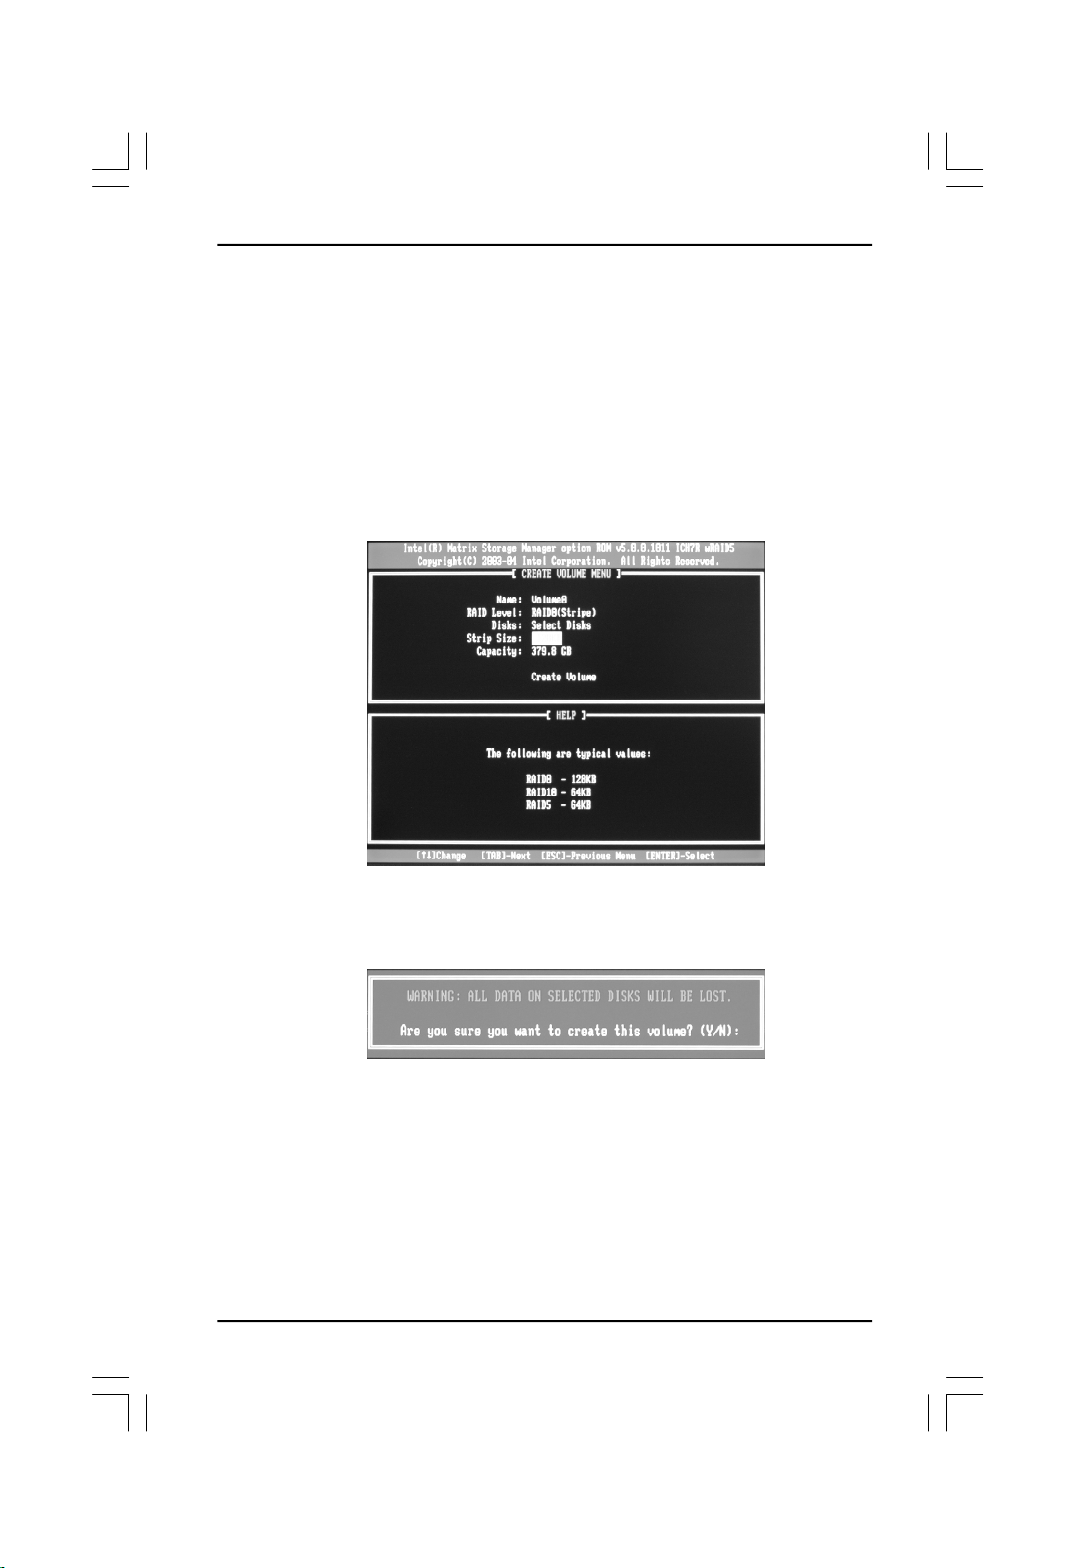
d.Use Up and Down arrow keys to select desired strip size when enter Strip Size
menu. The available values range from 4KB to 128KB. The strip value should
be based on the planned drive usage. Some suggested selections are listed
below. The default selection is 128KB.
16K_Best for sequential transfer
64K_Good general purpose strip size
128K_Best performance for most desktops and workstations
e.Press the <Enter> key after the Create Volume prompt appears to create the
array. Press the <Y> key after the prompt to confirm this selection.
f.Select option 4. Exit in main menu and press the <Enter> key to exit the RAID
configuration utility. Press <Y> key to confirm the exit.
5
Page 8
RAID User’s Guide
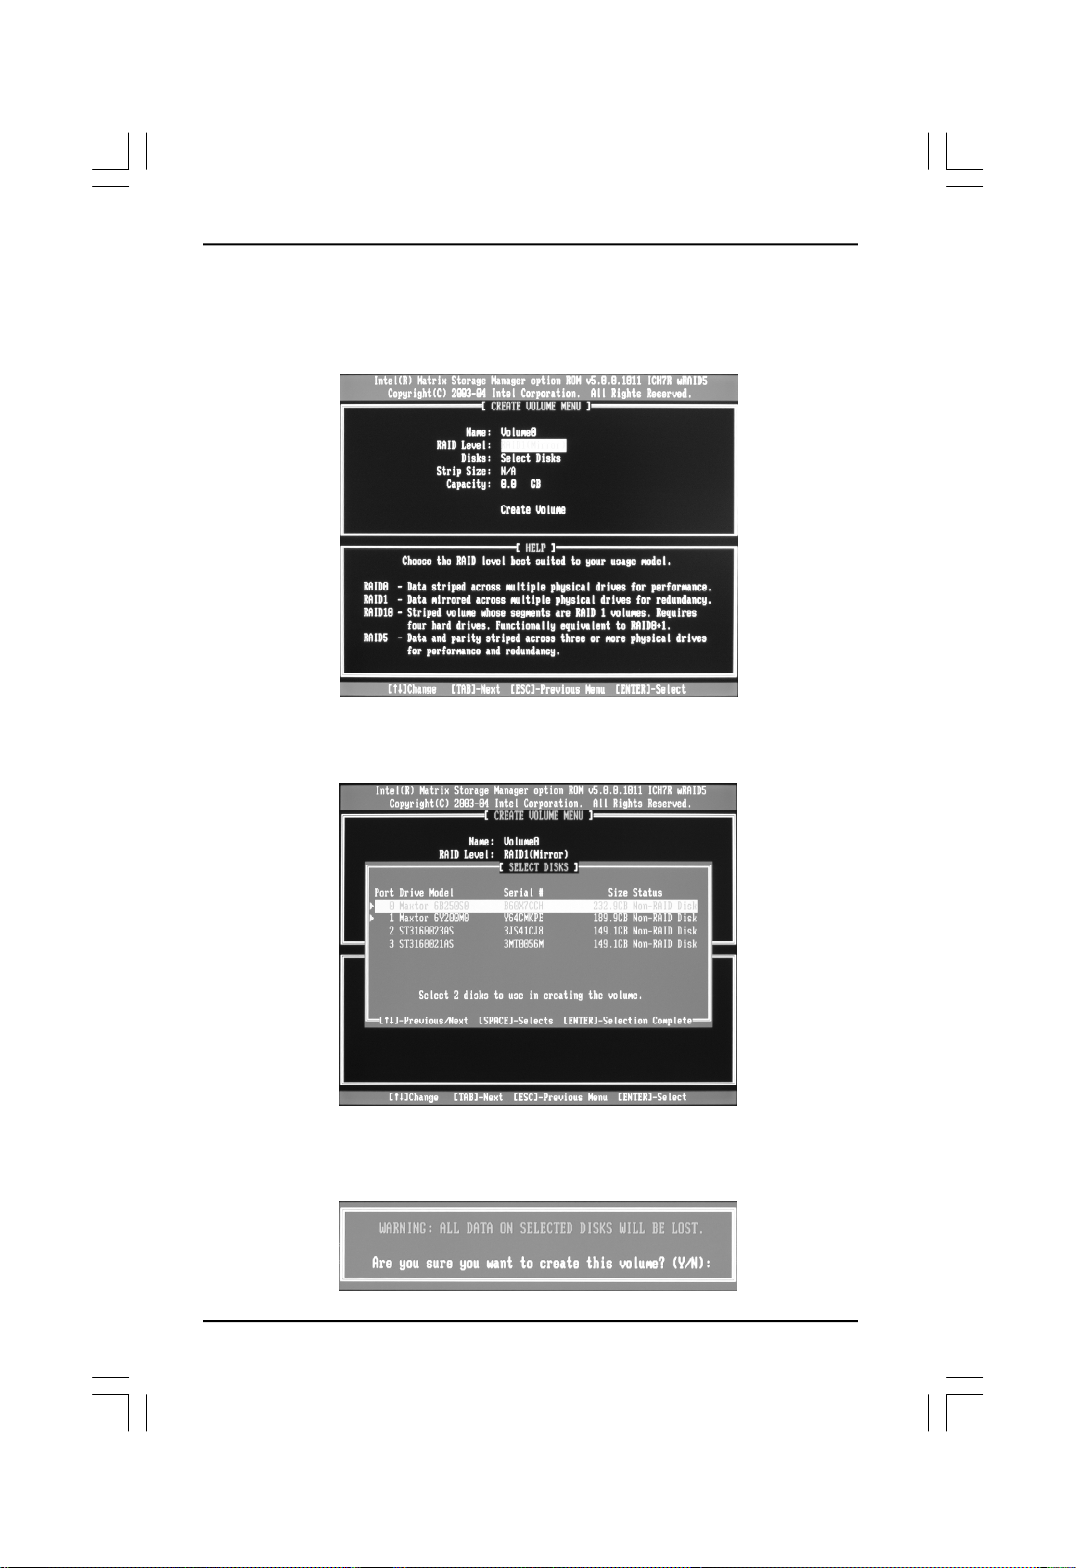
B.Setting RAID1
a.Select RAID1 (Mirror) by using Up and Down arrow keys in RAID Level item.
Press the <Enter> key to make selecting.
b.Using up or down arrow key to select the hard disks you want to set RAID 1 from
Disks item, <Space> key to confirm and <Enter> key to finish the selection.
c.Press the <Enter> key after the Create Volume prompt appears to create the
array. Press the <Y> key after the prompt to confirm this selection.
6
Page 9
RAID User’s Guide
d.Select option 4. Exit in main menu and press the <Enter> key to exit the RAID
configuration utility. Press <Y> key to confirm the exit.
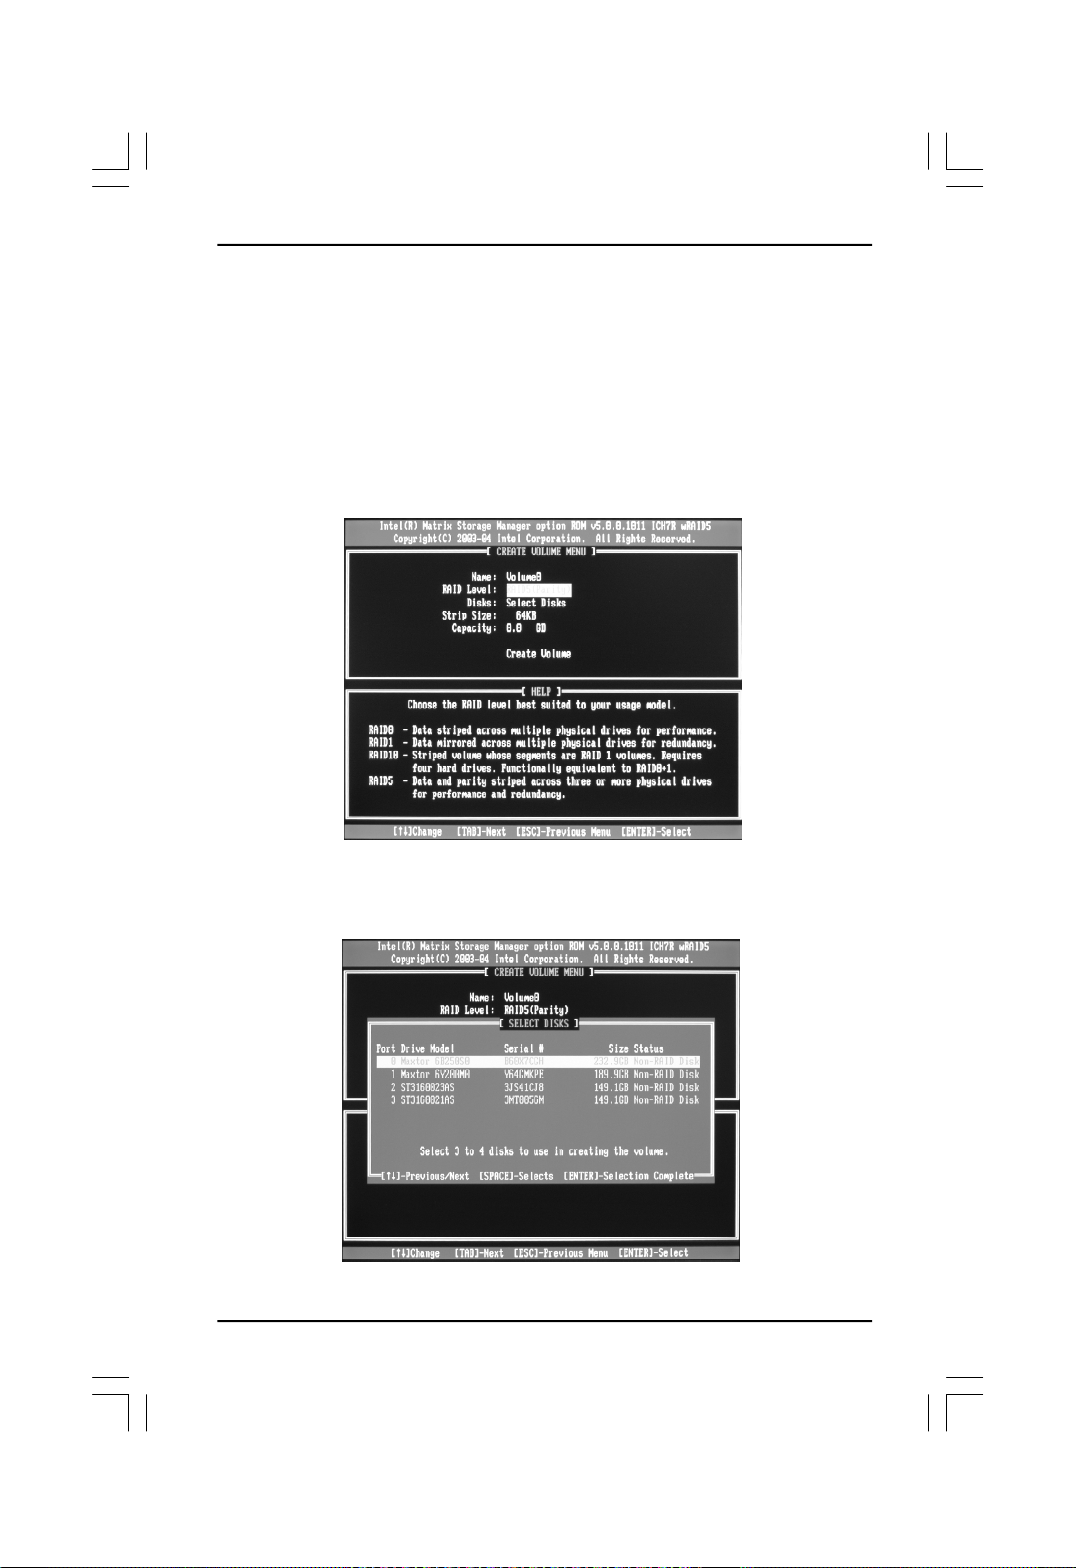
C.Setting RAID5
a.Select RAID5 (Parity) by using Up and Down arrow keys in RAID Level item.
Press the <Enter> key to make selecting.
b.Using up or down arrow key to select the hard disks you want to set RAID 5 from
Disks item, <Space> key to confirm and <Enter> key to finish the selection.
7
Page 10

RAID User’s Guide
c.Use Up and Down arrow keys to select desired strip size when enter Strip Size
menu. The available values range from 4KB to 128KB. The strip value should
be based on the planned drive usage. Some suggested selections are listed
below. The default selection is 128KB.
16K_Best for sequential transfer
64K_Good general purpose strip size
128K_Best performance for most desktops and workstations
d.Press the <Enter> key after the Create Volume prompt appears to create the
array. Press the <Y> key after the prompt to confirm this selection.
e.Select option 4. Exit in main menu and press the <Enter> key to exit the RAID
configuration utility. Press <Y> key to confirm the exit.
8
Page 11

RAID User’s Guide
D.Setting RAID 10(RAID0+1)
a.To utilize RAID 10 function, four SATA hard disks should be installed.
b.Choose Create RAID Volume and press <Enter> to enter. Press <Tab> to
switch to RAID Level item, and then use Up and Down arrow keys to select
RAID10(RAID0+1), pressing <Enter> confirms.
c.Use Up and Down arrow keys to select desired strip size when enter Strip
Size menu. The available values range from 4KB to 128KB. The strip value
should be based on the planned drive usage. Some suggested selections
are listed below. The default selection is 128KB.
16K_Best for sequential transfer
64K_Good general purpose strip size
128K_Best performance for most desktops and workstations
9
Page 12

RAID User’s Guide
d.Press the <Enter> key after the Create Volume prompt appears to create the
array. Press the <Y> key after the prompt to confirm this selection.
e.Select option 4. Exit in main menu and press the <Enter> key to exit the RAID
configuration utility. Press <Y> key to confirm the exit.
f.You may see the RAID type in the main menu, when you finished the setting
steps.
Note:
This operation will delete all the data from hard disk, so please take
care. And our company will not be responsible for data lose and benefit
damage caused.
10
Page 13

RAID User’s Guide
E.Setting Matrix RAID
a.Intel ICH7R chipset features a new RAID form named Matrix RAID, a combina-
tion of RAID 0 and RAID 1 bringing you the best of both worlds.
b.Follow Setting RAID 0 steps to set RAID 0. You should divide half capacity size
or less for RAID 1 in Capacity item. (For example, if the SATA hard disks total
capacity is 300 GB, divide 150 GB or less capacity for RAID 1.)
c.Follow Setting RAID 1 steps to set RAID 1.
11
Page 14

RAID User’s Guide
c.You may see the RAID type (Member Disk (0,1)) in the main menu, when you
finished the setting steps.
Note:
This operation will delete all the data from hard disk, so please take
care. And our company will not be responsible for data lose and benefit
damage caused.
12
Page 15

RAID User’s Guide
F.Delete RAID Volume
1.Select Delete RAID Volume in main menu and press <Enter> key.
2.Press <Del> key to delete the RAID volume in below screen.
3.Press <Y> key to confirm the volume deletion, and press <N> to cancel the
operation.
Note:
This operation will delete all the data from hard disk, so please take
care. And our company will not be responsible for data lose and benefit
damage caused.
G.Reset RAID
1.Select Reset Disk to Non-RAID in main menu and press <Enter> key to delete
the RAID setting and remove all RAID structures from the drives. Then you will
see:
Are you sure you want to reset RAID data on selected? (Y/N):
2.Press <Y> key to confirm the volume deletion, press <N> to cancel the operation.
13
Page 16

RAID User’s Guide
2) Silicon Image BIOS RAID Configuration Utility
A. Creating RAID Sets
As previously discussed, the Silicon Image SATA host adapter supports RAID 0, 1,
5, 10, and JBOD configurations using a Serial ATA port multiplier. The selection of
the RAID level to be used should be based upon factors including performance,
data security, and number of drives available. It is best to carefully consider the
long-term role of the system and plan the data storage strategy appropriately.
Silicon Image has made the creation of RAID sets very simple. They can be cre-
ated either automatically or to allow the greatest flexibility, manually.
a.Select “Create RAID set”.
b.Choose a RAID set.
c.Select Automatically or Manually configuration of the RAID Set.
14
Page 17

RAID User’s Guide
d.If manual configuration is selected, the chunk size of Striped Sets can be
selected. For Mirrored Sets, the Source and Target drives can be selected.
e.If auto configuration is selected, BIOS will select RAID member drives auto
matically and the chunk size of Striped Sets is set to 64KB.
f.Select RAID set size with ↑ and ↓ keys.
g.After the RAID set size is set, the message “Are You Sure (Y/N)?” will display
before completing the configuration. Answer “N” to abort the creation of the new
RAID set, or “Y” to proceed with the RAID set creation.
h.RAID sets can be created in both BIOS and in the SATARaid5 GUI. If you have
excess capacity left on your hard drives after creating a RAID set in the BIOS, you
can later go to the SATARaid5 GUI to create additional logical drives that fully
utilize the capacity on all your hard drives.
15
Page 18

RAID User’s Guide
B. Creating Spare Drive
If there is a RAID 1 set, spare driver can be created. The spare drive can be
allocated to the RAID 1 set in the event of a failure of one of the drives in the RAID1
set.
a.To create a spare drive for RAID 1 set, Select “Create RAID set”.
b.Select “Spare Drive” and press Enter.
c.Select spare drive from the physical drive list and press Enter.
d.Select spare drive size with ↑ and ↓ keys.
e.After the spare drive size is set, the message “Are You Sure (Y/N)?” will display
before completing the configuration. Answer “N” to abort the creation of the
spare drive, or “Y” to proceed with the spare drive creation.
C. Creating CONCATENATION
Since BIOS no longer reports non-RAID drives to the system BIOS, if a non-RAID
boot drive or data drive is desired, a JBOD can be created so BIOS will report it to
the system BIOS.
a.To create a CONCATENATION, Select ”Create RAID set”.
b.Select “CONCATENATION” and press Enter.
c.Select CONCATENATION drive from the physical drive list and press Enter.
d.Select CONCATENATION size with ↑ and ↓ keys.
e.After the CONCATENATION size is set, the message “Are You Sure? ” will disp-
lay beforecompleting the configuration. Answer “N” to abort the creation of the
CONCATENATION, or “Y” to proceed with the CONCATENATION creation.
16
Page 19

RAID User’s Guide
D. Deleting RAID Groups, Spare Drive, and CONCATENATION
a.To remove one or more RAID sets, spare drives, and CONCATENATION, select
“Delete RAID set”.
b.Select the desired item to delete from the logical drive list and press Enter.
c.Press “Y” when asked, “Are You Sure (Y/N)?”.
d.The drives will be returned to the selection of logical drives from which a new
RAID set can be created.
E. Rebuild RAID 1 Set
This menu selection is used to initiate the copying of data from an existing drive to
a replacement drive that has been installed in a RAID 1 set after the failure of one
of the members.
a.Select “Rebuild RAID1 set.
b.Select the desired set and press Enter.
c.Press “Y” when asked, “Are You Sure?”.
d.The set will be rebuilt. The status of the rebuild is displayed in the MAIN MENU
window.
17
Page 20

RAID User’s Guide
F. Resolving Conflict
When a RAID set is created, the metadata written to the disk includes drive con-
nection information including the channel on the host adapter to which it is
connected. If after a disk failure the replacement disk was previously part of a RAID
set or used in another system, it may have conflicting metadata, specifically in
reference to the drive connection information. If so, this will prohibit the RAID set
from being either created or rebuilt. In order for the RAID set to function properly,
this old metadata must be first overwritten with the new metadata. To correct this,
select “Resolve Conflict” and the correct metadata, including the correct drive
connection information; will automatically be written to the replacement disk.
a.Select “Resolve Conflicts” and press Enter.
b.Select the “Conflict” entry in the Logical Drive Status window and press Enter.
18
Page 21

RAID User’s Guide
c.Note that some conflict resolutions may result in the drive letter assignment
changing; for example the RAID set may have been drive D: but after the conflict
resolution, it may become drive E. Be aware of this when performing a conflict
resolution. To maintain the same drive lettering, the SATA cables connected to
the drives may need to be swapped, or in the case of a SATA-based removable
drive unit, the order of the drives within the chassis made need to be changed.
Press ‘Y’ to accept the change and resolve the conflict.
d.The conflict will be resolved. The RAID Set will appear in the Logical Drive
window.
19
Page 22

RAID User’s Guide
G. Low Level Formatting
The Low Level Format menu selection allows the complete erasure of data on a
hard drive. This is not an action which typically needs to be performed as format-
ting the drive under Windows is usually sufficient to prepare the drive for use.
H. Logical Drive Information
This menu item allows the display of the assignment of physical drives within a
logical set (RAID set, RAID 1 spare, or unassigned). It is a display-only function.
Use the up and down arrow keys to scroll between the drives in the Logical Drive
Properties window. Press the ESC key when done viewing logical drive information.
20
Page 23

RAID User’s Guide
I. Reserved Drive and Setting Size for RAID Set, Spare Drive, or CON-
CATENATION
Once a physical drive has been used to create a RAID set, spare drive, or CON-
CATENATION by BIOS utility, BIOS saves user selected set or drive size in the
reserved area of the physical drive. There is no way to remove the reserved area
information even after the user deletes the set or drive. For this reason, after a set
or drive is deleted, BIOS recognizes the physical drive as a reserved logical drive
and it will not report the drive to the system BIOS.
When user selects to create a RAID set, spare drive, or CONCATENATION, he or
she has to select size for the set or drive. BIOS will set a default size for it and user
can use the ↑ and ↓keys to change the size. If the physical drive has never been
used to create a set or drive by the BIOS before, the full size of the physical drive will
be set as default size. Otherwise, BIOS will set default size to the size it saved in
the reserved area of the physical drive before.
If the user wants to increase the default size, BIOS will display a warning message
in the help window and for user’s response before changing the default size.
21
Page 24

RAID User’s Guide
3) VASSTEK BIOS RAID Configuration (optional)
A. Setting RAIDm1 mode
a.Attach the HDD you would like to set RAIDm1 as Master device.
b.Boot up the system.
c.No matter the HDD is new or you have ever used, VASRAID would detect it is a
ATA Mode and shows ”ATA mode is detected!”
Press <Tab> key within 5 seconds as a bar is rotating.
d.Show [Warning !] message.
Press “Y” as asking “Are you sure?(Y/N)” to make sure you would like to set
Master HDD as RAIDm1 mode.
e.Press "Y" again as asking "Are you really sure?(Y/N)" to reconfirm you want to
set RAIDm1 mode.
f."RAIDm1 mode had been built done!" message shows done.
B.Returning to ATA mode
a.Boot up the system.
b.The screen displays ”RAIDm1 mode is detected!”
Press <Tab> key within 5 seconds as a bar is rotating.
c.Show [Warning !] message.
Press “Y” as asking “Are you sure?(Y/N)” to make sure you would like to set
Master HDD as RAIDm1 mode.
d.Press "Y" again as asking "Are you really sure?(Y/N)" to reconfirm you want to
set ATA mode.
e."ATA mode had been built done!" message shows done.
22
Page 25

RAID User’s Guide
5.Install Operating System with RAID Mode
a.Setup the desired RAID mode.
b.Insert the OS installation CD into the CD-ROM.
c.Press the <F6> when the following pictures appear:
d.Press <S> key to specify additional equipment when below picture appears.
e.Insert the RAID installation disk into floppy disk drive following the on-screen
instructions and press <Enter> to continue.
f.Follow screen instructions to install the RAID drivers.
23
Page 26

RAID User’s Guide
6. Installing RAID Driver
When you finish installing Operation System with RAID, in order to enable RAID
function you need to install RAID driver. The following instruction is provided for
your reference.
a. Insert the driver CD into CD-ROM drive. The driver CD will automatically display
main menu screen.
b.Click “Install Drivers” button.
c.Select the related button and click it. Follow the wizard to finish driver installation.
7. Creating a RAID Driver Floppy Disk
A floppy disk with the RAID driver is required when installing Windows 2000/XP/
2003 Operating System on a hard disk driver that is included in a RAID set. You can
make a floppy disk with the RAID driver by yourself. There are two ways to create
the RAID driver floppy.
A. On this motherboard
a.Insert the driver CD into CD-ROM drive under Windows Operation System.
b.The driver CD will automatically display main menu screen.
c.Click “Accessories” button.
d.Click “Create RAID Floppy” button.
e.Select RAID type and click the related button.
f.Click “Go” to start.
g.Select floppy drive from the list, then click “OK”.
h.Insert one floppy into your 3.5-inch standard model FDD.
i.RAID floppy tool will format your floppy, then start to create RAID driver.
j.After finished, “RAID floppy creation complete.” message will be displayed.
Click “OK” to finish the steps.
B. On other motherboards
a.Insert the driver CD into CD-ROM drive under Windows Operation System.
b.The driver CD will automatically display error screen.
c.Click “Create RAID Floppy” button.
d.Select RAID type and click the related button.
24
Page 27

RAID User’s Guide
e.Click “Go” to start.
f.Select floppy drive from the list, then click “OK”.
g.Insert one floppy into your 3.5-inch standard model FDD.
h.RAID floppy tool will format your floppy, then start to create RAID driver.
i.After finished, “RAID floppy creation complete.” message will be displayed.
Click “OK” to finish the steps.
Warning: Formatting will erase ALL data on your floppy disk, so please take care.
Note: Please make sure 3.5-inch standard model FDD is used.
25
 Loading...