

Page 1
Owner’ s Man ual
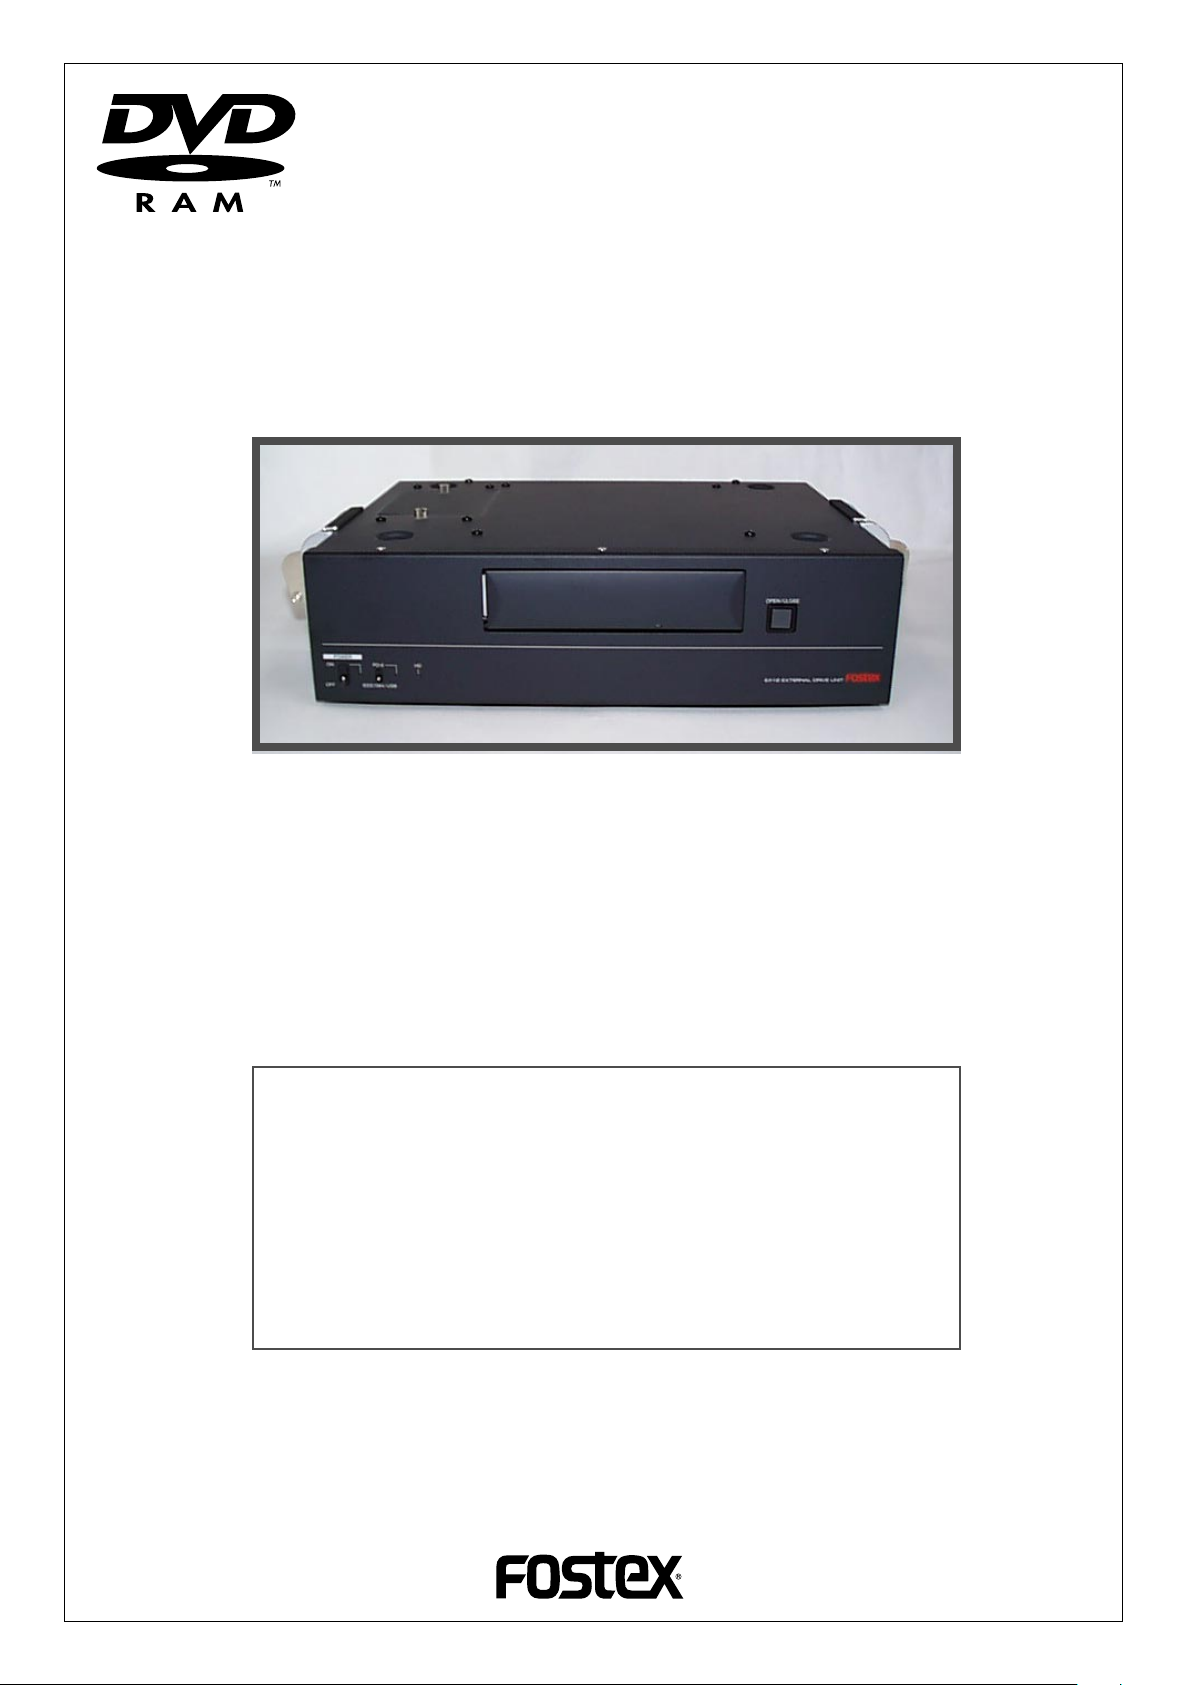
DVD-RAM drive unit with built-in HDD
Model EX12
Introduction
Thank you very much for purchasing the Fostex Model EX12.
The EX12 is a DVD-RAM drive unit dedicated to the PD-6. It incorporates a 12-cm DVD-RAM drive with a 2.5-inch HDD.
By connecting the EX12 to your PD-6, you can use two more drives
dedicated to the PD-6, in addition to the PD-6 internal DVD-RAM
drive.
Before using the EX12, read this manual carefully. We would be
very happy if the unit is helpful to you.
<Note>
To use the EX12, the PD-6 software version must be V2.00 or higher.
If the software version of your PD-6 is lower than V2.00, ask your
local Fostex dealer or sale office for upgrade.
The built-in HDD is formatted in the "Normal" mode when shipped.
This means, the HDD is divided into eight partitions, each of which
reserves approximately 4.7 GB capacity.
For details about how to use the EX12 with the PD-6, see "V2.0 supplement" supplied with the PD-6.
Page 2
CAUTION
RISK OF ELECTRIC SHOCK
DO NOT OPEN
CAUTION: TO REDUCE THE RISK OF ELECTRIC SHOCK,
DO NOT REMOVE COVER (OR BACK).
NO USER - SERVICEABLE PARTS INSIDE.
REFER SERVICING TO QUALIFIED SERVICE PERSONNEL.
"WARNING"
"TO REDUCE THE RISK OF FIRE OR ELECTRIC
SHOCK, DO NOT EXPOSE THIS APPLIANCE TO RAIN
OR MOISTURE."
SAFETY INSTRUCTIONS
1. Read Instructions - All the safety and operating instructions
should be read before the appliance is operated.
2. Retain Instructions - The safety and operating instructions
should be retained for future reference.
3. Heed Warnings - All warnings on the appliance and in the
operating instructions should be adhered to.
4. Follow Instructions - All operating and use instructions should
be followed.
5. Water and Moisture - The appliance should not be used
near water - for example, near a bathtub, washbowl, kitchen
sink, laundry tub, in a wet basement, or near a swimming
pool, and the like.
6. Carts and Stands - The appliance should be used only with
a cart or stand that is recommended by the manufacturer.
An appliance and cart combination should be moved with
care. Quick stops, excessive force, and uneven surfaces
may cause the appliance and cart combination to overturn.
7. Wall or Ceiling Mounting - The appliance should be mounted
to a wall or ceiling only as recommended by the
manufacturer.
8. Ventilation - The appliance should be situated so that its
location or position dose not interfere with its proper
ventilation.
For example, the appliance should not be situated on a bed,
sofa, rug, or similar surface that may block the ventilation
openings; or, placed in a built-in installation, such as a
bookcase or cabinet that may impede the flow of air through
the ventilation openings.
9. Heat - The appliance should be situated away from heat
sources such as radiators, heat registers, stoves, or other
appliances (including amplifiers) that produce heat.
CAUTION:
TO PREVENT ELECTRIC SHOCK, MATCH WIDE BLADE
OF PLUG TO WIDE SLOT, FULLY INSERT.
ATTENTION:
POUR EVITER LES CHOCS ELECTRIQUES,
INTRODUIRE LA LAME LA PLUS LARGE DE LA FICHE
DANS LA BORNE CORRESPONDANTE DE LA PRISE
ET POUSSER JUSQU' AU FOND.
The lightning flash with arrowhead symbol, within an
equilateral triangle, is intended to alert the user to the
presence of uninsulated "dangerous voltage" within the
product's enclosure that may be of sufficient magnitude to
constitute a risk of electric shock to persons.
The exclamation point within an equilateral triangle is
intended to alert the user to the presence of important
operating and maintenance (servicing) instructions in the
literature accompanying the appliance.
10. Power Sources - The appliance should be connected to a
power supply only of the type described in the operating
instructions or as marked on the appliance.
11. Grounding or Polarization - The precautions that should be
taken so that the grounding or polarization means of an
appliance is not defeated.
12. Power Cord Protection - Power supply cords should be
routed so that they are not likely to be walked on or pinched
by items placed upon or against them, paying particular
attention to cords at plugs, convenience receptacles, and
the point where they exit from the appliance.
13. Cleaning - The appliance should be cleaned only as
recommended by the manufacturer.
14. Nonuse Periods - The power cord of the appliance should
be unplugged from the outlet when left unused for a long
period of time.
15. Object and Liquid Entry - Care should be taken so that objects
do not fall and liquids are not spilled into the enclosure through
openings.
16. Damage Requiring Service - The appliance should be
serviced by qualified service personnel when:
A. The power supply cord or the plug has been damaged; or
B. Objects have fallen, or liquid has been spilled into the appliance;
or
C. The appliance has been exposed to rain; or
D. The appliance does not appear to operate normally or exhibits
a marked change in performance; or
E. The appliance has been dropped, or the enclosure damaged.
17. Servicing - The user should not attempt to service the
appliance beyond that described in the operating instructions.
All other servicing should be referred to qualified service
personnel.
18. The appliance should be situated away from drops of water
or spray of water.
19. Objects containing liquid such as vase must not be put on
the appliance.
20. The appliance is not completely isolated from the power
supply even if the power switch is at off position.
2
Page 3

Precautions
• Make sure that the voltage of your AC power outlet matches the voltage
requirements printed on the unit.
• When disconnecting the AC cable, make sure that the unit [POWER] switch is
set to "OFF".
Disconnecting the AC cable while the power is "ON" may damage data
because the unit always transfers data between the current card and memory.
• While the unit is accessing the DVD-RAM disk or internal HDD (for example,
during recording), never turn off the power. Make sure that the unit
completely stops accessing the disk before you turn off the power.
Otherwise, recorded data may be lost, as well as the DVD-RAM disk and
internal HDD may be damaged.
Note that Fostex assumes no responsibility on data loss or whatsoever due to use of
the unit.
• Fostex is not responsible for any "direct damage" or "indirect damage" caused
by using the unit.
• Do not let water or other liquid, or metal objects such as pins, accidentally
enter the inside of the unit (especially inside of the card slots) because this
may lead to electric shock or damage. Should water enter the inside of the
unit, turn off the power, unplug the AC cable, and consult your dealer or the
nearest FOSTEX service station.
• Do not drop the unit or give it a strong shock. The internal circuits may be
damaged. Although the unit is designed to operate outside, handle the unit
with great care because it is a precision machine.
• To prevent possible electric shock and damage to the unit, do not remove the
cover or reach the inside of the unit.
• When using the supplied carrying belt, to prevent the unit from dropping
accidentally, make sure that it is attached to the unit correctly.
Precautions on installation
• Do not install the unit in the following conditions.
• in a extremely hot or cold place
• in a moist place
• in a shaky or unstable place
• in a dusty place
• in a strong magnetic field or near a device which generates a magnetic field
• in the direct sunshine
• in the direct rain or water
• Notes on moisture condensation
When you bring the unit from a cold place to a warm place, moisture may
condense on the drive, display, panels, etc. In such a case, leave the unit for a
while until it warms up and evaporates any moisture.
38
Page 4

Names and functions
1
POWER
PD-6
ON
IEEE1394/USB
OFF
7
HD
6
2
OPEN/CLOSE
EX12 EXTERNAL DRIVE UNIT
45
3
8
CAUTION
RISK OF ELECTRIC SHOCK
DO NOT OPEN
RISQUE DE CHOC ELECTRIQUE
AVIS:
NE PAS OUVRIR
WARNING:
TO REDUCE THE RISK OF FIRE OR ELECTRIC
SHOCK, DO NOT EXPOSE THIS EQUIPMENT
TO RAIN OR MOISTURE.
13
1112
1) Fastenings
The left and right fastenings are used to fasten the
EX12 and PD-6 when stacking them up. (See the next
page for details.)
2) Disk tray
You can set a DVD-RAM disk on the tray.
3) [OPEN/CLOSE] key
Pressing this key opens or closes the disk tray.
Do not press this key while the disc is being accessed,
which may destroy the disc contents.
4) Access indicator
Flashes while the DVD-RAM disk is being accessed.
5) [HD] indicator
Flashes while the built-in HDD is being accessed.
6) PD-6/IEEE1394 USB select switch
Selects "PD-6" or "IEE1394 USB" according to the
situation.
PD-6
IEEE1394
USB
Set the selector to this position when you
use the EX12 as a recording/playback
drive for the PD-6.
Set the selector to this position when exporting a file recorded on a DVD-RAM
disk set on the EX12 to your PC.
910
<Note>:
While the EX12 is in operation (i.e. during
recording or playback using the EX12 HDD or DVDRAM drive, or while exporting or importing data),
do not switch the selector position, which may
cause malfunction.
7) Po wer s witc h
Turns on or off the power of the unit.
8) Cooling fan
9) [USB] port
Used to connect to a PC via USB.
10) [IEEE1394] ports
Two IEEE1394 connectors of different types are
provided. You can use either of the connectors
according to your PC.
<Notes>:
simultaneously.
Also note that you cannot use the [USB] and
[IEEE1394] ports while the selector is set to
"PD-6".
11) [DC OUT (PD-6 ONLY)] connector
Used to connect to the [DC IN] connector of the PD-6
using the DC cord supplied with the EX12.
12) [DC IN] connector
Used to connect to the external DC power supply.
Never use the IEEE1394 and USB ports
13) [AC IN] connector
Used to connect to the supplied AC cord.
4 7
Page 5

How to stack the PD-6 and EX12 together
1) Remove the blank panel at the bottom of the
PD-6.
2) Replace the two screws f or fixing the rubber
feet at the bottom of the PD-6 with the screws
supplied with the EX12.
4) Fix the supplied cushion using the fixing screws
which are removed in the previous step.
Cushion
5) Pull out the connection cable from inside the
EX12.
<Note>:
for fixing the rubber feet. Otherwise, the PD6 may malfunction or generate a noise because of imperfect grounding.
Never forget to replace the screws
3) Remove the two scre ws for fixing the cover at
the top of the PD-6, and open the co ver.
6) Put the PD-6 on the EX12 and plug the
connector of the cable to the PD-6, as sho wn
below. Make sure to plug the connector in the
correct direction.
<Note>:
for fixing the cushion. Be sure not to lose
them.
The removed screws are used later
56
Page 6

7) After connecting the cable, stac k the PD-6 on
the EX12.
After hanging the projection on the PD-6, lift
up the fixing angle until it is locked.
<Note>:
make sure to perfectly fit the dent of PD-6
rubber feet to the metallic projections of each
EX12. Otherwise, the PD-6 may malfunction
or generate a noise because of imperfect
grounding.
When stacking the PD-6 on the EX12,
9) Fasten the fixing screw of eac h fastening.
Fasten the fixing screw of each fastening so that
the fastening may not be off. Be careful not to
apply excessive force.
8) Use the fastenings on both the left and right
sides of the EX12 to fastening the PD-6.
Pull up the metallic projection of each fastening and hang it on the PD-6.(The following pictures show the example of the left side.)
Confirm both the left and right fastenings are
fixed tightly.
Now you complete stacking the EX12 and PD-6
together.
The next step is to connect the power cords.
See the next page.
Page 7

Connecting the power cords
To supply power to the PD-6 and EX12, connect the AC and DC cords supplied with the
EX12, as shown below.
Make connection using the supplied DC cord.
This connector is used when using the external DC power supply.
Connect to the AC outlet using the supplied AC cord.
<Notes>
• When the EX12 is connected to the PD-6, turn on the EX12 first, followed by the PD-6.
• When the EX12 is connected to the PD-6, make sure that both the PD-6 and EX12 are turned
off before you switch the selector (for selecting [PD-6 IEEE1394] or [USB]) on the EX12 front
panel.
PC connection
By connecting the EX12 to your PC regardless of whether the EX12 is connected to the PD6 or not, you can export the EX12 audio file data to your PC. Read the following notes
carefully before making connection. See also the next page for the connection examples.
<Notes for using the EX12 with y our PC>
To use the EX12 with your PC, install the dedicated driver (on the supplied CDROM) or commercially available DVD-RAM writing software to your PC.
Also note that even if the dedicated driver (or commercially available DVD-RAM
writing software) is correctly installed, the Read/Write functions are limited depending on OS, as below.
When using the [USB] port:
Windows XP, 2000 --> Both "Read" and "Write" are possible.
Macintosh OSX, OS9.2.1, OS9.2.2 --> Only "Read" is possible
When using the [IEEE1394] port:
Windows XP, 2000, ME, 98SE --> Both "Read" and "Write" are possible.
Macintosh OSX, OS9.2.1, OS9.2.2 --> Only "Read" is possible.
7
Page 8

Connecting the EX12 alone to your PC
By connecting the EX12 to your PC, you can export an audio file on a DVD-RAM disk set to
the EX12. Note that you cannot export an audio file on the EX12 internal HDD.
To the IEEE1394 or USB
port on your PC
<Notes for using>
• Set the selector on the EX12 front panel to "IEEE1394/USB".
• Connect the EX12 to your PC via the IEEE1394 or USB port. Never use both ports together.
Daisy-chaining the PD-6, EX12 and PC
By making "daisy chain" of the PD-6, EX12 and PC as shown below, you can export an audio
file on a DVD-RAM disk set to the PD-6 or EX12.
If your PC has more than one IEEE1394 port, you also can connect the PD-6 and EX12
individually to the IEEE1394 ports on the PC.
IEEE1394 port on the
PD-6
T o the IEEE1394 port
on the PC
<Notes for using>
• When the EX12 is connected to the PD-6, make sure that both the PD-6 and EX12 are turned
off before you switch the selector (for selecting [PD-6 IEEE1394] or [USB]) on the EX12 front
panel.
• Set the "IEEE1394" menu item in the Utility mode of the PD-6 to "CONNECT".
8
Page 9

Main specifications
DVD-RAM disk
Rack mount adaptor (x2)
Fixing screw (x2)
Cushion
AC connect cable
DC connect cable
DVD-RAM
Driver Software
Internal drives:
12-cm DVD-RAM drive and 2.5-inch HDD (40 GB)
Inputs/Outputs:
DC12V IN
Connector: XLR-4-32 type (male)
Pin assignment:
1: GND, 2: NC, 3: NC, 4: +12~18 V
DC12V OUT (PD-6 ONLY)
Connector: XLR-4-31 type (female)
Pin assignment:
1: GND, 2: NC, 3: NC, 4: +12~18 V
IEEE1394 port (for PC connection)
Connector: 1: FireWire 400 (4-pin)
2: FireWire 400 (6-pin)
Pin assignment (FireWire 400, 4-pin):
1: TPB-, 2: TPB+, 3: TPA-, 4: TPA+
Pin assignment (FireWire 400, 6-pin):
1: VP, 2: VG, 3: TPB-,
4: TPB+, 5: TPA-, 6: TPA+
USB port (for PC connection)
Connector: USB Series "B" receptacle
Pin assignment:
1: VBUS, 2: D- (DATA), 3: D+ (DATA),
4: GND
External dimensions:
386 (W) x 94 (H) x 231 (D) mm
Power requirement/power consumption:
100~240 VAC, 38W
12VDC 3A
Weight
Approx. 4.3 kg
Supplied accessories
* A pair of rack mount adaptors x2
* AC cord x1
* DC cord (for connection to the PD-6) x1
* Cushion x 1
* Fixing screws x2
* DVD-RAM disk x1
* DVD-RAM Driver Software (for windows) x1
9
Page 10

Declaration of EC Directive
This equipment is compatible with the EMC Directive (89/336/EEC) - Directive on approximation of member nation's ordinance
concerning the electromagnetic compatibility and with the Low Voltage Directive (73/23/EEC) - Directive on approximation
of member nation's ordinance concerning electric equipment designed to be used within the specified voltage range.
The Affect of Immunity on This Equipment
The affect of the European Specification EN61000-6-1 (coexistence of electromagnetic waves - common
immunity specification) on this equipment are as shown below.
In the electrical fast transient/burst requirements, surge, conducted disturbances by radio-frequency fields, power frequency
magnetic field, radiate electromagnetic field requirements and static electricity discharging environment, this could be
affected by generation of noise in some cases.
FOSTEX DISTRIBUTORS LIST IN EUROPE
* Including non-EU countries (as of October, 2003)
<AUSTRIA>
NAME: ATEC Audio-u. Videogeraete VertriebsgesmbH.
ADD: Im Winkel 5, A-2325 Velm, Austria
TEL: (+43) 2234-74004, FAX: (+43) 2234-74074
<BELGIUM>
NAME: General Audio
ADD: Albert Temmerstraat 21, 1731 Zellik, Belgium
TEL: (+32) 2-4630650, FAX: (+32) 2-4661500
<DENMARK>
NAME: SC Sound ApS
ADD: Malervej 2, DK-2630 Taastrup, Denmark
TEL: (+45) 4399-8877, FAX: (+45) 4399-8077
<FINLAND>
NAME: Noretron Oy Audio
ADD: P. O. Box 22, FIN-02631 Espoo, Finland
TEL: (+358) 9-5259330, FAX: (+358) 9-52593352
<FRANCE>
NAME: Sennheiser France
ADD: 128 bis, avenue Jean-Jaures, 94851 Ivry-sur-Seine
Cedex, France
TEL: (+33) 1 4987 0300, FAX: (+33) 1 4987 0324
<GERMANY>
NAME: Mega Audio GmbH
ADD: Stromberger Str. 32, D-55411 Bingen, Germany
TEL: (+49) 6721-94330, FAX: (+49) 6721-32046
<GREECE>
NAME: Bon Studio S. A.
ADD: 6 Zaimi Street, Exarchia, 106.83 Athens, Greece
TEL: (+30) 210-3809-605, 606, 607, 608
FAX: (+30) 210-3845-755, 210-3827-868
<ICELAND>
NAME: I. D. elrf. electronic Ltd.
ADD: ARMULA 38 108 REYKJAVIK, ICELAND
TEL: (+354) 588 5010, FAX: (+354) 588 5011
<ITALY>
NAME: Proel S. p. A.
ADD: Zona Via Alla Ruenia, 37/43 64027 -Sant’Omero
(Teramo), Italy
TEL: (+39) 0861-81241, FAX: (+39) 0861-887862
<THE NETHERLANDS>
NAME: IEMKE ROOS AUDIO B. V.
ADD: Kuiperbergweg 20, 1101 AG Amsterdam, The
Netherlands
TEL: (+31) 20-697-2121, FAX: (+31) 20-697-4201
<NORWAY>
NAME: Fitzpatrick
ADD: P. B. 4316 Nydalen, 0402 Oslo, Norway
TEL: (+47) 23 400 380, FAX: (+47) 23 400 389
<PORTUGAL>
NAME: Caius - Tecnologias Audio e Musica, Lda.
ADD: Praca do Bom Sucesso, No 61 Bom Sucesso Trade
Center, Escritorio 701/702, 4150 - 146 Porto, Portugal
TEL: (+351) 22-608-06-10, FAX: (+351) 22-608-06-29
<SPAIN>
NAME: Letusa S. A.
ADD: C/Laguna 10, 28923 Alcorcon, Madrid, Spain
TEL: (+34) 91-4862800, FAX: (+34) 91-6414597
<SWEDEN>
NAME: TTS Scandinavia AB
ADD: Kavallerivagen 24, 172 48 Sundbyberg, Sweden
TEL: (+46) 8-59798000, FAX: (+46) 8-59798001
<SWITZERLAND>
NAME: Audio Bauer Pro AG
ADD: Bernerstrasse-Nord 182, CH-8064 Zurich,
Switzerland
TEL: (+41) 1-4323230, FAX: (+41) 1-4326558
<UK>
NAME: SCV London
ADD: 40 Chigwell Lane, Oakwood Hill Industrial Estate,
Loughton, Essex IG10 3NY U. K.
TEL: (+44) 20-8418-0778, FAX: (+44) 20-8418-0624
10
 Loading...