

Page 1

Owner’s Manual
Model
CR300
Compact Disc Recorder
COMPACT DISC RECORDER
POWER
OFF ON
CR300
MANUAL
AUTO /
SKIP ID
TRACK NO.
CLEAR SKIP PLAY
WRITE
(MANUAL)
MENUSET
FINALIZE ERASE
FOR U.S. MODELS
NECESSARY INFORMATION FOR DHHS
RULES MARKED ON THE REAR BASE AND
ON THE TOP OF CD MECHANISM AS BELOW.
DANGER - LASER RADIA TION WHEN OPEN.
AVOID DIRECT EXPOSURE TO BEAM.
LINE
•
•
2
•
PHONES
LR
5
4
••••
3
1
•
0
LEVEL
6
7
•
8
•
9
•
10
MAXMIN
INPUT SELECTOR REC LEVELREC LEVEL
ANALOG
DIGITAL
XLR / +4
OPEN /
CLOSE
REC
•
RECORD
COAX XLR / -10
•
MUTE
TIME
/MARGIN
•
OPT
•
AES /
•
EBU
DIGITAL
SYCHRO
PROFESSIONAL
Page 2
CAUTION
RISK OF ELECTRIC SHOCK
DO NOT OPEN
CAUTION: TO REDUCE THE RISK OF ELECTRIC SHOCK,
DO NOT REMOVE COVER (OR BACK).
NO USER-SERVICEABLE PARTS INSIDE.
REFER SERVICING TO QUALIFIED SERVICE PERSONNEL.
The lightning flash with arrowhead symbol, within an
equilateral triangle, is intended to alert the user to the
presence of uninsulated "dangerous voltage" within
the product's enclosure that may be of sufficient
magnitude to constitute a risk of electric shock to
persons.
"WARNING"
"TO REDUCE THE RISK OF FIRE OR ELECTRIC SHOCK,
DO NOT EXPOSE THIS APPLIANCE TO RAIN OR MOISTURE."
SAFETY INSTRUCTIONS
1. Read Instructions - All the safety and Owner's Manual
should be read before the appliance is operated.
2. Retain Instructions - The safety and Owner's Manual
should be retained for future reference.
3. Heed Warnings - All warnings on the appliance and in the
Owner's Manual should be adhered to.
4. Follow Instructions - All operating and use instructions should
be followed.
5. Water and Moisture - The appliance should not be used near
water - for example, near a bathtub, washbowl, kitchen sink,
laundry tub, in a wet basement, or near a swimming pool, and
the like.
6. Carts and Stands - The appliance should be used only with a
cart or stand that is recommended by the manufacturer.
An appliance and cart combination should be moved with care.
Quick stops, excessive force, and uneven surfaces may cause
the appliance and cart combination to overturn.
7. Wall or Ceiling Mounting - The appliance should be mounted to
a wall or ceiling only as recommended by the manufacturer.
8. Ventilation - The appliance should be situated so that its location
or position dose not interfere with its proper ventilation.
For example, the appliance should not be situated on a bed,
sofa, rug, or similar surface that may block the ventilation
openings; or, placed in a built-in installation, such as a bookcase
or cabinet that may impede the flow of air through the ventilation
openings.
The exclamation point within an equilateral triangle is
intended to alert the user to the presence of important
operating and maintenance (servicing) instructions in
the literature accompanying the appliance.
9. Heat - The appliance should be situated away from heat
sources such as radiators, heat registers, stoves, or other
appliances (including amplifiers) that produce heat.
10. Power Sources - The appliance should be connected to a
power supply only of the type described in the operating
instructions or as marked on the appliance.
11. Grounding or Polarization - The precautions that should be
taken so that the grounding or polarization means of an
appliance is not defeated.
Alternate Warnings - This product is equipped with a threewire grounding-type plug, a plug having a third (grounding)
pin. This plug will only fit into a grounding-type power outlet.
This is safety feature. Do not defeat the safety purpose of the
grounding-type plug.
12. Power Cord Protection - Power supply cords should be routed
so that they are not likely to be walked on or pinched by items
placed upon or against them, paying particular attention to
cords at plugs, convenience receptacles, and the point where
they exit from the appliance.
13. Cleaning - The appliance should be cleaned only as
recommended by the manufacturer.
14. Nonuse Periods - The power cord of the appliance should be
unplugged from the outlet when left unused for a long period
of time.
15. Object and Liquid Entry - Care should be taken so that objects
do not fall and liquids are not spilled into the enclosure through
openings.
16. Damage Requiring Service - The appliance should be serviced
by qualified service personnel when:
A. The power supply cord or the plug has been damaged; or
B. Objects have fallen, or liquid has been spilled into the
appliance; or
C. The appliance has been exposed to rain; or
D. The appliance does not appear to operate normally or
exhibits a marked change in performance; or
E. The appliance has been dropped, or the enclosure
damaged.
17. Servicing - The user should not attempt to service the
appliance beyond that described in the Owner's Manual.
All other servicing should be referred to qualified service
personnel.
Page 3

This equipment has been tested and found to comply with the limits for a Class B digital device, pursuant to Part 15 of the
•
A
S
S
O
C
I
A
T
I
O
N
•
E
L
E
C
T
R
O
N
I
C
I
N
D
U
S
T
R
I
E
S
EST 1924
FCC Rules. These limits are designed to provide reasonable protection against harmful interference in a residential
installation. This equipment generates, uses, and can radiate radio frequency energy and, if not installed and used in
accordance with the instructions, may cause harmful interference to radio communications. However, there is no guarantee
that interference will not occur in a particular installation. If this equipment does cause harmful interference to radio or
television reception, which can be determined by turning the equipment off and on, the user is encouraged to try to correct
the interference by one or more of the following measures:
• Reorient or relocate the receiving antenna.
• Increase the separation between the equipment and receiver.
• Connect the equipment into an outlet on a circuit different from that to which the receiver is connected.
• Consult the dealer or an experienced radio/TV technician for help.
Information to User
Alteration or modifications carried out without appropriate authorization may invalidate the user's right to operate the equipment.
CAUTION
• Use of controls or adjustments or performance of procedures other than those specified herein may result in hazardous radiation
exposure.
• The use of optical instruments with this product will increase eye hazard.
CAUTION:
This product satisfies FCC regulations when shielded cables
and connectors are used to connect the unit to other
equipment. To prevent electromagnetic interference with
electric appliances such as radios and televisions, use shielded
cables and connectors for connections.
[For Canadian model]
This Class B digital apparatus meets all requirements of the
Canadian Interference-Causing Equipment Regulations.
[Pour le modele Canadien]
Cet appareil numerique de la Classe B respecte toutes les
exigences du Reglement sur le materiel brouilleur du Canada.
I
N
C
I
D
N
U
O
S
R
T
T
R
C
I
E
E
S
L
E
•
•
EST 1924
A
N
S
O
S
I
O
T
C
A
I
Selecting fine audio equipment such as the unit
you’ve just purchased is only the start of your musical
enjoyment. Now it’s time to consider how you can
maximize the fun and excitement your equipment
offers. This manufacturer and the Electronic Industries
Association’s Consumer Electronics Group want you to
get the most out of your equipment by playing it at a
safe level. One that lets the sound come through loud
and clear without annoying blaring or distortion-and,
most importantly, without affecting your sensitive
hearing.
Sound can be deceiving. Over time your hearing
“comfort level” adapts to higher volumes of sound. So
what sounds “normal” can actually be loud and harmful
to your hearing. Guard against this by setting your
equipment at a safe level BEFORE your hearing adapts.
To establish a safe level:
• Start your volume control at a low setting.
• Slowly increase the sound until you can hear it
comfortably and clearly, and without distortion.
We
Want You
LISTENING
For A Lifetime
POWER-CORD CAUTION
Handle the power cord by the plug. Do not pull out the plug by
tugging the cord and never touch the power cord when your
hands are wet as this could cause a short circuit or electric shock.
Do not place the unit, a piece of furniture, etc., on the power cord,
or pinch the cord. Never make a knot in the cord or tie it with other
cords. The power cords should be routed such a way that they
are not likely to be stepped on. A damaged power cord can cause
a fire or give you an electrical shock. Check the power cord
regularly. When you find it damaged, ask your nearest FOSTEX
authorized service station or your dealer for a replacement.
We Want You Listening For A LifetimeWe Want You Listening For A Lifetime
We Want You Listening For A Lifetime
We Want You Listening For A LifetimeWe Want You Listening For A Lifetime
Used wisely, your new sound equipment will provide
a lifetime of fun and enjoyment. Since hearing damage
from loud noise is often undetectable until it is too
late, this manufacturer and the Electronic Industries
Association’s Consumer Electronics Group recommend
you avoid prolonged exposure to excessive noise. This
list of sound levels is included for your protection.
DecibelDecibel
Decibel
DecibelDecibel
LevelLevel
Level
LevelLevel
THE FOLLOWING NOISES CAN BETHE FOLLOWING NOISES CAN BE
THE FOLLOWING NOISES CAN BE
THE FOLLOWING NOISES CAN BETHE FOLLOWING NOISES CAN BE
DANGEROUS UNDER CONSTANTDANGEROUS UNDER CONSTANT
DANGEROUS UNDER CONSTANT
DANGEROUS UNDER CONSTANTDANGEROUS UNDER CONSTANT
EXPOSUREEXPOSURE
EXPOSURE
EXPOSUREEXPOSURE
100 Garbage truck, chain saw, pneumatic drill
120 Rock band concert in front of speakers, thunderclap
140 Gunshot blast, jet plane
180 Rocket launching pad
ExampleExample
Example
ExampleExample
30 Quiet library, soft whispers
40 Living room, refrigerator, bedroom away from traffic
50 Light traffic, normal conversation, quiet office
60 Air conditioner at 20 feet, sewing machine
70 Vacuum cleaner, hair dryer, noisy restaurant
80 Average city traffic, garbage disposals, alarm clock
at two feet.
90 Subway, motorcycle, truck traffic, lawn mower
Once you have established a comfortable sound level:
Information courtesy of the Deafness Research Foundation.
• Set the dial and leave it there.
Taking a minute to do this now will help to prevent
hearing damage or loss in the future. After all, we want
you listening for a lifetime.
We
Want You
LISTENING
For A Lifetime
Page 4

FEATURES
This unit can be used to record CD-R (CD recordable) discs or CD-RW (CD rewritable) discs.
Once recorded, a CD-R disc cannot be erased. However, a recorded CD-RW disc can be erased later.
Both CD-R and CD-RW discs provide the high sound quality and excellent durability that is the hall mark of ordinary prerecorded
CDs (compact discs).
● Playback of CD-R, CD-RW and CD discs
This recorder can be used to play partially recorded CD-R or CD-RW discs, finalized CD-R or CD-RW discs and ordinary
prerecorded CD discs.
● Creation of CD-compatible discs
A CD-R disc can be played on any CD player just like ordinary prerecorded CD discs provided it has been finalized (by
recording TOC) after recording.
CD-RW discs can only be played back on a player specially designed to handle CD-RW discs.
● Sampling frequency converter
When recording a digital source using 32 kHz or 48 kHz sampling frequency such as satellite broadcasting, DAT and DCC, this
unit automatically converts the sampling frequency into 44.1 kHz which is the sampling frequency used with the CD.
However, the digital monitoring signal which is output during recording with this unit is based on the same sampling frequency
as the recorded source.
● Digital-source synchro recording modes
When recording digital signals from a CD, DAT, MD or DCC, the recording on this unit can be started and stopped in synchronism
with the starting and stopping of the playback of the source component.
A mode for synchro recording of a single track from the above-mentioned sources is available so that edited recording is easy.
● Build-in Multi-Level (Delta-Sigma) DAC
The multi-level Digital-Analog Converter achieves superior resolution compared to the conventional Delta-Sigma DAC, thus
producing high conversion accuracy even when jitter is present in the system clock.
● 1-bit A/D converter
The A/D converter (analog-to-digital converter) of this unit uses the latest 1-bit conversion system. This system provides the
following advantages compared to previous systems.
• Zero-cross distortion does not occur from the principle.
• Non-linear distortion does not occur throughout the frequency band.
• High accuracy is possible without adjustment.
These advantages preserve the original quality of the music including low-level signals.
● Newly-developed 3-beam differential push-pull pickup
The newly developed 3-beam pickup with differential push-pull system stabilizes operations and reproduces rich medium and
low frequencies.
● Direct construction with minimized signal path and separated digital and audio
The direct construction reduces cross-interference between signals by achieving a correct signal transfer. It reproduces musical
signals with high purity by thoroughly improving the distortion, channel separation and level linearity values. These improvements
are not in terms of values at a single point but applied over a wide frequency range.
● Features Copy Bit
CD-R and CD-RW discs can be made by selecting one of the following three modes:
• Disc without copy prohibition ( Copy Bit = 1 )
• One-time-copy disc ( Copy Bit = 0 )
• Copy prohibited disc ( Copy Bit = 1/0 )
● Complies to standard EIA rack
The mounting holes on both left and right ends of the front panel comply to 19 inch EIA standard racks.
Use standard 3/16” diameter, 3/8” long screws sold in hardware stores for installation.
4
CR300
<PRB1291-B>
Page 5

CONTENTS
IMPORTANT SAFETY INSTRUCTIONS .............................................................................................2
FEATURES ......................................................................................................................................4
CHECKING ACCESSORIES ............................................................................................................... 6
CAUTIONS REGARDING HANDLING ................................................................................................ 7
DISCS ......................................................................................................................................8
CONNECTIONS.................................................................................................................................10
CONTROLS AND INDICATORS .......................................................................................................12
DISC LOADING/UNLOADING ...........................................................................................................15
MODE OF RECORDING ...................................................................................................................16
AUTOMATIC DIGITAL-SOURCE SYNCHRO RECORDING
MANUAL DIGITAL-SOURCE RECORDING......................................................................................21
ANALOG-SOURCE RECORDING.....................................................................................................22
MENU BUTTON FUNCTIONS...........................................................................................................24
TRACK NUMBER WRITING..............................................................................................................26
CONVENIENT FUNCTIONS FOR RECORDING ..............................................................................27
SKIP ID RECORDING ......................................................................................................................29
FINALIZATION (TOC RECORDING).................................................................................................31
Front panel ..................................................................................................................12
Display panel...............................................................................................................13
Remote control unit .....................................................................................................14
1-track recording ......................................................................................................... 18
All-track recording ....................................................................................................... 19
Automatic finalization recording .................................................................................. 20
To pause recording ..................................................................................................... 27
Creating a blank ..........................................................................................................27
Starting recording with fade-in ....................................................................................27
Stopping recording with fade-out ................................................................................27
Checking the recording end point from the middle of a disc
Setting skip ID to a track (Track skip) .........................................................................29
Clearing skip ID of a track ...........................................................................................30
What is finalization? .................................................................................................... 31
Finalization procedure.................................................................................................31
.............................................................18
......................................................28
ERASING(CD-RW ONLY) .................................................................................................................32
PLAYBACK ....................................................................................................................................35
PROGRAMMED PLAYBACK............................................................................................................38
SKIPPING UNDESIRED TRACKS ....................................................................................................40
CHARACTER MESSAGE LIST .........................................................................................................41
TROUBLESHOOTING .......................................................................................................................42
INDEX ....................................................................................................................................44
SPECIFICATIONS .............................................................................................................................45
Last track erasing........................................................................................................33
TOC erasing................................................................................................................33
All tracks erasing.........................................................................................................34
All disc erasing ............................................................................................................34
Starting playback.........................................................................................................35
To pause playback ......................................................................................................35
Playing from the desired track.....................................................................................35
Searching an adjacent track........................................................................................36
Searching the desired point ........................................................................................36
Playing tracks repeatedly ............................................................................................37
Fade-in/fade-out during playback................................................................................37
Checking the playing time of each track .....................................................................37
Playback in Auto Pause Mode ................................................................................... 37
Playing Tracks in the Desired Order ........................................................................... 38
Program reservation....................................................................................................38
Clearing the entire program ........................................................................................39
Clearing a track from the program ..............................................................................39
Checking the programmed tracks ............................................................................... 39
Replacing a track in the program ................................................................................ 39
CR300
5
<PRB1291-B>
Page 6
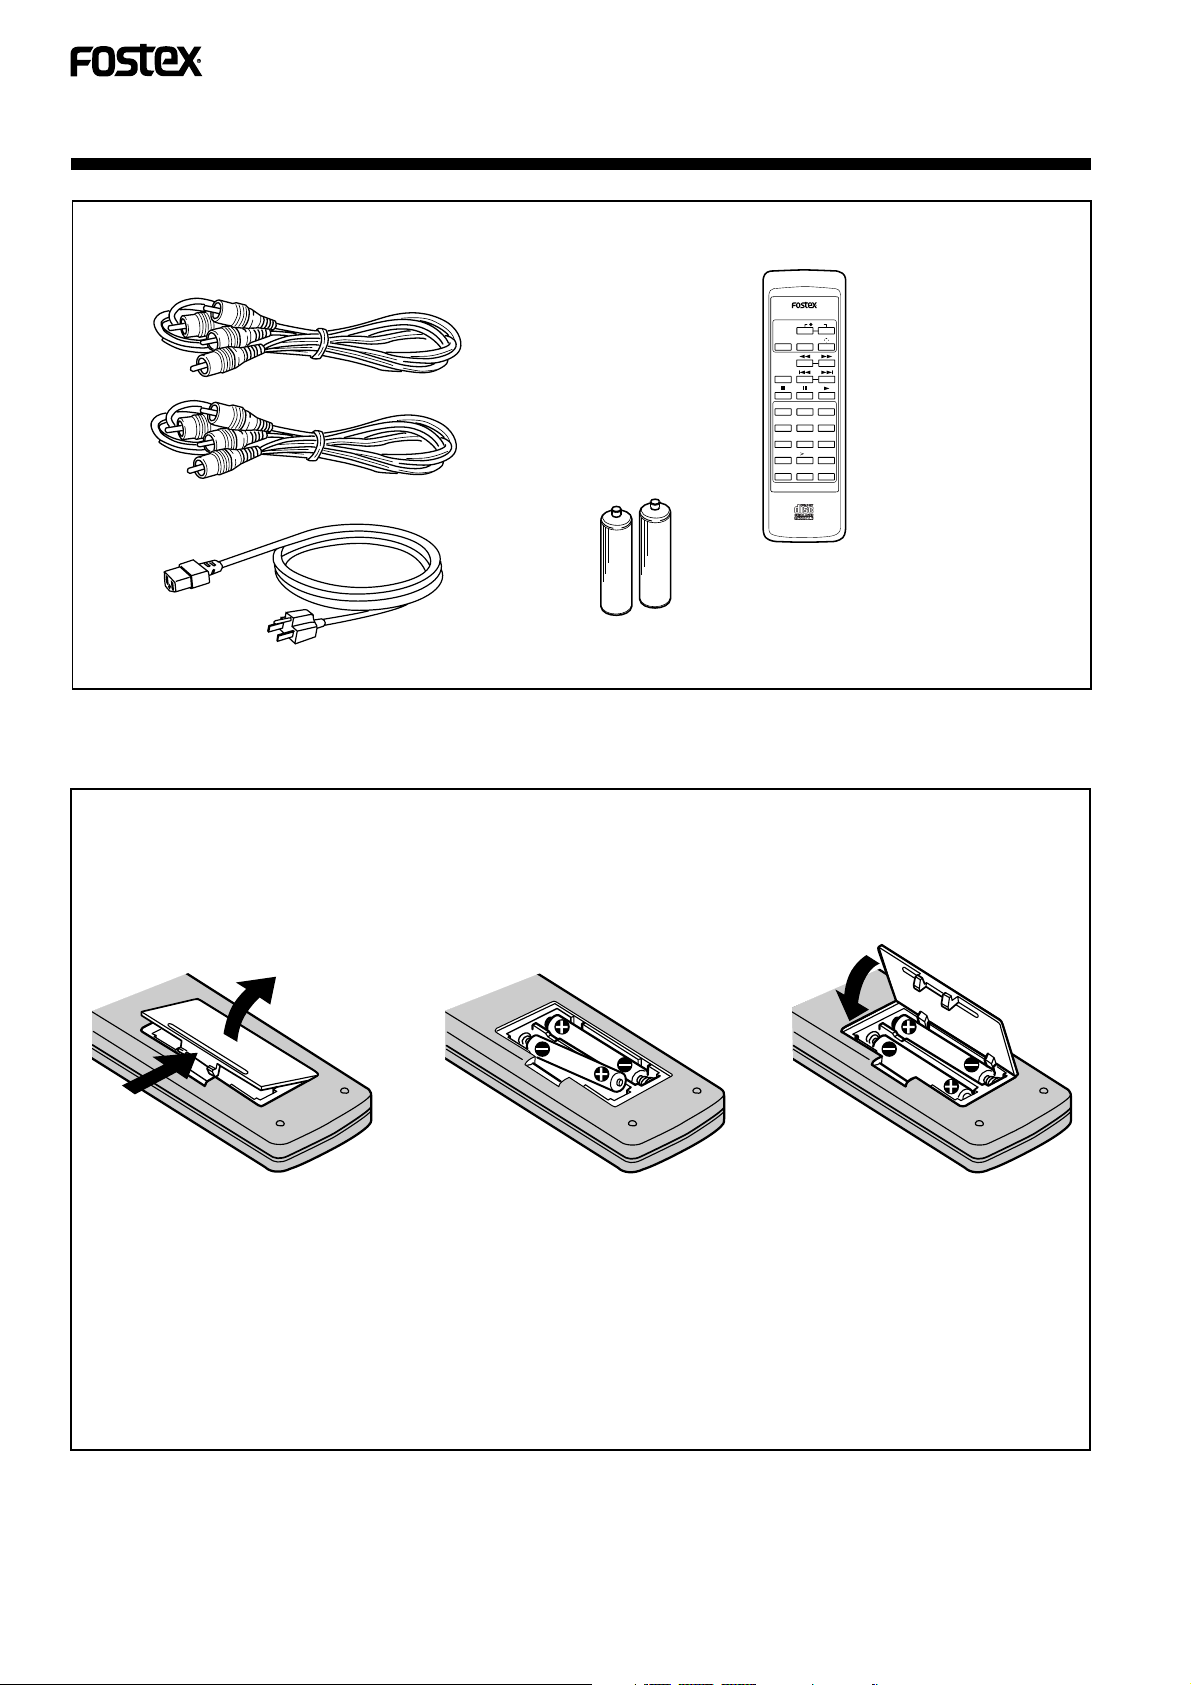
CHECKING ACCESSORIES
Audio cables ... x 2
Remote control unit (Model 8317)
(analog recording, analog playback output)
MODEL 8317
REC
TRACK NO.
WREITE
FADER
REPEAT
123
456
789
10
TIME
10
PGM CHECK CLEAR
AC power cord
Owner's Manual
(this booklet)
AAA/R03 dry cell batteries ... x 2
Loading batteries in to the remote control unit Model 8317
Battery loading method
Remove the battery cover on the rear, insert 2
batteries matching the polarities (+, -) to the
indications in the compartment and replace the
cover.
Insert batteries according to the
indications (+, -) in the
compartment.
Open battery cover.
<Caution on batteries>
• Load batteries with correct + and - orientations as
indicated inside the battery compartment.
• Do not mix new and used batteries.
• Even when two batteries have the same shape, their
rated output voltages may sometimes differ. Therefore,
do mix different brands of batteries.
6
CR300
<PRB1291-B>
2 batteries (AAA/R03 dry cell batteries)
• Some batteries are rechargeable while some are
not. Read the instructions indicated on the
batteries carefully before use.
• Battery life is about six months under normal use.
Remove the batteries when the remote control
unit is not to be used for a long period (more than
1 month).
• If the batteries leak, wipe the inside of the battery
compartment well, and then load new batteries.
Page 7

CAUTIONS REGARDING HANDLING
Location
Install the compact disc recorder in a well-ventilated location
where it will not be exposed to high temperatures or humidity.
Do not install the compact disc recorder in a location which
is exposed to direct rays of the sun, or near stoves or
radiators. Excessive heat can adversely affect the cabinet
and internal components. Installation of the player in a damp
or dusty environment may also result in a malfunction or
accident. (Avoid installation near cookers etc., where the
player may be exposed to oily smoke, steam or heat.)
Do not install the compact disc recorder on an unstable or
inclined surface.
Precautions regarding installation
• Placing and using the compact disc recorder for long
periods on heat-generating sources such as amplifiers
will affect performance. Avoid placing the compact disc
recorder on heat-generating sources.
• Install this compact disc recorder as far as possible from
tuners and TV sets. A compact disc recorder installed in
close proximity to such equipment may cause noise or
degradation of the picture.
• Such noise may be particularly noticeable when an indoor
antenna is used. In such cases, make use of an outdoor
antenna, or turn off power to the compact disc recorder.
• Please place this unit on a level surface.
CD lens cleaner
The compact disc recorder's pickup lens should not become
dirty in normal use, but if for some reason it should malfunction
due to soiling, consult your nearest FOSTEX authorized service
center. Lens cleaners for compact disc recorders are
commercially available, but special care should be exercised
in their use since some may cause damage to the lens.
Condensation
When this unit is brought into a warm room from previously
cold surroundings or when the room temperature rises
sharply, condensation may form inside, and the unit may not
be able to attain its full performance. If this occurs, allow the
unit to stand for about an hour or raise the room temperature
gradually.
Cleaning the compact disc recorder
To clean the compact disc recorder, wipe with a soft, dry
cloth. For stubborn dirt, wet a soft cloth with a mild detergent
solution made by diluting one part detergent to 5 or 6 parts
water, wring well, then wipe off the dirt. Also use a dry cloth
to wipe the surface dry. Do not use volatile liquids such as
benzene and thinner which are harmful to the unit.
Never move the unit during recording/playback
The disc rotates at a high speed during recording and
playback. Do not lift or move the unit during these
operations, otherwise the disc may be damaged or recording
is impossible.
CR300
7
<PRB1291-B>
Page 8

DISCS
Discs usable with this unit
CD-R and CD-RW discs
When recording signals on a CD-R disc or a CD-RW
discwith this unit, be sure to use the disc carrying the
following mark and indication.
1
*
or
In countries where the copyright fee collection system has
been established based on the respective copyright laws,
the copyright fee for discs carrying the CD-R mark*1 or the
CD-RW mark*2 and “FOR CONSUMER” or “FOR
CONSUMER USE” indication has already been paid to the
copyright owner as defined in the copyright law, so that the
user can record music on such discs for personal use.
However, if you want to use a disc for other purpose than
personal use, you need to obtain permission from the
copyright owner. Also note that the copyright laws are
variable depending on the countries; be sure to follow the
copyright-related law in your country.
CD disc
The CD disc used with this unit should be a disc carrying the
following mark (Compact Disc - digital audio with optical
recording).
2
*
CD-R finalization
If it is desired to play a recorded CD-R disc on an ordinary
CD player, the disc should be subjected to processing called
finalization.
Display panel
Nonrecorded
disc
(recordable)
Partially
recorded
disc
(recordable)
Before
finalization
(recordable)
The disc cannot be
played on an ordinary CD
player. It can be recorded
onto with a CD recorder.
➔
Blinking message
After finalization
(Recording
impossible)
The disc can be played
on an ordinary CD player.
Notes on the copyright
• Broadcast programs, records, other recording media
(music tapes, cassettes, CD discs, etc.) and musical
performance are protected by the copyright law in your
country just like the verse and melody of musical pieces.
• Therefore, the copyright law dictates that permission
should be obtained from the copyright owner if you sell,
transfer, distribute or lease a disc recorded from the
above mentioned sources or if you use it in business
(including background music in your store).
"CD-R" indicator lights.
"-R" indicator does not light.
CAUTION
After finalization;
• additional recording is impossible.
• Setting or clearing of skip IDs is impossible.
(Refer to page 30 of the Owner's Manual.)
CD-RW
A finalized CD-RW disc cannot be played back on a standard
CD player. A CD-RW disc player is required to play back such
discs.
Recordings made on a CD-RW discs can be erased when
they have been finalized (see page 32 for information on how
to erase recordings). New recordings can be made after
erasure.
8
CR300
<PRB1291-B>
Page 9

Handling of disc
• When holding a CD-R, CD-RW or CD disc, be careful not
to leave a fingerprint, dirt or a scratch on the signalrecording side. Hold the disc by placing your fingers on
the edge or across the center hole and edge. A disc
containing a fingerprint, dirt or a scratch can sometimes
become unusable for recording or playback.
Disc maintenance
• When a disc is stained with a fingerprint or dust, the signal
recorded on the disc itself is not affected but such a stain
could degrade the sound quality by reducing the
brightness of the light reflected from the signal recording
side. Therefore, always try to keep the disc surface clean.
For cleaning, use a soft cloth which is either dry or soaked
in alcohol and wipe with a light force in straight directions
from the center toward the edge.
• Be careful not to scratch the label side. A scratched disc
can sometimes become unusable for recording or
playback.
• The disc rotates at a high speed inside the player. Do not
attempt to use an abnormal disc (cracked disc, extremely
warped disc, etc.).
Do not play a CD with a special shape
Do not play a CD having other shape than a circular disc,
such as a heart shaped disc. Otherwise malfunction may
occur.
Do not wipe in a circular
direction.
• For disc cleaning, it is recommended to use an optional
disc cleaning kit.
• Do not use record spray or antistatic agent. Also take care
that volatile chemicals such as benzine and thinner do not
spill on the disc, for these substances may corrode the
surface.
Wipe lightly from the
center toward the edge.
Disc storage
• The CD-R, CD-RW and CD discs are made of plastic
material just like analog record so. When storing a disc,
take care so that it does not warp. Always put it in its case
and stand the case upright and avoid places subject to
direct sunlight, high temperatures, high humidity and
extremely low temperatures. It is not recommended to
leave the case on a car seat because the seat of a car in
direct sunlight can become unbelievably hot.
• Be sure to read the instructions provided with the disc.
• Do not stick paper or seals on the label surface.
Make sure the label surface is not scratched or damaged.
Scratched or damaged surfaces may result in playback or
recording failure.
Use only a felt pen sold on the market or similar pen to
write on the label. Never use a writing instrument with a
hard point (ballpoint pen, pencil, etc.), as this will damage
the disc.
CR300
9
<PRB1291-B>
Page 10
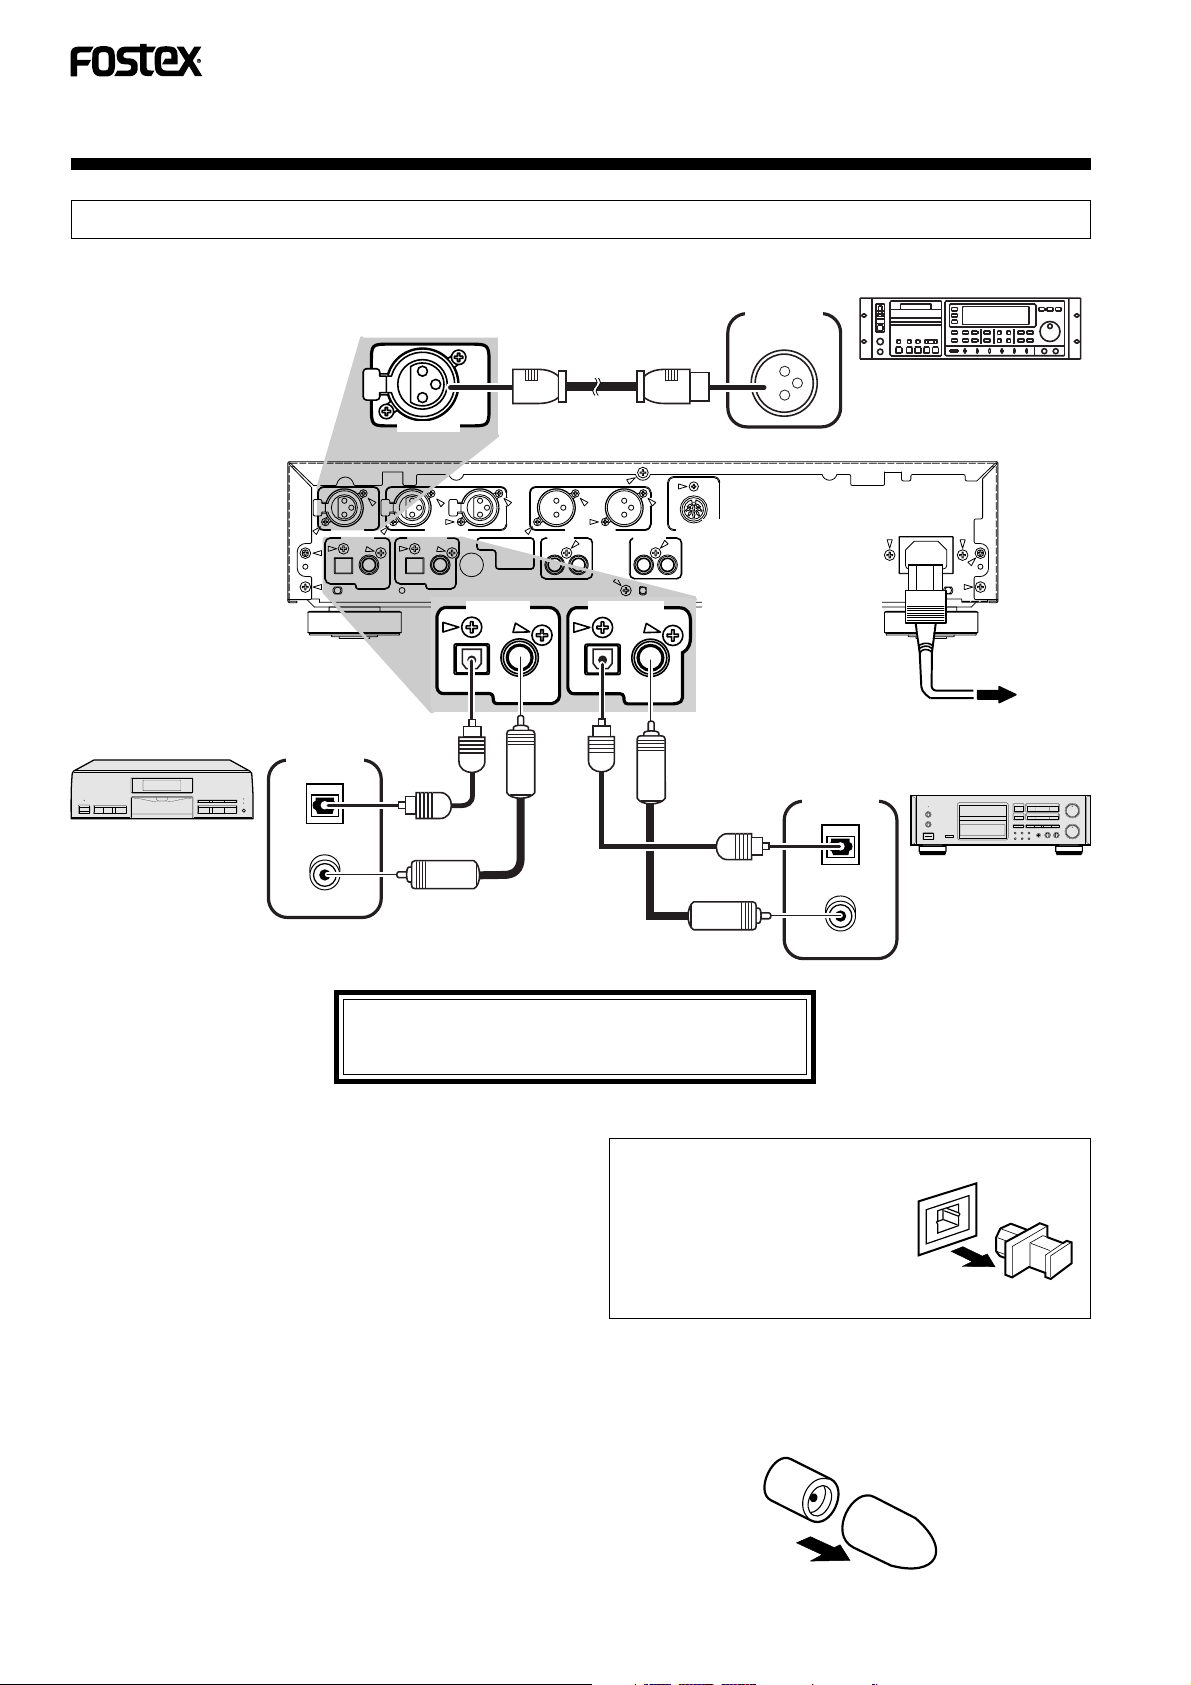
CONNECTIONS
DIGITAL SIGNAL CONNECTION
(Before connecting this unit with other equipment, unplug the power cord from the wall outlet.)
DIGITAL
OUTPUT
AES / EBU
Align the connector with the
shape of the socket and
insert fully into the socket.
PUSH
DIGITAL IN
AES
/EBU
XLR cable
Connect to equipment with AES/
EBU digital output jacks such as
a professional DAT recorder.
PUSH
AES
/ EBU
DIGITAL IN BALANCED IN
DIGITAL IN DIGITAL OUT
OPTICAL COAXIAL
S/PDIF
SRC(Sample Rate Converter)
condition can be set using the MENU
button functions. (See page 24)
DIGITAL
OUTPUT
OPTICAL
Connect to equipment
with a digital output
jack, such as a CD
COAXIAL
player.
RL RL
PUSH
OPTICAL COAXIAL
S/PDIF
PUSH
DIGITAL IN
OPTICAL
XLR-3 CN WIRING
1. GND
2. HOT ( + )
3. COLD ( - )
COAXIAL
S/PDIF
BALANCED OUT
LINE IN LINE OUT
RL RL
DIGITAL OUT
OPTICAL
COAXIAL
S/PDIF
PARALLEL
REMOTE
After completing
SIGNAL
GND
connections with
other equipment,
plug the power cord
into a wall outlet.
Digital Out condition
can be set using the
MENU button functions.
(See page 24)
optical fiber cable
coaxial pin cables
optical fiber cable
coaxial pin cables
CAUTION
Do not attempt to connect several units of the
CR300 in a series.
DIGITAL
INPUT
OPTICAL
COAXIAL
AC IN
AC
Connect to equipment
with digital input/output
jacks such as a DAT or
MD recorder.
Caution in use of optical fiber cables
• Do not bend an optical fiber cable to a steep angle, for this could
damage the cable. Be specially careful when mounting the unit
in a rack, etc. When an optical cable is stored in the form of a
loop, the loop should have a diameter larger than 15 cm (6 in.).
• An optical cable should be inserted deep into the socket. Avoid
incomplete connection.
• Use optical cables with a length of no more than 3 m (10 feet).
• Be careful not to leave dust on or scratch the optical fiber cable
plugs. If the plug is dusty, wipe with a soft cloth before
connection.
• When the optical fiber cables are not connected, protect the
OPTICAL sockets on the rear of the unit against dust by inserting
dust protective caps into them.
10
CR300
<PRB1291-B>
Optical sockets are delicate!!
• When the OPTICAL sockets
are used, pull out the dust
Cap
protective caps from them. Be
sure to insert them again when
the OPTICAL sockets are not to
be used.
• Retain the dust protective caps
Pull out.
carefully.
Digital input/output (coaxial) terminal cap
• Remove the black cap before using the digital input/output
terminal.
• Be sure to replace the black cap when not using the terminal.
Cap
Turn and remove
Page 11
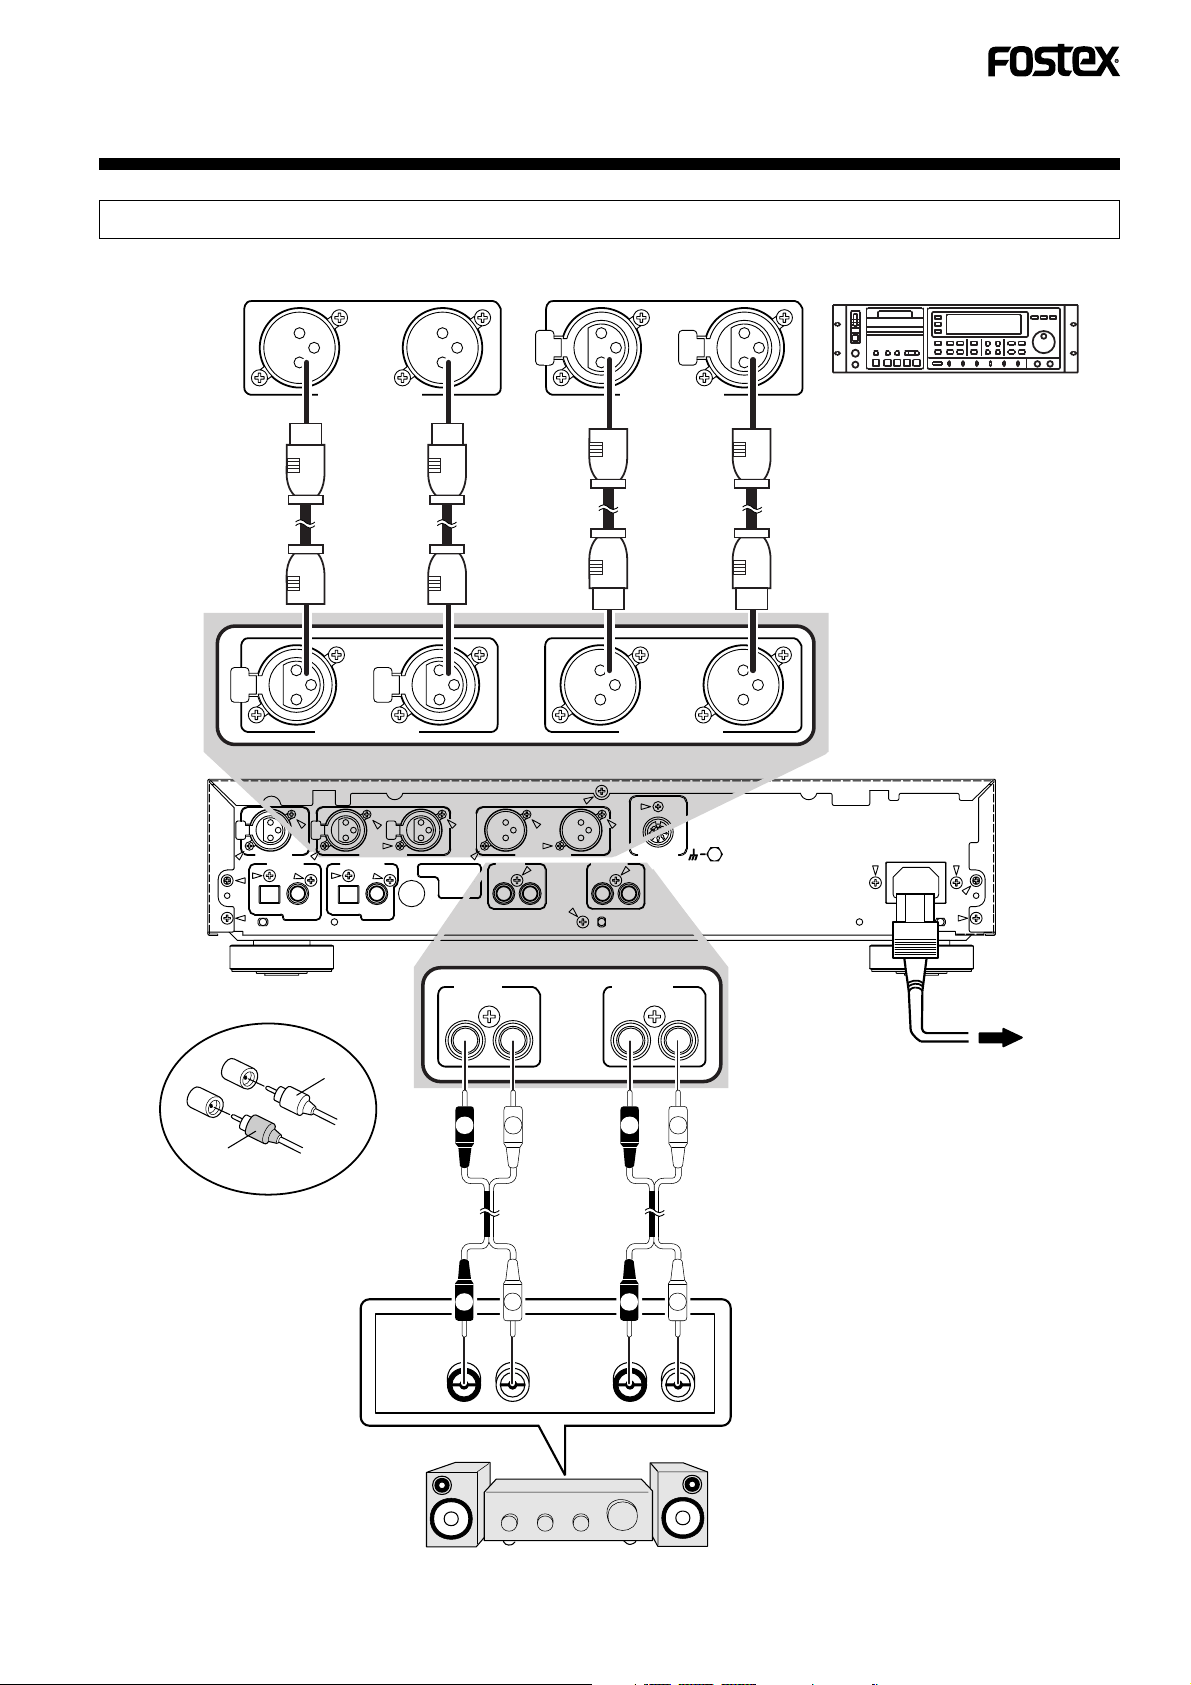
ANALOG SIGNAL CONNECTION
(Before connecting this unit with other equipment, unplug the power cord from the wall outlet.)
RL
BALANCED OUT
XLR cable
RL
OPTICAL COAXIAL
S/PDIF
PUSH
PUSH
XLR-3 CN WIRING
1. GND
2. HOT ( + )
3. COLD ( - )
LINE IN LINE OUT
RL RL
PUSH
BALANCED IN
RL RL
PUSH
DIGITAL IN BALANCED IN
OPTICAL COAXIAL
PUSH
AES
/ EBU
DIGITAL IN DIGITAL OUT
S/PDIF
RL
PUSH
BALANCED IN
PUSH
XLR cable
RL
BALANCED OUT
BALANCED OUT
PARALLEL
REMOTE
SIGNAL
GND
Connect to equipment with balanced
analog input and output jacks such
as a professional DAT recorder.
Balanced output level
can be set using the
MENU button functions.
(See page 24)
AC IN
L
R
White
Red
Connection of input and
output cords
Connect the white plug to
the (L) jack and red plug to
the (R) jack. Be sure to
fully insert the plugs into
the jacks.
LINE IN
RL
LR
Audio cables
L
R
RL RL
OUTPUT
INPUT
Stereo amplifier
LINE OUT
RL
LR
L
R
After completing
connections with
other equipment,
plug the power cord
into a wall outlet.
Connect to a stereo amplifier, etc.
CR300
AC
11
<PRB1291-B>
Page 12

CONTROLS AND INDICATORS
FRONT PANEL
The operations available using buttons marked "❋" are also available using the buttons with the
same names or inscriptions on the remote control unit 8317 (See page 14).
POWER switch
MENU button
(See p.24)
Copy bit indicator
(See p.24)
SKIP PLAY button
(See p.40)
SKIP ID SET,
CLEAR buttons
(See p.24, p.29)
COMPACT DISC RECORDER
POWER
OFF ON
AUTO /
MANUAL
CR300
SKIP ID
CLEAR SKIP PLAY
TRACK NO.
WRITE
(MANUAL)
FINALIZE ERASE
Function indicator
Recording ... Lights in red
Recording mute ... Blinks in red
Playback ... Lights in green
Erasing ... Lights in orange
❋TIME / MARGIN button (See p.13)
❋REC MUTE button ( )(See p.27)
MENUSET
❋RECORD button ( )
OPEN/CLOSE
button ( )
REC LEVEL knobs
(outer: L ch, inner: R ch)
(See p.22)
DIGITAL SYNCHRO
button (See p.18 – p.20)
INPUT SELECTOR
knob
INPUT SELECTOR REC LEVELREC LEVEL
ANALOG
DIGITAL
XLR / +4
OPEN /
CLOSE
REC
•
/MARGIN
COAX XLR / -10
•
MUTE
TIME
•
OPT
LINE
•
•
AES /
EBU
SYNCHRO
•
DIGITAL
2
PHONES
RECORD
PROFESSIONAL
•
•
LR
5
••
6
4
•
•
7
3
•
8
•
9
1
•
•
10
0
LEVEL
MAXMIN
TRACK No.
AUTO/MANUAL
button (See p.26)
❋TRACK No.
WRITE button
(See p.26)
TRACK No. WRITE
indicator (See p.26)
Lights when the track
number manual writing
is possible.
12
CR300
<PRB1291-B>
Display panel (See p.13)
❋Track/❋Manual search buttons
( )
Remote control
sensor (See p.14)
ERASE button
(See p.32)
FINALIZE button
(See p.31)
Disc tray
❋Play button ( )
Headphones
level control
(PHONES
LEVEL)
Headphones
jack (PHONES)
❋Stop button( )
❋Pause button( )
Page 13
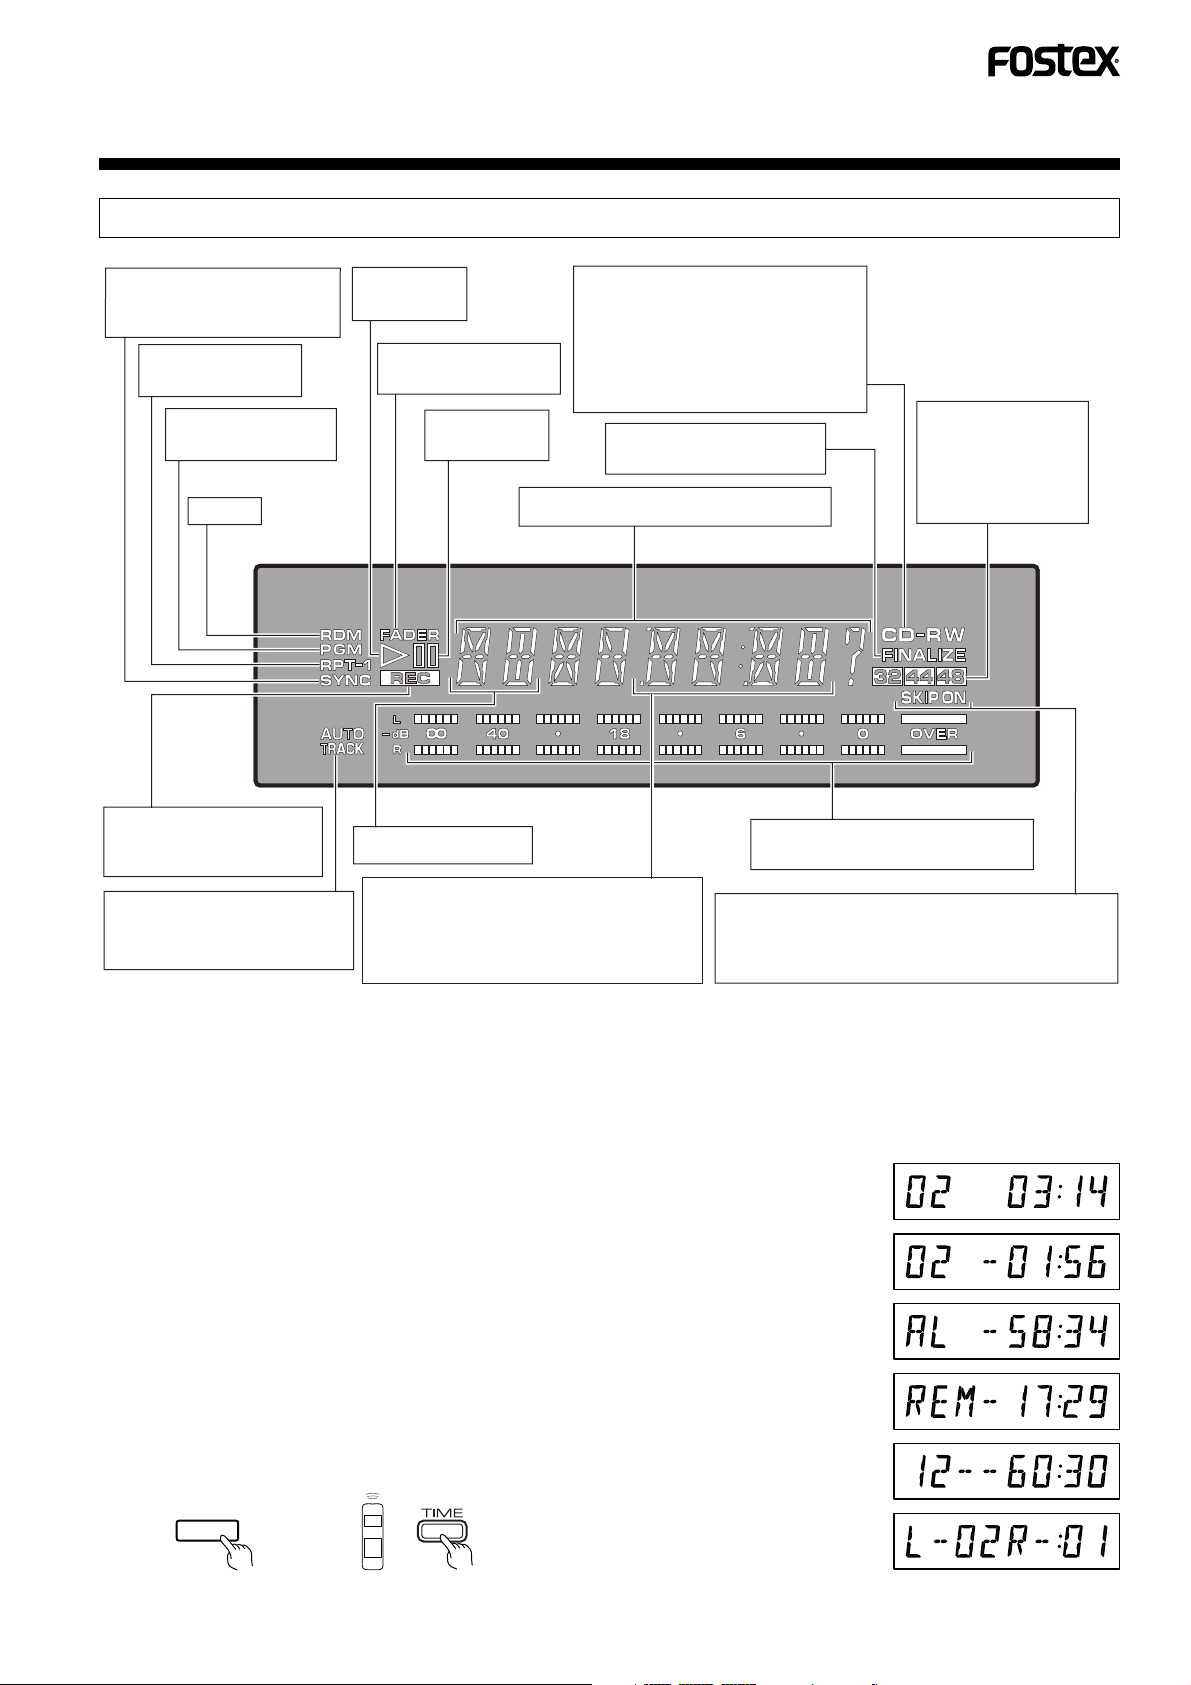
DISPLAY PANEL
Lights when automatic digitalsource synchro recording is
activated. (See p. 18 to 20.)
Lights during repeat
playback. (See p. 37)
Lights in the program
mode. (See p. 38.)
Not Use
Lights during record mode.
Blinks in the record muting
mode.
Lights when automatic track
number write during recording
is activated.
Lights during
playback.
Blinks during fade-in/out.
(See p. 27 and 37.)
Lights or blinks
during pause.
Displays the track No.
Displays the elapsed playing time, remaining
playing time, total playing time, elapsed
recording time, remaining recording time,
total recording time, margine level and
remaining time until the end of finalization.
Blinks during disc identification and
lights steadily. (See p. 15.)
CD: Lights when a disc is loaded.
CD-R: Lights if the loaded disc is a
CD-R disc before finalization.
CD-RW: Lights if the loaded disc is a
CD-RW disc
Lights if the loaded disc is a
finalized CD-RW disc.
Displays messages. (See p. 41 and p. 42)
Displays the sampling
frequency (Fs) of the
current digital input.
All indicators are off
when the input signal
is interrupted.
Displays the input level during record
or the play level during playback
Lights, goes off or blinks during skip ID setting or
clearing. (See p. 29 and p. 30)
The disc contains skip ID data, the SKIP ON indicator
lights automatically (See p. 40)
Switching the time display
By pressing either the TIME/MARGIN button on the main unit or the TIME button on the wireless remote controller, the time
diaplay contents is switched.
Depending on a condition of loaded disc and CR300, the time display contens will be swtiched as shown below.
• Playing : All discs
A ➔ B ➔ C1 ➔ D ➔ E ➔ A ➔ •••
• Recording : CD-R / CD-RW discs
A ➔ C2 ➔ D ➔ E ➔ A ➔ •••
• Stoping : CD-R (Not Finalized) / CD-RW (Not Finalized)
A ➔ B ➔ C2 ➔ D ➔ A ➔ •••
• Stoping : CD / CD-R(Finalized) / CD-RW(Finalized)
A ➔ B ➔ C1 ➔ D ➔ A ➔ •••
TIME
/MARGIN
A : Elapsed playing/
recording time
B : Remaining playing time
of track
C1 : Remaining playing time
of all tracks on disc
C2 : Remaining recording
time on disc
D : Total playing/recording
time
E : Margin indicator
CR300
13
<PRB1291-B>
Page 14
CONTROLS AND INDICAT ORS
30
30
7m(23 ft)
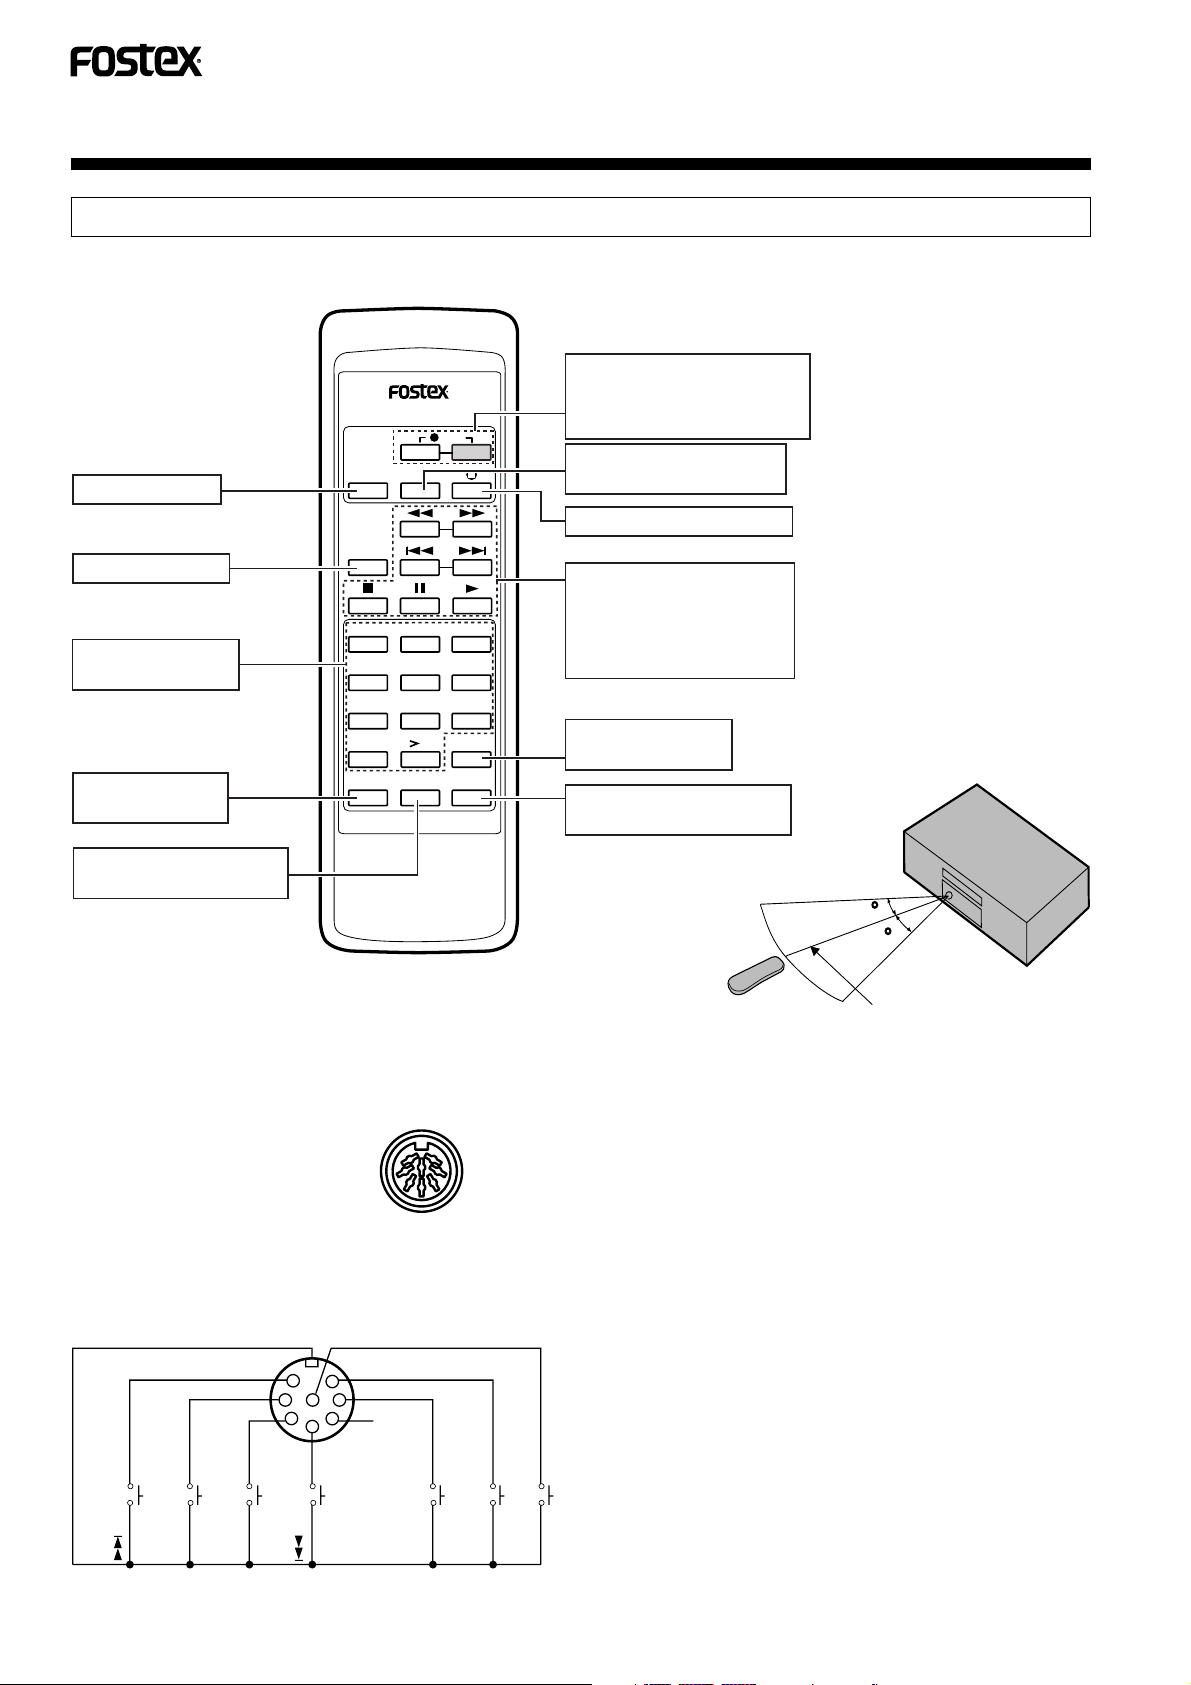
REMOTE CONTROL UNIT
● Wireless remote control
MODEL 8317
TRACK NO.
FADER button
PEPEAT button
Numeric buttons
(1 to 10, >10)
Program button
(PGM)
FADER
REPEAT
123
456
789
10
PGM CHECK CLEAR
WREITE
Operations performed by buttons marked "❋" can
also be carried out by using buttons with the same
name on the main unit (See page 12).
❋ Record buttons
(REC)
REC
NOTE:
press the 2 buttons simultaneously
For recording,
❋ Manual TRACK NO.
WRITE button
❋ Record muting button
❋ Manual search button
Acceptance of commands from
the wireless remote controller
by the CR300 can be set using
the MENU button function.
(See page 24)
❋ Track search button
❋ Stop button
❋ Pause button
❋ Play button
10
TIME
❋ Time button
(TIME)
Remote control sensor
Point the remote control
unit and press its buttons.
❋ Program clear button
(CLEAR)
Program check button
(CHECK)
● Parallel remote control
The CR300 can be controlled through the rear panel
parallel remote control input connector and also with
the wireless remote controller included with the
CR300.
DIN 8 pin connector
PARALLEL
REMOTE
The CR300 can be controlled with external switches by
utilizing the circuit shown below.
7
6
8
1
3
5
4
2
Not Use
GND
Remote controllable range
Caution on the remote control operation
• Remote control might not work if there is an obstacle
between the remote control unit and the CR300 or if the
remote control unit is operated at too great of an angle
from the remote control sensor.
• Erroneous operation may occur in strong light such as
direct sunlight or fluorescent lamp light shining into the
remote control sensor.
• The CR300 may operate erroneously if it is used near
equipment radiating infrared rays or if the infrared remote
control unit of other equipment is used near the CR300.
On the contrary, if this remote control unit is operated
near another piece of equipment which can be controlled
with infrared rays, that equipment might not work
correctly.
• Replace batteries when the remote controllable range
decreases noticeably.
14
CR300
MANUAL TRACK NO WRITE
PLAY
<PRB1291-B>
PAUSE
REC
STOP
Page 15
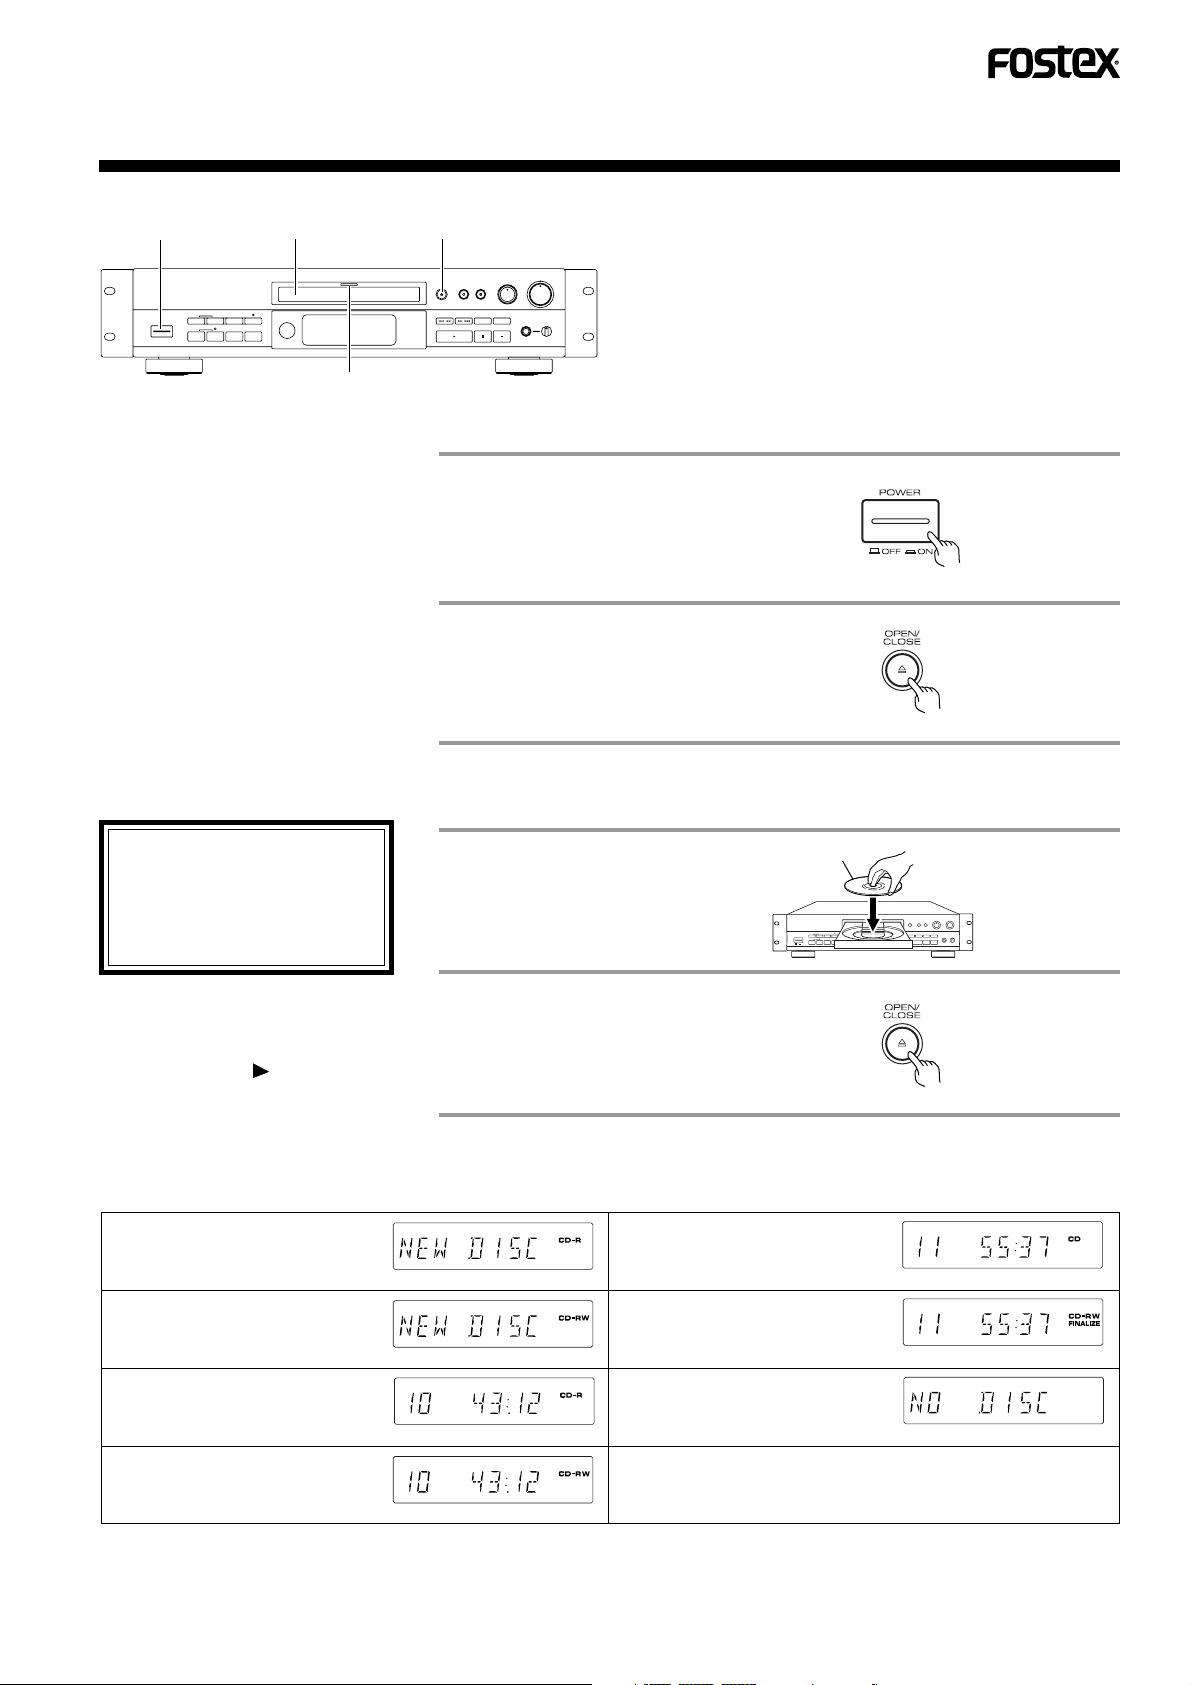
DISC LOADING/UNLOADING
1
• After recording or skip information
recording, it takes a few seconds
before the disc can be unloaded
because the recording information is
written on the disc. "OPEN" blinks in
this period.
3 2,4
Function indicator
A. OPEN THE DISC TRAY
Turn the power on.
1
• The function indicator will
flash green.
• The display panel is illuminated.
Open the disc tray.
2
"OPEN" is displayed and the
tray comes out.
B. CLOSE THE DISC TRAY (LOADING A DISC)
• Set a disc in the center of the tray
with the label side up.
• When loading an 8-cm (3-inch)
disc, set the disc in the groove in
the very center of the tray.
• Load only one disc at a time.
The disc tray can also be closed by;
• pressing the play ( ) button.
• pushing the disc tray lightly.
When a disc is loaded, the disc type is identified and the information on the disc is read out. (In this period, "CD", "CD-R" and
"CD-RW" are displayed alternately.)
Display for a non-recorded
CD-R disc:
Display for a non-recorded
CD-RW disc:
Display for a partially
recorded CD-R disc:
The total recording time is displayed.
Place a disc.
3
Close the disc tray.
4
"CLOSE" is displayed and the
tray is closed.
Display for a prerecorded
CD or finalized CD-R disc:
Display for a prerecorded
and finalized CD-RW disc:
An attempt is made to start
playback without loading a
disc:
Label side
The total playing time is displayed.
The total playing time is displayed.
Display for a partially
recorded CD-RW disc:
The total recording time is displayed.
CR300
15
<PRB1291-A>
Page 16

MODE OF RECORDING
This section introduces the summary of the modes of recording available with this unit.
It is recommended to use the automatic digital-source synchro recording when
recording a CD, DAT, MD or DCC source (S/P DIF only).
The track numbers are updated automatically by this unit.
For details, also refer to the corresponding descriptions.
This unit provides four mode of recording on CD-R and CD-RW discs.
Select a mode according to the source recorded.
Automatic digital-source
synchro recording (1-track)
...........When the source equipment starts to play, only one track is recorded automatically and the
recording stops automatically after that track. This mode is convenient for edited recording of a
CD, DAT, MD or DCC. (Refer to page 18 for the recording setup procedure.)
Automatic digital-source
synchro recording (all-track)
Automatic finalization
recording
Manual digital-source
recording
Analog-source recording
To monitor the recording input,
set the INPUT SELECTOR to
desired input position. Even if
the position is the same, it must
be changed to a different
position and then switched
back to monitor the input.
......... When the source equipment starts to play, all tracks are recorded automatically and the
recording stops automatically after the last track. This mode is convenient for recording an
entire CD, DAT, MD or DCC. (Refer to page 19 for the recording setup procedure.)
........... This mode automatically performs finalization after an all-track automatic digital source synchro
recording. (Refer to page 20 for the recording setup procedure.)
........... This mode is mainly used for recording the output from other digital sources than those
mentioned above. Recording is started or stopped manually. (Refer to page 21 for the recording
setup procedure.)
........... This mode is used for recording the line output of the source equipment. (Refer to page 22 for
the recording setup procedure.)
When the input is selected, the input source equipment name is displayed
INPUT SELECTOR
XLR / +4
COAX XLR / -10
•
•
OPT
•
AES /
•
EBU
ANALOGDIGITAL
•
as "INPUT" ➔ "CD"(only from digital input) ➔ "MONI".
• This display is available if the input source is a CD, MD, DAT or DCC.
• Before recording from LaserDisc, make sure that this unit’s sampling
LINE
•
frequency indicator lights in the display. Digital recording is not possible if
this indicator does not light. Check the source with the record monitor.
• When recording from digital sources like CD, CDV, or LD players, the
input source display may display “CD.”
• A digital input source other than mentioned above such as AES/EBU is
displayed as "-- --" .
CAUTION
This unit is a recorder for writable compact discs.
This recorder can record on discs carrying the CD-R mark*1, the CD-RW mark*2. The CD-R indicator lights when a CD-R
(Compact Disc - Recordable) is loaded while the CD-RW indicator lights when a CD-RW (Compact Disc - Rewritable) is
loaded. Recording on a partially recorded disc starts from the point where the previous recording left off. The CD-R disc is
recordable once and cannot be erased once recorded. The CD-RW disc is recordable and can erased and rerecorded again.
In the following cases, recording is impossible even when the RECORD or DIGITAL SYNCHRO button is pressed.
When the CD indicator is lit (CD or finalized CD-R), input monitoring is started by pressing any of the above buttons.
When the CD-RW and FINALIZE indicators are lit (finalized CD-RW), input monitoring is started by pressing any of the
above buttons.
When there is no remaining recording time and "REC FULL" is displayed.
When 99 tracks have been recorded and "REC FULL" is displayed. (No more recording is possible.)
When a CD-R or CD-RW disc is inserted, the unit automatically performs a series of adjustments designed to provide the
best possible recording.
It may take some time to complete the automatic adjustments if the unit is cold when the power is turned on. Please wait for
the recorder to enter the record standby mode.
Be sure to remove the disc before turning off the power. If the disc is left in the recorder, it may not operate normally next
time.
16
CR300
<PRB1291-A>
Page 17

CAUTION:
Do not play the DAT or DCC of the source player with programmed playback, for this may lead to incorrect
writing of the track numbers. If programmed playback should be recorded, record each track separately
using the 1-track recording procedure.
Recording from the middle of a disc
If a CD-R or CD-RW disc before finalization has some remaining recording time left and the total number of
tracks which have been recorded is below 99, recording can be restarted from the position after the last
recorded track.
Recording of other-than-audio signals
This unit is designed exclusively for recording audio signals. Non-audio signals such as the CD-ROM play signal
cannot be recorded. Recording is possible only when the input digital signal is an audio signal.
Even when a digital signal contains a graphic or character information signal, for example the CD graphics play
signal is input, the graphic or character information is not recorded.
Precautions regarding power interruptions during recording or while the display shows "PMA REC."
Never turn the power supply off during recording.
Be always sure to remove the disc before turning the power of the unit off.
In case the power supply is interrupted due to power failure or unplugging of the power cord by mistake during
recording;
the last part of the recording will not be possible.
In this case, "RESUME" is displayed until recording is possible again.
Caution in case the digital input is interrupted during recording
In case the sampling frequency from the digital signal of DAT, DCC or satellite broadcasting is switched during
recording, the digital input is interrupted but recording is continued. A non-recorded blank is recorded in this period.
In case the satellite broadcasting signal is interrupted, the digital signal line is disconnected or the power supply
of the source player is cut off and if the digital signal is recovered in less than about 5-seconds, recording is
continued while recording a non-recorded blank in this period. If the digital signal is not recovered in 5-seconds
or more, recording is interrupted and "CAN NOT" and "REC" are displayed; recording restarts when the digital
audio signal is input after the recovery of the digital signal.
Cautions when making digital recordings from DAT
Be sure to enter the start IDs in DAT tapes in positions located before the start of sound.
Tapes that are recorded using the DAT auto ID function records the start ID slightly after the beginning of the actual
recording. This recorder uses the start ID to sense the transition between tracks in a digital recording from DAT
tape.
Thus the following problems could occur when automatic updating of track numbers is used during automatic
digital-source synchro recording or manual digital-source recording.
The beginning of a track is not recorded.
A new track number is created slightly after the beginning of a new track.
The beginning of the next track is recorded at the end of a recording.
Manual recording of the DAT tape start ID is therefore recommended to avoid these problems.
For information on DAT operations, refer to the Owner's Manual provided with the DAT recorder.
CR300
17
<PRB1291-A>
Page 18

AUTOMATIC DIGITAL-SOURCE SYNCHRO RECORDING
E
A. 1-track recording
When the source equipment starts to play, only one track is recorded automatically and the
recording stops automatically after that track. This mode is convenient for edited recording
of a CD, DAT, MD or DCC(only S/P DIF).
4
21
REC
TRACK NO.
WREITE
FADER
REPEAT
7
After loading the disc, check that
the CD-R or CD-RW indicator stops
blinking and starts to light steadily.
In case it does not light steadily,
refer to page 42.
• The AES/EBU digital input cannot be
recorded with this function.
• The ANALOG input cannot be recorded
with this function.
• Confirm the track to be recorded before
recording.
• Every time the DIGITAL SYNCHRO
button is pressed, the mode is changed
in order of 1-SYNC ➔ AL-SYNC ➔
Record-pause mode.
Select "AL-SYNC" when all-track
recording is required.
• Do not start the playback of the
source player until the SYNC
indicator starts to blink.
•If the SYNC indicator is not
track synchro recording, the track to be
recorded next can be confirmed on the
source player.
cannot be started while the SYNC
indicator is not lit.)
SYNC indicator is not lit.
(Automatic recording
lit after 1-
1
Load a CD-R or CD-RW
Label side
disc containing a recordable space.
For a disc loading, refer to page 15.
2
Set the INPUT SELECTOR
to DIGITAL.
Select OPTICAL or COAXIAL.
3
Ensure that the source player is not playing (in stop or pause
INPUT SELECTOR
XLR / +4
COAX XLR / -10
•
•
OPT
•
AES /
•
EBU
ANALOGDIGITAL
•
LIN
•
mode).
• This function cannot be activated if the source is being played.
4
Press the DIGITAL
Wait until the SYNC indicator blinks.
SYNCHRO button.
• Check the copy bit indicator
(refer to page 24).
5
Start playing the source player.
• This unit starts recording automatically.
• The SYNC indicator is flashing (1-track synchro recording standby), or during 1-track
synchro recording, if the input signal is interrupted or the source is switched to a source
for which auto synchro recording is not possible, the 1-track synchro recording mode will
be canceled and the unit will enter the record-pause mode.
6
If the track changes (when input source is CD or Mini Disc), or
Blinks
if the next start ID is detected (when input source is DAT or
DCC), 1-track recording will be cancelled and the unit will enter the record-pause mode. The 1-track recording mode is also
cancelled if no signal (less than -90dB) condition lasts for
the length set by the MENU button functions.(See page 24)
• If it is required to record another track after 1-track recording, repeat steps 3 to 5 again.
18
CR300
<PRB1291-A>
7
After recording, press the stop ( )
button to end recording.
"PMA REC" is displayed and the unit
stops after recording the track data.
Page 19

B. All-track recording
E
When the source equipment starts to play, all tracks are recorded automatically and
the recording stops automatically after the last track. This mode is convenient for
recording an entire CD, DAT, MD or DCC(only S/P DIF).
4
21
6
FADER
REPEAT
TRACK NO.
WREITE
REC
• After loading the disc, check that
the CD-R or CD-RW indicator
stops blinking and starts to light
steadily.
In case it does not light steadily ,
refer to page 42.
• The AES/EBU digital input cannot be
recorded with this function.
• The ANALOG input cannot be recorded
with this function.
• Confirm the track to be recorded before
recording.
• Every time the DIGITAL SYNCHRO
button is pressed, the mode is changed
in order of 1-SYNC ➔ AL-SYNC ➔
Record-pause mode.
Select "AL-SYNC" when all-track
recording is required.
• Do not start the playback of the
source player until the SYNC
indicator starts to blink.
• The source unit stops playback
and after no signal(less than 90dB) condition lasts for the
length set by the MENU button
functions(see page 24), the unit
reverts to the status noted in step
4 and "AL-SYNC" is displayed
again.
Be careful not to restart playback
of the source player under this
condition, for this will start the
recording again.
Load a CD-R or CD-
1
Label side
RW disc containing
a recordable space.
For a disc loading, refer to
page 15.
Set the INPUT SELECTOR
2
to DIGITAL.
Select OPTICAL or COAXIAL.
3
Ensure that the source player is not playing (in stop or pause
INPUT SELECTOR
XLR / +4
COAX XLR / -10
•
•
OPT
•
AES /
•
EBU
ANALOGDIGITAL
•
LIN
•
mode).
• This function cannot be activated if the source is being played.
Press the DIGITAL
4
Wait until the SYNC indicator blinks.
SYNCHRO button.
• Check the copy bit indicator
(refer to page 24).
Blinks
5 Start playing the source player.
• This unit starts recording automatically.
• When the SYNC indicator is flashing (all-track synchro recording standby), or during alltrack synchro recording, if the input signal is interrupted or the source is switched to a
source for which auto synchro recording is not possible, the all-track synchro recording
mode will be canceled and the unit will enter the record-pause mode.
6
After recording, press the stop ( )
button to end recording.
"PMA REC" is displayed and the unit
stops after recording the track data.
CAUTION
• Do not play the DAT or DCC of the source player with programmed playback, for this may lead to incorrect writing of the track numbers.
If programmed playback should be recorded, record each track separately using the 1-track recording procedure.
• The track number is renewed when a start ID is detected during all-track synchro recording from DAT or DCC.
• When performing all-track synchro recording from a CD or Mini Disc player using normal playback, the track number is renewed just as
the track changes on the playback side. When the CD or Mini Disc player is in the programmed playback mode, however, the track
number is not renewed until the first sound is encountered after the track changes.
CR300
<PRB1291-A>
19
Page 20

AUTOMATIC DIGITAL-SOURCE SYNCHRO RECORDING
E
C. Automatic finalization recording
This operation automatically performs finalization after an
all-track recording (only S/P DIF). Finalization is the final
process in recording a CD-R or CD-RW disc that is playable
on standard CD players.
However, CD-RW discs, whether finalized or not, can only
be played back on a CD-RW disc player. See page 31 for
details.
• After loading the disc, check that
the CD-R or CD-RW indicator
stops blinking and starts to light
steadily.
In case it does not light steadily,
refer to page 42.
• The AES/EBU digital input cannot be
recorded with this function.
• The ANALOG input cannot be recorded
with this function.
• Confirm the track to be recorded before
recording.
Load a CD-R or CD-
1
RW disc containing
a recordable space.
For a disc loading, refer to
page 15.
Set the INPUT SELECTOR
2
to DIGITAL.
Select OPTICAL or COAXIAL.
3
Ensure that the source player is not playing (in stop or pause
mode).
• This function cannot be activated if the source is being played.
4
21
5
Label side
INPUT SELECTOR
OPT
AES /
EBU
ANALOGDIGITAL
XLR / +4
COAX XLR / -10
•
•
•
•
•
LIN
•
• Every time the DIGITAL SYNCHRO
button is pressed, the mode is changed
in order of 1-SYNC ➔ AL-SYNC ➔
Record-pause mode.
Select "AL-SYNC" when all-track
recording is required.
• Press the FINALIZE button once again
so that the FINALIZE indicator goes
out; the Automatic Finalization will not
occur (mode will revert to All-track
synchro).
• Do not start the playback of the
source player until the SYNC
indicator starts to blink.
• The source unit stops playback
and after no signal(less than 90dB) condition lasts for the
length set by the MENU button
functions(see page 24), the unit
reverts to the status noted in step
4 and "AL-SYNC" is displayed
again.
Be careful not to restart playback
of the source player under this
condition, for this will start the
recording again.
• Never turn off the power during
finalization!
4
Press the DIGITAL
Wait until the SYNC indicator blinks.
SYNCHRO button twice.
• Check the copy bit
indicator(refer to page 24).
5
Press the FINALIZE
Blinks
The FINALIZE indicator blinks.
button.
Blinks
When playback of the source is started, the All-track synchro
6
recording starts.
When the SYNC indicator is flashing (all-track synchro recording standby), or during alltrack synchro recording, if the input signal is interrupted or the source is switched to a
source for which auto synchro recording is not possible, the all-track synchro recording
mode will be canceled and the unit will enter the record-pause mode.
7
When the source playback standby continues for more than 1
minute during an ALL-TRACK SYNCHRO RECORDING, the
recorder assumes that the recording has stopped and finalization starts automatically.
• It usually takes about 4 minutes until the finalization completes.
• See page 31 for details.
• The finalize-standby mode can be cancelled by pressing the stop ( ) button or FINALIZE button while the unit is in the finalize-standby mode.
• Operating buttons do not respond when finalization has begun.
• Operation stops automatically without performing finalization when no more recording
time remains or when there are 99 or more tracks.
Blinks
20
CR300
<PRB1291-A>
Page 21

MANUAL DIGITAL-SOURCE RECORDING
REPEAT
FADER
TRACK NO.
WREITE
REC
This function is for recording of digital output of other digital source than CD, DAT, MD and DCC.
(It is recommended to use the automatic digital-source synchro recording when recording signals from a CD, DAT, MD or DCC.)
3
21
56
• After loading the disc, check that
the CD-R or CD-RW indicator
stops blinking and starts to light
steadily.
In case it does not light steadily ,
refer to page 42.
• Track numbers are automatically updated
when the AUTO TRACK indicator is on.
• In recordings of CD, MD, DAT, DCC and
other digital sources(S/P DIF only), track
numbers are automatically updated
based on start-ID and / or track number
included in the digital signal information.
• AES/EBU digital signal or digital signal
from media such as BS (satellite broadcasting) that contains no track number
information are recorded in the same
way as analog source.
• Track numbers are automatically updated if the following signal is input after 2seconds of ”no signal” condition.
• In the case of digital source input, the
CR300 detects the signal less than 90dB as ”no signal”. Track numbers are
automatically updated if the signal level
exceeds this level.
• Therefore recordings of classical music
and other music styles with long silent
passages will be recorded on more tracks
than required. Turn off the auto track
function and create new tracks manually to avoid this problem.
Load a CD-R or CD-
1
RW disc containing
a recordable space.
For a disc loading, refer to
page 15.
2
Set the INPUT SELECTOR
to DIGITAL.
Select the digital input to be recorded.
AES/EBU or OPT or COAX
Press the RECORD
3
(REC ) button(s).
• This unit enters recordpause mode.
• Check the copy bit indicator
(refer to page 24).
4
Start playing the source
player to confirm whether
recording of that source is
possible.
Press the pause ( ) or
5
play ( ) button in
record-pause mode.
or
Label side
INPUT SELECTOR
XLR / +4
COAX XLR / -10
•
•
OPT
•
AES /
•
EBU
ANALOGDIGITAL
•
LINE
•
Press two buttons
together.
or
• Press the PAUSE ( ) or PLAY
( ) buttons after the counter
displays "00:00".
6
After recording, press the stop
( ) button to end recording.
• "PMA REC" is displayed and the unit
stops after recording the track data.
CR300
21
<PRB1291-A>
Page 22

ANALOG-SOURCE RECORDING
E
This function is for recording the analog output.
3
241
56
FADER
REPEAT
TRACK NO.
WREITE
REC
• After loading the disc, check that
the CD-R or CD-RW indicator
stops blinking and starts to light
steadily.
In case it does not light steadily,
refer to page 42.
• Track numbers are automatically updated when the AUTO TRACK indicator
is on.
• Track numbers are automatically updated if the following signal is input after
2-seconds of ”no signal” condition.
• In the case of analog source, the CR300
detects the signal level selected by the
”Automatic Track Number Renewal Level Sensitivity Setting” menu as ”no signal”. Track numbers are automatically
updated if the signal level exceeds this
level. (See page 24.)
• Therefore recordings of classical music
and other music styles with long silent
passages will be recorded on more
tracks than required. Turn off the auto
track function and create new tracks
manually to avoid this problem.
Load a CD-R or CD-
1
RW disc containing
recordable space.
For a disc loading, refer to
page 15.
Set the INPUT SELECTOR
2
to
ANALOG
Select the analog input to be recorded.
XLR/+4 or XLR/-10 or LINE
Press the RECORD
3
.
(REC ) button(s).
• This unit enters record-pause mode.
• Check the copy bit indicator
(refer to page 24).
Adjust the recording level.
4
Refer to page 23 for the
adjustment method.
Label side
a
REC LEVELREC LEVEL
••
4
•
3
•
2
•
1
•
0
INPUT SELECTOR
OPT
AES /
EBU
5
ANALOGDIGITAL
XLR / +4
COAX XLR / -10
•
•
•
•
•
LR
6
•
7
•
8
•
9
•
10
LIN
•
Press two buttons
together.
• Start playback of the
source player.
• Press the PAUSE ( ) or PLAY
( ) buttons after the counter
displays "00:00".
22
CR300
<PRB1291-A>
Press the pause ( )
5
or play ( ) button in
record-pause mode.
• This unit starts recording.
• Start playback of the source
player after having started
the recording of this unit.
After recording, press the stop
6
( ) button to end recording.
• "PMA REC" is displayed and the unit
stops after recording the track data.
or
or
Page 23

Recording level adjustment
E
• Adjustment reference
For recording of analog input, adjust the recording level so that the OVER-level
indicator does not light even when the highest, or peak level is input. Sound may
be distorted if the OVER-level indicator lights.
• Level meter
The level meter segments light to indicate the input level during recording or play
INPUT SELECTOR
XLR / +4
COAX XLR / -10
•
•
OPT
•
AES /
•
EBU
ANALOGDIGITAL
•
LIN
•
level during playback.
Lights at between –1 dB and below 0 dB.
level is exceeded.
Lights at 0 dB or more.Each lights when the indicated
• Minimum recording time per track
As the CD specifications dictate that each CD track should be no less than 4 seconds, even when the pause ( ) or stop
( ) button is pressed in less than 4 seconds after the start of recording, recording does not pause or stop until a 4-second
track is created by leaving a non-recorded blank in the insufficient period.
In this case, the next operation cannot be activated until a 4-second track has been created.
• Track number write operation
Ordinary CD-digital audio contains the recording of track numbers so desired tracks can be selected and played. When
recording with a CD-R recorder, however, you need to write the track numbers yourself. When recording from digital sources
containing track number information (such as a CD, MD, DAT, or DCC), a new track number is recorded automatically when
this unit detects a change track number information and sound from the digital source. In case of recording of a source which
does not contain track number information such as an analog source or satellite broadcasting (BS), you must write a new
track number by yourself between tracks. (Be specially sure not to forget this for it is not possible to add track numbers once
recording has completed.)
For the track number write operation procedure, refer to page 26.
CD contains track number
information just like a dictionary
contains an index.
Dictionary
Index
CR300
<PRB1291-A>
23
Page 24

MENU BUTTON FUNCTIONS
By pressing the MENU button while the
CR300 is in STOP mode, operation of
various functions can be selected as
shown below. Pressing the MENU button every time would allows you to select a different MENU.
Select a desired MENU by pressing
1
the MENU button.
• Pressing the MENU button every time would allow
you to select a different setup MENU.
• The current setup MENU condition is displayed.
By pressing either the or
2
button, the setting is altered.
SET
MENU
MENU
3
Pressing the Skip ID SET button
would register the above condition.
SKIP ID
SET
CLEAR
A. Copy Bit Setting
This menu selects the Copy Bit condition recorded onto a disk. (Refer to page 18, 19, 20, 21, 22)
• Copy bit indicator: It indicates the Copy Bit condition while in the Record-Pause mode.
Display
Hereafter, unlimited digital copy is possible. default
Hereafter, digital copy is possible only once.
Hereafter, digital copy is prohibited.
B. Auto stop delay time Setting in Digital
In this menu, length of no signal(less than -90dB) recorded section can be selected in order to stop Digital
Synchro recording automatically. (Refer to page 18, 19, 20)
Display
0 sec default
10 sec
Digital Synchro recording cannot be stopped automatically.
Meaning
Synchro
Meaning
Copy bit indicator
Lit solid
Off
Blinking
Copy Bit
1
0
1/0
C. Fade In / Fade Out Time Setting
This menu allows to select the Fade in/Fade out time. (Refer to page 27, 37)
Meaning
24
CR300
Display
Fade time : 6 sec default
Fade time : 9 sec
Fade time : 12 sec
Fade time : 18 sec
<PRB1291-A>
Page 25

D. Automatic Track Number Renewal Level Sensitivity Setting
This menu selects the analog source input level sensitivity for automatic track number renewal. (Refer to page 22, 26)
Display
Meaning
-60dB default
-54dB
-48dB
-42dB
-38dB
-66dB
E. Auto Pause Mode Setting
This menu allows to select whether the AUTO PAUSE PLAY mode is turned on or off. (Refer to page 37)
Display
The AUTO PAUSE PLAY mode is turned off. default
The AUTO PAUSE PLAY mode is turned on.
Note : If the power is once turned off and on again, this mode will become Off condition.
Meaning
As shown in the drawing below, when the AUTO PAUSE mode is on,
the letter “P” is displayed.
F. Balanced Output Level Setting
This menu selects the standard level of Balanced Output. (Refer to page 11)
Display
Meaning
+4dBu default
-10dBV
G. Wireless Remote Control
This menu selects whether the CR300 is controlled by a wireless remote controller or not. (Refer to page 14)
Display
The CR300 can be controlled by a wireless remote controller. default
The CR300 cannot be controlled by a wireless remote controller.
Meaning
H. Sample Rate Converter Thru
This menu selects whether the 44.1kHz digital signal is input through the SRC(Sample Rate Converter) or
not. (Refer to page 10)
Display
The input signal passes through the SRC. default
The input signal goes around the SRC.
Note : If the power is once turned off and on again, this mode will become Off condition.
Meaning
I. Digital Out
This menu selects whether a signal is output from Digital Out terminal. (Refer to page 10)
Display
A signal is output from Digital Out terminal. default
A signal is not output from Digital Out terminal.
Meaning
CR300
25
<PRB1291-A>
Page 26

TRACK NUMBER WRITING
At the first, the track number automatic writing mode is selected automatically.
21
• Manual writing of track number
• Once the track number has been
written, it cannot be modified or
changed later.
• The WRITE (MANUAL) button is
defeated while the WRITE (MANUAL)
indicator is not lit.
Press the TRACK NO.
1
AUTO/MANUAL
button so that the
WRITE (MANUAL)
indicator lights.
FADER
Lights
TRACK NO.
WREITE
REC
• The track number can be renewed by
pressing the WRITE (MANUAL) button
when recording has elapsed for 4
seconds or more.
• During recording, the track number is
automatically renewed by detecting
the track changes based on the input
musical signal and digital sub-code
signal.
• If the space between tracks is
extremely short, the track number may
not be advanced.
Press the WRITE
2
(MANUAL) button at the
position where it is
required to renew the
track number during
recording.
• Automatic writing of track number
Press the TRACK NO. AUTO/
MANUAL button so that the
WRITE (MANUAL) indicator
is not lit but that the AUTO
TRACK indicator lights.
CAUTION
• Track numbers are automatically updated when the AUTO TRACK indicator is on.
• In recordings of CD, MD, DAT, DCC and other digital sources(S/P DIF only), track numbers
are automatically updated based on start-ID and / or track number included in the digital
signal information.
• AES/EBU digital signal or digital signal from media such as BS (satellite broadcasting) that
contains no track number information are recorded in the same way as analog source.
• Track numbers are automatically updated if the following signal is input after 2-seconds
of ”no signal” condition.
• In the case of digital source input, the CR300 detects the signal less than -90dB as ”no
signal”. Track numbers are automatically updated if the signal level exceeds this level.
• In the case of analog source, the CR300 detects the signal level selected by the ”Automatic
Track Number Renewal Level Sensitivity Setting” menu as ”no signal”. Track numbers are
automatically updated if the signal level exceeds this level. (See page 24.)
• Therefore recordings of classical music and other music styles with long silent passages
will be recorded on more tracks than required. Turn off the auto track function and create
new tracks manually to avoid this problem.
Goes off
Lights
26
CR300
<PRB1291-A>
Page 27

CONVENIENT FUNCTIONS FOR RECORDING
REC MUTE
FADER
REC
TRACK NO.
WREITE
FADER
• When the record-pause mode has continued for about 10 minutes, the recordpause mode stops. To enter the recordpause mode, press the RECORD
button(s).
• You can create 4-second or longer
silent passages by pressing the REC
MUTE button. The unit is set to the
record-pause mode when the button is
released.
• The REC MUTE button can be
used during recording or when
going from recording to recordpause mode. The REC MUTE
button cannot be used when the
record-pause mode is activated
from the stop mode.
REC
PAUSE
• To pause recording
Press the pause ( ) button
to pause recording
temporarily.
To restart recording, press the play ( )
or pause ( ) button.
• Creating a blank
Press the REC MUTE button
during recording.
The REC indicator blinks and a blank
is recorded. The unit automatically
enters record-pause mode in about 4
seconds.
• To restart recording, press the play
( ) or pause ( ) button.
• To end recording, press the stop ( )
button.
REPEAT
• To restart recording, press the play ( )
or pause ( ) button.
• To end recording, press the stop ( )
button.
• Starting recording with fade-in
Press the FADER button in
record-pause mode.
• Recording starts by gradually
increasing the recording level. The
FADER indicator blinks in this period.
• Fade time can be set using the MENU
button functions (See page 24).
• Stopping recording with fade-out
Press the FADER button in record mode.
• Recording stops by gradually decreasing the
recording level. The FADER indicator blinks in
this period. Recording stops in Fade-time after
the button is pressed. The unit enters the recordpause mode.
• Fade time can be set using the MENU button
functions (See page 24).
CR300
27
<PRB1291-A>
Page 28

CONVENIENT FUNCTIONS FOR RECORDING
1
REC
TRACK NO.
WREITE
FADER
2
• Checking the recording end point from the middle of a disc
Press the RECORD
1
(REC ) button(s) to
initiate the recordpause mode.
Press two buttons
together.
• Holding the ( or ) button
depressed allows you to move the
played position backward by about
2 minutes from the recording end
point.
• Pressing the RECORD (REC )
button(s) during playback puts the unit
back to record-pause mode again.
• Pressing the ( or ) button
allows forward manual search of the
recording end point.
• The indicator turns off during
playback until the recording end point.
2
Press and hold the
reverse search
button in the
record-
pause mode.
The played position is moved backward and
reverse play sound is heard while the button is
held depressed.
When the button is released, the previous recording is played until the end point, where the
unit enters record-pause mode again.
28
CR300
<PRB1291-A>
Page 29

SKIP ID RECORDING
By setting track skip IDs to the tracks which failed or which consist of a blank, they can be skipped
when the disc is played later.
CAUTION:
Skip IDs can be set or cleared for up to a total of 21 tracks.
If skip IDs are set or cleared repeatedly, the number of tracks to
which track skip IDs will decrease.
Skip IDs cannot be set or cleared with CD discs or finalized CDR, CD-RW discs.
• Skip playback is not possible with an ordinary CD player which
does not incorporate the skip function.
REC
TRACK NO.
WREITE
FADER
2,3 5
SKIP ID CLEAR
• If skip IDs have already been set, the
SKIP indicator lights on the display.
Lights.
• When the track search button ( or
) is pressed while "SKIP" and
"SET?" are displayed, tracks to which
the skip IDs are not set will be played in
order of track numbers.
• The selected tracks play back
repeatedly.
• When the play ( ) button or SKIP ID
CLEAR button is pressed during the
setting operation, the setting mode is
canceled.
REPEAT
123
456
789
10
10
TIME
1
A. Setting skip ID to a track (Track skip)
Play the track to be
1
skipped.
Select it with the numeric buttons of the remote control unit
or a track search button .
2
Press the SKIP ID
SET button.
"SKIP" and "SET?" are
displayed alternately.
• When an attempt is made to set or clear
more skip IDs than possible, "FULL" is
displayed and no more recording is
possible.
• When the button is pressed to remove
the disc, the skip ID setting data is
recorded on the disc. At this time, and
blinks "OPEN" is displayed for a few
seconds, and the tray opens after the
skip ID setting data has been recorded.
3
To set the skip ID,
press the SKIP ID
SET button again.
Skip IDs can be set to other tracks by
4
repeating steps 1 to 3 for each of them.
After having set the
5
required skip IDs,
press the OPEN/
CLOSE button.
CR300
29
<PRB1291-A>
Page 30

SKIP ID RECORDING
CAUTION:
Skip IDs cannot be cleared with CD discs or finalized CD-R, CDRW discs.
3,4 6
1
SKIP ID SET
2
B. Clearing skip ID of a track
REC
TRACK NO.
WREITE
FADER
REPEAT
123
456
789
10
10
TIME
• With a CD-R or CD-RW disc which does
not contain skip IDs, the SKIP ON
indicator will not light even when the
SKIP PLAY button is pressed.
• If skip IDs have already been set, the
SKIP indicator lights on the display.
Lights.
• When the track search button ( or
) is pressed while "SKIP" and
"CLEAR?" are displayed,
which the skip IDs are set will be played
in order of track numbers.
• The selected tracks play back
repeatedly.
• If you press the SKIP ID CLEAR button
during playback of a track without a
skip ID, the unit searches for the next
track with a skip ID (or it returns to the
beginning if there is no next track) and
starts playback.
• To cancel the clearing mode, press the
play ( ) button or SKIP ID SET button.
tracks to
Press the SKIP PLAY
1
button to turn the
SKIP ON indicator off.
Play the track which
2
is not to be skipped.
Select it with the numeric buttons of the remote control unit
or a track search button .
During playback of
3
the track which is
not to be skipped,
press the SKIP ID
CLEAR button.
"SKIP" and "CLEAR?" are
displayed alternately.
4
To clear the skip ID,
press the SKIP ID
CLEAR button again.
Turn SKIP ON indicator off.
• When the button is pressed to remove
the disc, the skip ID clear data is
recorded on the disc. At this time, and
blinks "OPEN" is displayed for a few
seconds, and the tray opens after the
skip ID clear data has been recorded.
30
CR300
<PRB1291-A>
Skip IDs can be cleared from other tracks
5
by repeating steps 2 to 4 for each of them.
After having cleared
6
the
required skip IDs, press the
OPEN/CLOSE button.
Page 31

FINALIZATION (TOC RECORDING)
What is finalization?
• Finalization is the final process in recording a CD-R or CD-RW disc that is playable on standard CD players. (However,
CD-RW discs, whether finalized or not, can only be played back on a CD-RW disc player.)
• Once a disc is finalized, neither recording nor skip ID setting/clearing is possible on the disc; be very careful.
• Never cut the power supply during finalization, for this may lead to disc damage.
1
REC
TRACK NO.
WREITE
FADER
REPEAT
32
Finalization procedure
• Ensure that there is no scratch, dust or
stain on the disc.
If the disc is dusty or stained, clean it by
referring to "Disc maintenance" on
page 9.
1
Load a CD-R or CDRW disc which has
been recorded on.
For a disc loading, refer to
page 15.
Label side
Press the FINALIZE
• If finalization is not required, press the
stop ( ) button; finalization will be
aborted.
• The procedure is canceled
automatically when the unit has
remained in record-pause mode
for about 10 minutes or more.
2
button.
The unit enters record-pause
mode.
• Wait until the time information is displayed.
3
Press the pause ( )
• The displayed time varies
depending on discs.
button.
Finalization starts now.
• The remaining time until the completion
of finalization is displayed during
finalization.
• It usually takes about 4 minutes until the finalization completes.
• When the CD-R finalization is completed normally, the CD-R indicator changes to the
CD indicator, and the unit enters stop mode automatically.
• When the CD-RW finalization is completed normally, the FINALIZE indicator lights
and the unit enters stop mode automatically.
CAUTION:
• Once finalization is started, no operation button is accepted until the finalization completes.
• If a scratched, stained or dusty disc is subjected to finalization, the finalization may sometimes not complete.
In case finalization does not complete in about 10 minutes from the start, it can be forced to be aborted by pressing the stop
( ) button. But such a disc cannot be played on ordinary CD players.
• Never unplug the power cord during finalization.
If the power supply is interrupted due to power failure or by mistake during finalization, the remaining finalization resumes
as soon as the power supply is recovered. In this case "RESUME" is displayed until the finalization is completed. Note that
the disc finalization may not resume properly in some cases.
CR300
31
<PRB1291-A>
Page 32

ERASING (CD-RW ONLY)
Erasing CD-RW discs
CD-RW discs can be erased and new recordings can be made where data has been erased. The
following types of erasing are provided.
A Last Track Erasing:
Erases the last track. This operation is not possible on a CD-RW disc that has been finalized.
B. All Tracks Erasing:
Erases all tracks.
C. TOC Erasing:
The TOC data on the finalized disc is erased.
D. All Disc Erasing:
This operation deletes all data on the disc.
This operation is mainly performed to enable disc recovery and is not normally performed.
CAUTION:
• The power must not be turned off during erasing since this could destroy the disc.
If a power outage occurs during erasing or you should inadvertently turn off the power during eras-
ing, turn on the power when it comes back on again. The erase operation is then automatically
restarted and takes 3 minutes for All tracks erasing and maximum recording time plus 5 minutes for
Disc erasing. However, there is no guarantee that the disc will be erased normally. The erase operation that is restarted when the power comes back can be stopped by pressing the stop ( ) button for
10 seconds. If this erase operation is stopped, the message "CHECK", "DISC" appears to indicate
that the disc has not been normally erased.
• If the message "CHECK", "DISC" appears during erasing and erasing stops, the disc may be dam-
aged.
Should this happen, eject the disc and check it. Then try erasing it again.
• Be sure to remove the disc after the erase operation and before turning off the power.
If the power is turned off with the disc still in the recorder, the backup data is deleted and the erase
operation is cancelled.
32
CR300
<PRB1291-A>
Page 33

2
Function indicator
3
1
REC
TRACK NO.
WREITE
FADER
REPEAT
Switching erase modes
Each press of the ERASE button
switches erase modes in the order
shown below.
Erase Off ➔ A. Last track erasing
C. All tracks erasing
Finalized CD-RW discs:
Erase Off ➔ B. TOC erasing
C. All tracks erasing
A. Last track erasing
Load a CD-RW disc
1
(take a few seconds. Not possible on a finalized CD-RW)
Label side
which has been
recorded on.
For a disc loading, refer to page 15.
Press the ERASE
2
button.
• The display panel successively displays "LAST", "TRACK" and "ERASE?" . Then the
function indicator blinks in orange indicating that the recorder is in last track erase standby
mode. The display panel displays the number of the track that can be erased and "TRACK"
and "ERASE."
Do not allow more than 8 seconds to elapse after step 2 has been performed before
proceeding with step 3.
Press the pause ( )
3
button to start the
last track erasing.
• The function indicator lights in orange and last track erasing starts.
• During last track erasing, the number of the erasing track and "TRACK"
and "ERASE" blinks successively.
• The recorder stops when Last track erasing stops.
• the FINALIZE indicator lights.
•
You can stop the erase process by
pressing the Stop (
seconds. However, if the erase
operation is stopped, the message
"CHECK", "DISC" appears to indicate
that the disc has not been normally
erased.
) button for 10
B. TOC erasing (Possible on a finalized CD-RW)
Load a CD-RW disc which has
1
been finalized.
• For a disc loading, refer to page 15.
2
Press the ERASE button.
• The display panel successively displays "TOC" and
"ERASE?" . Then the function indicator blinks in orange
indicating that the recorder is in TOC erase standby mode.
Do not allow more than 8 seconds to elapse after step 2 has been performed before
proceeding with step 3.
3
Press the pause ( ) button to start
the TOC erasing.
• The function indicator lights in orange and
TOC Erasing starts.
•
During TOC erasing, "ERS *:**" while the
remaining time is displayed.
• The recorder stops when TOC erasing is completed.
Label side
CR300
33
<PRB1291-A>
Page 34

ERASING (CD-RW ONLY)
3
2
Function indicator
1
C. All tracks erasing
FADER
REPEAT
TRACK NO.
WREITE
REC
•
All tracks erase is completed in several
seconds for a CD-RW.
Load a CD-RW disc which has
1
Label side
been recorded on.
For a disc loading, refer to page 15.
2
Press the ERASE button twice
(once to start last track erasing or
TOC erasing).
• The function indicator blinks in orange indicating that the
recorder is in all tracks erase standby mode.
In the case of a CD-RW which has not been finalized, do not allow more than 8 seconds to
elapse after step 2 has been performed before proceeding with step 3.
Press the pause ( ) button to start
3
the all tracks erasing.
• The function indicator lights in orange and
All Tracks Erasing starts.
•
During All tracks erasing of a CD-RW disc that has not be finalized, "ALL", "TRACK" and
"ERASE" blink successively.
•
During All tracks erasing of a finalized CD-RW disc, "ERS *:**" while the remaining time
is displayed.
• The recorder stops when All tracks erasing is completed.
•
You can stop the erase process by
pressing the Stop (
seconds. However, if the erase
operation is stopped, the message
"CHECK", "DISC" appears to indicate
that the disc has not been normally
erased.
) button for 10
34
CR300
<PRB1291-A>
D. All disc erasing (takes recordable time plus 5 minutes)
Load a CD-R or CD-RW disc which
1
has been recorded on.
For a disc loading, refer to page 15.
2
Press and hold the ERASE button
for about 4 seconds.
• The display panel displays "ALL," "DISC," "ERASE?" and
Then the function indicator blinks in orange indicating that the recorder is in the All disc
erase standby mode.
Press the pause ( ) button to start
3
the all disc erasing.
• The function indicator lights in orange and
All Disc Erasing starts.
•
During All disc erasing, "dE **:**" while the remaining time is displayed.
• The recorder stops when All disc erasing is completed.
Label side
"dE **:**"
successively.
Page 35

PLAYBACK
1 2
REC
TRACK NO.
WREITE
FADER
REPEAT
123
456
789
10
10
PGM CHECK CLEAR
TIME
Place the disc on the disc tray with the
label side facing upward.
Label side
For a disc loading, refer to page 15.
• When the pause mode has continued for
about 10 minutes, the pause mode stops
and unit enters the stop mode.
Starting playback
Press the play ( )
1
button.
This unit starts playback.
Press the stop ( )
2
button to stop playback.
To pause playback
Press the pause ( ) button to pause playback
temporarily.
To restart playback, press the play
( ) or pause ( ) button.
Playing from the desired track (Direct track selection)
• A higher track No. than the total number
of tracks on the disc cannot be selected.
When selecting a track number,
press numeric buttons at
intervals of less than 5 seconds.
Select the desired track
with the numeric buttons
of the remote control
unit.
• To select track No. 1 to 10, simply press
the corresponding button.
• To select track No. 11 or higher, press the
>10 button first.
(Example) To select track No. 26
• Press in order of (>10), (2) and (6).
CR300
<PRB1291-A>
35
Page 36

PLAYBACK
FADER
REPEAT
TRACK NO.
WREITE
REC
Each of the and
buttons of the main unit provides
two functions, as a track search
button and manual search button.
• During programmed playback, only the
current track being played can be
searched in the forward or reverse
direction. When the current track has
been searched in the forward direction
until the end, the unit enters pause
mode at the position immediately
before the next track; press the play
( ), pause ( ) or button to
release the pause mode. When the
current track has been searched in the
reverse direction until the beginning,
programmed playback restarts from the
position immediately before returning to
the previous track.
Searching an adjacent track (Track search)
A desired track can be searched by specifying it using the track search buttons.
Press the track search
button.
To search the
previous track
Tap lightly.
To search the
next track
• Pressing (or ) during playback or when playback is paused or stopped
skips the played position to the beginning of the next track. To skip to a track located
after the next track, press (or ) for the required number of times. When
programmed playback is activated, pressing (or ) skips to the next track
in the program.
• Pressing (or )skips the played position to the beginning of the current
track. To skip to a track located before the current track, press (or ) for
the required number of times. When programmed playback is activated, pressing
(or ) skips to the previous track in the program.
Searching the desired point (Manual search)
Press and hold the manual
search button.
• Pressing and holding (or ) during playback or when playback is paused
moves the played position in the forward direction at a high speed. When a disc has
been searched until the end, "END" is displayed and the unit enters the pause mode,
which can be released by pressing (or ).
• Pressing and holding (or ) moves the played position in the reverse
direction at a high speed. When a disc has been searched in the reverse direction
until the beginning, the unit enters play mode.
Backward
search
Press and hold.
Forward
search
36
CR300
<PRB1291-A>
Page 37

REC
TRACK NO.
WREITE
FADER
REPEAT
Playing tracks repeatedly (Repeat playback)
Press the REPEAT button of the remote control unit.
• Pressing once initiates 1-track repeat and the RPT-1 indicator lights. In
this mode, the track being played is played repeatedly. This is possible
in normal play, programmed play and random play modes.
• Pressing twice initiates all-track repeat and only the RPT indicator
lights. In this mode, all tracks are played repeatedly.
• In normal play mode, all tracks on the disc are played repeatedly (alltrack repeat).
• In programmed play mode, all tracks in the program are played
repeatedly in the order they are programmed.
Fade-in/fade-out during playback
• Fade time can be set using the MENU
button functions (See page 24).
• The SKIP indicator lights with tracks to
which the skip IDs have been set.
(Refer to page 29.)
• Auto Pause Mode can be set using the
MENU button functions (See page 24).
• When the FADER button is pressed during pause,
playback restarts with fade-in.
• When the FADER button is pressed during playback
,
fade-out starts and playback pauses after it.
Fade-in and fade-out are not applied to the digital outputs.
Checking the playing time of each track
(1-track time display)
When the button is pressed in stop
mode, each press displays the playing
time of each track in order of track numbers.
Pressing the button displays the
playing times in the reverse order.
Playback in Auto Pause Mode
• In the case that the AUTO PAUSE mode is turned on, every time the current
playback track advances to the next track, the CR300 is automaically put into
PAUSE mode at the beginning of next track
• In order to put the CR300 back to PLAY mode, the PAUSE or PLAY button should
be pressed.
As shown in the drawing below, when the AUTO PAUSE
mode is on, the letter “P” is displayed.
CR300
37
<PRB1291-A>
Page 38

PROGRAMMED PLAYBACK
OPEN/CLOSE
FADER
REPEAT
3
PGM CHECK CLEAR
Playing Tracks in the Desired Order
1
Press the PGM button of the remote
control unit.
REC
TRACK NO.
WREITE
123
456
789
10
10
TIME
The PGM indicator lights.
• Up to 24 tracks can be programmed.
• If the total playing time of the
programmed tracks is 100 minutes or
more, the total playing time is not
displayed.
Programming pause
If the pause ( ) button is pressed
during programming in stop mode,
a pause is programmed. (It cannot
be programmed as the first step of a
program.)
• Pause is also counted as a track.
Add programs
• Even during programmed
playback, tracks can be added to
the program by selecting them with
the numeric buttons.
Using the numeric
2
buttons, select the
tracks in the order
you want to play
them.
If the current mode is stop
mode, each track can also
be programmed by selecting its track number with
the or button and
pressing the PGM button.
Press the play ( )
3
button.
The tracks are played in the order
they are programmed.
Program reservation
Track No.
Total playing time
of program
38
CR300
If tracks are programmed by pressing the PGM button during normal playback, the
programmed tracks will be played from the beginning automatically when the playback
of the track now being played is completed.
Programmed playback can also be started from the beginning by just pressing the play
( ) button before the normal playback completes.
<PRB1291-A>
Page 39

• If the button is pressed during
programmed playback, the tracks after
the track being played can be cleared.
• This operation is available in stop mode
and after tracks have been
programmed. If the programmed tracks
are being played, stop playback before
proceeding to this operation.
Clearing the entire program
The program can be cleared with either A or B below.
Press the stop ( ) button to stop
A
programmed playback, then press
the stop button again.
Press 2 times.
B Press the OPEN/CLOSE button.
Clearing a track from the program
Press the CLEAR
button of the remote
control unit.
• Each press clears the newest
track in the program.
Checking the programmed tracks
Press the CHECK button
of the remote control
unit.
• Each press displays the track number programmed for each step of the program.
• When the button is pressed while the last step of the program is displayed, "00" is displayed.
Press again to display the first program step.
Program step No.
Programmed
track No.
• This operation is available in stop mode
and after tracks have been
programmed. If the programmed tracks
are being played, stop playback before
proceeding to this operation.
• The track number can also be selected
with the or button.
Replacing a track in the program
Press the CLEAR button of
1
the remote control unit the
required number of times
until the program step with
the track number to be
replaced is displayed.
Select the new track number
2
with the numeric buttons.
When track No. is changed to 4
3
Other tracks can also be replaced by repeating steps 1 and 2.
CR300
<PRB1291-A>
39
Page 40

SKIPPING UNDESIRED TRACKS (SKIP PLAYBACK)
SKIP PLAY
1
REC
TRACK NO.
WREITE
FADER
REPEAT
2
By setting skip IDs to the tracks which you do not want to play, these tracks can be
skipped when the disc is played. For setting skip IDs, refer to page 29,
Load a disc containing
1
the recording of skip ID
data.
• In case the disc contains skip ID data, the SKIP ON indicator lights automatically.
• In case the disc does not contain skip ID data, the SKIP ON indicator does not light.
Press the play ( )
2
button.
• The disc is played by skipping tracks to which skip IDs
have been set.
Lights.
• The SKIP PLAY button is not accepted
if the disc does not contain skip ID data.
• In case skip playback is not required
Discs containing tracks to which track skip IDs have been set can also be played
without skipping them. Just press the SKIP PLAY button to turn the SKIP ON
indicator off before playing the disc.
40
CR300
<PRB1291-A>
Page 41

CHARACTER MESSAGE LIST
Message
OPEN
CLOSE
“SET” “UP”
“TOC” “READ”
1-SYNC
AL-SYNC
“CAN NOT” “SYNC”
MONI
“INPUT” “CD”
(MD, DAT, DCC)
“PMA REC”
Description
The tray is being opened.
The tray is being closed.
The unit is performing initial setup for recording. Please wait a while.
The unit is reading the TOC of the disc. Please wait a while.
The unit is standing by for 1-track automatic digital recording. The recording
will start in synchronism with the start of the player.
The unit is standing by for all-track automatic digital recording. The recording
will start in synchronism with the start of the player.
This display will appear when the DIGITAL SYNCHRO button is pressed if the
INPUT selector is set for an analog source, or even in digital mode, if the
source selected is other than a CD, Mini Disc, DAT, or DCC (S/P DIF only).
The unit is monitoring the input selected with the input selector.
The unit displays the source it is monitoring (for CD, MD, DAT, and DCC).
(S/P DIF only)
Temporary TOC data is being recorded in the disc's PMA (Program Memory
Area).
Never turn off the power while this display is showing.
Ref. Page
page 15
page 15
page 18
page 19
page 18,
page 19,
page 20
page 16
page 16
page 17,
page 18, page 19,
page 21, page 22
“TRACK ?”
“SKIP” “SET?”
“SKIP” “CLEAR?”
“LAST” “TRACK”
“ERASE?”
“TOC”
“ERASE?”
“ALL” “TRACK”
“ERASE?”
“ALL” “DISC”
“ERASE?”
In addition to above, other character messages are also displayed as the unit detects troubles during use.
For other character messages than above, refer to “Self-diagnostics” on page 42.
The current operation is the track programming operation.
Select a track with the numeric buttons or or button.
The current operation is the track skip setting operation.
If you want to skip a track, select it with the SKIP ID SET button.
The current operation is the track skip clear operation.
If you want to clear the skip designation of a track, select it with the SKIP ID
CLEAR button.
Erases the last track.
If you want to erase the last track, press the pause ( ) button.
Erases the TOC (initializing it).
If you want to erase the TOC, press the pause ( ) button .
Erases all tracks.
If you want to erase the all tracks, press the pause ( ) button .
Erases the entire disc (initializing it).
If you want to erase the disc, press the pause ( ) button.
page 38
page 29
page 30
page 33
page 33
page 34
page 34
CR300
41
<PRB1291-A>
Page 42

TROUBLESHOOTING
In case of trouble, first check the following list. What seems to be a failure of the unit is sometimes due to imperfect maintenance,
defective disc or unaccustomed operation. Such troubles are often recovered by correcting simple mistake or misunderstanding
or by simple maintenance operation. If your trouble cannot be recovered after checking the following list, please call you nearest
FOSTEX service center or station.
Self-diagnostics
This unit incorporates a self-diagnostic function.
When it detects trouble during an operation, it displays one of the following messages on the display panel.
Display
Alternate display of
"CHECK" and "DISC"
Display blinks
"CHECK"
The disc is stopped due to dirt, stain,
scratch or vibration.
The disc may be loaded upside down.
A system error occurred perhaps due to
noise or static electricity.
Cause
Information messages related to recording operation
CauseDisplay
Alternate display of
"CAN NOT" and
"REC".
Cyclic display of
"CHECK", "INPUT"
and "CD ?".
Alternate display of
"SET" and "UP".
"REPAIR"
"REC FULL"
The digital input is interrupted.
The data (CD-ROM, etc.) provided
cannot be recorded.
The source player was already playing
when the DIGITAL SYNCHRO button
was pressed.
The unit is making preparations for
recording.
Because the disc was left in the unit after
recording and the power plug was
unplugged later, the track number and
recording time data have been cleared
without being recorded on the disc.
No more recording is possible because
the available recording time of the disc
has been used fully or 99 tracks have
already been recorded on the disc.
Treatment Ref. Page
Take out the disc and check for dirt, dust, scratch, etc.
Take out and check the disc.
If the same messages are displayed again after the disc is
reloaded, unplug the power cord and plug it in again.
If the same messages are displayed again, please contact a
FOSTEX authorized service center.
Unplug the power cord and plug it in again.
If the same messages are displayed again, please contact a
FOSTEX authorized service center.
Treatment
Check if the digital input cable is not disconnected and if the
power of the source player is on.
Check whether the source is a regular music source.
Stop playing the source player.
In a while, "1-SYNC" or "AL-SYNC" is displayed, and the unit
is set to the synchro recording standby mode.
Wait until these messages disappear.
While "REPAIR" is displayed, the track number and
recording time data are repaired by tracking the recorded
area. Further recording or finalization is possible whenever
the display returns to the previous condition.
Tracing of the recorded area takes about 40 minutes if the
disc has been recorded fully.
Replace the disc with a new one.
Erase a CD-RW disc.
Page 9
page 15
Ref. Page
Page 10
page 17
page 18
page 19
page 20
page 16
page 32
Information messages related to playback operation
CauseDisplay
“NEW DISC”
“NO DISC”
“RESUME”
A blank disc is loaded.
An attempt is made to play a blank disc.
An attempt is made to start playback
without loading a disc.
The unit is resuming an operation.
After the power supply is cut off by a
power failure or by mistake during
recording, the unit enters RESUME
mode so that additional recording is
possible.
42
CR300
<PRB1291-A>
Treatment
The loaded disc is a blank CD-R or CD-RW disc. Recording
is possible but playback is not.
Open the tray and check if a disc is loaded.
Wait until the message disappears.
Ref. Page
page 8
page 15
page 15
page 17
page 31
Page 43

TROUBLESHOOTING
Symptom
Power cannot be turned on.
Playback is impossible.
Recording is impossible.
Recorded sound is distorted.
Cause
The power cord is unplugged from the power outlet.
The power was turned off from the component
(stereo amplifier, audio time, etc.) to which it is
connected.
Signal connections are incorrect.
Signal connections are incorrect.
The CD-R or CD-RW disc in use has been
finalized.
The input selection is incorrect.
The REC LEVEL control is set too low.
Signal connections are incorrect.
There is interference from a TV set.
Remedy
Plug the power cord into a power outlet.
Turn on the component into which the power
cord is connected.
Connect properly as indicated in
"CONNECTIONS".
Connect properly as indicated in
"CONNOTATIONS".
Use a non-finalized disc.
Erase a CD-RW disc.
Select the input connected to the desired
source.
Increase the recording level to an optimum level.
Connect properly as indicated in
"CONNECTIONS".
Turn the TV power off or install this unit apart
from the TV.
Remote control operation
is impossible.
Certain tracks are skipped
without being played.
Skip playback does not occur.
A recorded CD-R disc
cannot be played on other
CD players.
The disc is damaged or warped.
The recording level is set too high.
The disc is extremely dirty.
The remote control batteries are exhausted.
There is an obstacle between the remote
control unit and main unit.
The remote control unit is operated outside the
remote controllable range.
The SKIP PLAY button is set to ON.
The SKIP PLAY button is set to OFF.
• The disc has not been finalized after
recording.
• When such a disc is loaded in the unit, the
CD-R indicator lights up. (Refer to page 8.)
Use another disc.
Decrease the recording level.
Clean the disc.
Replace both of the remote control batteries
with new ones.
Remove the obstacle.
Operate in the remote controllable range.
Set the SKIP PLAY button to OFF.
Set the SKIP PLAY button to ON.
Finalize the disc. (Refer to page 31)
CR300
43
<PRB1291-A>
Page 44

INDEX
Term
CD-R disc:
CD-RW disc:
Consumer disc:
Digital synchro recording
(automatic digital recording):
Disc damage:
Disc identification:
Fader:
Finalization:
Label side:
PMA:
Recording permitted/
inhibited:
Function
Compact Disc - Recordable.
Compact Disc - Rewritable.
CD-R or CD-RW disc designed for recording music for personal entertainment use.
Function which starts/stops recording automatically by detecting the play/stop
modes of a digital component.
Phenomenon with which recording and playback of disc become impossible
due to physical shock or power failure during recording.
Operation of checking whether the loaded disc is a CD, CD-R or CD-RW.
Function for recording or playing sound by smoothly varying the volume.
Operation for making a recorded CD-R disc playable on ordinary CD players.
The disc side on which letters, etc., are printed.
Program Memory Area. The area used for temporary storage of TOC data
until finalization of a CD-R or CD-RW.
Statuses set with the SCMS, in which digital recording is enabled/disabled
respectively.
Ref. page
p. 8, 16
p. 8, 16
p. 8, 16
p.18, 19, 20
p. 42
p. 15
p. 27, 37
p. 31
p. 15
p. 17, 18, 19
21, 22
p. 8, 16
Remaining recording time:
RESUME:
Skip:
Skip ID:
Skip ON/OFF:
TOC:
Total recording time:
Track number updating:
Write-once:
Time of the disc’s non-recorded section where recording is possible.
Operation initiated in case of trouble in recording, consisting of recovery of the
disc to enable next recording.
Refer to “Skipping undesired tracks”.
Identification which sets or cancels skipping of undesired track before disc
finalization.
Switching on/off of the function to skip undesired tracks to which skip IDs have
been set.
Table Of Contents of a disc which allows it to be played on ordinary CD players.
Time of the disc’s section which has already been recorded onto.
Function which, either automatically or manually, update the track number of
the track being recorded by one.
A CD-R disc can be recorded only once and the recording cannot be erased.
Recording always starts from the end of previous recording.
p. 13, 31
p. 17, 31, 42
p. 29, 40
p. 29, 40
p. 38
p. 31
p. 13, 31
p. 23, 26
p.16
44
CR300
<PRB1291-A>
Page 45

SPECIFICATIONS
1. GENERAL
Model Compact disc recorder
Applicable discs .................................................................................................... CDs, CD-Rs and CD-RWs
Power supply ....................................................................................................................... AC 120 V, 60 Hz
............................................................................................................................ AC 230 V, 50/60 Hz
Power consumption ................................................................................................................................24 W
Weight (without package) ..................................................................................................................... 7.0 kg
Max. dimensions.......................................................................................... 482 (W) x 105 (H) x 393 (D) mm
2. AUDIO UNIT (typical)
Frequency characteristics........................................................................................................4 Hz to 20 kHz
Playback S/N ............................................................................................................................110 dB (EIAJ)
Playback dynamic range.............................................................................................................98 dB (EIAJ)
Playback total harmonic distortion ........................................................................................ 0.0027 % (EIAJ)
Recording S/N ............................................................................................... 90 dB (analog), 105dB (digital)
Recording dynamic range................................................................................ 90 dB (analog), 95dB (digital)
Recording total harmonic distortion .....................................................................................0.005 % (analog)
.................................................................................................................................. 0.003 % (digital)
3. INPUT JACKS
Analog Input
XLR-3-31 type (pin 2 = Hot) x2
Standard input level ...........................................................................................+4dBu / -10dBV (switchable)
Input impedance ....................................................................................................................................10kΩ
RCA type x2
Standard input level ............................................................................................................................ -10dBV
Input impedance ....................................................................................................................................27kΩ
Digital Input
XLR-3-31 type (pin 2 = Hot)........................................................................................ IEC 60958 (AES/EBU)
RCA type ....................................................................................................................... IEC 60958 (S/P DIF)
OPTICAL type................................................................................................................ IEC 60958 (S/P DIF)
Parallel Remote Input
Connector ......................................................................................................................................... DIN 8pin
4. OUTPUT JACKS
Analog Output
XLR-3-32 type (pin 2 = Hot) x2
Standard output level.........................................................................................+4dBu / -10dBV (switchable)
Load impedance ................................................................................................................ Higher than 600Ω
RCA type (x2)
Standard output level.......................................................................................................................... -10dBV
Load impedance ................................................................................................................ Higher than 10kΩ
Digital Output
RCA type ....................................................................................................................... IEC 60958 (S/P DIF)
OPTICAL type................................................................................................................ IEC 60958 (S/P DIF)
5. ACCESSORIES
• Remote control unit (Model 8317) .............................................................................................................. 1
• Size AAA/R03 dry cell batteries ................................................................................................................. 2
• Audio cable................................................................................................................................................. 2
• AC power cord............................................................................................................................................ 1
• Owner's Manual.......................................................................................................................................... 1
NOTE:
The specifications and design of this product are subject to change without notice, due to improvements.
CR300
45
<PRB1291-A>
Page 46

Declaration of EC Directive
This equipment is compatible with the EMC Directive (89/336/EEC) - Directive on approximation of member nation's
ordinance concerning the electromagnetic compatibility and with the Low Voltage Directive (73/23/EEC) - Directive on
approximation of member nation's ordinance concerning electric equipment designed to be used within the specified
voltage range.
The Affect of Immunity on This Equipment
The affect of the European Specification EN61000-6-1 (coexistence of electromagnetic waves - common immunity
specification) on this equipment are as shown below.
In the electrical fast transient/burst requirements, and static electricity discharging environment, this could be affected by
generation of noise in some cases.
FOSTEX DISTRIBUTORS LIST IN EUROPE
• Including non-EU countries.
• underlined: contracted distributors (as of October, 2003)
<AUSTRIA>
NAME: ATEC Audio-u. Videogeraete VertriebsgesmbH.
ADD: Im Winkel 5, A-2325 Velm, Austria
TEL: (+43) 2234-74004, FAX: (+43) 2234-74074
<BELGIUM>
NAME: General Audio
ADD: Albert Temmerstraat 21, 1731 Zellik, Belgium
TEL: (+32) 2-4630650, FAX: (+32) 2-4661500
<DENMARK>
NAME: SC Sound ApS
ADD: Malervej 2, DK-2630 Taastrup, Denmark
TEL: (+45) 4399-8877, FAX: (+45) 4399-8077
<FINLAND>
NAME: Noretron Oy Audio
ADD: P. O. Box-22, FIN-02631 Espoo, Finland
TEL: (+358) 9-5259330, FAX: (+358) 9-52593352
<FRANCE>
NAME: Sennheiser France
ADD: 128 bis, avenue Jean-Jaures, 94851 Ivry-sur-Seine Cedex,
France
TEL: (+33) 1 4987 0300, FAX: (+33) 1 4987 0324
<GERMANY>
NAME: Mega Audio GmbH
ADD: Stromberger Str. 32, D-55411 Bingen, Germany
TEL: (+49) 6721-94330, FAX: (+49) 6721-32046
<GREECE>
NAME: Bon Studio S. A.
ADD: 6 Zaimi Street, Exarchia, 106.83 Athens, Greece
TEL: (+30) 210-3809-605, 606, 607, 608
FAX: (+30) 210-3845-755, 210-3827-868
<ICELAND>
NAME: I. D. elrf, electronic Ltd.
ADD: ARMULA 38 108 REYKJAVIK ICELAND
TEL: (+354) 588 5010, FAX: (+354) 588 5011
<ITALY>
NAME: Proel S. p. A.
ADD: Zona Via Alla Ruenia, 37/43 64027 - Sant'Omero (Teramo)
Italy
TEL: (+39) 0861-81241, FAX: (+39) 0861-887862
<THE NETHERLANDS>
NAME: IEMKE ROOS AUDIO B. V.
ADD: Kuiperbergweg 20, 1101 AG Amsterdam, The Netherlands
TEL: (+31) 20-697-2121, FAX: (+31) 20-697-4201
<NORWAY>
NAME: Fitzpatrick
ADD: P. B. 4316 Nydalen, 0402 Oslo, Norway
TEL: (+47) 23 400 380, FAX: (+47) 23 400 389
<PORTUGAL>
NAME: Caius - Tecnologias Audio e Musica, Lda.
ADD: Praca do Bom Sucesso, No 61 Bom Sucesso Trade Center,
Escritorio 701/702, 4150-146 Porto, Portugal
TEL: (+351) 22-608-06-10, FAX: (+351) 22-608-06-29
<SPAIN>
NAME: Letusa S. A.
ADD: C/Laguna 10, 28923 Alcorcon, Madrid, Spain
TEL: (+34) 91-4862800, FAX: (+34) 91-6414597
<SWEDEN>
NAME: TTS Scandinavia AB
ADD: Kavallerivagen 24, 172 48 Sundbyberg, Sweden
TEL: (+46) 8-59798000, FAX: (+46) 8-59798001
<SWITZERLAND>
NAME: Audio Bauer Pro AG
ADD: Bernerstrasse-Nord 182, CH-8064 Zurich, Switzerland
TEL: (+41) 1-4323230, FAX: (+41) 1-4326558
<UK>
NAME: SCV London
ADD: 40 Chigwell Lane, Oakwood Hill Industrial Estate, Loughton,
Essex IG10 3NY U. K.
TEL: (+44) 20-8418-0778, FAX: (+44) 20-8418-0624
Page 47

Page 48

FOSTEX CO.
3-2-35 Musashino, Akishima-shi, Tokyo 196-
0021,
Japan
FOSTEX AMERICA
15431, Blackburn Ave., Norwalk, CA 90650, U. S. A.
CR300 <PRB1291-A>
© PRINTED IN JAPAN FEB. 2004 8288 437 000 FX.
 Loading...