

Page 1
Guida rapida di utilizzo
Hoja de Características
Guia Ràpido de Utilização
Quick Start Guide
Mode d’emploi rapide
Gebrauchsanleitung
Gebruiksaanwijzing
Краткое руководство по эксплуатации
FL-F90 MTL
Page 2
18
FL-F90 MTL
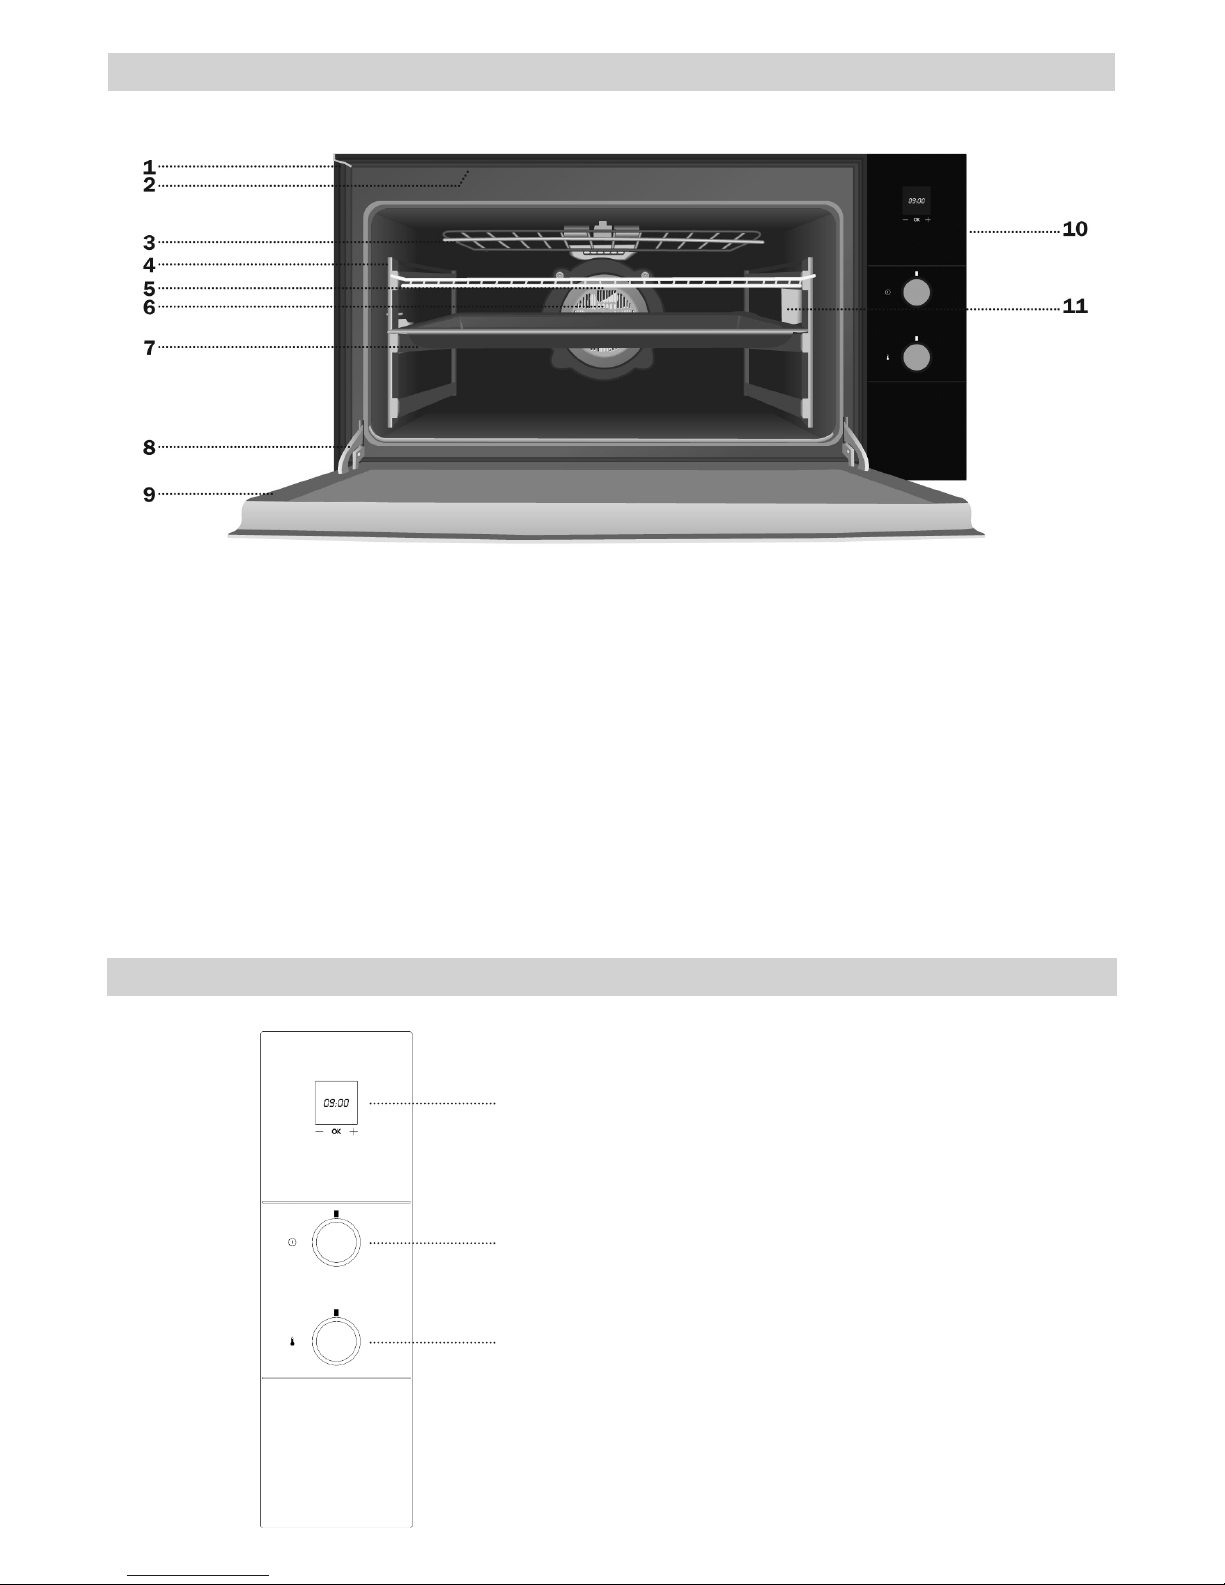
1 Fixing to Unit
2 Air Outlet
3 Fold-down Grill element
4 Chromed Support/
Telescopic Guide
5 Grid
6 Fan
7 Roasting Tray
8 Hinge
9
Door
10 Control Panel
11 Light
For other markets, accessories may not correspond to those described in this manual.
Control Panel
1 Electronic clock.
2 Function selector.
3 Temperature selector.
2
1
3
Page 3
19
ENGLISH
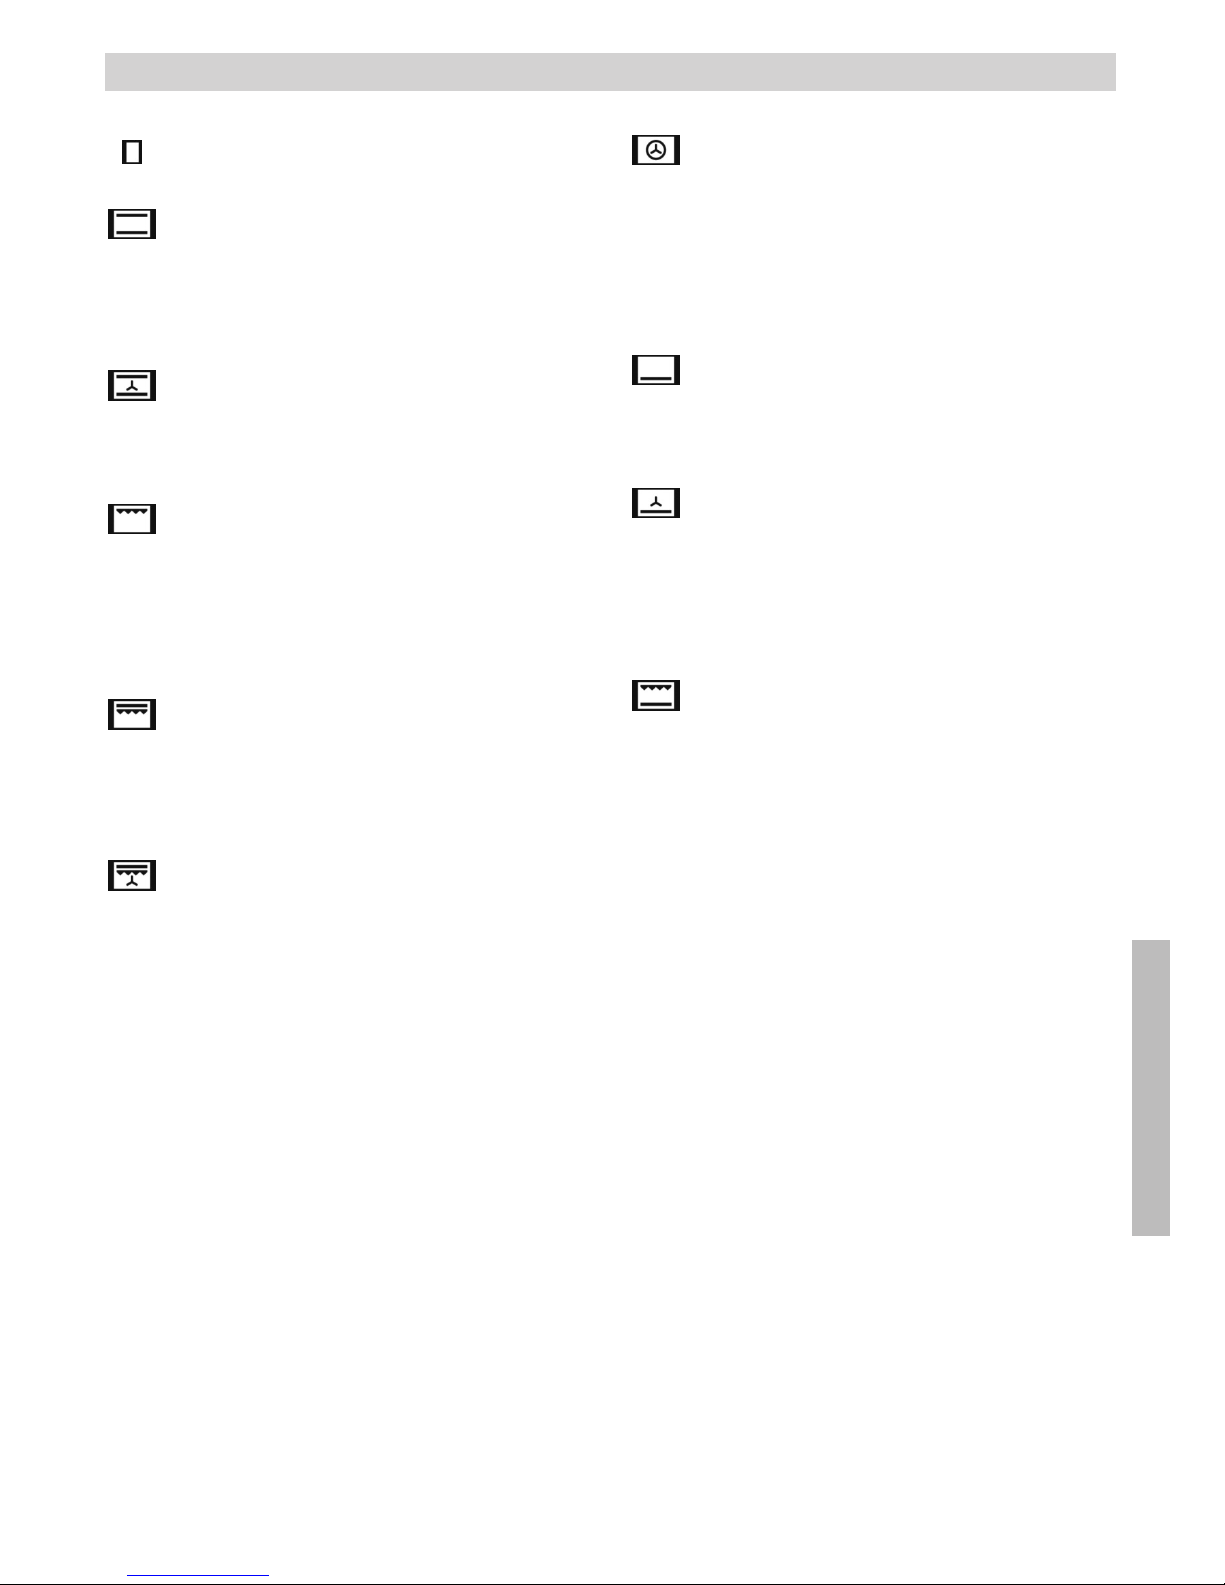
Switch off oven
Conventional
It is used for sponges and cakes where the
heat received must be uniform to achieve a
spongy texture.
Conventional with fan
Appropriate for roasts and cakes. The fan
spreads the heat uniformly inside the oven.
Grill
For preparing dishes with superficial roasting.
It allows the outer layer to be browned without
affecting the inside of the food. Ideal for flat
food, such as steaks, ribs, fish, toast.
MaxiGrill
Allows greater surfaces to be prepared, than
with the grill, together with higher power reducing the time required for browning of the food.
MaxiGrill with fan
Allows uniform roasting at the same time as
surface browning. Ideal for grills. Special for
large volume pieces, such as poultry, game,
etc. It is recommended to put the item on a
rack with a tray beneath to collect the stock
and juices.
Caution
While using the Grill, MaxiGrill or MaxiGrill with
fan, the door must be kept closed.
Turbo
The fan distributes the heat coming from an
element located at the back of the oven. As a
result of the evenly distributed temperature,
food can be cooked on two levels at the same
time.
Lower element
Heats only from beneath. Suitable for heating
dishes and raising pastry and similar.
Lower element with fan
It distributes the heat from the lower part of
the oven and is ideal for cakes with jam or fruit
filling, which only require heating from
beneath. Pre-heating is always necessary.
Grill and Lower element
Special for roasts. It can be used for any piece,
whatever its size.
Note
The pilot light remains on in any cooking
function.
Oven Functions
Page 4

20
Caution
The electronic clock features Touch-Control
technology. To operate, simply touch the glass
control symbols with your fingertip.
The touch control sensitivity continuously
adapts to ambient conditions. Make sure the
glass surface of the control panel is clean and
free of obstacles when plugging in the oven.
If the clock does not respond correctly when
you touch the glass, unplug the oven for a few
seconds and then plug it in again. Doing this
causes the sensors to adjust automatically so
that they will react once more to fingertip control.
Setting the time on the Electronic Clock
When the oven is connected to the power supply, the indication 00:00 flash on the display.
Press – or + to set the time on the clock. The
clock beeps twice to confirm the selected
time.
If you wish to modify the time, press – or +
until the current time flash on the screen.
Press OK. Then press – or + to modify the
time. The clock beeps twice to confirm the
modification.
Manual Operation
The oven is ready to be used when the clock
has been set. Select a cooking function and a
temperature.
When you begin cooking, symbol lights up
to indicate that the oven is heating the contents; the symbol goes out when the
selected temperature is reached.
Set the controls to to turn the oven off.
Functions of the Electronic Clock
Alarm: Creates an alarm signal when the peri-
od of time finishes; the oven does not need to
be in use in order to use this function.
Cooking Time: To cook for a selected length of
time; the oven turns itself off automatically
when the time finishes.
End Cooking Time: To cook until a set time;
the oven turns itself off automatically when
the time finishes.
Cooking time and End Cooking Time: To cook
for a selected length of time and end at a set
time. When this function is set, the oven
comes on automatically at the time required
in order to cook for the set length of time
(Cooking time) and end automatically at the
indicated time (End Cooking Time)
Programming the Alarm
1 Press + until symbol lights up. Press OK.
2 Set the period of time after which you wish
the alarm to sound by pressing – or +.
3 The clock beeps twice, the current time is
displayed and symbol lights up permanently to indicate that the alarm has been
set.
4 When the set period of time comes to an
end, the alarm sounds and symbol starts
to flash.
5 Press any button to stop the alarm; symbol
goes out.
You can consult the remaining time at any
moment by pressing – or + until symbol
flashes and then pressing OK. You can also
modify the set time at this point by pressing –
or +. The clock beeps twice to confirm the
change.
If you wish the remaining time to be displayed
until the end of the set period of time, press –
or + until symbol flashes and then press OK
and keep it pressed in. Symbol flashes.
Keep OK pressed in again to return to the real
time.
Using the Oven
Page 5

21
ENGLISH
Setting the Cooking Time
1 Press – or + until symbol lights up.
Press OK.
2 Select the period of time you wish to cook
for by pressing – or +.
3 The clock beeps twice, the current time is
displayed and symbol lights up permanently to indicate that the oven will turn
itself off automatically.
4 Select a cooking function and temperature.
5 When the cooking time comes to an end,
the oven turns itself off, the alarm sounds
and symbol flashes.
6 Press any button to stop the alarm and turn
the oven back on again.
7 Set the controls to to turn the oven off.
You can consult the remaining cooking time at
any moment by pressing – or + until symbol
flashes and then pressing OK. You can
also modify the set time at this point by pressing – or +. The clock beeps twice to confirm
the change.
If you wish the remaining time to be displayed
until the end of the set period of time, press
– or + until symbol flashes and then press
OK and keep it pressed in. Symbol flashes.
Keep OK pressed in again to return to the real
time.
Setting the End Cooking Time
1 Press – or + until symbol lights up.
Press OK.
2 Select the time you wish the cooking
process to finish at by pressing – or +.
3 The clock beeps twice, the current time is
displayed and symbol lights up permanently to indicate that the oven will turn
itself off automatically.
4 Select a cooking function and temperature.
5 When the set time is reached, the oven
turns itself off, the alarm sounds and symbol flashes.
6 Press any button to stop the alarm and turn
the oven back on again.
7 Set the controls to to turn the oven off.
You can consult the end cooking time at any
moment by pressing – or + until symbol
flashes and then pressing OK. You can also
modify the end cooking time at this point by
pressing – or +. The clock beeps twice to confirm the change.
This function can be used even when you are
already using the oven. To do this, follow the
instructions indicated above except point
number 4.
Setting the Cooking Time and the End
Cooking Time
1 Press – or + until symbol lights up.
Press OK.
2 Select the period of time you wish to cook
for by pressing – or +.
3 The clock beeps twice, the current time is
displayed and symbol lights up permanently.
4 Press – or + until symbol lights up.
Press OK.
5 Select the time you wish the cooking
process to finish at by pressing – or +.
6 The clock beeps twice, the current time is
displayed and symbol lights up permanently.
7 Select a cooking function and tempera-
ture.
8 The oven remains off with symbols and
lit up. Your oven is set.
9 When the time to start cooking is reached,
the oven starts up and cooks for the set
period of time.
Page 6

22
10 When the set end cooking time is reached,
the oven turns itself off, the alarm sounds
and symbols and flash.
11 Press any button to stop the alarm and
turn the oven back on again.
12 Set the controls to to turn the oven off.
You can modify the end cooking time by pressing – or + until symbol lights up and then
pressing OK. You can now modify the end
cooking time by pressing – or +. The clock
beeps twice to confirm the change.
Important
In the event of a power cut, all the electronic
clock settings are deleted and the indication
00:00 flashes on the display. It is necessary to
set the time and programme the clock again.
Page 7

Classe di efficienza energetica (dove A è
la classe di
maggiore efficienza e G di
minore efficienza).
Funzione di
riscaldamento.
Riscaldamento
standard.
Convezione
forzata.
Consumo
di energia.
Riscaldamento
standard.
Convezione
forzata.
Volume netto
(litri).
Tipo:
Piccolo
Medio
Grande
Tempo di cottura a carico normale.
Riscaldamento
standard.
Convezione
forzata.
Superficie di
cottura.
Rumore (dB (A)
re 1 pW).
Clase de
eficiencia
energética,
en una escala
que abarca
de A (más
eficiente)
a G (menos
eficiente).
Función de
calentamiento.
Calentamiento
convencional.
Convección
forzada.
Consumo
de energía.
Calentamiento
convencional.
Convección
forzada.
Volumen neto
(litros).
Tipo:
Pequeño
Medio
Grande
Tiempo de
cocción con
carga normal.
Calentamiento
convencional.
Convección
forzada.
Superficie de
cocción.
Ruido (dB (A)
re 1 pW).
Classe de
eficiência energética, numa
escala de A
(eficiente) a
G (ineficiente).
Função de
aquecimento.
Aquec i m e n to
convencional.
Convecção
forçada.
Consumo
de energia.
Aquec i m e n to
convencional.
Convecção
forçada.
Volume útil
(litros).
Tipo:
Pequeno
Médio
Grande
Tempo de
confecção com
carga normal.
Aquecimento
convencional.
Convecção
forçada.
Superfície de
confecção.
Ruído (dB (A)
re 1 pW).
Energy
efficiency
class on a
scale from A
(most efficient)
to G (least
efficient).
Heating setting
Conventional
heating.
Forced
convection.
Energy
consumption.
Conventional
heating.
Forced
convection.
Net volume
(litres).
Type:
Small
Medium
Large
Cooking time
with normal
load.
Conventional
heating.
Forced
convection.
Cooking
surface
Noise (dB (A)
re 1 pW).
Classe
d’efficience
énergétique,
sur une échelle de A (plus
efficient)
à G (le moins
efficient).
Fonction de
chauffage.
Chauffage
traditionnel.
Convection
forcée.
Consommation
d´énergie.
Chauffage
traditionnel.
Convection
forcée.
Volume net
(litres).
Type:
Petit
Moyen
Grand
Temps de cuisson à charge
normale.
Chauffage
traditionnel.
Convection
forcée.
Surface de
cuisson.
Niveau sonore
(dB (A) re1 pW).
SCHEDA / FICHA / FICHA / FILE / FICHE
Produttore Fabricante Fabricante Manufacturer Fabricant FOSTER
Modello Modelo Modelo Model Modèle
FL-F90 MTL
Desideriamo anche noi dare il nostro contributo all'ambiente; per questo la carta che utilizziamo è riciclata.
Nuestra aportación a la protección del medio-ambiente: utilizamos papel reciclado.
O nosso contributo para a protecção do meio ambiente: utilizamos papel reciclado.
Our contribution to protecting the environment - we use recycled paper.
Notre contribution à la protection de l’environnement : nous utilisons du papier recyclé.
.
Cod.: 83172783/3172783-000
A
1,12
kWh
0,99
kWh
78
44 min.
45 min.
1300 cm
2
Page 8

Energieeffizienzklasse
auf einer
Skala von
A (geringer
Verbrauch) bis
G (hoher
Verbrauch).
Beheizung.
Konventionelle
Beheizung.
Heißluft
Energieverbrauch.
Konventionelle
Beheizung.
Heißluft.
Nettovolumen
(Liter).
Typ:
Klein
Mittel
Groß
Garzeit bei
Standardbeladung.
Konventionelle
Beheizung.
Heißluft.
Backfläche.
Geräusch (dB(A)
re1 pW).
Klasse van
energie-efficiëntie, op een
schaal van A
(meest efficiënt) tot G
(minst efficiënt).
Verwarmingsfunctie.
Conventionele
verwarming.
Geforceerde
convectie.
Energieverbruik.
Conventionele
verwarming.
Geforceerde
convectie.
Nettovolume
(liter).
Type:
Klein
Middelgroot
Groot
Baktijd bij
normale
belasting.
Conventionele
verwarming.
Geforceerde
convectie.
Bakoppervlak.
Geluid (db (A)
re 1 pW).
Категория
энергетической
эффективности,
по шкале от A
(наиболее
эффективный)
до G
(наименее
эффективный).
Функция
нагрева.
Обычный
нагрев.
Форсированная
конвекция.
Расход
электроэнергии.
Обычный
нагрев.
Форсированная
конвекция.
Объем нетто
(литры).
Тип:
Маленький
Средний
Большой
Время
приготовления
при нормальной
загрузке.
Обычный
нагрев.
Форсированная
конвекция.
Поверхность
готовки.
Шум (dB (A)
re 1 pW).
A
1,12
kWh
0,99
kWh
78
44 min.
45 min.
1300 cm
2
DATENBLATT / GEGEVENS / ТЕХНИЧЕСКИЕ ДАННЫЕ /
Hersteller Fabrikant
Производитель
FOSTER
Modell Model Модель
FL-F90 MTL
Unser Beitrag zum Umweltschutz: Wir verwenden wiederverwertetes Papier.
Onze bijdrage aan de bescherming van het milieu: wij gebruiken kringlooppapier.
Наш вклад в защиту окружающей среды: используем только переработанную бумагу.
Cod.: 83172783/3172783-000
 Loading...