

Page 1
User Manual
Model: FN7118E-B4
Version: V1.0
Page 2

NVR User Manual
I
Table of Contents
Table of Contents...............................................................................................................................................I
Security Warning.............................................................................................................................................III
Preface..............................................................................................................................................................IV
Important Safety Instructions......................................................................................................................... V
1 Overview......................................................................................................................................................... 1
1.1 Product Introduction...........................................................................................................................1
1.2 Key Features.......................................................................................................................................1
1.3 Relevant Version................................................................................................................................ 3
1.4 Icons Description................................................................................................................................3
1.5 Common Operations..........................................................................................................................4
1.6 USB Mouse Operation...................................................................................................................... 5
2 GUI...................................................................................................................................................................6
2.1 Login.....................................................................................................................................................6
2.2 Setup Wizard.......................................................................................................................................6
2.3 Shortcut Menu.....................................................................................................................................6
2.4 Menu.....................................................................................................................................................9
2.4.1 Adding Devices......................................................................................................................10
2.4.2 Playback.................................................................................................................................12
2.4.3 Schedule.................................................................................................................................15
2.4.4 Device Information................................................................................................................16
2.4.5 Settings...................................................................................................................................19
2.4.6 System....................................................................................................................................32
3 Web................................................................................................................................................................36
3.1 Instructions before Login.................................................................................................................36
3.2 Login...................................................................................................................................................36
3.3 Live Video.......................................................................................................................................... 38
3.4 Parameter Configuration.................................................................................................................42
www.foscam.com
Page 3

NVR User Manual
II
3.4.1 IP Camera Setup.................................................................................................................. 42
3.4.2 Schedule Record.................................................................................................................. 43
3.4.3 Alarm.......................................................................................................................................44
3.4.4 Device Information................................................................................................................48
3.4.5 Basic Settings........................................................................................................................50
3.4.6 System Management........................................................................................................... 60
3.5 Playback............................................................................................................................................ 64
4 Appendix....................................................................................................................................................... 67
4.1 HDD Capacity Calculation..............................................................................................................67
4.2 Common Operations........................................................................................................................68
4.3 Specifications....................................................................................................................................73
4.4 FAQ.....................................................................................................................................................76
4.5 Glossary.............................................................................................................................................79
4.6 CE & FCC..........................................................................................................................................80
4.7 WARRANTY......................................................................................................................................81
4.8 Statement.......................................................................................................................................... 85
4.9 Obtaining Technical Support.......................................................................................................... 86
www.foscam.com
Page 4

NVR User Manual
III
Security Warning
Please change the password of your Foscam NVR App account, and NVR and cameras username
regularly. The password should contain a combination of numbers, letters and special characters.
Please keep the username and password of your cameras, NVR and Foscam NVR App account
safe.
Please update your camera to the latest firmware regularly for an optimal user experience.
www.foscam.com
Page 5

NVR User Manual
IV
Preface
Welcome to use our product, Network Video Recorder (NVR) Kit. This document mainly focuses on the
installation and configuration of NVR Kit application system. With high performance video, user-friendly
GUI, and practical industrial designs. This series NVR Kit is suitable for civil applications such as homes,
stores, internet cafes, and small businesses in addition to mainstream security and surveillance
applications.
Default Settings
NVR / Camera: Default administrator&password is admin&(blank).
Declaration
The feature of product on this manual is just for reference. Please prevail in physical product.
The manual provides multiple product models for reference. The specific operations are not listed
one by one. Please follow the operations depending on the actual product.
Because the actual environment may be discrepant, the actual values of some data may be different
from the values provided in the manual. If there are any question or dispute, the final interpretation of
prevails.
If you do not follow the manual during operation, you will bear any loss caused thereof.
www.foscam.com
Page 6

NVR User Manual
V
Important Safety Instructions
This chapter describes how to use the product properly so as to prevent danger and property loss. Be
sure to follow the security instructions when operating this product.
Installation Environment
Ensure device is installed in the well-ventilated, dust-free environment.
It is recommended to use a voltage stabilizer for supply of power. If the power supply was unmatched,
the device might work abnormally or stop working.
Check that the voltage of the extra power supply is the same with the NVR's requirement, and the
ground connection is working properly.
The distance between the NVR and other device or wall should be more than 6cm away to facilitate
heat dissipation.
Precautions
Please keep the device horizontally and avoid inclination or inversion.
Don't touch the power switch with wet hand or damp items to avoid shock.
Do not splash liquid or metal filing on the NVR To avoid short-circuit fault or blaze.
The NVR does not contain any storage device. Please install a hard disk or connect to storage
device firstly. Otherwise, you cannot perform operations such as recording and playback.
Please press power button to shut down the NVR instead cutting off the power directly to avoid to
damaged the storage device.
Do not take the device apart when it is operating (or connecting to power).
www.foscam.com
Page 7

NVR User Manual
1
1 Overview
1.1 Product Introduction
The series of product is a NVR Kit. This advanced product series receives a high quality video
stream that is transmitted digitally by the IP Camera (IPC). The product can perform live video
preview, recording, playback, remote access, and backup simultaneously.
1.2 Key Features
Network Monitoring
You can access the NVR system remotely through the browser on a PC or access the NVR system
locally by using the display or monitor.
Multi-screen Preview
Multi-screen preview indicates that several pages are displayed on the screen of the monitor based
on the same scale.
Recording
The NVR supports recording and storing video files on a Hard Disk Drive(HDD). Stored videos files
can be queried or played back through Web or local GUI.
Recording can be classified into schedule recording, manual recording, and alarm recording from
low priority to high priority. If recording of any two types is enabled at the same time, only the
recording of a higher priority takes effect.
Schedule Recording
You can select the scheduled time segment to enable or disable recording.
Manual Recording
You can manual enable recording in the corresponding channel.
Motion Detection Recording
After the motion detection function is enabled and recording is selected, motion detection recording
is enabled when motion detection is triggered in the detection time segment and detection area.
Note
www.foscam.com
Page 8

NVR User Manual
2
When NVR system time and IPC time are different, the NVR recording will based on the NVR
system time.
Playback
You can play recording video files stored in the Hard disk. Recording includes schedule recording,
manual recording, and alarm recording. Single-screen playback and four-screen synchronous
playback are supported. When display mode is 1080P, it only supports the single-screen playback.
Alarm
Motion Detection Alarm
You can configure motion detection information about the corresponding channel in the NVR system.
When an object moves in the detection time segment and detection area, an alarm is triggered, the
NVR system enables motion detection recording, sends pictures to your mailbox, and uploads
pictures to your FTP server.
IPC Management
You can search for IPC devices in the LAN through the NVR and add IPC devices to the NVR
channel. Through the NVR, you can also manage IPC devices.
HDD Management
When the HDD becomes exceptional (for example, HDD Loss, HDD Full, and HDD Error), the NVR
buzzer sounds an alarm.
When the HDD is full, you can select the cycle cover the earliest recording or stop recording.
Backup
You can query video files stored by the NVR in the HDD and can back up the files through a USB
interface and save the files to a mobile storage device.
Other Functions
Support the logging function.
Support local GUI output and perform shortcut operations through the mouse.
Three roles can access the NVR, which are respectively visitor, operator, and administrator. The
rights of the three roles vary from low to high.
www.foscam.com
Page 9
NVR User Manual
3
Name
Recommended Configuration
Monitor
You are recommended to equip a 16:9 monitor with the resolution higher than
1280 * 720.
Network
10/100M Ethernet or above.
Browser
This product supports 32-bit IE8 or later versions and does not support 64-bit
IE browsers.
1.3 Relevant Version
1.4 Icons Description
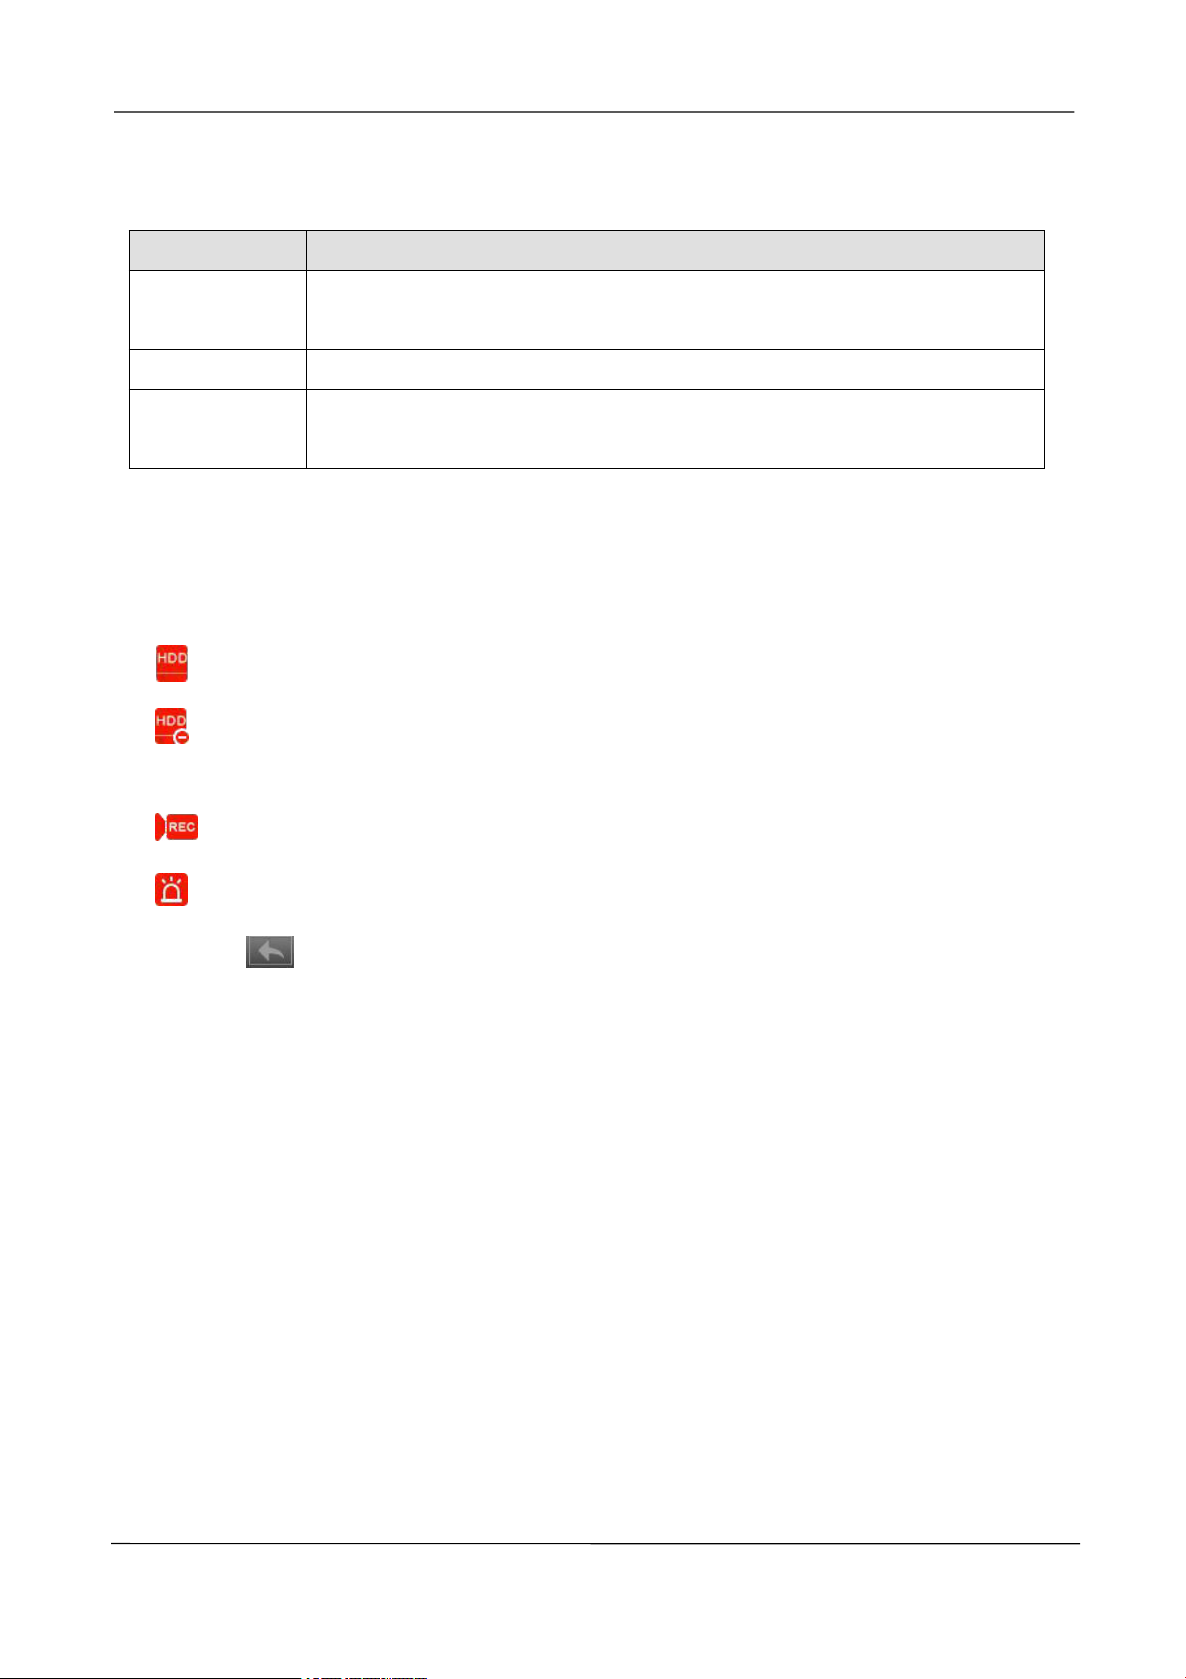
In the live view mode, there are icons at the right top of the full screen.
: The HDD is full, and the recording has been stopped.
: A HDD is not inserted into the NVR or the HDD connected to the NVR is abnormal.
In the live view mode, there are icons at the right bottom of the screen for each channel,
: NVR is recording for the IPC.
: The alarm of the IPC is triggered.
The icon
at the right top of the windows: Exit current menu to upper level menu.
www.foscam.com
Page 10

NVR User Manual
4
1.5 Common Operations
Starting Up the NVR
Turn on the power switch on the rear panel. The Power indicator LED should turn green indicating
that the device begins to start up.
Note
If the power LED indicator on the front panel is off, please check if the power supply is plugged into
an electrical outlet and the power switch is turned on;
Shutting Down the NVR
There are two proper ways to shut down the NVR in the GUI interface.
After login, right-click the mouse, you can click Shutdown in the shortcut menu.
Choose Menu > System in the Menu interface, then click Shutdown in the System interface.
Then turn off the power switch on the rear panel, the power LED indicator on the front panel turns
off.
Reset
You can reset the NVR device to restore the factory settings. You can choose any one of the
following methods operate.
Reset button: Press and hold it for 3 seconds to reset all parameters to factory defaults on the
bottom of the NVR.
Local GUI: Choose Menu > System in the Menu interface, then click Factory Reset in the System
interface.
Web GUI: Choose
(Parameter Configuration) > System Management > Factory Reset.
The Factory Reset page is displayed.
www.foscam.com
Page 11
NVR User Manual
5
Name
Action
Description
Left-Click
Single-Click
Menu or window: select and enter.
Double-Click
Preview mode or Playback mode: Switch between single-screen
and multi-screen.
Click and Drag
Time or Area box: Select the time or zone range.
Time bar: Drag time bar.
Right-Click
Single-Click
Live view: Show menu.
Menu: Exit current menu to upper level menu.
1.6 USB Mouse Operation
Plug USB mouse into one of the USB interfaces on the rear panel of the NVR.
The operation of the mouse on the local GUI is shown as below.
Note
The Single-Click mentioned in this article is refer to the left mouse click.
www.foscam.com
Page 12
NVR User Manual
6
2
GUI
You can visit the local NVR device via the display or monitor, and view or manage NVR system.
NVR device is connected to the network,mouse,and mobile storage devices have been successfully
installed. Make sure the video output device is connected successfully.
2.1 Login
For the operation, please refer to the Quick Operation Guide.
2.2 Setup Wizard
By default, the Setup Wizard starts once the NVR has loaded. The Setup Wizard can walk you
through some important settings of the NVR. If you don't want to use the Setup Wizard at that
moment, right click the mouse to quit.
For the operation, please refer to the Quick Operation Guide.
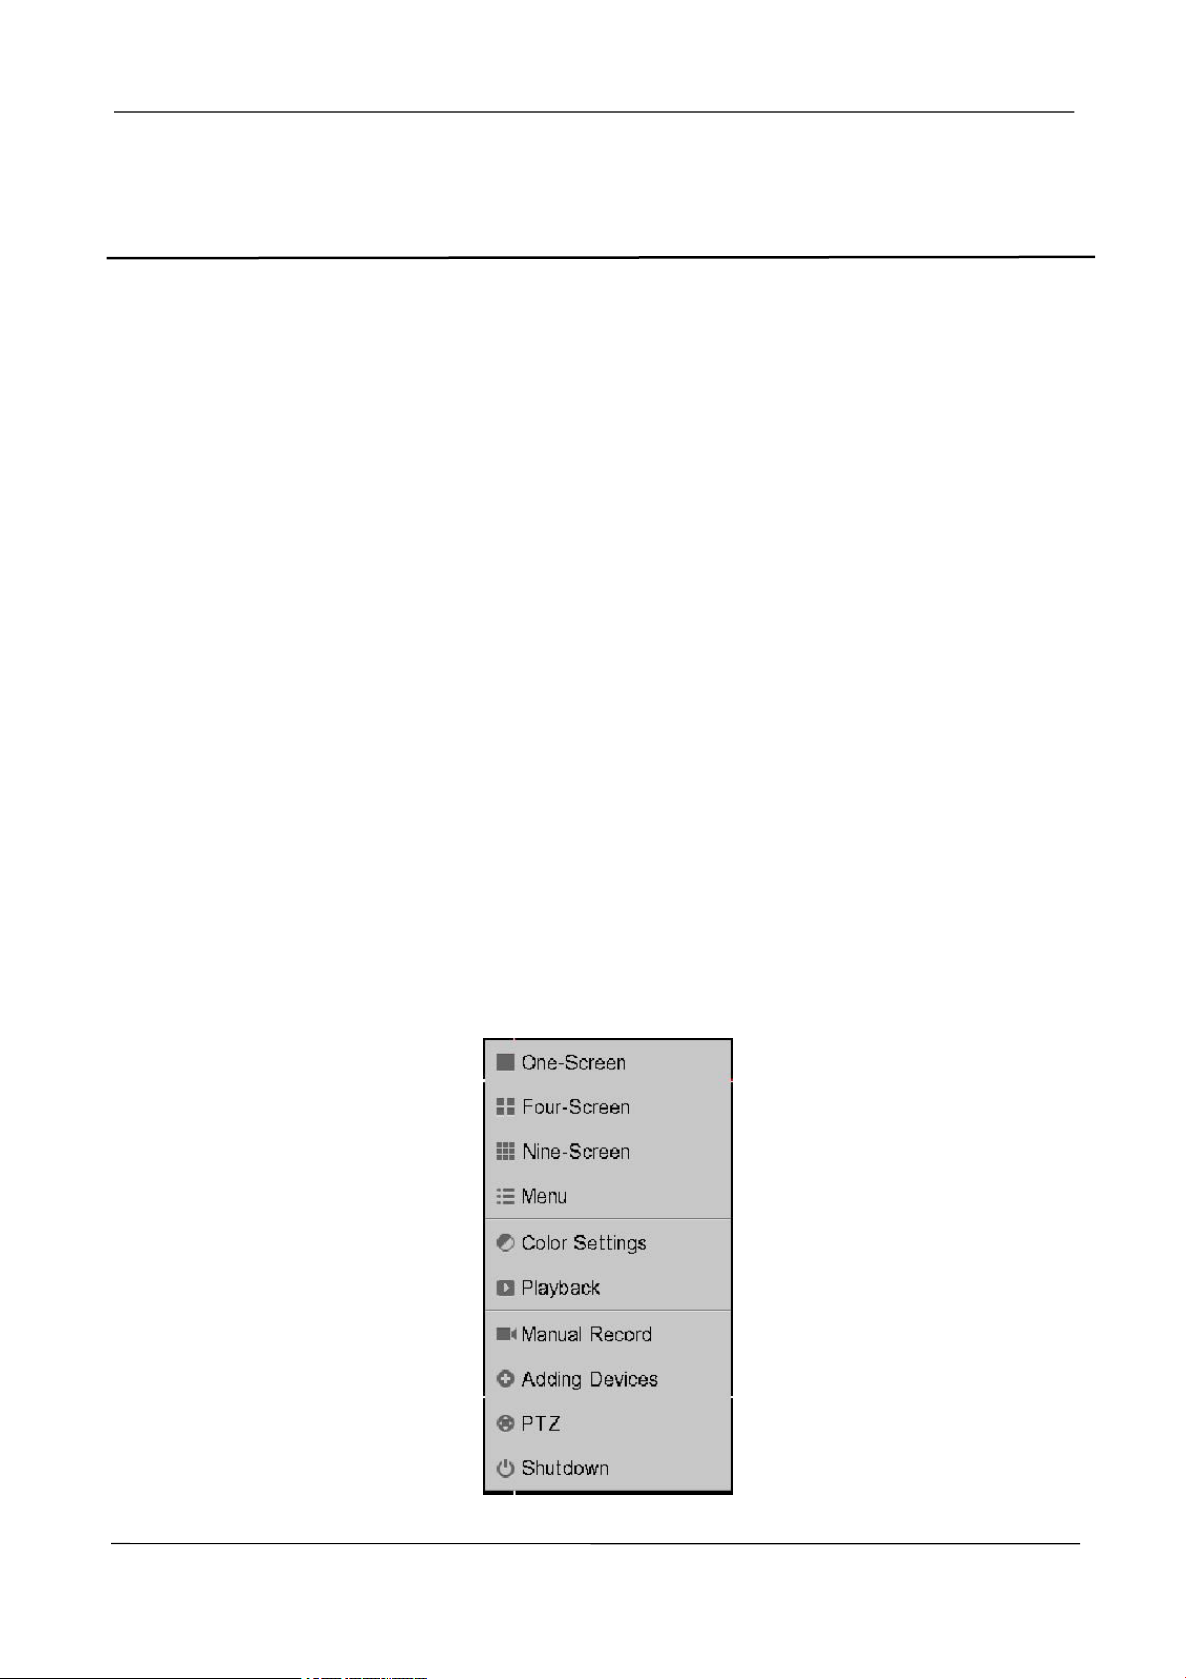
2.3 Shortcut Menu
After login, right-click the mouse, you will enter the shortcut menu.
www.foscam.com
Page 13
NVR User Manual
7
One-Screen / Four-Screen / Nine-Screen
Switch between different channels video.
Note: The NVR Kit supports eight channels. If you need to display nine channels on the live view
window, the sub stream of each IPC must be less than 720P.
Menu
Click Menu to enter the Menu interface, it includes IPC Manager, playback, Backup, About, Settings
and System. For details, please refer to
2.4 Menu.
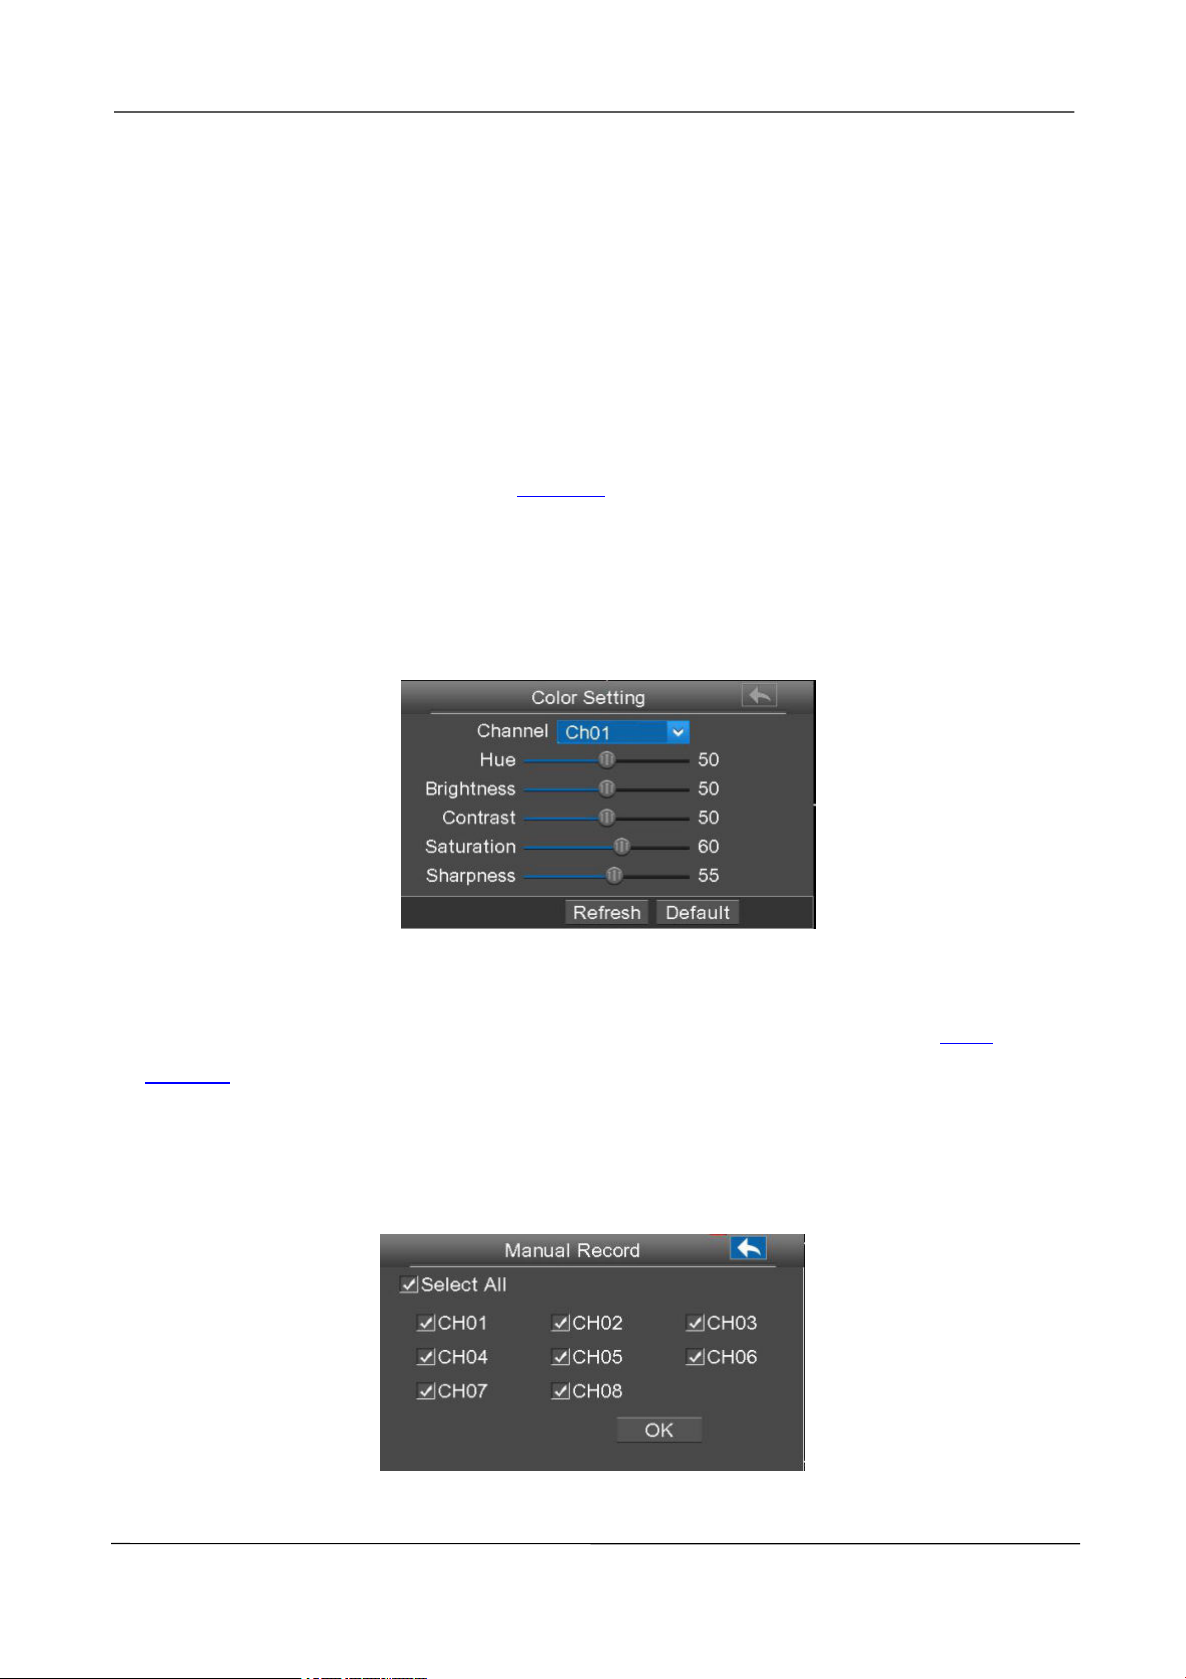
Color Settings
Click Color Settings to choose a channel to alter the color, then adjust the parameters of hue,
brightness, contrast, saturation and sharpness.
Playback
You can display the video of every a channel for playback. For details, please refer to
2.4.2
Playback.
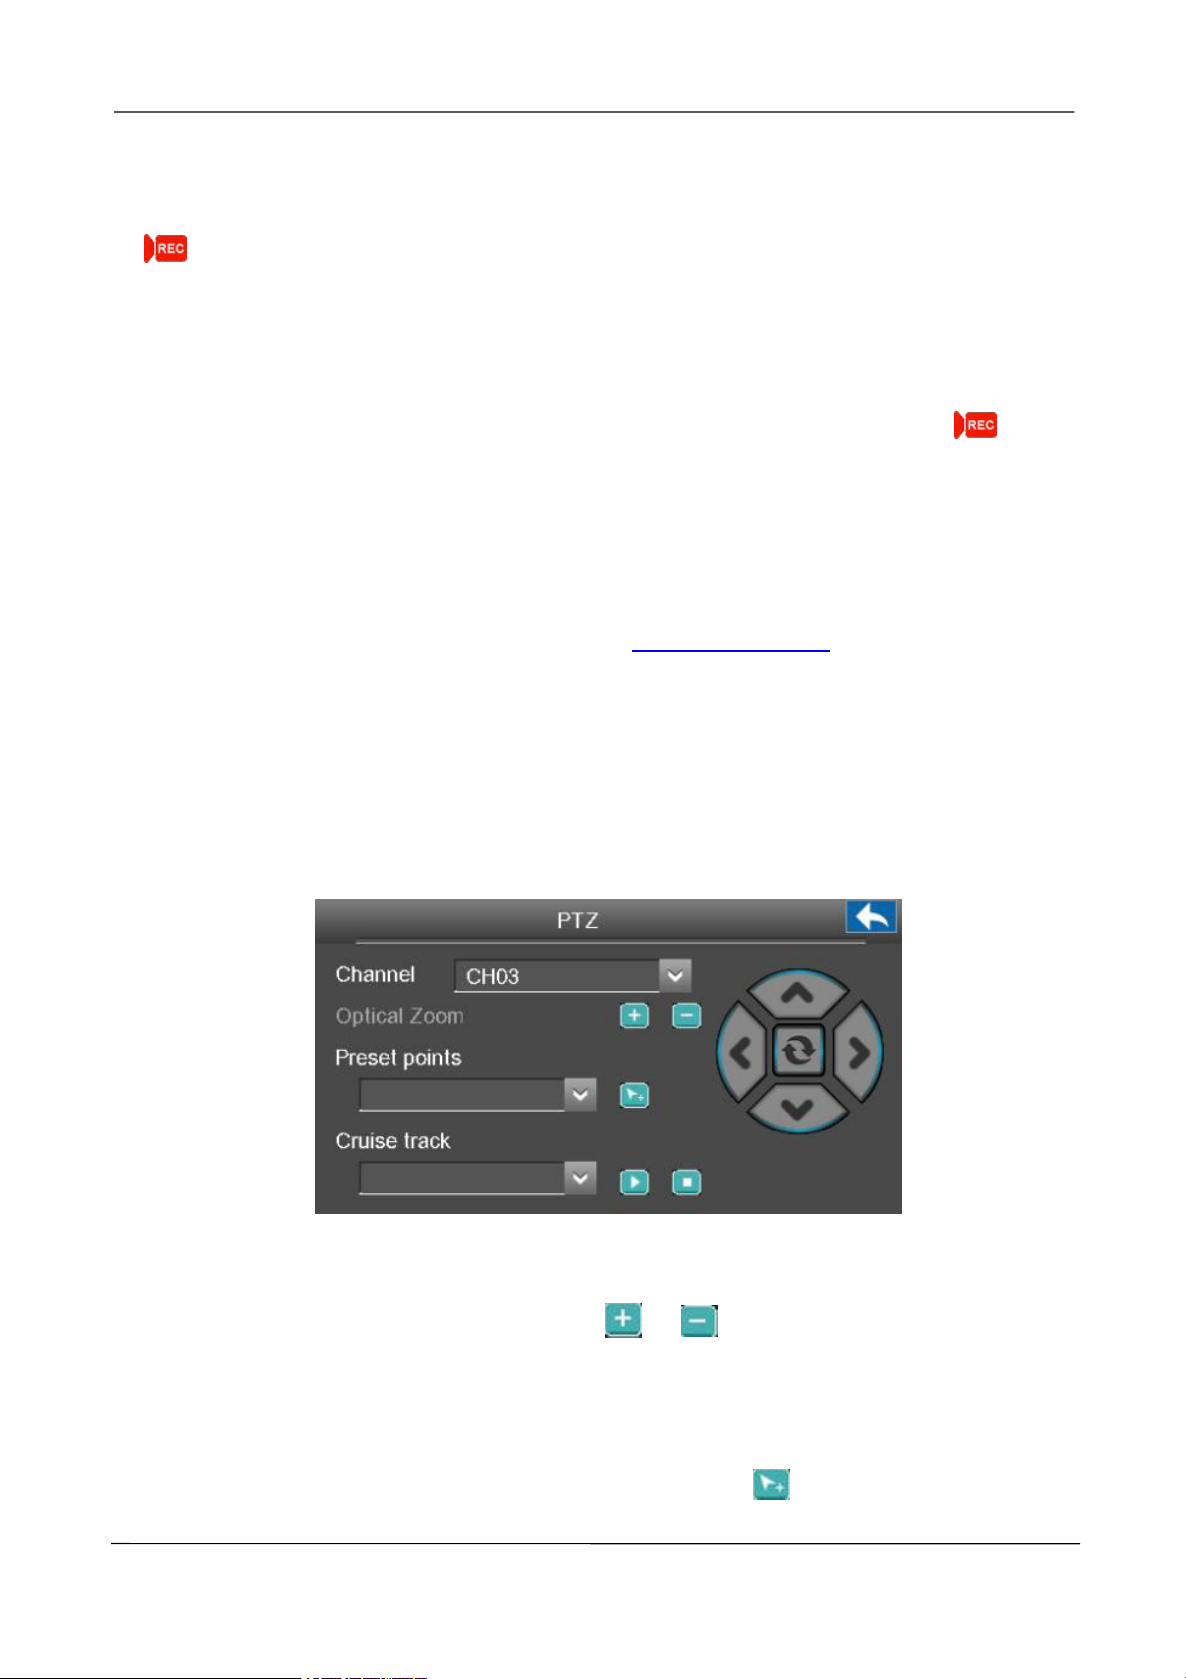
Manual Record
Click Manual Record to set manual record for single channel or all channels.
[Enable Manual Record]
www.foscam.com
Page 14
NVR User Manual
8
Check the Channel checkbox, Click OK button to take effect.
Right-click the mouse to back to the Live view interface. In the live view interface, there are icon
at the right bottom of the screen for the channel.
[Disable Manual Record]
Uncheck the channel checkbox, Click OK button to take effect.
Right-click the mouse to back to the Live view window. In the live view mode, The icon
disappeared at the right bottom of the screen for the channel.
Adding Devices
You can add and connect the IP Camera, configure the connection of IP cameras, delete the
connection of IP camera. For details, please refer to
2.4.1 Adding Devices.
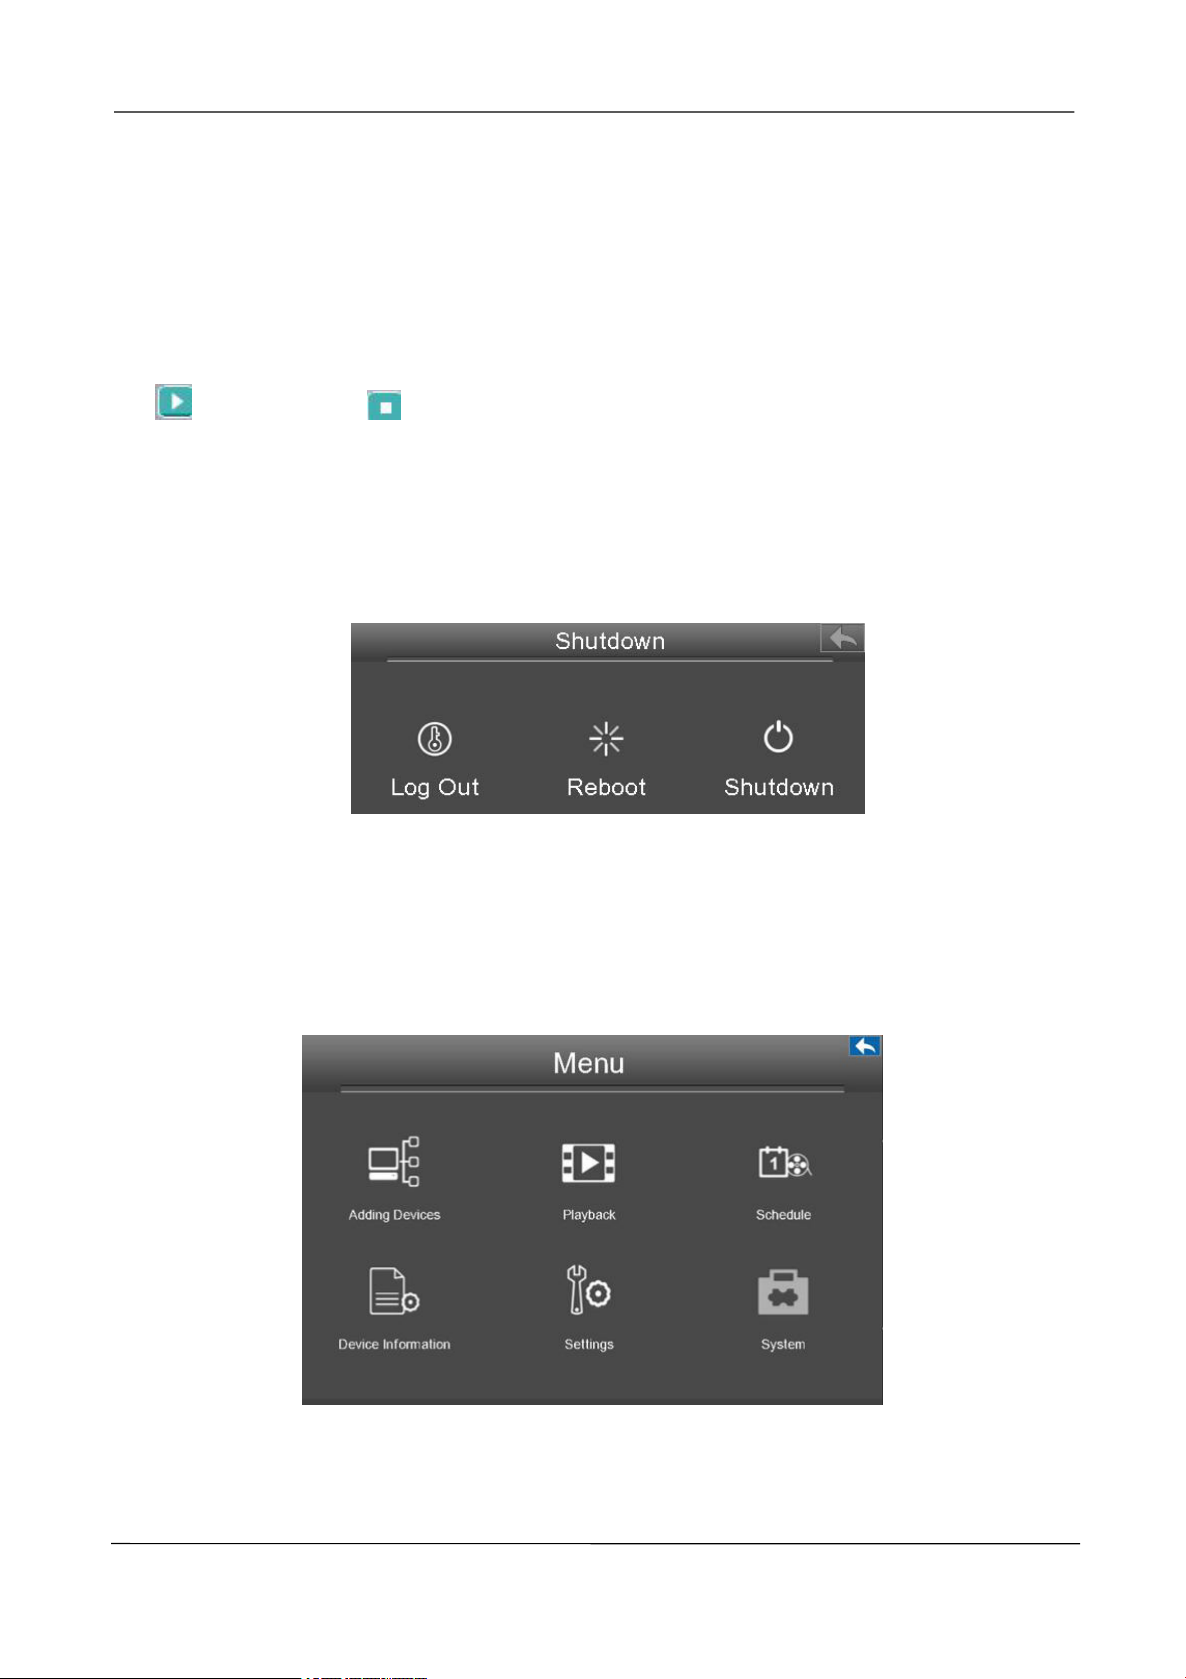
PTZ
If a channel is connected to IPC which have the PTZ function, you can control the PTZ(Pan, Tilt,
Zoom) of the IP Camera.
In PTZ control settings, select the channel from the drop-down list.
[Optical Zoom]
Configure the zoom of the IP Camera by clicking
devices with zoom function.)
[Preset points]
You can select the Preset position from drop-down list, then click
www.foscam.com
or . (This feature only supports IPC
to make the IP Camera move
Page 15
NVR User Manual
9
the preset position.
[Cruise track]
The default cruise tracks have two types: Vertical and Horizontal.
Vertical: The IP Camera of the channel will rotate from up to down.
Horizontal: The IP Camera of the channel will rotate from left to right.
: Start cruise. : Stop cruise.
Shutdown
Click Shutdown to enter the Shutdown page. You can log out, reboot or shut down the NVR system.
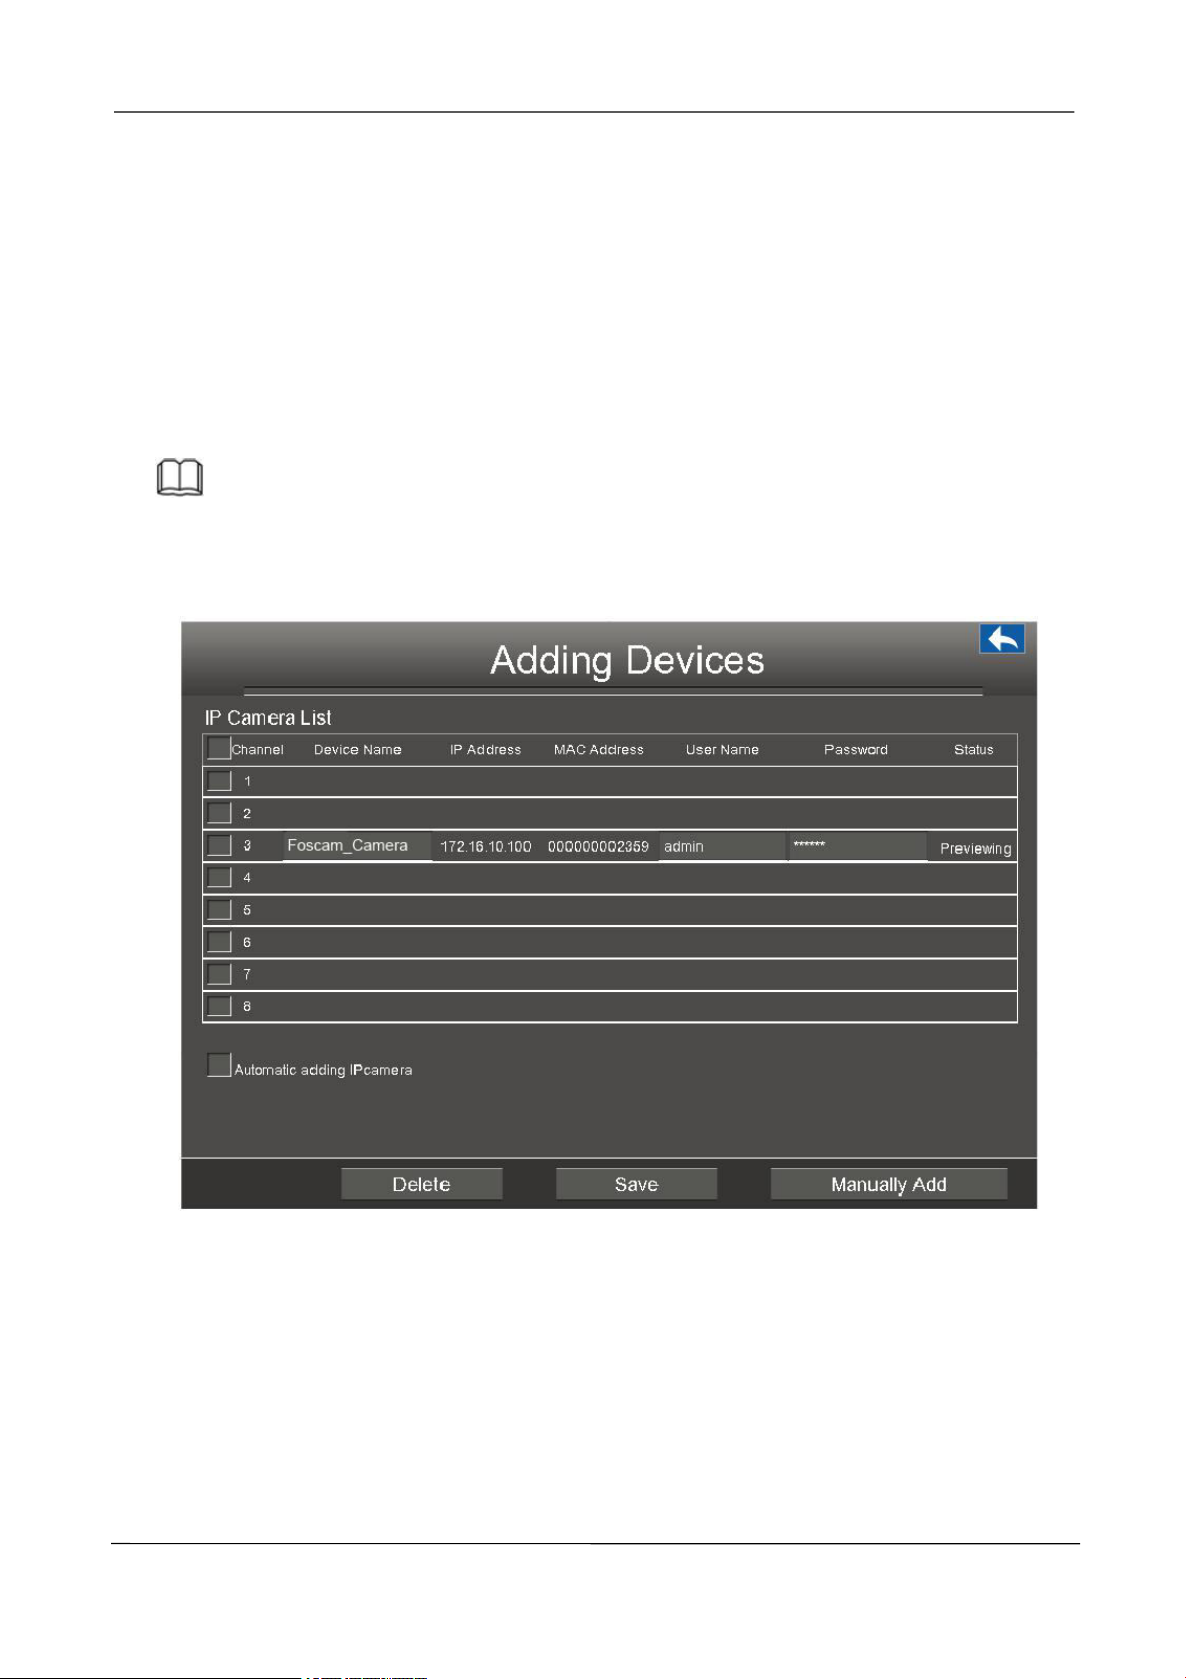
2.4 Menu
Right-click in live view mode and select Menu from the Shortcut Menu, the Menu interface is
displayed.
www.foscam.com
Page 16
NVR User Manual
10
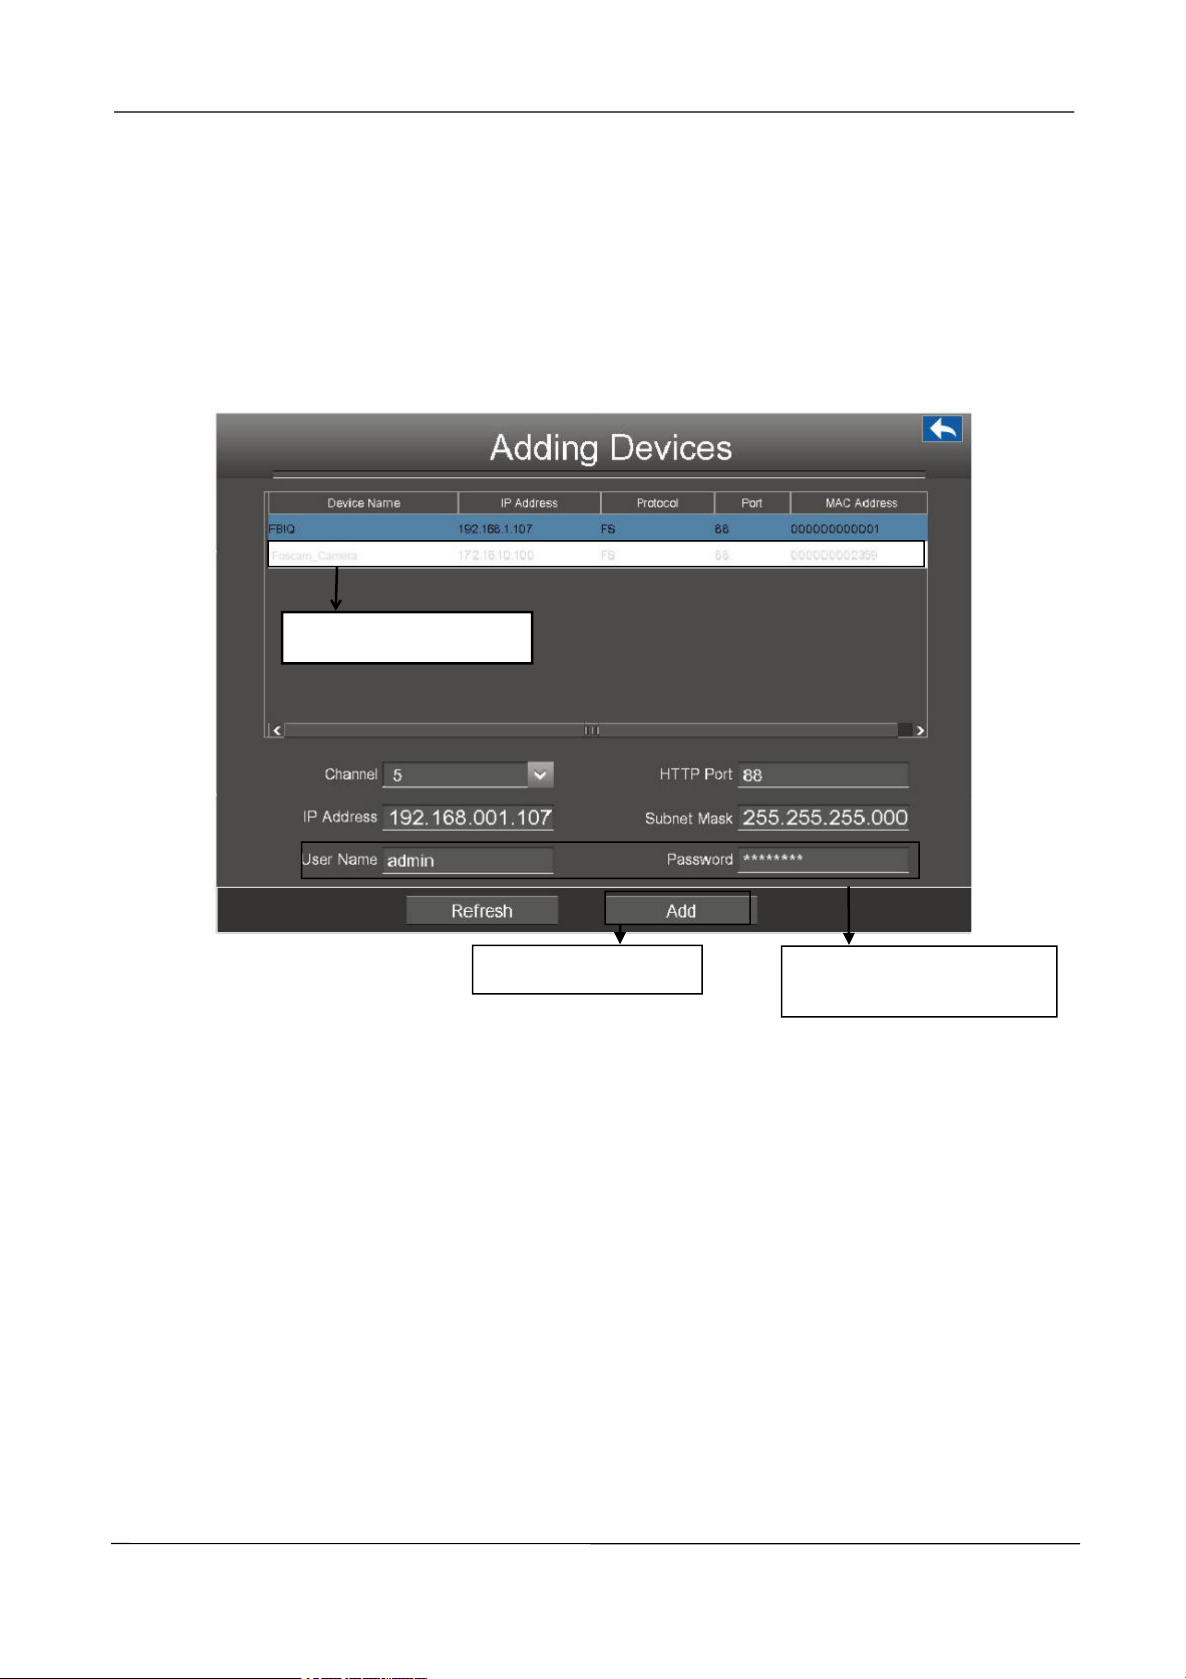
2.4.1 Adding Devices
Right-click in live view mode and select Adding Devices from the Shortcut Menu, or select Menu >
Adding Devices in the Menu interface. The Adding Devices interface is displayed.
You can search and add the online IP cameras by following the operation. After adding IP cameras,
the basic information of the camera lists in the IP Camera List, and you can configure the basic
setting of the IP cameras.
Note
Before adding the IP Camera, make sure that the IP Camera supports FS or ONIVF protocol. And
you have the username, password and port number of the IP camera.
NVR will automatically detect all the online IP Cameras which they can connect to. You will need to
know your IP Camera name and password to connect.
Automatic Adding IP Camera
If the camera connected camera which is equipmented in the package.You can automatically add
the camera to your NVR. Check the Automatic adding IP camera checkbox. The NVR system will
automatically synchronize its password with the Manually adding IP Camera.
www.foscam.com
Page 17
NVR User Manual
11
3.Click Add button.
2. Input the User Name
and Password of the IPC.
1.Select the IPC
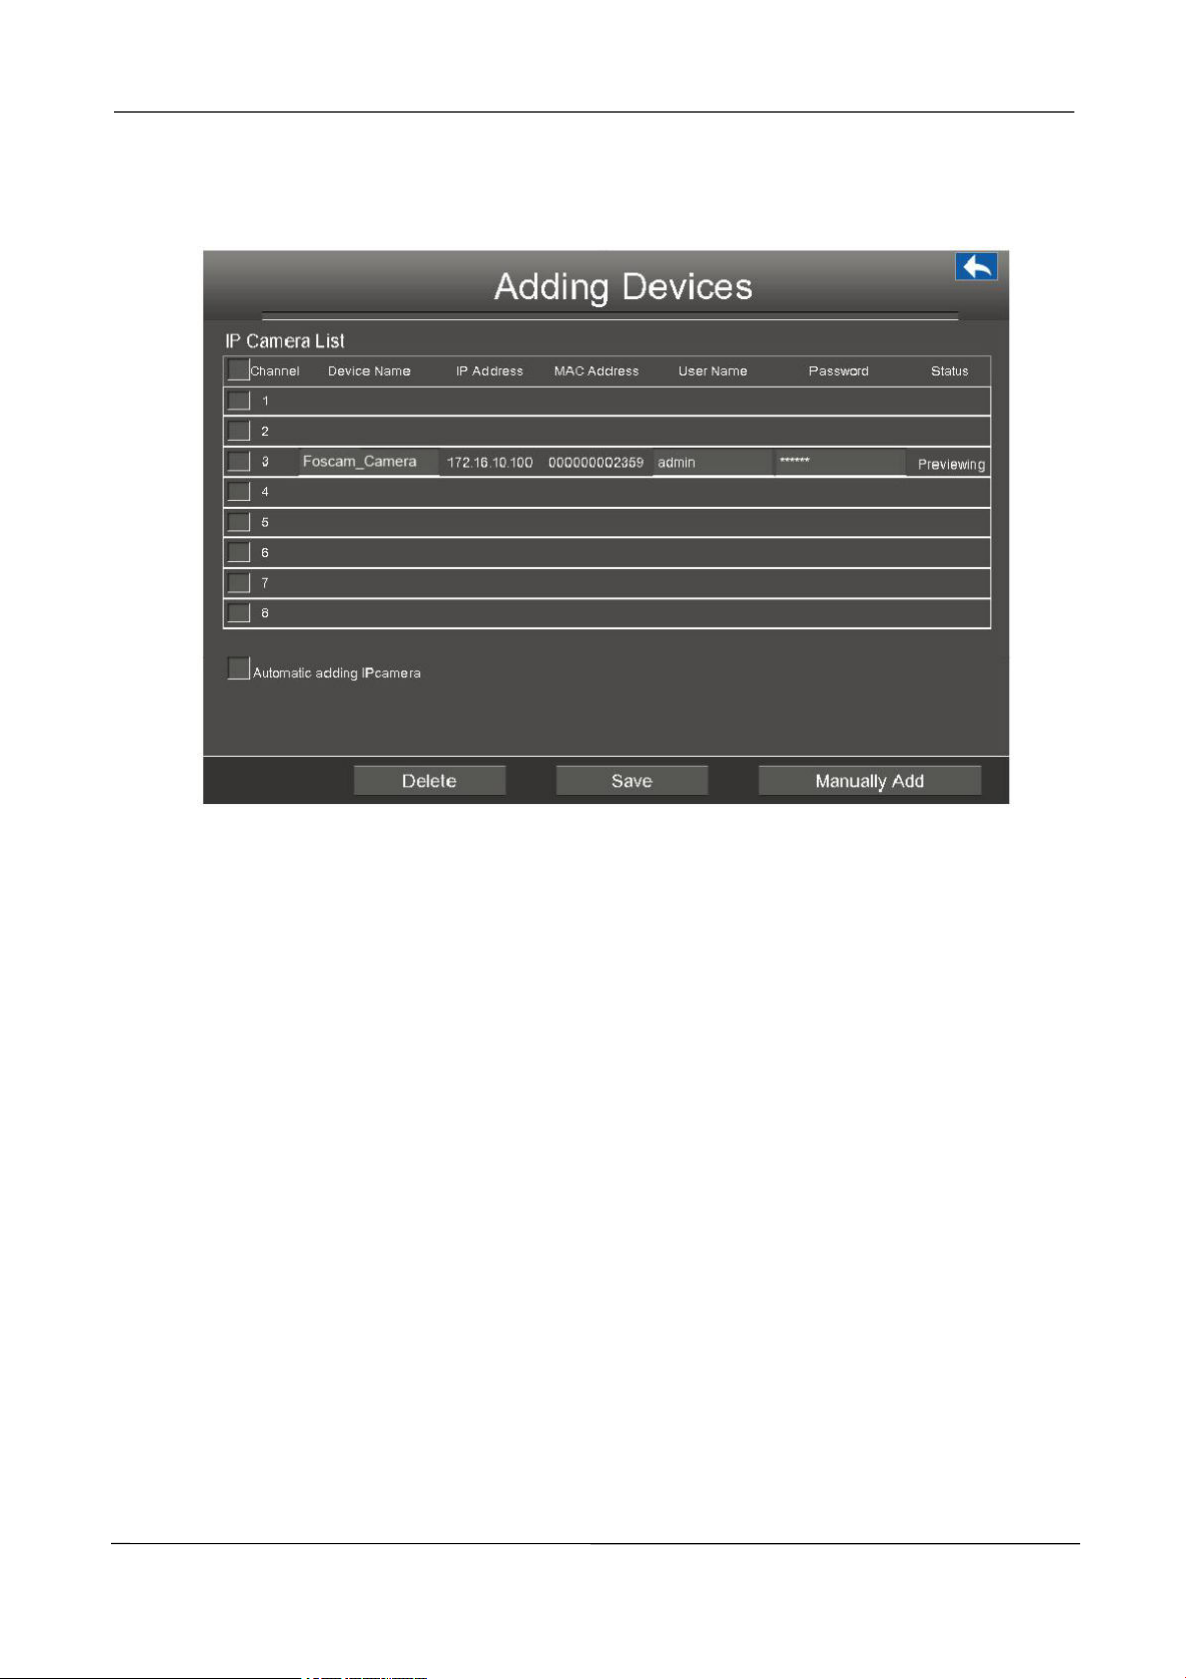
Manually Adding IP Cameras
If the connected camera which is not the equipmented in the package. You can manually add the
camera to your NVR.
1.Uncheck the Automatic adding IP camera checkbox.
2.Click the Manually Add button to adding devices page.
Note:
Make sure that the IP address of the IPC and NVR's in the same network segment, and the
subnet mask and gateway are the same as the NVR's.
www.foscam.com
Page 18
NVR User Manual
12
3.And the camera and its information will be added in the IP Camera list. Finally, click the Save
button to take effect
4.Right-Click to return the previous interface.
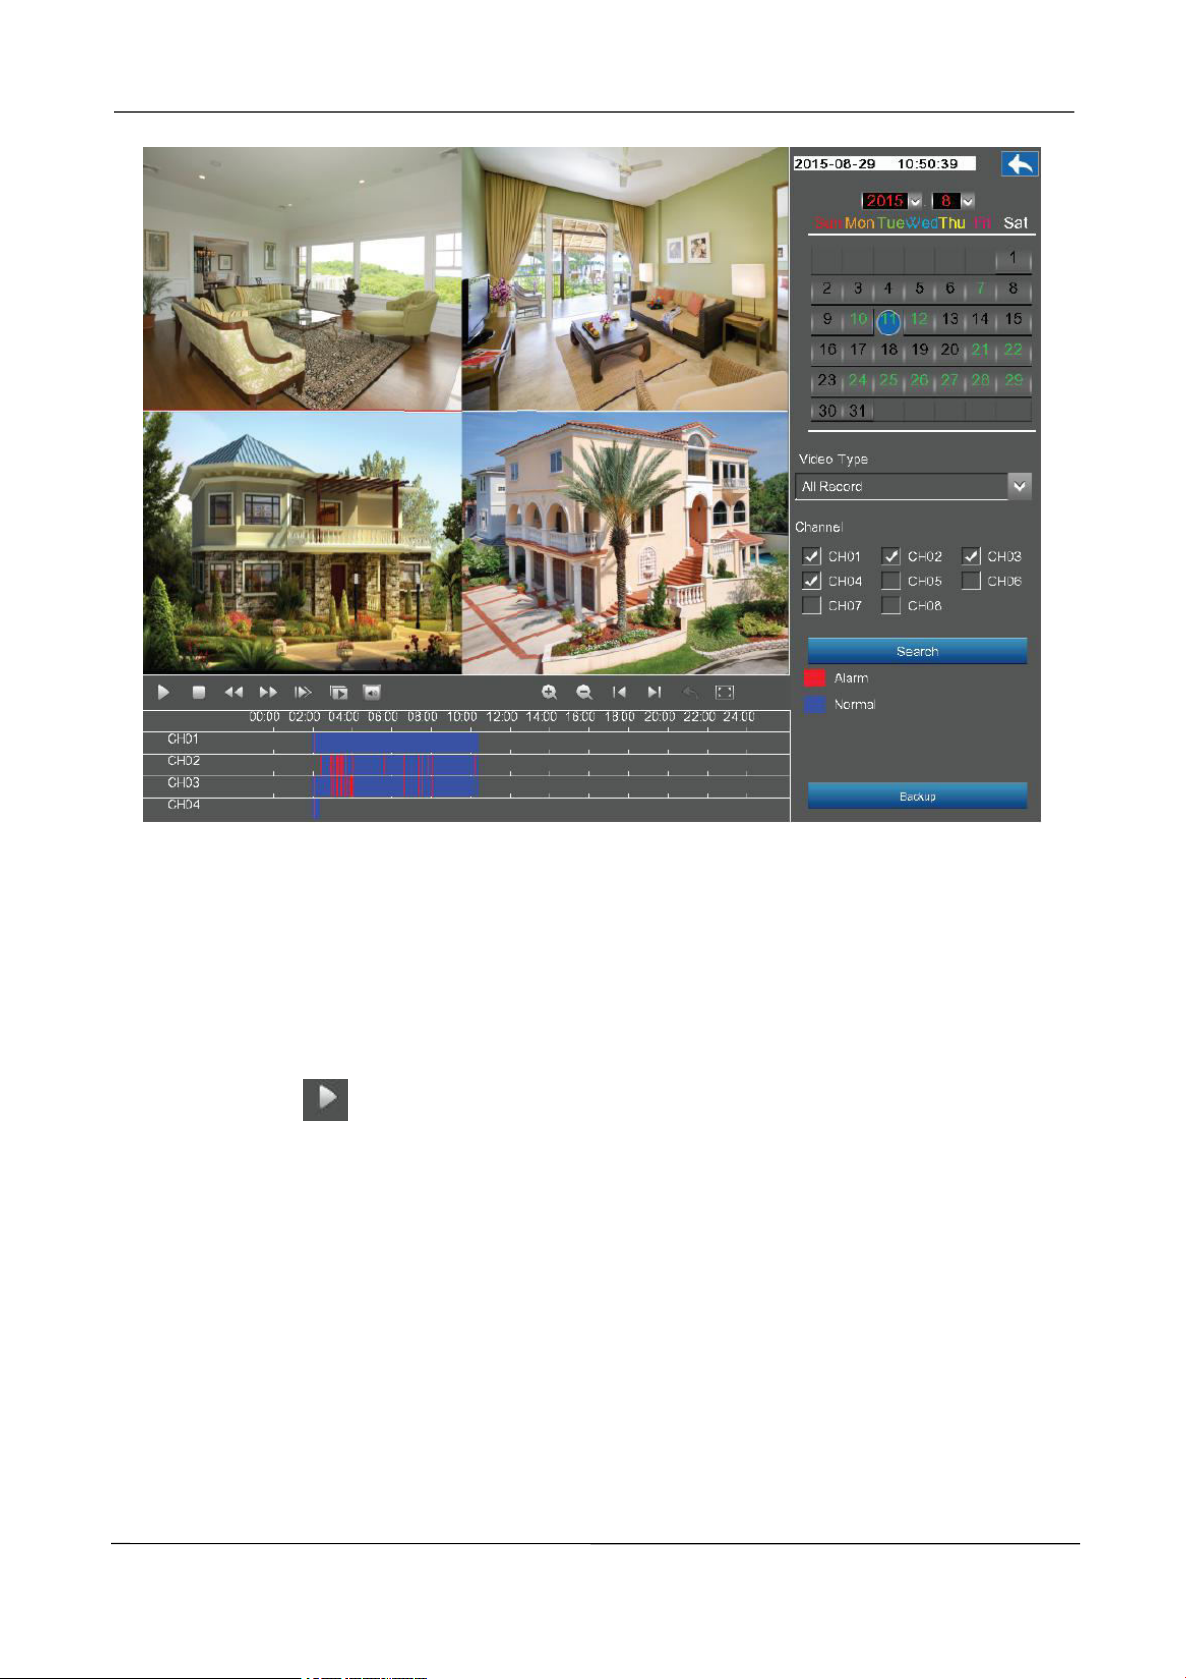
2.4.2 Playback
Right-click in live view mode and select Playback from the Shortcut Menu, or choose Menu >
Playback in the Menu interface. The Playback interface is displayed.
It supports single-screen or four screens.
www.foscam.com
Page 19
NVR User Manual
13
1: Select a date with recording in calendar.
2: Select the Video Type, and check the checkbox from Channels.You can select up to four
channels for playback at the same time.
3: Click Search button to search the matched recorded files. If there are search results, then they will
be shown in the time bar area.
4: Click the icon
to play the recording video.
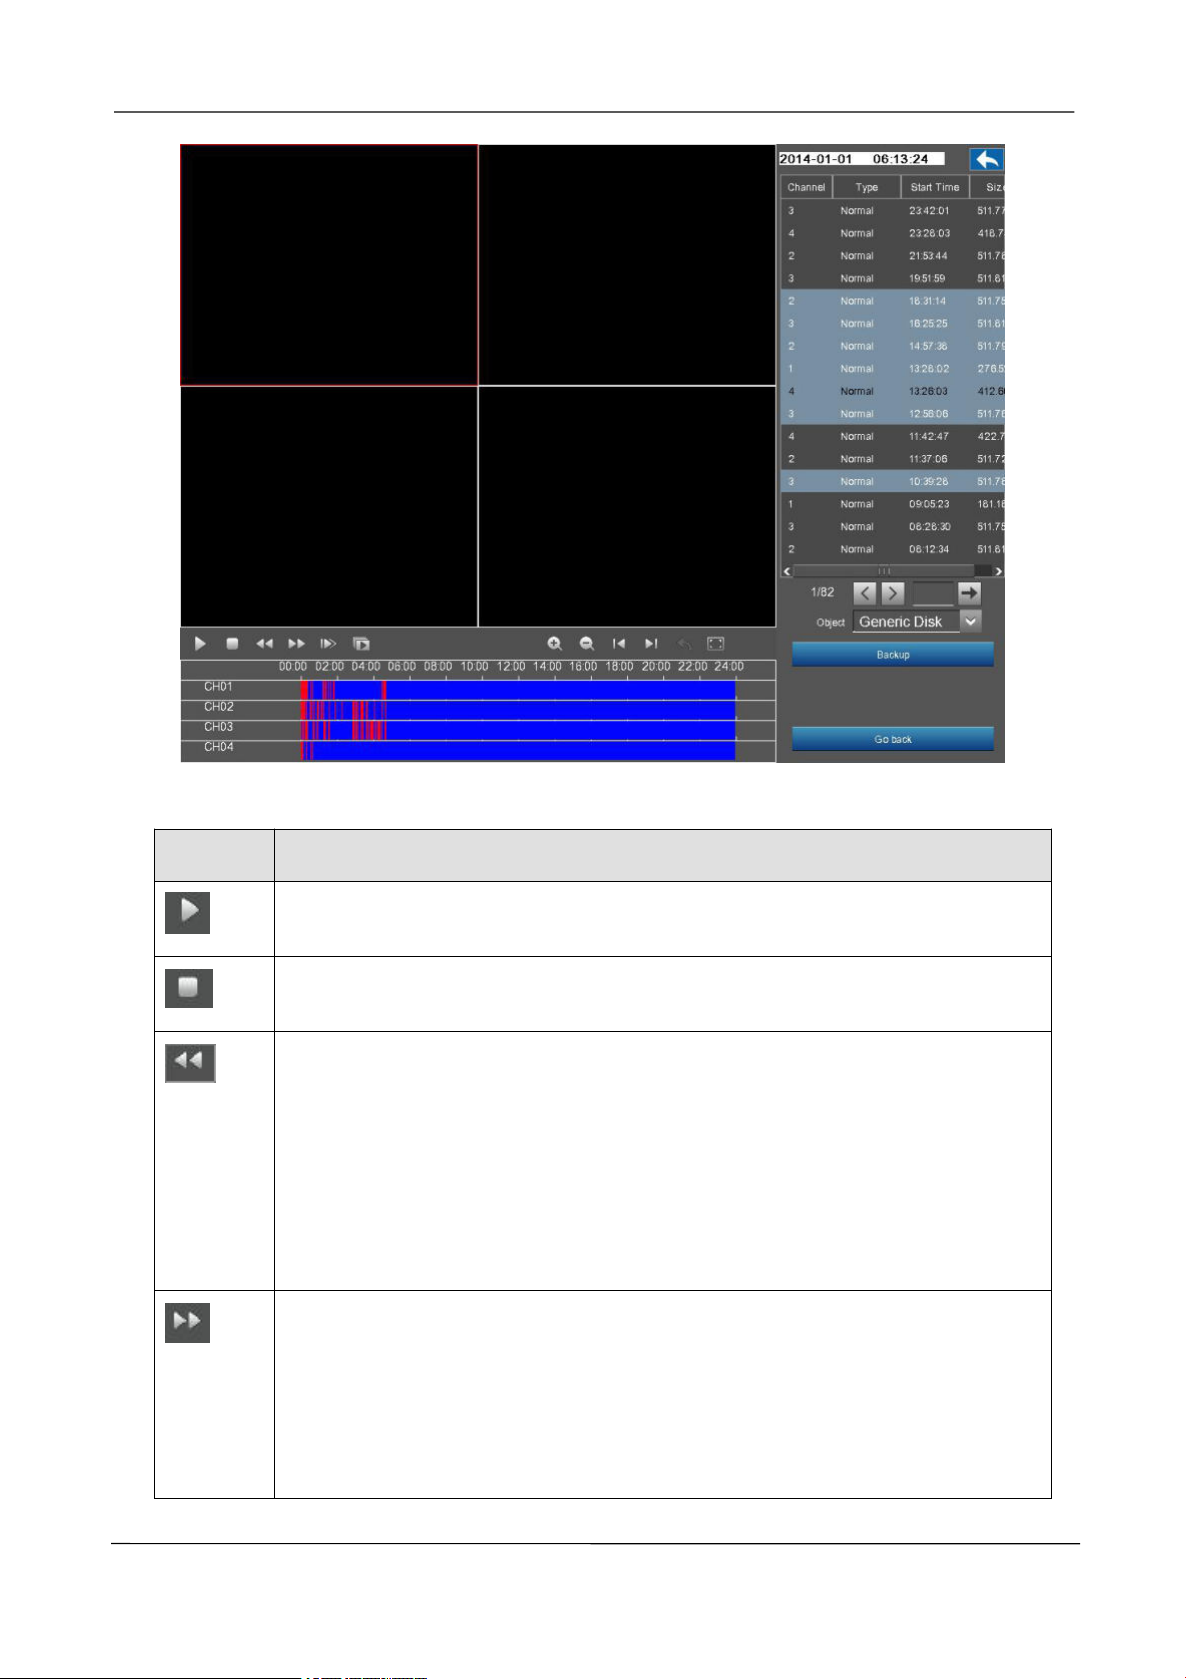
Backup the recording
Click the Backup button to view the video record. Please make sure that the USB Flash Disk has
been plugged in the NVR. Select some records in the list, then click the Backup button to save the
files to the USB Flash Disk.
If you want to see the video of this record, double click a record,.
www.foscam.com
Page 20
NVR User Manual
14
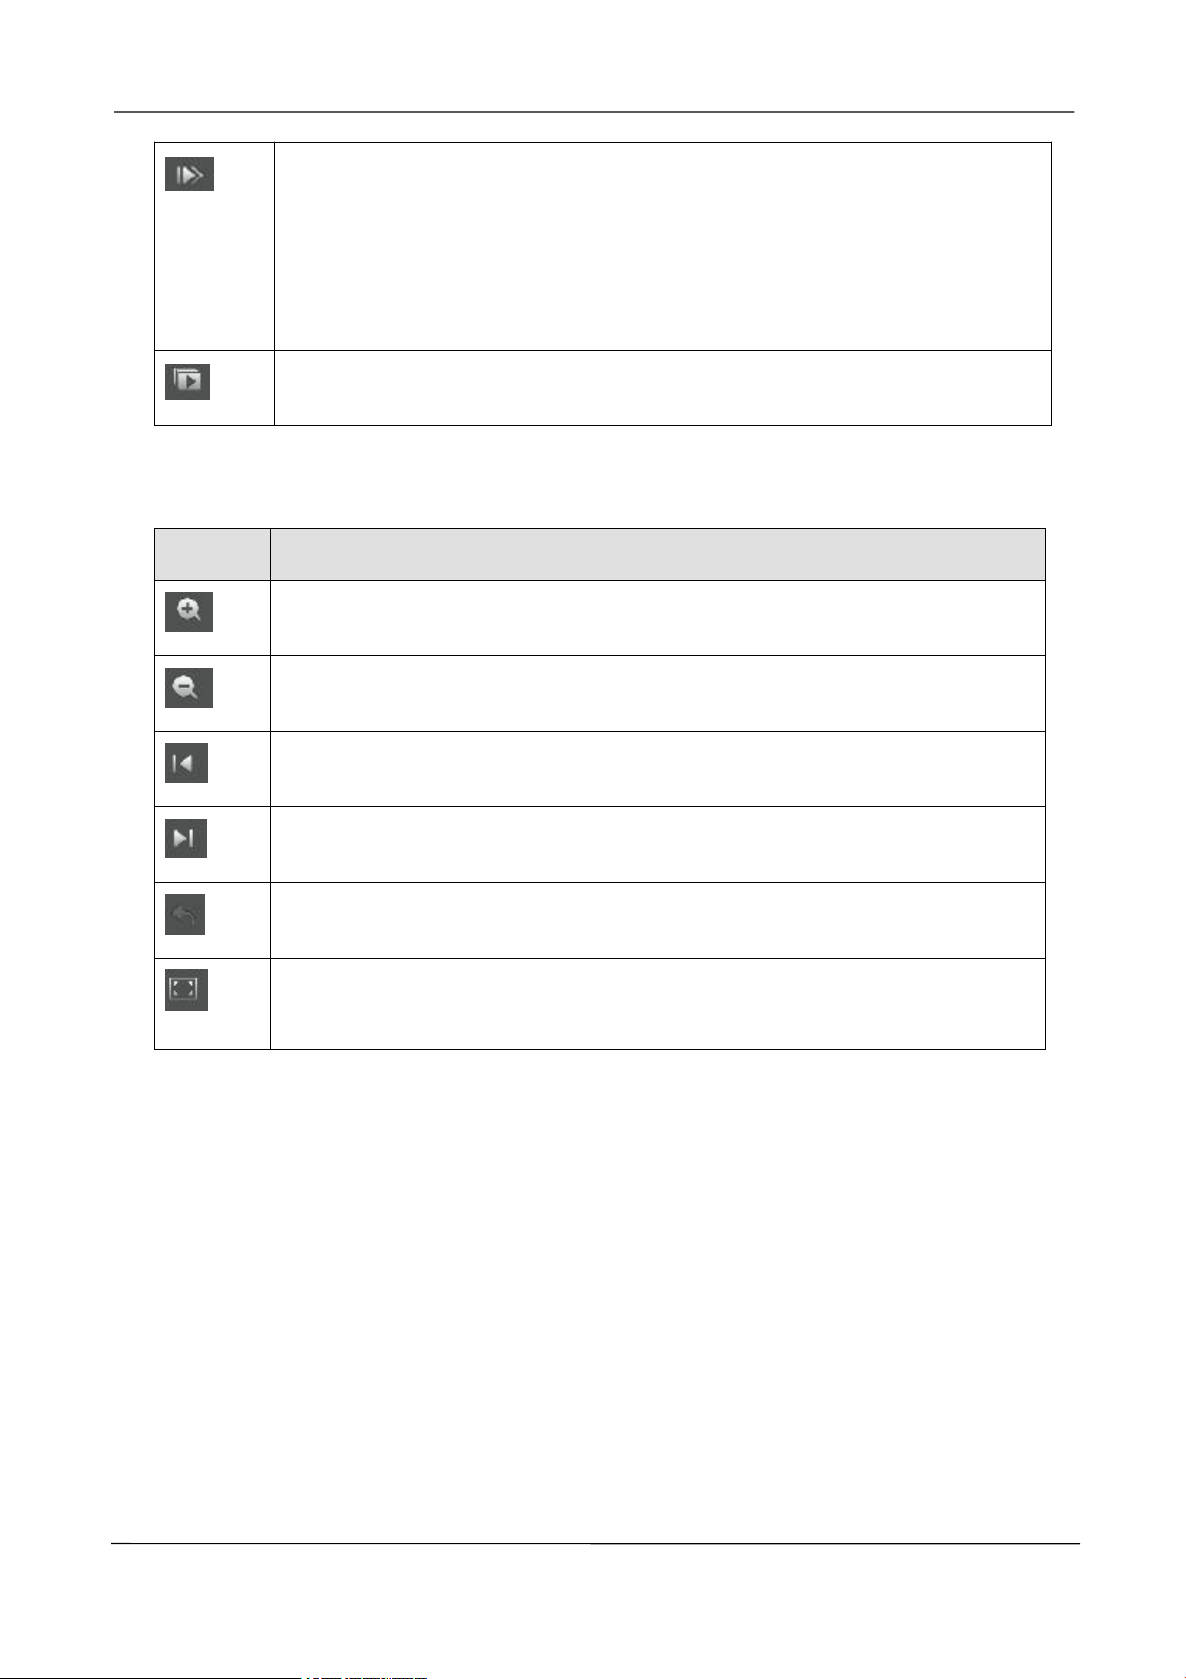
Button
Description
After searching file, click the button to play.
Stop
Fast backward. The fast backward speed can be 4 times, 8 times, 16 times or 32
times of the normal playing speed. Click this button. The multiple of normal
playing speed is displayed in the upper right corner of the playback page. For
example, "<< X4" indicates the current fast backward speed is four times of the
normal speed.
Fast forward. The fast forward speed can be twice, 4 times, 8 times, 16 times or
32 times of the normal playing speed. Click this button. The multiple of normal
playing speed is displayed in the upper right corner of the playback page. For
example, ">> X2" indicates the current playing speed is twice of the normal
speed.
Manage the recording
www.foscam.com
Page 21
NVR User Manual
15
Slow progress. The slow progress speed can be 1/2 times, 1/4 times, 1/8 times,
1/16 times or 1/32 times of the normal playing speed. Click this button. The
multiple of normal playing speed is displayed in the upper right corner of the
playback page. For example, ">> X1/2" indicates the current playing speed is 1/2
times of the normal speed.
Frame forward. View the image of each frame.
Button
Description
Zoom-in time axis.
Zoom-out time axis.
Left moving time axis.
Right moving time axis.
Return to the last playback progress bar.
Make the playing video maximized. After the video is maximized, right-click to exit
the currently maximized video.
Playback time and maximized video playback
2.4.3 Schedule
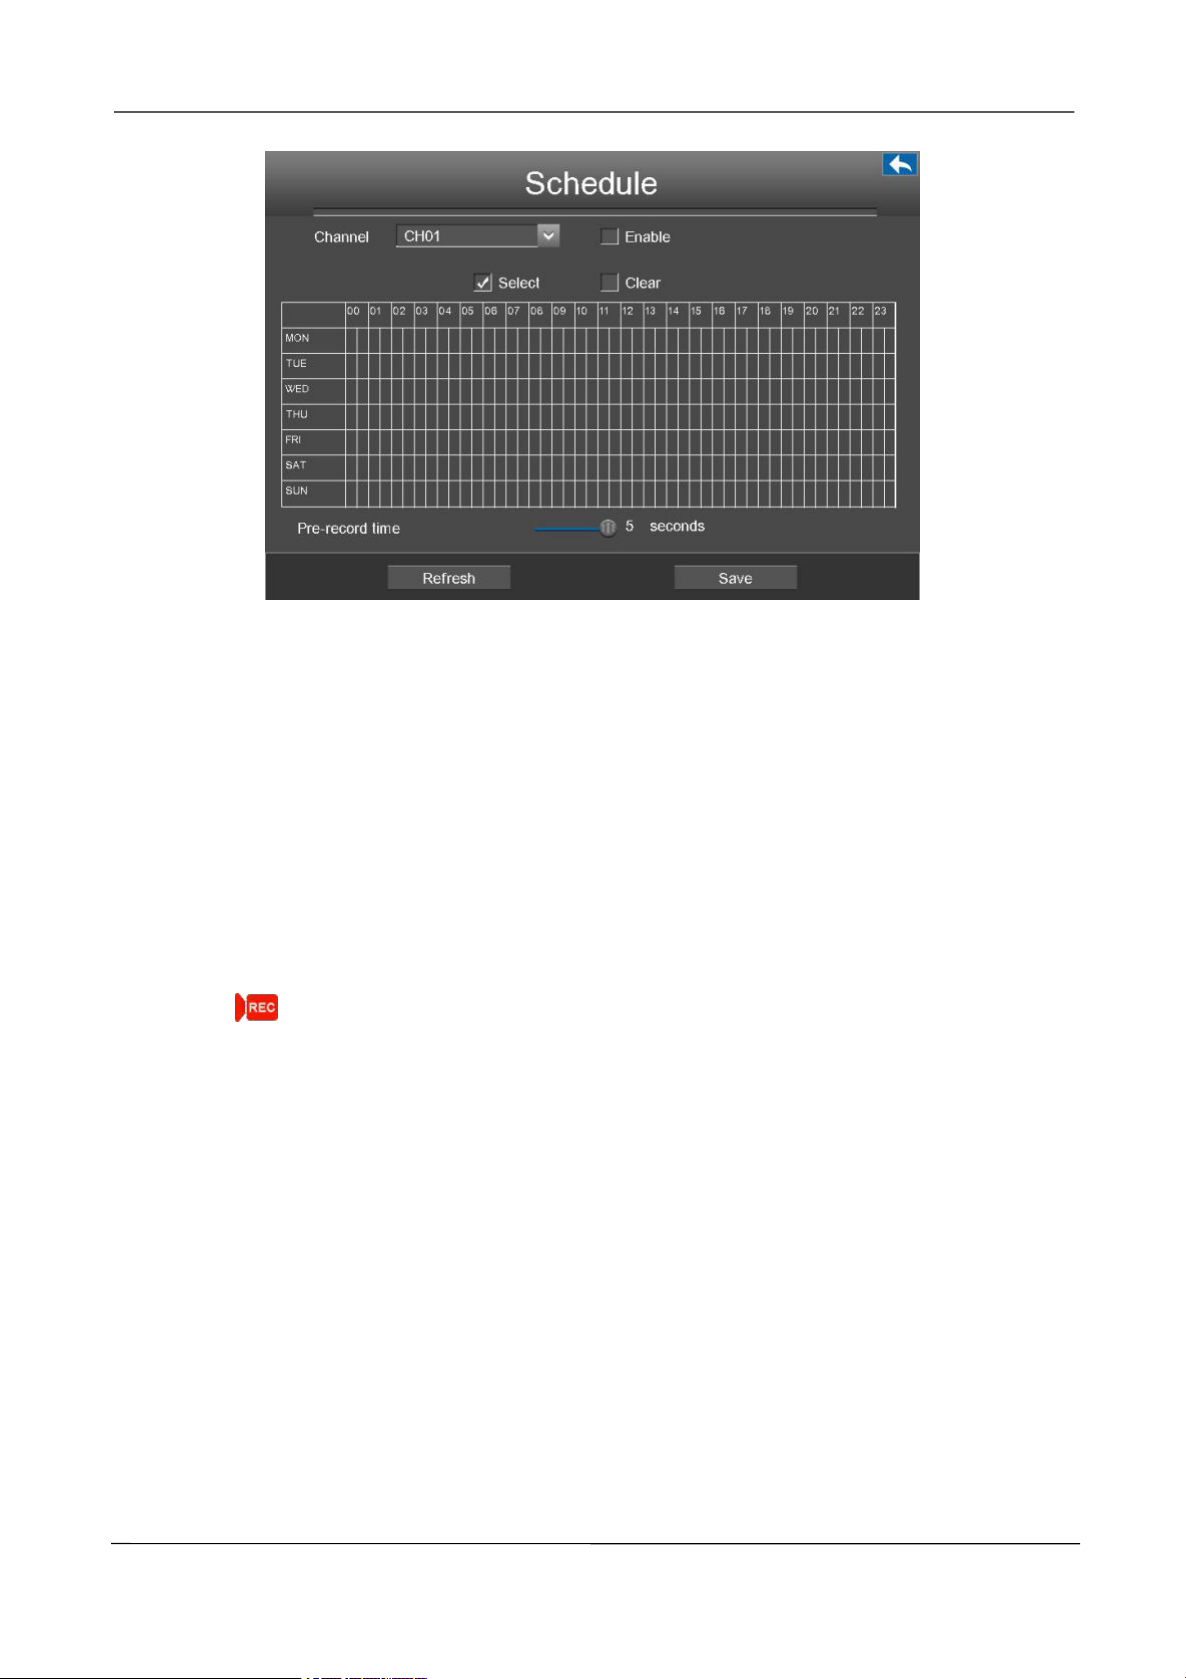
Choose Menu > Settings > Schedule in the Menu interface. The Schedule interface is displayed.
You can enable or disable schedule record for the every channel.
www.foscam.com
Page 22
NVR User Manual
16
[Enable Schedule Recording]
1.Select channel from drop-down box list.
2.Check the Enable checkbox to enable Schedule Recording function.
3.Check the Select checkbox.
Note: Check Clear checkbox and If you clear the area.
4.Click and drag the mouse in the relative positions. The selected area is red.
5.Click Save button to take effect for one certain channel.
The icon
channel.
[Disable Schedule Recording]
1.Select channel from drop-down box list.
2.Uncheck the Enable checkbox to disable Schedule Recording function.
3.Click Save button to take effect for one certain channel.
indicate starts schedule recording at the right bottom of the screen for certain
2.4.4 Device Information
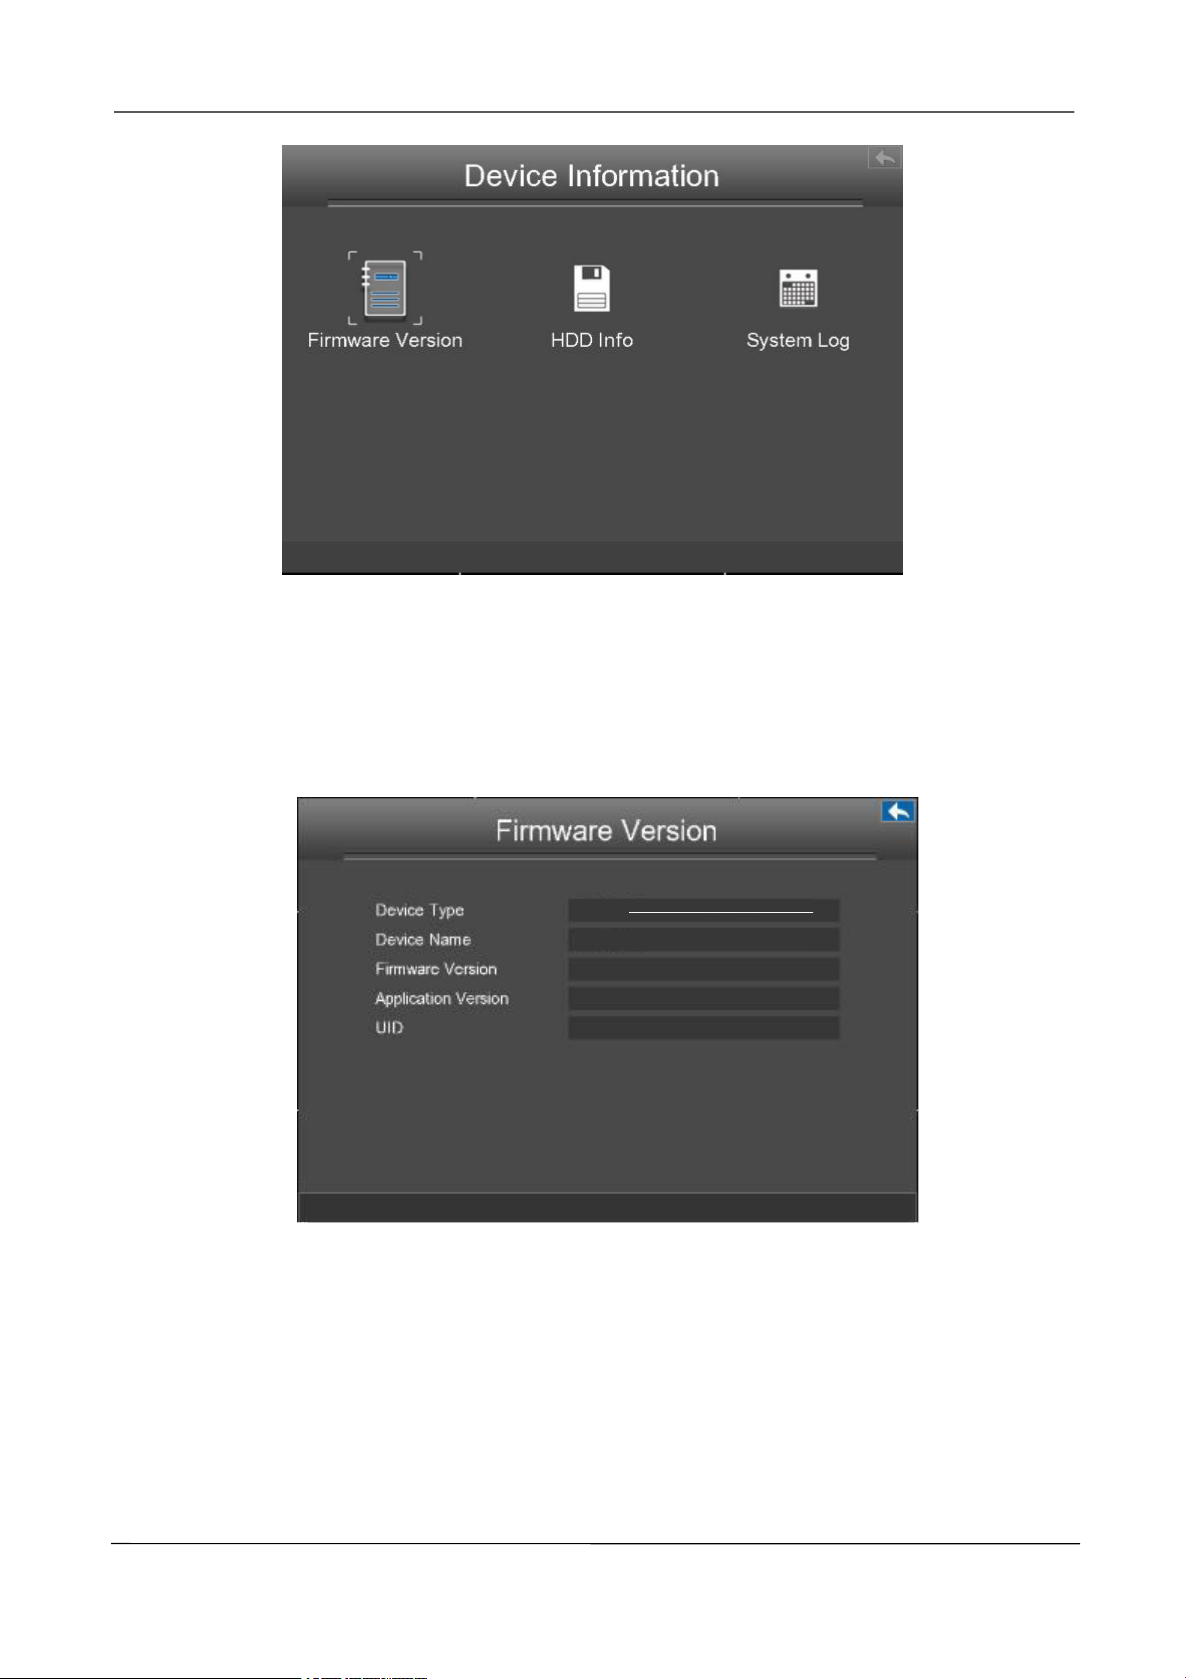
Choose Menu > Device Information in the Menu interface. The Device Information interface is
displayed.
You can view the firmware version, manage HDD Info and system log.
www.foscam.com
Page 23
NVR User Manual
17
FN7108HE
FN7108HE
Firmware Version
Choose Menu > About > Firmware Version in the Menu interface. The Firmware Version interface
is displayed. You can view the Device Type, Device Name, Firmware Version and Application
Version.
HDD Info
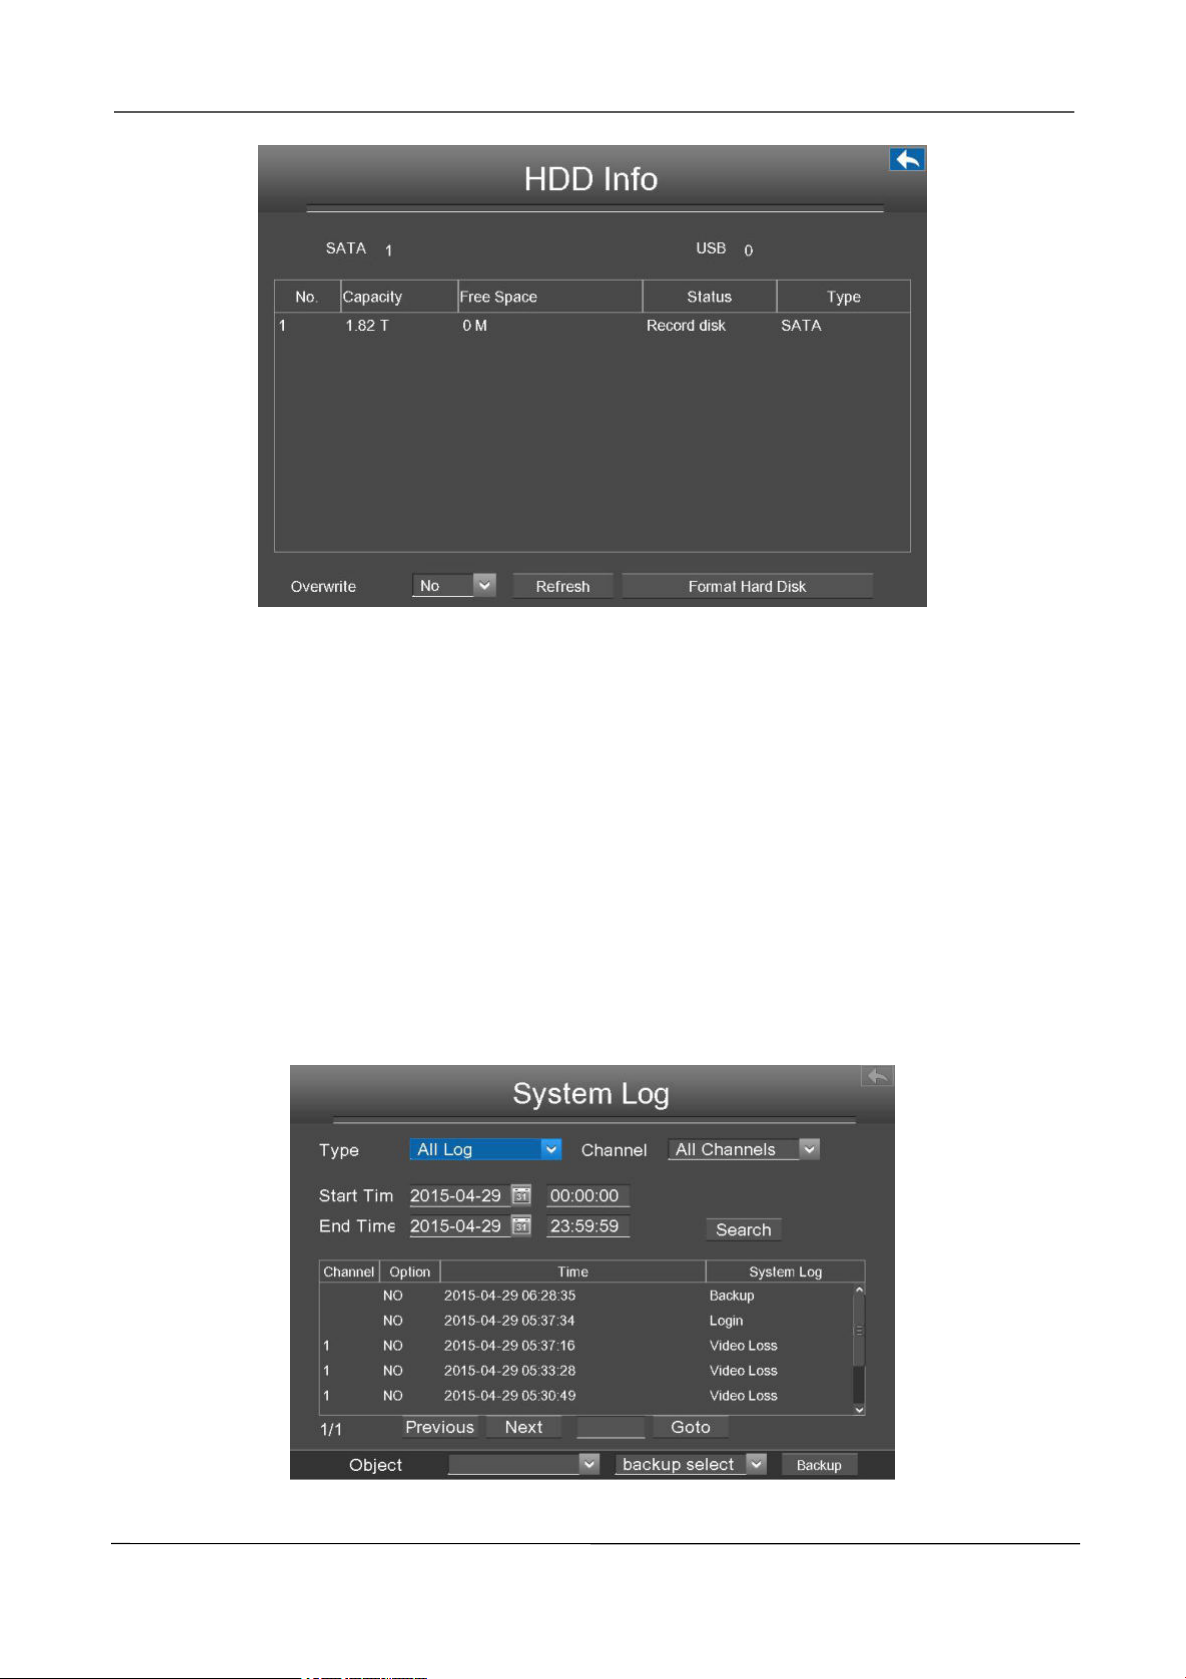
Choose Menu > About > HDD Info in the Menu interface. The HDD Info interface is displayed. You
can see, refresh, format backup disk and format record disk.
www.foscam.com
Page 24
NVR User Manual
18
[Overwrite]:When the HDD is full. You can select the whether cover the earliest recording. Select Yes,
the NVR will cycle cover the earliest recording; Select No, the NVR will stop recording.
[Refresh]:Click the Refresh button then you can update to the latest information on the hard disk.
[Format Hard Disk]:If the disk is uninitialized, select the record disk, then click Format Hard Disk to
format the record disk if the format is incorrect.
System Log
Choose Menu > About > System Log in the Menu interface. The System Log interface is
displayed. The operation, alarm, exception and information of the NVR can be stored in log files,
which can be viewed and exported at any time.
[Searching Log]
www.foscam.com
Page 25
NVR User Manual
19
1.Select the log type, channel and time.
2.Click the Search button to list all matched logs.
[Backup Log]
The log information can be exported to USB-flash disk for backup.
1.Double-click the log information by the left mouse in the search result list. The status of the log
will change from No to Yes.
2.After the USB-flash disk connect to the NVR by the USB interface. Select the Object from
drop-down list.
3.Select the backup select from drop-down list.
.Click Backup button and start backup.
4
5
.Check backup result.
The system saves the log to the mobile storage device. For example, 20140320-134022_01.log
indicates that a log is generated at 2014-3-20 13:40:22.
When searching for the log information, you can also select "backup page" or "backup all" to achieve
bulk backup.
2.4.5 Settings
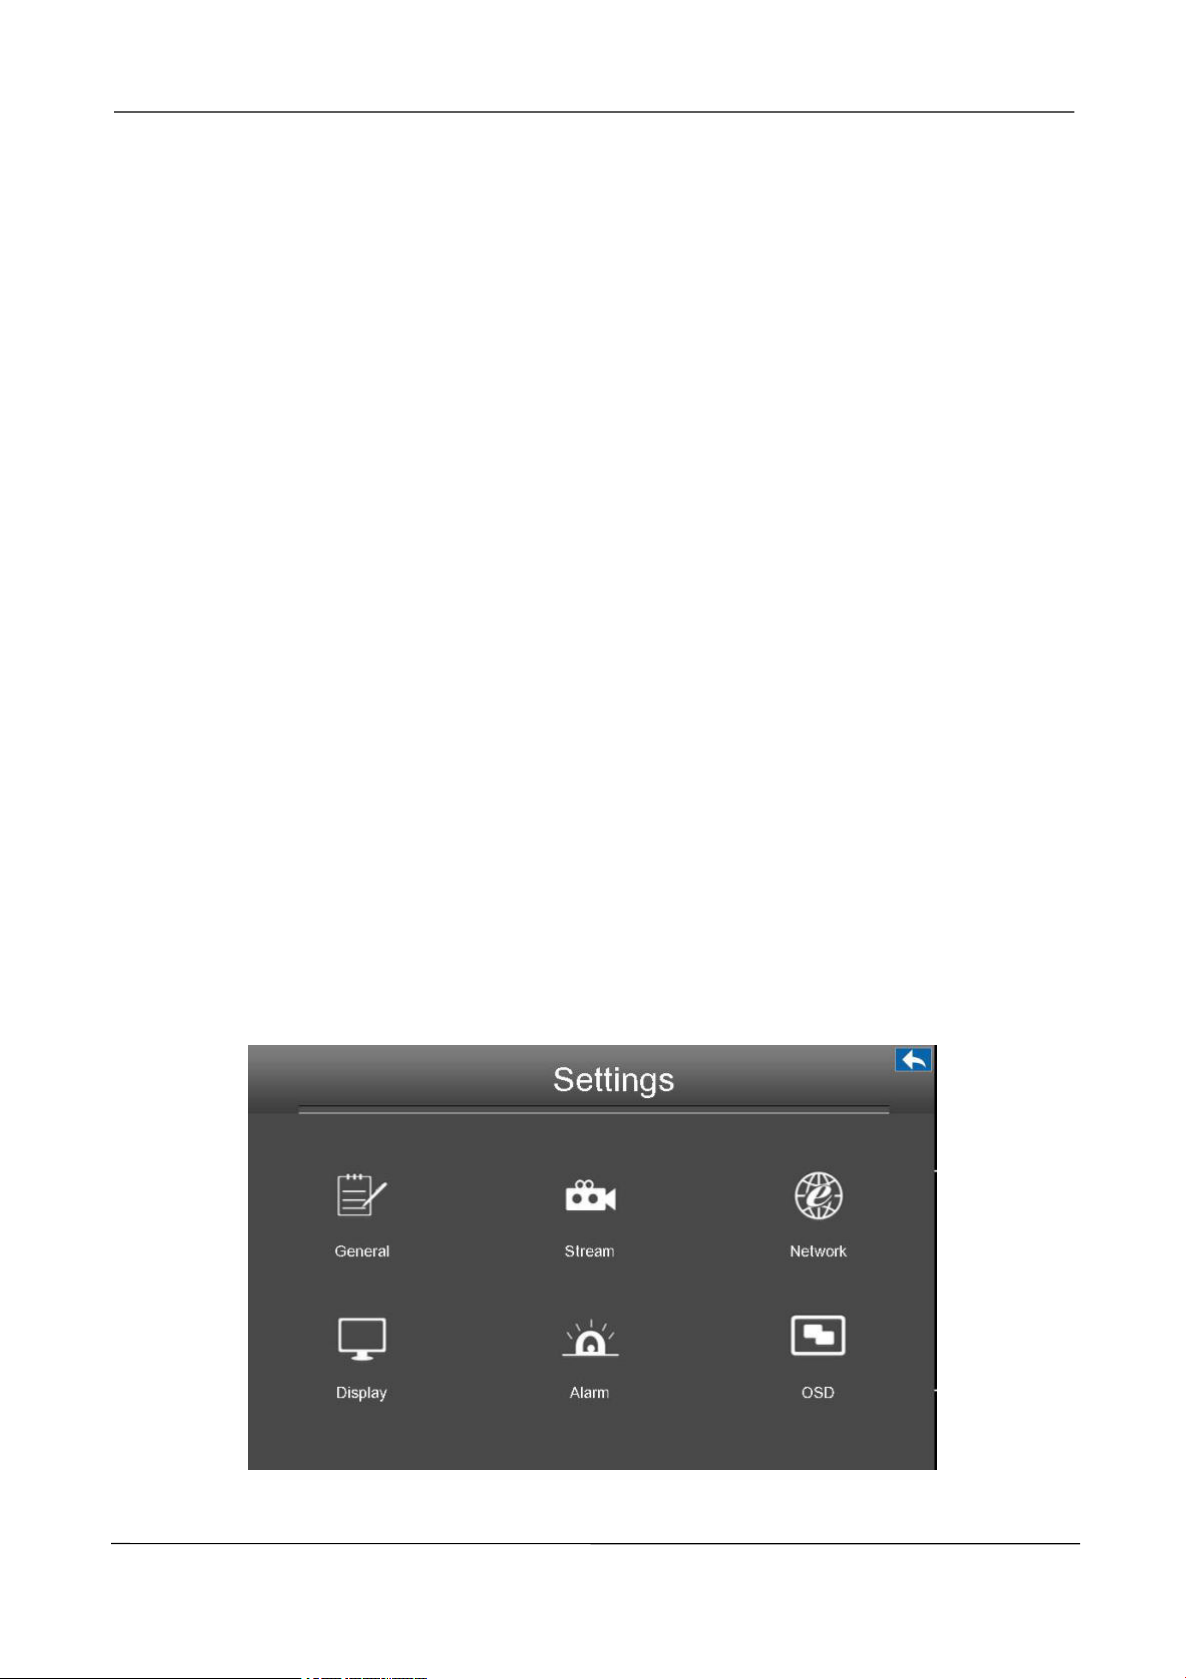
Choose Menu > Settings in the Menu interface. The Settings interface is displayed. You can
configure the general, video, schedule, network, display, Alarm Settings and OSD.
www.foscam.com
Page 26
NVR User Manual
20
Parameter
Description
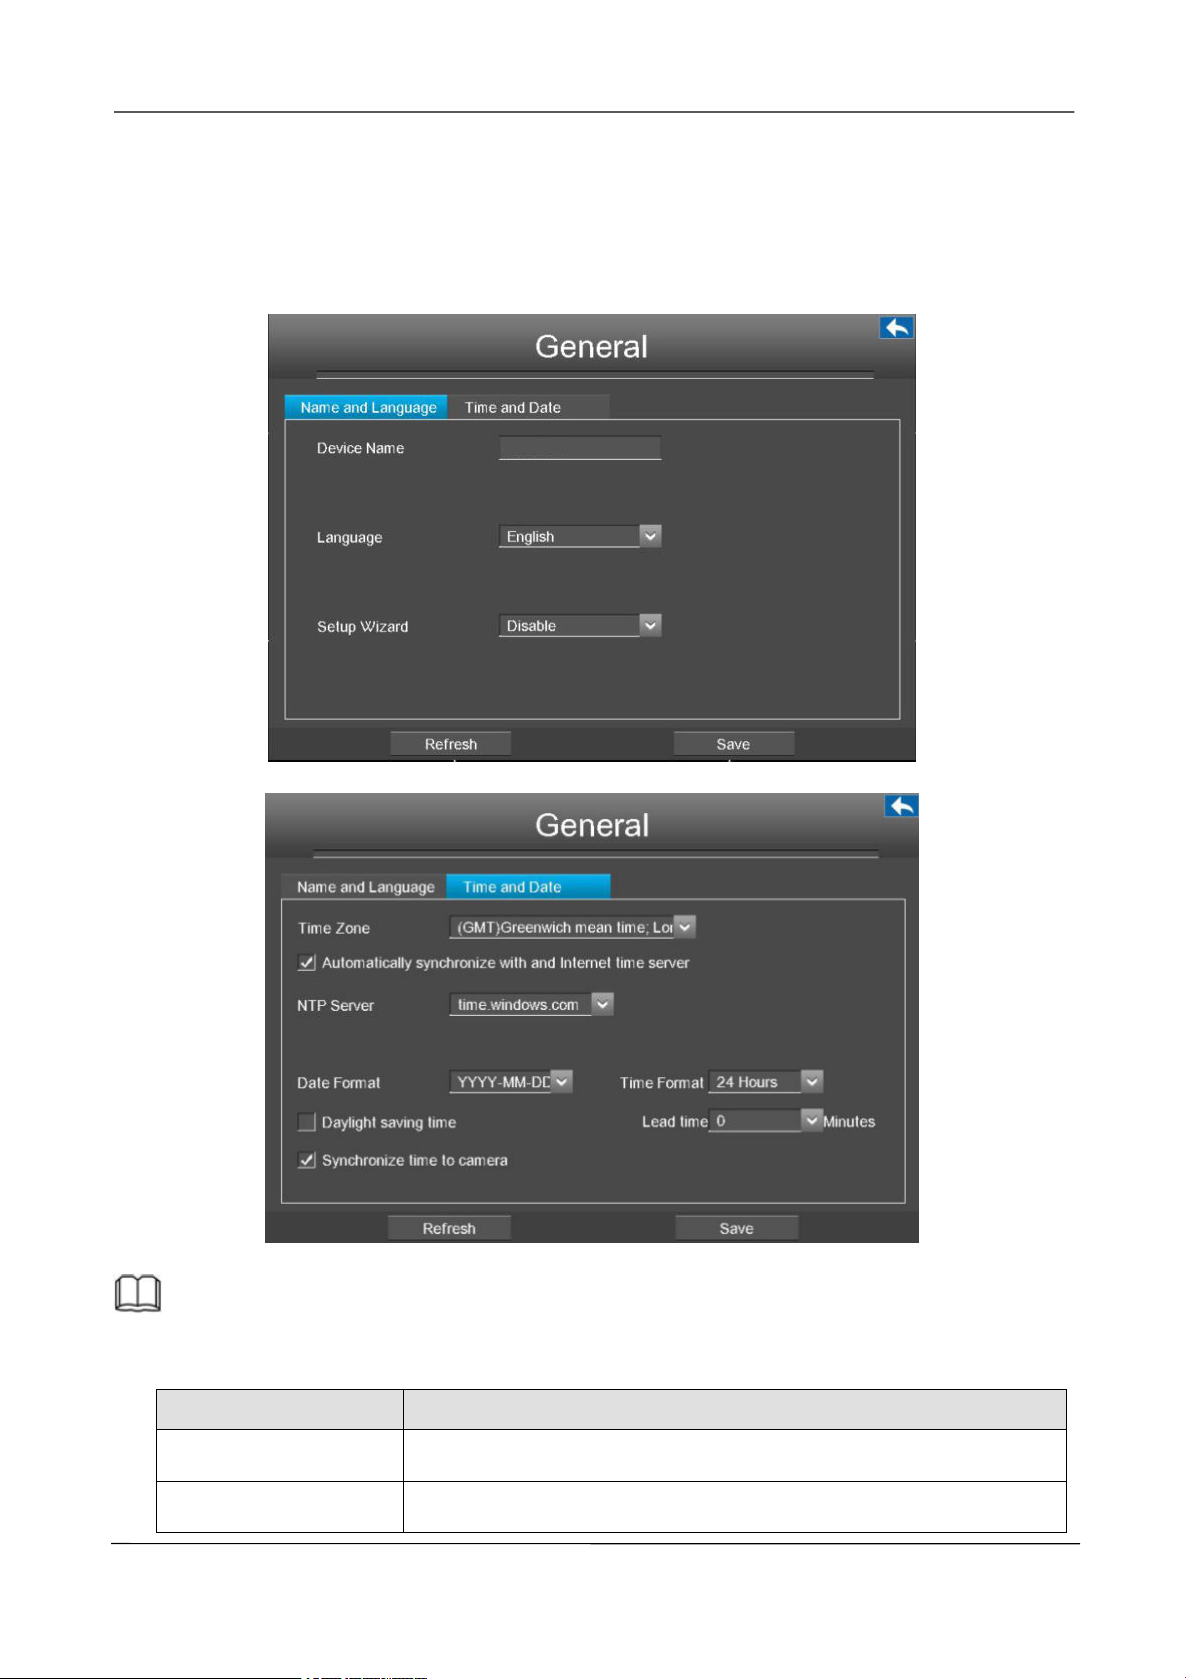
Device Name
You can modify your device name to help you identify it.
Language
Configure the language of the NVR interface.
FN7108HE
General
Choose Menu > Settings > General in the Menu interface. The General interface is displayed. You
can configure the basic information of the NVR.
NOTE
Please do not modify the NVR system time when recording.
www.foscam.com
Page 27
NVR User Manual
21
Setup Wizard
Whether to enable setup wizard when the NVR system starts again.
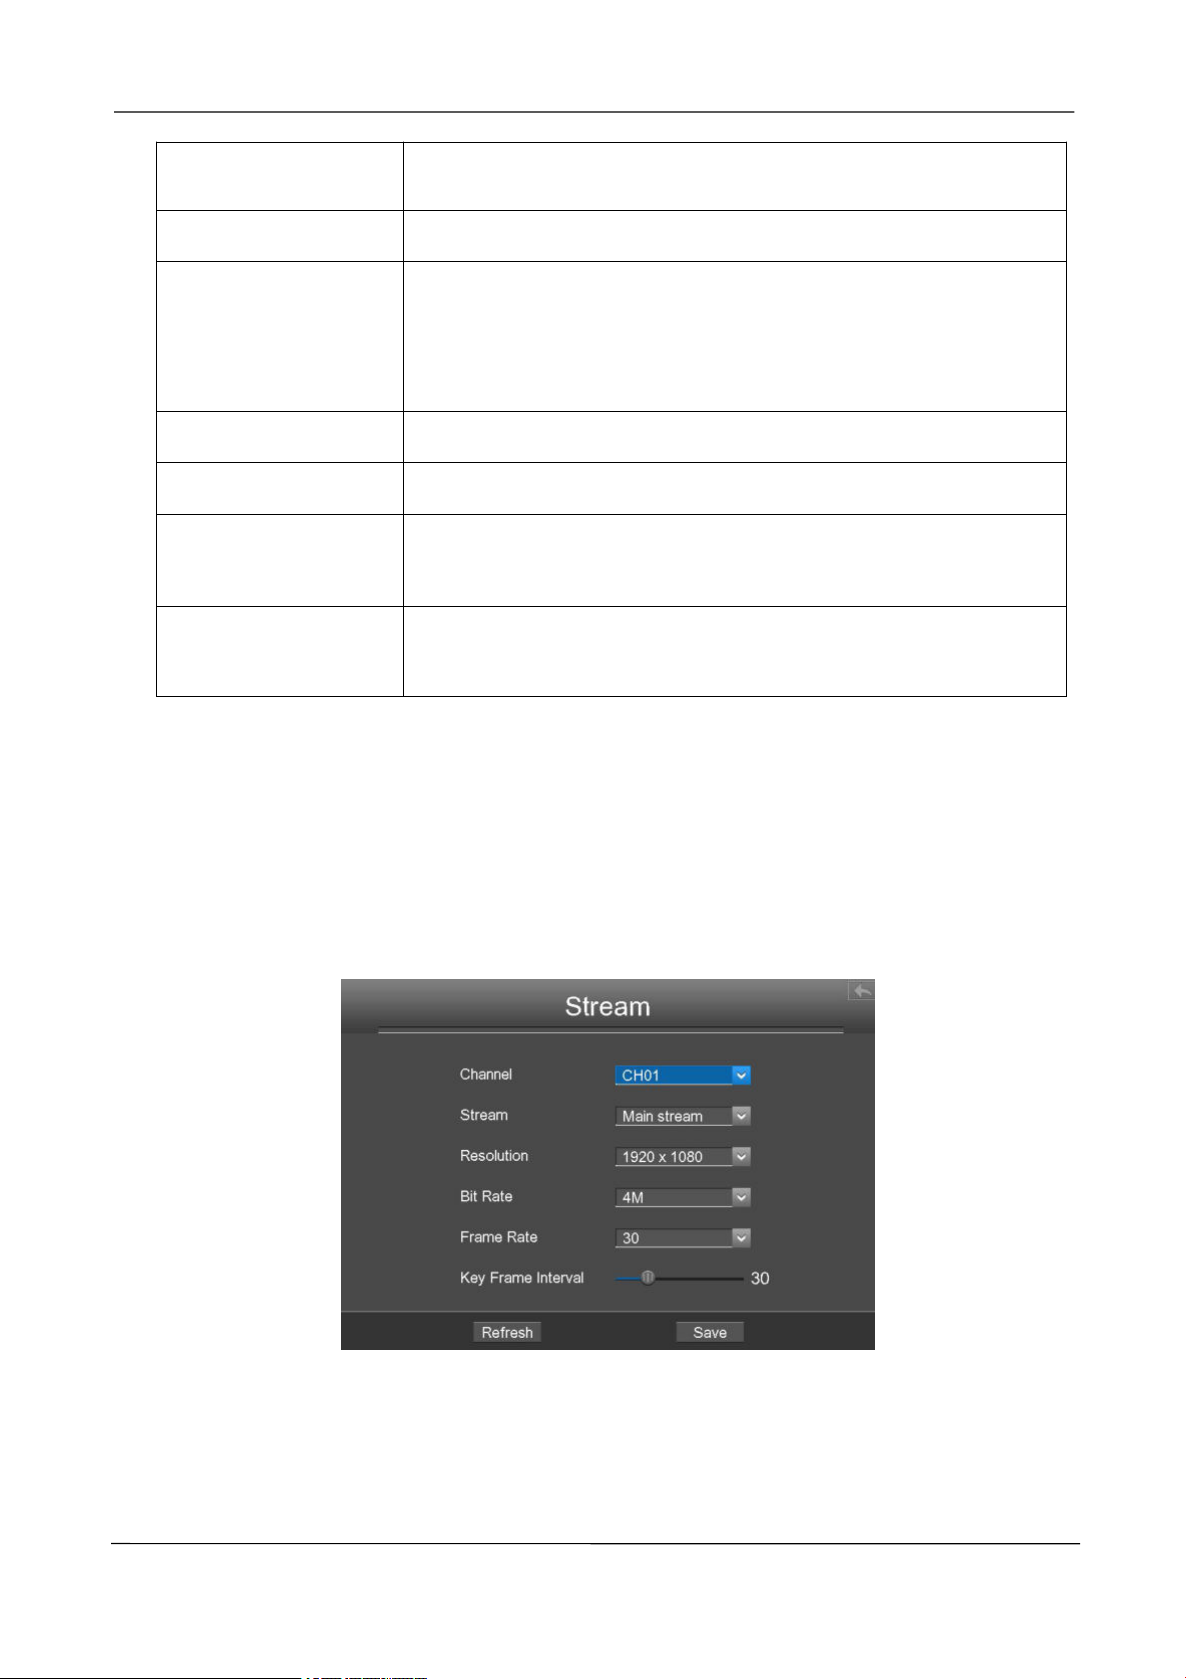
Time Zone
Please select the time zone according to the actual situation.
Automatically
synchronize with and
Internet time server
Whether synchronize your NVR with an Internet time server.
Check: You need to configure the NTP Server.
Uncheck: You need to configure the Date and Time.
Date Format
You need to configure the date format.
Time Format
You need to configure the time format.
Daylight saving time
Check the checkbox, then select the daylight saving time from the
dropdown list.
Synchronize time to
camera
Time set by the NVR system. Whether to synchronize the time to the
connected IPC device.
Click Save button to take effect.
Stream
Choose Menu > Settings > Stream in the Menu interface. The Stream interface is displayed.
You can configure the encoding scheme parameters of the IP Camera, the NVR system will
synchronize your IP camera with encoding scheme.
www.foscam.com
Page 28

NVR User Manual
22
Parameter
Description
Channel
You can select the channel for the IP Cameras.
Stream
You can set the value of Resolution, Bit Rate, Frame Rate, Key Frame
Interval when the video was set the main stream.
Resolution
The resolution of the IP Camera.
The higher the resolution is,the sharper the video quality is, but also with
the increasing stream, which will take up the higher bandwidth.
Bit Rate
Generally speaking, the larger the bit rate is, the clearer video will become.
But the bit rate configuration should combine well with the network
bandwidth. If the bandwidth is very narrow, and bit rate is large, that will
lead to video can not play well.
Frame Rate
Note that a larger frame size takes up more bandwidth.
When the video format is 50Hz, the maximum frame rate is 25 fps.
When the video format is 60Hz, the maximum frame rate is 30 fps.
You should choose a lower frame rate when the bandwidth is limited.
Normally, when the frame rate above 15, you can achieve fluently video.
Key Frame
Interval
The time between last key frame and next key frame. The shorter the
duration, the more likely you will get a better video quality, but at the cost of
higher network bandwidth consumption.
Click save button to take effect.
Network
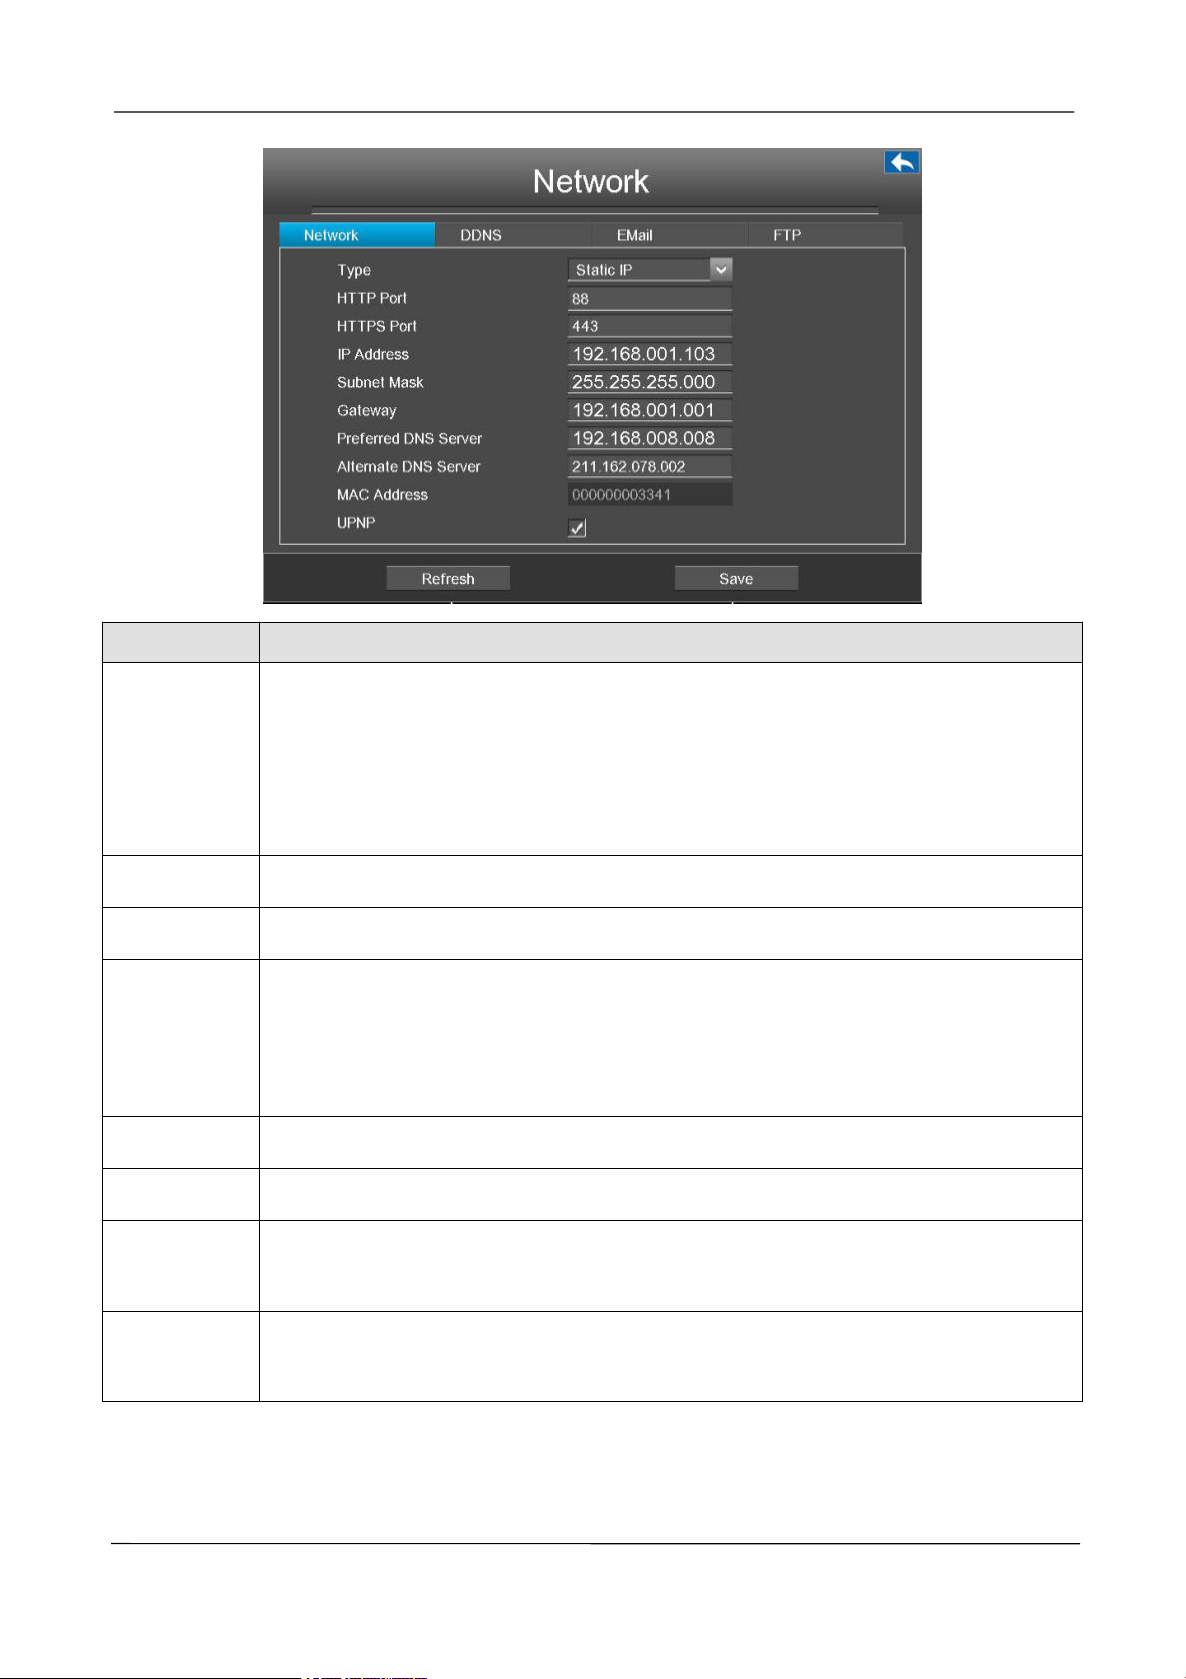
Choose Menu > Settings > Network in the Menu interface. The Network interface is displayed.You
can configure the information of Network, DDNS, E-Mail, FTP.
[Network]
Select the Network page, you can configure the network information of the NVR.
www.foscam.com
Page 29
NVR User Manual
23
Parameter
Description
Type
You can select the network type from the drop-down list box.
If select the DHCP, NVR system will automatically obtain an IP address and other
network settings from that server.
If select the Static IP, you can configure an IP address and other network settings.
HTTP Port
The default value is 88.
HTTPS Port
The default value is 443.
IP Address
You can configure the IP address of the NVR system.
Note:
The IP of IP cameras, PC and NVR should be in the same network segment and in the
same LAN.
Subnet Mask
The subnet mask of the NVR system.
Gateway
The gateway of the NVR system.
Primary DNS
Server
The primary DNS server of the NVR system.
Alternative
DNS Server
The secondary DNS server of the NVR system.
www.foscam.com
Page 30
NVR User Manual
24
MAC Address
You can use the UPnP function to enable the fast connection of the device to the WAN
via a router without port mapping.
Note:
If you want to enable the UPnP function of the NVR, you must enable the UPnP
function of the router to
which your NVR is connected.
UPNP
You can enable or disable the UPNP function.
Click Save button to take effect.
How to configure the IP Address, Subnet Mask, Gateway, Primary DNS Server, Secondary DNS
Server, please refer to 4.2 Common Operations 2. Configure the IP Parameters.
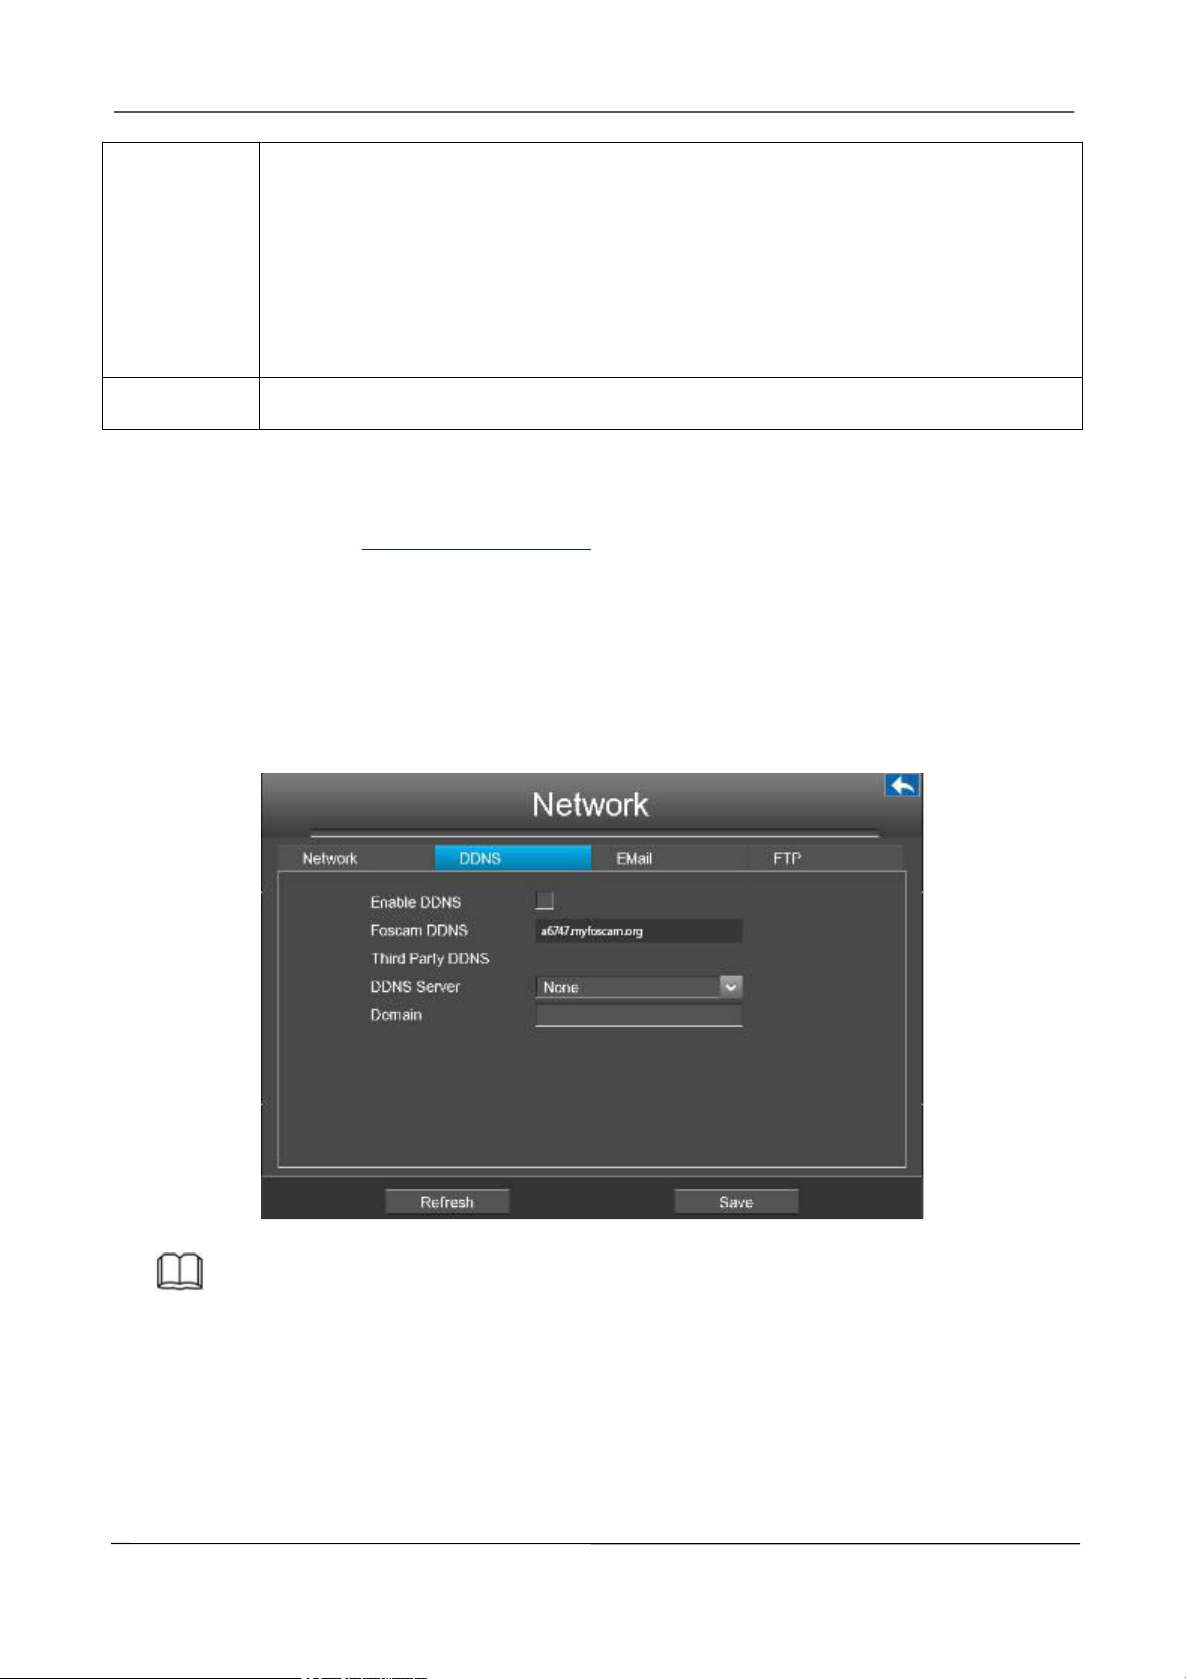
[DDNS]
Select the DDNS page, you can configure the DDNS information of the NVR.
The NVR has embedded a unique DDNS domain name when producing, and you can directly use
the domain name, you can also use the third party domain name.
Note
Here take a6747.myfoscam.org for example.
Enable DDNS:Check the DDNS checkbox to enable this feature.
Click Save button to take effect. Then you can use http:// Domain name + HTTP Port to access the
NVR via internet.
Take hostname a6747.myfoscam.org and HTTP Port. 88 for example, the accessing link of the
www.foscam.com
Page 31
NVR User Manual
25
Parameter
Description
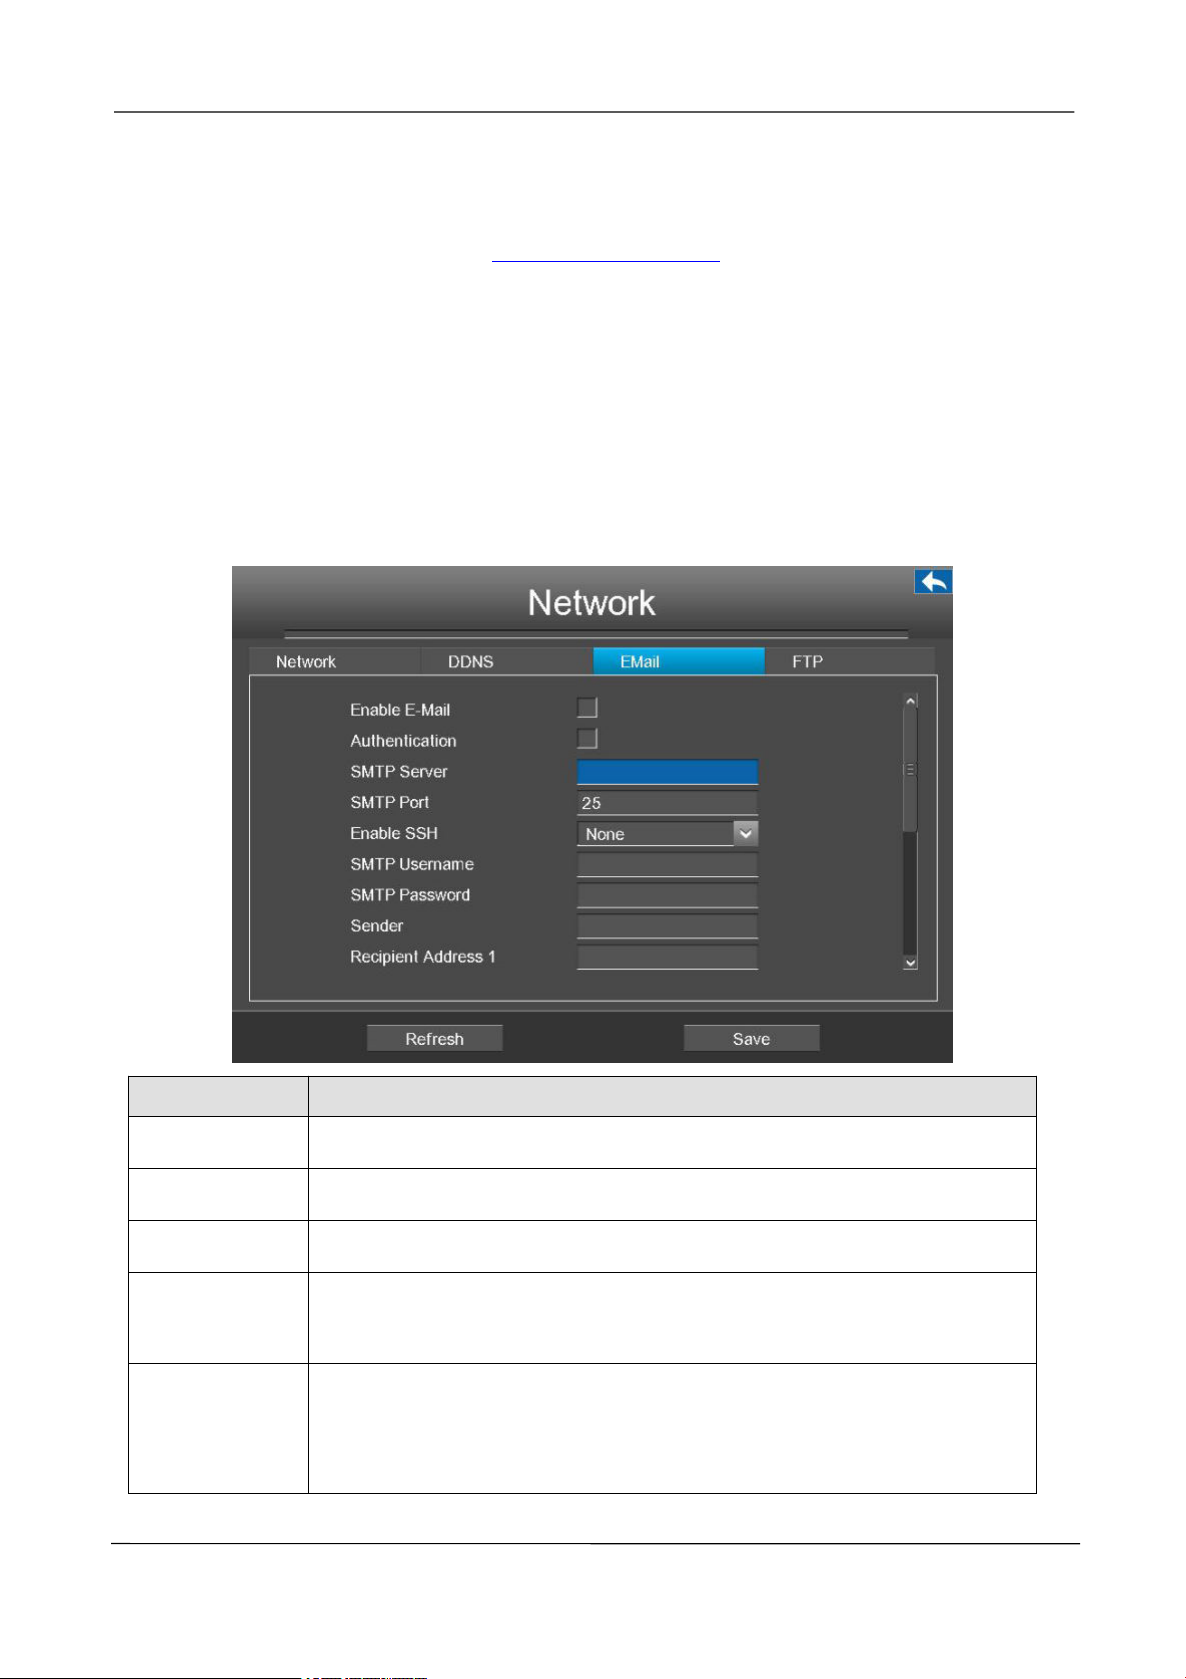
Enable E-Mail
Check the checkbox to enable the Eamil function.
Authentication
Whether to verify the user name and password during login to the mailbox.
SMTP Server
The SMTP Server IP address or host name.
SMTP Port
The SMTP port is usually set as 25. Some SMTP servers have their own
port, such as 587 or 465.
Enable SSH
Transport Layer Security usually is None.
If you use Gmail, Transport Layer Security must be set to TLS or STARTTLS
and SMTP Port must be set to 465 or 25 or 587, which port you choose
camera via internet would be http://a6747.myfoscam.org:88
Third Party DDNS:You can also use third part DDNS, such as www.no-ip.com, www. 3322.com. If
you set the third party DDNS, refer to 4.2 Common Operations 1.Third Party Domain Name Settings.
[EMail]
Select the EMail page, you can configure the E-mail information of the NVR.
The system can be configured to send an email to the designated users if an alarm or motion event
is detected etc..
Before configuring the Email settings, the NVR must be connected to a local area network (LAN) that
maintains an SMTP mail server.
www.foscam.com
Page 32
NVR User Manual
26
should be decided by which Transport Layer Security you select.
SMTP
Username
The user account of sender's Email for SMTP server authentication.
SMTP Password
The password of sender's Email for SMTP server authentication.
Sender
The Email address of sender.
Recipient
Address
The Email address of user to be notified. you can set 4 receivers
Click Save button to take effect.
Click E-Mail Test to see if Mail has been successfully configured.
If the test success, you can see the success information, at the same time the receivers will receive
a test mail.
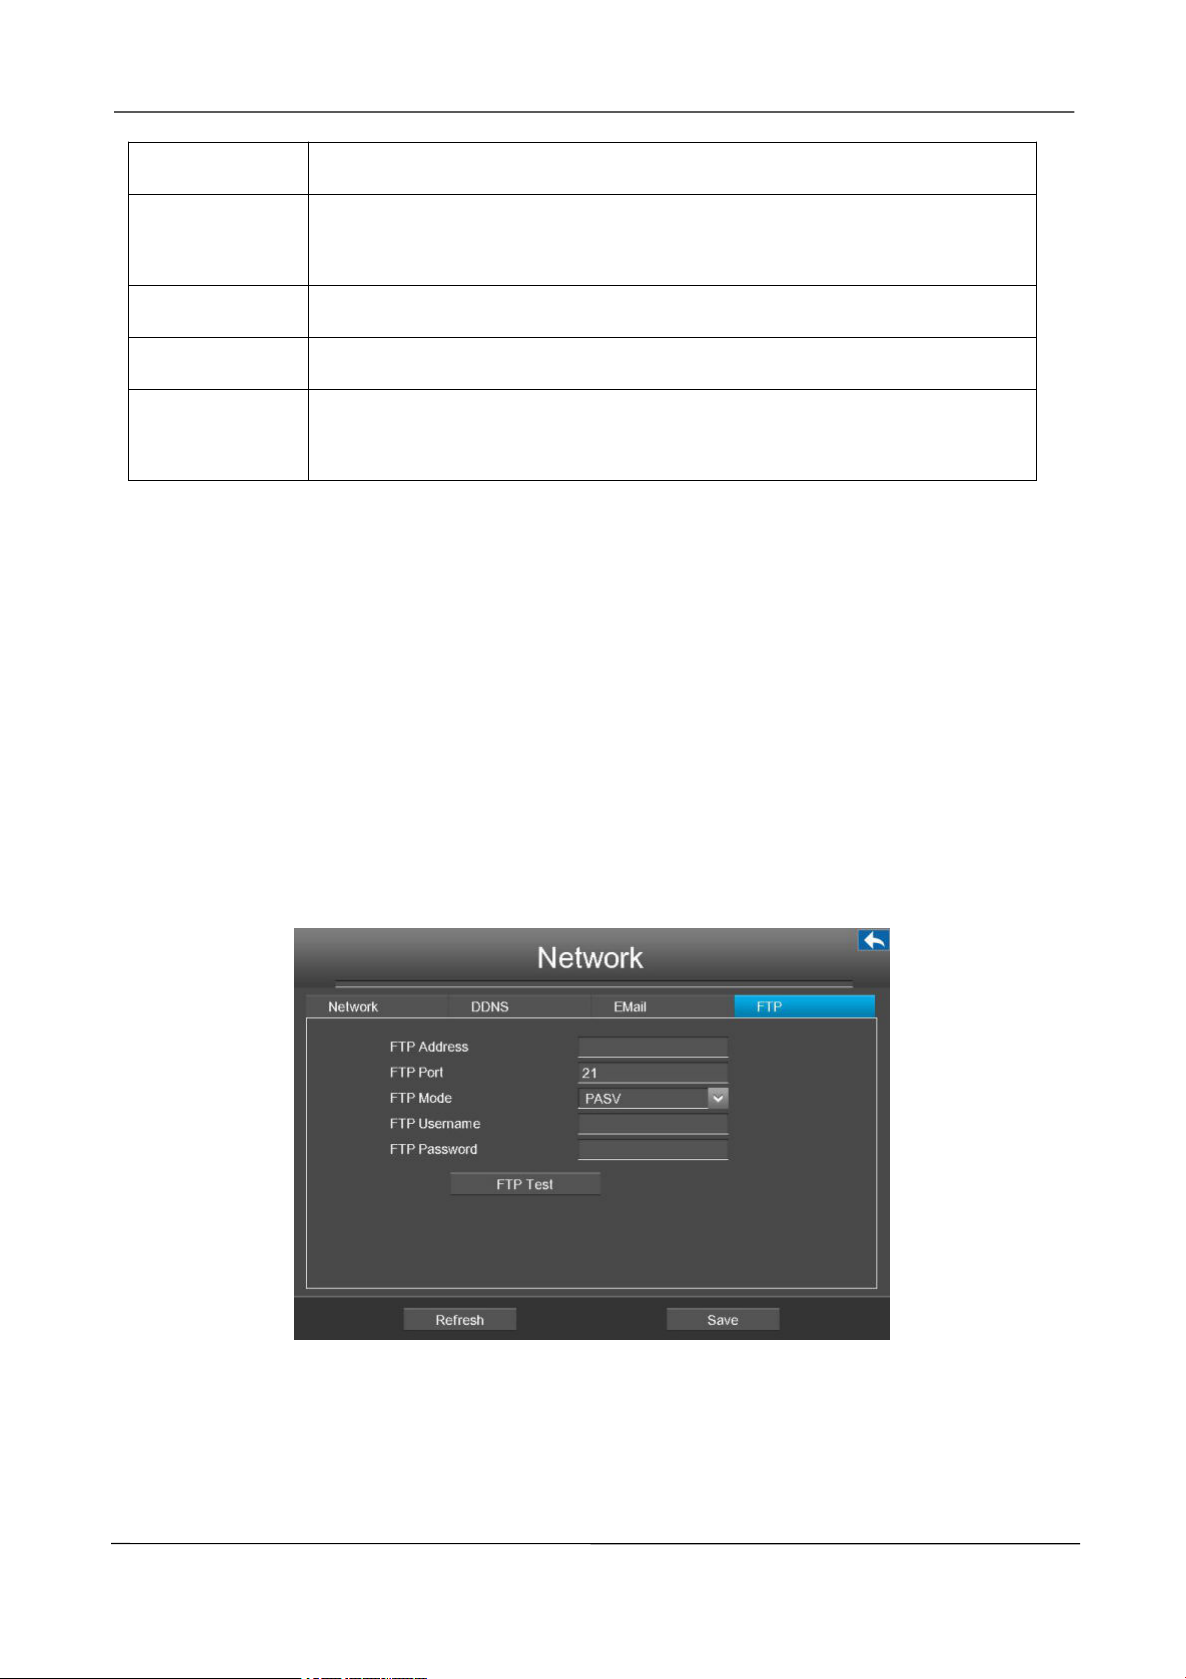
[FTP]
Select the FTP page, you can configure the FTP information of the NVR.
The system can be configured to send an picture to the FTP server if an alarm or motion event is
detected etc..
www.foscam.com
Page 33
NVR User Manual
27
Parameter
Description
FTP Address
If your FTP server is located on the LAN, you can set FTP address
as ftp://IP address/dir.(eg.ftp://192.168.1.103/dir).
If your FTP server is located on the WAN, you can set FTP
address as ftp://domain name/dir.(eg.ftp:test.no-ip.org/dir).
FTP Port
Default port is 21.You can also change this port manually through FTP
server.
FTP Mode
Here supports two modes: PORT and PASV.
FTP Username
The user account of FTP server.
FTP Password
The user password of FTP server.
Click Save button to take effect.
Click FTP Test to see if FTP has been successfully configured.
If the test success, you can see the success information.
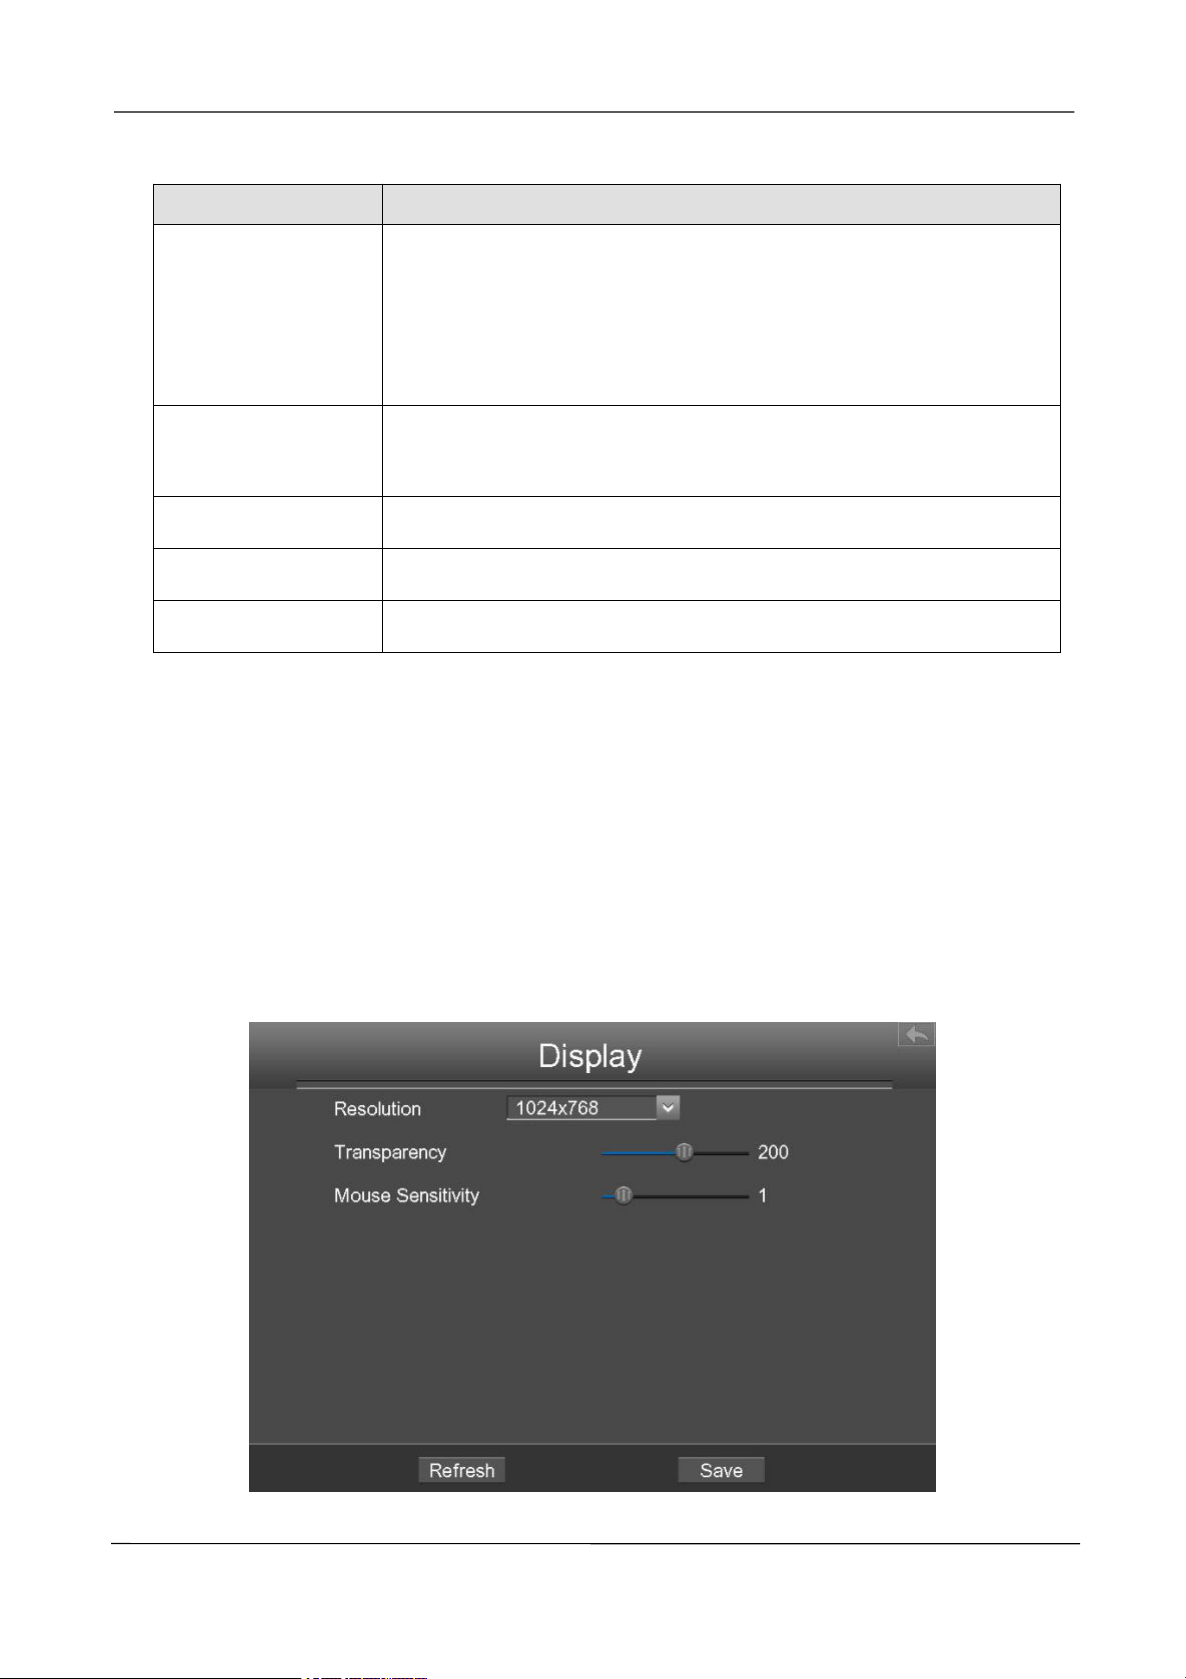
Display
Choose Menu > Settings > Display in the Menu interface. The Display interface is displayed.You
can configure the display mode, Resolution, Transparency, Mouse Sensitivity and Interval for the
NVR.
www.foscam.com
Page 34

NVR User Manual
28
Parameter
Description
Resolution
The output resolution of the NVR.
Transparency
Configure the transparency of the NVR output interface.
Mouse Sensitivity
Configure the sensitivity of the mouse.
Alarm Settings
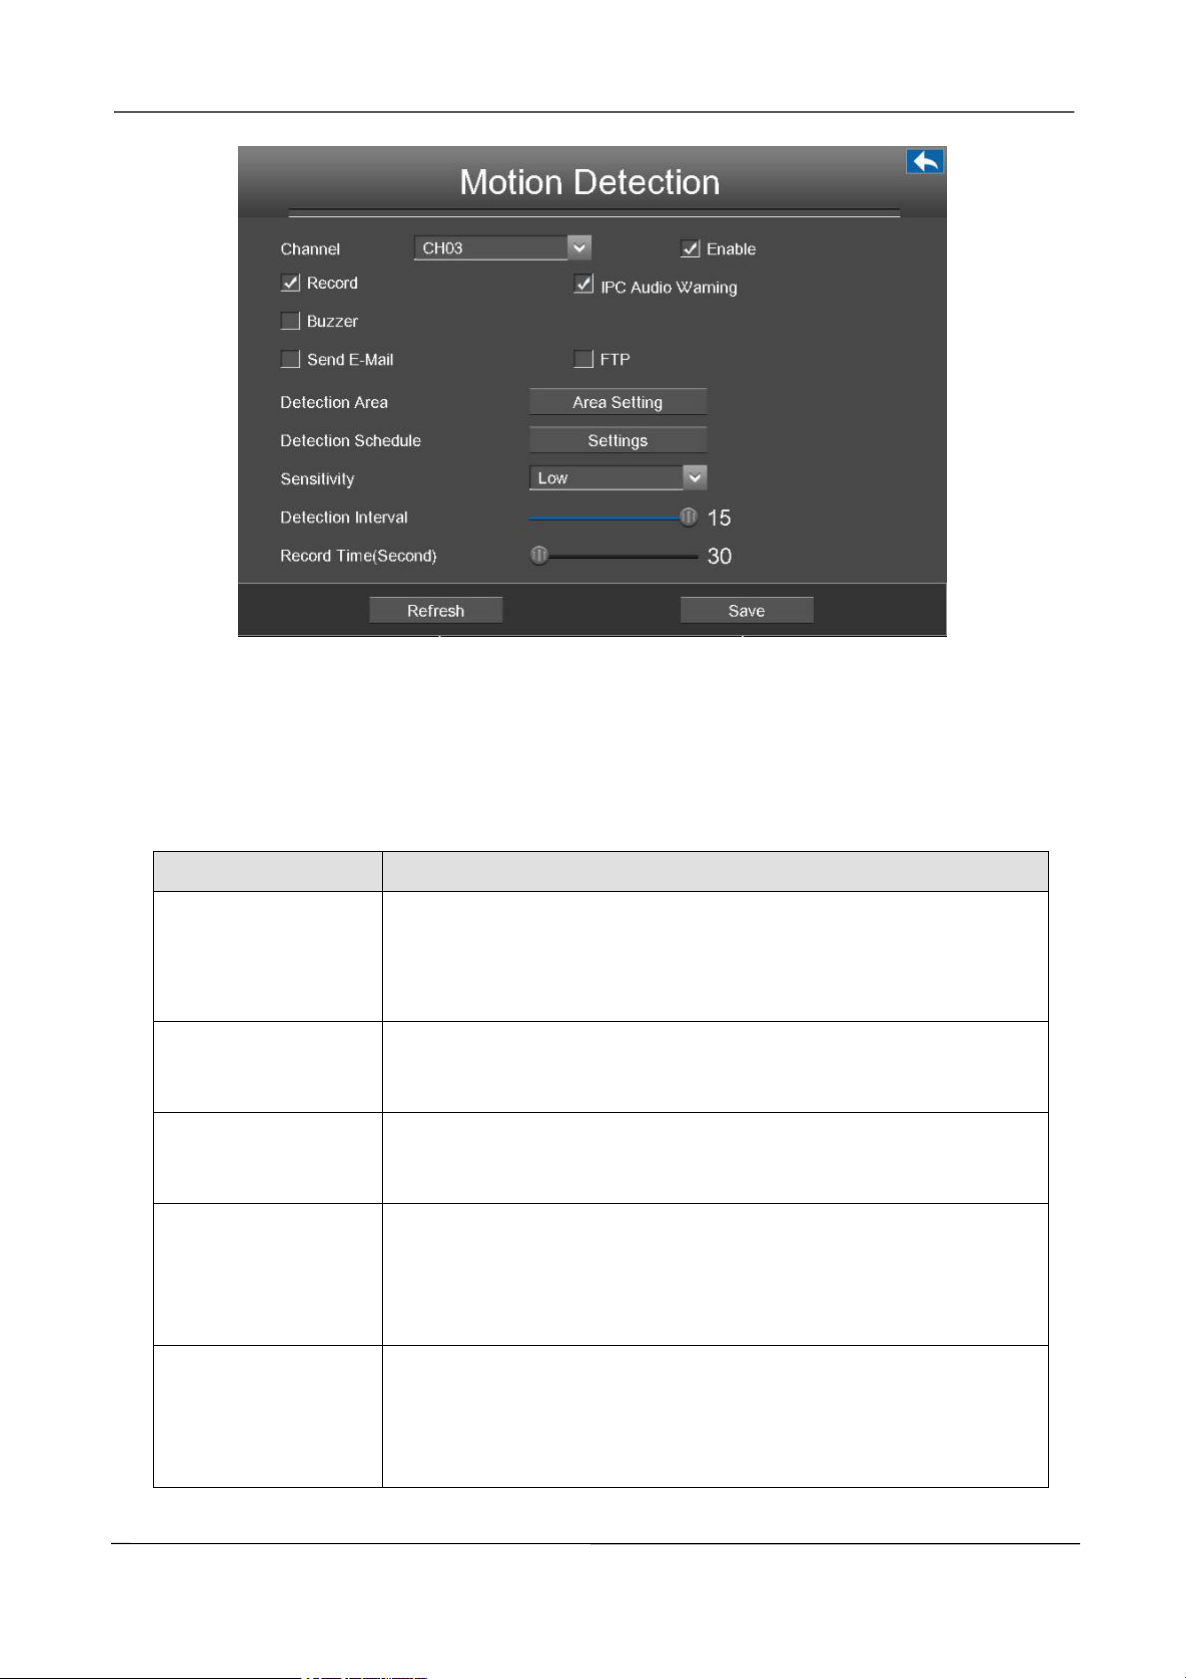
[Motion Detection]
Follow the steps to set the motion detection parameters. In the live view mode, once a motion
detection event takes place, the NVR can analyze it and perform many actions to handle it. Enable
motion detection function can trigger certain channels to start recording, or trigger full screen
monitoring, output alarm, send Email, upload figure to FTP, buzzer alarm and so on.
In the live view mode, there are icons at the right bottom of the screen for each channel.
The Icon
The Icon
In this chapter, you can follow the steps to schedule a record which triggered by the detected motion.
Choose Menu > Settings > Alarm Settings > Motion Detection in the Menu interface. The Motion
Detection interface is displayed.
indicate alarm was triggered.
indicate the IPC is recording.
www.foscam.com
Page 35
NVR User Manual
29
Parameter
Description
Record
If you select this checkbox, when the Motion detection is triggered,
the NVR will record automatically and store the record files to the
HDD.
IPC Audio Warning
If you select this checkbox, when the Motion detection is triggered,the
people around the camera will hear beep alarm sound of the IPC.
Buzzer
When the Motion detection is triggered, you can choose whether to
enable buzzing sound of the NVR device.
Send E-Mail
When the Motion detection is triggered, you can choose whether to
send e-mail.
Note: Make sure you have set Email.
FTP
When the Motion detection is triggered, you can choose whether to
upload detection picture to FTP server.
Note: Make sure you have set FTP.
Step1 Select channel from drop-down box list.
Step2 Check the checkbox to enable motion detection function.
Step3 Check the checkbox to select the linkage method. You may refer to follow table for details of
linkage methods.
Step4
Set Detection Area.
www.foscam.com
Page 36
NVR User Manual
30
Parameter
Description
Sensitivity
The higher the sensitivity, the NVR will be more easily alarmed.
Detection Interval
The Triggered Interval time between two motion detection. The unit is
second.
Record
(Time Second)
When you check the Record, you need to configure motion detection
recording time. The unit is second.
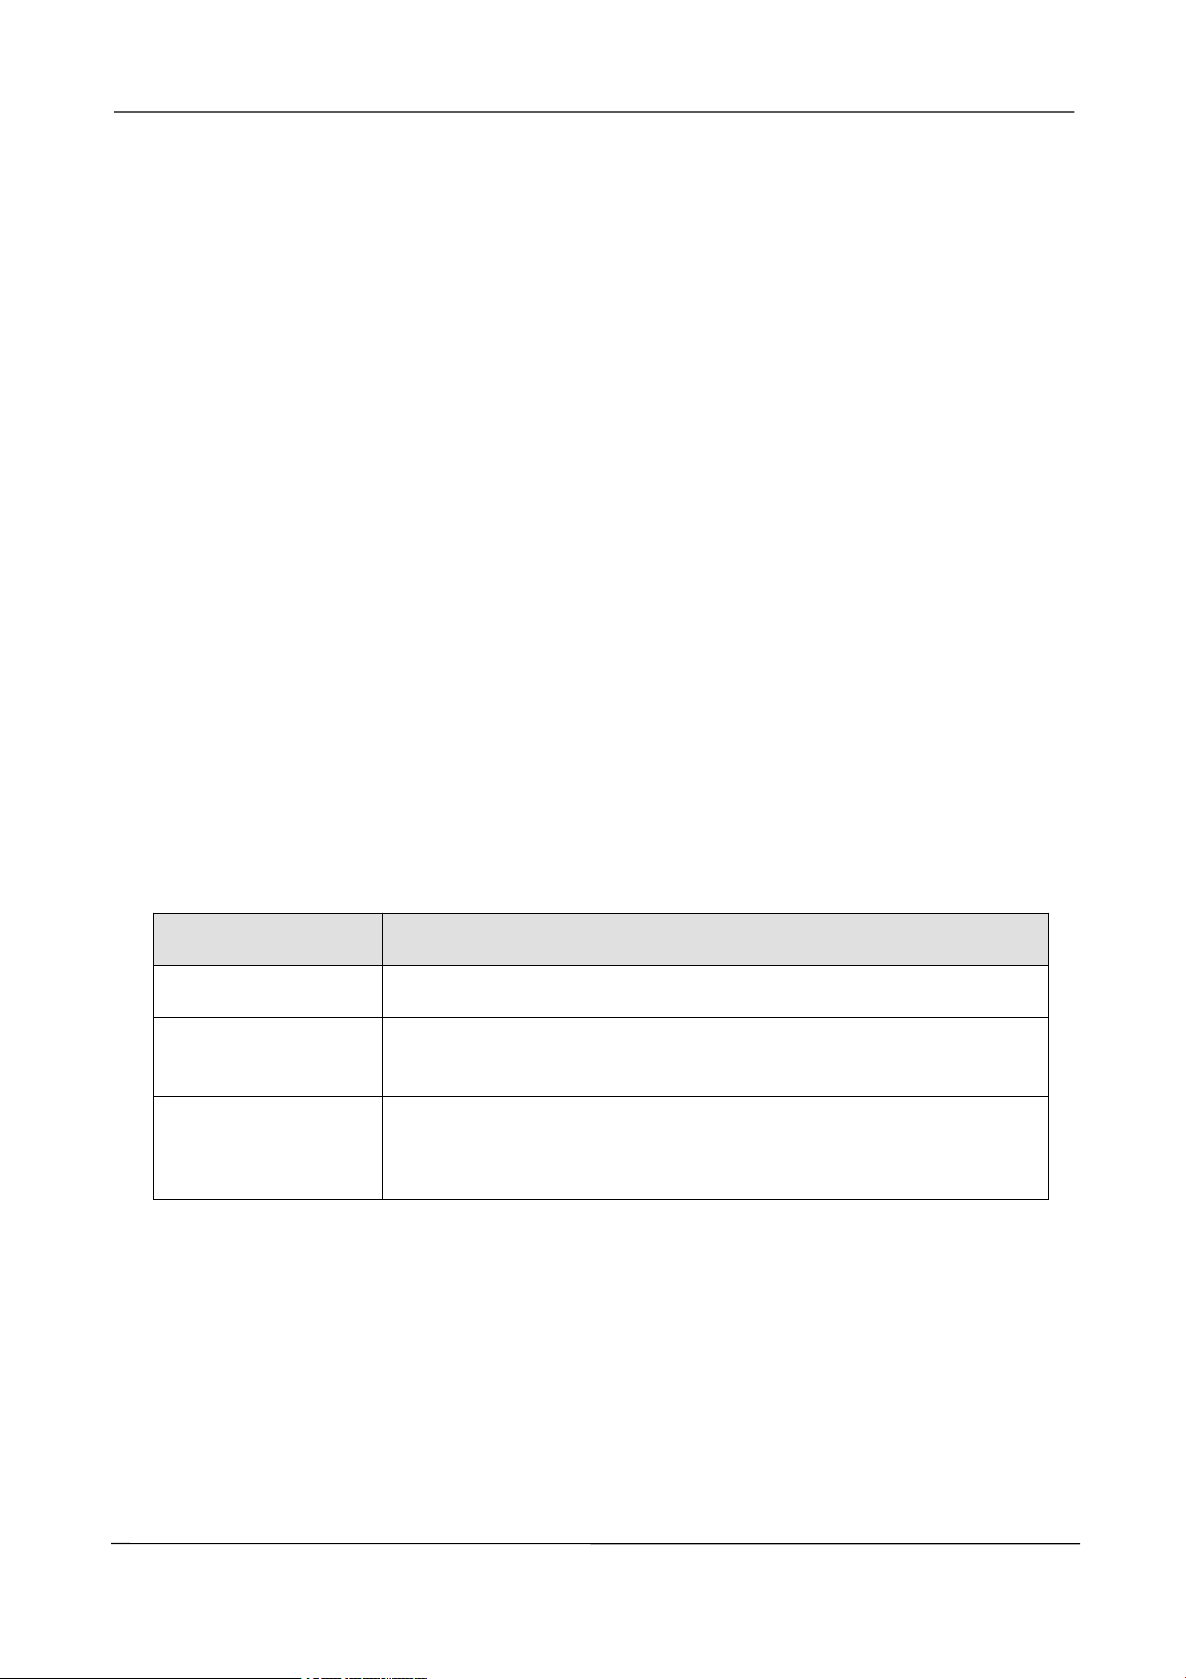
1.Click Area Setting button and it pop up a window.
2.Drag and draw the area for motion detection by left mouse.
3.Right-click with your mouse to save and quit. When something moving in the detection area,
the NVR will alarm.
Step5 Set Detection Schedule.
1.Click Settings button for the detection schedule.
Set up arming schedule of the channel for the motion detection.
You can choose a week, one day of a week, the certain time period for the motion detection
alarm.
2.Check Select checkbox to select the area.
3.Drag and draw the area for motion detection by left mouse.
Note:Check Clear checkbox and If you clear the area, then drag and draw the area for motion
detection by mouse.
4.Click the OK button to save and exit the window.
Step6 Select the Sensitivity from the drop-down box list. And then you can enable the detection
area.
You can drag the time bar to select the detection interval and record time.
Step7
When the motion has been detected during the detection time in the detection area, the NVR will
Click Save button to take effect.
alarm and adopt the corresponding alarm linkage.
Note: You must set the detection area and detection schedule, or else there is no alarm anywhere
and anytime.
-------End
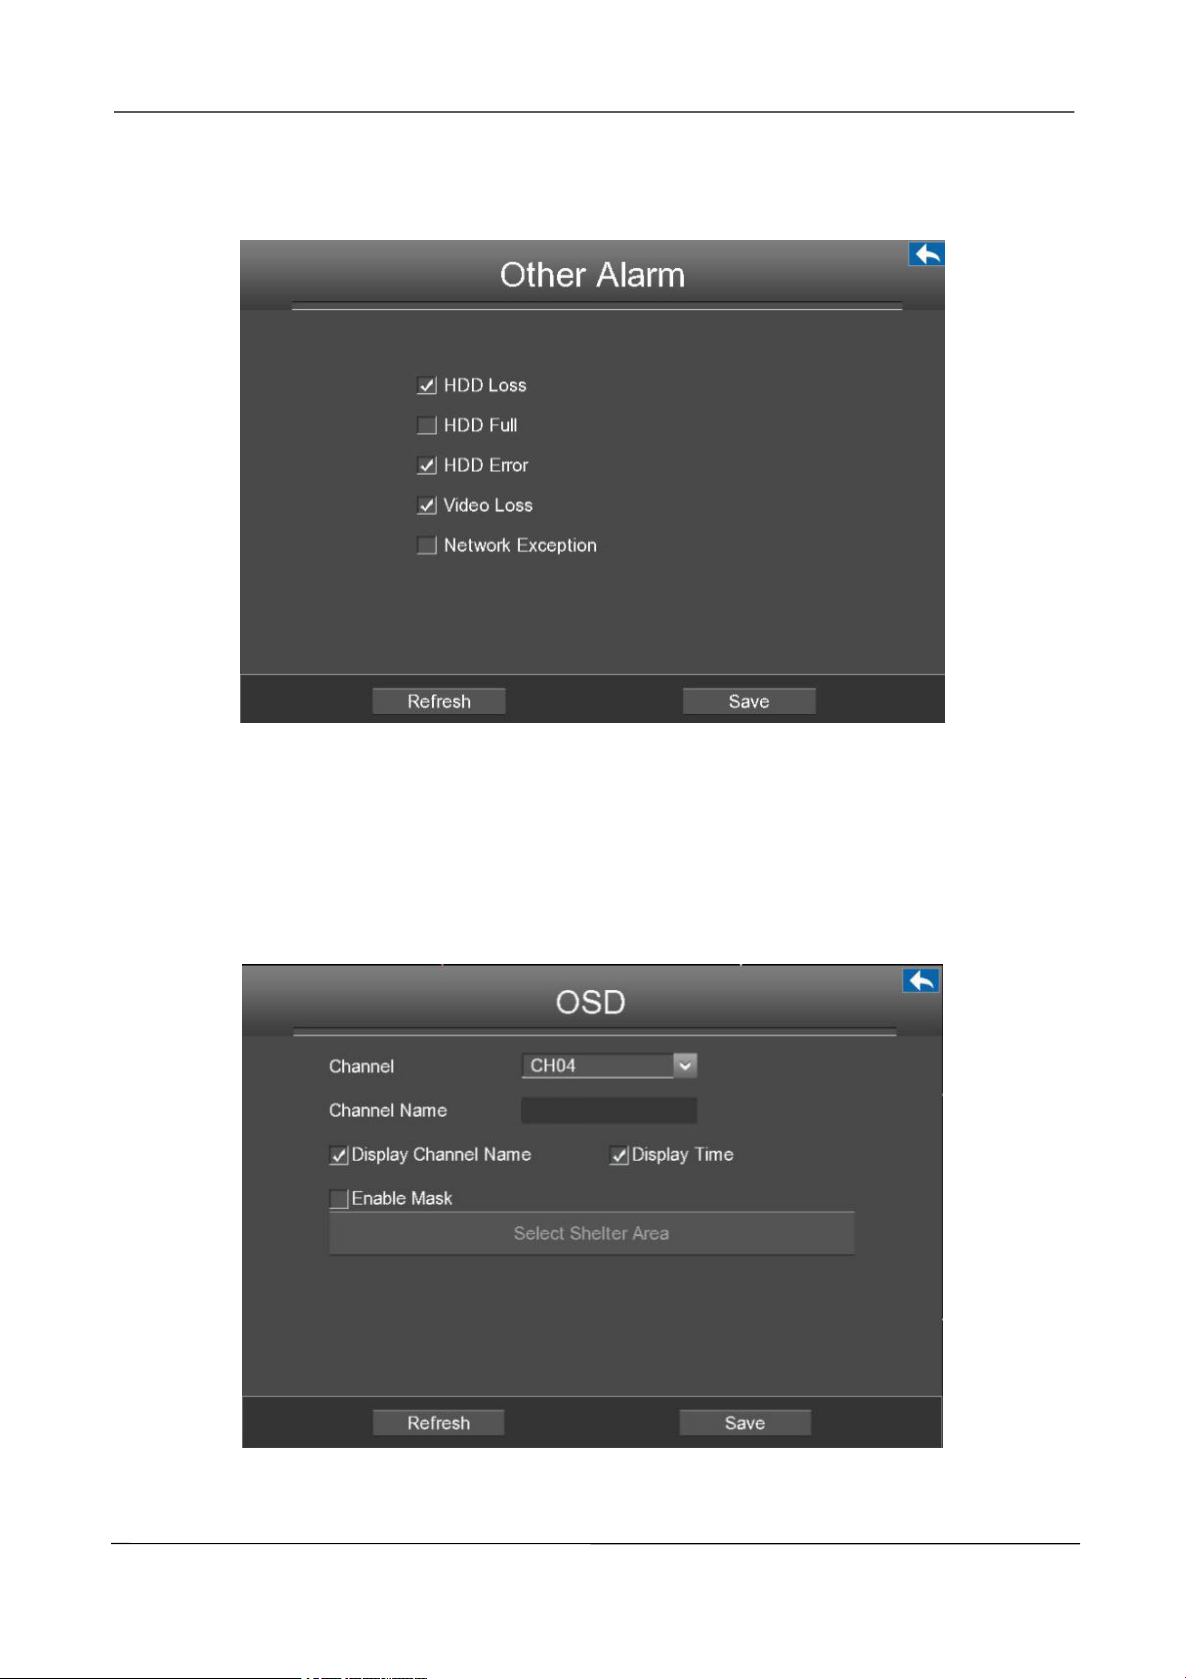
[Other Alarm]
www.foscam.com
Page 37
NVR User Manual
31
Foscam_camera
Choose Menu > Settings > Alarm Settings > Other Alarm in the Menu interface. The Other Alarm
interface is displayed.
Click Save button to take effect.
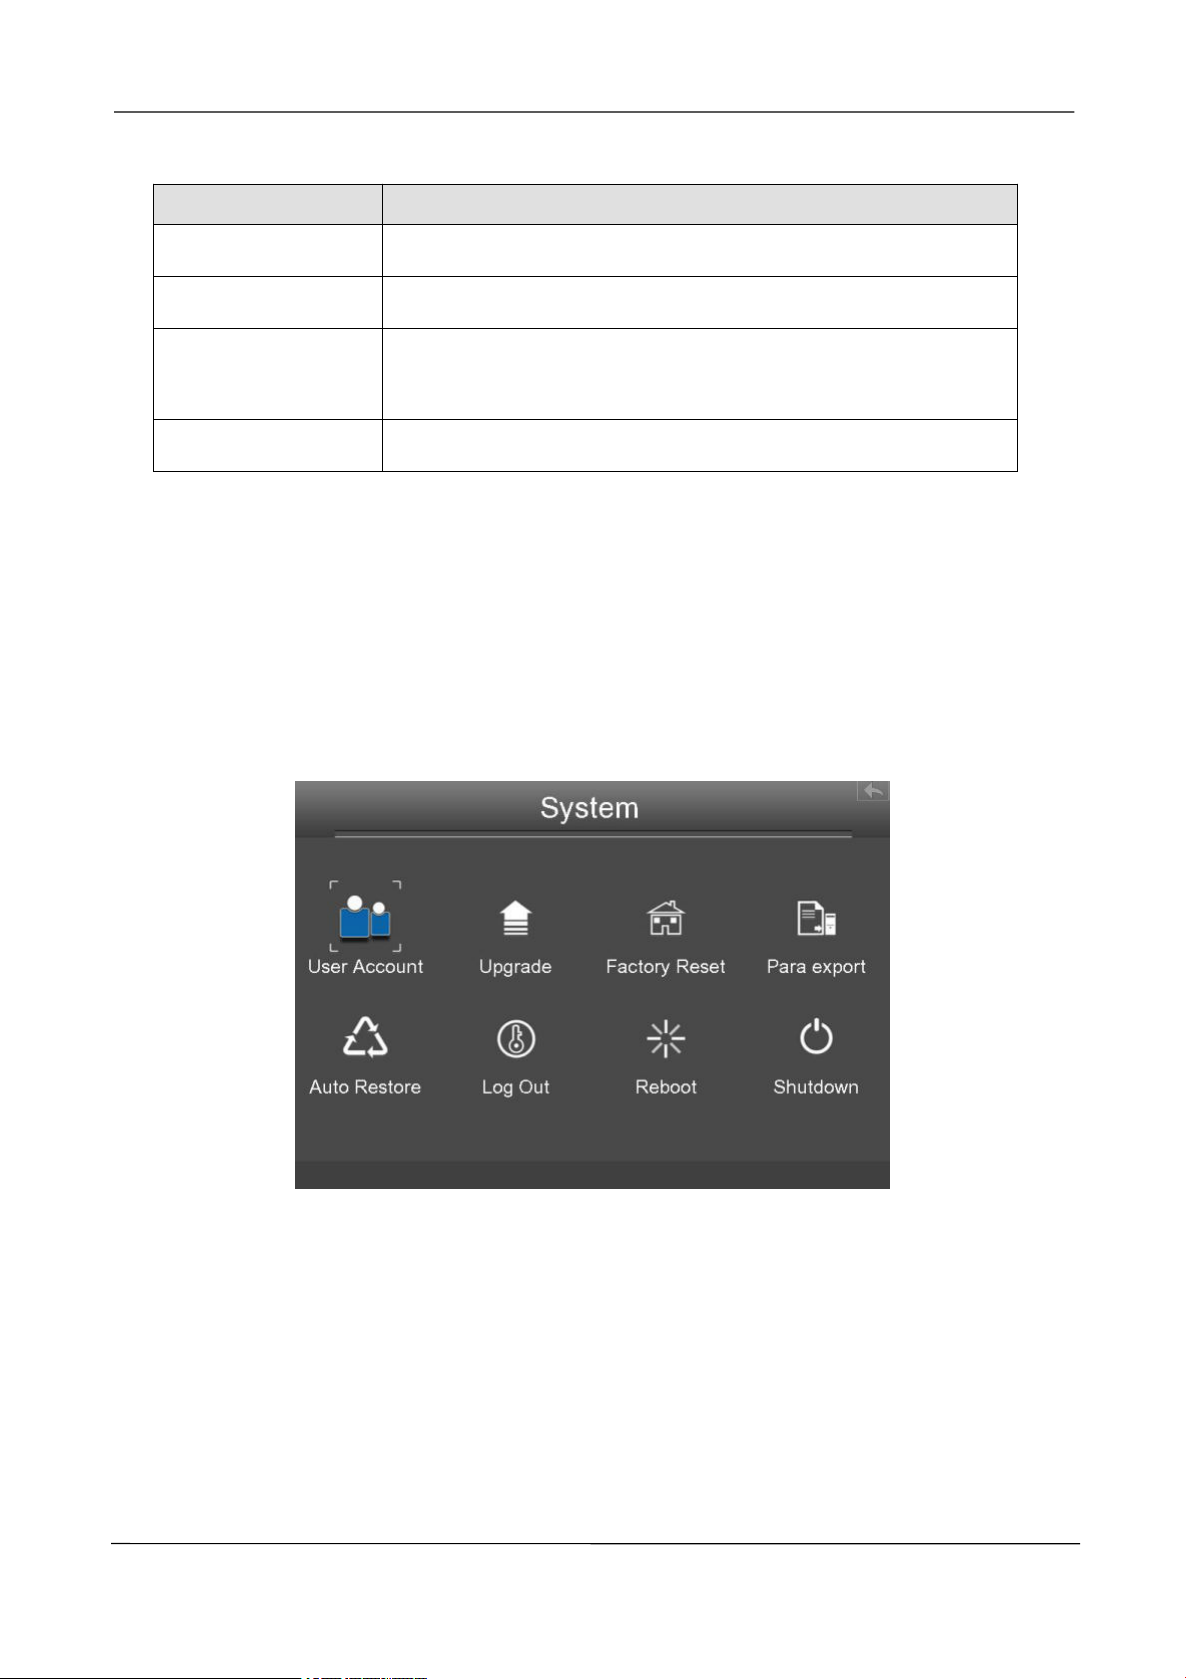
OSD
Choose Menu > Settings > OSD in the Menu interface. The OSD interface is displayed. You can
configure the OSD(On Screen Display) information.
www.foscam.com
Page 38
NVR User Manual
32
Parameter
Description
Channel
Select the channel from the drop-down list.
Channel Name
It displays the IPC device name of the corresponding channel.
Display Channel
Name
Whether to display the IPC device name on the selected channel.
Display Time
Whether to display the IPC device time on the selected channel.
2.4.6 System
Choose Menu > System in the Menu interface. The System interface is displayed.
You can manage the NVR device about User Account, Upgrade, Factory Reset, Para export, Auto
Restore, Log Out, Reboot, Shutdown.
User Account
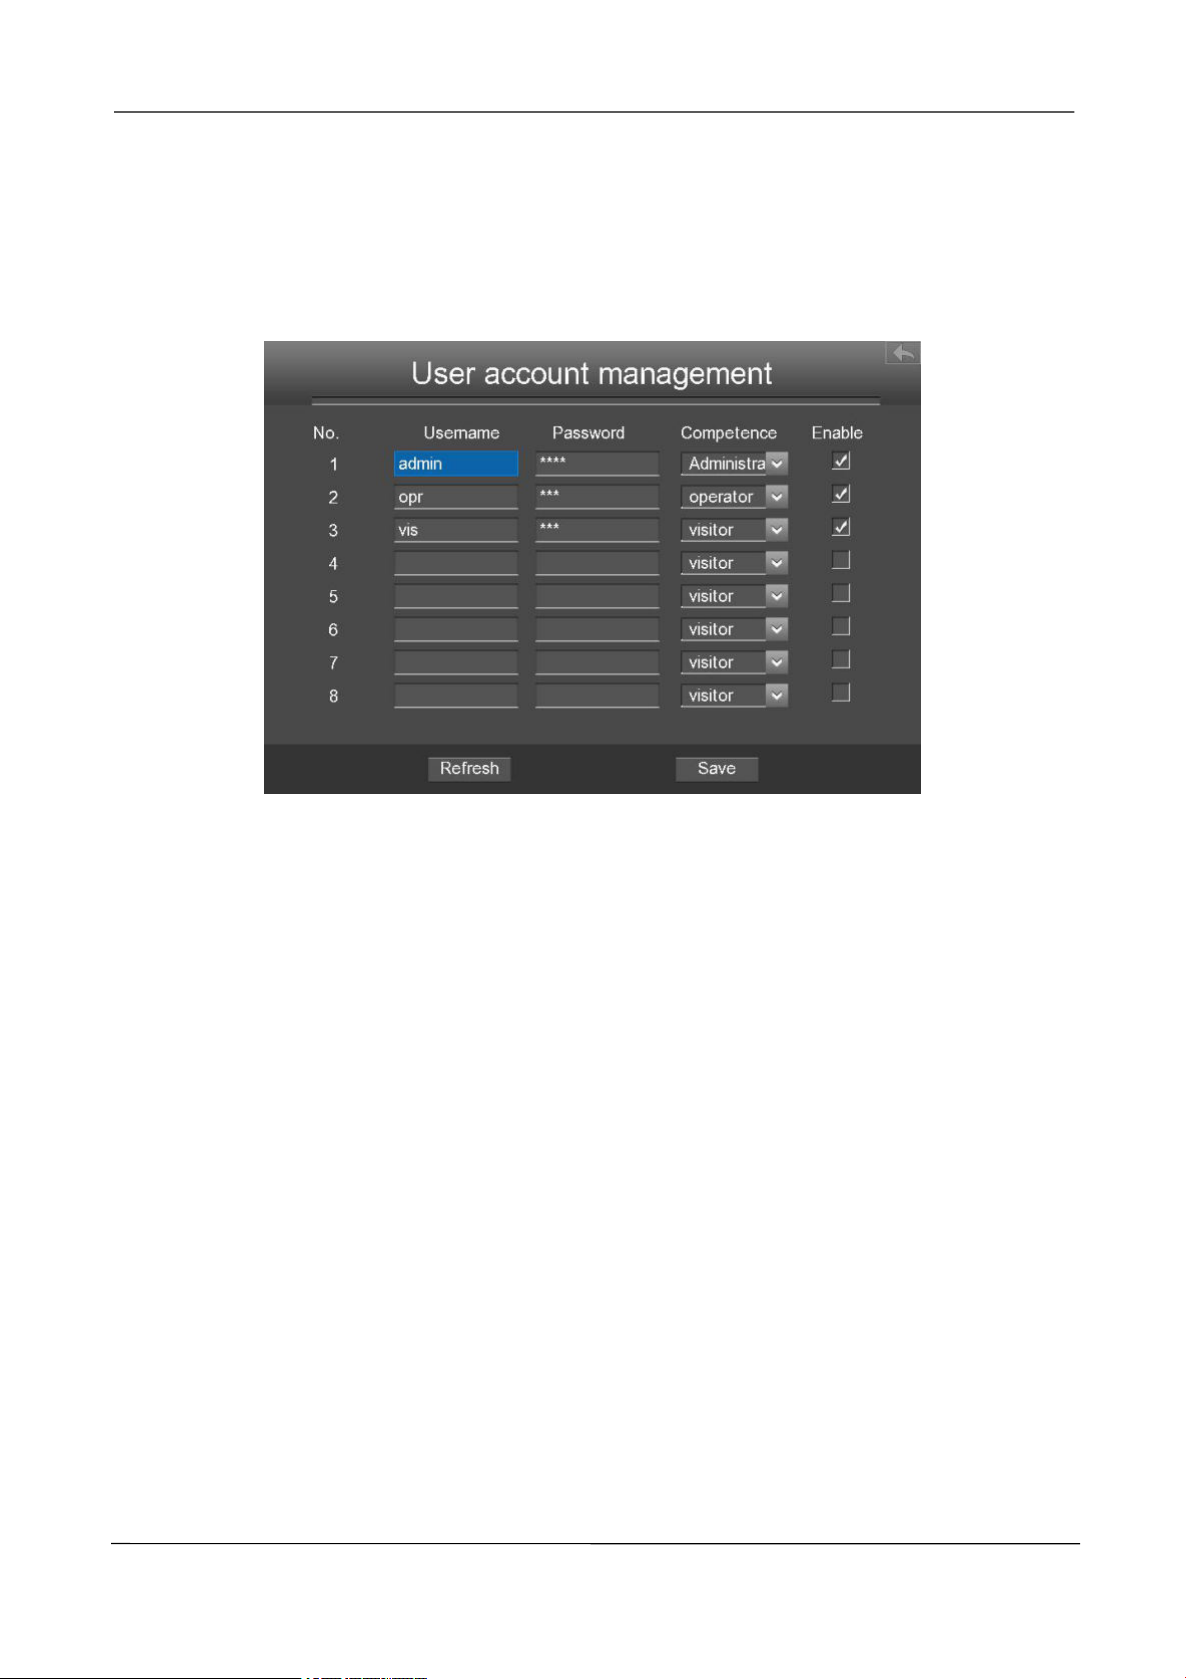
Choose Menu > System > User Account in the Menu interface. The User account management
interface is displayed.
User levels by permission from low to high are visitor, operator, administrator. Different user levels
have different operating permission.The default user name of device administrator is admin with no
password.
www.foscam.com
Page 39
NVR User Manual
33
The administrator has the permission to add and delete all users and configure user parameters.
You can add, modify, delete username / password or distribute authority for users.
The valid value range of Username and Password is 1 ~ 20 characters, it contains the English
letter, numeric and symbol.
After configure the username, password and competence, you need to check Enable checkbox.
Then click Save button to take effect.
Upgrade
Choose Menu > System in the Menu interface, then click upgrade in the System interface. You can
check for updates by network or upgrade by local.
[Local upgrade]
First, a mobile storage device needs to be inserted by the USB interface and the NVR system
upgrade file upgrade.bin has been stored in the root directory of the mobile storage device.
Click Local upgrade in the Upgrade interface, and then click OK button to start upgrade in the
pop-up message box.
[Remote Upgrade]
Click the Remote Upgrade button, the system will check the software version. If your software is not
latest, you can upgrade it by remote upgrading.
NOTE:
Don't shut down the power during upgrade. After upgrading, you can see the upgrade result.
www.foscam.com
Page 40
NVR User Manual
34
Factory Reset
Choose Menu > System in the Menu interface, then click Factory Reset in the System interface.
Click OK button in the pop-up message box and all parameters will return to factory settings. Click
OK button and then the NVR device will reboot automatically.
Para Export
Choose Menu > System in the Menu interface, then click Para export in the System interface. You
can import or export a configuration file for NVR system.
[Config Export]
It is used to save your current settings. It is recommended to backup your configuration before
modifying or upgrading firmware.
Click Config Export, and then click OK button in the pop-up message box. The configuration files of
the NVR will be exported to USB-flash disk for backup. The name of the configuration file name is
config.bin.
[Config Import]
Click Config Import, and then click OK button in the pop-up message box. The configuration file
from the USB-flash disk will be import.
The loading process takes about 50 seconds, After having finished the import of configuration files,
the NVR device will reboot automatically.
Note
Do not disturb the update process by turning off the power.
All current settings will be overwritten when importing a configuration file. If a bad configuration
file is uploaded the NVR may not work.
Auto Restore
Choose Menu > System > Auto Restore in the Menu interface. The Auto Restore interface is
displayed.
You can configure the Date and Time. The NVR will maintain system at the setting time.
Log Out
After logging out, the monitor turns to the live view mode and if you want to do some operation, you
www.foscam.com
Page 41

NVR User Manual
35
need to input user name and password tog in again.
Choose Menu > System in the Menu interface, then click Log Out in the System interface. Click OK
button in the pop-up message box, the NVR system will log out.
Note: After you have logged out the system, menu operation on the screen is invalid. It is required to
input a user name and password to unlock the system.
Reboot
Choose Menu > System in the Menu interface, then click Reboot in the System interface. Click OK
button in the pop-up message box, the NVR system will reboot.
Shutdown
Choose Menu > System in the Menu interface, then click Shutdown in the System interface.
Click OK button in the pop-up message box, the NVR system will shut down.
It is recommended that cut off the power after shut down.
www.foscam.com
Page 42
NVR User Manual
36
3
Web
You can access and manage the NVR on a PC through Web browser.
3.1 Instructions before Login
Before accessing the NVR Kit by using the Web browser, you need to obtain the following
information:
The NVR and the PC must be connected to the same LAN and are in the same network segment.
You can query or allocate the IP address of the NVR by using the following methods:
Through operation on the local GUI, configure an IP address for the NVR. For the specific
operation, please refer to
Allocate an IP address for the NVR through a router.
This product supports 32-bit IE8 or later versions and does not support 64-bit IE browsers.
4.2 Common Operations 2. Configure the IP Parameters.
3.2 Login
Step1 Log in to the Web client of the NVR. You can directly enter the IP address and port in the
browser or search out the NVR by using the search tool. Here we take search tool as an
example.
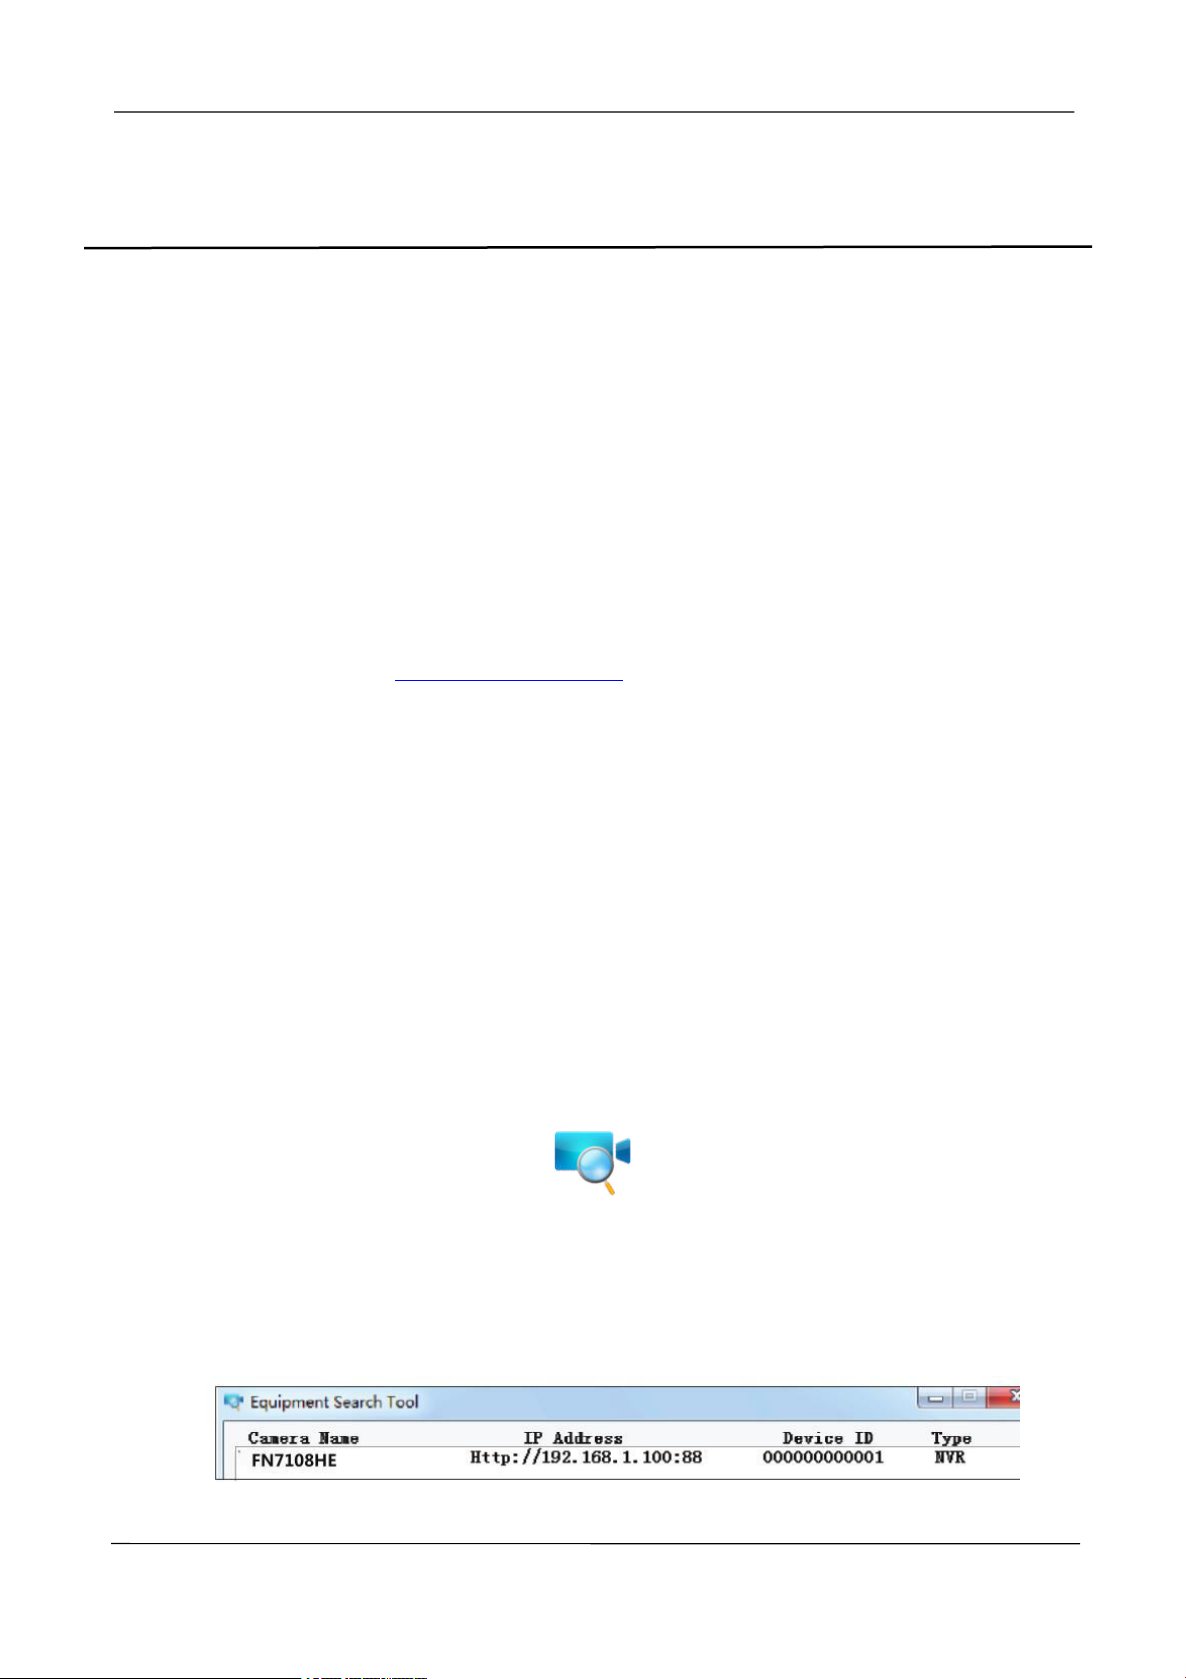
Step2 Visit Foscam official website http://www.foscam.com , select “Support > Download Center >
Software Tools”, then you can find the “Equipment Search Tool”, download the tool to your
computer, the icon shows as below:
Shortcut icon for Windows / Mac OS
Step3 Enable the DHCP feature of your router, then open the Equipment Search Tool program. It
should display the NVR's IP address in your LAN.
www.foscam.com
Page 43
NVR User Manual
37
Parameter
Description
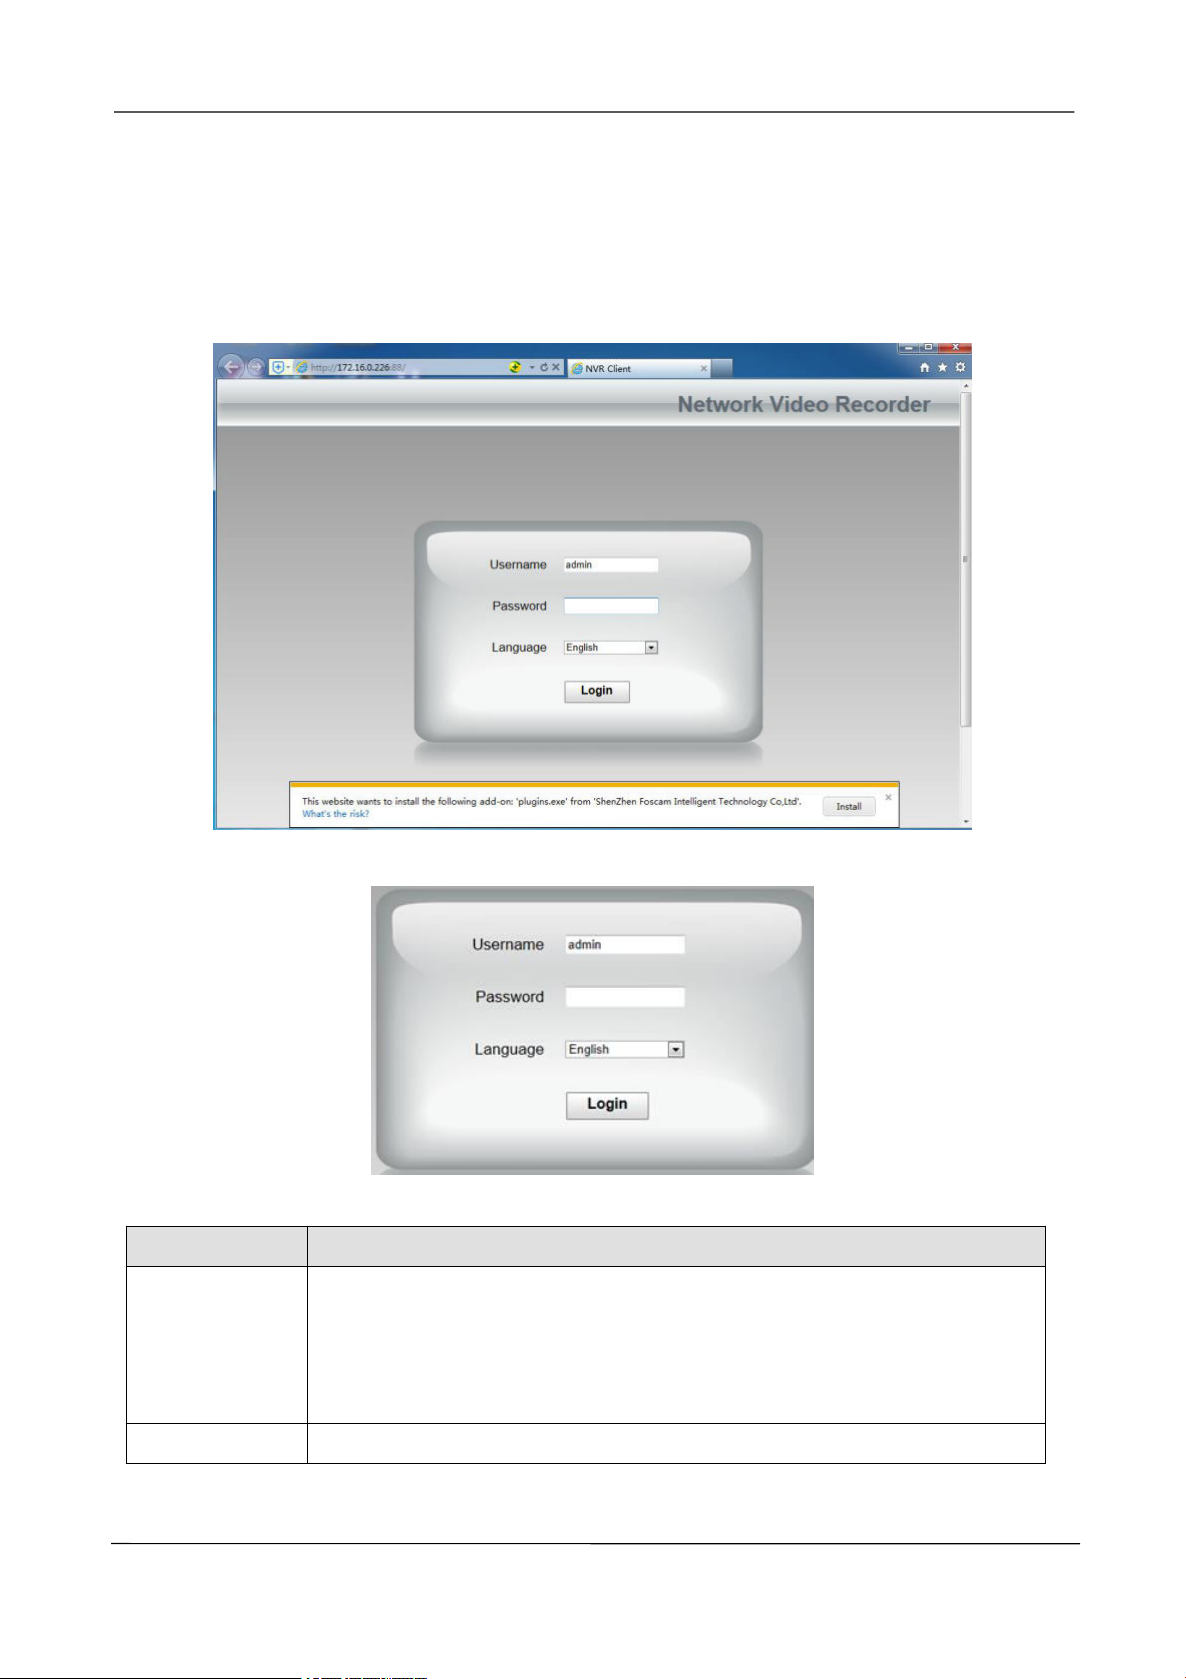
Username /
Password
The user name and password of the NVR client.
The default administrator username is admin with a blank password, please
set the new username or password at first using and prevent unauthorized
users login the NVR.
Language
Select the language type of the NVR client.
Step4 Double-click the NVR, and your default browser will open up to the NVR's login page. When
logging in for the first time, you will need to install the add-on.
It will pop up the message below the page, as shown in the following figure.
Click Install button to install the add-on. Please follow the installation instructions. (Please close
the browser during installation.)
Step5 After installing the add-on, refresh the browser and enter the login interface.
Input the follow parameter.
www.foscam.com
Page 44
NVR User Manual
38
1
2
4
3
Step6 Click Login button.
When you log in for the first time, it will come to the operating of modify the username and password
automatically.Enter the New Username, New password and Confirm the password.
-------End
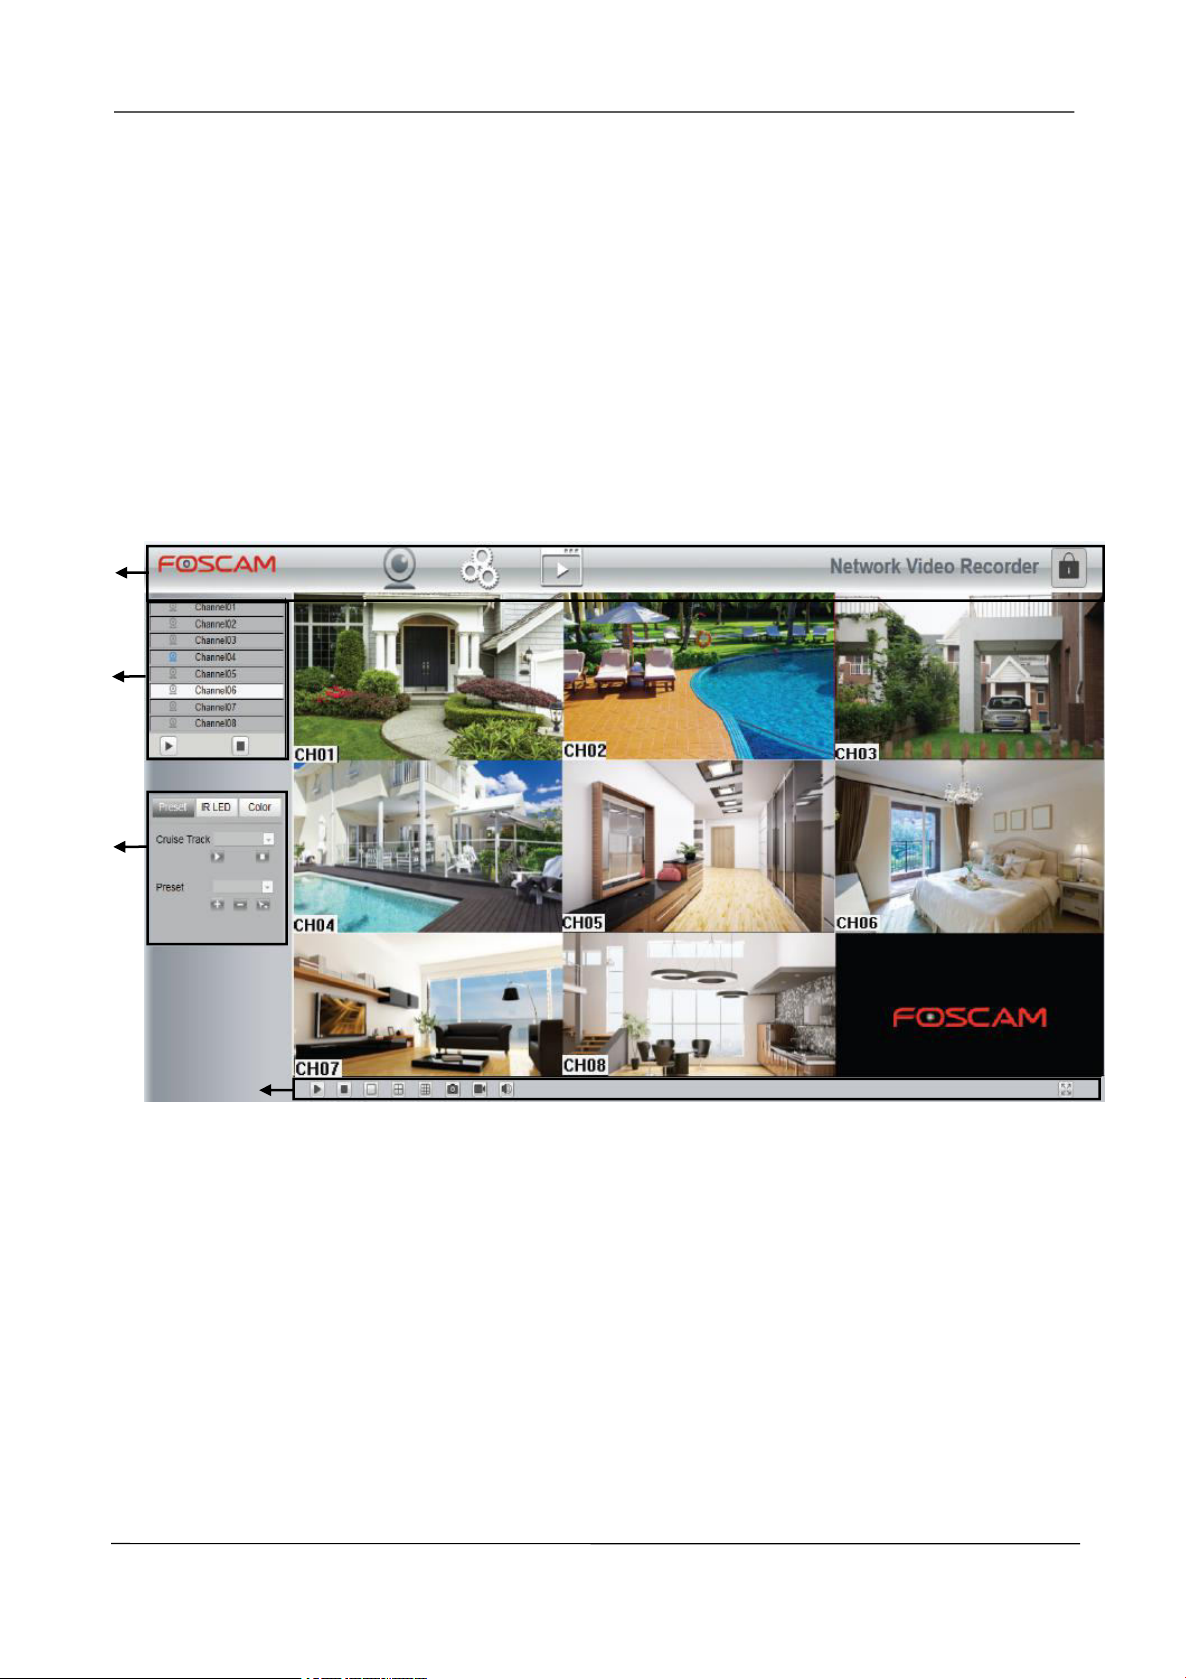
3.3 Live Video
After login, the live view interface will display. You can configure the play / stop the live view, manual
recording, manual capturing, preset, cruise, led, color and so on.
www.foscam.com
Page 45
NVR User Manual
39
Section
Icon
Name
Description
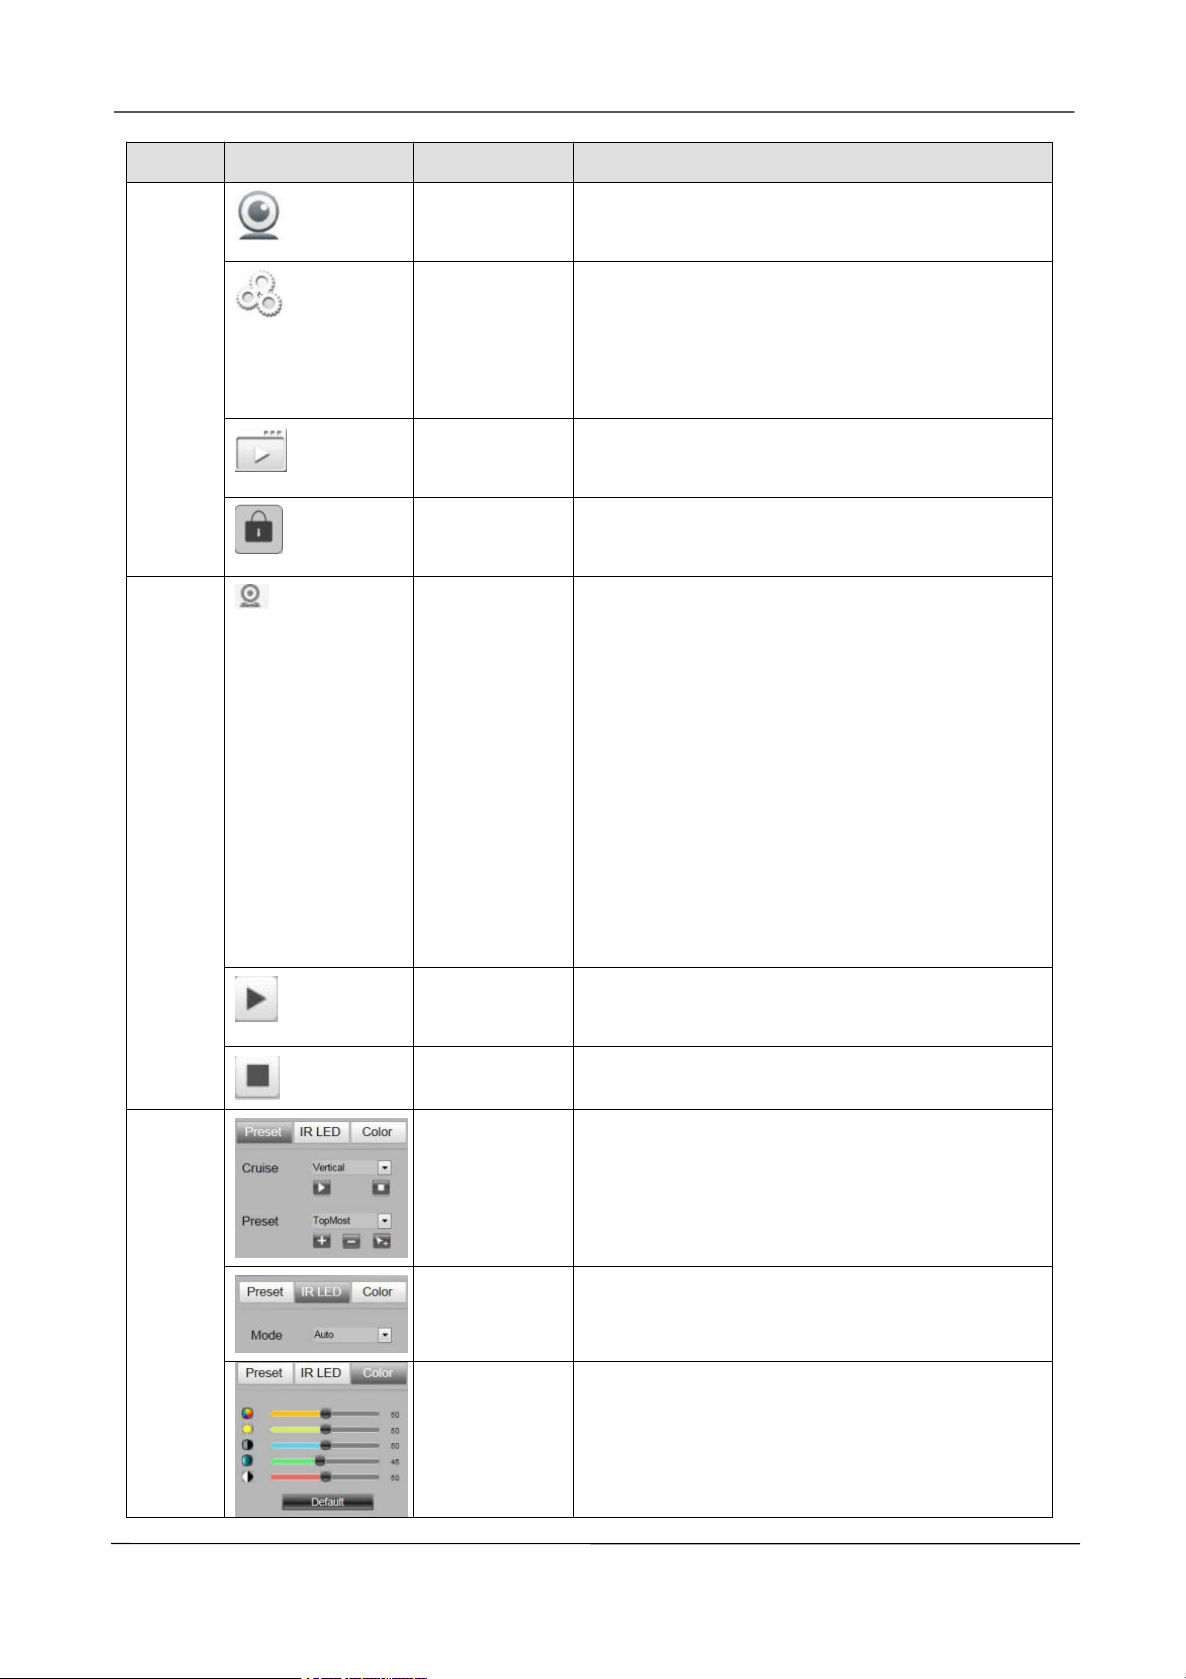
1
Live Video
Click this button and back to the realtime preview
window.
Parameter
Configuration
There are Local Settings, Settings, Service
Configuration, User Management, System
Management in the Parameter Configuration
interface.
Playback
Play back the recorded video files of a specific
channel in the live view mode.
Logout
Disconnect the link between the client page of the
current browser and the NVR server.
2
Channels
In channels of the NVR, you can add IPC
devices. The blue indicates that the channel is
previewing state. You can see the video of the
connected camera.
The gray indicates that the channel is oine state.
There was not the connected camera in this
channel.
Note: If you need to display nine channels IPC
device on the live view window, the sub stream of
each IPC must be less than 720P.
Play
Play an IPC monitoring video in a channel of the
NVR. By default, the video is played.
Stop
Stop playing the monitoring video in the channel.
3
Preset
You can configure the preset and cruise of the IP
Camera.
IR LED
You can configure the LED of the IP Camera.
There are two modes: Manual and Auto.
Color
You can configure the color of the IP Camera.
www.foscam.com
Page 46
NVR User Manual
40
4
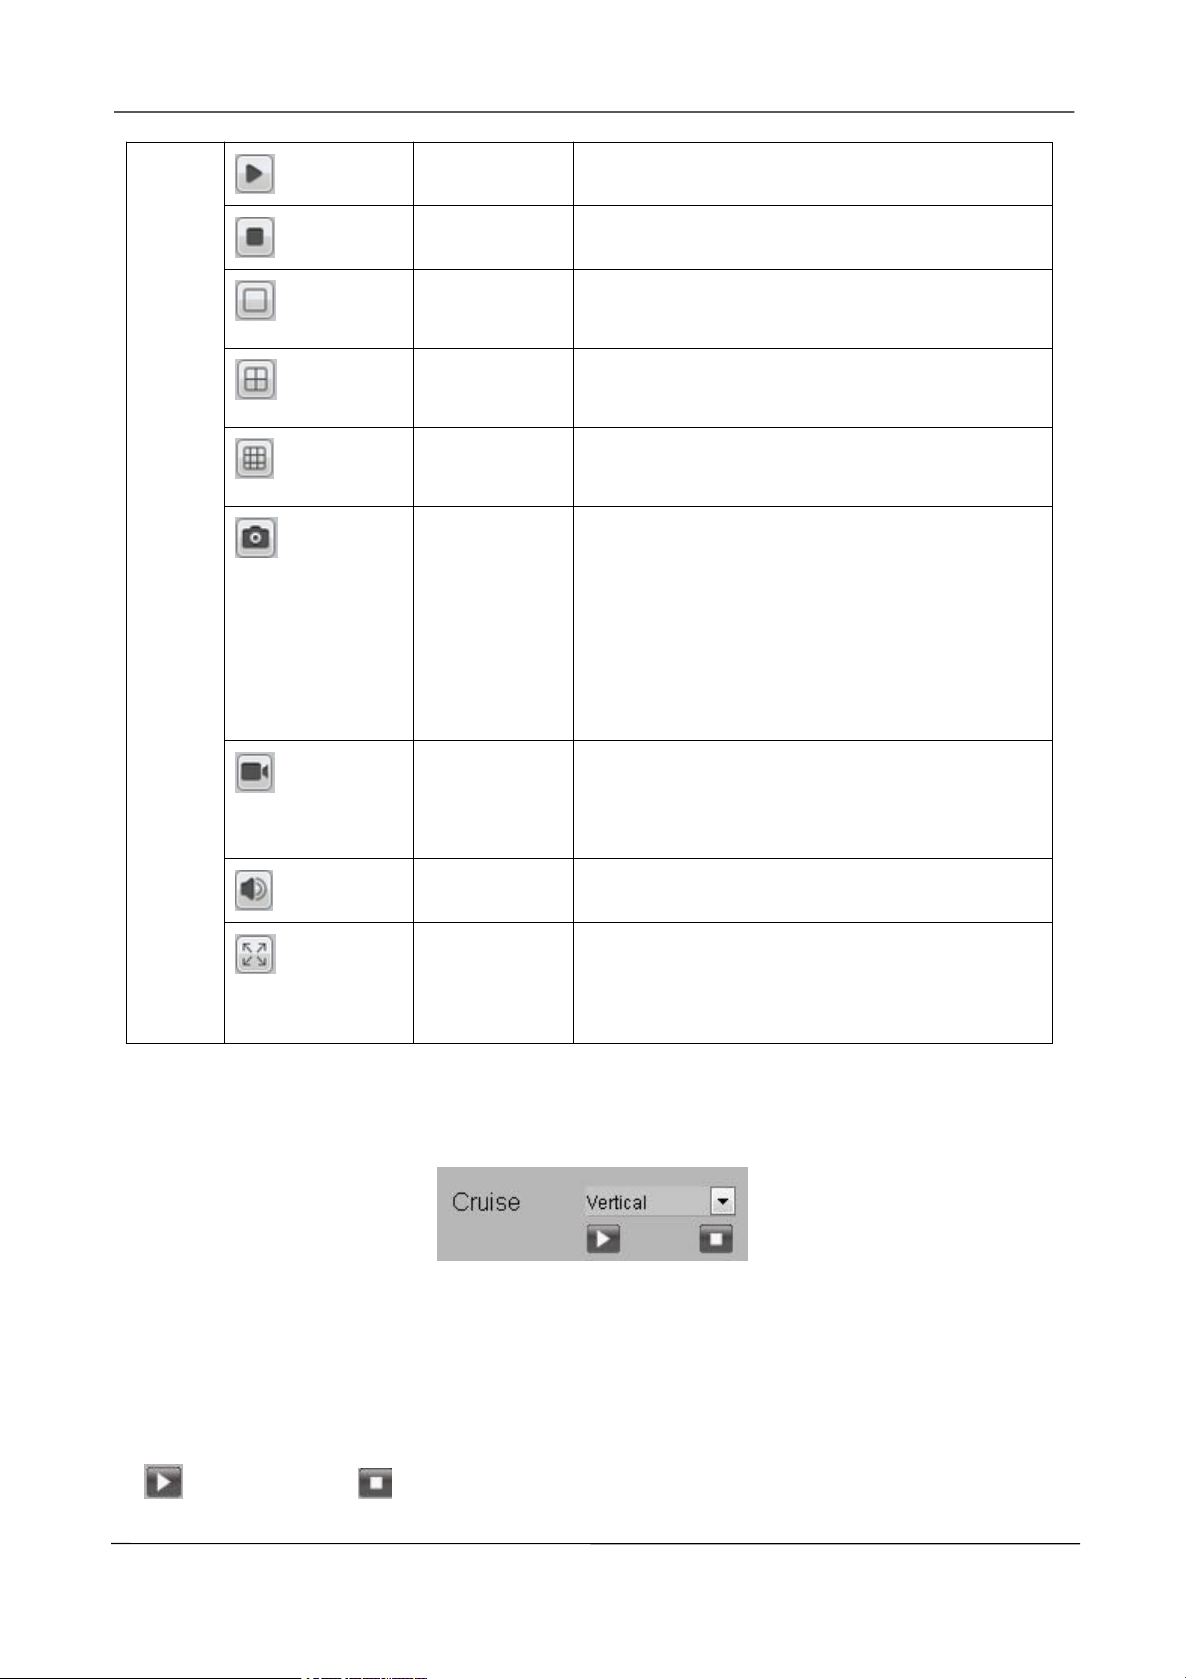
Play all
Play monitoring videos in all channels.
All off
Close monitoring videos in all channels.
1 Channel
Click this button, It will display one channel in the
live view interface.
4 Channels
Click this button, It will display four channels in
the live view interface.
9 Channels
Click this button, It will display 9 channels in the
live view interface.
Take
Snapshot
Select the channel, click this button, and you can
take a snapshot of the monitoring video page of a
corresponding channel to the local computer. You
can set the storage path, refer to the Web >
Parameter configuration > Settings > Storage
Location.
Record
Click this button to manually record the content
on the monitoring page. The recorded content is
stored in the HDD of the NVR.
Audio
Click this button to play the recording sound.
Full Screen
Click this button or double-click the monitoring
page to make the monitoring page displayed in
full screen. Press Esc to exit full screen mode.
Setting Cruise
The default cruise tracks have two types: Vertical and Horizontal.
Vertical: The IP camera will rotate from up to down.
Horizontal: The IP camera will rotate from left to right.
: Start cruise. : Stop cruise.
www.foscam.com
Page 47
NVR User Manual
41
If you want to define or change the cruise trace, please go to Parameter Configuration > Service
configuration > Preset Settings.
[How to do cruise?]
Step1 Select one track in the track drop-down list.
Step2
Step3
Click
Click
, the IP camera will cruise following the predefined path.
and finish cruising.
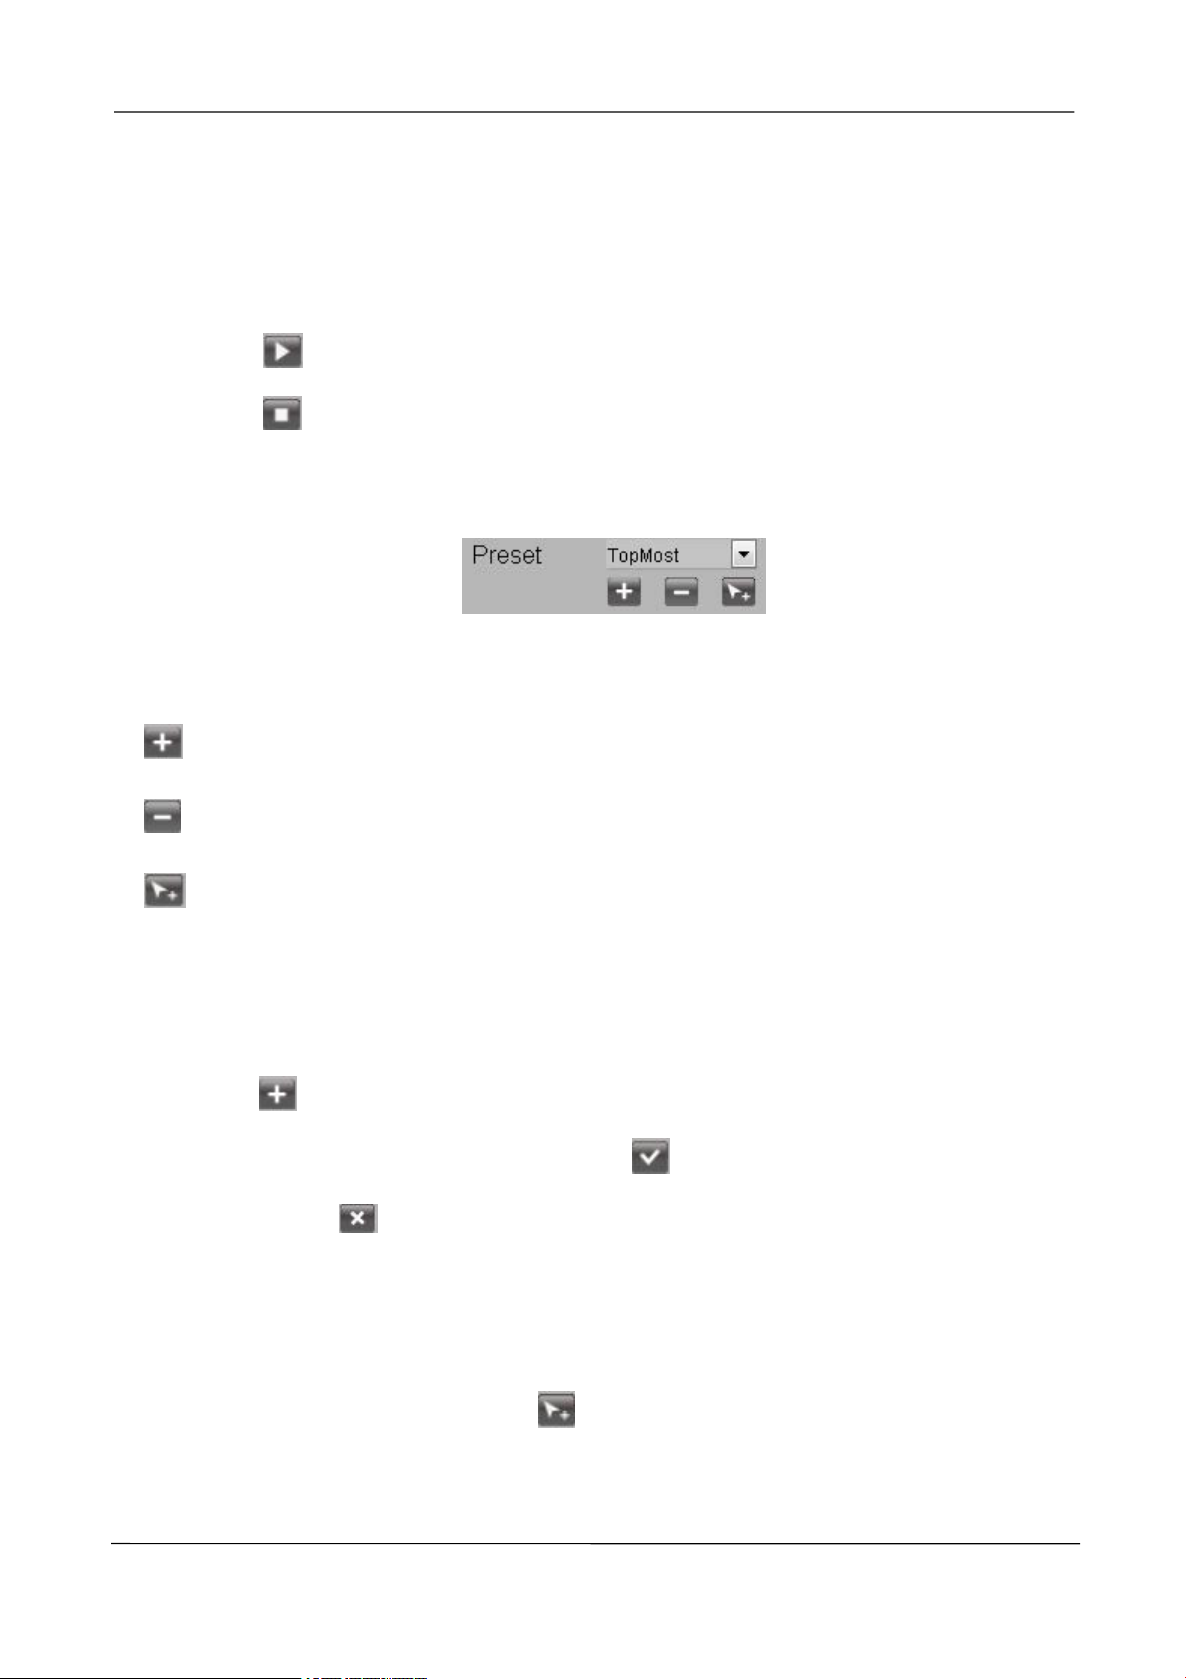
Preset Settings
The default preset position is TopMost, BottomMost, LeftMost, RightMost, you can add other preset
positions.
Add: Click this icon to save the position you need the IP camera to remember.
Delete: Select one preset position and click this button to delete it.
GO: Select one preset position in the preset drop-down list and click Go to make the IP camera
move the preset position.
[How to do preset position?]
Step1
Step2
Rotate the IP camera and stop at a desired place where you want make preset position.
click
cannot contain special characters. Then click
position, click
You can move the IP camera and stop at another place, and set another preset position. You
can do all the preset positions with this method.
button and input a descriptive name for the preset position. The preset position
to save it. If you want to reset the preset
.
Step3 If you want to see one preset position you have set, only select the preset position name from
the preset drop-down list, and click
button, the IP camera will go to the preset position.
www.foscam.com
Page 48
NVR User Manual
42
3.4 Parameter Configuration
Choose
Configuration, User Management, System Management and so on.
(Parameter Configuration), you can configure the Local Settings, Settings, Service
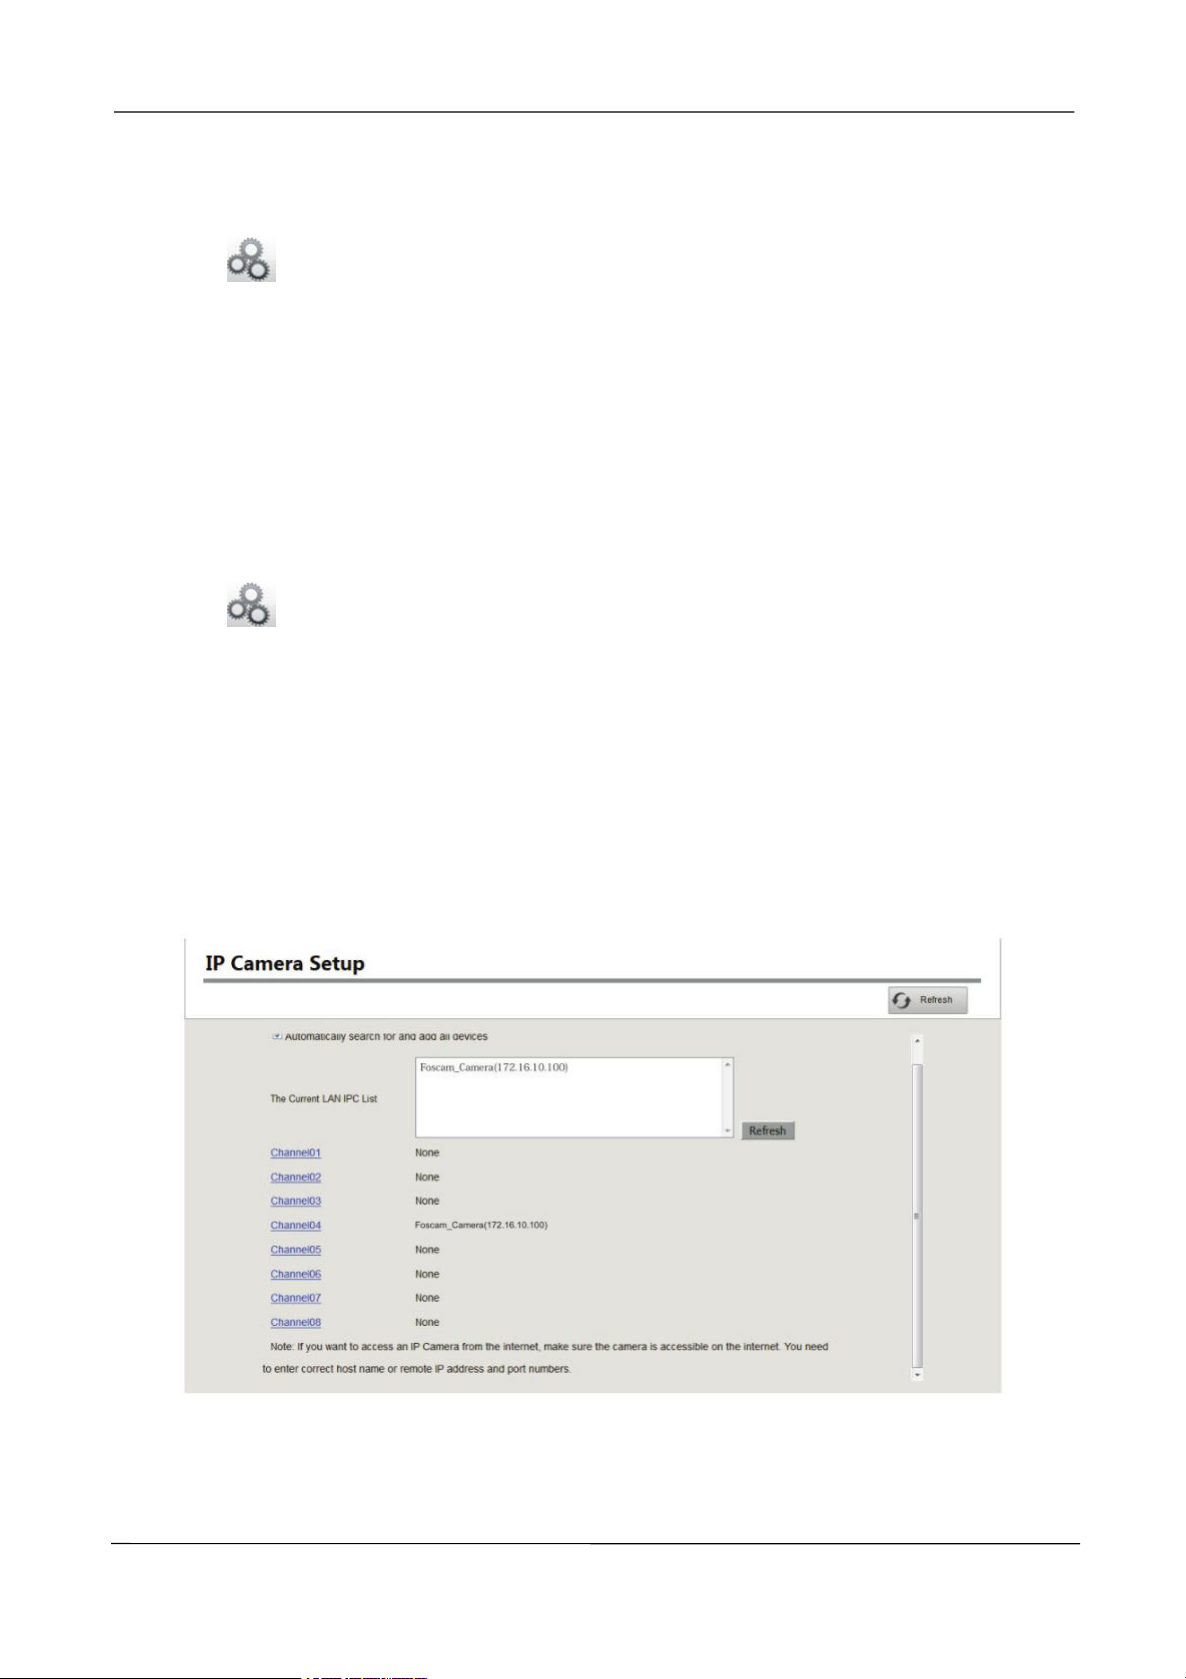
3.4.1 IP Camera Setup
NVR provide a function of auto searching IP camera. When there are supplied IP cameras in the
same network segment of a LAN with NVR, you may add it in one button with IP Camera's user
name, password and port number.
Choose
displayed.
[Auto Adding IPC]
Check the Automatically search for and add all devicescheckbox if the connected cameras which
are equipmented in the package. And make sure you can view all connectedcameras are in The
(Parameter Configuration) > Adding Device. The IP Camera Setup page is
Current LAN IPC List box. The NVR system will automatically synchronize its password with the
cameras. Then you can see the videos of the cameras on the Realtime Preview of the NVR.
[Manually Adding IPC]
If the connected cameras which are not the equipmented in thepackage, you can uncheck the
www.foscam.com
Page 49
NVR User Manual
43
Automatically search for and add all devices checkbox to manually add the other cameras. After
select any one of the channels, input information of the IPC. Then click Add button to finish adding.
Step1 Select one channel from Channels.
Step2 Choose the IP Camera in the list of 'The Current LAN IPC List' .
Choose the Protocol from the drop list. Input the Username and Password of the IPC.
Select the FS protocol for Foscam brand IPC, and select the ONVIF protocol for other brands
IPC.
Step3 Click Add button to finish adding.
-------End
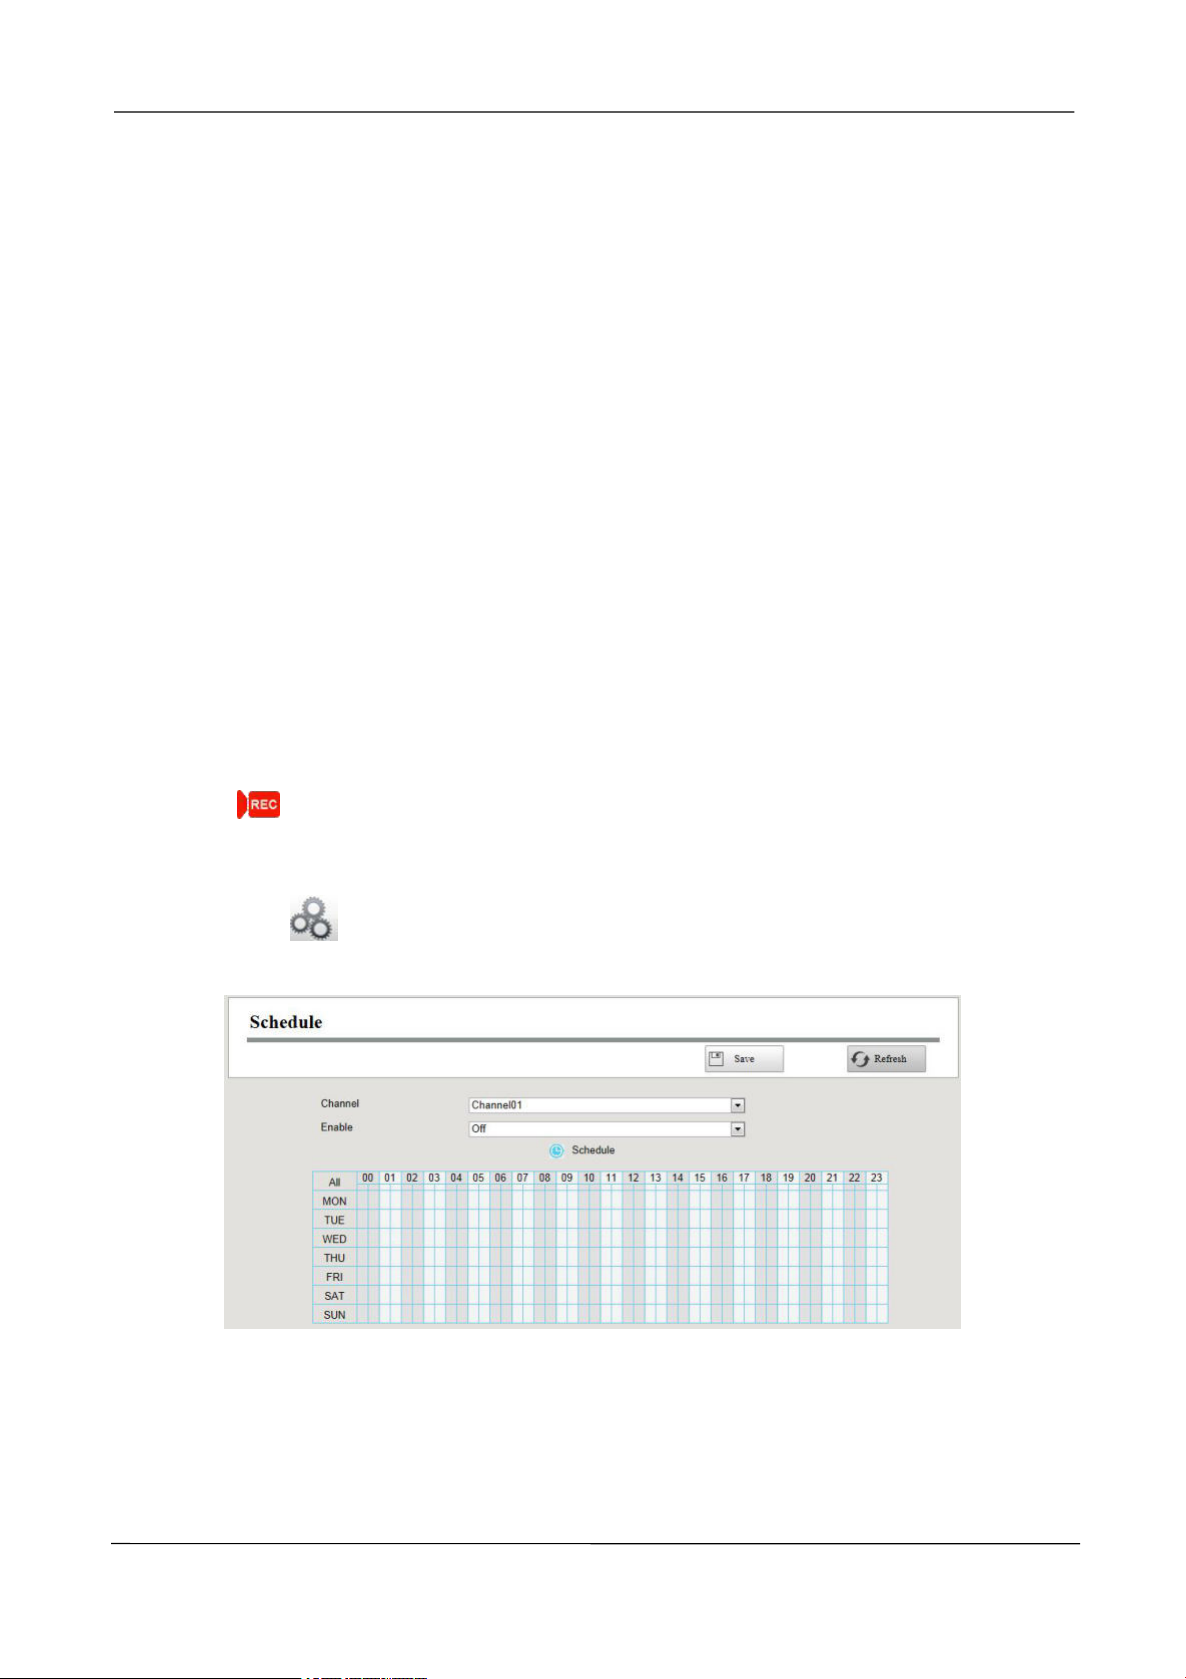
3.4.2 Schedule Record
You can enable or disable schedule recording for the every channel.
Set the recording schedule, and then the NVR automatically starts / stops recording according to the
configured schedule. The recording files will be save to the HDD or mobile store device.
The Icon
channel.
indicate starts schedule recording at the right bottom of the screen for certain
Step1 Choose (Parameter Configuration) > Schedule Record. The Schedule page is
displayed.
Step2
Select channel from drop-down box list.
Step3 Enable the Enable schedule record.
Step4
Set Recording schedule time of the channel.
You can choose a week, one day of a week, the certain time period for the recording.
www.foscam.com
Page 50
NVR User Manual
44
For detailed procedure, please refer to 3.4.3 Alarm Motion Detection.
Step5 Click Save button to take effect.
-------End
3.4.3 Alarm
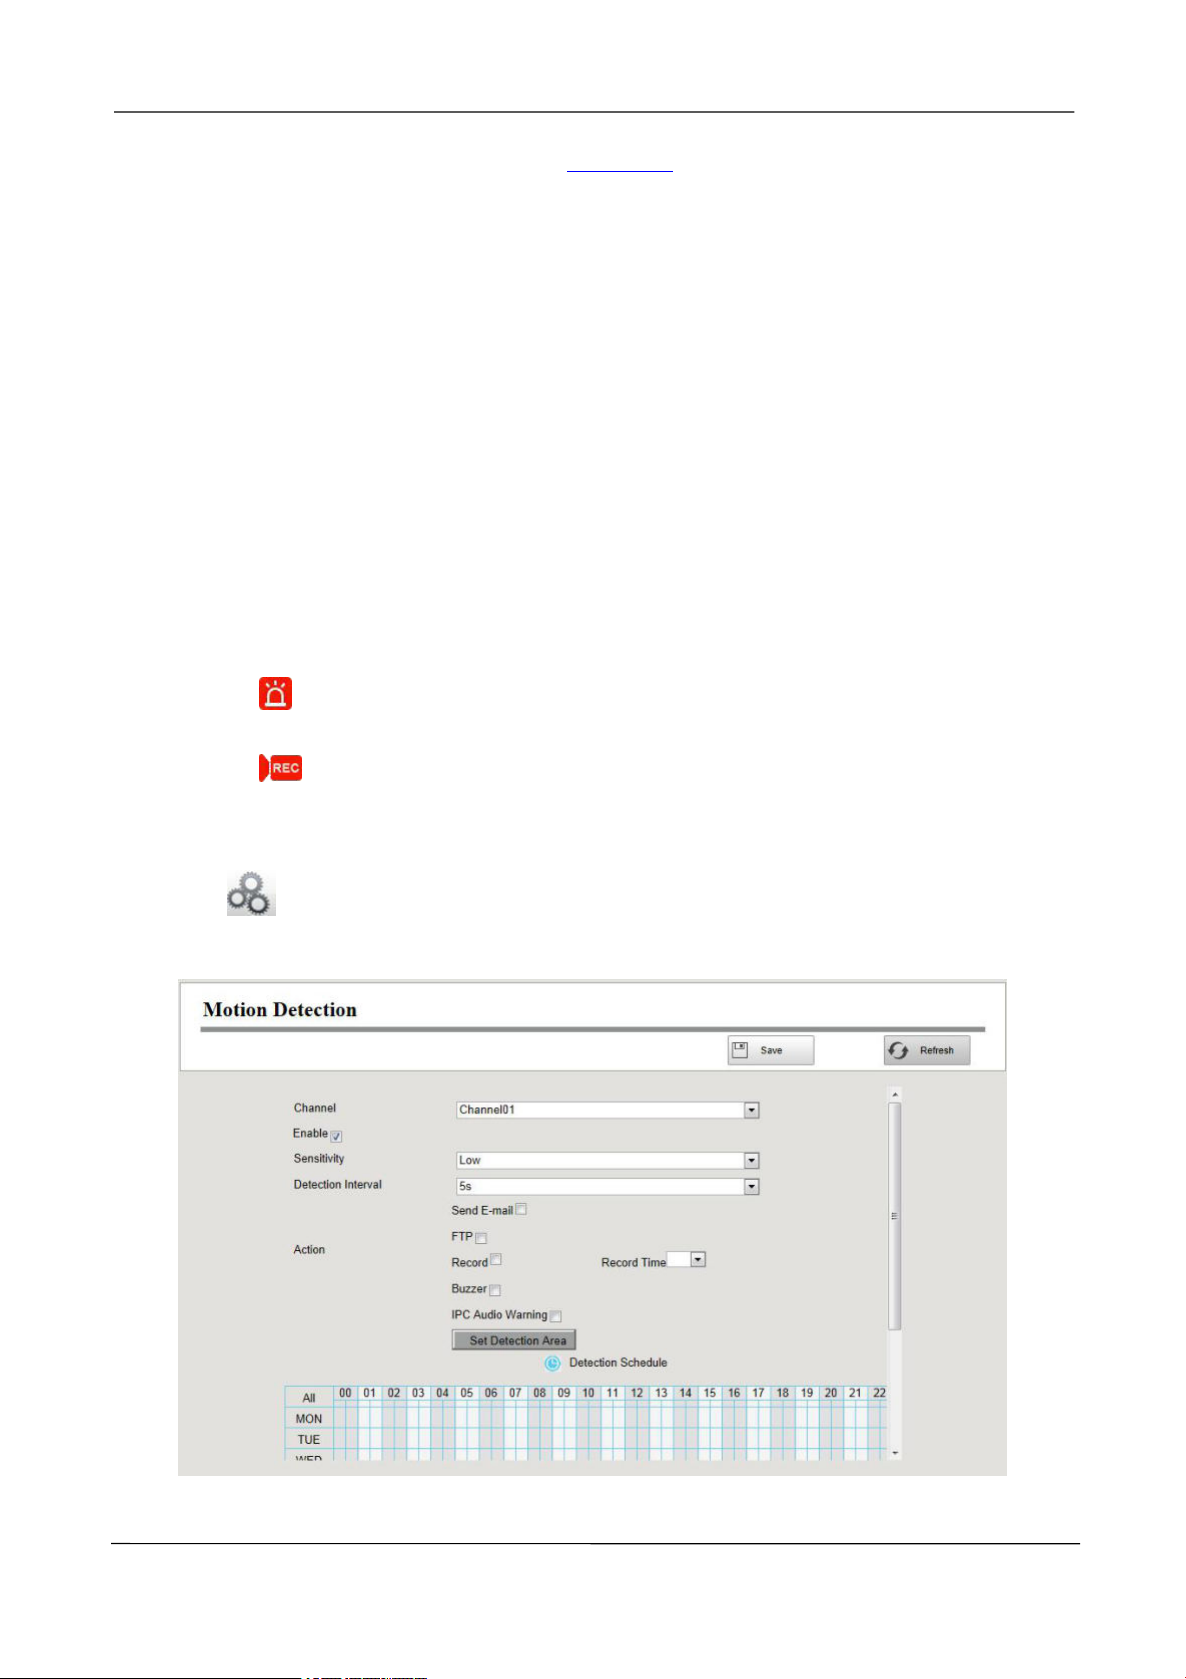
Motion Detection
Follow the steps to set the motion detection parameters. In the live view mode, once a motion
detection event takes place, the NVR can analyze it and perform many actions to handle it. Enable
motion detection function can trigger certain channels to start recording, or trigger full screen
monitoring, output alarm, send Email, upload FTP, buzzer alarm and so on.
In the live view mode, there are icons at the right bottom of the screen for each channel.
The Icon
The Icon
You can follow the steps to schedule a record which triggered by the detected motion.
Choose (Parameter Configuration) > Alarm > Motion Detection. The Motion Detection
page is displayed.
indicate alarm was triggered.
indicate the IPC is recording.
Step1
www.foscam.com
Select channel from drop-down box list.
Page 51

NVR User Manual
45
Parameter
Description
Send E-Mail
When the Motion detection is triggered, you can choose whether to send e-mail.
Note: Make sure you have set Email.
FTP
When the Motion detection is triggered, you can choose whether to upload
detection picture to FTP server.
Note: Make sure you have set FTP.
Record
If you select this checkbox, when the Motion detection is triggered, the NVR
will record automatically and store the record files to the HDD.
Record Time
When you check the Record, you need to configure motion detection recording
time.
Buzzer
When the Motion detection is triggered, you can choose whether to enable
buzzing sound of the NVR device.
IPC Audio
Warning
If you select this checkbox, when the Motion detection is triggered, the people
around the camera will hear beep alarm sound of the IPC.
Step2 Check the Enable checkbox to enable motion detection function.
Step3 Select the Sensitivity and Detection Interval.
The higher the sensitivity, the NVR will be more easily alarmed.
The Detection Interval time between two motion detection.
Step4 Check the checkbox to select the linkage method. You may refer to follow table for details of
linkage methods.
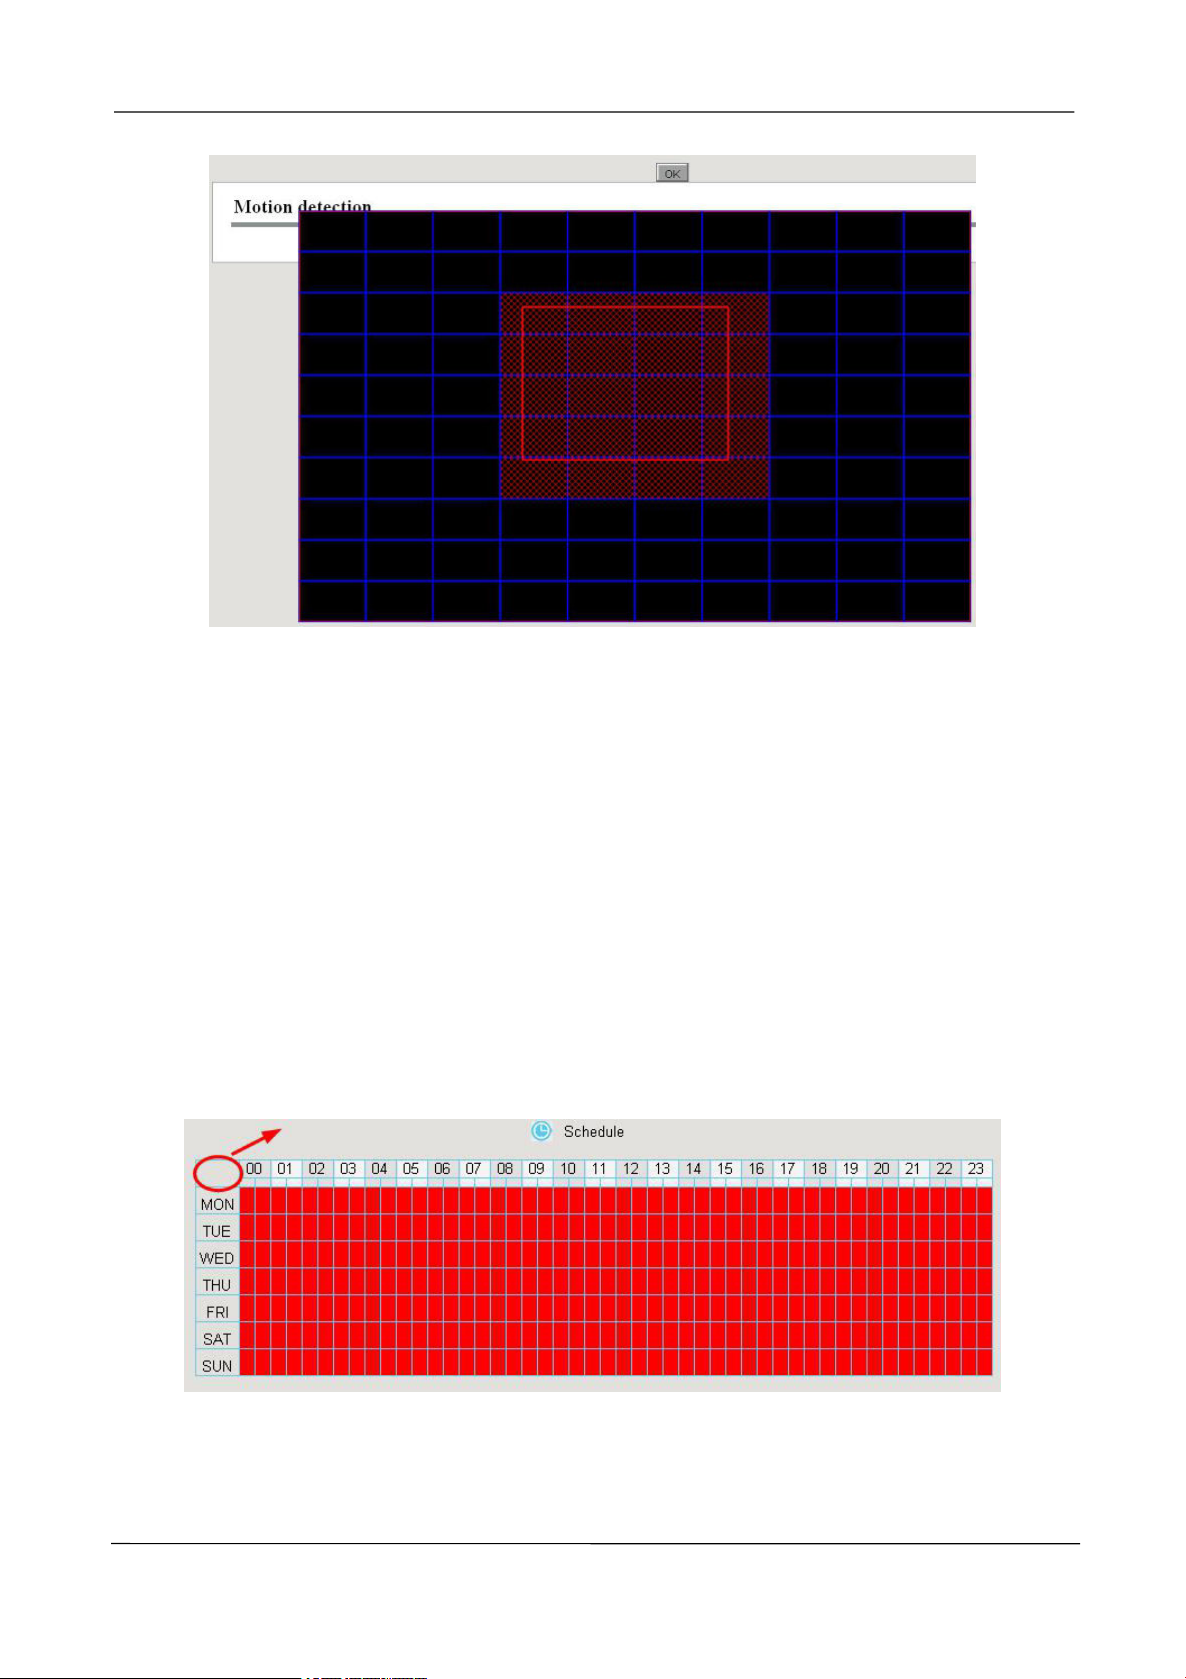
Step5 Set Detection Area
1.Click Set Detection Area button and it pop up a window.
www.foscam.com
Page 52
NVR User Manual
46
Click here
2.Drag and draw the area for motion detection by left mouse.
Note:To clear the motion detection area, Drag and draw the motion detection area by left mouse.
3.Click OK button to save and quit. When something moving in the detection area, the NVR will
alarm.
Step6 Set Detection Schedule
Set up arming schedule of the channel for the motion detection.
You can choose a week, one day of a week, the certain time period for the motion detection alarm.
Choose all Time Period
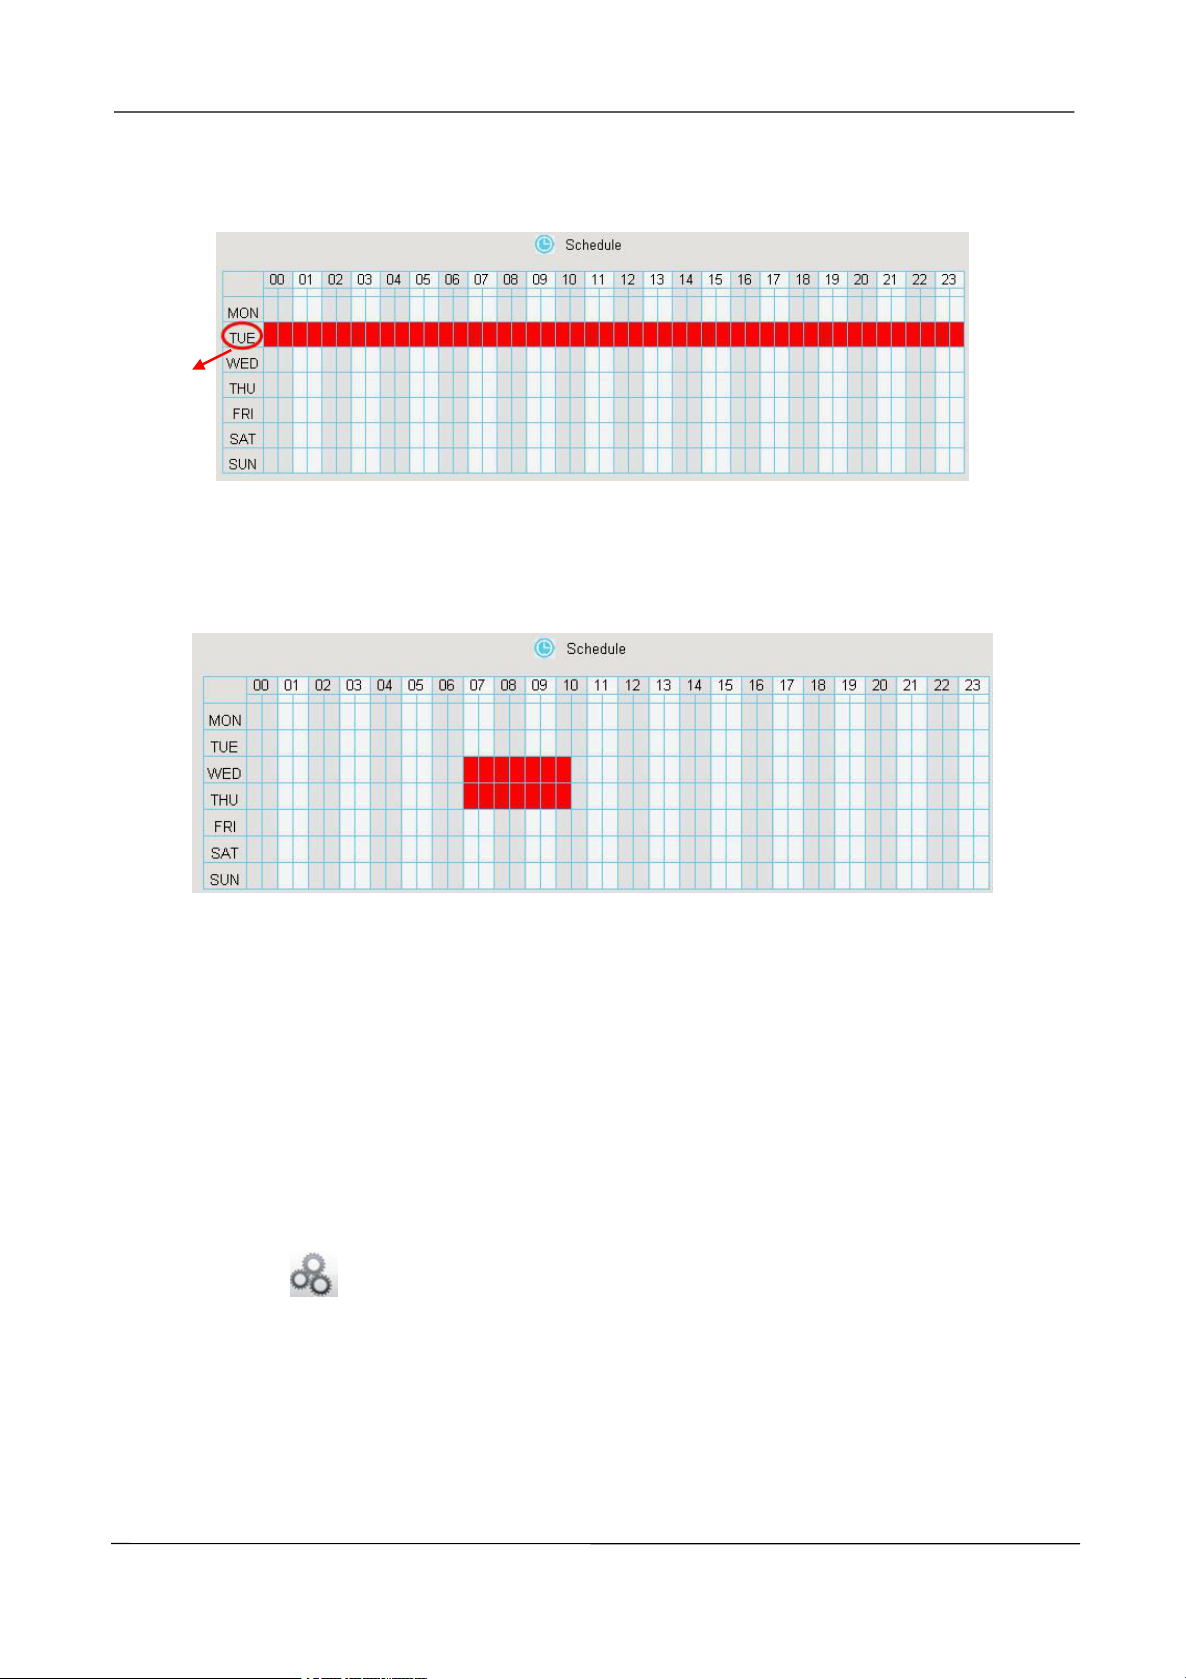
Click the black button up the MON, you will see all time range turn red. When something moving in
the detection area at anytime, the NVR will alarm.
Choose one day
Click the week day words, the corresponding column will be selected.
www.foscam.com
Page 53
NVR User Manual
47
Click here
For example, click TUE, the all column of TUE turns to red, that means during Tuesday whole day,
when something moving in the detection area, the camera will alarm.
Choose the Certain Time Period
Press the left mouse and drag it on the time boxes, you can select the serial area.
Step7 Click Save button to take effect.
When the motion has been detected during the detection time in the detection area, the NVR will
alarm and adopt the corresponding alarm linkage.
Note: You must set the detection area and detection schedule, or else there is no alarm anywhere
and anytime.
-------End
Other Alarm
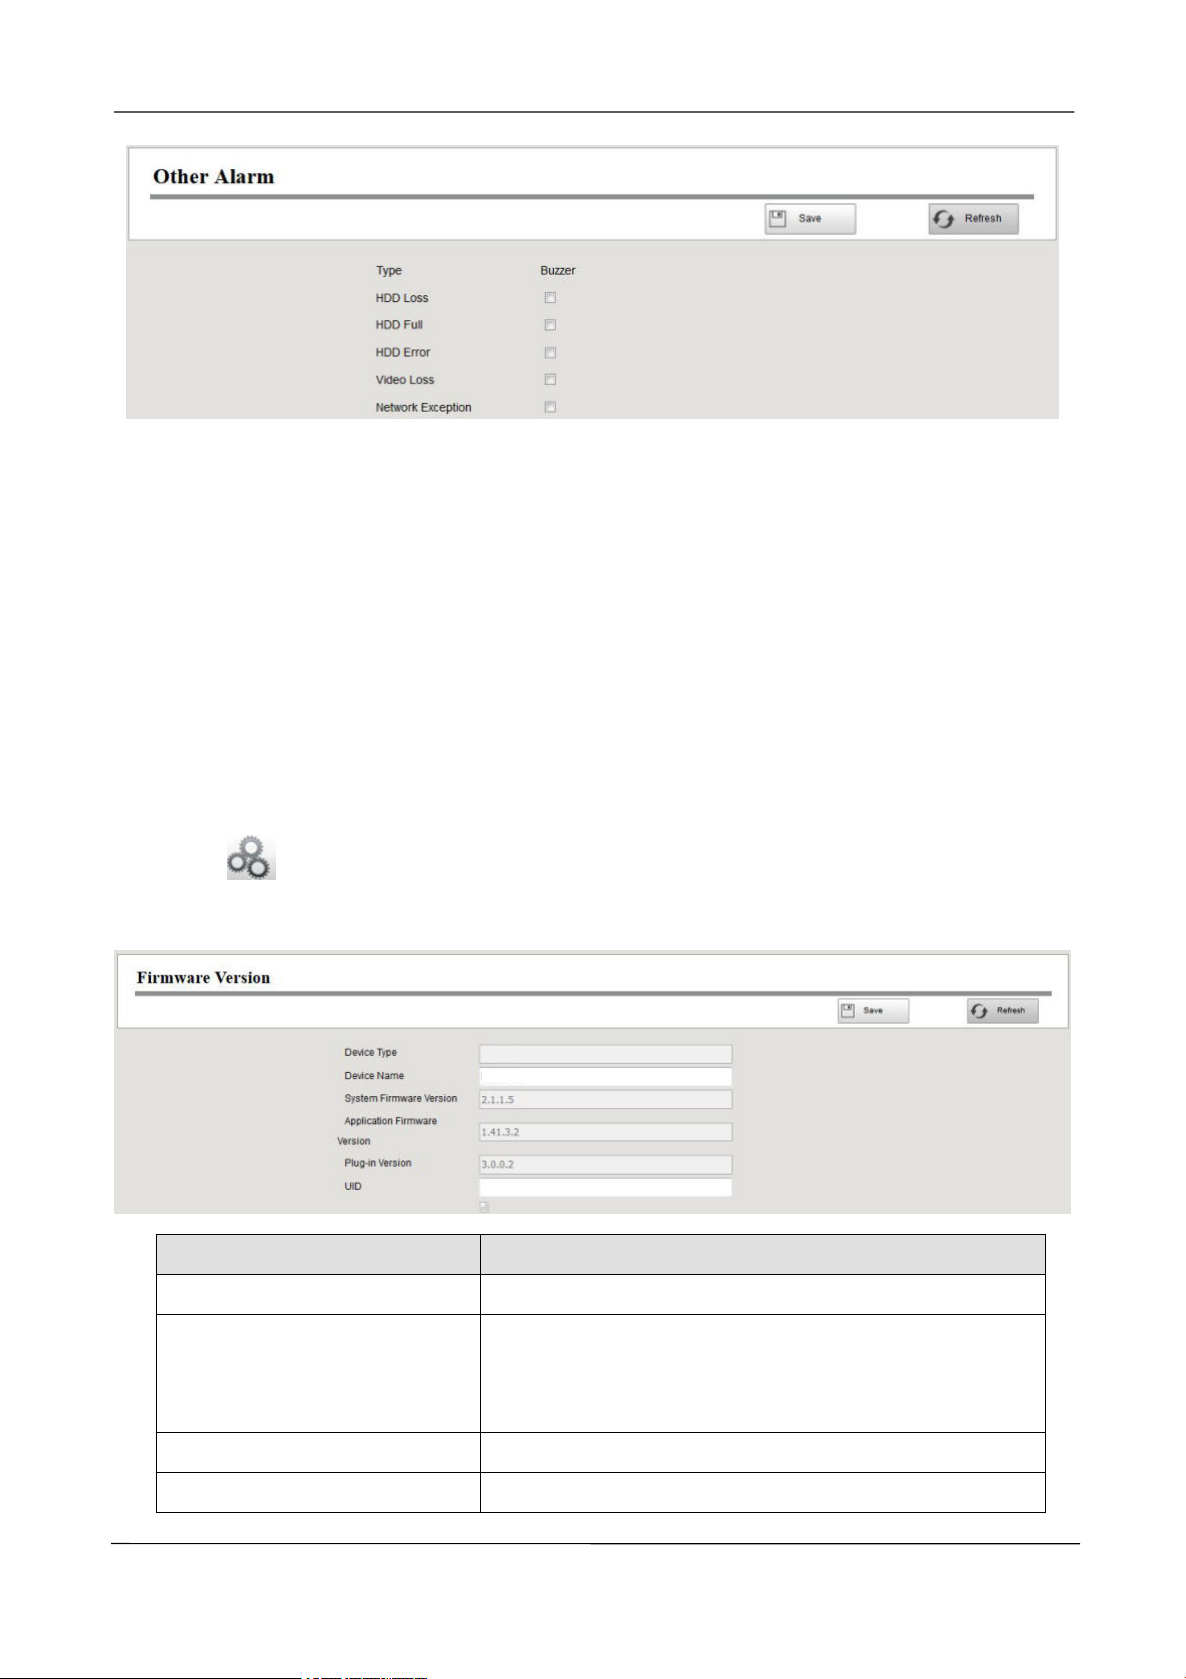
Step1 Choose (Parameter Configuration) > Alarm > Other Alarm, The Other Alarm page
is displayed.
www.foscam.com
Page 54
NVR User Manual
48
Parameter
Description
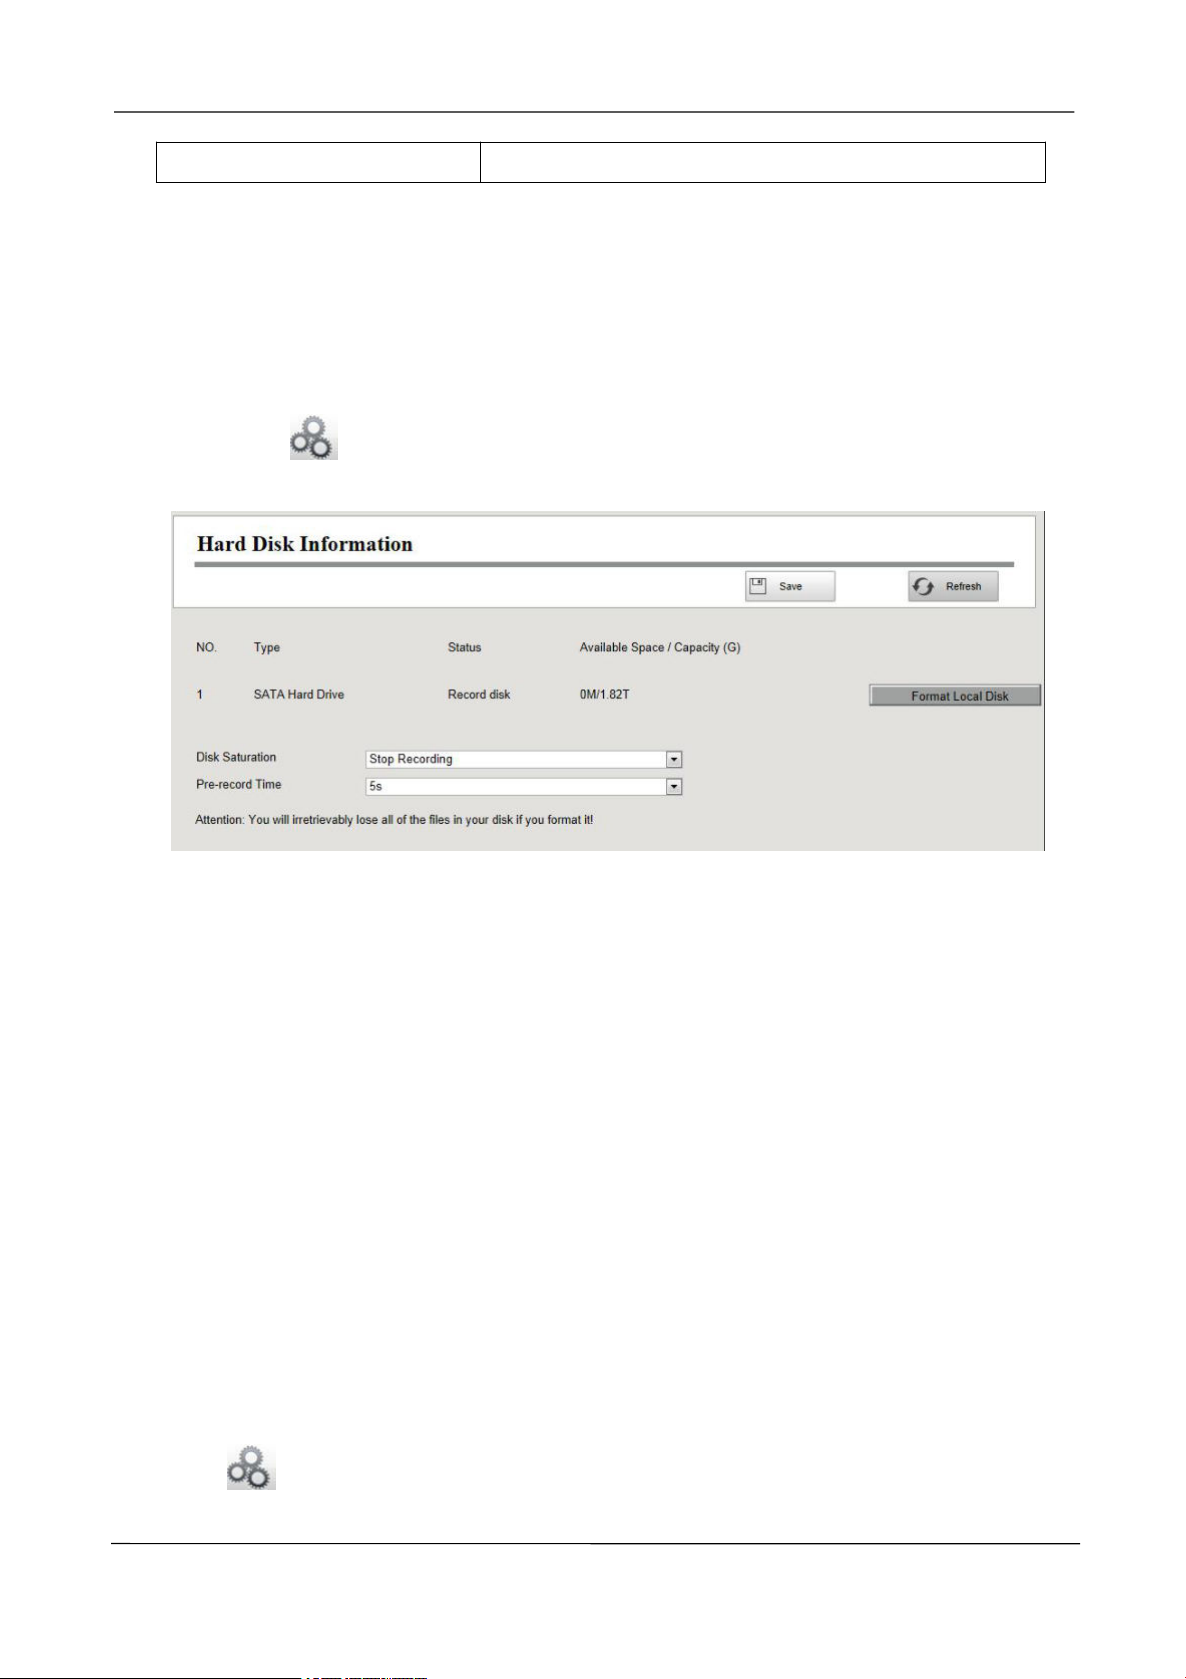
Device Type
The product type of NVR.
Device Name
The device name is a unique name that you can give to
your device to help you identify it.
You can change your NVR name.
System Firmware Version
Display the system version of your NVR.
Application Firmware Version
Display the application firmware version of your NVR.
FN7108HE
FN7108HE
Step2 Select Type form drop-down box list.
Step3 Check the Buzzer checkbox if you want to enable buzzing sound of the NVR device.
Step4 Click Save button to take effect.
-------End
3.4.4 Device Information
Firmware Version
You can view the NVR system information, or modify the Device Name.
Choose
Firmware Version page is displayed.
(Parameter Configuration) > Device Information > Firmware Version. The
www.foscam.com
Page 55
NVR User Manual
49
Plug-in version
Display the plug-in version of your NVR.
Click Save button to take effect.
Hard Disk Information
You can configure the Disk Saturation, Pre-recorded Time for HDD information.
Step1 Choose (Parameter Configuration) > Device Information > Hard Disk Information.
The Hard Disk Information page is displayed.
Step2 You can configure the following settings.
Format Hard Disk: Click the Format Hard Disk button to initialize the SATA disk for recording.
Note: Initializing the HDD will erase all the data saved on it, please backup the data before
formatting hard disk if necessary.
Disk Saturation:When the disk is saturated, you can choose to stop recording or cycle coverage.
Pre-record Time:The time you set to record before the event.
For example, when an alarm triggered the recording at 11:00, if you set the pre-record time as 5
seconds, the camera records it at 10:59:55.
Step3 Click Save button to take effect.
-------End
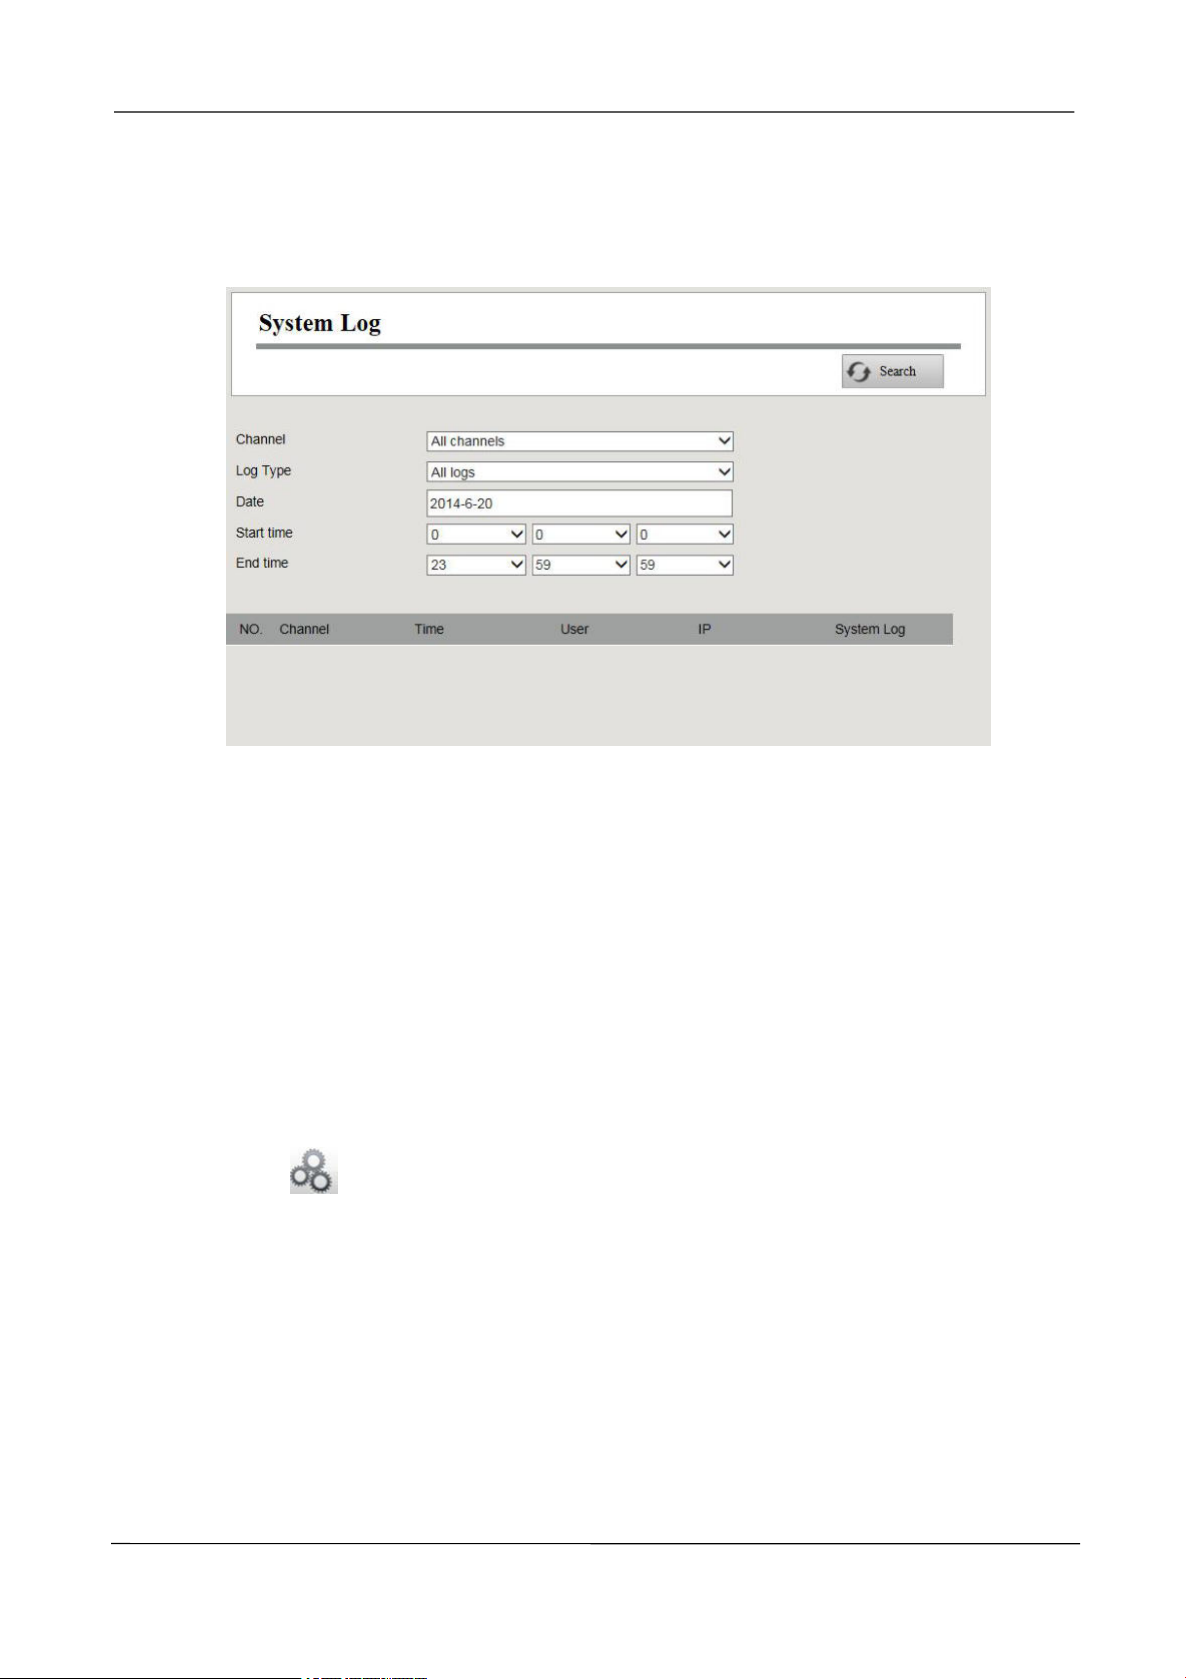
System Log
Choose
page is displayed.
www.foscam.com
(Parameter Configuration) > Device Information > System Log. The System Log
Page 56
NVR User Manual
50
The operation, alarm, exception and information of the NVR can be stored in log files, which can be
searched and viewed at any time.
The Log Type contains Alarm log, System log and Operation log.
[Search Log]
1.Select the Channel, Log Type, Date, Start time and End time.
2.Click the Search button to list all matched logs.
3.4.5 Basic Settings
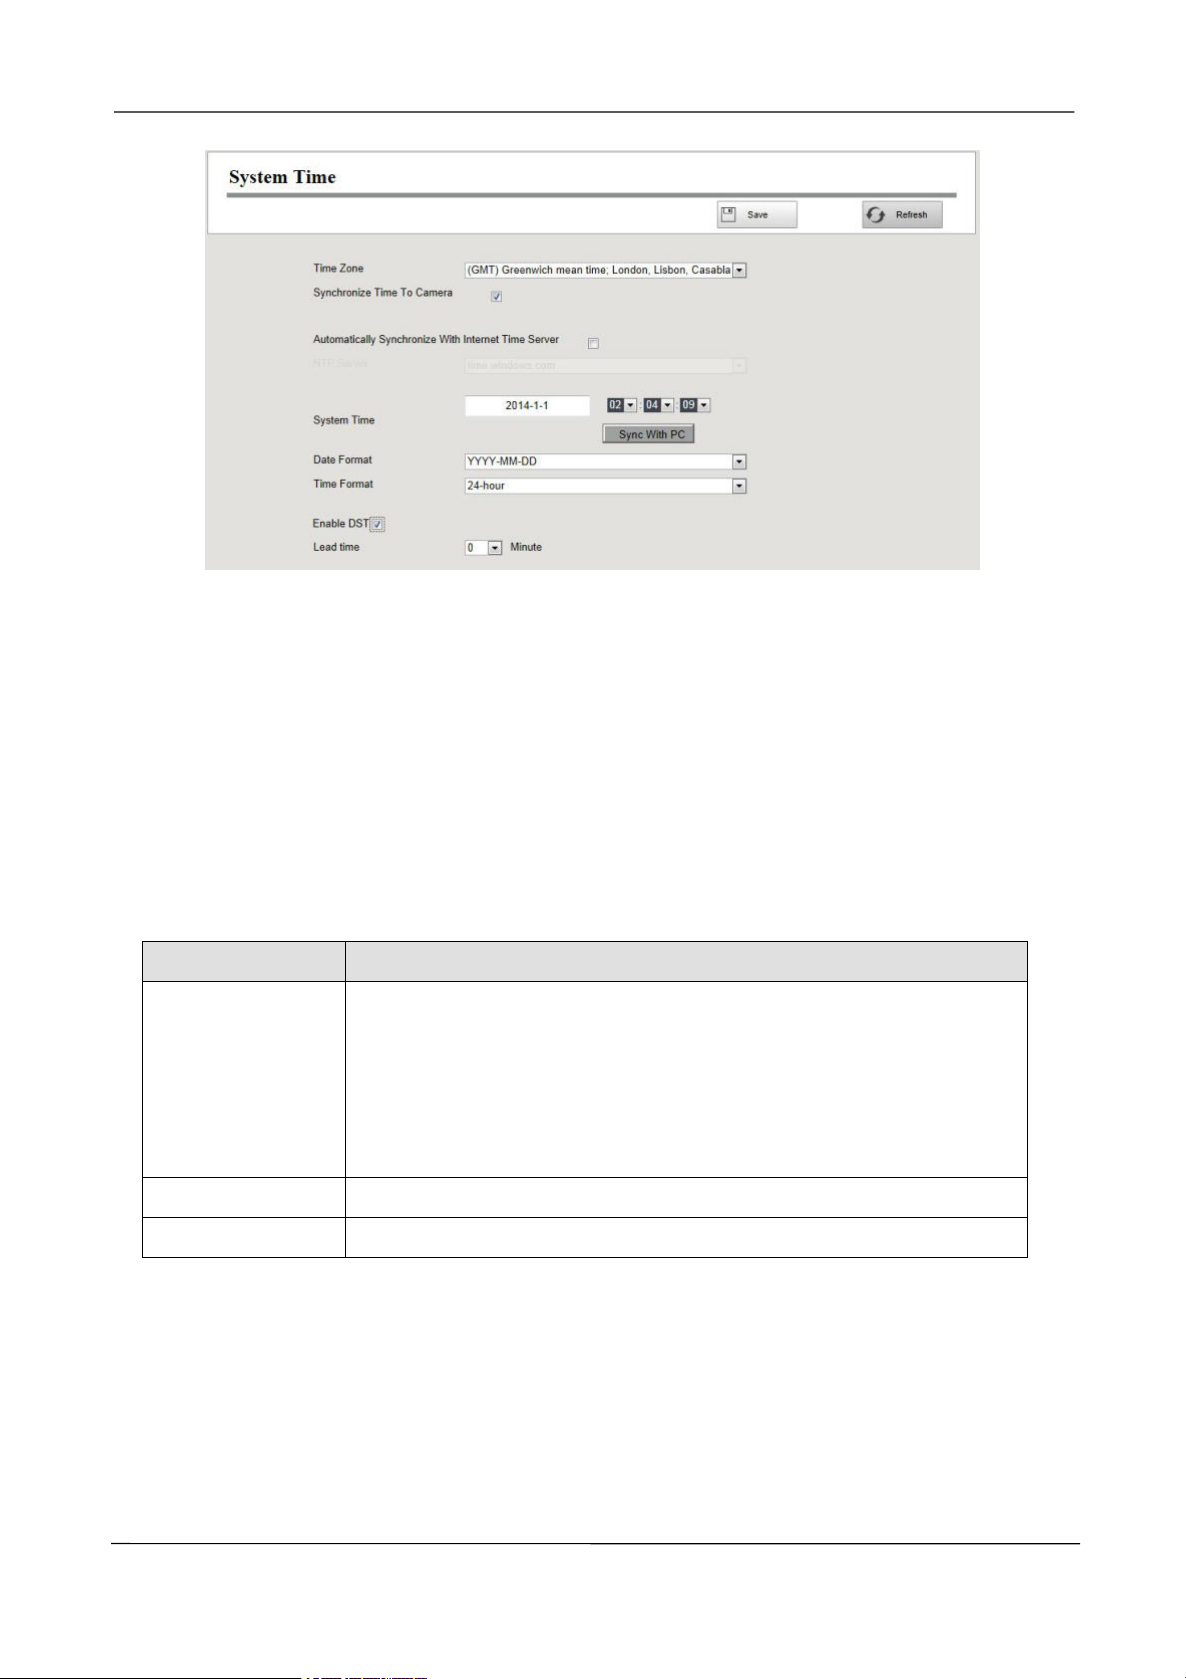
System Time
You can configure the date and time of the NVR.
Step1
Step2
Choose
Time page is displayed.
Configure the system time of the NVR.
(Parameter Configuration) > Basic Settings > System Time. The System
www.foscam.com
Page 57
NVR User Manual
51
Parameter
Description
System Time
There are two different ways for the date format to synchronize the date
and time of the NVR.
input the date and time manually. .
Click Sync with PC button to synchronize the date and time of the
NVR system with your computer.
Date Format
Select the date format from the drop-down list.
Time Format
Select the time format from the drop-down list.
Step3 Select the Time Zone from the drop-down list.
Step4 If you check the Synchronize Time To Camera checkbox, the default settings of the NVR for
the IP camera is applied to the added camera.
Step5 Configure the system date and time.
If you check the Automatically Synchronize With Internet Time Server checkbox, a Network
Time Protocol (NTP) Server can be configured on your NVR to ensure the accuracy of system
date / time. Choose the one that is closest to your NVR.
If you uncheck the Automatically Synchronize With Internet Time Server checkbox, configure
the following NTP settings.
Step6 Click Save button to take effect.
-------End
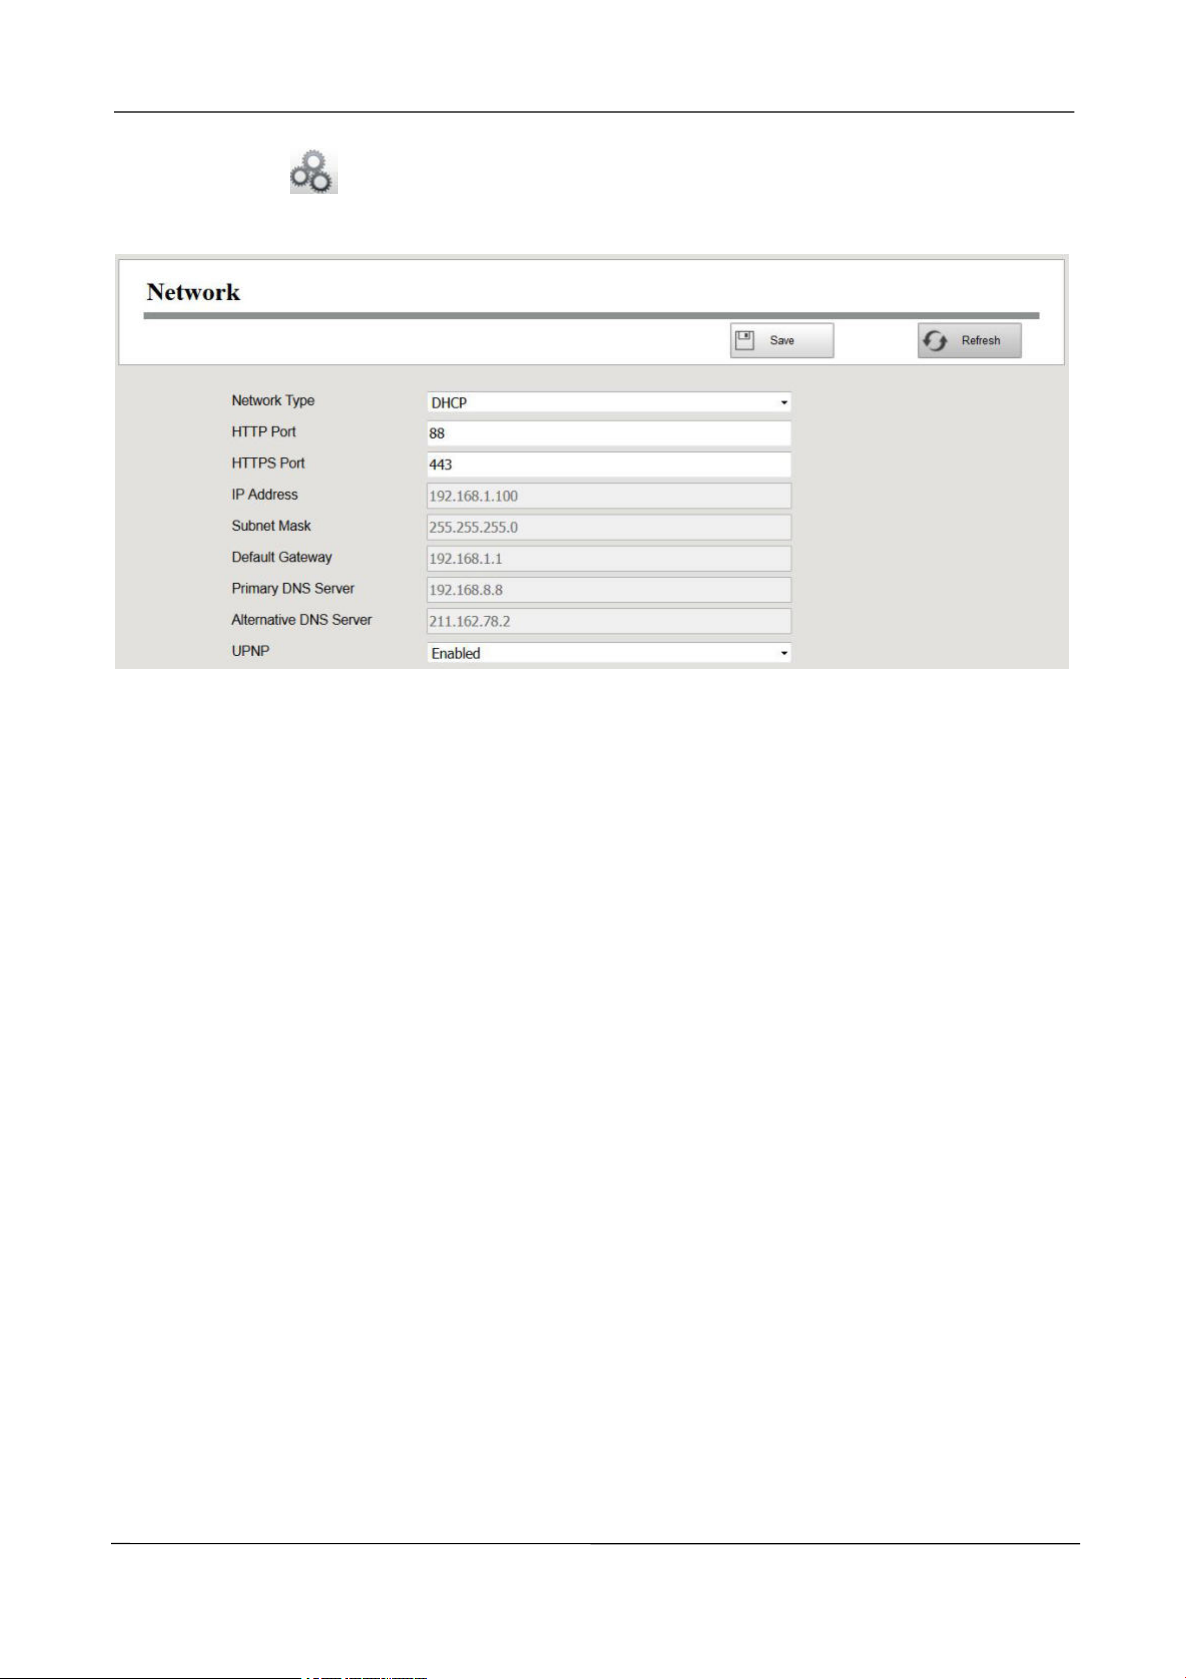
Network
You can configure the network information of the NVR.
www.foscam.com
Page 58
NVR User Manual
52
Step1 Choose (Parameter Configuration) > Basic Settings > Network.The Network page
is displayed.
www.foscam.com
Page 59

NVR User Manual
53
Parameter
Description
Network Type
You can select the network type from the drop-down list box.
If select the DHCP, the NVR system will automatically obtain an IP
address and other network settings from that server.
If select the Static IP, you can configure an IP address and other
network settings.
HTTP Port
The default value is 88.
HTTPS Port
The default value is 443.
IP Address
You can configure the IP address of the NVR system.
Note:
The IP of IP cameras, PC and NVR should be in the same network segment
and in the same LAN.
Subnet Mask
The subnet mask of the NVR system.
Gateway
The gateway of the NVR system.
Primary DNS
Server
The primary DNS server of the NVR system.
Alternative DNS
Server
The secondary DNS server of the NVR system.
UPNP
You can use the UPnP function to enable the fast connection of the device
to the WAN via a router without port mapping.
Note:
If you want to enable the UPnP function of the NVR, you must enable the
UPnP function of the router to which your NVR is connected.
Step2 Configure the network parameter.
How to configure the IP Address, Subnet Mask, Gateway, Primary DNS Server, Secondary DNS
Server, please refer to
Step3
-------End
Click Save button to take effect.
4.2 Common Operations 2. Configure the IP Parameters.
www.foscam.com
Page 60
NVR User Manual
54
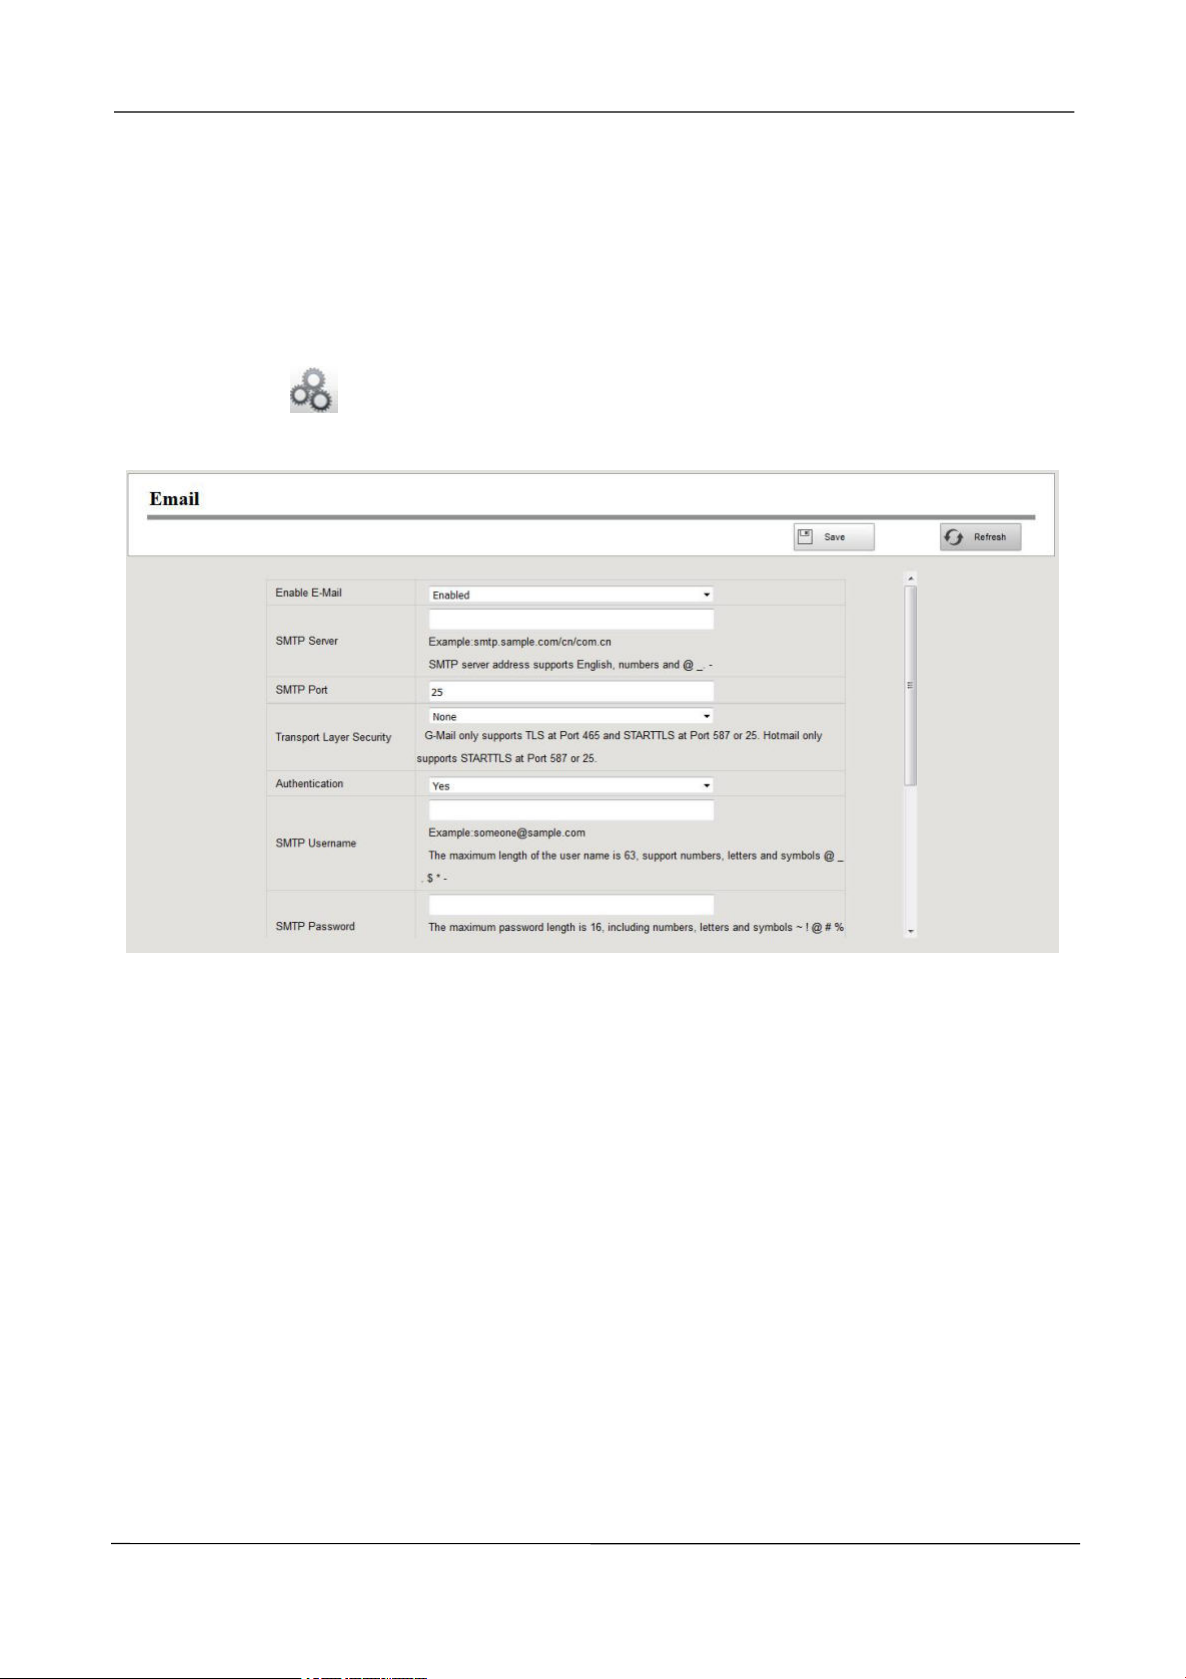
The system can be configured to send an email to the designated users if an alarm or motion event
is detected etc..
Before you configure the Email settings, the NVR must be connected to a local area network (LAN)
that maintains an SMTP mail server. The network must also be connected to either an intranet or the
Internet depending on the location of the e-mail accounts to which you want to send notification.
Step1 Choose (Parameter Configuration) > Basic Settings > Email. The Email page is
displayed.
Step2 Configure the Email parameter.
www.foscam.com
Page 61

NVR User Manual
55
Parameter
Description
Enable E-Mail
Enable or Disable the Email function.
SMTP Server
The SMTP Server IP address or host name.
SMTP Port
The SMTP port is usually set as 25. Some SMTP servers have their
own port, such as 587 or 465.
Transport Layer
Security
Transport Layer Security usually is None.
If you use Gmail, Transport Layer Security must be set to TLS or
STARTTLS and SMTP Port must be set to 465 or 25 or 587, which
port you choose should be decided by which Transport Layer Security
you select.
SMTP Username
The user account of sender's Email for SMTP server authentication.
SMTP Password
The password of sender's Email for SMTP server authentication.
Sender
The Email address of sender.
Receivers
Address1/2/3/4
The Email address of user to be notified. you can set 4 receivers
Step3
Click Save button to take effect.
Step4 Click Test to see if Mail has been successfully configured.
If the test success, you can see the success information, at the same time the receivers will receive a
test mail.
-------End
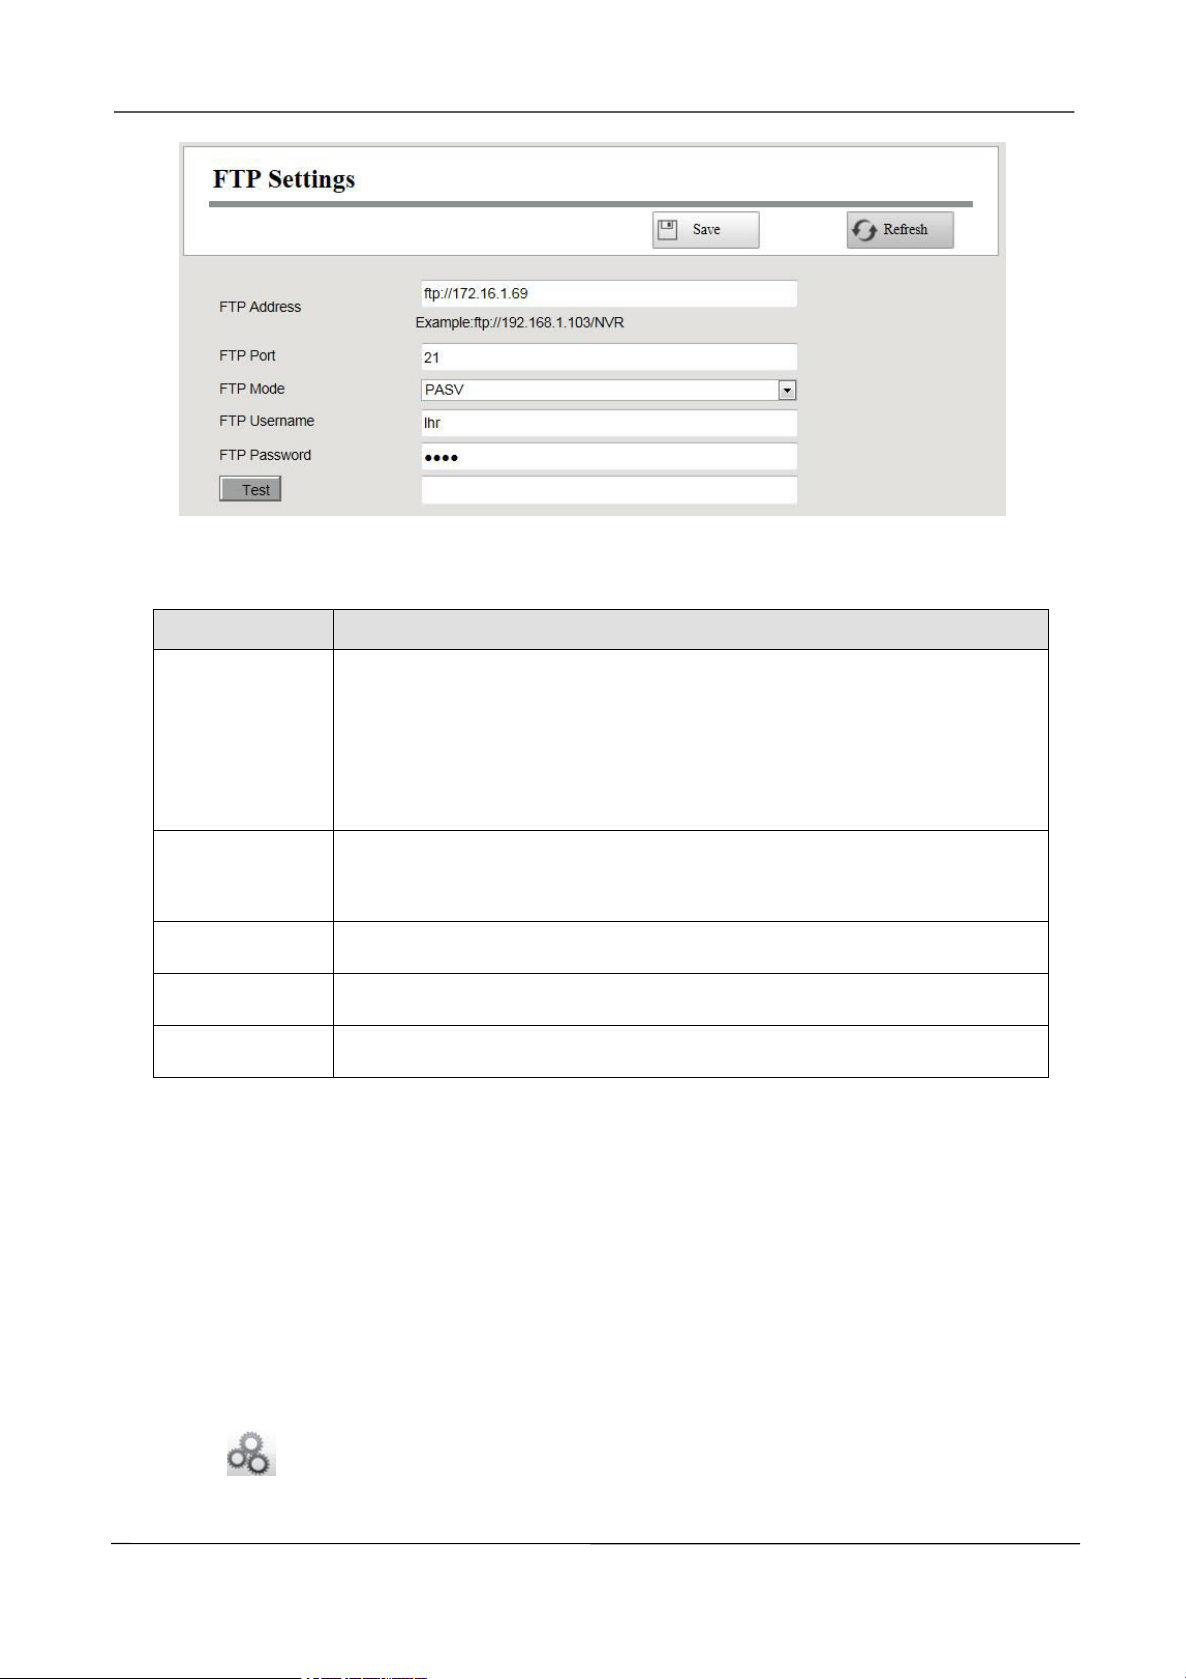
FTP Settings
The system can be configured to send an picture to the FTP server if an alarm or motion event is
detected etc..
Step1
Choose
Settings page is displayed.
(Parameter Configuration) > Basic Settings > FTP Settings. The FTP
www.foscam.com
Page 62
NVR User Manual
56
Parameter
Description
FTP Address
If your FTP server is located on the LAN, you can set FTP address as
ftp://IP address.(eg.ftp://192.168.1.103/dir).
If your FTP server is located on the WAN, you can set FTP address as
ftp://domain name/dir.(eg.ftp://test.no-ip.org/dir).
FTP Port
Default port is 21. If changed, external FTP client program must change the
server connection port accordingly.
FTP Mode
Here supports two modes: PORT and PASV.
FTP Username
The user account of FTP server.
FTP Password
The user password of FTP server.
Step2 Configure the FTP parameter.
Step3 Click Save button to take effect.
Step4
If the test success, you can see the success information.
-------End
Click Test to see if FTP has been successfully configured.
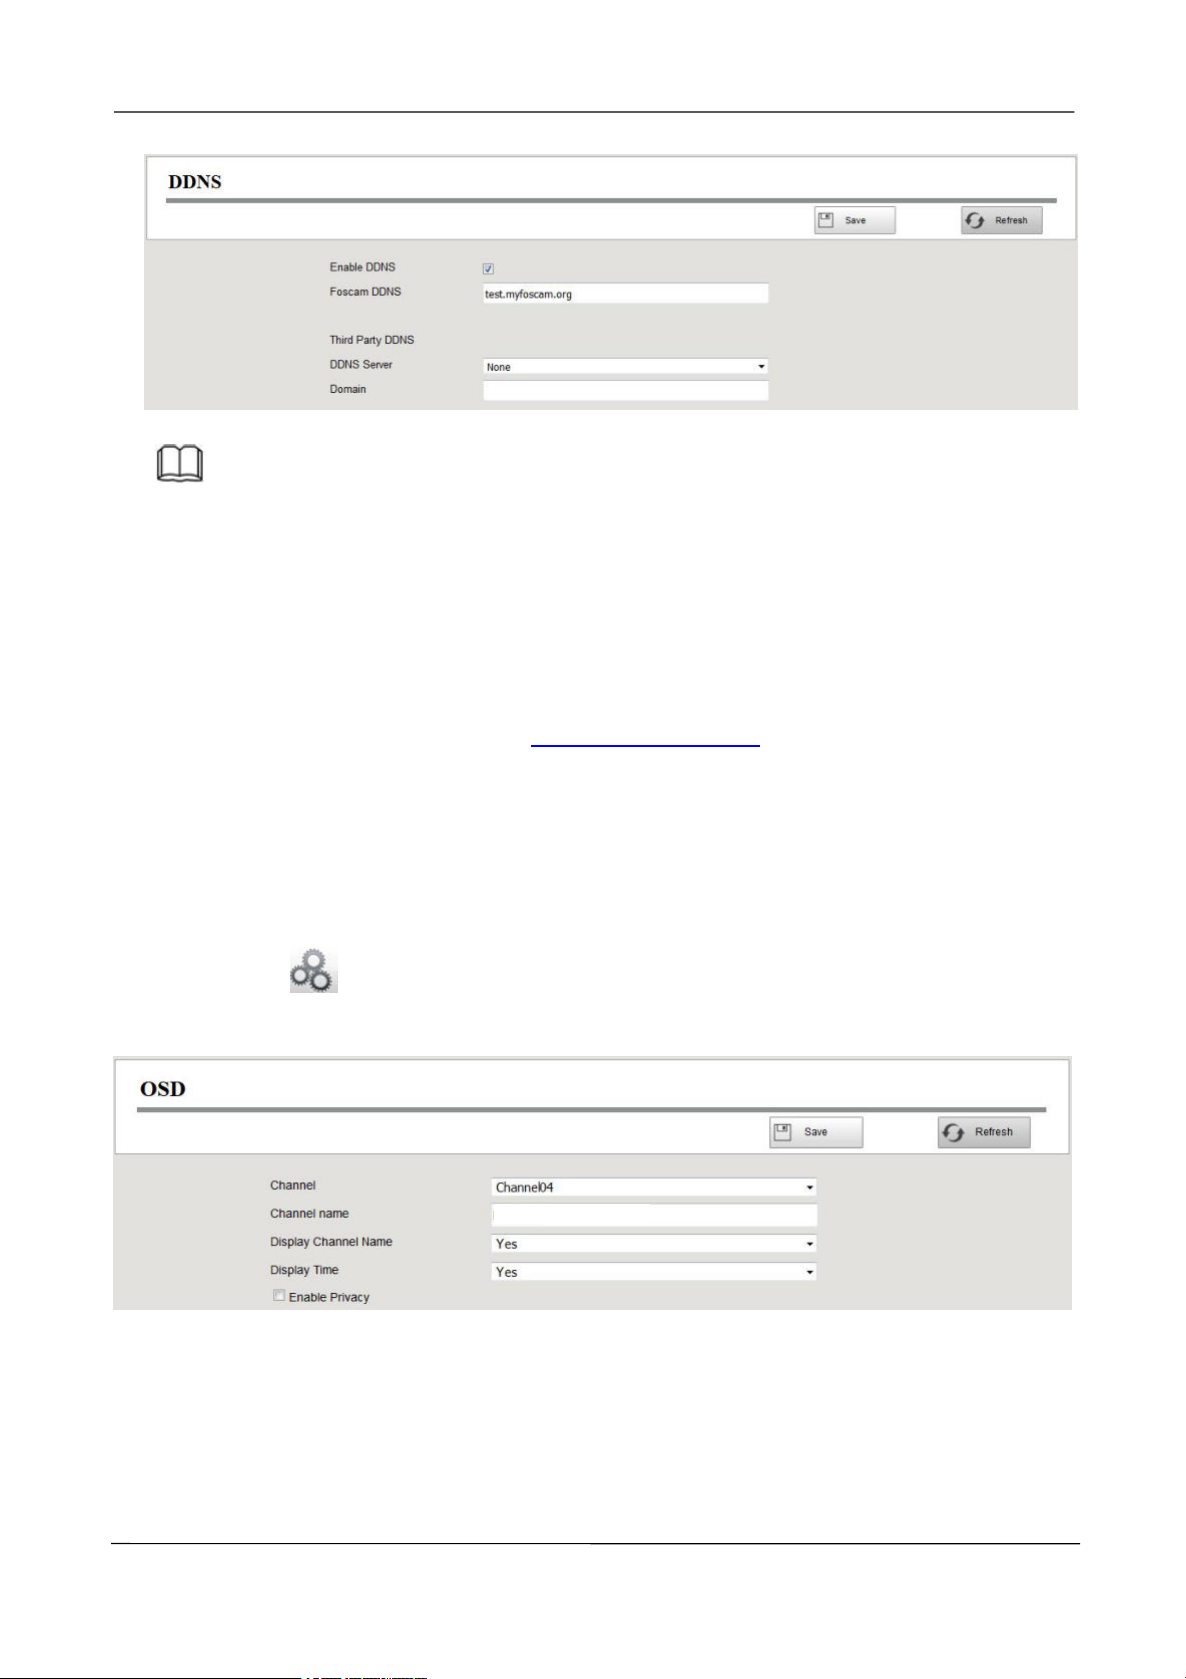
DDNS
The Foscam NVR has embedded a unique DDNS domain name when producing, and you can
directly use the domain name, you can also use the third party domain name.
Choose
displayed.
www.foscam.com
(Parameter Configuration) > Basic Settings > DDNS. The DDNS page is
Page 63
NVR User Manual
57
Foscam_camera
Note
Here take test.myfoscam.org for example.
Enable DDNS:Check the DDNS checkbox to enable this feature.
Click Save button to take effect. Then you can use http:// Domain name + HTTP Port to access the
NVR via internet.
Third Party DDNS:You can also use third part DDNS, such as www.no-ip.com, www. 3322.com. If
you set the third party DDNS, refer to the
1.Third Party Domain Name Settings.
4.2 Common Operations
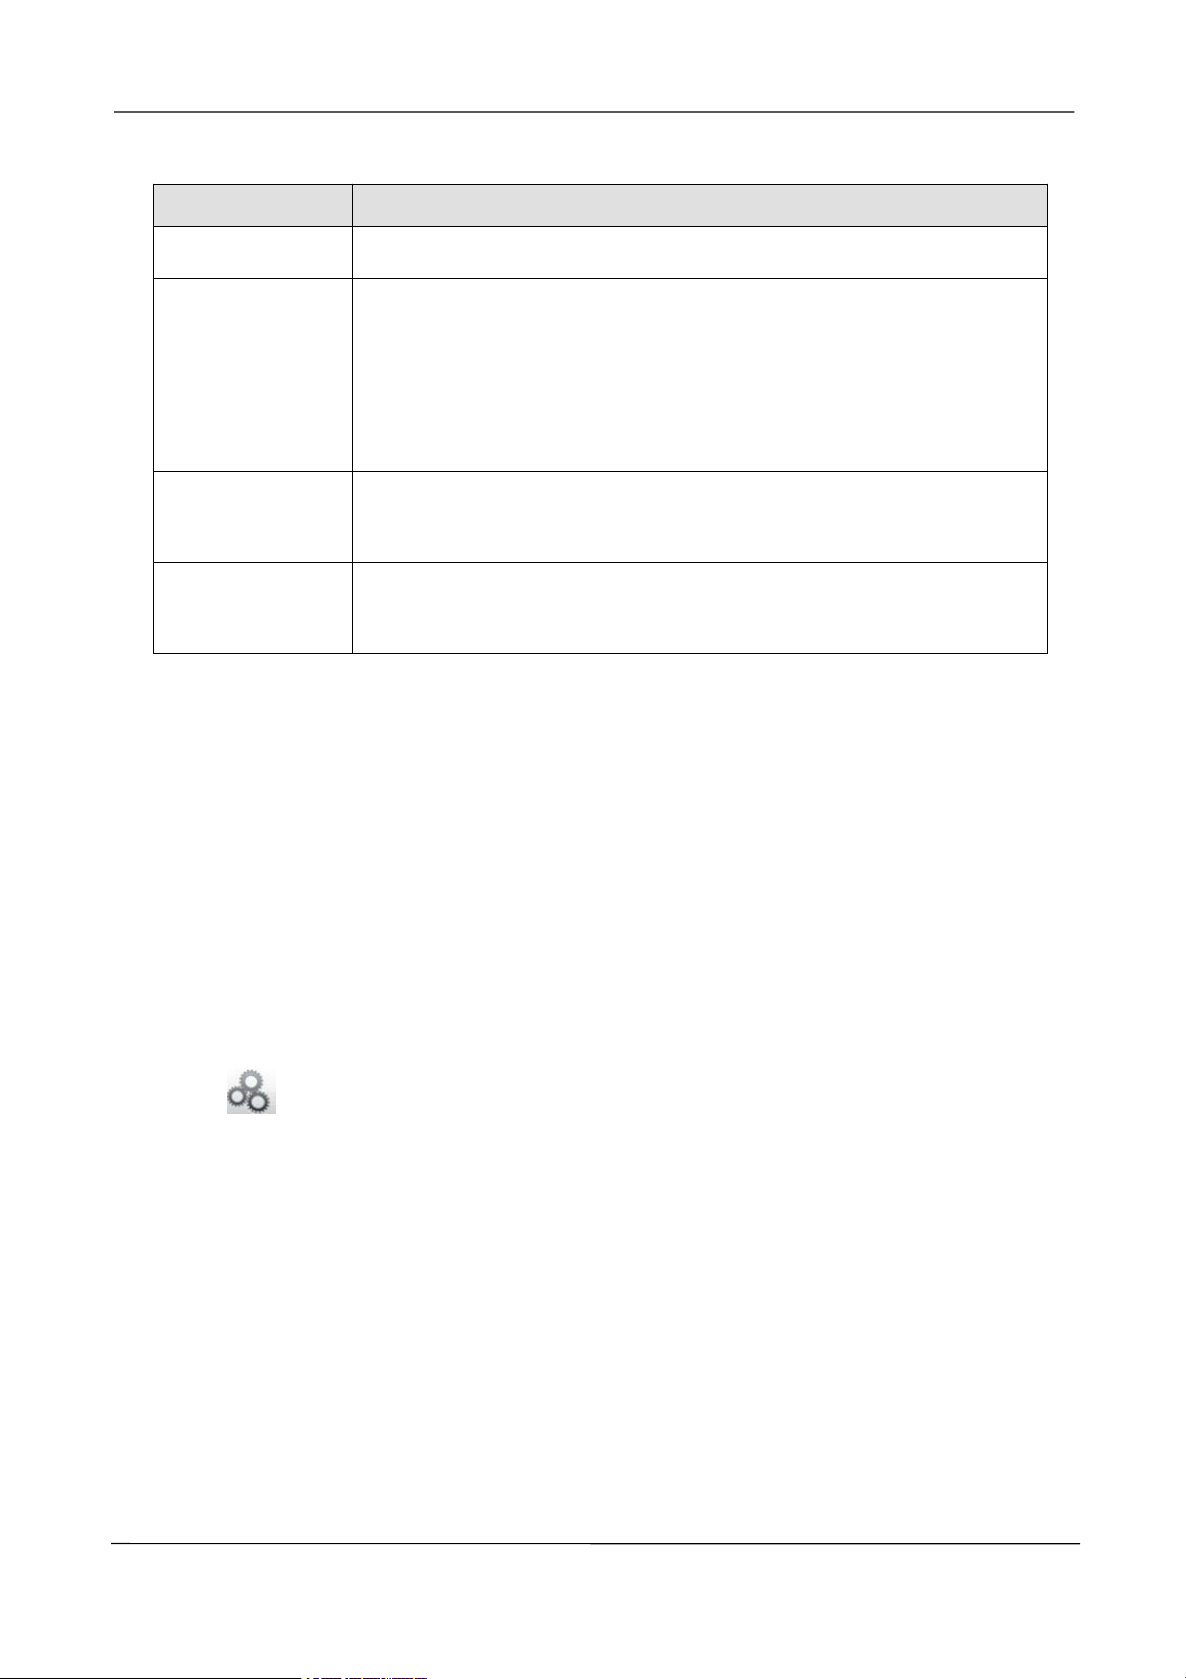
OSD
You can configure the OSD (On screen Display) information of the NVR.
Step1
Choose
displayed.
(Parameter Configuration) > Basic Settings > OSD,The OSD page is
Step2
www.foscam.com
You can configure the follow parameters.
Page 64
NVR User Manual
58
Parameter
Description
Channel
You can select one channel from drop-down box list..
Channel name
You can modify the IP Camera's name.
After you modify the name and save the modification, the NVR system
synchronizes the channel name to the corresponding IPC device name.
The channel name will be shown on the top left of the video image.
Display Channel
Name
There are two options: Yes or No. Select Yes and you can see the IP
camera's name on the video
Display Time
There are two options: Yes or NO. Select Yes and you can see the
system date on the channel video.
Step3
You can configure the privacy zone settings for the camera. Check the Enable Privacy
checkbox and it pop up a window. If the IPC device type is MJ or IPC protocol type is ONVIF,
the feature is invalid.
Step4 You can use the mouse to click and drag the text frame on the live view window to adjust the
OSD position.
Step5 Click Save button to finish the mask area setting. The mask area will be marked with black.
-------End
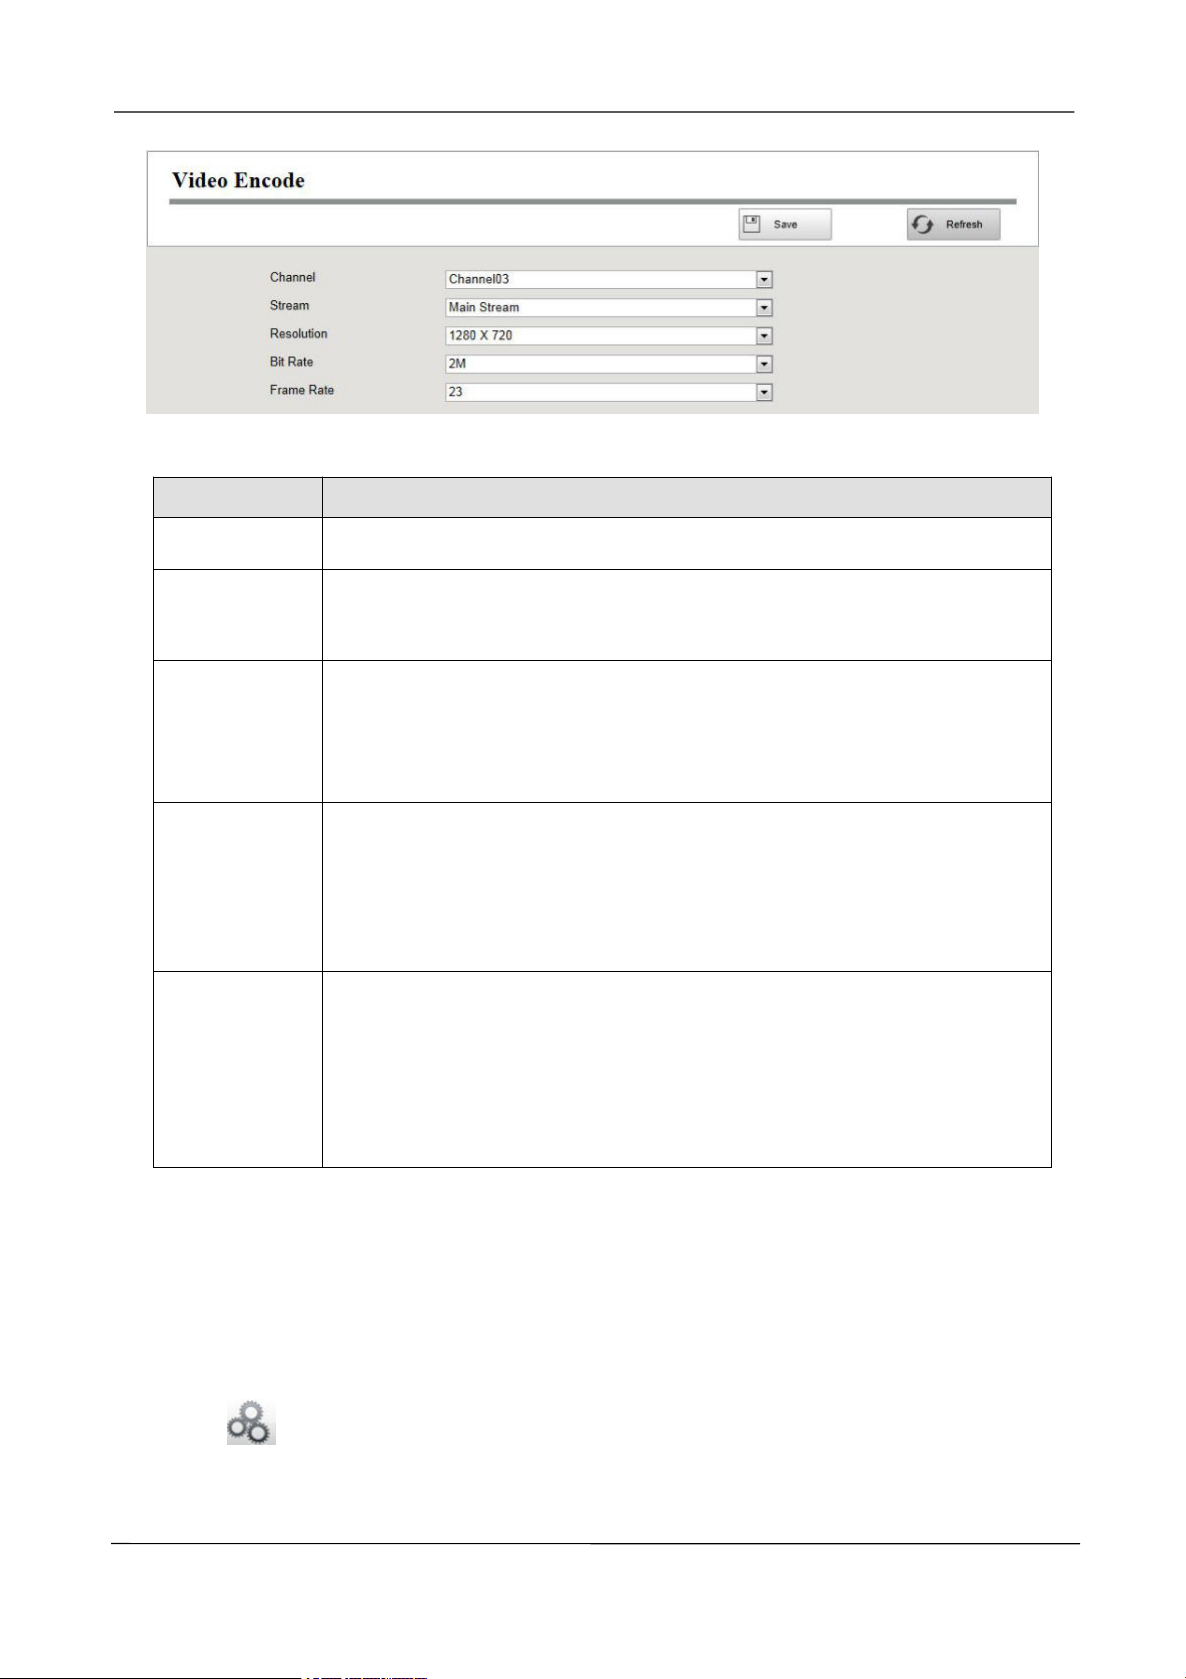
Video Encode
Choose
page is displayed.
You can configure the encoding scheme parameters of the IP Camera, the NVR system will
synchronize your IP camera with encoding scheme.
(Parameter Configuration) > Basic Settings > Video Encode. The Video Encode
www.foscam.com
Page 65
NVR User Manual
59
Parameter
Description
Channel
You can select the channel for the IP Cameras.
Stream
You can set the value of Resolution, Bit Rate, Frame Rate, Key Frame
Interval when the video was set the main stream.
Resolution
The resolution of the IP Camera.
The higher the resolution is,the sharper the video quality is, but also with the
increasing stream, which will take up the higher bandwidth.
Bit Rate
Generally speaking, the larger the bit rate is, the clearer video will become.
But the bit rate configuration should combine well with the network
bandwidth. If the bandwidth is very narrow, and bit rate is large, that will lead
to video can not play well.
Frame Rate
Note that a larger frame size takes up more bandwidth.
When the video format is 50Hz, the maximum frame rate is 25 fps.
When the video format is 60Hz, the maximum frame rate is 30 fps.
You should choose a lower frame rate when the bandwidth is limited.
Normally, when the frame rate above 15, you can achieve fluently video.
Click save button to take effect.
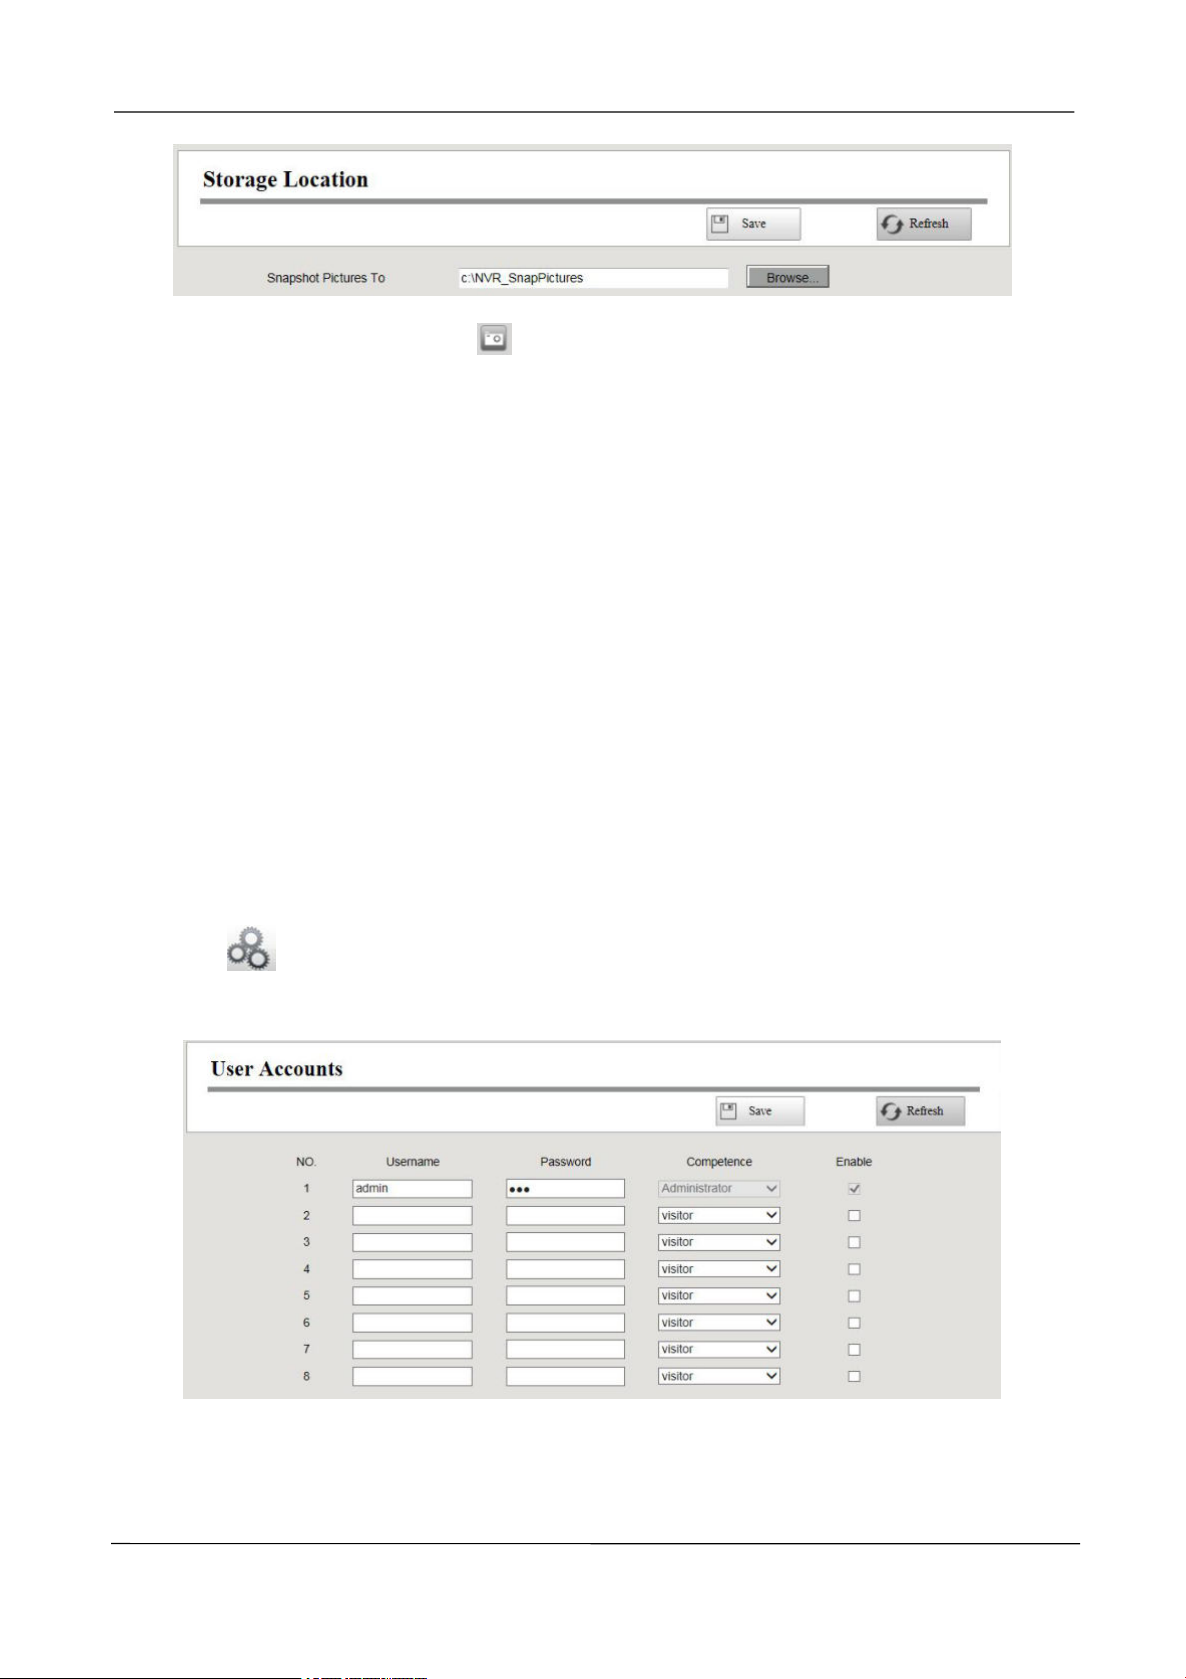
Storage Location
You can configure the storage location for snap picture and backup record file.
Choose
Location page is displayed.
www.foscam.com
(Parameter Configuration) > Basic Settings > Storage Location. The Storage
Page 66
NVR User Manual
60
Snapshot Pictures To: Click the icon (Take Snapshot) in the Real time Preview page or Playback
page, the snapshot picture will be saved to the Snap Picture Path in the local computer.
3.4.6 System Management
User Account
User levels by permission from low to high are visitor, operator, administrator. Different user levels
have different operating permission.The default user name of device administrator is admin with no
password.
The administrator has the permission to add and delete all users and configure user parameters.
You can add, modify, delete username / password or distribute authority for users.
The valid value range of Username and Password is 1 ~ 20 characters, it contains the English letter,
numeric and symbol.
Choose
Accounts page is displayed.
(Parameter Configuration) > System Management > User Account. The User
[Add a User]
1.input the Username and Password.
www.foscam.com
Page 67
NVR User Manual
61
2.Select the user level from the Competence.
3.Check the Enable checkbox.
4.Click Save button to save the settings and the added new user will be displayed on the list.
[Changing Password of Admin]
1.In the Password text field, delete the old password, input the new password.
2.Click Save button to take effect.
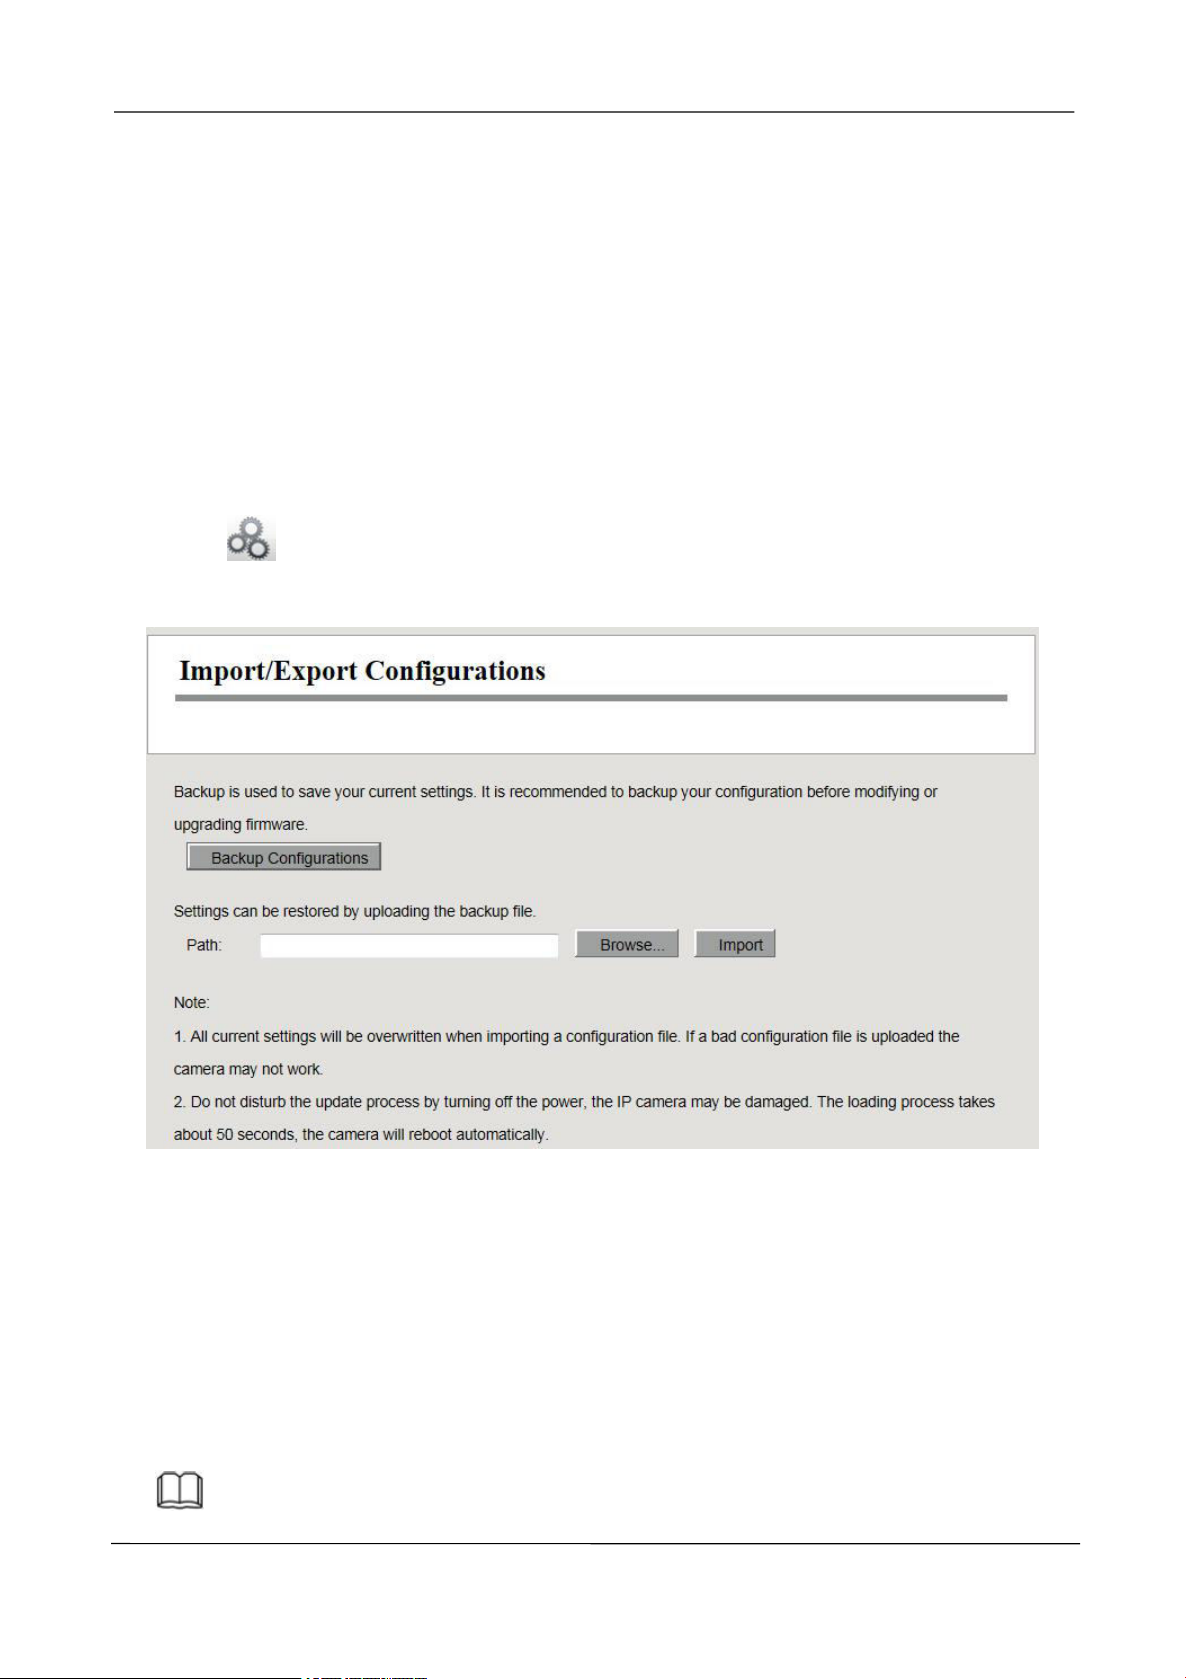
Import / Export Configurations
You can import or export a configuration file for NVR system.
Choose
Configuration. The Import / Export Configurations page is displayed.
(Parameter Configuration) > System Management > Import / Export
Backup Configurations: Backup is used to save your current settings. It is recommended to backup
your configuration before modifying or upgrading firmware. Click Backup button and the
configuration files of the NVR will be exported for backup. The name of the configuration file name
is config.bin.
Import: Click Browse..., select the config.bin file from the USB-flash disk and click the Import
button. The loading process takes about 50 seconds, After having finished the import of
configuration files, the NVR device will reboot automatically.
Note
www.foscam.com
Page 68
NVR User Manual
62
Foscam_camera
Do not disturb the update process by turning off the power.
All current settings will be overwritten when importing a configuration file. If a bad configuration
file is uploaded the NVR may not work.
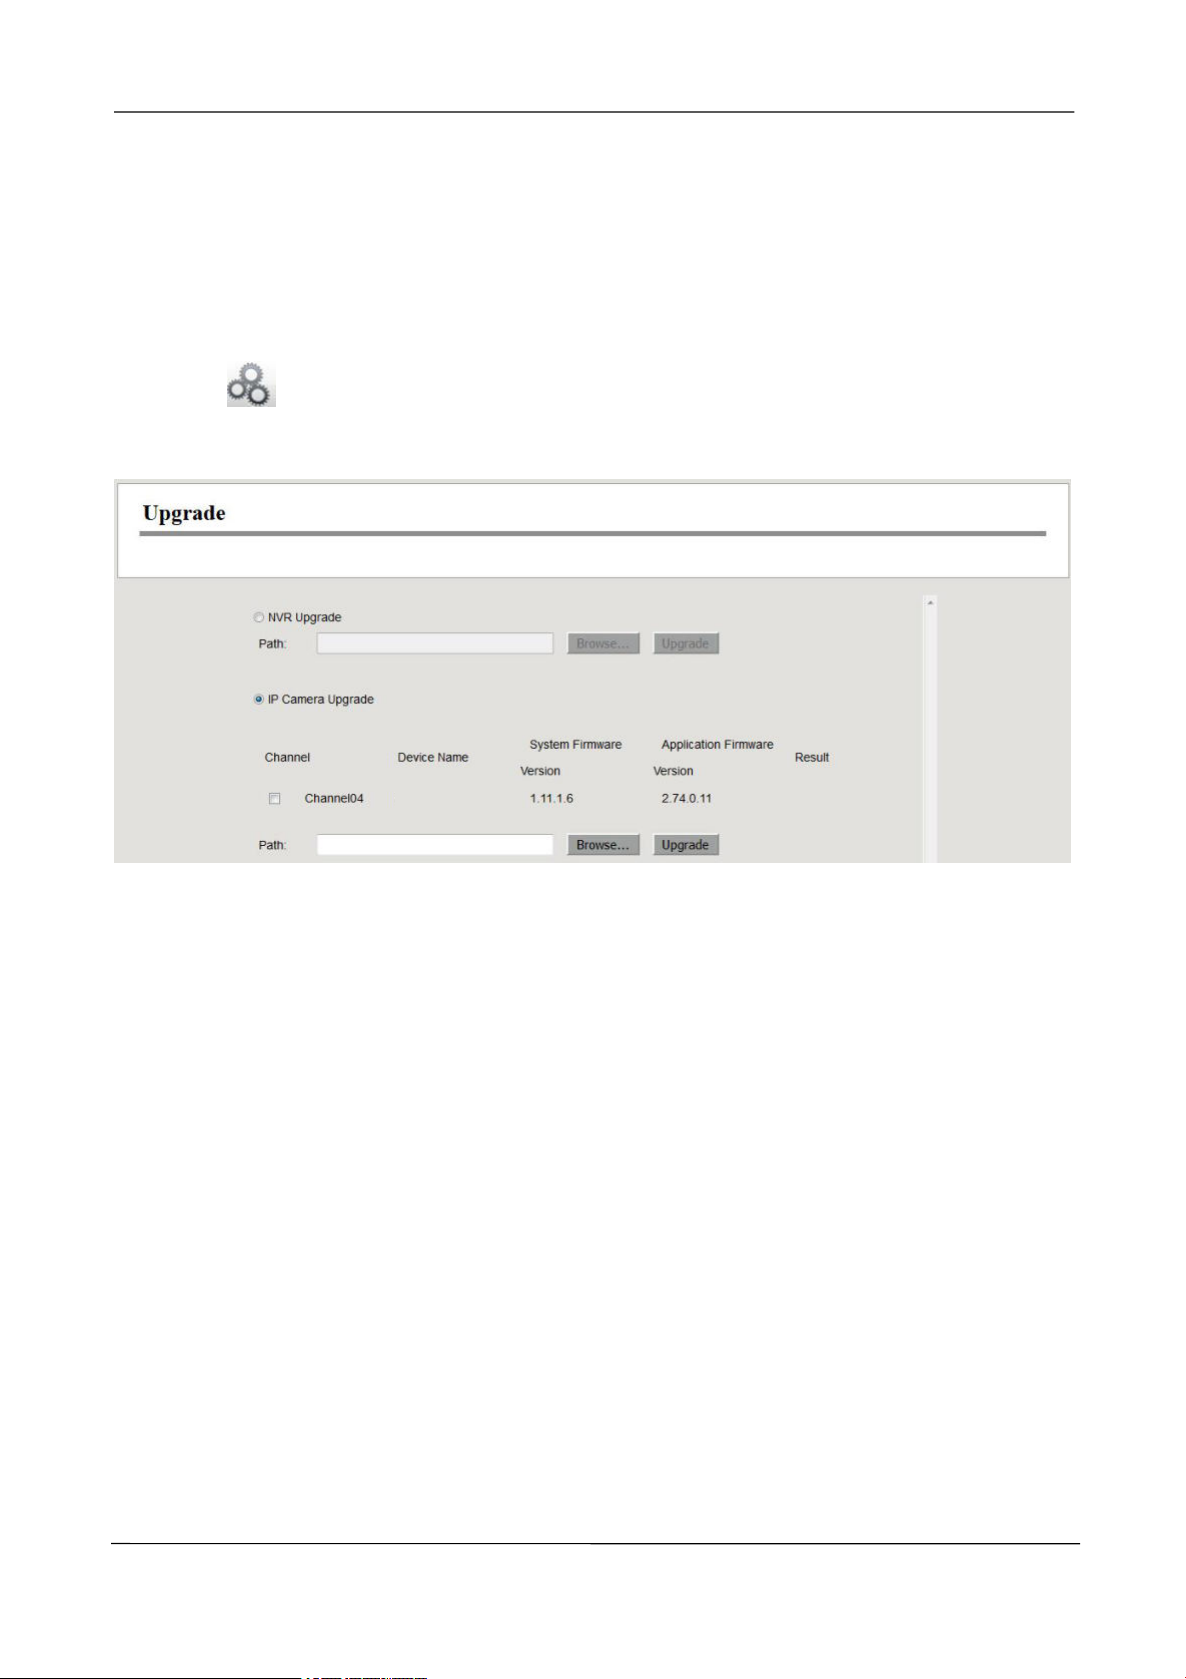
Upgrade
Choose
(Parameter Configuration) > System Management > Upgrade. The Upgrade
page is displayed.
Upgrading NVR
Check the NVR Upgrade, then click the Browse... button to choose the upgrade file of the NVR.
Click the Upgrade button to upgrade the NVR.
Upgrading IP Camera
Check the IP Camera Upgrade, then check the channel.
Click the Browse... button to choose the upgrade file of the camera. Click the Upgrade button to
upgrade the camera.
Note: If you want to upgrade the camera in the Kit. Please make sure that the camera is
connected to NVR through the cable, so that the camera has always been powered on.
Don't shut down the power during upgrade. After upgrading, you can see the upgrade result.
Your current system version will be displayed on your screen. You may go to the Parameter
Configuration > Device Information > Firmware Version Page to check for the latest system
www.foscam.com
Page 69
NVR User Manual
63
versions available.
Patch Installation
Choose (Parameter Configuration) > System Management > Patch Installation. The
Patch Installation page is displayed.
You can install or install patch of the NVR.
Click Browse to select the patch file in the local directory.
Factory Reset
Choose
Reset page is displayed.
Click Factory Reset button, then click OK button in the pop-up message box and all parameters will
return to factory settings. The NVR device will reboot automatically.
(Parameter Configuration) > System Management > Factory Reset. The Factory
Reboot
Choose
(Parameter Configuration) > System Management > Reboot. The Reboot page is
displayed.
Click Reboot button, then click OK button in the pop-up message box.The NVR system will reboot.
www.foscam.com
Page 70
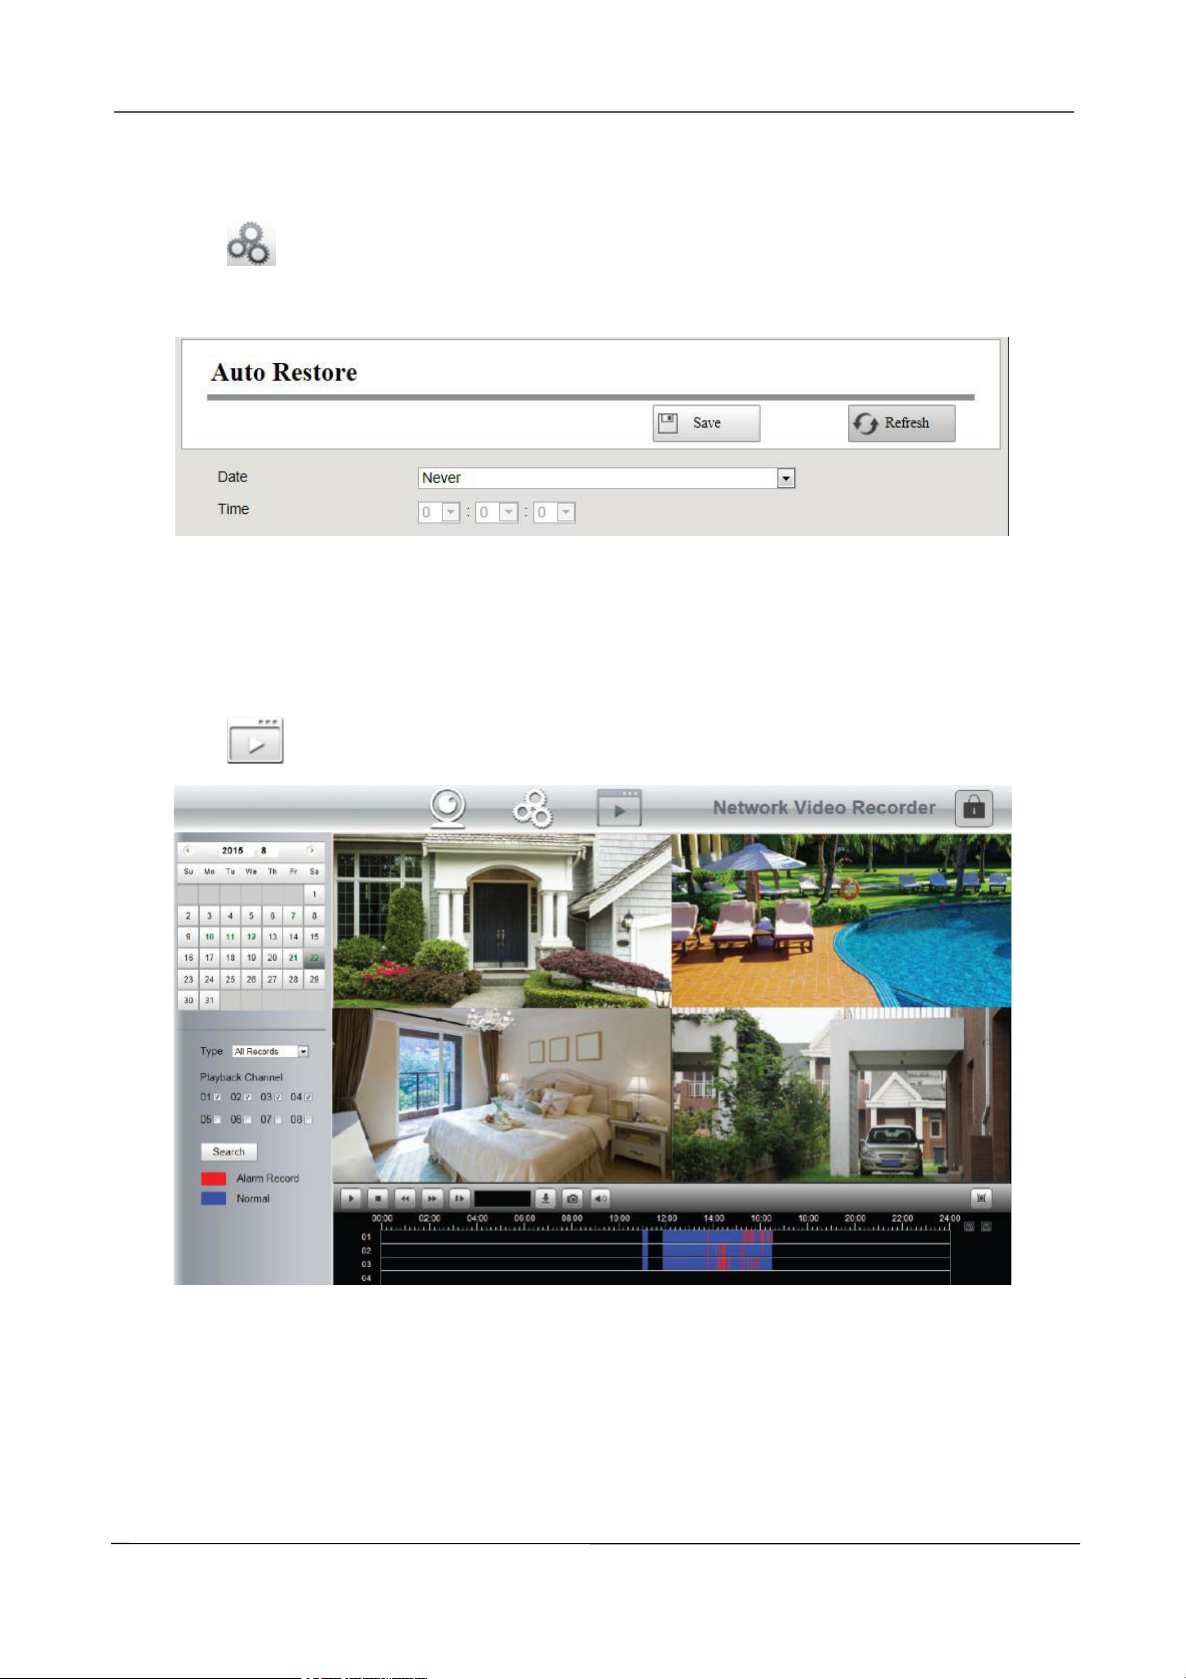
NVR User Manual
64
Auto Restore
Choose
Restore page is displayed.
You can configure the Date and Time. The NVR system will be maintained at the setting time.
(Parameter Configuration) > System Management > Auto Restore. The Auto
3.5 Playback
Choose
(Playback), you can play the recording file of the NVR.
1. Select a date with recording in calendar.
2. Select the Record Type, and check the checkbox from the Channels.
3. Click Search button to search the matched recorded files. If there are search results, then they
will be shown in the time bar area.
www.foscam.com
Page 71
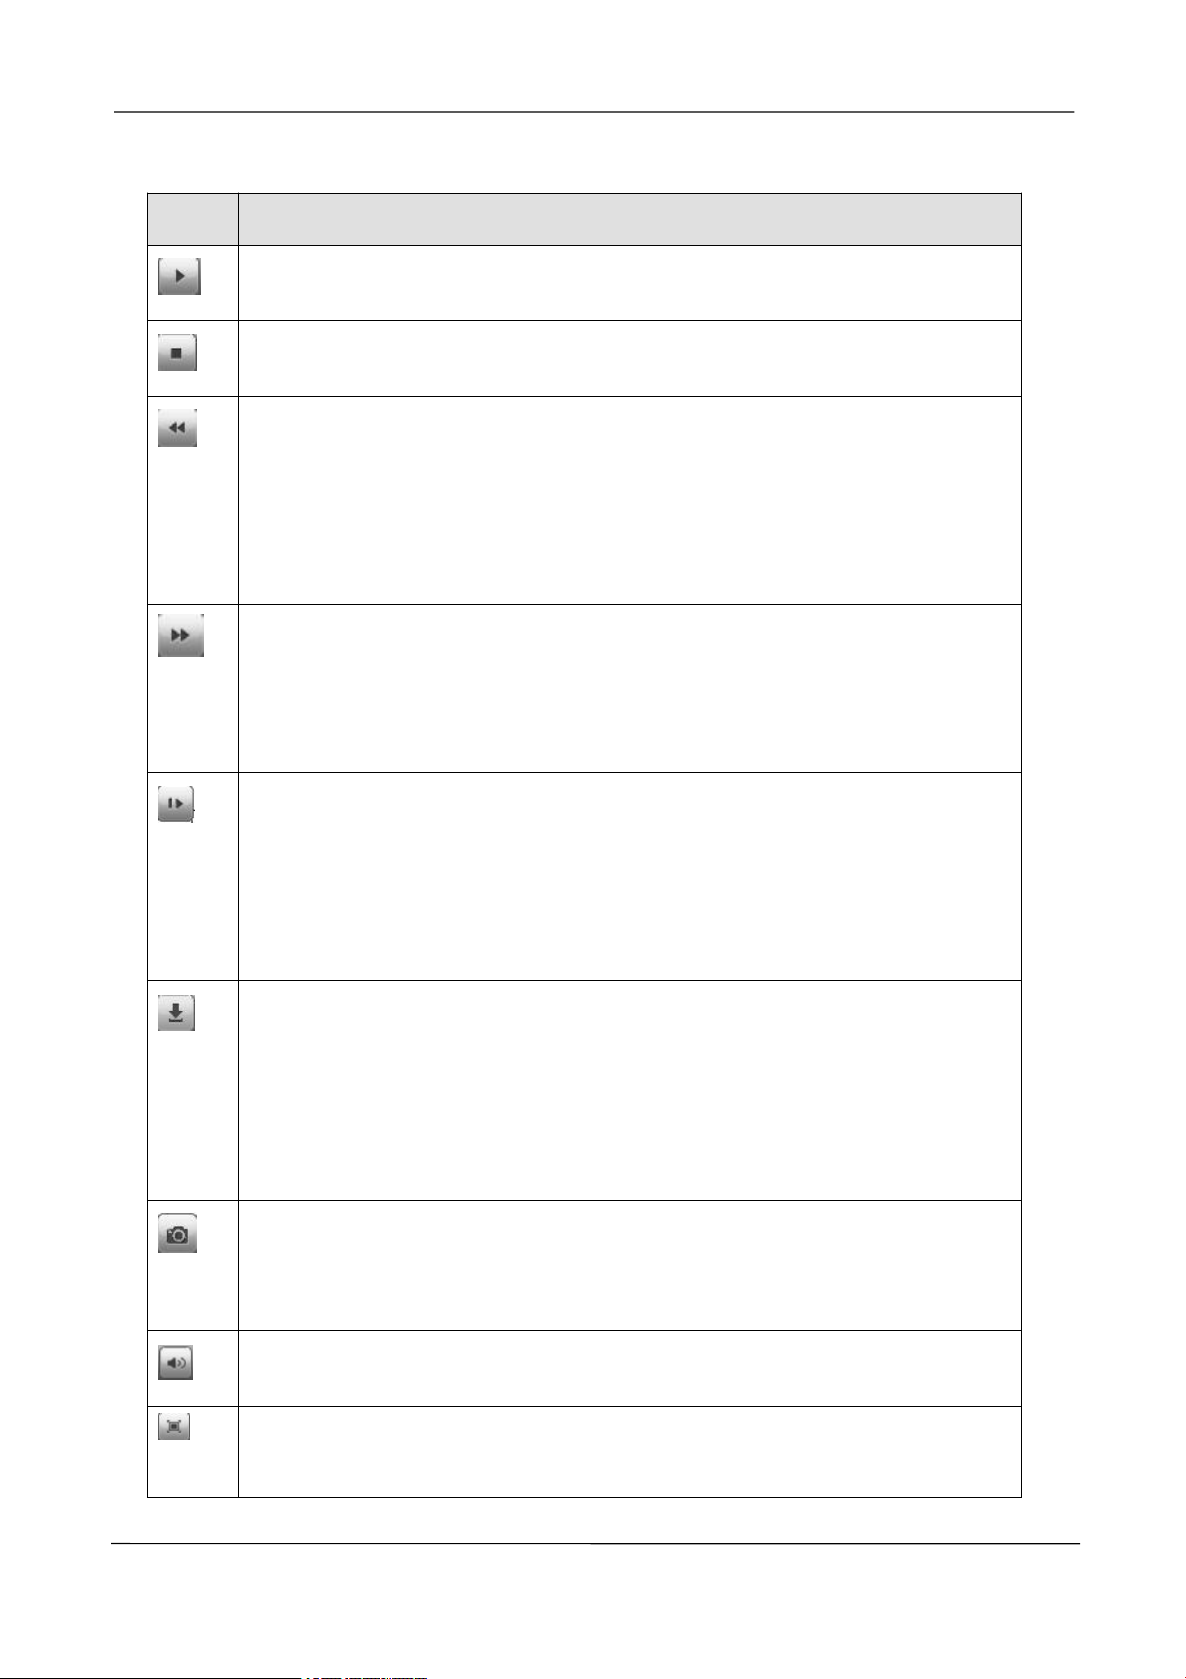
NVR User Manual
65
Icon
Description
Start
Stop
Fast backward. The fast backward speed can be 4 times, 8 times, 16 times or 32
times of the normal playing speed. Click this button. The multiple of normal playing
speed is displayed in the upper right corner of the playback page. For example,
"<< X4" indicates the current fast backward speed is four times of the normal
speed.
Fast forward. The fast forward speed can be twice, 4 times, 8 times, 16 times or 32
times of the normal playing speed. Click this button. The multiple of normal playing
speed is displayed in the upper right corner of the playback page. For example,
">> X2" indicates the current playing speed is twice of the normal speed.
Slow progress. The slow progress speed can be 1/2 times, 1/4 times, 1/8 times,
1/16 times or 1/32 times of the normal playing speed. Click this button. The
multiple of normal playing speed is displayed in the upper right corner of the
playback page. For example, ">> X1/2" indicates the current playing speed is 1/2
times of the normal speed.
Download. Downloaded files are stored to the local PC. If you need to download
the recording files, click the icon. Double click a record, you can see the video of
this record.
Check the record, then click the Download button to save the recording files to
your computer.
Select the channel, click this button, and you can take a picture of a corresponding
channel to the local computer. You can set the storage path, refer to the Web >
Parameter configuration > Settings > Storage Location.
Click this button to enabled/disabled the audio.
Full screen. Make the playing video maximized. After the video is maximized,
press ESC to exit full screen.
4. Manage the recording.
www.foscam.com
Page 72
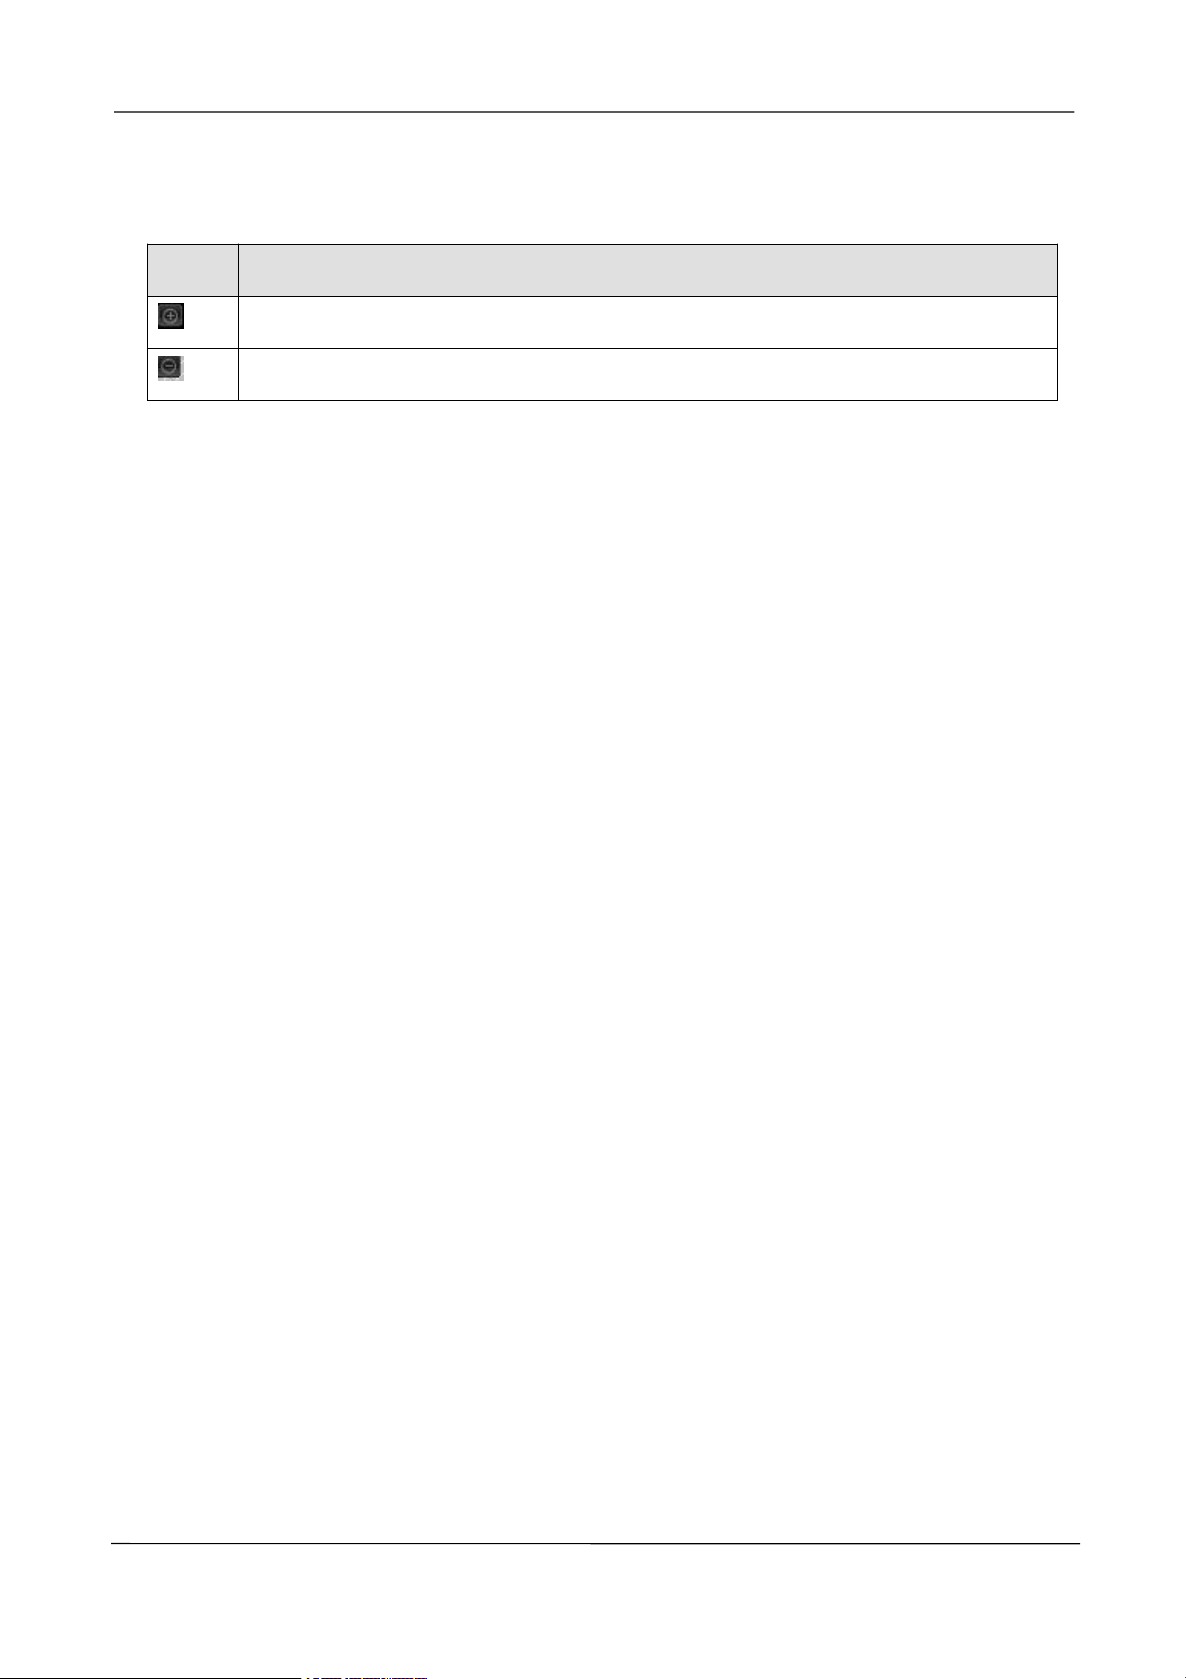
NVR User Manual
66
Icon
Description
Zoom-in time axis.
Zoom-out time axis.
5. Playback time
You can move the mouse to a specific time axis and click to watch the playback.
www.foscam.com
Page 73

NVR User Manual
67
)(sec3600
8
ond
bit
BitRate
3600
8
4
bit
Mbit
4
Appendix
4.1 HDD Capacity Calculation
This chapter describes how to determine the size of the HDD you need when you install the NVR for
the first time.
The NVR adopts the MPEG4/H.264 compression technology and its dynamic range is large.
Therefore, the capacity of the HDD depends on the estimated size of files generated in each channel
every hour according to code streams.
Computational formula of HDD Capacity:
Whole HDD Capacity(M)= number of the channels * time in need (hour) * spent of HDD Capacity per
hour (MB/hour)
The meanings of parameters are as follows:
Number of the channels: Number of channels where you need to enable recording.
Time in need (hour): Time you need to record.
Spent of HDD Capacity per hour
Spent of HDD Capacity per hour(M/hour)=
You can obtain the Bit Rate by using the following methods:
-In the GUI interface, choose Menu > Settings > Video , view the value of the Bit Rate.
-In the Web interface, choose Parameter Configuration > Local settings > Encoding Scheme,
view the value of the Bit Rate.
[Example]
If you select 4M for the bit rate and select four channels for recording and one week of recording is
needed, you can calculate the HDD capacity by using the following formula:
Recording time(hour) =7days*24 hours=168 hour
Spent of HDD Capacity per hour(M/hour)=
www.foscam.com
=1800M/hour
Page 74
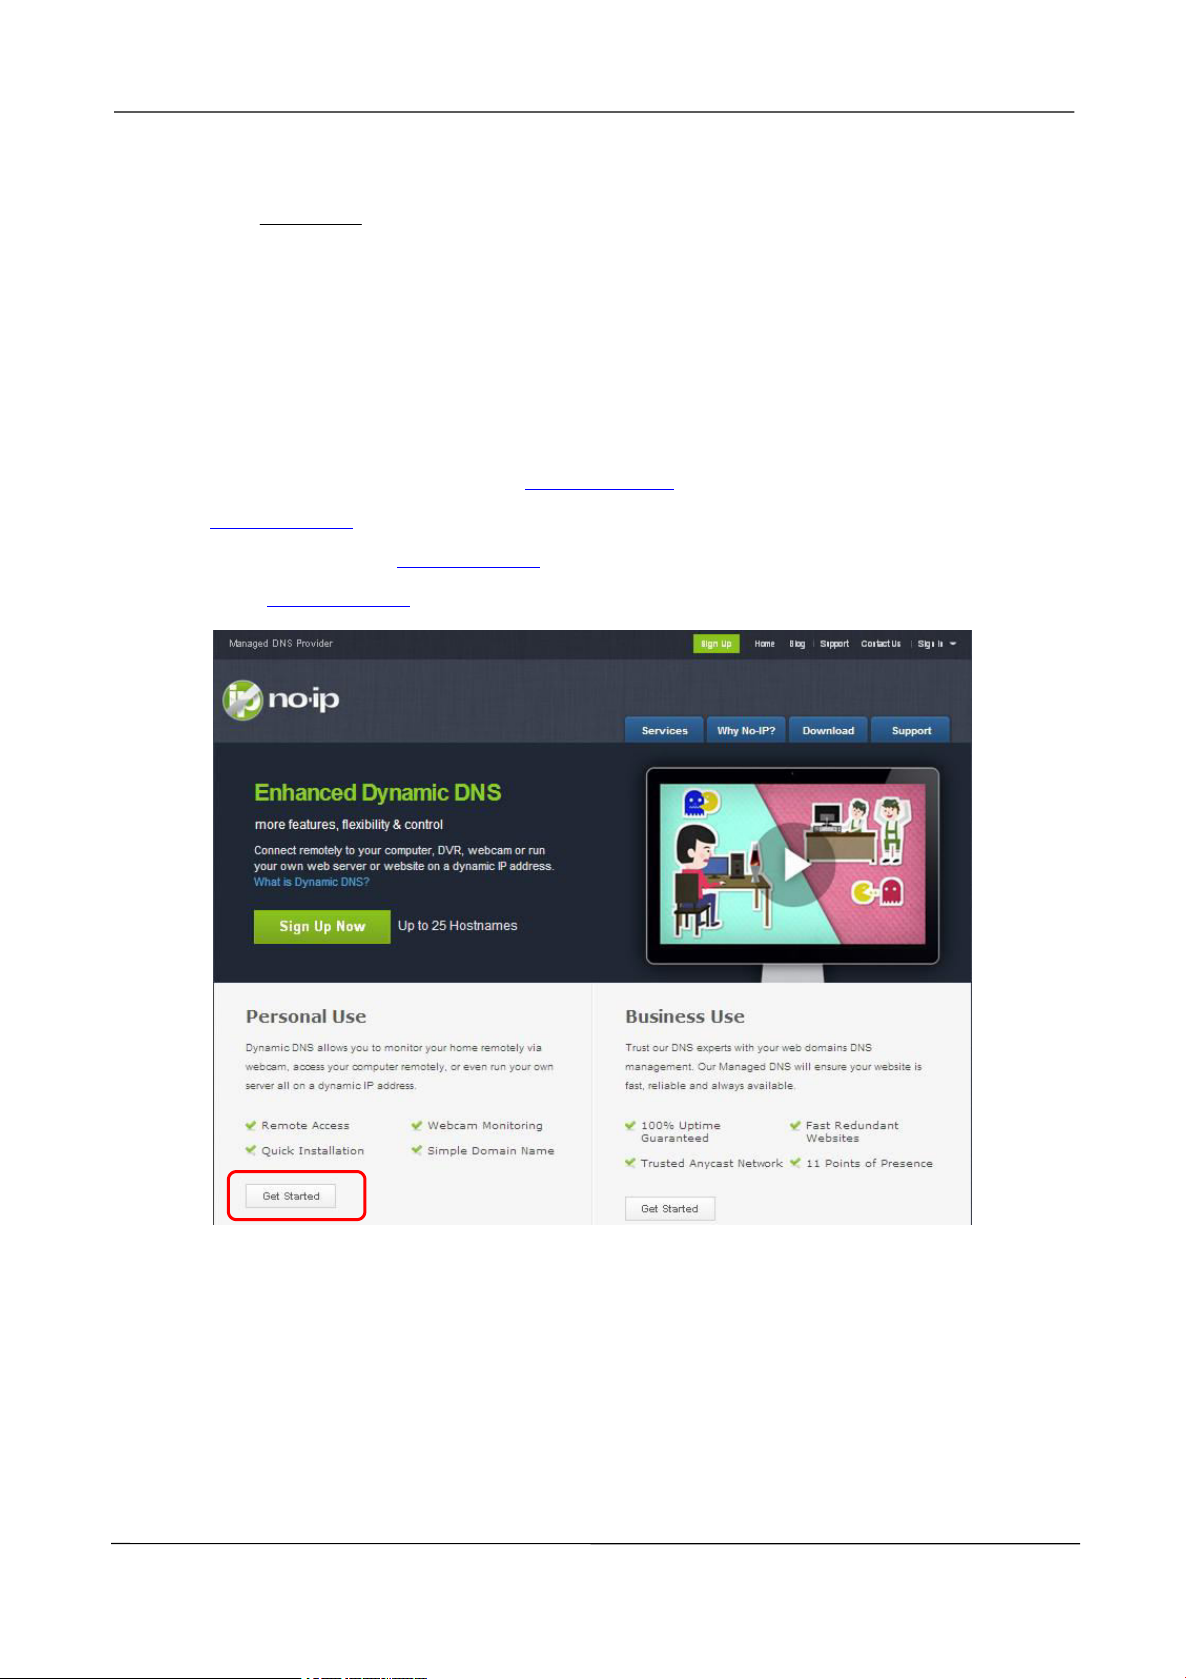
NVR User Manual
68
1024
1209600M
Whole HDD Capacity(M)=4*168(hour)*1800 (M/hour) =1209600M,
1209600M=
According to the preceding calculation result, you are advised to buy a HDD of 1.5 TB or above.
=1181.25G
4.2 Common Operations
1.Third Party Domain Name Settings
User can also use third part DDNS, such as www.no-ip.com, www. 3322.com
Here take
1) Step 1, Go to the website
Firstly: Login on
www.no-ip.com for example:
www.no-ip.com to create a free hostname
www.no-ip.com and click No-IP Free to register.
www.foscam.com
Page 75
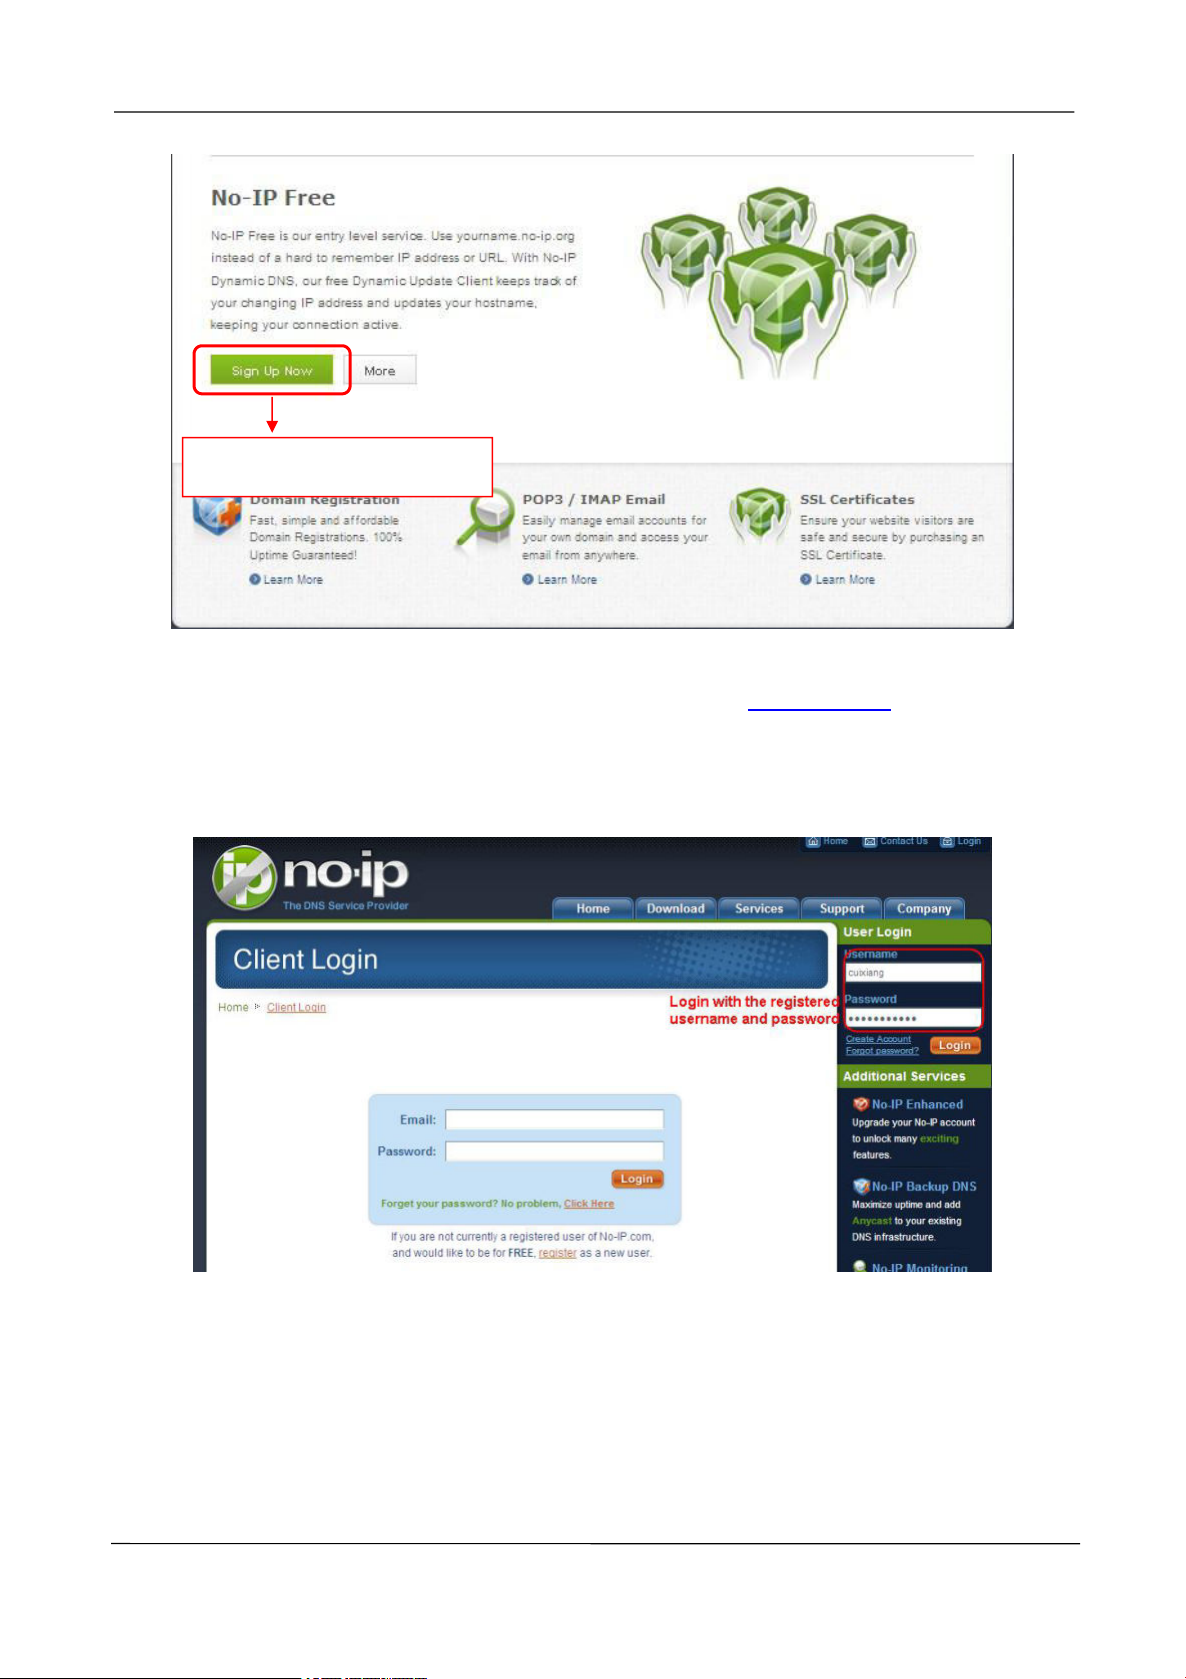
NVR User Manual
69
Click here to register .
Please register an account step by step according to instructions on www.no-ip.com.
After registration, please login your email which used to register. You will receive an email from website,
please click the link to activate your ACCOUNT as indicated in email.
Secondly: Login the link with the registered username and password to create your domain name.
www.foscam.com
Page 76
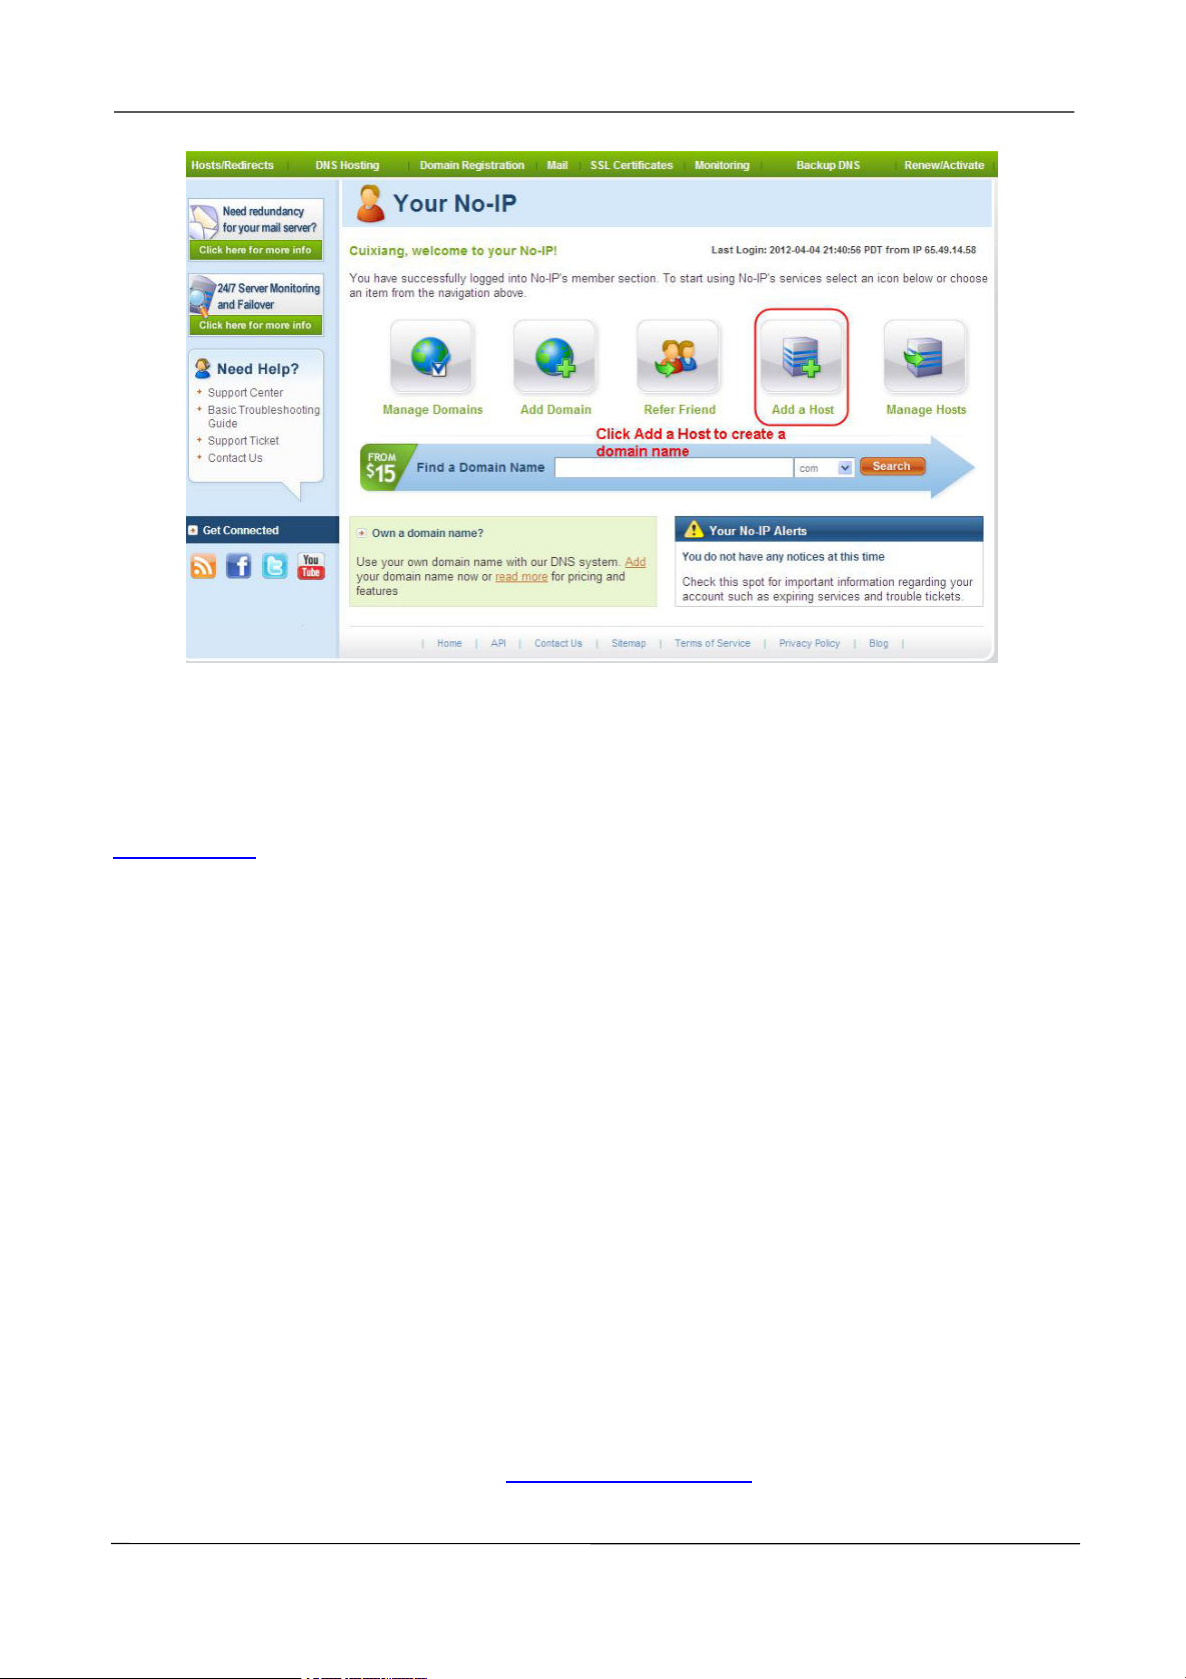
NVR User Manual
70
Please create the domain name step by step according to instructions on www.no-ip.com
Step 2, DO DDNS Service Settings within the NVR
Please set DDNS Settings within the NVR by hostname, a user name and password you've got from
www.no-ip.com
Take hostname ycxgwp.no-ip.info, user name cam, password cam2012 for example.
Firstly, goes to option of DDNS Settings on the administrator panel.
Secondly, select No-Ip as a server..
Thirdly, fill cam as DDNS user, fill password cam2012 as DDNS password, fill ycxgwp.no-ip.info as
DDNS domain and server URL, Then click save to make effect. The camera will restart and to take the
DDNS settings effective.
Fourthly, after the restart, login the NVR, and go to option of Device Status on the administrator panel,
and check if the DDNS status is successful.
If failed, please double check if you have input the correct hostname, user name, and password, and try
to redo the settings.
NOTE :
If you have set Third Party DDNS successfully ,the Domain Name will be invalid. The Third Party DDNS
and the Domain Name cannot work at the same time, the last time you configured will take effect.
2) Do port forwarding within the router
Example: The camera's LAN IP address is http://192.168.8.100:2000 , Media port no. is 9200.
Firstly, login the router, goes to the menu of Port Forwarding or Port Trigger (or named Virtue Server on
www.foscam.com
Page 77
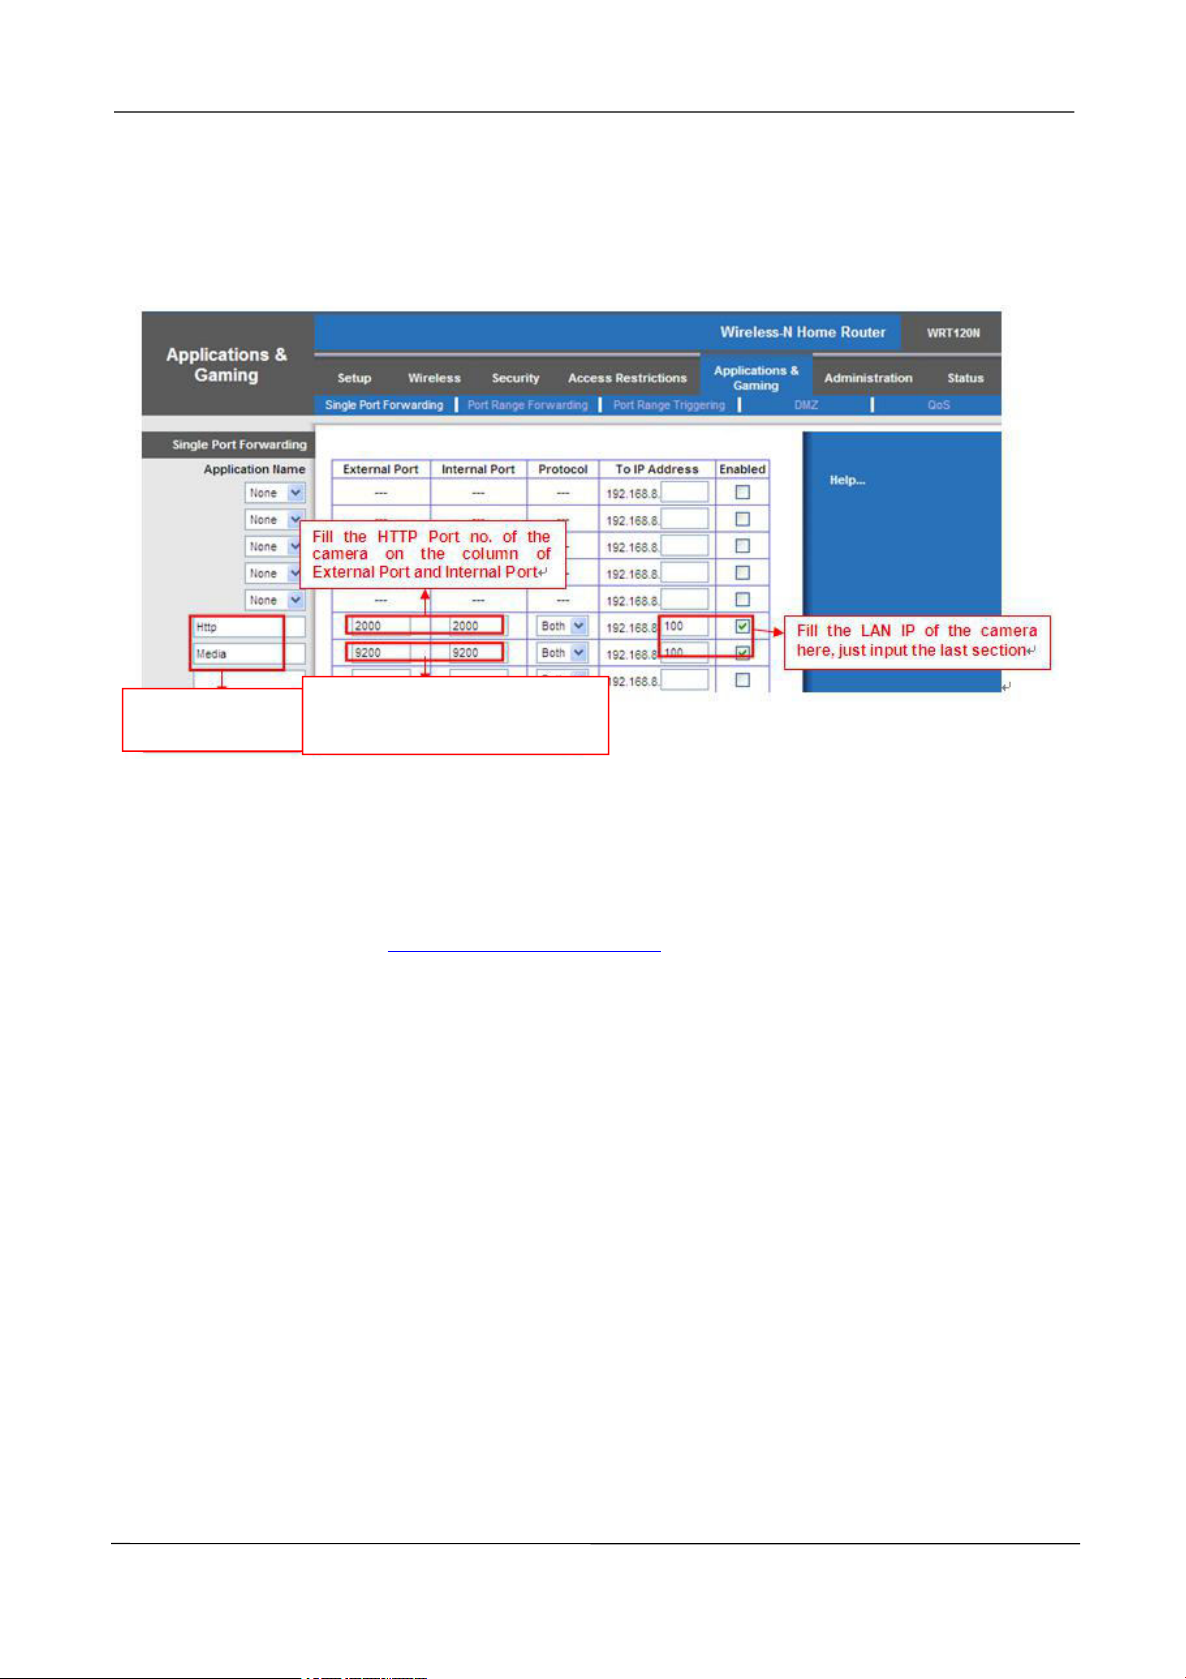
NVR User Manual
71
Assign a
Fill the Media Port no. of the
camera on the column of
some brands of router). Take Linksys brand router as an example, Login the router, and goes to
Applications & Gaming->Single Port Forwarding.
Secondly, Create a new column by LAN IP address & HTTP Port No. of the NVR within the router
showed as below.
3) Use domain name to access the camera via internet
After the port forwarding is finished, you can use the domain name+ http no.to access the camera via
internet. Take hostname ycxgwp.no-ip.info and http no. 2000 for example, the accessing link of the
camera via internet would be
http:// ycxgwp.no-ip.info:2000
2. Configure the IP Parameters
Here we take TP-LINK router as an example.
The IP address of the NVR must be in the range of the router address pool.
Log in to the router client through the browser and select DHCP Server > DHCP service. On the
DHCP page, you can view the start address and end address of the address pool.
www.foscam.com
Page 78
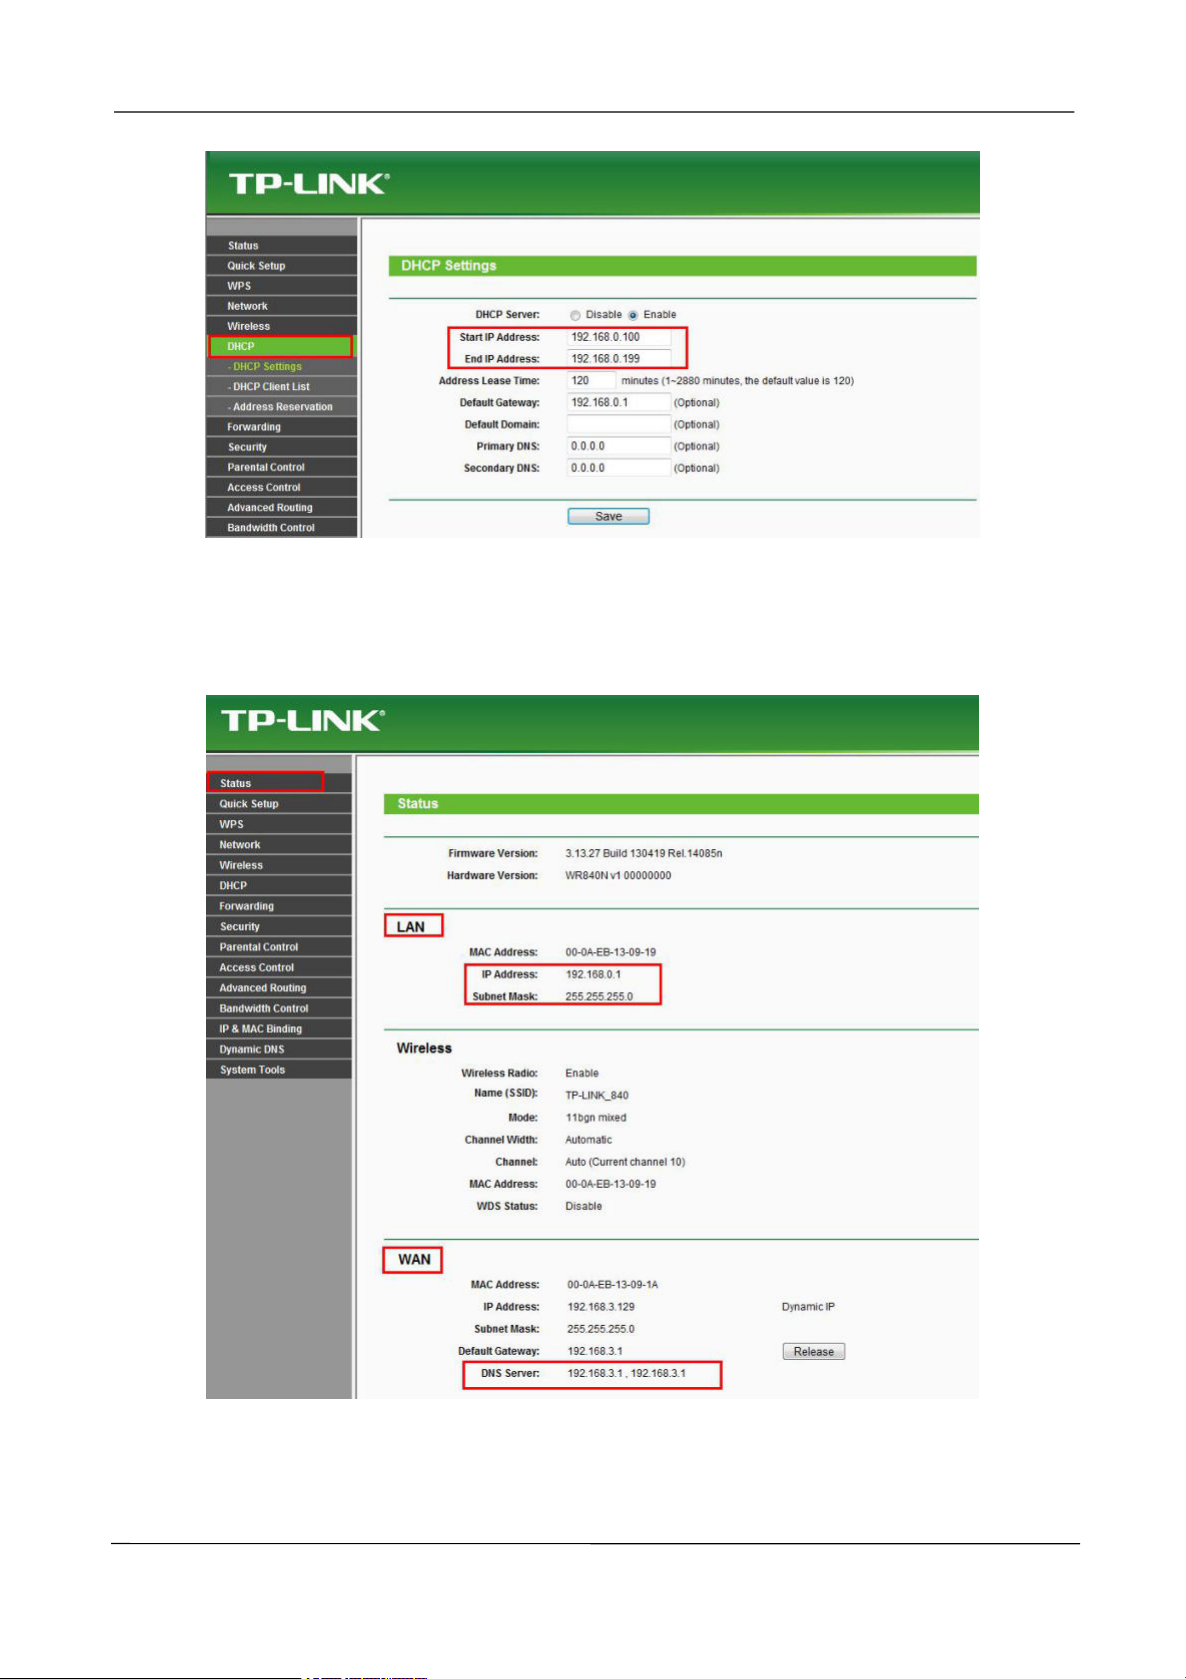
NVR User Manual
72
The subnet mask of the NVR must be the same as the subnet mask in LAN port status. The default
gateway of the NVR is the same as the IP address in LAN port status. The primary DNS and
secondary DNS can be the same as the DNS in WAN port status.
www.foscam.com
Page 79

NVR User Manual
73
NVR
Model
FN7108HE
Video Input
IP Video Input
8 Channels HD IP camera input
Video Output
HD-OUT Output
1 * HD-OUT
VGA Output
1 * VGA
Display Resolution
1920 * 1080 / 60Hz, 1280 * 720 / 60Hz,1440 * 900
/60Hz, 1024 * 768 / 60Hz
Recording
Recording Resolution
1080P per channel (8ch@1080P)
Record Mode
Manual / Time Scheduled / Motion Detect
Compression Format
H.264
Playback
Synchronous Playback
4 channel 1080P synchronous video playback
Playback Mode
Fast forward / Fast backward / Frame forward / Slow
Play
HDD
HDD
1TB security grade hard drive (Optional)
Capacity
Up to 4TB
External
Interface
Network Interface
1 * 10/100/1000 Mbps RJ45 port
USB Interface
1 * USB2.0 / 1 * USB3.0 interface for mouse and
4.3 Specifications
www.foscam.com
Page 80

NVR User Manual
74
external storage
Button
1 * Power on / off button, 1 * Reset button
Software
Computer Operating
System
Microsoft Windows XP, 7, 8, 8.1, Mac OS
Internet Viewing
Microsoft IE8 and above version
Smart phone
iOS, Android, 3G / 4G Smartphones
Language
Language
13 languages (Chinese, English, French,
Hungarian, Czech, Dutch, Greek, Russian, Polish,
Spanish, Portuguese, Italian, German)
Physical and
Environment
al
Power Supply
DC 48V / 1.87A
Dimension (L * W * H)
234mm * 234mm * 52mm / 9.2in * 9.2in * 2in
Net Weight
1200g / 2.6lb
Operating Temperature
-10ºC ~ 55ºC (-4ºF ~ 131ºF)
Operating Humidity
20% ~ 85% non-condensing
Storage Temperature
-20ºC ~ 60ºC (-4ºF ~ 140ºF)
Storage Humidity
0% ~ 90% non-condensing
Camera
Model
G2EP(FI9912EP)
www.foscam.com
Page 81

NVR User Manual
75
Image Sensor
Sensor Type
1/2.7" CMOS
Video Quality
1920 x 1080 (2.0M Pixels)
Min. Illumination
0 Lux (With IR Illuminator)
Backlight Compensation
Lens
Lens Type
f:4mm, F:2.0
Night Vision
20m
Infrared Mode
Automatic or manual
Diagonal Angle of View
105°
Horizontal View Angle
89º
Connectivity
802.3af PoE
Ethernet
RJ45
Software
Features
Video Format
H.264
Multi-Stream
Dual streams
Motion Detection
UPnP
Day / Night
www.foscam.com
Page 82

NVR User Manual
76
Physical and
Environmenta
l
Waterproof
IP66
Power
DC12V
Power Consumption
< 5W
Dimension (L x W x H)
97mm * 67mm * 64mm / 3.8in * 2.6in *
2.5in
Net Weight
255g
Certification
FCC, IC, CE, RoHS, IP66
Operating Temperature
-20°C~ 60°C (-4°F ~ 140°F)
Operating Humidity
10% ~ 80% non-condensing
Storage Temperature
-20°C ~ 60°C (-4°F ~ 140°F)
Storage Humidity
0% ~ 90% non-condensing
4.4 FAQ
1. No image displayed on the monitor after starting up normally.
Verify the device is connected with the monitor via HD-OUT or VGA cable.
Verify the connection cable is good.
Verify Input mode of the monitor is correct.
Please check the input mode of the monitor matches with the output mode of the device (e.g. if the
output mode of NVR is HD-OUT output, then the input mode of monitor must be the HD-OUT input).
And if not, please modify the input mode of monitor.
2. No record file found in the NVR local HDD, and prompt "No record file found".
Verify the system time setting is correct.
www.foscam.com
Page 83

NVR User Manual
77
Choose Menu > Settings > General in the GUI interface, and verify the time is correct.
Verify the search condition is correct.
Choose Menu > Playback in the GUI interface, and verify the channel and time are correct.
Verify the HDD status is normal.
Choose Menu > About > HDD Info in the GUI interface, view the HDD status.
3. Why recording is not performed after motion detection is enabled?
On the "Motion Detection" page, check whether the following are correctly set:
Check whether the motion detection channel is correct.
Check whether a trigger time segment is set.
Check whether a detection area is set.
Check whether recording is selected.
4. Why can the NVR search the IPC but cannot connect the IPC?
On the "IPC management" page, check whether the following are correctly set:
Check whether the user name and password for the IPC are correct.
Check whether the web page port for the IPC is correct.
Check whether the IPC also supports the protocol selected in the NVR.
5. The screen of the display is incomplete.
Confirm the current resolution and check the resolution supported by the display. If the resolution is
1920*1080, the display needs to support the resolution 1920*1080.
6. Why can't opened web pages on the client be used properly after the NVR server switches to
the 1080P mode?
When the NVR server switches to the 1080P mode, some functions can take effect only after the server
reboots. In this case, log out of the Web client and log in to it again. In similar cases, for example,
changing the IP address and HTTP port of the NVR, you need to log in to the client again.
7. Why can't video files be downloaded during video playback or downloaded files cannot be
played back properly?
To save consumed resources, the server limits concurrency of video playback and file download. In this
case, stop video playback and then download files or play back videos after video files are downloaded.
8. Why does the Web client prompt TIME OUT after you enable or disable UPNP in network
settings?
In this case, the server restarts some applications. Accordingly, you need to exit the web client and log
in to the client again.
9. It prompt "Have no right to create directory or file!" after taking snapshot.
When you use Windows7 or Vista, you may be not able to snapshot path because of the security
www.foscam.com
Page 84
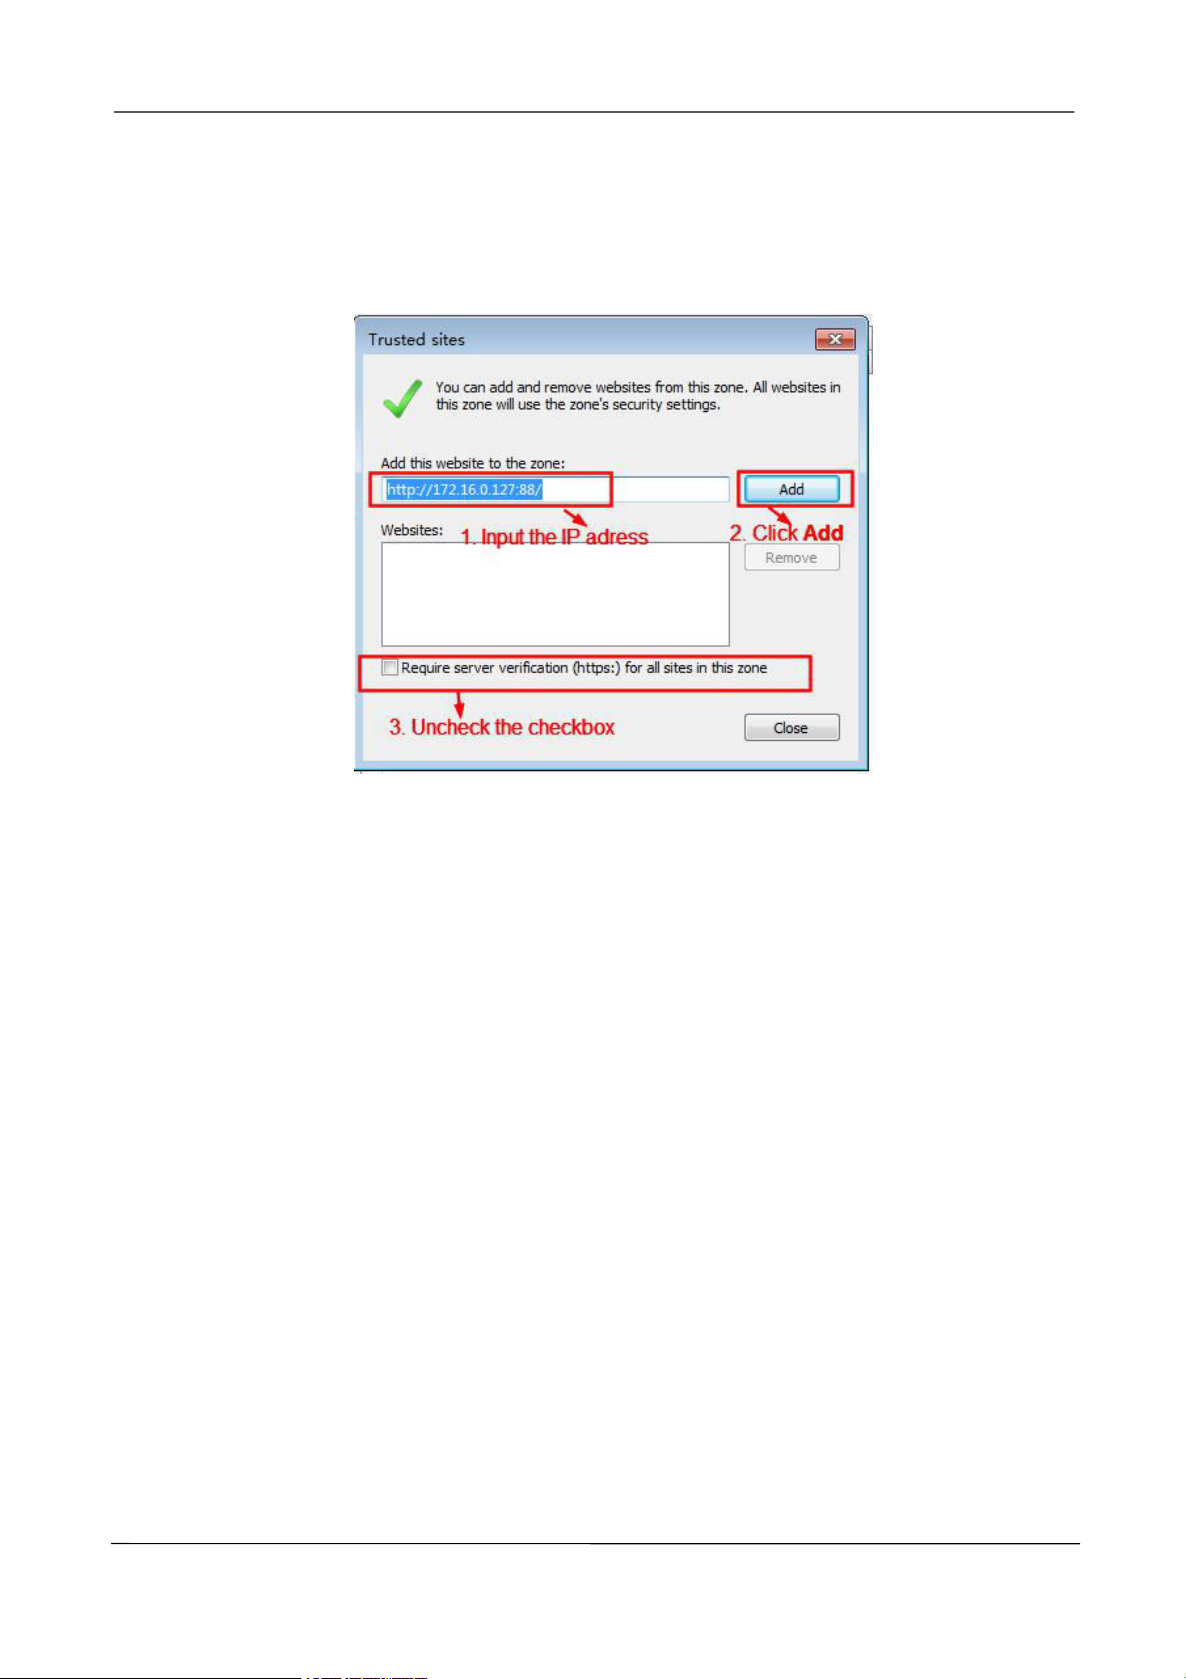
NVR User Manual
78
settings of computer.
Please add the NVR as a trusted site to resolve this issue. Open IE browser, Choose Tools > Internet
Options > Security, Select Trusted sites > then click Sites, it will pop up the page, as shown in the
following figure.
10. After the adding of the IPC successfully, the video of the corresponding channel has lost in
the live view mode.
Make sure that the IPC display mode is not more than NVR display mode. For example: NVR display
mode for the 4 * 960P, the IPC display mode can not be 1080P.
11. Why does the Web client prompt the message "Plugins are not found, Click me to download"
or "Find a new Plugins, Click me to download" after installing plug-in?
You need to close the current browser after installing the plug-in, and then open the browser to access
the login page.
www.foscam.com
Page 85

NVR User Manual
79
Acronym
Term
Description
DDNS
Dynamic Domain
Name Server
Dynamic DNS is a method, protocol, or network service that
provides the capability for a networked device, such as a router
or computer system using the Internet Protocol Suite, to notify a
domain name server to change, in real time (ad-hoc) the active
DNS configuration of its configured hostnames, addresses or
other information stored in DNS.
DHCP
Dynamic Host
Configuration Protocol
DHCP is a network application protocol used by devices
(DHCP clients) to obtain configuration information for operation
in an Internet Protocol network.
HDD
Hard Disk Drive
A storage medium which stores digitally encoded data on
platters with magnetic surfaces.
HTTP
Hypertext Transfer
Protocol
A protocol to transfer hypertext request and information
between servers and browsers over a network
PPPoE
Point-to-Point Protocol
over Ethernet
It is a network protocol for encapsulating Point-to-Point Protocol
(PPP) frames inside Ethernet frames. It is used mainly with
ADSL services where
individual users connect to the ADSL transceiver (modem) over
Ethernet and in plain Metro Ethernet networks.
PTZ
Pan, Tilt, Zoom
PTZ cameras are motor driven systems that allow the camera to
pan left and right, tilt up and down and zoom in and out.
NTP
Network Time Protocol
A protocol designed to synchronize the clocks of computers over
a network.
NVR
Network Video
Recorder
A NVR can be a PC-based or embedded system used for
centralized management and storage for IP cameras.
4.5 Glossary
www.foscam.com
Page 86

NVR User Manual
80
4.6 CE & FCC
Electromagnetic Compatibility (EMC)
FCC Statement
FCC Warning
This device complies with Part 15 of the FCC Rules. Operation is subject to the following two conditions:
(1) This device may not cause harmful interference, and (2) this device must accept any interference
received, including interference that may cause undesired operation. NOTE 1: This equipment has been
tested and found to comply with the limits for a Class B digital device, pursuant to part 15 of the FCC
Rules. These limits are designed to provide reasonable protection against harmful interference in a
residential installation. This equipment generates, uses and can radiate radio frequency energy and, if
not installed and used in accordance with the instructions, may cause harmful interference to radio
communications. However, there is no guarantee that interference will not occur in a particular
installation. If this equipment does cause harmful interference to radio or television reception, which can
be determined by turning the equipment off and on, the user is encouraged to try to correct the
interference by one or more of the following measures: - Reorient or relocate the receiving antenna. -
Increase the separation between the equipment and receiver. -Connect the equipment into an outlet on
a
circuit different from that to which the receiver is connected. -Consult the dealer or an experienced
radio/TV technician for help.
This equipment complies with FCC radiation exposure limits set forth for an uncontrolled
environment .This equipment should be installed and operated with minimum distance 20cm between
the radiator& your body.
NOTE 2: Any changes or modifications to this unit not expressly approved by the party responsible for
compliance could void the user's authority to operate the equipment.
CE Mark Warning
This is a Class A product. In a domestic environment, this product may cause radio interference, in
which case the user may be required to take adequate measures.
www.foscam.com
Page 87

NVR User Manual
81
4.7 WARRANTY
FOSCAM values your business and always attempts to provide you the very best of service.
No limited hardware warranty is provided by FOSCAM unless your Foscam product ("product")
as purchased from an authorized distributor or authorized reseller. Distributors may sell products to
resellers who then sell products to end users. No warranty service is provided unless the product is
returned to an authorized return center in the region where the product was first shipped by FOSCAM or
to the point-of-purchase, which may have regional specific warranty implications.
If you purchase your Foscam product from online store, please contact the oint-of-purchase
and ask for return / replacement / repair service.
Limited Hardware Warranty
The products are warranted to be free from manufacturing defects in materials and workmanship
starting from the shipping date of Foscam.
This limited hardware warranty does not cover:
Software, including the software added to the products through our factory-integration system,
software, etc.
Usage that is not in accordance with product instructions.
Failure to follow the product instructions.
Abuse firmware upgrade without the authorized technician's guidance.
Normal wear and tear.
Return Procedures
Please read Foscam warranty policy & policy of your reseller first before sending items back to
point-of-purchase.
Customer must first contact point-of-purchase to obtain a Return Merchandise Authorization (RMA)
number before returning the product. If the product you received is suspected to be defective and
the product warranty has not expired, The RMA number will allow your reseller to track your return
much easier and help them expedite processing your request.
After receiving your RMA case number, pack the item(s) very well with the original box and all the
original accessories included such as power adapters, brackets, cables, manuals.
Write your RMA number and the return reason (the problem of the product) on the warranty card
along with the complete package to send them back.
www.foscam.com
Page 88

NVR User Manual
82
Replacement Services
If customers ask for replacement service, please contact point-of-purchase and follow their
policy.
Our technicians will inspect all items returned for replacement requests. If the retuned product is
found in working order, we will return the same item received. However customers shall be
responsible for all shipping & handling charges incurred for getting the units back to customers.
If returned products are found defective, we will replace the product and assume the shipping cost
for sending back the replacement unit to customers.
If for any reason, we are unable to provide a replacement of the original returned item(s). You will
have a choice for a "Substitute" item at the same equal value.
We do not provide exchange and replacement due to normal hardware upgrade according the
market after 14 days after the product is delivered.
Our technicians will test the product before send out the replacement, any other demand for more
than two times replacement for the same product during replacement limit will be rejected.
Replaced products are warranted from the balance of the former warranty period.
Warranty Forfeiture
Warranty is void if purchase from unauthorized distributor or reseller.
Warranty is void if trade-mark, serial tags, product stickers have been removed, altered or
tampered with.
Warranty is void for mishandling, improper use, or defacing the product.
Abuse firmware upgrade without the authorized technician's guidance.
Warranty is void for physical damage, altered, either internally or externally, improper or inadequate
packaging when returned for RMA purposes.
Warranty is void if damage has resulted from accident, dismantle, abuse, or service or modification
by someone other than the appointed vendor, souse, fission or the spare part has been over the
period of warranty.
Warranty is void if product is damaged due to improper working environment or operation. (For
example, improper temperature, humidity, unusual physical or electrical stress or interference,
failure or fluctuation of electrical power, static electricity, using wrong power adapter, etc.)
Warranty is void if damaged by the use of parts not manufactured or sold by FOSCAM.
Damage caused by improper installation of third-party products.
Warranty is void if damaged for irresistible cause, such as earthquake, fire, lightning, flood, etc.
Product beyond limited warranty.
www.foscam.com
Page 89

NVR User Manual
83
Shipping Fee
If products are defective or damaged under normal use or operation in the replacement limit,
distributors or resellers are responsible for the shipping cost the product back to customers,
customers should assume the shipping cost send the product to the point-of-purchase.
During replacement limit, if customers ask for replacement due to the product does not fit for
customer's personal expectation, customers should responsible for both shipping fee.
Customers shall be responsible for both shipping fee if their product beyond the replacement limit
but still in warranty limit.
Repair Service Out Of Warranty
FOSCAM provide extra repair service for product that out of warranty, it is chargeable. The total fee
contains device cost and service fee. Device cost (including accessories) is the standard uniform
price provide by FOSCAM.
Different region may have different service fee, please contact the point-of-purchase to confirm that
before you ask for this service.
Our technicians will quote the total price after detect the product, If customers refused to repair
after the quotation, customers need pay for the test fee, $3.5/hour. If agree with the quotation, test
will be free.
Repaired product out of warranty will obtains 3-month warranty from the date of the product back to
customers.
Limitation of Liability
Foscam is not responsible for other extra warranty or commitment promised by resellers, if your
reseller promised some extra commitment or warranty; please ask for written documents to protect
your rights and interests.
Foscam does not offer refunds under any circumstances. Please contact the point-of-purchase and
follow their refund / return policy.
Foscam shall not be liable under any circumstances for any consequential, incidental, special or
exemplary damages arising out of or in any connection with this agreement or the products,
including but not limited to lost profits, or any claim based on indemnity or contribution, or the failure
of any limited or exclusive remedy to achieve its essential purpose or otherwise. Purchaser's
exclusive remedy, as against Foscam, shall be the repair or replacement of defective parts. If
Foscam lists a product on its website specification in error or that is no longer available for any
reason, Foscam reserves the right to explain it without incurring any liability.
www.foscam.com
Page 90

NVR User Manual
84
All rights reserved. FOSCAM and the Foscam logo are trademarks of ShenZhen
FOSCAM Intelligent Technology Limited., registered in the U.S. and other countries.
www.foscam.com
Page 91

NVR User Manual
85
4.8 Statement
You are advised to be cautious in daily life, keep personal account information carefully, do not share
personal account easily. Change passwords of your account and equipment periodically, and
upgrade equipment firmware to strengthen security consciousness.
Our company makes no warranty, implied or otherwise, that this product is suitable for any particular
purpose or use. You need to abide by the relevant laws and regulations of the use restrictions when
using products. Our company takes no responsibility of illegal activities by using our products.
Our company takes no responsibility of the loss by force majeure, such as failure or faults of telecom
system or the Internet network, computer viruses, malicious attacks of hackers, information damage
or loss, and faults of computer system.
My company does not need to take any responsibility of the special, incidental or corresponding loss
by the products of our company or any software provide by our company, including but not limited to
operating loss, profit or purpose. The company only takes the responsibility applicable to national
and local legal requirements.
Our company takes no responsibility of the loss caused by the following at ant time:
1) loss of purchases;
2) loss of intangible property damage, such as data, programs;
3) loss of compensation claimed by third-party customers.
Delete images, format the memory card or other data storage devices does not completely remove
the original image data. You can restore deleted files from discarded the storage device by
commercial software, but which will potentially lead to personal image data used maliciously by
others. The privacy of the data security belongs to user responsibility, the company takes no
responsibility.
Parts mentioned in this statement should not be understood by the configuration description of the
product purchased by the customer, the product configuration must accord to the specific models
purchased by the customer.
Without the prior written permission of my company, all the contents of relevant operating
instructions manual affiliated to the product must not be reproduced, transmitted, transcribed or
stored in a retrieval system, or translated into other languages.
Our company will reserve the right to improve and modify the product and corresponding manuals.
www.foscam.com
Page 92

NVR User Manual
86
The company reserves the right of final interpretation on our products.
4.9 Obtaining Technical Support
While we hope your experience with the IP camera network camera is enjoyable and easy to use, you
may experience some issues or have questions that this User's Guide has not answered.
If you have problem with FOSCAM IP camera, please first contact FOSCAM reseller for solving the
problems. If our reseller cannot provide service, please contact our service department:
CE Certificate Website: https://www.foscam.com/company/ce-certificate.html
Exporter and Importer Information Opened to Public:
https://www.foscam.com/company/open-information.html
Manufacturer: Shenzhen Foscam Intelligent Technology Co., Ltd
Addr: Room 901, Unit B, Building 7, Xingke 1st Street Vanke Cloud City Phase 1, Nanshan Dist.,
Shenzhen, 518055, China
www.foscam.com
 Loading...