

Page 1
User
User
Model: FN7108W-B4-1T kit
Manual
Manual
Model: FN8108H/ FN8108HE
Version: 1.0
Page 2

NVR User Manual
I
Table of Contents
Table of Contents.............................................................................................................................................. I
Security Warning.............................................................................................................................................IV
Important Safety Instructions......................................................................................................................... V
Preface..............................................................................................................................................................VI
1 Overview......................................................................................................................................................... 1
1.1 Product Introduction.......................................................................................................................... 1
1.2 Key Features.......................................................................................................................................1
1.3 Relevant Version................................................................................................................................3
1.4 Hard Disk Installation........................................................................................................................ 3
2 GUI...................................................................................................................................................................5
2.1 Before Starting....................................................................................................................................5
2.1.1 Icons Description.................................................................................................................... 5
2.1.2 Common Operations.............................................................................................................. 5
2.1.3 USB Mouse Operation...........................................................................................................6
2.2 Login.....................................................................................................................................................7
2.3 Guide....................................................................................................................................................7
2.4 Shortcut Menu.................................................................................................................................... 9
2.4.1 Channel Config......................................................................................................................10
2.4.2 Main Menu............................................................................................................................. 12
2.4.3 Playback.................................................................................................................................13
2.4.4 Record.................................................................................................................................... 15
2.4.5 Backup....................................................................................................................................16
2.4.6 PTZ Control............................................................................................................................17
2.4.7 IPC Config..............................................................................................................................17
2.4.8 Info...........................................................................................................................................21
2.4.9 Shutdown............................................................................................................................... 22
2.5 Main Menu........................................................................................................................................ 22
www.foscam.com
Page 3

NVR User Manual
II
2.5.1 Configuration......................................................................................................................... 23
2.5.2 Display....................................................................................................................................24
2.5.3 Record.................................................................................................................................... 25
2.5.4 Backup....................................................................................................................................26
2.5.5 Network...................................................................................................................................27
2.5.6 HDD.........................................................................................................................................27
2.5.7 User.........................................................................................................................................28
2.5.8 Event....................................................................................................................................... 29
2.5.9 Restore factory settings.......................................................................................................31
2.5.10 Upgrade................................................................................................................................31
2.5.11 IPC Config............................................................................................................................32
2.5.12 Channel Config................................................................................................................... 32
3 Access the NVR in Foscam App...............................................................................................................33
3.1 Download the Foscam APP...........................................................................................................33
3.2 Create A Foscam Account............................................................................................................. 33
3.3 Add Device in Foscam App............................................................................................................34
3.4 Foscam APP Surveillance Window.............................................................................................. 35
3.5 Watch Live........................................................................................................................................ 35
3.6 Setting................................................................................................................................................37
3.6.1 NVR Info.................................................................................................................................37
3.6.2 NVR Firmware.......................................................................................................................37
3.6.3 Camera Firmware................................................................................................................. 38
3.6.4 Recording Playback............................................................................................................. 38
3.6.5 Hard disk information........................................................................................................... 38
3.6.6 Reboot NVR...........................................................................................................................39
3.6.7 Delete NVR............................................................................................................................39
4 Surveillance Software Foscam VMS........................................................................................................40
4.1 Software Installation........................................................................................................................40
4.2 Create A Local Account...................................................................................................................40
4.3 Add Device........................................................................................................................................42
www.foscam.com
Page 4

NVR User Manual
III
4.3.1 LAN Add................................................................................................................................. 42
4.3.2 Manual add............................................................................................................................ 44
4.4 Surveillance Software GUI.............................................................................................................47
4.5 Setup..................................................................................................................................................51
4.5.1 Basic........................................................................................................................................51
4.5.2 Device Manager....................................................................................................................56
4.5.3 Application..............................................................................................................................59
4.5.4 System....................................................................................................................................66
5 Appendix....................................................................................................................................................... 69
5.1 HDD Capacity Calculation..............................................................................................................69
5.2 Specifications................................................................................................................................... 70
5.3 FAQ.................................................................................................................................................... 75
5.4 Glossary............................................................................................................................................ 76
5.5 CE & FCC..........................................................................................................................................77
5.6 WARRANTY..................................................................................................................................... 77
5.7 Statement.......................................................................................................................................... 81
5.8 Obtaining Technical Support......................................................................................................... 82
www.foscam.com
Page 5

NVR User Manual
IV
Please change the password of your Foscam App account, and NVR and cameras user name
Please keep the user name and password of your cameras, NVR and Foscam App account safe.
Please update your device to the latest firmware regularly for an optimal user experience.
Security Warning
regularly. The password should contain a combination of numbers, letters and special characters.
www.foscam.com
Page 6

NVR User Manual
V
Important Safety Instructions
This chapter describes how to use the product properly so as to prevent danger and property loss. Be
sure to follow the security instructions when operating this product.
The CR1220 model lithium battery is used inside the device. If other types of batteries are used, there is
a danger of explosion. When replacing the battery, do not put the old battery into fire or handle it with
household garbage. Please dispose of used batteries in accordance with local laws and regulations
www.foscam.com
Page 7

NVR User Manual
VI
The feature of product on this manual is just for reference. Please prevail in physical product.
The manual provides multiple product models for reference. The specific operations are not listed
Because the actual environment may be discrepant, the actual values of some data may be different
If you do not follow the manual during operation, you will bear any loss caused thereof.
The NVR in the FN7108W-B4 kit can only add the IPC in the kit, and the IPC in the kit can only be
Please keep the device horizontally and avoid inclination or inversion.
Do not install the wireless NVR in humid and dusty environment.
Put the wireless NVR in drafty environment in case of ventilation port being blocked.
Don't touch the power switch with wet hand or damp items to avoid shock.
Do not splash liquid or metal filing on the NVR To avoid short-circuit fault or blaze.
Preface
Welcome to use our product, Network Video Recorder (NVR). This document mainly focuses on the
installation and configuration of NVR application system. With high performance video, user-friendly
GUI, and practical industrial designs. This series NVR is suitable for civil applications such as homes,
stores, internet cafes, and small businesses in addition to mainstream security and surveillance
applications.
Default Settings
NVR: Default administrator name is admin.
Declaration
one by one. Please follow the operations depending on the actual product.
from the values provided in the manual. If there are any question or dispute, the final interpretation of
prevails.
used for the NVR in the kit.
Installation Environment
Precautions
www.foscam.com
Page 8

NVR User Manual
VII
Explosion may happen because of improper replacement of battery, do not replace it by yourself; If
Do not take the device apart when it is operating (or connecting to power).
Please use suitable and professional hard disk to ensure continues and stable recording.
Lightning protection is needed when device is connected to communication cables. Ethernet cable
Check the power supply to avoid damage because of voltage mismatch.
Make sure the wireless NVR working within suitable temperature and humidity environment.
you need, make sure it is the same type of battery. And do not open or repair it.
which comes form outside, connecting to the wireless NVR directly is forbidden.
Short circuit may occur when dust become wet on circuit board. Please clean the dust on circuit
board, connectors, and NVR case.
www.foscam.com
Page 9

NVR User Manual
1
Schedule recording
Motion detect recording
Alarm recording
1 Overview
1.1 Product Introduction
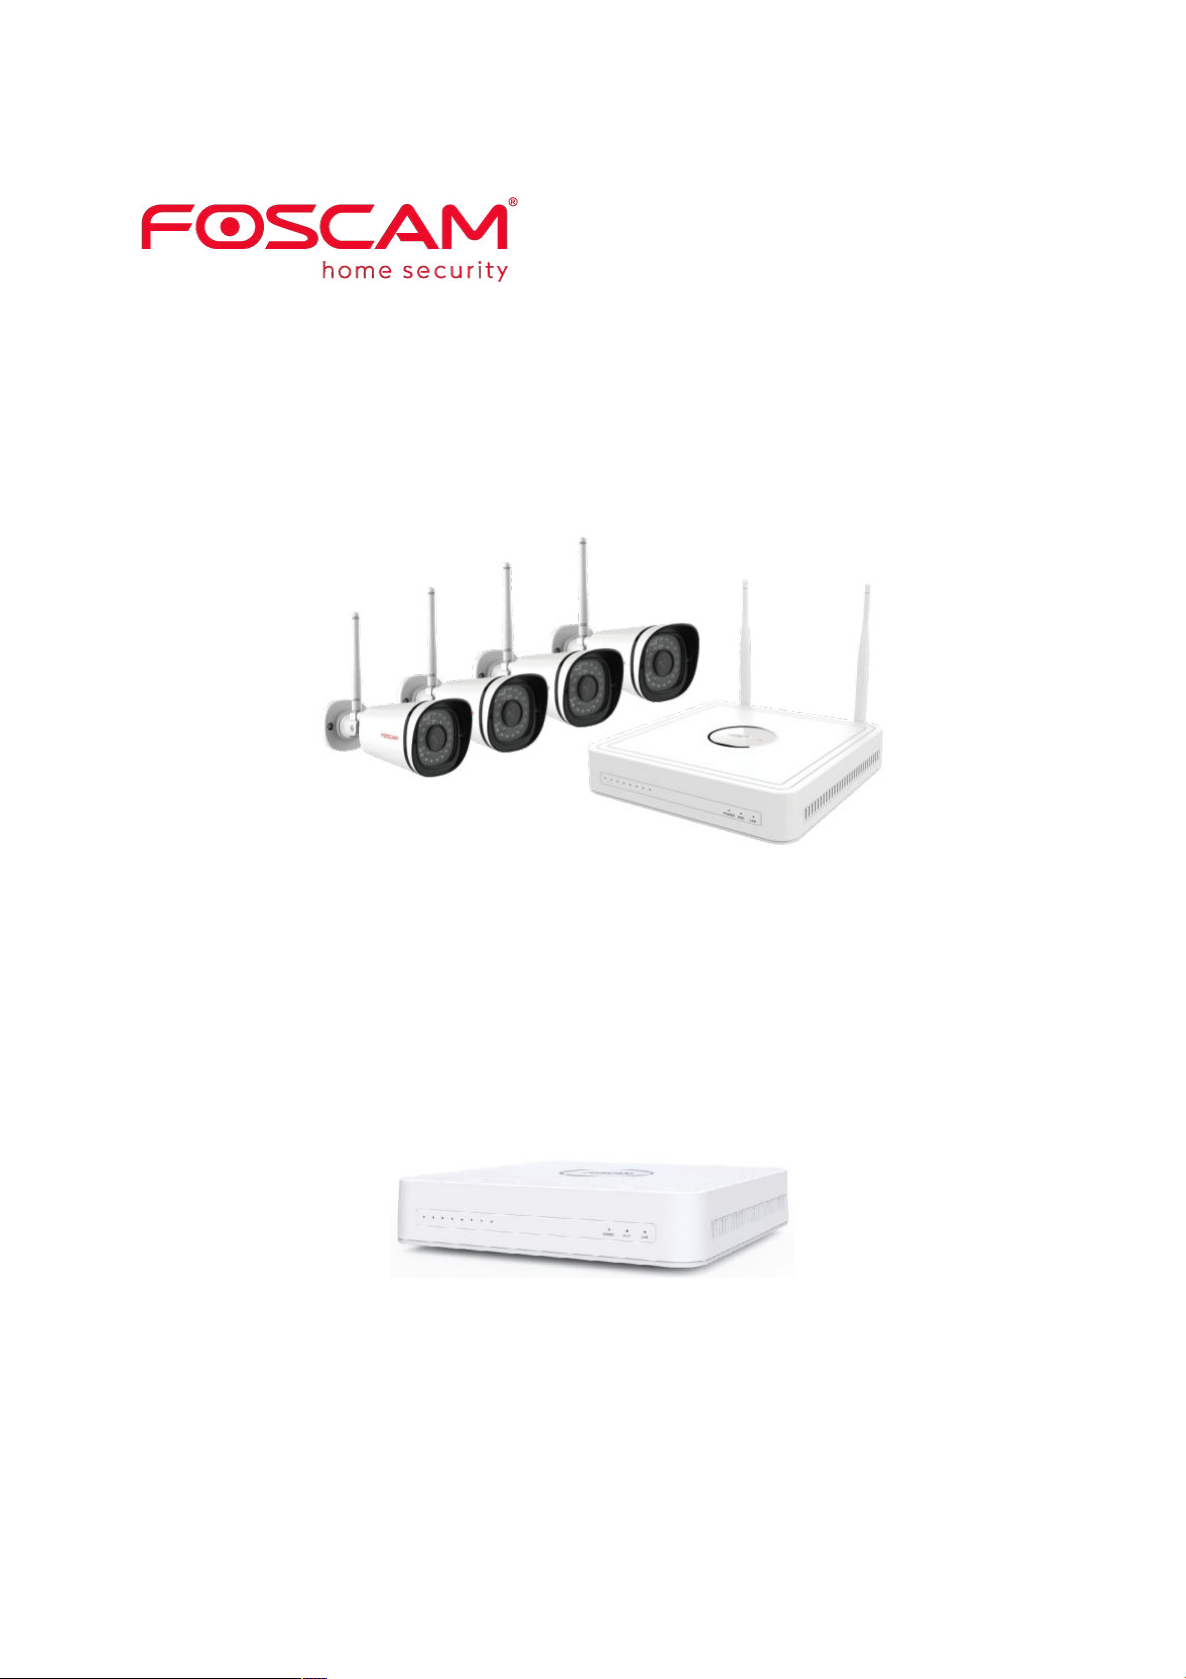
This document introduces a series of NVR products, including: FN7108W-B4 Kit, FN8108H, FN8108HE.
This advanced product series receives a high quality video stream that is transmitted digitally by the IP
Camera (IPC). The product can perform live video preview, recording, playback, remote access, and
backup simultaneously.
1.2 Key Features
Network Monitoring
You can access the NVR system remotely through the Video Management System (VMS) and Foscam
APP, or access the NVR system locally by using the display or monitor.
Multi-screen Preview
Multi-screen preview indicates that several pages are displayed on the screen of the monitor based on
the same scale.
Recording
The NVR supports recording and storing video files on a Hard Disk Drive (HDD). Stored videos files can
be queried or played back through local GUI.
Recording can be classified into schedule recording, and alarm recording from low priority to high
priority. If recording of any two types is enabled at the same time, only the recording of a higher priority
takes effect.
You can select the scheduled time segment to enable or disable recording.
After the motion detect is enabled and recording is selected, motion detect recording is enabled
when motion detection is triggered in the detection time segment and detection area.
After the Shelter is enabled and recording is selected, If the video is occluded, the video channel
www.foscam.com
Page 10

NVR User Manual
2
Support the logging function.
Support local GUI output and perform shortcut operations through the mouse (left click to select,
Three roles can access the NVR, which are respectively visitor, operator, and administrator. The
will have an alarm flag alert that triggers an alarm and alarm logging will be enabled.
Note
When NVR system time and IPC time are different, the NVR recording will based on the NVR
system time.
Playback
You can play recording video files stored in the Hard disk. Recording includes schedule recording,
manual recording, motion recording and alarm recording. Single-screen playback, four screens or nine
screens synchronous playback are supported.
Alarm
Motion Detection Alarm
You can configure motion detection information about the corresponding channel in the NVR system.
When an object moves in the detection time segment and detection area, an alarm is triggered, the NVR
system enables motion detection recording, sends pictures to your mailbox.
Manage
You can search for IPC devices in the LAN through the NVR and add IPC devices to the NVR channel.
Through the NVR, you can also manage IPC devices.
HDD Management
When the HDD becomes exceptional (for example, HDD Loss, HDD Full, and HDD Error), the NVR
buzzer sounds an alarm.
When the HDD is full, you can select the cycle cover the earliest recording or stop recording.
Note
Only FN7108W-B4-1T kit has a 1T hard drive installed at the factory.
Other Functions
right click to return to the previous menu).
www.foscam.com
Page 11
NVR User Manual
3
Name
Recommended Configuration
Monitor
You are recommended to equip a 16:9 monitor with the resolution higher than
1920 *1080. The maximum resolution of NVR support displays is 2560
* 1440.
Network
10/100M Ethernet or above.
Before installing a hard disk drive (HDD), please make sure the power is disconnected from the
It is recommended that a hard drive be used in 7200 high-speed or above.
rights of the three roles vary from low to high.
1.3 Relevant Version
1.4 Hard Disk Installation
If your NVR is FN8108H or FN8108HE, you must install the hard disk to the NVR.
FN7108W-B4-1T kit has a 1T hard drive installed at the factory.
WARNING
NVR.
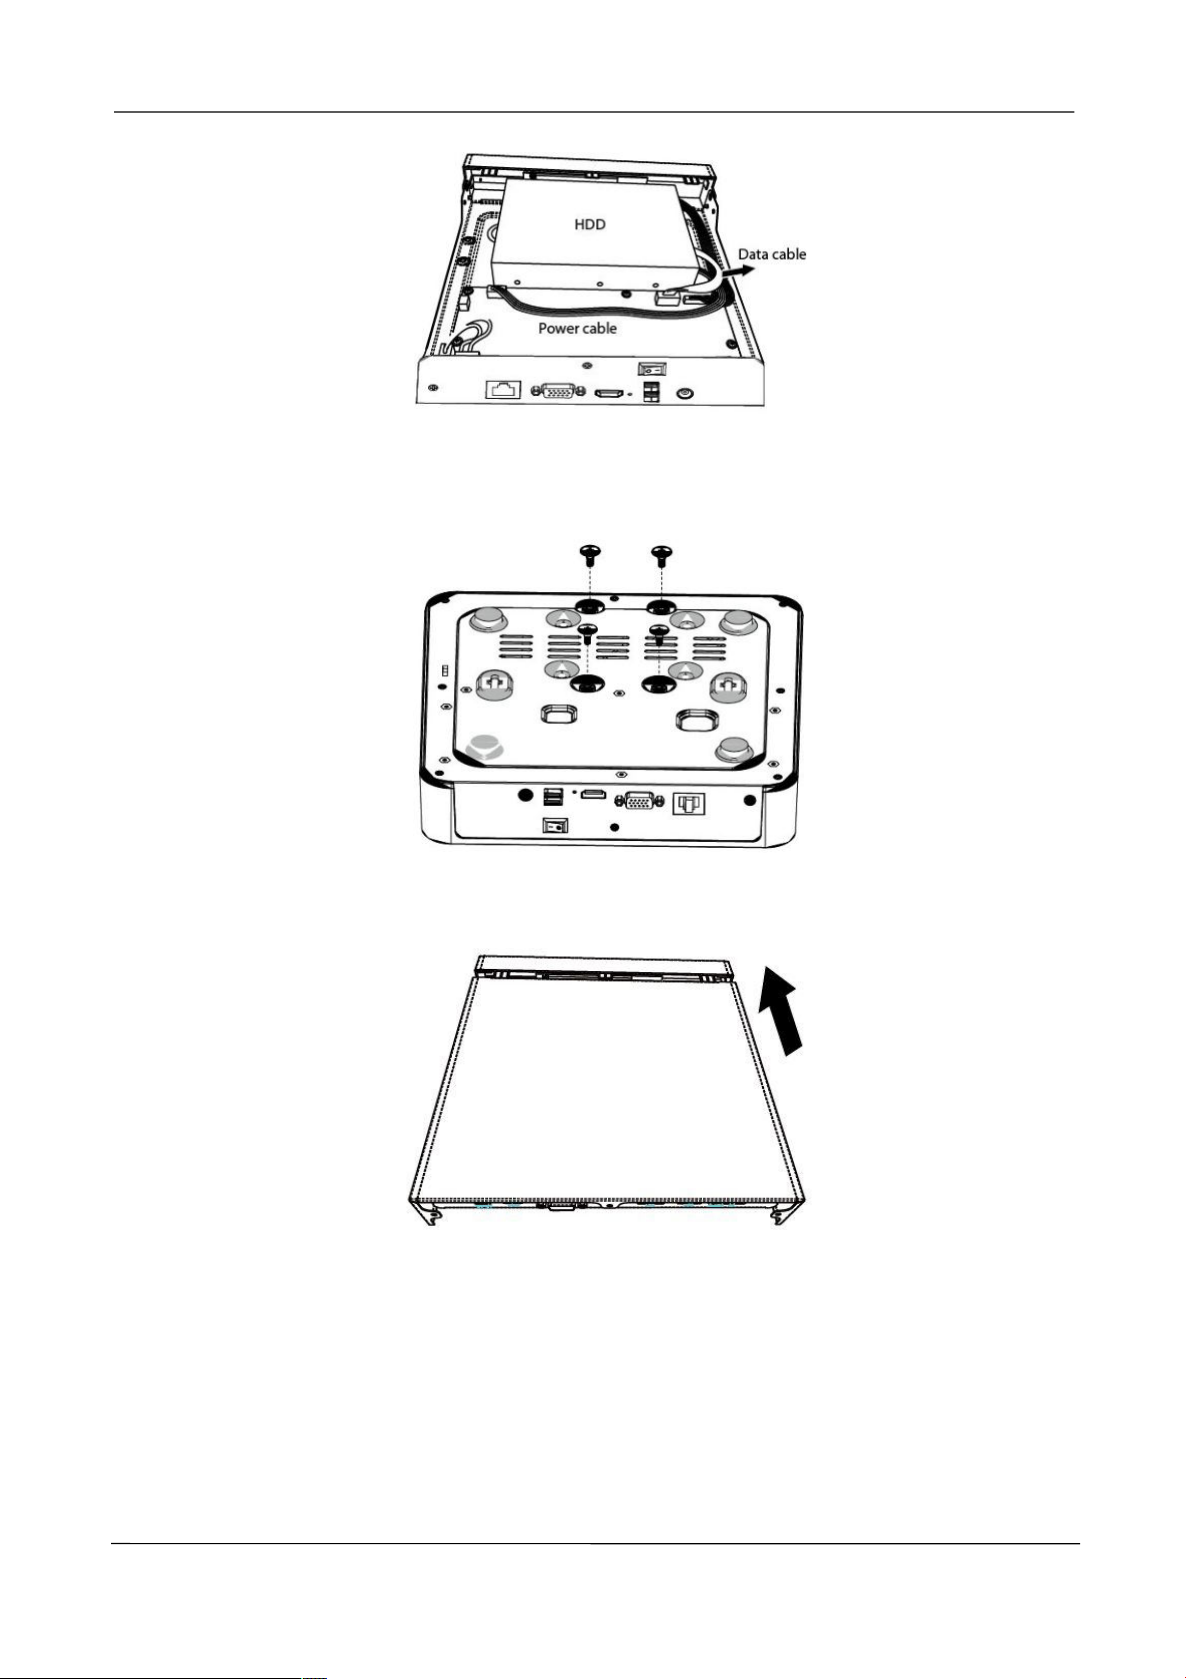
Step 1: Remove the cover from the NVR by unfastening the screws on the rear and bottom.
Step 2: Connect one end of the data cable and power cable to the motherboard of NVR and
the other end to the HDD.
www.foscam.com
Page 12
NVR User Manual
4
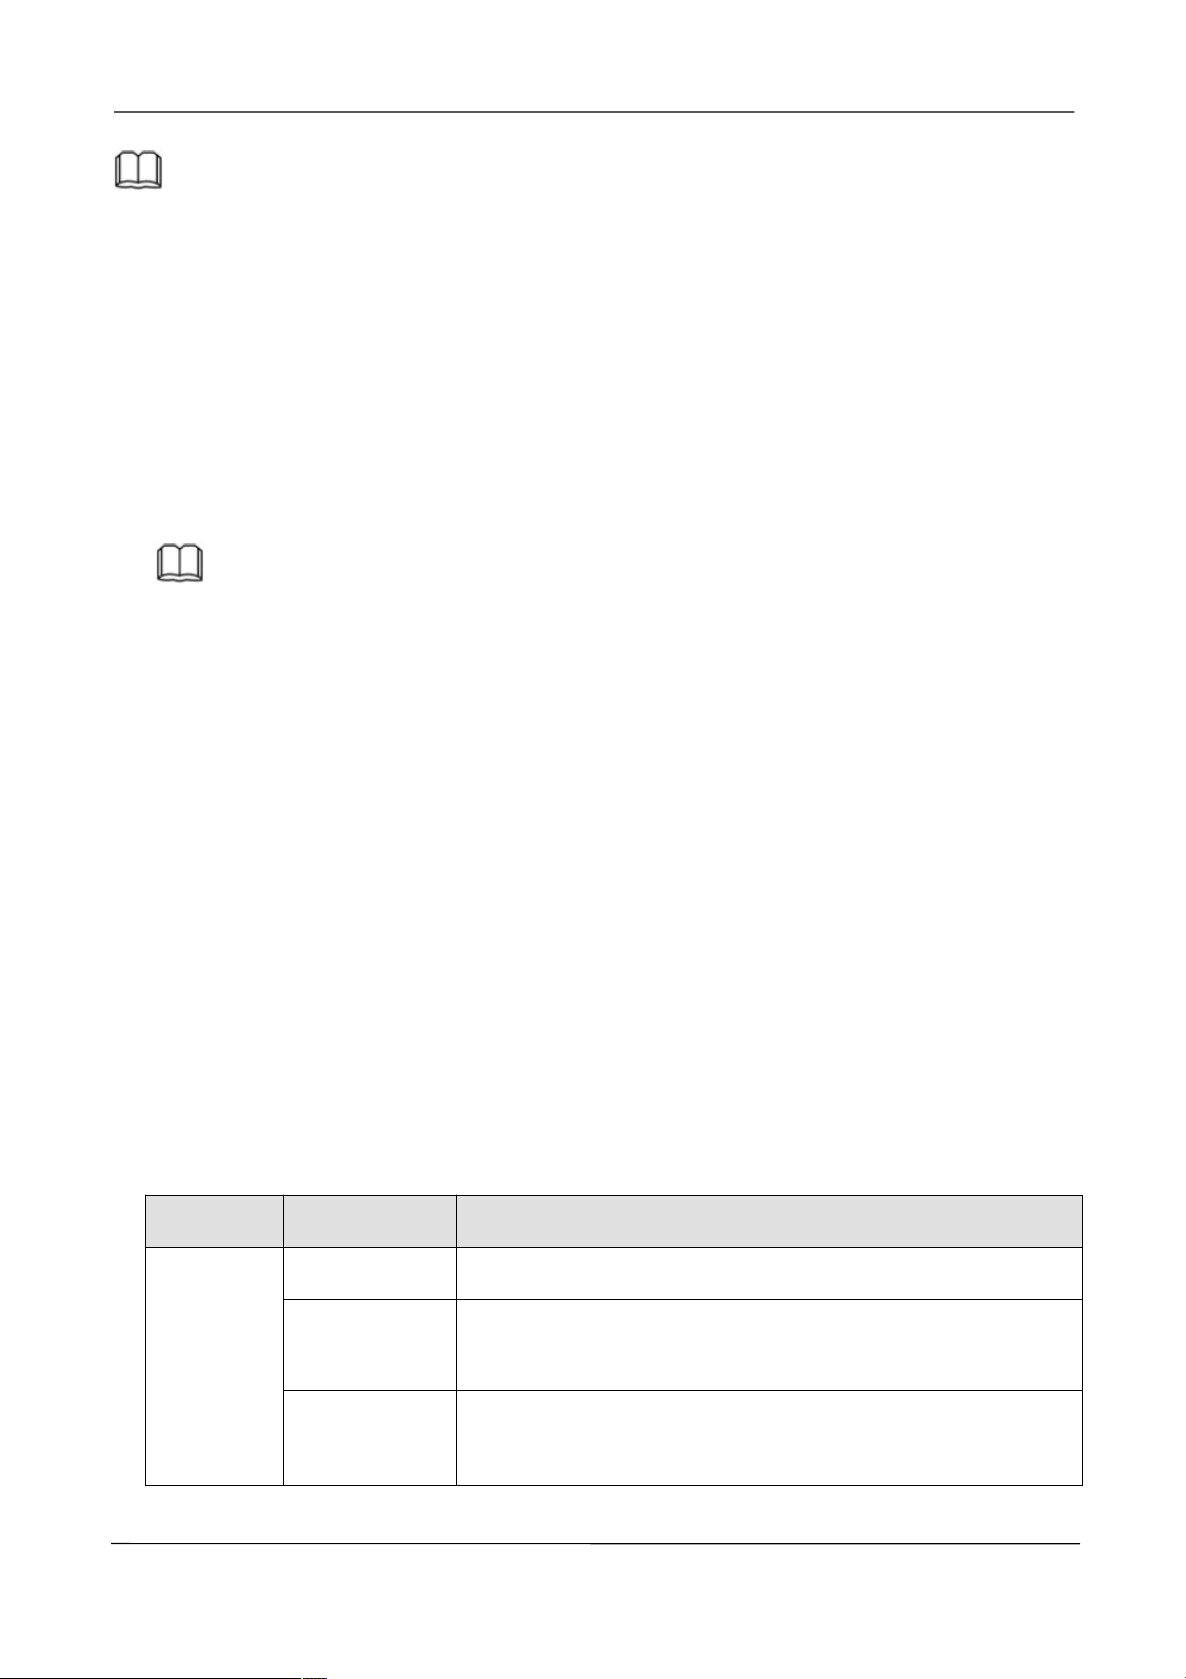
Step 3: Place the HDD on the bottom of the device and then fasten the screws on the
bottom to fix the HDD.
Step 4: Re-install the cover of the NVR and fasten screws.
www.foscam.com
Page 13

NVR User Manual
5
In the live view mode, there are icons at the left top of the full screen.
In the live view mode, there are icons at the right bottom of the screen for each channel,
2
GUI
Please refer to the Quick Setup Gu ide if you install the NVR for the first time. You can visit
the local NVR device via the display or monitor, and view or manage NVR system.
2.1 Before Starting
You need to know some basic information before you log on to the NVR system with the monitor or
display.
2.1.1 Icons Description
: The HDD is full, and the recording has been stopped. A HDD is not inserted into the NVR or
the HDD connected to the NVR is abnormal.
: Human Detection Alarm. Identify whether someone is moving within the range of the camera.
Only FN7108W-B4 kit supports this function.
: Motion Detection Alarm. The motion is detected during the detection time in the detection
area, the NVR will alarm.
: NVR is recording for the IPC.
: You can click this icon to control whether IPC records sound.
: Shows the strength of the IPC wireless network.Only FN7108W-B4 kit supports this function.
2.1.2 Common Operations
Starting Up the NVR
Turn on the power, The Power indicator LED should turn green indicating that the device begins to
start up.
www.foscam.com
Page 14
NVR User Manual
6
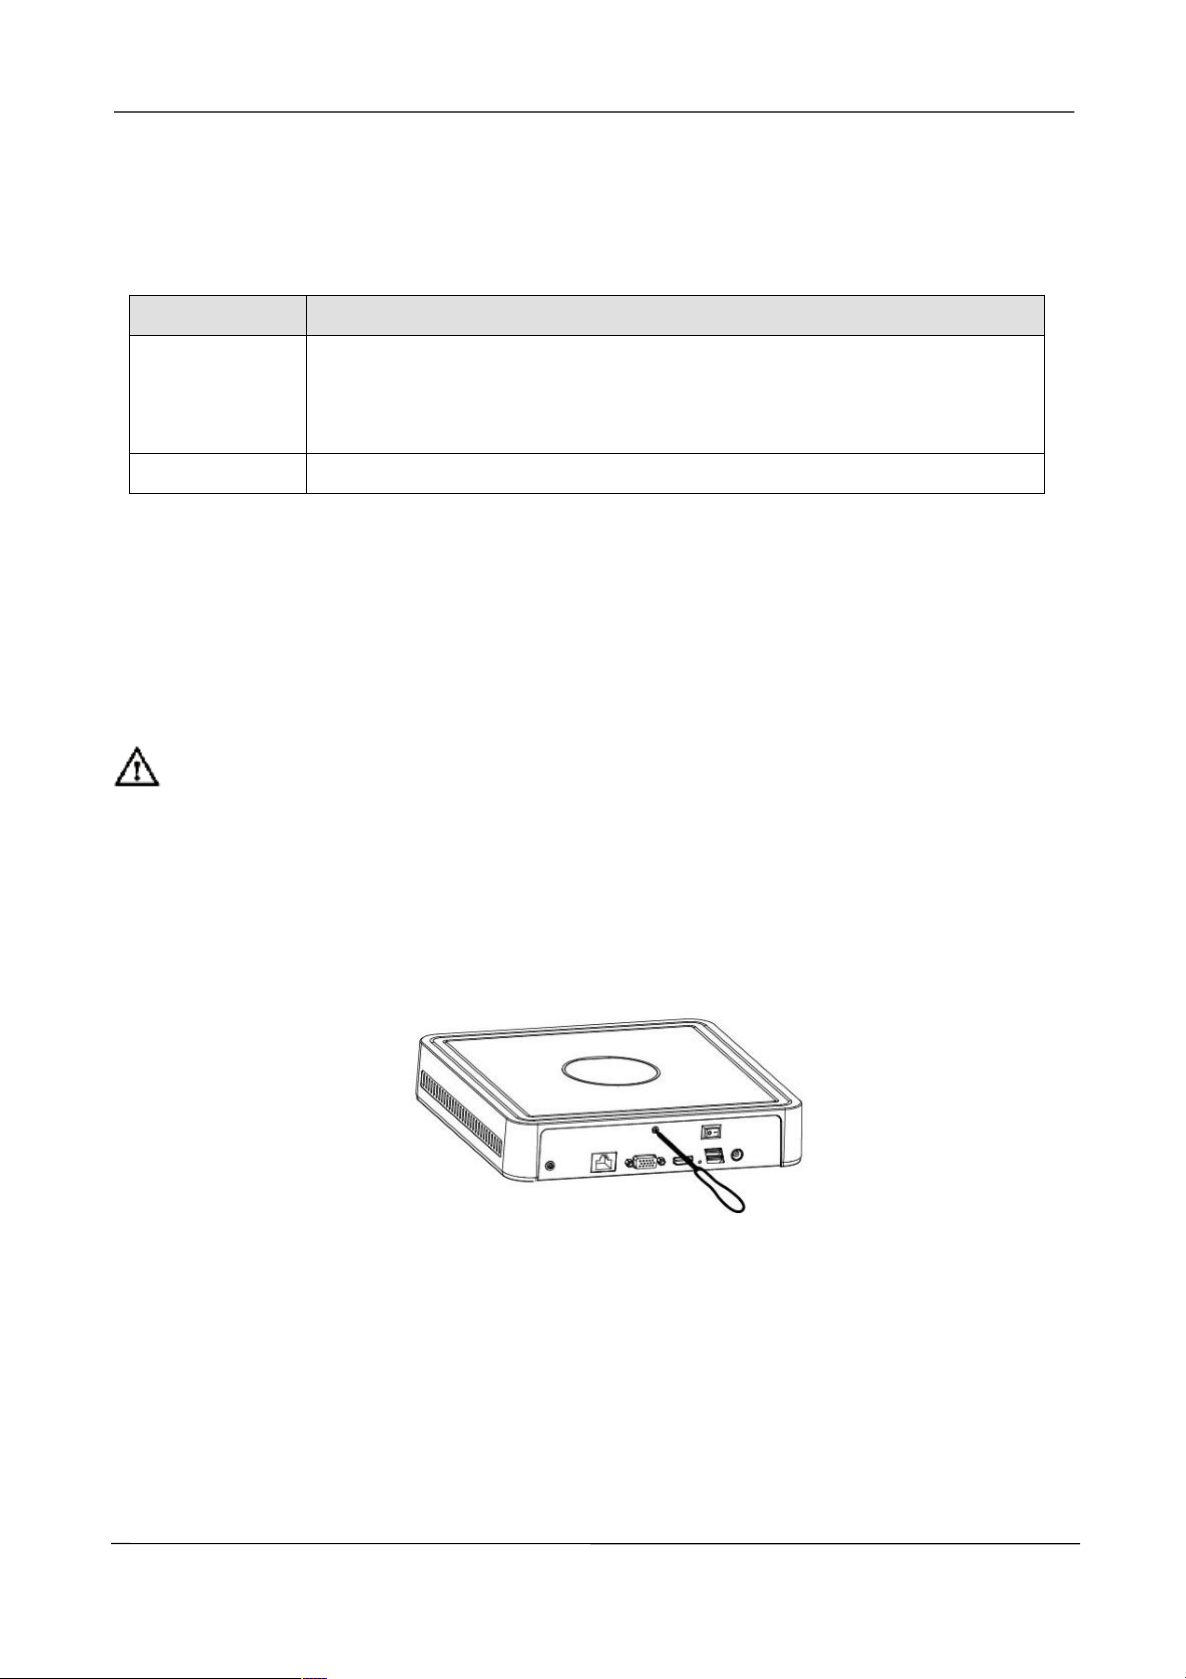
Reset button: Press and hold it for 3 seconds to reset all parameters to factory defaults on the
Local GUI: Right-click the mouse, Choose Main Menu > Restore in the Menu interface, then
Name
Action
Description
Left-Click
Single-Click
Menu or window: select and enter.
Double-Click
Preview mode or Playback mode: Switch between single-screen
and multi-screen.
Click and Drag
Time or Area box: Select the time or zone range.
Time bar: Drag time bar.
Note
If the power LED indicator on the front panel is off, please check if the power supply is plugged into
an electrical outlet.
Shutting Down the NVR
Proper ways to shut down the NVR in the GUI interface: After login, right-click the mouse, you can
click Shutdown in the shortcut menu. Choose Shutdown, click the OK button in the confirmation
box. Then turn off the power switch on the rear panel, the power LED indicator on the front panel
turns off.
Note
Don't turn off the power directly when you turning on.
Reset
You can reset the NVR device to restore the factory settings. You can choose any one of the
following methods operate.
bottom of the NVR.
choose to restore defaults in the Restore factory settings interface.
2.1.3 USB Mouse Operation
Plug USB mouse into one of the USB interfaces on the rear panel of the NVR.
The operation of the mouse on the local GUI is shown as below.
www.foscam.com
Page 15
NVR User Manual
7
Live view: Moving channel arrangement order.
Right-Click
Single-Click
Live view: Show menu.
Menu: Exit current menu to upper level menu.
Note
The Single-Click mentioned in this article is refer to the left mouse click.
2.2 Login
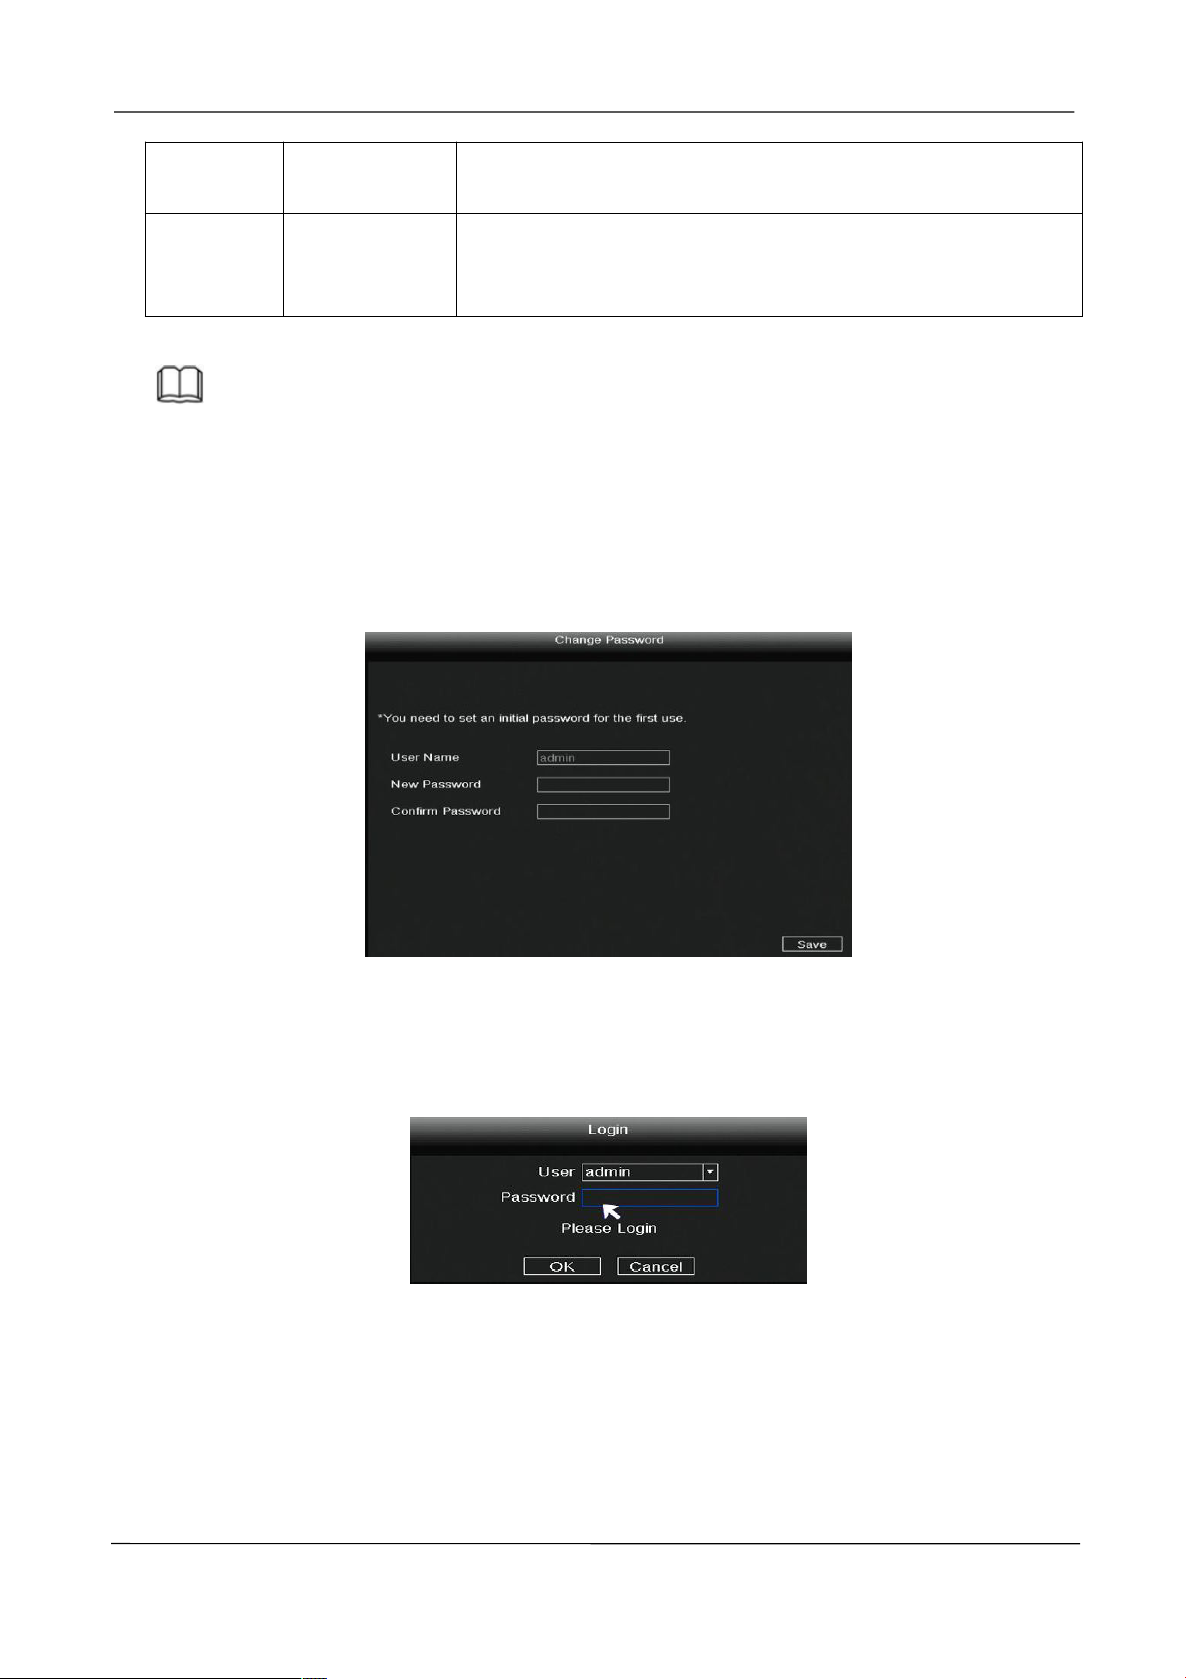
For your security, please set a new password for your NVR before Log In.
Login page.
Enter the Username and Password, then click on the OK button. You will be taken to the
Setup Wizard.
2.3 Guide
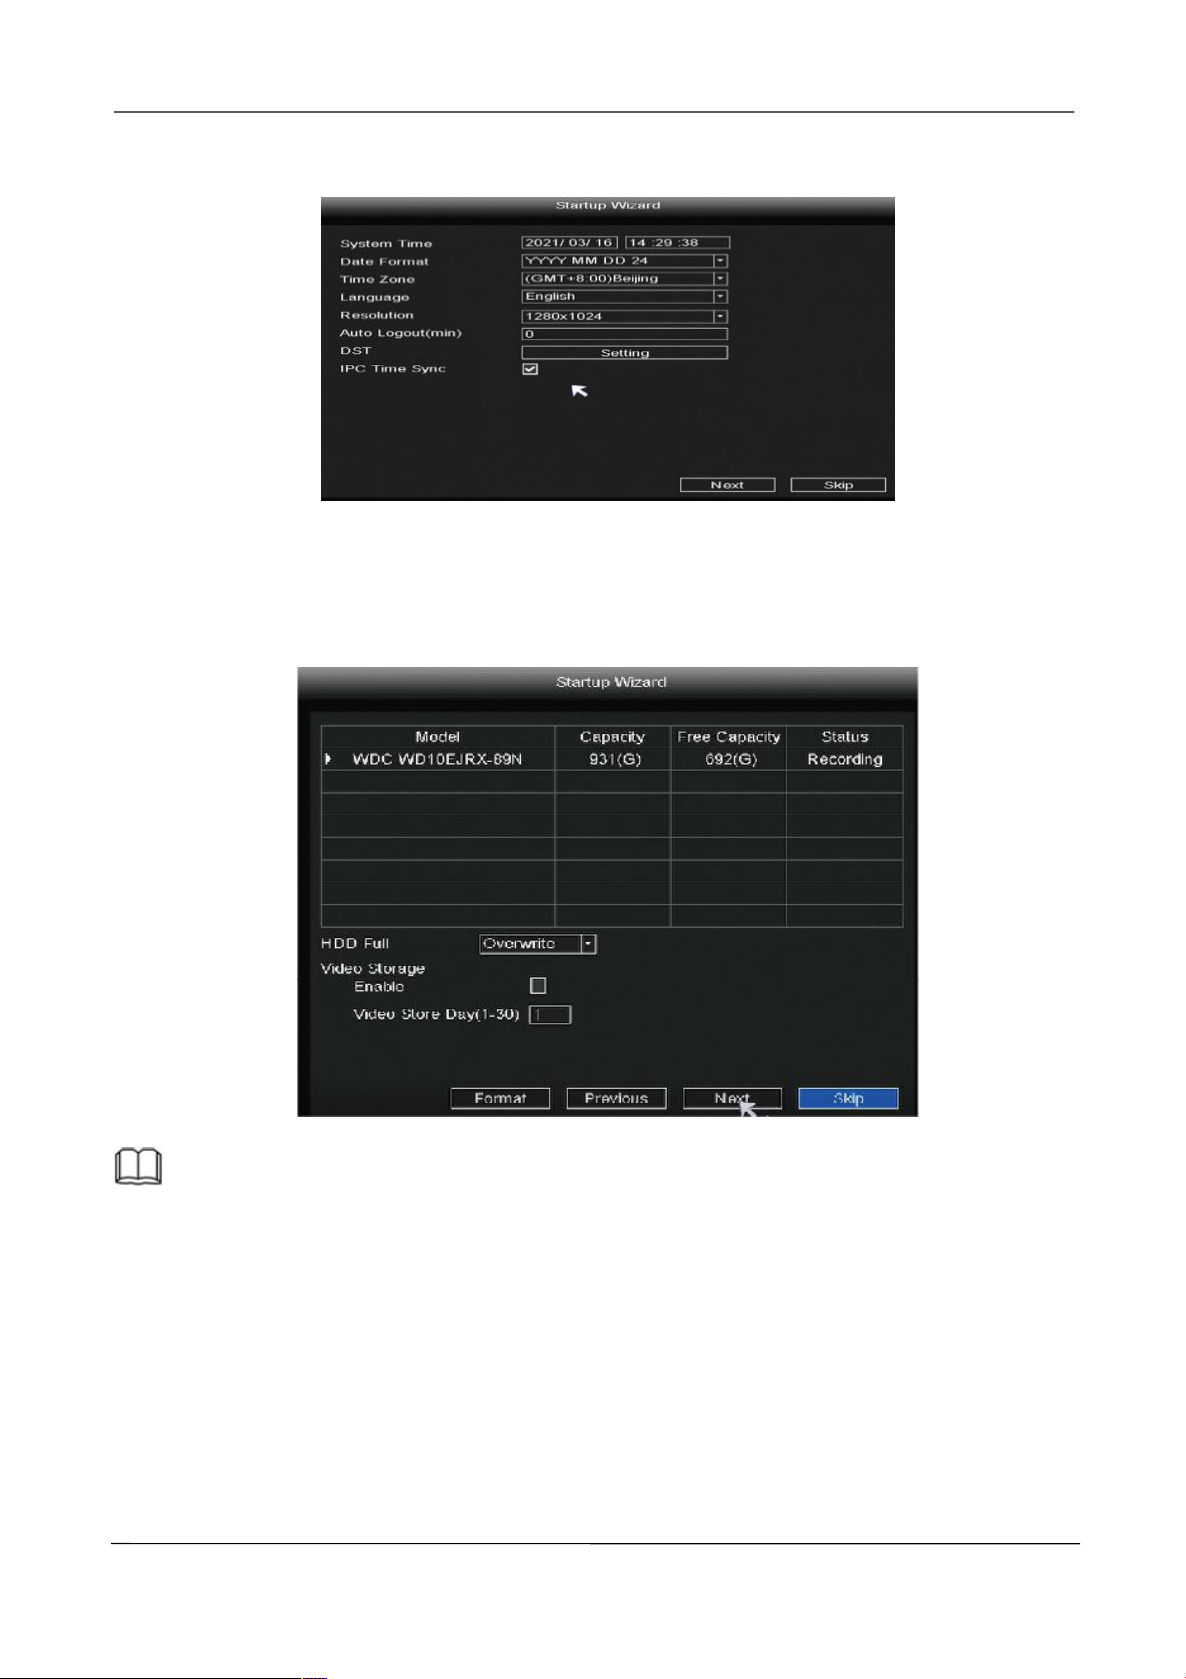
By default, the Guide starts once the NVR has loaded. The Guide can walk you through some
important settings of the NVR. If you don't want to use the Guide at that moment, right click the
mouse to quit.
www.foscam.com
Page 16
NVR User Manual
8
1. Setting the system time, date format, language, resolution of the monitor and so on.
2. Format HDD.
3. Network
4. P2P.
Click the Format button to set up the HDD. Note that this will delete all files on the HDD.
HDD Full Setting. Select Stop Record or Overwrite.
Note
Only FN7108W-B4-1T kit has a 1T hard drive installed at the factory.
You can set up the network information for the NVR.
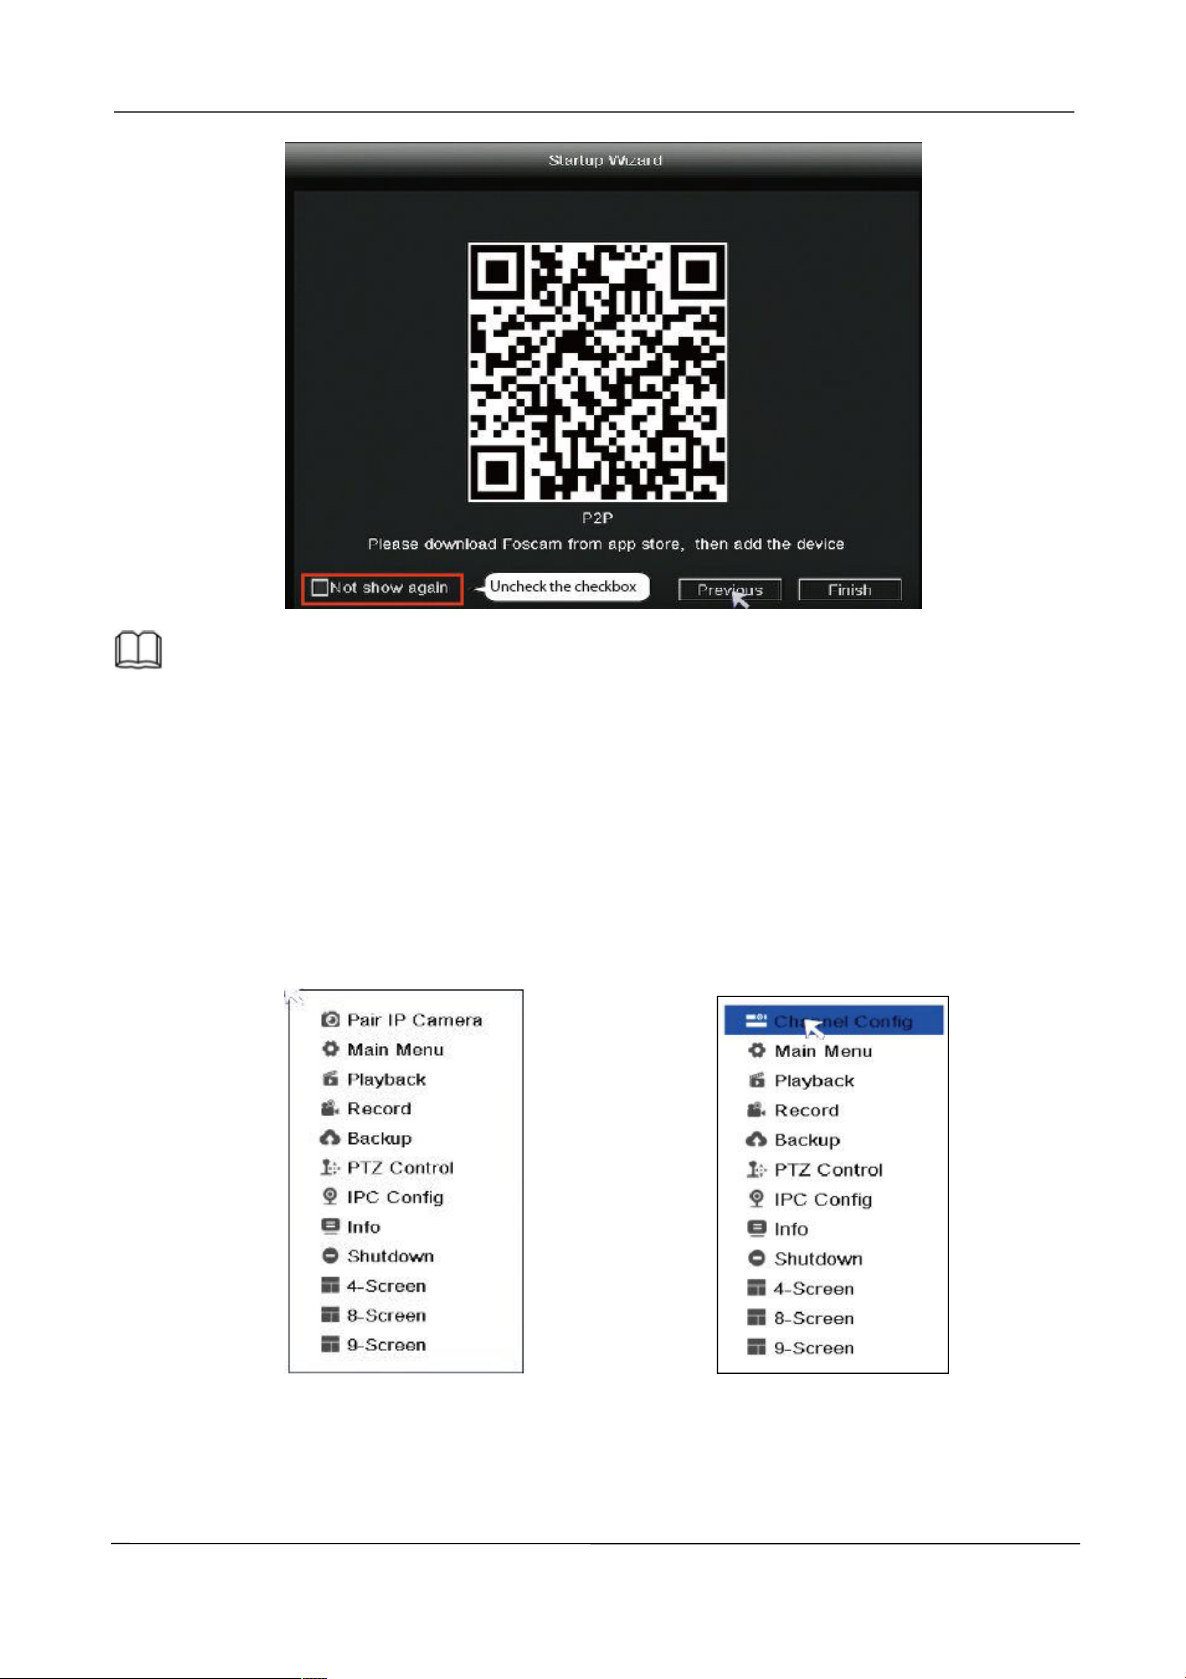
If you want to know the UID of the device, please scan the QR code. If you don’t want to
use the Setup Wizard next time, check Not sho w again checkbox. Click the Finish
button to complete the setup wizard.
www.foscam.com
Page 17
NVR User Manual
9
Note
The P2P in this article is only an example, please refer to the actual situation.
You can also Right-click “Main Menu > Configuration”, uncheck the Startup Wizard checkbox.
Click the Save button.
2.4 Shortcut Menu
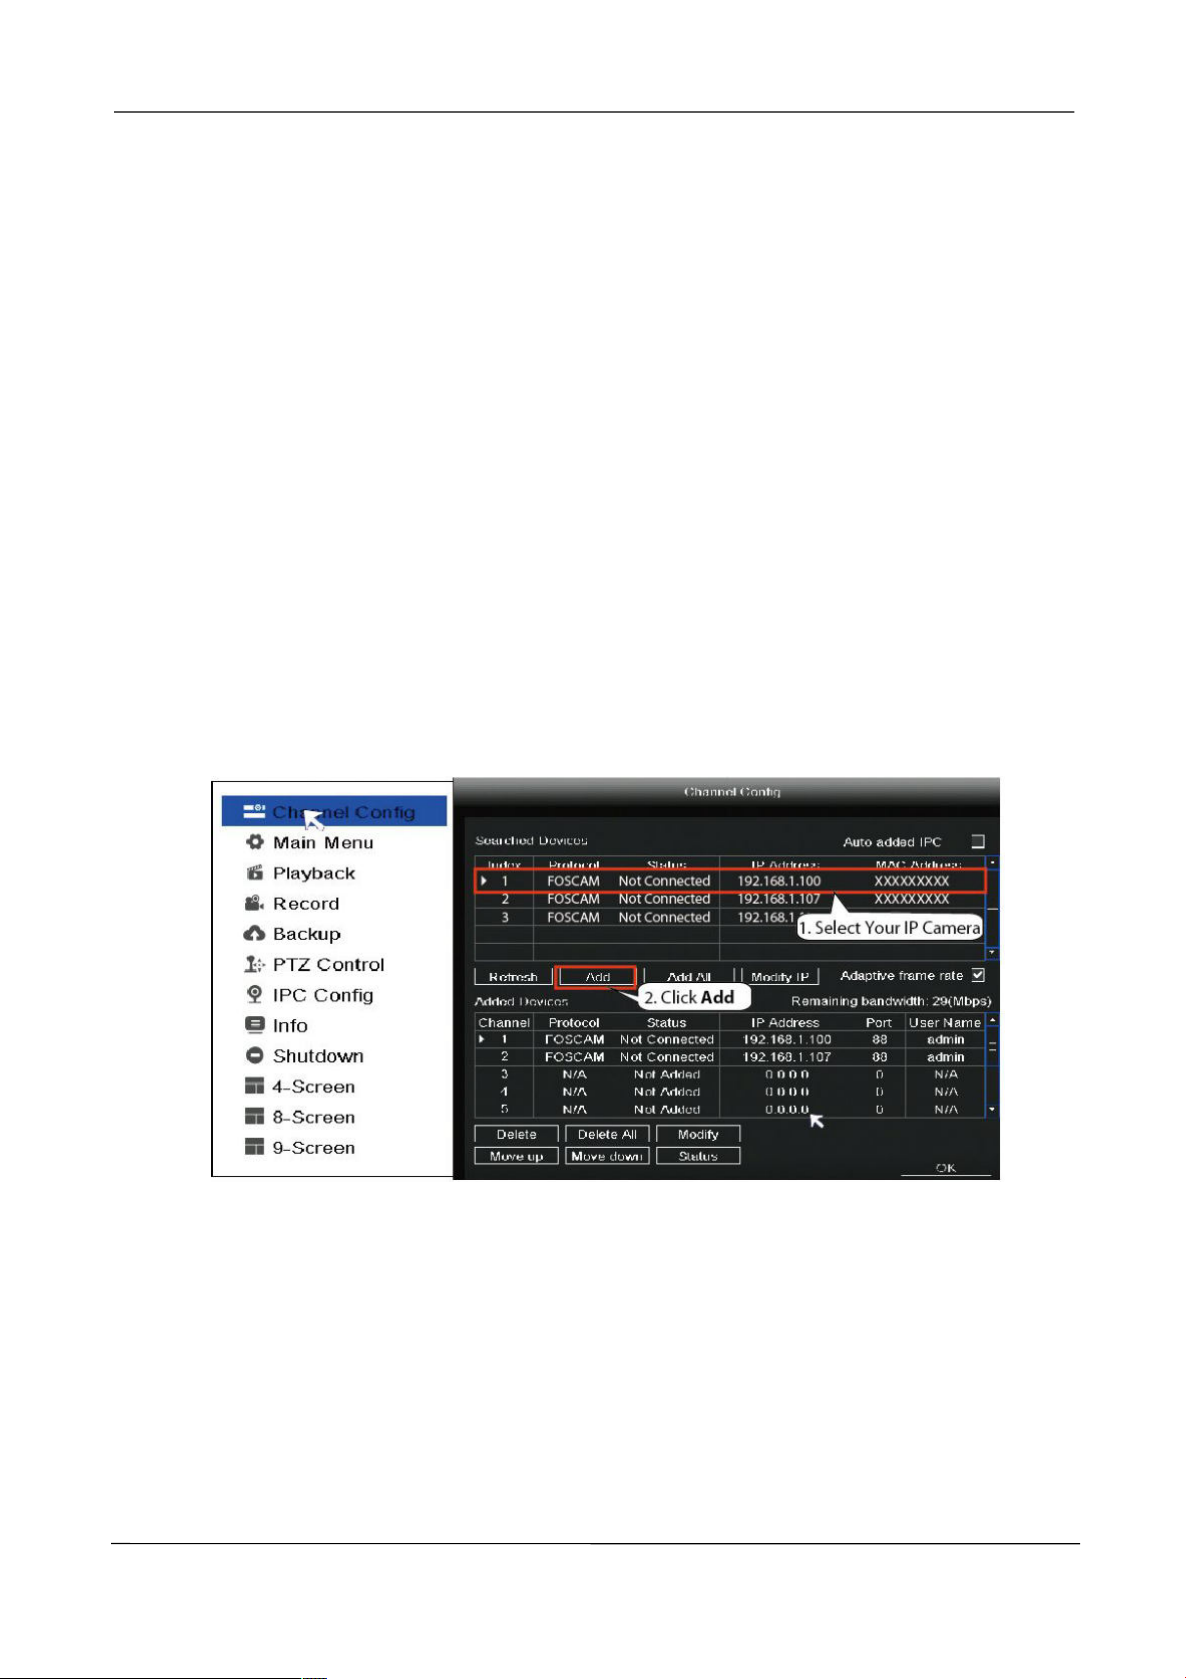
After login, right-click the mouse, you will enter the shortcut menu.
Only FN7108W-B4 kit FN8108H/FN8108HE
Right-click in live view mode and select screen from the Shortcut Menu, you can choose
4-screen, 8-screen or 9 screens.
www.foscam.com
Page 18
NVR User Manual
10
FOSCAM protocol: The High Definition (HD) IP Cameras for Foscam.
ONVIF protocol: IP Cameras which support ONVIF protocol.
2.4.1 Channel Config
Channel Config(FN8108H/FN8108HE)
Right-click in live view mode and select Channel Co nfig to enter the Channel Config
interface, On this page you can see device status such as channel, Status, IP Address, MAC
Address, Add IP Camera, Modify IP, Delete/Modify/move up/move down added device.
You can add an IP Camera that is connected to the internet on the NVR.
Step 1: Right-click on main interface, select Channel Config.
Step 2: Select your IP Camera or Auto added IPC.
Step 3: Click Add.
Step 4: Enter username and password of the camera. If your camera is in the factory default state,
you do not need to enter the user name and password.
Step 5: Click OK.
Select a protocol depending on which IP Camera you have.
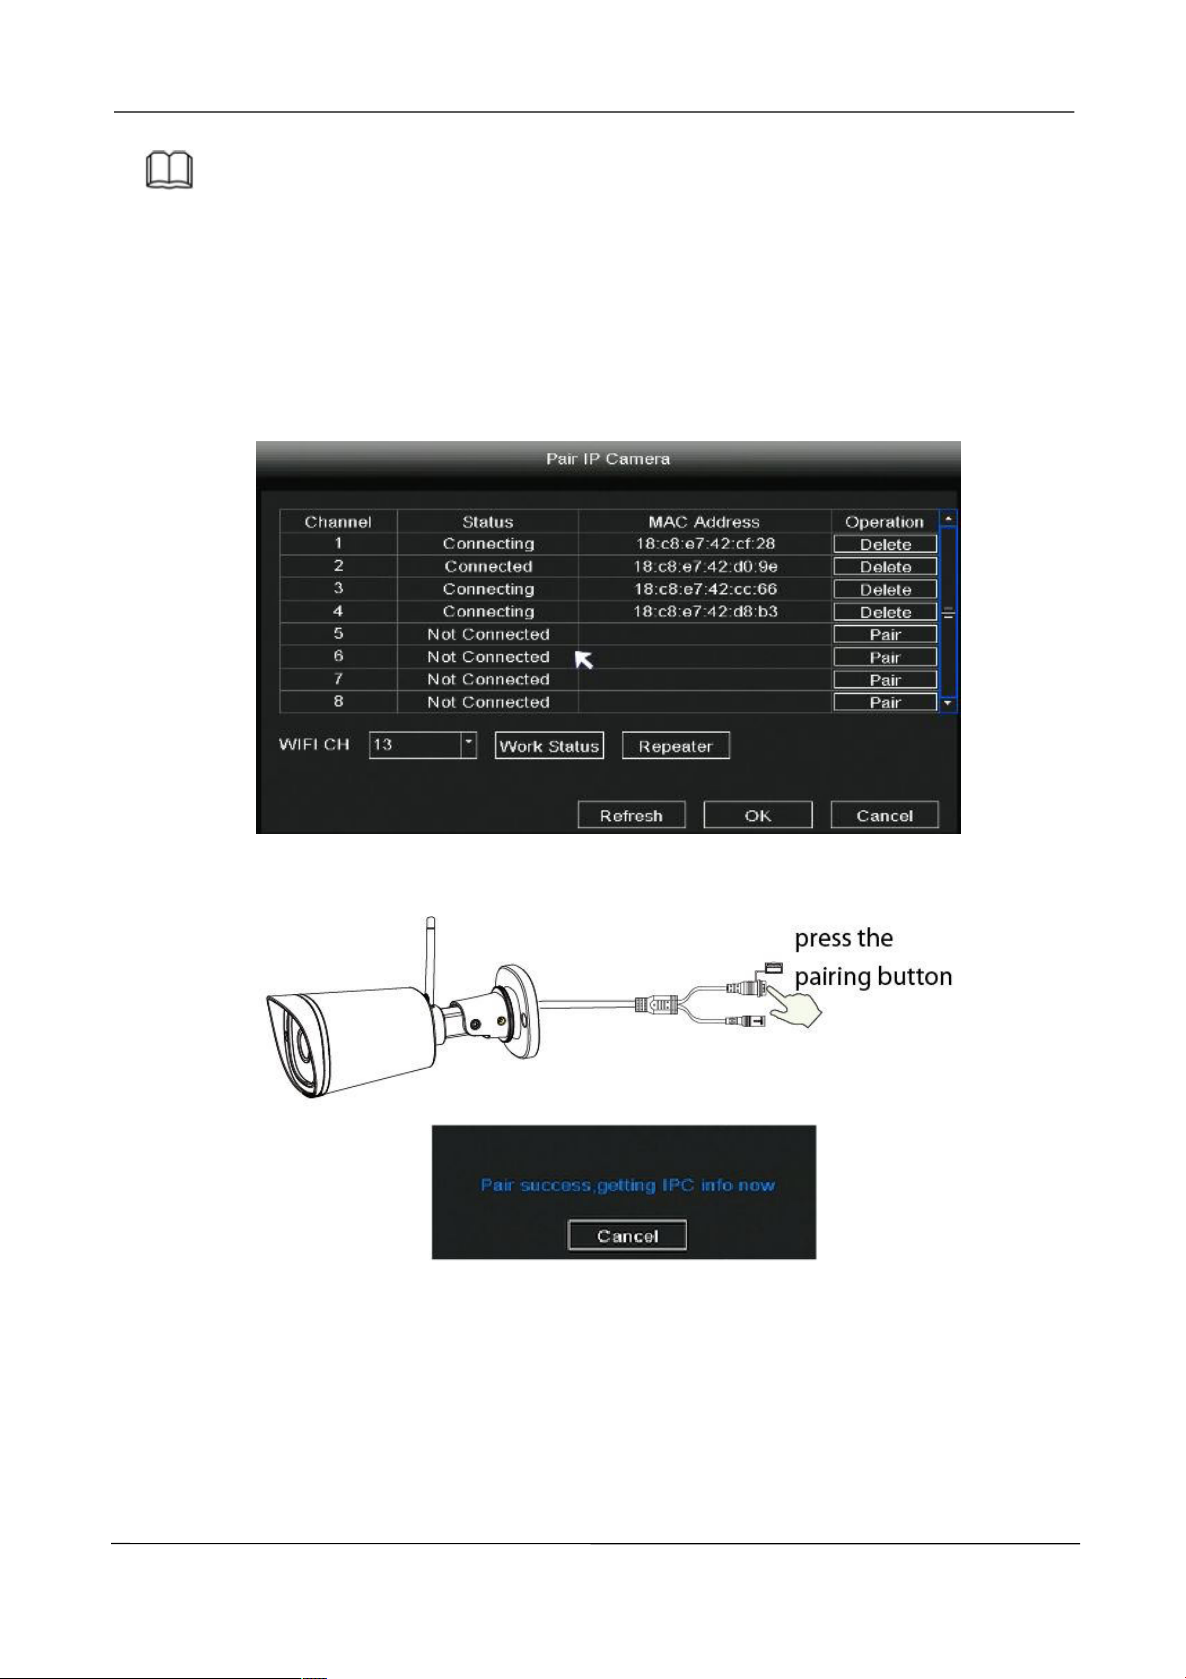
Pair IP Camera(Only FN7108W-B4 kit)
Right-click in live view mode and select Pair IP Camera to enter the Pair IP Camera interface,
On this page you can see device status such as channel, Status, MAC Address, Remove and Add IP
Camera.
www.foscam.com
Page 19
NVR User Manual
11
Note
The NVR and IP Camera are already paired. If you need to match more cameras (Only FI9910W),
please refer to the following steps.
Click Pair button and press the Reset button of the camera tail cable at the same time, until it
prompts that the pairing is successful. When finished code matching, The live view interface will
show you the video feed of each IP Camera.
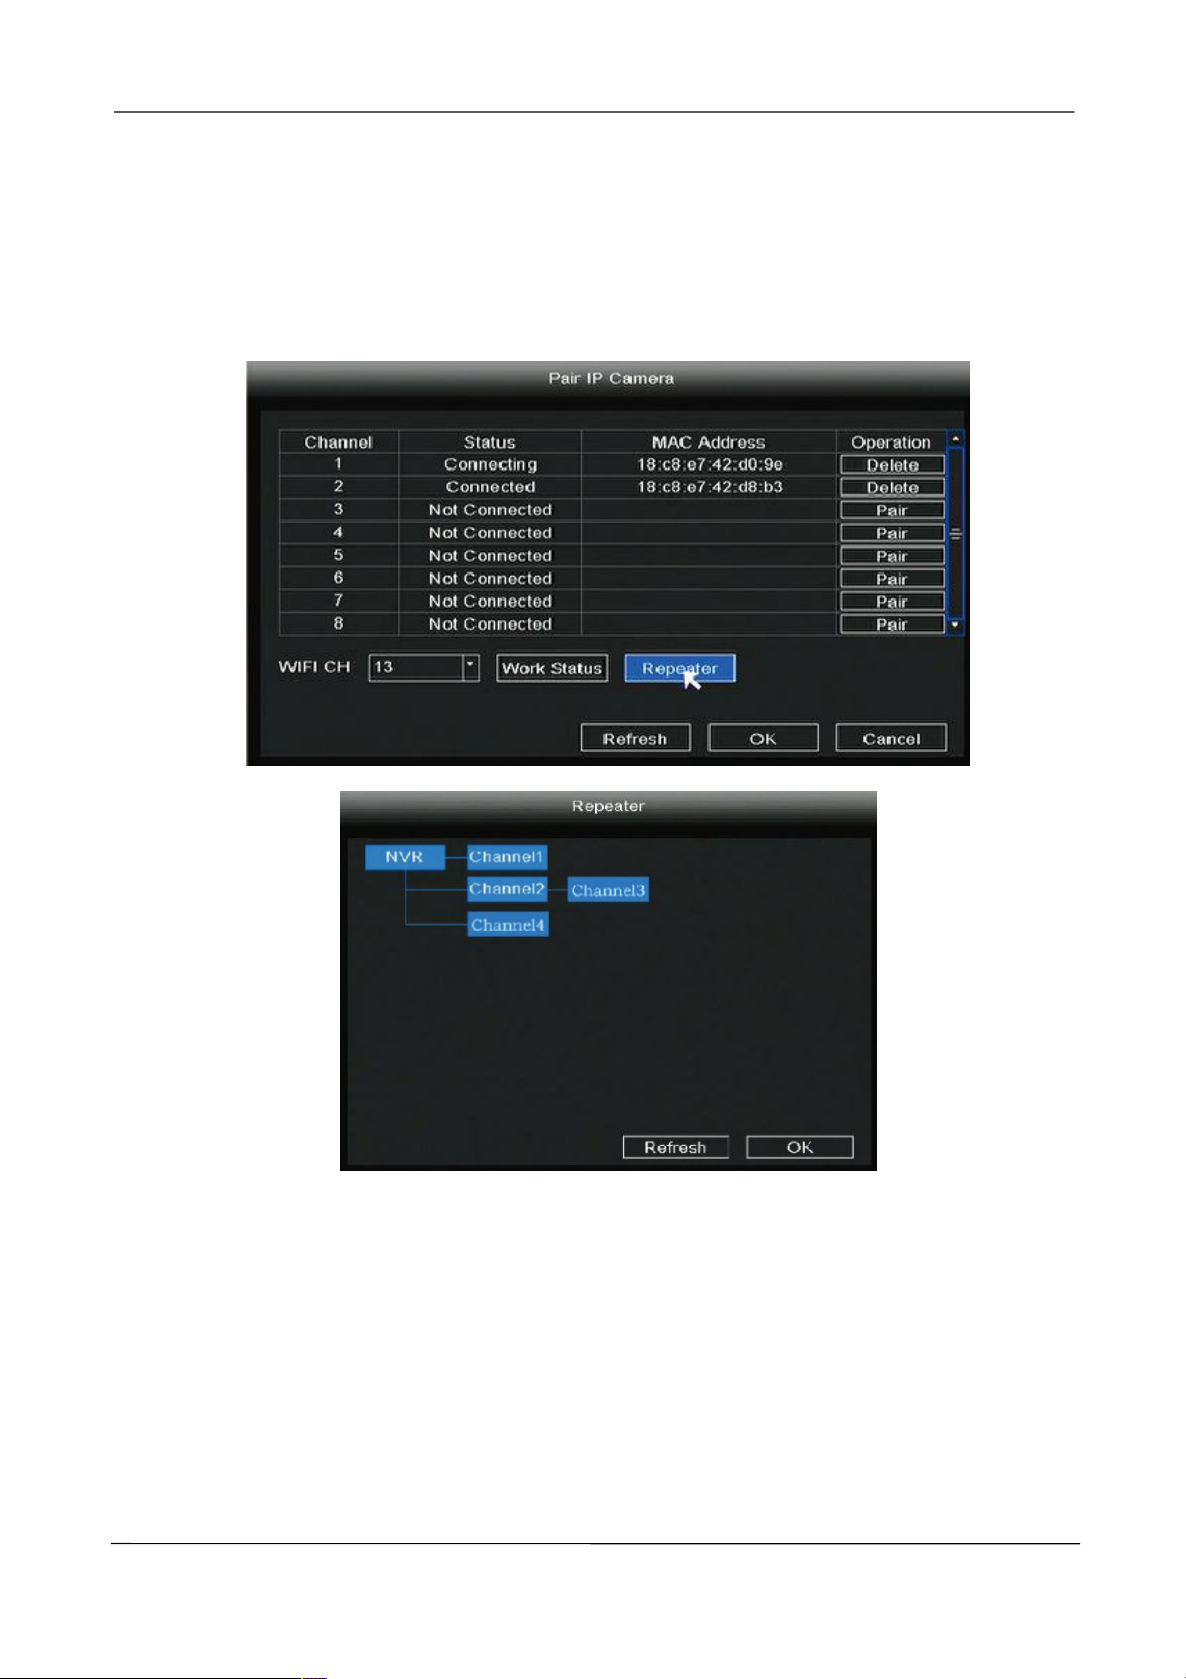
Auto Bridge
By new mesh network auto-bridging function, without any manual setting, wireless camera
in further area will have a judgment about the WIFI signal and auto connect to the camera
which have a better WIFI signal, to achieve more stable and reliable video transmission.
Auto bridging is designed to expand the coverage area of wireless signal, instead of
www.foscam.com
Page 20
NVR User Manual
12
enhancing the signal. When camera is a little far away from NVR, or there are too many
interference factors/sources between them, camera in further area will auto
bridge/connect to the one nearby to transmit the video data.
Right-click in live view mode to enter the Pair IP Camera interface, click Repeater button.Then,
bridging relationship will be showed on the interface automatically.
2.4.2 Main Menu
Right-click in live view mode and select Main Menu to enter the Main Menu interface, it
includes Configuration, Display, Record, Backup, Network, HDD, User, Event, Restore, Upgrade,
IPC Config, please refer to 2. 5 Main Menu.
www.foscam.com
Page 21
NVR User Manual
13
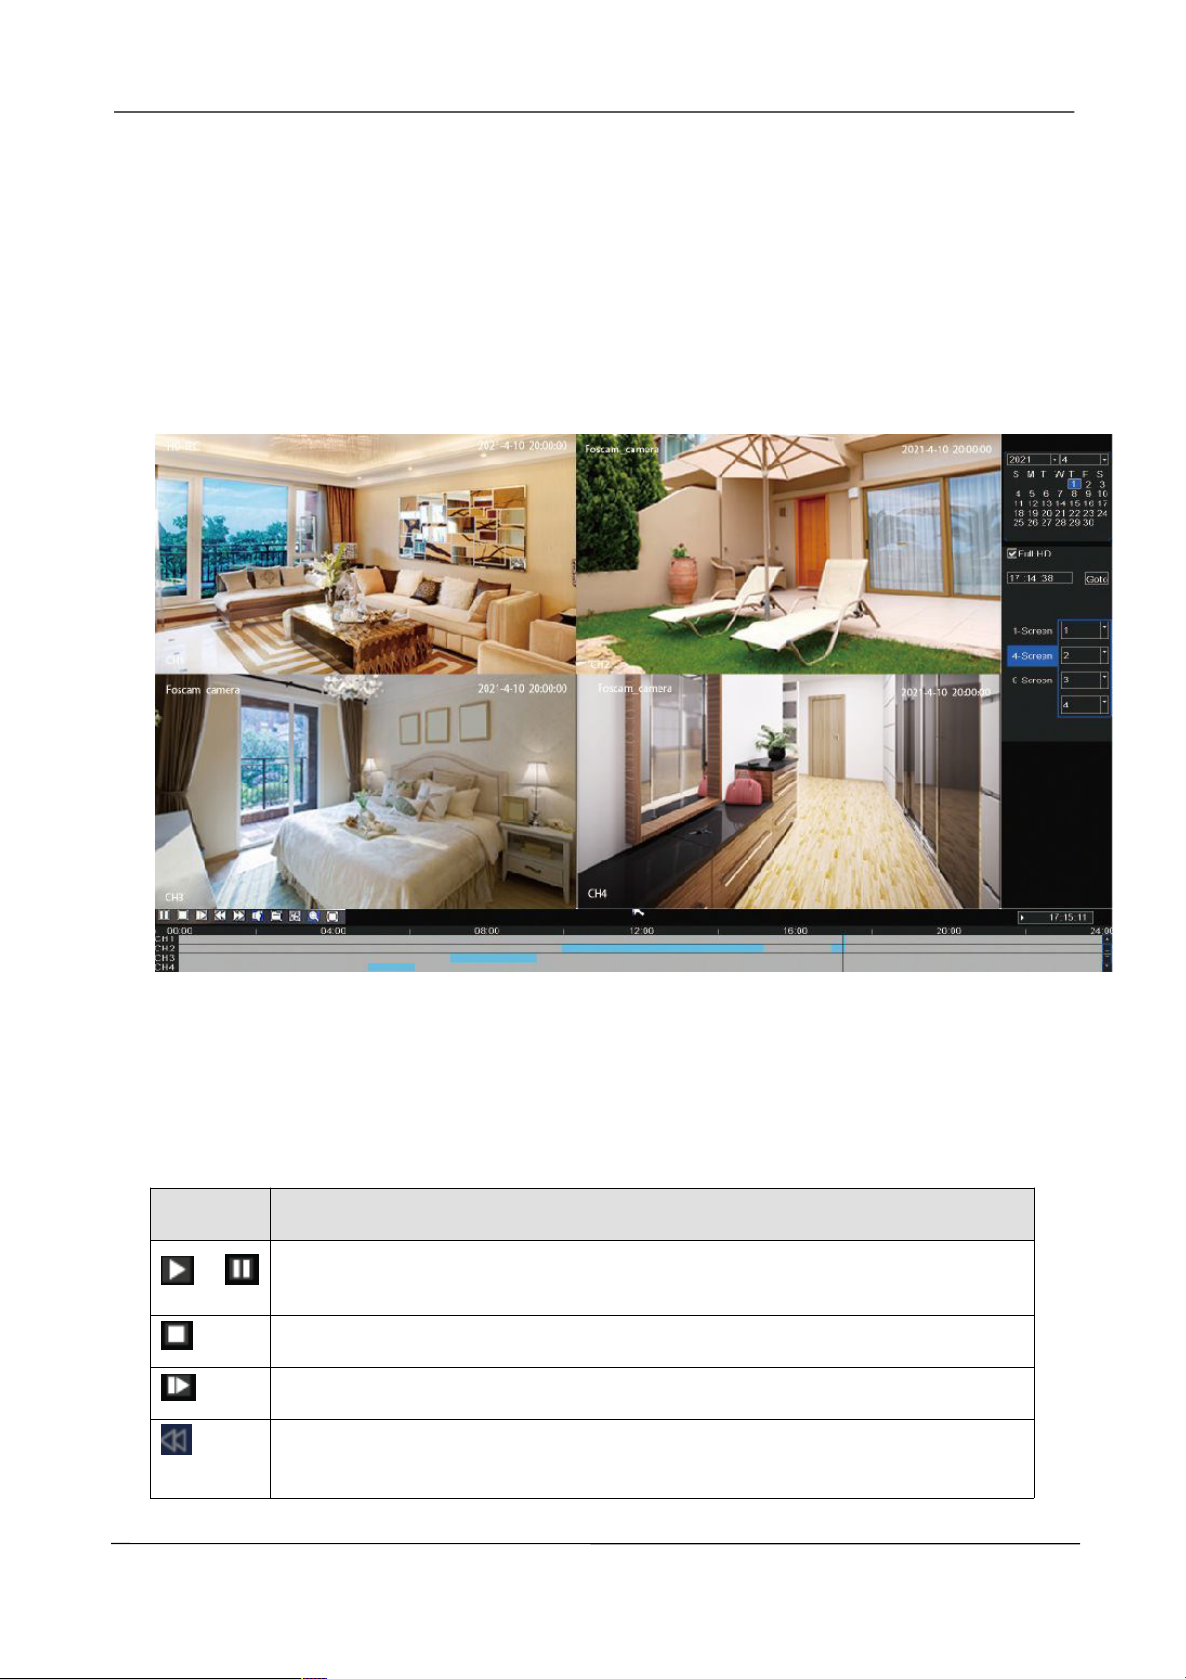
1. Select a date with recording in calendar.
2. Check the checkbox from Channels. You can select up to nine channels for playback at the same
Button
Description
/
After select the matched recorded file, click the button to play or pause.
Stop
Single Frame
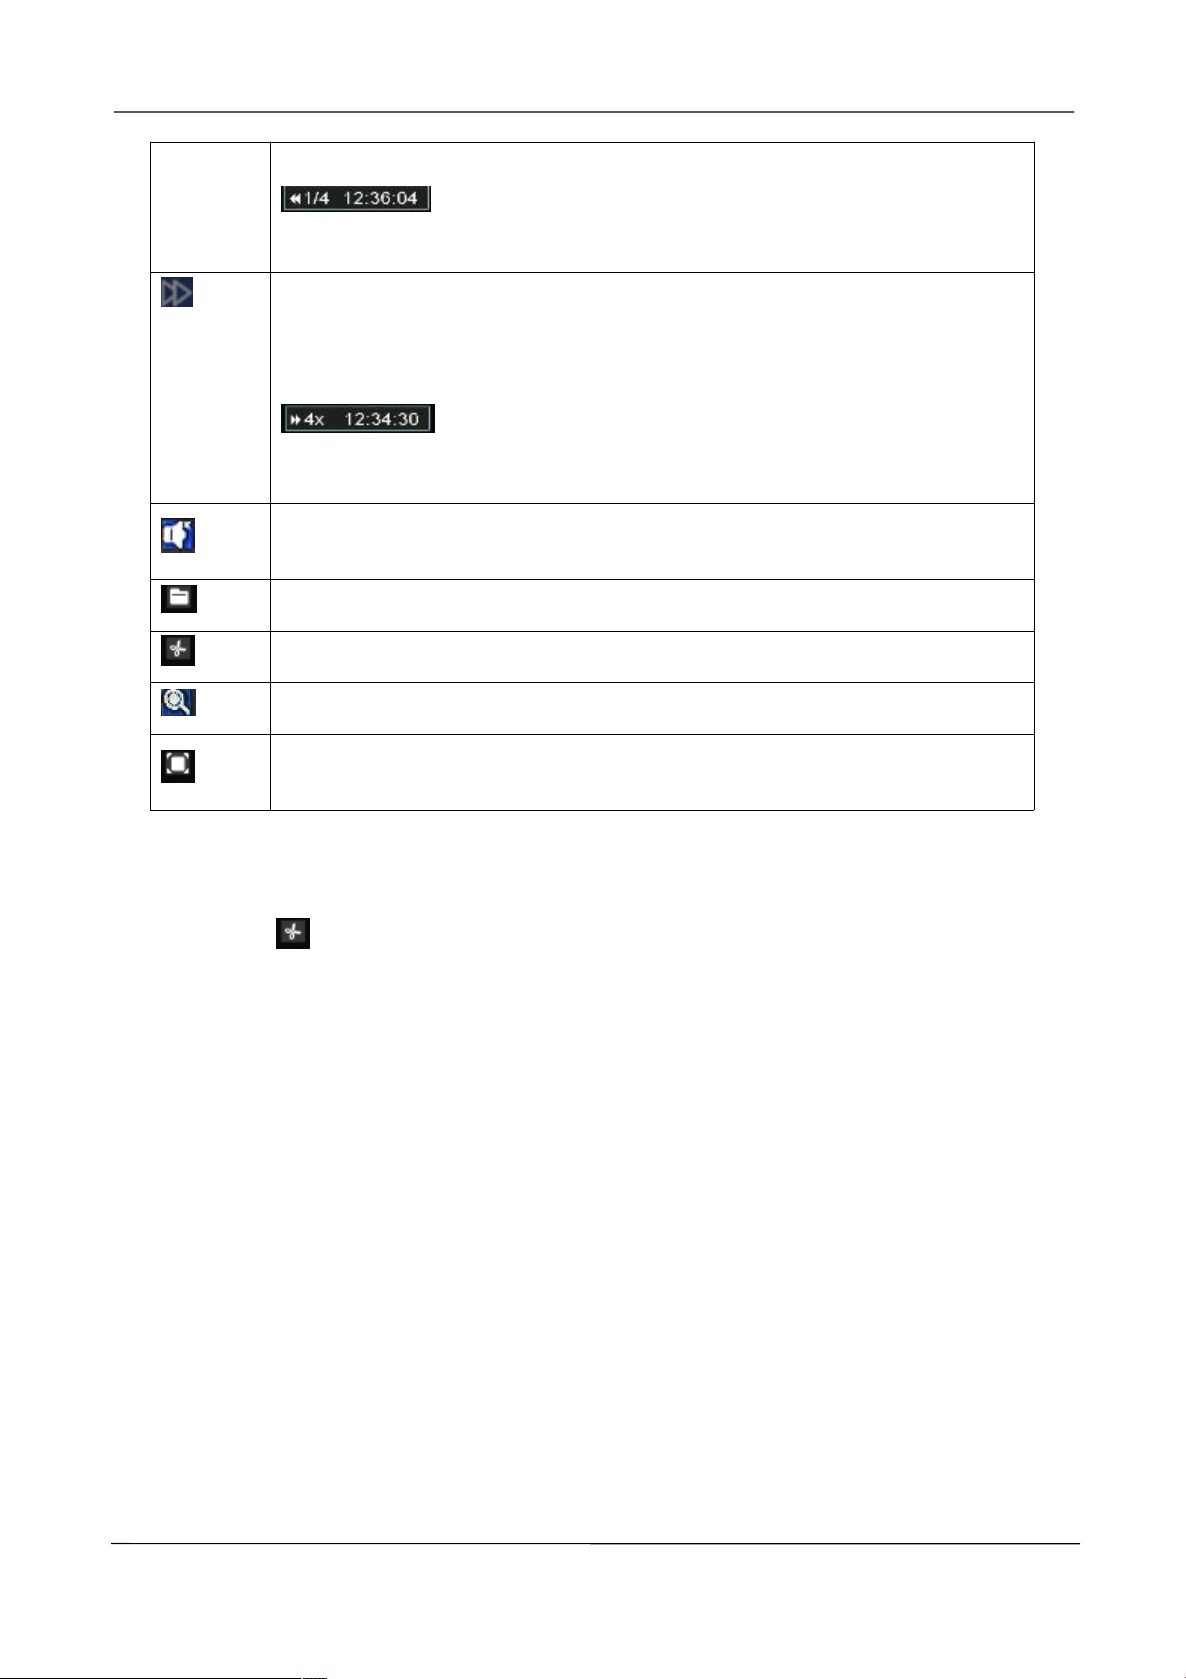
Fast backward. The fast backward speed can be 4 times, 8 times or 16 times of
the normal playing speed. Click this button. The multiple of normal playing
2.4.3 Playback
You can display the video of every a channel for playback.
Right-click in live view mode and select Playback to enter interface. It supports single-screen,
four screens or nine screens.
On this page you can view the record files stored in the hard disk.
time.
Manage the recording
www.foscam.com
Page 22
NVR User Manual
14
speed is displayed in the lower right of the fast backward icon. For example,
indicates the current fast backward speed is four times of the
normal speed.
Fast forward. The fast forward speed can be twice, 4 times, 8 times or 16 times
of the normal playing speed. Click this button. The multiple of normal playing
speed is displayed in the lower right of the playback page. For example,
indicates the current playing speed is four of the normal
speed.
Audio
Backup. Click this button and you will go to the backup page
Cut. See below the table for details.
Log. Click this button and you will go to the log page.
Full Screen
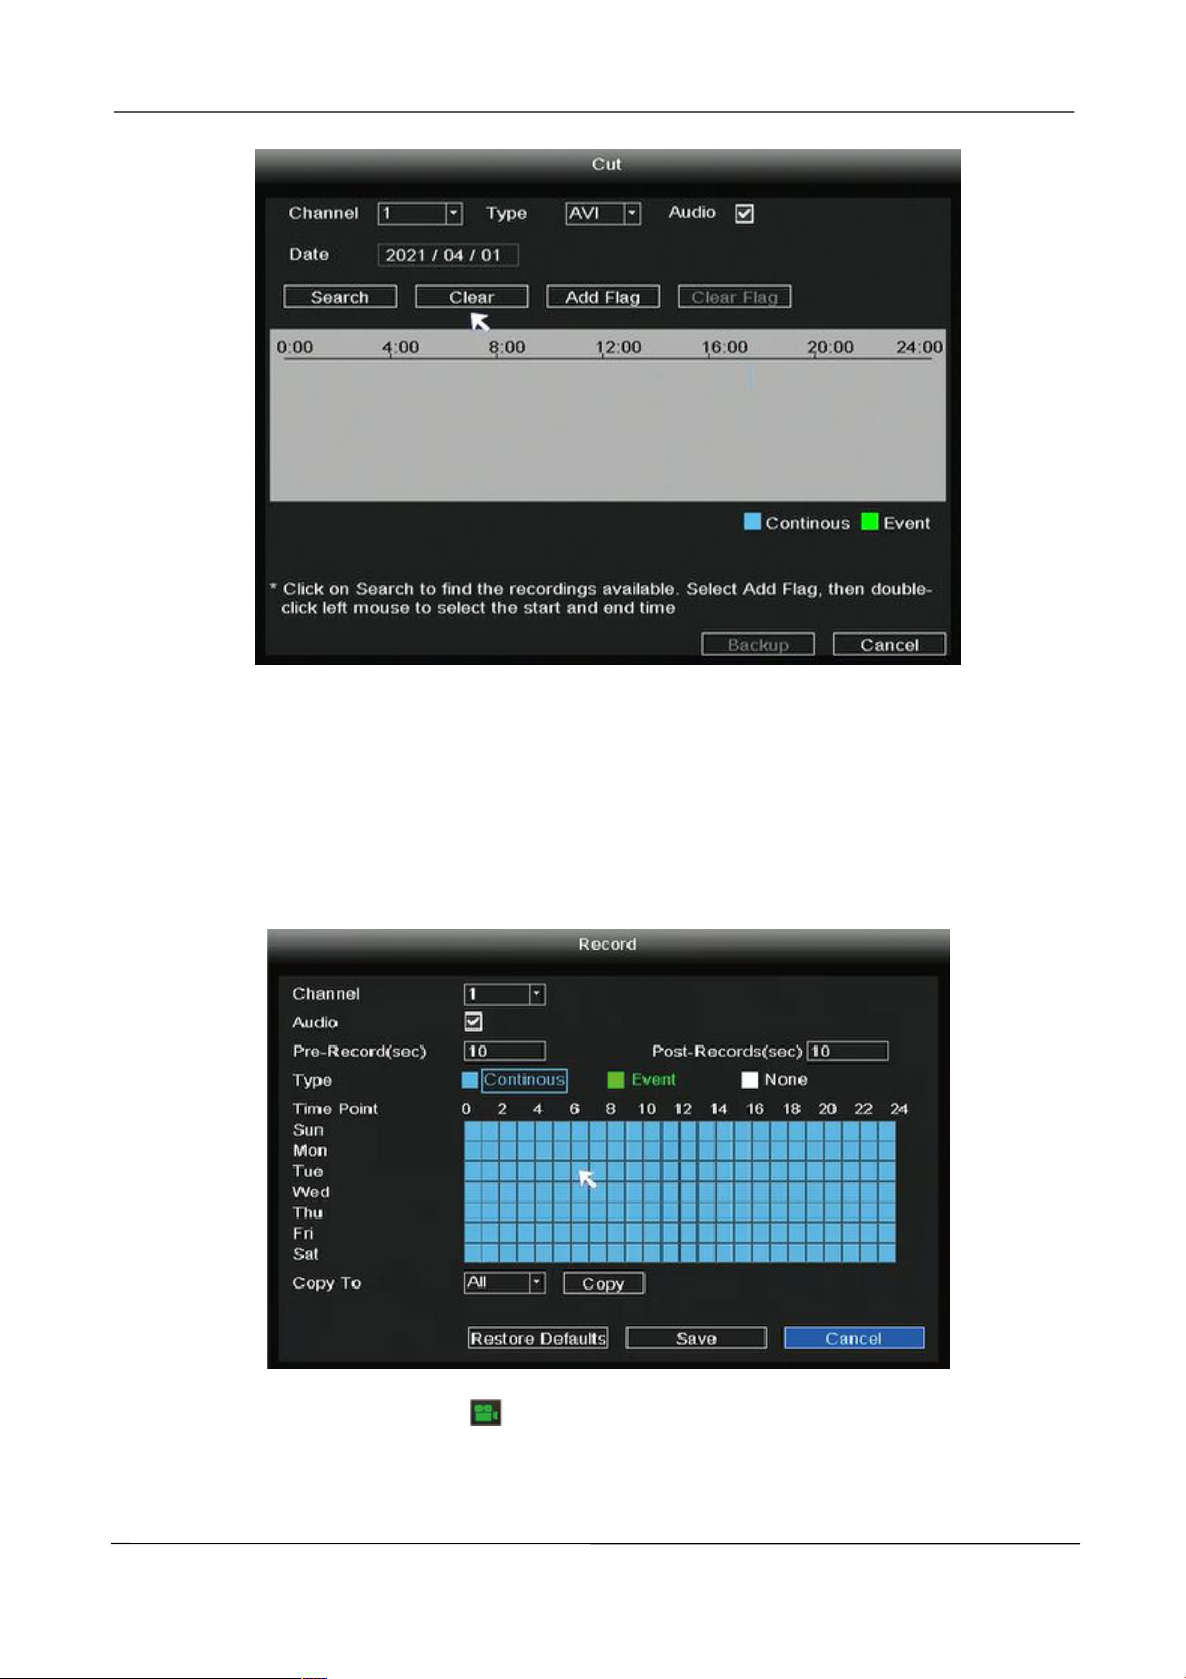
Cut
Step 1: Click
Step 2: Choose the Channel , Type, Da te .
Step 3: Click Se arch to find the recordings available.
Step 4: Select Add Flag , then double-click left mouse to select the start time and end time.
Step 5: Insert USB flash drive to the USB port located at the rear of your NVR.
Step 6: Click Backup button to save the video information to the USB flash drive. Tips are available
after the backup is complete
, you will go to the Cut interface.
www.foscam.com
Page 23
NVR User Manual
15
2.4.4 Record
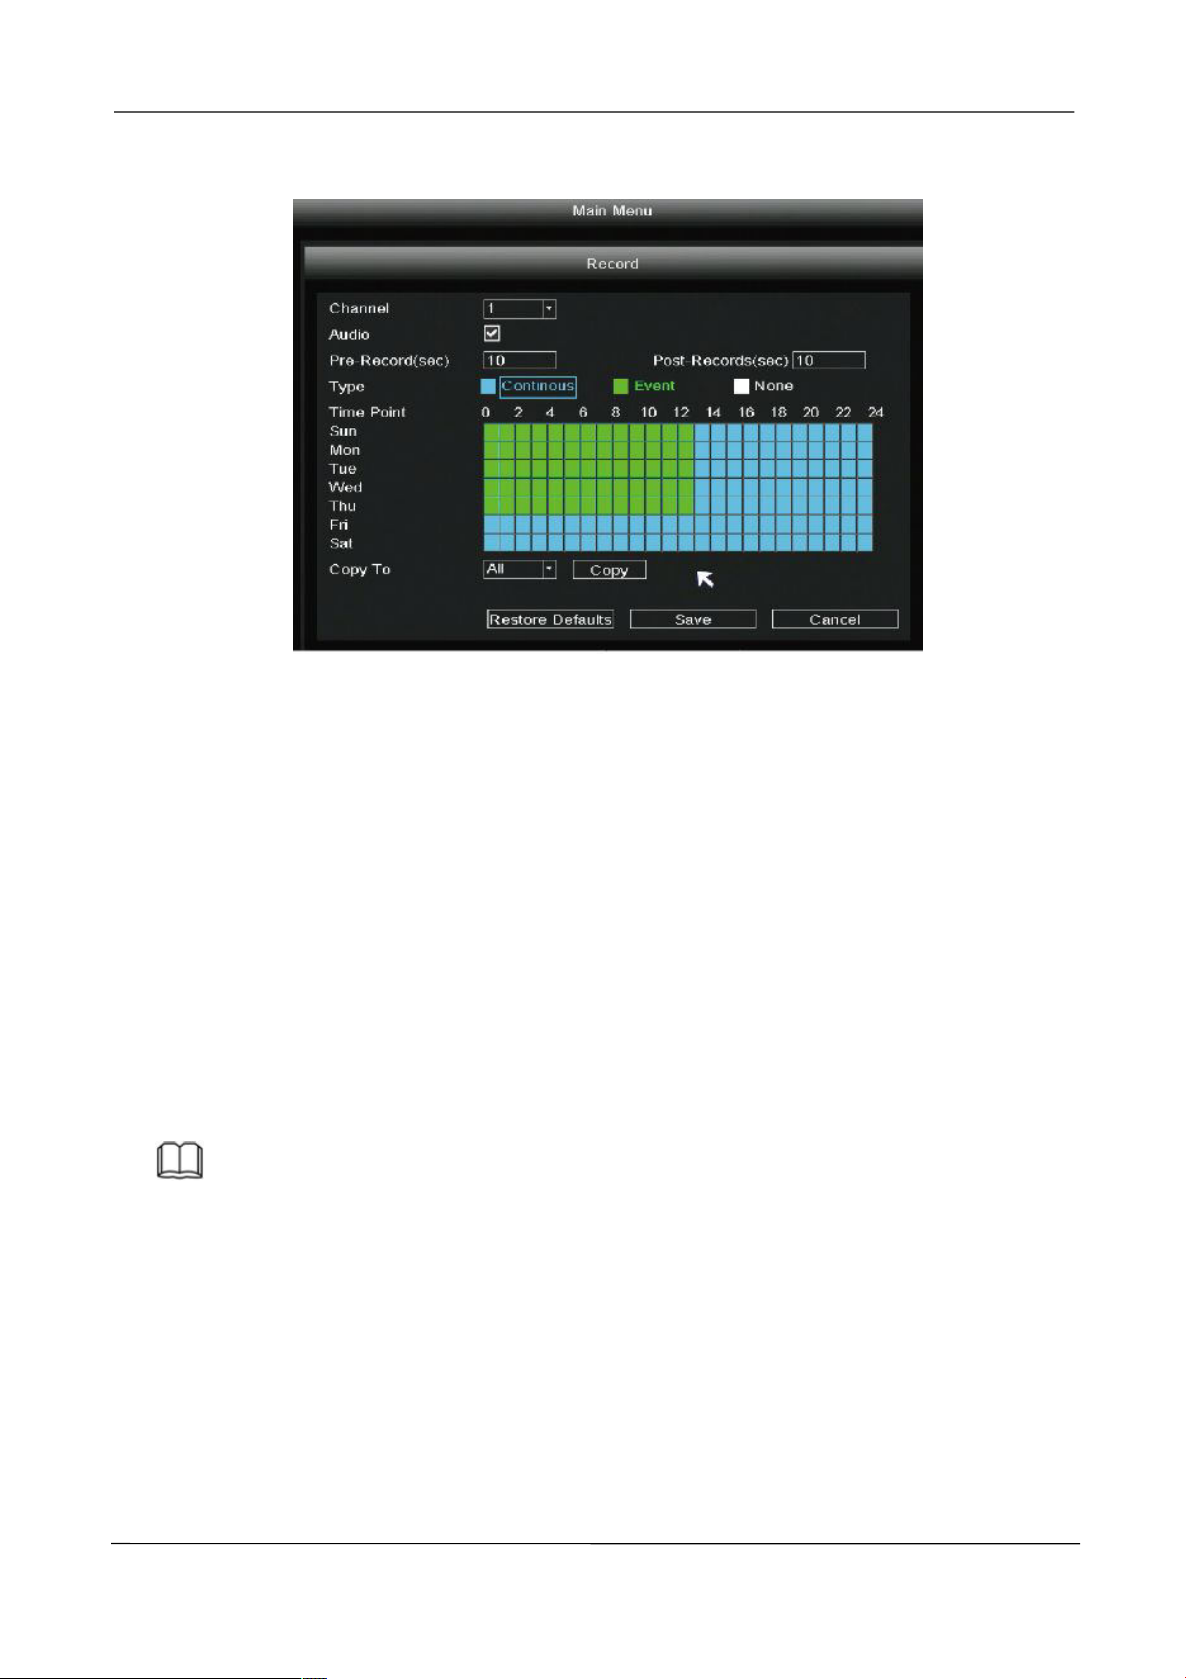
Right-click in live view mode and select Record to enter Record interface. Choose recording
channel, click Save button (Actually, the Wi-Fi NVR system have default set 24h scheduled
recording).
In the Live View mode, the icon is at the bottom right of the screen for each channel,
indicating recording is on going.
If you want to modify it to alarm recording, please use the left mouse button to select the time
www.foscam.com
Page 24
NVR User Manual
16
(turned to green), if the other channels operate in the same way, select copy button.
If you want to check the record, right-click in live view mode and select “Main Menu >
Playback”. Choose channel and date, then click timeline to check record.
2.4.5 Backup
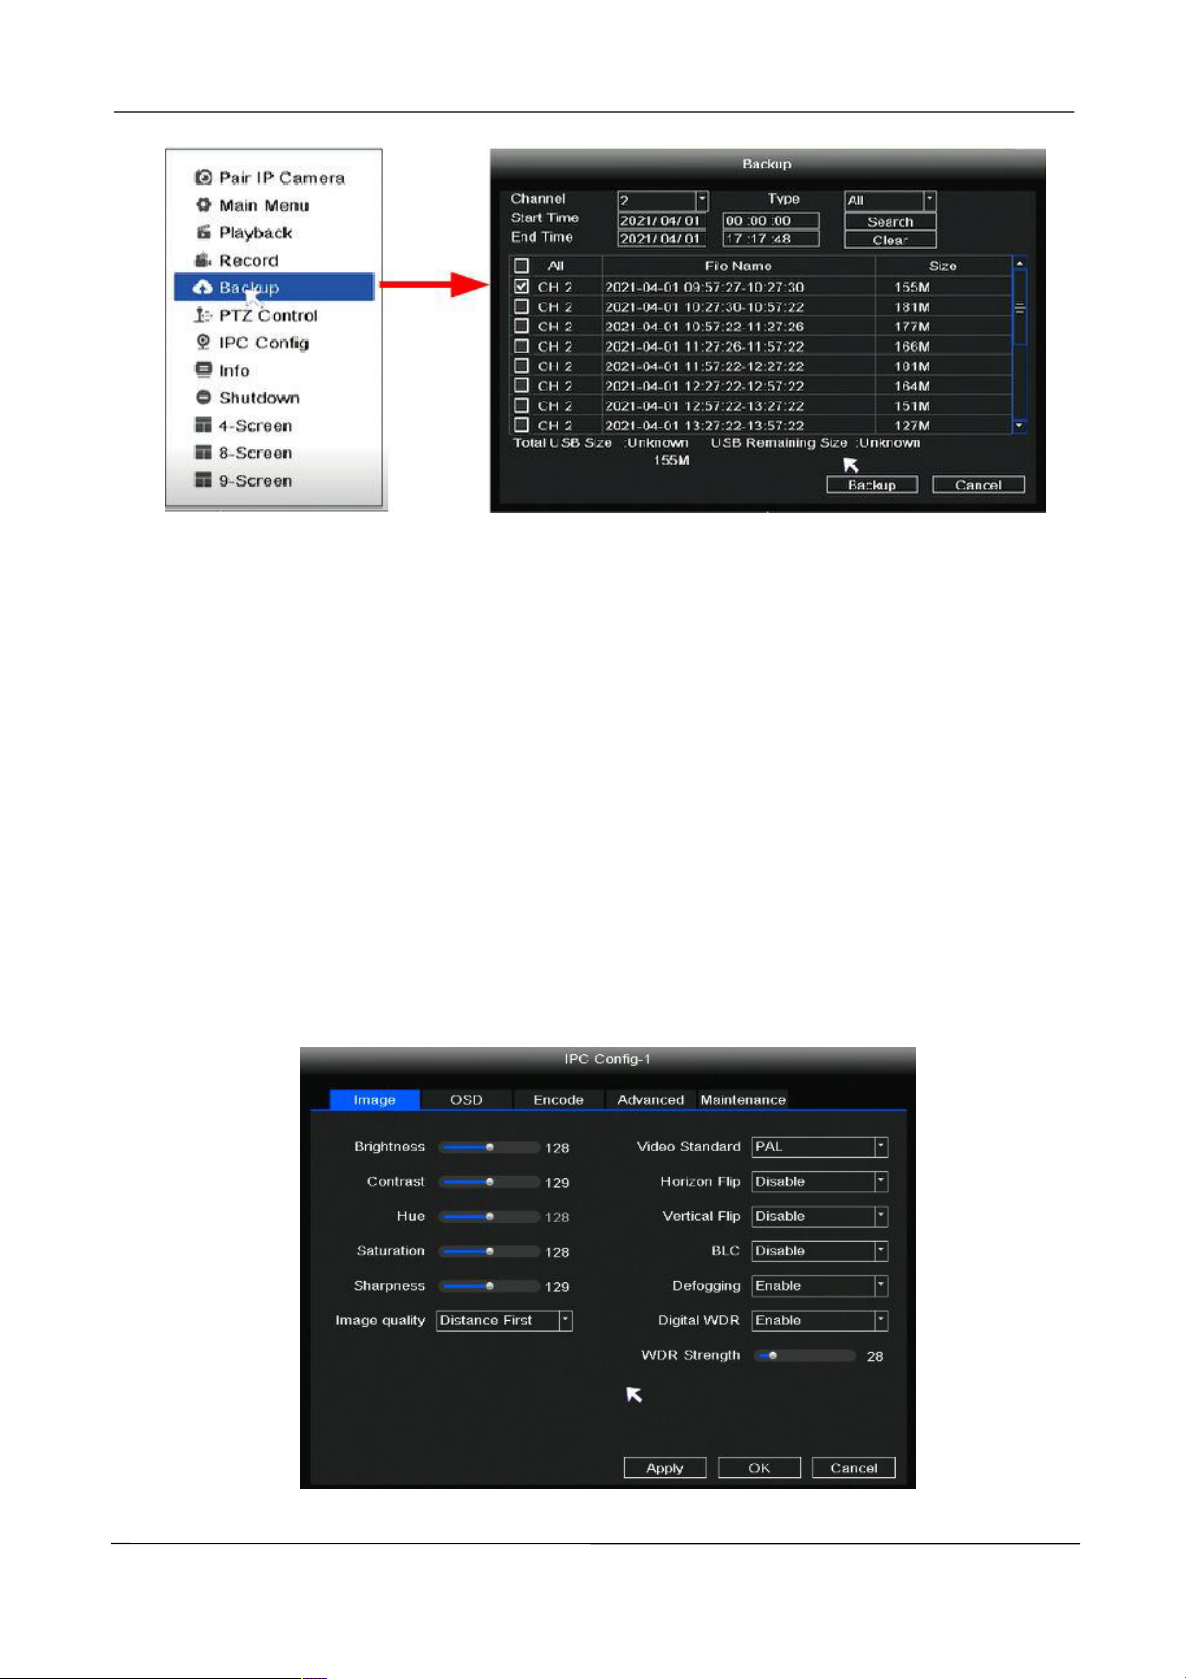
Insert USB flash drive to the USB port located at the rear of your NVR.
Right-click in live view mode select Backup to enter the Backup interface.
Step 1: Choose channel, type and time.
Step 2: Click Search button.
Step 3: Select target file.
Step 4: Click Backup button to finish backup.
Note
If target file can not be searched out, please click empty to add. Please remove the files which is no
need before backup. Ensure insert device (like USB) in 30 second, as system reserved searching
time for it is 30 second.
www.foscam.com
Page 25
NVR User Manual
17
2.4.6 PTZ Control
NVR can operate the lens steering of IPC, which must support PTZ function.
2.4.7 IPC Config
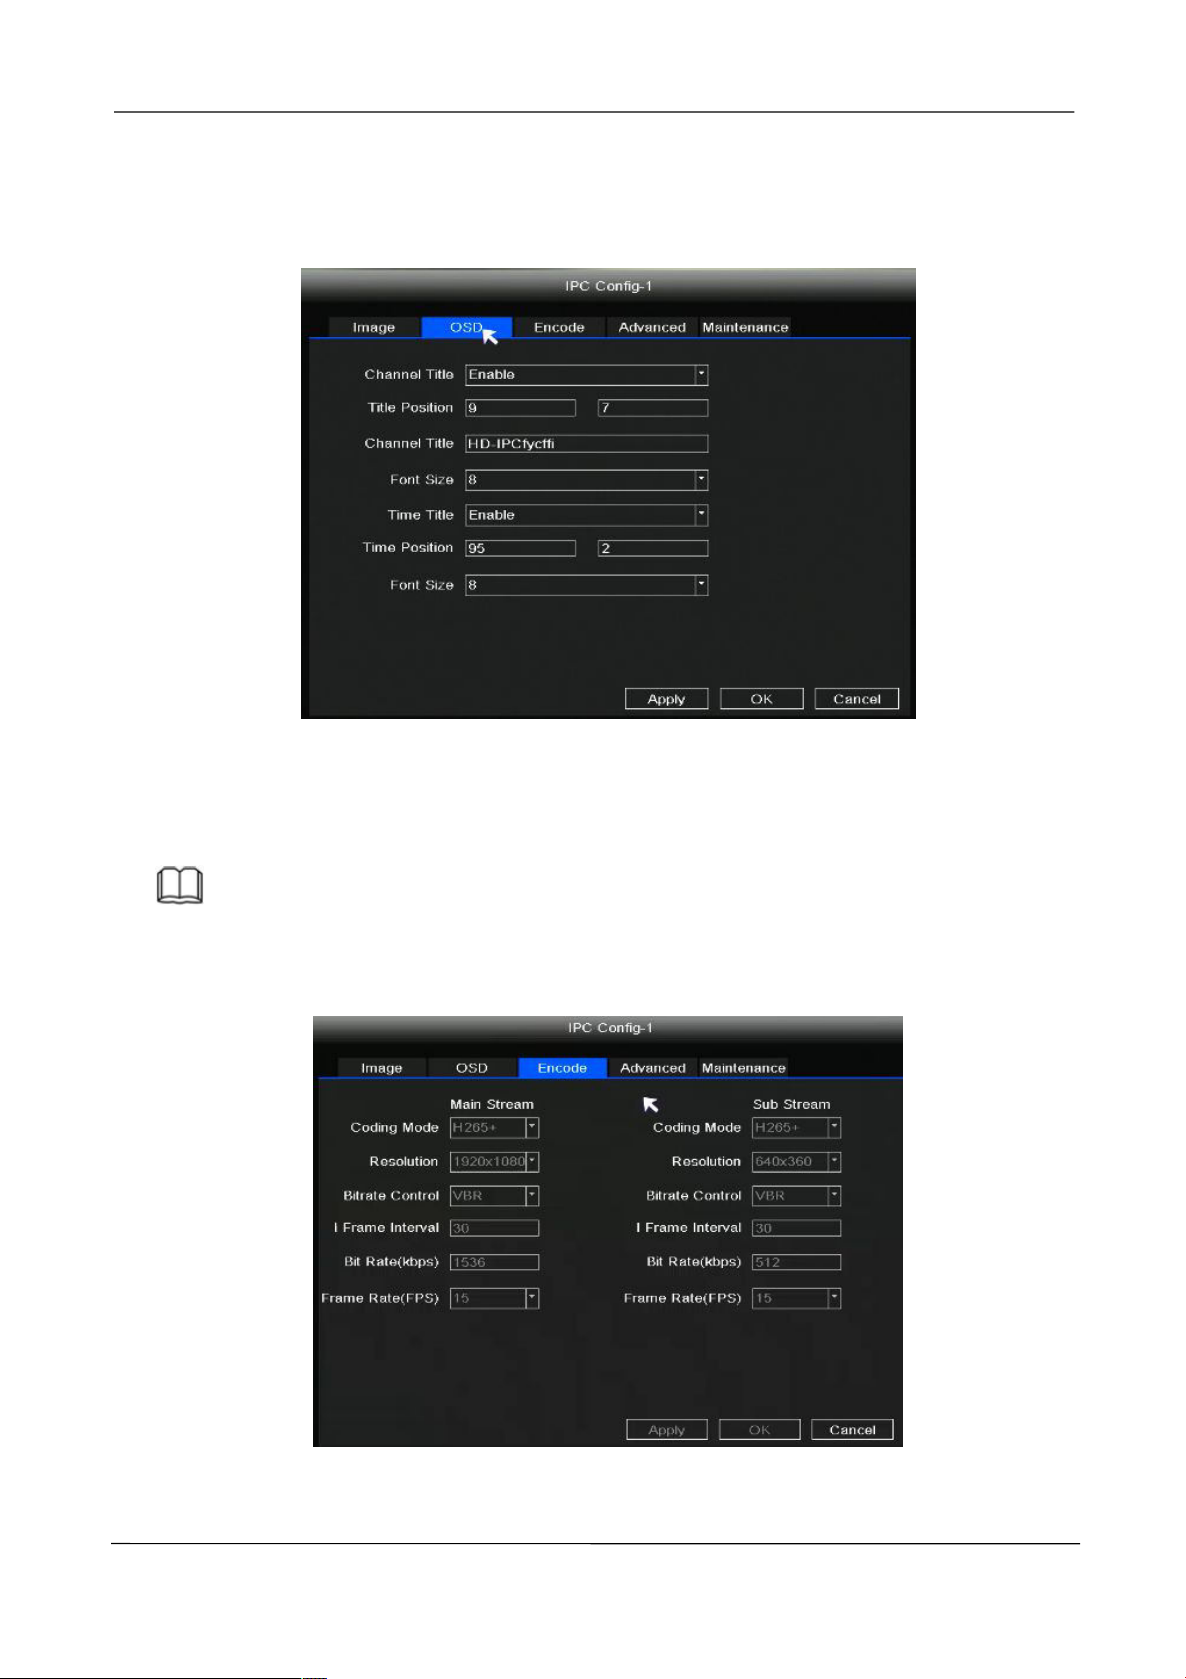
Right-click in live view mode and select IPC Config to enter the IPC Config-1 interface. You
can set the Image, OSD, Encode, Advanced, Maintenance for the IPC.
Image
Choose Image to enter the Image interface, On this page you can adjust the image color mode of
the monitor channel.
www.foscam.com
Page 26
NVR User Manual
18
OSD
Choose OSD to set the information on the screen for the IPC.
Encode
Choose Encode to set the information for the main stream and the sub stream.
Note
FN7108W-B4 kit will automatically configure the main/sub stream information according to the
network environment, so it is not editable here.
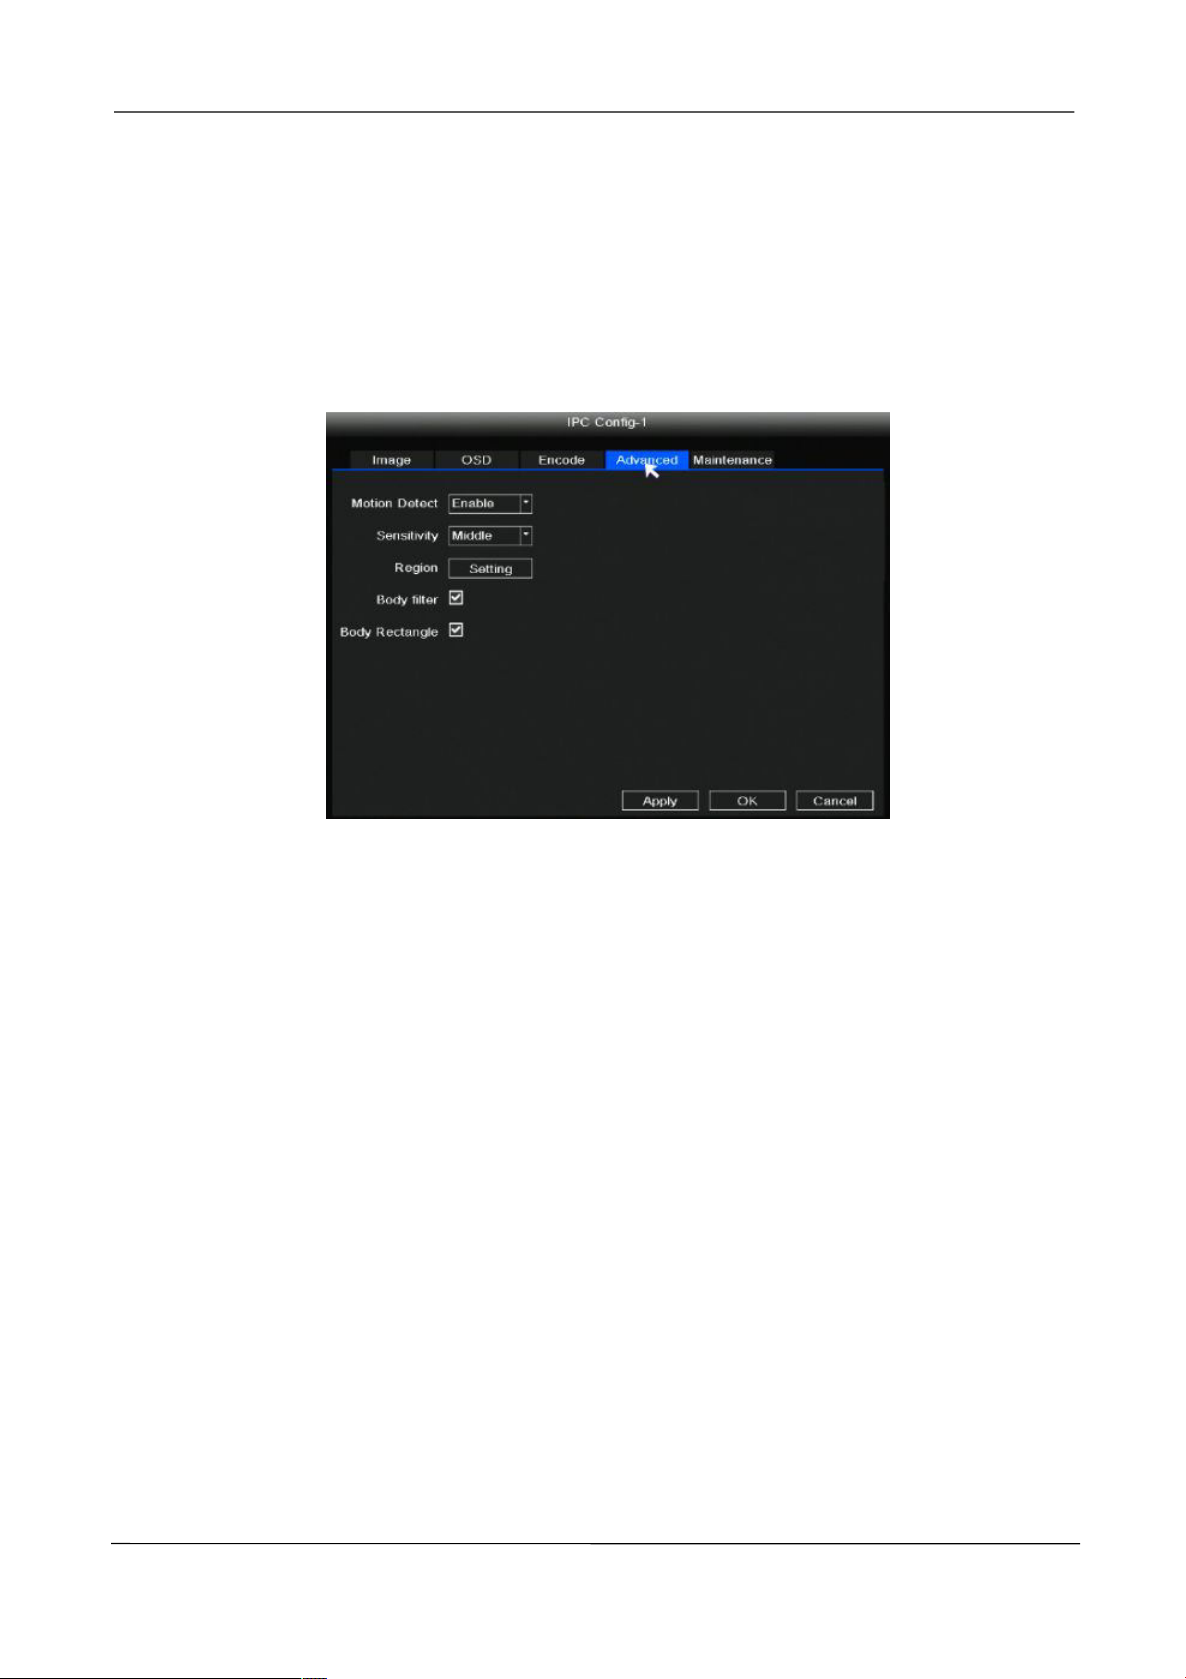
Advanced
www.foscam.com
Page 27
NVR User Manual
19
Step 1: Choose Advanced to set the Motion Detection Record for the IPC.
Step 2: Right-click in live view mode and select “Main Menu > IPC Config > Advanced ”.
Step 3: Choose Enable from the Motion Detect.
Step 4: Set Sensitivity, Region, Body Filter, Body Rectangle.
Step 5: Click Apply button.
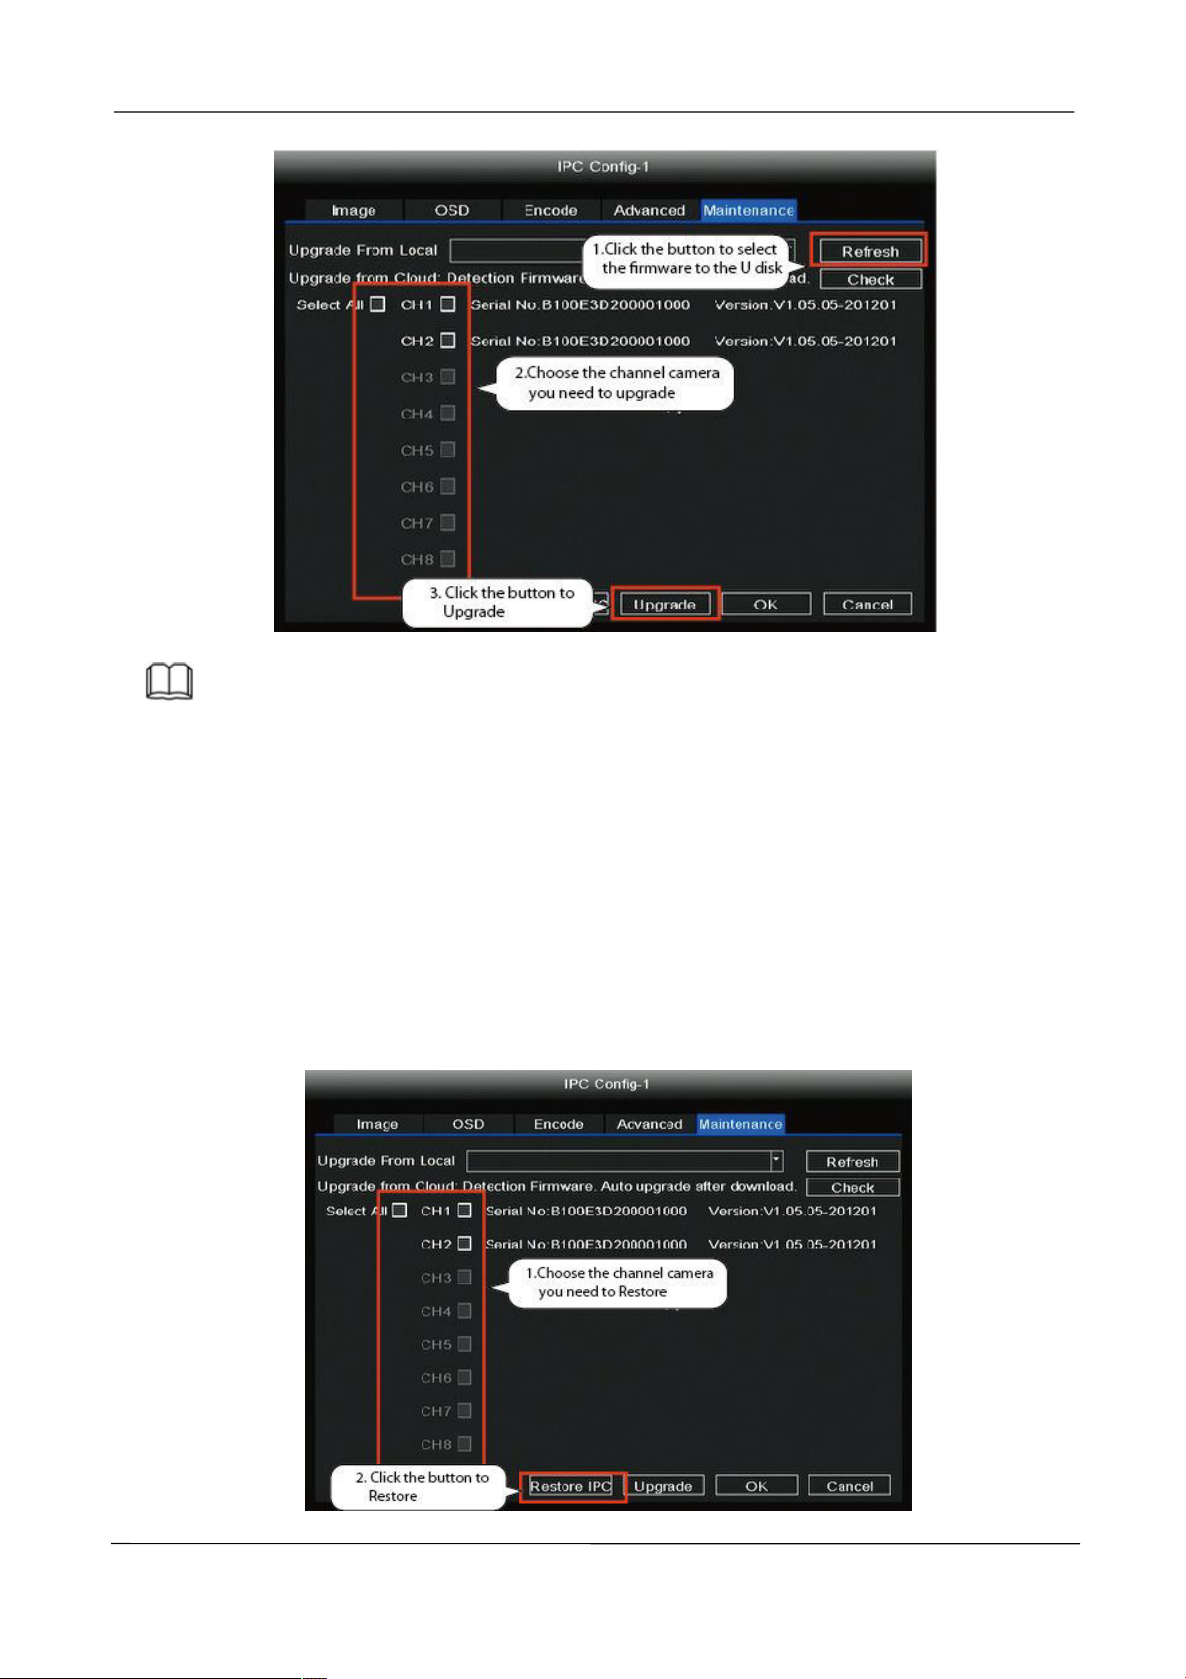
Maintenance
Choose Maintenance to set up the upgrade information for the IPC.
Step 1: Download the firmware to the USB flash drive.
Step 2: Insert USB flash drive to NVR USB port.
Step 3: Right-click in live view mode and select “Main Menu > IPC Config > Maintenance”.
Step 4: Click Refresh button.
Step 5: Choose the channel to update this camera or click Select All to upgrade your all
cameras.
Step 6: Click Refresh button.
www.foscam.com
Page 28
NVR User Manual
20
The upgrade file must be placed under the root directory of the USB flash drive.
Don't lose power for during upgrade.
Note
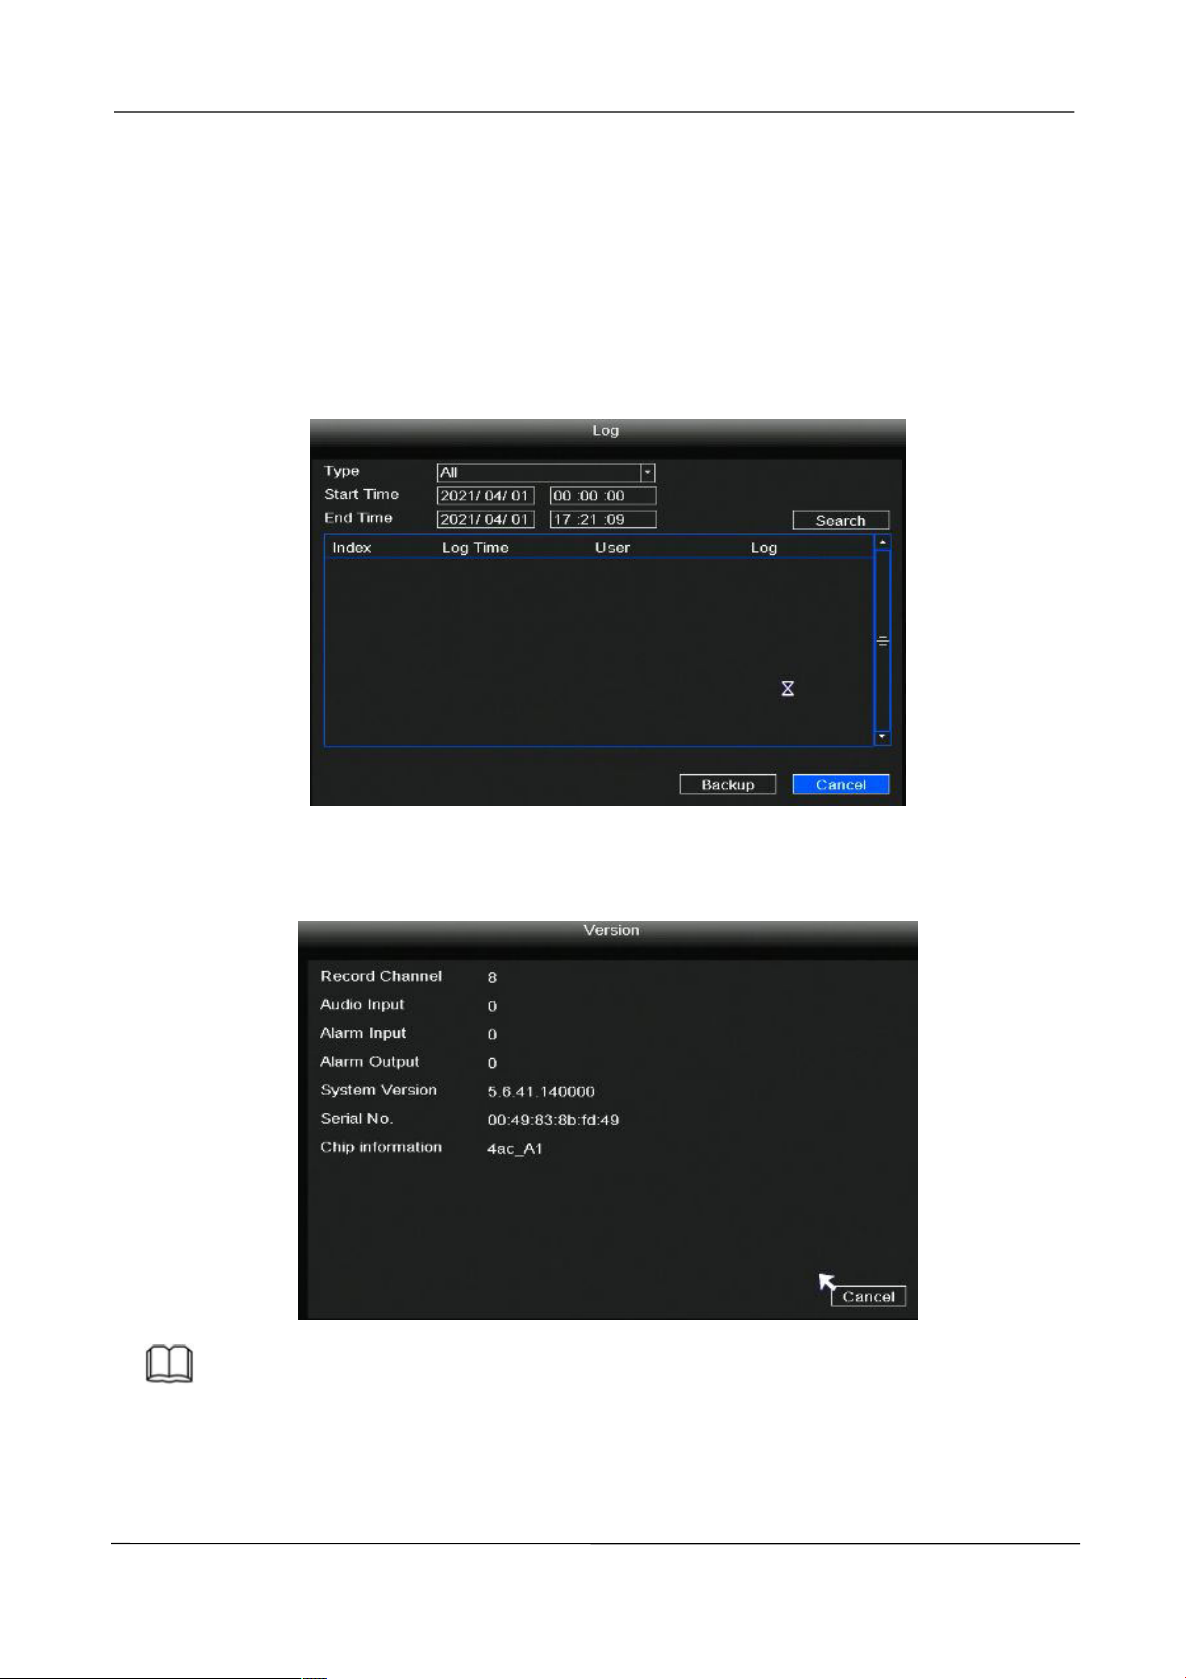
IPC Restore default:
Step 1: Right-click in live view mode and select “Main Menu > IPC Config > Maintenance”.
Step 2: Click CH to restore default this camera or click Select All to restore default your all cameras.
Step 3: Click Restore IPC button.
www.foscam.com
Page 29
NVR User Manual
21
2.4.8 Info
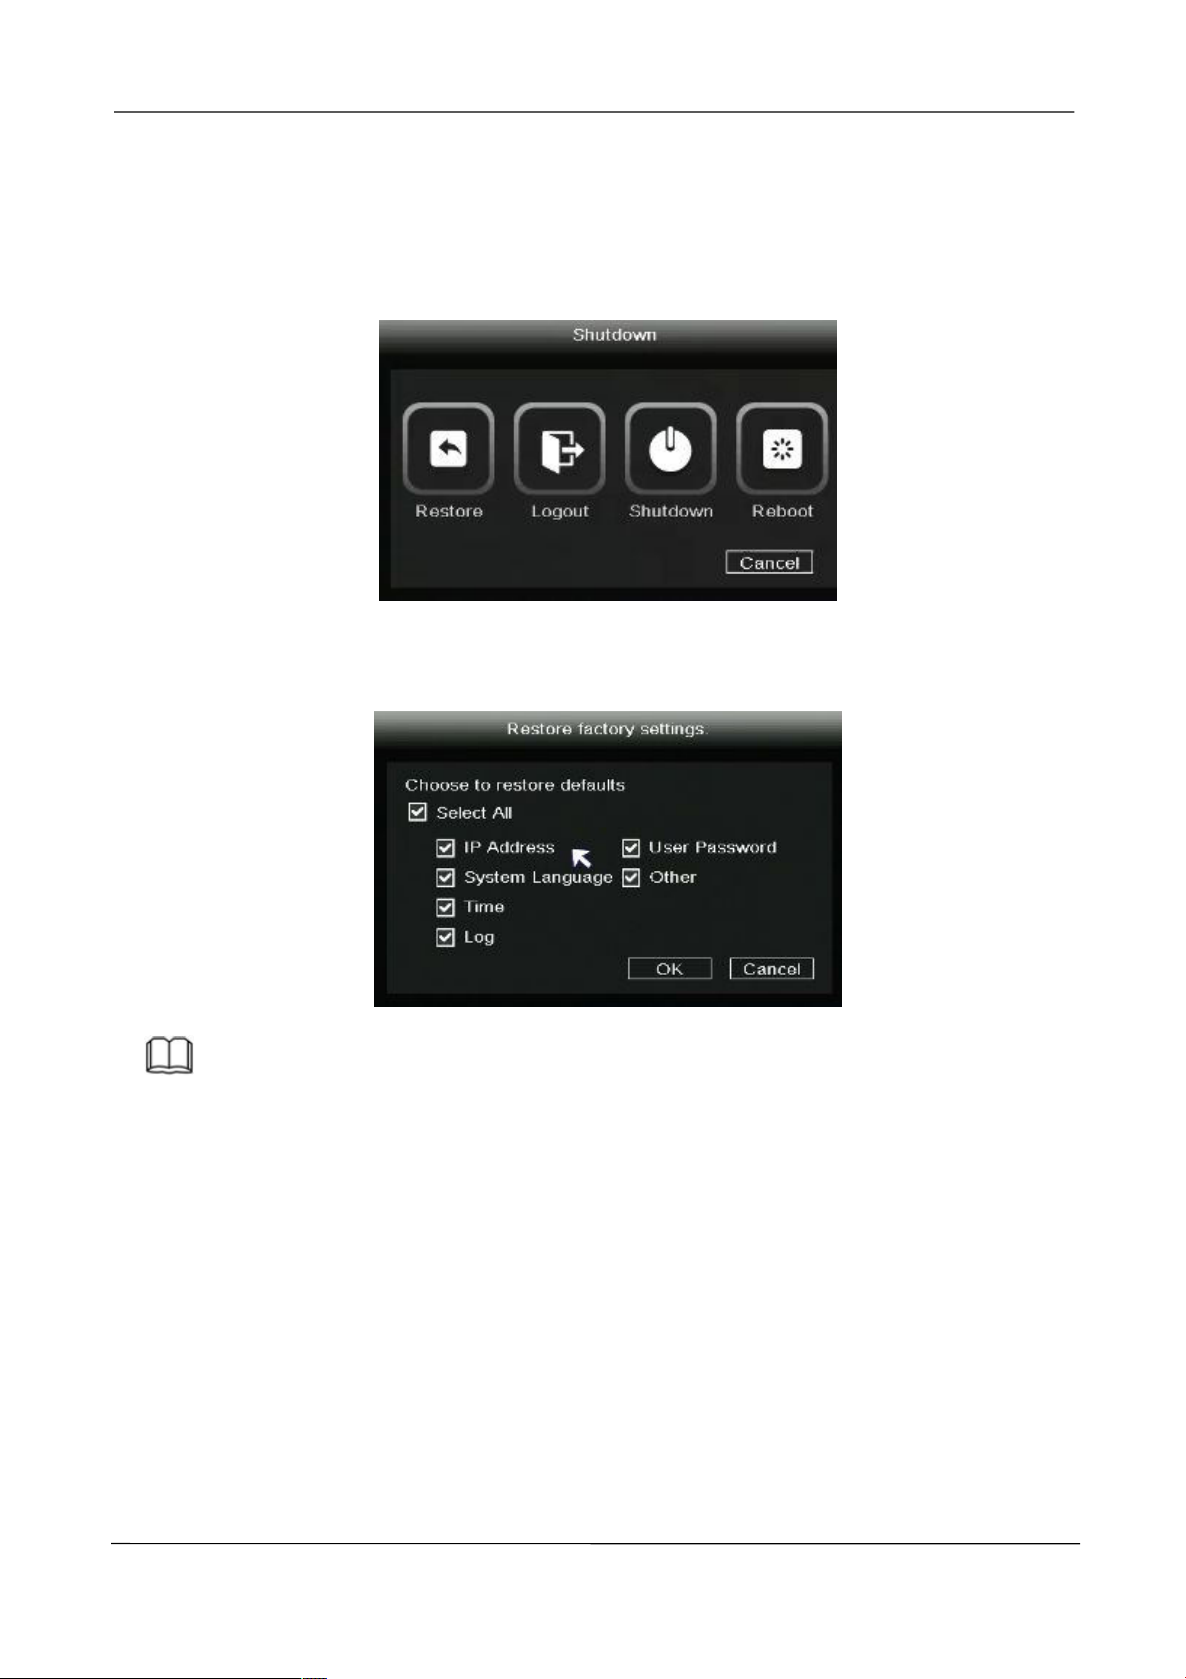
Right-click in live view mode and select “Info > log ”, you can search the log information of the
NVR. The log record shows recording time and accessed information.
If you want to back up the log information, please insert USB flash drive to the USB port
located at the rear of your NVR, and then click the Backup button.
Right-click in live view mode and select “Info > Vers ion”, you can view the version information
of the NVR.
Note
The data in the figure is only an example, please refer to the actual situation.
www.foscam.com
Page 30
NVR User Manual
22
2.4.9 Shutdown
Right-click in live view mode select Shutdown to enter the Shutdown interface. You can restore,
logout, reboot or shutdown the NVR system.
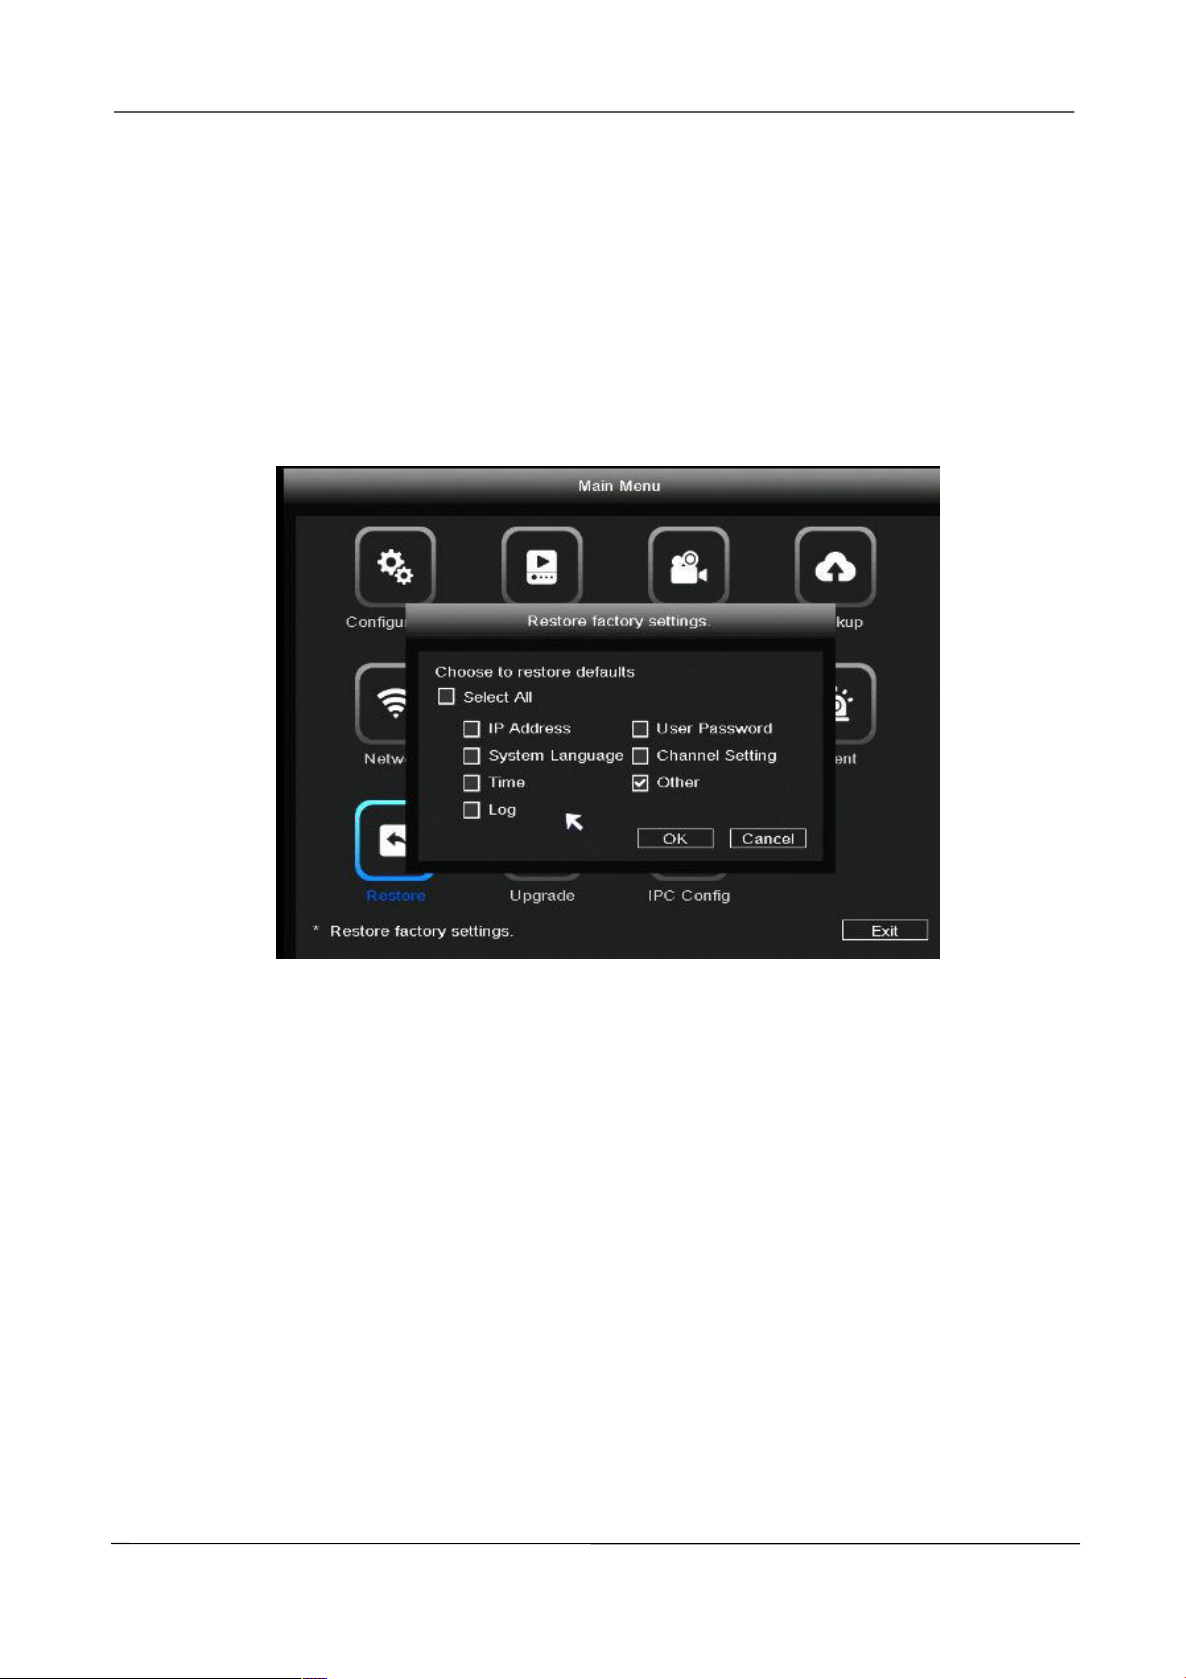
Click Restore, The Restore factory settings interface is displayed. You can check some
information to restore the factory settings, as shown in the figure below.
Note
Each model is slightly different, please refer to the actual interface.
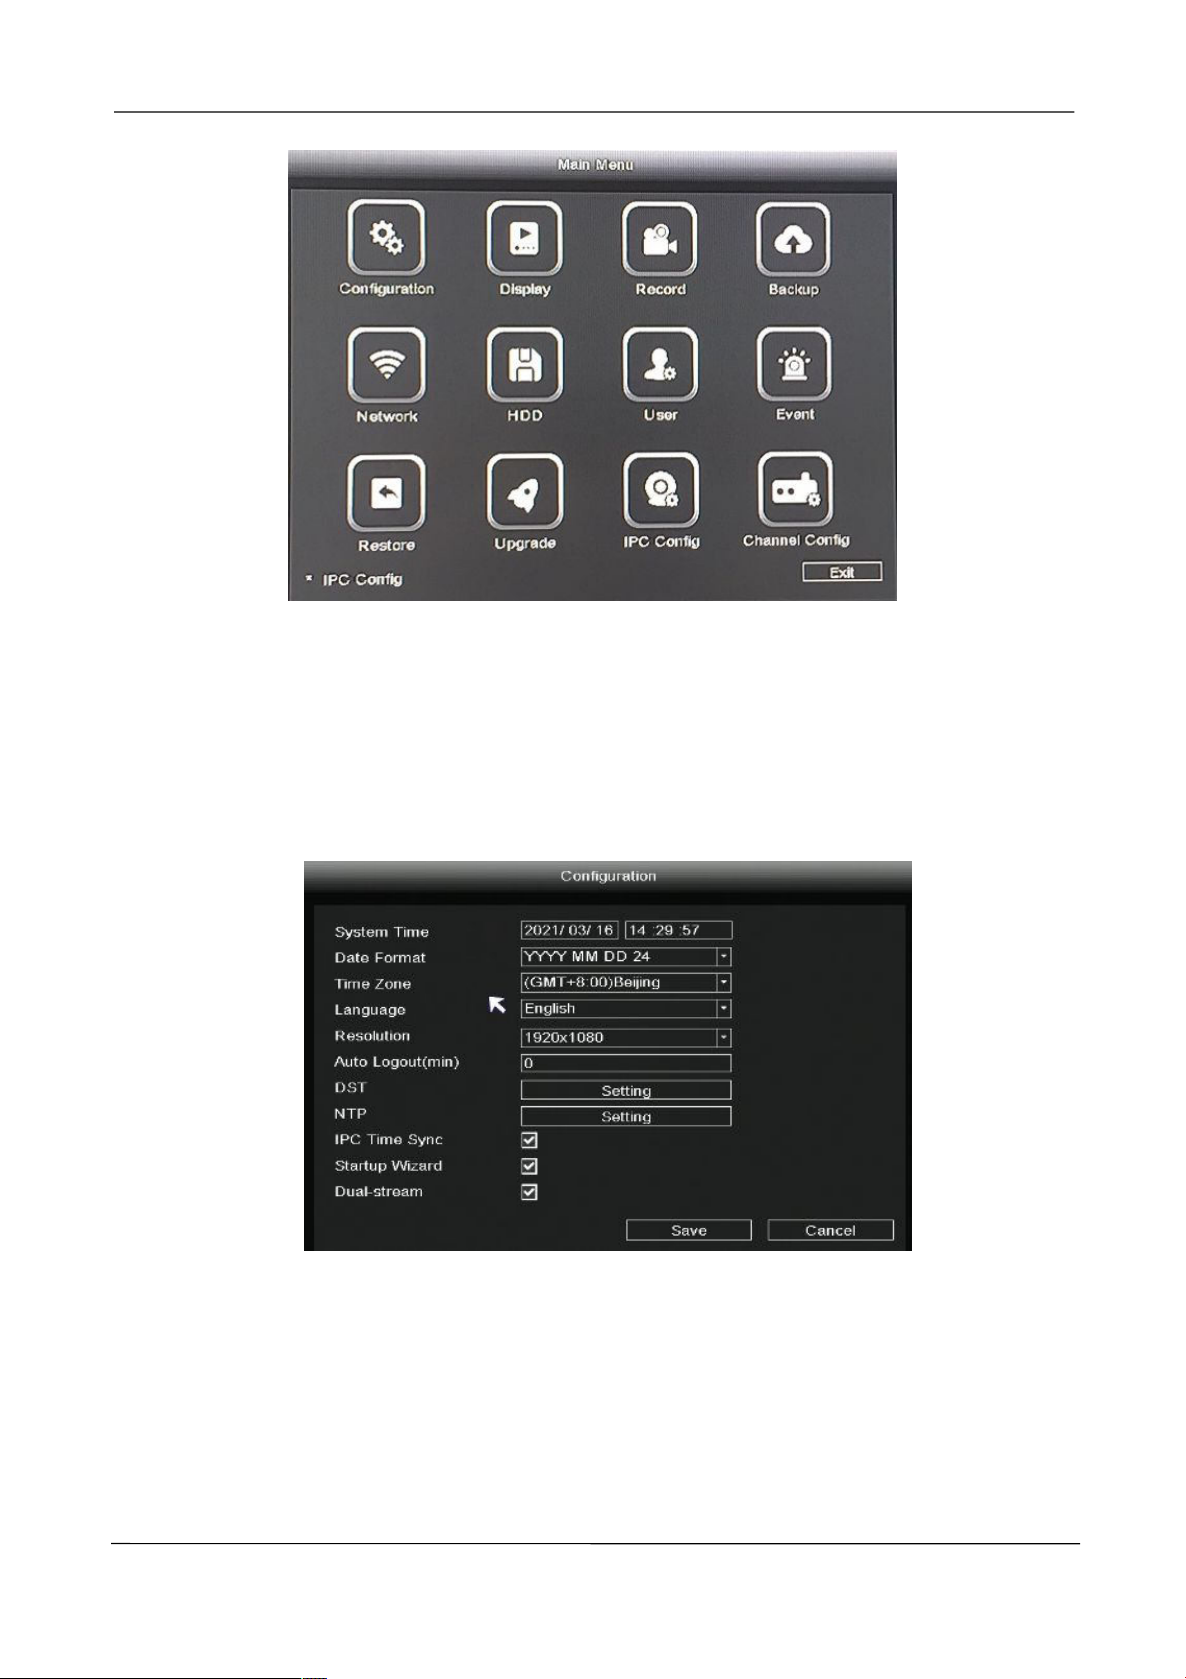
2.5 Main Menu
Right-click in live view mode and select Main Menu from the Shortcut Menu, the Main Menu
interface is displayed.
www.foscam.com
Page 31
NVR User Manual
23
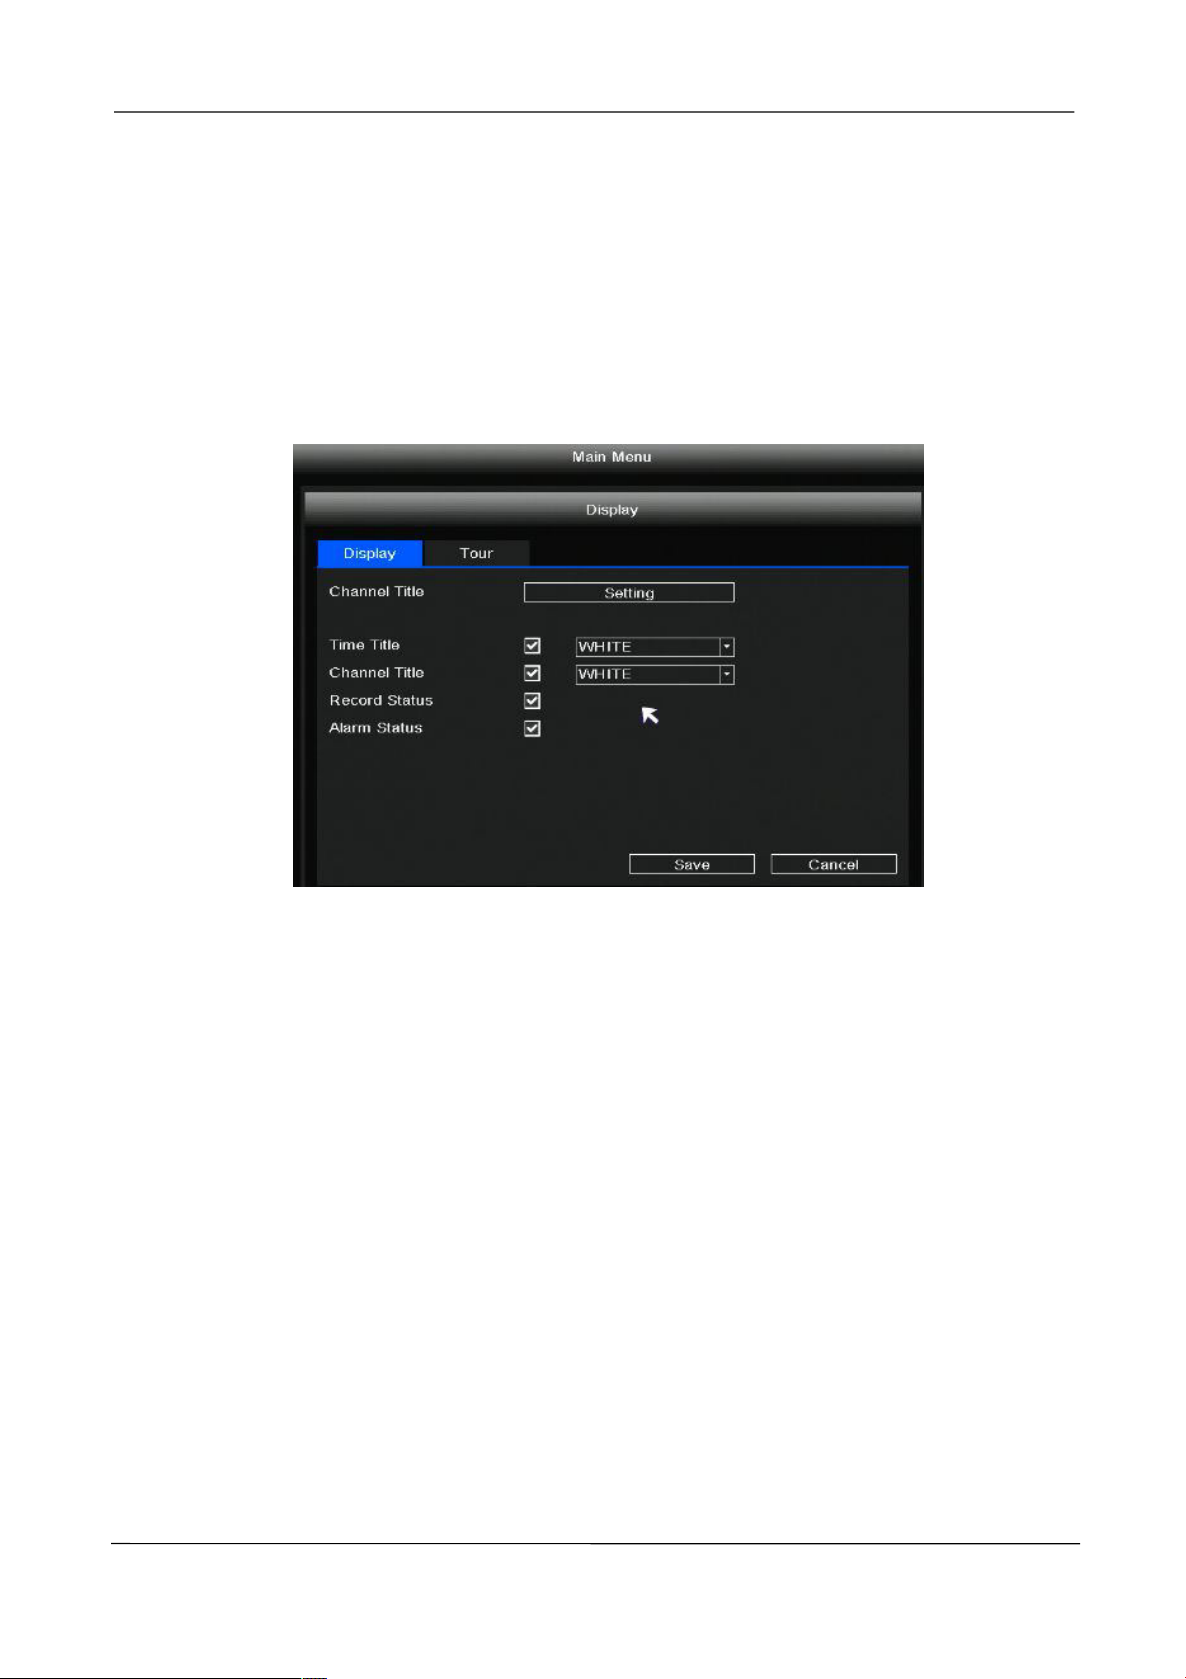
2.5.1 Configuration
Right-click in live view mode and select “Main Menu > Configuration” in the Main Menu interface.
The Configuration interface is displayed. You can set the system time, date format, language,
resolution of the monitor and so on.
If you don't want to display the startup wizard every time you turn it on, please uncheck the Startup
Wizard checkbox.
www.foscam.com
Page 32
NVR User Manual
24
2.5.2 Display
Display
Right-click in live view mode and select “Main Menu > Display” in the Main Menu interface. The
Display interface is displayed. You can set the Channel Title, Time Title, Channel Title, Record
Status, Alarm Status.
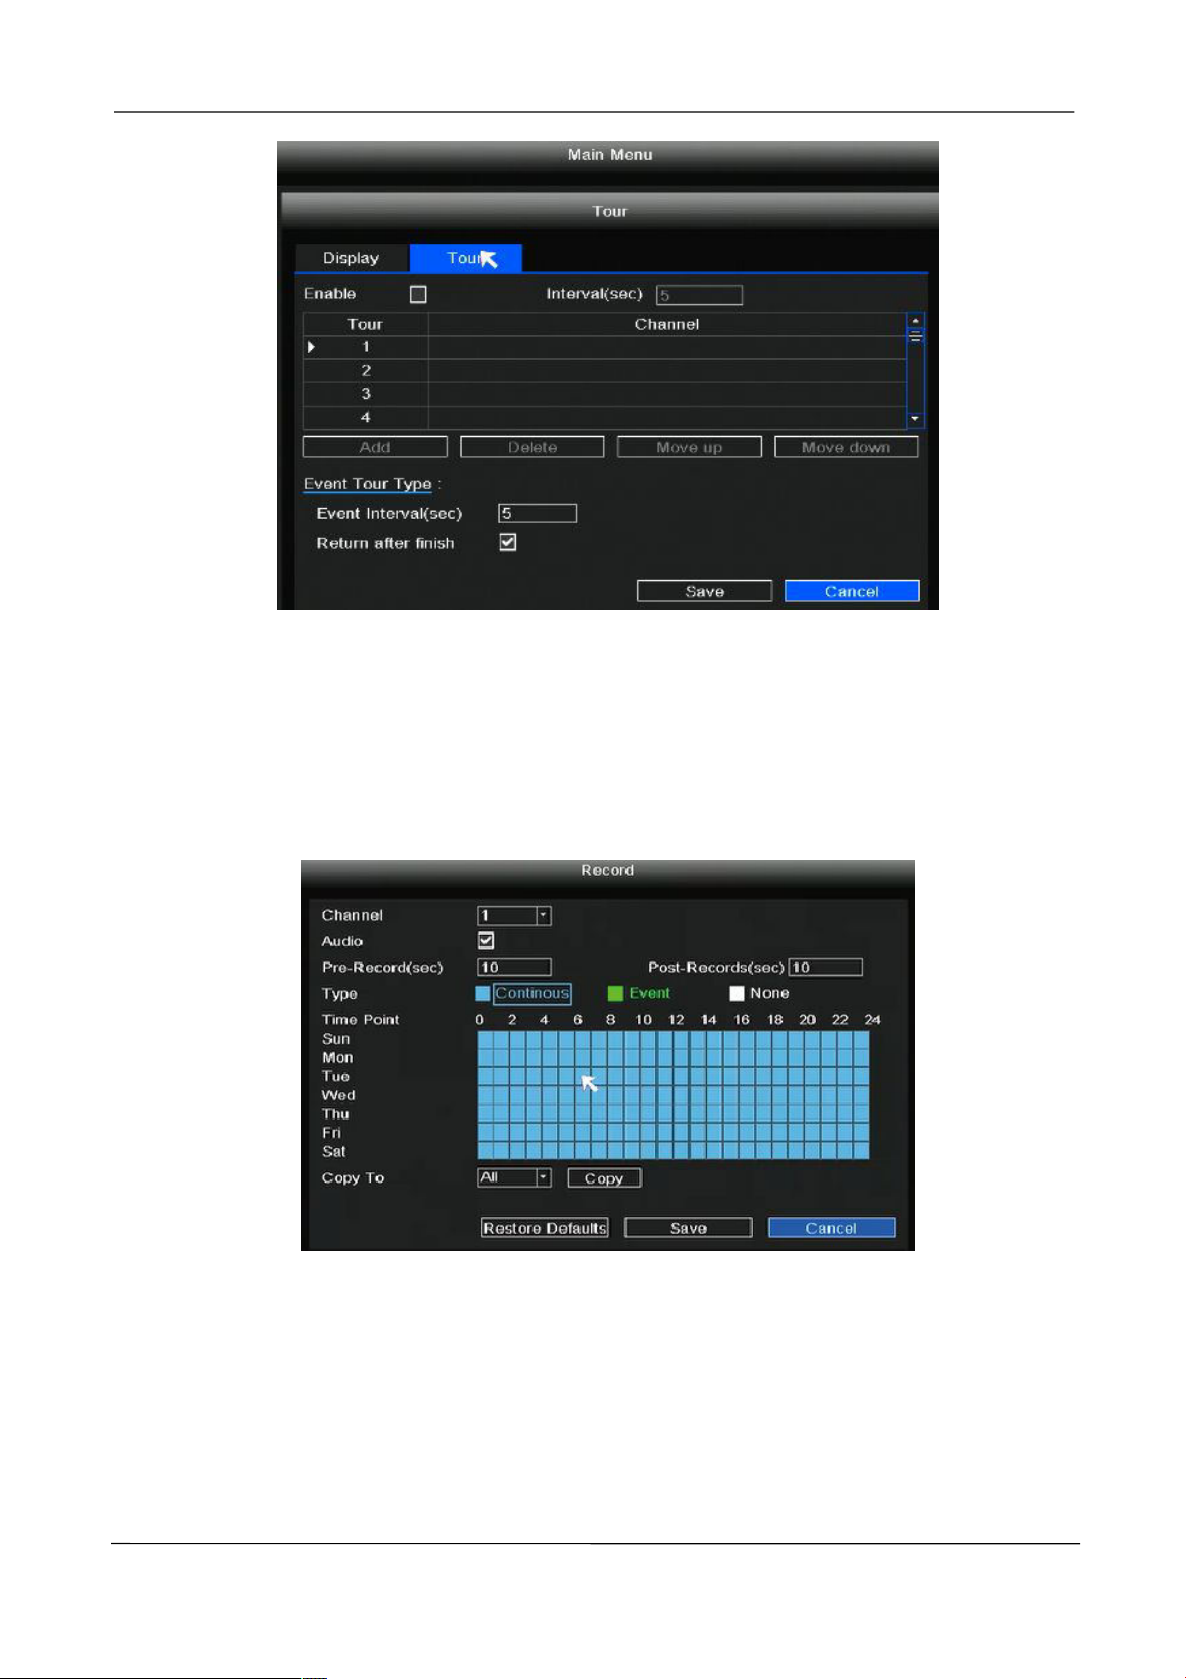
Tour
Right-click in live view mode and select “Main Menu > Display > Tour” in the Main Menu interface.
The Tour interface is displayed.
After the user sets the Tour function, NVR will play several channels of video on the display at the
same time according to the interval time set by the user. After each channel plays for a few seconds,
it will automatically jump to the next group of channels for cyclic playback.
Step 1: Check the Enable.
Step 2: Set the Interval(sec).
Step 3: Click the add button to select which channel videos can be played within each group.
Step 4: Click Save button.
www.foscam.com
Page 33
NVR User Manual
25
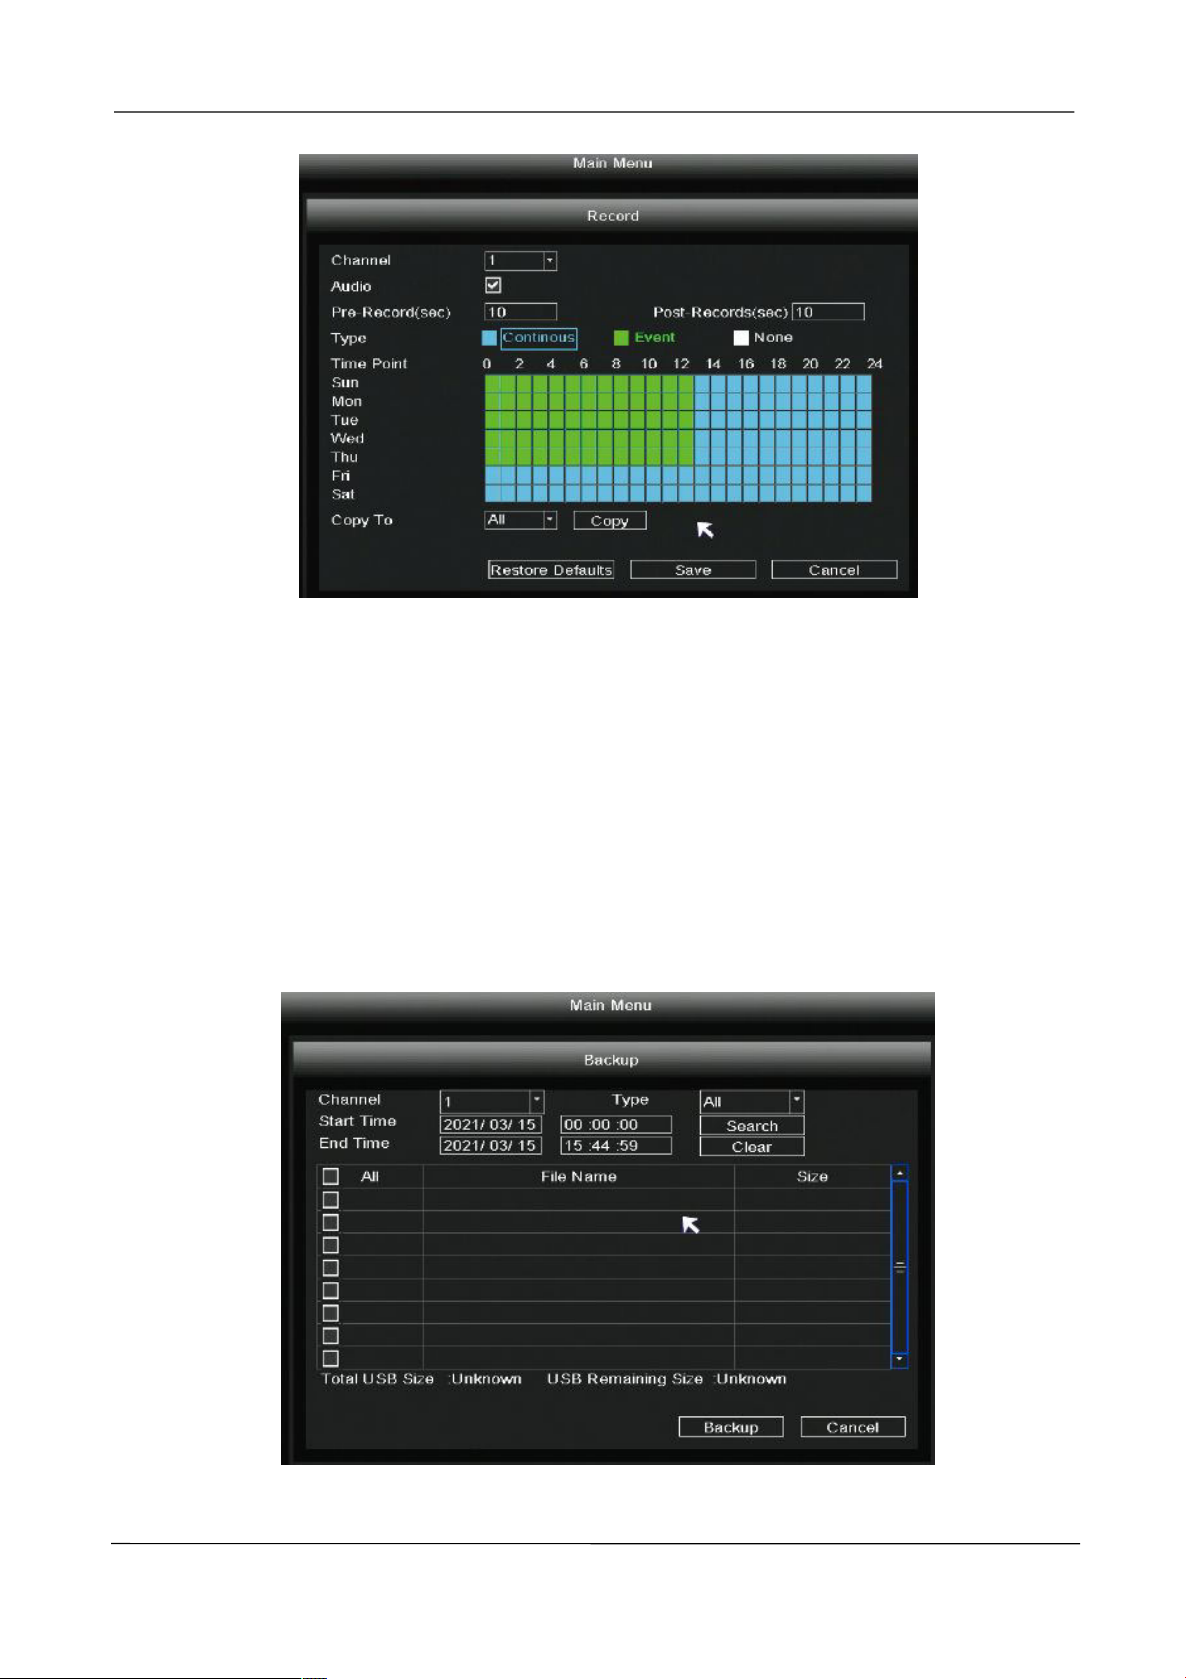
2.5.3 Record
Right-click in live view mode and select “Main Menu > Record” in the Main Menu interface. The
Record interface is displayed. Choose recording channel, click Save button. (Actually, the Wi-Fi
NVR system have default set 24h scheduled recording).
If you want to modify it to alarm recording, please use the left mouse button to select the time (turned
to green), if the other channels operate in the same way, select copy.
www.foscam.com
Page 34
NVR User Manual
26
2.5.4 Backup
Step 1: Insert USB flash drive to the USB port located at the rear of your NVR.
Step 2: Right-click in live view mode and select “Main Menu > Backup” in the Main Menu interface.
The Backup interface is displayed.
Step 3: Choose channel, type and time, Click Search button.
Step 4: Select target file.
Step 5: Click Backup button.
www.foscam.com
Page 35
NVR User Manual
27
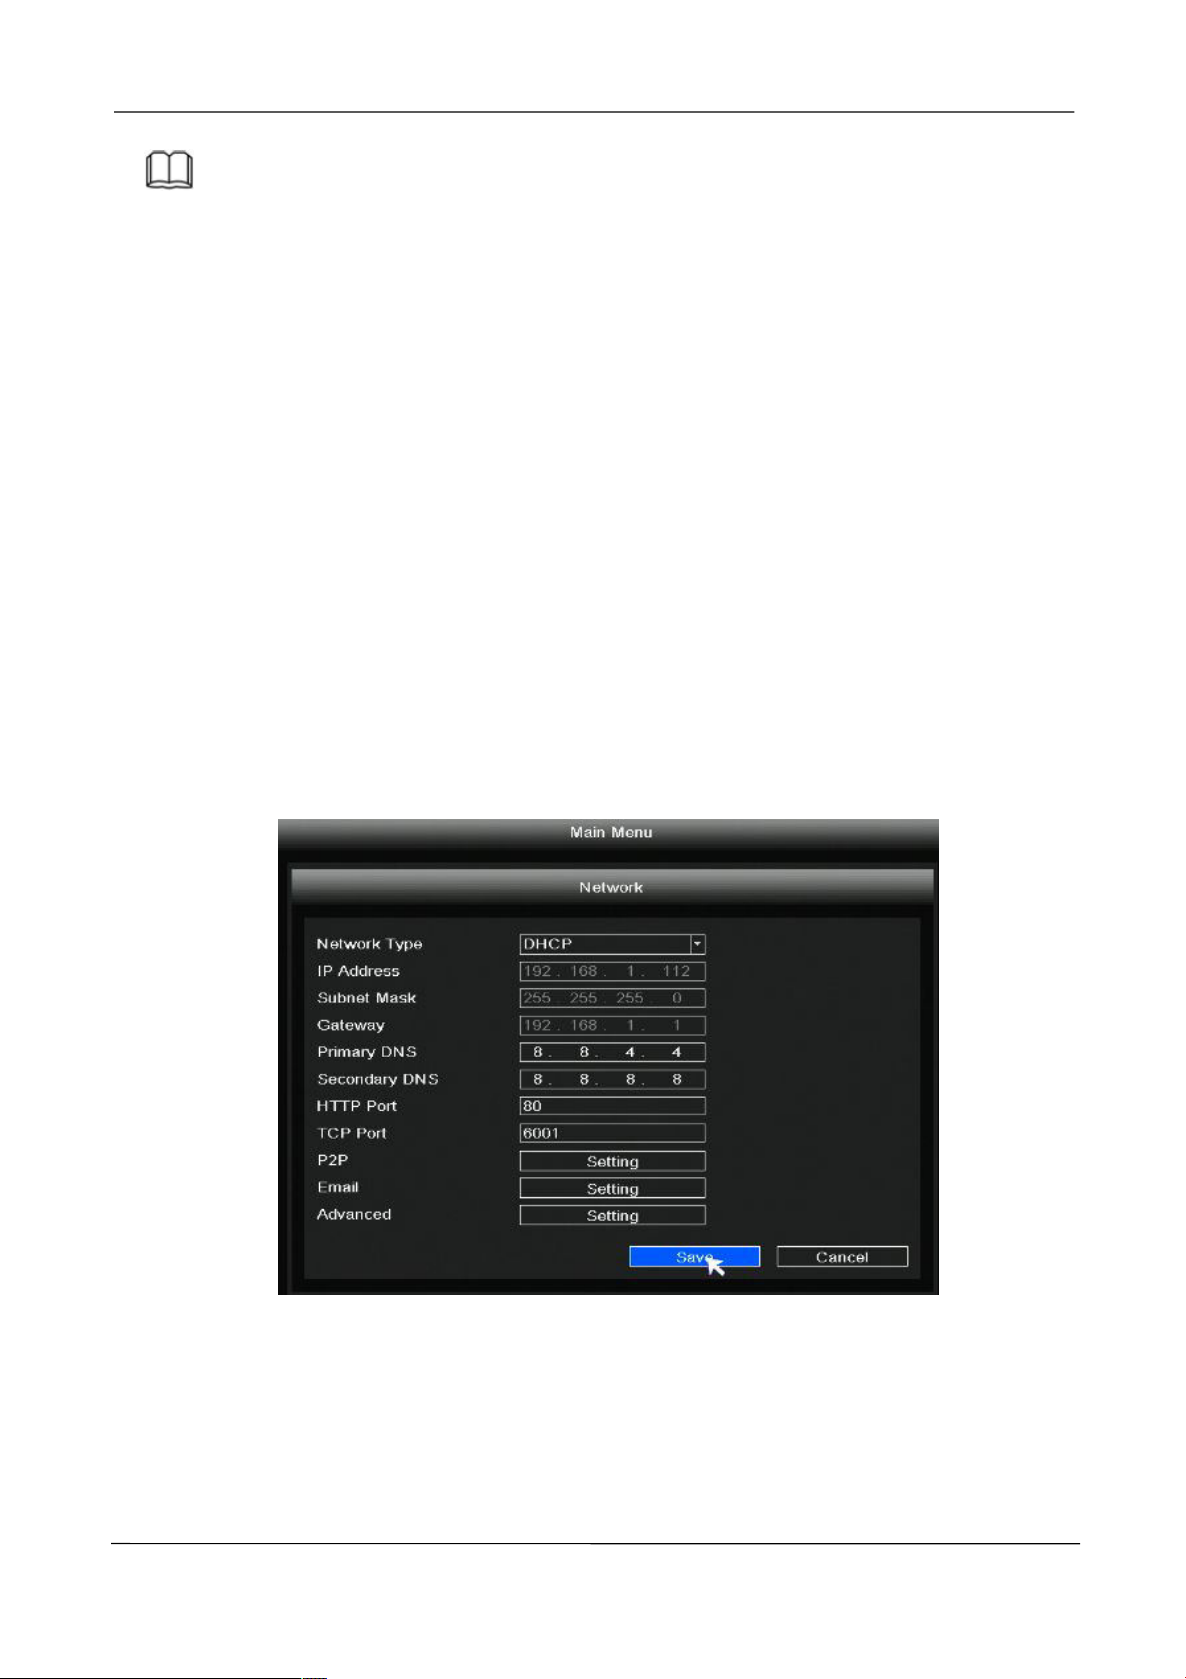
DHCP: Select DHCP from the Network Type, the device will connect to Internet automatically,
Manual setting: Select STATIC from the Network Type, fill in IP address, DNS data, and so on,
Note
If target file can not be searched out, please click Empty →Add. Please remove the files which is no
need before backup. Ensure insert device (like USB) in 30 second, as system reserved searching
time for it is 30 second.
2.5.5 Network
Right-click in live view mode and select “Main Menu > Network” in the Main Menu interface. The
Network interface is displayed.
There are two ways for NVR to connect to Internet.
no need data setting.
click Save button.
If user doesn’t familiar about the network environment, please prefer use DHCP first.
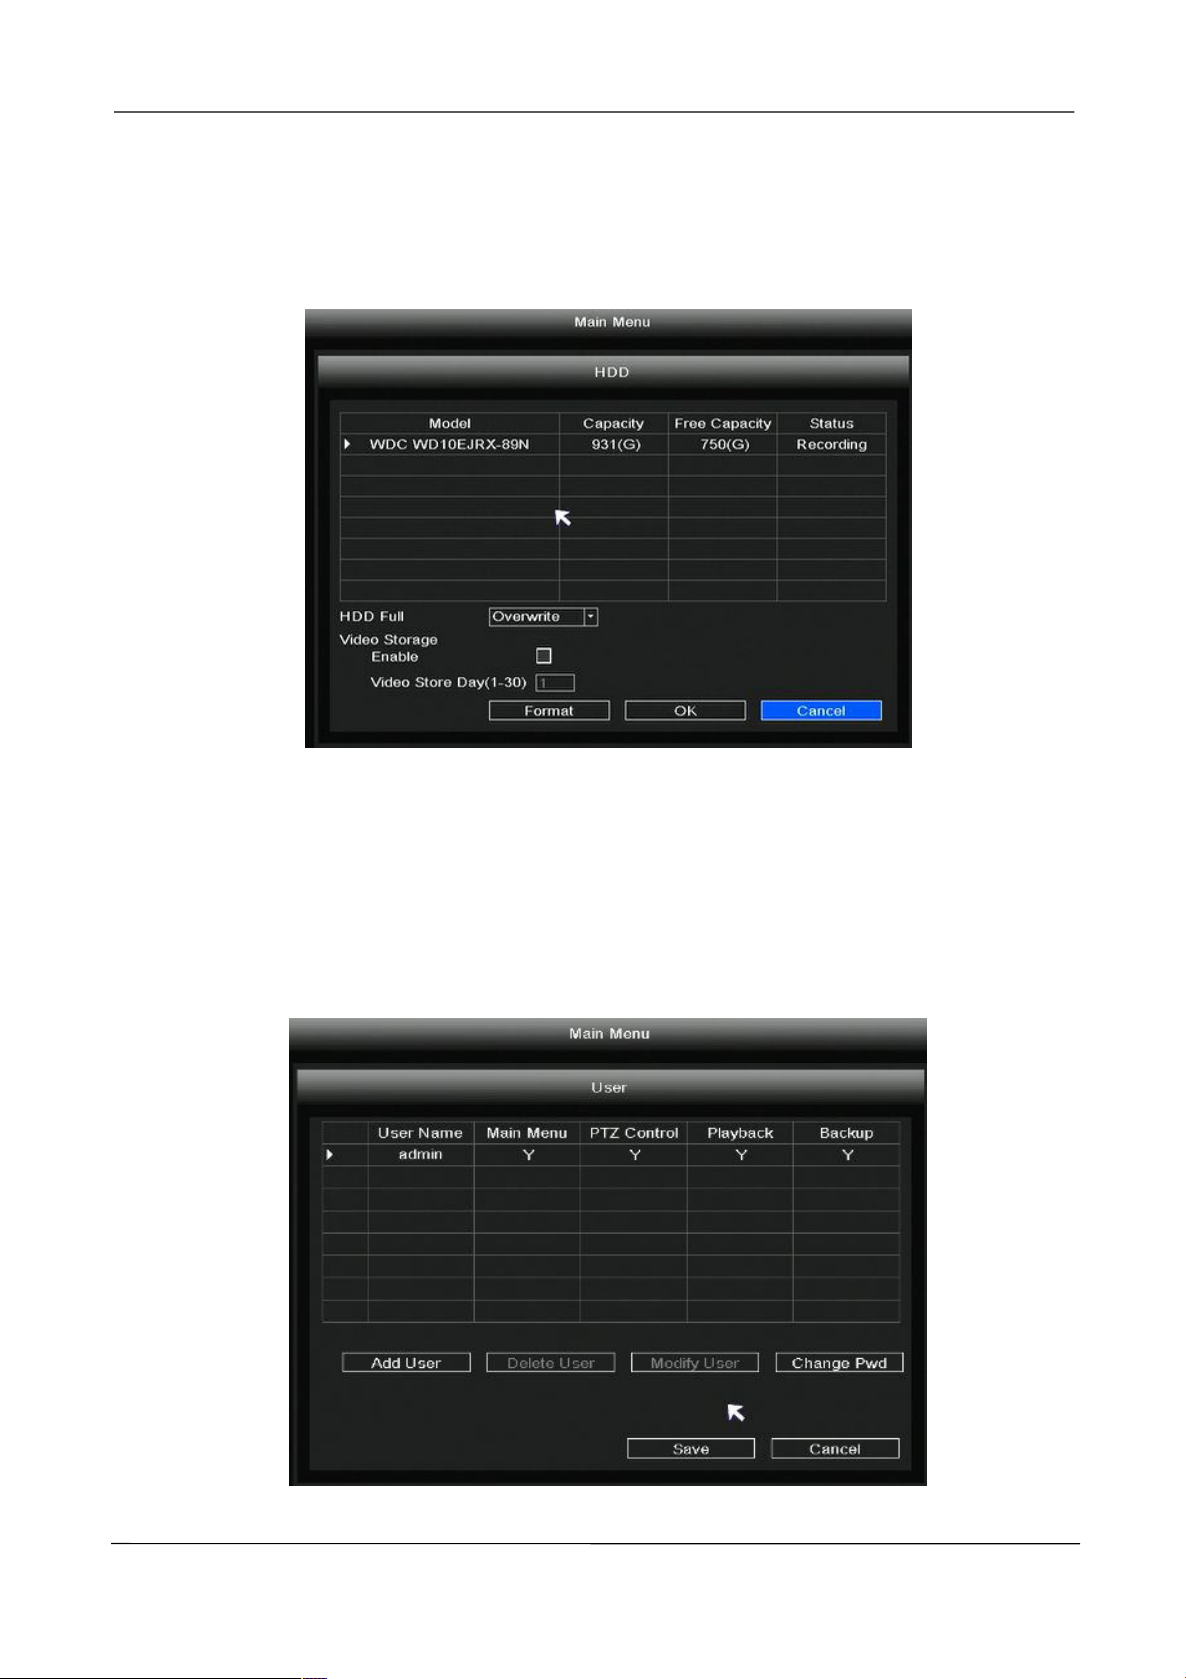
2.5.6 HDD
Right-click in live view mode and select “Main Menu > HDD” in the Main Menu interface. The HDD
interface is displayed.
www.foscam.com
Page 36
NVR User Manual
28
When the HDD is full, you can select the cycle cover the earliest recording or stop recording.
You can set the video storage time.
Click the Format button, you can also format the hard drive.
2.5.7 User
Right-click in live view mode and select “Main Menu > User” in the Main Menu interface. The User
interface is displayed.
You can add user, delete user, modify user and change password.
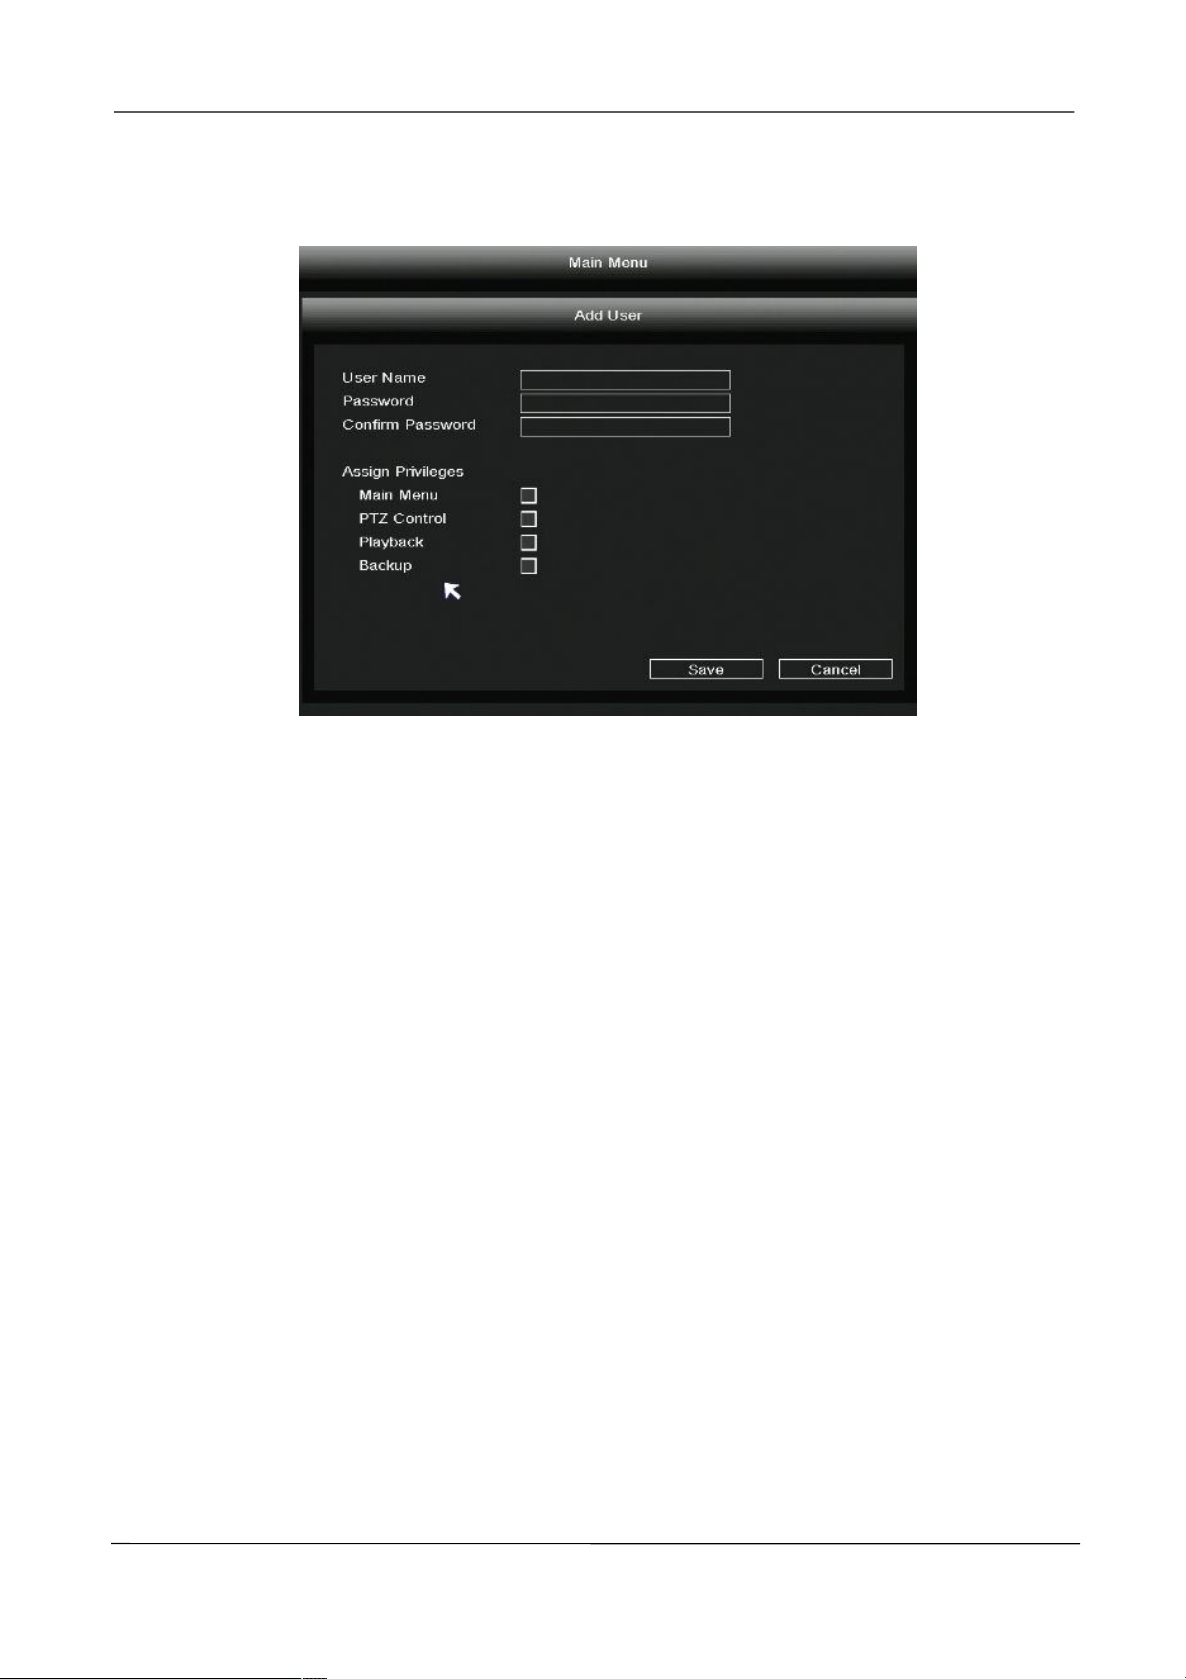
Add Us er
www.foscam.com
Page 37
NVR User Manual
29
Click Add User to enter the Add User interface, On this page you can add to user, user password
and Authority Option.
Modify User
Click Modify User to enter the Modify User interface, On this page you can change user password
and authority option.
Delete User
Click Delete User button to delete a user.
Change Pwd
Click Change Pwd button to change password.
2.5.8 Event
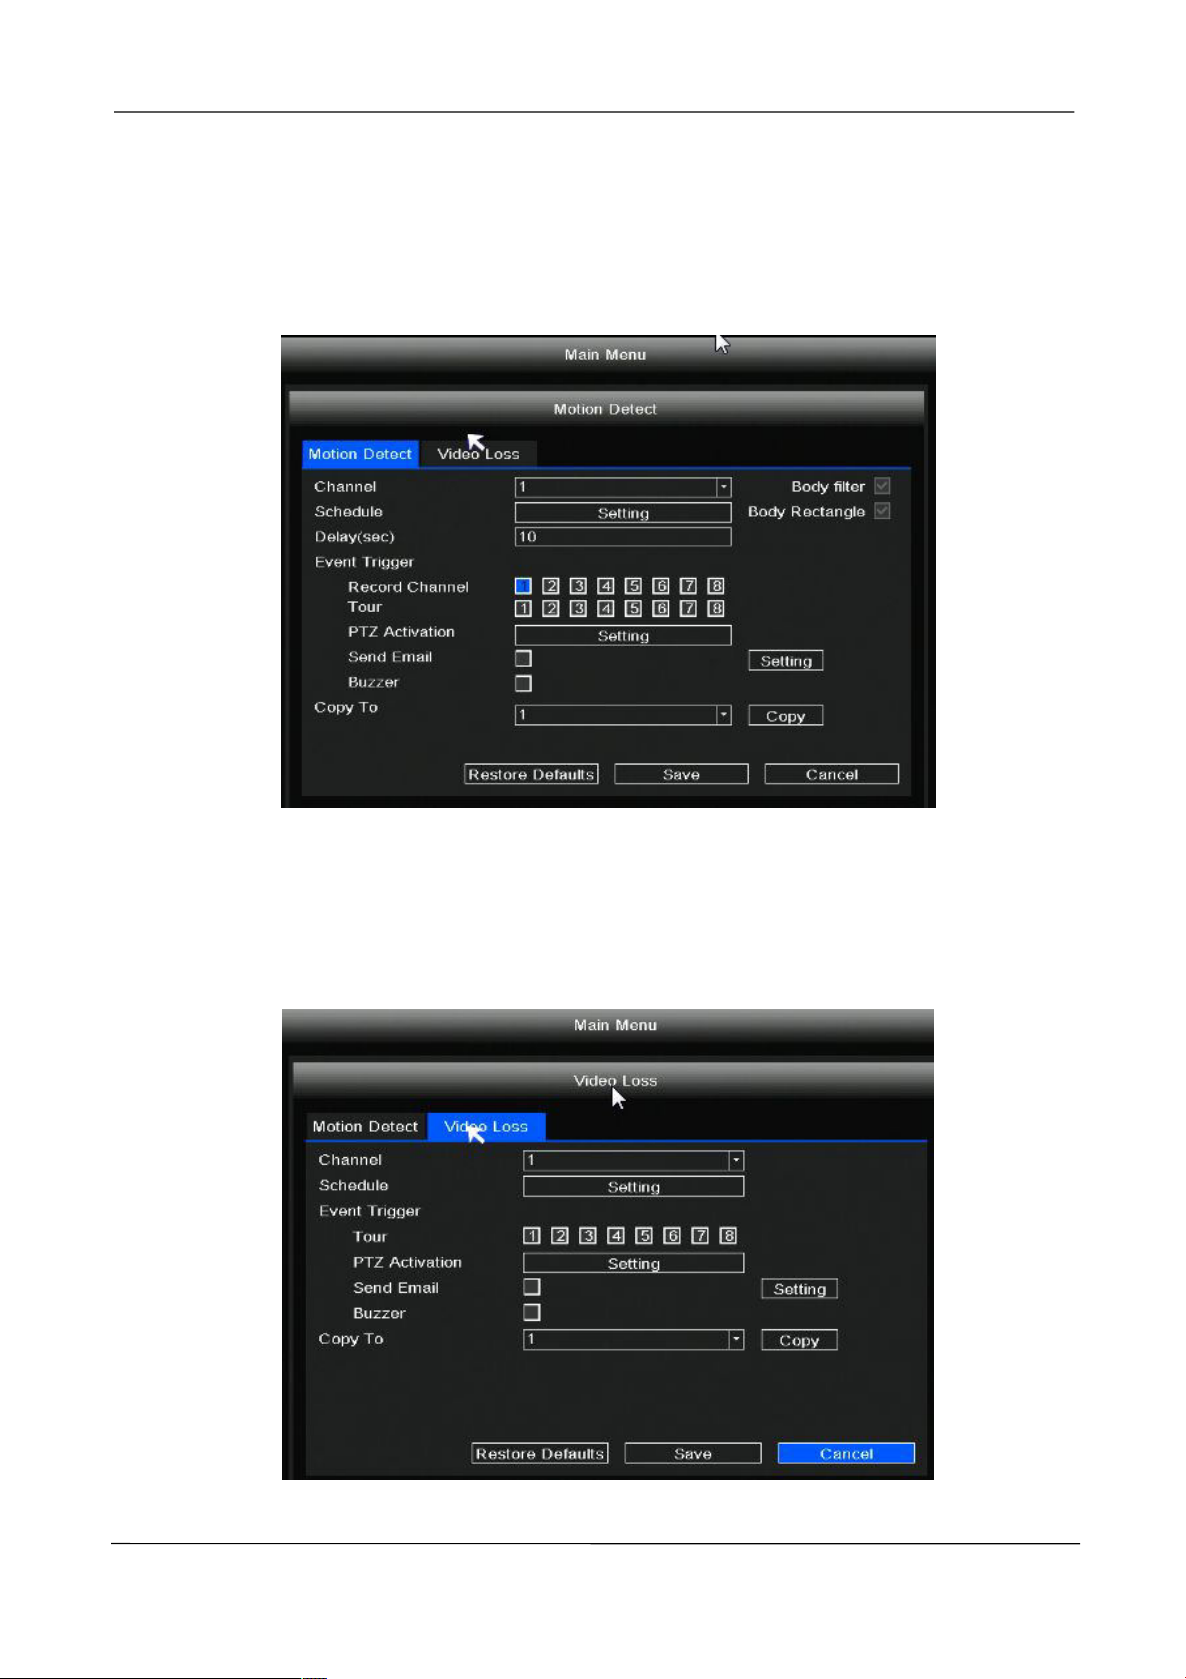
Motion Detect
Right-click in live view mode and select “Main Menu > Event” in the Main Menu interface. The
Motion Detect interface is displayed. On this page you can setting Channel, Scheduled, Delay and
Event Trigger mode.
Set the event alarm according to the following method:
Step 1: Choose target channel.
Step 2: Setting Schedule and Delay.
www.foscam.com
Page 38
NVR User Manual
30
Step 3: Select the Event Trigger. You can choose the following alarm triggering methods: Record
Channel, Tour, PTZ Activation, Send Email, Buzzer. If you want to set other channels to be the same,
you can select the "Copy To" , then click Copy button.
Step 4: Click Sa ve button to take effect.
Video Loss
Click Video Loss to enter the Video Loss interface. When there is no video in the channel, the NVR
alarm function is triggered. On this page you can setting Channel, Schedule, and Event Trigger.
www.foscam.com
Page 39
NVR User Manual
31
If you want to set other channels to be the same, you can select the "Copy To" , then click Copy
button.
2.5.9 Restore factory settings
Right-click in live view mode and select “Main Menu > Restore factory settings” in the Main Menu
interface. The Restore factory settings interface is displayed. On this page you can choose which
you can restore the factory settings.
2.5.10 Upgrade
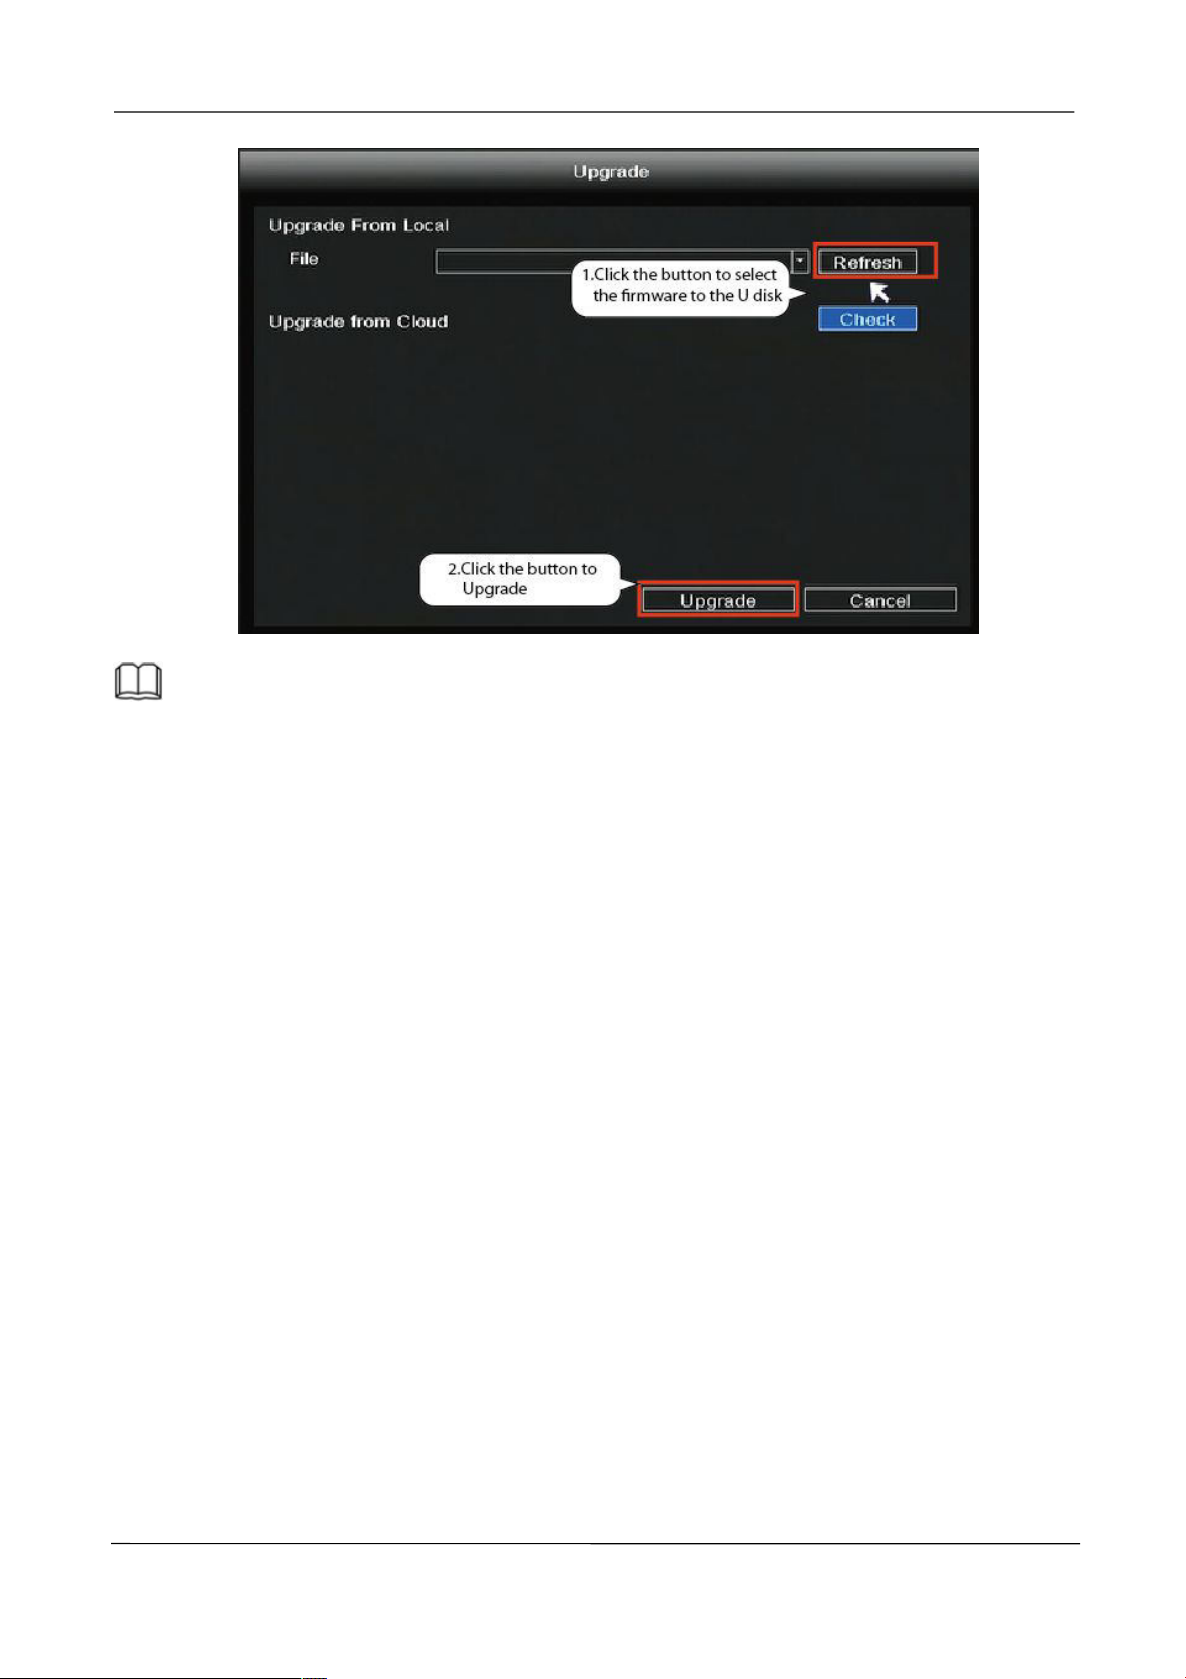
You can upgrade your NVR system with local Software.
Step 1: Download the firmware to the USB flash drive.
Step 2: Insert USB flash drive to the USB port located at the rear of your NVR.
Step 3: Right-click in live view mode and select “Main Menu > Upgrade” in the Main Menu
interface.
Step 4: Click Refresh button in the Upgrade interface.
Step 5: Select the firmware from the USB flash drive.
Step 5: Click Upgrade to upgrade your NVR.
www.foscam.com
Page 40
NVR User Manual
32
Note
Don't shut down the power during upgrade. After upgrading, NVR restarts.
2.5.11 IPC Config
Right-click in live view mode and select “Main Menu > IPC Conf ig ”, you can set the Image, OSD,
Encode, Advanced, Maintenance for the IPC. For detailed operation, please refer to 2.4.7 IPC
Config.
2.5.12 Channel Config
Right-click in live view mode and select “Main Menu > Channel Conf ig ” to enter the Pair IP
Camera interface . please refer to 2.4.1 Channel Config.
www.foscam.com
Page 41
NVR User Manual
33
3
Access the NVR in Foscam App
3.1 Download the Foscam APP
Please refer to the Quick Setup Guide if you install the NVR for the first time. You can start
to learn about software operation after finish quick installation.
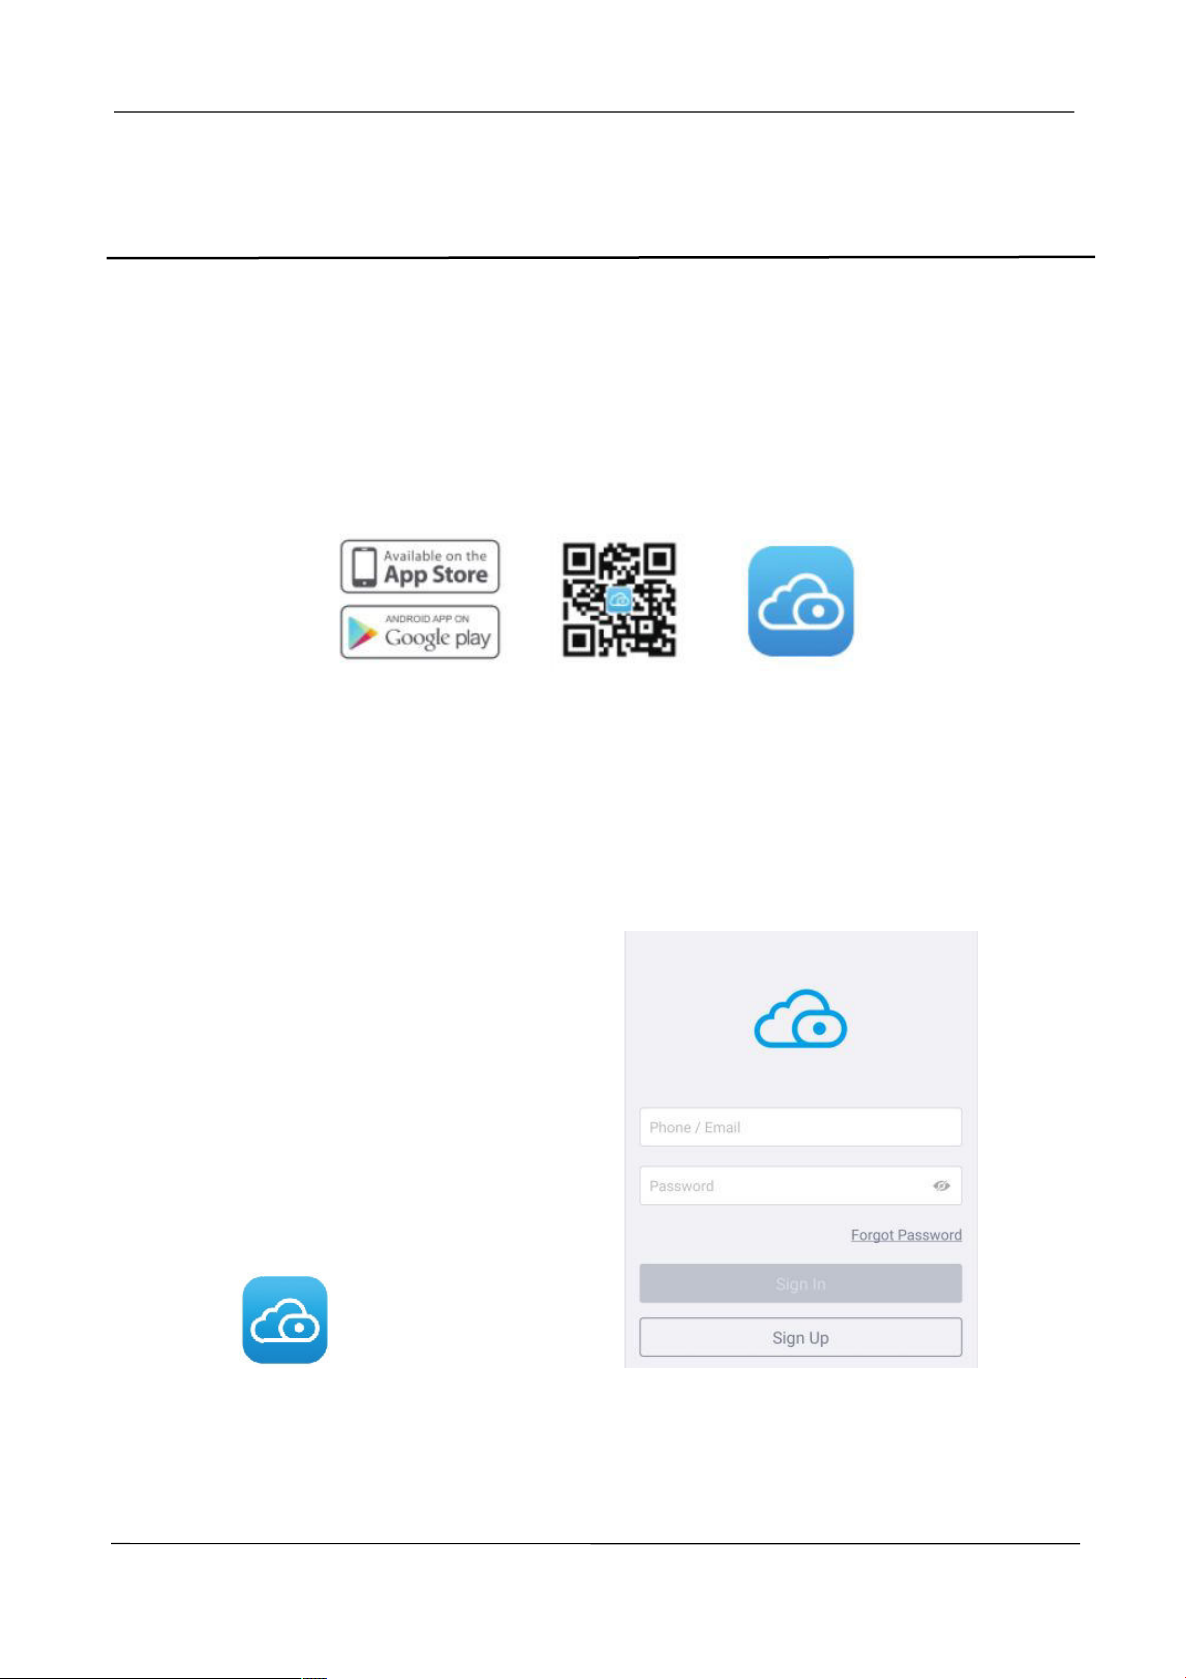
Scan the QR code below to download and install the Foscam APP.
3.2 Create A Foscam Account
You can create a Foscam account for the first time. Run the Foscam APP, and then register
for a Foscam account.
Step 1: Click Foscam app icon to enter the login page. Click Sign Up to create account.
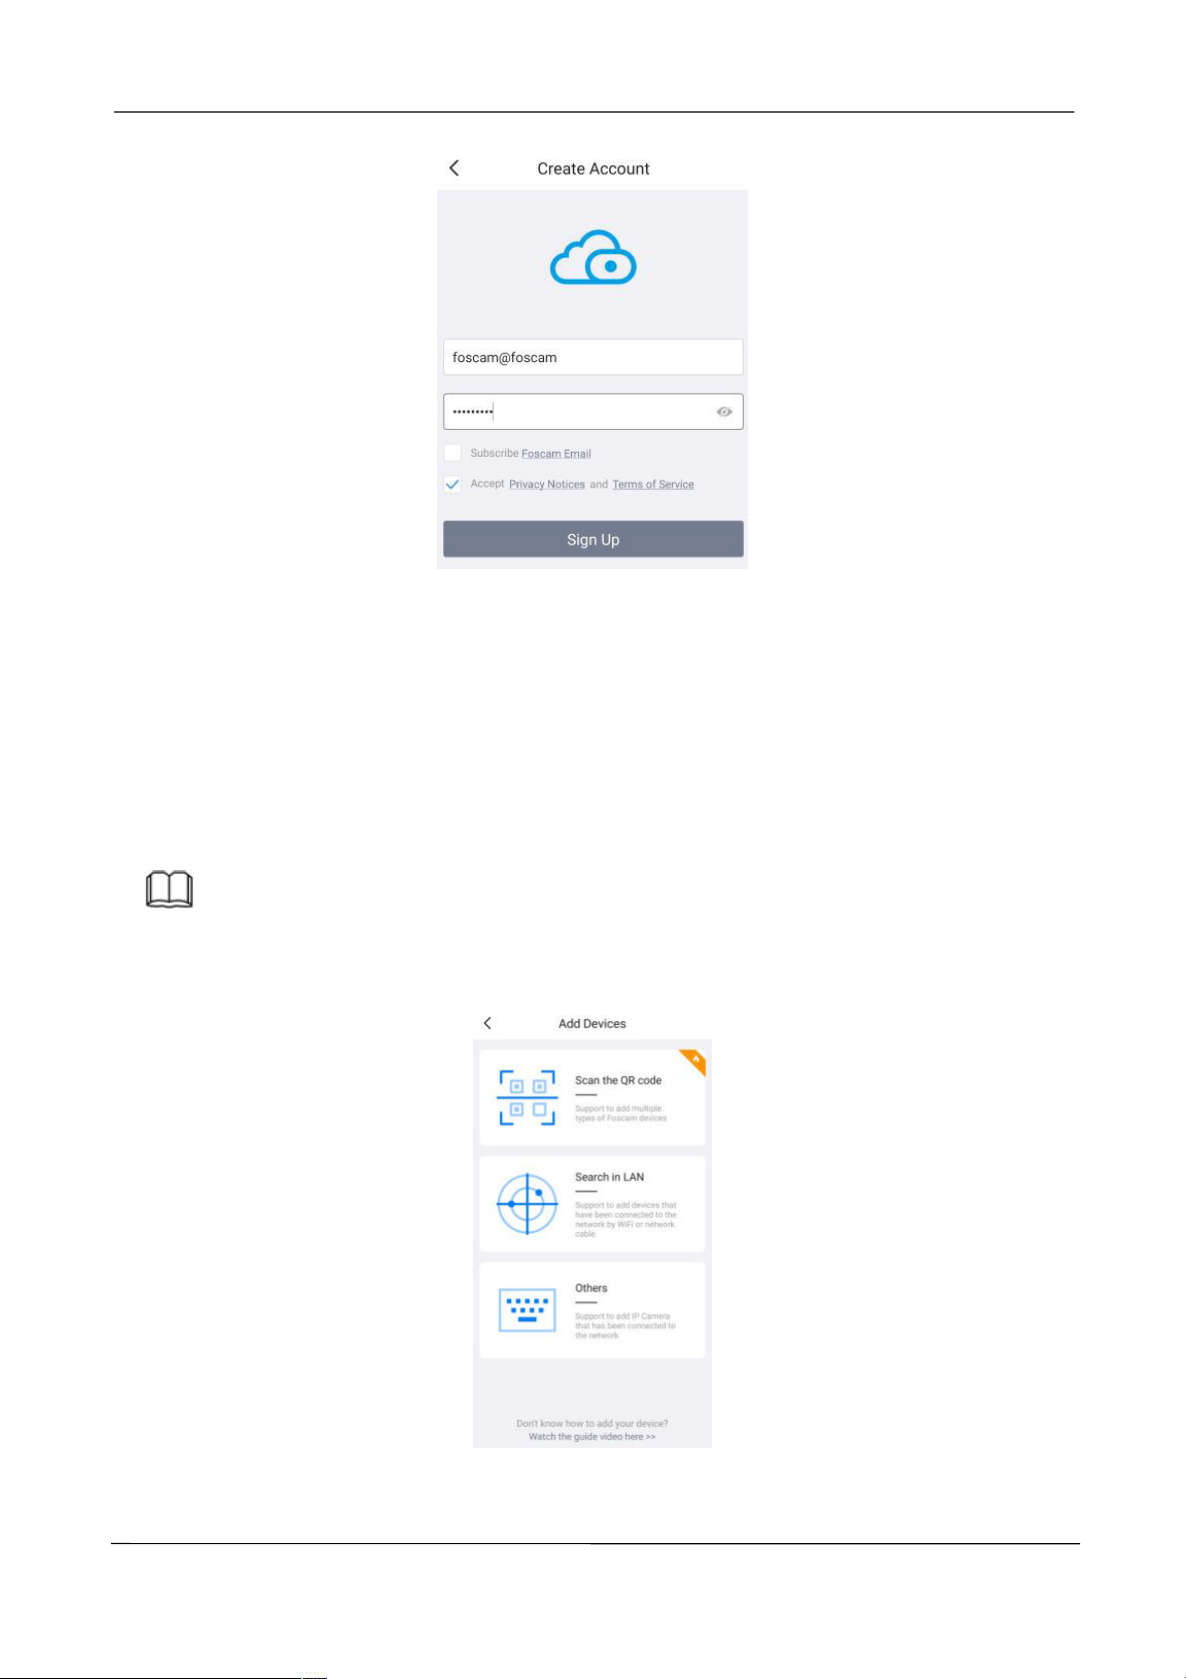
Step 2: You need to choose your region, then enter the mailbox name and new password.
Step 3: Check Accept Privacy Notices and Terms of Servic e , and click Sign Up.
www.foscam.com
Page 42
NVR User Manual
34
Select "Scan the QR code" and scan the QR code that labeled at the bottom of your NVR.
Step 4: The system will send activation information to your mailbox, and you need to log in
to your mailbox to activate your account.
3.3 Add Device in Foscam App
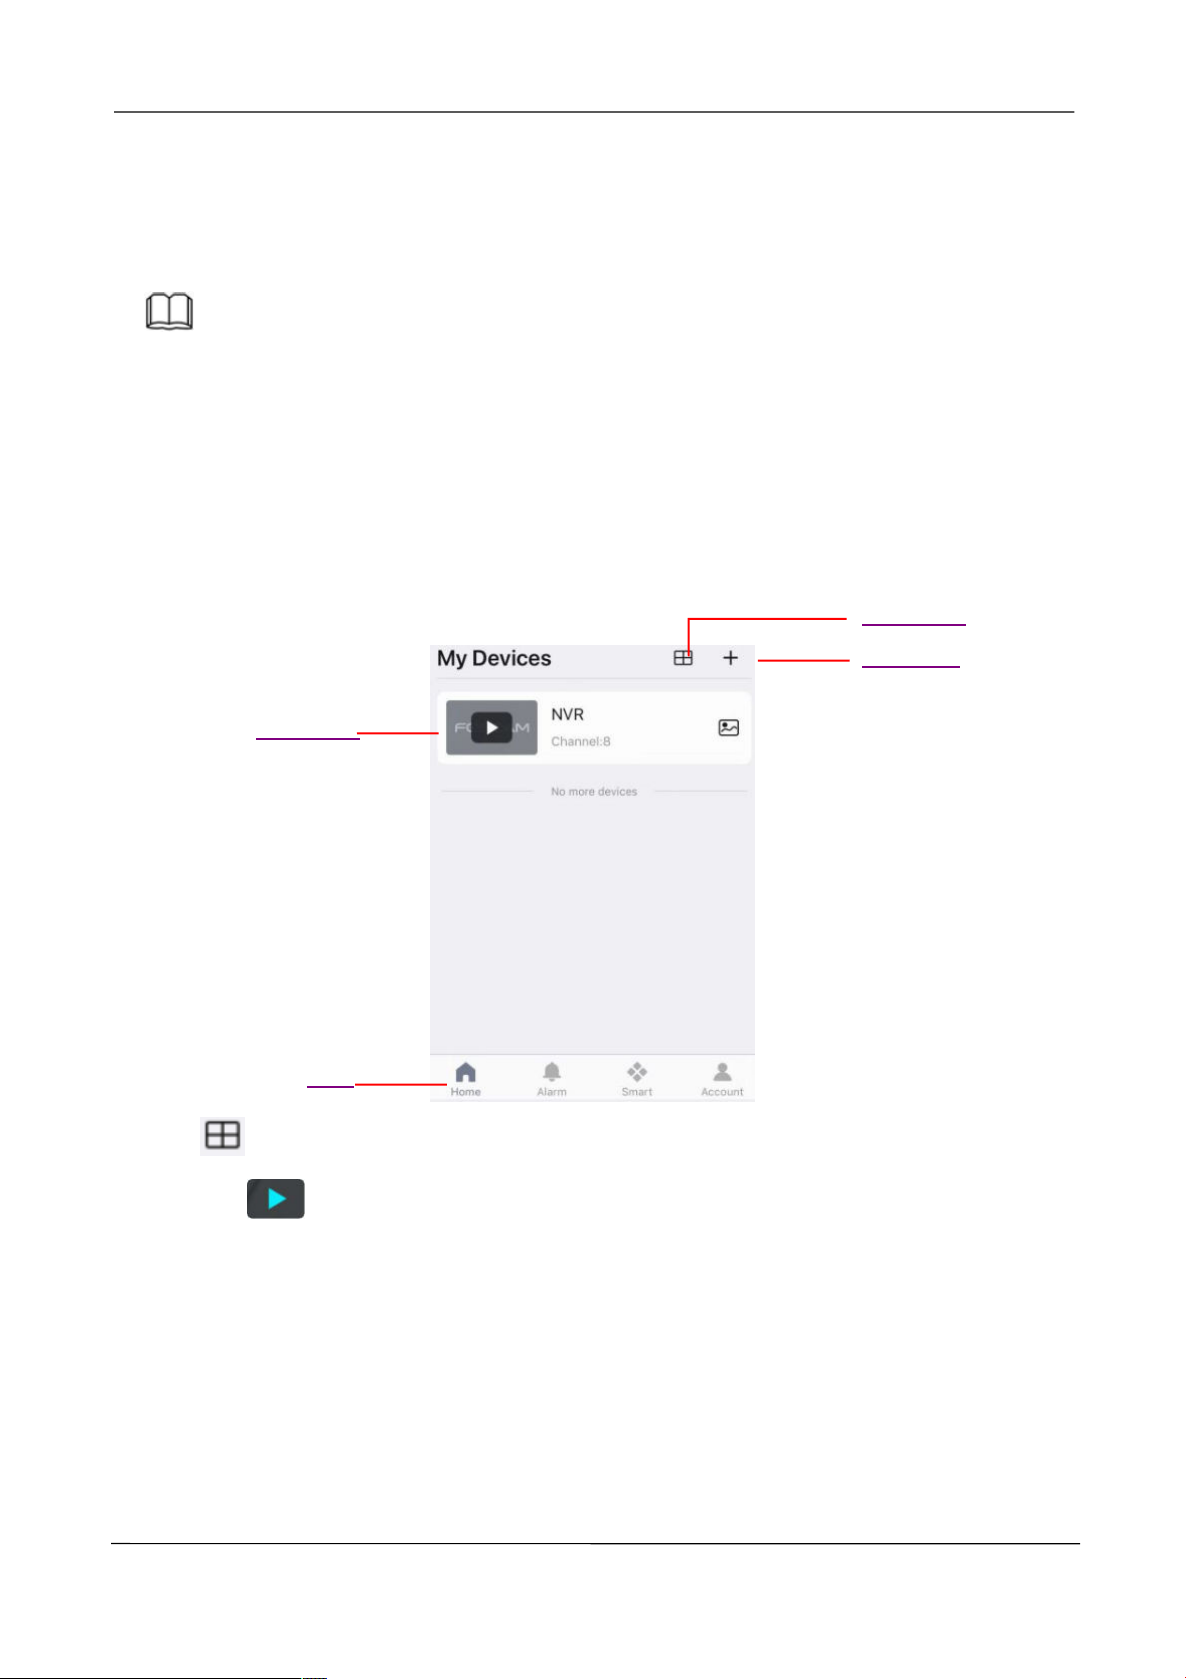
Open the foscam APP and please sign in if you have one already. After logging into Foscam
APP, select "+" icon on the upper right corner. The Add Devices interface is displayed.
Note
Please make sure that the NVR and your phone are both in the same Local Area Network
(LAN).
You have the following methods to add devices.
www.foscam.com
Page 43
NVR User Manual
35
Select “Search in LAN” to search for the device.
Select “Others”, You can manually add device information in three ways: UID/DDNS/IP
Split Screen
Add Device
Watch Live
Menu
Address.
Note
Neither FN7108W-B4 kit nor FN8108H/8108HE supports DDNS connection.
After the addition is successful, NVR video will be displayed in the Foscam app.
3.4 Foscam APP Surveillance Window
You can start to learn about software operation after finish quick installation.When you
launch the Foscam App, the devices page displays.
Click button, you can watch the live interface of 4 devices.
Tap Live
to view and listen to a live video.
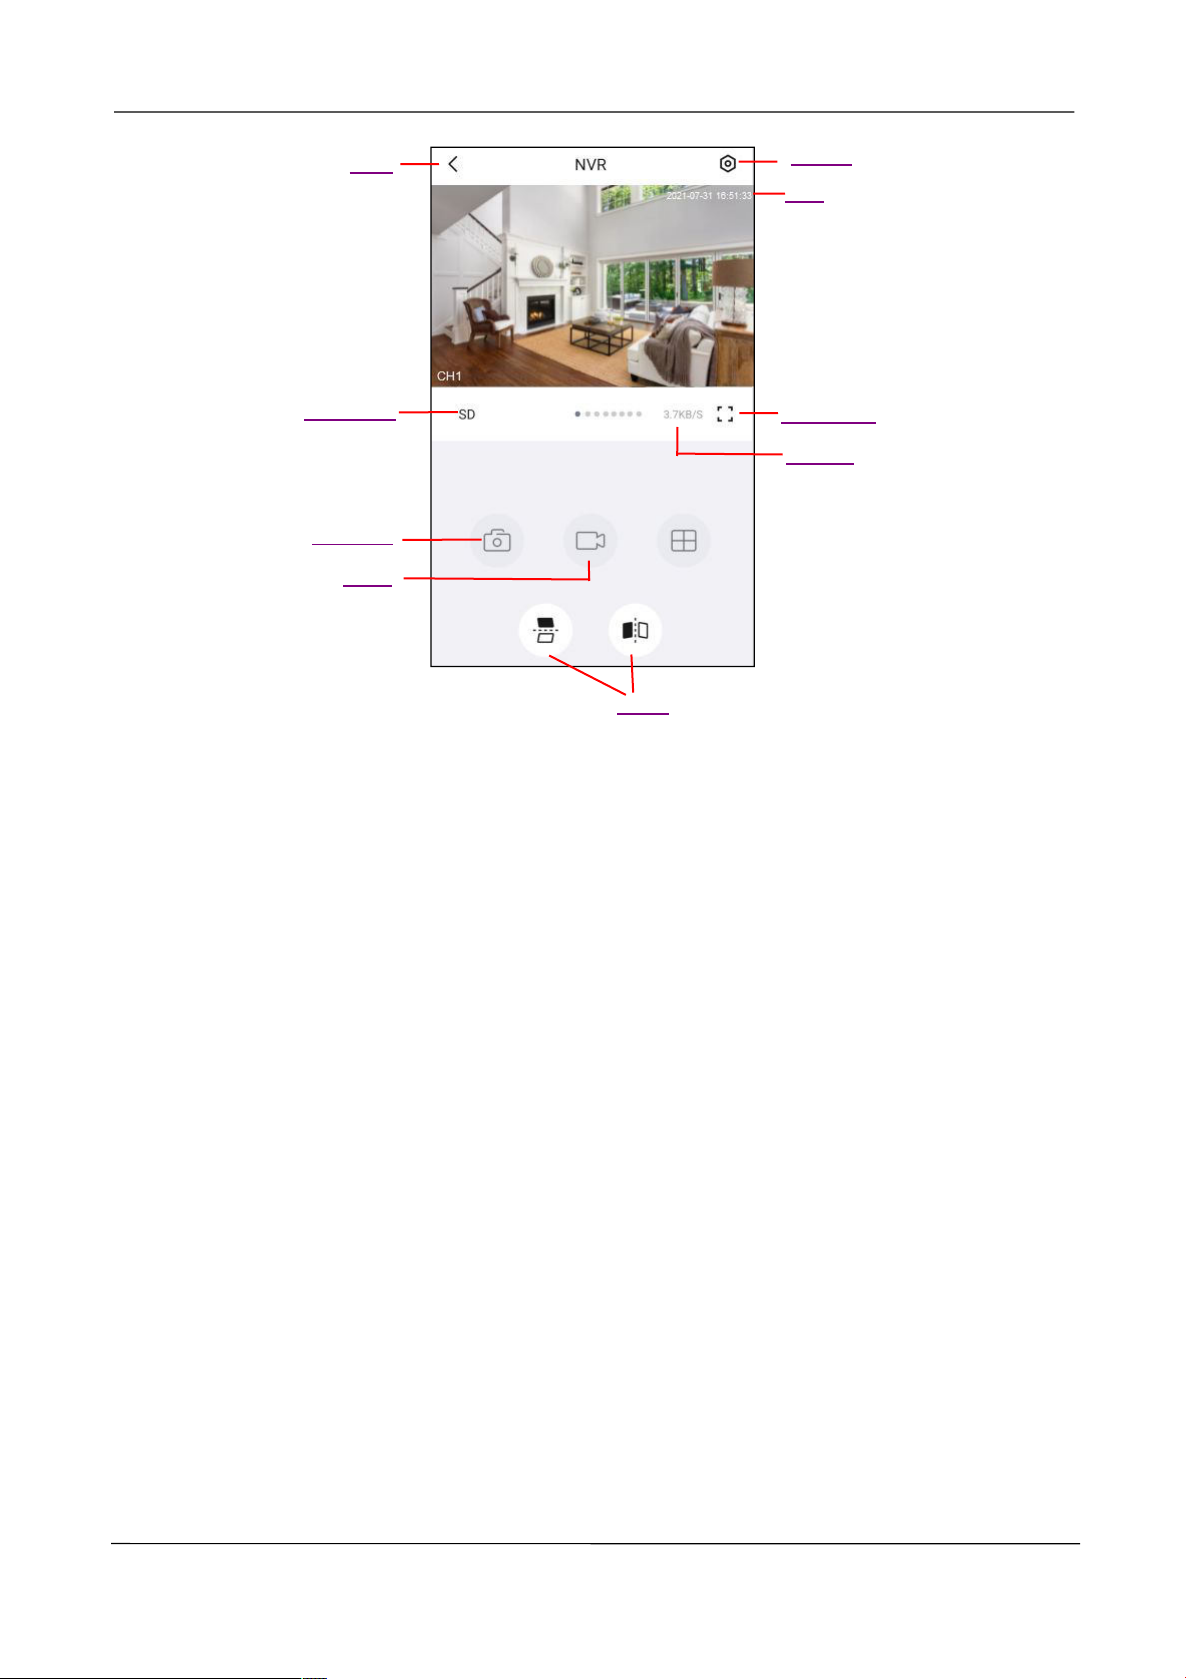
3.5 Watch Live
Click device in list to enter preview interface, select a channel to view it’s picture, as follow
shows:
www.foscam.com
Page 44
NVR User Manual
36
Setting
Back
Resolution
Date
Snapshot
Video
Bit Rate
Full screen
Mirror
Back: To stop viewing and listening to the live feed, tap the Back.
Resolution: There are two types to identify different streams you have set. If select the FHD Mode, the
clearer video will become, and it will take up more bandwidth; If select the SD Mode, the video will not
be as clear as FHD Mode, and it will take up less bandwidth.
If you want to catch the smaller details, pinch and drag any image as you do with photos on your smart
phone.
Snapshot
Video
:Click this button to Snapshot the image.
:Click this button to start the recording function.
Setting: Click this button to set more.
Date
:Display the date.
Full screen: Click this full screen button, you can live in full screen.
Bit Rate: You can see the current connection bit rate.
Mirror: You can flip the image horizontally/vertically with this button.
www.foscam.com
Page 45
NVR User Manual
37
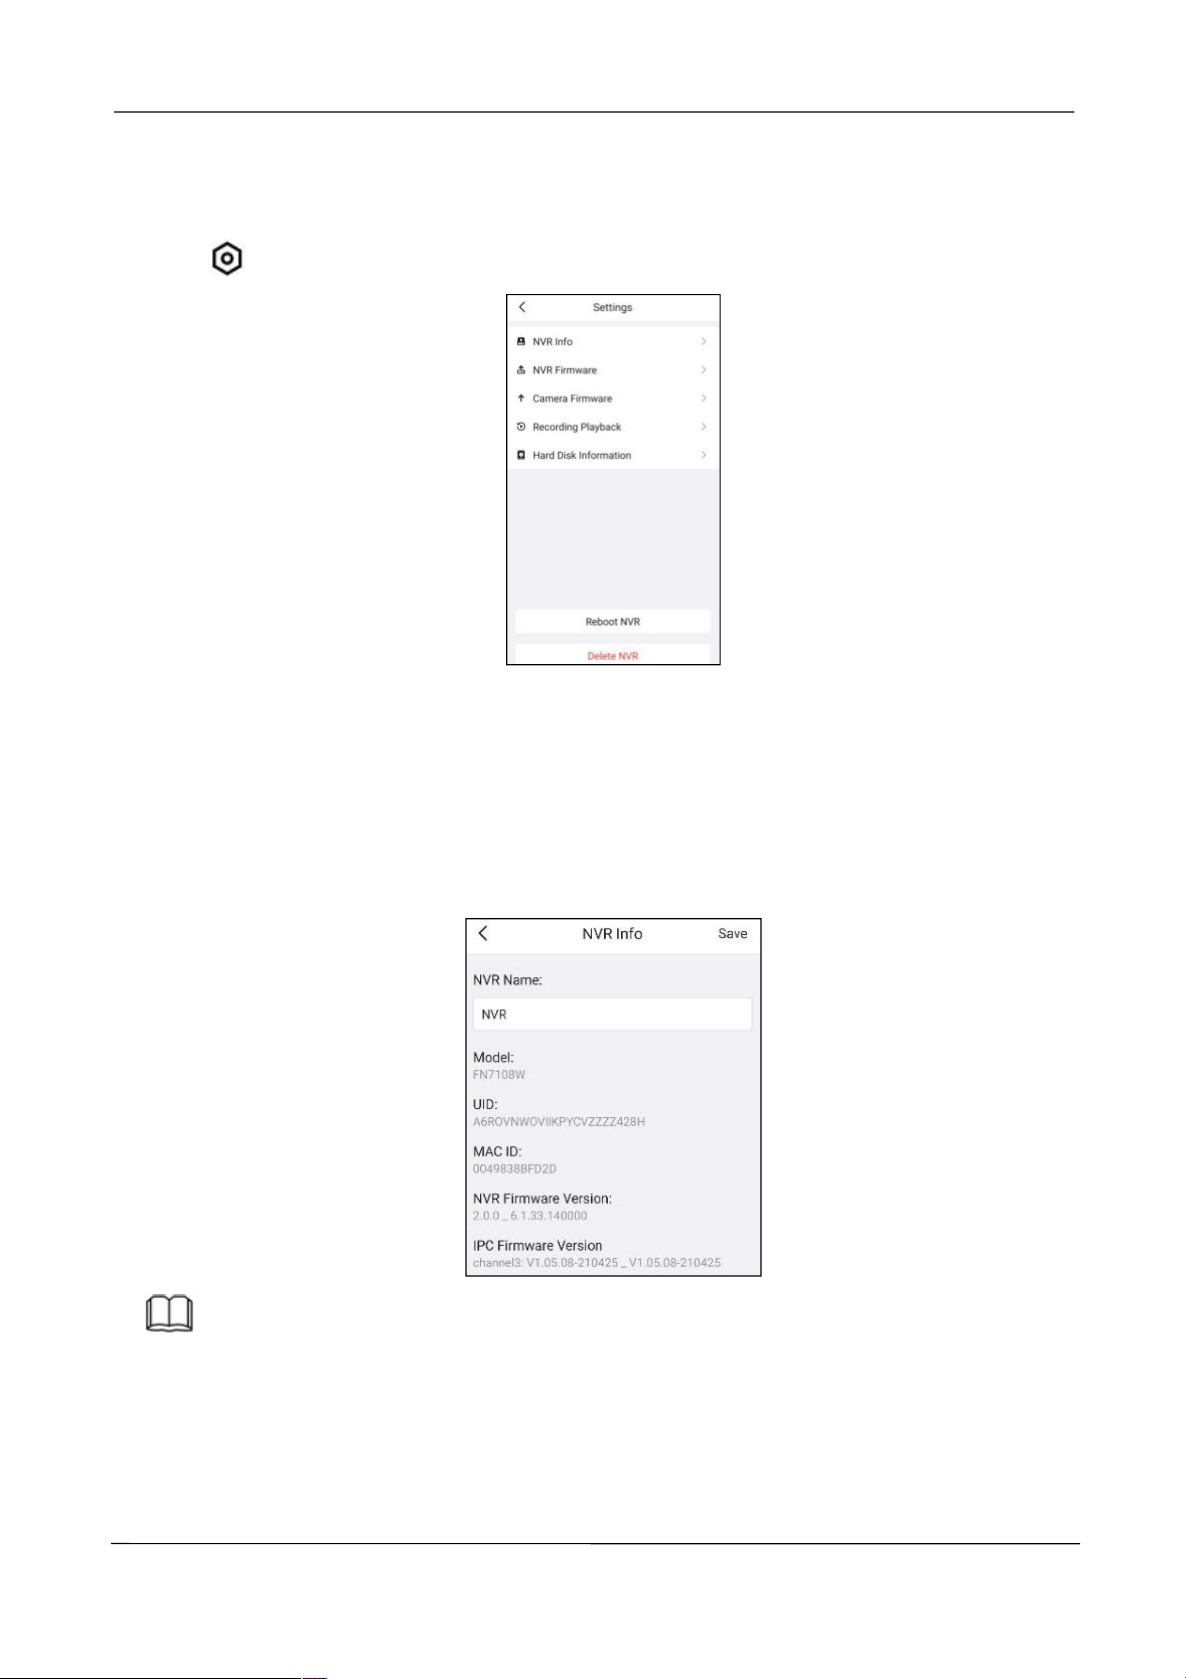
3.6 Setting
Tap
the button, goes to Settings to make advanced NVR settings.
3.6.1 NVR Info
You can modify the NVR name. You can also see the basic information of the NVR through
this, such as NVR model, UID, MAC ID, NVR firmware version information, IPC firmware
version information.
Note
The data in the figure is only an example, please refer to the actual situation.
3.6.2 NVR Firmware
You can see the current NVR's firmware version and whether there is new software that
www.foscam.com
Page 46
NVR User Manual
38
needs to be upgraded. If there is new firmware, you can click the “Upgrade” button to
upgrade.
3.6.3 Camera Firmware
You can see the current camera's firmware version and whether there is new software that
needs to be upgraded. If there is new firmware, you can click the “Upgrade” button to
upgrade.
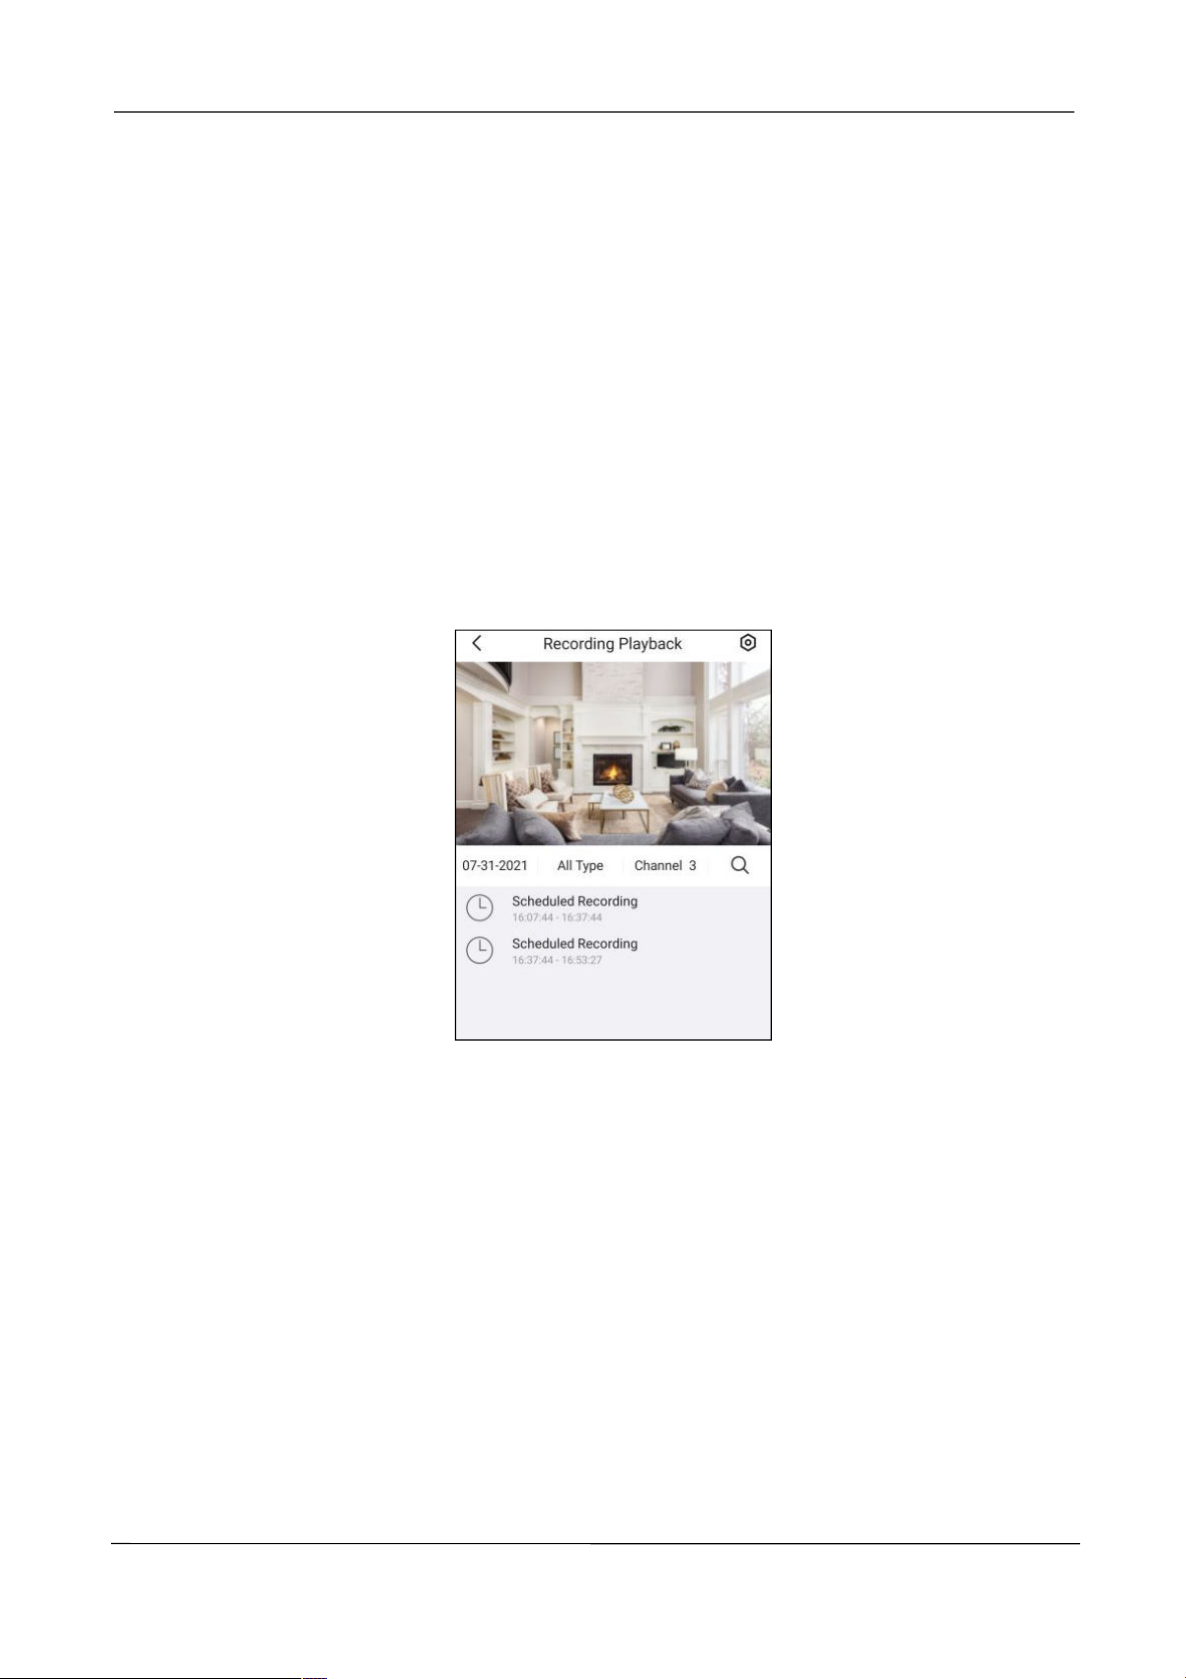
3.6.4 Recording Playback
You can query the recording playback content according to the time, type, and channel.
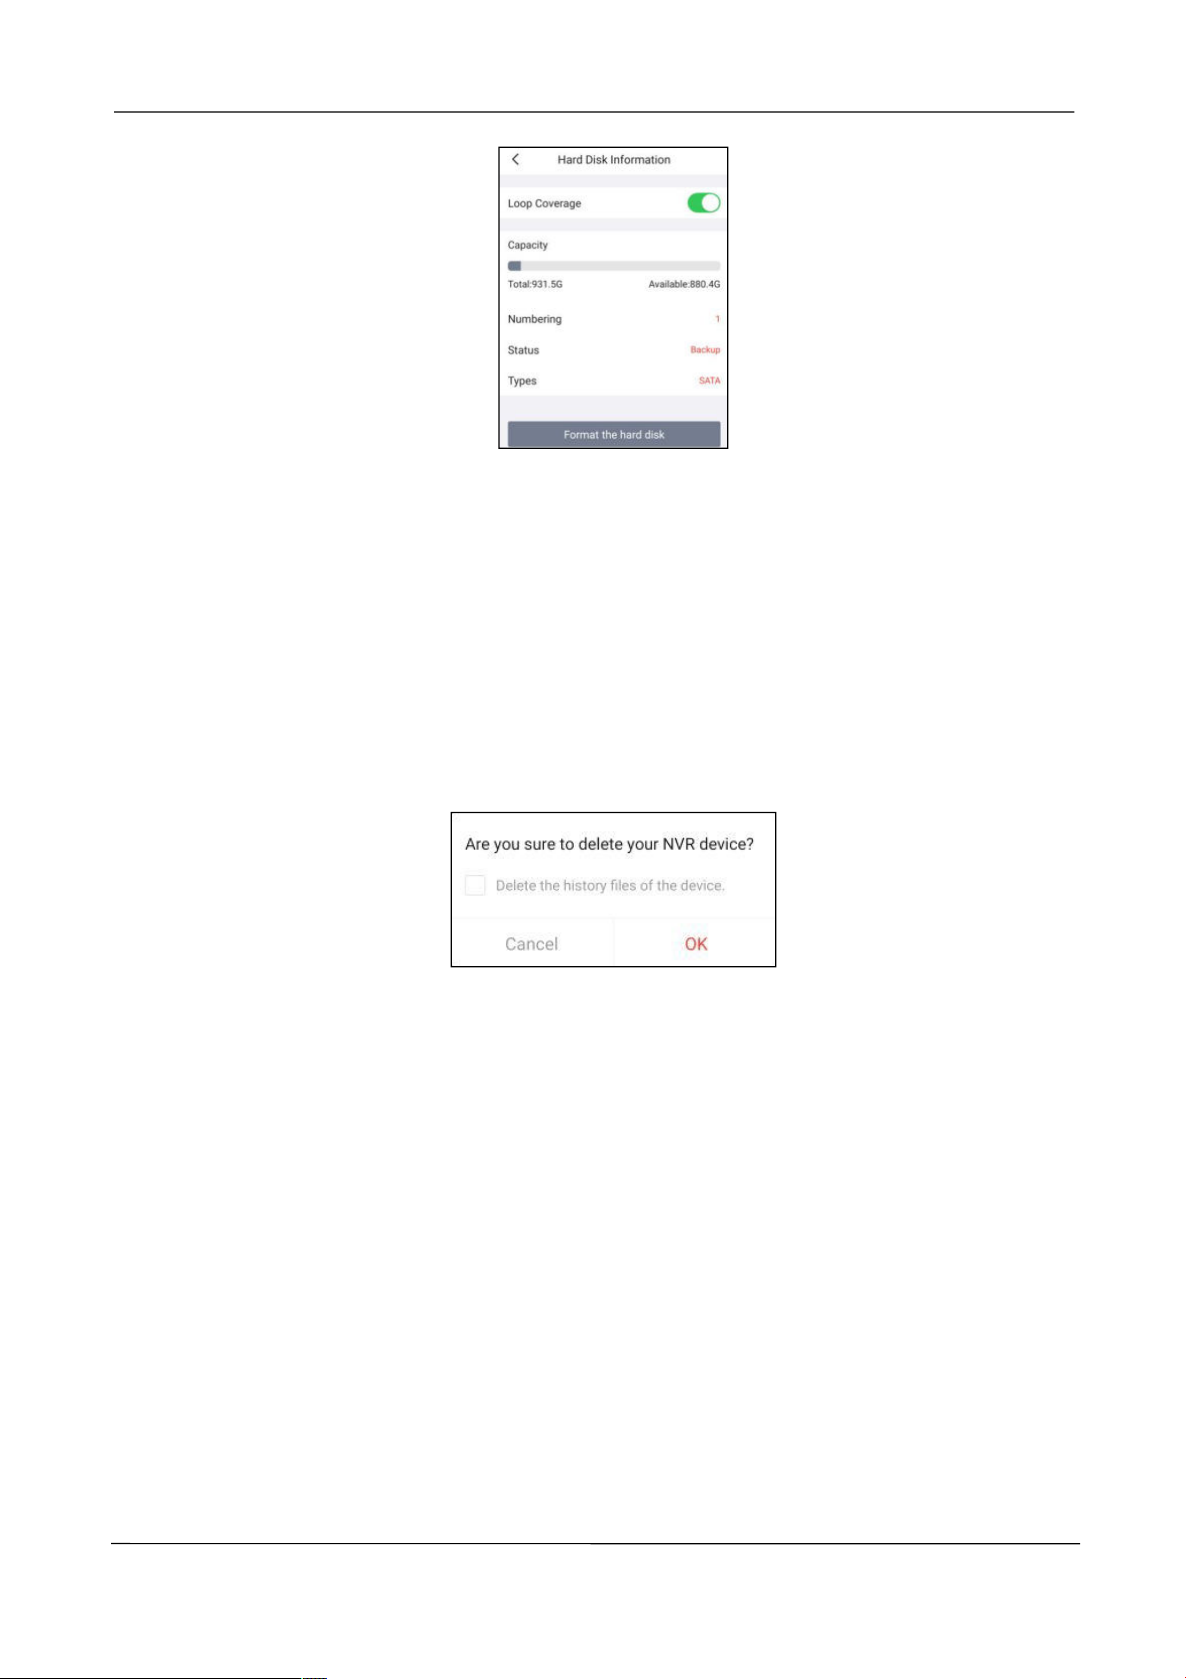
3.6.5 Hard disk information
When the HDD is full, you can check the Loop Coverage to select the cycle cover the earliest.
You can see the HDD information of the NVR.
You can format the hard information by clicking the For mat the hard disk button.
www.foscam.com
Page 47
NVR User Manual
39
3.6.6 Reboot NVR
Click Reboot NVR to reboot the NVR. This is similar to unplugging the power to the NVR.
3.6.7 Delete NVR
You can click Delete NVR button to delete the NVR from the app, or delete and keep
history files from the app.
www.foscam.com
Page 48

NVR User Manual
40
Windows: foscam.com/vms
Mac version from the APP store: https://apps.apple.com/cn/app/foscamvms/id1521202507?mt=12
4
Surveillance Software Foscam VMS
Foscam VMS is a new tool for PC. It does not require plug-ins and is compatible with Windows &
Mac, It supports all Foscam HD cameras and up to 36 cameras at the same time.
It is recommended that you first use the cloud account registered by the Foscam app, and
then use the local account.
4.1 Software Installation
If you would like to manage multiple cameras, we suggest you install the Foscam VMS.
You can download and install the “Foscam VMS” in the following ways.
After the installation is complete, the picture shown below will appear.
Note
Please make sure that the NVR and the computer are both in the same Local Area Network
(LAN).
4.2 Create A Local Account
You can create a local administrator account.
For security, it is strongly recommended to create local accounts and password
management, which prevents the entry of intruders.
Step 1: Click Foscam VMS to run Foscam VMS.
www.foscam.com
Page 49
NVR User Manual
41
Note
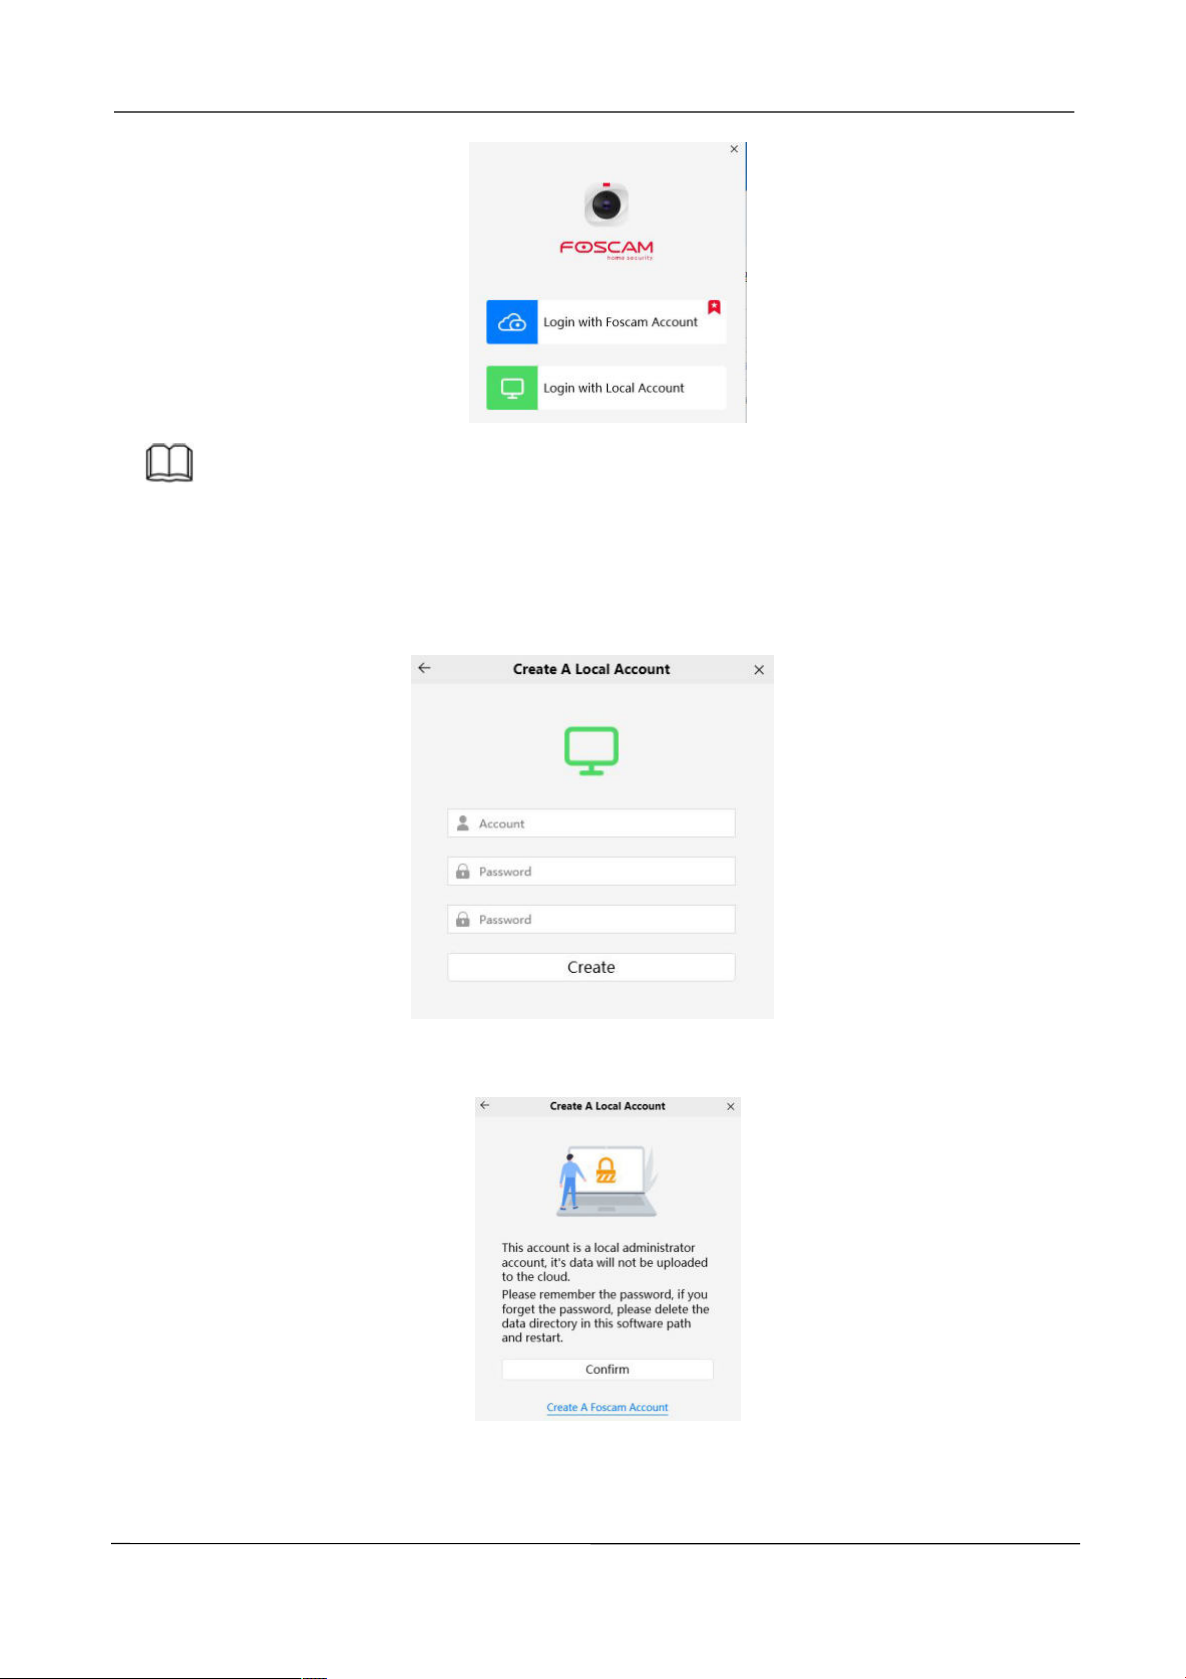
If you have created an account in the Foscam app, you can click Login with Foscam
Account to log in.
Step 2: Click Login with Local Account to enter the Create A Local Account interface.
Step 3: Enter the account and password, then click Create button.
Step 4: Click Confirm button to enter the main interface.
www.foscam.com
Page 50
NVR User Manual
42
4.3 Add Device
If your NVR is wired connect, you can choose the following method to add to Foscam VMS.
4.3.1 LAN Add
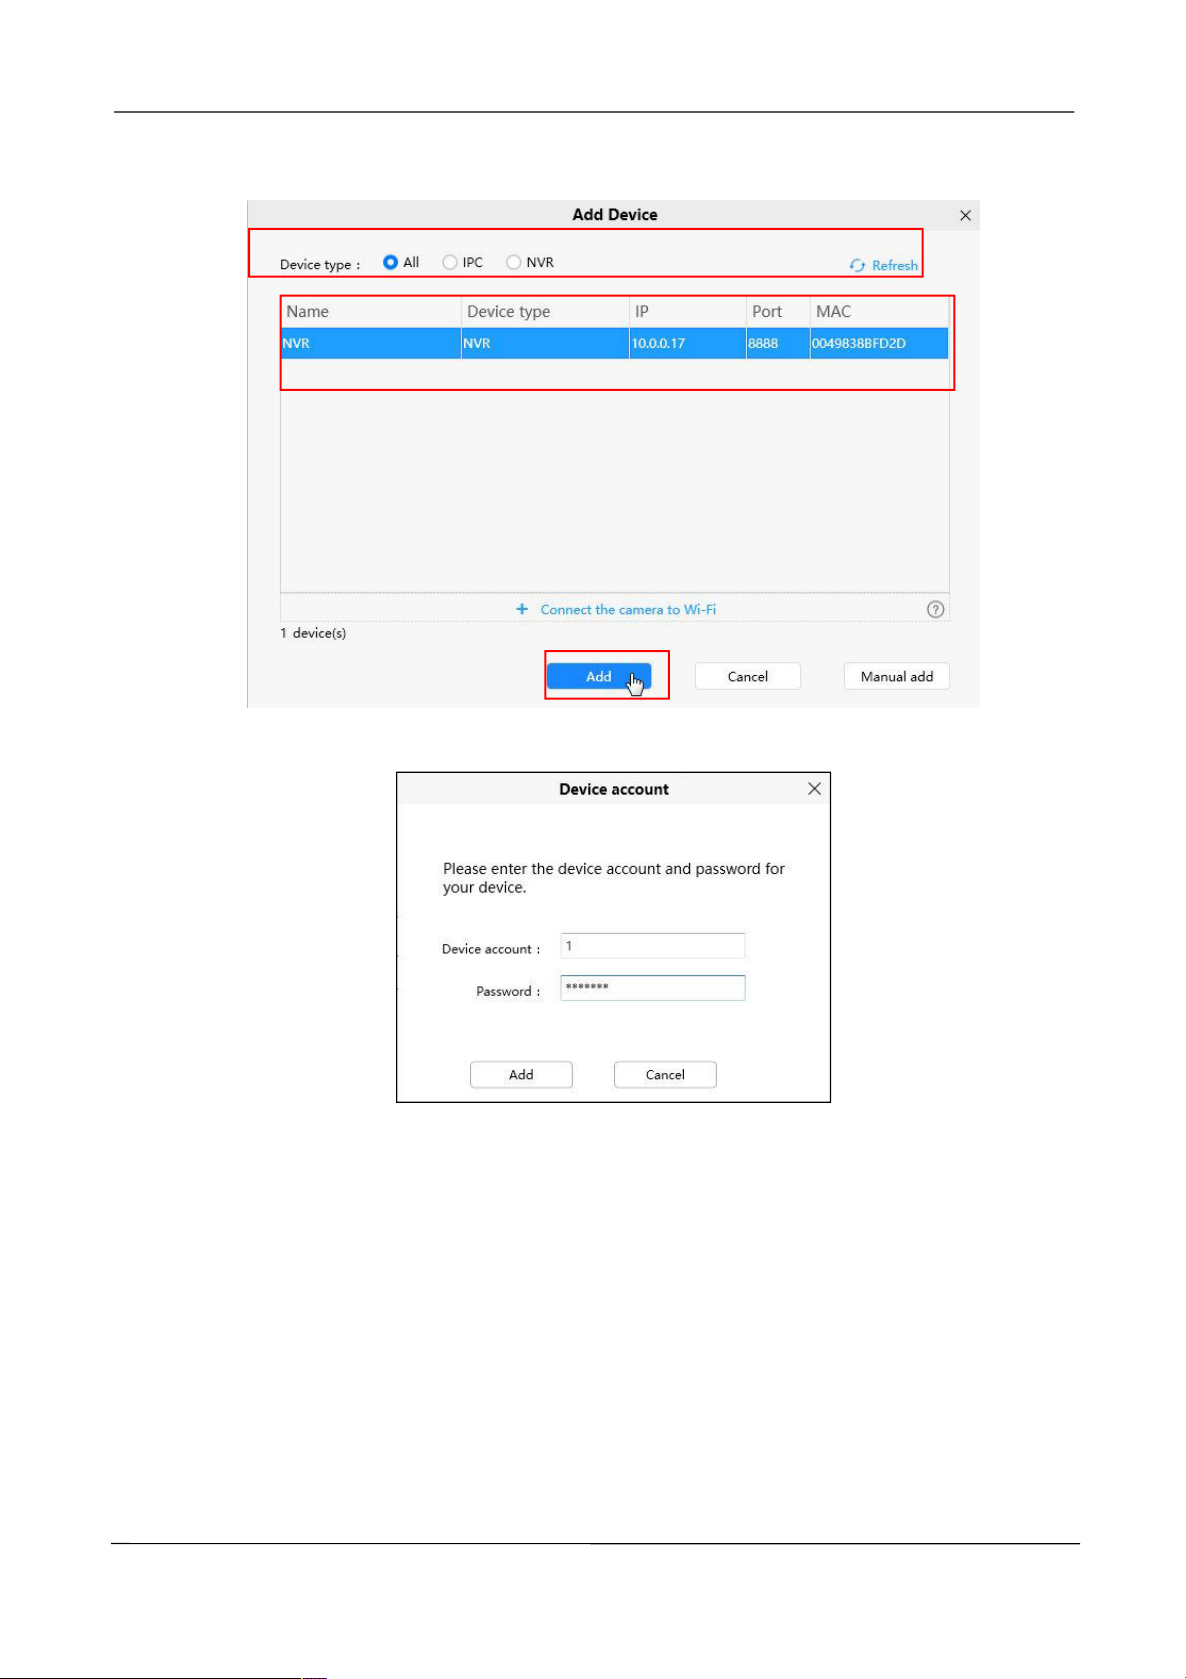
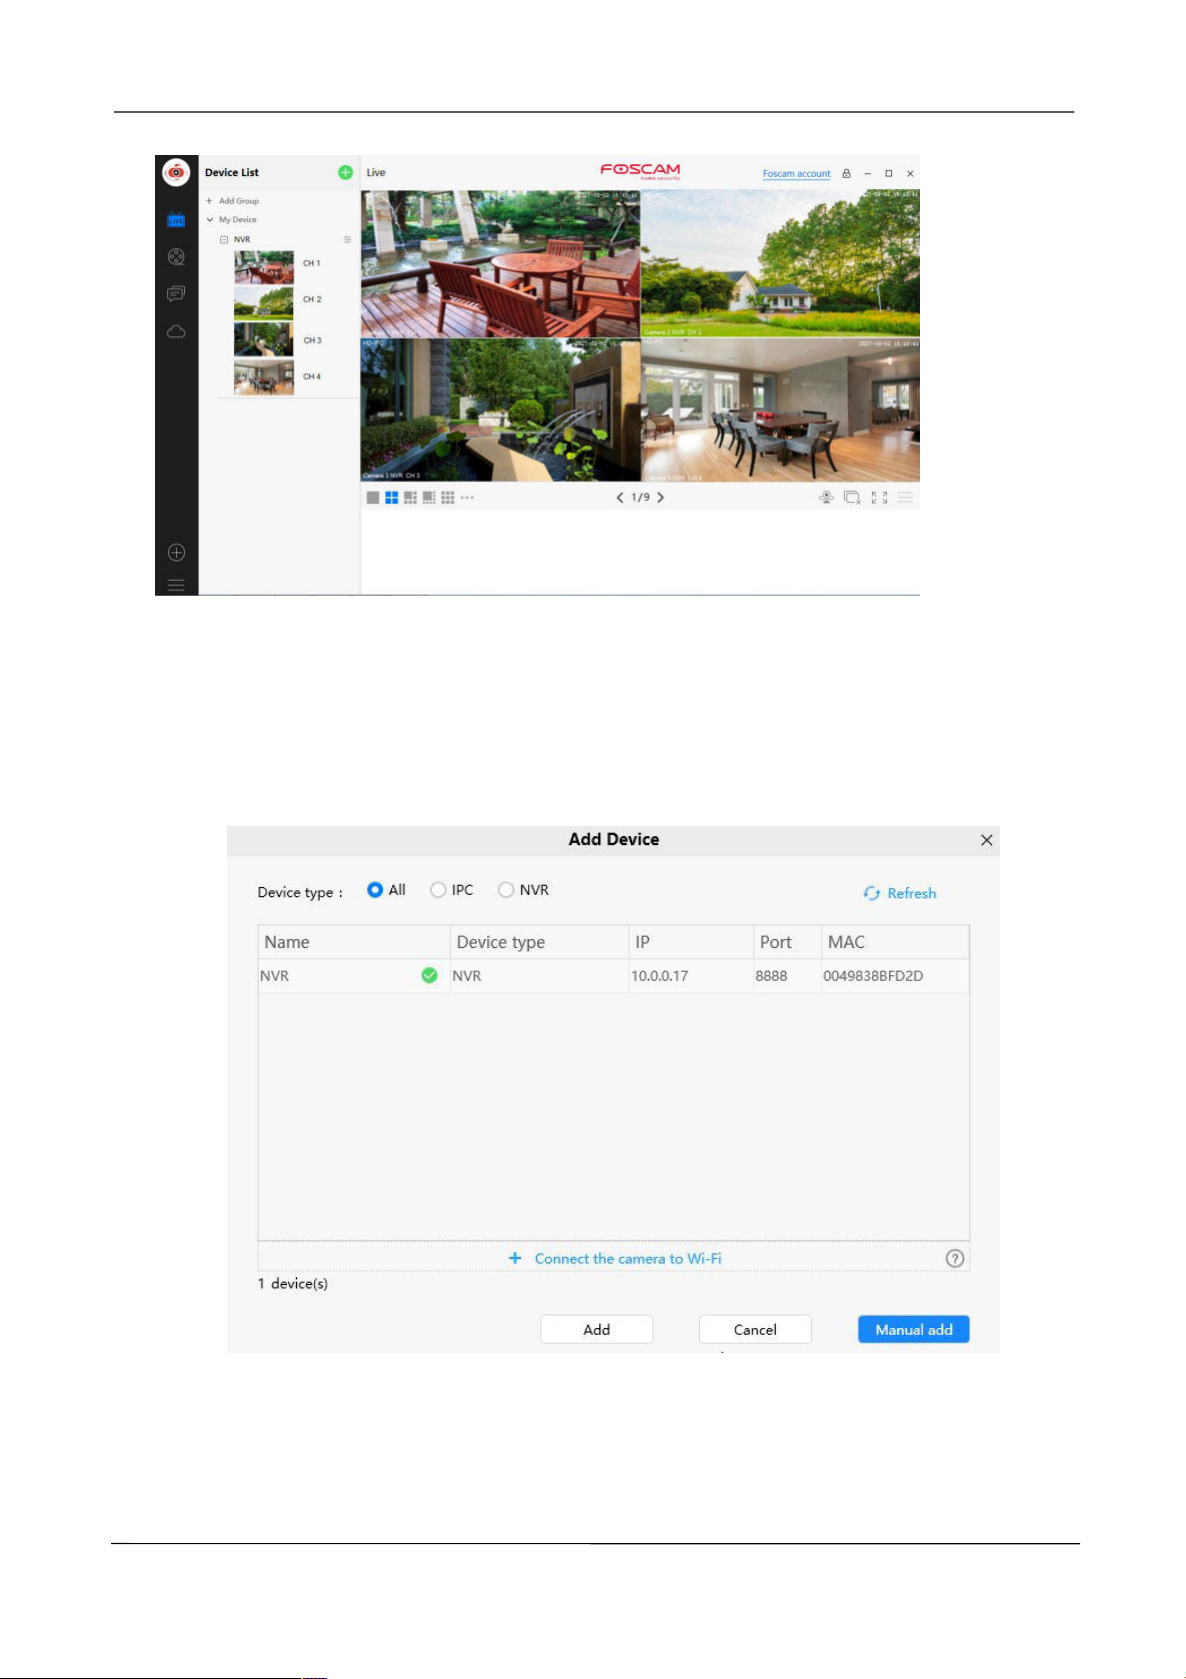
Click Add Device button, then follow below steps:
Step1 Select “ALL” from the device types.
Step2 Click the IP address of the NVR on the list, then the name of the NVR and the IP information
will be entered automatically.
www.foscam.com
Page 51
NVR User Manual
43
Step 3 Click Add.
Step 4 Enter the username and password of the NVR.
Step 5 Click Add button to finish adding.
www.foscam.com
Page 52
NVR User Manual
44
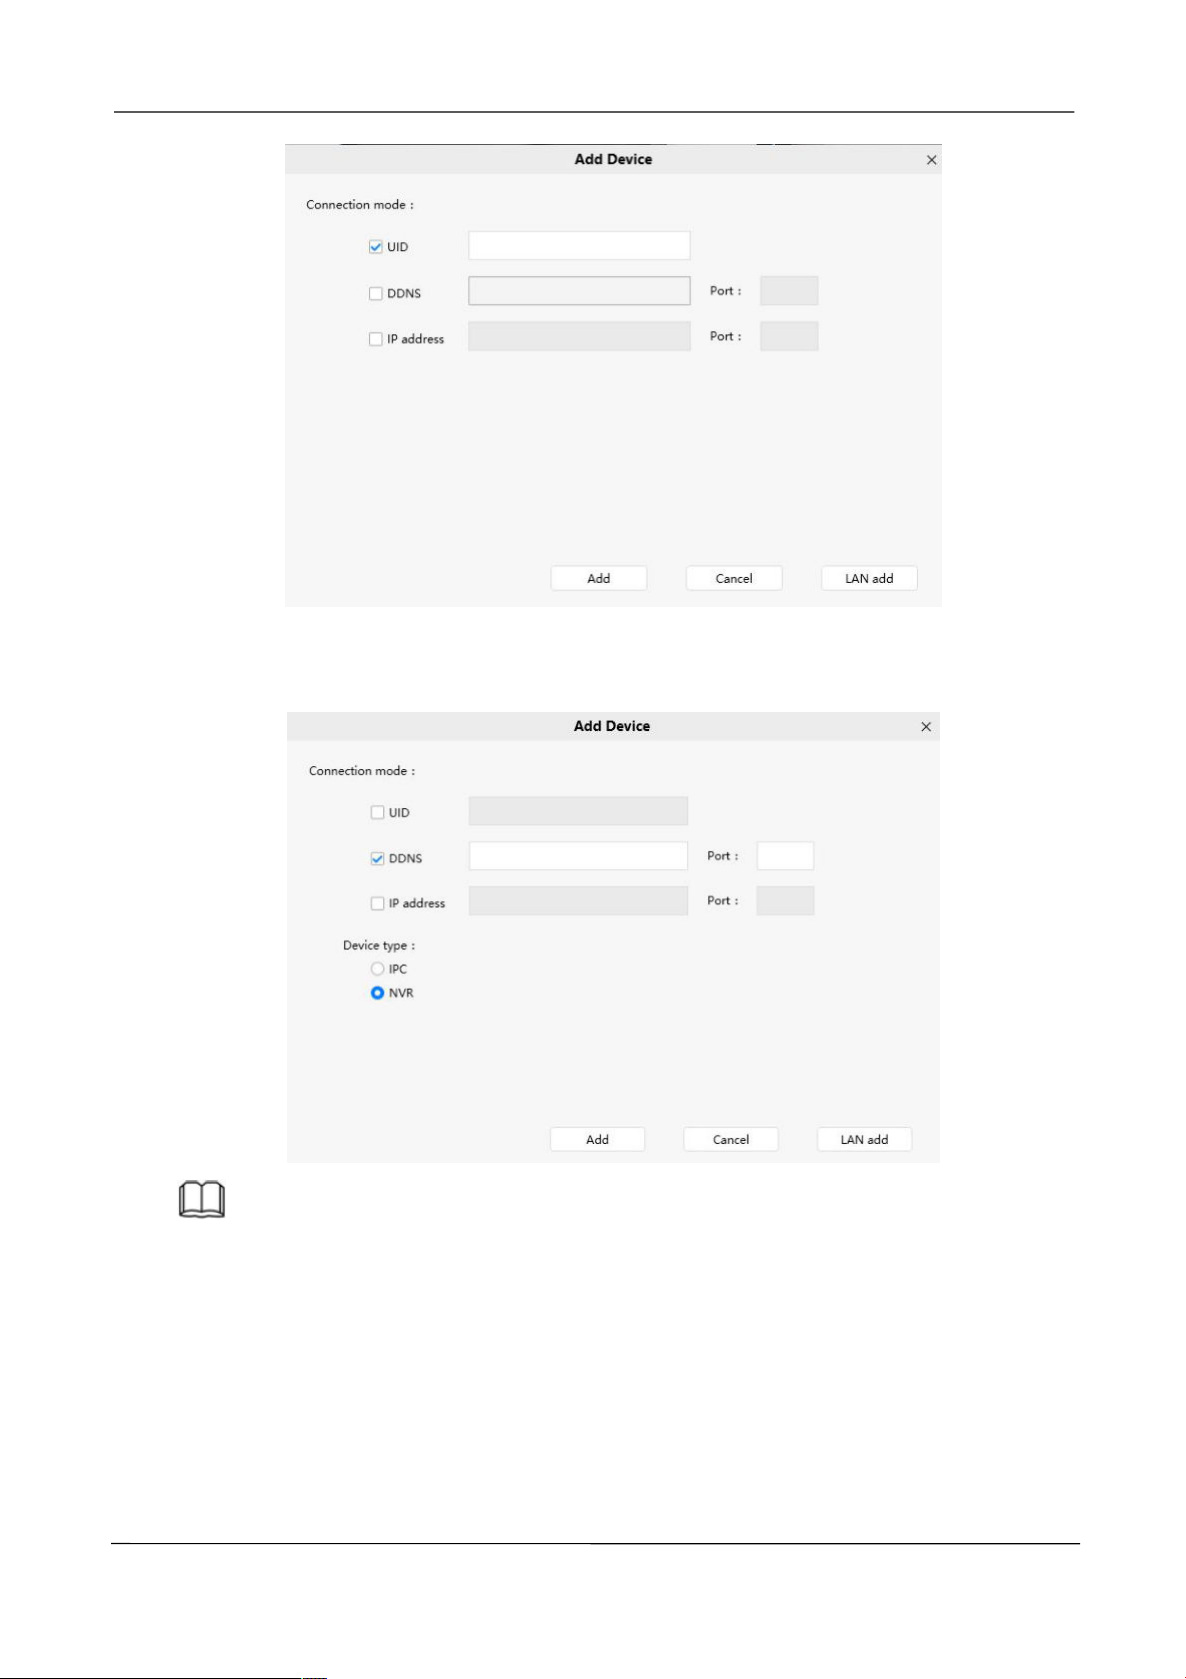
Check UID from Connection mode. Enter the UID of the device.
4.3.2 Manual add
You can add the NVR use manual add.
Step 1 Click Manual add first.
Step 2 There are three ways to connect mode, you can choose any one.
www.foscam.com
Page 53
NVR User Manual
45
Check DDNS from the Connection Mode. Enter the DDNS and Port of the NVR. Select NVR
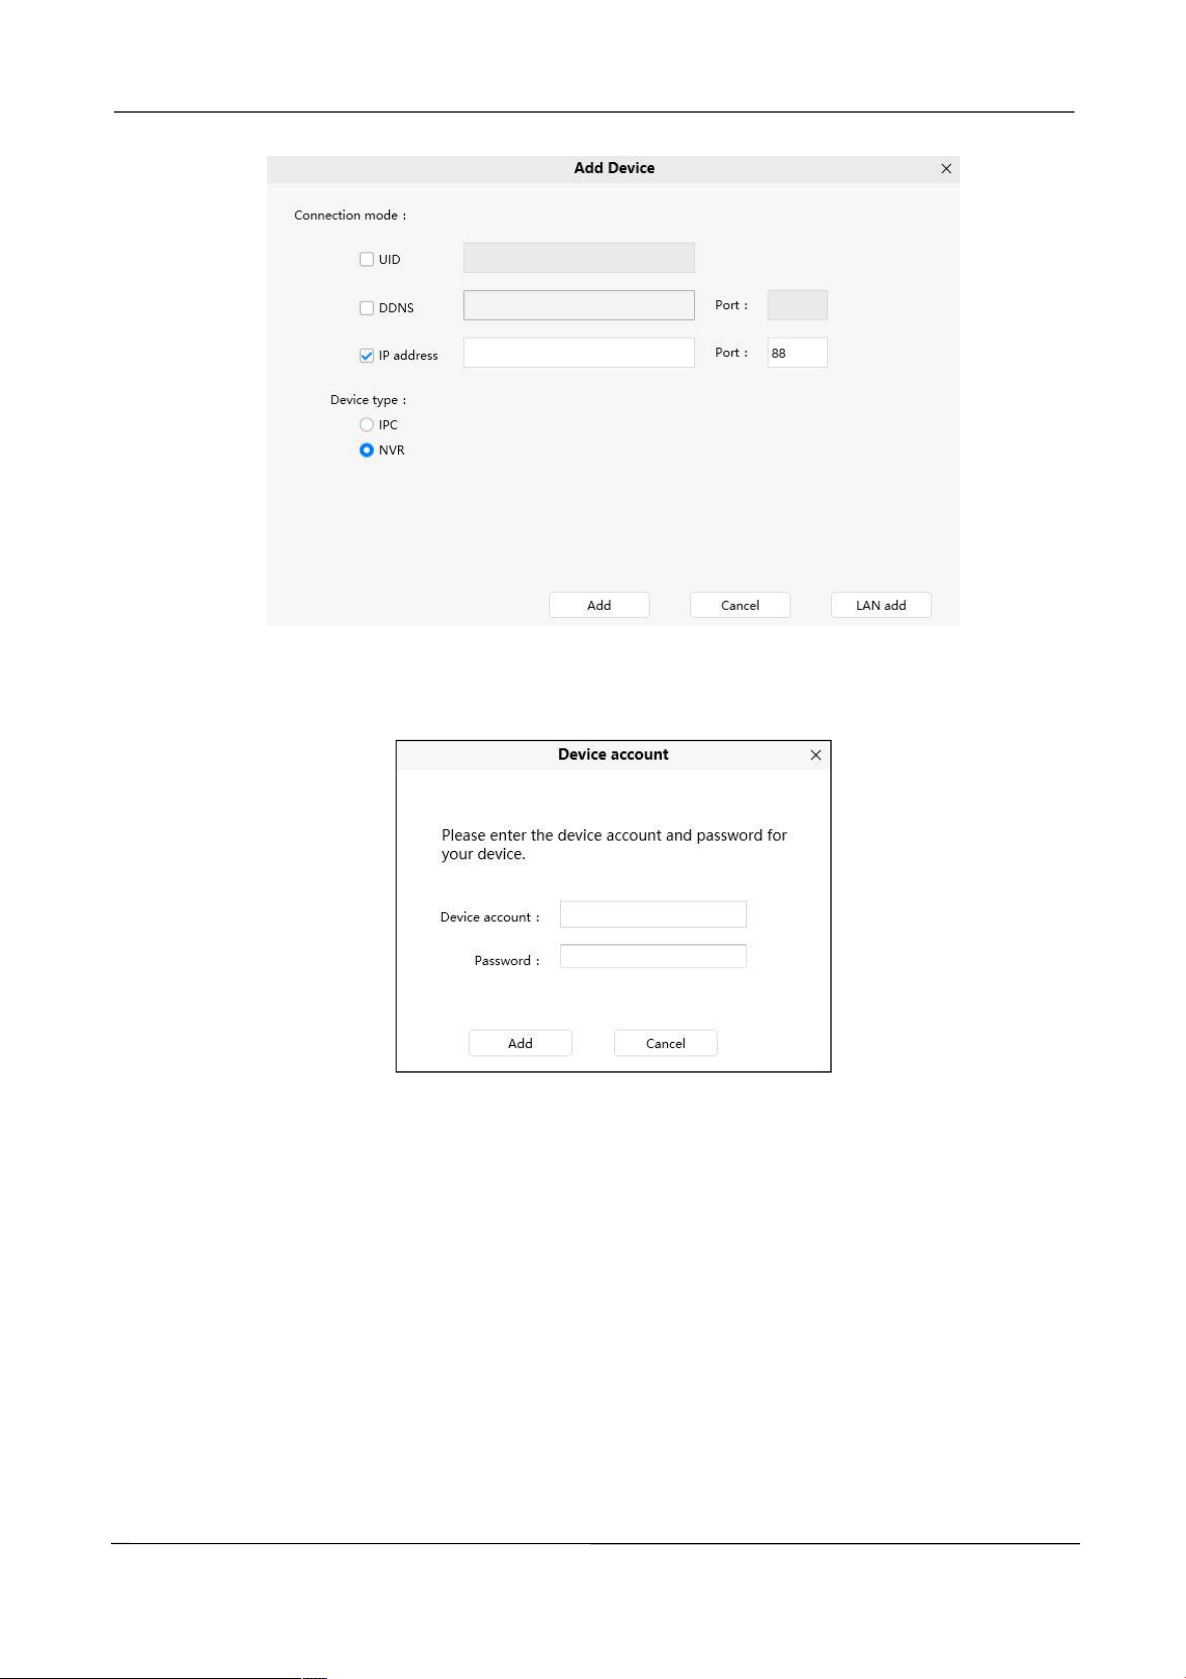
Check IP address from the Connection Mode. Enter the IP and Port of the NVR. Select NVR
from the Device types.
Note
Neither FN7108W-B4 kit nor FN8108H/8108HE supports DDNS connection.
from the Device types.
www.foscam.com
Page 54
NVR User Manual
46
Step 3 Click Add button.
Step 4 Enter Device account and Password of the NVR.
Step 5 Click Add button to finish adding device.
www.foscam.com
Page 55
NVR User Manual
47
1
2
3
4
5
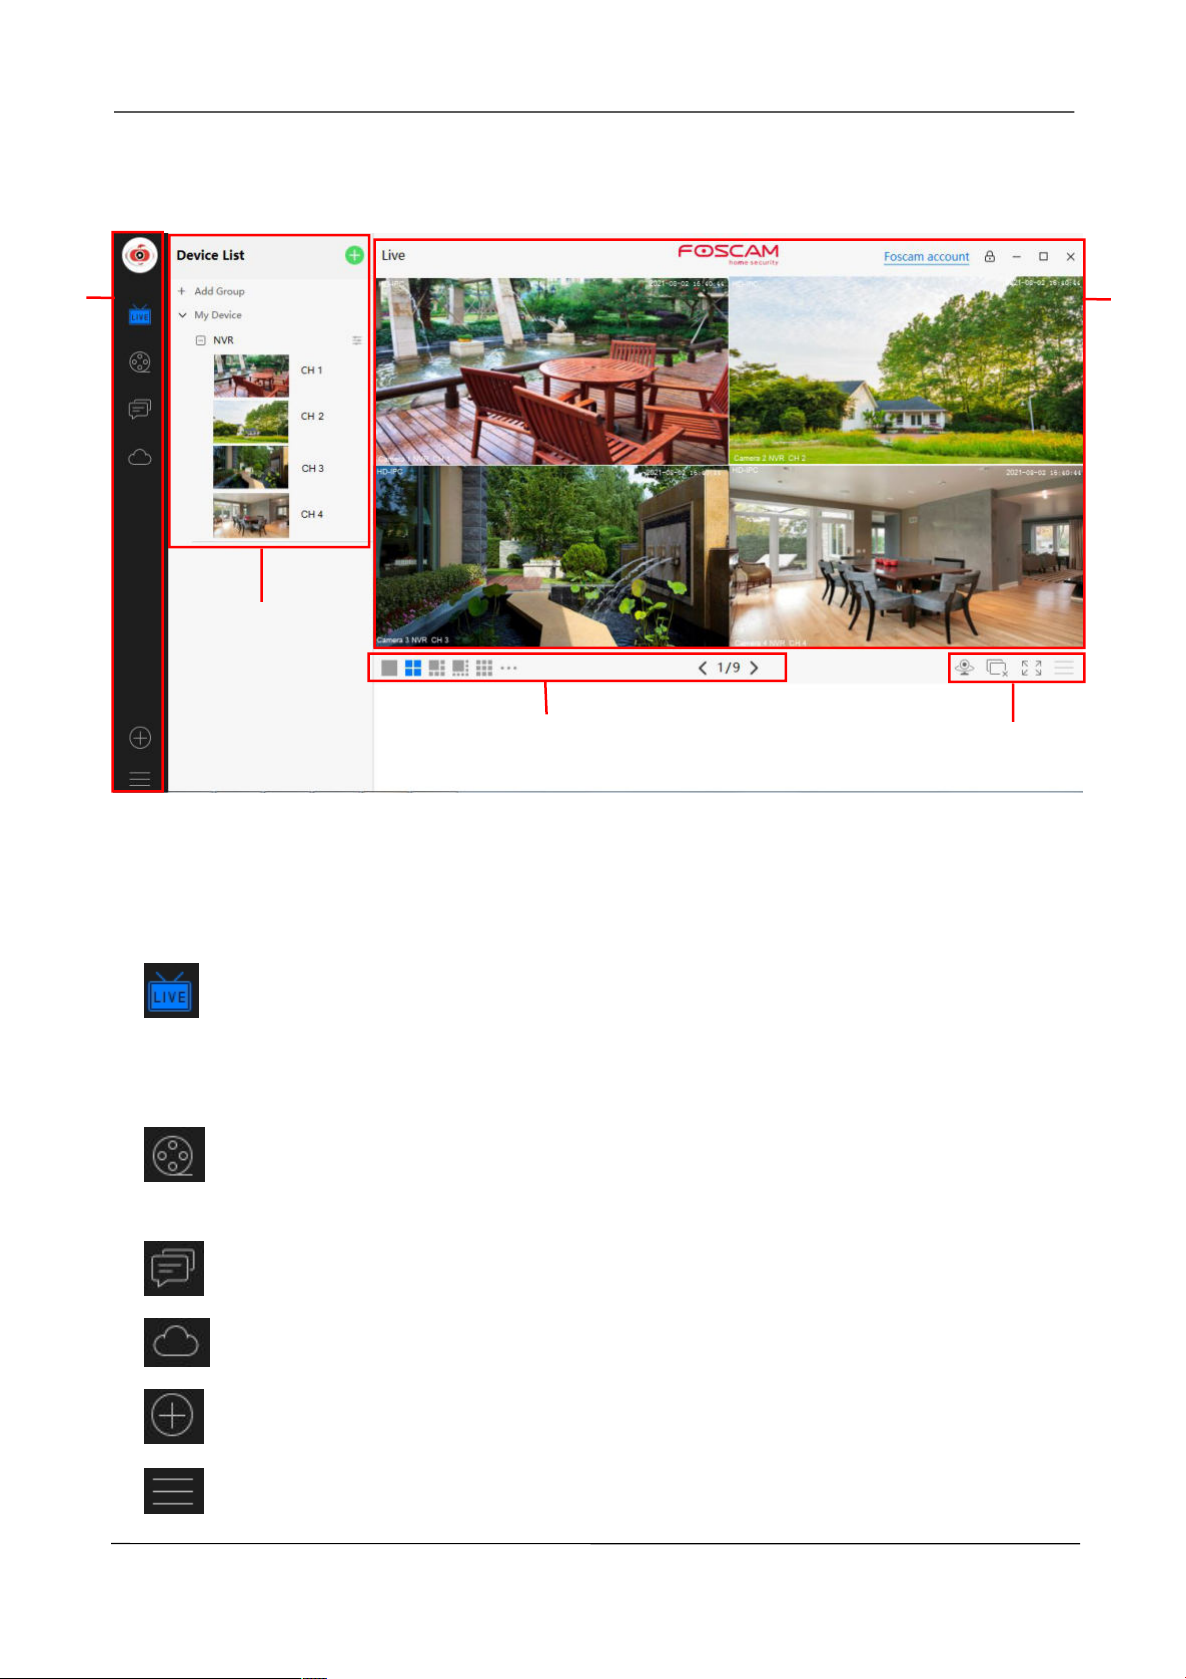
4.4 Surveillance Software GUI
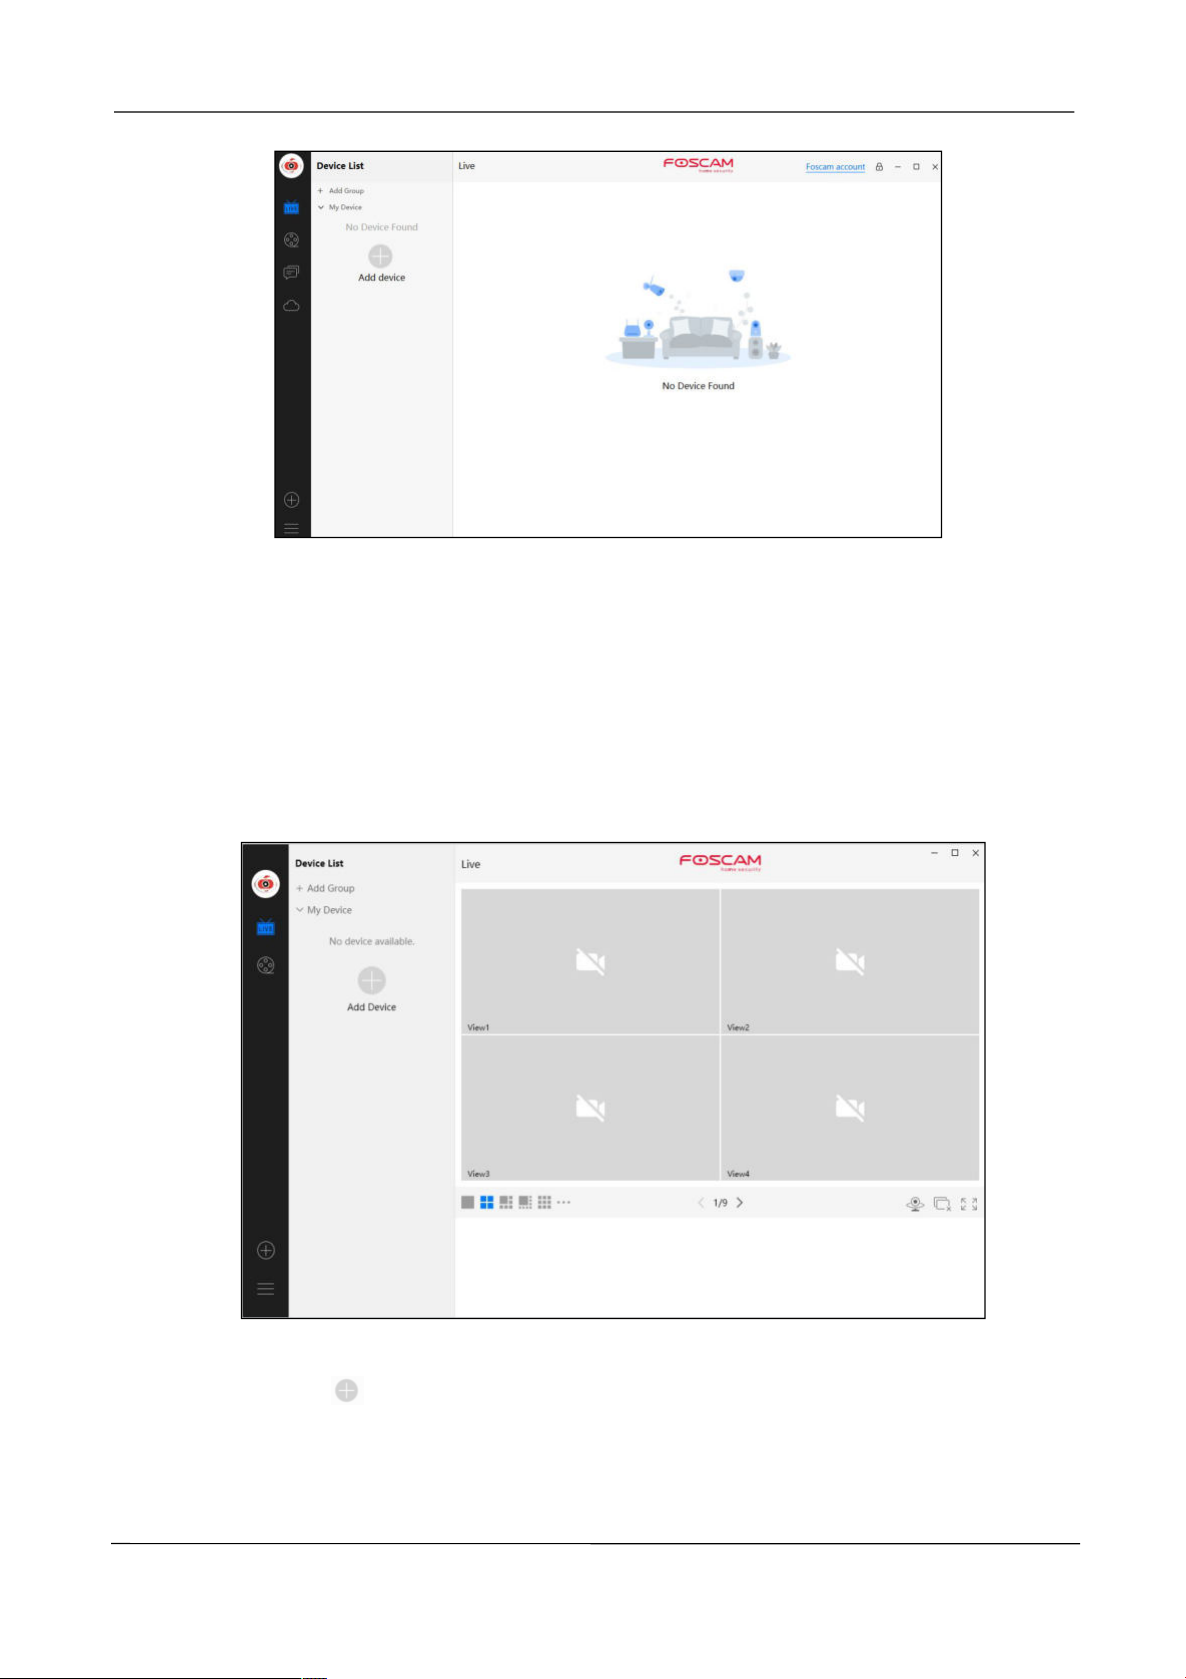
First time you login the software, the whole video window is gray, you need to connect the
NVR and add NVR to it.
Section1 Menu Bar
Path to surveillance window. Click this button enter to Device List and back to the
surveillance
window.
Playback the video recording, you can choose Cloud Playback, SD Card Playback,
NVR HDD Playback or Local Playback.
Login your Foscam cloud account to view alerts.
Login your Foscam cloud account.
Add Device, please refer chapter 4.3 Add De vice for the detail setting.
More, You can Setting Personal Account, Preference, My coupon, Log Query, Left
www.foscam.com
Page 56
NVR User Manual
48
1
2
3
4
5
Bar and Switch Account.
Section2 Left Bar
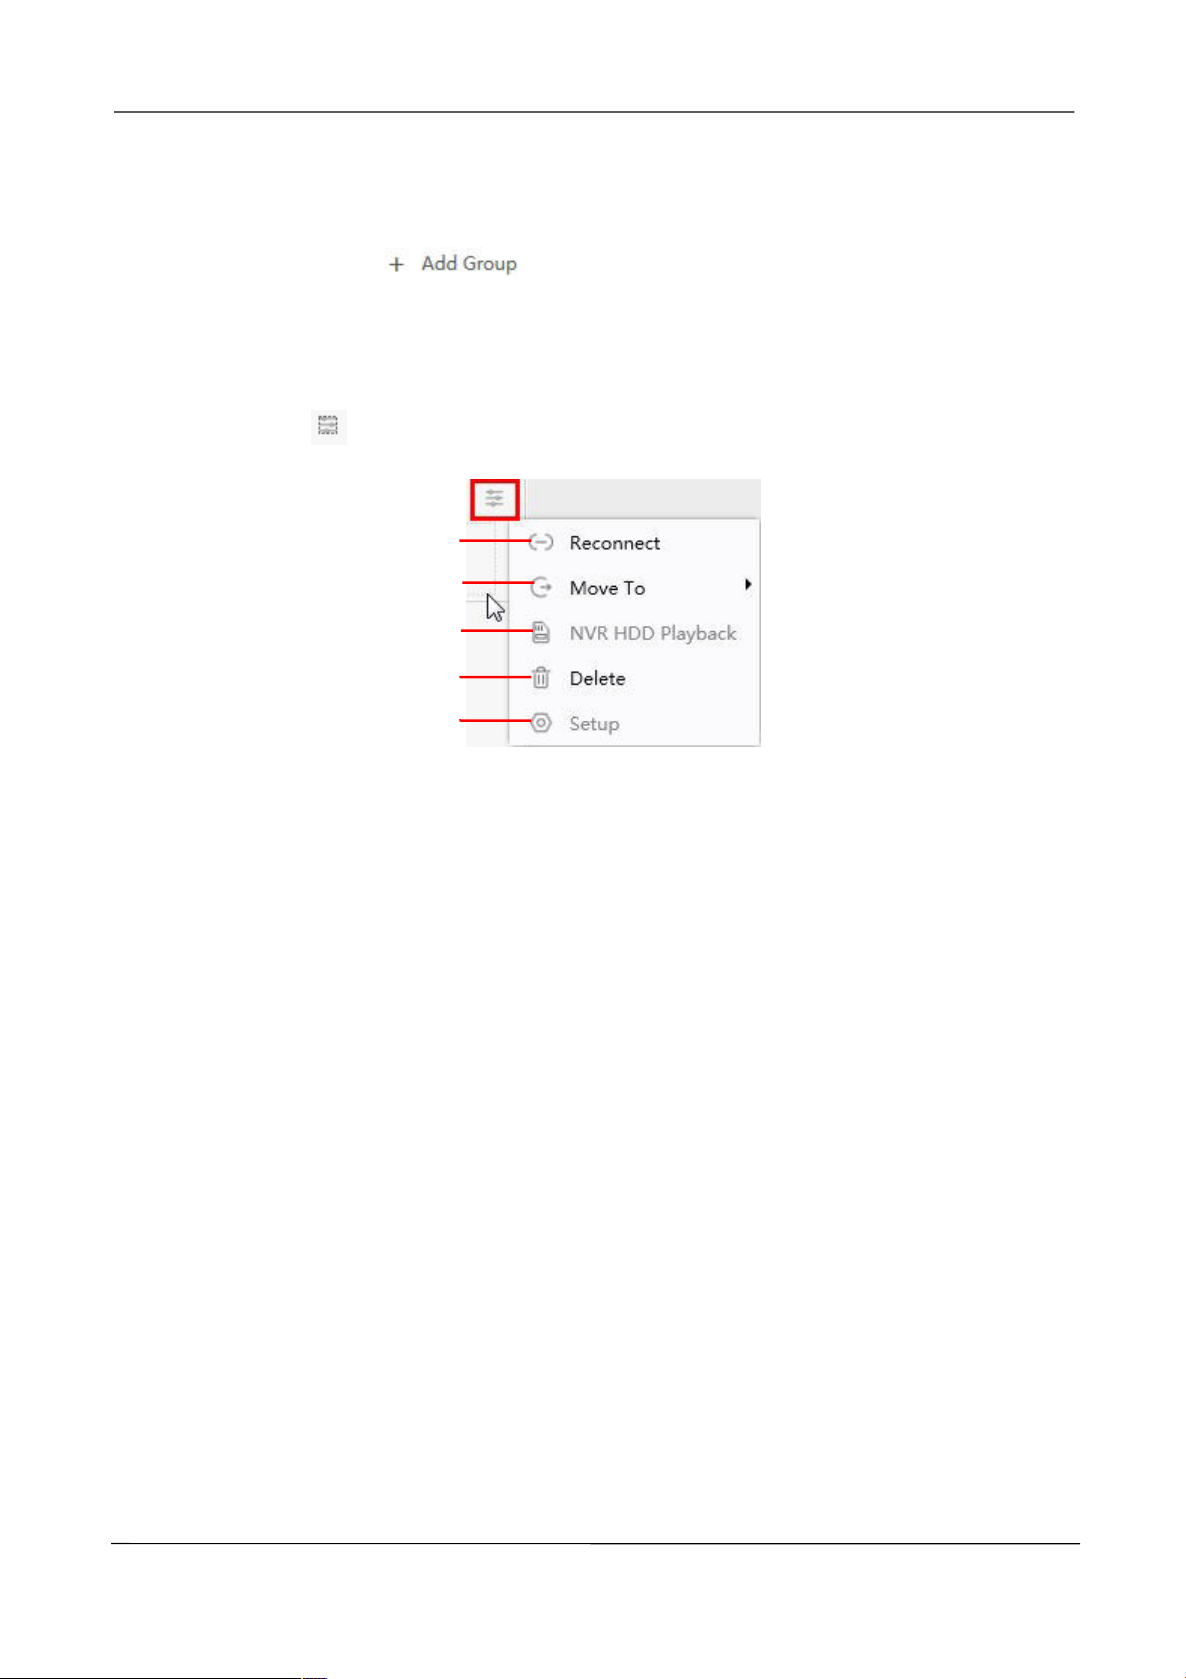
Add Group: Click the button, you can group the device list according to
your needs.
Left Bar of Live: You can view the list of connected NVR.
Select the icon
1-----Reconnect
Click Reconnect button and the device will reconnect.
2----- Move To
Click this button, you can move the device to your group list.
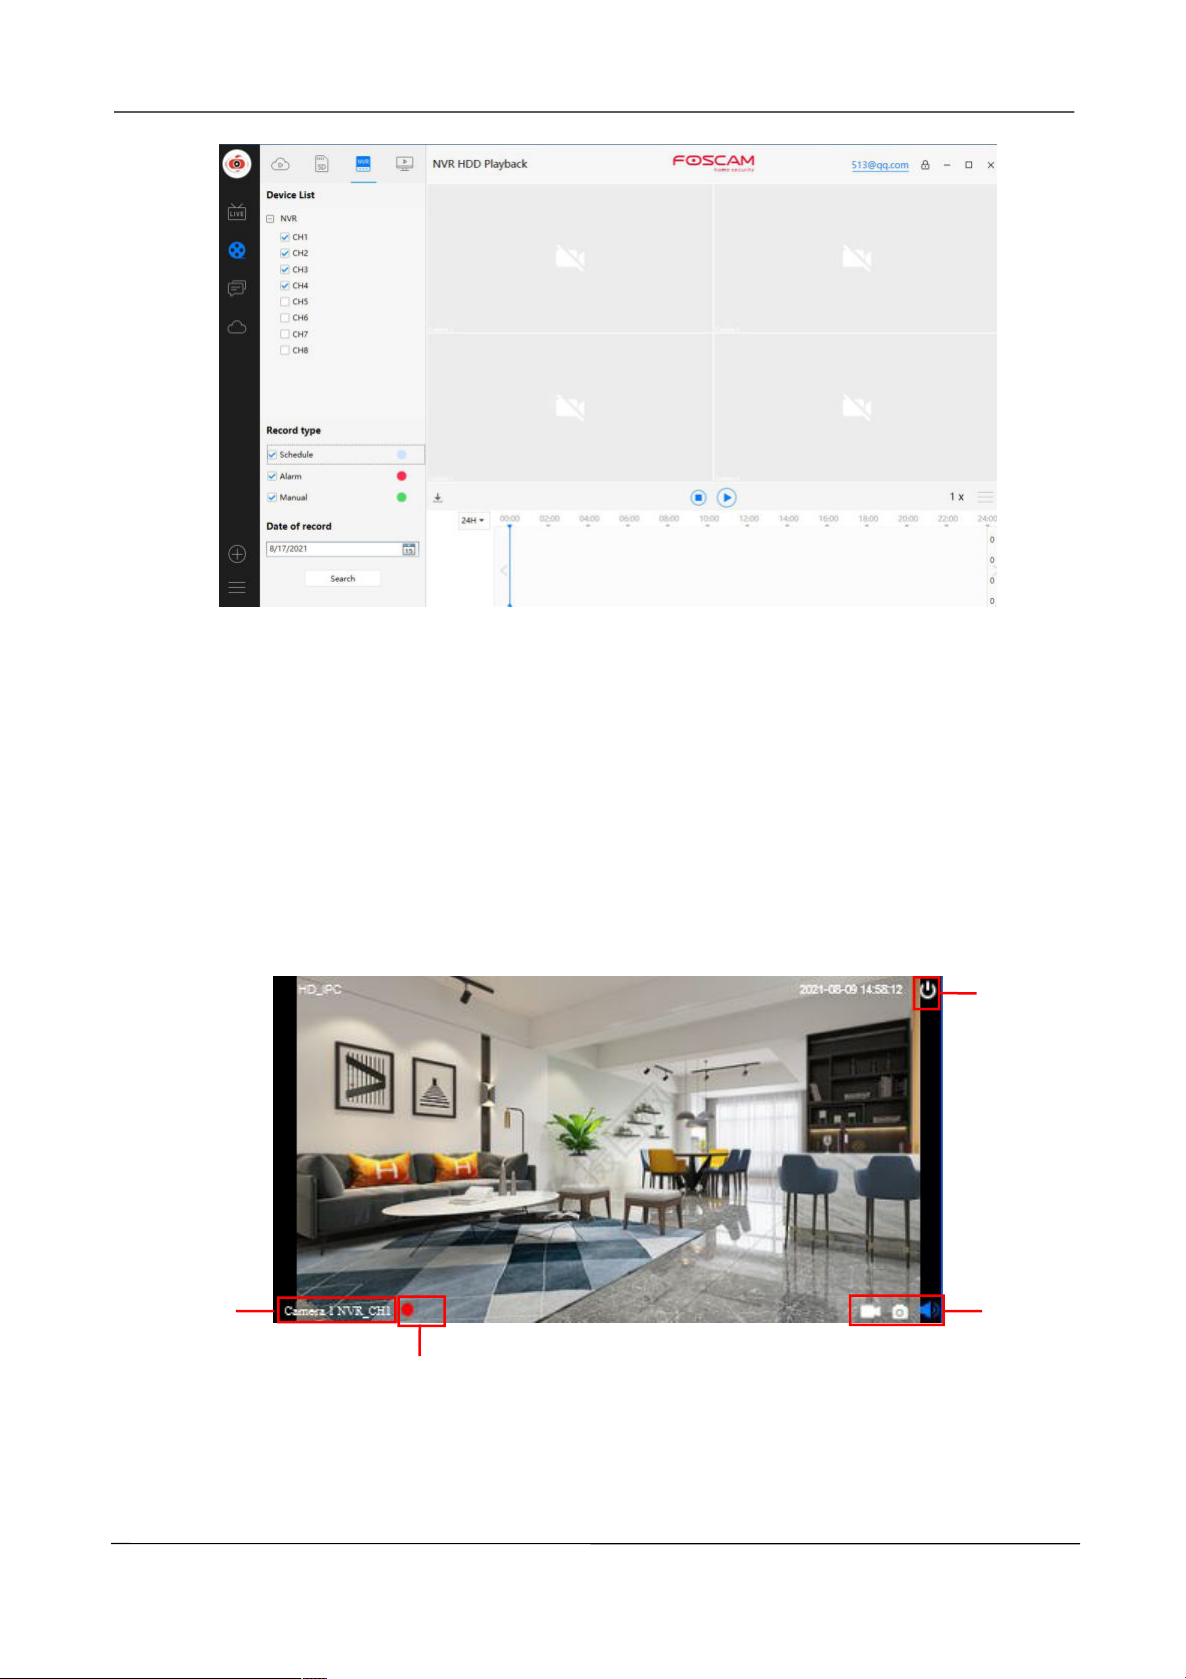
3-----NVR HD D Playback
on the right side of the NVR list to do the following.
If you have an HDD on your device, click this button to enter the NVR HDD Playback.
You can query the recording information of the hard disk by channel, record type, and date
of record.
www.foscam.com
Page 57
NVR User Manual
49
1
2
3
4
4-----Delete
Click the button, Delete the device.
5----- Setup
Click Setup button, goes to Device Settings Control Panel to make advanced NVR
settings.
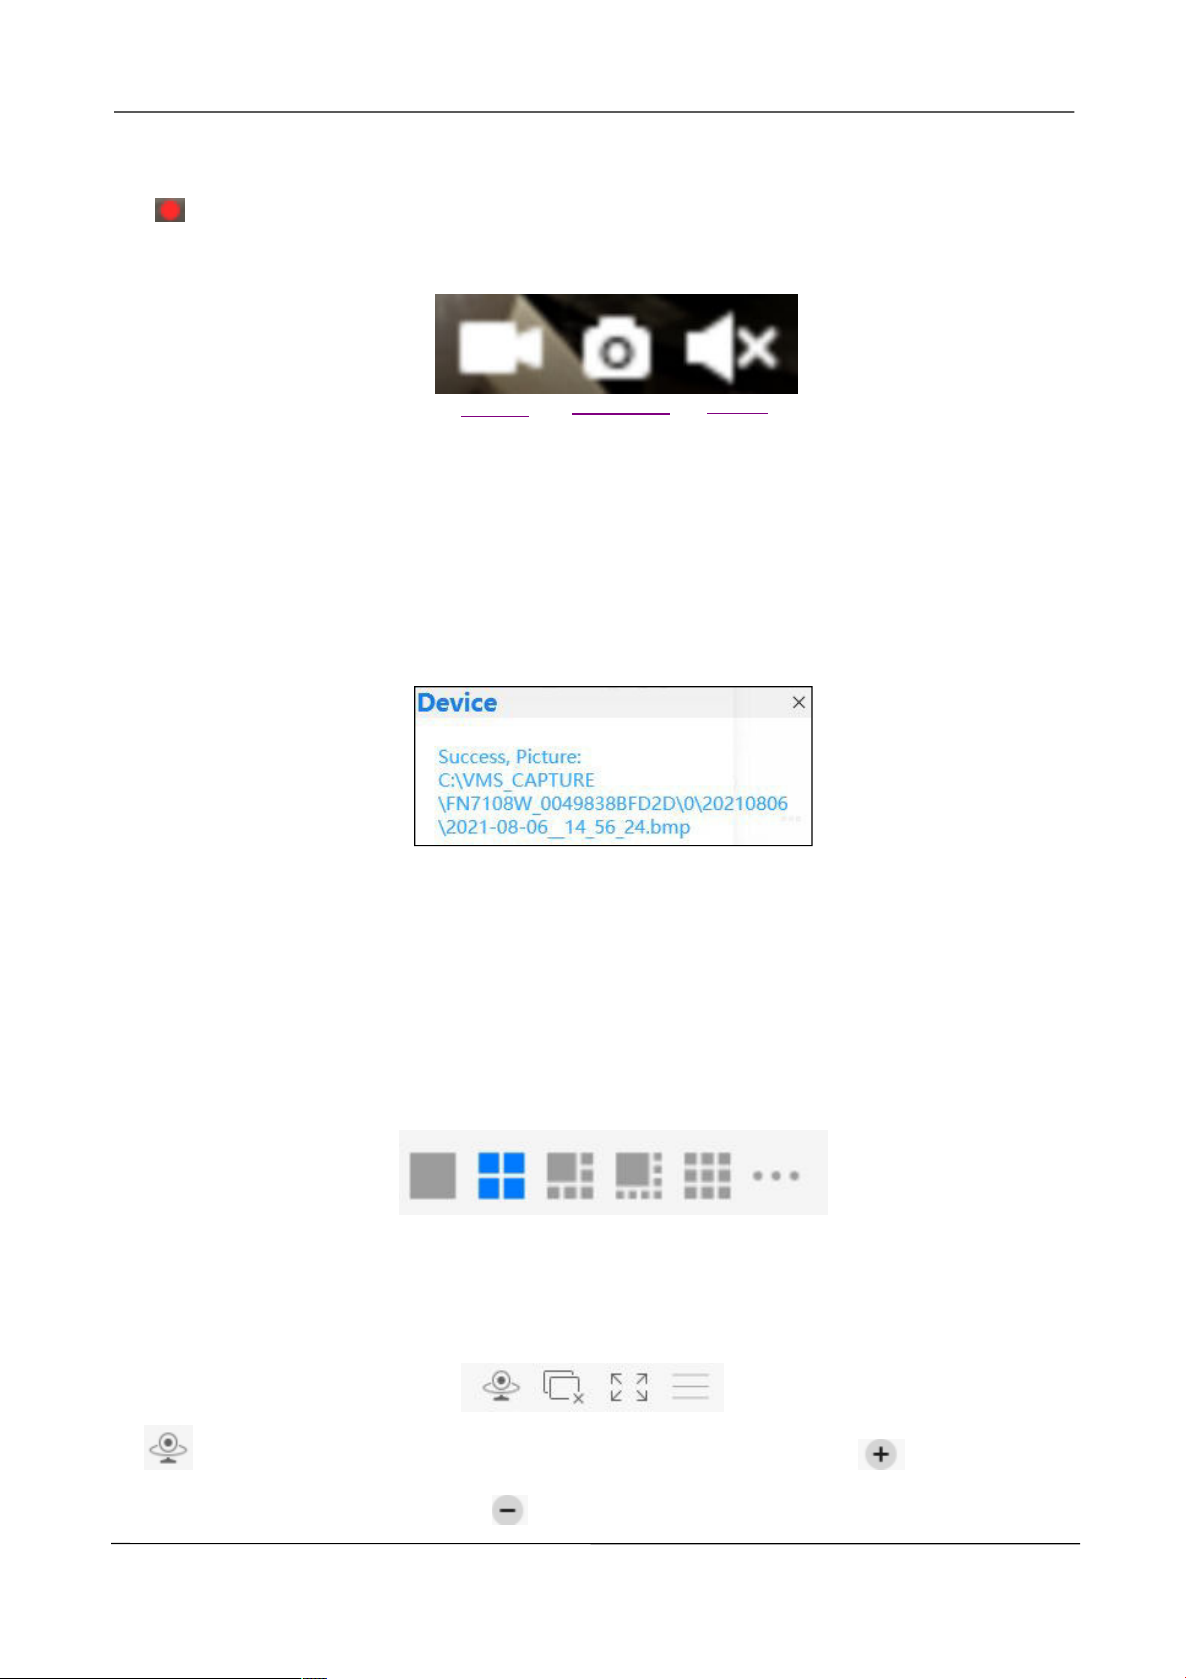
Section3 Live Window
When the mouse is placed on the video, the icon shown on the following figure appears.
1-----Close
Click the icon to close this channel live window
2-----Device Name
Show view channel and camera name.
www.foscam.com
Page 58
NVR User Manual
50
Record
Snap Shot
Sound
3-----Recording and Alarm status
This icon will turn to red, it indicates that the camera is recording
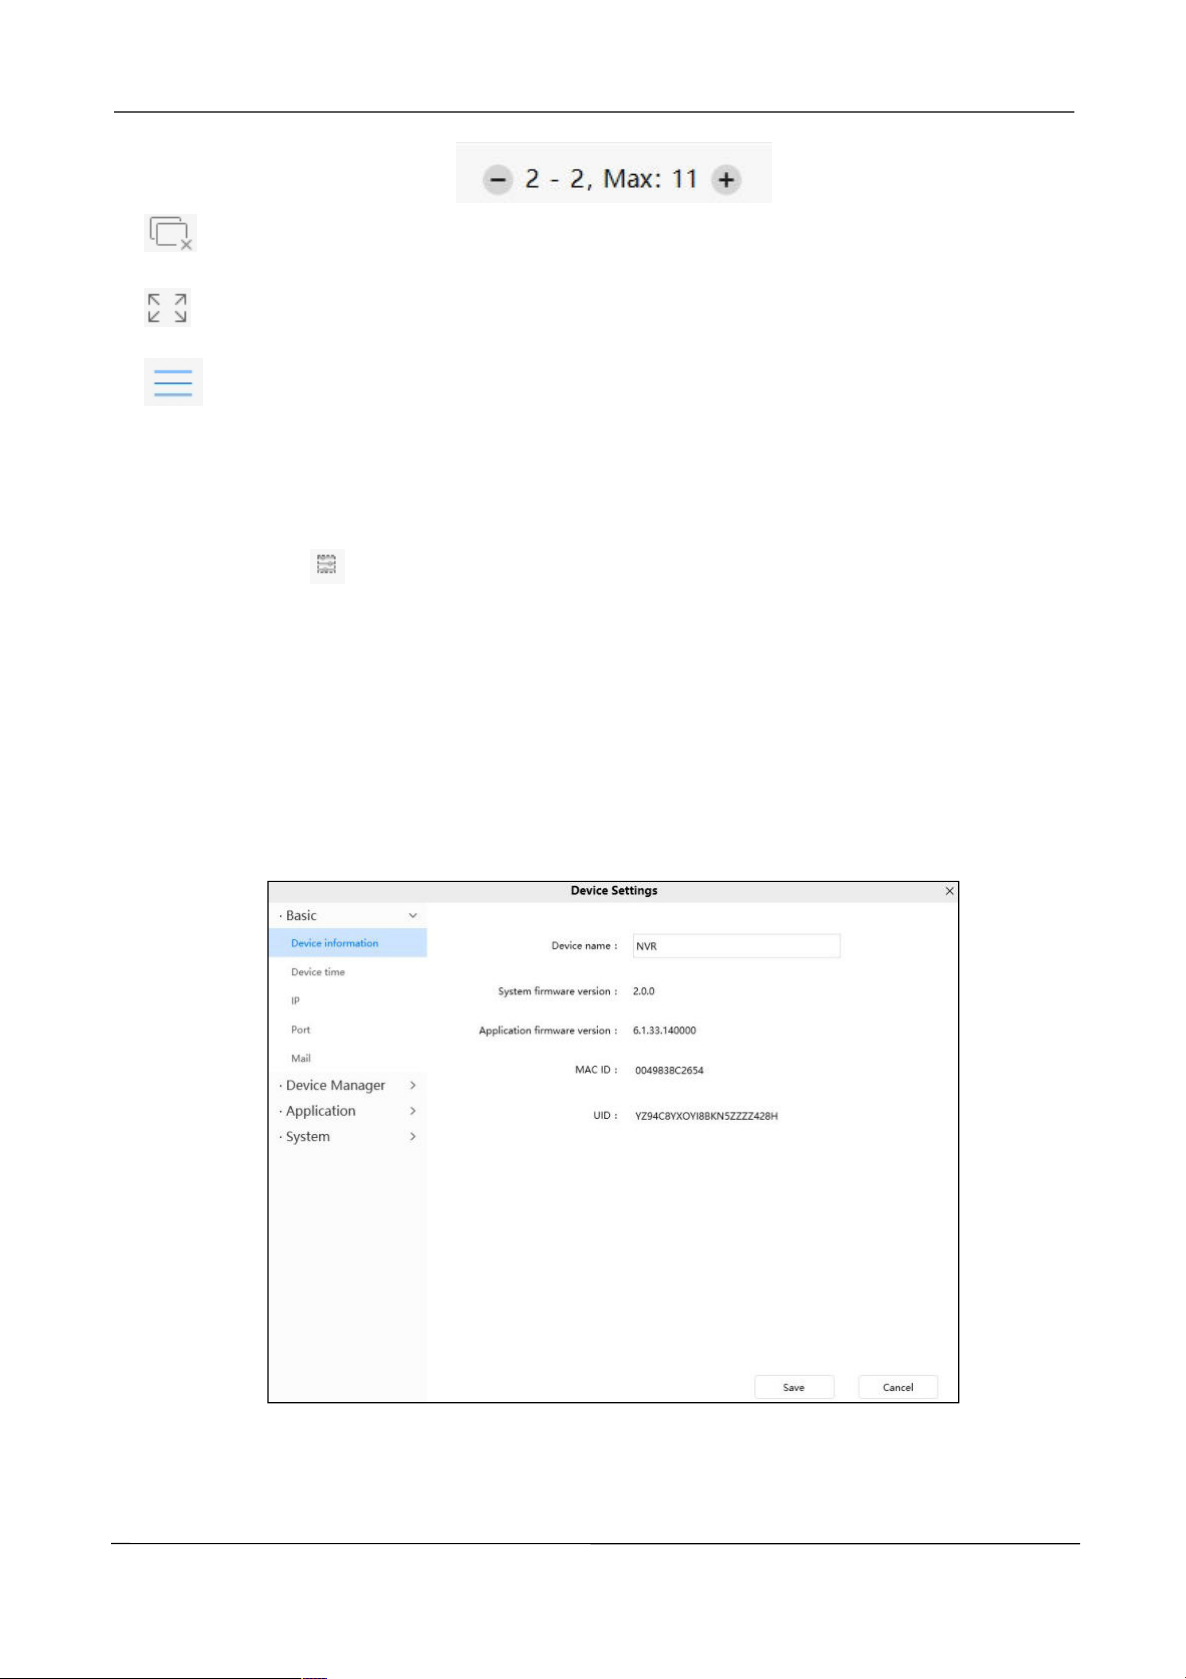
4----- Record / Snap Shot / Sound
Record ----- Click it and do manually recording. When recording, icon 1 will turn to blue.
Click it again and stop recording. The recording files will be stored to C:\VMS_RECORD
automatically.
Snap Shot ----- Click it to make snapshot. After snapshot, the button banner will prompt
Captur ed Successfully. And you can find the picture on default path C:\VMS_CAPTURE.
Sound ----- Click the icon then you will hear sound captured by the camera's built-in
microphone. You may need to plug in earphones or enable the computer speakers to hear
from the camera's microphone. Make sure the camera supports audio. Click again and
stop audio.
Section4 The number of split-screen
Click this button to select the number of split-screen on one page.
The client can monitor many cameras at one page, here you can choose the display
number. The maximum number is 16.
Section5 Live Cruise / Close All / Full Screen / Hide Bar
Live Cruise ----- Click this button to Live Cruise, you can click button to add a
loop page for live Cruise or click
www.foscam.com
button to reduce the loop page for live Cruise.
Page 59
NVR User Manual
51
Close All ----- Click this button to close all the cameras
Full Screen ----- Click this button to enter full screen, then click to exit full screen.
Hide Bar ----- Click this button, Hide and show Pan / Tilt control Bar
4.5 Setup
Select the icon
goes to Devi ce Settings control panel to make advanced NVR settings.
on the right side of the NVR list to do the following. Click Set up button,
4.5.1 Basic
Device Information
You can modify the device name. You can also see the basic information of the NVR.
Device name : The Device Name is a unique name that you can give to your device to help
you identify it. You can define a name for your NVR here such as NVR1. Click Save to save
your changes. The alias name cannot contain special characters.
www.foscam.com
Page 60
NVR User Manual
52
System firmware ver sion: Display the system firmware version of your NVR.
Application firmware vers ion: Display the application firmware version of your NVR.
MAC ID: Display the MAC address of your NVR. For example Device ID is 0049838BFD2D,
the same MAC ID sticker is found at the bottom of the NVR.
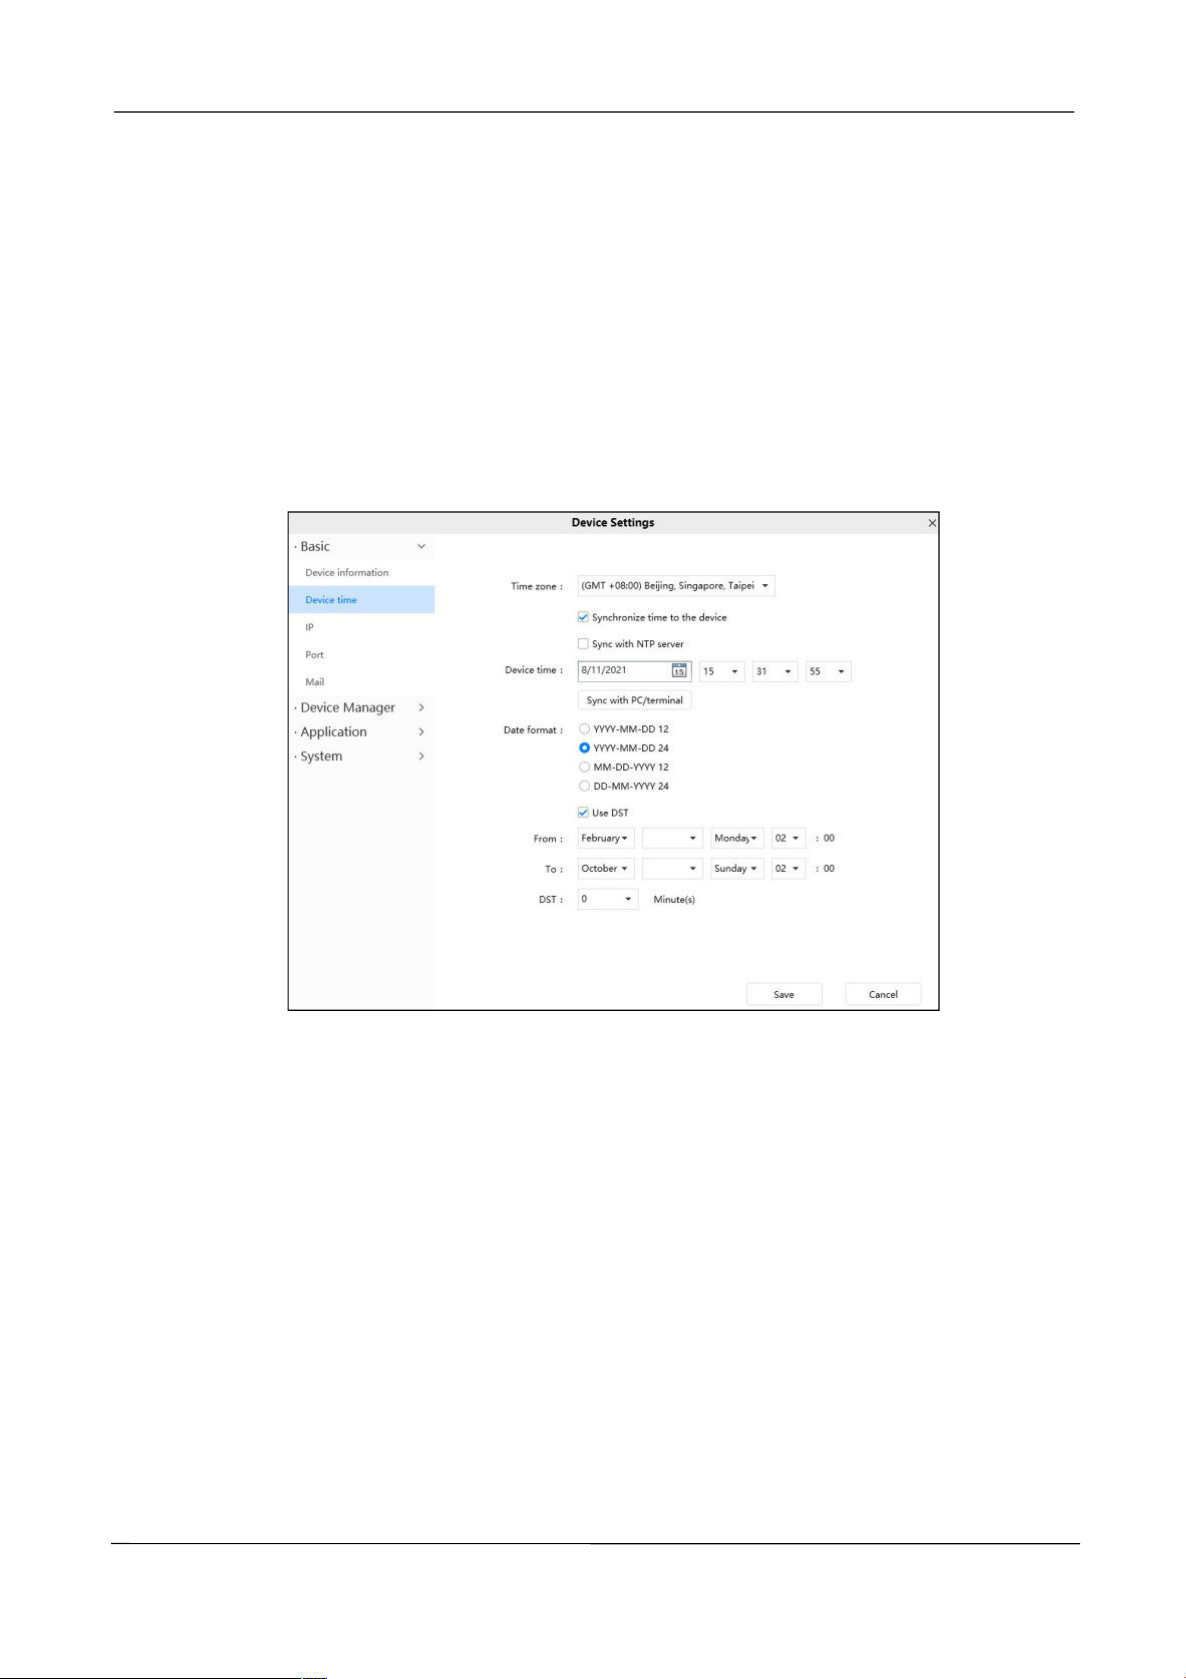
Device time
This section allows you to configure the settings of the internal system clock for your
camera. You can set the time zone, device time, date format.
Time zone: Select the time zone for your region from the drop down menu.
Synchronize time to the device: After checking the Synchronize time to the device
checkbox, you can set the device time, or click the Sync with PC /termin al button to
synchronize the PC/terminal time to your device.
Sync with NT P server: Network Time Protocol will synchronize your device with an
Internet time server. Choose the one that is closest to your device.
Use DS T : Select the use DST (Daylight Saving Time, to set the clock ahead of the
real-time), then set the start time and end time of the DST, select the daylight saving time
from the drop-down menu at last.
Click Save button and submit your settings.
www.foscam.com
Page 61
NVR User Manual
53
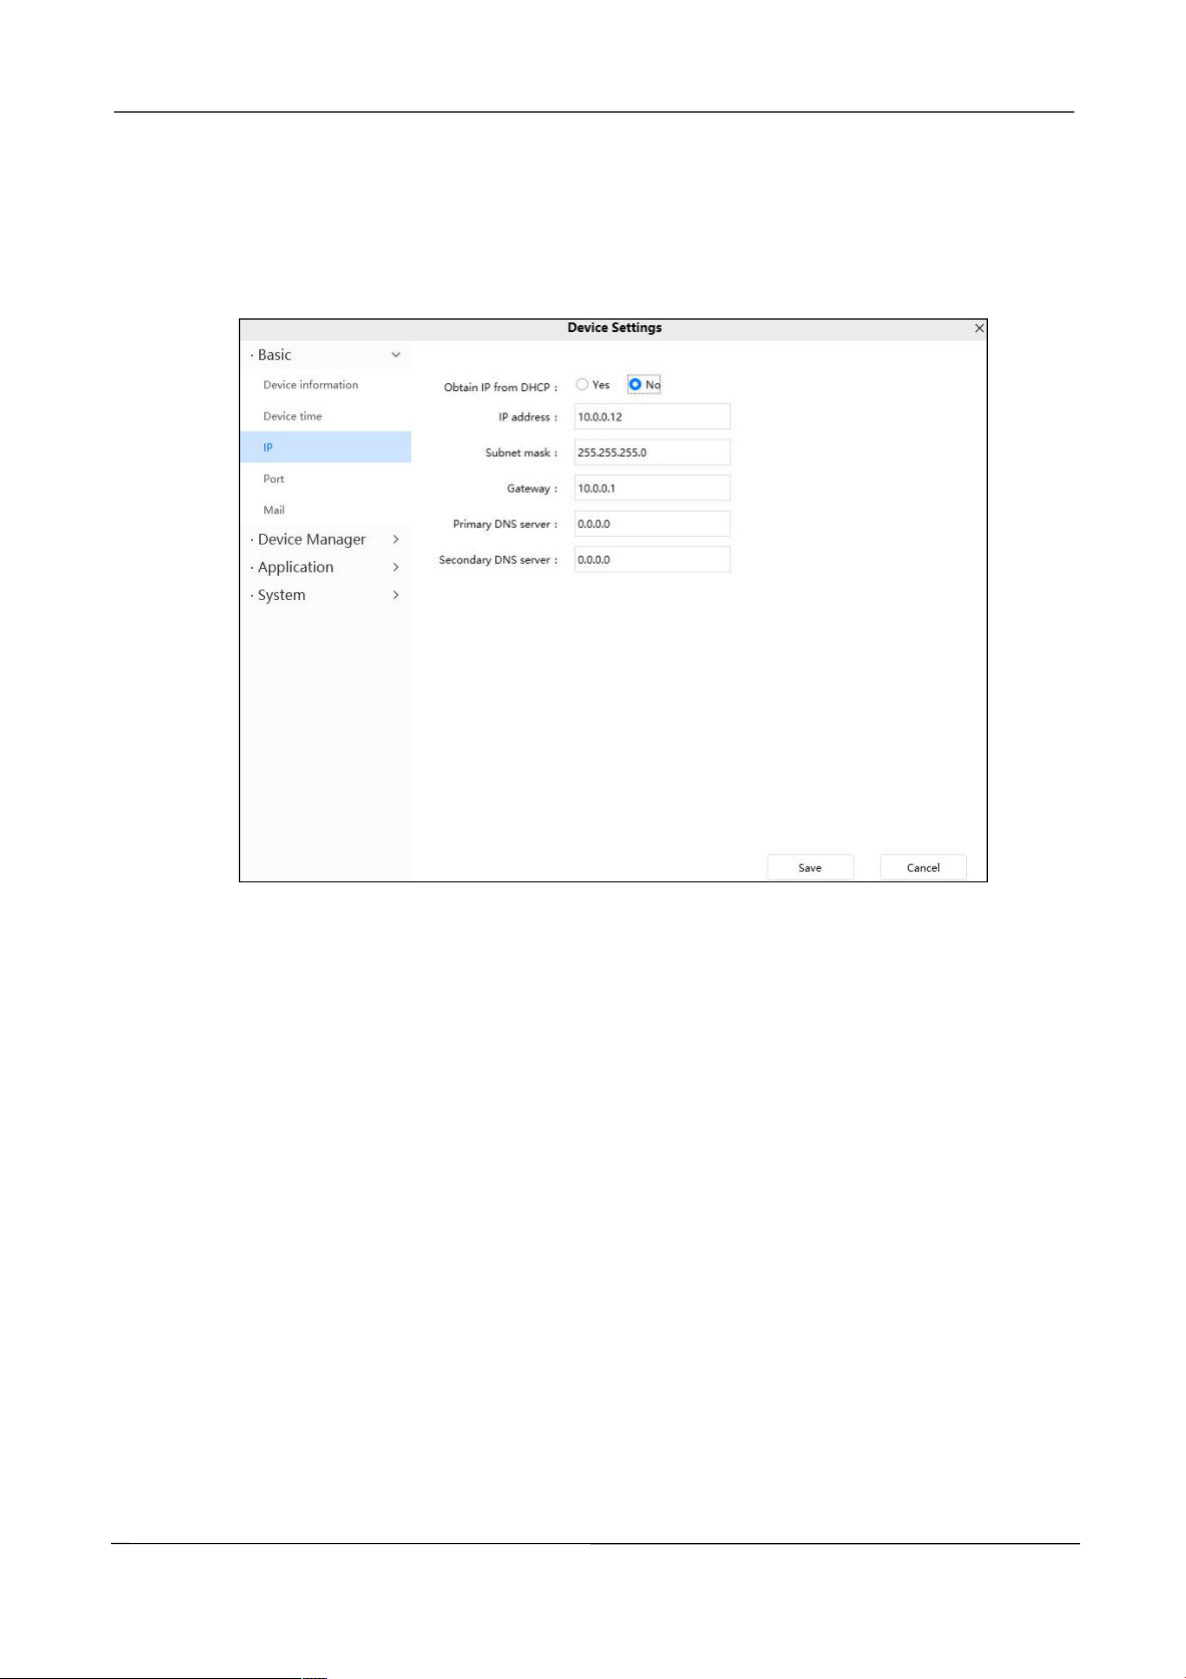
IP
If you want to set a static IP for the device, please go to IP page. Keep the device in the
same subnet of your router or computer.
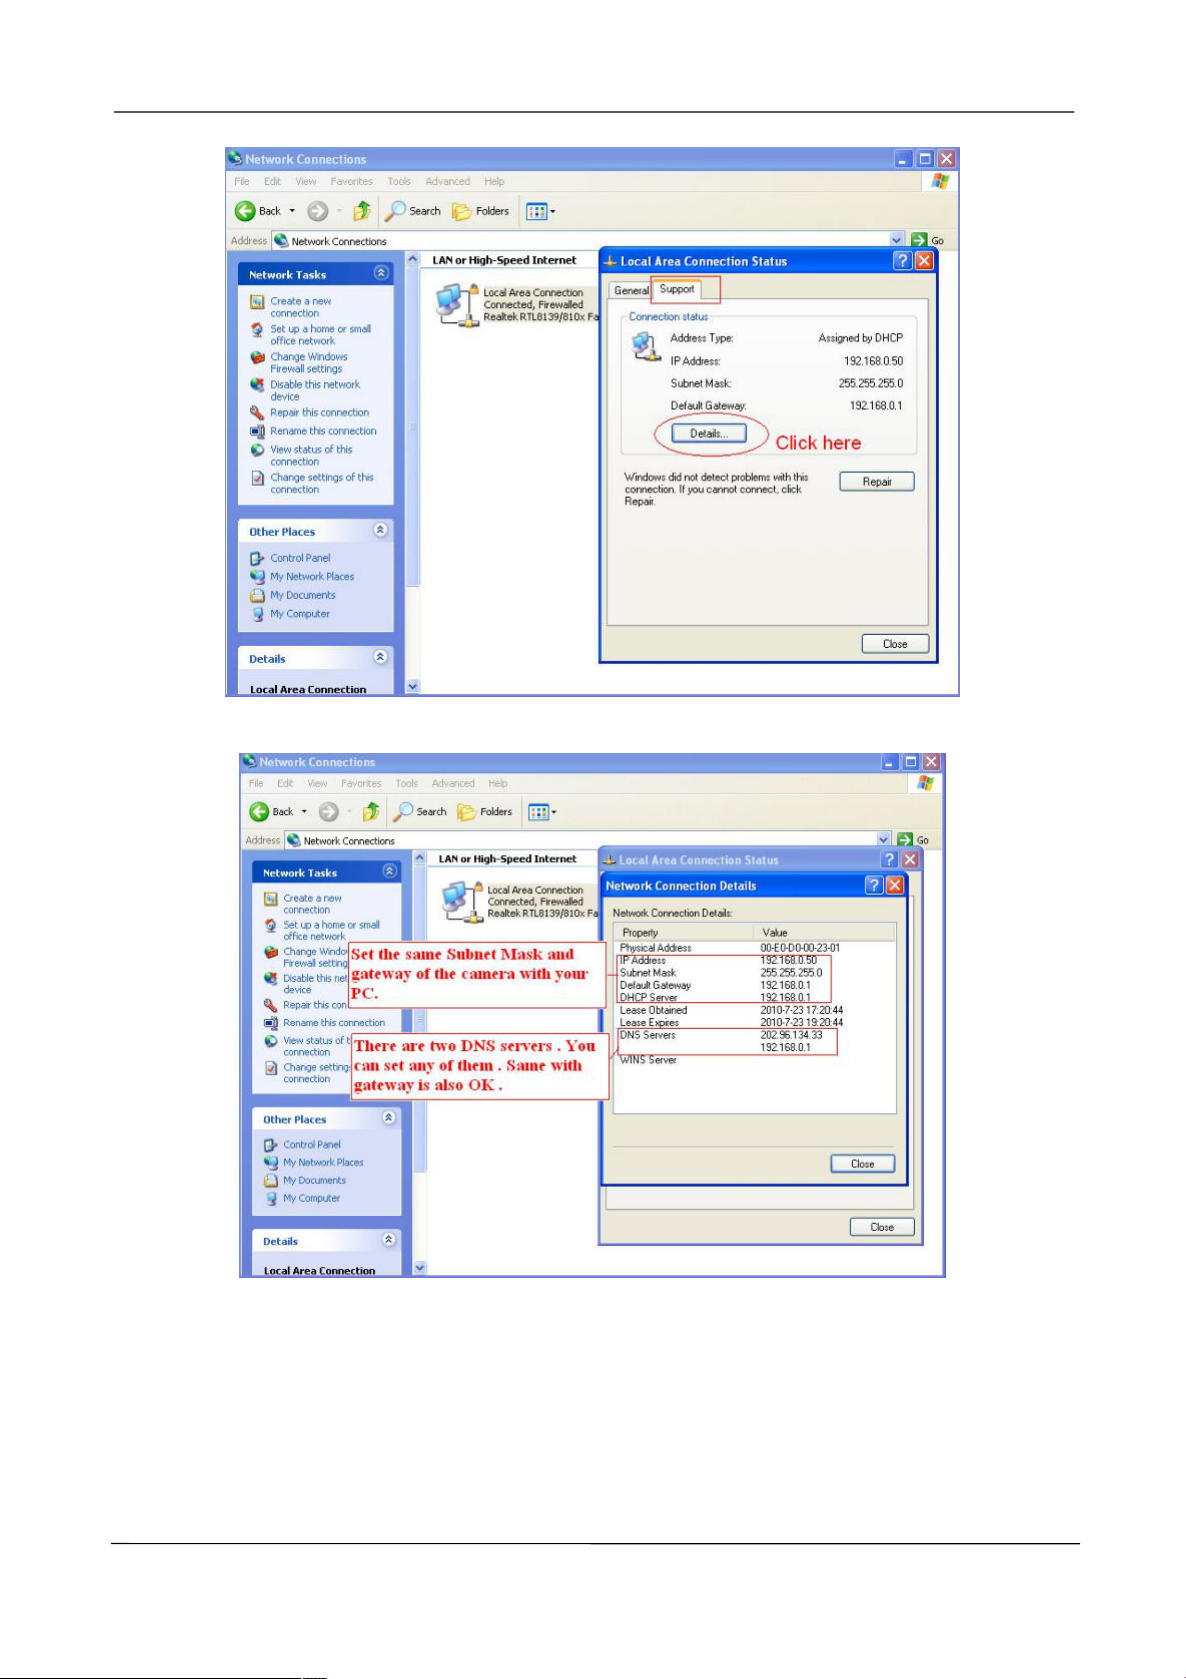
It is recommended that you use the subnet mask, gateway and DNS server from your
locally attached PC. If you don't know the subnet mask, gateway and DNS server, you can
check your computer's local area connection as follows:
Control Panel--Network Connections--Local Area Connections -- Choose
Support--Det ails.
www.foscam.com
Page 62
NVR User Manual
54
If you don't know the DNS server, you can use the same settings as the Default Gateway.
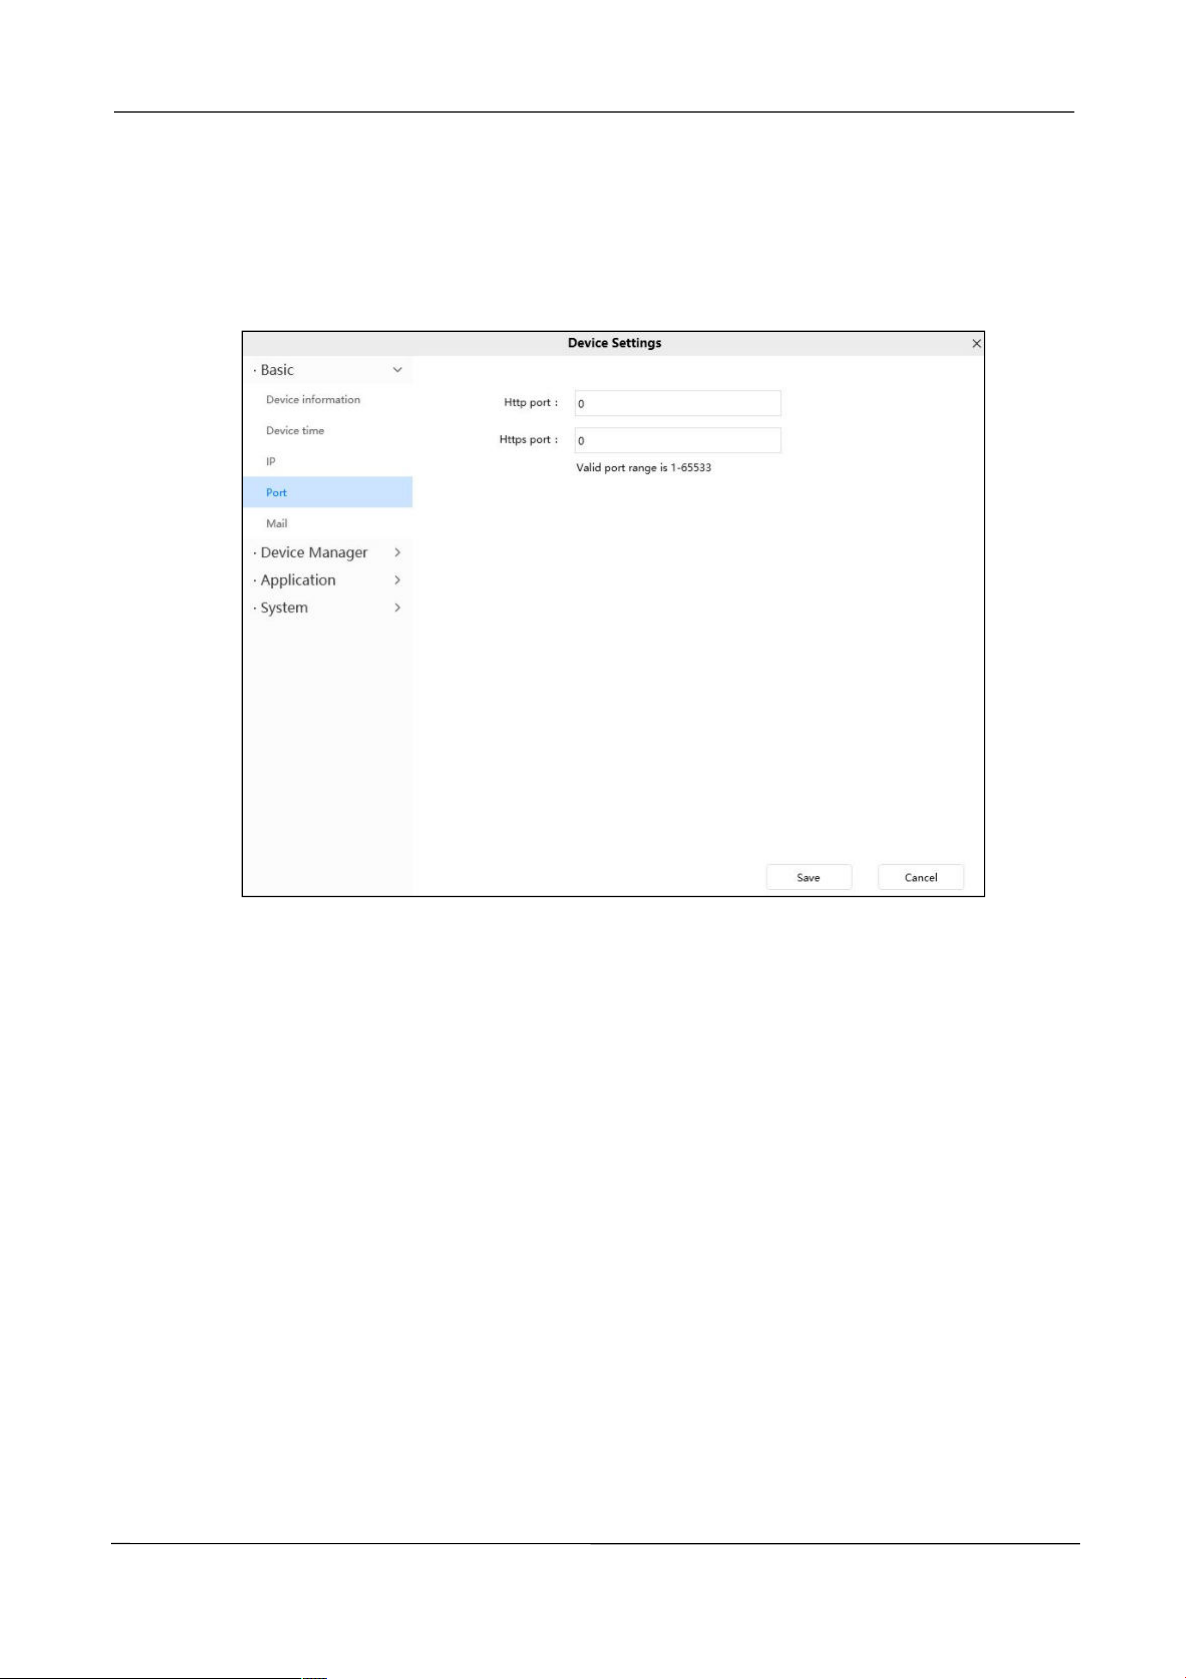
Port
This device supports HTTP Port / HTTPS Port Port. HTTP Port is used to access the
device remotely.
www.foscam.com
Page 63
NVR User Manual
55
HTTP port: By default, the HTTP is set to 88. Also, they can be assigned with another port
number between 1 and 65535. But make sure they can not be conflict with other existing
ports.
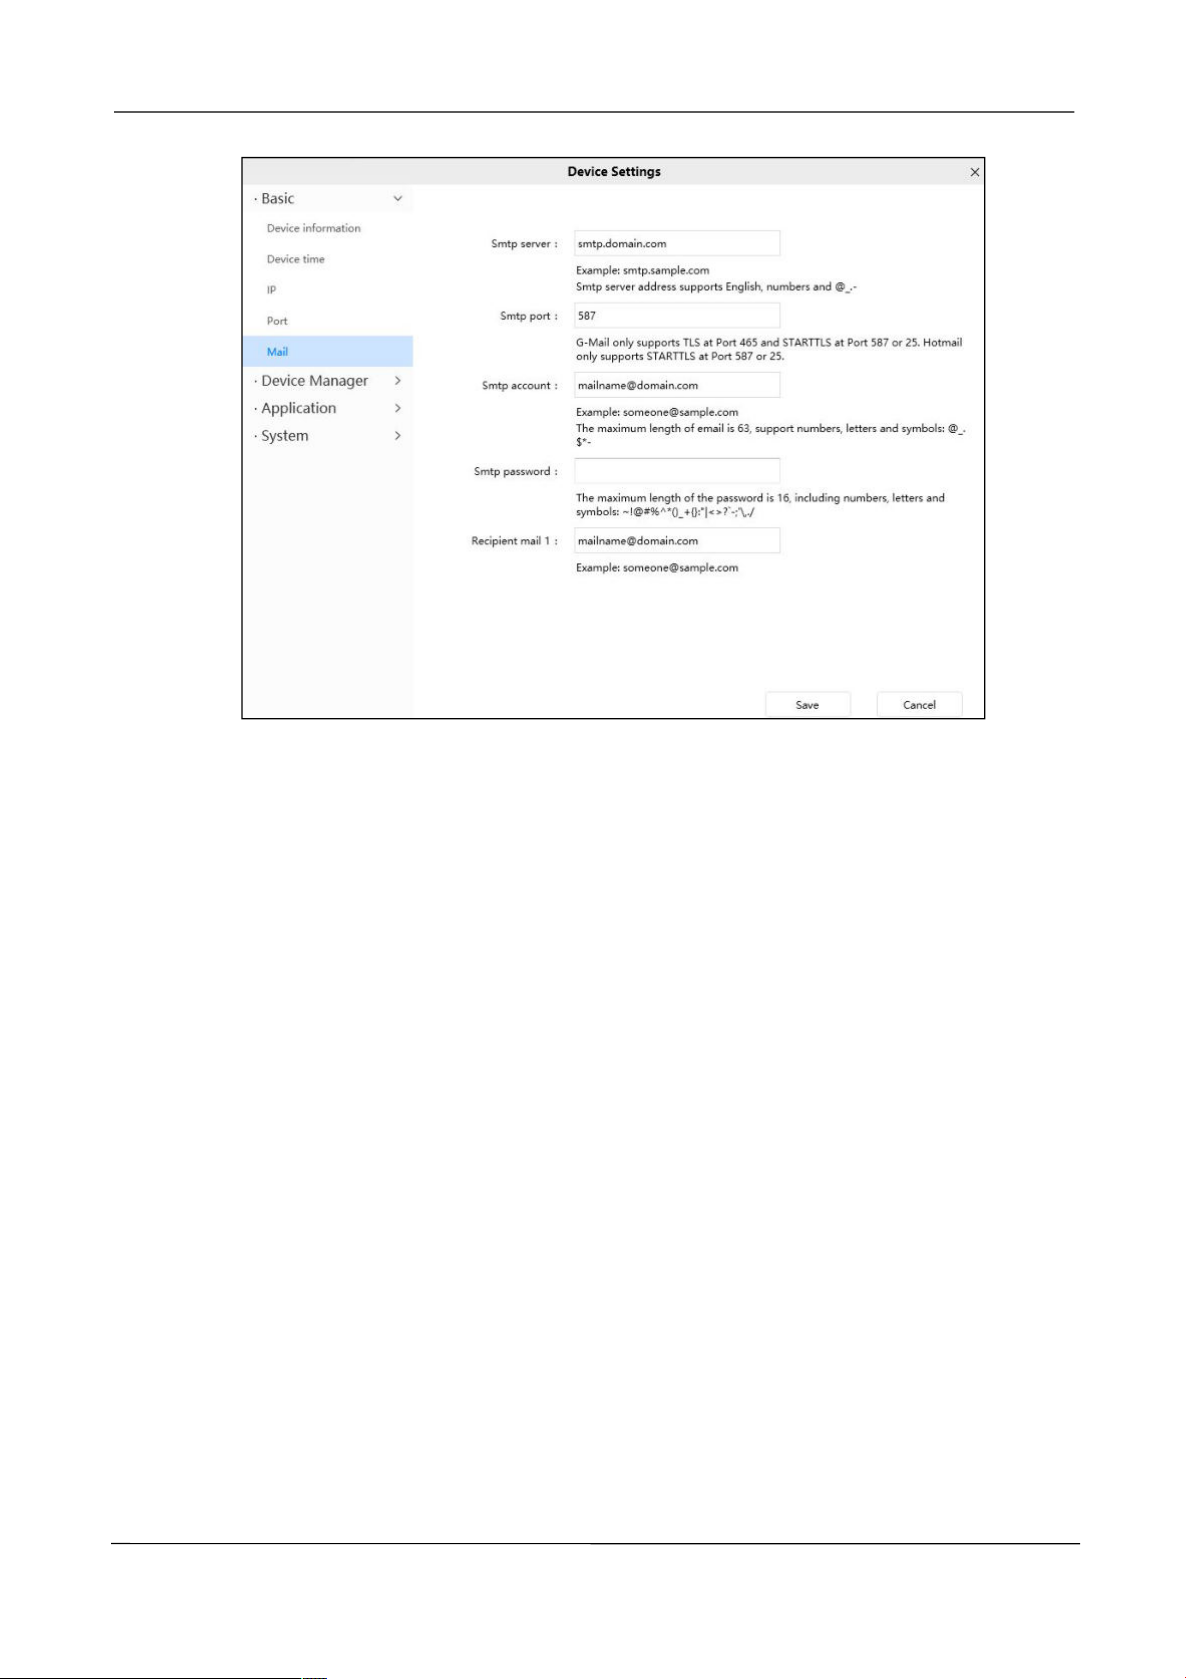
Mail
If you want the NVR to send emails when motion has been detected, here mail will need to
be configured.
www.foscam.com
Page 64
NVR User Manual
56
1----- SMTP server/ Port Enter SMTP server for sender. SMTP port is usually set as 25.
Some SMTP servers have their own port, such as 587 or 465, and Transport Layer
Security usually is None. If you use Gmail, Transport Layer Security must be set to TLS or
STARTTLS and SMTP Port must be set to 465 or 25 or 587, which port you choose should
be decided by which Transport Layer Security you select.
2----- SMTP account/ password ID account and password of the sender email address
3----- Recipient mail 1 Mailbox for receiver need not support SMTP, you can set 4
receivers.
4----- Save Click Save to take effect.
4.5.2 Device Manager
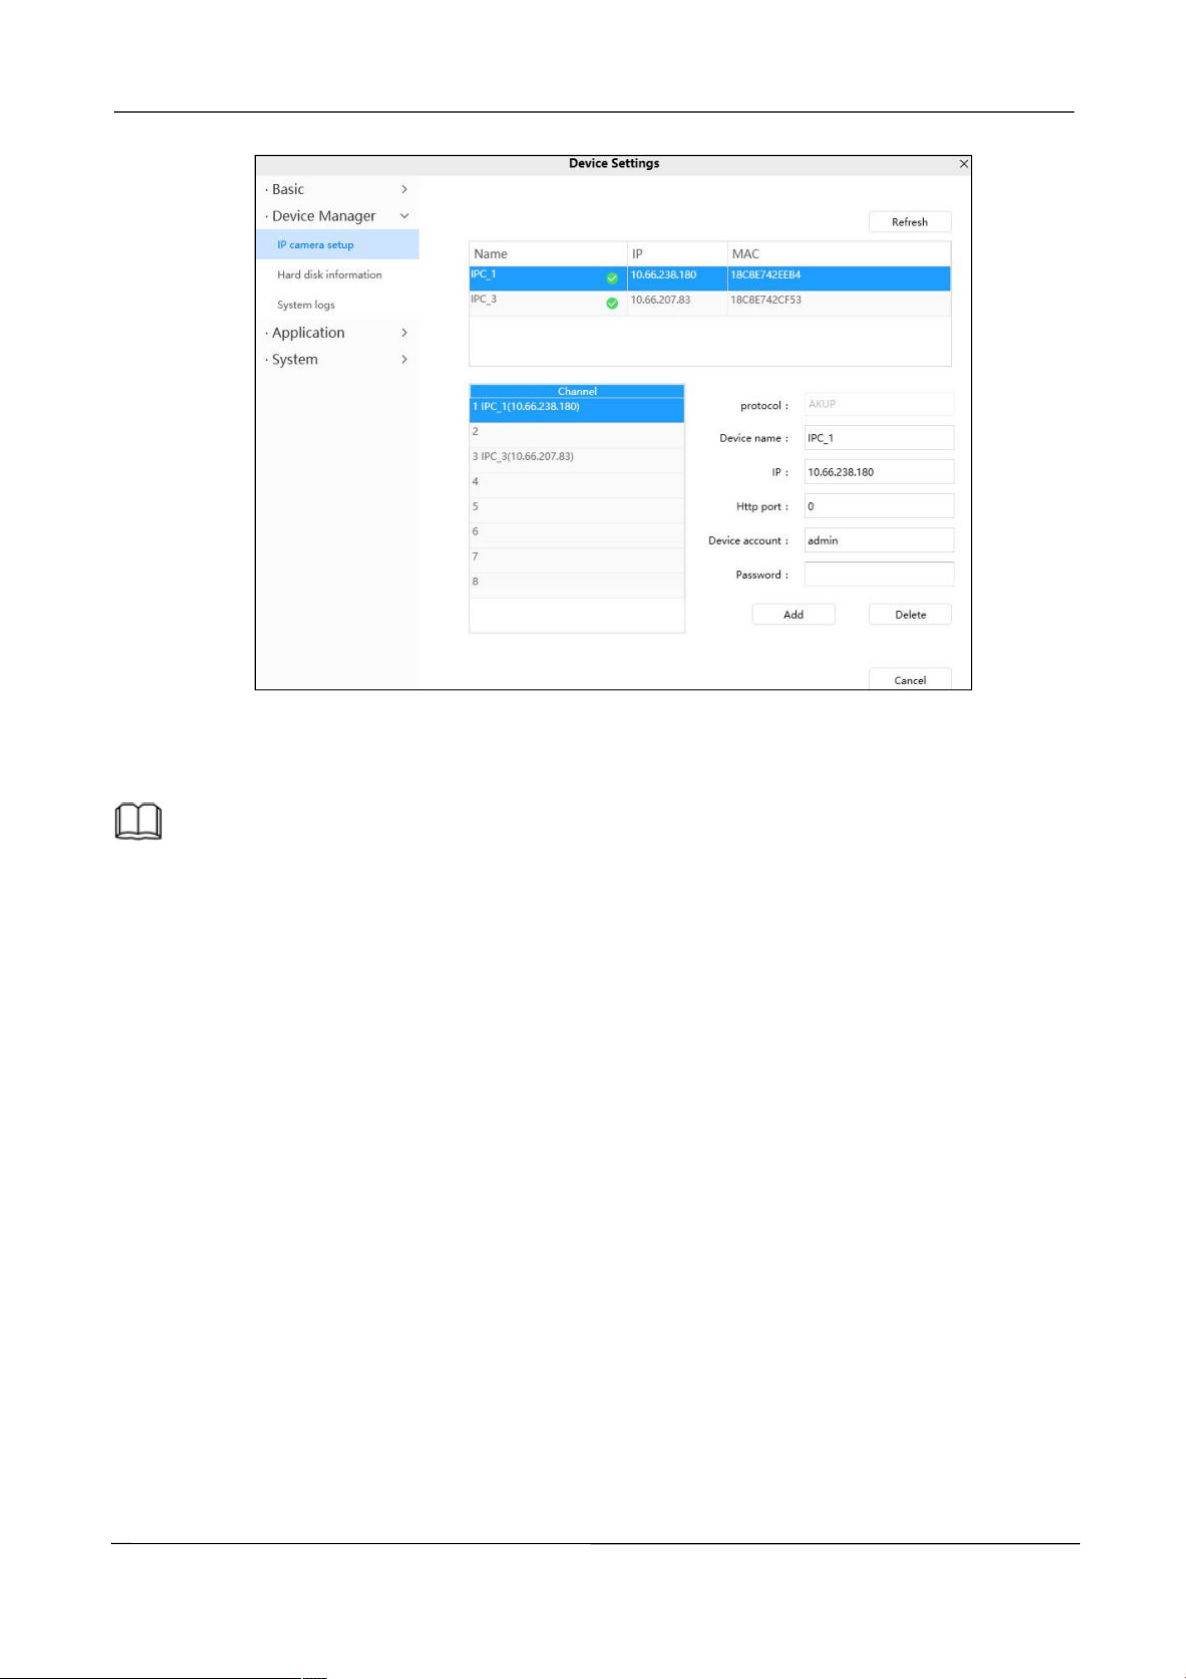
IP camera setup
You can add the camera for the NVR device on this page.
Select the channel in the channel list box, enter the device information, click the add
button, and the system will prompt for success.
www.foscam.com
Page 65
NVR User Manual
57
Device account/Pass word: The Device account/Password is the user name and
password you set when you first logged in to the NVR system using the monitor.
Note
The NVR in the FN7108W-B4 kit can only add the IPC in the kit, and the IPC in the kit can only be used
for the NVR in the kit. And NVR automatically matches IPC.
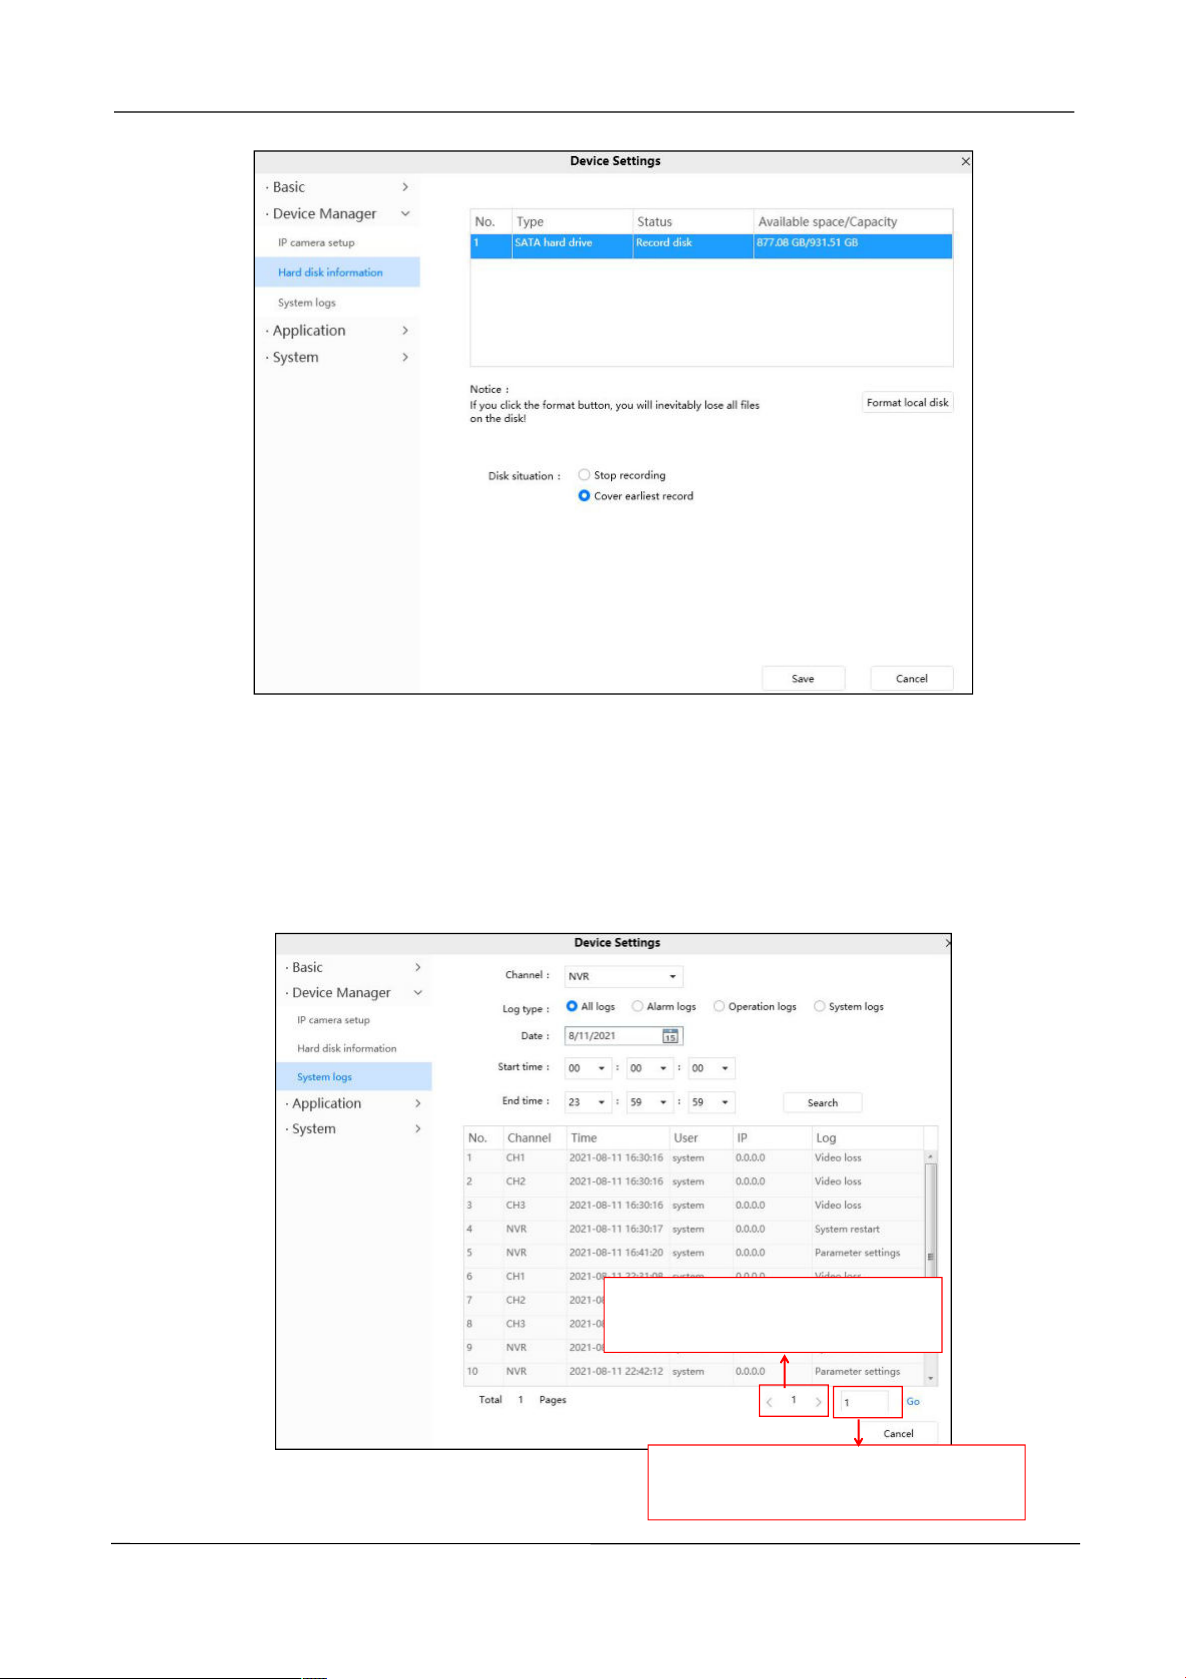
Hard disk information
You can view the hard disk information of NVR.
Click the Format local disk button to clear the hard disk information of NVR.
If your hard disk is full, you can check whether to Stop recording or Cover earliest record.
www.foscam.com
Page 66
NVR User Manual
58
Click the page number and go to the
corresponding page to see more logs
Full in one page number, click GO
button and go to the corresponding page.
After the modification is completed, click Save button to take effect.
System logs
You can query the Alarm logs, Operation logs and System log of the NVR.
www.foscam.com
Page 67
NVR User Manual
59
Send E-mail
4.5.3 Application
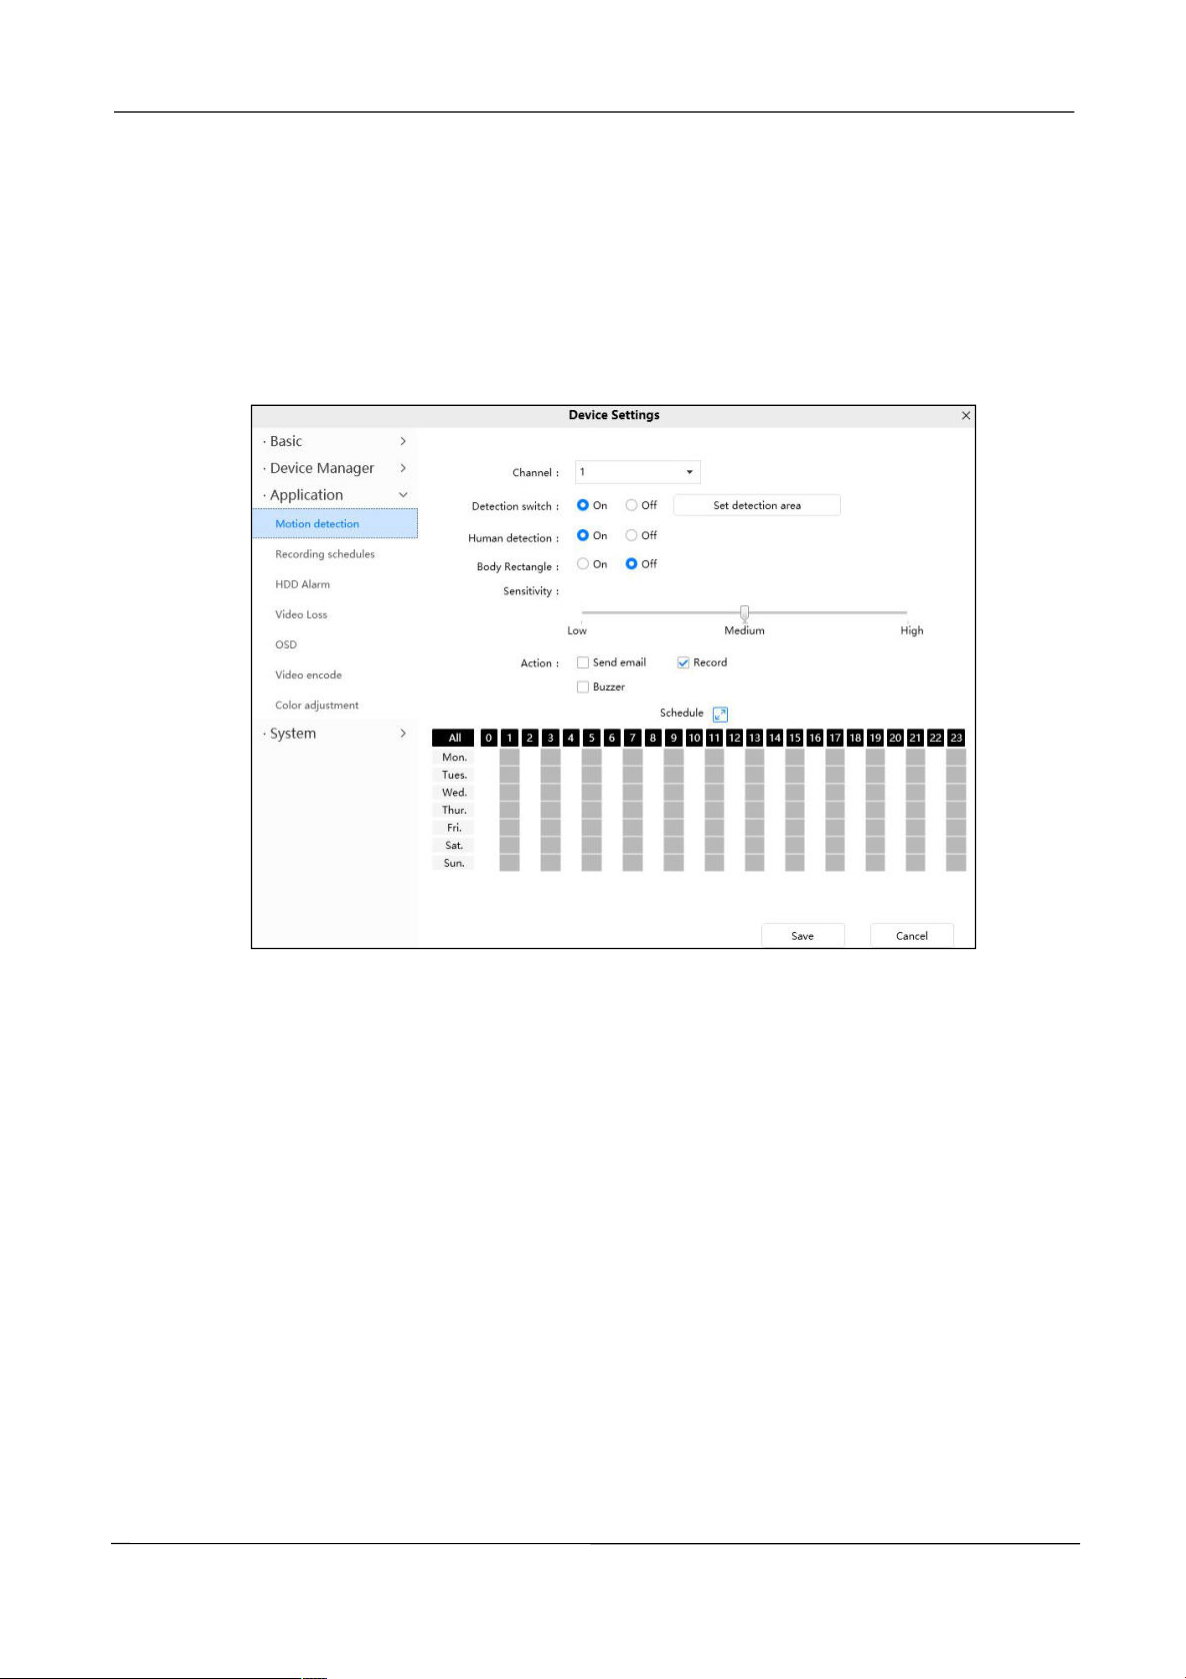
Motion detection
The NVR supports Motion Detection Alarm, when the motion has been detected, it will send emails.
To enable motion detection, follow the steps below:
1 Channel---- Select the channel that needs motion detection.
2 Detection switch---- Whether to enable motion detection
3 Set detection area----You can set the alarm area.
4 Human detection---- Whether to turn on detection.
5 Body Rectangle
6 Sensitivity---- It supports three modes: Low, Middle and High. The higher the sensitivity, the camera
will be more easily alarmed. Select one motion sensitivity.
7 Select the alarm Action
There are some alarm indicators:
If you want to receive alarm emails when motion is detected, you must select Send E-mail and set
www.foscam.com
Page 68
NVR User Manual
60
Recording
Buzzer
Alarm anytime when motion is detected.
Specify an alarm schedule
Mail Settings first. Make sure you have set E-mail in “Device Setting -> Basic -> Mail” interface.
If you select this checkbox, when the motion has been detected, the NVR will recording and store in
HDD.
If you select this checkbox, when the motion has been detected, the NVR will alert the buzzer.
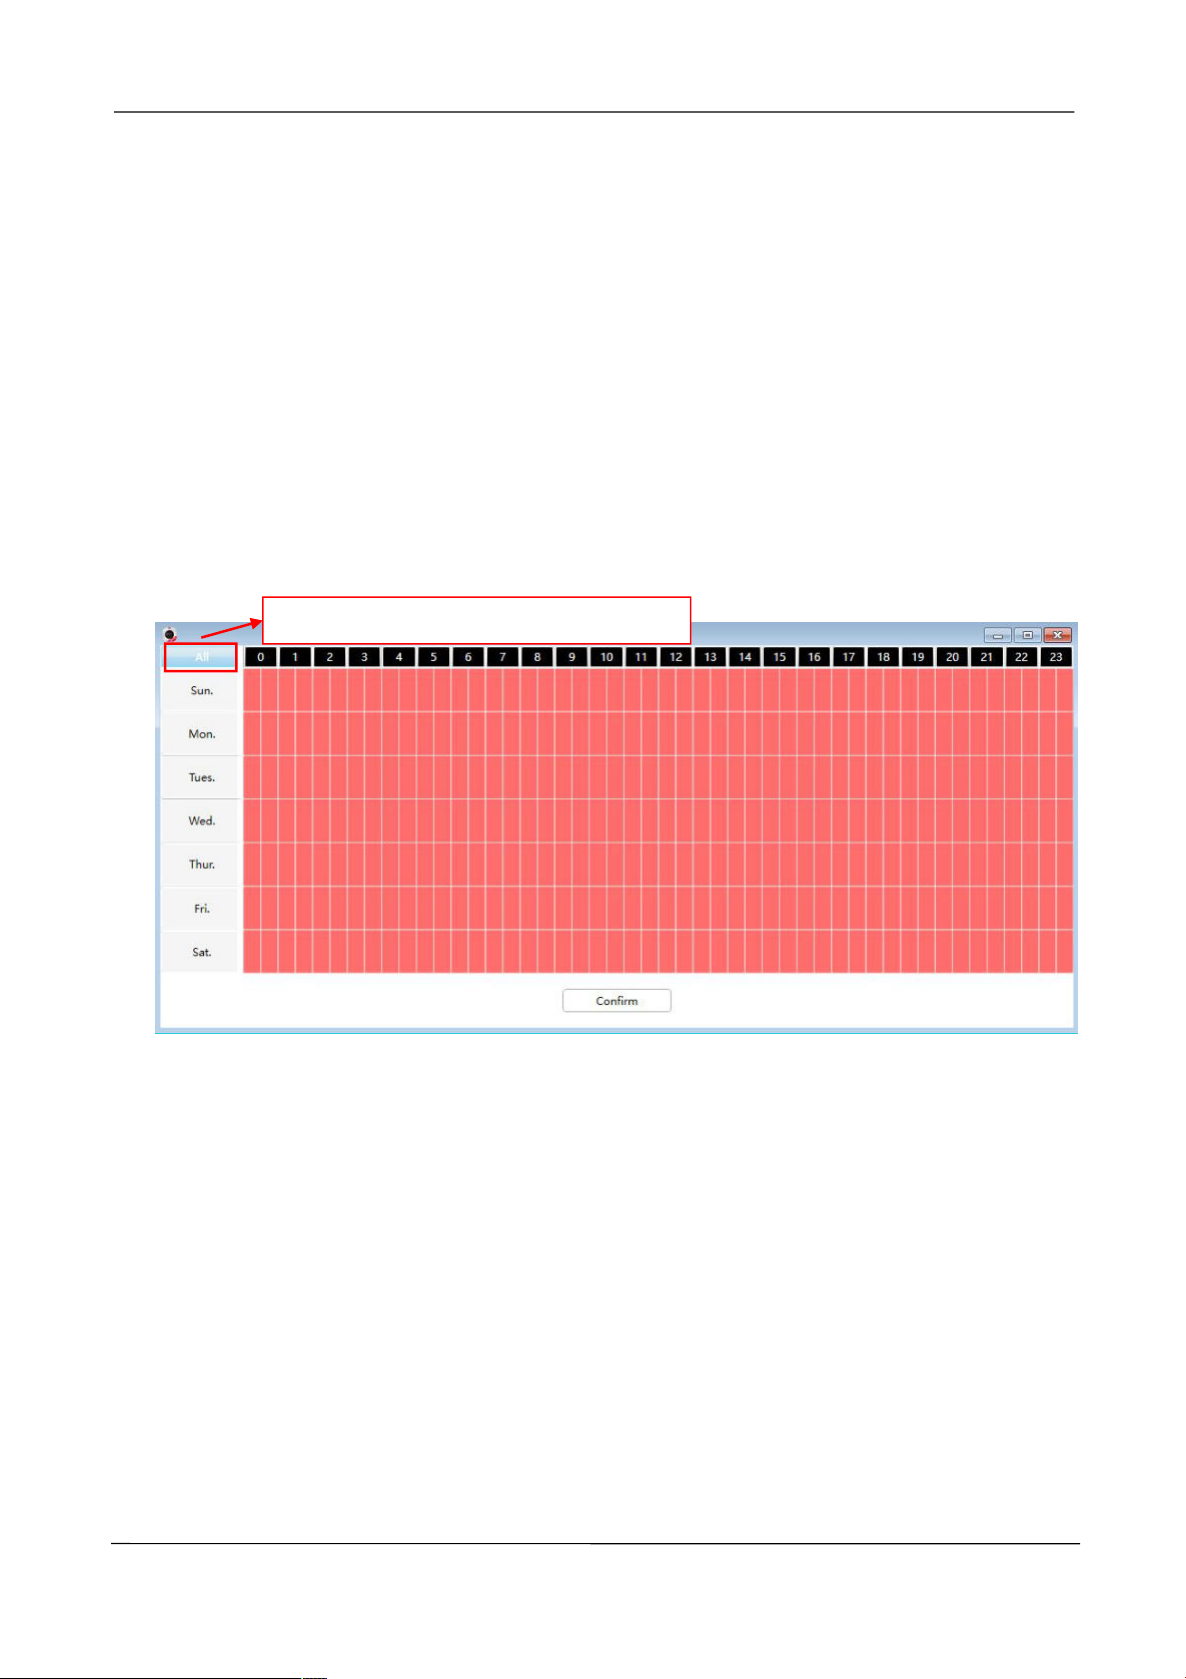
8 Alarm Schedule
Click the black button up the MON, you will see all time range turn red. When something moving in
the detection area at anytime, the NVR will alarm.
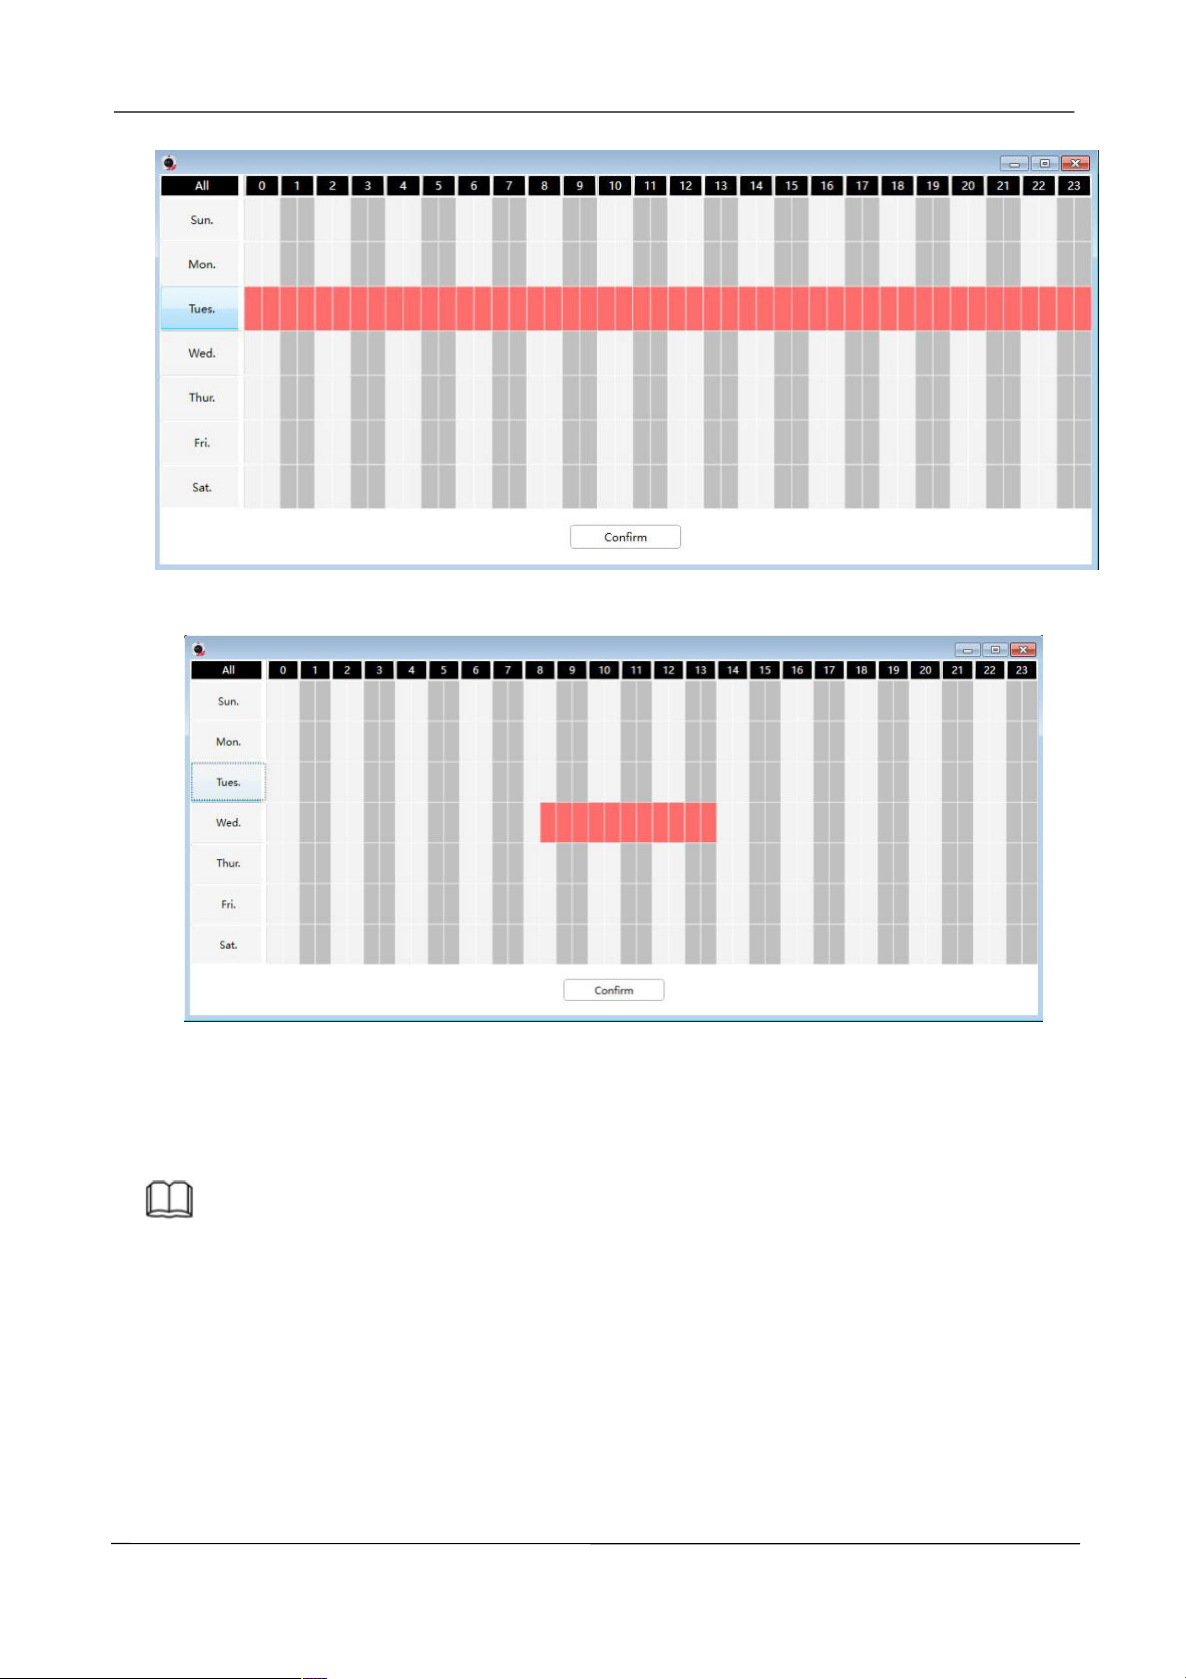
Click the week day words, the corresponding column will be selected. For example, click TUE, the
all column of TUE turns to red, that means during Tuesday whole day, when something moving in
the detection area, the NVR will alarm.
www.foscam.com
Page 69
NVR User Manual
61
Press the left mouse and drag it on the time boxes, you can select the serial area.
9 Click Save button to take effect. When the motion is detected during the detection time in the
detection area, the NVR will alarm and adopt the corresponding alarm indicators.
Note
You must set the detection area and detection schedule, or else there is no alarm
anywhere and anytime.
Recording schedules
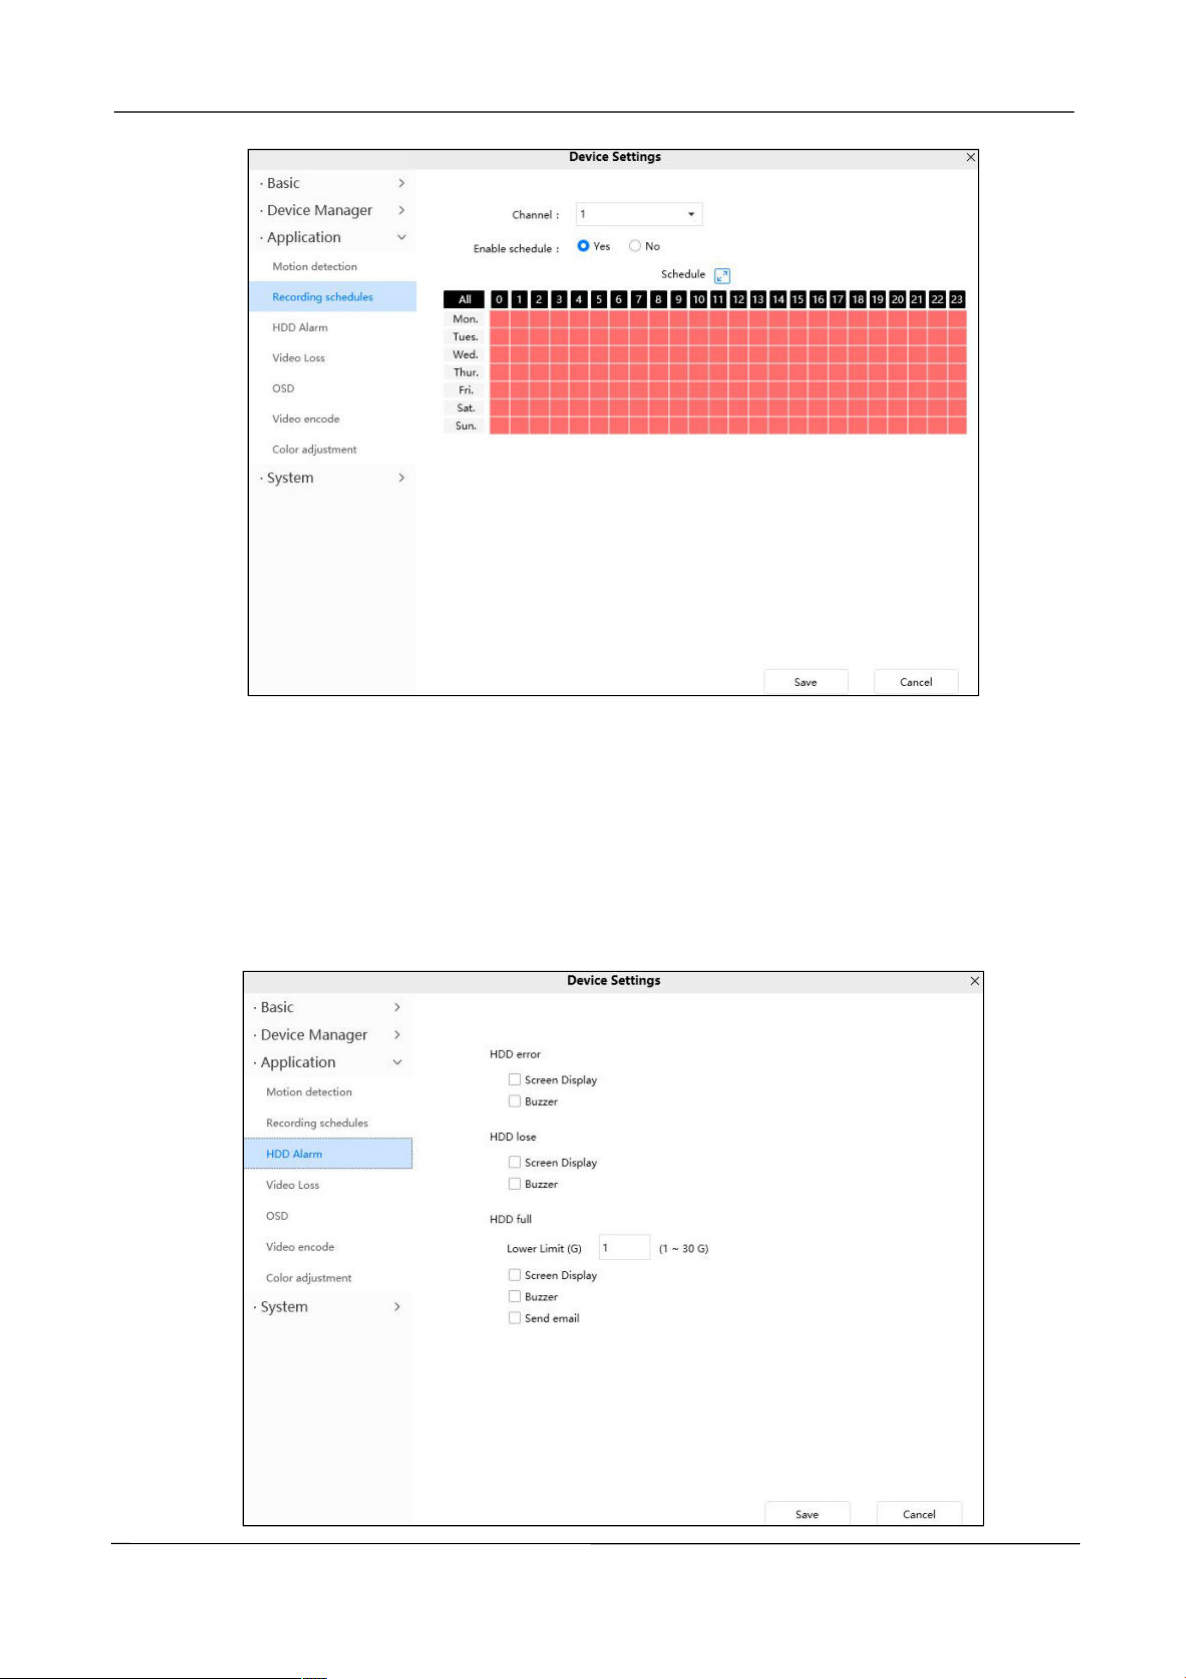
On the page you can configure the schedule record.Schedule Recording only supports
HDD.
www.foscam.com
Page 70
NVR User Manual
62
Select the recording channel. Check the Enable schedule checkbox, then you can set the
schedule for recording.
Click Save button to take effect.
HDD Alarm
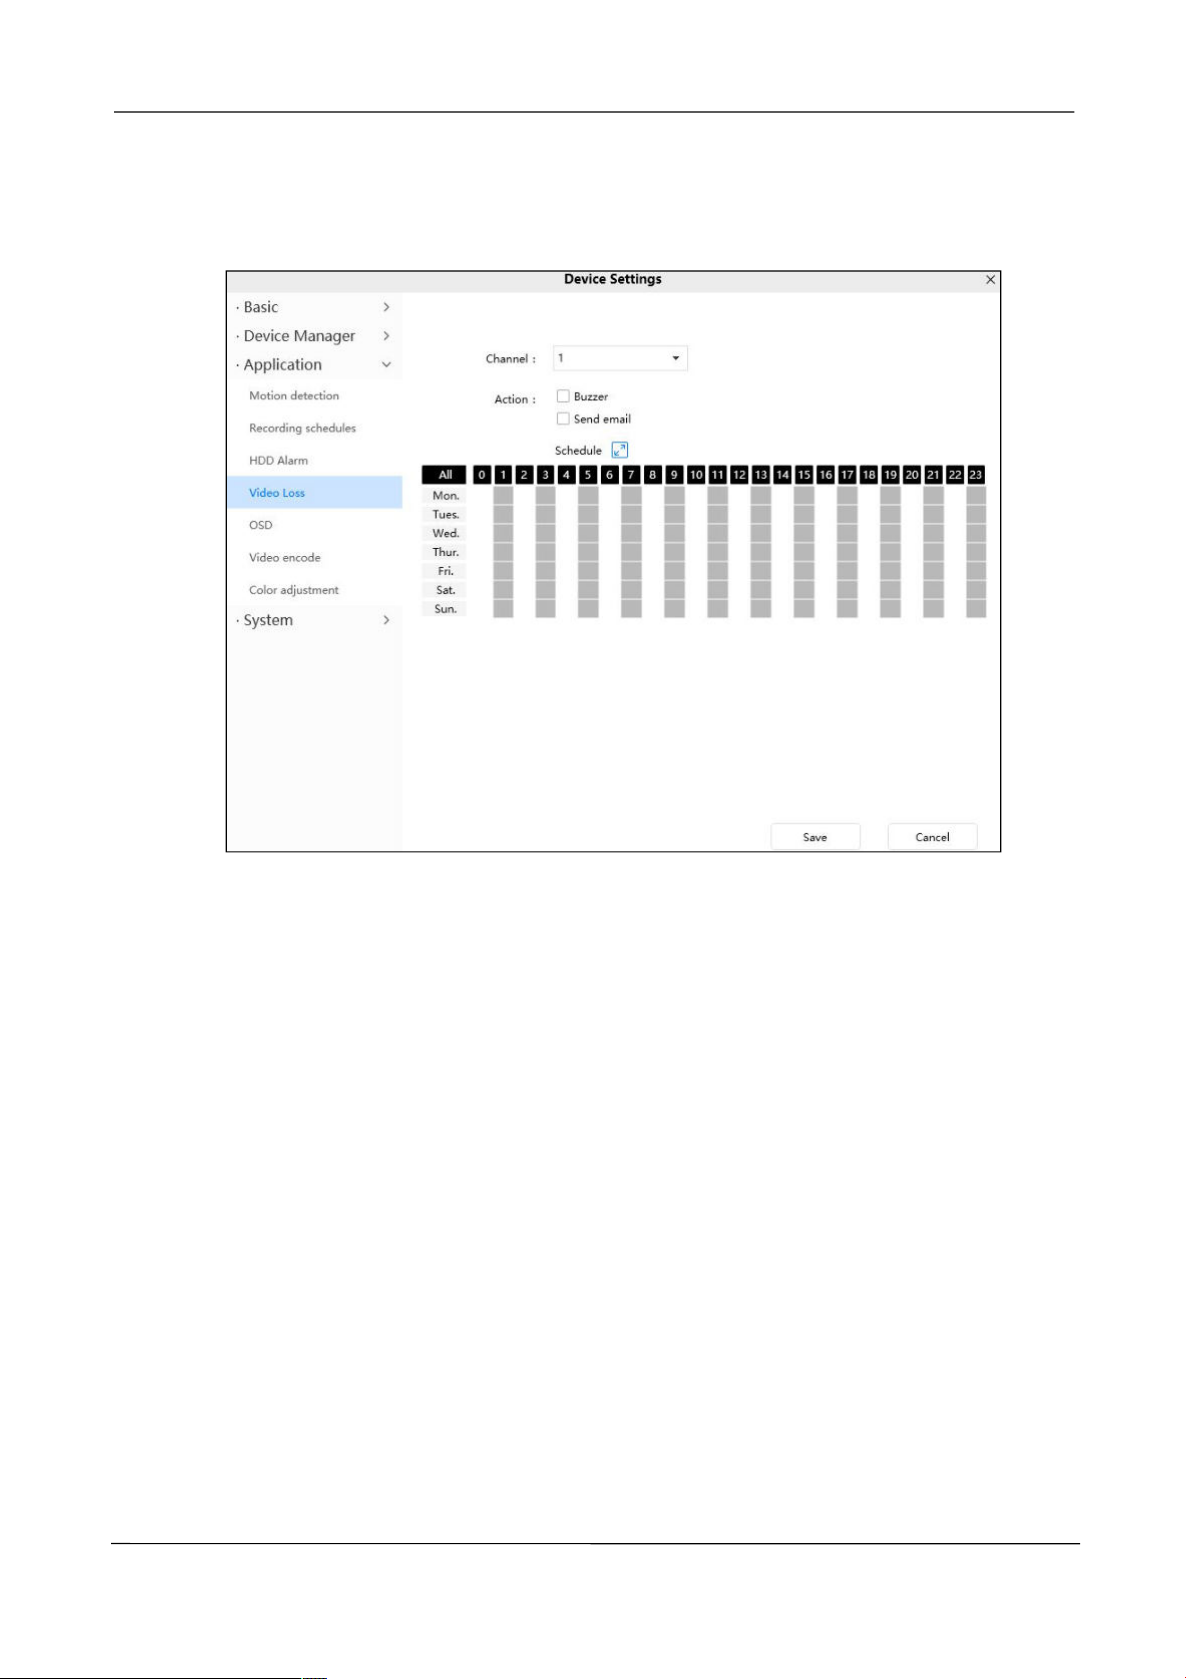
When the hard disk is error, lose or full, you can set the NVR alarm.
www.foscam.com
Page 71
NVR User Manual
63
Send E-mail
Buzzer
Video Loss
When the video is lost, you can set an alarm message.
To enable motion detection, follow the steps below:
1 Channel---- Select the channel.
2 Action
If you want to receive alarm emails when video loss, you must select Send E-mail and set Mail
Settings first. Make sure you have set E-mail in “Device Setting -> Basic -> Mail” interface.
If you select this checkbox, when the video has been loss, the NVR will alert the buzzer.
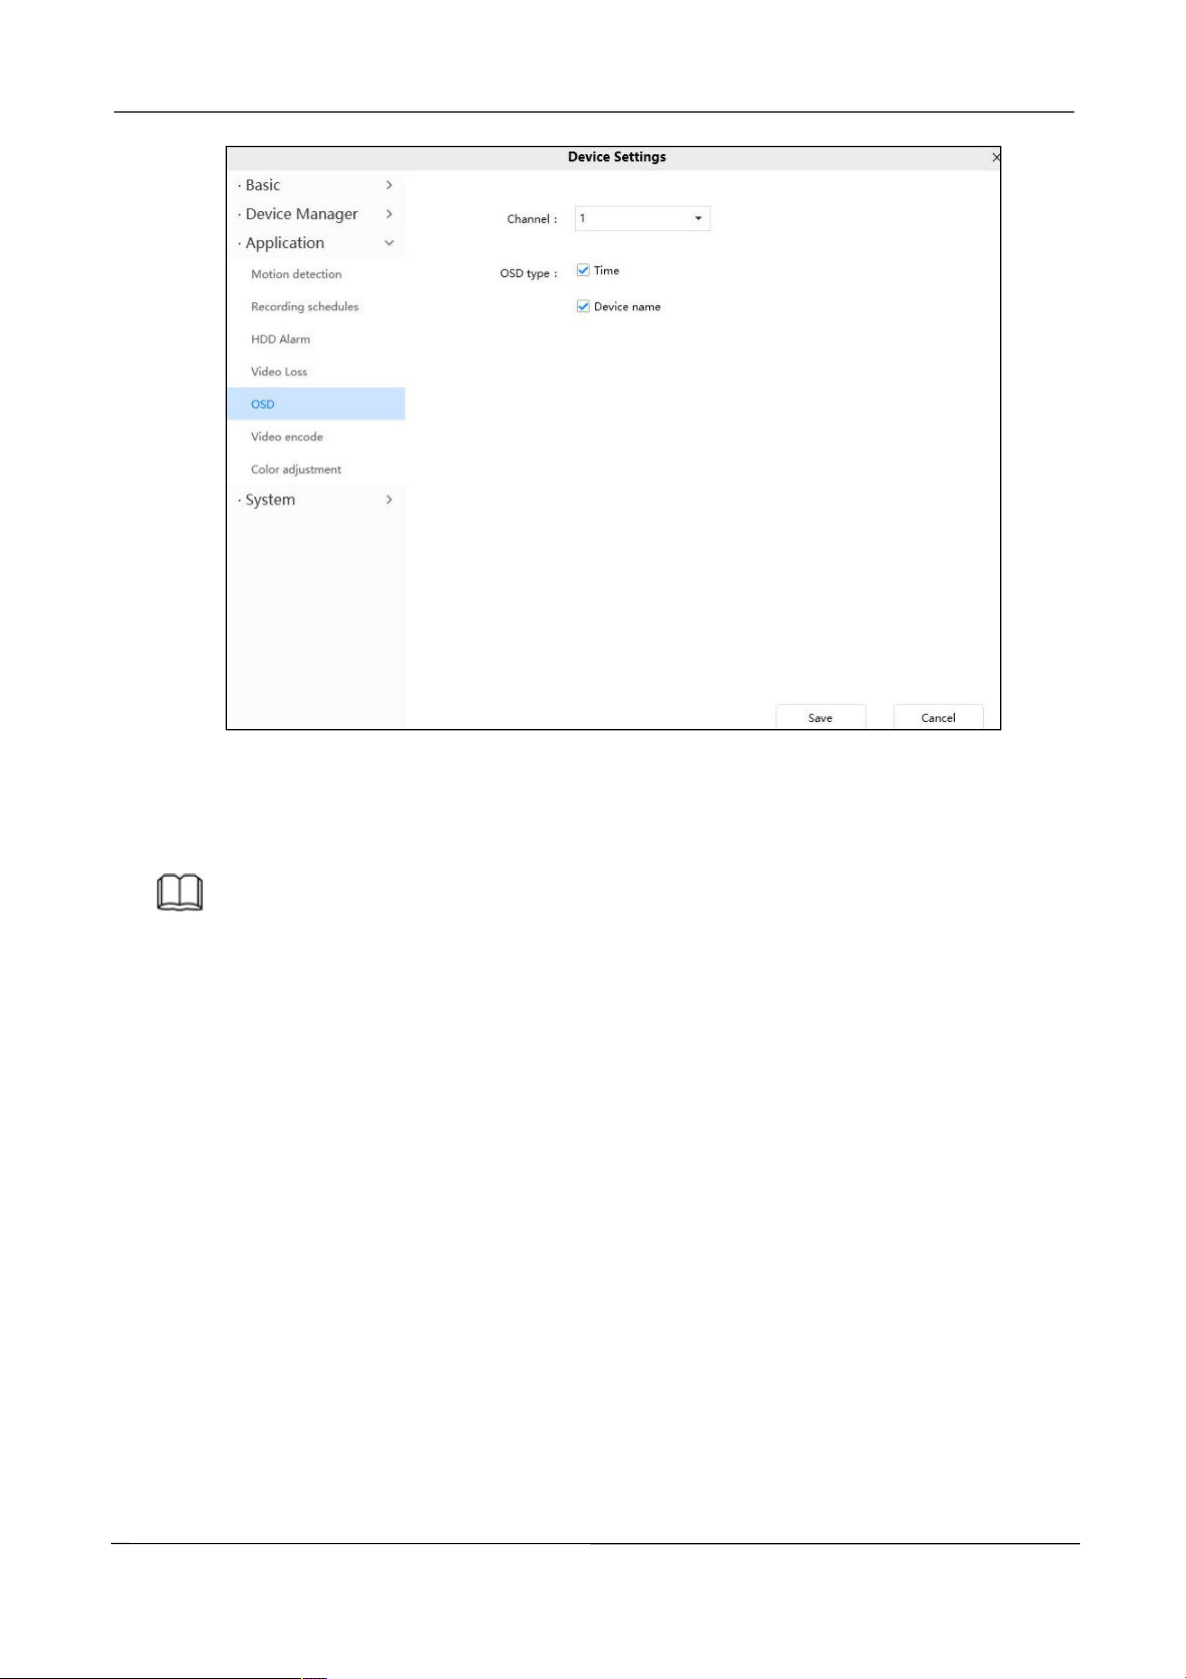
OSD
This page is used to add time and device name on the video.
www.foscam.com
Page 72
NVR User Manual
64
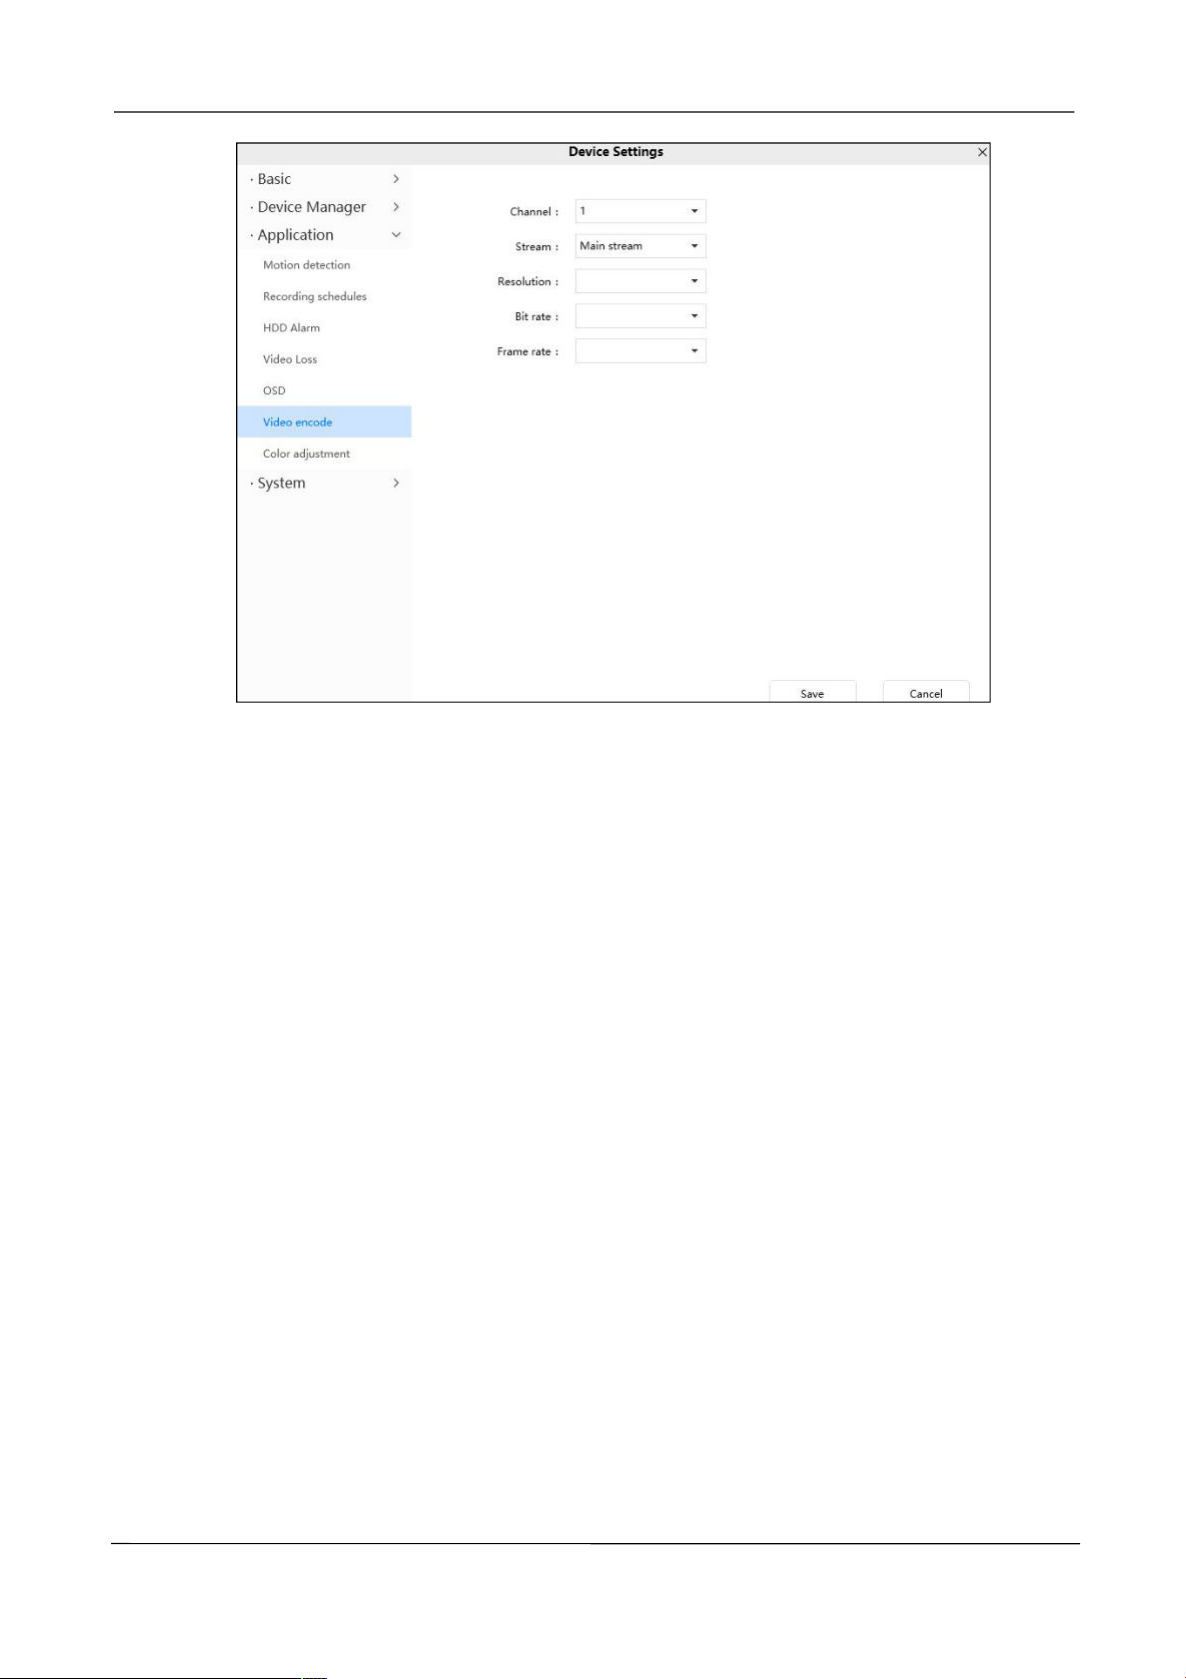
Video encode
This is main/sub stream video settings.
Note
FN7108W-B4 kit will automatically configure the main/sub stream information according to the
network environment, so it is not editable here.
www.foscam.com
Page 73
NVR User Manual
65
Channel: Select the channel.
Stream: There are two types to identify different streams you have set.
Resolution: The camera supports multiple types in the channel, For example: 2K,3M,1080P, 720P,
VGA. The higher the resolution is, the clearer video will become. But the code flux will become larger
too, and it will take up more bandwidth. (Different models support different specific types. )
Bit Rate: Generally speaking, the larger the bit rate is, the clearer video will become. But the bit rate
configuration should combine well with the network bandwidth. When the bandwidth is very narrow, and
bit rate is large, that will lead to video can not play well.
Frame Rate: Note that a larger frame size takes up more bandwidth. When the video format is 50Hz,
the maximum frame rate is 25 fps. When the video format is 60Hz, the maximum frame rate is 30 fps.
You should lower frame rate when the bandwidth is limited. Normally, when the frame rate above 15,
you can achieve fluently video.
Click Save button to take effect.
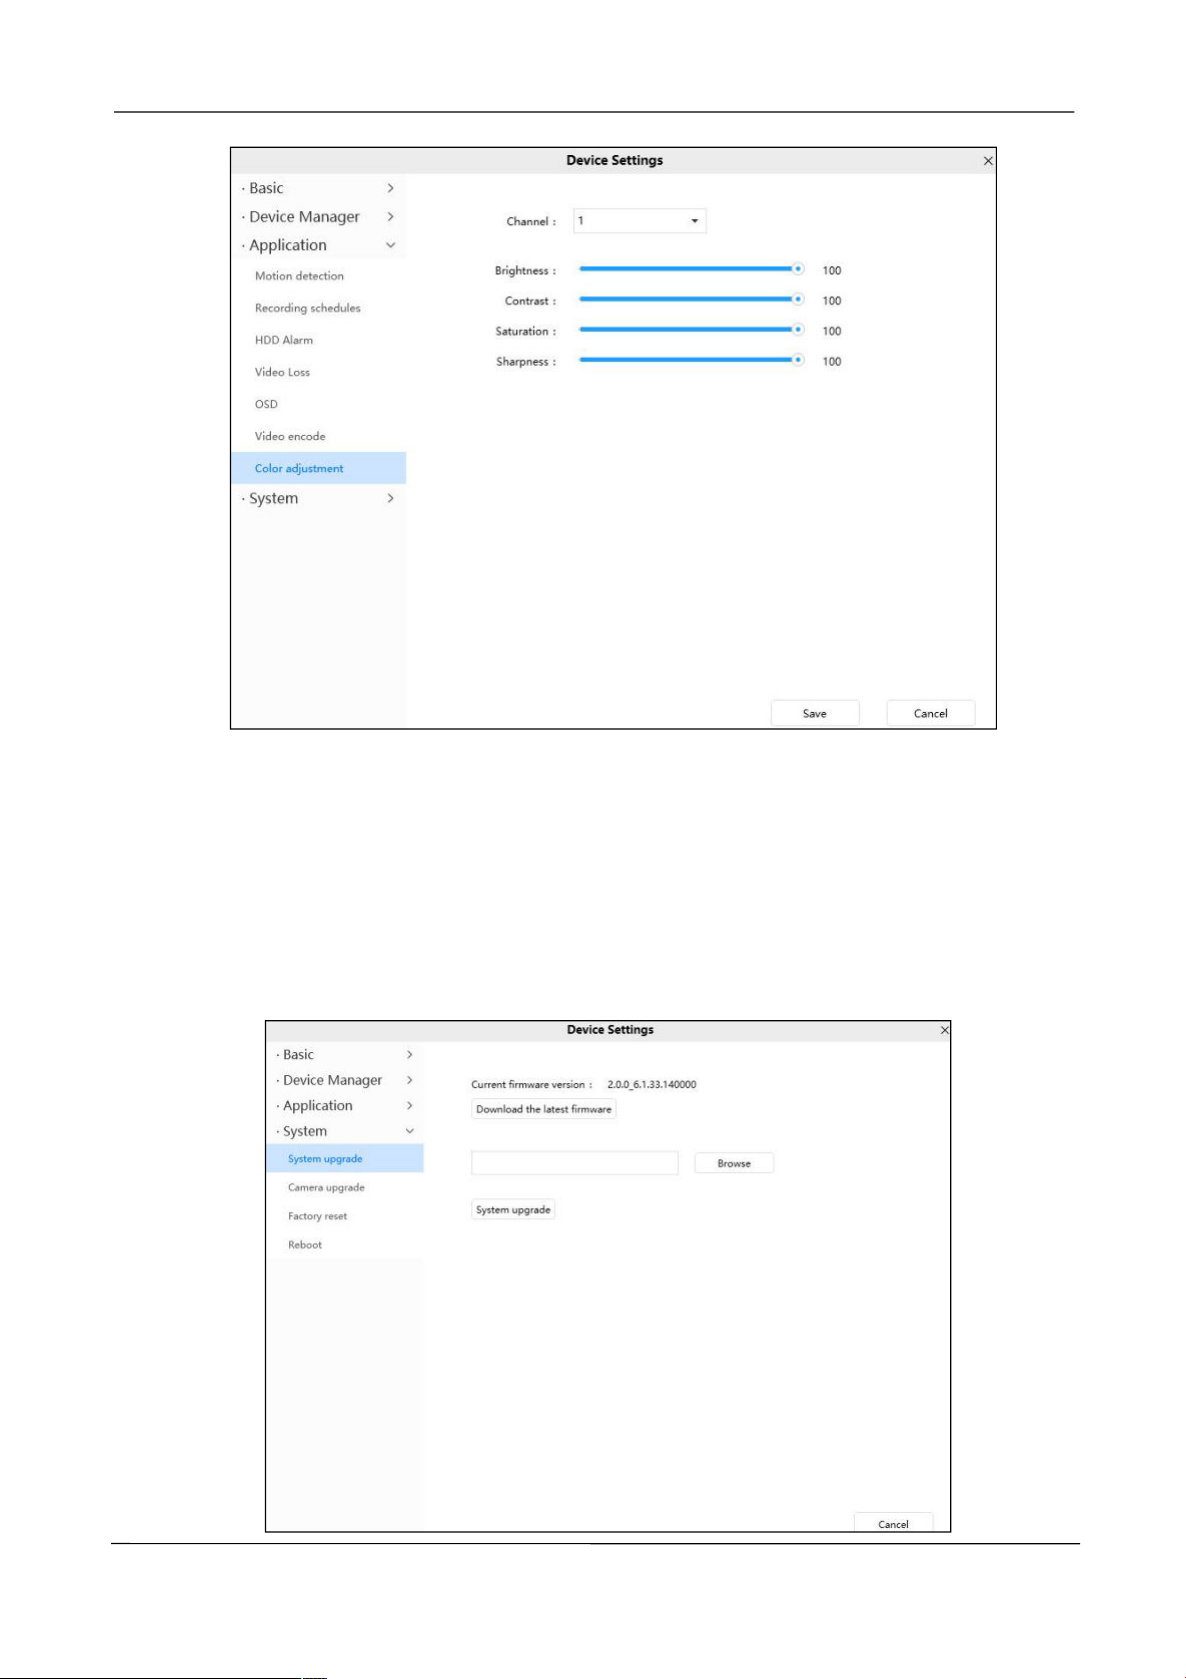
Color adjustment
You can adjust the settings to your liking.
www.foscam.com
Page 74
NVR User Manual
66
4.5.4 System
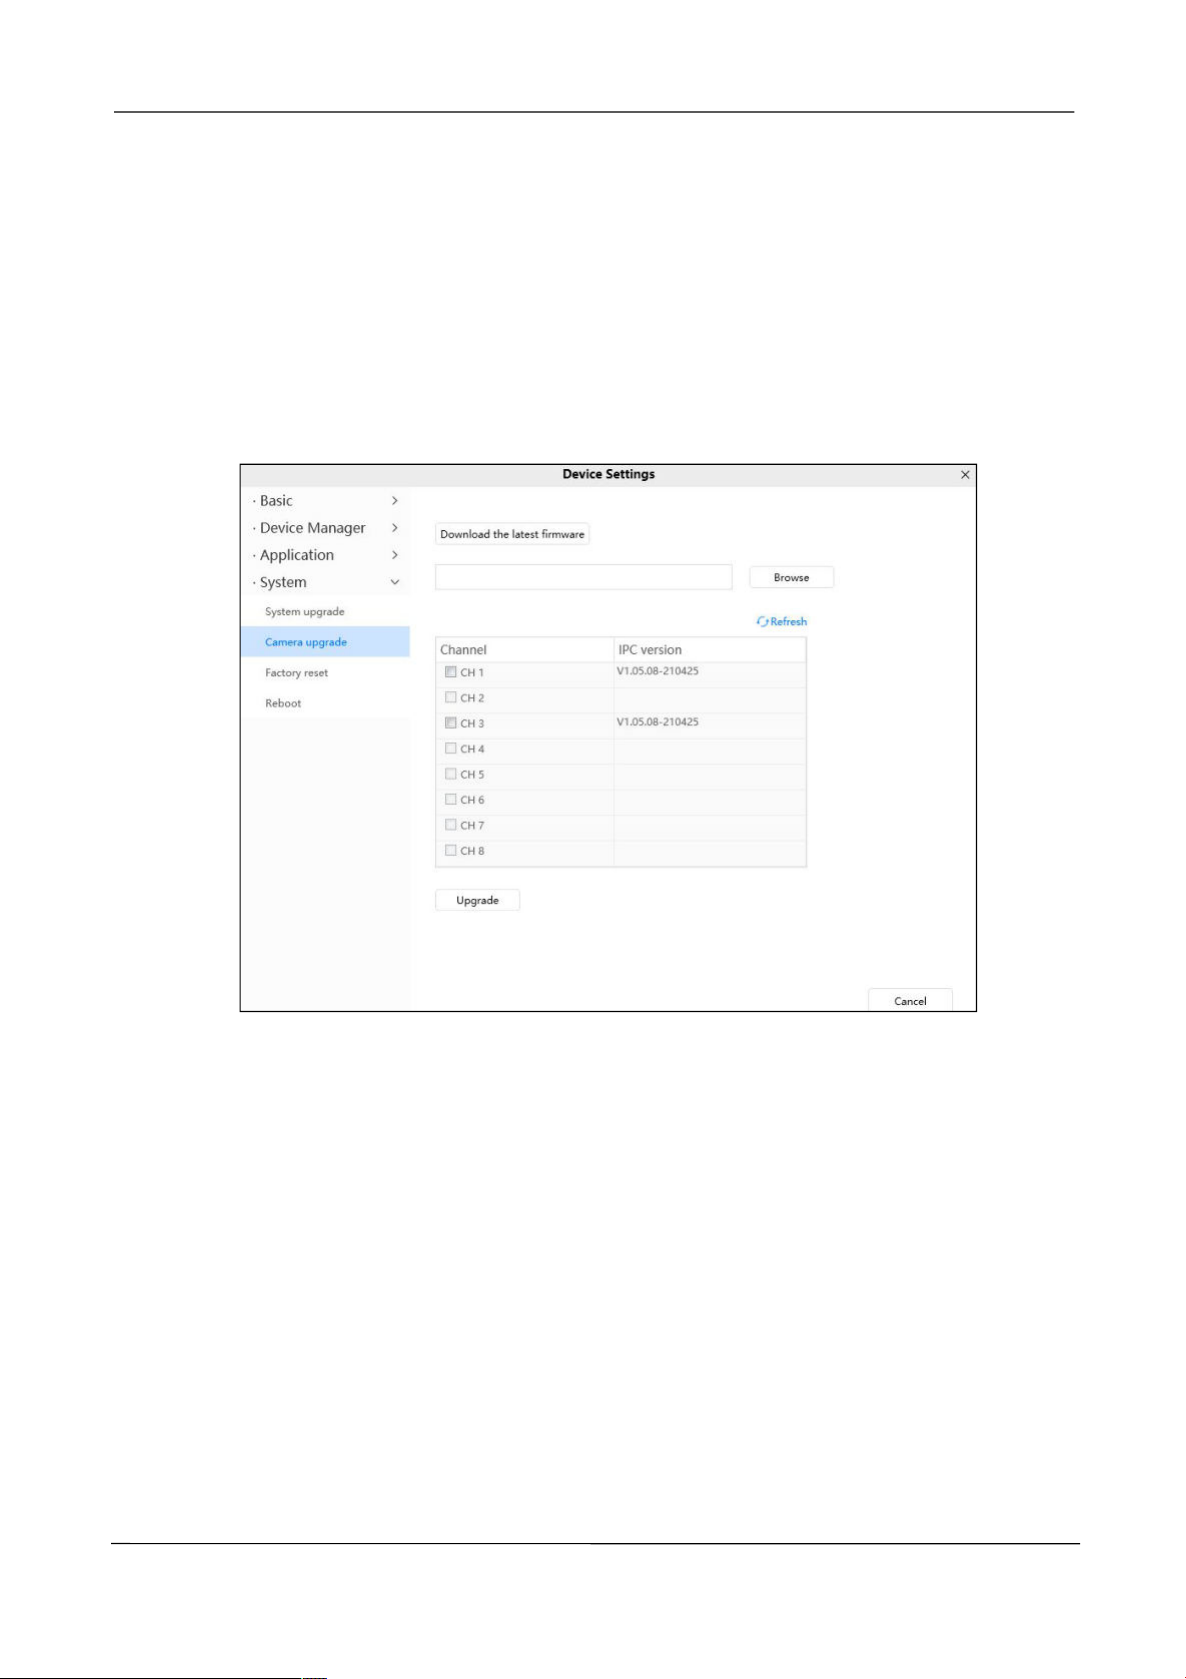
System upgrade
Click Download the Latest Firmware , you will see the following screen. And click Save to
save the firmware on your computer locally.
www.foscam.com
Page 75
NVR User Manual
67
Your current firmware version will be displayed on your screen.
Click Browse, choose the correct bin file and then click Sy stem upgrade.
Don't shut down the power during upgrade. After upgrading, you can see the upgrade result.
Camera upgrade
Click Download the Latest Firmware , you will see the following screen. And click Save to
save the firmware on your computer locally.
Your IPC current firmware version will be displayed on your screen.
Click Browse, choose the correct bin file and then click upgrade.
Don't shut down the power during upgrade. After upgrading, you can see the upgrade result.
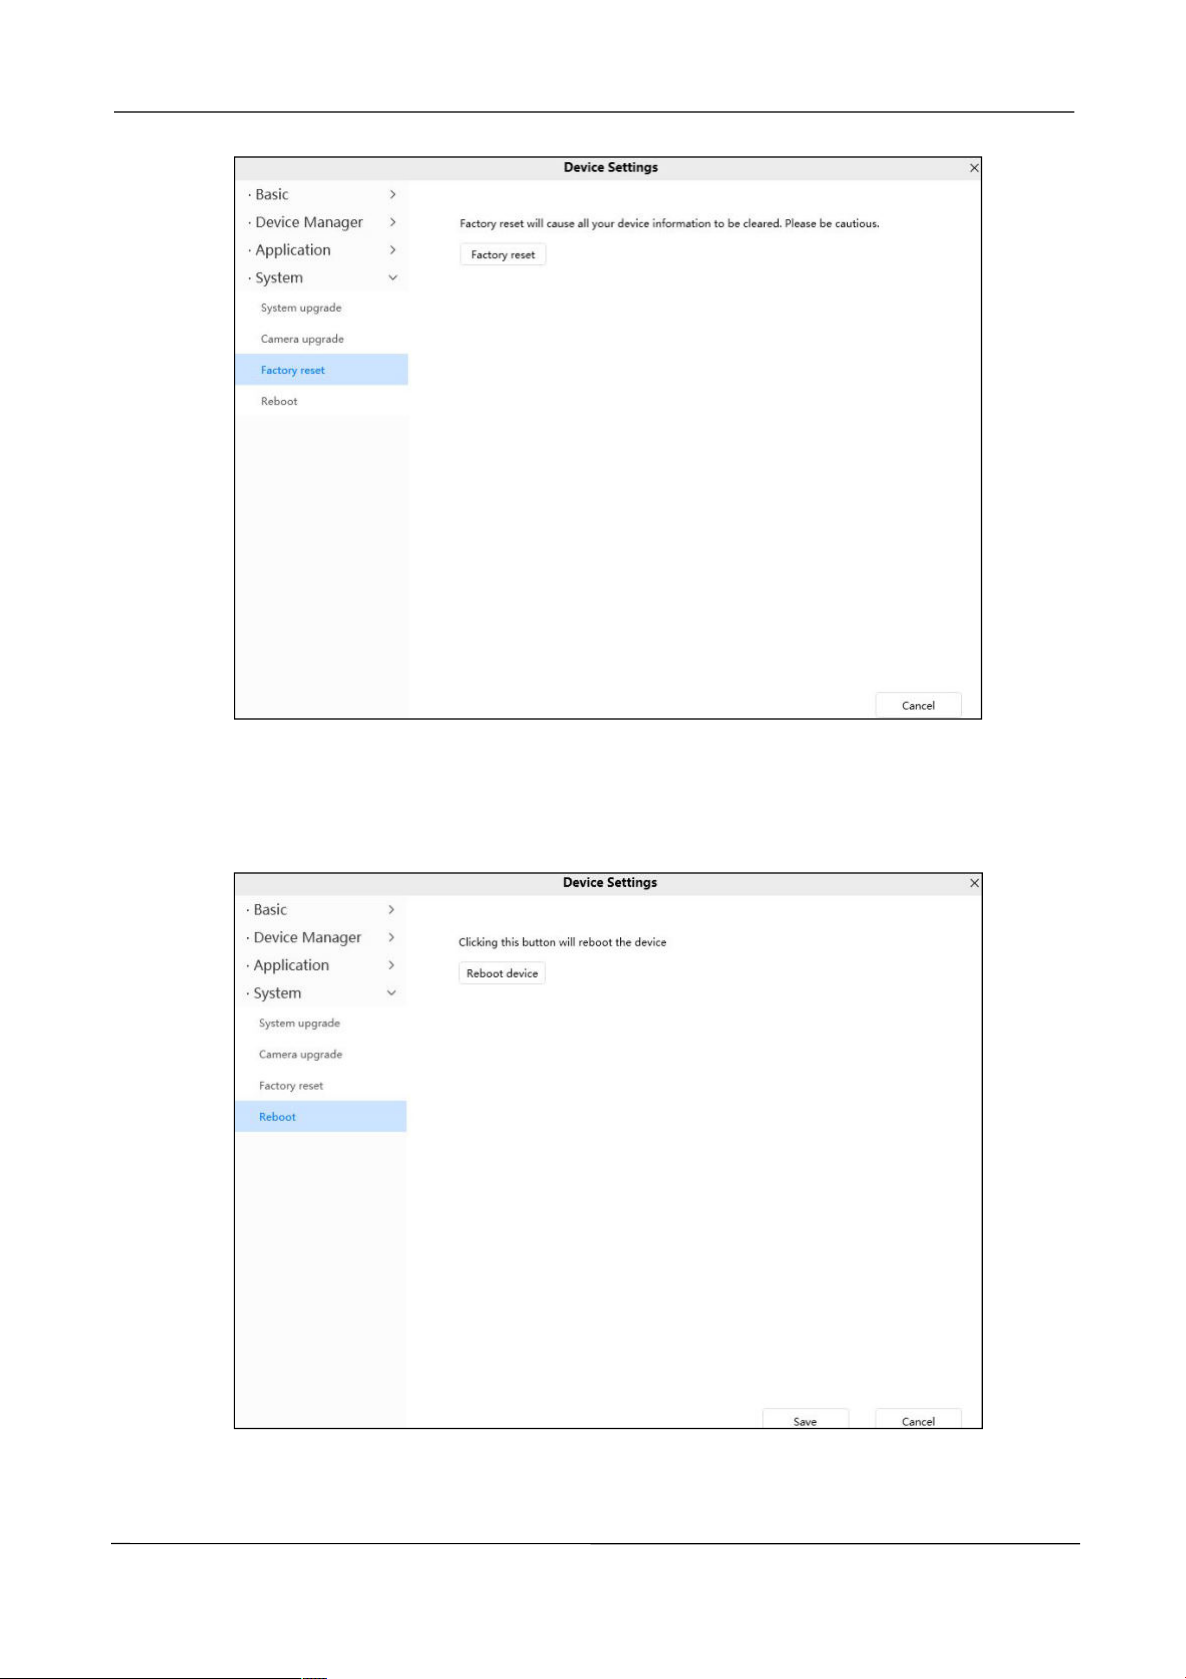
Factory reset
Click Factory Reset button and all parameters will return to factory settings if selected.
www.foscam.com
Page 76
NVR User Manual
68
Reboot
Click Reboot device to reboot the NVR. This is similar to unplugging the power to the NVR.
www.foscam.com
Page 77

NVR User Manual
69
Number of the channels: Number of channels where you need to enable recording.
Time in need (hour): Time you need to record.
Spent of HDD Capacity per hour
)(sec3600
8
ond
bit
BitRate
-In the GUI interface, choose Menu > Settings > Video , view the value of the Bit Rate.
-In the Web interface, choose Parameter Configuration > Local settings > Encoding Scheme,
3600
8
4
bit
Mbit
5
Appendix
5.1 HDD Capacity Calculation
This chapter describes how to determine the size of the HDD you need when you install the NVR for
the first time.
The NVR adopts the MPEG4/H.264 compression technology and its dynamic range is large.
Therefore, the capacity of the HDD depends on the estimated size of files generated in each channel
every hour according to code streams.
Computational formula of HDD Capacity:
Whole HDD Capacity(M)= number of the channels * time in need (hour) * spent of HDD Capacity per
hour (MB/hour)
The meanings of parameters are as follows:
Spent of HDD Capacity per hour(M/hour) =
You can obtain the Bit Rate by using the following methods:
view the value of the Bit Rate.
[Example]
If you select 4M for the bit rate and select four channels for recording and one week of recording is
needed, you can calculate the HDD capacity by using the following formula:
Recording time(hour) =7days*24 hours=168 hour
Spent of HDD Capacity per hour(M/hour)=
www.foscam.com
=1800M/hour
Page 78

NVR User Manual
70
1024
1209600M
NVR
Model
FN7108W-B4-1T
Video Input
IP Video Input
8 Channels FHD IP camera input
Video Output
HDMI Output
1×HDMI
VGA Output
1×VGA
Display Resolution
1920x1080,1440x900,1280x1024,1280x720,1024x768
Recording
Recording Resolution
1080P per channel ( 8ch@1080P )
Record Mode
Time Scheduled / Human Detect
Compression Format
H.264+
Playback
Synchronous Playback
8 channel 1080P synchronous video playback
Playback Mode
Pause / Stop / Slow / Fast/ Frame Play
HDD
HDD
1TB security grade hard drive (pre-installed)
Capacity
Up to 6TB
External Interface
Network Interface
1× 10/100 Mbps RJ45 port
USB Interface
2× USB2.0 interface for mouse and external storage
Button
1× Reset button
Network
Ethernet
One 10/100Mbps RJ45 port
Wireless Standard
IEEE802.11b/g/n
Wireless Security
WPA, WPA2
Network Protocol
IP、TCP、UDP、SMTP、DHCP、RTSP
Software
Computer Operating
System
Microsoft Windows XP, 7, 8, 8.1, 10, Mac OS
Whole HDD Capacity(M)=4*168(hour)*1800 (M/hour) =1209600M,
1209600M=
=1181.25G
According to the preceding calculation result, you are advised to buy a HDD of 1.5 TB or above.
5.2 Specifications
www.foscam.com
Page 79

NVR User Manual
71
Internet Viewing
N/A
Smart phone
iOS, Android, 3G/4G Smartphones
Language
Language
13 languages(Chinese、English、Russian、Japanese、Arabic
、
Spanish、German、Portuguese、French、Korean、Italian、Thai、Romanian
)
Physical and
Environmental
Power Supply
DC 12V/2A
Dimension(LxWxH)
234mm*234mm*52mm
Net Weight (g)
660g
Operating Temperature
0°C ~ 55°C (32°F ~ 131°F)
Operating Humidity
20% ~ 85% non-condensing
Storage Temperature
-20°C ~ 60°C (-4°F ~ 140°F)
Storage Humidity
0% ~ 90% non-condensing
Camera
Model
FI9910W
Image Sensor
Sensor Type
1/2.7" CMOS
Video Quality
1080p (1920*1080)
Wide Dynamic Range
N/A
Backlight Compensation
√
Lens
Lens Type
f:4mm, F:2.0
IR Range
65ft(20m)
Infrared Mode
Automatic
Diagonal Angle of View
94°
Software Features
Video Format
H.264+
Multi-Stream
Dual streams
Human Detection
√
Day/Night
√
Physical and
Environmental
Waterproof
IP66
Net Weight
360g
Power
DC12V
www.foscam.com
Page 80

NVR User Manual
72
Power Consumption
<5W
Dimension(LxWxH)
97(L)x67(W)x64(H)
Certification
FCC、CE、IP66
Warranty
Limited 2-year warranty
Operating Temperature
'-10°C~ 55°C (14°F ~ 140°F)
Operating Humidity
10% ~ 80% non-condensing
Storage Temperature
-20°C ~ 60°C (-4°F ~ 140°F)
Storage Humidity
0% ~ 90% non-condensing
NVR
Model
FN8108H
Video Input
IP Video Input
8 Channels QHD IP camera input
Video Output
HDMI Output
1×HDMI
VGA Output
1×VGA
Display Resolution
2560x1440,1920x1080,1440x900,1280x1024,1280x720,1024x768
Recording
Recording Resolution
Up to 5MP per channel ( 8ch@5MP )
Record Mode
Time Scheduled / Montion Detect
Compression Format
H.264+
Playback
Synchronous Playback
1channel 5.0MP or 4 channel 1080P synchronous video playback
Playback Mode
Pause / Stop / Slow / Fast/ Frame Play
HDD
Capacity
Up to 6TB
External Interface
Network Interface
1× 10/100 Mbps RJ45 port
USB Interface
2× USB2.0 interface for mouse and external storage
Button
1× Reset button
Network
Ethernet
One 10/100Mbps RJ45 port
Network Protocol
IP、TCP、UDP、SMTP、DHCP、RTSP
Software
Smart phone
iOS, Android, 3G/4G Smartphones
www.foscam.com
Page 81

NVR User Manual
73
Language
Language
13 languages(Chinese、English、Russian、Japanese、Arabic
、
Spanish、German、Portuguese、French、Korean、Italian、Thai、Romanian
)
Physical and
Environmental
Power Supply
DC 12V/2A
Dimension(LxWxH)
234mm*234mm*52mm
Net Weight (g)
660g
Operating Temperature
0°C ~ 55°C (32°F ~ 131°F)
Operating Humidity
20% ~ 85% non-condensing
Storage Temperature
-20°C ~ 60°C (-4°F ~ 140°F)
Storage Humidity
0% ~ 90% non-condensing
www.foscam.com
Page 82

NVR User Manual
74
NVR
Model
FN8108HE
Video Input
IP Video Input
8 Channels QHD IP camera input
Video Output
HDMI Output
1×HDMI
VGA Output
1×VGA
Display Resolution
2560x1440,1920x1080,1440x900,1280x1024,1280x720,1024x768
Recording
Recording Resolution
Up to 5MP per channel ( 8ch@5MP )
Record Mode
Time Scheduled / Montion Detect
Compression Format
H.264+
Playback
Synchronous Playback
1channel 5.0MP or 4 channel 1080P synchronous video playback
Playback Mode
Pause / Stop / Slow / Fast/ Frame Play
HDD
Capacity
Up to 6TB
External Interface
Network Interface
1× 10/100 Mbps RJ45 port
USB Interface
2× USB2.0 interface for mouse and external storage
Button
1× Reset button
Network
Ethernet
One 10/100Mbps RJ45 port
POE Standard
IEEE 802.3at/af
Network Protocol
IP、TCP、UDP、SMTP、DHCP、RTSP
Software
Smart phone
iOS, Android, 3G/4G Smartphones
Language
Language
13 languages(Chinese、English、Russian、Japanese、Arabic、Spanish
、
German、Portuguese、French、Korean、Italian、Thai、Romanian
)
Physical and
Environmental
Power Supply
DC 48V/2A
Dimension(LxWxH)
234mm*234mm*52mm
Net Weight (g)
660g
Operating Temperature
0°C ~ 55°C (32°F ~ 131°F)
Operating Humidity
20% ~ 85% non-condensing
Storage Temperature
-20°C ~ 60°C (-4°F ~ 140°F)
Storage Humidity
0% ~ 90% non-condensing
www.foscam.com
Page 83

NVR User Manual
75
Verify the device is connected with the monitor via HD-OUT or VGA cable.
Verify the connection cable is good.
Verify Input mode of the monitor is correct.
Verify the system time setting is correct.
Verify the search condition is correct.
Verify the HDD status is normal.
Check whether the motion detection channel is correct.
Check whether a trigger time segment is set.
Check whether a detection area is set.
Check whether recording is selected.
5.3 FAQ
1. No image displayed on the monitor after starting up normally.
Please check the input mode of the monitor matches with the output mode of the device (e.g. if the
output mode of NVR is HD-OUT output, then the input mode of monitor must be the HD-OUT input).
And if not, please modify the input mode of monitor.
2. No record file found in the NVR local HDD, and prompt "No record file found".
Choose Menu > Settings > General in the GUI interface, and verify the time is correct.
Choose Menu > Playback in the GUI interface, and verify the channel and time are correct.
Choose Menu > About > HDD Info in the GUI interface, view the HDD status.
3. Why recording is not performed after motion detection is enabled?
On the "Motion Detection" page, check whether the following are correctly set:
4. The screen of the display is incomplete.
Confirm the current resolution and check the resolution supported by the display. If the resolution is
1920*1080, the display needs to support the resolution 1920*1080.
5. Why can't video files be downloaded during video playback or downloaded files cannot be
played back properly?
To save consumed resources, the server limits concurrency of video playback and file download. In this
case, stop video playback and then download files or play back videos after video files are downloaded.
www.foscam.com
Page 84

NVR User Manual
76
Acronym
Term
Description
DDNS
Dynamic Domain
Name Server
Dynamic DNS is a method, protocol, or network service
that provides the capability for a networked device, such
as a router or computer system using the Internet Protocol
Suite, to notify a domain name server to change, in real
time (ad-hoc) the active DNS configuration of its
configured hostnames, addresses or other information
stored in DNS.
DHCP
Dynamic Host
Configuration
Protocol
DHCP is a network application protocol used by devices
(DHCP clients) to obtain configuration information for
operation in an Internet Protocol network.
HDD
Hard Disk Drive
A storage medium which stores digitally encoded data on
platters with magnetic surfaces.
PPPoE
Point-to-Point
Protocol over
Ethernet
It is a network protocol for encapsulating Point-to-Point Protocol
(PPP) frames inside Ethernet frames. It is used mainly with
ADSL services where
individual users connect to the ADSL transceiver (modem) over
Ethernet and in plain Metro Ethernet networks.
PTZ
Pan, Tilt, Zoom
PTZ cameras are motor driven systems that allow the camera to
pan left and right, tilt up and down and zoom in and out.
NTP
Network Time
Protocol
A protocol designed to synchronize the clocks of computers over
a network.
NVR
Network Video
Recorder
A NVR can be a PC-based or embedded system used for
centralized management and storage for IP cameras.
VMS
Video
Management
System
Foscam VMS is a new tool for PC. It does not require plug-ins
and is compatible with Windows & Mac, It supports all Foscam
HD cameras and up to 36 cameras at the same time.
5.4 Glossary
www.foscam.com
Page 85
NVR User Manual
77
This device may not cause harmful interference.
This device must accept any interference received, including interference that may cause
5.5 CE & FCC
Electromagnetic Compatibility (EMC)
FCC Statement
This device compiles with FCC Rules Part 15. Operation is subject to the following two
conditions.
undesired operation.
This equipment has been tested and found to comply with the limits for a Class A digital device,
pursuant to Part 15 of the FCC Rules. These limits are designed to provide reasonable protection
against harmful interference when the equipment is operated in a commercial environment. This
equipment generates, uses, and can radiate radio frequency energy and, if not installed and used in
accordance with the installation manual, may cause harmful interference to radio communications.
Operation of this equipment in a residential area is like to cause harmful interference, in which case the
user will be required to correct the interference at his own expense.
FCC Caution
Any changes or modification not expressly approved by the party responsible for compliance could void
the user's authority to operate this equipment.
CE Mark Warning
This is a Class A product. In a domestic environment, this product may cause radio interference, in
which case the user may be required to take adequate measures.
5.6 WARRANTY
FOSCAM values your business and always attempts to provide you the very best of service.
No limited hardware warranty is provided by FOSCAM unless your Foscam product ("product")
was purchased from an authorized distributor or authorized reseller. Distributors may sell products to
resellers who then sell products to end users. No warranty service is provided unless the product is
www.foscam.com
Page 86

NVR User Manual
78
The products are warranted to be free from manufacturing defects in materials and workmanship
Software, including the software added to the products through our factory-integration system,
Usage that is not in accordance with product instructions.
Failure to follow the product instructions.
Normal wear and tear.
Please read Foscam warranty policy & policy of your reseller first before sending items back to
Customer must first contact point-of-purchase to obtain a Return Merchandise Authorization (RMA)
After receiving your RMA case number, pack the item(s) very well with the original box and all the
Write your RMA number and the return reason (the problem of the product) on the warranty card
If customers ask for replacement service, please contact point-of-purchase and follow their
Our technicians will inspect all items returned for replacement requests. If the retuned product is
If returned products are found defective, we will replace the product and assume the shipping cost
returned to an authorized return center in the region where the product was first shipped by FOSCAM or
to the point-of-purchase, which may have regional specific warranty implications.
If you purchase your Foscam product from online store, please contact the
point-of-purchase and ask for return / replacement / repair service.
Limited Hardware Warranty
starting from the shipping date of Foscam.
This limited hardware warranty does not cover:
software, etc.
Return Procedures
point-of-purchase.
number before returning the product. If the product you received is suspected to be defective and
the product warranty has not expired, The RMA number will allow your reseller to track your return
much easier and help them expedite processing your request.
original accessories included such as power adapters, brackets, cables, manuals.
along with the complete package to send them back.
Replacement Services
policy.
found in working order, we will return the same item received. However customers shall be
responsible for all shipping & handling charges incurred for getting the units back to customers.
www.foscam.com
Page 87

NVR User Manual
79
If for any reason, we are unable to provide a replacement of the original returned item(s). You will
We do not provide exchange and replacement due to normal hardware upgrade according the
Our technicians will test the product before send out the replacement, any other demand for more
Replaced products are warranted from the balance of the former warranty period.
Warranty is void if purchase from unauthorized distributor or reseller.
Warranty is void if trade-mark, serial tags, product stickers have been removed, altered or
Warranty is void for mishandling, improper use, or defacing the product.
Warranty is void for physical damage, altered, either internally or externally, improper or inadequate
Warranty is void if damage has resulted from accident, dismantle, abuse, or service or modification
Warranty is void if product is damaged due to improper working environment or operation. (For
Warranty is void if damaged by the use of parts not manufactured or sold by FOSCAM.
Damage caused by improper installation of third-party products.
Warranty is void if damaged for irresistible cause, such as earthquake, fire, lightning, flood, etc.
Product beyond limited warranty.
If products are defective or damaged under normal use or operation in the replacement limit,
During replacement limit, if customers ask for replacement due to the product does not fit for
Customers shall be responsible for both shipping fee if their product beyond the replacement limit
for sending back the replacement unit to customers.
have a choice for a "Substitute" item at the same equal value.
market after 14 days after the product is delivered.
than two times replacement for the same product during replacement limit will be rejected.
Warranty Forfeiture
tampered with.
packaging when returned for RMA purposes.
by someone other than the appointed vendor, souse, fission or the spare part has been over the
period of warranty.
example, improper temperature, humidity, unusual physical or electrical stress or interference,
failure or fluctuation of electrical power, static electricity, using wrong power adapter, etc.)
Shipping Fee
distributors or resellers are responsible for the shipping cost the product back to customers,
customers should assume the shipping cost send the product to the point-of-purchase.
customer's personal expectation, customers should responsible for both shipping fee.
but still in warranty limit.
www.foscam.com
Page 88

NVR User Manual
80
FOSCAM provide extra repair service for product that out of warranty, it is chargeable. The total fee
Different region may have different service fee, please contact the point-of-purchase to confirm that
Our technicians will quote the total price after detect the product, If customers refused to repair
Repaired product out of warranty will obtains 3-month warranty from the date of the product back to
Foscam is not responsible for other extra warranty or commitment promised by resellers, if your
Foscam does not offer refunds under any circumstances. Please contact the point-of-purchase and
Foscam shall not be liable under any circumstances for any consequential, incidental, special or
Repair Service Out Of Warranty
contains device cost and service fee. Device cost (including accessories) is the standard uniform
price provide by FOSCAM.
before you ask for this service.
after the quotation, customers need pay for the test fee, $3.5/hour. If agree with the quotation, test
will be free.
customers.
Limitation of Liability
reseller promised some extra commitment or warranty; please ask for written documents to protect
your rights and interests.
follow their refund / return policy.
exemplary damages arising out of or in any connection with this agreement or the products,
including but not limited to lost profits, or any claim based on indemnity or contribution, or the failure
of any limited or exclusive remedy to achieve its essential purpose or otherwise. Purchaser's
exclusive remedy, as against Foscam, shall be the repair or replacement of defective parts. If
Foscam lists a product on its website specification in error or that is no longer available for any
reason, Foscam reserves the right to explain it without incurring any liability.
All rights reserved. FOSCAM and the Foscam logo are trademarks of ShenZhen
FOSCAM Intelligent Technology Limited., registered in the U.S. and other countries.
www.foscam.com
Page 89

NVR User Manual
81
5.7 Statement
You are advised to be cautious in daily life, keep personal account information carefully, do not share
personal account easily. Change passwords of your account and equipment periodically, and
upgrade equipment firmware to strengthen security consciousness.
Our company makes no warranty, implied or otherwise, that this product is suitable for any particular
purpose or use. You need to abide by the relevant laws and regulations of the use restrictions when
using products. Our company takes no responsibility of illegal activities by using our products.
Our company takes no responsibility of the loss by force majeure, such as failure or faults of telecom
system or the Internet network, computer viruses, malicious attacks of hackers, information damage
or loss, and faults of computer system.
My company does not need to take any responsibility of the special, incidental or corresponding loss
by the products of our company or any software provide by our company, including but not limited to
operating loss, profit or purpose. The company only takes the responsibility applicable to national
and local legal requirements.
Our company takes no responsibility of the loss caused by the following at ant time:
1) loss of purchases;
2) loss of intangible property damage, such as data, programs;
3) loss of compensation claimed by third-party customers.
Delete images, format the memory card or other data storage devices does not completely remove
the original image data. You can restore deleted files from discarded the storage device by
commercial software, but which will potentially lead to personal image data used maliciously by
others. The privacy of the data security belongs to user responsibility, the company takes no
responsibility.
Parts mentioned in this statement should not be understood by the configuration description of the
product purchased by the customer, the product configuration must accord to the specific models
purchased by the customer.
Without the prior written permission of my company, all the contents of relevant operating
instructions manual affiliated to the product must not be reproduced, transmitted, transcribed or
stored in a retrieval system, or translated into other languages.
Our company will reserve the right to improve and modify the product and corresponding manuals.
www.foscam.com
Page 90

NVR User Manual
82
The company reserves the right of final interpretation on our products.
5.8 Obtaining Technical Support
While we hope your experience with the NVR is enjoyable and easy to use, you may experience some
issues or have questions that this User's Guide has not answered.
If you have problem with device, please first contact reseller for solving the problems.
If our reseller cannot provide service, please contact our service department:
CE Certificate statement Website:
https://www.foscam.com/company/ce-certificate.html
Exporter and Importer Information Opened to Public:
https://www.foscam.com/company/open-information.html
www.foscam.com
Manufacturer: Shenzhen Foscam Intelligent Technology Co., Ltd
Addr: Room 901, Unit B, Building 7, Xingke 1st Street
Vanke Cloud City Phase 1, Nanshan Dist., Shenzhen, 518055, China
www.foscam.com
 Loading...