

Foscam FI9821W V2 User Manual
U
Usseerr
M
Maannuuaall
Model: FI9821W V2
Indoor HD Pan/Tilt Wireless IP Camera
(For Windows & Mac OS)
Black White

1
w
w
wwwww
w
..ffoossccaamm..ccoom
m
SShheennzzhheenn FFoossccaamm IInntteelllliiggeenntt TTeecchhnnoollooggyy CCoo..,, LLiimmiitteedd
TTeell:: 8866 775555 22667744 55666688 FFaaxx:: 8866 775555 22667744 5511668
8
1
Table of Contents
11 OOvveerrvviieewws
s .................................................................................................................................................... 2
1.1 Key Features...................................................................................................................................... 2
1.2 Read Before Use................................................................................................................................ 3
1.3 Packing Contents ............................................................................................................................... 3
1.4 Physical Description ........................................................................................................................... 3
1.5 SD Card ............................................................................................................................................. 5
22 AAcccceessssiinngg tthhee NNeettwwoorrkk CCaammeerra
a ................................................................................................................... 6
2.1 Access the Camera in LAN................................................................................................................. 6
2.2 Access the Camera in WAN ............................................................................................................... 9
2.3 Using the VLC player ....................................................................................................................... 14
3 Surveillance Software GUI ......................................................................................................................... 17
3.1 Login Window................................................................................................................................... 18
3.2 Surveillance Window ........................................................................................................................ 20
4 Advanced Camera Settings ........................................................................................................................ 28
4.1 Device Status ................................................................................................................................... 28
4.2 Basic Settings .................................................................................................................................. 30
44..33 NNeettwwoorrk
k............................................................................................................................................ 41
4.4 Video................................................................................................................................................ 58
4.5 Alarm................................................................................................................................................ 61
4.6 Record ............................................................................................................................................. 65
4.7 Pan/Tilt ............................................................................................................................................. 66
4.8 Path Settings.................................................................................................................................... 70
4.9 Firewall ............................................................................................................................................ 71
4.10 System ........................................................................................................................................... 71
5 Playback .................................................................................................................................................... 75
6 Phone APPs ............................................................................................................................................... 76
6.1 APP for Android cell phones ............................................................................................................. 76
6.2 APP for iPhones ............................................................................................................................... 84
7 APPENDIX ................................................................................................................................................. 92
7.1 Frequently Asked Questions............................................................................................................. 92
7.2 Default Parameters .......................................................................................................................... 97
7.3 Specifications ................................................................................................................................... 97
7.4 CE & FCC.......................................................................................................................................... 99
7.5 WARRANTY ..................................................................................................................................... 99
8 OBTAINING TECHNICAL SUPPORT ........................................................................................................102

2
w
w
wwwww
w
..ffoossccaamm..ccoom
m
SShheennzzhheenn FFoossccaamm IInntteelllliiggeenntt TTeecchhnnoollooggyy CCoo..,, LLiimmiitteedd
TTeell:: 8866 775555 22667744 55666688 FFaaxx:: 8866 775555 22667744 5511668
8
2
11 OOvveerrvviieewwss
FOSCAM FI9831W is an integrated wireless IP Camera with a color CMOS sensor enabling viewing resolution
1280*720. It combines a high quality digital video camera, with a powerful web server, to bring clear video to
your desktop from anywhere on your local network or over the Internet.
With flexible 300-degree pan and 120-degree tilt, FI9831W gives users more comprehensive control over a
monitored site. The FI9831W supports the industry-standard H.264 compression technology, drastically
reducing file sizes and conserving valuable network bandwidth.
The IPCAM is based on the TCP/IP standard. There is a WEB server inside which could support Internet
Explore. Therefore the management and maintenance of your device is simplified by using the network to
achieve the remote configuration and start-up.
The camera is designed for indoor surveillance applications such as retail stores, offices or banks. Controlling
the IPCAM and managing images are simplified by using the provided web interface across the network
utilizing wireless connectivity.
FOSCAM prov ides Phone APPs f or Android and iPhone us ers, please s earch “Foscam ip c a m viewer” and
install it through APP Store, then you can view your camera directly as a computer.
1.1 Key Features
Standard H.264 video compression algorithm to satisfy the transmission of high definition video in narrow
bandwidth network
1.0 Mega Pixel
Pan 300 degree, tilt 120 degree
Supports IE/Firefox/Google/Safari browser or any other standard browsers
Supports WEP,WPA and WPA2 Encryption
Wi-Fi compliant with wireless standards IEEE 802.11b/g/n
IR night vision (Range:8m)
Supports image snapshot
Supports dual-stream
Supports SD Card to 32G
Supports IR-Cut and the filter change automatically
Embedded FOSCAM DDNS(dynamic domain name service) Service
Supports two-way audio / remote viewing & record from anywhere anytime

3
w
w
wwwww
w
..ffoossccaamm..ccoom
m
SShheennzzhheenn FFoossccaamm IInntteelllliiggeenntt TTeecchhnnoollooggyy CCoo..,, LLiimmiitteedd
TTeell:: 8866 775555 22667744 55666688 FFaaxx:: 8866 775555 22667744 5511668
8
3
Multi-level users management w ith password protection
Motion detection alert via email or upload image to FTP
Supporting Third Party Domain Name Service
Providing Phone APPs for Android and iPhone users
Supports multiple netw ork protocols: HTTP /TCP /IP /UDP /FTP /DHCP /DDNS / UPNP
Providing Central Management Software to manage or monitor multi-cameras
1.2 Read Before Use
Please first verify that all contents received are complete according to the Package Contents listed below.
Before the Network Camera is installed, please carefully read and follow the instructions in the Quick
Installation Guide to avoid damage due to faulty assembly and installation. This also ensures the product is
used properly as intended.
1.3 Packing Contents
● IPCAM×1 ● CD×1
● Wi-Fi Antenna×1 (only available for wireless model) ● Quick Installation Guide ×1
● DC Pow er Supply×1
● Warranty Card×1
● Mounting bracket×1(option)
● Netw ork Cable×1
1.4 Physical Description
Front Panel
4
w
w
wwwww
w
..ffoossccaamm..ccoom
m
SShheennzzhheenn FFoossccaamm IInntteelllliiggeenntt TTeecchhnnoollooggyy CCoo..,, LLiimmiitteedd
TTeell:: 8866 775555 22667744 55666688 FFaaxx:: 8866 775555 22667744 5511668
8
4
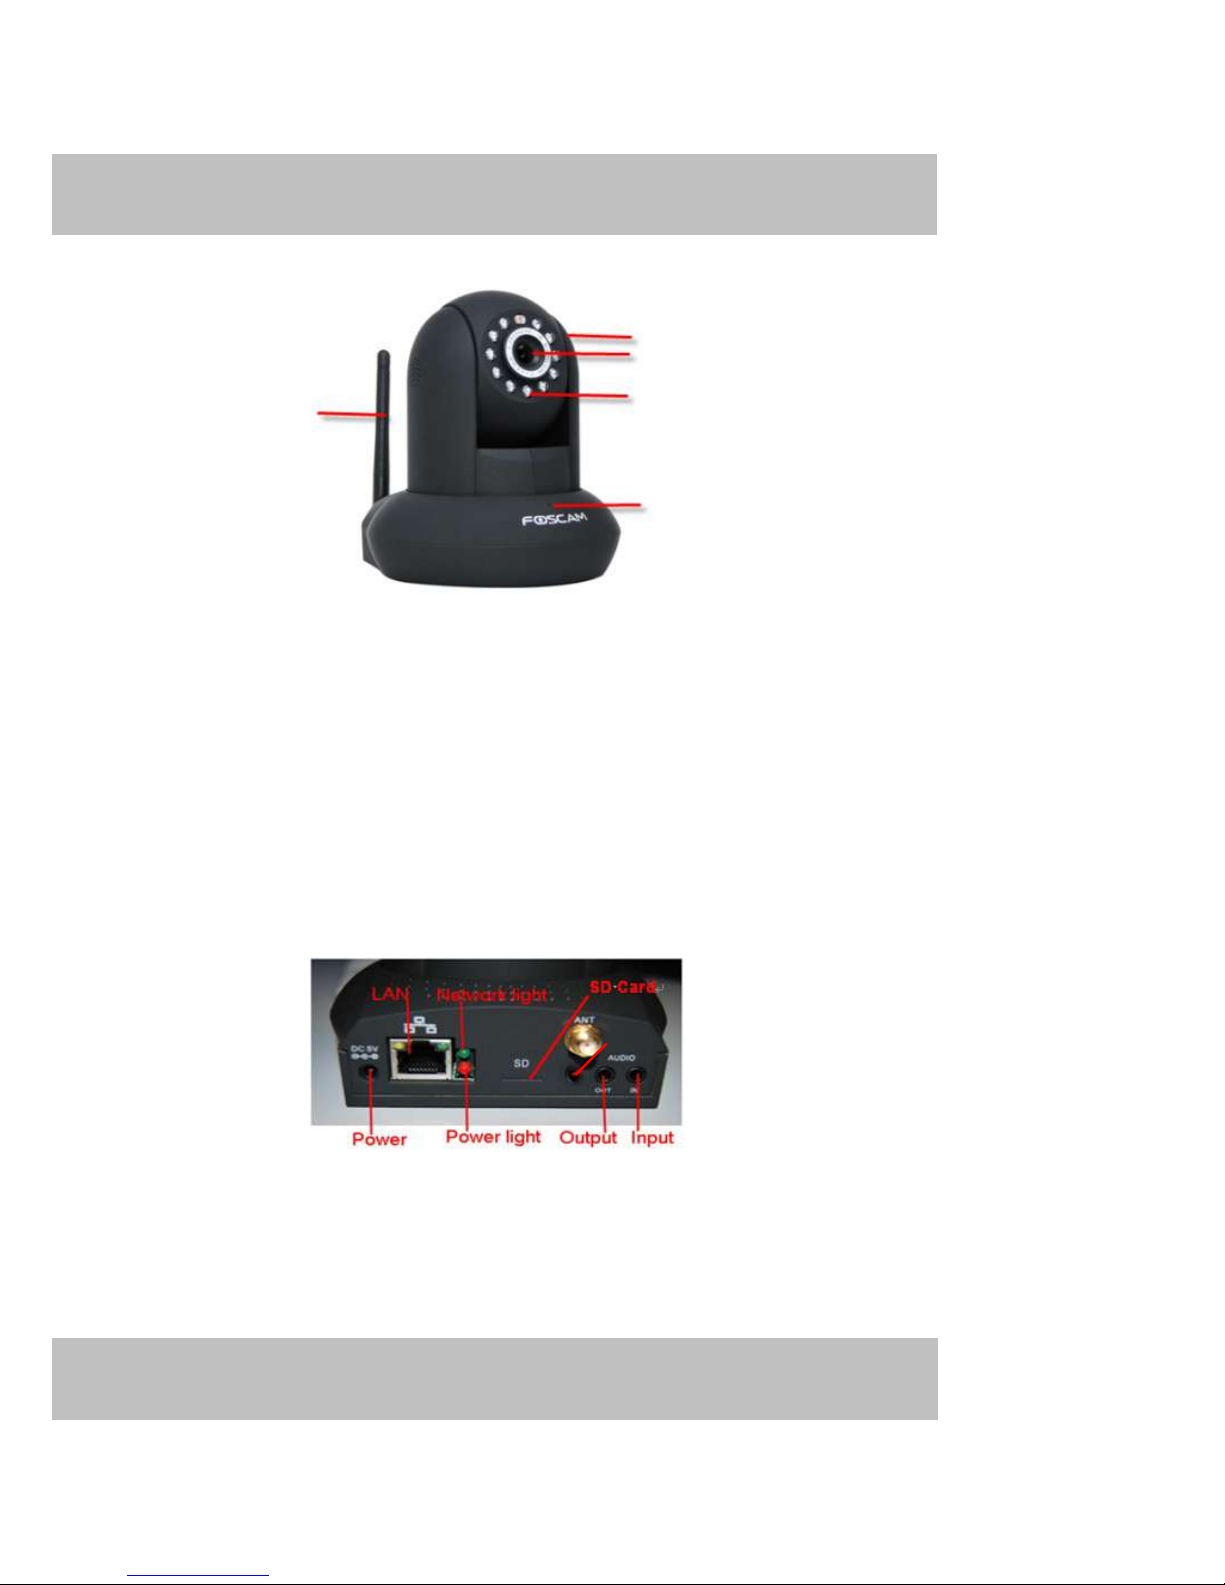
Figure 1.1
1 Speaker: Built-in speaker
2 LENS: CMOS sensor with fixed focus lens.
3 Infrared LED: 11 IR LEDs
4 Microphone: Built-in microphone
5 WIFI Antenna: Wireless Antenna
Rear Panel
Figure 1.2
LAN: RJ-45/10-100 Base T
Power: DC 5V/2A Power supply
Power Light: If the power adapter works well, the light will turn on.
Netw ork Light: The LED w ill blink when power and network cable are plugged in
1
2
3
4
5
WPS
5
w
w
wwwww
w
..ffoossccaamm..ccoom
m
SShheennzzhheenn FFoossccaamm IInntteelllliiggeenntt TTeecchhnnoollooggyy CCoo..,, LLiimmiitteedd
TTeell:: 8866 775555 22667744 55666688 FFaaxx:: 8866 775555 22667744 5511668
8
5
SD card: Supports to 32G
Audio Input: This jack is used to plug an external microphone
Audio Output: This jack is used to plug an external speaker
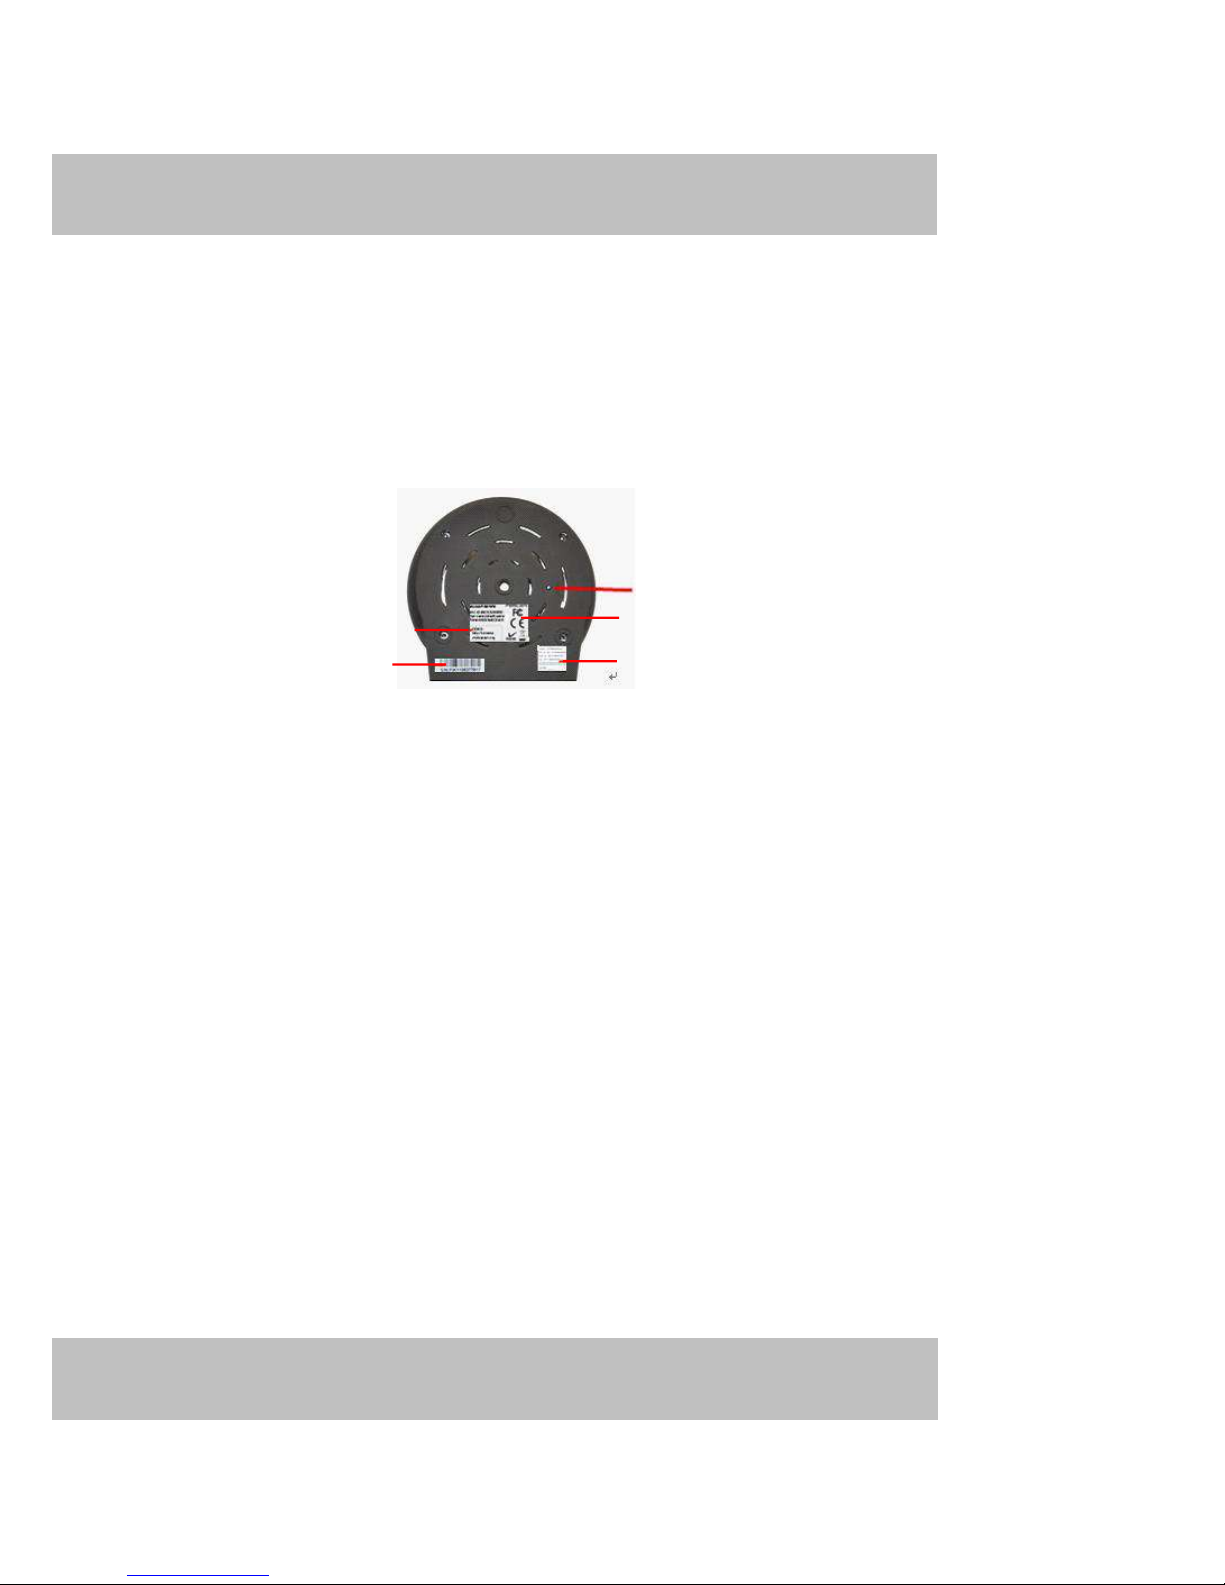
Bottom View
There are up to three labels located at the bottom of the camera; this is an important feature of original Foscam
cameras. If your camera does not have labels as shown in Figure 1.3, it may be a clone. Cloned Foscam
cameras can not use original firmware and are not eligible for warranty or technical services.
Figure 1.3
Reset button: Press and hold down the RESET BUTTON for 5 seconds. Wait for 20 seconds after released,
the IP camera will reboot and it will be reset back to factory default settings. You must power on the camera
before reset.
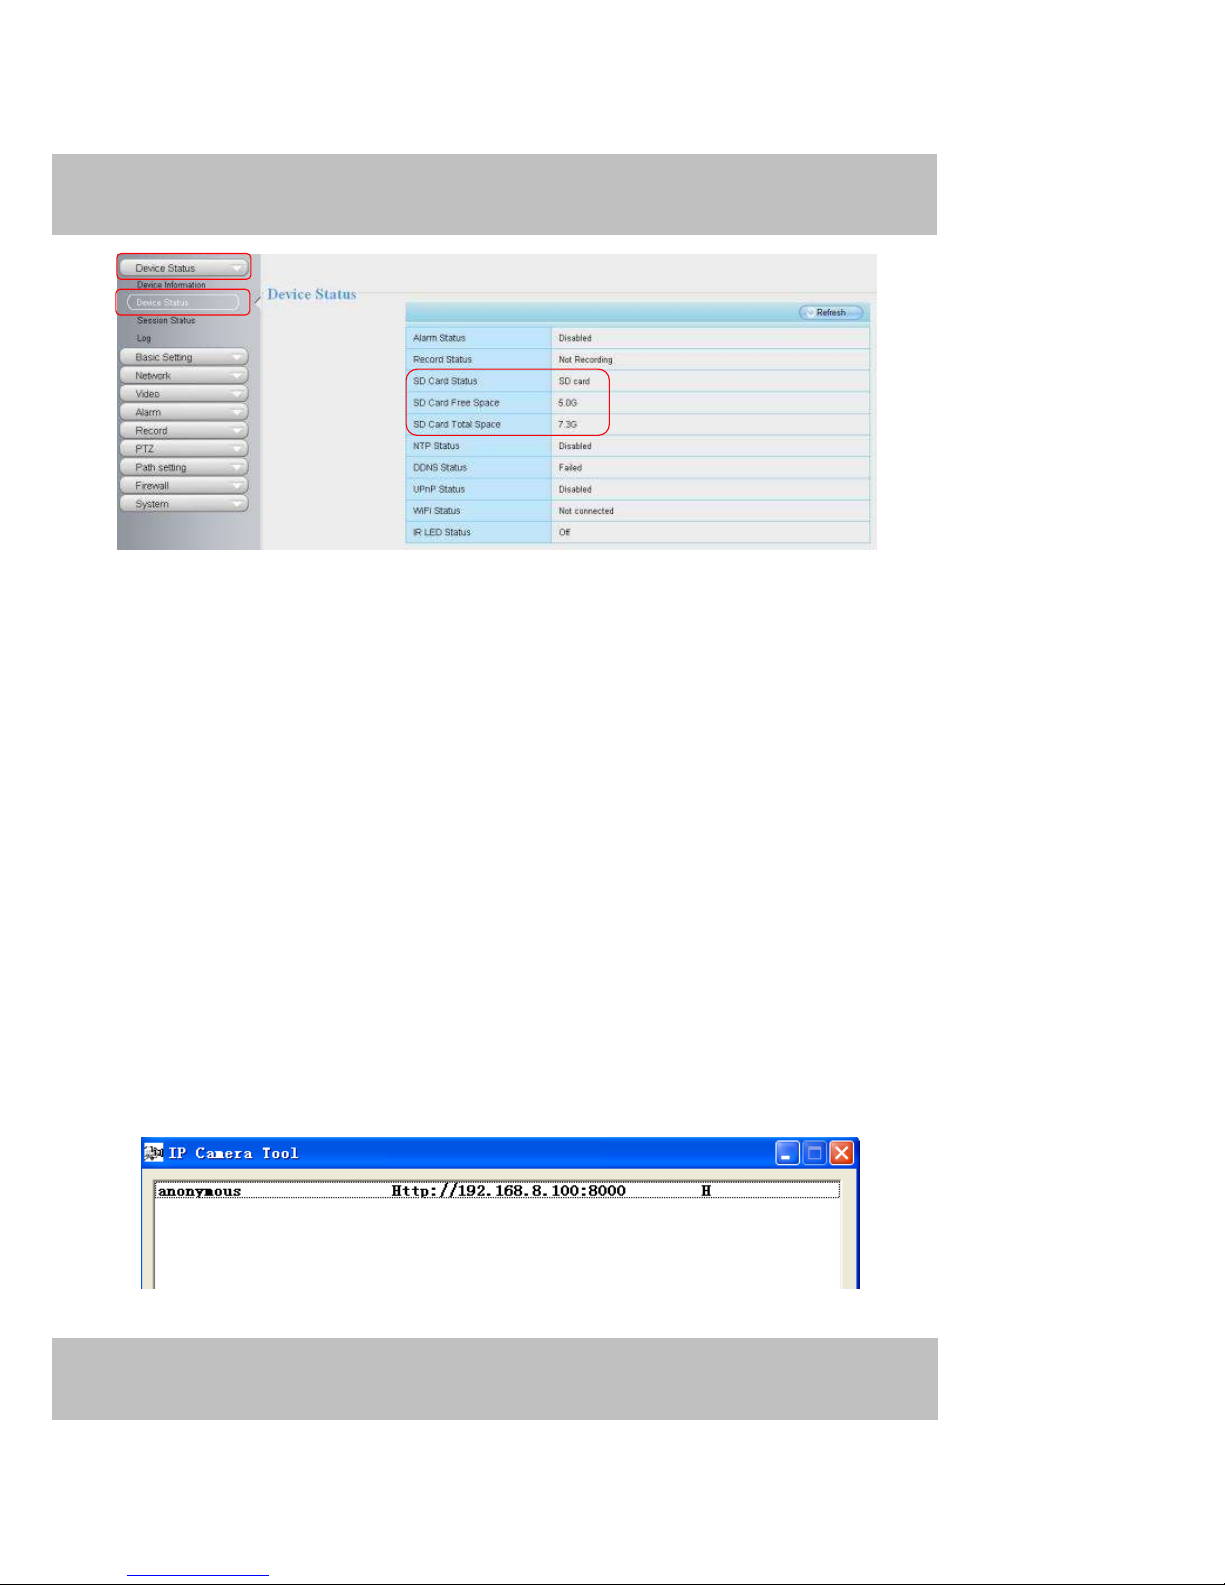
1.5 SD Card
This camera supports SD Card and the max size of SD card must be under 32G.
When you plug in the SD card during the camera work process, please reboot the camera again, or else the
SD Card may be cannot work well.
Go to the Settings Device Status Device Status page, you can see the SD card status.
FOSCAM domain name
Reset button
MAC address of wired connection
MAC address of wireless connection
S/N of FOSCAM
6
w
w
wwwww
w
..ffoossccaamm..ccoom
m
SShheennzzhheenn FFoossccaamm IInntteelllliiggeenntt TTeecchhnnoollooggyy CCoo..,, LLiimmiitteedd
TTeell:: 8866 775555 22667744 55666688 FFaaxx:: 8866 775555 22667744 5511668
8
6
The default storage path of alarm record files is SD card, when the available size of SD card is less than 256M,
the old record files will be deleted automatically.
22 AAcccceessssiinngg tthhee NNeettwwoorrkk CCaammeerraa
This chapter explains how to access the network camera through web browsers and RTSP players.
2.1 Access the Camera in LAN
This camera support HTTP and HTTPS protocols, so here will allow you to use HTTP and HTTPS port no.
(1) Http:// LAN IP + Http Port no.
Double click the IP Ca mera Tool icon and it should find the camera’s IP address automatically after you plug in
the network cable.
Figure 2.1
7
w
w
wwwww
w
..ffoossccaamm..ccoom
m
SShheennzzhheenn FFoossccaamm IInntteelllliiggeenntt TTeecchhnnoollooggyy CCoo..,, LLiimmiitteedd
TTeell:: 8866 775555 22667744 55666688 FFaaxx:: 8866 775555 22667744 5511668
8
7
Double click the IP address of the camera; your default browser will open to the camera login page.
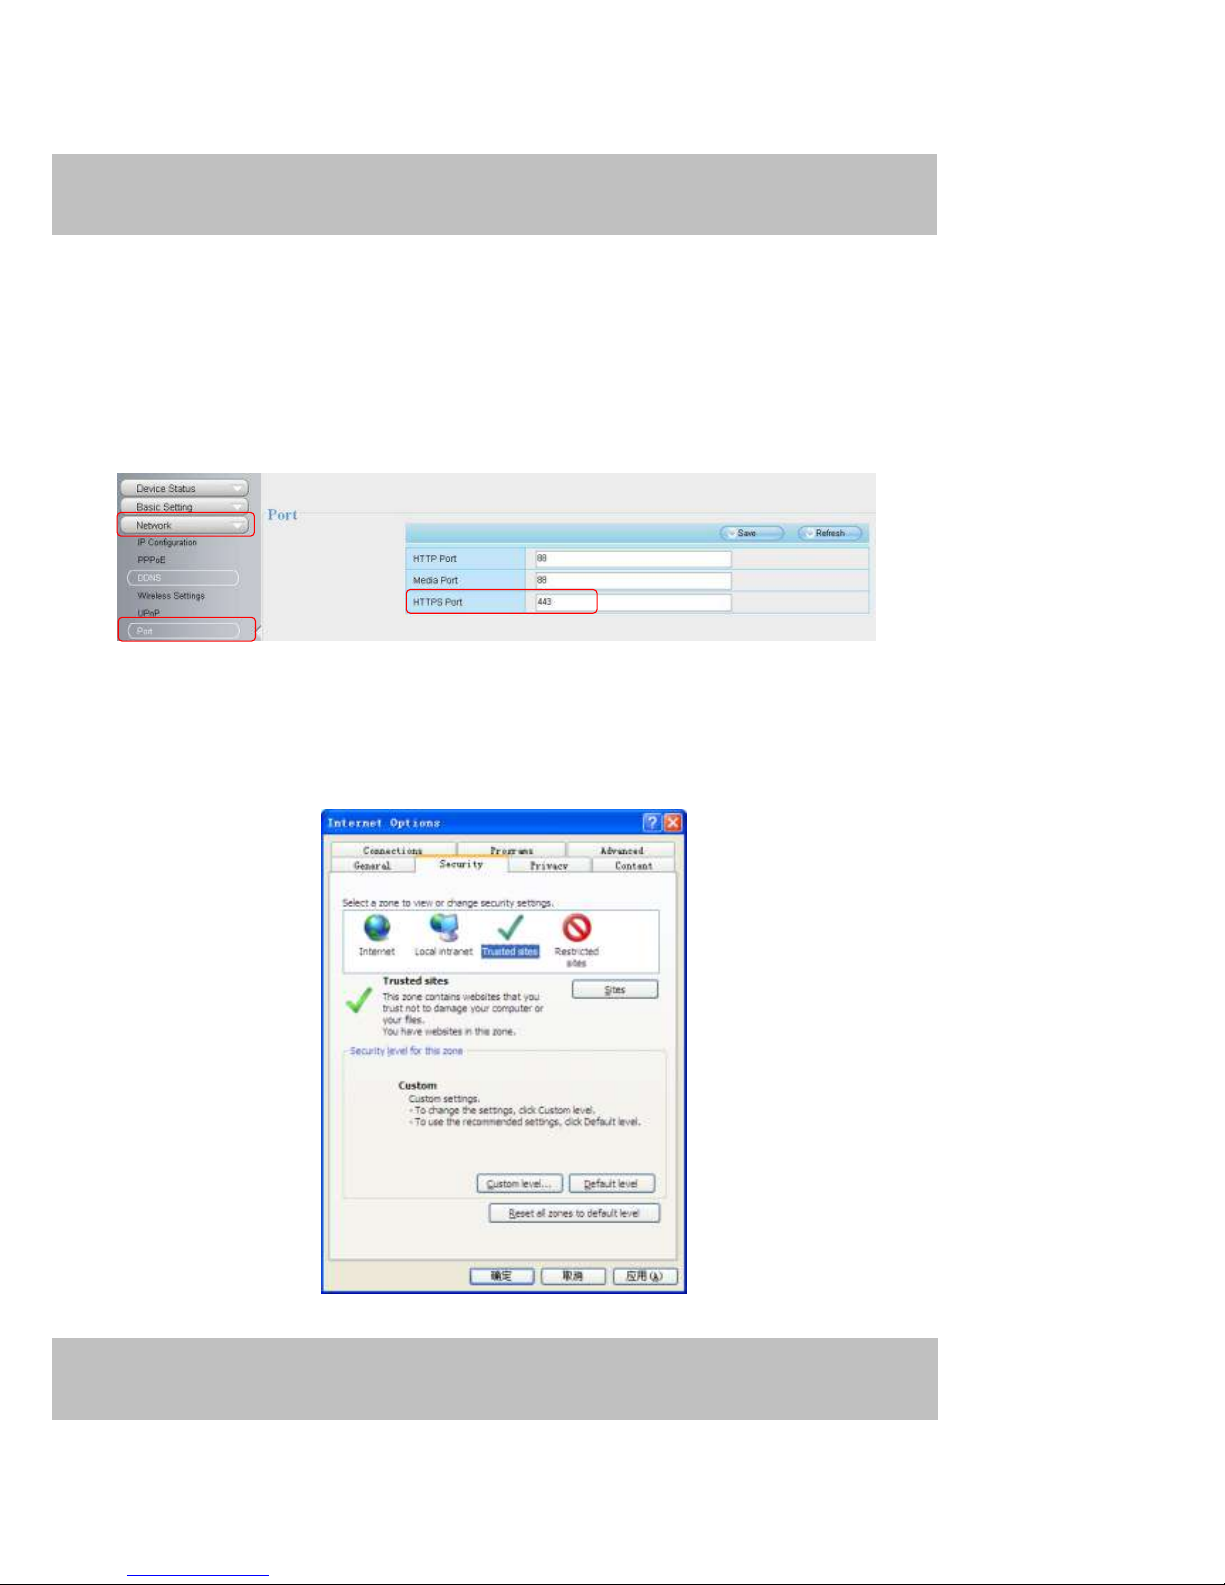
Https:// LAN IP + Https Port no.
The default Https port no. is 443. You can use the url to access the camera: https:// LAN IP + HTTPS port.
Go to Settings - Network - Port panel , you can see and change the https port no.
Figure 2.2
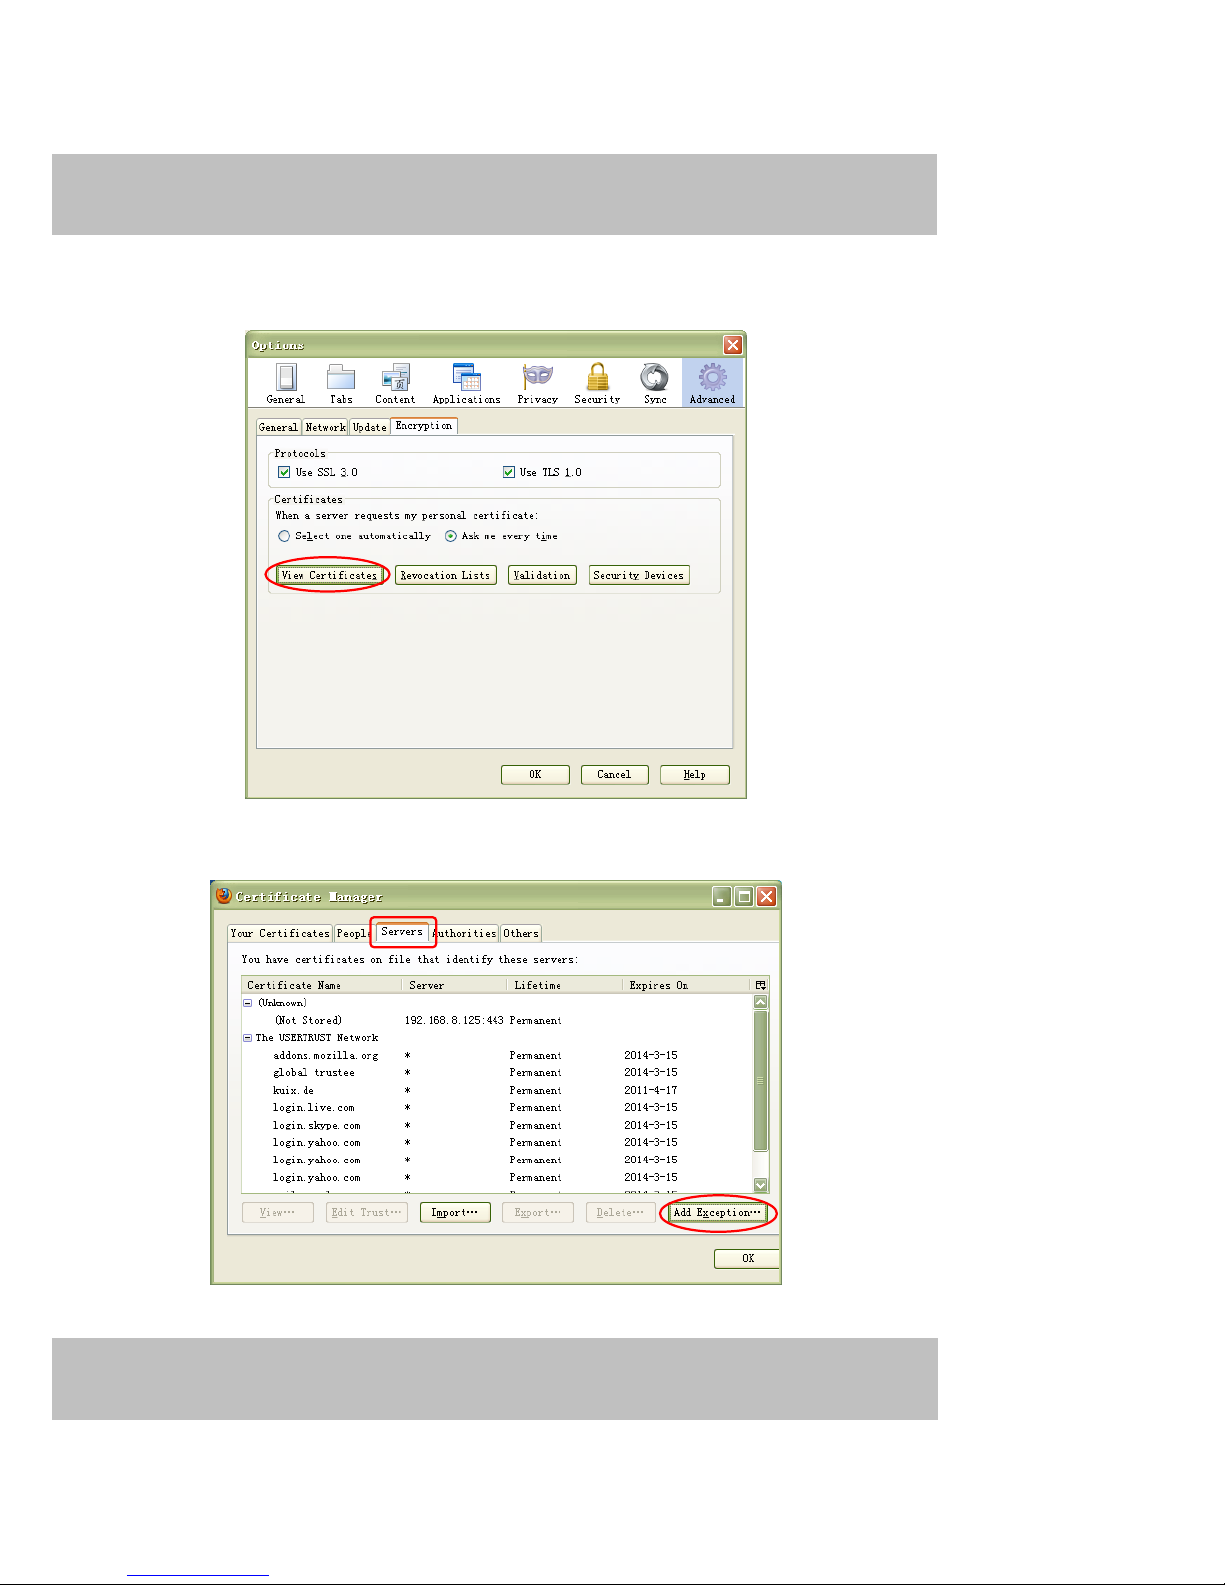
Sometimes you need to add the url to the Trusted Sites,
Open Internet Explorer if it is not already opened. Click on Tools, then click Internet Options.
Next, click the Security tab, then click the Trusted sites button.Finally ,click the Confirm button。
Figure 2.3
8
w
w
wwwww
w
..ffoossccaamm..ccoom
m
SShheennzzhheenn FFoossccaamm IInntteelllliiggeenntt TTeecchhnnoollooggyy CCoo..,, LLiimmiitteedd
TTeell:: 8866 775555 22667744 55666688 FFaaxx:: 8866 775555 22667744 5511668
8
8
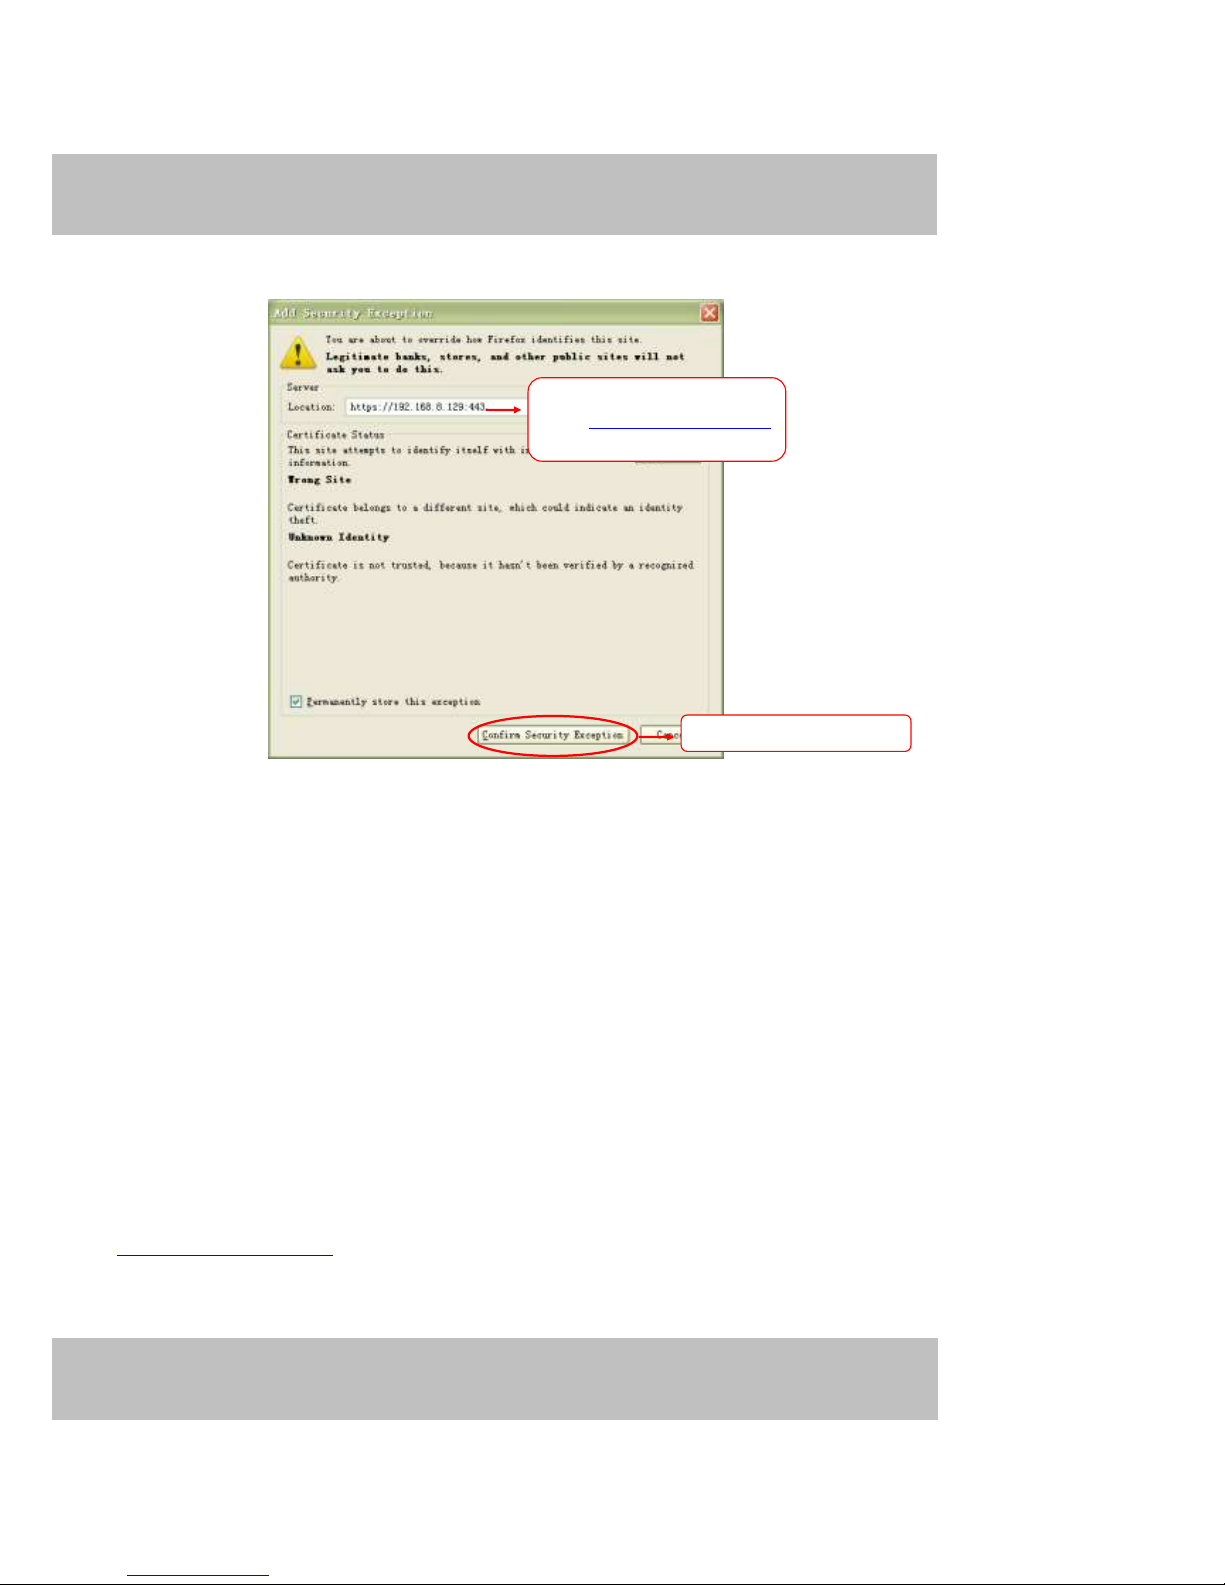
For Firefox, you can add the trusted as the following way:
Tools --- Options ---- Advanced --- View Certificates --- Servers
Figure 2.4
Click View Certificates, and go to Servers option.
Figure 2.5
9
w
w
wwwww
w
..ffoossccaamm..ccoom
m
SShheennzzhheenn FFoossccaamm IInntteelllliiggeenntt TTeecchhnnoollooggyy CCoo..,, LLiimmiitteedd
TTeell:: 8866 775555 22667744 55666688 FFaaxx:: 8866 775555 22667744 5511668
8
9
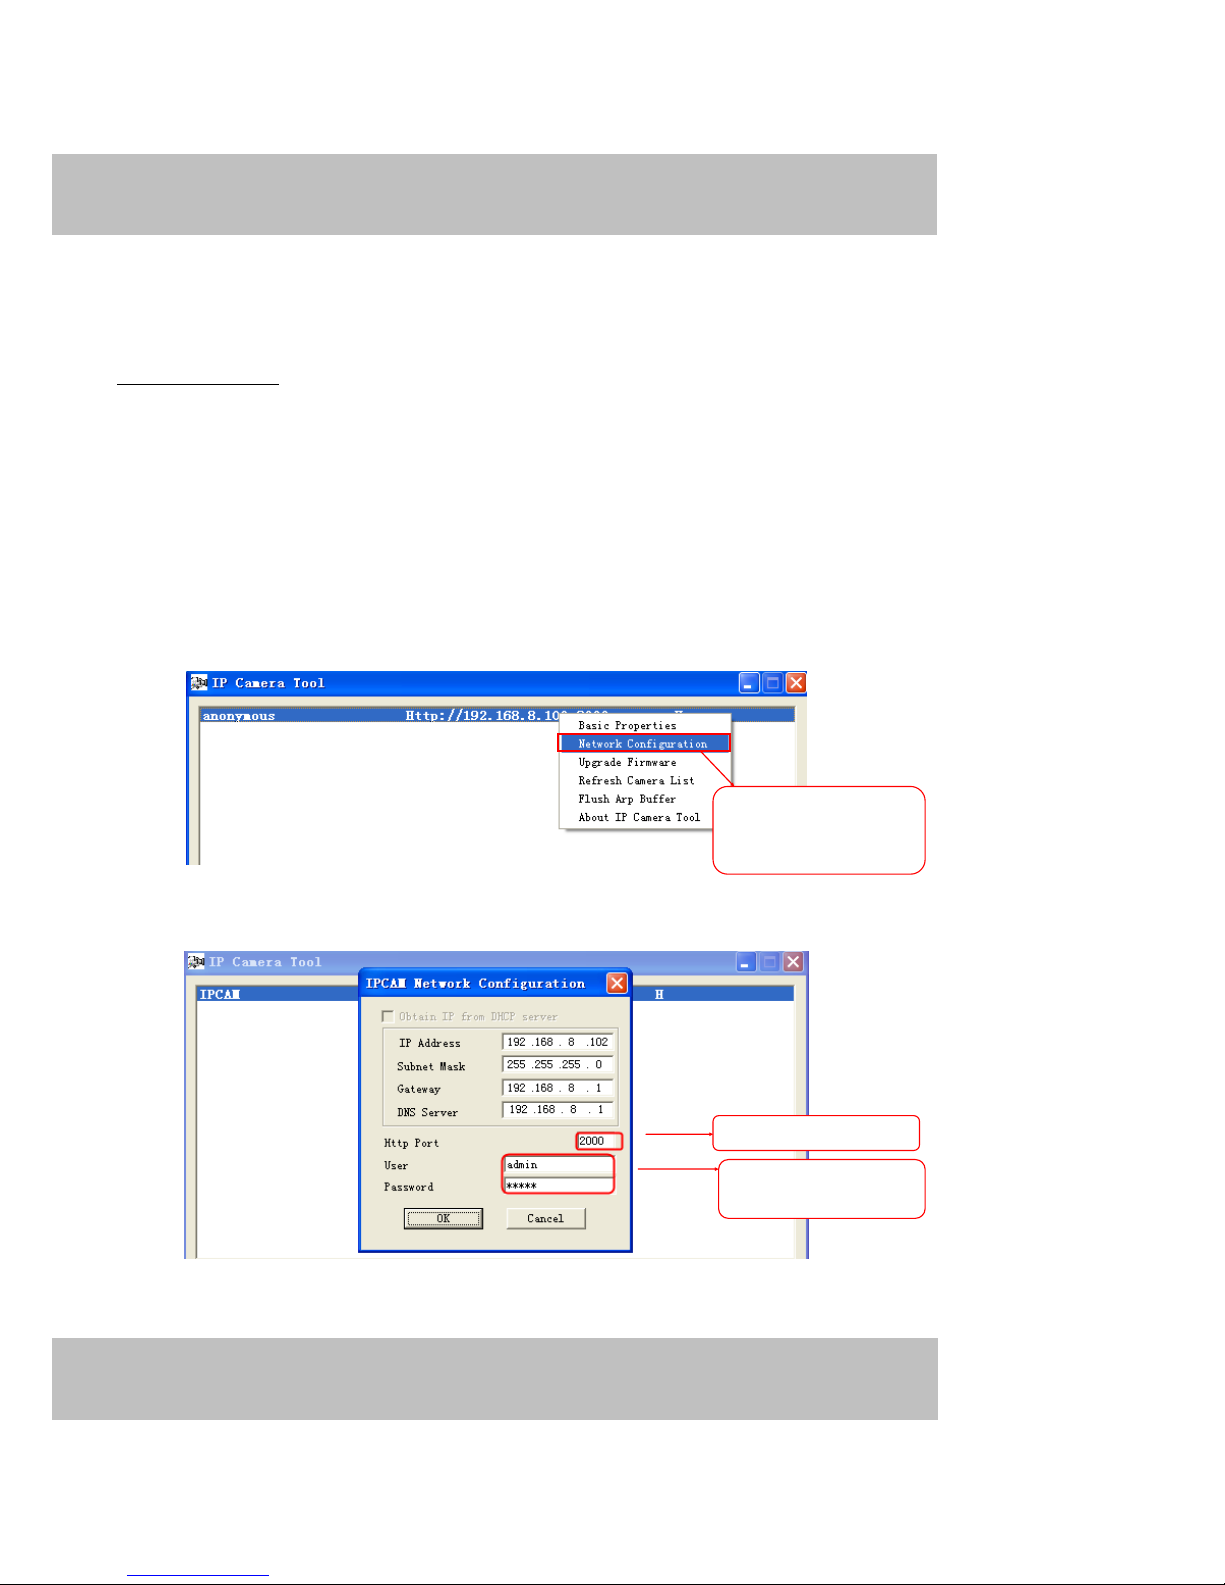
Go to Add Exception panel.
Figure 2.6
2.2 Access the Camera in WAN
2.2.1 Static IP Addresses
Users who have static IP addresses do not need to set DDNS service settings for remote access.
When you have finished connecting the camera using the LAN IP address and port forwarding,
you can access the camera directly from the Internet using the WAN IP address and port
number.
How to Obtain the WAN IP address from a public website
To obtain your WAN IP address, enter the following URL in your browser:
http://www.whatismyip.com.The webpage at this address will show you the current WAN IP.
Enter the camera’s url , here
take https://192.168.8.129:443
for example
Click this button to add it

10
w
w
wwwww
w
..ffoossccaamm..ccoom
m
SShheennzzhheenn FFoossccaamm IInntteelllliiggeenntt TTeecchhnnoollooggyy CCoo..,, LLiimmiitteedd
TTeell:: 8866 775555 22667744 55666688 FFaaxx:: 8866 775555 22667744 5511668
8
10
Figure 2.7
Access your IP Camera from the Internet
You can access the IP Camera from the Internet (remote access). Enter the WAN IP address
and port number in your standard browser. For example, you would enter http://
183.37.28.254:85
Make sure port forwarding is successful. You can do port forwarding two ways.
1) Login to y our router to enable the “UPNP” function. You c an then login to the camera as
administrator, choose Network, and then choose UPnP to enable UPnP. Make sure that the
status of UPnP reads “UPnP Successful” on the Device Status page.
2) Do port (HTTP port and Media port) forwarding manually. (See Figure 2.11 for further details)
If your router has a Virtual Server, it can do port forwarding. Add the camera’s LAN IP and port
which you had set earlier to your router’s port forwarding settings.
Note: If you plug the camera into a router, it will have a dynamic IP address and you need to set
DDNS service settings to view it remotely.
2.2.2 Dynamic IP Addresses
DDNS is a service that allow s your IP Camera, especially w hen assigned with a dynamic IP address, to have a
fixed host and domain name. This means that even though your WAN IP address is constantly changing, you
will have a fixed hostname you can use to access your cameras at all times. You can access the camera
directly from the Internet using the hostname and port number.
Note
11
w
w
wwwww
w
..ffoossccaamm..ccoom
m
SShheennzzhheenn FFoossccaamm IInntteelllliiggeenntt TTeecchhnnoollooggyy CCoo..,, LLiimmiitteedd
TTeell:: 8866 775555 22667744 55666688 FFaaxx:: 8866 775555 22667744 5511668
8
11
What is the HTTP Port no.?
Default HTTP Port is 88
All cameras have the default HTTP port of 88. For example, if the LAN IP link of the camera is
http://192.168.8.102:88, this means that the camera’s HTTP port is 88. You can change port 88 to another port
if you’d like such as 2000 or 8090, w hich w ill not be conflict w ith other existing ports like 25, 21,10000.Here you
can set the port no. between 1 and 65535.
Change the def ault http no.88 to another one.
How to assign a different HTTP Port No. and fixed the LAN IP of the camera by the IP Camera Tool?
Step 1: Open the IP Camera Tool, select the camera you would like to change the port of, right click on the IP
address, and click on ”Network Configuration”, this brings up the netw ork configuration box as shown in Figure
2.8 and 2.9.
Figure 2.8
Figure 2.9
Select which camera
you’d like to change the
port for, and right click
Modify the Http Port.
Enter the Username and
password, click OK.

12
w
w
wwwww
w
..ffoossccaamm..ccoom
m
SShheennzzhheenn FFoossccaamm IInntteelllliiggeenntt TTeecchhnnoollooggyy CCoo..,, LLiimmiitteedd
TTeell:: 8866 775555 22667744 55666688 FFaaxx:: 8866 775555 22667744 5511668
8
12
Step 2: Enter the username and password of the Administrator (default username is admin with a blank
password), and c lick “OK” to apply changes.
Step 3: Wait around 10 seconds, you’ll see that the camera’s LAN IP address has changed. In our example it
was changed to 2000, so we see http://192.168.8.102:2000 in IP Camera Tool. Also, the LAN IP address is
now fixed at a static IP address of http://192.168.8.102:2000. This IP address will not change even if the
camera is powered off and back on, the camera will remain on this LAN IP address. This is very important that
a static LAN IP address is set, or you may have problems later with remote access and seeing the camera
remotely if the camera loses power and reconnects on a different LAN IP address. Make sure you set a static
LAN IP address!
Figure 2.10
What is Port forwarding?
If you have never done port forwarding before, you can open and view the following link to understand the
basic concept. Port forwarding allows for outside connections to access a specific device on your network from
anywhere in the world. Every router automatically blocks any incoming connections for safety purposes. Using
port forwarding, you are telling your router to allow a connection through a certain port (you can think of it as a
gateway) into your router. You set this port to a specific device, in our case an IP Camera, so it can be
accessed from anywhere in the world.
Click this link to learn more about port forwarding: http://portforward.com/help/portforwarding.htm
How do we configure Port Forwarding?
For this section, we will be using an example:
Let’s say the camera’s LAN IP address is http://192.168.8.100:2000
Step 1: Login to the router, and go to your router’s port forw arding or port triggering menu. So metimes this is
also under the name of Virtual Server or NAT.
Using the Linksys brand router as an example, we would log into the router, and go to the Applications &
13
w
w
wwwww
w
..ffoossccaamm..ccoom
m
SShheennzzhheenn FFoossccaamm IInntteelllliiggeenntt TTeecchhnnoollooggyy CCoo..,, LLiimmiitteedd
TTeell:: 8866 775555 22667744 55666688 FFaaxx:: 8866 775555 22667744 5511668
8
13
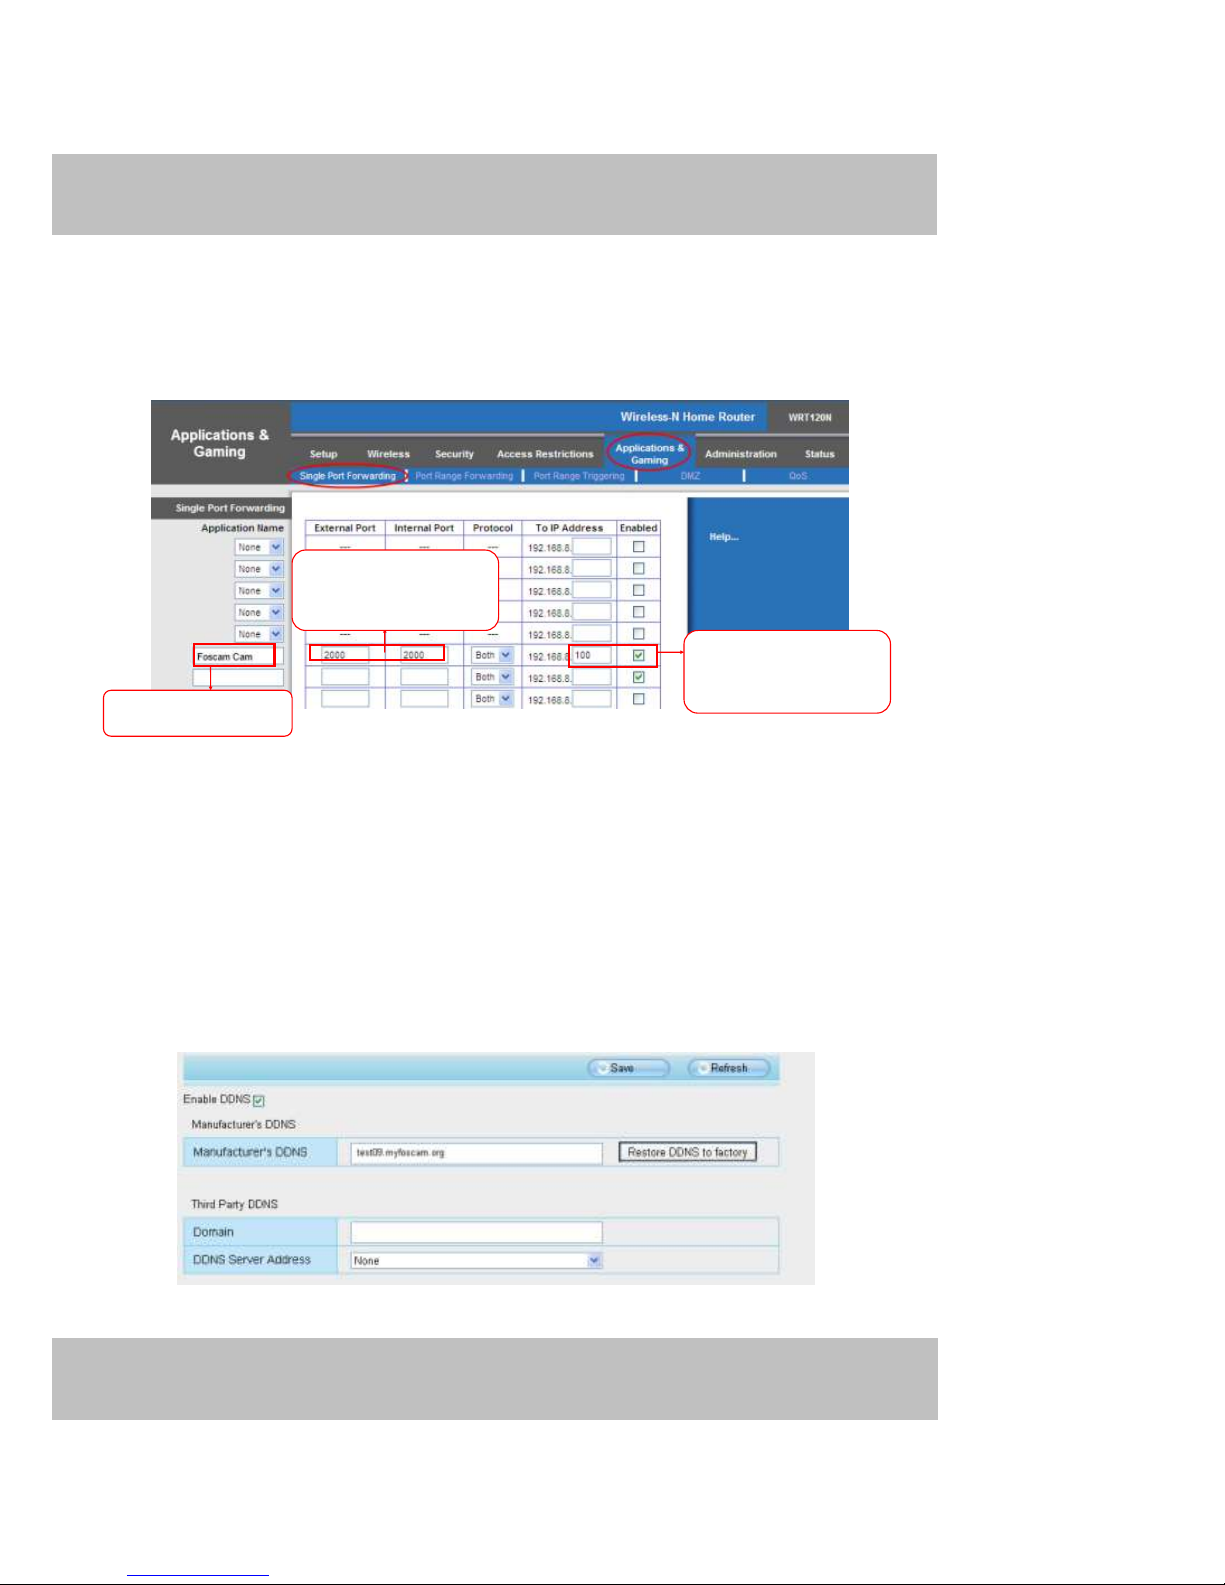
Gaming menu. We w ould then click on the “Single Port Forw arding” sub-menu.
Step 2: Create a new column using the LAN IP address & HTTP Port of the camera within the router as shown
below, then push OK or Submit to save your settings:
Figure 2.11
First method :
Use the embedded DDNS to access the camera via the Internet
Each Foscam camera has an embedded unique DDNS domain name, the format of this domain name is
xxxxxx.myfoscam.org. On the bottom of the camera, you can see the domain name sticker with this
information on it.
For example, we can use test09.myf oscam.org. In the c amera, click Settings at the top, clic k “Network” on the
left, then click “DDNS” to get to the DDNS s ettings page. Here you can see the unique domain name of y our
camera.
Figure 2.12
Fill the HTTP Port of the
camera in the columns of
External Port and Internal
Port. Example: 2000
Fill in this section with the
LAN IP of the camera; we
would enter “100” for our
example.
Assign a name for the
port forward setting here

14
w
w
wwwww
w
..ffoossccaamm..ccoom
m
SShheennzzhheenn FFoossccaamm IInntteelllliiggeenntt TTeecchhnnoollooggyy CCoo..,, LLiimmiitteedd
TTeell:: 8866 775555 22667744 55666688 FFaaxx:: 8866 775555 22667744 5511668
8
14
Now you can use “http://Domain name + HTTP Port” to access the camera v ia the Internet.
Take hostname test09.myfoscam.org and HTTP Port of 2000 for example, the URL link to access the camera
via the Internet would be http:// test09.myfoscam.org:2000.
Second method :
Use the Third party DDNS to access the camera via the Internet
Step 1 Please go to the third party DDNS website(such as www.no-ip.com) to create a free hostname.
Step 2 DO DDNS Service Settings within the Camera
Please s et DDNS Settings w ithin the camera by hostname, a user name and password y ou’ve got from
www.no-ip.com
Take hostname ycxgwp.no-ip.info, user name foscam, password foscam2012 for example.
Firstly, goes to option of DDNS Settings on the administrator panel.
Secondly, select No-Ip as a server.
Thirdly, fill foscam as DDNS user, fill password foscam2012 as DDNS password, fill ycxgwp.no-ip.info as
DDNS domain and server URL, Then click save to make effect. The camera will restart and to take the DDNS
settings effective.
Fourthly, after the restart, login the camera, and go to option of Device Status on the administrator panel, and
check if the DDNS status is successful.
If failed, please double check if you have input the correct hostname, user name, and password, and try to
redo the settings.
If you have set Third Party DDNS successfully ,the Foscam Domain Name w ill be invalid. The Third Party
DDNS and the Foscam Domain Name cannot work at the same time, the last time you configured will take
effect.
2.3 Using the VLC player
This camera supports RTSP streaming, here you can view the camera using VLC player.
RTSP URL rtsp:// [user name][:password]@IP:HTTP port number/videosream
The part in the square brackets may be omitted.
user name & password:
Note
15
w
w
wwwww
w
..ffoossccaamm..ccoom
m
SShheennzzhheenn FFoossccaamm IInntteelllliiggeenntt TTeecchhnnoollooggyy CCoo..,, LLiimmiitteedd
TTeell:: 8866 775555 22667744 55666688 FFaaxx:: 8866 775555 22667744 5511668
8
15
The user name and password to access the camera. This part can be omitted.
IP:
WAN or LAN IP address.
Videostream:
Here support three mode: videoMain, videoSub and audio. When the network speed is bad, here
you had better select videoSub. If you select audio, you can only hear the sound but cannot see
the video.
For example:
IP: 192.168.1.11
HTTP Port number: 88
User name: admin
Password: 123
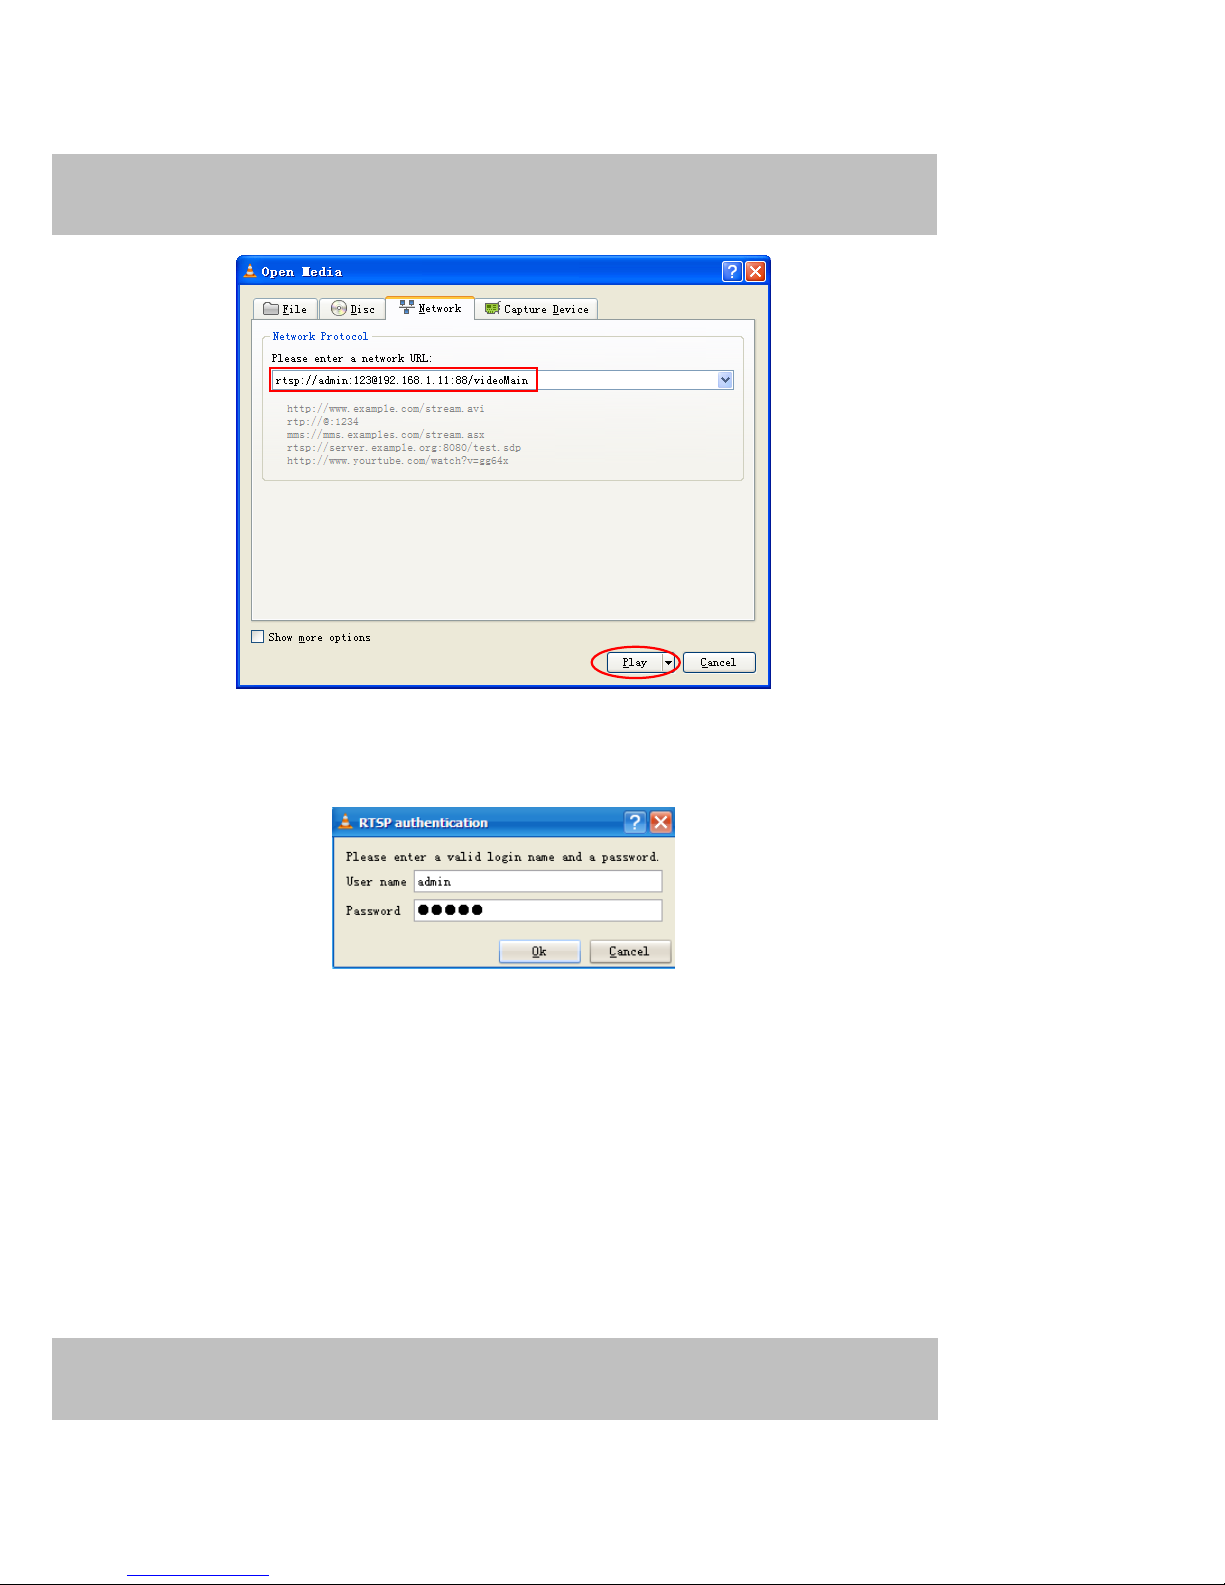
Here I can enter one of the following URLs in the VLC.
1) rtsp://admin:123@192.168.1.11:88/videoMain
2) rtsp:// @192.168.1.11:88/videoMain
3) rtsp://:123@192.168.1.11:88/videoMain
4) rtsp://admin@192.168.1.11:88/videoMain
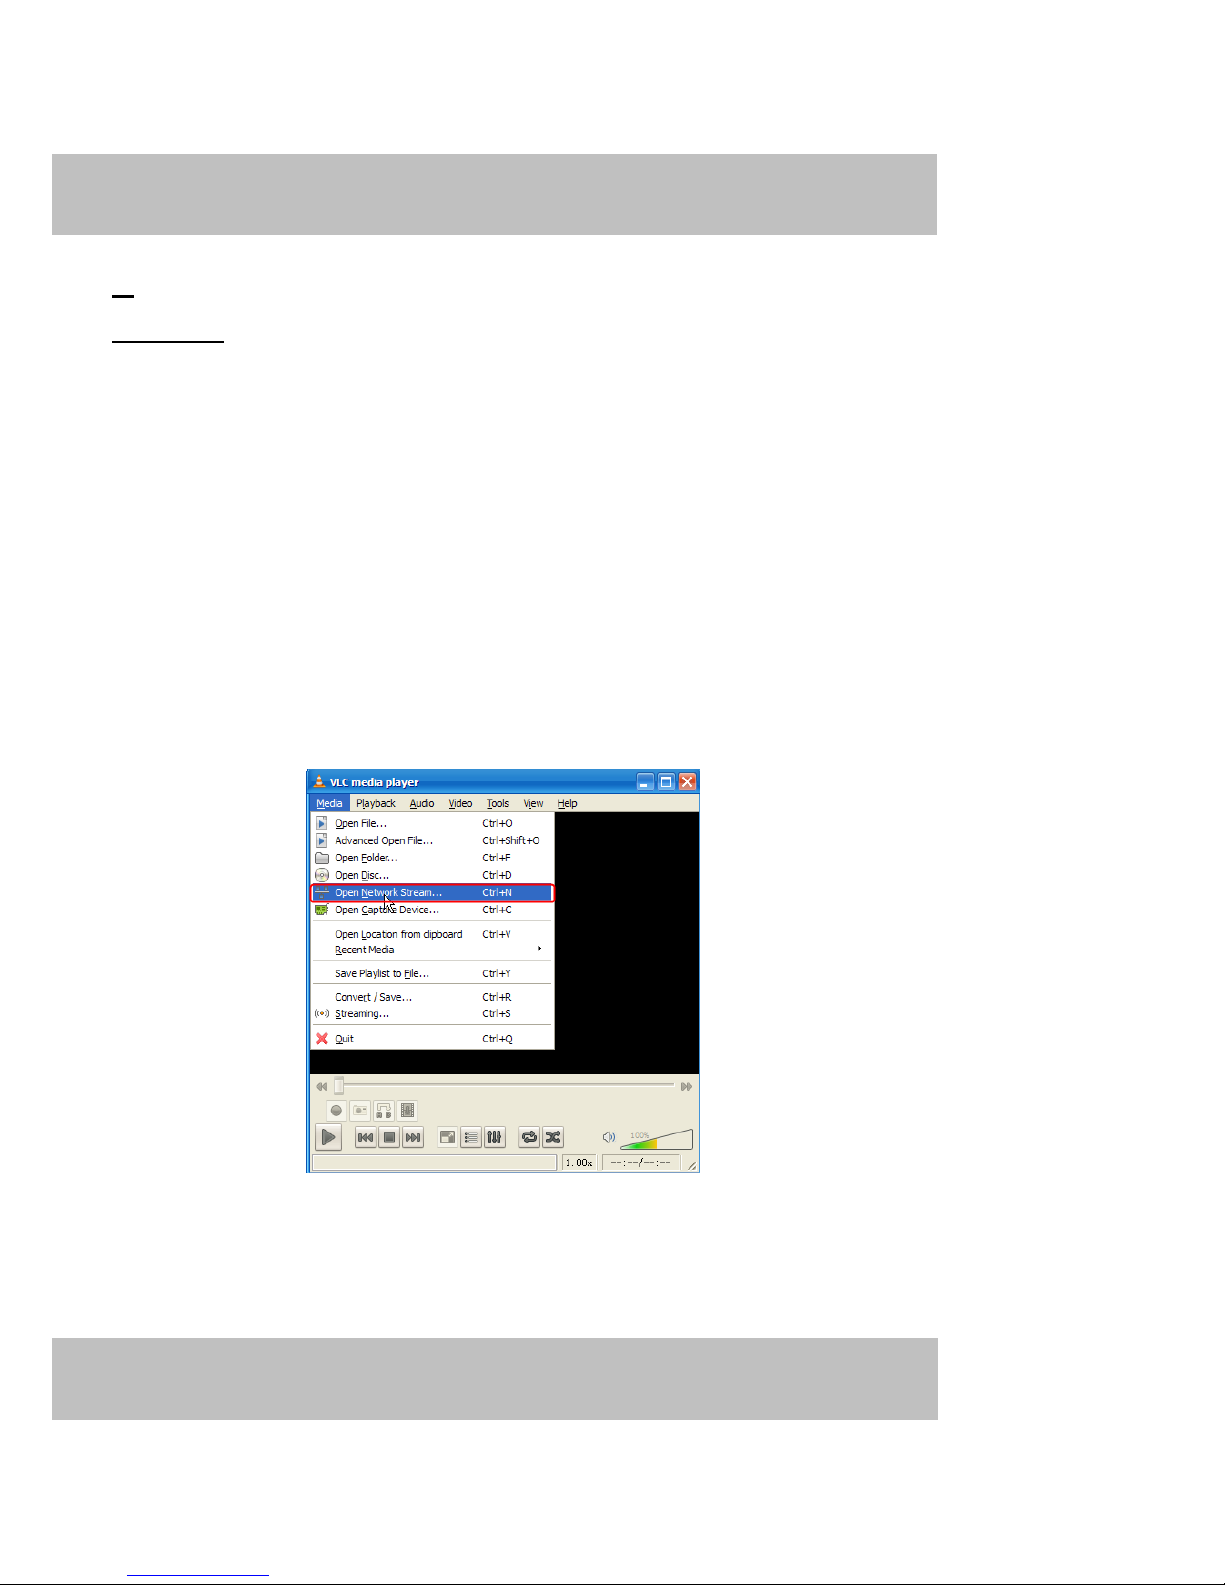
Open the VLC, and go to MediaOpen Network Stream option, then enter the URL into VLC.
Figure 2.13
16
w
w
wwwww
w
..ffoossccaamm..ccoom
m
SShheennzzhheenn FFoossccaamm IInntteelllliiggeenntt TTeecchhnnoollooggyy CCoo..,, LLiimmiitteedd
TTeell:: 8866 775555 22667744 55666688 FFaaxx:: 8866 775555 22667744 5511668
8
16
Figure 2.14
Sometimes you may need to enter the user name and password again. Click OK and you can
see the real-time preview.
Figure 2.15
17
w
w
wwwww
w
..ffoossccaamm..ccoom
m
SShheennzzhheenn FFoossccaamm IInntteelllliiggeenntt TTeecchhnnoollooggyy CCoo..,, LLiimmiitteedd
TTeell:: 8866 775555 22667744 55666688 FFaaxx:: 8866 775555 22667744 5511668
8
17
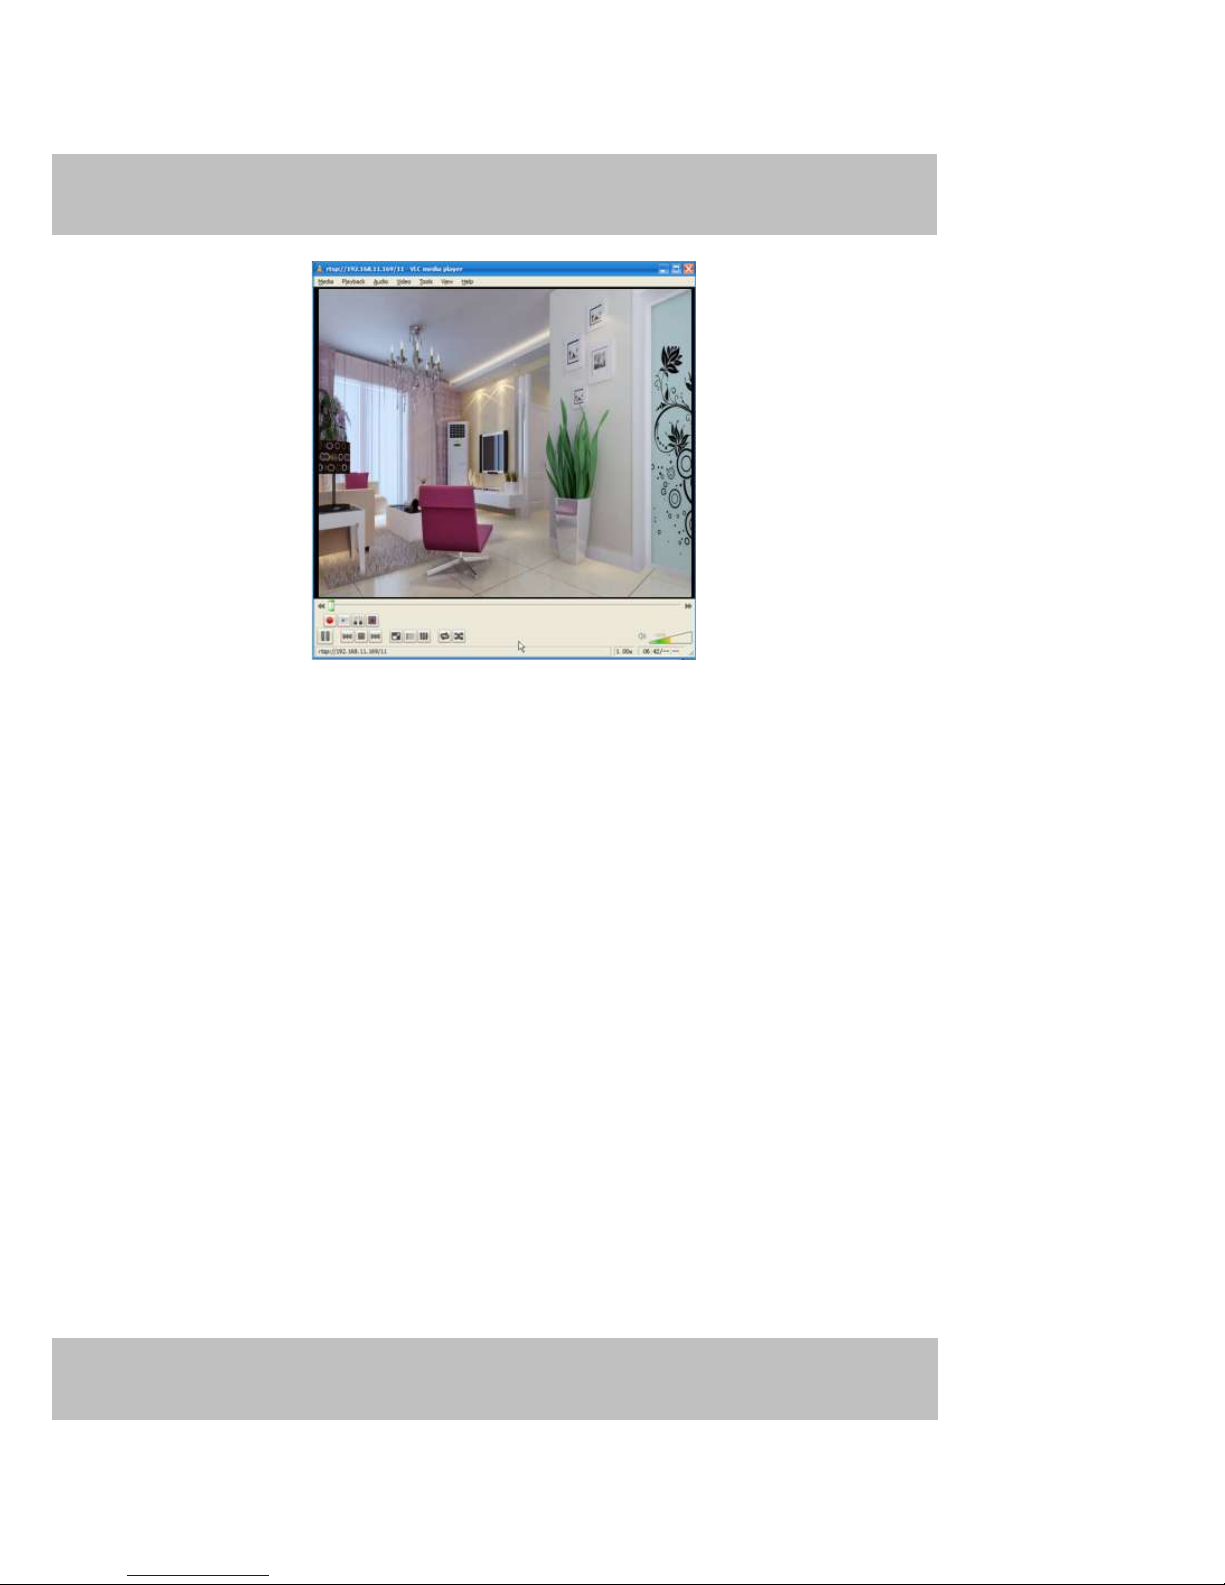
Figure 2.16
If you cannot play the video in the VLC player, please check the port mapping. You can read
Quick Installation Guide about How to configure port forwarding.
NOTE:
If you modify the camera’s username or password, you had better reboot the camera, or else the
new username and password cannot take effect when you enter the authentication in the VLC.
3 Surveillance Software GUI
Please refer to the Quick Installation Guide if you install the camera at first time. After finishing quick
installation, you can take time to learn the operation of the software.
18
w
w
wwwww
w
..ffoossccaamm..ccoom
m
SShheennzzhheenn FFoossccaamm IInntteelllliiggeenntt TTeecchhnnoollooggyy CCoo..,, LLiimmiitteedd
TTeell:: 8866 775555 22667744 55666688 FFaaxx:: 8866 775555 22667744 5511668
8
18
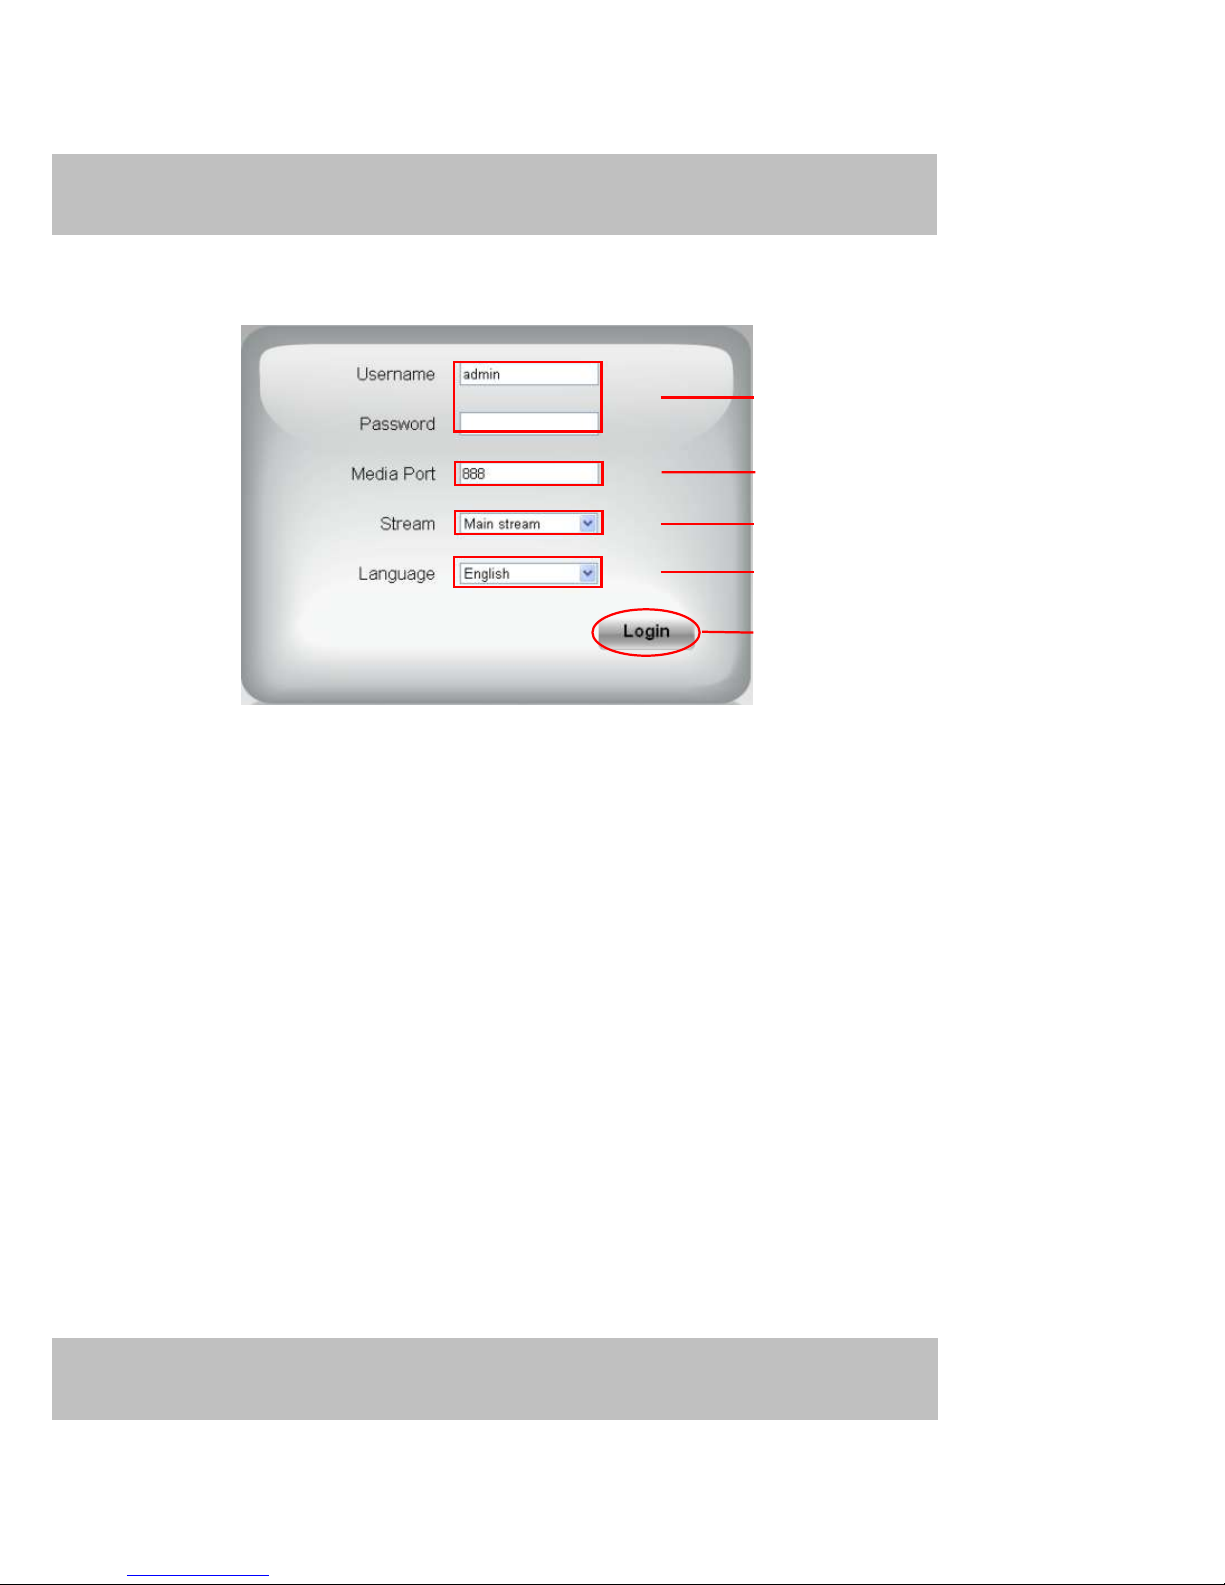
3.1 Login Window
Figure 3.1
Please check the login window above, it was divided to 5 sections from no. 1 to 5.
Section1 Enter the User name and password
The default administrator username is admin w ith a blank password, please reset the password at first using
and prevent unauthorized users login the camera (read chapter 3.2.4 about how to change).
Section2 Media port
The Media port is used to transfer video stream, and the default port no. is 888, you can reset the port no.
between 1 ~65535 on the Settings- Netw ork Port page. The camera w ill obtain the port no. automatically,
you need not to fill it manually.
Section3 Stream
The camera supports two stream modes: Main stream and sub stream. If you want to access the camera form
LAN, here you can select Main stream. If you want to access the camera from Internet, here we recommend
sub stream.
2
3
4
5
1
19
w
w
wwwww
w
..ffoossccaamm..ccoom
m
SShheennzzhheenn FFoossccaamm IInntteelllliiggeenntt TTeecchhnnoollooggyy CCoo..,, LLiimmiitteedd
TTeell:: 8866 775555 22667744 55666688 FFaaxx:: 8866 775555 22667744 5511668
8
19
Note: When the network bandw idth is badly you’d better select Sub Stream and the video will be more fluency.
Section4 Select the language
You can select the language you need via click on the language dropdown list to switch.
Section5 Login the camera
Click Login button and you will see the surveillance windows.
Figure 3.2

20
w
w
wwwww
w
..ffoossccaamm..ccoom
m
SShheennzzhheenn FFoossccaamm IInntteelllliiggeenntt TTeecchhnnoollooggyy CCoo..,, LLiimmiitteedd
TTeell:: 8866 775555 22667744 55666688 FFaaxx:: 8866 775555 22667744 5511668
8
20
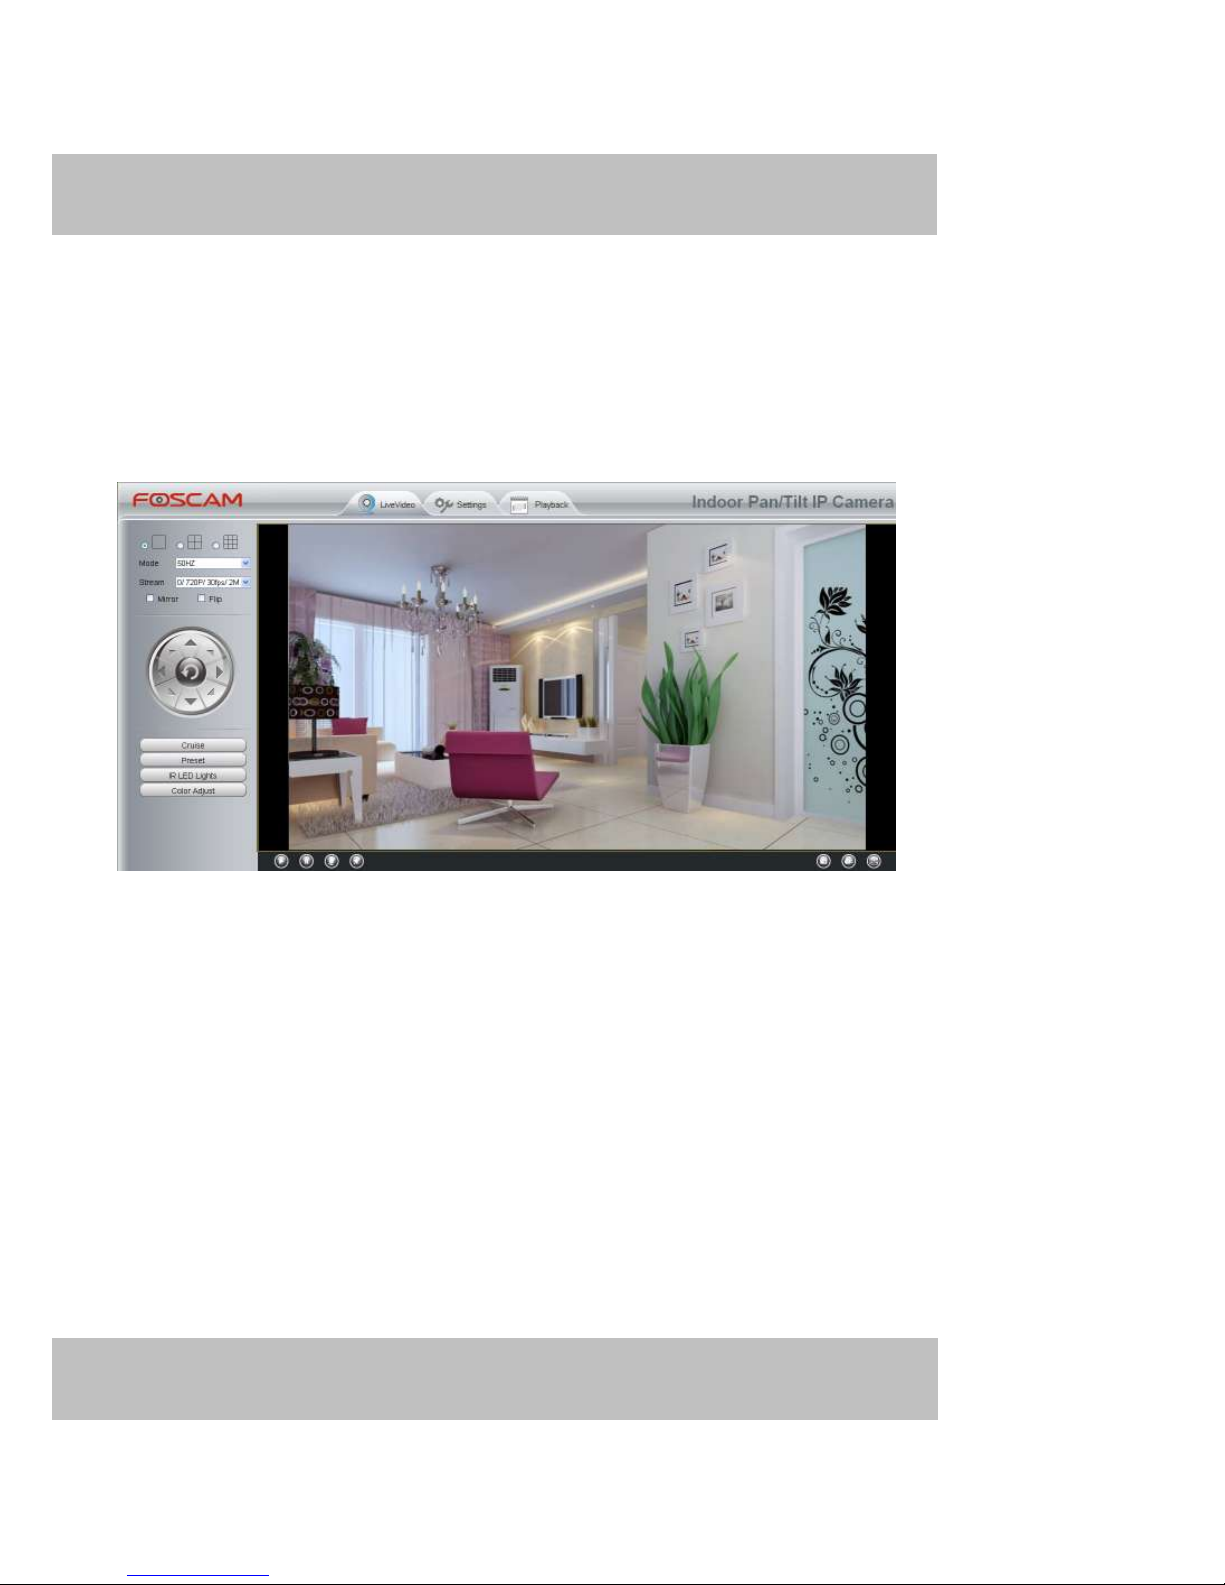
3.2 Surveillance Window
Figure 3.3
Section1 FOSCAM Logo/ LiveVideo / Settings/Playback buttons
: FOSCAM LOGO
: Path to surveillance window. Click this button and back to the surveillance window
: Path to Administrator Control Panel, Click it, and it w ill lead to Administrator Control Panel and
do advanced settings.
: Click this button and back to the Playback panel to view the stored audio files stored in the
SD Card.
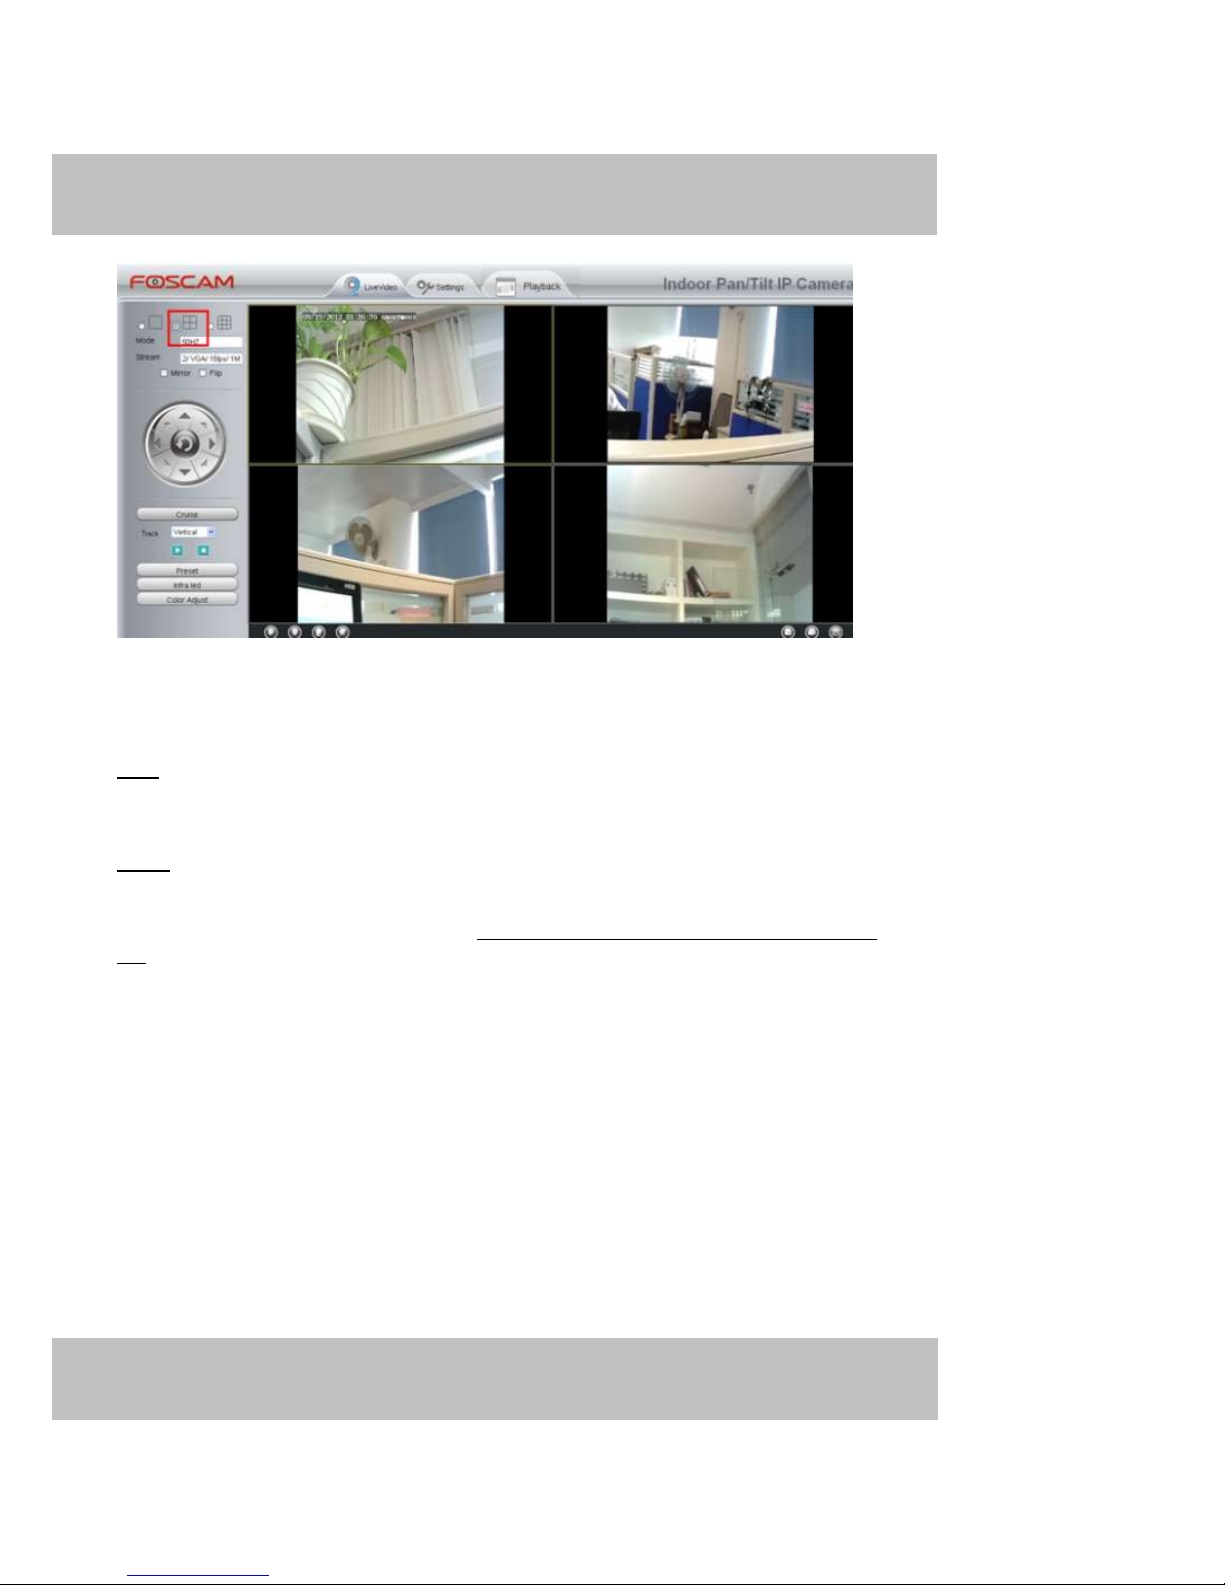
Section2 Multi-Device Window
The firmw are inside the camera supports up to maximum of 9 cameras being monitoring at the same time. You
can add other cameras in multi-device setting (read chapter 4.2.5).
1
9
2
4
3
5
8
6
7
21
w
w
wwwww
w
..ffoossccaamm..ccoom
m
SShheennzzhheenn FFoossccaamm IInntteelllliiggeenntt TTeecchhnnoollooggyy CCoo..,, LLiimmiitteedd
TTeell:: 8866 775555 22667744 55666688 FFaaxx:: 8866 775555 22667744 5511668
8
21
Figure 3.4
Section3 Mode/ Stream / Mirror/ Flip buttons
Mode
1) 50HZ ---------Indoor surveillance (Region: Europe, China)
2) 60HZ ---------Indoor surveillance (Region: USA, Canada)
Stream
The default Stream supports four modes: 0/720P/30fps/4M, 1/VGA/25fps/2M, 2/VGA/ 15fps/ 1M and 3/
VGA/10fps/200K. The format of the stream type is Stream type no. / Resolution / Maximum frame rate/ Bit
rate
1) Stream type no. : The number is used to identify the stream type.
2) 720P/ VGA
There are two resolutions, the bigger one is 720P, and the smaller one (VGA) is 640x480 pixels. The bigger the
resolution, the better of the image quality is. If you are accessing the camera via internet and want to get more
fluent video streaming, please select resolution VGA.
3) Maximum frame rate
When the video format is 50Hz, the maximum frame rate is 25 fps. When the video format is 60Hz, the
maximum frame rate is 30 fps. You should lower frame rate when the bandwidth is limited. Normally, when the
frame rate above 15, you can achieve fluently video.
4) Bit rate
Generally speaking, the larger the bit rate is, the clearer video will become. But the bit rate configuration should

22
w
w
wwwww
w
..ffoossccaamm..ccoom
m
SShheennzzhheenn FFoossccaamm IInntteelllliiggeenntt TTeecchhnnoollooggyy CCoo..,, LLiimmiitteedd
TTeell:: 8866 775555 22667744 55666688 FFaaxx:: 8866 775555 22667744 5511668
8
22
combine well with the netw ork bandwidth. When the bandwidth is very narrow, and bit rate is large, that will
lead to video can not play well.
You can reset the stream type on Settings-> Video-> Video Settings panel.
Figure 3.5
After changing, please re-login the camera and you can see the modification.
Section4 Pan/Tilt Control
1------Up control button, 2------Down control button,
3------Left control button, 4------Right control button,
5----- Up-Left control button 6----- Up-Right control button
7----- Down-Left control button 8----- Down-Right control button
Click this button and go to center
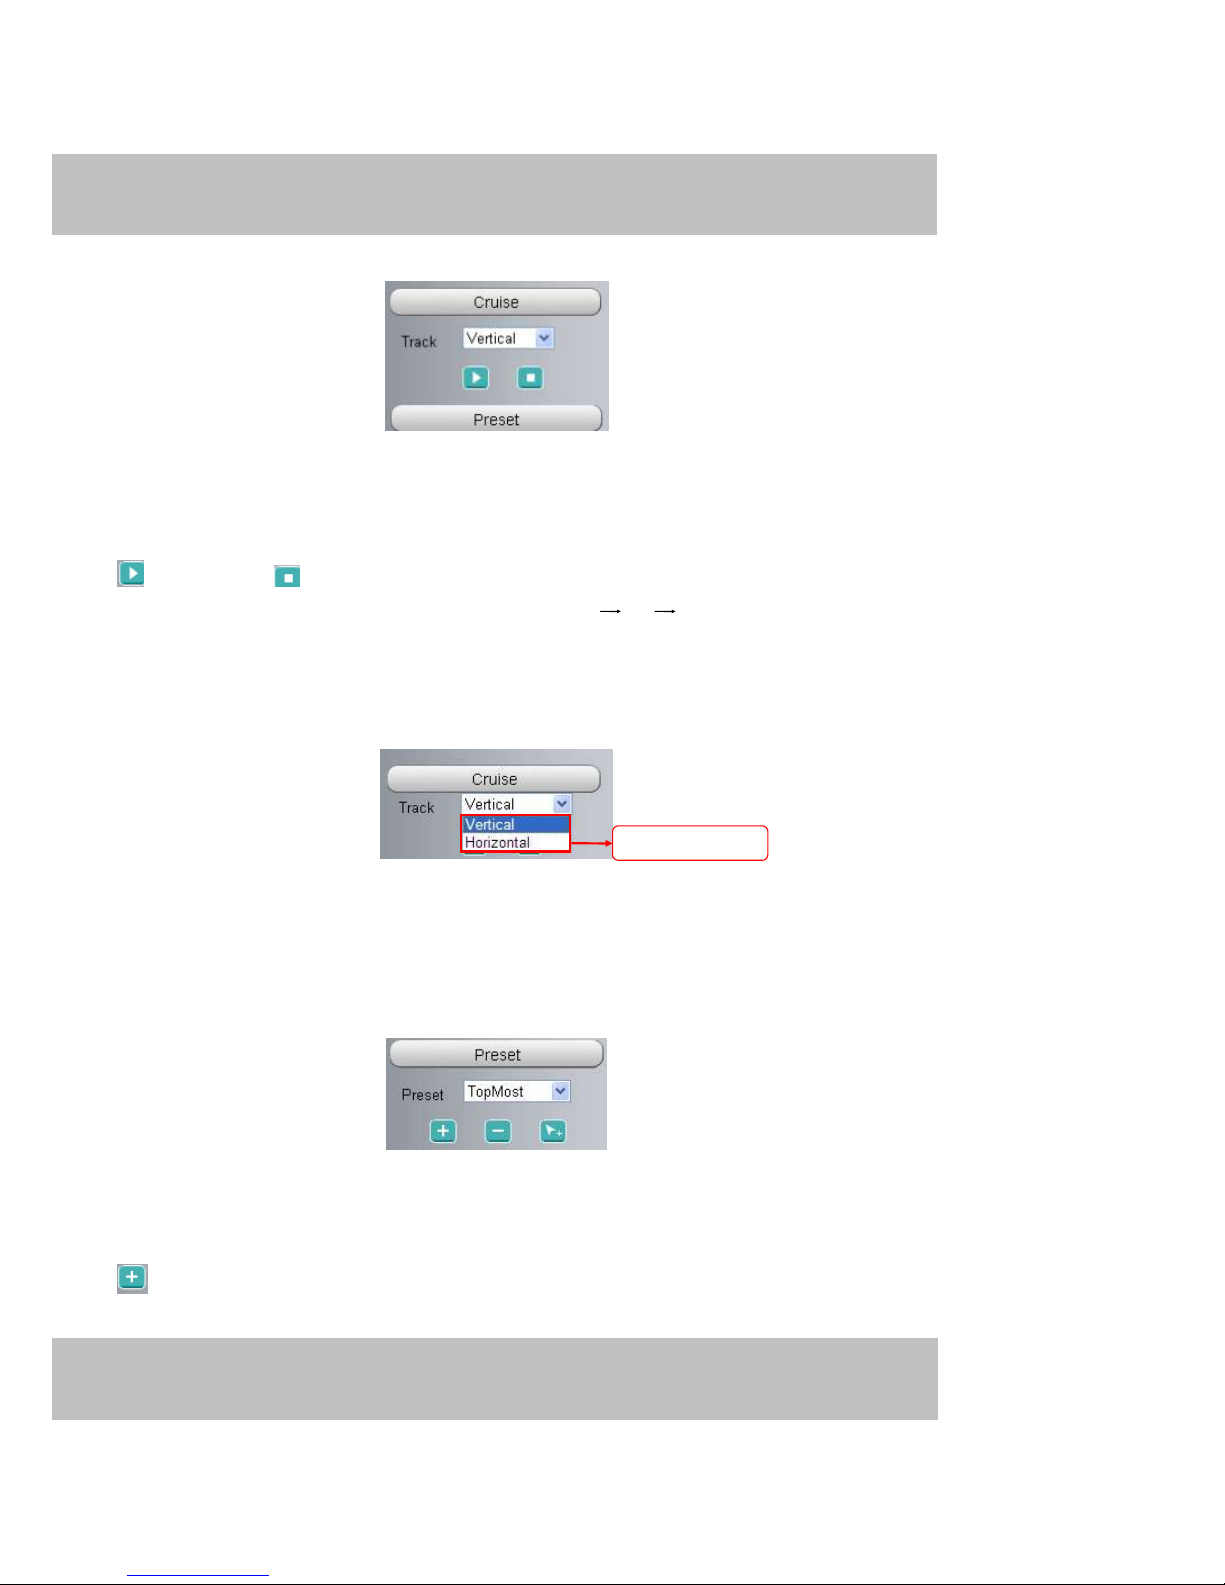
Section5 Cruise / Preset settings
Cruise Settings
1
2
3
4
5 6
7 8
23
w
w
wwwww
w
..ffoossccaamm..ccoom
m
SShheennzzhheenn FFoossccaamm IInntteelllliiggeenntt TTeecchhnnoollooggyy CCoo..,, LLiimmiitteedd
TTeell:: 8866 775555 22667744 55666688 FFaaxx:: 8866 775555 22667744 5511668
8
23
The default cruise tracks have two types: Vertical and Horizontal.
Vertical: The camera will rotate from up to down.
Horizontal: The camera will rotate from left to right.
: Start cruise.
: Stop cruise.
If you want to define or change the cruise trace, please go to Settings PTZ Preset Settings panel.
How to do cruise?
Firstly: Select one track in the track dropdown list
Secondly: Click Start cruise button, the camera will cruise following the predefined path.
Thirdly: Click stop button and finish cruising.
Preset settings
IPCAM supports 16 preset positions, which is considered enough for DIY home & small business surveillance
market
The default preset position is Topmost, Bottom most, Left most, right most, you can add other preset positions.
Add Click this icon to save the position you need the camera to remember
Select one of these

24
w
w
wwwww
w
..ffoossccaamm..ccoom
m
SShheennzzhheenn FFoossccaamm IInntteelllliiggeenntt TTeecchhnnoollooggyy CCoo..,, LLiimmiitteedd
TTeell:: 8866 775555 22667744 55666688 FFaaxx:: 8866 775555 22667744 5511668
8
24
Delete Select one preset position and click this button to delete it.
GO Select one preset position in the preset dropdown list and click Go to make the camera move the
preset position
How to do preset position?
Firstly, move the camera and stop at a desired place w here you want make preset position.
Secondly, click button and enter a descriptive name for the preset position. The preset position cannot
contain special characters. Then click OK to save it. If you w ant to reset the preset position, click Cancel.
After that, you can move the camera and stop at another place, and set another preset position. You can do all
the 16 preset positions with this method.
If you want to see one preset position you have set, only select the preset position name from the preset
dropdown list, and click go button, the camera will go to the preset position.
Section6 IR LED Lights
Click Infra led and there are two modes to adjust the infrared led: Auto and Manual.
Auto: Select it and the camera will adjust the infra led (on or off) automatically.
Manual: Select it and you can turn on or turn off the infra led manually.
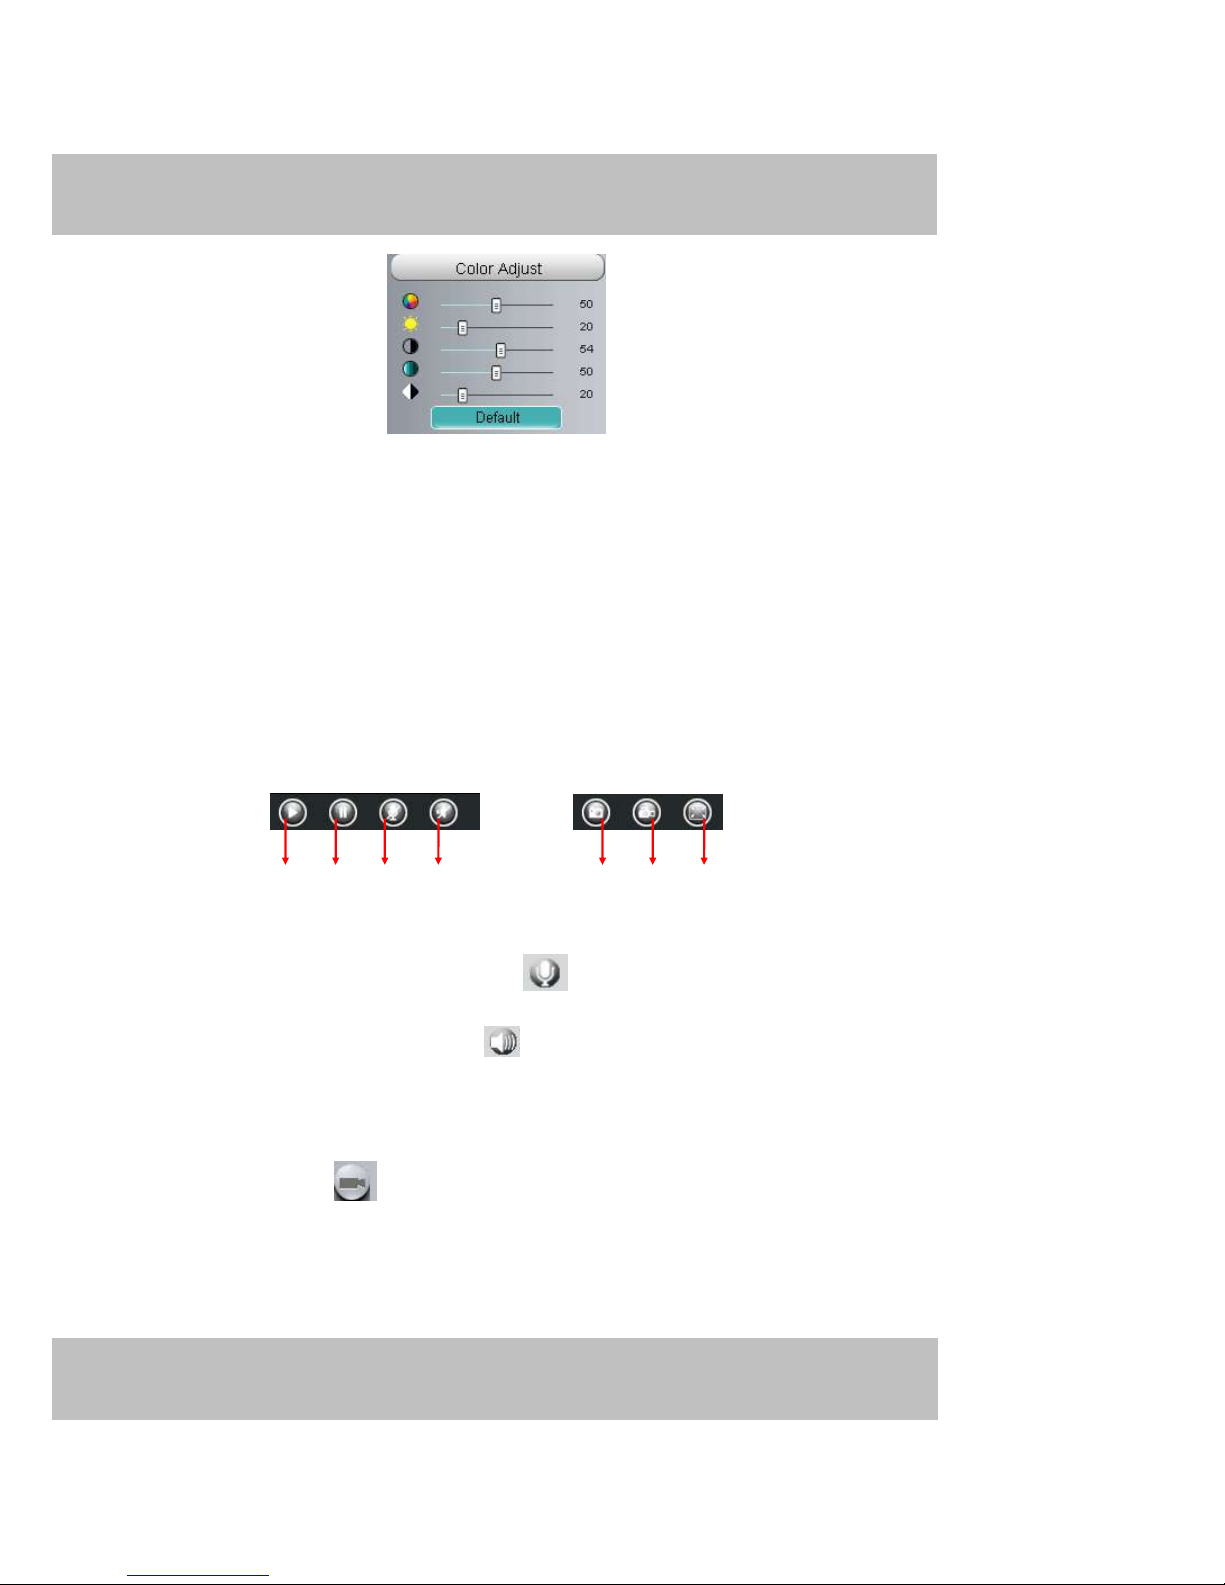
Section7 Image quality settings
In this page, you can tune Hue, Brightness, Contrast, Saturation, and Sharpness to get higher quality.
25
w
w
wwwww
w
..ffoossccaamm..ccoom
m
SShheennzzhheenn FFoossccaamm IInntteelllliiggeenntt TTeecchhnnoollooggyy CCoo..,, LLiimmiitteedd
TTeell:: 8866 775555 22667744 55666688 FFaaxx:: 8866 775555 22667744 5511668
8
25
Section8 OSD
If you have added time and camera name in the video, you can see it in the live window.
Go to Settings ---Basic settings---Camera name panel, and you can change another device name. The
default device name is anonymous.
Go to Settings ---Basic settings---Camera time panel and adjust the device time.
Go to Settings ---Video---On Screen Display panel, you can add or no add OSD.
Section9 Play/Stop/ Talk/Audio/ Snap/ Record/ Full screen button
1------Play Click it to play the video of the camera
2------Stop Click it to stop the video of the camera
3------ Talk Click the button and the icon will become to , then talk to the microphone that connected
with PC, people around the camera can here your voice. Click the icon again and stop talking.
4------ Audio Click this icon, the icon will become to you can hear the sound around the camera by the
earphone or speakers that connected with PC.
5----- Snapshot Click it to make snapshot and it pop-up a window which picture you snapshot, right click in
the window and save the picture to anywhere you want.
6----- Record Click the icon and the camera start recording, you can see a green dot in the live
window. Click again and stop recording. The default storage path is C:\IPCamRecord. You can change the
storage path: Go to Settings- >Record->Storage Location panel.
7------Full Screen Click it to make full-screen, or you can double click the surveillance screen to make
full-screen. Double click again and exit full-screen.
1 2 3
5 6 7
4

26
w
w
wwwww
w
..ffoossccaamm..ccoom
m
SShheennzzhheenn FFoossccaamm IInntteelllliiggeenntt TTeecchhnnoollooggyy CCoo..,, LLiimmiitteedd
TTeell:: 8866 775555 22667744 55666688 FFaaxx:: 8866 775555 22667744 5511668
8
26
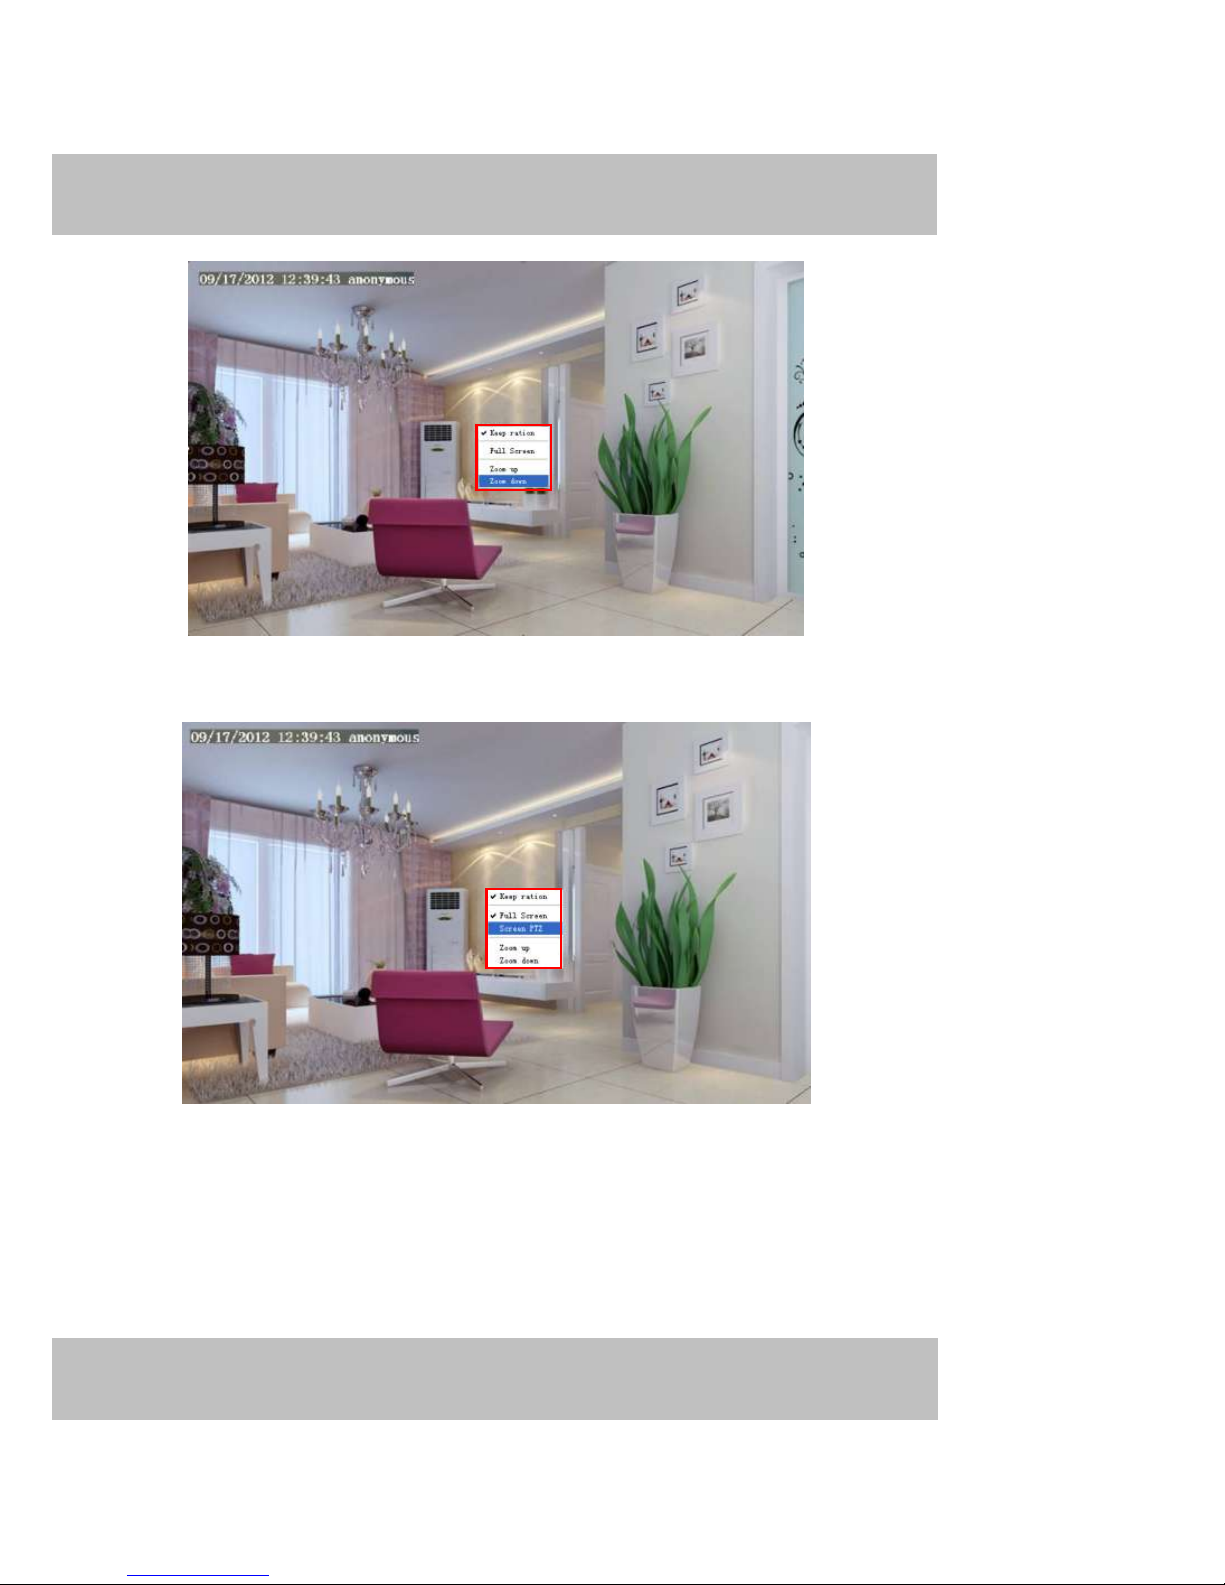
Onscreen Mouse Control
Right click the mouse and you can adjust the screen ration, full screen and Zoom up.
Figure 3.6
Keep ration: Select it and the camera will adjust the size of live window based on the the computer monitor
automatically. Sometimes there is a black border around the video, please select Keep ration to get a better
visual quality .
Full Screen: Select it and Click it to make full-screen, press ESC and exit full-screen.
Zoom up:
First Method: Here is a convenient and fast solution to Zoom up/down screen by Clicking Video Screen
and adjusting Mouse pulley, or by press the CTRL key and click the mouse left button.
Second Method: Click it and the live view will be digital zoomed up, then click Zoom Down and the live view
back to original size.
批注 [A1]:
27
w
w
wwwww
w
..ffoossccaamm..ccoom
m
SShheennzzhheenn FFoossccaamm IInntteelllliiggeenntt TTeecchhnnoollooggyy CCoo..,, LLiimmiitteedd
TTeell:: 8866 775555 22667744 55666688 FFaaxx:: 8866 775555 22667744 5511668
8
27
Figure 3.7
When you select the Full Screen, then click right mouse, there is a Screen PTZ button.
Figure 3.8
Click the Screen PTZ button and put the mouse on the screen to indicate the camera move direction you
prefer, press the left mouse, the camera will move to the corresponding direction. Loosen the mouse and stop
moving. Press Esc button or double click right mouse and cancel the function.
NOTE: For Mac OS, the plugin cannot support Onscreen Mouse Control, so you cannot allow to use it.
28
w
w
wwwww
w
..ffoossccaamm..ccoom
m
SShheennzzhheenn FFoossccaamm IInntteelllliiggeenntt TTeecchhnnoollooggyy CCoo..,, LLiimmiitteedd
TTeell:: 8866 775555 22667744 55666688 FFaaxx:: 8866 775555 22667744 5511668
8
28
4 Advanced Camera Settings
Click the button “Settings”, goes to Administrator Control Panel to make advanced camera s ettings.
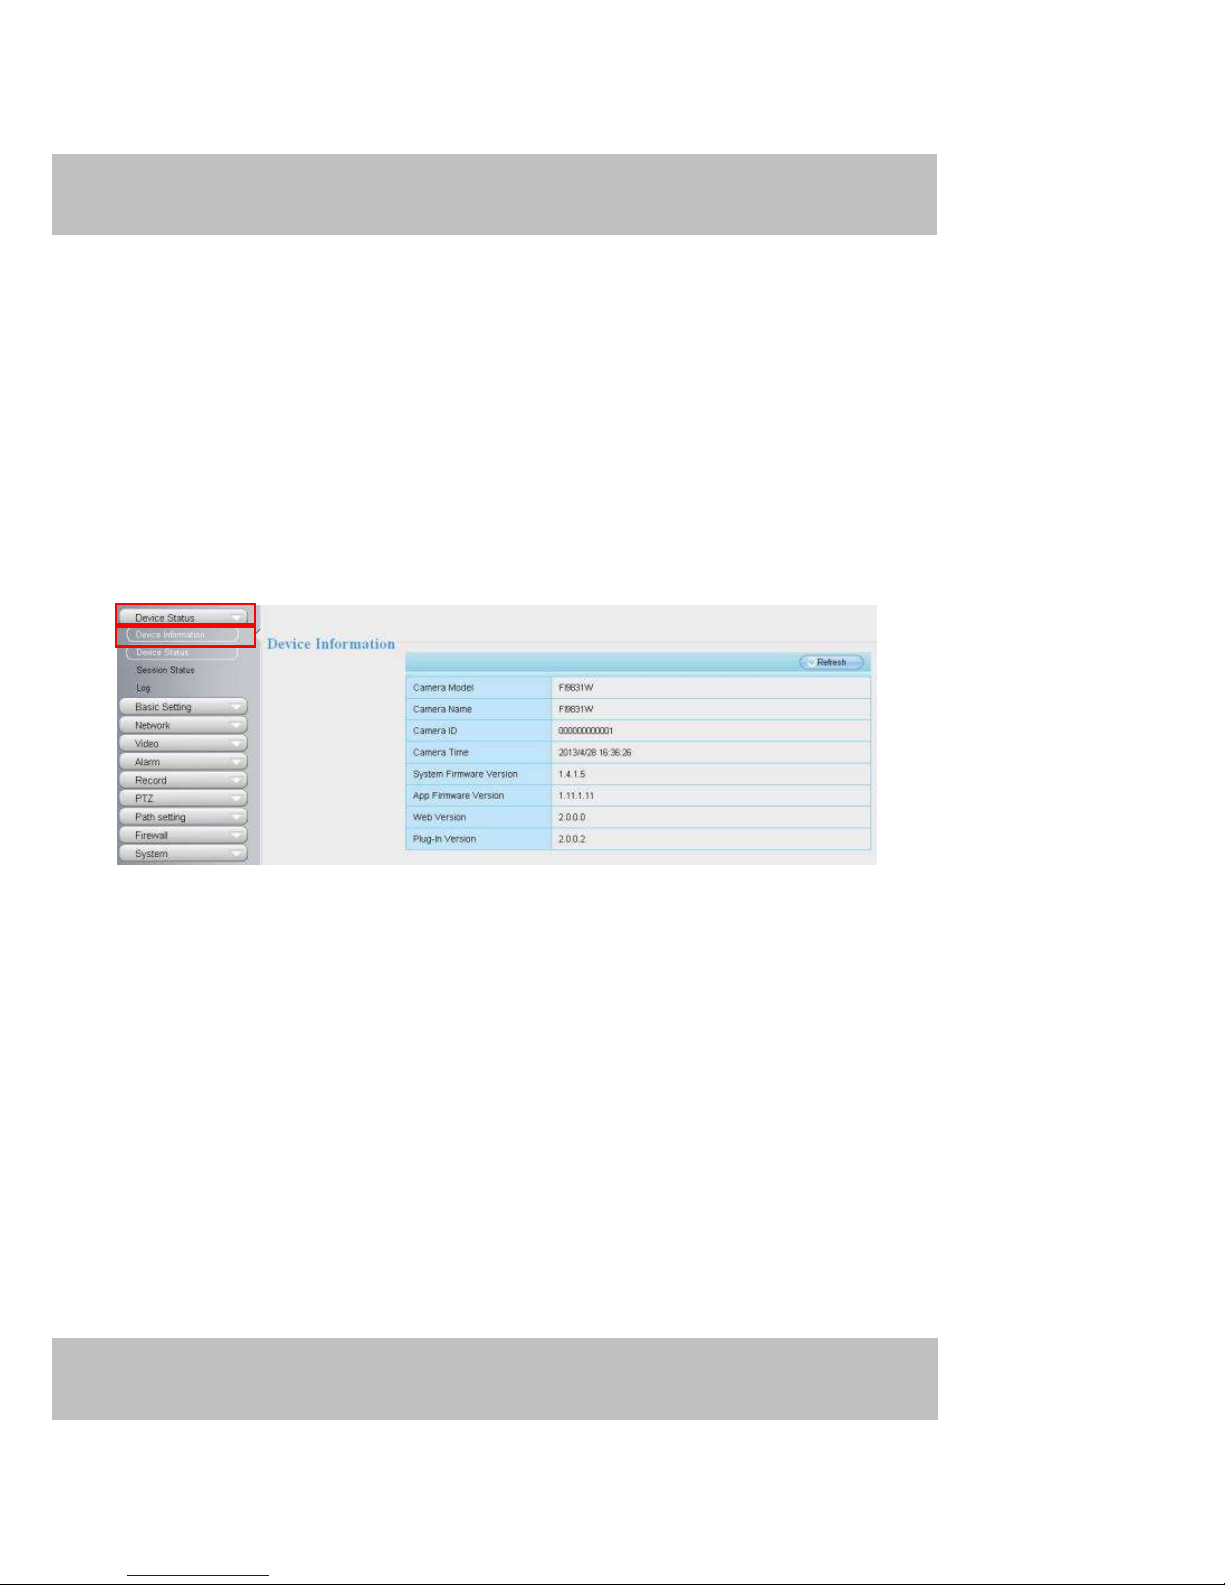
4.1 Device Status
Device Status contains four columns: Device Information, Device Status, Session Status and Log, it will show
you various information about your camera.
4.1.1 Device Information
Figure 4.1
Camera Model: The camera model no.
Camera Name: The Device Name is a unique name that you can give to your device to help you identify it.
Click Basic Settings and go to Camera name panel where you can change your camera name. The default
device name is anonymous.
Camera ID: Display the wired MAC address of your camera. For example Device ID is 000C5D00008, the
same MAC ID sticker is found at the bottom of the camera.
Camera Time: The system time of the device. Click Basic Settings and go to Camera time panel and adjust
the time.
System Firmware version: Display the System Firmw are version of your camera.
App Firmware version: Display the application firmw are version of your camera.
Web version: Display the web UI version of your camera
Plug-in version: Display the plug-in version of your camera

29
w
w
wwwww
w
..ffoossccaamm..ccoom
m
SShheennzzhheenn FFoossccaamm IInntteelllliiggeenntt TTeecchhnnoollooggyy CCoo..,, LLiimmiitteedd
TTeell:: 8866 775555 22667744 55666688 FFaaxx:: 8866 775555 22667744 5511668
8
29
4.1.2 Device Status
On this page you can see device status such as Alarm status/ Record Status ,DDNS status ,WIFI status and so
on.
Figure 4.2
4.1.3 Session status
Session status will display who and which IP is visiting the camera now.
Figure 4.3
4.1.4 Log
The log record shows who and which IP address accessed or logout the camera and w hen.
 Loading...