

Foscam FI9821W, FI9801W, FI9802W Quick Installation Manual
V2.01
Model: FI9821W
Quick Installation Guide
Indoor HD Pan/Tilt Wireless IP Camera
Black White
For Windows OS ------- Page 1
For MAC OS ------- Page 16
ShenZhen Foscam Intelligent Technology Co., Ltd

FI9821W Quick Installation Guide
www.foscam.com
- 1 -
Quick Installation Guide For Windows OS
HD IP Camera FI9821W x 1
DC Power Adapter (5V-2.0A) x 1
Network Cable x 1
Wi-Fi Antenna .x 1
Mounting Bracket .x 1
Quick Installation Guide x 1
CD-ROM with Setup Software .x 1
Warranty Card x 1
Package Contents
Quick Installation Diagram
Login to the Camera
Wireless Connection Setup
Remote Access Setup
Software Installation
Hardware Installation
FI9821W Quick Installation Guide
www.foscam.com
- 2 -
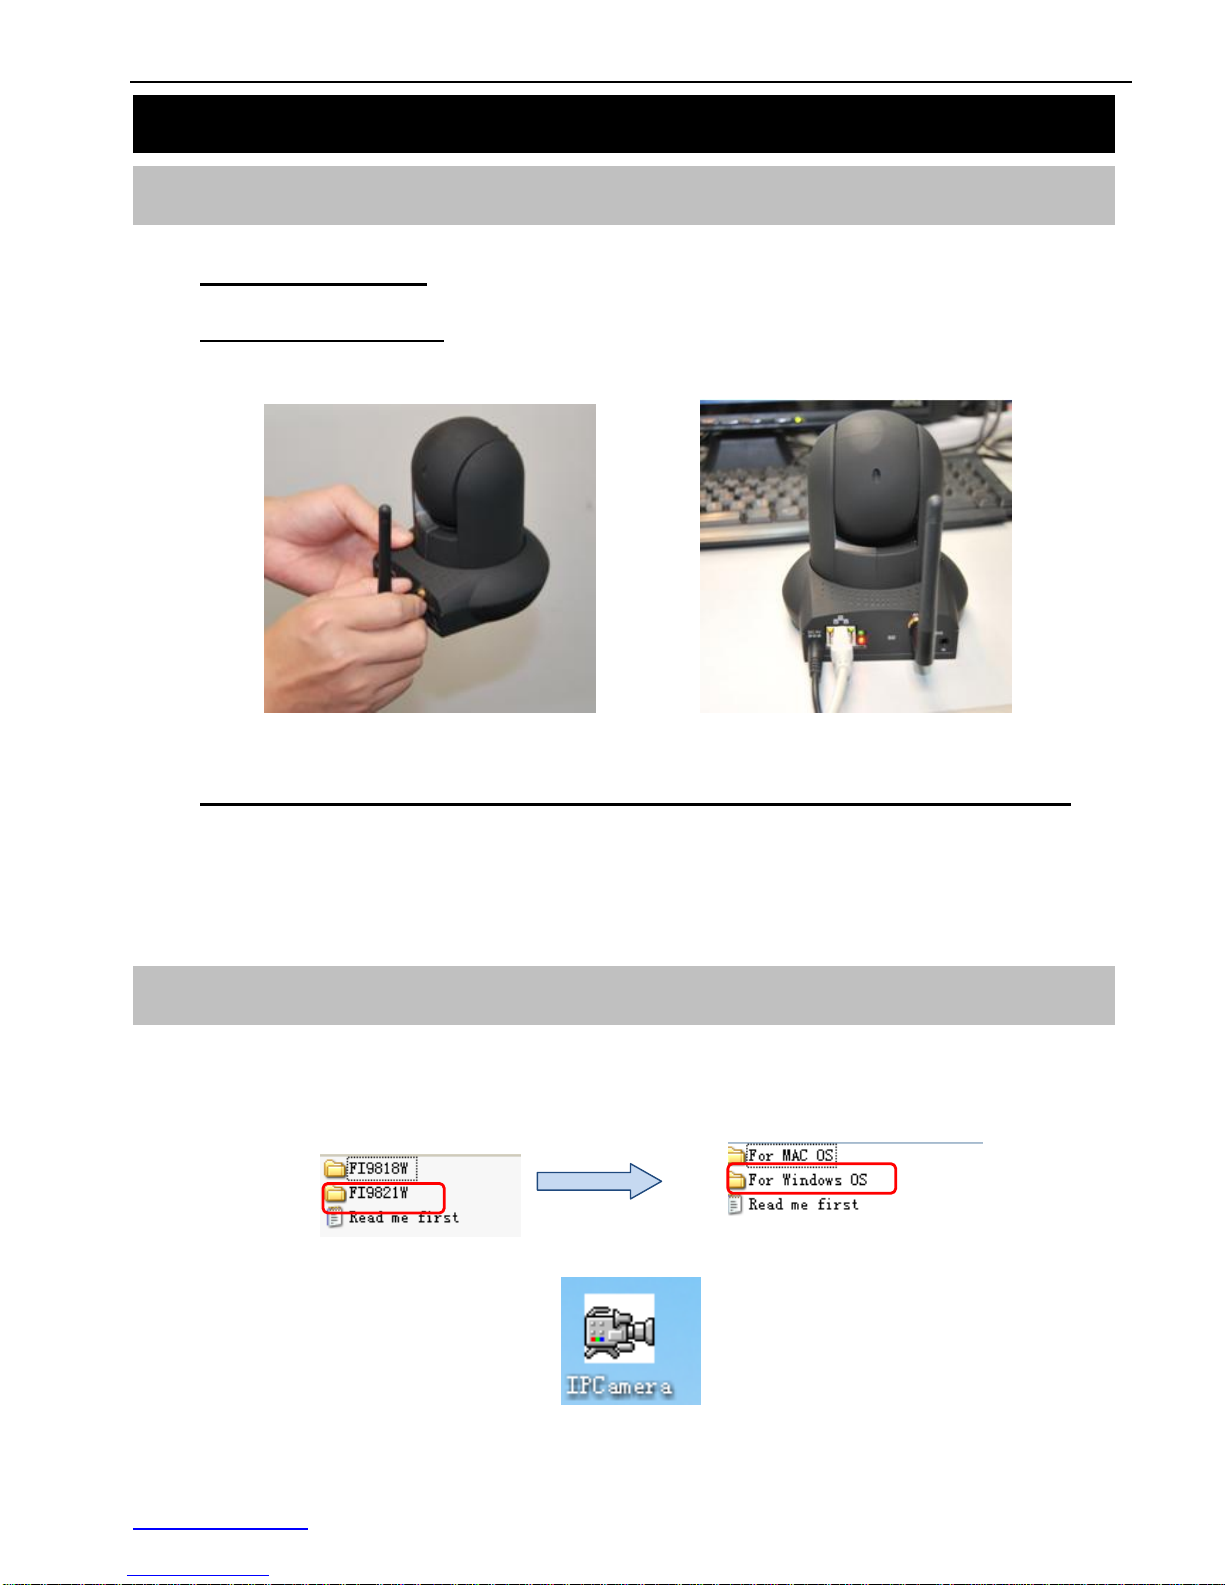
1) Open the package. Take the camera out of the box carefully.
2) Mount the antenna. Then take the Wi-Fi antenna, mount it on the SMA connector on the
back of the camera, screw the antenna into the port, and make the antenna stand vertically.
Figure 1.1 - Mount the antenna Figure 1.2 – Plug in the network cable
3) Get the camera connected to the router, and insert the power adapter.
Use the network cable to connect the camera to the router or the switch in the LAN network at
your home or your office. Plug in the power. The green network light at the rear of the camera will
blink and the camera will automatically pan/tilt. The red power light will also turn on.
Insert the CD into the CD drive of your computer and find the folder“FI9821W”, then go to the folder
“For Windows OS”. Copy the IP camera tool to your computer and start the program.
Figure 1.3 – IP Camera Tool icon
1. Hardware Installation
Start Installation
2. Software Installation
FI9821W Quick Installation Guide
www.foscam.com
- 3 -
Double click the IP Camera Tool icon and the following screen should appear.
Figure 1.4 - IP Camera Tool for Windows
The IP camera tool should find the camera’s IP address automatically after you plug in the network
cable. If not, please make sure that DHCP is enabled on your router and that MAC address filtering,
firewalls and anti-virus are disabled temporarily until the camera is set up.
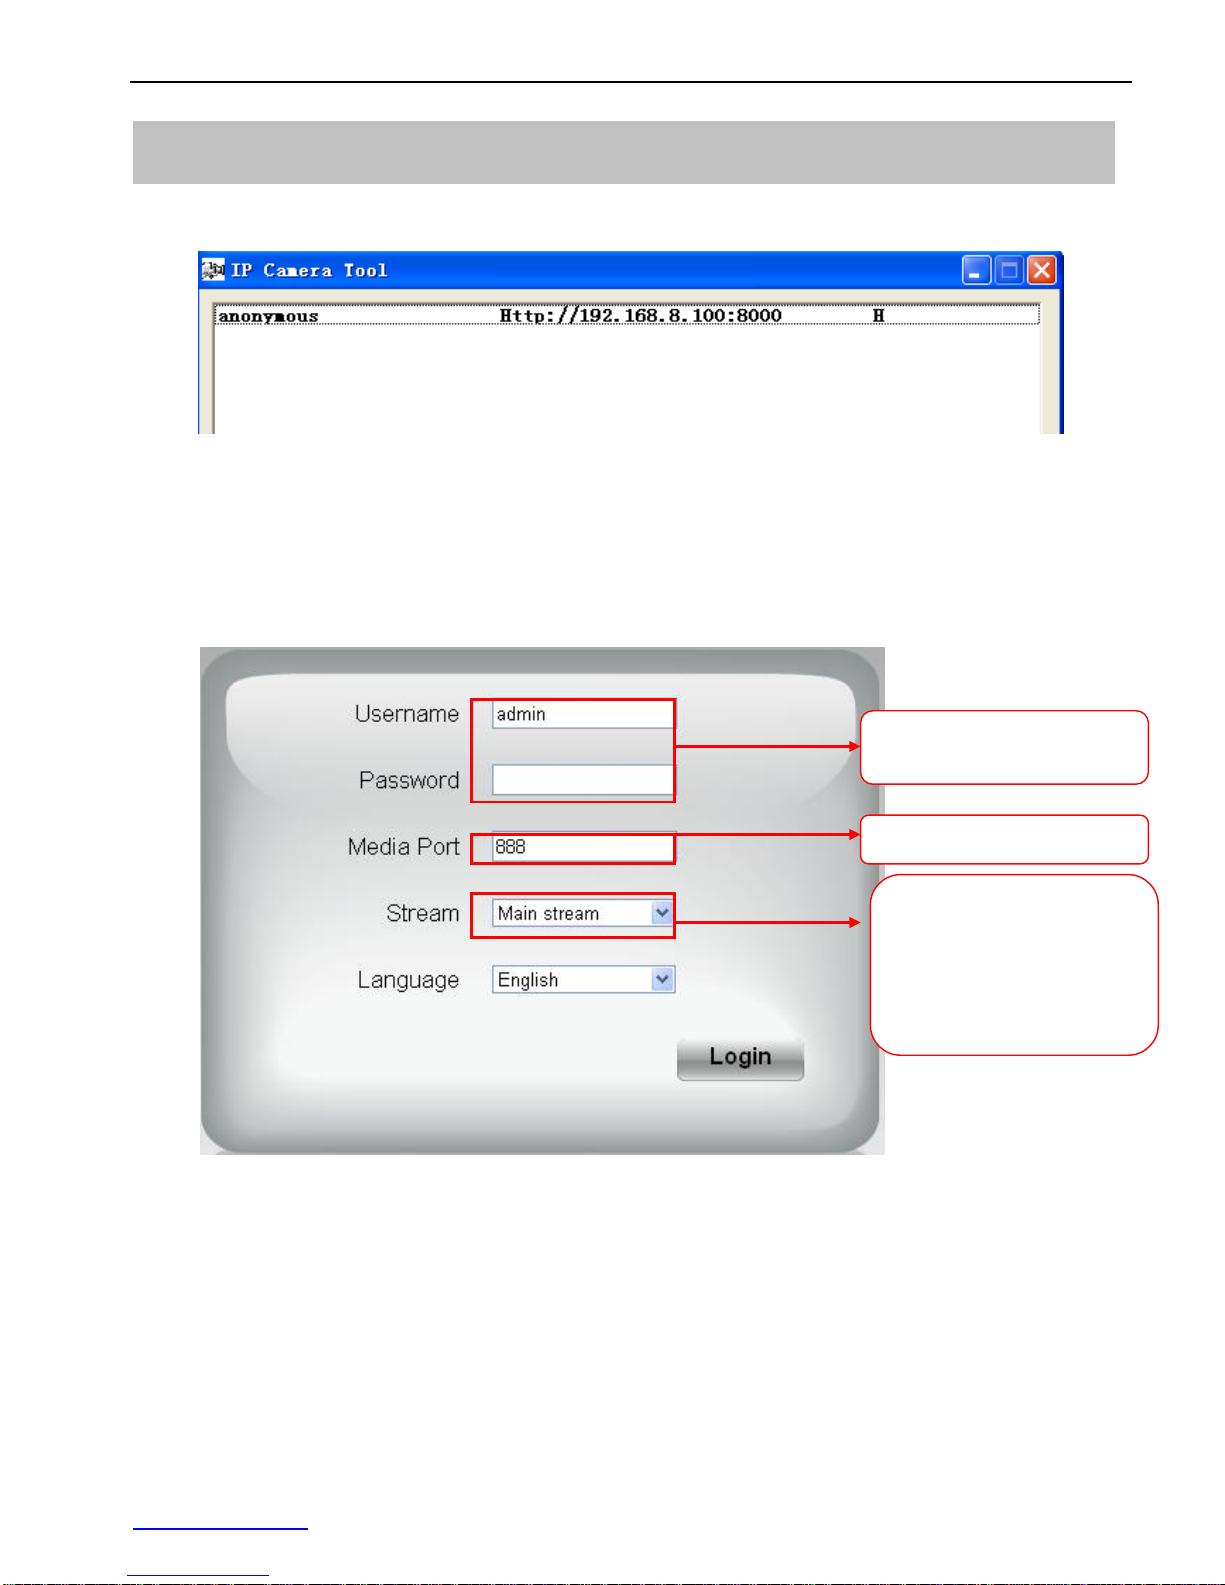
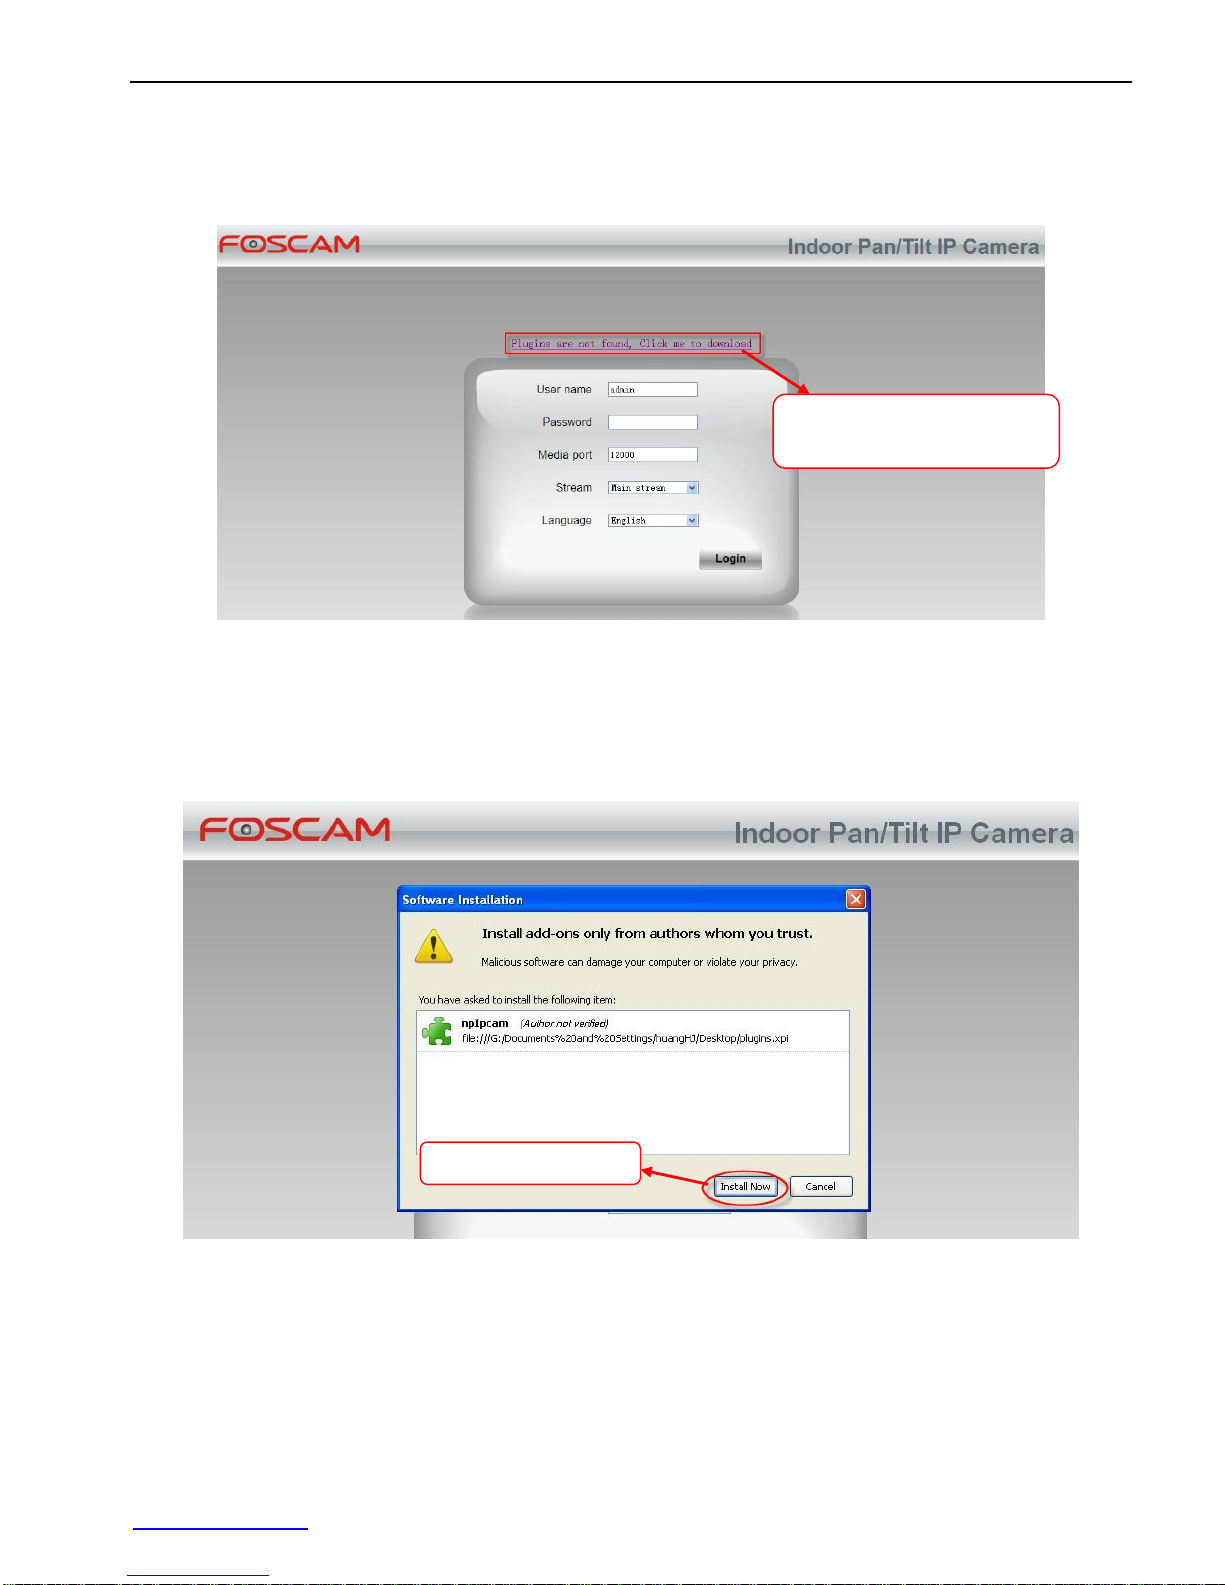
Double click the IP address of the camera; your default browser will open to the camera login page.
Figure 1.5 - The Login window
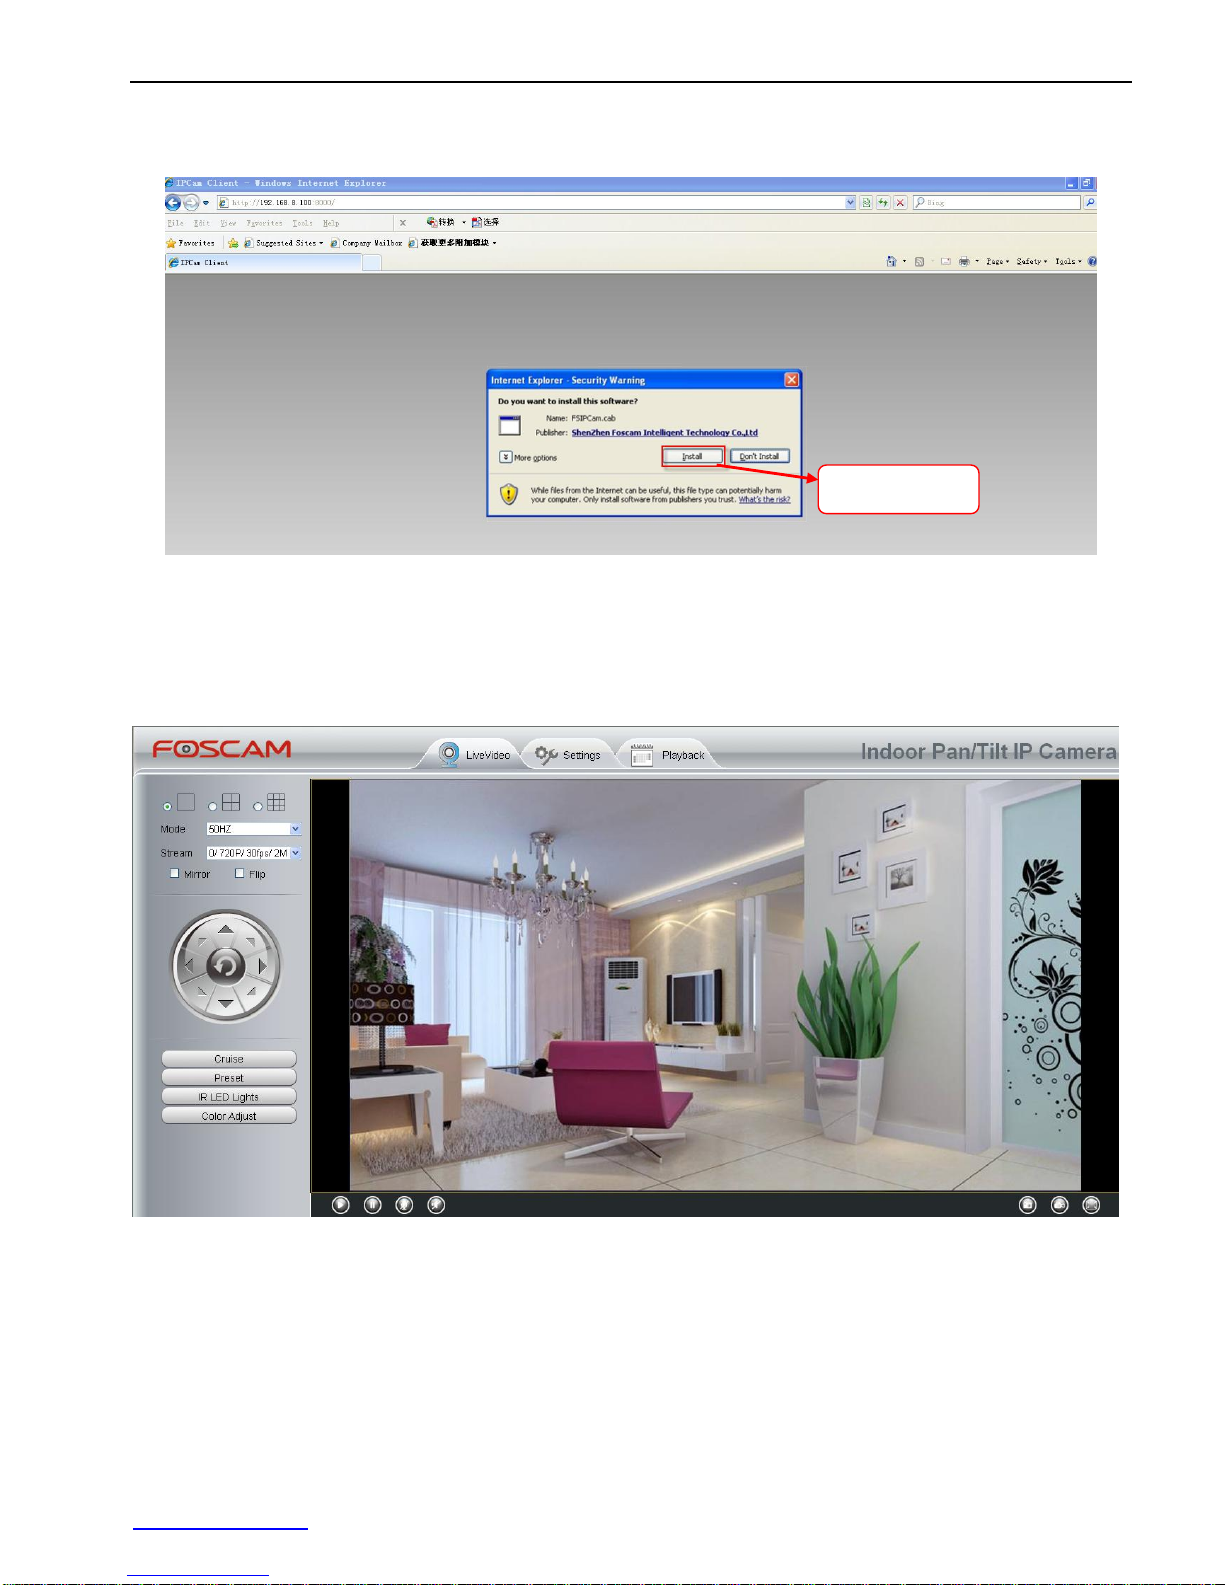
If it is your first time logging into the camera, it will prompt you to download the ActiveX plugin.
For Internet Explorer, please go to Chapter 3.1.
For Firefox, please go to Chapter 3.2.
For Google Chrome, please go to Chapter 3.3.
3. Login to the Camera
If you want to access the
camera form LAN, please
select Main stream, or
else select Sub stream to
get more fluent video.
Default Media port is 888
Default user is admin with
no password
FI9821W Quick Installation Guide
www.foscam.com
- 4 -
33..11 FFoorr IInntteerrnneett EExxpplloorreerr
Figure 1.6 - Install the ActiveX plugin (Internet Explorer)
After installing the plugin, refresh the browser and you will be able to see the live video screen.
Figure 1.7 – The Live Video Page
Click Install
FI9821W Quick Installation Guide
www.foscam.com
- 5 -
33..22 FFoorr FFiirreeffooxx
If this is your first time logging in on Firefox, it may prompt you to download the plugin.
Figure 1.8 - Download the plugin (Firefox)
Drag the download file into Firefox web page and it will prompt you to install it.
Figure 1.9 - Installing the Firefox plugin
Refresh or reopen Firefox after the plugin installation is successful, then login to the camera again,
you will be able to see the live video page (Figure 1.7).
Click here to download
the plugin
Click Install Now
FI9821W Quick Installation Guide
www.foscam.com
- 6 -
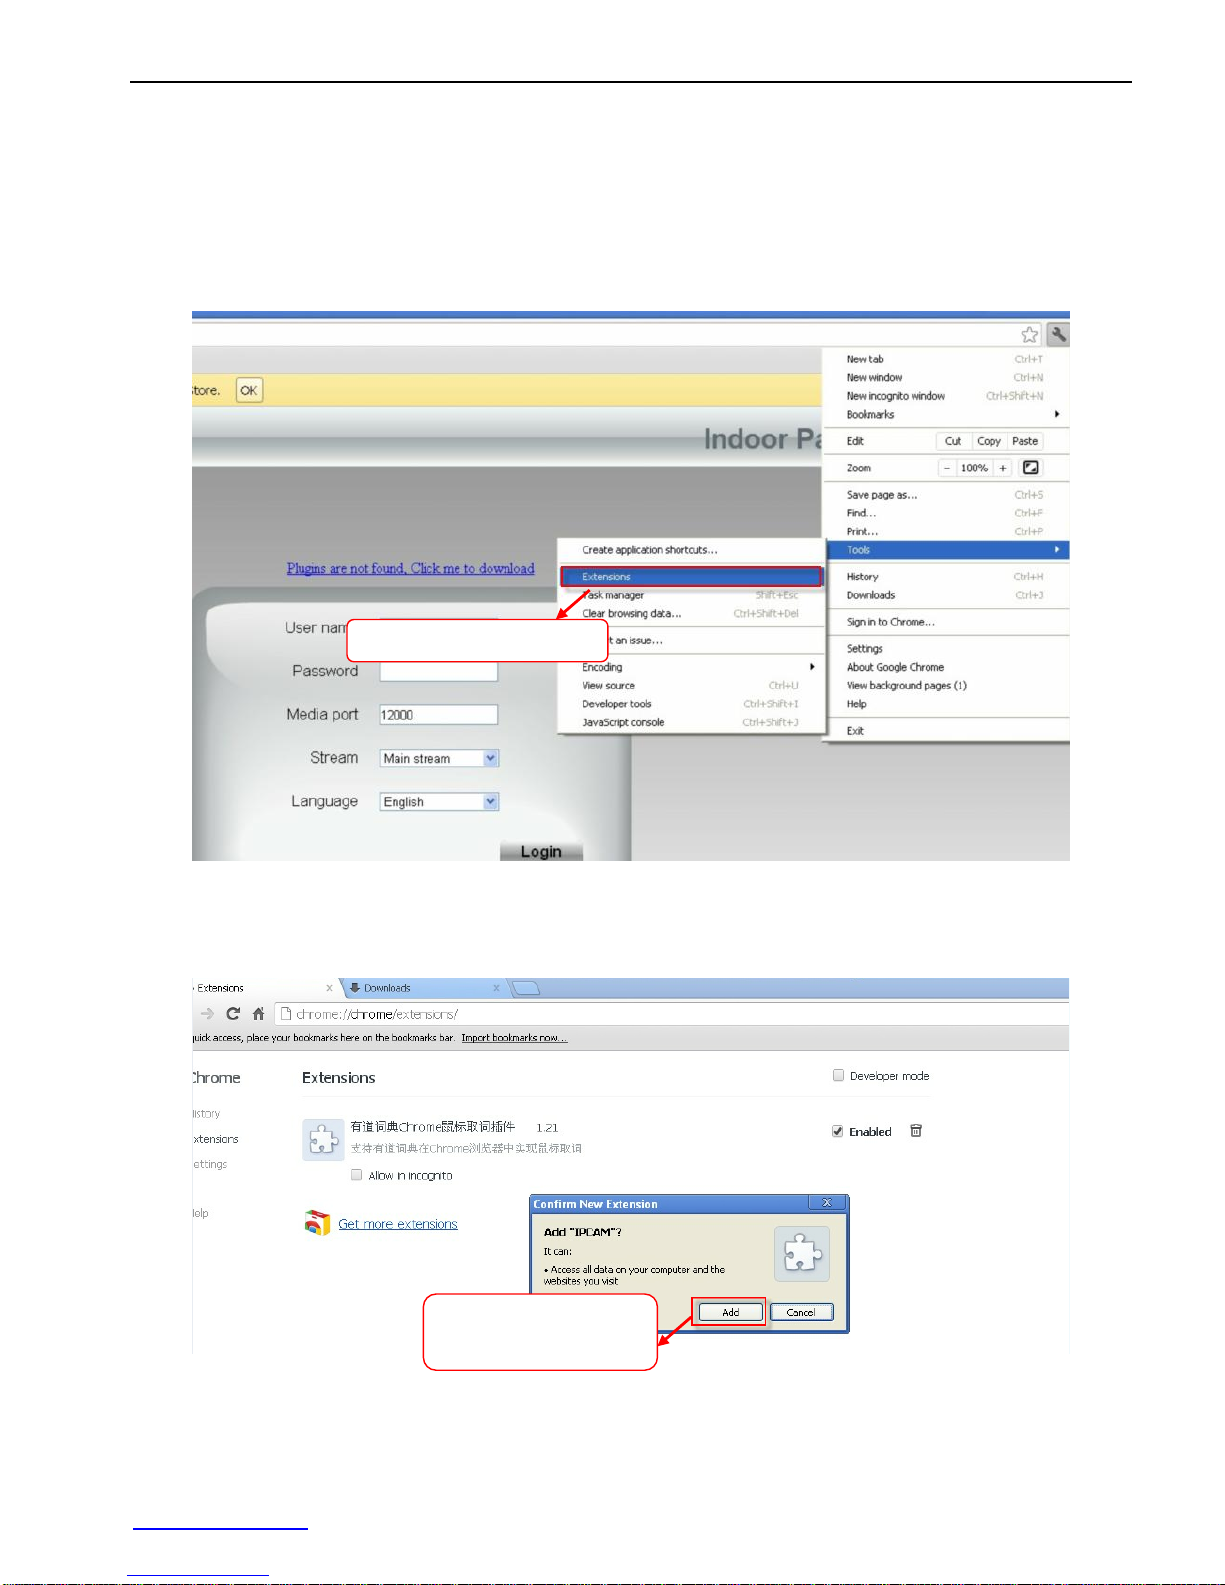
3.3 For Google Chrome
If this is your first time logging in to the camera with Google Chrome, it will prompt you to download
the plugin as in Figure 1.8.
Download the plugin and drag it to the Extensions page of Google Chrome.
Figure 2.0 – The Extensions page in Google Chrome
Click the “Add” button to install the Plugin.
Figure 2.1 – Installing the plugin on Google Chrome
Reboot the browser and login to the camera again; you will see the live video screen (Figure 1.7).
Go to Extensions page
Click Add button to
install the plugin
FI9821W Quick Installation Guide
www.foscam.com
- 7 -
Congratulations! You have succeeded in accessing the camera by a wired connection. Be sure to
leave all other menu options alone until finishing the rest of the installation.
If you only see a black screen with a red cross in the center, please try another port number instead
of the default “port 88” .You may want to try port 8005, etc.
If you are still unable to see live video, try shutting down any firewall or anti-virus software on your
computer.
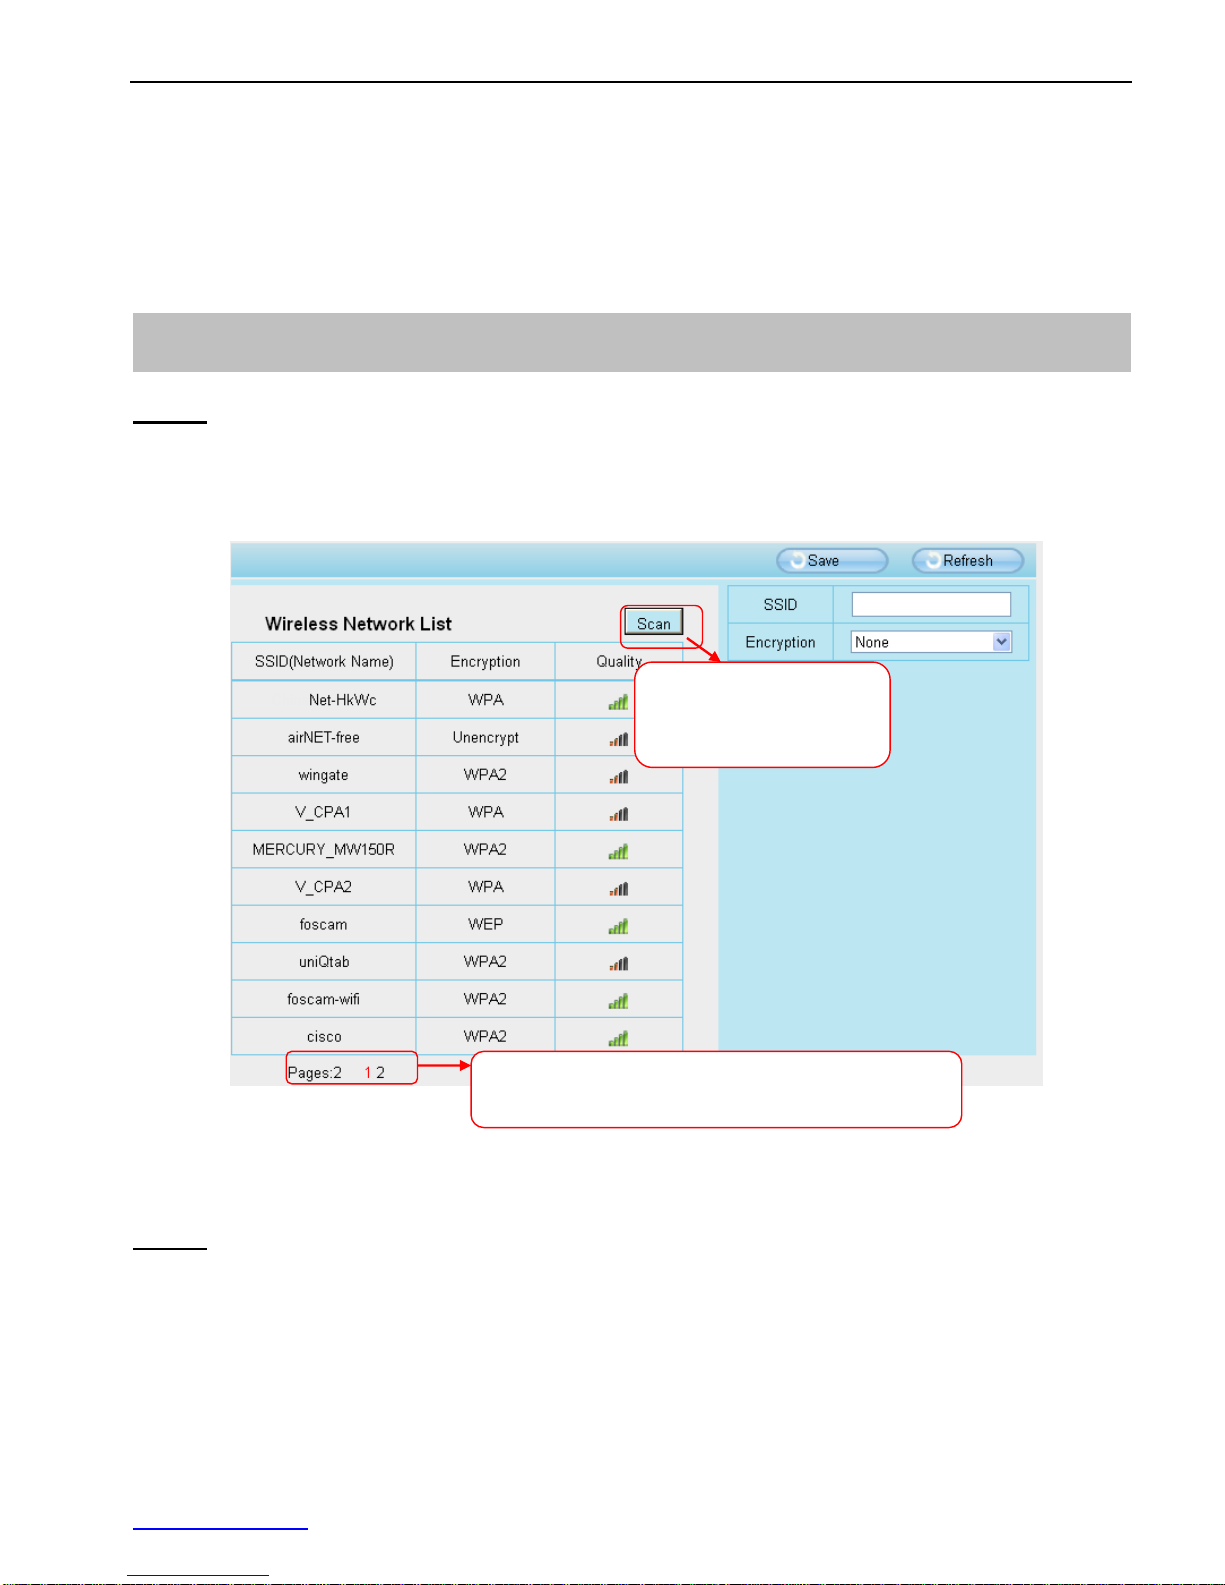
Step 1: Choose “Settings” on the top of the camera interface, and go to the “Network” panel on the
left side of the screen, then click “Wireless Settings.”
Click the Scan button and the camera will detect all wireless networks around the area. It should
also display your router in the list (Figure 2.2).
Figure 2.2 - Wireless Settings
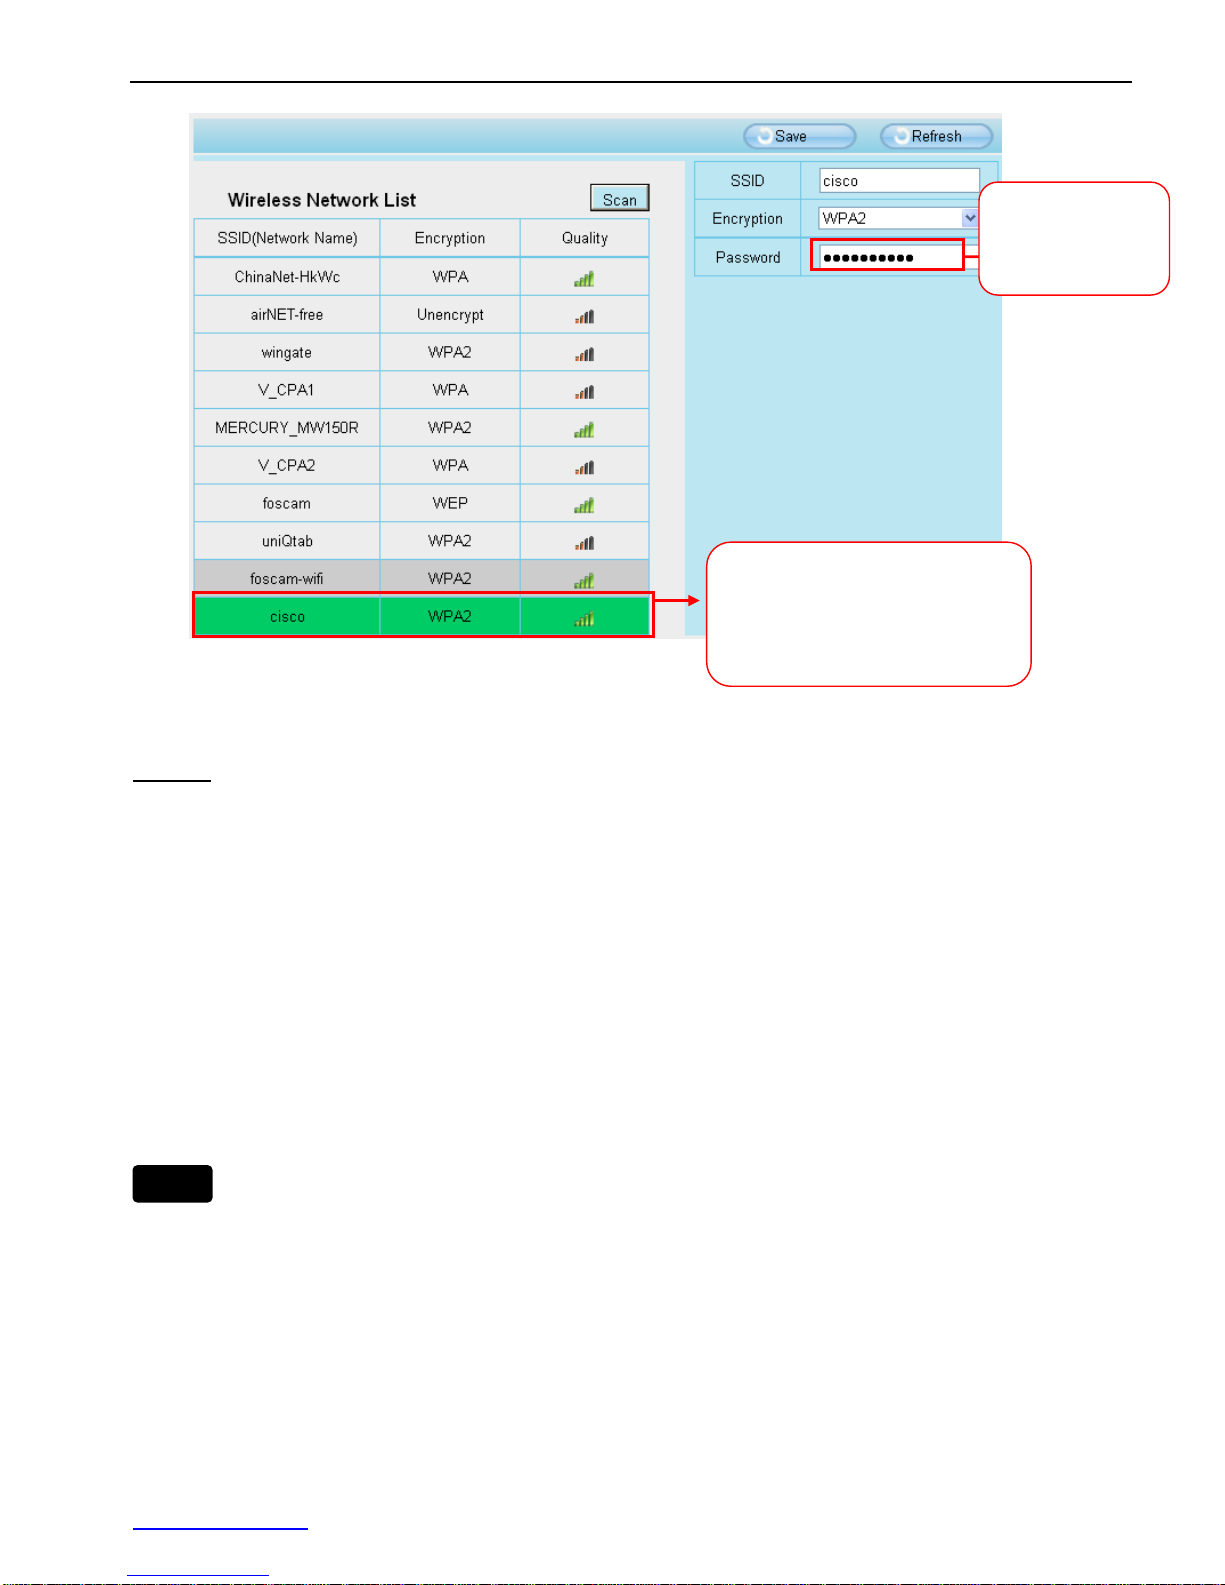
Step 2: Click the SSID (name of your router) in the list, the corresponding information related to your
network, such as the name and the encryption, will be filled into the relevant fields automatically.
You will only need to fill in the password of your network. Make sure that the SSID, Encryption and
the password you filled in are exactly the same for your router.
4. Wireless Connection Setup
Click the Page number to see other wireless
networks devices if there are more than 10.
Click the Scan button
to search for wireless
networks.
FI9821W Quick Installation Guide
www.foscam.com
- 8 -
Figure 2.3 - Wireless Settings
Step 3: Please click on the Save button after all settings have been entered and disconnect the
network cable. Never shut down the power of the camera until the IP camera is able to connect to
the wireless network.
The LAN IP address will disappear on the window of IP Camera Tool when the camera is configuring
a wireless connection. Wait about 1 minute, the camera should obtain a wireless connection, and the
LAN IP of the camera will show again on the window of the IP Camera Tool. The IP address may
have changed after the camera receives a wireless connection; we recommend setting a static local
IP address if this IP address changes by right clicking the camera in IP Camera Tools, setting a
static IP, and pushing OK (see Page 9).
Congratulations! You have set up the wireless connection of the camera successfully.
If you fail to make a wireless connection, please refer to your seller or
contact us directly for assistance.
Note
1 Click the SSID of your router
and the relevant information
will be filled in the fields
automatically.
2 Enter the
password of
your router
 Loading...