

Page 1

ANSWERS WITH INTELLIGENCE
®
TALKSWITCH®START GUIDE
TALKSWITCH
TS-850i AND
TS-860i TELEPHONE
CT.TP005.010903
Page 2

Copyright © 2011 Fortinet, Inc. All rights reserved. Fortinet®, FortiGate®,
FortiGuard®, FortiCare®, FortiManager®, FortiAnalyzer®, and TalkSwitch®
are registered trademarks of Fortinet, Inc. and other Fortinet names
herein may also be registered trademarks and/or common law trademarks
of Fortinet. Other product or company names may be trademarks of their
respective owners.
Reproduction, adaptation or translation without prior written permission
is prohibited, except as allowed under the copyright laws.
Information in this start guide is subject to change without notice and
does not represent any commitment on the part of TalkSwitch. No part
of this start guide may be reproduced or transmitted in any form or by
any means, electronic or mechanical (including photocopying, recording,
or information storage and retrieval systems) or translated to another
language, for any purpose other than the licensee’s personal use and as
specifically allowed in the licensing agreement, without the express
written permission of TalkSwitch.
CT.TP005.010903
May 2011
Page 3
EVERY CALL COUNTS 1
Introduction
Congratulations on your purchase of the TS-850i/TS-860i
Cordless DECT Phone!
This guide describes how to install and configure your new
telephone with a TalkSwitch system. For more information,
see the support section at http://global.talkswitch.com.
Installing the base
1. Place the base near a wired Ethernet router, either
on a tabletop or mounted on a wall. Avoid placing
the base in a location with a lot of metal, or near
devices that cause interference.
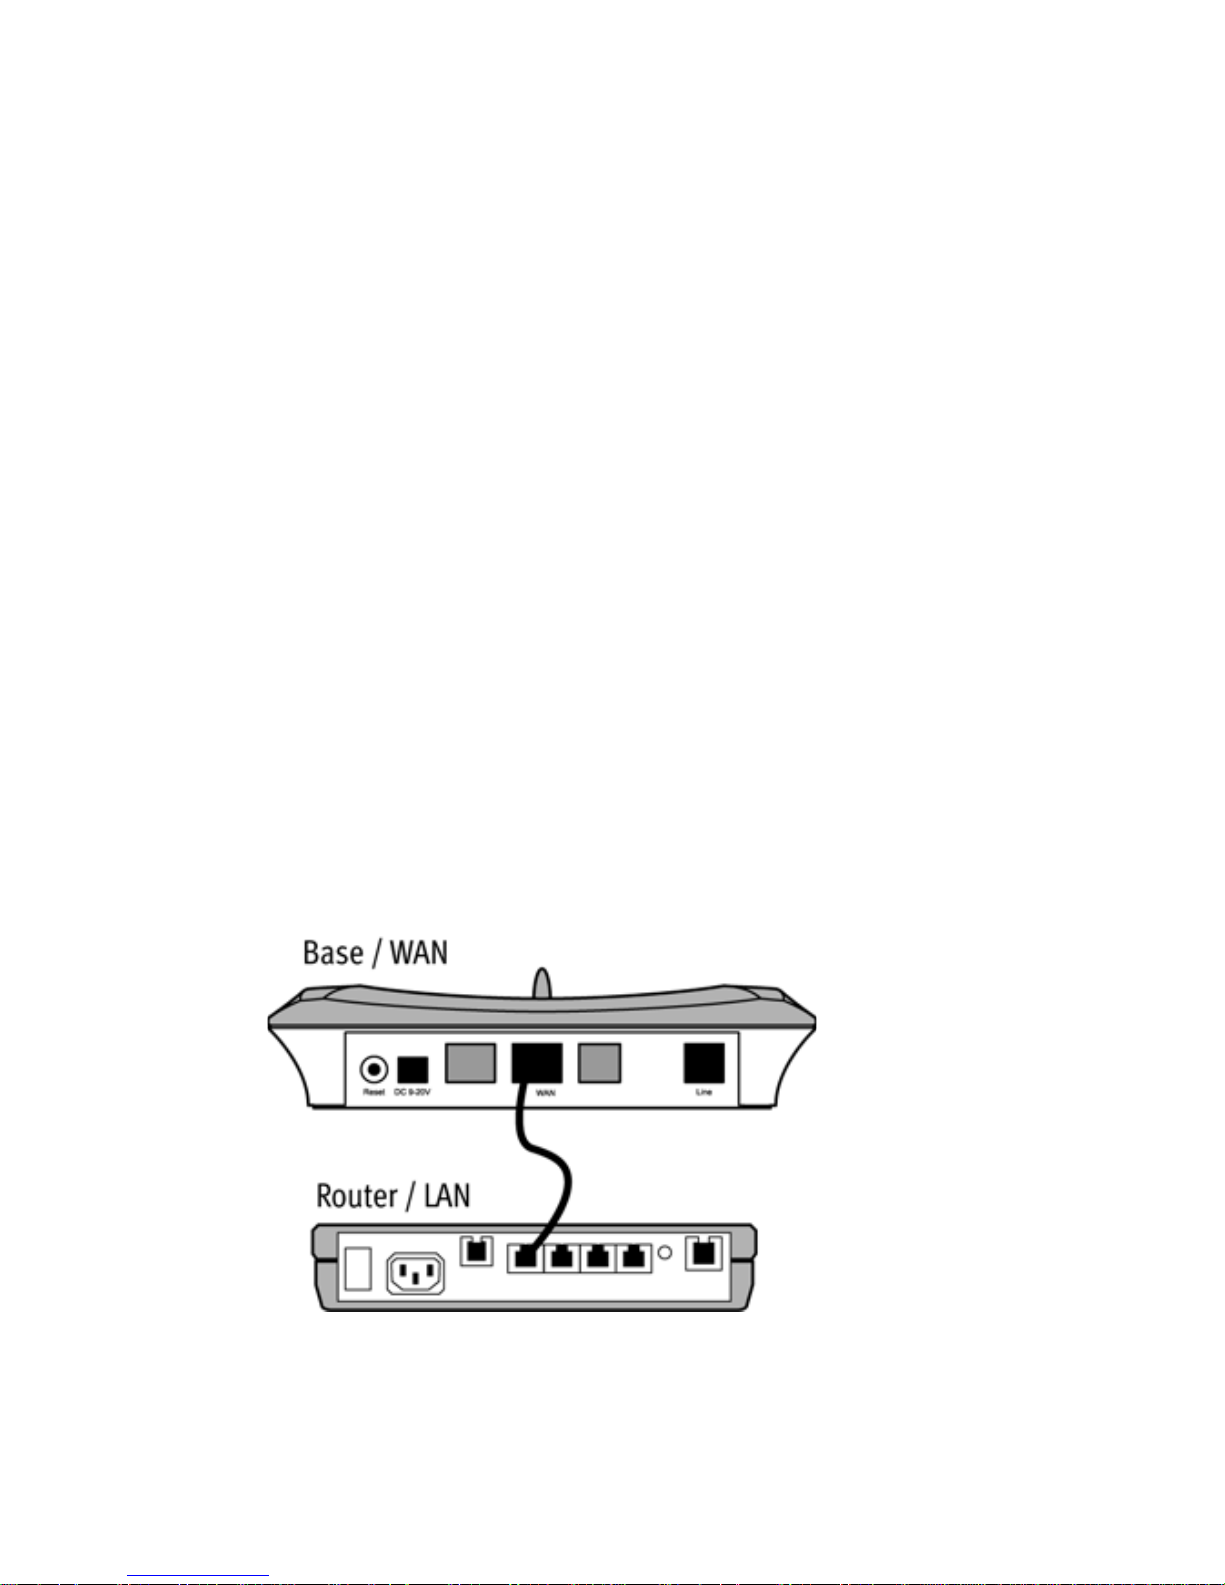
2. Connect the Ethernet cable from the WAN port on
the base to a LAN port on your router or Ethernet
switch. The TalkSwitch unit must be connected to
the same LAN.
TS-850i base
Page 4
2 TS-850i AND TS-860i START GUIDE
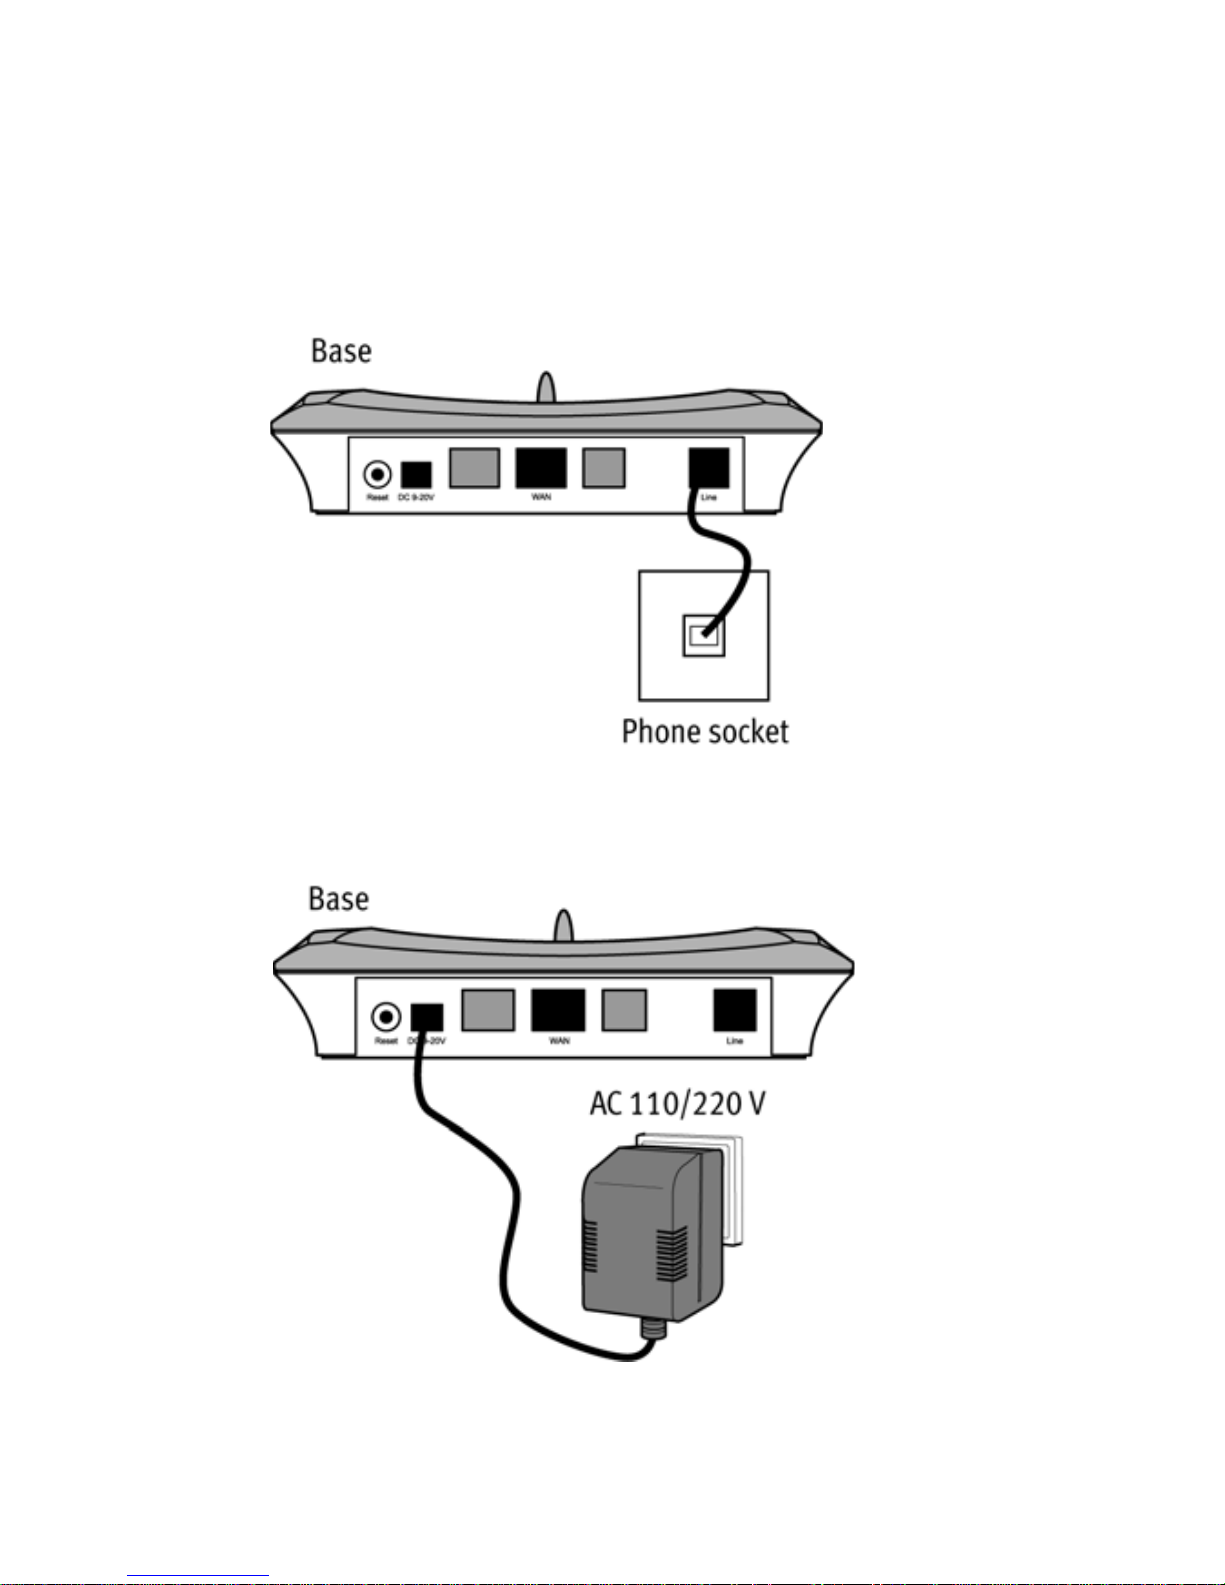
3. Optionally connect the telephone cable from the
Line port on the base to the telephone wall socket.
This will allow you to use the TS-850i/TS-860i as a
regular phone as well.
4. Connect the power adapter from the power outlet to
the power supply connector.
Page 5
EVERY CALL COUNTS 3
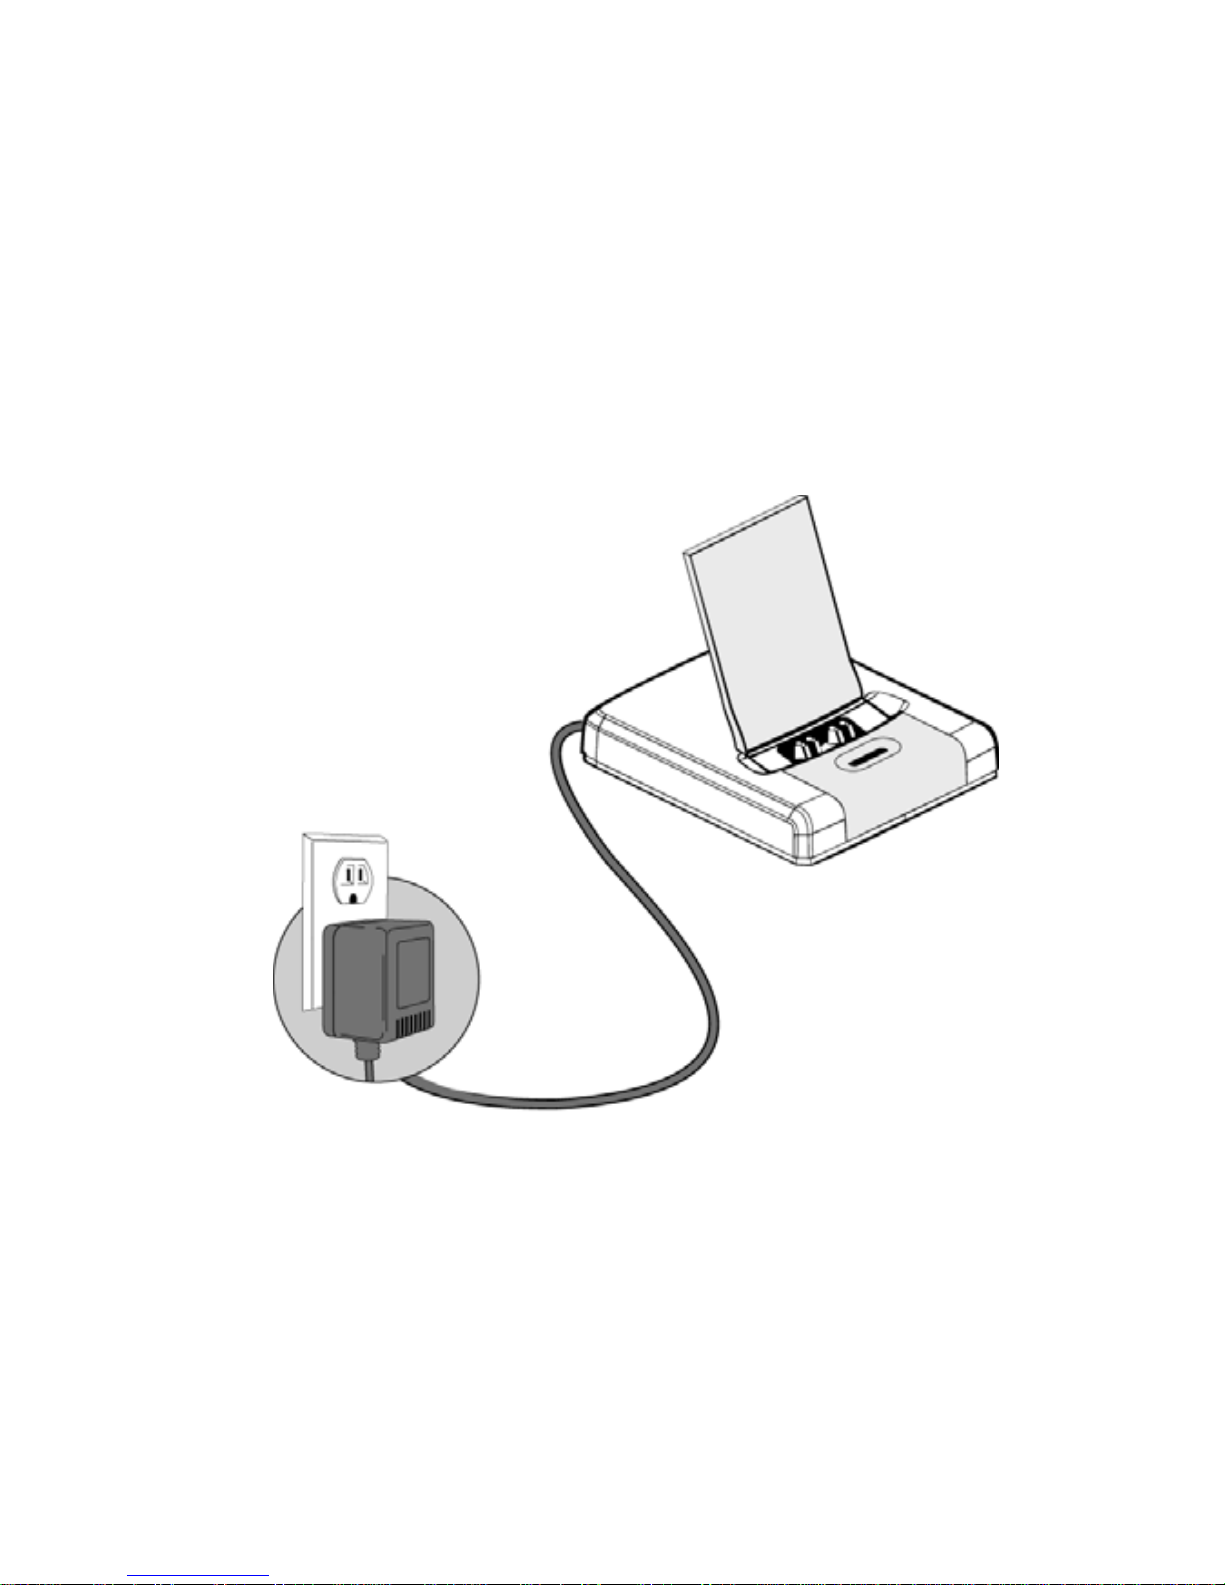
Installing the handset charger
1. Place the handset charger within the signal range of
the base. The handset has an indoor signal range of
up to 150 feet (50 meters) from the base. Concrete
and metal objects might affect the signal range.
2. Connect the power adapter from the power outlet to
the power supply connector.
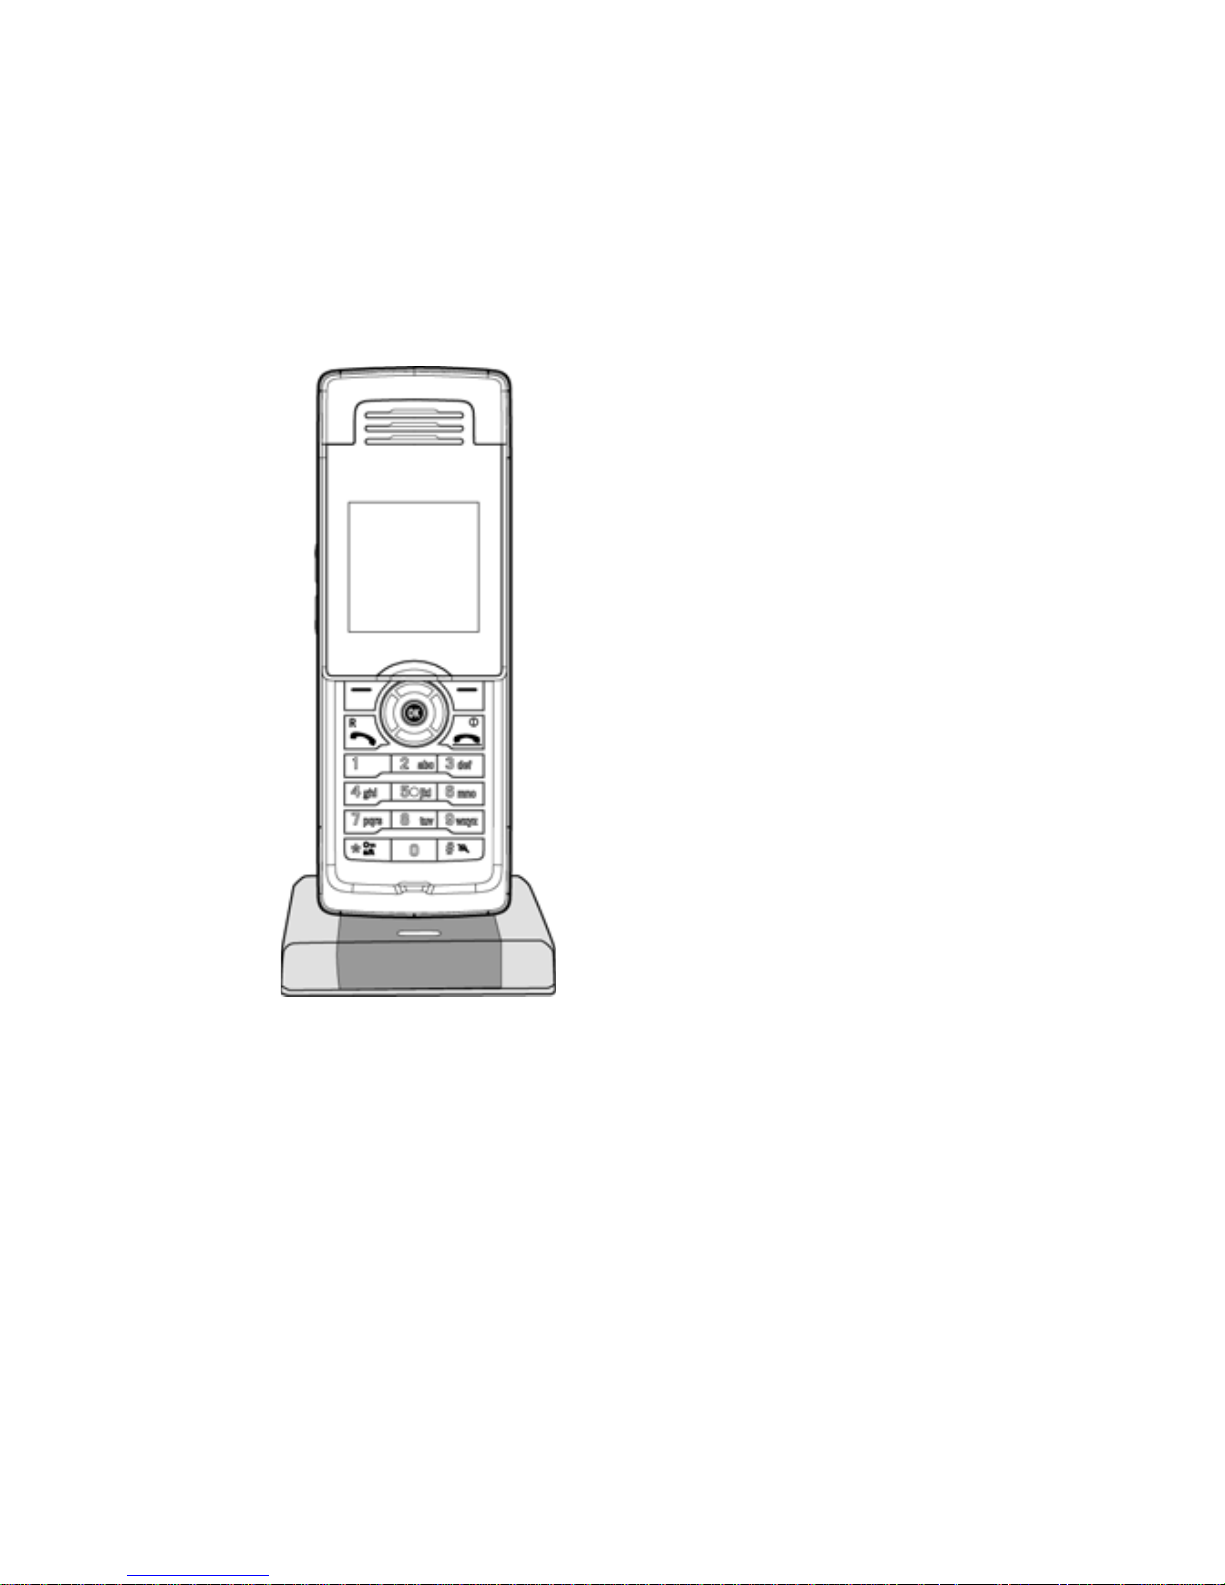
TS-860i charger
Page 6
4 TS-850i AND TS-860i START GUIDE
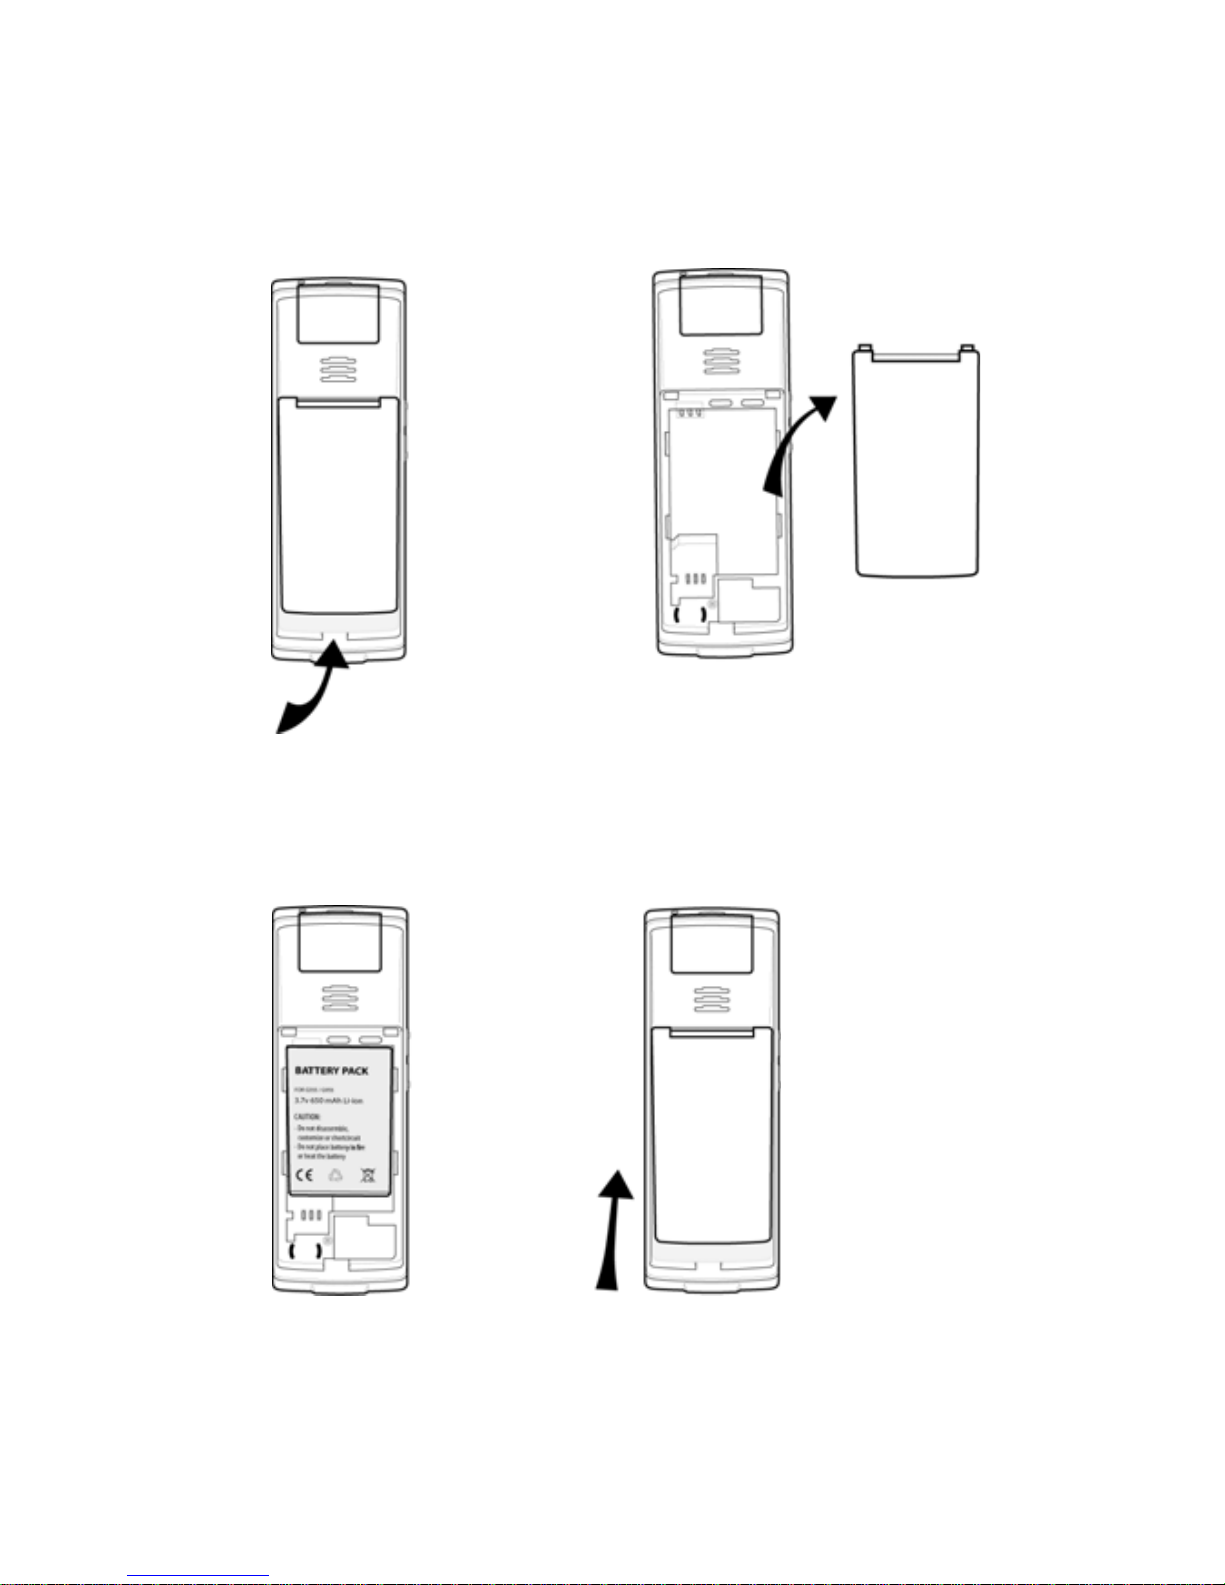
Installing the batteries
1. Release the battery cover from the bottom.
2. Insert the Li-ion cell battery in the handset, making
sure it is placed as shown in the illustration, and
then slide the battery cover shut.
TS-860i handset
Page 7
EVERY CALL COUNTS 5
Charging the batteries
1. Place the handset in the handset charger. The
handset turns on, and the battery charge indicator
in the display starts to flash.
2. Charge the batteries for at least 10 hours before
first use.
Page 8

6 TS-850i AND TS-860i START GUIDE
Registering handsets with the base
1. Press the Reset button on the back of the base. A
five-minute registration period starts, which allows
handsets to register with the base.
NOTE: If you have multiple bases, only reset one base
at a time, and wait five minutes before resetting the
next base.
2. If the handset is turned off, press the Red Phone
key to turn it on.
3. Place the handset in the handset charger. The handset
automatically registers with the base, and the Configure
SIP Domain message appears on the display. This
message indicates that you must configure the TS-850i/
TS-860i as an IP extension, as described later.
A base can support up to three handsets with three
concurrent calls. It can support up to eight handsets if
they aren’t all used at once. If you have more than
three handsets and are getting busy signals, add more
bases to your installation in order to handle more calls.
Page 9

EVERY CALL COUNTS 7
Once the handset is registered, the left connection
status indicator in the display will turn yellow.
4. Once the handset is registered, you can place
additional handsets in the handset charger for
registration. If the five-minute registration period
has expired, but the handsets aren’t all registered,
press the Reset button on the back of the base to
start a new registration period.
Page 10

8 TS-850i AND TS-860i START GUIDE
Configuring the TS-850i/TS-860i as an IP extension
You can configure the phone as an IP extension located
within the office, or outside the office (i.e. an external
IP extension).
Before configuring a phone, ensure that no handsets
registered with the associated base are being used. If a
handset is on a call, the call will be terminated when the
system resets the base during configuration of the phone.
NOTE: The TS-850i requires version 6.11 or greater of the
TalkSwitch management software. The TS-860i requires
version 6.50 or greater, which is available in the support
section at http://global.talkswitch.com.
Page 11

EVERY CALL COUNTS 9
Configuring the TS-850i/TS-860i for use within
the office
If the TS-850i/TS-860i is located within the office, it
connects to your TalkSwitch system over the local area
network (LAN).
1. Launch the TalkSwitch management software.
2. Select the Local Extensions/Fax page.
3. Click the Add button. The Add User / Extension
window appears.
4. Set the Extension type to IP Extension.
5. In a multi-unit system, select the TalkSwitch unit
the extension will be associated with. This unit will
hold the voicemail for the extension. Click Next.
Page 12

10 TS-850i AND TS-860i START GUIDE
6. Enter the user’s First name and Last name. The names
are used for caller ID and the dial-by-name directory.
7. Assign an Extension number.
8. Select TalkSwitch as the Manufacturer, and then
select the model.
9. Enter the MAC address of the phone:
•You can select the Phone MAC Address from a list
of automatically-detected phones connected to
your LAN. To use this method:
Page 13

EVERY CALL COUNTS 11
i) Click the Select button. A MAC Selection
window appears and lists TalkSwitch IP
phones of the selected type.
ii) Select the MAC address of the IP phone
associated to the extension, and then click
Select.
• You can enter the Phone MAC Address manually.
This is the required method if you are setting up
an external IP extension. The MAC Address is a
12-digit alphanumeric string located in the
barcode on the bottom of the base station and
the box the phone came in.
Note that multiple IP extensions can share the
same base.
Page 14

12 TS-850i AND TS-860i START GUIDE
10. Click Finish.
11. In the Extension tab, select the language for prompts
heard by the user of the extension in the System
Prompt Language list.
IP Extension Details area
1. Set the Location to Internal.
2. See Local Extensions/Fax in Help within the
TalkSwitch management software, for instructions on
configuring direct line access, hunt group
permissions, caller ID settings (VoIP only), call
handling and voicemail.
3. After configuring the extensions, choose File >
Save. The TalkSwitch system will automatically
configure each handset.
Page 15

EVERY CALL COUNTS 13
Configuring the TS-850i/TS-860i for use outside
the office
An external IP extension is located outside the office (e.g.
an office phone within the home), and connects to your
TalkSwitch system over the Internet. The TalkSwitch
system must be equipped with a VoIP module.
Checking the firewall
Run the firewall test to ensure the appropriate ports are
forwarded from the router at the TalkSwitch location to the
TalkSwitch unit acting as proxy. There should be no need to
make any adjustments to the firewall at the remote
location. For more information, see Router port forwarding
in Help within the TalkSwitch management software.
1. Launch the TalkSwitch management software.
2. Select the IP Configuration page.
Warning: Calls to an emergency service number using
an external IP extension will not send the correct
address to the emergency operator. We strongly
recommend that you apply a warning label to any
external IP extension stating:
If an emergency call is made from this phone, you
must provide your address to the emergency
operator.
Page 16

14 TS-850i AND TS-860i START GUIDE
3. Click Check Firewall. The Firewall Test
window appears.
4. Click Test Ports to run the firewall test and ensure
port forwarding is set up.
Selecting the extension
1. Select the Local Extensions/Fax page.
2. Click the Add button. The Add User / Extension
window appears.
3. Set the Extension type to IP Extension.
4. In a multi-unit system, select the TalkSwitch unit
the extension will be associated with. This unit will
hold the voicemail for the extension. Click Next.
Page 17

EVERY CALL COUNTS 15
5. Enter the user’s First name and Last name. The names
are used for caller ID and the dial-by-name directory.
6. Assign an Extension number.
7. If necessary, select TalkSwitch as the Manufacturer,
and then select the model.
8. Enter the MAC address of the phone:
•You can select the Phone MAC Address from a list
of automatically-detected phones connected to
your LAN. To use this method:
Page 18

16 TS-850i AND TS-860i START GUIDE
i) Click the Select button. A MAC Selection
window appears and lists TalkSwitch IP
phones of the selected type.
ii) Select the MAC address of the IP phone
associated to the extension, and then click
Select.
• You can enter the Phone MAC Address manually.
This is the required method if you are setting up
an external IP extension. The MAC Address is a
12-digit alphanumeric string located in the
barcode on the bottom of the base station and
the box the phone came in.
Note that multiple IP extensions can share the
same base.
Page 19

EVERY CALL COUNTS 17
9. Click Finish.
10. In the Extension tab, select the language for prompts
heard by the user of the extension in the System
Prompt Language list.
IP Extension Details area
1. Set the Location to External.
2. Select the Time Zone of the phone.
3. See Local Extensions/Fax in Help within the
TalkSwitch management software, for instructions on
configuring direct line access, hunt group
permissions, caller ID settings (VoIP only), call
handling and voicemail.
4. After configuring the extensions, choose File >
Save. The TalkSwitch system will create a file used to
configure each handset.
Page 20

18 TS-850i AND TS-860i START GUIDE
Configuring the external IP extension handset
1. In Idle mode, press the OK key on the handset to
access the Main menu. The OK key is the round key
between the navigation keys.
2. Choose Settings, and then press the OK key.
3. Choose Network settings, and then press the
OK key.
4. Select Provision server, and then press the OK key.
5. Enter the Public IP address or FQDN (fully qualified
domain name) of the TalkSwitch system as provided
by your administrator. To enter a period:
a) Press the Options softkey.
b) Choose Insert symbol, and then press the
OK key.
c) Use the navigation keys to choose the period,
and then press the OK key.
6. Press the Save softkey to accept the changes, and
then press the Back key.
7. When prompted to reboot the base, select Yes. The
TS-850i/TS-860i will automatically download the
configuration from the TalkSwitch system.
Page 21

EVERY CALL COUNTS 19
Using the TS-850i/TS-860i with a traditional phone line
NOTE: If you connected the telephone cable from the Line
port on the base to the telephone wall socket, you can use
the TS-850i/TS-860i with a traditional phone line.
When connected to the traditional telephone network
(PSTN) or to a TalkSwitch system as an analog extension,
FLASH is engaged by pressing the R# key on the TS-850i
and the key on the TS-860i. The key MUST be held
for approximately 2 seconds until you connect to the
other caller (call waiting) or receive dial tone to initiate
a calling feature.
More information
For information on troubleshooting and using the phone,
see the TS-850i and TS-860i User Guide. It is included
with the base of the TS-850i/TS-860i, and is available
through http://global.talkswitch.com.
Warranty
The TS-850i/TS-860i handset is covered by a one-year
limited warranty. For details and instructions on how to
obtain warranty service, see Warranty in the TS-850i and
TS-860i User Guide.
 Loading...