

Page 1

FortiSIEM 2000F Hardware Configuration Guide
Page 2

FORTINET DOCUMENTLIBRARY
http://docs.fortinet.com
FORTINETVIDEOGUIDE
http://video.fortinet.com
FORTINETBLOG
https://blog.fortinet.com
CUSTOMERSERVICE&SUPPORT
https://support.fortinet.com
http://cookbook.fortinet.com/how-to-work-with-fortinet-support/
FORTIGATECOOKBOOK
http://cookbook.fortinet.com
FORTINETTRAININGSERVICES
http://www.fortinet.com/training
FORTIGUARDCENTER
http://www.fortiguard.com
FORTICAST
http://forticast.fortinet.com
ENDUSER LICENSE AGREEMENT
http://www.fortinet.com/doc/legal/EULA.pdf
FORTINET PRIVACY POLICY
https://www.fortinet.com/corporate/about-us/privacy.html
FEEDBACK
Email: techdocs@fortinet.com
March 30, 2018
FortiSIEM 2000F Hardware Configuration Guide
Revision 1
Page 3

TABLEOFCONTENTS
Appliance Setup 4
Step 1: Rack mount the FSM-2000F appliance 4
Step 2: Power On the FSM-2000F appliance 4
Step 3: Verify System Information 4
Step 4: Configure Network 5
Step 5: Generate FortiSIEM FSM-2000F License Key file from FortiCare 5
Step 6: Register FortiSIEM License 5
Step 7: Accessing FortiSIEM UI 6
Step 8: Using FortiSIEM 6
Factory Reset 7
Step 1: Uninstall FortiSIEM application 7
Step 2: Reinstall FortiSIEM application 7
Upgrading FortiSIEM 8
Appliance Re-image 9
Step 1: Create Bootable Linux Image 9
Step 2: Copy FortiSIEM Appliance image to USB 9
Step 3: Prepare 2000F by removing FSM 10
Step 4: Configure 2000F BIOS to Boot into USB Drive 10
Step 5: Re-image 2000F boot drive from USB Linux 10
Page 4
Appliance Setup
Follow the steps below to setup FSM-2000F appliance.
Step 1: Rack mount the FSM-2000F appliance
1.
Follow FortiSIEM 2000F QuickStart Guide here to mount FSM-2000F into rack.
2.
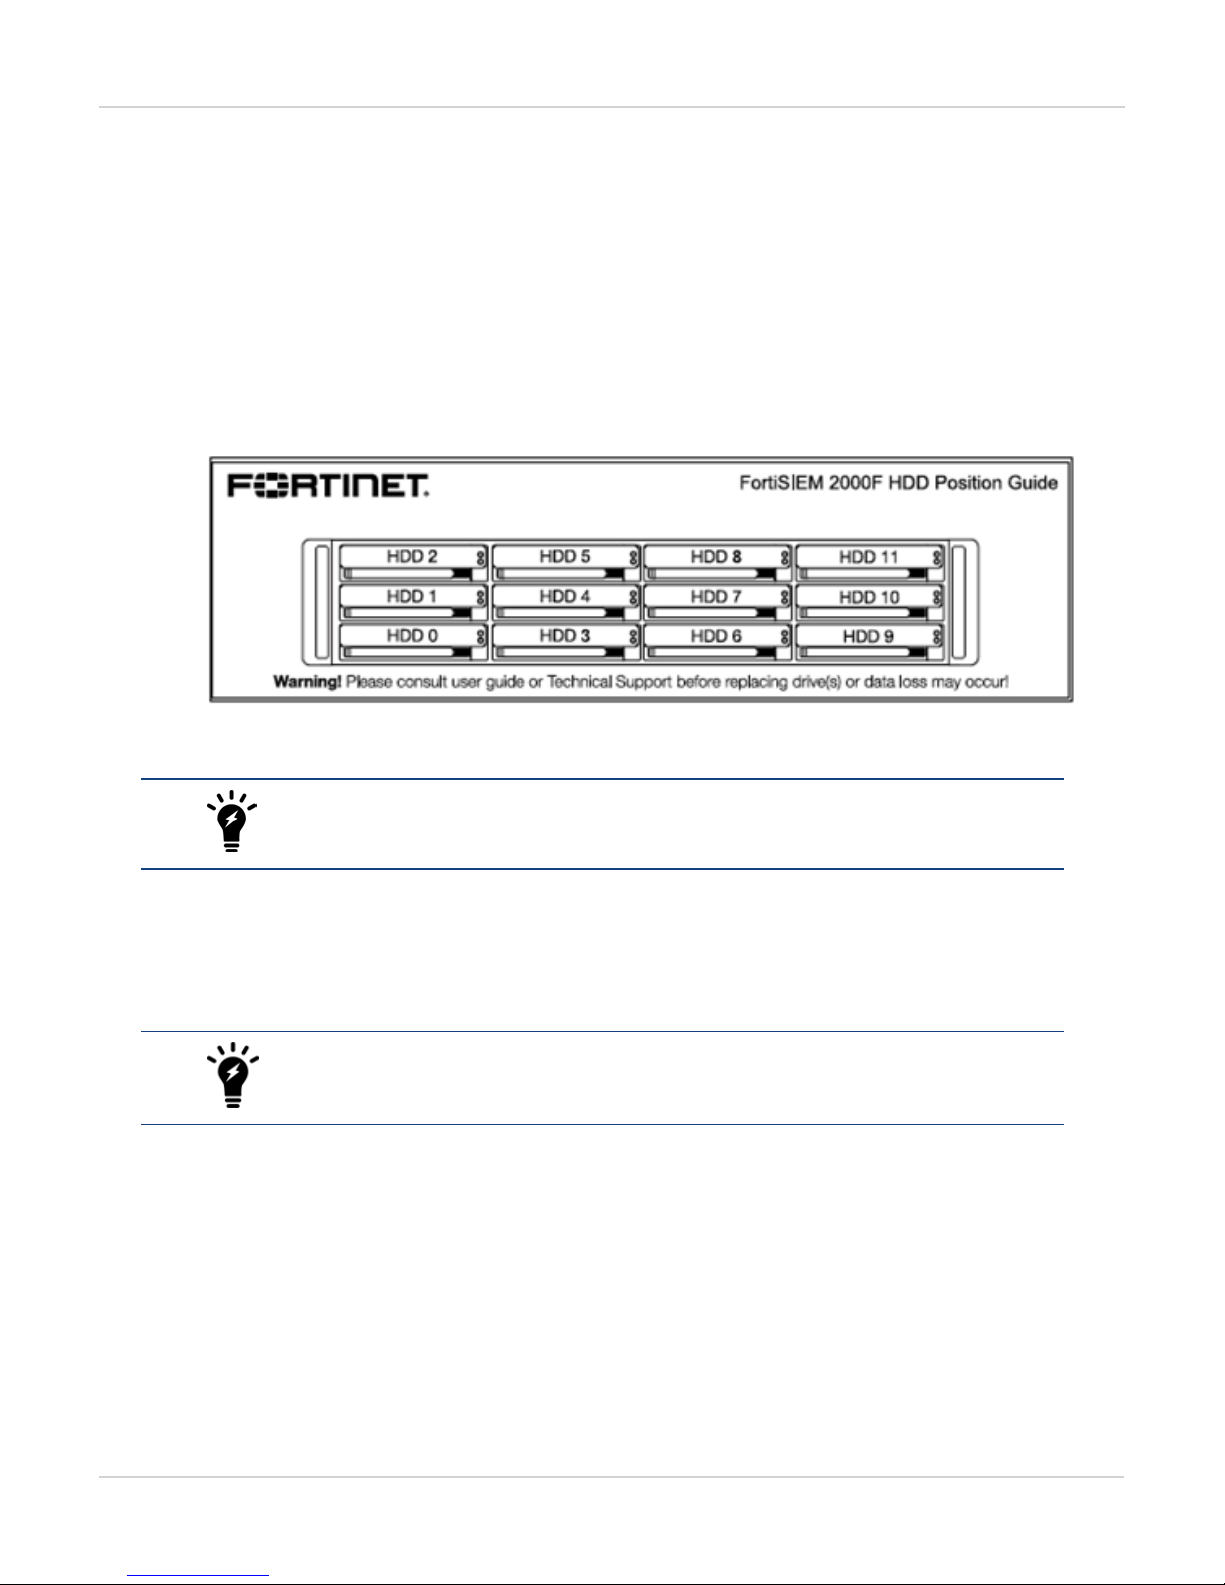
Insert Hard Disks positions as shown below:
Appliance Setup
3.
Connect FSM-2000F to the network by connecting an Ethernet cable to Port1.
Before proceeding to the next step, connecting Ethernet cable to Port1 is required for
Network configuration.
Step 2: Power On the FSM-2000F appliance
1.
Make sure the FSM-2000F device is connected to a Power outlet and an Ethernet cable is connected to Port1.
2.
Power On the FSM-2000F device.
FSM-2000F appliance does not have a default IP address. To connect to the GUI, an
IP address must be configured using the CLI (Step 4).
Step 3: Verify System Information
1.
Connect to the FSM-2000F appliance using VGA port or Console port.
2. Login as ‘root’ user with password 'ProspectHills'.
3.
Run get to check the available FortiSIEM commands.
4.
Use the below commands to check the hardware information. After running each command, ensure that there are
no errors in the displayed output.
4 FortiSIEM - 2000F Hardware Configuration Guide
Fortinet Technologies Inc.
Page 5

Appliance Setup
Command Description
get system status
diagnose hardware info
diagnose interface detail port1
5.
Displays system name, version and serial number.
Displays system hardware information like CPUs, Memory
and RAID information.
Displays interface status.
Step 4: Configure Network
1. On the hardware console, selectSet Timezoneand then pressEnter.
2. Select yourLocation, and then pressEnter.
3. Select yourCountry, and then pressEnter.
4. Select yourTimezone, and then pressEnter.
5. Review your Timezone information, select1, and then pressEnter.
6. When theConfigurationscreen reloads, selectLogin, and then pressEnter.
7.
Enter the default login credentials:
Login
Password
root
ProspectHills
8.
Run thevami_config_netscript to configure the network.
/opt/vmware/share/vami/vami_config_net
9. When prompted, enter the information for these network components to configure the Static IP address:IP
Address,Netmask,Gateway,DNS Server(s).
Note: The authenticated proxy server is not supported in this version of FortiSIEM.
10. PressYto accept the network configuration settings.
11. Enter theHost name,and then pressEnter.
Once the configuration is complete, the system reboots automatically.
Step 5: Generate FortiSIEM FSM-2000F License Key file from FortiCare
1.
Obtain the Hardware Serial Number from FSM-2000F appliance.
2.
Follow 'FortiSIEM Licensing Guide' here to generate the license key file - remember to use ‘Hardware Serial
Number’ for Hardware ID.
Step 6: Register FortiSIEM License
1.
Note the IP Address assigned to FortiSIEM VM in Step 4.
2.
Access FortiSIEM VM from browser (https://<FortiSIEM-IP>).
3. Upload the license file obtained from Step 5 and select the License Type based on your deployment (note this
choice can only be made once and is not reversible):
l Enterprise for single organizations
l Service Provider for multiple organizations
FortiSIEM - 2000F Hardware Configuration Guide
Fortinet Technologies Inc.
5
Page 6

4. Click Upload to complete the license registration.
Step 7: Accessing FortiSIEM UI
1.
Note the IP Address assigned to FortiSIEM VM in Step 5.
2.
Access FortiSIEM VM from browser (https://<FortiSIEM-IP>).
3.
Login to FortiSIEM using the default user name, password, and organization:
l
UserID: admin
l
Password: admin*1
l
Cust/OrgID: super (if shown)
Step 8: Using FortiSIEM
Refer to FortiSIEM User Guide here for detailed information about using FortiSIEM.
Appliance Setup
6 FortiSIEM - 2000F Hardware Configuration Guide
Fortinet Technologies Inc.
Page 7

Factory Reset
Factory Reset
Follow the steps below to perform factory reset on FortiSIEM FSM-2000F.
Step 1: Uninstall FortiSIEM application
1.
Connect FortiSIEM device using VGA or Console port.
2. Login as ‘admin’ user without password.
3.
To check the available FortiSIEM commands, run sudo get.
4.
To uninstall FortiSIEM, run sudo execute fsm-clean.
This script will uninstall FortiSIEM application.
Step 2: Reinstall FortiSIEM application
1.
Power on the hardware.
2. Login as ‘admin’ without password.
3.
To configure RAID, run execute format disk.
4.
To check Hardware status and RAID information, run diagnose hardware info.
5.
To install FortiSIEM, run execute factoryreset.
This script takes 5 minutes to complete FortiSIEM installation.
6.
To configure network on FortiSIEM, stop FortiSIEM services by running sudo execute preparebox.
This script will stop running FortiSIEM services and power offs the hardware.
Follow the steps under Appliance Setup to configure FSM-2000F.
FortiSIEM - 2000F Hardware Configuration Guide
Fortinet Technologies Inc.
7
Page 8

Upgrading FortiSIEM
Before upgrading to v5.0.0 from v4.9.2, FortiSIEM must be upgraded to v4.10.0.
After successful upgrade to FortiSIEM v4.10.0, register the new License from Fortinet support site.
Follow the steps below to upgrade FortiSIEM from v4.9.2 to v5.0.0:
1.
Register and download the new v4.10.0 license from FortiCare support site.
Refer to the 'Licensing Guide' here for more information about License Registration.
2.
Download v4.10.0 Installation packages.
3.
Upgrade to v4.10.0.
4.
Apply FortiCare license.
5.
Upgrade from v4.10.0 to v5.0.0.
Refer to the section 'Upgrading a FortiSIEM Single Node Deployment' in the Upgrade Guide here.
Upgrading FortiSIEM
8 FortiSIEM - 2000F Hardware Configuration Guide
Fortinet Technologies Inc.
Page 9

Appliance Re-image
Appliance Re-image
Ensure that the following prerequisites are met before re-imaging FortiSIEM.
Hardware Software
Peripherals
l USB Keyboard
l USB Mouse
l VGA Monitor
l Ubuntu Desktop Setup Files
l Rufus (Bootable USB Utility)
l FortiSIEM Appliance Image
USB Thumbdrive
l 4 GB Thumbdrive (for Linux installation)
l 8 GB Thumbdrive (for FortiSIEM appliance image)
Follow the below steps to re-image FortiSIEM.
Step 1: Create Bootable Linux Image
1.
Connect 4GB USB drive to the system (desktop or laptop).
2.
Open Rufus.
3.
Select the following settings for the USB:
a. Partition scheme and target system type: MBR partition scheme for BIOS or UEFI
b. File system: FAT32
c. Cluster size: 4096 bytes (Default)
d. Quick Format: Enable
e. Create a bootable disk using: ISO image
4.
Click on the 'CD-ROM' icon and select the Ubuntu Setup ISO.
5. Click Start and allow Rufus to complete.
Once finished, the disk is ready to boot.
Note: Alternatively, you can use the Ubuntu guide for creating a USB drive with Ubuntu.
Step 2: Copy FortiSIEM Appliance image to USB
1.
Connect 8GB USB Drive to the system (desktop or laptop).
2. Open Windows Explorer > right-click Drive > click Format.
3.
Select the following options:
a. File system: NTFS
b. Allocation unit size: 4096 bytes
c. Quick Format: Enable
4.
Copy the image file to USB drive. For example: FortiSIEM-VA-2000F-3500F-5.0.0.1201-hw.raw
5.
Safely remove the USB drive from the desktop or laptop by unmounting it through the operating system.
FortiSIEM - 2000F Hardware Configuration Guide
Fortinet Technologies Inc.
9
Page 10

Step 3: Prepare 2000F by removing FSM
1.
Connect to the console/SSH of the FortiSIEM appliance.
2.
Run the following command: execute fsm-clean
3.
After fsm-clean is complete, format RAID by executing the command: execute format disk
4.
Power-off the FortiSIEM appliance.
Step 4: Configure 2000F BIOS to Boot into USB Drive
1.
Connect the 4GB USB drive to the FortiSIEM appliance.
2.
Power on the FortiSIEM appliance.
3. During the boot screen, press F11 to login to the boot options.
4.
Select the option to enter into the BIOS set up.
5.
Select the option for Boot options.
6.
Select the 'USB drive'.
7.
Save the options and quit set up.
Appliance Re-image
Step 5: Re-image 2000F boot drive from USB Linux
1.
Power on FortiSIEM appliance.
2. Once the FortiSIEM appliance loads from the USB drive, click Try Ubuntu.
3.
Connect the 8GB USB drive to the FortiSIEM appliance.
4.
Open a terminal.
5.
Type the following command to identify the FortiSIEM boot disk (29.5GiB): sudo fdisk –l.
Note: This drive will be referred as /dev/sdb in the following steps..
6.
Enter into root while in the terminal using the following command:
sudo –s
7.
Determine the mount point of this drive by using the following command:
df –l
Note: For this guide, the assumption for the 8GB mount point is: /media/ubuntu/123456789/*
8.
Copy the image from the 8GB disk to the FortiSIEM boot disk.
9.
Extract the Gzipped raw image and copy the image into SATA disk (32GB). For example, use the command:
gunzip -c FortiSIEM-VA-2000F-3500F-5.0.0.1201-hw.raw.gz | dd of=/dev/sdb
status=progress
10.
Once this is completed, power off the FortiSIEM appliance using the following commands:
shutdown –h now
11.
After shutdown, remove both USB drives from the FortiSIEM appliance.
12.
Power on the FortiSIEM appliance.
13.
Reinstall the FortiSIEM application (as in Factory Reset - step 2).
10 FortiSIEM - 2000F Hardware Configuration Guide
Fortinet Technologies Inc.
Page 11

Copyright© 201Fortinet, I nc. All rights reserved. F ortinet®, FortiGate®, F ortiCare® and FortiGuard®, and certain other marks are registered trademarks of Fortinet,
Inc., in t he U.S. and other jurisdictions, and other Fortinet names herein may also be registered and/or common law t rademarks of Fortinet. All other product or company
names may be trademarks of their respective owners. Performance and other metrics contained herein were attained in internal lab tests under ideal conditions, and
actual performance and other results may vary. Network variables, different network environments and other conditions may affect performance results. Nothing herein
represents any binding comm itment by Fortinet, and Fortinet disclaims all warranties, whether express or implied, except to the extent Fortinet enters a binding writt en
contract, signed by Fortinet’s General Counsel, with a purchaser t hat expressly warrants that the identified product will perform according to certain expressly-identified
performance metrics and, in such event, only the s pecific performance metrics expressly identified in s uch binding written contract shall be binding on Fortinet. For
absolute clarity, any such warranty will be limited to performance in t he s ame ideal conditions as in Fortinet’s internal lab tests. In no event does Fortinet make any
commitment related to future deliverables, features or development, and circumstances may change such that any forward-looking st atements herein are not accurate.
Fortinet disclaims in full any covenants, representations, and guarantees pursuant hereto, whether express or implied. Fortinet reserves the right to change, modify,
transfer, or otherwise revise t his publication without notice, and the most current version of the publication shall be applicable.
 Loading...