

Page 1

USER GUIDE
FortiOS v3.0 MR7
User Authentication User Guide
www.fortinet.com
Page 2

FortiOS v3.0 MR7 User Authentication User Guide
28 Aug 2008
01-30007-0347-20080828
© Copyright 2008 Fortinet, Inc. All rights reserved. No part of this
publication including text, examples, diagrams or illustrations may be
reproduced, transmitted, or translated in any form or by any means,
electronic, mechanical, manual, optical or otherwise, for any purpose,
without prior written permission of Fortinet, Inc.
Trademarks
Fortinet, FortiGate and FortiGuard are registered trademarks and
Dynamic Threat Prevention System (DTPS), APSecure, FortiASIC,
FortiBIOS, FortiBridge, FortiClient, FortiDB, FortiGate, FortiGate Unified
Threat Management System, FortiGuard-Antisp am, FortiGuard-Antivirus,
FortiGuard-Intrusion, FortiGuard-Web, FortiLog, FortiAnalyzer,
FortiManager, FortiOS, FortiPartner, FortiProtect, FortiReporter,
FortiResponse, FortiShield, and FortiV oIP, are trademarks of Fortinet, Inc.
in the United States and/or other countries. The names of actual
companies and products mentioned herein may be the trademarks of
their respective owners.
Page 3

Contents
Contents
Introduction........................................................................................ 5
About authentication......................................................................................... 5
User’s view of authentication........................................................................... 6
Web-based user authentication .................................................................... 6
VPN client-based authentication................................................................... 6
FortiGate administrator’s view of authentication........................................... 7
Authentication servers................................................................................... 8
Public Key Infrastructure (PKI) authentication .................................... .......... 9
Peers............................................................................................................. 9
Users............................................................................................................. 9
User groups................................................................................................... 9
Authentication timeout................................................................................. 10
Firewall policies........................................................................................... 10
VPN tunnels..................................... ... ... .... ... ... ... ....................................... . 10
About this document....................................................................................... 10
Document conventions................................................................................ 10
Typographic conventions........................... ... ....................................... . 11
FortiGate documentation................................................................................ 11
Related documentation................................................................................... 12
FortiManager documentation.............................................. .... ... ... ... ....... ... . 13
FortiClient documentation ........................................................................... 13
FortiMail documentation................... ... ... .... ...................................... ... .... .... 13
FortiAnalyzer documentation ...................................................................... 13
Fortinet Tools and Documentation CD........................................................ 14
Fortinet Knowledge Center ........................................................................ 14
Comments on Fortinet technical documentation ................................ ........ 14
Customer service and technical support...................................................... 14
FortiGate authentication servers.................................................... 15
RADIUS servers............. ... .... ... ... ....................................... ... ........................... 15
Configuring the FortiGate unit to use a RADIUS server.............................. 16
LDAP servers................. ... .... ... ... ... ....................................... ... .... .................... 19
Configuring the FortiGate unit to use an LDAP server................................ 21
Using the Query icon............................................................................ 24
TACACS+ servers............................................................................................ 24
Configuring the FortiGate unit to use a TACACS+ authentication server... 25
Directory Service servers ............................................................................... 26
Configuring the FortiGate unit to use a Directory Service server................ 28
FortiOS v3.0 MR7 User Authentication User Guide
01-30007-0347-20080828 3
Page 4

Contents
Users/peers and user groups......................................................... 31
Users/peers...................................................................................................... 31
Creating local users .................................................................................... 32
Creating peer users .................................................................................... 34
User groups ..................................................................................................... 37
Firewall user groups.................................................................................... 37
Directory Service user groups..................................................................... 37
SSL VPN user groups................... ... .... ... ... ....................................... ... ... .... 38
Protection profiles ................................ ... ... ... ... .... ... .................................... 38
Configuring user groups.............................................................................. 39
Configuring Directory Service user groups........................................... 40
Configuring SSL VPN user groups....................................................... 41
Configuring Peer user groups............................................................... 42
Configuring authenticated access ................................................. 43
Authentication timeout ........................ .... ...... ... ... .... ... ... ... .... ... ... ... ... .... ... ... ... . 43
Authentication protocols..... ... .... ... ................................................................. 43
Firewall policy authentication ........................................................................ 44
Configuring authentication for a firewall policy............................................ 45
Firewall policy order.................................................................................... 46
Configuring authenticated access to the Internet........................................ 47
VPN authentication.......................................................................................... 48
Configuring authentication of SSL VPN users ............................................ 48
Configuring strong authentication of SSL VPN users/user groups ............. 50
Configuring authentication of VPN peers and clients.................................. 51
Configuring authentication of PPTP VPN users/user groups............... 51
Configuring authentication of L2TP VPN users/user groups................ 52
Configuring authentication of remote IPSec VPN users....................... 52
Configuring XAuth authentication......................................................... 54
Index.................................................................................................. 57
FortiOS v3.0 MR7 User Authentication User Guide
4 01-30007-0347-20080828
Page 5

Introduction About authentication
Introduction
This section introduces you to the authentication process from the user and the
administrators perspective, and pr ovides supplementary information about
Fortinet publications.
Note: This document does not describe certificate-based VPN authentication. For
information about this type of authentication, see the FortiGate IPSec VPN Guide and the
FortiGate Certificate Management User Guide.
The following topics are covered in this section:
• About authentication
• User’s view of authentication
• FortiGate administrator’s view of authentication
• About this document
• FortiGate documentation
• Related documentation
• Customer service and technical support
About authentication
Computer networks have, for the most part, improved worker efficiency and
helped a company’s bottom line. Along with these benefits, the need has arisen
for workers to be able to remotely access their corporate network, with
appropriate security measures in place. In general terms, authentication is the
process of attempting to verify the (digital) identity of the sender of a
communication such as a log in request. The sender may be someone using a
computer, the computer itself, or a computer program. A computer system should
only be used by those who are authorized to do so, therefore there must be a
measure in place to detect and exclude any unauthorized access.
On a FortiGate unit, you can control access to network resources by defining list s
of authorized users, called user groups. To use a particular resource, such as a
network or a VPN tunnel, the user must:
• belong to one of the user groups that is allowed access
• correctly enter a user name and password to prove his or her identity, if asked
to do so
This process is called authentication.
You can configure authentication for:
• any firewall policy with Action set to ACCEPT
• SSL VPNs
• PPTP and L2TP VPNs
• a dialup IPSec VPN set up as an XAUTH server (Phase 1)
• a dialup IPSec VPN that accepts user group authentication as a peer ID
FortiOS v3.0 MR7 User Authentication User Guide
01-30007-0347-20080828 5
Page 6
User’s view of authentication Introduction
User’s view of authentication
The user sees a request for authentication when they try to access a protected
resource. The way in which the request is presented to the user depends on the
method of access to that resource.
VPN authentication usually controls remote access to a private network.
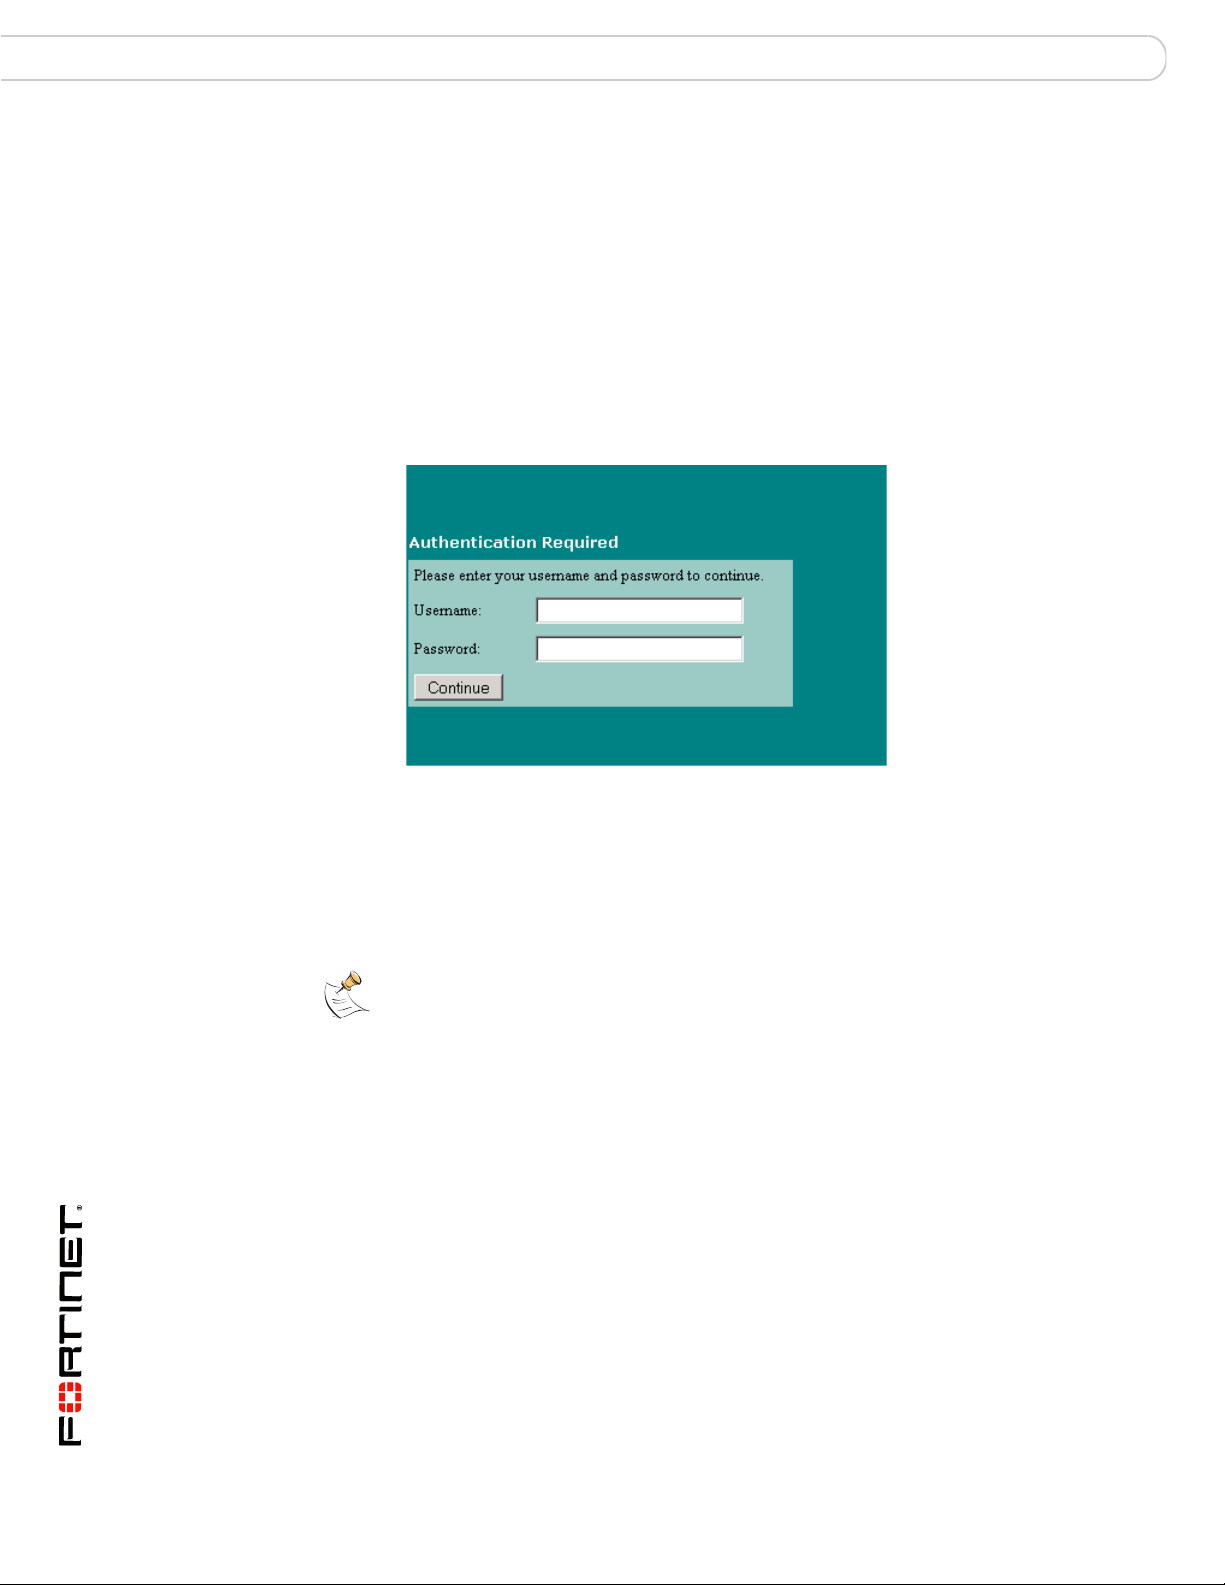
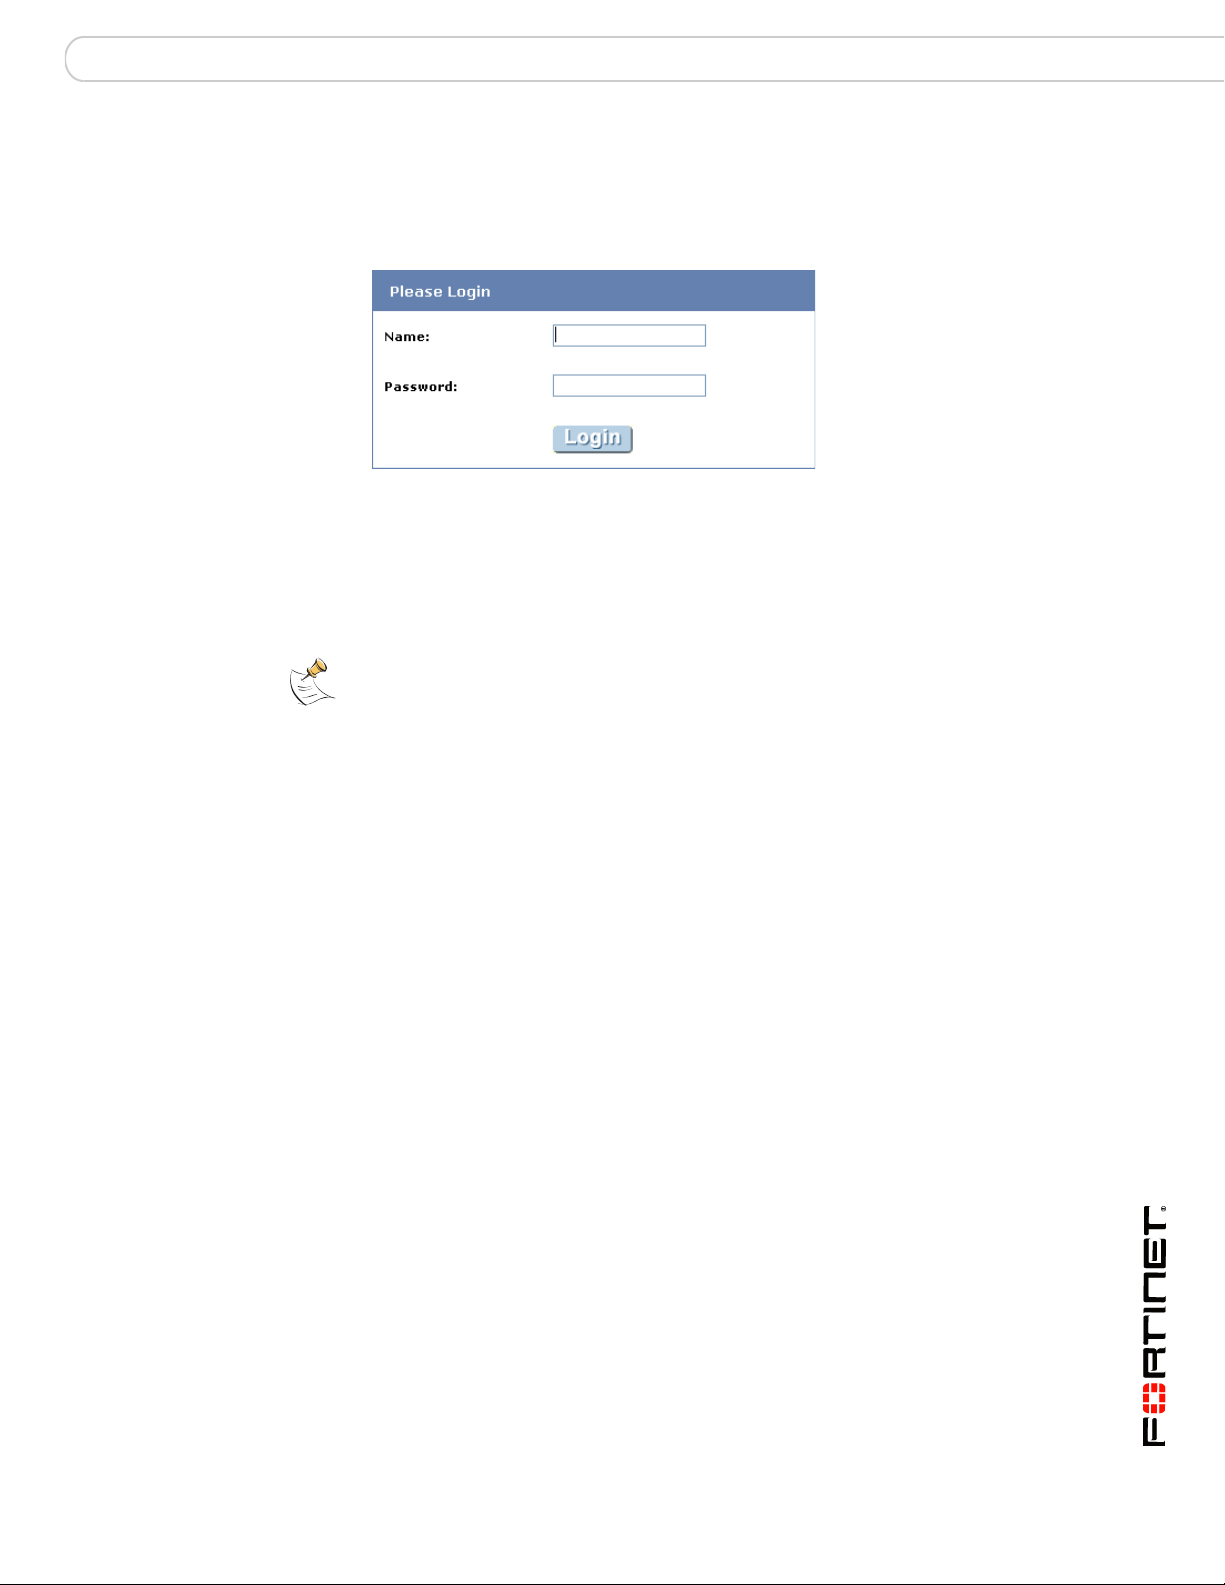
Web-based user authentication
Firewall policies usually control browsing access to an external network that
provides connection to the Internet. In this case, the FortiGate unit requests
authentication through the web browser:
The user types a user name and password and then selects Continue/Login. If the
credentials are incorrect, the authentication screen is redisp layed with blank fields
so that the user can try again. When the user enters valid credentials, they get
access to the required resource. In some cases, if a user tries to authenticate
several times without success, a message appears, such as: “Too many bad login
attempts. Please try again in a few minutes.”
Note: After a defined period of user inactivity (the authentication timeout, defined
by the FortiGate administrator), the user access will expire. The default is 5
minutes. To access the resource, the user will have to authenticate again.
VPN client-based authentication
VPNs provide remote clients with access to a private network for a variety of
services that include web browsing, email, and file sharing. A client program such
as FortiClient negotiates the connection to the VPN and manages the user
authentication challenge from the FortiGate unit.
FortiOS v3.0 MR7 User Authentication User Guide
6 01-30007-0347-20080828
Page 7
Introduction FortiGate administrator’s view of authentication
FortiClient can store the user name and password for a VPN as part of the
configuration for the VPN connection and pass them to the FortiGate unit as
needed. Or, FortiClient can request the user name and password from the user
when the FortiGate unit requests them.
SSL VPN is a form of VPN that can be used with a standard Web browser. There
are two modes of SSL VPN operation (supported in NAT/Route mode only):
• web-only mode, for thin remote clients equipped with a web-browser only
• tunnel mode, for remote computers that run a variety of client and server
applications.
Note: After a defined period of user inactivity on the VPN connection (the idle
timeout, defined by the FortiGate administrator), the user access will expire. The
default is 1500 seconds (25 minutes). To access the resource, the user will have
to authenticate again.
FortiGate administrator’s view of authentication
Authentication is based on user groups. You configure authentication parameters
for firewall policies and VPN tunnels to permit access only to members of
particular user groups. A member of a user group can be:
• a user whose user name and password are stored on the FortiGate unit
• a user whose name is stored on the FortiGate unit and whose password is
stored on a remote or external authenticatio n serv er
• a remote or external authentication server with a database that contains the
user name and password of each person who is permitted access
1 If remote or external authentication is needed, configure the required servers.
•See “Configuring the FortiGate unit to use a RADIUS server” on page 16.
•See “Configuring the FortiGate unit to use an LDAP server” on page 21.
•See “Configuring the FortiGate unit to use a Directory Service server” on
page 28.
2 Configure local and peer (PKI) user identities (see “Public Key Infrastructure (PKI)
authentication” on page 9). For each local user, you can choose whether the
FortiGate unit or a remote authentication server verifies the password. Peer
members can be included in user groups for use in firewall policies.
•See “Creating local users” on page 34.
•See “Creating peer users” on page 36.
FortiOS v3.0 MR7 User Authentication User Guide
01-30007-0347-20080828 7
Page 8

FortiGate administrator’s view of authentication Introduction
3 Create user groups.
Add local/peer user members to each user group as appropriate. You can also
add an authentication server to a user group. In this case, a ll users in the serve r’s
database can authenticate. You can only configure peer user groups through the
CLI.
•See “Configuring user groups” on page 41.
4 Configure firewall policies and VPN tunnels that require authenticated access.
See “Configuring authentication for a firewall policy” on page 49.
See “Configuring authentication of PPTP VPN users/user groups” on page 55.
See “Configuring authentication of remote IPSec VPN users” on page 56.
See “Configuring XAuth authentication” on page 58.
Authentication servers
The FortiGate unit can store user names and passwords and use them to
authenticate users. In an enterprise environment, it might be more convenient to
use the same system that provides authentication for local area network access,
email and other services. Users who access the corporate network from home or
while traveling could use the same user name and password that they use at the
office.
Y ou can configure the FortiGate unit to work with remote or external authentication
servers in two different ways:
• Add the authentication server to a user group.
Anyone in the server’s database is a member of the user group. This is a
simple way to provide access to the corporate VPN for all employees, for
example. You do not need to configure individual users on the FortiGate unit.
or
• Specify the authentication server instead of a password when you configure
the individual user identity on the FortiGate unit.
The user name must exist on both the FortiGate unit and authentication server.
User names that exist only on the authentication server cannot authenticate on
the FortiGate unit. This method enables you to provide access only to selected
employees, for example.
Note: You cannot combine these two uses of an authentication server in the same user
group. If you add the server to the user group, adding individual users with authentication to
that server is redundant.
If you want to use remote or external authentication servers, you must configure
them before you configure users and user groups . See “RADIUS servers” on
page 15, “LDAP servers” on page 19, “TACACS+ servers” on page 25, and
“Directory Service servers” on page 27.
FortiOS v3.0 MR7 User Authentication User Guide
8 01-30007-0347-20080828
Page 9

Introduction FortiGate administrator’s view of authentication
Public Key Infrastructure (PKI) authentication
A Public Key Infrastructure (PKI) is a comprehensive system of policies,
processes, and technologies workin g toge t her to enable users of the Internet to
exchange information in a secure and confidential manner. PKIs are based on the
use of cryptography - the scrambling of information by a mathematical formula
and a virtual key so that it can only be decoded by an authorized party using a
related key. The public and private cryptographic key pair is obtained and shared
through a trusted authority. The public key infrastructure enables the creation of a
digital certificate that can identify an individual or organization, and directory
services that can store and also revoke the certificates.
Public Key Infrastructure (PKI) authentication utilizes a certificate authentication
library that takes a list of ‘peers’, ‘peer’ groups, and/or user groups and returns
authentication ‘successful’ or ‘denied’ notifications. Users only need a valid
certificate for successful authentication - no username or password are
necessary.
Peers
A peer is a user that is a digital certificate holder used in PKI authentication. To
use PKI authentication, you must define peers to inc l ud e in th e au th en ticatio n
user group. See “Users/peers” on page 33.
Users
User groups
Although it is simpler to define passwords locally, when there are many users the
administrative effort to maintain the database is considerable. Users cannot
change their own passwords on the FortiGate unit. When a remote or external
remote authentication server is part of an enterprise network authentication
system, users can change their own passwords. See “Users/peers” on page 33.
Note: Frequent changing of passwords is a good security practice.
A user group can contain individual users/peers and authentication servers. A
user/peer or authentication server can belong to more than one group.
Authentication is group-based. Firewall policies can allow multiple groups access,
but authentication for a VPN allows access to only one group. These
considerations affect how you define the group s for your organization. Usually you
need a user group for each VPN. For firewall policies, you ca n create user group s
that reflect how you manage network privileges in your organization. For example,
you might create a user group for each department or create user groups based
on functions such as customer support or account management.
You select a protection profile for each user group. Protection profiles determine
the level of web filtering, antivirus protection, an d spam filtering ap plie d to traffic
controlled by the firewall policy to which members of this user group authenticate.
For more information about protection profiles, see the FortiGate Administration
Guide.
FortiOS v3.0 MR7 User Authentication User Guide
01-30007-0347-20080828 9
Page 10

About this document Introduction
Authentication timeout
An authenticated connection expires when it has been idle for a length of time that
you specify. The authentication timeout value set in User > Authentication >
Authentication applies to every user of the system. The choice of timeout
duration is a balance between security and user convenience. The default is
5 minutes. For information about setting the authentication timeout, see
“Authentication timeout” on page 47.
Firewall policies
Access control is defined in the firewall policy that provides access to the network
resource. For example, access to the Internet through the external interface from
workstations on the internal network is made possible by an Internal to External
firewall policy.
Firewall policies apply web filtering, antivirus protection, and spam filtering to the
traffic they control according to a protection profile. If the firewall policy requires
authentication, the protection profile in the firewall policy is disabled. Instead, the
protection profile is configured in the authenticating user group.
For more information about firewall policies and protection profiles, see the
Firewall chapters of the FortiGate Administration Guide.
VPN tunnels
When you configure a PPTP or L2TP VPN, you choose one user group to be
permitted access. For IPSec VPNs, you can use authentication by user group or
XAUTH authentication using an external authentication server as an alte rnative to
authentication by peer ID. Access to SSL VPN applications is controlled through
user groups. When the remote client connects to the FortiGate unit, the FortiGate
unit authenticates the user based on user name, password, and authentication
domain. Authentication for a VPN allows access to only one group.
For more information about VPNs, see the FortiGate PPTP VPN User Guide,
FortiGate SSL VPN User Guide, or the FortiGate IPSec VPN User Guide.
About this document
This document explains how to configure authentication for firewall policies, PP TP,
L2TP and SSL VPNs, and dialup IPSec VPNs, and contains the following
chapters:
• Authentication servers contains procedures for configurin g RADIUS, LDAP,
and Microsoft Active Directory authentication servers.
• Users/peers and user groups contains procedures for defining users/peers and
user groups.
• Configuring authenticated access contains procedures to set authentication
timeouts, configure authentication in firewall policies, for PPTP, L2TP and SSL
VPNs, and certain configurations of IPSec VPNs.
Document conventions
The following document conventions are used in this guide:
FortiOS v3.0 MR7 User Authentication User Guide
10 01-30007-0347-20080828
Page 11
Introduction FortiGate documentation
!
• In the examples, private IP addresses are used for both private and public IP
addresses.
• Notes and Cautions are used to provide important information:
Note: Highlights useful additional information.
Caution: Warns you about commands or procedures that could have unexpected or
undesirable results including loss of data or damage to equipment.
Typographic conventions
FortiGate documentation uses the following typographical conventions:
Convention Example
Keyboard input
Code examples config sys global
CLI command syntax config firewall policy
Document names
File content <HTML><HEAD><TITLE>Firewall
Menu commands Go to VPN > SSL > Config.
Program output Welcome!
Variables <group_name>
In the Name field, type admin.
set ips-open enable
end
edit id_integer
set http_retry_count <retry_integer>
set natip <address_ipv4mask>
end
FortiGate SSL VPN User Guide
Authentication</TITLE></HEAD>
<BODY><H4>You must authenticate to use this
service.</H4>
FortiGate documentation
The most up-to-date publications and previous releases of Fortinet product
documentation are available from the Fortinet Technical Documentation web site.
The following FortiGate product documentation is available:
• FortiGate QuickStart Guide
Provides basic information about connecting and installing a FortiGate unit.
• FortiGate Installation Guide
Describes how to install a FortiGate unit. Includes a hardware reference,
default configuration information, installation procedures, connection
procedures, and basic configuration procedures. Choose the guide for your
product model number.
FortiOS v3.0 MR7 User Authentication User Guide
01-30007-0347-20080828 11
Page 12

Related documentation Introduction
• FortiGate Administration Guide
Provides basic information about how to configure a FortiGate unit, including
how to define FortiGate protection profiles and firewall policies; how to apply
intrusion prevention, antivirus protection, web content filtering, and spam
filtering; and how to configure a VPN.
• FortiGate online help
Provides a context-sensitive and searchable version of the Administration
Guide in HTML format. You can access online help from the web-based
manager as you work.
• FortiGate CLI Reference
Describes how to use the FortiGate CLI and contains a reference to all
FortiGate CLI commands.
• FortiGate Log Message Reference
Available exclusively from the Fortinet Knowledge Center, the FortiGate Log
Message Reference describes the structure of FortiGate log messages and
provides information about the log messages that are generated by FortiGate
units.
• FortiGate High Availability User Guide
Contains in-depth information about the FortiGate high availability feature and
the FortiGate clustering protocol.
• FortiGate IPS User Guide
Describes how to configure the FortiGate Intrusion Preventio n System settings
and how the FortiGate IPS deals with some common attacks.
• FortiGate IPSec VPN User Guide
Provides step-by-step instructions for configuring IPSec VPNs using the webbased manager.
• FortiGate SSL VPN User Guide
Compares FortiGate IPSec VPN and FortiGate SSL VPN technology, and
describes how to configure web-only mode and tunne l-mode SSL VPN access
for remote users through the web-based manager.
• FortiGate PPTP VPN User Guide
Explains how to configure a PPTP VPN using the web-based manager.
• FortiGate Certificate Management User Guide
Contains procedures for managing digital certificates including generating
certificate requests, installing signed certificates, importing CA root certificates
and certificate revocation lists, and backing up and resto r ing installed
certificates and private keys.
• FortiGate VLANs and VDOMs User Guide
Describes how to configure VLANs and VDOMS in both NAT/Route and
Transparent mode. Includes detailed examples.
Related documentation
Additional information about Fortinet products is available from the following
related documentation.
FortiOS v3.0 MR7 User Authentication User Guide
12 01-30007-0347-20080828
Page 13

Introduction Related documentation
FortiManager documentation
• FortiManager QuickStart Guide
Explains how to install the FortiManager Console, set up the FortiManager
Server, and configure basic settings.
• FortiManager System Administration Guide
Describes how to use the FortiManager System to manage FortiGate devices.
• FortiManager System online help
Provides a searchable version of the Administration Guide in HTML format.
You can access online help from the FortiManager Console as you work.
FortiClient documentation
• FortiClient Host Security User Guide
Describes how to use FortiClient Host Security software to set up a VPN
connection from your computer to remote networks, scan your computer for
viruses, and restrict access to your computer and applications by setting up
firewall policies.
• FortiClient Host Security online help
Provides information and procedures for using and configuring the FortiClient
software.
FortiMail documentation
• FortiMail Administration Guide
Describes how to install, configure, and manage a FortiMail unit in gateway
mode and server mode, including how to configure th e unit; create pr ofiles and
policies; configure antispam and antivirus filters; create user accounts ; and set
up logging and reporting.
• FortiMail online help
Provides a searchable version of the Administration Guide in HTML format.
You can access online help from the web-based manager as you work.
• FortiMail Web Mail Online Help
Describes how to use the FortiMail web-based email client, including how to
send and receive email; how to add, import, a nd export addresse s; and how to
configure message display preferences.
FortiAnalyzer documentation
• FortiAnalyzer Administration Guide
Describes how to install and configure a FortiAnalyzer unit to collect FortiGate
and FortiMail log files. It also describes how to view FortiGate and FortiMail log
files, generate and view log reports, and use the FortiAnalyzer unit as a NAS
server.
• FortiAnalyzer online help
Provides a searchable version of the Administration Guide in HTML format.
You can access online help from the web-based manager as you work.
FortiOS v3.0 MR7 User Authentication User Guide
01-30007-0347-20080828 13
Page 14

Customer service and technical support Introduction
Fortinet Tools and Documentation CD
All Fortinet documentation is available from the Fo rtinet Tools and Documentation
CD shipped with your Fortinet product. The document s on this CD are current at
shipping time. For up-to-date versions of Fortinet documentation see the Fortinet
Technical Documentation web site.
Fortinet Knowledge Center
Additional Fortinet technical documentation is available from the Fortinet
Knowledge Center. The knowledge center contains troubleshooting and how-to
articles, FAQs, technical notes, and more.
Comments on Fortinet technical documentation
Please send information about any errors or omissions in this document, or any
Fortinet technical documentation, to techdoc@fortinet.com.
Customer service and technical support
Fortinet Technical Support provides services designed to make sure that your
Fortinet systems install quickly, configure easily, and operate reliably in your
network.
Please visit the Fortinet Technical Support to learn about the technical support
services that Fortinet provides.
FortiOS v3.0 MR7 User Authentication User Guide
14 01-30007-0347-20080828
Page 15

Authentication servers RADIUS servers
Authentication servers
FortiGate units support the use of authentication servers. If you are going to use
FortiGate authentication servers, you must configure the servers before you
configure FortiGate users or user groups that require them. An authentication
server can provide password checking for selected FortiGate users or it can be
added as a member of a FortiGate user group.
This section describes:
• RADIUS servers
• LDAP servers
• TACACS+ servers
• Directory Service servers
RADIUS servers
Remote Authentication and Dial-in User Service (RADIUS) servers provide
authentication, authorization, and accounting functions. FortiGate units use the
authentication and accounting functions of the RADIUS server.
Your RADIUS server listens on either port 1812 or port 1645 for authentication
requests. You must configure it to accept the FortiGate unit as a client.
The RADIUS server user database can be any combination of:
• user names and passwords defined in a configuration file
• an SQL database
• user account names and passwords configured on the computer where the
RADIUS server is installed.
The RADIUS server uses a “shared secret” key to encrypt information passed
between it and clients such as the FortiGate unit.
The FortiGate units send the following RADIUS attributes in the accounting
start/stop messages:
1. Acct-Session-ID
2. User Name
3. NAS-Identifier (FGT hostname)
4. Framed-IP-Address (IP address assigned to the client)
5. Fortinet-VSA (IP address client is connecting from)
6. Acct-Input-Octets
7. Acct-Output-Octets
Table 1 describes the supported authentication events and the RADIUS attributes
that are sent in the RADIUS accounting message.
FortiOS v3.0 MR7 User Authentication User Guide
01-30007-0347-20080828 15
Page 16

RADIUS servers Authentication servers
Table 1: RADIUS attributes sent in RADIUS accounting message
A TTRIBUTE
AUTHENTICATION METHOD 1234567
Web XXX X
XAuth of IPSec (without DHCP) XXX X
XAuth of IPSec (with DHCP) XXXXX
PPTP/L2TP (in PPP) XXXXXXX
SSL-VPN XXX X
In order to support vendor-specific attributes (VSA), the RADIUS server requires a
dictionary to define what the VSAs are.
Fortinet’s dictionary is configured this way:
##
Fortinet’s VSA’s
#
VENDOR fortinet 12356
BEGIN-VENDOR fortinet
ATTRIBUTE Fortinet-Group-Name 1 string
ATTRIBUTE Fortinet-Client-IP-Address 2 ipaddr
ATTRIBUTE Fortinet-Vdom-Name 3 string
#
# Integer Translations
#
END-VENDOR Fortinet
See the documentation provided with your RADIUS server for configuration
details.
Configuring the FortiGate unit to use a RADIUS server
To configure the FortiGate unit to use a RADIUS server, you need to know the
server’s domain name or IP address and its shared secret key. You will select the
authentication protocol. The maximum number of remote RADIUS servers that
can be configured for authentication is 10.
On the FortiGate unit, the default port for RADIUS traffic is 1812. If your RADIUS
server is using port 1645, you can either:
• Reconfigure the RADIUS server to use port 1812. See your RADIUS server
documentation for more information.
or
FortiOS v3.0 MR7 User Authentication User Guide
16 01-30007-0347-20080828
Page 17
Authentication servers RADIUS servers
• Change the FortiGate unit default RADIUS port to 1645 using the CLI:
config system global
set radius_port 1645
end
To configure the FortiGate unit for RADIUS authentication - web-based
manager
1 Go to User > Remote > RADIUS and select Create New.
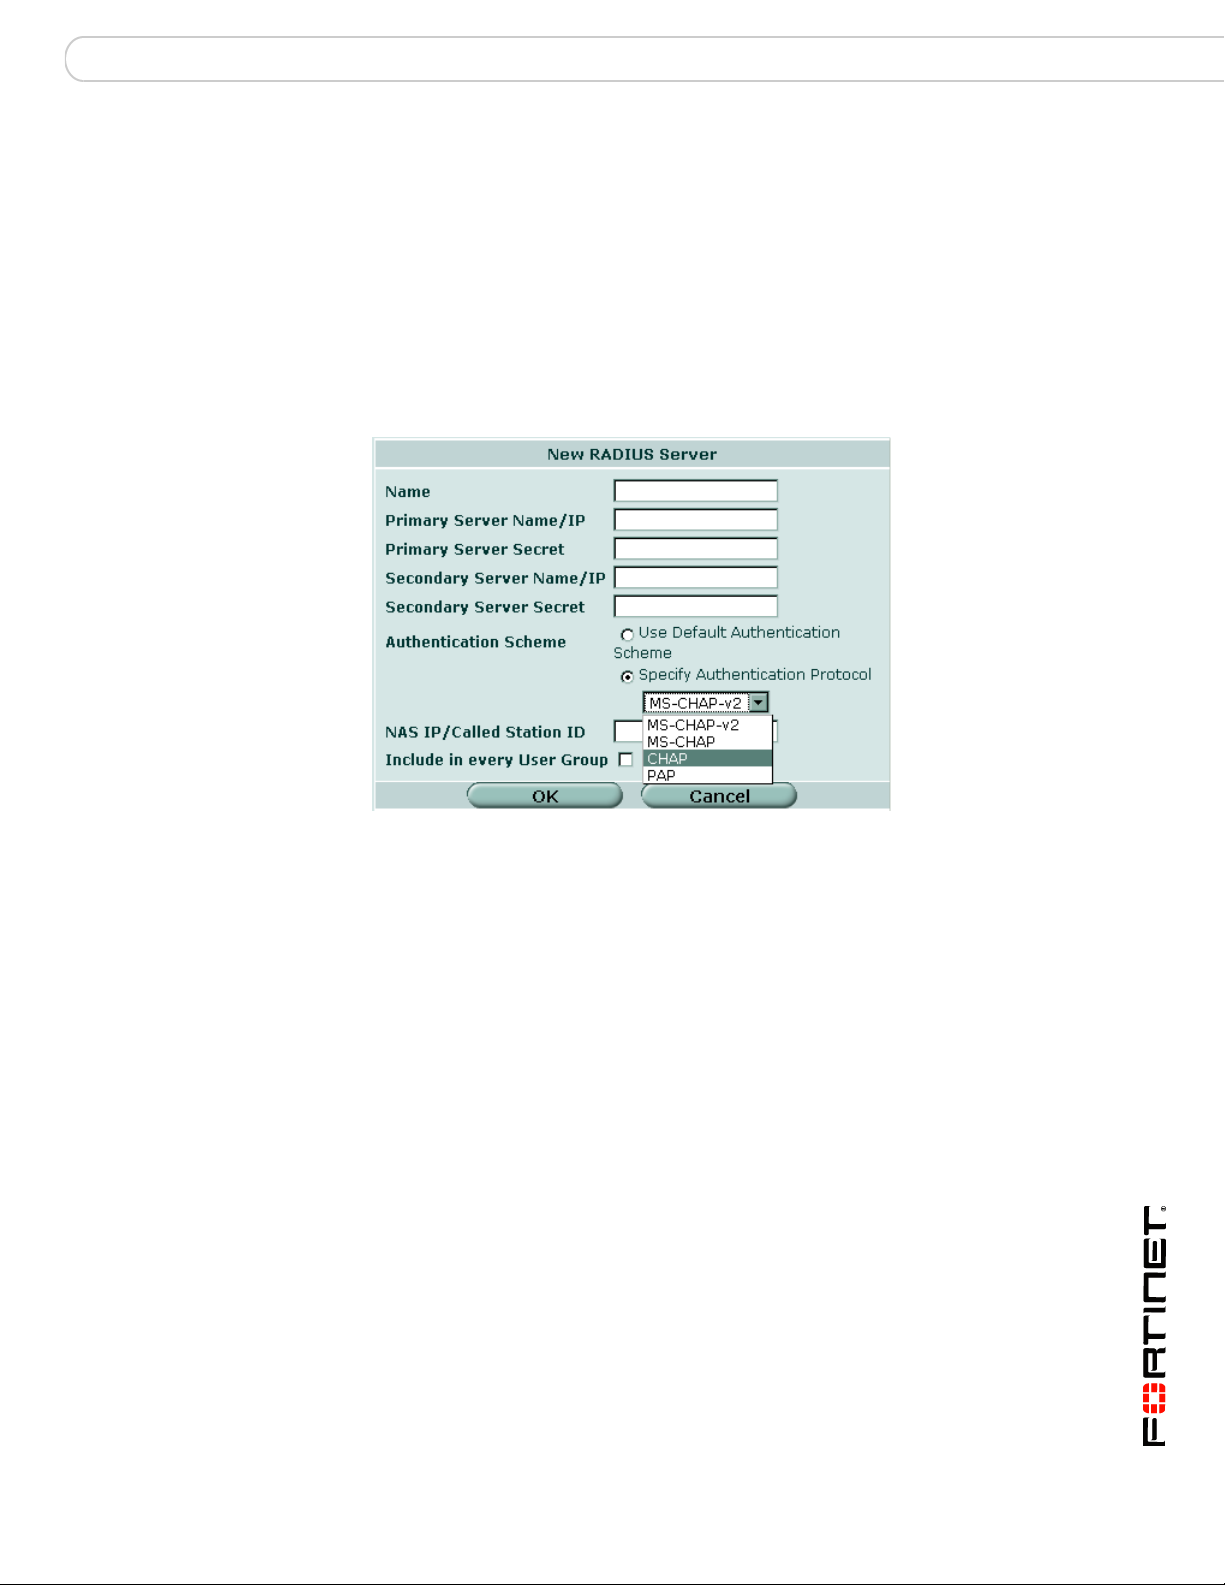
2 Enter the following information, and select OK.
Figure 1: Configure FortiGate unit for RADIUS authentication
Name Enter the name that is used to identify the RADIUS server
Primary Server Name/IP Enter the domain name or IP address of the primary
Primary Server Secret Enter the RADIUS server secret key for the primary
Secondary Server Name/IP Enter the domain name or IP address of the secondary
Secondary Server Secret Enter the RADIUS server secret key for the secondary
Authentication Scheme Select Use Default Authentication Scheme to authenticate
NAS IP/Called Station ID Enter the NAS IP address and Called Station ID (for more
Include in every User Group Select to have the RADIUS server automatically included in
on the FortiGate unit.
RADIUS server.
RADIUS server.
RADIUS server, if you have one.
RADIUS server.
with the default method. The default authentication scheme
uses PAP, MS-CHAP-V2, and CHAP, in that order.
Select Specify Authentication Protocol to override the
default authentication method, and choose the protocol
from the list: MS-CHAP-V2, MS-CHAP, CHAP, or PAP,
depending on what your RADIUS server needs.
information about RADIUS Attribute 31, see
RFC 2548 Microsoft Vendor-specific RADIUS Attributes). If
you do not enter an IP address, the IP address that the
FortiGate interface uses to communicate with the RADIUS
server will be applied.
all user groups.
FortiOS v3.0 MR7 User Authentication User Guide
01-30007-0347-20080828 17
Page 18
RADIUS servers Authentication servers
Edit
Delete
To configure the FortiGate unit for RADIUS authentication - CLI
config user radius
edit <server_name>
set all-usergroup {enable | disable }
set auth-type <authentication_protocol>
set nas-ip <nas_ip_called_id>
set radius-port <radius_port_id>
set secondary-server <secondary_ip_address>
set secondary-secret <secondary_password>
set server <primary_ip_address>
set secret <primary_password>
set use-group-for-profile <group_profile_select>
set use-management-vdom <vdom_requests>
end
The use-group-for-profile and use-management-vdom can only be
added to RADIUS authentication requests via the CLI. You enable use-group-
for-profile to use the RADIUS group attribute to select the firewall protection
profile to apply. Enable use-management-vdom to use the management VDOM
to send all RADIUS requests. For more information, refer to the
Reference.
FortiGate CLI
To remove a RADIUS server from the FortiGate unit configuration - webbased manager
Note: You cannot remove a RADIUS server that belongs to a user group. Remove it from
the user group first.
1 Go to User > Remote > RADIUS.
2 Select the Delete icon beside the name of the RADIUS server that you want to
remove.
3 Select OK.
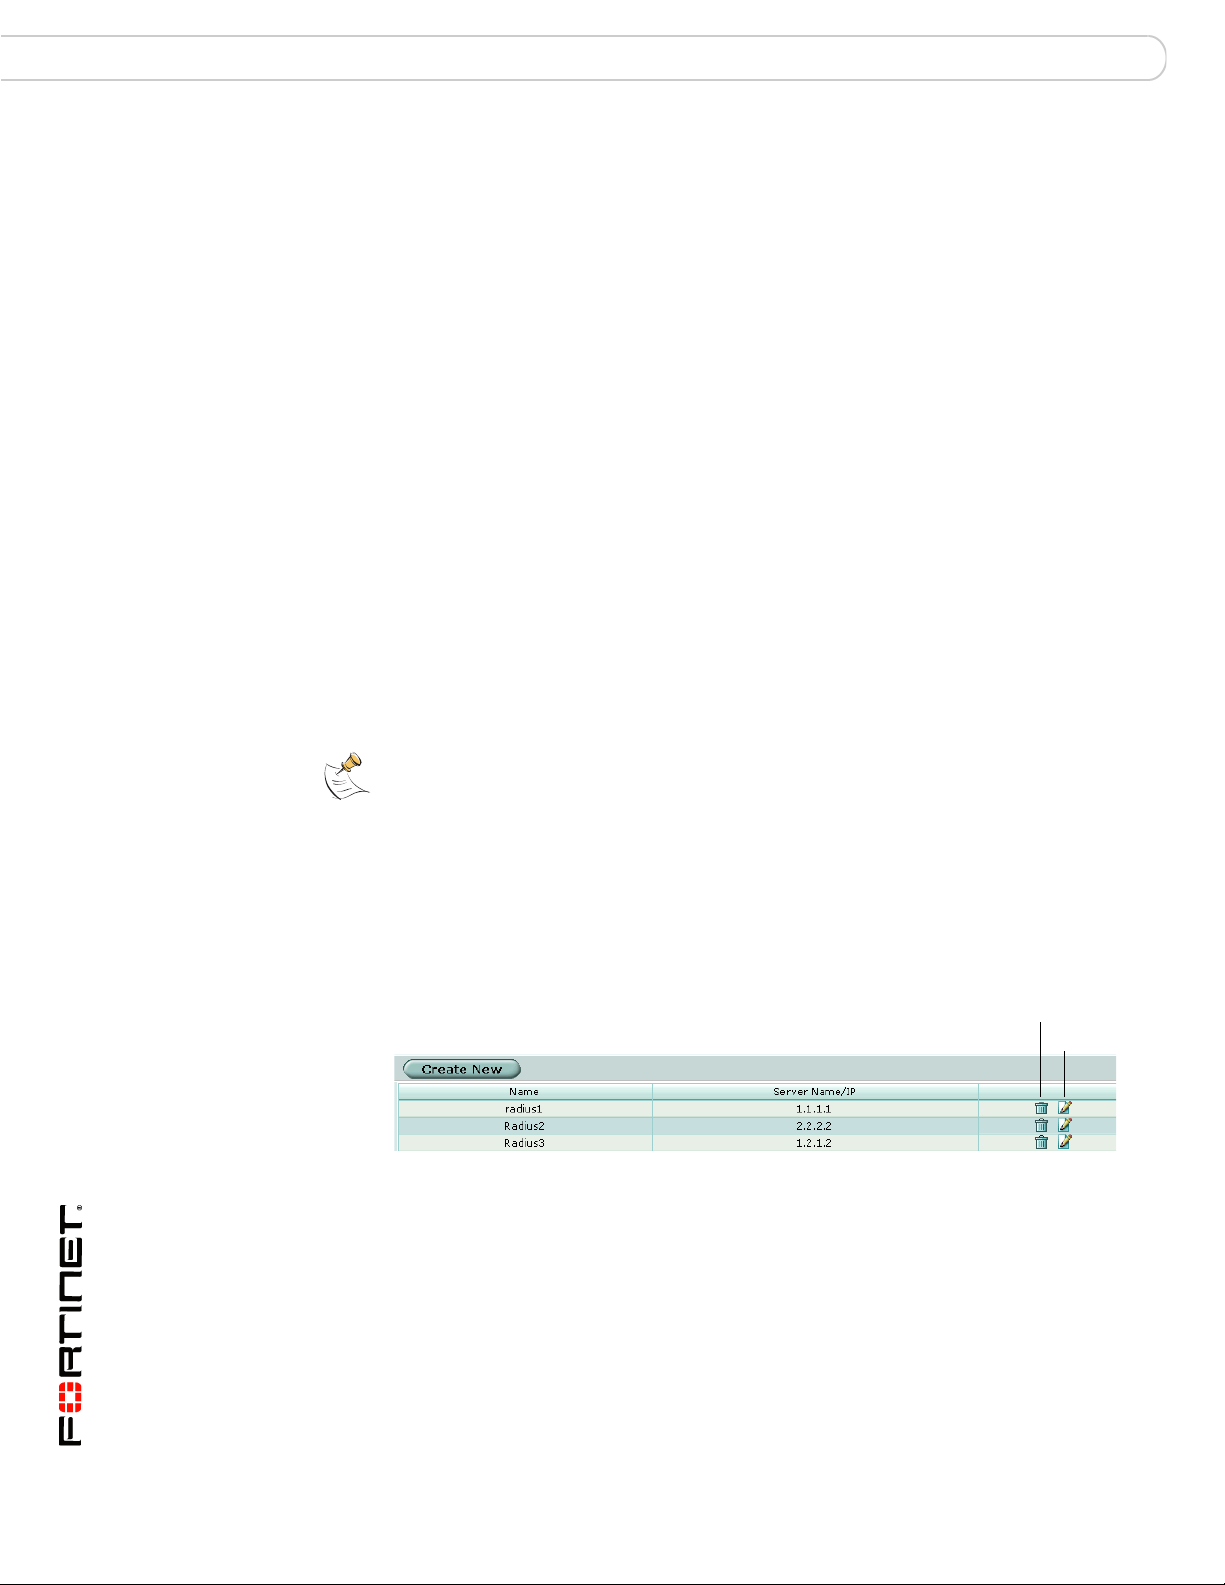
Figure 2: Delete (remove) a RADIUS server
Create New Add a new RADIUS server. The maximum number is 10.
Name The name that identifies the RADIUS server on the FortiGate unit.
Server Name/IP The domain name or IP address of the RADIUS server.
Delete icon Delete (remove) a RADIUS server from the FortiGate configuration.
You cannot remove a RADIUS server that has been added to a user
group.
Edit icon Edit a RADIUS server configuration.
18 01-30007-0347-20080828
FortiOS v3.0 MR7 User Authentication User Guide
Page 19

Authentication servers LDAP servers
To remove a RADIUS server from the FortiGate unit configuration - CLI
config user radius
delete <server_name>
end
LDAP servers
Lightweight Directory Access Protocol (LDAP) is an Internet protocol used to
maintain authentication data that may include departments, people, groups of
people, passwords, email addresses, and printers. An LDAP consists of a datarepresentation scheme, a set of defined operations, and a request/response
network.
The scale of LDAP servers ranges from big public servers such as BigFoot and
Infospace, to large organizational servers at universities and corporations, to
small LDAP servers for workgroups. This document focuses on the institutional
and workgroup applications of LDAP.
A directory is a set of objects with similar attributes organized in a logical and
hierarchical way. Generally, an LDAP directory tree reflects geographic and/or
organizational boundaries, with the Domain name system (DNS) names to
structure the top level of the hierarchy. The common name identifier for most
LDAP servers is cn, however some servers use other common name identifiers
such as uid.
If you have configured LDAP support and a user is required to authenticate using
an LDAP server, the FortiGate unit contacts the LDAP server for authentication.
To authenticate with the FortiGate unit, the user enters a user name and
password. The FortiGate unit sends this user name and password to the LDAP
server. If the LDAP server can authenticate the user, the user is successfully
authenticated with the FortiGate unit. If the LDAP server cannot authenticate the
user, the connection is refused by the FortiGate unit.
Binding is the step where the LDAP server authenticates the user, and if the user
is successfully authenticated, allows the user access to the LDAP server based
on that user’s permissions.
The FortiGate unit can be configured to use one of three types of binding:
• anonymous - bind using anonymous user search
• regular - bind using username/password and then search
• simple - bind using a simple password authentication without a search
You can use simple authentication if the user records all fall under one dn. If the
users are under more than one dn, use the an onymous or regular type , which can
search the entire LDAP database for the required user name.
If your LDAP server requires authenticati on to perform searches, use the regular
type and provide values for username and password.
The FortiGate unit supports LDAP protocol functionality defined in
RFC 2251: Lightweight Directory Access Protocol v3, for looking up and validating
user names and passwords. FortiGate LDAP supports all LDAP servers compliant
with LDAP v3. In addition, FortiGate LDAP supports LDAP over SSL/TLS. To
configure SSL/TLS authentication, refer to the
FortiGate CLI Reference.
FortiOS v3.0 MR7 User Authentication User Guide
01-30007-0347-20080828 19
Page 20
LDAP servers Authentication servers
FortiGate LDAP does not support proprietary functionality, such as notification of
password expiration, which is available from some LDAP servers. FortiGate LDAP
does not supply information to the user about why authentication failed.
To configure your FortiGate unit to work with an LDAP server, you need to
understand the organization of the information on the server.
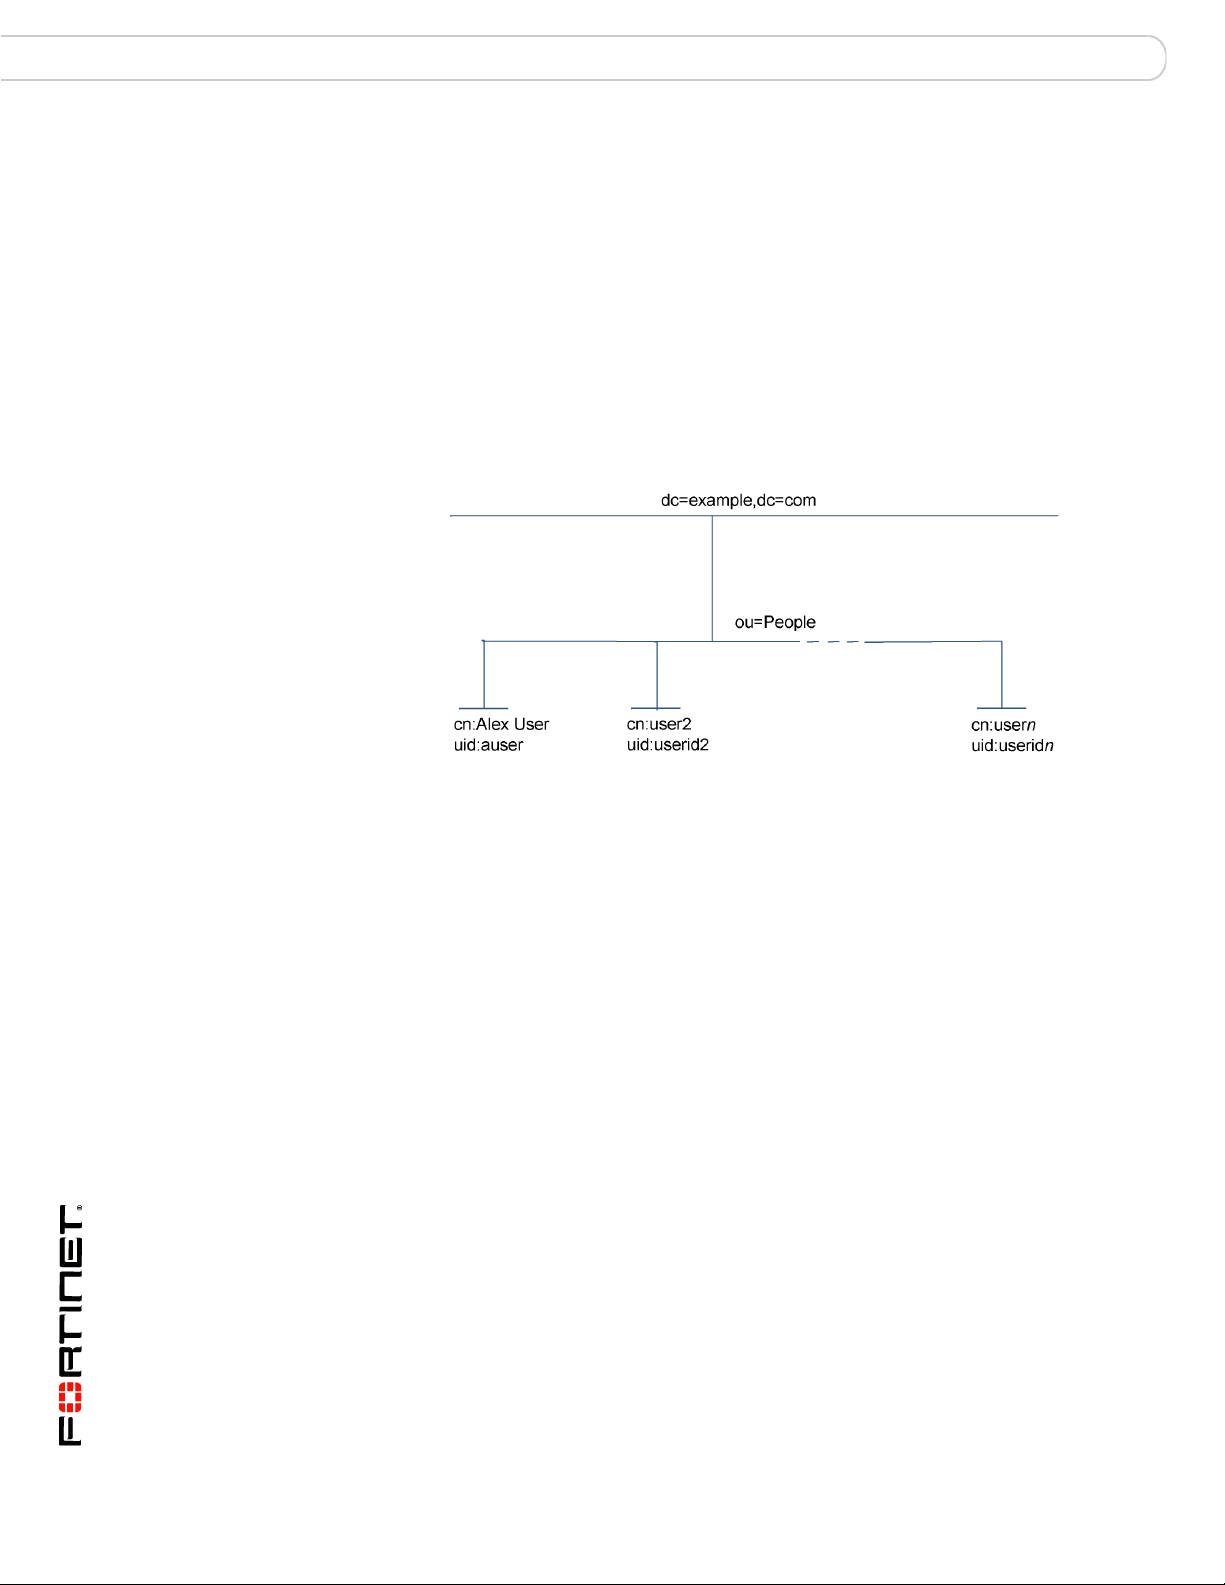
The top of the hierarchy is the organizat ion itself. Usually this is defined as
Domain Component (DC), a DNS domain. If the name contains a dot, such as
“example.com”, it is written as two parts: “dc=example,dc=com”.
In this example, Common Name (CN) identifiers reside at the Organization Unit
(OU) level, just below DC. The Distinguished Name (DN) is
ou=People,dc=example,dc=com.
In addition to the DN, the FortiGate unit needs an identifier for the individual
person. Although the FortiGate unit GUI calls this the Common Name (CN), the
identifier you use is not necessarily CN. On some servers, CN is the full name of a
person. It might be more convenient to use the same identifier used on the local
computer network. In this example, User ID (UID) is used.
You need to determine the levels of the hierarchy from the top to the level that
contains the identifier you want to use. This defines the DN tha t the FortiGate unit
uses to search the LDAP database. Frequently used distinguished name
elements include:
• pw (password)
• cn (common name)
• ou (organizational unit)
• o (organization)
• c (country)
One way to test this is with a text-based LDAP client program. For example,
OpenLDAP includes a client, ldapsearch, that you can use for this purpose.
Enter the following command:
ldapsearch -x '(objectclass=*)'
FortiOS v3.0 MR7 User Authentication User Guide
20 01-30007-0347-20080828
Page 21

Authentication servers LDAP servers
The output is lengthy, but the information you need is in the first few lines:
version: 2
#
# filter: (objectclass=*)
# requesting: ALL
#
dn: dc=example,dc=com
dc: example
objectClass: top
objectClass: domain
dn: ou=People,dc=example,dc=com
ou: People
objectClass: top
objectClass: organizationalUnit
...
dn: uid=auser,ou=People,dc=example,dc=com
uid: auser
cn: Alex User
Configuring the FortiGate unit to use an LDAP server
After you determine the common name and distinguished name identifiers and the
domain name or IP address of the LDAP server, you can configure the server on
the FortiGate unit. The maximum number of remote LDAP servers that can be
configured for authentication is 10.
To configure the FortiGate unit for LDAP authentication - web-based
manager
1 Go to User > Remote > LDAP and select Create New.
2 Enter the following information, and select OK.
FortiOS v3.0 MR7 User Authentication User Guide
01-30007-0347-20080828 21
Page 22

LDAP servers Authentication servers
Query Icon
Figure 3: Configure FortiGate unit for LDAP authentication
Name Enter the name that identifies the LDAP server on the FortiGate
Server Name/IP Enter the domain name or IP address of the LDAP server.
Server Port Enter the TCP port used to communicate with the LDAP server.
Common Name
Identifier
Distinguished Name Enter the base distinguished name for the server using the
Query icon View the LDAP server Distinguished Name Query tree for the
Bind Type Select the type of binding for LDAP authentication.
Regular Connect to the LDAP server directly with user name/password,
Anonymous Connect as an anonymous user on the LDAP server, then
Simple Connect directly to the LDAP server with user name/password
Filter Enter the filter to use for group searching. Available if Bind Type
User DN Enter the Distinguished name of the user to be authenticated.
Password Enter the password of the user to be authenticated. Available if
Secure Connection Select to use a secure LDAP server connection for
unit.
By default, LDAP uses port 389.
If you use a secure LDAP server, the default port changes when
you select Secure Connection.
Enter the common name identifier for the LDAP server. The
maximum number of characters is 20.
correct X.500 or LDAP format. The FortiGate unit passes this
distinguished name unchanged to the server. The maximum
number of characters is 512.
LDAP server that you are configuring so that you can crossreference to the Distinguished Name.
For more information, see the “Using the Query icon” on
page 24.
then receive accept or reject based on search of given values.
retrieve the user name/password and compare them to given
values.
authentication.
is Regular or Anonymous.
Available if Bind Type is Regular.
Bind Type is Regular.
authentication.
FortiOS v3.0 MR7 User Authentication User Guide
22 01-30007-0347-20080828
Page 23

Authentication servers LDAP servers
Delete
Edit
Protocol Select a secure LDAP protocol to use for authentication.
Certificate Select a certificate to use for authentication from the list. The
Depending on your selection, the value in Server Port will
change to the default port for the selected protocol. Available
only if Secure Connection is selected.
LDAPS: port 636
STARTTLS: port 389
certificate list comes from CA certifica tes at System >
Certificates > CA Certificates.
To configure the FortiGate unit for LDAP authentication - CLI
config user ldap
edit <server_name>
set cnid <common_name_identifier>
set dn <distinguished_name>
set port <port_number>
set server <domain>
set type <auth_type>
set username <ldap_username>
set password <ldap_passwd>
set group <group>
set filter <group_filter>
set secure <auth_port>
set ca-cert <cert_name>
end
To remove an LDAP server from the FortiGate unit configuration web-based manager
Note: You cannot remove a LDAP server that belongs to a user group. Remove it from the
user group first.
1 Go to User > LDAP.
2 Select the Delete icon beside the name of the LDAP server that you want to
remove.
3 Select OK.
Figure 4: Delete LDAP server
Create New Add a new LDAP server. The maximum number is 10.
Name The name that identifies the LDAP server on the FortiGate unit.
Server Name/IP The domain name or IP address of the LDAP server.
Port The TCP port used to communicate with the LDAP server.
FortiOS v3.0 MR7 User Authentication User Guide
01-30007-0347-20080828 23
Page 24

LDAP servers Authentication servers
Common Name Identifier (CN)
Distinguished Name (DN)
Expand Arrow
Common Name
Identifier
Distinguished
Name
Delete icon Delete the LDAP server configuration.
Edit icon Edit the LDAP server configuration.
The common name identifier for the LDAP server. Most LDAP servers
use cn. However, some servers use other common name identifiers
such as uid.
The distinguished name used to look up entries on the LDAP servers
use. The distinguished name reflects the hierarchy of LDAP database
object classes above the common name identifier.
To remove an LDAP server from the FortiGate unit configuration - CLI
config user ldap
delete <server_name>
end
Using the Query icon
The LDAP Distinguished Name Query list displays the LDAP Server IP addres s,
and all the distinguished names associated with the Common Name Identifier for
the LDAP server . The tree helps you to determine the appropr iate entry for the DN
field. To see the distinguished name associated with the Common Name identifier,
select the Expand icon next to the CN identifier. Select the DN from the list. The
DN you select is displayed in the Distinguished Name field. Select OK and the
Distinguished Name you selected will be saved in the Distinguished Name field of
the LDAP Server configuration.
T o see the users within the LDAP Server user group for the selected Distinguished
Name, expand the Distinguished Name in the LDAP Distinguished Name Query
tree.
Figure 5: LDAP server Distinguished Name Query tree
FortiOS v3.0 MR7 User Authentication User Guide
24 01-30007-0347-20080828
Page 25

Authentication servers TACACS+ servers
TACACS+ servers
In recent years, remote network access has shifted from terminal access to LAN
access. Users are now connecting to their corporate network (using noteboo ks or
home PCs) with computers that utilize complete network connections. Remote
node technology allows users the same level of acce ss to th e cor p or at e ne two rk
resources as they would have if they were physically in the office. When users
connect to their corporate network remotely, they do so through a remote access
server. As remote access technology has evolved, the need for network access
security has become increasingly important.
Term in al Access Co nt ro ller Acces s-C on tr ol Syst em (TACACS+) is a remote
authentication protocol that provides access control for routers, network access
servers, and other networked computing devices via one or more centralized
servers. TACACS+ allows a client to accept a username and password and send
a query to a TACACS+ authentication server. The server host determines whether
to accept or deny the request and sends a response back that allows or denies
network access to the user. The default TCP port for a TACACS+ server is 49.
You can only change the default port of the TACACS+ server using the CLI.
There are several different authe ntication protocols that TACACS+ can use during
the authentication process:
• ASCII
Machine-independent technique that uses representations of English
characters. Requires user to type a user name and password that are sent in
clear text (unencrypted) and matched with an entry in the user datab ase stored
in ASCII format.
• PAP (password authentication protocol)
Used to authenticate PPP connections. Transmits passwords and other user
information in clear text.
• CHAP (challenge-handshake authentication protocol)
Provides the same functionality as PAP, but is more secure as it does not send
the password and other user information over the network to the security
server.
• MS-CHAP (Microsoft challenge-handshake authentication protocol v1)
Microsoft-specific version of CHAP.
The default protocol configuration, Auto, uses PAP, MS-CHAP, and CHAP, in that
order.
Configuring the FortiGate unit to use a TACACS+ authentication server
The maximum number of remote TACACS+ servers that can be configured for
authentication is 10.
To configure the FortiGate unit for TACACS+ authentication - web-based
manager
1 Go to User > Remote > TACACS+ and select Create New.
2 Enter the following information, and select OK.
FortiOS v3.0 MR7 User Authentication User Guide
01-30007-0347-20080828 25
Page 26

T ACACS+ servers Authentication servers
Delete
Edit
Figure 6: TACACS+ server configuration
Name Enter the name of the TACACS+ server.
Server Name/IP Enter the server domain name or IP address of the TACACS+
Server Key Enter the key to access the TACACS+ server.
Authentication Type Select the authentication type to use for the TACACS+ server.
server.
Selection includes: Auto, ASCII, PAP, CHAP, and MSCHAP. Auto
authenticates using PAP, MSCHAP, and CHAP (in that order).
To configure the FortiGate unit for TACACS+ authentication - CLI
config user tacacs+
edit <server_name>
set auth-type {ascii | auto | chap | ms_chap | pap}
set key <server_key>
set tacacs+-port <tacacs+_port_num>
set server <domain>
end
To remove a TACACS+ server from the FortiGate unit configuration web-based manager
Note: You cannot remove a TACACS+ server that belongs to a user group. Remove it from
the user group first.
1 Go to User > TACACS+.
2 Select the Delete icon beside the name of the TACACS+ server that you want to
remove.
3 Select OK.
Figure 7: Delete TACACS+ server
Create New Add a new TACACS+ server. The maximum number is 10.
Server The server domain name or IP address of the TACACS+ server.
26 01-30007-0347-20080828
FortiOS v3.0 MR7 User Authentication User Guide
Page 27

Authentication servers Directory Service servers
Authentication Type The supported authentication method. TACACS+ authentication
Delete icon Delete this TACACS+ server.
Edit icon Edit this TACACS+ server.
To remove a TACACS+ server from the FortiGate unit configuration - CLI
config user tacacs+
delete <server_name>
end
Directory Service servers
Windows Active Directory (AD) and Novell edirectory provide central
authentication services by storing information about network resources across a
domain (a logical group of computers running versions of an operating system) in
a central directory database. On networks that use Directory Service servers for
authentication, FortiGate units can transparently authenticate users without
asking them for their user name and pa ssword. Each person who uses computers
within a domain receives his or her own unique account/user name. This account
can be assigned access to resources within the domain. In a domain , the directory
resides on computers that are configured as domain controllers. A domain
controller is a server that manages all security-related features that affect the
user/domain interactions, security centralization, and administrative functions.
methods include: Auto, ASCII, PAP, CHAP, and MSCHAP.
FortiGate units use firewall policies to control access to resources based on user
groups configured in the policies. Each FortiGate user group is associated with
one or more Directory Service user groups. When a user logs in to the Windows
or Novell domain, a Fortinet Server Authentication Extension (FSAE) sends the
FortiGate unit the user’s IP address and the names of the Directory Service user
groups to which the user belongs.
The FSAE has two components that you must install on your network:
• The domain controller (DC) agent must be installed on every domain controller
to monitor user logons and send information about them to the collector agent.
• The collector agent must be installed on at least one domain controller to send
the information received from the DC agents to the FortiGate unit.
The FortiGate unit uses this information to maintain a copy of the domain
controller user group database. Because the domain controller authenticates
users, the FortiGate unit does not perform authentication. It recognizes group
members by their IP address.
You must install the Fortinet Server Authentication Extensions (FSAE) on the
network domain controllers, and configure the FortiGate unit to retrieve
information from the Directory Service server.
FortiOS v3.0 MR7 User Authentication User Guide
01-30007-0347-20080828 27
Page 28

Directory Service servers Authentication servers
Expand Arrow (Directory Service server)
Domain and groups
Edit User/Group
Add User/Group
Edit
Delete
Server
To view the list of Directory Service servers, go to User > Directory Service.
Figure 8: Example Directory Service server list
Create New Add a new Directo ry Service server.
Name You can select the Expand arrow beside the server/domain/group
FSAE Collector IP The IP addresses and TCP ports of up to five FSAE collector
Delete icon Delete this Directory Service server.
Edit icon Edit this Directory Service server.
Add User/Group Add a user or group to the list. You must know the distinguished
Edit Users/Group Select users and groups to add to the list.
Configuring the FortiGate unit to use a Directory Service server
You need to configure the FortiGate unit to access at least one FSAE collector
name to display Directory Service domain and group information.
Server The name defined for the Directory Service
server.
Domain Domain name imported from the Directory
Service server.
Groups The group names imported from the Directory
Service server.
agents that send Directory Service server login information to the
FortiGate unit.
name for the user or group.
agent. You can specify up to five Directory Service servers on which you have
installed a collector agent. If it is necessary for your FSAE collector agent to
require authenticated access, you enter a password for the server. The server
name appears in the list of Directory Service servers when you create user
groups. You can also retrieve information directly through an LDAP server instead
of through the FSAE agent.
Note: You can create a redundant configuration on your FortiGate unit if you install a
collector agent on two or more domain controllers. If the current collector agent fails, the
FortiGate unit switches to the next one in its list of up to five collector agents.
FortiOS v3.0 MR7 User Authentication User Guide
28 01-30007-0347-20080828
Page 29

Authentication servers Directory Service servers
For more information about FSAE, see the FSAE Technical Note.
To configure the FortiGate unit for Directory Service authentication web-based manager
1 Go to User > Directory Service and select Create New.
2 Enter the following information, and select OK.
Figure 9: Directory Service server configuration
Name Enter the name of the Directory Service server. This name appears in
FSAE Collector
IP/Name
Port Enter the TCP port used for Directory Service. This must be the same
Password Enter the password for the collector agent. This is required only if you
LDAP Server Select the check box and select an LDAP server to access the
the list of Directory Service servers when you create user groups.
Enter the IP address or name of the Directory Service server where
this collector agent is installed. The maximum number of characters is
63.
as the FortiGate listening port specified in the FSAE collector agent
configuration.
configured your FSAE collector agent to require authenticated access.
Directory Service.
For information about Directory Service user groups, see “Configuring Directory
Service user groups”.
To configure the FortiGate unit for Directory Service authentication - CLI
config user fsae
edit <server_name>
set ldap-server <ldap_server_name>
set password <password> password2 <password2>
password3 <password3> password4 <password4> password5
<password5>
set port <port_number> port2 <port_number2> port3
<port_number3> port4 <port_number4> port5
<port_number5>
set server <domain> server2 <domain2> server3
<domain3> server4 <domain4> server5 <domain5>
end
FortiOS v3.0 MR7 User Authentication User Guide
01-30007-0347-20080828 29
Page 30

Directory Service servers Authentication servers
Delete
Edit
Edit User/Group
Add User/Group
T o remov e a Dire ctory Service server from th e FortiGa te unit c onfig uration web-based manager
Note: You cannot remove a Directory Service server that belongs to a user group. Remove
it from the user group first.
1 Go to User > Directory Service.
2 Select the Delete icon beside the name of the Directory Service server that you
want to remove.
3 Select OK.
Figure 10: Delete Directory Service server
Create New Add a new Directo ry Service server.
Name The name defined for the Directory Service server.
FSAE Collector IP The IP addresses and TCP ports of up to five FSAE collector
Delete icon Delete this Directory Service server.
Edit icon Edit this Directory Service server.
Add User/Group Add a user or group to the list. You must know the distinguished
Edit Users/Group Select users and groups to add to the list.
agents that send Directory Service server login information to the
FortiGate unit.
name for the user or group.
T o remov e a Dire ctory Service server from th e FortiGa te unit c onfig uration CLI
config user fsae
delete <name>
end
To view the domain and group information that the FortiGate unit receives from
the Directory Service servers, go to User > Directory Service and select the
Expand arrow beside the server/domain/group name.
FortiOS v3.0 MR7 User Authentication User Guide
30 01-30007-0347-20080828
Page 31

Authentication servers Directory Service servers
Expand Arrow (Directory Service server)
Domain and groups
Edit User/Group
Add User/Group
Edit
Delete
Server
Figure 11: Example Directory Service server list
Create New Add a new Directory Service server.
Name You can select the Expand arrow beside the server/domain/group
name to display Directory Service domain and group information.
Server The name defined for the Directory Service
server.
Domain Domain name imported from the Directory
Service server .
Groups The group names imported from the Directory
Service server .
FSAE Collector IP The IP addresses and TCP ports of up to five FSAE collector
agents that send Directory Service server login information to the
FortiGate unit.
Delete icon Delete this Directory Service server.
Edit icon Edit this Directory Service server.
Add User/Group Add a user or group to the list. You must know the distinguished
name for the user or group.
Edit Users/Group Select users and groups to add to the list.
FortiOS v3.0 MR7 User Authentication User Guide
01-30007-0347-20080828 31
Page 32

Directory Service servers Authentication servers
FortiOS v3.0 MR7 User Authentication User Guide
32 01-30007-0347-20080828
Page 33

Users/peers and user groups Users/peers
Users/peers and user groups
FortiGate authentication controls system access by user group. First you
configure users/peers, then you create user groups and add users/peers to them.
• Configure local user accounts. For each user, you can choose whether the
password is verified by the FortiGate unit, by a RADIUS server, by an LDAP
server, or by a TACACS+ ser ve r. See “Creating local users” on page 34.
• Configure your FortiGate unit to authenticate users by using your RADIUS,
LDAP, or TACACS+ servers. See “Configuring the FortiGate unit to use a
RADIUS server” on page 16, “Configuring the FortiGate unit to use an LDAP
server” on page 21, and “Configuring the FortiGate unit to use a TACACS+
authentication server” on page 25.
• Configure access to the FortiGate unit if you use a Directory Service server for
authentication. See “Configuring the FortiGate unit to use a Directory Service
server” on page 28.
• Configure for certificate-based authentication for administrative access
(HTTPS web-based manager), IPSec, SSL-VPN, and web-based firewall
authentication.
Users/peers
For each network resource that requires authentication, you specify which user
groups are permitted access to the network. There are three types of user groups:
Firewall, Directory Service, and SSL VPN. See “Configuring user groups” on
page 41 and “Configuring Directory Service user groups” on page 42.
This section describes:
• Users/peers
• User groups
A user is a user/peer account configured on the FortiGate un it and/or on a re mote
or external authentication server. Users can access resources that require
authentication only if they are members of an allowed user group.
T able 2: How the FortiGate unit authenticates different types of users
User type Authentication
Local user with password
stored on the FortiGate unit
Local user with password
stored on an authentication
server
The user name and password must match a user account
stored on the FortiGate unit.
The user name must match a user account stored on the
FortiGate unit and the user name and password must
match a user account stored on the authentication server
associated with that user.
FortiOS v3.0 MR7 User Authentication User Guide
01-30007-0347-20080828 33
Page 34

Users/peers Users/peers and user groups
User type Authentication
Authentication server user Any user with an identity on the authentication server can
Peer user with certificate
authentication
This section describes how to configure local users and peer users. For
information about configuration of auth e nt ica tion ser ve rs se e “Authentication
servers” on page 15.
Creating local users
To de fin e a loc al use r yo u ne ed :
• a user name
• a password or the name of an authentication server that has been configured
on the FortiGate unit
If the user is authenticated remotely or extern ally, the user name on the FortiGate
unit must be identical to the user name on the authentication server.
To create a local user - web-based manager
1 Go to User > Local.
2 Select Create New.
3 Enter the user name.
4 Do one of the following:
• To authenticate this user locally, select Password and type a password.
• To authenticate this user using an LDAP server, select LDAP and select the
server name.
• To authenticate this user using a RADIUS server, select RADIUS and select
the server name.
authenticate on the FortiGate unit by providing a user name
and password that match a user identity stored on the
authentication server.
A peer user is a digital certificate holder that authenticates
using a client certificate.
If you want to use an authentication server, you must configure access to it first.
See “Authentication servers” on page 15.
5 Select OK.
Figure 12: Create new local user
FortiOS v3.0 MR7 User Authentication User Guide
34 01-30007-0347-20080828
Page 35

Users/peers and user groups Users/peers
Edit icon
Delete icon
User Name Type or edit the user name.
Disable Select Disable to prevent this user from authenticating.
Password Select Password to authenticate this user using a password stored on
LDAP Select LDAP to authenticate this user using a password stored on an
RADIUS Select RADIUS to authenticate this user using a password stored on a
TACACS+ Select TACACS+ to authenticate this user using a password stored on
the FortiGate unit.
Type or edit the password. The password should be at least six
characters long.
LDAP server. Select the LDAP server from the list.
Note: You can only select an LDAP server that has been added to the
FortiGate LDAP configuration.
RADIUS server. Select the RADIUS server from the list.
Note: Y ou can only select a RADIUS server that has been added to the
FortiGate RADIUS configuration.
a TACACS+ server. Select the TACACS+ server from the list.
Note: You can only select a TACACS+ server that has been added to
the FortiGate TACACS+ configuration.
To view a list of all local users, go to User > Local.
Figure 13: Local user list
Create New Add a new local user account.
User Name The local user name.
Type The authentication type to use for this user.
Delete icon Delete the user.
Note: The delete icon is not available if the user belongs to a user
group.
Edit icon Edit the user account.
To create a local user - CLI
config user local
edit <user_name>
set type password
set passwd <user_password>
end
or
FortiOS v3.0 MR7 User Authentication User Guide
01-30007-0347-20080828 35
Page 36

Users/peers Users/peers and user groups
Delete icon
config user local
edit <user_name>
set type ldap
set ldap_server <server_name>
end
or
config user local
edit <user_name>
set type radius
set radius_server <server_name>
end
or
config user local
edit <user_name>
set type tacacs+
set tacacs+_server <server_name>
end
To remove a user from the FortiGate unit configuration - web-based
manager
Note: You cannot remove a user that belongs to a user group that is part of a firewall policy .
Remove it from the user group first.
1 Go to User > Local.
2 Select the Delete icon beside the name of the user that you want to remove.
3 Select OK.
Figure 14: Remove a Local user
To remove a user from the FortiGate unit configuration - CLI
config user local
end
Creating peer users
delete <user_name>
A peer user is a digital certificate holder that can use PKI authentication. To use
PKI authentication, you must define peers to include in the authentication user
group that is incorporated in the authentication policy. Peer users can be included
in a firewall or SSL VPN user group.
To define a peer user you need:
36 01-30007-0347-20080828
FortiOS v3.0 MR7 User Authentication User Guide
Page 37

Users/peers and user groups Users/peers
• a peer user name
• the text from the subject field of the certificate of the authenticating peer user,
or the CA certificate used to authenticate the peer user. You can configure a
peer user with no values for the subject and certificate fields. This user
behaves like a user account or policy that is disabled.
Note: If you create a PKI user in the CLI with no values in subject or ca, you will not be
able to open the user record in the GUI, or you will be prompted to add a value in Subject
(subject) or CA (ca).
To create a peer user for PKI authentication - web-based manager
1 Go to User > PKI.
2 Select Create New, enter the following information, and select OK.
Figure 15: PKI peer user configuration
Note: Even though Subject and CA are optional fields, one of them must be set.
Name Enter the name of the PKI peer user. This field is mandatory.
Subject Enter the text string that appears in the subject field of the
CA Enter the CA certificate that must be used to authenticate this peer
certificate of the authenticating peer user. This field is optional.
user. This field is optional.
To view a list of PKI peer users, go to User > PKI.
Figure 16: PKI peer user list
Create New Add a new PKI peer user.
User Name The name of the PKI peer user.
Subject The text string that appears in the subjec t field of the certificate of
the authenticating peer user.
FortiOS v3.0 MR7 User Authentication User Guide
01-30007-0347-20080828 37
Page 38

Users/peers Users/peers and user groups
Delete icon Delete this PKI peer user. Note: The delete icon is not available if
Edit icon Edit this PKI peer user.
the peer user belongs to a user group.
To create a peer user for PKI authentication - CLI
config user peer
edit <peer name>
set subject <subject_string>
set ca <ca_cert_string>
end
T o remove a PKI peer user from the For tiGate unit configuration - web-b ased
manager
1 Go to User > PKI.
2 Select the Delete icon beside the name of the PKI peer user that you want to
remove.
3 Select OK.
Figure 17: Remove PKI peer user
To remove a PKI peer user from the FortiGate unit configuration - CLI
config user peer
delete <peer_name>
end
Note: You cannot remove a peer user that belongs to a user group that is part of a firewall
policy. Remove it from the user group first.
There are other configuration setting s that can be added/modified for PKI
authentication, for example, you can configure the use of an LDAP server to
check access rights for client certificates. For infor matio n ab o ut the de tailed PKI
configuration settings only available through the CLI, see the
Reference.
FortiGate CLI
FortiOS v3.0 MR7 User Authentication User Guide
38 01-30007-0347-20080828
Page 39

Users/peers and user groups User groups
User groups
A user group is a list of user/peer identities. An identity can be:
• a local user account (user name/password) stored on the FortiGate unit
• a local user account with the password stored on a RADIUS, LDAP, or
TACACS+ ser ver
• a peer user account with digital client authentication certificate stored on the
FortiGate unit
• a RADIUS, LDAP, or TACACS+ server (all identities on the server can
authenticate)
• a user group defined on a Directory Service server.
Firewall policies and some types of VPN configurations allow access to user
groups, not to individual users.
Each user group belongs to one of three types: Firewall, Directory Service or
SSLVPN. For information about each type, see “Firewall user groups” on
page 39, “Directory Service user groups” on page 39, and “SSL VPN user groups”
on page 40. For information on configuring each type of user group, see
“Configuring user groups” on page 41.
In most cases, the FortiGate unit authenticates users by requesting their user
name and password. The FortiGate unit checks local user accounts first. If a
match is not found, the FortiGate unit checks the RADIUS, LDAP, or TACACS+
servers that belong to the user group. Authentication succeeds when a matching
user name and password are found.
Firewall user groups
A firewall user group provides access to a firewall policy that requires
authentication and lists the user group as one of th e allowed groups. The
FortiGate unit requests the group member’s user name and p assword when the
user attempts to access the resource that the policy protects.
You can also authenticate a user by certificate if you have selected this method.
For more information, see “Adding authentication to firewall policies” on p age 286.
A firewall user group can also provide access to an IPSec VPN for dialup users. In
this case, the IPSec VPN phase 1 configuration uses the Accept peer ID in dialup
group peer option. The user’s VPN client is configured with the user name as peer
ID and the password as pre-shared key. The user can connect successfully to the
IPSec VPN only if the user name is a member of the allowed user group and the
password matches the one stored on the FortiGate unit.
Note: A user group cannot be a dialup group if any member is authenticated using a
RADIUS or LDAP server.
Directory Service user groups
On a network, you can configure the FortiGate unit to allow acce ss to members of
Directory Service server user groups who have been authenticated on the
network. The Fortinet Server Authentication Extensions (FSAE) must be installed
on the network domain controllers.
FortiOS v3.0 MR7 User Authentication User Guide
01-30007-0347-20080828 39
Page 40

User groups Users/peers and user groups
Note: You cannot use Directory Service user groups directly in FortiGate firewall policies.
Y ou must add Directory Service groups to FortiGate user groups. A Directory Service group
should belong to only one FortiGate user group. If you assign it to multiple FortiGate user
groups, the FortiGate unit recognizes only the last user group assignment.
For a Directory Service user group, the Directory Service server authenticates
users when they log on to the network. The FortiGate unit receives the user’s
name and IP address from the FSAE collector agent. For more information about
FSAE, see the
FSAE Technical Note.
A Directory Service user group provides access to a firewall policy that requires
Directory Service type authentication and lists the user group as one of the
allowed groups. The members of the user group are Directory Service users or
groups that you select from a list that the FortiGate unit receives from the
Directory Service servers that you have configured. See “Directory Service
servers” on page 27.
Note: A Directory Service user group cannot have SSL VPN access.
For more information about users and user groups, see the FortiGate
Administration Guide.
SSL VPN user groups
An SSLVPN user group provides access to a firewall policy that requires
SSLVPN type authentication and lists the user group as one of the allowed
groups. Local user accounts, LDAP, and RADIUS servers can be members of an
SSLVPN user group. The FortiGate unit requests the user’s user name and
password when the user accesses the SSLVPN web portal. The user group
settings include options for SSLVPN features.
An SSL VPN user group can also provide access to an IPSec VPN for dialup
users. In this case, the IPSec VPN phase 1 configuration uses the Accept peer ID
in dialup group peer option. You configure the user’s VPN client with the user
name as peer ID and the password as pre-shared key. The user can connect
successfully to the IPSec VPN only if the user name is a member of the allowed
user group and the password matches the one stored on the FortiGate un it.
Protection profiles
Note: A user group cannot be an IPSec dialup group if any member is authenticated using
a RADIUS or LDAP server.
Each user group is associated with a protection profile to determine the antivirus,
web filtering, spam filtering, logging, and in trusion protection settin gs that appl y to
the authenticated connection. The FortiGate unit contains several pre-configured
protection profiles and you can create your own as needed.
When you create or modify any firewall policy, you can select a protection profile.
If the firewall policy requires authentication, its own protection profile is disabled
and the authentication user group protection profile applies.
Note: Protection profiles do not apply to VPN connections.
FortiOS v3.0 MR7 User Authentication User Guide
40 01-30007-0347-20080828
Page 41

Users/peers and user groups User groups
Expand Arrow
Left Arrow
Right Arrow
For more information about protection profiles, see the FortiGate Administration
Guide.
Configuring user groups
You create a user group by typing a name, selecting users and/or authentication
servers, and selecting a protection profile.
To create a Firewall user group - web-based manager
1 Go to User > User Group.
2 Select Create New and enter the following information:
Figure 18: User group configuration - Firewall
FortiOS v3.0 MR7 User Authentication User Guide
01-30007-0347-20080828 41
Name Type or enter the name of the user group.
Type Select the user group type:
Firewall Select this group in any firewall policy that
Directory Service Select this group in any firewall policy that
SSL VPN Select this group in any firewall policy with
Protection Profile Available only if Type is Firewall or Directory Service.
Select a protection profile for this user group from the list. To
create a new protection profile, select Create New from this list.
Enter the appropriate information and select OK.
Available
Users/Groups or
Available Members*
The list of Local users, RADIUS servers, LDAP servers,
T ACACS+ servers, Directory Service users/user groups, or PKI
users that can be added to the user group. To add a member to
this list, select the name and then select the Right Arrow.
* Available Members if user group type is Directory Service.
requires Firewall authentication.
requires Directory Service authentication.
Action set to SSLVPN.
Not available in Transparent mode.
Page 42

User groups Users/peers and user groups
Members The list of Local users, RADIUS servers, LDAP servers,
FortiGuard Web
Filtering Override
TACACS+ servers, Directory Service users/user groups, or PKI
users that belong to the user group. To remove a member, select
the name and then select the Left Arrow.
Available only if Type is Firewall or Directory Service.
Select the Expand Arrow to configure Web Filtering override
capabilities for this group.
3 Select OK.
To create a firewall user group - CLI
config user group
edit <group_name>
set group-type <grp_type>
set member <user1> <user2> ... <usern>
set profile <profile_name>
end
For more specific user group CLI commands, see the
Fortinet CLI Guide.
Configuring Directory Service user groups
On a network, you can configure the FortiGate unit to allow access to members of
Directory Service server user groups who have been authenticated on the
network. The Fortinet Server Authentication Extensions (FSAE) must be installed
on the network domain controllers.
Note: You cannot use Directory Service user groups directly in FortiGate firewall policies.
Y ou must add Directory Service groups to FortiGate user groups. A Directory Service group
should belong to only one FortiGate user group. If you assign it to multiple FortiGate user
groups, the FortiGate unit recognizes only the last user group assignment.
A Directory Service user group provides access to a firewall policy that requires
Directory Service type authentication and lists the user group as one of the
allowed groups. The members of the user group are Directory Service users or
groups that you select from a list that the FortiGate unit receives from the
Directory Service servers that you have configured.
Note: A Directory Service user group cannot have SSL VPN access.
To create an Directory Service user group
1 Go to User > User Group.
2 Select Create New, enter the following information, and select OK.
FortiOS v3.0 MR7 User Authentication User Guide
42 01-30007-0347-20080828
Page 43

Users/peers and user groups User groups
Right Arrow
Left Arrow
Expand Arrow
Figure 19: User group configuration - Directory Service
Name Type or enter the name of the user group.
Type Select the user group type:
Protection Profile Available only if Type is Firewall or Directory Service.
Available
Users/Groups or
Available Members*
Members The list of Local users, RADIUS servers, LDAP servers,
FortiGuard Web
Filtering Override
SSL-VPN User Group
Options
Firewall Select this group in any firewall policy that
requires Firewall authentication.
Directory Service Select this group in any firewall policy that
requires Directory Service authentication.
SSL VPN Select this group in any firewall policy with
Action set to SSLVPN.
Not available in Transparent mode.
Select a protection profile for this user group from the list. To
create a new protection profile, select Create New from this list.
Enter the appropriate information and select OK.
The list of Local users, RADIUS servers, LDAP servers,
T ACACS+ servers, Directory Service users/user groups, or PKI
users that can be added to the user group. To add a member to
this list, select the name and then select the Right Arrow.
* Available Members if user group type is Directory Service.
T ACACS+ servers, Directory Service users/user groups, or PKI
users that belong to the user group. To remove a member, select
the name and then select the Left Arrow.
Available only if Type is Firewall or Directory Service.
Configure Web Filtering override capabilities for this group.
Available only if Type is SSL VPN.
FortiOS v3.0 MR7 User Authentication User Guide
01-30007-0347-20080828 43
Configuring SSL VPN user groups
For detailed instructions about how to configure SSL VPN web-only mode or
tunnel mode operation, see the FortiGate SSL VPN User Guide.
Page 44

User groups Users/peers and user groups
Expand Arrow
Edit
Delete
Configuring Peer user groups
Peer user groups can only be configured using the CLI. Peers are digital
certificate holders defined using the config user peer command. You use the
peer groups you define here in the config vpn ipsec phase1 command if
you specify peertype as peergrp.
For PKI user authentication, you can add or edit peer group member information.
User groups that use PKI authentication can also be configured using config
user group.
To create a peer group - CLI
config user peergrp
edit groupname
set member peer_name
end
This example shows how to add peers to the peergrp EU_branches.
config user peergrp
edit EU_branches
set member Sophia_branch Valencia_branch Cardiff_branch
end
Viewing a list of user groups
To view the list of FortiGate user groups, go to User > User Group.
Figure 20: Example User group list
Create New Add a new user group.
Group Name The name of the user group. User group names are listed by type of
Members The Local users, RADIUS servers, LDAP servers, TACACS+ servers,
Protection Profile The protection profile associated with this user group.
Delete icon Dele te the user group.
Edit icon Edit the membership and options of the group.
user group: Firewall, Directory Service and SSL VPN. For more
information, see “Firewall user groups” on page 39, “Directory Service
user groups” on page 39, and “SSL VPN user groups” on page 40.
Directory Service users/user groups or PKI users found in the user
group.
You cannot delete a user group that is included in a firewall policy, a
dialup user phase 1 configuration, or a PPTP or L2TP configuration.
FortiOS v3.0 MR7 User Authentication User Guide
44 01-30007-0347-20080828
Page 45

Users/peers and user groups User groups
Expand Arrow
Edit
Delete
To remove a user group from the FortiGate unit configuration - web-based
manager
1 Go to User > User Group.
2 Select the Delete icon beside the name of the user group that you want to
remove.
3 Select OK.
Figure 21: Remove user group
To remove a user group from the FortiGate unit configuration - CLI
config user group
delete <group_name>
end
Note: You cannot remove a user group that is part of a firewall policy. Remove it from the
firewall policy first.
FortiOS v3.0 MR7 User Authentication User Guide
01-30007-0347-20080828 45
Page 46

User groups Users/peers and user groups
FortiOS v3.0 MR7 User Authentication User Guide
46 01-30007-0347-20080828
Page 47

Configuring authenticated access Authentication timeout
Configuring authenticated access
When you have configured authentication servers, users, and user groups, you
are ready to configure firewall policies and certain types of VPNs to require user
authentication.
This section describes:
• Authentication timeout
• Authentication protocols
• Firewall policy authentication
• VPN authentication
Authentication timeout
Y ou set the firewall u ser authentication timeout (Authe ntication T imeout) to co ntrol
how long an authenticated connection can be idle before the user must
authenticate again. The maximum timeout is 480 minutes (8 hours). The default
timeout is 5 minutes.
To set the firewall authentication timeout
1 Go to User > Authentication.
2 Enter the Authentication Tim eout value in minutes.
The default authentication timeout is 5 minutes.
3 Select Apply.
You set the SSL VPN user authentication timeout (Idle Timeout) to control how
long an authenticated connection can be idle before the user must authenticate
again. The maximum timeout is 28800 seconds. The default timeout is 300
seconds.
To set the SSL VPN authentication timeout
1 Go to VPN > SSL > Config.
2 Enter the Idle Timeout value (seconds).
3 Select Apply.
Authentication protocols
User authentication can be performed for the following protocols:
• HTTP
• HTTPS
•FTP
•Telnet
FortiOS v3.0 MR7 User Authentication User Guide
01-30007-0347-20080828 47
Page 48

Firewall policy authentication Configuring authenticated access
When user authentication is enabled on a firewall policy, the authentication
challenge is normally issued for any of the four protocols (dependent on the
connection protocol). By making selections in the Protocol Support list, the user
controls which protocols support the authentication challenge. The user must
connect with a supported protocol first so they can subsequently connect with
other protocols. If you have selected HTTP, FTP, or Telnet, user name and
password-based authentication occurs: the FortiGate unit prompts network users
to input their firewall user name and password. If you have selected HTTPS,
certificate-based authentication (HTTPS, or HTTP redirected to HTTPS only)
occurs: you must install customized certificates on the FortiGate unit and on the
browsers of network users.
Note: If you do not install certificates on the network user’s web browser, the network users
may see an SSL certificate warning message and have to manually accept the default
FortiGate certificate. The network user’s web browser may deem the default certificate as
invalid.
Note: When you use certificate authentication, if you do not specify any certificate when
you create the firewall policy, the global settings are used. If you specify a certificate, the
per-policy setting will overwrite the global setting. For information about the use of
certificate authentication, see the FortiGate Certificate Management User Guide.
To set the authentication protocols
1 Go to User > Authentication.
2 In Protocol Support, select the required authentication protocols.
3 If using HTTPS protocol support, in Certificate, select a Local certificate from the
drop-down list.
4 Click Apply.
Figure 22: Authentication Settings
Firewall policy authentication
Firewall policies control traffic between FortiGate interfaces, both physical
interfaces and VLAN subinterfaces. Without authentication, a firewall policy
enables access from one network to another for all users on the source network.
Authentication enables you to allow access only for users who are members of
selected user groups.
FortiOS v3.0 MR7 User Authentication User Guide
48 01-30007-0347-20080828
Page 49

Configuring authenticated access Firewall policy authentication
The style of the authentication method varies by the authentication protocol. If you
have selected HTTP, FTP or Telnet, user name and password-based
authentication occurs: the FortiGate unit prompts network users to input their
firewall user name and password. If you have selected HTTPS, certificate-based
authentication (HTTPS or HTTP redirected to HTTPS only) occurs: you must
install customized certificates on the FortiGate unit and on the browsers of
network users, which the FortiGate unit matches.
Note: You can only configure user authentication for firewall policies where Action is set to
Accept.
Configuring authentication for a firewall policy
Authentication is an Advanced firewall option.
Figure 23: Advanced Firewall policy options
To configure authentication for a firewall policy
1 Create users and one or more Firewall user groups.
You must select Type: Firewall for the user group. For more information, see
“Users/peers and user groups” on page 33.
2 Go to Firewall > Policy.
3 Select Create New (to create a new policy) or select the Edit icon (to edit an
existing policy).
4 From the Action list, select ACCEPT.
5 Configure the other firewall policy parameters as appropriate.
For information about firewall policies, see the Firewall chapter of the FortiGate
Administration Guide.
6 Select Authentication.
FortiOS v3.0 MR7 User Authentication User Guide
01-30007-0347-20080828 49
Page 50

Firewall policy authentication Configuring authenticated access
Move To
Delete
Edit
Insert Policy before
7 One at a time, select user group names from the Available Groups list and select
the right-pointing arrow button to move them to the Allowed list. All members of
the groups in the Allowed list will be authenticated with this firewall policy.
8 To use a CA certificate for authentication, in Certificate, select the certificate to
use from the drop-down list.
9 To requ ire the use r to ac ce pt a disclaimer to connect to the destination, select
User Authentication Disclaimer.
The User Authentication Disclaimer replacement message is displayed. You can
edit the User Authentication Disclaimer replacement message text by going to
System > Config > Replacement Messages.
10 Type a URL in Redirect URL if the user is to be redirected after they are
authenticated or accept the disclaimer.
11 Select OK.
Firewall policy order
The firewall policies that you create must be correctly placed in the policy list to be
effective. The firewall evaluates a connection request by checking the policy list
from the top down, looking for the first policy that matches the source and
destination addresses of the packet. Keep these rules in mind:
• More specific policies must be placed above more general ones.
• Any policy that requires authentication must be placed above any similar policy
that does not.
• If a user fails authentication, the firewall drops the request and do es no t check
for a match with any of the remaining policies.
• If you create a policy that requires authentication for HTTP access to the
Internet, you must precede this policy with a policy for unauthenticated access
to the appropriate DNS server.
To change the position of the DNS server in the policy list - web-based
manager
1 Go to Firewall > Policy.
2 If necessary, expand the list to view your policies.
3 Select the Move To icon beside the DNS policy you created.
Figure 24: Firewall > Policy - Move To
FortiOS v3.0 MR7 User Authentication User Guide
50 01-30007-0347-20080828
Page 51

Configuring authenticated access Firewall policy authentication
The FortiGate unit performs authentication only on requests to access HTTP,
HTTPS, FTP, and Telnet. Once the user is authenticated, the user can access
other services if the firewall policy permits.
4 Select the position of the DNS policy so that it precedes the policy that provides
access to the Internet.
Figure 25: Move firewall policy position selection
5 Select OK.
Configuring authenticated access to the Internet
A policy for accessing the Internet is similar to a policy for accessing a specific
network, but the destination address is set to all. The destination interface is the
one that connects to the Internet service provider. For general purpose Internet
access, the Service is set to ANY.
Access to HTTP, HTTPS, FTP and Telnet sites may require access to a domain
name service. DNS requests do not trigger authentication. You must configure a
policy to permit unauthenticated access to the appropriate DNS server, and this
policy must precede the policy for Internet access.
To configure a firewall policy for access to a DNS server - web-based
manager
1 Go to Firewall > Policy.
2 Select Create New to create a new firewall policy, enter the following information,
and select OK.
Source Interface/
Zone
Source Address List of so urce address names. Select all.
Destination Interface/
Zone
Destination Address List of destination address names. Select all.
Schedule List of available schedules. Select always.
Service List of available services. Select DNS.
Action List of available authentication result actions. Select ACCEPT.
Note: Position the DNS server in the firewall policy list according to the guidelines outlined
in “Firewall policy order”.
List of source interfaces available. Select the interface to which
computers on your network are connected.
List of destination interfaces available. Select the interface that
connects to the Internet.
FortiOS v3.0 MR7 User Authentication User Guide
01-30007-0347-20080828 51
Page 52

VPN authentication Configuring authenticated access
VPN authentication
All VPN configurations require users to authenticate. Authentication based on
user groups applies to:
• SSL VPNs
• PPTP and L2TP VPNs
• an IPSec VPN that authenticates users using dialup groups
• a dialup IPSec VPN that uses XAUTH authentication (Phase 1)
This document does not describe the use of certificates for VPN authentication.
See the FortiGate IPSec VPN User Guide and the FortiGate Certificate
Management User Guide for information on this type of authentication.
Y ou must create user accounts and user groups before performing the procedures
in this section. If you create a user group for dialup IPSec clients or peers that
have unique peer IDs, their user accounts must be stored locally on the FortiGate
unit. You cannot authenticate these types of users using a RADIUS or LDAP
server.
Configuring authentication of SSL VPN users
To configure authentication for an SSL VPN - web-based manager
1 Configure the users who are permitted to use this VPN. Create a user group and
add them to it.
For more information, see “Users/peers and user groups” on page33.
2 Go to VPN > SSL.
3 Select Enable SSL-VPN and enter information as follows:
Figure 26: SSL VPN Settings
Enable SSL VPN Select to enable SSL VPN connections.
Tunnel IP Range Specify the range of IP addresses reserved for tunnel-
52 01-30007-0347-20080828
mode SSL VPN clients. Type the starting and ending
address that defines the range of reserved IP
addresses.
FortiOS v3.0 MR7 User Authentication User Guide
Page 53

Configuring authenticated access VPN authentication
Server Certificate Select the signed server certificate to use for
Require Client Certificate If you want to enable the use of group certificates for
Encryption Key Algorithm Select the algorithm for creating a secure SSL
Default - RC4(128
bits) and higher
High - AES(128/256
bits) and 3DES
Low - RC4(64 bits),
DES and higher
Idle Timeout Type the period of time (in seconds) to control how long
Portal Message If you want to display a custom caption at the top of the
Advanced (DNS and WINS Servers)
DNS Server #1
DNS Server #2
WINS Server #1
WINS Server #2
Apply Select to save and apply settings.
authentication purposes. If you leave the default setting
(Self-Signed), the FortiGate unit offers its factory
installed (self-signed) certificate from Fortinet to remote
clients when they connect.
authenticating remote clients, select the check box.
Afterward, when the remote client initiates a connection,
the FortiGate unit prompts the client for its client-side
certificate as part of the authentication process.
connection between the remote client web browser and
the FortiGate unit.
If the web browser on the remote client can match a
cipher suite greater than or equal to 128 bits, select this
option.
If the web browser on the remote client can match a high
level of SSL encryption, select this option to enable
cipher suites that use more than 128 bits to encrypt data.
If you are not sure which level of SSL encryption the
remote client web browser supports, select this option to
enable a cipher suite greater than or equal to 64 bits.
the connection can remain idle before the system forces
the user to log in again. The range is from 10 to 28800
seconds. You can also set the value to 0 to have no idle
connection timeout. This setting applies to the SSL VPN
session. The interface does not time out when web
application sessions or tunnels are up.
web portal home page, type the message.
Enter up to two DNS Servers to be provided for the use
of clients.
Enter up to two WINS Servers to be provided for the use
of clients.
FortiOS v3.0 MR7 User Authentication User Guide
01-30007-0347-20080828 53
Page 54

VPN authentication Configuring authenticated access
To configure authentication for an SSL VPN - CLI
config vpn ssl settings
set algorithm
set auth-timeout
set dns-server1
set dns-server2
set idle-timeout
set portal-heading
set reqclientcert
set route-source-interface
set servercert
set sslv2
set sslv3
set sslvpn-enable
set tunnel-endip
set tunnel-startip
set url-obscuration
set wins-server1
set wins-server2
end
The tunnel-endip and tunnel-startip keywords are required for tunnelmode access only. All other keywords are optional.
When you configure the timeout settings, if you set the authentication timeout
(auth-timeout) to 0, then the remote client does not have to re-authenticate
again unless they log out of the system. In order to fully take advantage of this
setting, the value for idle-timeout has to be set to 0 also, so the client does
not timeout if the maximum idle time is reached. If the idle-timeout is not set
to the infinite value, the system will log out if it reaches the limit set, regardless of
the auth-timeout setting.
Strong authentication is a form of computer security in which the identities of
networked users, clients, and servers are verified without transm itting passwords
over the internet. To verify a user’s identity, strong authentication combines
something the user knows (a user name and password) with something the user
has (a client-side certificate). Strong authentication can be configured for SSL
VPN user groups using X.509 (version 1 or 3) digital certificates.
Configuring strong authentication of SSL VPN users/user groups
You can use strong authentication to verify the identities of SSL VPN user group
members. The accounts for individual users and user groups containing those
users have to be created prior to configuring strong auth entication, and a firewall
encryption policy has to be created to permit access by that user group.To enable
strong authentication for an SSL VPN user group:
• Obtain a signed group certificate from a CA and load the signed group
certificate into the web browser used by each user. Follow the browser
documentation to load the certificates.
• Install the root certificate and the CRL from the issuing CA on the FortiGate
unit.
• Configure strong authentication for the group of users having a copy of the
group certificate.
FortiOS v3.0 MR7 User Authentication User Guide
54 01-30007-0347-20080828
Page 55

Configuring authenticated access VPN authentication
Note: The SSL protocol requires that the FortiGate unit identify itself whenever a web
browser accesses the web portal login page through an HTTPS link. If you would like to
configure the FortiGate unit to identify itself using a CA-issued server certificate instead of
the factory-installed self-signed certificate, select the name of the signed server certificate
from the Server Certificate list on the SSL-VPN Settings page when you enable strong
authentication for SSL VPN users. The server certificate must be installed before you can
select it from the list. For more information about server certificates, see the
Certificate Management User Guide
.
FortiGate
To enable strong authentication for an SSL VPN
1 Go to VPN > SSL > Config.
2 Select Require Client Certificate, and then select Apply.
3 Go to Firewall > Policy.
4 Select the Edit icon in the row that corresponds to the firewall policy for traffic
generated by holders of the group certificate.
5 Select SSL Client Certificate Restrictive.
6 Select OK.
For information about how to create user accounts and user groups, see the
FortiGate Administration Guide. For detailed information about configuring SSL
VPNs, see the FortiGate SSL VPN User Guide.
Configuring authentication of VPN peers and clients
After the required server or group certificates and CA root certificates have been
installed on the VPN peers and clients, the peers and clients identify themselves
using those certificates when prompted by the FortiGate unit. The FortiGate unit
provides its public key to the remote peer or client so th at the remote peer or client
can send encrypted messages to the FortiGate unit. Conversely, the remote peer
or client provides its public key to the FortiGate unit, which uses the key to encrypt
messages destined for the remote peer or client.
Configuring authentication of PPTP VPN users/user groups
To configure authentication for a PPTP VPN - web-based manager
1 Configure the users who are permitted to use this VPN. Create a user group and
add them to it.
For more information, see “Users/peers and user groups” on page 33.
2 Go to VPN > PPTP.
Figure 27: PPTP VPN Range settings
3 Select Enable PPTP.
FortiOS v3.0 MR7 User Authentication User Guide
01-30007-0347-20080828 55
Page 56

VPN authentication Configuring authenticated access
4 Enter Starting IP and Ending IP addresses. This defines the range of ad dresses
assigned to VPN clients.
5 Select the user group that is to have access to this VPN. The FortiGate unit
authenticates members of this user group.
6 Select Apply.
To configure authentication for a PPTP VPN - CLI
config vpn pptp
set eip <starting_ip>
set sip <ending_ip>
set status enable
set usrgrp <user_group_name>
end
You also need to define a firewall policy that permits packets to pass from VPN
clients with addresses in the specified range to IP addresses that the VPN clients
need to access on the private network behind the FortiGate unit. The Action for
this firewall policy is ACCEPT, not ENCRYPT, because the allowed user group is
defined in the PPTP VPN configuration, not in the firewall policy.
For detailed information about configuring PP TP, see the FortiGate PPTP VPN
User Guide.
Configuring authentication of L2TP VPN users/user groups
Authentication of a FortiGate L2TP configuration must be done using the
config vpn l2tp CLI command.
To configure authentication for an L2TP VPN - CLI
config vpn l2tp
set eip <starting_ip>
set sip <ending_ip>
set status enable
set usrgrp <user_group_name>
end
For more information, see the FortiGate CLI Reference.
Configuring authentication of remote IPSec VPN users
An IPSec VPN on a FortiGate unit can authenticate remote users through a dialup
group. The user account name is the peer ID and the password is the pre-sha red
key . For information about authentication using peer IDs and peer g roups, see th e
FortiGate IPSec VPN User Guide.
Authentication through user groups is supported for groups containing only local
users. To authenticate users using a RADIUS or LDAP server, you must configure
XAUTH settings. See “Configuring XAuth authentication” on page 58.
To configure user group authentication for dialup IPSec - web-based
manager
1 Configure the dialup users who are permitted to use this VPN. Create a user
group with Type:Firewall and add them to it.
For more information, see “Users/peers and user groups” on page33.
FortiOS v3.0 MR7 User Authentication User Guide
56 01-30007-0347-20080828
Page 57

Configuring authenticated access VPN authentication
2 Go to VPN > IPSec > Auto Key (IKE), select Create Phase 1 and enter the
following information.
Figure 28: Configure VPN IPSec dialup authentication
Name Name for group of dialup users using the VPN for authentication.
Remote Gateway List of the types of remote gateways for VPN. Select Dialup User.
Authentication
Method
Peer Options Selection of peer ID options available. Select the user group that
Note: The Accept peer ID in dialup group option does not support authentication of users
through an authentication server.
List of authentication methods available for users. Select
Preshared Key.
is to be allowed access to the VPN. The listed user groups contain
only users with passwords on the FortiGate unit.
3 Select Advanced to reveal additional parameters and configure other VPN
gateway parameters as needed.
4 Select OK.
To configure user group authentication for dialup IPSec - CLI
config vpn ipsec phase1
edit <gateway_name>
set peertype dialup
set usrgrp <user_group_name>
end
Note: Parameters specific to setting up the VPN itself are not shown here. For detailed
information, see the FortiGate IPSec VPN User Guide.
FortiOS v3.0 MR7 User Authentication User Guide
01-30007-0347-20080828 57
Page 58

VPN authentication Configuring authenticated access
Configuring XAuth authentication
Extended Authentication (XAuth) increases security by requiring additional user
authentication in a separate exchange at the end of the VPN Phase 1 negotiation.
The FortiGate unit challenges the user for a user name and password. It then
forwards the user credentials to an external RADIUS or LDAP server for
verification.
XAuth can be used in addition to or in place of IPSec phase 1 peer options to
provide access security through an LDAP or RADIUS authentication server. You
must configure dialup users as members of a user group who are externally
authenticated. None can have passwords stored on the FortiGate unit.
To configure authentication for a dialup IPSec VPN - web-based manager
1 Configure the users who are permitted to use this VPN. Create a user group and
add them to it.
For more information, see “Users/peers and user groups” on page33.
2 Go to VPN > IPSec > Auto Key (IKE), and enter the following information:
Figure 29: IPSec configuration for dialup users
FortiOS v3.0 MR7 User Authentication User Guide
58 01-30007-0347-20080828
Page 59

Configuring authenticated access VPN authentication
Name Name for group of dialup users using the VPN for authentication
Remote Gateway List of the types of remote gateways for VPN. Select Dialup User.
Authentication
Method
through RADIUS or LDAP servers.
List of authentication methods available for users. Select
Preshared Key.
3 Select Advanced to reveal additional parameters and enter the following
information.
XAuth Select Enable as Server.
Server Type Select PAP, CHAP, or AUTO. Use CHAP whenever possible. Use
User Group List of available user groups. Select the user group that is to have
PAP with all implementations of LDAP and with other
authentication servers that do not support CHAP, including some
implementations of Microsoft RADIUS. Use AUTO with the
Fortinet Remote VPN Client and where the authentication server
supports CHAP but the XAuth client does not.
access to the VPN. The list of user groups does not include any
group that has members whose password is stored on the
FortiGate unit.
4 Configure other VPN gateway parameters as needed.
5 Select OK.
For more information about XAUTH configuration, see the
FortiGate IPSec VPN User Guide.
To configure authenticati on fo r a di al u p IPSe c VPN - CLI
config vpn ipsec phase1
edit <gateway_name>
set peertype dialup
set xauthtype pap
set authusrgrp <user_group_name>
end
Parameters specific to setting up the VPN itself are not shown here. For detailed
information about configuring an IPSec VPN, see the
FortiGate IPSec VPN User Guide.
FortiOS v3.0 MR7 User Authentication User Guide
01-30007-0347-20080828 59
Page 60

VPN authentication Configuring authenticated access
FortiOS v3.0 MR7 User Authentication User Guide
60 01-30007-0347-20080828
Page 61

Index
Index
A
Active Directory - see Directory Service
administrator
authentication 7
ASCII 25
attributes
RADIUS 15
authenticated access
configuring 47
authenticating users
FortiGate 33
with LDAP servers 34
with RADIUS servers 34
with TACACS+ servers 34
authentication 54
about 5
access to DNS server 51
certificate 54
firewall policy 48, 49
FortiGate administrator 7
Internet access 51
IPSec VPN 56
L2TP 56
PKI 9
PPTP VPN 55
protocols 47
SSL VPN 52
SSL VPN timeout 54
strong 54
timeout 47
user’s view 6
VPN 52, 55
VPN client-based 6
web-based user 6
XAuth 58
authentication protocols
ASCII 25
CHAP 25
MS-CHAP 25
PAP 25
setting 48
TACACS+ servers 25
authentication servers
about 8
Directory Service 27
LDAP 19
RADIUS 15
TACACS+ 25
authentication timeout 10
firewall 47
setting 47
SSL VPN 47, 54
B
binding
LDAP servers 19
C
certificate
authentication 54
changing
list order 50
CHAP 25
collector agent 27
common name
LDAP servers 20
configuring
authenticated access 47
Directory Service user groups 42
firewall policy authentication 49
Internet access authentication 51
IPSec VPN authentication 56
L2TP VPN authentication 56
local users 34
peer user groups 44
peer users 36
PPTP VPN authentication 55
SSL VPN authentication 52
XAuth authentication for IPSec dialup users 58
XAuth authentication with LDAP servers 58
XAuth authentication with RADIUS servers 58
creating
Directory Service user groups 42
local users 34
peer user groups 44
peer users 36
user groups 41
customer service 14
D
default port
RADIUS servers 16
TACACS+ servers 25
deleting
Directory Service server from FortiGate configura-
tion 30
LDAP server from FortiGate configuration 23
local users from FortiGate configuration 36
peer users from FortiGate configuration 38
RADIUS server from FortiGate configuration 18
TACACS+ server from FortiGate configuration 26
user group from FortiGate configuration 45
dialup users
configuring authentication for 56
dictionary
RADIUS attriutes 16
directory
LDAP servers 19
Directory Service
user groups 39
Directory Service servers 27
configuring FortiGate unit to use 28
deleting from FortiGate configuration 30
FSAE 27
FortiOS v3.0 MR7 User Authentication User Guide
01-30007-0347-20080731 61
Page 62

Index
FSAE collector agent 27
FSAE domain controller 27
redundant configuration 28
removing from FortiGate configuration 30
retrieving information from LDAP server 28
viewing domain and group information 30
viewing list of 28
Directory Service user groups
configuring 42
creating 42
distinguished names
elements 20
LDAP servers 20
list of 24
DNS server
access using firewall policy 51
Document conventions 10
documentation
commenting on 14
Fortinet 11
Fortinet product 12
domain component
LDAP servers 20
domain controller 27
E
edirectory - see Directory Service
elements
distinguished names 20
enabling
SSL VPN strong authentication 54
F
firewall
configuring user groups 41
creating user groups 41
DNS server access 51
Internet access authentication 51
IPSec VPN dialup user access 39
policy authentication 48, 49
user authentication timeout 47
user groups 39
firewall policies
FortiGate administrator’s view 10
firewall policy
changing list order 50
list order 50
list order rules 50
strong authentication 55
FortiGate
authenticating users 33
authenticating with XAuth 58
configuring to use Directory Service server 28
configuring to use LDAP server 21
configuring to use RADIUS server 16
configuring to use TACACS+ server 25
IPSec VPN 56
viewing information sent to Directory Service serv-
ers 30
FortiGate administrator
authentication 7
authentication servers 8
FortiGate administrator’s view
firewall policies 10
VPN tunnels 10
Fortinet
customer service 14
Knowledge Center 14
product documentation 12
technical support 14
Fortinet documentation 11
commenting on 14
Fortinet Knowledge Center 14
Fortinet Server Authentication Extension - see FSAE
FSAE 27
collector agent 27
components 27
domain controller 27
H
hierarchy
LDAP servers 20
I
Idle timeout
VPN connection 7
Internet access authentication 51
introduction
Fortinet documentation 11
IP address range
setting for L2TP VPN 56
setting for PPTP VPN 55
setting for SSL VPN 52
IPSec VPN
configuring authentication for 56
dialup users, access to 40
dialup users, configuring authentication for 56
K
Knowledge Center 14
L
L2TP VPN
configuring authentication for 56
LDAP
XAuth authentication with 58
LDAP servers 19
authenticating users with 34
binding 19
common name 20
configuring FortiGate unit to use 21
deleting from FortiGate configuration 23
directory 19
Distinguished Name Query list 24
distinguished names 20
domain component 20
hierarchy 20
protocols 19
removing from FortiGate configuration 23
RFC compliance 19
using with Directory Service authentication 28
FortiOS v3.0 MR7 User Authentication User Guide
62 01-30007-0347-20080731
Page 63

Index
list order
changing 50
firewall policy 50
local users
configuring 34
creating 34
deleting from FortiGate configuration 36
removing from FortiGate configuration 36
viewing list of 35
M
MS-CHAP 25
N
Novell edirectory - see Directory Service
P
PAP 25
peer user groups
configuring 44
creating 44
peer users 33, 36
configuring 36
creating 36
deleting from FortiGate configuration 38
viewing list of 37
peers
about 9
PKI authentication
about 9
PKI authentication - see peer users
policy
list order rules 50
port
RADIUS servers 16
PPTP VPN
authentication 55
configuring authentication for 55
IP address range 55
protection profiles 40
protocols
authentication 47
LDAP servers 19
Q
Query list
LDAP Distinguished Name 24
R
RADIUS
XAuth authentication with 58
RADIUS attributes 15
RADIUS authentication servers 15
RADIUS servers
attribute dictionary 16
authenticating users with 34
changing default port 16
configuring FortiGate unit to use 16
default port 16
deleting from FortiGate configuration 18
port 16
removing from FortiGate configuration 18
VSA 16
removing
Directory Service servers from FortiGate configura-
tion 30
LDAP servers from FortiGate configuration 23
local users from FortiGate configuration 36
peer users from FortiGate configuration 38
RADIUS server from FortiGate configuration 18
TACACS+ servers from FortiGate configuration 26
user group from FortiGate configuration 45
Require Client Certificate option 55
RFC compliance
LDAP servers 19
rules
firewall policy order 50
S
servers
configuring XAuth authentication using 58
setting
authentication protocols 48
firewall policy authentication 48
firewall user authentication timeout 47
SSL VPN authentication timeout 47, 54
SSL Client Certificate Restrictive option 55
SSL VPN
authentication timeout 47, 54
checking client certificates 53
configuring strong authentication 54
enabling strong authentication 54
setting the cipher suite 53
specifying server certificate 53
specifying timeout values 53
strong authentication 54
tunnel IP range 52
user authentication 52
SSL VPN user groups 40
configuring 40
creating 40
IPSec VPN dialup users 40
strong authentication 54
enabling 54
for SSL VPN users 54
T
TACACS+ servers 25
ASCII 25
authenticating users with 34
authentication protocols 25
changing default port 25
CHAP 25
configuring the FortiGate unit to use 25
default port 25
deleting from FortiGate configuration 26
MS-CHAP 25
PAP 25
port 25
removing from FortiGate configuration 26
technical support 14
FortiOS v3.0 MR7 User Authentication User Guide
01-30007-0347-20080731 63
Page 64

Index
timeout
authentication 10
tunnel mode
SSL VPN IP range 52
types of user groups 39
types of users 33
Typographic conventions 11
U
user authentication
IPSec VPN dialup users 56
L2TP VPN 56
PPTP VPN 55
protocols 47
SSL VPN 52
timeout 47
XAuth 58
user groups 39
about 9
creating 41
Directory Service 39
Directory Service, configuring 42
Directory Service, creating 42
firewall 39
peer, configuring 44
peer, creating 44
protection profiles 40
types of 39
users 33
administration 9
authenticating with LDAP servers 34
authenticating with RADIUS servers 34
authenticating with TACACS+ servers 34
local, creating 34
local, deleting from FortiGate configuration 36
local, removing from FortiGate configuration 36
peer, configuring 36
peer, creating 36
peer, deleting from FortiGate configuration 38
peer, removing from FortiGate configuration 38
types of 33
viewing list of local users 35
V
vendor-specific attributes - see VSA
viewing
list of Directory Service servers 28
list of peer users 37
VPN
authentication 55
IPSec 56
L2TP 56
PPTP 55
SSL 52
VPN authentication 52
VPN client-based authentication 6
VPN connection
idle timeout 7
VPN tunnels
FortiGate administrator’s view 10
VSA
RADIUS servers 16
W
web-based user authentication 6
X
XAuth 58
configuring authentication with 58
FortiOS v3.0 MR7 User Authentication User Guide
64 01-30007-0347-20080731
Page 65

www.fortinet.com
Page 66

www.fortinet.com
 Loading...