

Page 1

FortiFone™ User Guide
for FON-C71
Page 2

FortiFone™ User Guide for FON-C71
Revision 1
June 18, 2018
Copyright© 2018 Fortinet, Inc. All rights reserved. Fortinet®, FortiGate®, FortiCare® and
FortiGuard®, and certain other marks are registered trademarks of Fortinet, Inc., in the U.S. and
other jurisdictions, and other Fortinet names herein may also be registered and/or common law
trademarks of Fortinet. All other product or company names may be trademarks of their
respective owners. Performance and other metrics contained herein were attained in internal lab
tests under ideal conditions, and actual performance and other results may vary. Network
variables, different network environments and other conditions may affect performance results.
Nothing herein represents any binding commitment by Fortinet, and Fortinet disclaims all
warranties, whether express or implied, except to the extent Fortinet enters a binding written
contract, signed by Fortinet's General Counsel, with a purchaser that expressly warrants that
the identified product will perform according to certain expressly-identified performance metrics
and, in such event, only the specific performance metrics expressly identified in such binding
written contract shall be binding on Fortinet. For absolute clarity, any such warranty will be
limited to performance in the same ideal conditions as in Fortinet's internal lab tests. In no event
does Fortinet make any commitment related to future deliverables, features or development,
and circumstances may change such that any forward-looking statements herein are not
accurate. Fortinet disclaims in full any covenants, representations, and guarantees pursuant
hereto, whether express or implied. Fortinet reserves the right to change, modify, transfer, or
otherwise revise this publication without notice, and the most current version of the publication
shall be applicable.
FortiVoice fortivoice.com
Technical Documentation docs.fortinet.com
Knowledge Base kb.fortinet.com
Customer Service & Support support.fortinet.com
Training Services training.fortinet.com
FortiGuard fortiguard.com
Document Feedback techdocs@fortinet.com
Page 3

Contents
Introduction....................................................................................................... 1
Phone features......................................................................................................... 1
FON-C71 base unit .................................................................................................. 1
Display layout........................................................................................................... 3
LED Indication.......................................................................................................... 4
Installation......................................................................................................... 5
Connecting the network and power ........................................................................ 5
Connecting a USB flash drive.................................................................................. 6
Setting up the Phone........................................................................................ 7
Power over Ethernet .......................................................................................... 5
To connect the PoE...................................................................................... 5
Power adapter (optional).................................................................................... 6
To connect the power adapter..................................................................... 6
For use as an internal extension ........................................................................ 7
For use as an external extension ....................................................................... 7
Personalizing your Phone................................................................................ 8
How to navigate through menus.............................................................................. 8
Entering values with the dial pad and softkeys ....................................................... 8
Configuration Overview ................................................................................... 9
Status....................................................................................................................... 9
Features ................................................................................................................... 9
Auto redial.......................................................................................................... 9
History setting.................................................................................................. 10
Diagnostics ...................................................................................................... 10
Settings.................................................................................................................. 10
Basic settings................................................................................................... 10
Language ................................................................................................... 10
Time & date ................................................................................................ 10
Display ....................................................................................................... 12
Sound......................................................................................................... 12
Change PIN................................................................................................ 13
Phone lock ................................................................................................. 13
Bluetooth.................................................................................................... 15
Activating/deactivating Bluetooth on the FON-C71............................. 15
Paring a mobile phone with the FON-C71 ........................................... 15
Making/receiving a mobile call on the FON-C71 via Bluetooth ........... 15
Contents Page iii FortiFone User Guide
Page 4

Using the FON-C71 as a Bluetooth speaker........................................ 15
Making the FON-C71 discoverable via Bluetooth................................ 16
Editing device information.................................................................... 16
Disconnecting a Bluetooth device ....................................................... 16
Wi-Fi........................................................................................................... 16
Activating the Wi-Fi mode.................................................................... 16
Connecting to the wireless network..................................................... 17
Viewing the wireless network information............................................ 18
Managing the saved wireless networks ............................................... 18
Disconnecting from the wireless network ............................................ 19
Advanced settings ........................................................................................... 19
Account...................................................................................................... 19
Network...................................................................................................... 19
VLAN .................................................................................................... 20
Web server ........................................................................................... 20
802.1X .................................................................................................. 21
VPN ...................................................................................................... 21
LLDP..................................................................................................... 22
CDP ...................................................................................................... 23
NAT ...................................................................................................... 23
Change password ...................................................................................... 23
Auto provision ............................................................................................ 24
Set AES key ............................................................................................... 24
Reset to factory settings ............................................................................ 24
FWD International....................................................................................... 24
Messages............................................................................................................... 25
Voicemail.......................................................................................................... 25
History.................................................................................................................... 25
Adding to contacts........................................................................................... 25
Deleting (single or all entries) ........................................................................... 25
Directory ................................................................................................................ 26
Adding a contact.............................................................................................. 26
Editing a contact .............................................................................................. 26
Deleting a contact ............................................................................................ 26
Searching a contact ......................................................................................... 26
USB Recording ...................................................................................................... 27
Conference recording ...................................................................................... 28
Idle recording ................................................................................................... 28
Recorded files playback .................................................................................. 29
Contents Page iv FortiFone User Guide
Page 5

Using your Phone ........................................................................................... 30
Receiving a call ...................................................................................................... 30
Placing a call.......................................................................................................... 30
Ending a call .......................................................................................................... 31
Hold ....................................................................................................................... 31
Mute....................................................................................................................... 31
Attendant transfer .................................................................................................. 31
Blind transfer.......................................................................................................... 31
Conference calls .................................................................................................... 31
Call waiting ............................................................................................................ 32
DND ....................................................................................................................... 32
Voicemail................................................................................................................ 32
Troubleshooting ............................................................................................. 33
Information............................................................................................................. 33
Troubleshooting guide ..................................................................................... 33
Warranty .......................................................................................................... 34
Contents Page v FortiFone User Guide
Page 6

Page 7
Introduction
This user guide includes information about configuring and using your FON-C71 IP conference
phone.
Phone features
• 3.1" pixel graphic display
• Full duplex speakerphone
• Three microphone array
• PoE support eliminates the need for a power adapter
• Connect mobile phone via Bluetooth for conference call
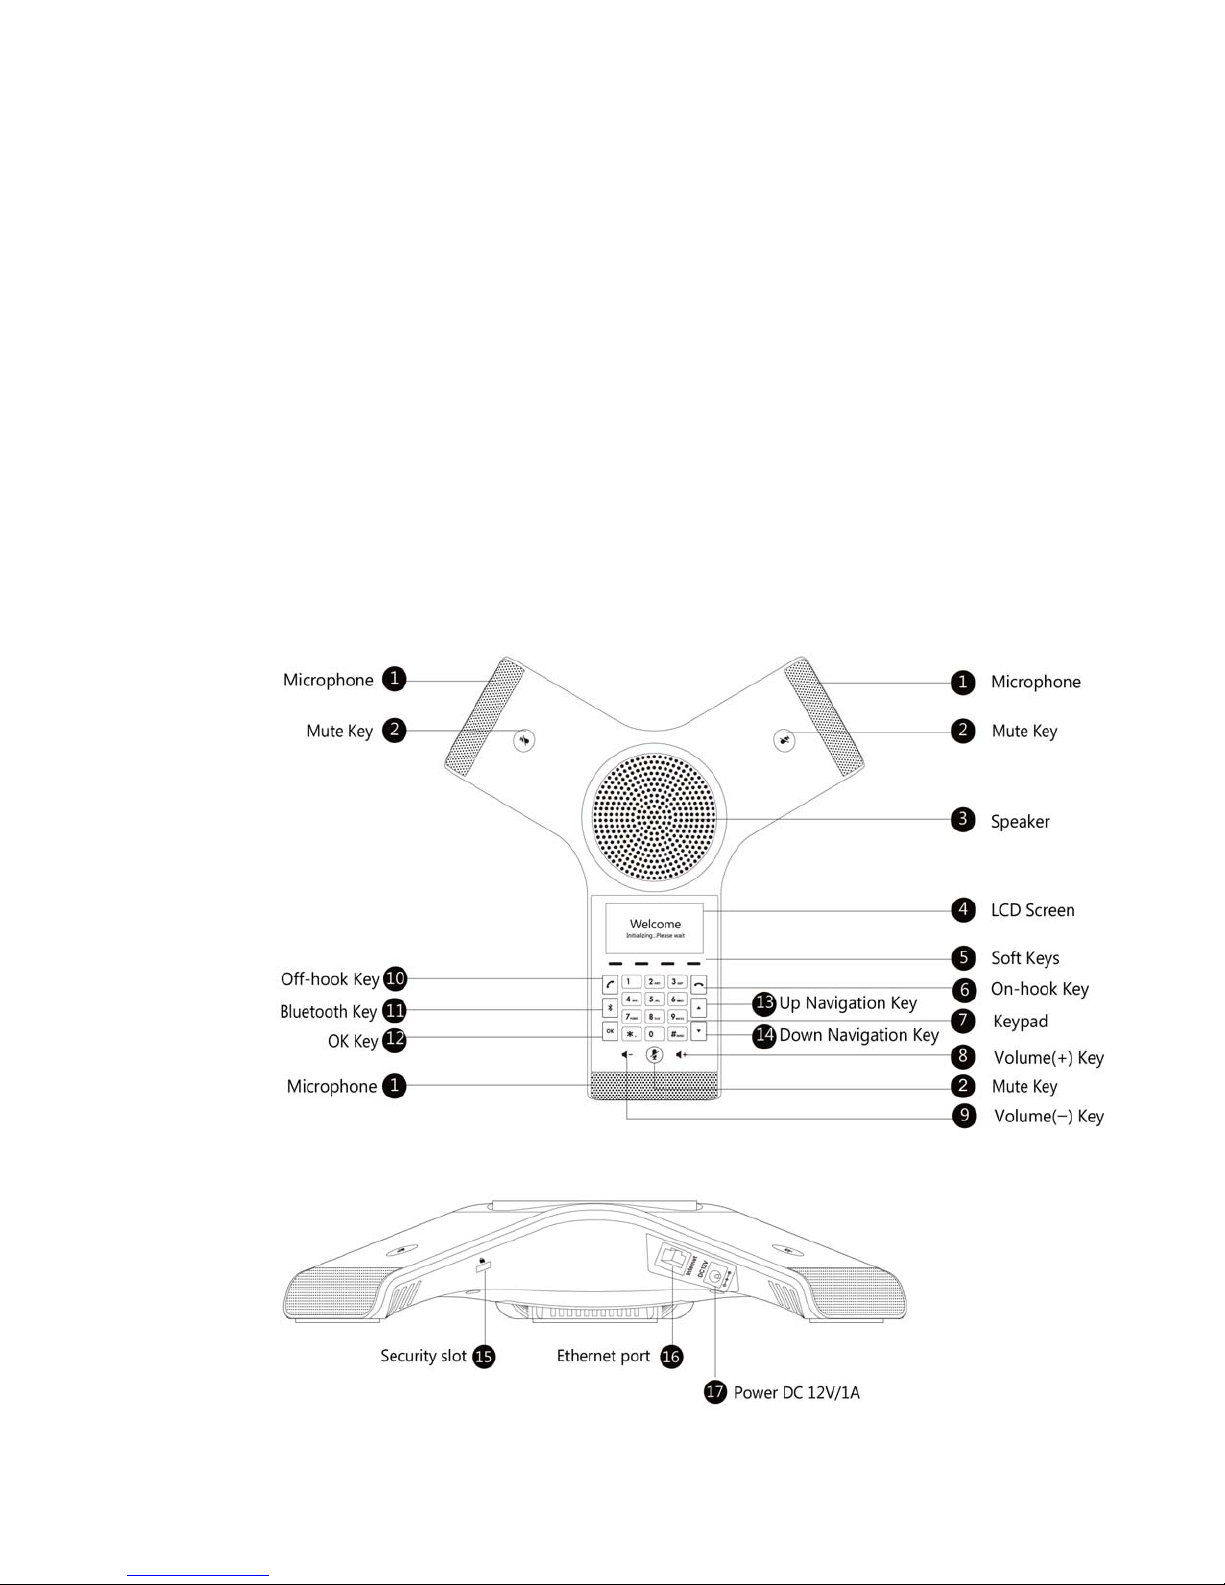
FON-C71 base unit
Introduction Page 1 FortiFone User Guide
Page 8
Item Description
1 Three Internal Microphones Provides 20-foot (6-meter) pickup range.
2
Mute Key
Toggles mute feature.
3 Speaker Provides ringer and hands-free (speakerphone) audio output.
4 LCD Screen
Shows information about calls, messages, softkeys, time, date and
other relevant data.
5 Softkeys For various context-sensitive features. See table below.
6
7 Keypad
8
9
10
11
12
On-hook Key
Volume + Key
Volume - Key
Off-hook Key
Bluetooth Key
OK Key
Ends a call or returns to the idle screen.
Provides the digits, letters, and special characters in
context-sensitive applications.
Increases the volume of the speaker and ringer.
Decreases the volume of the speaker and ringer.
Initiates a call.
Opens the Bluetooth settings.
Confirms actions or answers incoming calls.
13
14
Up Navigation Key
Down Navigation Key
15 Security Slot
16 Ethernet Port
17 Power DC 12V/1A Connect the power adapter if necessary.
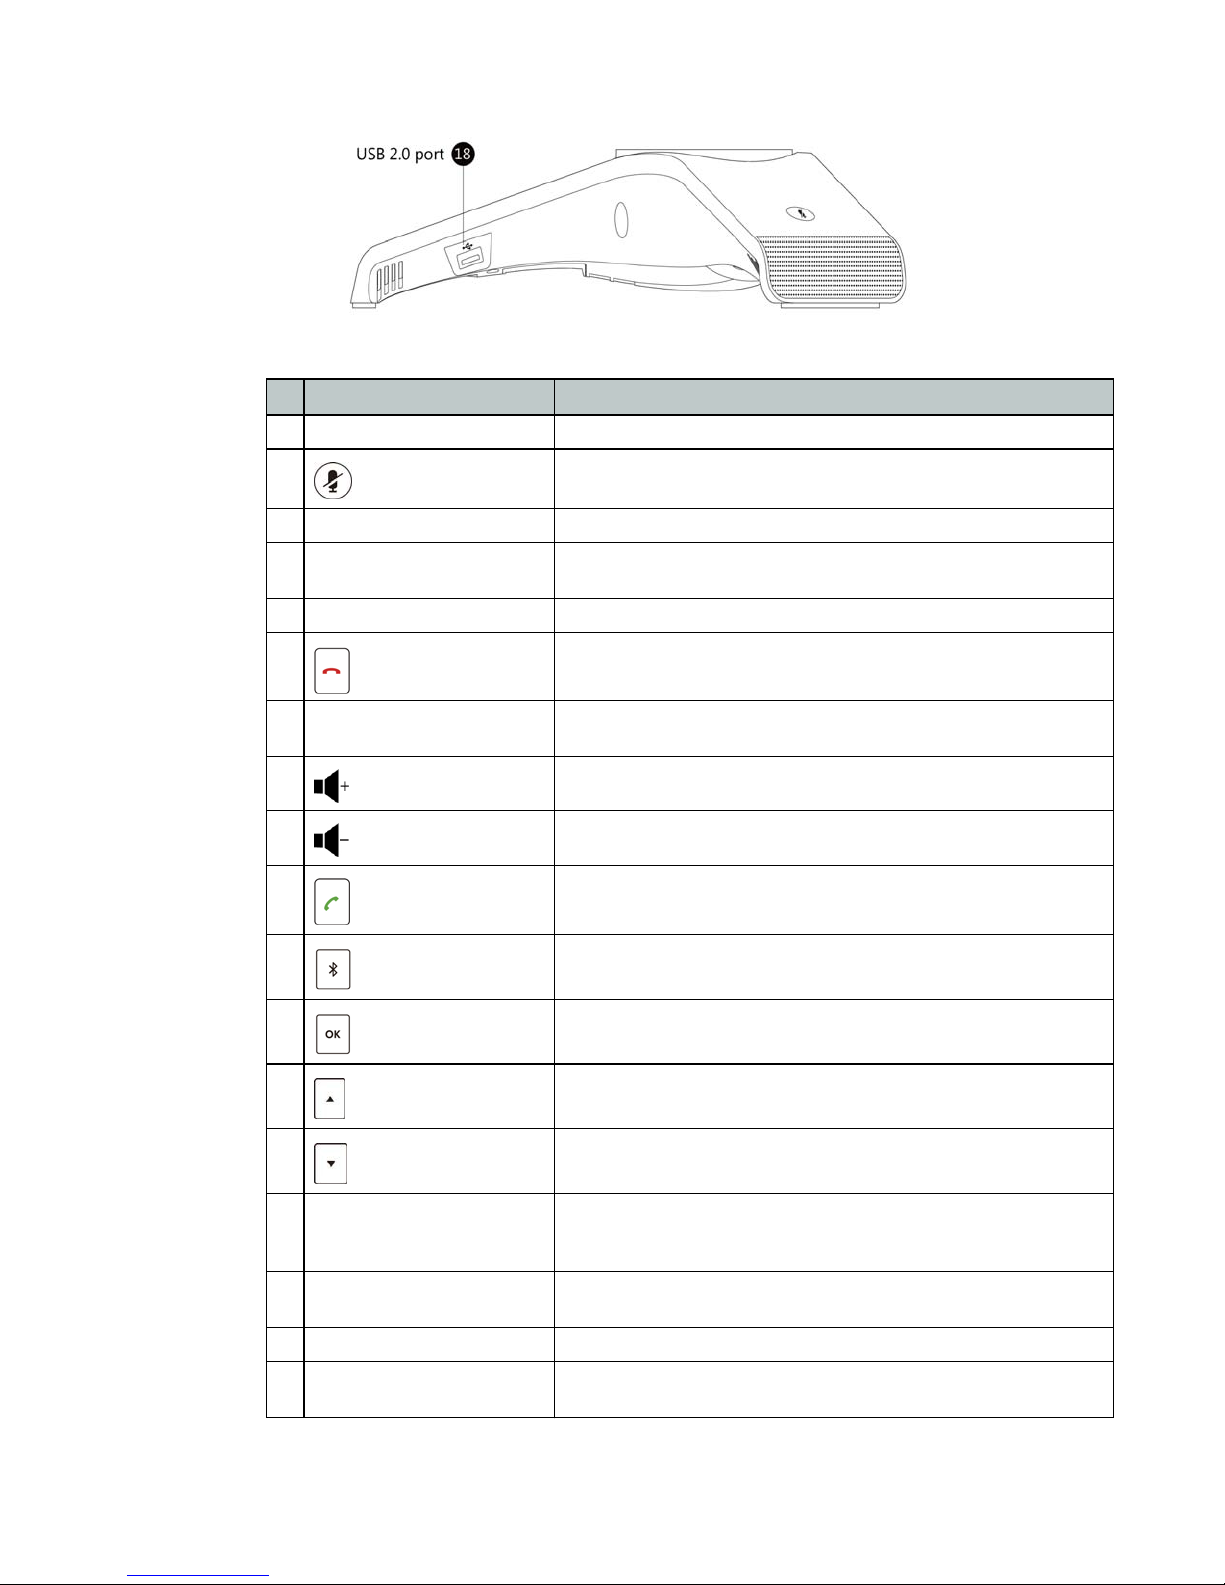
18 USB 2.0 Port
Introduction Page 2 FortiFone User Guide
Scrolls through the displayed information upwards. Views call
history list when the phone is idle.
Scrolls through the displayed information downwards. Views the
directory list when the phone is idle.
Allows you to connect a universal security cable to your phone so
you can lock down your phone. The phone will not be removed after
locked.
Allows you to connect the FON-C71 to your network. The Ethernet
port also uses Power over Ethernet (PoE).
Allows you to connect an optional USB flash drive to your phone so
you can record and play back calls.
Page 9
Softkey Function
History Displays a list of previous calls.
Directory Displays a list of saved contacts.
DND Toggles Do Not Disturb on and off.
Menu Brings up the Settings menu.
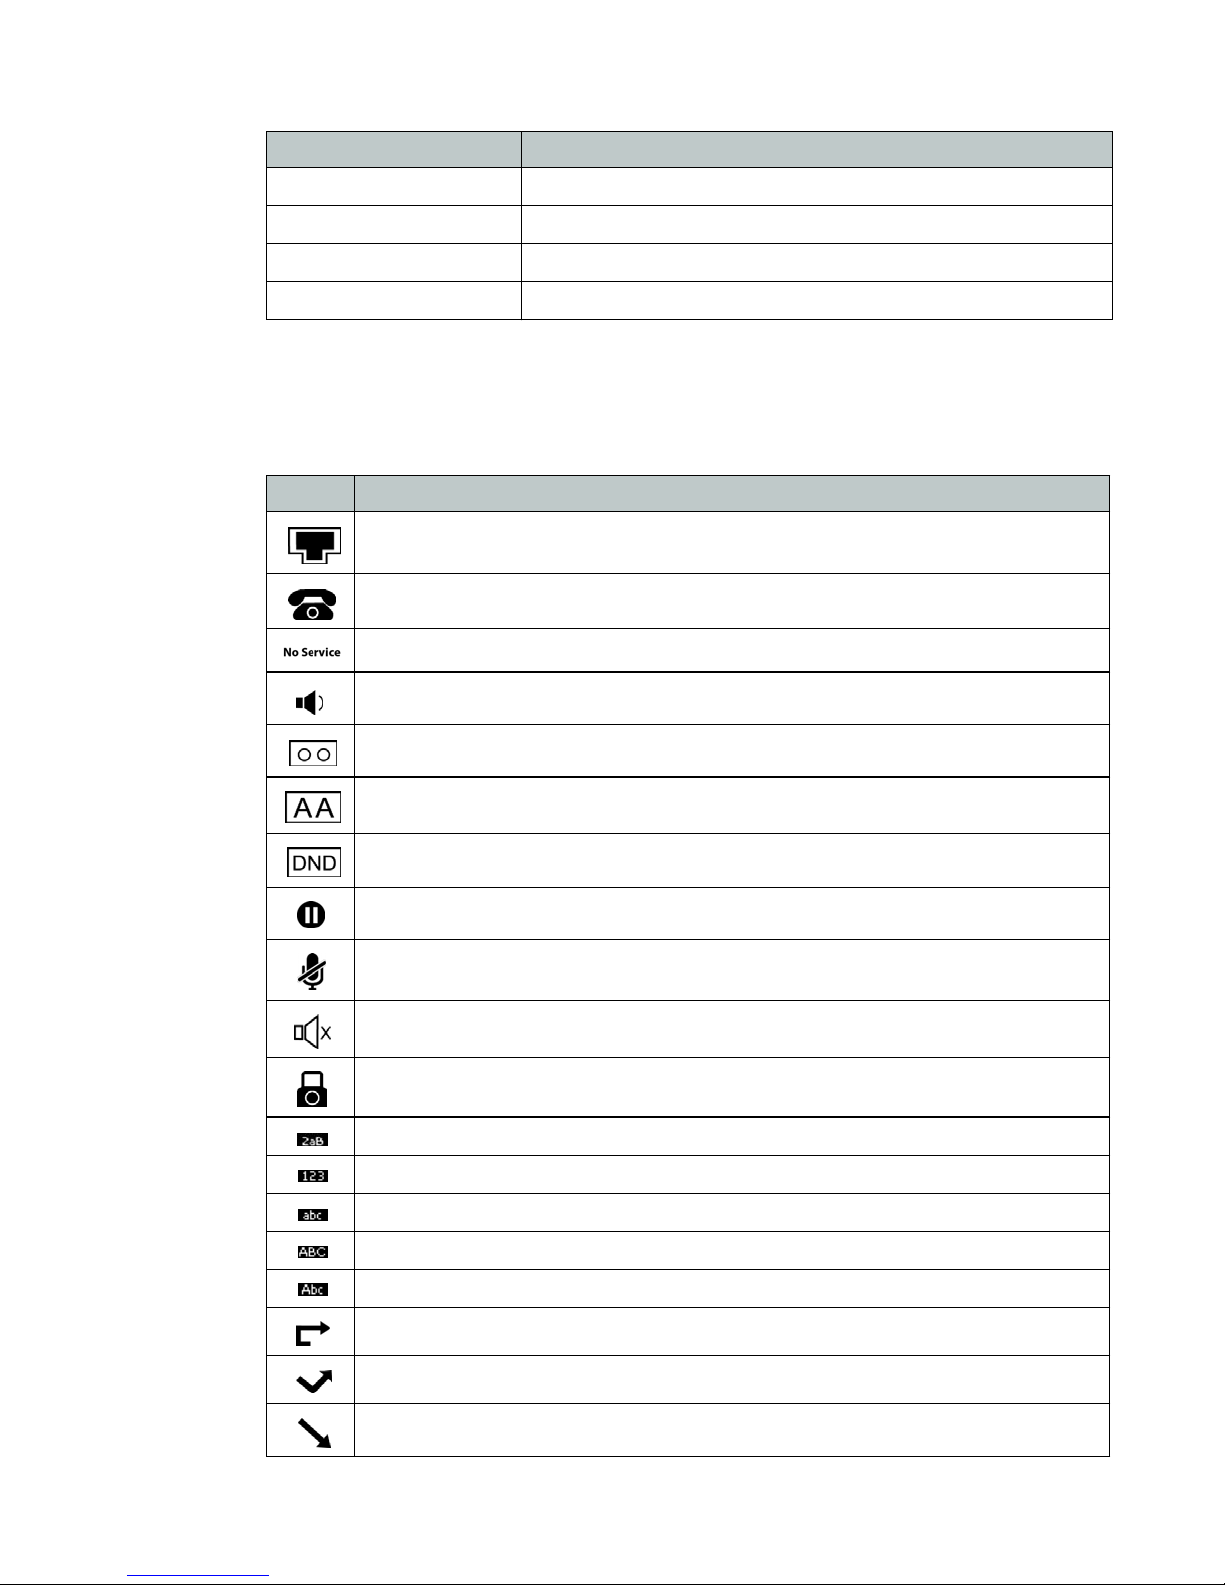
Display layout
The FON-C71 top line of the screen will display the extension name and number. The following
status icons will also appear on the display:
Icon Description
Network is available
Registered successfully
Registering / Not registered
Hands-free speakerphone mode
Voicemail
Auto Answer
Do Not Disturb
Call hold
Call mute
Ringer volume is 0
Keypad lock
Alphanumeric input mode
Numeric input mode
Multilingual lowercase letters input mode
Multilingual uppercase letters input mode
Multilingual uppercase and lowercase letters input mode
Call forward / Forwarded calls
Missed called
Received calls
Introduction Page 3 FortiFone User Guide
Page 10
Icon Description
LED indication
The Mute keys can indicate various call states via LED.
Placed calls
Call and Conference recording
Idle recordings
USB flash drive is detected
USB flash drive is detecting
Bluetooth enabled
Bluetooth enabled mobile device paired and connected
WiFi enabled
High Definition Voice
LED Status Description
Solid red The phone is initializing or the call is muted
Flashing red The phone is ringing
Solid green The phone is on a call
Flashing green The call is held
Off The phone is in an idle state
Introduction Page 4 FortiFone User Guide
Page 11

Installation
Connecting the network and power
There are two options for powering the phone:
1. Power over Ethernet (PoE)
2. Power adapter (Optional)
Power over Ethernet
The FON-C71 can obtain network access as well as be powered through a Power over Ethernet
(PoE) switch/hub.
To connect the PoE
Connect an Ethernet cable between the Internet port on the phone and an available port on the
PoE enabled switch/hub.
Installation Page 5 FortiFone User Guide
Page 12
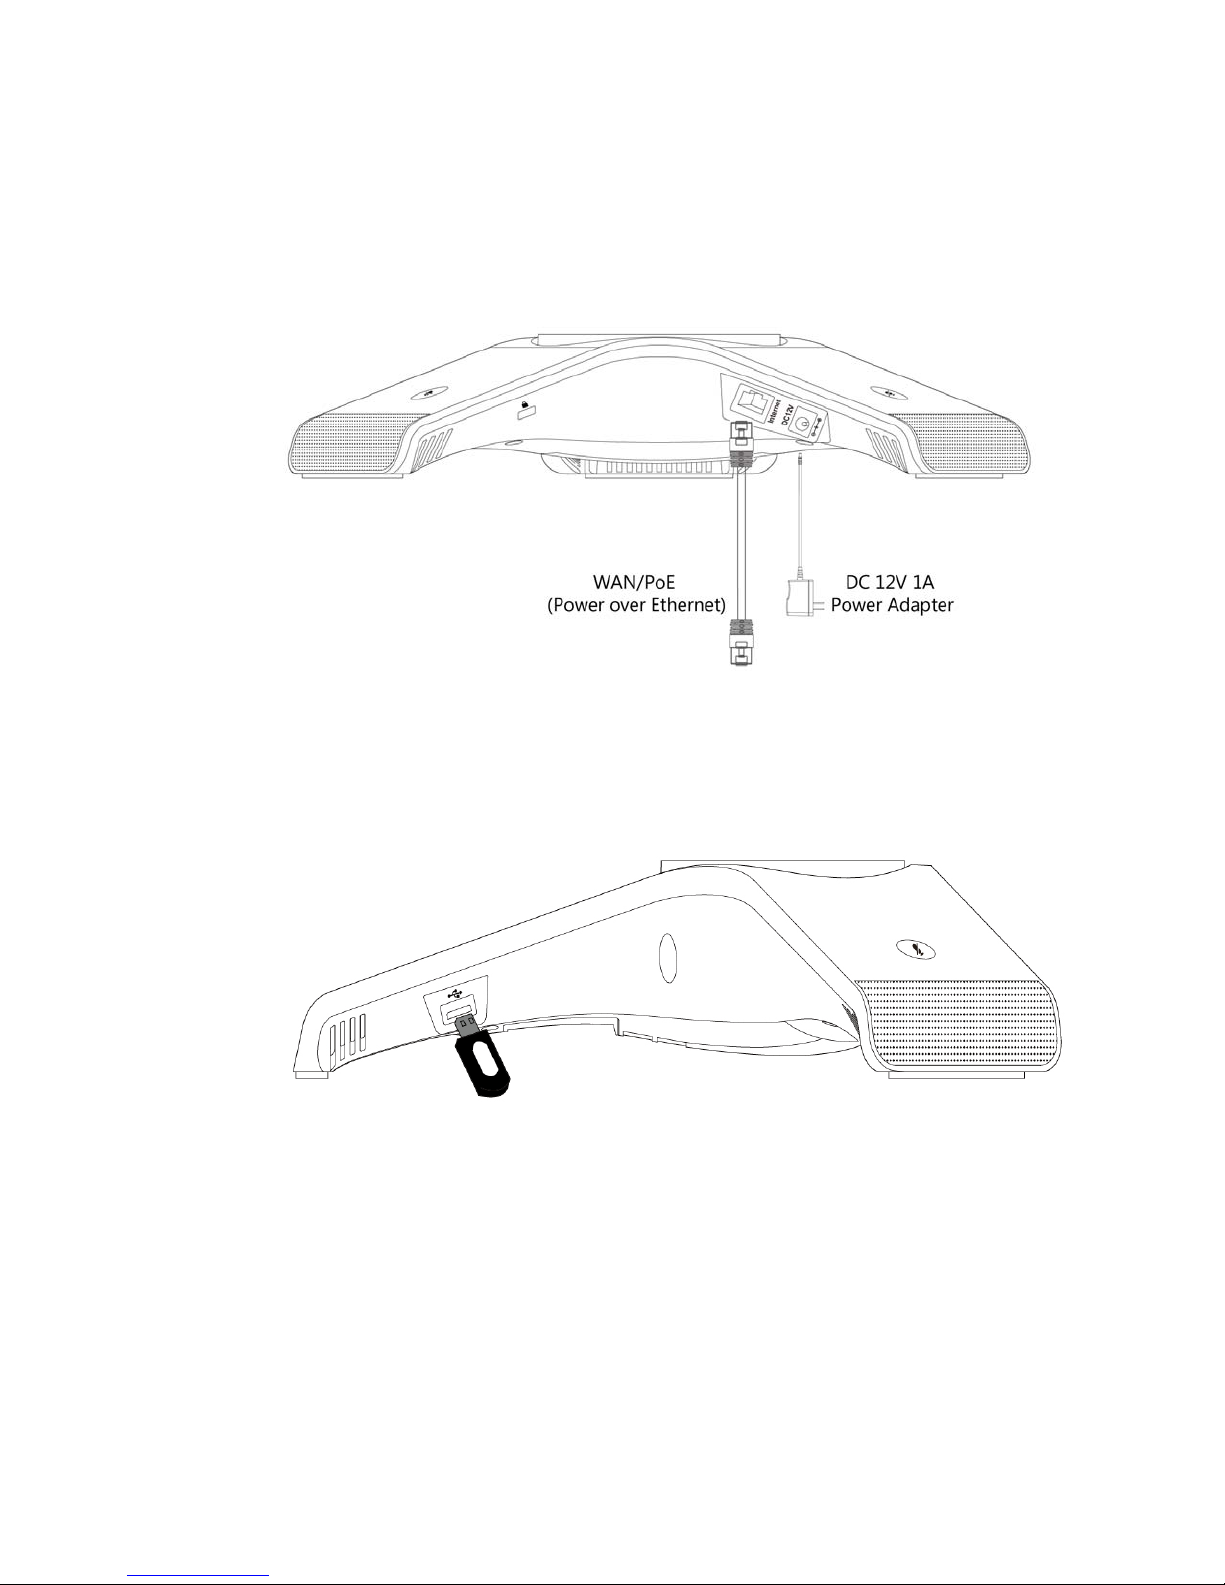
Power adapter (optional)
To connect the power adapter
1. Connect the the power adapter to the DC12V/1A port on the phone and the other end of the
power adapter into an electrical power outlet.
2. Connect an Ethernet cable between the Internet port on the phone and the one on the wall
or switch/hub device port.
Connecting a USB flash drive
You can connect a USB flash drive to record and play back calls. Insert a USB flash drive into
the USB port on the phone.
Installation Page 6 FortiFone User Guide
Page 13

Setting up the Phone
For use as an internal extension
The phone supports plug and play installation and will automatically download its configuration
from the FortiVoice system. The phone will display the extension number and name when it has
registered.
Once configured within the FortiVoice system, reboot the phone to download its configuration
and register to the system.
The following icons will be displayed on the LCD screen of the phone to indicate the registration
status:
For use as an external extension
1. Tap the Menu softkey.
2. Select Settings > Advanced Settings. Tap OK.
3. Enter 23646 as the Password. Tap OK.
4. Select Auto Provision. Tap OK.
5. Enter the IP address or FQDN of the FortiVoice system in the URL field. Tap the Save
softkey.
6. A window will appear asking to provision the phone. Tap the OK softkey to provision.
Setting up the Phone Page 7 FortiFone User Guide
Page 14

Personalizing your Phone
How to navigate through menus
To access the configuration menu:
• Tap the Menu softkey.
To select an item:
• Use the arrow keys to select an item, then tap the OK button.
The bottom line of the display shows up to 4 softkey functions at a time. To return to a previous
menu, tap the Back softkey.
To exit the Configuration menu, tap .
Entering values with the dial pad and softkeys
Use the dial pad to input numbers, letters, special characters, and a period. The dial pad mode
is displayed above the second softkey as for numeric, for uppercase characters,
for lowercase characters and to be able to enter any of the characters.
To enter characters with the dial pad, use the digit with the desired character. Tap the same digit
repeatedly until the desired character appears in the LCD. After entering a character, pause to
allow the cursor to move to next character position.
Other special entries include:
• To enter a period or dot (for example, to input an IP address), tap _ on the dial pad.
• To delete a letter in front of the cursor, tap the DELETE softkey.
• To enter special characters, tap A on the dial pad while the mode softkey is set to ,
or .
• To enter a space, tap : on the dial pad while the mode softkey is set to , or .
Prior to saving an entry, you may discard changes by tapping the BACK softkey to move to the
previous menu, or tap to exit the Settings menu.
Personalizing your Phone Page 8 FortiFone User Guide
Page 15

Configuration Overview
The phone supports the access and configuration of many parameters directly from the
Telephone User Interface. To access the Configuration menu, tap the Menu softkey while the
phone is not in use.
The Configuration menu consists of several sub-menus as listed below:
• Status
• Features
• Settings
• Messages
• History
• Directory
• USB Recording
Status
The Status page includes the IP address, MAC address and firmware of the phone. It also
provides more details about the phone, the network connections and the registration status.
Features
Auto redial
The following features of the FON-C71 are used to enable a redial state, change History settings
and to run certain diagnostics for troubleshooting.
You can enable auto redial to automatically redial a phone number when the called party is
busy. You can also configure the number of auto redial attempts and the time to wait between
redial attempts.
To configure auto redial via phone user interface:
1. Tap Menu > Features > Auto Redial.
2. Tap the or softkey to select Enable from the Auto Redial field.
3. Enter the desired time (in seconds) in the Redial Interval field.
The default time interval is 10 seconds.
4. Enter the desired number of redial attempts in the Redial Times field. The default value is 10.
5. Tap the Save softkey to accept the change or the Back softkey to cancel.
Configuration Overview Page 9 FortiFone User Guide
Page 16

History setting
You can enable/disable the FON-C71 ability to keep a record of Missed Calls and Placed Calls
through this setting. By default this setting is enabled.
To change the option for History Record:
1. Tap Menu > Features > History Setting.
2. Tap the or softkey to select Enabled or Disabled.
Diagnostics
You can run a Ping or Trace Route if the FON-C71 is having network connection issues.
To run a Ping:
1. Tap Menu > Features > Diagnostics.
2. Tap OK to enter the Network section.
3. Select Ping and tap Enter.
4. Enter the IP address or URL of the destination to Ping and tap Start.
5. The Ping results will be displayed on the screen of the phone.
To run a Trace Route:
Settings
Basic settings
1. Tap Menu > Features > Diagnostics.
2. Tap OK to enter the Network section.
3. Select Trace Route and tap Enter.
4. Enter the IP address or URL of the destination to Trace Route to and tap Start.
5. The Trace Route results will be displayed on the screen of the phone.
Language
The default language of the phone user interface is English. If the language of your web browser
is not supported by the phone, the web user interface will use English by default. You can
change the language for the phone user interface and the web user interface respectively.
To change the language for the phone user interface:
1. Tap Menu > Settings > Basic Settings > Language.
2. Tap or to select the desired language.
3. Tap the Save softkey to accept the change.
Time & date
The time and date are displayed on the LCD screen when the phone is idle. You can configure
the phone to obtain the time and date from the Simple Network Time Protocol (SNTP) server
automatically, or configure the date and time manually. If the phone cannot obtain the time and
date from the SNTP server, contact your system administrator for more information.
Configuration Overview Page 10 FortiFone User Guide
Page 17

To configure the SNTP settings via phone user interface:
1. Tap Menu > Settings > Basic Settings > Time & Date > SNTP Settings.
2. Tap the or softkey to select the time zone that applies to your area from the Time
Zone field.
3. The default time zone is +8.
4. Enter the domain name or IP address in the NTP Server1 and NTP Server2 field
respectively.
5. Tap the or softkey to select the desired value from the Daylight Saving field.
6. Tap the or softkey to select the desired time zone name from the Location field.
This field appears only if Daylight Saving field is selected Automatic.
7. Tap the Save softkey to accept the change or the Back softkey to cancel.
To configure the time and date manually via phone user interface:
1. Press Menu > Settings > Basic Settings > Time & Date > Manual Settings.
2. Enter the specific time and date.
3. Tap the Save softkey to accept the change.
4. The date and time displayed on the LCD screen will change accordingly.
To configure the time and date format via phone user interface:
1. Tap Menu > Settings > Basic Settings > Time & Date > Time & Date Format.
2. Tap the or softkey to select the desired time format (12 Hour or 24 Hour) from the Time
Format field.
3. Tap the or softkey to select the desired date format from the Date Format field.
4. Tap the Save softkey to accept the change or the Back softkey to cancel.
There are 7 available date formats. For example, for the date format WWW DD MMM, WWW
represents the abbreviation of the weekday, DD represents the two-digit day, and MMM
represents the first three letters of the month.
These are the date formats available:
Date Format Example (2015-03-18)
WWW-MMM-DD Wed Mar 18
DD-MMM-YY 18-Mar-15
YYYY-MM-DD 2015-03-18
DD/MM/YYYY 18/03/2015
MM/DD/YY 03/18/15
DD MMM YYYY 18 Mar 2015
WWW DD MMM Wed 18 Mar
Configuration Overview Page 11 FortiFone User Guide
Page 18

Display
You can configure the backlight to adjust the brightness of the LCD screen. Backlight status on
the LCD screen can be configured from the following options:
• Always On: Backlight is on permanently.
• Always Off: Backlight is off permanently.
• 15s, 30s, 1min, 2min, 5min, 10min or 30min: Backlight is turned off when the phone has
been inactive longer than the designated time.
To configure the backlight via phone user interface:
1. Tap Menu > Settings > Basic Settings > Display > Backlight Settings.
2. Tap the or softkey to select the desired value from the Backlight Time field.
3. Tap the Save softkey to accept the change or the Back softkey to cancel.
You can configure the contrast of the LCD screen to a comfortable level. The intensity of
contrast ranges from 1 to 10 and the highest intensity is 10.
To configure the contrast via phone user interface:
1. Tap Menu > Settings > Basic Settings > Display > Contrast.
2. Tap the or softkey to decrease or increase the intensity of contrast. The default
contrast level is 6.
3. Tap the Save softkey to accept the change or the Back softkey to cancel.
Sound
Ring Tones
Ring tones are used to indicate incoming calls. You can select different ring tones to distinguish
your phone from your neighbor’s.
To select a ring tone for the phone via phone user interface:
1. Tap Menu > Settings > Basic Settings > Sound > Ring Tones > Common.
2. Tap or to select the desired ring tone.
3. Tap the Save softkey to accept the change or the Back softkey to cancel. A ring tone for the
phone is configurable via web user interface at the path Settings > Preference > Ring Type.
To select a ring tone for the account via phone user interface:
1. Tap Menu > Settings > Basic Settings > Sound > Ring Tones.
2. Tap or to select the desired account, then tap the Enter softkey.
3. Tap or to select the desired ring tone. If Common is selected, this account will use the
ring tone selected for the phone.
4. Tap the Save softkey to accept the change or the Back softkey to cancel.
A ring tone for the account is configurable via web user interface at the path Account > Basic >
Ring Type.
Configuration Overview Page 12 FortiFone User Guide
Page 19

Key Tone
You can enable or disable a tone being heard when dialing on the FON-C71.
To change the Key Tone setting via phone user interface:
1. Tap Menu > Settings > Basic Settings > Sound > Key Tone.
2. Tap the or softkey to select Enable or Disable.
3. Tap the Save softkey to accept the change or the Back softkey to cancel.
Touch Tone
You can enable or disable a tone being heard when touching any of the keys on the FON-C71.
To change the Touch Tone setting via phone user interface:
1. Tap Menu > Settings > Basic Settings > Sound > Touch Tone.
2. Tap the or softkey to select Enable or Disable.
3. Tap the Save softkey to accept the change or the Back softkey to cancel.
Change PIN
The FON-C71 has a feature to lock the phone (see Phone Lock under the Advanced Settings),
which requires a PIN to unlock the phone. This setting allows the user of the phone to
customize the PIN for the Phone Lock feature.
To change the Phone Lock PIN via phone user interface:
1. Tap Menu > Settings > Basic Settings > Change PIN.
2. Enter the desired value in the Old PIN, New PIN and Confirm PIN fields respectively.
3. Tap the Save softkey to accept the setting or the Back softkey to cancel.
The unlock PIN length must be within 15 digits.
Phone lock
You can lock your phone temporarily when you are not using it. This feature helps to protect
your phone from unauthorized use.
Phone lock consists of the following:
• Menu Key: The Menu softkey is locked. You cannot access the menu of the phone until
unlocked.
• Function Keys: The function keys are locked. You cannot use the , , or navigation
keys and softkeys until unlocked.
• All Keys: All keys are locked, except the keys, , , _, ? and digit keys. You
are only allowed to dial emergency numbers, reject by tapping the Reject softkey or ,
answer incoming calls by tapping the Answer softkey or , end a call by tapping the
EndCall softkey or and mute the ringer by tapping the Silence softkey.
Configuration Overview Page 13 FortiFone User Guide
Page 20

To activate the phone lock via phone user interface:
1. Tap Menu > Settings > Advanced Settings (Default password: 23646) > Phone Lock.
2. Tap the or softkey to select Enabled from the Lock Enable field.
3. Tap the or softkey to select the desired type from the Lock Type field.
4. (Optional) Enter the desired interval of automatic phone lock in the Lock Time Out field. The
default timeout is 0. It means the phone will not be automatically locked. You need to long
press the ? key to lock it immediately when the phone is idle. If it is set to other values
except 0 (e.g. 5), the phone will be locked when the phone is inactive in idle screen for the
designated time (in seconds).
5. Tap the Save softkey to accept the change.
When the phone is locked, the LCD screen prompts Phone locked and displays the icon.
To unlock the phone, you must know the phone unlock PIN. The default phone unlock PIN is 123.
To change the phone unlock PIN via phone user interface:
1. Tap Menu > Settings > Basic Settings > Change PIN.
2. Enter the desired value in the Old PIN, New PIN and Confirm PIN fields respectively.
3. Tap the Save softkey to accept the setting or the Back softkey to cancel.
The unlock PIN length must be within 15 digits.
To unlock the phone via phone user interface:
1. Tap any locked key, the LCD screen prompts Please Enter PIN.
2. Enter the PIN in the Unlock PIN field.
3. Tap the OK softkey to unlock the keypad. The icon disappears from the LCD screen.
You can long tap ? or wait for a period of time (if configured) to lock the keypad again.
You can also unlock the keypad by entering the administrator password. When you enter the
administrator password to unlock the keypad, the phone will turn to the Change PIN screen.
Program emergency numbers on the phone so that they can be dialed when the phone is locked.
To specify emergency numbers via web user interface:
1. Click on Features > Phone Lock.
2. Enter the emergency number in the Emergency field. For multiple emergency numbers,
enter a comma between every two numbers. The default emergency numbers are 112, 911,
110.
3. Click on Confirm to accept the change.
Emergency number is configurable via web user interface only.
Configuration Overview Page 14 FortiFone User Guide
Page 21

Bluetooth
Activating/deactivating Bluetooth on the FON-C71
The FON-C71 features Bluetooth connectivity between itself and mobile phones.
To activate Bluetooth on the FON-C71:
1. Tap .
2. Tap the Switch softkey to change the Bluetooth setting between On/Off.
3. Tap the Save softkey.
Paring a mobile phone with the FON-C71
You can pair many mobile phones with your IP phone; however, only one mobile phone can be
connected at a time.
Before you pair a mobile phone, check the Bluetooth mode on the mobile phone to make sure
that the mobile phone is discoverable.
To pair and connect the Bluetooth-enabled mobile phone with your FON-C71:
1. Activate the Bluetooth mode.
2. Tap the Scan softkey to scan the available Bluetooth device automatically.
3. Select the desired mobile phone.
4. Tap the Connect softkey to connect the mobile phone to your IP phone. The prompt
Connecting… appears the screen.
5. Make sure that your mobile phone is showing the same passkey, and then tap the OK
softkey on your mobile phone and the FON-C71.
6. The icon will be displayed on the status bar of the FON-C71, indicating a successful
pairing.
Making/receiving a mobile call on the FON-C71 via Bluetooth
You can enable the phone audio feature to make/receive a mobile call using the FON-C71. The
FON-C71 acts as a hands-free device for your mobile phone. The call is made through your
mobile phone, but the audio is present on and the call control done by the FON-C71.
To configure the phone audio feature:
1. Pair and connect the Bluetooth-enabled mobile phone.
2. Tap .
3. Select Paired Bluetooth Device.
4. Select the paired mobile phone, then tap the Option softkey.
5. Select Detail > Channel Control.
6. Tap the or softkey to select Enabled from the Phone audio field.
7. Tap the Save softkey.
Using the FON-C71 as a Bluetooth speaker
You can enable the media audio feature to use the FON-C71 as a Bluetooth speaker for music
played on your mobile phone/PC.
To configure the media audio feature:
1. Pair and connect the Bluetooth-enabled mobile phone/PC.
Configuration Overview Page 15 FortiFone User Guide
Page 22

2. Tap .
3. Select Paired Bluetooth Device.
4. Select the connected mobile phone, then tap the Option softkey.
5. Tap the or softkey to select Enabled from the Media audio field.
6. Tap the Save softkey.
Making the FON-C71 discoverable via Bluetooth
If you make the FON-C71 discoverable, other Bluetooth devices can scan and find the
FON-C71.
To make the FON-C71 discoverable:
1. Activate Bluetooth mode.
2. Tap .
3. Select Edit My Device Information.
4. Select Open Discover and tap the Switch softkey to change the setting to On.
5. Tap the Save softkey.
Editing device information
You can change the Device Name of the FON-C71 to reflect its location during Bluetooth discovery.
To change the Device Name:
1. Activate Bluetooth mode.
2. Tap .
3. Select Edit My Device Information.
4. Enter the desired name in the Device Name field.
5. Tap the Save softkey.
Disconnecting a Bluetooth device
To disconnect a Bluetooth device from the FON-C71:
1. Tap .
2. Select Paired Bluetooth Device.
3. Select the connected Bluetooth device and tap the Disconnect softkey.
Wi-Fi
The FON-C71 has builtin Wi-Fi. In order to connect to activate and connect via Wi-Fi, follow
these steps.
Activating the Wi-Fi mode
To activate the Wi-Fi mode on the FON-C71:
1. Tap Menu > Settings > Basic Settings > Wi-Fi.
2. Tap the Switch softkey to select On.
3. Tap the Save softkey.
Configuration Overview Page 16 FortiFone User Guide
Page 23

Connecting to the wireless network
There are three ways to connect the FON-C71 to your wireless network:
• Manually connect to an available wireless network
• Wi-Fi Protected Setup (WPS)
• Manually add a wireless network
Manually connect to a wireless network
To manually connect to a wireless network:
1. Tap Menu > Settings > Basic Settings > Wi-Fi.
2. Tap the Switch softkey to select On. The FON-C71 will scan for an available wireless network.
3. Tap or to select the available networks then tap the Enter softkey.
4. Tap or to select the desired wireless network.
5. Tap the Connect softkey.
6. If the wireless network is secure, enter the password when prompted and tap OK.
7. Once connected to the wireless network the icon will appear in the status bar.
Connecting via WPS
There are two ways to connect the FON-C71 via WPS.
• Push Button Configuration
• Personal Identification Number
To connect using Push Button Configuration:
1. Tap Menu > Settings > Basic Settings > Wi-Fi.
2. Tap the Switch softkey to On.
3. Tap the WPS softkey and select WPS from the prompt list. The LCD screen will display a
prompt WPS has been activated, connect in 120s!
4. Long tap the WPS key on your gateway/router.
5. Once WPS setup has completed successfully, the icon will appear in the status bar.
To connect using Personal Identification Number:
1. Tap Menu > Settings > Basic Settings > Wi-Fi.
2. Tap the Switch softkey to On.
3. Tap the WPS softkey and then select WPS-PIN.
4. The LCD screen prompts Please input below PIN code on your Wi-Fi router and tap OK to
start connecting: xxx.
5. Log into your gateway/router web interface and configure it to search for clients. For more
information, refer to the documentation from the gateway/router manufacturer.
6. Once WPS setup has completed successfully, the icon will appear in the status bar.
Configuration Overview Page 17 FortiFone User Guide
Page 24

Manually add a wireless network
If your gateway/router has SSID broadcast disabled, it might not appear in the scanning results.
In that case, you must manually add the wireless network.
To manually add the wireless network:
1. Tap Menu > Settings > Basic Settings > Wi-Fi.
2. Tap the Switch softkey to On.
3. Tap or to select Known Networks.
4. Tap the Add softkey.
5. Use the WLAN settings obtained from your gateway/router to configure the WLAN Profile:
• If you select None or WEP from the pull-down list of Security Mode, enter the Profile
Name, SSID, WPA shared key in the corresponding fields.
• If you select WPA-PSK or WPA2-PSK from the pull-down list of Security Mode, select
the desired Cipher type (TKIP, AES or TKIP AES) from the Cipher Type field. Enter the
Profile Name, SSID, WPA shared key in the corresponding fields.
6. Tap the Save softkey.
7. Once WPS setup has completed successfully, the icon will appear in the status bar.
Viewing the wireless network information
To view connected wireless network information:
1. Tap Menu > Settings > Basic Settings > Wi-Fi > available networks.
2. Tap or to select the desired network.
3. Tap the Detail softkey to view detailed wireless network information (Profile Name, SSID or
Signal Strength, etc.)
Managing the saved wireless networks
Once the FON-C71 has connected to a wireless network, the wireless network profile is saved
in the Known Networks section. The next time you enable Wi-Fi, the FON-C71 will automatically
connect to the wireless network with the highest priority (the first in the list). Up to 5 wireless
network profiles can be saved in the Known Networks section. If you want to add a new wireless
network connection and 5 wireless network profiles already exist, you will need to delete one of
the older wireless network profiles.
To manage the Known Networks:
1. Tap Menu > Settings > Basic Settings > Wi-Fi > Known Networks.
2. Tap the Option softkey.
3. You can perform the following:
• To edit the wireless network profile:
i. Select Edit from the prompt list.
ii. Edit the desired wireless network information.
iii. Tap the Save softkey.
• To change the priority of the wireless network:
i. Select Move Up or Move Down from the prompt list to raise or lower the priority of
the wireless network that the FON-C71 automatically connects to.
Configuration Overview Page 18 FortiFone User Guide
Page 25

• To delete the desired wireless network profile:
i. Select Delete or Delete All from the prompts list. If you delete your wireless network
profile, you will need to manually connect the next time Wi-Fi is enabled.
Disconnecting from the wireless network
To disconnect from the wireless network:
1. Tap Menu > Settings > Basic Settings > Wi-Fi > available networks.
2. Select the connected wireless network and then tap the Disconnect softkey.
Advanced settings
Account
You can register only one account on the FON-C71 IP conference phone.
To register an account via phone user interface:
1. Tap Menu > Settings > Advanced Settings (Default password: 23646) > Account.
2. Tap the Enter softkey.
3. Tap the or softkey to select Enabled from the Account Status field.
4. Enter the desired value in Label, Display Name, Register Name, User Name, Password and
SIP Server1/2 fields respectively.
If you use the outbound proxy servers, do the following:
5. Press the or softkey to select Enabled from the Outbound Status field.
6. Enter the desired value in the Outbound Proxy1/2 and Proxy Fallback Interval fields
respectively.
7. Tap the Save softkey to accept the change or the Back softkey to cancel.
To disable an account via phone user interface:
1. Tap Menu > Settings > Advanced Settings (Default password: admin) > Account.
2. Tap the Enter softkey.
3. Tap the or softkey to select Disabled from the Account Status field.
4. Tap the Save softkey to accept the change or the Back softkey to cancel.
Registering an account is configurable via web user interface at the path Account > Register.
Network
WAN port
If your phone cannot contact a DHCP server for any reason, you need to configure network
settings manually. The IP phone can support either or both IPv4 and IPv6 addresses.
To configure the IP mode via phone user interface:
1. Tap Menu > Settings > Advanced Settings (Default password: admin) > Network > WAN Port.
2. Tap the or softkey to select IPv4 IP, IPv6 or IPv4 & IPv6 from the IP Mode field.
3. Tap the Save softkey to accept the change or the Back softkey to cancel.
Configuration Overview Page 19 FortiFone User Guide
Page 26

You can configure a static IPv4 address for the IP phone. Before configuring it, make sure that
the IP mode is configured as IPv4 IP or IPv4 & IPv6.
To configure a static IPv4 address via phone user interface:
1. Tap Menu > Settings > Advanced Settings (Default password: 23646) > Network > WAN Port.
2. Tap to select IPv4 IP and tap the Enter softkey.
3. Tap to select Static IPv4 Client and tap the Enter softkey.
4. Enter the desired value in the IPv4 Address, IPv4 Subnet Mask, IPv4 Default Gateway, IPv4
Pri.DNS and IPv4 Sec.DNS fields respectively.
5. Tap the Save softkey to accept the change or the Back softkey to cancel.
You can configure a static IPv6 address for the IP phone. Before configuring it, make sure that
the IP mode is configured as IPv6 or IPv4 & IPv6.
To configure a static IPv6 address via phone user interface:
1. Tap Menu > Settings > Advanced Settings (Default password: 23646) > Network > WAN Port.
2. Tap to select IPv6 and tap the Enter softkey.
3. Tap to select Static IPv6 Client and tap the Enter softkey.
4. Enter the desired value in the IPv6 IP, Prefix, Default Gateway, Primary.DNS and
Secondary.DNS fields respectively.
5. Tap the Save softkey to accept the change or the Back softkey to cancel.
VLAN
To configure VLAN:
1. Tap Menu > Settings > Advanced Settings (password: 23646) > Network > VLAN > WAN
Port.
2. Tap or to select the desired value from VLAN Status field.
3. Enter the VLAN ID (1-4094) in the VID Number field.
4. Enter the desired value (0 to 7) in the Priority field. 7 is the highest priority.
5. Tap the Save softkey to accept the change. The FON-C71 must reboot afterwards.
Web server
Users can configure the user or administrator features of the phone via web user interface. Web
server type determines access protocol of the FON-C71 web user interface, either HTTP or
HTTPS.
To configure the Web Server type:
1. Tap Menu > Advanced (default password: 23646) > Network > Web Server.
2. Tap or to select the desired value from the HTTP Status field.
3. Enter the desired HTTP port number in the HTTP Port field.
4. Tap or to select the desired value from the HTTPS Status field.
5. Enter the desired HTTPS port number in the HTTPS Port field.
6. Tap the Save softkey to accept the change. A dialog box pops up to prompt that the
settings will take effect after a reboot.
7. Tap OK to reboot the phone.
Configuration Overview Page 20 FortiFone User Guide
Page 27

802.1X
IEEE 802.1X authentication is an IEEE standard for Port-based Network Access Control (PNAC),
part of the IEEE 802.1 group of networking protocols. It offers an authentication mechanism for
devices to connect/link to a LAN or WLAN.
The 802.1X authentication involves three parties: a supplicant, an authenticator and an
authentication server. The supplicant is the FON-C71 that wishes to attach to the LAN or WLAN.
With 802.1X port-based authentication, the FON-C71 provides credentials, such as user name
and password, for the authenticator, and then the authenticator forwards the credentials to the
authentication server for verification. If the authentication server determines the credentials are
valid, the FON-C71 is allowed to access resources located on the protected side of the network.
To configure the 802.1X authentication via phone user interface:
1. Tap Menu > Advanced (default password: 23646) > Network > 802.1x.
2. Tap or to select the desired value from the 802.1x Mode field.
a. If you select EAP-MD5:
i. Enter the user name for authentication in the Identity field.
ii. Enter the password for authentication in the MD5 Password field.
b. If you select EAP-TLS:
i. Enter the user name for authentication in the Identity field.
ii. Leave the MD5 Password field blank.
c. If you select EAP-PEAP/MSCHAPv2:
i. Enter the user name for authentication in the Identity field.
ii. Enter the password for authentication in the MD5 Password field.
d. If you select EAP-TTLS/EAP-MSCHAPv2:
i. Enter the user name for authentication in the Identity field.
ii. Enter the password for authentication in the MD5 Password field.
e. If you select EAP-PEAP/GTC:
i. Enter the user name for authentication in the Identity field.
ii. Enter the password for authentication in the MD5 Password field.
f. If you select EAP-TTLS/EAP-GTC:
i. Enter the user name for authentication in the Identity field.
ii. Enter the password for authentication in the MD5 Password field.
g. If you select EAP-FAST:
i. Enter the user name for authentication in the Identity field.
ii. Enter the password for authentication in the MD5 Password field.
3. Tap Save to accept the change. A dialog box pops up to prompt that the settings will take
effect after a reboot.
4. Tap OK to reboot the phone.
VPN
The FON-C71 supports SSL VPN, which provides remote-access VPN capabilities through SSL.
OpenVPN is a full featured SSL VPN software solution that creates secure connections in
remote access facilities, designed to work with the TUN/TAP virtual network interface. TUN and
TAP are virtual network kernel devices. TAP simulates a link layer device and provides a virtual
point-to-point connection, while TUN simulates a network layer device and provides a virtual
network segment.
Configuration Overview Page 21 FortiFone User Guide
Page 28

FON-C71s use OpenVPN to achieve VPN feature. To prevent disclosure of private information,
tunnel endpoints must authenticate each other before secure VPN tunnel is established. After
VPN feature is configured properly on the FON-C71, the FON-C71 acts as a VPN client and
uses the certificates to authenticate the VPN server.
To use VPN, the compressed package of VPN-related files should be uploaded to the FON-C71
in advance. The file format of the compressed package must be *.tar. The related VPN files are:
certificates (ca.crt and client.crt), key (client.key) and the configuration file (vpn.cnf) of the VPN
client.
The *.tar file must be uploaded via the web interface first. To upload the *.tar file:
1. Enter the IP address of the FON-C71 in a web browser.
2. Log into the web interface (Username: admin, Password 23646).
3. Click on Network > Advanced.
4. Under VPN, click on Browse to locate your *.tar file.
5. Once the *.tar file has been selected, click on Upload.
6. Once the *.tar file has been uploaded, select the desired value from the Active pull-down list.
7. Click on Confirm at the bottom.
8. Click OK to reboot the phone.
To configure the VPN via the phone after uploading the *.tar file:
1. Tap Menu > Advanced (default password: 23646) > Network > VPN.
2. Tap or to select the desired value from the VPN Active field.
3. Tap the Save softkey to accept the changes.
4. Tap OK to reboot the phone.
LLDP
LLDP (Linker Layer Discovery Protocol) is a vendor-neutral Link Layer protocol, which allows
FON-C71 to receive and/or transmit device-related information from/to directly connected
devices on the network that are also using the protocol, and store the information about other
devices.
When the LLDP feature is enabled on the FON-C71, the FON-C71 periodically advertises their
own information to the directly connected LLDP-enabled switch. The FON-C71 can also receive
LLDP packets from the connected switch. When the application type is voice, FON-C71
decides whether to update the VLAN configurations obtained from the LLDP packets. When the
VLAN configurations on FON-C71 are different from the ones sent by the switch, the FON-C71
performs an update and reboots. This allows the FON-C71 to be plugged into any switch,
obtain their VLAN IDs, and then start communications with the call control.
To configure the LLDP feature:
1. Tap Menu > Advanced (default password: 23646) > Network > LLDP > LLDP Status.
2. Tap or to select the desired value from the LLDP Status field.
3. Enter the priority value (1-3600s) in the Packet Interval field.
4. Tap the Save softkey to accept the change. A dialog box pops up to prompt that the
settings will take effect after a reboot.
5. Tap OK to reboot the phone.
Configuration Overview Page 22 FortiFone User Guide
Page 29

CDP
CDP (Cisco Discovery Protocol) allows the FON-C71 to receive and/or transmit device-related
information from/to directly connected devices on the network that are also using the protocol,
and store the information about other devices.
When CDP feature is enabled on the FON-C71, the FON-C71 periodically advertises their
information to the directly connected CDP-enabled switch. The FON-C71 can also receive CDP
packets from the connected switch. When the VLAN configurations on the FON-C71 are
different from the ones sent by the switch, the FON-C71 performs an update and reboots. This
allows the FON-C71 to be plugged into any switch, obtain their VLAN IDs, and then start
communications with the call control.
To configure CDP:
1. Tap Menu > Advanced (default password: 23646) > Network > CDP > CDP Status.
2. Tap or to select the desired value from the CDP Status field.
3. Enter the priority value (1-3600s) in the Packet Interval field.
4. Tap the Save softkey to accept the change. A dialog box pops up to prompt that the
settings will take effect after a reboot.
5. Tap OK to reboot the phone.
NAT
To configure NAT traversal and STUN server:
1. Tap Menu > Advanced (default password: 23646) > Network > NAT > NAT Status.
2. Tap or to select the desired value from the NAT Status field.
3. Enter the IP address or the domain name of the STUN server in the STUN Server field.
4. Enter the port of the STUN server in the STUN Port field.
5. Tap the Save softkey to accept the change. A dialog box pops up to prompt that the
settings will take effect after a reboot.
6. Tap OK to reboot the phone.
Change password
The administrator password can be changed on the phone when not used with a FortiVoice.
To change the administrator password via phone user interface:
1. Tap Menu > Settings > Advanced Settings (Default password: 23646) > Change Password.
2. Enter the current password in the Old PWD field.
3. Enter the new password in the New PWD field.
4. Re-enter the new password in the Confirm PWD field.
5. Tap the Save softkey to accept the change or the Back softkey to cancel.
Administrator password is configurable via web user interface at the path Security > Password.
Configuration Overview Page 23 FortiFone User Guide
Page 30

Auto provision
The FON-C71 can be set to obtain configuration files through auto provisioning via
FTP/TFTP/HTTP/HTTPS.
To configure auto provisioning via the phone user interface:
1. Tap Menu > Settings > Advanced Settings (Default password: 23646) > Auto Provision.
2. Enter the URL of the auto provisioning server.
3. Tap to enter the User Name.
4. Tap to enter the Password.
5. Tap the Save softkey.
Reboot the phone to start the auto provisioning process.
Set AES key
When using encrypted configuration files during auto provisioning, the AES Key settings can be
set here:
1. Tap Menu > Settings > Advanced Settings (Default password: 23646) > Set AES Key.
2. Select Common AES or MAC Oriented AES.
3. Enter the AES Key.
4. Tap the Save softkey to accept the change or the Back softkey to cancel.
Reset to factory settings
The FON-C71 can be factory reset, which will default all settings within the configuration.
To reset the phone via phone user interface:
1. Tap Menu > Settings > Advanced Settings (Default password: 23646) > Reset Config.
2. Select Reset to Factory Settings and tap the Enter softkey.
3. Tap the OK softkey.
4. The FON-C71 will need to restart and will then be reset to factory settings.
FWD International
Forward international allows users to forward an incoming call to an international telephone
number (the prefix is 00).
To configure FWD International:
1. Tap Menu > Settings > Advanced Settings (Default password: 23646) > FWD International.
2. Tap or to select Enabled or Disabled.
Configuration Overview Page 24 FortiFone User Guide
Page 31

Messages
Voicemail
History
The Messages section is where you can check Voicemail.
When receiving a new voicemail, the LCD screen will prompt n New Voicemail(s) (n indicates the
number of unread voice messages, e.g., 89 New Voicemail(s)) and display .
To listen to voicemail:
1. When the LCD screen prompts that the phone receives a new voicemail, you can tap the
Connect softkey to dial out the voicemail access code.
2. Follow the voice prompt to listen to your voicemail.
To view the voicemail via phone user interface:
1. Tap Menu > Message > Voicemail > View Voicemail. The LCD screen displays the amount of
new and old voicemails.
2. Tap the Connect softkey to listen to voicemail.
The phone stores logs to track inbound and outbound calls. There are separate logs that
support 100 entries each:
• Missed Calls: stores calls that were unanswered.
• Received Calls: stores calls that were answered.
• Placed Calls: stores calls placed from this phone.
• Forwarded Calls: stores calls that have been forwarded from this phone.
Tap or to go between logs. You can also see all entries by selecting All Calls.
Adding to contacts
To add an entry to your contacts:
1. Using the navigation keys, select an entry.
2. Tap the Option softkey.
3. Select Move to Contact. Tap OK softkey.
4. Complete the contact’s information. Tap the Save softkey to finish.
Deleting (single or all entries)
To delete a single entry:
1. Using the navigation keys, select an entry.
2. Tap the Delete softkey.
To delete all entries:
1. Tap the Option softkey.
2. Select Delete All. Tap OK.
Configuration Overview Page 25 FortiFone User Guide
Page 32

Directory
Adding a contact
The phone supports up to 1000 contacts. Each contact can have up to 3 phone numbers and a
ring tone assigned. When a call is received from the contact, the specified ring tone overrides
the default one.
To add a contact:
1. Tap Menu > Directory > Local Directory > All Contacts.
2. Tap the Add softkey.
3. Edit the following fields:
• Name: name of the contact.
• Office: office phone number.
• Mobile: mobile phone number.
• Other: additional phone number field.
• Account: the account that will be used when calling this contact. FortiVoice systems use
Account 1.
• Ring: the ring tone that will be used when receiving calls from this contact.
• Group: the contact group that the contact is part of.
Editing a contact
To edit a contact:
1. Using the navigation keys, select an entry.
2. Tap the Option softkey.
3. Select Detail, tap the OK softkey.
4. Edit the information.
5. Tap the Save softkey.
Deleting a contact
To delete a contact:
1. Using the navigation keys, select a contact.
2. Tap the Option softkey.
3. Select Delete. Tap the OK softkey.
Searching a contact
To search for a contact:
1. Tap the Search softkey.
2. Enter part of a number or name to search for.
3. Tap OK or the OK softkey.
Configuration Overview Page 26 FortiFone User Guide
Page 33

USB Recording
If you insert a USB flash drive into the USB port on your phone, you can record active calls and
conferences on your phone. Recordings are stored as *.wav files on the USB flash drive.
When your phone is idle, and you insert a USB flash drive into the USB port on your phone, the
phone will detect the USB flash drive and display the prompt message USB Inserted and .
If the phone detects the USB flash drive, will display on the idle screen.
Before recording any call, it is necessary to know about the rules and restrictions governing
call recording in your country.
The Start REC softkey controls the recording function, and is available:
• when there are one or more calls connected to your phone
• during an active call
• when calls are on hold or muted
• during an attended transfer
• during a conference call.
The Start REC softkey is not available when:
• there are no connected calls on your phone
• you place a new call
• the phone prompts you to answer an incoming call.
The recording is not paused when the following occurs:
• you place a call on hold
• you mute a call
• you set up a conference call
• you perform the attended or semi-attended transfer
• an incoming call arrives on your phone.
To record a call:
Tap the More softkey, then tap the Start REC softkey during a call.
If the automatic recording feature is enabled, the call will be automatically recorded once it is
set up. The LCD screen prompts the approximate time remaining (depending on the free space
of the USB flash drive), and displays and recording duration.
During the recording, you can do the following:
• To pause the recording, tap the PauseREC softkey. The Re REC softkey appears on the LCD
screen. The LCD screen displays the icon and the duration stops counting.
• To continue the recording, tap the Re REC softkey.
Configuration Overview Page 27 FortiFone User Guide
Page 34

• To stop the recording, tap the StopREC softkey. The StartREC softkey appears on the LCD
screen. Recording stops and the LCD screen prompts Record file saved.
If there is insufficient free space (30 or 10 minutes left) on the USB flash drive during
recording, recording will not be stopped. When there is 30 minutes left, LCD screen
prompts the following: 30 minutes left for call recording.
Tap the Cancel softkey to return to the previous screen.
If there is no free space on the USB flash drive during recording, recording is stopped and
the recorded file is saved automatically. The LCD screen prompts the following: Storage is
not enough, recorded file is saved.
You can hold, transfer or set up a conference call while recording.
When you end a call while recording, the recording will be stopped and saved to the USB flash
drive automatically.
To stop recording while the phone records, do one of the following:
• Tap the StopREC softkey. The LCD screen prompts Record file saved, the and recording
duration disappear.
• When there is only a single call on the phone, tap the More softkey and then tap the End Call
softkey, or tap directly. The LCD screen prompts Record file saved, the and
recording duration disappear, and the phone returns to the idle screen.
The recording will be stored as a new .wav file on the USB flash drive when the phone starts
recording again.
Conference recording
You can record conference calls in the same way as other calls with the following exceptions:
All conference participants are recorded while recording. If one of the participants taps the Hold
softkey, only that participant is recorded. If one of the participants taps , only that participant
is not recorded.
Idle recording
You can insert a USB flash drive into the USB port on the FON-C71 to record an important
discussion when the phone is idle. Recordings are stored in *.wav format. The filenames include
a date & time stamp and a keyword “idleREC”, for example, 20161202-1043-idleREC was
created on December 2, 2016, at 10:43 when the phone is idle.
Idle recording is not available by default. For more information, contact your system
administrator. The size of a single recording file should be less than 2 GB.
To record a discussion when the phone is idle:
1. Tap Menu > USB > Idle Record.
2. Tap the StartREC softkey.
The LCD screen displays the and recording duration.
Configuration Overview Page 28 FortiFone User Guide
Page 35

During the recording, you can do the following:
• To pause the recording, tap the PauseREC softkey. The Re REC softkey appears on the LCD
screen. The LCD screen displays the icon and the duration stops counting.
• To continue the recording, tap the Re REC softkey.
• To stop the recording, tap the StopREC softkey. The LCD screen prompts Record file saved.
• To go back to the previous screen, tap the Back softkey. The phone returns to the USB
Record screen. The recording continues.
• To call a party and record the call, tap the Conference softkey to place a new call.
Recorded files playback
If you insert a USB flash drive into the USB port on the FON-C71, you can play back recorded
files on the FON-C71. You can also browse and delete the recorded files on the USB flash drive.
Playback can occur on either the FON-C71 or a computer using an application capable of
playing .wav files.
To browse the recorded files:
1. Tap Menu > USB > Browse Audio. The LCD screen shows all recorded files on the USB
flash drive. The recording duration and the size of the recorded file display after the
filename.
2. Tap or to scroll through the recorded files.
To play back a recording:
1. Tap Menu > USB > Browse Audio.
2. Tap or to highlight the recording you want to play back.
3. Tap the Play softkey.
During the recording playback, you can do the following:
• To pause the playback, tap the Pause softkey. The Play softkey appears on the LCD screen.
• To continue the playback, tap the Play softkey.
• To skip forward the playback, tap the softkey. Tap once to skip forward 8 seconds.
• To rewind the playback, tap the softkey. Tap once to rewind 8 seconds.
• To adjust the volume of the speakerphone, tap or .
• To stop the playback, tap the Back softkey. The phone returns to the Browse Audio screen.
If you are playing back a recorded call and an incoming call arrives on your phone, the playback
pauses and the phone rings. The playback will not continue until you tap the Play softkey.
To delete a recorded file:
1. Tap Menu > USB > Browse Audio.
2. Tap or to highlight the recording you want to delete.
3. Tap the Delete softkey. The LCD screen will prompt you to confirm the deletion.
4. Tap the OK softkey to confirm the deletion or the Cancel softkey to cancel.
You can also delete all recorded files by tapping the Clear softkey.
Configuration Overview Page 29 FortiFone User Guide
Page 36

Using your Phone
Receiving a call
When you receive a call, the phone will display the call details and the ring indicator will flash.
The phone will also ring unless the ringer is off.
To answer a call:
• Tap or the Answer softkey.
If your extension has call waiting enabled, you can tap the Answer softkey to answer the second call.
To reject a call:
• Tap the Reject softkey. The call will follow the extension’s Busy settings as configured in the
Call handling section.
Placing a call
You can place a call by dialing a number, selecting a number from the History or a contact from
the Directory.
To dial an extension number:
1. Dial the extension number. After about 4 seconds, the phone will dial the number.
2. Optionally, tap OK, the Send softkey or ? to place the call immediately.
To dial an outside number:
1. Dial the phone number. After about 4 seconds, the phone will dial the number.
2. Optionally, tap OK, the Send softkey or ? to place the call immediately.
To dial a number from the History:
1. Tap the History softkey.
2. Select a History entry. Tap the Send softkey.
To dial a number from the Directory:
1. Tap the Directory softkey.
2. Select the directory to browse.
3. Select the contact to dial.
4. Tap OK or the Dial softkey.
Using your Phone Page 30 FortiFone User Guide
Page 37

Ending a call
To end a call:
• Tap the EndCall softkey or .
Hold
To place calls on hold, tap the Hold softkey. While a call is on hold, you can answer or place
other calls. The held party will hear music, if configured to do so.
To toggle between two calls, tap the SWAP softkey or select a call using or and tap the
Resume softkey.
Mute
Mute turns the phone’s microphone on or off.
1. Tap to disable the microphone.
2. Tap again to enable the microphone.
Attendant transfer
Calls can be announced to the party receiving the transfer before completing the transfer.
To perform an attendant transfer:
1. Tap the Transfer softkey.
2. Dial the extension or phone number.
3. Announce the call.
4. Tap the Transfer softkey.
Blind transfer
Calls can be transferred without talking to the party receiving the transfer.
To perform a blind transfer:
1. Tap the Transfer softkey.
2. Dial the extension or phone number.
3. Tap the Transfer softkey.
Conference calls
The phone supports conferencing with up to four other parties.
To create a conference call:
1. Place the first call.
2. Tap the Conf softkey. The first call will be placed on hold.
3. Call the second party for the conference.
4. When the second party answers, tap the Conf softkey again.
5. Repeat steps for additional parties.
Using your Phone Page 31 FortiFone User Guide
Page 38

Call waiting
DND
Voicemail
To end a conference call:
1. Tap the Split softkey to separate the parties from the conference. All parties will be placed
on hold.
2. Tap the EndCall softkey to end the conference call. All parties will be disconnected.
When call waiting is enabled, the phone will present new calls to you while you’re on a call. In
order to use call waiting, it will first need to be enabled in the FortiVoice interface.
To answer an incoming call while on a call, tap the Answer softkey. The initial call will be placed
on hold. Refer to the “Hold” section on how to toggle between calls.
When DND (Do Not Disturb) is enabled, you will not be notified of incoming calls.
1. Tap the DND softkey to enable DND. will be displayed on the LCD screen.
2. Tap the DND softkey again to disable DND.
When you have a message waiting, appears to indicate you have new messages in your
mailbox.
To access your voice mailbox:
• Tap the Menu softkey and navigate to Messages > Voicemail.
• Alternatively, dial _LJ to access the voice mailbox.
Using your Phone Page 32 FortiFone User Guide
Page 39

Troubleshooting
Information
Tapping the OK button on the phone provides the means to quickly view the network
parameters (IP address, default gateway address, and subnet-mask), registration status of
phone, MAC address and firmware version. This information may be useful if calling Fortinet
Support.
Troubleshooting guide
Symptoms Corrective actions
Display is blank Confirm the phone’s power source.
1. If you are using the power adapter:
• Ensure it is plugged in. If it still doesn’t work, replace the
power adapter.
2. If you are using Power over Ethernet (PoE):
• Ensure your Ethernet cable is plugged into the INTERNET
port on the back of your phone.
• Ensure the PoE switch is properly configured. If it still
doesn’t work, replace the Ethernet cable.
Phone displays
“Obtaining IP Address”
for more than
2 minutes
is displayed Your phone is not registered.
The DHCP server is not responding.
1. Ensure your DHCP server is online. This is typically your router.
2. Reboot the router or DHCP server.
3. If you are still experiencing issues, the phone may require
advanced network configuration. Contact your administrator.
1. On the Extension page of the FortiVoice interface, ensure the
MAC address is correctly entered and the Phone Type is
FON-C71. Save your configuration and reboot the phone.
2. On the phone, ensure the Auto Provision address is correct.
To verify, see “For use as an external extension” on page 7.
3. If your phone is configured as an external extension, check the
network connection and firewall settings at the phone system
location.
Troubleshooting Page 33 FortiFone User Guide
Page 40

Warranty
This phone is covered by a one-year hardware warranty against manufacturing defects as set
forth in the EULA.
www.fortivoice.com/support
For warranty service:
• In North America, please call 1-866-648-4638 for further information.
• Outside North America, contact your sales representative for return instructions.
You will be responsible for shipping charges, if any. When you return this telephone for warranty
service, you must present proof of purchase.
Warranty Page 34 FortiFone User Guide
Page 41

 Loading...