

Fortinet FortiAP 112B Quick Start Manual

FortiAP 112B
QuickStart Guide

September 14, 2012
20-430-177873-20120914
Copyright© 2012 Fortinet, Inc. All rights reserved. Fortinet®,
FortiGate®, and FortiGuard®, are registered trademarks of
Fortinet, Inc., and other Fortinet names herein may also be
trademarks of Fortinet. All other product or company names
may be trademarks of their respective owners. Performance
metrics contained herein were attained in internal lab tests under
ideal conditions, and performance may vary. Network variables,
different network environments and other conditions may affect
performance results. Nothing herein represents any binding
commitment by Fortinet, and Fortinet disclaims all warranties,
whether express or implied, except to the extent Fortinet enters
a binding written contract, signed by Fortinet’s General Counsel,
with a purchaser that expressly warrants that the identified
product will perform according to the performance metrics
herein. For absolute clarity, any such warranty will be limited to
performance in the same ideal conditions as in Fortinet’s internal
lab tests. Fortinet disclaims in full any guarantees. Fortinet
reserves the right to change, modify, transfer, or otherwise revise
this publication without notice, and the most current version of the
publication shall be applicable.

Table of Contents
Package Contents 1
Connecting Your FortiAP Unit 2
Access Point Configuration 3
Mesh Mode Configuration 5
Mounting Your FortiAP Unit 7
Technical Specifications 9
LED Specifications 10
Documentation and Links 11
Cautions and Warnings 12
Register Your Product 14
Product License Agreement 15
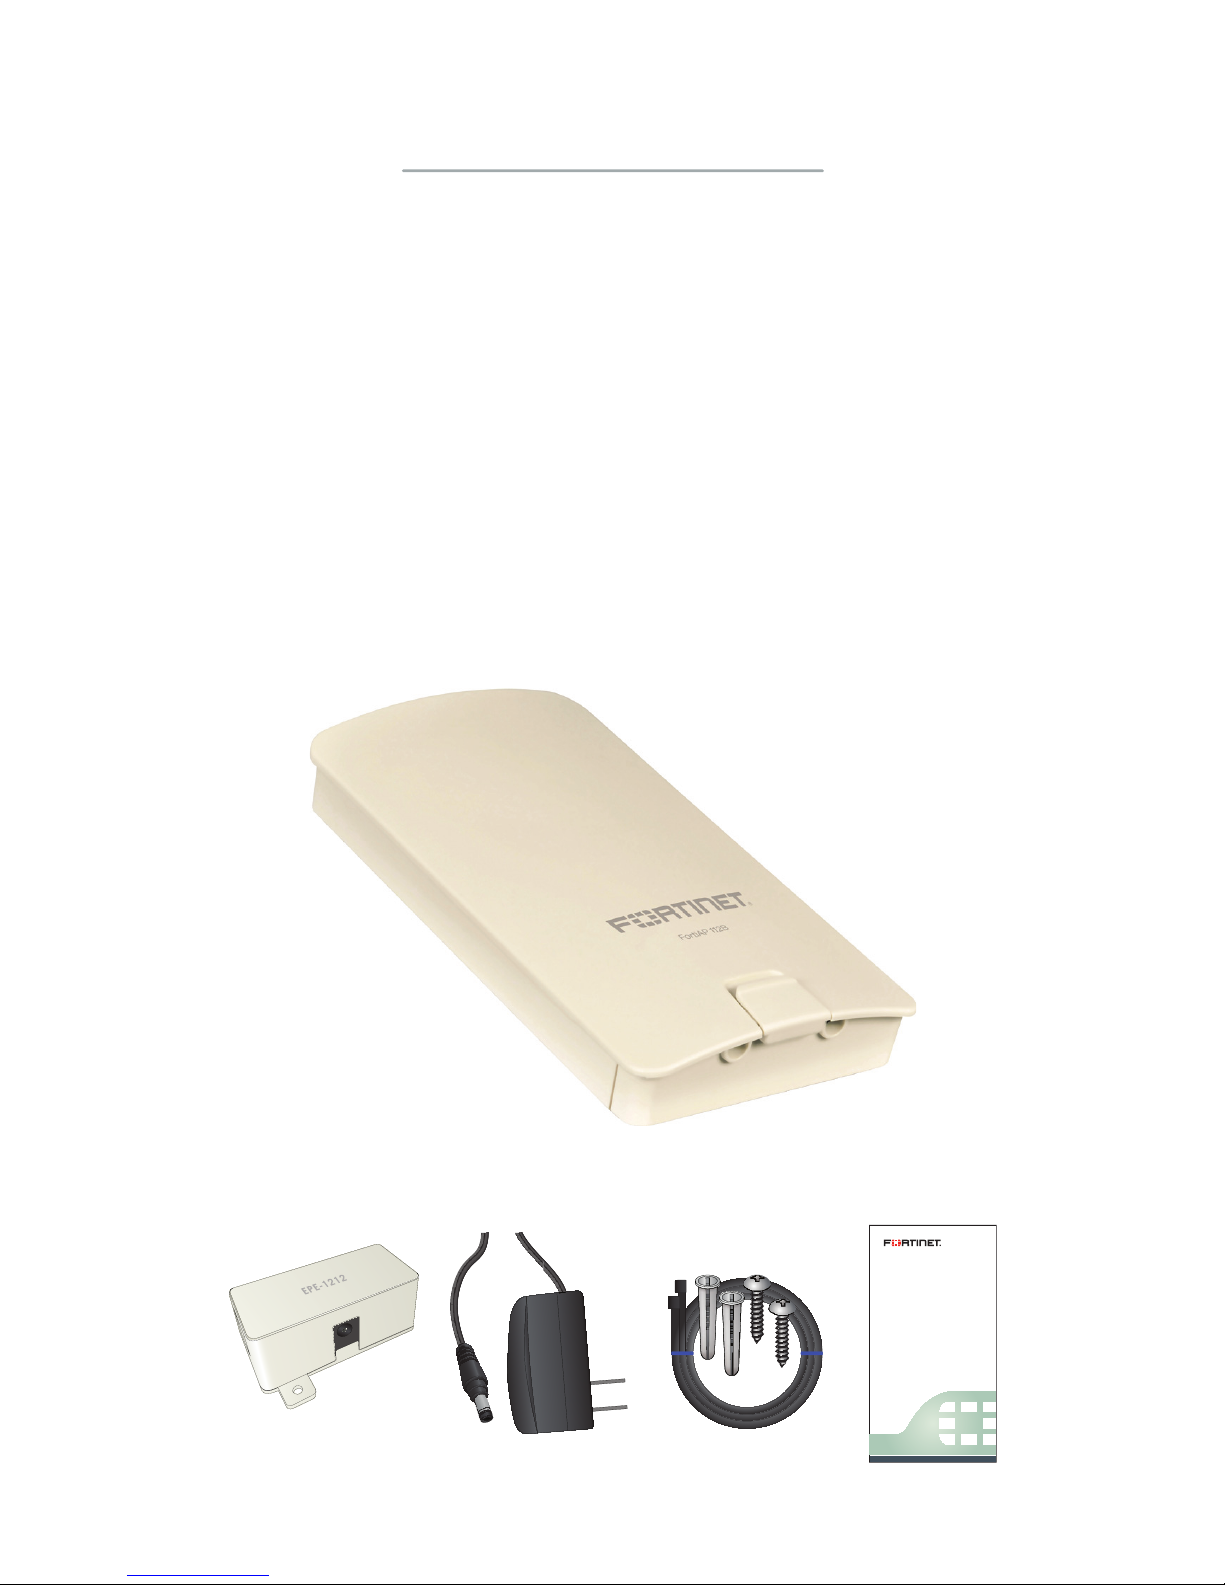
Package Contents
Page 1
Fortinet’s FortiAP wireless thin access points deliver secure,
identity-driven WiFi client access that creates a fortifi ed
WLAN network that is centrally managed by a FortiGate or
FortiWiFi platform. The FortiAP 112B has built-in proprietary
PoE to support long-range network installation. It can be
setup either as an access point, or in mesh mode.
Your box contains the following:
FortiAP 112B
QuickStart Guide
Wall/Pole Mounting Hardware Kit
PoE Injector with Power Adapter
FortiAP 112B
QuickStart Guide
Quickstart
Guide
Wall/Pole Mounting
Hardware Kit
LAN
PoE
PoE Injector Power Adapter

Page 2
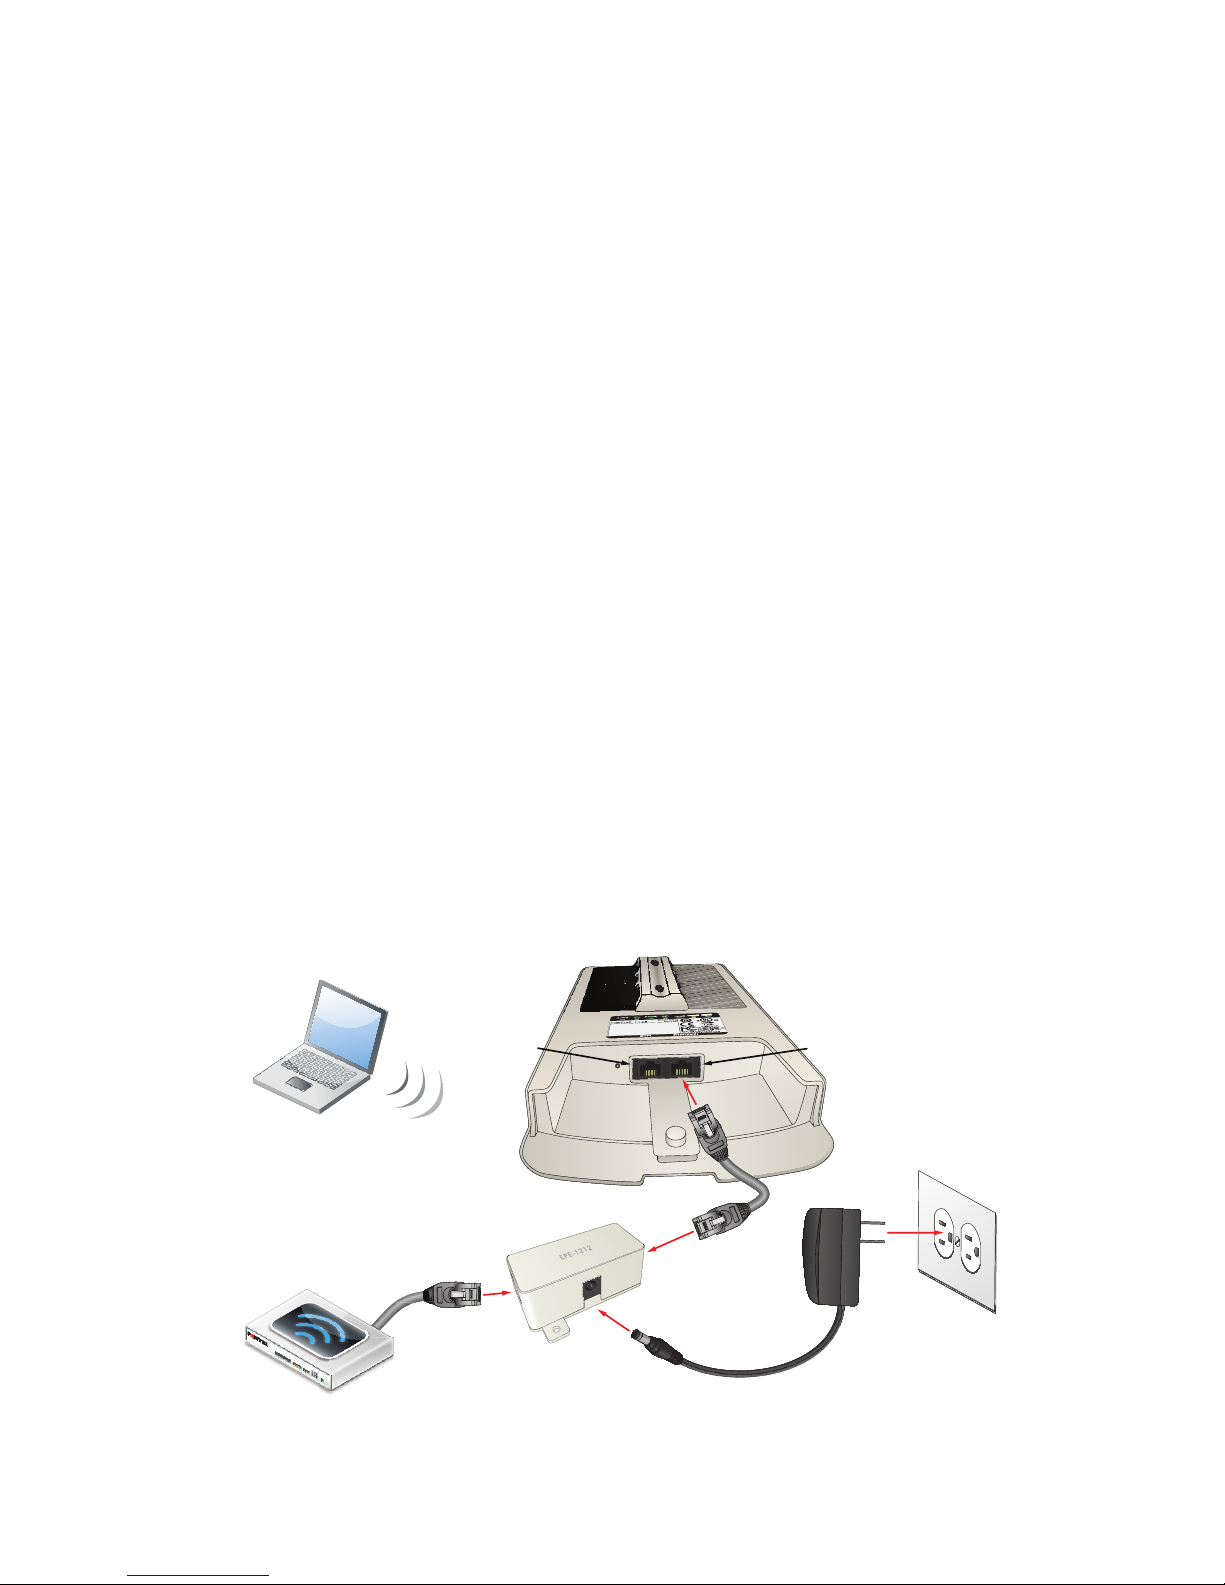
Connecting Your FortiAP Unit
The FortiAP 112B -PoE can be configured to function as an access
point, or to operate in mesh mode.
Adequate grounding must be provided to the FortiAP unit and the
PoE injector, in compliance with the local electrical code.
Note: The included PoE injector must be mounted indoors, as it is
not weatherproof.
Caution: Only use the provided PoE injector (EPE-1212) and power
adapter with this devices. Using a different PoE injector or power
adapter may cause damage to the device.
Note: The FortiAP 112B has a directional antenna located on the
front of the device. For a reliable wireless connection, the device
must be aimed towards its target to establish a connection. See
Mounting Your FortiAP Unit on page 7.
To connect the FortiAP unit:
1. Insert an Ethernet cable into the ETH (PoE) port of the FortiAP
unit and insert the other end of the cable into the PoE port on
the provided PoE injector.
2. Insert one end of the provided power adapter into the PoE
injector, and plug the other end into an electrical outlet.
The Status LED will light up.
3. Insert an Ethernet cable from the LAN port of the provided PoE
injector or the ETH port of the FortiAP unit, to a PC, FortiGate,
or FortiWifi device.
To configure the management computer:
1. Configure the management computer to be on the same subnet
as the internal interface of the FortiAP unit:
a. Browse to the Network and Sharing Center > Change
Adapter Settings > Local Area Connection Properties >
Internet Protocol Version 4 (TCP/IPv4) Properties.
b. Change the IP address of the management computer to
192.168.1.1 and the netmask to 255.255.255.0.
2. Connect from the LAN port of the PoE injector, or the ETH port
on the FortiAP unit, to the management computer using an
Ethernet cable.

Page 3
The FortiAP unit is designed to require no configuration in most
networks. Zero Configuration mode works if the unit is directly
connected (or through the PoE injector) to the FortiGate or FortiWifi
performing the Wireless LAN Controller (WLC) functions, or on the
same layer-2 network and subnet as the FortiGate or FortiWifi unit.
If the FortiAP wireless controller’s IP address cannot be determined
using Zero Configuration mode, or if the network uses static IP
addresses, it can be configured to use a static IP address.
To enable the FortiAP using Zero Configuration:
1. After connecting the FortiAP unit as described in the previous
chapter, the unit goes through its boot procedure and requests
an IP address from the DHCP server.
2. If the IP address is retrieved successfully, the FortiAP enters
discovery mode to locate a FortiGate or FortiWifi wireless
controller. The discovery modes are:
• Broadcast
• Multicast
• DHCP option 138
3. Verify that the FortiAP has successfully connected to the
controller.
In the FortiGate Web-based Manager, go to WiFi Controller >
Managed Access Points > Managed FortiAP. A successfully
discovered unit displays an orange circle with a question mark.
4. Select the access point and click Edit.
5. In the State field, select Authorize.
6. In the AP Profile field, select Change, then select a profile from
the list and click OK.
The configuration is downloaded from the wireless controller to
the FortiAP and the WiFi LED lights up.
To enable the FortiAP with a static IP address:
1. Connect the unit and configure the management computer as
described in the “Connecting Your FortiAP Unit” chapter.
2. Telnet to IP address 192.168.1.2.
3. Type admin in the Name field, leave the Password field blank,
and press Enter.
Access Point Configuration
4. Confi gure a static IP address for the FortiAP unit and netmask
& gateway information for your network, using the following
commands:
cfg -a ADDR_MODE=STATIC
cfg –a AP_IPADDR=xxx.xxx.xxx.xx
cfg –a AP_NETMASK=255.255.255.0
cfg –a IPGW=yyy.yyy.yyy.yyy
cfg –a AC_IPADDR_1=zzz.zzz.zzz.zzz
where xxx is the IP address of the FortiAP unit, yyy is the
Gateway IP address and zzz is the IP address of the FortiGate
Wireless Controller.
5. Save the confi guration by typing the following command:
cfg –c
6. Unplug the FortiAP unit and plug it back in order for the
confi guration to take effect.
7. Move the FortiAP to the intended deployment location and
connect the Ethernet cable as described in the Connecting
chapter.
8. Log in to the FortiGate controller Web-based Manager, and
go to WiFi Controller > Managed Access Points > Managed
FortiAP. A successfully discovered unit displays an orange circle
with a question mark in the Status column.
9. Select the access point and click Edit.
10. In the State fi eld, select Authorize.
11. In the Edit FortiAP dialog box, select Enable Wireless Radio.
Leave the remaining settings at their default values. The
confi guration is downloaded from the FortiGate unit to the
FortiAP device.
For more information, see the Deploying Wireless Networks
Guide, available on Fortinet’s technical documentation website,
http://docs.fortinet.com.
Page 4
LAN
PoE
LAN
Port
ETH
Port
ETH (PoE)
Port
PoE
Port

Mesh Mode Configuration
Page 5
The Mesh operation mode can be configured using either the
Web-based Manager, or the Command Line Interface (CLI).
Before starting, make note of the device’s MAC address and serial
number, then clearly mark the FortiAP unit to avoid confusion
during installation.
Mesh mode requires an upstream FortiAP or FotiWiFi device that
has mesh downlink enabled.
Mesh mode can only connect with the Mesh-Backhaul SSID from
a device. It cannot connect with the common SSID from a FortiAP,
FortiWiFi, or third party device.
Note: Mesh mode can only be used with a controller running
FortiOS v5.0 or later.
Using the Web-based Manager:
1. Connect the unit and configure the management computer as
described in the “Connecting Your FortiAP Unit” chapter.
2. Start a browser of your choice and browse to http://192.168.1.2.
3. Type admin in the Name field, leave the Password field blank,
and select Login.
4. Find the Uplink section on the System Information tab, set the
Operation Mode to Mesh, and setup the Mesh AP SSID and
Mesh AP Password.
The default SSID and password are fortinet.mesh.root.
It is recommended that you change both the default SSID and
password.
5. Optionally, select Ethernet Bridge to enable building to building
bridging.
6. Select Apply.
7. Disconnect the FortiAP device from the management computer.
8. Aim the front of the FortiAP unit towards the upstream mesh
node (usually another AP device) to complete the association.
Once the link is established, the Mesh signal intensity indicators
should change from flashing to red, yellow, or green. If red,
adjust the location of the unit and the direction it is facing until
the intensity indicators show yellow or green.
Using the CLI
1. Connect the unit and configure the management computer as
described in the “Connecting Your FortiAP Unit” chapter.
 Loading...