

Page 1

FortiAnalyzer-4000B®
Rack and Hardware Install Guide
Version 4.0 MR2
Page 2

FortiAnalyzer-4000B Rack and Hardware Install Guide
Version 4.0 MR2
28 May 2010
05-420-126194-20100608
© Copyright 2010 Fortinet, Inc. All rights reserved. No part of this publication including text, examples,
diagrams or illustrations may be reproduced, transmitted, or translated in any form or by any means,
electronic, mechanical, manual, optical or otherwise, for any purpose, without prior written permission of
Fortinet, Inc.
Trademarks
Dynamic Threat Prevention System (DTPS), APSecure, FortiASIC, FortiBIOS, FortiBridge, FortiClient,
FortiGate®, FortiGate Unified Threat Management System, FortiGuard®, FortiGuard-Antispam,
FortiGuard-Antivirus, FortiGuard-Intrusion, FortiGuard-Web, FortiLog, FortiAnalyzer, FortiManager,
Fortinet®, FortiOS, FortiPartner, FortiProtect, FortiReporter, FortiResponse, FortiShield , Fo rtiVoIP, and
FortiWiFi are trademarks of Fortinet, Inc. in the United States and/or other countries. The names of actual
companies and products mentioned herein may be the trademarks of their respective owners.
Regulatory compliance
FCC Class A/Class B Part 15 CSA/CUS
Caution: Risk of Explosion if Battery is replaced by an Incorrect Type. Dispose of Used Batteries According
to the Instructions
Page 3

Contents
Introduction 1
Registering your Fortinet product. . . . . . . . . . . . . . . . . . . . . . . . . . . . . 1
Customer service and technical support . . . . . . . . . . . . . . . . . . . . . . . . . 1
Fortinet documentation . . . . . . . . . . . . . . . . . . . . . . . . . . . . . . . . . 2
Fortinet Tools and Documentation CD . . . . . . . . . . . . . . . . . . . . . . . . 2
Fortinet Knowledge Center . . . . . . . . . . . . . . . . . . . . . . . . . . . . . 2
Comments on Fortinet technical documentation . . . . . . . . . . . . . . . . . . 2
Conventions . . . . . . . . . . . . . . . . . . . . . . . . . . . . . . . . . . . . . . . 2
IP addresses . . . . . . . . . . . . . . . . . . . . . . . . . . . . . . . . . . . . . 2
CLI constraints . . . . . . . . . . . . . . . . . . . . . . . . . . . . . . . . . . . . 2
Notes, Tips and Cautions . . . . . . . . . . . . . . . . . . . . . . . . . . . . . . 2
Typographical conventions. . . . . . . . . . . . . . . . . . . . . . . . . . . . . . 3
Rack and Hard Drive Installation Instructions 5
Installing Hard Drives. . . . . . . . . . . . . . . . . . . . . . . . . . . . . . . . . . . 5
Removing Hard Drive Trays from the Chassis . . . . . . . . . . . . . . . . . . . . 5
Installing a Hard Drive to the Hard Drive Tray . . . . . . . . . . . . . . . . . . . . 6
Rack Installation . . . . . . . . . . . . . . . . . . . . . . . . . . . . . . . . . . . . . 8
Overview . . . . . . . . . . . . . . . . . . . . . . . . . . . . . . . . . . . . . . . 8
Unpacking the System . . . . . . . . . . . . . . . . . . . . . . . . . . . . . . . . 8
Preparing for Setup. . . . . . . . . . . . . . . . . . . . . . . . . . . . . . . . . . 8
Choosing a Setup Location. . . . . . . . . . . . . . . . . . . . . . . . . . . . . . 8
Warnings and Precautions!. . . . . . . . . . . . . . . . . . . . . . . . . . . . . . 9
Rack Precautions . . . . . . . . . . . . . . . . . . . . . . . . . . . . . . . . 9
General Server Precautions . . . . . . . . . . . . . . . . . . . . . . . . . . . 9
Rack Mounting Considerations. . . . . . . . . . . . . . . . . . . . . . . . . . . . 9
Ambient Operating Temperature. . . . . . . . . . . . . . . . . . . . . . . . . 9
Reduced Airflow . . . . . . . . . . . . . . . . . . . . . . . . . . . . . . . . . 9
Mechanical Loading . . . . . . . . . . . . . . . . . . . . . . . . . . . . . . . 9
Circuit Overloading. . . . . . . . . . . . . . . . . . . . . . . . . . . . . . . . 9
Reliable Ground . . . . . . . . . . . . . . . . . . . . . . . . . . . . . . . . 10
Rack Mounting Instructions. . . . . . . . . . . . . . . . . . . . . . . . . . . . . . . 10
Rack Rails Assembly. . . . . . . . . . . . . . . . . . . . . . . . . . . . . . . . 10
Identifying the Inner Rack Rails . . . . . . . . . . . . . . . . . . . . . . . . . . 10
Installing the Inner Rails on the Chassis . . . . . . . . . . . . . . . . . . . . . . 10
Installing the Outer Rails onto a Rack . . . . . . . . . . . . . . . . . . . . . . . 11
Installing the Chassis into a Rack . . . . . . . . . . . . . . . . . . . . . . . . . 12
Version 4.0 MR2 Rack and Hardware Install Guide
05-420-126194-20100608 i
http://docs.fortinet.com/ • Feedback
Page 4

Contents
Version 4.0 MR2 Rack and Hardware Install Guide
ii 05-420-126194-20100608
http://docs.fortinet.com/ • Feedback
Page 5

Introduction
Welcome and thank you for selecting Fortinet products for your network protection.
Fortinet
network misuse and abuse, and help you use communications resources more efficiently
without compromising the performance of your network. Fortinet systems are ICSAcertified for Antivirus, Firewall, IPSec, SSL- TLS, IPS, Intrusion detection, an d AntiS pyware
services.
Fortinet systems are dedicated, easily managed security devices that deliver a full suite of
capabilities including:
• Application-level services such as virus protection, intrusion protection, spam filtering,
• Network-level services such as firewall, intrusion detection, IPSec and SSL VPN, and
• Management services such as user authentication, logging, reporting with
The Fortinet security system uses Fortinet’s Dynamic Threat Prevention System
(DTPS™) technology, which leverages breakthroughs in chip design, networking, security
and content analysis. The unique ASIC-accelerated architecture analyzes content and
behavior in real-time, enabling key applications to be deployed right at the network edge
where they are most effective at protecting your networks.
This chapter contains the following topics:
• Registering your Fortinet product
• Customer service and technical support
• Fortinet documentation
• Conventions
®
ASIC-accelerated multi-threat security systems improve network security, reduce
web content filtering, IM, P2P, and VoIP filtering
traffic shaping
FortiAnalyzer, administration profiles, secure web and CLI administrative access, and
SNMP.
Registering your Fortinet product
Before you begin, take a moment to registe r your Fortinet product at the Fortinet Technical
Support web site, https://support.fortinet.com.
Many Fortinet customer services, such as firmware updates, technical support, and
FortiGuard Antivirus and other FortiGuard services, require product registration.
For more information, see the Fortinet Knowledge Center article Registration Frequently
Asked Questions.
Customer service and technical support
Fortinet Technical Support provides services designed to make sure that your Fortinet
products install quickly, configure easily, and operate reliably in your network.
To learn about the technical support services that Fortinet provides, visit the Fortinet
Technical Support web site at https://support.fortinet.com.
FortiAnalyzer-4000B Version 4.0 MR2 Rack and Hardware Install Guide
05-420-126194-20100608 1
http://docs.fortinet.com/ • Feedback
Page 6

Fortinet documentation Introduction
You can dramatically improve the time that it takes to resolve your technical support ticket
by providing your configuration file, a network diagram, and other spec ific information. For
a list of required information, see the Fortinet Knowledge Center article Wh at doe s
Fortinet Technical Support require in order to best assist the customer?
Fortinet documentation
The Fortinet Technical Documentation web site, http://docs.fortinet.com, provides the
most up-to-date versions of Fortinet publications, as well as additional technical
documentation such as technical notes.
In addition to the Fortinet Technical Documentation web site, you can find Fortinet
technical documentation on the Fortin et Tools and Documentation CD, and on the Fortinet
Knowledge Center.
Fortinet Tools and Documentation CD
Many Fortinet publications are available on the Fortinet Tools and Documentation CD
shipped with your Fortinet product. The documents on this CD are current at shipping
time. For current versions of Fortinet documentation, visit the F ortin et Technical
Documentation web site, http://docs.fortinet.com.
Fortinet Knowledge Center
Comments on Fortinet technical documentation
Conventions
IP addresses
CLI constraints
The Fortinet Knowledge Center provides additional Fortinet technical documentation,
such as troubleshooting and how-to-articles, examples, FAQs, technical notes, a glossar y,
and more. Visit the Fortinet Knowledge Center at http://kb.fortinet.com.
Please send information about any errors or omissions in this or any Fortinet technica l
document to techdoc@fortinet.com.
Fortinet technical documentation uses the conventions described below.
To avoid publication of public IP addresses that belong to Fortinet or any other
organization, the IP addresses used in Fortinet technical documentation are fictional and
follow the documentation guidelines specific to Fortinet. The addresses used ar e from the
private IP address ranges defined in RFC 1918: Address Allocation for Private Internets,
available at http://ietf.org/rfc/rfc1918.txt?number-1918.
CLI constraints, such as <address_ipv4>, indicate which data types or string patterns
are acceptable input for a given parameter or variable value. CLI constraint conventions
are described in the CLI Reference document for each product.
Notes, Tips and Cautions
Fortinet technical documentation uses the following guidance and styles for notes, tips
and cautions.
FortiAnalyzer-4000B Version 4.0 MR2 Rack and Hardware Install Guide
2 05-420-126194-20100608
http://docs.fortinet.com/ • Feedback
Page 7
Introduction Conventions
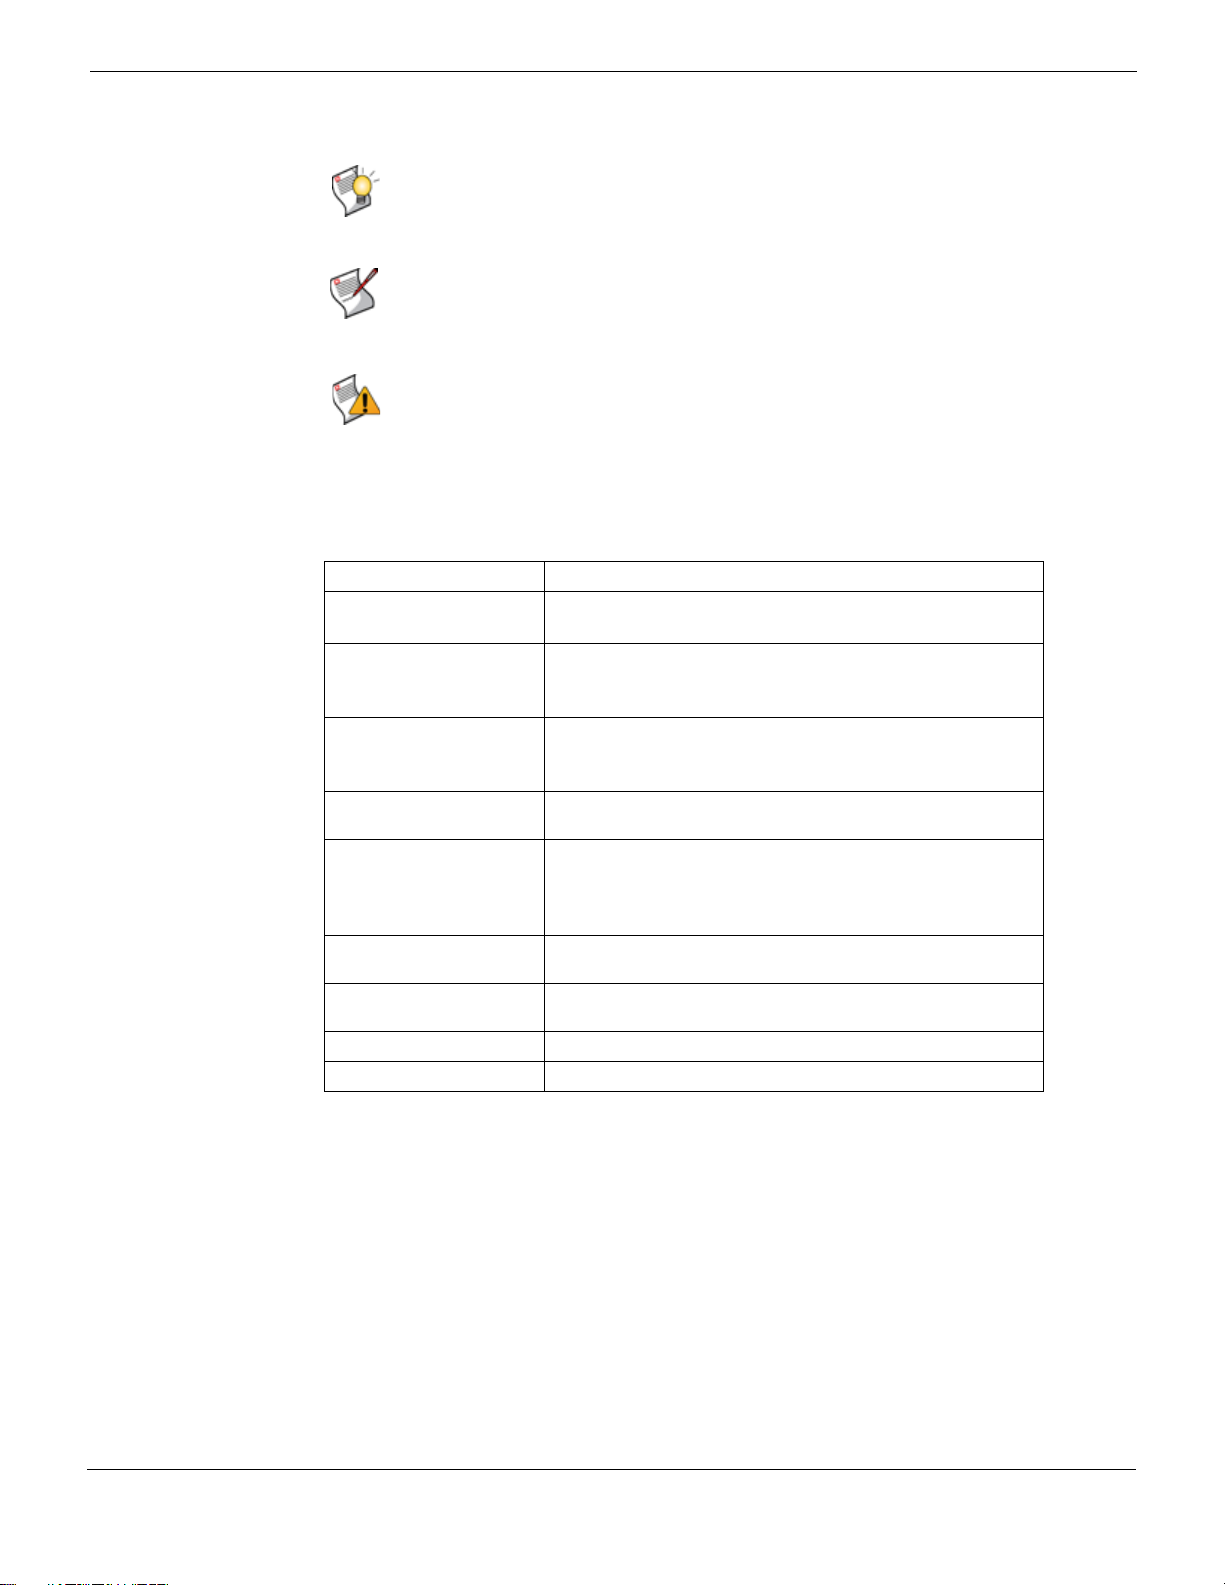
Tip: Highl ights useful additional information, often tailored to your workplace activity.
Note: Also presents useful information, but usually focused on an alternative, optional
method, such as a shortcut, to perform a step.
Caution: Warns you about commands or procedures that could have unexpected or
undesirable results including loss of data or damage to equipment.
Typographical conventions
Fortinet documentation uses the following typographical conventions:
Table 1: Typographical conventions in Fortinet technical documentation
Convention Example
Button, menu, text box,
field, or check box label
CLI input config system dns
CLI output FGT-602803030703 # get system settings
Emphasis HTTP connections are not secure and can be intercepted by
File content <HTML><HEAD><TITLE>Firewall
Hyperlink Visit the Fortinet Technical Support web site,
Keyboard entry Type a name for the remote VPN peer or client, such as
Navigation Go to VPN > IPSEC > Auto Key (IKE).
Publication For details, see the
From Minimum log level, select Notification.
set primary <address_ipv4>
end
comments : (null)
opmode : nat
a third party.
Authentication</TITLE></HEAD>
<BODY><H4>You must authenticate to use this
service.</H4>
https://support.fortinet.com.
Central_Office_1.
FortiGate Administration Guide.
FortiAnalyzer-4000B Version 4.0 MR2 Rack and Hardware Install Guide
05-420-126194-20100608 3
http://docs.fortinet.com/ • Feedback
Page 8

Conventions Introduction
FortiAnalyzer-4000B Version 4.0 MR2 Rack and Hardware Install Guide
4 05-420-126194-20100608
http://docs.fortinet.com/ • Feedback
Page 9
Rack and Hard Drive Installation
2
1
Instructions
The FortiAnalyzer-4000B comes with a sliding rail kit. Use the instructions below to install
the rails.
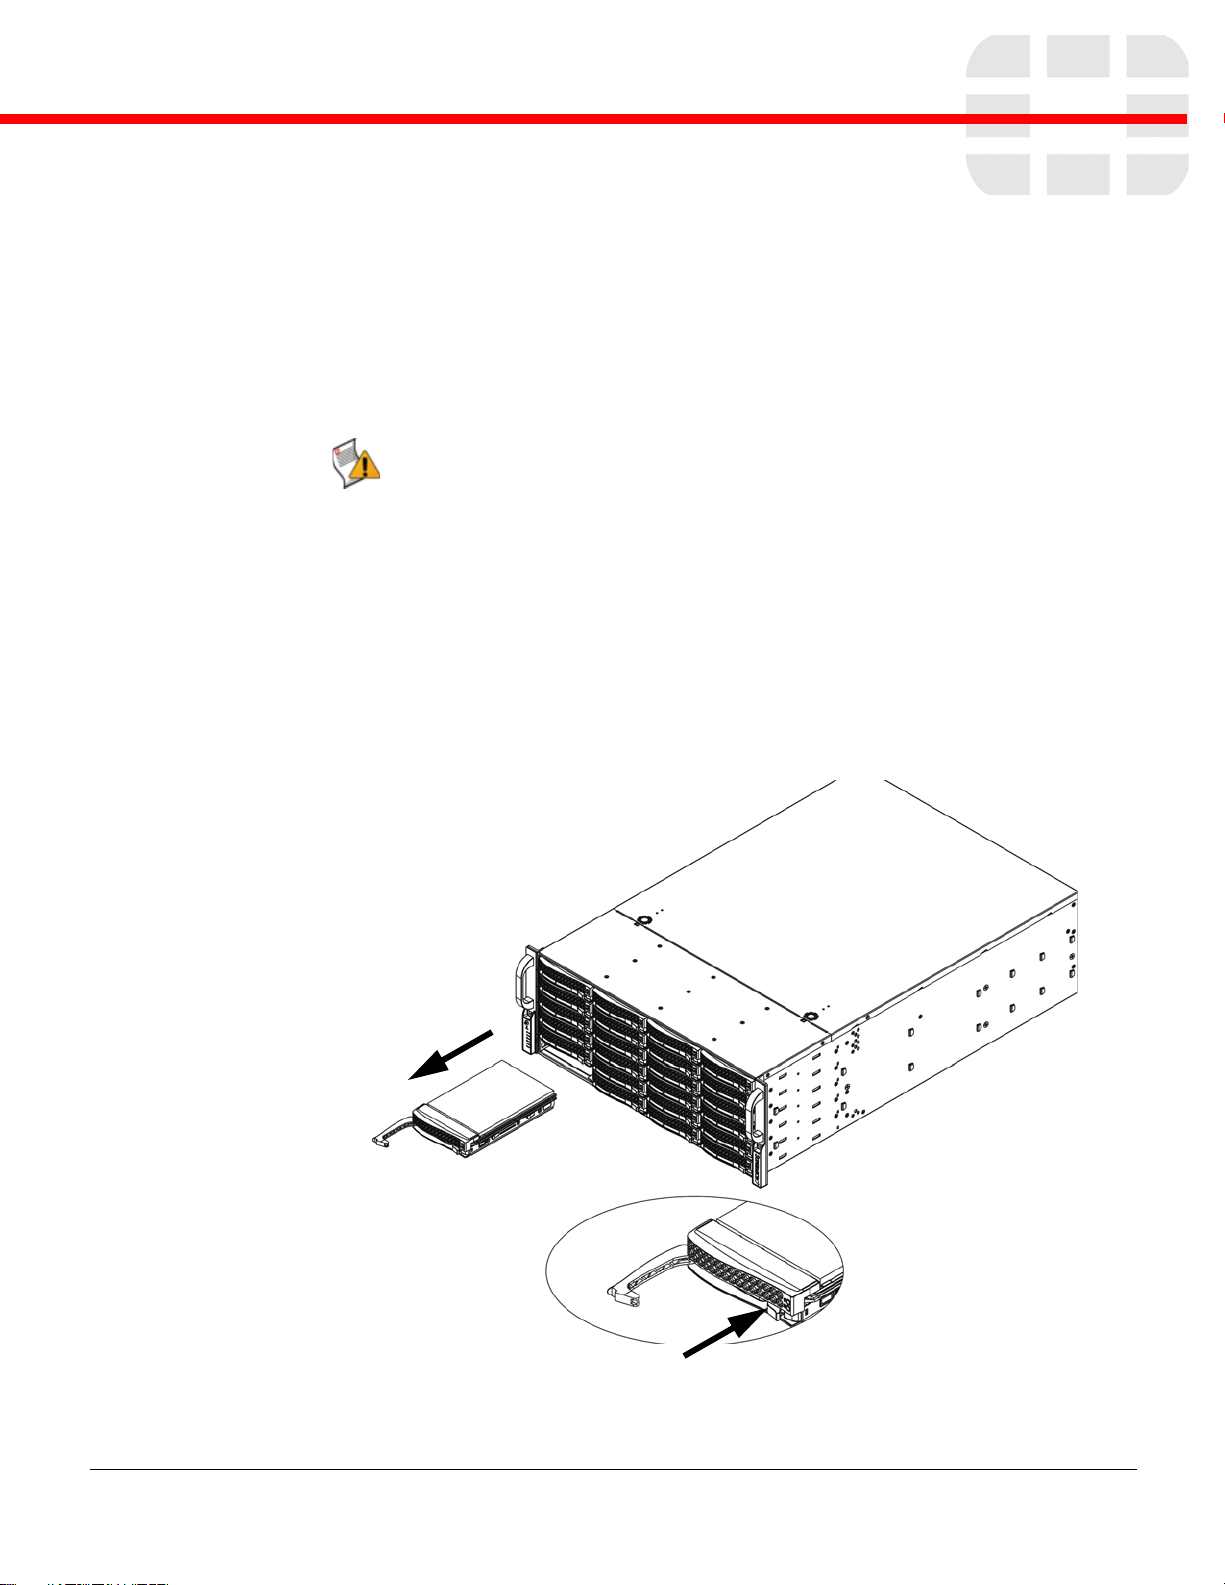
Caution: Only trained service technicians are authorized to remove the system cover and
access any of the components inside the system. Before you begin, review the safety
instructions that came with the system.
Installing Hard Drives
Removing Hard Drive Trays from the Chassis
To remove a hard drive tray from the chassis
1 Press the release button on the drive tray. This extends the drive bay handle.
2 Use the handle to pull the drive out of the chassis.
Figure 1: Removing the hard drive.
The drives are mounted in drive trays to simplify their installation and remo val from the
chassis. These trays also help promote proper airflow for the drive bays.
FortiAnalyzer-4000B Version 4.0 MR2 Rack and Hardware Install Guide
05-420-126194-20100608 5
http://docs.fortinet.com/ • Feedback
Page 10

Installing Hard Drives Rack and Hard Drive Installation Instructions
Drive tray
Dummy drive
Figure 2: Chassis drive tray.
Note: Except for short periods of time (swapping hard drives), do not operate the server
with the hard drives empty.
Installing a Hard Drive to the Hard Drive Tray
To install a hard drive into the hard drive tray
1 Remove the two screws securing the dummy drive to the drive tray and remove the
dummy drive. Place the hard drive tray on a flat surface such as a desk, table or work
bench.
FortiAnalyzer-4000B Version 4.0 MR2 Rack and Hardware Install Guide
6 05-420-126194-20100608
http://docs.fortinet.com/ • Feedback
Page 11

Rack and Hard Drive Installation Instructions Installing Hard Drives
SATA hard
drive
Drive tray
Figure 3: Removing dummy drive from tray.
2 Slide the hard drive into the tray with the printed circuit board side facing down.
Figure 4: Installing the hard driv e int o the tray.
FortiAnalyzer-4000B Version 4.0 MR2 Rack and Hardware Install Guide
05-420-126194-20100608 7
http://docs.fortinet.com/ • Feedback
3 Carefully align the mounting holes in both the drive tray and the hard drive.
4 Secure the hard drive to the tray using six screws.
Page 12
Rack Installation Rack and Hard Drive Installation Instructions
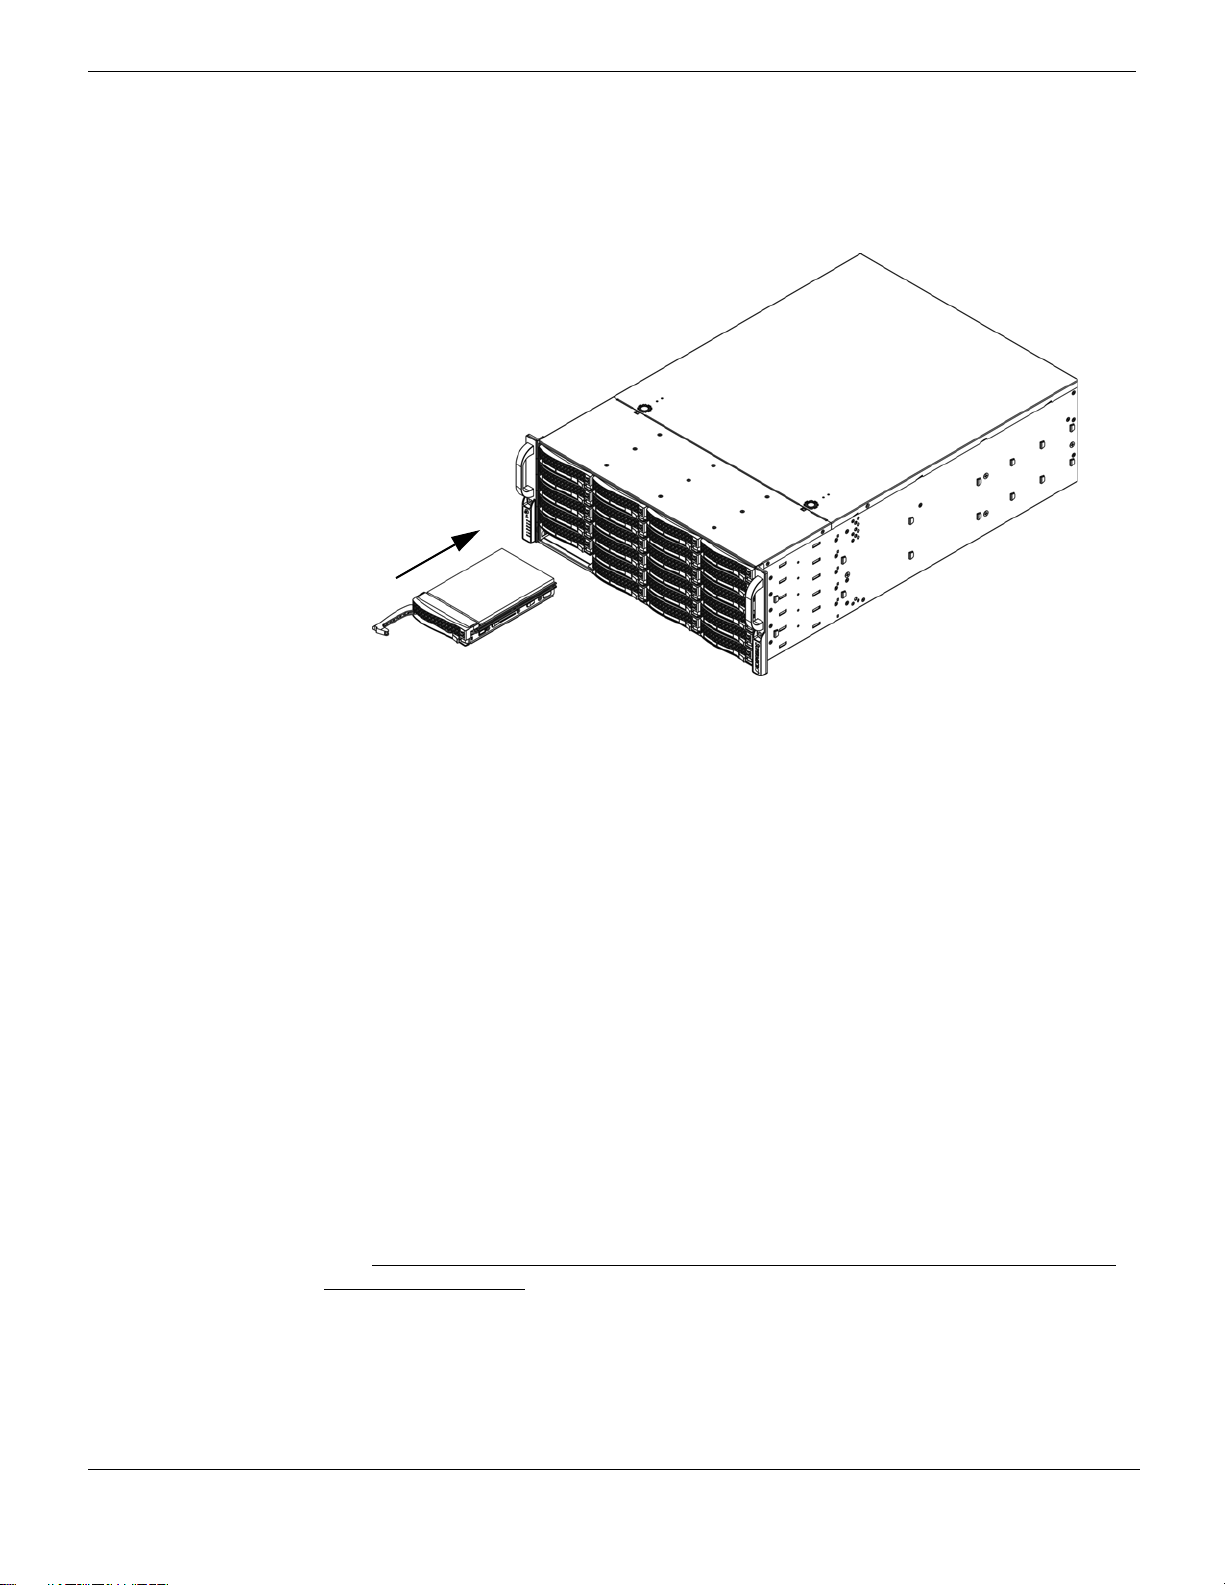
5 Replace the drive tray into the chassis. Make sure to close the drive tray handle to lock
the drive tray into place.
Figure 5: Installing the hard drive in the chassis.
Rack Installation
Overview
This chapter provides a quick setup checklist to get your chassis up and running.
Following these steps in the order given should enable you to have th e system operational
within a minimum amount of time.
Unpacking the System
You should inspect the box the chassis was shipped in and note if it was damaged in any
way. If the chassis itself shows damage you should file a damage claim with the carrier
who delivered it.
Decide on a suitable location for the rack unit that will hold your chassis. It should be
situated in a clean, dust-free area that is well ventilated. Avo id areas where heat, electrical
noise and electromagnetic fields are generated. You will also need it placed near a
grounded power outlet. Be sure to read the Rack and Server Precautions in the next
section.
Preparing for Setup
The box your chassis was shipped in should include two sets of rail assemblies, two rail
mounting brackets and the mounting screws you will need to install the system into the
rack. Read this section in its entirety before you begin the installation procedure outlined in
the sections that follow.
Choosing a Setup Location
Leave enough clearance in front of the rack to enable you to open the fr ont door
completely (~25 inches).
FortiAnalyzer-4000B Version 4.0 MR2 Rack and Hardware Install Guide
8 05-420-126194-20100608
http://docs.fortinet.com/ • Feedback
Page 13

Rack and Hard Drive Installation Instructions Rack Installation
Leave approximately 30 inches of clearance in the back of the rack to allow for sufficient
airflow and ease in servicing.
Warnings and Precautions!
This product is for installation only in a Restricted Access Location (dedicated equipment
rooms, service closets and the like).
Rack Precautions
Ensure that the leveling jacks on the bottom of the rack are fully extended to the floor with
the full weight of the rack resting on them.
In single rack installation, stabilizers should be attached to the rack.
In multiple rack installations, the racks should be coupled together.
Always make sure the rack is stable before extending a component from the rack.
You should extend only one component at a time - extending two or more simultaneously
may cause the rack to become unstable.
General Server Precautions
Review the electrical and general safety precautions that came with the components you
are adding to your chassis.
Determine the placement of each component in the rack before you install the rails.
Install the heaviest server components on the bottom of the rack first, and then work up.
Use a regulating uninterruptible power supply (UPS) to protect the server from power
surges, voltage spikes and to keep your system operating in case of a power failure.
Allow the hot plug hard drives and power supply modules to cool before touching them.
Always keep the rack's front door and all panels and components on the servers closed
when not servicing to maintain proper cooling.
Rack Mounting Considerations
Ambient Operating Temperature
If installed in a closed or multi-unit rack assembly, the ambient operating temperature of
the rack environment may be greater tha n th e am bie n t tem p er at ur e of the ro om .
Therefore, consideration should be given to installing the equipment in an environment
compatible with the manufacturer’s maximum rated ambient temperature (Tmra).
Reduced Airflow
Equipment should be mounted into a rack so that the amount of airflow required for safe
operation is not compromised.
Mechanical Loading
Equipment should be mounted into a rack so that a hazardous condition does not arise
due to uneven mechanical loading.
Circuit Overloading
Consideration should be given to the connection of the equipment to the power supply
circuitry and the effect that any possible overloading of circuits might have on overcurrent
protection and power supply wiring. Approp r iate c ons ider a tion of eq uip m en t na m ep la te
ratings should be used when addressing this concern.
FortiAnalyzer-4000B Version 4.0 MR2 Rack and Hardware Install Guide
05-420-126194-20100608 9
http://docs.fortinet.com/ • Feedback
Page 14

Rack Mounting Instructions Rack and Hard Drive Installation Instructions
Reliable Ground
A reliable ground must be maintained at all times. To ensure this, the rack itself should be
grounded. Particular attention should be given to power supply connections other than the
direct connections to the branch circuit (i.e. the use of power strips, etc.).
Rack Mounting Instructions
Rack Rails Assembly
This section provides information on installing the SC846 chassis into a rack unit with the
rails provided. There are a variety of rack units on the market, which may mean that the
assembly procedure will differ slightly. You should also refer to the installation instructions
that came with the rack unit you are using.
Note: This rail will fit a rack between 27" and 34.45" deep.
Caution: The left and right rails differ from each other. Do not exchange their inner rails.
Caution: Keep the ball bearing shuttle locked at the front of the middle rail during
installation.
Caution: A minimum of two people are required for safe installation of the chassis.
To install the unit on the rack
1 Pull the inner rail out of the outer rail until it is fully extended.
FortiAnalyzer-4000B Version 4.0 MR2 Rack and Hardware Install Guide
10 05-420-126194-20100608
http://docs.fortinet.com/ • Feedback
Page 15

Rack and Hard Drive Installation Instructions Rack Mounting Instructions
PULL
Outer rail
Middle rail
Inner rail
Figure 6: Pulling the inner rail out of the outer rail until it is fully extended and pressing
the locking tab down.
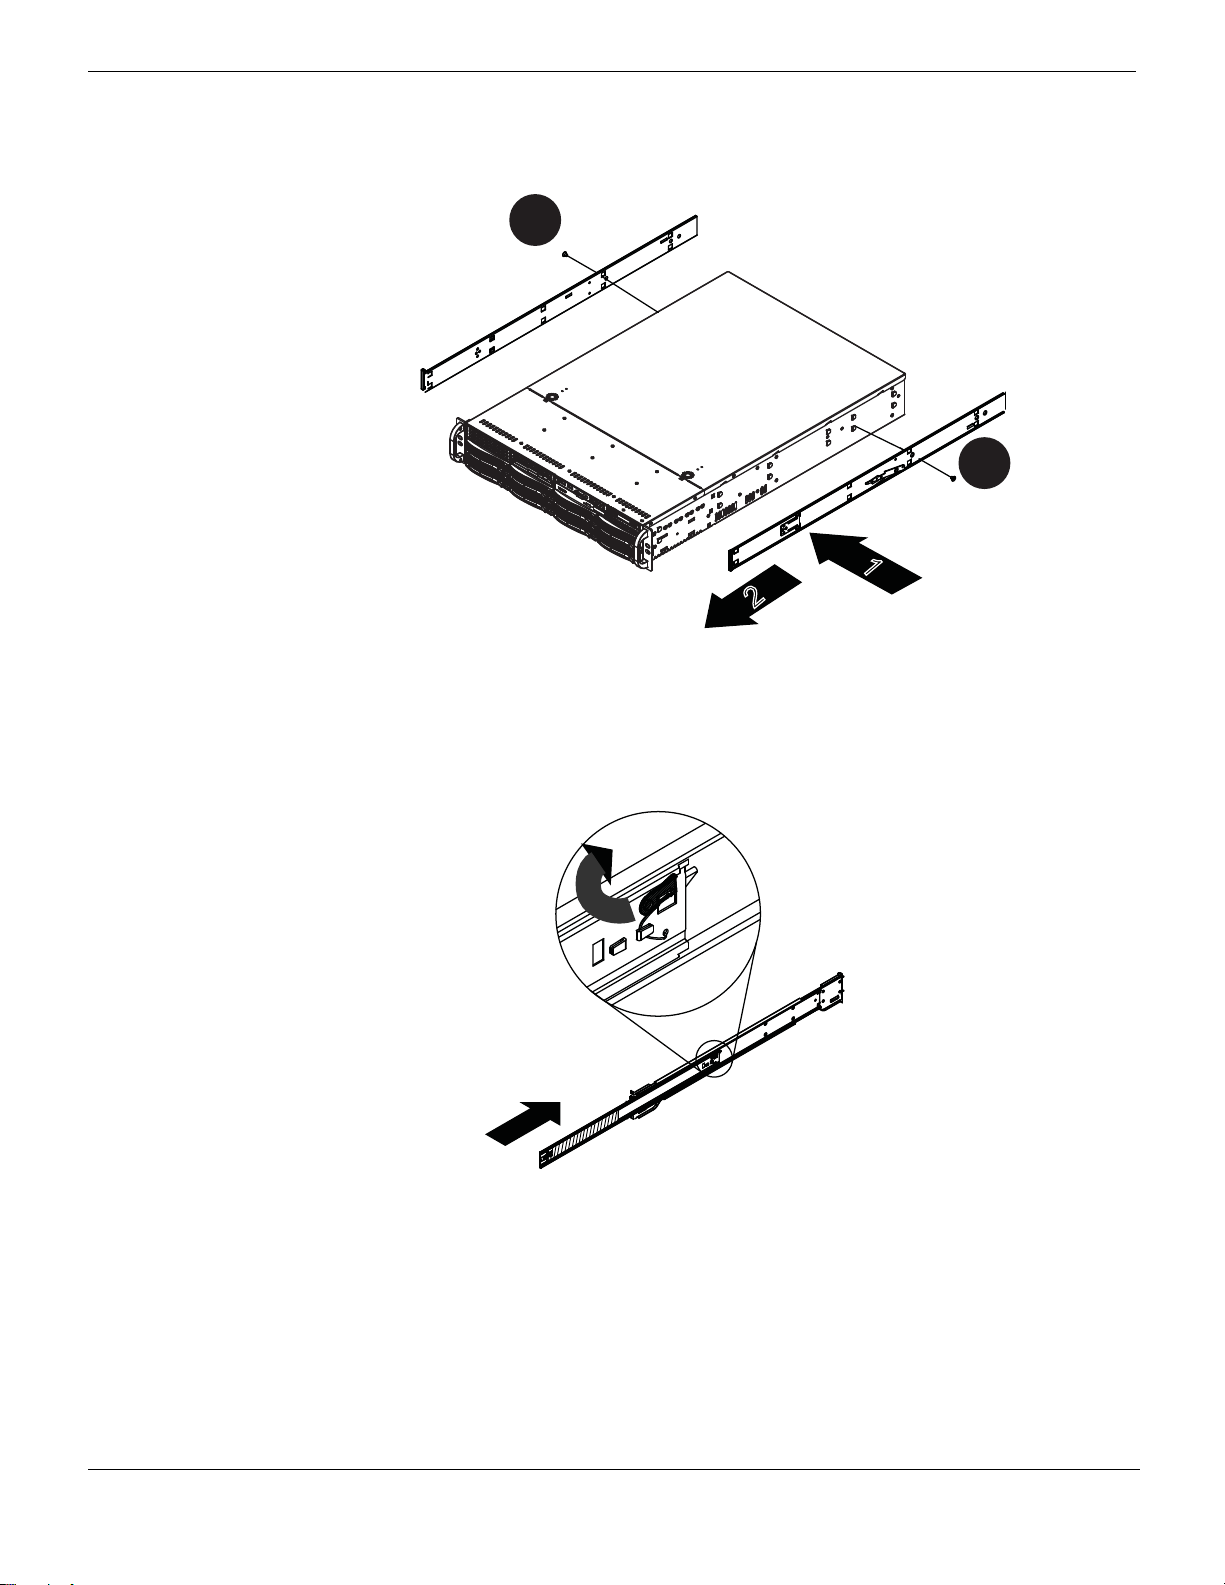
2 Press the locking tab down to release the inner rail. See the locking tab in Figure 6.
Figure 7: Releasing the inner rail.
3 Place the inner rail firmly against the side of the chassis. Make sure that the hooks
straight and aligned with the holes in the inner rail. See Figure 8 (1).
4 Slide the inner rail forward until it clicks into the locked position. See Figure 8 (2)
5 Secure the inner screw (optional). See Figure 8 (3)
FortiAnalyzer-4000B Version 4.0 MR2 Rack and Hardware Install Guide
05-420-126194-20100608 11
http://docs.fortinet.com/ • Feedback
Page 16
Rack Mounting Instructions Rack and Hard Drive Installation Instructions
1
2
1
3
1
3
Slide the inner rail
Screw
Screw
Figure 8: Attaching the rails to the chassis.
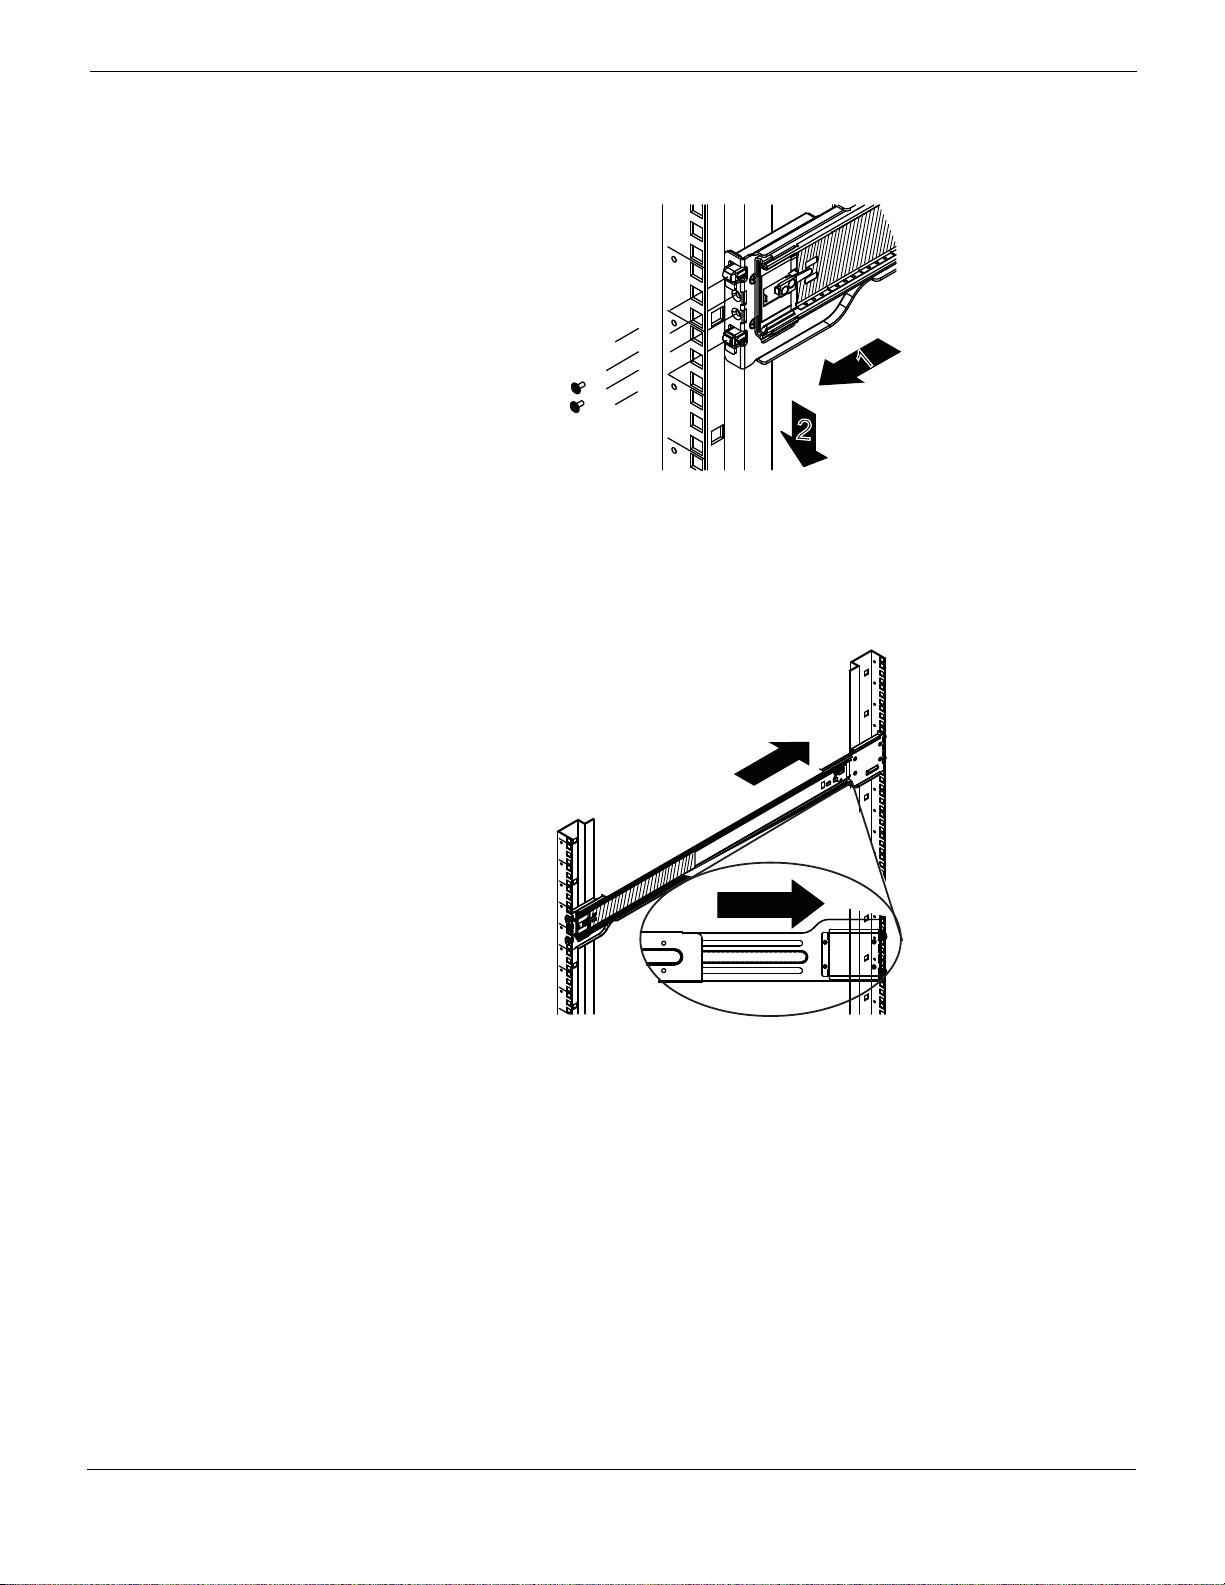
6 Press the locking tab and push the middle rail back into the outer rail.
Figure 9: Press the locking tab and push the middle rail back into the outer rail.
7 Hang the hooks of the rails on the rack holes and if necessary, secure with screws.
12 05-420-126194-20100608
FortiAnalyzer-4000B Version 4.0 MR2 Rack and Hardware Install Guide
http://docs.fortinet.com/ • Feedback
Page 17
Rack and Hard Drive Installation Instructions Rack Mounting Instructions
1
2
Optional
screws
Figure 10: Inserting the hooks on the rails.
8 Repeat Step 7 to mount the four ends, exte nding the rails as necessary.
Figure 11: Installing the rails to the server rack.
9 Pull the middle rail out of the front of the outer rail and make sure that the ball bearing
shuttle is locked at the front of the middle rail.
10 Align the inner rails with the middle rails and then push evenly on both sides of the
chassis until it clicks into the fully extended position.
FortiAnalyzer-4000B Version 4.0 MR2 Rack and Hardware Install Guide
05-420-126194-20100608 13
http://docs.fortinet.com/ • Feedback
Page 18

Rack Mounting Instructions Rack and Hard Drive Installation Instructions
Ball bearing
shuttle
Figure 12: Installing the chassis on the rack.
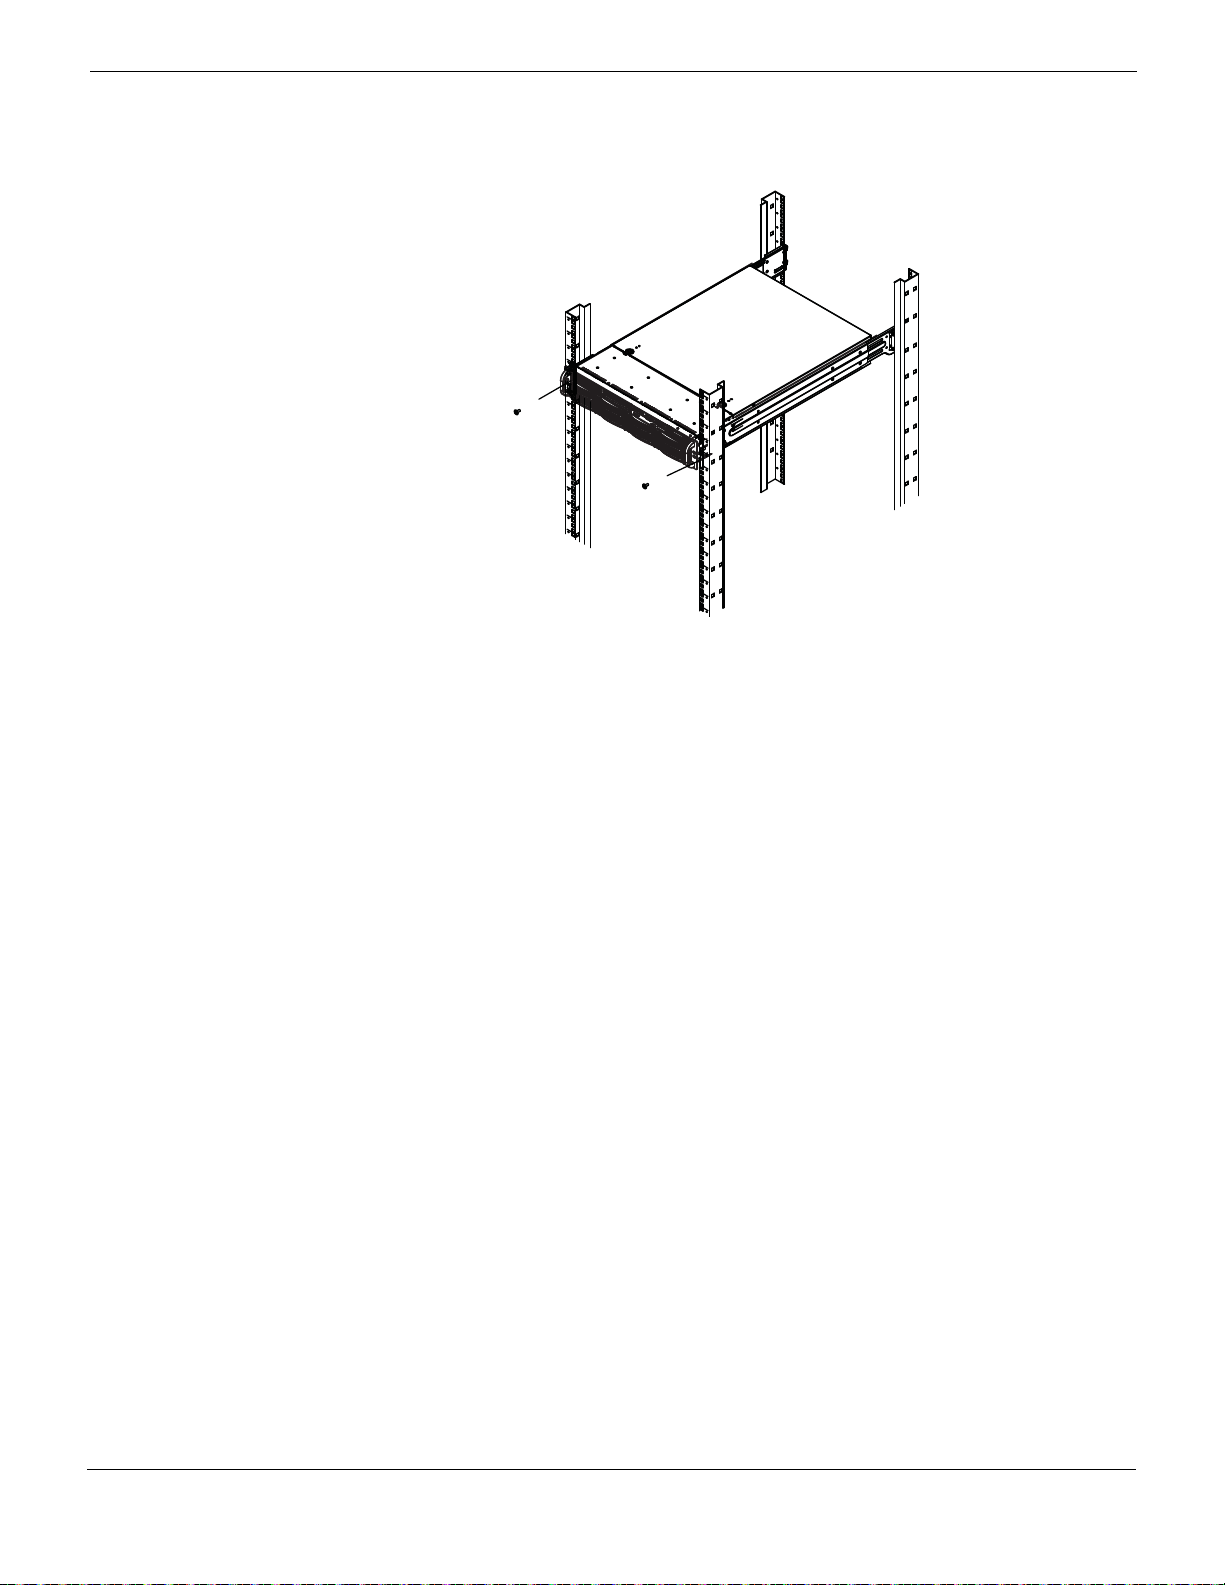
11 Depress the locking tabs on both sides of the chassis simultaneously and push the
chassis all the way into the rear of the rack.
12 If additional security is required, secure the chassis handles to the front of the rack with
two screws (optional).
FortiAnalyzer-4000B Version 4.0 MR2 Rack and Hardware Install Guide
14 05-420-126194-20100608
http://docs.fortinet.com/ • Feedback
Page 19
Rack and Hard Drive Installation Instructions Rack Mounting Instructions
Screw
Screw
Figure 13: Optional screws to secure chassis to rack.
FortiAnalyzer-4000B Version 4.0 MR2 Rack and Hardware Install Guide
05-420-126194-20100608 15
http://docs.fortinet.com/ • Feedback
Page 20

Rack Mounting Instructions Rack and Hard Drive Installation Instructions
FortiAnalyzer-4000B Version 4.0 MR2 Rack and Hardware Install Guide
16 05-420-126194-20100608
http://docs.fortinet.com/ • Feedback
Page 21

www.fortinet.com
Page 22

www.fortinet.com
 Loading...