

Page 1

FortiAnalyzer-2000B
Version 4.0 MR1
Rack and Hardware Install Guide
®
Page 2

FortiAnalyzer-2000B Rack and Hardware Install Guide
Version 4.0 MR1
5 January 2010
Revision 1
© Copyright 2009 Fortinet, Inc. All rights reserved. No part of this publication including text, examples,
diagrams or illustrations may be reproduced, transmitted, or translated in any form or by any means,
electronic, mechanical, manual, optical or otherwise, for any purpose, without prior written permission of
Fortinet, Inc.
Trademarks
Dynamic Threat Prevention System (DTPS), APSecure, FortiASIC, FortiBIOS, FortiBridge, FortiClient,
FortiGate®, FortiGate Unified Threat Management System, FortiGuard®, FortiGuard-Antispam,
FortiGuard-Antivirus, FortiGuard-Intrusion, FortiGuard-Web, FortiLog, FortiAnalyzer, FortiManager,
Fortinet®, FortiOS, FortiPartner, FortiProtect, FortiReporter, FortiResponse, FortiShield, FortiVoIP, and
FortiWiFi are trademarks of Fortinet, Inc. in the United States and/or other countries. The names of actual
companies and products mentioned herein may be the trademarks of their respective owners.
Regulatory compliance
FCC Class A/Class B Part 15 CSA/CUS
Caution: Risk of explosion if battery is replaced by incorrect type.
Dispose of used batteries according to instructions
Page 3

Contents
Contents
Introduction .............................................................................................. 3
Registering your Fortinet product................................................................................. 3
Customer service and technical support...................................................................... 3
Fortinet documentation ................................................................................................. 3
Fortinet Tools and Documentation CD ....................................................................... 4
Fortinet Knowledge Base ........................................................................................... 4
Comments on Fortinet technical documentation ....................................................... 4
Conventions .................................................................................................................... 4
IP addresses............................................................................................................... 4
CLI constraints............................................................................................................ 4
Notes, Tips and Cautions ........................................................................................... 4
Typographical conventions......................................................................................... 4
Rack Installation Instructions................................................................. 7
Removing the system from the rack ......................................................................... 12
Cable Management Arm Installation ........................................................................... 13
Installing the Bezel........................................................................................................ 18
Connecting the Keyboard, Mouse, and Monitor ........................................................ 19
Connecting the Power Cables ..................................................................................... 20
Securing the Power Cord ............................................................................................. 20
Turning on the System ................................................................................................. 21
Installing Hard Drives ............................................................................ 23
Hard Drives............................................................................................................... 23
Mixed SAS/SATA Hard-Drive Configurations .................................................... 23
Removing a Hard-Drive Blank............................................................................ 23
Installing a Hard-Drive Blank.............................................................................. 24
Removing a Hot-Swap Hard Drive ..................................................................... 24
Installing a Hot-Swap Hard Drive ....................................................................... 24
Removing a Hard Drive From a Hard-Drive Carrier ........................................... 25
Installing a Hard Drive Into a Hard-Drive Carrier ............................................... 25
Index........................................................................................................ 27
FortiAnalyzer-2000B Version 4.0 MR1 Rack and Hardware Install Guide
Revision 1 1
http://docs.fortinet.com/ • Feedback
Page 4

Contents
2 Revision 1
FortiAnalyzer-2000B Version 4.0 MR1 Rack and Hardware Install Guide
http://docs.fortinet.com/ • Feedback
Page 5

Introduction Registering your Fortinet product
Introduction
Welcome and thank you for selecting Fortinet products for your network protection.
FortiAnalyzer units are network appliances that provide integrated log collection and
reporting tools. Reports analyze logs for email, FTP, web browsing, security events, and
other network activity to help identify security issues and reduce network misuse and
abuse.
In addition to logging and reporting, FortiAnalyzer units also have several major features
that augment or enable certain FortiGate unit functionalities, such as DLP archiving and
quarantining, and improve your ability to stay informed about the state of your network.
This chapter contains the following topics:
• Registering your Fortinet product
• Customer service and technical support
• Fortinet documentation
• Conventions
Registering your Fortinet product
Before you begin, take a moment to register your Fortinet product at the Fortinet Technical
Support web site, https://support.fortinet.com.
Many Fortinet customer services, such as firmware updates, technical support, and
FortiGuard Antivirus and other FortiGuard services, require product registration.
For more information, see the Fortinet Knowledge Base article Registration Frequently
Asked Questions.
Customer service and technical support
Fortinet Technical Support provides services designed to make sure that your Fortinet
products install quickly, configure easily, and operate reliably in your network.
To learn about the technical support services that Fortinet provides, visit the Fortinet
Technical Support web site at https://support.fortinet.com.
You can dramatically improve the time that it takes to resolve your technical support ticket
by providing your configuration file, a network diagram, and other specific information. For
a list of required information, see the Fortinet Knowledge Base article Fortinet Technical
Support Requirements.
Fortinet documentation
The Fortinet Technical Documentation web site, http://docs.fortinet.com, provides the
most up-to-date versions of Fortinet publications, as well as additional technical
documentation such as technical notes.
In addition to the Fortinet Technical Documentation web site, you can find Fortinet
technical documentation on the Fortinet Tools and Documentation CD, and on the Fortinet
Knowledge Center.
FortiAnalyzer-2000B Version 4.0 MR1 Rack and Hardware Install Guide
Revision 1 3
http://docs.fortinet.com/ • Feedback
Page 6

Conventions Introduction
Fortinet Tools and Documentation CD
Many Fortinet publications are available on the Fortinet Tools and Documentation CD
shipped with your Fortinet product. The documents on this CD are current at shipping
time. For current versions of Fortinet documentation, visit the Fortinet Technical
Documentation web site, http://docs.fortinet.com.
Fortinet Knowledge Base
The Fortinet Knowledge Base provides additional Fortinet technical documentation, such
as troubleshooting and how-to-articles, examples, FAQs, technical notes, and more. Visit
the Fortinet Knowledge Base at http://kb.fortinet.com.
Comments on Fortinet technical documentation
Please send information about any errors or omissions in this or any Fortinet technical
document to techdoc@fortinet.com.
Conventions
Fortinet technical documentation uses the conventions described below.
IP addresses
To avoid publication of public IP addresses that belong to Fortinet or any other
organization, the IP addresses used in Fortinet technical documentation are fictional and
follow the documentation guidelines specific to Fortinet. The addresses used are from the
private IP address ranges defined in RFC 1918: Address Allocation for Private Internets,
available at http://ietf.org/rfc/rfc1918.txt?number-1918.
CLI constraints
CLI constraints, such as <address_ipv4>, indicate which data types or string patterns
are acceptable input for a given parameter or variable value. CLI constraint conventions
are described in the CLI Reference document for each product.
Notes, Tips and Cautions
Fortinet technical documentation uses the following guidance and styles for notes, tips
and cautions.
Tip: Highlights useful additional information, often tailored to your workplace activity.
Note: Also presents useful information, but usually focused on an alternative, optional
method, such as a shortcut, to perform a step.
Caution: Warns you about commands or procedures that could have unexpected or
undesirable results including loss of data or damage to equipment.
Typographical conventions
Fortinet documentation uses the following typographical conventions:
4 Revision 1
FortiAnalyzer-2000B Version 4.0 MR1 Rack and Hardware Install Guide
http://docs.fortinet.com/ • Feedback
Page 7

Introduction Conventions
Table 1: Typographical conventions in Fortinet technical documentation
Convention Example
Button, menu, text box,
field, or check box label
CLI input config system dns
CLI output FGT-602803030703 # get system settings
Emphasis HTTP connections are not secure and can be intercepted by
File content <HTML><HEAD><TITLE>Firewall
Hyperlink Visit the Fortinet Technical Support web site,
Keyboard entry Type a name for the remote VPN peer or client, such as
Navigation Go to VPN > IPSEC > Auto Key (IKE).
Publication For details, see the
From Minimum log level, select Notification.
set primary <address_ipv4>
end
comments : (null)
opmode : nat
a third party.
Authentication</TITLE></HEAD>
<BODY><H4>You must authenticate to use this
service.</H4>
https://support.fortinet.com.
Central_Office_1.
FortiAnalyzer Rack and Hardware
Install Guide
.
FortiAnalyzer-2000B Version 4.0 MR1 Rack and Hardware Install Guide
Revision 1 5
http://docs.fortinet.com/ • Feedback
Page 8

Conventions Introduction
6 Revision 1
FortiAnalyzer-2000B Version 4.0 MR1 Rack and Hardware Install Guide
http://docs.fortinet.com/ • Feedback
Page 9
Rack Installation Instructions
1
2
Rack Installation Instructions
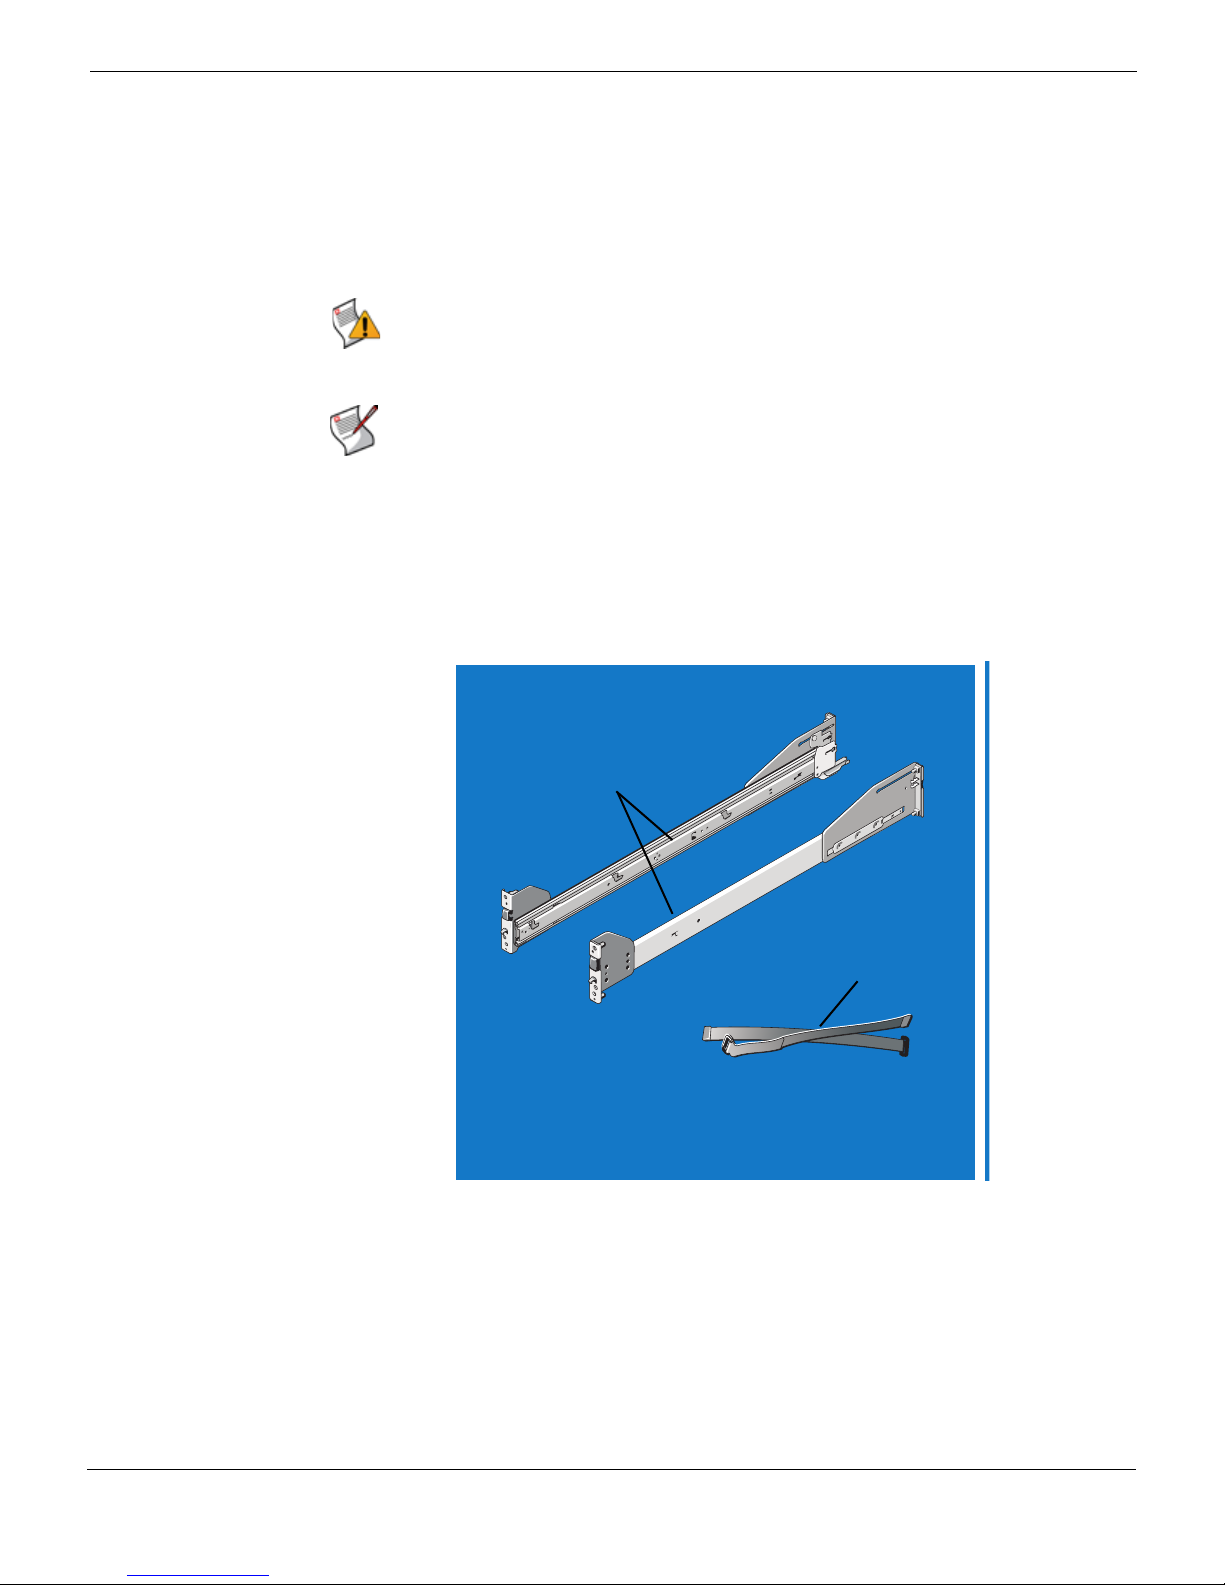
The FortiAnalyzer-2000B comes with a sliding rail kit. Use the instructions below to install
the rails.
Caution: Only trained service technicians are authorized to remove the system cover and
access any of the components inside the system. Before you begin, review the safety
instructions that came with the system.
Note: The illustrations in this document are not intended to represent a specific server.
To install the sliding rail kit
1 Locate the components for installing the rail kit assembly:
• Two sliding rail assemblies (1)
• Two Velcro straps (2)
Figure 1: Rail kit contents
2 In square-hole racks, do the following:
• Position the left and right rail end pieces of the rail module labeled FRONT facing
inward and orient each end piece to seat in the square holes on the front side of the
vertical rack flanges (3).
FortiAnalyzer-2000B Version 4.0 MR1 Rack and Hardware Install Guide
Revision 1 7
http://docs.fortinet.com/ • Feedback
Page 10

Figure 2: Installing and removing the rails (square-hole racks)
3
6
5
4
Rack Installation Instructions
• Align each end piece to seat the pegs in the bottom hole of the first U and the top
hole of the second U (4).
• Engage the back end of the rail until it fully seats on the vertical rack flange and the
second “tooth” on the latch locks in place. Repeat these steps to position and seat
the front end piece on the vertical flange (5).
• To remove the rails, pull on the latch release button on the end piece midpoint and
unseat each rail (6).
3 In round-hole racks, do the following:
• Position the left and right rail end pieces of the rail module labeled FRONT facing
inward and orient each end piece to seat in the round holes on the front side of the
vertical rack flanges (7).
8 Revision 1
FortiAnalyzer-2000B Version 4.0 MR1 Rack and Hardware Install Guide
http://docs.fortinet.com/ • Feedback
Page 11

Rack Installation Instructions
7
8
9
10
Figure 3: Installing and removing the rails (round-hole racks)
• Align each end piece to seat the pegs in the bottom hole of the first U and the top
hole of the second U (8).
• Engage the back end of the rail until it fully seats on the vertical rack flange and the
first “tooth” on the latch locks in place. Repeat these steps to position and seat the
front end piece on the vertical flange (9).
• To remove the rails, pull on the latch release button on the end piece midpoint and
unseat each rail (10).
4 To install the system into the rack, do the following:
• Pull the inner slide rails out of the rack until they lock into place (11).
FortiAnalyzer-2000B Version 4.0 MR1 Rack and Hardware Install Guide
Revision 1 9
http://docs.fortinet.com/ • Feedback
Page 12

Figure 4: Installing the system on the rack
11
12
13
14
Rack Installation Instructions
• Locate the three shoulder screws on one side of the system and lower them into the
J-slots on the slide assembly (12).
• Seat the three screws on the other side, lowering the system until all shoulder
screws engage in the J-slots (13).
• Push the system inward until the front release latch clicks into place. Press the
slide-release lock buttons on both rails and slide the system into the rack (14).
5 To engage and release the slam latch, do the following:
• Facing the front, locate the slam latch on either side of the system (15).
10 Revision 1
FortiAnalyzer-2000B Version 4.0 MR1 Rack and Hardware Install Guide
http://docs.fortinet.com/ • Feedback
Page 13

Rack Installation Instructions
15
16
17
Figure 5: Engaging and releasing the slam latch
• The latches engage automatically as the system is pushed into the rack and are
released by pulling up on the latches (16).
• To secure the system for shipment in the rack or for other unstable environments,
locate the hard-mount screw under each latch and tighten each screw with a #2
Phillips screwdriver (17).
6 To route the cables, do the following:
• Locate the inner and outer CMA brackets on the interior sides of both rack flanges
(18).
FortiAnalyzer-2000B Version 4.0 MR1 Rack and Hardware Install Guide
Revision 1 11
http://docs.fortinet.com/ • Feedback
Page 14

Figure 6: Routing the cables
18
20
19
Rack Installation Instructions
• Bundle the cables gently, pulling them clear of the system connectors to the left and
right sides (19).
• Thread the Velcro straps through the tooled slots on the outer or inner CMA
brackets on each side of the system to secure the cable bundles (20).
Removing the system from the rack
To remove the system from the rack
1 Locate the lock levers on the front ends of both inner rails (1).
12 Revision 1
FortiAnalyzer-2000B Version 4.0 MR1 Rack and Hardware Install Guide
http://docs.fortinet.com/ • Feedback
Page 15

Rack Installation Instructions Cable Management Arm Installation
1
3
2
Figure 7: Removing the system from the rack
2 Pull up on each lever into the release position to unlock (2).
3 Grasp the sides of the system firmly and pull forward and up to unseat the system from
the J-slots. Lift the system up and away from the rack and place on a level surface (3).
Cable Management Arm Installation
The FortiAnalyzer-2000B comes with a Cable Management Arm. Use the instructions
below to install the Cable Management Arm.
Caution: Only trained service technicians are authorized to remove the system cover and
access any of the components inside the system. Before you begin, review the safety
instructions that came with the system.
Note: The illustrations in this document are not intended to represent a specific server.
To install the cable management arm
1 Locate the components for installing the Cable Management Arm (CMA) assembly:
• Cable Management Arm tray (1)
• Cable Management Arm (2)
• Nylon cable tie wraps (3)
FortiAnalyzer-2000B Version 4.0 MR1 Rack and Hardware Install Guide
Revision 1 13
http://docs.fortinet.com/ • Feedback
Page 16

Cable Management Arm Installation Rack Installation Instructions
1
2
3
Figure 8: Cable Management Arm kit contents
Note: To secure the CMA for shipment in the rack, loop the tie wraps around both baskets
and tray and cinch them firmly. For larger CMAs, the tie wraps can be threaded through the
inner and outer baskets and around the tray to secure them. Securing the CMA in this
manner will also secure your system in unstable environments.
2 To install or remove the Cable Management Arm Tray, do the following:
Note: The CMA tray provides support and acts as a retainer for the CMA.
• Align and engage each side of the tray with the receiver brackets on the inner
edges of the rails and push forward until the tray clicks into place (4).
14 Revision 1
FortiAnalyzer-2000B Version 4.0 MR1 Rack and Hardware Install Guide
http://docs.fortinet.com/ • Feedback
Page 17

Rack Installation Instructions Cable Management Arm Installation
5
4
Figure 9: Installing and removing the Cable Management Arm Tray
• To remove the tray, squeeze the latch-release buttons on both sides toward the
center and pull the tray out of the receiver brackets (5).
3 To install and remove the CMA, do the following:
Note: You can attach the CMA to either the right or left mounting rail, depending on how
you intend to route cables from the system. Mounting the CMA on the side opposite of the
power supplies is recommended; otherwise, the CMA must be disconnected in order to
remove the outer power supply. You must remove the tray before removing the power
supplies.
• At the back of the system, fit the latch on the front end of the CMA on the innermost
bracket of the slide assembly until the latch engages (6).
FortiAnalyzer-2000B Version 4.0 MR1 Rack and Hardware Install Guide
Revision 1 15
http://docs.fortinet.com/ • Feedback
Page 18

Cable Management Arm Installation Rack Installation Instructions
6
7
8
Figure 10: Installing and removing the Cable Management Arm
• Fit the other latch on the end of the outermost bracket until the latch engages (7).
• To remove the CMA, disengage both latches by pressing the CMA release buttons
at the top of the inner and outer latch housings (8).
4 To move the CMA away from the CMA tray, do the following:
• The CMA can be pulled away from the system and extended away from the tray for
access and service (9).
16 Revision 1
FortiAnalyzer-2000B Version 4.0 MR1 Rack and Hardware Install Guide
http://docs.fortinet.com/ • Feedback
Page 19

Rack Installation Instructions Cable Management Arm Installation
9
10
Figure 11: Moving the CMA away from the CMA tray
• At the hinged end, lift the CMA up and off of the tray to unseat it from the tray catch.
Once it is unseated from the tray, swing the CMA away from the system (10).
Note: You can also extend the CMA into the service position once it is cabled to access the
back of the system.
5 To cable the system using the CMA, do the following:
Caution: To avoid potential damage from protruding cables, secure any slack in the status
indicator cable before routing this cable through the CMA.
• Using the tie wraps provided, bundle the cables together as they enter and exit the
baskets so they do not interfere with adjacent systems (11).
FortiAnalyzer-2000B Version 4.0 MR1 Rack and Hardware Install Guide
Revision 1 17
http://docs.fortinet.com/ • Feedback
Page 20

Installing the Bezel Rack Installation Instructions
11
12
13
14
15
16
Figure 12: Cabling the system using the CMA
• With the CMA in the service position, route the cable bundle through the inner and
• Use the preinstalled Velcro straps on either end of the baskets to secure the cables
• Adjust the cable slack as needed at the hinge position (14).
• Swing the CMA back into place on the tray (15).
• Install the status indicator cable at the back of the system and secure the cable by
Installing the Bezel
A lock on the bezel restricts access to the power button, optical drive, and hard drive(s).
The LCD panel and navigation buttons are accessible through the front bezel.
To remove the Front Bezel
1 Using the system key, unlock the bezel.
2 Pull up on the release latch next to the key lock.
3 Rotate the left end of the bezel away from the system to release the right end of the
bezel.
4 Pull the bezel away from the system. See Figure 13.
outer baskets (12).
(13).
routing it through the CMA. Attach the other end of this cable to the corner of the
outer CMA basket. (16).
18 Revision 1
FortiAnalyzer-2000B Version 4.0 MR1 Rack and Hardware Install Guide
http://docs.fortinet.com/ • Feedback
Page 21

Rack Installation Instructions Connecting the Keyboard, Mouse, and Monitor
4
1
3
2
Figure 13: Removing the Front Bezel
1 release latch 2 bezel
3 hinge tabs 4 key lock
To install the Front Bezel
1 Insert the hinge tab on the right of the bezel into the slot on the right side of the system
front panel.
2 Rotate the left side of the bezel toward the system.
3 Press the bezel to the system to engage the latch.
Connecting the Keyboard, Mouse, and Monitor
Connect the keyboard, mouse, and monitor (optional).
The connectors on the back of your system have icons indicating which cable to plug into
each connector. Be sure to tighten the screws (if any) on the monitor's cable connector.
FortiAnalyzer-2000B Version 4.0 MR1 Rack and Hardware Install Guide
Revision 1 19
http://docs.fortinet.com/ • Feedback
Page 22

Connecting the Power Cables Rack Installation Instructions
Figure 14: Connecting the keyboard, mouse, and monitor
Connecting the Power Cables
Connect the system’s power cable(s) to the system and, if a monitor is used, connect the
monitor’s power cable to the monitor.
Figure 15: Connecting the power cables.
Securing the Power Cord
Bend the system power cable into a loop as shown in the illustration and secure the cable
to the bracket using the provided strap.
Plug the other end of the power cables into a grounded electrical outlet or a separate
power source such as an uninterruptible power supply (UPS) or a power distribution unit
(PDU).
20 Revision 1
FortiAnalyzer-2000B Version 4.0 MR1 Rack and Hardware Install Guide
http://docs.fortinet.com/ • Feedback
Page 23

Rack Installation Instructions Turning on the System
Figure 16: Securing the power cord
Turning on the System
Press the power button on the system and the monitor. The power indicators should light.
Figure 17: Turning on the system
FortiAnalyzer-2000B Version 4.0 MR1 Rack and Hardware Install Guide
Revision 1 21
http://docs.fortinet.com/ • Feedback
Page 24

Turning on the System Rack Installation Instructions
22 Revision 1
FortiAnalyzer-2000B Version 4.0 MR1 Rack and Hardware Install Guide
http://docs.fortinet.com/ • Feedback
Page 25

Installing Hard Drives
Installing Hard Drives
Hard Drives
Your system has six 3.5-inch drive bays. All chassis support hot-swappable SAS and
SATA hard drives.
All drives are installed at the front of the system and connect to the system board through
the SAS backplane. Hard drives are supplied in special hot-swappable hard-drive carriers
that fit in the hard-drive bays.
Caution: Do not turn off or reboot your system while the drive is being formatted. Doing so
can cause a drive failure
Note: Use only drives that have been tested and approved for use with the SAS backplane
board.
When you format a hard drive, allow enough time for the formatting to be completed. Be
aware that high-capacity hard drives can take a number of hours to format.
Mixed SAS/SATA Hard-Drive Configurations
Mixed hard-drive configurations of SAS and SATA drives are allowed. In this configuration,
two SAS drives must be installed in hard-drive slots 0 and 1 only. The remaining slots can
have SATA drives installed.
Mixed 2.5-inch and 3.5-inch configurations of SAS and SATA drives are also supported in
the 3.5-inch–bay chassis only. In this configuration, two 10,000-RPM 2.5-inch SAS drives
installed in 3.5-inch adapters must be used in hard-drive slots 0 and 1 only. The remaining
hard drives must be 3.5 inches in size and must be either all SAS or all SATA drives.
Removing a Hard-Drive Blank
Caution: To maintain proper system cooling, all empty hard-drive bays must have drive
blanks installed
1 Remove the front bezel. See “Installing the Bezel” on page 18.
2 Grasp the front of the hard-drive blank, press the release lever on the right side, and
slide the blank out until it is free of the drive bay. See Figure 1.
FortiAnalyzer-2000B Version 4.0 MR1 Rack and Hardware Install Guide
Revision 1 23
http://docs.fortinet.com/ • Feedback
Page 26

Figure 1: Removing and Installing a Hard Drive Blank
3
1
2
3
1 3.5-in hard drive blank 2 2.5-in hard drive blank
3release latch
Installing Hard Drives
Installing a Hard-Drive Blank
Align the hard-drive blank with the drive bay and insert the blank into the drive bay until the
release lever clicks into place.
Removing a Hot-Swap Hard Drive
Caution: Ensure that your operating system supports hot-swap drive removal and
installation. See the documentation provided with your operating system for more
information.
1 If present, remove the front bezel. See “Installing the Bezel” on page 18.
2 From the RAID management software, prepare the drive for removal. Wait until the
hard-drive indicators on the drive carrier signal that the drive can be removed safely.
See your SAS RAID controller documentation for information about hot-swap drive
removal.
If the drive has been online, the green activity/fault indicator will flash as the drive is
powered down. When the drive indicators are off, the drive is ready for removal.
3 Press the button on the front of the drive carrier and open the drive carrier release
handle to release the drive. See Figure 2.
4 Slide the hard drive out until it is free of the drive bay.
5 Insert a drive blank in the vacated drive bay. See “Installing a Hard-Drive Blank”.
6 If applicable, install the bezel. See “Installing the Bezel” on page 18.
Installing a Hot-Swap Hard Drive
Caution: When installing a hard drive, ensure that the adjacent drives are fully installed.
Inserting a hard-drive carrier and attempting to lock its handle next to a partially installed
carrier can damage the partially installed carrier's shield spring and make it unusable.
24 Revision 1
FortiAnalyzer-2000B Version 4.0 MR1 Rack and Hardware Install Guide
http://docs.fortinet.com/ • Feedback
Page 27

Installing Hard Drives
2
1
1 If present, remove the front bezel. See “Installing the Bezel” on page 18.
2 If a drive blank is present in the bay, remove it. See “Removing a Hard-Drive Blank”.
Figure 2: Installing a Hot-Swap Hard Drive
1 release button 2 hard drive carrier handle
3 Install the hot-swap hard drive.
• Press the button on the front of the drive carrier and open the handle.
• Insert the hard-drive carrier into the drive bay until the carrier contacts the
backplane.
• Close the handle to lock the drive in place.
4 If applicable, install the bezel. See “Installing the Bezel” on page 18.
Removing a Hard Drive From a Hard-Drive Carrier
Remove the screws from the slide rails on the hard-drive carrier and separate the hard
drive from the carrier. See
Figure 3
.
Installing a Hard Drive Into a Hard-Drive Carrier
1 Insert the hard drive into the hard-drive carrier with the connector end of the drive at
the back. See Figure 3.
2 Align the screw holes on the hard drive with the back set of holes on the hard drive
carrier.
When aligned correctly, the back of the hard drive will be flush with the back of the
hard-drive carrier.
3 Attach the four screws to secure the hard drive to the hard-drive carrier.
FortiAnalyzer-2000B Version 4.0 MR1 Rack and Hardware Install Guide
Revision 1 25
http://docs.fortinet.com/ • Feedback
Page 28

Figure 3: Installing a Hard Drive into a Drive Carrier
1
3
2
4
Installing Hard Drives
1 hard-drive carrier 2 screws (4)
3 hard drive 4 SAS screw hole
FortiAnalyzer-2000B Version 4.0 MR1 Rack and Hardware Install Guide
26 Revision 1
http://docs.fortinet.com/ • Feedback
Page 29

Index
Index
B
bezel
installing, 18
blank
hard drive, 23
C
cable management arm, 13
cable management arm tray, 13
comments, documentation, 4
customer service, 3
D
documentation
commenting on, 4
Fortinet, 3
drive blank
installing, 24
removing, 23
drive carrier
hard drive, 25
F
Fortinet
Knowledge Base, 4
Fortinet customer service, 3
Fortinet documentation, 3
commenting on, 4
H
hard drive
drive carrier, 25
installing, 24
mixed configurations, 23
removing, 24
hot-swap
hard drives, 23
I
installing
bezel, 18
hard drive blank, 24
hard drives, 24
introduction
Fortinet documentation, 3
K
keyboard, 20
M
monitor, 20
mouse, 20
P
power cables, 20
power cord, 21
R
removing
hard drive blank, 23
hard drive from a drive carrier, 25
hard drives, 24
system from the rack, 12
round-hole racks, 8
S
sliding rail kit, 7
square-hole racks, 7
SSD hard drives, 23
system
turning on, 21
T
technical support, 3
turning on the system, 21
FortiAnalyzer-2000B Version 4.0 MR1 Rack and Hardware Install Guide
Revision 1 27
http://docs.fortinet.com/ • Feedback
Page 30

Index
28 Revision 1
FortiAnalyzer-2000B Version 4.0 MR1 Rack and Hardware Install Guide
http://docs.fortinet.com/ • Feedback
Page 31

www.fortinet.com
Page 32

www.fortinet.com
 Loading...