

Page 1

FortiFone™ User Guide
for FON-870i
Page 2

FortiFone™ User Guide for FON-870i
Revision 1
January 13, 2014
Copyright © 2014 Fortinet, Inc. All rights reserved. Fortinet®, FortiGate®, and FortiGuard®, are
registered trademarks of Fortinet, Inc., and other Fortinet names herein may also be trademarks of
Fortinet. All other product or company names may be trademarks of their respective owners.
Performance metrics contained herein were attained in internal lab tests under ideal conditions,
and performance may vary. Network variables, different network environments and other
conditions may affect performance results. Nothing herein represents any binding commitment by
Fortinet, and Fortinet disclaims all warranties, whether express or implied, except to the extent
Fortinet enters a binding written contract, signed by Fortinet’s General Counsel, with a purchaser
that expressly warrants that the identified product will perform according to the performance
metrics herein. For absolute clarity, any such warranty will be limited to performance in the same
ideal conditions as in Fortinet’s internal lab tests. Fortinet disclaims in full any guarantees. Fortinet
reserves the right to change, modify, transfer, or otherwise revise this publication without notice,
and the most current version of the publication shall be applicable.
Technical Documentation docs.fortinet.com
Knowledge Base kb.fortinet.com
Customer Service & Support support.fortinet.com
Training Services training.fortinet.com
FortiGuard fortiguard.com
Document Feedback techdocs@fortinet.com
Page 3

Contents
Introduction....................................................................................................... 1
Phone features......................................................................................................... 1
Codecs and protocols ............................................................................................. 1
Requirements........................................................................................................... 1
Phone views............................................................................................................. 2
Display layout .......................................................................................................... 3
Installation......................................................................................................... 4
Installing the base station ........................................................................................ 4
Installing the handset charger.................................................................................. 5
Installing the batteries.............................................................................................. 6
Registering the handsets ......................................................................................... 6
Deregistering a handset from a base....................................................................... 6
Configuring the handset .................................................................................. 7
Typing text ............................................................................................................... 7
Inserting a symbol.............................................................................................. 7
Changing the input mode .................................................................................. 7
Changing the audio settings .................................................................................... 7
The Settings menu................................................................................................... 8
Time and date .................................................................................................... 8
Language ........................................................................................................... 8
Indicator Light .................................................................................................... 8
Power save ........................................................................................................ 8
Automatic keylock.............................................................................................. 8
Line .................................................................................................................... 9
Reset settings .................................................................................................... 9
Status................................................................................................................. 9
Enabling auto answer mode .............................................................................. 9
Silent charging ................................................................................................... 9
Do not disturb (DND).......................................................................................... 9
Hide number ...................................................................................................... 9
Idle screen saver ................................................................................................ 9
Alarms .................................................................................................................... 10
Alarm................................................................................................................ 10
Recurrent alarm ............................................................................................... 10
Snooze time ..................................................................................................... 10
Functional keys ...................................................................................................... 10
Calling .............................................................................................................. 10
Adding a functional key ................................................................................... 11
Contents Page iii FortiFone User Guide
Page 4

Editing a functional key.................................................................................... 11
Deleting functional keys................................................................................... 11
Associating a functional key with a speed dial ................................................ 11
Using the phone.............................................................................................. 12
Using the speakerphone........................................................................................ 12
Adjusting the handset volume ............................................................................... 12
Locking and unlocking the keypad........................................................................ 12
Activating silent mode ........................................................................................... 12
Receiving a call ...................................................................................................... 12
Placing a call.......................................................................................................... 12
Placing a call on hold............................................................................................. 13
Screened call transfer ............................................................................................ 13
Blind call transfer ................................................................................................... 13
Three-party conference ......................................................................................... 13
Call waiting ............................................................................................................ 13
Dialing using a speed dial number......................................................................... 14
Do Not Disturb (DND)............................................................................................. 14
Muting a call........................................................................................................... 14
Accessing your voicemail ...................................................................................... 14
Call logs ................................................................................................................. 14
Viewing numbers in the call log ....................................................................... 14
Contacts ................................................................................................................ 15
Adding a contact.............................................................................................. 15
Choosing a contact.......................................................................................... 15
Deleting a contact............................................................................................ 15
Editing a contact .............................................................................................. 16
Changing the ring tone for a contact ............................................................... 16
Specifying a speed dial number for a contact ....................................................... 16
Adding a call log number to an existing contact ................................................... 16
Using your phone with FortiVoice................................................................. 17
Access an outside line ........................................................................................... 17
Accessing features ................................................................................................ 17
Voicemail................................................................................................................ 18
Updating the Firmware .......................................................................................... 18
Troubleshooting ............................................................................................. 19
Limited warranty............................................................................................. 21
Contents Page iv FortiFone User Guide
Page 5

Introduction
Phone features
• 15 handsets per base
• Call log and contacts
• Indoor range up to 150 feet (50 m)
• Outdoor range up to 1000 feet (300 m)
• Talk time up to 18 hours. Standby up to 200 hours
Codecs and protocols
• G.711 (A-law & µ-law) and G.729a
• SIP (Session Initiation Protocol)
• ToS (Type of Service)
• DiffServ (Differentiated Services tagging)
• IP sound quality: GIPS NetEQTM
Requirements
• FortiVoice™ phone system
• Ethernet or fast Ethernet network for connection
• Power source:
a. Base station — requires a PoE (Power over Ethernet) switch that conforms to IEEE
802.3af specifications for PoE
b. Handset charger — use only the power supply shipped with the product. This adapter is
rated with an output of 5.5V at 600 mA.
Introduction Page 1 FortiFone User Guide
Page 6
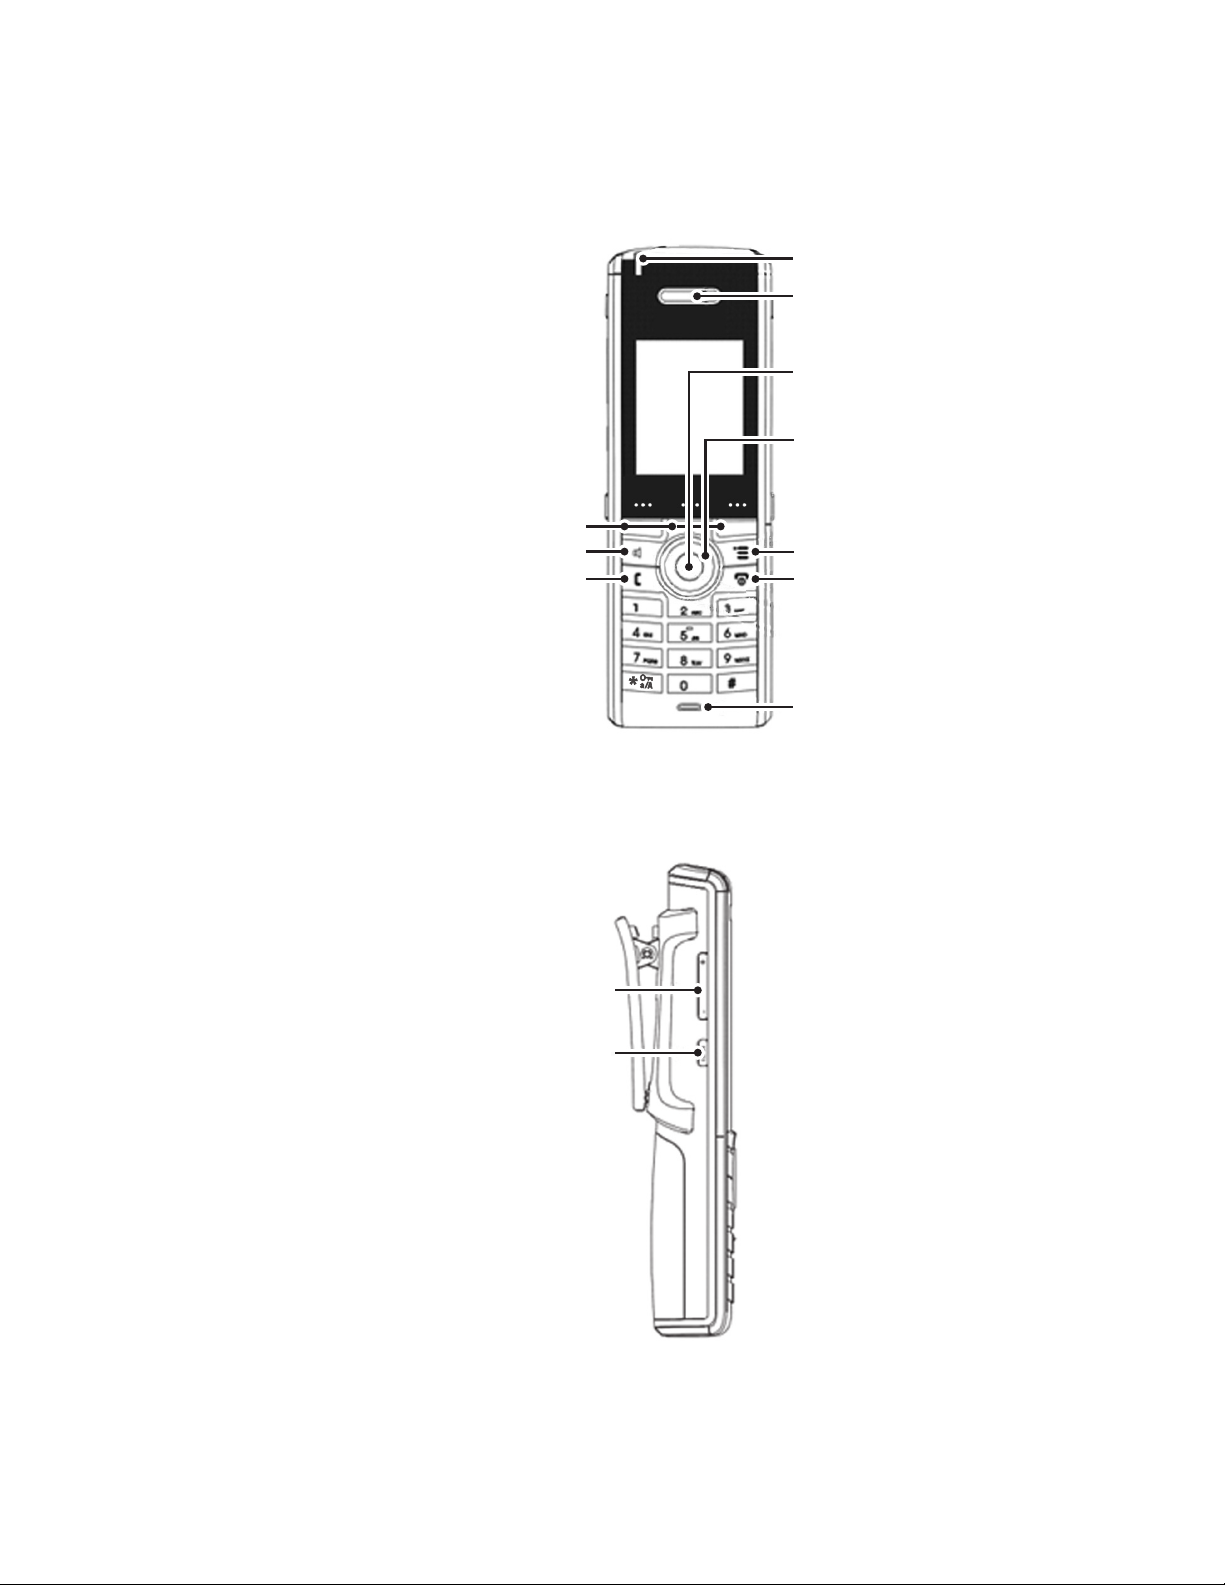
Phone views
Figure 1: Handset — front view
Softkeys
Speaker button
Answer Call button
Indicator light
Speaker
OK button
Navigation button
(left, right, up, down)
Menu button
On/Off and
End Call button
Figure 2: Handset — side view
adjustment
Mute button
Microphone
Volume
button
Introduction Page 2 FortiFone User Guide
Page 7
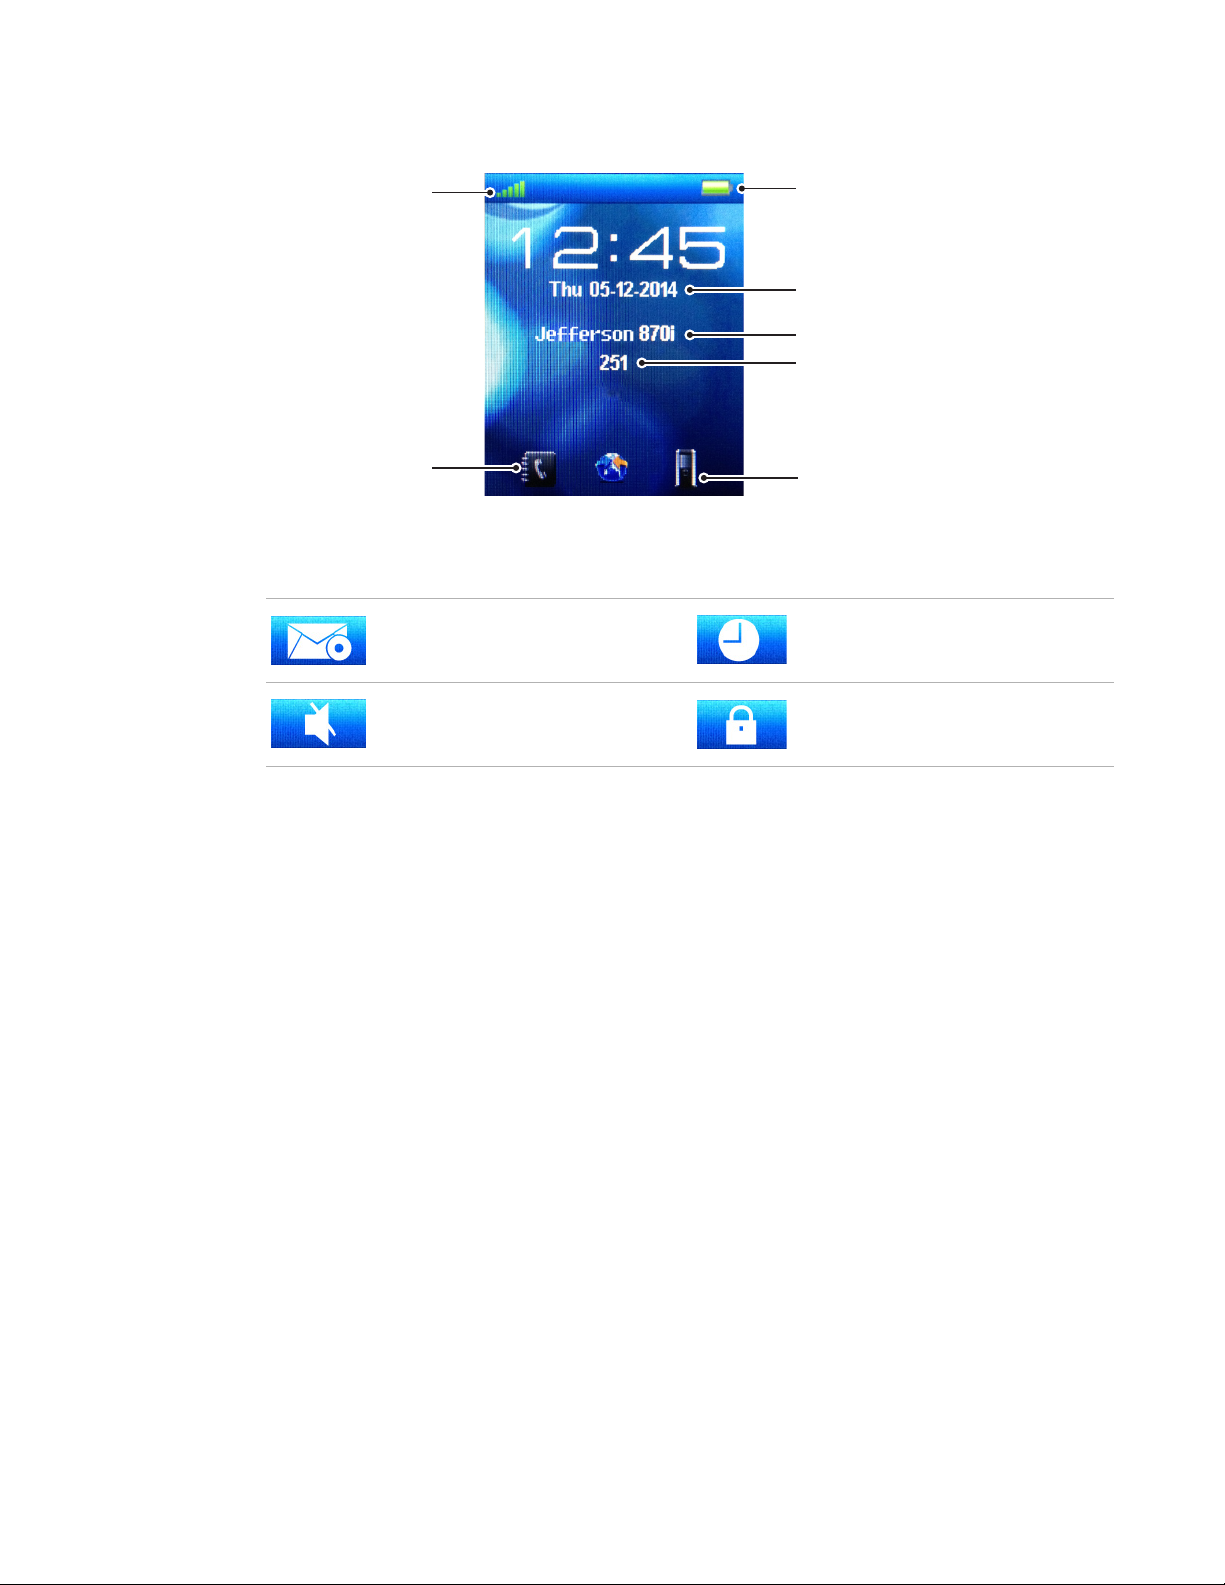
Display layout
Connection status
indicator
Contacts
The following icons appear in the top bar to indicate:
new voicemail alarm enabled
silent mode enabled keylock enabled
Battery status and
charging indicator
Time and date
Extension name
Extension number
Call log
Introduction Page 3 FortiFone User Guide
Page 8
Installation
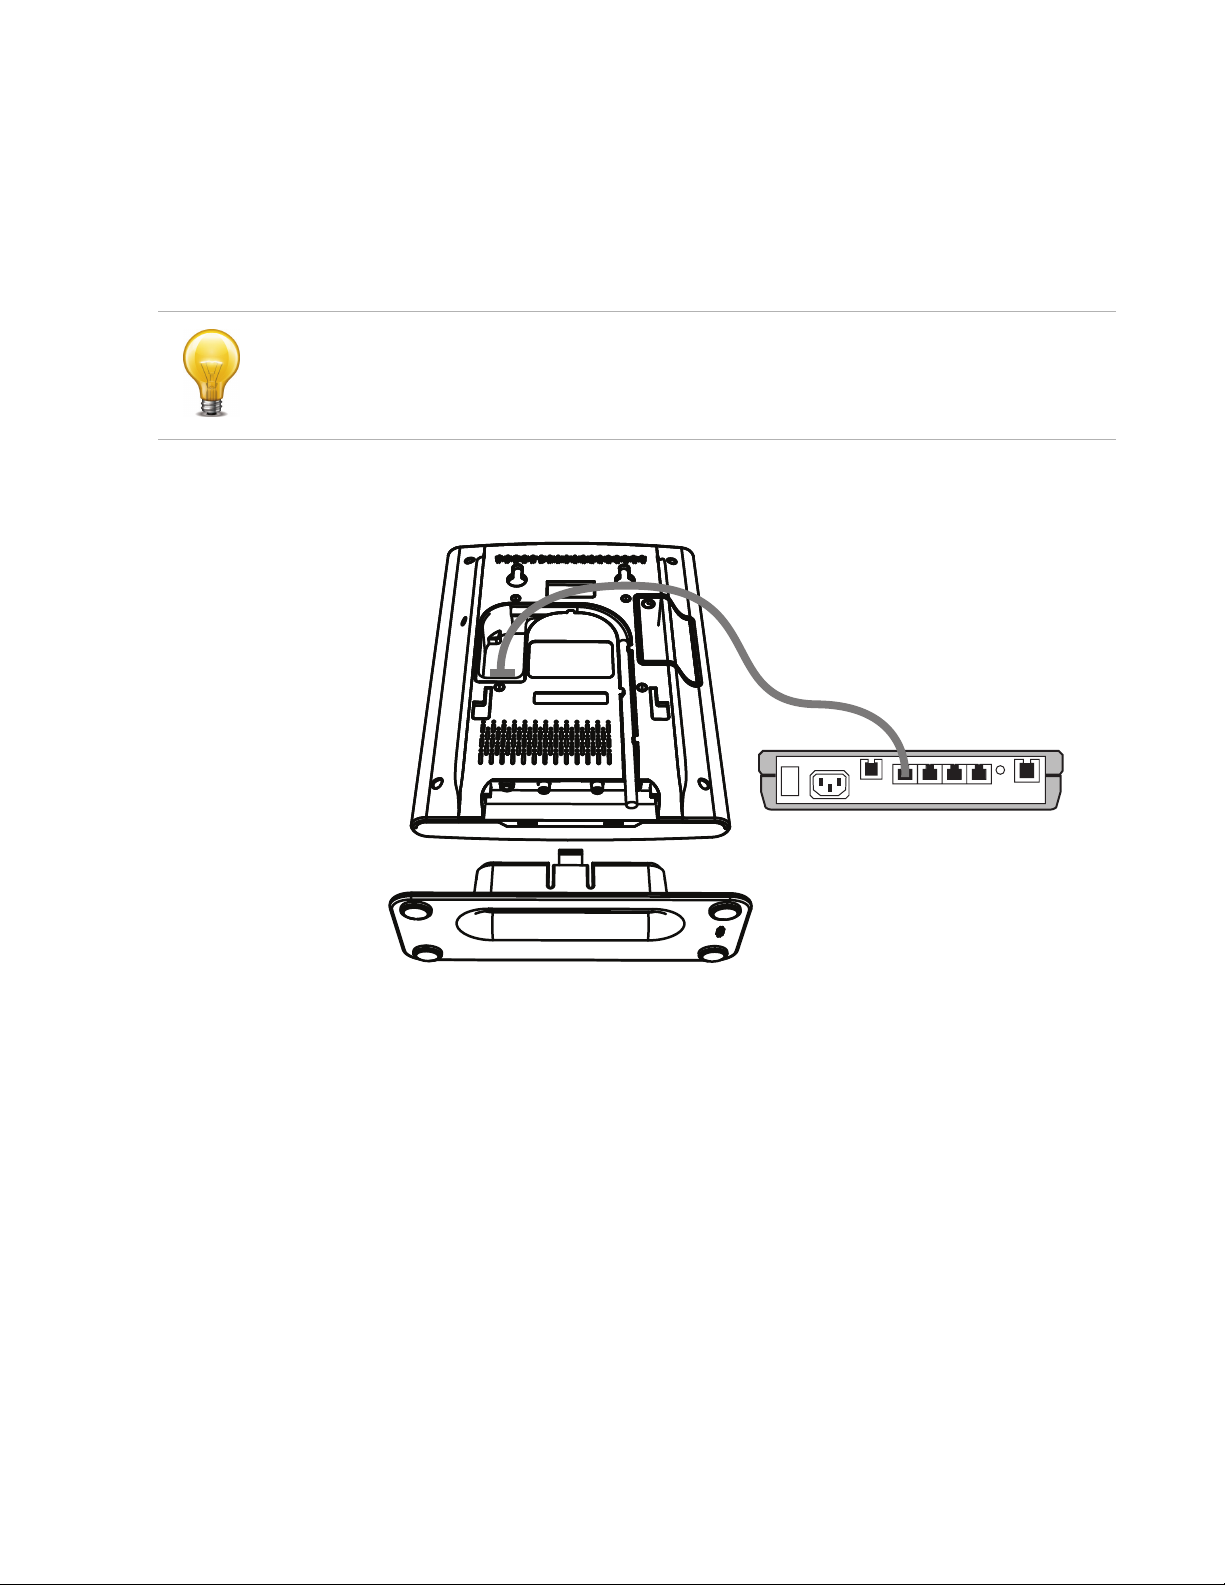
Installing the base station
Ensure you have an available PoE port on your network switch before continuing with
this installation.
Connect the RJ45 cable from the network port on the base station to the PoE switch.
PoE
Installation Page 4 FortiFone User Guide
Page 9

Installing the handset charger
1. Place the handset charger within 150 feet (50 meters) of the base. Concrete and metal
objects might affect the signal range.
2. Connect the power adapter from the power outlet to the handset charger.
Only use the power supply included with the product. Using an unauthorized power supply will
void the product warranty and may damage the handset.
Installation Page 5 FortiFone User Guide
Page 10

Installing the batteries
Use only approved rechargeable batteries. Never use other batteries or conventional
alkaline batteries.
Lithium Ion (Li-ion) 3.7V 1100 mAh 4.1Wh.
1. Remove the battery cover from the phone and insert the battery as shown in the illustration.
Replace the battery cover.
2. Place the handset in the charger. The blue light on the battery charger will turn on.
Ensure the phone is fully charged before using for the first time.
Registering the handsets
A base station can support up to 15 registered handsets with up to 10 concurrent calls.
1. For each handset, ensure the extensions are configured in the phone system. For further
details on configuring an extension, see the FortiVoice Administration Guide.
2. Press and use the navigation button to select Connectivity.
3. Select Register, enter 0000 as the access code. Press the OK button.
4. Reboot the base by pressing the Reset button. Once the base has finished rebooting, the
phone will automatically register and display the name and extension number.
Deregistering a handset from a base
1. Press .
2. Choose Connectivity. Press the OK button.
3. Choose Deregister. Press the OK button.
4. Enter 0000 as the PIN. Press the OK button.
Installation Page 6 FortiFone User Guide
Page 11

Configuring the handset
Typing text
When using the keypad to enter information (such as adding a new contact), three softkeys will
be displayed.
• Save — allows you to save.
• Symbol — allows you to insert a symbol.
• Clear — allows you to erase text.
To type letters, press the key with the letter repeatedly until the letter you want is highlighted in
the lower right of the screen.
Inserting a symbol
1. In the text editor, press the Symbol softkey.
2. Use the navigation button to choose a symbol, and press OK.
Changing the input mode
The lower left corner of the display shows which input mode is currently selected.
• ABC — All uppercase letters.
• Abc — Sentence case. The first letter of the sentence is capitalized, and the rest is
lowercase.
• abc — All lowercase letters.
• 123 — Numbers only.
In the text editor, press _ to change the input mode.
Changing the audio settings
1. Press .
2. Choose Audio settings. Press the OK button.
3. Select the item. Press the OK button. Items include:
• Ringer volume — sets the volume of the ringtone.
• Ringer melody — sets the ringtone for incoming calls.
• Alert volume — sets the volume for alerts.
• Alert tone — sets the ring tone for alerts.
• Vibrator — enables vibrate.
• Key sound — sets the tone that sounds when you press a key.
• Confirmation sound — turn on/off confirmation sounds.
• Coverage warning — turn on/off coverage warning.
• Charger warning — turn on/off charger warning.
4. Select the setting. Press the OK button. Different settings are available for each item.
Configuring the handset Page 7 FortiFone User Guide
Page 12

The Settings menu
Time and date
The time and date are automatically configured by the FortiVoice phone system and do not
require manual configuration.
Language
The phone has multiple supported languages. The default is English. Languages are configured
in the FortiVoice Management software of the extension. Contact your administrator.
Indicator Light
The color of the indicator light can be customized to represent different events.
1. Press .
2. Select Settings. Press the OK button.
3. Select LED signal. Press the OK button.
4. Select a color. Press the OK button.
5. Choose the event. Press the OK button.
Power save
The power save feature helps conserve the handset’s battery life. You can set the number of
seconds before the phone goes into power save mode.
1. Press .
2. Select Settings. Press the OK button.
3. Select Power save. Press the OK button.
4. Select the delay. Press the OK button.
Automatic keylock
The keypad can be set to lock automatically, requiring a password to unlock it.
1. Press .
2. Select Settings. Press the OK button.
3. Select Security. Press the OK button.
4. Select Automatic keylock. Press the OK button.
5. Select the delay before the handset is locked. Press the OK button.
To set your password:
1. Press .
2. Select Settings. Press the OK button.
3. Select Security. Press the OK button.
4. Select Change PIN. Press the OK button.
5. Enter the current PIN. Press the OK button. The default PIN is 0000.
6. Enter the new PIN. Press the OK button.
Configuring the handset Page 8 FortiFone User Guide
Page 13

Line
Indicates the extension number of the handset.
Reset settings
To return the handset to factory default:
1. Press .
2. Select Settings. Press the OK button.
3. Select Reset settings. Press the OK button.
4. Press the Yes softkey.
Status
Provides information about the handset. This includes the hardware and firmware version and
the IP address of the base station.
Enabling auto answer mode
You can set the FON-870i to auto answer when you pick up the handset from the handset
charger.
1. Press .
2. Choose Settings. Press the OK button.
3. Choose Answer mode. Press the OK button.
4. Choose Automatic. Press the OK button.
Silent charging
Silent charging mutes the ringer when the handset is in the cradle. Silent mode is disabled when
the handset is picked up.
1. Press .
2. Choose Settings. Press the OK button.
3. Select Silent charging. Press the OK button.
4. Select Silent. Press the OK button. To turn off silent charging, select Off.
Do not disturb (DND)
Use the FortiVoice system’s do not disturb so calls follow the call handling. Ensure the do not
disturb on the phone is set to disabled. To enable the system-level DND, press _HS + .
Hide number
Not available. Ensure this setting is off.
Idle screen saver
Not available. Ensure this setting is off.
Configuring the handset Page 9 FortiFone User Guide
Page 14

Alarms
Alarm
Recurrent alarm
To set a onetime alarm:
1. Press .
2. Select Alarms. Press the OK button.
3. Select Alarm. Press the OK button.
4. Select the time, and press the Save softkey. To disable an alarm, select Alarm and press the
Turn off softkey.
To set a recurrent alarm:
1. Press .
2. Select Alarms. Press the OK button.
3. Select Recurrent alarm. Press the OK button.
4. Select the time, and press the Save softkey.
5. Select the days by pressing the Mark softkey.
6. Press the OK softkey. To disable a recurrent alarm, select Recurrent alarm and press the
Turn off softkey.
Snooze time
To select the snooze duration:
1. Press .
2. Select Alarms. Press the OK button.
3. Select Snooze time. Press the OK button.
4. Select the snooze time duration. Press the OK button.
Functional keys
You can add functional keys that can automatically dial digits. Each functional key can be
assigned to one of 8 speed dials.
Calling
1. Select F-Keys. Press the OK button.
2. Select the functional key you wish to dial, and press the Call softkey.
Configuring the handset Page 10 FortiFone User Guide
Page 15

Adding a functional key
1. Select F-Keys. Press the OK button.
2. Press the More softkey.
3. Select Add F-key.
4. Select Name, and press the Edit softkey.
5. Input the name, and press the Save softkey.
6. Select Number, and press the Edit softkey.
7. Input the number, and press the Save softkey.
8. Press the Save softkey, and press the Yes softkey.
Editing a functional key
1. Select F-Keys. Press the OK button.
2. Select a functional key you wish to edit, and press the Edit softkey.
3. Make changes to the name or number, and press the Save softkey.
Deleting functional keys
1. Select F-Keys. Press the OK button.
2. Select the functional key you wish to delete, and press the More softkey.
3. Select Delete F-Key, and press the Yes softkey.
4. Alternatively, select Delete all F-Keys to remove all functional keys from the handset.
Associating a functional key with a speed dial
1. Select F-Keys. Press the OK button.
2. Select the functional key you wish to associate with a speed dial, and press the
More softkey.
3. Select Speed dial.
4. Select an available speed dial number, and press the Add softkey.
Configuring the handset Page 11 FortiFone User Guide
Page 16

Using the phone
Using the speakerphone
During a call, press . To deactivate the speakerphone, press again.
Adjusting the handset volume
During a call, press the volume up or volume down buttons on the side of the phone. The
volume setting is automatically saved. See “Handset — side view” on page 2.
Locking and unlocking the keypad
You can lock the keypad so that you don’t use it accidentally.
• Press and hold _. To unlock the keypad, press and hold _.
The keypad unlocks automatically when you answer an incoming call.
Activating silent mode
You can activate silent mode to disable the ringer and confirmation sounds.
• Press and hold ?. To deactivate, press and hold ?.
Receiving a call
When you receive a call, the phone rings while the display shows the incoming call information.
To answer an incoming call:
• Press , or to activate the speakerphone.
To end a call:
• Press .
To refuse a call:
• Press the Refuse softkey. The phone system will handle the call according to the
‘busy’ settings.
Placing a call
To place a call:
• Enter the number and press .
To end a call:
• Press .
Using the phone Page 12 FortiFone User Guide
Page 17

Placing a call on hold
To place a call on hold:
• Press the Hold softkey.
To toggle between two calls:
• Press the Swap softkey.
To retrieve a call on hold:
• Press the Retrieve softkey.
Screened call transfer
You can talk to the person you want to transfer a call to before making the transfer.
1. Press the Transfer softkey. The call status changes to hold.
2. Enter the extension or an outside party, and press .
3. Wait for the party to answer and announce the transfer.
4. Press the Transfer softkey. To cancel the transfer, press .
Blind call transfer
You can transfer a call to another extension without talking to the party receiving the call.
1. Press the Transfer softkey.
2. Enter the extension or dial the outside party.
3. Press the Transfer softkey. To cancel the transfer, press .
Three-party conference
The phone supports conferencing with two other parties.
1. Place the first call.
2. Press the Conf softkey to place the first call on hold.
3. Enter the number of the second party for the conference, and press .
4. When the party answers, press the Conf softkey.
Call waiting
The handset will beep and display call information for a new call if you are already on a call.
Call waiting must be configured for the extension in the Management software.
To answer an incoming call while on a call:
• Press . The first call will be placed on hold and you will be connected to the second caller.
Using the phone Page 13 FortiFone User Guide
Page 18

Dialing using a speed dial number
To place a call using a speed dial number:
• Press and hold the number associated with the speed dial.
Do Not Disturb (DND)
When DND is activated, calls will be routed according to the settings programmed for
your extension.
To activate DND:
• Press _HS + .
To deactivate DND:
• Press _HS + .
Muting a call
Mute toggles the audio input off or on. When mute is active, the connected party will not hear
anything from the phone.
Accessing your voicemail
When you have a message waiting, the indicator light flashes.
To access your voice mailbox:
• Press __ + , or press and hold . Follow the instructions to listen to messages.
Call logs
The call logs keep track of all your calls. There is a log for all calls, missed calls, incoming calls
and outgoing calls.
Each call log stores up to 50 calls. For each call, the call log keeps track of the number, date,
time and type of call (incoming, outgoing, or missed). If the caller’s name and number is stored
in the contacts, the caller’s name is also displayed. A number or name is only listed once, but all
missed calls are counted so you can see how many times a caller has tried to reach you.
Viewing numbers in the call log
1. Press the Call log softkey.
2. Use the navigation button to scroll horizontally through the other logs and vertically to scroll
through the names and numbers.
Using the phone Page 14 FortiFone User Guide
Page 19

Contacts
3. Select a number in the call log, and press Call, View or More Options to access the following:
Option Description
View details Provides details on the record such as the number, duration
and when the call occurred.
Save as contact Opens a text editor so that you can add the selected number
as a contact. For more information, see “Adding a contact” on
page 15.
Append as contact Opens Contacts so that you can add the selected number to an
already existing contact. For more information, see “Adding a
call log number to an existing contact” on page 16.
Edit for call Opens the number editor so that you can edit the number
before calling. Example: Add a hunt group.
Delete item Deletes the selected number from the call log.
Delete all items Deletes all numbers in the call log list.
Contacts are stored names and numbers. The names and numbers are listed in alphabetical
order. You can store up to 100 contacts, with up to four phone numbers per contact.
Adding a contact
1. Press the Contacts softkey.
2. Press the More softkey, choose Add contact. Press the OK button.
3. Press the Edit softkey. Type the name of the contact, and press the Save softkey.
4. Scroll down and choose a field for the kind of number you want to enter (work, mobile,
home or other). Press the Edit softkey, type a number, and press the Save softkey.
5. Press the Save softkey, and press the Yes softkey when prompted to save. You need to type
both a name and a number for a contact before you can save the information.
Choosing a contact
1. Press the Contacts softkey.
2. Use the navigation button to navigate through the groups and to scroll up and down. You
can also search for a contact by entering the first letter of the name. The first name starting
with that letter is highlighted. Use the navigation button to scroll through the names that
start with that letter.
Deleting a contact
1. Press the Contacts softkey.
2. Choose the contact you want to delete.
3. Press the More softkey, choose Delete contact, and press the Yes softkey when prompted.
4. To delete all contacts, choose Delete all contacts, and press the Yes softkey when prompted.
Using the phone Page 15 FortiFone User Guide
Page 20

Editing a contact
1. Press the Contacts softkey.
2. Choose the contact you want to edit.
3. Press the Edit softkey, then choose the field that you want to edit.
4. Press the Edit softkey, make your edits, and press the Save softkey.
5. Press the Save softkey, and press the Yes softkey when prompted.
Changing the ring tone for a contact
1. Press the Contacts softkey.
2. Choose the contact for which you want to specify a ring tone.
3. Press the Edit softkey.
4. Choose Ring tone, and press the Edit softkey.
5. Use the navigation button to scroll through the ring tones.
6. Press the Play softkey to listen to the selected ring tone.
7. Press the Stop softkey to stop a ring tone from playing.
8. Press OK to select the ring tone.
9. Press the Save softkey, and press the Yes softkey when prompted.
Specifying a speed dial number for a contact
1. Press the Contacts softkey.
2. Choose the contact to which you want to add a speed dial number.
3. Press the More softkey, choose Speed dial. Press the OK button.
4. To use a new speed dial number, select an empty entry, and press the Add softkey.
5. Press to return to contacts.
Adding a call log number to an existing contact
1. Press the Call log softkey, then choose the number you want to append to an
existing contact.
2. Press the More softkey, choose Append to contact. Press the OK button.
3. Choose the contact to which you want to add the number, and press the Append softkey.
The contact opens. Select the number type and press the Append or Replace softkey.
4. Press the Save softkey, and press the Yes softkey when prompted to save.
Using the phone Page 16 FortiFone User Guide
Page 21

Using your phone with FortiVoice
Access an outside line
Press hunt group L or KA–KK (Americas, UK), press : or KA–KK (other countries).
No hunt group is required if direct line access is enabled. You can select a line directly if it has a
programmed key.
Accessing features
If direct line access is enabled, press __ to access features indicated with a , unless you
are using a programmed key.
Do not disturb
Press _HS + to toggle on/off.
Pick up — Any ringing extension
Press _L + .
Pick up — Specific extension
Press _J + extension + .
Place a caller on hold
Press the Hold softkey.
Retrieve a caller on hold
Press the Retrieve softkey.
Answer queued call
Press J + to retrieve the next caller in your queue.
Answer FortiVoice call waiting
Press .
Screened transfer
Press the Transfer softkey + <extension> (or outside number) + . To complete the transfer,
press the Transfer softkey. To cancel transfer, press then the Resume softkey to connect to
the caller on hold.
Blind transfer
Press the Transfer softkey + <extension> (or outside number) + the Transfer softkey.
Voicemail transfer
Press the Transfer softkey + _ + <extension> + .
Conference call
Press the Conf softkey to put the first party on hold. Call the second party (for external calls,
first access an outside line). Press the Conf softkey to connect to all parties.
Park a caller
Press the Transfer softkey + _GA: + . The system will respond with a parking orbit.
Retrieve a parked caller
Press __ + orbit + .
Using your phone with FortiVoice Page 17 FortiFone User Guide
Page 22

Voicemail
Two-way intercom/group paging to FortiVoice phones
Press _KF (Intercom) or _KG (Paging) + <extension> + .
Attach account code to last call
Press _KK + . When prompted, enter <Account code> + .
CDR logging must be active.
Access Mailbox — Locally __ + , or press and hold
Access Mailbox — Remotely
Change greeting options
Change personal options (password, date stamp, remote notification options) D
MESSAGE PLAYBACK CONTROLS
Rewind 10 seconds
Go to beginning AA
Skip ahead 10 seconds D
Skip to end of message DD
Check time and date stamp G
Forward message H
Delete message J
Save message L
Skip to next message ?
Updating the Firmware
__ + <mailbox number>
S
A
In the system management software, go to Tools > Update Phones and follow the instructions.
For instructions on obtaining firmware for your region and language, contact your reseller. If you
purchased directly from Fortinet, visit http://www.fortinet.com/fortivoice to obtain further
information or assistance.
Using your phone with FortiVoice Page 18 FortiFone User Guide
Page 23

Troubleshooting
The following is a list of solutions to the most common issues that you may experience when
you use the FON-870i.
Problem Possible causes Possible solutions
The power indicator on
the base is not lit.
The handset display
is black.
The handset does
not charge.
The display reads
“Searching”.
The base is
not powered.
The handset is in power
saving mode.
The power is not
turned on.
The battery is drained. Charge the phone.
The handset charger is
not properly connected.
The base is not
powered.
The base is rebooting. The base may take up to 30 seconds to
The handset is out
of range.
Check that the base is connected to a
PoE switch.
Press any key.
Press .
Check that the power adapter is
connected properly to the handset charger.
Ensure the blue light on the cradle goes on
when the handset is cradled.
Check that the base is connected to a
PoE switch.
finish its boot sequence. Wait 30 seconds
and see if the message clears.
Return to within range of the base station.
If the range is significantly less than 50m,
elevate the base station above
obstructions.
The display reads
“No SIP Reg”.
The display reads
“Deregistered”.
The display is missing
the extension name
and number.
Troubleshooting Page 19 FortiFone User Guide
The handset is not
configured in the
FortiVoice Management
software.
The handset is not
registered.
The handset was not
configured with the
lowest available
handset ID.
Refer to the steps outlined in the quickstart
guide.
Register the handset:
1. Press .
2. Select Connectivity. Press the
OK button.
3. Select Register. Press the OK button.
4. Enter 0000 as the access code. Press
the OK button.
5. Reboot the base.
1. Select the lowest available handset ID
in the FortiVoice Management
software.
2. Save your configuration. The base
station will reboot.
Page 24

Problem Possible causes Possible solutions
I can’t make calls. Hide Number is enabled
on the handset.
I can’t receive calls. The handset’s Do not
disturb feature is
enabled.
Ensure Hide Number is disabled:
1. Press .
2. Select Settings. Press the OK button.
3. Select Hide Number. Press the
OK button.
4. Select Off.
Disable Do not disturb:
1. Press .
2. Select Settings. Press the OK button.
3. Select Do not disturb. Press the
OK button.
4. Select Disabled.
Troubleshooting Page 20 FortiFone User Guide
Page 25

Limited warranty
This phone is covered by a one-year limited warranty against manufacturing defects.
www.fortivoice.com/support
For warranty service:
• In North America, please call 1-866-393-9960 for further information.
• Outside North America, contact your sales representative for return instructions.
You will be responsible for shipping charges, if any. When you return this telephone for warranty
service, you must present proof of purchase.
Limited warranty Page 21 FortiFone User Guide
Page 26

 Loading...