

Page 1

FON-860i Telephone
User Guide
Page 2

FON-860i Telephone User Guide
March 14, 2013
27-400-170921-20130314
Copyright © 2013 Fortinet, Inc. All rights reserved. Fortinet®,
FortiGate®, and FortiGuard®, are registered trademarks of
Fortinet, Inc., and other Fortinet names herein may also be
trademarks of Fortinet. All other product or company names may
be trademarks of their respective owners. Performance metrics
contained herein were attained in internal lab tests under ideal
conditions, and performance may vary. Network variables,
different network environments and other conditions may affect
performance results. Nothing herein represents any binding
commitment by Fortinet, and Fortinet disclaims all warranties,
whether express or implied, except to the extent Fortinet enters
a binding written contract, signed by Fortinet’s General Counsel,
with a purchaser that expressly warrants that the identified
product will perform according to the performance metrics
herein. For absolute clarity, any such warranty will be limited to
performance in the same ideal conditions as in Fortinet’s internal
lab tests. Fortinet disclaims in full any guarantees. Fortinet
reserves the right to change, modify, transfer, or otherwise revise
this publication without notice, and the most current version of
the publication shall be applicable.
Technical Documentation docs.fortinet.com
Knowledge Base kb.fortinet.com
Customer Service & Support support.fortinet.com
Training Services training.fortinet.com
FortiGuard fortiguard.com
Document Feedback techdocs@fortinet.com
Page 3

Fortinet Technologies Inc. Page i FON-860i Telephone User Guide
Table of Contents
Introduction.................................................................. 1
Phone features ................................................................. 1
Codecs and protocols ...................................................... 1
Parts list............................................................................ 2
Installing the FON-860i................................................ 7
Installing the base............................................................. 7
Installing the handset charger .......................................... 9
Installing the batteries .................................................... 10
Charging the batteries .................................................... 11
Registering handsets with the base ............................... 11
Using the handset charger ....................................... 12
Using the handset itself ............................................ 12
Deregistering a handset from a base ............................. 13
Viewing all handsets registered with a base .................. 13
Checking and updating firmware ................................... 13
Checking the current firmware version..................... 13
Checking for firmware updates ................................ 14
If there is no Internet access at this location ...... 14
If there is Internet access at this location ........... 14
Configuring the FON-860i as an IP extension......... 16
Configuring the FON-860i for use within the office ........ 16
IP Extension Details area.......................................... 18
Configuring the FON-860i for use outside the office...... 19
Checking the firewall ................................................ 19
Selecting the extension ............................................ 20
IP Extension Details area.......................................... 22
Configuring the external IP extension handset......... 22
Configuring the handset ........................................... 24
Enabling auto answer mode........................................... 24
Page 4

Fortinet Technologies Inc. Page ii FON-860i Telephone User Guide
Changing the display contrast........................................ 24
Restoring the default display contrast............................ 24
Changing the audio settings........................................... 25
Using the FON-860i ................................................... 26
Using the speakerphone ................................................ 26
Adjusting the handset volume ........................................ 26
Locking and unlocking the keypad................................. 26
Activating silent mode .................................................... 27
Typing text and numbers................................................ 27
Inserting a symbol .......................................................... 27
Changing the input mode ............................................... 28
Making and answering calls ..................................... 29
Calling an outside number.............................................. 29
Calling an extension ....................................................... 29
Calling a voice mailbox................................................... 29
Making a call using a system speed dial number .......... 30
Calling the receptionist................................................... 30
Making a call using contacts .......................................... 30
Making a call using the call log ...................................... 30
Making a call using redial ............................................... 31
Making a call using a speed dial number ....................... 31
Making an emergency call.............................................. 32
Making a conference call................................................ 32
Making an analog call..................................................... 32
Answering a call ............................................................. 33
Answering call waiting .................................................... 33
Answering a queued call ................................................ 34
Picking up a call for any extension................................. 34
Picking up a call for a specific extension ....................... 34
Answering an analog call................................................ 34
Page 5

Fortinet Technologies Inc. Page iii FON-860i Telephone User Guide
Rejecting a call ............................................................... 35
Muting a call ................................................................... 35
Ending a call ................................................................... 35
Caller ID .......................................................................... 35
Using the FON-860i with a traditional phone line........... 36
Holding and transferring calls .................................. 37
Placing a call on hold ..................................................... 37
Taking a call off hold ...................................................... 37
Transferring a call ........................................................... 37
Attended transfer............................................................ 38
Parking calls and paging........................................... 39
Parking a call .................................................................. 39
Retrieving a parked call .................................................. 39
Two-way intercom paging.............................................. 39
One-way group paging................................................... 40
Overhead paging ............................................................ 40
Voicemail .................................................................... 41
Setting up voicemail ....................................................... 41
Checking voicemail using the FortiVoice feature code .. 41
Checking voicemail using the voicemail menu............... 41
Controlling message playback ....................................... 42
Other features ............................................................ 43
Toggling do not disturb mode ........................................ 43
Attaching an account code to the last call ..................... 43
Call log........................................................................ 44
Viewing numbers in the call log...................................... 44
Contacts ..................................................................... 45
Adding a contact ............................................................ 45
Choosing a contact ........................................................ 45
Page 6

Fortinet Technologies Inc. Page iv FON-860i Telephone User Guide
Deleting a contact .......................................................... 46
Editing a contact............................................................. 46
Changing the ring tone for a contact.............................. 46
Changing the default number for a contact ................... 47
Specifying a speed dial number for a contact................ 47
Adding a call log number to contacts ............................ 48
Adding a call log number to an existing contact ............ 48
Creating a group............................................................. 48
Editing a group ............................................................... 49
Adding a contact to a group........................................... 49
Deleting a group ............................................................. 49
Removing a contact from a group ................................. 50
Changing a ring tone for a group ................................... 50
Troubleshooting......................................................... 51
Appendix A: Optional configuration methods......... 56
Configuring the FON-860i as an analog local extension 56
Configuring the analog local extension handset ...... 57
Configuring the FON-860i as a standalone IP phone..... 58
Configuring a static IP address ...................................... 58
Configuring the voice settings........................................ 59
Legal ........................................................................... 60
Limited warranty........................................................ 61
Index ........................................................................... 62
Page 7

Fortinet Technologies Inc. Page 1 FON-860i Telephone User Guide
Introduction
Congratulations on your purchase of the FON-860i Cordless DECT
Phone!
This guide describes how to install, configure and use your new phone with
a FortiVoice system. Read the installation section from beginning to end.
The rest of the guide shows how to use the features. For more information,
visit the support section at http://www.fortinet.com/fortivoice.
If you require technical support, have your serial number and MAC
address (found on the bottom of the base) ready when contacting us.
For inquiries concerning telephony services, contact your Internet
Telephony Service Provider (ITSP). For inquiries concerning your
broadband connection, contact your Internet Service Provider (ISP).
Phone features
• Multiple handsets per base with support for multiple bases.
• Call transfer, hold, park, unpark, pickup, conference, do not
disturb and page.
• Call log and contacts.
• Superior sound quality with mute, volume controls, ring tones,
speakerphone and 2.5 mm headphone jack.
• Telephony via Internet and PSTN/POTS.
• Indoor range up to 150 feet (50 m).
Outdoor range up to 1000 feet (300 m).
• Talk time up to 10 hours. Standby up to 200 hours.
Codecs and protocols
• Enhanced G.711 (64 kbps, A-law & µ-law) and G.729A.
• ILBC (Internet Low Bit Rate CODEC) (RFC 3951/RFC 3952).
• SIP (Session Initiation Protocol).
• ToS (Type of Service).
• DiffServ (Differentiated Services tagging).
• IP sound quality: GIPS NetEQTM.
Page 8

Fortinet Technologies Inc. Page 2 FON-860i Telephone User Guide
Parts list
In addition to the FON-860i Telephone Start Guide and FON-860i
Telephone User Guide, the following items are included in your
FON-860i package. Check this list before installation to ensure that
you have received each item. If you are missing any items, please
contact your system administrator or reseller.
Figure 1: Parts list
Base
Power adapter for base
Power adapter for handset charger
FON-860i handset
and belt clip
Handset charger
Telephone cable Ethernet cable
Rechargeable Li-ion battery
BATTERY PACK
FOR G355 / G955
3.7v 650 mAh Li-ion
- Do not disassemble,
customize or shortcircuit
- Do not place battery in re
or heat the battery
CAUTION
Page 9
Fortinet Technologies Inc. Page 3 FON-860i Telephone User Guide
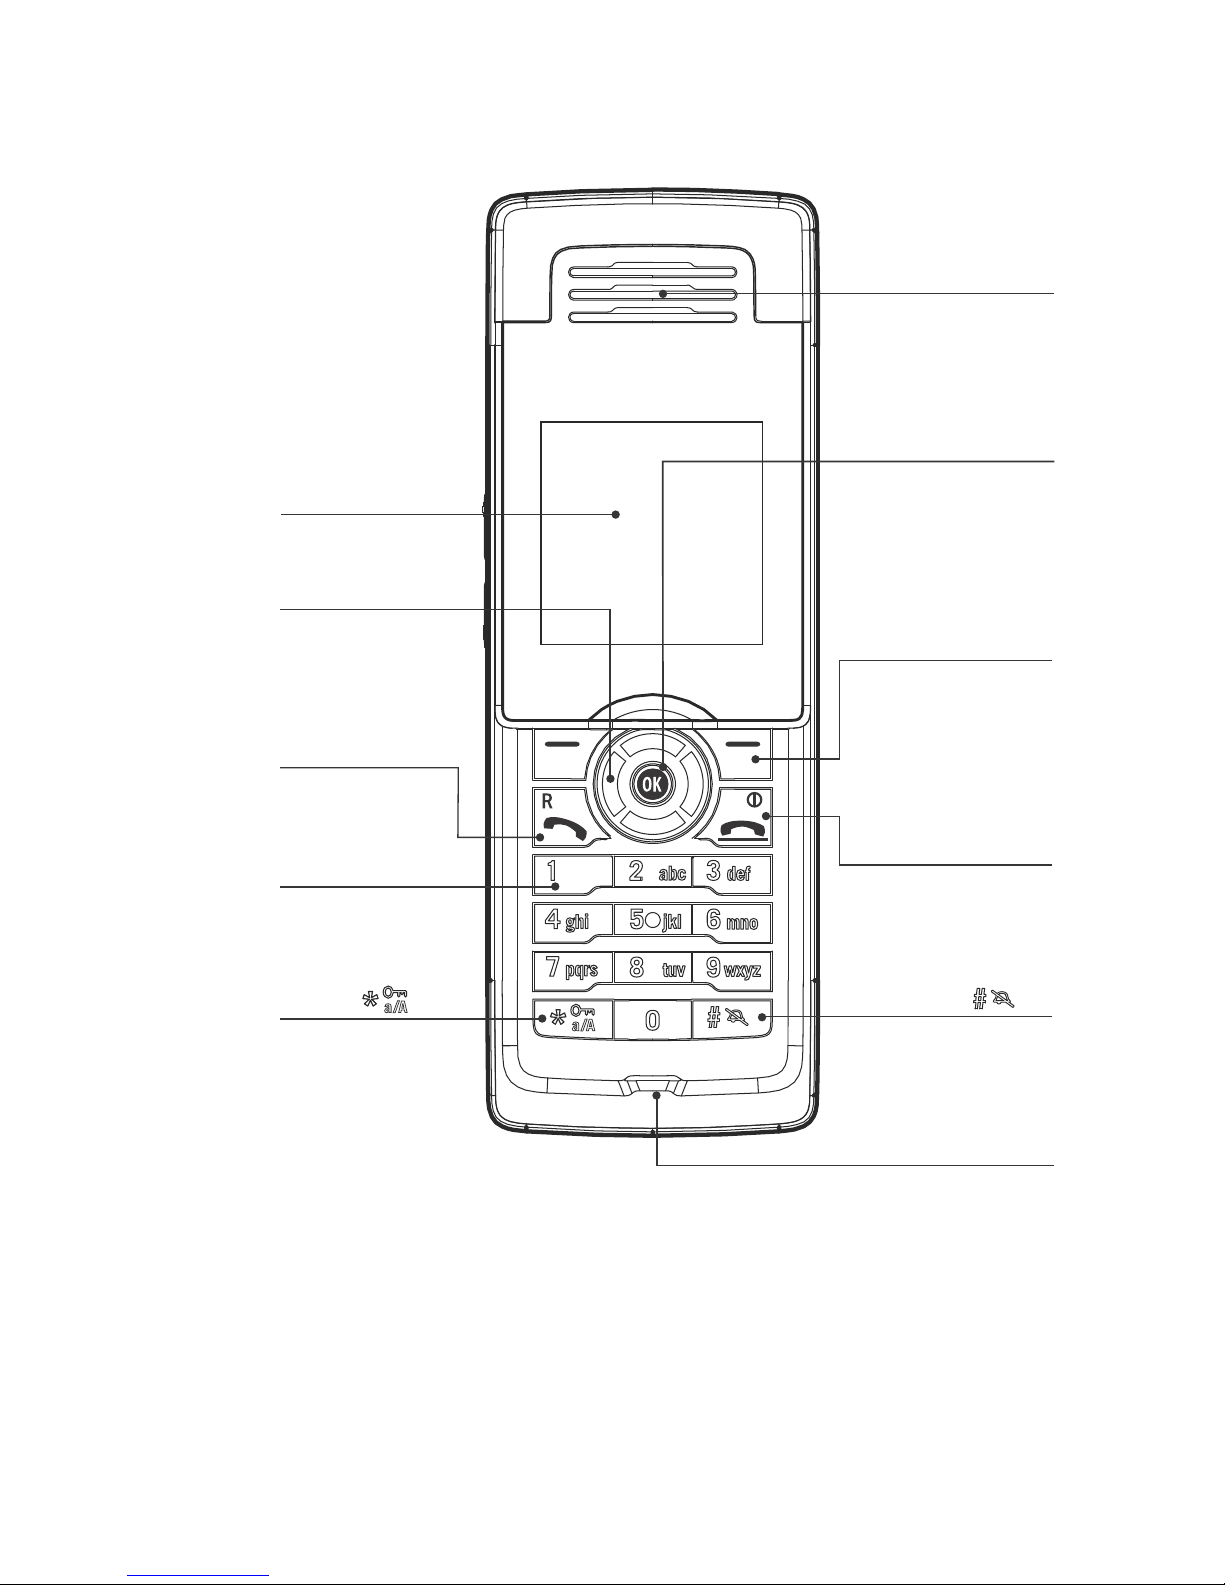
Figure 2: Handset — front view
OK key
used to select menus
and options
Earpiece
Microphone
Navigation keys
used to scroll
through menus
Color display
Red Phone key
used to end calls,
leave menus and turn
the handset on or off
key
used to send a
ash/recall signal.
Press and hold
for 2 seconds
Keypad
used to dial numbers
and enter characters
Green Phone key
used to place
a call
Star key
used to access
FortiVoice features,
capitalize letters
and enter numbers
Softkeys
used to select
context-sensitive
options
Page 10

Fortinet Technologies Inc. Page 4 FON-860i Telephone User Guide
Figure 3: Handset — side view
Loudspeaker
for speakerphone
Volume keys
adjust audio and
ringer volume.
Pressing the
+ key in
Idle mode shows the system
status of the phone
(MAC address, IP address,
software version and
handset ID).
Speakerphone
activation and
deactivation key
Headset jack (2.5mm)
Page 11

Fortinet Technologies Inc. Page 5 FON-860i Telephone User Guide
Figure 4: Handset charger
Figure 5: Base — front view
Figure 6: Base — rear view
Power supply connector
Front view Rear view
Power indicator
indicates power on
VoIP indicator
indicates the base has a connection to the phone
system or an Internet Telephony Service Provider
I-net indicator
indicates the base has
received an IP address
Call indicator
indicates landline or
Internet call in progress
Reset button
enables handset registration
WAN port
for Ethernet cable
Power port
Line port
for telephone cable
Page 12
Fortinet Technologies Inc. Page 6 FON-860i Telephone User Guide
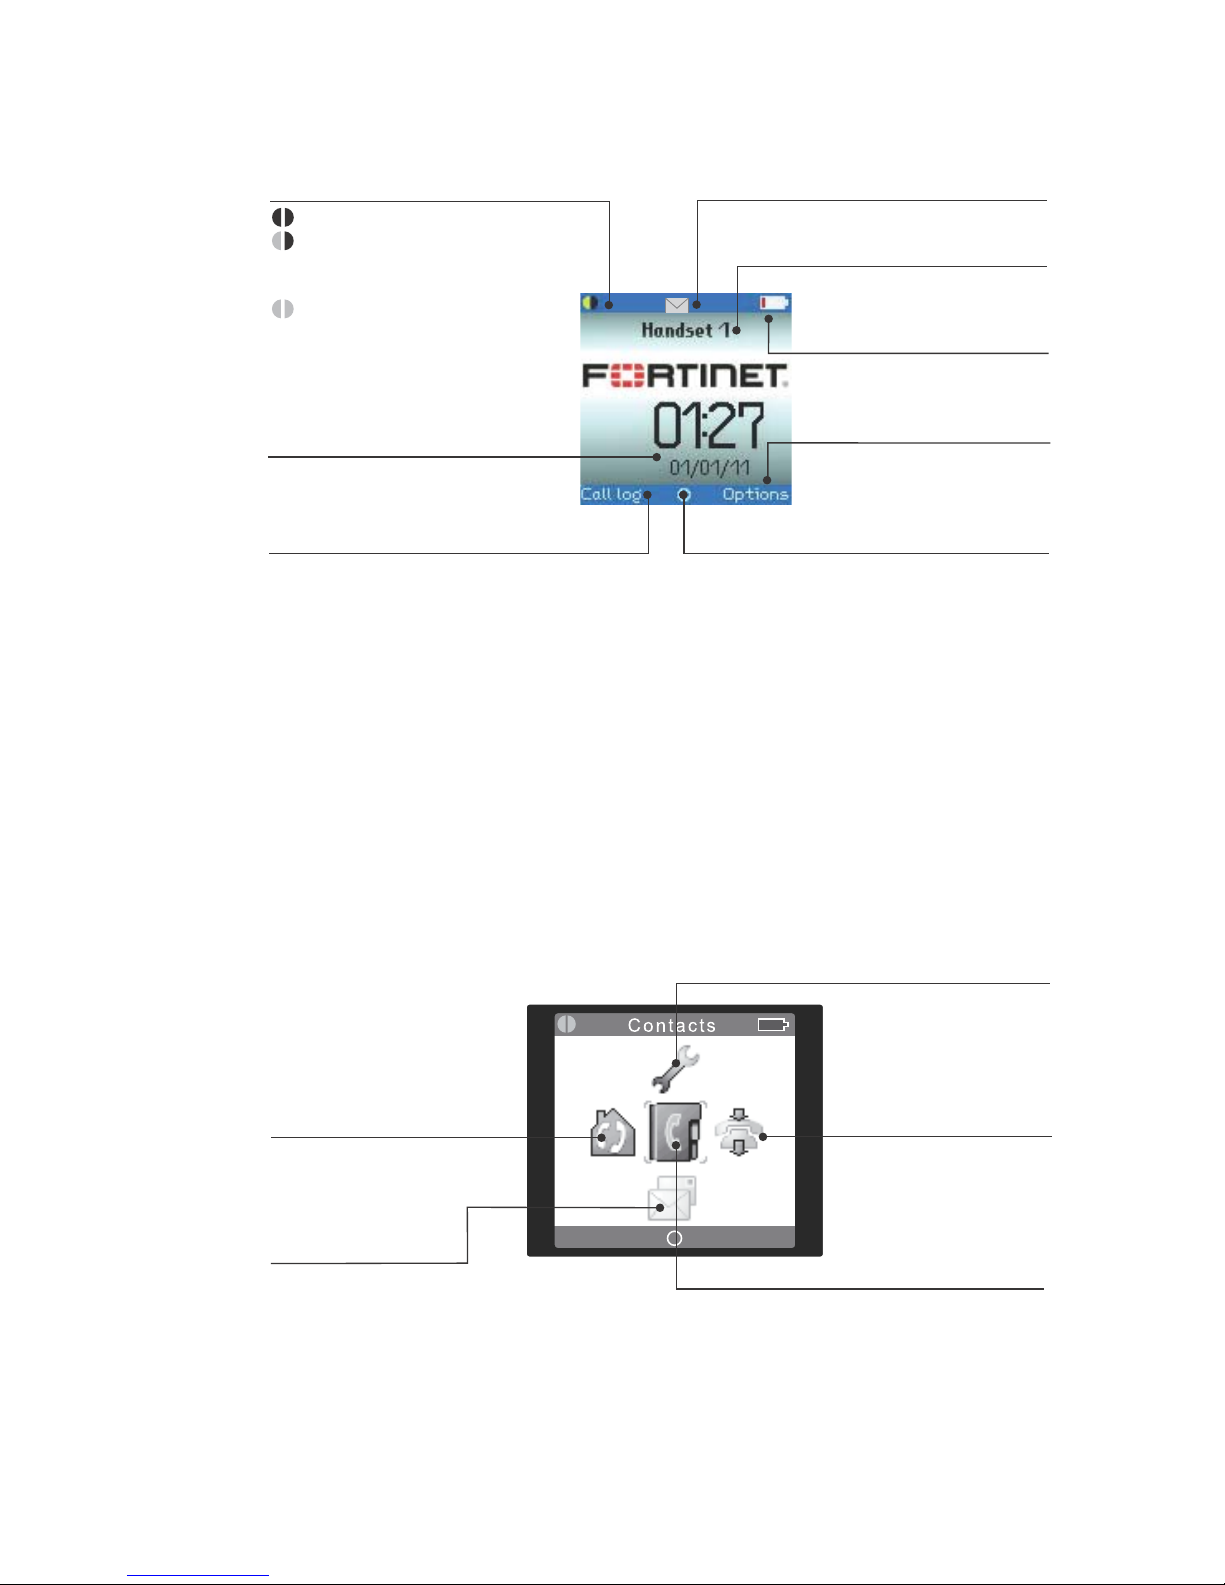
Figure 7: Handset screen — idle mode
The Main menu has seven icons. The icons provide access to
menus, which allow you to change your settings, and to access
voicemail (page 41), the call log (page 44) and contacts (page 45).
In Idle mode, press the OK key to access the Main menu. Use the
navigation keys to choose a menu icon, and then press the OK key
to select a menu.
Figure 8: Handset screen — main menu
OK key indicator
signifies that the OK key is active
Time and date
Handset name
Message indicator
for voicemail
Battery status
and charging indicator
Options
for redial and active calls
(activated with soft keys)
Connection status indicators
Black/black – out of range of the base
Yellow/black – within range of the
base, but not ready
for Internet calls
Yellow/yellow – within range of
the base, and
ready for
Internet calls
Call log
for incoming, outgoing and missed calls
(activated with soft keys)
Messages
voicemail
Contacts
list of contacts
Intercom
for communication
between two handsets
Settings
handset setup
Call log
incoming, outgoing
and missed calls
Page 13
Fortinet Technologies Inc. Page 7 FON-860i Telephone User Guide
Installing the FON-860i
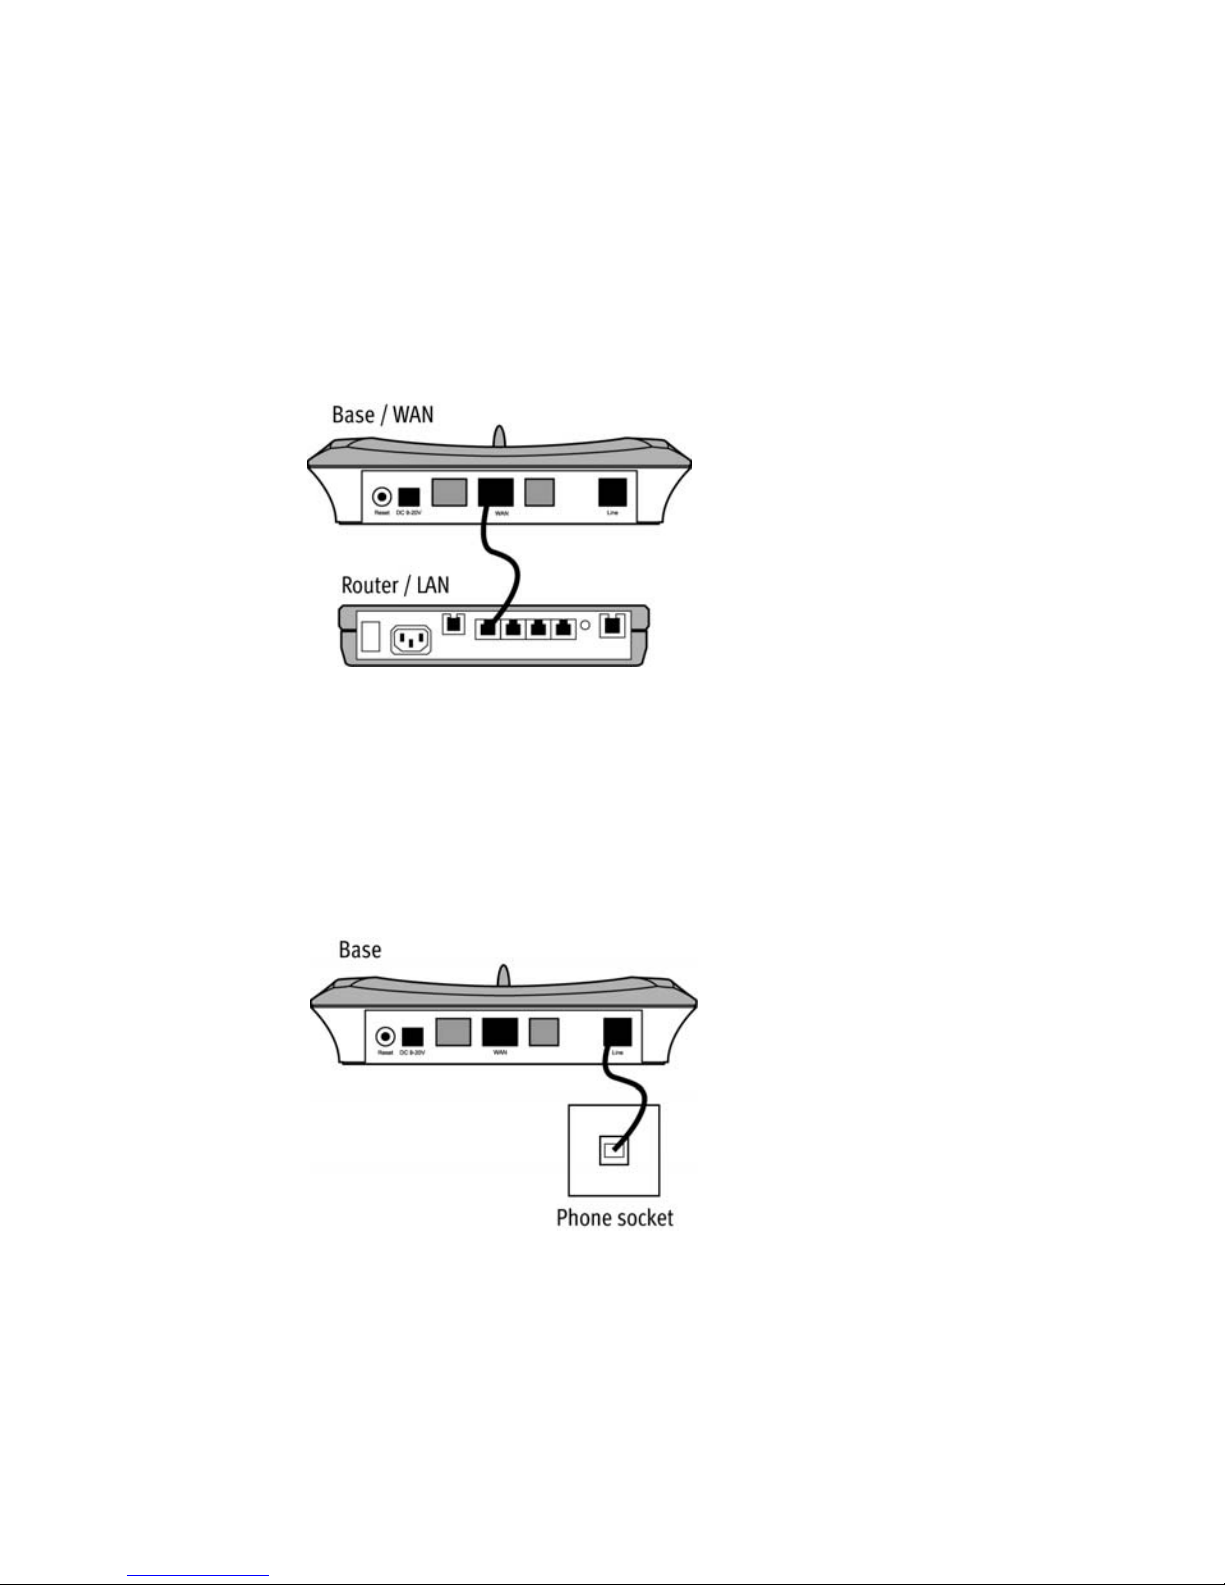
Installing the base
1. Place the base near a wired Ethernet router, either on a tabletop
or mounted on a wall. Avoid placing the base in a location with a
lot of metal, or near devices that cause interference.
2. Connect the Ethernet cable from the WAN port on the base to a
LAN port on your router or Ethernet switch. The FortiVoice unit
must be connected to the same LAN.
3. Optionally connect the telephone cable from the Line port on the
base to the telephone wall socket. This will allow you to use the
FON-860i with a traditional phone line.
Page 14
Fortinet Technologies Inc. Page 8 FON-860i Telephone User Guide
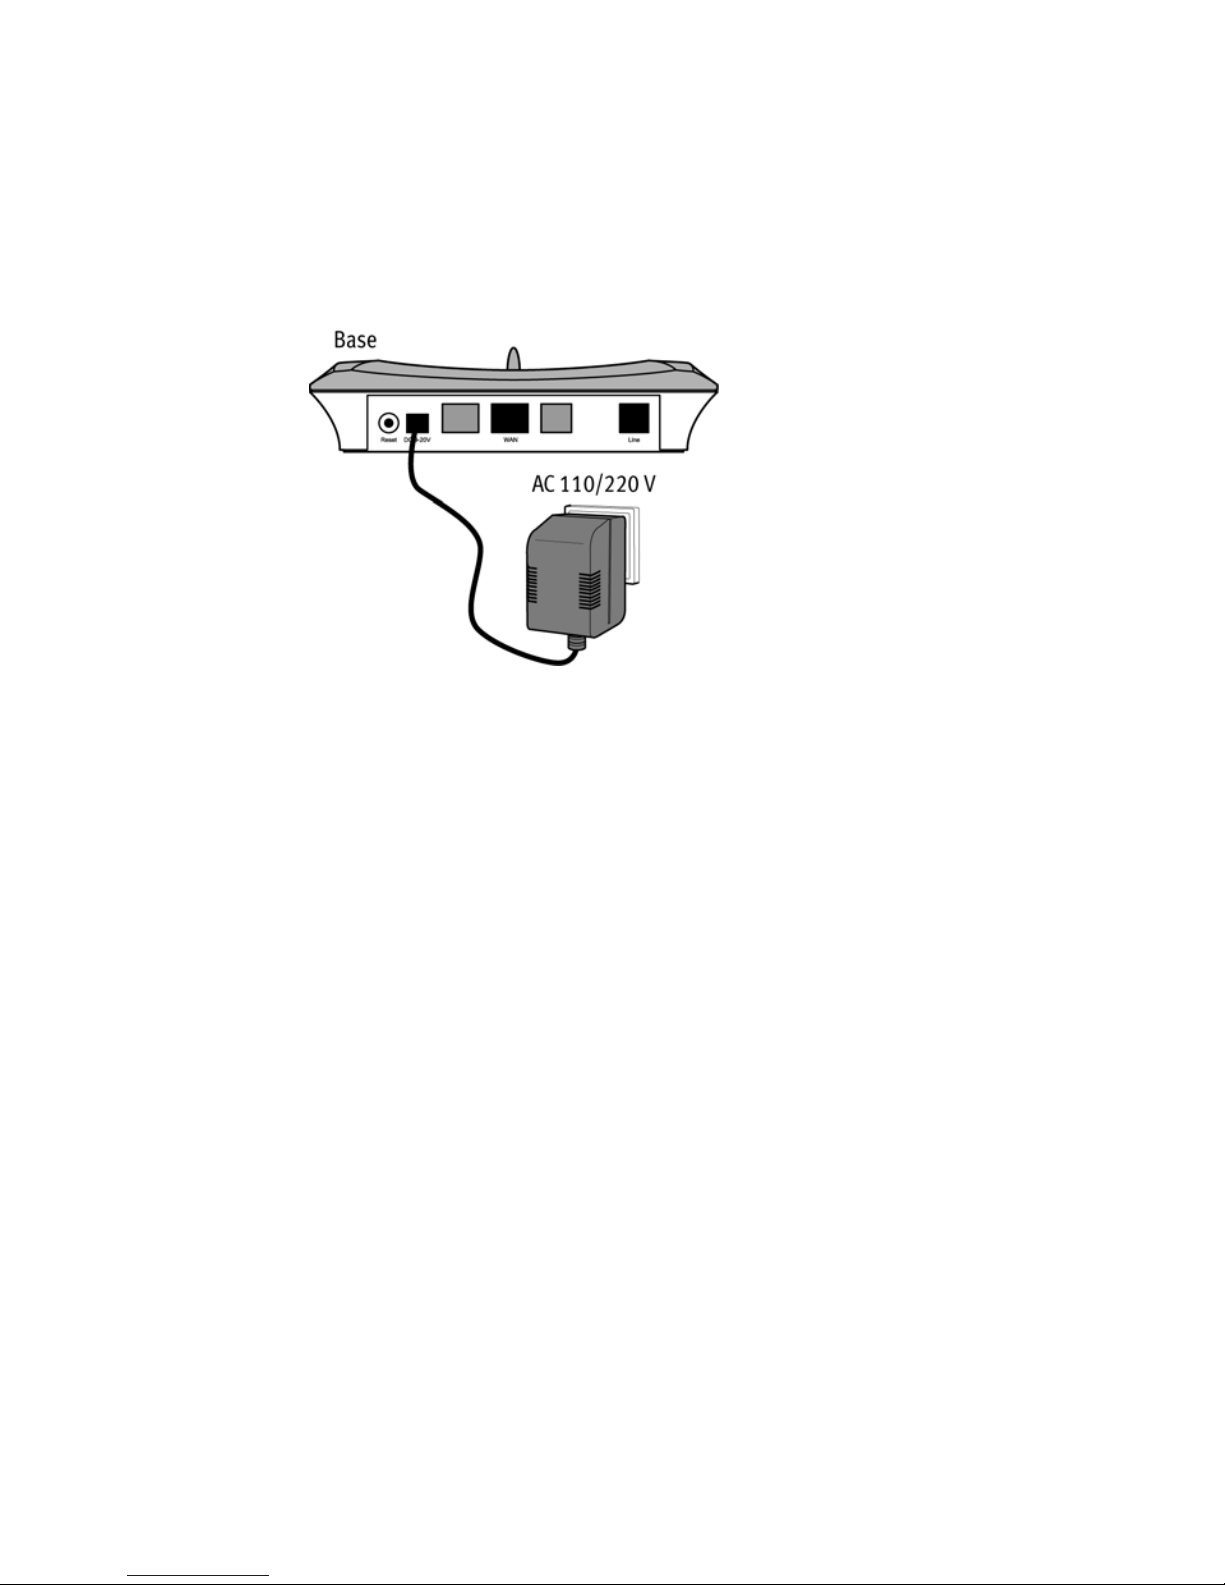
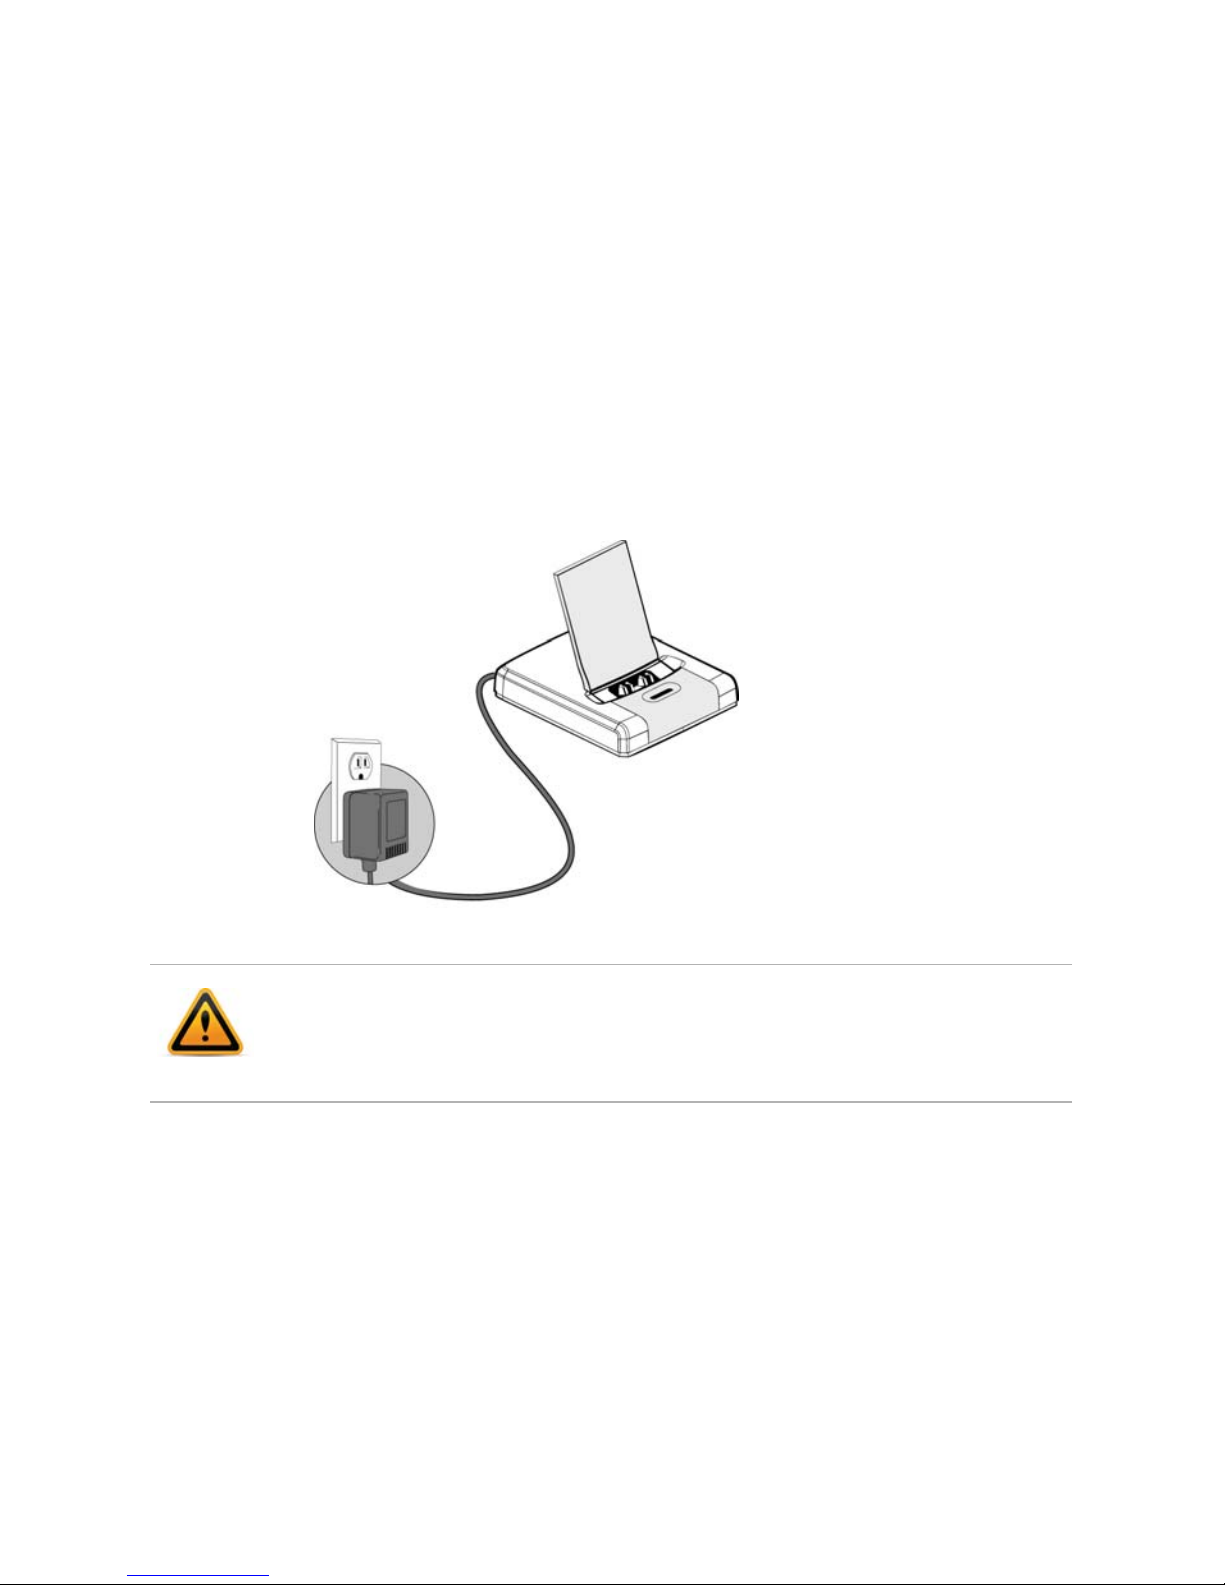
4. Connect the power adapter from the power outlet to the power
supply connector. Use a continuous power outlet without a
switch, which provides uninterrupted power. We recommend
using an AC surge arrester in the power outlet. This is to avoid
damage to the equipment caused by lightning and other
electrical surges.
Only use the power supply included with the product. Using an
unauthorized power supply will invalidate the product warranty
and may damage the telephone.
Page 15
Fortinet Technologies Inc. Page 9 FON-860i Telephone User Guide
Installing the handset charger
1. Place the handset charger within the signal range of the base.
The handset has an indoor signal range of up to 150 feet (50
meters) from the base. Concrete and metal objects might affect
the signal range.
2. Connect the power adapter from the power outlet to the power
supply connector. Use a continuous power outlet without a
switch, which provides uninterrupted power. We recommend
using an AC surge arrester in the power outlet. This is to avoid
damage to the equipment caused by lightning and other
electrical surges.
Only use the power supply included with the product. Using an
unauthorized power supply will invalidate the product warranty and
may damage the telephone.
Page 16
Fortinet Technologies Inc. Page 10 FON-860i Telephone User Guide
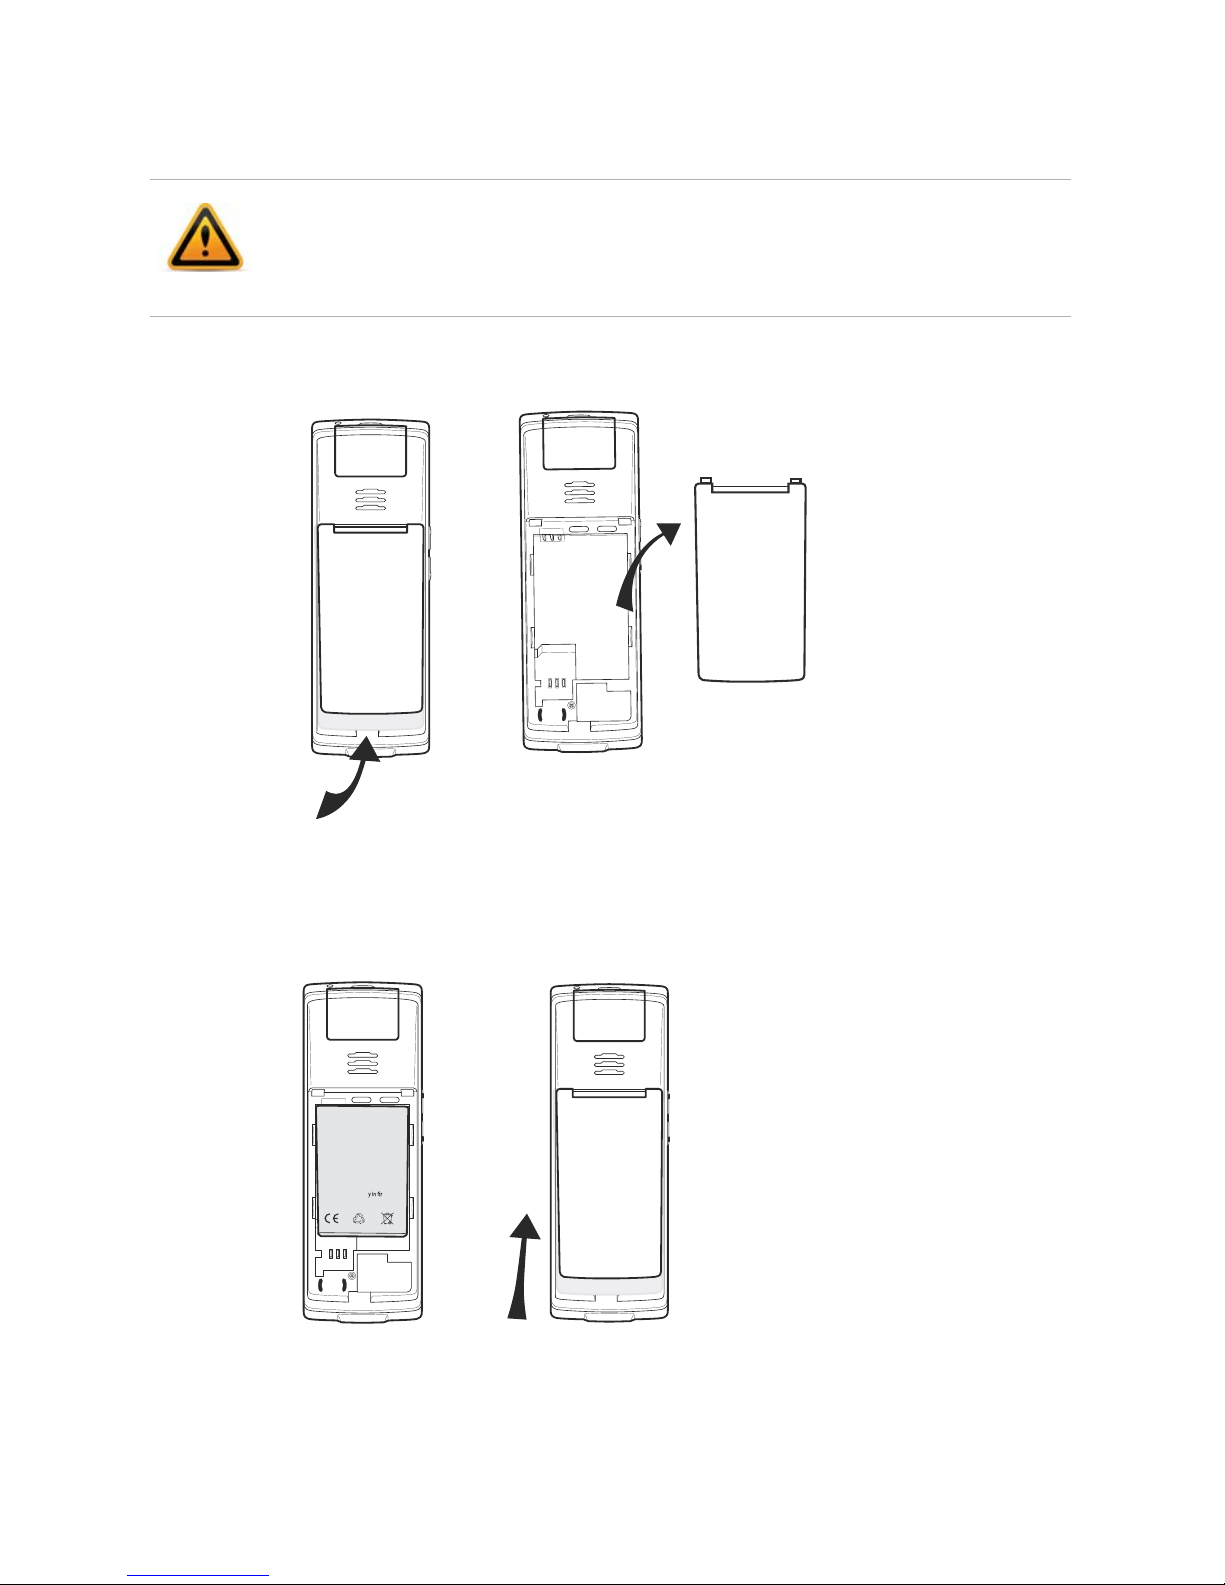
Installing the batteries
1. Release the battery cover from the bottom.
2. Insert the Li Polymer cell battery in the handset, making sure it is
placed as shown in the illustration, and then slide the battery
cover shut.
Use only approved rechargeable batteries. Never use other batteries
or conventional alkaline batteries.
FON-860i: Lithium Ion (Li-ion) 650 mAh 3.7V.
B
AT
TERY
PA
CK
3.7v 650 m
A
h Li-io
n
FOR G355 / G955
C
A
UTION
:
- D
o not disassemble
,
c
ustomiz
e or sho
r
tci
r
c
uit
- D
o not place batter
e
or he
at the b
a
ttery
Page 17
Fortinet Technologies Inc. Page 11 FON-860i Telephone User Guide
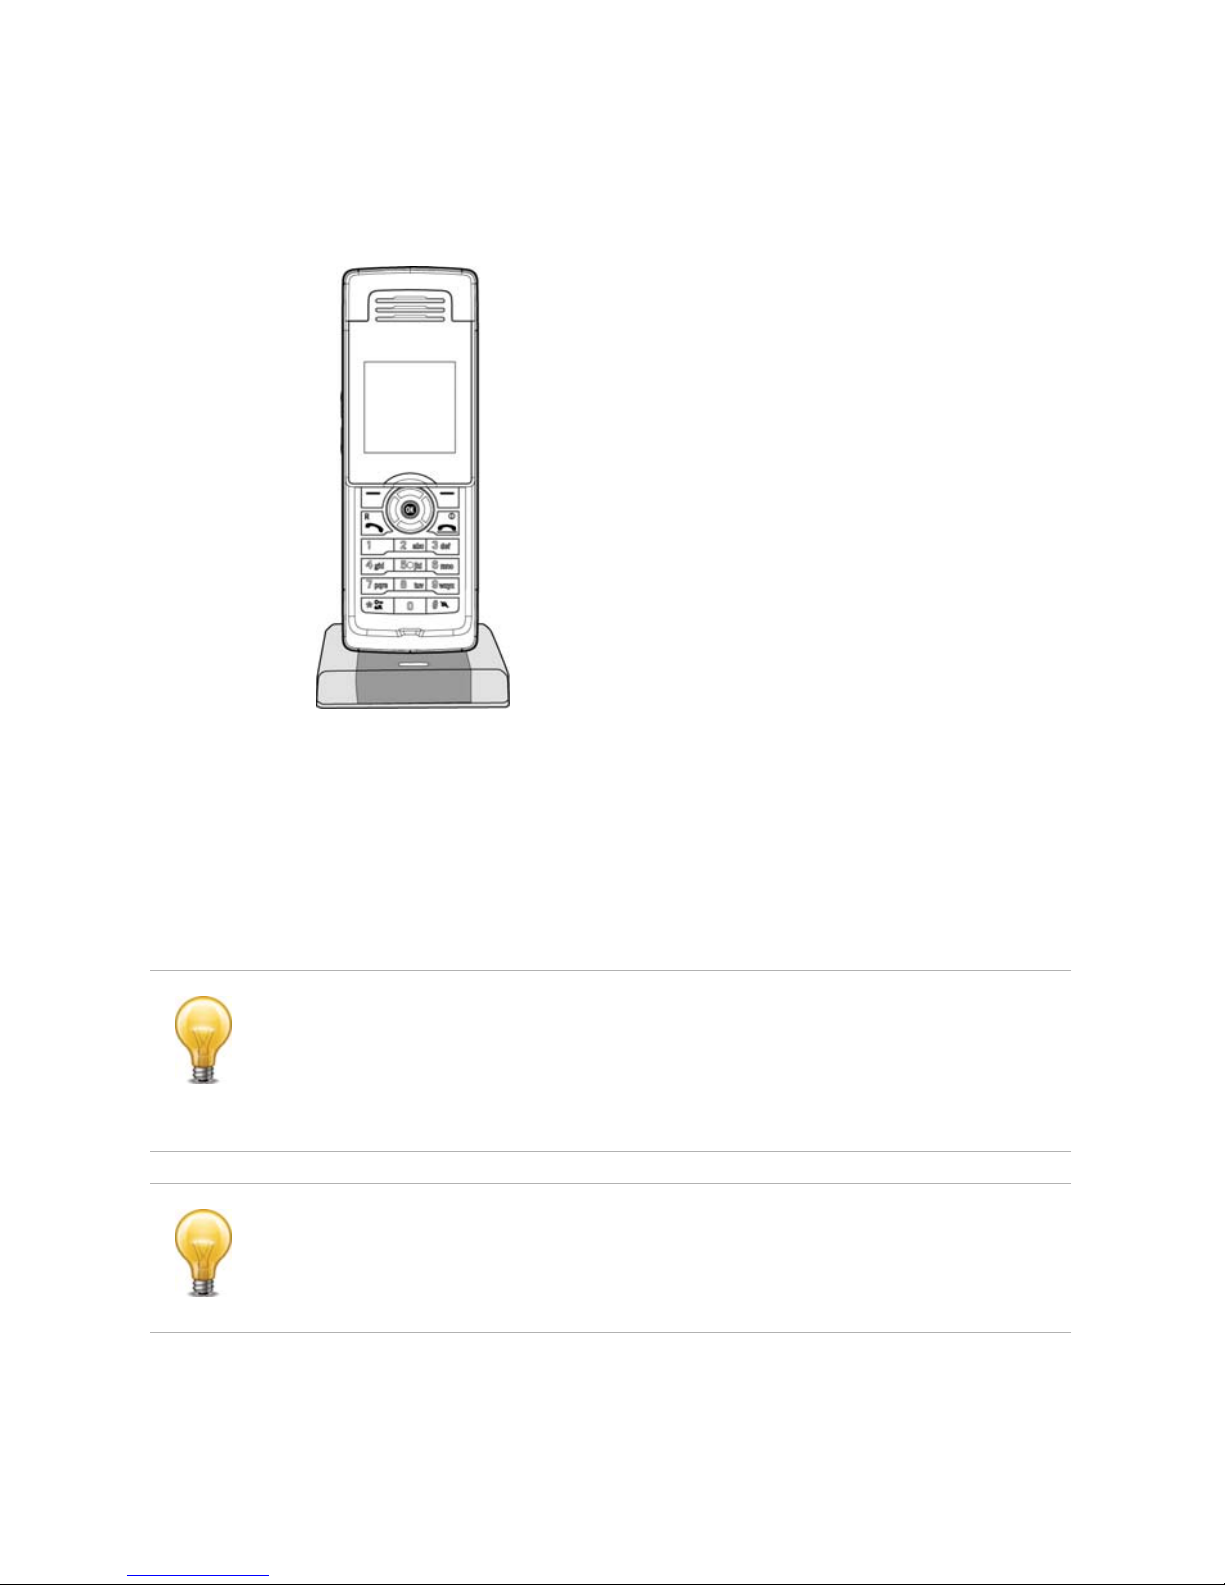
Charging the batteries
1. Place the handset in the handset charger. The handset turns on,
and the battery charge indicator in the display starts to flash.
2. Charge the batteries for at least 10 hours before first use.
Registering handsets with the base
You must register the handsets with the base. You can use the
handset charger, or you can use the handset itself.
A base can support up to three handsets with three concurrent
calls. It can support up to eight handsets if they aren’t all used at
once. If you have more than three handsets and are getting busy
signals, add more bases to your installation in order to handle
more calls.
If
If the handset you want to register is already registered with another
base, you need to deregister the handset from that base before you
can register it with a new base. See “Deregistering a handset from a
base” on page 13
Page 18

Fortinet Technologies Inc. Page 12 FON-860i Telephone User Guide
Using the handset charger
1. Press the Reset button on the back of the base. A five-minute
registration period starts, which allows handsets to register with
the base.
2. If the handset is turned off, press the Red Phone key to turn it on.
3. Place the handset in the handset charger. The handset
automatically registers with the base, and the Configure SIP
Domain message appears on the display. This message indicates
that you must configure the FON-860i as an IP extension, as
described later. Once the handset is registered, the left
connection status indicator in the display will turn yellow. See
“Handset screen — idle mode” on page 6.
4. Once the handset is registered, you can place additional
handsets in the handset charger for registration. If the five-minute
registration period has expired, but the handsets aren’t all
registered, press the Reset button on the back of the base to
start a new registration period.
Using the handset itself
1. Press the Reset button on the back of the base. A five-minute
registration period starts.
2. In Idle mode, press the OK key on the handset to access the
Main menu.
3. Choose Settings, and then press the OK key.
Reset button
enables handset registration
If you have multiple bases, only reset one base at a time, and wait
five minutes before resetting the next base.
Page 19

Fortinet Technologies Inc. Page 13 FON-860i Telephone User Guide
4. Choose System settings, and then press the OK key.
5. Choose Handset settings, and then press the OK key.
6. Choose Register handset, press the OK key, and then press the
Yes softkey when prompted to register the handset. The handset
automatically registers with the base.
Deregistering a handset from a base
1. In Idle mode, press the OK key to access the Main menu.
2. Choose Settings, and then press the OK key.
3. Choose System settings, and then press the OK key.
4. Choose Handset settings, and then press the OK key.
5. Choose Deregister handset, press the OK key, and then press the
Yes softkey when prompted to deregister the handset.
Viewing all handsets registered with a base
1. In Idle mode, press the OK key to access the Main menu.
2. Choose Settings, and then press the OK key.
3. Choose System settings, and then press the OK key.
4. Choose Handset settings, and then press the OK key.
5. Choose Handsets, and then press the OK key. A list appears with
the handsets registered with the base.
Checking and updating firmware
Occasionally, you may want to check and/or update the FON-860i
firmware.
Checking the current firmware version
1. In Idle mode, press the Increase Volume button on the left side of
the handset. After a brief delay the phone will display a System
Status screen.
2. Press the down arrow button to show the second screen, which
includes the firmware version (next to the title “SW:”).
Page 20

Fortinet Technologies Inc. Page 14 FON-860i Telephone User Guide
Checking for firmware updates
If there is no Internet access at this location
Update the firmware using the FortiVoice Management software.
Go to Tools > Update Phones and follow the instructions.
If there is Internet access at this location
1. Make sure that no calls are in progress on handsets connected to
the base station you wish to update. If your system uses
repeaters to extend the range of your handsets, turn the
repeaters off until the update process completes.
2. On a handset connected to the base, press the OK key to view
the main menu.
3. Use the up arrow key to select the Settings symbol, then press
the OK key.
4. Use the up arrow key to select the System Settings menu, then
press the OK key.
5. Use the up arrow key to select Firmware update, then press the
OK key. The handset will search for available updates.
6. If a newer version is available, a Firmware upd. screen will appear
showing the new version (e.g. Version0139). Ensure the newest
version is selected (use the arrow keys if needed) then press the
OK key.
If a Timeout or Error screen appears, contact your reseller or
Fortinet Techical Support at 1.866.393.9960.
7. A screen will appear with language options. Use the up/down
arrow keys to select the preferred language for your handset,
then press the OK key.
8. A warning dialog will appear notifying that updates may take up
to 20 minutes per handset, and asking whether to proceed.
Select either the Yes softkey to proceed, or the No softkey to go
to the previous menu.
If an update is selected, all handsets will display a progress
screen describing the update process. Each handset on the base
station will be updated sequentially.
Page 21

Fortinet Technologies Inc. Page 15 FON-860i Telephone User Guide
9. When the update process completes, the handset will display a
Firmware upd. dialog stating the new firmware version number.
Press the OK key to return to normal handset operation.
For instructions on obtaining firmware for your region and language,
contact your reseller. If you purchased directly from Fortinet, visit
http://www.fortinet.com/fortivoice to obtain further information or
assistance.
If you use repeaters and turned them off in step 1, turn them back
on and ensure their correct operation.
Page 22
Fortinet Technologies Inc. Page 16 FON-860i Telephone User Guide
Configuring the FON-860i as an
IP extension
After following the procedures described in “Installing the FON-860i”
on page 7, configure your phone as an IP extension. The phone can
be located within the office, or outside the office (i.e. an external IP
extension).
Before configuring a phone, ensure that no handsets registered with
the associated base are being used. If a handset is on a call, the call
will be terminated when the system resets the base during
configuration of the phone.
Configuring the FON-860i for use within the office
If the FON-860i is located within the office, it connects to your phone
system over the local area network (LAN).
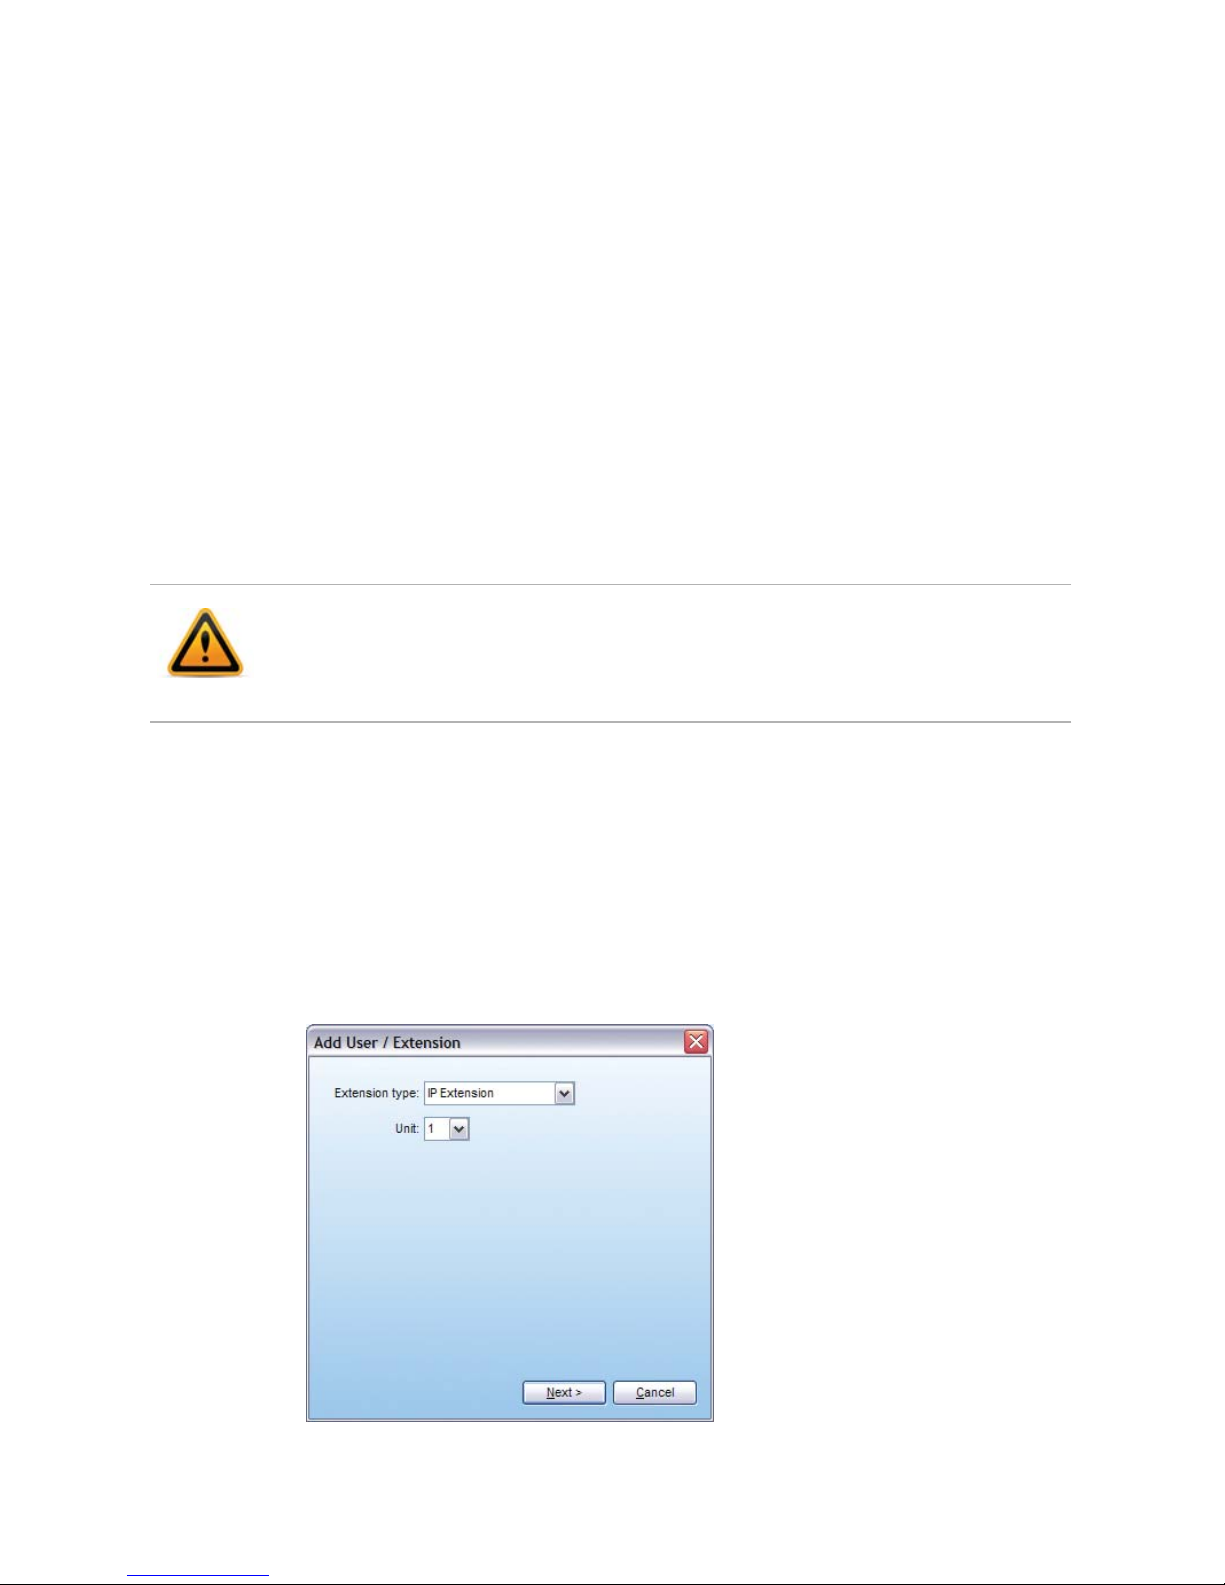
1. Launch the FortiVoice Management software.
2. Select the Local Extensions/Fax page.
3. Click the Add button. The Add User / Extension window appears.
4. Set the Extension type to IP Extension.
The FON-860i requires version 7.00 or greater of the FortiVoice
Management software, which is available at
http://www.fortinet.com/fortivoice.
Page 23

Fortinet Technologies Inc. Page 17 FON-860i Telephone User Guide
5. In a multi-unit system, select the FortiVoice unit the extension will
be associated with. This unit will hold the voicemail for the
extension. Click Next.
6. Enter the user’s First name and Last name. The names are used
for caller ID and the dial-by-name directory.
7. Assign an Extension number.
8. Select the Manufacturer, and then select the Model.
9. Enter the MAC address of the phone:
• You can select the Phone MAC Address from a list of
automatically-detected phones connected to your LAN. To
use this method:
i. Click the Select button. A MAC Selection window appears
and lists IP phones of the selected type.
Page 24

Fortinet Technologies Inc. Page 18 FON-860i Telephone User Guide
ii. Select the MAC address of the IP phone associated to the
extension, and then click Select.
• You can enter the Phone MAC Address manually. This is the
required method if you are setting up an external IP extension.
The MAC Address is a 12-digit alphanumeric string located in
the barcode on the bottom of the base station and the box the
phone came in.
Note that multiple IP extensions can share the same base.
10.Click Finish.
11.In the Extension tab, select the language for prompts heard by
the user of the extension in the System Prompt Language list.
IP Extension Details area
1. Set the Location to Internal.
2. See “Local Extensions/Fax” in Help within the FortiVoice
Management software, for instructions on configuring direct line
access, hunt group permissions, caller ID settings (VoIP only),
call handling and voicemail.
3. After configuring the extensions, choose File > Save. The phone
system will automatically configure each handset.
Page 25

Fortinet Technologies Inc. Page 19 FON-860i Telephone User Guide
Configuring the FON-860i for use outside the office
An external IP extension is located outside the office (e.g. an office
phone within the home), and connects to your phone system over
the Internet. The phone system must be equipped with a VoIP
module.
Checking the firewall
Run the firewall test to ensure the appropriate ports are forwarded
from the router at the FortiVoice location to the FortiVoice unit acting
as proxy. There should be no need to make any adjustments to the
firewall at the remote location. For more information, see “Firewall
Settings” in Help within the FortiVoice Management software.
1. Launch the FortiVoice Management software.
2. Select the IP Configuration page.
3. Click Check Firewall. The Firewall Test window appears.
4. Click Test Ports to run the firewall test and ensure port forwarding
is set up.
Calls to an emergency service number using an external IP
extension will not send the correct address to the emergency
operator. We strongly recommend that you apply a warning label to
any external IP extension stating:
If an emergency call is made from this phone, you must provide
your address to the emergency operator.
Page 26

Fortinet Technologies Inc. Page 20 FON-860i Telephone User Guide
Selecting the extension
1. Select the Local Extensions/Fax page.
2. Click the Add button. The Add User / Extension window appears.
3. Set the Extension type to IP Extension.
4. In a multi-unit system, select the FortiVoice unit the extension will
be associated with. This unit will hold the voicemail for the
extension. Click Next.
5. Enter the user’s First name and Last name. The names are used
for caller ID and the dial-by-name directory.
6. Assign an Extension number.
7. Select the Manufacturer, and then select the Model.
Page 27

Fortinet Technologies Inc. Page 21 FON-860i Telephone User Guide
8. Enter the MAC address of the phone:
• You can select the Phone MAC Address from a list of
automatically-detected phones connected to your LAN. To
use this method:
i. Click the Select button. A MAC Selection window appears
and lists IP phones of the selected type.
ii. Select the MAC address of the IP phone associated to the
extension, and then click Select.
• You can enter the Phone MAC Address manually. This is the
required method if you are setting up an external IP extension.
The MAC Address is a 12-digit alphanumeric string located in
the barcode on the bottom of the base station and the box the
phone came in.
Note that multiple IP extensions can share the same base.
9. Click Finish.
10.In the Extension tab, select the language for prompts heard by
the user of the extension in the System Prompt Language list.
Page 28

Fortinet Technologies Inc. Page 22 FON-860i Telephone User Guide
IP Extension Details area
1. Set the Location to External.
2. Select the Time Zone of the phone.
3. See “Local Extensions/Fax” in Help within the FortiVoice
Management software, for instructions on configuring direct line
access, hunt group permissions, caller ID settings (VoIP only),
call handling and voicemail.
4. After configuring the extensions, choose File > Save. The phone
system will create a file used to configure each handset.
Configuring the external IP extension handset
1. In Idle mode, press the OK key on the handset to access the
Main menu.
2. Choose Settings, and then press the OK key.
3. Choose Network settings, and then press the OK key.
4. Select Provision server, and then press the OK key.
5. Enter the Public IP address or Public domain name of the system
as provided by your administrator. To enter a period:
a. Press the Options softkey.
b. Choose Insert symbol, and then press the OK key.
c. Use the navigation keys to choose the period, and then press
the OK key.
6. Press the Save softkey to accept the changes, and then press
the Back key.
Page 29

Fortinet Technologies Inc. Page 23 FON-860i Telephone User Guide
7. When prompted to reboot the base, select Yes. The FON-860i
will automatically download the configuration from the phone
system.
When connected to the traditional telephone network (PSTN) or to a
FortiVoice system as an analog extension, FLASH is engaged by
pressing the key. The key MUST be held for approximately 2
seconds until you connect to the other caller (call waiting) or receive
dial tone to initiate a calling feature.
If you connected the telephone cable from the Line port on the base
to the telephone wall socket, you can use the FON-860i with a
traditional phone line.
Page 30

Fortinet Technologies Inc. Page 24 FON-860i Telephone User Guide
Configuring the handset
Enabling auto answer mode
You can set the FON-860i to auto answer when you pick up the
handset from the handset charger.
1. In Idle mode, press the OK key to access the Main menu.
2. Choose Settings, and then press the OK key.
3. Choose Telephony settings, and then press the OK key.
4. Choose Answer mode, and then press the OK key.
5. Choose Auto answer, and then press the OK key.
6. Select Enabled, and then press the OK key.
Changing the display contrast
1. In Idle mode, press the OK key to access the Main menu.
2. Choose Settings and then press the OK key.
3. Choose System settings, and then press the OK key.
4. Choose Handset settings, and then press the OK key.
5. Choose Display Contrast, and then press the OK key.
6. Use the navigation keys to select the preferred contrast, and then
press the OK key.
Restoring the default display contrast
1. In Idle mode, press the OK key to access the Main menu.
2. Press GGG, and then press the Yes softkey when prompted to
restore the contrast.
Page 31

Fortinet Technologies Inc. Page 25 FON-860i Telephone User Guide
Changing the audio settings
1. In Idle mode, press the OK key to access the Main menu.
2. Choose Settings, and then press the OK key.
3. Choose Audio settings, and then press the OK key.
4. Select the item, and then press the OK key. Items include:
• Ringer melody — Sets the ringtone for incoming VoIP and
Landline calls. The Intercom setting is for intercom calls
between handsets connected to the same base, but is not
used with a FortiVoice system.
• Ringer volume — Sets the volume of the ringtone.
• Message tone — Sets the notification tone for a new
voicemail message.
• Keypad sound — Sets the tone that sounds when you press a
key.
• Advisory tones — Sets whether a tone sounds when the
battery is low, the handset is out of range of the base, or the
handset has received confirmation.
• Silence options — Turns all tones on or off.
5. Select the setting, and then press the OK key. Different settings
are available for each item.
Page 32

Fortinet Technologies Inc. Page 26 FON-860i Telephone User Guide
Using the FON-860i
Using the speakerphone
During a call, press the speakerphone button on the side of the
phone. To deactivate the speakerphone, press the speakerphone
button again. See “Handset — side view” on page 4.
Adjusting the handset volume
During a call, press the volume up or volume down buttons on the
side of the phone to adjust the volume up or down. The volume
setting is automatically saved when you end the call. See “Handset
— side view” on page 4.
Locking and unlocking the keypad
If you are carrying the handset around, you can lock the keypad so
that you do not use it accidentally.
1. In Idle mode, press _, and then press the Lock softkey. To
unlock the keypad, press _, and then press the Unlock softkey.
The keypad unlocks automatically when you answer an incoming
call.
To enjoy the best sound quality, place the handset horizontally with
the loudspeaker facing up (located on the back of the handset).
Page 33

Fortinet Technologies Inc. Page 27 FON-860i Telephone User Guide
Activating silent mode
You can activate silent mode to disable the ringer and confirmation
sounds. This might be useful when in meetings or at night. The
system will route calls according to your extension’s unanswered
call cascade, and the phone will add missed calls to the call log.
1. In Idle mode, press ?, and then press the Silence on softkey. To
restore the ringer and confirmation sounds, press ?, and then
press the Silence off softkey.
Alternatively, when the phone is ringing, press the Silence
softkey. The phone will disable the ringer during the current call.
Typing text and numbers
When you are using the keypad to dial a number, you can only enter
numbers.
When you are using the keypad to enter other information (such as
adding a new contact), you may use alphanumeric characters or
symbols. Two softkeys will be displayed: Erase and Options.
The Erase softkey allows you to erase text that you have just typed.
The Options softkey provides you with the following two options:
Insert symbol and Input mode.
Inserting a symbol
1. In the text editor, press the Options softkey.
2. Choose Insert symbol, and then press the OK key.
3. Use the navigation keys to choose a symbol, and then press the
OK key.
Page 34

Fortinet Technologies Inc. Page 28 FON-860i Telephone User Guide
Changing the input mode
The upper right corner of the display shows which input mode is
currently selected. The following input modes are available:
• ABC — All uppercase letters.
• Abc — Sentence case. The first letter of the sentence is
capitalized, and the rest is lowercase.
• abc — All lowercase letters.
• 123 — Numbers only.
1. In the text editor, press _ to change the input mode.
OR
1. In the text editor, press the Options softkey.
2. Choose Input mode, and then press the OK key.
3. Choose the preferred input mode, and then press the OK key.
Page 35

Fortinet Technologies Inc. Page 29 FON-860i Telephone User Guide
Making and answering calls
If you have direct line access enabled, you will automatically access
an outside line. To place an intercom call or to access features
indicated with a , first dial __.
Calling an outside number
1. In Idle mode, dial L (: in some countries) or KA–KK to get
an outside line. This is not required if you have direct line access,
which automatically chooses an outside line.
2. Dial the phone number, and then press the Green Phone key.
If an access code is configured for your extension:
1. In Idle mode, dial L (: in some countries) or KA–KK, and
then press the Green Phone key to get an outside line. This is not
required if you have direct line access, which automatically
chooses an outside line.
2. Dial the access code when prompted.
3. Dial the phone number, and then press the Green Phone key.
Calling an extension
You can call a local extension, remote extension, ring group, general
voice mailbox, or a VoIP number within a multi-branch VoIP network.
1. In Idle mode, dial the extension number, and then press the
Green Phone key.
Calling a voice mailbox
You can leave voicemail without ringing the user’s extension.
1. In Idle mode, dial _ + extension, and then press the Green
Phone key.
Page 36

Fortinet Technologies Inc. Page 30 FON-860i Telephone User Guide
Making a call using a system speed dial number
A system speed dial number allows you to quickly call an outside
number from any local extension. The administrator maintains the
list of system speed dial numbers.
1. In Idle mode, dial the speed dial range defined by Administration,
and then press the Green Phone key.
Calling the receptionist
The administrator can set up a speed dial number to reach the
receptionist or another resource.
1. In Idle mode, dial : (L in some countries), and then press the
Green Phone key.
Making a call using contacts
1. In Idle mode, press the OK key to access the Main menu.
2. Choose Contacts, and then press the OK key.
3. Choose the contact you want to call.
4. If a hunt group is required, ensure the hunt group number is
inserted in front of the phone number. For example,
1-555-333-1234 might need to be programmed as
9-1-555-333-1234 if hunt group 9 is used for outbound calls. This
is not required if you have direct line access.
5. Press the Green Phone key. The default number is dialed.
For more information about contacts, see “Contacts” on page 45.
Making a call using the call log
1. In Idle mode, press the Call log softkey. Alternatively, you can
press the OK key to access the Main menu, choose Call log, and
then press the OK key.
2. Choose the number you want to call.
Page 37

Fortinet Technologies Inc. Page 31 FON-860i Telephone User Guide
3. If a hunt group is required, ensure the hunt group number is
inserted in front of the phone number. This is not required if you
have direct line access. See “Call log” on page 44.
4. Press the Green Phone key.
For more information about the call log, see “Call log” on page 44.
Making a call using redial
1. In Idle mode, press the Options softkey.
2. Choose Redial, and then press the OK key. The most recently
dialed number is displayed.
3. If a hunt group is required, ensure that hunt group is inserted in
front of the phone number. This is not required if you have direct
line access.
4. Press the Green Phone key to call the number.
Making a call using a speed dial number
A speed dial number allows you to quickly call one of the contacts
stored in your handset. See “Specifying a speed dial number for a
contact” on page 47.
1. In Idle mode, dial the speed dial number assigned to the contact
you want to call (1–9), and then press the Green Phone key.
In countries where you dial L to call the receptionist, speed dial 9
is not available.
Page 38

Fortinet Technologies Inc. Page 32 FON-860i Telephone User Guide
Making an emergency call
1. In Idle mode, dial L (: in some countries) or KA–KK to get
an outside line. This is not required if you have direct line access,
which automatically chooses an outside line.
2. Dial the emergency number for your area, and then press the
Green Phone key.
You cannot make emergency calls in the following situations:
• Power failure
• Handset is out of range of the base
• Handset batteries are drained
• Firmware update is in progress
Making a conference call
1. Make a call to the first party.
2. Press the Hold softkey.
3. Make a call to the second party.
4. Press the Options softkey, select Conference, and then press the
OK key.
Making an analog call
If you have connected a telephone cable from the Line port on the
base to the telephone wall socket, you can make an analog call over
the traditional phone line.
1. In Idle mode, press the OK key on the handset to access the
Main menu.
Calls to an emergency service number using an external IP
extension will not send the correct address to the emergency
operator. We strongly recommend that you apply a warning label to
any external IP extension stating:
If an emergency call is made from this phone, you must provide
your address to the emergency operator.
Page 39

Fortinet Technologies Inc. Page 33 FON-860i Telephone User Guide
2. Choose Settings, and then press the OK key.
3. Choose Telephony Settings, and then press the OK key.
4. Choose Primary line, and then press the OK key.
5. Choose Landline, and then press the OK key.
6. Dial the phone number, and then press the Green Phone key.
Answering a call
1. Press the Green Phone key.
2. If call screening is enabled, press ? to accept the call, or _ to
reject it. Rejecting the call routes it to your extension’s answered
(but rejected) call cascade (e.g. voicemail or another user).
You can also set the FON-860i to auto answer when you pick up the
handset from the handset charger. In this case you do not have to
press the Green Phone key.
Answering call waiting
1. If you hear the call waiting tone during a call, press the Green
Phone key. The first call is put on hold automatically.
2. To switch between the two calls, press the Options softkey,
choose Swap calls, and then press the OK key.
3. To set up a conference call, press the Options softkey, choose
Conference, and then press the OK key.
If you are making an analog call over the traditional phone line, you
must engage Flash to answer call waiting. To engage Flash, press
the key for approximately two seconds until you connect to the
other caller.
Note that the keypad unlocks automatically when you answer an
incoming call.
Page 40

Fortinet Technologies Inc. Page 34 FON-860i Telephone User Guide
Answering a queued call
1. Press the Hold softkey. The current call is put on hold.
2. Dial J, and then press the Green Phone key. The system
connects you to the oldest call in the queue.
OR
1. Press the Red Phone key to end the current call. If you have a
queued call, your extension will ring.
2. Press the Green Phone key to answer the queued call.
Picking up a call for any extension
1. To answer an incoming call for any extension, dial _L, and
then press the Green Phone key.
Picking up a call for a specific extension
1. To answer an intercom or incoming call for a specific extension,
dial _J + extension, and then press the Green Phone key.
Answering an analog call
If you have connected a telephone cable from the Line port on the
base to the telephone wall socket, the base can receive an analog
call over the traditional phone line.
1. Press the Green Phone key.
If the base receives an analog call, all handsets will ring by default.
You can disable a handset from ringing during an incoming analog
call.
1. In Idle mode, press the OK key to access the Main menu.
2. Choose Settings, and then press the OK key.
3. Choose Telephony settings, and then press the OK key.
4. Choose Call groups, and then press the OK key.
5. Clear the Landline box.
Page 41

Fortinet Technologies Inc. Page 35 FON-860i Telephone User Guide
Rejecting a call
1. Instead of answering the call, press the Reject softkey. Rejecting
the call routes it to your extension’s call cascade (e.g. voicemail
or another user).
• If your phone is configured as an IP extension, rejecting the
call routes it to your extension’s busy call cascade.
• If your phone is configured as an analog extension, rejecting
the call routes it to your extension’s no answer call cascade.
You can also turn off the ringer. See “Activating silent mode” on
page 27.
Muting a call
1. During a call, press the Mute softkey. The phone switches off the
microphone. The person on the line will not be able to hear what
you are saying. To turn the microphone on again, press the Mute
off softkey.
Ending a call
1. During a call, press the Red Phone key, or place the handset in
the handset charger.
Caller ID
When you receive an incoming call, the caller ID appears if you have
the service, with the following exceptions:
• If the caller has blocked display of caller ID, no caller ID appears.
• If caller ID based routing has an alternate name set up, the
alternate name appears instead of the caller ID name.
• If the caller is stored as a contact, the contact name appears
instead of the caller ID name or the alternate name.
Page 42

Fortinet Technologies Inc. Page 36 FON-860i Telephone User Guide
Using the FON-860i with a traditional phone line
When connected to the traditional telephone network (PSTN) or to a
FortiVoice system as an analog extension, FLASH is engaged by
pressing the key. The key MUST be held for approximately
2 seconds until you connect to the other caller (call waiting) or
receive dial tone to initiate a calling feature.
Page 43

Fortinet Technologies Inc. Page 37 FON-860i Telephone User Guide
Holding and transferring calls
Placing a call on hold
1. During a call, press the Hold softkey.
Taking a call off hold
1. Press the Options softkey, choose Retrieve call, and then press
the OK key.
Transferring a call
1. During a call, press the Hold softkey.
2. Press the Options softkey, choose Transfer, and then press the
OK key.
3. Transfer the call to a contact, extension, voice mailbox or outside
number:
• To transfer the call to a contact:
i. Press the Contacts softkey.
ii. Choose the contact to whom you want to transfer the call,
and then press the OK key.
iii. Choose the number to dial, and then press the Select
softkey.
iv. Press the Green Phone key.
• To transfer the call to an extension, dial the extension number,
and then press the Green Phone key.
• To transfer the call to voicemail, dial _ + extension, and then
press the Green Phone key.
• To transfer the call to an outside number:
i. Dial the L (: in some countries) or KA–KK to get an
outside line. If you have the Same Line Connect feature,
and want to transfer an outside caller to an outside
number, you can also dial K: to use the same line.
ii. Dial the phone number, and then press the Green Phone key.
Page 44

Fortinet Technologies Inc. Page 38 FON-860i Telephone User Guide
Attended transfer
1. During a call, press the Hold softkey.
2. Choose a contact or dial the number, and then press the Green
Phone key.
3. If the person wants the call, press the Options softkey, choose
Transfer, and then press the OK key.
4. If the other person does not want the call, press the Red Phone
key. You are reconnected to the caller.
Page 45

Fortinet Technologies Inc. Page 39 FON-860i Telephone User Guide
Parking calls and paging
If you have direct line access enabled, you will automatically access
an outside line. To place an intercom call or to access features
indicated with a , first dial __.
Parking a call
Parking a call is similar to placing a call on hold, but a user can
retrieve a parked call from any local extension.
1. During a call, press the Hold softkey.
2. Dial _GA:, and then press the Green Phone key. The
system responds with a parking orbit (500–509).
3. Page the user for whom the call is parked, and provide the
parking orbit.
Retrieving a parked call
1. Dial __+ parking orbit (500–509), and then press the Green
Phone key.
Two-way intercom paging
Two-way intercom paging connects your phone to the other
extension’s speaker, and allows the other user to respond. The other
phone must be a FortiFone telephone.
1. In Idle mode, dial _KF + extension, and then press the Green
Phone key.
Page 46

Fortinet Technologies Inc. Page 40 FON-860i Telephone User Guide
One-way group paging
One-way group paging connects your phone to the speakers of the
extensions within a ring group, without allowing the other users to
respond. It can also connect your phone to one other extension. The
other phones must be FortiFone analog telephones (FON-600) or IP
phones (FON-350i, FON-450i or FON-550i).
1. In Idle mode, dial _KG + ring group (or extension), and then
press the Green Phone key.
Overhead paging
Overhead paging connects your phone to the PA amplifier
connected to the phone system.
1. In Idle mode, dial _:, and then press the Green Phone key.
Page 47

Fortinet Technologies Inc. Page 41 FON-860i Telephone User Guide
Voicemail
Setting up voicemail
1. Go to a quiet environment within range of your base station to
minimize background noise when recording your greeting and
name.
2. In Idle mode, press __, and then press the Green Phone key.
If you have direct line access, press __first.
3. When prompted, enter a password, record a greeting and record
your name for the dial-by-name directory. A sample greeting is:
You have reached [your name]. I'm sorry that I can't answer your
call. Please leave a message and I will return your call as quickly
as possible. Thank you.
Checking voicemail using the FortiVoice
feature code
The voicemail indicator flashes to indicate there is a new voicemail
message. The indicator appears in the status bar on the screen. New
Voicemail also appears on the screen.
1. Once New Voicemail appears on the screen, press the Red
Phone key.
2. Press __, and then press the Green Phone key. If you have
direct line access, press __ first.
3. When prompted, enter your password, and then press ?.
4. Press A to listen to your messages.
Checking voicemail using the voicemail menu
1. Once New Voicemail appears on the screen, press the OK key.
2. Choose Voicemail, and then press the OK key.
3. Choose your name, and then press the OK key. The screen shows
the number of new messages and the total number of messages.
4. Press the Play softkey.
5. When prompted, enter your password, and then press ?.
6. Press A to listen to your messages.
Page 48

Fortinet Technologies Inc. Page 42 FON-860i Telephone User Guide
Controlling message playback
While listening to a voicemail message, you can use the following
message playback controls.
Rewind 10 seconds
Press A
Skip ahead 10 seconds
Press D
Check time and date
Press G
Delete message
Press J
Skip to next message
Press ?
Go to beginning
Press AA
Skip to end
Press DD
Forward message
Press HH
Save message
Press L
Page 49

Fortinet Technologies Inc. Page 43 FON-860i Telephone User Guide
Other features
If you have direct line access enabled, you will automatically access
an outside line. To place an intercom call or to access features
indicated with a , first dial __.
Toggling do not disturb mode
You can toggle do not disturb mode off and on. Do not disturb mode
prevents your phone from ringing, and immediately routes incoming
calls according to your extension’s do not disturb call cascade.
1. In Idle mode, dial _HS, then press the Green Phone key.
Attaching an account code to the last call
Your company can classify inbound and outbound calls (but not
intercom calls) for accounting purposes. The administrator must
enable Call detail record logging.
1. End the call.
2. In Idle mode, dial _KK, then press the Green Phone key.
3. When prompted, dial the account code + ?.
Page 50

Fortinet Technologies Inc. Page 44 FON-860i Telephone User Guide
Call log
The call log keeps track of all your incoming and outgoing calls. It
consists of four different call logs that you can scroll through using
the navigation keys on the handset. There are call logs for all calls,
missed calls, incoming calls and outgoing calls.
The call log stores up to 30 numbers. For each call, the call log keeps
track of the number, the date and time of the call, and the type of call:
incoming, outgoing, or missed. If the caller’s name and number is
stored in Contacts, the caller’s name is also displayed. A number or
name is only listed once, but all missed calls are counted so you can
see how many times the same caller has tried to reach you.
Viewing numbers in the call log
1. In Idle mode, press the Call log softkey. Alternatively, in the Main
menu, choose Call log, and then press the OK key.
2. Use the navigation keys to page through the other logs and
up/down to scroll through the names and numbers.
3. Select a number in the call log and then press the Options
softkey to access the following options:
For information on how to make a call from the call log, see “Making
a call using the call log” on page 30.
Option Description
Add as
contact
Opens a text editor so that you can add the selected
number as a contact. For more information, see
“Adding a call log number to contacts” on page 48.
Append as
contact
Opens Contacts so that you can add the selected
number to an already existing contact. For more
information, see “Adding a call log number to an
existing contact” on page 48.
Edit for call Opens the number editor so that you can edit the
number before calling. Example: Add a hunt group.
Delete Deletes the selected number from the call log.
Delete list Deletes all numbers in the call log list.
Page 51

Fortinet Technologies Inc. Page 45 FON-860i Telephone User Guide
Contacts
Contacts are stored names and numbers that allow you to easily dial
them. The Contacts menu consists of one or more groups that you
can scroll through using the left/right navigation keys on the
handset. The names and numbers are listed in alphabetical order for
each group. You can store up to 170 contacts, with up to four phone
numbers per contact. Contact entries are shared between all
handsets registered with the base.
Adding a contact
1. In the Main menu, choose Contacts, and then press the OK key.
2. Press the Options softkey, choose Add contact, and then press
the OK key.
3. Press the Edit softkey to enter the name editor, type the name of
the contact, and then press the OK key.
4. Scroll down and choose a number field, press the OK key, and
then type a number.
5. Press the Options softkey, choose Number type, and then press
the OK key.
6. Choose the preferred number type, press the OK key to confirm,
and then press the Red Phone key to return to the number editor.
Do the same for all the numbers you want to add to the contact.
7. Press the Save softkey, and then press the Yes softkey when
prompted to save. You need to type both a name and a number
for a contact before you can save the information.
Choosing a contact
1. In the Main menu, choose Contacts and then press the OK key.
2. Use the navigation keys to navigate through the groups and to
scroll up and down. You can also search for a contact by entering
the first letter of the name. The first name starting with that letter
is highlighted.
Page 52

Fortinet Technologies Inc. Page 46 FON-860i Telephone User Guide
Deleting a contact
1. In the Main menu, choose Contacts, and then press the OK key.
2. Choose the contact you want to delete.
3. Press the Options softkey, choose Delete contact, and then press
the Yes softkey when prompted to delete the contact.
4. To delete all contacts, choose Delete all contacts, and then press
the Yes softkey when prompted to delete the list.
When you delete a contact, it is automatically deleted from any
related groups.
Editing a contact
1. In the Main menu, choose Contacts, and then press the OK key.
2. Choose the contact you want to edit.
3. Press the Options softkey, choose Edit contact, and then choose
the field that you want to edit.
4. Press the Edit softkey, make your edits, and then press the OK
key.
5. Press the Save softkey, and then press the Yes softkey when
prompted to save.
Changing the ring tone for a contact
1. In the Main menu, choose Contacts, and then press the OK key.
2. Choose the contact for which you want to specify a ring tone.
3. Press the Options softkey, and then choose Edit contact.
4. Choose Ringer melody, and then press the OK key.
5. Press the Play softkey to listen to the ring tones.
6. Use the arrow keys to scroll through the ring tones.
7. Press the Stop softkey to stop the ring tones from playing.
8. Press the OK key to select the ring tone, and then press the Red
Phone key to return to the contact.
9. Press the Save softkey, and then press the Yes softkey when
prompted to save.
Page 53

Fortinet Technologies Inc. Page 47 FON-860i Telephone User Guide
Changing the default number for a contact
The first number you save for a contact is automatically the default
number. If you use speed dial, for example, it is always the default
number that is dialed. You can always change the default number for
a contact.
1. In the Main menu, choose Contacts, and then press the OK key.
2. Choose the contact that requires a new default number.
3. Press the Options softkey, choose Edit contact, and then press
the OK key.
4. Choose the new default number, and then press the Edit softkey.
5. Press the Options softkey, choose Default, and then press the OK
key.
6. Press the Yes softkey when prompted to save the number as
default number.
7. Press the Red Phone key to return to the contact.
8. Press the Save softkey, and then press the Yes softkey when
prompted to save.
Specifying a speed dial number for a contact
1. In the Main menu, choose Contacts, and then press the OK key.
2. Choose the contact to which you want to add a speed dial
number.
3. Press the Options softkey, choose Speed dial, and then press the
OK key.
4. To use a new speed dial number, select an empty entry, and then
press the Add softkey.
5. To replace an existing speed dial number, select the entry you
want to replace, and then press the Replace softkey.
6. Press the Red Phone key to return to contacts.
Page 54

Fortinet Technologies Inc. Page 48 FON-860i Telephone User Guide
Adding a call log number to contacts
1. In Idle mode, press the Call log softkey.
2. Choose the number you want to add to contacts.
3. Press the Options softkey, choose Add as contact, and then
press the OK key. The number is automatically added to the new
contact.
4. Press the Edit softkey to enter the name editor, write the name of
the contact, and then press the OK key. If Caller ID is used, the
name is entered automatically.
5. Press the Save softkey, and then the Yes softkey when prompted
to save.
Adding a call log number to an existing contact
1. In Idle mode, press the Call log softkey, and then choose the
number you want to append to an existing contact.
2. Press the Options softkey, choose Append to contact, and then
press the OK key.
3. Choose the contact to which you want to add the number, and
then press the Append softkey. The contact opens, and the
number is added automatically.
4. Press the Save softkey, and then press the Yes softkey when
prompted to save.
Creating a group
You can organize your contacts into appropriate groups to gain an
easier overview of all contacts, and you can specify a different ring
tone for each group. When you create a group, the newly named
group is automatically added to the Contacts menu. The group
contains all the members assigned to that group.
1. In the Main menu, choose Contacts, and then press the OK key.
2. Press the Options softkey, choose Groups, and then press the
OK key.
3. Press the Options softkey, choose Add group, and then press the
OK key.
4. Write a name for the group, press the OK key, and then press the
Yes softkey when prompted to save.
Page 55

Fortinet Technologies Inc. Page 49 FON-860i Telephone User Guide
Editing a group
1. In the Main menu, choose Contacts, and then press the OK key.
2. Press the Options softkey, choose Groups, and then press the
OK key.
3. Choose the group you want to edit.
4. Press the Options softkey, choose Edit group, and then press the
OK key.
5. Make your edits, press the OK key, and then press the Yes
softkey when prompted to save.
Adding a contact to a group
1. In the Main menu, choose Contacts, and then press the OK key.
2. Choose the contact you want to add to a group.
3. Press the Options softkey, choose Edit contact, and then press
the OK key.
4. Choose Groups, and then press the OK key.
5. Choose the group or groups to which you want to add the
contact.
6. Press the Red Phone key to return to the contact.
7. Press the Save softkey, and then press the Yes softkey when
prompted to save.
Deleting a group
When you delete a group, the individual entries remain in the
common Contacts list.
1. In the Main menu, choose Contacts, and then press the OK key.
2. Press the Options softkey, choose Groups, and then press the
OK key.
3. Choose the group you want to delete.
4. Press the Options softkey, choose Delete group, and then press
the OK key.
5. Press the Yes softkey when prompted to delete the group.
Page 56

Fortinet Technologies Inc. Page 50 FON-860i Telephone User Guide
Removing a contact from a group
1. In the Main menu, choose Contacts, and then press the OK key.
2. Choose the contact that you want to remove from a group.
3. Press the Options softkey, choose Edit contact, and then select
Groups.
4. Choose the group from which you want to remove the contact,
and then press the OK key.
5. Press the Red Phone key.
6. Press the Save softkey, and then press the Yes softkey when
prompted to save.
Changing a ring tone for a group
You can specify a different ring tone for each group you create.
1. In the Main menu, choose Contacts, and then press the OK key.
2. Press the Options softkey, choose Groups, and then press the
OK key.
3. Choose the group for which you want to specify a ring tone.
4. Press the Options softkey, choose Ringer tone, and then press
the OK key.
5. Press the Play softkey to listen to the ring tones.
6. Use the arrow keys to scroll through the ring tones.
7. Press the Stop softkey to stop the ring tones from playing.
8. Press the OK key to select the ring tone, and then press the Red
Phone key to return to the group.
Page 57

Fortinet Technologies Inc. Page 51 FON-860i Telephone User Guide
Troubleshooting
See “Base — front view” on page 5 for a description of the LEDs on
the front of the base. See “Handset screen — idle mode” on page 6
for a description of the connection status indicators on the handset
screen.
The following is a list of solutions to the most common issues that
you may experience when you use the FON-860i. Most of the
problems you can easily solve yourself, whereas others require that
you contact your service provider.
Problem Possible causes Possible solutions
The handset display
is black.
The handset is in
power saving
mode.
Press any key.
The batteries
are drained.
Charge the batteries.
Power is not turned
on.
Check that the
batteries are inserted
with the plus and minus
ends facing the correct
way. Press and hold the
Red Phone key.
The handset does
not charge.
The handset
charger is not
powered.
Check that the power
adapter is connected
properly to the
handset charger.
The batteries are
not inserted
correctly.
Check that the
batteries are inserted
with the plus and minus
ends facing the correct
way.
Page 58

Fortinet Technologies Inc. Page 52 FON-860i Telephone User Guide
The handset is
registered to the
wrong base.
You have multiple
bases, and the
handset is
registered to the
wrong one.
Clear the handset
registrations by
pressing the Reset
button for about 10
seconds until all four
LEDs on the base light
up. This restores
factory defaults.
Re-register the
handsets for each
base, one base at a
time. After pressing the
Reset button on a base,
wait at least five
minutes before
pressing the Reset
button on the next
base.
The handset
registration failed,
and the status
indicator on the
display is black.
The handset is out
of range of the
base.
Move the handset
closer to the base,
place it in the handset
charger, and reset the
base.
The display reads,
“Searching for
base”.
The handset is out
of range of the
base.
Move the handset
closer to the base.
The base is
not powered.
Check that the power
adapter is connected
properly to the base.
The POWER
indicator on the
base is not lit.
The base is
not powered.
Check that the power
adapter is connected
properly to the base.
Problem Possible causes Possible solutions
Page 59

Fortinet Technologies Inc. Page 53 FON-860i Telephone User Guide
The I-NET indicator
on the base is not
lit.
The Ethernet cable
is not connected.
Check that the Ethernet
cable between the
WAN port on the base
and the LAN port on
your modem or router
is connected properly.
The router or
modem is not
powered.
Turn on the power to
the modem or router.
The base cannot
retrieve an IP
address.
In Internet settings,
check that the IP mode
corresponds to the IP
mode of your Internet
connection.
There is no audio
when I make
Internet calls.
The router blocks
audio.
Use port forwarding.
Check your router’s
user guide to see how
to configure port
forwarding.
I can’t make
Internet calls, the
VoIP indicator on
the base is not lit,
and the right status
indicator in the
upper left corner of
the display is black.
The configuration of
the FON-860i is not
complete.
Check that you have
configured your
FON-860i properly.
Go to the FortiVoice
Management software
and check the
configuration. For more
information, contact
your Internet Telephony
Service Provider.
The base has not
been reset after you
saved the
configuration.
Reset the base and
allow the base two
minutes to log in at
your Internet Telephony
Service Provider.
Problem Possible causes Possible solutions
Page 60

Fortinet Technologies Inc. Page 54 FON-860i Telephone User Guide
I can’t make
Internet calls, the
VoIP indicator on
the base is not lit,
and the right status
indicator in the
upper left corner of
the display is black.
(continued)
The router uses
port forwarding.
Check that you have
configured your router
so that it always
assigns the same IP
address to your
FON-860i’s MAC
address when using
port forwarding.
Otherwise incoming
traffic is probably not
forwarded to your
FON-860i. For more
information, check your
router’s user guide.
The router blocks
Internet telephony.
Try disabling STUN.
Open the Internet
settings menu, choose
STUN mode, and
select Disabled. Reset
the base. For more
information, contact
your Internet Telephony
Service Provider.
Use port forwarding.
The default SIP port is
5060, and the default
RTP port is 5004.
Ensure that your router
always assigns the
same IP address to
your FON-860i when
using port forwarding.
For more information,
check your router’s
user guide.
The router firmware
needs updating.
Check your router’s
user guide to see how
to update the firmware.
Problem Possible causes Possible solutions
Page 61

Fortinet Technologies Inc. Page 55 FON-860i Telephone User Guide
When I make
Internet calls, the
sound quality is
poor.
There is too much
simultaneous data
traffic on your
broadband
connection.
Reduce the amount of
traffic on your
broadband connection.
Sign up for a Quality of
Service agreement with
your broadband
provider.
Order a connection
with higher speed from
your broadband
provider.
Your Internet
Telephony Service
Provider’s Quality of
Service is based on
a “best efforts”
rather than a
guaranteed voice
priority method.
Contact your Internet
Telephony Service
Provider regarding
ensured voice
prioritization across
the network.
I cannot make
Internet calls, but it
worked yesterday.
The base is not
logged in at the
Internet Telephony
Service Provider.
Check that all cables
are connected properly,
and check that power
is turned on, and then
reset the base.
The router is turned
off.
Turn on the router.
The SIP server is
down.
Contact your Internet
Telephony Service
Provider.
The Internet
connection is down.
Contact your
broadband provider.
Problem Possible causes Possible solutions
Page 62

Fortinet Technologies Inc. Page 56 FON-860i Telephone User Guide
Appendix A: Optional configuration
methods
Configuring the FON-860i as an analog
local extension
Once you have completed the procedures in “Installing the
FON-860i” on page 7, you can configure the FON-860i as an analog
local extension. The base will support one extension. If multiple
handsets are registered with the base, they will share the extension.
Calling the extension will ring all handsets, but only one handset can
be used at a time.
If the FON-860i is configured as an analog local extension, you must
engage Flash to hold, transfer and park calls; to answer call waiting
and queued calls; and to get an internal dial tone if direct line access
is enabled. To engage Flash, press the key for approximately
two seconds until you receive dial tone or connect to the other caller.
1. Connect the telephone cable from the Line port on the base to
the E1–E8 jack on the FortiVoice unit.
2. If possible, connect the Ethernet cable from the WAN port on the
base to a LAN port on your router or Ethernet switch. This will
prevent the No IP address message from appearing.
3. Launch the FortiVoice Management software.
4. Select the Local Extensions/Fax page.
5. Click the Add button. The Add User / Extension window appears.
Page 63

Fortinet Technologies Inc. Page 57 FON-860i Telephone User Guide
6. Set the Extension type to Regular phone or fax.
7. In a multi-unit system, select the FortiVoice unit the extension will
be associated with. This unit will hold the voicemail for the
extension. Click Next.
8. Enter the user’s First name and Last name. The names are used
for caller ID and the dial-by-name directory.
9. Assign an Extension number.
10.If necessary, select the Manufacturer, and then select the Model.
11.Click Finish.
12.After configuring the extensions, choose File > Save. The phone
system will automatically configure each handset.
Configuring the analog local extension handset
1. In Idle mode, press the OK key on the handset to access the
Main menu.
2. Choose Settings, and then press the OK key.
3. Choose Telephony Settings, and then press the OK key.
4. Choose Primary line, and then press the OK key.
5. Choose Landline, and then press the OK key.
Page 64

Fortinet Technologies Inc. Page 58 FON-860i Telephone User Guide
Configuring the FON-860i as a standalone IP phone
Once you have completed the procedures in “Installing the
FON-860i” on page 7, you can configure the FON-860i as a
standalone IP phone without using the FortiVoice Management
software. If necessary, you will configure a static IP address for the
base. You will then configure the voice settings.
Configuring a static IP address
If your network supports dynamic assignment of IP addresses
(DHCP), you can skip this section. If your network does not support
DHCP, you must set the static IP address of the base.
1. In the Main menu, choose Settings, and then press the OK key.
2. Choose Network settings, and then press the OK key.
3. Choose IP Mode, and then press the OK key.
4. Choose Static, press the OK key, and press the Back softkey.
5. Choose IP address, and then press the OK key. Enter the IP
address, and then press the OK key. When prompted, press the
Yes softkey.
6. Choose Subnet mask, and then press the OK key. Enter the
subnet mask, and then press the OK key. When prompted, press
the Yes softkey.
7. Choose DNS server, and then press the OK key. Enter the primary
DNS server, and then press the OK key. When prompted, press
the Yes softkey.
8. Choose Default gateway, and then press the OK key. Enter the
default gateway, and then press the OK key. When prompted,
press the Yes softkey.
A standalone IP phone does not provide any FortiVoice features.
When entering IP addresses, enter periods as described in
“Configuring the external IP extension handset” on page 22. Do not
press the _ or ? key to enter a period.
Page 65

Fortinet Technologies Inc. Page 59 FON-860i Telephone User Guide
Configuring the voice settings
1. Connect your computer to the same
router/LAN/sub-net as the base.
2. In Idle mode, press the volume up key on the
handset. The System Status screen appears.
Note the IP address of the base.
3. Open a web browser on a computer connected to the same LAN
as the base.
4. Enter the IP address of the base from Step 2. You may have to
enter http:// before the IP address.
5. When prompted, enter admin as the username, and 23646 as
the password.
6. Click Voice Settings. The Voice Settings page appears.
7. Complete the Voice Server settings with account information
from your ITSP (Internet telephony service provider). Contact
your ITSP for more information.
8. Click SAVE CHANGES. The system saves the changes and then
returns to the main page.
9. Click REBOOT. The system configures the base and handsets.
Both status indicators in the upper left corner of the display will
turn yellow.
If the System Status screen does not appear, there may be a
problem with the DHCP server settings. The MAC address should
match the MAC address of the base. If your network supports
DHCP, the IP address should be assigned by your network.
Page 66

Fortinet Technologies Inc. Page 60 FON-860i Telephone User Guide
Legal
For the US: This equipment complies with Part 15 of the FCC rules and
Part 68 of the FCC rules, and the requirements adopted by the
Administrative Council for Terminal Attachments (ACTA). Located on the
equipment is a label that contains, among other information, the FCC
registration number, and the ringer equivalence number (REN). If
requested, this information must be provided to the telephone company.
The REN is used to determine the number of devices that may be
connected to the telephone line. Excessive RENs on the telephone line
may result in devices not ringing in response to an incoming call. In
most, but not all areas, the sum of the RENs should not exceed five (5.0).
To ascertain the number of devices that may be connected to the line, as
determined by the total RENs, contact the telephone company to
determine the maximum REN for the calling area.
For the EU: The telephone’s conformity with EU directives is confirmed
by the CE symbol. We hereby declare that the LAN Cordless FON-860i
is in compliance with the essential requirements and other relevant
provisions of Directive 1999/5/EC.
This equipment cannot be used on the telephone company-provided
coin service. Connection to Party Line Service is subject to State Tariffs.
If this equipment causes harm to the telephone network, the telephone
company will notify you in advance that temporary discontinuance of
service may be required. If such advance notice is not practicable, the
telephone company will notify the customer as soon as possible. Also,
you will be advised of your right to file a complaint with the FCC if you
believe this is necessary.
The telephone company may make changes in its facilities, equipment,
operations, or procedures that could affect the operation of the
equipment. If this happens, the telephone company will provide advance
notice to enable you to make the necessary modifications in order to
maintain uninterrupted service. If the trouble is causing harm to the
telephone network, the telephone company may request you to
disconnect the equipment from the network until the problem is resolved.
This equipment uses the following USOC jacks: RJ11C.
This product is manufactured for Fortinet. Copyright © 2013 Fortinet, Inc.
All rights reserved. Any copying or reproduction of the product or its
associated user guide is strictly prohibited. The content of this document
is subject to change without prior notice.
Page 67

Fortinet Technologies Inc. Page 61 FON-860i Telephone User Guide
Limited warranty
This phone is covered by a one-year limited warranty against
manufacturing defects.
www.fortivoice.com/support
For warranty service:
• In North America, please call 1-866-393-9960 for further
information.
• Outside North America, contact your sales representative for
return instructions.
You will be responsible for shipping charges, if any. When you return
this telephone for warranty service, you must present proof of
purchase.
Page 68

Fortinet Technologies Inc. Page 62 FON-860i Telephone User Guide
Index
A
Account code 43
Activating silent mode 27
Add User / Extension window
16, 20, 56
Adding
call log number to an existing
contact 48
call log number to contacts 48
contact 45
contact to a group 49
Adjusting volume 26
Advisory tones 25
Analog call 32
Analog local extension
configuring 56
Answering
call 33
call for a specific extension 34
call for any extension 34
call waiting 33
queued call 34
Audio settings
changing 25
Auto answer mode
enabling 24
B
Base
front view 5
installing 7
rear view 5
Batteries
charging 11
installing 10
C
Call log 44
adding a number to an existing
contact 48
adding a number to contact 48
calling 30
Call waiting 33
Caller ID 35
Calling
analog call 32
call log 30
conference call 32
contact 30
emergency 32
extension 29
outside number 29
receptionist 30
redial 31
speed dial number 31
system speed dial number 30
voice mailbox 29
Changing
audio settings 25
default number for a contact 47
display contrast 24
input mode 28
ring tone for a contact 46
ring tone for a group 50
Charging batteries 11
Checking
current firmware version
Current firmware version
checking 13
firmware updates
Firmware updates
checking 14
Checking and updating firmware 13
Checking firewall 19
Choosing a contact 45
Codecs 1
Conference call 32
Page 69

Fortinet Technologies Inc. Page 63 FON-860i Telephone User Guide
Configuring
analog local extension 56
external IP extension 19
FON-860i 16
handset 24
handset of external IP extension 22
IP extension 16
standalone IP phone 58
Contact
adding 45
adding a call log number 48
adding to a group 49
calling 30
changing a ring tone for a group 50
changing default number 47
changing ring tone 46
choosing 45
creating a group 48
deleting 46
deleting a group 49
editing 46
editing a group 49
removing from a group 50
specifying a speed dial number 47
Contrast
changing 24
restoring default 24
Creating a group 48
D
Default number
changing for a contact 47
Deleting
contact 46
group 49
Deregistering a handset 13
Deregistering handsets 13
Direct line access 29
Display contrast
changing 24
restoring default 24
Do not disturb mode 43
E
Editing
contact 46
group 49
Emergency call 32
Enabling auto answer mode 24
Ending a call 35
Ethernet cable 7
Extension
calling 29
External IP extension
configuring 19
configuring handset 22
F
Firewall
checking 19
First name box 17, 20, 57
FON-860i
configuring 16
installing 7
G
Group
adding a contact 49
changing ring tone 50
creating 48
deleting 49
editing 49
removing a contact 50
H
Handset
adjusting volume 26
configuring 24
configuring handset of external IP
extension 22
deregistering 13
front view 3
registering 11
screen 6
side view 4
viewing registered handsets 13
Page 70

Fortinet Technologies Inc. Page 64 FON-860i Telephone User Guide
Handset charger 5
installing 9
Hold 37
I
Idle mode 6
Input mode
changing 28
Inserting a symbol 27
Installing
base 7
batteries 10
FON-860i 7
handset charger 9
IP extension
configuring 16
K
Keypad
locking and unlocking 26
Keypad sound 25
L
Last name box 17, 20, 57
Legal 60
Limited warranty 61
Line port 7
Locking the keypad 26
M
Main menu 6
Message tone 25
Muting a call 35
N
Numbers
typing 27
O
Outside number
calling 29
P
Paging 39
Parking a call 39
Parts list 2
Phone features 1
Picking up a call 34
Placing a call on hold 37
Power adapter 8, 9
Protocols 1
Public IP address 22
Q
Queued call 34
R
Receptionist 30
Redial 31
Registering handsets 11
Rejecting a call 35
Removing a contact from a group 50
Restoring default display contrast 24
Retrieving a parked call 39
Ring tone
changing for a contact 46
changing for a group 50
Ringer melody 25
Ringer volume 25
Router 7
S
Silent mode 27
Speakerphone 26
Specifying a speed dial number for a
contact 47
Speed dial number
calling 31
specifying for a contact 47
Standalone IP phone
configuring 58
Symbol
inserting 27
System speed dial number 30
T
Taking a call off hold 37
Page 71

Fortinet Technologies Inc. Page 65 FON-860i Telephone User Guide
Telephone cable 7
Text
typing 27
Transferring a call 37
Troubleshooting 51
Typing text and numbers 27
U
Unlocking the keypad 26
Using the FON-860i with a traditional
phone line 36
V
Viewing registered handsets 13
Voice mailbox
calling 29
Voicemail
checking 41
controlling playback 41
setting up 41
Volume
adjusting 26
W
WAN port 7
Page 72

 Loading...