

Page 1

FortiFone™ User Guide
for FON-375
Page 2

FortiFone™ User Guide for FON-375
Revision 1
October 5, 2016
Copyright© 2016 Fortinet, Inc. All rights reserved. Fortinet®, FortiGate®, FortiCare® and
FortiGuard®, and certain other marks are registered trademarks of Fortinet, Inc., in the U.S. and
other jurisdictions, and other Fortinet names herein may also be registered and/or common law
trademarks of Fortinet. All other product or company names may be trademarks of their
respective owners. Performance and other metrics contained herein were attained in internal
lab tests under ideal conditions, and actual performance and other results may vary. Network
variables, different network environments and other conditions may affect performance results.
Nothing herein represents any binding commitment by Fortinet, and Fortinet disclaims all
warranties, whether express or implied, except to the extent Fortinet enters a binding written
contract, signed by Fortinet's General Counsel, with a purchaser that expressly warrants that
the identified product will perform according to certain expressly-identified performance metrics
and, in such event, only the specific performance metrics expressly identified in such binding
written contract shall be binding on Fortinet. For absolute clarity, any such warranty will be
limited to performance in the same ideal conditions as in Fortinet's internal lab tests. In no event
does Fortinet make any commitment related to future deliverables, features or development,
and circumstances may change such that any forward-looking statements herein are not
accurate. Fortinet disclaims in full any covenants, representations, and guarantees pursuant
hereto, whether express or implied. Fortinet reserves the right to change, modify, transfer, or
otherwise revise this publication without notice, and the most current version of the publication
shall be applicable.
FortiVoice fortivoice.com
Technical Documentation docs.fortinet.com
Knowledge Base kb.fortinet.com
Customer Service & Support support.fortinet.com
Training Services training.fortinet.com
FortiGuard fortiguard.com
Document Feedback techdocs@fortinet.com
Page 3

Contents
Introduction....................................................................................................... 1
Phone features......................................................................................................... 1
Programmable keys................................................................................................. 2
Display layout........................................................................................................... 2
Installation......................................................................................................... 3
Attaching the stand.................................................................................................. 3
Connecting the phone ............................................................................................. 4
Setting up the phone ............................................................................................... 5
Personalizing your Phone................................................................................ 6
How to navigate through menus.............................................................................. 6
For desktop use ................................................................................................. 3
For wall mounting .............................................................................................. 3
For use as an internal extension ........................................................................ 5
For use as an external extension ....................................................................... 5
Entering values with the dial pad and softkeys ....................................................... 6
Configuration Overview ................................................................................... 7
Status....................................................................................................................... 7
Features ................................................................................................................... 7
Auto hangup....................................................................................................... 7
Call waiting......................................................................................................... 7
DND.................................................................................................................... 7
Blocking anonymous call ................................................................................... 7
Ban outgoing...................................................................................................... 7
Dial peer............................................................................................................. 8
Intercom............................................................................................................. 8
Auto redial.......................................................................................................... 8
Ring from headset.............................................................................................. 8
Hide DTMF......................................................................................................... 8
Password dial..................................................................................................... 8
Predial ................................................................................................................ 8
Call logs ............................................................................................................. 9
Default line ......................................................................................................... 9
Auto switch line.................................................................................................. 9
Settings.................................................................................................................... 9
Basic settings..................................................................................................... 9
Screen settings ............................................................................................ 9
Ring settings ................................................................................................ 9
Voice volume................................................................................................ 9
Contents Page iii FortiFone User Guide
Page 4

Time & date .................................................................................................. 9
Language ..................................................................................................... 9
Advanced settings ............................................................................................. 9
Accounts ...................................................................................................... 9
Network............................................................................................................ 10
Network settings ........................................................................................ 10
QoS & VLAN............................................................................................... 11
VPN ............................................................................................................ 11
Web server type ......................................................................................... 11
Security ............................................................................................................ 11
Menu password ......................................................................................... 11
Keyboard status......................................................................................... 11
Keyboard password................................................................................... 11
Maintenance .................................................................................................... 12
Auto provision ............................................................................................ 12
TR069......................................................................................................... 12
Reset to Default ............................................................................................... 12
Applications ........................................................................................................... 12
SMS ................................................................................................................. 12
Memo ............................................................................................................... 12
Voice Message................................................................................................. 12
Ping .................................................................................................................. 12
Phonebook............................................................................................................. 13
Contacts........................................................................................................... 13
Adding a contact........................................................................................ 13
Editing a contact ........................................................................................ 13
Deleting a contact ....................................................................................... 13
Searching a contact ................................................................................... 13
Groups ............................................................................................................. 14
Add a group ............................................................................................... 14
Delete a group............................................................................................ 14
Add a contact to a group ........................................................................... 14
Add an existing contact to a group............................................................ 14
Blacklist............................................................................................................ 15
Add a new contact to the Blacklist ............................................................ 15
Add an existing contact to the Blacklist .................................................... 15
Cloud phonebook ............................................................................................ 15
LDAP ................................................................................................................ 15
Speed dial ........................................................................................................ 15
Adding a number to the Speed Dial........................................................... 15
Call Logs ................................................................................................................ 15
Reboot System ...................................................................................................... 15
Contents Page iv FortiFone User Guide
Page 5

Using the Phone ............................................................................................. 16
Receiving a call...................................................................................................... 16
Placing a call.......................................................................................................... 16
Ending a call .......................................................................................................... 17
Redial ..................................................................................................................... 17
Diverting a call ....................................................................................................... 17
Hold ....................................................................................................................... 17
Mute....................................................................................................................... 17
Attendant transfer .................................................................................................. 17
Blind transfer.......................................................................................................... 18
3-party conference ................................................................................................ 18
Call waiting ............................................................................................................ 18
DND ....................................................................................................................... 18
Voicemail................................................................................................................ 18
Troubleshooting ............................................................................................. 19
Information............................................................................................................. 19
Troubleshooting guide ..................................................................................... 19
Character table to dial pad mode .................................................................... 20
Warranty .......................................................................................................... 21
Contents Page v FortiFone User Guide
Page 6

Page 7
Introduction
This user guide includes information about configuring and using your FON-375 IP phone.
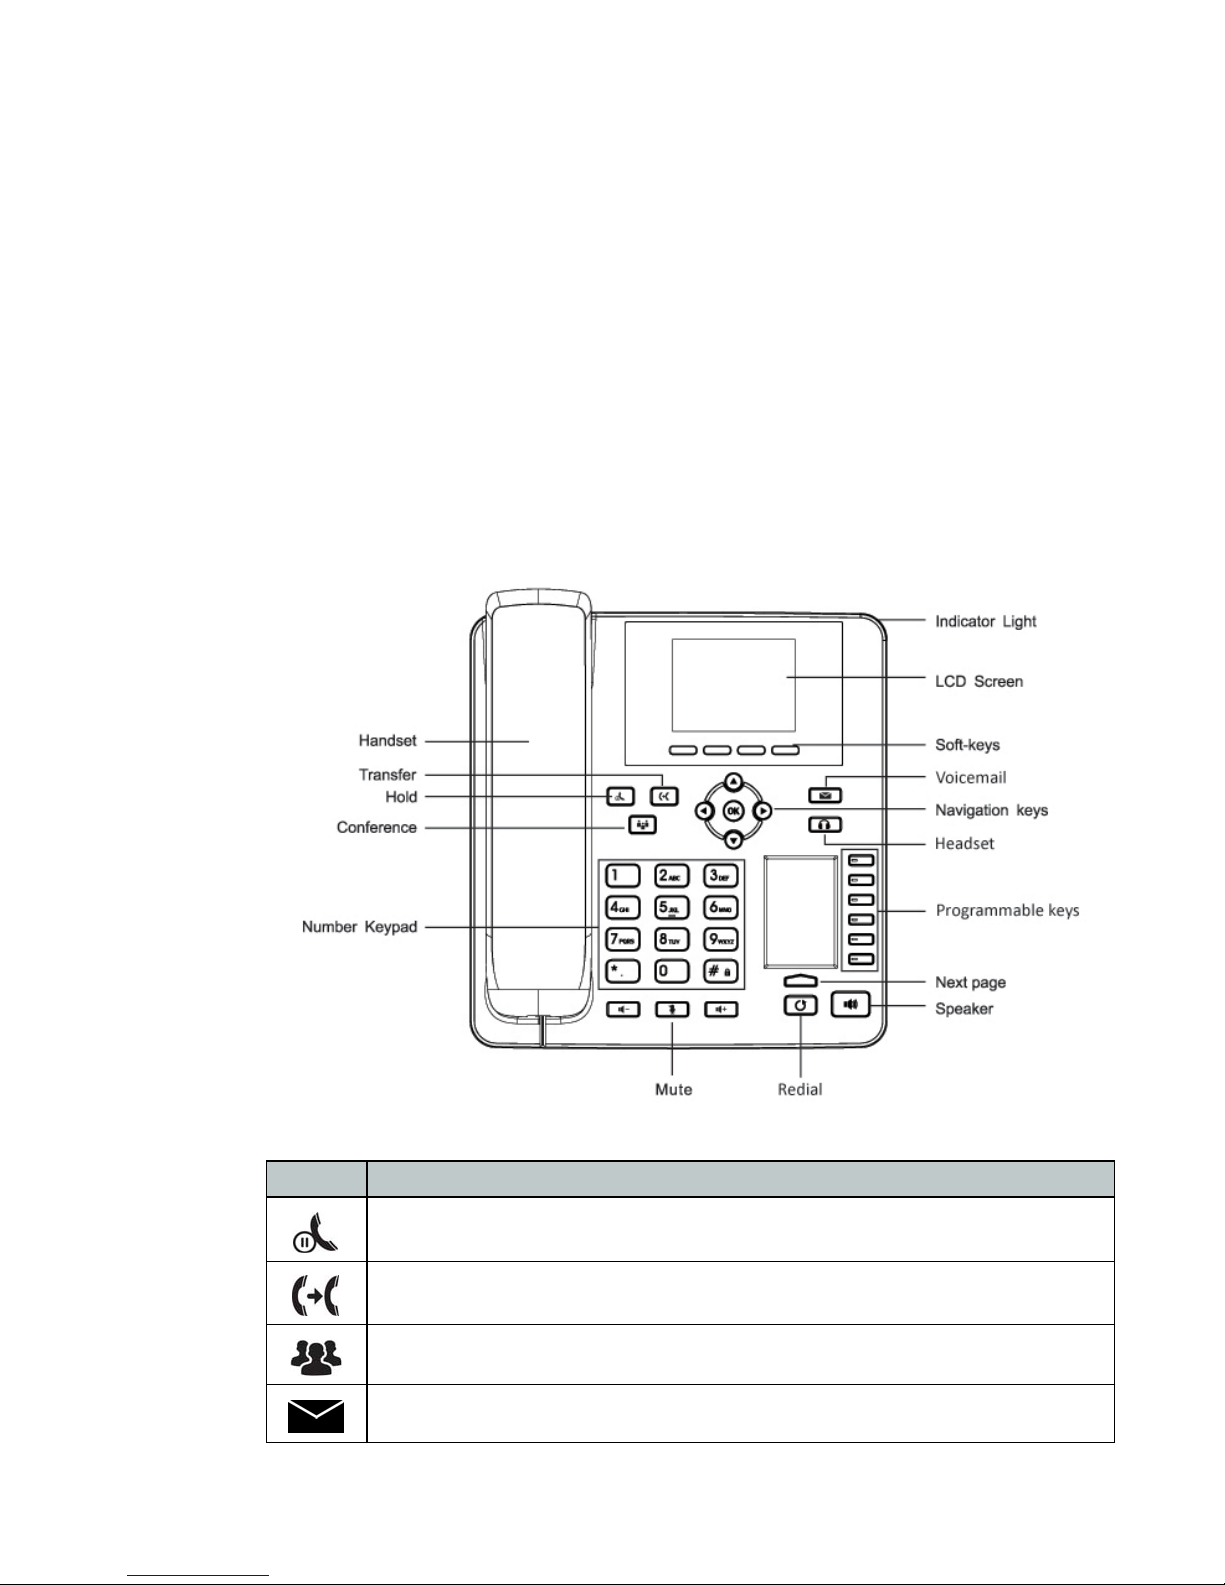
Phone features
• 2.8" color display
• Dedicated feature keys
• 18 programmable keys
• Full duplex speakerphone
• 2x 10/100/1000 Mbps ports allow you to share the network connection with your computer
• PoE support eliminates the need for a power adapter
Button Function
Hold — places and retrieves calls on hold.
Transfer — transfers calls to another extension or outside line.
Conference — brings multiple calls together in a conference.
Voicemail — accesses voicemail and voicemail greetings.
Introduction Page 1 FortiFone User Guide
Page 8
Button Function
Programmable keys
For information on how to configure the programmable keys, please consult the FVE Admin
Guide located here: http://www.fortivoice.com/support/documentation/index.html.
Display layout
The phone has a 2.8" screen with a 320 x 240 resolution, used to display information to the user,
such as the time and date, as well as various status icons.
Headset — toggles the headset on and off.
Mute — Toggles the microphone on and off.
Redial— places a call to the last number dialed.
Speakerphone— toggles the speaker on and off.
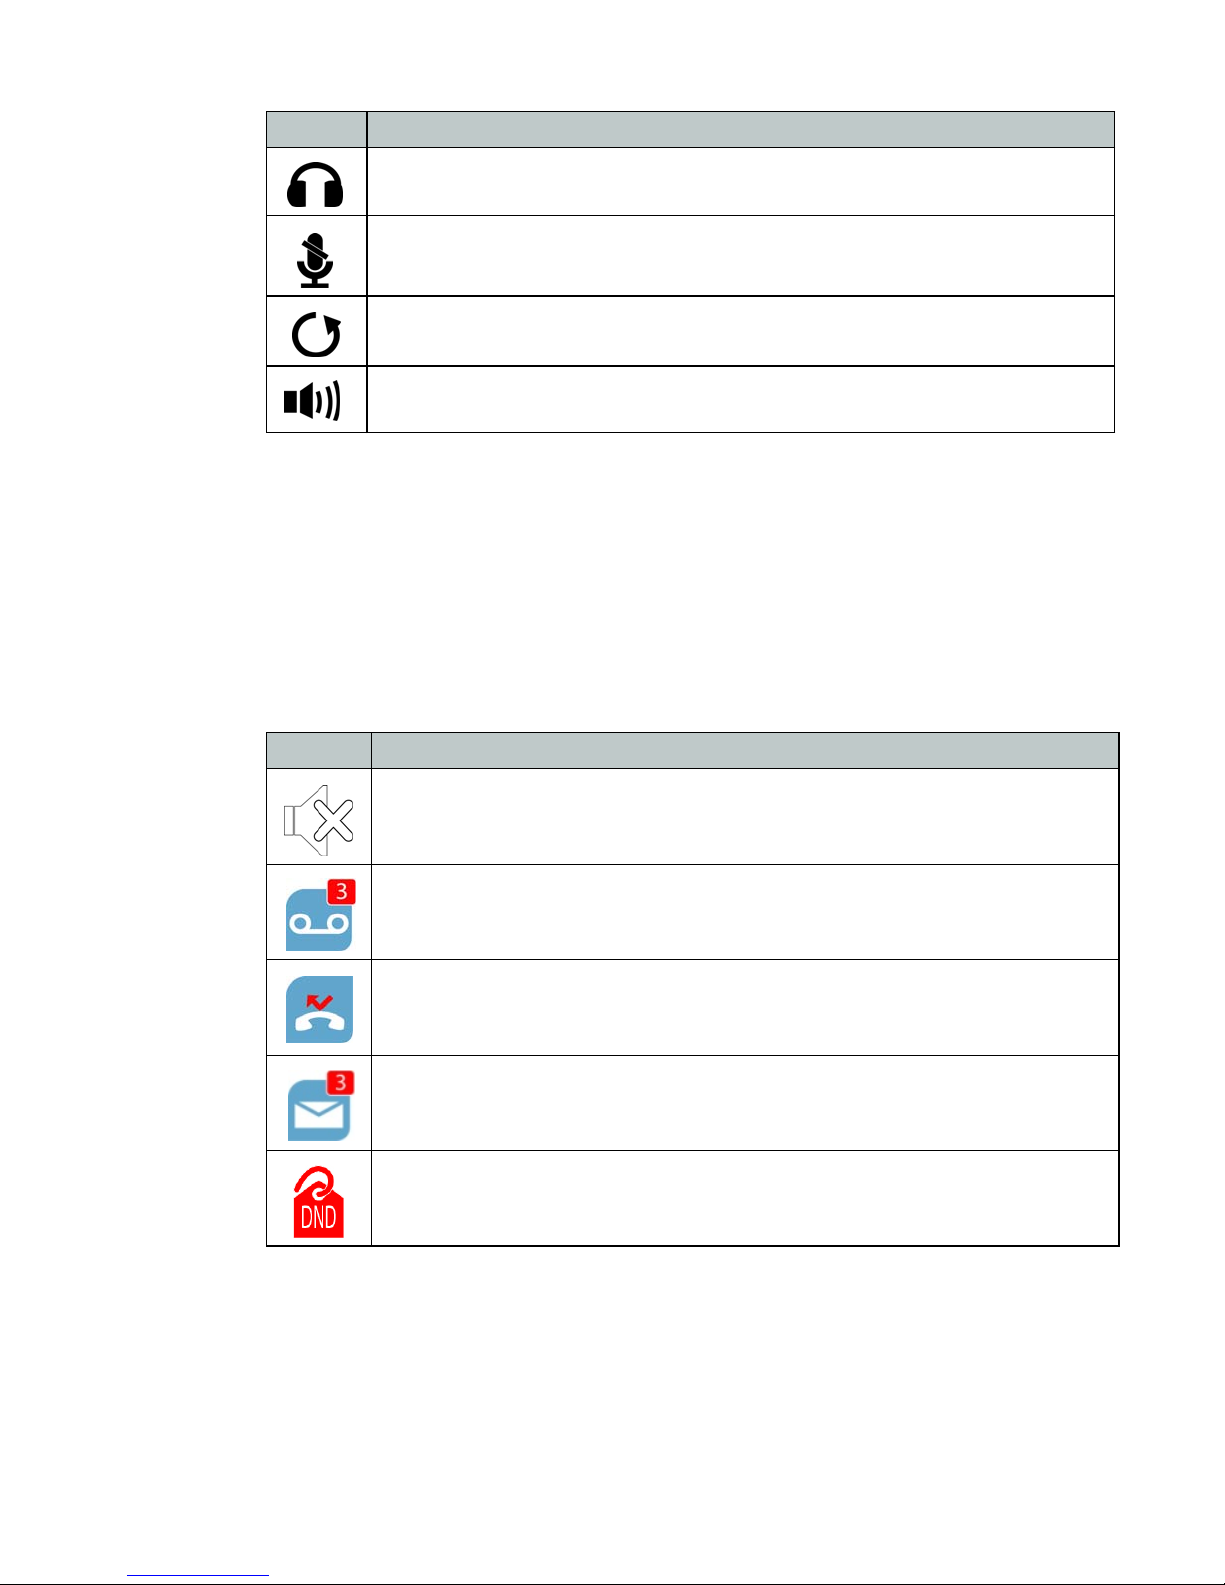
Icons Descriptions
Ringer is turned off
New voicemail
Missed calls
New SMS messages
Do Not Disturb is enabled
The bottom line shows choices associated with the 4 context-sensitive softkeys located just
below the display.
Introduction Page 2 FortiFone User Guide
Page 9
Installation
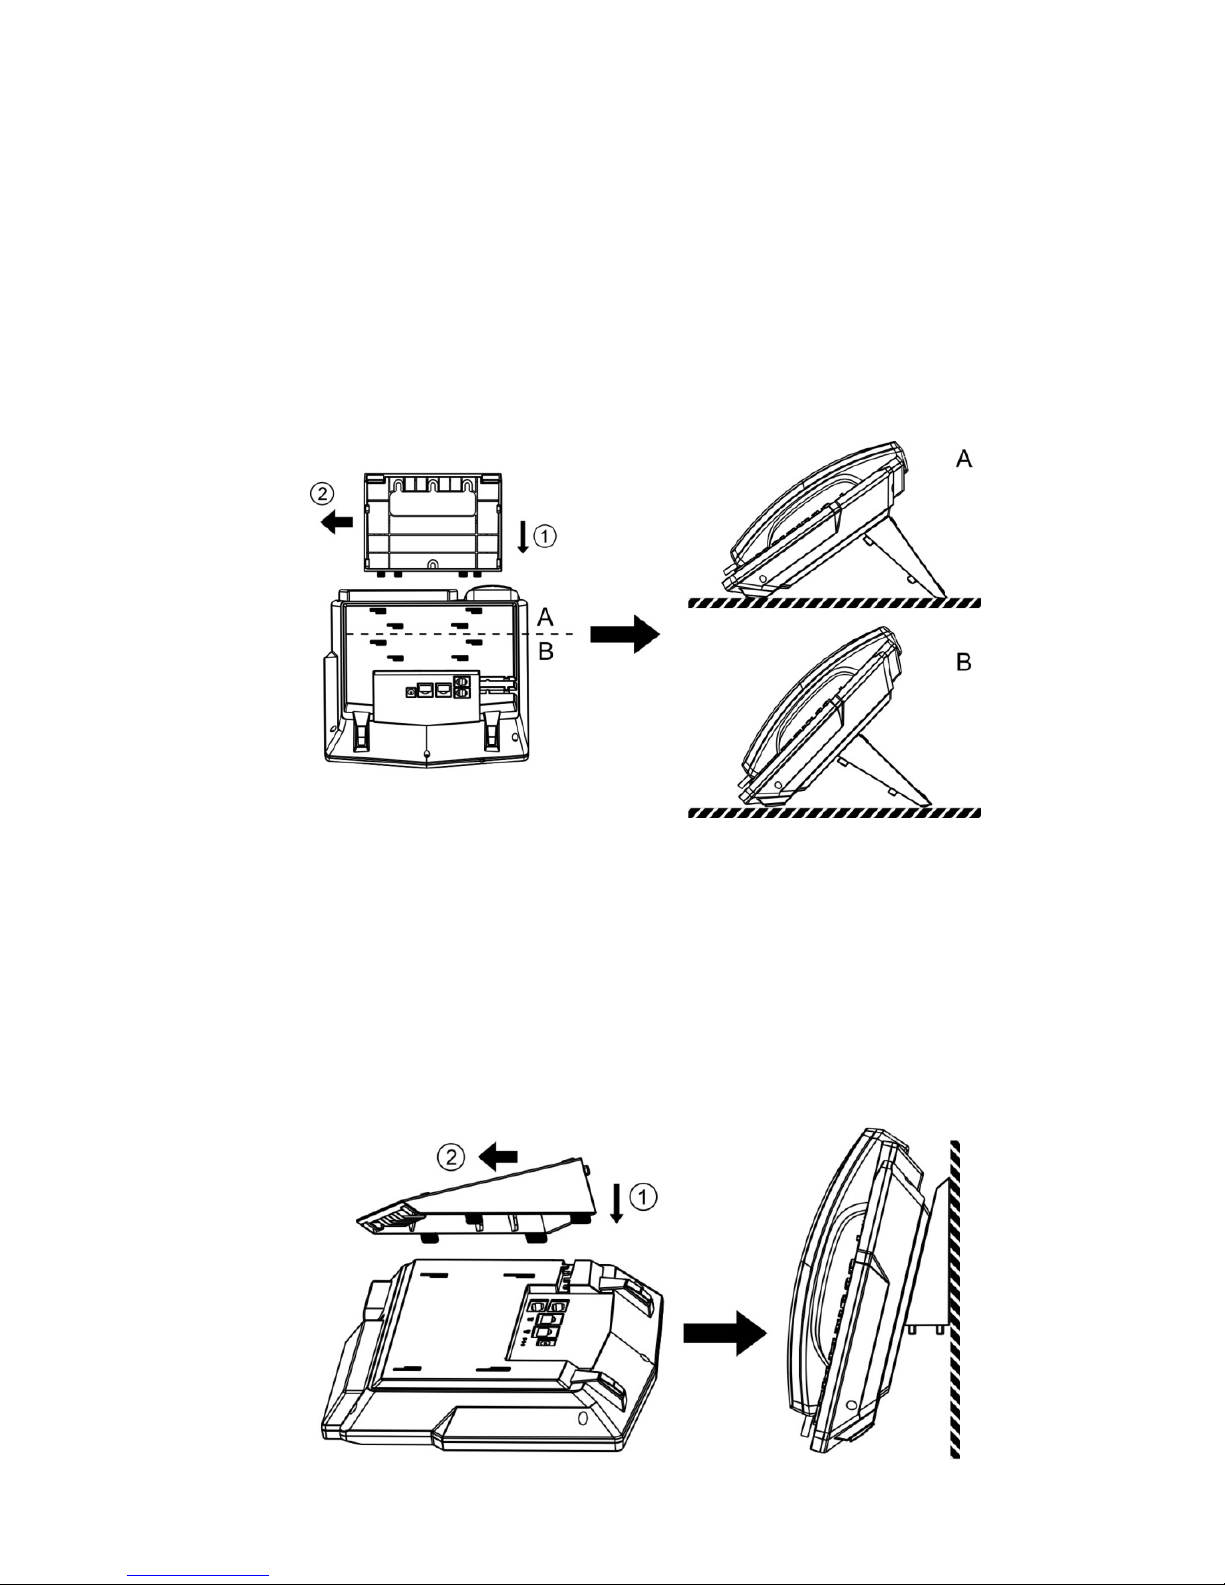
Attaching the stand
For desktop use
1. Line the 4 posts on the top of the base up with the 4 holes on the back of the phone.
2. Slide sideways into place until secure.
For wall mounting
1. Attach top part of base to the phone.
2. Mark and drill three 5/16" (7 mm) holes according to their placement on the base.
3. Insert plastic wall anchors (not included) into the holes. Place a screw into the bottom hole,
leaving about 1/8" (2.5 mm) exposed.
4. Slide the base over the bottom screw. Secure the base using screws in the top two holes.
5. Slide the phone onto the base and ensure the phone is secure. It may be necessary to
remove the phone and tighten or loosen the screws for secure mounting.
Installation Page 3 FortiFone User Guide
Page 10

Connecting the phone
1. Connect the handset cord to the handset and the jack on the phone.
2. Optionally connect an amplified headset to the jack.
3. Connect the WAN port to the network with the provided Ethernet cable.
4. Optionally connect your desktop PC to the PC port with an Ethernet cable (not supplied).
5. If the network supports PoE, a power adapter is not required. The phone requires 5.7 W to
function with PoE. If PoE is not supported on the network, connect the power adapter to the
DC 5V 1A power jack.
Installation Page 4 FortiFone User Guide
Page 11

Setting up the phone
For use as an internal extension
The phone supports plug and play installation and will automatically download its configuration
from the FortiVoice system. The phone will display the extension number and name when it has
registered.
Once configured within the FortiVoice system, reboot the phone to download its configuration
and register to the system.
For use as an external extension
1. On the phone, press the Menu softkey.
2. Select Settings.
3. Select Advanced Settings.
4. Enter the Password as 23646.
5. Select Maintenance.
6. Select Auto Provision.
7. Select Static Provisioning Server.
8. Set the Mode to After Reboot.
9. Press the down arrow and set the Protocol to TFTP.
10. Press the down arrow and set the Server as the public IP Address of the FortiVoice.
11. Press Save.
12. Return to the Main Menu and select Reboot System.
Installation Page 5 FortiFone User Guide
Page 12

Personalizing your Phone
How to navigate through menus
To access the configuration menu:
• Press the Menu softkey.
To select an item:
• Use the arrow keys to select an item and then press OK.
The bottom line of the display shows up to 4 softkey functions at a time. To return to a previous
menu, press the Prev. softkey.
To exit the configuration menu, press the Exit softkey.
Entering values with the dial pad and softkeys
Use the dial pad to input numbers, letters, special characters, and a period. The dial pad mode
is displayed above the second softkey as for numeric, for uppercase characters,
for lowercase characters and to be able to enter any of the characters.
To enter characters with the dial pad, use the digit with the desired character. Press the same
digit repeatedly until the desired character appears on the screen. After entering a character,
pause to allow the cursor to move to next character position.
Other special entries include:
• To enter a period or dot (for example, to input an IP address), press _ on the dial pad.
• To delete a letter in front of the cursor, press the Delete softkey.
• To enter special characters, press A on the dial pad while the mode softkey is set to ,
or .
• To enter a space, press : on the dial pad while the mode softkey is set to , or .
Prior to saving an entry, you may discard changes by pressing the Back softkey to move to the
previous menu.
Personalizing your Phone Page 6 FortiFone User Guide
Page 13

Configuration Overview
The phone supports the access and configuration of many parameters directly from the
Telephone User Interface. To access the Configuration menu, press the Menu softkey while the
phone is not in use.
The Configuration menu consists of several sub menus as listed below:
• Status
• Features
• Settings
• Applications
• Phonebook
• Call Logs
• Reboot System
Status
The Status page includes the network Mode, IP address and Software version of the phone.
Selecting the More option provides more details about the phone, the network connections and
the registration status.
Features
Auto hangup
Call waiting
DND
Blocking anonymous call
Ban outgoing
The features here should be handled on the FortiVoice system and configured by the system
administrator. Making changes to these features on the phone is not recommended.
If enabled, the phone can automatically hang up and return to dial tone after the set amount of
time.
Enable/disable the Call Waiting feature as well as the tone that is played.
Enable/disable Do Not Disturb.
Enable/disable the option to block calls that use Anonymous as the caller ID.
Enable/disable the ability to make calls from the phone.
Configuration Overview Page 7 FortiFone User Guide
Page 14

Dial peer
This feature can be used to make dialing longer numbers easier by creating rules for them. The
following fields can be configured for creating dial rules:
Phone Number — Enter the number to be dialed to trigger a match. There are two types of
matches; Full Match and Prefix Match. The Full Match will be triggered by the entire number
being dialed and must match exactly. The Prefix Match uses a wild card of T. For example;
entering 9T here will trigger the dial rule when 9 is dialed, followed by any other number. Prefix
Match will allow a maximum of 30 digits.
Destination — Set the Destination address. This is used for IP direct calls.
Port — Set the signal port. The default for SIP is 5060.
Alias — This setting can replace a phone number, add numbers, delete numbers or replace
specified characters. Enter these commands to take advantage of the Alias:
• all: xxx — xxx will replace the phone number.
• add: xxx — xxx will be dialed before the phone number.
• del — the characters will be deleted from the phone number.
• rep: xxx — xxx will be substituted for the specified characters.
Suffix —Digits entered here will be added to the end of a matching phone number.
Delete Length — Set the number of digits to be removed from the beginning of the matching
phone number.
Intercom
Enable/disable Intercom functionality.
Auto redial
Enable/disable the option to automatically redial a number that is busy or rejected. The redial
can be timed to occur at specified intervals and given a set amount of times to try the redial.
Ring from headset
Enable/disable ring tone heard on the headset.
Hide DTMF
Enable/disable the option to hide DTMF digits from being displayed on the screen.
Password dial
Enable/disable the option to hide a specific set of numbers. The Prefix is the number used to
trigger hiding the number; the Length is how many numbers after the Prefix you would like to
have hidden.
Predial
Enable/disable the option to predial numbers. When enabled, the phone will not open an audio
channel immediately while dialing a number.
Configuration Overview Page 8 FortiFone User Guide
Page 15

Call logs
Default line
Auto switch line
Settings
Basic settings
View all calls to and from the phone.
If enabled, the default line to make outbound calls can be selected.
If enabled, the phone will choose the first available line when making an outbound call.
Screen settings
The screen of the phone can be set to always be on or to dim after a specified period of time.
Ring settings
The Ring Volume can be changed here for both the handset and headset modes. The phone
also supports different ring tones which can be set here under the Ring Type.
Voice volume
This setting allows the user to change the volume heard at the handset, hands-free speaker and
headset.
Time & date
The Time & Date can be set to be obtained automatically or manually. The manual settings
allows the user to change the Timezone, Location, set Daylight Saving Time, 12-hour Clock,
Date, Time and the date Format.
Language
The phone supports many languages which can be selected here. This setting will only adjust
the language on the screen of the phone. To change the audio prompts, the language of the
extension must be set within the FortiVoice.
Advanced settings
The default password to enter the advanced settings is 23646.
Accounts
The Accounts section contains parameters to allow the phone to register to a SIP server or
PBX. Contact your administrator before proceeding.
Configuration Overview Page 9 FortiFone User Guide
Page 16

Basic settings
The following fields will be configured automatically through the FortiVoice. To make any
changes to these settings, contact the system administrator:
• Registration: enable or disable the account. Enabled accounts will try to register using the
configured settings.
• Server Address: enter the IP address of the service to register with.
• Server Port: enter the port to register with the server on.
• User Name: the phone number or extension number of the account.
• Auth User: enter the authentication username for this account.
• Auth Password: enter the authentication password for this account.
• Display Name: the caller ID that will be displayed when calling other phones. When
connected to a FortiVoice system, the caller ID information will be configured in the
web-based interface.
• Outbound Proxy: set the IP address or FQDN of the outbound proxy.
Advanced settings
The following fields will be configured automatically through the FortiVoice. To make any
changes to these settings contact the system administrator:
• Domain Realm: enter the Realm for the account.
• Dial Without Registered: enable/disable this feature to make calls through a proxy server
with no registration required.
• Anonymous: enable anonymous Caller ID using either RFC3323 or RFC3325.
• DTMF Mode: set the way that the phone sends DTMF.
• Use STUN: enable/disable the STUN setting.
• Local Port: set the port that the phone will use for registration.
• Ring Type: change the ring tone that this particular account will use when receiving a call.
• MWI Number: enter the information needed for the phone to subscribe to a message waiting
indicator.
• Pickup Number: enter the Pickup Number for the system.
• Park Number: enter the Park Number for the system.
• Join Call Number: enter the Join Call Number for the system.
• Missed Call Logs: enable/disable the option to show missed calls to this account.
• Feature Sync: enable/disable Feature Sync with the server.
• SCA: enable/disable Shared Call Appearance.
Network
Network settings
Connection mode
The Connection mode contains the options for how the phone will connect to the network:
• DHCP
• PPPoE
• Static IP
Configuration Overview Page 10 FortiFone User Guide
Page 17

Static IP settings
The phone can be set up with a static IP address using these settings:
• IP Address
• Subnet Mask
• Gateway
• DNS1
• DNS2
DHCP settings
Enable/disable the phone from obtaining an IP address using DHCP.
PPPoE settings
Configure the Username and Password necessary to use PPPoE.
QoS & VLAN
These settings for QoS and VLAN can be enabled/disabled here:
• LLDP
• QoS
• WAN VLAN
• LAN VLAN
Security
Once a setting is enabled, press the down arrow button on the phone to view and configure the
next setting.
VPN
Enable/disable and configure the VPN settings here.
Web server type
The Web Server Type can be set here as either HTTP or HTTPS.
Menu password
The password to access the Advanced Settings can be changed here.
Keyboard status
Enables/disables the Keylock feature, which will lock the dialpad and require a password to
unlock.
Keyboard password
Set the password to unlock the keyboard if the Keylock feature is enabled.
Configuration Overview Page 11 FortiFone User Guide
Page 18

Maintenance
Auto provision
DHCP option
Set the DHCP Option to automatically provision the phone:
• Option 43
• Option 66
• Custom 128–254 (if selected, press the down arrow to enter the value for this option)
• Disabled
SIP Plug and Play
Enable/Disable the SIP Plug and Play options.
Static Provisioning Server
Enable/disable the use of a Static Provisioning Server. If enabled, press the down arrow on the
dial pad to access additional settings.
TR069
Settings
Reset to Default
Applications
SMS
Memo
Voice Message
Enable/disable the use of TR069. If enabled, press the down arrow on the dial pad to access
additional settings.
Status
If TR069 has been configured, this section will display status updates.
This will default all of the settings on the phone.
View SMS messages.
The phone can bring up a short notification based upon a specified time.
Displays the amount of new and total voicemail messages for this extension.
Ping
The Ping feature can send a ping out to a specified IP address.
Configuration Overview Page 12 FortiFone User Guide
Page 19

Phonebook
Contacts
The phone supports up to 500 contacts. Each contact can have up to 3 phone numbers and a
ring tone assigned. When a call is received from the contact, the specified ring tone overrides
the default one.
Adding a contact
To add a contact:
1. Press the Add softkey.
2. Edit the following fields:
• Name: name of the contact.
• Tel: phone number.
• Mobile: mobile phone number.
• Other: additional phone number field.
• Ring: the ring tone that will be used when receiving calls from this contact.
Editing a contact
To edit a contact:
1. Select a contact.
2. Press the Option softkey.
3. Select Edit, press OK.
4. Edit the information.
5. Press the Save softkey.
Deleting a contact
To delete a contact:
1. Select a contact.
2. Press the Option softkey.
3. Select Delete. Press OK.
Searching a contact
To search for a contact:
1. Press the Option softkey.
2. Select Search.
3. Enter part of a number or name to search for.
4. Press the OK softkey.
Configuration Overview Page 13 FortiFone User Guide
Page 20

Groups
Contacts can be added to specific groups such as Friends, Work, Businesses, etc, keeping your
contacts organized.
Add a group
To add a new group:
1. Press the Option softkey.
2. Select Add.
3. Press the OK softkey.
Delete a group
To delete a group:
1. Press the Option softkey.
2. Select Delete.
3. Press the OK softkey.
Add a contact to a group
To add a contact:
1. Select a group to add a contact to.
2. Press the Enter softkey.
3. Press the Add softkey.
4. Edit the following fields:
• Name: name of the contact.
• Tel: phone number.
• Mobile: mobile phone number.
• Other: additional phone number field.
• Ring: the ring tone that will be used when receiving calls from this contact.
Add an existing contact to a group
1. Press the Menu softkey.
2. Select Contacts.
3. Select the contact you would like to add to the group.
4. Press the Option softkey.
5. Select Groups.
6. Select the group you would like to add the contact to.
7. Press the Save softkey.
Configuration Overview Page 14 FortiFone User Guide
Page 21

Blacklist
Adding a contact to the Blacklist will prevent the contact from being able to call this extension.
Add a new contact to the Blacklist
1. Press the Add softkey.
2. Select the Type you would like to add: Number or Prefix.
3. Enter the Value, either the number or prefix.
4. Choose which Line to have the number or prefix blacklisted on.
Add an existing contact to the Blacklist
1. Press the Menu softkey.
2. Select Contacts.
3. Select the contact you would like to add to the blacklist.
4. Press the Option softkey.
5. Select Blacklist.
6. Press the Save softkey.
Cloud phonebook
LDAP
Speed dial
Call Logs
The Cloud Phonebook is a list of contacts hosted by a server on the network.
The LDAP settings allow for retrieving a contact list from a LDAP server.
The phone can store up to 9 custom speed dial numbers.
Adding a number to the Speed Dial
1. Select the Speed Dial to create.
2. Press the Edit softkey.
3. Enter the Name of the speed dial.
4. Enter the number to dial under Tel.
5. Choose the Line to call out on.
6. Press the Save softkey.
The phone stores up to 100 calls in the Call Log, displaying inbound, outbound and missed
calls.
Reboot System
Selecting this option will reboot the phone.
Configuration Overview Page 15 FortiFone User Guide
Page 22

Using the Phone
Receiving a call
When you receive a call, the phone will display the call details and the ring indicator will flash.
The phone will also ring unless the ringer is off.
• To answer the call with the handset, lift the handset.
• To answer the call with the speakerphone, press or the Answer softkey.
• To answer the call with the headset, press .
If your extension has call waiting enabled, you can press the Answer softkey to answer the
second call.
To reject a call, press the Reject softkey. The call will follow the extension’s Busy settings as
configured in the Call handling section.
Placing a call
You can place a call by dialing a number, selecting a number from the call log or a contact from
the phone book.
To dial an extension number:
1. Dial the extension number.
2. After about 4 seconds, the phone will dial the number. Optionally, press OK, the Send
softkey or ? to place the call immediately.
To dial an outside number:
1. To access an outside line, dial the outgoing access code (for example: 9 or 0) if configured
within the Fortivoice.
2. Dial the phone number.
3. After about 4 seconds, the phone will dial the number. Optionally, press OK, the Send
softkey or ? to place the call immediately.
To dial a number from the call log:
1. Press the History softkey.
2. Select a call log entry. Press the Dial softkey.
To dial a number from the phone book:
1. Press the Phonebook softkey.
2. Select the Phonebook option you would like to dial from.
3. Select Contact.
4. Press the Dial softkey.
By default, all calls will use the speakerphone. Lift the handset if you wish to place a call using
the handset. Press if you wish to place a call using the headset.
Using the Phone Page 16 FortiFone User Guide
Page 23

Ending a call
To end a call:
• Press the End softkey.
• If you are using the handset, place it in the cradle.
• If you are on speakerphone, press .
• If you are using a headset, press .
Redial
Allows you to redial the last number dialed:
• Press . The phone activates the speakerphone and places the call.
• You can also lift the handset or press followed by pressing .
Diverting a call
While the phone is ringing during an incoming call, the call may be diverted to another extension
without answering. To divert a call:
1. Press the Divert softkey.
2. Enter the extension number to divert the call to.
3. Press the Divert softkey.
Hold
To place calls on hold press the Hold softkey. While a call is on hold you can answer or place
other calls. The held party will hear music, if configured to do so.
To toggle between two calls, use the navigation keys and press the Answer or Resume softkey.
To retrieve a call held on a different line, double press the flashing L1 or L2 key associated with
the call on hold.
Mute
Mute turns the phone’s microphone on or off.
1. Press to disable the microphone. The mute button will turn red and Mute will appear on
the display.
2. Press again to enable the microphone.
Attendant transfer
Calls can be announced to the party receiving the transfer before completing the transfer.
To perform an attendant transfer:
1. Press the L1 or L2 key.
2. Dial the extension or phone number.
3. Announce the call.
4. Press the Xfer softkey.
Using the Phone Page 17 FortiFone User Guide
Page 24

Blind transfer
Calls can be transferred without talking to the party receiving the transfer.
To perform a blind transfer:
1. Press the Xfer softkey.
2. Dial the extension or phone number.
3. Press the Dial softkey.
3-party conference
The phone supports conferencing with two other parties.
To create a 3-party conference:
1. Place the first call.
2. Press the Conf softkey, the first call will be placed on hold.
3. Call the second party for the conference.
4. When the second party answers, press the Conf softkey again.
To end a conference call:
Call waiting
DND
Voicemail
1. Press the Split softkey to separate the parties from the conference.
2. Press the End softkey to end the conference call. Both parties will be disconnected.
When Call Waiting is enabled, the phone will present new calls to you while you’re on a call. In
order to use Call Waiting, it will first need to be enabled in the FortiVoice interface.
To answer an incoming call while on a call, press the flashing L1 or L2 key. Alternately, use the
navigation keys to view the caller and then press the Answer softkey. The initial call will be
placed on hold. Refer to the Hold section on how to toggle between calls.
When DND (Do Not Disturb) is enabled, you will not be notified of incoming calls.
1. Press DND softkey to enable DND. The DND status icon will be displayed.
2. Press the DND softkey again to disable DND.
When you have a message waiting, the message indicator flashes and the voicemail icon
appears to indicate you have new messages in your mailbox.
To access your voice mailbox:
• Press or the View softkey.
Using the Phone Page 18 FortiFone User Guide
Page 25

Troubleshooting
Information
Pressing the OK button on the phone provides the means to quickly view the network
parameters (IP address, default gateway address, and subnet-mask), registration status of the
phone, MAC address and firmware version. This information may be useful if calling Fortinet
Support.
Troubleshooting guide
Symptoms Corrective actions
Display is blank Confirm the phone’s power source.
1. If you are using the power adapter:
• Ensure it is plugged in. If it still doesn’t work, replace
the power adapter.
2. If you are using Power over Ethernet (PoE):
• Ensure your Ethernet cable is plugged into the
INTERNET port on the back of your phone.
• Ensure the PoE switch is properly configured. If it still
doesn’t work, replace the Ethernet cable.
Phone not obtaining an
IP address
Phone will not register Your phone is not registered.
No audio during a call 1. Check the handset/headset connections.
The DHCP server is not responding.
1. Ensure your DHCP server is online. This is typically your
router.
2. Reboot the router or DHCP server.
3. If you are still experiencing issues, the phone may require
advanced network configuration. Contact your
administrator.
1. On the Extension page of the FortiVoice interface, ensure
the MAC address is correctly entered and the Phone
Type is FON-375. Save your configuration and reboot
the phone.
2. On the phone, ensure the TFTP IP address is correct. To
verify, see “For use as an external extension” on page 5
3. If your phone is configured as an external extension,
check the network connection and firewall settings at the
phone system location.
2. Make sure the phone is properly registered with the
phone system.
3. If your phone is configured as an external extension,
check the network connection and firewall settings at the
phone system location.
Troubleshooting Page 19 FortiFone User Guide
Page 26

Character table to dial pad mode
Digit
abc ABC 2aB 123
111
2 abc ABC 2 a b c A B C 2
3 def DEF 3 d e f D E F 3
4 ghi GHI 4 g h i G H I 4
5 jkl JKL 5 j k l J K L 5
6 mno MNO 6 m n o M N O 6
7 pqrs PQRS 7 p q r s P Q R S 7
8 tuv TUV 8 t u v T U V 8
9 wxyz WXYZ 9 w x y z W X Y Z 9
0 Space Space 0 Space 0
Dial Pad Mode
* #@,.;?$%&()<>[]~!_=+-? #@,.;?$%&()<>[]~!_=+-? * *
###
Troubleshooting Page 20 FortiFone User Guide
Page 27

Warranty
This phone is covered by a one-year hardware warranty against manufacturing defects as set
forth in the EULA.
www.fortivoice.com/support
For warranty service:
• In North America, please call 1-866-648-4638 for further information.
• Outside North America, contact your sales representative for return instructions.
You will be responsible for shipping charges, if any. When you return this telephone for warranty
service, you must present proof of purchase.
Warranty Page 21 FortiFone User Guide
Page 28

 Loading...