

Page 1

Formax Atlas C300
High-Speed Automatic
Creaser and Folder
Instruction Manual
Page 2

Atlas C300
Auto-Feed High-Speed Creaser/Folder
3/2017
OPERATOR MANUAL
First Edition
Page 3

INDEX
INTRODUCTION&SPECIFICATION
TheAtlas C300 Creaser and Perforator
SAFETYDo’s&Don’ts5
THEAtlas C-300
LabeledPhotograph
THESWITCHPANEL
Detaileddiagramanddescription
Featuresontheswitchpanel
OPERATINGTHEAtlas C300
AdjustingthePapergate
SettingtheSuctionSlot
SettingtheVacuumBleed
SettingtheAdjustableSideLay
SettingtheBack-Stop
SettingtheAirDistribution
SettingtheAirSeparationPressure
SettingthePositionsoftheDriveWheelsandHubs
PAGE4
7
8
9
10
10
11
11
11
11
11
12
TOUCHSCREENOPERATION
TouchscreenLayout
PaperSettingsPage
RollerGapSet&TiltMechanismPage
CreaseSettingsPages
Creasesin‘SetByFold’mode
Creasesin‘SetByPosition’mode
FoldSettingsPages
Foldsin‘SetByFold’mode
Foldsin‘SetByPosition-’mode
Exampleof‘SetByPosition’mode
DeliverySettingsPage
StatusScreen
RunningtheJob
Settingthemachinetooperateinmanualsheetfeedmode
StorePages
ToolsMenu
TouchscreenCalibration
DeflectTrimAdjustment
THEBLADEASSEMBLY
Adjustingthebladepressure
14
15
17
20
21
23
24
26
27
29
30
31
32
35
36
37
38
Page2
FOLDING
Page 4

INDEX
REPLACINGCREASINGBLADESETS
Installingnewbladesets
SpareBlades
PERFORATING
Equipment,Spares
Settingthemachine
RecommendedPositionoftheDriveWheelsandHubs
REMOVINGPAPERJAMS46
TROUBLESHOOTING
Papercreaseoutofsquare
CreasePositionInaccuracy 47
Paperfoldoutofsquare
PaperJamming
Machinewillnotstart
Papernotfeeding
Crackingoftheprintedmaterialalongthecrease
UsingtheCorrectBladeSet
PAGE39
42
43
44
45
47
47
47
48
48
48
49
ERRORSCREENS
0150
SheetdidNotArrive
0250
PaperCrunch
0350
DoubleSheetFeed
0450
BladeNotHome
0551
BladeBusy
0651
BladeHomeFailure1
0751
BladeHomeFailure2
0852
FlyingHomeFailure
0952
Clip1NOTClear
1052
Clip1NOTBlocked
1152
Clip2NOTClear
1253
Clip2NOTBlocked
1353
Overlap
DISPATCHKIT60
ACCESSORIESANDOPTIONS61
RECOMMENDEDSPARES62-63
MACHINECALIBRATIONHISTORYSHEET64
FUSEPOSITIONS&RATINGS65
PRODUCTRECYCLINGANDDISPOSAL66
Page3SYSTEM
Page 5

INTRODUCTION
INTRODUCTIONANDSPECIFICATION
Itistonotethattopreventcracking,whenusingdryinkortonerbasedprint
IMPORTANT
engines,thematerialbefullyacclimatisedforatleast48hoursbeforeputtingan
imageontothepaper.
IMPORTANT
16°Cand27°CMaximum.
FeedingSystem................................................Bottomsuctionfeed
Max.SheetSize................................................700mmx385mm(27.5”x15”)[900mmx
Min.SheetSize.................................................210mmx140mm(8.3”x5.5”)(dependant
Max.PaperThickness...................................0.40mm(variesaccordingtohardness,
Min.PaperThickness.......................................0.11mm
Max.No.CreasesperSheet..............................9
Max.No.FoldsperSheet..................................2
Max.No.StoredProgrammes...........................Unlimited
Min.RepeatCreaseDistance.............................40mm(1.6”)
Min.RepeatFoldDistance................................70
Min.CreaseDistancefromLeadingEdge..........50mm(1.96”)
Min.FoldDistancefromLeadingEdge.............50mm(1.96”)(dependingonpaperweight)
Min.CreaseDistancefromTailEdge.................50mm(1.96”)
Min.FoldDistancefromTailEdge....................50mm(1.96”)(dependingonpaperweight)
Min.FoldLength...............................................70mm(2.75”)
SpeedperHour(A4inhalf)...............................6000sheets
Note:
Dimensions.......................................................L:2020mmH:1265mmW:680mm
Weight...............................................................190Kgs(+50Kgspacking)
PowerRequirement..........................................1phase230v50Hz
SoundPowerLevel.....................80.0decibels
*Aspartofourcontinuedproductimprovementplan,specificationsandinformation
publishedinthismanualaresubjecttochangewithoutnotice.
Allspecificationsaredependantonapplication,typeofstock,temperature,relative
humidity,RHandprintengineused.
Specificationsquotedweremeasuredonuncoatedandunprintedstock.E&OE.
theoperatingenvironmentshouldbecontrolledtoatemperaturebetween
Theproductionspeedvariesaccordingtothematerialsizeand
thefoldtype.
must
Specification
385mm(35.4”x15”)withOptional
extensiontable].
onstiffnessofpaperandtypeoffold).
typeoffold,andsubstrate).
(variesaccordingtohardness,
typeoffold,andsubstrate).
mm(2.75”)(dependingonpaperweight)
L:(79.5”)H:(49.8”)W:(26.8”)
1phase220v60Hz
Page4
Page 6

SafetyDo’s&Don’ts
SafetyDo’s&Don’ts
REGLESDESECURITE:«AFAIRE»ET«ANEPASFAIRE»
Do-readthisoperatormanualfullybeforeoperatingthemachine.
Lirecemoded'emploiavantd'utiliserlamachine.
Do-operatewiththedesignatedACcurrentonly.Useanexclusiveoutlet,as
overloadingmaycausefireoranelectricshock.
Respecterl'alimentationélectriqueindiquée.Branchersurunepriseséparée
carunesurchargepeutentraînerunincendieouunchocélectrique.
Do-installthepowercordoutofthewaytoavoidatrippinghazard.
Installerlecordond'alimentationdemanièreànepaspouvoir
trébucherpardessus.
Do-makesurethatthemainsinletconnectorisalwayseasilyaccessible.
Ménagerunaccèslibreàlaprisedecourant.
Donot-installthemachineinanunstableplacesuchthatittiltsorshakes.
Nepasinstallerlamachinesurunesurfacenonplane,afind'éviter
qu'ellenepencheounevibre.
Donot-unplugtheplugorunplugthepowercordfromtheoutletwithawethand,
thiscancauseanelectricshock.
Nepasinstallerlamachinesurunesurfacenonplane,afind'éviter
qu'ellenepencheounevibre.
Donot-unscrewandremoveanycoversfromthemachine,asitcancausean
electricshockorinjury.
Nedémonteretenleveraucuncarterdelamachine,parcraintededécharge
électriqueoudeblessure.
Donot-placereceptaclescontainingliquidsonanysurface.
Nepasplacerderécipientcontenantunliquidesurlamachine.
Donot-adjustanypartofthemachinewhilstrollersarerunning
N'effectueraucunréglagependantquelesrouleauxfonctionnent.
Donot-operatethemachinewithlooseortrailingclothingorloosehair.
Nepasporterdevêtementsflottantsetrassemblerlescheveuxlongs
lorsdel'utilisationdelamachine.
Donot-underanycircumstancesadjustthepapergatewhenthemachineis
switchedon.
Enaucunecirconstance,réglerleséparateurdepapierlorsquela
machineestbranchée.
Page5SYSTEM
Page 7
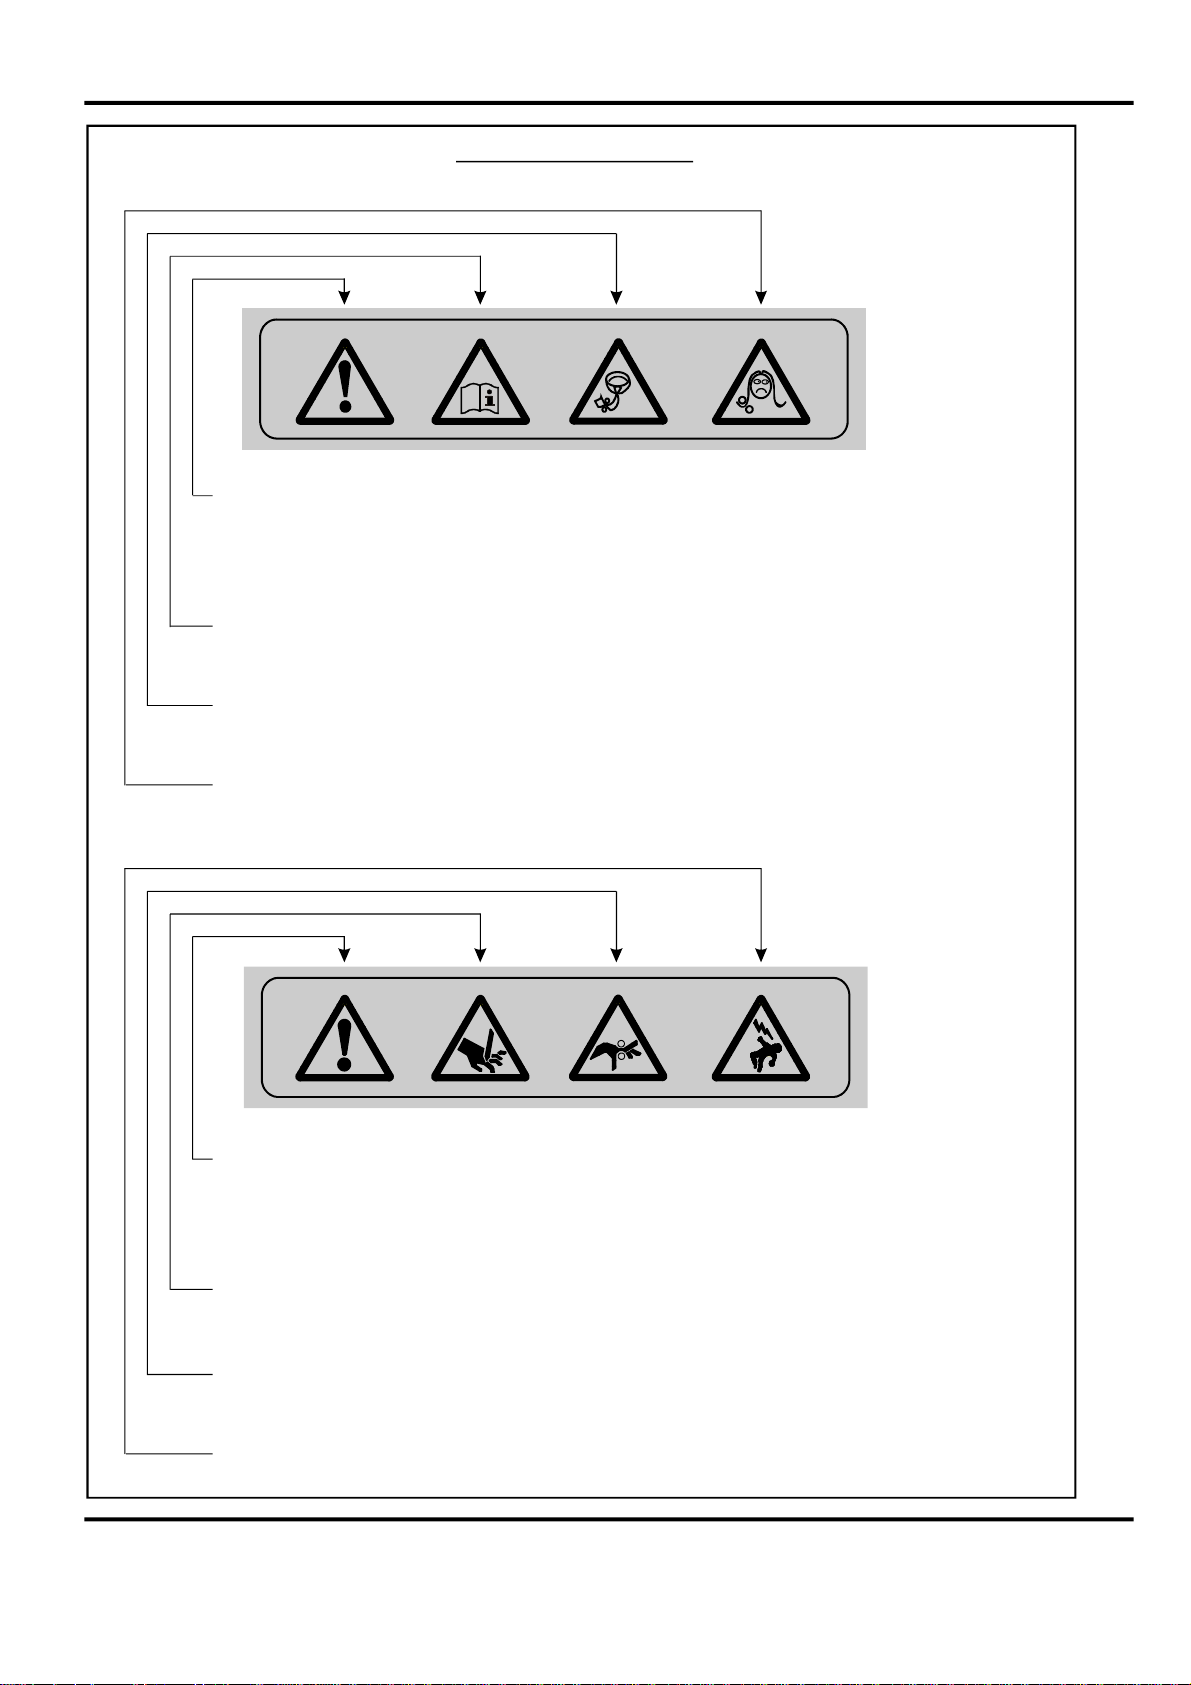
WarningLabels
Do-beawareofanyfingertrapsandrotatingpartswhenoperating
themachine.
Attentionaurisquedesecoincerlesdoigts,etauxpiècesen
mouvementlorsdufonctionnementdelamachine.
Do-readthisoperatormanualfullybeforeoperatingthemachine.
Lirecemoded’emploiavantd’utiliserlamachine.
Donot-operatethemachinewithlooseortrailingclothing.
Nepasporterdevêtementsflottantslorsdel'utilisationdelamachine
Donot-operatethemachinewithloosehair.
Rassemblerlescheveuxlongslorsdel'utilisationdelamachine.
Do-beawareofanyfingertrapsandrotatingpartswhenoperating
themachine.
Attentionaurisquedesecoincerlesdoigts,etauxpiècesen
mouvementlorsdufonctionnementdelamachine.
Do-beawareofsharppointsandblades.
Attentionauxélémentstranchantsetauxcouteaux.
Page6
Do-beawareofrotatingrollers.
Attentionauxrouleauxenfonctionnement
Do-beawareoflowcurrentanti-staticshock.
Attentionauxfaibleschocsd'électricitéstatique
FOLDING
Page 8
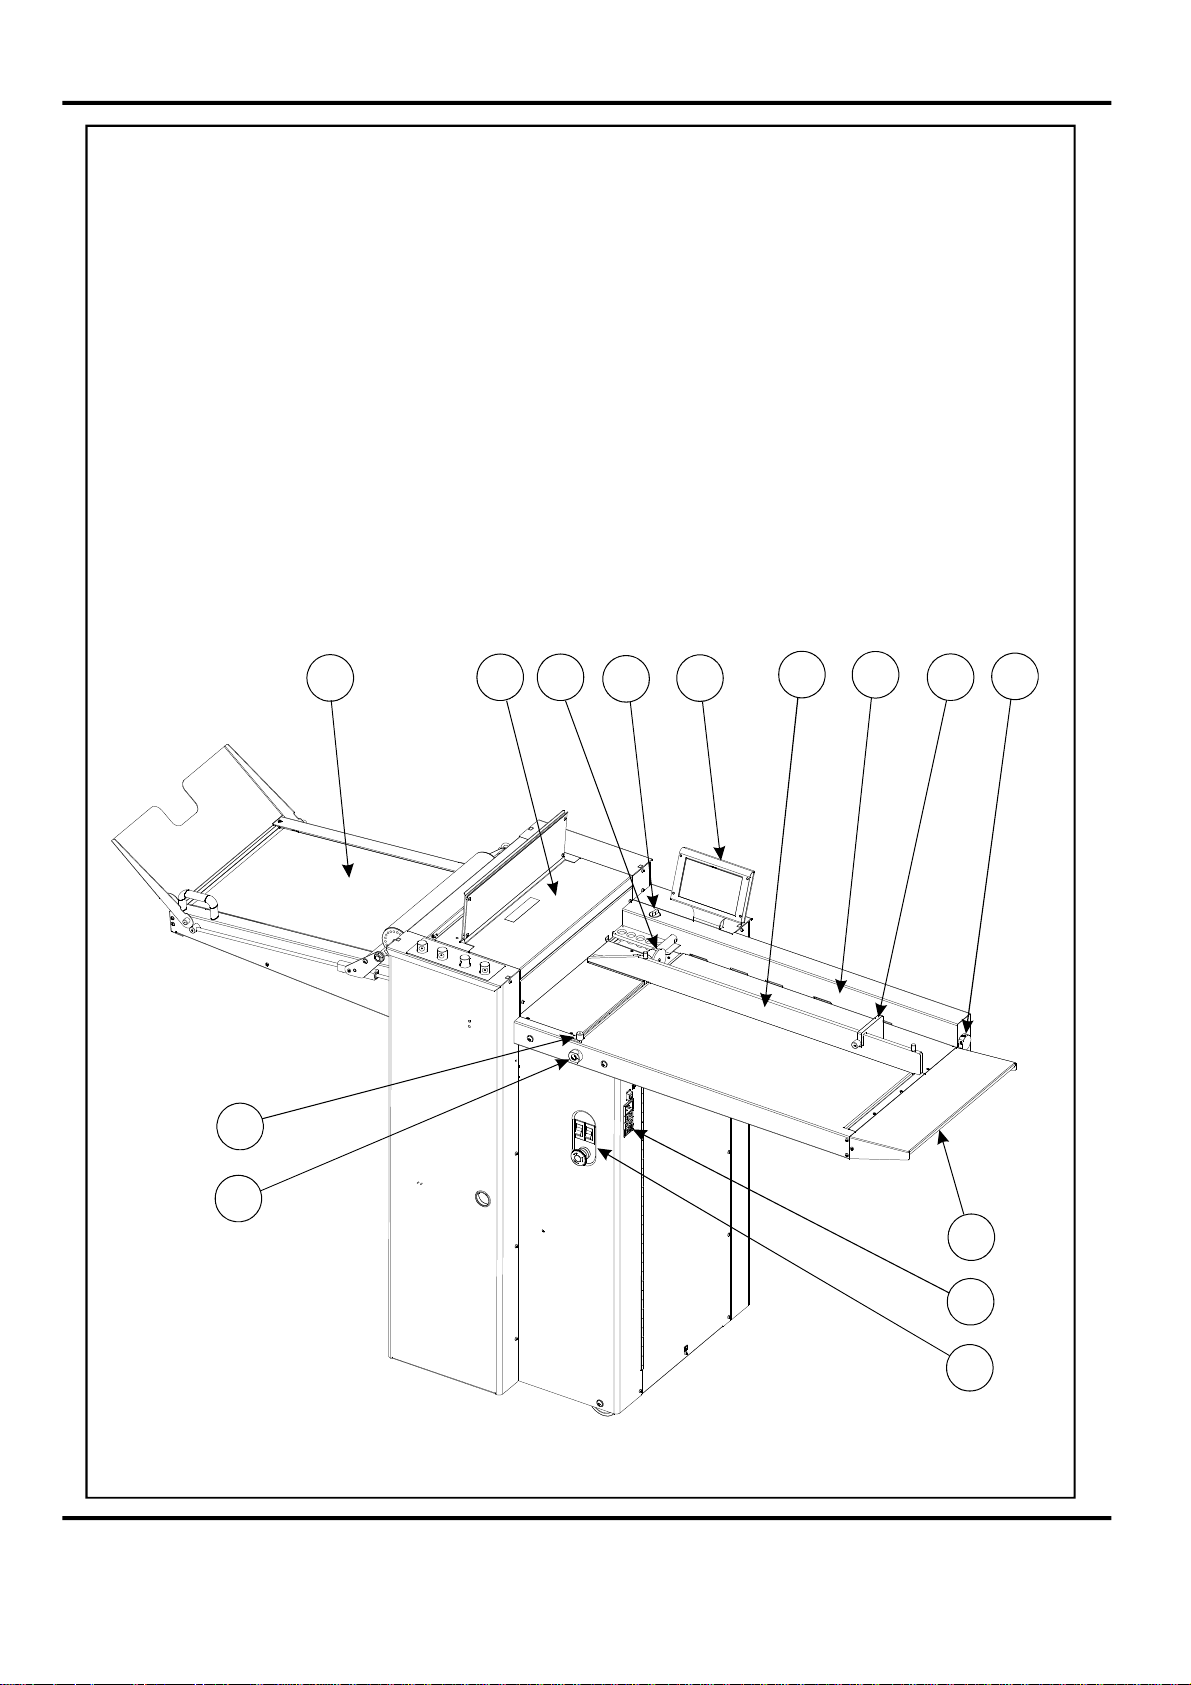
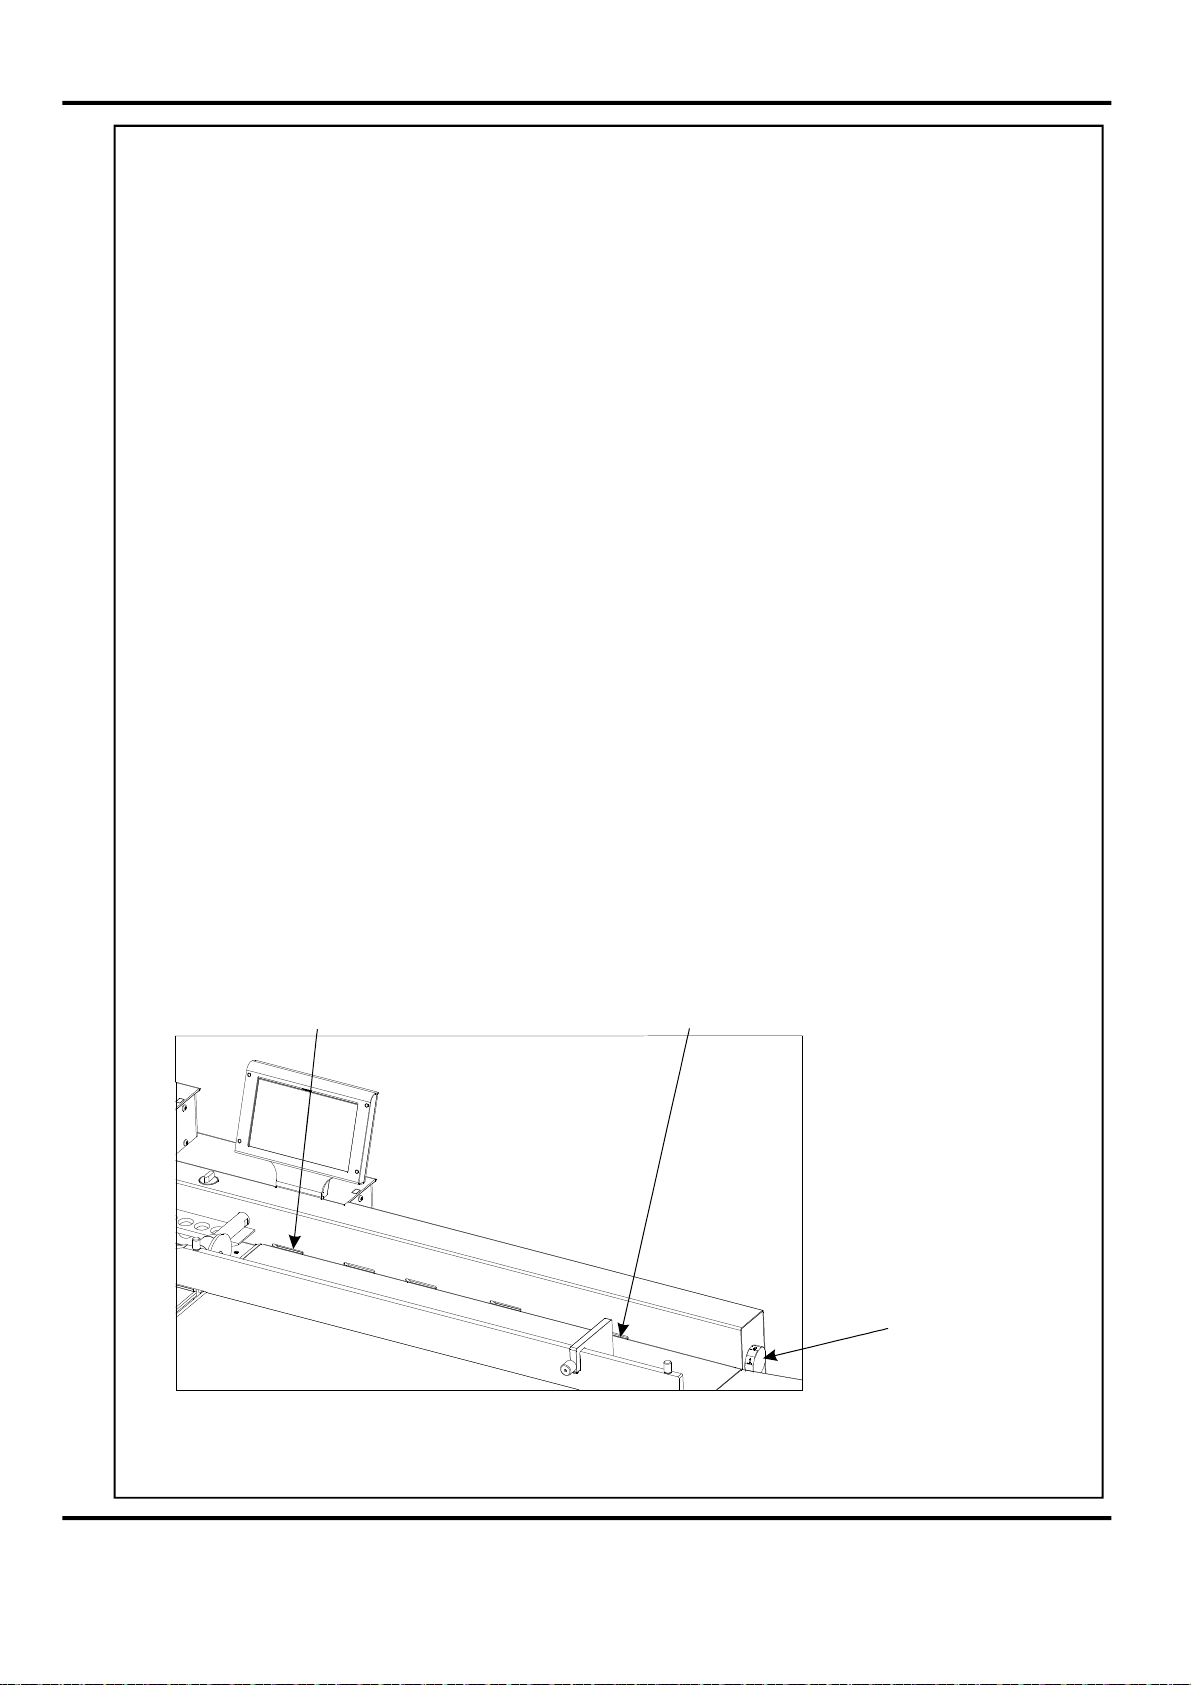
Atlas C300 Creaser Folder
Keytophotographbelow
1Deliveryassembly6AirSeparationKnob11PaperGate
2Vacuumbleedknob7Adjustablesidelay12Topcover
3Suctionslotknob8Backstop13Touchscreen
4Switchpanel9Fixedsidelay14OptionalExtensionTable
5Airdistributionknob10Fuses
1
3
2
12611
13
7
9
8
5
14
10
4
Page7SYSTEM
Page 9
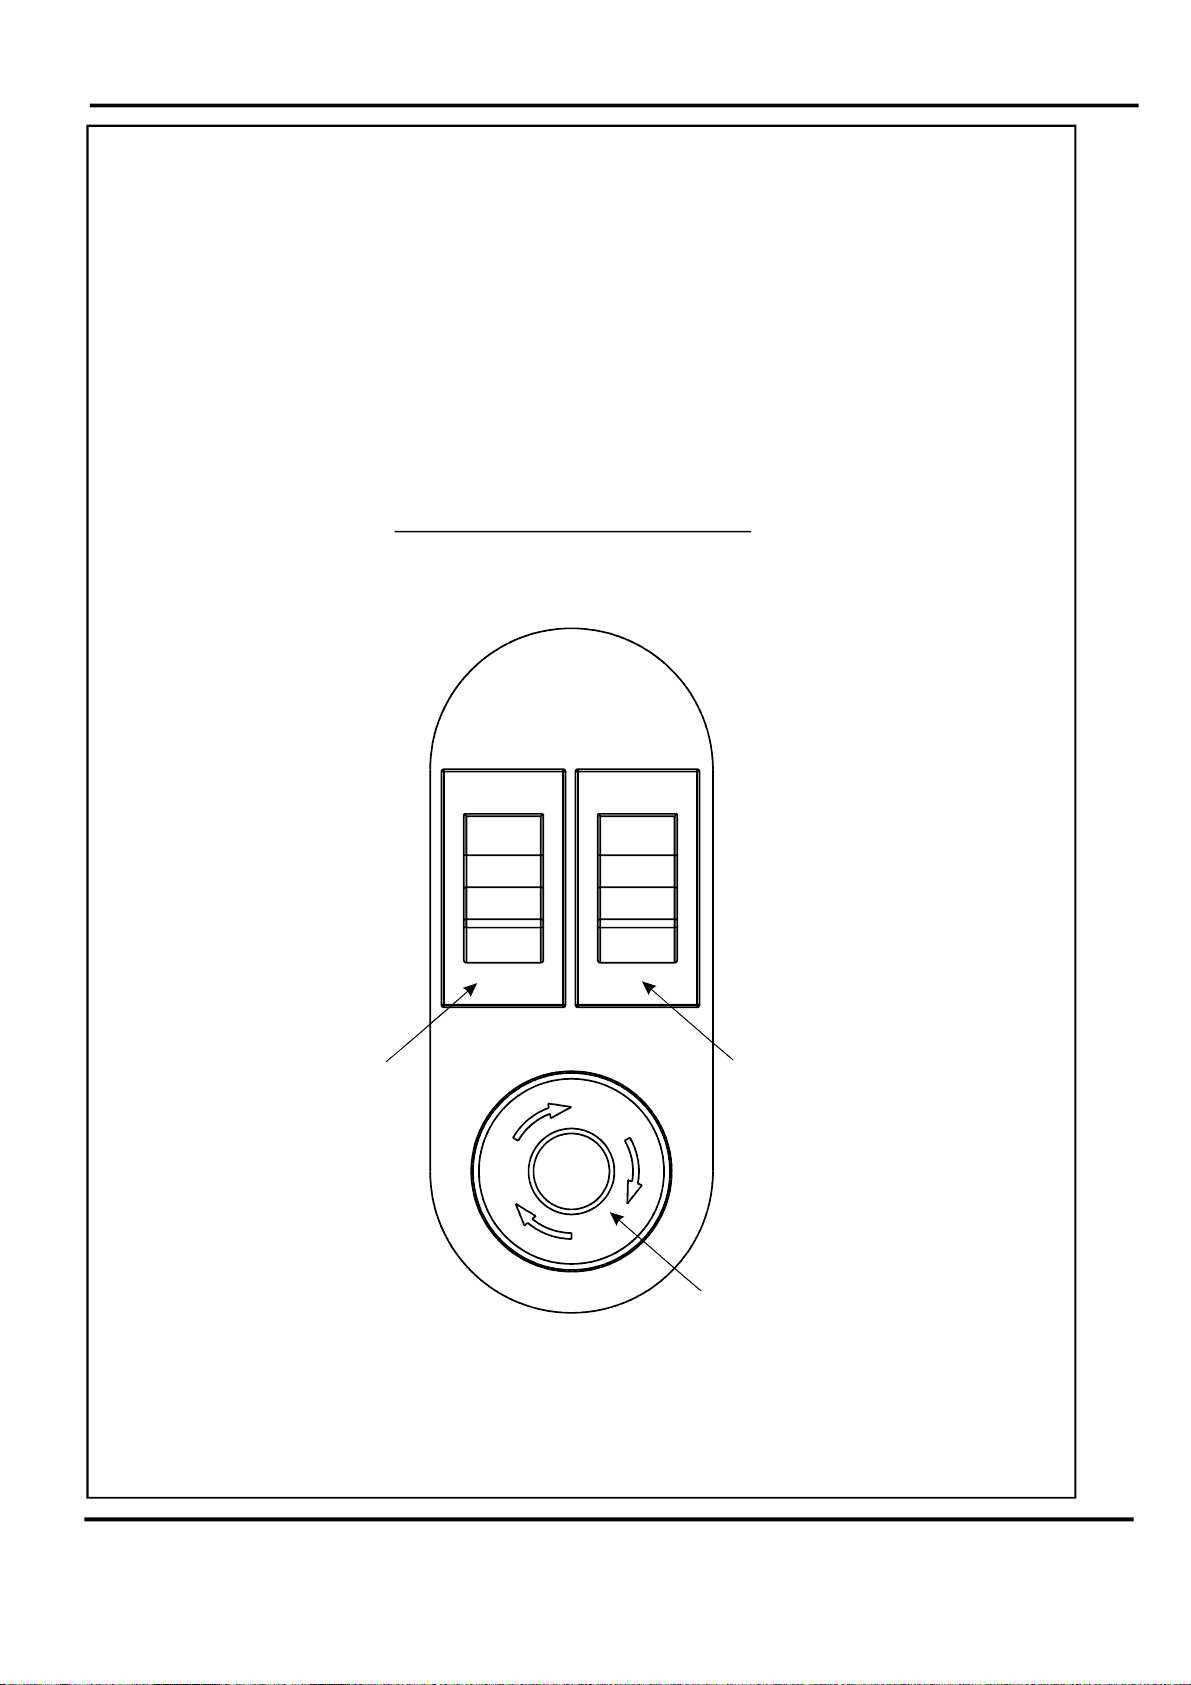
TheSwitchPanel
TheSwitchPanelhousestheCompressorswitch,Systemswitch,andan
industrystandardEmergencyStopswitchwhichwillstopallpowergoingto
themachinewhenactivated.
THESWITCHPANEL
CompressorSwitch
Page8
SystemSwitch
EmergencyStopSwitch
FOLDING
Page 10

TheSwitchPanel
Systemswitch
Whenactivatedthesystemswitchwilloperatethemotorsinordertobeginthe
creasingsequence.
Compressorswitch
Allowstheoperatortoswitchoffthecompressorunitinordertoutilisethemachine
tomanuallyfeedsheets.
FeaturesontheSwitchPanel
Page9SYSTEM
Page 11
Operatingthe Atlas C300
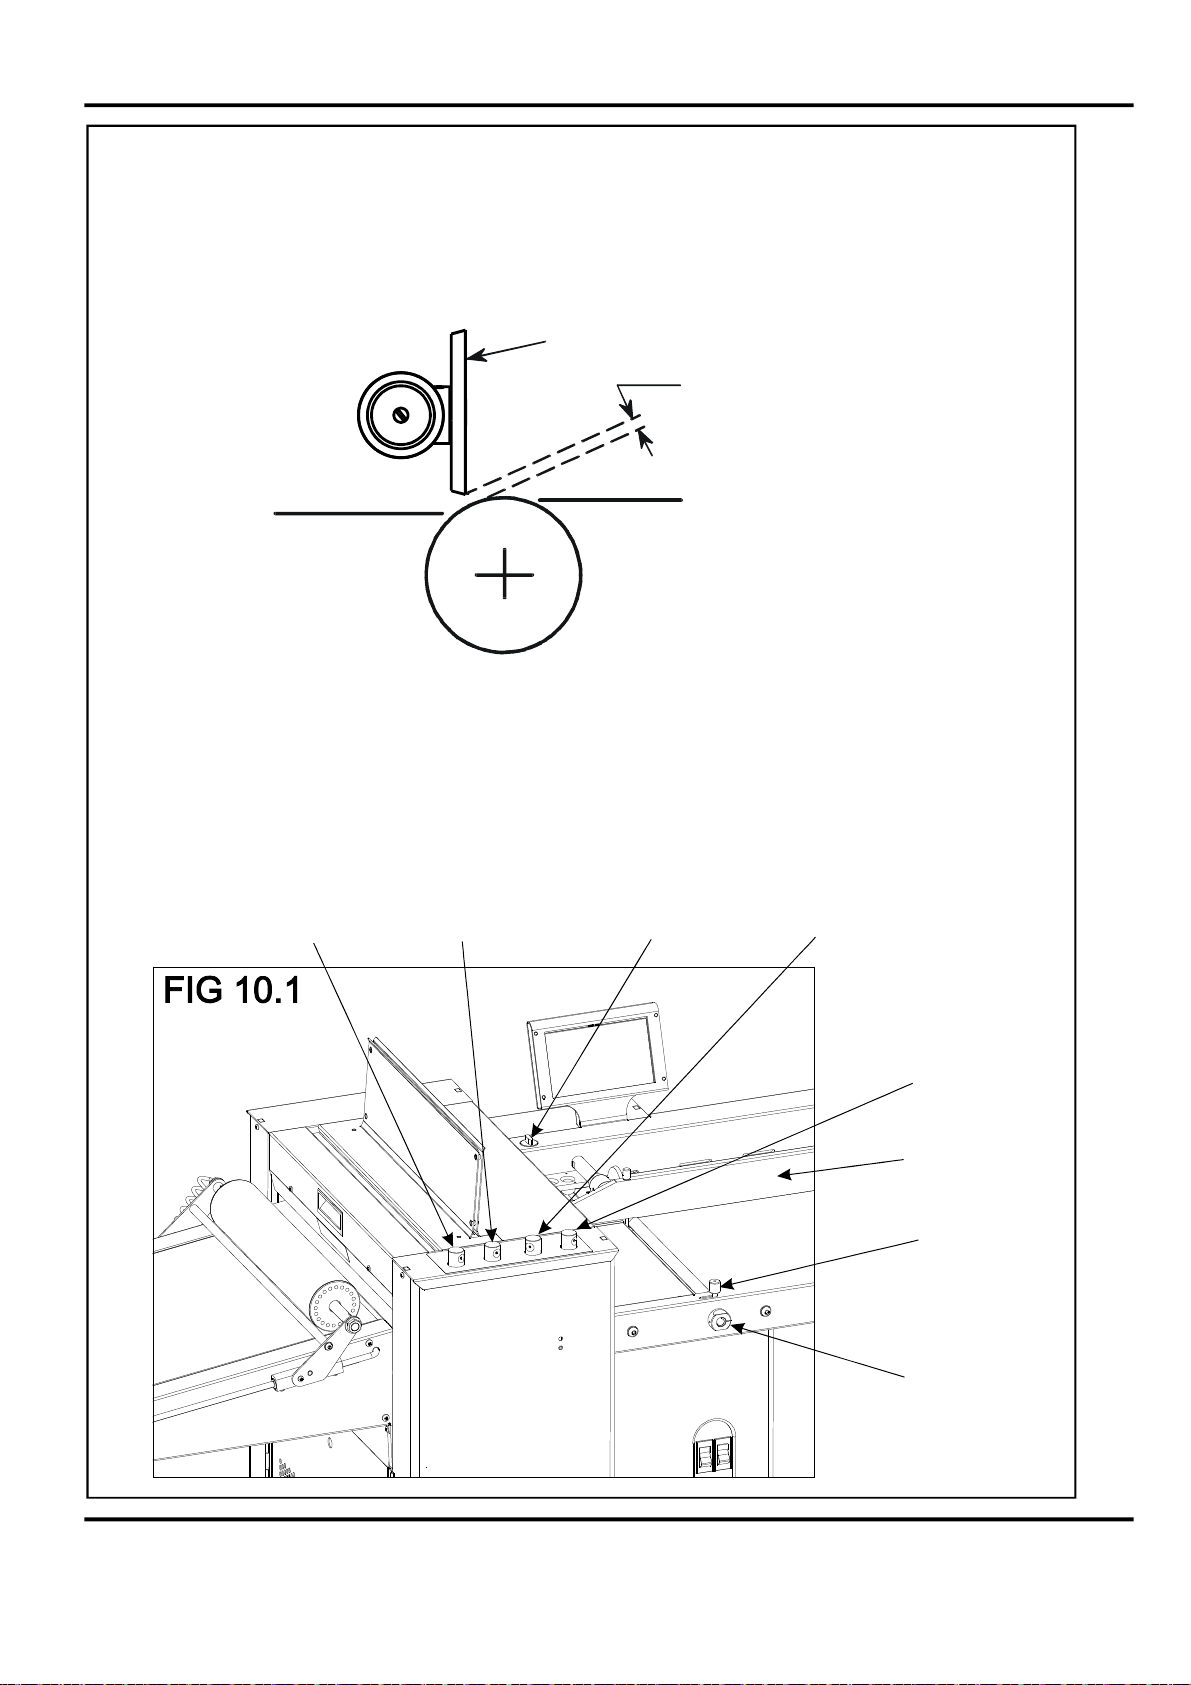
AdjustingthePaperGate
SettheheightofthePaperGatetoapproximatelytwothicknessesofpaper,byturningthe
discj.Anexcessivegapisamostlikelycauseofdoublesheetfeeding.
Thissettingisonlyintendedasaguide,forinstance,sheetswithanupwardcurlwill
requirethissettingtobeincreased.
J
TWOTHICKNESSES
OFPAPER
WARNING.
DONOTADJUSTTHE
PAPERGATEWHILETHE
MACHINEISRUNNINGOR
THESUCTIONDRUMMAY
BECOMEDAMAGED.
SettingtheSuctionSlot
Thesuctionslotislocatedinsidethevacuumrollerandcanbeadjustedbyreleasingand
movingthesuctionknobhorizontallyineitherdirectiontotherequiredposition.
Forlightstockssettheknobtotheleftandforheavierstockssettheknobtotheright.
RollerGap3
Knob
RollerGap2
Knob
AirSeperation
Knob
RollerGap1
Knob
BladeTilt
Knob
Adjustable
SideLay
Suction
SlotKnob
Page10
Vacuum
BleedKnob
FOLDING
Page 12
OperatingtheAtlas C300
SettingtheVacuumBleed
Situatedonthefrontofthefeedtable,theVacuumBleedKnobisusedtoallowmore
controlofthesuctiononthevacuumdrum.
Whenlightweightpaperisbeingfedthroughthemachineturntheknobclockwiseto
reducethepossibilityofmarking,ordamagetotheleadingedgeofthepaper.
SettingtheAdjustableSideLay
Placethepaperstackontotheloadingtableandslideuptothefixedsidelayandpaper
Gate.Releasetheclampslocatedateachendofthesidelayandslideuptowardsthe
paperstackasdemonstratedinfig10.1.Allowagapofapproximately0.5mm(1/64inch)
betweenthepaperandthesidelay.
SettingtheBackStop
Positionthebackstopandslideuptowardsthepaperstackallowingagap(asspecified
intheabovestep).
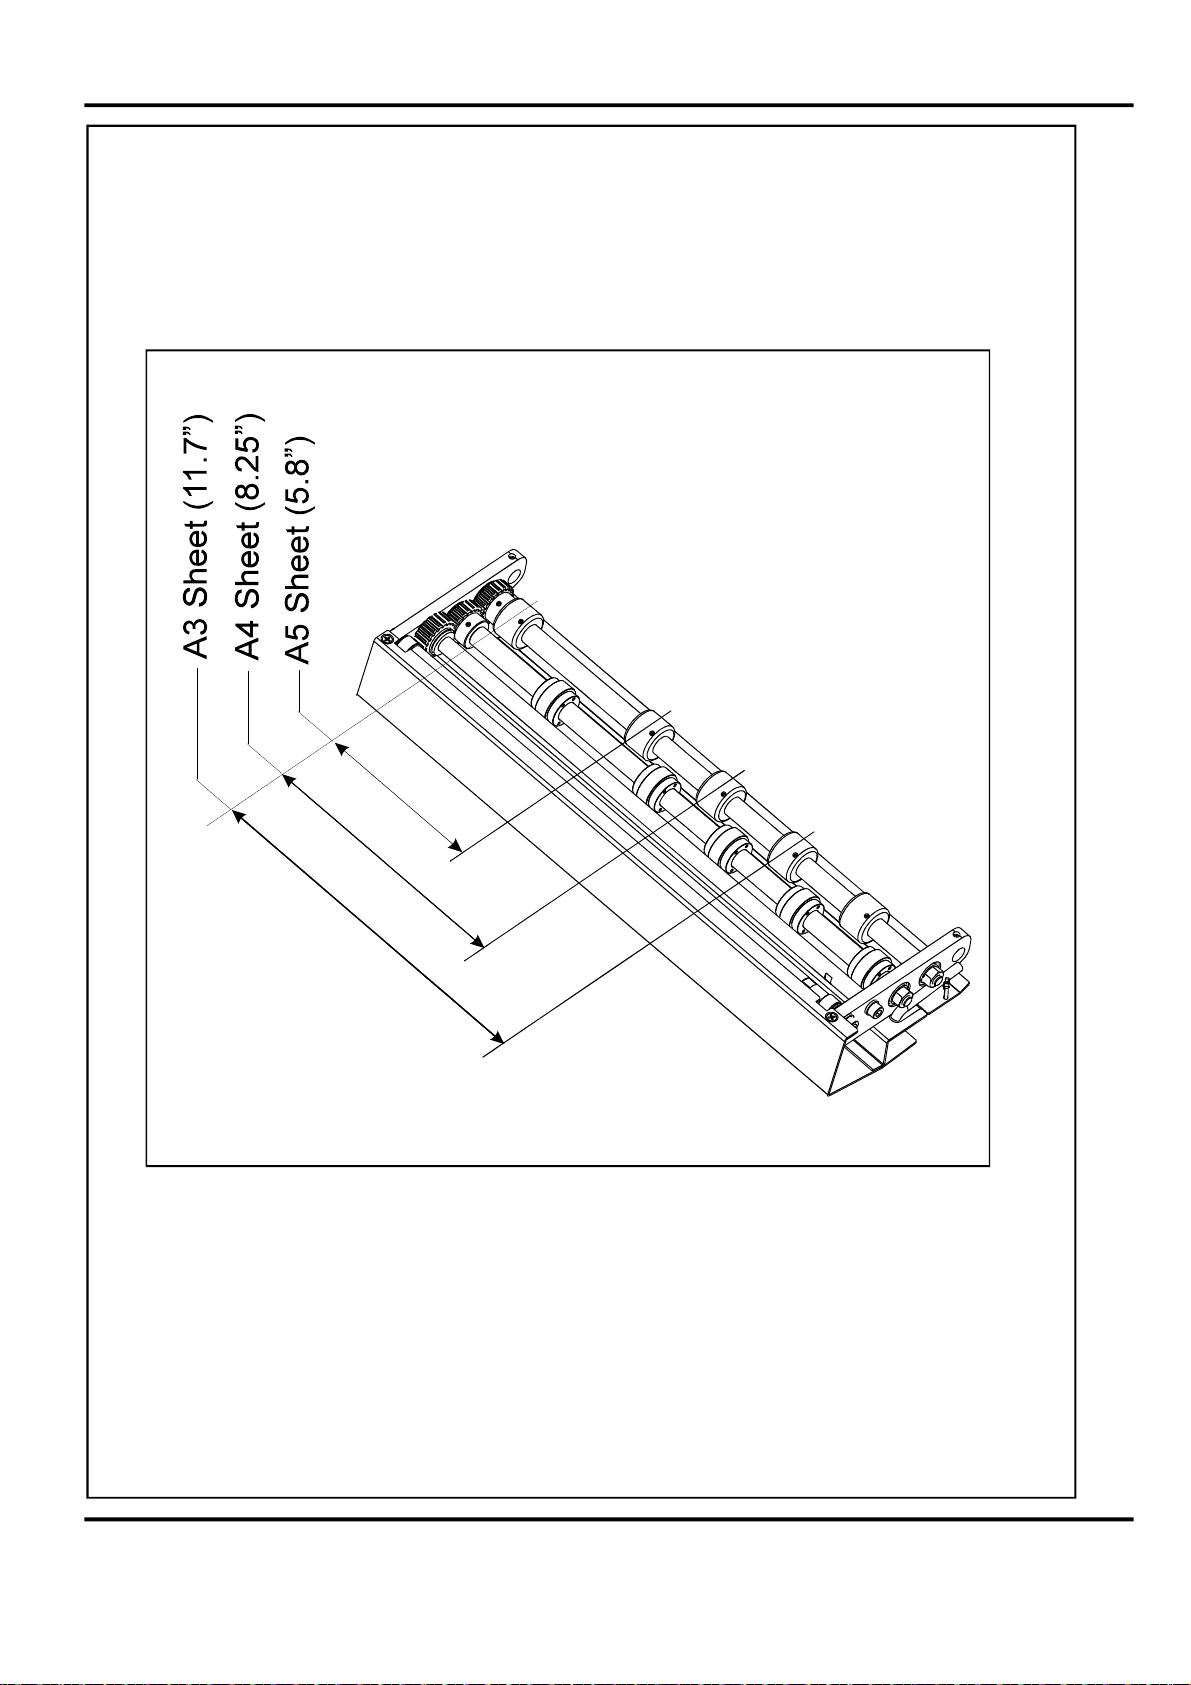
SettingtheAirDistribution
Dependingonthelengthofthesheettobecreased,theairdistributionknobcanbe
rotatedtovariouspositionsinordertosupplyairtodifferentports.Position2is
recommendedformostsheetsizes.However,abetterresultmaybeobtainedbyusing
thesettingsbeloworbyexperimentation.
Position1-
2345-
0-
ForsheetslongerthanA3(17”)inordertosupplyairtothecentreofthe
stack,ports2,3and4open.
ForA5sheetsor8incheslong,ports1and2open.
ForA4sheetsor11incheslong,ports1and3open.
ForA3sheetsor17incheslong,ports1and4open.
ForsheetslongerthanA3(17”)inordertosupplyairtotheendsofthestack,
ports1and5open.
ForsheetslongerthanA3(17”)inordertosupplyairevenlyalongthestack,
ports1,3and5open.
Port1 Port5
AirDistribution
KnobShown
SetToPosn.1
SettingtheAirSeparationPressure
Tocontroltheamountofairsuppliedtotheports,theairseparationknobcanberotated
clockwisetodecreasethepressureoranti-clockwisetoincreasethepressure.
Page11SYSTEM
Page 13
OperatingtheAtlas C300
Settingthepositionsofdrivewheelsandhubs
Itisimportantthatthedrivewheelsanddrivehubs,ontherollershafts,arearrangedacross
thewidthofthemediabeingcreased;thisisdonetoensurethatthemediaisaccurately
drivenandsupportedthroughtherollers.Asuggestedlayout,,isshown
below(seeFIG15.1).Thesuggestedlayout,isdifferent,andisshownon
page45(seeFIG38.1).
Thedrivewheelsandhubsarefixedtotherollersbygrubscrews.
whenperfing,
whenFolding
FIG15.1
Page12
WHEEL&HUBARRANGEMENT,(WHENFOLDING)
FOLDING
Page 14

Page 15
OperatingtheAtlas C300
TOUCHSCREENOPERATION
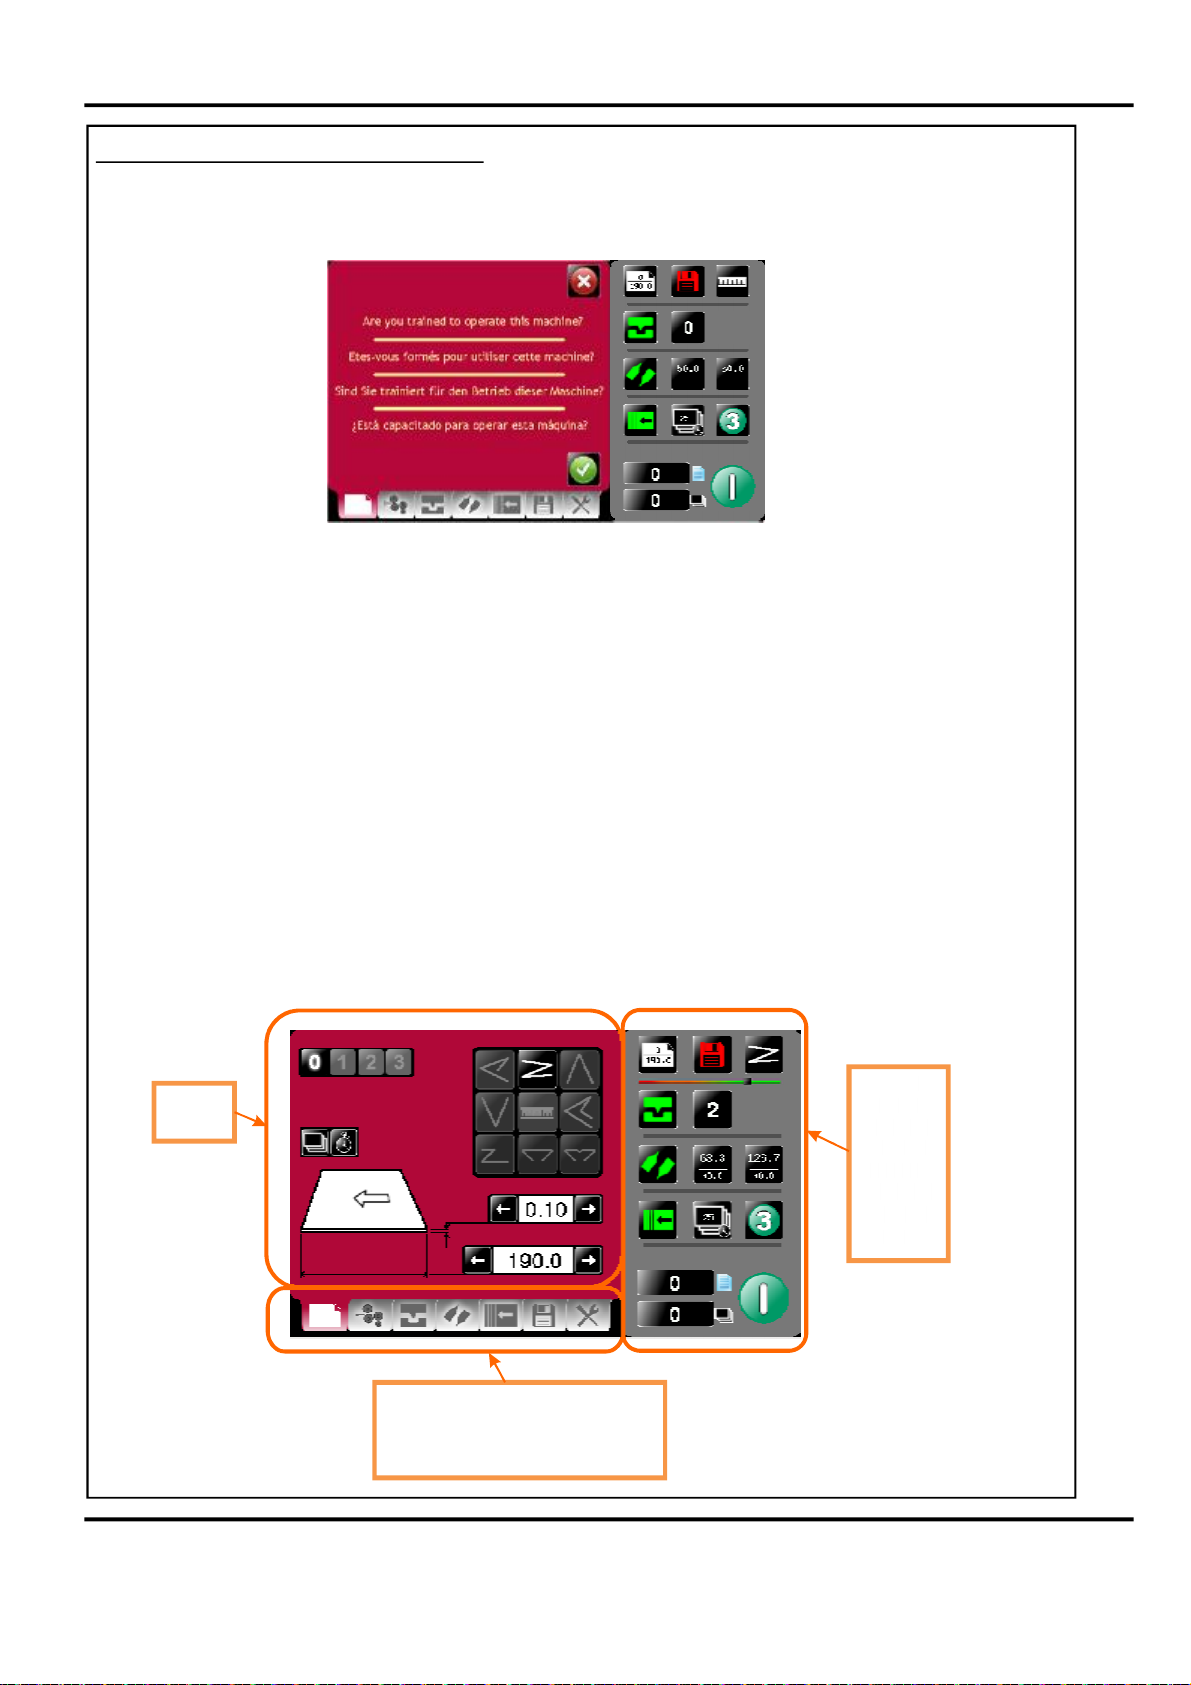
1.TurntheEmergencyStopbuttonclockwisetoswitchthepoweron.Afterthe
systemstartupprocedurethetouchscreenwillbedisplayedasshownbelow.
IMPORTANT.
Ifyouhavenotbeentrainedtooperatethismachine,westronglyadvisethatyouselect
theredcrossicon.
Werecommendthatyoueitherseektrainingoraskatrainedoperatortorunthemachine
foryou.
Selectthegreentickicononlyifyouhavebeentrainedtooperatethismachine.
Ifyouhavenotbeentrainedtooperatethismachineandyouselectthegreentickicon,
MorganaSystemsLtdacceptnoresponsibilityforpersonalinjury,damagetothe
machineordamagetomaterialsbeingprocessedbythemachine.
WARNING:-
Waitatleast10seconds,aftermakinganyselectionontheTouchscreen
panel,beforeswitchingthemachineOFF.Failuretodosocouldresultinthe
datastoragebeingcorrupted,andthemachinenotoperating.
Thetouchscreenislaidoutinto3mainareasasshownbelow:
Setting
page
Tabstoenableswitchingbetweensetting
chooseeitherPaper
pages
settings,CreaseSetting,Foldsettings,
Deliverysettings,StoreandTools.
Settings,Gap
Statusof
machine
dataentry
area.Also
usedfor
quicklinks
tosetting
pages.
&
Page14
FOLDING
Page 16
OperatingtheAtlas C300
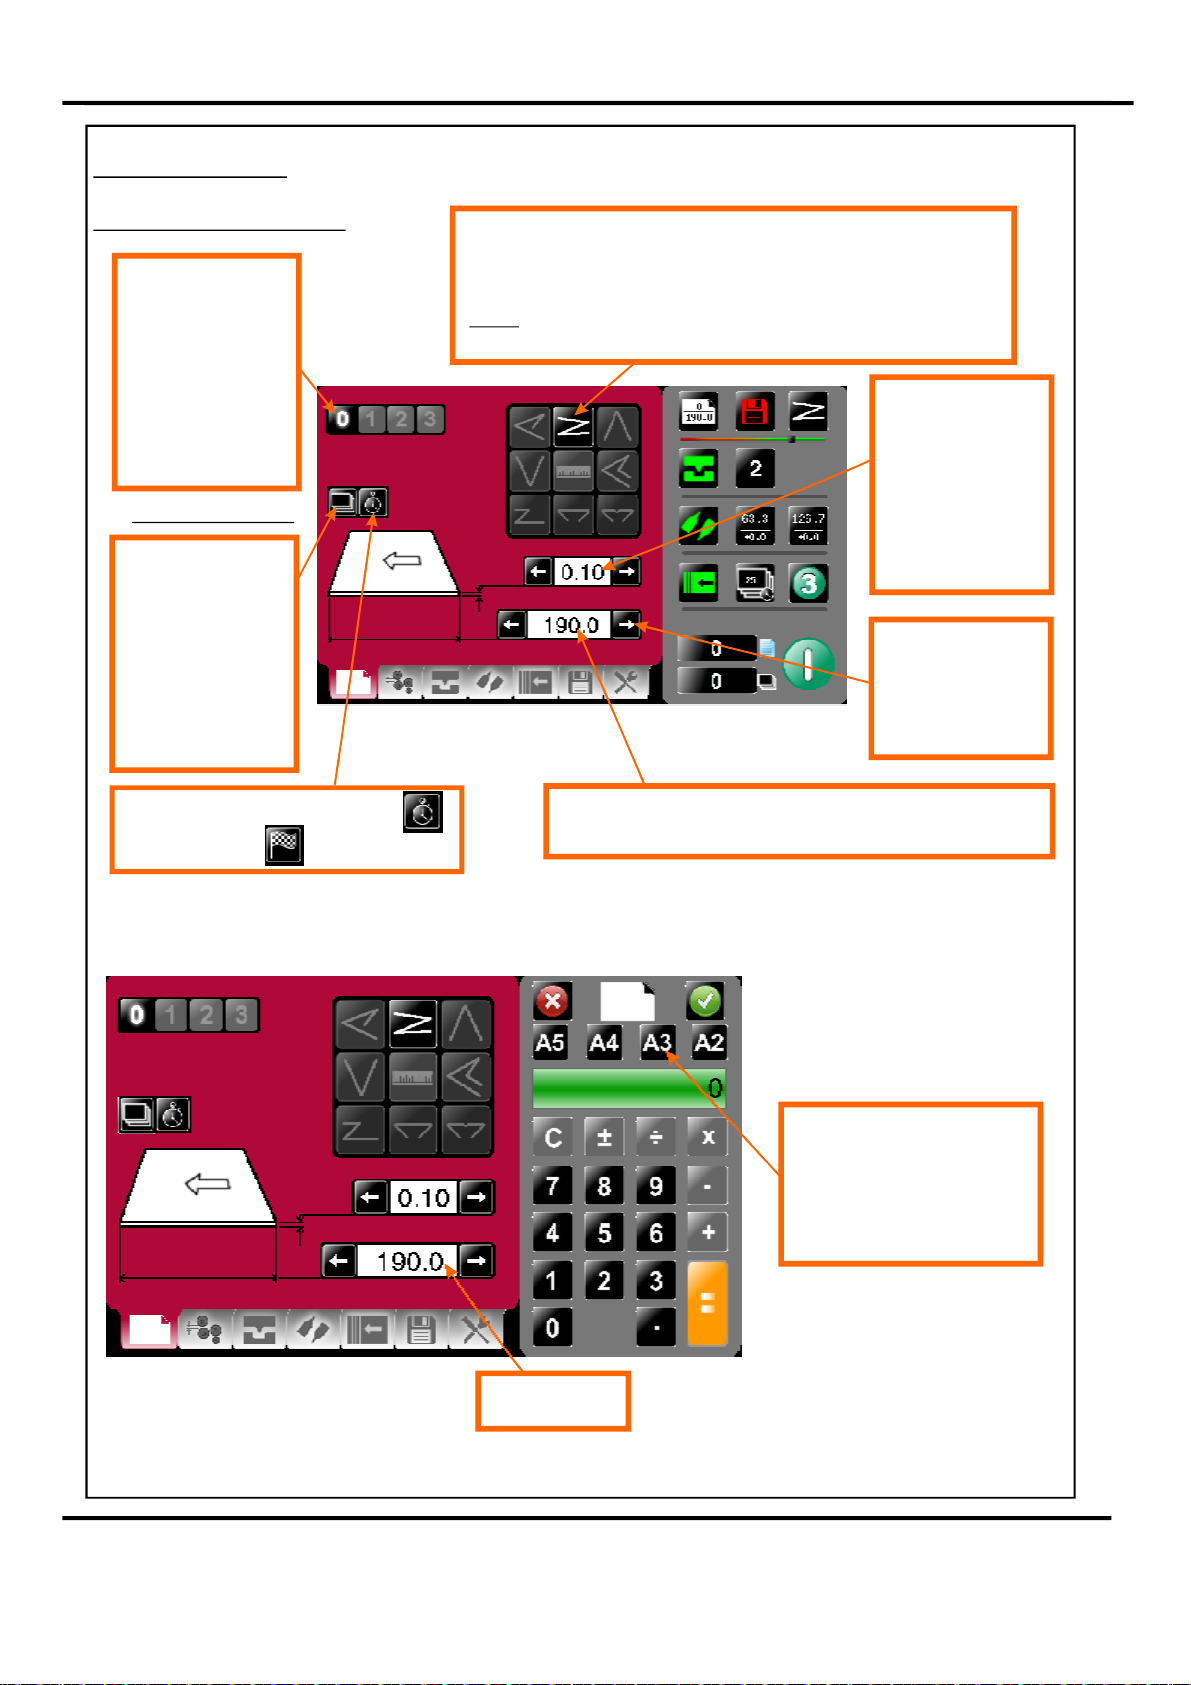
SettingPages.
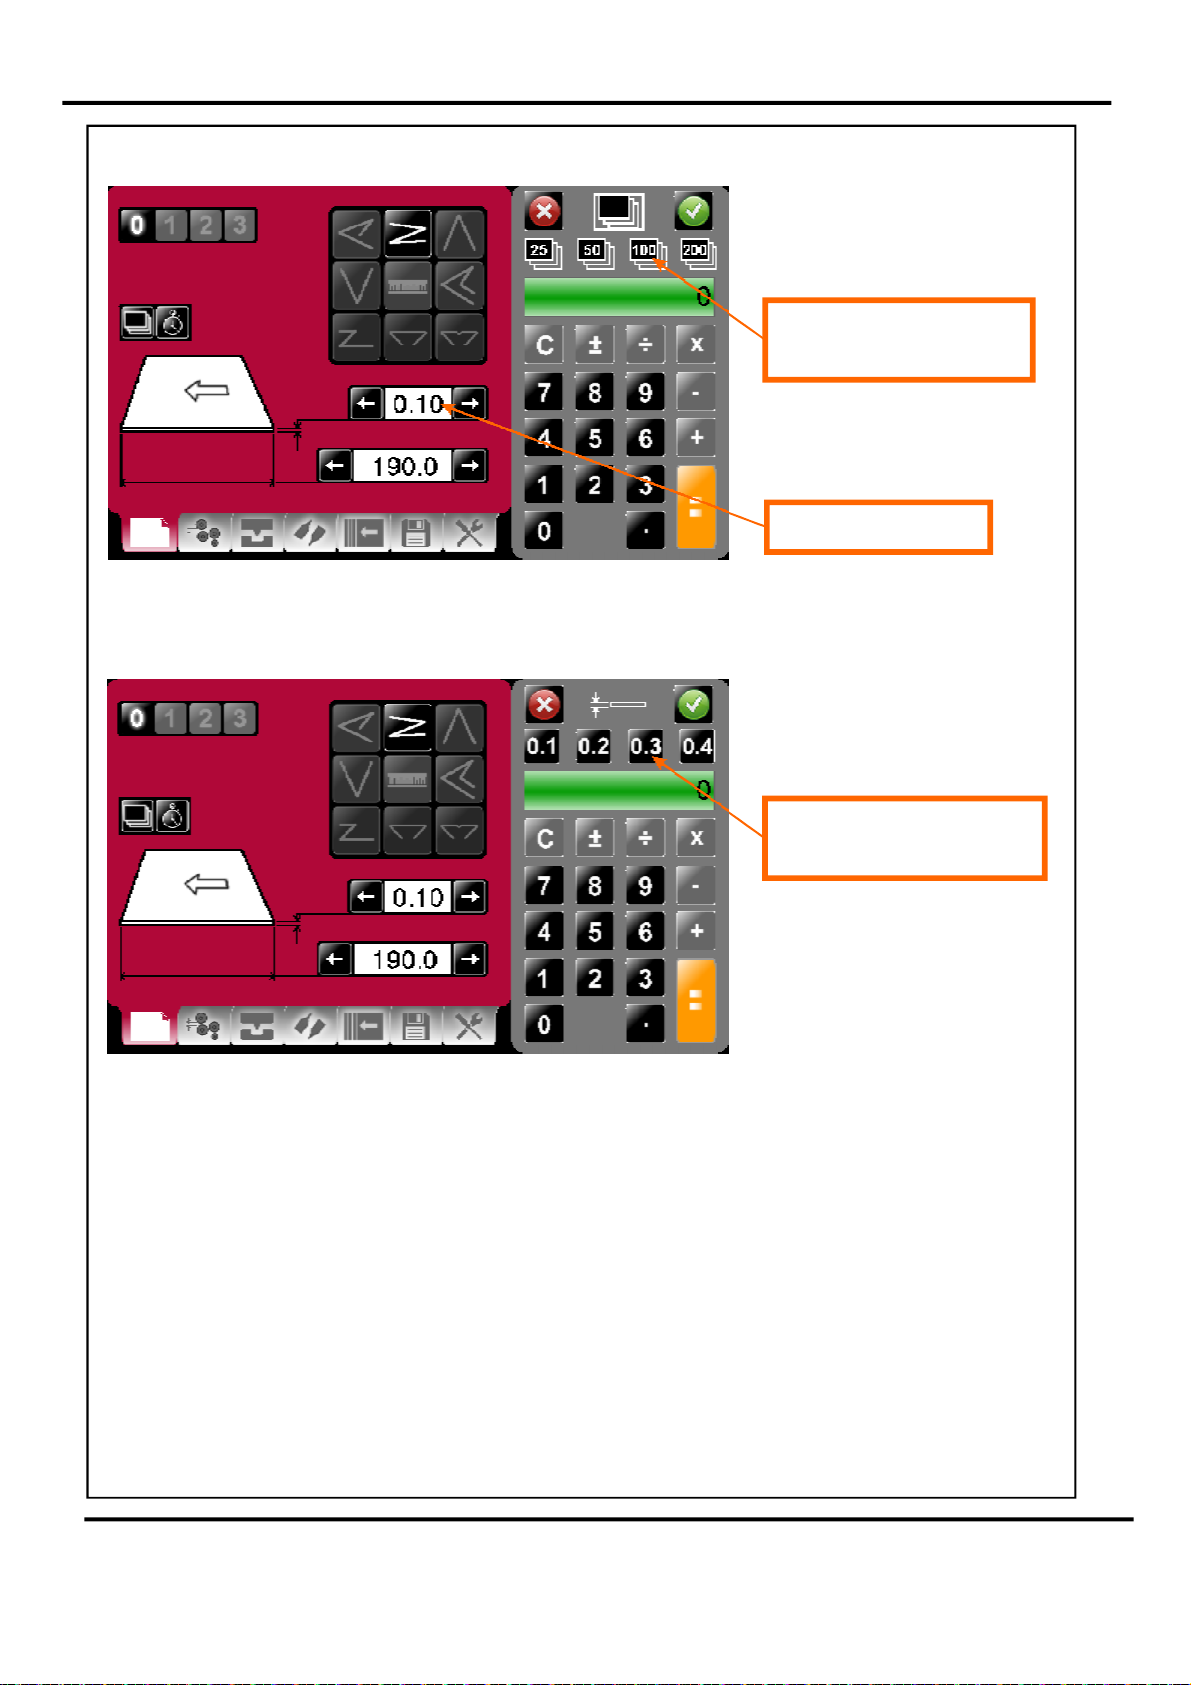
PapersettingsPage
PaperType-Asa
guidechooseas
follows:
0-approx0.1thk
1-approx0.2thk
2-approx0.3thk
3-approx0.3+thk
SeePage25
BatchButton-Image
isidenticaltothat
showninthestatus
area.Onselectionthe
statusareaisreplaced
withacalculatorfor
inputtingnewvalues.
Batchsizesof1to
998maybeset.
FoldSelection-Forquicksettingoffoldpositionsonstandardsizesheets.
Highlightedfoldistypecurrentlyselected,otherfoldsmaybeselected.
Currentlyselectedfoldisshowninthestatusarea.
NOTE:SelecttheRulerIcontosetFoldpositionsmanually(’SetbyPosition’mode).
PageThickness-On
selectionofstatus
areaisreplacedwith
acalculatorfor
inputtingnewvalues
Range=0.1to0.4mm
Incrementsof0.01mm
Arrowsmaybe
selectedtoincrease
ordecreasethepage
sizein0.1mm
increments
Togglebetween,Delaybetweenbatches
andstopafterbatch
PapersizeSelection.
PaperLength-Onselectionthestatusareaisreplacedwitha
calculatorforinputtingnewvalues.Lengthrange=190mm-900mm
Pre-setPapersizesfor
quickinsertion-Standard
sizesforcountryorigin
wouldbeshown.
Paperinput
Page15SYSTEM
Page 17
OperatingtheAtlas C300
BatchsizeSelection.
Pre-setBatchsizesforquick
insertion.
PaperThicknessinput
PaperThicknessSelection.
Pre-setPaperThicknesssizes
forquickinsertion.
Page16
FOLDING
Page 18
OperatingtheAtlas 300
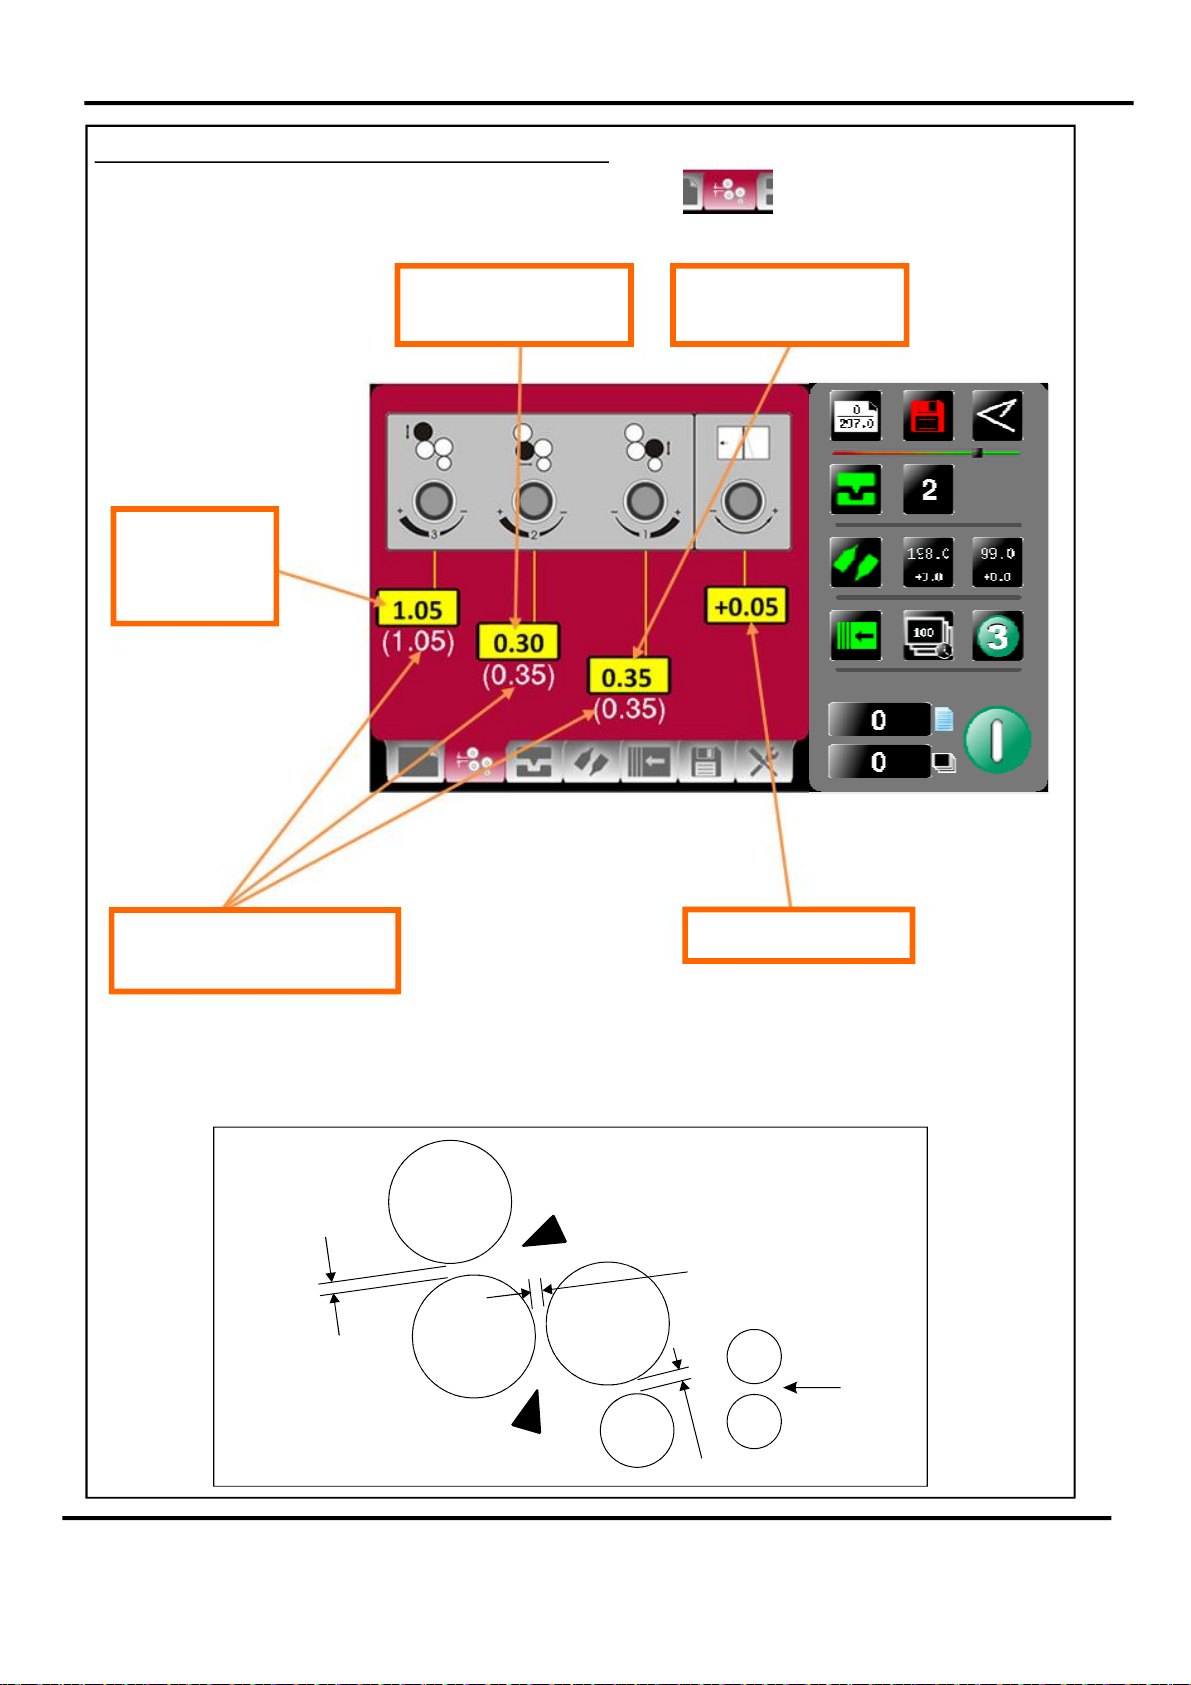
RollerGapSet&TiltMechanismPage.
Togettotherollergapsettingpageclickthelowertab
Rollergapsmaybeintherangeof0.05mmto1.5mm,withincrementsof0.05mm
Currentgap
settingfor3rd
FoldRoller
Currentgapsetting
for2ndFoldRoller
Currentgapsetting
for1stFoldRoller
Recommendedgapvalues-
basedonpaperthickness.
CurrentsetTiltAngle
SettingtheRollerGaps(Gap1,Gap2&Gap3)
Therollergapscanbeadjustedtosuitthethicknessofthematerialbeingcreasedor
folded;andthetypeoffoldbeingproduced.Therollergapsmayalsorequireadjustment
ifcrackingoftheprintisnoticeable.(seeFig13.1below).
FIG13.1
RollerGap3
K1
K2
RollerGap2
INFEED
RollerGap1
Page17SYSTEM
Page 19
OperatingtheAtlas 300
Thegapsettings(Gap1,Gap2&Gap3)canthenbeadjustedbyrotatingtheRoller
GapSetKnobs(seeFIG10.1onpage10).
IMPORTANT.
Whensettingrollergaps,youfirstadjustthegaptoavaluegreaterthanthatrequired
andthendecreasethevaluetotherequiredsetting.(Donotsetthegap,fromavaluelower
thanthatrequired).
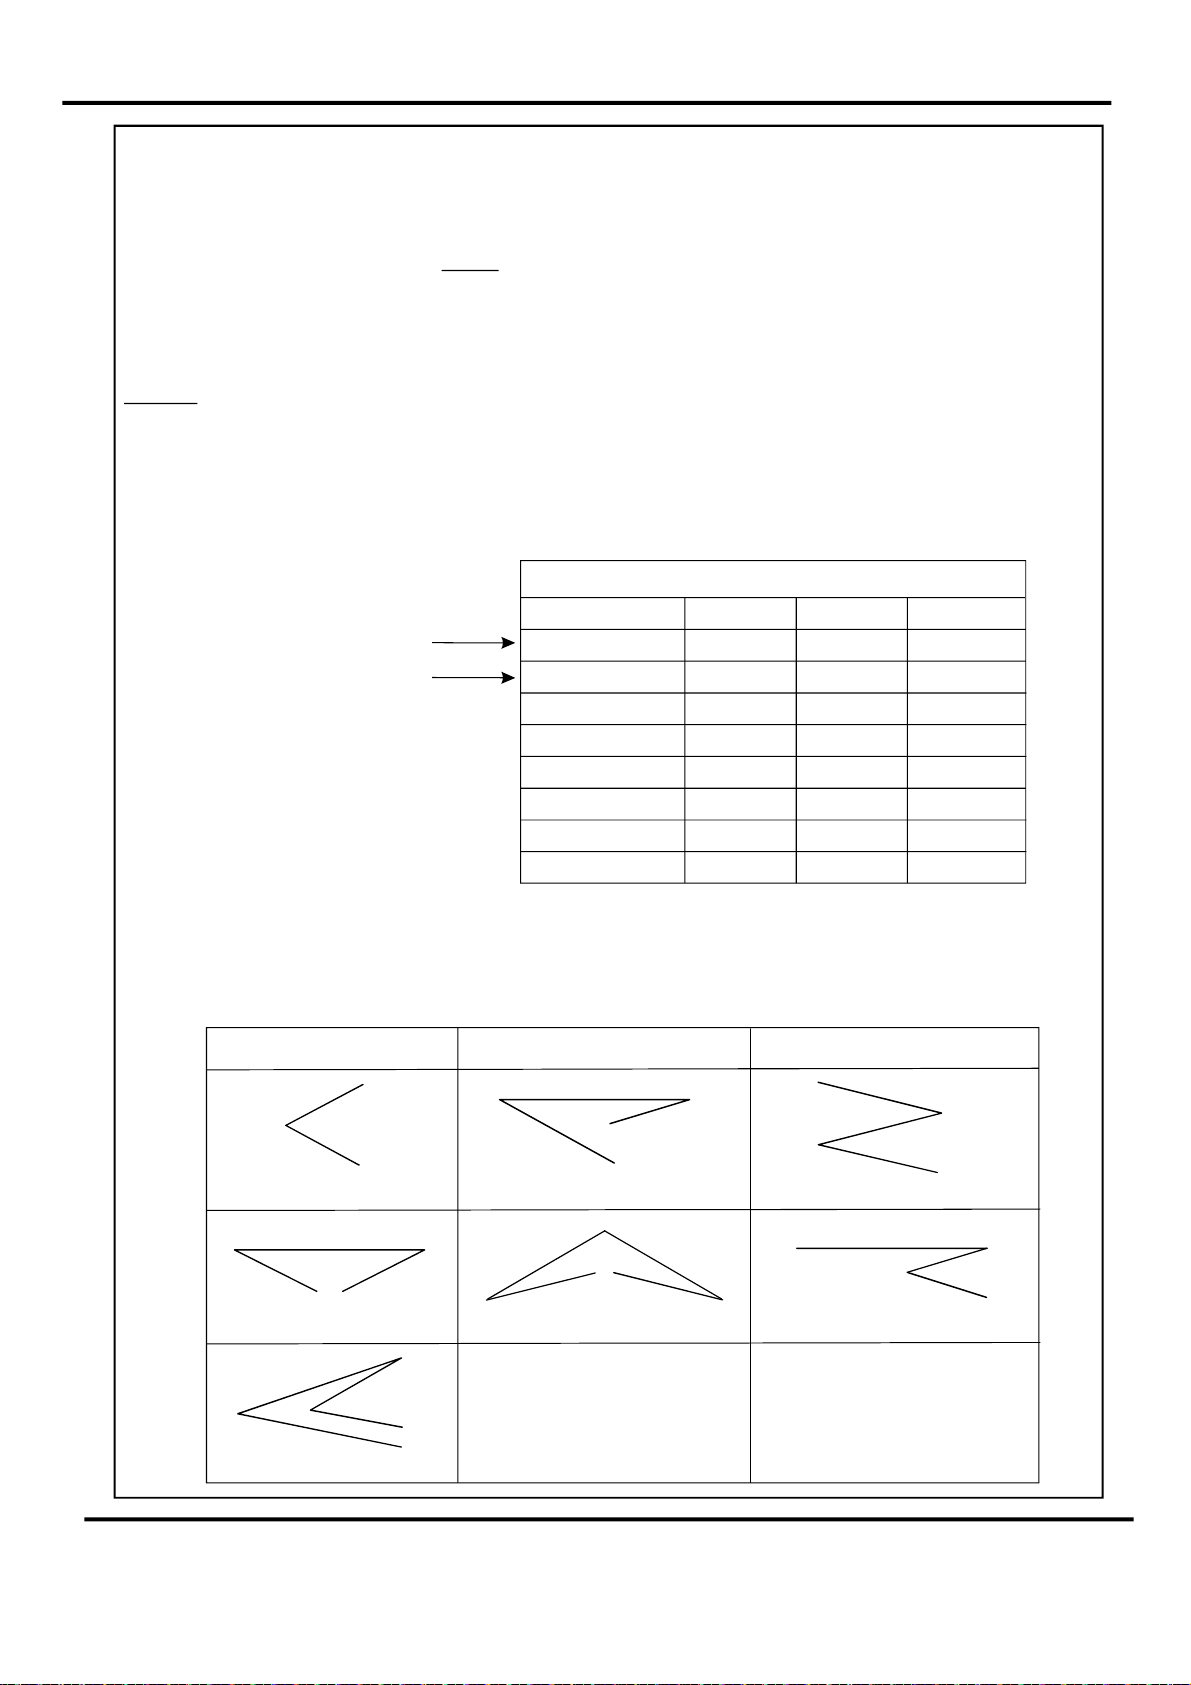
PROCEDURE.(FORSETBYPOSITION).
NOTE.
UsetheonscreenguideforSetbyFold.
(i)MeasurethethicknessofthesheetusingaDigitalVernierCalliper.
(ii)SetrollerGAP1tothevernierreading.
(iii)SetrollerGAP2androllerGAP3,(forthetypeoffoldbeingproduced),usingthe
GAPSETGUIDEtableshownbelow.
HalfFoldonKnife1
HalfFoldonKnife2
must
GAPSETGUIDE
FOLDTYPE GAP1GAP2GAP3
HalfK1
HalfK2
Letter
Concertina
Gate
ClosedGate
Engineering
Double X2X4X
2X
2X
3X
3X
3X
3X
3X
2X
X
X
X
X
X
X
X
X
X
X
X
X
X
Example1:-Whenproducingafold,ifGAP1is0.2(X)thensetGAP2to0.4
HalfK1
(2xX)andsetGAP3to0.4(2xX).
Example2:-Whenproducingafold,ifGAP1is0.3(X)thensetGAP2to0.3(X)
Gate
andsetGAP3to0.9(3xX).
FOLDTYPES
HALF
GATE
DOUBLE
LETTER
CLOSEDGATE
CONCERTINA
ENGINEERING
Page18
FOLDING
Page 20

OperatingtheAtlas C300
SettingtheBladeTiltMechanism
Thebladetiltmechanismhasbeendesignedtocompensateforwhenthecreasing
positiononthesheetisnotsquare.Thiscouldbeduetoaninaccuracyinthemediaoran
unexplainedfeedissue.Themechanismwillbesettozero(square)whenthemachineis
supplied.TheBladeTiltMechanismcanbeadjustedifnecessarybyrotatingtheBladeTilt
Knob(seeFIG10.1onpage10).
Page19SYSTEM
Page 21
peratingtheAtlas C300
O
CreaseSettingsPages.
Togettothecreasesettingpageclickthelowertaborfromthe
statusarea.
IfyouhaveselectedapredefinedstandardFoldTypefromthepapersettingspage
thecreasepositionswillbesetforyou.Thesepositionscanbefinetunedby
incrementsbypressingthearrowbuttonsforeachcrease.
Creasesin‘SetByFold’mode.
Creasetrim-Onselection
thestatusareais
replacedwithacalculator
forinputtingnewvalues.
±0.1mm
Creaseon/offselector
greenison&redisoff.
Thisisalsoindicatedin
thestatusarea.
Trimmingcreasesin‘SetByFold’mode.
Turncreasingoff.
Greyedoutareaindicates
thetrimisnotselectable
Creasesmaybetrimmed
by0.1mmincrements
withintherangeof
5.0mmto+5.0mm.
Statusshowscreasingoff
icon
Thisbuttontoggles
creasingon&off.
Page20
FOLDING
Page 22

OperatingtheAtlas C300
Creasesin‘SetByPosition’mode.
Arrowsmaybeselected
toincreaseordecrease
Thepagesizein0.1mm
increments
Numberofcreases-if
morethan6creasesare
addedascrollbarwill
appearfortoenable
viewingofallcreases.
Alsoshowninstatusarea.
Crossboxfordeletionof
crease.Ondeletionof
creasefollowingcreases
willmoveupbyone
place.Youwillbeasked
toconfirmdeletionofthe
crease.
Creaseposition-Onselectionthe
statusareaisreplacedwitha
calculatorforinputtingnewvalues,a
maximumof9creasescanbeadded.
Presstoremoveall
creases-youwillbe
askedtoconfirm
deletion.
Plusboxforinserting
additionalcreases.On
selectionfollowing
creaseswillmovedown
byoneplaceamaximum
numberof6creasescan
beseenatanyonetime
furthercreasescanbe
accessedbyuseofthe
scrollbar.
Trimmingcreasesin‘SetByPosition’mode.
Additionalcreases
added-scrollbar
appearsformorethan
sixcreases.
Creasesmaybetrimmed
by0.1mmincrements
withintherangeof
5.0mmto+5.0mm.
Page21SYSTEM
Page 23

OperatingtheAtlas C300
Turncreaseon/off.
Greyedoutareaindicates
thetrimisnotselectable
Individualdeletionofcreaseconfirmationscreen.
Statusshowscreasingoff
icon
Thisbuttontoggles
creasingon&off.
Crease150mmfromlead
edgewillbedeleted.
Removeallcreasesconfirmationscreen.
Page22
Allcreases-inthiscase7
offwillbedeleted.
FOLDING
Page 24

OperatingtheAtlas C300
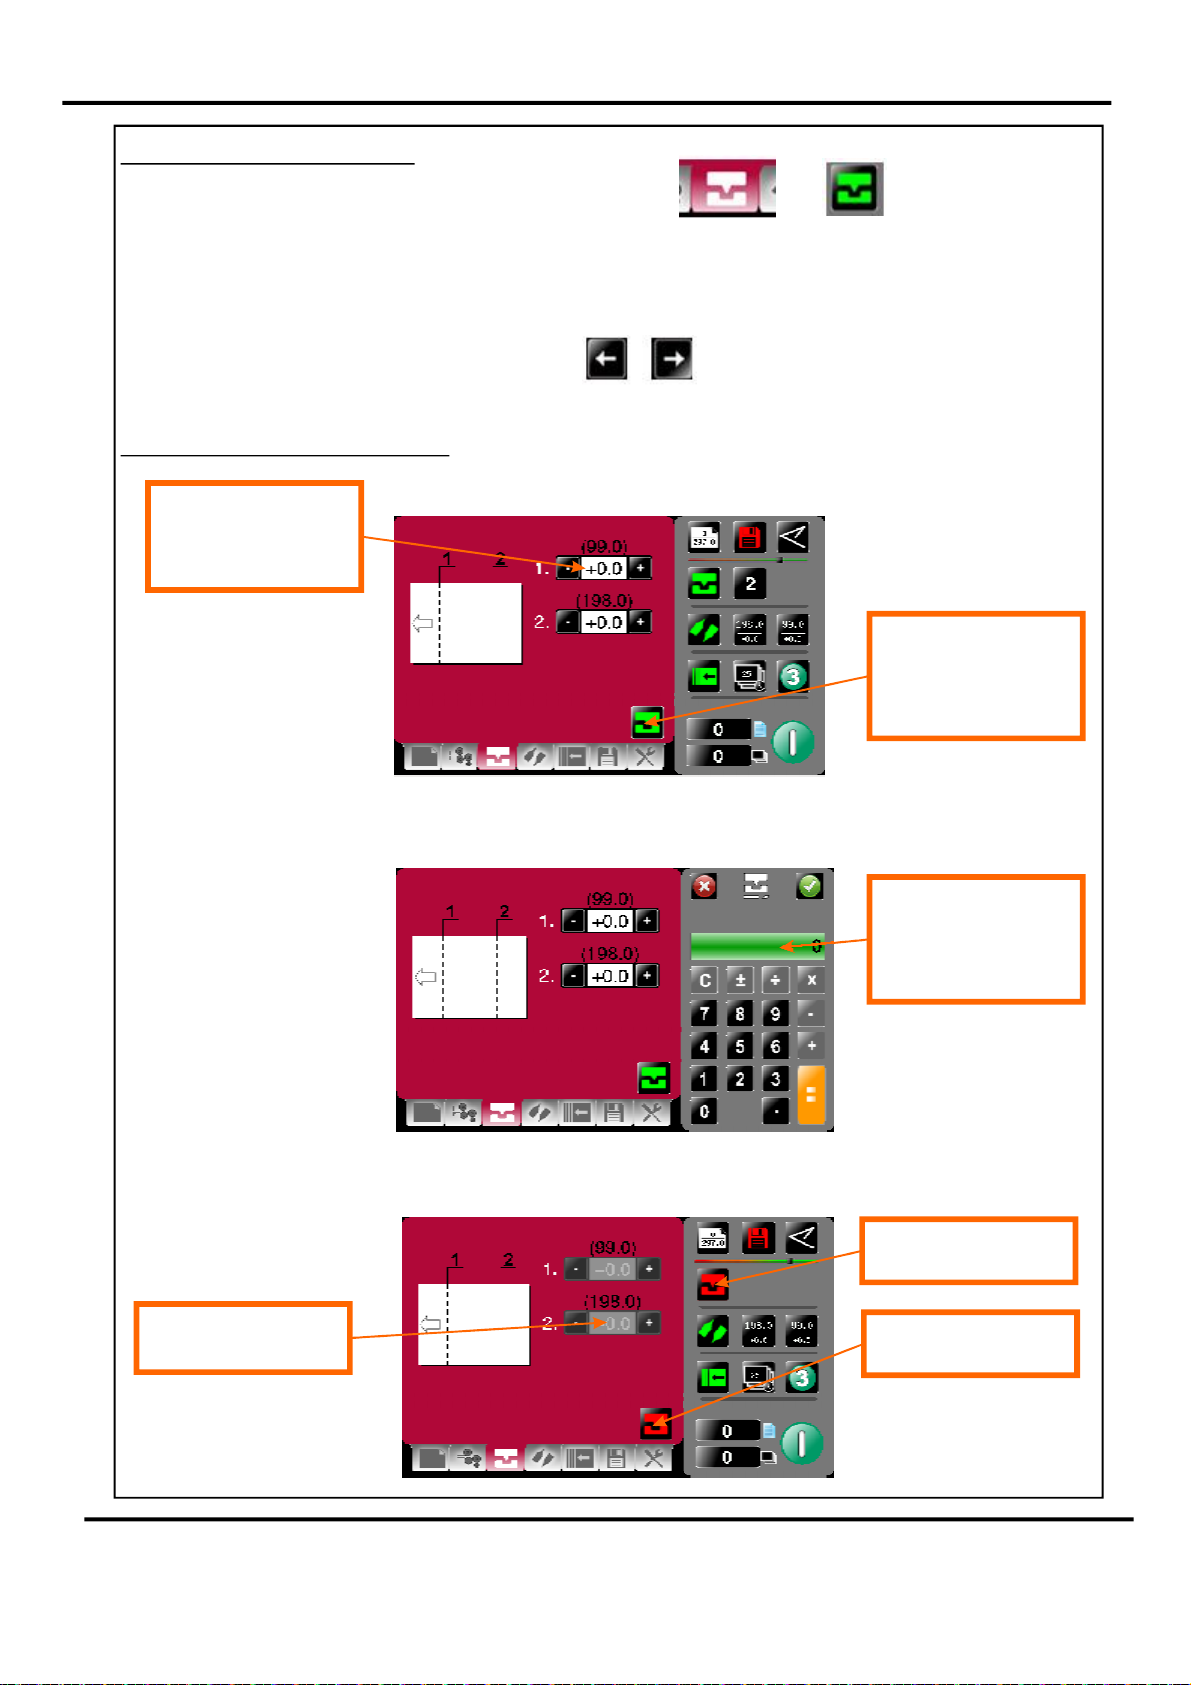
FoldSettingsPages.
TogettotheFoldsettingpageclickthelowertaborfromthe
statusarea.
IfyouhaveselectedapredefinedstandardFoldTypefromthepapersettingspage
thecreasepositionswillbesetforyou.Thesepositionscanbefinetunedby
incrementsbypressingthearrowbuttonsforeachcrease.
Foldsin‘SetByFold’mode.
K1Foldtrim-Onselection
thestatusareaisreplaced
withacalculatorfor
inputtingnewvalues.
Trimrangeis-5.0to+5.0
withincrementsof0.1mm
±0.1mm
WithFoldingturnedoffthe
deflectpositionedcanbe
trimmed.
Trimrangeis-5.0to+5.0
withincrementsof0.1mm
Foldingcanbetrimmed
forfineadjustments.
Trimrangeis-5.0to+5.0
withincrementsof
0.1mm
Foldingon/offselector
greenison&redisoff.
Thisisalsoindicatedin
thestatusarea.
Page23SYSTEM
Page 25

OperatingtheAtlas C300
Foldsin‘SetByPosition’mode.
Folddistancefromlead
edgeforknives(K1&K2)
incrementsof0.1mm
K1deflectbutton
K1indeflectposition.
Thiscanbemicroadjusted.
Trimrangeis-5.0+5.0
withincrementsof0.1mm
K1&K2indeflectposition.
Thiscanbemicroadjusted.
K1microadjustselected
Clickingthisiconswitches
deflectoff&K1returnsto
itsoriginalposition.
Trimrangeis-5.0+5.0
withincrementsof0.1mm
Page24
FOLDING
Page 26

OperatingtheAtlas C300
NOTES:Ifacreasepositionisadjusted,thefoldwillmovewithit.
Ifafoldpositionisadjusted,thenonlythefoldwillmove.
Adjustafoldonlyifthefoldappearstobegivinganoutofsquareor
inconsistentresult.
Thefoldisprobablytooclosetothecentreofthecreaseandwillbetryingto
foldfromonesideofthecreasetotheoppositesideofthecrease,or
wanderingbetweenonesideofthecreasetotheother.(seebelowfor
explanation).
PaperType-0,1,2and3,isafoldcompensationforvariationsin
paperthickness,hardnessandsubstrate.
l Papertype ‘0’
beusedbutbewaresomethinstockswillallowthefoldtowanderfromonesideof
thecreasetotheother.(Usetrimstoovercomethis).
-Thecreaseandfoldaresetatexactlythesameposition.Thismay
Papertype‘1’‘2’‘3’
l
shouldbetriedoutwiththestockinuse.
Generallyahighernumberwillbebestforathickerstock,butsomesettingswill
swapthefoldfromonesidetotheothersideofthecrease,thisenablestheuserto
choosethesidethatthecreasewillbeseen.Forexample,onafrontcover.
andwillmovethefoldrelativetothecreaseand
SETBYPOSITION
IMPORTANTNOTES.
1.Ifthefoldistoonear,oronthecenterlineofthecrease;thefoldmaytrytofold
diagonallyacrossthecreaseprofileandpullthefoldoutofsquaretothepaper.
Thebestfoldsquarenessisachievedwhenthefoldisonthecenterlineofthe
crease,itshouldbetoonesideofthecreasecenterlineasshownbelow.
Unlessthebladeisonthebottomorknife2.
Thusforacreasesettingof100forexample,thefoldshouldbesettoafigure
slightlysmallerorgreaterthan100.
not
.
idealfoldline
centerlineofcrease
2.Whenusingalldimensionsarefromtheleadingedgeofthepaper
asshownintheexampleonpage26.
SetByPosition,
idealfoldline
Page25SYSTEM
Page 27

OperatingtheAtlas C300
ExampleofSetbyPosition.
FeedDirection
LeadingEdge
PaperLength=350mm(13.8”)
SETTINGS
Crease1=97.0mm(3.8”)
Crease2=179.0mm(7”)
Crease3=260.0mm(10.2”)
Fold1=179.0mm(7”)
Fold2=260mm(10.2”)
Crease2
Fold1
9mm
(0.35”)
=179.0
(7”)
Crease1 Crease2 Crease3
Fold1 Fold2
Alldimensionsarefromtheleadingedgeofthepaper
LeadingEdge
Crease3
Fold2
LeadingEdge
=260.0
(10.2”)
Page26
FirstFold
FinishedDocument
SecondFold
9mm(0.35”)
LeadingEdge
9mm(0.35”)
FOLDING
Page 28

OperatingtheAtlas C300
DeliverySettingsPage.
TogettotheDeliverysettingpageclickthelower
Rollerpositionmaybe
microadjustedbyclicking
here.
Shinglemaybemicro
adjustedbyclickinghere.
Rolleradjustment
calculator.
TheDeliverycanbe
toggledOnorOffby
clickinghere.
Shingleadjustment
calculator.
Deliveryon/offstatus
redisoffgreenison.
Page27SYSTEM
Page 29

OperatingtheAtlas C300
SettingtheDeliveryConveyorSystem.
WARNINGS:-
1.TheMachinewillstartifthedeliveryunitisnotinitsupposition.
2.Ifthedeliveryisturnedofftherollerwillfeedtothefarendofthebeltconveyorandpark
thereuntilturnedonagain.
3.Ifthedeliveryisturnedonwhenusingthe‘SetbyFold’modeofoperation;theRoller
PositionandShingleLengthareautomaticallyset,relativetothepaperlengthandtypeof
foldselected.
4.Whenusingthe‘SetbyPosition’modeofoperation;theRollerPositionandShingle
Lengthmustbeadjustedmanuallytosuitthejob.(SeeFIG17.1below).
5.Whentheoptimumsettingsfortherollerpositionandshinglelengthareachievedthey
canbestoredwiththejob.
NOTE.
WhensettingthemachinetodoaDoubleFoldorEngineeringFold,withapaperlengthof
279mm(11”)orless,thestackerrollerwilltraveltothefarendoftheconveyorandstop.
Thisisduetotheshortnessofthefoldedpaperexitingfromthemachine.
not
FIG17.1
Page28
FOLDING
Page 30

OperatingtheAtlas C300
StatusScreen.
Greeniconindicatessettingsare
saved-arediconwouldshowthat
settingshavechangedbut
thejobhasnotbeensaved.
Paperlength&Paper
Type-inputfromthe
papersettingscreen.
LeadEdgeSensorStrength,
IndicatorBar
Numberofcreases-this
mayalterautomaticallyif
apre-definedfoldis
selected.Adjustments
maybemadeinthe
creasesettingscreen.
Indicatorforstatusof
knives.
Clickinginthisareawilltake
youtothestorepage
Clickinginthisareawilltake
youtothepapersetting
page.
Currentlyselectedfoldtype
-canbeoneofthe
following.
Clickinginthisareawilltake
youtothecreasesetting
page.
K1&K2On.
K1Off&K2On
K1On&K2Off
K1&K2Off
Clickinginthisareawilltake
youtothedeliverysetting
page.
Sheetcount-clicktozero
Ascreenwillappearto
confirmthatyouwantto
resetthecount.
Batchcount-clicktozero
Ascreenwillappeartoconfirmthat
youwanttoresetthecount.
FoldPositions&Trim
settings
Clickinginthisareawilltake
youtotheFoldsetting
page.
Selectthisbuttontoproduce
3testsheetswiththe
settingscurrentlyshown.
Batchquantity-thisis
inputfromthebatch
calculatoronthepaper
settingscreen-max.999
Clicktostartmachinewithsettingscurrently
shown-youwillreceiveanotificationif
systemswitchisnoton.Pressagaintostop
Job
Page29SYSTEM
Page 31

OperatingtheAtlas C300
RunJob.
SystemSwitchNotOn.
Clicktorunmachine.
Themachinerunningscreenwillappear.
ClicktoconfirmSystem
switchison&thenclick
runbuttonagain
Runcount
BatchCount
JobCount
Clicktostopmachine.
Page30
FOLDING
Page 32

OperatingtheAtlas C300
Settingthemachinetooperateinmanualsheetfeedmode
Inordertofeedheavystock,verysmallorverylargesheets,embossedorevenirregular
shapedsheets,itmaybenecessarytofeedthesheetsmanually.
Themachinecanbeprogrammedandsetupinexactlythesamewayasexplainedwhen
operatingthemachineautomatically.However,thepapergatemustberaisedtoitshighest
positionforthesheetstobefedfreely.
ThemachinecannowbestartedbyactivatingtheSystemswitchto‘on’.
theCompressorswitch.
Selecttheicononthetouchscreenandbegintoslidethesheetsindividuallythrough
thepapergateuntiltheyaredrivenbythedrivebelts.
Tostopfeedingthesheets,selecttheicononthetouchscreenandswitchthe
SystemSwitchoff.
NOTE.
Ifthedelaybetweenfeedingsheetsisexcessive,thesystemwilltimeout.
Donotactivate
Page31SYSTEM
Page 33
OperatingtheAtlas C300
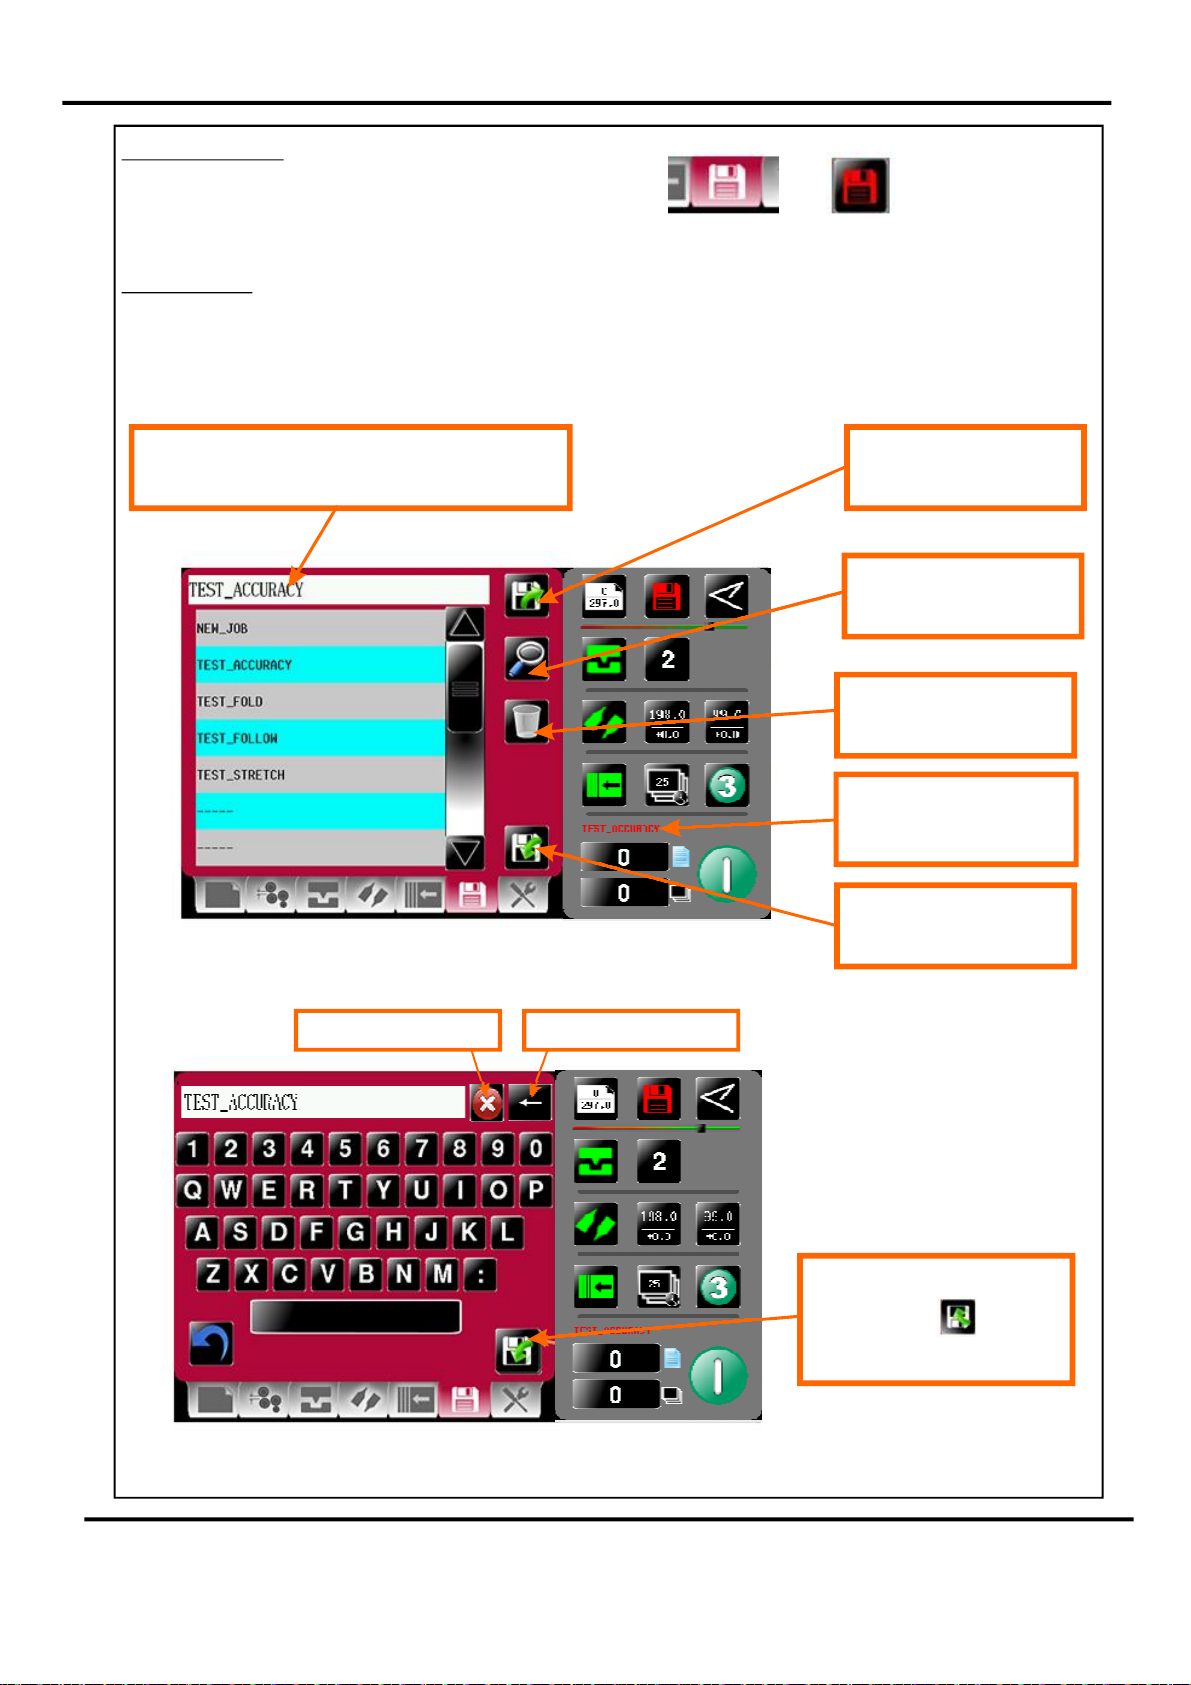
StorePages.
TogettotheStoresettingpageclickthelowertaborfromthe
statusarea.
NewJobs.
Havingsetupyourjobyoucangivethejobanameandsaveittoastore.Youcan
alsoretrievepreviouslysavedjobs,modifythemordeletejobsyounolongerrequire.
Tocreateanewjobnameclickintextarea&
keyboardwillopentoinputjobname.
Keyboardforenteringjobname.
Loadexistingjobfrom
store
Clickingtosearch
currentlystoredjobs
Clickingtodelete
currentlystoredjobs
CurrentJobName
YellowTextDenotesSavedJob
RedTextDenotesUnsavedJob
Clickingtosavejob
shown.
DeletelastcharacterDeleteallcharacters
Page32
ReturntoStoreMenu&
clicksaveicontosave
jobtostore
FOLDING
Page 34

OperatingtheAtlas C300
Saveconfirmationscreen.
Toconfirmsaving
ofjobclickhere.
Searchforcurrentjobstoloadormodify.
Youcansearchforjobsbyclickingthesearchicon,thiswillbringupthe
searchkeyboardfortextinput.
Tochangeyourmind&
returntotheprevious
screenclickhere.
Jobsmatching
charactersintextbox
willbeshowninthis
area-selectingjob
fromthisareawill
showjobsettingsin
therighthandstatus
area.Jobselectedwill
beshownintextbox.
Typeinjobdescription
orfirstfewcharacters
Presssearchicon
tostartsearch
Togglebetweensearch
results&fulllistof
jobs
Presstoloadjob
shownintextbox.
Page33SYSTEM
Page 35

Operatingthe Atlas C300
Loadingjobconfirmationscreen.
Loadedjobmaybemodifiedandthenre-savedasthesamejobname.
Tocancelloadingof
Jobpresshere
Toconfirmloadingof
Jobpresshere
Overwritejobconfirmationscreen.
Deletejobconfirmationscreen.
Tocanceloverwriteof
Jobpresshere.
Toconfirmoverwrite
ofJobpresshere
Tocanceldeletionof
Jobpresshere
Page34
Toconfirmdeletionof
Jobpresshere
FOLDING
Page 36

OperatingtheAtlas C300
ToolsMenu.
TogettotheToolspageclickthelowertab
Inchpaperindirection
ofarrowtoclearjams
ClickonUpArrowto
putAnvilintoTop
DeadCentreposition
(TDC)
CleanLeadEdgeSensor
TouchScreenCalibration
SeePage36
ChangeMachinemeasurement
settings,Imperial/Metric
Touchscreensoftware
revision
ToggleK2ONandOFF
UsedtoSetDeflectTrims
SeePage37
Inchpaperindirection
ofarrowtoclearjams
Clickingthisiconwill
showMachine
programmerevision&
TouchScreensoftware
revision.
Machinemainboard
softwarerevision
Page35SYSTEM
Page 37
OperatingtheAtlas C300
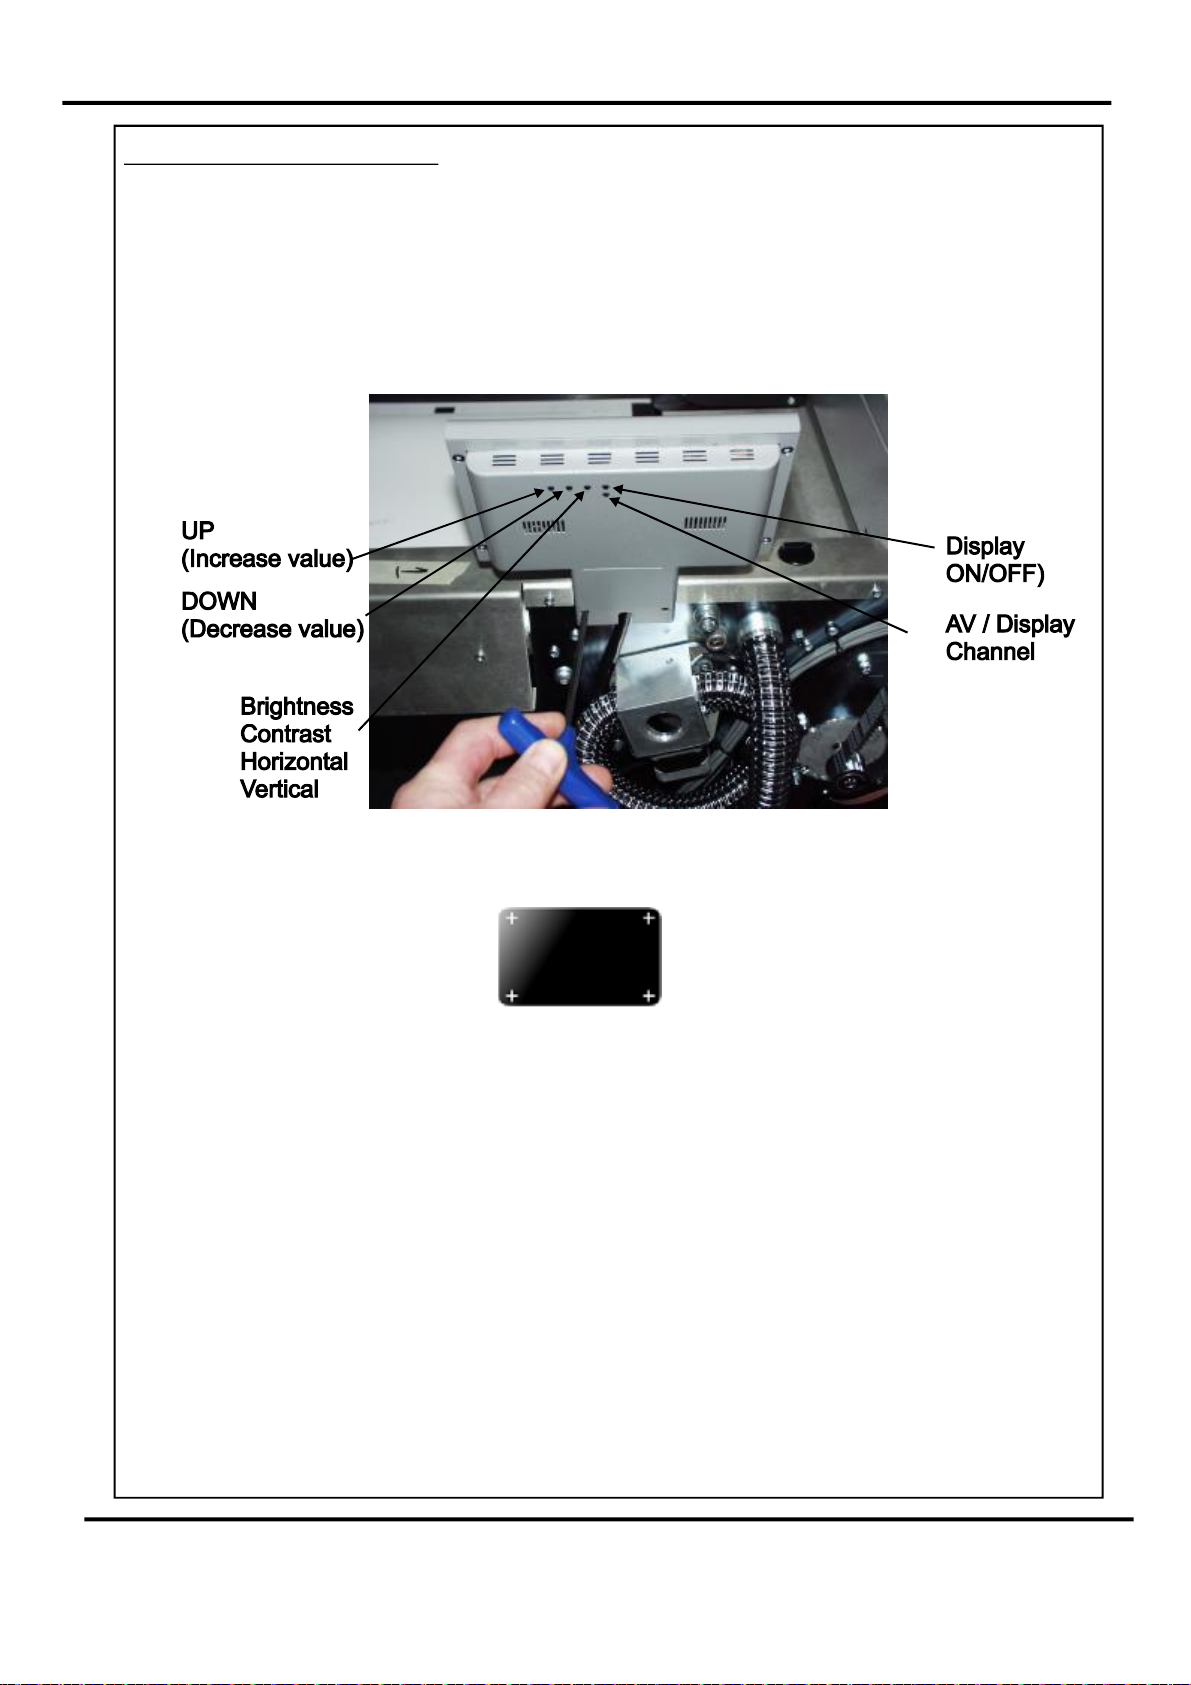
TouchSc
1.Switc
reenCalibration.
commencingtocheckthehorizontalandverticalpositionofthedisplay.
Thepositionofthedisplaywithinthesurroundisachievedbyoperatingthebutton
attherearofthehousing,pressthisanumberoftimestoobtainthecorrect
orientationrequired,movetothenextbuttontomovethepositiontocentralize
horizontal.
hthemainspoweronandwaitforthemainscreentoappearbefore
2.(i)Selectthetoolsmenutab,andthenSelecttheTouchScreencalibrationicon.
(ii)Usingaplasticpointer,softleadedpencil,birocapetc.andwithgentlepressure.
TouchthecentreofthecrossineachcorneroftheTouchScreen,asprompted,by
thehandgraphics.ThisprocedurewillcalibratetheTouchScreen.
Page36
FOLDING
Page 38

OperatingtheAtlas C300
DeflectTrimAdjustments
Thedefl
withoutdamagingtheleadedge.
ConductthistestwithK2turnedoffusingthe'Tools'menu.
IfmarkingoccursonK1thenfollowthesegeneralrules.
•
EnsureK2isturnedonusingthe'Tools'menu.
IfmarkingoccurswhenK2isturnedonthenfollowthesegeneralrules.
ecttrimsmayneedtobecalibratedtoallowthesheettopassthroughthemachine
1.K1DoubleDeflectTrim
Inthetoolsmenu
RollermarksarecausedbytheFoldknifebeingtoolate,andsominussomeK1
Deflecttrim.
Generalscuffingofthesheetundersidearecausedbythefoldknifebeingtooearly,
•
addsomeK1deflecttrim.
2.K2DoubleDeflectTrim
•
RollermarksarecausedbytheFoldknifebeingtoolate,andsominussomeK2
deflecttrim.
Generalscuffingofthesheetuppersidearecausedbythefoldknifebeingtooearly,
•
AddsomeK2deflecttrim.
Page37SYSTEM
Page 39

TheBladeAssembly
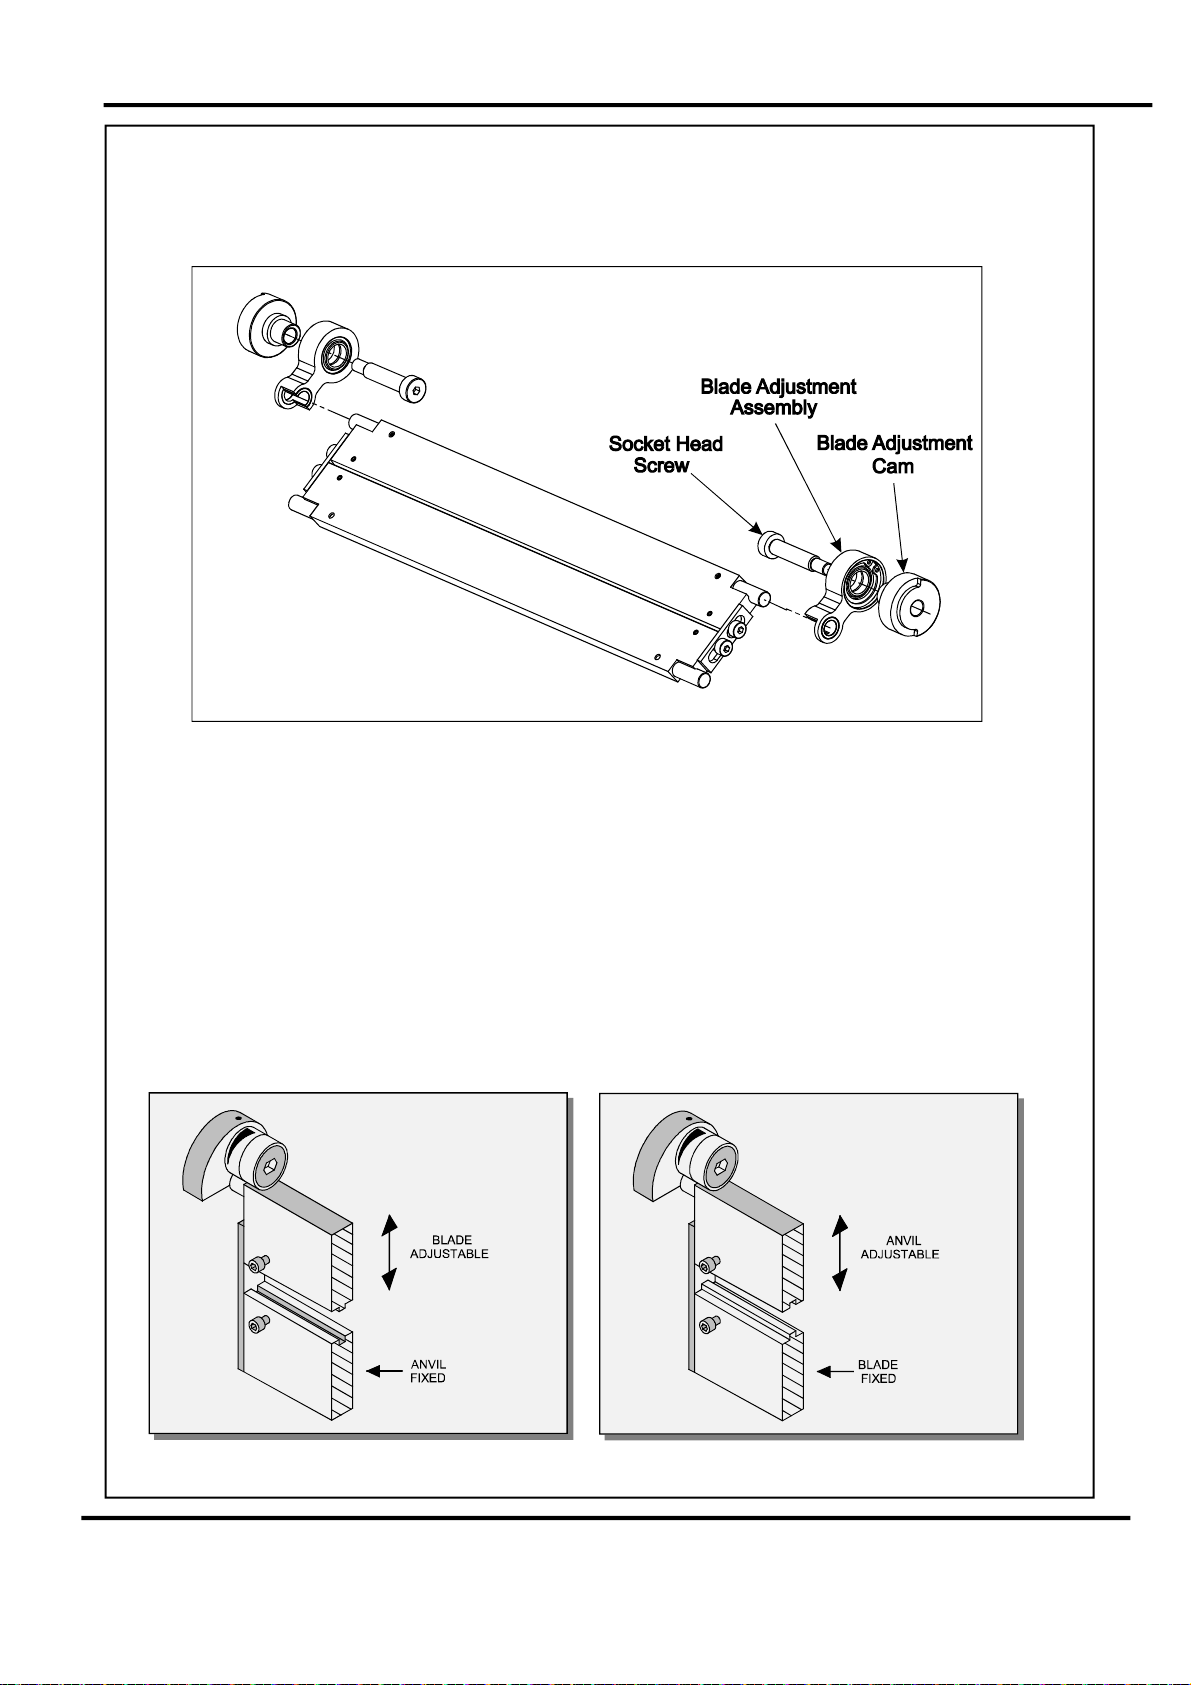
Adjustingthebladepressure(nopaperrequired)
1.(i)Switchthepower‘on’byturningtheEmergencystopbuttonclockwisetoreleasethe
safetylatch.
(ii)SelecttheToolstabatthebottomofthetouchscreen,thedisplaywill
changetothatshownbelow.
(iii)Activatethesystemswitchto‘ON’
(iv)SelecttheuparrowtomovethebladetotheTopDeadCentreposition.
ClickonUpArrowto
putAnvilintoTop
DeadCentreposition
(TDC)
2.Raisetheexitguard
3.Usinga5mmallenkey,unlockthesocketheadscrewspositionedateachendofthe
creasingblade.
4.Rotatethebladeadjustmentcamsuntiltheyarejusttight,andthenbackoffslightly
beforetighteningthesocketheadscrews.
Thediagrambelowdemonstratestheadjustmentofthebladepressure
5
Page38
FOLDING
Page 40

ReplacingBladeSets
1.Beforeremovingthebladeassembly,ensurethatthelowerblade/anvilisat‘TopDead
Centre’,seepage38.
2.Liftthetopcover.
3.Usinga5mmallenkey,removethetwosocketheadscrews,oneeachendoftheBlade
Set,asshowninFIG32.1below.
FIG32.1
4.RemovetheSheetGuideAssembly,bypullingupwardsonthetwoflanges,oneeach
end,asshowninFIG32.2andFIG32.3below.
Flange
SheetGuideAssembly
FIG32.2 FIG32.3
5.TheBladeSetcannowberemovedfromthemachineusingtheBladeExtractorTools
showninFIG32.4below.
FIG32.4
BladeExtractorTools
Page39SYSTEM
Page 41

ReplacingBladeSets
6.InserttheBladeExtractorTools,oneateachendoftheBladeSet,asshownin
FIG33.1below.
FIG33.1
NoteThePositionofThe
BladeExtractorTool
UnderTheLipofThe
BladeAdjusterAssembly
7.LevertheBladeAssemblyinthedirectionshowninFIG33.2tounclipandreleasethe
BladeSet.
FIG33.2
Page40
FOLDING
Page 42
ReplacingBladeSets
8.Slidethebladeassemblyoutofthecreasingunitandlayitonaflatsurface.
9.Slidethebladeadjustmentcamsandthebladeadjustmentassembliesawayfromthe
dowelslocatedintheendsoftheblades/anvilsasshowninFIG34.1below.
FIG34.1
10.Slidethebladeadjustmentassembliesandthebladeadjustmentcamsontothe
dowelsofthenewbladeset.
11.SlidethenewbladesetintotheslotsofthecreasingunitasshowninFIG.34.3.
NOTE.
ThebladesetcanbefittedwiththeANVILatthebottomorwiththeANVILatthetop.
ThebladesetissuppliedfromthefactorywiththeANVILatthebottomasshownin
FIG34.2A.
ThebladesetcanbechangedtohavetheANVILatthetop(asshowninFIG34.2B),this
canimprovetherepeatabilityofthefoldrelativetothecreaseforcertainfoldtypesor
whenusinglighterstocks.
FIG34.2BFIG34.2A
SYSTEM
Page41
Page 43

ReplacingBladeSets
12.Rotatethebladeadjustmentcamsuntiltheyarejusttight,andthenbackoffslightly.
Resetbladeto‘TopDeadCentre’andmakefinaladjustments.
FIG34.3
13.RefittheSheetGuideAssembly
14.Closethetopcover
15.Switchthemachineonandtestthecreaseforform.
ThefollowingBladesetsaresuppliedasstandard.
StandardBladesetPartnumber176-213-02
Consistingofastandardbladeandanvil,pre-setforyourmachine.
NarrowBladesetPartnumber176-213-01
Consistingofastandardbladeandanarrowanvil,pre-setforyourmachine.
NOTE.
Bladesetsareindividuallysetforeachmachineatthepointofmanufacture.
ReplacementBladesetswillthereforeneedtobesetupbyafactorytrainedservice
engineer.
DonotattempttouseaBladesetfromanotheDigifoldPro.
Whenrunninglighterstocksitisrecommendedthatanisused,
thiscanbepurchasedfromMorganaSystemsLtd,
UltraNarrowBladeSet
Partnumber176-213-03
.
Page42
FOLDING
Page 44

Perforating
Oncethemachineisset-up,theMachinecanbeusedtoperforateorcrease.
Notes
1.Perforatingandcreasingcanbecarriedoutsimultaneously.However,ifany
adjustmentismadetotherollertiltmechanisminordertocompensateforthe
perforationlinebeing’outofsquare’,thismayeffecttheaccuracyofthecrease.If
thisoccurscreasingandperforatingmustbecarriedoutasseparateoperations.
2.Byadjustingtheoutfeeddrivetyresrelativetothedrivehubsitispossibletostear
thesheet,(i.e.Byplacingthetyreontopofthehubonesideofthepaperwillstear
fasteronthatside).
Thecomponentsandtoolsrequiredtoinstalltheperforatorarecontainedinthedespatch
kitsuppliedwiththemachine,theyarelistedbelow.
1offSetofstandardperforation‘28tooth’blades.
1offSetofstandardhardenedanvils.
1off3mmbondhuswrench/allenkey
1off2mmbondhuswrench/allenkey
Theperforatorbladesaresplitintotwomatchinghalvesand
arefittedtothedrivewheelsasshowninthephotograph
usingthefourscrewssupplied.
Ahardenedanvilisfittedtothedrivehubasshowninthe
photographalsousingthefourscrewssupplied.Againthe
anvilsaremadefrommatchinghalves.
Important:Theperforatorbladesareverysharpand
caremustbetakenwhilsthandling.
Donotmixthematchingpairsofbladesoranvils.
Perforating‘Spares’kits
Forperforatingandothertypesofpaper,variousspareskitsareavailablewhichcanbe
assembledtothemachineinthesamefashion.Theyarelistedbelowalongwitharange
ofscoringwheels,
Perforatingblades1-99-41
56teethPartNumber-Standardstock/
fineperforations.
28teethPartNumber-Mediumstock/
20teethPartNumber-Heavystock/
Anvils1-99-35
StandardPartNumber-Forallbladetypes
1-99-12
1-99-10
Mediumperforations.
coarseperforations.
Page43SYSTEM
Page 45

Perforating
Allofthebladesandanvilsaresuppliedwithfixings.
*Perforatorstripper177-05-01
*Itisrecommendedthatformultipleperforations,aseparateperforatorstripperisusedfor
everyperforatingbladesetfittedinthecreasingunit.
StandardPartNumber
Settingthemachine
1.Turnthemainssupplytothemachine‘off’.
2.Opentheperforatorassemblytogetaccesstothedrivewheelsandhubs.
3.Locateandremovetheblades/anvilsfromthedespatchkitsuppliedwiththe
machine.
4.Usingthe2mmallenkey(supplied),loosenthedrivewheelthatistoaccommodate
theblades.
5.Slidethedrivewheelawayfromanyobstructingdrivewheelsorhubsinorderto
mounttheblades.
FIG37.1
6.Usingthe2.5mmallenkey(supplied),takeone
halfofthematchingpairofbladesandmounton
tothedrivewheel.Donotsecuretheblade.
FIG37.2
7.Mounttheotherhalfofthebladetothedrive
wheelasshown(FIG37.1).Securethebladesto
thewheelensuringnottoovertightengrubscrew.
8.Markonasinglesheetthedesiredperforating
position.Feedthesheetthroughthemachine
manuallyuntilthemarkcanbeseen.Usethis
marktoassistinfixingthepositionofthe
perforatingdrivewheeltotherollerdriveshaft.
9.Usingthe2mmallenkey,loosenthedrivehub
nearesttheperforatingdrive.Slidethedrivehub
awayfromanyobstructingdrivewheelsorhubs
inordertomounttheanvils.
10.Usingthe2.5mmallenkey,takeonehalfofthe
matchingpairofanvilsandmounttothedrive
hub.Donotsecuretheanvil.
11.Mounttheotherhalfoftheanviltothedrivehub
asshown(FIG37.2).Securetheanvilstothedrive
hubensuringnottoovertightenthegrubscrews.
Page44
FOLDING
Page 46

Perforating
12.Slidethedrivehubtowardstheperforatingdrivewheeluntilthereisaclearance
of0.5mm(0.020”).
13.Topreventdamagetothebladesortheanvils,donotforcethedrivewheelagainst
thehub.
14.Fixtheperforatorstripperadjacenttothedrivewheelandbladeasshown.
15.Operatethemachineandtesttheperforationsforform.
Itisimportantthatthedrivehubsarearrangedevenlyacrossthewidthofthepaper
inordertoreducetheriskofjamming.
Formultipleperforationsrepeattheaboveprocedure.
1
4
3
5
2
FIG38.1
Fig38.1
14
-Perforatingdrivewheelwithmountedblades-Drivehubwithmountedanvils
25
-Perforatorstripper-Standarddrivehub
3
-Standarddrivewheel
Demonstratesatypicalset-upforperforatingsheets.
Alwaysremovebladesandanvilsoncetheperforatingoperationhasbeen
completedtoavoidmarkingondigitalordelicatemedia.
Page45SYSTEM
Page 47

RemovingPaperJams
RemovingPaperJams
Intheeventofapaperjamoccurring,whilstrunningthemachine,followthesteps
describedbelowtoallowaccesstoremovethejammedpaper.
1.Unlockandlowerthedeliveryunit,openthetopcoverandtheperforatorunit;see
FIG39.1below.
2.Ifthepaperisjammedinthefoldrollers;trytorotatethetopfoldroller,usingboth
hands.Positionthethumbsunderthetiebarandspreadthefingersoutabovethetie
bar.
FIG39.1
TieBar
TopFoldRoller
TopCover
Page46
DeliveryUnit
PerforatorUnit
FOLDING
Page 48

TroubleShooting
Papercreaseoutofsquare
Checkthatthesheetsareallsquareandexactlythesamesizebeforeloadingthe
stackontothetable.
Checkthattheadjustablesidelayhasbeencorrectlypositionedie.Nofurtherthan
0.5mm(0.020”)fromthepaperstack.
Checkthatthebladetiltmechanismiscorrectlyset.
CreasePositionInaccuracy
Checkthatthecreaseprofilehasnotbeensettoodeep.
CheckthatthecorrectBladeSetisfitted.(StandardBladeSetformaterial
thicknessof0.25mm(0.010”)andabove,NarrowBladeSetformaterialthicknessof
0.25mm(0.010”)andbelow).
Paperfoldoutofsquare
Note:-thebestfoldsquarenessmaybeachievedwhenthefoldisnotonthecenter
ofthecrease,buttoonesideortheother.
Trythisfirst.
Checkthatthefoldistoonesideofthecreasecenterline.
Checkthattherollergapsarenottootightandsquashingthecrease.
Checkthattherollergapsarenottoolargeandallowingthepapertoslide
(especiallysoonglossypaper).
Paperjamming
Checkthattheleadingedgeofthepaperisnotbeingdamagedbythepapergate.
Ifthisisoccurring,checkthatthesuctionslotandthepapergatehavebeen
correctlyset.
Checkthatthefirstcrease/foldpositionisnottooclosetotheleadingedgeof
thepaper.Aminimumdistanceof50mm(1.96”)isrecommended.
IfjammingisoccurringinthePerforator-adjusttheHubs(seePages12&45).
Page47SYSTEM
Page 49

TroubleShooting
Machinewillnotstart
Checkthepowersupplytothemachine.
Checkthattheemergencystopbuttonhasbeenreleased.
Checkthatthetopcoverisdown.
Checkthattheperforatorassemblyisinitsclosedposition.
Checkthatthedeliveryunitisintheupposition,andlocatedcorrectly,(themachine
willnotstartifthedeliveryunitisnotinitsupposition).
Papernotfeeding
Checkthatthepaperstackisnottoohighortooheavyforthefeeder.Theheightof
thepaperstackshouldbedefinedbytheweightandthesizeofthestockbeing
creased.
Ensurethattheadjustablesidelayisnotpressedagainstthepaperstack.However,if
theclearancebetweentheadjustablesidelayandthepaperstackistoogreat,the
airsupplywillescapeinsteadofblowingthroughthepaperthusmakingitdifficultto
feed.
Checkthattheclearancebetweenthepapergateandthesuctionrollerisnotsettoo
low.
Ondigitalmedia,thefeedingperformancemaybeimprovediftheleadingedgeofthe
stackistrimmedbeforeloadingontotheDigifold.
Checkthattheairdistributionhasbeencorrectlyset.
Checkthattheairseparationhasbeensethighenoughtofeedthesheets.
Forheavystocks,verysmallorverylargesheets,embossedorevenirregularstock,
itmaybenecessarytofeedthesheetsmanually-seepage31.
CrackingofthePrintedMaterialalongtheCrease.
Crackingofthematerialalongthecreasemaybecausedbythefollowing:-
Pressuretooheavyonthetopblade-reducepressure.
Crackingononeedgecausedbymisalignmentoftheanvilandblade.
Whenusingdryinkortonerbasedprintengines,thematerialbefully
acclimatisedforatleast48hoursbeforeputtinganimageontothepaper.
must
Page48
FOLDING
Page 50

TroubleShooting
UsingtheCorrectBladeSet.
TwoBladesetsaresuppliedwiththemachine.
TheStandardBladesetissuitableformaterialthicknessesof0.25mm(0.010”)and
greater.
TheNarrowBladesetissuitableformaterialthicknessesof0.25mm(0.010”)and
smaller.
IftheStandardBladeSetisusedtocreaseandfoldmaterialslessthan0.25mm
(0.010”)inaccurateresultscanbeproduced.
IftheNarrowBladeSetisusedtocreaseandfoldmaterialsgreaterthan0.25mm
(0.010”)crackingcanoccur.Moreimportantlythiscouldcausethemainmotorto
temporarilystall.Thisprobablywon’tbethatnoticeableuntilyoulookattheresults,
wherebythecreasepositionwillvary.
Page49SYSTEM
Page 51

TroubleShooting
Sheetdidnotarrive.
Ifthemachinestopsanderrormessage01isdisplayedonthetouchscreen,this
indicatesthatthepaperdidnotarriveattheendofthesuckprocess;sothemachine
timedout.Pressthegreentickbuttonandthenpressthestartbutton.
PaperCrunch
Ifthemachinestopsanderrormessage02isdisplayedonthetouchscreen,this
indicatesthatapaperjamhasbeendetected.
Pressthesystemswitchdownandthenselecttherightorleftarrows,toinchthe
paperforwardsorbackwards.Seepage39thatdescribeshowtoremovepaperjams.
Pressthegreentickbuttonandthenpressthestartbutton.
ErrorScreens
DoubleSheetFeed
Ifthemachinestopsanderrormessage03isdisplayedonthetouchscreen,this
indicatesthatadoublesheetfeedhasbeendetected.Checkthatthepapergatehas
beensetcorrectly.Pressthegreentickbuttonandthenpressthestartbutton.
BladeNotHome
Ifthemachinestopsanderrormessage04isdisplayedonthetouchscreen,this
indicatesthatthelowerblade/anvilhasnotmadecontactwiththeHOMEswitch.
i.e.bladestillintopposition.Switchthemachineoffandremovethebladesetand
ensurethattheareaisfreefromobstructions.Returnthebladesettothecreasingunit
andswitchthemachineon.Operatethemachineinthenormalsequence,ifthe
displaycontinuestoreaderrormessage04itisadvisedtocontactaServiceEngineer
immediately.
Page50
FOLDING
Page 52

TroubleShooting
ErrorScreens(Continued)
BladeBusy
Ifthemachinestopsanderrormessage05isdisplayedonthetouchscreen,this
indicatesthatthebladeisbusy.Trytooperatethemachineagain,Ifthisfailsitis
advisedtocontactaServiceEngineer.
BladeHomeFailure1
Ifthemachinestopsanderrormessage06isdisplayedonthetouchscreen,this
indicatesthattheremaybesomecreasingerrors,andthatthecreasingpressure
shouldbechecked,(alsocheckforadoublethatmayhavegotthrough,causingthis
error).
BladeHomeFailure2
Ifthemachinestopsanderrormessage07isdisplayedonthetouchscreen,this
indicatesthatthecreasebladedidnotgetbacktoitshomepositioncorrectlyor
atthecorrecttime.Causes,canbeexcessivebladepressure(suspectadouble),or
Somekindofjamwhichcausedmorethanonesheetthicknesstobecreased.
Page51SYSTEM
Page 53

TroubleShooting
FlyingHomeFailure
Ifthemachinestopsanderrormessage08isdisplayedonthetouchscreen,this
indicatesthatthehomesignalwasmissedduringcreasing.Checkthattheblade
pressureisnottoohigh.
ErrorScreens(Continued)
Clip1NOTclear
Ifthemachinestopsanderrormessage09isdisplayedonthetouchscreen,this
indicatesthatthesensorisorwasblockedwhenitshouldhavebeenclear.
i.e.Ajaminthepaperpathorthewronglengthofpaperhaspassedthroughthe
sensor.
Tocorrect-checkifpaperispresentandcheckthatthepaperpathisclearbefore
restarting.Seepage46thatdescribeshowtoremovepaperjams.
Clip1NOTBlocked
Ifthemachinestopsanderrormessage10isdisplayedonthetouchscreen,this
indicatesthatthesensordidnotseethepaperatthecorrecttime.
i.e.Ajaminthepaperpath.
Tocorrect-Checkifpaperhasjammedinthemachinepriortothesensor.
Seepage46thatdescribeshowtoremovepaperjams.
(BackSensor)
(BackSensor)
Clip2NOTclear
Ifthemachinestopsanderrormessage11isdisplayedonthetouchscreen,this
indicatesthatthesensorisorwasblockedwhenitshouldhavebeenclear.
i.e.Ajaminthepaperpathorthewronglengthofpaperhaspassedthroughthe
sensor.
Tocorrect-checkifpaperispresentandcheckthatthepaperpathisclearbefore
restarting.Seepage46thatdescribeshowtoremovepaperjams.
Page52
(TopSensor)
FOLDING
Page 54

TroubleShooting
Clip2NOTBlocked (TopSensor)
Ifthemachinestopsanderrormessage12isdisplayedonthetouchscreen,this
indicatesthatthesensordidnotseethepaperatthecorrecttime.
i.e.Ajaminthepaperpath.
Tocorrect-Checkifpaperhasjammedinthemachinepriortothesensor.
Seepage46thatdescribeshowtoremovepaperjams.
ErrorScreens(Continued)
SENSORPOSITIONS
Clip1
(BackSensor)
Clip2
(TopSensor)
Overlap
Ifthemachinestopsanderrormessage13isdisplayedonthetouchscreen,this
indicatesthatthe‘LeadEdgeSensor’hasseenasheetsubsequenttothefirst
oneasbeinglonger.Againthiscouldactuallybealongersheet,ORitcouldbea
sensorproblem(ifitisarecurringproblem).Checkthatthepapergatehasbeenset
correctly.
Page53SYSTEM
Page 55

TroubleShooting
ErrorScreens(Continued)
LeadE
Ifthemachinestopsanderrormessage60isdisplayedonthetouchscreen,this
indicatesthattheleadedgesensorisblocked.
Pressthesystemswitchdownandthenselecttherightorleftarrows,toinchthe
paperforwardsorbackwards.
Pressthegreentickbuttonandthenpressthestartbutton.
Thiserrormessagecouldalsomeanthattheleadedgesensorsarefaultyorneed
cleaning.
dgeSensorFault
.
Page54
FOLDING
Page 56

ErrorScreens(Continued)
CleanLeadEdgeSensor-WarningScreens.
1.TheCleanLeadEdgeSensorwarningscreen,shownbelow,willappearwhenthe
RunbuttonispressedandthestrengthoftheLeadEdgeSensorBeamisatabout
50%(i.e.thesliderisataboutthemid-pointpositionalongtheIndicatorScale).
SENSORCLEANINGWARNINGSCREEN
PresstheToolsbuttontocleanthe
Sensors,asdescribedonPages56&57.
PresstheRunbuttontoignoretheWarning,
andcontinuerunningthejob.
2.TheCleanSensor,Error65warningscreen,shownbelow,willappearifthestrength
oftheLeadEdgeSensorBeamisallowedtogetdowntoabout25%.TheLeadEdge
Sensorsshouldideallybecleanedbeforethiswarningscreenappears.
NOTE.
TheLeadEdgeSensorscanbecleanedatanytimebyselectingtheToolsTab
atthebottomoftheTouchscreenandcleaningtheSensorsasdescribedonPages56&
57.
Page55SYSTEM
Page 57

TroubleShooting
ErrorScreens(Continued)
LeadEdgeSensorCleaning.
SelecttheToolsmenuontheTouchscreenDisplay,andthenselectthecleansensor
icon
ThescreennowshownisavisualindicationofthestrengthoftheLeadEdgeSensorbeam.
FLASHING(GREEN/BLACK)TO
INDICATETHATTHESOFTWARE
ISINTERROGATINGTHESENSOR
BEAM
SLIDER
INDICATORSCALE
Theverticalindicatorscaleisdividedintofoursections,thepositionofthesliderindicates
thestrengthofthebeam.Thestrengthofthebeamisatitsstrongesttowardsthetophalfof
theindicatorscale(green)andatitsweakesttowardsthebottomhalfoftheindicatorscale
(red).Notethepositionofthesliderontheindicatorscaleandthencleanthesensorsas
describedonPage57.
NOTE:-
handsideoftheTouchscreenDisplayasshownbelow.
Thisverticalindicatorscaleisrepeatedasahorizontalindicatorscaleontheright
HORIZONTALINDICATORSCALE
Page56
FOLDING
Page 58

ErrorScreens(Continued)
Tocleantheleadedgesensorsopenthetopcoverunittoexposethebladeset.Usingth
SensorCleaningBrush(partnumber601-185),suppliedinthedispatchkit,slid
thebrushundertheballholderandpushitthroughtoreachtheupperandlowerleadedg
sensors.(SeeFIG.3andFIG.4below).Movethebrushbackwardsandforwardsseveral
timesacrossthesensorstocleanthem.Notethepositionofthesliderontheindicator
scale;theslidershouldhavemovednearertothetopofthescale,indicatingthatdustha
beenremovedfromthesensors.Thissensorcleaningoperationcanberepeatedagaint
seeifthesensorbeamstrengthcanbefurtherimproved.TheSensorscanalsobe
cleanedwithacanofcompressedair.
e
e
e
s
o
,
Page57SYSTEM
Page 59

TroubleShooting
Recommendedweeklyoperatormaintenance
Cleanallsensors.
Theleadedgesensorhousingislocatedonthelayedgesideofthemachinebetweentheinput
rollershafts.Withaslimbrushthesensorscanbecleanedwhenrequired.Passthebrushunder
theballholderandpushthroughuntilitpassestheinfeedrollers.Alternativelyitcanbeblown
withcompressedair.
TheJamSensorissituatedjustaftertheedgesensorandisinlineacrossthepaperpathwith
thereceiverintheoperatorsidesideplate.Thisisnotusualysensitivetodustbutifrequiredcan
beblownwithcompressedair.
Clip1sensorissituatedonthelowerguidesbeneaththedeliveryconveyorandcanbe
cleanedwhenrequiredusingaslimbrush.
Clip2sensorissituatedontheupperguidesinsidethetopcoverandcanbecleaned
whenrequiredusingaslimbrush.
Cleaninfeedrollersandoutputdrivehubsusingthecleaningkitsupplied
(cleaningkitpartnumber90-018).
Removeandcleanthebladeassembly.
TechnicianMaintenance
ItisrecommendedthatyourMachineisfullyservicedatleastonceeverysixmonthsbyafactory
trainedServiceEngineer.
Page58
FOLDING
Page 60

BLANK
PAGE
Page59SYSTEM
Page 61

DISPATCHKIT
ITEM PARTNUMBER QTY DESCRIPTION
174-036
1
2 90-018 1 ROLLERCLEANINGKIT
650-040 1 POWERCORDC19UK16A2.5m
3
170-009-01 2 BLADEREMOVALTOOL
4
601-167 1 DIGITALTHICKNESSGAUGE
5
403-01-030-006
6
7
409-01-040-004
8
620-007 1 HEXAGONBALLDRIVER2mm
620-020 HEXAGONBALLDRIVER2.5mm
9
1 OPERATORSMANUAL
12 SCREW-SOCKETCAPHEAD-M3x6LG
1 SCREW-SKT.SETFLATPT.-M4x4LG
1
-
10
620-026 1 BONDUSLWRENCH4mm
11
620-027 1 BONDUS WRENCH5mmL
12
624-025 1 STATIONERYTUBE330MMX50MM
13
170-002-01 QUICKSTARTCHART
14 624-018 1 DISPATCHBOX
15
1-99-35 1 SLITTINGANVILSET
1-99-12 1 SLITTERPERFBLADE28T16
613-229 1 WRITE-ONSERIALNO.LABEL17
65-104 1 SPECIFICATIONLABELMSL/CE18
1
Page60
FOLDING
Page 62

ACCESSORIESANDOPTIONS
ITEM PARTNUMBER DESCRIPTION
1
2
3
4
5
6
7
8
9
10
172-022-01
AC-75
AC-76
AC-77
AC-79
AC-70
172-04-01
173-169-01
AC-60
178-01-02
LOADINGTABLEEXTENSION
PERFORATINGBLADESET20T(Card)
PERFORATINGBLADESET28T(SingleSheets)
PERFORATINGBLADESET56T(FinePerfs)
ANVILSETUSEDWITHABOVEBLADESETS
DOUBLESHEETDETECTORKIT
NARROWSHEETKIT
ETHERNETKIT
DYNAMICBLADESET-ULTRANARROW
STACKERASSEMBLY-
ACCESSORIES....OPTIONS....
....Maybeobtainedfrom....Mayalsobeobtainedand
yourdealerandfittedtoyourfittedbyyourdealer.Youshould
machineusingtheinstructionsnotattempttofitoptionsas
supplied,orbyreadingyourspecialisttoolsandknowledgeare
operatorsmanual.required.
Page61SYSTEM
Page 63

RECOMMENDEDSPARES
PARTNO. DESCRIPTION
125-21-02DualStepperDriverBoard
125-25-01SmallStepperDriver-HighPower
174-06-01SmallStepperDriver-LowPower
174-01-02ControllerPCBAssembly+Chip
174-19-01RS232AdaptorPCBAssy.
75-500-01MiniITXMotherboard-
126-059-02Link-PaperGuide
128-026-03DeliveryBelt
145-093-02KnifeDriverPin-M8
76-261Lead-DeliveryInputConnector
173-57-01Lead-BladePositionSensor
173-45-01Lead-TiltPot
173-46-01Lead-GapSet3Pot
173-47-01Lead-GapSet2Pot
173-48-01Lead-GapSet1Pot
173-06-01PowerSupply-48V
173-06-02PowerSupply-24V
76-272PSUAssembly-ATX12V-300W
173-49-01StepperMotor-crease
76-240StepperMotor-Drive
76-257StepperMotor-FoldKnives
175-31-01InputrollerAssembly-Lower
175-31-04InputRollerAssembly-Upper
175-042-01FeedBelt
175-10-01EdgeSensorAssembly
75-06-02TouchScreenAssembly-7”(NewController)
175-11-01SensorBarAssembly
175-11-02SensorBarAssembly-Clip
175-11-03SensorBarAssembly
175-12-011stBladeAssembly
175-12-022ndBladeAssembly
175-125-01ConnectingLinkAssembly-Drive
175-125-02ConnectingLinkAssembly-KnifeHubs
175-29-01FoldRoller-1st
175-29-02FoldRoller-2nd
175-29-03FoldRoller-3rd
175-29-04FoldRoller-Fixed
Page62
FOLDING
Page 64

RECOMMENDEDSPARES
PARTNO.
DESCRIPTION
172-05-01PaperGateAssembly
175-21-01VacuumRollerAssembly
176-02-01BladeAdjusterAssembly
176-081-01WormWheel-GapSet
176-213-01DynamicBladeSet-Narrow
176-213-02DynamicBladeSet-Standard
177-01-01PerforatorAssembly
602-160PlainBush-creaseGuideBlock
604-100GasSpring-Perf.Unit
604-103GasSpring-Delivery
607-005Belt-VacuumRoller
607-045MultiBeamCoupler
607-171TimingBelt-Drive
607-175Belt-Drive
607-183TimingBelt-190XL062
681-020Fuse-500mA-20x5mm-Anti-surge
681-011Fuse-315mA-20x5mmAnti-surge-Ceramic
681-019Fuse-6.3A-20x5mm-Anti-surgeCeramic
652-047Fuse-15A-32x6.3mm-Anti-surge
613-351MicroSwitch-Guard
613-365EmergencyStopSwitch-DoublePole
626-007Anti-StaticSensorBar
652-011Switch-LowCurrentCoil-Black
75-512Anti-StaticTransformer-UL
175-28-01ButterflyValve-Stepper
76-262StepperMotor-RollerDrive
76-258StepperMotor-BeltDrive
76-259StepperMotor-RollerPosition
76-266Lead-FoldKnivesSensor
124-01-27Lead-DeliveryRollerPot
175-072-01Lead-JamDetector-Emitter
175-072-02Lead-JamDetector-Receiver
75-530-01TransformerAssy.-230Vto110V
NOTE.....
Theitemslistedaboverepresentpartswhicharesubjecttowear,loss,oraccidental
damage,andisincludedforyourguidanceonly.
Replacementofpartsfittedtoyourmachinerequirespecialistknowledgeandshould
thereforebeentrustedtoyourdealer.
Page63SYSTEM
Page 65

MACHINECALIBRATIONHISTORY
Date:-
TotalCount:-
VacSuckTrim
VacParkTrim
Stretch
LeadEdgeTrim
FollowStretch
Del.RollerTrim
Knife1Trim
Knife2Trim
K1DeflectTrim
K2DeflectTrim
K1Travel
K2Travel
Date:-
TotalCount:-
VacSuckTrim
VacParkTrim
Stretch
LeadEdgeTrim
FollowStretch
Del.RollerTrim
Knife1Trim
Knife2Trim
K1DeflectTrim
K2DeflectTrim
K1Travel
K2Travel
SerialNumber:-
TotalCount:-
VacSuckTrim
VacParkTrim
Stretch
LeadEdgeTrim
FollowStretch
Del.RollerTrim
Knife1Trim
Knife2Trim
K1DeflectTrim
K2DeflectTrim
K1Travel
K2Travel
Page64
Date:-
FOLDING
Page 66

FUSEPOSITIONS&RATINGS
(POSITIONETCLASSIFICATIONDESFUSIBLES)
TRANSFORMERASSY.
T500mAH250V(681-020)
PSUs(24V&48V)
(FUSIBLEPSUs(24V&48V)
T6.3AH250V(681-019)
ANTI-STATICUNIT
SPAREFUSE
POSITION
(POSITIONPORTE
FUSIBLE)
MAINSIN
F15AH250V(652-047)
Page65SYSTEM
Page 67

PRODUCTRECYCLING&DISPOSAL
DisposalInformationforCommercialUsers
Applicationofthissymbolonyourequipmentisconfirmationthatyou
mustdisposeofthisequipmentincompliancewithagreednational
Procedures.
InaccordancewithEuropeanlegislationendoflifeelectricaland
electronicequipmentsubjecttodisposalmustbemanagedwithin
agreedprocedures.
Priortodisposalpleasecontactyourlocaldealerorrepresentativefor
endoflifetakebackinformation.
DisposalInformationforDomesticUsers
Applicationofthissymbolonyourequipmentisconfirmationthat
youshouldnotdisposeoftheequipmentinthenormalhousehold
wastestream.
InaccordancewithEuropeanlegislation,endoflifeelectricaland
electronicequipmentsubjecttodisposalmustbesegregated
fromhouseholdwaste.
PrivatehouseholdswithinEUMemberStatesmayreturnused
electricalandelectronicequipmenttodesignatedcollection
facilitiesfreeofcharge.Pleasecontactyourlocaldisposal
authorityforinformation.
InsomeMemberStateswhenyoupurchasenewequipmentyour
localretailermayberequiredtotakebackyouroldequipment
freeofcharge.Pleaseaskyourretailerforinformation.
OtherCountries
Pleasecontactyourlocalwasteauthoritiesandrequestdisposalinformation.
Page66
FOLDING
Page 68

REVISIONHISTORY
ModNo.Rev. ModDescription Date ModBy
ScreenshotgraphicschangedtoshowtheLeadEdgeSensorIndicator
Bar,onallrelativepages.
4 ECO2809 02/01/13 BAL
NewpagesinsertedtoshowtheCleanLeadEdgeSensorWarning
ScreensandhowtocleantheLeadEdgeSensors.(Pages55to57)
Page67SYSTEM
 Loading...