

Page 1

6606 Series Inserters
8/2014
Operator Manual
Page 2

Table of Contents
How this Help Works ....................................................................................11
Help Menu........................................................................................................1
User Guide.......................................................................................................1
Meet your Document System .......................................................................32
Introduction.......................................................................................................3
System Overview.............................................................................................4
Operating Controls...........................................................................................6
Control Panel....................................................................................................7
Power Up..........................................................................................................7
How to Operate the Touch Screen...................................................................9
Open a Web Browser.....................................................................................11
What is a Job?................................................................................................11
Job List...........................................................................................................12
Job Overview..................................................................................................13
High Capacity Document Feeder (HCDF)......................................................15
Production Feeder (FD 6606-00).................................................................15
Thin Booklet Feeder (FD 6606-15).. .............................................................16
Catch Tray......................................................................................................17
Shut Down the System...................................................................................18
Working with Jobs ......................................................................................193
Introduction.....................................................................................................19
Use an Existing Job........................................................................................19
Create a New Job...........................................................................................20
About Automatic Jobs....................................................................................21
Create an Automatic Job................................................................................21
Create a Manual Job......................................................................................23
Create an Test Mail Set..................................................................................35
Page 3

Mail Sets.........................................................................................................41
Change to Another Feeder Tray.....................................................................47
Link Feeder Trays...........................................................................................47
Edit a Job.......................................................................................................48
Save a Job.....................................................................................................49
Delete or Move an Enclosure.........................................................................50
Copy a Job.....................................................................................................51
Lock a Job......................................................................................................51
Rename a Job................................................................................................53
Delete a Job...................................................................................................54
Loading the System ....................................................................................554
Document Orientation....................................................................................55
Document Feed Trays....................................................................................56
Load Envelopes..............................................................................................66
Adjust the Side Guides and Envelope Separation.........................................67
Fill the Sealing Liquid Reservoir.....................................................................68
Options ........................................................................................................695
Support for Curved Reply Envelopes (option for Thin Booklet Feeder).........69
Power Stacker Support..................................................................................69
High Capacity Envelope Hopper (FD 6606-30/EF-4).....................................70
High Capacity Conveyor Belt (FD 6606-25)..................................................72
Settings menu .............................................................................................746
Open the Settings Menu.................................................................................74
Open the Settings Menu (Supervisor)............................................................76
Supervisor Settings Menu..............................................................................78
Connect the System to the Internet ..........................................................957
Options for Connection...................................................................................95
Set up a Wired Connection............................................................................95
Set up a Wireless Connection........................................................................97
Test the Connection........................................................................................99
Page 4

Reading ......................................................................................................1008
Introduction...................................................................................................100
OCR Code Description.................................................................................101
BCR Code Description.................................................................................104
OMR Code Description................................................................................108
Flex Reading Code Description....................................................................112
Create Jobs with Reading............................................................................113
Reading Settings..........................................................................................119
Exit Selection with Reading..........................................................................122
Operator Maintenance ..............................................................................1239
Maintenance Schedule.................................................................................123
Clean and Replace Brushes.........................................................................124
Replace or Clean Moistening Cloth..............................................................125
Calibrate Photocells.....................................................................................126
Fault Finding .............................................................................................12710
Messages.....................................................................................................127
Clear Stoppages...........................................................................................130
Operator Troubleshooting.............................................................................136
Troubleshooting Table..................................................................................137
Specifications ............................................................................................14211
Technical Specifications...............................................................................142
Hopper and Feeder Capacity.......................................................................143
Configuration Dimensions............................................................................143
Document and Insert Specifications.............................................................143
Envelope and Document Set Specifications................................................144
Production Feeder Specifications...............................................................145
Thin Booklet Feeder Specifications.............................................................146
High Capacity Envelope Hopper Specifications...........................................147
High Capacity Conveyor Belt Specifications................................................148
Terminology ...............................................................................................14912
Page 5

How this Help Works1
Help Menu
The help button [?] gives access to help topics via a pull-down menu.
The contents of the help menu can be different for your situation. The help menu can contain
the following topics:
• Search; use the search engine to find a specific topic.
• User Guide; user instructions describing how to use the system.
• FAQ's (option); when the system is connected to the internet, frequently asked
questions are answered here (option).
• What can I do here; a list with relevant help topics related to the current screen.
• Remote assistance (option); online remote assistance for helpdesk guidance. Call
the phone number that is displayed and follow the instructions of the support assistant.
User Guide
1
English
You can use this guide as follows:
• Use the contents overview to browse the contents.
• Use the keyword search, to enter a keyword for the search. The information button
at the keyword search supplies detailed information on how to optimize the search.
• If necessary, use the advanced search to narrow down your keyword search to better
matching results.
1
Page 6
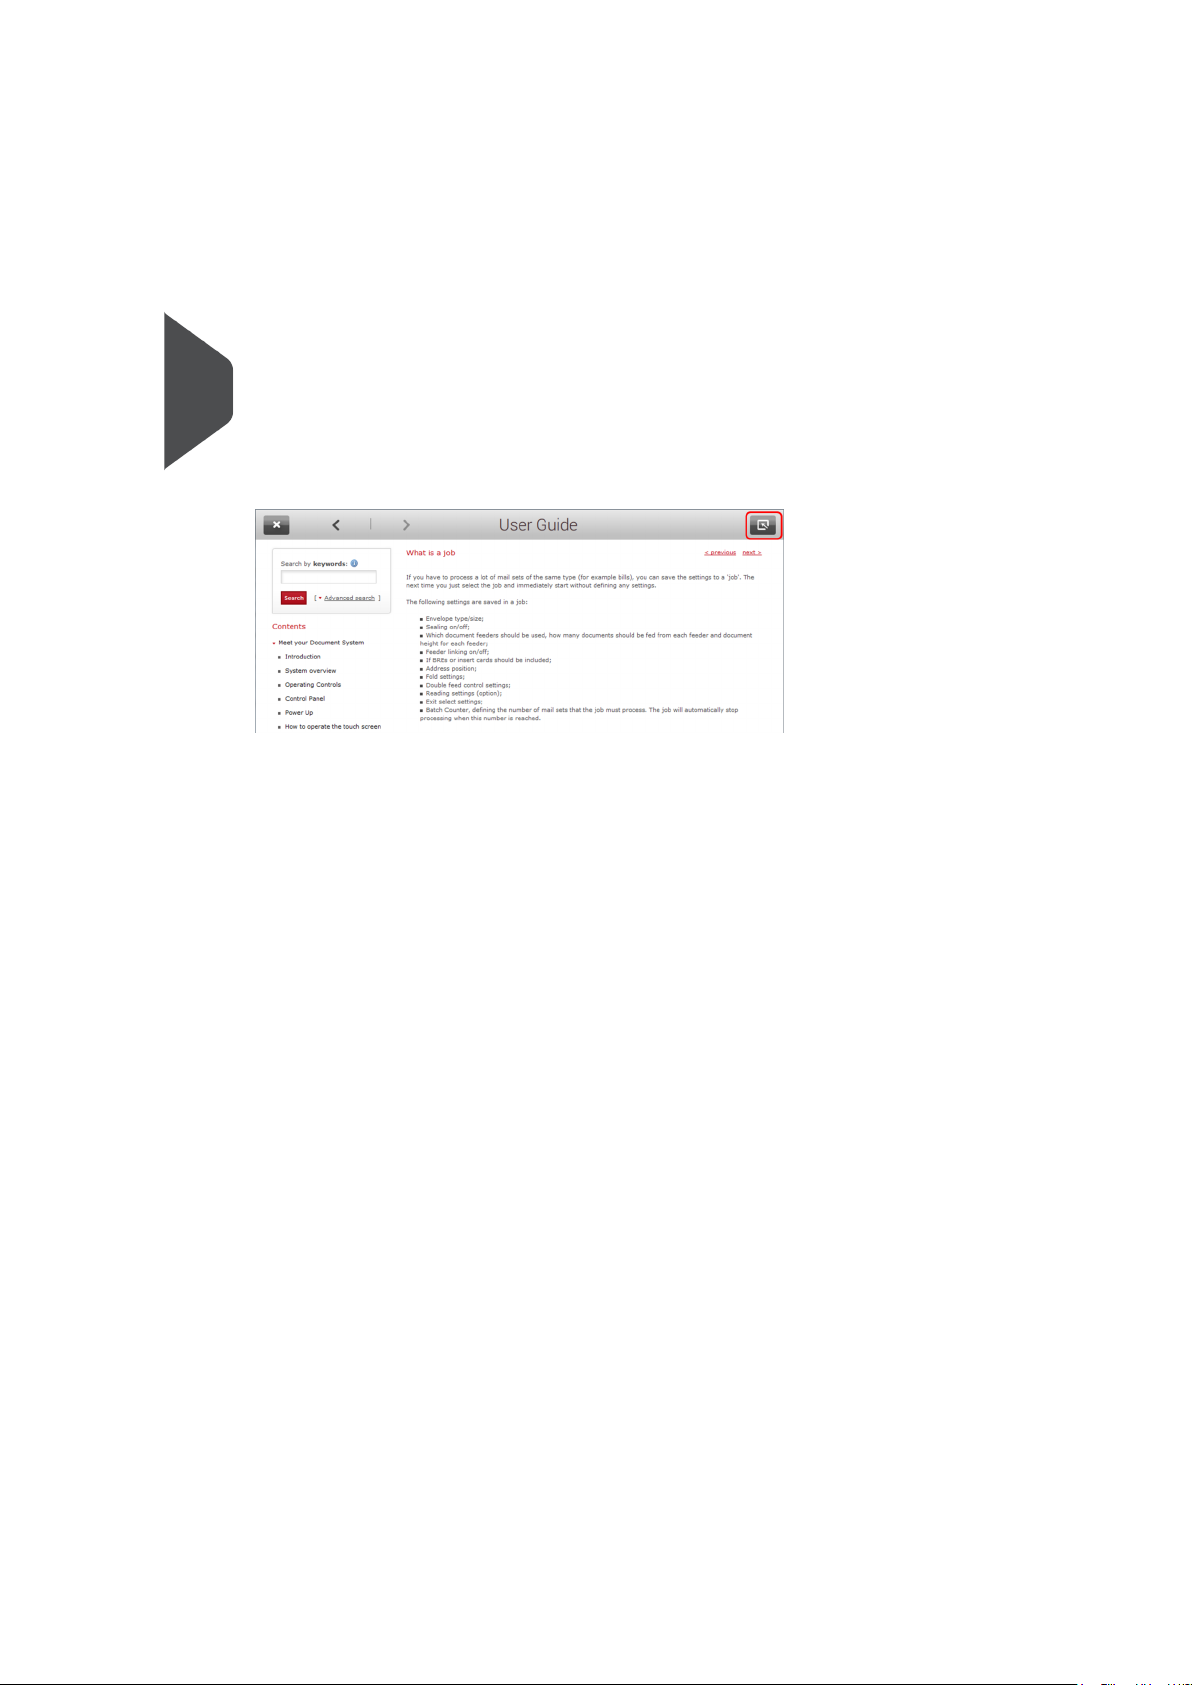
To navigate through the User Guide:
• Tap to select
• Swipe up/down to scroll
• Double tap to zoom
1
English
• Pinch in/out to zoom in/out
See also How to operate the touchscreen on page 9.
When you use the User Guide, you can minimize it, to operate the system. Use the minimize
button to minimize the User Guide.
The help button shows a purple color when the User Guide is minimized. When you click
the help button, the User Guide is restored.
2
Page 7

Meet your Document System2
Introduction
The system is a folding and inserting system for processing mail easily. The system:
• feeds documents
• folds the documents
• inserts the documents into envelopes
• seals the envelopes
• stacks the envelopes
Automatic monitoring ensures the correct number of documents per envelope. The system
can be operated by means of a user friendly interface. The settings of the system (type of
documents, type of envelopes and the type of fold) are recorded in so called jobs. These
jobs can be created by the operator.
The system is equipped with a variety of special features, such as:
• mail set thickness detection
• job wizard for creating jobs
• Double Feed Control
• feeder tray linking
• feeder tray swapping
• daily mail
• Flexible Feeders on page 4
• Divert Deck on page 4
• Folding Power on page 4
Operator and supervisor
2
English
You can use the system as operator and as supervisor. The supervisor has access to more
settings than the operator. You can switch from operator to supervisor in every screen.
When you switch to supervisor, you see immediately the result: extra tabs appear for the
advanced settings. Also the side menu contains extra functions.
3
Page 8
System Overview
2
English
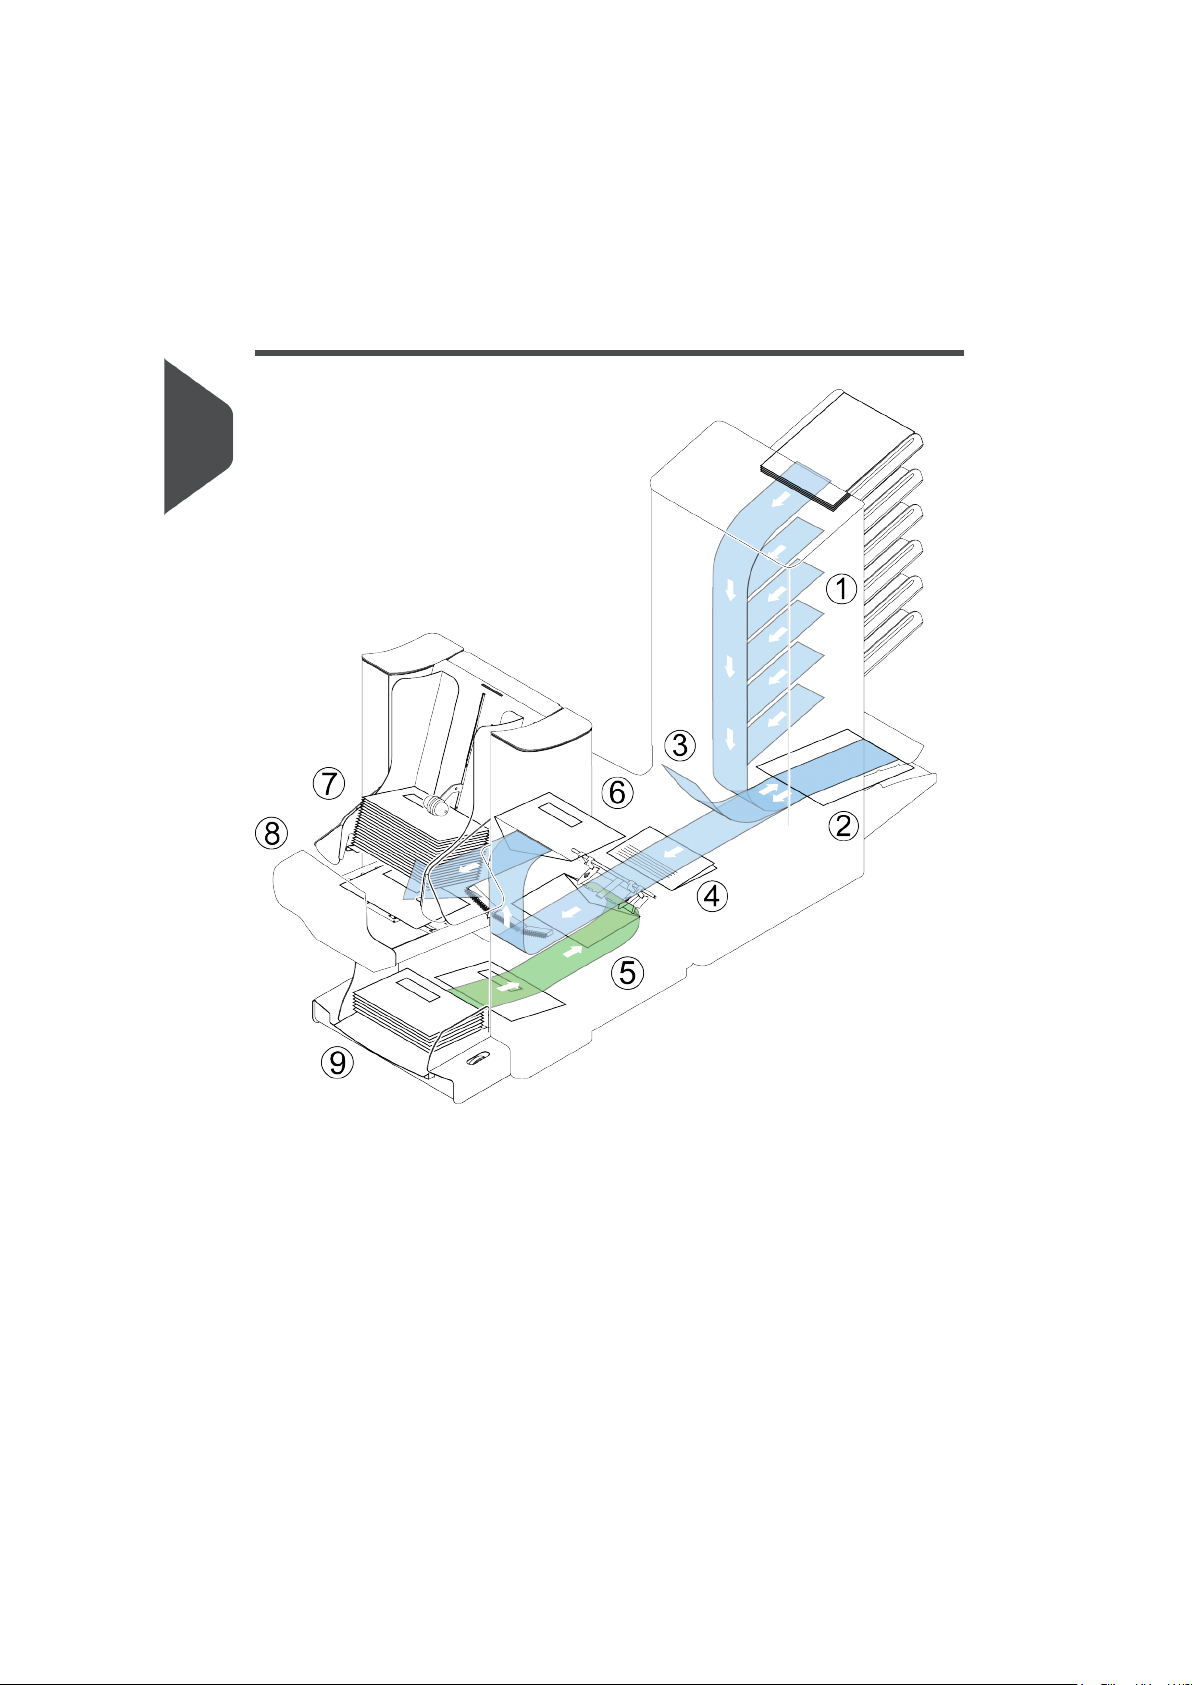
The figure shows an overview of the system.
Document Feeders (1)
The Document Feeders are the
automatic and the special feeder. The automatic feeder does not require any adjustments for
the separation. From a feeder you can feed one or more documents (multi feed). The feeders
have a double feed control (DFC). DFC detects if more documents are fed instead of one.
You can link feeders. This means that two feeders can be linked as pairs. When the first
feeder is empty, the system switches to the other feeder. Meanwhile the empty feeder can
be refilled without stopping the system.
feeding part of the system. There are two types of feeders: the
4
Page 9

| Page 5 | feb-24-2014 01:32 | Meet your Document System
The upper automatic feeder is equipped with a 'daily mail' function. You can use this feeder
to process sets of documents that you cannot process automatically (stapled documents
and sets with varying thickness).
Collating Area (2)
All documents of a document set are collated and aligned in the collating area.
Divert Deck(3)
The Divert Deck automatically throws out incorrect sets of documents. In this way the
system does not need to stop. Correct sets will be transported to the folding unit.
Folding Unit (4)
The fold unit folds the documents. The following fold types are possible (see Terminology
on page 149):
• No fold
• V-fold
• C-fold
• Z-fold
• Double V-fold
Inserter (5)
After the documents are folded, the documents are transported to the inserter. The inserter
inserts the documents into a waiting envelope. The inserter seals the envelope or not,
depending on the settings. Automatic monitoring ensures the correct number of inserts per
envelope.
Present on Deck (6)
The documents inserted (or not) can leave the inserter from the upper unit (present on
deck). This can occur when:
• Clearing the machine;
• Making a test set;
• Depending on the reading code.
Stacker (7)
The documents inserted (or not) are transported to the stacker depending on the
programmed job. The stacker automatically stacks inserted documents.
Side exit (8)
The documents inserted are transported to the side exit depending on the programmed
job. The side exit can be used for sorting and stacking of documents into the catch tray as
well as transporting to the optional conveyor belt or franking/mailing machine.
Envelope Hopper (9)
Envelopes that are placed on a stack by the user, are fed one by one into the system by
the envelope hopper.
2
English
5
Page 10
| Page 6 | feb-24-2014 01:32 | Meet your Document System
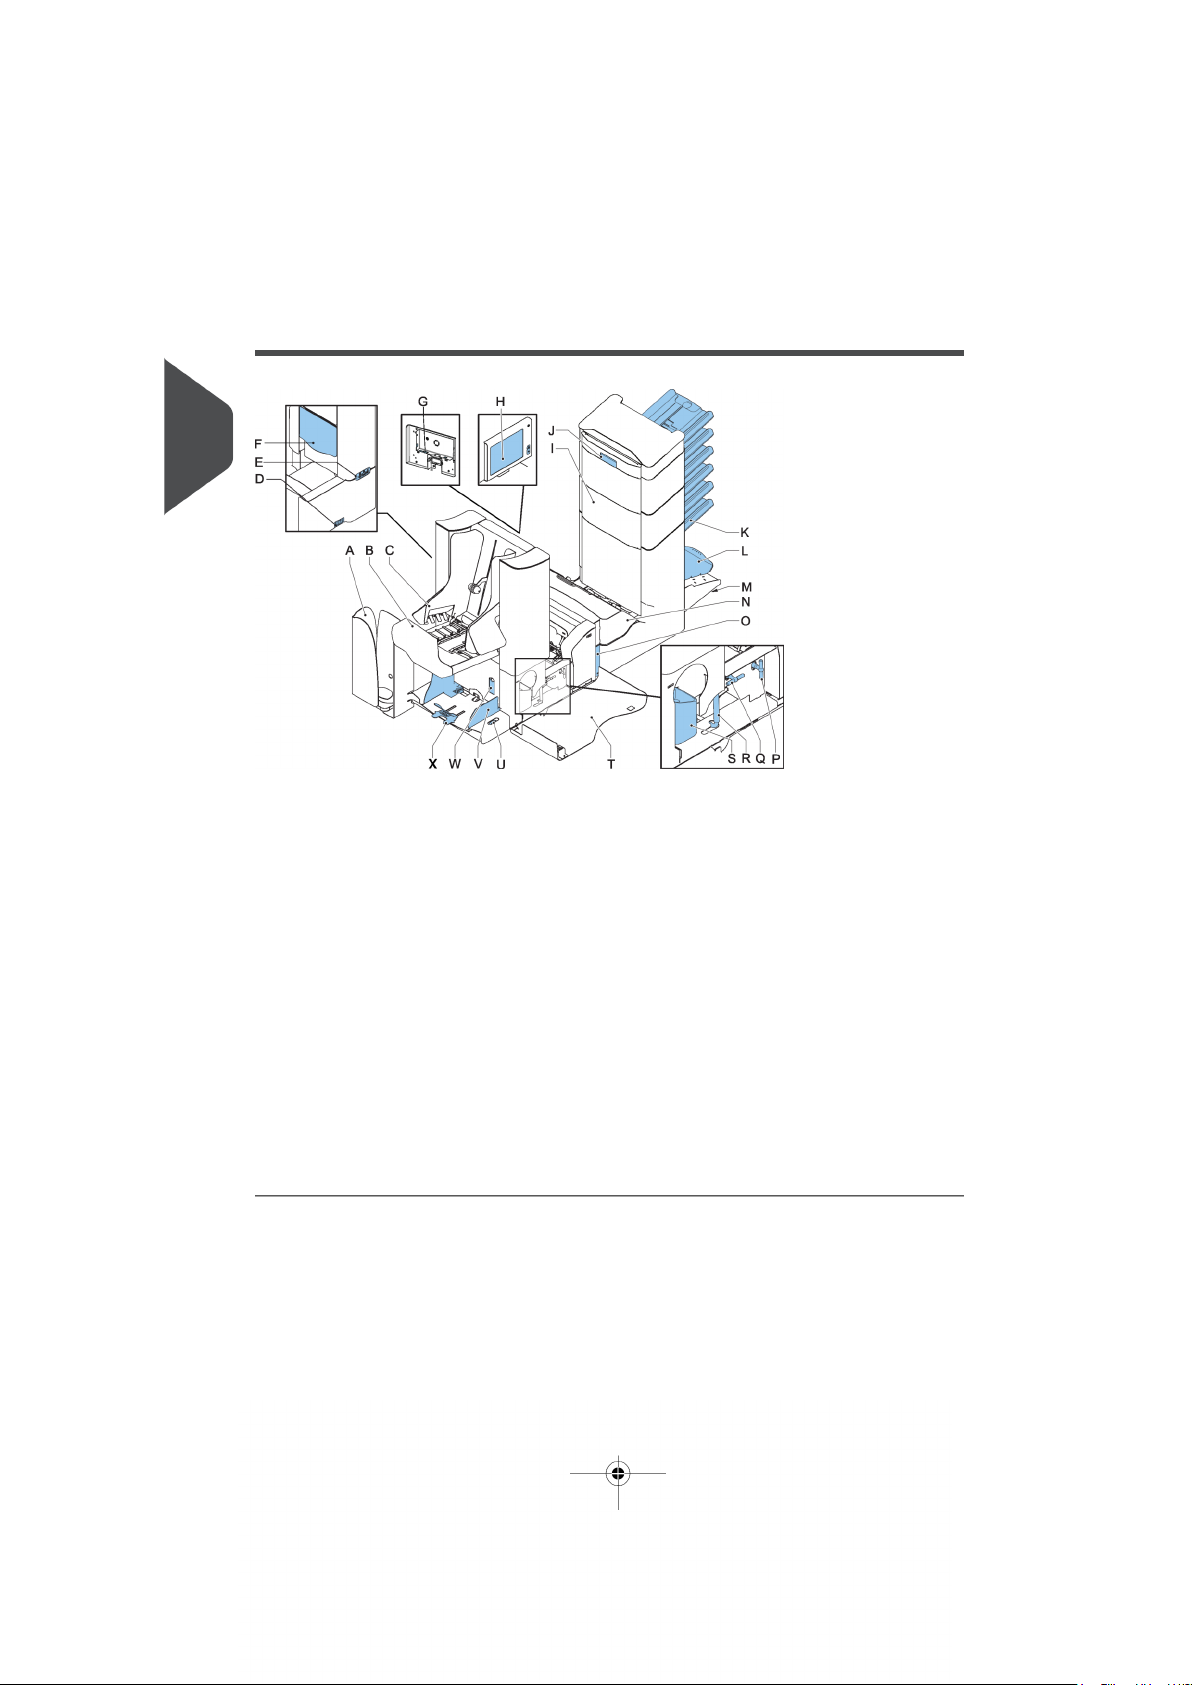
Operating Controls
2
English
A - catch tray (optional)
B - side exit / stacker unit
C - side guides stacker
D - power inlet, power switch
E - USB (service only)
F - unlocking lever for upper unit
G - USB (2x), RS232 and ethernet
H - control panel
I - vertical transport
J - hand grip vertical transport cover
K - document feed tray
L - collator arm
M - Divert Deck
N - Folding unit
O - locking handle Folding unit
P - handle for manual transport of the envel-
ope
Q - handle for manual transport of the mail
set
R - unlocking handle for rollers envelope
track
S - sealing liquid reservoir
T - side cover (opened)
U - thumb wheel for side guide adjustment
V - side guides envelope feed tray
W - flap for envelope separation adjustment
X - envelope support
6
Page 11
| Page 7 | feb-24-2014 01:32 | Meet your Document System
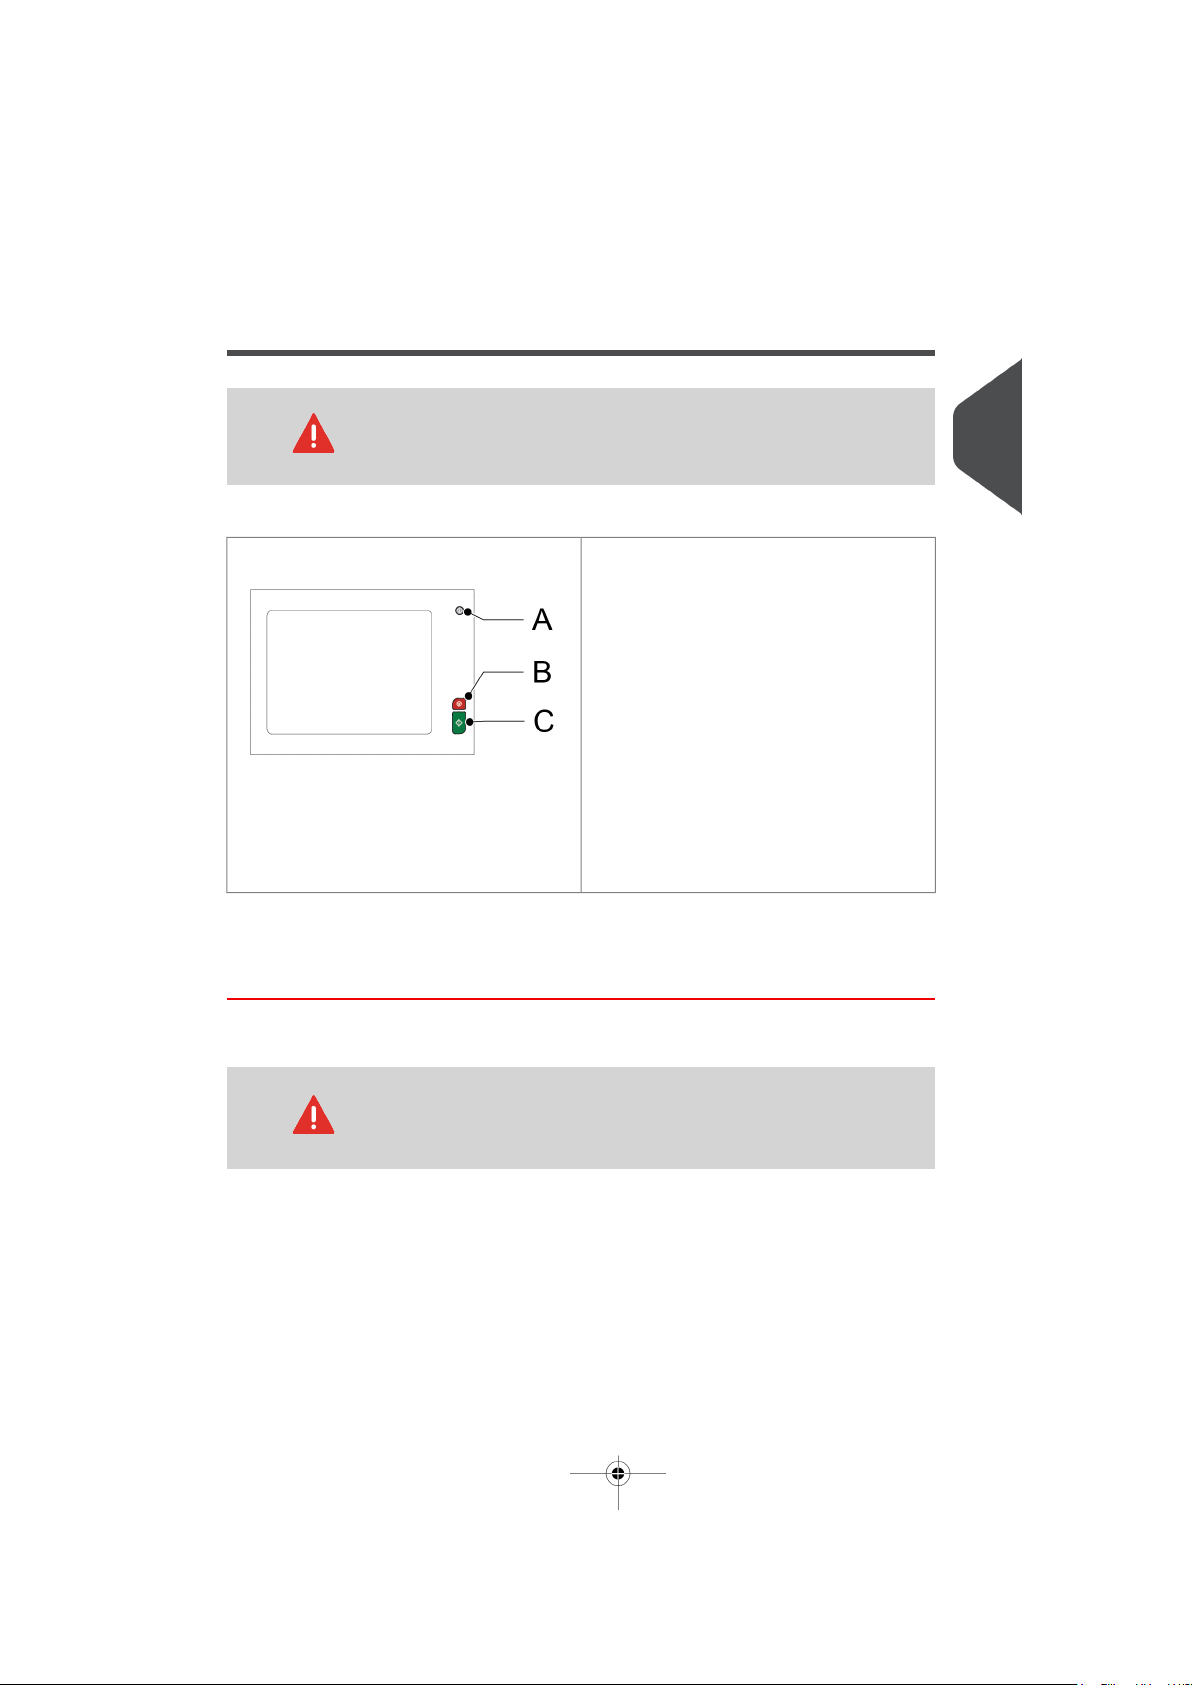
Control Panel
The touch screen is covered with a thin pressure-sensitive layer.
To avoid permanent damage of the touch screen, do not use sharp
objects to press on the touch screen.
2
The control panel consists of the touch screen and the following buttons:
A: On/Off button. Switches the system on or
off. If the system is not used for one hour,
the system switches to the power save
mode. Press the On/Off button to switch back
to the user mode.
B: Stop button. The system completes the
current mail set and stops, leaving the system empty and ready for a new set. The Stop
button and [Stop] on the touch screen have
the same functionallity.
C: Start button. The system starts to process
mail sets. The Start button and [Start] on
the touch screen have the same functionallity.
Power Up
To start up the system:
You can severely damage the machine if it is connected to the
incorrect mains voltage. Before plugging in the machine, check if
the local voltage is the same as the voltage mentioned on the type
plate.
English
1. Connect the system to the mains power supply.
7
Page 12
| Page 8 | feb-24-2014 01:32 | Meet your Document System
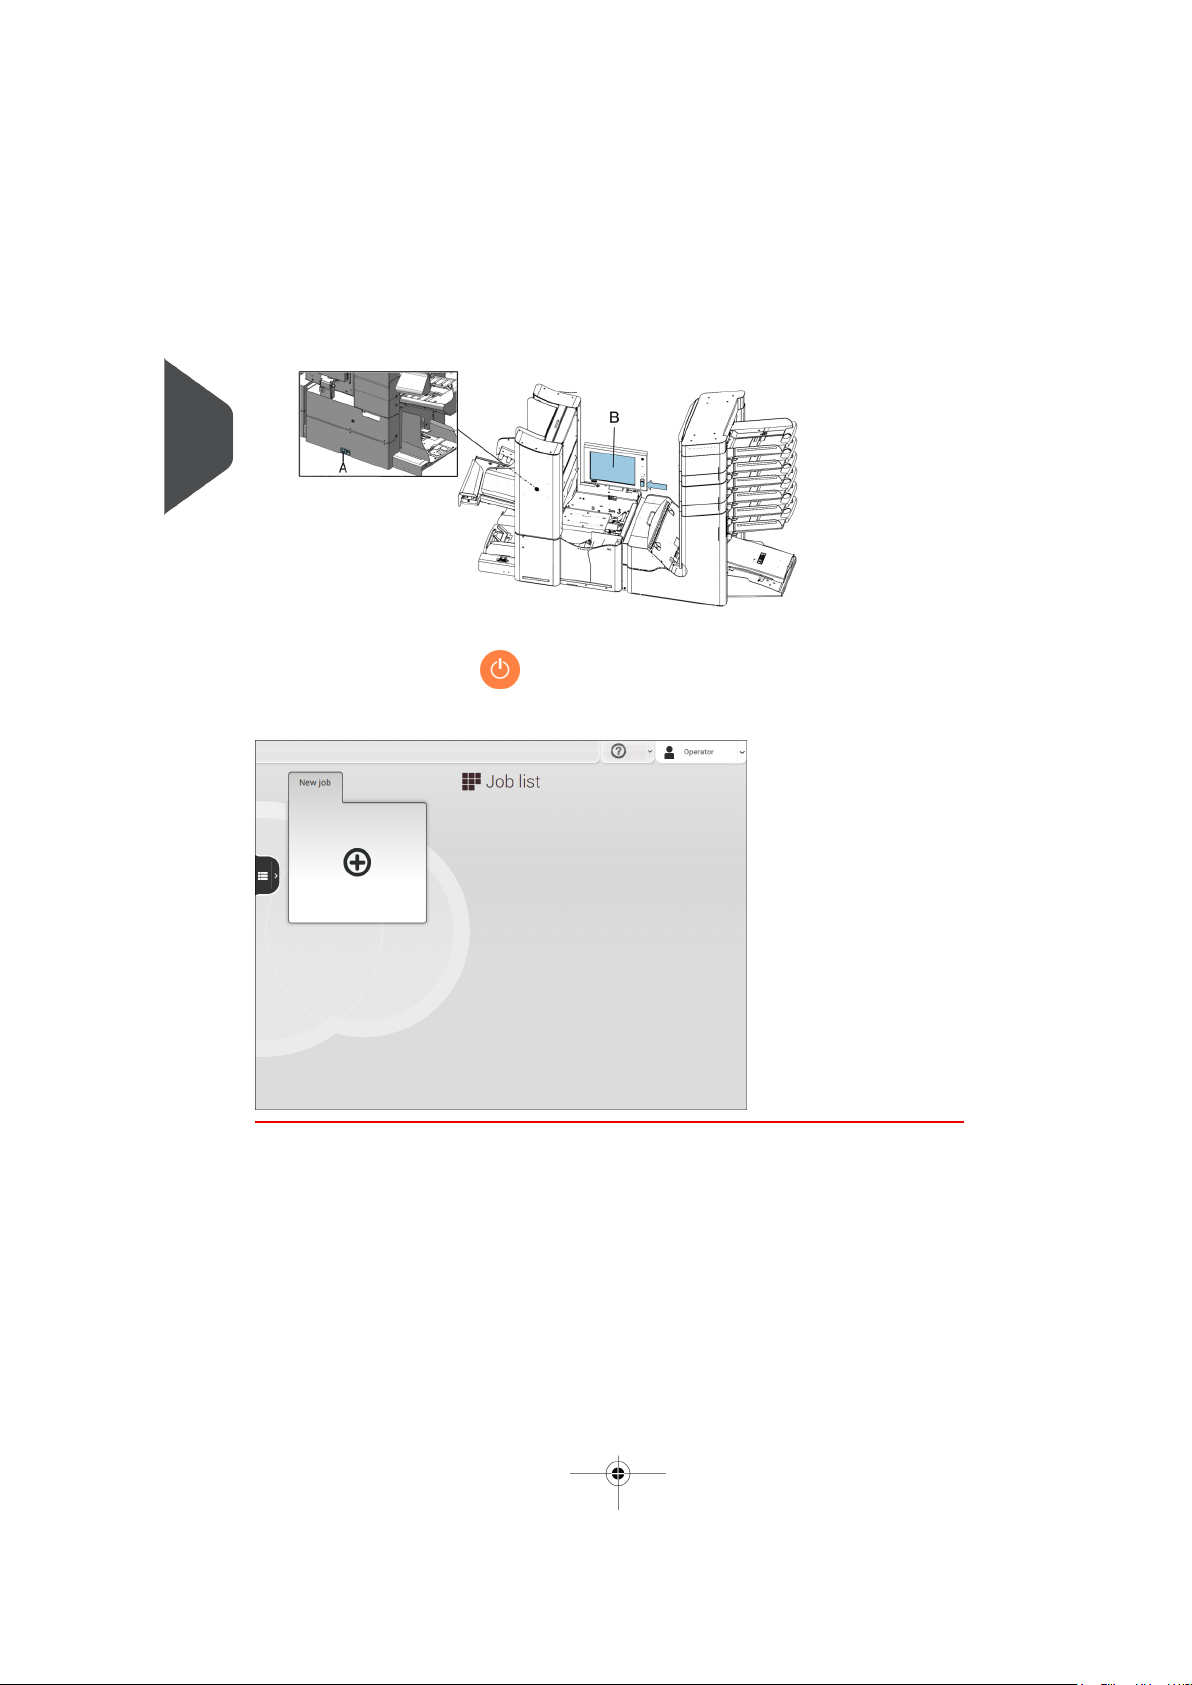
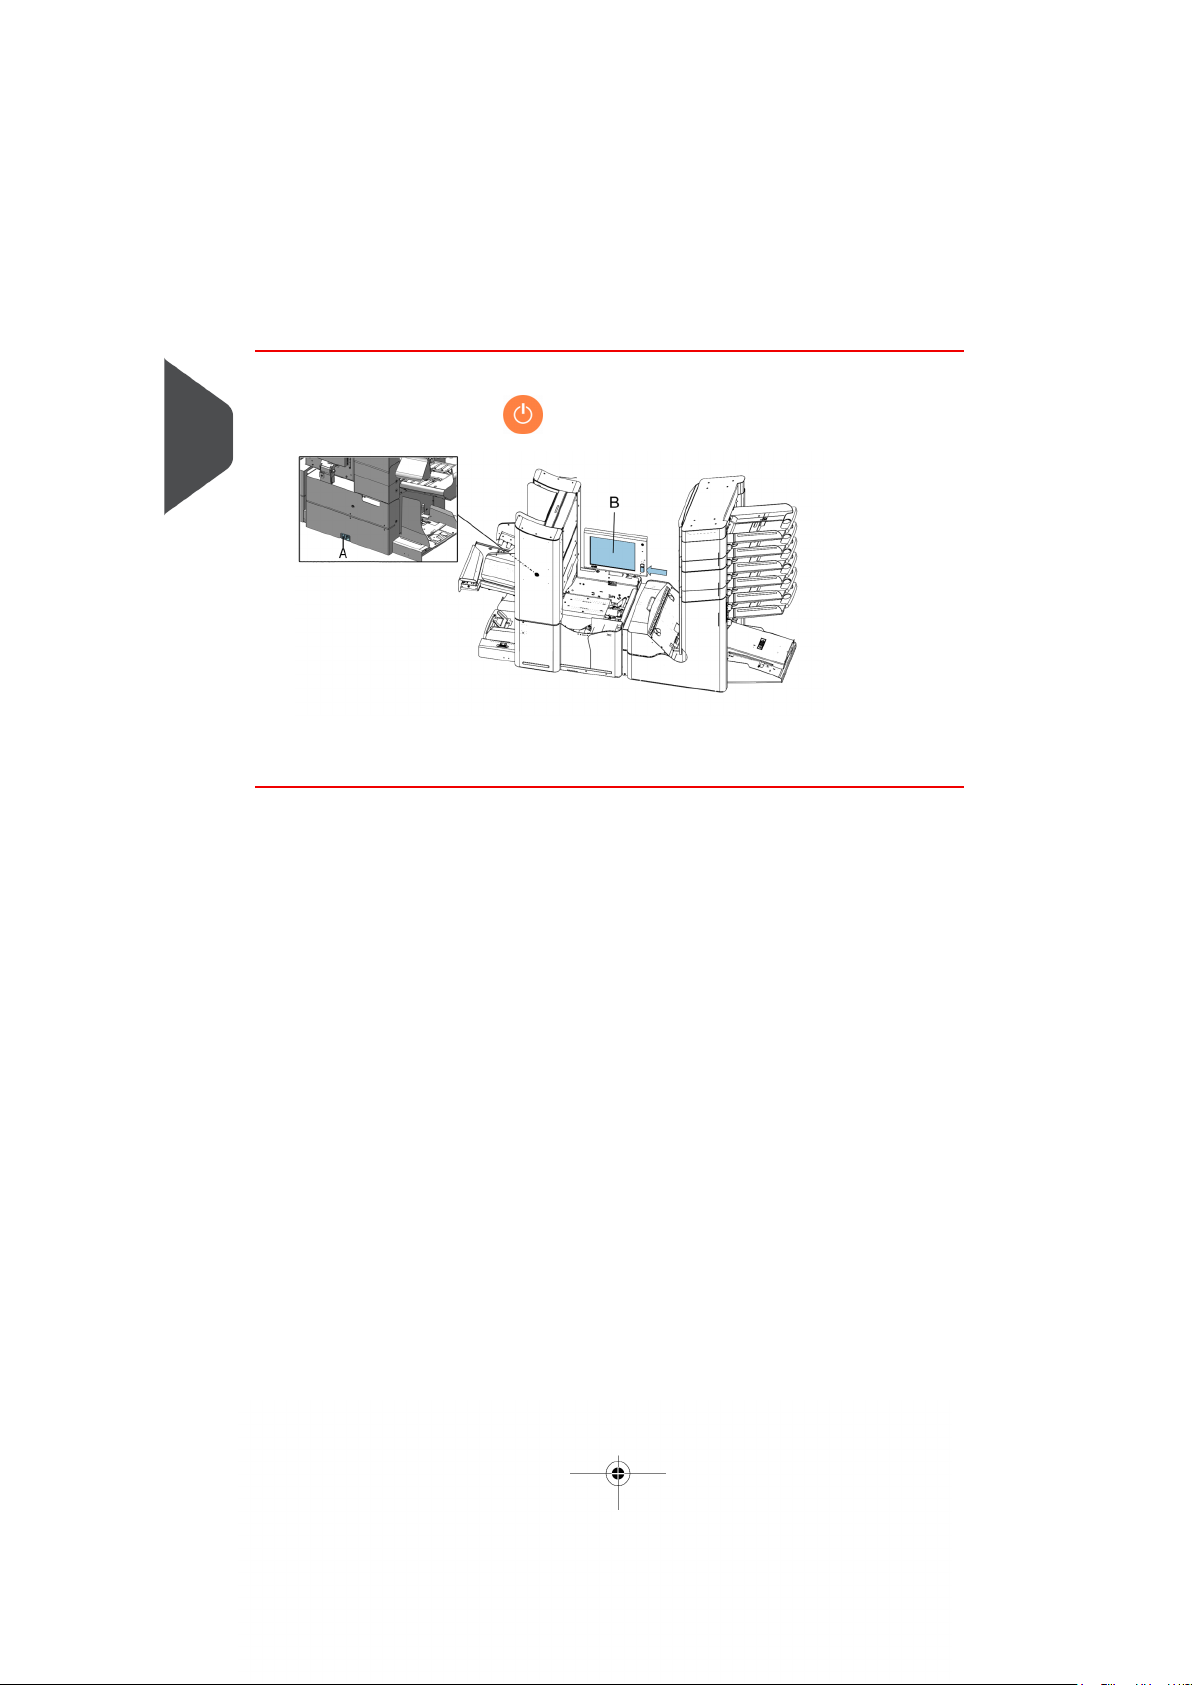
2. Use the power switch A to switch the system on. The power switch is located on the
back of the system.
2
English
3.
Press the on/off button next to the display B.
The touch screen shows the Job list screen.
8
Page 13
| Page 9 | feb-24-2014 01:32 | Meet your Document System
How to Operate the Touch Screen
You can operate the touch screen like a tablet:
• Tap: touch and release the screen with your finger
2
English
• Swipe: touch the screen, hold it and move your finger(s) left or right
• Tap and hold: touch the screen with your finger and hold it for two seconds
9
Page 14
| Page 10 | feb-24-2014 01:32 | Meet your Document System
2
English
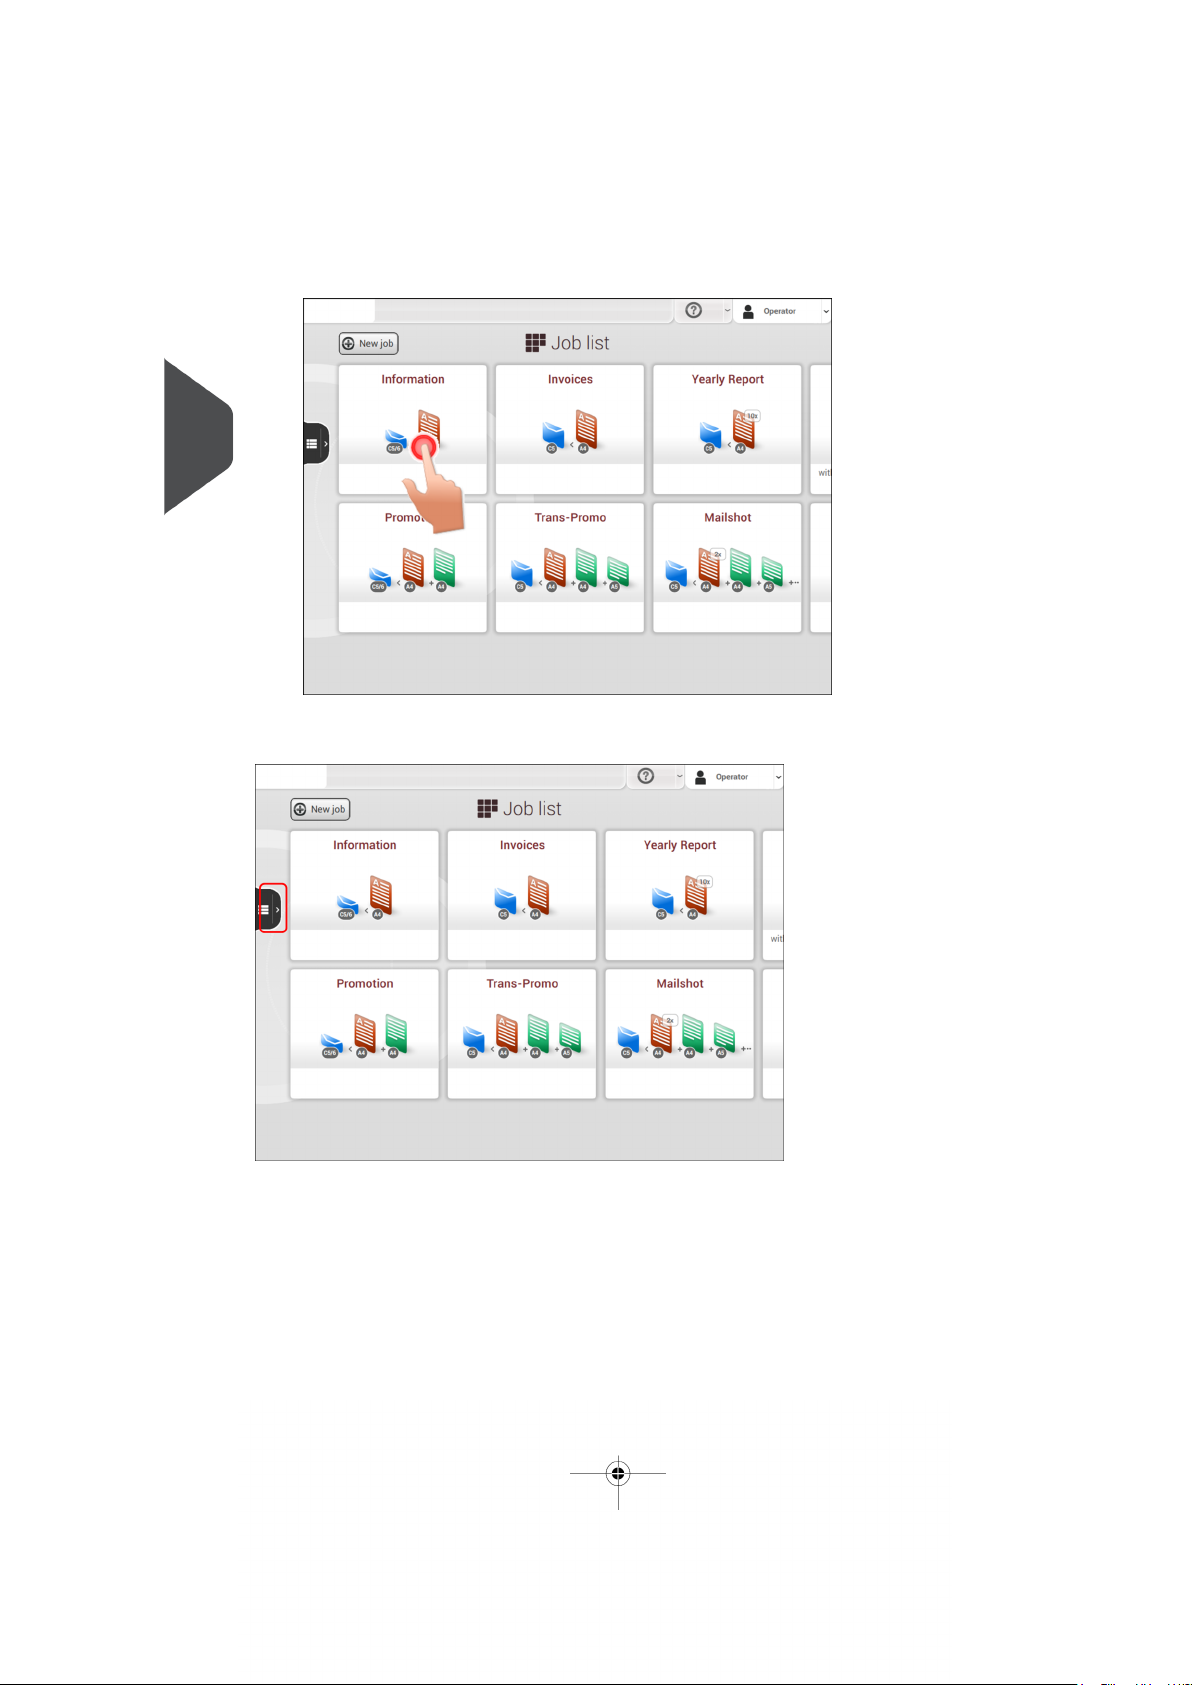
Some screens have a side menu. Which functions the side menu contains, depends on
the screen you are working in, and on authorization on page 3.
To open the side menu, tap the icon on the left.
10
Page 15
| Page 11 | feb-24-2014 01:32 | Meet your Document System
Open a Web Browser
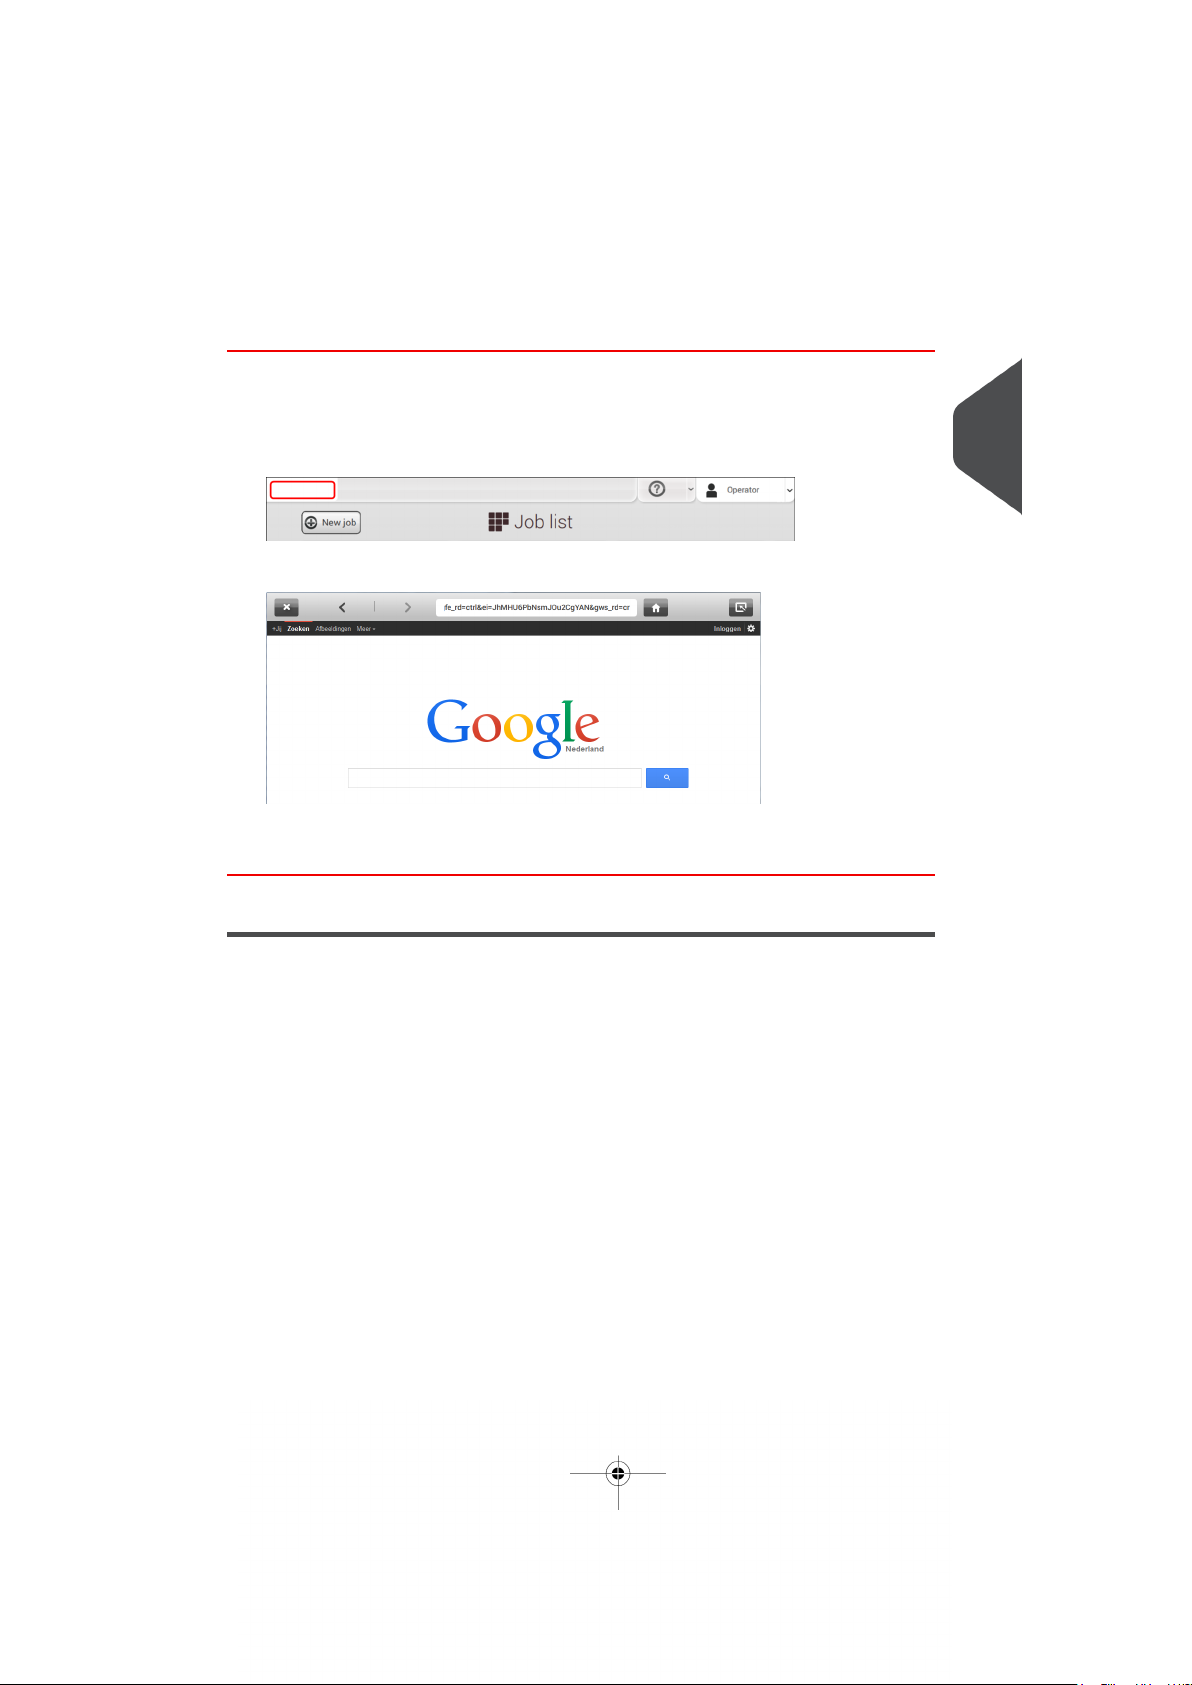
You can open a web browser in the user interface of the system. Open the web browser
as follows:
Tap on the logo in the upper left corner of the screen.1.
2. Tap the cross in the upper left corner of the screen to close the web browser.
If you work with a special keyboard for your language, you can switch the keyboard back
to the English version on page 82 to type e.g. a web address.
What is a Job?
If you have to process a lot of mail sets of the same type (for example bills), you can save
the settings to a 'job'. The next time you just select the job and immediately start without
defining any settings.
The following settings are saved in a job:
• Envelope type/size;
• Sealing on/off;
• Which document feeders should be used, how many documents should be fed from
each feeder and document height for each feeder;
• Feeder linking on/off;
• If BREs or insert cards should be included;
• Address position;
• Fold settings;
• Double feed control settings;
• Reading settings (option);
• Exit select settings;
• Batch Counter, defining the number of mail sets that the job must process. The job
will automatically stop processing when this number is reached.
2
English
11
Page 16
| Page 12 | feb-24-2014 01:32 | Meet your Document System
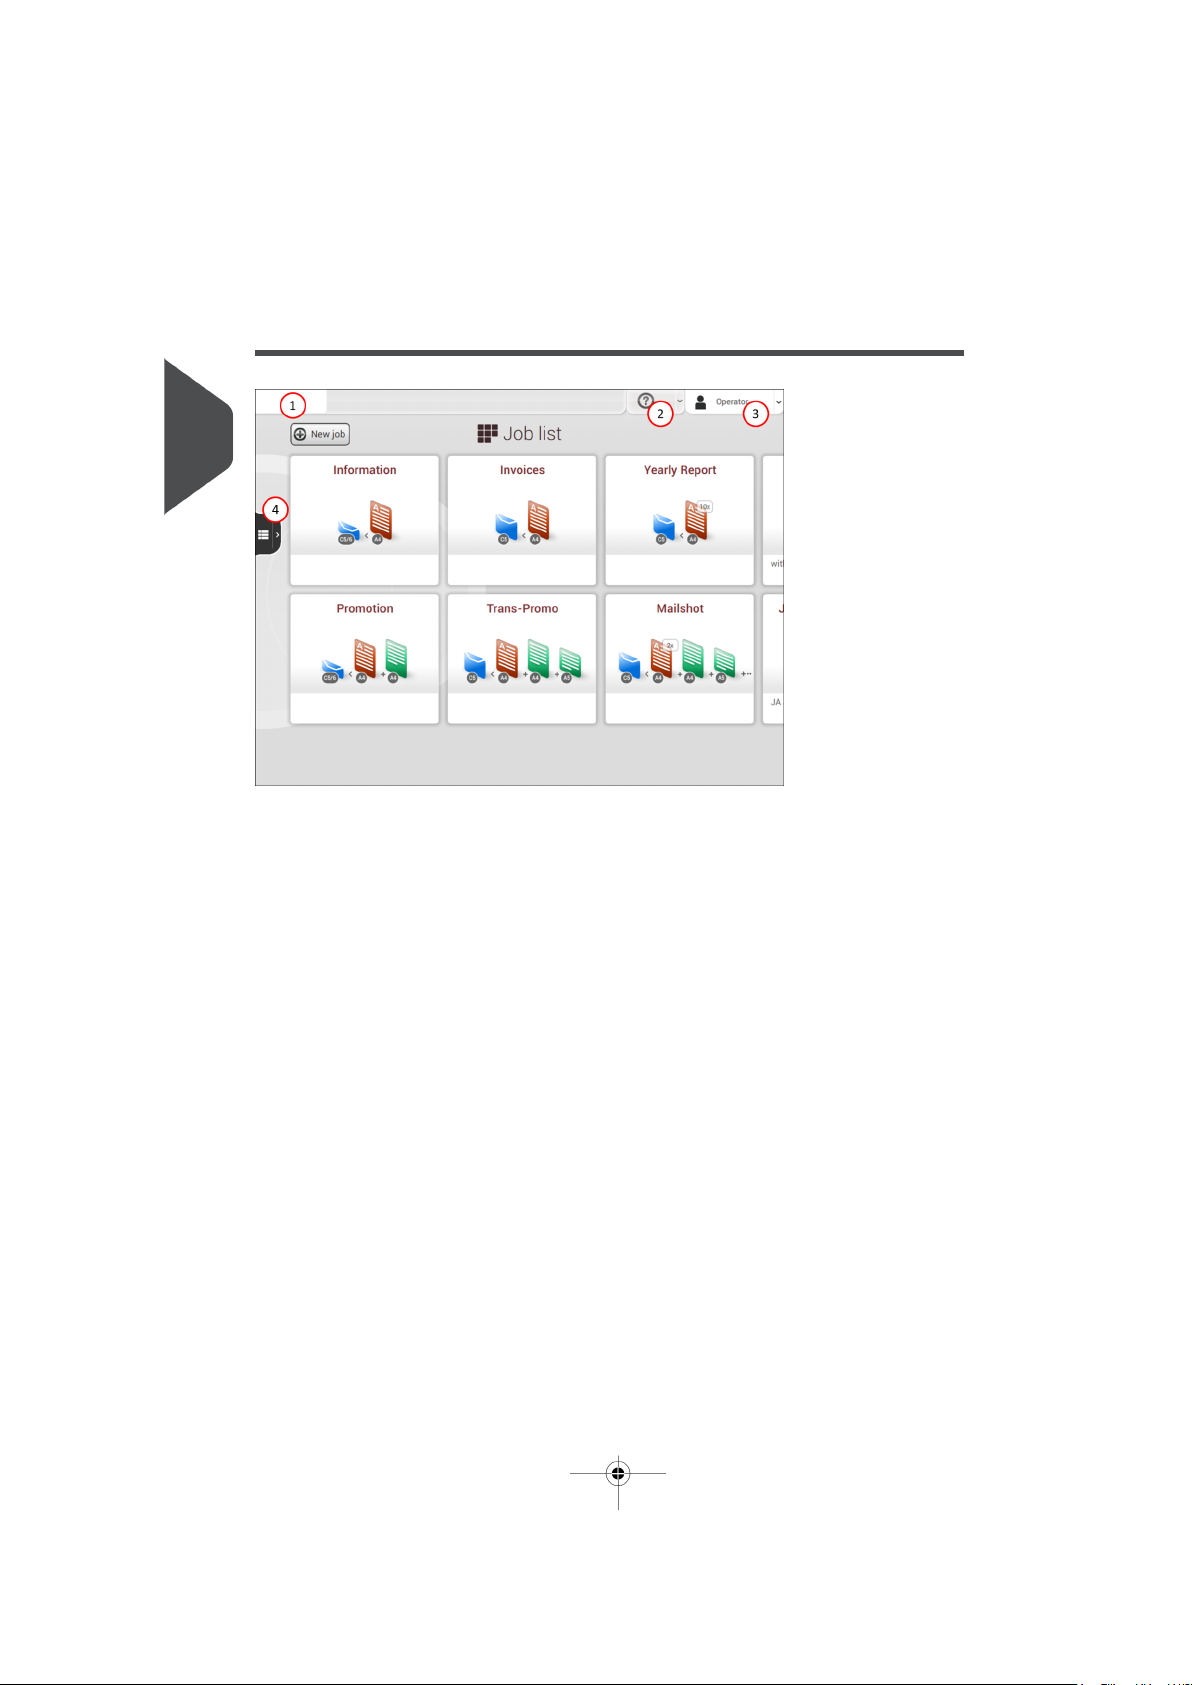
Job List
2
English
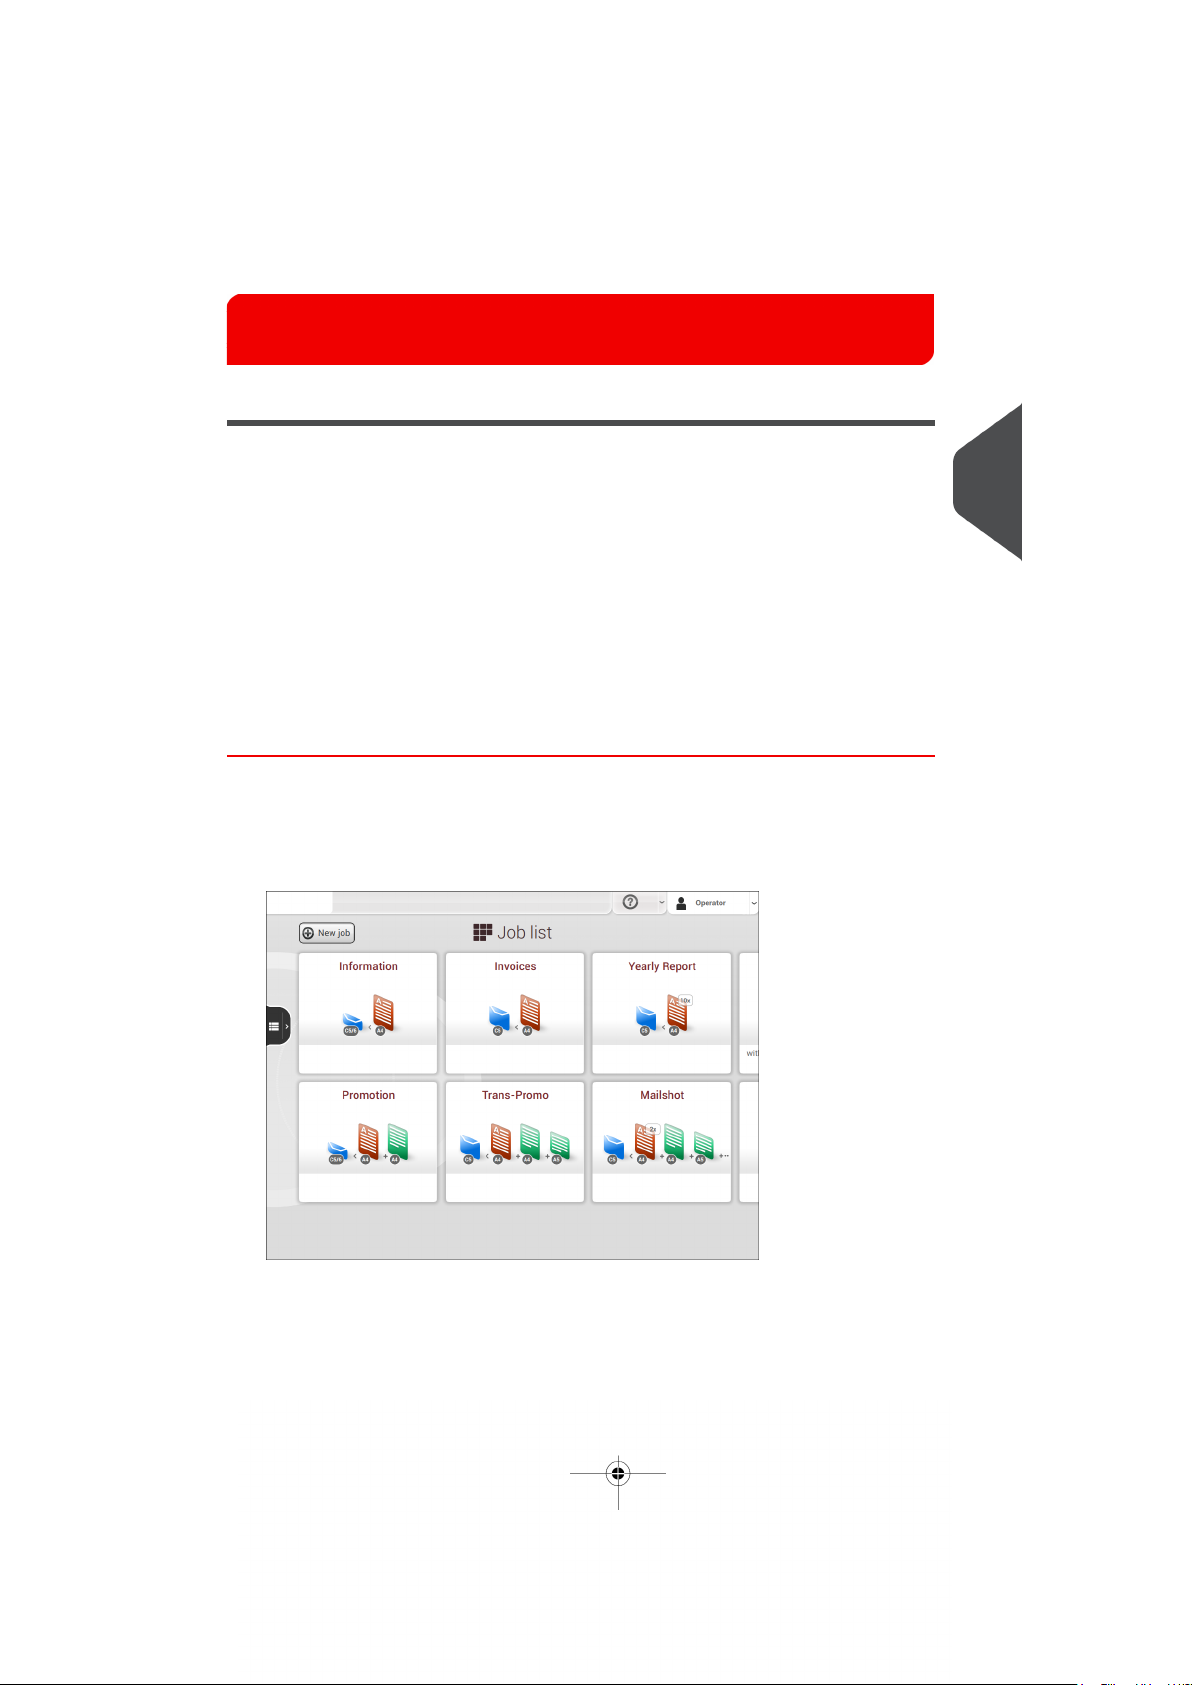
When you start up the system, the ‘Job list’ menu appears.
1. Open a web browser on page 11
2. Help menu on page 1
3. Login, see Introduction on page 3
4. Side menu
The side menu contains the settings menu (see Settings menu operator on page 74). When
you are logged in as supervisor, the settings menu is extended with advanced settings
(see Settings menu supervisor on page 76).
If you want more information on a job, select the job. With the [Job list] button you get
back to the home menu.
See also: Working with Jobs on page 19.
12
Page 17
| Page 13 | feb-24-2014 01:32 | Meet your Document System
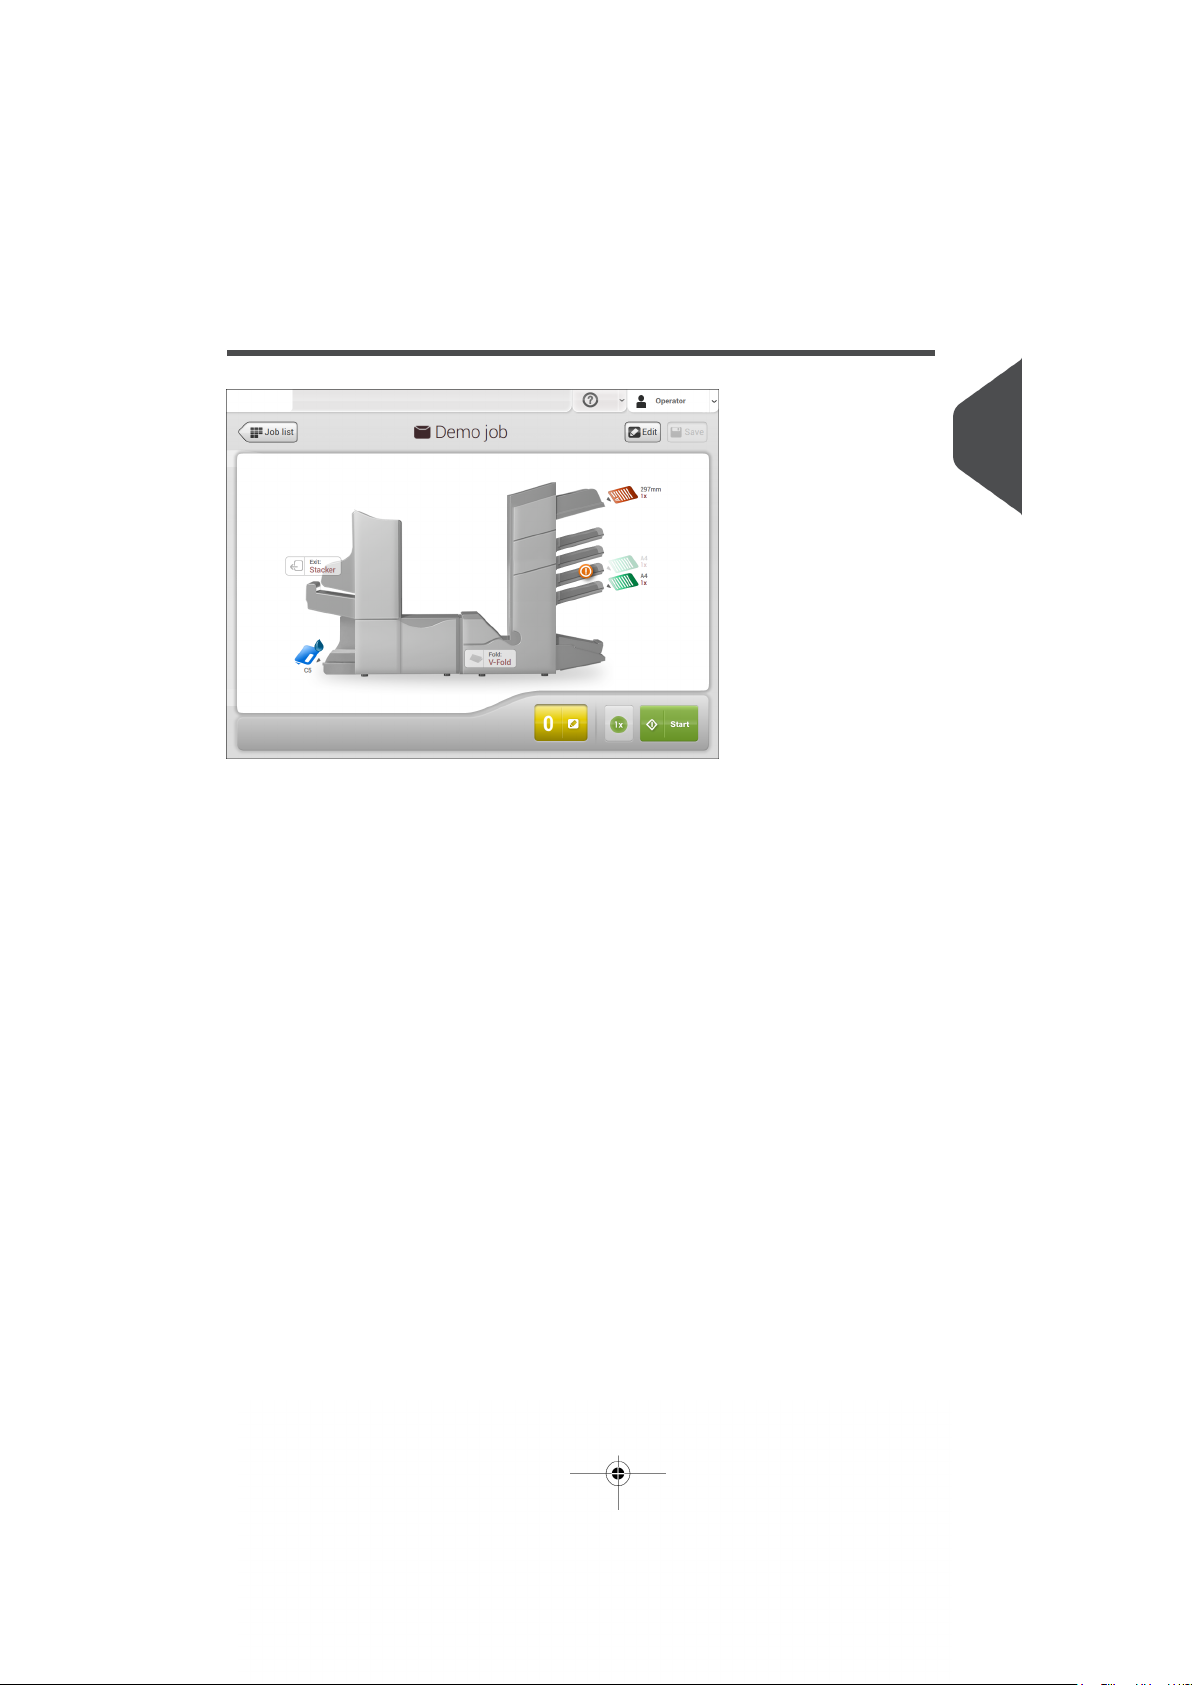
Job Overview
If you want more information on a job, select the job in the Job List menu.
The touch screen shows the following information of the selected job:
• Job name
• Job settings (for example the document and envelope type)
• How to load envelopes and documents for this job
• The number of envelopes that have been processed with this job
In this screen you can change the following settings:
• Counter settings (see Change the counter settings on page 31)
• Job settings (see Editing a job on page 48)
• Move documents between feeders (see Change to an other feeder tray on page 47)
• Link feeders (see Link feeder trays on page 47)
• Start the job or run a test run (see Performing a test run)
2
English
13
Page 18
| Page 14 | feb-24-2014 01:32 | Meet your Document System
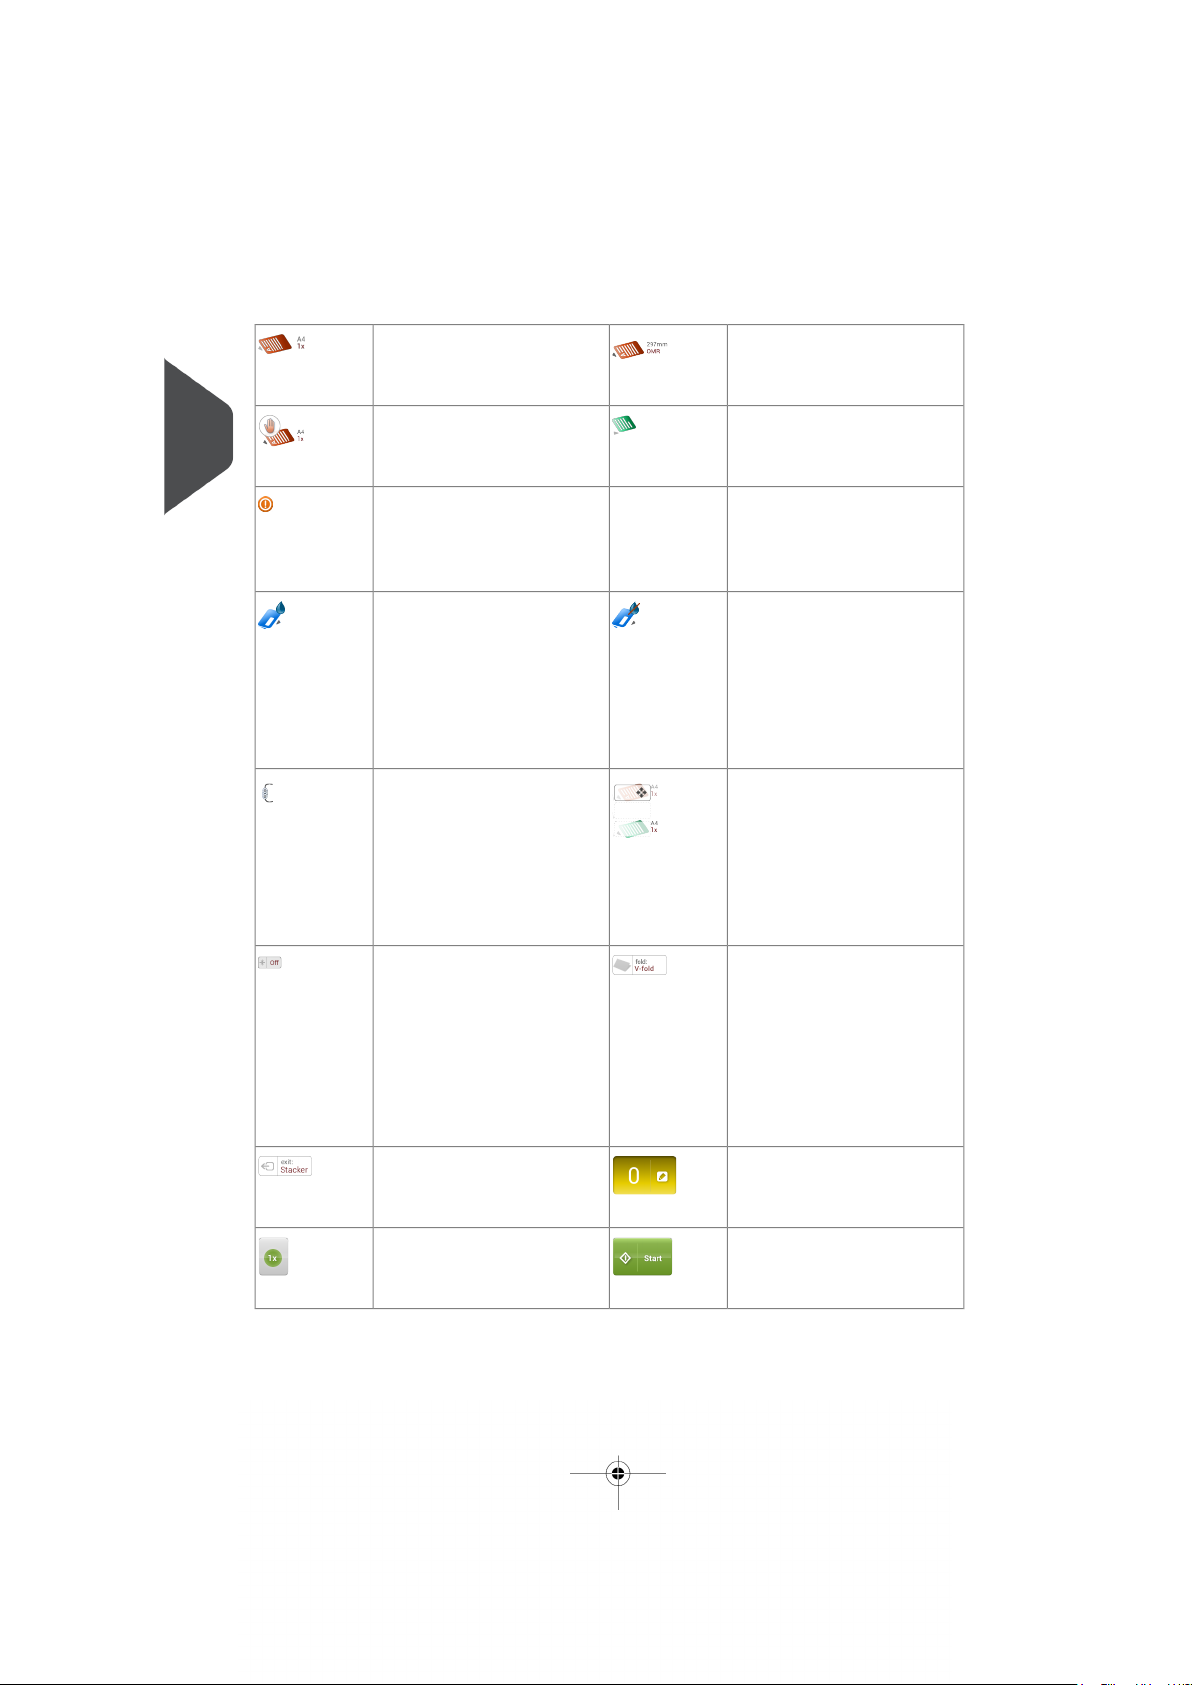
The following is a list of symbols or icons and their descriptions.
2
English
Main document.
Shows the correct document
orientation; A is the address.
ally insert mail-sets one by
one into the system.
NotificationNext to this symbol, a message appears, e.g.
Sealing liquid low, empty
feeder.
Envelope, sealing onEnvelopes will be sealed. The
symbol shows the correct
envelope orientation.
Feeder linkingLinking means
that when one feeder is
empty, the system automatically starts feeding documents
from the other feeder. This
symbol at the feeders shows
if the feeders are linked.
DFC/mail set thickness detectionDouble feed control
and/or mail set thickness detection has been set to 'off'.
By default the dfc/mail set
thickness detection will be set
to 'on' and the icon will not be
shown.
Exit settingThis icon shows
what kind of exit setting has
been set.
1x buttonAfter tapping this
button the system will create
an example mail set.
Document with reading
Shows the correct document
orientation; A is the address.
EnclosureDaily mailFeature to manu-
Envelope sealing offEnvel-
opes will not be sealed. The
symbol shows the correct
envelope orientation.
When sealing is off, the flap
of the envelope is closed but
not moistened.
Change feeder traysPossibility to change from one feeder tray to another.
Fold type
This icon shows what kind of
fold type has been set.
Counter settingShows on
what number the counter has
been set.
Start button
Tapping this button runs the
job.
14
Page 19

| Page 15 | feb-24-2014 01:32 | Meet your Document System
Job list buttonAfter tapping
this button the job list screen
will be shown.
Edit buttonGives access for
editing a job.
Stop buttonButton to stop
the system The current mail
set will be completed and the
system stops, being empty
and ready for a new set.
Save buttonSave the job or
changes that have been
made to a job.
High Capacity Document Feeder (HCDF)
The High Capacity Document Feeder (HCDF) is an option that can be delivered from factory,
or added to a 2 or 4 station version by a service engineer. The High Capacity Document
Feeder has a capacity for up to 725 sheets. The normal document feeder tray has a capacity
of 325 sheets.
For more information on the operation of the HCDF, refer to the topic on loading documents
for the HCDF on page 63.
2
English
Production Feeder
The Production Feeder is a feeder that can be loaded with a high number of
documents. This feeder is intended to be used for Business Reply Envelopes (BRE),
but also 'standard' documents up to 356 mm (14") length can be processed with it.
For more information on the operation of the Production Feeder, refer to the topic on
loading documents for the Production Feeder on page 59.
15
Page 20
| Page 16 | feb-24-2014 01:32 | Meet your Document System
2
English
Thin Booklet Feeder (FD 6606-15)
The Thin Booklet Feeder is used to feed booklets, regardless of the thickness of the
cover, to the document flow from the feeder to the inserter. Because of the location of the
Thin Booklet Feeder (downstream the feeder module) documents feeded by the Thin
Booklet Feeder will not be folded.
When the Thin Booklet Feeder is added to the configuration, this is shown in the
screens at the operator panel.
For more information on the operation of the Thin Booklet Feeder, refer to the topic on
loading documents for the Thin Booklet Feeder.
16
Page 21
| Page 17 | feb-24-2014 01:32 | Meet your Document System
Catch Tray
2
English
For stacking envelopes leaving from the side exit a catch tray can be mounted. You can
select the catch tray in the Output settings tab of the job definition (see Exit settings on
page 29).
Instead of a catch tray at the right hand (RH) side of the system it is also possible to install
a catch tray on the left hand (LH) side. To achieve this it is necessary to reverse the side
exit of the Stacker from RH to LH.
Contact your supplier for more information about this option.
17
Page 22
| Page 18 | feb-24-2014 01:32 | Meet your Document System
Shut Down the System
1.
Press the [On/Off] button next to display B to shut down the system.
2
English
When the system is busy, it completes and inserts the current set, stops and will be shut
down.
18
Page 23
| Page 19 | feb-24-2014 01:32 | Working with Jobs
Working with Jobs3
Introduction
With the system you can process mail sets in the following ways:
• Using an existing job. Existing jobs are shown in the Job list and saved via the
'automatic' or 'manual' job creation process. How to use an existing job is described
in Using an existing job on page 19.
• Automatic job: The system automatically picks one sheet from each filled feeder
and processes them into mail sets.
The automatic feature is described in About Automatic jobs on page 21.
• Manual job: various settings, not available in an Automatic job, can be set in a
'manual job. This includes the use of daily mail. Working with manual jobs is described
in Create a manual job on page 23.
Use an Existing Job
If you want to use an existing job:
3
English
Open the job list.1.
2. Tap the icon of the job you want to use.
3. Load the feeders as shown on the display.
4. Tap [1x] to create an example mail set, see Example mail set on page 35.
5. Select an exit for the example mail set.
19
Page 24
| Page 20 | feb-24-2014 01:32 | Working with Jobs
6. Check the example mail set.
7. If example mail set is OK: tap [Start].If the example mail set is not OK: adjust the
address position or envelope stop position or check and re-adjust the job settings.
If desired tap the counter button to set the counters. See Counter
settings on page 31.
3
8. Tap [Start] to start the job.
9. Press the [Stop] button to finish the job.
English
10. Tap [Job list] to return to the job list.
Create a New Job
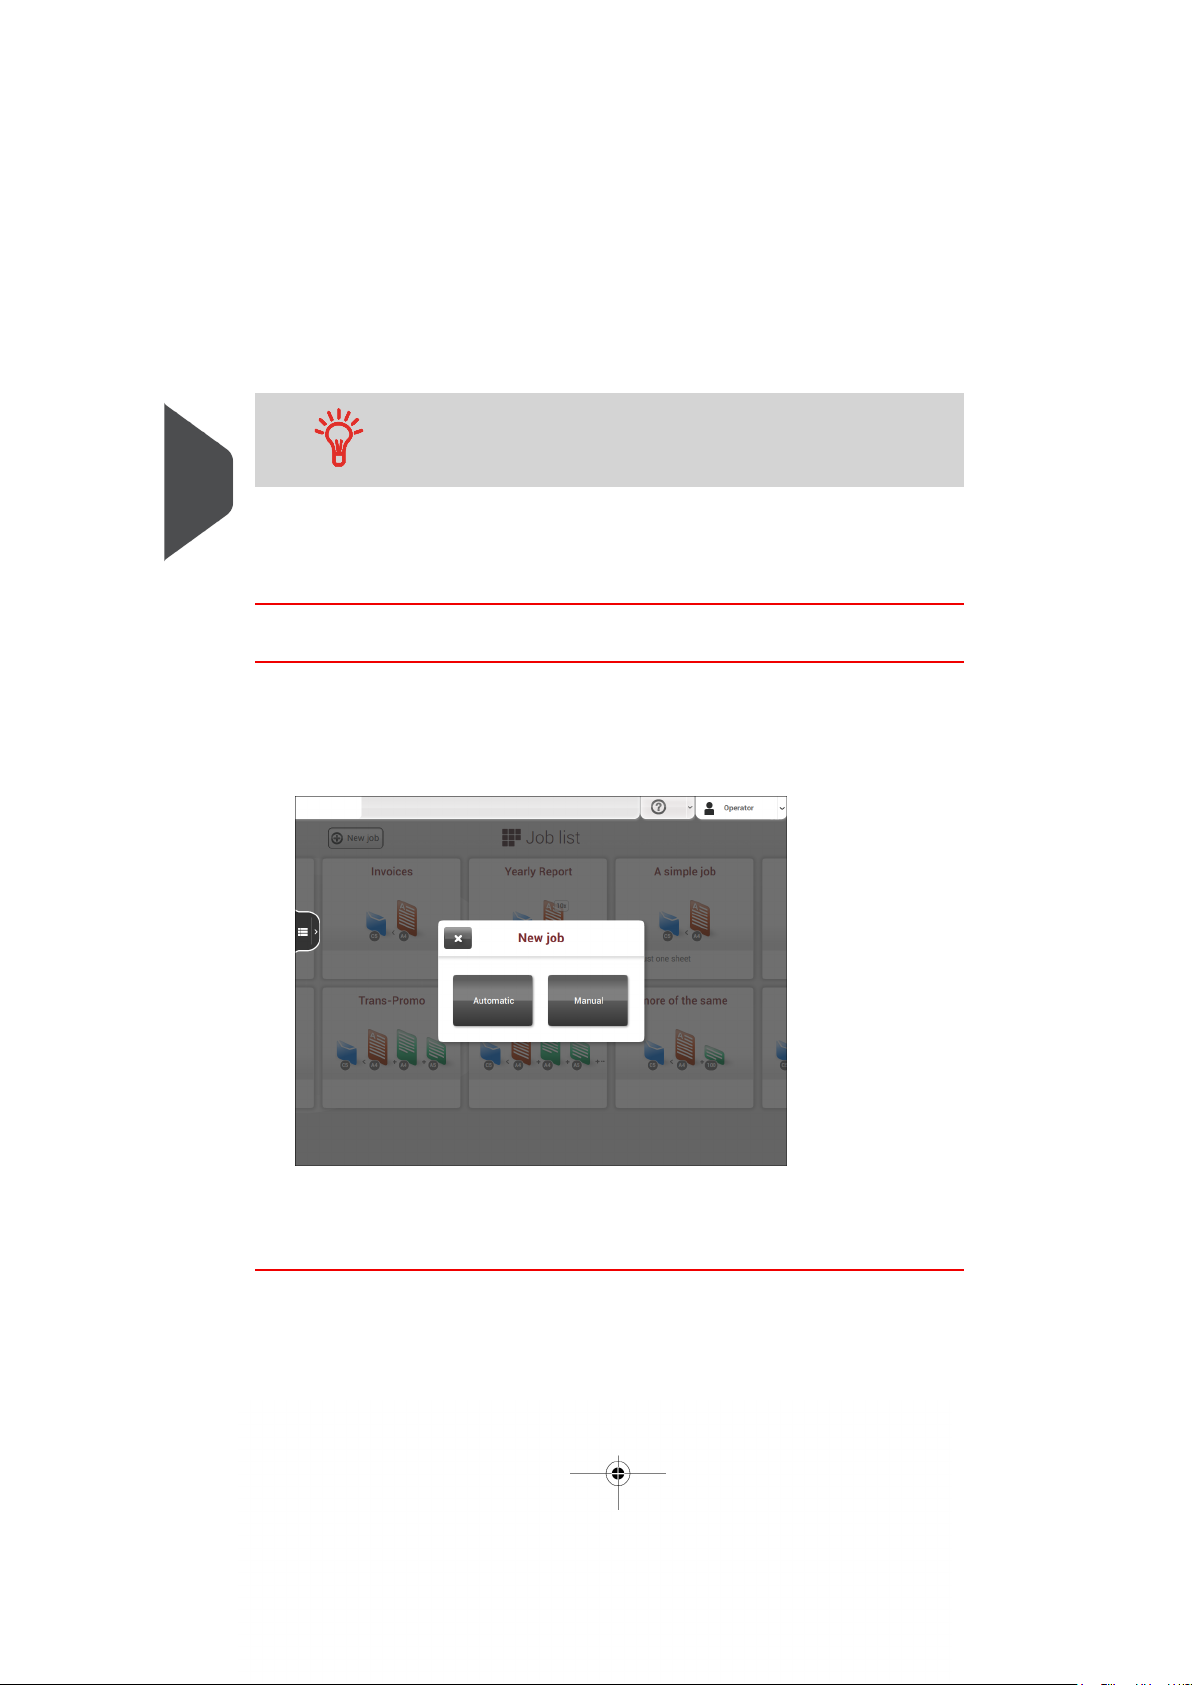
To create a new job:
From the Job list menu, tap [New job].1.
2. Choose [Automatic] or [Manual] to create a new job.
3. If you choose 'Automatic' follow the description as can be found in Create an Automatic
job on page 21.
4. If you choose 'manual' follow the description as can be found in Create a manual job.
20
Page 25

| Page 21 | feb-24-2014 01:32 | Working with Jobs
About Automatic Jobs
You can save every automatically created job and edit it like any job.
An Automatic job processes mail sets according to the following rules:
• The machine picks one sheet from each filled feeder;
• The picked documents will be folded (if necessary) and inserted into an envelope;
• Only the feeders that feed successfully will be selected;
• Only the Double Feed Control (DFC) of the upper feeder will be selected (this is done
automatically).
The following features are not supported with Automatic job processing.
• Linked feeders (the option where, if one feeder is empty, the system automatically
continues using another feeder)
• Multiple sheet feeding (picking more than one sheet from a certain feeder)
• Daily mail
• Reading functionality
• No envelopes (use envelopes yes/no)
• Exit select
If you want to use any of these features, you have to use Manual jobs to process the mail
set.
3
English
Create an Automatic Job
Proceed as follows if you want to create an automatic job:
From the Job list menu, tap [New job].1.
21
Page 26
| Page 22 | feb-24-2014 01:32 | Working with Jobs
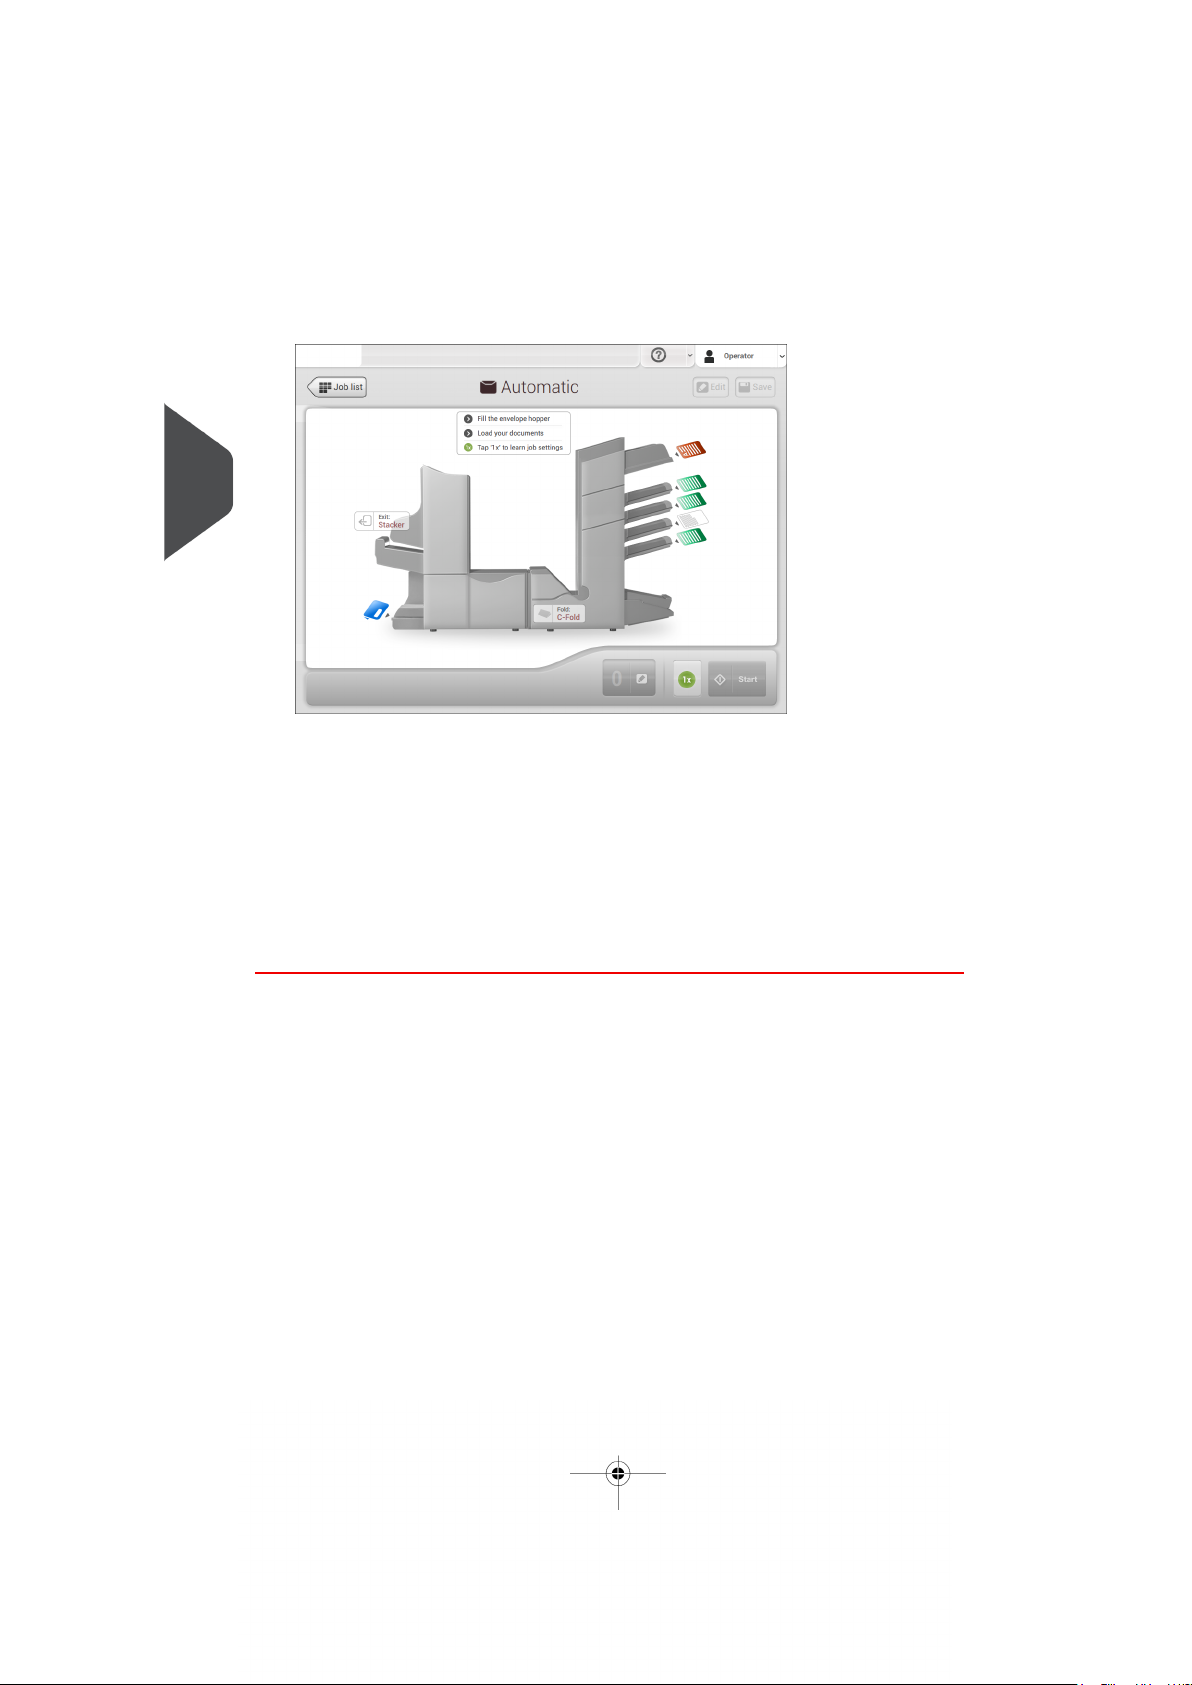
2. Tap [Automatic] to start an Automatic job.
3
English
3. Fill the envelope hopper, load your documents and tap [1x] to create an example mail
set.
4. Make sure that the address position and the envelope stop position is correct. If
not, adjust the address position on page 36 and envelope stop position on page 39.
5. If necessary, tap the counter symbol to set the counters. See counter settings on page
31.
6. Tap [Start] to start the job.
7. Tap [Stop] to finish the job.
Tap [Save] if you want to save the settings of the Automatic job to a new job.
22
Page 27

| Page 23 | feb-24-2014 01:32 | Working with Jobs
Create a Manual Job
Introduction
Creating jobs manually is easy: the user interface guides you through the job definition with
clear steps.
These steps are:
• Define the mail set: envelope type, main document and optional enclosures.
• Define how to fold the document set.
• Define the exit of the system that should be used for this job.
Create a Job Manually
To create a job manually:
1. From the Job list menu, tap [New job].
2. Choose [Manual] to define the job settings.
3
English
Continue with the envelope settings (see Envelope on page 24).
23
Page 28
| Page 24 | feb-24-2014 01:32 | Working with Jobs
Mail Settings
Envelope
3
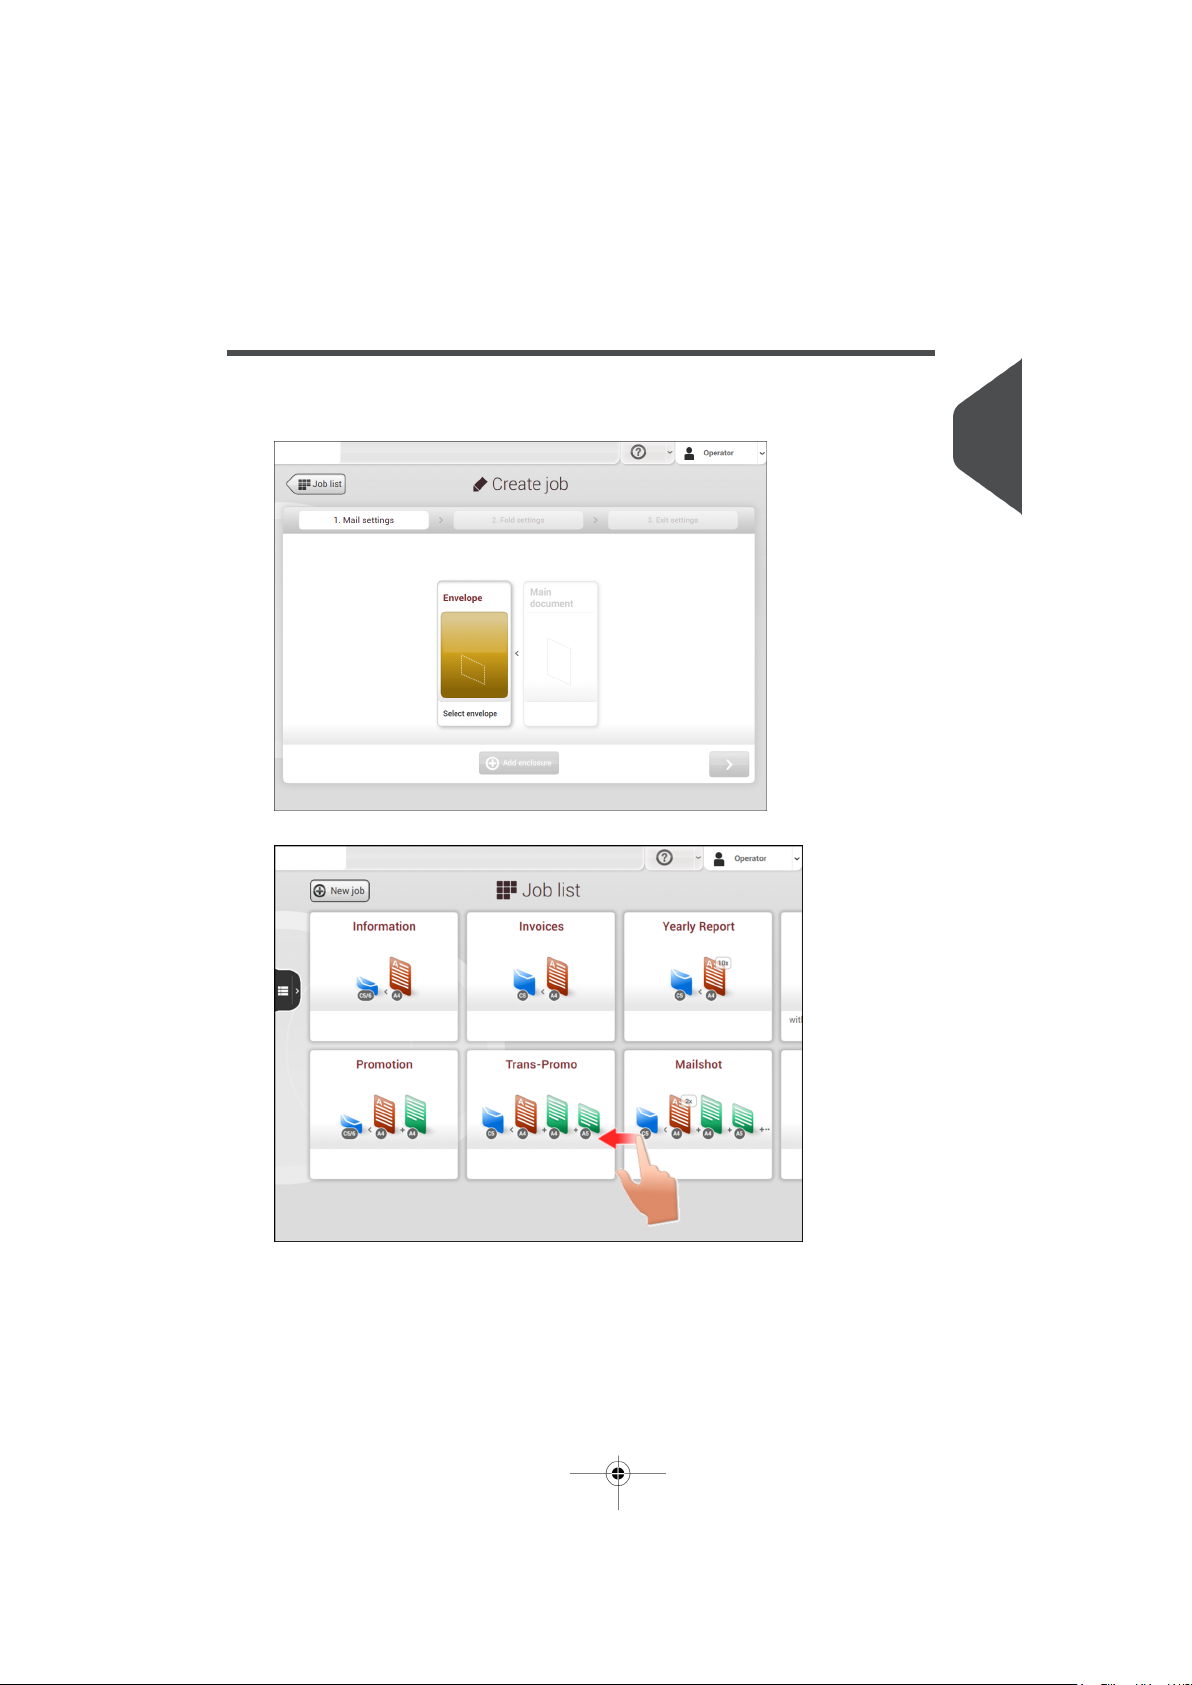
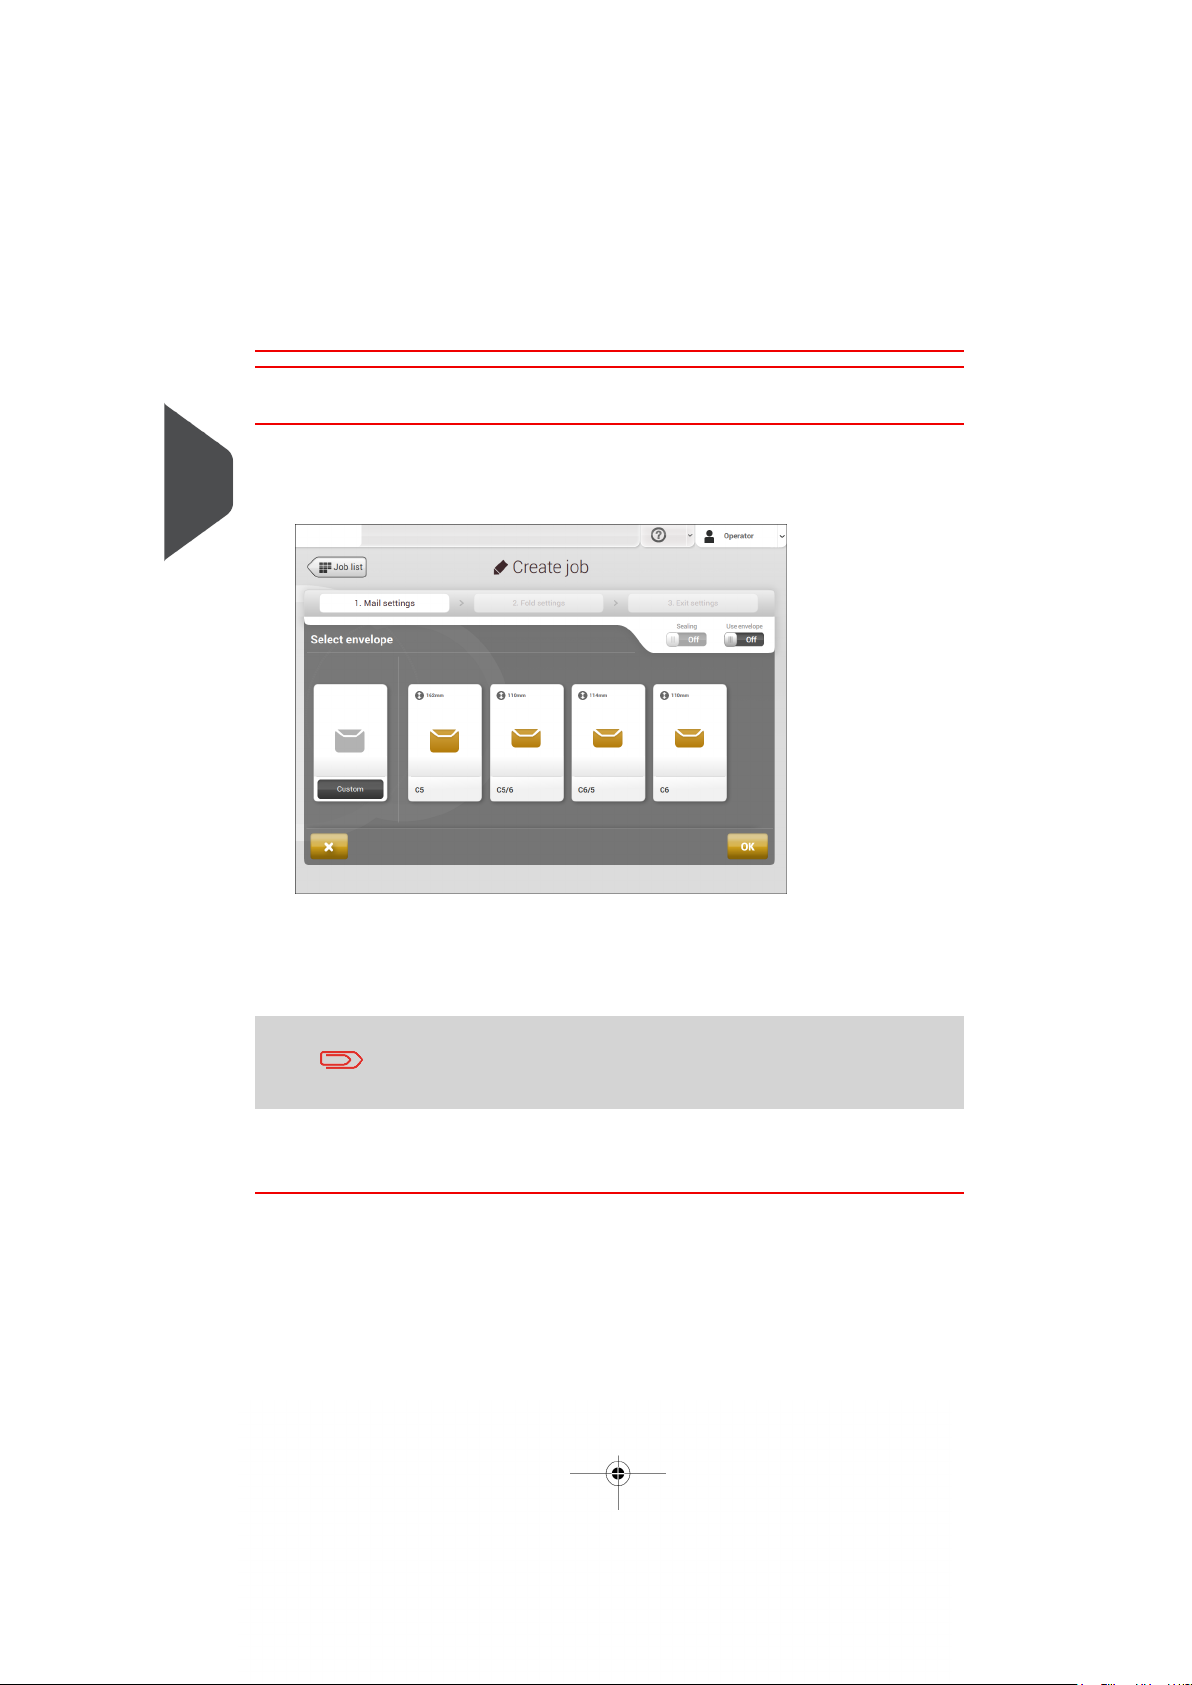
1. Tap [Envelope].
English
2. Select a predefined envelope or create a custom envelope on page 45.Optionally tap
[Use envelope] to set the use of envelopes to 'off' if you want to Create a job without
the use of envelopes.
3. Tap [Sealing] to switch it on or off.
By default the envelopes will be sealed.
4. Confirm the envelope settings with [OK].
Continue with the main document settings (see Main Document on page 25).
24
Page 29
| Page 25 | feb-24-2014 01:32 | Working with Jobs
Main Document
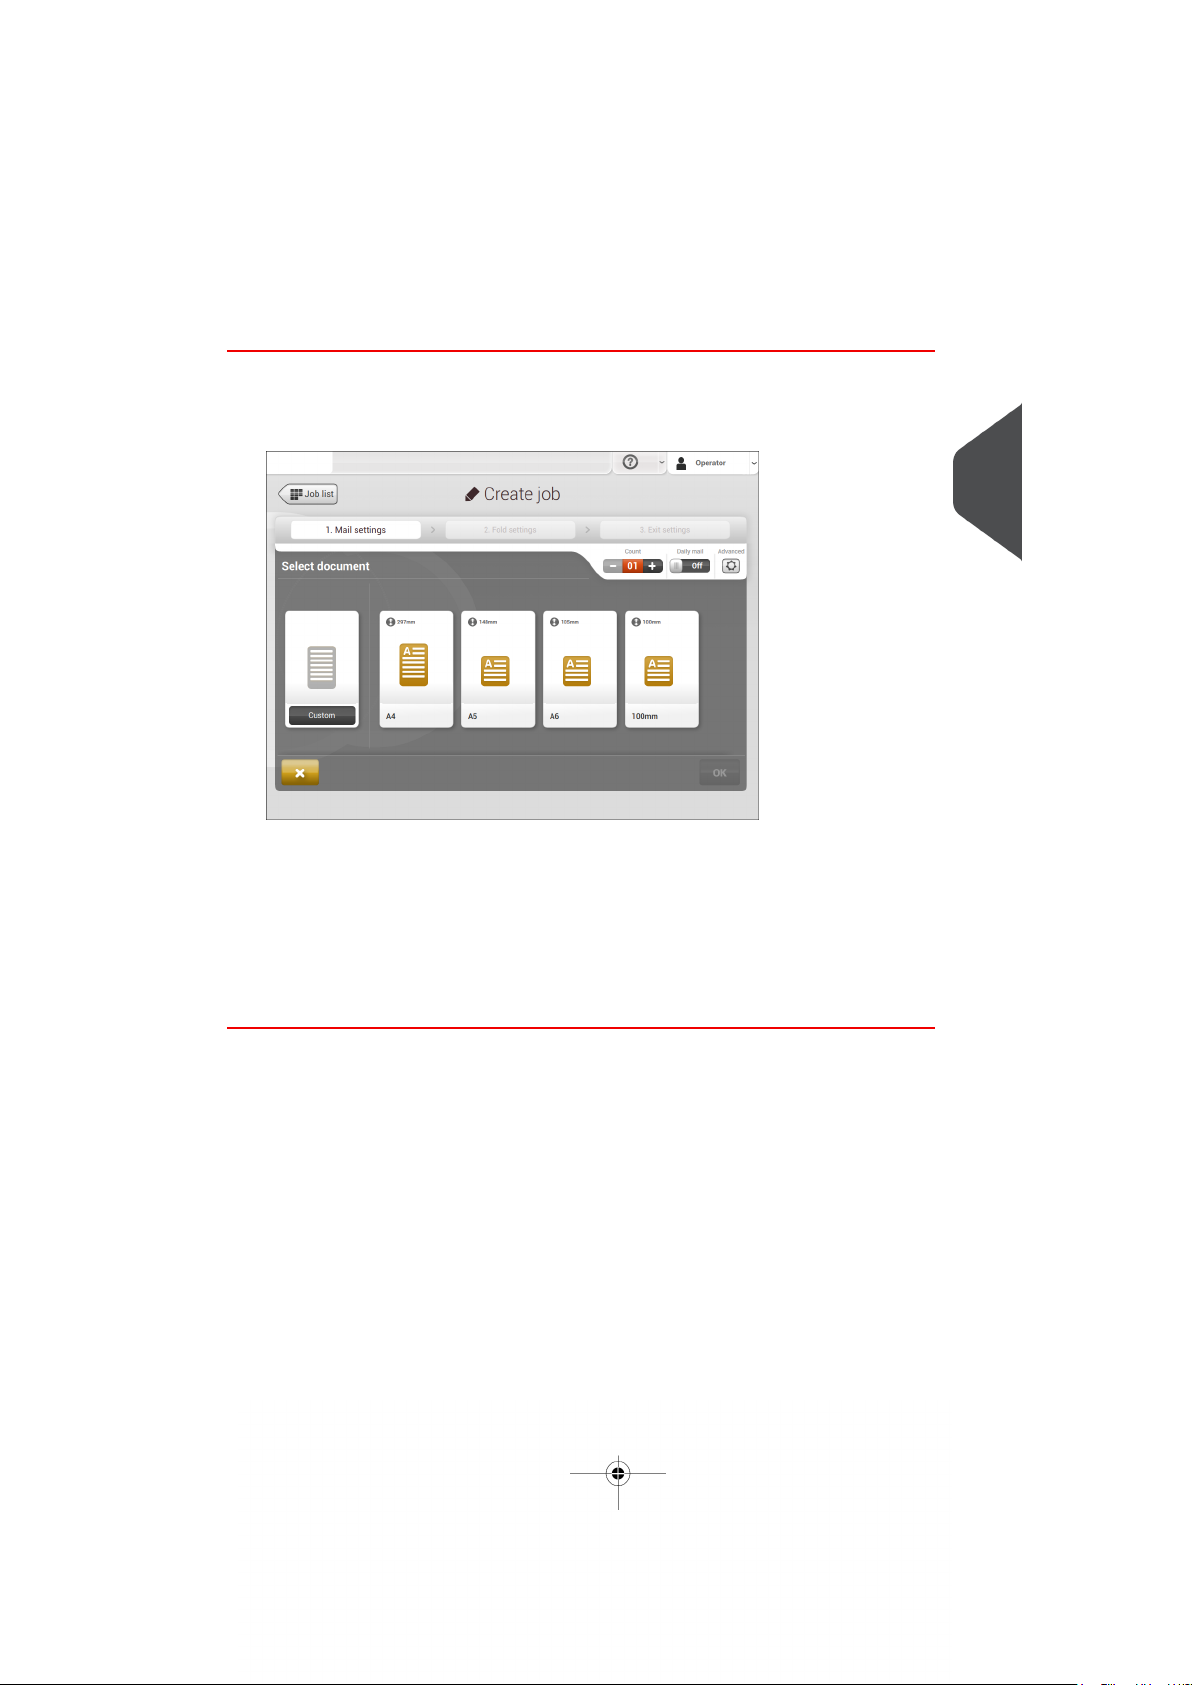
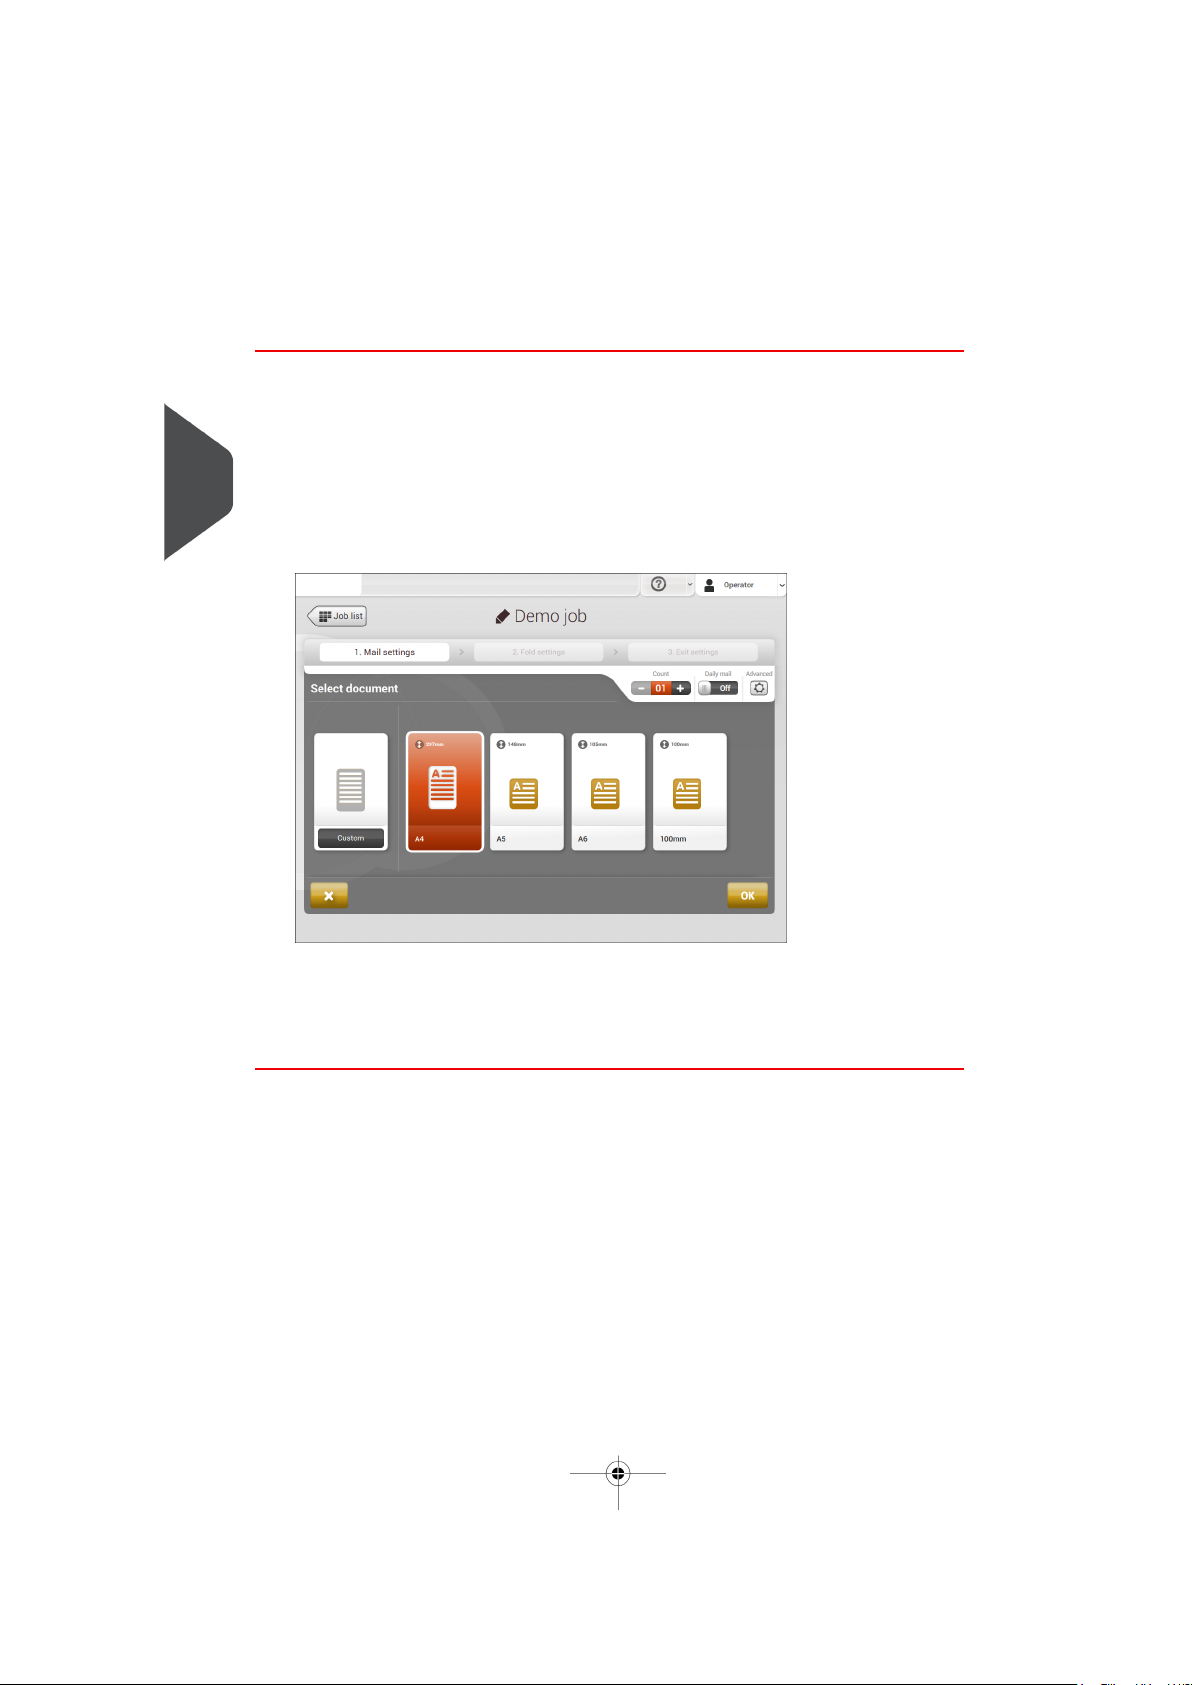
1. Tap [Main document].
3
English
2. Select a predefined document or create a custom document on page 46.
3. Change the [Count] to add more than one document from a feeder (multiple sheet
feeding).
4. Optionally tap Daily Mail on page 43 to set Daily Mail to 'on' or tap [Advanced] to set
the DFC Settings on page 26.
5. Confirm the document settings with [OK].
Continue with the enlosure settings (see Enclosure on page 27).
25
Page 30
| Page 26 | feb-24-2014 01:32 | Working with Jobs
Switch DFC on or off for feeders
For every feeder you can switch the double feed control (DFC) on or off.
To change the DFC settings:
Tap the job that you want the change the DFC settings for.1.
2. Tap [Edit].
3
3. Tap the document that you want to change the DFC for.
4. Tap [Advanced].
English
5. Tap Double Feed Control to switch it on or off.
6. Tap Continue on double to switch it on or off. If Continue on double is on, the machine
will not stop if two sheets are fed instead of one. The document-set that contains the
double sheets will be diverted.
26
Page 31

| Page 27 | feb-24-2014 01:32 | Working with Jobs
Enclosure
1. Tap [Add enclosure].
3
English
2. Select a predefined document or create a custom document on page 46 as
your enclosure.
If you want to remove an enclosure from the job, or change the order of the enclosures,
see Delete or move an enclosure on page 50.
27
Page 32

| Page 28 | feb-24-2014 01:32 | Working with Jobs
3. Change the [Count] for more than one document from a feeder.
4. Confirm the enclosure settings with [OK].
Continue with the fold settings (see Fold settings on page 28).
Fold Settings
3
Default the machine suggests the most logical fold type. This fold type is highlighted in
purple. However, you can select other fold types and change their settings.
English
Tap a fold type.1.
2. If necessary, tap [Settings] to change the fold settings.
3. Tap [>].
If you want to revert to the machine recommended fold type, switch [Use recommended
fold] to On.
Continue with the exit settings (see Exit settings on page 29).
28
Page 33

| Page 29 | feb-24-2014 01:32 | Working with Jobs
Exit Settings
Select the Exit Settings:
1.
3
English
The system has two exits: the stacker and the side exit. In the Exit settings of the job,
you define which exit is used. When Reading is on, more options for exit selection are
available on page 122. Standard (without reading), you choose between:
- Fixed exit: tap [Settings] to select which exit must be used for this job. If you
select stacker, you can choose to let the system continue on the side exit if the
stacker is full.
- Batching: tap [Settings] to define after what number of mail sets, the system
must switch to the other exit.
- Thickness: tap [Settings] to define the exit for document-sets that are too thin
or too thick. At the inserter, the thickness is measured and compared to a
reference thickness. Depending on the selection in this menu the envelopes
exit to the stacker or the side exit. The first document-set determines the
reference thickness.
2. Optionally tap the [Advanced] button to set the mail set thickness detection on page
30 settings.
3. Tap [>].
Continue with Finish the job definition and start the job on page 34, or set the counter
settings on page 31.
29
Page 34

| Page 30 | feb-24-2014 01:32 | Working with Jobs
Switch the mail set thickness detection on and off
You can switch the mail set thickness detection to 'yes' (= on) or 'no' (= off). By default the
mail set thickness detection is set to 'yes'.
To change these settings:
3
If the job uses reading, you cannot switch on the Mail Set Thickness
Detection (DFC) for the document set. With reading, the document
set size can be different for every set.
English
1. Select the job that you want the change the mail set thickness detection setting for.
2. Tap [Edit].
3. Navigate to 3.Exit settings.
4. Tap [Advanced].
30
Page 35

| Page 31 | feb-24-2014 01:32 | Working with Jobs
5. Tap the 'Double Feed Control' button to switch it on or off.
6. Tap the 'Continue on double' button to switch it on or off. If Continue on double is on,
the machine will not stop if two sheets are fed instead of one. The mail set that contains
the double sheets will be presented on deck.
7. Enter the 'Measurement area offset'. After the DFC detects the document set, it delays
the thickness measurement. It starts measuring as soon as the offset has passed.
3
English
Change the Counter Settings
The counter settings are job related.
31
Page 36

| Page 32 | feb-24-2014 01:32 | Working with Jobs
In the Counter submenu you can set the (daily) Job counter, the Stop counter and the Job
total counter. The following will be shown in the Counter submenu:
• Job counter (as shown), the daily job counter: number of mail sets that have been
processed using this job, after tapping [Start].
• Stop counter/Stop at value: set a number (of processed mail sets) after which the
system stops processing. You can set from 5 through 9999. The system will continue
processing mail sets until the job counter reaches the stop counter value. The system
3
English
stops and can be restarted.
When the processing of mail sets has been interrupted the system shows how many
mail sets have been completed. This is shown at 'completed so far'.
• Job total counter: total number of mail sets that have been processed using this job.
To reset/set the counters proceed as follows:
In the Job overview screen tap the counters button.1.
32
Page 37

| Page 33 | feb-24-2014 01:32 | Working with Jobs
2. Tap the reset button for the daily job counter to set it to zero.
3. Tap the [on/off] button to set the Stop counter to ‘on’ or ‘off’. If you set the Stop counter
to ‘on’ you can enter the ‘Stop at value’. Enter a value from 5 through 9999.
4. Tap the reset button for the Job total counter to set it to zero.
3
English
If you set the Job total counter to zero the number history of this
job will be lost.
5. Tap [OK] to go back to the job overview screen and tap [Start].
33
Page 38

| Page 34 | feb-24-2014 01:32 | Working with Jobs
Finish the Job Definition and Start the Job
When you have finished the exit settings, the touch screen shows an overview of the job
settings.
3
English
In this screen you can change the following settings:
• Move documents between feeders (see Change to an other feeder tray on page 47)
• Link feeders (see Link feeder trays on page 47)
• Change the counter settings (see Change the counter settings on page 31)
When you are ready with these settings, proceed as follows:
Load the documents on page 55 as indicated on the Job info screen.1.
2. Tap [1x] to create a test mail set (see Test mail set on page 35).
3. If desired, you can save the job (see Save a job on page 49).
4. Tap [Start] to start the job.
34
Page 39

| Page 35 | feb-24-2014 01:32 | Working with Jobs
Create an Test Mail Set
Before starting an existing job or a new, manual created job, it is possible to create a test
mail set.
This test run is intended to validate the settings of the Inserting System:
• Check if the address is correctly positioned behind the envelope window.
See Adjusting the Address position on page 36.
• Inspect and adjust the stop position of the envelope. See Adjusting the Envelope
Insert fingers on page 37.
• Check the fold settings for one set. See Fold settings on page 28.
When you tap the [1x] button, you can choose between three test mail sets:
3
English
• Selected exit: creates one mail set that leaves the system at the defined exit. Use
this option to test the complete process.
• Present on deck: creates one mail set without sealing. The mail set leaves the system
from the upper unit. Use this option to verify and adjust the address position.
• Envelope stop position: separates one envelope and transports the envelope to the
envelope stop position. Use this option to verify and adjust the envelope stop position.
After a test mail set, the system asks if the mailset is ok or not ok. When you select not
ok, you are guided through a wizard that helps you to find the cause.
35
Page 40

| Page 36 | feb-24-2014 01:32 | Working with Jobs
See also:
• Adjusting the address position on page 36
• Verifying the Insert Position on page 39
• Adjusting the envelope insert fingers on page 37
Adjust the Address Position
If the address on your mail is not correctly positioned behind the envelope window, change
3
the address position as follows:
English
1. Choose a job and tap [1x].
2. Tap Mail set not OK if asked if the mail set is correct.
3. Tap Address position not correct.
4. Change the address position: slide the position indicator to the correct position.
Adjusting the address position is only possible after creating an
example mail set (by using the [1x] button).
5. Tap the green button to create another example mail set or tap [OK] to confirm the
settings.
36
Page 41

| Page 37 | feb-24-2014 01:32 | Working with Jobs
Adjust the Envelope Insert Fingers
To verify that the position of the fingers is correct:
Choose a job and tab [1x] (envelope only).1.
3
English
2. Tap the 'Envelope stop position' button.
3. Lift the unlocking lever A of the upper unit and pull up the upper unit.
37
Page 42

| Page 38 | feb-24-2014 01:32 | Working with Jobs
4. Tap the arrow to move to the next screen.
3
English
5. Follow the instructions on screen.
38
Page 43

| Page 39 | feb-24-2014 01:32 | Working with Jobs
If the insert fingers are not correct, adjust the fingers as follows:
1. Loosen the knurled knob C on top of each finger.
2. Adjust each finger so that the tip enters about 5 mm (0.2 inch) into the envelope.
3. Re-tighten the knurled knob.The fingers can be moved sideways to the desired position.
4. Place the outer fingers D about 5 to 10 mm (0.2 to 0.4 inch) from the edges of the
envelope.
3
English
Check the position of the insert fingers when changing to a different
type of envelope.
5. Tap the envelope button on the touch screen to fetch another envelope.
6. Make sure that the finger position is correct. If not, repeat the steps for adjusting the
fingers.
Verify the Insert Position
To verify the insert position:
This adjustment must only be checked in case of problems or when
changing the envelope type.
1. Choose a job and tap [1x] (envelope only).
39
Page 44

| Page 40 | feb-24-2014 01:32 | Working with Jobs
2. Lift the unlocking lever A of the upper unit and pull up the upper unit.
3
3. Follow the instructions on screen.
English
4. Tap the envelope button to fetch another envelope.
5. Make sure that the insert position is correct. If not, repeat the steps for adjusting the
insert position.
40
Page 45

| Page 41 | feb-24-2014 01:32 | Working with Jobs
Mail Sets
Adjust the Separation of Special Feeders
Adjust the separation of special feeders as follows:
Push knob A forward until it clicks.1.
3
English
2. Turn knob A counter clockwise to open the separation gap.
3. Place a document on the feeder tray and slide it into the system until it can go no
further.
4. Turn knob A clockwise to get resistance.
5. Move the document to and fro. The separation is adjusted correctly when a slight
resistance is felt on the document. Turn knob A counter clockwise again if the
resistance was set too high.
6. Pull the knob A back again when ready.
41
Page 46

| Page 42 | feb-24-2014 01:32 | Working with Jobs
Process a Mail Set with BRE or Inserts
A mail set with BRE or insert consists of a main document (address carrier), a BRE or an
insert and perhaps other enclosures. This set is inserted into an envelope.
From the Job list menu, tap [New job].1.
2. Add the BRE as a (custom) enclosure.
3
3. Follow the job creation process (see Create a manual job on page 23).
English
42
Page 47

| Page 43 | feb-24-2014 01:32 | Working with Jobs
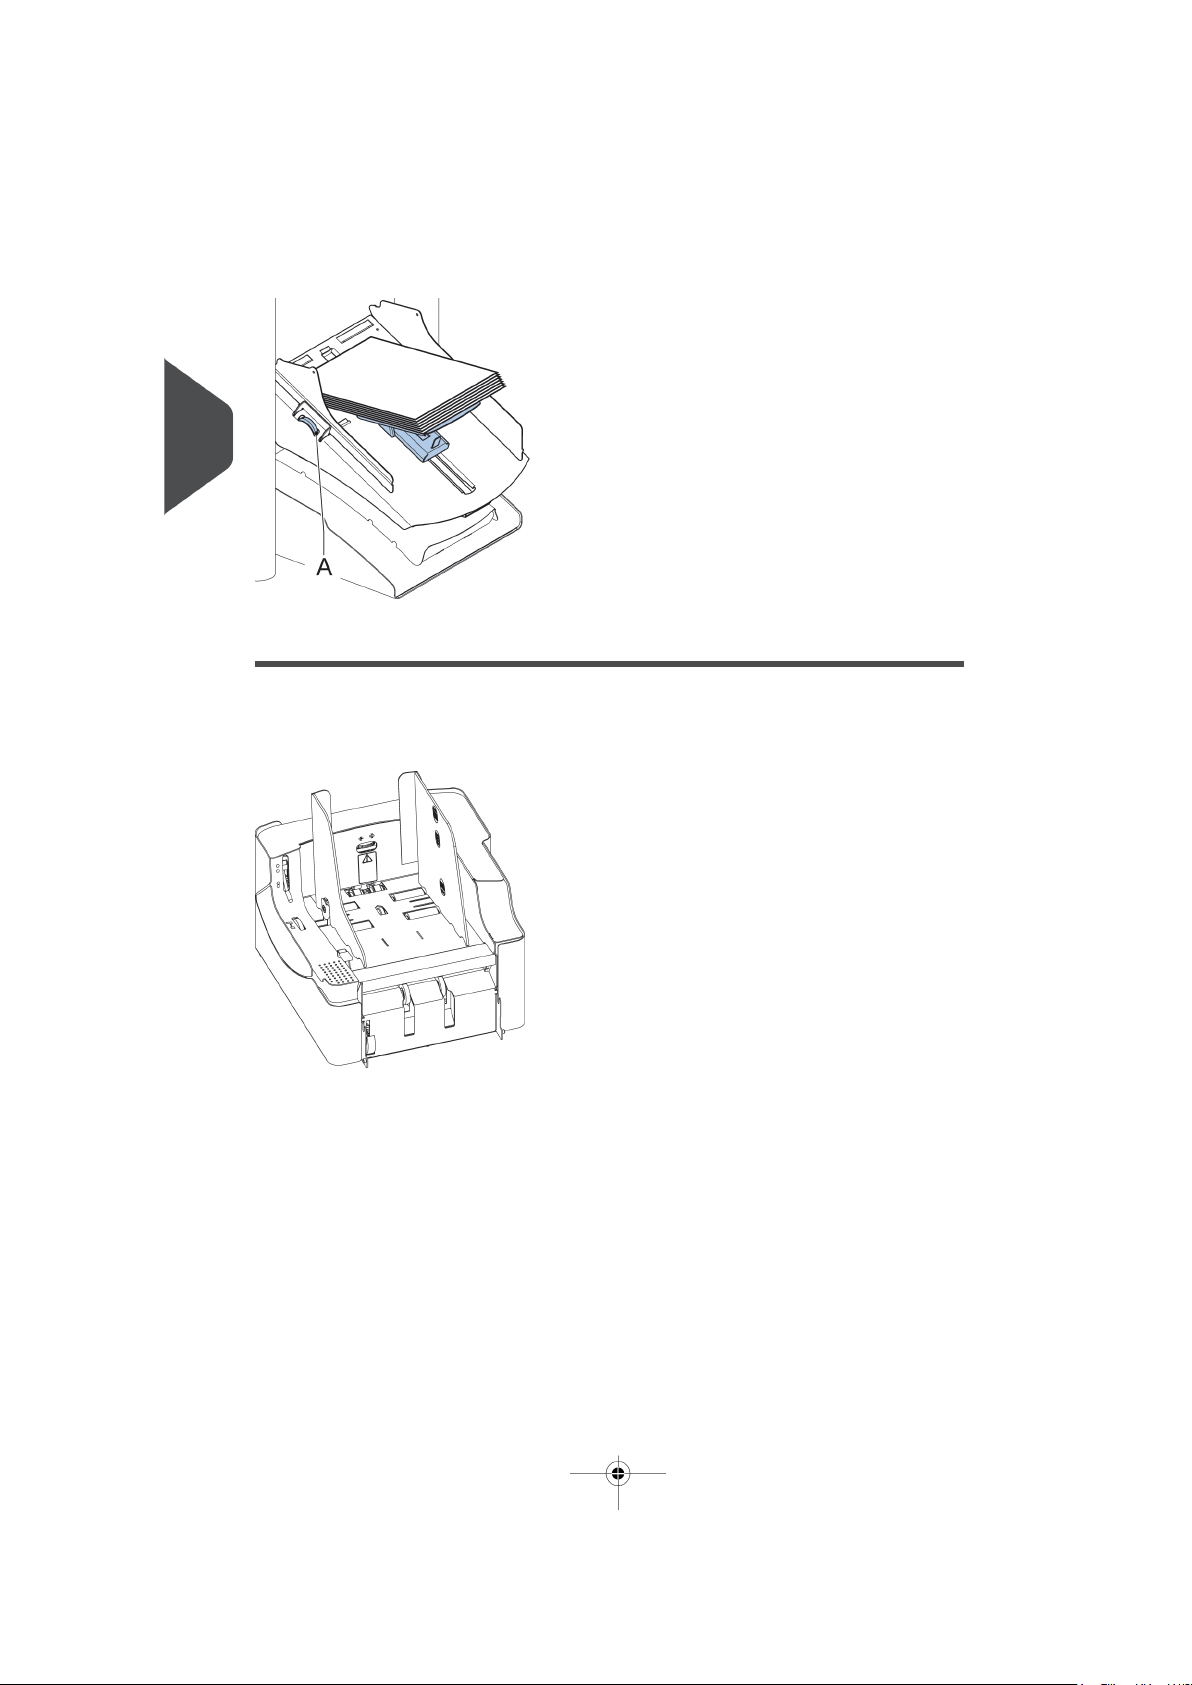
Process Mail Sets with Daily Mail
To process mail sets with Daily Mail:
Create a Manual job on page 23 and select [DailyMail] for your Main document.1.
3
English
2. Complete the job settings.
3. Tap [start] to start the job.
A daily mail switch notification and instruction appears on the screen.
4. Turn down the left side guide A of the upper tray. Now you can see the Daily Mail
handle B.
5. Move the handle B to the right to enable the Daily Mail function.
6. Turn side guide A upwards.
43
Page 48

| Page 44 | feb-24-2014 01:32 | Working with Jobs
7. Place the document or document set in the feeder tray (see Loading documents on
page 58). The document or document set will be folded and inserted into the envelope
as described in the selected job.
8. Place the next document or document set in the feeder tray. The system will keep
running to process the inserted document or document set.
9. When finished with Daily Mail, tap [stop] to stop the job.
10. Set the Daily Mail handle B to the ‘AUTO’ position to disable the Daily Mail and enable
3
the automatic document separation.
English
Process Mail Sets with Very Long or Very Short Documents
When you define a job for very long or very short documents, the system asks you to adjust
the document stoppers as indicated on the display.
To adjust the collator stop position:
Lift and hold the collator arm D.1.
2. To remove a stopper: push it towards the system to release tab Z from the slotted
hole. Tip the stopper over and lift to release tabs X and Y.
3. To place a stopper: insert the tabs X and Y into the slotted holes. Click tab Z into the
slotted hole.
4. Repeat these steps for the remaining stoppers.
5. Close the collator.
44
Page 49

| Page 45 | feb-24-2014 01:32 | Working with Jobs
Create a Job with Custom Envelopes
Makes sure that your custom envelopes fit within the specifications
(see Envelope Specifications on page 144).
1. Create a Manual job on page 23 and select envelope.
2. Tap [Custom].
3. Enter the envelope height.
4. Tap the [Flap] tab if you use open flap envelopes.
5. Select if you want to feed envelopes with flaps up (On) or with flap down (Off).
3
English
6. Tap [OK] to save and close the envelope settings.
7. Complete the Fold Settings and Exit Settings to complete the job and tap [Save] to
save the job.
Follow the instructions as described in 'Create test mail set' on page 35.
45
Page 50

| Page 46 | feb-24-2014 01:32 | Working with Jobs
Create a Job with Custom Documents
Makes sure that your custom documents fit within the specifications
(see Document Specifications on page 143).
3
1. Create a Manual job on page 23 and select a custom document as your main
document or enclosure.
2. Tap [Custom] to create a custom document.
English
3. Enter the height of the document.
4. Tap the [Address] tab to set the address position for a main document.
5. Confirm the document settings with [OK].
6. Complete the Fold Settings and Exit Settings to complete the job and tap [Save] to
save the job.
Follow the instructions as described in 'Create a test mail set' on page 35.
46
Page 51

| Page 47 | feb-24-2014 01:32 | Working with Jobs
Change to Another Feeder Tray
You cannot change the order of the documents in the mail set by
changing feeders. If you want to change the order of the mail set,
see Delete or move an enclosure on page 50.
If you want to move the main document or enclosures to another feeder tray:
Select a job from the Job list.1.
2. Tap the document that you want to move to another feeder tray.
All available feeder trays are marked with a dotted box.
3. Tap the dotted box of the feeder tray where you want to move your document to.
The new feeder tray is selected for feeding of the document.
4. Tap [Save] to save the feeder tray selection to the job.
Link Feeder Trays
Link feeder trays as follows:
Select a job from the Job list.1.
2. Tap the feeder tray that you want to link to another feeder tray.
The link symbol appears.
3
English
47
Page 52

| Page 48 | feb-24-2014 01:32 | Working with Jobs
3. Tap the link symbol.
The figure shows an example of linked feeders.
3
4. Tap [Save] to save the link to the job.
English
When you want to un-link the feeders, tap the feeder trays and tap the un-link symbol.
Edit a Job
To edit an existing job:
From the Job list menu, select a job you want to edit.1.
2. Tap [Edit].
When you tap [edit], you enter the guided job flow that enables you to make the desired
changes.
3. Make the changes you want to make. When you completed the job programming,
tap [Save] to save the changes.
4. Tap [1x] to make sure that the Insert Position and Address Position are correct
(see Verifying the Insert Position on page 39 and Adjusting the Address Position on
page 36).
48
Page 53

| Page 49 | feb-24-2014 01:32 | Working with Jobs
Save a Job
When you have created a new job or edited a job, save the job as follows:
After you have completed the job definition, tap [Save].1.
3
English
2. Enter the job name.
3. If necessary, add a description to the job. The description is visible in the job list.
4. Tap [OK] to save the job.
The job is added to the job list.
49
Page 54

| Page 50 | feb-24-2014 01:32 | Working with Jobs
Delete or Move an Enclosure
If you want to delete an enclosure in your job or change the order of the enclosures, proceed
as follows:
From the Job list menu, select a job you want to edit.1.
2. Tap [Edit].
3
3. Tap and hold the enclosure you want to move or delete.
English
Now drag the enclosure to an other position. Or tap the waste bin to delete the
enclosure from your mail set.
4. Tap the arrow buttons [>] to pass the other job definition steps and close the job editor.
5. Tap [Save] to save the changes.
6. Tap [1x] to make sure that the Insert Position and Address Position are correct
(see Verifying the Insert Position on page 39 and Adjusting the Address Position on
page 36).
50
Page 55

| Page 51 | feb-24-2014 01:32 | Working with Jobs
Copy a Job
To copy existing job settings to a new job:
Tap and hold the job in the Job list menu.1.
3
English
2. Tab [Copy].
3. Enter the name of the new job and tab [OK].
Lock a Job
To lock an existing job:
Log on as supervisor.1.
51
Page 56

| Page 52 | feb-24-2014 01:32 | Working with Jobs
2. Tap and hold the job in the Job list menu.
3
English
3. Tap [Lock].
4. Tap [OK] to confirm.
The job shows a lock in the job list. If the supervisor is logged on, the lock is open. If the
operator is logged on, the lock is closed. The operator cannot edit, delete or rename the
job.
52
Page 57

| Page 53 | feb-24-2014 01:32 | Working with Jobs
Rename a Job
To rename a job:
Tap and hold the job in the Job list menu.1.
3
English
2. Tab [Rename].
3. Enter the name of the new job and tab [OK].
53
Page 58

| Page 54 | feb-24-2014 01:32 | Working with Jobs
Delete a Job
To delete an existing job:
Tap and hold the job in the Job list menu.1.
3
English
2. Tap [Delete].
3. Tap [OK] to confirm.
54
Page 59

| Page 55 | feb-24-2014 01:32 | Loading the System
Loading the System4
Document Orientation
The touch screen shows how to load documents and envelopes into the feeders. The table
shows the meaning of the symbols:
Address carrier face up and leading (top
address)
Address carrier face up and leading (bottom
address)
Address carrier face down and trailing (top
address)
Enclosure face up
Enclosure face down
4
English
55
Page 60

| Page 56 | feb-24-2014 01:32 | Loading the System
Document Feed Trays
Standard Document feed Trays
Install the Document Feed Trays
4
Place the document feeder trays in position:
Hold the document feeder tray slightly inclined as shown in the figure.1.
English
2. Place the front end of the document feeder tray underneath the two black rollers.
3. Move the document feeder tray upwards (lifting the black rollers), until it is possible
to ‘hook’ the feeder tray into place.
4. Move the document feeder tray towards the machine and move the hooks over the
mounting points (on both sides).
5. Let the document feeder tray rest on the machine.
56
Page 61

| Page 57 | feb-24-2014 01:32 | Loading the System
Adjust the Side Guides
To adjust the side guides it is best to remove the document feeder tray from the feeder as
follows:
Push handle A downwards.1.
2. Lift the document feeder tray upwards to unhook it and then pull it out from the feeder.
3. Loosen the knob B half a turn.
4
English
4. Grab the side guides in the middle and push them apart as far as possible.
5. Put a small stack of documents between the side guides.
6. Grab the side guides in the middle and push them towards the documents.The space
between the side guides and the documents should be such that the documents have
just enough play to move freely.
7. Re-tighten knob B.
8. Remove the stack of documents.
9. Replace the document feeder tray (see Installing the Document Feeder Trays on page
56).
57
Page 62

| Page 58 | feb-24-2014 01:32 | Loading the System
Load Documents
Fill the document feeder tray as follows:
Note the Document Orientation when filling the document feeder
trays.
4
1. Open the left-hand side guide A by turning it downwards.
The feed rollers will automatically be lifted.
English
2. Place a stack of documents between the side guides.
3. Turn the left side guide upwards again.
Document Separation
The term ‘Document separation’ refers to the adjustment required for separating the upper
document from the rest of the documents in the stack. This prevents pulling too many
documents from the stack at the same time.
The document separation for the automatic feeders is set automatically; there are no manual
adjustments needed.
Feeders 1 and 2 (the feeders in the two lowest positions) can be special feeders. The
document separation for special feeders must be adjusted manually. While special feeder
trays fit in all positions, adjusting the separation is only possible when they are fitted on
position 1 and 2.
To adjust the separation of special feeders follow the instructions as described in Processing
mail sets with glossy material.
58
Page 63

| Page 59 | feb-24-2014 01:32 | Loading the System
Production Feeder
Adjust the Production Feeder Side Guides
Adjust the side guides:
Take a stack of documents/BREs and place them in the feeder tray.
1.
BREs with flap down and leading (top side pointing to system).
4
English
2. Adjust the side guides by turning the thumb wheel A such that the documents/BREs
just fit and can move without resistance.
Too much play causes skewing.
59
Page 64

| Page 60 | feb-24-2014 01:32 | Loading the System
Adjust the Production Feeder Document Separation
When the Production Feeder is used at an automatic separation feeder, the separation is
set automatically.
The Production Feeder can also be used on a feeder position with a manually adjusted
separation. To adjust, proceed as follows:
Remove the document feeder trays 2 and 3.
1.
4
English
The lowest feeder is feeder 1.
2. Squeeze the two blue handles A and B and shift the feeding plate C as far as possible
to the front.
3. Push knob D forward until it clicks.
4. Place a document/BRE on the feeder tray and slide it in the system till the leading
edge is not visible anymore. Turn knob D counterclockwise if the separation is set to
narrow.
5. Push the document/BRE between the rollers.
6. Turn knob D clockwise to get more resistance and counterclockwise if the separation
is set to narrow.
The separation is adjusted correctly when a slight resistance is felt on the
document/BRE.
7. Pull knob D back when ready.
8. Replace the document feeder trays 2 and 3.
60
Page 65

| Page 61 | feb-24-2014 01:32 | Loading the System
Load Documents (Production Feeder)
To load documents:
When loading the Production Feeder, make sure that the
document/BREs are positioned parallel in relation to the feeding
plate assembly to ensure correct feeding.
The feeding plate assembly will be shifted up automatically (when the system starts
processing) until documents/BREs are underneath the rubber paper pullers.
In case of long documents, use the feeding plate extension B to
support the documents.
1. Squeeze the two blue handles A and B.
4
English
2. Shift the feeding plate assembly C to the rear position.
3. Loosen the stack of documents and place them in the feeder tray.
BREs with flap down and leading (top side pointing to system).
61
Page 66

| Page 62 | feb-24-2014 01:32 | Loading the System
High Capacity Document Feeder
Adjust the Side Guides
To adjust the side guides B:
4
English
Loosen knob D, which is located underneath the feeder tray, half a turn.1.
2. Put a small stack of documents between the side guides.
3. Rotate wheel E.
The space between the side guides and the documents should be such that the
documents have just enough play to move freely.
4. Re-tighten knob D.
62
Page 67

| Page 63 | feb-24-2014 01:32 | Loading the System
Load Documents (HCDF)
To load the document feeder tray:
Pull down lever A.
1.
The feeder rollers C move up to filling level.
2. Place a stack of documents between the side guides (max. 725 sheets, 80 g/m²).
See Document Orientation how to place the documents in the feeder tray.
3. Release lever A.
4
English
63
Page 68

| Page 64 | feb-24-2014 01:32 | Loading the System
Thin Booklet Feeder (FD 6606-15)
Adjust the Side Guides
The side guides can be adjusted as follows:
Place a stack of documents into the feeder tray.1.
4
English
2. Adjust the feeder tray side guides B by turning the thumbwheel C. Provide just enough
space for the documents to move freely. Too much play causes skewing.
64
Page 69

| Page 65 | feb-24-2014 01:32 | Loading the System
Adjust the Document Separation
The document separation can be adjusted as follows:
Check before the adjustment that the release handle D for the
separation unit is in the closed (down) position.
1. Turn the separation adjustment wheel A counter clockwise until a document can be
moved backwards and forwards without resistance.
4
English
2. Turn the separation adjustment wheel clockwise until a slight resistance is felt on the
document when the document is moved backwards and forwards.
3. Turn the separation adjustment wheel clockwise to get more resistance or counter
clockwise to lower the resistance.
4. Check the separation before starting the system. After starting the system it may occur
that more than one document at a time is pulled in. If this happens, turn the separation
adjustment wheel more clockwise to obtain correct operation. For poor feeding turn
the separation adjustment wheel counter clockwise.
65
Page 70

| Page 66 | feb-24-2014 01:32 | Loading the System
Feeder Tray Capacity
To avoid irregular feeding there are three levels for the maximum heights of the feeder tray
capacity. The symbols for these three levels are printed on the right hand side guide of the
feeder tray. The level indication is a guideline.
Maximum feeder tray capacity of booklets with a tough cover (maximum
height: 250 mm).
Maximum feeder tray capacity for booklets with a weak cover (maximum
4
height: 150 mm).
English
Maximum feeder tray capacity for single sheets: minimum sheet quality:
80 gr/m2 (maximum height: 50 mm).
Load Envelopes
Before you load the envelopes, make sure the envelope separation and side guides are
correctly set as described in Adjusting the Side Guides and Envelope Separation on page
67.
Loosen the stack of envelopes and place the stack on top of the bottom envelope.1.
2. Shift the envelope support in or out. The top side of the envelope must touch the
dotted line on the support.
3. Turn the envelope support to distribute the weight of the envelopes evenly on both
sides.
66
Page 71

| Page 67 | feb-24-2014 01:32 | Loading the System
Adjust the Side Guides and Envelope Separation
Adjust the side guides and envelope separation as follows.
Rotate thumb wheel D to move the side guides C apart.1.
2. Put a small stack of envelopes between the side guides.
3. Move the side guides towards the envelopes. The space between the side guides and
the envelopes should be such that the envelopes have just enough play to move freely.
4
English
If the distance between the side guides is too large, the envelopes
will twist sidewards, when transported into the machine.
4. Pull down small lever B to set the separation.
5. Insert one envelope up to the stoppers. The position of the envelope is flap down and
trailing (bottom side of the envelope pointing to the system).
6. Return lever B.
67
Page 72

| Page 68 | feb-24-2014 01:32 | Loading the System
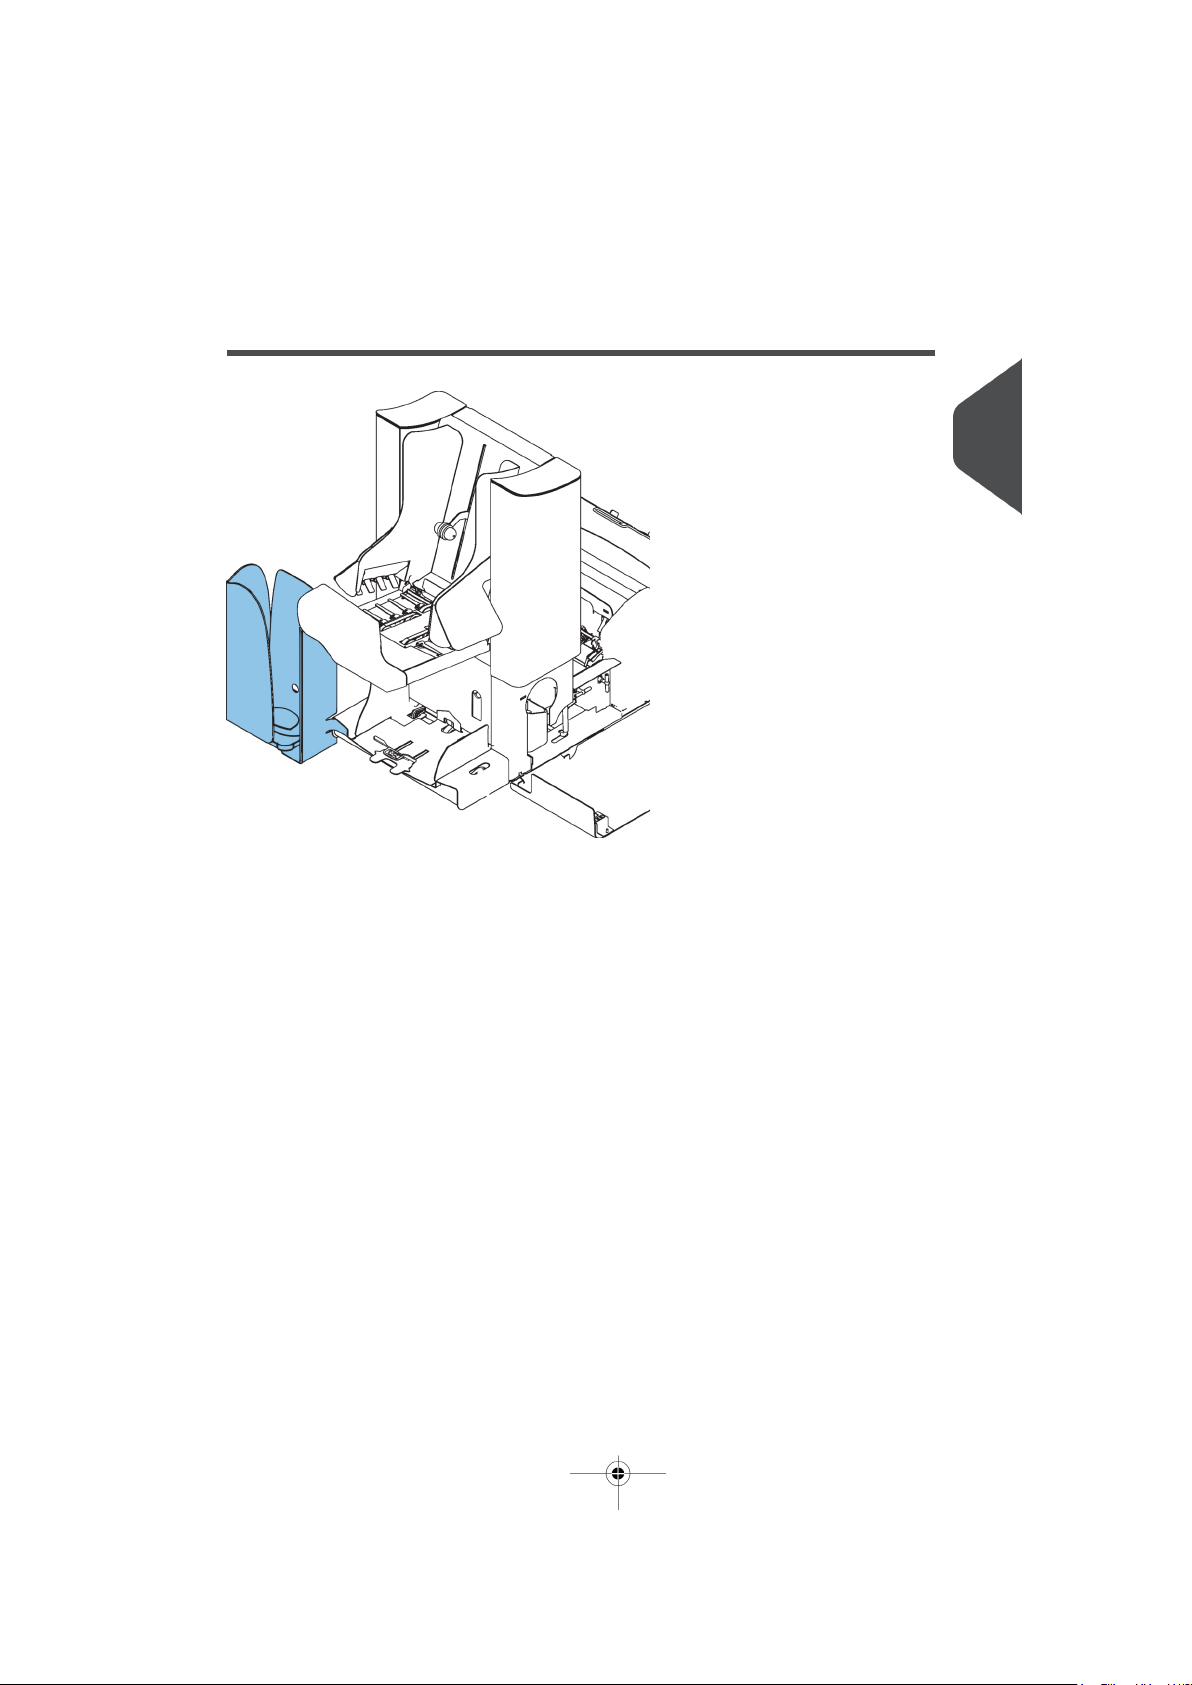
Fill the Sealing Liquid Reservoir
Open the front cover A.1.
4
English
2. Fill the reservoir B to the "Max" lip with sealing liquid.
3. Close the front cover A.
Before starting the job, wait approximately 5 minutes for the brushes to moisten or use
moistened brushes. For instructions on the installation of brushes, see Clean and replace
brushes.
If the liquid reservoir is almost empty the touch screen shows a message to warn you that
you should refill the reservoir.
68
Page 73

| Page 69 | feb-24-2014 01:32 | Options
Options5
Support for Curved Reply Envelopes (option for
Thin Booklet Feeder)
Depending on the quality of the paper, the conditions during storage, etc. envelopes can
be curved. This can cause smaller reply envelopes to skew while being processed by the
Thin Booklet Feeder.
A special support is available to allow curved envelopes to be correctly processed. It can
be used for envelopes with a height up to 110 mm (4.33").
5
English
Power Stacker Support
Depending on the inserted type and amount of documents, the filled envelopes may get
stack fanshaped at the stacker.
To prevent this, an optional power stacker support can be used in order to stack the
envelopes correctly.
69
Page 74

| Page 70 | feb-24-2014 01:32 | Options
High Capacity Envelope Hopper (FD 6606-30/EF-4)
For feeding large amounts of envelopes a high capacity envelope hopper can be installed.
To start up the high capacity envelope hopper:
Switch on the hopper.
1.
5
English
To ensure correct feeding envelope support A has to be adjusted parallel. Proceed
as follows:
2. Move the high capacity envelope hopper backwards, away from the inserter.
3. Hold an envelope against the hopper plate B as indicated.
4. Place the envelope support A such that the envelope is aligned with recess C.
5. Apply the same alignment at the position of recess D.
6. Adjust the inserter side guides and the separation as described in Loading Envelopes.
7. Put an envelope in the envelope height measurement area.
70
Page 75

| Page 71 | feb-24-2014 01:32 | Options
8. Rotate thumbwheel E to adjust the envelope height setting. The envelope should fit
exactly in the space indicated by the arrows.
9. Rotate thumbwheel F to adjust the side guides so, that the envelopes:- Fit exactly
between the side guides- Can move freely
10. Fill the envelope hopper with envelopes, positioned upside down. The flaps should
face the inserter.
11. Tip over the envelopes.
12. Load the envelope feeder of the inserter with about 50 envelopes.
5
English
13. Press the [Start] button.
The envelopes on the envelope hopper will be transported towards the feeder of the
inserter. Envelopes will be transported and dropped in the inserter feeder until the
envelopes reach a certain level. At that moment a sensor will detect the envelopes
and the high capacity envelope hopper will stop transporting.
When the sensor does not detect envelopes anymore the hopper will start again and
the process will be repeated.
71
Page 76

| Page 72 | feb-24-2014 01:32 | Options
High Capacity Conveyor Belt (FD 6606-25/CS-2)
The high capacity conveyor belt is designed for envelope transport from the inserter or
franking device. The conveyor belt has two operation modes:
• The belt moves continuously.
• The belt moves in intervals. The belt moves about 45 mm (1.7 inch) each time a
sensor detects the passage of an envelope.
The guide plate and side guides prevent the envelopes from falling off the belt.
The conveyor belt switch has three positions:
5
• Mode D: the belt moves in intervals.
• Mode E: the belt is switched off.
• Mode F: the belt moves continuously.
English
72
Page 77

| Page 73 | feb-24-2014 01:32 | Options
With the turning knob (G) it is possible to set the interval distance between envelopes on
the conveyor belt. The distance depends on the type of job and preference of the user.
Guideline:(G)
Minimal interval distance: 15 mm, setting for a job with thin envelopes.
Neutral interval distance: 20 mm
Maximal interval distance: 40 mm, setting for a job with thick envelopes.
5
English
73
Page 78

| Page 74 | feb-24-2014 01:32 | Settings menu
Settings menu6
Open the Settings Menu
In the settings menu for the operator it is possible to edit the display settings and to set the
localisation.
If you want to view or edit any of the Operator Settings:
Go to the Job list and tap the side menu on the left side and select [Settings].1.
6
English
2. Tap [Localisation] if you want to change the document standard or the language.
74
Page 79

| Page 75 | feb-24-2014 01:32 | Settings menu
3. Tap [Display settings] if you want to:- set the 'Key' click to on/off
- set the Volume
- set the Backlight
- set the BrightnessTo set the backlight and brightness, a test pattern is available as
a reference.
6
English
For more information on Open source licenses, see Open source licenses on page 88.
75
Page 80

| Page 76 | feb-24-2014 01:32 | Settings menu
Open the Settings Menu (Supervisor)
Supervisor Settings are all settings that can be found under the Settings Menu when logged
in as supervisor (pin code 2546).
The following flowchart shows which subjects are available via the Supervisor settings
menu.
6
English
If you want to view or edit any of the Supervisor Settings:
76
Login as Supervisor with pin code 2546.1.
Page 81

| Page 77 | feb-24-2014 01:32 | Settings menu
2. Go to the Job list and tap the side menu on the left side and select [Settings].
6
English
77
Page 82

| Page 78 | feb-24-2014 01:32 | Settings menu
Supervisor Settings Menu
Configuration
The Configuration menu contains the configuration information settings for the system.
System Info
The System info part of the Configuration menu shows the following information:
• Flex certificate - this option is used for reading
• Counter since last visit - the counter value since the last service visit
• Last error (description) - The last error and error description generated by the system
6
English
78
Page 83

| Page 79 | feb-24-2014 01:32 | Settings menu
Software Overview
The Software overview part of the Configuration menu shows the versions of the software
that is present in the total system.
6
English
79
Page 84

| Page 80 | feb-24-2014 01:32 | Settings menu
Licensed Options
The Licensed options part of the Configuration menu shows the following information:
• Chip ID
• Serial number
• Installed options
The installed options are enabled with license codes. These license codes, together with
the identification number of the machine enable the relevant options. The enabled and
available software options are displayed in this screen. Contact your dealer for information
about these license codes.
The system supports the following licensed options:
• Remote assistance
• Online help
6
English
• Advanced/Basic reading
• OMR 1 track
• BCR 1D
• BCR 2D
• OCR
• Flex reading
80
Page 85

| Page 81 | feb-24-2014 01:32 | Settings menu
Add a Licensed Option
To add a licensed option:
In the Configuration, Licensed options screen, enter the license code.1.
6
English
2. Tap [Add].The system verifies the license key.
If the license key has been verified successfully, the option is added to the system and can
be used.
Settings
The Settings menu contains the configuration settings for the system.
81
Page 86

| Page 82 | feb-24-2014 01:32 | Settings menu
Localisation
Tap [Localisation] if you want to change the document standard or the language.
6
English
When you need a keyboard to enter e.g. a job name, you get a special keyboard in case
of Russian, Czech and Katakana. But the keyboard has always a button to switch back to
the English keyboard.
82
Page 87

| Page 83 | feb-24-2014 01:32 | Settings menu
Display Settings
See the settings menu for the operator on page 74.
Date-time
Tap [Date/time] to set the:
• Date
• Time
• Date format; you can choose between three format to show the date: dd-mm-yyyy,
mm-dd-yyyy or yyyy-mm-dd
• Time format; you can choose between a '12 hours' notation or a '24 hours' notation
6
English
83
Page 88

| Page 84 | feb-24-2014 01:32 | Settings menu
Production Settings
6
English
Tap [Production settings] to define when envelopes should be cleared from the system.
• Envelopes clearing after job selection: this setting defines if the envelopes should
be cleared when you select a job. 'Ask' means that the system asks if you want to
clear the envelopes.
• Envelopes clearing after job edit: this setting defines if the envelopes should be
cleared when you have edited a job. 'Ask' means that the system asks if you want
to clear the envelopes.
Job Settings
84
Job settings normally will be changed by a service engineer only.
Therefore first consult the service organization before you change
any settings. Changes to the job settings can result in malfunctioning
of jobs.
You can also define the job settings per job. Select a job from the
Job list, tap Edit, navigate to the Exit settings, and tap Advanced
on page 30.
Page 89

| Page 85 | feb-24-2014 01:32 | Settings menu
6
The Job settings part of the Settings menu covers settings that improve the processing of
jobs:
• Flap closer offset: to improve the sealing of specific envelopes you can delay or
advance the moment of sealing. You enter the number of pulses. A minus value
means the sealing is advanced, a plus value means the sealing is delayed. You can
enter a number between -20 and 20.
• System output: mode 1 mode 2
Mode 1 focuses on the versatility of paper parameters (paper thickness; document
length), i.e. correct operation under even extreme paper conditions. Mode 2 is the
default mode, and focuses on high speed. Use Mode 1 with a paper thickness of 65
g/m2 or less, a document length of 12 inch (305 mm) or higher, and for situations
where Mode 2 is not functioning properly. In all other cases use Mode 2.
• BRE with window: if the BRE has a window, set this setting to yes. Only available
with Mode 2.
• Document offset (A in the figure): the extend to which documents are not overlapping
in the vertical transport. In the vertical transport of documents fed by the various
feeders, the documents are partially overlapping each other. This to make sure that
the documents are properly aligned in the collator area. The default value is 50
mm (2.0 inch). The document offset can be varied between 20 mm (0.8 inch) and
250 mm (9.8 inch).
English
85
Page 90

| Page 86 | feb-24-2014 01:32 | Settings menu
6
English
• BRE offset: in the case of offset is “yes”, the last document that was added to the
set is shifted from the rest of the set (offsetting, see below).
• Collator stop optimisation: if set to "off", the system does not show a message,
when a collator stop change can improve the system output.
Explanation of BRE offset: if a BRE is longer than the set fold but shorter than the envelope
height, this BRE can get folded (A in the figure). Under certain conditions (see below) you
can prevent the BRE from being folded. In the case of offset “yes”, the BRE is held back
during a certain distance (B in the figure). This means that the trailing edge of the BRE
leaves the collator last. The document is not folded. During the insertion into the envelope
the documents of the set are aligned.
86
Page 91

| Page 87 | feb-24-2014 01:32 | Settings menu
The conditions are:
• No multi-feed is used for the BREs.
• The document directly under the BRE must have a height of at least 60 mm (2.4 inch)
more than the BRE.
• The height of the BRE is more than the set fold length.
• The folding mode is either V-fold or C-fold (no Z-fold).
• The BRE must be shorter than the envelope height.
The whole BRE offset is based on friction between documents within a set. Therefore it is
necessary to make use of these conditions to reduce the risk of bad transporting, folding
and inserting.
It is possible to use the BRE offset for a BRE and an enclosure
(card) in one set. The extra condition is that this enclosure is equal
to or smaller than the set address fold and should be placed direct
underneath the BRE in the set.
Connectivity
6
English
See Connect the system to the internet on page 95.
87
Page 92

| Page 88 | feb-24-2014 01:32 | Settings menu
Open Source Licenses
6
English
Open source licenses show license information on the open source software that is used
in the system.
Diagnostics
The diagnostics menu contains the basic diagnostics functions available for a supervisor.
System Test
Use the [System test] to check if all motors, clutches and sensors are correctly connected.
The test briefly activates the actuators and clutches and measures the current.
To run a system test:
In the Settings menu, tap the [Diagnostics] tab.1.
88
Page 93

| Page 89 | feb-24-2014 01:32 | Settings menu
2. Tap [System test].
3. Remove all documents and envelopes and close all covers before starting the diagnose.
4. Tap [Start test].
5. When the test is finished, the Status report is shown, showing a list of all problems
found during diagnostics. If tests fail, contact your service organization.
6
English
89
Page 94

| Page 90 | feb-24-2014 01:32 | Settings menu
Maintenance
When too much paper dust is built up at the sensors a warning message will be displayed.
To check the conditions of the photocells or to calibrate them follow the instructions as
described in Calibrate photocells on page 126.
Reading
The reading menu contains the configuration items for the reading functions. Because
reading is optional, this menu is only available when there is at least one reading license
present. For more information on the reading option, see Reading on page 100.
OMR Code Definition
6
English
The Reading OMR code definition screen shows the configuration of the system for OMR.
For every OMR code option, it shows if it is on or off. If it is on, the screen shows information
on what the system does, when it reads a mark or no mark.
90
Page 95

| Page 91 | feb-24-2014 01:32 | Settings menu
BCR 1D Configuration Sheet
The Reading BCR 1D configuration sheet allows you to read a configuration sheet. The
result is visible in this screen, but also in the BCR 1D code definition screen. See Reading
a configuration sheet on page 115.
BCR 1D Code Definition
6
English
The BCR 1D code definition screen shows only information when a configuration sheet is
read. It shows which codes are enabled and how they work.
91
Page 96

| Page 92 | feb-24-2014 01:32 | Settings menu
BCR 2D Configuration Sheet
6
English
The Reading BCR 2D configuration sheet allows you to read a configuration sheet. The
result is visible in this screen, but also in the BCR 2D code definition screen. See Reading
a configuration sheet on page 115.
BCR 2D Code Definition
The BCR 2D code definition screen shows only information when a configuration sheet is
read. It shows which codes are enabled and how they work.
92
Page 97

| Page 93 | feb-24-2014 01:32 | Settings menu
Last Image
The Last image screen shows the result of the last code that the system read. The figure
shows an example of the image of an OMR code. You can use this image to see if the read
code fits within the reading window.
When you click on the Information button of an image of OMR code, the screen shows a
graphical representation of the marks read from the last OMR document (oscilloscope
function). It shows the time-dependant OMR output voltage.
6
English
93
Page 98

| Page 94 | feb-24-2014 01:32 | Settings menu
History
The History screen shows an overview of the jobs run.
Tap on the [History] tab to view the Job history.1.
6
English
2. Tap on the [Today] pull down button if you want to view the jobs that are run 'Today',
'Last week' or 'All'.
The history is displayed on the touch screen. With [Save to USB], you save the history in
CSV format to a USB drive. The USB connector A is located at the control panel.
94
Page 99

| Page 95 | feb-24-2014 01:32 | Connect the System to the Internet
Connect the System to the
7
Internet
Options for Connection
Connect the system to the internet in one of the following ways:
• Wired connection with the gigabit ethernet connection:
Connect with DHCP (Automatic IP address)-
- Manual Configuration
• Wireless connection:
Search for SSID-
- Manually configure SSID
In all cases, you can use proxy for the connection.
7
Log on as Supervisor to complete this procedure.
Set up a Wired Connection
Set up a wired connection as follows:
Connect the system to a LAN with a network cable. The figure shows the LAN
1.
connector on the display module (A).
English
95
Page 100

| Page 96 | feb-24-2014 01:32 | Connect the System to the Internet
2. Open the supervisor settings menu.
3. Tap the Settings tab, [Connectivity].
4. Tap [LAN settings].
7
English
5. Select Wired from the Connection pulldown menu.
6. Set Automatically obtain IP address (DHCP) to Yes or No. If Yes, the system
connects automatically to the LAN. If No, set up a connection manually. Enter the
necessary details to setup a manual connection.
96
 Loading...